Embed Size (px)
Citation preview
New Features in GeoCue 2012.1 Products (R2)
September 28, 2012
Important Note: This guide provides information only about changes from GeoCue 2011.1 to 2012.1. Please see the appropriate On-line Help for full information regarding the use of GeoCue products.
GeoCue Corporation 9668 Madison Blvd. Suite 202 Madison, AL 35758 1-256-461-8289 www.geocue.com
NOTICES The material in GeoCue documents is protected by United States Copyright laws.
You may make as many copies of this document for use internal to your company as you desire. Please do not distribute this document outside of your company without first discussing with us.
Trademarks, Service Marks
MapObjects and ESRI are trademarks of Environmental Systems Research Institute
Windows and .NET are trademarks of Microsoft Corporation
MicroStation is a trademark of Bentley Systems Incorporated
TerraScan is a trademark of Terrasolid Oy
ImageStation, OrthoPro and DMC are trademarks of Intergraph Corporation, a Hexagon company
GeoCue®, NIIRS10®, CuePac® are registered trademarks of GeoCue Corporation
SOCET SET is a trademark of BAE Systems
GPro/XPro are service marks of Hexagon Geospatial Solutions
LYNX™ is a Trademark of Optech
Best Practices – Throughout this document you will see this symbol. This flags a tip or a best practice for improving your GeoCue experience.
Getting Help
This guide contains information about using features new to Version 2012.1 of the GeoCue product family. We are sure that you will experience different problems with GeoCue that range from installation issues to defects that made it through our testing undetected. We hope that you will immediately contact us with any problems or questions and have the patience to work with us through a successful GeoCue deployment.
Please contact us via email for assistance with or comments about GeoCue products. email:
GeoCue New Features User’s Guide
New Features in GeoCue 2012.1 Products i 12 September 2012 Copyright 2012 GeoCue Corporation
Contents 1 An Overview of GeoCue 2012.1 ............................................................................... 1-1
1.1 GeoCue Server/Client: ..................................................................................... 1-1
1.2 Project Administrator ...................................................................................... 1-1
1.3 Environment Builder (included with GeoCue Server)...................................... 1-2
1.4 LIDAR 1 CuePac ................................................................................................ 1-2
1.5 Mobile Mapping System (MMS) CuePac ......................................................... 1-2
1.6 DMC PPS CuePac (available from GeoCue and Hexagon) ............................... 1-2
1.7 RCD 30 CuePac (available from GeoCue and Hexagon) - Beta ........................ 1-2
2 GeoCue Server and GeoCue Client .......................................................................... 2-4
2.1 New Select Methods ........................................................................................ 2-4
2.2 Significant improvements to the Named Queues ........................................... 2-5
2.3 Mass import of images (Image Cataloging) .................................................... 2-6
2.4 Quick Launch .................................................................................................... 2-7
2.5 File Versioning .................................................................................................. 2-9
2.5.1 Configuring Versioning ............................................................................. 2-10
2.5.2 Creating Versions ..................................................................................... 2-13
2.5.3 Restoring Versions ................................................................................... 2-15
2.5.4 Versioning Tools ....................................................................................... 2-17
2.6 DirectDrive™ .................................................................................................. 2-18
2.7 Other New Features ....................................................................................... 2-18
2.7.1 Support for NAD83 (2011), Geoid 201 ..................................................... 2-18
2.7.2 Viewer for Point Grey Research (PGR) Ladybug 360° images ................. 2-19
2.7.3 Processing Groups in the Command Dispatch System ............................ 2-19
2.8 GeoCue Easter Eggs ....................................................................................... 2-20
3 LIDAR 1 CuePac ........................................................................................................ 3-1
3.1 DirectDrive™ .................................................................................................... 3-1
3.1.1 The DirectDrive™ Toolbar .......................................................................... 3-1
3.1.2 Checklists and Checklist Steps for DirectDrive .......................................... 3-2
3.1.3 Starting DirectDrive.................................................................................... 3-3
3.1.4 Setting DirectDrive Parameters ................................................................. 3-4
3.1.5 DirectDrive Entities dialog ......................................................................... 3-5
3.1.6 Using DirectDrive for QC Operations ......................................................... 3-8
3.1.7 Using DirectDrive for Editing Operations .................................................. 3-8
3.1.8 DirectDrive and Quick Launch.................................................................... 3-9
3.2 New Z Probe ..................................................................................................... 3-9
4 Project Administrator .............................................................................................. 4-1
4.1 Invoking Project Administrator ........................................................................ 4-2
4.2 Using Project Administrator............................................................................. 4-3
5 Environment Builder ................................................................................................ 5-1
5.1 Modifying a System Defined Checklist............................................................. 5-1
GeoCue New Features User’s Guide
New Features in GeoCue 2012.1 Products ii 12 September 2012 Copyright 2012 GeoCue Corporation
5.2 Checklist Fields ................................................................................................. 5-2
GeoCue New Features User’s Guide
New Features in GeoCue 2012.1 Products 1-1 12 September 2012 Copyright 2012 GeoCue Corporation
1 An Overview of GeoCue 2012.1 GeoCue 2012.1 is the major GeoCue feature upgrade release for 2012. GeoCue has now been in heavy day-to-day production (in commercial release) for about 8 years. Many of the new features that have appeared in GeoCue are a direct result of the feedback that we received from our user base of GeoCue customers. GeoCue Version 2012.1 and the associated CuePacs contain a number of new features. The highlights of these new features are described in the following sections with details provided in the subsequent chapters.
Note: GeoCue Server is available in three versions. Sections that apply only to a specific version will be denoted as follows:
GeoCue Workstation (W)
GeoCue Professional (P)
GeoCue Departmental (formerly Enterprise) (D)
1.1 GeoCue Server/Client:
New "point in polygon" and "Single Nearest Entity" selection Quick Launch of processing steps (with new Quick Launch Toolbar)
Significant improvements to the Named Queues (including helper Wizards)
File Versioning Toolbar
File Versioning - Automatic on Checklist Step
File Versioning - Named Checkpoints
Mass import of images with automatic Coordinate Reference System (CRS) recognition (image cataloging)
GUI for Gridded QC System (generalization of "King's Move) - Part of Named Queue system
Support for NAD83 (2011)
Support for NAVD 88, Geoid 2012
Viewer for Point Grey Research (PGR) Ladybug 360° images
Ability to collect entities into processing "groups" for hybrid dispatched/distributed processing - provides ability to optimize DMC image development, Ladybug image development
1.2 Project Administrator
Completely rewritten application. We have changed Project Administrator from a "Step-centric" view of micro-project status to an Entity-Centric view. Ability to view consolidated effort by entity (e.g. LAS Working Segment)
GeoCue New Features User’s Guide
New Features in GeoCue 2012.1 Products 1-2 12 September 2012 Copyright 2012 GeoCue Corporation
Ability to view effort by technician
Ability to time slice status views
Color-coded list based on entity status
Full dynamic synchronization with the Map View
1.3 Environment Builder (included with GeoCue Server)
Settings on entities to enable file versions
Settings on Checklists to set automatic versions
1.4 LIDAR 1 CuePac
Completely reworked/improved Z Probe reporting
Dynamic synchronization of TerraScan with GeoCue Map View
Dynamic synchronization of LP360 with GeoCue Map View
Gridded QC system using both TerraScan and LP360
1.5 Mobile Mapping System (MMS) CuePac
Import Ladybug spherical camera "tracks"
Refine tracks with respect to POS trajectories
Extract 360° (" bubble") image centers with distance-based thinning
"Develop" Ladybug images via GeoCue distributed processing
1.6 DMC PPS CuePac (available from GeoCue and Hexagon)
Support for all DMC versions including DMC-II
Support for automatic generation of thumbnails from processed images
Iterative search for best calibration set when calibration fails (e.g. over water areas or poorly textured surfaces)
1.7 RCD 30 CuePac (available from GeoCue and Hexagon) - Beta
All new CuePac for the Hexagon RCD-30 digital camera system Support up to 5 head configurations
Reads FramePro FlightData XML File to Create a Representation of a FramePro Project in GeoCue
o Transforms photo locations from geographic coordinates to a selected projected coordinates (required for ISPM)
o Photo centers and strips are displayed in the GeoCue map view o Uses processing settings from last invocation of the FramePro application
Enables Distributed Processing of Flight Lines of Photos
GeoCue New Features User’s Guide
New Features in GeoCue 2012.1 Products 1-3 12 September 2012 Copyright 2012 GeoCue Corporation
Supports Generation of ISPM Projects from Processed Photos (nadir) for direct use in the OrthoPro CuePac
The most significant new features from an improved productivity point of view in GeoCue 2012.1 are:
Direct Drive for TerraScan and LP360 EQC
File Versioning
The new Project Administrator
Incorporating these new features into your production workflows should result in significant gains in throughput, accuracy and project tracking.
Note: This document contains minimal information on how to use the new features. We have updated all of the GeoCue on-line help with this release. Use this (there is a help button on each dialog) to learn how to use these new features.
GeoCue New Features User’s Guide
New Features in GeoCue 2012.1 Products 2-4 12 September 2012 Copyright 2012 GeoCue Corporation
2 GeoCue Server and GeoCue Client This section contains the highlights of new features in the core GeoCue products; GeoCue Server and GeoCue Client. As usual, most of your direct experience with GeoCue Server will be via the GeoCue Client interface. Thus, in the topics of the following sections, we will not try to make a big distinction between what services are provided on the Client-side versus what is supplied by the Server. Those interested in this level of detail are typically using GeoCue as a development platform and can make any necessary differentiation via the GeoCue Software Developer Kit (SDK) documentation.
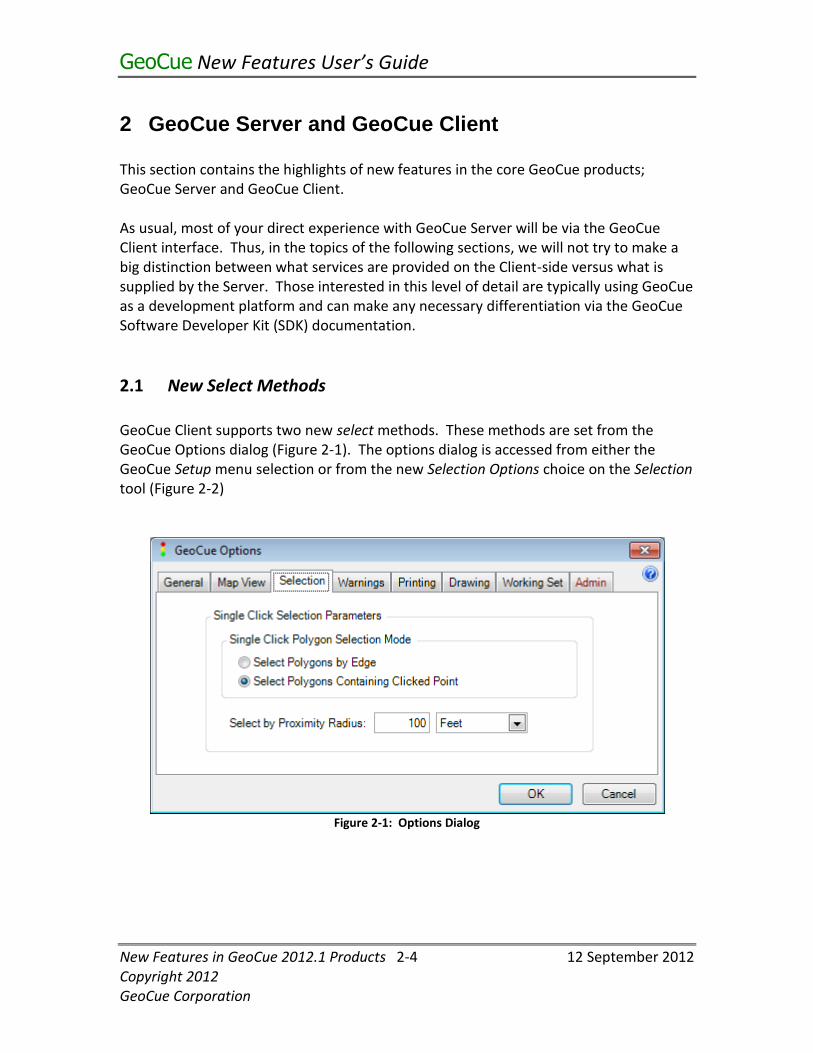
2.1 New Select Methods
GeoCue Client supports two new select methods. These methods are set from the GeoCue Options dialog (Figure 2-1). The options dialog is accessed from either the GeoCue Setup menu selection or from the new Selection Options choice on the Selection tool (Figure 2-2)
Figure 2-1: Options Dialog

GeoCue New Features User’s Guide
New Features in GeoCue 2012.1 Products 2-5 12 September 2012 Copyright 2012 GeoCue Corporation
Figure 2-2: Selection Options accessed from the Selection tool
Using the new option to "Select Polygons containing Clicked Point" in concert with the new Quick Launch tools will enable you to do operations such as launch a LAS Working Segment into TerraScan or LP360-EQC with a single mouse click.
2.2 Significant improvements to the Named Queues
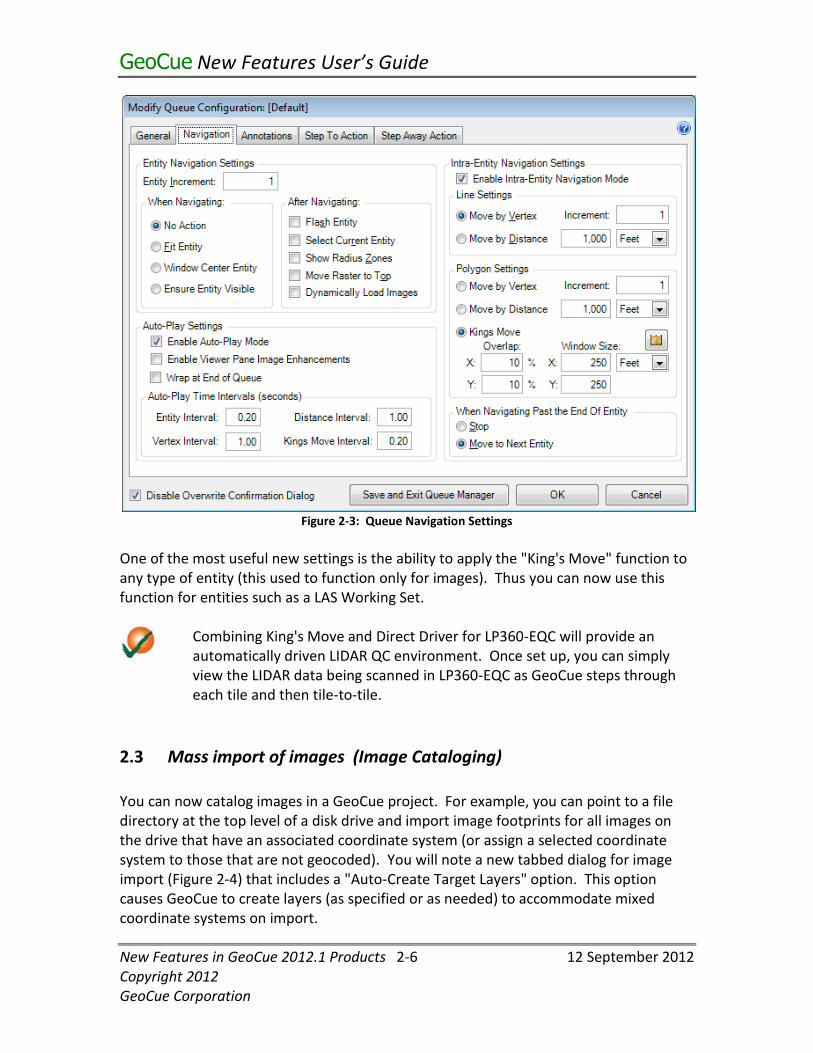
We have made significant enhancements to Named Queues with this release. Some of the most useful are the navigation modes (both availability and how they function). Navigation modes are set on the Configuration dialog, Navigation tab (Figure 2-3).
GeoCue New Features User’s Guide
New Features in GeoCue 2012.1 Products 2-6 12 September 2012 Copyright 2012 GeoCue Corporation
Figure 2-3: Queue Navigation Settings
One of the most useful new settings is the ability to apply the "King's Move" function to any type of entity (this used to function only for images). Thus you can now use this function for entities such as a LAS Working Set.
Combining King's Move and Direct Driver for LP360-EQC will provide an automatically driven LIDAR QC environment. Once set up, you can simply view the LIDAR data being scanned in LP360-EQC as GeoCue steps through each tile and then tile-to-tile.
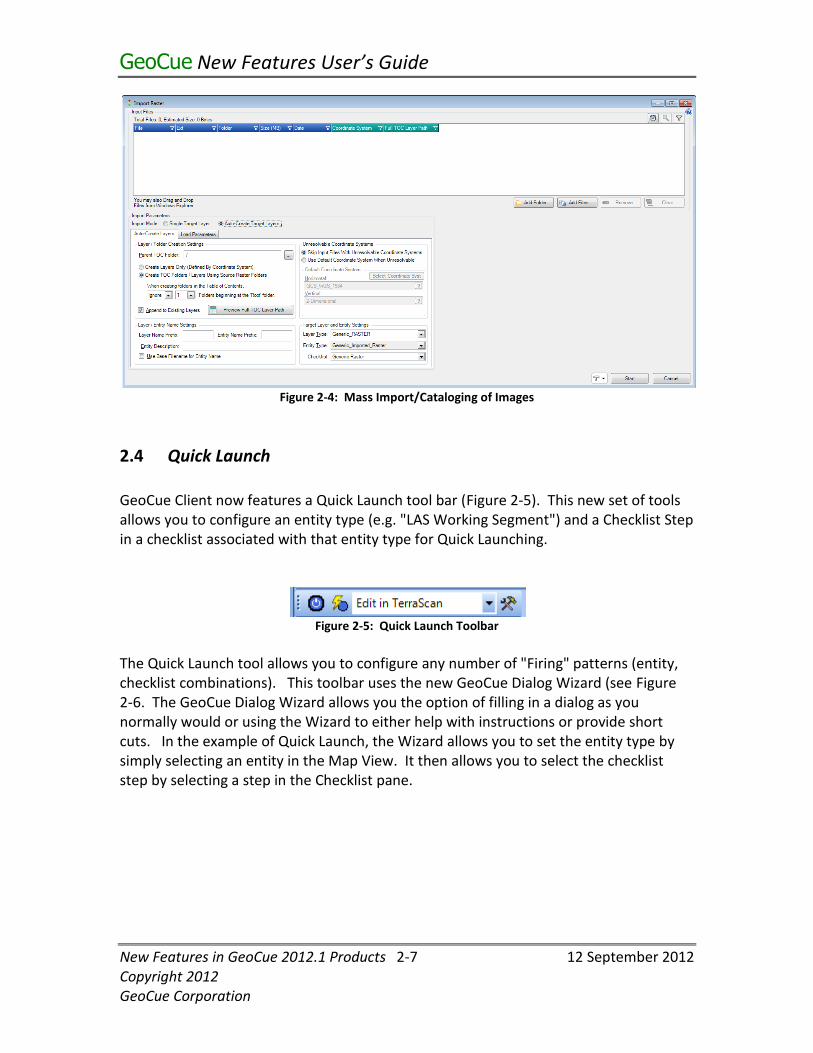
2.3 Mass import of images (Image Cataloging)
You can now catalog images in a GeoCue project. For example, you can point to a file directory at the top level of a disk drive and import image footprints for all images on the drive that have an associated coordinate system (or assign a selected coordinate system to those that are not geocoded). You will note a new tabbed dialog for image import (Figure 2-4) that includes a "Auto-Create Target Layers" option. This option causes GeoCue to create layers (as specified or as needed) to accommodate mixed coordinate systems on import.
GeoCue New Features User’s Guide
New Features in GeoCue 2012.1 Products 2-7 12 September 2012 Copyright 2012 GeoCue Corporation
Figure 2-4: Mass Import/Cataloging of Images
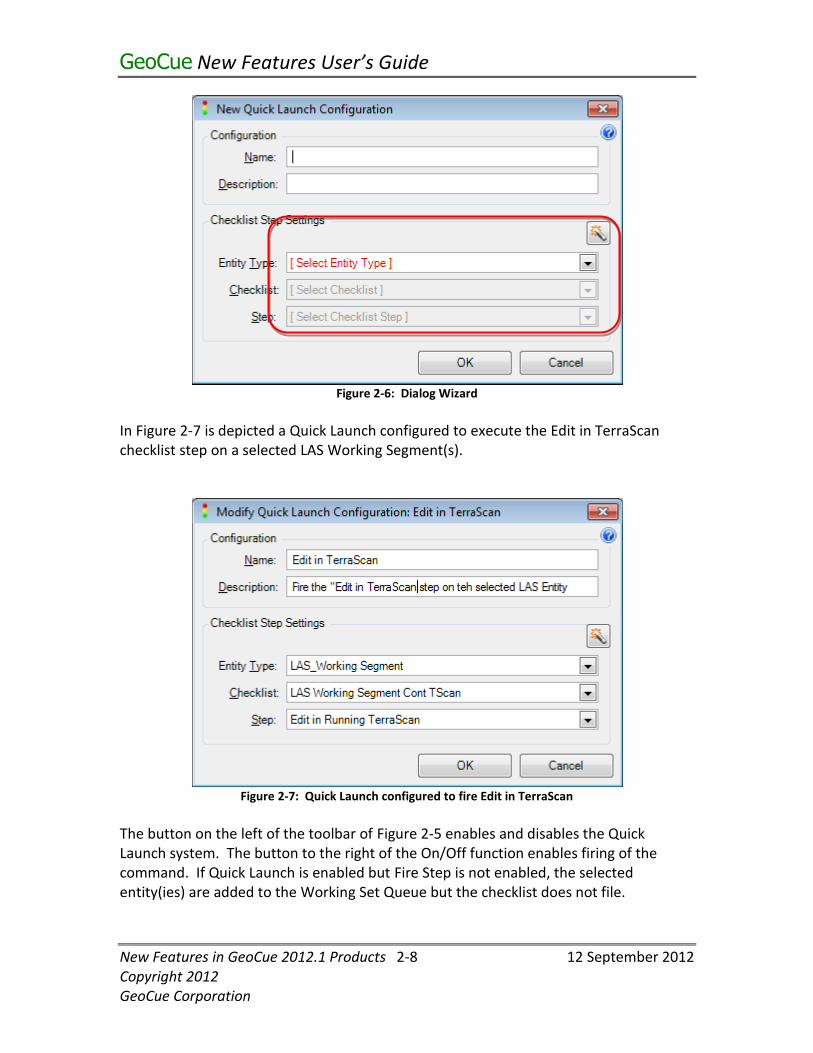
2.4 Quick Launch
GeoCue Client now features a Quick Launch tool bar (Figure 2-5). This new set of tools allows you to configure an entity type (e.g. "LAS Working Segment") and a Checklist Step in a checklist associated with that entity type for Quick Launching.
Figure 2-5: Quick Launch Toolbar
The Quick Launch tool allows you to configure any number of "Firing" patterns (entity, checklist combinations). This toolbar uses the new GeoCue Dialog Wizard (see Figure 2-6. The GeoCue Dialog Wizard allows you the option of filling in a dialog as you normally would or using the Wizard to either help with instructions or provide short cuts. In the example of Quick Launch, the Wizard allows you to set the entity type by simply selecting an entity in the Map View. It then allows you to select the checklist step by selecting a step in the Checklist pane.
GeoCue New Features User’s Guide
New Features in GeoCue 2012.1 Products 2-8 12 September 2012 Copyright 2012 GeoCue Corporation
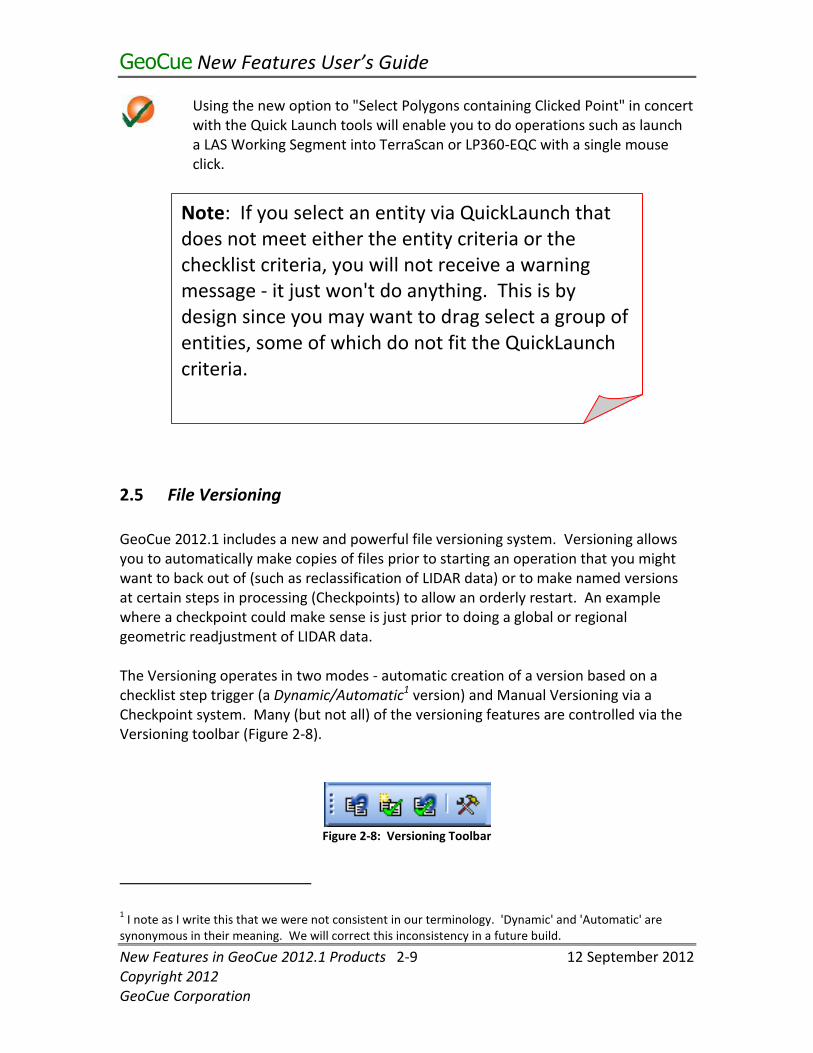
Figure 2-6: Dialog Wizard
In Figure 2-7 is depicted a Quick Launch configured to execute the Edit in TerraScan checklist step on a selected LAS Working Segment(s).
Figure 2-7: Quick Launch configured to fire Edit in TerraScan
The button on the left of the toolbar of Figure 2-5 enables and disables the Quick Launch system. The button to the right of the On/Off function enables firing of the command. If Quick Launch is enabled but Fire Step is not enabled, the selected entity(ies) are added to the Working Set Queue but the checklist does not file.
GeoCue New Features User’s Guide
New Features in GeoCue 2012.1 Products 2-9 12 September 2012 Copyright 2012 GeoCue Corporation
Using the new option to "Select Polygons containing Clicked Point" in concert with the Quick Launch tools will enable you to do operations such as launch a LAS Working Segment into TerraScan or LP360-EQC with a single mouse click.
2.5 File Versioning
GeoCue 2012.1 includes a new and powerful file versioning system. Versioning allows you to automatically make copies of files prior to starting an operation that you might want to back out of (such as reclassification of LIDAR data) or to make named versions at certain steps in processing (Checkpoints) to allow an orderly restart. An example where a checkpoint could make sense is just prior to doing a global or regional geometric readjustment of LIDAR data. The Versioning operates in two modes - automatic creation of a version based on a checklist step trigger (a Dynamic/Automatic1 version) and Manual Versioning via a Checkpoint system. Many (but not all) of the versioning features are controlled via the Versioning toolbar (Figure 2-8).
Figure 2-8: Versioning Toolbar
1 I note as I write this that we were not consistent in our terminology. 'Dynamic' and 'Automatic' are
synonymous in their meaning. We will correct this inconsistency in a future build.
Note: If you select an entity via QuickLaunch that does not meet either the entity criteria or the checklist criteria, you will not receive a warning message - it just won't do anything. This is by design since you may want to drag select a group of entities, some of which do not fit the QuickLaunch criteria.
GeoCue New Features User’s Guide
New Features in GeoCue 2012.1 Products 2-10 12 September 2012 Copyright 2012 GeoCue Corporation
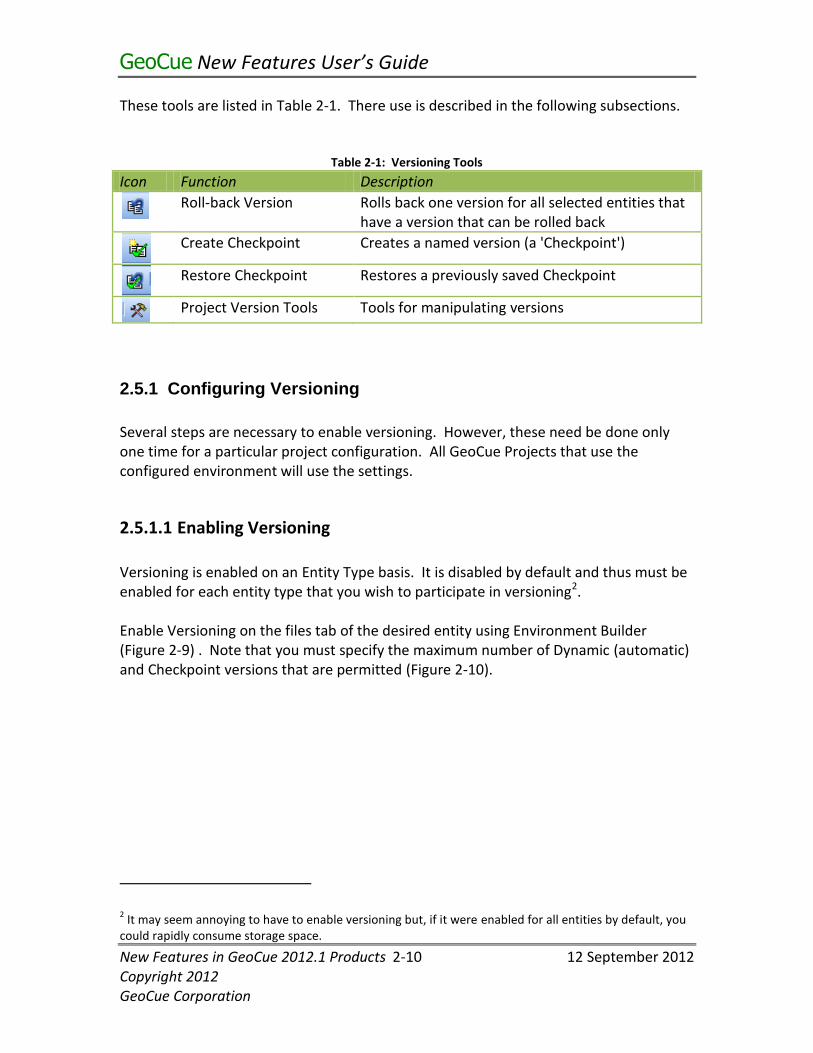
These tools are listed in Table 2-1. There use is described in the following subsections.
Table 2-1: Versioning Tools
Icon Function Description
Roll-back Version Rolls back one version for all selected entities that
have a version that can be rolled back
Create Checkpoint Creates a named version (a 'Checkpoint')
Restore Checkpoint Restores a previously saved Checkpoint
Project Version Tools Tools for manipulating versions
2.5.1 Configuring Versioning
Several steps are necessary to enable versioning. However, these need be done only one time for a particular project configuration. All GeoCue Projects that use the configured environment will use the settings.
2.5.1.1 Enabling Versioning
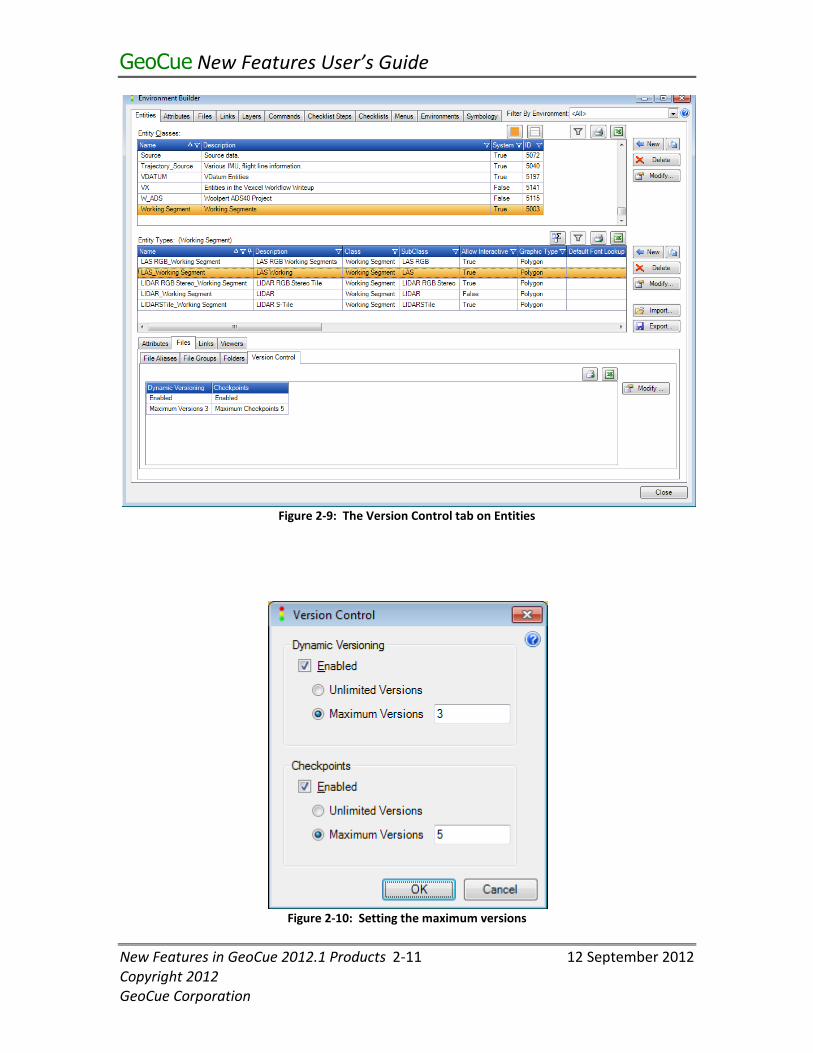
Versioning is enabled on an Entity Type basis. It is disabled by default and thus must be enabled for each entity type that you wish to participate in versioning2. Enable Versioning on the files tab of the desired entity using Environment Builder (Figure 2-9) . Note that you must specify the maximum number of Dynamic (automatic) and Checkpoint versions that are permitted (Figure 2-10).
2 It may seem annoying to have to enable versioning but, if it were enabled for all entities by default, you
could rapidly consume storage space.
GeoCue New Features User’s Guide
New Features in GeoCue 2012.1 Products 2-11 12 September 2012 Copyright 2012 GeoCue Corporation
Figure 2-9: The Version Control tab on Entities
Figure 2-10: Setting the maximum versions
GeoCue New Features User’s Guide
New Features in GeoCue 2012.1 Products 2-12 12 September 2012 Copyright 2012 GeoCue Corporation
2.5.1.2 The Automatic (Dynamic) Version Stack
Automatic versioning uses a 'most recent in, most recent out' stack to track versions. When you attempt to add an automatic version to an entity that will cause the number of stored versions to exceed the maximum that you have permitted for the entity type, the oldest version is deleted and all of the other versions are pushed 'down' the stack. For example, if you set the maximum automatic versions count on an entity to 4, the oldest version will be deleted when you save the 5th version.
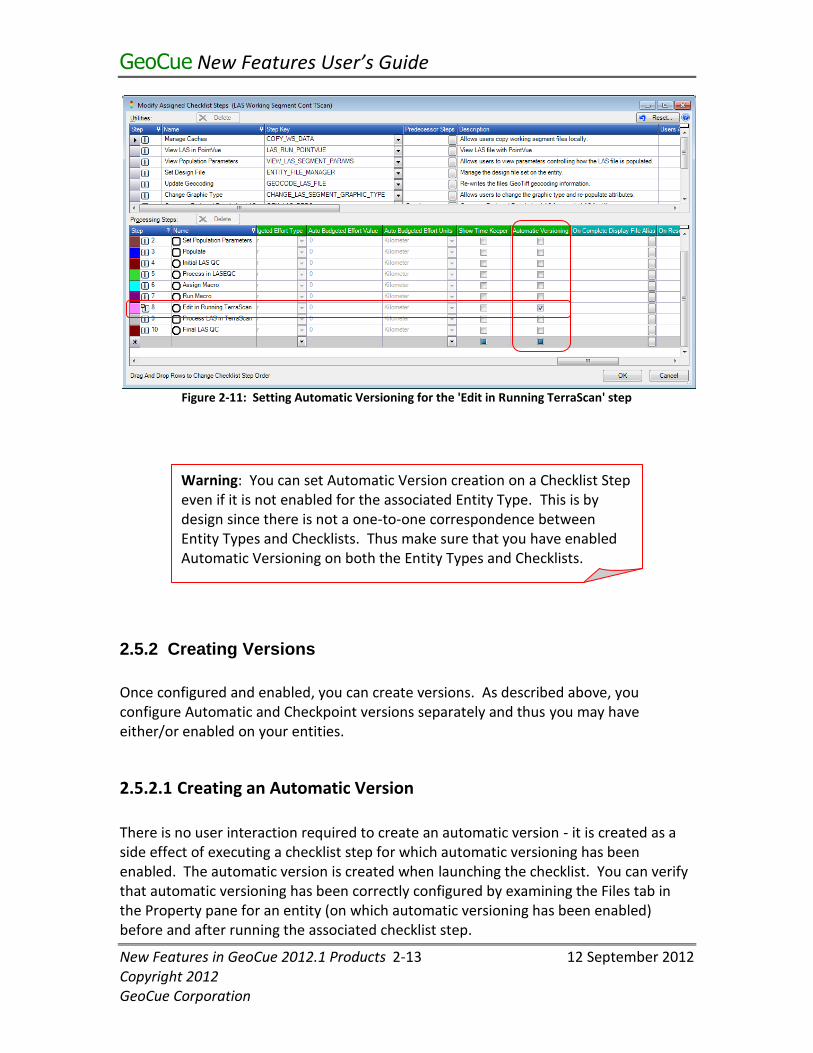
2.5.1.3 Setting an Automatic Version Trigger
GeoCue, when properly configured, automatically creates a version of the files (warehouse-stored only) associated with an entity when a specified checklist step is executed. For example, you can configure your system to automatically version the LAS file attached to a LAS Working Set when you execute the Process in TerraScan step. Should you make an unrecoverable error while editing the tile or you elect just to start over, you can "roll back" to the version that was saved prior to entering TerraScan. A dynamic (automatic) version trigger is set on the checklist step that you want to cause the version creation. This option is set using the Modify Checklist function of the Checklists tab of Environment Builder.
1. Select the Checklist for which a version is to be created 2. Set the checkbox under "Automatic Versioning" for the desired checklist step.
An example of enabling automatic versioning for a LAS Working Segment, step "Edit in Running TerraScan" is depicted in Figure 2-11.
GeoCue New Features User’s Guide
New Features in GeoCue 2012.1 Products 2-13 12 September 2012 Copyright 2012 GeoCue Corporation
Figure 2-11: Setting Automatic Versioning for the 'Edit in Running TerraScan' step
2.5.2 Creating Versions
Once configured and enabled, you can create versions. As described above, you configure Automatic and Checkpoint versions separately and thus you may have either/or enabled on your entities.
2.5.2.1 Creating an Automatic Version
There is no user interaction required to create an automatic version - it is created as a side effect of executing a checklist step for which automatic versioning has been enabled. The automatic version is created when launching the checklist. You can verify that automatic versioning has been correctly configured by examining the Files tab in the Property pane for an entity (on which automatic versioning has been enabled) before and after running the associated checklist step.
Warning: You can set Automatic Version creation on a Checklist Step even if it is not enabled for the associated Entity Type. This is by design since there is not a one-to-one correspondence between Entity Types and Checklists. Thus make sure that you have enabled Automatic Versioning on both the Entity Types and Checklists.
GeoCue New Features User’s Guide
New Features in GeoCue 2012.1 Products 2-14 12 September 2012 Copyright 2012 GeoCue Corporation
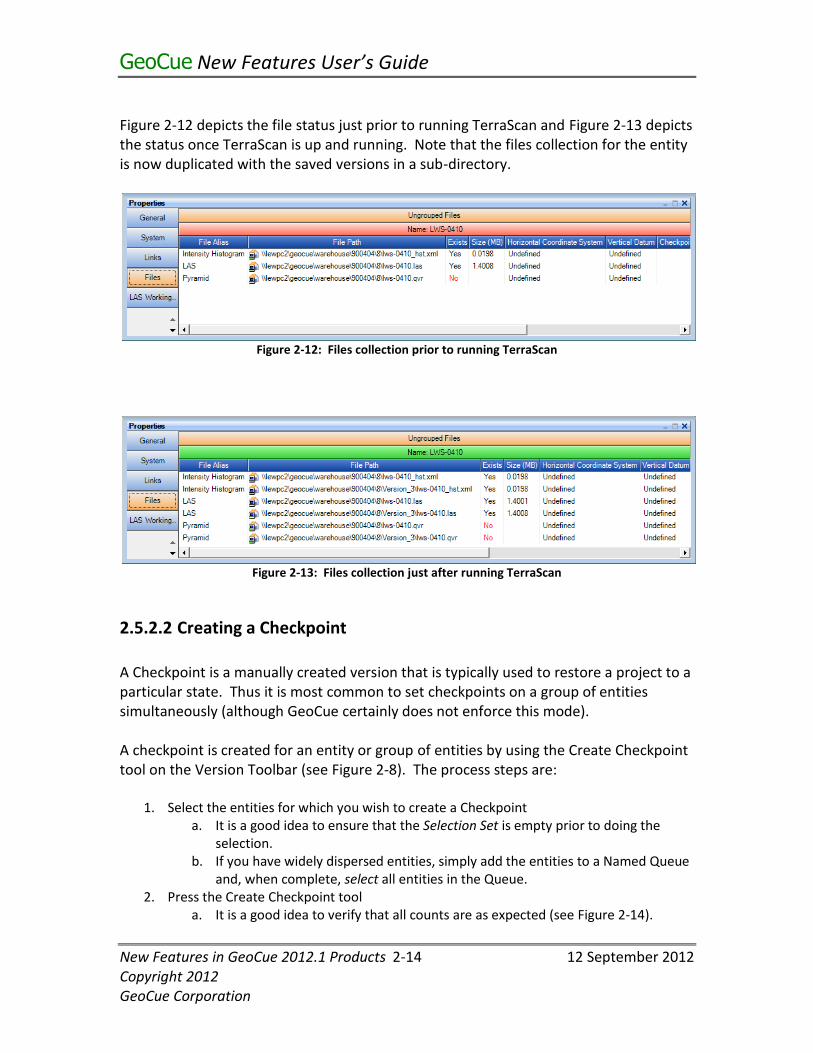
Figure 2-12 depicts the file status just prior to running TerraScan and Figure 2-13 depicts the status once TerraScan is up and running. Note that the files collection for the entity is now duplicated with the saved versions in a sub-directory.
Figure 2-12: Files collection prior to running TerraScan
Figure 2-13: Files collection just after running TerraScan
2.5.2.2 Creating a Checkpoint
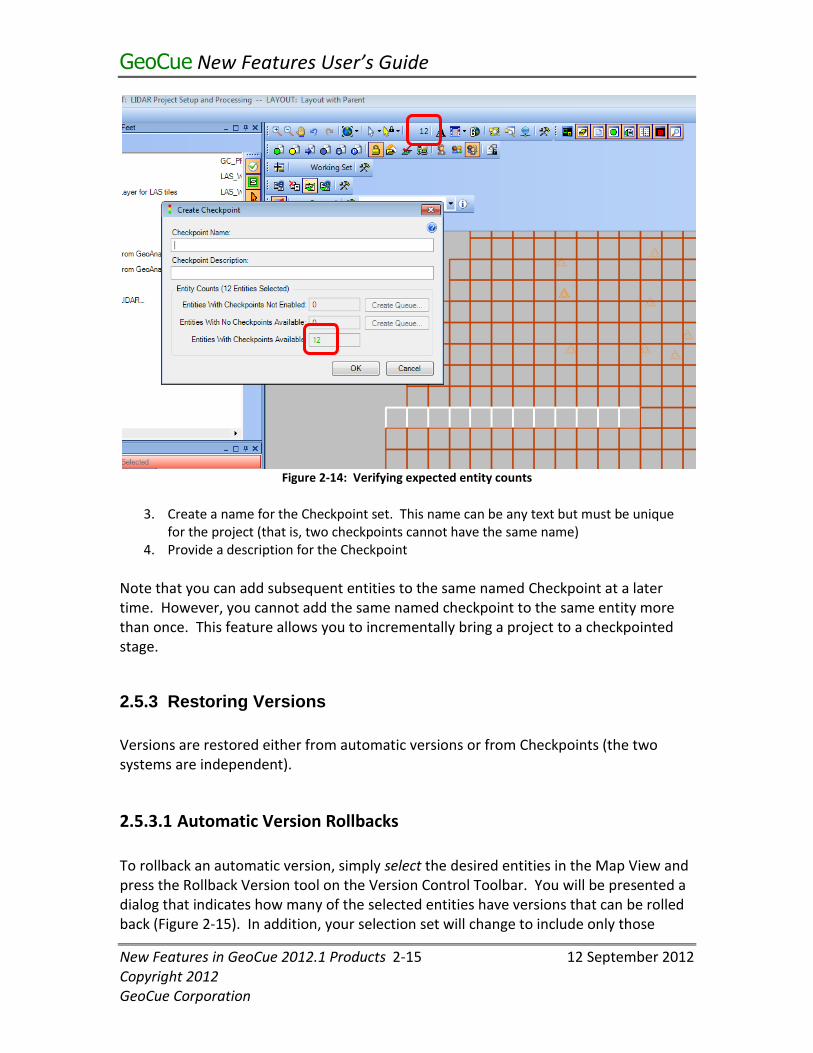
A Checkpoint is a manually created version that is typically used to restore a project to a particular state. Thus it is most common to set checkpoints on a group of entities simultaneously (although GeoCue certainly does not enforce this mode). A checkpoint is created for an entity or group of entities by using the Create Checkpoint tool on the Version Toolbar (see Figure 2-8). The process steps are:
1. Select the entities for which you wish to create a Checkpoint a. It is a good idea to ensure that the Selection Set is empty prior to doing the
selection. b. If you have widely dispersed entities, simply add the entities to a Named Queue
and, when complete, select all entities in the Queue. 2. Press the Create Checkpoint tool
a. It is a good idea to verify that all counts are as expected (see Figure 2-14).
GeoCue New Features User’s Guide
New Features in GeoCue 2012.1 Products 2-15 12 September 2012 Copyright 2012 GeoCue Corporation
Figure 2-14: Verifying expected entity counts
3. Create a name for the Checkpoint set. This name can be any text but must be unique
for the project (that is, two checkpoints cannot have the same name) 4. Provide a description for the Checkpoint
Note that you can add subsequent entities to the same named Checkpoint at a later time. However, you cannot add the same named checkpoint to the same entity more than once. This feature allows you to incrementally bring a project to a checkpointed stage.
2.5.3 Restoring Versions
Versions are restored either from automatic versions or from Checkpoints (the two systems are independent).
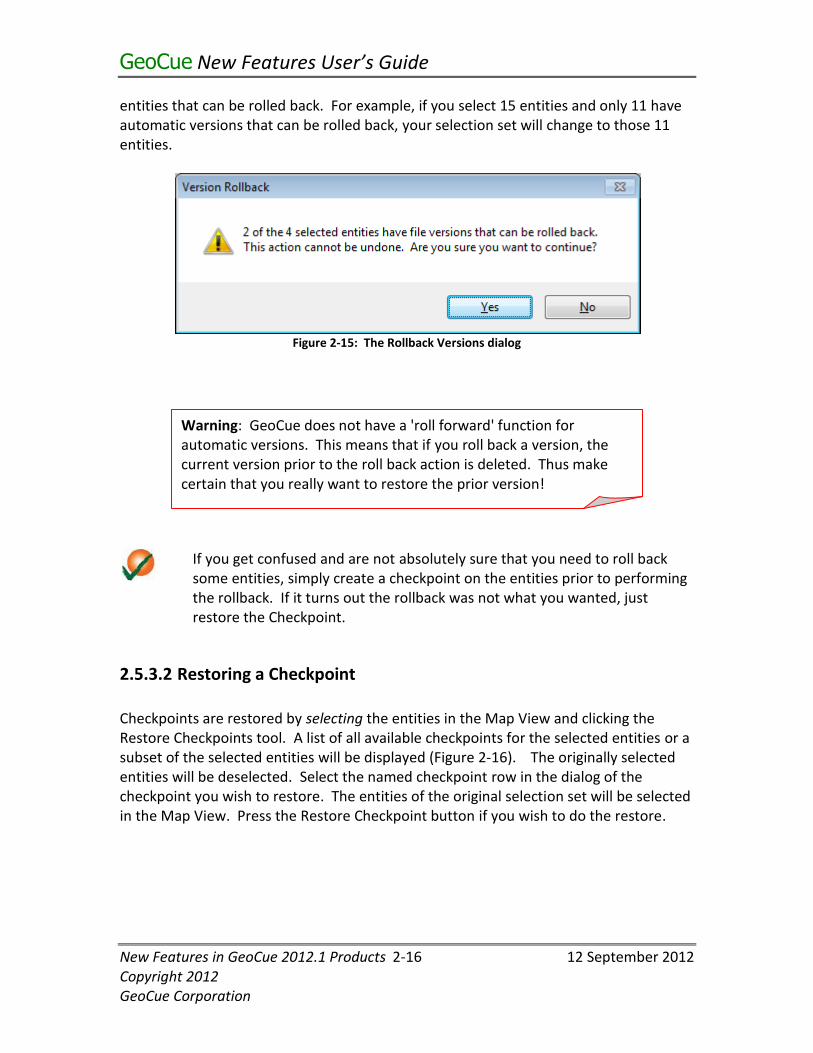
2.5.3.1 Automatic Version Rollbacks
To rollback an automatic version, simply select the desired entities in the Map View and press the Rollback Version tool on the Version Control Toolbar. You will be presented a dialog that indicates how many of the selected entities have versions that can be rolled back (Figure 2-15). In addition, your selection set will change to include only those
GeoCue New Features User’s Guide
New Features in GeoCue 2012.1 Products 2-16 12 September 2012 Copyright 2012 GeoCue Corporation
entities that can be rolled back. For example, if you select 15 entities and only 11 have automatic versions that can be rolled back, your selection set will change to those 11 entities.
Figure 2-15: The Rollback Versions dialog
If you get confused and are not absolutely sure that you need to roll back some entities, simply create a checkpoint on the entities prior to performing the rollback. If it turns out the rollback was not what you wanted, just restore the Checkpoint.
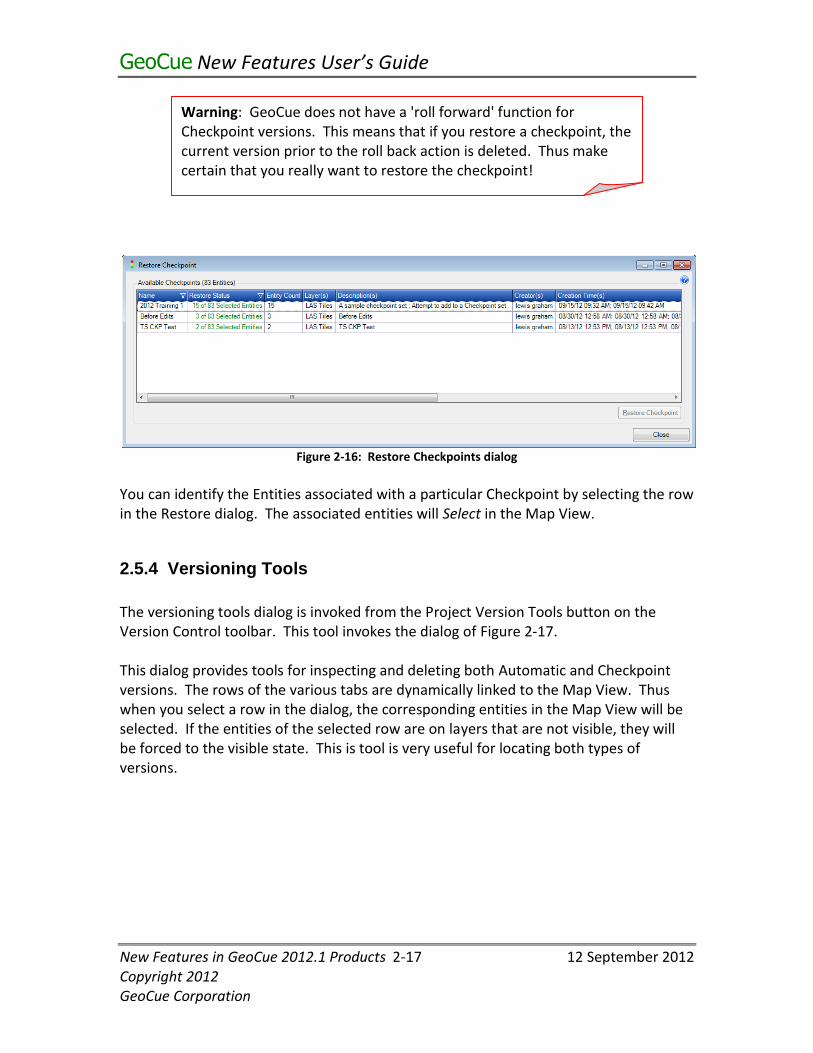
2.5.3.2 Restoring a Checkpoint
Checkpoints are restored by selecting the entities in the Map View and clicking the Restore Checkpoints tool. A list of all available checkpoints for the selected entities or a subset of the selected entities will be displayed (Figure 2-16). The originally selected entities will be deselected. Select the named checkpoint row in the dialog of the checkpoint you wish to restore. The entities of the original selection set will be selected in the Map View. Press the Restore Checkpoint button if you wish to do the restore.
Warning: GeoCue does not have a 'roll forward' function for automatic versions. This means that if you roll back a version, the current version prior to the roll back action is deleted. Thus make certain that you really want to restore the prior version!
GeoCue New Features User’s Guide
New Features in GeoCue 2012.1 Products 2-17 12 September 2012 Copyright 2012 GeoCue Corporation
Figure 2-16: Restore Checkpoints dialog
You can identify the Entities associated with a particular Checkpoint by selecting the row in the Restore dialog. The associated entities will Select in the Map View.
2.5.4 Versioning Tools
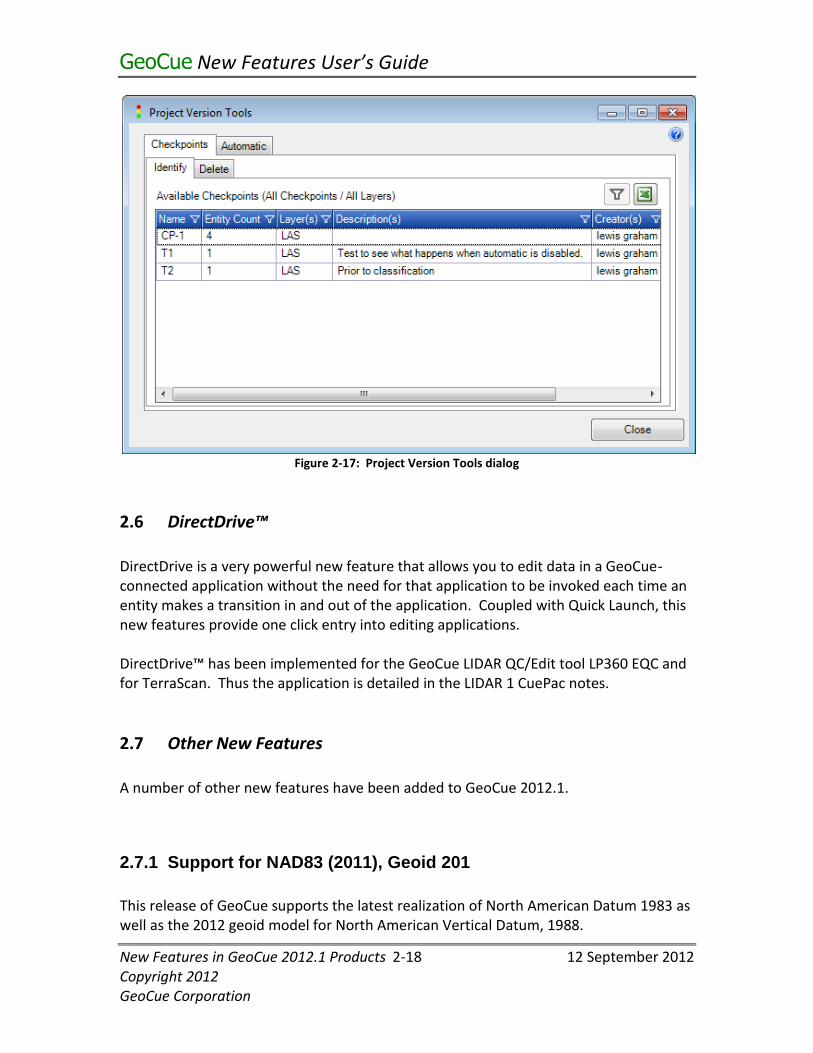
The versioning tools dialog is invoked from the Project Version Tools button on the Version Control toolbar. This tool invokes the dialog of Figure 2-17. This dialog provides tools for inspecting and deleting both Automatic and Checkpoint versions. The rows of the various tabs are dynamically linked to the Map View. Thus when you select a row in the dialog, the corresponding entities in the Map View will be selected. If the entities of the selected row are on layers that are not visible, they will be forced to the visible state. This is tool is very useful for locating both types of versions.
Warning: GeoCue does not have a 'roll forward' function for Checkpoint versions. This means that if you restore a checkpoint, the current version prior to the roll back action is deleted. Thus make certain that you really want to restore the checkpoint!
GeoCue New Features User’s Guide
New Features in GeoCue 2012.1 Products 2-18 12 September 2012 Copyright 2012 GeoCue Corporation
Figure 2-17: Project Version Tools dialog
2.6 DirectDrive™
DirectDrive is a very powerful new feature that allows you to edit data in a GeoCue-connected application without the need for that application to be invoked each time an entity makes a transition in and out of the application. Coupled with Quick Launch, this new features provide one click entry into editing applications. DirectDrive™ has been implemented for the GeoCue LIDAR QC/Edit tool LP360 EQC and for TerraScan. Thus the application is detailed in the LIDAR 1 CuePac notes.
2.7 Other New Features
A number of other new features have been added to GeoCue 2012.1.
2.7.1 Support for NAD83 (2011), Geoid 201
This release of GeoCue supports the latest realization of North American Datum 1983 as well as the 2012 geoid model for North American Vertical Datum, 1988.
GeoCue New Features User’s Guide
New Features in GeoCue 2012.1 Products 2-19 12 September 2012 Copyright 2012 GeoCue Corporation
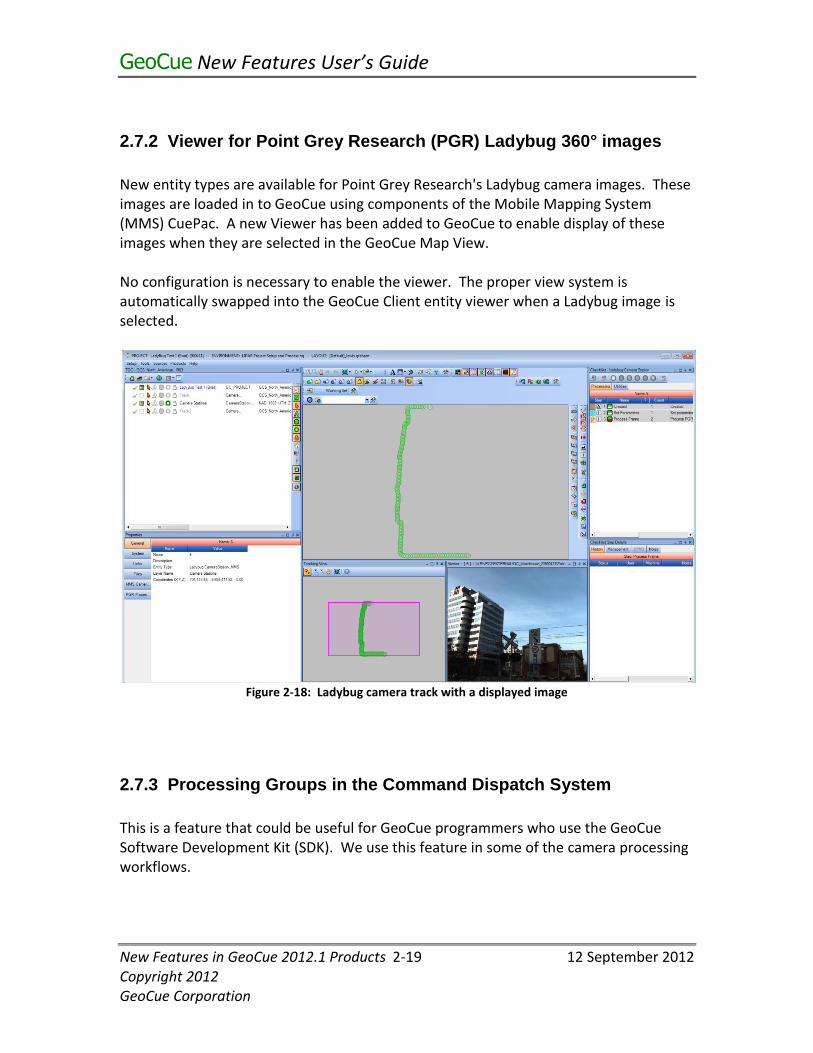
2.7.2 Viewer for Point Grey Research (PGR) Ladybug 360° images
New entity types are available for Point Grey Research's Ladybug camera images. These images are loaded in to GeoCue using components of the Mobile Mapping System (MMS) CuePac. A new Viewer has been added to GeoCue to enable display of these images when they are selected in the GeoCue Map View. No configuration is necessary to enable the viewer. The proper view system is automatically swapped into the GeoCue Client entity viewer when a Ladybug image is selected.
Figure 2-18: Ladybug camera track with a displayed image
2.7.3 Processing Groups in the Command Dispatch System
This is a feature that could be useful for GeoCue programmers who use the GeoCue Software Development Kit (SDK). We use this feature in some of the camera processing workflows.
GeoCue New Features User’s Guide
New Features in GeoCue 2012.1 Products 2-20 12 September 2012 Copyright 2012 GeoCue Corporation
2.8 GeoCue Easter Eggs
GeoCue contains a number of “non-obvious” commands (usually keyboard activated) for recovery operations or command modification. These features are listed below:
1. Ctrl-Key down when dialog is opening resets default size/location 2. Ctrl-Key AND Shift-Key down when clicking any toolbar button command will reset
command mode to “Select” (useful when XC crashes and leaves GeoCue Client locked waiting on XC to release)
3. While in Draw Ellipse command: a. Default is to draw fitted ellipse b. Shift-Key draws fitted circle c. Ctrl-Key draws fitted ellipse with ellipse center at first data point, d. Ctrl-Key AND Shift-Key draws fitted circle with center at first data point.
4. While in any drawing command, hold down the Alt key to snap to the nearest vertex of existing geometry
5. Pressing any letter after selecting a row in the legend will automatically find and select the next row beginning with that letter.
6. Ctrl-Key down when starting GeoCue will reset default size/location and NOT Auto-Open last project (if this option is selected in GeoCue options)
7. Ctrl-Key down when starting Layer Properties will allow changing Layer Coordinate System. (same as Repair Tools.
8. Ctrl-Key down when wheel zooming will do a fast zoom. 9. Double-clicking Layer in legend will display Layer Properties. 10. Double-clicking Raster Row in legend will display Raster Properties. 11. Double-clicking Folder Row in legend will expand/collapse folder. 12. Ctrl-Key down when selecting entities in map will append to select queue (or unselect
entities if previously selected) 13. Ctrl-Key down when “Flashing” the current queue entity will also “Navigate To” that
entity using the current navigation mode. 14. Ctrl-Key down when opening a project will load the TOC like it’s the first time in project.
Gives user opportunity to create a “New” Layout with default settings. 15. Ctrl-Key down in Queue Playback mode will disable image enhancements (boost
playback speed). 16. Multi-selecting rows in TOC/Entity Manager and clicking checkbox will toggle checkbox
for all selected rows. 17. Ctrl-Key down when starting User Manager from pull-down menu will run the old Non-
Web version of User Manager. 18. Ctrl-Key down when digitizing a shape is the same as a double-click data point. Allows
better precision. 19. Shift-Key in Map View enables LP360 Zoom and Pan Mode. Left mouse button zooms,
right mouse button pans. 20. Ctrl-A in many grids will select all rows in the grid. 21. Ctrl-Key down while closing a project will save the entire Active Layout from scratch to
match the existing state of the TOC.
GeoCue New Features User’s Guide
New Features in GeoCue 2012.1 Products 3-1 12 September 2012 Copyright 2012 GeoCue Corporation
3 LIDAR 1 CuePac New features in the LIDAR 1 CuePac are contained in this chapter. See the LIDAR 1 online Help for details concerning these changes.
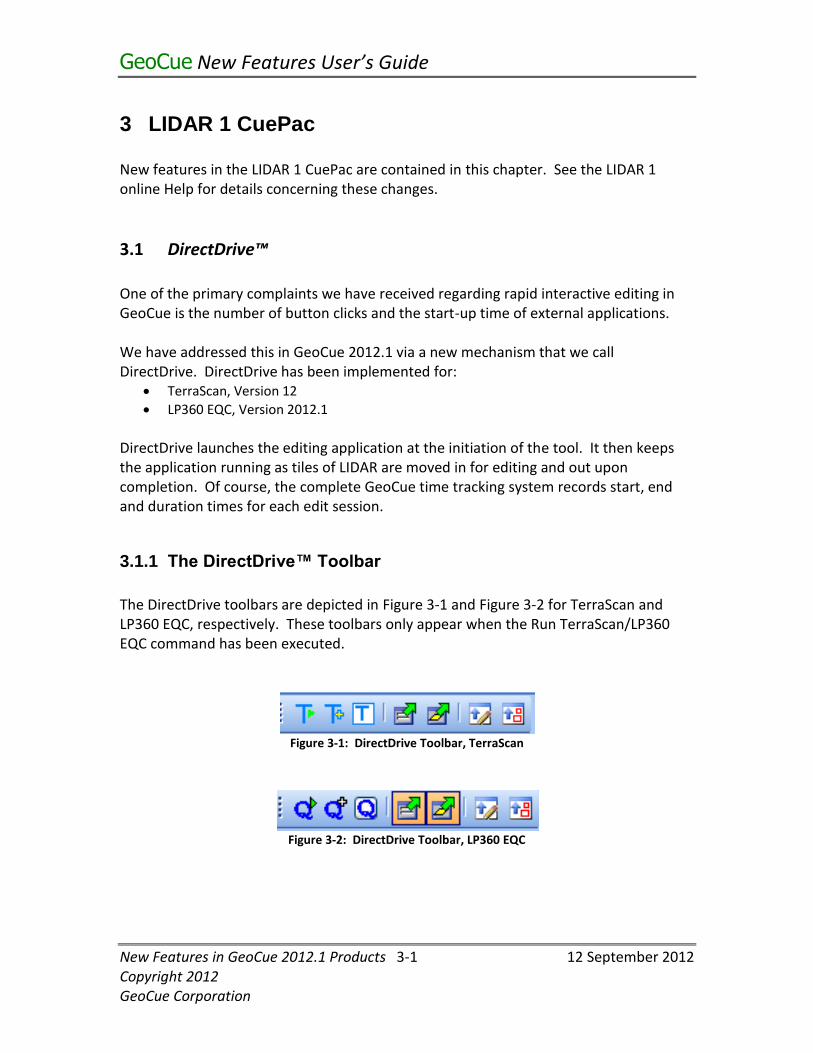
3.1 DirectDrive™
One of the primary complaints we have received regarding rapid interactive editing in GeoCue is the number of button clicks and the start-up time of external applications. We have addressed this in GeoCue 2012.1 via a new mechanism that we call DirectDrive. DirectDrive has been implemented for:
TerraScan, Version 12
LP360 EQC, Version 2012.1
DirectDrive launches the editing application at the initiation of the tool. It then keeps the application running as tiles of LIDAR are moved in for editing and out upon completion. Of course, the complete GeoCue time tracking system records start, end and duration times for each edit session.
3.1.1 The DirectDrive™ Toolbar
The DirectDrive toolbars are depicted in Figure 3-1 and Figure 3-2 for TerraScan and LP360 EQC, respectively. These toolbars only appear when the Run TerraScan/LP360 EQC command has been executed.
Figure 3-1: DirectDrive Toolbar, TerraScan
Figure 3-2: DirectDrive Toolbar, LP360 EQC
GeoCue New Features User’s Guide
New Features in GeoCue 2012.1 Products 3-2 12 September 2012 Copyright 2012 GeoCue Corporation
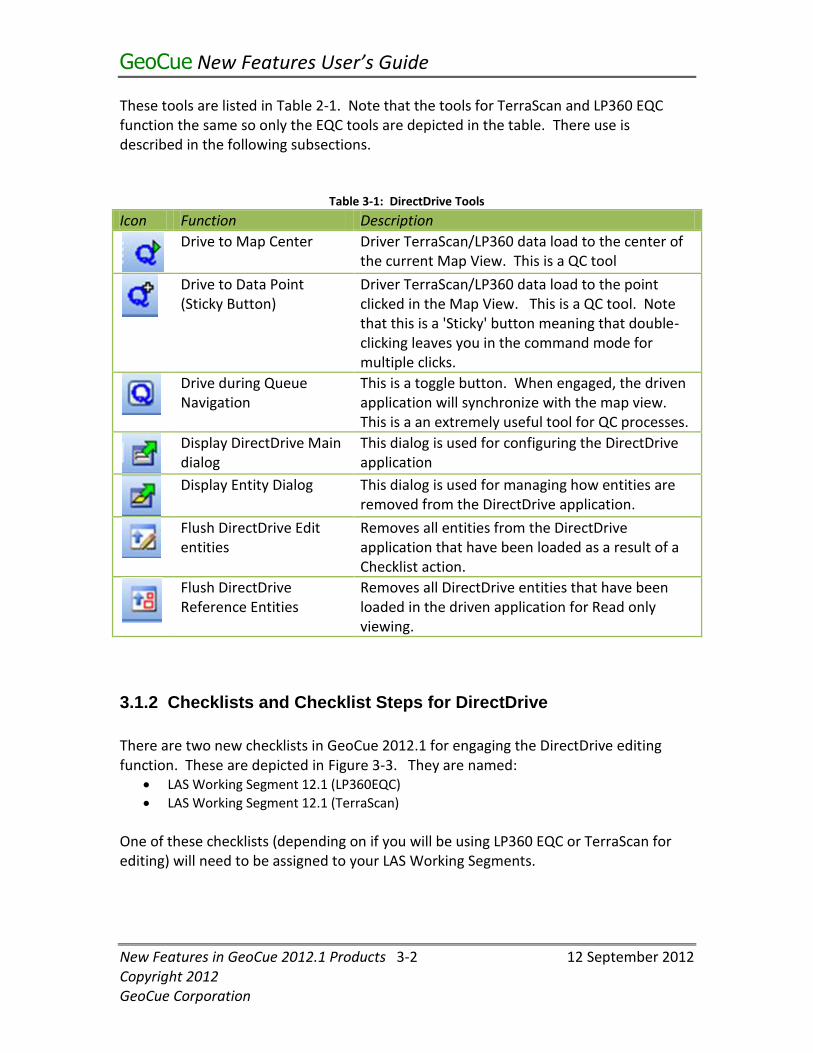
These tools are listed in Table 2-1. Note that the tools for TerraScan and LP360 EQC function the same so only the EQC tools are depicted in the table. There use is described in the following subsections.
Table 3-1: DirectDrive Tools
Icon Function Description
Drive to Map Center Driver TerraScan/LP360 data load to the center of the current Map View. This is a QC tool
Drive to Data Point (Sticky Button)
Driver TerraScan/LP360 data load to the point clicked in the Map View. This is a QC tool. Note that this is a 'Sticky' button meaning that double-clicking leaves you in the command mode for multiple clicks.
Drive during Queue Navigation
This is a toggle button. When engaged, the driven application will synchronize with the map view. This is a an extremely useful tool for QC processes.
Display DirectDrive Main dialog
This dialog is used for configuring the DirectDrive application
Display Entity Dialog This dialog is used for managing how entities are removed from the DirectDrive application.
Flush DirectDrive Edit entities
Removes all entities from the DirectDrive application that have been loaded as a result of a Checklist action.
Flush DirectDrive Reference Entities
Removes all DirectDrive entities that have been loaded in the driven application for Read only viewing.
3.1.2 Checklists and Checklist Steps for DirectDrive
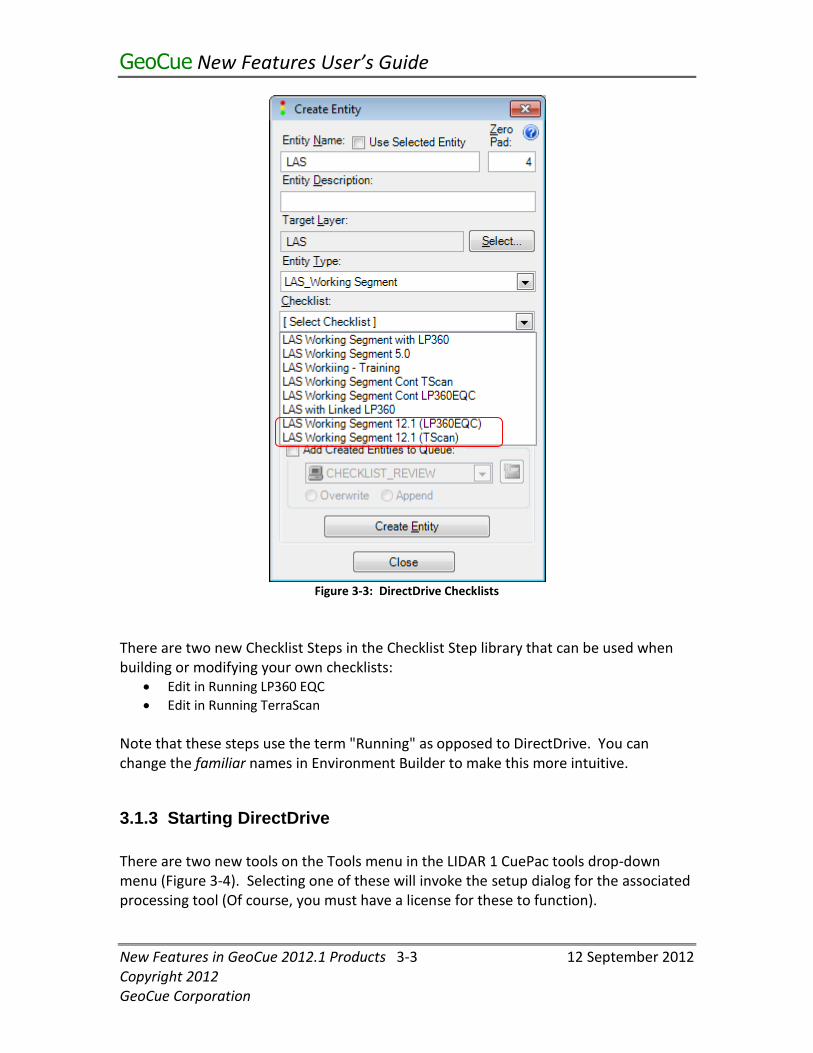
There are two new checklists in GeoCue 2012.1 for engaging the DirectDrive editing function. These are depicted in Figure 3-3. They are named:
LAS Working Segment 12.1 (LP360EQC)
LAS Working Segment 12.1 (TerraScan)
One of these checklists (depending on if you will be using LP360 EQC or TerraScan for editing) will need to be assigned to your LAS Working Segments.
GeoCue New Features User’s Guide
New Features in GeoCue 2012.1 Products 3-3 12 September 2012 Copyright 2012 GeoCue Corporation
Figure 3-3: DirectDrive Checklists
There are two new Checklist Steps in the Checklist Step library that can be used when building or modifying your own checklists:
Edit in Running LP360 EQC
Edit in Running TerraScan
Note that these steps use the term "Running" as opposed to DirectDrive. You can change the familiar names in Environment Builder to make this more intuitive.
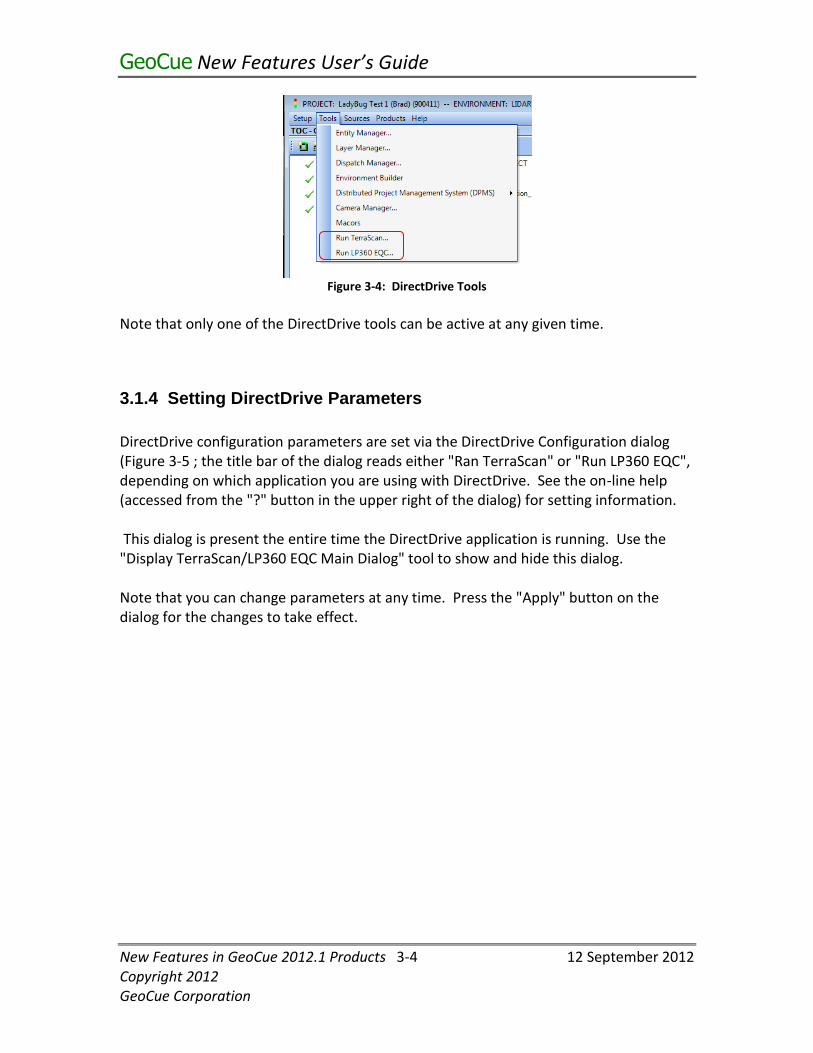
3.1.3 Starting DirectDrive
There are two new tools on the Tools menu in the LIDAR 1 CuePac tools drop-down menu (Figure 3-4). Selecting one of these will invoke the setup dialog for the associated processing tool (Of course, you must have a license for these to function).
GeoCue New Features User’s Guide
New Features in GeoCue 2012.1 Products 3-4 12 September 2012 Copyright 2012 GeoCue Corporation
Figure 3-4: DirectDrive Tools
Note that only one of the DirectDrive tools can be active at any given time.
3.1.4 Setting DirectDrive Parameters
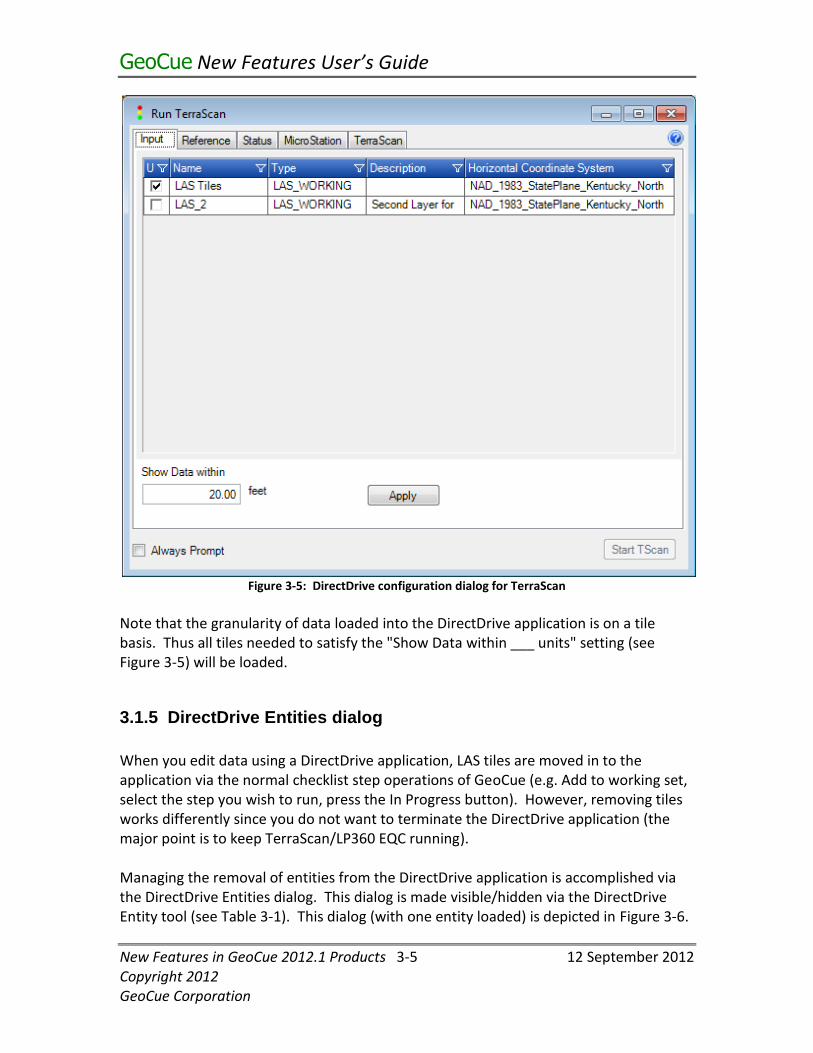
DirectDrive configuration parameters are set via the DirectDrive Configuration dialog (Figure 3-5 ; the title bar of the dialog reads either "Ran TerraScan" or "Run LP360 EQC", depending on which application you are using with DirectDrive. See the on-line help (accessed from the "?" button in the upper right of the dialog) for setting information. This dialog is present the entire time the DirectDrive application is running. Use the "Display TerraScan/LP360 EQC Main Dialog" tool to show and hide this dialog. Note that you can change parameters at any time. Press the "Apply" button on the dialog for the changes to take effect.
GeoCue New Features User’s Guide
New Features in GeoCue 2012.1 Products 3-5 12 September 2012 Copyright 2012 GeoCue Corporation
Figure 3-5: DirectDrive configuration dialog for TerraScan
Note that the granularity of data loaded into the DirectDrive application is on a tile basis. Thus all tiles needed to satisfy the "Show Data within ___ units" setting (see Figure 3-5) will be loaded.
3.1.5 DirectDrive Entities dialog
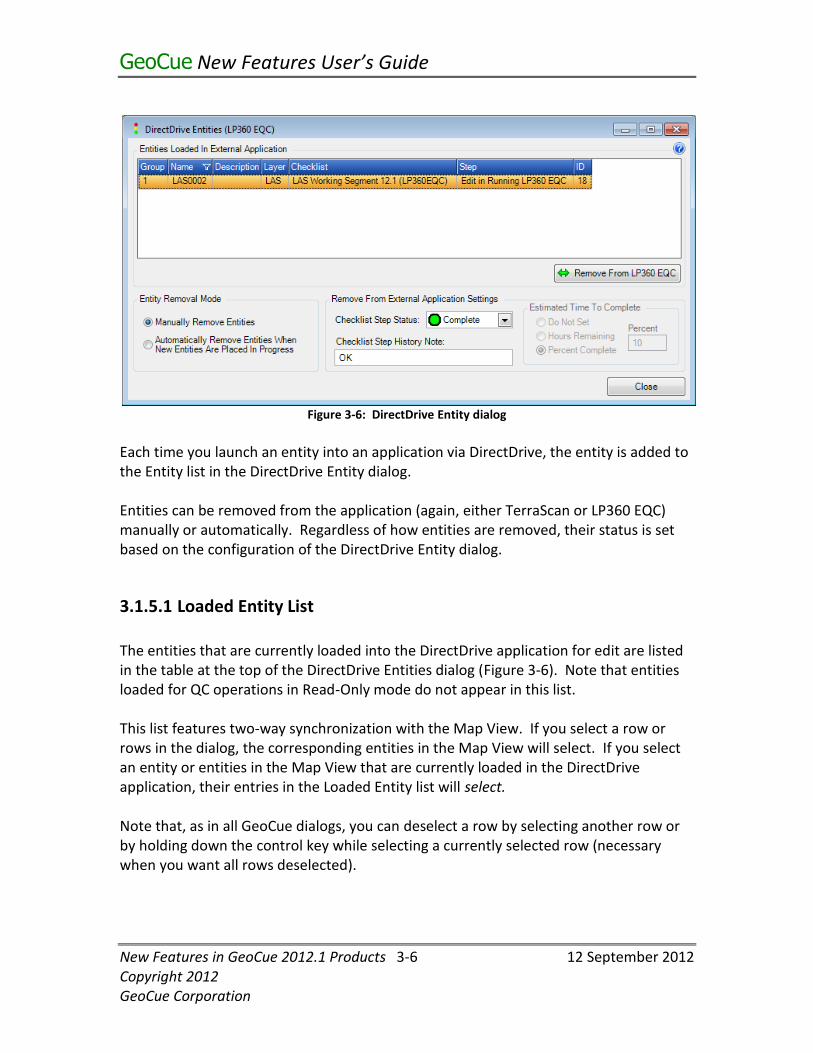
When you edit data using a DirectDrive application, LAS tiles are moved in to the application via the normal checklist step operations of GeoCue (e.g. Add to working set, select the step you wish to run, press the In Progress button). However, removing tiles works differently since you do not want to terminate the DirectDrive application (the major point is to keep TerraScan/LP360 EQC running). Managing the removal of entities from the DirectDrive application is accomplished via the DirectDrive Entities dialog. This dialog is made visible/hidden via the DirectDrive Entity tool (see Table 3-1). This dialog (with one entity loaded) is depicted in Figure 3-6.
GeoCue New Features User’s Guide
New Features in GeoCue 2012.1 Products 3-6 12 September 2012 Copyright 2012 GeoCue Corporation
Figure 3-6: DirectDrive Entity dialog
Each time you launch an entity into an application via DirectDrive, the entity is added to the Entity list in the DirectDrive Entity dialog. Entities can be removed from the application (again, either TerraScan or LP360 EQC) manually or automatically. Regardless of how entities are removed, their status is set based on the configuration of the DirectDrive Entity dialog.
3.1.5.1 Loaded Entity List
The entities that are currently loaded into the DirectDrive application for edit are listed in the table at the top of the DirectDrive Entities dialog (Figure 3-6). Note that entities loaded for QC operations in Read-Only mode do not appear in this list. This list features two-way synchronization with the Map View. If you select a row or rows in the dialog, the corresponding entities in the Map View will select. If you select an entity or entities in the Map View that are currently loaded in the DirectDrive application, their entries in the Loaded Entity list will select. Note that, as in all GeoCue dialogs, you can deselect a row by selecting another row or by holding down the control key while selecting a currently selected row (necessary when you want all rows deselected).
GeoCue New Features User’s Guide
New Features in GeoCue 2012.1 Products 3-7 12 September 2012 Copyright 2012 GeoCue Corporation
3.1.5.2 Earned Value Management Settings
The settings for Earned Value Management (EVM) tracking information in GeoCue are configured using the lower right section of the DirectDrive Entity dialog. Note that these settings reflect the completion dialog that displays when you are doing non-DirectDrive processing in GeoCue. Regardless of the entity removal mode that you select, these settings are applied to the entity/entities as they are removed from the DirectDrive application.
3.1.5.3 Manual Removal of Entities
To enable the manual removal mode, select the radio button option "manual remove entities." To remove entities, select the row or rows of the entities that you want to remove. The Remove button will enable. Pressing the Remove button will cause the DirectDrive application to:
Save the files associated with the entities being removed
Remove the entity reference from the currently loaded data set
Set the Earned Value Management values for the removed entities
Remove the Write locks that were placed on the entities while they were in the DirectDrive application
The DirectDrive application, however, will not terminate.
3.1.5.4 Automatic Removal of Entities
If your work practice is to load entities into an application, do editing and then remove all of the entities prior to moving on to the next group, then the Automatic removal method will significantly reduce button clicking. Automatic removal removes all entities from the DirectDrive Application when you load a new group of entities. A typical automatic scenario is (assuming you have configured the Automatic mode in the DirectDrive Entities dialog):
1. Select an entity (or multiple entities) to the Working Set Queue 2. Fire the DirectDrive step 3. Edit the data 4. Select the next entity (or entities) to the Working Set Queue 5. Fire the DirectDrive step
GeoCue New Features User’s Guide
New Features in GeoCue 2012.1 Products 3-8 12 September 2012 Copyright 2012 GeoCue Corporation
At step 5, the prior entity (entities) will be unloaded as described in the manual unload section.
Combining DirectDrive in Automatic mode with Quick Launch provides "one click to edit state" in GeoCue 2012. This was, in fact, the design goal of DirectDrive.
3.1.6 Using DirectDrive for QC Operations
Once you have configured DirectDrive, use the navigation buttons on the DirectDrive tool bar (the three tools to the left) to load data into the DirectDrive application and drive as desired. Note that data loaded via the QC tools is loaded in Read Only or Reference mode. This means that more than one GeoCue Client can be viewing the same data in a DirectDrive application. A very useful QC mode is to set the GeoCue Map View to the desired level of zoom and engage the Drive to Map Center DirectDrive tool. Now simply click in the GeoCue Tracking View to drive both the Map View and the DirectDrive application to the point you desire. Note that entities loaded into the DirectDrive application for QC are independent of entities loaded for edit. QC entities are removed from the DirectDrive application when you move to a new QC area. You can remove all QC entities from the DirectDrive application by pressing the "Flush DirectDrive Reference Entities" button on the DirectDrive toolbar.
3.1.7 Using DirectDrive for Editing Operations
DirectDrive is an extremely powerful tool set for rapidly editing LIDAR data. It removes the lag time of starting up the editing application (currently TerraScan and LP360 EQC) each time a tile or group of tiles are set "In Progress" for editing. You can manually invoke the DirectDrive Application via the "Run TerraScan or Run LP360 EQC" menu items on the Tools Menu or allow it to automatically invoke the first time you launch tiles. Generally you should use the Tool option if you need to adjust settings for your project (e.g. reference data you would like loaded and so forth).
GeoCue New Features User’s Guide
New Features in GeoCue 2012.1 Products 3-9 12 September 2012 Copyright 2012 GeoCue Corporation
Invoking a DirectDrive step against one or more LAS Working Segments is the same as a normal checklist step. However, removing tiles from the editing application upon completion of editing uses the new DirectDrive Entities dialog. This was described in the previous sections describing the DirectDrive Entity dialog.
3.1.8 DirectDrive and Quick Launch
The most efficient editing setup is to combine DirectDrive with Automatic entity removal and Quick Launch. The following settings enable single click editing of LAS data in either TerraScan or LP360 EQC. This means that you can click inside a LAS tile in the Map View (or, if you are doing multi-tile editing, drag the selection cursor over the group of tiles you wish to edit) and have GeoCue automatically load the tile for editing the application. When you select the next tile(s), the previous tile(s) will be unloaded as described in the Automatic settings section above. The general configuration is:
1. Set the Map View selection mode to Select Polygons Containing Clicked Point (see the New Selection modes section of this document)
2. Set the Entity Removal Mode to Automatic in the DirectDrive Entities dialog 3. Configure the Quick Launch system to fire a LAS Working Segment to the DirectDrive
checklist step (either LP360 EQC or TerraScan)
Combining DirectDrive in Automatic mode with Quick Launch provides "one click to edit state" in GeoCue 2012. This was, in fact, the design goal of DirectDrive.
3.2 New Z Probe
LIDAR 1 CuePac for 2012.1 includes a completely rewritten Z Probe tool for assessing Vertical Accuracy. The process for launching the tool is the same as previous versions of GeoCue: 1) Import Control into the GeoCue project using the Import Control tool
a) Use Photogrammetric Point as the Entity Type b) Use the "Z Probe Point" checklist
2) Select all desired control to the Working Set Queue and Run the Probe step 3) You will generally want to select the Ground class and Model Key Points (either class or flag)
for the Z Probe operation from the Filter dialog. 4) Press the Probe button on the Filter dialog
GeoCue New Features User’s Guide
New Features in GeoCue 2012.1 Products 3-10 12 September 2012 Copyright 2012 GeoCue Corporation
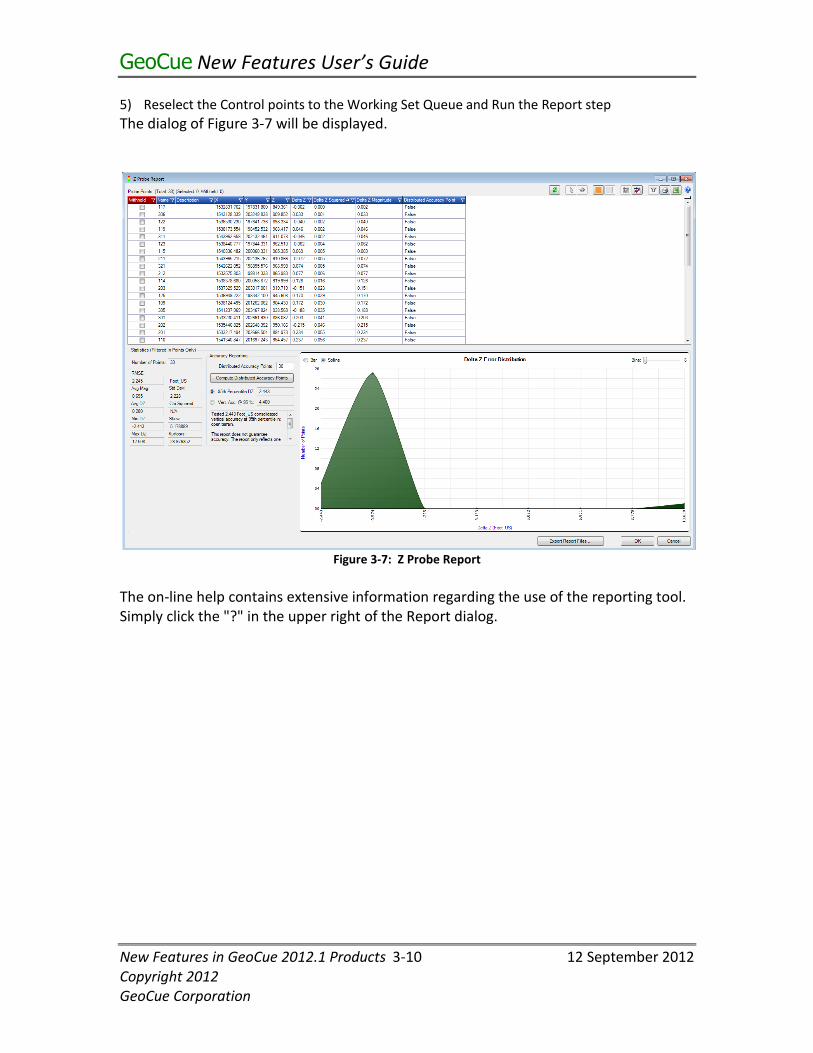
5) Reselect the Control points to the Working Set Queue and Run the Report step
The dialog of Figure 3-7 will be displayed.
Figure 3-7: Z Probe Report
The on-line help contains extensive information regarding the use of the reporting tool. Simply click the "?" in the upper right of the Report dialog.
GeoCue New Features User’s Guide
New Features in GeoCue 2012.1 Products 4-1 12 September 2012 Copyright 2012 GeoCue Corporation
4 Project Administrator To consistently make a predictable profit on a production job, you have to apply consistent, real-time budget management practices. There are two general levels of management that are required:
Project Phase Level management (managing the major phases of the project)
Project Entity management where entities are the individual components that roll up to a phase (for example, the individual flight lines that comprise a collect)
Many companies use a project management software package such as Microsoft Project for these tasks. However, tools such as Project has three fundamental flaws:
It cannot easily manage the status of the entities of a project (for example, how would you use Project to manage each of the thousands of ortho images in an ortho production project?)
These tools report what individual contributors enter into the reporting tool. This is quite often far from the reality state of the project (e.g. everything is always 80% complete)
Tools such as Project report on the past, not the present. That is, data entry is made after the event that is causing an overrun in budget or schedule.
GeoCue is designed around the management principal called Earned Value Management (EVM). It is a rigorous scientific management process that, when faithfully followed, will provide assessments of performance against plan as well as predictions of the ultimate outcome. The basic elements of GeoCue (GeoCue Client and Server) contain the EVM framework for data collection and storage. There are two optional tools that you can add to GeoCue for Earned Value Management monitoring and reporting:
Project Administrator - This tool is used for "micro managing" projects at the entity level
GeoCue Federator - The server provides roll-up reporting of the entities that comprise project phases and allows web access to project status
Project Administrator has been completely rewritten for GeoCue 2012.1. It now provides much better reporting at the entity (micro) level.
Note: You must have at least one Project Administrator license in your GeoCue constellation to use Project Administrator.
GeoCue New Features User’s Guide
New Features in GeoCue 2012.1 Products 4-2 12 September 2012 Copyright 2012 GeoCue Corporation
4.1 Invoking Project Administrator
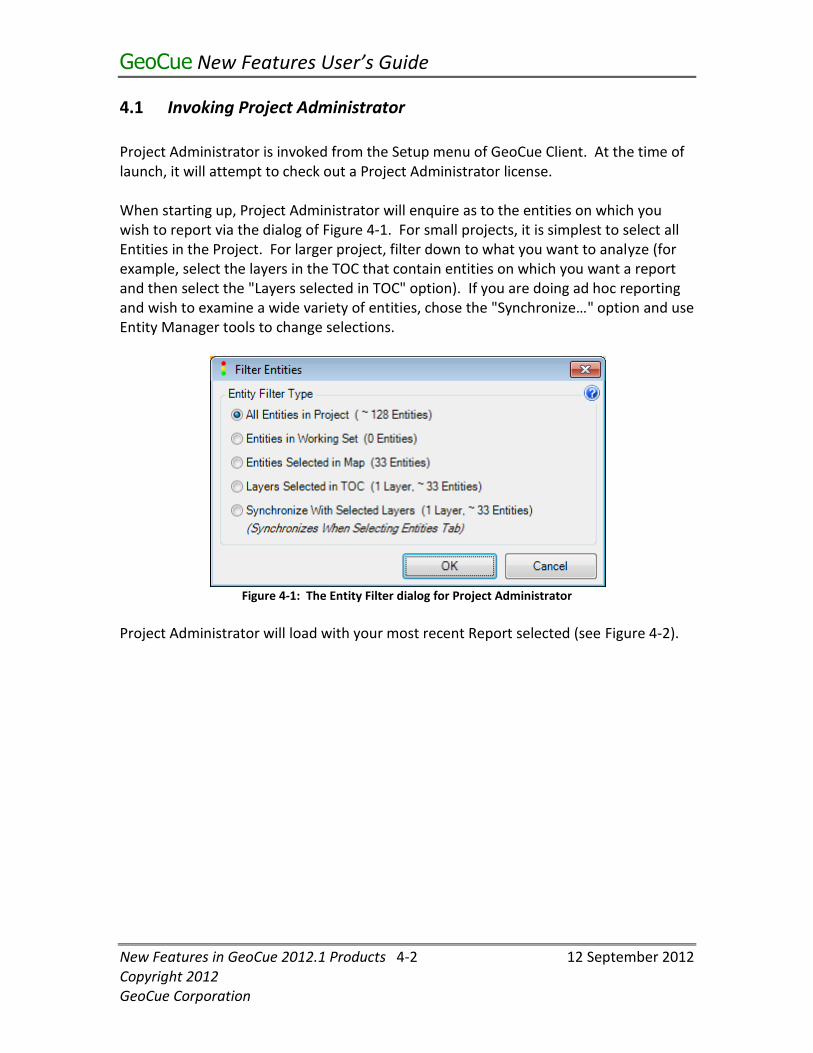
Project Administrator is invoked from the Setup menu of GeoCue Client. At the time of launch, it will attempt to check out a Project Administrator license. When starting up, Project Administrator will enquire as to the entities on which you wish to report via the dialog of Figure 4-1. For small projects, it is simplest to select all Entities in the Project. For larger project, filter down to what you want to analyze (for example, select the layers in the TOC that contain entities on which you want a report and then select the "Layers selected in TOC" option). If you are doing ad hoc reporting and wish to examine a wide variety of entities, chose the "Synchronize…" option and use Entity Manager tools to change selections.
Figure 4-1: The Entity Filter dialog for Project Administrator
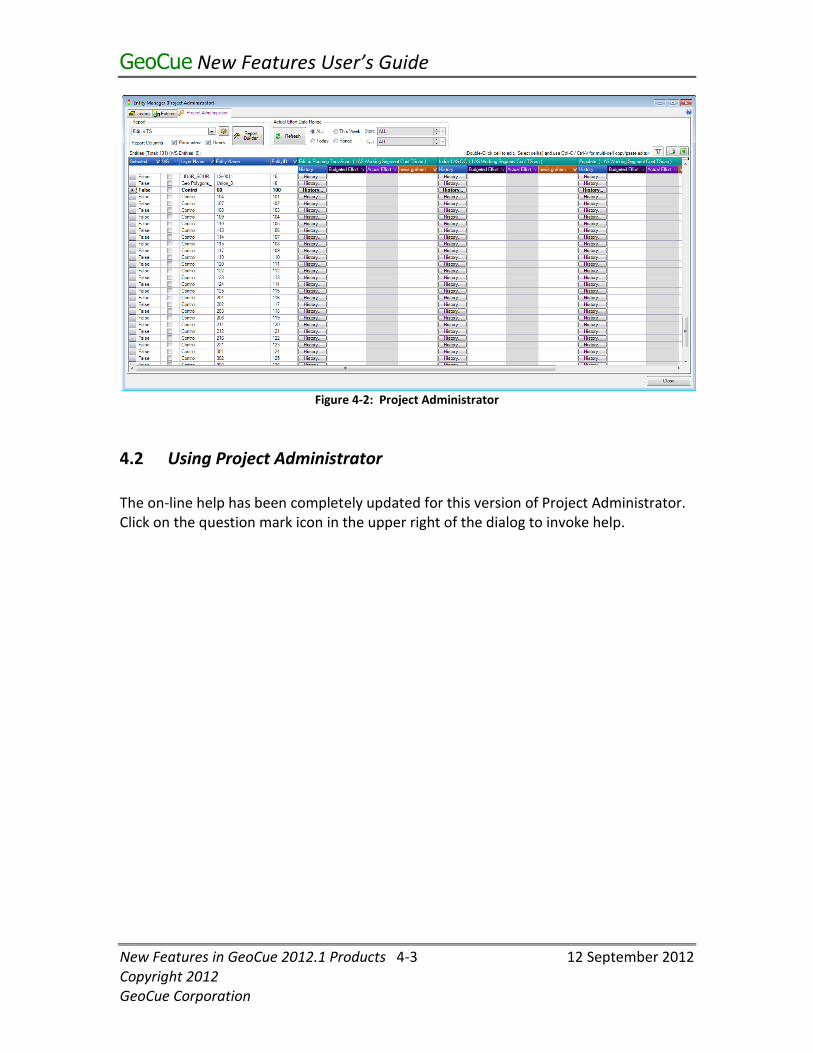
Project Administrator will load with your most recent Report selected (see Figure 4-2).
GeoCue New Features User’s Guide
New Features in GeoCue 2012.1 Products 4-3 12 September 2012 Copyright 2012 GeoCue Corporation
Figure 4-2: Project Administrator
4.2 Using Project Administrator
The on-line help has been completely updated for this version of Project Administrator. Click on the question mark icon in the upper right of the dialog to invoke help.
GeoCue New Features User’s Guide
New Features in GeoCue 2012.1 Products 5-1 12 September 2012 Copyright 2012 GeoCue Corporation
5 Environment Builder A number of changes have been made in Environment Builder for release 2012.1, primarily in support of managing the new file versioning system.
5.1 Modifying a System Defined Checklist
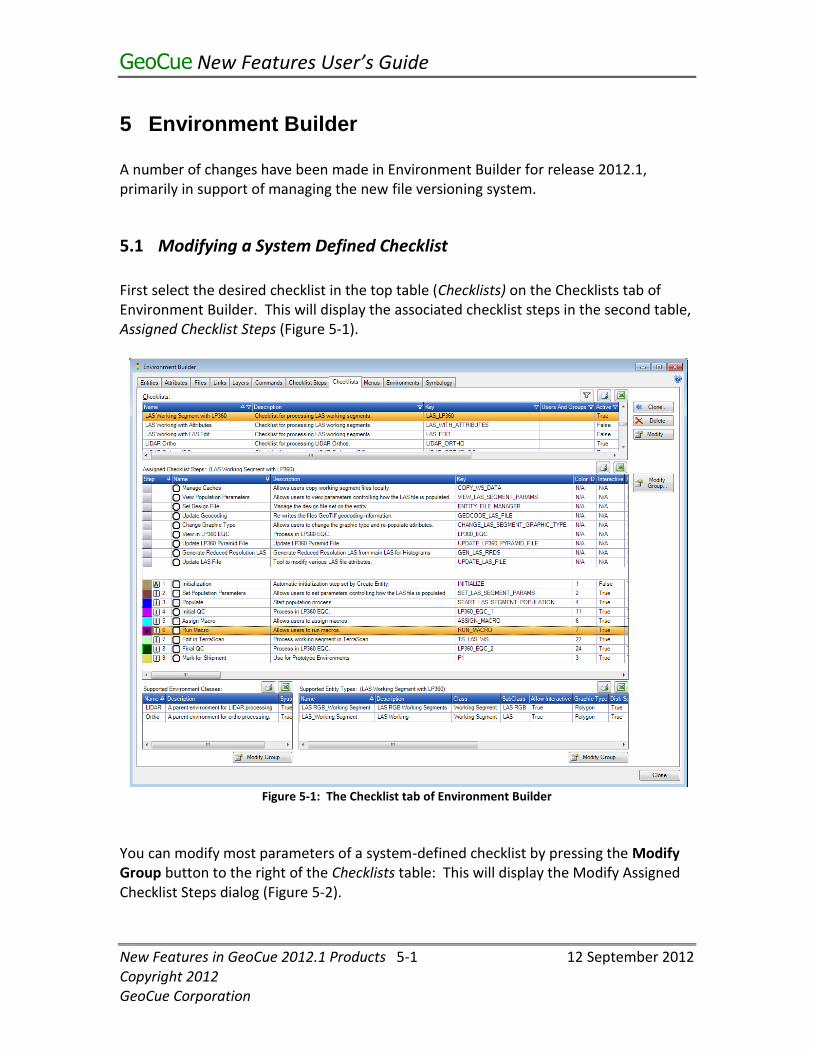
First select the desired checklist in the top table (Checklists) on the Checklists tab of Environment Builder. This will display the associated checklist steps in the second table, Assigned Checklist Steps (Figure 5-1).
Figure 5-1: The Checklist tab of Environment Builder
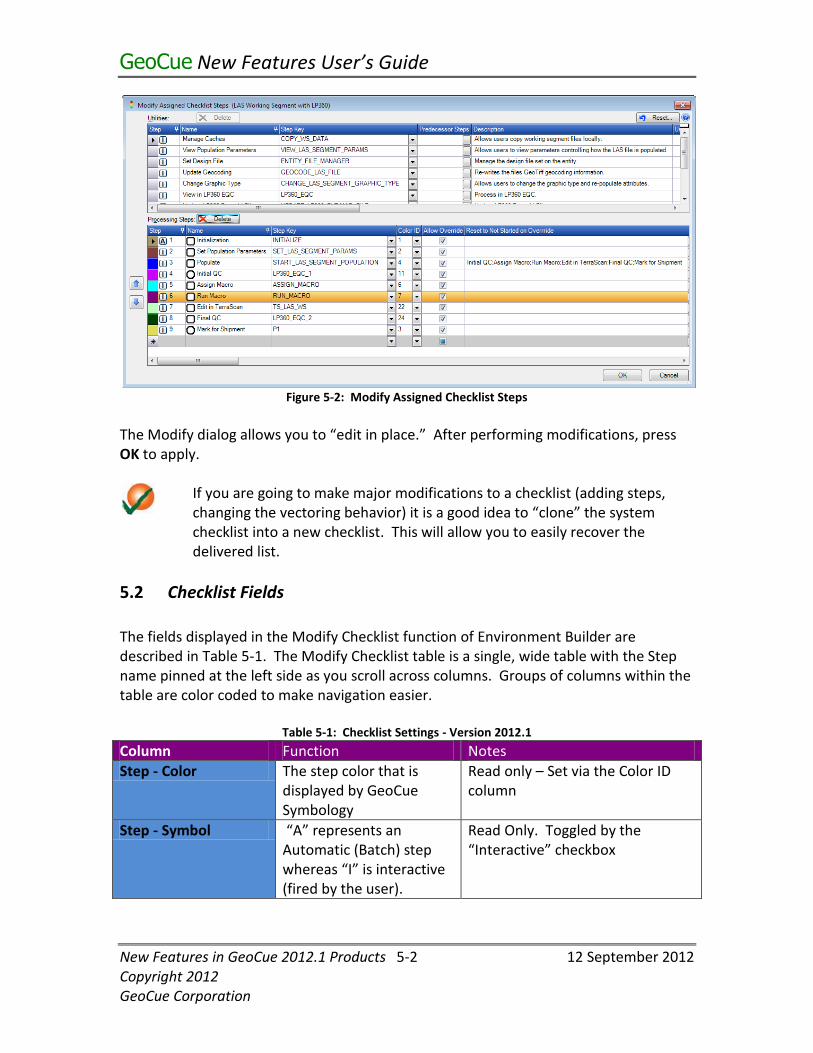
You can modify most parameters of a system-defined checklist by pressing the Modify Group button to the right of the Checklists table: This will display the Modify Assigned Checklist Steps dialog (Figure 5-2).
GeoCue New Features User’s Guide
New Features in GeoCue 2012.1 Products 5-2 12 September 2012 Copyright 2012 GeoCue Corporation
Figure 5-2: Modify Assigned Checklist Steps
The Modify dialog allows you to “edit in place.” After performing modifications, press OK to apply.
If you are going to make major modifications to a checklist (adding steps, changing the vectoring behavior) it is a good idea to “clone” the system checklist into a new checklist. This will allow you to easily recover the delivered list.
5.2 Checklist Fields
The fields displayed in the Modify Checklist function of Environment Builder are described in Table 5-1. The Modify Checklist table is a single, wide table with the Step name pinned at the left side as you scroll across columns. Groups of columns within the table are color coded to make navigation easier.
Table 5-1: Checklist Settings - Version 2012.1
Column Function Notes
Step - Color The step color that is displayed by GeoCue Symbology
Read only – Set via the Color ID column
Step - Symbol “A” represents an Automatic (Batch) step whereas “I” is interactive (fired by the user).
Read Only. Toggled by the “Interactive” checkbox
GeoCue New Features User’s Guide
New Features in GeoCue 2012.1 Products 5-3 12 September 2012 Copyright 2012 GeoCue Corporation
Column Function Notes
Step Number Sequential number of this step.
Read Only – note that this does not represent the order in which steps are executed – this is determined by the vector logic.
Name Step Name preceded by a: Square represents a Mandatory step, Round represents an Optional step.
You can rename the step by editing in the name field. This overrides the name specified in the Checklist Step area of Environment Builder. The Mandatory, Optional symbol is controlled by the “Optional” check box field.
Step Key Step Key This is the unique GeoCue key assigned when you create a step in the Checklist Step section of Environment Builder. This is where you actually select the step that will be executed. Thus this is the first field that must be edited when building a new checklist or adding a step. It is selected via a drop-down list. NOTE: A specific Checklist Step can appear only once in a Checklist.
Color ID Override the Checklist Step default color
Pick the desired color from the drop-down. The colors are selected from the Checklist Step master table (accessed from the Checklist Steps tab).
Allow Override Allow the user to enter this step, provided its Predecessor conditions are met, by using the Override Step Sequence button on the Checklist Toolbar
Generally used to do out-of-sequence processing when things go awry. An example might be the need to repopulate working segments in a LIDAR flow. The step will not enable if predecessor conditions are not set.
GeoCue New Features User’s Guide
New Features in GeoCue 2012.1 Products 5-4 12 September 2012 Copyright 2012 GeoCue Corporation
Column Function Notes
Reset to Not Started on Override
You can specify one or more steps in the Checklist. These steps will be set back to their Not Started status if this step is executed via the Override Step Sequence button on the checklist toolbar.
This function allows you to ensure, in your state logic, that the user does not become confused when stepping back in a checklist. An example would be setting Populate to Not Started if Set Population Parameters is run via an override after Populate had already been successfully run.
Reentry Allowed This flag specifies (if checked) that this step can be executed again (if it is the target another step).
This function is used for “fire once” scenarios. For example, you might group three steps and allow the user to execute them in any order. You can use this function to prevent the user from running the same step twice, even if its predecessor condition is valid.
Predecessor Steps One or more steps that must be in the COMPLETE state before this step can be executed.
This is the most fundamental of the Checklist transition rules. It cannot be overridden by any checklist action.
COMPLETE Targets These are the steps that will potentially be enabled when this step transitions to Complete.
Steps will not enable if their predecessor condition is not met or they have already been transitioned to complete and their Allow Reentry flag is not set.
Select Step This is the step that will be selected (when the entity associated with this checklist instance is moved into the working set) from the list of COMPLETE Targets after the associated step completes.
If the Select Target cannot be executed (due to predecessor requirements or the Reentry flag), no step will be Selected. Note that the Select Step must be one of the COMPLETE Targets.
ERROR Targets These are the steps that will enable if the executable associated with this step crashes.
Note that like all steps, the ERROR target must have its predecessor targets complete.
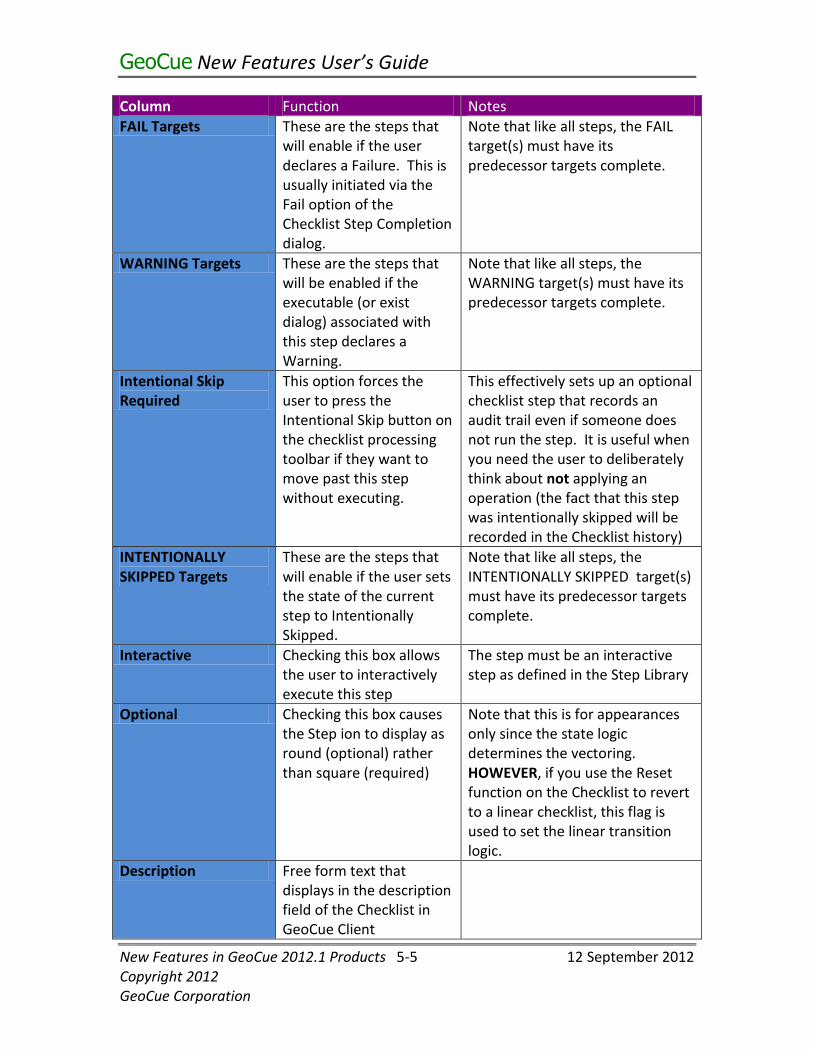
GeoCue New Features User’s Guide
New Features in GeoCue 2012.1 Products 5-5 12 September 2012 Copyright 2012 GeoCue Corporation
Column Function Notes
FAIL Targets These are the steps that will enable if the user declares a Failure. This is usually initiated via the Fail option of the Checklist Step Completion dialog.
Note that like all steps, the FAIL target(s) must have its predecessor targets complete.
WARNING Targets These are the steps that will be enabled if the executable (or exist dialog) associated with this step declares a Warning.
Note that like all steps, the WARNING target(s) must have its predecessor targets complete.
Intentional Skip Required
This option forces the user to press the Intentional Skip button on the checklist processing toolbar if they want to move past this step without executing.
This effectively sets up an optional checklist step that records an audit trail even if someone does not run the step. It is useful when you need the user to deliberately think about not applying an operation (the fact that this step was intentionally skipped will be recorded in the Checklist history)
INTENTIONALLY SKIPPED Targets
These are the steps that will enable if the user sets the state of the current step to Intentionally Skipped.
Note that like all steps, the INTENTIONALLY SKIPPED target(s) must have its predecessor targets complete.
Interactive Checking this box allows the user to interactively execute this step
The step must be an interactive step as defined in the Step Library
Optional Checking this box causes the Step ion to display as round (optional) rather than square (required)
Note that this is for appearances only since the state logic determines the vectoring. HOWEVER, if you use the Reset function on the Checklist to revert to a linear checklist, this flag is used to set the linear transition logic.
Description Free form text that displays in the description field of the Checklist in GeoCue Client
GeoCue New Features User’s Guide
New Features in GeoCue 2012.1 Products 5-6 12 September 2012 Copyright 2012 GeoCue Corporation
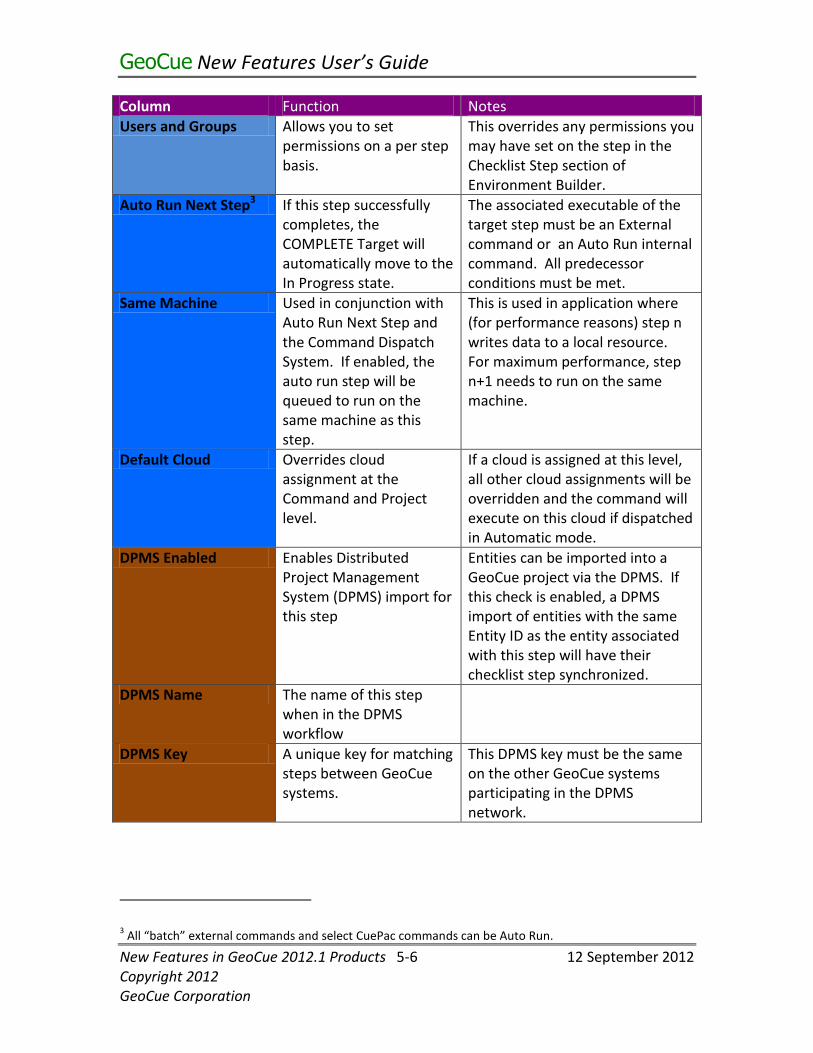
Column Function Notes
Users and Groups Allows you to set permissions on a per step basis.
This overrides any permissions you may have set on the step in the Checklist Step section of Environment Builder.
Auto Run Next Step3 If this step successfully completes, the COMPLETE Target will automatically move to the In Progress state.
The associated executable of the target step must be an External command or an Auto Run internal command. All predecessor conditions must be met.
Same Machine Used in conjunction with Auto Run Next Step and the Command Dispatch System. If enabled, the auto run step will be queued to run on the same machine as this step.
This is used in application where (for performance reasons) step n writes data to a local resource. For maximum performance, step n+1 needs to run on the same machine.
Default Cloud Overrides cloud assignment at the Command and Project level.
If a cloud is assigned at this level, all other cloud assignments will be overridden and the command will execute on this cloud if dispatched in Automatic mode.
DPMS Enabled Enables Distributed Project Management System (DPMS) import for this step
Entities can be imported into a GeoCue project via the DPMS. If this check is enabled, a DPMS import of entities with the same Entity ID as the entity associated with this step will have their checklist step synchronized.
DPMS Name The name of this step when in the DPMS workflow
DPMS Key A unique key for matching steps between GeoCue systems.
This DPMS key must be the same on the other GeoCue systems participating in the DPMS network.
3 All “batch” external commands and select CuePac commands can be Auto Run.
GeoCue New Features User’s Guide
New Features in GeoCue 2012.1 Products 5-7 12 September 2012 Copyright 2012 GeoCue Corporation
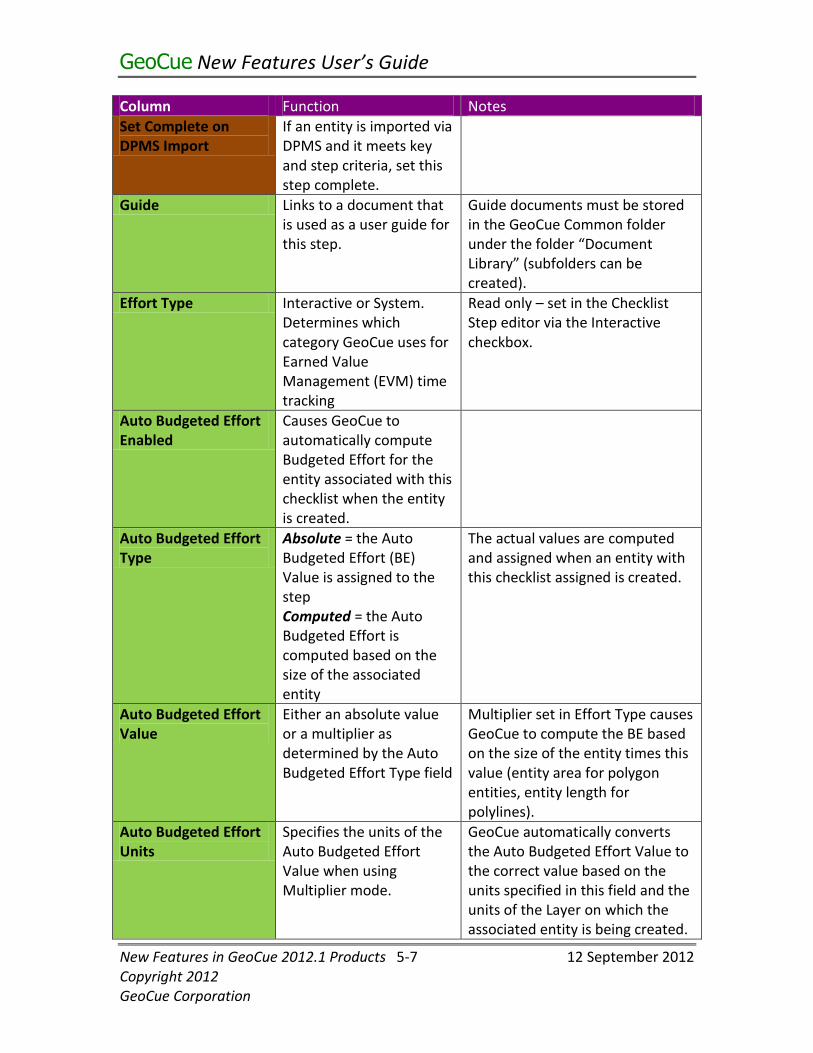
Column Function Notes
Set Complete on DPMS Import
If an entity is imported via DPMS and it meets key and step criteria, set this step complete.
Guide Links to a document that is used as a user guide for this step.
Guide documents must be stored in the GeoCue Common folder under the folder “Document Library” (subfolders can be created).
Effort Type Interactive or System. Determines which category GeoCue uses for Earned Value Management (EVM) time tracking
Read only – set in the Checklist Step editor via the Interactive checkbox.
Auto Budgeted Effort Enabled
Causes GeoCue to automatically compute Budgeted Effort for the entity associated with this checklist when the entity is created.
Auto Budgeted Effort Type
Absolute = the Auto Budgeted Effort (BE) Value is assigned to the step Computed = the Auto Budgeted Effort is computed based on the size of the associated entity
The actual values are computed and assigned when an entity with this checklist assigned is created.
Auto Budgeted Effort Value
Either an absolute value or a multiplier as determined by the Auto Budgeted Effort Type field
Multiplier set in Effort Type causes GeoCue to compute the BE based on the size of the entity times this value (entity area for polygon entities, entity length for polylines).
Auto Budgeted Effort Units
Specifies the units of the Auto Budgeted Effort Value when using Multiplier mode.
GeoCue automatically converts the Auto Budgeted Effort Value to the correct value based on the units specified in this field and the units of the Layer on which the associated entity is being created.
GeoCue New Features User’s Guide
New Features in GeoCue 2012.1 Products 5-8 12 September 2012 Copyright 2012 GeoCue Corporation
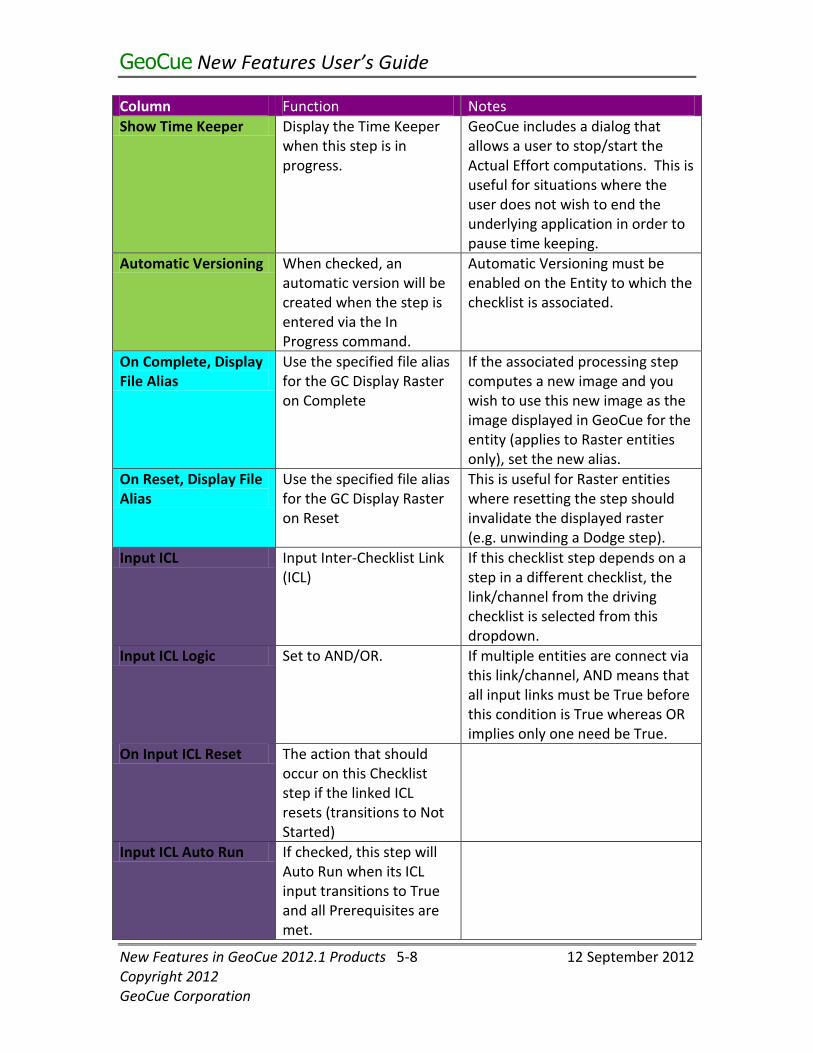
Column Function Notes
Show Time Keeper Display the Time Keeper when this step is in progress.
GeoCue includes a dialog that allows a user to stop/start the Actual Effort computations. This is useful for situations where the user does not wish to end the underlying application in order to pause time keeping.
Automatic Versioning When checked, an automatic version will be created when the step is entered via the In Progress command.
Automatic Versioning must be enabled on the Entity to which the checklist is associated.
On Complete, Display File Alias
Use the specified file alias for the GC Display Raster on Complete
If the associated processing step computes a new image and you wish to use this new image as the image displayed in GeoCue for the entity (applies to Raster entities only), set the new alias.
On Reset, Display File Alias
Use the specified file alias for the GC Display Raster on Reset
This is useful for Raster entities where resetting the step should invalidate the displayed raster (e.g. unwinding a Dodge step).
Input ICL Input Inter-Checklist Link (ICL)
If this checklist step depends on a step in a different checklist, the link/channel from the driving checklist is selected from this dropdown.
Input ICL Logic Set to AND/OR. If multiple entities are connect via this link/channel, AND means that all input links must be True before this condition is True whereas OR implies only one need be True.
On Input ICL Reset The action that should occur on this Checklist step if the linked ICL resets (transitions to Not Started)
Input ICL Auto Run If checked, this step will Auto Run when its ICL input transitions to True and all Prerequisites are met.
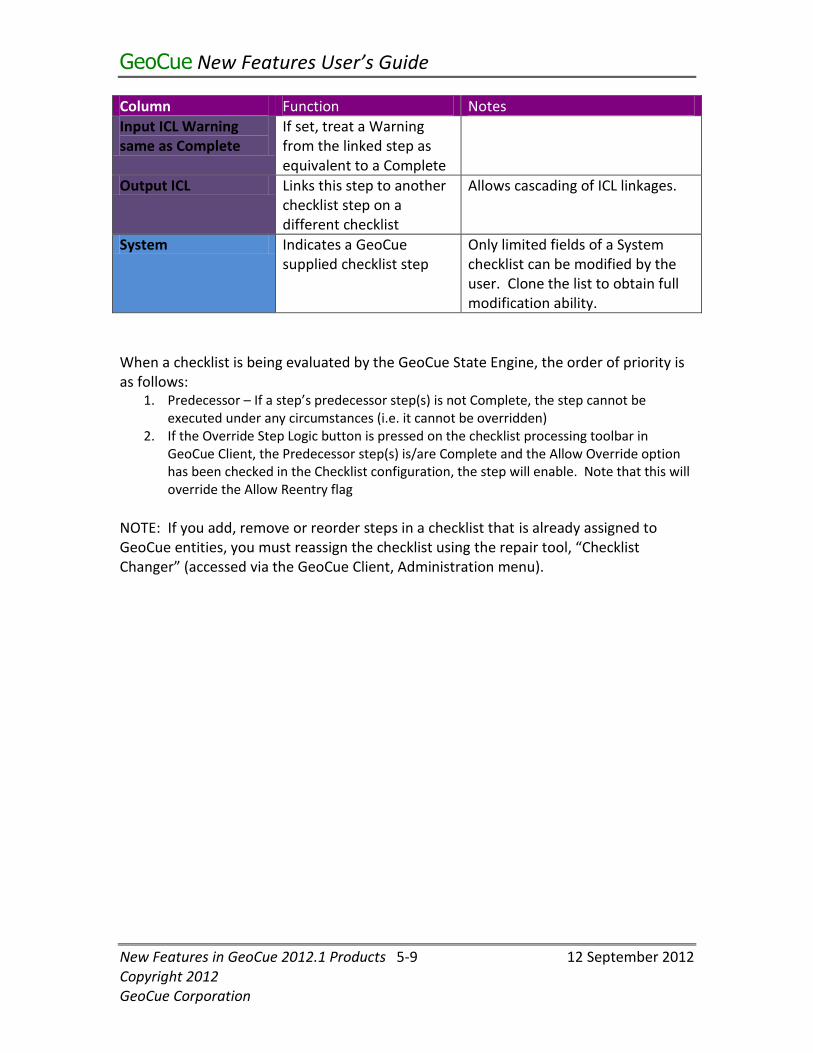
GeoCue New Features User’s Guide
New Features in GeoCue 2012.1 Products 5-9 12 September 2012 Copyright 2012 GeoCue Corporation
Column Function Notes
Input ICL Warning same as Complete
If set, treat a Warning from the linked step as equivalent to a Complete
Output ICL Links this step to another checklist step on a different checklist
Allows cascading of ICL linkages.
System Indicates a GeoCue supplied checklist step
Only limited fields of a System checklist can be modified by the user. Clone the list to obtain full modification ability.
When a checklist is being evaluated by the GeoCue State Engine, the order of priority is as follows:
1. Predecessor – If a step’s predecessor step(s) is not Complete, the step cannot be executed under any circumstances (i.e. it cannot be overridden)
2. If the Override Step Logic button is pressed on the checklist processing toolbar in GeoCue Client, the Predecessor step(s) is/are Complete and the Allow Override option has been checked in the Checklist configuration, the step will enable. Note that this will override the Allow Reentry flag
NOTE: If you add, remove or reorder steps in a checklist that is already assigned to GeoCue entities, you must reassign the checklist using the repair tool, “Checklist Changer” (accessed via the GeoCue Client, Administration menu).
GeoCue New Features User’s Guide
New Features in GeoCue 2012.1 Products 5-1 12 September 2012 Copyright 2012 GeoCue Corporation