Embed Size (px)
Citation preview
New Device Enrollment
i. Input username and password (Windows/Domain Password). Click "LOGIN"
ii. On next screen, Click Start setup.
iii. Select your device type; then, click Continue.
iv. Follow the instruction set below corresponding to the option you chose: mobile phone or tablet,
landline. v. Once you have followed one of the below instruction sets, continue down to Connecting to VPN
using Duo with Cisco AnyConnect.

Mobile phone or Tablet
1. (Mobile phone option only) Select your country from the dropdown list and type in your phone number. Be sure to use the number of the mobile phone that you’ll have with you when logging into a Duo-protected application.
2. (Mobile phone option only) Confirm that you entered your number correctly by checking the box; then, click Continue.
3. Choose your mobile device’s operating system and click Continue.
4. Install the Duo Mobile app on your device following the directions provided by the Duo
webpage.
5. Once installed, open the application on your mobile device. 6. After accepting the License Agreement, return to your web browser and click I have Duo Mobile
installed.
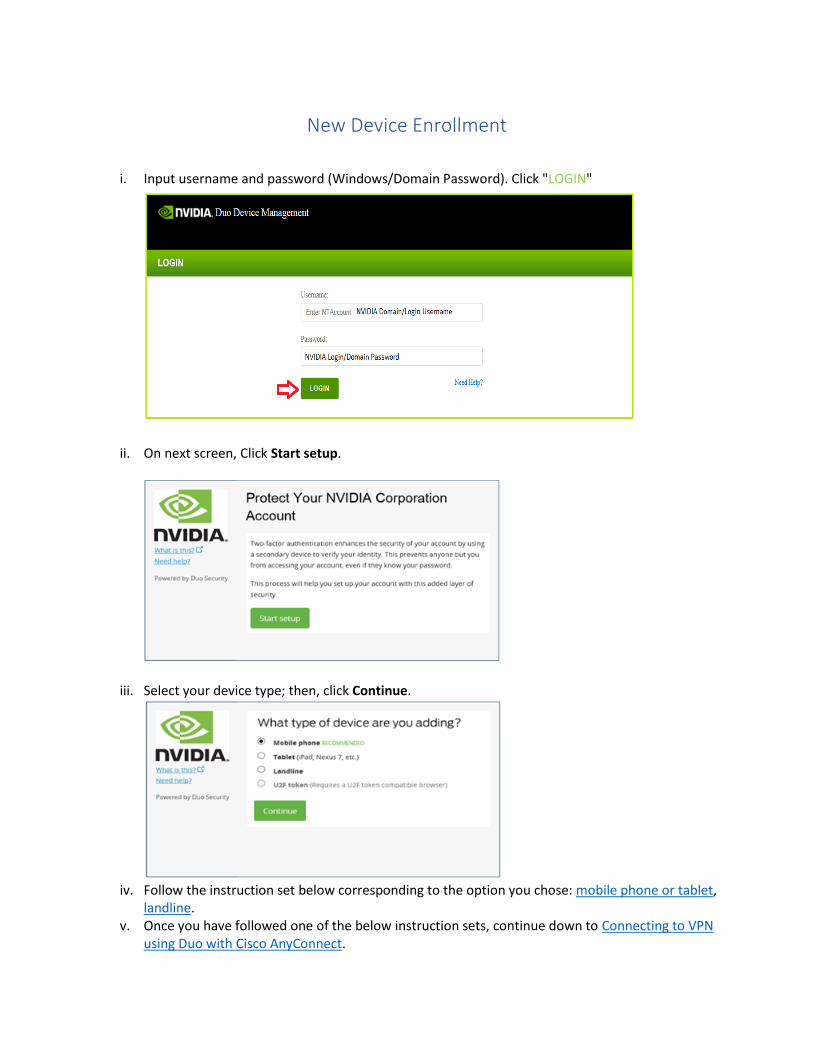
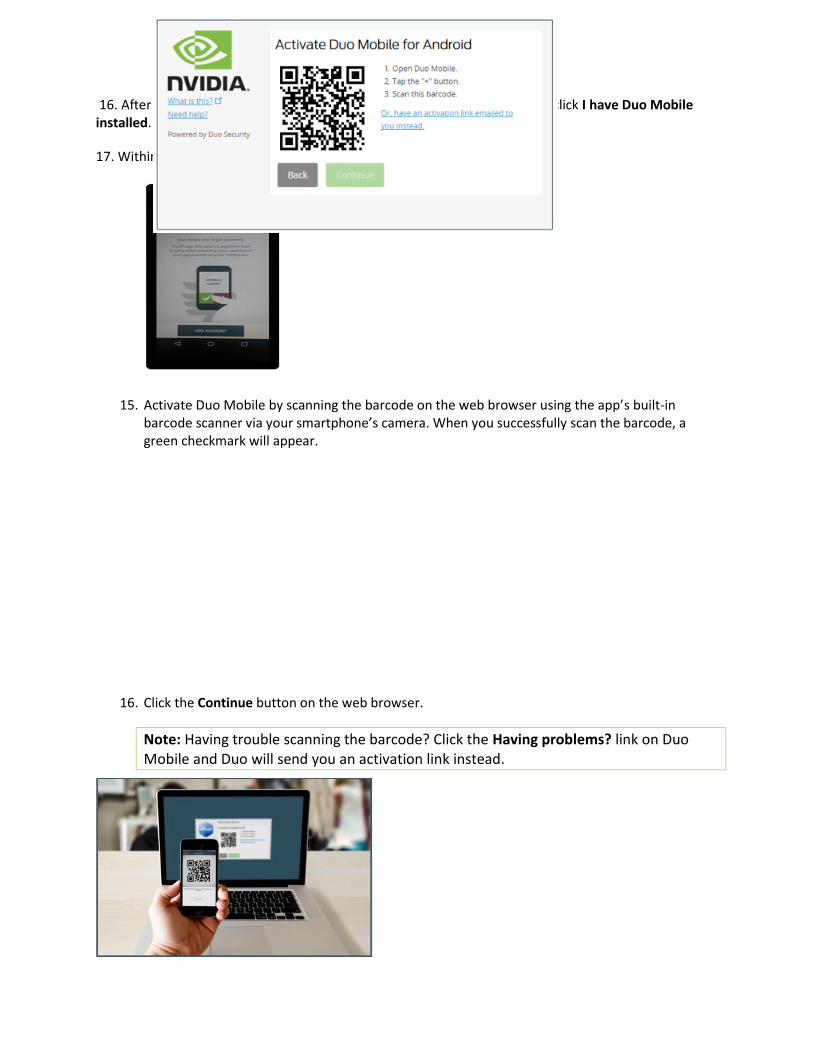
7. Within the Duo Mobile app, click Add Account.
8. Activate Duo Mobile by scanning the barcode on the web browser using the app’s built-in barcode scanner via your smartphone’s camera. When you successfully scan the barcode, a green checkmark will appear.
9. Click the Continue button on the web browser.
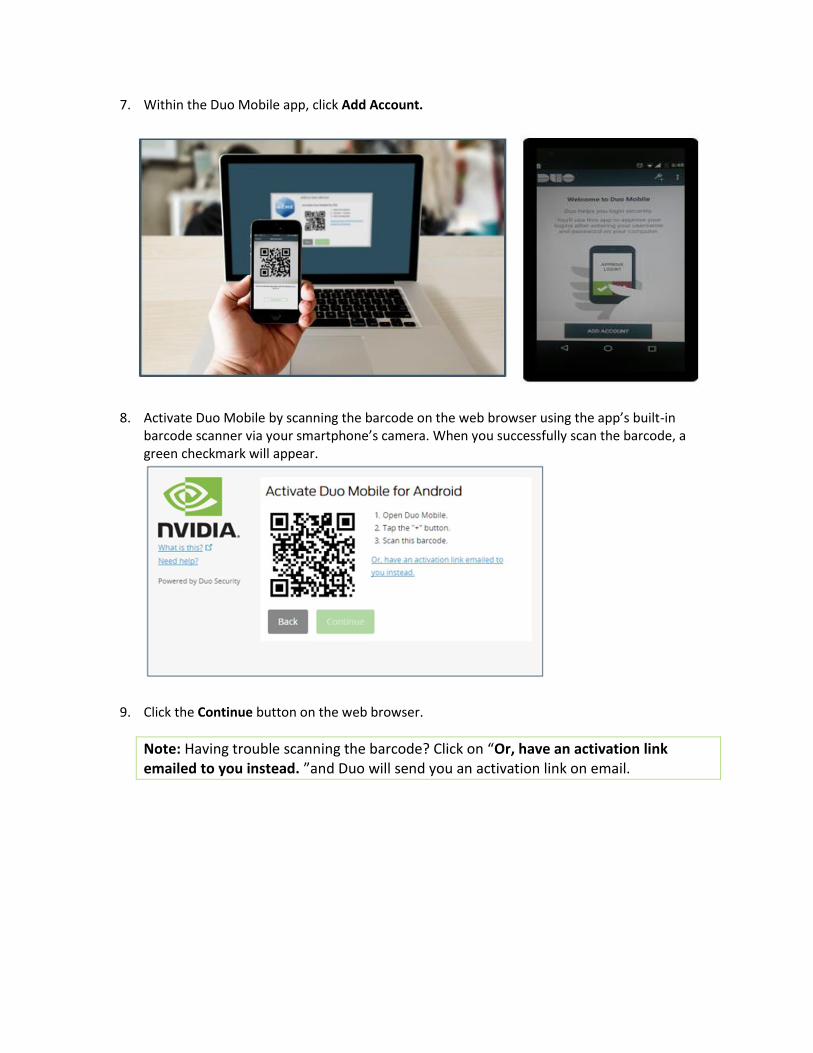
Note: Having trouble scanning the barcode? Click on “Or, have an activation link emailed to you instead. ”and Duo will send you an activation link on email.
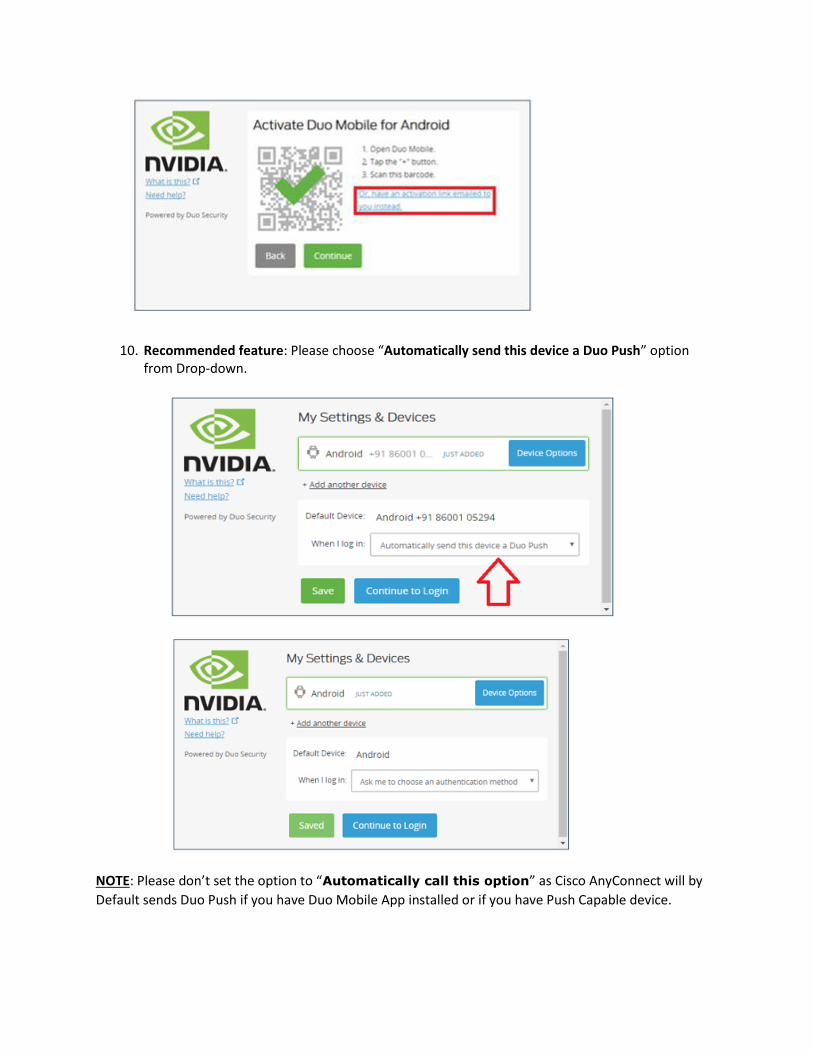
10. Recommended feature: Please choose “Automatically send this device a Duo Push” option
from Drop-down.
NOTE: Please don’t set the option to “Automatically call this option” as Cisco AnyConnect will by
Default sends Duo Push if you have Duo Mobile App installed or if you have Push Capable device.
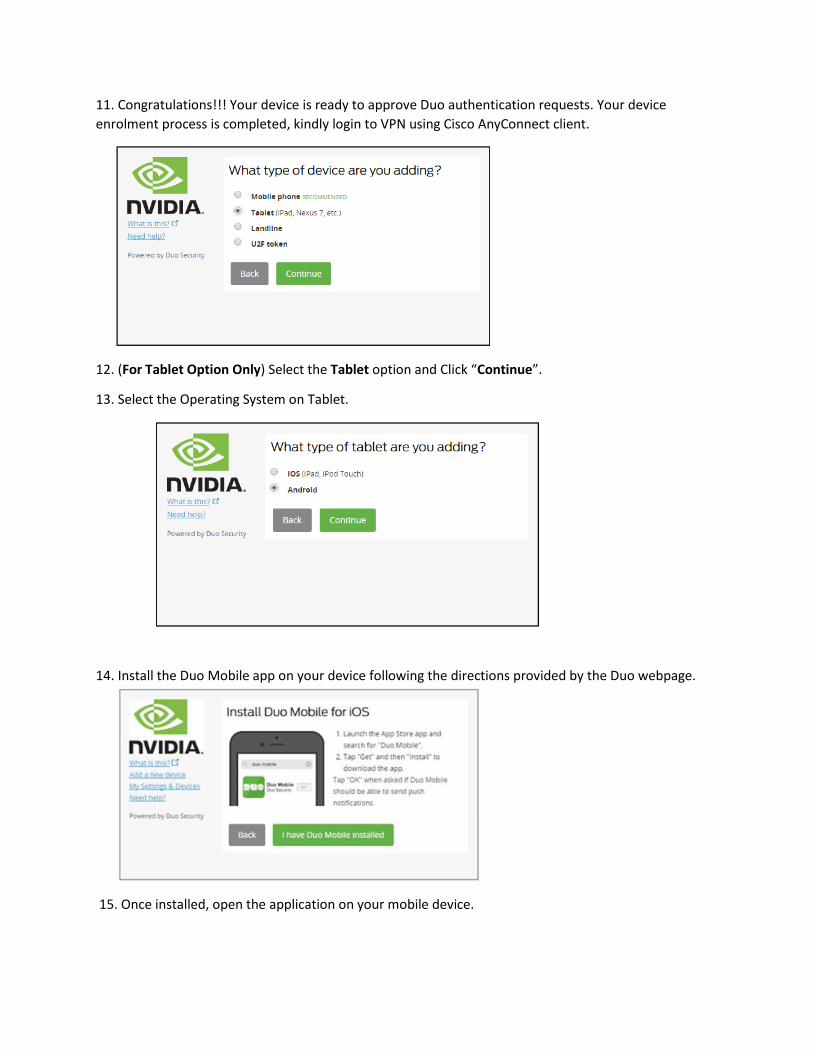
11. Congratulations!!! Your device is ready to approve Duo authentication requests. Your device
enrolment process is completed, kindly login to VPN using Cisco AnyConnect client.
12. (For Tablet Option Only) Select the Tablet option and Click “Continue”.
13. Select the Operating System on Tablet.
14. Install the Duo Mobile app on your device following the directions provided by the Duo webpage.
15. Once installed, open the application on your mobile device.
16. After accepting the License Agreement, return to your web browser and click I have Duo Mobile installed.
17. Within the Duo Mobile app, click Add Account.
15. Activate Duo Mobile by scanning the barcode on the web browser using the app’s built-in barcode scanner via your smartphone’s camera. When you successfully scan the barcode, a green checkmark will appear.
16. Click the Continue button on the web browser.
Note: Having trouble scanning the barcode? Click the Having problems? link on Duo Mobile and Duo will send you an activation link instead.
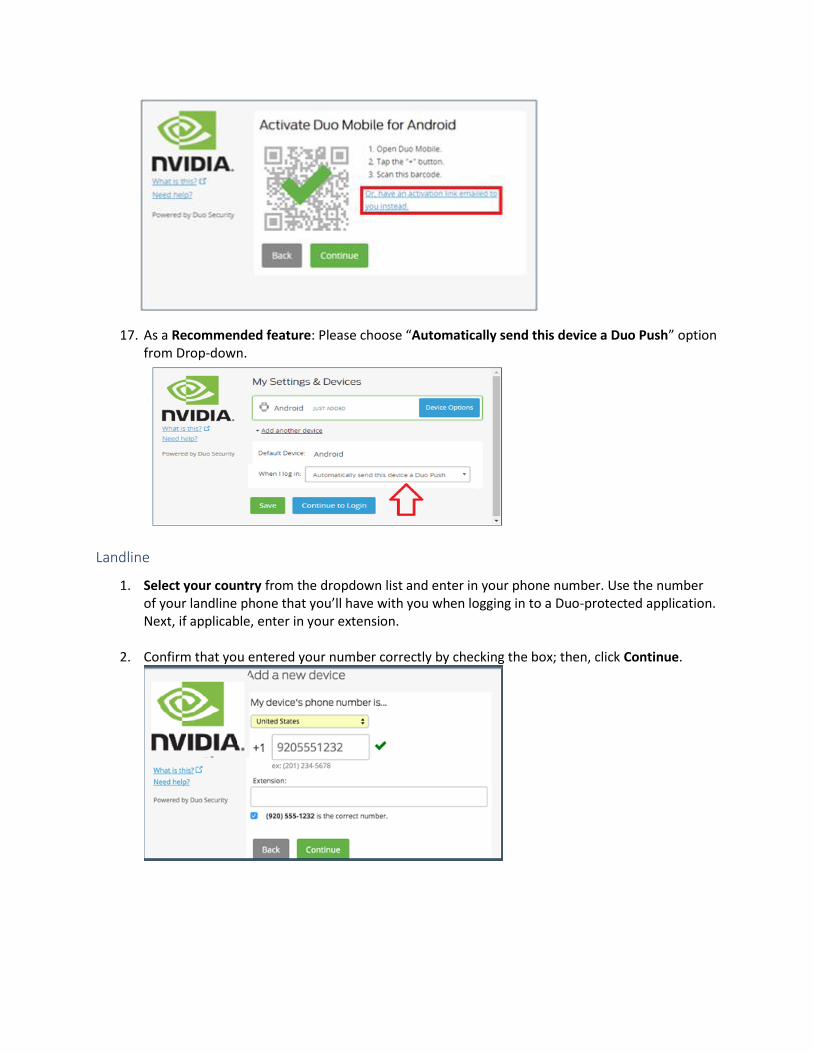
17. As a Recommended feature: Please choose “Automatically send this device a Duo Push” option from Drop-down.
Landline
1. Select your country from the dropdown list and enter in your phone number. Use the number of your landline phone that you’ll have with you when logging in to a Duo-protected application. Next, if applicable, enter in your extension.
2. Confirm that you entered your number correctly by checking the box; then, click Continue.

3. Verify ownership of the phone number you entered by clicking Call me.
4. Duo will call you and provide a 6-digit verification code. Enter in the verification code and click Verify.
5. After verifying your phone number, click Continue.
6. Recommended Feature - If this is the device you'll use most often with Duo then you have to
choose option “When I Log in: Automatically call this device” from Drop-down.
With this option set, Duo automatically calls your phone to authenticate once you log in to a
protected application, saving you time during the authentication process.
7. Congratulations!!! Your landline phone is ready to approve Duo authentication requests
Note: Yubikey and DigiPass token Enrolment will be only done by IT Admins.
Connecting to NVIDIA’s Corporate Gateways Note: A full list of corporate gateways is available here: http://ngvpn.nvidia.com

• It is recommended that you connect to the gateway nearest to you or to the
regional Data Center.
Step 1: Launching the client:
a) Go to System Tray > locate the Cisco Tray Icon > Click Cisco AnyConnect Secure Mobility
Client and launch the client application “Cisco AnyConnect Secure Mobility Client”.
Or
b) Go to Start > All Programs > Cisco > Cisco AnyConnect Secure Mobility Client and launch the
client application “Cisco AnyConnect Secure Mobility Client”.
a)
b)
Note: If your system is provided by Nvidia and your Java installation is up to date and functioning, you
can connect directly to a gateway and Cisco AnyConnect will install automatically.
example: https://nvgate01.nvidia.com
Step 2: Type the address of the server, in this example “ngvpn01.nvidia.com” Santa Clara gateway.
Click “Connect” to continue.
Click to launch:
“Cisco AnyConnect Secure Mobility Client”
Click to launch:
“Cisco AnyConnect Secure Mobility Client”
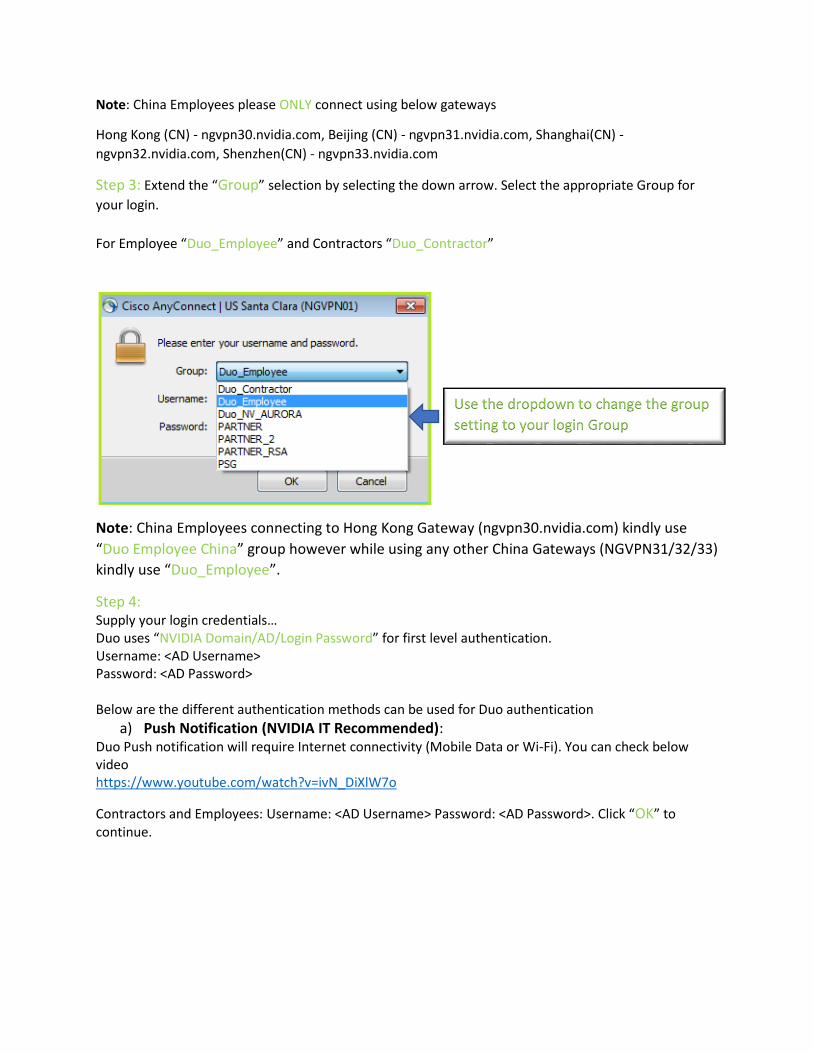
Note: China Employees please ONLY connect using below gateways
Hong Kong (CN) - ngvpn30.nvidia.com, Beijing (CN) - ngvpn31.nvidia.com, Shanghai(CN) -
ngvpn32.nvidia.com, Shenzhen(CN) - ngvpn33.nvidia.com
Step 3: Extend the “Group” selection by selecting the down arrow. Select the appropriate Group for
your login.
For Employee “Duo_Employee” and Contractors “Duo_Contractor”
Note: China Employees connecting to Hong Kong Gateway (ngvpn30.nvidia.com) kindly use
“Duo Employee China” group however while using any other China Gateways (NGVPN31/32/33)
kindly use “Duo_Employee”.
Step 4: Supply your login credentials… Duo uses “NVIDIA Domain/AD/Login Password” for first level authentication. Username: <AD Username> Password: <AD Password> Below are the different authentication methods can be used for Duo authentication
a) Push Notification (NVIDIA IT Recommended): Duo Push notification will require Internet connectivity (Mobile Data or Wi-Fi). You can check below video https://www.youtube.com/watch?v=ivN_DiXlW7o
Contractors and Employees: Username: <AD Username> Password: <AD Password>. Click “OK” to continue.
Use the dropdown to change the group
setting to your login Group
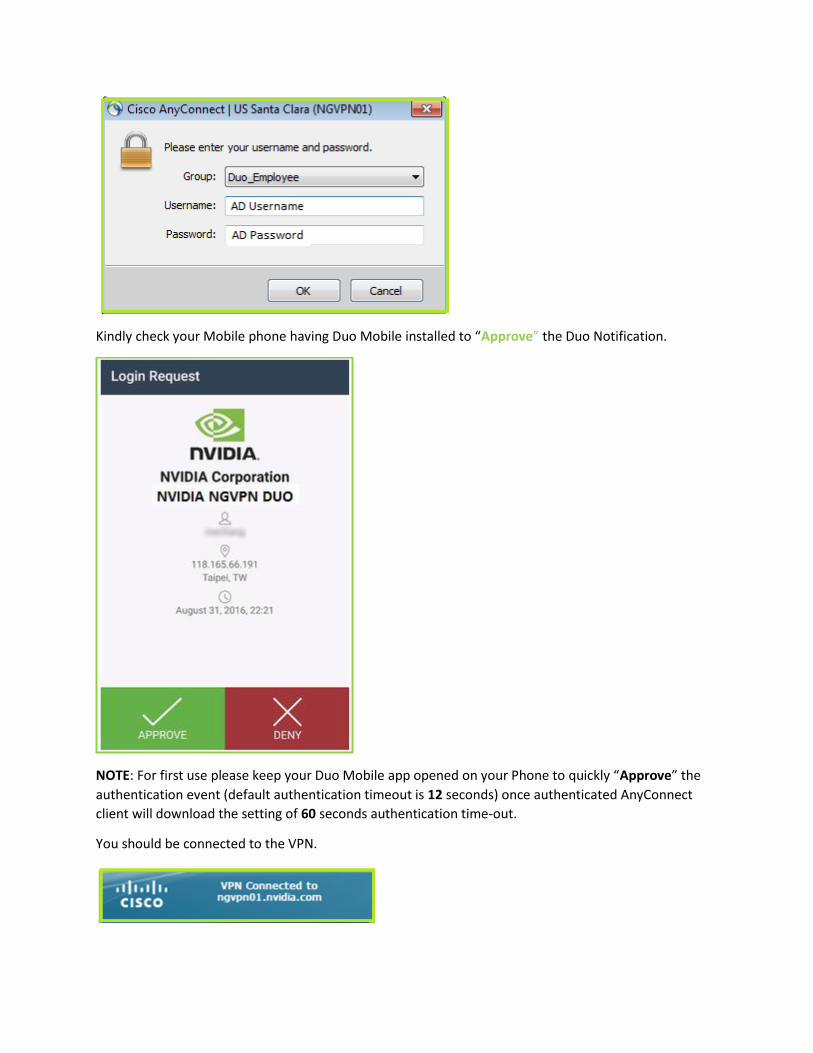
Kindly check your Mobile phone having Duo Mobile installed to “Approve” the Duo Notification.
NOTE: For first use please keep your Duo Mobile app opened on your Phone to quickly “Approve” the
authentication event (default authentication timeout is 12 seconds) once authenticated AnyConnect
client will download the setting of 60 seconds authentication time-out.
You should be connected to the VPN.

Note: Users in China with Android device will require to use Pull to refresh to get Duo notification in Duo
Mobile App (Reference Link: https://duo.com/docs/whats_new_in_duo_mobile#pull-to-refresh ). If you
haven’t sent Default Authentication Method
Please use "Password,Push" (no space after comma) for login to VPN.
Click “OK” to continue. You should be connected to the VPN.
b) Passcode:
You can generate a passcode from Duo Mobile app (no internet connectivity required) for login to the
VPN. Open your Duo mobile app and click on the KEY symbol to generate the passcode.
Note: Please use "Password,Passcode" for login to VPN. If your Windows/AD password is ABCD1234 then
you should use "ABCD1234,632814" (no space between comma and passcode) in Cisco VPN. Passcode
method can be used for first time login to Cisco AnyConnect VPN client as authentication timeout
won’t affect the passcode login (we are providing Password+Passcode same time).

Click “OK” to continue. You should be connected to the VPN.
c) Phone Call:
You will phone call on your registered mobile device phone number or landline number. You will
receive the call and press any key on the authenticate (kindly listen to IVR).
“Use AD Password,Phone” (no space between comma and Phone)
Note: Please don’t type actual phone number in place of Phone.
Click “OK” to continue. You should be connected to the VPN.

d) SMS: Duo will send you set of multiple passcodes over SMS and you can anyone of the code for login to VPN.
You will receive set of passcodes on your registered phone number and you can any of the code for authentication. Cisco AnyConnect will show you login failed message. Enter the passcode received on the SMS along with AD Password. “AD Password,SMS Passcode” (no space between comma and passcode) Check below snap as example where “ABCD121343” is AD Password (Windows Password) and “632814” is the passcode received on SMS.
Note: SMS authentication is not reliable service for India Users because of regulatory reasons.
Click “OK” to continue. You should be connected to the VPN.
e) Yubikey Token For authenticating using Yubikey Token Username: <AD Username> Password: <AD Password,>

Then touch (around 3to 5 seconds) the Yubico token check below snap for reference
You will a long string
(passcode) automatically added after touching the Yubikey for 3-5 seconds.
You should be connected to the VPN.

f) Digipass Token
To authenticate using a DigiPass token, Press the button on your DigiPass token to generate a new Token code.
Enter Password, and type the displayed Token code (“Password,Passcode” no space after comma).
Click “OK” to continue. You should be connected to the VPN.
PSG users: Username: <AD username> Password: <AD Password> supplied by NVIDIA. Click “OK” to continue.
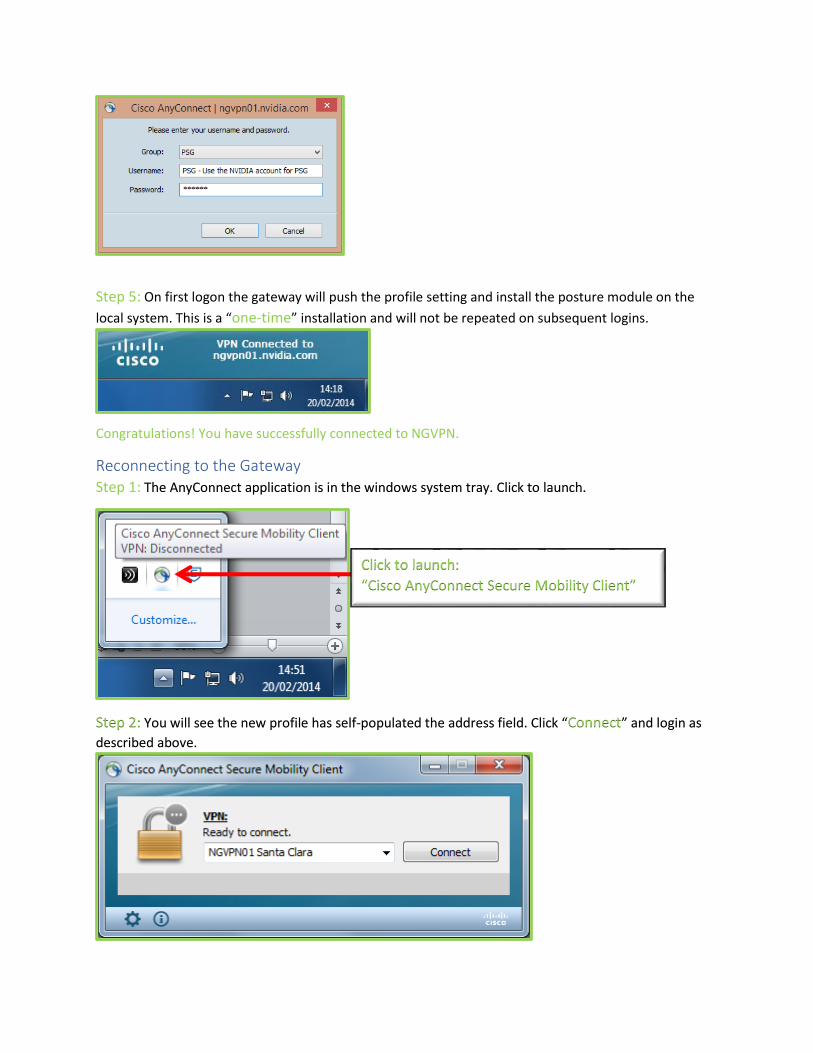
Step 5: On first logon the gateway will push the profile setting and install the posture module on the
local system. This is a “one-time” installation and will not be repeated on subsequent logins.
Congratulations! You have successfully connected to NGVPN.
Reconnecting to the Gateway Step 1: The AnyConnect application is in the windows system tray. Click to launch.
Step 2: You will see the new profile has self-populated the address field. Click “Connect” and login as
described above.
Click to launch:
“Cisco AnyConnect Secure Mobility Client”

END.

![Duo MFA MobileApp iPhone - University of Miami Authentication (MFA) Documentation: iPhone and Duo Mobile [3] Swipe down on the Duo Mobile banner notification received when your screen](https://img.pdfslide.us/doc/110x75/5ae61ae97f8b9a3d3b8cc4b7/duo-mfa-mobileapp-iphone-university-of-miami-authentication-mfa-documentation.jpg)


![Duo MFA Managing Your Devices - University of MiamiMulti-Factor Authentication (MFA) Documentation: Managing Devices [5] Reactivate Duo Mobile Click the “Reactivate Duo Mobile”](https://img.pdfslide.us/doc/110x75/5f1e89f8efa5f70a91561bbb/duo-mfa-managing-your-devices-university-of-miami-multi-factor-authentication.jpg)