Embed Size (px)
Citation preview

141595
Scale / PrinterTechnical Manual
8442NETWORK

ii
Mettler-Toledo, Inc. 2000No part of this manual may be reproduced or transmitted in any form or by any means, electronic ormechanical, including photocopying and recording, for any purpose without the express writtenpermission of Mettler-Toledo, Inc.U.S. Government Restricted Rights: This documentation is furnished with Restricted Rights.

iiiiiiiiiiiiiii
FCC NoticeThis device complies with Part 15 of the FCC Rules and the Radio Interference Requirements of theCanadian Department of Communications. Operation is subject to the following conditions: (1) thisdevice may not cause harmful interference, and (2) this device must accept any interference received,including interference that may cause undesired operation.This equipment has been tested and found to comply with the limits for a Class A digital device, pursuantto Part 15 of FCC Rules. These limits are designed to provide reasonable protection against harmfulinterference when the equipment is operated in a commercial environment. This equipment generates,uses, and can radiate radio frequency energy and, if not installed and used in accordance with theinstruction manual, may cause harmful interference to radio communications. Operation of thisequipment in a residential area is likely to cause harmful interference in which case the user will berequired to correct the interference at his own expense.
METTLER TOLEDO RESERVES THE RIGHT TO MAKE REFINEMENTS ORCHANGES WITHOUT NOTICE.
INTRODUCTION
This publication is provided solely as a guide for individuals who have received Technical Training inservicing the METTLER TOLEDO product.Information regarding METTLER TOLEDO Technical Training may be obtained by writing to:
METTLER TOLEDO1900 Polaris ParkwayColumbus, Ohio 43240
(614) 438-4511

iv
PRECAUTIONSREAD this manual BEFOREoperating or servicing thisequipment.
FOLLOW these instructionscarefully.
SAVE this manual for futurereference.
DO NOT allow untrainedpersonnel to operate, clean,inspect, maintain, service, ortamper with this equipment.
ALWAYS DISCONNECT thisequipment from the powersource before cleaning orperforming maintenance.
CALL METTLER TOLEDO for parts,information, and service.

v
1.Specifications ........................................................................................................................................ 1-1General Description ................................................................................................................................... 1-1Features ................................................................................................................................................... 1-2Customer/Vendor Display ........................................................................................................................... 1-3Weighing Capcity ...................................................................................................................................... 1-4Keyboard ................................................................................................................................................. 1-5Tare ......................................................................................................................................................... 1-7
Memory Specifications ............................................................................................................................... 1-8Agency Approvals ..................................................................................................................................... 1-8Label Printer ............................................................................................................................................. 1-9Electrical .................................................................................................................................................. 1-9Operator & Storage temperature .................................................................................................................. 1-9Dimensions ............................................................................................................................................... 1-10Major Component Map .............................................................................................................................. 1-12 External Components ........................................................................................................................... 1-12
Internal Components ............................................................................................................................ 1-13
Database Records ..................................................................................................................................... 1-14Label Specifications ................................................................................................................................... 1-15Index of Specifications ............................................................................................................................... 1-15Index of Accessories .................................................................................................................................. 1-16Barcode Symbols ...................................................................................................................................... 1-16
Contents
2.Setup ..................................................................................................................................................... 2-1
Unpack the shipping carton ....................................................................................................................... 2-1Setup Checklist .......................................................................................................................................... 2-2Leveling ................................................................................................................................................... 2-3Installl Tower ............................................................................................................................................ 2-3Install Platter ............................................................................................................................................. 2-5Power On ................................................................................................................................................. 2-5
Install Label .............................................................................................................................................. 2-5
Install 8442-xx10H .................................................................................................................................... 2-7Calibration ................................................................................................................................................ 2-8Reset RAM ................................................................................................................................................. 2-12Password ................................................................................................................................................. 2-133.Function code Mode ............................................................................................................................... 3-1
Overview of mode function ......................................................................................................................... 3-1
Overview of function codes ......................................................................................................................... 3-2
Scale configuration ................................................................................................................................... 3-3
Operator configuration ............................................................................................................................... 3-4
Data entry ................................................................................................................................................ 3-6
Price changes ........................................................................................................................................... 3-19
Increase/decrease ...................................................................................................................................... 3-21X-report .................................................................................................................................................... 3-22Z-report .................................................................................................................................................... 3-25
Special functions ....................................................................................................................................... 3-29Keyboard configuration ............................................................................................................................. 3-37Label format ............................................................................................................................................. 3-40Spct program............................................................................................................................................ 3-41Flashing software ...................................................................................................................................... 3-424.Service Mode ......................................................................................................................................... 4-1Presentation of the "SERVICE MODE" Menu ................................................................................................... 4-1Function Test ............................................................................................................................................ 4-3
Memory Test ............................................................................................................................................. 4-4Interface Test ............................................................................................................................................. 4-4Expand Display ......................................................................................................................................... 4-5

vi
Error Report .............................................................................................................................................. 4-5
Primary Configure ..................................................................................................................................... 4-6Reset Ticket number ................................................................................................................................... 4-6Creep Compensate ..................................................................................................................................... 4-7Set Creep Parameter .................................................................................................................................. 4-8Clear Battery Backuped RAM ....................................................................................................................... 4-8
Set Creep Parameter .................................................................................................................................. 4-8
Print Font Size Table .................................................................................................................................. 4-9
Clear EEPROM ........................................................................................................................................... 4-9
Flash Checksum ........................................................................................................................................ 4-10
Delete PLU Memory .................................................................................................................................... 4-10
Delete Group Memory ................................................................................................................................ 4-11
Set Operator Memory ................................................................................................................................. 4-11
Ticket Printer Test ...................................................................................................................................... 4-12
Label Printer Test ....................................................................................................................................... 4-135.TroubleShooting..................................................................................................................................... 5-1TroubleShooting Guide .............................................................................................................................. 5-1Power Supply ........................................................................................................................................... 5-3Main Logic PCB for type 8442-x300 ............................................................................................................ 5-5
Main Logic PCB for type 8442-x310&H ........................................................................................................ 5-7
Main Logic PCB for type 8442-x6xx&H ........................................................................................................ 5-8
Motor ....................................................................................................................................................... 5-9
Sensor ..................................................................................................................................................... 5-10
Load Cell .................................................................................................................................................. 5-11
Display PCB (type 8442-xx00) .................................................................................................................... 5-12
Warning Message ...................................................................................................................................... 5-13
Error Message ........................................................................................................................................... 5-16
Interconnecting Diagram for type 8442-x300 ............................................................................................... 5-18
Interconnecting Diagram for type 8442-x310 ............................................................................................... 5-19
Interconnecting Diagram for type 8442-x310H ............................................................................................. 5-20
Interconnecting Diagram for type 8442-x6xx&H ........................................................................................... 5-216.Parts Replacement ................................................................................................................................. 6-1
Cover Removal .......................................................................................................................................... 6-1Load Cell Replacement .............................................................................................................................. 6-2Overload Stops ......................................................................................................................................... 6-3
Shift Test ................................................................................................................................................... 6-4
Printhead Replacement .............................................................................................................................. 6-5
Gap Sensor or Stepper Motor Replacement .................................................................................................. 6-6
Take Label Sensor or Rewind Motor Replacement ......................................................................................... 6-8
Replace components for type 8442-xx10H ................................................................................................... 6-97.Maintenance .......................................................................................................................................... 7-1External Cleaning ...................................................................................................................................... 7-1Cleaning Printhead .................................................................................................................................... 7-1Rezeroing ................................................................................................................................................. 7-28.Replacement Parts ................................................................................................................... 8-1
8442-xx00 Base and parts list .................................................................................................................... 8-1
8442-xx10 Base and parts list .................................................................................................................... 8-3
8442-xx10H Base and parts list .................................................................................................................. 8-5Printer Engine ........................................................................................................................................... 8-7Printer Engine Parts List ............................................................................................................................. 8-8
1-1 1-1 1-1 1-1 1-1
Chapter 1: Specifications
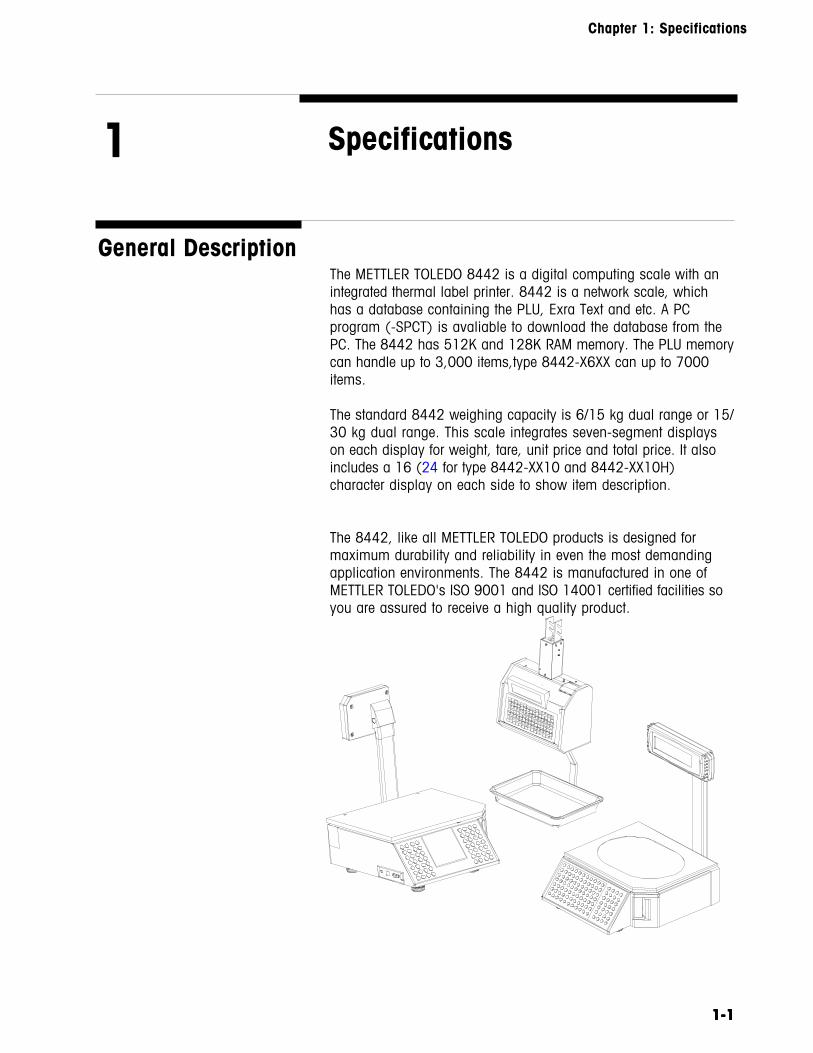
The METTLER TOLEDO 8442 is a digital computing scale with anintegrated thermal label printer. 8442 is a network scale, whichhas a database containing the PLU, Exra Text and etc. A PCprogram (-SPCT) is avaliable to download the database from thePC. The 8442 has 512K and 128K RAM memory. The PLU memorycan handle up to 3,000 items,type 8442-X6XX can up to 7000items.
The standard 8442 weighing capacity is 6/15 kg dual range or 15/30 kg dual range. This scale integrates seven-segment displayson each display for weight, tare, unit price and total price. It alsoincludes a 16 (24 for type 8442-XX10 and 8442-XX10H)character display on each side to show item description.
The 8442, like all METTLER TOLEDO products is designed formaximum durability and reliability in even the most demandingapplication environments. The 8442 is manufactured in one ofMETTLER TOLEDO's ISO 9001 and ISO 14001 certified facilities soyou are assured to receive a high quality product.
1 Specifications
General Description

METTLER TOLEDO 8442 Technical Manual
1-21-21-21-21-2
Features• 6/15 x .002/.005 kg or 15/30x.005/.010kg.
• LCD display with LED backlight on both operator side andcustomers side.
• Four seven-segment numeric display for : 5 digits weight, 5 digitstare, 6 digits unit price and 6 digits total price (Special for 7 digitsunit price and 7 total price). One 16-character or 24-characteralphanumeric display for programming and item description.
• Indicators for zero, net and prepack mode.
• Compliance with H44 3000e, R76 OIML 3000e and CanadianW&M.
• Tactile feel membrane keyboard and an audible beeper.
• A 56 or 154 position preset keyboard for fast PLU retrieval.
• Real time clock and RAM are backed up by a lithium rechargablebattery with at least 1 month memory retention without externalpower.
• Push button zero (auto zero at power up) and automatic zerotracking.
• VOID key for clearing previous transaction from accumulator.
• Computer interface port (ethernet interface) for use withSPCT&AUTODOWN software and RS232 for use FLASH software.
• Integral thermal label printer with 8 dots/mm print head.Adjustable 40 to 60mm width. Supports EAN and UPC symbology.The printer can use die cut labels, continuous strip labels andcontinuous thermal paper.

1-3 1-3 1-3 1-3 1-3
Chapter 1: Specifications
Customer/VendorDisplay There are two displays on the scale, one is on the vendor side and
the other is on the customer side. For type 8442-XX00,the vendordisplay is mounted in the top cover and the customer display canbe installed either on the base or on the tower .
These two LCD displays incorporate LED backlight. The backlightis an orange color. Both the customer and vendor displays show5 digits of weight, 5 digits of tare, 6 or 7 digits of unit price and 6 or7 digits of total price values along with cursors for Zero, Net andPrepack mode. Both the customer and vendor displays can alsoshow 16 or 24 alphanumeric characters for commoditydescription, marquee and prompt messages during programming.
The Weight and Total Price display characters are 12mm high by7.4mm wide. The Tare and Unit Price display are 10mm high by6mm wide. The alphanumeric characters are 7.6mm high and5mm wide.TYPE 8442-XX00:TYPE 8442-XX00:TYPE 8442-XX00:TYPE 8442-XX00:TYPE 8442-XX00:
TYPE 8442-XX10 and 8442-XX10H:TYPE 8442-XX10 and 8442-XX10H:TYPE 8442-XX10 and 8442-XX10H:TYPE 8442-XX10 and 8442-XX10H:TYPE 8442-XX10 and 8442-XX10H:
The Display Legends Definitions are shown in the following Table.
WEIGHT (Kg) UNIT PRICE ($/Kg) TOTAL PRICE ($)
TARE (Kg) Max6/15kg Min40g e=2/5g

METTLER TOLEDO 8442 Technical Manual
1-41-41-41-41-4
Weighing CapacityThe standard 8442 weighing capacity is 6/15 x .002/ .005 kg or 15/30x.005/.010 kg version. The built-in scale is designed to withstandstatic overloads up to five times the rated capacity without sustainingpermanent damage. A weight greater than five increments overcapacity causes the weight display to "-----" and printing is inhibited. Ifthe scale is under zero by more than five increments, the weight fieldwill display dashes "|_____|". When zero can not be captured, theweight field will display EEEEE.
ROSRUC NOITINIFED
TEN sithgiewehtdnaderetneneebsaheratasetacidnI.ten
OREZ .tnemercni4/1nihtiw.e.i,oreztaelacssetacidnI
KCAPERP .detcelesneebsahedomkcaperPsetacidnI

1-5 1-5 1-5 1-5 1-5
Chapter 1: Specifications
Keyboard The keyboard consists of a membrane switch pad with an overlaythat thas raised domes over the switch positions to provide tactilefeedback and an audible tone.The 28 keys on the right keypad are used for entering basic scalefunctions.
Meaning of the function key
Ó Continue
Ô Go back
t Tare
² Zero
o Code and switching
v Mode and switching
» Paper feed
Ä Free entry of a price per piece
° Vendor, clerk
Ò Numeric keypad
c Clear
Ç Customer total
Æ Manual entry of a price per piece to add
Å Manual entry of a price per piece to substract
x Multiplication
f Fixed unit price / fixed tare
r Change back
³ Void
Special functions keysTYPE 8442-XX00 8442-XX10 or 8442-XX10H
The left 28 keys 77 keys preset key
V2,V3,V4 vender key [Discount] increase/decrease key
'
yY
zZ .:

METTLER TOLEDO 8442 Technical Manual
1-61-61-61-61-6
The following function keys can be used as word processing keyswhile entering PLU description, store address, Extra Text and etc.
h Go to beginning of text
e Go to end of text
^ move the cursor one ponsition left in the text edit mode
] move the cursor one ponsition right in the text edit mode
Ó Go to next sub-menu
Ô Return to previous sub-menu
s get upper case characters in text edit modeor select a key's 2nd function
q Alternate : special characters in text edit mode
¬ Select font size
b Backspace (delete the character left of the cursor)
{ Delete (delete the character on the cursor)
i Insert (insert a character on the cursor)
Á Centerlize the text in text edit mode
j Carriage return (next line)
Ç Selection of a menu

1-7 1-7 1-7 1-7 1-7
Chapter 1: Specifications
The following numerical keys can be used to enter the specialcharacters while SHIFT is active.
È =
É !
Ê "
Ë +
Ì $
Í %
Î &
Ï /
Ð (
Ñ )
TareTare is limited to a maximum of 2/3 full capacity.
Remark :
* (or V2~V4) can be configurated as preset key orvender key ,but one function is avaliable at one time.
yY* (or [Discount]) can be configurated as preset key or increase/decrease key ,but only one function is available at one time.
'zZ .:
METTLER TOLEDO 8442 Technical Manual
1-81-81-81-81-8
MemorySpecifications
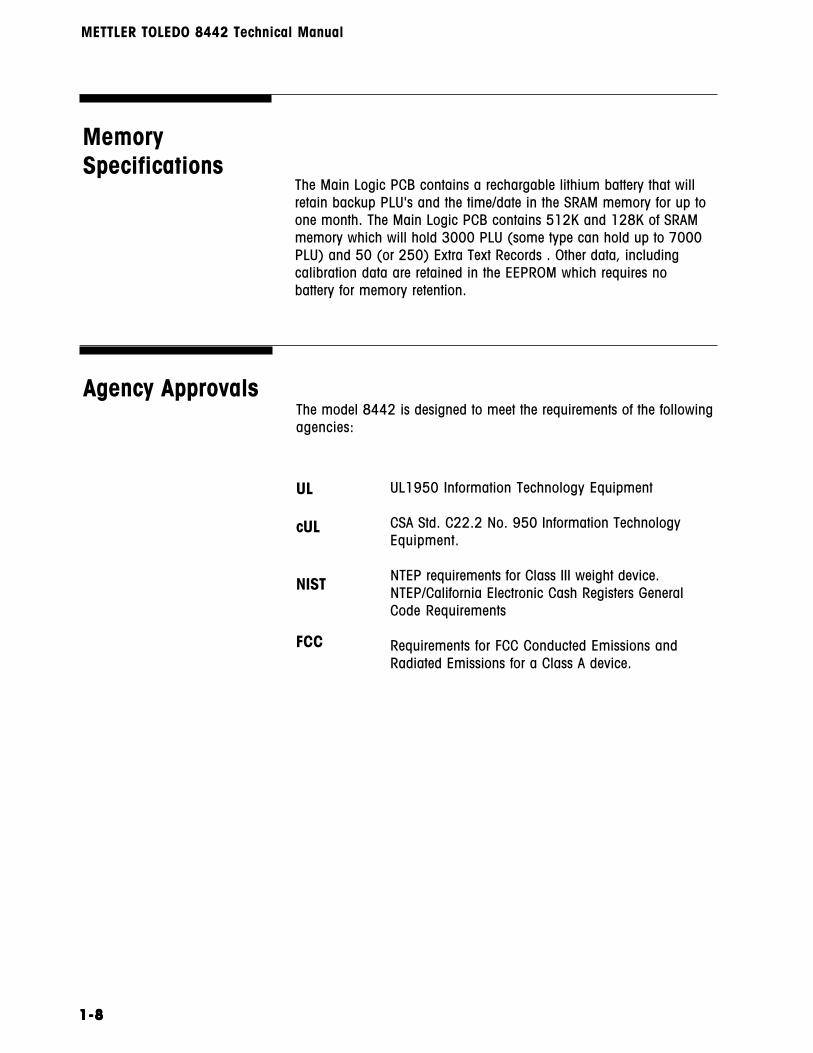
The Main Logic PCB contains a rechargable lithium battery that willretain backup PLU's and the time/date in the SRAM memory for up toone month. The Main Logic PCB contains 512K and 128K of SRAMmemory which will hold 3000 PLU (some type can hold up to 7000PLU) and 50 (or 250) Extra Text Records . Other data, includingcalibration data are retained in the EEPROM which requires nobattery for memory retention.
Agency Approvals
UL1950 Information Technology Equipment
CSA Std. C22.2 No. 950 Information TechnologyEquipment.
NTEP requirements for Class III weight device.NTEP/California Electronic Cash Registers GeneralCode Requirements
Requirements for FCC Conducted Emissions andRadiated Emissions for a Class A device.
The model 8442 is designed to meet the requirements of the followingagencies:
UL
cUL
NIST
FCC

1-9 1-9 1-9 1-9 1-9
Chapter 1: Specifications
Label PrinterLabels can be printed with the built-in thermal label printer. Theprinter uses a 60mm (2.36'') wide, high resolution, 8 dots/mm,thermal printhead. The printer driver PCB incorporates a heatdetection circuit to ensure the best possible print quality whileeliminating any possibility of overheating the head. Overheating isthe major cause of premature printhead failure. The print speedand density can be adjusted via SERVICE MENU to compensatefor varying types of labels.
The printer can use standard label sizes ranging from 48mm(1.9'')to 94mm(3.7") long, and continuous strip stock or continuousthermal paper. Labels can be loaded in a stripped or unstrippedmode. In stripped mode, the labels automatically peel from thebacking liner. In the unstripped mode, the label and liner will bedelivered. A tear/bar allows continuous stock to be torn to exactlength needed. Print specifications for the thermal printer are asfollows:
PRINTHEAD TYPE: Thick Film Thermal PrintheadDOT DENSITY: 8 Dots/mmPRINT SPEED: 75 mm/second (2.95 in/Second) maximum
Operating & StorageTemperature
The 8442 requires a dedicated grounded 220 VAC, 50 HZ supply,and draws 0.3 amps (scale/printer versions.) The AC line(including ground) must not be shared with noise and surgegenerating equipment such as, electric motors, compressors,thermostats, fluorescent lights, etc. A line conditioning device isrecommended to provide protection from surges and spikes. ThePower supply uses an electronic overload protection circuitdesigned to protect the internal electrical components.
Electrical
0°C to 40°C (32°F to 104°F), humidity from5% to 95% non-condensing.
0°C to 70°C (32°F to 158°F), humidity from5% to 95% non-condensing.
Operating Range:
Storage Range:

METTLER TOLEDO 8442 Technical Manual
1-101-101-101-101-10
Dimensions Unit: mm

30
230
264840
181 94
362
395295
310
R4
41
1-11 1-11 1-11 1-11 1-11
Chapter 1: Specifications

1-12 1-12 1-12 1-12 1-12
Major ComponentMap
External Components
A
B
C
D
E
FGH
I
J
feR noitpircseD
A yalpsiDremotsuC
B rewoT
C rettalP
D retnirP
E dapyeKciremuN
F yalpsiDrotarepO
G dapyeKteserP
H troPlaireS
I hctiwSrewoP
J xobrewoT
K troptenrehtE
K
A
B
C
D
E
F
G
D
E
FG
(some type in the bottom of the scale)
(some type in the bottom of the scale)
METTLER TOLEDO 8442 Technical Manual
1-131-131-131-131-13
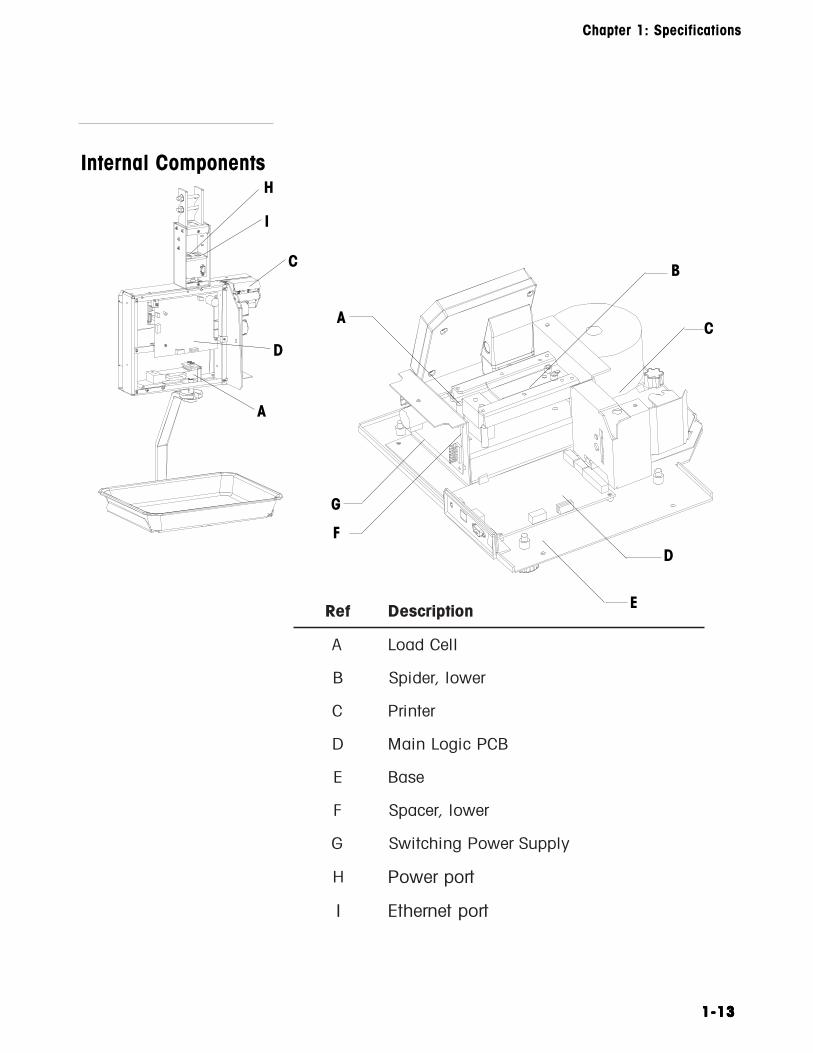
Internal Components
A
B
C
D
E
F
G
feR noitpircseD
A lleCdaoL
B rewol,redipS
C retnirP
D BCPcigoLniaM
E esaB
F rewol,recapS
G ylppuSrewoPgnihctiwS
H troprewoP
I troptenrehtE
A
C
D
H
I
Chapter 1: Specifications

1-14 1-14 1-14 1-14 1-14
Database Records
The Price Look Up Number is a number between 1and 999999 used for database indexing and tocall up a record
The product number is a number that is encodedin the EAN Bar Code symbol. This number can beinputed up to 13 digit.
Text used to describe the product. Normally 36characters.
A two digit number between 1 and 20 used forreports.
Pricing range is 9999.99
A two digit number between 1 and 16 used to linka preprogrammed tare to the PLU record. The tarerange is up to 2/3 full capacity.
A two digit number between 1 and 11 used forlabel format indexing.
A two digit number between 1 and 10 used to linka preprogrammed Advertise Text Record to the PLUrecord.
A three digit number between 1 and 50 used tolink a preprogrammed Extra Text Record to thePLU record.
The Net Weight of By Count PLU.
The PLU database file consists of:
PLU
ITEMNUMBER
DESCRIPTION
GROUP
UNIT PRICE
TARE RANGE
LABELFORMAT
ADVERTISETEXT
EXTRA TEXT
FIX WEIGHT
METTLER TOLEDO 8442 Technical Manual

METTLER TOLEDO 8442 Technical Manual
1-151-151-151-151-15
LabelSpecifications
Label formatting is flexible with the 8442. Many different types oflabels can be used. The following table shous standard label sizesavailable from METTLER TOLEDO .
Index ofSpecifications
#traP #traP #traP #traP #traP #YROTCAFELACS #YROTCAFELACS #YROTCAFELACS #YROTCAFELACS #YROTCAFELACS yrtnuoC yrtnuoC yrtnuoC yrtnuoC yrtnuoC YTICAPAC YTICAPAC YTICAPAC YTICAPAC YTICAPAC
654931 654931 654931 654931 654931 0033-2448 0033-2448 0033-2448 0033-2448 0033-2448 ----- 7070707070 11111 eropagniS eropagniS eropagniS eropagniS eropagniS gk500./200.x51/6 gk500./200.x51/6 gk500./200.x51/6 gk500./200.x51/6 gk500./200.x51/6
754931 754931 754931 754931 754931 540-0033-2448 540-0033-2448 540-0033-2448 540-0033-2448 540-0033-2448 aisenodnI aisenodnI aisenodnI aisenodnI aisenodnI gk500./200.x51/6 gk500./200.x51/6 gk500./200.x51/6 gk500./200.x51/6 gk500./200.x51/6
674141 674141 674141 674141 674141 350-0033-2448 350-0033-2448 350-0033-2448 350-0033-2448 350-0033-2448 aisyalaM aisyalaM aisyalaM aisyalaM aisyalaM gk500./200.x51/6 gk500./200.x51/6 gk500./200.x51/6 gk500./200.x51/6 gk500./200.x51/6
774141 774141 774141 774141 774141 460-0033-2448 460-0033-2448 460-0033-2448 460-0033-2448 460-0033-2448 senipillihP senipillihP senipillihP senipillihP senipillihP gk500./200.x51/6 gk500./200.x51/6 gk500./200.x51/6 gk500./200.x51/6 gk500./200.x51/6
516151 516151 516151 516151 516151 170-0063-2448 170-0063-2448 170-0063-2448 170-0063-2448 170-0063-2448 eropagniS eropagniS eropagniS eropagniS eropagniS gk500./200.x51/6 gk500./200.x51/6 gk500./200.x51/6 gk500./200.x51/6 gk500./200.x51/6
616151 616151 616151 616151 616151 540-0063-2448 540-0063-2448 540-0063-2448 540-0063-2448 540-0063-2448 aisenodnI aisenodnI aisenodnI aisenodnI aisenodnI gk500./200.x51/6 gk500./200.x51/6 gk500./200.x51/6 gk500./200.x51/6 gk500./200.x51/6
716151 716151 716151 716151 716151 350-0063-2448 350-0063-2448 350-0063-2448 350-0063-2448 350-0063-2448 aisyalaM aisyalaM aisyalaM aisyalaM aisyalaM gk500./200.x51/6 gk500./200.x51/6 gk500./200.x51/6 gk500./200.x51/6 gk500./200.x51/6
816151 816151 816151 816151 816151 460-0063-2448 460-0063-2448 460-0063-2448 460-0063-2448 460-0063-2448 senipillihP senipillihP senipillihP senipillihP senipillihP gk500./200.x51/6 gk500./200.x51/6 gk500./200.x51/6 gk500./200.x51/6 gk500./200.x51/6
068741 068741 068741 068741 068741 170-0163-2448 170-0163-2448 170-0163-2448 170-0163-2448 170-0163-2448 eropagniS eropagniS eropagniS eropagniS eropagniS gk500./200.x51/6 gk500./200.x51/6 gk500./200.x51/6 gk500./200.x51/6 gk500./200.x51/6
168741 168741 168741 168741 168741 170-H0163-2448 170-H0163-2448 170-H0163-2448 170-H0163-2448 170-H0163-2448 eropagniS eropagniS eropagniS eropagniS eropagniS gk500./200.x51/6 gk500./200.x51/6 gk500./200.x51/6 gk500./200.x51/6 gk500./200.x51/6
#traP #traP #traP #traP #traP noitpircseD noitpircseD noitpircseD noitpircseD noitpircseD htgneLlebaL htgneLlebaL htgneLlebaL htgneLlebaL htgneLlebaL htdiWlebaL htdiWlebaL htdiWlebaL htdiWlebaL htdiWlebaL
587321 587321 587321 587321 587321 mm04x64,llorlebaL mm04x64,llorlebaL mm04x64,llorlebaL mm04x64,llorlebaL mm04x64,llorlebaL mm64 mm64 mm64 mm64 mm64 mm04 mm04 mm04 mm04 mm04
787321 787321 787321 787321 787321 mm06x73,llorlebaL mm06x73,llorlebaL mm06x73,llorlebaL mm06x73,llorlebaL mm06x73,llorlebaL mm73 mm73 mm73 mm73 mm73 mm06 mm06 mm06 mm06 mm06
887321 887321 887321 887321 887321 mm06x04,llorlebaL mm06x04,llorlebaL mm06x04,llorlebaL mm06x04,llorlebaL mm06x04,llorlebaL mm04 mm04 mm04 mm04 mm04 mm06 mm06 mm06 mm06 mm06
987321 987321 987321 987321 987321 mm06x13,llorlebaL mm06x13,llorlebaL mm06x13,llorlebaL mm06x13,llorlebaL mm06x13,llorlebaL mm13 mm13 mm13 mm13 mm13 mm06 mm06 mm06 mm06 mm06
497321 497321 497321 497321 497321 repapsuounitnoc,tekciT repapsuounitnoc,tekciT repapsuounitnoc,tekciT repapsuounitnoc,tekciT repapsuounitnoc,tekciT A/N A/N A/N A/N A/N mm06 mm06 mm06 mm06 mm06
Chapter 1: Specifications

1-16 1-16 1-16 1-16 1-16
Bar Code SymbolsThe 8442 is capable of printing EAN bar code symbols. The barcode must be setup correctly to work with the store's scanner.See page 2-18.
Index ofAccessories
#TRAP #TRAP #TRAP #TRAP #TRAP NOITPIRCSED NOITPIRCSED NOITPIRCSED NOITPIRCSED NOITPIRCSED
453531 453531 453531 453531 453531 2448,teserP,tresnI 2448,teserP,tresnI 2448,teserP,tresnI 2448,teserP,tresnI 2448,teserP,tresnI
558931 558931 558931 558931 558931 xirtaMtoD-2448,teserP,tresnI xirtaMtoD-2448,teserP,tresnI xirtaMtoD-2448,teserP,tresnI xirtaMtoD-2448,teserP,tresnI xirtaMtoD-2448,teserP,tresnI
848321 848321 848321 848321 848321 )m3(tf01,2448ottroPlaireS9BDCP,elbaC )m3(tf01,2448ottroPlaireS9BDCP,elbaC )m3(tf01,2448ottroPlaireS9BDCP,elbaC )m3(tf01,2448ottroPlaireS9BDCP,elbaC )m3(tf01,2448ottroPlaireS9BDCP,elbaC
235931 235931 235931 235931 235931 TCPS,erawtfoS TCPS,erawtfoS TCPS,erawtfoS TCPS,erawtfoS TCPS,erawtfoS
335931 335931 335931 335931 335931 edocnoitacilppA,erawtfoS edocnoitacilppA,erawtfoS edocnoitacilppA,erawtfoS edocnoitacilppA,erawtfoS edocnoitacilppA,erawtfoS
664331 664331 664331 664331 664331 tiktsetecafretnI tiktsetecafretnI tiktsetecafretnI tiktsetecafretnI tiktsetecafretnI
METTLER TOLEDO 8442 Technical Manual

2-1 2-1 2-1 2-1 2-1
Chapter 2: Setup
Open up the package box. Take out the platter first, then take outthe scale. Remove the foam inserts and plastic bag. Put the scaleon the working counter and inspect for damage. Report anydamage to the carrier promptly. DO NOT LIFT THE SCALE USINGTHE SPIDER OR BACK DISPLAY. Verify you received the accessorieslisted below.
2 Setup
Unpack theshipping carton
Note: If you choose to disposeof the package, please recyclethe materials. The packagingis recyclable natural fiber withbiodegradable adhesives.
A
B
C
D
EF
G
H.feR noitpircseD
A rewoT
B 2448
C dorgnitcetorP
D rettalP
E drocrewoP
F nepgninaelC
G launamrotarepO
H dapyekteserP
Not shown: Security Seal and Quality Feedback card.

METTLER TOLEDO 8442 Technical Manual
2-22-22-22-22-2
Setup ChecklistIevel the unit using the feet for adjustment and bubbleindicator as a guide.
Install Display Tower.
Install protecting rod on the platter.
Install labels in the printer.
New scales must be calibrated on site.
Initialize the scale and set all softswitches to factorydefault.
To configure the passwords of the specific menus.
To configure the function keys and directly accesskeys of the keyboard.
To configure printed media, individual label or ticketor total label.
To configure default label format.
To select bar code type.
To set up current date and time.
SPCT is a PC program, which can be used todownload or restore the PLU record, configuration, orother data.
Leveling
Install Tower
Install platter
Install label
Calibration
Reset RAM
Password
keyboard
OperatorConfiguration
Label format
Barcode
Date/Time
SPCT

2-3 2-3 2-3 2-3 2-3
Chapter 2: Setup
Install Tower
Adjust the four feet until the bubble is in the center of the bubblelevel. Then adjust the foot locks until the feet are secure.
Right Wrong
Bubble Level
foot
foot lock
bubble level
Leveling
The following is example for 8442-XX00, If you install the 8442-XX10 you only have to take the tower and display component outand connect to scale as step 3 and 4.
1.Take out the back display from package box

METTLER TOLEDO 8442 Technical Manual
2-42-42-42-42-4
2.Open the small door at the left side of the scale and remove the towerfrom the scale. Then close the door. Remove the adhesive tape aroundone head of the tower.
3.Connect two flat cables together between the tower and the displaybase.
4.Insert the tower and install four bolts on both side of the display baseto lock the tower.
5.Plug the phone jack connector on the other end of the tower into thesocket on the back display.
6.Press the buttons, which are on the sides of the tower. Then insertthe back display.

2-5 2-5 2-5 2-5 2-5
Chapter 2: Setup
Install Platter
Take out the nuts, washers and the protecting rod from accessorybag. Insert the rod into the two holes on the platter , land secure itwith the nuts and washers. Put the platter on the scale.
Take the power cord from the package box. Install the power cordin the receptacle on the bottom of the scale. (If unit has been storedor transported in below freezing temperatures, allow the unit towarm up to room temperature before turning on AC power.).Connect the power cord to AC power. Set the power switch to theON position. Allow at least 30 minutes warm-up time before initialcalibration.
Power On
Install Labels In
Remove the adhesive tape on the plastic door on the right side ofthe scale, and open the door.

METTLER TOLEDO 8442 Technical Manual
2-62-62-62-62-6
Slide out the printer.
Press the trigger to open the printer head.
Install the label according to the instruction legend on the printerframe. Don't forget to roll the liner on the rewind Spool.
Close the printer head gently, until it clicks.
Slide the printer into the scale. Close the plastic door.
Press the ` key to bring the label into the start position.

Install 8442-XX10H
40X40X3Screw M8 GB6170-86(2)
Bolt M8X65 GB/T5780-86(2)
Gasket GB97.1-85(4)
Open up the package box. Remove the foam inserts. Take out thescale main (1) first, then take out the platter supporter (2) andplatter (3). Put the scale on the working counter and inspect fordamage. Report any damage to the carrier promptly.Then installing this scale,first remove the transport protection set(A), and according the following diagram to install the 8442 scale,put the platter (3) and platter supporter (2) together to the scale.After confirming the 8442 scale is deep-set, don't forget to connectthe power cord to the scale and the AC power.Then to install the label or ticket in the printer as others 8442 scale.
1
2
3
A
power
2-7 2-7 2-7 2-7 2-7

2-8 2-8 2-8 2-8 2-8
Chapter 2: Setup
CalibrationTo access calibration switch, remove the sealing wire and screwfirst. The following diagram show the sealing screw for type 8442-XXXX scale. In the 8442-XXXXH type the sealing method is thesame as this, but the position isn't in the bottom of the scale , it'sjust in the upper of the scale.

METTLER TOLEDO 8442 Technical Manual
2-92-92-92-92-9
*CODE ENTER SERVICE MODEÍ
SERVICE MODE
SERVICE CELL05
Ó
*
Enter the preset 05
DIGI FILTER 0
Ó
Ó
0.00 0.00 0.00
Select digital filter0=no digital filter; 1= light ; 2= medium;3=heavyEntry the gene of acceleration of gravity.
DO NOT ENTER CAL Select: enter calibration0= not enter; 1=enter
ÏÉÊ ËÌ ÐÎ
0-3
0-1
ÉÈÓ
CODE
PUSH CAL BUTTON
Press the calibration switch within 40seconds, otherwise the scale will exitSERVICE CELL menu automatically.
Press thecalibration switchwithin 40secondsNot press the
calibration switchwithin 40seconds
Continued on the next page
Remarks:Remarks:Remarks:Remarks:Remarks:You can press <CODE> key to exit anytime during the calibration. The scale will reset.
SELECT GEO
Ó0

2-10 2-10 2-10 2-10 2-10
Chapter 2: Setup
CAPACITY
Not used.
ÉÈ
Continued from the last page
CAPACITY 0
È É
CAPACITY 1
È É
CAPACITY 2
È É
CAPACITY 3
È É
Continued on the next page
Press É to select capacity, or press
È to skip this step.
Not used.
Capacity 2 = 6/15kg dual range
Capacity 3 = 15/30kg dual range
CAPACITY 4
È É
CAPACITY 5
È É
Not used.
Capacity 5 = 30 lb single range.(if lb unitis selected)

METTLER TOLEDO 8442 Technical Manual
2-112-112-112-112-11
Continued from the last page
SET WEIGHT 5KG
È É
SET WEIGHT 10KG
È É
SET WEIGHT 15LB
È
UNLOAD
É
É
SET WEIGHT 15KG
SAVE PARAMETERS
ÉÈ
Save the calibrationdata and reset thescale
Reset the scale withoutsaving
Calibration weight = 5kg
Calibration weight = 10kg
Calibration weight = 15kg
Add the selected weight on the platter, and
confirm with É
Remove the weight on the platter and
confirm with É
The scale will read the weight data. Pleasekeep the weight stable and wait for 5seconds...
SET PRELOAD
ÉEmpty the platter, Confirm with É
The scale will read the zero data. Pleasekeep the weight stable and wait for 5seconds...
È É
SET WEIGHT 15LBSET WEIGHT 20KGCalibration weight = 20kg
È É
SET WEIGHT 15LBSET WEIGHT 30KG Calibration weight = 30kg
Remarks:Remarks:Remarks:Remarks:Remarks:To achieve the optimal weighingperformance, please choose the calibrationweight closest to full capacity load.Remarks:Remarks:Remarks:Remarks:Remarks:If the scale shows " INIT. CELL...", when it issaving the calibration data. It indicates youmis-operated the scale during the calibration, try to calibrate the scale again accordingthe intructions in this manual.

2-12 2-12 2-12 2-12 2-12
Chapter 2: Setup
CAUTION! This operation will clear all PLU records and reset allformats to factory defaults! This should be used when setting up anew unit, or if the Main Logic PCB is replaced.
Reset RAM
*CODE Call the "SERVICE MODE" menuÍ
SERVICE MODE
WORK CONFIG15
Ó
*
Enter the preset 15
CONFIG NO
Ó
0.00 0.00 0.00
0=Not reset RAM; 1= Reset RAM
ÏÉÊ ËÌ ÐÎ
0-1
CODEPress the o key to return to the weighingmode.

METTLER TOLEDO 8442 Technical Manual
2-132-132-132-132-13
Password
*CODE Call the "CODE NUMBER" menuÍ
CODE NUMBER
NEW VALUE01
Ó
*
Press the o key to return to theweighing mode.
Enter the preset code 01.
DATA ENTRY _
Ó
Ó
Ó
ÓCODE
0.00 0.00 0.00
Enter the code of "DATA ENTRY"
X REPORT Enter the code of "X REPORT"
Z REPORT Enter the code of "Z REPORT"
ÑÏÉ ÊË Ì
_
_
ÓOPERATORCONF. Enter the code of "OPERATOR
CONFIGURE"Enter the code of "SCALE CONFIGURE"
_
ÓSPECIAL FUNCTION Enter the code of "SPECIAL FUNCTION"_
ÓKEYBOARDCONF. Enter the code of "KEYBOARD
CONFIGURE"_
ÓPRICE CHANGE Enter the code of "PRICE CHANGE"_
LABEL DEF. Enter the code of "LABEL DEFINITION"_
This operation is used when the customer needs to change thedefault password of certain code menus.
ÓSCALE CONF. _
Ó

2-14 2-14 2-14 2-14 2-14
Chapter 2: Setup

Chapter 3:function code mode
3 - 13 - 13 - 13 - 13 - 1
M Call the menu "MODE CHANGE"
overview of mode functions
3 FUNCTION CODE MODE
MODE CHANGE
_00
_SERVICE
With _ Q select the desired sub-menu, orenter the preset code.
Select/return to service mode.
CODE-MODE03 Select/return to code mode.
_
MENU END09 Press _ to continue or * to return toweighing mode.
With _Q or the preset code, select the corresponding menu item, then activate it with the * key.
TRAINING-MODE04
_Select/return to training mode.
Service mode-For all weighing functions, registering, data entry and sales reporting
Code mode-Enter the code functions
Training mode-Learning and practical exercises on the device, without the realized turnover beingmemorized.-The display reads "TRAINING"
Void oper. mode -VOID OPERATION AFTER CHECK OUT means the ticket or label has been printout, and these transactions will be deleted from the statistics data.
Prepack mode -For packing fieldwork of the supermarket. In this application, only print label, the small variety but large quantity print-work.
Large sales mode -When the article is too big to weigh, operator can enter this mode by inputting the article weight and count price.
VOID OPER.01
_PREPACK02
_
LARGE SALES08
_
Select/return to void operation mode.
Select/return to prepack mode.
Select/return to large sales mode.
METTLER TOLEDO 8442 Technical Manual
3 - 23 - 23 - 23 - 23 - 2
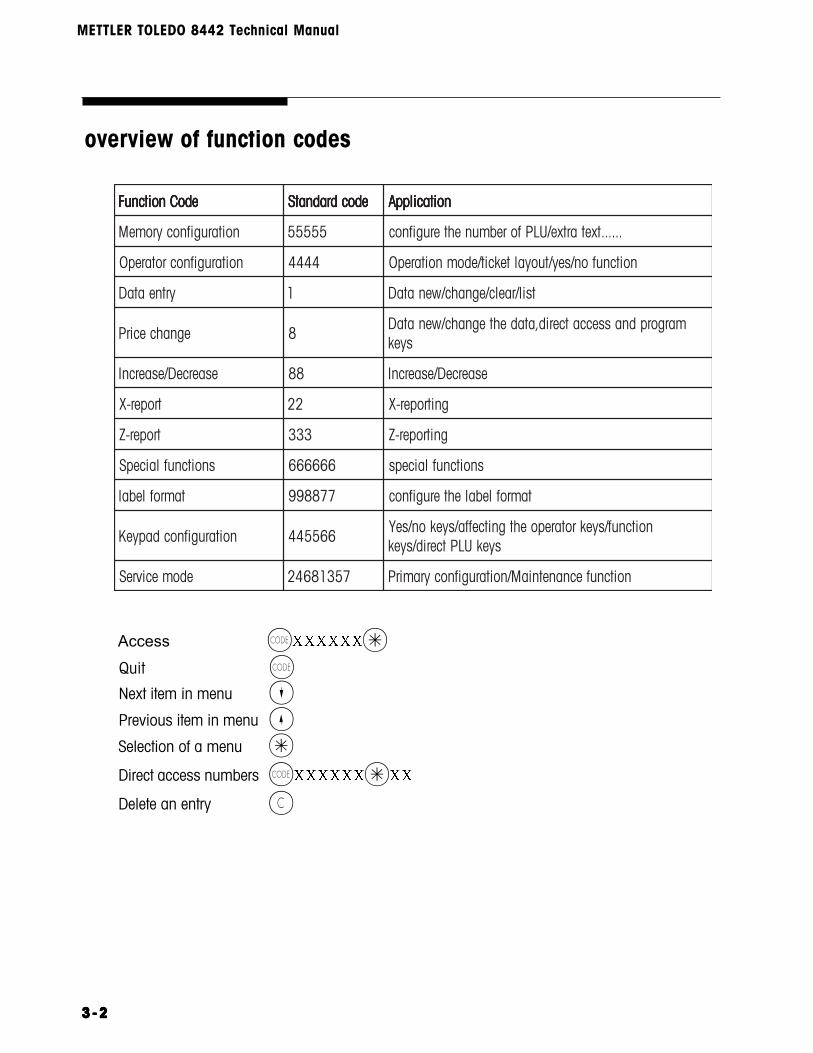
overview of function codes
Access K *Quit KNext item in menu _Previous item in menu QSelection of a menu *Direct access numbers K *Delete an entry C
edoCnoitcnuF edoCnoitcnuF edoCnoitcnuF edoCnoitcnuF edoCnoitcnuF edocdradnatS edocdradnatS edocdradnatS edocdradnatS edocdradnatS noitacilppA noitacilppA noitacilppA noitacilppA noitacilppA
noitarugifnocyromeM 55555 ......txetartxe/ULPforebmunehterugifnoc
noitarugifnocrotarepO 4444 noitcnufon/sey/tuoyaltekcit/edomnoitarepO
yrtneataD 1 tsil/raelc/egnahc/wenataD
egnahcecirP 8margorpdnasseccatcerid,atadehtegnahc/wenataD
syek
esaerceD/esaercnI 88 esaerceD/esaercnI
troper-X 22 gnitroper-X
troper-Z 333 gnitroper-Z
snoitcnuflaicepS 666666 snoitcnuflaiceps
tamroflebal 778899 tamroflebalehterugifnoc
noitarugifnocdapyeK 665544noitcnuf/syekrotarepoehtgnitceffa/syekon/seY
syekULPtcerid/syek
edomecivreS 75318642 noitcnufecnanetniaM/noitarugifnocyramirP

Chapter 3:function code mode
3 - 33 - 33 - 33 - 33 - 3
K55555* Call the menu "Scale configure", this menu for distributing thememory of scale.
SCALE CONFIG.
_01 NEW CONFIG.
02 STANDARD CONFIG.
03 PRINT OUT
04 MENU END
_
_
_
SCALE CONFIGURATION
SCALE CONFIG.
NO PP APPL.*
_01 NEW CONFIG.
0-1
new configuration:enter preset code 01
0=no PLU label data1=with PLU label data
enter the max.number of PLU
select whether use special offer in the scale0=forbid;1=allow
enter the max. amount of extra tex.(up to 50)
whether to save the change0=no;1=yes
return to weighing mode
NUMBER OF PLU_
3000
SPECIAL OFFER_
1
EXTRA TEXT_
0
CONFIG. NO_
0-1
_ 0,000 0,00 0,00

METTLER TOLEDO 8442 Technical Manual
3 - 43 - 43 - 43 - 43 - 4
K4444* Call the menu "Operator Configuration"
OPERATOR CONFIGURATION
_01 NEW CONFIG
02 STANDARD CONFIG
03 PRINTING
04 QUIT MENU
_
_
_
OPERATOR CONFIGURATION
LABEL
PLU NUMBER PRINT ON
*
_
_
_01 NEW CONFIG
HEADER PRINT ON
BOTTOM PRINT ON
STUB OFF
EAN ON TICKET OFF
_
_
_
0-5
0-1
0-1
0-1
0-1
0-1
new configuration:
_
OPERATOR CONFIGURATION
enter the preset code 01
select the mode0=service mode;1=prepack mode
select printing of customber tickets or label 0=ticket;1=label;2=label+total label;3=ticket onlabel;4=endless label;5=endless label+total labelPLU number printed on customber ticket.0=notprint;1=printed
header printed on customber ticket.0=not printed;1=printed
footer printed on customber ticket.0=not printed;1=printed
counterfoil printer.0=not printed;1=printed
EAN code printed on customber ticket.0=notprinted;1=printed
SERVICE MODE
_0-1

Chapter 3:function code mode
3 - 53 - 53 - 53 - 53 - 5
EAN ON STUB OFF
_
RUNNING MESS. ON
NO TARE PRINT
_
_
TOTAL WEIGHT OFF
_LABEL WITH TICKET NUMBER
PRICE INPUT WITH #
_
0-1
0-1
0-1
0-1
0-1
0-1
EAN code printed on counterfoil.0=not printed;1=printed
total weight printed on ticket.0=not printed;1=printed
running message on display.0=not printed;1=printed
tare printed on ticket.0=not printed;1=printed
print the ticket number on label:0=not print;1=print
enter price with # key.0=without;1=with
printing the new configuration then return to theweighting mode 0,000 0,00 0,00
_
02 STANDARD CONFIG
03 PRINTING
04 QUIT MENU
*
OPERATOR CONFIGURATION
_
* 0,000 0,00 0,00
OPERATOR CONFIGURATION
_
0,000 0,00 0,00
OPERATOR CONFIGURATION
_
* 0,000 0,00 0,00
printing the standard configuration and thenreturn to weighing mode
enter the preset code 03
printing the operator configuration,quit the menuand return to weighing mode.
enter the preset code 04
return to weighing mode without printing
enter the preset code 02
standard configuration:
printing operator configuration:
quit this menu:

METTLER TOLEDO 8442 Technical Manual
3 - 63 - 63 - 63 - 63 - 6
K1* Call the menu "Data Entry"
DATA ENTRY
CREATE PLU
COPY PLU
_
_
_
_01 PRICE CHANGE
02
03
LIST PLU
DELETE PLU
DEFINE PRESETS
LIST PRESETS
STANDARD PRESET
_
_
_
_
_07
08
09
10
11
CREATE ARTICLE GROUP
LIST ARTICLE GROUP
12
14
15
_
_
DELETE PRESET
_DELETE ARTICLE GROUP
SP.OFFER BACKW.
16
27
_
_
VALUE ADDED TAX
TICKET HEADER
TICKET BOTTOM
31
35
36
_
_
_
_
SHOP NAME
ADVERTISEMENT
DATE TEXT
50
51
52_
_
57 DATE / TIME
_ CREATE IN/DECR.60
PACK DATE OFFSET63_
CREATE OX47
_
CREATE EAN CODE32
_
RUNNING MESSAGE38
_
STATUS OX48
_DELETE OX49
_
DATA ENTRY
CREATE SP.OFFER26
_
TARE30
_
DELETE SP.OFFER28
_LIST SP.OFFER29
_
PLU LABEL DATA
_05

Chapter 3:function code mode
3 - 73 - 73 - 73 - 73 - 7
DATA ENTRY
_
*CREATE PLU02
Press the _ key twice or enter thepreset code 02.
ENTER TEXT 2
_
_
_
_
_
PLU NUMBER
ART. NR.
ENTER TEXT 1
UNITPRICE
ARTICLEGROUP
0
0
0
0,00
Enter the PLU number.(1~999999)
Enter the article number (up to 13figures).
Enter the first line and second linecommodity text (up to 70 characters)
Enter the unitprice.(0~9999.99)
Enter the article group number.(1~20)
_TARE NUMBER 0
Enter the best before offset(0~499)
Enter the sell by offset(0~499)
0=by weight;1=by count
Enter the fix weight of the article
0=don't allow in./decrease1=allow in./decrease
_VAT NUMBER 0
_BEST BEF.OFFSET 0
_SELL BY OFFSET 0
_PIECE NO 0
0=no vat1~8=vat number
0=no tare 1~16=tare number
0=price can't be changed 1=price can be changed by # key
create plu:(each item can be chosen in menu "code-666666-18(plu format skip)"
DATA ENTRY
_01 PRICE CHANGE
*
_PLU NUMBER 0
UNITPRICE 0.00
enter the preset code 01
0=by plu;1=by preset
enter PLU number (6 digits)
enter new price
price change:
_BY PLU 0-1
_FIX WEIGHT 0
_NO IN/DECREASE 0-1
OPEN PRICE YES 0
_

METTLER TOLEDO 8442 Technical Manual
3 - 83 - 83 - 83 - 83 - 8
DATA ENTRY
_
*COPY PLU03
0
PLU NUMBER NEW 0_
PLU NUMBER OLD
copy PLU:
_
KK
0,000 0,00 0,00
enter preset code 03
enter PLU number
enter PLU number
copy next plu,
return to weighing mode
enter preset code 07
0=price list;1=PLU list
enter PLU number(0=all PLU)
enter PLU number(0=all PLU)
enter presset code 08
enter PLU number
0=not delete;1=deleteclear next PLU
return to weighing mode
LIST PLU07
*0-1
TO PLU NUMBER 0
_PRICE LIST
_
DELETE PLU08
*0
DELETE NO 0-1_
PLU NUMBER
_
DATA ENTRY
_
DATA ENTRY
_
K 0,000 0,00 0,00
0,000 0,00 0,00
list PLU:
KK
delete PLU:
0FROM PLU NUMBER
_

Chapter 3:function code mode
3 - 93 - 93 - 93 - 93 - 9
DEFINE PRESETS
LIST PRESETS
STANDARD PRESET
_
09
10
11
*FXX
PLU NUMBER 0
L1 PLU KEY
*
* ALLOCATION NO 0-1
enter preset code 09
press a preset key(you can choose the layer L1 orL2 by press the key Q )L1=0~28 ;L2=29~56enter the PLU numberdefine next preset key
return to weighing mode
enter preset code 10
print the list
enter the preset code 11
0=not allocate,1=automatic allocation by thesystem(plu 1-F001)
_
DATA ENTRY
_
KK
0,000 0,00 0,00
DATA ENTRY
_
K
0,000 0,00 0,00
DATA ENTRY
_
K
0,000 0,00 0,00
define preset keys:
list preset keys:
standard preset key:

METTLER TOLEDO 8442 Technical Manual
3-103-103-103-103-10
12 DELETE PRESET
_
* DELETE NO 0-1
DATA ENTRY
_
K
0,000 0,00 0,00
enter the preset code 12
0=not delete,1=all preset keys are cleared
return to weighing mode
CREATE ARTICLE GROUP14
_
*0
ENTER TEXT_
ARTICLE GROUP
___
LIST ARTICLE GROUP15
*0
TO GROUP 0
_ FROM GROUP
_
DATA ENTRY
_
KK
0,000 0,00 0,00
enter preset code 14
enter group number
enter group name(18 characters)
difine next group
return to weighing mode
list article group:
enter preset code 15
enter group number (0=all group)
enter group number (0=all group)
printing the list of group
return to weighing modeK
0,000 0,00 0,00
DATA ENTRY
_
delete preset key:
create article group:

Chapter 3:function code mode
3-113-113-113-113-11
CREATE SP.OFFER26
*
FROM 00-00
SP.OFFER TEXT
enter preset code 16
enter group number
0=not delete;1=delete
delete the next group
retun to weighing mode
enter preset code 26
enter the detail of special text
enter the start time
enter the end time
enter PLU number
enter the special offer
return to weighing mode
DELETE ARTICLE GROUP16
*0
DELETE NO 0-1
_ ARTICLE GROUP
_
DATA ENTRY
_
KK
0,000 0,00 0,00
DATA ENTRY
_
_
KK
0,000 0,00 0,00
delete article group:
create special offer:
___
TO 00-00
SPECIAL OFFER 0
_PLU NUMBER 0
_
_

METTLER TOLEDO 8442 Technical Manual
3-123-123-123-123-12
DELETE SP. OFFER28
*0-1
_ DELETE NO
LIST SP. OFFER29
*0-1
_ OVERVIEW
enter preset code 27
enter PLU number
0=not forbid special offer;1=forbid
forbid the next special offer
retun to weighing mode
enter preset code 28
delete the special offer0=not;1=yes
return to weighing mode
enter preset code 29
0=overview1=complete list
return to weighing mode
SP. OFFER BACKW.27
*0
BACK NO 0-1
_ PLU NUMBER
_
DATA ENTRY
_
KK
0,000 0,00 0,00
DATA ENTRY
_
K
0,000 0,00 0,00
DATA ENTRY
_
0,000 0,00 0,00
forbid special offer:
delete special offer:
list special offer:
K

Chapter 3:function code mode
3-133-133-133-133-13
TARE30
*0
TARE 0.00
_ TARE NUMBER
VALUE ADDED TAX31
*0
PERCENT 0.00
_ VAT NUMBER
enter preset code 30
enter tare number(1-16)
enter tare value
enter preset code 31
enter VAT number(1-8)
enter a volid rate in precent(i.e."16.00"=16%)define next VAT or return to weighing mode
return to weighing mode
DATA ENTRY
_
_
KK
0,000 0,00 0,00
DATA ENTRY
_
_
0,000 0,00 0,00
KK
define tare:
define vat:
CREATE EAN CODE32
*0
EAN CODE_
EAN CODE NUMBER
___
DATA ENTRY
_
KK
0,000 0,00 0,00
_
create EAN code:enter preset code 32
enter EAN code number(1-8):1=for ticket and 2-8 forlabel
As you use EAN 13 code format,max.13 figures,13thfigure=checkdigit,you must enter 12 figures.(As youuse EAN 25 code format,max.18 figures,18thfigure=checkdigit,you must enter 17 figures.As you use EAN 14 code format,max.14 figures,nocheckdigit,you must enter 14 figures.)Then define next EAN code
return to weighing mode

METTLER TOLEDO 8442 Technical Manual
3-143-143-143-143-14
TICKET HEADER35
*ENTER TEXT ___
DATA ENTRY
_
_
K
0,000 0,00 0,00
enter preset code 35
enter text(Max.4 lines;100 characters)
return to weighing mode
enter preset code 36
enter text(Max.4 lines;100 characters)
return to weighing mode
define ticket header:
NOITACIFITNEDNINAEFODNEGEL NOITACIFITNEDNINAEFODNEGEL NOITACIFITNEDNINAEFODNEGEL NOITACIFITNEDNINAEFODNEGEL NOITACIFITNEDNINAEFODNEGEL
rebmunelcitra=A serugif31otpu
tigidkcehc=C erugif1
etad=D serugif6
edocULP=P serugif6
rebmunpuorg=W serugif2
tuoma=B serugif6/5
ytitnauq=Q serugif5/4
serugiF9-0 serugif21
:elpmaxE
P,W,9-0:6-1serugiF yrtneelbissoP=
C:8+7serugiF yrtneelbissoP=
9-0,Q,B:21-8serugiF yrtneelbissoP=
C:31serugiF yrtneelbissoP=
TICKET BOTTOM36
*ENTER TEXT ___
DATA ENTRY
_
_
K
0,000 0,00 0,00
define ticket bottom:

Chapter 3:function code mode
3-153-153-153-153-15
RUNING DISPLAY MESSAGE38
*ENTER TEXT ___
enter operator number(1-5)
enter operator name(18 characters) define next vendor
return to weighing mode
enter preset code 48
printing the list
enter preset code 38
enter text(Max.100 characters)
return to weighing mode
enter preset code 47
DATA ENTRY
_
_
K
0,000 0,00 0,00
DATA ENTRY
_ CREATE OPERATOR OX47
*0
ENTER TEXT_
OPERATOR NUMBER
___
_
KK
0,000 0,00 0,00
define runing display message:
create operator:
OPERATOR STATUS48
*
DATA ENTRY
_
K
0,000 0,00 0,00
operator status:

METTLER TOLEDO 8442 Technical Manual
3-163-163-163-163-16
SHOP NAME50
DELETE OPERATOR49
*0
DELETE NO 0-1
_ OPERATOR NUMBER
ENTER TEXT ___
*
enter preset code 49
enter operator number(1-5)
0=nor delete;1=deletedelete next operator
return to weighing mode
enter preset code 50
enter text(4 lines,100 characters)
return to weighing mode
enter preset code 51
1-10 advertise text number
enter text(1 lines,60 characters)
return to weighing mode
DATA ENTRY
_
_
KK
0,000 0,00 0,00
DATA ENTRY
_
_
K
0,000 0,00 0,00
delete operator:
difine shop name:
ADVERTISEMENT TEXT51
*0
ENTER TEXT_
ADV. TEXT NUMBER
___
DATA ENTRY
_
_
KK
define advertisement text:
0,000 0,00 0,00

Chapter 3:function code mode
3-173-173-173-173-17
DATE TEXT52
*1-3
ENTER TEXT_
DATE TEXT NUMBER
___
DATA ENTRY
_
_
KK
0,000 0,00 0,00
enter preset code 52
0=none ;1-3 date entry
enter text(18 characters)
return to weighing mode
enter preset code 57
enter date in format:DD-MM-YY
enter time in format:HH-MM-SS
return to weighing mode
define date text :
57 DATE / TIME
*0
TIME 0
_ DATE
DATA ENTRY
_
_
K
0,000 0,00 0,00
define date/time:

METTLER TOLEDO 8442 Technical Manual
3-183-183-183-183-18
enter preset code 60
enter increase/decrease number(1-9)
enter increase/decrease name
enter increase/decrease text
enter increase/decrease rate
return to weighing mode
enter preset code 63
input the pack date offset number.
return to weighing mode
INCREASE/DECREASE60
*0
INCREASE/DECREASE NAME_
INCREASE/DECREASE NR.
PERCENT 0.00
_
INCREASE/DECREASE TEXT
_ ___
___
DATA ENTRY
_
_
KK
0,000 0,00 0,00
define increase/decrease:
PACK DATE OFFSET63
*
DATA ENTRY
_
0,000 0,00 0,00
define pack date offset:
0
_

Chapter 3:function code mode
3-193-193-193-193-19
01 PRICE CHANGE
*
_PLU NUMBER 0
UNITPRICE 0.00
enter preset code 01
0=by plu;1=by preset
enter PLU number(4 digits)
enter new price
return to weighing mode
K8* Call the menu "PRICE CHANGE"
DATA ENTRY
_01 PRICE CHANGE
02 CREATE PLU
_
_
_
06 MENU END
03 COPY PLU
04 DEFINE PRESETS
DATA ENTRY
_
_
KK
0,000 0,00 0,00
_
change unitprice:
PRICE CHANGES
02 CREATE PLU
DATA ENTRY
_
.....
.....
.....
The same as page 3-7.create PLU:
BY PLU 0-1
_

METTLER TOLEDO 8442 Technical Manual
3-203-203-203-203-20
03 COPY PLU
*0
PLU NUMBER NEW 0
_ PLU NUMBER OLD
04 DEFINE PRESETS
*FXX
PLU NUMBER 0
L1 PLU KEY
enter preset code 03
enter PLU number
enter PLU numbercopy next PLU
return to weighing mode
enter preset code 04
press the preset key
define next preset key
return to weighing mode
enter preset code 06
return to weighing mode
DATA ENTRY
_
KK
0,000 0,00 0,00
_
DATA ENTRY
_
_
KK
0,000 0,00 0,00
copy PLU:
define preset keys:
06 MENU END
*
DATA ENTRY
_
0,000 0,00 0,00
quit this menu:

Chapter 3:function code mode
3-213-213-213-213-21
01 IN/DECREASE
*0-1
_ NO IN/DECREASE
enter preset code 01
0=increase/decreasse locked;1=increase/decreaseactivated
return to weighing mode
INCREASE/DECREASE
_
K88* Call the menu "INCREASE/DECREASE"
K 0,000 0,00 0,00
INCREASE/DECREASE
_01 IN/DECREASE
02 CREATE INCR./DECR.
03 MENU END
_
_
02 CREATE INCR./DECR.
*0
PERCENT 0.00
_ INCR/DECR NR.
INCREASE/DECREASE
_
_
0,000 0,00 0,00
KK
define increase/decrease:
create incr./decrease:
enter preset code 02
enter increase/decrease number
enter precent
enter preset code 03
return to weighing mode
INCREASE/DECREASE
03 MENU END
*
INCREASE/DECREASE
_
0,000 0,00 0,00
quit this menu:

METTLER TOLEDO 8442 Technical Manual
3-223-223-223-223-22
enter preset code 01
printing operator list
return to weighing mode
enter preset code 05
enter article group number
enter article group number
printing
return to weighing mode
K22* Call the menu "X-REPORTING"
01 OX TOTAL
05 ARTICLE GROUP TOTAL
06 PLU TOTAL
13 SCALE TOTAL LABEL
16 PLU TOTAL LABEL
17 SCALE TOTAL
_
_
_
_
_
01 OPERATOR TOTAL
*
X-REPORTING
_
X-REPORTING
_
K
0,000 0,00 0,00
operator total:
10 PLU PRICE CHANGE TOTAL
_11 TIME REPORT
_
X-REPORTING
9 ACTION ACTION
_
05 ARTICLE GROUP TOTAL
*0
TO ART.GRP 0
_ FROM ART.GRP
_
X-REPORTING
_
article group total:
18 MENU END_
K
0,000 0,00 0,00

Chapter 3:function code mode
3-233-233-233-233-23
06 PLU TOTAL
*0
TO 0_
FROM
_
09 ACTION ACTION
*
enter preset code 06
enter plu number
enter plu number
printing
return to weighing mode
enter preset code 09
printing the report of special offer
enter preset code 10
printing the report of PLU price change
return to weighing mode
X-REPORTING
_
K
0,000 0,00 0,00
X-REPORTING
_
PLU total:
K
0,000 0,00 0,00
Special offer report:
10 PLU PRICE CHANGE TOTAL
*
X-REPORTING
_
K
0,000 0,00 0,00
PLU price change:

METTLER TOLEDO 8442 Technical Manual
3-243-243-243-243-24
16 PLU TOTAL LABEL
*0 PLU NUMBER
13 SCALE TOTAL LABEL
*
X-REPORTING
_
11 TIME REPORT
*
X-REPORTING
_
HOUR 0-1
FROM 0
TO 0_
_
_
K
0,000 0,00 0,00
K
0,000 0,00 0,00
X-REPORTING
_
_
KK
0,000 0,00 0,00
enter preset code 11
0=time,1=day of the week
enter time:0~24or enter the day of the week:1=monday...7=sunday
printing
enter preset code 13
printing
enter preset code 16
enter the choosen PLU numberprinting
return to weighing mode
scale total label:
total for a certain PLU:
time report:

Chapter 3:function code mode
3-253-253-253-253-25
enter preset code 17
select the tltal0=Daily total;1=weekly total;2=monthly total
printing
return to weighing mode
enter preset code 05
printing
0=no;1=yes
0=not delete;1=delete
return to weighing mode
X-REPORTING
_17 SCALE TOTAL
*
K333* Call the menu "Z-REPORTING"
Z-REPORTING
_05 OPERATOR TOTAL
09 GROUP TOTAL
_
10 PLU TOTAL
_
_
_
_
15 SCALE TOTAL LABELS
18 PLU LABEL
19 SCALE TOTAL
05 OPERATOR TOTAL
*
0-1
_ MORE REPORTS NO
0-1
_ DELETE NO
Z-REPORTING
_
PRINTING
K 0,000 0,00 0,00
scale total report:
operator total:
12 PLU PRICE CHANGE TOTAL
_13 TIME REPORT
_
Z-REPORT
TURNOVER LEVEL 0
_
K
0,000 0,00 0,00
11 ACTION ACTION
_20 MENU END
_

METTLER TOLEDO 8442 Technical Manual
3-263-263-263-263-26
09 GROUP TOTAL
* PRINTING
0-1
_ MOR REPORTS
0-1
_ DELETE NO
10 PLU TOTAL
* PRINTING
0-1
_ MORE REPORTS
0-1
_ DELETE NO
enter preset code 09
printing0=no,1=yes
0=not delete;1=delete
return to weighing mode
enter preset code 10
printingmore report 0=no,1=yes
0=not delete;1=delete
return to weighing mode
enter preset code 11
printing the report of special offermore report 0=no,1=yes
0=not delete;1=delete
return to weighing mode
Z-REPORTING
_
K 0,000 0,00 0,00
Z-REPORTING
_
K 0,000 0,00 0,00
group total:
PLU total:
11 ACTION ACTION
* PRINTING
0-1
_ MORE REPORTS
0-1
_ DELETE NO
Z-REPORTING
_
K 0,000 0,00 0,00
Special offer report:

Chapter 3:function code mode
3-273-273-273-273-27
enter preset code 12
printing the report of PLU price change
0=no,1=yes
0=not delete,1=delete
return to weighing mode
enter preset code 13
printing
0=no,1=yes
0=not delete;1=delete
return to weighing mode
12 PLU PRICE CHANGE TOTAL
* PRINTING
0-1
_ OTHER REPORT
0-1
_ DELETE NO
Z-REPORTING
_
K
0,000 0,00 0,00
0-1
0-1
13 TIME REPORT
* PRINTING
_ OTHER REPORT
_ DELETE NO
Z-REPORTING
_
K
0,000 0,00 0,00
Price change report:
Time report:

METTLER TOLEDO 8442 Technical Manual
3-283-283-283-283-28
Z-REPORTING
_15 SCALE TOTAL LABELS
*
PRINTING
0-1
_ OTHER REPORT
0-1
_ DELETE NO
1-3
_ TURNOVER LEVEL
enter preset code 15
1=Daily total;2=weekly total;3=monthly total
printing
0=no,1=yes
0=not delete;1=delete
enter preset code 16
enter the choosen PLU number
printing
0=no,1=yes
0=not delete;1=delete
return to weighing mode
K
0,000 0,00 0,00
18 PLU LABEL
*
PRINTING
0-1
_ OTHER REPORT
0-1 DELETE NO
0
_ PLU NUMBER
Z-REPORTING
_
K
_
K
0,000 0,00 0,00
scale total:
total for certain PLU:

Chapter 3:function code mode
3-293-293-293-293-29
enter preset code 19
0=Daily total;1=weekly total;2=monthly total3=the day before yesterday;4=yesterday;5=three daysago.printing
more report: 0=no,1=yes
0=not delete;1=delete
SPECIAL FUNCTIONS
_
K666666* Call the menu "SPECIAL FUNCTIONS"
ROUND02
03 BARCODE TYPE_
scale total report:
SPECIAL FUNCTIONS
_CHECKSUM TYPE04
05 SELECT WGT. UNIT_
_SELECT PRINT WGT.06
07 SELECT PRINT MOD.
_
09 SELT. YEAR LENGTH_
_
TOT. PRICE CHANGE10
11 DECIAMAL POINT
_
12 SAVE TRANSACTION_
_IF PRINT UNIT13
14 THOUSAND MARK
_
Z-REPORTING
_19 SCALE TOTAL
*
PRINTING
0-1
_ OTHER REPORT
0-1
_ DELETE NO
0-5
_ TURNOVER LEVEL
K
0,000 0,00 0,00
_15 TICKET WIDTH
_16 LCD WIDTH
_17 PLU TYPE SWITCH
_
18 PLU FORMAT SKIP
_19 MONTH TYPE
_20 ART. NO. SHIFT
_21 UNIT SYMBOL
_22 COMMUNICATE TYPE
_25 MENU END
METTLER TOLEDO 8442 Technical Manual
3-303-303-303-303-30
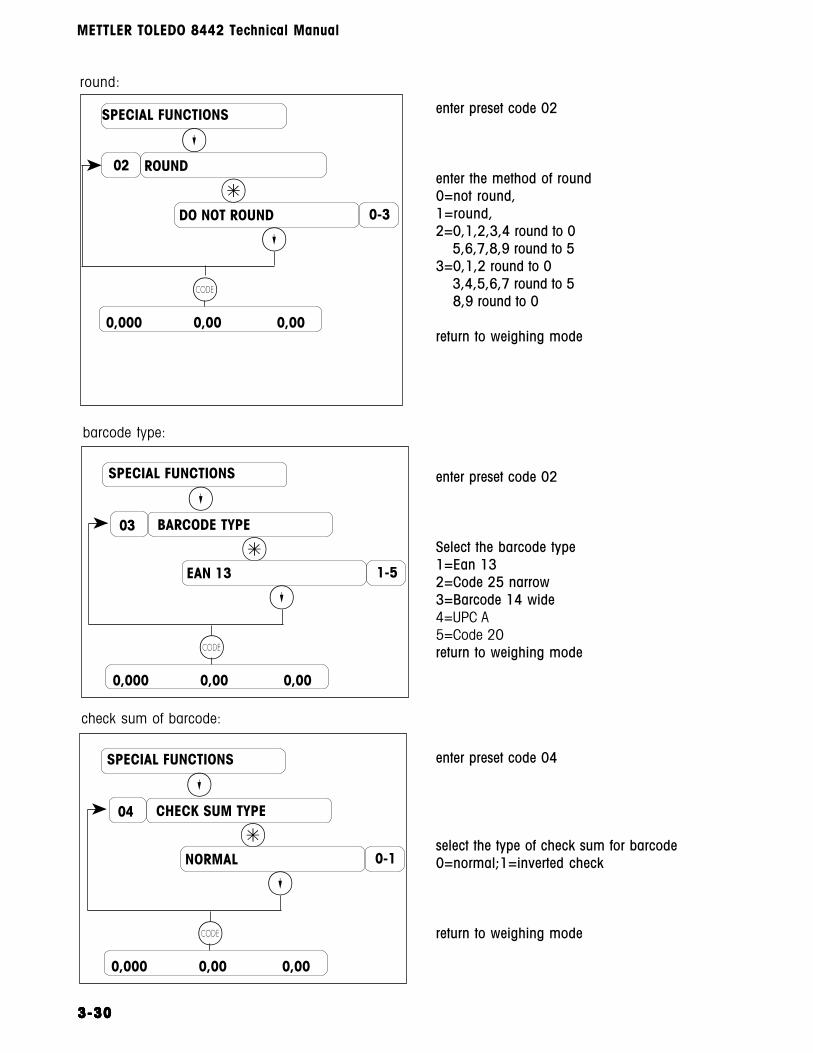
SPECIAL FUNCTIONS
_
*ROUND
DO NOT ROUND
_
02
0-3
03 BARCODE TYPE
*
SPECIAL FUNCTIONS
_
round:
K
0,000 0,00 0,00
barcode type:
enter preset code 02
enter the method of round0=not round,1=round,2=0,1,2,3,4 round to 0 5,6,7,8,9 round to 53=0,1,2 round to 0 3,4,5,6,7 round to 5 8,9 round to 0
return to weighing mode
enter preset code 02
Select the barcode type1=Ean 132=Code 25 narrow3=Barcode 14 wide4=UPC A5=Code 20return to weighing mode
enter preset code 04
select the type of check sum for barcode0=normal;1=inverted check
return to weighing mode
EAN 13
_1-5
K
0,000 0,00 0,00
04 CHECK SUM TYPE
*
SPECIAL FUNCTIONS
_
check sum of barcode:
NORMAL
_0-1
K
0,000 0,00 0,00

Chapter 3:function code mode
3-313-313-313-313-31
05 SELECT WGT UNIT
*
SPECIAL FUNCTIONS
_
NORMAL
_0-3
K
0,000 0,00 0,00
Select the unit :
enter preset code 05
select the unit0=price/1000g;1=price/500g;2=price/100g;3=price/g
return to weighing mode
enter preset code 06
select the unit of printed weight0=Kg;1=g
return to weighing mode
enter preset code 07
select the print mode0=with motion of the weitht1=without motion
return to weighing mode
06 SELECT PRINT WGT
*
SPECIAL FUNCTIONS
_
KG
_0-1
K
0,000 0,00 0,00
Select the unit of printed weitht:
07 SELECT PRINT MOD.
*
SPECIAL FUNCTIONS
_
WITH MOTION
_0-1
K
0,000 0,00 0,00
Select print mode:
METTLER TOLEDO 8442 Technical Manual
3-323-323-323-323-32
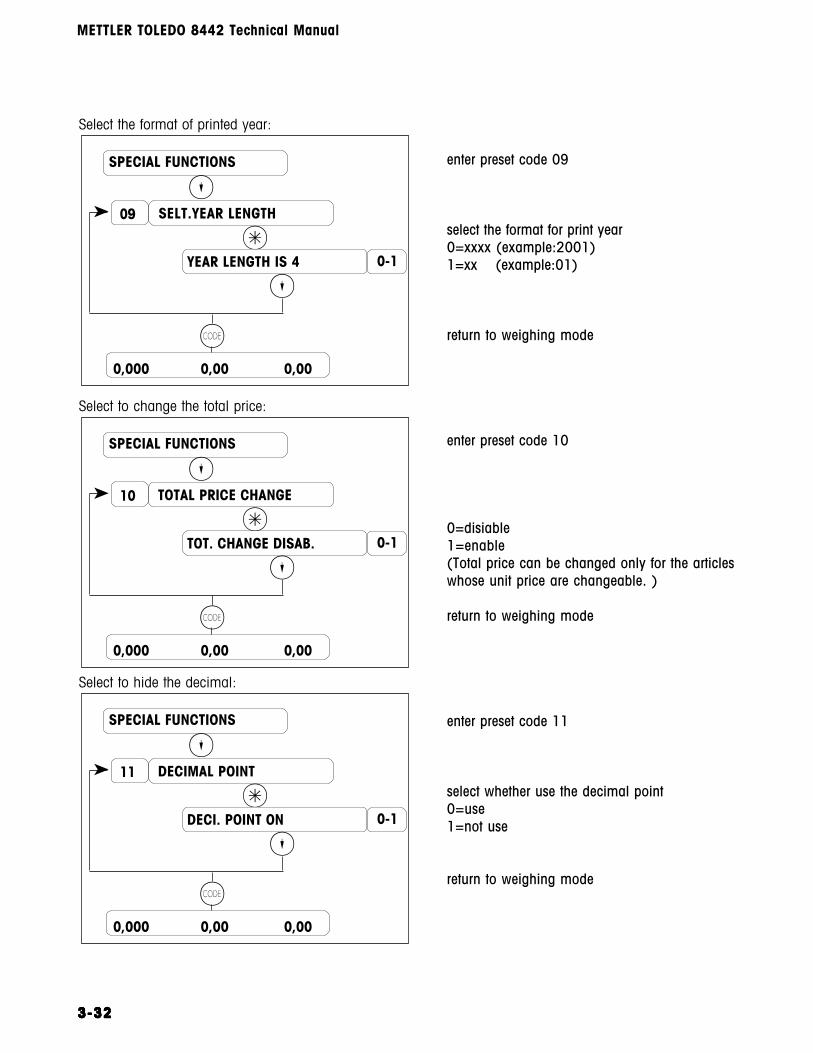
09 SELT.YEAR LENGTH
*
SPECIAL FUNCTIONS
_
YEAR LENGTH IS 4
_0-1
K
0,000 0,00 0,00
Select the format of printed year:
enter preset code 09
select the format for print year0=xxxx (example:2001)1=xx (example:01)
return to weighing mode
enter preset code 10
0=disiable1=enable(Total price can be changed only for the articleswhose unit price are changeable. )
return to weighing mode
enter preset code 11
select whether use the decimal point0=use1=not use
return to weighing mode
10 TOTAL PRICE CHANGE
*
SPECIAL FUNCTIONS
_
TOT. CHANGE DISAB.
_0-1
K
0,000 0,00 0,00
Select to change the total price:
11 DECIMAL POINT
*
SPECIAL FUNCTIONS
_
DECI. POINT ON
_0-1
K
0,000 0,00 0,00
Select to hide the decimal:

Chapter 3:function code mode
3-333-333-333-333-33
12 SAVE TRANSACTION
*
SPECIAL FUNCTIONS
_
SAVE TRANS. ENABLE
_0-1
K
0,000 0,00 0,00
Select to save the transaction:
enter preset code 12
whether to save the transaction0=save1=not save
return to weighing mode
enter preset code 13
select whether to print the unit of price0=print1=not print
return to weighing mode
enter preset code 14
select whether to print price with thousand mark0=not print1=print
return to weighing mode
13 IF PRINT UNIT
*
SPECIAL FUNCTIONS
_
PRINT UNIT ENABLE
_0-1
K
0,000 0,00 0,00
Select whether to print the unit of price:
14 THOUSAND MARK
*
SPECIAL FUNCTIONS
_
THOUSAND MARK OFF
_0-1
K
0,000 0,00 0,00
Select whether to print thousand mark:

METTLER TOLEDO 8442 Technical Manual
3-343-343-343-343-34
15 TICKET WIDTH
*
SPECIAL FUNCTIONS
_
TICKET 60MM
_0-1
K
0,000 0,00 0,00
Select ticket width:
enter preset code 15
select ticket width0=60mm1=40mm
return to weighing mode
enter preset code 16
select LCD width0=LCD width 6 digit1=LCD width 7 digit
return to weighing mode
enter preset code 17
select whether to print price with thousand mark0=switch off1=switch on , plu can switch between by weightand by count according the weight on platter.
return to weighing mode
16 LCD WIDTH
*
SPECIAL FUNCTIONS
_
LCD WIDTH 6
_0-1
K
0,000 0,00 0,00
Select LCD width:
17 PLU TYPE SWITCH
*
SPECIAL FUNCTIONS
_
PLU TYPE SWITCH OFF
_0-1
K
0,000 0,00 0,00
PLU type switch:

Chapter 3:function code mode
3-353-353-353-353-35
18 PLU FORMAT SKIP
*
SPECIAL FUNCTIONS
_
ART.NR. ON
_0-1
K
0,000 0,00 0,00
PLU format skip:
enter preset code 18
whether to show these items in create PLU menu0=off1=on
return to weighing mode
enter preset code 19
select month print type0=print number1=print character
return to weighing mode
enter preset code 20
set the shift digit number of the article number inbarcode
return to weighing mode
19 MONTH TYPE
*
SPECIAL FUNCTIONS
_
MONTH TYPE NUMBER
_0-1
K
0,000 0,00 0,00
Select month print type:
20 ART. NO. SHIFT
*
SPECIAL FUNCTIONS
_
ART. NO. SHIFT
_0
K
0,000 0,00 0,00
Set article number shift in barcode:
...... ......

METTLER TOLEDO 8442 Technical Manual
3-363-363-363-363-36
21 UNIT SYMBOL
*
SPECIAL FUNCTIONS
SYMBOL
_0-1
K
0,000 0,00 0,00
Select unit symbol:
enter preset code 21
select unit symbol0=off, default Kg1=on, change to lb
return to weighing mode
enter preset code 22
select communicate type0=ethernet1=commport
return to weighing mode
22 COMMUNICATE TYPE
*
SPECIAL FUNCTIONS
_
ETHERNET
_0-1
K
0,000 0,00 0,00
Select communicate type:
_

Chapter 3:function code mode
3-373-373-373-373-37
KEY BOARD CONFIGURATION
_
*STANDARD CONFIG.01
0-1 CONFIGURATION NO
enter preset code 01
0=not configuration;1=configuration
return to weighing mode
KEY BOARD CONFIGURATION
_STANDARD CONFIG.01
02 FUNCTION KEYS
_
03 SPEC. FUNCTION KEYS_
05 PRINT OUT
06 MENU END
_
_
_
K
0,000 0,00 0,00
K445566* Call the menu "KEYBOARD CONFIGURATION"
standard configuration:
KEYBOARD CONFIGURATION

METTLER TOLEDO 8442 Technical Manual
3-383-383-383-383-38
03 SPEC. FUNCTION KEYS
*0
_ OPERATOR KEYS
0-1
_ INCR/DECREASE KEY
enter presest code 02
0=off,1=on
0=off,1=on
0=off;1=on
0=off,1=on
0=off,1=on
0=off,1=on
return to weighing mode
enter preset code 03
enter umber of operator keys(1-4)
enable/disable direct increass/decreasse key0=disable,1=enable
enter increase/decrease number
return to weighing mode
02 FUNCTION KEYS
*
_ R KEY ON
0-1
_ X KEY ON
0-1
_ _ KEY ON
0-1
_ ST KEY ON
0-1
0-1
_ + KEY ON
0-1
_ # KEY ON
KEY BOARD CONFIGURATION
_
K
0,000 0,00 0,00
KEY BOARD CONFIGURATION
_
0 INCR/DECREASE NUMBER
0-1 CONFIG. NO
_
_
K
0,000 0,00 0,00
define function keys:
define special function keys:

Chapter 3:function code mode
3-393-393-393-393-39
enter preset code 05
printing out the result of key board configuration
return to weighing mode
enter preset code 06
return to weighing mode
05 PRINT OUT
*
KEY BOARD CONFIGURATION
_
0,000 0,00 0,00
06 QUIT MENU
*
KEY BOARD CONFIGURATION
_
0,000 0,00 0,00
quit this menu:
Print out the kaybord configuration:

METTLER TOLEDO 8442 Technical Manual
3-403-403-403-403-40
label formatThis operation is used, when the customer needs to change thedefault label formats.
Enter the number of the label format.
Font size of the 1st line of the PLU text
Font size of the extra text
Enter the preset code of the desire label type.02 = Service label03 = Total label04 = Prepack label
0 = PLU text left justified1 = centered PLU text2 = PLU text auto formatted
LABEL DEFINITION
LABEL NR.
PLU TEXT LEFT
SIZE PLU L1
SIZE EXTRA TEXT
XX
0
0-2
0
0
PACK. DATE TEXT NR.
BEST BEFORE TEXT NR.
0
0
NO SHOP NAME
ADV. TEXT NR.
0-1
0
Continued on the next page
Enter the number of the packing date textO = do not print the date
Printing of the store address0 = no printing / 1 = printing
Enter the number of the advertisement text0 = no printing
Enter the number of the best before date text.O = do not print the date
Call the "LABEL DEFINITION" menu*CODE
Ó
*
Ó
Ó
Ó
Ó
Ó
Ó
Ó
Ó
ÑÑÐÐÏÏ
Select the selected label type
XX Select the label type
*
Select one kind label.02 = Weight label01 = Count label

Chapter 3:function code mode
3-413-413-413-413-41
Continued from the last page
NO PACK DATE
NO SELL BY DATE
NO BEST BEFORE
SELL BY DATE TEXT NR. 0
0-2
0-3
0-3
0 = Do not print the date ; 1 = DD/MM/YY ; 2 =MM/DD/YY;3=YY/MM/DD
0 = Do not print the date ; 1 = DD/MM/YY ; 2 =MM/DD/YY;3=YY/MM/DD
Enter the number of the sell by date text.O = Do not print
Ó
Ó
Ó
ÓCODE
0.00 0.00 0.00
0 = Do not print the date ; 1 = DD/MM/YY ; 2 =MM/DD/YY;3=YY/MM/DD
Press the o key to return to the weighing mode.
SPCT programPLU records and setup data of the 8442 can be programmedthrough a PC (Personal Computer) using the METTLER TOLEDOprogram SPCT. New scales can be easily set up by using thisprogram.
SPCT requires an IBM or compatible PC with Windows 95/NT orhigher version operating system. A 3.5 inch floppy drive isrequired. And the connector at the 8442 is a standard ETHERNETconnector for RJ45. You can connect to the ETHERNET directly.

METTLER TOLEDO 8442 Technical Manual
3-423-423-423-423-42
Flashing SoftwareThe 8442 Operating System Software is retained in Flash EEPROM'son the Main Logic PCB. The EPROM's can be reprogrammed using aPC and a downloader program called FLASH. Cables andcomponents are shown as bellow:
Before downloading the software, turn the 8442 power OFF. Connectone end of the cable to the PC's serial port and the other end to the8442 serial port. Then turn the 8442 power ON and enter flashingstatus according to the following instructions.
*CODE Call the "SERVICE MODE" menuÍ
SERVICE MODE
SOFTWARE LOAD22
Ó
*
Enter the preset code 22
WAIT FOR HOST...
Ó
ÏÉÊ ËÌ ÐÎ
0-1
Waiting for PC signal...
Then enter FLASH command at DOS prompt. The FLASH commandline is as follows:
FLASH filename.dat(Replace filename.dat with the actual file name. Example: FLASH123456R.dat). If you get a DOS Bad command or file name error,check to make sure you have not mis-typed the file name, and theFLASH.EXE is in your PC's path or current directory. FLASH uses theCOM1 RS232 Serial Port as a default. If COM2 is required, you willneed to add "2" at the end of the command line. (For example:FLASH 123456R.dat 2).
After you typed FLASH command, the PC screen will display a statusmenu to show the flashing progress. When the flashing is completed,the scale will reset automatically. Press any key to exit FLASHprogram at the PC.
PCDB9-FTO 9-PIN SERIALRS232 PORT
8442DB9-FTO 9-PIN SERIALRS232 PORT
235
325
123848 Cable, PC DB9 to 8442 10ft/3m

4-1 4-1 4-1 4-1 4-1
Chapter 4: Service Mode
Service Mode is a special function menu which is provided todiagnose scale problems.
4 Service mode
Presentation of the"SERVICE MODE"menu
*CODE ÍÏÉÊ ËÌ ÐÎ
Select desired menu with Ó or Ô enter presetcode and activate with key.
SERVICE MODE
MEMORY TEST
INTERFACE TEST
HIGH RESOLUTION
ERROR REPORT
PRIMARY CONFIG
CREEP COMPENSATE
CREEP PARA. SET
CLEAR BRAM
FONT SIZE TABLE
CLEAR EEPROM
FLASH CHECKSUM
10
11
12
13
14
15
16
WORK CONFIG
01 FUNCTION TEST
02
03
04
06
08
09
Continued :Presentation of the "SERVICE MODE" menu
on the next page
PLU-MEM DELETE17
SERVICE CELL CALIBRATION05
Ó
Ó
Ó
Ó
Ó
Ó
Ó
Ó
Ó
Ó
Ó
Ó
Ó
Ó
Ó
Ó
Ó
TICKETNR TO 0
*

METTLER TOLEDO 8442 Technical Manual
4-24-24-24-24-2
Continued from the last page
0X-MEM DELETE
SOFTWARE LOAD
19
22
AG-MEM DELETE18
MENU END
25
28
LABEL PRINTER
TICKET PRINTER24
Ó
Ó
Ó
Ó
Ó
Select desired menu with Ó or Ô enter preset codeand activate with key.*
NET WORK CONFIG.21
Ó
26 CONF.INTERFACE
Ó

4-3 4-3 4-3 4-3 4-3
Chapter 4: Service Mode
Function TestThis function is used to diagnose display, printer and keyboard.
SERVICE MODE
FUNCTION TEST01
Ó
*
8888888888888888
Ó
Enter the preset code 01
Turn on all display segments
DISPLAYTEST.1234 Turn on individual segments one byone
PRINTERTEST Print out test ticket
KEYBOARDTESTLIN 1 SPA 1
Press each key left to right and updown...
LIN 7 SPA 8
...

METTLER TOLEDO 8442 Technical Manual
4-44-44-44-44-4
Memory TestThis function is used to test RAM chip U21.
SERVICE MODE
MEMORY TEST02
Ó
*
IC 21
Enter the preset code 02
The test result will be displayed andprinted.
IC 21 OK
Interface TestThis function is used to test the RS232 Serial Port
SERVICE MODE
INTERFACE TEST03
Ó
*
COM TEST PASS
Enter the preset code 03
The test result will be displayed .
Install the interface test kit .

4-5 4-5 4-5 4-5 4-5
Chapter 4: Service Mode
Expand display
SERVICE MODE
HIGH RESOLUTION04
ÓEnter the preset code 04
356989 1.368
Press CODE key to exit Expand Displaymode
CODE
ENTER
NOT APPROVED
The accuracy of the weight isexpanded 10 times on the TOTALPRICE display area, this read is onlyused for service purpose only.The internal A/D counts is displayed onthe UNIT PRICE display area.
Error ReportThis function is used to record hardware errors
SERVICE MODE
ERROR REPORT06
ÓEnter the preset code 06
DELETE NO
* The Error report is printed out.
0-1
Ó
Delete error report0= Do not delete; 1=delete

METTLER TOLEDO 8442 Technical Manual
4-64-64-64-64-6
Primary ConfigureThis function is used to set up scale number.
SERVICE MODE
PRIMARY TEST08
Ó
*
SCALE NUMBER
Enter the preset code 08
Enter the scale number (1-64)1
Ó
Reset TicketNumber This function is used to reset ticket number.
SERVICE MODE
TICKETNR. TO 009
Ó
*
BACK NO
Enter the preset code 09
Reset ticket number0=Do not reset; 1= Reset
0-1
Ó
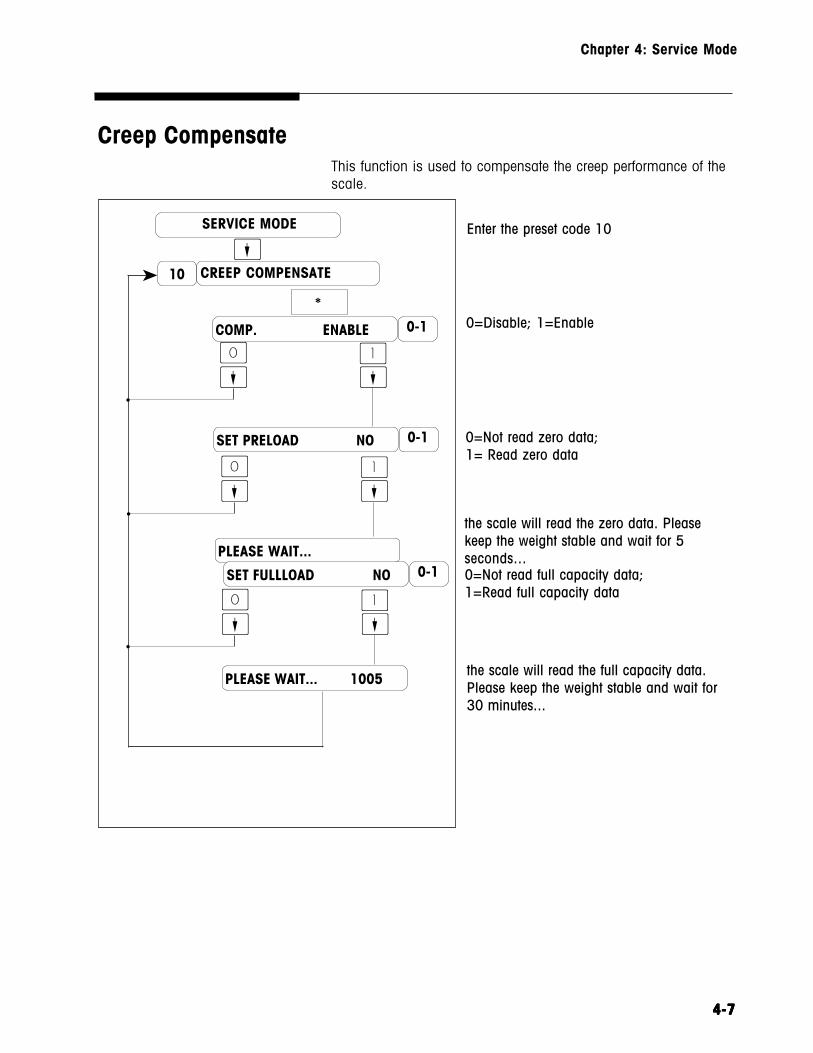
4-7 4-7 4-7 4-7 4-7
Chapter 4: Service Mode
Creep CompensateThis function is used to compensate the creep performance of thescale.
SERVICE MODE
CREEP COMPENSATE10
ÓEnter the preset code 10
COMP. ENABLE
*
0-1 0=Disable; 1=Enable
ÓÉÈ
Ó
SET PRELOAD NO 0-1 0=Not read zero data;1= Read zero data
ÓÉÈ
Ó
SET FULLLOAD NO 0-1PLEASE WAIT...
the scale will read the zero data. Pleasekeep the weight stable and wait for 5seconds...0=Not read full capacity data;1=Read full capacity data
ÓÉÈ
Ó
PLEASE WAIT... 1005 the scale will read the full capacity data.Please keep the weight stable and wait for30 minutes...

METTLER TOLEDO 8442 Technical Manual
4-84-84-84-84-8
Set CreepParameter This function is used to set up creep parameter manually.
SERVICE MODE
CREEP PARA. SET11
Ó
*
ENTER CREEP PARA.
Enter the preset code 11
Enter the creep parameter on the L/Clabel.
0.000
Ó
Clear BatteryBackup RAM This function is used to clear battery backup RAM.
SERVICE MODE
CLEAR BRAM12
Ó
*
Enter the preset code 12
The scale will be reset after thisoperation. A error message "ERROR200 DATABA" will be shown after reset.You have to initialize the scale at thistime(See Reset RAM of chapter 2).
THIS OPERATION WILL ERASE ALL THE PLU RECORDS , EXTRATEXT AND OTHER PROGRAMMED DATA. THE SCALE MUST BEINITIALIZED AFTER THIS OPERATION.

4-9 4-9 4-9 4-9 4-9
Chapter 4: Service Mode
Print Font SizeTable
SERVICE MODE
FONT SIZE TABLE13
ÓEnter the preset code 13
*A sample of different size fonts isprinted out.
Clear EEPROM
SERVICE MODE
CLEAR EEPROM14
ÓEnter the preset code 14
*
THIS OPERATION WILL ERASE ALL THE CALIBRATION DATA, ERRORREPORT AND PRINTER PARAMETERS. YOU HAVE TO CALIBRATE THESCALE AGAIN AND RUN TICKET PRINTER TEST AND LABEL PRINTERTEST AFTER THIS OPERATION.

METTLER TOLEDO 8442 Technical Manual
4-104-104-104-104-10
Flash ChecksumThis function is used to verify if the scale code is correct.
SERVICE MODE
FLASH CHECKSUM16
Ó
*
CHECKING FLAS.
Enter the preset code 16
The test result will be shown.
CHECKSUM OK
Delete PLU MemoryThis function is used to clear PLU memory.
SERVICE MODE
PLU-MEM. DELETE17
ÓEnter the preset code 17
DELETE NO
*
0-1
Ó
Delete PLU memory0= Do not delete; 1=delete
THIS OPERATION WILL ERASE ALL THE PLU RECORDS AND PLUTOTAL.

4-11 4-11 4-11 4-11 4-11
Chapter 4: Service Mode
Delete GroupMemory This function is used to clear Group memory.
SERVICE MODE
AG-MEM. DELETE18
ÓEnter the preset code 18
DELETE NO
*
0-1
Ó
Delete Group memory0= Do not delete; 1=delete
Delete OperatorMemory This function is used to clear Operator memory.
SERVICE MODE
OX-MEM. DELETE19
ÓEnter the preset code 19
DELETE NO
*
0-1
Ó
Delete Operator memory0= Do not delete; 1=delete
THIS OPERATION WILL ERASE ALL THE GROUP RECORDS ANDGROUP TOTAL.
THIS OPERATION WILL ERASE ALL THE OPERATOR RECORDS ANDOPERATOR TOTAL.
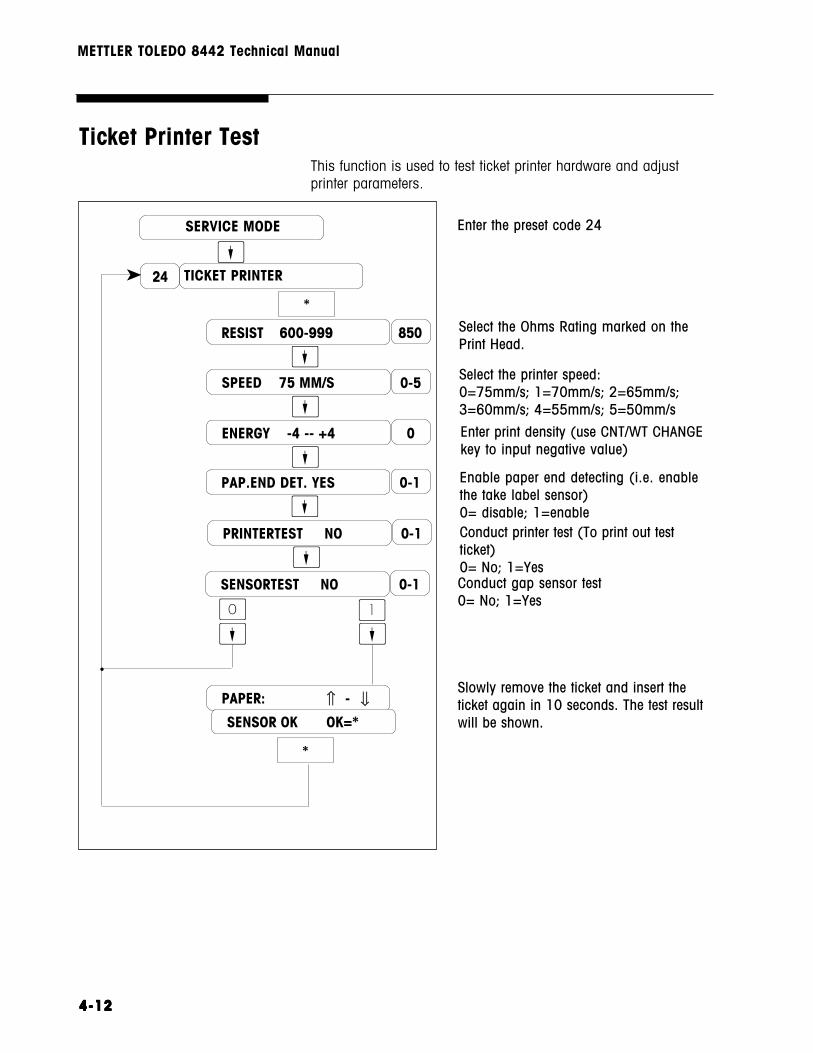
METTLER TOLEDO 8442 Technical Manual
4-124-124-124-124-12
Ticket Printer TestThis function is used to test ticket printer hardware and adjustprinter parameters.
SERVICE MODE
TICKET PRINTER24
Ó
*
RESIST 600-999
Enter the preset code 24
Select the Ohms Rating marked on thePrint Head.
850
ÓSPEED 75 MM/S 0-5
ÓENERGY -4 -- +4 0
Ó
Select the printer speed:0=75mm/s; 1=70mm/s; 2=65mm/s;3=60mm/s; 4=55mm/s; 5=50mm/s
Enter print density (use CNT/WT CHANGEkey to input negative value)
PAP.END DET. YES 0-1
ÓEnable paper end detecting (i.e. enablethe take label sensor)0= disable; 1=enable
PRINTERTEST NO 0-1 Conduct printer test (To print out testticket)0= No; 1=Yes
ÓÉÈ
Ó
SENSORTEST NO 0-1 Conduct gap sensor test0= No; 1=Yes
Ó
PAPER: -Slowly remove the ticket and insert theticket again in 10 seconds. The test resultwill be shown.SENSOR OK OK=*
*
⇑ ⇓

4-13 4-13 4-13 4-13 4-13
Chapter 4: Service Mode
Label Printer TestThis function is used to test label printer hardware and adjustprinter parameters.
SERVICE MODE
LABEL PRINTER25
Ó
*
RESIST 600-999
Enter the preset code 25
Select the Ohms Rating marked on thePrint Head.
850
ÓSPEED 75 MM/S 0-5
ÓENERGY -4 -- +4 0
Ó
Select the printer speed:0=75mm/s; 1=70mm/s; 2=65mm/s;3=60mm/s; 4=55mm/s; 5=50mm/s
Enter print density (use CNT/WT CHANGEkey to input negative value)
PAP.END DET. YES 0-1
ÓEnable paper end detecting (i.e. enablethe take label sensor)0= disable; 1=enable
PRINTERTEST NO 0-1 Conduct printer test (To print out testticket)0= No; 1=Yes
ÓÉÈ
Ó
SENSORTEST NO 0-1 Conduct gap sensor and take label sensortest0= No; 1=Yes
Select the threshold of the label0~5 means 2/8,3/8,4/8,5/8,6/8,7/8
Ó
LABEL POS OK=* Lead the label to the start positionmanually. The scale will test gap sensor.
*
REWIND YES 0-1
ÓEnable rewind feature0= disable; 1=enable
OFFSET 40
ÓEnter offset length in mm (Eject distance)
TAKEUP THRESHOLD 200
ÓEnter takeup threshold value, used onadjusting the advantage of take labelsensor.
Continued on the next page
THRESH LEVEL 2
Ó

METTLER TOLEDO 8442 Technical Manual
4-144-144-144-144-14
LABEL TEAR OK=*
Continued from the last page
The scale will test take label sensor
SENSOR OK OK=* The scale will issue two or three labelsand show the test results.
*
*

5-1 5-1 5-1 5-1 5-1
Chapter 5: Troubleshooting
Following is a list of symptoms that could occur, and therecommended action to correct the problem.
SCALE INOPERATIVE/BLANK DISPLAYS1. Check AC power at outlet.2. Check Voltage on Main Logic PCB. If voltages are zero, checkPower Supply.3. If test point voltage is good replace Main Logic PCB.4. Check Display Cable on Main Logic PCB and Operator DisplayPCB. Check Display PCB.
KEYBOARD INOPERATIVE1. Check keyboard connection on Main Logic.2. Replace Keyboard.
SCALE WON'T ZERO (DISPLAY "PUT PLATTER ON" or "ZERO NOTCAPTURE")1. Check platter and spider for obstructions. Turn power off, thenback on.2. Recalibrate.3. Check Load Cell supply voltage.5. Replace Load Cell.
LOSING PROGRAMMED DATA1. Check Error Report of Service Mode.2. Check Main Logic voltage at test points.3. Replace Main Logic PCB.
PRINTER WON'T DELIVER LABEL1. Check printer for obstructions.2. Check if there is a label which has not been removed.3. Check Take Label sensor obstructions.4. Clean Take Label sensor.5. Test Take label sensor with SENSOR TEST in Service Mode.6. Check harness from Printer to Main PCB.7. Check label stepper motor.8. Replace Main Logic PCB.
5 Troubleshooting
TroubleshootingGuide

METTLER TOLEDO 8442 Technical Manual
5-25-25-25-25-2
INCORRECTLY INDEXES LABELS1. Check label installation.2. Check label format and label size.3. Clean Gap Sensor Lens.4. Check and clean platen roller, stripper bar, and delivery pathusing MT cleaning pen.5. Adjust label Gap Sensor through SENSOR TEST in Service Mode.6. Replace Gap Sensor Assembly.7. Replace Main Logic PCB.
LABELS DARK1. If labels are printed correctly, but are excessively dark, check theENERGY setting in Service Mode.2. Check printhead harnesses for loose wires.
LABELS MISSING DOTS1. If the labels are streaked by lines from top to bottom, replace thePrinthead.2. If characters are cut off, check label format programming. If OK,replace printhead.
LABELS ARE EXCESSIVELY LIGHT/DARK1. Check Print SPEED and ENERGY setting in Service Mode.2. Check with other known good label stock.3. If light print, check and clean printhead resistor line and platenroller.4. Check printhead harness for loose wires.5. Check Main Logic PCB voltages. If OK, replace Printhead.
LABEL PRINT IS MOTTLED WITH LIGHT SPOTS1. Check with other known good label stock.2. Check and clean printhead resistor line and platen.3. Replace printhead.
LABELS NOT STRIPPING CORRECTLY1. Check with other known good label stock, e.g. Nashua.2. Check label format programming.3. Check rewind spool for wear.4. Check Gap Sensor and Take Label Sensor with SENSOR TEST inService Mode.
LABELS PRINTED EVEN IF ONE IS NOT YET TAKEN1. Check PAP. END DET. option in Service Mode (Paper EndDetection)2. Check Take Label Sensor.3. Check Main Logic PCB.

5-3 5-3 5-3 5-3 5-3
Chapter 5: Troubleshooting
OUT OF LABELS ERROR1. Make sure labels are threaded through the Gap Sensor.2. Clean/Check Gap Sensor.3. Check Gap Sensor through SENSOR TEST in Service mode.4. Replace Gap Sensor.5. Replace Main Logic PCB.
CAN'T COMMUNICATE WITH PC1. Test scale serial port through INTERFACE TEST in Service Mode.2. Check the connection cable.3. Check which port is used at PC.4. If using SPCT, check the ethernet port.
POWER SUPPLY
Place the Power Switch to the OFF position. Remove the platter,spider, and top cover (Refer to Chapter 6). Disconnect the operatordisplay harness and keyboard harnesses. Remove the DC powerharness. Place the power switch to ON, then check the +24VDCoutput voltage from the Power Supply terminal between theterminals marked +V and GND, as shown in following Figure. Theacceptable output range is +24VDC +/-0.50 VDC.
If the voltage is normal, the Power Supply should be good, andthe problem should be suspected as being in the Main Logic PCBor a component that connects to the Main Logic PCB.

METTLER TOLEDO 8442 Technical Manual
5-45-45-45-45-4
If the output voltage is zero, check the 120 VAC input voltage. Placeyour positive meter lead on the lower pin of fuse FS1 and yournegative meter lead on the right pin of R36. If the correct AC inputvoltage is present, but there is no +24 VDC output, replace the PowerSupply.
If no voltage is present, check the fuse (240VAC 4A) on the powersupply. If the fuse is OK, check AC input at the Line Cord Jack betweenthe Red wire and Black wire. If the 120VAC is present, suspect adefective power switch. If 120 VAC is not present at the jack, check thefuse (240VAC 3A) installed in the Line Cord Jack, as shown in thefollowing Figure. If the fuse is OK, verify voltage is present at the ACwall outlet.
working fuse
backup fuse

5-5 5-5 5-5 5-5 5-5
Chapter 5: Troubleshooting
Main Logic PCB fortype 8442-X300
The Main Logic PCB receives +24VDC from the Power Supply anduses this to supply +10VDC and +5VDC to other components. TheMain Logic PCB controls all functions in the unit including thethermal printer. Inputs and Outputs to the Main Logic include theLabel Taken Sensor, Gap Sensor, Printhead, Stepper Motor,Rewind Motor, Load Cell and etc. The following Figure shows thelocations of the various components and connectors on the MainLogic PCB.
Check the voltage between the left pin of F1 and the left pin of F4,the correct range is +10VDC +/- 0.25VDCCheck the voltage between two terminal of C18, the correct range is+2.8VDC-3.1VDCCheck the voltage between two terminal of C31, the correct range is+5VDC +/- 0.25VDC
If the volages are not within the range specified, and the PowerSupply voltage is correct, replace the Main Logic PCB.
NOTE: WHEN REPLACING THE MAIN LOGIC PCB, THE UNIT MUSTBE REFLASHED.

METTLER TOLEDO 8442 Technical Manual
5-65-65-65-65-6
feR noitpircseD feR noitpircseD
A 1JrotcennoclleCdaoL J 2JrotcennoCtroPlaireS
B .desuton,8C K tnioptsetCDV5+,13C
C ylppuSrewoPmrofylppusCDV42+,5J L tnioptsetCDV3+,81C
D 6JrotcennocdaehtnirP M tnioptsetrosneSpaG,94R
E 7JrotcennocrotomreppetS N tnioptsetrosneSlebaLekaT,76R
F 8JrotcennocrotomdniweR O tnioptsetCXE-,4F
G dnuorG P tnioptsetGIS-,3F
H B/A9JrotcennocdraobyeK Q tnioptsetGIS+,2F
I 3JrotcennocyalpsiD R tnioptsetCXE+,1F
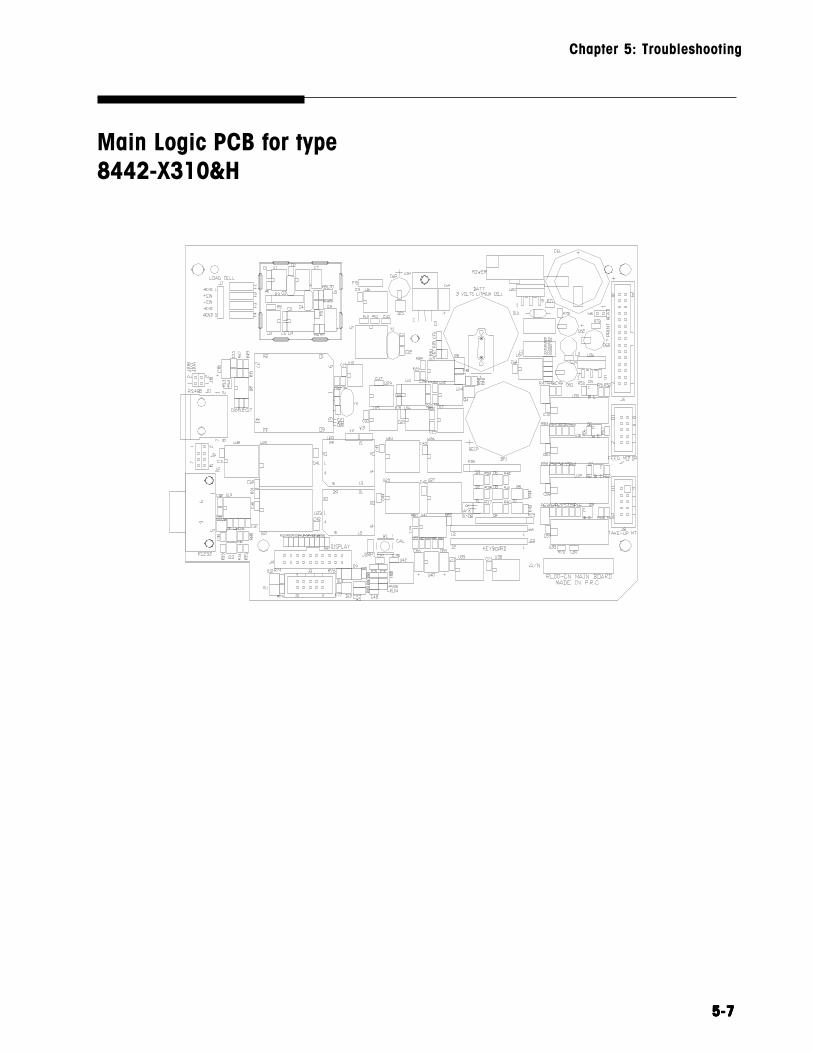
Main Logic PCB for type8442-X310&H
5-7 5-7 5-7 5-7 5-7
Chapter 5: Troubleshooting

Main Logic PCB for type8442-X6XX&H
5-8 5-8 5-8 5-8 5-8
METTLER TOLEDO 8442 Technical Manual

5-9 5-9 5-9 5-9 5-9
Chapter 5: Troubleshooting
Motor
The Stepper Motor can be tested by disconnecting it from the MainLogic PCB at connector J7. Connect your ohm meter between pin1 and 2 of Stepper Motor connector. You should read between 9ohms and 11 ohms. Next, connect your ohm meter between pin 3and 4 of Stepper Motor connector. You should read between 9ohms and 11 ohms. If the motor checks good and does notappear to have a mechanical bind, replace the Main Logic PCB.
The Rewind Motor can be tested by disconnecting it from the MainLogic PCB at connector J8. Connect your ohm meter between pin1 and 2 of Stepper Motor connector. You should read between 9ohms and 11 ohms. Next, connect your ohm meter between pin 3and 4 of Stepper Motor connector. You should read between 9ohms and 11 ohms. If the motor checks good and does notappear to have a mechanical bind, replace the Main Logic PCB.

METTLER TOLEDO 8442 Technical Manual
5-105-105-105-105-10
Sensor
The Take Label Sensor detects the presence of an issued label in theprinter to prevent multiple labels issuing in Prepack mode or salemode when the labels are being stripped. The sensor locations areshown in the following Figure. Before troubleshooting Take Labelproblems, always make sure the sensor lens are clean. The TakeLabel Sensor can be tested as follows. Place your positive meter leadon the upper pin of R67 and your negative meter lead on Ground. Thereading should be above +2.1VDC when the take label sensor is notblocked and below +0.8VDC when it is blocked. If the Take LabelSensor fail this test, replace it.
Tip: The Take Label Sensor can be disabled via by disabling paperend detecting in Service Mode.
The Gap Sensor is used to detect the gaps between die cut labels andis used as a reference point for indexing the labels. Low stockconditions are aslo detected using the Gap Sensor. The Gap Sensorcan be adjusted automatically while running the Sensor Test inService Mode.If the automatic adjustment fails to correct an indexing problem, inserta piece of the customer's label liner in the Gap Sensor. Place yourmeter on volts and turn the Power on. Put the positive meter lead onthe upper pin of R49 and the negative on Ground. Note the meterreading. Then install a piece of label liner and label stock in the labelgap sensor. This reading should be at least 1 volt higher value.(Example: 1 VDC liner only, and 2 VDC with liner and label blockingsensor). If the Gap Sensor fails this test, replace the sensor.
Take Label SensorGap Sensor

5-11 5-11 5-11 5-11 5-11
Chapter 5: Troubleshooting
Load Cell
The Load Cell can be tested for proper analog voltage input andmillivolt output by measuring the voltage at connector J1 on theMain Logic PCB. To check the input voltage across +EXC & -EXC,place your meter on volts and put the positive lead on the left pinof F1 and the negative lead on the left pin of F4. You should bereading a steady +10VDC +/- 0.25VDC.
If the Excitation voltage is good, the signal output can be checkedacross +SIG & -SIG. Set the meter to read in millivolts (mV). Put thepositive lead on the left pin of F2 and negative lead on the left pinof F3. With no weight on the platter, you should read zero data.As you add weight to the platter, the voltage should rise and belinear if equal weight is added each time. If the output is linear andcorrect, but no weight is displayed, replace the Main Logic PCB. Ifthere is no output from the load cell, but correct input voltage,replace the load cell.

METTLER TOLEDO 8442 Technical Manual
5-125-125-125-125-12
Display PCB
The following Figure shows the locations of the various componentson the Display PCB.
Check the voltage between two terminal of C3, the correct range is+5VDC +/- 0.25VDCCheck the voltage between two terminal of C6, the correct range is+24VDC +/- 0.5VDC
If the correct voltage is present, but the display is blank, replace theDisplay PCB.NOTES: SHORT W1 FOR OPERATOR DISPLAY PCB, OPEN W1 FORCUSTOMER DISPLAY PCB
(TYPE 8442-XX00)

5-13 5-13 5-13 5-13 5-13
Chapter 5: Troubleshooting
Warning Message
INPUT TOO BIGThe input is too big.
INPUT TOO SMALLThe input is too small.
TOO MUCH INPUTThe input is out of limit.
WRONG CODENR.The code number is invalid.
KEY NO FUNCTIONThe key has no function.
KEY BLOCKEDThe key is disabled. Check the KEYBOARD CONFIGURE.
PLU NOT FOUNDThe entered PLU number does not exist.
AG NOT FOUNDThe entered Group number does not exist.
OPER.NOT FOUNDThe entered Operator number does not exist.
LABEL NOT FOUNDThe entered Label Format does not exist.
PLUNR IS OCCUPYou are trying to duplicate a PLU into an exist PLU number.
LABELNR. OCCUPYou are trying to duplicate a label format into an exist label formatnumber.
AG NOT DELETABLEThis Group contains total data and can not be deleted.
OP NOT DELETABLEThis Operator contains total data and can not be deleted.

METTLER TOLEDO 8442 Technical Manual
5-145-145-145-145-14
MEMORY FULLMemory is full.
WEIGH AGAINYou are trying to record one item twice. Remove the item from theplatter and put a new item on the platter.
WRONG LABELThe installed label roll does not match the configured label format.
LABEL MOVEDThe stepper motor or the rewind motor is not working properly.
CHANGE PAPERROLLThe label roll is not installed or the label roll is empty.
TAKE LABEL OFFTake off the current label before printing the next one.
NO FREE OX KEYAll the configured operator keys have been occupied.
PRINT TICKETPrint out the customer ticket before logging out.
OPEN CUST. TICKYou are trying to delete an operator who has total data.
OX NOT LOGGED-INThe operator has not be assigned to an operator.
PAYMENT TOO LOWThe payment is less than the total amount.
NO FURTHER REG.No further transaction has been recorded.
DISCOUNT IMPOSSThis PLU does not allow to be discounted. Check the PLU Discountconfiguration, or this PLU is in special offer.
TARE TOO BIGThe entered tare is too big.
PLU TARE ACTIVEYou are forbidden to override the PLU tare.

5-15 5-15 5-15 5-15 5-15
Chapter 5: Troubleshooting
NO STABLE WEIGHTThe weight is not stable.
PUT PLATTER ONThe weight is too small and out of power up zero range.
ZERO NOT CAPTUREThe weight is too big and out of power up zero range.
WEIGHT TOO SMALLThe weight is too small to be printed.
ERROR TAKE-SENSThe take label sensor is not working properly.
ERROR POS_SENSThe gap sensor is not working properly.
ERROR INTERFACEThe serial port is not working properly.

METTLER TOLEDO 8442 Technical Manual
5-165-165-165-165-16
Error MessageListed below are the possible error codes are listed. When an errorcode appears, the scale should be switched off and on. In manycases the error will disappear.There are 3 different kinds of error messages:Error Status 1:Warning! After the warning the scale can still be used.Error Status 2:Press "CODE" key. Change to one of the CODE menu. Back to normaloperation mode.Error Status 3:Press "CODE" key and enter SERVICE MODE, after returning to normaloperation mode the scale will perform RESET.

5-17 5-17 5-17 5-17 5-17
Chapter 5: Troubleshooting
Meaning of XX01 Operator 07 Group data02 Ticket data 13 Label data03 Time total data 15 Date text data04 Text data 21 PLU label data05 Barcode data 23 Store adress06 Tare data 24 PLU data
Meaning of YY01 Operator Configure 04 Password Configure03 Keyboard Configure
egasseMrorrE nosaeR sutatS noitcA
RETNIRP003RORRE tcefedrevirdretnirP 2 BCPcigoLniaMecalpeR
RETNIRP103RORRE tcefedrevirdretnirP 2erawtfosehthsalfeR1
BCPcigoLniaMecalpeR2
RETNIRP703RORRE tcefeddaehtnirP 2daehtnirpecalpeR1
ssenrahdaehtnirpecalpeR2BCPcigoLniaMecalpeR3
RETNIRP803RORRE tcefedrevirdretnirP 1 BCPcigoLniaMecalpeR
RETNIRP013RORRE tcefedrevirdretnirP 2 BCPcigoLniaMecalpeR
PA101RORRE tcefedkcolCemiTlaeR 1 BCPcigoLniaMecalpeR
LLEC004RORRE tcefedlleCdaoL -BCPcigoLniaMecalpeR1
lleCdaoLecalpeR2
LLEC104RORRE tcefedlleCdaoL -etarbilaceR1
BCPcigoLniaMecalpeR2lleCdaoLecalpeR3
ESABATAD002RORRE rorreknabataD 3 MARteseR
ESABATADXX102RORRE rorreataDXX 2MARteseR1
XXataDeteleD2
ESABATADXX202RORRE rorreataDXX 2MARteseR1
XXataDeteleD2
ESABATADYY302RORRE rorreataDYY 2MARteseR1erugifnoC2 YY
ESABATAD502RORRE rorreknabataD 3 MARteseR

METTLER TOLEDO 8442 Technical Manual
5-185-185-185-185-18
Interconnecting Diagramfor type 8442-X300

Interconnecting Diagram fortype 8442-X310
5-19 5-19 5-19 5-19 5-19
Chapter 5: Troubleshooting

Interconnecting Diagram fortype 8442-X310H
5-205-205-205-205-20
METTLER TOLEDO 8442 Technical Manual

Interconnecting Diagram fortype 8442-X6XX&H
NOTE:NOTE:NOTE:NOTE:NOTE:TYPE 8442-X600 Right of the keyboard pin must according the sign "1" on keyboard pin in the main PCB.And the display harness must connect the J3P3 in the main PCB.TYPE 8442-X610&H According the diagram to connect the keyboard, and the display harness nust connectthe J4P4 in the main PCB.
5-21 5-21 5-21 5-21 5-21
Chapter 5: Troubleshooting

5-225-225-225-225-22
METTLER TOLEDO 8442 Technical Manual

6-1 6-1 6-1 6-1 6-1
Chapter 6: Parts Replacement
6 Parts Replacement
Cover Removal
Turn the scale power off by placing the power switch to theOFF position(Press the "0" on the power switch). Disconnectpower cord from outlet. Then remove the platter.
Remove the 4 Phillips Head screws, then remove the upperspider.
Open the printer door.
Remove the 3 top Philips Head screws, then remove the 2screws underneath the scale base.
When removing the top cover, slightly lift the cover anddisconnect the keyboard harnesses on the Main Logic PCBand disconnect the display harness on the front display PCBbefore lifting the cover off the base.
A
B
C
D
E
B
D

METTLER TOLEDO 8442 Technical Manual
6-26-26-26-26-2
Load CellReplacement
Turn the scale power off and disconnect power cord fromoutlet and remove the platter, upper spider and top cover.
Disconnecting the Load Cell harness, then remove the twosocket head Allen screws on the lower spider with a 6mmHex Wrench.
Remove the lower spider and the upper load cell spacer .
Remove the two Phillips head screws underneath the scalebase, then remove the battery cover.
Remove the two socket head Allen screws inside the batterybox.
If the load cell is removed or replaced, the load cell and thelower spider must be installed square to the base. Thecapscrews should be tightened to 8Nm (metric Newton-Meters or 70 in-lb or 6 ft-lb) with a torque wrench.
NOTE: IF THE LOAD CELL IS REPLACED, THE OVERLOADSTOPS MUST BE CHECKED AND ADJUSTED TO FACTORYSPECIFICATIONS AS DESCRIBED IN THE NEXT SECTION.
A
B
C
D
E
F
B

6-3 6-3 6-3 6-3 6-3
Chapter 6: Parts Replacement
Overload StopsIf the Load Cell, or lower Spider is replaced, the overload stop gapsmust be checked and adjusted per factory specifications. Theoverload protection is by set screws in the lower spider which aredesigned to contact stops on the scale base in the event of anoverload condition.NOTES: FAILURE TO PROPERLY CHECK AND SET THE OVERLOADGAPS MAY RESULT IN SEVERE DAMAGE TO THE LOAD CELL INTHE EVENT OF AN OVERLOAD CONDITION.
To check the spider overload stop gaps, insert the proper sizefeeler gauge in between the overload stop set screw and theoverload stop on the scale base, as shown in the following Figure.Gauges can be made using the appropriate size of music wire.The music wire should be bent into a hook shape to check thegaps. If the gap is set properly a slight snap and drag will be feltwhen pulling the hooked end through the gap. If a slight snap isnot felt, the gap is too wide, or if the drag is excessive, the gap isto narrow. To adjust the gap, turn the overload set screw in or outwith a 5mm Hex Wrench until a the slight snap (drag) is felt whenpulling the gauge through. Refer to the following Figure foroverload stop positions and gap specifications.
D
F
Overload StopSet Screw

METTLER TOLEDO 8442 Technical Manual
6-46-46-46-46-4
Shift TestThe shift test should be performed after calibration. Place 25 lb of testweight on the scale platter at point A, as shown in the follwoing Figure.Proceed with the test at points B through E. Points B through E aremidway between the center of the platter and the edge of the platter.The NIST H-44 acceptance tolerance is +/-0.015 lb of any of the pointsB through E compared to A.
If the scale fails the meet the specified tolerance at one or more testpoints, check the load cell overload stop screws for properadjustment, check top scale cover for proper seating and possibleinterference with sub-platter. The Spider and load cell spacer must beproperly centered to avoid interference with top cover. If none of theabove conditions exist, replace the load cell, recalibrate the scale,and recheck the shift.
If any of the overload stops are adjusted, remove the screws, cleanoff residue from threads, then apply Loctite to the threads to preventvibration from turning the set screws. Re-adjustment is not required ifthe top cover or upper spider is removed and reinstalled.
noitisoPpaG gk6=yticapaC bl03rogk51=yticapaC
)hcni/mm(A 530.0/9.0 740.0/2.1
)hcni/mm(B 030.0/57.0 530.0/9.0
Overload Stop Set Screw
Overload Stop

6-5 6-5 6-5 6-5 6-5
Chapter 6: Parts Replacement
PrintheadReplacement
Turn the scale power off. Disconnect power cord from outlet.Then remove the platter, upper spider and top cover.
Disconnector the Printhead harness, Stepper motor harnessand Rewind motor harness on Main Logic PCB.
Remove the socket head Allen screw and the printer holder.Take out of the printer from scale base.
Open printhead by pressing green button on the printhead.
Then remove the two springs with needle nose pliers
Remove the wash with a pliers.
Then remove the shaft downside.
Remove the two socket head Allen screws with a 2.5mm HexWrench.
Disconnect Printhead harness from printhead, then replacethe printhead.
A
B
C
D
E
F
G
H
I

METTLER TOLEDO 8442 Technical Manual
6-66-66-66-66-6
Gap Sensor orStepper MotorReplacement
E
D
F
G
H
I

6-7 6-7 6-7 6-7 6-7
Chapter 6: Parts Replacement
Turn the scale power off. Disconnect power cord from outlet.Then remove the platter, upper spider and top cover.
Disconnector the Printhead harness, Stepper motor harnessand Rewind motor harness on Main Logic PCB.
Remove the socket head Allen screw and the printer holder.Then take out of the printer from scale base.
Remove the Stepper motor clip with pliers. Then take off theStepper motor.
Remove the socket head Allen screw with a 2.5mm HexWrench. Then take off the Gap sensor.
Open the harness clip underneath the printer, and replacethe Stepper motor and Gap sensor harness.
A
B
C
D
E
F
DE

METTLER TOLEDO 8442 Technical Manual
6-86-86-86-86-8
Take Label Sensoror Rewind MotorReplacement
Turn the scale power off. Disconnect power cord from outlet,then remove the platter, upper spider and top cover.
Disconnect the Printhead harness, Stepper motor harnessand rewind motor harness on Main Logic PCB.
Remove the socket head Allen screw and the printer holder.Then take out of the printer from scale base.
Remove the Rewind motor clip with pliers. Then take off theRewind motor.
Remove the Philip Head screw and take off the Take Labelsensor.
Open the harness clip underneath the printer, and replacethe Rewind motor and Take Label sensor harness.
A
B
C
D
E
F
ED
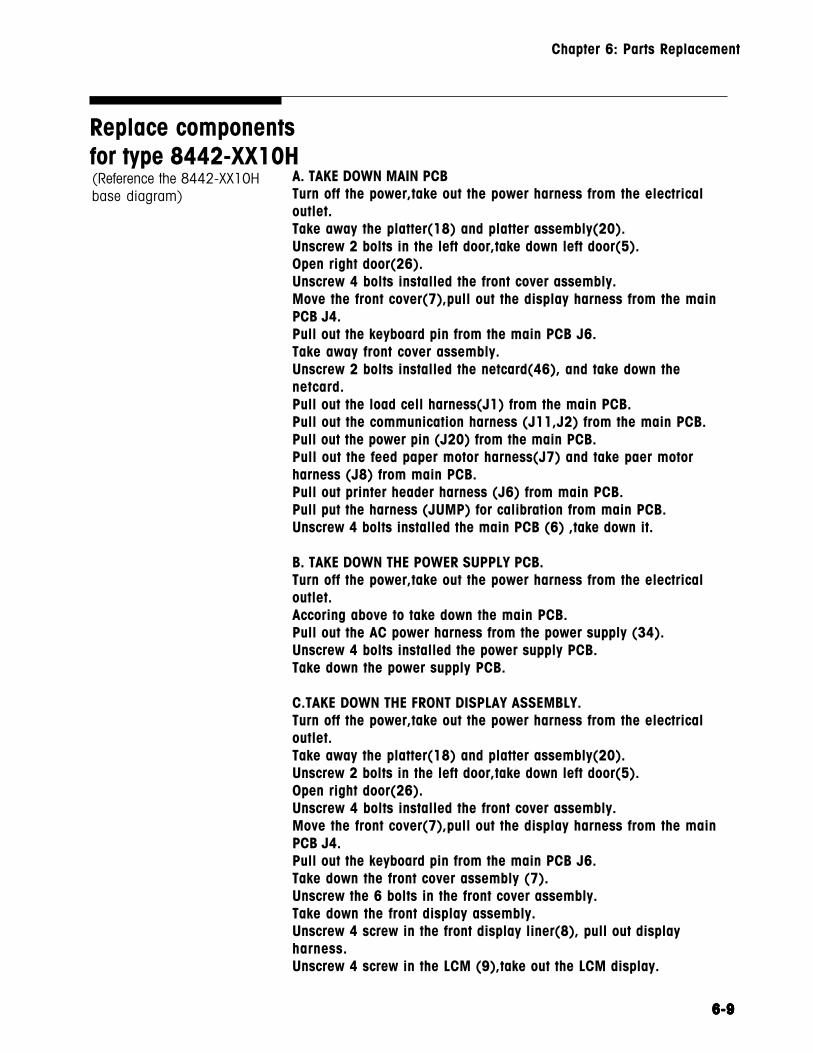
Replace componentsfor type 8442-XX10H
A. TAKE DOWN MAIN PCBTurn off the power,take out the power harness from the electricaloutlet.Take away the platter(18) and platter assembly(20).Unscrew 2 bolts in the left door,take down left door(5).Open right door(26).Unscrew 4 bolts installed the front cover assembly.Move the front cover(7),pull out the display harness from the mainPCB J4.Pull out the keyboard pin from the main PCB J6.Take away front cover assembly.Unscrew 2 bolts installed the netcard(46), and take down thenetcard.Pull out the load cell harness(J1) from the main PCB.Pull out the communication harness (J11,J2) from the main PCB.Pull out the power pin (J20) from the main PCB.Pull out the feed paper motor harness(J7) and take paer motorharness (J8) from main PCB.Pull out printer header harness (J6) from main PCB.Pull put the harness (JUMP) for calibration from main PCB.Unscrew 4 bolts installed the main PCB (6) ,take down it.
B. TAKE DOWN THE POWER SUPPLY PCB.Turn off the power,take out the power harness from the electricaloutlet.Accoring above to take down the main PCB.Pull out the AC power harness from the power supply (34).Unscrew 4 bolts installed the power supply PCB.Take down the power supply PCB.
C.TAKE DOWN THE FRONT DISPLAY ASSEMBLY.Turn off the power,take out the power harness from the electricaloutlet.Take away the platter(18) and platter assembly(20).Unscrew 2 bolts in the left door,take down left door(5).Open right door(26).Unscrew 4 bolts installed the front cover assembly.Move the front cover(7),pull out the display harness from the mainPCB J4.Pull out the keyboard pin from the main PCB J6.Take down the front cover assembly (7).Unscrew the 6 bolts in the front cover assembly.Take down the front display assembly.Unscrew 4 screw in the front display liner(8), pull out displayharness.Unscrew 4 screw in the LCM (9),take out the LCM display.
(Reference the 8442-XX10Hbase diagram)
6-9 6-9 6-9 6-9 6-9
Chapter 6: Parts Replacement

D.TAKE DOWN USER DISPLAY PCBTurn off the power,take out the power harness from the electricaloutlet.According above steps to take down the main PCB.Pull out the display harness in the user display (9), unscrew 4 screws.Take down user display LCM.
E.TAKE DOWN LOAD CELL.Turn off the power,take out the power harness from the electricaloutlet.According above steps to take down front cover assembly (7) andmain PCB assembly (6).Snip the sealing (B11) on the upper of back cover, unscrew 2 sealingbolts (B10).Disconnect 2 harness in the back of switch.(Remember the position ofeach wire)Unscrew 3 screw in the back cover assembly.Take down the back cover assembly (36).Pull out load cell harness from the main PCB (6).Unlace from load cell.Unscrew hexagonal bolts (B3) in the bottom of scale,take downcongloation (23).Unscrew 2 hexagonal bolts (B6) through 2 holes in the bottom of thescale.Take down the load cell (16) , load cell spacer (17) and structualmatter (24).
F.TAKE DOWN KEYBOARD.Turn off the power,take out the power harness from the electricaloutlet.Take away the platter (18) and platter assembly (20).Unscrew 2 bolts in the left door, take down left door (5).Open right door (26).Unscrew 4 bolts in the upper of the front cover and bottom of it.Move the front cover (7),pull out display harness from the main PCB.Pull out the keyboard harness (J6) from the main PCB.Take down the front cover assembly (7).Tear the keyboard overlay (12), pay attention to clear the gluewater.
G.TAKE DOWN THE NET COMMUTATOR PCB.Turn off the power,take out the power harness from the electricaloutlet.Unscrew 2 bolts in the port cover (4), takedown it.Pull out power harness (45) from the outlet (39), pull out all theethernet harness and RS232 harness.Unscrew 4 bolts (B2) in the outlet holder (3),take down it.Pull out the RS232 converter harness (43) and ethernet converterharness (41) from the commutator PCB (40).Unsrew 1 bolt in the converter PCB,unscrew 2 hexagonal bolts in the Dtype 9 pin and holder, take down the commutator PCB (40).
6-106-106-106-106-10
METTLER TOLEDO 8442 Technical Manual

7-1 7-1 7-1 7-1 7-1
Chapter 7: Maintenance
7 Maintenance
External Cleaning
Turn the scale power off by placing the power switch to the OFFposition(Press the "0" on the power switch). Disconnect power cordfrom outlet.
Use a soft clean cloth dampened with a mild detergent and water(or a mild cleaner) to wipe the exterior surfaces. Do not spray liquiddirectly on the unit. A mild spray cleaner can be used by sprayingthe cleaning cloth.
Cleaning Printhead
CLEAN PRINTHEAD USING METTLER TOLEDO LIQUID CLEANER OREQUIVALENT OR THE METTLER TOLEDO CLEAN PEN.DO NOT SCRAPE THE PRINTHEAD WITH ANY OBJECT TO REMOVEGLUE OR LABEL DEBRIS OR SEVERE DAMAGE MAY RESULT.

METTLER TOLEDO 8442 Technical Manual
7-27-27-27-27-2
This scale is equipped with an automatic zeroing device, whichcompensates for small weight change. This device is not activatedwhen a package tare is compensated. After cleaning the dirt fromthe platter with the scale on, the display can read :• a negative value• or "_ _ _ _ _" segments can be lit.
Solution :Press the ZERO key
If the message appears again :Turn the scale off and back on again with the main power switch.
Turn the scale off by placing the power switch to the OFF position.Discount power cord from outlet.
Open the plastic door on the right side of the scale.
Slide out the printer .
Press the trigger to open the printhead.
Clean the printhead with a soft clean cloth soaked in isopropylalcohol, METTLER TOLEDO liquid cleaner or equivalent, or theMETTLER TOLEDO Cleaning Pen.
Push back the printhead until it clicks.
Slide the printer in.
Close the plastic door.
Rezeroing

8-1 8-1 8-1 8-1 8-1
Chapter 8: Replacement Parts
8 Replacement Parts
8442-XX00 Base
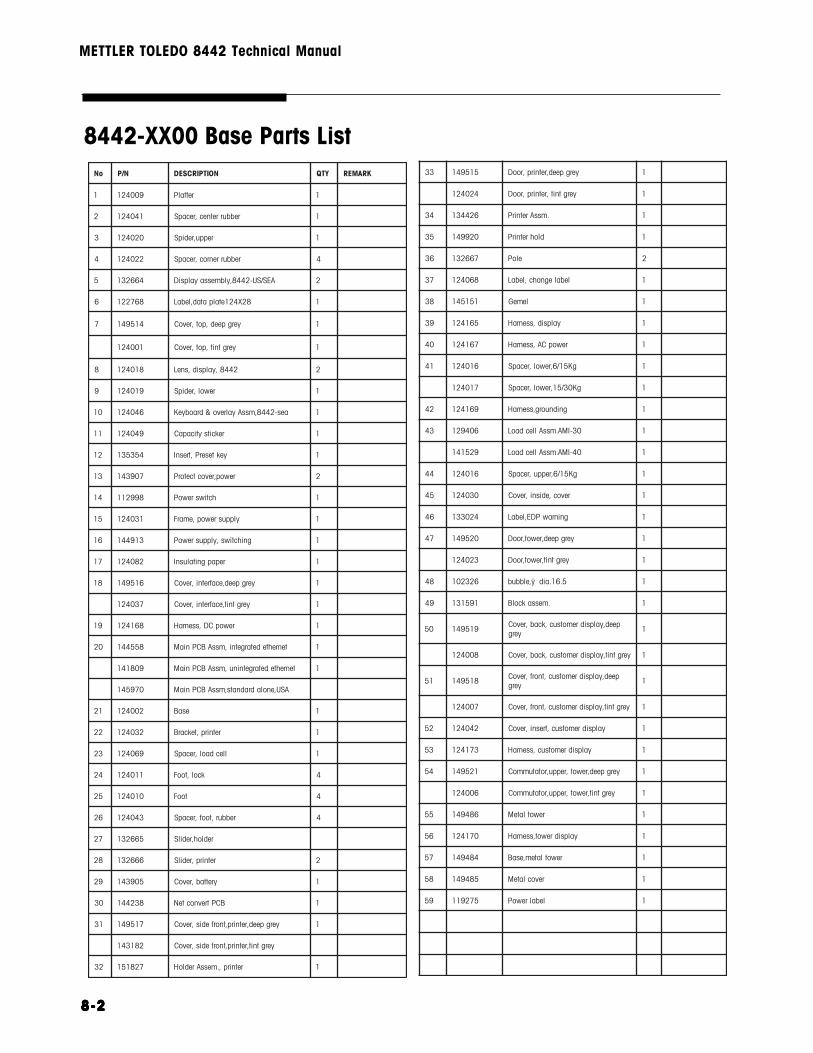
METTLER TOLEDO 8442 Technical Manual
8-28-28-28-28-2
8442-XX00 Base Parts ListoN N/P NOITPIRCSED YTQ KRAMER
1 900421 rettalP 1
2 140421 rebburretnec,recapS 1
3 020421 reppu,redipS 1
4 220421 rebburrenroc,recapS 4
5 466231 AES/SU-2448,ylbmessayalpsiD 2
6 867221 82X421etalpatad,lebaL 1
7 415941 yergpeed,pot,revoC 1
100421 yergtnit,pot,revoC 1
8 810421 2448,yalpsid,sneL 2
9 910421 rewol,redipS 1
01 640421 aes-2448,mssAyalrevo&draobyeK 1
11 940421 rekcitsyticapaC 1
21 453531 yekteserP,tresnI 1
31 709341 rewop,revoctcetorP 2
41 899211 hctiwsrewoP 1
51 130421 ylppusrewop,emarF 1
61 319441 gnihctiws,ylppusrewoP 1
71 280421 repapgnitalusnI 1
81 615941 yergpeed,ecafretni,revoC 1
730421 yergtnit,ecafretni,revoC 1
91 861421 rewopCD,ssenraH 1
02 855441 tenrehtedetargetni,mssABCPniaM 1
908141 tenrehtedetargetninu,mssABCPniaM 1
079541 ASU,enoladradnats,mssABCPniaM
12 200421 esaB 1
22 230421 retnirp,tekcarB 1
32 960421 llecdaol,recapS 1
42 110421 kcol,tooF 4
52 010421 tooF 4
62 340421 rebbur,toof,recapS 4
72 566231 redloh,redilS
82 666231 retnirp,redilS 2
92 509341 yrettab,revoC 1
03 832441 BCPtrevnocteN 1
13 715941 yergpeed,retnirp,tnorfedis,revoC 1
281341 yergtnit,retnirp,tnorfedis,revoC
23 728151 retnirp,.messAredloH 1
33 515941 yergpeed,retnirp,rooD 1
420421 yergtnit,retnirp,rooD 1
43 624431 .mssAretnirP 1
53 029941 dlohretnirP 1
63 766231 eloP 2
73 860421 lebalegnahc,lebaL 1
83 151541 lemeG 1
93 561421 yalpsid,ssenraH 1
04 761421 rewopCA,ssenraH 1
14 610421 gK51/6,rewol,recapS 1
710421 gK03/51,rewol,recapS 1
24 961421 gnidnuorg,ssenraH 1
34 604921 03-IMA.mssAllecdaoL 1
925141 04-IMA.mssAllecdaoL 1
44 610421 gK51/6,reppu,recapS 1
54 030421 revoc,edisni,revoC 1
64 420331 gninrawPDE,lebaL 1
74 025941 yergpeed,rewot,rooD 1
320421 yergtnit,rewot,rooD 1
84 623201 5.61.aidÿ,elbbub 1
94 195131 .messakcolB 1
05 915941peed,yalpsidremotsuc,kcab,revoC
yerg1
800421 yergtnit,yalpsidremotsuc,kcab,revoC 1
15 815941peed,yalpsidremotsuc,tnorf,revoC
yerg1
700421 yergtnit,yalpsidremotsuc,tnorf,revoC 1
25 240421 yalpsidremotsuc,tresni,revoC 1
35 371421 yalpsidremotsuc,ssenraH 1
45 125941 yergpeed,rewot,reppu,rotatummoC 1
600421 yergtnit,rewot,reppu,rotatummoC 1
55 684941 rewotlateM 1
65 071421 yalpsidrewot,ssenraH 1
75 484941 rewotlatem,esaB 1
85 584941 revoclateM 1
95 572911 lebalrewoP 1

8442-XX10 Base
Chapter 8: Replacement Parts
8-3 8-3 8-3 8-3 8-3

oN N/P NOITPIRCSED YTQ KRAMER
1 900421 rettalP 1
2 140421 rebburretnec,recapS 1
3 020421 reppu,redipS 1
4 220421 rebburrenroc,recapS 4
5 871341 etihwtnit,xobrewot,rooD 1
6 867221 etalpatad,lebaL 1
7 771341 pot,revoC 1
8 702041 reniLrevoC 1
9 910421 rewol,redipS 1
01 657741 AES-2448,mssAyalrevo&draobyeK 1
11 604921 03-IMA,.messallecdaoL 1
925141 04-IMA,.messallecdaoL 1
21 558931 yekteserP,tresnI 1
31 709341 rewop,revoctcetorP 1
41 899211 hctiwsrewoP 1
51 130421 ylppusrewop,emarF 1
61 319441 gnihctiws,ylppusrewoP 1
71 280421 repapgnitalusnI 1
81 181341 ecafretni,revoC 1
91 861421 rewopCD,ssenraH 1
02 855441 tenrehtedetargetni,.mssABCPniaM 1
928441 tenrehtedetargetninu,.mssABCPniaM 1
12 200421 esaB 1
22 230421 retnirp,tekcarB 1
32 960421 llecdaol,recapS 1
42 110421 kcol,tooF 4
52 010421 tooF 4
62 340421 rebbur,toof,recapS 4
72 566231 redloh,redilS 2
82 666231 retnirp,redilS 2
92 509341 yrettab,revoC 1
03 832441 BCProtatummocteN
13 281341 tnorf,revoC 1
23 728151 retnirp,redloH 1
33 081341 retnirp,rooD 1
43 624431 .mssAretnirP 1
53 029941 dlohretnirP 1
63 766231 eloP 2
73 860421 lebalegnahc,lebaL 1
83 151541 lemeG 1
93 860341 yalpsid,ssenraH 1
04 761421 rewopCA,ssenraH 1
14 710421 gK03/51,recapS 1
24 961421 gnidnuorg,ssenraH 1
34 610421 gK51/6,recapS 1
44 030421 revoc,edisni,revoC 1
54 623201 5.61.aiD,elbbuB 1
64 195131 etalp,.messakcolB 1
74 957741 aes-2448,.messayalpsiD 1
84 848931 yalpsidesenihc,revoctnorF 1
94 966141 MCLyalpsiD 1
05 948931 yalpsidesenihc,revockcaB 1
15 058931 troppusBCP 1
25 528211 yartgnitalusni 2
35 218841 yalpsid,ssenraH 1
45 158931 rewot,draobsserP 1
55 956151 rewotyrevliS 1
65 484941 rewot,esaB 1
75 584941 revoclateM 1
85 420331 lebalcitatstneverp,lebal 1
95 572911 lebalrewoP 1
Parts List
METTLER TOLEDO 8442 Technical Manual
8-48-48-48-48-4

8442-XX10H Base
METTLER TOLEDO 8442 Technical Manual
8-58-58-58-58-5

Parts ListoN N/P NOITPIRCSED YTQ KRAMER
1 470141 redloH 1
2 942141 ylbmessarednepsuS 1
3 519141 ssenrahrewoP 1
4 440141 kcaj,redloH 1
5 640141 trop,revoC 1
6 346541 BCPtrevnoC 1
7 446541 trevnocten,ssenraH
8 040141 tfel,rooD 4
9 720141 redrigniaM 1
01 340141 BCPretrevnoc,redloH 1
11 219141 noitarbilac,ssenraH 1
21 837641 rewopCD,ssenraH 1
31 855441 tenrehtedetargetni,BCPniaM 1
298441 tenrehtedetargetninu,BCPniaM 1
41 240141 redlohBCP 2
51 188141 AwercslanogaxeH 4
61 542141 kcab,ylbmessarevoC 1
71 150141 reniLyalpsiD 1
81 966141 MCL 2
91 050141 ArenilyalpsiD 1
02 857741 aes-2448,yalrevoyalpsiD 1
12 757741 yalrevO&draobyeK 2
22 619141 yalpsid,ssenraH 1
32 188141 BwercslanogaxeH 4
42 152141 eceipgnirpS 1
52 030141 llecdaol,redipS 1
62 604921 03-IMA,llecdaoL 1
925141 04-IMA,llecdaoL 1
72 288141 llecdaol,recapS 1
82 730141 rettalP 1
92 430141 leetssselniats,kooH 1
03 052141 ylbmessarettalP 1
13 342141 tesnoitcetorP 1
23 230141 elopsselniatS 1
33 330141 noitabolgnoC 1
43 130141 rettamlarutcurtS 1
53 642141 thgir,ylbmessarooD 1
63 624431 ylbmessaretnirP 1
73 920141 retnirp,redloH 1
83 820141 redrigtnatsissA 1
93 319441 rewoP 1
04 442141 tnorf,ylbmessarevoC 1
14 913731 hctiwS 1
Chapter 8: Replacement Parts
8-6 8-6 8-6 8-6 8-6

Printer Engine
METTLER TOLEDO 8442 Technical Manual
8-78-78-78-78-7

Printer EngineParts List
oN N/P NOITPIRCSED YTQ KRAMER
1 344431 reggirT 1
2 944431 epipcitsalP 1
3 934431 .mssarevocpoT 1
4 054431 niphtiwrevocpoT 1
5 478631 .mssadniwergniW 1
6 278631 erugifwohS 1
7 954431 .mssallorlebal,gniW 1
8 678631 .mssallortfahS 1
9 764431 etalpredniH 1
01 244431 rotom,pilC 2
11 395831 .mssarotomreppetS 1
21 495831 .mssarotomdniweR 1
31 964431 01tfahS 2
41 817131 llup,gnirpS 1
51 864431 etalpnoitatneirO 1
61 834331 elddim,raeG 2
71 734331 gib,raeG 1
81 114331 pilC 2
91 564431 gnirmurpuC 1
02 934331 llams,raeG 2
12 064431 tundaxeh,tfahS 1
22 754431 etalpdexiF 1
32 834431 .mssaesaB 1
42 717131 gnirpS 4
52 644431 tnorf,revoC 1
62 430421 tekcarB 1
72 134431 3,tfahS 1
82 274431 daehretnirp,esabnoitallatanI 1
92 857351 esabgnirps,redloH 1
03 174431 daehretnirp,eceiP 1
13 435921 daehretnirP 1
23 661421 daehretnirp,ssenraH 1
33 444331 .mseealeehW 1
43 044331 leehw,kcuT 1
53 444431 eloP 5
63 154431 kcartrepapdael 1
8-8 8-8 8-8 8-8 8-8
Chapter 8: Replacement Parts

METTLER TOLEDOScales & Systems1900 Polaris ParkwayColumbus, Ohio 43240
P/N: 141595
(11/2003).01
METTLER TOLEDOis registered trademarks of Mettler-Toledo, Inc.2000 Mettler-Toledo, Inc.
141595


![The DFLU flux for systems of conservation laws · arXiv:1401.0190v1 [cs.NA] 31 Dec 2013 RESEARCH ISSN 0249-6399 ISRN INRIA/RR--8442--FR+ENG REPORT N° 8442 December 2013 Project-Team](https://img.pdfslide.us/doc/110x75/5ecf73156dae822b9756e881/the-dflu-iux-for-systems-of-conservation-laws-arxiv14010190v1-csna-31-dec.jpg)