Embed Size (px)
Citation preview
Netcool Configuration ManagerVersion 6.4.1
Installation and Configuration GuideR2E5
���

Netcool Configuration ManagerVersion 6.4.1
Installation and Configuration GuideR2E5
���

NoteBefore using this information and the product it supports, read the information in “Notices” on page 127.
This edition applies to version 6, release 4 of IBM Tivoli Netcool Configuration Manager (5725-F56) and to allsubsequent releases and modifications until otherwise indicated in new editions.
© Copyright IBM Corporation 2010, 2015.US Government Users Restricted Rights – Use, duplication or disclosure restricted by GSA ADP Schedule Contractwith IBM Corp.

Contents
About this publication . . . . . . . . vIntended audience . . . . . . . . . . . . vWhat this publication contains . . . . . . . . vPublications . . . . . . . . . . . . . . vAccessibility . . . . . . . . . . . . . . ixTivoli technical training . . . . . . . . . . ixSupport information . . . . . . . . . . . ixConventions used in this publication . . . . . . x
Chapter 1. Planning. . . . . . . . . . 1Architecture . . . . . . . . . . . . . . 1Running the IBM Prerequisite Scanner tool . . . . 2Hardware requirements. . . . . . . . . . . 3Software requirements . . . . . . . . . . . 6FIPS 140-2 requirements . . . . . . . . . . 8
Chapter 2. Installing . . . . . . . . . 11Preparing to install . . . . . . . . . . . . 11
Creating OS user accounts . . . . . . . . 13Creating installation directories . . . . . . . 14Preparing the Oracle database . . . . . . . 14Preparing the DB2 database . . . . . . . . 16Preparing the operating system. . . . . . . 19Preparing an AIX installation . . . . . . . 21Preparing a Linux installation . . . . . . . 22Preparing a Solaris installation . . . . . . . 22Configuring the firewall . . . . . . . . . 23
Installing the product . . . . . . . . . . . 23Installation information checklist . . . . . . 24Installing a GUI and worker server . . . . . 27Installing a worker server only . . . . . . . 32Installing the product in silent mode . . . . . 37Installing ITNCM-Reports . . . . . . . . 42Installing ITNCM-Reports in silent mode . . . 44
Installing drivers . . . . . . . . . . . . 46Drivers overview . . . . . . . . . . . 46Driver installation prerequisites. . . . . . . 49Installing standard drivers . . . . . . . . 50Installing SmartModel drivers . . . . . . . 53
Installing auto-discovery . . . . . . . . . . 60Installing auto-discovery via CLI (all platforms) 61Installing auto-discovery via GUI (all platforms) 62Installing auto-discovery in silent mode . . . . 63
Installing OOBC . . . . . . . . . . . . . 64Extracting OOBC software . . . . . . . . 64Installing a daemon . . . . . . . . . . 64Installing OOBC software. . . . . . . . . 65Configuring a daemon. . . . . . . . . . 67Troubleshooting the OOBC software installation 67
Chapter 3. Configuring . . . . . . . . 69Loading the databases . . . . . . . . . . . 69Configuring DB2 HADR . . . . . . . . . . 70Configuring immediate execution (Native CommandSet workflow) . . . . . . . . . . . . . 71
Configuring high priority queue . . . . . . . 72Configuring a pre-emptive high-priority queue . . 73Deploying the keystore and user files. . . . . . 75Increasing the Java Heap size . . . . . . . . 75
Configuring the Java Heap size for immediateexecution (Native Command Set workflow) . . 76
Internal housekeeping . . . . . . . . . . . 76HTTPS connection setup . . . . . . . . . . 77Configuration of eventpollers.xml file . . . . . 77Creating a Worker server general resource . . . . 77Importing sample compliance policies . . . . . 78Enabling auto-restart of Netcool ConfigurationManager after reboot . . . . . . . . . . . 79Changing platform configuration . . . . . . . 79Configuring mail servers . . . . . . . . . . 80Enabling and disabling FIPS 140-2 mode . . . . 80
Enabling FIPS . . . . . . . . . . . . 81Disabling FIPS . . . . . . . . . . . . 85
Configuring reporting on a stand-alone installation 85Configuring OOBC . . . . . . . . . . . . 86
OOBC system prerequisites . . . . . . . . 86OOBC default configuration file . . . . . . 87Configure out-of-band change . . . . . . . 90Configure monitor . . . . . . . . . . . 90Configure Netcool Configuration Manager server 92Configure syslog users . . . . . . . . . 93Configure syslog match . . . . . . . . . 94Configure actions . . . . . . . . . . . 96Configure notifiers . . . . . . . . . . . 98
Chapter 4. Upgrading . . . . . . . . 101Upgrade from Netcool Configuration Manager6.3.0.x to 6.4.1 . . . . . . . . . . . . . 101
Pre-upgrade procedures . . . . . . . . . 101Upgrade procedures . . . . . . . . . . 102Post-upgrade procedures . . . . . . . . 108
Upgrade from Netcool Configuration Manager6.4.0.x to 6.4.1 . . . . . . . . . . . . . 111
Pre-upgrade procedures . . . . . . . . . 111Upgrade procedures . . . . . . . . . . 112Post-upgrade procedures . . . . . . . . 118
Upgrading Netcool Configuration ManagerReporting . . . . . . . . . . . . . . 120
Chapter 5. Uninstalling . . . . . . . 123Uninstalling Netcool Configuration Manager . . . 123Uninstalling ITNCM-Reports . . . . . . . . 124Uninstalling OOBC Software . . . . . . . . 124
Uninstalling an OOBC daemon . . . . . . 125Uninstalling OOBC software . . . . . . . 125
Notices . . . . . . . . . . . . . . 127Trademarks . . . . . . . . . . . . . . 129
Index . . . . . . . . . . . . . . . 131
© Copyright IBM Corp. 2010, 2015 iii

iv IBM Tivoli Netcool Configuration Manager: Installation and Configuration Guide
About this publication
Netcool Configuration Manager provides configuration management capabilitiesfor network devices, as well as extensive configuration policy thresholdingcapabilities.
The IBM Tivoli Netcool Configuration Manager Installation and Configuration Guidedescribes how to install Netcool Configuration Manager. The guide also describespost-installation configuration tasks. This publication is for administrators whoneed to install and set up Netcool Configuration Manager.
Intended audienceThis publication is intended for administrators who need to install NetcoolConfiguration Manager and perform post-installation configuration. Readers mustbe familiar with network management and operating system configuration tasks.
What this publication containsThis publication contains the following sections:v Chapter 1, “Planning,” on page 1v Chapter 2, “Installing,” on page 11v Chapter 3, “Configuring,” on page 69v Chapter 4, “Upgrading,” on page 101v Chapter 5, “Uninstalling,” on page 123
PublicationsThis section lists publications in the Netcool Configuration Manager PDFdocument set. The prerequisite publications in the IBM Tivoli Network Manager IPEdition and IBM Tivoli Netcool/OMNIbus library are also listed here. The sectionalso describes how to access Tivoli publications online and how to order Tivolipublications.
Netcool Configuration Manager PDF document set
The following documents are available in the Netcool Configuration Managerlibrary:v IBM Tivoli Netcool Configuration Manager Installation and Configuration Guide
Describes how to install IBM Tivoli Netcool Configuration Manager. It alsodescribes necessary and optional post-installation configuration tasks. Thispublication is for administrators who need to install and set up IBM TivoliNetcool Configuration Manager.
v IBM Tivoli Netcool Configuration Manager User Guide
Describes user tasks for IBM Tivoli Netcool Configuration Manager, such as howto access reports, use devices, and execute the different utilities to maintain andsupport Auto-Discovery. This publication is for users working with IBM TivoliNetcool Configuration Manager.
v IBM Tivoli Netcool Configuration Manager Administration Guide
© Copyright IBM Corp. 2010, 2015 v
Describes administration tasks for IBM Tivoli Netcool Configuration Manager,such as how to set up user accounts, create and manage the OS registry,administer database and policy exports and imports, and perform housekeepingand security tasks. This publication is for administrators who are responsible forthe maintenance and availability of IBM Tivoli Netcool Configuration Manager.
v IBM Tivoli Netcool Configuration Manager Reference Guide
Contains reference information about IBM Tivoli Netcool ConfigurationManager.
v IBM Tivoli Netcool Configuration Manager API Guide
Provides information about how to use the Java API to programmatically accessIBM Tivoli Netcool Configuration Manager.
v IBM Tivoli Netcool Configuration Manager NSM REST API GuideDescribes the Service Management Interface API.
v IBM Tivoli Netcool Configuration Manager Integration Guide
Describes how to integrate Netcool Configuration Manager with TivoliNetcool/OMNIbus and Network Manager.
v IBM Tivoli Netcool Configuration Manager Quick Start Guide
Gets you started with a typical installation for IBM Tivoli Netcool ConfigurationManager.
v IBM Tivoli Netcool Configuration Manager Release Notes
Gives important and late-breaking information about IBM Tivoli NetcoolConfiguration Manager. This publication is for deployers and administrators,and should be read first.
Prerequisite publications: IBM Tivoli Network Manager IP Edition
To use the information in this publication effectively when dealing with anintegrated installation of Netcool Configuration Manager, Network Manager, andTivoli Netcool/OMNIbus, you must have some prerequisite knowledge, which youcan obtain from the Network Manager documentation, especially the followingpublications:v IBM Tivoli Network Manager IP Edition Release Notes
Gives important and late-breaking information about IBM Tivoli NetworkManager IP Edition. This publication is for deployers and administrators, andshould be read first.
v IBM Tivoli Network Manager Getting Started Guide
Describes how to set up IBM Tivoli Network Manager IP Edition after you haveinstalled the product. This guide describes how to start the product, make sure itis running correctly, and discover the network. Getting a good networkdiscovery is central to using Network Manager IP Edition successfully. Thisguide describes how to configure and monitor a first discovery, verify the resultsof the discovery, configure a production discovery, and how to keep the networktopology up to date. Once you have an up-to-date network topology, this guidedescribes how to make the network topology available to Network Operators,and how to monitor the network. The essential tasks are covered in this shortguide, with references to the more detailed, optional, or advanced tasks andreference material in the rest of the documentation set.
v IBM Tivoli Network Manager IP Edition Product Overview
Gives an overview of IBM Tivoli Network Manager IP Edition. It describes theproduct architecture, components and functionality. This publication is foranyone interested in IBM Tivoli Network Manager IP Edition.
vi IBM Tivoli Netcool Configuration Manager: Installation and Configuration Guide

v IBM Tivoli Network Manager IP Edition Installation and Configuration Guide
Describes how to install IBM Tivoli Network Manager IP Edition. It alsodescribes necessary and optional post-installation configuration tasks. Thispublication is for administrators who need to install and set up IBM TivoliNetwork Manager IP Edition.
v IBM Tivoli Network Manager IP Edition Administration Guide
Describes administration tasks for IBM Tivoli Network Manager IP Edition, suchas how to administer processes, query databases and start and stop the product.This publication is for administrators who are responsible for the maintenanceand availability of IBM Tivoli Network Manager IP Edition.
v IBM Tivoli Network Manager IP Edition Discovery Guide
Describes how to use IBM Tivoli Network Manager IP Edition to discover yournetwork. This publication is for administrators who are responsible forconfiguring and running network discovery.
v IBM Tivoli Network Manager IP Edition Event Management Guide
Describes how to use IBM Tivoli Network Manager IP Edition to poll networkdevices, to configure the enrichment of events from network devices, and tomanage plug-ins to the Tivoli Netcool/OMNIbus Event Gateway, includingconfiguration of the RCA plug-in for root-cause analysis purposes. Thispublication is for administrators who are responsible for configuring andrunning network polling, event enrichment, root-cause analysis, and EventGateway plug-ins.
v IBM Tivoli Network Manager IP Edition Network Troubleshooting Guide
Describes how to use IBM Tivoli Network Manager IP Edition to troubleshootnetwork problems identified by the product. This publication is for networkoperators who are responsible for identifying or resolving network problems.
v IBM Tivoli Network Manager IP Edition Network Visualization Setup Guide
Describes how to configure the IBM Tivoli Network Manager IP Edition networkvisualization tools to give your network operators a customized workingenvironment. This publication is for product administrators or team leaders whoare responsible for facilitating the work of network operators.
v IBM Tivoli Network Manager IP Edition Management Database Reference
Describes the schemas of the component databases in IBM Tivoli NetworkManager IP Edition. This publication is for advanced users who need to querythe component databases directly.
v IBM Tivoli Network Manager IP Edition Topology Database Reference
Describes the schemas of the database used for storing topology data in IBMTivoli Network Manager IP Edition. This publication is for advanced users whoneed to query the topology database directly.
v IBM Tivoli Network Manager IP Edition Language Reference
Describes the system languages used by IBM Tivoli Network Manager IPEdition, such as the Stitcher language, and the Object Query Language. Thispublication is for advanced users who need to customize the operation of IBMTivoli Network Manager IP Edition.
v IBM Tivoli Network Manager IP Edition Perl API Guide
Describes the Perl modules that allow developers to write custom applicationsthat interact with the IBM Tivoli Network Manager IP Edition. Examples ofcustom applications that developers can write include Polling and DiscoveryAgents. This publication is for advanced Perl developers who need to write suchcustom applications.
v IBM Tivoli Monitoring for Tivoli Network Manager IP User's Guide
About this publication vii
Provides information about installing and using IBM Tivoli Monitoring for IBMTivoli Network Manager IP Edition. This publication is for systemadministrators who install and use IBM Tivoli Monitoring for IBM TivoliNetwork Manager IP Edition to monitor and manage IBM Tivoli NetworkManager IP Edition resources.
Prerequisite publications: IBM Tivoli Netcool/OMNIbus
To use the information in this publication effectively when dealing with anintegrated installation of Netcool Configuration Manager, Network Manager, andTivoli Netcool/OMNIbus, you must have some prerequisite knowledge, which youcan obtain from the Tivoli Netcool/OMNIbus documentation, especially thefollowing publications:v IBM Tivoli Netcool/OMNIbus Installation and Deployment Guide
Includes installation and upgrade procedures for Tivoli Netcool/OMNIbus, anddescribes how to configure security and component communications. Thepublication also includes examples of Tivoli Netcool/OMNIbus architectures anddescribes how to implement them.
v IBM Tivoli Netcool/OMNIbus User's Guide
Provides an overview of the desktop tools and describes the operator tasksrelated to event management using these tools.
v IBM Tivoli Netcool/OMNIbus Administration Guide
Describes how to perform administrative tasks using the TivoliNetcool/OMNIbus Administrator GUI, command-line tools, and process control.The publication also contains descriptions and examples of ObjectServer SQLsyntax and automations.
v IBM Tivoli Netcool/OMNIbus Probe and Gateway Guide
Contains introductory and reference information about probes and gateways,including probe rules file syntax and gateway commands.
v IBM Tivoli Netcool/OMNIbus Web GUI Administration and User's Guide
Describes how to perform administrative and event visualization tasks using theTivoli Netcool/OMNIbus Web GUI.
Accessing terminology online
The IBM Terminology website consolidates the terminology from IBM productlibraries in one convenient location. You can access the Terminology website at thefollowing Web address:
http://www.ibm.com/software/globalization/terminology
Accessing publications online
IBM posts publications for this and all other Tivoli products, as they becomeavailable and whenever they are updated, to the Tivoli Information Center websiteat:
http://publib.boulder.ibm.com/infocenter/tivihelp/v3r1/index.jsp
Note: If you print PDF documents on other than letter-sized paper, set the optionin the File > Print window that allows Adobe Reader to print letter-sized pages onyour local paper.
viii IBM Tivoli Netcool Configuration Manager: Installation and Configuration Guide
Ordering publications
You can order many Tivoli publications online at the following website:
http://www.elink.ibmlink.ibm.com/publications/servlet/pbi.wss
You can also order by telephone by calling one of these numbers:v In the United States: 800-879-2755v In Canada: 800-426-4968
In other countries, contact your software account representative to order Tivolipublications. To locate the telephone number of your local representative, performthe following steps:1. Go to the following website:
http://www.elink.ibmlink.ibm.com/publications/servlet/pbi.wss2. Select your country from the list and click Go. The Welcome to the IBM
Publications Center page is displayed for your country.3. On the left side of the page, click About this site to see an information page
that includes the telephone number of your local representative.
AccessibilityAccessibility features help users with a physical disability, such as restrictedmobility or limited vision, to use software products successfully.
With this product, you can use assistive technologies to hear and navigate theinterface. You can also use the keyboard instead of the mouse to operate allfeatures of the graphical user interface.
Tivoli technical training
For Tivoli technical training information, refer to the following IBM TivoliEducation website:
http://www.ibm.com/software/tivoli/education
Support informationIf you have a problem with your IBM software, you want to resolve it quickly. IBMprovides the following ways for you to obtain the support you need:
OnlineGo to the IBM Software Support site at http://www.ibm.com/software/support/probsub.html and follow the instructions.
IBM Support AssistantThe IBM Support Assistant (ISA) is a free local software serviceabilityworkbench that helps you resolve questions and problems with IBMsoftware products. The ISA provides quick access to support-relatedinformation and serviceability tools for problem determination. To installthe ISA software, go to http://www.ibm.com/software/support/isa
About this publication ix
Conventions used in this publicationThis publication uses several conventions for special terms and actions andoperating system-dependent commands and paths.
Typeface conventions
This publication uses the following typeface conventions:
Bold
v Lowercase commands and mixed case commands that are otherwisedifficult to distinguish from surrounding text
v Interface controls (check boxes, push buttons, radio buttons, spinbuttons, fields, folders, icons, list boxes, items inside list boxes,multicolumn lists, containers, menu choices, menu names, tabs, propertysheets), labels (such as Tip: and Operating system considerations:)
v Keywords and parameters in text
Italic
v Citations (examples: titles of publications, diskettes, and CDs)v Words defined in text (example: a nonswitched line is called a
point-to-point line)v Emphasis of words and letters (words as words example: "Use the word
that to introduce a restrictive clause."; letters as letters example: "TheLUN address must start with the letter L.")
v New terms in text (except in a definition list): a view is a frame in aworkspace that contains data
v Variables and values you must provide: ... where myname represents....
Monospace
v Examples and code examplesv File names, programming keywords, and other elements that are difficult
to distinguish from surrounding textv Message text and prompts addressed to the userv Text that the user must typev Values for arguments or command options
Operating system-dependent variables and paths
This publication uses the UNIX convention for specifying environment variablesand for directory notation.
When using the Windows command line, replace $variable with %variable% forenvironment variables, and replace each forward slash (/) with a backslash (\) indirectory paths. For example, on UNIX systems, the $NCHOME environmentvariable specifies the directory where the Network Manager core components areinstalled. On Windows systems, the same environment variable is %NCHOME%.The names of environment variables are not always the same in the Windows andUNIX environments. For example, %TEMP% in Windows environments isequivalent to $TMPDIR in UNIX environments.
If you are using the bash shell on a Windows system, you can use the UNIXconventions.
x IBM Tivoli Netcool Configuration Manager: Installation and Configuration Guide
Chapter 1. Planning
Use this information to plan a new installation of Netcool Configuration Manager.For upgrading and migrating from existing installations, see the Migration andUpgrading sections instead.Related information:“Installing auto-discovery” on page 60
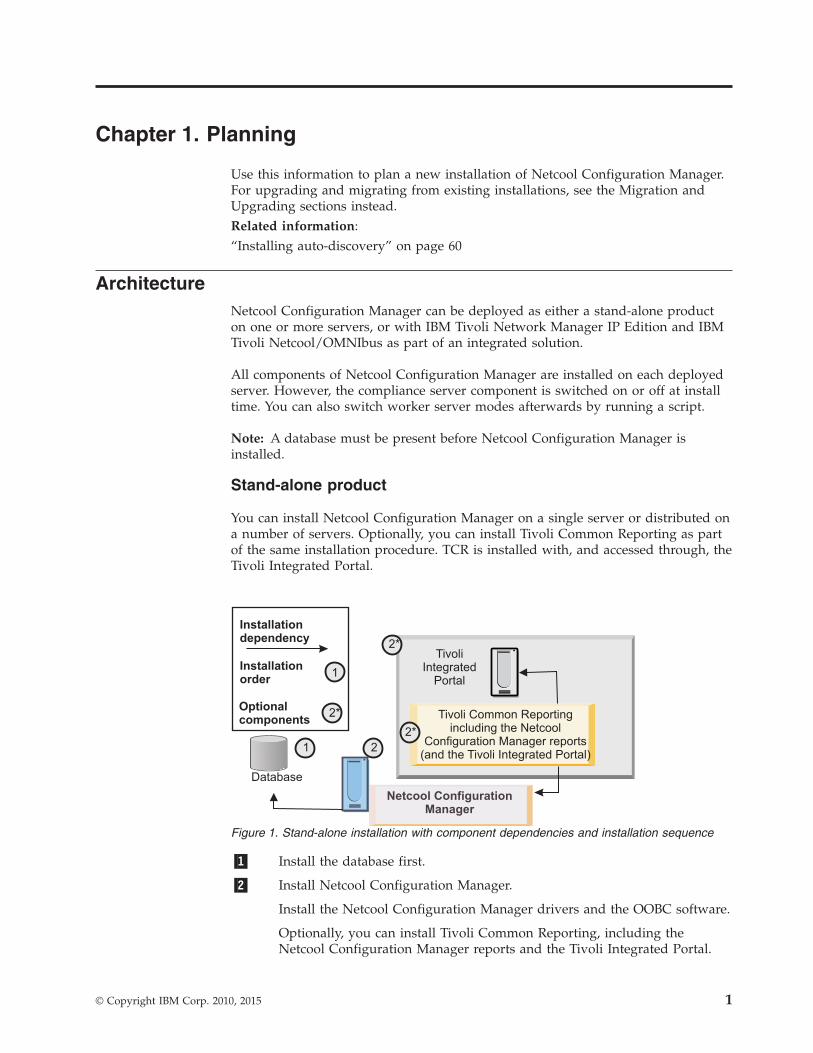
ArchitectureNetcool Configuration Manager can be deployed as either a stand-alone producton one or more servers, or with IBM Tivoli Network Manager IP Edition and IBMTivoli Netcool/OMNIbus as part of an integrated solution.
All components of Netcool Configuration Manager are installed on each deployedserver. However, the compliance server component is switched on or off at installtime. You can also switch worker server modes afterwards by running a script.
Note: A database must be present before Netcool Configuration Manager isinstalled.
Stand-alone product
You can install Netcool Configuration Manager on a single server or distributed ona number of servers. Optionally, you can install Tivoli Common Reporting as partof the same installation procedure. TCR is installed with, and accessed through, theTivoli Integrated Portal.
�1� Install the database first.
�2� Install Netcool Configuration Manager.
Install the Netcool Configuration Manager drivers and the OOBC software.
Optionally, you can install Tivoli Common Reporting, including theNetcool Configuration Manager reports and the Tivoli Integrated Portal.
2*
2*Optionalcomponents
2
Netcool ConfigurationManager
Tivoli Common Reportingincluding the Netcool
Configuration Manager reports(and the Tivoli Integrated Portal)
TivoliIntegrated
Portal
Database
1
2*
Installationorder
1
Installationdependency
Figure 1. Stand-alone installation with component dependencies and installation sequence
© Copyright IBM Corp. 2010, 2015 1
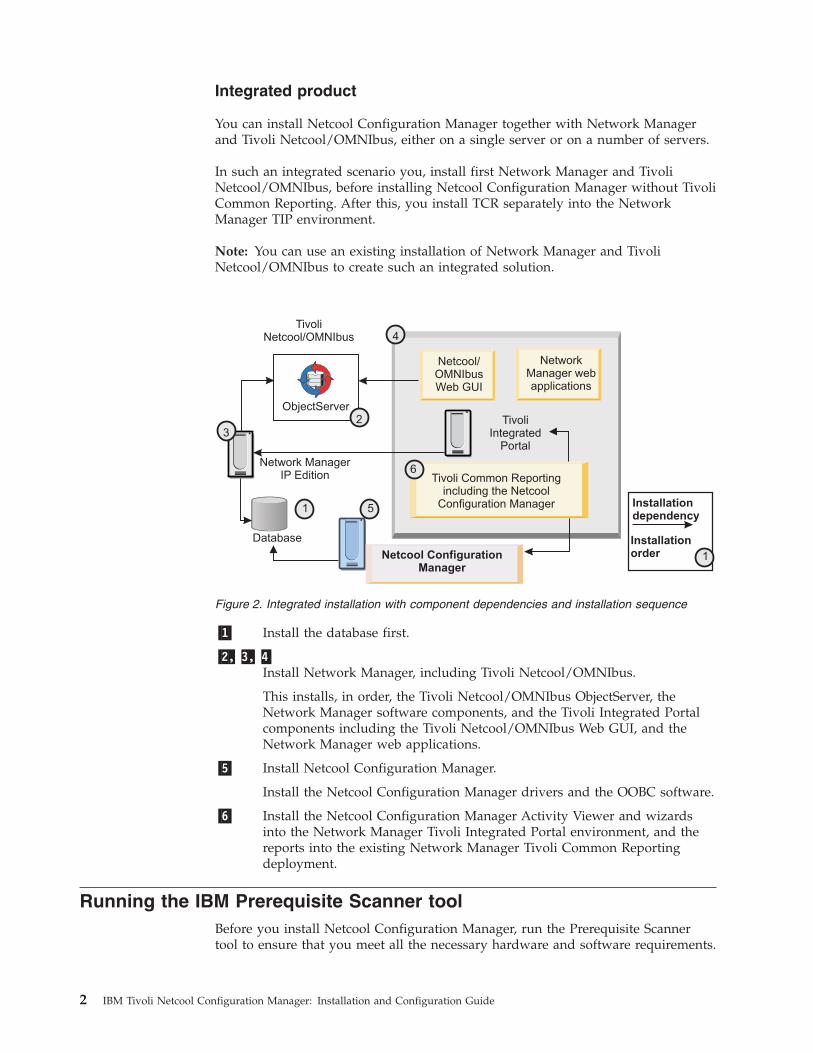
Integrated product
You can install Netcool Configuration Manager together with Network Managerand Tivoli Netcool/OMNIbus, either on a single server or on a number of servers.
In such an integrated scenario you, install first Network Manager and TivoliNetcool/OMNIbus, before installing Netcool Configuration Manager without TivoliCommon Reporting. After this, you install TCR separately into the NetworkManager TIP environment.
Note: You can use an existing installation of Network Manager and TivoliNetcool/OMNIbus to create such an integrated solution.
�1� Install the database first.
�2, 3, 4�Install Network Manager, including Tivoli Netcool/OMNIbus.
This installs, in order, the Tivoli Netcool/OMNIbus ObjectServer, theNetwork Manager software components, and the Tivoli Integrated Portalcomponents including the Tivoli Netcool/OMNIbus Web GUI, and theNetwork Manager web applications.
�5� Install Netcool Configuration Manager.
Install the Netcool Configuration Manager drivers and the OOBC software.
�6� Install the Netcool Configuration Manager Activity Viewer and wizardsinto the Network Manager Tivoli Integrated Portal environment, and thereports into the existing Network Manager Tivoli Common Reportingdeployment.
Running the IBM Prerequisite Scanner toolBefore you install Netcool Configuration Manager, run the Prerequisite Scannertool to ensure that you meet all the necessary hardware and software requirements.
5
Netcool ConfigurationManager
ObjectServer
Network ManagerIP Edition
NetworkManager webapplications
TivoliIntegrated
Portal
Netcool/OMNIbusWeb GUI
TivoliNetcool/OMNIbus
Database
2
1
3
4
Installationorder 1
Installationdependency
Tivoli Common Reportingincluding the Netcool
Configuration Manager
6
Figure 2. Integrated installation with component dependencies and installation sequence
2 IBM Tivoli Netcool Configuration Manager: Installation and Configuration Guide
Prerequisite Scanner is a tool that checks the configuration of your chosenenvironment and detects missing prerequisites.
Download the latest version of Prerequisite Scanner for UNIX from IBM FixCentral (http://www.ibm.com/support/fixcentral), extract the package, run theNCM.sh wizard script, and select deployment configuration for the server.
The NCM.sh script optionally lets you define a single parameter, which specifiesthe release of Netcool Configuration Manager that is being installed in the formatof an 8-digit string vvrrmmff. In this string, vv represents the version, rr therelease, mm the modification and ff the fixpack. For Netcool ConfigurationManager, each value is padded with a leading zero, so for example NetcoolConfiguration Manager Version 6.4.1 is 06040100. If no parameter is supplied,NCM.sh will check the server against the latest version supported by the tool.
Note: Fix Pack 3 The Prerequisite Scanner tool checks that the hostname of NetcoolConfiguration Manager servers is in DNS, but this is not mandatory for NetcoolConfiguration Manager.
Note: Fix Pack 3 The Prerequisite Scanner tool (and Netcool ConfigurationManager) will not work if /tmp is mounted with noexec.
As an alternative to using the wizard, you can use the prerequisite scanner tooldirectly by specifying Netcool Configuration Manager as the product to be tested.However, you must set and export the environment variables to set the variousNetcool Configuration Manager installation options before you run the tool.#./NCM.sh
Prerequisite scanner for ITNCM 06040100 release.
Please select your desired deployment for this server:-
1. Presentation Server + Worker Server : Compliance Core=Enabled : Reporting = Not to be installed2. Presentation Server + Worker Server : Compliance Core=Enabled : Reporting = To be installed3. Presentation Server + Worker Server : Compliance Core=Disabled : Reporting = Not to be installed4. Presentation Server + Worker Server : Compliance Core=Disabled : Reporting = To be installed
5. Worker Server : Base=Enabled : Compliance Eval Engine=Enabled6. Worker Server : Base=Enabled : Compliance Eval Engine=Disabled7. Worker Server : Base=Disabled : Compliance Eval Engine=Enabled
0. Quit
Select option ->
Check the output results of the scanner and resolve any failed checks.
Hardware requirementsHardware requirements vary according to the size and composition of yournetwork and the features of Netcool Configuration Manager that you want to use.They are also influenced by your database and operating system configuration, andby whether you install a 32 bit or 64 bit version of Netcool Configuration Manager.
Ensure that your servers meet at least the minimum hardware requirements beforeyou proceed to an installation.
Chapter 1. Planning 3
Table 1. Netcool Configuration Manager server hardware requirements
Item Requirement
CPU 2 GHz
Memory (32 bitoperating systems)
Note: Fix Pack 1 32-bit operating systems are not supportedbyNetcool Configuration Manager from version 6.4.1 Fix Pack 1onwards. Consequently, it is very strongly recommended that a 64-bitversion of Netcool Configuration Manager is installed so that thesecurity updates and APAR fixes delivered in Fix Pack 1, and anysubsequent 6.4.1 fix packs, can be applied.
Netcool Configuration Manager components require the followingamount of memory:
v Presentation JVM: 2GB
v Compliance JVM: 2GB
v Reporting JVM: 2GB
v Worker Base JVM: 2GB
v Worker Compliance engine JVM: 2GB
The following examples illustrate the memory requirements for anumber of typical deployments:
v Presentation server + Compliance core + Worker Base + Reporting:8GB
v Presentation server + Compliance core + Worker Base: 6GB
v Presentation server + Compliance core + Reporting: 6GB
v Presentation server + Worker Base + Reporting: 6GB
v Presentation server + Compliance core: 4GB
v Worker Base: 2GB
v Compliance evaluation engine only: 2GB
v Worker Base + Compliance evaluation engine: 4GB
Note: These requirements are for Netcool Configuration Managercomponents only, that is, they do not include the database oroperating system memory requirements. Consult the database and OSdocumentation for more information specific to your OS and databasememory needs.
4 IBM Tivoli Netcool Configuration Manager: Installation and Configuration Guide

Table 1. Netcool Configuration Manager server hardware requirements (continued)
Item Requirement
Memory (64 bitoperating systems)
Netcool Configuration Manager components require the followingamount of memory:
v Presentation JVM: 2GB
v Compliance core JVM: 2GB
v Reporting JVM: 2GB
v Worker Base JVM: 3GB
v Worker Compliance engine JVM: 2GB
The following examples illustrate the memory requirements for anumber of typical deployments:
v Presentation server + Compliance core + Worker Base + Reporting:9GB
v Presentation server + Compliance core + Worker Base: 7GB
v Presentation server + Compliance core + Reporting: 6GB
v Presentation server + Worker Base + Reporting: 7GB
v Presentation server + Compliance core: 5GB
v Worker Base: 2GB
v Compliance evaluation engine only: 2GB
v Worker Base + Compliance evaluation engine: 4GB
Note: These requirements are for Netcool Configuration Managercomponents only, that is, they do not include the database oroperating system memory requirements. Consult the database and OSdocumentation for more information specific to your OS and databasememory needs.
Disk space 10 GB of space is recommended as a base for initial installation.Requirements may change based on individual company needs.
The Installer by default uses 5 GB of space in /tmp. If /tmp isn't largeenough, IATEMPDIR can be used to specify another directory instead.The IATEMPDIR environment variable specifies an alternativedirectory into which the Netcool Configuration Manager installer mayextract files before actual installation. However, a small amount ofdata (about 1MB) will be written to /tmp even if IATEMPDIR is beingused.Important: When installing Tivoli Common Reporting: TheIATEMPDIR directory is required when installing Tivoli CommonReporting and you must specify a minimum of 10 GB.
Important: Fix Pack 3 When using the Prerequisite Scanner tool: ThePrerequisite Scanner tool (and Netcool Configuration Manager) willnot work if /tmp is mounted with noexec.
Network interfacecard
Gigabit Ethernet
Database diskspace
500 GB
Swap/pagingspace
Your system should have swap/paging space equivalent to half of theRAM allocated. For example, for 10 GB RAM, you should have 5 GBof paging space. Refer to your database documentation for moredetailed database swap/paging space guidelines.
Chapter 1. Planning 5

Software requirementsSoftware requirements vary according to the operating system and features ofNetcool Configuration Manager that you want to use.
Note: When given a choice, a 64-bit operating system is preferred to a 32-bitoperating system. If Juniper devices are to be managed, then a 64-bit operatingsystem should be used.
Note: Fix Pack 1 32-bit operating systems are not supported byNetcoolConfiguration Manager from version 6.4.1 Fix Pack 1 onwards. Consequently, it isvery strongly recommended that a 64-bit version of Netcool ConfigurationManager is installed so that the security updates and APAR fixes delivered in FixPack 1, and any subsequent 6.4.1 fix packs, can be applied.
Table 2. Netcool Configuration Manager supported operating systems
Item Requirement
AIX 6.1 and 7.1Note: AIX 6.1 and 7.1 are no longer available as 32 Bit architecture.However, Netcool Configuration Manager remains available for both 32and 64 Bit versions of AIX, and both are compatible with AIX 6.1 and7.1.
Package tar-1.14-2.aix5.1.ppc.rpm (GNU tar) or later should be installedfor Netcool Configuration Manager Tivoli Common Reporting, or elsethe installation will fail.
Linux SUSE Linux 10 and 11 (32 and 64 Bit versions)
Red Hat Enterprise Linux 5 and 6 (32 and 64 Bit versions)
Restriction: For Red Hat Enterprise Linux 6, Netcool ConfigurationManager Tivoli Common Reporting is not supported. If you requireTivoli Common Reporting on a Red Hat Enterprise Linux platform, useVersion 5 (32 or 64 Bit versions).
The following system libraries must be installed on Red Hat EnterpriseLinux 6 (32 and 64 Bit versions), or the installation will fail:
v glibc-2.12-1.25.el6_1.3.i686
v libgcc-4.4.5-6.el6.i686
Solaris 10 and 11
Table 3. Netcool Configuration Manager database requirements
Database Version supported
Note: For all database types and versions, use the latest fix pack, unless otherwisespecified.
DB2 9.5
9.7
10.1
10.5 Fix Pack 3
6 IBM Tivoli Netcool Configuration Manager: Installation and Configuration Guide
Table 3. Netcool Configuration Manager database requirements (continued)
Database Version supported
Oracle 10g R2 (10.2.0.1)
11g R2 (11.2.0.1.0)
Tip: Netcool Configuration Manager supports Oracle Real ApplicationClusters (Oracle RAC), but if a switchover occurs, you must restartNetcool Configuration Manager on all servers.
Note: The database must be installed before Netcool Configuration Manager.Ensure a minimum 8kb block size per instance.
Table 4. Netcool Configuration Manager client software requirements
Item Requirement
Web Browsersupport
Internet Explorer 8.0, 9.0, and 10.0
Mozilla Firefox 10,17,24 Extended Support Release (ESR)Restriction: When using TCR Reporting, only IE 8.0/9.0 and MozillaFirefox 10,17 ESR are currently supported.Note: This should be installed on the client before any other software isinstalled.
Java RuntimeEnvironment Not integrated with Network Manager
JRE 1.6 or 1.7 installed on the client
Integrated with Network ManagerJRE 1.6 installed on the client
Table 5. Other Netcool Configuration Manager requirements
Item Notes
FTP, TFTP, Tar,Unzip, gunzip
This should be installed on all servers before any other software isinstalled.
Network timeprotocol (NTP)
This should be installed and configured on all servers before any othersoftware is installed.
DB2 RuntimeClient
Note: Required only for the following scenarios:
v Installations of Netcool Configuration Manager that are not integratedwith Network Manager, exercise the option to install Tivoli CommonReporting, and utilize a DB2 database.
v Installations of Netcool Configuration Manager that use a DB2database and are integrated with Network Manager using a differentdatabase.
For more information, see “Installing and configuring the DB2 Run TimeClient” on page 16.
Chapter 1. Planning 7

Table 5. Other Netcool Configuration Manager requirements (continued)
Item Notes
Tivoli CommonReporting
Important: Tivoli Common Reporting prerequisites should be installedon all servers before any other software is installed.Review therequirements for Tivoli Common Reporting to make sure you meet yourperformance requirements. For detailed information on software andhardware requirements, see the Tivoli Common Reporting informationcenter at the following URL: http://www-01.ibm.com/support/knowledgecenter/SSH2DF/welcome
Restriction: Tivoli Common Reporting must be installed in the TivoliIntegrated Portal in a single server deployment. A distributed installationof Tivoli Common Reporting is not supported when integrated withNetcool Configuration Manager.
Tip: The Tivoli Common Reporting prerequisites listed in the TivoliCommon Reporting documentation apply to all versions of Red HatEnterprise Linux 5, and not just to 5.1 and 5.2. Netcool ConfigurationManager can be installed on versions 5.1 to 5.5.Restriction: For Red Hat Enterprise Linux, Tivoli Common Reportingcan only be installed on Red Hat Enterprise Linux 5 (32 and 64 Bitversions 5.1 to 5.5). Red Hat Enterprise Linux 6 is not compatible withTivoli Common Reporting.
Remember: When deploying Tivoli Common Reporting onto a existingintegrated Linux platform, ensure unixODBC-2.2.X.X or higher RPM ispresent.
Note: When deploying a stand-alone version of Tivoli CommonReporting onto a Solaris platform, ensure that the Solaris servertimezone is one that is supported by Tivoli Common Reporting. IfSolaris uses a time zone Tivoli Common Reporting does not recognize, atime zone error will occur when you access Tivoli Common Reporting.See the Tivoli Common Reporting information center for more time zoneinformation.
Related tasks:“Installing and configuring the DB2 Run Time Client” on page 16“Installing a GUI and worker server” on page 27“Installing a worker server only” on page 32
FIPS 140-2 requirementsEnabling FIPS 140-2 on Netcool Configuration Manager requires that you run thecorrect version of Drivers and that you configure the HTTPS connection setup.
Specifically, the following list elaborates on the requirements for enabling FIPS140-2 compliance on Netcool Configuration Manager:
Drivers 14, or aboveNetcool Configuration Manager can operate with a variety of Driverreleases. However, in order to enable FIPS 140-2 compliance, you must berunning with Drivers 14, or above. Users running an earlier Driversversion and who want to enable FIPS 140-2 compliance must upgrade to atleast Drivers 14.
Tip: Always ensure you are running the latest Drivers release.
Configure the HTTPS connection setupCertificate export/import is required for HTTPS. When Netcool
8 IBM Tivoli Netcool Configuration Manager: Installation and Configuration Guide

Configuration Manager uses encryption over HTTPS, FIPS-certified ciphersare used. Therefore, configuring the HTTPS connection setup is aprerequisite for enabling FIPS 140-2 mode on Netcool ConfigurationManager.
For more information, see “HTTPS connection setup” on page 77.Related information:“Enabling and disabling FIPS 140-2 mode” on page 80
Chapter 1. Planning 9

10 IBM Tivoli Netcool Configuration Manager: Installation and Configuration Guide
Chapter 2. Installing
Use this information to install Netcool Configuration Manager. After installation,you perform configuration tasks. For supplementary information on integratingwith Network Manager IP Edition and Tivoli Netcool/OMNIbus, see the IBMTivoli Netcool Configuration Manager Integration Guide.
Preparing to installBefore you install a new version of Netcool Configuration Manager, you mustperform a number of preparatory tasks.
Before you begin
Important: To install a non-integrated, stand-alone version of NetcoolConfiguration Manager, follow the instructions contained in the following sections.However, for an installation of Netcool Configuration Manager that is to beintegrated with Network Manager IP Edition and Tivoli Netcool/OMNIbus, seethe IBM Tivoli Netcool Configuration Manager Integration Guide before you attemptany installation tasks.
Ensure you have downloaded the correct installation files for your operatingsystem. You need three separate installation files to install the three NetcoolConfiguration Manager installation components, as well as the drivers and OOBCinstallation files.
Note: Fix Pack 1 32-bit operating systems are not supported byNetcoolConfiguration Manager from version 6.4.1 Fix Pack 1 onwards. Consequently, it isvery strongly recommended that a 64-bit version of Netcool ConfigurationManager is installed so that the security updates and APAR fixes delivered in FixPack 1, and any subsequent 6.4.1 fix packs, can be applied.
Main installation imageThese platform-specific images contain the main installation files and arerequired for all installation scenarios.
The platform-specific files are as follows:
AIX ITNCM_aix_ppc32.bin, or ITNCM_aix_ppc64.bin
Linux ITNCM_linux_ia32.bin, or ITNCM_linux_x86_64.bin
SolarisITNCM_solaris_sparc.bin, or ITNCM_solaris_sparc64.bin
Tivoli Common Reporting componentThese platform-specific images contain a separate installer that contains theinstallation files for the Tivoli Common Reporting component.
Note: Ensure you review the software and hardware requirements forTivoli Common Reporting to make sure you meet your performancerequirements. For detailed information on requirements, see the TivoliCommon Reporting Knowledge Center at the following URL:http://www-01.ibm.com/support/knowledgecenter/SSH2DF/welcome
© Copyright IBM Corp. 2010, 2015 11
Remember: These files also contain Tivoli Integrated Portal, into whichTivoli Common Reporting will be installed. These files are required onlyfor non-integrated, stand-alone installations of Netcool ConfigurationManager that require access to Tivoli Common Reporting.
The platform-specific files are as follows:
Linux (32bit)ITNCM_Reports_linux_ia32.tar
Linux (64bit)ITNCM_Reports_linux_x86_64.tar
Solaris (32bit)ITNCM_Reports_solaris_sparc32.tar
Solaris (64bit)ITNCM_Reports_solaris_sparc64.tar
AIX (32bit)ITNCM_Reports_aix_ppc32.tar
AIX (64bit)ITNCM_Reports_aix_ppc64.tar
Tivoli Integrated Portal component
Remember: These files are required only for integrated installationscenarios. For more information on installing these integrated components,see the IBM Tivoli Netcool Configuration Manager Integration Guide.
These platform-specific images contain the installation files for the NetcoolConfiguration Manager Activity Viewer, the wizards and the thick-clientlaunch portal, as well as the default Tivoli Common Reporting reports.
You install these components into the existing Network Manager version ofTivoli Integrated Portal.
The platform-specific files are as follows:
AIX ITNCM_TIP_aix.bin
Linux ITNCM_TIP_linux.bin
SolarisITNCM_TIP_solaris.bin
Drivers installation filesThe multi-platform ITNCMDrivers.bin driver files are contained within theinstallation folders and are required for all installation scenarios.
For more information on installing drivers, see the related links.
OOBC installation filesThe multi-platform oobc.zip OOBC files are contained within theinstallation folders and are required for all installation scenarios.
For more information on installing OOBC, see the related topics.
Note: Netcool Configuration Manager installation examples use the defaultdirectory path of /opt/IBM/tivoli/netcool/ncm. You can override this with a pathappropriate to your own requirements.Related tasks:“Installing a GUI and worker server” on page 27
12 IBM Tivoli Netcool Configuration Manager: Installation and Configuration Guide
“Installing a worker server only” on page 32Related information:“Installing drivers” on page 46“Installing OOBC” on page 64
Creating OS user accountsNetcool Configuration Manager requires a system user and an FTP user thatbelong to the same user group.
Before you begin
For commands specific to your operating system, refer to your OS documentation.
Netcool Configuration Manager operates under the default system user account'icosuser' and group 'icosgrp'. Additionally, FTP servers that communicate withdevices (GUI and Worker), or that process UOWs (Worker), use the default 'icosftp'user account. Icosgrp, icosuser and icosftp can be changed if your administrationcircumstances require this. However, the two users must belong to the same group.
About the FTP user accountYou must create an FTP user account only on a server that is to be the FTPserver communicating with devices (GUI & Worker), or that is going toprocess UOWs (Worker).
The FTP user account must be set up and used to create the networkdevice configuration files, and it must exist on all workers.
The FTP user account is also used for FTP communications.
Note: Netcool Configuration Manager requires a designated space as arepository for all network device configuration files. This space will beused regardless of network configuration transfer mode (that is, FTP, TFTP,or streaming).
Note: This procedure assumes that the default system user, FTP user, and usergroup are used.
Procedure1. Log into the machine as root.2. Create the icosgrp group.3. Add the icosuser user to icosgrp.4. Set the password for icosuser.
Remember: Make a note of the password, as this will be required to completethe installation and administer the product.
5. Add the icosftp user to icosgrp.6. Set the password for the icosftp user.
Remember: Make a note of the password.7. To allow general access to the icosftp directory, set the folder permissions at
774.
Chapter 2. Installing 13
What to do next
Now, create the installation directories.
Creating installation directoriesYou use the mkdir command to create the installation directories on each serverthat Netcool Configuration Manager is to be installed.
Before you begin
You must create the installation directories on each server Netcool ConfigurationManager will be installed.
Procedure1. Log on to the server as root
2. Execute the following command:mkdir -p /opt/IBM/tivoli/netcool/ncm
Note: This is the default directory path.3. Set the permissions on the install directory by typing:
chown icosuser:icosgrp /opt/IBM/tivoli/netcool/ncm
What to do next
Now, install the installation directories on the other servers as required. Whendone, you prepare the database for installation.
Preparing the Oracle databasePrior to installing or upgrading Netcool Configuration Manager, Oracle databaseparameters must be set.
Before you begin
To prepare the Oracle database, you update the database, and then create theOracle user account, before ensuring that all Netcool Configuration ManagerOracle database users have the appropriate system permissions.
Note: The default user is icosuser, which you can change.
Depending on the platform configuration, calculate your connection pool sizesbased on the following default values:
Note: These are the minimum Netcool Configuration Manager requirements only.Presentation Server with Compliance enabled
Worker Server Core = 55Presentation = 65Compliance Core = 55
Total = 175 ( + 55 if IDT is changed to run standalone)
Presentation Server with Compliance disabled
Worker Server Core = 55Presentation = 65
14 IBM Tivoli Netcool Configuration Manager: Installation and Configuration Guide

Total = 120 ( + 55 if IDT is changed to run standalone)
Worker Server (Base + Compliance Eval Engine)
Worker Server Core = 55Compliance EE = 55
Total = 110
Worker Server (Base only)
Worker Server Core = 55
Total = 55
Worker Server (Evaluation Engine Only)
Evaluation Engine = 55
Total = 55
+ 15 for command-line tools
Note: This procedure assumes that the default icosuser is used.
Procedure1. Calculate Oracle processes using the formula specified.2. Specify the following SQL*Plus command to specify the number of processes
for the Oracle database:ALTER SYSTEM SET PROCESSES=value from formula SCOPE=SPFILEOracle must be restarted for these settings to take effect. Before modifying theOracle processes of an existing Netcool Configuration Manager deployment, itis necessary to stop all servers accessing the database prior to executing anymodifications. In addition it is recommended when the application servers areto be started, that each server is shut down and allowed to restart one at a timebefore restarting the next one. This will result in a reduced impact on theOracle database.
3. If using Oracle Version 10, set the Cursor Sharing to EXACT using thefollowing SQL *Plus command carried on the Oracle server:ALTER SYSTEM SET CURSOR_SHARING=’EXACT’ SCOPE=BOTH
4. As the SYSDBA user, create the Oracle user account by executing the followingSQL command:CREATE USER icosuser IDENTIFIED BY <password>
5. Using SQL, assign the CONNECT and RESOURCE roles to the user as follows:GRANT connect, resource TO icosuser
6. Assign the CREATE VIEW privilege to the user as follows:GRANT CREATE VIEW TO icosuser
7. Assign the CREATE SESSION privilege to the user as follows:GRANT CREATE SESSION TO icosuser
8. Issue the following SQL statement to allocate LOB chunks more efficiently:ALTER SYSTEM SET EVENT=’44951 TRACE NAME CONTEXT FOREVER, LEVEL 1024’scope=spfile;
9. Restart the database.
Chapter 2. Installing 15
What to do next
Now, prepare the operating system for installation.
Preparing the DB2 databaseThe following steps to prepare the DB2 database assume that you have alreadyinstalled your DB2 database instance.
Before you begin
These steps assume that your DB2 instance owner is 'db2inst1'. If your instanceowner is not 'db2inst1' then change 'db2inst1' references to your user.
The following steps also assume that the Netcool Configuration Manager databaseuser is different from the instance owner and called 'ncmdbuser'. If you are usingdb2inst1 as the NCM database user, replace all 'ncmdbuser' references incommands with 'db2inst1'.
Procedure1. Login into DB2 Server as the instance owner 'db2inst1'.2. Create the Netcool Configuration Manager database with a pagesize of 32768:
db2 create database ITNCM automatic storage yes pagesize 32768 dft_extent_sz 32
3. Configure database user privileges.db2 connect to itncm
Note: The Grant command may fail if your user already has privilegesassigned.db2 "GRANT BINDADD,CONNECT,CREATE_NOT_FENCED_ROUTINE,CREATE_EXTERNAL_ROUTINE,QUIESCE_CONNECT ON DATABASE TO USER ncmdbuser"
4. Update the transaction log size:db2 update db cfg using logfilsiz 5000db2 update db cfg for itncm using logprimary 200db2 update db cfg for itncm using logsecond 50
5. Increase database storage used for locking:db2 update db cfg for itncm using LOCKLIST 8192
6. Commit Changes:db2 commit
7. Reset the database connection:db2 connect reset
Installing and configuring the DB2 Run Time ClientWhen not integrating with Network Manager, and installing the NetcoolConfiguration Manager Tivoli Common Reporting component with a DB2database, you must obtain and install the DB2 runtime client, catalogue theTCP/IP node (that is, the platform running the DB2 database), and also cataloguethe DB2 database instance. You also perform these actions when integratingNetcool Configuration Manager using a DB2 database with a version of NetworkManager that does not use a DB2 database.
Before you begin
Installation of the DB2 database is a prerequisite, which is described in the DB2Knowledge Center. You can access the DB2 Knowledge Center at the following
16 IBM Tivoli Netcool Configuration Manager: Installation and Configuration Guide

link: http://www-01.ibm.com/support/knowledgecenter/SSEPGG_9.5.0/com.ibm.db2.luw.doc/welcome.html
Restriction: This procedure applies only to the following two scenarios:v Installations of Netcool Configuration Manager that are not integrated with
Network Manager, exercise the option to install Tivoli Common Reporting, andutilize a DB2 database.
v Installations of Netcool Configuration Manager that use a DB2 database and areintegrated with Network Manager using a different database.
For all other scenarios, ignore this procedure and move on to the topic describinghow to add regular expression support to the DB2 database.
For information on configuring the DB2 Run Time Client, see the 'Configuringclient-to-server connections using the command line processor' topic at thefollowing link: http://www-01.ibm.com/support/knowledgecenter/SSEPGG_9.5.0/com.ibm.db2.luw.qb.client.doc/doc/t0007243.html
You can install the DB2 runtime client after installing Netcool ConfigurationManager. If you do, ensure you then catalog the Netcool Configuration Managerdatabase using the same alias that you supplied when installing the TivoliCommon Reporting components.
Procedure1. Download the DB2 Run Time Client.
The runtime client can be obtained at the IBM Support Portal.a. On the IBM Support Portal, navigate to the Downloads tab and search for
the version of the DB2 Run Time Client that you want to download.b. Select the appropriate link to display a table that lists the DB2 download
packages.c. To download the DB2 Run Time Client, select the appropriate package from
the table.For more information on the supported versions of DB2, see “Softwarerequirements” on page 6.
2. Install the DB2 Run Time Client as root user.a. Unzip and untar the file. The rtcl directory is created.b. From the rtcl directory, run the db2_install command.
You can install the client locally or anywhere else, such as the icosuserhome directory.
Remember: You need to specify this directory when installing the NetcoolConfiguration Manager Tivoli Common Reporting component.As part of the installation, the sqllib subdirectory is created in the installdirectory of the runtime client.
3. Catalog the TCP/IP Node (the platform running the DB2 database) using thefollowing command:db2 catalog tcpip node <node name> remote <db server hostname> server<db port>
Tip: The node name is at our discretion.4. Catalog the DB2 database instance using the following command:
Chapter 2. Installing 17
db2 catalog database <database name> at node <node name>db2 catalog database itncm at node dbnodedb2 terminate
5. Test your connection using the following command:db2 connect to <database name> user <db username>
Related reference:“Software requirements” on page 6
Adding user-defined functionsInstall Netcool Configuration Manager user-defined functions to your databaseuser to prevent the schema installation from reporting errors.
Procedure1. Download the Netcool Configuration Manager user-defined function jar
(ibm_tivoli-ncm_db2_udf.jar) unto the DB2 Server in your NetcoolConfiguration Manager database user home directory, for example/home/ncmdbuser.
2. Login to the DB2 server as Netcool Configuration Manager database user'ncmdbuser'.
3. Source the db2profile if not already configured in your unix login profile:. /home/db2inst1/sqllib/db2profile
4. Install the user-defined functions:db2 connect to itncm user ncmdbuser using <db password>db2 "CALL SQLJ.INSTALL_JAR(’file:/home/ncmdbuser/ibm_tivoli-ncm_db2_udf.jar’, ncm_db2_udf)"db2 "CALL SQLJ.REFRESH_CLASSES()"
What to do next
Important: After installing the schema during the installation process, ensure thatyou grant 'execute' permissions on the functions to your Netcool ConfigurationManager database user (after installation has completed).
You now prepare the operating system.
Troubleshooting: Removing incorrect regex:
Before configuring regular expression support for the DB2 database by installingthe appropriate jar file on the DB2 database server, you may need to remove anexisting, incorrect Jar file from the DB2 database server first. This is not necessaryon a fresh installation, but may be necessary if previous versions have existed.
Before you begin
Before completing these steps, stop the database server.
Procedure
1. Connect to the existing DB2 database and set the schema, if required.2. Remove functions by typing the following commands:
db2 drop function ’REGEXP_LIKE(CLOB,VARCHAR(512),VARCHAR(3))’db2 drop function ’REGEXP_LIKE(VARCHAR(3000),VARCHAR(512),VARCHAR(3))’db2 drop function DECODE_FUNCTION
3. Remove the existing jar by typing the following:db2 "CALL SQLJ.REMOVE_JAR(ncm_db2_udf)"
18 IBM Tivoli Netcool Configuration Manager: Installation and Configuration Guide
where
ncm_db2_udfIs the existing jar.
4. Restart the database server.
What to do next
You can now install the correct Jar to the DB2 database.
Preparing the operating systemTo prepare the operating system for installation, you edit the hosts and networkfiles, enable the locale on each server, and enable IPv6 for AIX, Linux, and Solaris.
Before you begin
You only need to perform this task for first time installations, not upgrades. Thistask requires that you be familiar with the following:v UNIX files, tools, and concepts — Examples of UNIX tools include the /etc/host
and /etc/sysconfig/network files, vi editor, and network-related commandssuch as ip and ifconfig. See your operating system documentation for moreinformation.
v Networking concepts — Some examples of networking concepts include layers,protocols, interfaces, Domain Name System (DNS), and so forth.
v IPv4 configuration — Having background in IPv4 configuration will help you tounderstand IPv6 configuration.
v IPv6 concepts — You can acquire an understanding of IPv6 concepts byconsulting with a variety of sources on the Web. One concept you should befamiliar with is IPv6 address types.
If networking is not configured properly (for example, if Netcool ConfigurationManager is installed against the loopback interface or the server's primaryhostname maps to an unroutable IP address) then various components, such asIDT, may not function correctly.
Procedure1. Install the locale en_US.UTF-8 on each Netcool Configuration Manager server
(that is, GUI and all Workers) before you install Netcool ConfigurationManager.
2. Enable IPv6 on the AIX, Solaris, and Linux servers to facilitate IPv6 addressingfor imports. See the operating system documentation for information on how toenable IPv6 support.
3. Add the IPv6 address by using either the ip or ifconfig command. Thefollowing example uses the ip command on Linux to add an IPv6 address(fe80::20c:29ff:fea8:b1b8) with a prefix length of 64, and a device name ofeth0:# ip -6 addr add fe80::20c:29ff:fea8:b1b8/64 dev eth0
The following example uses the ifconfig command on Linux to add an IPv6address (fe80::20c:29ff:fea8:b1b8) with a prefix length of 64, and a devicename of eth0:# ifconfig eth0 inet6 add fe80::20c:29ff:fea8:b1b8/64
Chapter 2. Installing 19
Note: See your IPv6 documentation for information on address types.Depending on where the servers are located and what they need access to willdetermine which addresses to use.
4. Each server in a distributed environment must be able to resolve the hostnameof, and establish network communication to, every other server in the installenvironment. This can be achieved by ensuring that each server is configuredto use a DNS server containing mappings for all servers, or by ensuring thatthe /etc/hosts file contains entries for all Netcool Configuration Managerservers. Thus, you can add to the /etc/hosts file:v the IP address and associated hostname for the DNS server that contains
mappings for all serversor
v the IP address and associated hostname for each server on which NetcoolConfiguration Manager is installed
The following example specifies an entry for /etc/hosts that describes a DNSserver with an IP address of 192.168.248.30, a hostname of myhost, and adomain name of .ibm.com that contains mappings for all servers in the installenvironment:192.168.248.30 myhost.ibm.com
5. On Linux, ensure that the HOSTNAME in /etc/sysconfig/network is correctand fully qualified. For example:HOSTNAME=myhost.ibm.com
Note: The hostname specified in the /etc/sysconfig/network file should havea corresponding entry in the /etc/hosts file, as can be seen in the example inthe previous step. The IP address of the hostname in /etc/sysconfig/networkshould be up and running on the primary interface of the server (typically,eth0).
Example
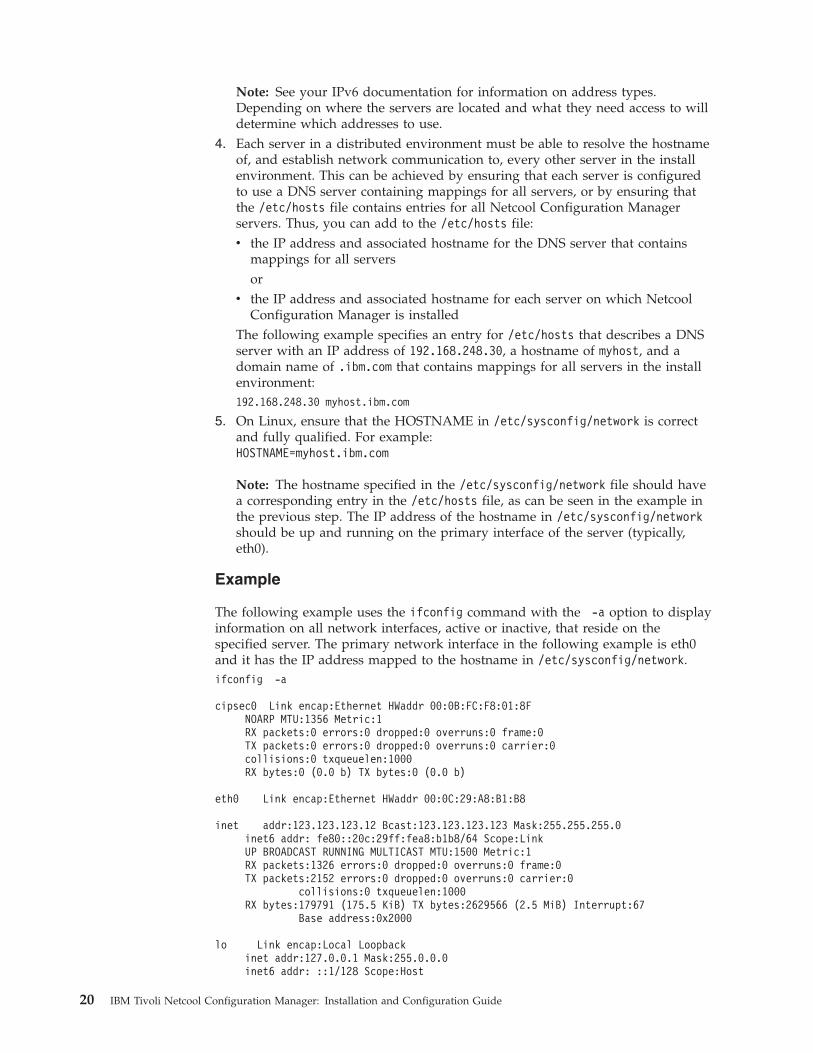
The following example uses the ifconfig command with the -a option to displayinformation on all network interfaces, active or inactive, that reside on thespecified server. The primary network interface in the following example is eth0and it has the IP address mapped to the hostname in /etc/sysconfig/network.ifconfig -a
cipsec0 Link encap:Ethernet HWaddr 00:0B:FC:F8:01:8FNOARP MTU:1356 Metric:1RX packets:0 errors:0 dropped:0 overruns:0 frame:0TX packets:0 errors:0 dropped:0 overruns:0 carrier:0collisions:0 txqueuelen:1000RX bytes:0 (0.0 b) TX bytes:0 (0.0 b)
eth0 Link encap:Ethernet HWaddr 00:0C:29:A8:B1:B8
inet addr:123.123.123.12 Bcast:123.123.123.123 Mask:255.255.255.0inet6 addr: fe80::20c:29ff:fea8:b1b8/64 Scope:LinkUP BROADCAST RUNNING MULTICAST MTU:1500 Metric:1RX packets:1326 errors:0 dropped:0 overruns:0 frame:0TX packets:2152 errors:0 dropped:0 overruns:0 carrier:0
collisions:0 txqueuelen:1000RX bytes:179791 (175.5 KiB) TX bytes:2629566 (2.5 MiB) Interrupt:67
Base address:0x2000
lo Link encap:Local Loopbackinet addr:127.0.0.1 Mask:255.0.0.0inet6 addr: ::1/128 Scope:Host
20 IBM Tivoli Netcool Configuration Manager: Installation and Configuration Guide

UP LOOPBACK RUNNING MTU:16436 Metric:1RX packets:232615 errors:0 dropped:0 overruns:0 frame:0TX packets:232615 errors:0 dropped:0 overruns:0 carrier:0
collisions:0 txqueuelen:0RX bytes:57057016 (54.4 MiB) TX bytes:57057016 (54.4 MiB)
sit0 Link encap:IPv6-in-IPv4NOARP MTU:1480 Metric:1RX packets:0 errors:0 dropped:0 overruns:0 frame:0TX packets:0 errors:0 dropped:0 overruns:0 carrier:0 collisions:0
txqueuelen:0RX bytes:0 (0.0 b) TX bytes:0 (0.0 b)
What to do next
Now, prepare the platforms for installation.
Preparing an AIX installationIf you are planning to install as a non-root user on AIX®, and use SSH to accessyour AIX server, you must perform extra configuration steps before you access theAIX server. If you use rlogin or telnet to access your AIX server, you do not needto perform these steps. You also need to install the AIX unzip utility beforeinstalling Netcool Configuration Manager.
Procedure1. Obtain the AIX utilities from the IBM AIX Toolbox for Linux Applications
website: http://www-03.ibm.com/systems/power/software/aix/linux/toolbox/altlic.html and follow the online prompts to install the requiredutilities.a. Install the rpm package manager first using the following command:
installp -YqacXgd rpm.rte rpm.rte.The rpm package manager allows you to install the other utilities.
b. As a minimum, download and install the unzip utility using rpm packagemanager using the following command:rpm - i unzip-version.rpm.
2. Open the /etc/ssh/sshd_config file on the AIX server where you want toinstall Netcool Configuration Manager.
3. Ensure that the file contains the following line:UseLogin yes
4. Save and close the file.
What to do next
You can now configure the firewall, if required, before using SSH to access theserver and install Netcool Configuration Manager.
Chapter 2. Installing 21

Preparing a Linux installationBy default, the hosts file of Red Hat Enterprise Linux sets the FTP host IP to . Youedit this file to change the hostname and associate it with the appropriate networkaddress.
Before you begin
Ensure that the host name is registered with the DNS.
The following 32-bit libraries must be installed on Red Hat Enterprise Linux 5 and6 platforms (32 and 64 bit versions), or the installation will fail.v RHEL5: glibc-2.5 and libgcc-4.1.1 or laterv RHEL6: glibc-2.12 and libgcc-4.4.4 or later
Procedure1. When installing a Netcool Configuration Manager GUI server or
ITNCM-Reports onto a Linux platform, set nproc to a value of 131072 to safelyaccount for all the forked threads within processes that could be created.For more information, see the following technote: http://www-01.ibm.com/support/docview.wss?uid=swg21648497
2. Open the /etc/hosts file and go to the following line:127.0.0.1 localhost hostname
3. Modify the hostname and associate it with the appropriate network address, asin the following example.
Note: As a rule, each address should have its own line.
Example10.216.1.141 hostname (replace with your system hostname and IP Address)127.0.0.1 localhost
What to do next
Now, you configure the firewall to ensure uninterrupted operation for theinstallation and function, before proceeding to the installation.
Preparing a Solaris installationTo ensure your Solaris operating system correctly calculates free space, you mustensure that a POSIX-compliant df is installed.
The Install Anywhere installer, used by all Netcool Configuration Managerinstallations, has a dependency on a POSIX-compliant df command being available.On AIX and Linux the default df is POSIX-compliant. However, on Solaris, thedefault df is not POSIX-compliant. This can cause issues in the calculation of freespace on the server if a POSIX-compliant df is not installed.
Procedure
Ensure that each Solaris server has the SUNWxcu4 package installed.
What to do next
You can now configure the firewall, if required, before installing the product.
22 IBM Tivoli Netcool Configuration Manager: Installation and Configuration Guide
Configuring the firewallTo ensure uninterrupted operation for the installation, you must ensure that allports used for device communication are open.
Procedure
Ensure that all required ports are open.The following example is a list of all default ports required during installation.These may be different for your installation scenario.v 1521 (default Oracle database port; only required if an Oracle database is used)v 50000 (default DB2 database port; only required if a DB2 database is used)v 7001 (default WebSphere Application Server HTTP port)v 7002 (default WebSphere Application secure port)v 8101 (default admin port)v 8102 (default Log server admin port)v 8103 (default Log server port)v 8104 (default IDT daemon port)v 16310v 16311 (if TCR installed)v 18100v 18101 (for the ISC Console)
What to do next
Now, you proceed to the installation.
Installing the productNetcool Configuration Manager installers for AIX, Linux and Solaris are available.Ensure you obtain the correct installer for your operating system.
Before you begin
You can obtain the Netcool Configuration Manager installation images either froma product media, or by downloading them from the IBM Passport Advantage Website:http://www.ibm.com/software/howtobuy/passportadvantage
Note: These procedures describe the separate installation of the reportingcomponent, as well as all other Netcool Configuration Manager installation tasksas executed by the main installer, including the installation options you must selectwithin the main installer when integrating with Network Manager and TivoliNetcool/OMNIbus. For additional integration installation and configuration tasksthat apply only to integrated deployments, see the IBM Tivoli Netcool ConfigurationManager Integration Guide.
A Java virtual machine is included with the installation image. This will runautomatically when you run the shell script.
Note: Netcool Configuration Manager installation examples use the defaultdirectory path of /opt/IBM/tivoli/netcool/ncm. You can override this with a pathappropriate to your own requirements.
Chapter 2. Installing 23
Remember: The TIP-based Netcool Configuration Manager Activity Viewer,wizards, and thick-client launch portal are only available when integrated withNetwork Manager and Tivoli Netcool/OMNIbus.
Note: Ensure you install the latest drivers after installing Netcool ConfigurationManager.
You can perform an installation as either root- or non-root user.
Installation information checklistYou can define checklists for all Netcool Configuration Manager servers that are tobe installed as part of the deployment. Details you must assemble beforeinstallation include server names, passwords and system paths.
IDT servers
If you have multiple presentation servers in a deployment of NetcoolConfiguration Manager, one server must be chosen as the main, or master,presentation server. This means that all IDT connections will be passed throughthis server if you are running IDT in master mode. For more information, see theAdministration Guide.
Netcool Configuration Manager installation information
Note: Do not make use of spaces in any names provided for the checklist.
Table 6. Installation information checklist for Netcool Configuration Manager
Type Information Details Default value
Note: If you do not supply a root realm, it defaults to itncm
NetcoolConfigurationManager installers
Note: Fix Pack 1
32-bit operatingsystems are notsupportedbyNetcoolConfigurationManager fromversion 6.4.1 FixPack 1 onwards.Consequently, it isvery stronglyrecommendedthat a 64-bitversion of NetcoolConfigurationManager isinstalled so thatthe securityupdates andAPAR fixesdelivered in FixPack 1, and anysubsequent 6.4.1fix packs, can beapplied.
AIX / Linux /Solaris (alleither 32-bit or64-bit)
Linux (32bit)ITNCM_linux_ia32.tar
Linux (64bit)ITNCM_linux_x86_64.tar
Solaris (32bit)ITNCM_solaris_sparc32.tar
Solaris (64bit)ITNCM_solaris_sparc64.tar
AIX (32bit)ITNCM_aix_ppc32.tar
AIX (64bit)ITNCM_aix_ppc64.tar
24 IBM Tivoli Netcool Configuration Manager: Installation and Configuration Guide
Table 6. Installation information checklist for Netcool Configuration Manager (continued)
Type Information Details Default value
Tivoli CommonReportinginstallers
Note: Fix Pack 1
32-bit operatingsystems are notsupportedbyNetcoolConfigurationManager fromversion 6.4.1 FixPack 1 onwards.Consequently, it isvery stronglyrecommendedthat a 64-bitversion of NetcoolConfigurationManager isinstalled so thatthe securityupdates andAPAR fixesdelivered in FixPack 1, and anysubsequent 6.4.1fix packs, can beapplied.
AIX / Linux /Solaris (alleither 32-bit or64-bit)
Linux (32bit)ITNCM_Reports_linux_ia32.tar
Linux (64bit)ITNCM_Reports_linux_x86_64.tar
Solaris (32bit)ITNCM_Reports_solaris_sparc32.tar
Solaris (64bit)ITNCM_Reports_solaris_sparc64.tar
AIX (32bit)ITNCM_Reports_aix_ppc32.tar
AIX (64bit)ITNCM_Reports_aix_ppc64.tar
License Accept / reject You can choose to print the license, orreturn to the previous screen. If you donot accept the license, the installation isaborted.
none
Installationdirectory
You can choose your own location.Note: Netcool Configuration Managerdocumentation assumes the defaultlocation.
/opt/IBM/tivoli/netcool/ncm
Database Oracle or DB2 Must be installed and configuredbeforehand
Oracle
If Oracle database IP address/hostname
Port 1521
SID itncm
Service name itncm
Username
Password
If DB2 database IP address/hostname
Port 50000
Name
Alias
DB2 InstanceHome Directoryon this platform
/home/db2inst1
Username
Password
Chapter 2. Installing 25
Table 6. Installation information checklist for Netcool Configuration Manager (continued)
Type Information Details Default value
WebSphereApplicationServer
HTTP port 7001
Secure port . 7002
For more information about configuring WebSphere to use the SSL port, please seeport number settings in the WebSphere information center at http://www-01.ibm.com/support/knowledgecenter/SSEQTP_7.0.0/com.ibm.websphere.migration.base.doc/info/aes/ae/rmig_portnumber.html
NetcoolConfigurationManager details
Root realm ITNCM
Superuserpassword
FTP Server
User account
User accountdirectory
/home/icosftp
Password
SMTP server SMTP server For example, smtp.IBM.net
Current server Server Unique Netcool Configuration Managerserver name
Installation type GUI server +worker server /Worker server
Depends on whether the installation ispart of a stand-alone installation, or adistributed installation.Note: To improve load balancing, adistributed installation can have morethan one 'GUI server + worker server'installation type.
GUI server + workerserver
If worker serverinstallation type
ITNCM-Baseonly /ITNCM-ComplianceEvaluationEngine only /ITNCM-BaseandITNCM-ComplianceEvaluationEngine
Depends on what kind of distributedinstallation is being performed.
ITNCM-Base only
Link to existingITNCMinstallation oncurrent server?
Enables the worker server about to beinstalled to reuse the drivers alreadyinstalled on this server.Note: The existing installation must havethe drivers installed and the correctdeployment keystore files in place. If youchoose to link to an existing server, youwill be prompted to provide theinstallation directory (default =/opt/IBM/tivoli/netcool/ncm).
No
Compliance coreserver
Not active /Active
Depends on whether the installation ispart of a stand-alone installation, inwhich case you should select Active, or adistributed installation. Also depends onwhat kind of distributed installation isbeing performed.Note: The compliance core is alwaysinstalled, this setting determines whetherit is active or not.
Not active
26 IBM Tivoli Netcool Configuration Manager: Installation and Configuration Guide

Table 6. Installation information checklist for Netcool Configuration Manager (continued)
Type Information Details Default value
AdministrationportsNote: If you areinstalling aworker server andlinking it to anexisting NetcoolConfigurationManagerinstallation on thesame server, thedefault ports willalready be in use.Therefore youmust specify new,unused ports.
Admin port 8101
Log serveradmin port
8102
Log server port 8103
IDT daemonport
8104
Complianceadministrationport + next fiveconsecutiveports
Specifies the Netcool ConfigurationManager - Compliance administrationport. The next five consecutive ports willbe selected automatically.
8110
Main IDTDaemon Server
Yes / No Depends on whether the installation ispart of a stand-alone installation, or adistributed installation. Also depends onwhat kind of distributed installation isbeing performed.
Yes
Pre-installsummary
Proceed Yes /Proceed No
Displays product name, install folder,and platform type. Also displays diskspace information, both required andavailable.
Yes
Database schema Yes / No Loading the database schema removesexisting schemas and removes all data.Can be performed later.
Related tasks:“Installing a GUI and worker server”“Installing a worker server only” on page 32
Installing a GUI and worker serverYou install Netcool Configuration Manager either on a single server, or on severalservers in a distributed architecture. The installation of a GUI and worker servercan be part of a stand-alone installation on a single server, or it can be the firststep in the installation of a distributed architecture on several servers.
Before you begin
Ensure you have completed all required prerequisite tasks, such as the installationof either an Oracle or a DB2 database, as described in “Preparing to install” onpage 11.
Gather all the required information, such as hostnames and passwords, as listed in“Installation information checklist” on page 24.
Important: Quit all programs before continuing with this installation.
If performing a stand-alone installation of Netcool Configuration Manager, that is,not integrated with Network Manager, ensure you have fulfilled the requirementsfor Tivoli Common Reporting, as listed in “Software requirements” on page 6.
If you preparing to perform an integrated installation, ensure you have consultedthe IBM Tivoli Netcool Configuration Manager Integration Guide before proceeding.
Chapter 2. Installing 27
Perform the following checks before installation:
Defining sufficient memory (or SWAP) spaceThere can be issues installing Netcool Configuration Manager if there isnot enough available memory or SWAP space. This problem can beeliminated by doing one of the following:v Allocate more SWAP space.v Separate SWAP and /tmp.v Allocate more space to /tmp.v Use the IATEMPDIR environment variable to specify a separate
directory for the master installer's temporary space.
Note: You need 4GB of free SWAP or free space in the directoryspecified by IATEMPDIR.
Setting sufficient Oracle process limitsThere may be issues with Oracle responsiveness if there is not a sufficientamount of processes running. The Oracle process limit must be at least 55processes per worker server that will be deployed.
Synchronizing server timingsIt is a requirement that all servers must have their times synced to within10 seconds of each other for correct operation. Each server can be syncedby setting up the NTP protocol.
Increasing WebSphere Application Server memory on Linux
Note: Applies only to a scenario where a GUI server or Tivoli CommonReporting is being installed onto a Linux platform.
When installing a Netcool Configuration Manager GUI server or TivoliCommon Reporting onto a Linux platform, set nproc to a value of 131072to safely account for all the forked threads within processes that could becreated.
For more information, see the following technote: http://www-01.ibm.com/support/docview.wss?uid=swg21648497
This task describes the installation of a GUI and worker server with the followingvariations:v Installation on either AIX, Linux or Solaris platforms.v Optional integration with IBM Tivoli Network Manager IP Edition.v Configuration of a previously installed Oracle or DB2 database.v Enablement of the compliance core server (required if stand-alone).v Optional selection of the current server as the main IDT presentation server
(required if stand-alone).v Optional loading of the database schema.
Tip: You can perform an installation as either root- or non-root user.
Respond to each prompt in order to proceed to the next step in the installation.You may cancel this installation at any time by typing 'quit'. You can replace anysuggested default values with your own.
If you want to change a previous step, type back.
28 IBM Tivoli Netcool Configuration Manager: Installation and Configuration Guide
Restriction: The back functionality does not work at all points of the installationsequence. At times you may receive the following system message when typingBack: This step does not allow returning to a previous step at the moment.
Procedure1. Log on to the server, and from the directory which contains the installer,
execute one of the following commands specific to your OS:
For Solaris 32-bitsh ./ITNCM_solaris_sparc32.bin
For Solaris 64-bitsh ./ITNCM_solaris_sparc64.bin
For Linux 32-bitsh ./ITNCM_linux_ia32.bin
For Linux 64-bitsh ./ITNCM_linux_x86_64.bin
For AIX 32-bitsh ./ITNCM_aix_ppc32.bin
For AIX 64-bitsh ./ITNCM_aix_ppc64.bin
The installer extracts the JRE and other resources from the installer archive,prepares the installer for the system's environment, and displays an openingmessage.
2. Click Enter to display the license. You can choose to print the license, orreturn to the previous screen. If you do not accept the license, the installationis aborted.
3. Accept the license to proceed.4. Confirm that the prerequisites have been met.5. Enter a complete path for the installation folder location, or accept the default.
Note: The default directory path is /opt/IBM/tivoli/netcool/ncm.6. Select one of the following Network Manager IP Edition integration options:
No integration with Network Manager IP EditionDefault option.
Important: If you do not plan to integrate with Network Manager,you must install Tivoli Common Reporting in order to access thereports. For more information, see “Installing ITNCM-Reports” onpage 42.
Integrate with Network Manager IP EditionIntegrates with an existing Network Manager IP Edition installation.
Enter the Network Manager IP Edition TIP server IPaddress/hostname.
Remember: After completing the Netcool Configuration Managerinstallation described here, you complete the integration by followingthe steps described in the IBM Tivoli Netcool Configuration ManagerIntegration Guide.
7. Choose whether to install an Oracle or a DB2 database, and define thefollowing Netcool Configuration Manager database parameters:
Chapter 2. Installing 29
v IP address/ hostnamev Portv SID (for Oracle), or Name (for DB2)v Usernamev Password
8. Define the following IBM WebSphere Application Server parameters:v HTTP portv Secure port
9. Enter the following Netcool Configuration Manager parameters:v Root realmv Superuser password
10. Enter the following FTP server parameters:v Serverv User accountv User account directoryv Password
11. Enter the SMTP server address.12. Enter a unique name for the Netcool Configuration Manager instance being
installed on the current server.13. Choose the installation type of GUI Server + Worker Server.
Remember: You choose this option under the following circumstances:v If your installation is part of a stand-alone installation.v If you are installing Netcool Configuration Manager on the first of several
servers as part of a distributed installation. For subsequent servers, you caneither choose the installation type of GUI Server + Worker Server toimprove load balancing, or Worker Server, as described in “Installing aworker server only” on page 32.
14. Choose one of the following compliance core server installation options:
Compliance server not activeDefault option. Does not activate the compliance core that has beeninstalled on the current server.
Choose this option only for a distributed installation. You mustactivate the compliance core on at least one server.
You can activate the compliance core at a later stage by running theplatform configuration script:/opt/IBM/tivoli/netcool/ncm/bin/utils/setPlatform.sh
Note: For more information on using this script, see “Changingplatform configuration” on page 79.
Compliance server activeActivates the compliance core on the current server.
Choose this option for a stand-alone installation.15. Define the following administration port numbers:
v Admin portv Log server admin portv Log server port
30 IBM Tivoli Netcool Configuration Manager: Installation and Configuration Guide

v IDT daemon portv Compliance port
Note: If this is the first instance of Netcool Configuration Manager on thecurrent server, accept the default port numbers.
16. Choose one of the following IDT presentation server options:
The current server is the main IDT presentation serverDefault option.
Choose this option for a stand-alone installation.
You can also choose this option for a distributed installation, if you donot wish to select another server to be the main IDT server.
The current server is not the main IDT presentation serverYou can choose this option for a distributed installation. If you do,you must select another server to be the main IDT presentation serverwhen installing Netcool Configuration Manager as a worker server, asdescribed in “Installing a worker server only” on page 32.
17. Enter the SMTP server IP address/hostname.18. Verify the pre-installation summary, then click Enter to continue.19. Optional: Choose whether to load the database schema.
Important: In a distributed architecture the schema must be loaded from oneNetcool Configuration Manager GUI server only. If the database schema hasalready been loaded, do not load it again.CAUTION:Loading the database schema removes any existing Netcool ConfigurationManager database schema, removing all existing data.
Note: You can load the Database Schema at a later stage. For moreinformation on how to load the database, see “Loading the databases” onpage 69.
20. Required: For DB2 databases only: If you have loaded the database schema,grant execute permissions to the functions.
Restriction: You can only perform this step after the schema has been loaded.a. Log into the DB2 server as instance owner 'db2inst1'.b. Grant execute permissions on functions:
db2 connect to itncm user ncmdbuser using <db password>db2 grant execute on function ’REGEXP_LIKE(CLOB,VARCHAR(512),VARCHAR(3))’to ’ncmdbuser’db2 grant execute on function ’REGEXP_LIKE(VARCHAR(3000),VARCHAR(512),VARCHAR(3))’ to ’ncmdbuser’db2 grant execute on function ’DECODE_FUNCTION’ to ’ncmdbuser’db2 commitdb2 connect reset
Results
The installation is complete when the following system message is displayed:Installation Complete. Netcool Configuration Manager has been successfullyinstalled to: /opt/IBM/tivoli/netcool/ncm
Chapter 2. Installing 31
What to do next
If this installation of a GUI and worker server completes a stand-alone installationon a single server, you install the drivers and OOBC software next, as well as(optionally) Tivoli Common Reporting. For more information, see “Installingdrivers” on page 46, “Installing OOBC” on page 64, and“InstallingITNCM-Reports” on page 42.
After that, you perform a number of post-installation procedures, such assafeguarding the keystore and increasing the Java Heap size. For information onthese and other configuration tasks, see Chapter 3, “Configuring,” on page 69.
If this installation was the first step in the installation of a distributed architectureon several servers, you install the worker servers next.Related tasks:“Preparing to install” on page 11“Changing platform configuration” on page 79“Installing ITNCM-Reports” on page 42“Loading the databases” on page 69“Installing a worker server only”“Deploying the keystore and user files” on page 75“Increasing the Java Heap size” on page 75Chapter 3, “Configuring,” on page 69“Configuring reporting on a stand-alone installation” on page 85Related reference:“Software requirements” on page 6“Installation information checklist” on page 24Related information:“Installing OOBC” on page 64
Installing a worker server onlyYou install a Netcool Configuration Manager worker server as part of a distributedarchitecture deployed on one or more servers. You install one or more workerservers after having completed the installation of one or more GUI and workerservers.
Before you begin
Ensure the GUI and worker server has been installed, as described in “Installing aGUI and worker server” on page 27.
Ensure you have completed all required prerequisite tasks, such as the installationof either an Oracle or a DB2 database, as described in “Preparing to install” onpage 11.
Gather all the required information, such as hostnames and passwords, as listed in“Installation information checklist” on page 24.
Important: Quit all programs before continuing with this installation.
32 IBM Tivoli Netcool Configuration Manager: Installation and Configuration Guide
If installing Netcool Configuration Manager on its own, that is, not integrated withNetwork Manager, ensure you have fulfilled the requirements for Tivoli CommonReporting, as listed in “Software requirements” on page 6.
If you preparing to perform an integrated installation, ensure you have consultedthe IBM Tivoli Netcool Configuration Manager Integration Guide before proceeding.
Perform the following checks before installation:
Defining sufficient memory (or SWAP) spaceThere can be issues installing Netcool Configuration Manager if there isnot enough available memory or SWAP space. This problem can beeliminated by doing one of the following:v Allocate more SWAP space.v Separate SWAP and /tmp.v Allocate more space to /tmp.v Use the IATEMPDIR environment variable to specify a separate
directory for the master installer's temporary space.
Note: You need 4GB of free SWAP or free space in the directoryspecified by IATEMPDIR.
Setting sufficient Oracle process limits (for Oracle database use)There may be issues with Oracle responsiveness if there is not a sufficientamount of processes running. The Oracle process limit must be at least 55processes per worker server that will be deployed.
Synchronizing server timingsIt is a requirement that all servers must have their times synced to within10 seconds of each other for correct operation. Each server can be syncedby setting up the NTP protocol.
This task describes the installation of a worker server with the followingvariations:v Installation on either AIX, Linux or Solaris platforms.v Optional installation of the worker server on the same physical server as the
presentation server, or other worker servers.v Optional integration with IBM Tivoli Network Manager IP Edition.v Configuration of a previously installed Oracle or DB2 database.v Optional installation of the compliance core server (if not installed already).v Optional selection of the current server as the main IDT presentation server (if
not selected already).
Tip: You can perform an installation as either root- or non-root user.
Respond to each prompt in order to proceed to the next step in the installation.You may cancel this installation at any time by typing 'quit'. You can replace anysuggested default values with your own.
If you want to change a previous step, type back.
Restriction: The back functionality does not work at all points of the installationsequence. At times you may receive the following system message when typingBack: This step does not allow returning to a previous step at the moment.
Chapter 2. Installing 33
Procedure1. Log on to the server as icosuser.2. From the directory which contains the installer, execute one of the following
commands specific to your OS:
For Solaris 32-bitsh ./ITNCM_solaris_sparc32.bin
For Solaris 64-bitsh ./ITNCM_solaris_sparc64.bin
For Linux 32-bitsh ./ITNCM_linux_ia32.bin
For Linux 64-bitsh ./ITNCM_linux_x86_64.bin
For AIX 32-bitsh ./ITNCM_aix_ppc32.bin
For AIX 64-bitsh ./ITNCM_aix_ppc64.bin
The installer extracts the JRE and other resources from the installer archive,prepares the installer for the system's environment, and displays an openingmessage.
3. Click Enter to display the license. You can choose to print the license, orreturn to the previous screen. If you do not accept the license, the installationis aborted.
4. Accept the license to proceed.5. Confirm that the prerequisites have been met.6. Enter a complete path for the installation folder location, or accept the default.
Note: The default directory path is /opt/IBM/tivoli/netcool/ncm.7. Select one of the following Network Manager IP Edition integration options:
No integration with Network Manager IP EditionDefault option.
Important: If you do not plan to integrate with Network Manager,you must install Tivoli Common Reporting in order to access thereports. For more information, see “Installing ITNCM-Reports” onpage 42.
Integrate with Network Manager IP EditionIntegrates with an existing Network Manager IP Edition installation.
Enter the Network Manager IP Edition TIP server IPaddress/hostname.
Remember: After completing the Netcool Configuration Managerinstallation described here, you complete the integration by followingthe steps described in the IBM Tivoli Netcool Configuration ManagerIntegration Guide.
8. Choose whether to install an Oracle or a DB2 database, and define thefollowing Netcool Configuration Manager database parameters:v IP address/ hostnamev Port
34 IBM Tivoli Netcool Configuration Manager: Installation and Configuration Guide
v SID (for Oracle), or Name (for DB2)v Usernamev Password
9. Define the following IBM WebSphere Application Server parameters:v HTTP portv Secure port
10. Enter the following Netcool Configuration Manager parameters:v Root realmv Superuser password
11. Enter the following FTP server parameters:v Serverv User accountv User account directoryv Password
12. Enter the SMTP server address.13. Enter a unique name for the Netcool Configuration Manager instance being
installed on the current server.14. Choose the installation type of Worker Server.
Remember: You choose this option if you have already performed theNetcool Configuration Manager GUI Server + Worker Server installation, andare now installing one or several worker servers as part of a distributedarchitecture. For more information on the GUI Server and Worker Serverinstallation, see “Installing a GUI and worker server” on page 27.
15. Choose one of the following options:
ITNCM-Base onlyActivates another instance of Netcool Configuration Manager toenhance data processing capability.
ITNCM-Compliance evaluation engine onlyActivates only the evaluation engine component of the complianceserver.
Enhances evaluation performance, because work is shared between thetwo engines.
Should be installed on a separate computer from the main activecompliance core.
Tip: Co-resident evaluation engines can be supported depending onplatform specification.
ITNCM-Base and ITNCM-Compliance evaluation engineInstalls another instance of Netcool Configuration Manager, as well asthe evaluation engine component of the compliance server.
Suitable for distributed server architectures that do not require that allcomponents are installed on their own servers.
Note: You can activate the compliance core at a later stage by running theplatform configuration script:/opt/IBM/tivoli/netcool/ncm/bin/utils/support/setPlatform.shFor more information on using this script, see “Changing platformconfiguration” on page 79.
Chapter 2. Installing 35
16. Choose whether to link this worker server to an existing NetcoolConfiguration Manager installation on this server:v Choose No if you do not need to link to an existing Netcool Configuration
Manager installation on this server.v Choose Yes to link to an existing Netcool Configuration Manager
installation. This enables the worker server you are installing to reuse thedrivers already installed on this server.
Note: The existing installation must have the drivers installed and thecorrect deployment keystore files in place.Enter the installation directory of the existing installation. This will bechecked to ensure it is valid.
Note: The checks performed determine whether you have read permissionsfor the existing installation. They also ensure that the drivers directory andthe lib/driverinterface.jar file are present.
If you choose Yes, the installation process will link this installation's drivers tothe existing installation of Netcool Configuration Manager.
17. Define the following administration port numbers:v Admin portv Log server admin portv Log server portv IDT daemon portv Compliance administration port + next five consecutive ports
Note: If this is the first instance of Netcool Configuration Manager on thecurrent server, accept the default port numbers. If you are installing a workerserver on the same (physical) server as an existing installation of NetcoolConfiguration Manager, you must provide new, that is, unused, port numbers.
18. Verify the pre-installation summary, then click Enter to continue.
Results
The installation is complete when the following system message is displayed:Installation Complete. Netcool Configuration Manager has been successfullyinstalled to: /opt/IBM/tivoli/netcool/ncm
What to do next
Repeat this task for all worker server installations.
If this worker server installation completes the distributed deployment of NetcoolConfiguration Manager, you install the drivers and OOBC software next, as well as(optionally) Tivoli Common Reporting. For more information, see “Installingdrivers” on page 46, “Installing OOBC” on page 64, and “InstallingITNCM-Reports” on page 42.
After that, you perform a number of post-installation procedures, such assafeguarding the keystore and increasing the Java Heap size. For information onthese and other configuration tasks, see Chapter 3, “Configuring,” on page 69.Related tasks:“Preparing to install” on page 11
36 IBM Tivoli Netcool Configuration Manager: Installation and Configuration Guide
“Changing platform configuration” on page 79“Installing ITNCM-Reports” on page 42“Installing a GUI and worker server” on page 27Chapter 3, “Configuring,” on page 69“Deploying the keystore and user files” on page 75“Loading the databases” on page 69“Configuring reporting on a stand-alone installation” on page 85Related reference:“Software requirements” on page 6“Installation information checklist” on page 24Related information:“Installing OOBC” on page 64
Installing the product in silent modeThe silent installation process provides the ability to customize the NetcoolConfiguration Manager installation process for any deployment situation. Youinstall Netcool Configuration Manager in silent mode by first editing the productproperties file (ITNCM.properties), and then launching the platform-specificinstaller with the silent command (-i silent) suffixed.
Before you begin
Close and stop all system processes before beginning silent installation. Thisincludes all monitoring software, databases, and third party packages.
The properties and bin installer files must be in the same directory.
Performing the installation requires full administrative access to the entire system.Full system authorization to read, write, add, and delete all system files andapplications must be established before beginning the installation.
Note: You can create a ‘Standby' system which can be brought online if theprimary system fails. Backups from the primary server will be restored on the‘Standby' server. The recommendation is to use two identical systems, withinstallation of the application on both at initial start-up.
Perform the following checks before installation:
Defining sufficient memory (or SWAP) spaceThere can be issues installing Netcool Configuration Manager if there isnot enough available memory or SWAP space. This problem can beeliminated by doing one of the following:v Allocate more SWAP space.v Separate SWAP and /tmp.v Allocate more space to /tmp.v Use the IATEMPDIR environment variable to specify a separate
directory for the master installer's temporary space.
Note: You need 4GB of free SWAP or free space in the directoryspecified by IATEMPDIR.
Setting sufficient Oracle process limits (for Oracle database use only)There may be issues with Oracle responsiveness if there is not a sufficient
Chapter 2. Installing 37
amount of processes running. The Oracle process limit must be at least 55processes per worker server that will be deployed.
Synchronizing server timingsIt is a requirement that all servers must have their times synced to within10 seconds of each other for correct operation. Each server can be syncedby setting up the NTP protocol.
Increasing WebSphere Application Server memory on Linux
Note: Applies only to a scenario where a GUI server or Tivoli CommonReporting is being installed onto a Linux platform.
When installing a Netcool Configuration Manager GUI server or TivoliCommon Reporting onto a Linux platform, set nproc to a value of 131072to safely account for all the forked threads within processes that could becreated.
For more information, see the following technote: http://www-01.ibm.com/support/docview.wss?uid=swg21648497
Installation parameters are defined in the ITNCM.properties file. You can replaceany suggested default values with your own.
There are two methods of referencing the properties file:v You may use the -f flag to explicitly reference the file, regardless of name or
location. For example:sh ITNCM_aix_ppc32.bin -i silent -f ../myproperties.propertieswhere ITNCM_aix_ppc32.bin is the name of your installer, and../myproperties.properties is the location and name of your properties file.
v Or you may use a properties file with the same filename as the installer andlocated in the same directory. However, the extension must be changed to.properties.For example, for an installation using the ITNCM_aix_ppc32.bin file, you changethe properties file name to ITNCM_aix_ppc32.properties.
When silently installing more than one instance of Netcool Configuration Manageron the same server, you must alter the installation directory for each instance. Youmust also choose different ports for each instance, and ensure that these ports arefree and not in use. The following parameters must be unique for each instance:v $ADMIN_PORT$
v $LOG_PORT$
v $LOG_LISTEN_PORT$
v $MAIN_IDT_SERVER$
v $USER_INSTALL_DIR$
v $USER_WAS_HTTP_PORT$
v $PBCM_ADMIN_PORT$
Installing the product in silent mode should take 15 - 20 minutes, excludingpreparation time and the installation of any prerequisite software. During theinstallation process, an embedded version of the IBM WebSphere® ApplicationServer (EWAS) is also installed. This server is required to communicate with thedatabase.
38 IBM Tivoli Netcool Configuration Manager: Installation and Configuration Guide
Procedure1. From the directory which contains the installer, open ITNCM.properties in a
text editor.2. Edit the following installation parameters for each instance of the product:
Table 7. Silent installation parameters checklist for Netcool Configuration Manager
Type Parameter Details Default value
NetcoolConfigurationManagerinstallationdirectory
$USER_INSTALL_DIR$ When silently installing morethan one instance of NetcoolConfiguration Manager on thesame server, you must have adifferent installation directoryfor each instance.
/opt/IBM/tivoli/netcool/ncm
Database $DB_IP$ Hostname or IP-address of theOracle platform
none
$DB_PORT$ Database listener port 1521
$DB_USERNAME$ Database username
$DB_PASSWORD$ Database password
$DB_SID$ Database SID / Instance name itncm
$DB_SERVICE_NAME$ Database service name
Compliancecore server
$PBCM_DB_IP$ Hostname or IP-address of theOracle platform
none
WebSphereApplicationServer
$USER_WAS_HTTP_PORT$
Default portNote: Must be unique for eachinstance of NetcoolConfiguration Manager that isbeing installed on the sameserver.
7001
$USER_WAS_SSL_PORT$ Secure portNote: Must be unique for eachinstance of NetcoolConfiguration Manager that isbeing installed on the sameserver.
7002
NetcoolConfigurationManager
$USER_ROOT_REALM$ Root realm ITNCM
$INTELLIDEN_SUPER_USER_PASSWORD$
Password for user Intelliden(superuser password)
$FTP_SERVER_HOST$ FTP Server localhost
$FTP_SERVER_USER$ FTP user
$FTP_SERVER_USER_PASSWORD$
FTP user password
$FTP_SERVER_USER_DIR$ FTP user directory /home/icosftp
$WORKER_SERVER$ PLATFORM TYPE - set to 1 fortrue
0
$SMTP_SERVER$ SMTP server smtp.ibm.net
$RSERIES_FRIENDLY_NAME$
ITNCM NAME (unique in adeployment)
none
Chapter 2. Installing 39
Table 7. Silent installation parameters checklist for Netcool ConfigurationManager (continued)
Type Parameter Details Default value
$LINKED_WORKER_SERVER$
Indicates that this installationwill be linked to an existinginstallation on the same server.Applicable only to new workerserver installations.
FALSE
$MAIN_LINKED_INSTALL_DIR$
If this worker server is to belinked to an existinginstallation on the same server,specifies the existinginstallation directory.
/opt/IBM/tivoli/netcool/ncm
$ADMIN_PORT$ Admin portNote: Must be unique for eachinstance of NetcoolConfiguration Manager that isbeing installed on the sameserver.
8101
$LOG_LISTEN_PORT$ Log server admin portNote: Must be unique for eachinstance of NetcoolConfiguration Manager - Basethat is being installed on thesame server.
8102
$LOG_PORT$ Log server portNote: Must be unique for eachinstance of NetcoolConfiguration Manager that isbeing installed on the sameserver.
8103
$MAIN_IDT_SERVER$ Main IDT Daemon serverNote: Must be unique for eachinstance of NetcoolConfiguration Manager that isbeing installed on the sameserver.
TRUE
$IDT_PORT$ IDT daemon port 8104
$PBCM_ADMIN_PORT$ Compliance administrationport (+ next five consecutiveports)
8110
$AUTO_LOAD_SCHEMA$
Set to TRUE if the databaseschema is to be reloaded on afresh install.Note: Make sure this is onlyset on one GUI+Worker Serverinstallation if there is morethan one.
CAUTION:Loading the database schemaremoves existing schemas andremoves all data, and can beperformed later. Ensure alldata has been backed upbefore setting this parameterto TRUE.
FALSE
$LICENSE_ACCEPTED$ Silent License Acceptance Aftersetting this parameter to true,you must also remove the #sign.
false
40 IBM Tivoli Netcool Configuration Manager: Installation and Configuration Guide
Reporting $REPORTING_ACTIVE$ Activates Reporting. This mustbe set to TRUE if installingstand-alone reporting.
FALSE
3. Ensure that the properties file you have changed is in the same directory as thebin installer file.
4. Change the name of the properties file to correspond to your platform-specificinstallation file.For example, if you are about to install Netcool Configuration Manager onto a64-bit Solaris platform using the ITNCM_solaris_sparc64.bin installation file,you must change the properties file name toITNCM_solaris_sparc64.properties
Note: Alternatively, you can explicitly reference the properties file using the -fflag.
5. Log on to the server, and from the directory which contains the installation andproperties files, execute one of the following commands:
For Solaris 32-bitsh ./ITNCM_solaris_sparc32.bin -i silent
For Solaris 64-bitsh ./ITNCM_solaris_sparc64.bin -i silent
For Linux 32-bitsh ./ITNCM_linux_ia32.bin -i silent
For Linux 64-bitsh ./ITNCM_linux_x86_64.bin -i silent
For AIX 32-bitsh ./ITNCM_aix_ppc32.bin -i silent
For AIX 64-bitsh ./ITNCM_aix_ppc64.bin -i silent
The silent installation process runs without prompting for any user input, andit does not provide a message indicating successful installation.
Remember: You can refer to the installation log file in the following location toverify successful installation:ncm install dir/ITNCM-Base_InstallLog.log
6. Repeat steps 1-5 for each instance of the product.
What to do next
Now, you perform a number of post-installation procedures. For example, if youdid not set the $AUTO_LOAD_SCHEMA$ property value of the properties file to TRUE,you must manually load the schema before you can start Netcool ConfigurationManager.Related tasks:“Loading the databases” on page 69“Configuring reporting on a stand-alone installation” on page 85
Chapter 2. Installing 41
Installing ITNCM-ReportsIf you are not integrating with Network Manager, which ships with its ownversion of Tivoli Integrated Portal, you must install ITNCM-Reports separately inorder to access the reporting functionality.
Before you begin
Ensure you have obtained the required Netcool Configuration Manager Reports tarfiles for your installation.
Linux (32bit)ITNCM_Reports_linux_ia32.tar
Linux (64bit)ITNCM_Reports_linux_x86_64.tar
Solaris (32bit)ITNCM_Reports_solaris_sparc32.tar
Solaris (64bit)ITNCM_Reports_solaris_sparc64.tar
AIX (32bit)ITNCM_Reports_aix_ppc32.tar
AIX (64bit)ITNCM_Reports_aix_ppc64.tar
Ensure you have completed the Netcool Configuration Manager installation.
Important: Confirm that no previous installation of ITNCM-Reports exists bychecking for the following files and directories in the installation user's homedirectory. If they exist, you must uninstall the previous installation ofITNCM-Reports, or the new installation will fail. Confirm after uninstalling aprevious version that the following files have been removed:v .acsi_icosuser
v .acsi_<hostname>
v .coi
Remember: You only install ITNCM-Reports on its own if you do not plan tointegrate your installation of Netcool Configuration Manager with NetworkManager.
Restriction: You must install ITNCM-Reports as the same user that you installedNetcool Configuration Manager as.
Respond to each prompt in order to proceed to the next step in the installation.You may cancel this installation at any time by typing quit. You can replace anysuggested default values with your own.
If you want to change a previous step, type back.
Procedure1. Consult the following technote to ensure Cognos Report Studio menus are
usable: http://www-01.ibm.com/support/docview.wss?uid=swg21641737
42 IBM Tivoli Netcool Configuration Manager: Installation and Configuration Guide

2. Log on to the platform as the same user that you installed NetcoolConfiguration Manager as and perform one of the following steps to launch theinstaller:v If you have a downloaded tar file, access the directory containing the tar file,
and untar it by using the following command:tar xvf ITNCM_Reports_yourOS.tarwhere yourOS is specific to your operating system. For example, for a 32-bitLinux installation, you would typetar xvf ITNCM_Reports_linux_ia32.tar
v If you have a DVD, place the DVD in the DVD ROM drive, and then changedirectory to the mount point. Type:sh Disk1/InstData/VM/ITNCM_Reports_yourOS.binwhere yourOS is specific to your operating system.
Restriction: Always execute the ITNCM-Reports installer from the samedirectory that Disk1 is located, using the command described in the previousstep. Do not run the installer from a lower level directory.
3. Click Enter to display the license. You can choose to print the license, or returnto the previous screen. If you do not accept the license, the installation isaborted.
4. Accept the license to proceed.5. Enter a complete path for the Netcool Configuration Manager installation
folder location, or accept the default.
Note: The default directory path is /opt/IBM/tivoli/netcool/ncm.6. Define the current Netcool Configuration Manager installation database type
(either Oracle or DB2), and then provide the following Netcool ConfigurationManager database parameters:v IP address/ hostnamev Portv Usernamev Passwordv SID / Instance namev Service name (for Oracle)v Alias (for DB2)v Database instance home directory on this platform (for DB2)
7. Enter the Tivoli Integrated Portal administrator user name and password.8. Verify the pre-installation summary, then click Enter to continue.9. For all Production deployments, migrate the default Derby datastore to a
database supported by IBM Cognos. See the following technote for moredetails: http://www-01.ibm.com/support/docview.wss?uid=swg21609287
Results
The installation is complete when the following system message is displayed:ITNCM Reports version <version> has been successfully installed.
What to do next
For information on how to add user accounts to ITNCM-Reports, see “Configuringreporting on a stand-alone installation” on page 85
Chapter 2. Installing 43

Related tasks:“Installing a GUI and worker server” on page 27“Installing a worker server only” on page 32“Loading the databases” on page 69“Configuring reporting on a stand-alone installation” on page 85
Installing ITNCM-Reports in silent modeYou can install ITNCM-Reports in silent mode by first editing the productproperties file (ITNCM.properties) or creating your own *.properties file, beforelaunching the platform-specific installer with the silent command (-i silent)suffixed.
Before you begin
The properties and bin installer files must be in the same directory, unless theproperties file is explicitly referenced using the -f flag.
Performing the installation requires full administrative access to the entire system.Full system authorization to read, write, add, and delete all system files andapplications must be established before beginning the installation.
The ITNCM-Reports installation parameters are defined in a properties file. Youcan replace any suggested default values with your own.
You can create your own *.properties file, if you wish. However, the followingprocedure assumes that you are editing the default ITNCM.properties file.
Procedure1. Consult the following technote to ensure Cognos Report Studio menus are
usable: http://www-01.ibm.com/support/docview.wss?uid=swg216417372. From the directory which contains the installer, open ITNCM.properties in a
text editor.3. Edit the following installation parameters for each instance of the product:
Table 8. Silent installation parameters checklist for reporting
Type Parameter Details Default value
NetcoolConfigurationManagerinstallationdirectory
$USER_INSTALL_DIR$ When silently installing morethan one instance of NetcoolConfiguration Manager on thesame server, you must have adifferent installation directory foreach instance.
/opt/IBM/tivoli/netcool/ncm
Database $DB_IP$ Hostname or IP-address of theOracle platform
none
$DB_PORT$ Database listener port 1521
$DB_USERNAME$ Database username
$DB_PASSWORD$ Database password
$DB_SID$ Database SID
$DB_SERVICE_NAME$ Oracle only
$DB2_INSTALL_DIR$ DB2 only /home/db2inst1
$DB2_ALIAS$ DB2 only
44 IBM Tivoli Netcool Configuration Manager: Installation and Configuration Guide
Table 8. Silent installation parameters checklist for reporting (continued)
Type Parameter Details Default value
Tivoli IntegratedPortal
$TIP_SUPER_USER_NAME$
$TIP_SUPER_USER_PASSWORD$
NetcoolConfigurationManager
$LICENSE_ACCEPTED$ Silent License Acceptance Aftersetting this parameter to true,you must also remove the # sign.
false
Stand alonereporting
$REPORTING_ACTIVE$ Set to TRUE if installingITNCM-Reports in stand alonemode.
FALSE
4. Log on to the server as the same user that you installed Netcool ConfigurationManager as.
5. From the directory which contains the installer and the silent installationparameters files, execute one of the following commands:
For Solaris 32-bitsh Disk1/InstData/VM/ITNCM_Reports_solaris_sparc32.bin -i silent
For Solaris 64-bitsh Disk1/InstData/VM/ITNCM_Reports_solaris_sparc64.bin -i silent
For Linux 32-bitsh Disk1/InstData/VM/ITNCM_Reports_linux_ia32.bin -i silent
For Linux 64-bitsh Disk1/InstData/VM/ITNCM_Reports_linux_x86_64.bin -i silent
For AIX 32-bitsh Disk1/InstData/VM/ITNCM_Reports_aix_ppc32.bin -i silent
For AIX 64-bitsh Disk1/InstData/VM/ITNCM_Reports_aix_ppc64.bin -i silent
6. For all Production deployments, migrate the default Derby datastore to adatabase supported by IBM Cognos. See the following technote for moredetails: http://www-01.ibm.com/support/docview.wss?uid=swg21609287
Results
The silent installation process runs without prompting for any user input, and itdoes not provide a message indicating successful installation.
Remember: You can refer to the installation log file in the install directory toverify successful installation.
Example
Tip: If you do not use the same name as the installer, and/or place the propertiesfile in a different directory to the installer, you can use the -f option to run the
Chapter 2. Installing 45
installation file. For example, if you rename it to mysilentinstall.properties andplace it at one level above the installer file, you can use the following command torun the installation (Solaris 64 Bit example):sh Disk1/InstData/VM/ITNCM_Reports_solaris_sparc64.bin -i silent -f../responsefile.properties
What to do next
For information on how to add user accounts to ITNCM-Reports, see “Configuringreporting on a stand-alone installation” on page 85Related tasks:“Loading the databases” on page 69“Configuring reporting on a stand-alone installation” on page 85
Installing driversUse this information to install Netcool Configuration Manager drivers.Related tasks:“Preparing to install” on page 11
Drivers overviewThe drivers supplied with Netcool Configuration Manager, or obtained from theIBM Passport Advantage Web site, enable Netcool Configuration Manager tocommunicate with the different devices used within your network. Drivers areinstalled by the driver installer, and consist of scripts and rules used by the deviceswhen communicating with Netcool Configuration Manager. After driverinstallation, you update your devices with the new drivers.
Note: The Netcool Configuration Manager Server may be slow to start after a fullor individual drivers installation, as it needs to revalidate the drivers installed onthe system. During this startup period the worker server will not pick up anywork.
Driver packages
Important: The same versions of drivers must be installed on all servers beingused for the Netcool Configuration Manager platform, regardless of whether theyare Worker or GUI servers.
Note: Optionally, when you are using multiple instances of Netcool ConfigurationManager distributed over a range of shared servers, you can install drivers in ashared location on each server.
There are a number of different driver packages available for use with NetcoolConfiguration Manager providing different driver feature levels known asStandard mode or SmartModel mode. Each package also provides support fordifferent types of devices. You may be required to install more than one package toget support for the devices at the feature level you need. Your driver requirementsare determined by the devices in your network.
Note: Before selecting the package to install, ensure that you have obtained therequired device information from you network administrator or equivalentnetwork device expert. For details of the devices supported by each package, seethe Netcool Configuration Manager Supported Drivers List for the specific release
46 IBM Tivoli Netcool Configuration Manager: Installation and Configuration Guide
of Drivers you are installing. Also view the drivers release notes packaged with thedrivers for additional information.These packages can be installed using either the product media, or bydownloading them from the IBM Passport Advantage Web site:http://www-01.ibm.com/software/howtobuy/passportadvantage/
Standard driversWhen using Standard drivers Netcool Configuration Managercommunicates with a device using a generic set of scripts and metadatawhich are not tailored for any specified device.
To install Standard drivers download and install either or both of thefollowing packages, as required:v Standard Basic Devicev Standard Device
SmartModel driversWhen using SmartModel drivers Netcool Configuration Managercommunicates with a device using a tailored set of scripts and metadatafor access to an individual device.
SmartModel drivers can also be used in 'Standard' mode where the genericset of scripts and metadata can be used to access a device if preferred.SmartModel drivers are also required to be able to create NetcoolConfiguration Manager core compliance modeled definitions.
SmartModel support for devices is licensed per device. Therefore driversare initially installed in 'Standard' mode, and need to be upgraded toSmartModel mode using the SmartModel upgrade tool, before the fullSmartModel features on the device can be utilised.
To install the SmartModel packages, download and install one or more ofthe following packages, as required:v SmartModel Basic Devicev SmartModel Devicev SmartModel Complex Device
Three options for installing drivers are provided: Graphical User Interface (GUI),the console (CLI), or Silent installation. For each option there are two types ofdriver installers: full and individual.
Full installersThe full installer provides the ability to easily install all the drivers withina package, but is larger and will take longer to install.
Full installers are available for standard and SmartModel driver packages.
Full installers for SmartModels also allow for all, or a customised subset, ofdrivers to be installed.
Full installers are available both on DVD and in downloadable format.
Individual installersIndividual installers provide a method to install a single driver withsupport for a small set of devices, thereby allowing for smaller downloadswhen compared to the full installer.
Individual installers are only available for drivers in the SmartModelpackages.
Chapter 2. Installing 47
Individual installers may also be made available when support for newdevices become available, or by IBM Support to resolve issues with a givendriver in advance of a full installer becoming available.
Individual installers are available only in downloadable format.
Tip: The GUI installation option may be preferable for ease of use, if you have toperform custom installations of drivers from various vendors.
Important: If you are using command set groups: When adding or removingNetcool Configuration Manager drivers, you must reevaluate all existing commandset groups. Use the ReevaluateGroups utility located in the /bin/icosutildirectory to do so. This utility determines if the addition or deletion of drivers hasan impact on the coverage of the command set groups and updates themaccordingly. In addition to running the ReevaluateGroups utility following theaddition or removal of drivers, you should also manually review the coverage ofthe command set groups after adding or removing drivers.
Upgrading to SmartModel
Drivers can be used in SmartModel mode or Standard mode. In Standard modeNetcool Configuration Manager communicates with a device using a generic set ofscripts and metadata which are not tailored for any specified device. InSmartModel mode a tailored set of scripts and metadata is supplied for access toan individual device. Drivers installed with Netcool Configuration Managerdefault to Standard mode until the SmartModel upgrade tool has been run.
The SmartModel installer package also deploys the SmartModel upgrade tool toallow drivers to be upgraded from Standard to SmartModel mode. Once upgradedto SmartModel mode it is not possible to downgrade a driver from SmartModelmode to Standard mode.
SmartModel mode comes in three packages, each of which comes with an upgradetool to upgrade devices to SmartModel. The relevant tools are installed to/opt/IBM/tivoli/netcool/ncm/drivers/bin:
SmartModelBasicUpgrade.shFor the SmartModel Basic Device package
SmartModelUpgrade.shFor the SmartModel Device package
SmartModelComplexUpgrade.shFor the SmartModel Complex Device package
Drivers can be upgraded to SmartModel mode either on an individual basis, or forall drivers on the system.
Tip: You should perform a driver update of 'All Configurations' from the NetcoolConfiguration Manager GUI for all devices that have been upgraded fromStandard to SmartModel.
Driver versioning after installation
Because of the current Driver install format, there is no upgrade procedurerequired from one version to the next. Multiple versions of Drivers can be safelyinstalled together.
48 IBM Tivoli Netcool Configuration Manager: Installation and Configuration Guide
After installing new Drivers, existing devices may be marked to indicate a newerversion of the Driver has been installed. Devices which have been using the oldDriver configuration may have an orange or red arrow icon against them, whichindicates that a newer version of the same driver or a more optimal driver isinstalled and available for the device, and they need a Driver update to update tothe newer driver. This is performed in the Driver Management screens. The oldDriver config versions do not need to be saved elsewhere, nor migrated.
Command Sets using the original Driver configs are also affected when newDrivers are installed. When the Command Set is created, a Driver ID identifyingthe current optimal driver for that VTMOS is associated with it. Following a Driverupdate, the Driver ID associated to a Command Set may not be the Optimal onefor that VTMOS. The Driver installation attempts to update those Command Setshaving Non-Optimal Driver IDs with the correct Drivers. If this is not possible, thedevice is marked as incompatible.
Driver removal
When Netcool Configuration Manager loads it places a reference to all the installeddrivers into its database. In order to remove drivers it is necessary to determine ifa driver is in use before removing it from filestore. Failure to do this will causeproblems with your Netcool Configuration Manager system. In order to removesingle drivers, the Netcool Configuration Manager driverTools.sh script may beused to determine if a driver or set of drivers is in use and to remove a singledriver.
Uninstalling drivers
Drivers should not be uninstalled, as they may be referenced by the NetcoolConfiguration Manager database and may be required for correct NetcoolConfiguration Manager operation. The only instance when drivers should beuninstalled is when Netcool Configuration Manager is being completely removedfrom the server. This is the only circumstance in which theUninstall_ITNCMDrivers script should be used.
CAUTION:It is not recommended that the Uninstall_ITNCMDrivers script within theUninstall_ITNCMDrivers directory is run unless Netcool Configuration Manageris being completely removed from the server.
Driver installation prerequisitesTo ensure that the system on which you are installing the drivers is compatible,there are a number of requirements.
Note: It should take 30 to 50 minutes to install the driver packages, althoughinstalling individual drivers could take much less time. This estimate applies if allproduct prerequisites are met, and does not take into account the time required toinstall additional prerequisite software.
Netcool Configuration Manager
Ensure you have installed Netcool Configuration Manager before installing thedrivers.
Chapter 2. Installing 49

If drivers are to be installed centrally before Netcool Configuration Manager isinstalled, then a Java Runtime Environment is required; otherwise the JRE includedwith the Netcool Configuration Manager installation will be used.
Note: Netcool Configuration Manager installation examples use the defaultdirectory path of /opt/IBM/tivoli/netcool/ncm. You can override this with a pathappropriate to your own requirements.
Unix utilities
Ensure that the Unix sort utility is present on the UNIX server. For the Solarisplatform, the SUNWxcu4 package must be installed.
Driver installer space requirements
There can be issues installing the Drivers if there is not enough free disk space. Inaddition to the core Netcool Configuration Manager requirements, ensure that youhave 14 GB of free disk space for driver installation.
Installing standard driversStandard driver packages may be installed using the full installer, either viacommand line (CLI), GUI, or silently.
Installing standard drivers via CLIThe standard driver packages are made available with the 'full' driver installeronly. This task describes how to install the standard drivers using the commandline interface (CLI).
Before you begin
Access the /opt/IBM/tivoli/netcool/ncm/bin directory, and execute the stop servercommand:itncm.sh stop
You have the option to install 'Standard Basic Device' or 'Standard Device' drivers.
Procedure1. Log on to the platform as icosuser and perform one of the following steps to
launch the installer:v If you have a downloaded tar file, access the directory containing the tar file,
and extract the installer using the command:tar xvf ./ITNCMDrivers.tar (or the name of the downloaded tar file).
v If you have a DVD, place the DVD in the DVD ROM drive, and then changedirectory to the mount point. Type:sh ./Disk1/InstData/ITNCMDrivers.bin LAX_VM /opt/IBM/tivoli/netcool/ncm/jre/bin/java -i consoleand press Enter.
2. To accept the license agreement, select Enter.
What to do next
Netcool Configuration Manager must be restarted after the drivers have beeninstalled. Execute the start server command:/opt/IBM/tivoli/netcool/ncm/bin/itncm.sh startTo ensure that all servers in a distributed environment have the same drivers
50 IBM Tivoli Netcool Configuration Manager: Installation and Configuration Guide
installed, it is useful to check the driver consistency on all servers. Navigate to theSystems Manager, and access Servers. Driver consistency is indicated by the DriverChecksum field against each server.
Installing standard drivers using the GUIThe standard driver packages are made available with the 'full' driver installeronly.
Before you beginv Download the ITNCMDrivers.tar file.v Access the /opt/IBM/tivoli/netcool/ncm/bin directory, and execute the stop
server command as follows:/opt/IBM/tivoli/netcool/ncm/bin/itncm.sh stop
This task describes how to install the standard drivers using the GUI.
Note: You have the option to install 'Standard Basic Device' or 'Standard Device'drivers.
Procedure1. Log on to the platform as icosuser and perform one of the following steps to
launch the installer:v If you have a downloaded tar file, access the directory containing the tar file,
and extract the installer using the command:tar xvf ./ITNCMDrivers.tar (or the name of the downloaded tar file).
v If you have a DVD, place the DVD in the DVD ROM drive, and then changedirectory to the mount point. Type:sh ./Disk1/InstData/ITNCMDrivers.bin LAX_VM /opt/IBM/tivoli/netcool/ncm/jre/bin/java -i guiand press Enter.
2. To accept the license agreement, select Next.3. Choose the installation directory, or accept the default, then click Next. The
Pre-Installation Summary window is displayed.4. Review the installation details and click Install. The installation proceeds and
when complete, the Install Complete window is displayed.5. Click Done to exit the installer.
What to do nextv Netcool Configuration Manager must be restarted after the drivers have been
installed. Execute the start server command:/opt/IBM/tivoli/netcool/ncm/bin/itncm.sh start
v To ensure that all servers in a distributed environment have the same driversinstalled, it is useful to check the driver consistency on all servers. Navigate tothe Systems Manager, and access Servers. Driver consistency is indicated by theDriver Checksum field against each server.
Chapter 2. Installing 51

Installing standard drivers silentlyThis task describes how to install the standard drivers using the CLI silentinstallation facility.
Before you begin
Access the /opt/IBM/tivoli/netcool/ncm/bin directory, and execute the stop servercommand:itncm.sh stop
You first edit the drivers.properties file, and then run one of the following driverinstallers in silent mode:v ITNCMStandard.tarv ITNCMStandardBasic.tar
Procedure1. Open drivers.properties in a text editor.2. Edit the appropriate installation parameters.3. Log on to the platform as icosuser and complete the silent driver installation
using the following steps:v If you have a DVD:
a. Place the DVD in the DVD ROM drive, and then change directory to themount point.
b. Type sh ./Disk1/InstData/ITNCMDrivers.bin LAX_VM/opt/IBM/tivoli/netcool/ncm/jre/bin/java -i silent -fdrivers.propertieswhere ITNCMDrivers.bin is the name of the driver installation file, and/opt/IBM/tivoli/netcool/ncm/jre/bin/java is the location of theproperties file that you have changed.
c. Press Enter.v If you have a downloaded installation tar file:
a. Access the directory containing the tar file.b. Extract the installer using the following command:
tar xvf ./ITNCMDrivers.tarwhere ITNCMDrivers.tar is the name of the downloaded driver tar file.
c. Ensure that the drivers.properties file you have changed is in the samedirectory as the bin installer file.
d. Type sh .ITNCMDrivers.bin -i silent -f drivers.properties
e. Press Enter.
What to do next
Netcool Configuration Manager must be restarted after the drivers have beeninstalled. Execute the start server command:/opt/IBM/tivoli/netcool/ncm/bin/itncm.sh startTo ensure that all servers in a distributed environment have the same driversinstalled, it is useful to check the driver consistency on all servers. Navigate to theSystems Manager, and access Servers. Driver consistency is indicated by the DriverChecksum field against each server.
52 IBM Tivoli Netcool Configuration Manager: Installation and Configuration Guide

Installing SmartModel driversSmartModel driver packages may be installed using the full installer or usingindividual driver installers, depending on the installer that was downloaded. Youcan also use SmartModel driver packages to upgrade standard drivers toSmartModel drivers. Once upgraded to SmartModel mode it is not possible todowngrade a driver from SmartModel mode to Standard mode. Note that the GUIinstallation option may be preferable for ease of use, if you have to performcustom installations of drivers from various vendors.
Installing SmartModel drivers via CLIThe SmartModel full installer provides the ability to install drivers by vendor typeor by other selection criteria, using the customize option. Use this information toperform a SmartModel installation using the command line interface (CLI).
Before you begin
Access the /opt/IBM/tivoli/netcool/ncm/bin directory, and execute the stop servercommand:itncm.sh stop
Procedure1. Log on to the platform as icosuser and perform one of the following steps to
launch the installer:v If you have a downloaded tar file, access the directory containing the tar file,
and extract the installer using the command:tar xvf ./ITNCMDrivers.tar (or the name of the downloaded tar file).
v If you have a DVD, place the DVD in the DVD ROM drive, and then changedirectory to the mount point. Type:sh ./Disk1/InstData/ITNCMDrivers.bin LAX_VM /opt/IBM/tivoli/netcool/ncm/jre/bin/java -i consoleand press Enter.
2. To accept the license agreement, select Enter.3. An Install Set must be chosen in order to install the drivers. The Install Set
listing displayed is grouped by Vendor. Enter the number(s) required for thedevice install required and press Enter.a. If you require more than one install set, separate the choices using commas,
for example 2,3,5,6.b. For more complex selections a custom installation is available, so a selection
of drivers from various vendors or of different types, models and OSs canbe entered. This is the last option on the Install Set listing.To retrieve a full listing of all Driver selections, please type a question mark(“?”), followed by a carriage return. The listing should be reviewed todetermine which Drivers are required. This process follows the same formatas the GUI installation where check boxes are selected for Vendor's devices.To select the required Drivers the corresponding number(s) should beentered and separated by commas. The options should be treated as atoggle between ‘Install' and ‘Do Not Install'. By default no Vendors areenabled for ‘Install'.The principles of the Parent-Children hierarchy should be applied. Forexample if a Parent (Vendor) is toggled as ‘Install', all Children (Type,Model, OS) shall also be toggled as ‘Install'. Similarly if a Child (OS) istoggled as ‘Install', all Parent hierarchies (Vendor, Type and Model) of that
Chapter 2. Installing 53

child shall also be toggled as ‘Install'. This is often a complex process, andthe following examples should be used as guidance when entering thefeature numbers required.
4. The Pre-Installation Summary is displayed. Verify the information you enteredfor the installation, and press Enter to invoke the installation process.
Example
These examples illustrate a custom installation, and refer to the below extract fromthe Install Set Drivers listing. (The following is a partial list of available contentonly, and should not be mistaken for all the options available with the drivers).
1- [X] None2- [X] Alcatel3- |-[X] 7330-xx4- |-[X] 2.25- |-[X] 2.46- |-[X] Router7- |-[X] 7750-xx8- |-[X] 2.09- |-[X] 3.x10- |-[X] Switch11- |-[X] 7450-xx12- |-[X] 2.x13- |-[X] 3.x...177- [X] Lucent178- |-[X] DSLAM179- |-[X] Stinger180- |-[X] 9.x181- [X] Motorola182- |-[X] CMTS183- |-[X] 64000184- |-[X] 3.x185- [X] Nortel186- |-[X] Switch187- |-[X] 8xxx188- |-[X] 3.x189- [X] World Wide Packets190- |-[X] Switch191- |-[X] LE-311v192- |-[X] LEOS-04-01-02-0006...227- [X] Juniper228- |-[X] Firewall229- |-[X] NSxx230- |-[X] 5.0.0231- |-[X] 6.0.0
54 IBM Tivoli Netcool Configuration Manager: Installation and Configuration Guide

232- |-[X] Router233- |-[X] ERXx234- |-[X] 5.1.x235- |-[X] 6.x236- |-[X] 7.x237- |-[X] 8.x238- |-[X] 9.x239- |-[X] EX240- |-[X] 10.0241- |-[X] 9.5242- |-[X] 9.x243- |-[X] JX244- |-[X] 10.0245- |-[X] 9.3246- |-[X] 9.x247- |-[X] Mxxx248- |-[X] 6.2249- |-[X] 7.1250- |-[X] 7.4251- |-[X] 8.2252- |-[X] 9.3253- |-[X] 9.x254- |-[X] 10.0255- |-[X] SRX256- |-[X] 9.5257- |-[X] 10.0
1. All drivers are deselected by default.2. Choosing 185 - Will choose to install all Vendor type Nortel (185)3. Choosing 187 - Will choose not to install Nortel Switch 8xxx (187)4. Choosing 252 - Will choose to install Juniper Router Mxxx 9.3 (252)5. Choosing 185,187,252 - Will install Nortel Switch 3.x and Juniper Router Mxxx
9.3
What to do next
Netcool Configuration Manager must be restarted after the drivers have beeninstalled. Execute the start server command:/opt/IBM/tivoli/netcool/ncm/bin/itncm.sh startOnce Netcool Configuration Manager has restarted, any newly installedSmartModel drivers will be recognized and catalogued, but they will be inStandard mode. To switch them to SmartModel mode, follow the documentation at“Changing SmartModel drivers from Standard to SmartModel mode” on page 59.To ensure that all servers in a distributed environment have the same driversinstalled, it is useful to check the driver consistency on all servers. Navigate to theSystems Manager, and access Servers. Driver consistency is indicated by the DriverChecksum field against each server.
Chapter 2. Installing 55

Installing individual SmartModel drivers via CLIIndividual driver installers are made available as part of the SmartModel packages,and may also be made available by IBM Support to resolve issues with a givendriver when supplied with such an installer. This task describes how to install theindividual SmartModel drivers using the command line interface (CLI).
Before you begin
Access the /opt/IBM/tivoli/netcool/ncm/bin directory, and execute the stop servercommand:itncm.sh stop
Procedure1. Log on to the platform as icosuser.2. Access the directory to where you have downloaded the installer.3. Enter the following command:
sh ./driverversion.bin LAX_VM /opt/IBM/tivoli/netcool/ncm/jre/bin/java-i consolewhere driverversion.bin is the name of the driver to be installed.
4. Click Enter to begin the installation.5. To accept the license agreement, click Enter.6. Continue to click Enter to continue with the installation.
What to do next
Netcool Configuration Manager must be restarted after the drivers have beeninstalled. Execute the start server command:/opt/IBM/tivoli/netcool/ncm/bin/itncm.sh startOnce Netcool Configuration Manager has restarted, any newly installedSmartModel drivers will be recognized and catalogued, but they will be inStandard mode. To switch them to SmartModel mode, follow the documentation at“Changing SmartModel drivers from Standard to SmartModel mode” on page 59.To ensure that all servers in a distributed environment have the same driversinstalled, it is useful to check the driver consistency on all servers. Navigate to theSystems Manager, and access Servers. Driver consistency is indicated by the DriverChecksum field against each server.
Installing SmartModel drivers using the GUIThe SmartModel full installer provides the ability to install drivers by vendor typeor by other selection criteria. Use this information to perform a SmartModelinstallation using the GUI.
Before you begin
Access the /opt/IBM/tivoli/netcool/ncm/bin directory, and execute the stop servercommand:itncm.sh stop
Procedure1. Log on to the platform as icosuser and perform one of the following steps to
launch the installer:v If you have a downloaded tar file, access the directory containing the tar file,
and extract the installer using the command:tar xvf ./ITNCMDrivers.tar (or the name of the downloaded tar file).
56 IBM Tivoli Netcool Configuration Manager: Installation and Configuration Guide
v If you have a DVD, place the DVD in the DVD ROM drive, and then changedirectory to the mount point. Type:sh ./Disk1/InstData/ITNCMDrivers.bin LAX_VM /opt/IBM/tivoli/netcool/ncm/jre/bin/java -i guiand press Enter.
2. The Introductory dialog is presented. Click Next to proceed.3. An Install Set must be chosen in order to install the drivers. The Install Set
listing displayed is grouped by Vendor.a. If you require more than one install set, hold down the Shift key while
selecting.Once install sets have been selected, click Next.
b. A custom installation is available, so a selection of drivers from variousvendors can be entered. Use the check boxes on the Choose Install Setwindow to select the drivers required.Click Next when complete.
4. To accept the license agreement, select Enter.5. The Pre-Installation Summary is displayed. Verify the information you entered
for the installation, and press Enter to invoke the installation process.
What to do next
Netcool Configuration Manager must be restarted after the drivers have beeninstalled. Execute the start server command:/opt/IBM/tivoli/netcool/ncm/bin/itncm.sh startOnce Netcool Configuration Manager has restarted, any newly installedSmartModel drivers will be recognized and catalogued, but they will be inStandard mode. To switch them to SmartModel mode, follow the documentation at“Changing SmartModel drivers from Standard to SmartModel mode” on page 59.To ensure that all servers in a distributed environment have the same driversinstalled, it is useful to check the driver consistency on all servers. Navigate to theSystems Manager, and access Servers. Driver consistency is indicated by the DriverChecksum field against each server.
Installing SmartModel drivers silentlyThis task describes how to install the SmartModel drivers silently using thecommand line silent installation facility.
Before you begin
Access the /opt/IBM/tivoli/netcool/ncm/bin directory, and execute the stop servercommand:itncm.sh stop
You first edit the ITNCMDrivers_Silent.properties file, and then run one of thefollowing SmartModel driver installers in silent mode:v ITNCMSmartModelBasic.tarv ITNCMSmartModel.tarv ITNCMSmartModelComplex.tar
Procedure1. Open ITNCMDrivers_Silent.properties in a text editor.2. Edit the following installation parameters:
Chapter 2. Installing 57

$DRIVERS_INSTALL_DIR$You define the directory where the driver subdirectory will be installed,for example:
$DRIVERS_INSTALL_DIR$=/opt/IBM/tivoli/netcool/ncm
$CHOSEN_INSTALL_SET$You can install either all device drivers, or one specific driver only.
If you need to install more than one specific driver, you can change thevalue for this parameter and then rerun the silent installation process.
$LICENSE_ACCEPTED$You must accept the license, or the installation will not proceed. Toinstall, set $LICENSE_ACCEPTED$=true
3. Log on to the platform as icosuser and complete the silent driver installationusing the following steps:v If you have a DVD:
a. Place the DVD in the DVD ROM drive, and then change directory to themount point.
b. Type sh ./Disk1/InstData/ITNCMSmartModel.bin LAX_VM/opt/IBM/tivoli/netcool/ncm/jre/bin/java -i silent -fITNCMDrivers_Silent.propertieswhere ITNCMSmartModel.bin is the name of the SmartModel driverinstallation file, and /opt/IBM/tivoli/netcool/ncm/jre/bin/java is thelocation of the properties file that you have changed.
c. Press Enter.v If you have a downloaded installation tar file:
a. Access the directory containing the tar file.b. Extract the installer using the following command:
tar xvf ./ITNCMSmartModel.tarwhere ITNCMSmartModel.tar is the name of the downloaded SmartModeldriver tar file.
c. Ensure that the ITNCMDrivers_Silent.properties file you have changed isin the same directory as the bin installer file.
d. Type sh .ITNCMSmartModel.bin -i silent -fITNCMDrivers_Silent.properties
e. Press Enter.
Results
The silent installation proceeds based on the parameters you have defined in theITNCMDrivers_Silent.properties file.
What to do next
Netcool Configuration Manager must be restarted after the drivers have beeninstalled. Execute the start server command:/opt/IBM/tivoli/netcool/ncm/bin/itncm.sh startOnce Netcool Configuration Manager has restarted, any newly installedSmartModel drivers will be recognized and catalogued, but they will be inStandard mode. To switch them to SmartModel mode, follow the documentation at“Changing SmartModel drivers from Standard to SmartModel mode” on page 59.To ensure that all servers in a distributed environment have the same driversinstalled, it is useful to check the driver consistency on all servers. Navigate to the
58 IBM Tivoli Netcool Configuration Manager: Installation and Configuration Guide
Systems Manager, and access Servers. Driver consistency is indicated by the DriverChecksum field against each server.
Changing SmartModel drivers from Standard to SmartModelmodeThe SmartModel installer package also deploys the SmartModel upgrade tool toallow drivers to be upgraded from Standard to SmartModel mode. Once upgradedto SmartModel mode it is not possible to downgrade a driver from SmartModelmode to Standard mode.
Before you begin
Important: After installing SmartModel drivers, you must have restarted NetcoolConfiguration Manager in order for the new drivers to be catalogued. If the drivershave not been catalogued before you follow this procedure, it will not take effect.
The relevant tools are installed to /opt/IBM/tivoli/netcool/ncm/drivers/bin:
smartModelBasicUpgrade.shFor the SmartModel Basic Device package
smartModelUpgrade.shFor the SmartModel Device package
smartModelComplexUpgrade.shFor the SmartModel Complex Device package
Drivers can be upgraded to SmartModel mode either on an individual basis, or forall drivers on the system.
Procedure1. Change directory to /opt/IBM/tivoli/netcool/ncm/drivers/bin directory and
run one of the SmartModel upgrade scripts (you do not need to run each ofthem) with the appropriate arguments as described here:
To put all SmartModel drivers into SmartModel modesmartModel*Upgrade.sh -all
To put a single SmartModel driver into SmartModel modesmartModel*Upgrade.sh -uuid IBM-########-####-####-####-############
where ########-####-####-####-############ is the uuid of the driverto be upgraded.
Note: Some legacy drivers may still use the old format prefix of 'Isd'instead of 'IBM'.
The driver identifier can be found by using driverTools.sh-show-details as described in Managing device drivers (driverTools.sh)
2. Required: Only for versions of Netcool Configuration Manager earlier than6.4.0.0: Restart Netcool Configuration Manager using the following command:/opt/IBM/tivoli/netcool/ncm/bin/itncm.sh restart
3. In the Gui, click Tools > Reload drivers to refresh the screen, and show thenew driver support levels.
Results
Drivers have been upgraded from Standard to SmartModel mode, and reloaded.
Chapter 2. Installing 59

Installing auto-discoveryUse this information to install the Netcool Configuration Manager auto-discoverydriver. You must install the most current drivers before installing auto-discovery.
Auto-discovery overview
The Netcool Configuration Manager auto-discovery component determines thenetwork resource Vendor, Type, Model, and Operating System (VTMOS), bysending a series of queries via TELNET, SNMP or SSH to each network resource.
You can obtain the auto-discovery component (ITNCM_Autodiscovery.tar) eitherfrom the product media, or by downloading it from the IBM Passport AdvantageWeb site: http://www-01.ibm.com/software/howtobuy/passportadvantage
There are three options for installing auto-discovery: command line interfaceconsole (CLI), graphical user interfcae (GUI), or silent installation.
Once installed, auto-discovery provides the following functionality:
UpdateUpdates to latest version of auto-discovery.
After auto-discovery installation, updates to existing auto-discovery takeeffect once the server is restarted.
Important: By default, an existing Netcool Configuration Managerdeployment of auto-discovery will not be updated at install time, unlessotherwise specified.
RestoreRestores a previously installed version of auto-discovery.
Each time auto-discovery is updated, the previous configuration is saved,and can be restored if required.
See the related links for more information.
VersionDisplays the current version of auto-discovery in the console.
Auto-discovery installation prerequisites
Before installing auto-discovery, install Netcool Configuration Manager, as well asthe Netcool Configuration Manager drivers. Netcool Configuration Managerrequirements are documented in the planning section. It should take one or twominutes to install auto-discovery.
For more information on using the auto-discovery functionality, see the followingsection in the IBM Tivoli Netcool Configuration Manager User Guide:Executing the Auto-Discovery toolRelated information:Chapter 1, “Planning,” on page 1
60 IBM Tivoli Netcool Configuration Manager: Installation and Configuration Guide
Installing auto-discovery via CLI (all platforms)The auto-discovery installation is not platform-specific, so only one genericinstaller is required for installation. This task describes how to installauto-discovery using the command line interface.
Before you begin
Ensure Netcool Configuration Manager and the most current driver packages havebeen installed.
Access the Netcool Configuration Manager installation directory (the default is/opt/IBM/tivoli/netcool/ncm/bin), and execute the stop server commanditncm.sh stop
Note: Before executing the auto-discovery installer, make a backup of the existingauto-discovery XML files located in the following directory: /<ncm installdir>/autodiscovery/xmlThe auto-discovery installer overwrites all files in this directory. Once the installerhas completed, review the backup files and recreate your custom changes asrequired.
Procedure1. Log on to the server as the user that installed Netcool Configuration Manager.
The default isicosuser.2. Access the directory where you have downloaded the installer.3. Type sh./autodiscovery-version.bin LAX_VM /opt/IBM/tivoli/netcool/ncm/
jre/bin/java -i consolewhere version is the auto-discovery installer version, and /opt/IBM/tivoli/netcool/ncm/jre/bin/java is the default directory.
4. Click Enter to begin the installation, then Enter again to continue.5. To accept the license agreement, select 1.6. When asked to choose the install folder, you must ensure that this is the
directory containing the drivers folder. The default, which you can change, is/opt/ibm/tivoli/netcool/ncm
7. Updates to auto-discovery automatically take effect once the server is restarted.To accept this, choose 1.
Tip: You have the option to immediately apply auto-discovery updates in thefollowing ways, if required:v To automatically deploy the latest auto-discovery version immediately,
choose 2, then enter a valid Netcool Configuration Manager directory whenprompted at the next screen.Your current version of auto-discovery is updated immediately.
v To manually deploy the latest auto-discovery version, access the/opt/IBM/Tivoli/drivers/autodiscovery/bin folder and run the followingcommand:autodiscoveryUtil <<itncm_install_path>> -u (You can perform thismanual update at any time.)
8. Check the installation summary details, and click Enter to continue.
Chapter 2. Installing 61
Installing auto-discovery via GUI (all platforms)The auto-discovery installation is not platform-specific, so only one genericinstaller is required for installation. This task describes how to installauto-discovery using the GUI.
Before you begin
Ensure Netcool Configuration Manager and the most current driver packages havebeen installed.
Access the Netcool Configuration Manager installation directory (the default is/opt/IBM/tivoli/netcool/ncm/bin), and execute the stop server commanditncm.sh stop
Note: Before executing the auto-discovery installer, make a backup of the existingauto-discovery XML files located in the following directory: /<ncm installdir>/autodiscovery/xmlThe auto-discovery installer overwrites all files in this directory. Once the installerhas completed, review the backup files and recreate your custom changes asrequired.
Procedure1. Log on to the server as the user that installed Netcool Configuration Manager.
The default isicosuser.2. Access the directory where you have downloaded the installer.3. Type sh./autodiscovery-version.bin LAX_VM /opt/IBM/tivoli/netcool/ncm/
jre/bin/java -i guiwhere version is the auto-discovery installer version, and /opt/IBM/tivoli/netcool/ncm/jre/bin/java is the default directory.
4. Click Enter to begin the installation, then Next to continue.5. Accept the license agreement, then click Next.6. When asked to choose the install folder, you must ensure that this is the
directory containing the drivers folder. The default, which you can change, is/opt/ibm/tivoli/netcool/ncm
7. Updates to auto-discovery automatically take effect once the server is restarted.To accept this, select No.
Tip: You have the option to immediately apply auto-discovery updates in thefollowing ways, if required:v To automatically deploy the latest auto-discovery version immediately,
choose Yes and Next, then enter a valid Netcool Configuration Managerdirectory when prompted at the next screen.Your current version of auto-discovery is updated immediately.
v To manually deploy the latest auto-discovery version, access the/opt/IBM/Tivoli/drivers/autodiscovery/bin folder and run the followingcommand:autodiscoveryUtil <<itncm_install_path>> -u (You can perform thismanual update at any time.)
8. Check the pre-installation summary details, and click Install to continue.
62 IBM Tivoli Netcool Configuration Manager: Installation and Configuration Guide
Results
The installation proceeds and the results are displayed. If you have chosenauto-update, those results are also displayed. Click Done to exit the installer.
Installing auto-discovery in silent modeYou install auto-discovery in silent mode by firstly editing the properties file(autodiscovery.properties), and then launching the installer with the silentcommand (-i silent) suffixed.
Before you begin
Close and stop all system processes before beginning silent installation. Thisincludes all monitoring software, databases, and third party packages.
Performing the installation requires full administrative access to the entire system.Full system authorization to read, write, add, and delete all system files andapplications must be established before beginning the installation.
Note: Before executing the auto-discovery installer, make a backup of the existingauto-discovery XML files located in the following directory: /<ncm installdir>/autodiscovery/xmlThe auto-discovery installer overwrites all files in this directory. Once the installerhas completed, review the backup files and recreate your custom changes asrequired.
Installation parameters are defined in the autodiscovery.properties file. You canreplace any suggested default values with your own.
Tip: There are two methods of referencing the properties file:
The default documented here (step 3)Use the -f flag to explicitly reference the file, regardless of name orlocation. For example:
sh ./autodiscovery-version.bin -i silent -f myproperties.properties
whereautodiscovery-version.bin is the name of your installer, andmyproperties.properties is the location and name of your properties file.
OptionalUse a properties file with the same filename as the installer and located inthe same directory.
However, the extension of the properties file must be changed to.properties, for example for an installation using the autodiscovery-version.bin file, you change the properties file name toautodiscovery-version.properties.
When silently installing auto-discovery, you must ensure that the$LICENSE_ACCEPTED$ property is set to true.
Installing the product in silent mode should take one or two minutes, excludingpreparation time and the installation of any prerequisite software.
Procedure1. From the directory which contains the installer, open autodiscovery.properties
in a text editor.
Chapter 2. Installing 63

2. Edit the installation parameters as required.3. Type the following command:
sh./autodiscovery-version.bin LAX_VM /opt/IBM/tivoli/netcool/ncm/jre/bin/java -i silent -f /file_path/mypropertiesfile.propertieswhere version is the auto-discovery installer version, and /opt/IBM/tivoli/netcool/ncm/jre/bin/java is the default directory.
Installing OOBCUse this information about Netcool Configuration Manager to install the OOBCdaemon, install the OOBC software, configure an OOBC daemon, and troubleshootOOBC installation issues.Related tasks:“Preparing to install” on page 11“Installing a GUI and worker server” on page 27“Installing a worker server only” on page 32Related information:“Configuring OOBC” on page 86
Extracting OOBC softwareThe OOBC software is in an archived format suited for the operating systemenvironment that you have chosen.
This task requires you to download the installer.
Procedure1. Netcool Configuration Manager can be installed using either the product
media, or by downloading it from the IBM Passport Advantage® Web site:http://www.ibm.com/software/howtobuy/passportadvantage/
2. Retrieve the correct download for the operating system you are using.3. Download the .tgz file.4. Use the following gunzip command to unpack the file, and then tar to untar it:
gunzip -c --stdout filename.tgz | tar xf -
What to do next
Now, you install a daemon.Related information:“Configuring OOBC” on page 86
Installing a daemonInstall an OOBC daemon on the server.
Before you begin
A running syslog daemon is a prerequisite for OOBC to work.
Tip: In order to receive messages from the network using an internet domainsocket with the syslog service, use the -r parameter when performing a Linuxsyslog daemon installation. (The default is to not receive any messages from thenetwork.)
64 IBM Tivoli Netcool Configuration Manager: Installation and Configuration Guide

The OOBC software can be installed a number of times. Each time the software isinstalled a new run directory is created in the root of the OOBC software tree. Eachnew run directory has a unique name (for example, run1, run2, run3, and so forth).Each OOBC run directory is configurable without impacting other OOBC runinstances. This allows for a single server machine to host multiple OOBC daemonswhere each daemon is processing its own syslog file (or any suitable log file). Thistask requires you to install an OOBC daemon.
Procedure1. Execute the install script with superuser privilege to allow the addition of links
within the rc.d system, enabling auto-start on a reboot of the server.2. From a command prompt change your directory to the install folder. For a Unix
platform you must manually set the permissions before being able to executethe install script (for example, the chmod command).
3. Download the .tgz file.4. Using the following command gunzip unpacks the file, and then uses tar to
untar it:gunzip -c --stdout <filename>.tgz | tar xf -
What to do next
Now, you install the OOBC software.Related information:“Configuring OOBC” on page 86
Installing OOBC softwareThese steps explain how to install the OOBC software.
Install the OOBC software after you extract the OOBC installers and install adaemon.
Procedure1. Execute as a user with superuser privilege.2. Access the directory containing the OOBC installer. The location of the
directory depends on where you unzipped the oobc.zip file. The path is:pathwhereyouunzippedoobczipfile/OutofBandChange/install.
3. Run the OOBC installer by typing the following command and then pressingEnter:./install.sh
4. The Installation path is requested for the new OOBC Run directory. Asalready mentioned, multiple OOBC Run Directories can be installed:Beginning install process for new OOBC Run directory:/opt/oobc/OutOfBandChange/run1
Press Enter to accept the default path, or enter an alternative path.5. The installer requests Unix ownership:
Enter the Unix owner of the OOBC software? [icosuser:icosgrp]
Press Enter to accept the default user provided, or enter an alternative username.
6. The installer requests the ITNCM - Base server name:Enter the servername of the ITNCM - Base? [ITNCM - Base]
Enter the server name where ITNCM - Base is installed, and press Enter.
Chapter 2. Installing 65

7. The installer asks if the ITNCM - Base server is running HTTPS:Is the ITNCM - Base running a secure connection (https)? [no]
Type Yes or No to indicate whether the ITNCM - Base is being run on a serverrunning HTTPS, and then press Enter.
8. The installer requests the port on which ITNCM - Base is running:What port is the ITNCM - Base running on [80]?
Enter the ITNCM - Base port number, and press Enter.9. The installer requests the user name of the user to be logged into ITNCM -
Base:What user do you want to login to the ITNCM - Base as [OOBCUser]?
Enter the user that will be logged into ITNCM - Base, and press Enter.10. The installer requests the password for the user specified in the previous step:
Enter clear text password:
Enter the ITNCM - Base user password, and press Enter.11. The installer requests the Worker Server (server on which ITNCM - Base
executes work) username:Enter the worker user id ITNCM - Base executes work as [ITNCM - Base]?
Press Enter to accept the default Worker User ID, and press Enter. The valueentered here will be skipped when present in the Syslog. If multiple userentries are required, additional values can be added under <ITNCM-users> afterinstall.
12. The installer requests the Worker Server address:Enter the worker server address[ITNCM]
Please press Enter to accept the default Worker server address, or enter analternative. Worker Servers are specified as IP addresses. If multiple WorkerServer entries are required, additional values can be added under<worker-servers> after install.
13. The installer requests an authorized third party user ID. This user does notrequire notification when an activity is recorded.Enter an authorized 3rd party user id that does not require notificationwhen activity is recorded in the syslog [3rdPartyUser]?
Press Enter to accept the default third Party User ID. If multiple user entriesare desired, then more values can be added under <authorized-users> afterinstall.
14. The installer requests the path to the syslog file:Enter the full path to the syslog file to be parsed:[/opt/oobc/OutOfBandChange/run1/local7.log]
Enter the path to the log or press Enter to accept the default.15. The installer requests the path to the syslog save file:
Enter the full path to the syslog saver file:[/opt/oobc/OutOfBandChange/run1/log.syslog-messages]
Enter the path to the log or press Enter to accept the default.16. The installer displays a message similar to the following:
ITNCM OOBC Install Properties:Install Owner: icosuser:icosgrpInstall Directory: /opt/oobc/OutOfBandChange/run1ITNCM URL: t3://ITNCM:80/Syslog File: /opt/oobc/OutOfBandChange/run1/local7.logOOBC User: OOBCUserUser Password: d8adea5c67c7c9d4ITNCM Worker: ITNCM3rd Party User: 3rdPartyUser
66 IBM Tivoli Netcool Configuration Manager: Installation and Configuration Guide

Worker Server: ITNCMSyslog Message Storage File: /opt/oobc/OutOfBandChange/run1/log.syslog messagesIs this OK? (yes,no)yes
Type Yes and press Enter to accept the information.The installation proceeds and a message similar to the following displays oncethe install completes:Copying Configuration FilesSetting permissionsCreating symbolic links in /etc/rc2.dBUILD SUCCESSFULTotal time: 52 seconds
What to do next
If the installation of the OOBC software is successful your next task is to configurea daemon. Otherwise, read the troubleshooting installation issues to resolve themost commonly encountered OOBC installation issues.Related information:“Configuring OOBC” on page 86
Configuring a daemonConfigure an OOBC daemon on the server after you complete the OOBC softwareinstallation.
Procedure1. Change directory to the run directory which was specified during the
installation process. For example:cd /opt/OutOfBandChange/run1
2. Edit the oobc.properties.xml file.3. Make any other customizations to this configuration file that is required for
your environment.
What to do next
Now, you configure the OOBC software.Related information:“Configuring OOBC” on page 86
Troubleshooting the OOBC software installationThis section is designed to help troubleshoot some of the most commonlyencountered OOBC installation issues.
Issue #1
The installer is designed to install various RC scripts to assist in starting andstopping the daemon server when it is rebooted. The OOBC installation must becarried out by the root user. Otherwise the installation will be unsuccessful, andthe following error is generated:Creating symbolic links for Solaris/etc/rc0.d/K39OOBCDaemon_run1/etc/rc1.d/K39OOBCDaemon_run1/etc/rc2.d/S75OOBCDaemon_run1/etc/rcS.d/K39OOBCDaemon_run1
Chapter 2. Installing 67
ln: cannot create /etc/rc0.d/K39OOBCDaemon_run1: Permission deniedBUILD FAILED/home/icosuser/OutOfBandChange/install/install.xml:336: The following erroroccurred while executing this line:/home/icosuser/OutOfBandChange/install/install.xml:391: ln failed withreturn code 2
This error means that the RC scripts were not installed but the OOBC software wasand can be configured and run.
Issue #2
Another installer issue that may arise is when the following error is generated:bash-2.05$ ./install.shBUILD FAILED/home/icosuser/OutOfBandChange/install/install.xml:427: The next generatedinstall directory [/home/icosuser/OutOfBandChange/run1] already exists.
Please review the current install directories and then edit theinstall.properties file resetting any one of the install.xxx properties toa suitable value such that the next generated directory does not exist.When you have done this, re-run this install script.Total time: 0 seconds
This will occur when there is an existing run1 directory. This can be fixed by eitherdeleting/moving/renaming the run1 files system or modifying theinstall.properties file. This would occur when two OOBC daemons are neededon the same machine to monitor two different files.Related information:“Configuring OOBC” on page 86
68 IBM Tivoli Netcool Configuration Manager: Installation and Configuration Guide
Chapter 3. Configuring
After installation, you perform a number of post-installation configuration tasks.Related tasks:“Installing a GUI and worker server” on page 27“Installing a worker server only” on page 32
Loading the databasesLoading the database for Netcool Configuration Manager builds the schemas andloads the content. You can load the databases during installation, or separately at alater stage.
Before you begin
It is a requirement that the Oracle instance is reachable, and the user accountcredentials are active.
All relevant tables, keys and sequences are built in preparation for the databasecontent. The scripts then create the content, such as realms, security settings,properties, searches, and other required functions.
Important: In a distributed architecture the schema must be loaded from oneNetcool Configuration Manager GUI server only. If the database schema hasalready been loaded during installation, do not load it again.
CAUTION:Loading the database schema removes any existing Netcool ConfigurationManager database schema, removing all existing data.
Procedure1. Access the directory containing the utilities:
/opt/IBM/tivoli/netcool/ncm/bin/utils/database
2. Run the load schema script. If the installation is part of a distributed setup,execute the loadDBSchema.sh script from the main GUI server.sh ./loadDBSchema.shThis script creates a log file called dbload.log in ncm_install_dir/logs.
Tip: This log file should be checked regularly, as errors from this script are notdisplayed on the console.
3. Required: For DB2 databases only: Grant regex execute permissions asrequired.For example:db2 grant execute on function 'REGEXP_LIKE(CLOB,VARCHAR(512),VARCHAR(3))' to
'db2inst1'db2 grant execute on function 'REGEXP_LIKE(VARCHAR(3000),VARCHAR(512),VARCHAR(3))' to
'db2inst1'db2 grant execute on function 'DECODE_FUNCTION' to 'db2inst1'
4. Required: For Tivoli Common Reporting: Configure Tivoli Common Reportingto use your enterprise database. For detailed information, see the TivoliCommon Reporting information center.
Related tasks:
© Copyright IBM Corp. 2010, 2015 69
“Installing a GUI and worker server” on page 27“Installing the product in silent mode” on page 37“Installing a worker server only” on page 32“Installing ITNCM-Reports” on page 42“Installing ITNCM-Reports in silent mode” on page 44
Configuring DB2 HADRNetcool Configuration Manager can be configured to use the DB2 High Availabilityand Disaster Recovery (HADR) feature.
Before you begin
Reference the following IBM Redbook: High Availability and Disaster RecoveryOptions for DB2 for Linux, UNIX, and Windows (SG24-7363-02), where it describesthe options to configure DB2 HADR. The Redbook can be obtained at thefollowing location:http://www.redbooks.ibm.com/redbooks/pdfs/sg247363.pdf
Also reference the DB2 documentation for the specific DB2 release that you haveinstalled.
HADR is a database replication method that provides a high availability solutionfor both partial and complete site failures. This task describes how to configureNetcool Configuration Manager with DB2 HADR Automatic Client Reroute option.
Procedure1. Configure the HADR DB2 servers using the detailed HADR configuration
procedures in the Redbook or DB2 documentation.When configuring HADR, ensure that the following is true:v Primary and standby servers must have the same operating system and
patch level.v The Netcool Configuration Manager database user credentials must be the
same on DB2 primary and standby servers.v Management of HADR archive logs on both Primary and Standby DB2
servers has been discussed with your database administrator.v On each DB2 server ensure that the hostname matches the entry in
<db2home>/sqllib/db2nodes.cfg2. Once DB2 has been configured for HADR, stop all running NCM instances.3. Execute the DB2 'list db directory' command for each DB2 instance, taking note
of the output.4. If DB2 servers are configured in a direct IP mode, (that is, not sharing a virtual
IP address), then for each Netcool Configuration Manager instance, edit therseries.properties file in <NCM_INSTALL_DIR>/config/properties, and modify thejpa/connUrl property to include details of the client reroute servers.For example:jpa/connUrl=jdbc:db2://<Primary DB2 Server Fully Qualified HostName>:<Primary DB2 Server Port>/itncm:clientRerouteAlternateServerName=<Standby DB2 Server FullyQualified Host Name>;clientRerouteAlternatePortNumber=<Standby DB2Server Port>;
5. If the DB2 servers are sharing a Virtual IP (VIP), edit /<ncm installpath>/config/properties/rseries.properties and modify the hostname for
70 IBM Tivoli Netcool Configuration Manager: Installation and Configuration Guide
the jpa/connUrl variable so that it matches the DB2 VIP/hostname.For ACR the DB2 VIP/hostname should be seen in the 'Alternate serverhostname' field from the 'list db directory' command executed in step 3.
6. If you are using DB2 version 10.1:a. Download the IBM Data Server Driver for JDBC that matches your DB2
release and fixpack version from Fix Central at the following address:http://www.ibm.com/support/fixcentral/
b. On each Netcool Configuration Manager instance, back up the DB JDBCclient jars db2jcc4.jar and db2jcc_license_cu.jar found in<NCM_INSTALL_DIR>/lib to a safe location.
c. Extract the downloaded driver, and take the jars db2jcc4.jar anddb2jcc_license_cu.jar and place them in the <NCM_INSTALL_DIR>/libdirectory.
7. Restart all Netcool Configuration Manager instances.
Note: When the primary database fails (hardware failure/forced shutdown),the following is expected:v There may be a delay of up to 120 seconds for the switch to the standby
database to take place.v The Netcool Configuration Manager user interface will freeze until the
standby database takes over from the primary.v UoWs which are currently executing will fail. A database exception will be
written to the Intelliden log with the DB2 error code -4498, this errormessage also appears in the UOW log. You should re-queue failed UoWs.
v No notification will appear in the Netcool Configuration Manager UI toshow that a database switch has occurred.
v Tivoli Common Reporting reports will show the egg timer during theswitchover.
v The Netcool Configuration Manager account management page will takelonger to process adding or editing users and groups, while it waits for theswitchover to complete.
v A wizard initialization error may be generated by the Tivoli Integrated PortalWizard during a database takeover from primary to standby. If this occurs,reapply the Tivoli Integrated Portal Wizard operation.
Configuring immediate execution (Native Command Set workflow)
Fix Pack 1
The 'immediate execution' workflow is a mechanism to reserve threads for dealingwith high priority native command set execution via the Java or SOAP API.
Fix Pack 2
The new API methods are described in the API examples topic.
See the Applying an immediate or high priority native command set to a devicetopic in the IBM Tivoli Netcool Configuration Manager NSM REST API Guide.
Chapter 3. Configuring 71

Procedure1. Open /<ncm install path>/config/properties/rseries.properties within a
text editor.2. Edit the variable 'WorkerAdminManager/immediateNCSPoolSize' to modify
the thread count reserved for the immediate execution workflow.
Note: The variable 'WorkerAdminManager/maxHighPriorityPoolSize' is usedin Netcool Configuration Manager 6.4.1.1 to modify the thread count reservedfor the immediate execution workflow.
3. Open the GUI and select the Servers pane within the Systems Manager.4. Edit the variable 'Max Normal Pool Size' to modify the worker server's normal
thread pool.
Note: Reduce the 'Max Normal Pool Size' by the same value configured for the'WorkerAdminManager/maxHighPriorityPoolSize' for each affected workerserver.
Related tasks:“Configuring high priority queue”
Configuring high priority queue
Fix Pack 2
The High Priority Queue is a mechanism to reserve threads for dealing with highpriority Units of Work created through the GUI.
During the creation of a Unit of Work the priority can be set to indicate itsimportance, and set it to execute before lower priority work.
The following procedure describes how to reserve threads to deal specifically withHigh Priority Units of Work.
For related information on setting an immediate workflow execution, or oncreating a high priority import UoW, see the following topics:v “Configuring immediate execution (Native Command Set workflow)” on page
71v Importing devices in the IBM Tivoli Netcool Configuration Manager User Guide.
Procedure1. Open the GUI and select the Servers pane within the Systems Manager.2. Edit the variable 'Max High Priority Pool Size' to modify the worker server's
high priority thread pool.3. Edit the variable 'Max Normal Pool Size' to modify the worker server's normal
thread pool.4. Select OK to save the new thread pool configuration.Related tasks:“Configuring immediate execution (Native Command Set workflow)” on page 71Related reference:“Configuring a pre-emptive high-priority queue” on page 73
72 IBM Tivoli Netcool Configuration Manager: Installation and Configuration Guide

Configuring a pre-emptive high-priority queue
Fix Pack 3
The pre-emptive high-priority queue feature allows a task in an executinghigh-priority Unit of Work (UOW) to pre-empt an executing task that holds thedevice lock on the same device.
Behavior
The pre-emptive task interrupts the executing task being pre-empted and requeststhat it discontinue its operations and release the device lock. Once released, thepre-emptive task acquires the device lock and executes its operations. Apre-emptive task cannot itself be pre-empted.
A task in a UOW will pre-empt another task if and only if all of the following aretrue:v The pre-emptive task's UOW priority is set to High.v Both the pre-emptive task and the task to be pre-empted are modifying the same
device.v Both the pre-emptive task and the task to be pre-empted execute on the same
Worker server.v The task to be pre-empted is in an Executing work state.v The task to be pre-empted is executing either an Import or a Synchronize Device
to ITNCM operation.v The high-priority queue feature is configured.v The pre-emptive high-priority feature is configured, as described below.
Note: The task to be pre-empted's device driver must support pre-emption inorder for this feature to function correctly. If the underlying driver does notsupport pre-emption, the pre-empted task, although interrupted, will notdiscontinue its operations and release the device lock in the manner describedabove, causing the interrupting pre-emptive task to fail.
Configuration
The pre-emptive high-priority queue feature is configured on a per Worker serverbasis via a number of properties in the following file:<NCM_Install_Directory>/config/properties/rseries.properties
Table 9. Pre-emptive high-priority queue properties
Property name Default value Details
WorkerAdminManager/preEmptiveHighPriorityQueueActive
false This propertyenables (true) ordisables (false) thepre-emptivehigh-priority queuefeature on theWorker server.
Chapter 3. Configuring 73
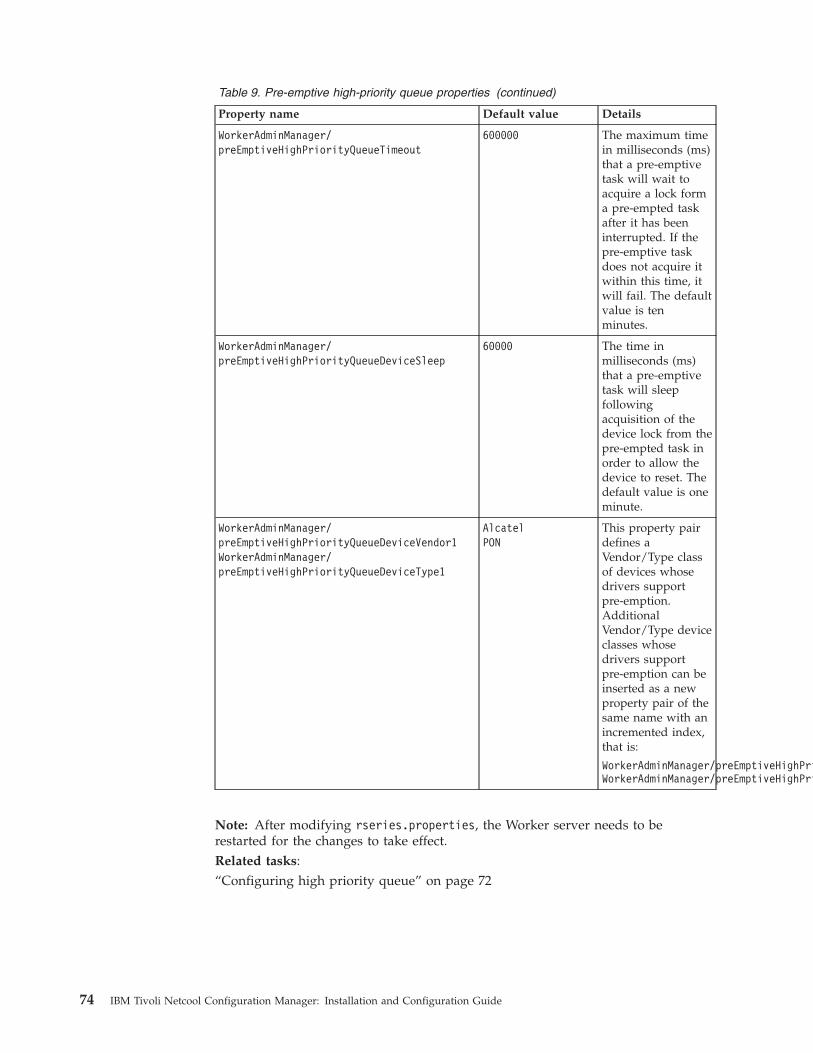
Table 9. Pre-emptive high-priority queue properties (continued)
Property name Default value Details
WorkerAdminManager/preEmptiveHighPriorityQueueTimeout
600000 The maximum timein milliseconds (ms)that a pre-emptivetask will wait toacquire a lock forma pre-empted taskafter it has beeninterrupted. If thepre-emptive taskdoes not acquire itwithin this time, itwill fail. The defaultvalue is tenminutes.
WorkerAdminManager/preEmptiveHighPriorityQueueDeviceSleep
60000 The time inmilliseconds (ms)that a pre-emptivetask will sleepfollowingacquisition of thedevice lock from thepre-empted task inorder to allow thedevice to reset. Thedefault value is oneminute.
WorkerAdminManager/preEmptiveHighPriorityQueueDeviceVendor1WorkerAdminManager/preEmptiveHighPriorityQueueDeviceType1
AlcatelPON
This property pairdefines aVendor/Type classof devices whosedrivers supportpre-emption.AdditionalVendor/Type deviceclasses whosedrivers supportpre-emption can beinserted as a newproperty pair of thesame name with anincremented index,that is:
WorkerAdminManager/preEmptiveHighPriorityQueueDeviceVendor2=SomeVendorWorkerAdminManager/preEmptiveHighPriorityQueueDeviceType2=SomeType
Note: After modifying rseries.properties, the Worker server needs to berestarted for the changes to take effect.Related tasks:“Configuring high priority queue” on page 72
74 IBM Tivoli Netcool Configuration Manager: Installation and Configuration Guide
Deploying the keystore and user filesFor installations using a distributed environment, you must copy the keystore anduser files to each worker server, or else these worker servers will not beoperational.
The default keystore and user files names are:v .intelliden.keystore
v .intelliden.user
Procedure1. On the GUI Server from where the database schema was loaded, access the
directory containing the keystore and user files. The default location is:/opt/IBM/tivoli/netcool/ncm/config/properties/
2. Rename and move both files. For example, by using the following command:mv .intelliden.keystore .intelliden.keystore.original mv.intelliden.user .intelliden.user.original
3. From the GUI + Worker server, from which both the loadDBContent andloadDBSchema scripts were executed, copy the .intelliden.keystore and.intelliden.user files to the following location on each worker server:/opt/IBM/tivoli/netcool/ncm/config/properties
4. Set each keystore file on each server to read-only using the followingcommand: chmod 444 /opt/IBM/tivoli/netcool/ncm/config/properties/.intelliden.keystore
Related tasks:“Installing a GUI and worker server” on page 27“Installing a worker server only” on page 32
Increasing the Java Heap sizeIf it is intended that network resources will have large configuration sizes beingprocessed on the Worker server, an increase in the Java heap size may be required.
The default Netcool Configuration Manager Java heap size will fail if used for theprocessing of large configurations. The maximum this may be increased to on32-bit systems is 2048 MB, while for 64-bit systems there is no limit. A 64-bit JRE ishighly recommended.
Restriction: You are restricted by the resources of your server.
To increase the Java heap size, you need to locate and edit the MemoryEnvironment script.
Procedure1. Open
/<ncm install path>/bin/utils/support/setEnv.sh
2. Edit the memory arguments as required.
Note: On a 16GB server, the Java recommendation is 4GB for the WorkerServer and 4GB each for the GUI Servers.v For a standalone Worker server, set the WORKER_MEM_ARGS parameter.v For GUI Worker servers, set the following parameters:
Chapter 3. Configuring 75
– WEBSPHERE_MAXIMUMHEAP_SIZE– WORKER_MEM_ARGS
3. Execute /<ncm install path>/bin/utils/support/setWSMem.sh to set thememory variables updated within 'setEnv.sh'.
Related tasks:“Installing a GUI and worker server” on page 27
Configuring the Java Heap size for immediate execution(Native Command Set workflow)
Fix Pack 1 In order not to overstress the system, the safest approach is for you toreduce the normal execution thread count by the number of the new immediateexecution threads that you have configured.
If you choose to add the new thread pool as additional threads, then you mustincrease the resources for the server in question.
Procedure
If you are adding Immediate Execution threads, add (or allow) a further 200MB ofRAM per thread.
Example
For example if you currently have a 4GB Heap configured for running 20 normalexecution threads on the Worker Server, and wish to add a further 2 Immediateexecution threads, then the JVM Heap allocation should be increased to 4.4GB.
Note: The server should have enough physical or virtual RAM available toaccommodate JVM Memory increases, including any memory requirements for theoperating system, other applications or utilities that are run on the server.
Internal housekeepingBy default Internal Housekeeping is not automatically run as a component. Thismust be manually configured by updating the config.xml file.
Procedure1. Access the /opt/IBM/tivoli/netcool/ncm/config/server directory.2. Edit the config.xml file to add the Internal Housekeeping component.
For example:<component>
<name>InternalHousekeepingComponent</name><class>com.intelliden.internalhousekeeping.InternalHousekeepingComponent</class>
</component>
3. Save the changes made to the config.xml file.
What to do next
For more information on housekeeping, see the IBM Tivoli Netcool ConfigurationManager Administration Guide .
76 IBM Tivoli Netcool Configuration Manager: Installation and Configuration Guide

HTTPS connection setupThis task provides information about configuring the https connection setup.
Before you begin
Make sure that you have selected the Secure checkbox on the UI launch screen.
You must be familiar with the command line and a text editor such as vi toperform this task.
Procedure1. To configure https connections, following the steps for 'Creating a CA certificate
in SSL'. This procedure can be found at http://www-01.ibm.com/support/knowledgecenter/SS7JFU_7.0.0/com.ibm.websphere.express.doc/info/exp/ae/tsec_7createcacert.html
2. You will then need to make a change to therseries.properties file.Access/opt/IBM/tivoli/netcool/ncm/config/properties.
3. Use a text editor such as vi to edit the rseries.properties file.4. The configurable property is WAS/protocol. This should be set tohttps.5. Save the changes made to the properties file, and exit.
What to do next
You will need to restart the server for the changes to take effect.
Configuration of eventpollers.xml fileIn a deployment of two or more Netcool Configuration Manager presentationservers with one Network Manager IP Editionserver reporting SNMP traps raisedby Netcool Configuration Manager, two events are generated by default for eachpresentation server when a UOW is submitted on one server.
The default eventpollers.xml file is configured to work optimally with onepresentation server. In a deployment strategy encompassing n NetcoolConfiguration Manager presentation servers, where n > 1, the file must bechanged. The eventpollers.xml file is located under /opt/IBM/tivoli/netcool/ncm/config/server.
Note: The pollerid must be the same on both servers.
Creating a Worker server general resourceYou must update the server name for the default Worker Server general resource(GR) that has been created.
Before you begin
Ensure that the Netcool Configuration Manager server is running.
Procedure1. Navigate to the Resource Browser by locating it within the tree structure on the
left hand side of the screen.2. Locate the Worker server GR, right click to select, then click Edit.
Chapter 3. Configuring 77

3. Replace the server id with that of your Worker Server name. For example:<workserver>
<server id="<Name of your Server>"><delayseconds>0</delayseconds>
</server></workserver>
4. Save the changes, exit the text editor, and then restart Netcool ConfigurationManager.
Importing sample compliance policiesYou can import sample compliance policies. These policies have been installed bydefault, and after you have imported them they will be available in the NetcoolConfiguration Manager - Compliance UI.
Before you begin
Before sample policies can be viewed, access permissions must be granted.
Note: Policies exported from a previous version of Netcool Configuration Managercan be imported into the most current version, but some errors may be reported.
Procedure1. Locate the sample policy folder:
/opt/IBM/tivoli/netcool/ncm/compliance/db/export/samplePolicies
2. Copy the sample policies from the original location to the following directory:/opt/IBM/tivoli/netcool/ncm/compliance/db/export/tablesYou can use the following command:cp /opt/IBM/tivoli/netcool/ncm/compliance/db/export/samplePolicies/sample_policies.tar/opt/IBM/tivoli/netcool/ncm/compliance/db/export/tables
3. Locate the /opt/IBM/tivoli/netcool/ncm/compliance/db/export/tablesdirectory and access the sample_policies.tar tar file. You can use thefollowing command:tar xvf sample_policies.tar
CAUTION:This step overwrites existing policies. Back up existing policy xml files, ifrequired.
4. In the /opt/IBM/tivoli/netcool/ncm/compliance/bin/utils directory, run thefollowing script to install the sample policies, and merge these with anyexisting policies:./dbImport.sh
5. To grant access privileges to the users who requires read access to the samplepolicies, use AdminUser SecurityRealm Access Control, and then add the userto Allowed Groups.
78 IBM Tivoli Netcool Configuration Manager: Installation and Configuration Guide
Enabling auto-restart of Netcool Configuration Manager after rebootYou must enable the automatic restart of Netcool Configuration Manager after aserver reboot.
Procedure1. Login to the server as root.2. Access the utils folder. The default directory is: ../ncm/bin/utils3. Within this directory, run the command enabling automatic startup following
reboot:./createAutoStart.sh
Changing platform configurationYou can change platform configuration by running the setPlatform.sh script.
Before you begin
Use this script to change the configuration of a platform. When you run it, you getthe current status.
Procedure1. Run the script by typing the following command: bash-3.2$ ./setPlatform.sh
The current platform configuration is displayed.For example:Platform Type = GUI + Worker ServerCompliance Core = EnabledReporting = EnabledDo you wish to change the current configuration of this deployment? [y/n]
2. Change the current configuration as required.
Example
The list of options presented depends on you current configuration. For example,you may be offered the following choices:1. GUI + Worker Server : Compliance Core=Enabled2. GUI + Worker Server : Compliance Core=Disabled3. Worker Server : Base=Enabled | Compliance Eval Engine=Enabled4. Worker Server : Base=Enabled | Compliance Eval Engine=Disabled5. Worker Server : Base=Disabled | Compliance Eval Engine=Enabled6. Reporting=Enabled7. Reporting=Disabled0. Exit this utility
Please choose an option from the list above (1-7) or 0 to exit this utility.
Related tasks:“Installing a GUI and worker server” on page 27“Installing a worker server only” on page 32
Chapter 3. Configuring 79
Configuring mail serversYou configure the mail server properties for both Netcool Configuration Manager -Base and Netcool Configuration Manager - Compliance.
You configure mail server properties in the rseries.properties andWorkFlowManager.properties files.
Procedure1. To configure the mail server for the Netcool Configuration Manager - Base
presentation and worker servers, perform the following edits for each server:a. Access rseries.properties:
1) cd <install_dir>/config/properties
2) vi rseries.properties
b. Search for the core/smtp property and enter the mail server hostname.c. Set Notification/sendmail= true
2. To configure the mail server for the Netcool Configuration Manager -Compliance server, perform the following edits for each server:a. Access WorkFlowManager.properties:
1) cd <install_dir>/compliance/config/properties
2) vi WorkFlowManager.properties
b. Search for the mailHost property and enter the mail server hostname.c. Optionally, change the settings for the following properties:
v mailFrom
v mailDebug (set to true to log debug information to Netcool ConfigurationManager - Compliance log files)
3. When done, restart Netcool Configuration Manager.
Enabling and disabling FIPS 140-2 modeUse this information to either enable or disable FIPS 140-2 mode.
The following table identifies the available scenarios for enabling FIPS 140-2 modeon Netcool Configuration Manager.
Note: Before enabling FIPS 140-2 mode, ensure that you have configured theHTTPS connection setup.
For more information, see “HTTPS connection setup” on page 77.
FIPS enable scenarios Main steps
Netcool Configuration Manager stand alonewithout Tivoli Common Reporting
1. Enable FIPS 140-2 mode for theembedded WebSphere Application Server(eWAS)
2. Enable FIPS 140-2 mode for the eWASJRE
3. Enable FIPS 140-2 mode for NetcoolConfiguration Manager
80 IBM Tivoli Netcool Configuration Manager: Installation and Configuration Guide
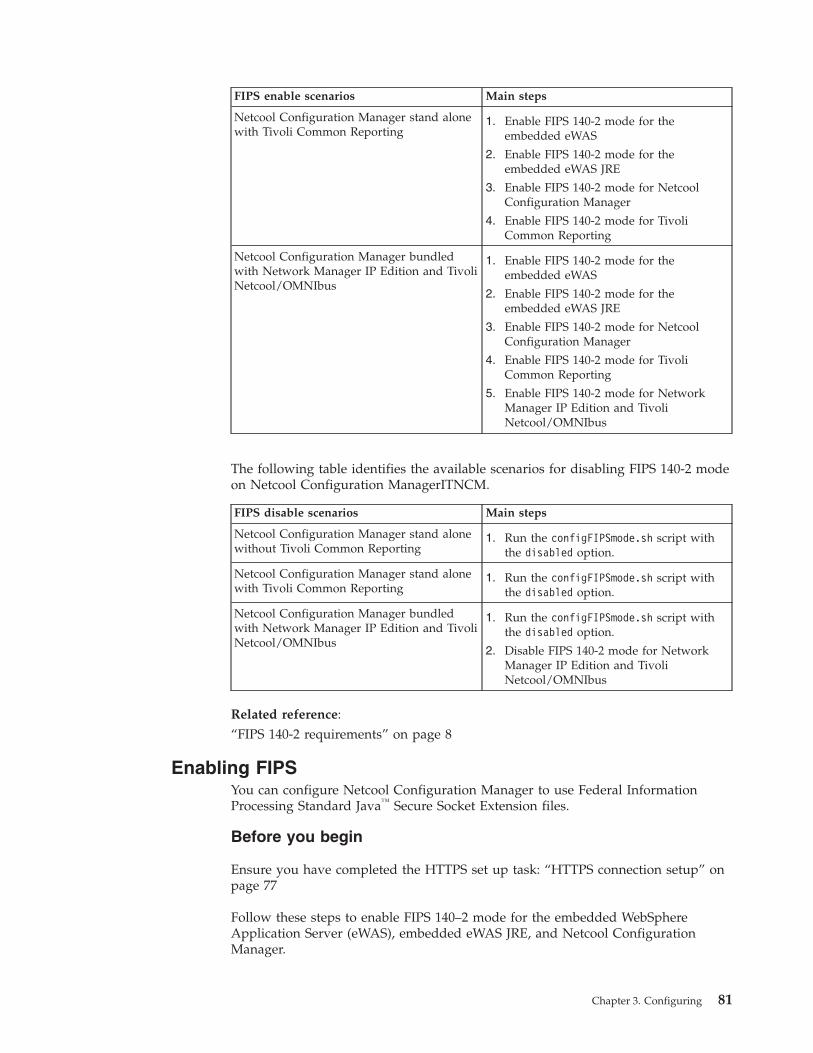
FIPS enable scenarios Main steps
Netcool Configuration Manager stand alonewith Tivoli Common Reporting
1. Enable FIPS 140-2 mode for theembedded eWAS
2. Enable FIPS 140-2 mode for theembedded eWAS JRE
3. Enable FIPS 140-2 mode for NetcoolConfiguration Manager
4. Enable FIPS 140-2 mode for TivoliCommon Reporting
Netcool Configuration Manager bundledwith Network Manager IP Edition and TivoliNetcool/OMNIbus
1. Enable FIPS 140-2 mode for theembedded eWAS
2. Enable FIPS 140-2 mode for theembedded eWAS JRE
3. Enable FIPS 140-2 mode for NetcoolConfiguration Manager
4. Enable FIPS 140-2 mode for TivoliCommon Reporting
5. Enable FIPS 140-2 mode for NetworkManager IP Edition and TivoliNetcool/OMNIbus
The following table identifies the available scenarios for disabling FIPS 140-2 modeon Netcool Configuration ManagerITNCM.
FIPS disable scenarios Main steps
Netcool Configuration Manager stand alonewithout Tivoli Common Reporting
1. Run the configFIPSmode.sh script withthe disabled option.
Netcool Configuration Manager stand alonewith Tivoli Common Reporting
1. Run the configFIPSmode.sh script withthe disabled option.
Netcool Configuration Manager bundledwith Network Manager IP Edition and TivoliNetcool/OMNIbus
1. Run the configFIPSmode.sh script withthe disabled option.
2. Disable FIPS 140-2 mode for NetworkManager IP Edition and TivoliNetcool/OMNIbus
Related reference:“FIPS 140-2 requirements” on page 8
Enabling FIPSYou can configure Netcool Configuration Manager to use Federal InformationProcessing Standard Java™ Secure Socket Extension files.
Before you begin
Ensure you have completed the HTTPS set up task: “HTTPS connection setup” onpage 77
Follow these steps to enable FIPS 140–2 mode for the embedded WebSphereApplication Server (eWAS), embedded eWAS JRE, and Netcool ConfigurationManager.
Chapter 3. Configuring 81
Procedure1. Log into the Netcool Configuration Manager client and run the following script
with one of the valid options:ncm/bin/utils/configFIPSmode.sh disabled | warn | strict
Where:v disabled — Disables FIPS 140-2 mode. In this mode there is no guarantee
that either server or client is using a FIPS compliant cipher for securecommunications and the availability of a FIPS compliant cipher provider isnot checked on either the server or the client.
v warn — Enables FIPS 140-2 mode. When Netcool Configuration Manager isoperating in FIPS WARN mode, the system issues a warning to any userattempting a secure connection using a non-FIPS compliant algorithm on theclient. Such clients have the option of proceeding with their secureconnection using their non-FIPS compliant provider or aborting theconnection. GUI clients are warned by a pop up dialogue when connecting(in both SSO and login mode). Java API clients are warned that their secureconnection is non-FIPS compliant through an exception of classcom.intelliden.icos.SecurityException. During system start up (itncm.shstart) the system prints a warning message on the console (STDERR) if theIBMJCEFIPS provider is not configured in the server's JRE.
v strict — Enables FIPS 140-2 mode. This option allows only FIPS compliantalgorithms. Use of non-FIPS algorithms will be prevented. In other words,clients (including API clients) that attempt to make a secure connection, butare not using a FIPS compliant cipher provider are rejected by the NetcoolConfiguration Manager server. GUI clients are informed via a pop updialogue. Java API clients receive an exception of classcom.intelliden.icos.SystemException.
Note: You only need to run this script once from one of the Presentationservers. In STRICT mode, if the server's JRE is not configured with theIBMJCEFIPS provider, the system will not start up (and itncm.sh start willprint an error message and exit with error code 1).
2. On each Presentation Server, log into the Integrated Solutions Console (ISC)from the following URL:http://hostname:18100/ibm/console
a. At the User ID: field, specify the super user ID.b. At the Password: field, specify the super user password.
3. Configure Netcool Configuration Manager to use FIPS.a. Click Security > SSL certificate and key management.b. Select Manage Fips under Configuration Settings, then select Enable FIPS
140-2.c. Click Apply and OK, then click Save under messages.d. Log out of the ISC.
4. Configure java.security to enable IBMJCEFIPS:
Note: Perform this and subsequent steps on both the Presentation and Workerservers.a. Open the install_dir/eWAS/java/jre/lib/security/java.security file in a
text editor.b. Uncomment the IBMJCEFIPS provider
(com.ibm.crypto.fips.provider.IBMJCEFIPS) entry before the IBMJCEprovider entry, and also renumber the other providers in the provider list.
82 IBM Tivoli Netcool Configuration Manager: Installation and Configuration Guide

The IBMJCEFIPS provider must be in the java.security file provider list.See the example at the end of this topic.
5. Enable your browser to use Transport Layer Security (TLS) 1.0:v Microsoft Internet Explorer: Open the Internet Explorer and click Tools >
Internet Options. On the Advanced tab, select the Use TLS 1.0 option.v Firefox: TLS 1.0 is enabled by default.
6. Export Lightweight Third Party Authentication keys so applications that usethese LTPA keys can be reconfigured.a. In the navigation pane, click Settings > Websphere Admin Console and
click Launch Websphere Admin Console.b. In the WebSphere Application Server administrative console, select Settings
> Global security.c. In the Global security page, from the Authentication area, click the LTPA
link.d. Under Cross-cell single sign-on, specify a key file and provide a filename
and password for the file that will contain the exported LTPA keys.e. Click Export keys.
7. For SSO, enable FIPS for any other application server, then import the updatedLTPA keys from the first server into these servers:a. Copy the LTPA key file to another application server computer.b. In the navigation pane, click Settings > Websphere Admin Console and
click Launch Websphere Admin Console.c. In the WebSphere Application Server administrative console, select Settings
> Global security.d. In the Global security page, from the Authentication area, click the LTPA
link.e. Under Cross-cell single sign-on, provide the filename and password from
above for the file that contains the exported LTPA keys.f. Click Import keys.
8. Restart the Netcool Configuration Manager server.
Example
The install_dir/eWAS/java/jre/lib/security/java.security file looks like thiswhen IBMJCEFIPS is enabled on a Linux or AIX system:security.provider.1=com.ibm.crypto.fips.provider.IBMJCEFIPSsecurity.provider.2=com.ibm.crypto.provider.IBMJCEsecurity.provider.3=com.ibm.jsse.IBMJSSEProvidersecurity.provider.4=com.ibm.jsse2.IBMJSSEProvider2security.provider.5=com.ibm.security.jgss.IBMJGSSProvidersecurity.provider.6=com.ibm.security.cert.IBMCertPathsecurity.provider.7=com.ibm.crypto.pkcs11impl.provider.IBMPKCS11Implsecurity.provider.8=com.ibm.security.cmskeystore.CMSProvidersecurity.provider.9=com.ibm.security.jgss.mech.spnego.IBMSPNEGOsecurity.provider.10=com.ibm.security.sasl.IBMSASLsecurity.provider.11=com.ibm.xml.crypto.IBMXMLCryptoProvidersecurity.provider.12=com.ibm.xml.enc.IBMXMLEncProvidersecurity.provider.13=org.apache.harmony.security.provider.PolicyProvider
The install_dir/eWAS/java/jre/lib/security/java.security file looks like thiswhen IBMJCEFIPS is enabled on a Solaris system:security.provider.1=com.ibm.crypto.fips.provider.IBMJCEFIPSsecurity.provider.2=com.ibm.security.jgss.IBMJGSSProvidersecurity.provider.3=sun.security.provider.Sun
Chapter 3. Configuring 83

security.provider.4=com.ibm.crypto.provider.IBMJCEsecurity.provider.5=com.ibm.jsse.IBMJSSEProvidersecurity.provider.6=com.ibm.jsse2.IBMJSSEProvider2security.provider.7=com.ibm.security.cert.IBMCertPathsecurity.provider.8=com.ibm.security.cmskeystore.CMSProvidersecurity.provider.9=com.ibm.security.jgss.mech.spnego.IBMSPNEGOsecurity.provider.10=com.ibm.security.sasl.IBMSASLsecurity.provider.11=com.ibm.xml.crypto.IBMXMLCryptoProvidersecurity.provider.12=com.ibm.xml.enc.IBMXMLEncProvider#security.provider.13=com.ibm.crypto.pkcs11.provider.IBMPKCS11
Connecting to the Webstart GUI with FIPS enabledThis section explains how to connect to the webstart GUI when FIPS is enabled.
Procedure1. Configure java.security to enable IBMJCEFIPS.
a. Open the JAVA_HOME/java/jre/lib/security/java.security file in a texteditor.
b. Add the IBMJCEFIPS provider(security.provider.1=com.ibm.crypto.fips.provider.IBMJCEFIPS) entry beforeany other entry, and also renumber the other providers in the provider list.The IBMJCEFIPS provider must be in the java.security file provider list.
2. Export the default trust certificate from the presentation server you wish toconnect to from Install_dir/eWAS/profiles/RSeries/etc/trust.p12.Example command to export certificate:Install_dir/eWAS/java/jre/bin/keytool -export -alias default -storepassWebAS -file Install_dir/ncmtrust.crt -storetype PKCS12 -keystoreInstall_dir/eWAS/profiles/RSeries/etc/trust.p12
3. Import the exported certificate from step 2 to your local Java cacert.Example command:c:\Program Files\IBM\Java70\jre\bin>keytool.exe -import -aliasncmaix01trust -trustcacerts -file C:\ncmaix01trust.crt -keystore"C:\Program Files\IBM\ Java70\jre\lib\security\cacerts"
v When prompted for the password the default for the java keystore is'changeit' unless the user has previously changed it.
v Accept the certificate.
What to do next
If you are enabling FIPS 140-2 mode for Netcool Configuration Manager standalone with Tivoli Common Reporting, your next task is to enable FIPS 140-2 modeon Tivoli Common Reporting.
For information on enabling FIPS 140-2 mode for Tivoli Common Reporting, seethe 'Enabling Federal Information Processing Standard' topic at the following URL:www-01.ibm.com/support/knowledgecenter/SSH2DF_2.1.0/ttcr_enabling_fips_overview.html.
84 IBM Tivoli Netcool Configuration Manager: Installation and Configuration Guide
Disabling FIPSYou can configure Netcool Configuration Manager to not use Federal InformationProcessing Standard Java Secure Socket Extension files.
Follow these steps to disable FIPS 140–2 mode for the embedded WebSphereApplication Server (eWAS), embedded eWAS JRE, and Netcool ConfigurationManager.
Procedure
Log into the Netcool Configuration Manager client and run the following scriptwith the disabled option:ncm/bin/utils/configFIPSmode.sh disabled
Where:v disabled — Disables FIPS 140-2 mode.
Note: You only need to run this script once from one of the Presentation Servers.
Configuring reporting on a stand-alone installationIf Netcool Configuration Manager Reporting has been installed stand-alone, thereare a number of configuration steps which must be followed to access the reports.
Before you begin
Access the /opt/IBM/tivoli/netcool/ncm/bin directory, and execute the startserver command: itncm.sh start. This should also start the Tivoli CommonReporting Server.
This task describes how to configure Netcool Configuration Manager Reporting ona stand-alone installation.
Procedure1. Using a browser, launch the Netcool Configuration Manager web portal from
http://<ncmserver-hostname-ip>:<port-number> (the port number will havebeen specified during installation). Select the ITNCM Reporting link from thelaunch options. Alternatively, using a browser launch the Tivoli IntegratedPortal from: http://<ncmserver-hostname-ip>:16310/ibm/console.
2. The Tivoli Integrated Portal login screen displays. Log in as the TivoliIntegrated Portal Administration User, and use the password you supplied atinstall time.
3. On the left hand side of the screen, expand the Users and Groups selection.Next, click on Manage Users.
4. Select the Create button. Create a user that matches a user in NetcoolConfiguration Manager , for example, administrator. Select the Create button tocomplete.
5. From the menu choices on the left hand side of the screen, click on the UserRoles link, and select the Search button. The user you just created will bedisplayed. Click on that user.
6. From the Available Roles menu, select the tcrPortalOperator role checkbox.Click on the Save button to finish.
Chapter 3. Configuring 85
7. Log out of the Tivoli Integrated Portal, and log back in as the user you havejust created.
8. Expand the Reporting option, and click on the ITNCMReports link.
What to do next
For more information, see the IBM Tivoli Netcool Configuration Manager User Guide.Related tasks:“Installing the product in silent mode” on page 37“Installing a GUI and worker server” on page 27“Installing a worker server only” on page 32“Installing ITNCM-Reports” on page 42“Installing ITNCM-Reports in silent mode” on page 44
Configuring OOBCUse this information about Netcool Configuration Manager to configure OOBC.Related tasks:“Configuring a daemon” on page 67“Installing a daemon” on page 64“Extracting OOBC software” on page 64“Installing OOBC software” on page 65Related reference:“Troubleshooting the OOBC software installation” on page 67Related information:“Installing OOBC” on page 64
OOBC system prerequisitesYou must ensure that the configuration of devices, OOBC and syslogd meetscertain requirements in order to allow communication between these components.Devices need to send syslog messages when their configuration is changed, andsend the syslog messages in a format that will be parsable by the OOBC daemon.
Communication prerequisites
The sample OOBC default configuration file described in “OOBC defaultconfiguration file” on page 87 contains the following configuration:"</log-pattern><!-- this pattern matches the most common log messages likeApr 17 11:53:24 test_3-2 12984: Apr 17 07:52:23.318 %SYS-5-CONFIG_I: Configuredfrom console by cisco on console--><log-pattern actionName="ConfigSyncIn" uowPriority="LOW" notifyName="FileNotifier"><pattern>([A-S][a-u][by]\s+\d{1,2}\s+\d{2}:\d{2}:\d{2})\s+\[?([\.A-Za-z0-9_-]+)\]?[\.\S+]*\s+.*?SYS-5-CONFIG_I:\s(Configured\sfrom.*by\s(.*)\s+on\s(.*$))</pattern>"
In order to produce syslog messages in the format above, the configuration for aCisco device, for example, must contain the following line:
86 IBM Tivoli Netcool Configuration Manager: Installation and Configuration Guide
service timestamps log datetime
In order to send the message to the syslog daemon, logging for the Cisco has to beconfigured at 'notification' level, and the IP address of the syslog server must beprovided in the device configuration, as in the following examples:logging buffered 4096 notificationslogging 192.168.30.112
In this example 4096 is the size of the log, and 192.168.30.112 is the IP address ofthe syslog server.
OOBC default configuration fileThe oobc.properties.xml file is the default configuration file for the OOBCsoftware. All configuration parameters are set in this file except for LOG4Jproperty settings which are in the etc/log4j.xml file. The XML schema for thisconfiguration file can be found in the installation directory of the OOBC software.
Sample
The following is an example oobc.properties.xml file with sample values. Theremainder of this section will dissect each portion of the XML file and explain itspurpose.<?xml version="1.0"?><out-of-band-change xmlns="http://intelliden.com/oobc/properties"xmlns:xsi="http://www.w3.org/2001/XMLSchema-instance" xsi:schemaLocation="http://intelliden.com/oobc/properties..\OutOfBandProperties.xsd"><!-- Properties to configure what and how we monitor --><monitor><logFile>/opt/OutOfBandChange/run1/local7.log</logFile><markerFile>/opt/OutOfBandChange/run1/log.marker</markerFile><syslogMessageSaverFile>/opt/OutOfBandChange/run1/log.syslog-messages</syslogMessageSaverFile><recoveryFile>/opt/OutOfBandChange/run1/log.recovery</recoveryFile><pollFrequencySeconds>5</pollFrequencySeconds><rollupAlgorithm>IdleTimeout</rollupAlgorithm><rollupFrequencySeconds>1800</rollupFrequencySeconds><fatalRestartSeconds>15</fatalRestartSeconds><notifyOnUnmanaged>true</notifyOnUnmanaged></monitor><!-- ITNCM API access settings --><intelliden-server><host>10.0.0.2</host><port>7001</port><user>OOBCUser</user><password>ce6f3ea926ad712172f8f9d7a67ccc07</password><protocol>iiop</protocol><initialContextFactory>com.ibm.websphere.naming.WsnInitialContext-Factory</initialContextFactory></intelliden-server><!-- List of ITNCM and other third party system users --><!-- List of ITNCM worker servers --><worker-servers><server>intelliden</server></worker-servers><syslog-users><!-- ITNCM system users do work on behalf of ITNCM.Syslog entries that contain these user ID’s are skipped. --><intelliden-users><user>intelliden</user></intelliden-users><!-- Third party system users do work that needs synchronizationinto ITNCM but
Chapter 3. Configuring 87
nobody needs to be notified. --><authorized-users><user>3rdPartyUser</user></authorized-users></syslog-users><syslog-match><!-- this pattern matches the most common log messages likeApr 17 06:46:24 test_2-1 12980: Apr 17 02:46:23.318 EDT: %SYS-5-CONFIG_I: Configured from console by unknown on vty0 (10.0.0.1)--><log-pattern actionName="ConfigSyncIn" uowPriority="LOW" notifyName="FileNotifier"><pattern>([A-S][a-u][by]\s+\d{1,2}\s+\d{2}:\d{2}:\d{2})\s+\[?([\.A-Za-z0-9_-]+)\]?[\.\S+]*\s+.*?SYS-5-CONFIG_I:\s(Configured\sfrom.*by\s(.*)\s+on\s(.*$))</pattern><timeStampIndex>1</timeStampIndex><dnsNameIndex>2</dnsNameIndex><userIdIndex>4</userIdIndex><descriptionIndex>3</descriptionIndex><sourceHostIndex>5</sourceHostIndex></log-pattern><!-- this pattern matches the most common log messages likeApr 17 11:53:24 test_3-2 12984: Apr 17 07:52:23.318%SYS-5-CONFIG_I: Configured from console by cisco on console--><log-pattern actionName="ConfigSyncIn" uowPriority="LOW" notifyName="FileNotifier"><pattern>([A-S][a-u][by]\s+\d{1,2}\s+\d{2}:\d{2}:\d{2})\s+\[?([\.A-Za-z0-9_-]+)\]?[\.\S+]*\s+.*?SYS-5-CONFIG_I:\s(Configured\sfrom.*by\s(.*)\s+on\s(.*$))</pattern><timeStampIndex>1</timeStampIndex><dnsNameIndex>2</dnsNameIndex><userIdIndex>4</userIdIndex><descriptionIndex>3</descriptionIndex><sourceHostIndex>5</sourceHostIndex></log-pattern><!-- this pattern matches the most common log messages likeApr 17 11:53:24 test_3-2 12984: Apr 17 07:52:23.318%SYS-5-CONFIG_I: Configured from console by vty0 (10.0.0.1)--><log-pattern actionName="ConfigSyncIn" uowPriority="LOW" notifyName="FileNotifier"><pattern>([A-S][a-u][by]\s+\d{1,2}\s+\d{2}:\d{2}:\d{2})\s+\[?([\.A-Za-z0-9_-]+)\]?[\.\S+]*\s+.*?SYS-5-CONFIG_I:\s(Configured\sfrom.*by\s(.*)\s+on\s(.*$))</pattern><timeStampIndex>1</timeStampIndex><dnsNameIndex>2</dnsNameIndex><userIdIndex>4</userIdIndex><descriptionIndex>3</descriptionIndex><sourceHostIndex>5</sourceHostIndex></log-pattern><log-pattern actionName="Import" uowPriority="HIGH" notifyName="FileNotifier"><pattern>([A-S][a-u][by]\s+\d{1,2}\s+\d{2}:\d{2}:\d{2})\s+\[?([\.A-Za-z0-9_-]+)\]?[\.\S+]*\s+.*?SYS-5-SUMTHIN_ELSE:\s(Configured\sfrom.*by\s(.*)\s+on\s(.*$))</pattern><timeStampIndex>1</timeStampIndex><dnsNameIndex>2</dnsNameIndex><userIdIndex>4</userIdIndex><descriptionIndex>3</descriptionIndex><sourceHostIndex>5</sourceHostIndex></log-pattern><log-pattern actionName="Reload" uowPriority="MEDIUM" notifyName="FileNotifier">
88 IBM Tivoli Netcool Configuration Manager: Installation and Configuration Guide

<pattern>([A-S][a-u][by]\s+\d{1,2}\s+\d{2}:\d{2}:\d{2})\s+\[?([\.A-Za-z0-9_-]+)\]?[\.\S+]*\s+.*?SYS-5-RELOAD:\s(Reload\srequested\sby\s(.*)\s+on\s(.*$))</pattern><timeStampIndex>1</timeStampIndex><dnsNameIndex>2</dnsNameIndex><userIdIndex>4</userIdIndex><descriptionIndex>3</descriptionIndex><sourceHostIndex>5</sourceHostIndex></log-pattern></syslog-match><!--All current implementations of the OutOfBandAction interface.These actions are referenced by name from a log-pattern match.An instance of the OutOfBandAction class is invoked whenever a syslogmatch is found. It is the responsibility of the action objectto take whatever steps are necessary to synchronize the out-of-bandchanges to the network device with ITNCM or vice versa.--><actions><action name="Import" priority="2"><className>com.intelliden.oobc.impl.ImportFromDevice</className><properties><property name="overrideConflicts" value="true"/></properties></action><action name="ConfigSyncIn" priority="3"><className>com.intelliden.oobc.impl.SynchronizeFromDevice</className><properties><property name="overrideConflicts" value="true"/></properties></action><action name="Reload" priority="1"><className>com.intelliden.oobc.impl.ReloadAction</className><properties><property name="overrideConflicts" value="true"/><property name="secondsBetweenUOWs" value="30"/><property name="realmPath" value="ITNCM/commandSets"/><property name="commandSetName" value="testCommandSet"/></properties></action></actions><!--The default implementation of the OutOfBandNotifier interface.The OutOfBandNotifier is notified of non-ITNCM and un-Authorizeduser access to an ITNCM managed network resources.One example of an OutOfBandNotifier interface is an EmailNotifierclass that sends email messages in its process(Event e) method.The following implementation is a file notifier which writes formattedmessages to the output file.--><notifiers><notify name="FileNotifier" priority="1"><className>com.intelliden.oobc.impl.FileSerializer</className><pollFrequency>5000</pollFrequency><properties><property name="outFile" value="/opt/OutOfBandChange/run2/notification.log"/><property name="format"value="{0,date,yyyyMMddHHmmss’Z’}|{1}|ITNCMAlarm|{2}|{3} of{4} syslog events. {5}"/><property name="formatDNF"value="{0,date,yyyyMMddHHmmss’Z’}|{1}|ITNCMNot-Found|{2}|Device {1} not currently managed by ITNCM. {3} of {4} syslogevents. {5}"/>
Chapter 3. Configuring 89
</properties></notify></notifiers></out-of-band-change>
Configure out-of-band changeThe <out-of-band-change> section of the oobc.properties.xml file contains theelements that define some administrative XML information as well as XML schemaname space.
XML Syntax
The following example shows the XML code for the out-of-band-change element:<out-of-band-changexmlns="http://intelliden.com/oobc/properties"xmlns:xsi="http://www.w3.org/2001/XMLSchema-instance"xsi:schemaLocation="http://intelliden.com/oobc/properties..\OutOfBandProperties.xsd">
Description
The top portion of the document contains some administrative XML informationsuch as the version of XML and the associated schema for this file.
The root element of this XML document is the <out-of-band-change> element. Ithas a default XML Schema name space which refers to theOutOfBandPropertes.xsd. The only other XML Schema name space declared is the'xsi' name space for the XML Schema data types.
Configure monitorThe <monitor> section of the oobc.properties.xml file contains the elements thatcontrol the basic behavior of the OutOfBandChange daemon.
XML Syntax
The following example shows the XML code for the <monitor> element:<monitor><logFile>@syslog.file.name@</logFile><markerFile>@oobc.marker.file@</markerFile><syslogMessageSaverFile>@oobc.syslog.saver.file@</syslogMessageSaverFile><recoveryFile>@oobc.recovery.file@</recoveryFile><pollFrequencySeconds>5</pollFrequencySeconds><rollupAlgorithm>IdleTimeout</rollupAlgorithm><rollupFrequencySeconds>1800</rollupFrequencySeconds><fatalRestartSeconds>15</fatalRestartSeconds><notifyOnUnmanaged>true</notifyOnUnmanaged></monitor>
Description
The <monitor> section of the oobc.properties.xml file gives fine control over whatsyslog file is monitored and how often the background threads will poll eventqueues, rollup events, and restart after failure.
The following table describes the XML elements specified within the <monitor>section of the oobc.properties.xml file:
90 IBM Tivoli Netcool Configuration Manager: Installation and Configuration Guide
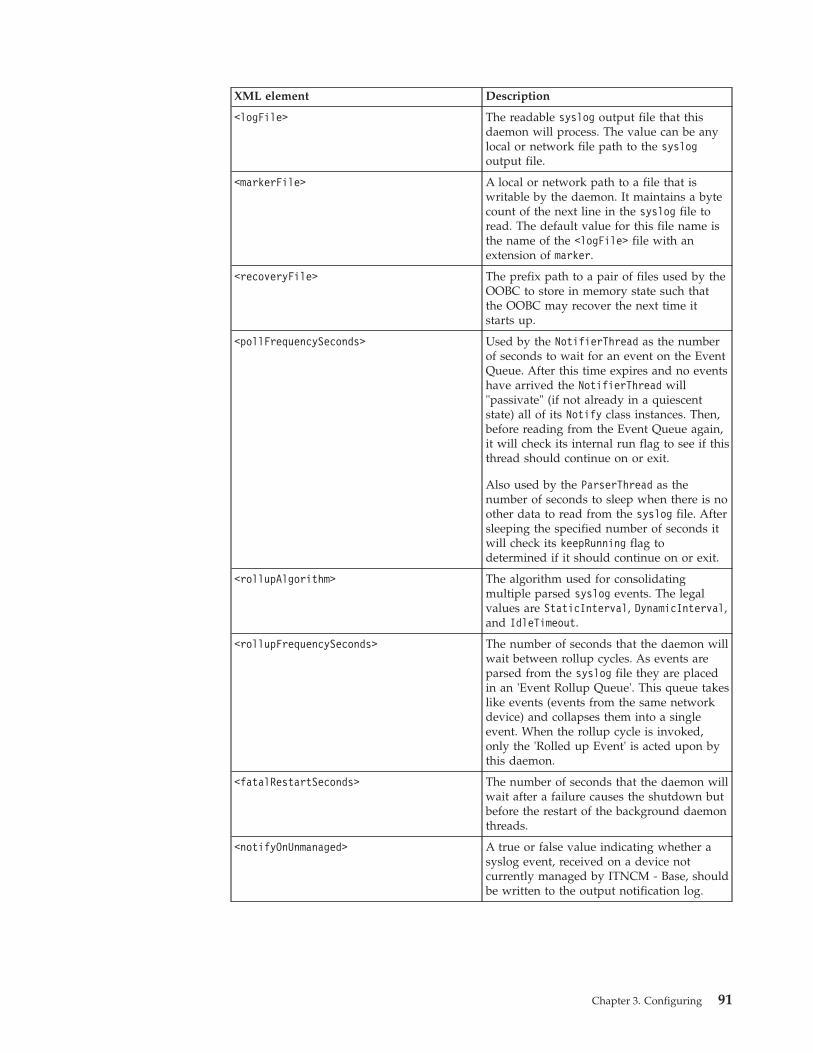
XML element Description
<logFile> The readable syslog output file that thisdaemon will process. The value can be anylocal or network file path to the syslogoutput file.
<markerFile> A local or network path to a file that iswritable by the daemon. It maintains a bytecount of the next line in the syslog file toread. The default value for this file name isthe name of the <logFile> file with anextension of marker.
<recoveryFile> The prefix path to a pair of files used by theOOBC to store in memory state such thatthe OOBC may recover the next time itstarts up.
<pollFrequencySeconds> Used by the NotifierThread as the numberof seconds to wait for an event on the EventQueue. After this time expires and no eventshave arrived the NotifierThread will"passivate" (if not already in a quiescentstate) all of its Notify class instances. Then,before reading from the Event Queue again,it will check its internal run flag to see if thisthread should continue on or exit.
Also used by the ParserThread as thenumber of seconds to sleep when there is noother data to read from the syslog file. Aftersleeping the specified number of seconds itwill check its keepRunning flag todetermined if it should continue on or exit.
<rollupAlgorithm> The algorithm used for consolidatingmultiple parsed syslog events. The legalvalues are StaticInterval, DynamicInterval,and IdleTimeout.
<rollupFrequencySeconds> The number of seconds that the daemon willwait between rollup cycles. As events areparsed from the syslog file they are placedin an 'Event Rollup Queue'. This queue takeslike events (events from the same networkdevice) and collapses them into a singleevent. When the rollup cycle is invoked,only the 'Rolled up Event' is acted upon bythis daemon.
<fatalRestartSeconds> The number of seconds that the daemon willwait after a failure causes the shutdown butbefore the restart of the background daemonthreads.
<notifyOnUnmanaged> A true or false value indicating whether asyslog event, received on a device notcurrently managed by ITNCM - Base, shouldbe written to the output notification log.
Chapter 3. Configuring 91

Configure Netcool Configuration Manager serverThe <intelliden-server> section of the oobc.properties.xml file contains theelements that define all of the parameters required to communicate (via the API)with the Netcool Configuration Manager server.
XML Syntax
The following example shows the XML code for the <intelliden-server> element:<intelliden-server><host>@intelliden.host@</host><port>@intelliden.port@</port><user>@intelliden.user@</user><password>@intelliden.pass@</password><protocol>@intelliden.protocol@</protocol><initialContextFactory>com.ibm.websphere.naming.WsnInitialContextFactory</initialContextFactory></intelliden-server>
Description
The <intelliden-server> section of the oobc.properties.xml file gives fine controlover server and protocol information as well as user and password details.
The following table describes the XML elements specified within the<intelliden-server> section of the oobc.properties.xml file:
Table 10. The intelliden-server XML elements in the oobc.properties.xml file
XML element Description
<host> The IP address or DNS name of the server that NetcoolConfiguration Manager is installed on.
<port> The port that the Netcool Configuration Manager HTTP serverlistens on. This is typically either 443 for securecommunications (via HTTPS) or 80 for normal communication(via HTTP).
<user> The user name to log-in to Netcool Configuration Manager. Allwork performed by the OutOfBandChange daemon will beperformed as this user within Netcool Configuration Manager.
<password> The encrypted password for the user specified above. The cleartext password entered by the user during the installationprocess is encrypted before it is stored in the configuration file.
<protocol> There are only two legal values for this field and it depends onhow Netcool Configuration Manager was installed. For a BEAWebLogic Server installation the protocol is 't3'. For an IBMWebSphere installation the protocol is 'iiop'.
<initialContextFactory> There are only two legal values for this field and it depends onhow Netcool Configuration Manager was installed. For a BEAWebLogic Server installation the initial context factory is'weblogic.jndi.WLInitialContextFactory'. For an IBM WebSphereinstallation the protocol is at the following URL:http://com.ibm.websphere.naming.WsnInitialContextFactory
92 IBM Tivoli Netcool Configuration Manager: Installation and Configuration Guide
Configure syslog usersThe <syslog-users> section of the oobc.properties.xml file contains the elementsthat define user IDs.
XML Syntax
The following example shows the XML code for the <syslog-users> element:<syslog-users><!-- ITNCM system users do work on behalf of ITNCM.Syslog entries that contain these user ID’s are skipped. --><intelliden-users><user>@intelliden.worker@</user></intelliden-users><!-- Third party system users do work that needs synchronizationinto ITNCM but nobody needs to be notified. --><authorized-users><user>@3rd.party.user@</user></authorized-users></syslog-users>
Description
The <syslog-users> section of the oobc.properties.xml file defines two uniquesets of user IDs. There are three types of users that the OutOfBandChange daemonlooks for. First there is the ITNCM - Base user that performs all the Units of Work.Any syslog entry showing work performed by this user is automaticallydisregarded since it was technically done within the bounds of ITNCM - Base. The<intelliden-users> element can occur only once but can contain multiple <user>elements. Typically only the icosftpuser is required since this is the default useraccount that performs device updates from ITNCM - Base.
The second category of users is the Authorized 3rd Party users. These users aretypically system users of 3rd party applications that are allowed to make directchanges to the device. In this case no external notification is required but asynchronization action must occur to keep ITNCM - Base up to date with thecontents on the network device. The <authorized-users> element must only occuronce but it can contain multiple <user> entries, one for each 3rd party user thatmay make changes directly to the network device.
The final category of users encompasses all users not in the ITNCM - Base or 3rdParty categories. These users have gone outside of the control of ITNCM - Base tomake changes and therefore are both a non-ITNCM - Base and un-authorized user.In this case, an action is performed to synchronize the device with ITNCM - Baseand a notification is made to an external system.
The following table describes the XML elements specified within the syslog-userssection of the oobc.properties.xml file:
XML element Description
<intelliden-users> Must occur only once and represents the setof users that are in the 'Intelliden' categoryof users.
<authorized-users> Must occur only once and represents allusers in the 'Authorized 3rd Party' category.
Chapter 3. Configuring 93
XML element Description
<user> A child element of both <authorized-users>and <intelliden-users>. There can bemultiple peer <user> elements. This fieldshould contain the user id as it is found inthe syslog file.
Configure syslog matchThe <syslog-match> section of the oobc.properties.xml file contains the elementsthat describe how the OutOfBandChange daemon should parse the syslog file.
XML Syntax
The following example shows the XML code for the <syslog-match> element:<syslog-match><!-- Matches Sthe most common log messages likeApr 17 06:46:24 test_2-1 12980: Apr 17 02:46:23.318 EDT: %SYS-5-CONFIG_I:Configured from console by unknown on vty0 (10.0.0.1) --><log-pattern actionName="ConfigSyncIn" uowPriority="LOW" notifyName="FileNotifier"><pattern>([A-S][a-u][by]\s+\d{1,2}\s+\d{2}:\d{2}:\d{2})\s+\[?([\.A-Za-z0-9_-]+)\]?[\.\S+]*\s+.*?SYS-5-CONFIG_I:\s(Configured\sfrom.*by\s(.*)\s+on\s(.*$))</pattern><timeStampIndex>1</timeStampIndex><dnsNameIndex>2</dnsNameIndex><userIdIndex>4</userIdIndex><descriptionIndex>3</descriptionIndex><sourceHostIndex>5</sourceHostIndex></log-pattern><!-- this pattern matches the most common log messages likeApr 17 11:53:24 test_3-2 12984: Apr 17 07:52:23.318 EDT:%SYS-5-CONFIG_I: Configured from console by vty0 (10.0.0.1)--><log-pattern actionName="ConfigSyncIn" uowPriority="LOW" notifyName="FileNotifier"><pattern>([A-S][a-u][by]\s+\d{1,2}\s+\d{2}:\d{2}:\d{2})\s+\[?([\.A-Za-z0-9_-]+)\]?[\.\S+]*\s+.*?SYS-5-CONFIG_I:\s(Configured\sfrom.*by\s(.*)\s+on\s(.*$))</pattern><timeStampIndex>1</timeStampIndex><dnsNameIndex>2</dnsNameIndex><userIdIndex>4</userIdIndex><descriptionIndex>3</descriptionIndex><sourceHostIndex>5</sourceHostIndex></log-pattern><log-pattern actionName="Import" uowPriority="HIGH" notifyName="FileNotifier"><pattern>([A-S][a-u][by]\s+\d{1,2}\s+\d{2}:\d{2}:\d{2})\s+\[?([\.A-Za-z0-9_-]+)\]?[\.\S+]*\s+.*?SYS-5-SUMTHIN_ELSE:\s(Configured\sfrom.*by\s(.*)\s+on\s(.*$))</pattern><timeStampIndex>1</timeStampIndex><dnsNameIndex>2</dnsNameIndex><userIdIndex>4</userIdIndex><descriptionIndex>3</descriptionIndex><sourceHostIndex>5</sourceHostIndex></log-pattern><log-pattern actionName="Reload" uowPriority="MEDIUM" notifyName="FileNotifier"><pattern>([A-S][a-u][by]\s+\d{1,2}\s+\d{2}:\d{2}:\d{2})\s+\[?([\.A-Za-z0-9_-
94 IBM Tivoli Netcool Configuration Manager: Installation and Configuration Guide
]+)\]?[\.\S+]*\s+.*?SYS-5-RELOAD:\s(Reload\srequested\sby\s(.*)\s+on\s(.*$))</pattern><timeStampIndex>1</timeStampIndex><dnsNameIndex>2</dnsNameIndex><userIdIndex>4</userIdIndex><descriptionIndex>3</descriptionIndex><sourceHostIndex>5</sourceHostIndex></log-pattern></syslog-match>
Description
The <syslog-match> section of the oobc.properties.xml file gives fine control overwhat syslog entries are considered an 'Out-Of-Band' change as well as what'actions' and 'notifications' must occur because of the 'Out-Of-Band' change. Thereis only one <syslog-match> element but it will typically contain multiple<log-pattern> elements for each of the various types of entries found in a typicalsyslog file.
The following table describes the XML elements specified within the<syslog-match> section of the oobc.properties.xml file:
Table 11. The syslog-match XML elements in the oobc.properties.xml file
XML element Description
<syslog-match> This is an outer wrapper element that contains one or more<log-pattern> elements.
<log-pattern> A log-pattern describes what pattern must be matched within thesyslog file before it is considered an 'Out-Of-Band' change event. Thiselement has two attributes which reference other elements in thisdocument by name. It contains one attribute called actionName whichis a reference to an action that must be performed.
The second attribute called notifyName is a reference to a notificationthat must occur if a match is made in the syslog file. For details onthese references see Configure Actions and Configure Notifiers.
The third attribute called uowPriority indicates the priority that theunitOfWork will be submitted with. This attribute is optional.Possible values are (not case sensitive) 'LOW', 'MEDIUM' and'HIGH'. If this property is not specified or an incorrect value isspecified then a default of MEDIUM will be used. Since multiple'Out-Of-Band' changes get rolled up into a single 'rollup event' anddifferent events within the 'rolledup event' have different UOWpriorities associated with them, the highest UOWPriority will beselected. Refer to the example above: if there are two log messagesfor the same device that match two of the log patterns (in this case alog pattern match for the Import action and one for the Config-SyncIn action) - the UOWPriority of the action that is chosen will beHIGH. So, depending on the priority flag setting in the action youmay get a configuration sync UOW submitted with a high priority.
<pattern> The pattern contains a Perl 5 regular expression syntax describingwhat pattern of text to match within the syslog file. If this patternmatches an entry in the syslog file, then the syslog entry is parsedeven further and the appropriate 'action' and 'notification' will occur.If no match then this syslog entry is ignored.
Chapter 3. Configuring 95
Table 11. The syslog-match XML elements in the oobc.properties.xml file (continued)
XML element Description
<timeStampIndex> The index of the sub-expression within the 'pattern' that contains thetime stamp.
Also used by the ParserThread as the number of seconds to sleepwhen there is no other data to read from the syslog file. Aftersleeping the specified number of seconds it will check its keepRunningflag to determined if it should continue on or exit.
<dnsNameIndex> The index of the sub-expression within the 'pattern' that contains theDNS name (or IP address) of the network device that was changed.
<userIdIndex> The index of the sub-expression within the 'pattern' that contains theuser name that caused a change to the network device.
<descriptionIndex> The index of the sub-expression within the 'pattern' that contains thedescription of the change that occurred to the network device.
Configure actionsThe <actions> section of the oobc.properties.xml file contains the elements thatdescribe the different synchronization actions that can be invoked.
XML Syntax
The following example shows the XML code for the <actions> element:<actions><action name="Reload" uowPriority="HIGH" priority="1"><className>com.intelliden.oobc.impl.ReloadAction</className><properties><property name="overrideConflicts" value="true"/><property name="secondsBetweenUOWs" value="30"/><property name="realmPath" value="capstonec/commandsets"/><property name="commandSetName" value="SetupSyslog"/></properties></action></actions>
Description
The <actions> section of the oobc.properties.xml file contains the elements thatdescribe the different synchronization actions that can be invoked. As'Out-Of-Band' changes occur, some 'action' must occur to synchronize ITNCM -Base with the network device. The types of synchronization actions that can occurwill be described within individual <action> elements.
The following table describes the XML elements specified within the <actions>section of the oobc.properties.xml file:
96 IBM Tivoli Netcool Configuration Manager: Installation and Configuration Guide
Table 12.
XML element Description
<action> Describes a synchronization action that c an be invoked for an'Out-Of-Band' change. This element contains both a name and priorityattribute. The name attribute is an identifier for this action that is referred toby the actionName attribute of the <log-pattern> element.
Since multiple 'Out-Of-Band' changes get rolled up into a single 'rollupevent' and that single event could potentially have multiple actionreferences, the priority attribute of the <action> element is used todetermine which action should be taken. Each action should have a uniquepriority number with a priority of 1 being the highest priority action.
<className> The fully qualified package/class name of the Java class that implementsthe OutOfBandAction interface. You can write your own implementation oruse one of three implementations that are provided for you under thecom.intelliden.oobc.impl package.
<properties> The various pluggable classes that implement the OutOfBandActioninterface could require specific initialization parameters. These are specifiedin the <properties> section with zero or more <property> elements.
<property> A <property> element has both a name and name attribute for specifying aninitialization parameter to an action class.
There are three implementations of the OutOfBandAction interfaceprovided for you and all reside within the com.intelliden.oobc.implpackage. The first OutOfBandAction implementation class isSynchronizeFromDevice, which as its name implies executes theConfigurationSynchronizationWork UOW with a synchronization directionof 'from device'. This UOW has the behavior of pulling the devicesconfiguration and updating ITNCM - Base.
The second action class is Import which executes theNetworkResourceImportWork UOW. This has nearly identical behavior asthe SynchronizeFromDevice action class except that it also extracts thelatest vendor, type, model, and OS values from the device to populate intoITNCM - Base.
The third action class is Reload. This class first invokes theImportNetworkResource UOW followed by the CommandSetWork UOW.This action class requires three initialization parameters as follows:
<property name="secondsBetweenUOWs" value="30"/><property name="realmPath" value="capstonec/commandsets"/><property name="commandSetName" value="SetupSyslog"/>
The secondsBetweenUOWs property specifies the number of seconds towait between the scheduled start times of the ImportNetworkResourceUOW and the CommandSetWork UOW. The realmPath is a slash "/"separated list of realm names to traverse to find the command set. ThecommandSetName is the command set that should be invoked by thisaction.
Handling work conflicts
By default, ITNCM - Base will reject UOWs (Units of Work) submitted againstdevices with other UOWS pending or executing. The OOBC software can beconfigured to override this behavior. To allow UOWs to be submitted againstdevices with pending work, add the overrideConflicts property with a value oftrue to the action representing the type of UOW you wish to submit. For example:
Chapter 3. Configuring 97
<action name="Import" priority="2"><className>com.intelliden.oobc.impl.ImportFromDevice</className><properties><property name="someproperty" value="somevalue"/><property name="overrideConflicts" value="true"/><property name="someotherproperty" value="someothervalue"/></properties></action>
Configure notifiersThe <notifiers> section of the oobc.properties.xml file contains the elements thatdescribe the different notifications that can be invoked.
XML Syntax
The following example shows the XML code for the <notifiers> element:<notifiers><notify name="FileNotifier" priority="1"><className>com.intelliden.oobc.impl.FileSerializer</className><pollFrequency>5000</pollFrequency><properties><property name="outFile" value="logs/OOBCNotification.log"/><property name="format" value="{0,date,yyyyMMddHHmmss’Z’}|{1}|IntellidenAlarm|{2}|{3} of {4} syslog events. {5}"/><property name="formatDNF" value="{0,date,yyyyMMddHHmmss’Z’}|{1}|IntellidenDeviceNotFound|{2}|Device {1} not currently managed by Intelliden.{3} of {4} syslog events. {5}"/></properties></notify></notifiers>
Description
The <notifiers> section of the oobc.properties.xml file contains the elements thatdescribe the different notifications that can be invoked. As 'Out-Of-Band' changesoccur some 'notifications' must occur to alert personnel about changes to a networkdevice. The types of notifications that can occur will be described within individual<notify> elements.
The following table describes the XML elements specified within the <notifiers>section of the oobc.properties.xml file:
Table 13. The notifiers XML elements in the oobc.properties.xml file
XML element Description
<notify> Describes a notification that can be invoked for an 'Out-Of- Band'change if the user making the change is not in the ITNCM - Base orAuthorized 3rd Party lists of users. This element contains both a nameand priority attribute. The name attribute is an identifier for this<notify> element that is referred to by the notifyName attribute of the<logpattern> element.
Since multiple 'Out-Of-Band' changes get rolled up into a single 'rollupevent' and that single event could potentially have multiple <notify>references, the priority attribute is used to determine whichnotification should be invoked. Each <notify> element should also havea priority attributes which specifies a unique priority number with apriority of 1 being the highest priority.
98 IBM Tivoli Netcool Configuration Manager: Installation and Configuration Guide
Table 13. The notifiers XML elements in the oobc.properties.xml file (continued)
XML element Description
<className> The fully qualified package/class name of the Java class thatimplements the OutOfBandNotifier interface. You can write your ownimplementation or use the default implementation that is provided foryou under the com.intelliden.oobc.impl package.
<properties> The various pluggable classes that implement the OutOfBandNotifyinterface could require specific initialization parameters. These arespecified in the <properties> section with zero or more <property>elements.
<property> A <property> element has both a name and value attribute forspecifying an initialization parameter to a notify class.
The FileNotifier (implemented by thecom.intelliden.oobc.impl.FileSerializer class) is currently the onlyimplementation of the OutOfBandNotifier interface. Its sole purpose isto write all out of band change notifications to an output file. TheFileNotifier requires the following properties be defined:
<property name="outFile" value="logs/OOBCNotification.log"/><property name="format" value="{0,date,yyyyMMddHHmmss’Z’}|{1}|IntellidenAlarm|{2}|{3} of {4} syslog events. {5}"/><property name="formatDNF" value="{0,date,yyyyMMddHHmmss’Z’}|{1}|IntellidenDeviceNotFound|{2}|Device {1} not currentlymanaged by Intelliden.{3} of {4} syslog events. {5}"/>
The first property is named outFile and specifies the path to the outputlog file that the notifier will write to.
The second and third properties are format and formatDNF whichspecify the output format of the message written to the log file in thecase where an OOBC action was performed or when an action couldnot be performed because the device was not found (DNF) in ITNCM -Base. Refer to the notifyOnUnmanged property described in “Configuremonitor” on page 90 to learn how to enable/disable messages fordevices not managed by ITNCM - Base.
Both the format and formatDNF can be individually tailored. Thefollowing list describes the arguments that can be specified in theformatted message. Refer to the value of the format and formatDNFproperties in the previous example.
v {0} {0,date,yyMMdd} — This argument is the date/time from thesyslog event. Its output format can be specified via the 2nd and 3rdparameters within the { } braces. Refer to the Sun documentationhttp://java.sun.com/j2se/1.4.2/docs/api/ for further details.
v {1} — The name of the network resource (IP address or a DNSname) as extracted from the syslog message.
v {2} — The user id, extracted from the syslog message, of theindividual who made the out of band change to the networkresource.
v {3} — The number of syslog events rolled up for the user specifiedin {2}.
v {4} — The total number of syslog events rolled up into the singleOOBC action. This number could potentially include syslog eventsfrom users other than the user in {2}.
v {4} — The description of the first syslog event rolled up into theOOBC action.
Chapter 3. Configuring 99

100 IBM Tivoli Netcool Configuration Manager: Installation and Configuration Guide
Chapter 4. Upgrading
Use this information to upgrade Netcool Configuration Manager from version6.3.0.x or version 6.4.0.x to version 6.4.1.
Important: If you have Netcool Configuration Manager 6.2.0.x, you must followthe upgrade procedures in the Netcool Configuration Manager version 6.4.0documentation and upgrade to version 6.4.0 first, before returning to this sectionand upgrading to Netcool Configuration Manager 6.4.1.
Note: This guide makes use of examples where the default directory path of/opt/IBM/tivoli/netcool/ncm is shown. Bear in mind if you have used anotherdirectory in your installation, enter the appropriate path here instead.
Upgrade from Netcool Configuration Manager 6.3.0.x to 6.4.1Use this information to upgrade from Netcool Configuration Manager 6.3.0.x to6.4.1 only.
Pre-upgrade proceduresUse the following pre-upgrade procedure when upgrading Netcool ConfigurationManager version 6.3.0.x to version 6.4.1.
Before you begin
Important: Ensure no work is executing on any of the servers before attempting toupgrade, as data loss may occur.
Remember: It is imperative that all databases are backed up prior to running theupgrade procedure.
Procedure1. Back up the Netcool Configuration Manager database.2. You should confirm that the current installed version of Netcool Configuration
Manager is 6.3.0.x. Access the /opt/IBM/tivoli/netcool/ncm/bin directory, andrun the following script: ./itncm.sh status. Check that the Load version is6.3.0.x.
What to do next
Now, you download the installer.
Downloading the upgrade installerBefore performing the upgrade procedure, you download the bin files used forinstalling Netcool Configuration Manager onto the existing 6.3.0.x server.
Before you begin
Netcool Configuration Manager - Base can be installed using either the productmedia, or by downloading it from the IBM Passport Advantage® Web site:http://www.ibm.com/software/howtobuy/passportadvantage
© Copyright IBM Corp. 2010, 2015 101
Note: The installers for Solaris, Linux and AIX are available. Please ensure thatyou retrieve the correct installer for the operating system you are using. A Javavirtual machine is included with this download. This will run automatically whenyou run the shell script.
This task describes how to download the upgrade installer.
Procedure1. Obtain the Netcool Configuration Manager - Base installer (ITNCM_<OS
type>_<bit type>.bin).2. Obtain the Tivoli Common Reporting installer (if required) (ITNCM_Reports_<OS
type>_<bit type>.tar) and place it in the same directory as the main NetcoolConfiguration Manager 6.4.1 installer.
3. Stop the existing installation of 6.3.0.x. Access the /opt/IBM/tivoli/netcool/ncm/bin and run the following command:./itncm.sh stopYou will be prompted for the Netcool Configuration Manager superuserusername and password before the script runs. If this is a stand-alone instanceof Netcool Configuration Manager that has Reporting installed, you will also beprompted for the tipadmin password.
Upgrade proceduresYou can upgrade all installation permutations of Netcool Configuration Managerversion 6.3.0.x to version 6.4.1 either interactively, or silently.
Upgrading Netcool Configuration Manager 6.3.0 interactivelyThe following procedure explains how to upgrade Netcool Configuration Managerusing the command line.
Before you begin
Quit all programs before continuing with this installation.
Perform the following checks before upgrading:
Defining sufficient memory (or SWAP) spaceThere can be issues upgrading if there is not enough available memory orSWAP space. This problem can be eliminated by doing one of thefollowing:v Allocate more SWAP space.v Separate SWAP and /tmp.v Allocate more space to /tmp.v Use the IATEMPDIR environment variable to specify a separate
directory for the master installer's temporary space.
Note: You need 4GB of free SWAP or free space in the directoryspecified by IATEMPDIR.
Setting sufficient Oracle process limitsThere may be issues with Oracle responsiveness if there is not a sufficientamount of processes running. The Oracle process limit must be at least 55processes per worker server that will be deployed.
102 IBM Tivoli Netcool Configuration Manager: Installation and Configuration Guide
Synchronizing server timingsIt is a requirement that all servers must have their times synced to within10 seconds of each other for correct operation. Each server can be syncedby setting up the NTP protocol.
Restriction: You must use the Netcool Configuration Manager installer with theappropriate Bit version, that is, the Bit version that corresponds to your existinginstallation, when upgrading from version 6.3.0 to 6.4.1.
Confirm your current architecture before upgrading:
Determining whether you have a 32 Bit or 64 Bit installationYou must run the installer that corresponds to your existing 32 Bit or 64 Bitinstallation.
To double-check whether you have a 32 Bit or a 64 Bit architecture, use thefollowing script:ncm_install_dir/eWAS/bin/versionInfo.sh
Tip: You can also view your current product version by running thefollowing script:ncm_install_dir/eWAS/bin/itncm.sh status
Respond to each prompt to proceed to the next step in the installation. If you wantto change something on a previous step, type 'back'. You may cancel thisinstallation at any time by typing 'quit'. You can replace the suggested defaultvalues with your own.
Procedure1. Log on to the server as icosuser, or the user that installed 6.3.0.x.2. On each 6.3.0.x Netcool Configuration Manager server, and from the directory
which contains the installer, run the installer bin files using the followingcommand:
For Solaris 32-bitsh ./ITNCM_solaris_sparc32.bin
For Solaris 64-bitsh ./ITNCM_solaris_sparc64.bin
For Linux 32-bitsh ./ITNCM_linux_ia32.bin
For Linux 64-bitsh ./ITNCM_linux_x86_64.bin
For AIX 32-bitsh ./ITNCM_aix_ppc32.bin
For AIX 64-bitsh ./ITNCM_aix_ppc64.bin
3. Accept the license.4. Confirm that the pre-requisites specified in the installation guide for Netcool
Configuration Manager 6.4.1 have been met.5. When asked for the installation directory, supply the 6.3.0.x directory. Ensure
that you choose the original installation directory when prompted. Thedefault directory path is /opt/IBM/tivoli/netcool/ncm
Chapter 4. Upgrading 103
6. Confirm that you wish to upgrade the existing installation of NetcoolConfiguration Manager.
7. You will be prompted to confirm if this upgrade will be integrated into anOMNIbus/Network Manager deployment. If you select “no”, you will then beprompted whether you wish to install Tivoli Common Reporting (if Reportingis not already installed). Refer to the Integration guide for further information.
8. Verify the pre-upgrade summary, and then click Enter to continue. Theinstallation is complete when the following system message is displayed:Installation Complete. Netcool Configuration Manager has beensuccessfully upgraded to version 6.4.0.0-xxx at: /opt/IBM/tivoli/netcool/ncm. Please refer to the ITNCM Upgrade procedure for any furthersteps to complete this upgrade..
What to do next
Now, you carry out the post-upgrade procedures.
Upgrading the product in silent modeThe silent upgrade process provides the ability to customize the NetcoolConfiguration Manager upgrade process for any deployment situation. Youupgrade Netcool Configuration Manager in silent mode by first editing the productproperties file (ITNCM.properties), and then launching the platform-specificinstaller with the silent command (-silent) suffixed.
Before you begin
Close and stop all system processes before beginning the upgrade. This includes allmonitoring software, databases, and third party packages.
The properties and bin installer files must be in the same directory.
Performing the upgrade requires full administrative access to the entire system.Full system authorization to read, write, add, and delete all system files andapplications must be established before beginning the upgrade.
Note: You can create a ‘Standby' system which can be brought online if theprimary system fails. Backups from the primary server will be restored on the‘Standby' server. The recommendation is to use two identical systems, withupgrade of the application on both at initial start-up.
Perform the following checks before upgrading:
Defining sufficient memory (or SWAP) spaceThere can be issues upgrading if there is not enough available memory orSWAP space. This problem can be eliminated by doing one of thefollowing:v Allocate more SWAP space.v Separate SWAP and /tmp.v Allocate more space to /tmp.v Use the IATEMPDIR environment variable to specify a separate
directory for the master installer's temporary space.
Note: You need 4GB of free SWAP or free space in the directoryspecified by IATEMPDIR.
104 IBM Tivoli Netcool Configuration Manager: Installation and Configuration Guide
Setting sufficient Oracle process limitsThere may be issues with Oracle responsiveness if there is not a sufficientamount of processes running. The Oracle process limit must be at least 55processes per worker server that will be deployed.
Synchronizing server timingsIt is a requirement that all servers must have their times synced to within10 seconds of each other for correct operation. Each server can be syncedby setting up the NTP protocol.
Restriction: You must use the Netcool Configuration Manager 32 Bit installer foryour operating system to upgrade from version 6.3.0.x to 6.4.1.
Confirm your current architecture before upgrading:
Determining whether you have a 32 Bit or 64 Bit installationYou must run the installer that corresponds to your existing 32 Bit or 64 Bitinstallation.
To double-check whether you have a 32 Bit or a 64 Bit architecture, use thefollowing script:ncm_install_dir/eWAS/bin/versionInfo.sh
Tip: You can also view your current product version by running thefollowing script:ncm_install_dir/eWAS/bin/itncm.sh status
Upgrade parameters are defined in the ITNCM.properties file. You can replace anysuggested default values with your own. When silently upgrading more than oneinstance of Netcool Configuration Manager on the same server, you must alter theupgrade directory for each instance. You must also choose different WebSphere andadmin ports for each instance, and ensure that these ports are free and not in use.The following parameters must be unique for each instance:v $ADMIN_PORT$
v $LOG_PORT$
v $LOG_LISTEN_PORT$
v $MAIN_IDT_SERVER$
v $USER_INSTALL_DIR$
v $USER_WAS_HTTP_PORT$
Upgrading the product in silent mode should take 15 - 20 minutes, excludingpreparation time and the upgrade of any prerequisite software. During theupgrade process, an embedded version of the IBM WebSphere® Application Server(EWAS) is also installed. This server is required to communicate with the database.
Procedure1. From the directory which contains the installer, open ITNCM.properties in a
text editor.2. Edit the following upgrade parameters for each instance of the product:
Chapter 4. Upgrading 105
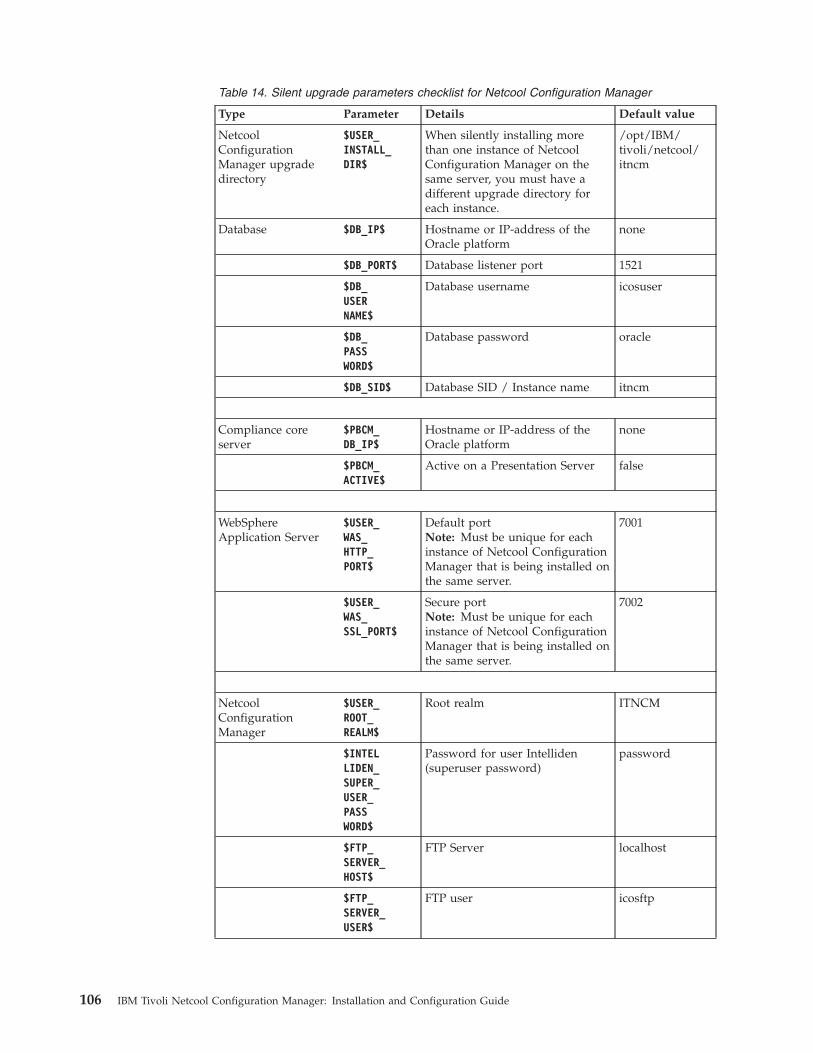
Table 14. Silent upgrade parameters checklist for Netcool Configuration Manager
Type Parameter Details Default value
NetcoolConfigurationManager upgradedirectory
$USER_INSTALL_DIR$
When silently installing morethan one instance of NetcoolConfiguration Manager on thesame server, you must have adifferent upgrade directory foreach instance.
/opt/IBM/tivoli/netcool/itncm
Database $DB_IP$ Hostname or IP-address of theOracle platform
none
$DB_PORT$ Database listener port 1521
$DB_USERNAME$
Database username icosuser
$DB_PASSWORD$
Database password oracle
$DB_SID$ Database SID / Instance name itncm
Compliance coreserver
$PBCM_DB_IP$
Hostname or IP-address of theOracle platform
none
$PBCM_ACTIVE$
Active on a Presentation Server false
WebSphereApplication Server
$USER_WAS_HTTP_PORT$
Default portNote: Must be unique for eachinstance of Netcool ConfigurationManager that is being installed onthe same server.
7001
$USER_WAS_SSL_PORT$
Secure portNote: Must be unique for eachinstance of Netcool ConfigurationManager that is being installed onthe same server.
7002
NetcoolConfigurationManager
$USER_ROOT_REALM$
Root realm ITNCM
$INTELLIDEN_SUPER_USER_PASSWORD$
Password for user Intelliden(superuser password)
password
$FTP_SERVER_HOST$
FTP Server localhost
$FTP_SERVER_USER$
FTP user icosftp
106 IBM Tivoli Netcool Configuration Manager: Installation and Configuration Guide
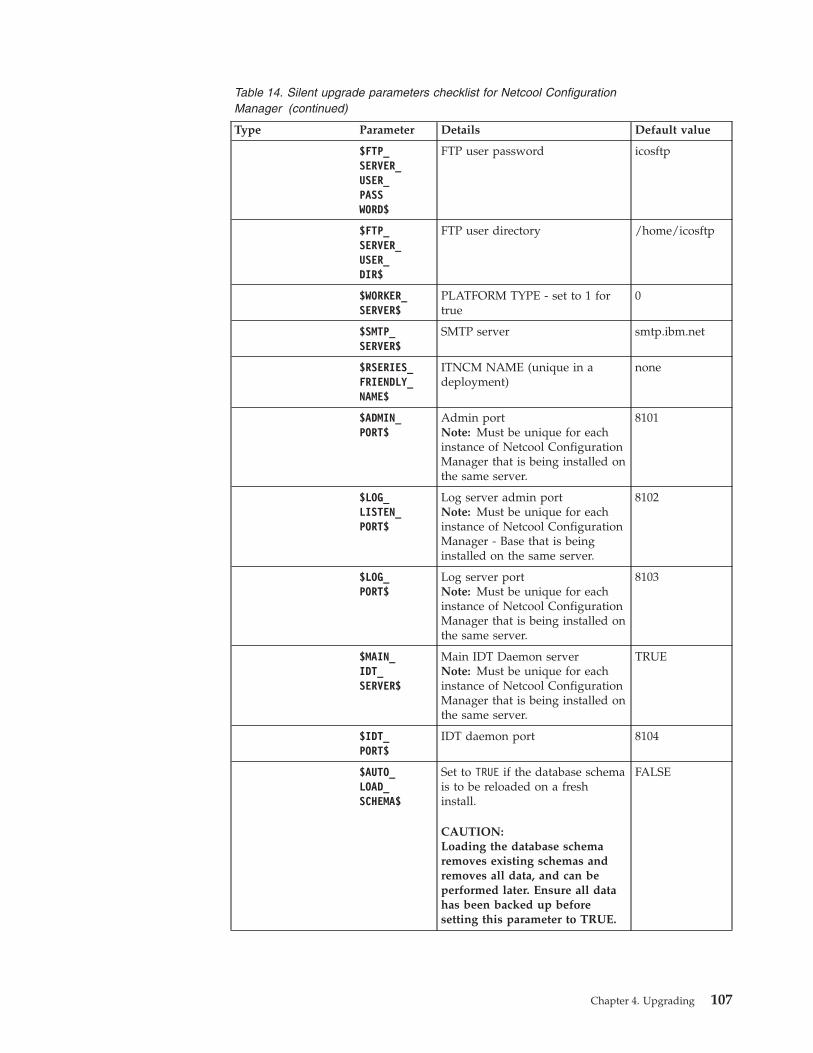
Table 14. Silent upgrade parameters checklist for Netcool ConfigurationManager (continued)
Type Parameter Details Default value
$FTP_SERVER_USER_PASSWORD$
FTP user password icosftp
$FTP_SERVER_USER_DIR$
FTP user directory /home/icosftp
$WORKER_SERVER$
PLATFORM TYPE - set to 1 fortrue
0
$SMTP_SERVER$
SMTP server smtp.ibm.net
$RSERIES_FRIENDLY_NAME$
ITNCM NAME (unique in adeployment)
none
$ADMIN_PORT$
Admin portNote: Must be unique for eachinstance of Netcool ConfigurationManager that is being installed onthe same server.
8101
$LOG_LISTEN_PORT$
Log server admin portNote: Must be unique for eachinstance of Netcool ConfigurationManager - Base that is beinginstalled on the same server.
8102
$LOG_PORT$
Log server portNote: Must be unique for eachinstance of Netcool ConfigurationManager that is being installed onthe same server.
8103
$MAIN_IDT_SERVER$
Main IDT Daemon serverNote: Must be unique for eachinstance of Netcool ConfigurationManager that is being installed onthe same server.
TRUE
$IDT_PORT$
IDT daemon port 8104
$AUTO_LOAD_SCHEMA$
Set to TRUE if the database schemais to be reloaded on a freshinstall.
CAUTION:Loading the database schemaremoves existing schemas andremoves all data, and can beperformed later. Ensure all datahas been backed up beforesetting this parameter to TRUE.
FALSE
Chapter 4. Upgrading 107
Table 14. Silent upgrade parameters checklist for Netcool ConfigurationManager (continued)
Type Parameter Details Default value
$LICENSE_ACCEPTED$
Silent License Acceptance Aftersetting this parameter to TRUE,you must also remove the # sign.
FALSE
Reporting $REPORTING_ACTIVE$
Activates Reporting. This must beset to TRUE if installingstand-alone reporting.
FALSE
3. Log on to the server as icosuser.4. From the directory which contains the installer and silent upgrade parameters
files, execute one of the following commands:
For Solaris 32-bitsh ./ITNCM_solaris_sparc32.bin -i silent
For Solaris 64-bitsh ./ITNCM_solaris_sparc64.bin -i silent
For Linux 32-bitsh ./ITNCM_linux_ia32.bin -i silent
For Linux 64-bitsh ./ITNCM_linux_x86_64.bin -i silent
For AIX 32-bitsh ./ITNCM_aix_ppc32.bin -i silent
For AIX 64-bitsh ./ITNCM_aix_ppc64.bin -i silent
The silent upgrade process runs without prompting for any user input, and itdoes not provide a message indicating successful upgrade.
5. Repeat steps 1 - 4 for each instance of the product.
What to do next
Now, you perform a number of post-upgrade procedures. For example, if you didnot rebuild the database schema as part of the silent upgrade, you must do somanually before you can start Netcool Configuration Manager.
Post-upgrade proceduresThe following procedure explains the post-upgrade procedures required.
Before you begin
The script to upgrade the database schema must only be run once on the mainNetcool Configuration Manager presentation server only, and never for a secondtime on this or any other server.
This task describes how to upgrade the database schema.
Procedure1. Set or confirm your database capacity and auto-extend parameters.
108 IBM Tivoli Netcool Configuration Manager: Installation and Configuration Guide
Tip: For information specific to your database, consult your databaseadministrator.
For Oracle databasesConfirm that the data file used for 'undo table space', and the tablespace used for Netcool Configuration Manager tables has auto-extendenabled, and there is at least 50% free space available.
For DB2 databasesConfirm that the table space used for the Netcool ConfigurationManager tables has auto-resize enabled, and that there is at least 50%free space available.
2. Required: If you are upgrading from Netcool Configuration Manager 6.3.0.5 (orlater), you add schema mapping entries to the upgradeMapping.properties file:
Access the upgrade directorycd <install_dir>/bin/utils/database/upgrade
When upgrading from 6305
a. cp upgrade6304to6410.xml upgrade6305to6410.xml
b. Add the following line to upgradeMapping.properties:6.3.0.5_6.4.1.0=upgrade6305to6410.xml
Note: Adjust this step as required if you are upgrading from a versionof Netcool Configuration Manager later than 6.3.0.5
3. Access the directory containing the upgrade subdirectory. The default locationis: /opt/IBM/tivoli/netcool/ncm/bin/utils/database/upgrade.
4. Run the upgrade script to upgrade the database schema, using the followingcommand:./upgradeDBSchema.sh.
5. Required: Only if enabling FIPS: Configure java.security to enableIBMJCEFIPS:
Note: Perform these steps on both the presentation and worker servers.a. Open the install_dir/java/jre/lib/security/java.security file in a text
editor.b. Uncomment the IBMJCEFIPS provider
(com.ibm.crypto.fips.provider.IBMJCEFIPS) entry before the IBMJCEprovider entry, and also renumber the other providers in the provider list.The IBMJCEFIPS provider must be in the java.security file provider list.See the example at the end of this topic.
6. To start the 6.4 server, access /opt/IBM/tivoli/netcool/ncm/bin and run thefollowing command:./itncm.sh start.
Example
On Linux or AIX: The install_dir/java/jre/lib/security/java.security filelooks like this when IBMJCEFIPS is enabled on a Linux or AIX system:security.provider.1=com.ibm.crypto.fips.provider.IBMJCEFIPSsecurity.provider.2=com.ibm.crypto.provider.IBMJCEsecurity.provider.3=com.ibm.jsse.IBMJSSEProvidersecurity.provider.4=com.ibm.jsse2.IBMJSSEProvider2security.provider.5=com.ibm.security.jgss.IBMJGSSProvidersecurity.provider.6=com.ibm.security.cert.IBMCertPathsecurity.provider.7=com.ibm.crypto.pkcs11impl.provider.IBMPKCS11Implsecurity.provider.8=com.ibm.security.cmskeystore.CMSProvider
Chapter 4. Upgrading 109
security.provider.9=com.ibm.security.jgss.mech.spnego.IBMSPNEGOsecurity.provider.10=com.ibm.security.sasl.IBMSASLsecurity.provider.11=com.ibm.xml.crypto.IBMXMLCryptoProvidersecurity.provider.12=com.ibm.xml.enc.IBMXMLEncProvidersecurity.provider.13=org.apache.harmony.security.provider.PolicyProvider
On Solaris: The install_dir/java/jre/lib/security/java.security file looks likethis when IBMJCEFIPS is enabled on a Solaris system:security.provider.1=com.ibm.crypto.fips.provider.IBMJCEFIPSsecurity.provider.2=com.ibm.security.jgss.IBMJGSSProvidersecurity.provider.3=sun.security.provider.Sunsecurity.provider.4=com.ibm.crypto.provider.IBMJCEsecurity.provider.5=com.ibm.jsse.IBMJSSEProvidersecurity.provider.6=com.ibm.jsse2.IBMJSSEProvider2security.provider.7=com.ibm.security.cert.IBMCertPathsecurity.provider.8=com.ibm.security.cmskeystore.CMSProvidersecurity.provider.9=com.ibm.security.jgss.mech.spnego.IBMSPNEGOsecurity.provider.10=com.ibm.security.sasl.IBMSASLsecurity.provider.11=com.ibm.xml.crypto.IBMXMLCryptoProvidersecurity.provider.12=com.ibm.xml.enc.IBMXMLEncProvider#security.provider.13=com.ibm.crypto.pkcs11.provider.IBMPKCS11
What to do next
Now, you carry out the post-upgrade procedures for an integrated environment ifrequired.
Integrated post-upgrade proceduresFollow this procedure only if you are working within an integrated environment.
Before you begin
Netcool Configuration Manager - Base can be installed using either the productmedia, or by downloading it from the IBM Passport Advantage® Web site:http://www.ibm.com/software/howtobuy/passportadvantage.
Restriction: This procedure applies only to an integrated environment.
Procedure1. Obtain the TIP installer (ITNCM_TIP_<os>.bin).2. Ensure that TIP is running.3. On the Network Manager TIP server, and as the same user that installed
Network Manager, run sh ./ITNCM_TIP_<os>.bin.4. At the end of the installation, you will be prompted to restart TIP. Access the
/opt/IBM/tivoli/netcool directory and do the following:a. Add env.sh
b. Run itnm_stop tip to stop TIP.c. Run itnm_start tip to start TIP.
5. Log into TIP. Put the Configuration Management Menu back in the AEL menu.For further information, see Configuring the Alerts menu of the Active EventList.
110 IBM Tivoli Netcool Configuration Manager: Installation and Configuration Guide
Upgrade from Netcool Configuration Manager 6.4.0.x to 6.4.1Use this information to upgrade from Netcool Configuration Manager 6.4.0.x to6.4.1 only.
Pre-upgrade proceduresUse the following pre-upgrade procedure when upgrading Netcool ConfigurationManager version 6.4.0.x to version 6.4.1.
Before you begin
Important: Ensure no work is executing on any of the servers before attempting toupgrade, as data loss may occur.
Remember: It is imperative that all databases are backed up prior to running theupgrade procedure.
Procedure1. Back up the Netcool Configuration Manager database.2. You should confirm that the current installed version of Netcool Configuration
Manager is 6.4.0.x. Access the /opt/IBM/tivoli/netcool/ncm/bin directory, andrun the following script: ./itncm.sh status. Check that the Load version is6.4.0.x.
What to do next
Now, you download the installer.
Downloading the upgrade installerBefore performing the upgrade procedure, you download the bin files used forinstalling Netcool Configuration Manager onto the existing 6.4.0.x server.
Before you begin
Netcool Configuration Manager - Base can be installed using either the productmedia, or by downloading it from the IBM Passport Advantage® Web site:http://www.ibm.com/software/howtobuy/passportadvantage
Note: The installers for Solaris, Linux and AIX are available. Please ensure thatyou retrieve the correct installer for the operating system you are using. A Javavirtual machine is included with this download. This will run automatically whenyou run the shell script.
This task describes how to download the upgrade installer.
Procedure1. Obtain the Netcool Configuration Manager - Base installer (ITNCM_<OS
type>_<bit type>.bin).2. Obtain the Tivoli Common Reporting installer (if required) (ITNCM_Reports_<OS
type>_<bit type>.tar) and place it in the same directory as the main NetcoolConfiguration Manager 6.4.1 installer.
3. Stop the existing installation of 6.4.0.x. Access the /opt/IBM/tivoli/netcool/ncm/bin and run the following command:./itncm.sh stop
Chapter 4. Upgrading 111
You will be prompted for the Netcool Configuration Manager superuserusername and password before the script runs. If this is a stand-alone instanceof Netcool Configuration Manager that has Reporting installed, you will also beprompted for the tipadmin password.
Upgrade proceduresYou can upgrade all installation permutations of Netcool Configuration Managerversion 6.4.0.x to version 6.4.1 either interactively, or silently.
Upgrading Netcool Configuration Manager 6.4.0 interactivelyThe following procedure explains how to upgrade Netcool Configuration Managerusing the command line.
Before you begin
Quit all programs before continuing with this installation.
Perform the following checks before upgrading:
Defining sufficient memory (or SWAP) spaceThere can be issues upgrading if there is not enough available memory orSWAP space. This problem can be eliminated by doing one of thefollowing:v Allocate more SWAP space.v Separate SWAP and /tmp.v Allocate more space to /tmp.v Use the IATEMPDIR environment variable to specify a separate
directory for the master installer's temporary space.
Note: You need 4GB of free SWAP or free space in the directoryspecified by IATEMPDIR.
Setting sufficient Oracle process limitsThere may be issues with Oracle responsiveness if there is not a sufficientamount of processes running. The Oracle process limit must be at least 55processes per worker server that will be deployed.
Synchronizing server timingsIt is a requirement that all servers must have their times synced to within10 seconds of each other for correct operation. Each server can be syncedby setting up the NTP protocol.
Restriction: You must use the Netcool Configuration Manager installer with theappropriate Bit version, that is, the Bit version that corresponds to your existinginstallation, when upgrading from version 6.4.0 to 6.4.1.
Confirm your current architecture before upgrading:
Determining whether you have a 32 Bit or 64 Bit installationYou must run the installer that corresponds to your existing 32 Bit or 64 Bitinstallation.
To double-check whether you have a 32 Bit or a 64 Bit architecture, use thefollowing script:ncm_install_dir/eWAS/bin/versionInfo.sh
112 IBM Tivoli Netcool Configuration Manager: Installation and Configuration Guide
Tip: You can also view your current product version by running thefollowing script:ncm_install_dir/eWAS/bin/itncm.sh status
Respond to each prompt to proceed to the next step in the installation. If you wantto change something on a previous step, type 'back'. You may cancel thisinstallation at any time by typing 'quit'. You can replace the suggested defaultvalues with your own.
Procedure1. Log on to the server as icosuser, or the user that installed 6.4.0.x.2. On each 6.4.0.x Netcool Configuration Manager server, and from the directory
which contains the installer, run the installer bin files using the followingcommand:
For Solaris 32-bitsh ./ITNCM_solaris_sparc32.bin
For Solaris 64-bitsh ./ITNCM_solaris_sparc64.bin
For Linux 32-bitsh ./ITNCM_linux_ia32.bin
For Linux 64-bitsh ./ITNCM_linux_x86_64.bin
For AIX 32-bitsh ./ITNCM_aix_ppc32.bin
For AIX 64-bitsh ./ITNCM_aix_ppc64.bin
3. Accept the license.4. Confirm that the pre-requisites specified in the installation guide for Netcool
Configuration Manager 6.4.1 have been met.5. When asked for the installation directory, supply the 6.4.0.x directory. Ensure
that you choose the original installation directory when prompted. Thedefault directory path is /opt/IBM/tivoli/netcool/ncm
6. Confirm that you wish to upgrade the existing installation of NetcoolConfiguration Manager.
7. You will be prompted to confirm if this upgrade will be integrated into anOMNIbus/Network Manager deployment. If you select “no”, you will then beprompted whether you wish to install Tivoli Common Reporting (if Reportingis not already installed). Refer to the Integration guide for further information.
8. Verify the pre-upgrade summary, and then click Enter to continue. Theinstallation is complete when the following system message is displayed:Installation Complete. Netcool Configuration Manager has beensuccessfully upgraded to version 6.4.0.0-xxx at: /opt/IBM/tivoli/netcool/ncm. Please refer to the ITNCM Upgrade procedure for any furthersteps to complete this upgrade..
What to do next
Now, you carry out the post-upgrade procedures.
Chapter 4. Upgrading 113

Upgrading the product in silent modeThe silent upgrade process provides the ability to customize the NetcoolConfiguration Manager upgrade process for any deployment situation. Youupgrade Netcool Configuration Manager in silent mode by first editing the productproperties file (ITNCM.properties), and then launching the platform-specificinstaller with the silent command (-silent) suffixed.
Before you begin
Close and stop all system processes before beginning the upgrade. This includes allmonitoring software, databases, and third party packages.
The properties and bin installer files must be in the same directory.
Performing the upgrade requires full administrative access to the entire system.Full system authorization to read, write, add, and delete all system files andapplications must be established before beginning the upgrade.
Note: You can create a ‘Standby' system which can be brought online if theprimary system fails. Backups from the primary server will be restored on the‘Standby' server. The recommendation is to use two identical systems, withupgrade of the application on both at initial start-up.
Perform the following checks before upgrading:
Defining sufficient memory (or SWAP) spaceThere can be issues upgrading if there is not enough available memory orSWAP space. This problem can be eliminated by doing one of thefollowing:v Allocate more SWAP space.v Separate SWAP and /tmp.v Allocate more space to /tmp.v Use the IATEMPDIR environment variable to specify a separate
directory for the master installer's temporary space.
Note: You need 4GB of free SWAP or free space in the directoryspecified by IATEMPDIR.
Setting sufficient Oracle process limitsThere may be issues with Oracle responsiveness if there is not a sufficientamount of processes running. The Oracle process limit must be at least 55processes per worker server that will be deployed.
Synchronizing server timingsIt is a requirement that all servers must have their times synced to within10 seconds of each other for correct operation. Each server can be syncedby setting up the NTP protocol.
Restriction: You must use the Netcool Configuration Manager 32 Bit installer foryour operating system to upgrade from version 6.4.0.x to 6.4.1.
Confirm your current architecture before upgrading:
Determining whether you have a 32 Bit or 64 Bit installationYou must run the installer that corresponds to your existing 32 Bit or 64 Bitinstallation.
114 IBM Tivoli Netcool Configuration Manager: Installation and Configuration Guide
To double-check whether you have a 32 Bit or a 64 Bit architecture, use thefollowing script:ncm_install_dir/eWAS/bin/versionInfo.sh
Tip: You can also view your current product version by running thefollowing script:ncm_install_dir/eWAS/bin/itncm.sh status
Upgrade parameters are defined in the ITNCM.properties file. You can replace anysuggested default values with your own. When silently upgrading more than oneinstance of Netcool Configuration Manager on the same server, you must alter theupgrade directory for each instance. You must also choose different WebSphere andadmin ports for each instance, and ensure that these ports are free and not in use.The following parameters must be unique for each instance:v $ADMIN_PORT$
v $LOG_PORT$
v $LOG_LISTEN_PORT$
v $MAIN_IDT_SERVER$
v $USER_INSTALL_DIR$
v $USER_WAS_HTTP_PORT$
Upgrading the product in silent mode should take 15 - 20 minutes, excludingpreparation time and the upgrade of any prerequisite software. During theupgrade process, an embedded version of the IBM WebSphere® Application Server(EWAS) is also installed. This server is required to communicate with the database.
Procedure1. From the directory which contains the installer, open ITNCM.properties in a
text editor.2. Edit the following upgrade parameters for each instance of the product:
Table 15. Silent upgrade parameters checklist for Netcool Configuration Manager
Type Parameter Details Default value
NetcoolConfigurationManager upgradedirectory
$USER_INSTALL_DIR$
When silently installing morethan one instance of NetcoolConfiguration Manager on thesame server, you must have adifferent upgrade directory foreach instance.
/opt/IBM/tivoli/netcool/itncm
Database $DB_IP$ Hostname or IP-address of theOracle platform
none
$DB_PORT$ Database listener port 1521
$DB_USERNAME$
Database username icosuser
$DB_PASSWORD$
Database password oracle
$DB_SID$ Database SID / Instance name itncm
Compliance coreserver
$PBCM_DB_IP$
Hostname or IP-address of theOracle platform
none
Chapter 4. Upgrading 115
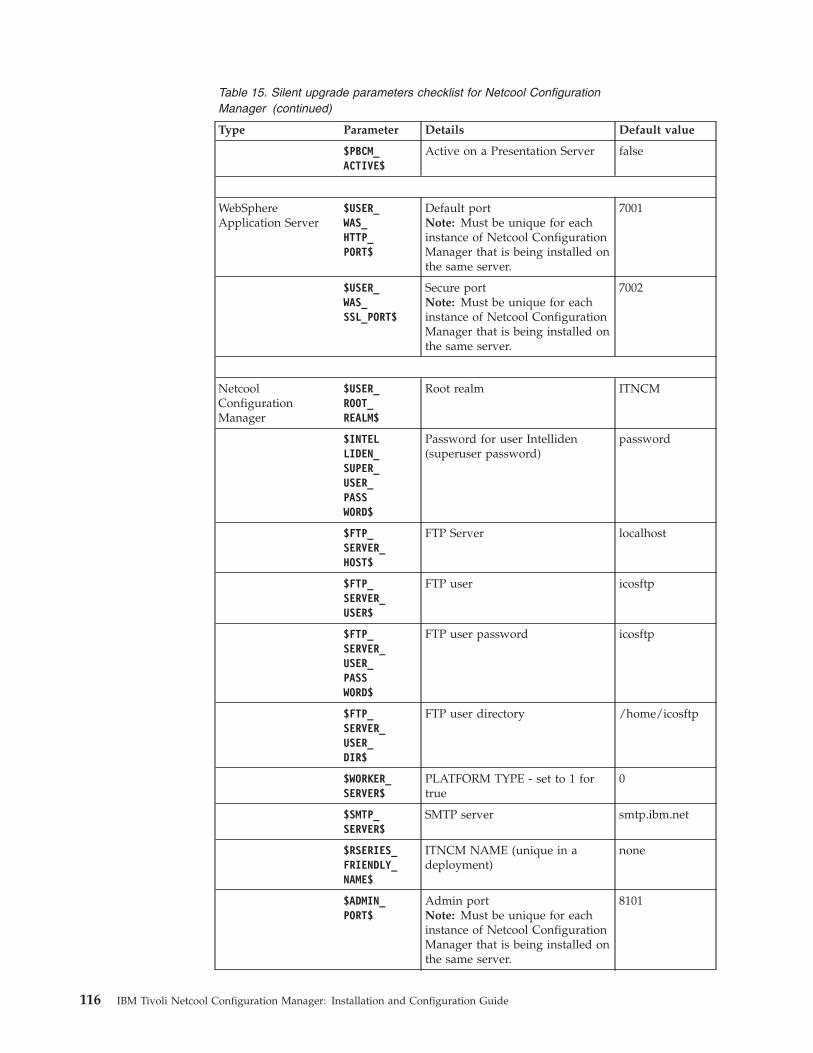
Table 15. Silent upgrade parameters checklist for Netcool ConfigurationManager (continued)
Type Parameter Details Default value
$PBCM_ACTIVE$
Active on a Presentation Server false
WebSphereApplication Server
$USER_WAS_HTTP_PORT$
Default portNote: Must be unique for eachinstance of Netcool ConfigurationManager that is being installed onthe same server.
7001
$USER_WAS_SSL_PORT$
Secure portNote: Must be unique for eachinstance of Netcool ConfigurationManager that is being installed onthe same server.
7002
NetcoolConfigurationManager
$USER_ROOT_REALM$
Root realm ITNCM
$INTELLIDEN_SUPER_USER_PASSWORD$
Password for user Intelliden(superuser password)
password
$FTP_SERVER_HOST$
FTP Server localhost
$FTP_SERVER_USER$
FTP user icosftp
$FTP_SERVER_USER_PASSWORD$
FTP user password icosftp
$FTP_SERVER_USER_DIR$
FTP user directory /home/icosftp
$WORKER_SERVER$
PLATFORM TYPE - set to 1 fortrue
0
$SMTP_SERVER$
SMTP server smtp.ibm.net
$RSERIES_FRIENDLY_NAME$
ITNCM NAME (unique in adeployment)
none
$ADMIN_PORT$
Admin portNote: Must be unique for eachinstance of Netcool ConfigurationManager that is being installed onthe same server.
8101
116 IBM Tivoli Netcool Configuration Manager: Installation and Configuration Guide
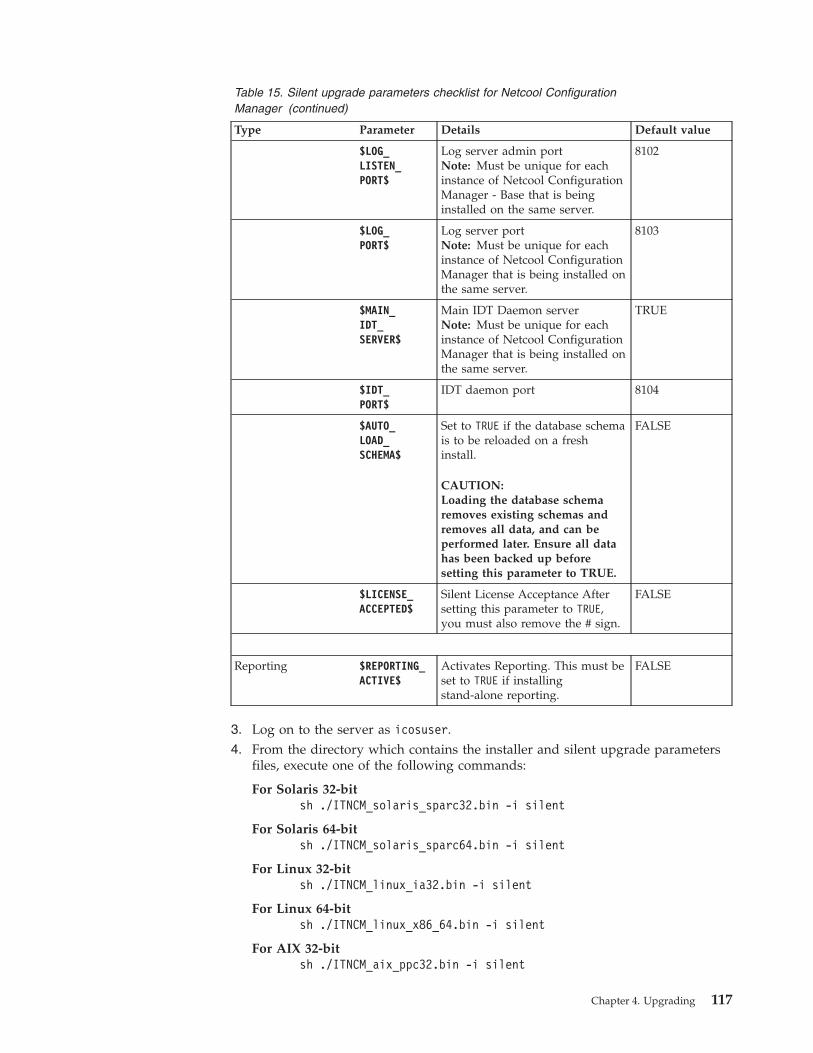
Table 15. Silent upgrade parameters checklist for Netcool ConfigurationManager (continued)
Type Parameter Details Default value
$LOG_LISTEN_PORT$
Log server admin portNote: Must be unique for eachinstance of Netcool ConfigurationManager - Base that is beinginstalled on the same server.
8102
$LOG_PORT$
Log server portNote: Must be unique for eachinstance of Netcool ConfigurationManager that is being installed onthe same server.
8103
$MAIN_IDT_SERVER$
Main IDT Daemon serverNote: Must be unique for eachinstance of Netcool ConfigurationManager that is being installed onthe same server.
TRUE
$IDT_PORT$
IDT daemon port 8104
$AUTO_LOAD_SCHEMA$
Set to TRUE if the database schemais to be reloaded on a freshinstall.
CAUTION:Loading the database schemaremoves existing schemas andremoves all data, and can beperformed later. Ensure all datahas been backed up beforesetting this parameter to TRUE.
FALSE
$LICENSE_ACCEPTED$
Silent License Acceptance Aftersetting this parameter to TRUE,you must also remove the # sign.
FALSE
Reporting $REPORTING_ACTIVE$
Activates Reporting. This must beset to TRUE if installingstand-alone reporting.
FALSE
3. Log on to the server as icosuser.4. From the directory which contains the installer and silent upgrade parameters
files, execute one of the following commands:
For Solaris 32-bitsh ./ITNCM_solaris_sparc32.bin -i silent
For Solaris 64-bitsh ./ITNCM_solaris_sparc64.bin -i silent
For Linux 32-bitsh ./ITNCM_linux_ia32.bin -i silent
For Linux 64-bitsh ./ITNCM_linux_x86_64.bin -i silent
For AIX 32-bitsh ./ITNCM_aix_ppc32.bin -i silent
Chapter 4. Upgrading 117
For AIX 64-bitsh ./ITNCM_aix_ppc64.bin -i silent
The silent upgrade process runs without prompting for any user input, and itdoes not provide a message indicating successful upgrade.
5. Repeat steps 1 - 4 for each instance of the product.
What to do next
Now, you perform a number of post-upgrade procedures. For example, if you didnot rebuild the database schema as part of the silent upgrade, you must do somanually before you can start Netcool Configuration Manager.
Post-upgrade proceduresThe following procedure explains the post-upgrade procedures required.
Before you begin
The script to upgrade the database schema must only be run once on the mainNetcool Configuration Manager presentation server only, and never for a secondtime on this or any other server.
This task describes how to upgrade the database schema.
Procedure1. Set or confirm your database capacity and auto-extend parameters.
Tip: For information specific to your database, consult your databaseadministrator.
For Oracle databasesConfirm that the data file used for 'undo table space', and the tablespace used for Netcool Configuration Manager tables has auto-extendenabled, and there is at least 50% free space available.
For DB2 databasesConfirm that the table space used for the Netcool ConfigurationManager tables has auto-resize enabled, and that there is at least 50%free space available.
2. Access the directory containing the upgrade subdirectory. The default locationis: /opt/IBM/tivoli/netcool/ncm/bin/utils/database/upgrade.
3. Run the upgrade script to upgrade the database schema, using the followingcommand:./upgradeDBSchema.sh.
4. Required: Only if enabling FIPS: Configure java.security to enableIBMJCEFIPS:
Note: Perform these steps on both the presentation and worker servers.a. Open the install_dir/java/jre/lib/security/java.security file in a text
editor.b. Uncomment the IBMJCEFIPS provider
(com.ibm.crypto.fips.provider.IBMJCEFIPS) entry before the IBMJCEprovider entry, and also renumber the other providers in the provider list.The IBMJCEFIPS provider must be in the java.security file provider list.See the example at the end of this topic.
118 IBM Tivoli Netcool Configuration Manager: Installation and Configuration Guide
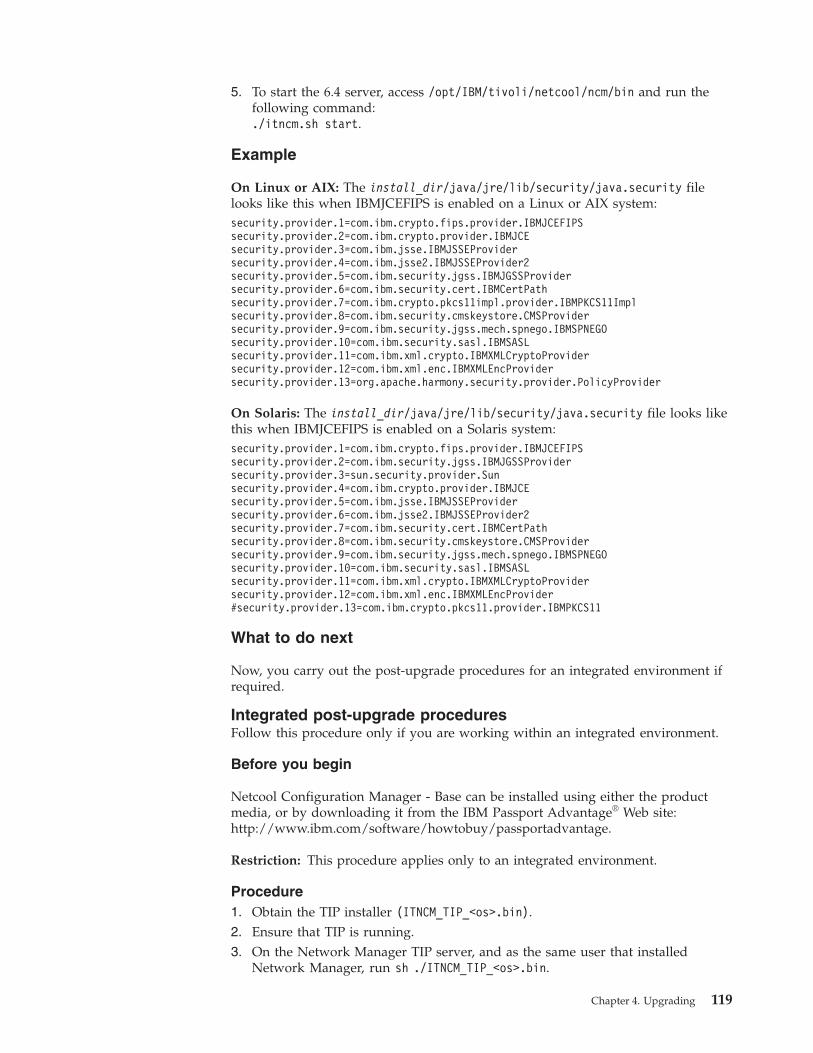
5. To start the 6.4 server, access /opt/IBM/tivoli/netcool/ncm/bin and run thefollowing command:./itncm.sh start.
Example
On Linux or AIX: The install_dir/java/jre/lib/security/java.security filelooks like this when IBMJCEFIPS is enabled on a Linux or AIX system:security.provider.1=com.ibm.crypto.fips.provider.IBMJCEFIPSsecurity.provider.2=com.ibm.crypto.provider.IBMJCEsecurity.provider.3=com.ibm.jsse.IBMJSSEProvidersecurity.provider.4=com.ibm.jsse2.IBMJSSEProvider2security.provider.5=com.ibm.security.jgss.IBMJGSSProvidersecurity.provider.6=com.ibm.security.cert.IBMCertPathsecurity.provider.7=com.ibm.crypto.pkcs11impl.provider.IBMPKCS11Implsecurity.provider.8=com.ibm.security.cmskeystore.CMSProvidersecurity.provider.9=com.ibm.security.jgss.mech.spnego.IBMSPNEGOsecurity.provider.10=com.ibm.security.sasl.IBMSASLsecurity.provider.11=com.ibm.xml.crypto.IBMXMLCryptoProvidersecurity.provider.12=com.ibm.xml.enc.IBMXMLEncProvidersecurity.provider.13=org.apache.harmony.security.provider.PolicyProvider
On Solaris: The install_dir/java/jre/lib/security/java.security file looks likethis when IBMJCEFIPS is enabled on a Solaris system:security.provider.1=com.ibm.crypto.fips.provider.IBMJCEFIPSsecurity.provider.2=com.ibm.security.jgss.IBMJGSSProvidersecurity.provider.3=sun.security.provider.Sunsecurity.provider.4=com.ibm.crypto.provider.IBMJCEsecurity.provider.5=com.ibm.jsse.IBMJSSEProvidersecurity.provider.6=com.ibm.jsse2.IBMJSSEProvider2security.provider.7=com.ibm.security.cert.IBMCertPathsecurity.provider.8=com.ibm.security.cmskeystore.CMSProvidersecurity.provider.9=com.ibm.security.jgss.mech.spnego.IBMSPNEGOsecurity.provider.10=com.ibm.security.sasl.IBMSASLsecurity.provider.11=com.ibm.xml.crypto.IBMXMLCryptoProvidersecurity.provider.12=com.ibm.xml.enc.IBMXMLEncProvider#security.provider.13=com.ibm.crypto.pkcs11.provider.IBMPKCS11
What to do next
Now, you carry out the post-upgrade procedures for an integrated environment ifrequired.
Integrated post-upgrade proceduresFollow this procedure only if you are working within an integrated environment.
Before you begin
Netcool Configuration Manager - Base can be installed using either the productmedia, or by downloading it from the IBM Passport Advantage® Web site:http://www.ibm.com/software/howtobuy/passportadvantage.
Restriction: This procedure applies only to an integrated environment.
Procedure1. Obtain the TIP installer (ITNCM_TIP_<os>.bin).2. Ensure that TIP is running.3. On the Network Manager TIP server, and as the same user that installed
Network Manager, run sh ./ITNCM_TIP_<os>.bin.
Chapter 4. Upgrading 119
4. At the end of the installation, you will be prompted to restart TIP. Access the/opt/IBM/tivoli/netcool directory and do the following:a. Add env.sh
b. Run itnm_stop tip to stop TIP.c. Run itnm_start tip to start TIP.
5. Log into TIP. Put the Configuration Management Menu back in the AEL menu.For further information, see Configuring the Alerts menu of the Active EventList.
Upgrading Netcool Configuration Manager ReportingIf you have a stand-alone installation of Tivoli Common Reporting as part of yourNetcool Configuration Manager version 6.3.0.x or 6.4.0.x installation, you mustupgrade both Netcool Configuration Manager and Tivoli Common Reporting toversion 6.4.1.
Before you begin
Ensure you have upgraded Netcool Configuration Manager to version 6.4.1.
Gather all the required information, such as your database details, the installationfolder location, and the Tivoli Integrated Portal administration user names andpasswords. Ensure you have obtained the required Netcool Configuration ManagerReports tar files for your installation.
Note: You cannot upgrade a stand-alone 32-bit version of Tivoli CommonReporting to a 64-bit version. If you want to move from a 32-bit version to a 64-bitversion, you must uninstall the 32-bit version first, and then install the 64-bitversion.
Linux (32bit)ITNCM_Reports_linux_ia32.tar
Linux (64bit)ITNCM_Reports_linux_x86_64.tar
Solaris (32bit)ITNCM_Reports_solaris_sparc32.tar
Solaris (64bit)ITNCM_Reports_solaris_sparc64.tar
AIX (32bit)ITNCM_Reports_aix_ppc32.tar
AIX (64bit)ITNCM_Reports_aix_ppc64.tar
Important: Quit all programs before continuing with this installation.
Remember: You only upgrade Tivoli Common Reporting on its own if you do notplan to integrate your installation of Netcool Configuration Manager with NetworkManager.
Tip: You can perform an installation as either root- or non-root user.
120 IBM Tivoli Netcool Configuration Manager: Installation and Configuration Guide
Respond to each prompt in order to proceed to the next step in the installation.You may cancel this installation at any time by typing 'quit'. You can replace anysuggested default values with your own.
If you want to change a previous step, type back.
Procedure1. Log on to the platform as icosuser and perform one of the following steps to
launch the installer:v If you have a downloaded tar file, access the directory containing the tar file,
and untar it by using the following command:tar xvf ITNCM_Reports_yourOS.tarwhere yourOS is specific to your operating system. For example, for a 32-bitLinux installation, you would typetar xvf ITNCM_Reports_linux_ia32.tar
v If you have a DVD, place the DVD in the DVD ROM drive, and then changedirectory to the mount point. Type:sh Disk1/InstData/VM/ITNCM_Reports_yourOS.binwhere yourOS is specific to your operating system.
2. Click Enter to display the license. You can choose to print the license, or returnto the previous screen. If you do not accept the license, the installation isaborted.
3. Accept the license to proceed.4. Confirm that the reporting prerequisites have been met.5. Enter a complete path for the Netcool Configuration Manager installation
folder location, or accept the default.
Note: The default directory path is /opt/IBM/tivoli/netcool/ncm.The installer will detect your existing version of the stand-alone NetcoolConfiguration Manager Tivoli Common Reporting.
6. Confirm that you wish to upgrade the existing installation to the most currentversion.
7. Define the current Netcool Configuration Manager installation database type(either Oracle or DB2), and then provide the following Netcool ConfigurationManager database parameters:v IP address/ hostnamev Portv Usernamev Passwordv SID / Instance namev Service name (for Oracle)v Alias (for DB2)v Database instance home directory on this platform (for DB2)
8. Enter the Tivoli Integrated Portal administrator user name and password.9. Verify the pre-installation summary, then click Enter to continue.
Results
The upgrade is complete when the following system message is displayed: ITNCMReports version <version> has been successfully installed to: <yourinstallation directory>
Chapter 4. Upgrading 121

What to do next
If this upgrade of Tivoli Common Reporting completes a stand-alone installation,you install the drivers and OOBC software next. For more information, see“Installing drivers” on page 46 and “Installing OOBC” on page 64.
After that, you perform a number of post-installation procedures, such assafeguarding the keystore and increasing the Java Heap size. For information onthese and other configuration tasks, see Chapter 3, “Configuring,” on page 69.
122 IBM Tivoli Netcool Configuration Manager: Installation and Configuration Guide
Chapter 5. Uninstalling
You must use the scripts and instructions provided to uninstall the product.
Uninstalling Netcool Configuration ManagerTo uninstall Netcool Configuration Manager and remove all files and components,you stop the server, remove all relevant schema tables, keys and sequences, andthen run the uninstaller. You then remove all remaining files and directories. Theuninstall script also uninstalls Tivoli Common Reporting.
Before you begin
You must remove all device drivers before uninstalling the product.
You need the superuser username and password to uninstall the product.
Restriction: Only remove schema tables in a distributed system if you wish tocompletely remove all Netcool Configuration Manager software, rather than aparticular Netcool Configuration Manager instance.
Procedure1. Access the installation directory. The default location is /opt/IBM/tivoli/
netcool/ncm/bin
2. Execute the stop server command /itncm.sh stop
3. When prompted, enter the superuser username and password.4. Access the utils directory. The default location is /opt/IBM/tivoli/netcool/
ncm/bin/utils/database
5. Execute the drop schema script sh ./dropDBSchema.sh
CAUTION:Do not execute this step within a distributed system unless you areuninstalling all Netcool Configuration Manager servers.
6. Access the directory containing the uninstaller. The default location is/opt/IBM/tivoli/netcool/ncm/bin
7. Execute the script sh ./uninstall.sh to invoke the uninstaller.
Note: The uinstaller will also remove Tivoli Common Reporting.
Note: If your installation is a Netcool Configuration Manager stand-aloneinstallation and you want to uninstall only Tivoli Common Reporting, thenexecute the script sh ./uninstall_reports.sh. The uninstall_reports.shscript is located in the $INSTALL_DIR/reporting/ITNCMReports directory.
8. Follow the prompts to uninstall the product.9. Delete the following files and directories:
Restriction: Only remove these items if Netcool Configuration Manager is theonly product installed on the server that made use of InstallAnywhere.v In the install directory (/opt/IBM/tivoli/netcool/ncm), delete the
ITNCM_InstallLog log.v In the /home/icosuser directory, delete the com.zerog.registry.xml file.
© Copyright IBM Corp. 2010, 2015 123
v Delete the install directory /opt/IBM/tivoli/netcool/ncm
10. For integrated installations, you run the required uninstall script to removethe Netcool Configuration Manager TIP installation from the NetworkManager TIP server, and then delete the ITNCM Reports folder from theReporting section.Perform the following steps:a. Access the directory containing the uninstaller as the same user who
installed it. The default location is /opt/IBM/tivoli/netcool/ncm/bin
b. Execute uninstall_itncm_tip.sh
c. Log into Network Manager Tivoli Integrated Portal, click Reporting >Common Reporting, then select ITNCM Reports.
d. Click Delete to remove the ITNCM Reports folder from NetworkManager Tivoli Common Reporting display.
Results
You have successfully uninstalled Netcool Configuration Manager.
What to do next
If you are uninstalling Netcool Configuration Manager from an environmentintegrated with Network Manager in order to reinstall it immediately, you mustrun the itnm_stop command followed by the itnm_start command betweenuninstalling and reinstalling Netcool Configuration Manager.
Restriction: Always execute the itnm_status, itnm_stop, and itnm_startcommands as the same user that installed Network Manager.
Note: Source the Network Manager environment script (env.sh) before executingthese steps.
Uninstalling ITNCM-ReportsTo uninstall Netcool Configuration Manager Tivoli Common Reporting onlywithout removing any other components, you run the reporting uninstall script.
Before you begin
You need the superuser username and password to uninstall the product.
Procedure1. Change directory to the Netcool Configuration Manager installation directory.
The default is /opt/IBM/tivoli/netcool/ncm
2. Execute the following command:./reporting/ITNCMReports/uninstall_reports.sh
Results
You have uninstalled Tivoli Common Reporting.
Uninstalling OOBC SoftwareUse this information about Netcool Configuration Manager to uninstall OOBCdaemons and OOBC software.
124 IBM Tivoli Netcool Configuration Manager: Installation and Configuration Guide

Uninstalling an OOBC daemonUninstall an OOBC daemon by following the steps in this section.
Since the OOBC software can be installed multiple times on a single machine, theuninstall process consists of 1) running a script for each OOBC run directory(daemon) created and then 2) manually removing the software. The followingprocedure outlines how to uninstall OOBC software.
Procedure1. Log on to the platform as root.2. Access the directory containing the OOBC installer. The default is
/opt/IBM/tivoli/netcool/ncm/OOBC/install.3. The installer requests the installation path for the new OOBC run directory. As
already mentioned, multiple OOBC Run Directories can be installed.Enter path to OOBC run directory to be removed? /opt/OutOfBandChange/run1
Press Enter to accept the default path, or enter an alternative path.4. The installer requests that you confirm the removal of the specified OOBC run
time configuration:Beginning UN-Install process for pre-existing OOBC Run directory:/opt/OutOfBandChange/run1Are you sure you want to remove this OOBC runtime configuration? (yes,no)yesRemoving symbolic links in /etc/rc2.d for run1BUILD SUCCESSFULTotal time: 12 seconds
Type yes and press Enter.
What to do next
Now, you can uninstall the OOBC software.
Uninstalling OOBC softwareUninstall OOBC software by following the steps in this section.
After all run directories have been uninstalled then you can simply remove theOOBC install root directory from your system.
Procedure1. Change directory to /opt:
# cd /opt
2. Remove the OOBC install root directory for your system. For example:# rm -rf OutOfBandChange
Chapter 5. Uninstalling 125

126 IBM Tivoli Netcool Configuration Manager: Installation and Configuration Guide
Notices
This information was developed for products and services offered in the U.S.A.
IBM® may not offer the products, services, or features discussed in this documentin other countries. Consult your local IBM representative for information on theproducts and services currently available in your area. Any reference to an IBMproduct, program, or service is not intended to state or imply that only that IBMproduct, program, or service may be used. Any functionally equivalent product,program, or service that does not infringe any IBM intellectual property right maybe used instead. However, it is the user's responsibility to evaluate and verify theoperation of any non-IBM product, program, or service.
IBM may have patents or pending patent applications covering subject matterdescribed in this document. The furnishing of this document does not grant youany license to these patents. You can send license inquiries, in writing, to:
IBM Director of LicensingIBM CorporationNorth Castle DriveArmonk, NY 10504-1785U.S.A.
For license inquiries regarding double-byte (DBCS) information, contact the IBMIntellectual Property Department in your country or send inquiries, in writing, to:
Intellectual Property LicensingLegal and Intellectual Property LawIBM Japan Ltd.19-21, Nihonbashi-Hakozakicho, Chuo-kuTokyo 103-8510, Japan
The following paragraph does not apply to the United Kingdom or any othercountry where such provisions are inconsistent with local law: INTERNATIONALBUSINESS MACHINES CORPORATION PROVIDES THIS PUBLICATION "AS IS"WITHOUT WARRANTY OF ANY KIND, EITHER EXPRESS OR IMPLIED,INCLUDING, BUT NOT LIMITED TO, THE IMPLIED WARRANTIES OFNON-INFRINGEMENT, MERCHANTABILITY OR FITNESS FOR A PARTICULARPURPOSE. Some states do not allow disclaimer of express or implied warranties incertain transactions, therefore, this statement may not apply to you.
This information could include technical inaccuracies or typographical errors.Changes are periodically made to the information herein; these changes will beincorporated in new editions of the publication. IBM may make improvementsand/or changes in the product(s) and/or the program(s) described in thispublication at any time without notice.
Any references in this information to non-IBM Web sites are provided forconvenience only and do not in any manner serve as an endorsement of those Websites. The materials at those Web sites are not part of the materials for this IBMproduct and use of those Web sites is at your own risk.
© Copyright IBM Corp. 2010, 2015 127
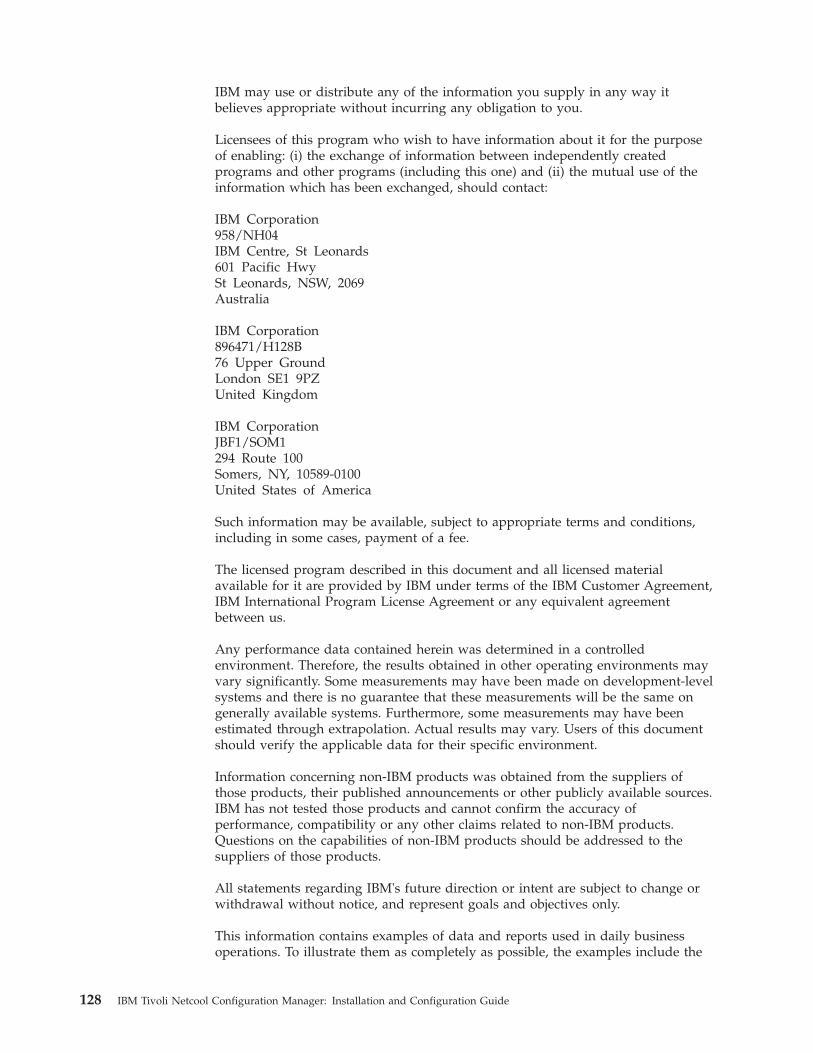
IBM may use or distribute any of the information you supply in any way itbelieves appropriate without incurring any obligation to you.
Licensees of this program who wish to have information about it for the purposeof enabling: (i) the exchange of information between independently createdprograms and other programs (including this one) and (ii) the mutual use of theinformation which has been exchanged, should contact:
IBM Corporation958/NH04IBM Centre, St Leonards601 Pacific HwySt Leonards, NSW, 2069Australia
IBM Corporation896471/H128B76 Upper GroundLondon SE1 9PZUnited Kingdom
IBM CorporationJBF1/SOM1294 Route 100Somers, NY, 10589-0100United States of America
Such information may be available, subject to appropriate terms and conditions,including in some cases, payment of a fee.
The licensed program described in this document and all licensed materialavailable for it are provided by IBM under terms of the IBM Customer Agreement,IBM International Program License Agreement or any equivalent agreementbetween us.
Any performance data contained herein was determined in a controlledenvironment. Therefore, the results obtained in other operating environments mayvary significantly. Some measurements may have been made on development-levelsystems and there is no guarantee that these measurements will be the same ongenerally available systems. Furthermore, some measurements may have beenestimated through extrapolation. Actual results may vary. Users of this documentshould verify the applicable data for their specific environment.
Information concerning non-IBM products was obtained from the suppliers ofthose products, their published announcements or other publicly available sources.IBM has not tested those products and cannot confirm the accuracy ofperformance, compatibility or any other claims related to non-IBM products.Questions on the capabilities of non-IBM products should be addressed to thesuppliers of those products.
All statements regarding IBM's future direction or intent are subject to change orwithdrawal without notice, and represent goals and objectives only.
This information contains examples of data and reports used in daily businessoperations. To illustrate them as completely as possible, the examples include the
128 IBM Tivoli Netcool Configuration Manager: Installation and Configuration Guide
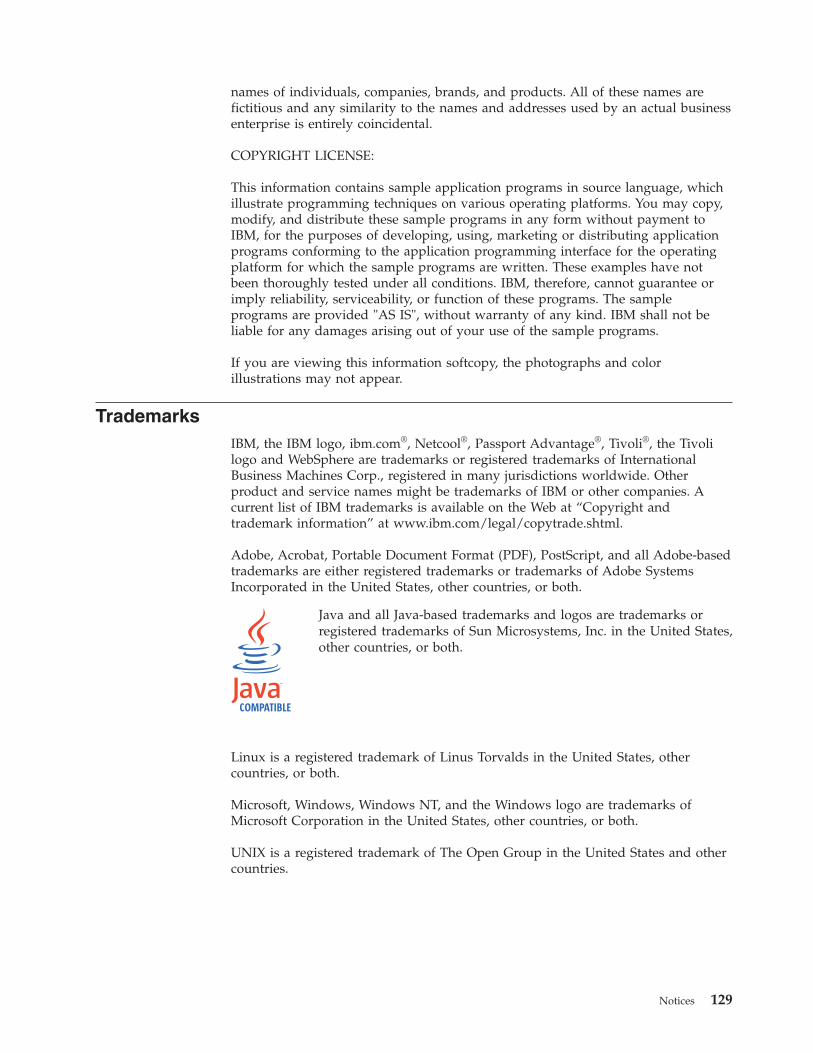
names of individuals, companies, brands, and products. All of these names arefictitious and any similarity to the names and addresses used by an actual businessenterprise is entirely coincidental.
COPYRIGHT LICENSE:
This information contains sample application programs in source language, whichillustrate programming techniques on various operating platforms. You may copy,modify, and distribute these sample programs in any form without payment toIBM, for the purposes of developing, using, marketing or distributing applicationprograms conforming to the application programming interface for the operatingplatform for which the sample programs are written. These examples have notbeen thoroughly tested under all conditions. IBM, therefore, cannot guarantee orimply reliability, serviceability, or function of these programs. The sampleprograms are provided "AS IS", without warranty of any kind. IBM shall not beliable for any damages arising out of your use of the sample programs.
If you are viewing this information softcopy, the photographs and colorillustrations may not appear.
TrademarksIBM, the IBM logo, ibm.com®, Netcool®, Passport Advantage®, Tivoli®, the Tivolilogo and WebSphere are trademarks or registered trademarks of InternationalBusiness Machines Corp., registered in many jurisdictions worldwide. Otherproduct and service names might be trademarks of IBM or other companies. Acurrent list of IBM trademarks is available on the Web at “Copyright andtrademark information” at www.ibm.com/legal/copytrade.shtml.
Adobe, Acrobat, Portable Document Format (PDF), PostScript, and all Adobe-basedtrademarks are either registered trademarks or trademarks of Adobe SystemsIncorporated in the United States, other countries, or both.
Java and all Java-based trademarks and logos are trademarks orregistered trademarks of Sun Microsystems, Inc. in the United States,other countries, or both.
Linux is a registered trademark of Linus Torvalds in the United States, othercountries, or both.
Microsoft, Windows, Windows NT, and the Windows logo are trademarks ofMicrosoft Corporation in the United States, other countries, or both.
UNIX is a registered trademark of The Open Group in the United States and othercountries.
Notices 129

130 IBM Tivoli Netcool Configuration Manager: Installation and Configuration Guide

Index
Aaccessibility ix
Cconventions, typeface x
Eeducation
see Tivoli technical training ixenvironment variables, notation x
FFIPS support 81, 85
Mmanuals v
NNCM
FIPS disablement 85FIPS enablement 81
Oonline publications vordering publications v
Ppublications v
Ssupport information ix
TTivoli software information center vTivoli technical training ixtraining, Tivoli technical ixtypeface conventions x
Vvariables, notation for x
© Copyright IBM Corp. 2010, 2015 131

132 IBM Tivoli Netcool Configuration Manager: Installation and Configuration Guide


����
Printed in the Republic of Ireland