Embed Size (px)
Citation preview

NeoPixel Ring Bangle BraceletCreated by Becky Stern
Last updated on 2018-08-22 03:38:43 PM UTC

2367
11161620
Guide Contents
Guide ContentsOverviewCircuit DiagramBuild it!Arduino CodeCircuitPython CodePlanningWear it!
© Adafruit Industries https://learn.adafruit.com/neopixel-ring-bangle-bracelet Page 2 of 21

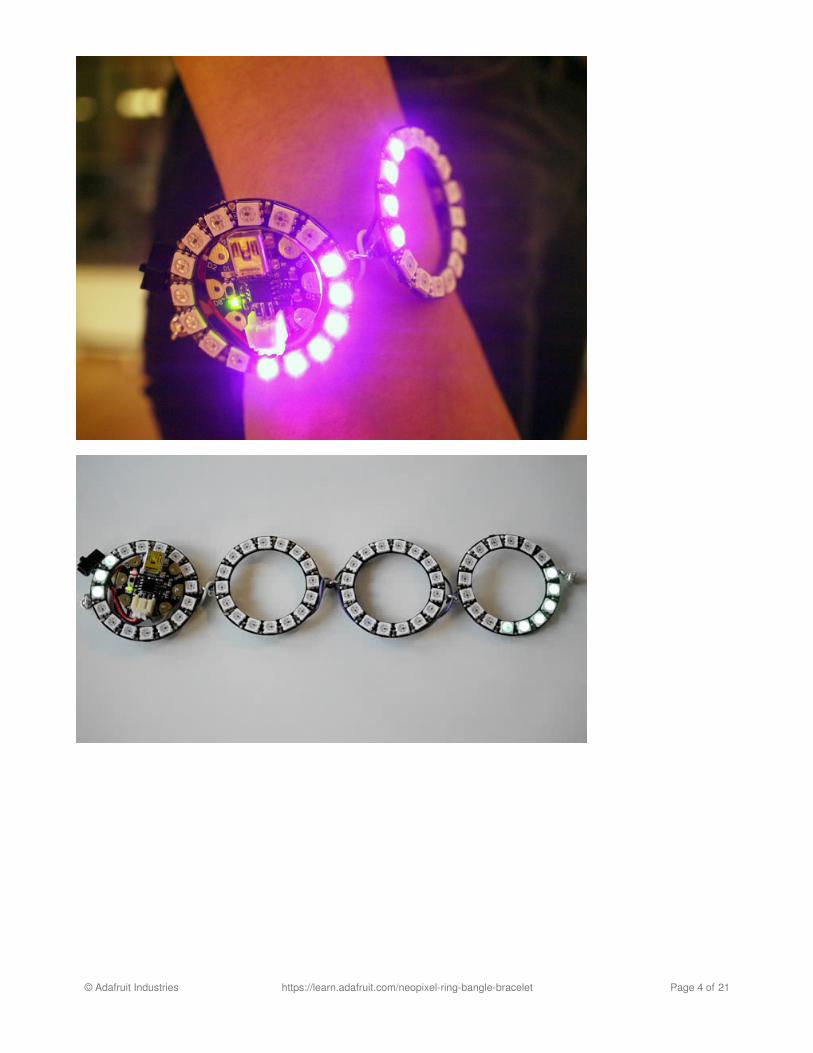
OverviewWear a bangle of light! Build a charming bracelet from four NeoPixel rings and GEMMA, Adafruit's tiny wearableelectronics platform. You will need:
4x NeoPixel Rings (http://adafru.it/1463) (16-size)GEMMA (http://adafru.it/1222) or GEMMA M0 (https://adafru.it/ytb) wearable microcontrollertiny lipoly battery (http://adafru.it/1317)tiny switch (http://adafru.it/805)jewelry findings (https://adafru.it/d2f)jump ringsmagnetic clasp (https://adafru.it/d2g)two pairs of plierssmall gauge stranded wiresoldering iron (http://adafru.it/180) and solder (http://adafru.it/145)wire strippers (http://adafru.it/527)flush snips (http://adafru.it/152)E6000 craft adhesive
This guide was written for the 'original' Gemma board, but can be done with either the original or M0Gemma. We recommend the Gemma M0 as it is easier to use and is more compatible with moderncomputers!
© Adafruit Industries https://learn.adafruit.com/neopixel-ring-bangle-bracelet Page 3 of 21
© Adafruit Industries https://learn.adafruit.com/neopixel-ring-bangle-bracelet Page 4 of 21

© Adafruit Industries https://learn.adafruit.com/neopixel-ring-bangle-bracelet Page 5 of 21

Circuit Diagram
Click to enlarge. GEMMA's D1 pin is wired to the first pixel ring's input pin. Signal output of first ring chains tosubsequent ring's input pin, and so on.
GEMMA's Vout pin is wired to all four pixel ring's VCC pins. Likewise GEMMA's ground pin is wired to all the rings'GND pins.
This diagram uses the original Gemma but you can also use the Gemma M0 with the exact same wiring!
© Adafruit Industries https://learn.adafruit.com/neopixel-ring-bangle-bracelet Page 6 of 21

Build it!
Lay out four NeoPixel rings on a gridded surface like a cutting mat. Glue on your metal jewelry findings as shown withE6000 craft adhesive and let dry overnight.
The orientation of the rings in the photo above matches up with our coding diagram on the next page. This orientationaffects how any multi-ring animations will look!
Open your jump rings by twisting the wire ends away
from each other with two pairs of pliers. Torque the wire
ends, don't splay them.
Use your jump rings to attach the jewelry findings to one
another, and also to attach a magnetic clasp.
Close jump rings the same way you opened them: twist
the wire ends towards each other with two pairs of
pliers until they match up.
© Adafruit Industries https://learn.adafruit.com/neopixel-ring-bangle-bracelet Page 7 of 21

Follow the circuit diagram to connect GEMMA and the four NeoPixel Rings. Use small-gauge stranded wire, and routethe wires through the jump rings so they are hidden from the front side of the pixel rings.
Make sure that the wires are not under strain-- they should be long enough to allow the segments of the bracelet tomove semi-freely without tugging. The metal findings/jump ring should be responsible for strain relief.
When soldering power and ground connections, where more than one wire will affix to each joint, put both wires in atonce before soldering. It's easier to solder two wires at once than it is to solder one wire in, then have to reheat thesolder to add another.
© Adafruit Industries https://learn.adafruit.com/neopixel-ring-bangle-bracelet Page 8 of 21

You are making a piece of delicate jewelry, but you'll wear it out on your wrist, so there's a chance your wires couldget snagged! To provide extra strain relief, add a dot of E6000 over each solder connection on the NeoPixel rings.
© Adafruit Industries https://learn.adafruit.com/neopixel-ring-bangle-bracelet Page 9 of 21

To add a power switch, cut and strip one of the wires
leading to your battery.
Add two small pieces of heat shrink tubing to the
stripped wires and solder to two legs of the small switch
(center leg and one outer leg). Slide the heat shrink to
cover the exposed metal and shrink with a heat gun.
Use a piece of foam tape to stick the battery behind the
GEMMA, with the switch sticking out the side. Plug in
the battery and glue the switch in place.
© Adafruit Industries https://learn.adafruit.com/neopixel-ring-bangle-bracelet Page 10 of 21

Arduino Code
To program GEMMA, make sure you have set up the Arduino IDE as explained in the "Introducing GEMMA"guide (https://adafru.it/jc5). Also, you’ll need the NeoPixel library installed as explained in the NeoPixelÜberguide (https://adafru.it/nBF).
Above is a diagram numbering the NeoPixels in their programatic order. It's handy for writing animations that seem toflow between rings, like the basic sine wave animation here:
The Arduino code presented below works equally well on all versions of GEMMA: v1, v2 and M0. But if youhave an M0 board, consider using the CircuitPython code on the next page of this guide, no Arduino IDErequired!
© Adafruit Industries https://learn.adafruit.com/neopixel-ring-bangle-bracelet Page 11 of 21

Here's another fun animation, it's similar to the sine wave but loops back around on itself when it gets to the fourth ringin a "figure eight."
//Basic sine wave animation for NeoPixel Ring Bangle Bracelet//by Dano Wall and Becky Stern for Adafruit Industries#include <Adafruit_NeoPixel.h>
#define PIN 1 // Marked D1 on GEMMA#define NUM_LEDS 64
// Parameter 1 = number of pixels in strip// Parameter 2 = pin number (most are valid)// Parameter 3 = pixel type:// NEO_GRB Pixels are wired for GRB bitstream (most NeoPixel products)// NEO_RGB Pixels are wired for RGB bitstream (v1 FLORA pixels, not v2)Adafruit_NeoPixel strip = Adafruit_NeoPixel(NUM_LEDS, PIN, NEO_GRB);
uint32_t color = strip.Color(75, 250, 100); // Change RGB color value here
// These are the pixels in order of animation-- 36 pixels in total:int sine[] = { 4, 3, 2, 1, 0, 15, 14, 13, 12, 20, 21, 22, 23, 24, 25, 26, 27, 28, 36, 35, 34, 33, 32, 47, 46, 45, 44, 52, 53, 54, 55, 56, 57, 58, 59, 60 };
void setup() { strip.begin(); strip.show(); // Initialize all pixels to 'off' strip.setBrightness(40); // 40/255 brightness (about 15%)}
void loop() { for(int i=0; i<36; i++) { strip.setPixelColor(sine[i], color); // Draw 'head' pixel strip.setPixelColor(sine[(i + 36 - 8) % 36], 0); // Erase 'tail' strip.show(); delay(40); }}
© Adafruit Industries https://learn.adafruit.com/neopixel-ring-bangle-bracelet Page 12 of 21

This code randomly flashes pixels in three colors of your choice.
//Figure-Eight animation for Neopixel Ring Bangle Bracelet//By Dano Wall and Becky Stern for Adafruit Industries#include <Adafruit_NeoPixel.h>
#define PIN 1 // Marked D1 on GEMMA#define NUM_LEDS 64
// Parameter 1 = number of pixels in strip// Parameter 2 = pin number (most are valid)// Parameter 3 = pixel type:// NEO_GRB Pixels are wired for GRB bitstream (most NeoPixel products)// NEO_RGB Pixels are wired for RGB bitstream (v1 FLORA pixels, not v2)Adafruit_NeoPixel strip = Adafruit_NeoPixel(NUM_LEDS, PIN, NEO_GRB);
uint32_t color = strip.Color(5, 250, 200); // Change RGB color value here
// Array of pixels in order of animation - 70 in total:int sine[] = { 4, 3, 2, 1, 0, 15, 14, 13, 12, 20, 21, 22, 23, 24, 25, 26, 27, 28, 36, 35, 34, 33, 32, 47, 46, 45, 44, 52, 53, 54, 55, 56, 57, 58, 59, 60, 61, 62, 63, 48, 49, 50, 51, 52, 44, 43, 42, 41, 40, 39, 38, 37, 36, 28, 29, 30, 31, 16, 17, 18, 19, 20, 12, 11, 10, 9, 8, 7, 6, 5 };
void setup() { strip.begin(); strip.show(); // Initialize all pixels to 'off' strip.setBrightness(40); // 40/255 brightness (about 15%)}
void loop() { for(int i=0; i<70; i++) { strip.setPixelColor(sine[i], 0); // Erase 'tail' strip.setPixelColor(sine[(i + 10) % 70], color); // Draw 'head' pixel strip.show(); delay(60); }}
© Adafruit Industries https://learn.adafruit.com/neopixel-ring-bangle-bracelet Page 13 of 21
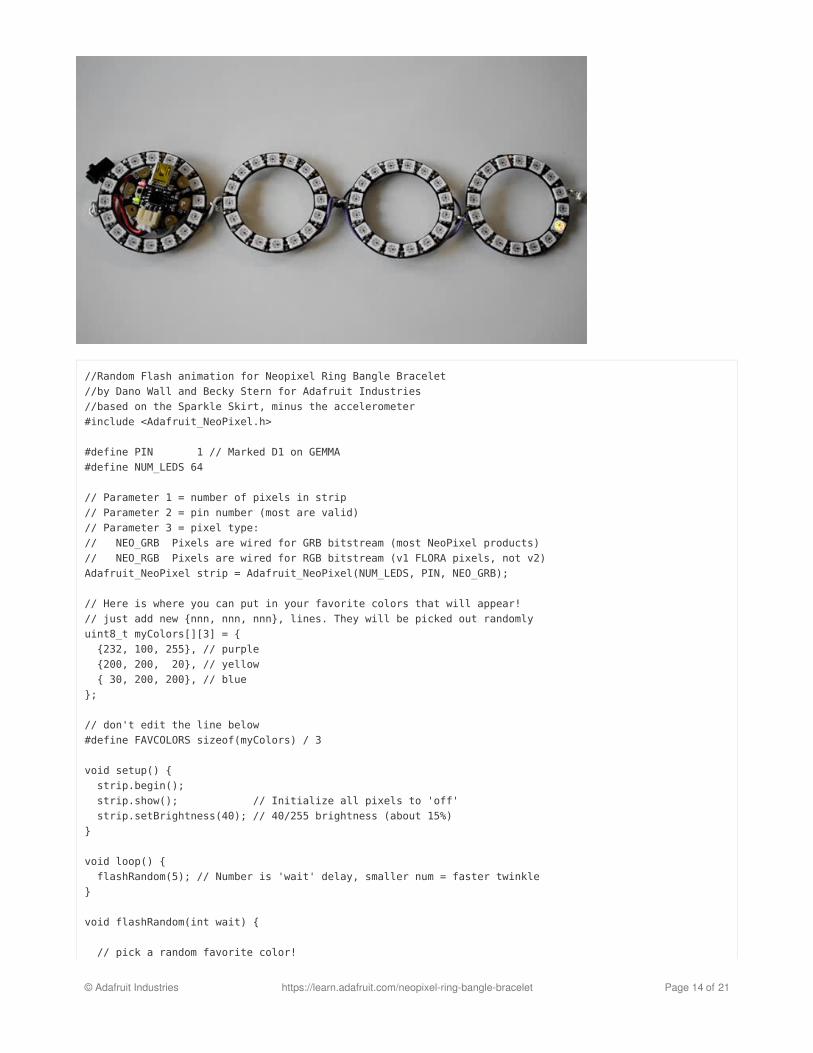
//Random Flash animation for Neopixel Ring Bangle Bracelet//by Dano Wall and Becky Stern for Adafruit Industries//based on the Sparkle Skirt, minus the accelerometer#include <Adafruit_NeoPixel.h>
#define PIN 1 // Marked D1 on GEMMA#define NUM_LEDS 64
// Parameter 1 = number of pixels in strip// Parameter 2 = pin number (most are valid)// Parameter 3 = pixel type:// NEO_GRB Pixels are wired for GRB bitstream (most NeoPixel products)// NEO_RGB Pixels are wired for RGB bitstream (v1 FLORA pixels, not v2)Adafruit_NeoPixel strip = Adafruit_NeoPixel(NUM_LEDS, PIN, NEO_GRB);
// Here is where you can put in your favorite colors that will appear!// just add new {nnn, nnn, nnn}, lines. They will be picked out randomlyuint8_t myColors[][3] = { {232, 100, 255}, // purple {200, 200, 20}, // yellow { 30, 200, 200}, // blue};
// don't edit the line below#define FAVCOLORS sizeof(myColors) / 3
void setup() { strip.begin(); strip.show(); // Initialize all pixels to 'off' strip.setBrightness(40); // 40/255 brightness (about 15%)}
void loop() { flashRandom(5); // Number is 'wait' delay, smaller num = faster twinkle}
void flashRandom(int wait) {
// pick a random favorite color!
© Adafruit Industries https://learn.adafruit.com/neopixel-ring-bangle-bracelet Page 14 of 21

int c = random(FAVCOLORS); int red = myColors[c][0]; int green = myColors[c][1]; int blue = myColors[c][2];
// get a random pixel from the list int j = random(strip.numPixels());
// now we will fade in over 5 steps for (int x=1; x <= 5; x++) { int r = red * x / 5; int g = green * x / 5; int b = blue * x / 5;
strip.setPixelColor(j, strip.Color(r, g, b)); strip.show(); delay(wait); } // & fade out in 5 steps for (int x=5; x >= 0; x--) { int r = red * x / 5; int g = green * x / 5; int b = blue * x / 5;
strip.setPixelColor(j, strip.Color(r, g, b)); strip.show(); delay(wait); } // LED will be off when done (they are faded to 0)}
© Adafruit Industries https://learn.adafruit.com/neopixel-ring-bangle-bracelet Page 15 of 21

CircuitPython Code
GEMMA M0 boards can run CircuitPython — a different approach to programming compared to Arduino sketches. Infact, CircuitPython comes factory pre-loaded on GEMMA M0. If you’ve overwritten it with an Arduino sketch, or justwant to learn the basics of setting up and using CircuitPython, this is explained in the Adafruit GEMMA M0guide (https://adafru.it/z1B).
Below is CircuitPython code that works similarly (though not exactly the same) as the Arduino sketch shown on a priorpage. To use this, plug the GEMMA M0 into USB…it should show up on your computer as a small flash drive…then editthe file “main.py” with your text editor of choice. Select and copy the code below and paste it into that file, entirelyreplacing its contents (don’t mix it in with lingering bits of old code). When you save the file, the code should startrunning almost immediately (if not, see notes at the bottom of this page).
If GEMMA M0 doesn’t show up as a drive, follow the GEMMA M0 guide link above to prepare the board forCircuitPython.
Planning
These directions are specific to the “M0” GEMMA board. The original GEMMA with an 8-bit AVRmicrocontroller doesn’t run CircuitPython…for those boards, use the Arduino sketch on the “Arduino code”page of this guide.
© Adafruit Industries https://learn.adafruit.com/neopixel-ring-bangle-bracelet Page 16 of 21

Above is a diagram numbering the NeoPixels in their programatic order. It's handy for writing animations that seem toflow between rings, like the basic sine wave animation here:
And here’s the CircuitPython code, using a table of pixel numbers to sequence the animation:
Here's another fun animation, it's similar to the sine wave but loops back around on itself when it gets to the fourth ringin a "figure eight."
import time
import boardimport neopixel
numpix = 64 # Number of NeoPixelspixpin = board.D1 # Pin where NeoPixels are connectedstrip = neopixel.NeoPixel(pixpin, numpix, brightness=0.15)color = [75, 250, 100] # RGB color - teal
sine = [ # These are the pixels in order of animation - 36 pixels in total: 4, 3, 2, 1, 0, 15, 14, 13, 12, 20, 21, 22, 23, 24, 25, 26, 27, 28, 36, 35, 34, 33, 32, 47, 46, 45, 44, 52, 53, 54, 55, 56, 57, 58, 59, 60]
while True: # Loop forever... for i in range(len(sine)): # Set 'head' pixel to color: strip[sine[i]] = color # Erase 'tail,' 8 pixels back: strip[sine[(i + len(sine) - 8) % len(sine)]] = [0, 0, 0] strip.write() # Refresh LED states time.sleep(0.016) # 16 millisecond delay
© Adafruit Industries https://learn.adafruit.com/neopixel-ring-bangle-bracelet Page 17 of 21

This code randomly flashes pixels in three colors of your choice.
import time
import boardimport neopixel
numpix = 64 # Number of NeoPixelspixpin = board.D1 # Pin where NeoPixels are connectedstrip = neopixel.NeoPixel(pixpin, numpix, brightness=0.15)color = [5, 250, 200] # RGB color - cyan
sine = [ # These are the pixels in order of animation - 70 pixels in total: 4, 3, 2, 1, 0, 15, 14, 13, 12, 20, 21, 22, 23, 24, 25, 26, 27, 28, 36, 35, 34, 33, 32, 47, 46, 45, 44, 52, 53, 54, 55, 56, 57, 58, 59, 60, 61, 62, 63, 48, 49, 50, 51, 52, 44, 43, 42, 41, 40, 39, 38, 37, 36, 28, 29, 30, 31, 16, 17, 18, 19, 20, 12, 11, 10, 9, 8, 7, 6, 5]
while True: # Loop forever... for i in range(len(sine)): # Erase 'tail': strip[sine[i]] = [0, 0, 0] # Draw 'head,' 10 pixels ahead: strip[sine[(i + 10) % len(sine)]] = color strip.write() # Refresh LED states time.sleep(0.04) # 40 millisecond delay
© Adafruit Industries https://learn.adafruit.com/neopixel-ring-bangle-bracelet Page 18 of 21

import boardimport neopixel
try: import urandom as randomexcept ImportError: import random
numpix = 64 # Number of NeoPixelspixpin = board.D1 # Pin where NeoPixels are connectedstrip = neopixel.NeoPixel(pixpin, numpix, brightness=0.0)colors = [ [232, 100, 255], # Purple [200, 200, 20], # Yellow [30, 200, 200], # Blue]
while True: # Loop forever... c = random.randint(0, len(colors) - 1) # Choose random color index j = random.randint(0, numpix - 1) # Choose random pixel strip[j] = colors[c] # Set pixel to color for i in range(1, 5): strip.brightness = i / 5.0 # Ramp up brightness strip.write() for i in range(5, 0, -1): strip.brightness = i / 5.0 # Ramp down brightness strip.write() strip[j] = [0, 0, 0] # Set pixel to 'off'
© Adafruit Industries https://learn.adafruit.com/neopixel-ring-bangle-bracelet Page 19 of 21

Wear it!
Enjoy your new bangle bracelet! Perfect a New Year's party, sporting event (with team colors, of course), wedding, batmitzvah, quinceañera, and more.
© Adafruit Industries https://learn.adafruit.com/neopixel-ring-bangle-bracelet Page 20 of 21

© Adafruit Industries Last Updated: 2018-08-22 03:38:37 PM UTC Page 21 of 21


![INTERMEDIATE | METAL CLAY Metal Clay-Wrapped Bangle · bangle smaller, use a jeweler’s saw and a 2/0 blade to cut out a section of the bangle. [2] To make the bangle larger, spread](https://img.pdfslide.us/doc/110x75/5f0cd8317e708231d4376986/intermediate-metal-clay-metal-clay-wrapped-bangle-bangle-smaller-use-a-jeweleras.jpg)