Embed Size (px)
Citation preview

NavNet Controller App
INDEX
1. New NavNet Controller App on Android™
2. Getting Started – Connection of Android™ Devices via Router 2-1 Router Setting – Summary 2-2 Updating Model TZT9/14/BB to v3.12 or Later 2-3 Network
3. Operating NavNet Controller App 3-1 Operation Screens 3-2 Setting Page 3-3 Limitations and Notes
2
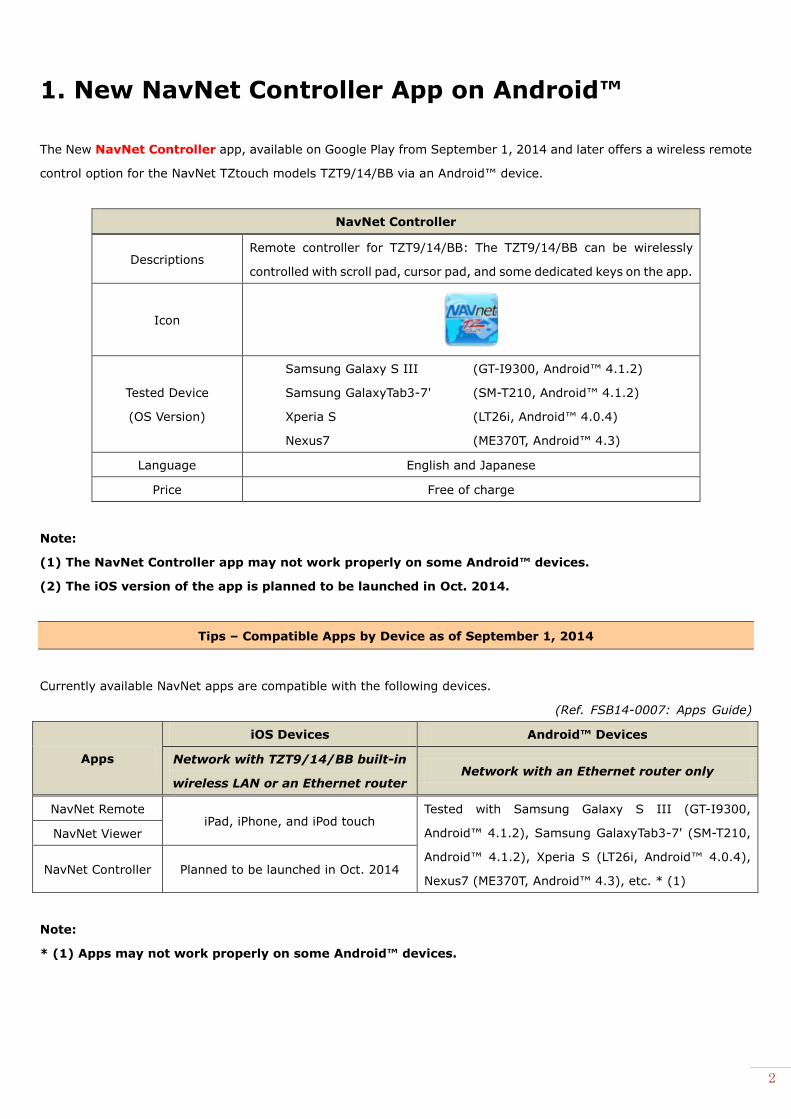
1. New NavNet Controller App on Android™
The New NavNet Controller app, available on Google Play from September 1, 2014 and later offers a wireless remote
control option for the NavNet TZtouch models TZT9/14/BB via an Android™ device.
NavNet Controller
Descriptions Remote controller for TZT9/14/BB: The TZT9/14/BB can be wirelessly
controlled with scroll pad, cursor pad, and some dedicated keys on the app.
Icon
Tested Device
(OS Version)
Samsung Galaxy S III (GT-I9300, Android™ 4.1.2)
Samsung GalaxyTab3-7' (SM-T210, Android™ 4.1.2)
Xperia S (LT26i, Android™ 4.0.4)
Nexus7 (ME370T, Android™ 4.3)
Language English and Japanese
Price Free of charge
Note:
(1) The NavNet Controller app may not work properly on some Android™ devices.
(2) The iOS version of the app is planned to be launched in Oct. 2014.
Tips – Compatible Apps by Device as of September 1, 2014
Currently available NavNet apps are compatible with the following devices.
(Ref. FSB14-0007: Apps Guide)
Apps
iOS Devices Android™ Devices
Network with TZT9/14/BB built-in
wireless LAN or an Ethernet router Network with an Ethernet router only
NavNet Remote iPad, iPhone, and iPod touch
Tested with Samsung Galaxy S III (GT-I9300,
Android™ 4.1.2), Samsung GalaxyTab3-7' (SM-T210,
Android™ 4.1.2), Xperia S (LT26i, Android™ 4.0.4),
Nexus7 (ME370T, Android™ 4.3), etc. * (1)
NavNet Viewer
NavNet Controller Planned to be launched in Oct. 2014
Note:
* (1) Apps may not work properly on some Android™ devices.

3
2. Getting Started – Connection of Android™ Devices via Router
The TZT9/14/BB built-in wireless LAN supports iOS devices only. Android™ devices should be networked via an
Ethernet router. This section describes the overview of the network setting including a router.
2-1 Router Setting – Summary
Set the router as follows and connect it to the TZT9/14/BB network.
Setting 1 (Mandatory) Fix the IP address of a router to 192.168.252.2 to 192.168.252.99
(e.g. 192.168.252.2).
Setting 2 (Mandatory) Set the Subnet Mask to 255.255.255.0.
Setting 3 (Mandatory) Activate the DHCP server function.
Setting 4 (Mandatory) Set the security mode to other than Open or Disabled.
Setting 5 (Recommended) Set the wireless channel to Auto, instead of fixing to one channel. * (1)
Setting 6 (Recommended) Rename the router’s SSID to easily find the router with an iOS device. ** (2)
Setting 7 (If necessary) Change the router’s Password. ** (2)
Note:
* (1) Setting the router’s wireless channel to Auto will have an effect on avoiding signal conflicts between many wireless
devices.
** (2) The original SSID and password are usually stated on a sticker pasted on a router.
For details on setting, see the Sales Bulletin FSB15-0008.
2-2 Updating Model TZT9/14/BB to v3.12 or Later
To utilize the NavNet Controller app, the TZT9/14/BB program should be v3.12 or later, which is optimized to accept
control commands from the app.

4
2-3 Network
1. After the router is properly set, connect the router to the TZT9/14/BB network.
2. Wirelessly connect an Android™ device to the router.
3. Open the NavNet Controller app.
Now, you are ready to wirelessly operate the TZT9/14/BB with the app.
Note:
A maximum of five (5) devices can be networked
to one (1) TZT9/14/BB for the NavNet Controller
app.
3. Operating NavNet Controller App
3-1 Operation Screens
The NavNet Controller app has two (2) main screens for operation: scroll pad and touch pad modes. Each screen mode
has dedicated operation icons.
Scroll Pad Mode Touch Pad Mode

5
No Icons/Pad Descriptions Comparison with Operation by…
MCU-002 Mouse
1 Mode Selection Switches the screen mode between scroll
pad and touch pad [CURS/SCRL] key -
2 Scroll Pad Scrolls the Plotter, Radar, Fish Finder
screens
Joystick operation under
scroll mode Drag
3 Touch Pad Moves the cursor in any direction Joystick operation under
cursor mode Moving the cursor
4 RotoKey™ (Press) Acts as pressing the RotoKey™ [ENT] key Pressing the wheel
5 Slider Bar Acts as rotating the RotoKey™ for
zooming in/out of the screen, etc.
[-/▲ (UP)] key
[+/▼ (DOWN)] key Rotating the wheel
6 Home Opens the Home page [Home] key -
7 Center/Cancel
Acts as tapping [Center Vessel] (Plotter),
[Center Radar] (Radar), and [Cancel
History] (Fish Finder) icons
Acts as cancel function
[Center] key
[Cancel] key -
8 Function Acts as Function Gesture [FUNC] key Right-click
9 Setting Opens the setting page - -
Note:
(1) The screen layout is fixed to portrait only.
(2) As described on Section 2-2, ensure to update the TZT9/14/BB to v3.12 or later to utilize all the control
icons of the NavNet Controller app above.
(1) Mode Selection
These icons switch the screen mode between scroll pad and touch pad. Depending on the
required operation, tap these icons.
(2) Scroll Pad
On the scroll pad mode, these arrow keys can scroll charts, offset the Radar screen, and scroll back and
shift the Fish Finder screen.
(3) Touch Pad
On the touch pad mode, you can move the cursor with your finger and tap the pad as a single tap on the
TZT9/14/BB screen. For touch pad operation, we recommend that the cross cursor setting be activated on the
TZT9/14/BB.

6
Menu Setting Cross Cursor on Screen
[Menu] – [General] – [Cross Cursor] – [ON]
(Cross cursor speed setting is active for the MCU-002 and
USB-mouse operation only.)
While the touch pad is in operation, the gray, thick cross
cursor appears on the screen.
Notes:
(1) The touch pad is compatible with single touch operation only. Multi touch operation is not available.
(2) The touch pad is not compatible with long-press.
(4) RotoKey™ (Push Only)
This icon functions in the same was as pressing the
RotoKey™.
Note:
This icon is not compatible with long-press. We recommend that the
TZT9/14/BB be set to show full RotoKey™ menus. Access [Menu] –
[General] – [RotoKeys] and set to [Full] (default: [Base]).
(5) Slider Bar
The slider bar works in the same way as rotating the RotoKey™. In combination with the RotoKey™ icon and
slider bar, you can operate the TZT9/14/BB as follows.

7
Swipe your finger upwards/downwards on the slider will zoom in/out of the Plotter and Radar screens and changes the
Fish Finder ranges.
Tap the RotoKey™ icon to show RotoKey™ menus.
Swipe your finger on the slider bar to move the RotoKey™
menus and tap the RotoKey™ icon. In this example,
[Overlay] is selected.
(6) Home
This icon opens the Home page on the
TZT9/14/BB. After tapping this icon, the screen
mode of the app will change to the touch pad mode, so that you
can operate the TZT9/14/BB Home page, such as tapping on the
[Menu] with the touch pad. To open a page, select it with the
slider bar and tap the RotoKey™ icon or place the cursor on the
required page and tap on the touch pad.
(7) Center/Cancel
This icon sets the own vessel to the center on the screen of Plotter and Radar presentations and cancels
the echo history of Fish Finder.

8
This icon also works in the same way as the MCU-002 [CANCEL] key for the following functions.
(1) Closes Home/Menu/Lists/Tides/Catalog pages, RotoKey™ and contexual menus, and dialog boxes
(2) Mutes alarm sound
(3) Ends action such as creating a route and moving a point
Note: No “Undo” function is available for this action.
(8) Function
This icon activates the function set in [Menu] – [General] – [Function Gesture] on the TZT9/14/BB. In
the following example, the Function Gesture is assigned to [Event]. The [FUNC] key opens the event
window.
You can select an event mark on the
TZT9/14/BB with the slider bar and enter it
with the RotoKey™ icon, or place the cursor
on a required event mark and tap on the
touch pad.
(9) Setting
This icon opens the setting page of the app. For details on settings, see Section 3-2.

9
3-2 Setting Page
The setting page guides you to the following options.
Setting Page No Keys Descriptions
(1) Network Config
Shows the IP address/(es) of TZT9/14/BB units on
the network to connect the device to one of the
selected TZT9/14/BB units
(2) Application Config Switches the position of the slider bar between left
edge and right edge of the screen
(3) Power / Brilliance Shows the brilliance control window of the
TZT9/14/BB
(4) About Shows the app version and end user license
agreement
(1) Network Configuration
This page allows you to see available TZT9/14/BB units on the network.
As shown at left, the IP address(es) of TZT9/14/BB units on the network will be shown
on the page. In this example, two (2) sets of TZT9/14/BB are networked. On the
Network Config page, select either of the IP addresses to wirelessly access and operate
that TZT9/14/BB.
(2) Application Configuration
This page allows you to switch the position of the slider bar between the left and right edge of the
screen. In default, the slider bar is at the left edge. To change the position to the right edge, tap [Zoom Bar Position]
and select [Right].

10
Default: [Left]
Changed to [Right]
(3) Power/Brilliance
This page opens the brilliance control window.
After the brilliance control window opens, the screen changes to the touch pad
mode. Adjust the brilliance with the slider bar or cursor and close the window
with the Center/Cancel icon. To turn off the unit, place the cursor on [Power Off
This Device] or [Power Off Network] and tap on the touch pad.
(4) About Page
This page shows the program version of the app and end user license agreement.
Tips
The back icon [ ] available on Android™ devices can turn from the current page to the
previous page and close the app from the top page.
11
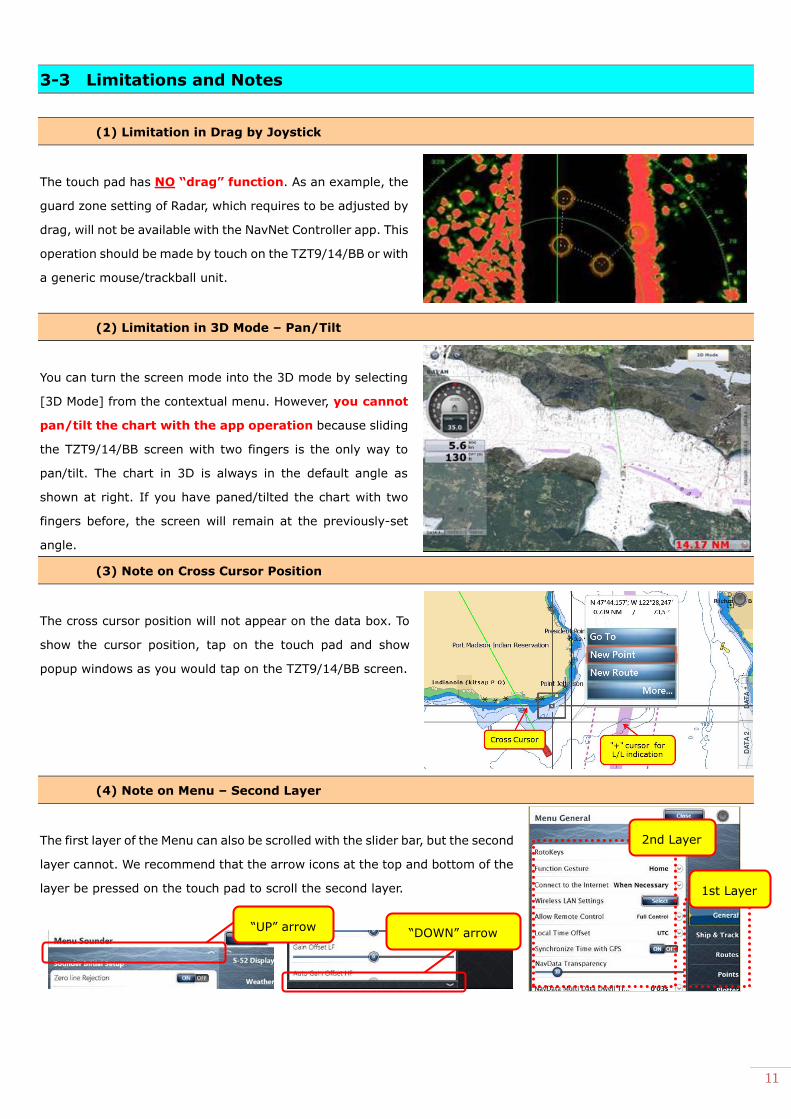
3-3 Limitations and Notes
(1) Limitation in Drag by Joystick
The touch pad has NO “drag” function. As an example, the
guard zone setting of Radar, which requires to be adjusted by
drag, will not be available with the NavNet Controller app. This
operation should be made by touch on the TZT9/14/BB or with
a generic mouse/trackball unit.
(2) Limitation in 3D Mode – Pan/Tilt
You can turn the screen mode into the 3D mode by selecting
[3D Mode] from the contextual menu. However, you cannot
pan/tilt the chart with the app operation because sliding
the TZT9/14/BB screen with two fingers is the only way to
pan/tilt. The chart in 3D is always in the default angle as
shown at right. If you have paned/tilted the chart with two
fingers before, the screen will remain at the previously-set
angle.
(3) Note on Cross Cursor Position
The cross cursor position will not appear on the data box. To
show the cursor position, tap on the touch pad and show
popup windows as you would tap on the TZT9/14/BB screen.
(4) Note on Menu – Second Layer
The first layer of the Menu can also be scrolled with the slider bar, but the second
layer cannot. We recommend that the arrow icons at the top and bottom of the
layer be pressed on the touch pad to scroll the second layer.
2nd Layer
1st Layer
“UP” arrow “DOWN” arrow

12
(5) Note on Virtual Keyboard
To enter characters and numbers with a virtual keyboard, use the touch pad.
Place the cursor on a required key and tap on the touch pad.
(6) Note on Active Window
In the split screen mode, even if you place the cursor on a different screen, the
window will not be active. Tap on the touch pad as you would tap on the
TZT9/14/BB screen to activate it.
--- END ---
- Android™ is registered trademarks or trademarks of Google Inc.
- iPad, iPhone, and iPod touch are trademarks of Apple Inc. All brand and product names are registered trademarks,
trademarks or service marks of their respective holders.