Embed Size (px)
Citation preview
Navigation Updated 10/13/2016
• Signing On and Off Oracle Applications• Using Forms and Menus• The Menu Bar• Entering Data Using Forms• Querying Data Using Forms• Accessing Online Help• Running Reports and Programs• Customizing the Presentation of Data
Objectives After completing this course, you should be able to do the following:
• Sign on and off of Oracle Applications• Enter and maintain data using Oracle Applications forms• Search for data using Oracle Applications forms
Introduction This course discusses the basic features of navigating within Oracle Applications. The aim is to enable you to navigate within any of the Oracle Applications forms, regardless of the application module. You will learn to enter data, retrieve information in the form of a query, maintain data, and access online Help. Additionally, concurrent processing and standard report submission topics will be discussed.
This course is intended for all end users of Oracle Applications as a prerequisite to any applications course.
Objectives After completing this course, you should be able to do the following:
• Access online Help within the Oracle Applications environment• Run and monitor reports and programs• Customize the presentation of the data in Oracle Applications forms• Move around the Oracle Application

• Perform Queries on data
Overview of Oracle Applications
Sample Flow of Oracle Applications Data Oracle Applications is a tightly integrated family of application products that share a common look and feel. Using the menus and windows of Oracle Applications, you have access to all the functions that you need to manage your business information.
Oracle Applications software is highly responsive to users by providing full point-and-click capability. You use your mouse or keyboard to operate graphical controls such as pull-down menus, buttons, pop-up lists, check boxes, or alternative regions. An Oracle Applications form is a user’s interface to business data stored in the database. You may have called it a “screen” in other applications. You navigate between and within forms to enter and access information from the database.
Lesson 1: Signing On and Off Oracle Applications
Lesson Overview
Objectives After completing this lesson, you should be able to do the following:
• Log on to Oracle Applications • Choose a responsibility • Use the Oracle Applications Navigator • Explain the function of the buttons that appear on the Navigator window and other forms
Navigating in Oracle Applications To use Oracle Applications productively, you need to understand the various components of a form, the menu paths, and keystrokes necessary to access and navigate within the system to perform your various job tasks.
Starting Oracle Applications

Logging On to Oracle Applications • From either the PD Web page (Quick Links > Applications > Accounting/Financial
Section > Oracle Financials) or the customer web page, double-click the Oracle Applications program Instance Icon for Production to begin the logon process. Do not create a shortcut on your desktop for the Oracle application. You can create a favorite on your internet browser that will take you to PD Web or your customer page.
1. Enter your username and password. A username is a unique identifier for each person who will use the system. The Password field does not actually display the characters that you type into it in order to protect the confidentiality of your password. You should keep your password confidential to prevent unauthorized users from gaining access to the system.
2. Click Login when you are finished entering your username and password. 3. Click Cancel to clear the sign-on form to start over. 4. To close the sign-on form, select File from the menu bar and click on Close from the drop
down menu.

E-Business Suite Home Page
Selecting a Responsibility Once you have used the sign-on form to begin the logon process, you must tell the system what type of access you will be using. A role is a predefined set of data, menus, and forms that defines your particular level of authority while using the system. For example, you would want the Accounting Services Branch technicians to only have access to the purchasing and invoice forms for FSA in the system, but you would not want them to be able to access any general ledger information. Another example is that the Supervisors for the branch will want to have access to all the data that his or her employees can use, so the Supervisor would want access to purchasing, accounts payable and general ledger information.
Responsibility Properties The following is a list of the types of responsibilities and their particular properties that are defined in Oracle Applications by your system administrator:
• A specific application (or applications), such as Oracle General Ledger. • A restricted list of windows to which you can navigate. For example, a responsibility may
allow certain Oracle Financials users to enter invoices, but not to enter suppliers (vendors) or customers.
• A restricted list of functions you can perform. For example, two responsibilities may have access to the same window, but the window of one responsibility may have additional functional buttons.

• Reports in a specific application. Your system administrator can assign groups of reports to one or more responsibilities, so the responsibility you choose determines the reports that you can submit.
Responsibility Assignments Each user has at least one responsibility and several users can share the same responsibility. Your system administrator can assign you any of the standard responsibilities provided with Oracle Applications. The responsibilities assigned to your user id will appear on the left hand side of the E-Business Suite Home Page. To proceed:
• Select a responsibility • Scroll to the menu item you wish to navigate to in the center column of the screen. • Single-click on the link to choose it. • The java applet will launch at this point, and the form selected will open automatically. • The E-Business Home Page will remain open in the background. You can minimize this
window, but don’t close it. Closing this window prevents you from being able to log back into Oracle, without losing your data, when you get timed out.
• Once you have finished with this form, you can navigate to other Oracle forms using the Navigator Window.
Using the Navigator Window

Navigator Window The Navigator window displays the name of the responsibility you selected.
Use this window to navigate to a form so you can perform a specific business flow. The forms that you can navigate to are displayed in a navigation list on the left side of the Navigator window.
Expanding or Collapsing the Navigation List Choose one of the following methods to expand an item to its next sublevel form:
Action Description Double-click the item → Select the item and choose Open. → OPEN Select the item and choose Expand. → + To collapse any expanded items, select the item and choose Collapse. → -

Navigator Buttons Each user can access the Oracle Applications forms in several ways so that they can use the system quickly, according to their own computer style.
Expanding or Collapsing Several Items To expand or collapse several items at once, choose one of the following buttons:
Action Description Expand All Children expands all the sublevels of the currently selected item. + ⤵
Expand All expands all the sublevels of all expandable items in the navigation lists. ++
Collapse All collapses all currently expanded items in the navigation list. --
Logging Off of Oracle Applications
Exiting Oracle Applications From the menu bar, choose File → Exit Oracle Application to log off the system. It is important to exit the system in this manner, rather than any other, as this is the only way to ensure that your username is cleared from system access.
Practice 1-1 Overview In this practice you will use Oracle Applications forms and menus to:
• Log on to Oracle Applications • Choose a responsibility • Identify specific buttons and menu items • Log off of Oracle Applications
Lesson 2: Using Forms and Menus

Objectives After completing this lesson, you should be able to do the following:
Open a form from the Navigator window
Define basic form terminology
Use various menu options available in Oracle Applications
Discuss keyboard shortcuts
Using Forms and Menus This lesson discusses using forms and menus from the Navigator window. Form terminology, the applications toolbar, and keyboard shortcuts will be explained to enable you to move quickly within Oracle Applications forms.
Opening a Form from the Navigator Window

The Navigator Window Each Oracle application has a Navigator window, which is used to navigate between forms.
Use the Close Other Forms (Tools /Close other forms) check box to specify whether multiple windows will be opened at the same time, as you proceed from form to form within the application. Similar to other Windows applications running simultaneously that have been collapsed, the other form will appear as a button on the Taskbar at the bottom of your screen, next to any other running, collapsed, applications. You can move between forms by clicking the button of the form you want to go to.
Basic Form Terminology

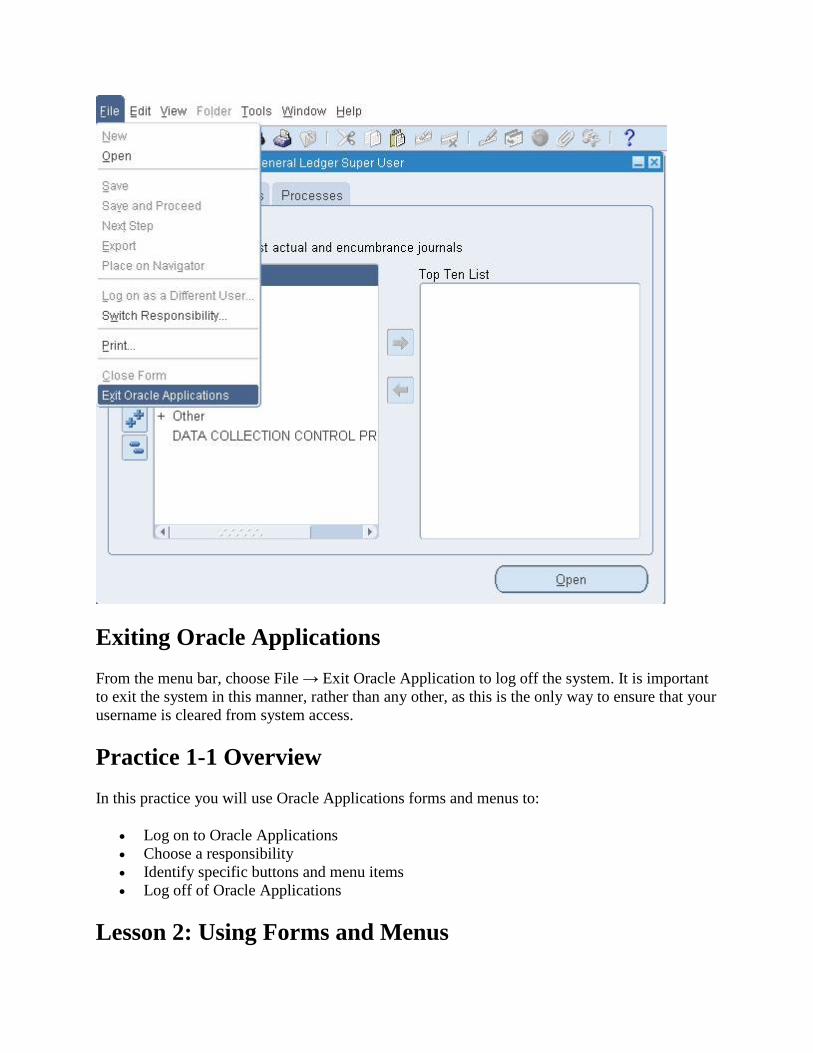
Form Terminology Oracle Applications Release 11i works specifically in a Network Computer Architecture (NCA), or Web-enabled environment. It is important to understand the terminology of the components within an Oracle Applications form. The following table defines 14 common terms used in Oracle Applications forms.
Label Number Term Definition
1 Menu bar Use pull-down menus from this menu bar to navigate within a form
2 Window
An area where the user interacts with an application (Many windows can be open at one time and you can access these “overlapping” windows to perform data entry or data search activities.)
3 Window title Text in the title bar that indicates the name of the window, and usually, context information pertinent to the information in that window
4 Region A logical grouping of fields set apart from other fields.
5 Alternative Region
A collection of regions that occupy the same space in a window where only one region can be displayed at a time
6 Field An area in a window that displays data or enables you to enter data
Label Number Term Definition
7 Button A graphic element that initiates a predefined action when you click it
8 Option button A button that indicates an individual selection is available within an option group
9 Dialog box A window that requires you to act on its content before continuing
10 Scrolling region A region, containing a scroll bar, in which to view other fields
11 Block An area of information relative to a specific business function or entity
12 Record or Row A set of one or more data items grouped for processing
13 Check box A box in which you can toggle between an on/off or yes/no state of a particular value
14 Pop-up list or LOV A list of values (LOV) for the current field, if available
The Applications Toolbar Note: You may need to resize other open windows to keep these lines visible at all times. The Toolbar window replicates many commonly used menu items so that you can invoke their actions quickly without having to search for them in the menu bar.

Label Number Term Definition
1 Toolbar window title The window name
2 Message line Oracle Applications displays pertinent information for processing your form, including error messages
3 Status line Oracle Applications displays status information
The Toolbar Icons
Icon Description
New The New Record icon creates a new record.
Find The Find icon displays the Find window to search for data within the field.
Show Navigator Takes you back to the Navigator Window
Save The Save icon saves any pending changes
Switch Responsibilities Allows the user to switch responsibilities quickly.
Printer The Print icon prints the current screen to your assigned default printer.
Close Form The Close Form icon closes the open form in the current window.
Cut The Cut icon cuts the selected text.
Copy The Copy icon copies the selected text to the clipboard.
Paste The paste icon pastes the text from the clipboard to the document.
Clear Record The Clear Record icon clears all data pertaining to the current record in the window.
Delete Record The Delete Record icon deletes the current record from the database. Note: This button is not always available because many records cannot be deleted from the Oracle database. An example is a customer record, which can only be inactivated, not deleted.
Edit Field The Edit icon opens the Editor window for the current field
Translations The Translations icon opens the Translations window.

Icon Description
Folder Tools The Folder Tools icon displays the folder tool palette.
Attachments The Attachments icon opens the Attachments window.
Help The Help icon provides standard Oracle help.
Keyboard Shortcuts
Using Keyboard Shortcuts You can perform some tasks with the keyboard that you can perform with the mouse. The default keyboard mapping for some shortcuts in Oracle Forms is shown in the table below. Your system administrator can change the keyboard mapping defaults to fit your business needs.
Key Function Key Function F11 Enter Query Ctrl F11 Execute Query F4 Cancel Query F12 Count Query Ctrl S Save (Commit) Ctrl L List of Values
Shift F5 Duplicate Field from above Shift F6 Duplicate Record from above
F5 Clear Field F6 Clear Record F7 Clear Block F8 Clear Form Ctrl Up Delete Record Ctrl Down Insert Record Ctrl U Update Record Shift Ctrl E Display Error Ctrl E Edit Shift Tab Go to Previous Field Tab Go to next field
The Menu Bar
Using the Menu Bar When you navigate to an Oracle Applications form you can use the pull-down menu to navigate within a form, to edit or retrieve data, or to perform various other actions.
Menu Item Description
File Saves or clears data in a window, logon as a different user, switch responsibilities or exit the application
Edit Edits your data in Oracle Applications View Finds data, View Concurrent Manager Requests Folder Modifies and saves the display of information in a window

Menu Item Description Tools Expand, Collapse, Top ten list Window Cascade, Tile Horizontally, Tile Vertically
Help
Shows context-sensitive or system Help, quick-reference information such as the status and results of a report or program that was submitted to run, a keyboard mapping, a detailed explanation of any database warning message that you encounter, information about the current record, or general information about Oracle Applications
The File Menu
Menu Item Description New Opens a new record in the active form Open Opens the selected form Save Saves any pending changes in the current form Save and Proceed Saves any pending changes and proceeds with data entry Next Step Proceeds to the next step Export Exports the data into another application when available Place on Navigator Saves documents to the Navigator window for later access Logon as different user Allows you to logon as a different user Switch Responsibility Allows you to switch responsibilities Print Prints the current window Close Form Closes all windows of the current form Exit Oracle Applications Quits the Oracle Application
The Edit Menu
Using the Edit Menu from the Menu Bar
Menu Item Description Undo Typing Erases data input in the current field Cut Cut the current selection to the clipboard Copy Copy the current selection to the clipboard Paste Pastes the contents of the clipboard to the current field Duplicate Record Above Copies all values from the prior record to the current record Duplicate field above Copies the value of the current field from the prior row Clear Field Clears data from a field Delete Deletes the current record from the database Clear Record Erases the current record from the window Clear Form Erases any pending changes from the current form
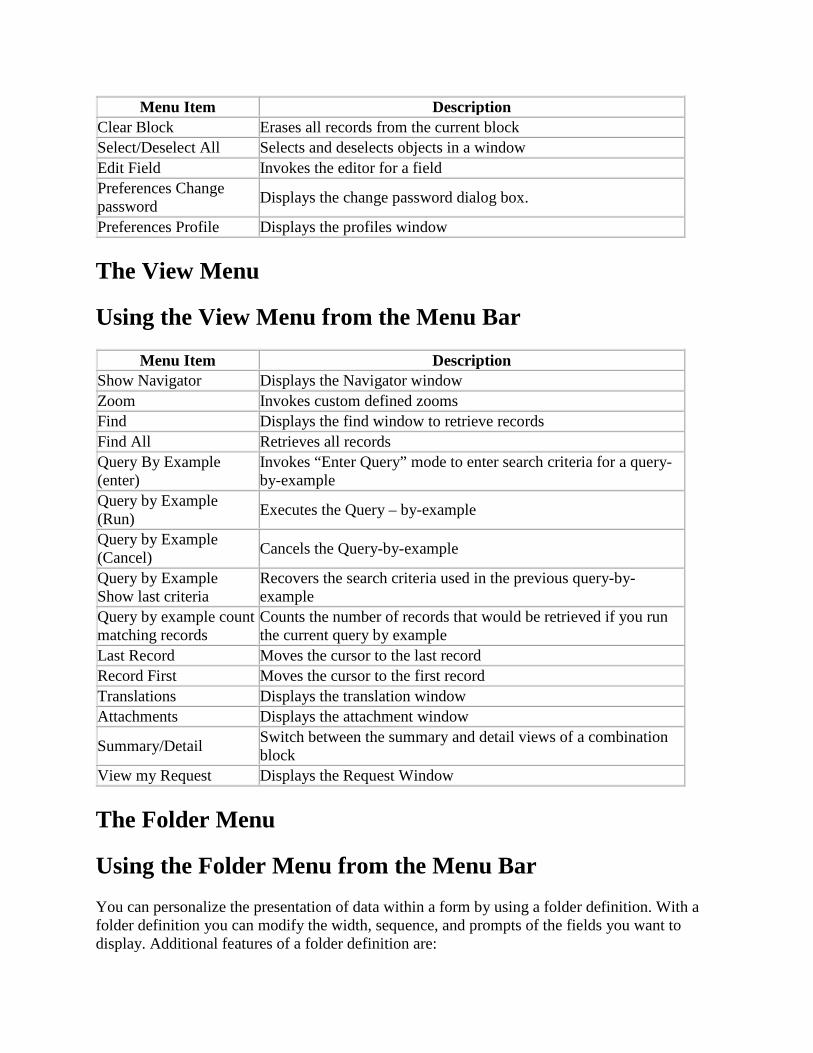
Menu Item Description Clear Block Erases all records from the current block Select/Deselect All Selects and deselects objects in a window Edit Field Invokes the editor for a field Preferences Change password Displays the change password dialog box.
Preferences Profile Displays the profiles window
The View Menu
Using the View Menu from the Menu Bar
Menu Item Description Show Navigator Displays the Navigator window Zoom Invokes custom defined zooms Find Displays the find window to retrieve records Find All Retrieves all records Query By Example (enter)
Invokes “Enter Query” mode to enter search criteria for a query-by-example
Query by Example (Run) Executes the Query – by-example
Query by Example (Cancel) Cancels the Query-by-example
Query by Example Show last criteria
Recovers the search criteria used in the previous query-by-example
Query by example count matching records
Counts the number of records that would be retrieved if you run the current query by example
Last Record Moves the cursor to the last record Record First Moves the cursor to the first record Translations Displays the translation window Attachments Displays the attachment window
Summary/Detail Switch between the summary and detail views of a combination block
View my Request Displays the Request Window
The Folder Menu
Using the Folder Menu from the Menu Bar You can personalize the presentation of data within a form by using a folder definition. With a folder definition you can modify the width, sequence, and prompts of the fields you want to display. Additional features of a folder definition are:

• Displaying only those fields you are interested in viewing • Displaying a subset of records based on your specific criteria • Automatically querying for a subset of records each time you open a specific folder • Keeping your folder customizations private or making them public for others to use
(folders that are to be made public should be created by USB only!) • Making your customizations the default layout for a folder
Note: Using a folder is covered in detail in the upcoming lesson “Customizing the Presentation of Data”.
The Tools Menu
Using the Tools Menu from the Menu Bar
Menu Item Description Add to List Adds a form to your top ten list Remove from List Removes a navigation path from your top ten list Function List Toggles from top ten list to functional list Top Ten List Toggles from Function List to Top Ten List
Note: The tool menu contains actions to view and personalize your Navigator. These actions are discussed in the Expanding or Collapsing the Navigation List.
The Help Menu
Using the Help Menu from the Menu Bar
Menu Item Description Window Help Displays Help for the current window Oracle Applications Library
Displays a window that lists all available Oracle Applications Help text
Keyboard Help Displays the current mapping of specific functions and menu options
Diagnostics Used for troubleshooting. Record History Displays information about the current record About Oracle Applications Displays information about the current window and application
Lesson 3: Entering Data Using Forms
Lesson Overview

Objectives After completing this lesson, you should be able to do the following:
Enter data into a form using various editing functions
Delete data from a form or from the database
Use a list of values to simplify your data entry
Entering Data Using Forms This lesson illustrates the many functions that are available to you while performing data entry within Oracle Applications forms.
Creating New Record
Creating a New Record When you add a new record to the database, Oracle Applications will move the current record down and insert a new blank row. You add a new record by entering information into this blank row.

After you finish entering the data for your new record, you must remember to click Save so that your newly added information will be written to the database. If you enter five new blank rows of information but do not click Save when you are finished, none of this newly added information will be updated in the database.
How to Create a New Record 1. You can click the down arrow on your keyboard to insert a blank row, if you are not in a
table on the form. Additionally, some applications have a button labeled New, and clicking it will insert a blank row.
2. Type the new information into the blank row. 3. Choose File → Save, or File → Save and Proceed, or click Save to save the new record.
Deleting Records
Deleting a Record from the Database If you want to delete a record from the database, you must first display the record on your form and then click Delete Record.
Note: This option is not always available. For example, in Oracle Applications you cannot delete a customer once they have been entered; you can only inactivate their status.
If you do not Save this new change to the database, the record is not truly deleted.
How to Delete a Record 1. Choose Edit → Delete or Click Delete Record. 2. Choose File → Save, or File → Save and Proceed, or Click Save.
Using a List of Values
Using the LOV The List of Values (LOV) feature is very useful while entering data in Oracle Applications. It provides you with a powerful, easy-to-use data entry method that increases your accuracy and productivity. Using the LOV makes data entry an easy task for novice users, and experienced users can enter correct data with a minimum number of keystrokes.
Oracle Applications notifies you when a list of acceptable input values is available for a field by displaying the List symbol on the field. When you display a list, the values appear in a window with a title that describes the contents.

By using the LOV feature, you can save time and enter data quickly without having to memorize or look up valid data for each field. You can choose data from an online list of valid input choices when you want. Additionally, you are relying on Oracle Applications to validate your input since you will know right away if your entry does not match an option from the LOV.
Choosing a Value from a List To choose a value from a list, select the list symbol on the right side of the field. If you do not want to view the entire list selection, you can reduce the length of a list, or select directly from the list by using some of the methods described below.
• Without clicking in the Find field, type the first character(s) of a value to reduce the list to only those values that match the characters you enter.
• Search for a value by clicking in the Find field, then enter your search criteria in the Find field and click the Find button.
• Select a value directly from the list by using the mouse to scroll through the list and then double-click the value to choose it, or click once on the value and then click OK to choose it.
• Use the wild card (%) to limit your search.
Once you choose a value, the list window closes and inserts the value into the current field. To close a list window without choosing a value, select Cancel.
Using the Calendar to Enter Dates

Choosing a Date in the Calendar Window You can use a calendar to enter a valid value in a date field if the field displays the List of values symbol.
Put your cursor in a valid date field.
1. Select the List of Values symbol to display the Calendar window. The date value that appears below the calendar is called the selected date, which is either the value already in the field, the default value of the field, or the current system date.
2. Highlight and click the date on the calendar that you want to select. 3. Click on a date. *Note: Disabled buttons that show dimmed text represent invalid days,
which cannot be chosen. Similarly, if a date field is display only, you can display the Calendar window for the field, but you cannot change the date shown on the calendar.
4. Click OK to accept the selected date and close the window. 5. Click Cancel if you want to close the window without choosing a date.
Using the Edit Function

Editing a Field You can display an Editor window to view, enter or update the entire contents of a text field. The Editor window is especially useful for editing scrollable text fields. A scrollable text field is a field in which the actual width is greater than the display width, but you can review the contents by scrolling though the field.
To use the Editor window for a field, choose Edit → Edit Field. You can enter a new value or edit the existing value in the Editor window. If the current field is a display-only field, then the Editor window appears in display-only mode.
You can also use the Editor window to search for a phrase and replace it with another phrase. Click Search in the Editor window to display a Search/Replace window. Then, enter a value in the Search For field, and enter the other value in the Replace With field. Click Search to search for the value, or click Replace or Replace All to search for the value and replace the first occurrence or all occurrences with your new value, respectively.
Once you are satisfied with the value in the Editor window, click OK to close the window and insert the value into the field.
Clearing Data from a Form

You can clear data from the screen at almost any time. Typically, you will use this feature when you start to enter data into a field and then change your mind. Oracle Applications will think you are in the middle of processing a record and may not proceed with your next task until you clear the field. The data you clear is simply erased from the screen and not deleted from the database.
Note: If the data is new and has never been saved to the database, it will be lost permanently when you clear it from the screen.
Select Edit from the Toolbar window, and then the appropriate choice, to clear a field, record, block, or form.
Duplicating Data
Duplicating Data from a Previous Record To save time during data entry, you can duplicate data from a previous record if much of the data needs to be repeated again in the new record.
How to Copy a Field Value from the Previous Record
1. Enter a new record or query an existing record in your form. 2. Select File → New or click New Record to insert a new record after the existing record. 3. Place your cursor in the field whose value you want to duplicate. 4. Select Edit → Duplicate Field Above, to copy the field value from the previous record
into the current record.
How to Copy All Field Values from the Previous Record
1. Follow Steps 1, 2 above. 2. Select Edit → Duplicate Record Above, to copy all field values from the previous record
into the current record.
Note: Depending on the record storage in the database and relevant database tables, not all fields may be copied when using this feature. Be sure to check your new record carefully before you assume all fields have been copied into the new record.
Saving Your Work When you save your work, Oracle Applications updates the underlying database with the work you have done since you last saved your changes and then informs you that the transaction is complete. Saving your work is sometimes referred to as committing a change or committing a transaction.

Oracle Applications always validates your work upon saving it. If any of the data you enter is invalid or missing, Oracle Applications displays a message describing the problem and does not save the data.
To save your work, use any of the following methods:
• Select File → Save, from the menu in the Menu window. • Select File → Save and Proceed, from the menu. This will save any changes you have
made to the current window and move to the next record (new or existing) so you can enter another transaction.
• Click Save in the Toolbar window. • Use keyboard shortcut [Ctrl] + [S].
Lesson 4: Querying Data Using Forms
Lesson Overview
Objectives After completing this lesson, you should be able to do the following:
• Search for existing data in an application using Query mode • Use the Find window to perform a search • Include wildcards and query operators in your search criteria • Review records retrieved from a search
Querying Data Using Forms Oracle Applications provides you with easy-to-use search capabilities to access application information. This lesson demonstrates how to retrieve, view, and maintain data within Oracle Applications forms.
Basic Business Needs In Oracle Applications you can quickly retrieve and review all available information in your database without having to remember the information displayed in the windows, or without having to print lengthy reports to see the data. Instead, you can simply run a search to obtain the information you want, and then review the data online in the same window you used to enter the data.
By using the query function in Oracle Applications, you can satisfy the following information search needs.

• Gain instant, online access to all of your application information. You can find information quickly and easily, without having to use a complex query language.
• Search for a specific record or for a group of records based on criteria you enter. You can retrieve this information directly, without having to review all the information in your application database.
• Search for information using criteria of different types or lengths, including a single letter, a single word, or a group of characters, or anything else you want to enter.
• Find out how much information is available that matches your search criteria before a search for a single piece of information yields 10,000 responses.
Find Mode
Steps Select Find Specify search criteria Click Find Review retrieved records
Using Find Mode To query for records in your current block or window, use the Find window. The Find window contains fields for entering search criteria. These fields are specific to the current block and often validate the search criteria you enter against a list of valid values.
Generally, a Find window is displayed for those blocks that have many records or for those blocks that can be best searched using criteria in more than one field.

Using the Find Window 1. Enter your search criteria in the appropriate fields of the Find window. If a field does not
provide a list of values for you to choose from, you can enter wildcard characters in the search phrase. You cannot, however, use query operators (such as >, <, and so on) in a Find window.
2. Click Find to find any matching records. 3. Click Clear to clear the current search criteria from the Find window so you can enter
new search criteria. 4. Click New to enter a new record in your current block if your search finds no matching
records. 5. Click More to add more fields to the Find window to enter additional search criteria.
Query Mode
Using Query Mode To retrieve a group of records based on more sophisticated search criteria than Find mode can achieve, you can use Query mode to specify complex search criteria in most of the fields of your current block. The search criteria can include specific values, phrases containing wildcard characters, and phrases containing query operators to help you pinpoint the data of interest.

In addition, if you do not actually need to retrieve the records in Query mode, but only want to know how many records match your search criteria, you can perform a query count to save yourself time.
How to Use Query Mode 1. Select Query → Enter or F11 2. Enter search criteria in any of the fields, using wildcard characters and query operators as
necessary. You can also select query → Show Last Criteria to display the search criteria used in your last search, if you performed one.
3. Select Query → Run or Ctrl F11 to perform the search. 4. Select Query → Cancel or F4 to cancel from Enter Query mode.
How to Obtain a Query Count 1. Perform steps 1 and 2 above. 2. Select View → Query by Example → Count Matching records to display the number of
records a Query-by-Example search would retrieve.
Specifying Search Criteria
Using Query Operators
Operator Meaning Example = Equal to = ‘Janet’ or =107 != Not equal to !=’Janet’ or !=107 > Greater than >99.1 or >’Joan’ >= Greater than or equal to >=55 < Less than <1000 <= Less than or equal to <=100 #BETWEEN Between two values #BETWEEN 1 and 100
Wildcard Characters You can use the percent “%” wildcard character to represent any character or group of characters. For example, use “Manuf%” to represent Manufacturing, Manufacturer, and so on. You can also use the underline “_” character to represent any single character. For example, “Product_” can represent ProductA, or Product1.
The Difference Between Query Mode and Find Mode
Query Versus Find

Query Mode Find Mode • Menu bar, F11 • Menu bar, icon
• Existing window • New window
• Wildcards—general • Wildcards—specific
• Query count • No find count
Query Mode • In Query mode, you can use the menu bar to access a query, or you can use keyboard
shortcuts, [F11] to enter a query, and [Ctrl] + [F11] to execute a query. • You use the existing window to prepare your search criteria for the query. You can enter
specific information into any field to narrow your search. • When using wildcards to prepare your search criteria, you can use all query operators to
narrow your search. • In query mode, you can check to see how many records match your criteria even before
retrieving the data that matches your query.
Find Mode • In Find mode, you use the menu bar to access the Find window, or you click the icon
from the Toolbar window. • You use a new window, the Find window, to prepare your search criteria. • Only specific wildcards are accepted in the Find window; those are determined by your
application. • The Query Count feature is not available in Find mode.
Search for Data in a Flexfield
Flexfields A flexfield is a flexible data field that your organization can customize for your business needs without programming. Oracle Applications uses two types of flexfields:
• Key flexfields • Descriptive flexfields
The Basic Business Needs for Flexfields With Oracle Applications flexfields you can satisfy the following business needs:

• Using “intelligent” fields—fields comprising one or more segments, where each segment has both a value and a meaning
• Relying upon your application to validate the values or the combination of values that you enter in intelligent fields
• Changing the structure of an intelligent field depending on data in your application • Capturing additional information that is not provided by existing fields • Customizing data fields to meet your business needs without programming • Querying intelligent fields for specific information
Key Flexfields A key flexfield is a field that you can customize to enter multi-segment values such as part numbers, account numbers, and so on.
Using Key Flexfields in Oracle Applications A key flexfield is a field made up of segments, each of which has both a value and a meaning. You can think of a key flexfield as an “intelligent” field that your business can use to store information represented as codes.
Most organizations use codes to identify general ledger accounts, part numbers, and other business entities. Each segment in the code represents a characteristic of the entity. A combination of segment values, also known as a key flexfield code combination, uniquely describes a business entity stored in a key flexfield. When you change the value of one or more segments in a key flexfield, you change the combination of segment values.
Your organization decides the following information for each key flexfield: (1) how many segments an entity has, (2) what each segment means, (3) what values each segment can have, and (4) what each segment value means. Your organization can also define rules that govern which combination of segment values are valid (cross-validation rules) dependencies among the segments.
A key flexfield looks like any other field in a block. You can simply type the segment values you want into a key flexfield and separate each segment with a character called a segment separator. Alternatively, you can open a flexfield window for a key flexfield to display a separate field for each of its segments.

Descriptive Flexfield A descriptive flexfield is a field you customize to enter additional information for which your Oracle Applications product has not already provided a field.
Example: You want to provide an additional field to enter whether or not the invoice should be sent to Prism.
Using Descriptive Flexfields in Oracle Applications A descriptive flexfield gives you room to expand your forms, because Oracle Applications cannot predict all the possible information you may want to track. Your organization can use descriptive flexfields to capture additional information that is important and unique to your business.
A descriptive flexfield appears in a block as a two-character, unnamed field enclosed in brackets. If you are viewing data in a table format, the descriptive flexfield will appear at the top of the column as an unnamed field enclosed in brackets.
A descriptive flexfield window is displayed when you move the cursor into a customized descriptive flexfield. Your organization’s implementation team can customize a descriptive

flexfield to include as many additional fields as your organization needs. These fields, also called segments, appear in the descriptive flexfield window.
Reviewing Retrieved Records
Example of Posted Journal query
Reviewing Your Data After a search, Oracle Applications retrieves any records that matched your search criteria.
How to Review Retrieved Records • Down Arrow to display the next retrieved record. • Up Arrow to see a previous record. • Use the scroll bar to view additional records currently not visible on the screen in a multi-
record block. • View → Record Last to go to the last record retrieved • View → Record First to go to the first record retrieved.
Lesson 5: Accessing Online Help
Lesson Overview

Objectives After completing this lesson, you should be able to do the following:
• Display Help information online • View explanations for application messages and errors • Identify who created and updated a row of data
Using Online Information The online documentation and Help features can greatly enhance your ability to understand how to accomplish tasks using Oracle Applications. You can also determine how to identify the user responsible for the entry or maintenance of a record for further clarification of a business issue. This lesson explains how to obtain online information about the application and records.
Window Help
Accessing Window Help Oracle Applications provides you with a complete online Help facility through your web browser tool.

How to Display Help for a Current Window
1. Select Help → Window Help. A Help window is displayed, providing information and a list of topics associated with the current application window.
2. Click on a topic of interest to display more detailed information. 3. Use the menus or buttons in the Help window to navigate to other topics of interest, or
from the File menu in the Help window, select Exit to leave Help.
The Glossary
Using the Glossary The glossary provides online Help information by topic, alphabetically. To open the glossary, first open Window Help, type in glossary and click on the find button. The information contained in the glossary is primarily reference, or brief descriptions of each topic. More detailed information on the topic can be found in Window Help.
Record History
Learning About a Record

You can always display information about a record that has been previously saved. This record information includes who created the record, the date of creation, and the database table where the record resides. You can also learn who last changed the record using Oracle Applications, the date of the change, and that user’s logon and terminal information (if the terminal information has been specifically designated by your system administrator).
How to Learn About the Current Record
1. Select Help → Record History. A window appears that shows you information about the current record.
2. Click OK to close the window.
Lesson 6: Running Reports and Programs
Lesson Overview
Objectives After completing this lesson, you should be able to do the following:
• Discuss the concurrent processing feature • Submit a report or program • Define request sets • View the progress of a concurrent request

Concurrent Processing To manage information in Oracle Applications, you must be able to run and monitor reports and programs. This lesson explains how to submit reports and processes, and monitor their status, using the concurrent manager.
Reports and Programs
Business Needs for Concurrent Processing and Standard Request Submission Concurrent processing helps you satisfy the following business needs:
• Continue working at your computer while running data-dependent reports and programs. • Fully use the capacity of your hardware by executing many application tasks at once.
Standard Request submission lets you satisfy a related set of business needs. You can:
• Use a standard interface to run your programs and reports.

• Control access to different reports and programs. • View report output online. • Automatically run programs, reports, or request sets at specific time intervals. • View a log file that summarizes the completion Information about all the reports and
programs in a request set.
Concurrent Processing
Definitions
Concurrent Request A concurrent request is a request that you submit to run a concurrent program as a concurrent process. You issue a concurrent request when you submit a report or program to run using Standard Request Submission or when you click an action button in a product-specific submission window.
Concurrent Manager A concurrent manager is a component of concurrent processing that monitors and runs requests without tying up your computer.
Request Set A request set is a collection of reports or programs that you group together. You submit the reports or programs in a request set all at once using one transaction.
Stage A stage is a component of a request set used to group requests within the set. All requests in a stage are run in parallel, while the stages themselves are run sequentially in the request set.
Parameter In Standard Request Submission (SRS), a parameter is a report variable whose value you can change each time you run a report. For example, you might run an account balance report and change the account number each time you run the report. The account number is a parameter for the report.
Concurrent Processing Options

You can control and change certain run options for each of your concurrent requests. Not only can you control and change the number of copies to print, which print style to use, and which printer to use, but you can also choose to hold a request from being run, choose a specific date or time to start a request, or choose to save the results of your concurrent request in a standard file format.
Online Request Review You can review the output and log files from your concurrent requests online. You can see the results of a concurrent request without the delay of printing out the entire report or log file.
Using Concurrent Processing You can run a non-interactive, data-dependent function such as a report or program, simultaneously with online operations. With concurrent processing, you can complete non-interactive tasks without interfering with the interactive work that you perform at your terminal.
An example of concurrent processing occurs when you use the Post Journals window in your Oracle General Ledger application. Once you specify the journal batches to post and click Post, your Oracle General Ledger application uses concurrent processing to post the journal batch entries without further involvement from you. Meanwhile, your terminal is still available for you to continue doing other work in Oracle Applications.
Oracle Applications runs all of its reports and programs as concurrent processes whether you submit them using the Submit Requests window, or using a product-specific submission window. Your system administrator can tailor concurrent processing to optimize the performance of Oracle Applications for you to ensure that your system is not overloaded with processing at any time.
Standard Request Submission

Using Standard Request Submission (SRS) Using Standard Request Submission gives you control over how you can run your requests and request sets.
There are three elements involved in submitting a request: selecting the request or request set to be submitted, defining a submission schedule, and providing completion options.
Defining a schedule can be as simple as submitting As Soon as Possible, or it can involve using a more complex schedule that you define when you first submit your request. The schedule you define may also be used for other requests in the future.
Completion options enable you to deliver notification to others using Oracle Workflow, specify which printers, and how many copies of the output you want to produce for each request.
You can submit as many requests as you like from the Submit Request window. You can even submit a request more than once if you want to run the same request with different parameter values.
To Submit a Request 1. Navigate to the Submit a New Request window. Navigation Path: Other → Requests →
Run

2. Check the Request option to submit single requests, or choose to submit a predefined group of requests by checking Request Set.
3. Click OK. 4. Use the Copy a Prior Request button to take advantage of previously entered request
submissions. Or, select the Name of the request (report or program) that you want to run from the list of available requests. Note that the responsibility you are using determines the request group and the requests that will appear in the list.
Using the Parameters Window 5. A Parameters window automatically appears if you select a request that requires
parameter values. The prompts in the Parameters window are specific to the request that you select.
6. Enter the values in the required parameter fields and click OK. The Parameters window closes, and your parameter values are concatenated and displayed in the Parameters window.

Defining a Submission Schedule 7. Click Schedule to open the Scheduling window. The scheduling window provides you
with several scheduling options. You can choose to re-use a schedule you previously defined and saved, or define a new schedule. You can define your schedule to run a request as soon as possible, at a specific time, or repeatedly at specific intervals, on specific days of the week or month.
8. Choose a type of schedule. 9. To save your schedule, select the “Save this schedule for use again later” check box. You
must also provide a unique name for each schedule you save, and you can provide additional information in the Description field.
10. Click OK.

Defining Completion Options 11. Select the Save all Output Files box to write your request to a file. If you want to view
your report online, you must use this check box. 12. Click Completion Options. 13. Specify additional people to notify using Oracle Workflow, upon completion of this
report. 14. Select a print style. 15. Use the LOV to select the printers you want used to produce a hardcopy of your report. 16. Click OK. 17. Click Submit Request when you are finished specifying scheduling and completion
options.
The Request ID Oracle Applications assigns a request ID to each request submission so that you can identify the results of the request when it is complete.
You can use the request ID to query for your request output in the Concurrent Requests window. Oracle Applications also assigns a new request ID number to each resubmission of a request and displays the request ID in the log file of the previous request.
Reprinting a Report

Reprinting a Report That Has Already Been Run 1. Navigate to the Requests window. Menu path: View → Requests 2. Query your request so that it is displayed as a record in the Requests window. 3. Select the specific request that you want to reprint. 4. From the Toolbar window, select Tools → Reprint
Defining Request Sets By defining request sets, you can submit the same set of requests regularly by using a single transaction. You use the Request Set window to create and edit request sets. You can also use the Request Set Wizard to create simple request sets.
Organizing Requests with Stages Request Sets are divided into one or more stages, which are linked to determine the sequence in which your requests are run. Each stage consists of one or more requests that you want to run in parallel (at the same time in any order). For example, in the simplest request set structure, all requests are assigned to one stage. This allows all requests to run in parallel.

To run requests in sequence, you assign requests to different stages, and then link the stages in the order you want the requests to run.
The concurrent manager allows only one stage in a request to run at a time. When one stage is complete, the next stage is submitted. A stage is not considered complete until all of the requests in the stage are complete. One advantage of using stages is the ability to run several requests in parallel and then move sequentially to the next stage. This enables you to create more versatile and efficient request sets.
Submitting a Request Set By defining request sets, you can submit the same set of requests repeatedly using a single transaction. Use the Submit a New Request window to create and edit request sets.
How to Create a Request Set
1. Navigate to the Submit a New Request window and check Request set, and click OK. 2. In the Submit Request Set window, enter the name of the Request Set, or click Copy a
Prior Request to use a previously defined request set submission. 3. Enter the Application with which to associate your request set. 4. Click Schedule to define a schedule for this request set submission. 5. Enter a Description for your request set. 6. Note that the owner field defaults to your username and can only be changed by your
system administrator. 7. Enter the Active Dates From and To fields to define an effective period. If the current
date is outside the range you define, the request set will not be available in the Submit Requests window.
8. Select the Print Together check box to send all your requests to the printer together when they complete, or clear the check box to send each request one at a time to the printer as it completes.
9. Select the Allow Incompatibility check box to allow your system administrator to specify programs that are incompatible with this request and may not run with it. Leave the Allow Incompatibility checkbox unselected to specify that this request set may run with all other concurrent requests or request sets.
10. Click Define Stages to define the stages for your request set.
Defining Stages The value for the Display Sequence is defaulted in sequence as you enter your stages. You may change the display order of the stages by modifying the field.
1. Enter a name for the stage. 2. Enter a Description for your stage. 3. Enter a Short Code for the stage. This code is used internally to reference the stage.

4. Use the LOV in the Function field to select a function. The default value for this field is the Standard Stage Evaluation function. This function bases its completion status on the normal completion status of the requests it contains.
5. Use the Return Value of this Stage Affects the Set Outcome check box if you want to ensure that the request set’s completion status is equal to the completion status of this stage. *Note: If you select this box for more than one stage, the completion status of the request set will equal the completion status of the last of these stages to run in the set.
6. Use the Allowed Incompatibility checkbox as described above to determine if this stage is incompatible with other concurrent processing programs.
7. Click Requests to display the Stage Requests window.
Stage Requests Window In this window you define which requests you want to include in this stage.
8. Select the report or program you want to include in your request set. Note that the description of the request you choose and its associated application appears in the Description and Application fields.
9. Specify the number of Copies of output to print, the Style to print, the Printer to print to, and whether to save the output to an operating system file.
10. Use the Allow Stage Function to Use This Program’s Result’s check box to indicate which programs or reports should be included.
11. Click Parameters to display the Request Parameters window.
Request Parameters Window Use the Request Parameters window to customize the parameter values of a specific request in a request set. The fields at the top of the Request Parameters window list general information about the current request set for which you can customize the parameter values. The multi-row portion of the window lists the parameters for that request.
12. Note that the Sequence and Prompt fields are display only. 13. Select the Display check box to specify that you can see a request parameter at
submission time, or clear the box to specify that a parameter should not be displayed at submission time.
14. Select the Modify check box to specify that you can insert or change the value for a request parameter at submission time, or clear the box to specify that the parameter cannot be changed at submission time.
15. Use the Shared Parameter field to set a default value for a parameter that occurs in more than one report or program of a request set. Use the shared parameter label to set an initial default value for all occurrences of the same parameter so that you can avoid typing the same value all over again for every occurrence of the parameter.
16. Save your work.
Link Stages

Now that you have defined your stage or stages, you will need to link them in the order that you want them to run.
1. Navigate to the Requests Sets window. 2. Enter the Start Stage. The stage you enter here is the first stage submitted for the request
set. 3. Enter the stages you want to run in the Success, Warning and Error columns. To ensure
that a particular stage follows the preceding stage regardless of the completion status, enter the desired stage in all three columns. To stop the request set if a stage ends in Error, leave the Error column blank. Any time you do not specifically indicate which stage should follow for a completion status, the request set will exit on that completion status.
4. Click Done when you are finished.
Who Can Use a Request Set After you define a request set, it becomes your private request set. You can run it as long as you have access to a standard Submit Requests window that does not limit access to specific requests.
Other users can run the request set only if your system administrator assigns the request set to their responsibility’s request group. It is possible to have a request set in your request group that contains individual requests that are not in your request group. You can only edit request sets that you own. You can add any requests in your request group to the request set. You can delete any request from the request set, regardless of whether that request is in your request group. To update information about an individual request in the request set, however, the request set must be in your request group.
Viewing and Changing Requests Since all reports, programs, and request sets are run as concurrent requests in Oracle Applications, you can navigate to the Request window to view the progress and output of all your concurrent requests, and you can change aspects of a request’s processing options.
Using the Request Window You can use the Request window (summary and detail) to view a list of all the submitted concurrent requests, check whether your request has run, change aspects of a request’s processing options, diagnose errors, or find the position of your request in the queues of available concurrent managers.
How to Use the Request Window
1. Navigate to the Request window. 2. Enter specific criteria in the Find window that appears, or click Find to display all of your
requests that you have submitted.

You can click various buttons in this window to perform tasks relating to concurrent processing.
• Refresh Data button: The Request window will not automatically refresh in order to display updated progress of your request. Use this button to re-query the lines in the request table.
• Find Request button: Displays the Find Request window to perform a search for additional requests.
• Submit New Request button: Displays the Submit Requests window to submit a new request to the concurrent manager.
• Hold Request and Cancel Request buttons: These buttons illuminate if the concurrent manager has not already begun running the program. You could Hold and Cancel a request by using these buttons.
• View Details button: Displays the Details window to view detailed information about your request, for example, submission dates, scheduling and other information. If a request has not run, you can change selected fields so that the updated information will affect your request when it is run by the concurrent manager.
• Diagnostics button: Displays diagnostic information about your request such as when it ran and if it completed successfully.
• View Output button: Displays an online format of your report. Note: The program must have an actual paper output to make it possible for online viewing.
• View Log button: Display information about the request regarding arguments used and other technical information.
Four Phases of a Concurrent Request
Concurrent Request Phase and Status Information The Concurrent Requests Summary window displays a phase and status summary for each concurrent request listed in the window.
A concurrent request has a life cycle consisting of the following phases:
• Pending • Running • Completed • Inactive
During each phase, a concurrent request has a specific condition or status. The table lists each phase/status combination and describes its meaning in relation to a request.
Pending Phase A program in the Pending phase can be in one of four statuses:

• Normal: The program is waiting for an available manager. • Waiting: A child program is waiting for a parent to mark it ready to run. • Standby: A program is waiting for another incompatible program in the same logical
database to complete. • Scheduled: The scheduled start of a program time has not yet elapsed.
Running Phase A program in the Running phase can be in one of four statuses:
• Normal: Program is in process. • Paused: A parent program is waiting for one or more child programs to complete. • Resuming: A parent program is continuing after the completion of one or more child
programs. • Terminating: The program is being terminated.
Completed Phase A program in the Completed phase can be in one of five statuses:
• Normal: Program completed successfully. • Warning: program completed successfully but with warning messages. • Error: Program failed to complete successfully. • Terminated: A running program was terminated. • Canceled: A pending or inactive program was canceled before it started.
Inactive Phase A program in the Inactive phase can be in one of three statuses:
• Disabled: The requested program has not been enabled for execution. • On Hold: The requested program has been placed on hold. • No Manager: There is no manager defined to run this type of request.
Canceling Requests
Canceling or Holding a Request That Has Not Yet Completed
1. Navigate to the Requests window. 2. Select the Specific Request option button. 3. Enter the Request ID or other appropriate search criteria. 4. Click Find.

5. With the cursor on the request you want to cancel, click Cancel request. If the request is in Pending or Inactive phase, click Cancel Request or Hold Request to either cancel the request or put the request on hold. If the request is in Running phase, click Cancel Request to terminate the request. If you cancel a request set, then Oracle Applications will automatically cancel all requests in the set.
6. Choose Save from the Action menu.
Changing Request Options
Changing Request Options If your request or request set has not started running, you can change how your request or request set runs and prints its output by using the Requests window.
How to Change the Request Options of a Request or Request Set
1. Navigate to the Requests window. 2. Use the Find window to search for your request or request set ID. 3. Click Hold Request to put your request on hold. 4. You can change the start date and time for your request or request set. If the request is
Pending or Scheduled, you can change the printer, the number of copies you want to print, and whether Oracle Application saves your report output to an operating system file. You can also change resubmission options in this window.
Lesson 7: Customizing the Presentation of Data
Lesson Overview
Objectives After completing this lesson, you should be able to do the following:
• Create a personal Navigator top ten list • Save a document to your Navigator for easy access
Personalizing Your Access to Oracle Applications You can use several features of Oracle Applications to enhance your proficiency in the system. Use a Navigator top ten list to put your commonly used forms on your main menu or Navigator. By using special forms, you can customize the presentation of data or fields. Additionally, you can create a folder definition, in which you can specify query criteria and rearrange the layout of the form. This lesson explains how to use these features to make your access to the system easier.

Navigator Top Ten List
The Navigator Window If there are forms that you use frequently, you can add them to a navigation “top ten list” located on the right side of the Navigator window. The top ten list displays your forms numerically so you can choose them instantly without having to search for them in the navigation list. You can add a maximum of ten forms to the “top ten list” and you can create a different top ten list for each responsibility for which you have access. A top ten list is unique for the responsibility and user sign-on combination that you use.
How to Create a Navigation Top Ten List 1. Select a frequently used form from the navigation list by highlighting it in the Navigator
window. 2. Click Add to add that form to the “top ten list”. 3. Click Remove to remove a form from your “top ten list”. 4. Enter the “top ten list” number that precedes the form you want to open. Note:
Sometimes the form that you add changes names when it appears in the top ten listing. An example is that Suppliers becomes Vendors, and Orders, Returns becomes Order Workbench.
Saving a Document to the Navigator
Using the Save to Navigator Option Some Oracle Applications enable you to save a document to the Navigator for easy access when you first log into the system. The Action menu on the Toolbar will illuminate the Save to Navigator option when it is available within your applications.
You can save up to 99 documents to your Navigator. The Documents alternate region on the Navigator window will list those documents that you have saved. This eliminates having to query the database to find your specific document. Instead, you can select it from the Navigator window and go directly to the window containing your document.
How to Access a Document from the Navigator Window
1. Select Documents from the alternate region displayed at the navigator window. 2. Select the document from the list of documents displayed to go directly to the
applications form window for that document.
Basic Business Needs of a Folder

Oracle Applications Folder A folder is a special block in which the field and record layout can be customized. You can identify a folder from a regular block by noting that an Open Folder button appears in the upper-left corner of a folder block, or that an enabled Folder Tools button appears on the toolbar when your cursor is in a folder block.
Although you have access to all of the records of a specific entity in a folder, you can customize a folder to retrieve only a subset of records and display those records in a specific layout. You can save your customizations to a folder definition, which defines the layout of your fields and the query criteria used to retrieve your subset of records. *Note: With the addition of Multilanguage support, Folders are now associated with specific languages as defined at the Site responsibility profile level.
Folder Definitions You can create and save new folder definitions or open and delete existing folder definitions. When you open a new folder definition, the layout for the new folder definition replaces the layout for the current folder definition.
How to Create a New Folder Definition
1. Select Folder → New. 2. Enter a new and unique folder name. 3. Select the Autoquery frequency in which you want the folder to automatically query for a
subset of records each time you open the folder definition. 4. Select Open as Default if you want this specific folder definition to open as your default
each time you navigate to this folder for the first time after invoking the form. 5. Select Public if you want other Oracle Applications users to have access to this folder
definition *If you want a public folder created, please contact USB. Do not create the folder yourself.*
6. Click OK when you are finished.
Querying Records in a Folder
Defining query Criteria for a Folder One advantage of a folder is that you can customize it to display only the records you want to see. You can easily define and alter the query criteria for any folder and save that criteria in a folder definition.
How to Define Query Criteria for a Folder

1. Run the query that you want, either by using Query Find or Query-by-Example. At least one record must be retrieved for the folder to memorize the query.
2. Select Folder → Save As if you want to save this query criteria in a folder definition. 3. Enter a name for the folder definition. 4. Check Auto Query if you want this to perform every time you open this folder definition. 5. Click OK when you are finished.
When you save a folder definition, the query criteria is “locked in” to the folder definition. When you perform another query on that same folder definition, you actually query on the subset of records. If you want to perform a new Query-by-Example on the complete set of records, reset the query for the folder definition.
Resetting the Query Criteria for a Folder Definition 1. Select Folder → Reset Query, to clear the WHERE clause from the current folder
definition, but it will retain the current folder name and its field layout. To view the query criteria for a folder definition, select Folder → View Query.
2. Perform another query and select Folder → Save to save the new query to your current folder definition. To alter the sorting order of data in a multiple-record folder definition, select Folder → Sort Data. This menu item acts as a toggle switch to display the Order By buttons for the first three fields of a multiple-record folder block. The Order By buttons appear beneath those fields that can be changed.
3. Click an Order By button to switch the fields to any one of three settings: o Ascending o Descending o Unsorted
4. Select View → Query by Example Run to rerun the query in your folder definition and to apply any ordering changes to the records.
5. Select Folder → Save or Folder → Save As to save this query criteria to a folder definition.
The Folder Tools
Using Folder Tools When you navigate to a folder block, the Folder Tools button becomes enabled on the Toolbar. Click this button to display the folder tools on your screen.
Folder Tools Menu You can customize the presentation of data in a folder using the Folder Tools menu.

Menu Item Description New Creates a new folder definition Open Opens a saved folder definition Save Saves changes to the current folder definition Save As Saves the current folder definition to a new name Delete Deletes an existing folder definition Show Field Displays a field that is currently hidden Hide Field Hides the current field Move Right Moves the current field to the right Move Left Moves the current field to the left Move Up Moves the current field up (not always available) Move Down Moves the current field down (not always available) Widen Field Increases the width of the current field Shrink Field Decreases the width of the current field Change Prompt Changes the prompt for the current field
Autosize All Adjusts all field widths proportionately to fill the window (This cannot be undone without resizing each window.)
Sort Data Toggles the display of the Order By Buttons so you can specify the sort order for the first three field columns
View Query Displays the query criteria for the current folder definition Reset Query Erases the current query criteria Folder Tools Displays the folder tool palette
Recovering the Original Default Folder Definition for a Folder Once you create a custom folder definition and make it the default, you can recover the original default folder definition shipped with the product. Note that if you like the original default folder definition, give it a name and save it (without making any changes) before you create any new folder definitions. This way, you can open the original folder definition by choosing it from a list of all your predefined folder definitions.
How to Recover the Original Default Folder Definition
1. Select Folder → Save As.
2. Clear Open as Default in the Save As window.
3. Click OK when you are finished.
4. Navigate to this folder again to display the original default folder definition.
To Open Another Folder Definition

1. Select Folder → Open to load a predefined folder definition. Or, click the Open Folder button located in the upper left corner of the folder block.
2. Select a private or public folder definition from the list window that is displayed, and click OK to replace the current folder definition with the new folder definition.
To Save Changes to a Folder Definition 1. Select Folder → Save to save any layout or query changes made to the current folder
definition or choose Folder → Save As to save the current folder definition under a new name. If there are any pending changes to the information in the folder, you will be prompted to commit the changes.
2. Click OK after you have completed the information requested in the Save Folder window.
If you save a folder definition to Open as Default and then open another folder definition and save that second definition also as Open as Default, the second definition is reset as the new default.
If you modify a public folder definition in any way, saving it makes it a private folder definition.
Deleting a Folder Definition 1. Select Folder → Delete. 2. Select a folder definition from the list that is displayed and click OK to delete the
definition. Note that you can only delete folders you have created. If another user is referencing that folder definition as their Open as Default folder, that reference is deleted as well.


![Financials Drill Down [Read-Only] - DOUG | Dallas Oracle ... · Financials Drill Down Receivables / Payables / Assets ... •Receipts •Journal Entries ... Oracle Receivables Oracle](https://img.pdfslide.us/doc/110x75/5b2606d07f8b9a364a8b4ba5/financials-drill-down-read-only-doug-dallas-oracle-financials-drill.jpg)