Embed Size (px)
Citation preview
National Career Service Portal User Manual – PLACEMENT ORGANISATION v4.0
Released on – 31ST/MARCH/2017

1 | P a g e Placement Organisation-v4.0.31.03.2017
Contents 1. Overview ......................................................................................................................................... 3
2. Getting Started ................................................................................................................................ 4
2.1 Access the Application ................................................................................................................ 4
2.2 Signup/Registration .................................................................................................................... 4
2.3 Login into the NCS Portal ............................................................................................................ 9
2.4 View/Update Placement Organisation Profile ............................................................................ 10
2.5 Logout of the Application.......................................................................................................... 12
3. Post New Job ................................................................................................................................. 12
3.1 Post Drafted Job ....................................................................................................................... 16
4. Search User ................................................................................................................................... 17
5. Jobs and Responses ....................................................................................................................... 18
5.1 Filter posted jobs ................................................................................................................ 18
5.2 View Posted Job ................................................................................................................. 19
5.3 Close Posted Job ................................................................................................................. 21
5.4 Edit Posted Job ................................................................................................................... 22
5.5 Search Candidate ................................................................................................................ 23
5.6 Shortlisted Profile ............................................................................................................... 25
5.7 Scheduled Interview ........................................................................................................... 26
6. Scheduled Interview ...................................................................................................................... 26
7. User Management ......................................................................................................................... 27
7.1 Primary Member Request ................................................................................................... 27
7.2 Add Member ...................................................................................................................... 29
7.3 Manage User ...................................................................................................................... 30
7.4 Manage Role ...................................................................................................................... 31
8. Feedback on Local Services ............................................................................................................ 32
9. Grievances/Feedback .................................................................................................................... 34
10. Cases ............................................................................................................................................. 36
11. Announcements ............................................................................................................................ 38
12. Service Request ............................................................................................................................. 38
13. Change Password .......................................................................................................................... 39
14. Candidate Request ........................................................................................................................ 40
15. Reports.......................................................................................................................................... 41
2 | P a g e Placement Organisation-v4.0.31.03.2017
16. Documents .................................................................................................................................... 42
17. NCS Policy Documents ................................................................................................................... 43
18. RTI ................................................................................................................................................. 44
19. Key Performance Indicators ........................................................................................................... 44
20. Annual Reports .............................................................................................................................. 45
21. Government Jobs .......................................................................................................................... 45
22. Organisation Preferences .............................................................................................................. 46
3 | P a g e Placement Organisation-v4.0.31.03.2017
1. Overview In the National Career Service (NCS) portal a placement organisation is akin to a person who runs
a private business. The NCS portal helps a placement organisation to search for jobseekers
matching their requirements and place these jobseekers in appropriate professions. To do so the
placement organisation has to register themselves with the NCS portal.
The placement organisation menu covers the following functionality:
Placement Organisation Registration
View/Edit Placement Organisation Profile
Post New Job
Search User
Jobs and Responses
Scheduled Interview
User Management
Feedback on Local Services
Grievance/Feedback
Cases
Announcements
Request for services
Change Password
Candidate Request
Reports
Documents
NCS Policy Documents
RTI
Key Performance indicators
Annual Reports
Government Jobs
4 | P a g e Placement Organisation-v4.0.31.03.2017
2. Getting Started
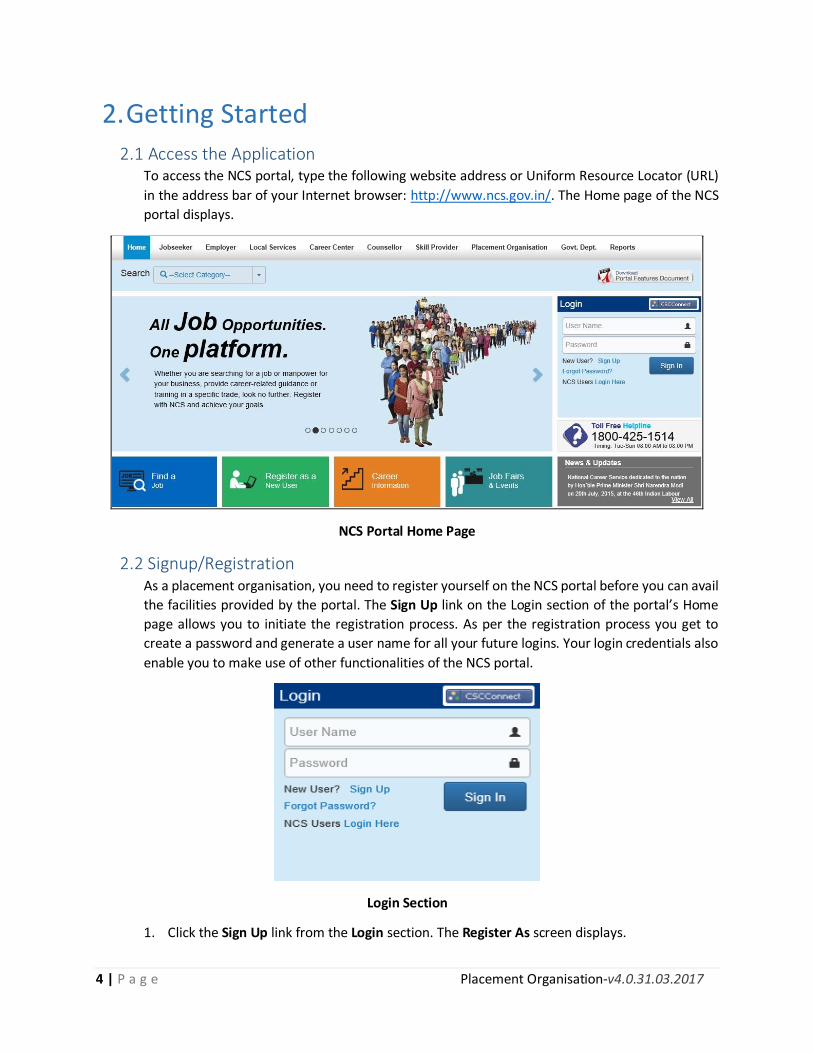
2.1 Access the Application To access the NCS portal, type the following website address or Uniform Resource Locator (URL)
in the address bar of your Internet browser: http://www.ncs.gov.in/. The Home page of the NCS
portal displays.
NCS Portal Home Page
2.2 Signup/Registration As a placement organisation, you need to register yourself on the NCS portal before you can avail
the facilities provided by the portal. The Sign Up link on the Login section of the portal’s Home
page allows you to initiate the registration process. As per the registration process you get to
create a password and generate a user name for all your future logins. Your login credentials also
enable you to make use of other functionalities of the NCS portal.
Login Section
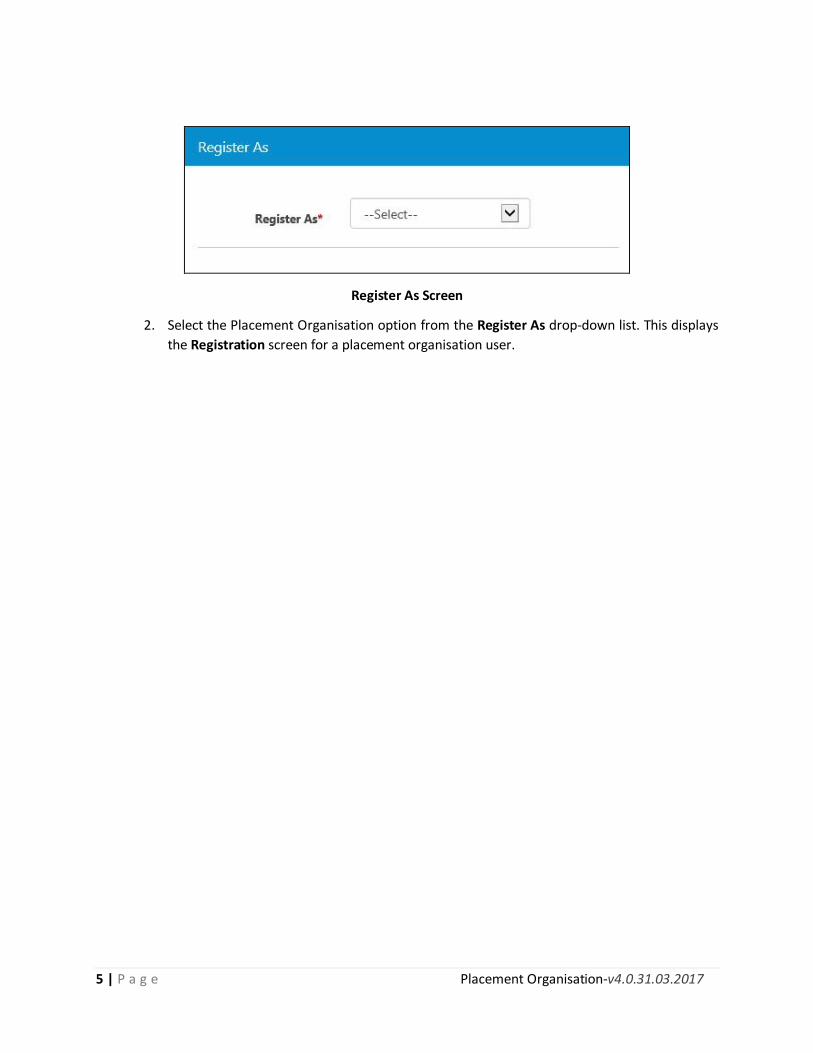
1. Click the Sign Up link from the Login section. The Register As screen displays.
5 | P a g e Placement Organisation-v4.0.31.03.2017
Register As Screen
2. Select the Placement Organisation option from the Register As drop-down list. This displays
the Registration screen for a placement organisation user.
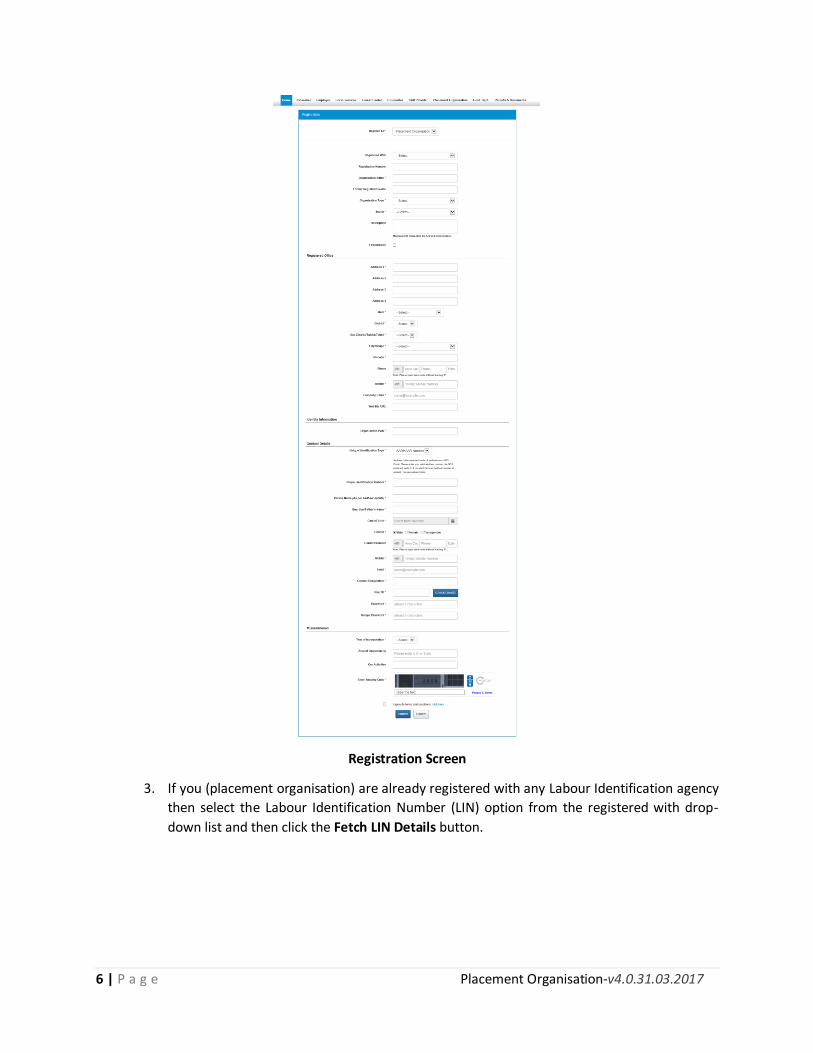
6 | P a g e Placement Organisation-v4.0.31.03.2017
Registration Screen
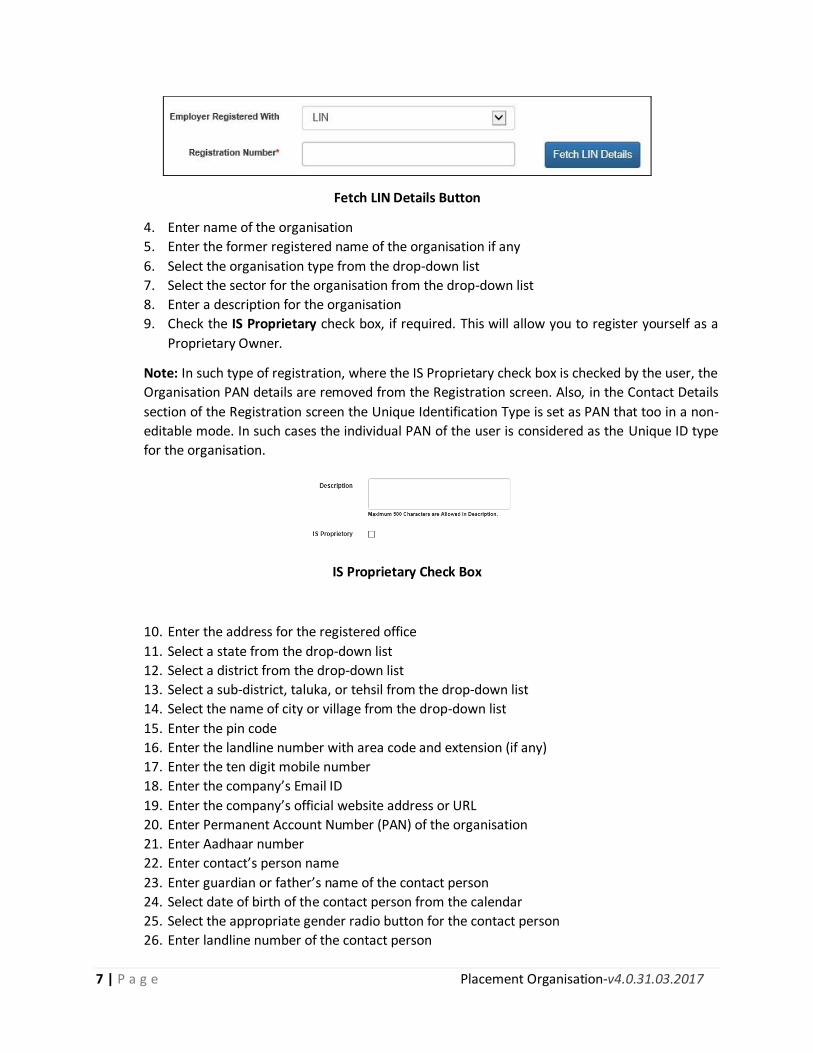
3. If you (placement organisation) are already registered with any Labour Identification agency
then select the Labour Identification Number (LIN) option from the registered with drop-
down list and then click the Fetch LIN Details button.
7 | P a g e Placement Organisation-v4.0.31.03.2017
Fetch LIN Details Button
4. Enter name of the organisation
5. Enter the former registered name of the organisation if any
6. Select the organisation type from the drop-down list
7. Select the sector for the organisation from the drop-down list
8. Enter a description for the organisation
9. Check the IS Proprietary check box, if required. This will allow you to register yourself as a
Proprietary Owner.
Note: In such type of registration, where the IS Proprietary check box is checked by the user, the
Organisation PAN details are removed from the Registration screen. Also, in the Contact Details
section of the Registration screen the Unique Identification Type is set as PAN that too in a non-
editable mode. In such cases the individual PAN of the user is considered as the Unique ID type
for the organisation.
IS Proprietary Check Box
10. Enter the address for the registered office
11. Select a state from the drop-down list
12. Select a district from the drop-down list
13. Select a sub-district, taluka, or tehsil from the drop-down list
14. Select the name of city or village from the drop-down list
15. Enter the pin code
16. Enter the landline number with area code and extension (if any)
17. Enter the ten digit mobile number
18. Enter the company’s Email ID
19. Enter the company’s official website address or URL
20. Enter Permanent Account Number (PAN) of the organisation
21. Enter Aadhaar number
22. Enter contact’s person name
23. Enter guardian or father’s name of the contact person
24. Select date of birth of the contact person from the calendar
25. Select the appropriate gender radio button for the contact person
26. Enter landline number of the contact person
8 | P a g e Placement Organisation-v4.0.31.03.2017
27. Enter the ten digit mobile number for the contact person
28. Enter the Email ID of the contact person
29. Enter designation of the contact person in the organisation
30. Enter User ID and then click the Check UserID button to check the availability of the entered
ID
31. Enter a password. The password should at least have eight characters, contain at least one
alphabet, one number and one special character (@ $ %) for example: “pass@word1”.
32. Retype the same password for confirmation
33. Select the incorporation year from the drop-down list
34. Enter the area of operation (city or state) for the organisation
35. Enter key activities done by the organisation
36. Enter security code as shown in image
37. Check the I agree to terms and conditions check box. To read the terms and conditions
document of the NCS portal, click the Click Here link.
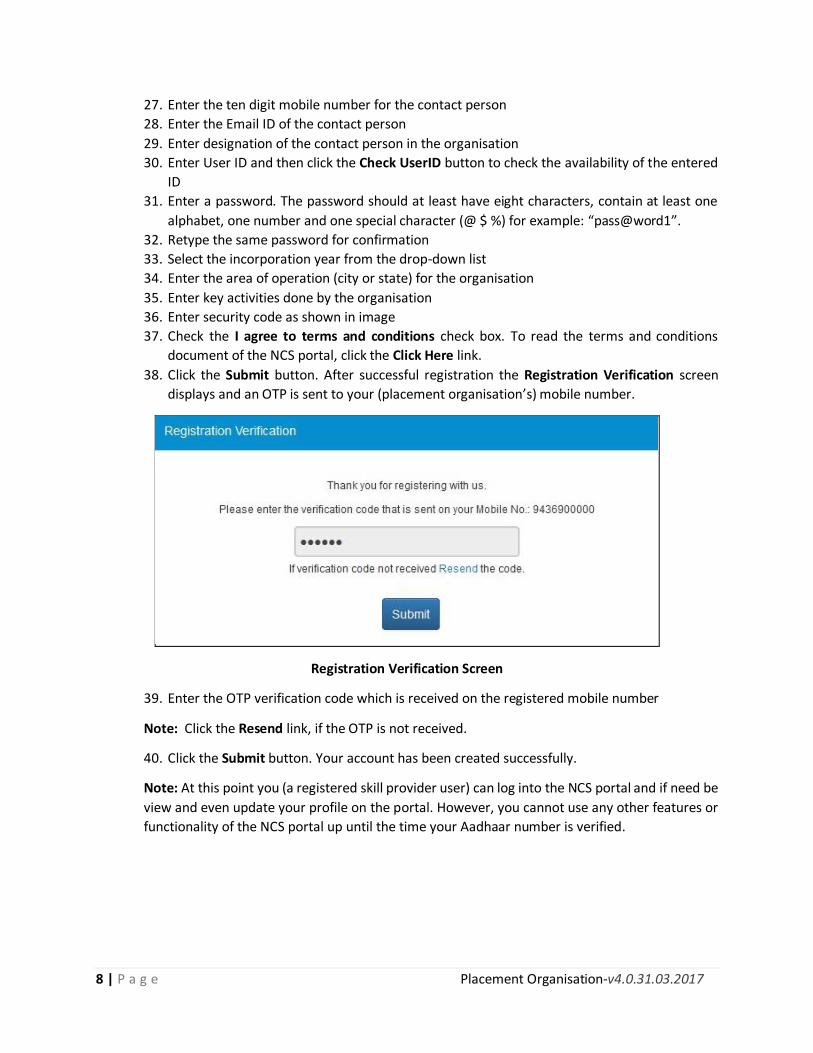
38. Click the Submit button. After successful registration the Registration Verification screen
displays and an OTP is sent to your (placement organisation’s) mobile number.
Registration Verification Screen
39. Enter the OTP verification code which is received on the registered mobile number
Note: Click the Resend link, if the OTP is not received.
40. Click the Submit button. Your account has been created successfully.
Note: At this point you (a registered skill provider user) can log into the NCS portal and if need be
view and even update your profile on the portal. However, you cannot use any other features or
functionality of the NCS portal up until the time your Aadhaar number is verified.
9 | P a g e Placement Organisation-v4.0.31.03.2017
Successful Registration Notification
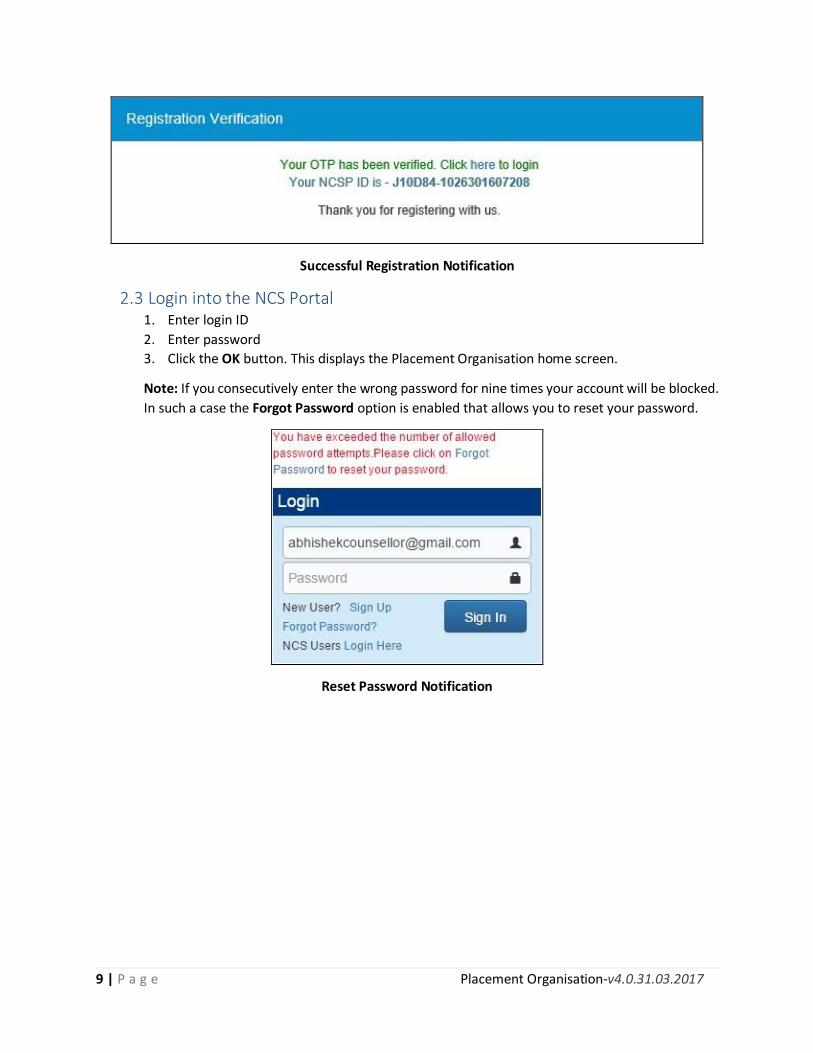
2.3 Login into the NCS Portal 1. Enter login ID
2. Enter password
3. Click the OK button. This displays the Placement Organisation home screen.
Note: If you consecutively enter the wrong password for nine times your account will be blocked.
In such a case the Forgot Password option is enabled that allows you to reset your password.
Reset Password Notification
10 | P a g e Placement Organisation-v4.0.31.03.2017
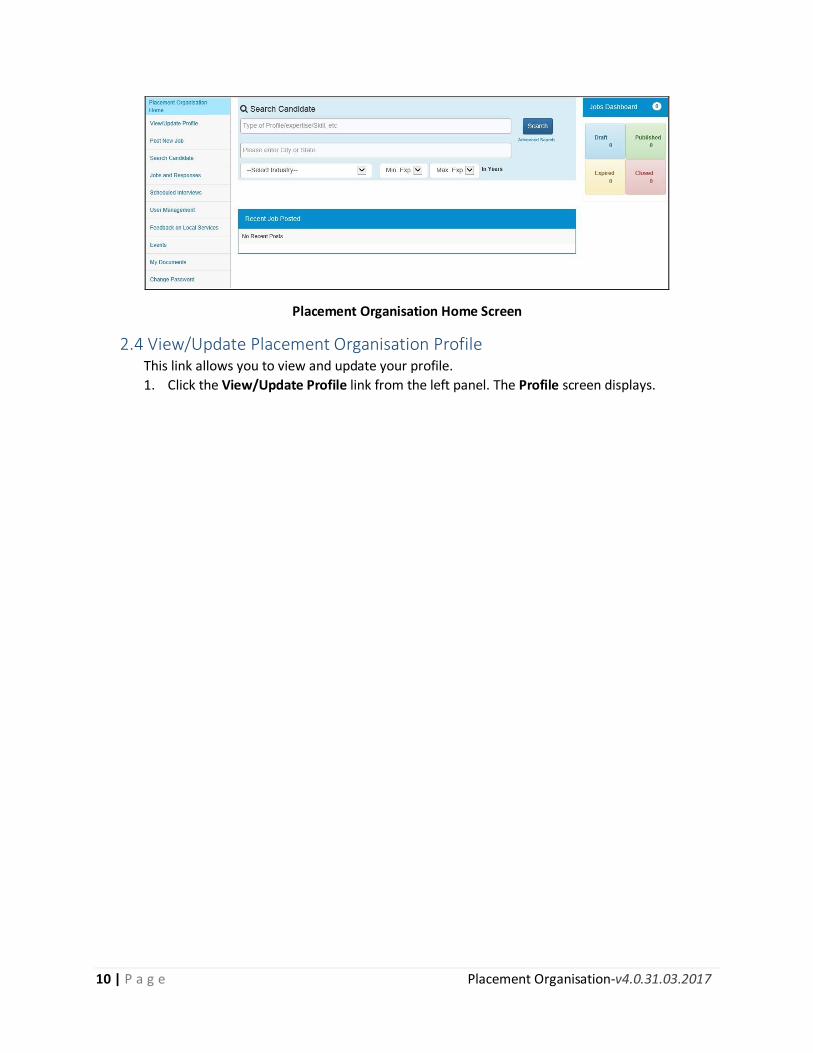
Placement Organisation Home Screen
2.4 View/Update Placement Organisation Profile
This link allows you to view and update your profile.
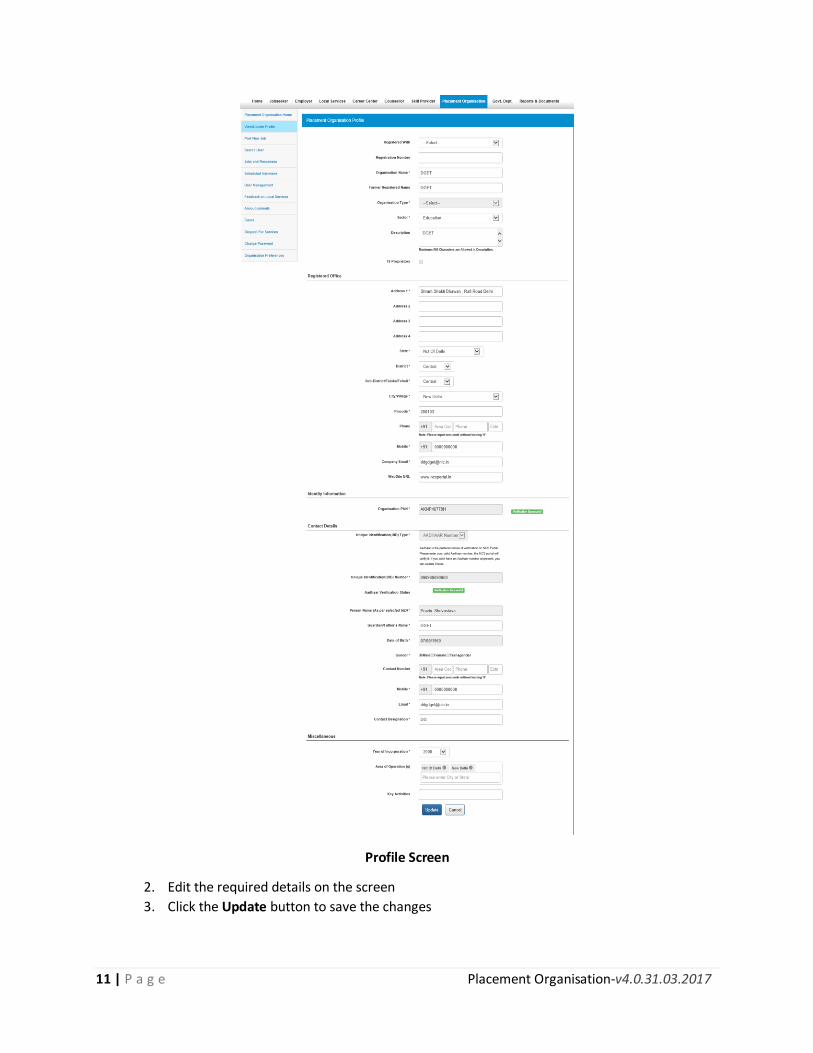
1. Click the View/Update Profile link from the left panel. The Profile screen displays.
11 | P a g e Placement Organisation-v4.0.31.03.2017
Profile Screen
2. Edit the required details on the screen
3. Click the Update button to save the changes
12 | P a g e Placement Organisation-v4.0.31.03.2017
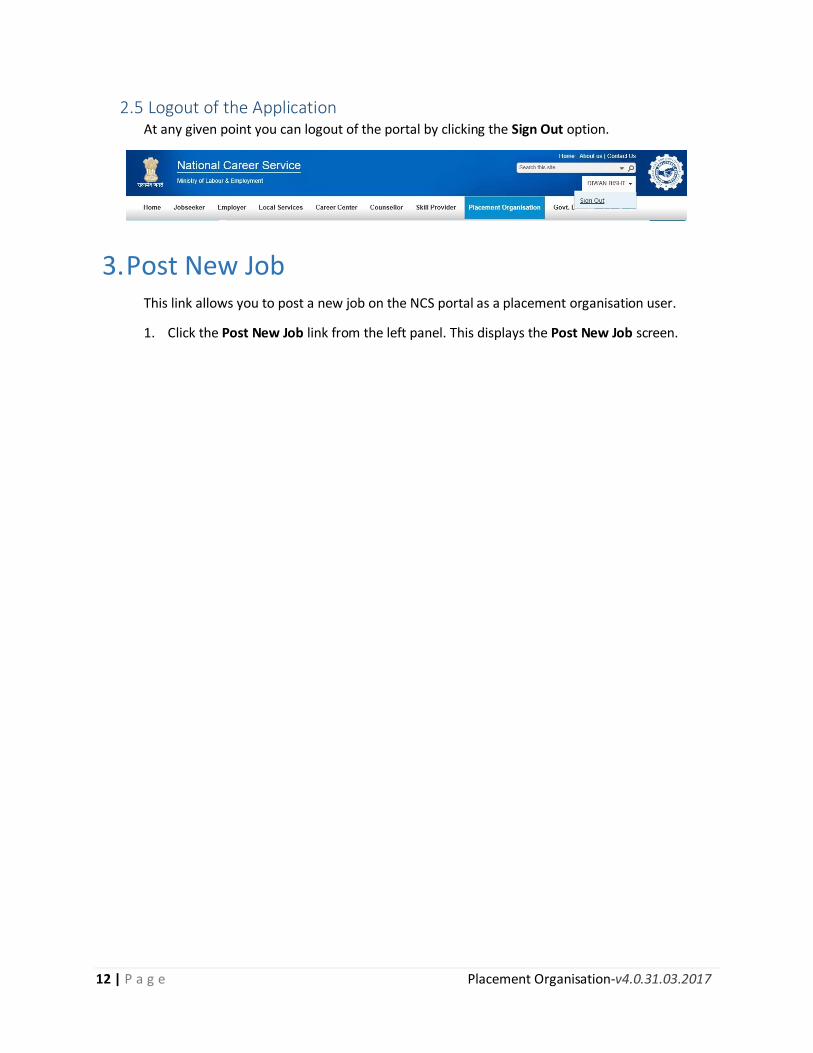
2.5 Logout of the Application At any given point you can logout of the portal by clicking the Sign Out option.
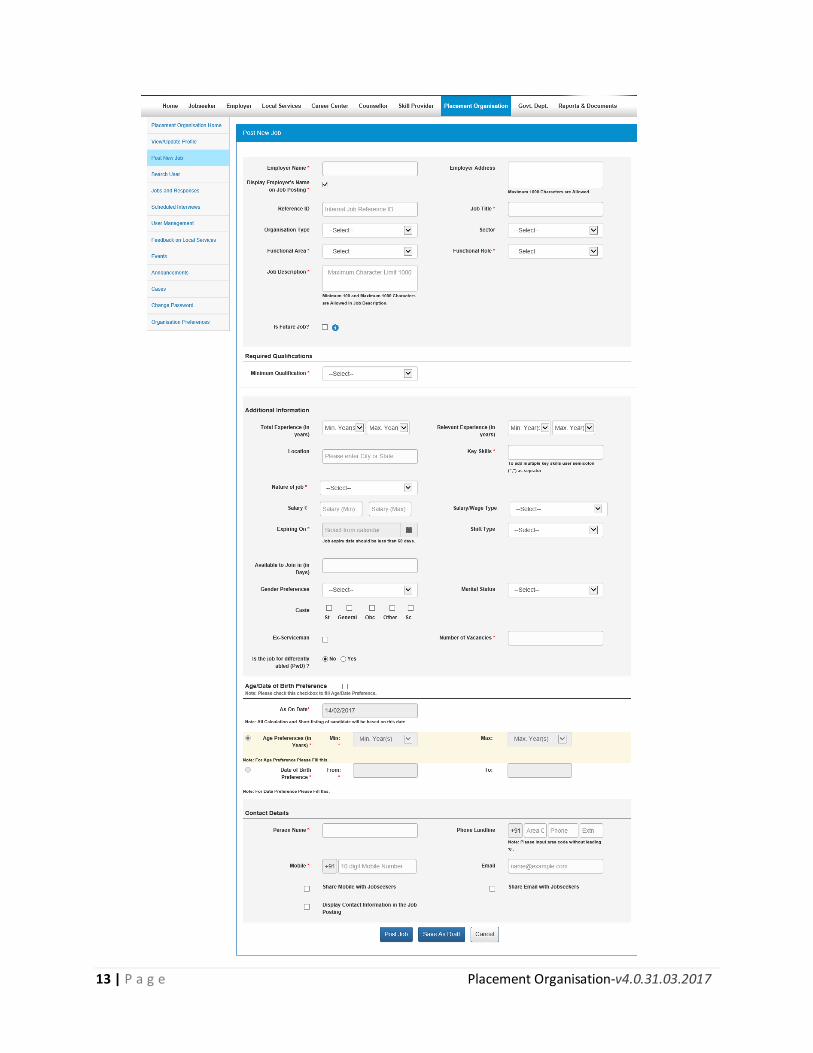
3. Post New Job This link allows you to post a new job on the NCS portal as a placement organisation user.
1. Click the Post New Job link from the left panel. This displays the Post New Job screen.
13 | P a g e Placement Organisation-v4.0.31.03.2017
14 | P a g e Placement Organisation-v4.0.31.03.2017
Post New Job Screen
1. Enter job reference id
2. Select the organisation type from the drop-down list.
3. Select job’s sector from the drop-down list.
4. Enter job title
5. Select Functional Area
6. Select Functional Role
7. Enter job description
8. Select minimum qualification from the drop-down list
9. Select the Future Job check box, if you wish to publish a job for future.
10. Select the future job activation date
11. Enter the desired qualification based on minimum qualification like post graduate, graduate
and under graduate details
12. Select Minimum and Maximum Experience in Years from the drop down
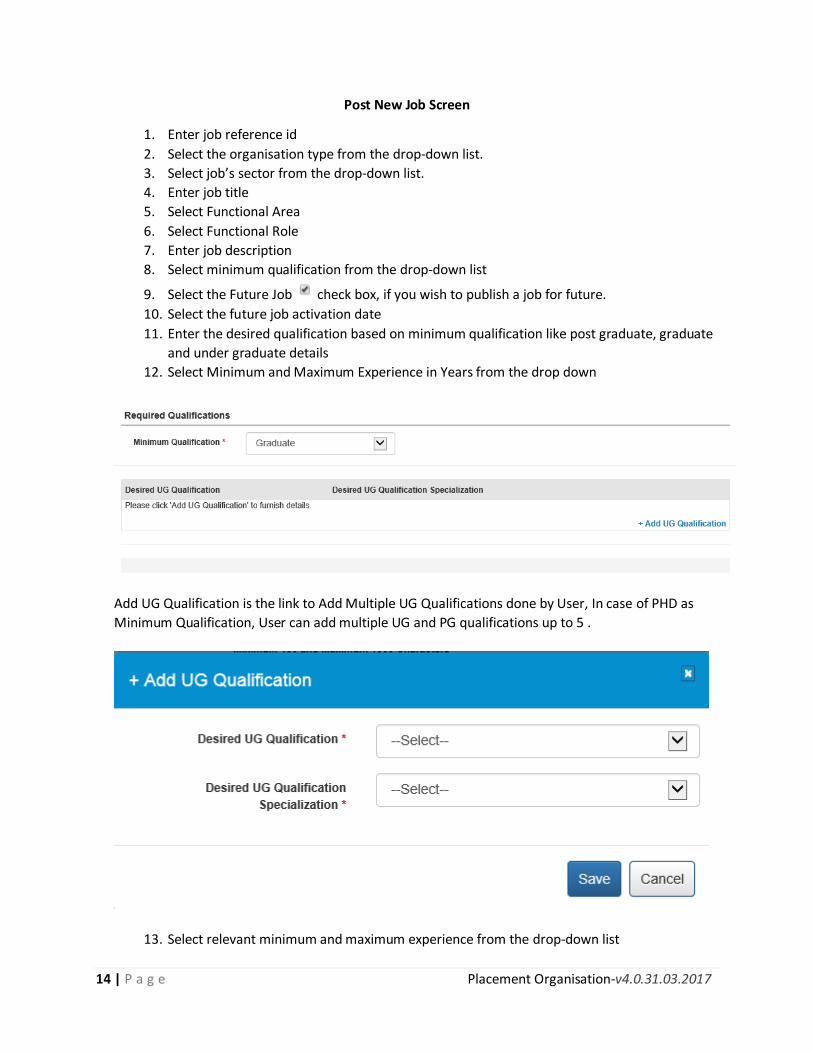
Add UG Qualification is the link to Add Multiple UG Qualifications done by User, In case of PHD as
Minimum Qualification, User can add multiple UG and PG qualifications up to 5 .
13. Select relevant minimum and maximum experience from the drop-down list
15 | P a g e Placement Organisation-v4.0.31.03.2017
14. Total Experience in Year
15. Select Relevant Minimum and Maximum Experience from the drop down
16. Enter Job location
17. Enter Job key skills
18. Select nature of job from the drop-down list
19. Enter minimum and maximum salary
20. Select Salary/Wage type from the drop-down list
21. Click on Calendar icon and then select job expiry date
Note: Job Expiry date should be less than 60 days.
22. Select shift type from the drop-down list
23. Enter the days availability to join
24. Select candidate’s age preference from the drop-down list
25. Select gender preference from the drop-down list
26. Select the appropriate caste check box.
27. Click on Ex-Serviceman check box, if you are retired from service.
28. Select appropriate abled option
29. Enter the number of vacancies
30. Enter certification details
31. On job Posting Page PO can specify the age range restriction for the jobseekers who would be eligible to apply for the said job. For example, an PO can specify that only candidates or jobseekers between the age range of 21 years (minimum age) and 24 years (maximum age) can apply for a job. This enables the PO to filter out unwanted applications based on age range specified for the job.
To apply this filter, the user needs to choose a base date from the As On Date calendar control. Next, the user needs to define the date range using either the Age Preference (minimum and maximum age range) fields or the Date of Birth Preference (date of birth range) fields. Any option selected by the user is in respect to the base date that has already been selected from the As On Date field.
32. Enter contact’s person name
33. Enter landline number
16 | P a g e Placement Organisation-v4.0.31.03.2017
34. Enter mobile number
35. Enter Email ID
36. Click on check box, if you wish to share your mobile number with jobseeker
37. Enter contact Email ID
38. Click on check box, if you wish to display contact information in job vacancy
39. Click on Post Job button.
Click on Save as Draft button, if you wish to save current job on draft mode.
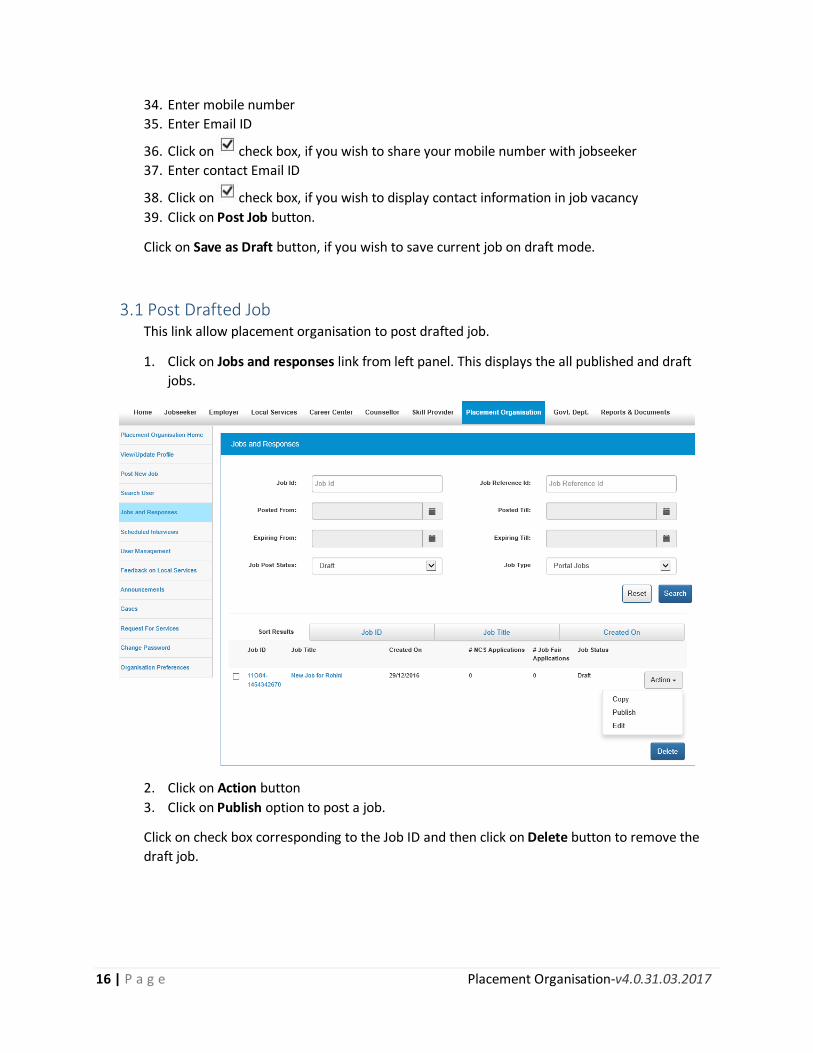
3.1 Post Drafted Job
This link allow placement organisation to post drafted job.
1. Click on Jobs and responses link from left panel. This displays the all published and draft
jobs.
2. Click on Action button
3. Click on Publish option to post a job.
Click on check box corresponding to the Job ID and then click on Delete button to remove the
draft job.

17 | P a g e Placement Organisation-v4.0.31.03.2017
4. Search User This link allows placement organisation to search candidate for posted jobs.
1. Click on Search user from Placement Organisation from left panel. The search user screen
displays.
2. Enter keyword
3. Click on Search button to view the candidate count.
4. Refine User panel of the Search User Result enables and Placement Organisation to further
refine their search results for appropriate user.
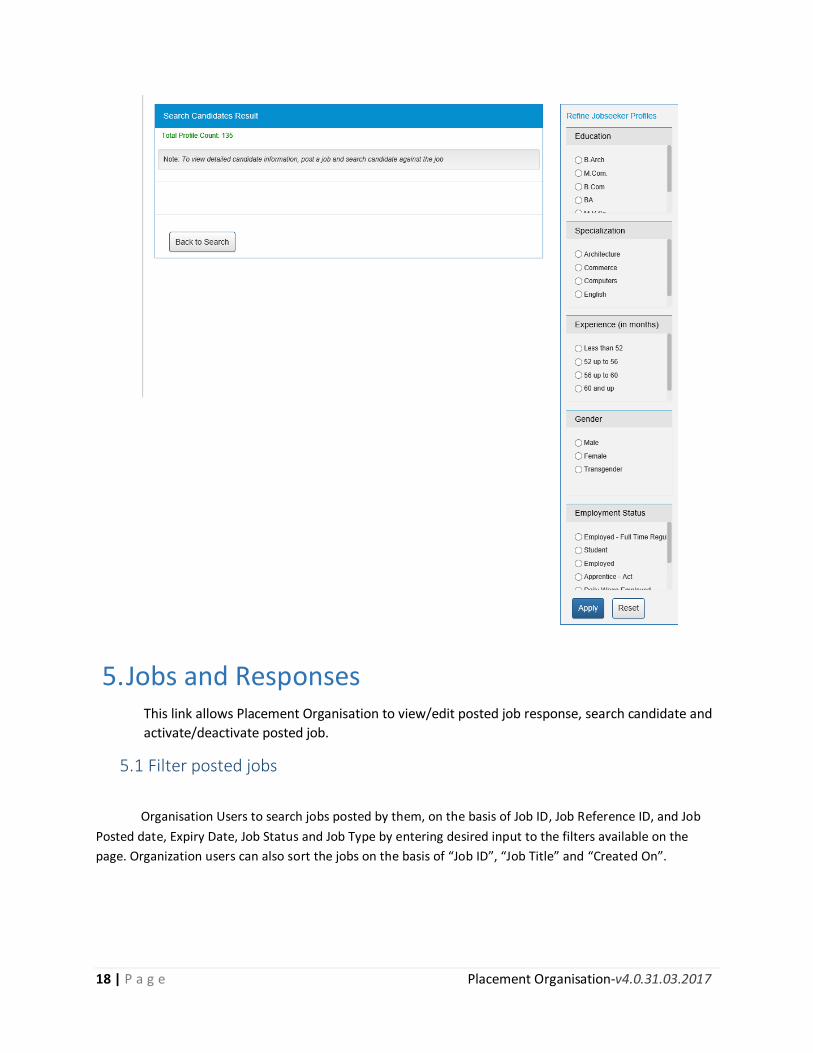
18 | P a g e Placement Organisation-v4.0.31.03.2017
5. Jobs and Responses This link allows Placement Organisation to view/edit posted job response, search candidate and
activate/deactivate posted job.
5.1 Filter posted jobs
Organisation Users to search jobs posted by them, on the basis of Job ID, Job Reference ID, and Job
Posted date, Expiry Date, Job Status and Job Type by entering desired input to the filters available on the
page. Organization users can also sort the jobs on the basis of “Job ID”, “Job Title” and “Created On”.
19 | P a g e Placement Organisation-v4.0.31.03.2017
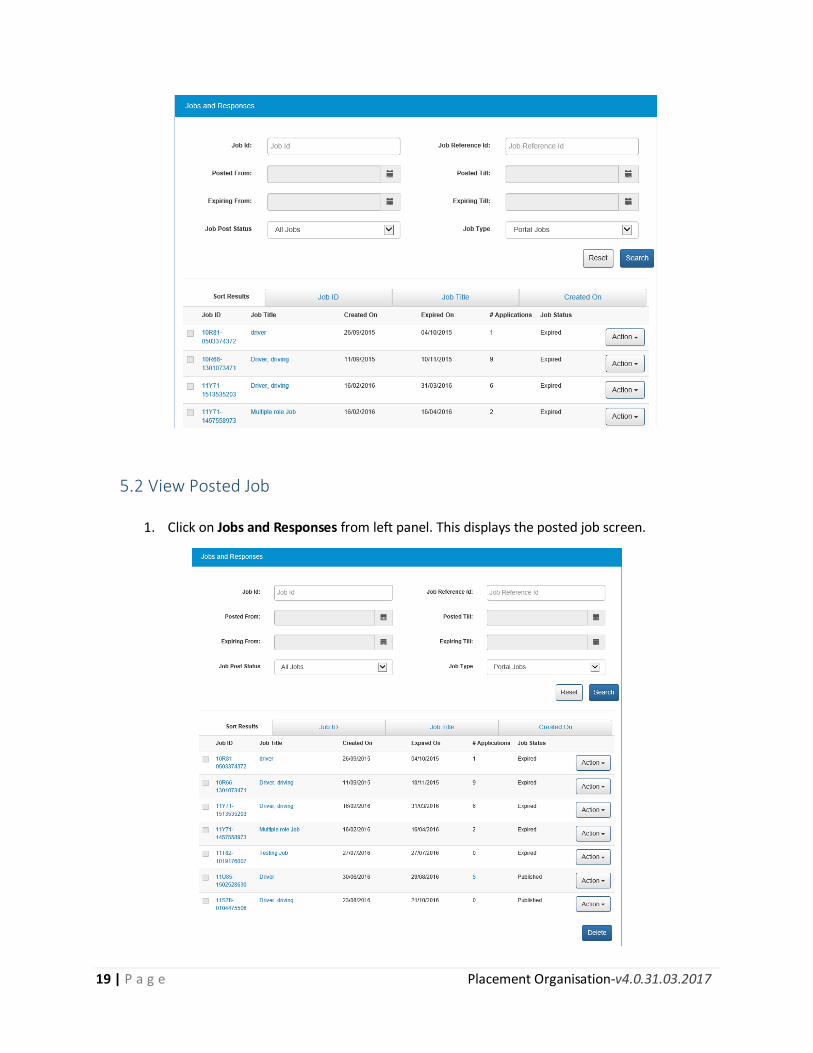
5.2 View Posted Job
1. Click on Jobs and Responses from left panel. This displays the posted job screen.
20 | P a g e Placement Organisation-v4.0.31.03.2017
2. Click on check box corresponding to the Job ID and then click on Delete button to remove
the posted job.
3. Organisation Users will be able to view the list of qualified candidates by clicking on number
of applications on “Jobs and Responses” page for published jobs only. By clicking on number
of applications, Organisation Users will navigate to “Job Application Details” page.
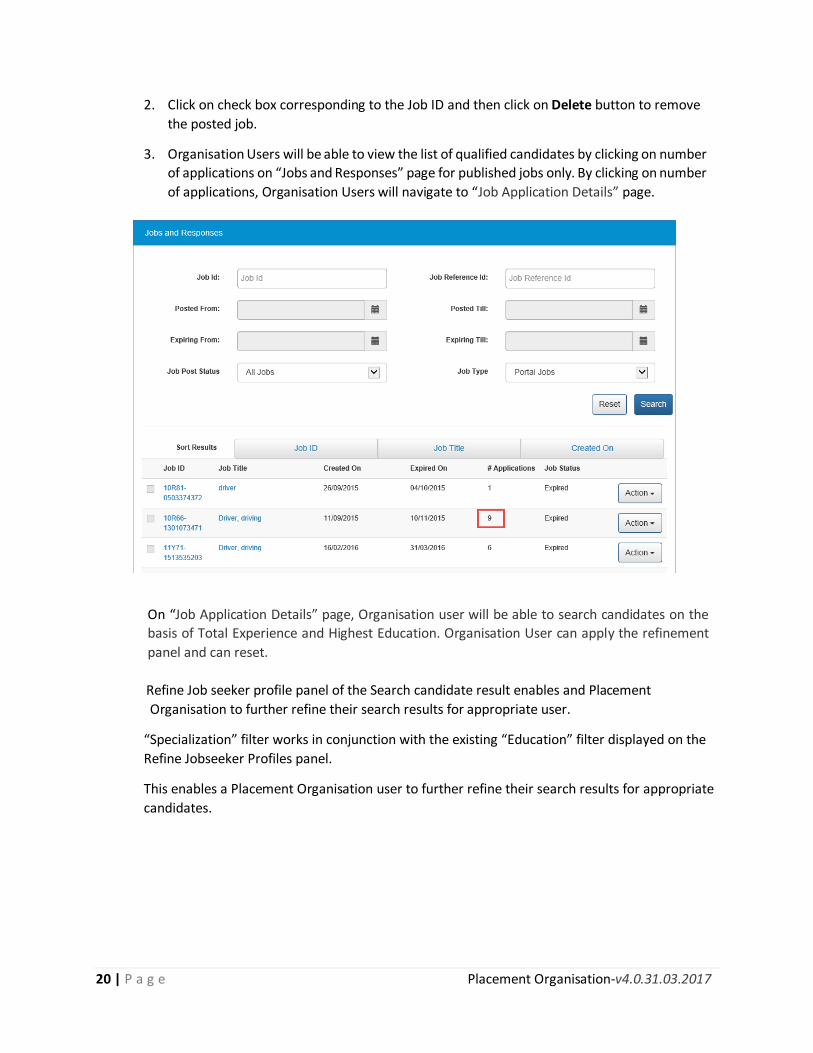
On “Job Application Details” page, Organisation user will be able to search candidates on the
basis of Total Experience and Highest Education. Organisation User can apply the refinement
panel and can reset.
Refine Job seeker profile panel of the Search candidate result enables and Placement
Organisation to further refine their search results for appropriate user.
“Specialization” filter works in conjunction with the existing “Education” filter displayed on the
Refine Jobseeker Profiles panel.
This enables a Placement Organisation user to further refine their search results for appropriate
candidates.
21 | P a g e Placement Organisation-v4.0.31.03.2017
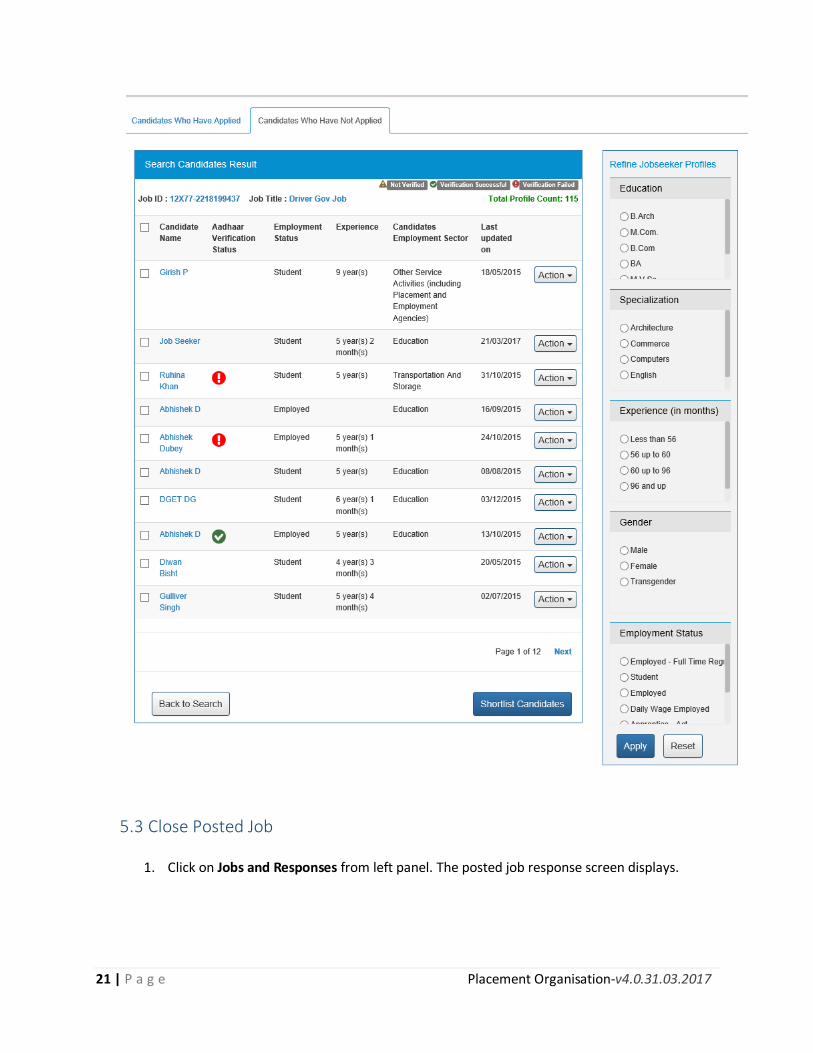
5.3 Close Posted Job
1. Click on Jobs and Responses from left panel. The posted job response screen displays.

22 | P a g e Placement Organisation-v4.0.31.03.2017
2. Click on Action button and select Close option.
3. Select the reason from the drop down list.
4. Click on Submit button
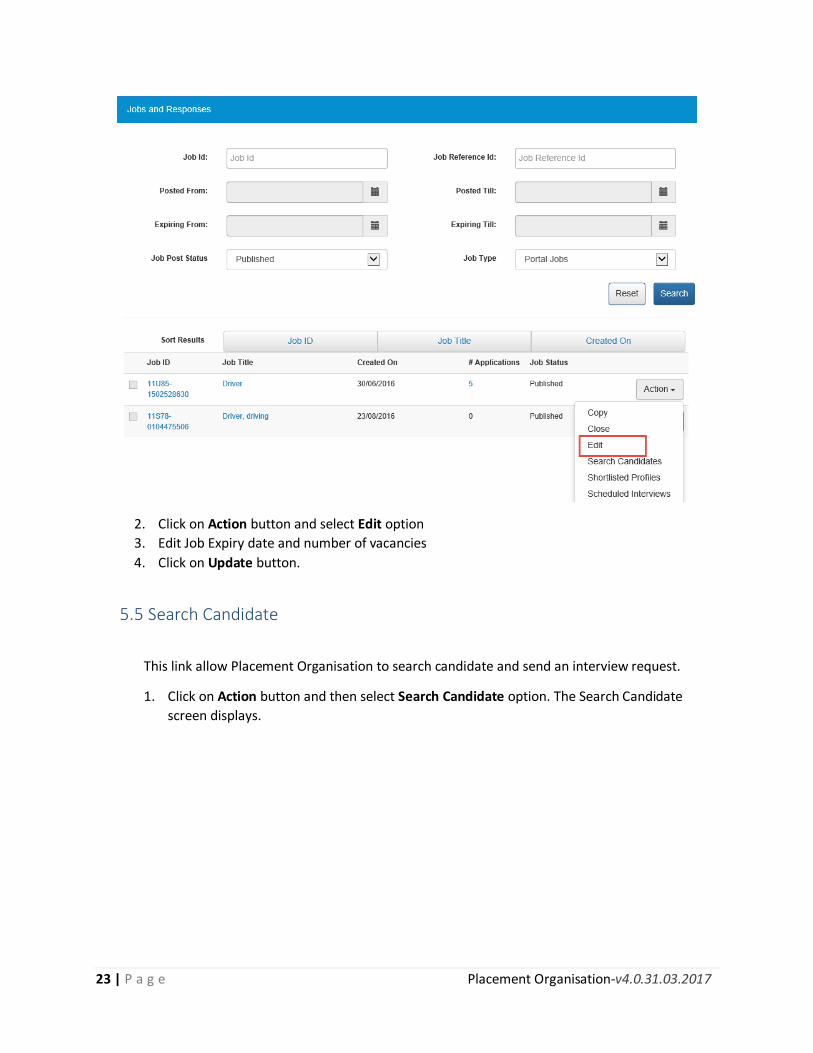
5.4 Edit Posted Job
1. Click on Jobs and Responses from left panel. This displayed the job and responses screen.
23 | P a g e Placement Organisation-v4.0.31.03.2017
2. Click on Action button and select Edit option
3. Edit Job Expiry date and number of vacancies
4. Click on Update button.
5.5 Search Candidate
This link allow Placement Organisation to search candidate and send an interview request.
1. Click on Action button and then select Search Candidate option. The Search Candidate
screen displays.
24 | P a g e Placement Organisation-v4.0.31.03.2017
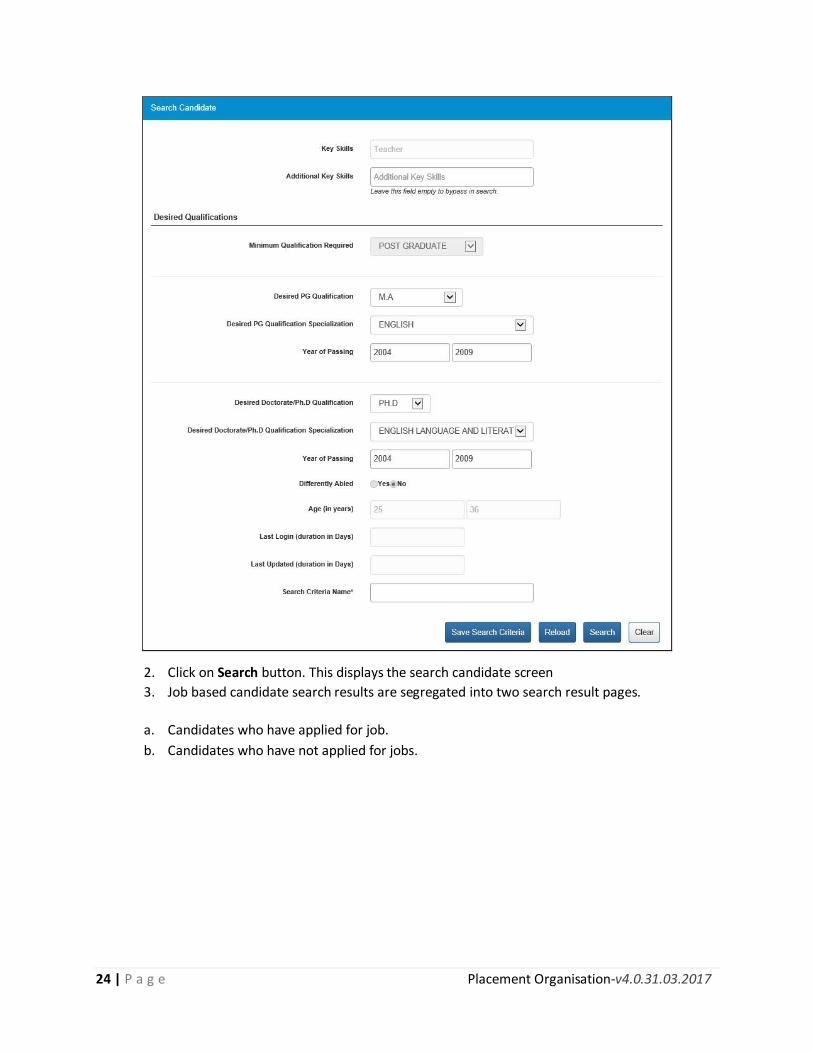
2. Click on Search button. This displays the search candidate screen
3. Job based candidate search results are segregated into two search result pages.
a. Candidates who have applied for job.
b. Candidates who have not applied for jobs.
25 | P a g e Placement Organisation-v4.0.31.03.2017
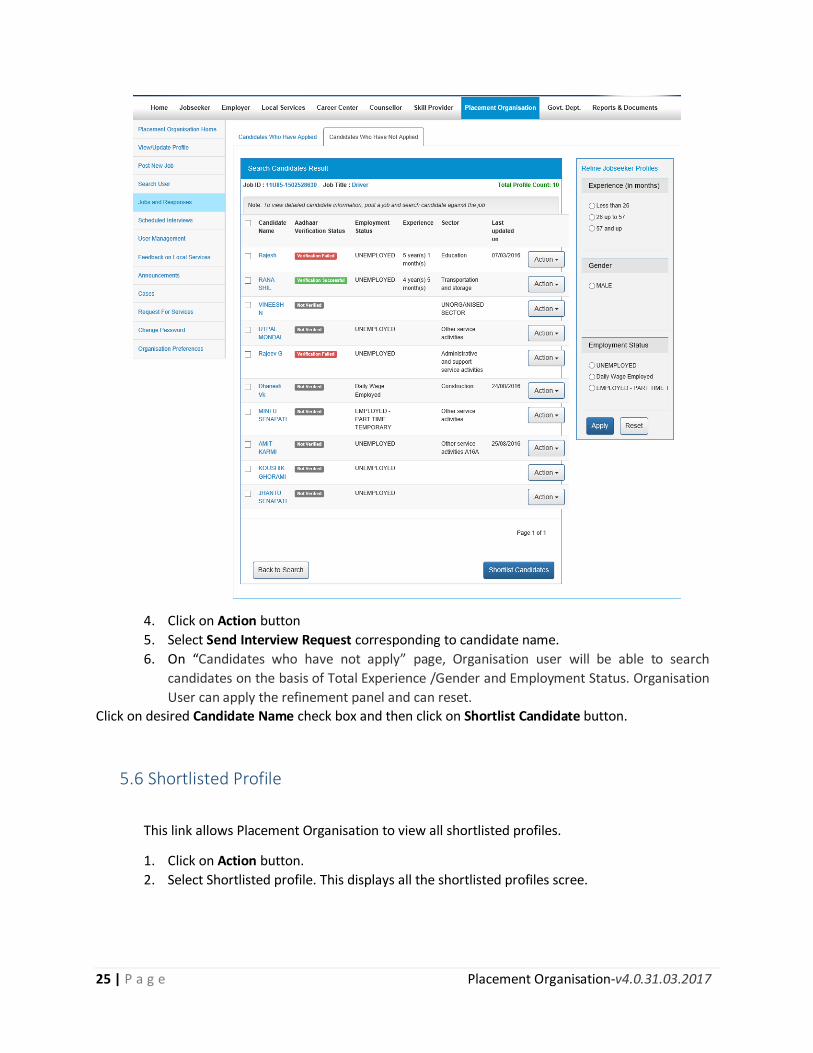
4. Click on Action button
5. Select Send Interview Request corresponding to candidate name.
6. On “Candidates who have not apply” page, Organisation user will be able to search
candidates on the basis of Total Experience /Gender and Employment Status. Organisation
User can apply the refinement panel and can reset.
Click on desired Candidate Name check box and then click on Shortlist Candidate button.
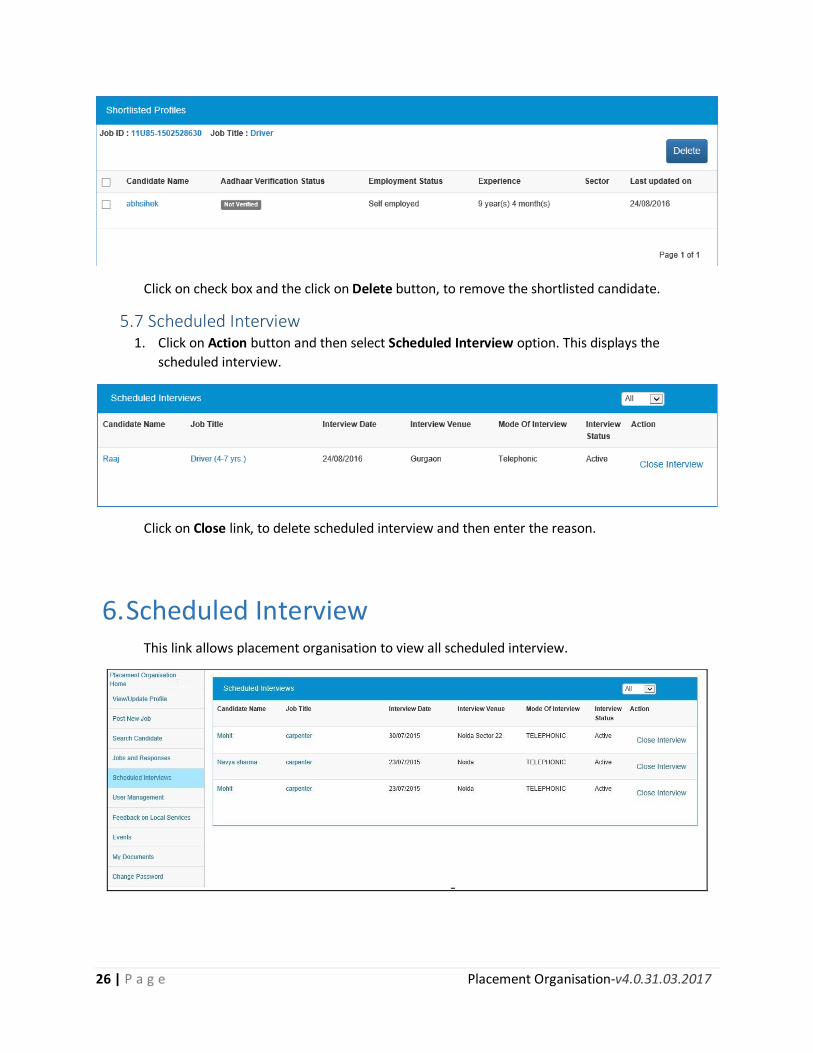
5.6 Shortlisted Profile
This link allows Placement Organisation to view all shortlisted profiles.
1. Click on Action button.
2. Select Shortlisted profile. This displays all the shortlisted profiles scree.
26 | P a g e Placement Organisation-v4.0.31.03.2017
Click on check box and the click on Delete button, to remove the shortlisted candidate.
5.7 Scheduled Interview 1. Click on Action button and then select Scheduled Interview option. This displays the
scheduled interview.
Click on Close link, to delete scheduled interview and then enter the reason.
6. Scheduled Interview This link allows placement organisation to view all scheduled interview.
27 | P a g e Placement Organisation-v4.0.31.03.2017
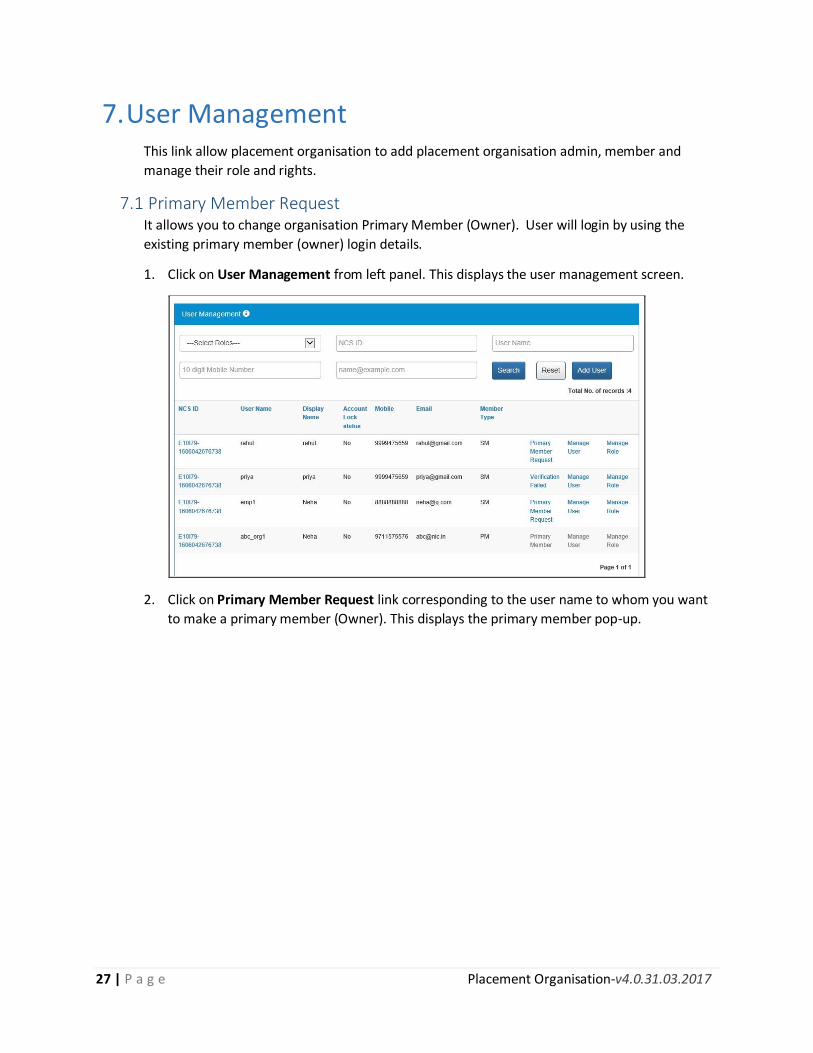
7. User Management This link allow placement organisation to add placement organisation admin, member and
manage their role and rights.
7.1 Primary Member Request It allows you to change organisation Primary Member (Owner). User will login by using the
existing primary member (owner) login details.
1. Click on User Management from left panel. This displays the user management screen.
2. Click on Primary Member Request link corresponding to the user name to whom you want
to make a primary member (Owner). This displays the primary member pop-up.
28 | P a g e Placement Organisation-v4.0.31.03.2017
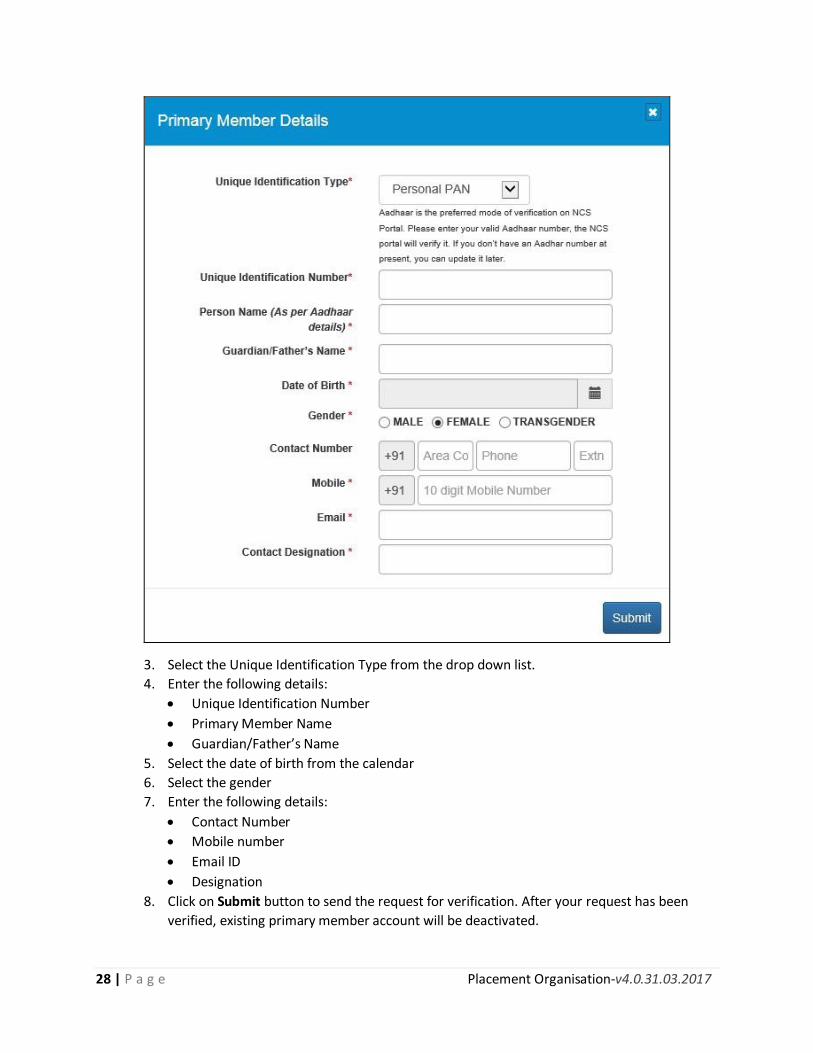
3. Select the Unique Identification Type from the drop down list.
4. Enter the following details:
Unique Identification Number
Primary Member Name
Guardian/Father’s Name
5. Select the date of birth from the calendar
6. Select the gender
7. Enter the following details:
Contact Number
Mobile number
Email ID
Designation
8. Click on Submit button to send the request for verification. After your request has been
verified, existing primary member account will be deactivated.
29 | P a g e Placement Organisation-v4.0.31.03.2017
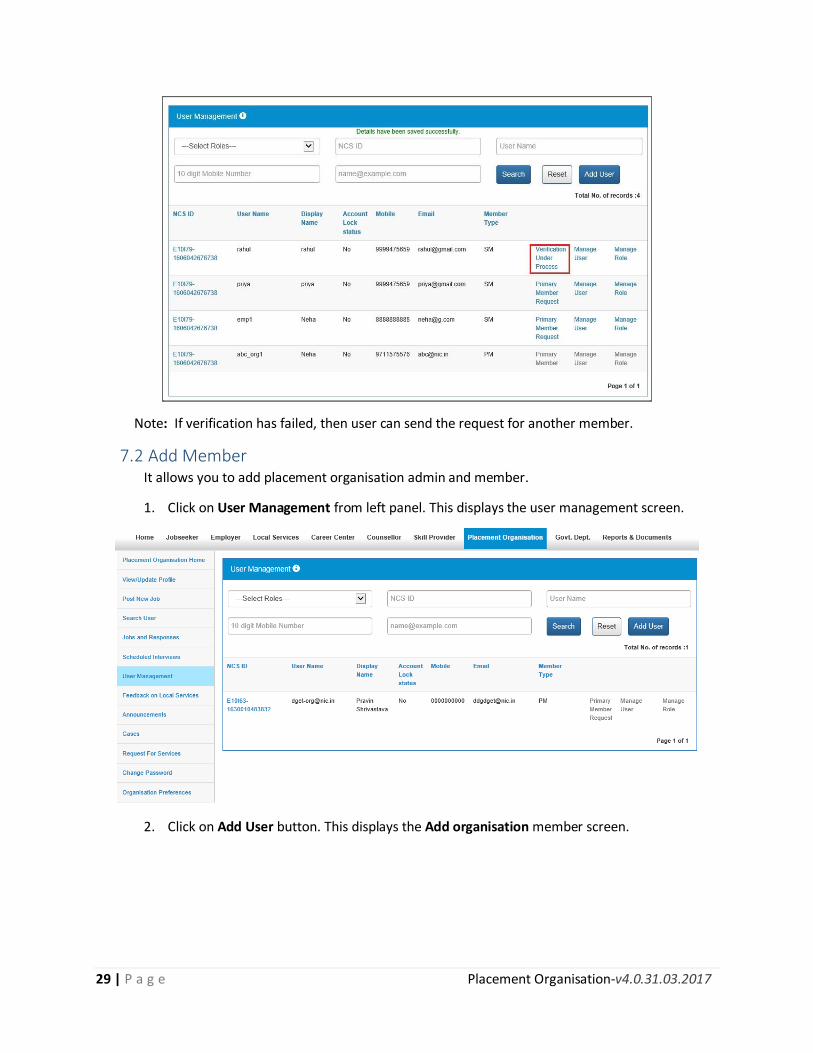
Note: If verification has failed, then user can send the request for another member.
7.2 Add Member It allows you to add placement organisation admin and member.
1. Click on User Management from left panel. This displays the user management screen.
2. Click on Add User button. This displays the Add organisation member screen.
30 | P a g e Placement Organisation-v4.0.31.03.2017
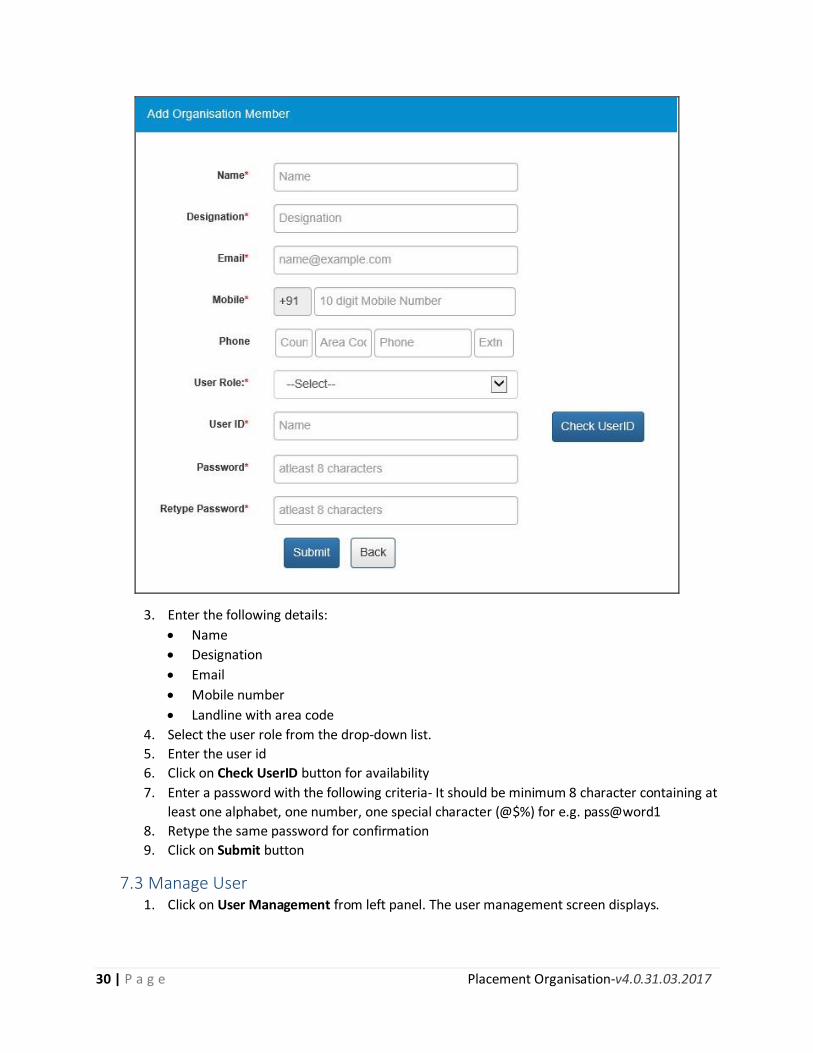
3. Enter the following details:
Name
Designation
Mobile number
Landline with area code
4. Select the user role from the drop-down list.
5. Enter the user id
6. Click on Check UserID button for availability
7. Enter a password with the following criteria- It should be minimum 8 character containing at
least one alphabet, one number, one special character (@$%) for e.g. pass@word1
8. Retype the same password for confirmation
9. Click on Submit button
7.3 Manage User 1. Click on User Management from left panel. The user management screen displays.
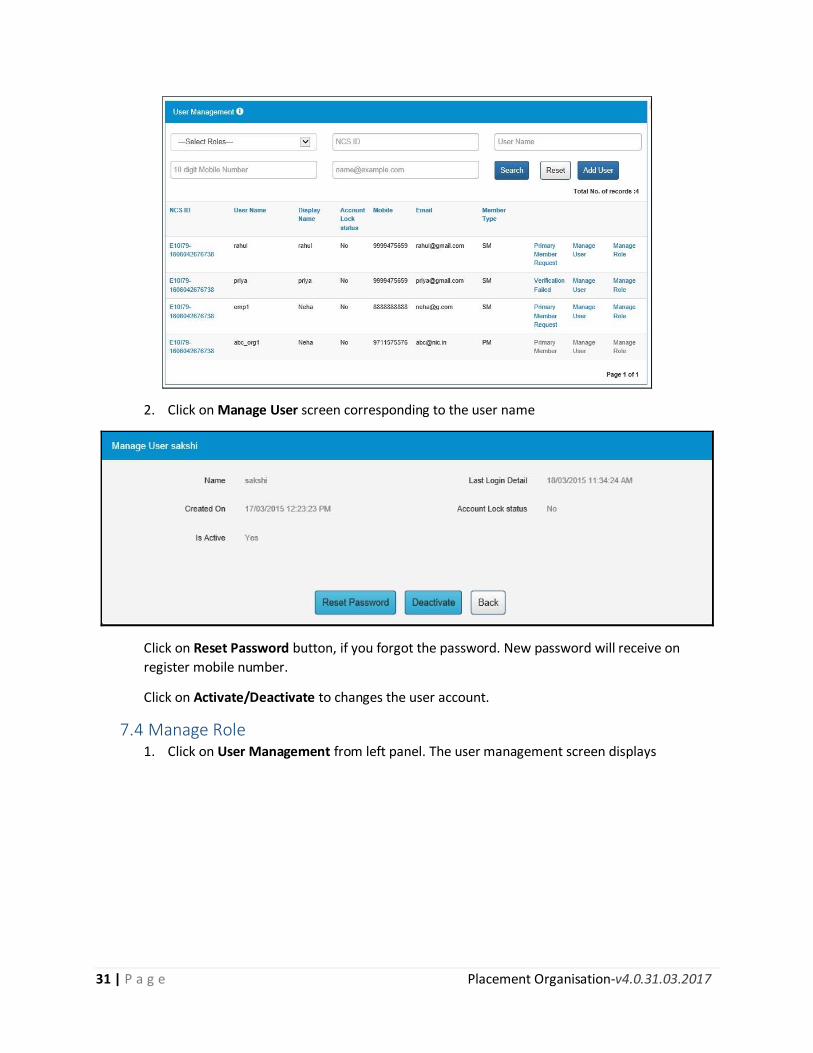
31 | P a g e Placement Organisation-v4.0.31.03.2017
2. Click on Manage User screen corresponding to the user name
Click on Reset Password button, if you forgot the password. New password will receive on
register mobile number.
Click on Activate/Deactivate to changes the user account.
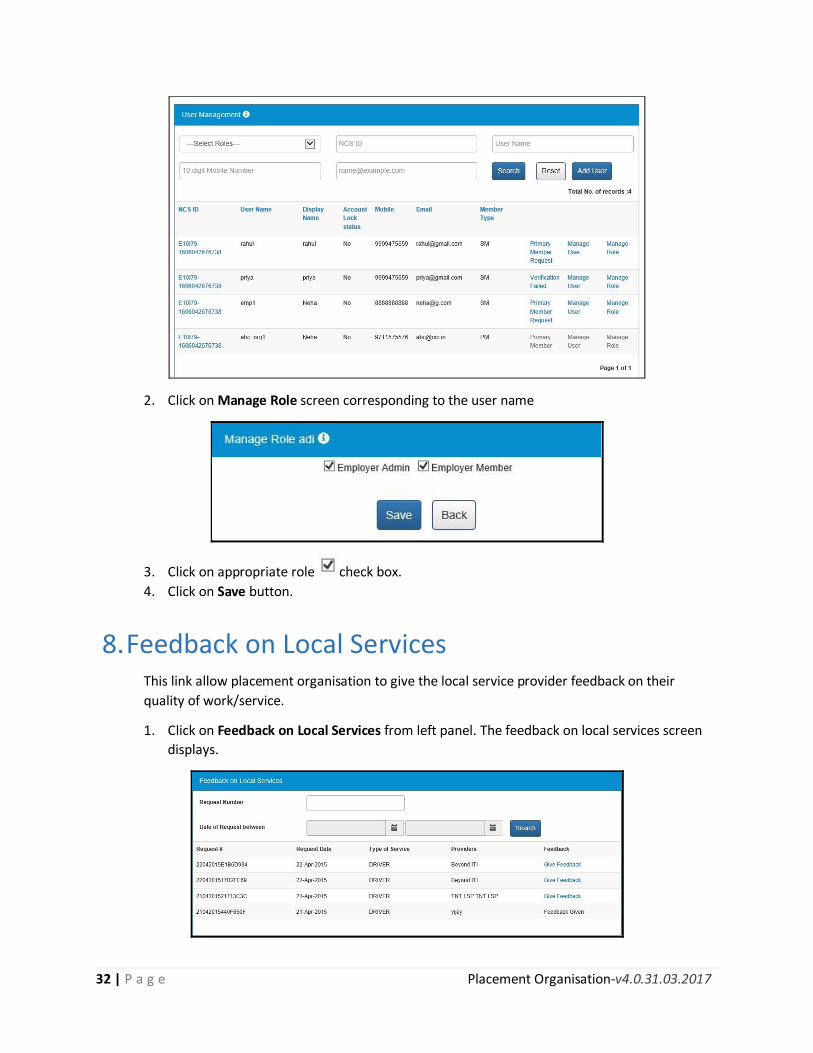
7.4 Manage Role 1. Click on User Management from left panel. The user management screen displays
32 | P a g e Placement Organisation-v4.0.31.03.2017
2. Click on Manage Role screen corresponding to the user name
3. Click on appropriate role check box.
4. Click on Save button.
8. Feedback on Local Services This link allow placement organisation to give the local service provider feedback on their
quality of work/service.
1. Click on Feedback on Local Services from left panel. The feedback on local services screen
displays.
33 | P a g e Placement Organisation-v4.0.31.03.2017
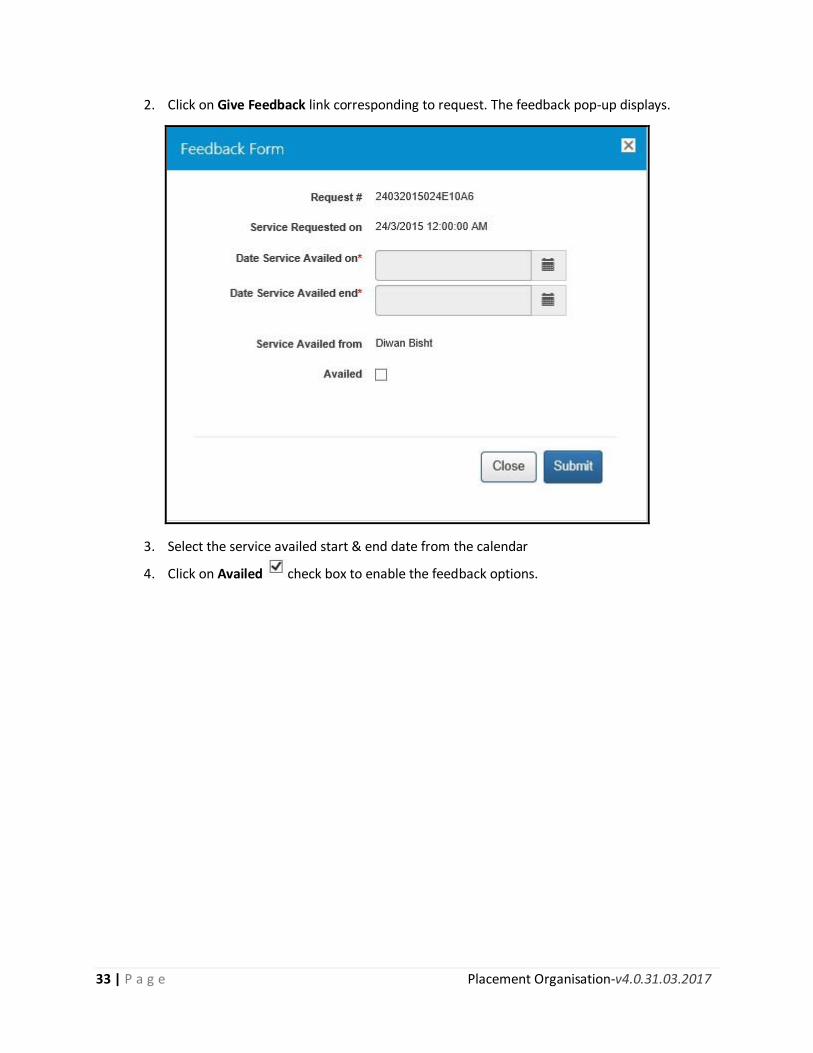
2. Click on Give Feedback link corresponding to request. The feedback pop-up displays.
3. Select the service availed start & end date from the calendar
4. Click on Availed check box to enable the feedback options.
34 | P a g e Placement Organisation-v4.0.31.03.2017
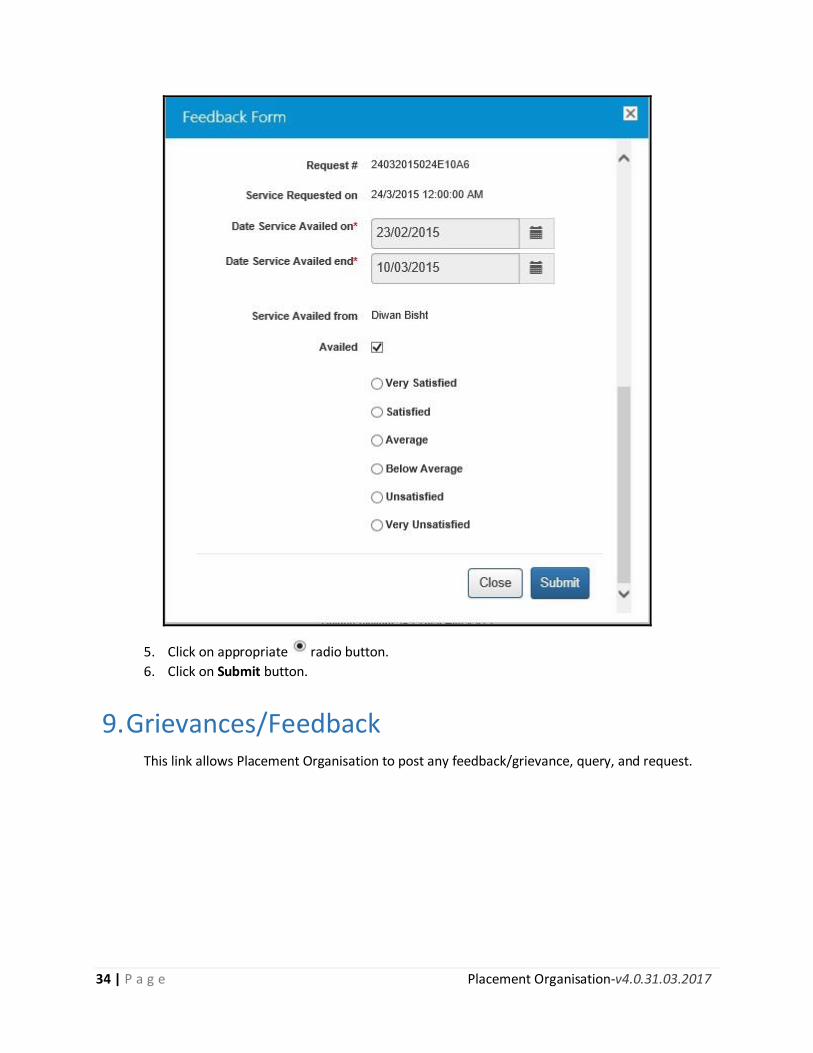
5. Click on appropriate radio button.
6. Click on Submit button.
9. Grievances/Feedback This link allows Placement Organisation to post any feedback/grievance, query, and request.
35 | P a g e Placement Organisation-v4.0.31.03.2017
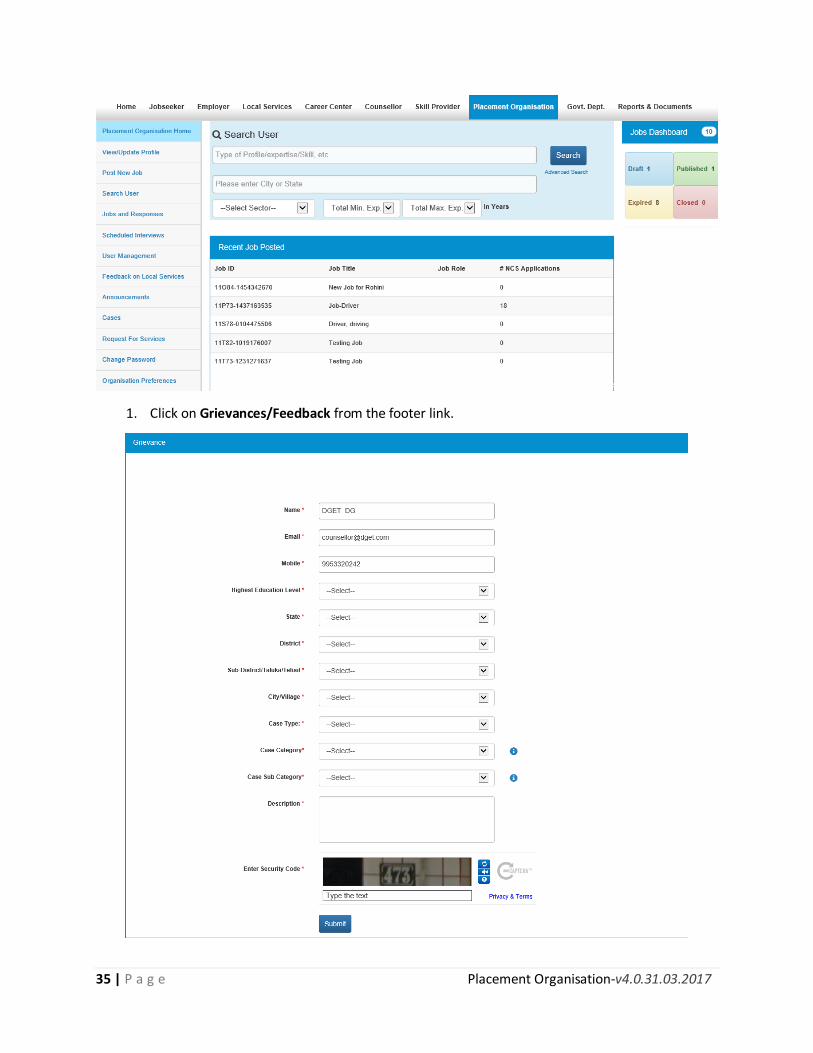
1. Click on Grievances/Feedback from the footer link.
36 | P a g e Placement Organisation-v4.0.31.03.2017
2. Select the following details:
3. Highest Education Level
4. State
5. District
6. Sub-District/Taluka/Tehsil
7. City/Village
8. Case Type
9. Case Category
10. Case Sub Category
11. Enter the description
12. Enter security code as shown in image.
13. Click on Submit button.
14. Click on Help tool tip to know about the “Case category” and “Case Sub Category” types.
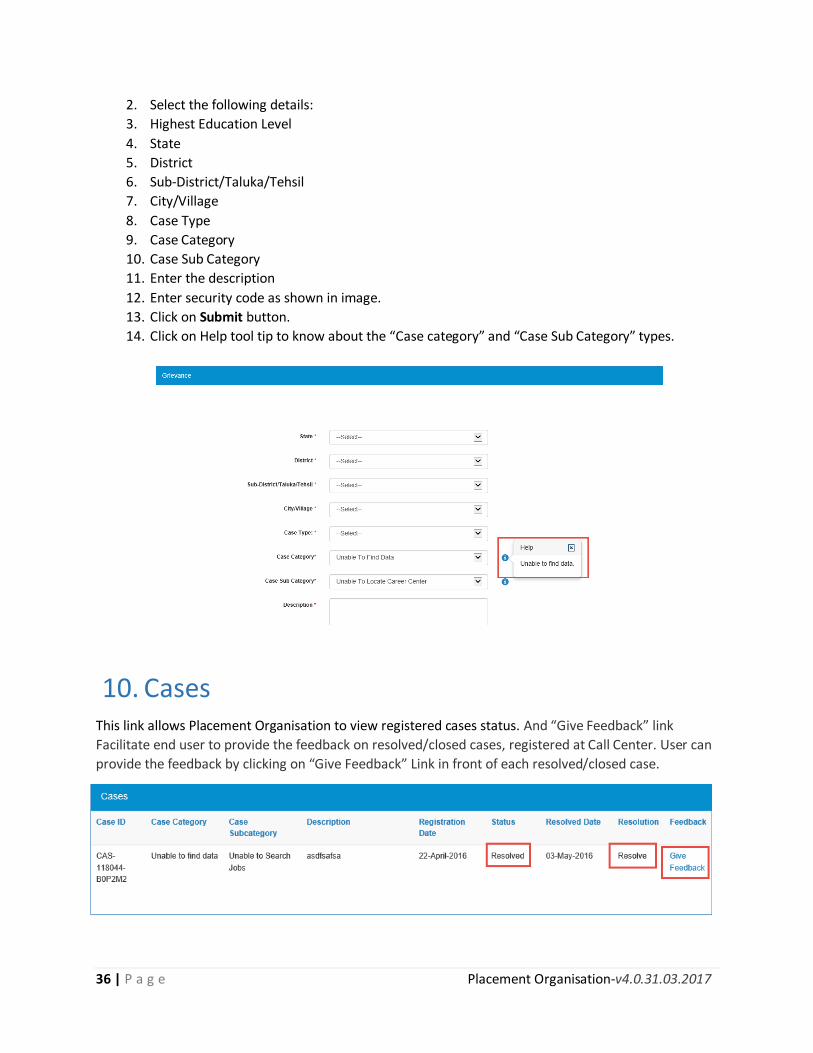
10. Cases This link allows Placement Organisation to view registered cases status. And “Give Feedback” link
Facilitate end user to provide the feedback on resolved/closed cases, registered at Call Center. User can
provide the feedback by clicking on “Give Feedback” Link in front of each resolved/closed case.
37 | P a g e Placement Organisation-v4.0.31.03.2017
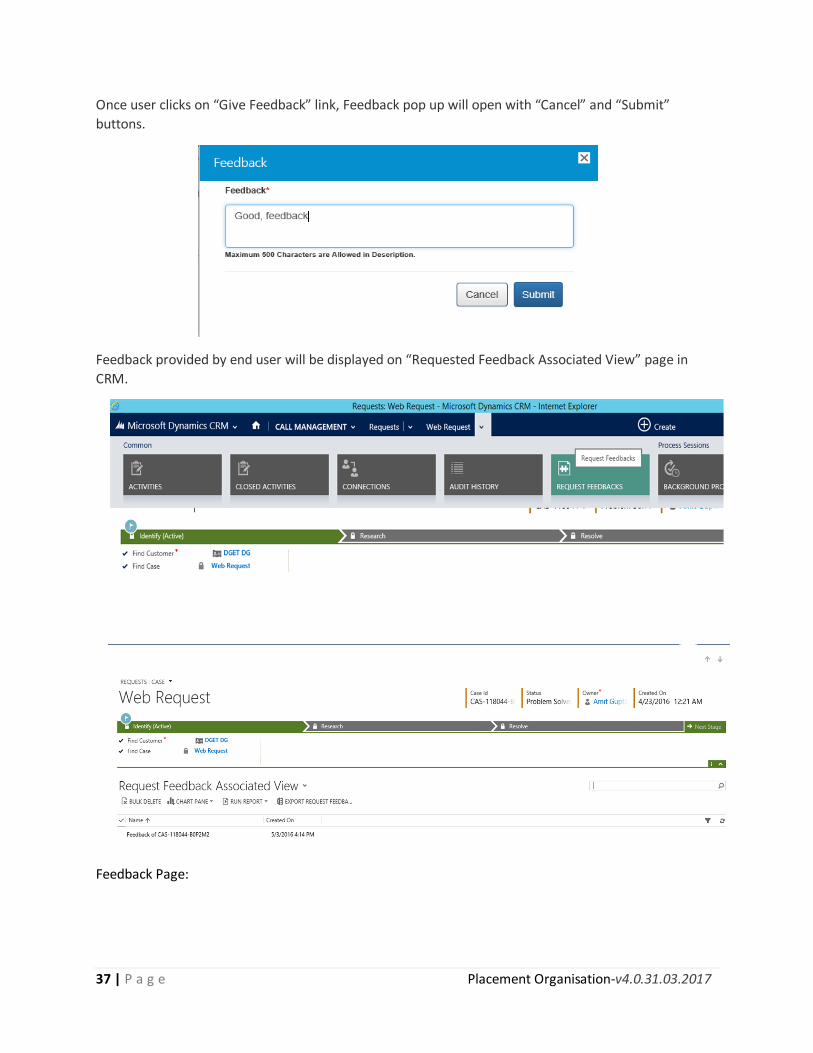
Once user clicks on “Give Feedback” link, Feedback pop up will open with “Cancel” and “Submit”
buttons.
Feedback provided by end user will be displayed on “Requested Feedback Associated View” page in
CRM.
Feedback Page:
38 | P a g e Placement Organisation-v4.0.31.03.2017
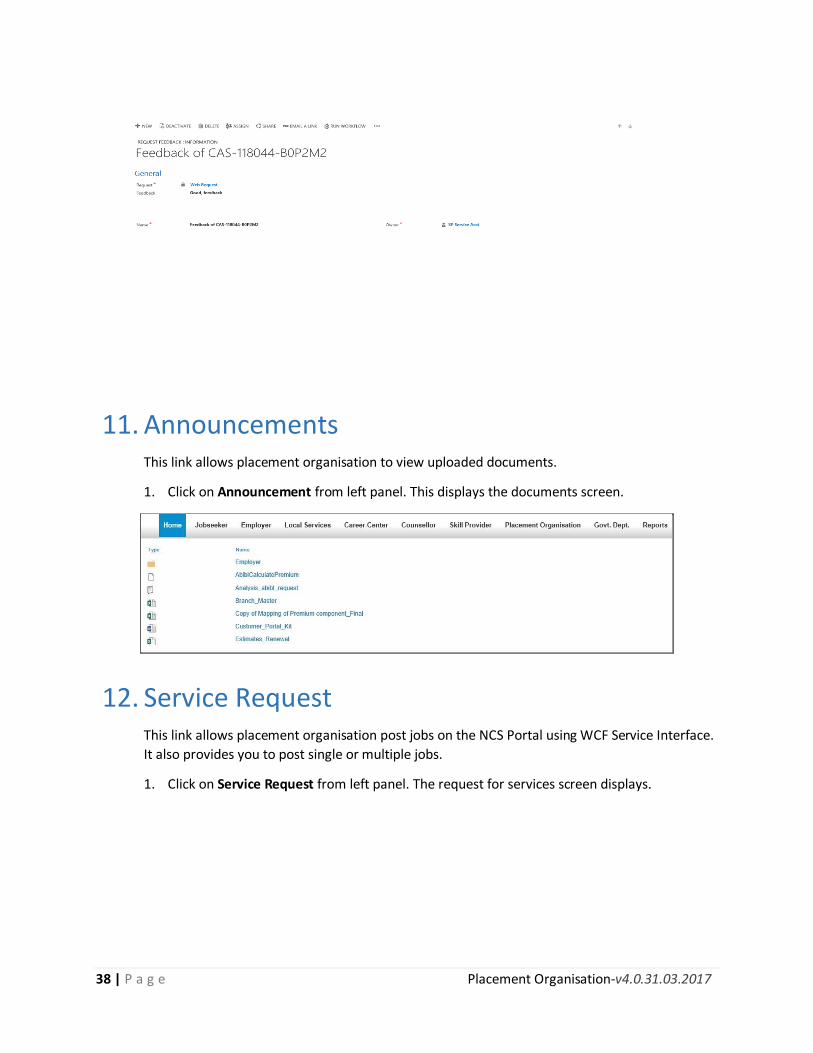
11. Announcements This link allows placement organisation to view uploaded documents.
1. Click on Announcement from left panel. This displays the documents screen.
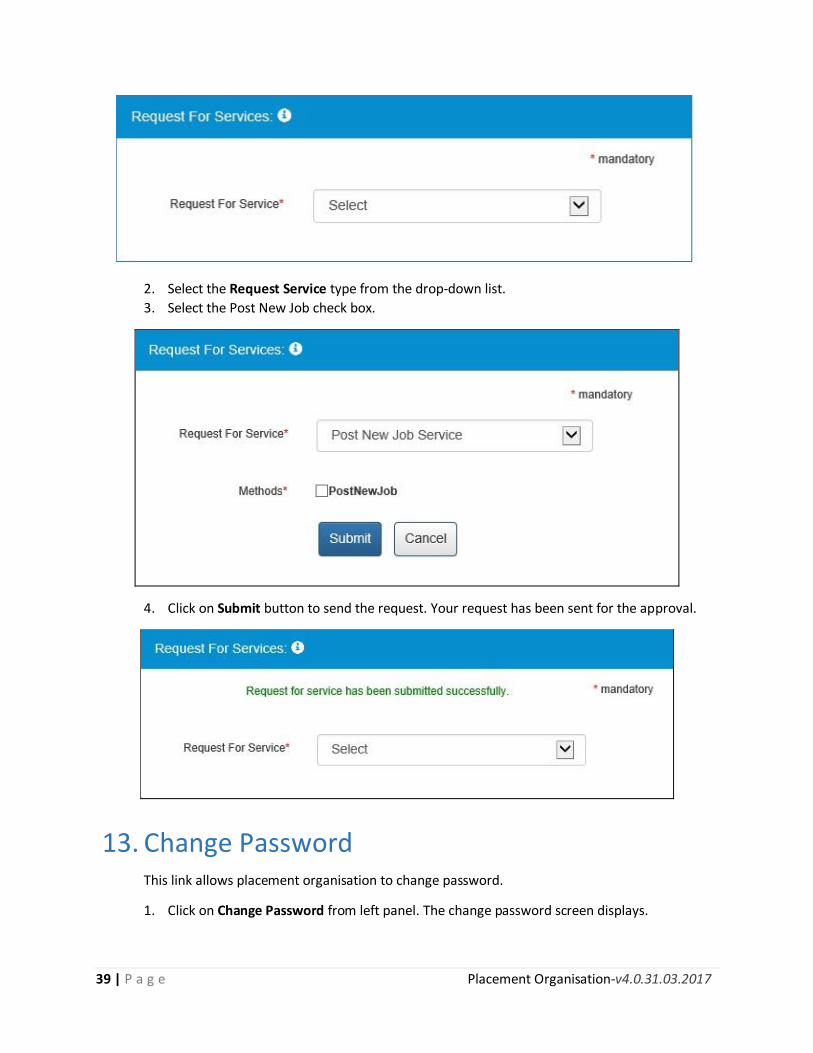
12. Service Request This link allows placement organisation post jobs on the NCS Portal using WCF Service Interface.
It also provides you to post single or multiple jobs.
1. Click on Service Request from left panel. The request for services screen displays.
39 | P a g e Placement Organisation-v4.0.31.03.2017
2. Select the Request Service type from the drop-down list.
3. Select the Post New Job check box.
4. Click on Submit button to send the request. Your request has been sent for the approval.
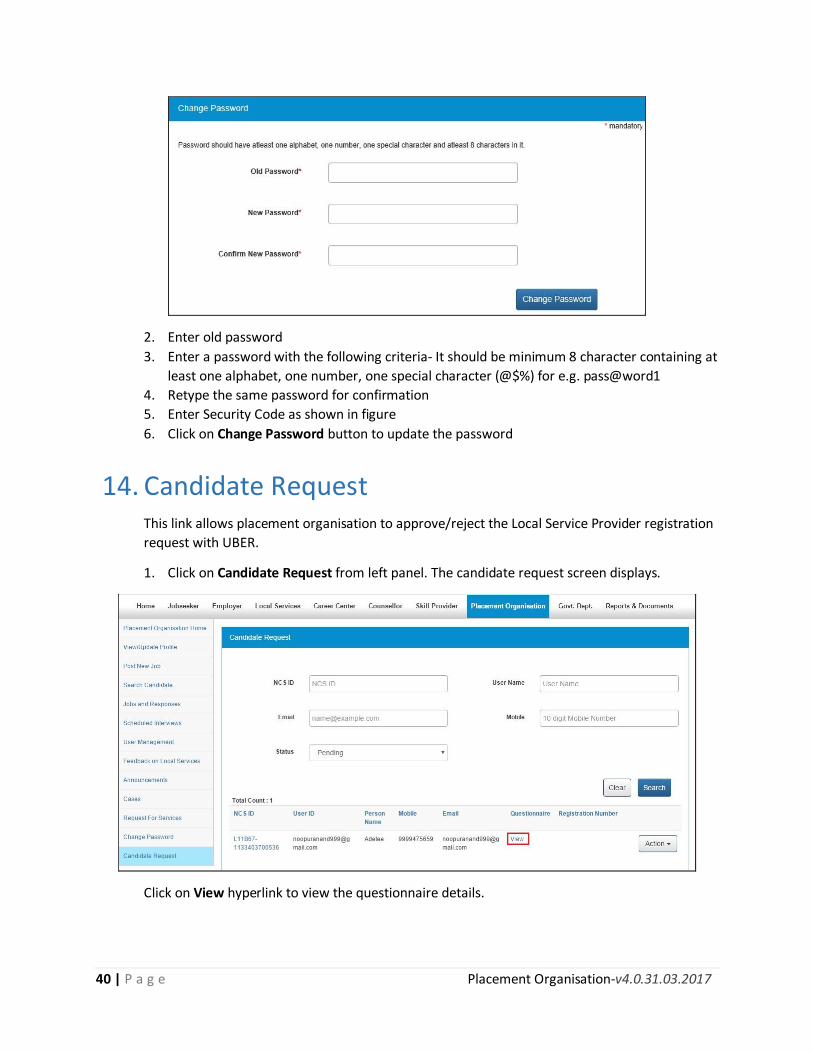
13. Change Password This link allows placement organisation to change password.
1. Click on Change Password from left panel. The change password screen displays.
40 | P a g e Placement Organisation-v4.0.31.03.2017
2. Enter old password
3. Enter a password with the following criteria- It should be minimum 8 character containing at
least one alphabet, one number, one special character (@$%) for e.g. pass@word1
4. Retype the same password for confirmation
5. Enter Security Code as shown in figure
6. Click on Change Password button to update the password
14. Candidate Request This link allows placement organisation to approve/reject the Local Service Provider registration
request with UBER.
1. Click on Candidate Request from left panel. The candidate request screen displays.
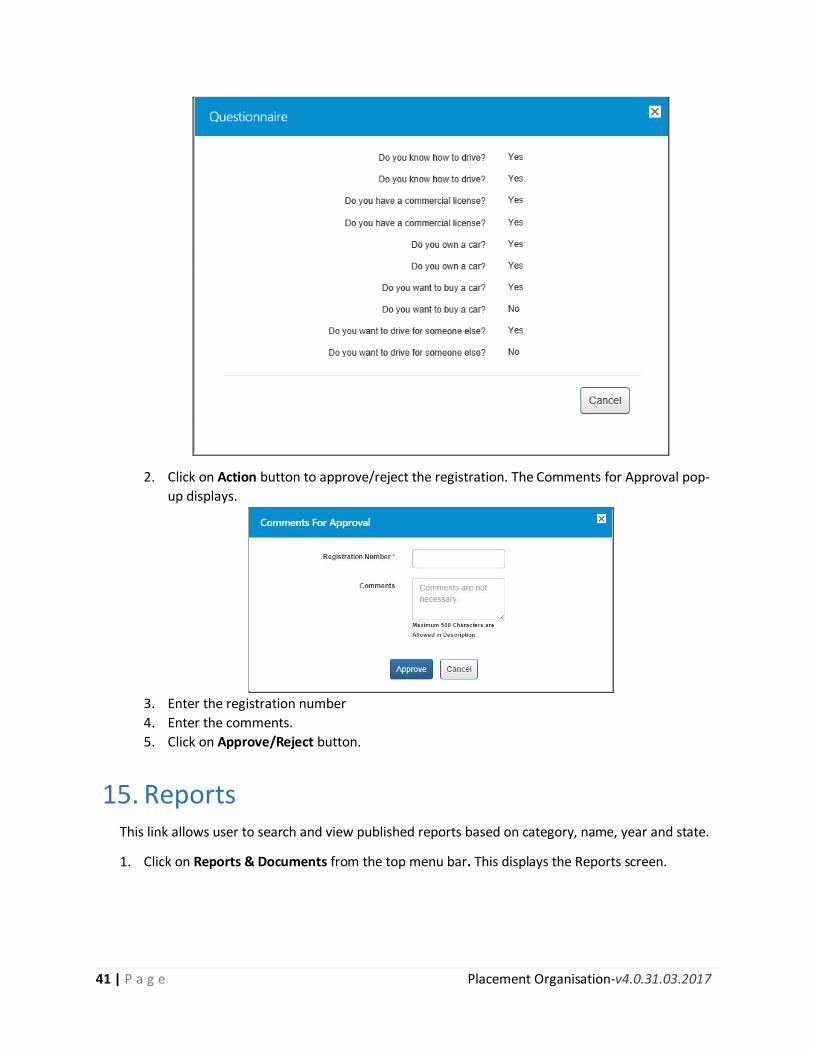
Click on View hyperlink to view the questionnaire details.
41 | P a g e Placement Organisation-v4.0.31.03.2017
2. Click on Action button to approve/reject the registration. The Comments for Approval pop-
up displays.
3. Enter the registration number
4. Enter the comments.
5. Click on Approve/Reject button.
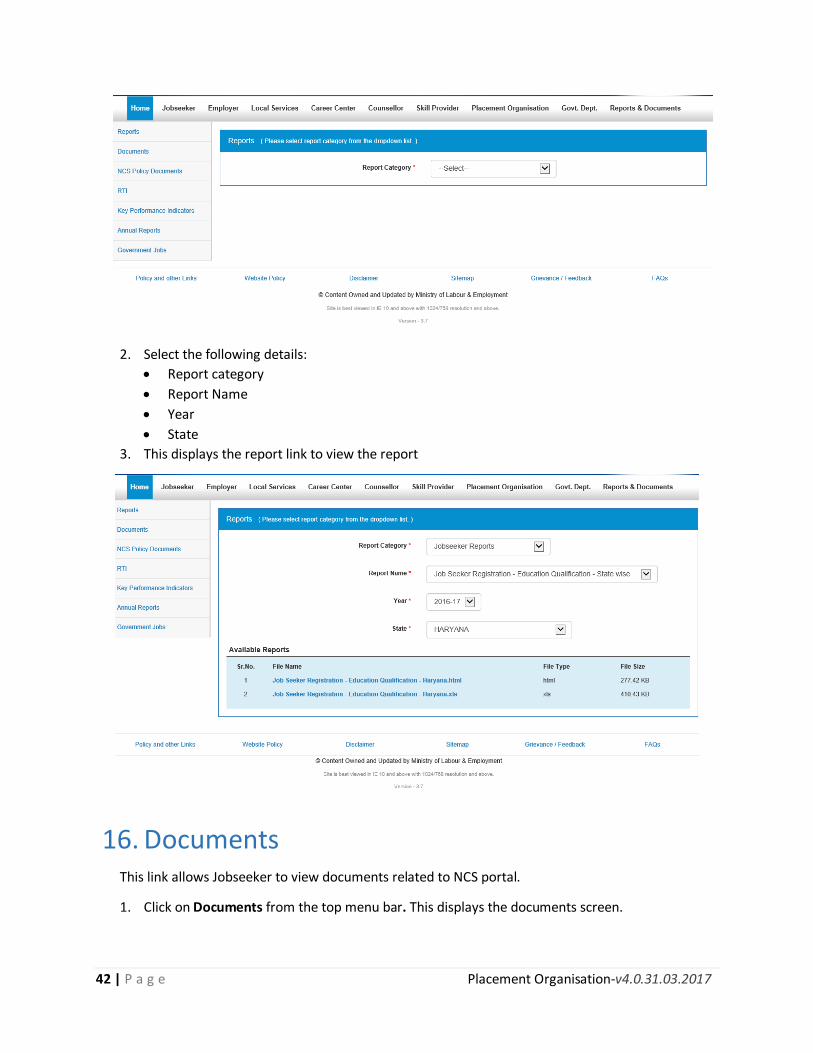
15. Reports This link allows user to search and view published reports based on category, name, year and state.
1. Click on Reports & Documents from the top menu bar. This displays the Reports screen.
42 | P a g e Placement Organisation-v4.0.31.03.2017
2. Select the following details:
Report category
Report Name
Year
State
3. This displays the report link to view the report
16. Documents This link allows Jobseeker to view documents related to NCS portal.
1. Click on Documents from the top menu bar. This displays the documents screen.
43 | P a g e Placement Organisation-v4.0.31.03.2017
2. Click on desired link to view the documents.
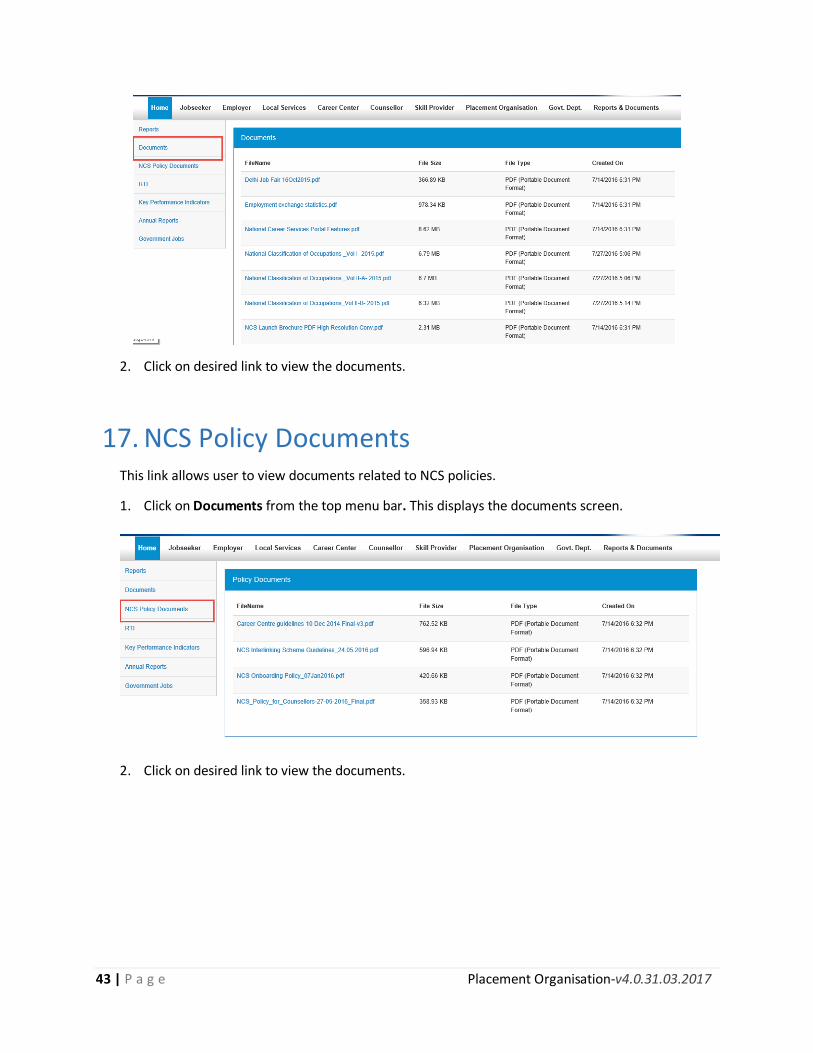
17. NCS Policy Documents This link allows user to view documents related to NCS policies.
1. Click on Documents from the top menu bar. This displays the documents screen.
2. Click on desired link to view the documents.
44 | P a g e Placement Organisation-v4.0.31.03.2017
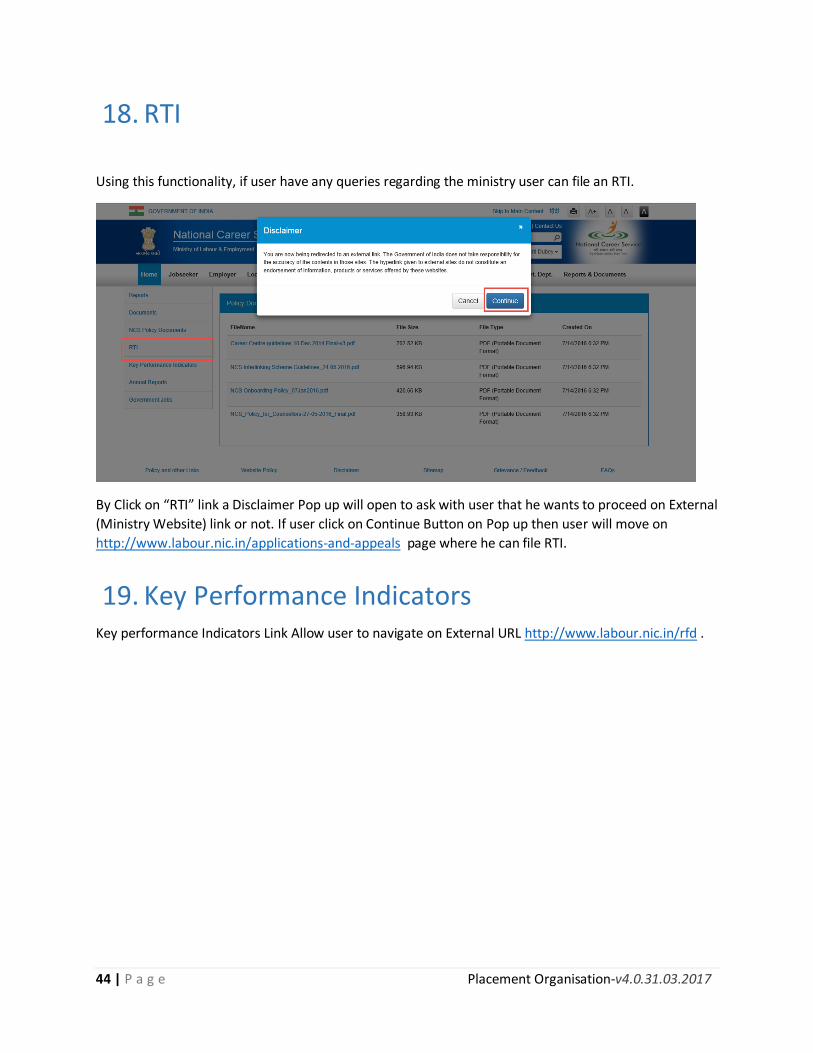
18. RTI
Using this functionality, if user have any queries regarding the ministry user can file an RTI.
By Click on “RTI” link a Disclaimer Pop up will open to ask with user that he wants to proceed on External
(Ministry Website) link or not. If user click on Continue Button on Pop up then user will move on
http://www.labour.nic.in/applications-and-appeals page where he can file RTI.
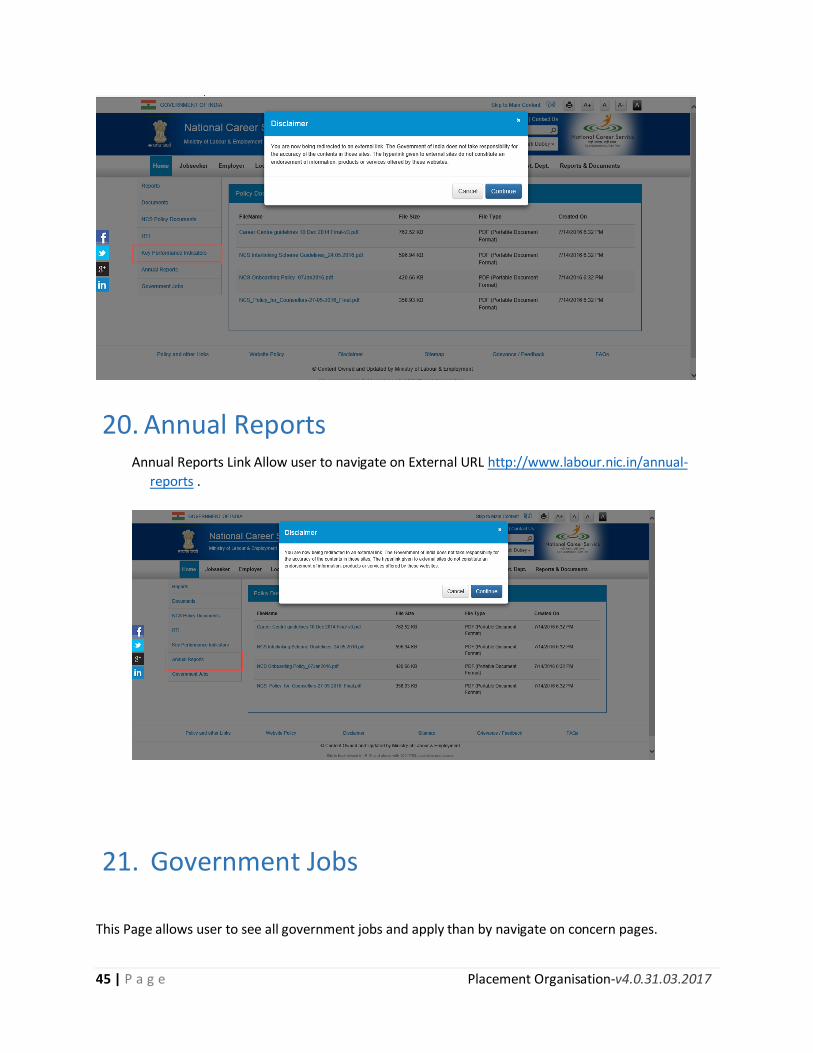
19. Key Performance Indicators Key performance Indicators Link Allow user to navigate on External URL http://www.labour.nic.in/rfd .
45 | P a g e Placement Organisation-v4.0.31.03.2017
20. Annual Reports Annual Reports Link Allow user to navigate on External URL http://www.labour.nic.in/annual-
reports .
21. Government Jobs
This Page allows user to see all government jobs and apply than by navigate on concern pages.
46 | P a g e Placement Organisation-v4.0.31.03.2017
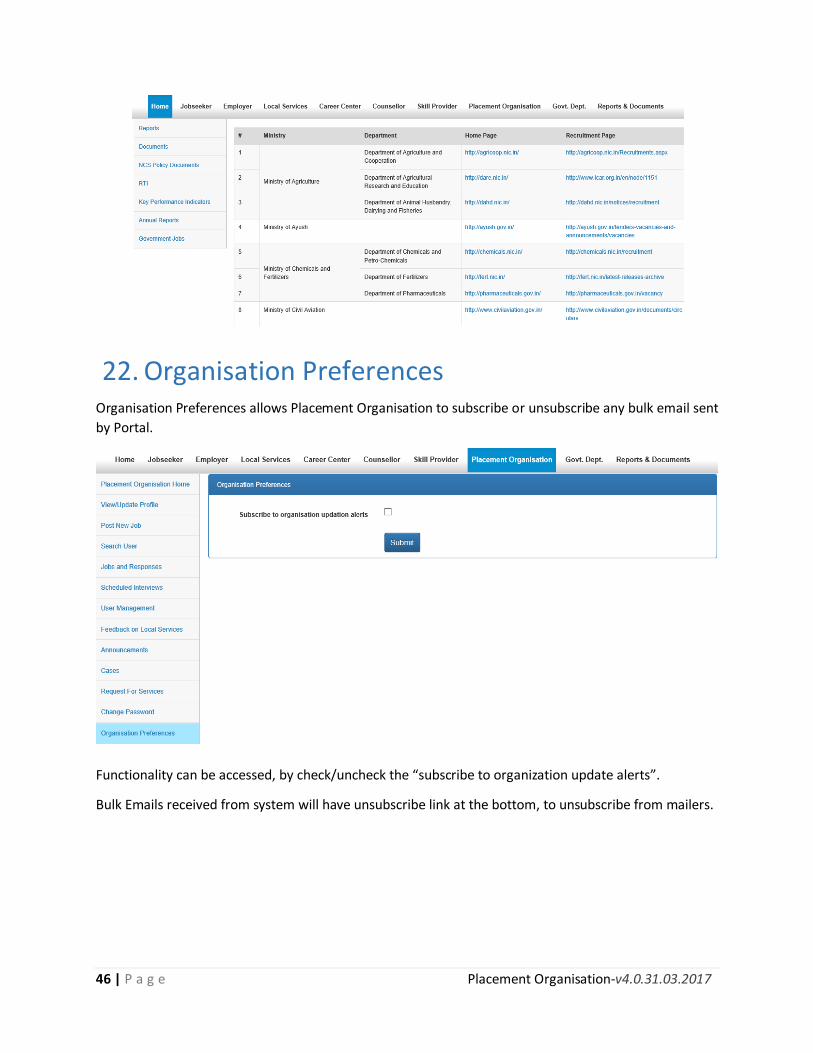
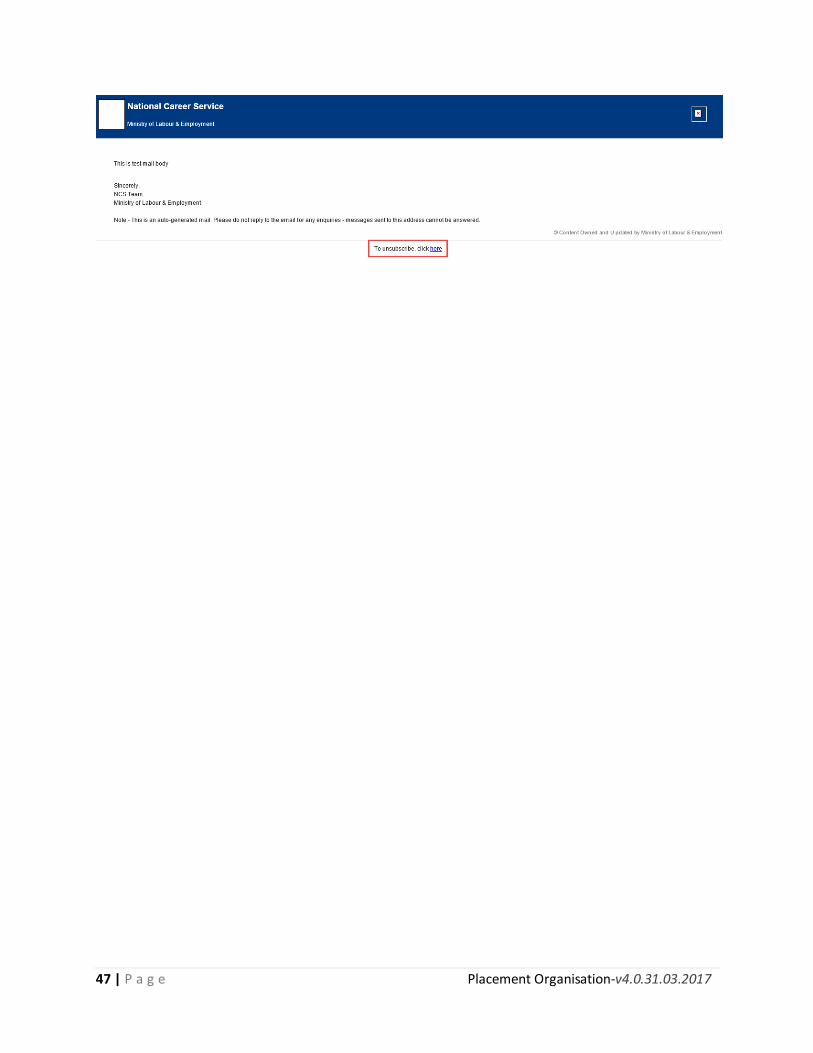
22. Organisation Preferences Organisation Preferences allows Placement Organisation to subscribe or unsubscribe any bulk email sent
by Portal.
Functionality can be accessed, by check/uncheck the “subscribe to organization update alerts”.
Bulk Emails received from system will have unsubscribe link at the bottom, to unsubscribe from mailers.
47 | P a g e Placement Organisation-v4.0.31.03.2017