Embed Size (px)
DESCRIPTION
NA INSTRUCTION
Citation preview

NA INSTRUCTIONCUBICASA OY
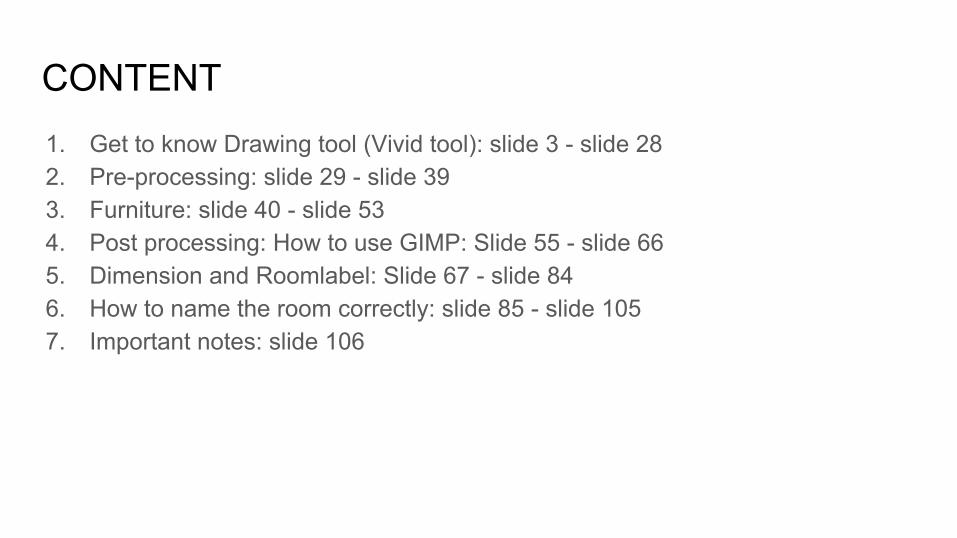
CONTENT1. Get to know Drawing tool (Vivid tool): slide 3 - slide 282. Pre-processing: slide 29 - slide 393. Furniture: slide 40 - slide 534. Post processing: How to use GIMP: Slide 55 - slide 665. Dimension and Roomlabel: Slide 67 - slide 846. How to name the room correctly: slide 85 - slide 1057. Important notes: slide 106

Get to know Vivid toolCubiCasa Oy

PREPARATION
GO TO: http://producer.cubicasa.com/VividWebNote: Install Unity Web Player (plug-in) if required
LOGIN by USERNAME & PASSWORD: username: training6 password: cubicasaremember to create your own folder (your full name) and save all your floorplans there
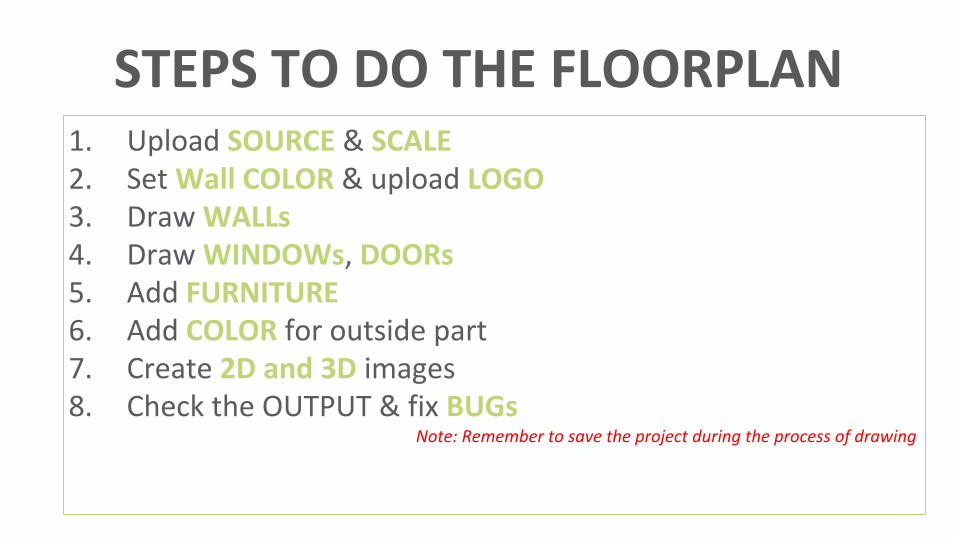
STEPS TO DO THE FLOORPLAN1. Upload SOURCE & SCALE2. Set Wall COLOR & upload LOGO3. Draw WALLs4. Draw WINDOWs, DOORs5. Add FURNITURE6. Add COLOR for outside part7. Create 2D and 3D images 8. Check the OUTPUT & fix BUGs
Note: Remember to save the project during the process of drawing
NOW WE WILL DO A SAMPLE WORK
PLEASE FOLLOW THE INSTRUCTION CAREFULLY
WATCH : http://youtu.be/GHtpsvVdS7g
(this is guide to draw a Finnish house, so this is Finnish source)

1A: UPLOAD SOURCE1. Go to EDIT MODE2. Click the FLOORPLAN EDIT MODE
FLOORPLAN
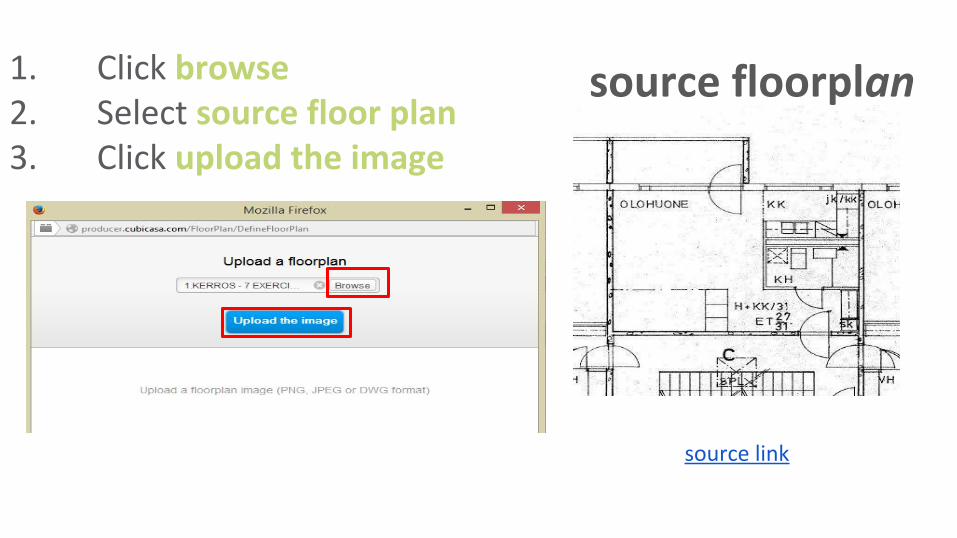
source floorplan
source link
1. Click browse 2. Select source floor plan3. Click upload the image
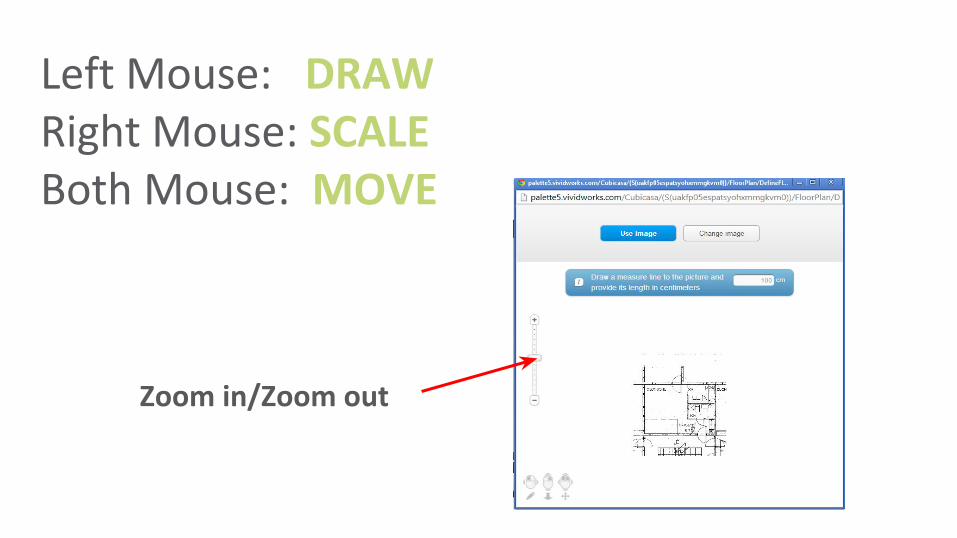
Zoom in/Zoom out
Left Mouse: DRAWRight Mouse: SCALEBoth Mouse: MOVE
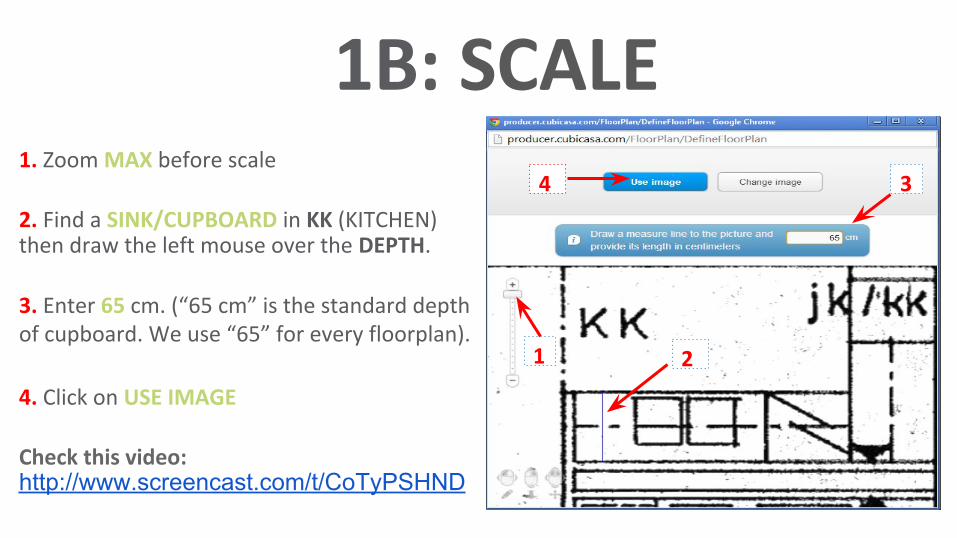
1. Zoom MAX before scale
2. Find a SINK/CUPBOARD in KK (KITCHEN) then draw the left mouse over the DEPTH.
3. Enter 65 cm. (“65 cm” is the standard depth of cupboard. We use “65” for every floorplan).
4. Click on USE IMAGE
Check this video:http://www.screencast.com/t/CoTyPSHND
1B: SCALE
1 2
34

NOTES• Click SAVE AS to save your work.• Create a folder with your FULL NAME, store all your works there
• Always save your works in CAPITAL LETTERS
E.g: “EXAMPLE”, NOT “example”
• NO space in the name, replace space by “_”
E.g: “EXAMPLE_1”, NOT “EXAMPLE 1”, NOT “EXAMPLE1”
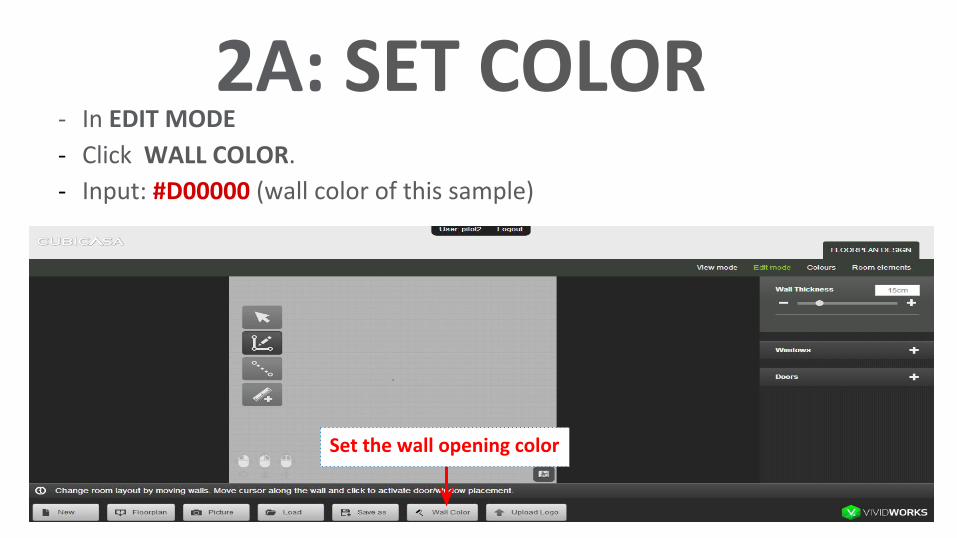
2A: SET COLOR - In EDIT MODE
- Click WALL COLOR.
- Input: #D00000 (wall color of this sample)
Set the wall opening color
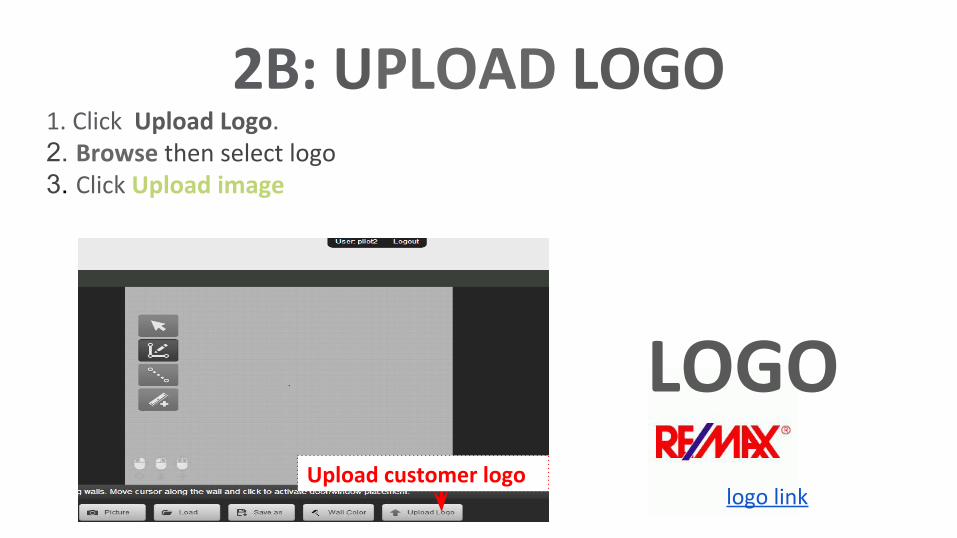
Upload customer logo
2B: UPLOAD LOGO1. Click Upload Logo. 2. Browse then select logo 3. Click Upload image
LOGO
logo link
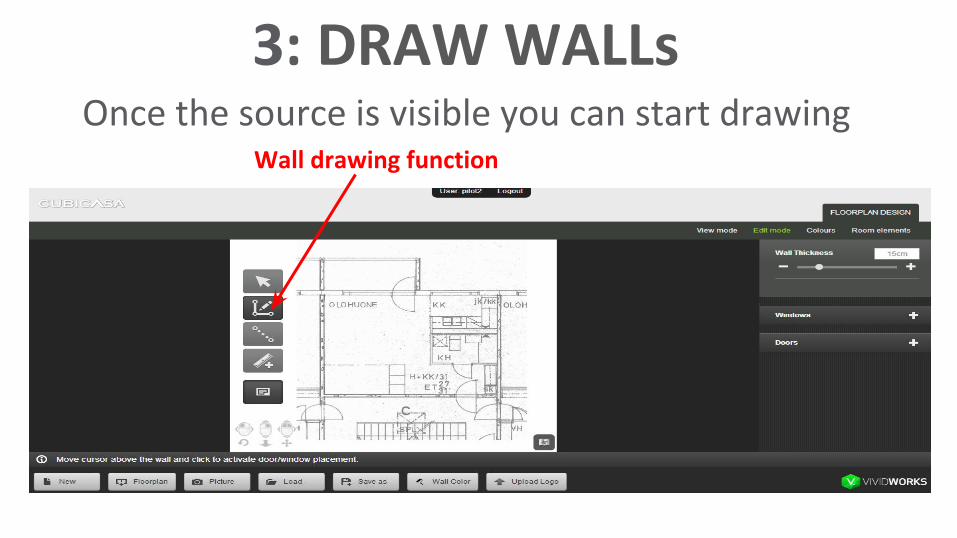
3: DRAW WALLsOnce the source is visible you can start drawing
Wall drawing function
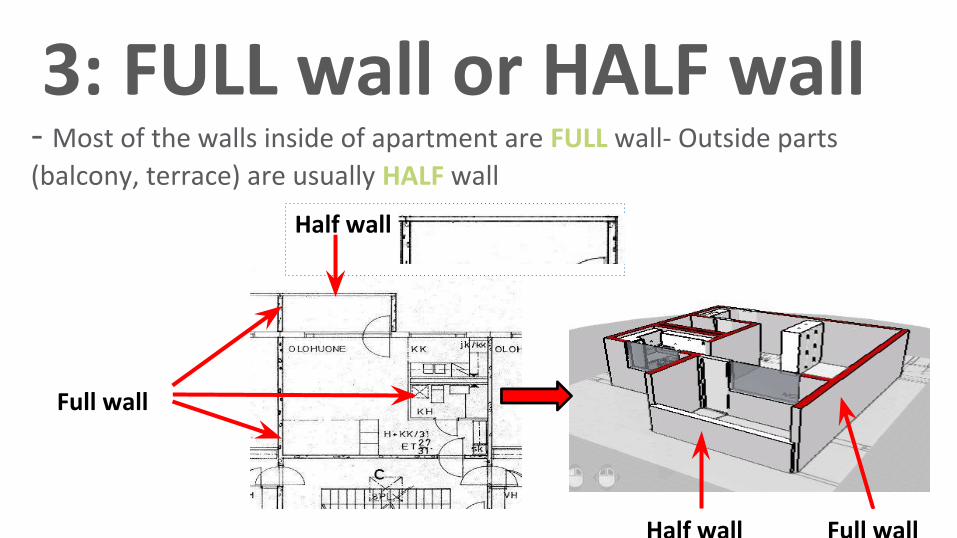
3: FULL wall or HALF wall
Full wallHalf wall
Full wall
Half wall
- Most of the walls inside of apartment are FULL wall- Outside parts (balcony, terrace) are usually HALF wall

MATERIAL
- Textbook for Finnish floorplan: link
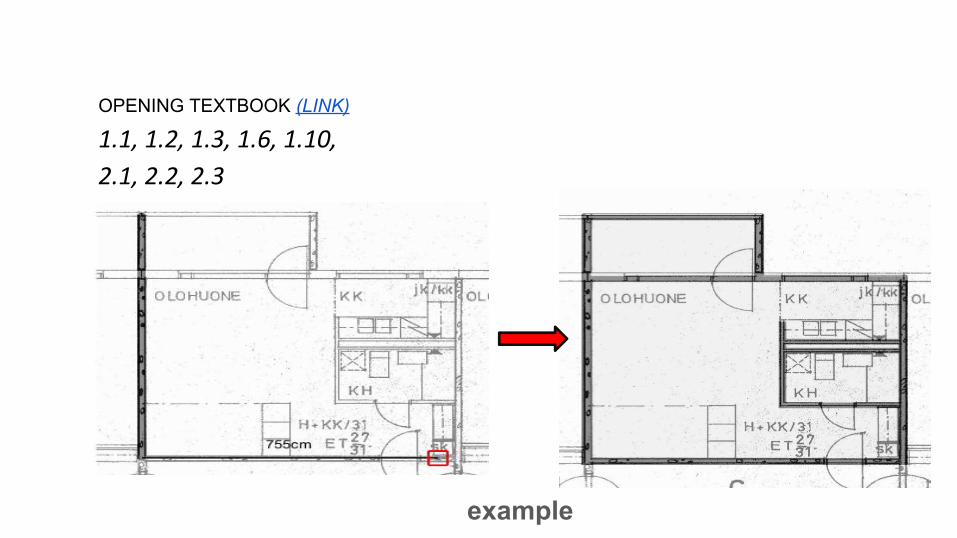
OPENING TEXTBOOK (LINK)
1.1, 1.2, 1.3, 1.6, 1.10,
2.1, 2.2, 2.3
example
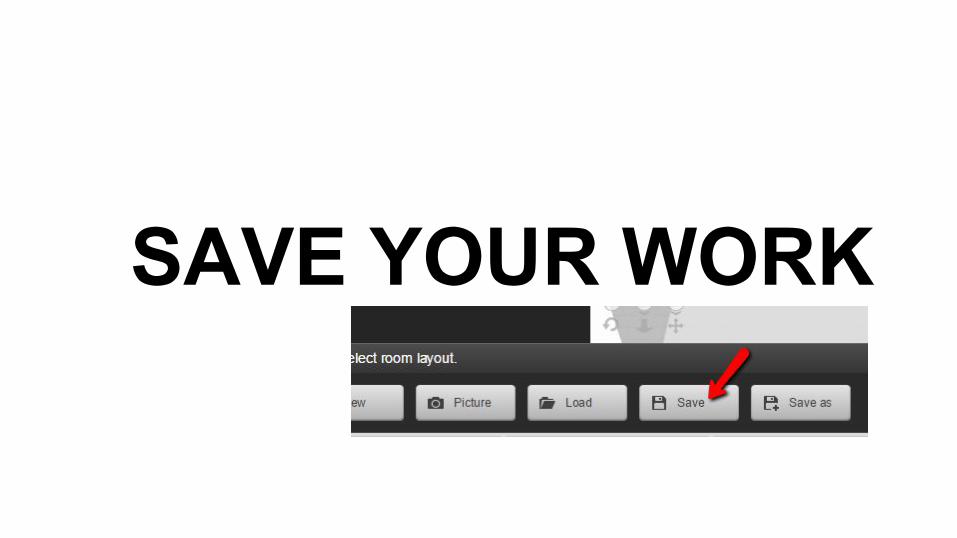
SAVE YOUR WORK
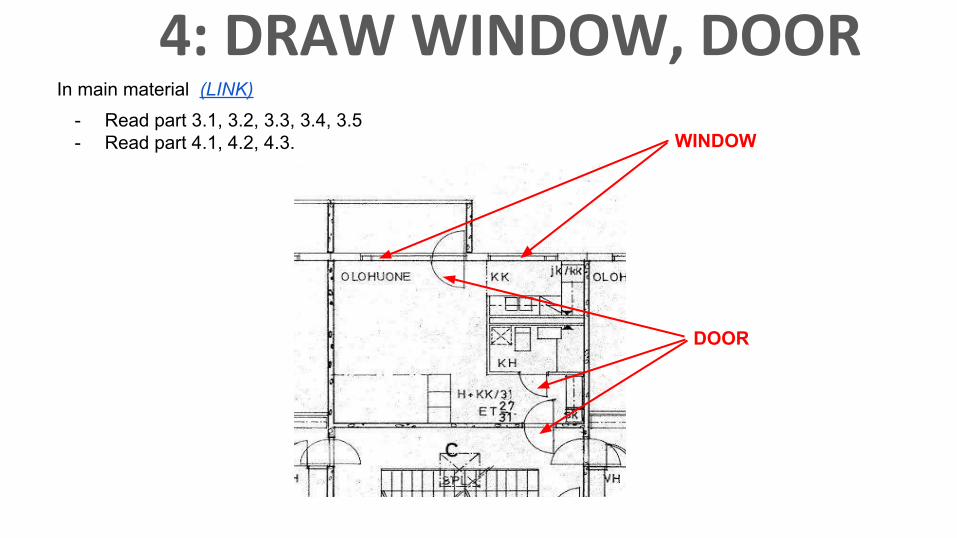
4: DRAW WINDOW, DOORIn main material (LINK)
- Read part 3.1, 3.2, 3.3, 3.4, 3.5- Read part 4.1, 4.2, 4.3. WINDOW
DOOR
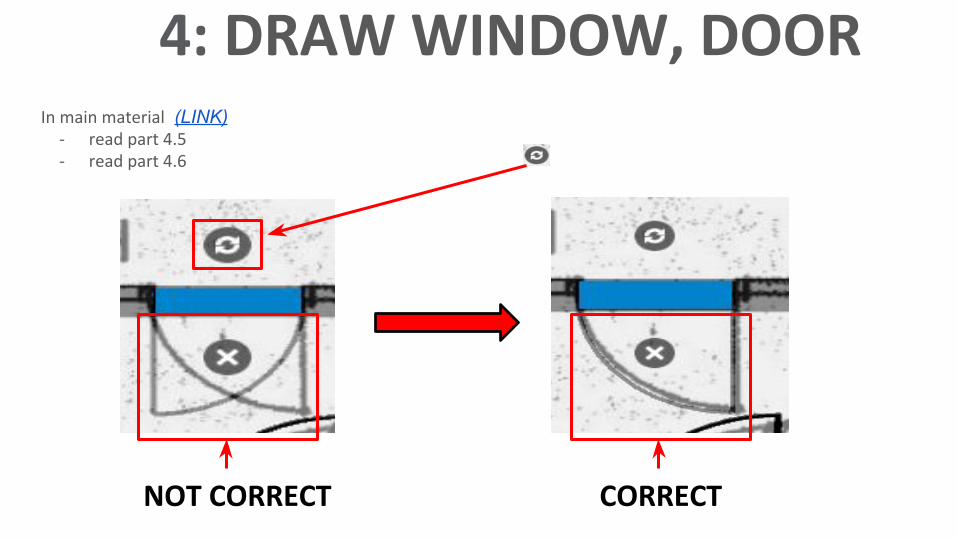
In main material (LINK)- read part 4.5- read part 4.6
NOT CORRECT CORRECT
4: DRAW WINDOW, DOOR

SAVE YOUR WORK
In main material (LINK)
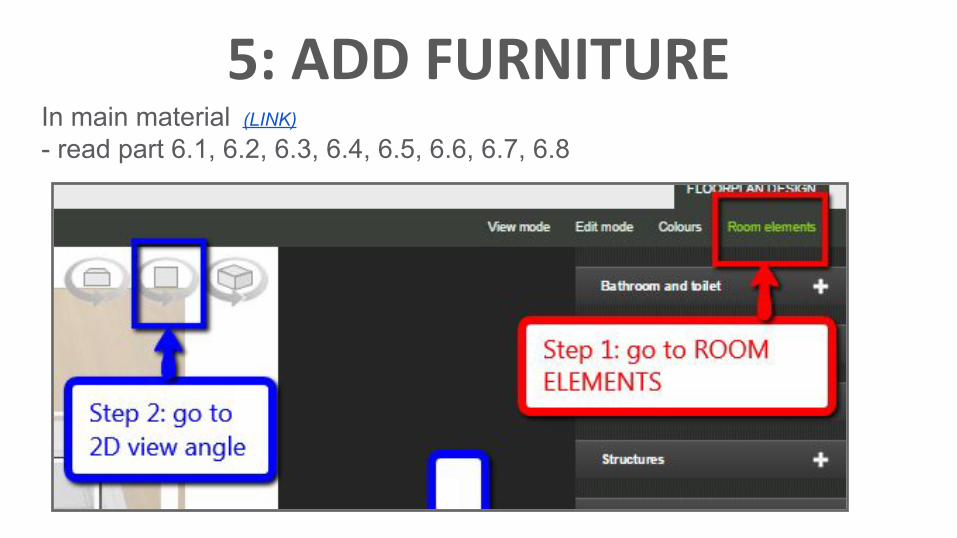
- read part 6.1, 6.2, 6.3, 6.4, 6.5, 6.6, 6.7, 6.8
5: ADD FURNITURE

SAVE YOUR WORK
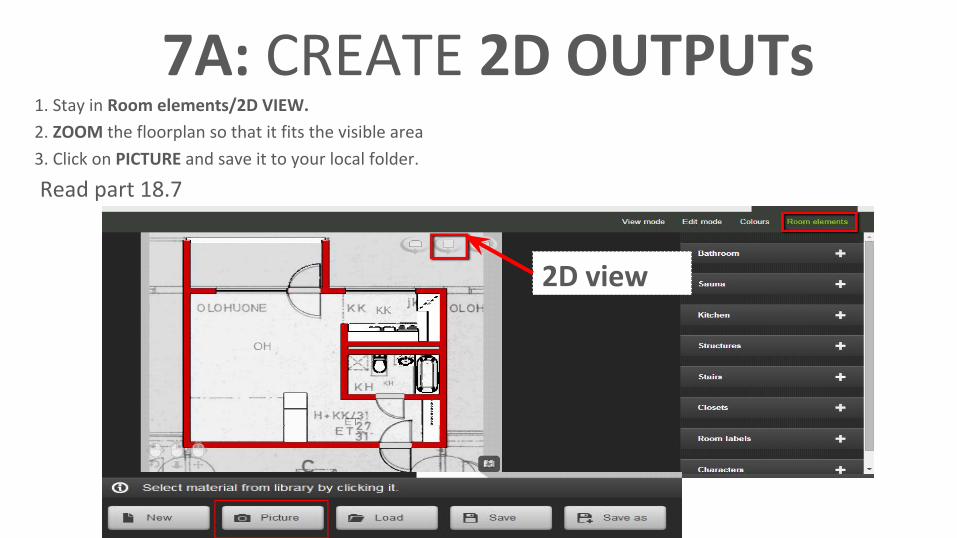
7A: CREATE 2D OUTPUTs1. Stay in Room elements/2D VIEW.
2. ZOOM the floorplan so that it fits the visible area
3. Click on PICTURE and save it to your local folder.
Read part 18.7
2D view

7- ZOOM TO MAXIMUM
TOO SMALL, NO GOOD TOO BIG, Then some part of model is missing.
GOOD!
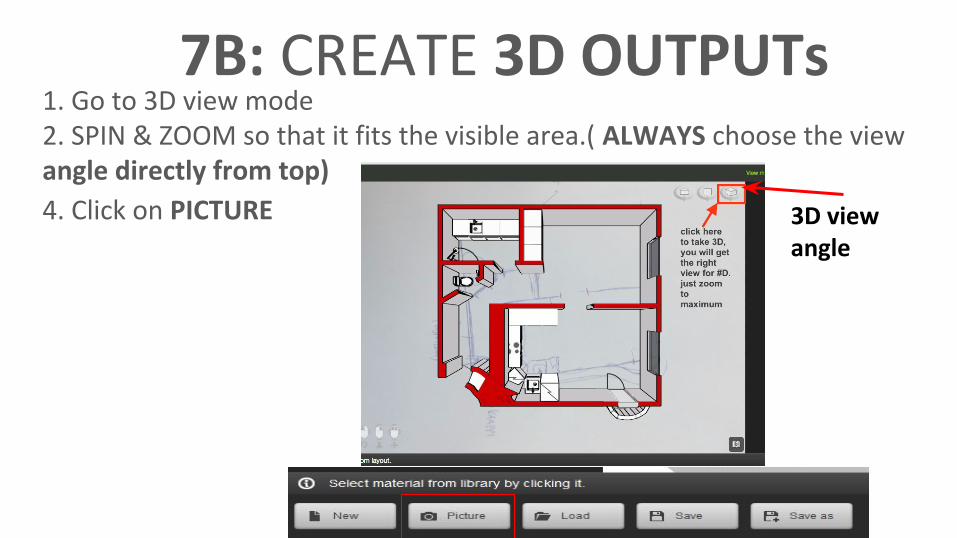
7B: CREATE 3D OUTPUTs1. Go to 3D view mode2. SPIN & ZOOM so that it fits the visible area.( ALWAYS choose the view angle directly from top)
4. Click on PICTURE
3D view angle
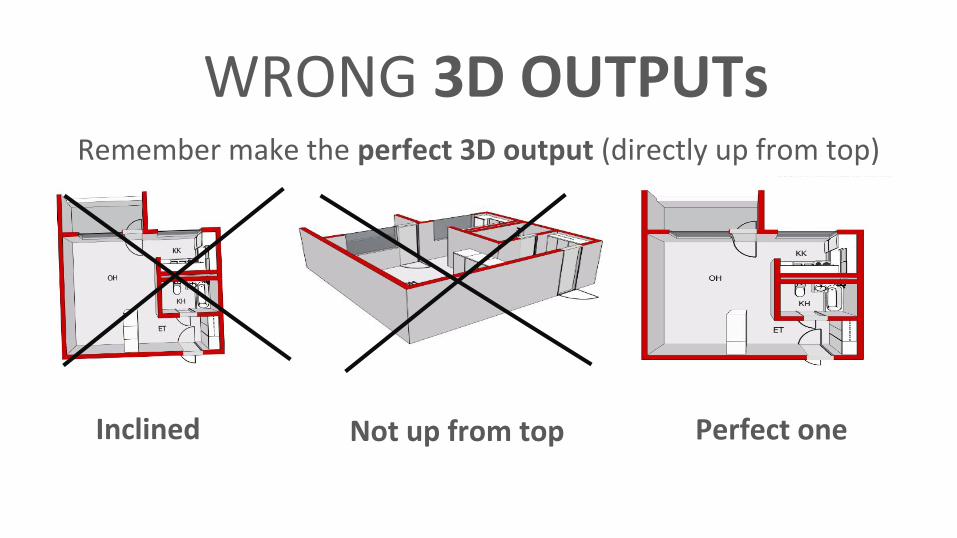
WRONG 3D OUTPUTsRemember make the perfect 3D output (directly up from top)
Inclined Not up from top Perfect one
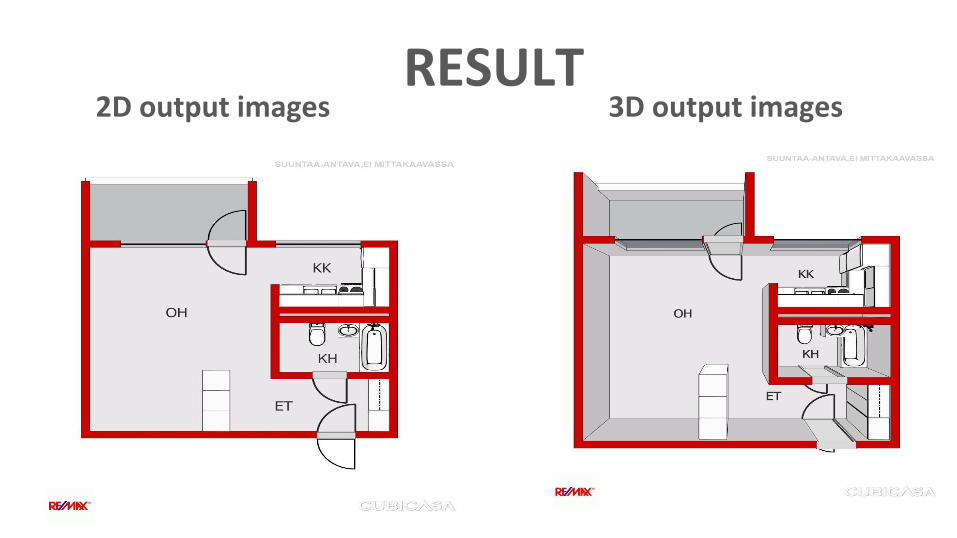
2D output images 3D output imagesRESULT

PRE-PROCESSING
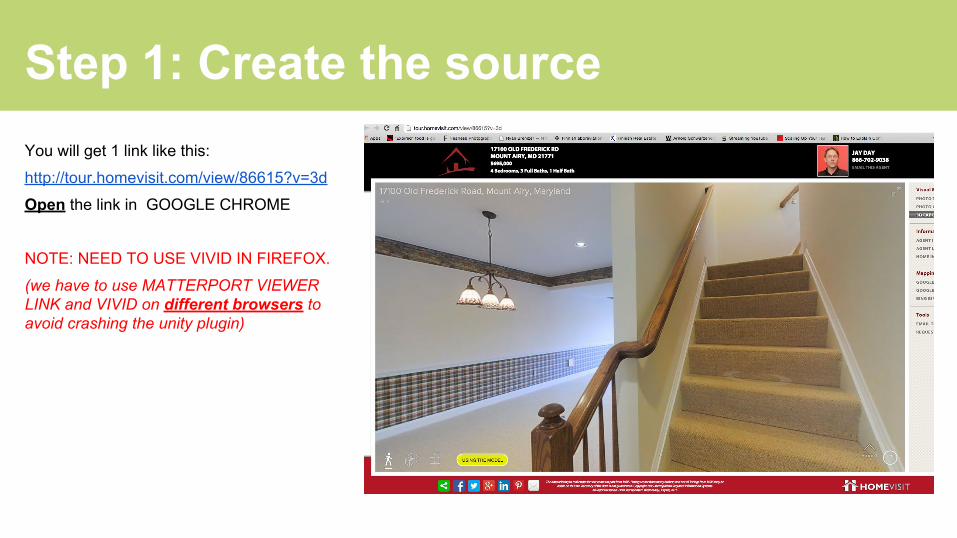
Step 1: Create the sourceYou will get 1 link like this:
http://tour.homevisit.com/view/86615?v=3d
Open the link in GOOGLE CHROME
NOTE: NEED TO USE VIVID IN FIREFOX.
(we have to use MATTERPORT VIEWER LINK and VIVID on different browsers to avoid crashing the unity plugin)
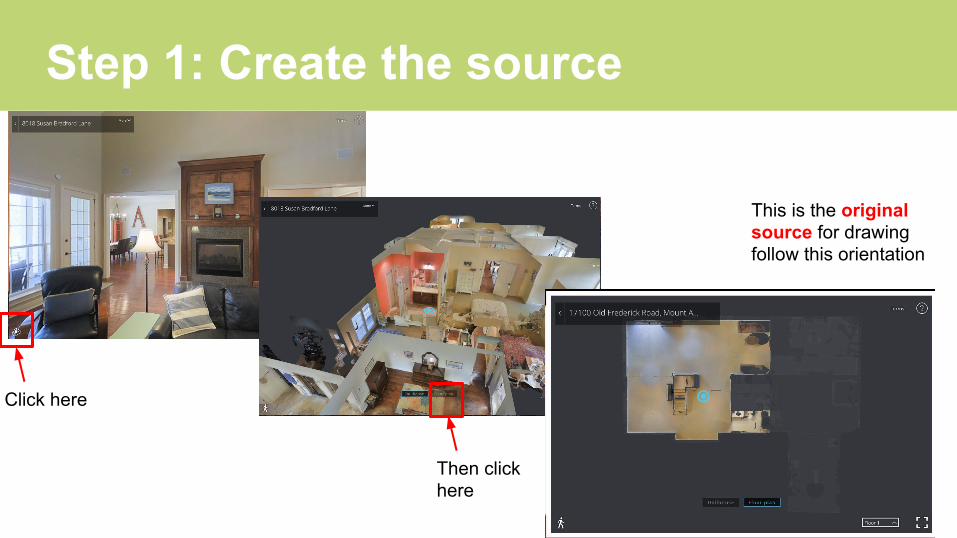
Step 1: Create the source
Click here
This is the original source for drawingfollow this orientation
Then click here
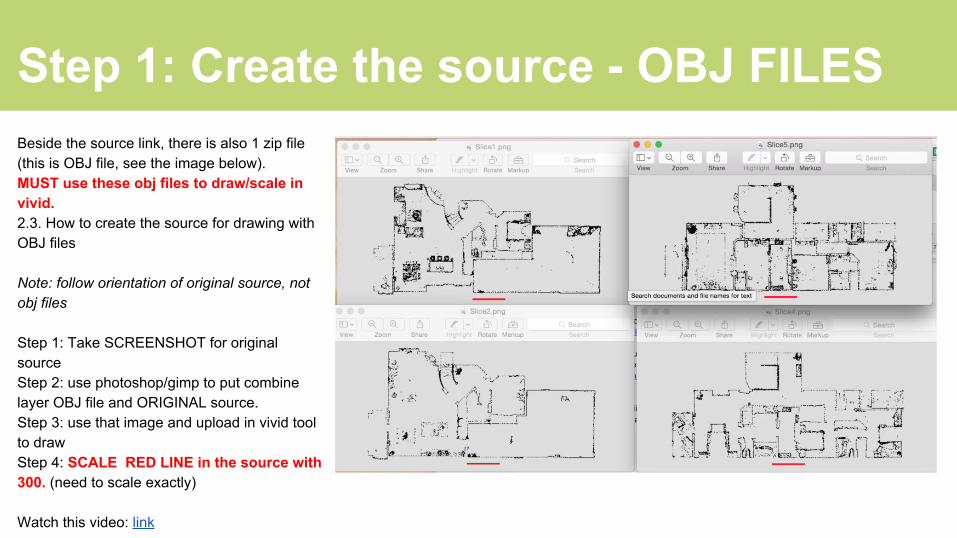
Step 1: Create the source - OBJ FILESBeside the source link, there is also 1 zip file (this is OBJ file, see the image below). MUST use these obj files to draw/scale in vivid.2.3. How to create the source for drawing with OBJ files
Note: follow orientation of original source, not obj files
Step 1: Take SCREENSHOT for original source Step 2: use photoshop/gimp to put combine layer OBJ file and ORIGINAL source.Step 3: use that image and upload in vivid tool to drawStep 4: SCALE RED LINE in the source with 300. (need to scale exactly)
Watch this video: link
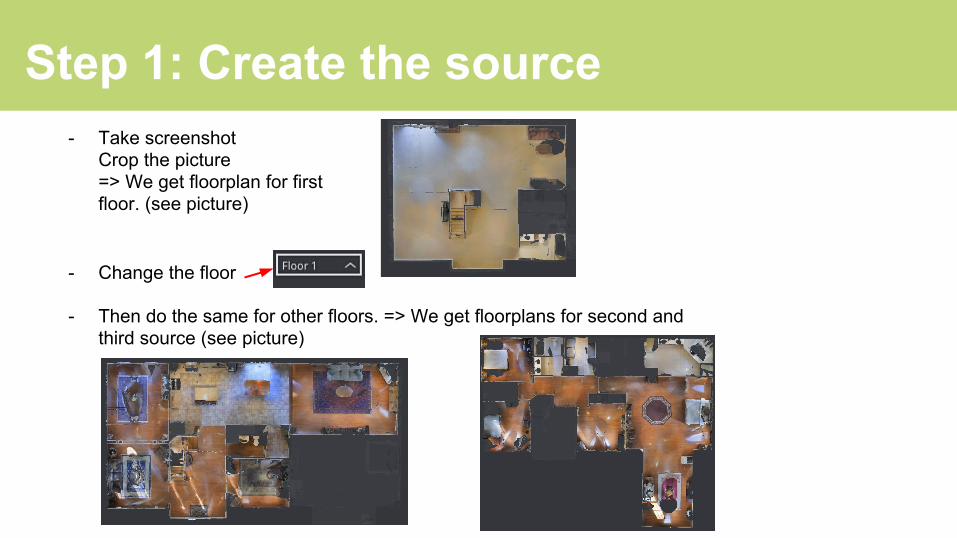
Step 1: Create the source- Take screenshot
Crop the picture => We get floorplan for first floor. (see picture)
- Then do the same for other floors. => We get floorplans for second and third source (see picture)
- Change the floor
Step 1: Create the sourceImportant note:
Keep the direction from the source link (Not OBJ file). All the floor have the same direction.
EACH floor is drawn in 1 MODEL (e.g: 3 vivid IDs for 3 floors)
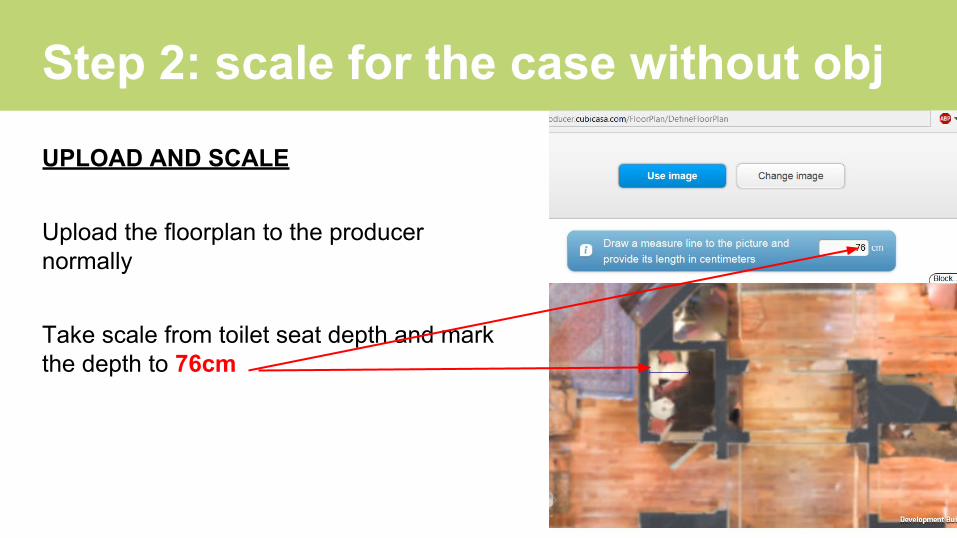
Step 2: scale for the case without obj
UPLOAD AND SCALE
Upload the floorplan to the producer normally
Take scale from toilet seat depth and mark the depth to 76cm

Finish drawing wall/window/door/furniture for 1 floor first, then continue with another floor
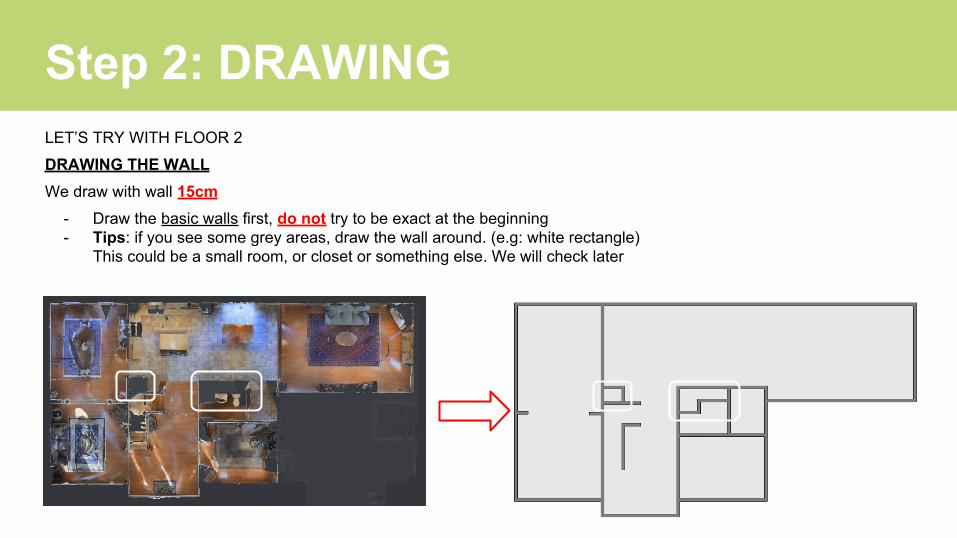
Step 2: DRAWINGLET’S TRY WITH FLOOR 2
DRAWING THE WALLWe draw with wall 15cm
- Draw the basic walls first, do not try to be exact at the beginning- Tips: if you see some grey areas, draw the wall around. (e.g: white rectangle)
This could be a small room, or closet or something else. We will check later
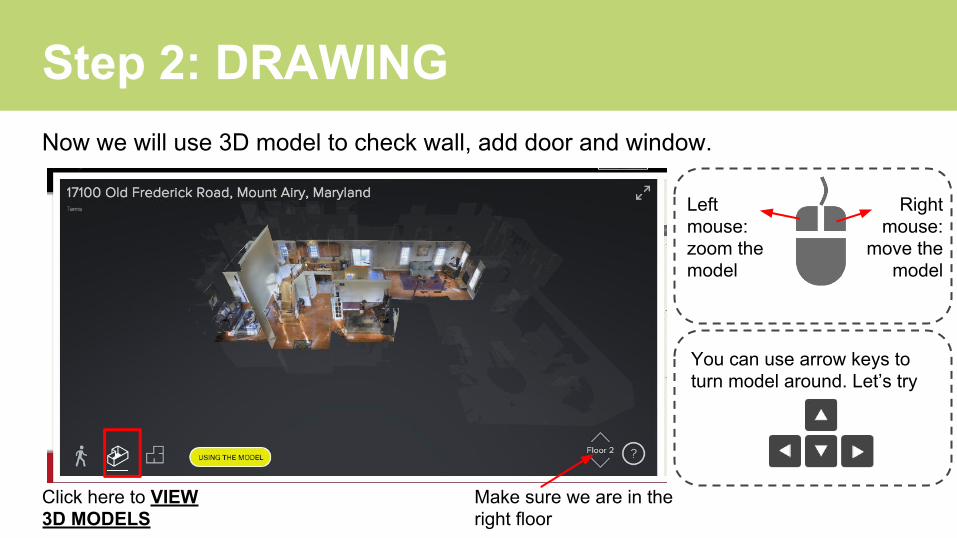
Step 2: DRAWINGNow we will use 3D model to check wall, add door and window.
Click here to VIEW 3D MODELS
Make sure we are in the right floor
Left mouse: zoom the model
Right mouse:
move the model
You can use arrow keys to turn model around. Let’s try
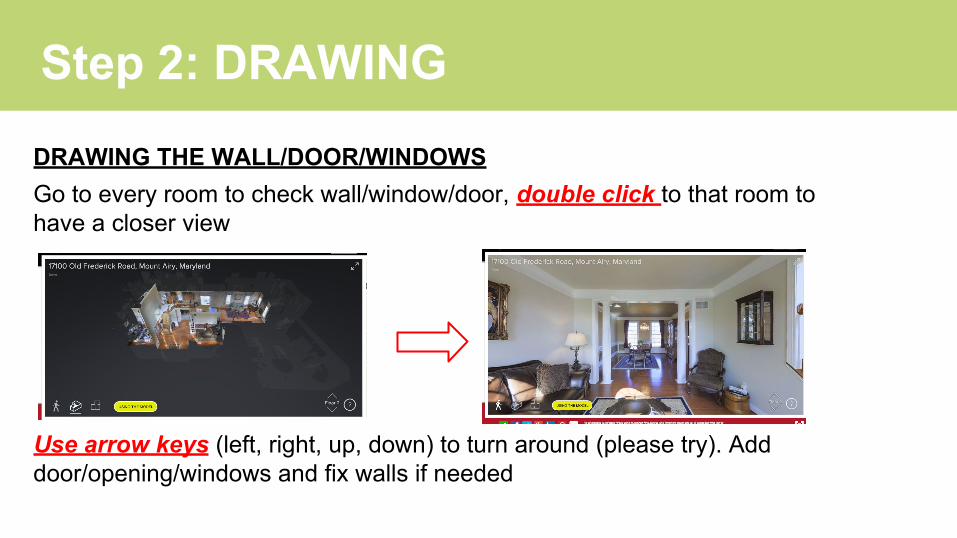
Step 2: DRAWING
DRAWING THE WALL/DOOR/WINDOWSGo to every room to check wall/window/door, double click to that room to have a closer view
Use arrow keys (left, right, up, down) to turn around (please try). Add door/opening/windows and fix walls if needed
FurnitureCheck the showcase link for each room
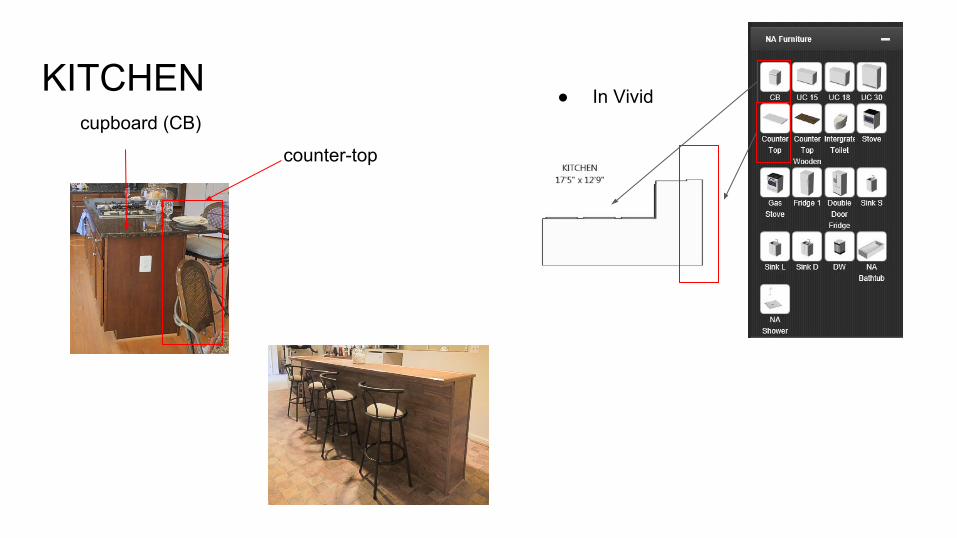
KITCHEN
counter-top
cupboard (CB)● In Vivid

you will see this many times in NA kitchen, this are oven and cupboard above. But we dont have this furniture in Vivid, so we use closet for this
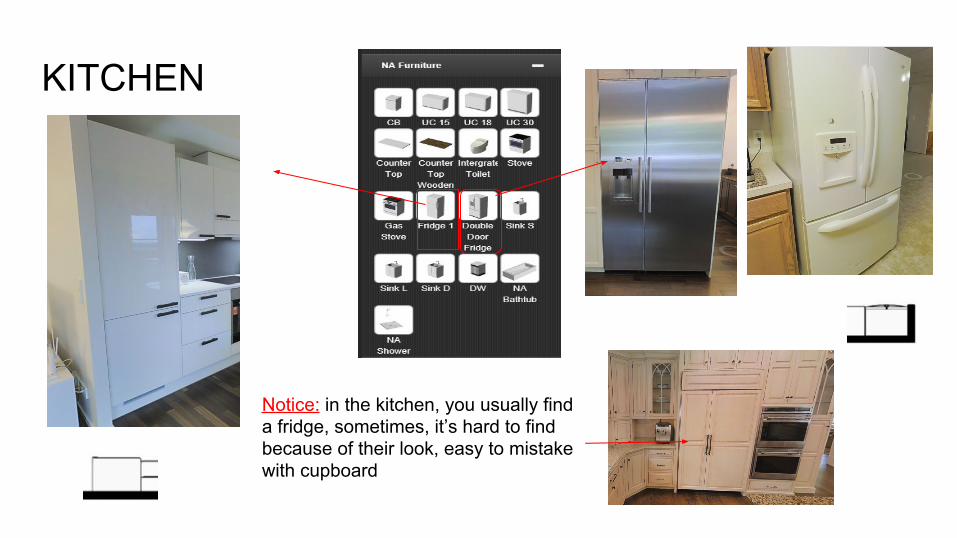
KITCHEN
Notice: in the kitchen, you usually find a fridge, sometimes, it’s hard to find because of their look, easy to mistake with cupboard
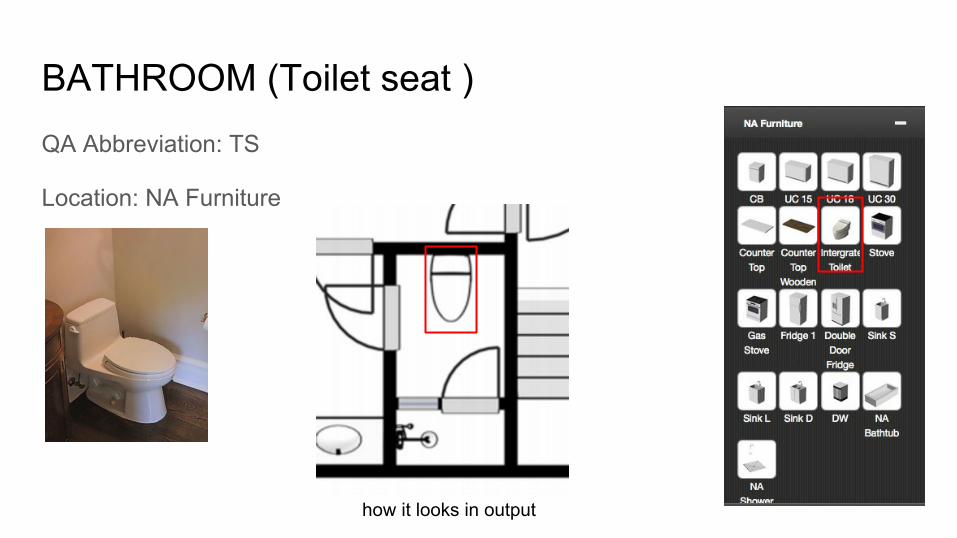
BATHROOM (Toilet seat )QA Abbreviation: TS
Location: NA Furniture
how it looks in output
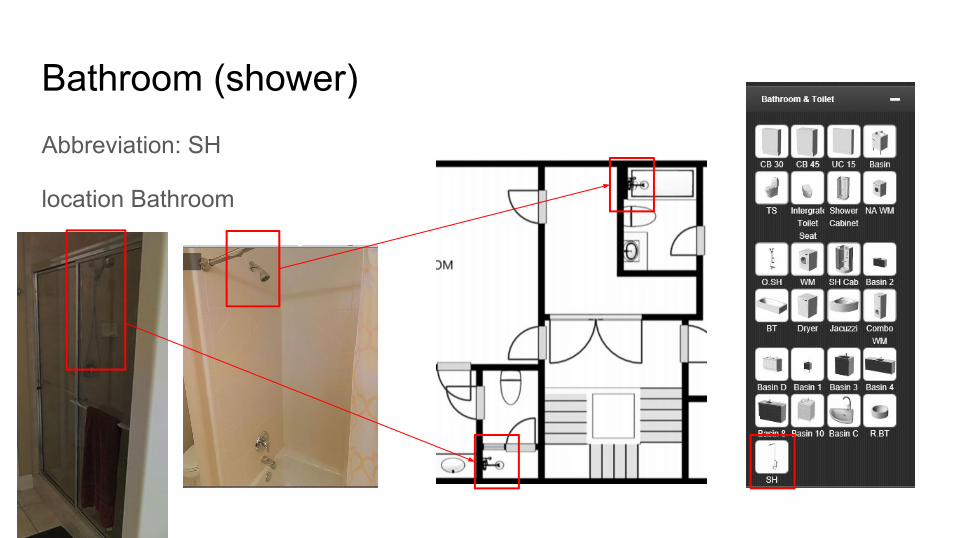
Bathroom (shower)
Abbreviation: SH
location Bathroom
Location:
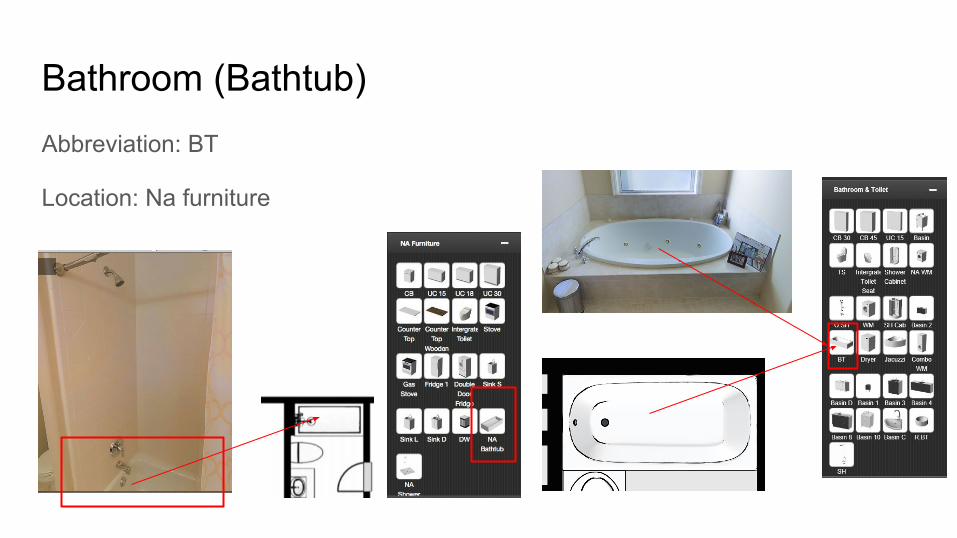
Bathroom (Bathtub)Abbreviation: BT
Location: Na furniture
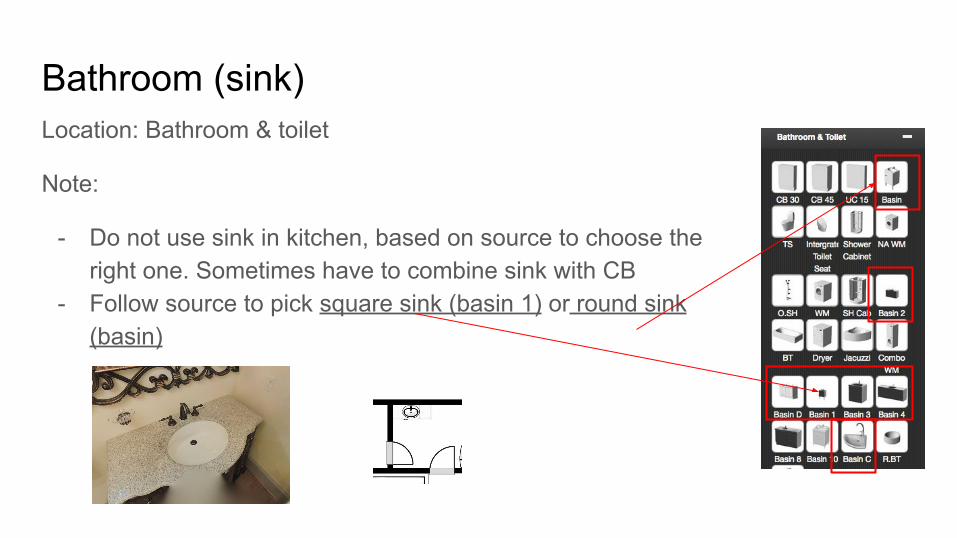
Bathroom (sink)Location: Bathroom & toilet
Note:
- Do not use sink in kitchen, based on source to choose the right one. Sometimes have to combine sink with CB
- Follow source to pick square sink (basin 1) or round sink (basin)
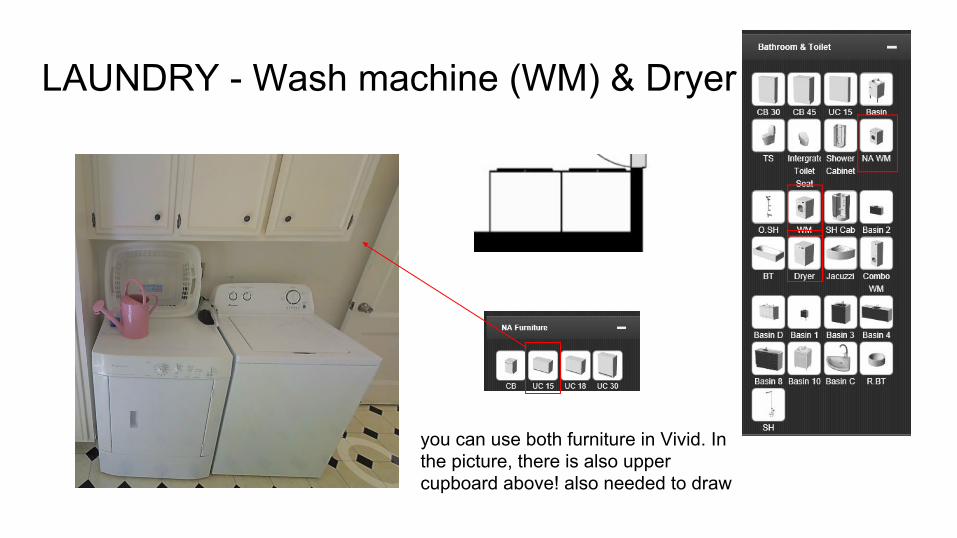
LAUNDRY - Wash machine (WM) & Dryer
you can use both furniture in Vivid. In the picture, there is also upper cupboard above! also needed to draw
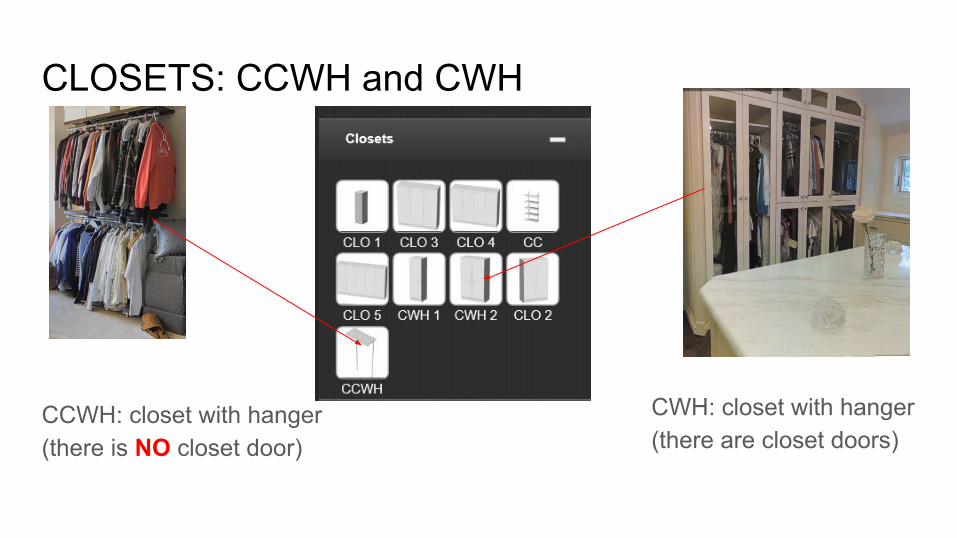
CLOSETS: CCWH and CWH
CCWH: closet with hanger (there is NO closet door)
CWH: closet with hanger (there are closet doors)

Fireplace in dining, living room, family roomAbbreviation: FP
Location: Structure
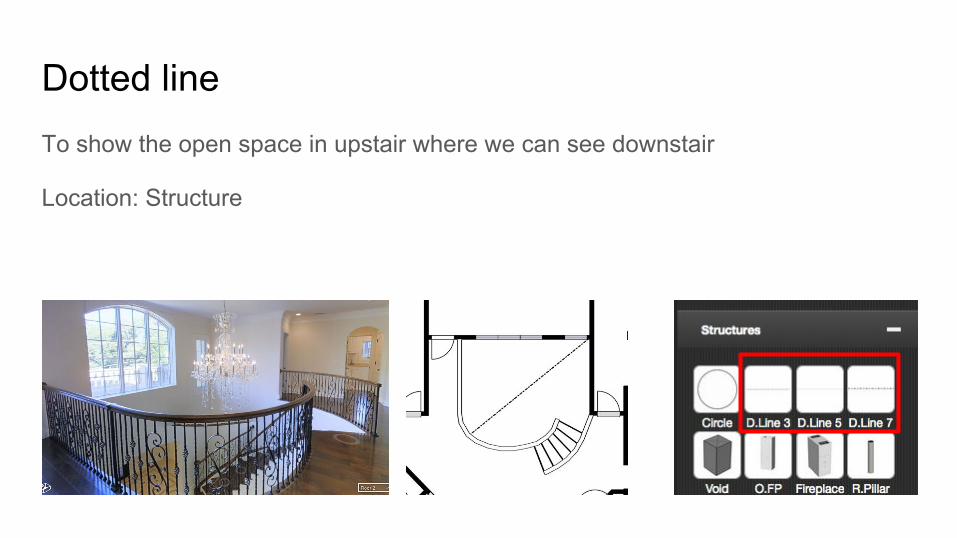
Dotted lineTo show the open space in upstair where we can see downstair
Location: Structure
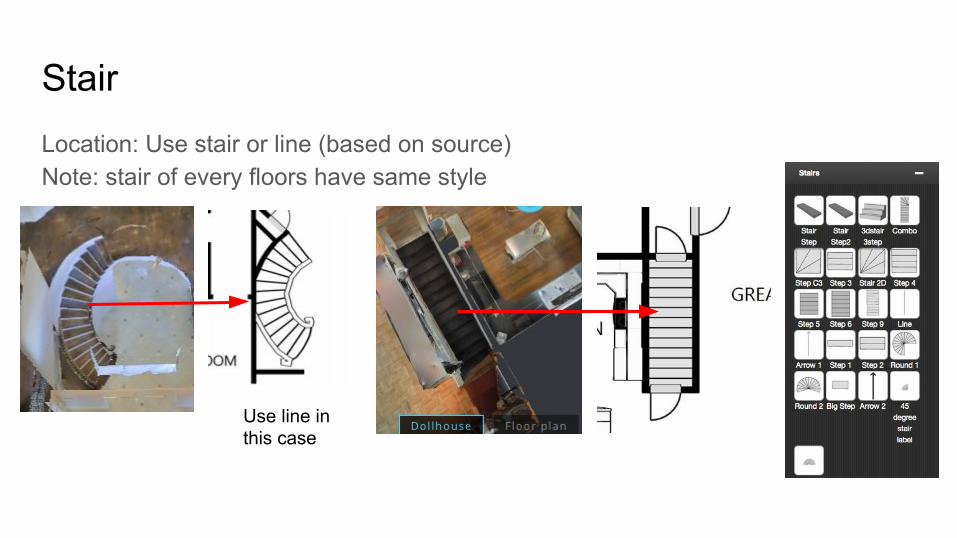
StairLocation: Use stair or line (based on source)Note: stair of every floors have same style
Use line in this case
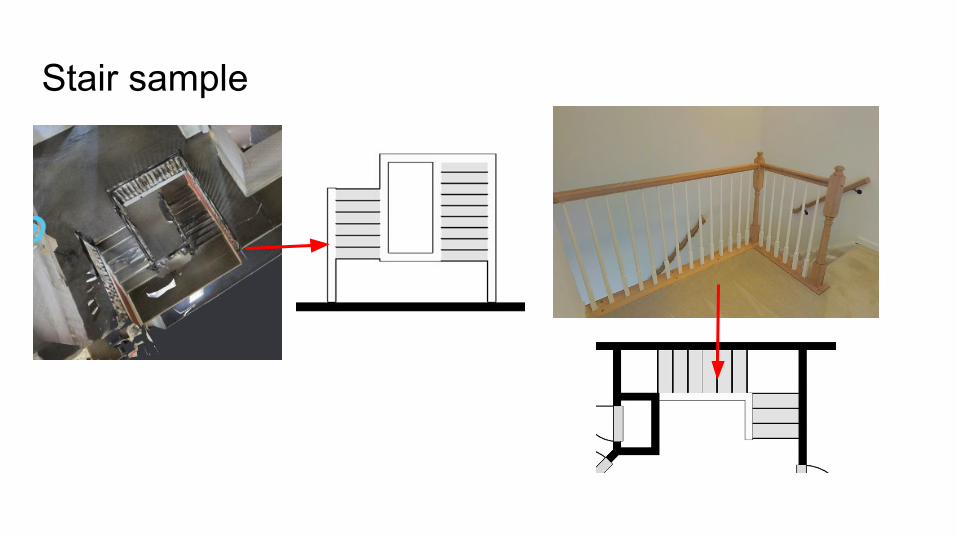
Stair sample
POST PROCESSINGWe use Gimp for doing post processin (add roomlabels, dimension)

HOW TO USE GIMPFOR DOING PO.P (POST PROCESSING)
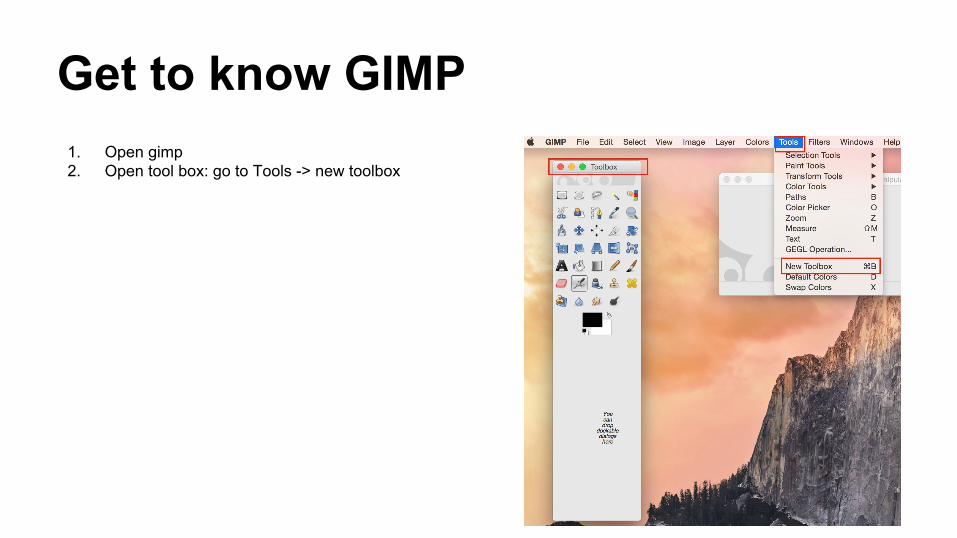
Get to know GIMP1. Open gimp2. Open tool box: go to Tools -> new toolbox
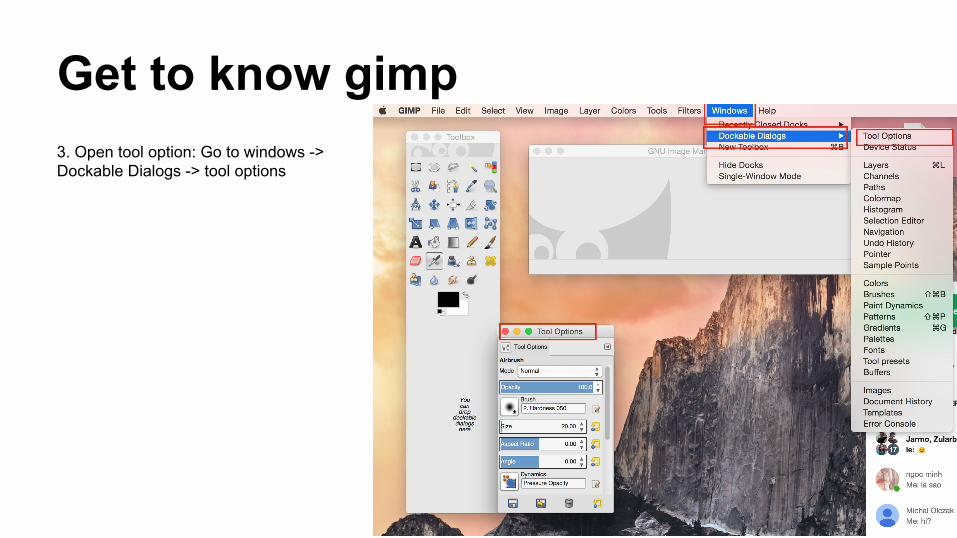
Get to know gimp3. Open tool option: Go to windows -> Dockable Dialogs -> tool options
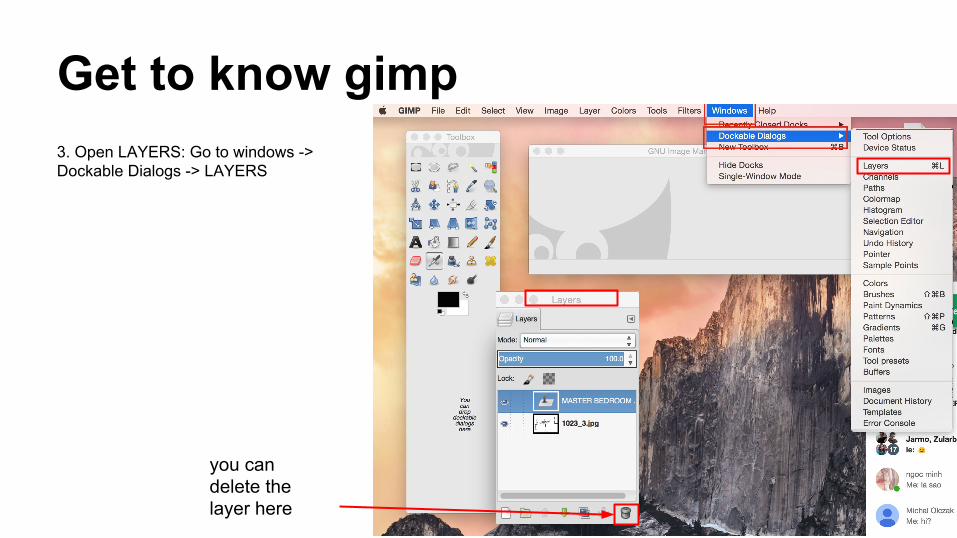
Get to know gimp3. Open LAYERS: Go to windows -> Dockable Dialogs -> LAYERS
you can delete the layer here
Get to know gimp
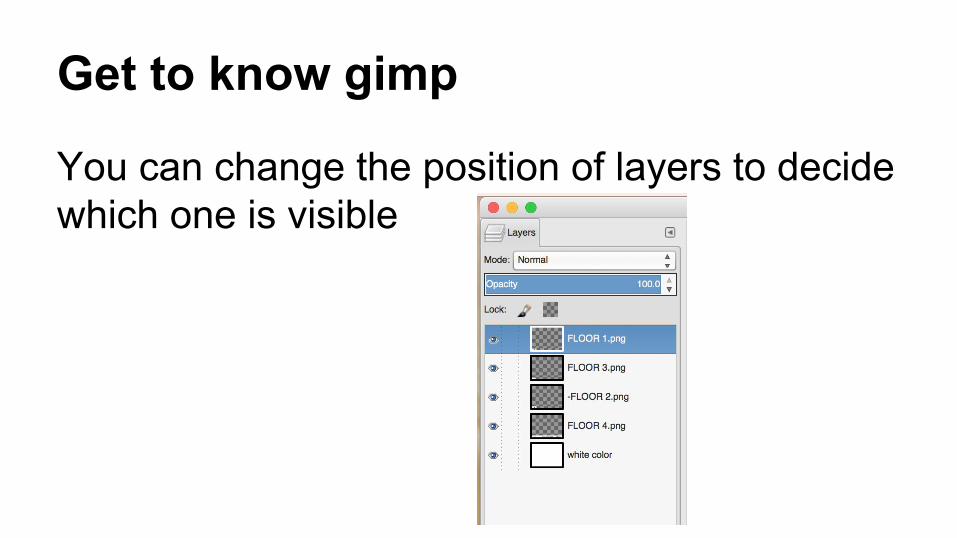
You can change the position of layers to decide which one is visible
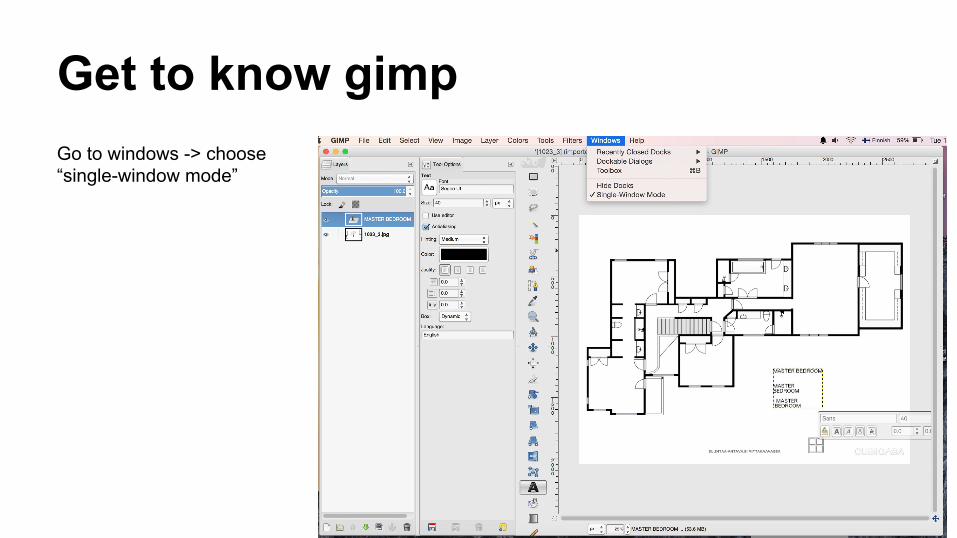
Get to know gimpGo to windows -> choose “single-window mode”
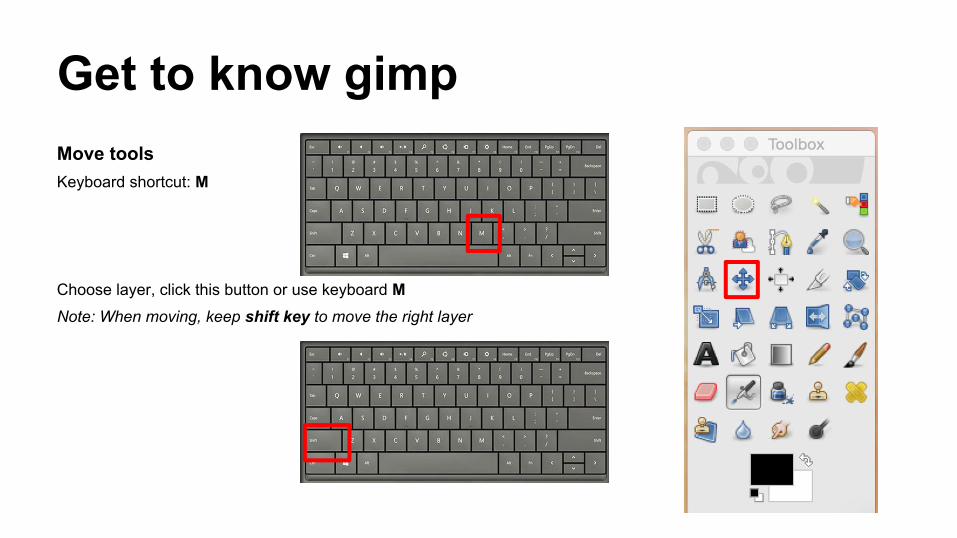
Get to know gimpMove toolsKeyboard shortcut: M
Choose layer, click this button or use keyboard MNote: When moving, keep shift key to move the right layer
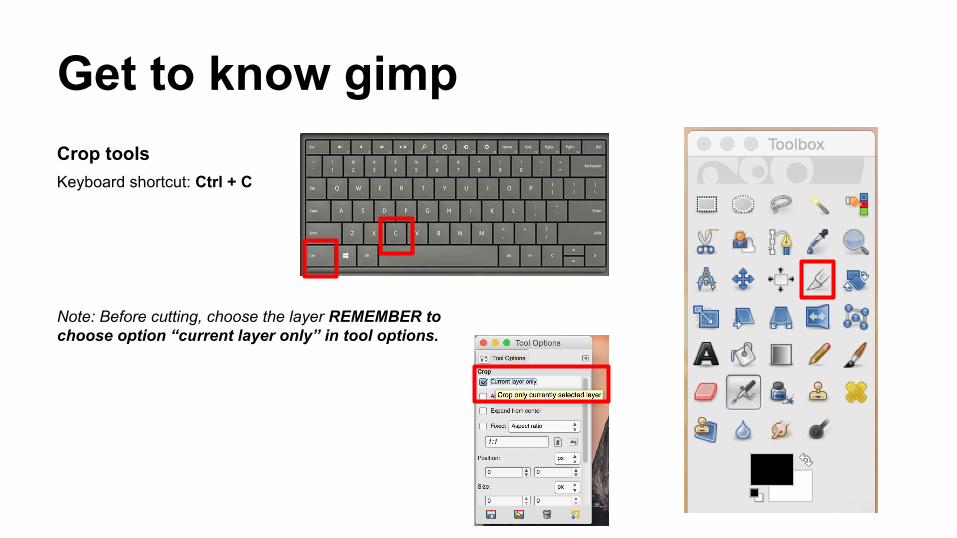
Get to know gimpCrop toolsKeyboard shortcut: Ctrl + C
Note: Before cutting, choose the layer REMEMBER to choose option “current layer only” in tool options.
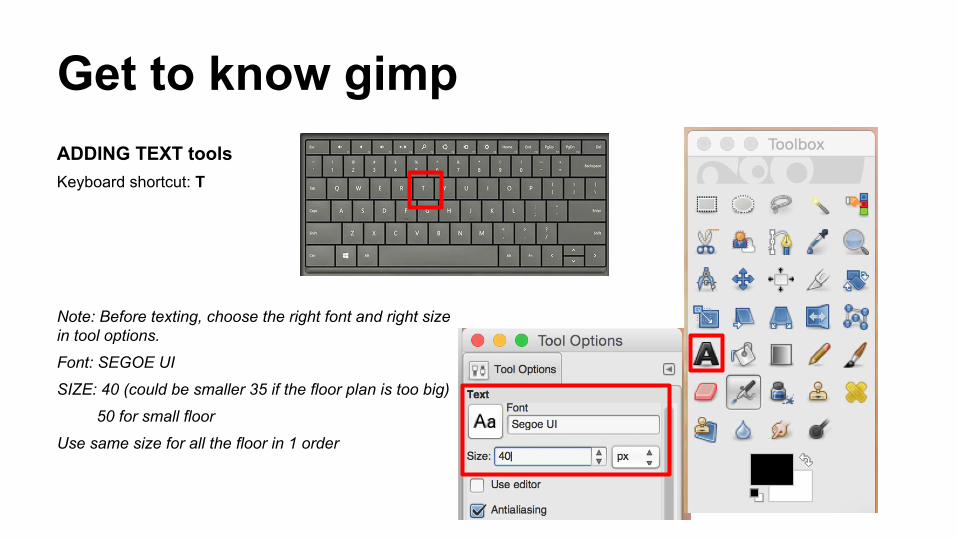
Get to know gimpADDING TEXT toolsKeyboard shortcut: T
Note: Before texting, choose the right font and right size in tool options.
Font: SEGOE UI
SIZE: 40 (could be smaller 35 if the floor plan is too big)
50 for small floor
Use same size for all the floor in 1 order
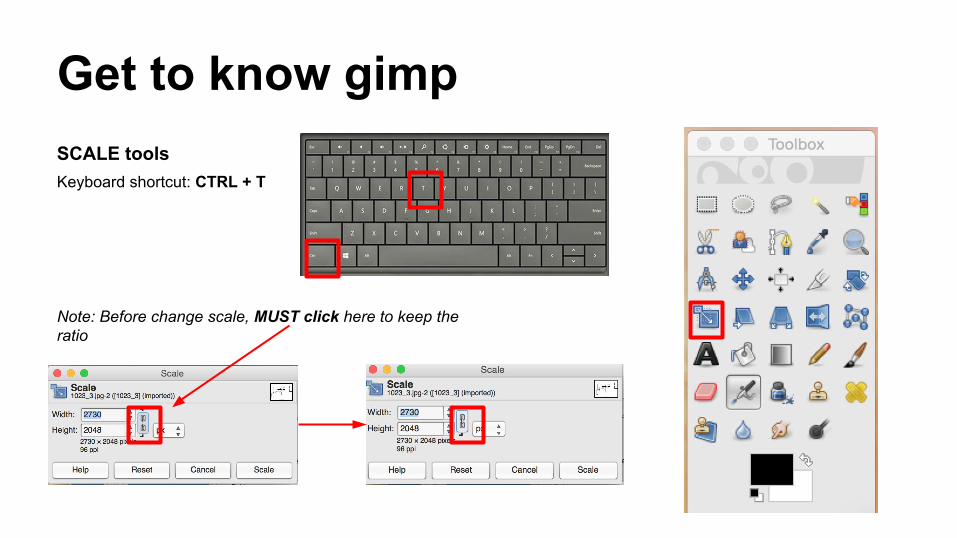
Get to know gimpSCALE toolsKeyboard shortcut: CTRL + T
Note: Before change scale, MUST click here to keep the ratio
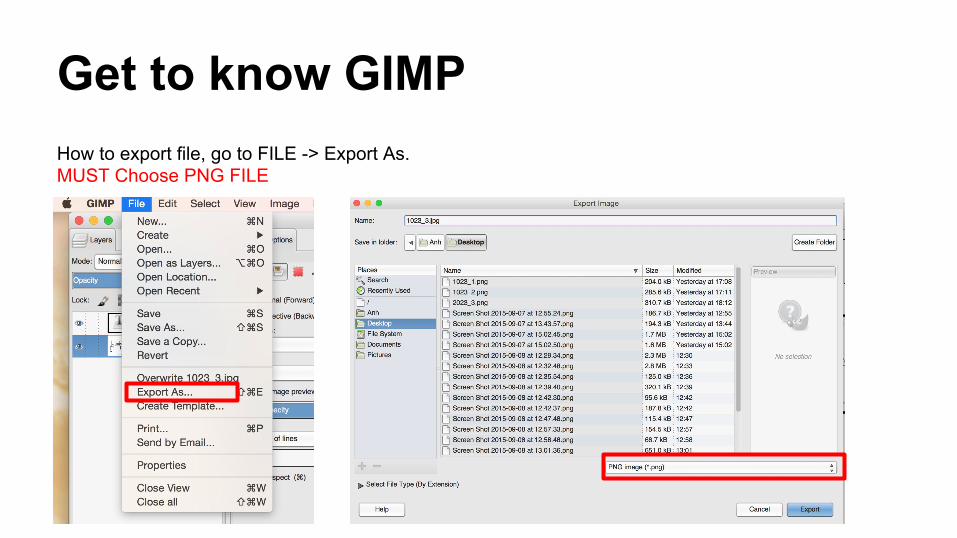
Get to know GIMPHow to export file, go to FILE -> Export As.MUST Choose PNG FILE
Dimension and Roomlabelwe use CubiCasa tool to create the layer of
dimension and roomlabel
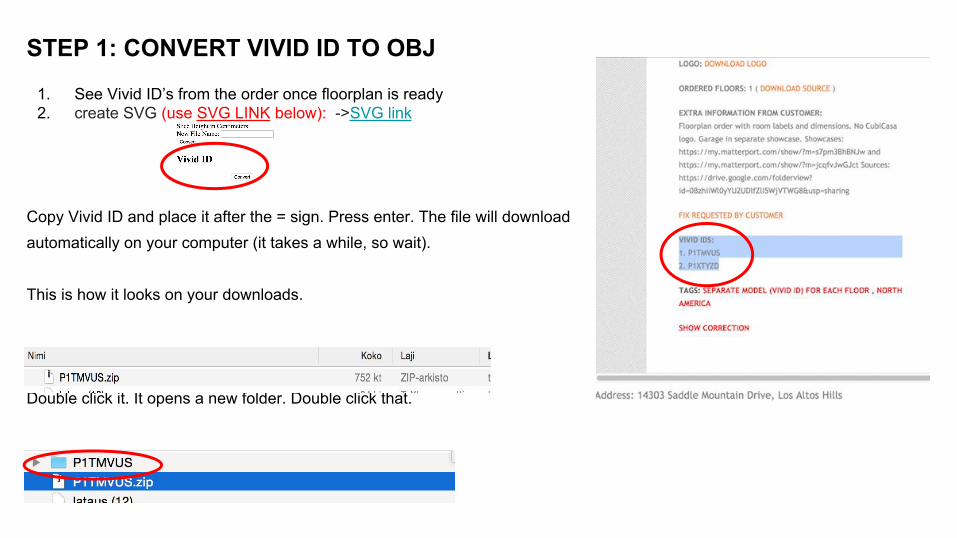
STEP 1: CONVERT VIVID ID TO OBJ
1. See Vivid ID’s from the order once floorplan is ready2. create SVG (use SVG LINK below): ->SVG link
Copy Vivid ID and place it after the = sign. Press enter. The file will download automatically on your computer (it takes a while, so wait).
This is how it looks on your downloads.
Double click it. It opens a new folder. Double click that.
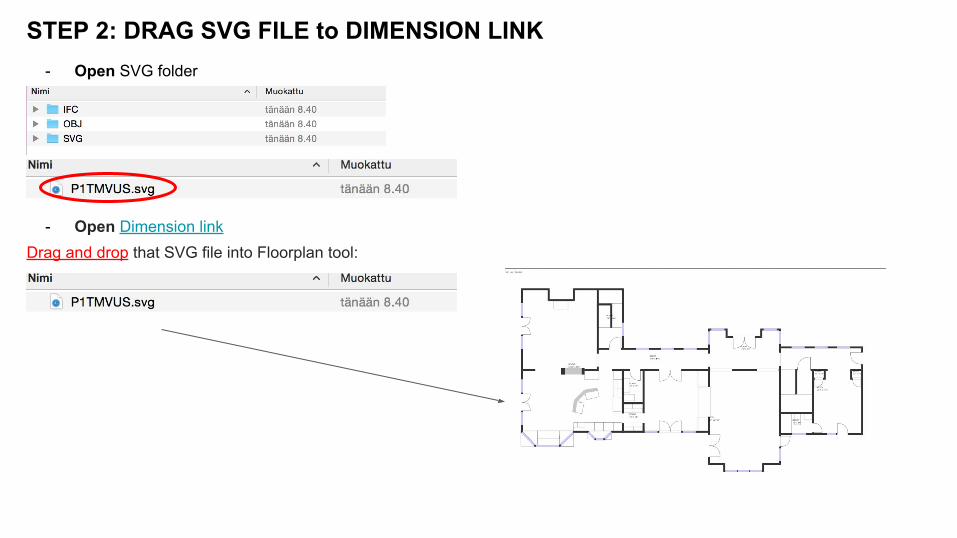
STEP 2: DRAG SVG FILE to DIMENSION LINK- Open SVG folder
- Open Dimension linkDrag and drop that SVG file into Floorplan tool:
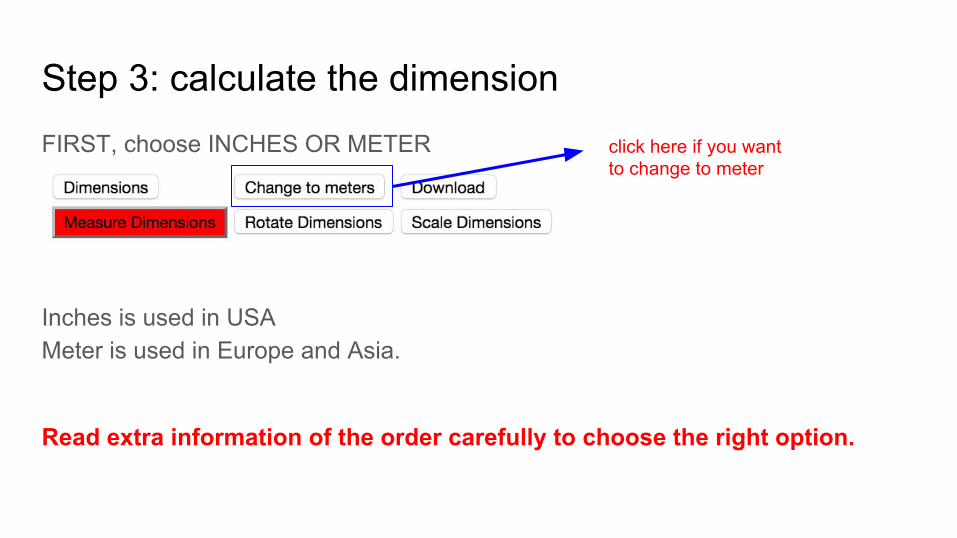
Step 3: calculate the dimensionFIRST, choose INCHES OR METER
Inches is used in USAMeter is used in Europe and Asia.
Read extra information of the order carefully to choose the right option.
click here if you want to change to meter
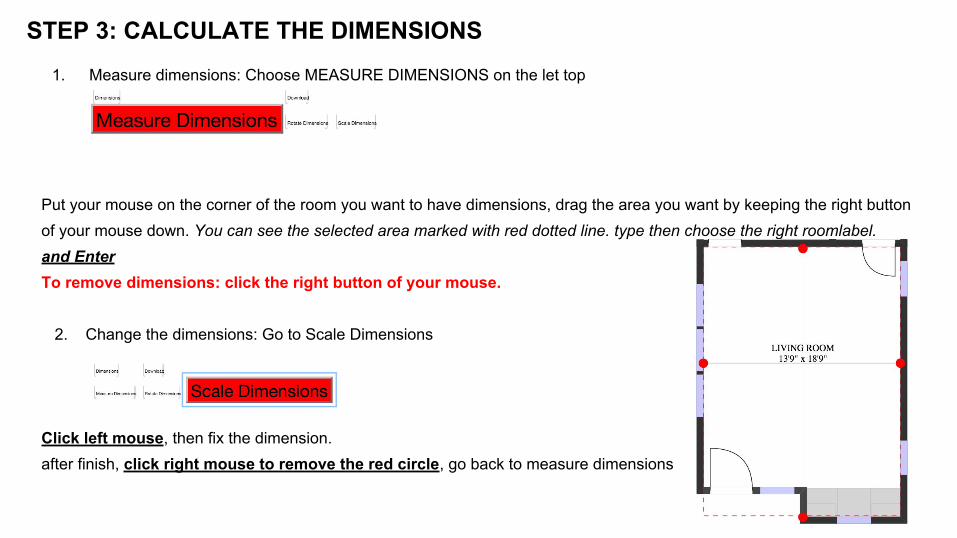
1. Measure dimensions: Choose MEASURE DIMENSIONS on the let top
Put your mouse on the corner of the room you want to have dimensions, drag the area you want by keeping the right button of your mouse down. You can see the selected area marked with red dotted line. type then choose the right roomlabel.and EnterTo remove dimensions: click the right button of your mouse.
2. Change the dimensions: Go to Scale Dimensions
Click left mouse, then fix the dimension.after finish, click right mouse to remove the red circle, go back to measure dimensions
STEP 3: CALCULATE THE DIMENSIONS

STEP 3: CALCULATE THE DIMENSIONS
3. How to rotate the dimensions. (for the inclined room). Choose ROTATE DIMENSIONS
RIGHT MOUSE: rotate the dimension CLOCKWISELEFT MOUSE: rotate the dimension COUNTER-CLOCKWISE
must-watch video: http://screencast.com/t/70nrmF3deKu

STEP 3: CALCULATE THE DIMENSIONS
4. Change the size for roomlabels and dimension if needed.The default size is 28.With big model, change it to 30,32, or 35 if labels are too small
with small model, change it to 25,22, or even 20 if labels are too crowded
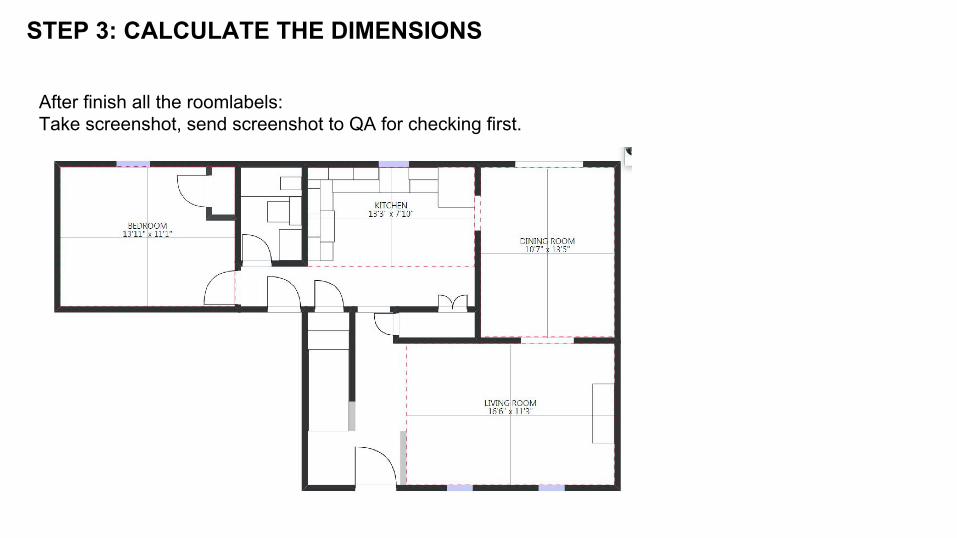
STEP 3: CALCULATE THE DIMENSIONS
After finish all the roomlabels:Take screenshot, send screenshot to QA for checking first.
STEP 3: CALCULATE THE DIMENSIONS
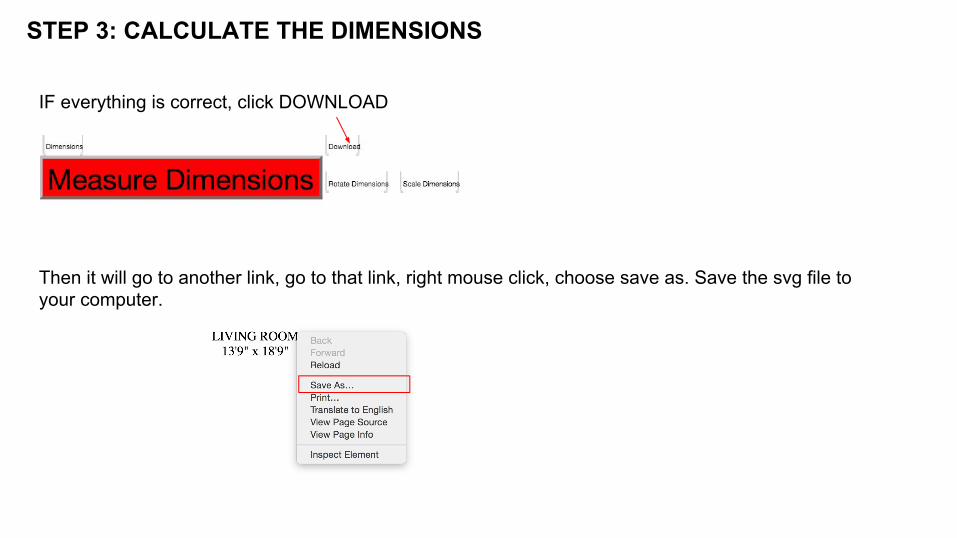
IF everything is correct, click DOWNLOAD
Then it will go to another link, go to that link, right mouse click, choose save as. Save the svg file to your computer.
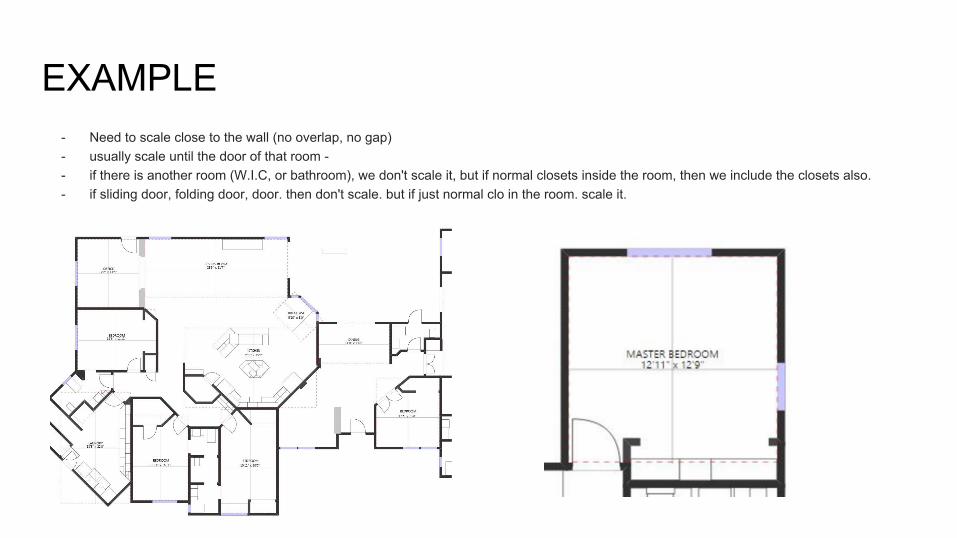
EXAMPLE- Need to scale close to the wall (no overlap, no gap)- usually scale until the door of that room -- if there is another room (W.I.C, or bathroom), we don't scale it, but if normal closets inside the room, then we include the closets also.- if sliding door, folding door, door. then don't scale. but if just normal clo in the room. scale it.
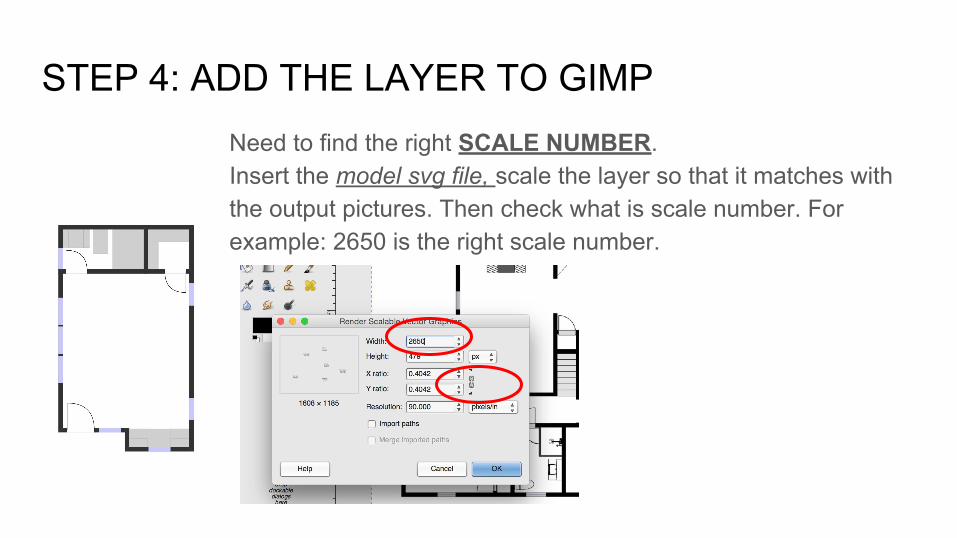
STEP 4: ADD THE LAYER TO GIMPNeed to find the right SCALE NUMBER.Insert the model svg file, scale the layer so that it matches with the output pictures. Then check what is scale number. For example: 2650 is the right scale number.
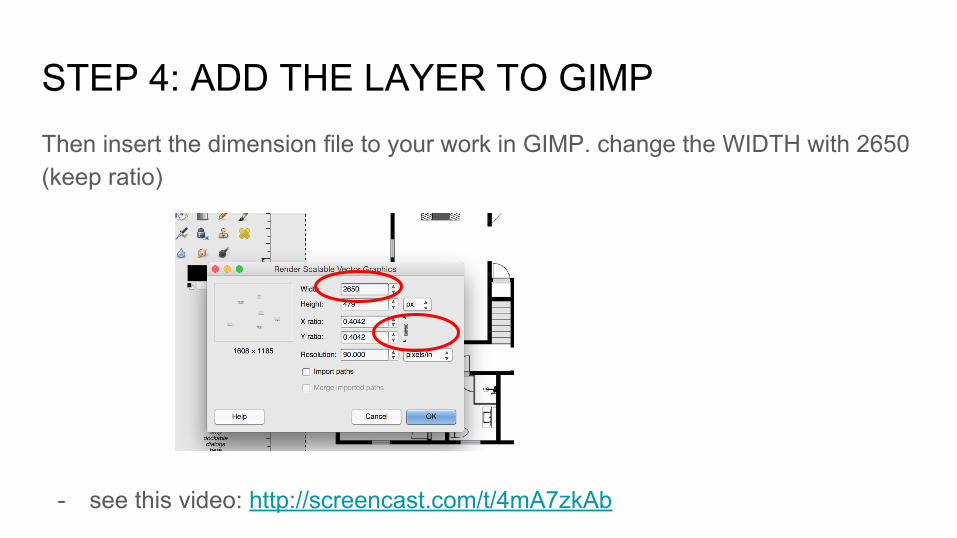
STEP 4: ADD THE LAYER TO GIMPThen insert the dimension file to your work in GIMP. change the WIDTH with 2650(keep ratio)
- see this video: http://screencast.com/t/4mA7zkAb
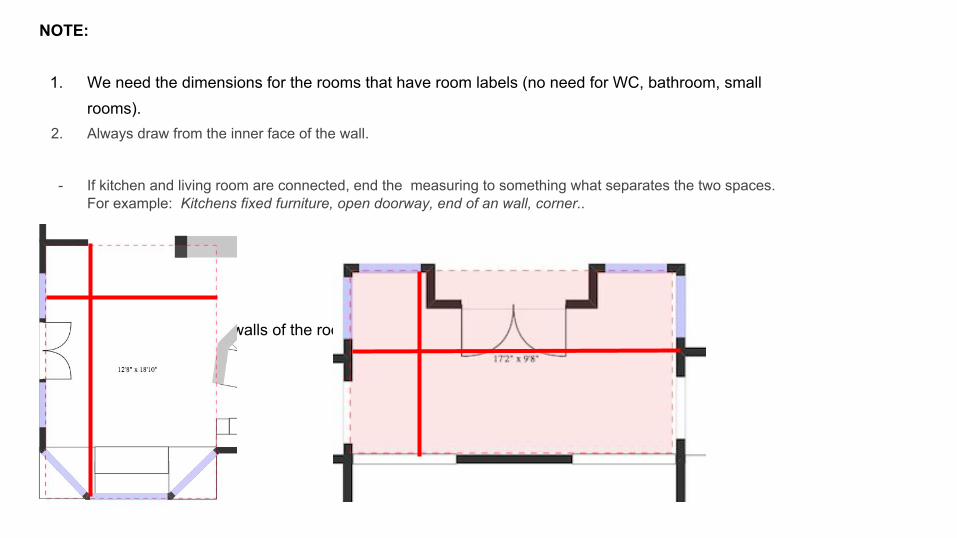
NOTE:
1. We need the dimensions for the rooms that have room labels (no need for WC, bathroom, small rooms).
2. Always draw from the inner face of the wall.
- If kitchen and living room are connected, end the measuring to something what separates the two spaces. For example: Kitchens fixed furniture, open doorway, end of an wall, corner..
3.
HOW TO MEASUREAlways choose the longest walls of the room to calculate
VIDEOWatch these video for doing dimension:
- If you use gimp (recommended):
- If you use photoshop: https://drive.google.com/file/d/0B-HMst0tDfoqZ1RQaTJKXzN5UjQ/view?usp=drive_web
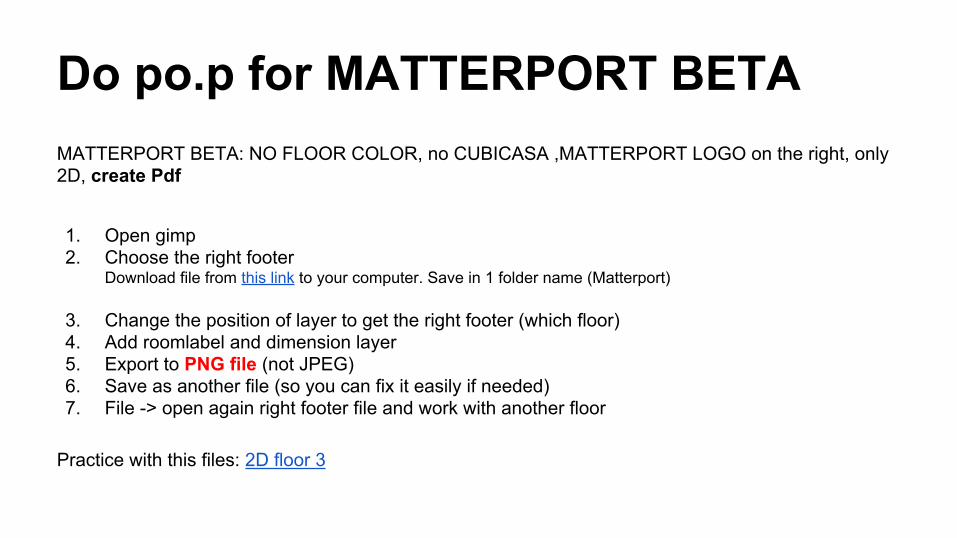
Do po.p for MATTERPORT BETAMATTERPORT BETA: NO FLOOR COLOR, no CUBICASA ,MATTERPORT LOGO on the right, only 2D, create Pdf
1. Open gimp2. Choose the right footer
Download file from this link to your computer. Save in 1 folder name (Matterport)
3. Change the position of layer to get the right footer (which floor)4. Add roomlabel and dimension layer5. Export to PNG file (not JPEG)6. Save as another file (so you can fix it easily if needed)7. File -> open again right footer file and work with another floor
Practice with this files: 2D floor 3
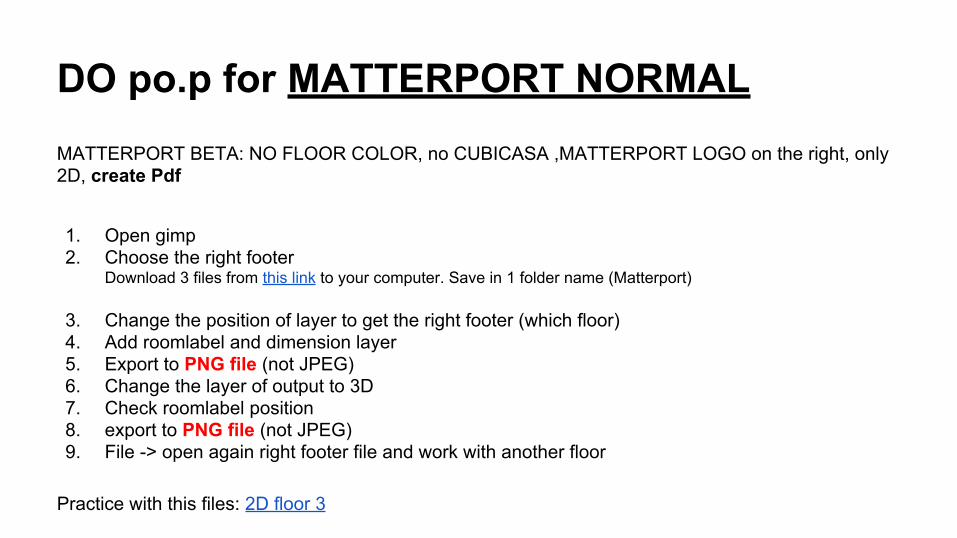
DO po.p for MATTERPORT NORMALMATTERPORT BETA: NO FLOOR COLOR, no CUBICASA ,MATTERPORT LOGO on the right, only 2D, create Pdf
1. Open gimp2. Choose the right footer
Download 3 files from this link to your computer. Save in 1 folder name (Matterport)
3. Change the position of layer to get the right footer (which floor)4. Add roomlabel and dimension layer5. Export to PNG file (not JPEG)6. Change the layer of output to 3D7. Check roomlabel position8. export to PNG file (not JPEG)9. File -> open again right footer file and work with another floor
Practice with this files: 2D floor 3
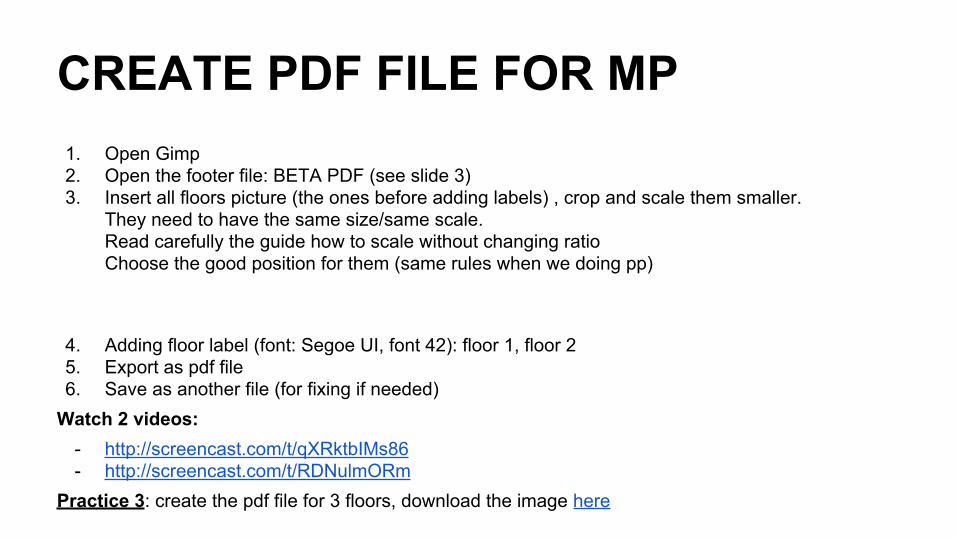
CREATE PDF FILE FOR MP 1. Open Gimp2. Open the footer file: BETA PDF (see slide 3)3. Insert all floors picture (the ones before adding labels) , crop and scale them smaller.
They need to have the same size/same scale. Read carefully the guide how to scale without changing ratioChoose the good position for them (same rules when we doing pp)
4. Adding floor label (font: Segoe UI, font 42): floor 1, floor 25. Export as pdf file6. Save as another file (for fixing if needed)
Watch 2 videos:- http://screencast.com/t/qXRktbIMs86- http://screencast.com/t/RDNulmORm
Practice 3: create the pdf file for 3 floors, download the image here

Output
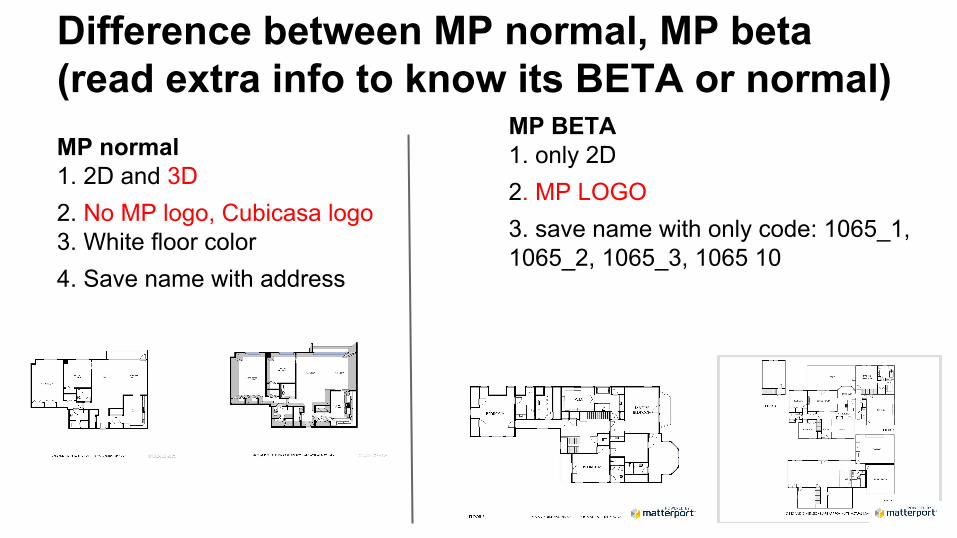
Difference between MP normal, MP beta (read extra info to know its BETA or normal)MP normal1. 2D and 3D2. No MP logo, Cubicasa logo3. White floor color4. Save name with address
MP BETA1. only 2D2. MP LOGO3. save name with only code: 1065_1, 1065_2, 1065_3, 1065 10
How to name the room
ROOM LABEL
-Biggest bedroom is always Master Bedroom,
-Don’t name bathrooms
-Room next to kitchen with table = Breakfast
-Room with dining table = Dining (but if next to kitchen check above)
-Room with television and sofa = Family Room
-Room with sofa but no tv = Living Room
-Room with billiard table or something else similar = Game Room-Room with table and office chair = Office
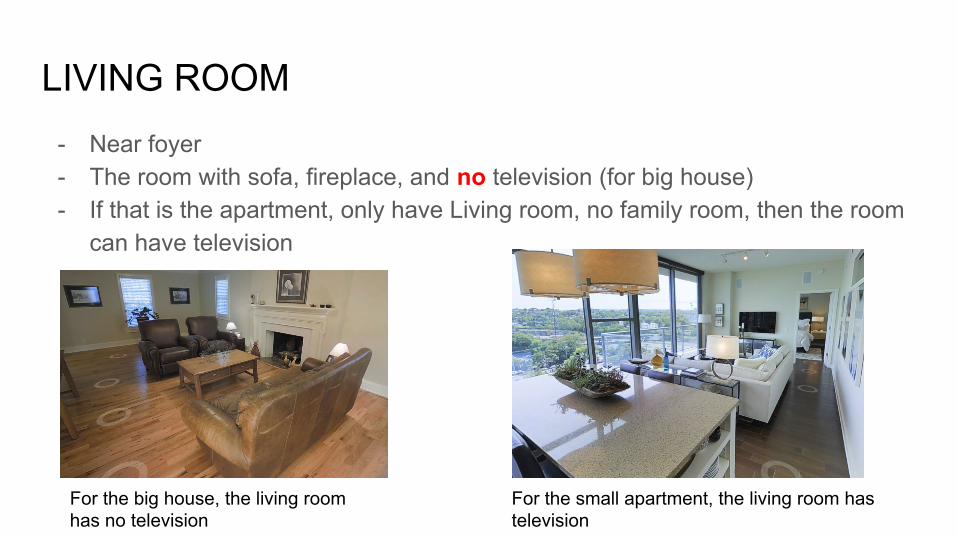
LIVING ROOM- Near foyer- The room with sofa, fireplace, and no television (for big house)- If that is the apartment, only have Living room, no family room, then the room
can have television
For the big house, the living room has no television
For the small apartment, the living room has television

FAMILY ROOM
In the big house, we usually have FAMILY ROOM
- Near kitchen- Have sofa,
television, fireplace
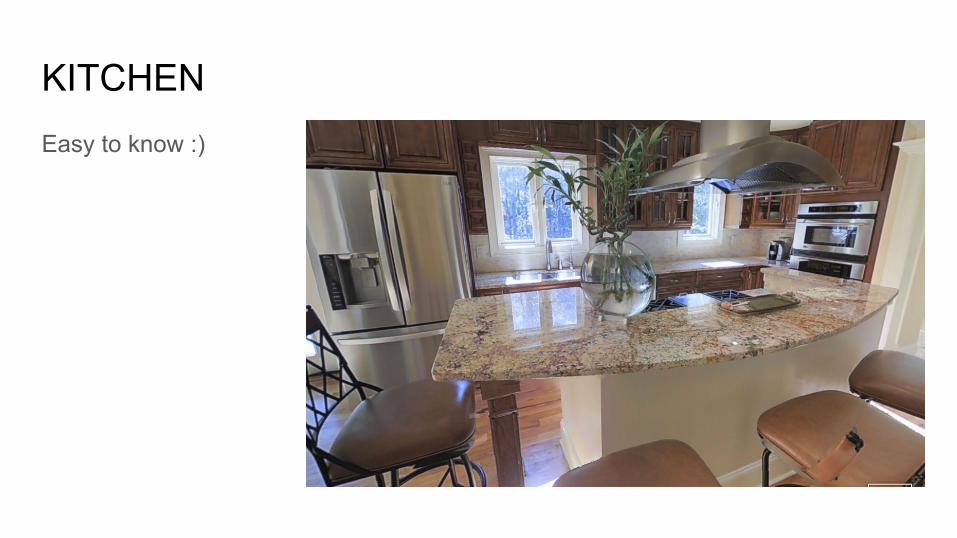
KITCHENEasy to know :)
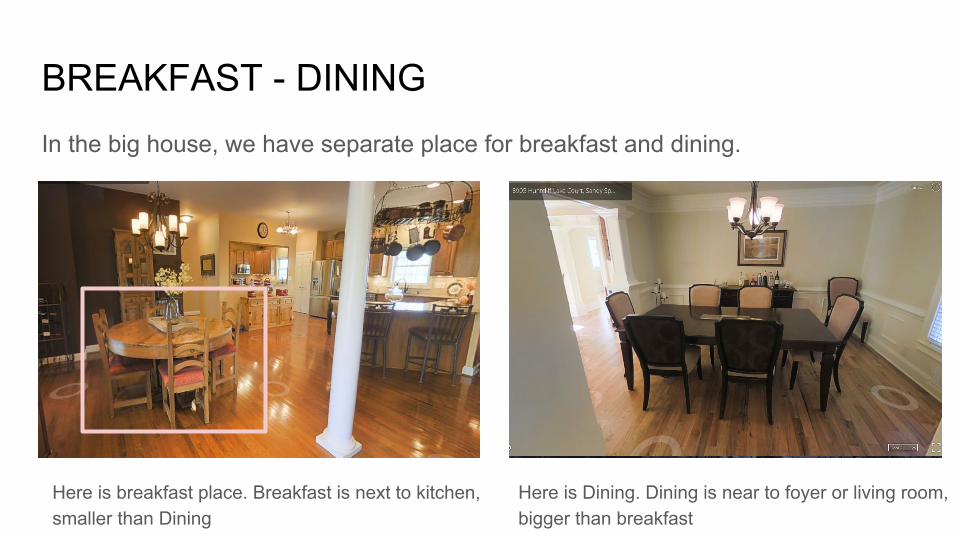
BREAKFAST - DININGIn the big house, we have separate place for breakfast and dining.
Here is breakfast place. Breakfast is next to kitchen, smaller than Dining
Here is Dining. Dining is near to foyer or living room, bigger than breakfast

BEDROOM - MASTER BEDROOMThe biggest bedroom in the house is MASTER BEDROOMMaster Bedroom usually links with the biggest bathroom (has bathtub)If there is only 1 bedroom in an apartment, then put BEDROOM.
here is MASTER BEDROOM. Its bathroom has bathtub
here is BEDROOM.
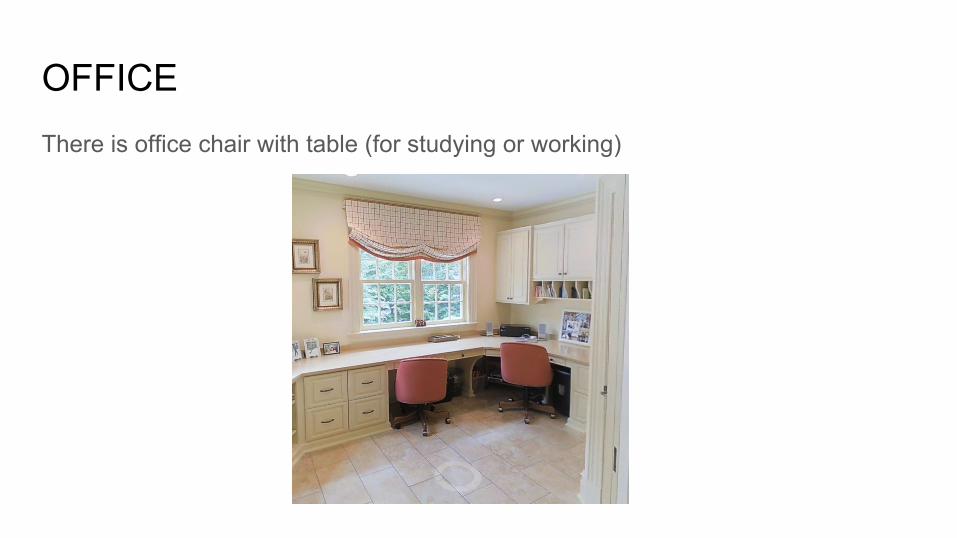
OFFICEThere is office chair with table (for studying or working)
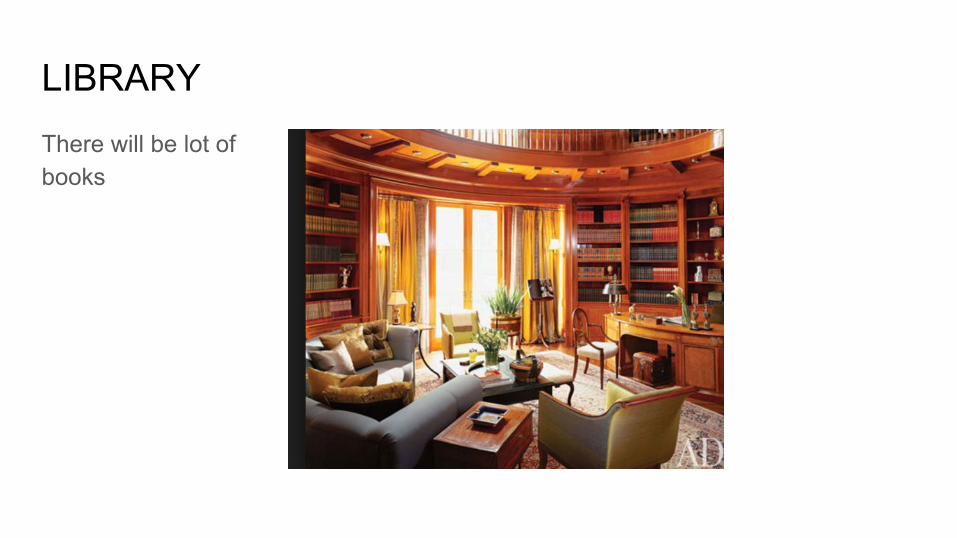
LIBRARYThere will be lot of books
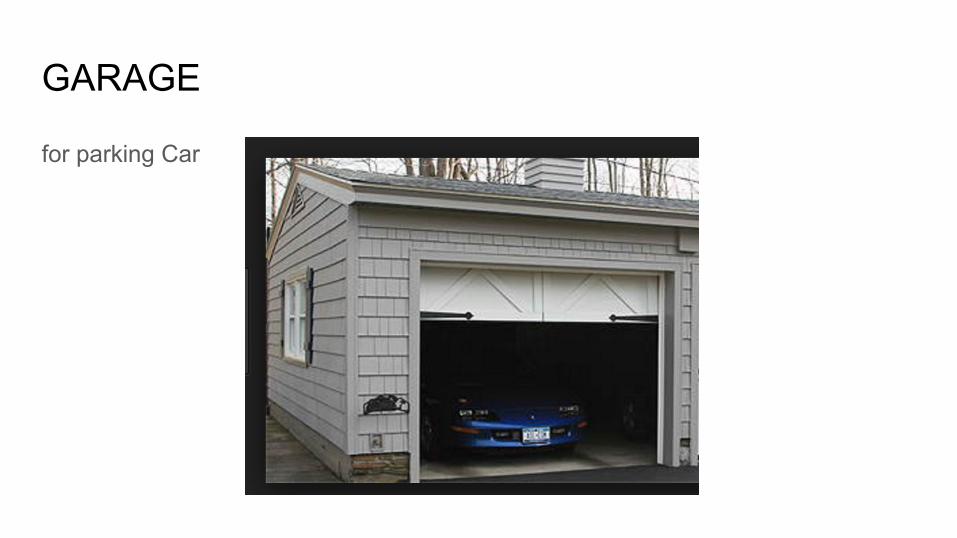
GARAGE
for parking Car
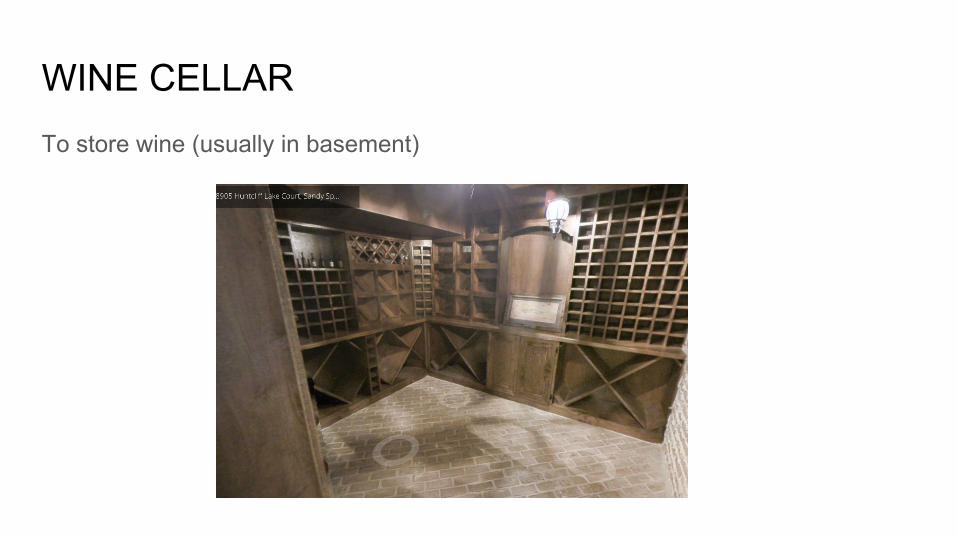
WINE CELLARTo store wine (usually in basement)

STORAGE
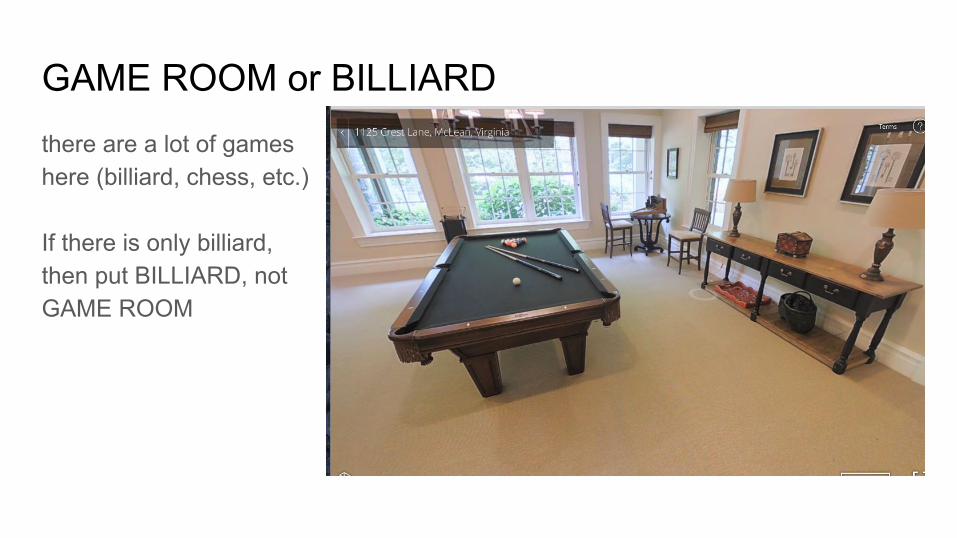
GAME ROOM or BILLIARDthere are a lot of games here (billiard, chess, etc.)
If there is only billiard, then put BILLIARD, not GAME ROOM
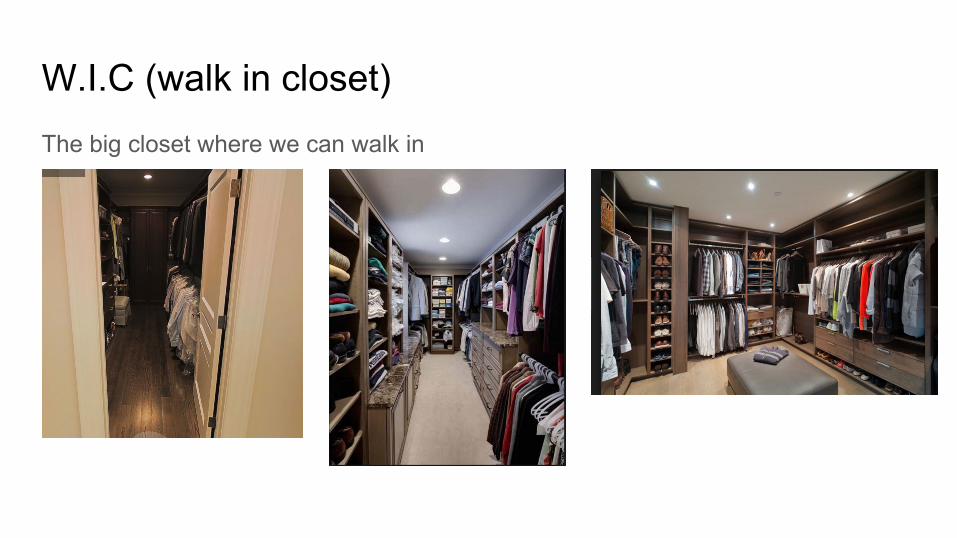
W.I.C (walk in closet)The big closet where we can walk in
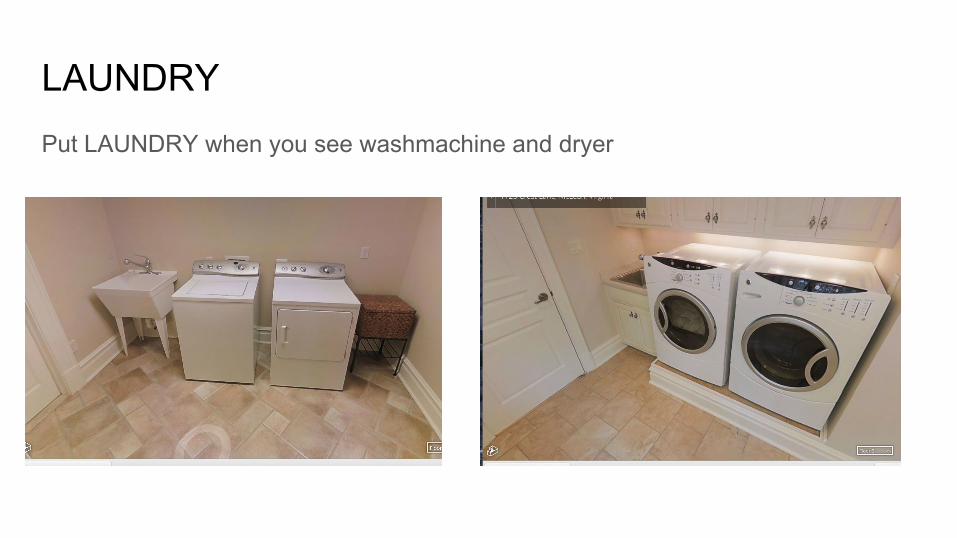
LAUNDRYPut LAUNDRY when you see washmachine and dryer
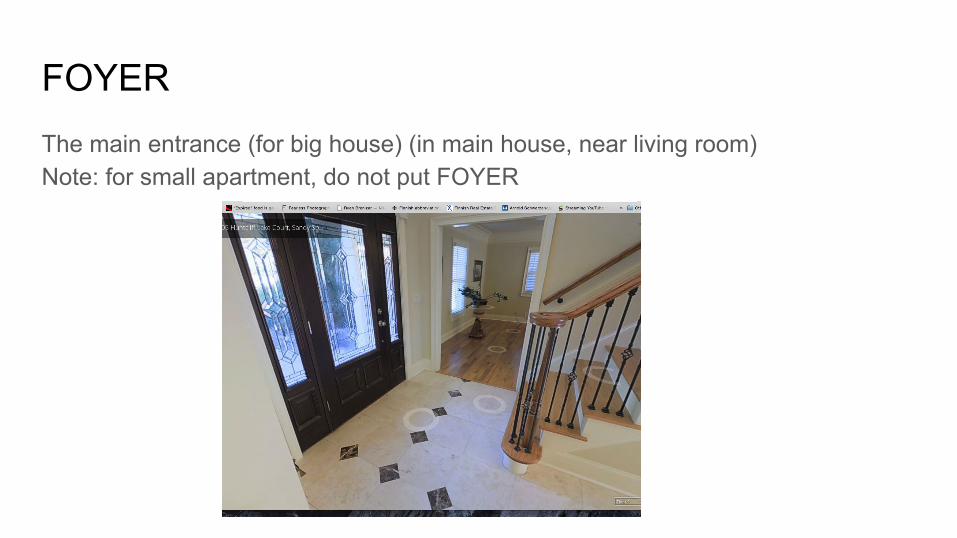
FOYERThe main entrance (for big house) (in main house, near living room)Note: for small apartment, do not put FOYER
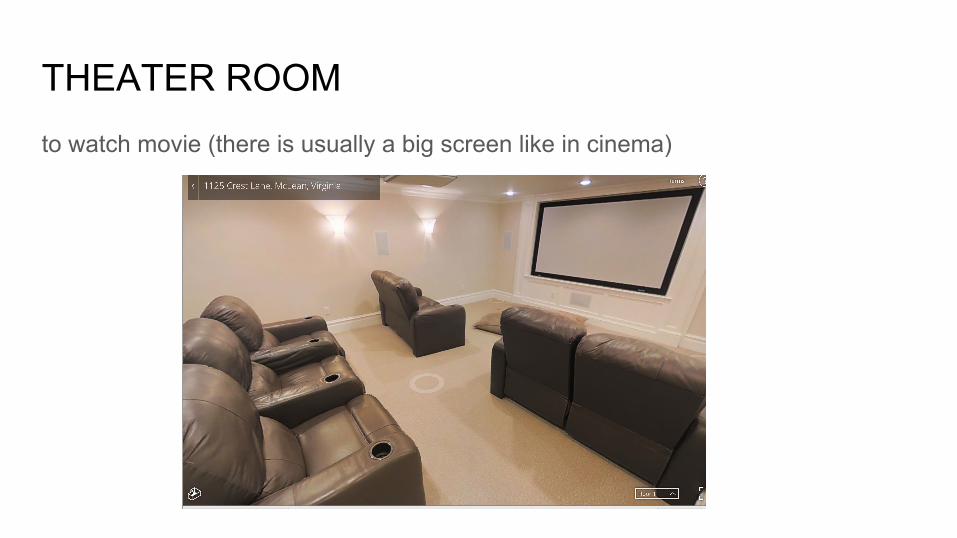
THEATER ROOMto watch movie (there is usually a big screen like in cinema)
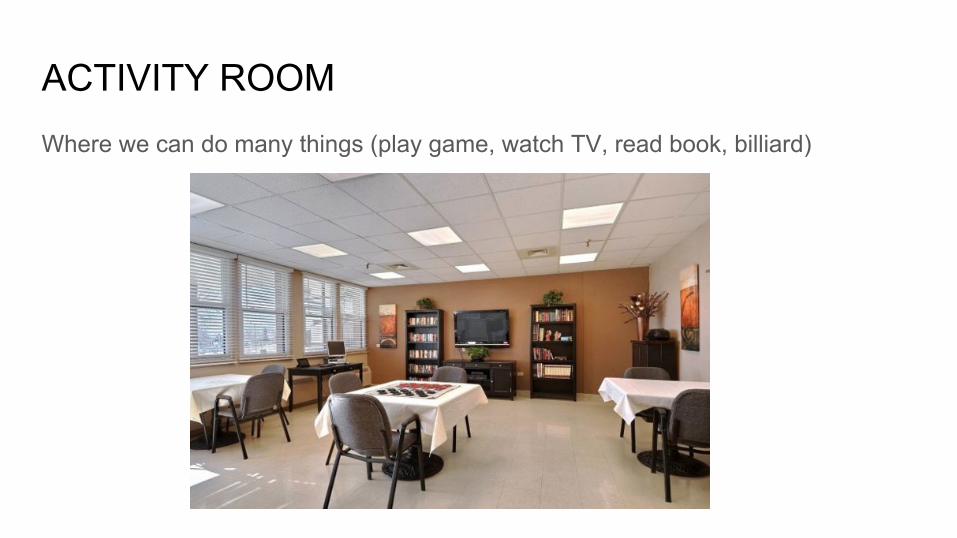
ACTIVITY ROOMWhere we can do many things (play game, watch TV, read book, billiard)
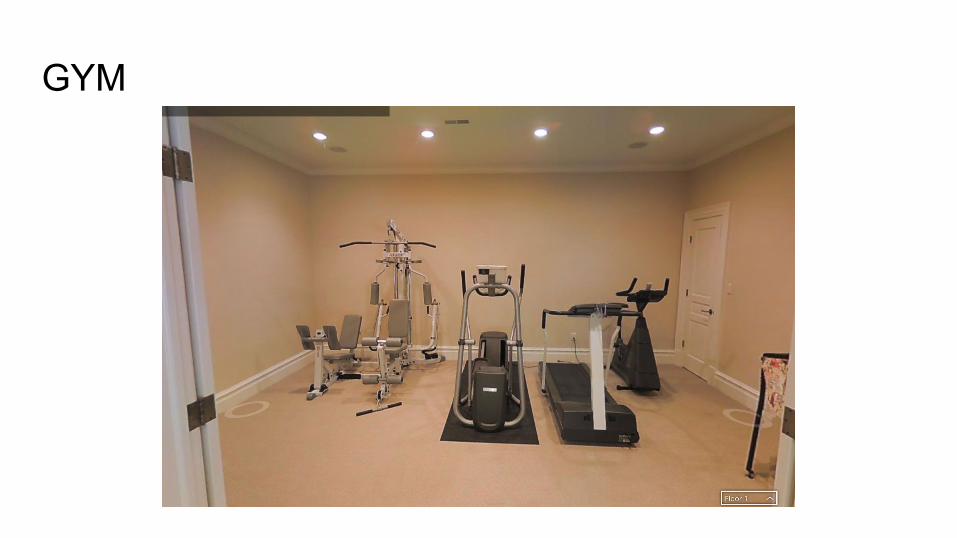
GYM
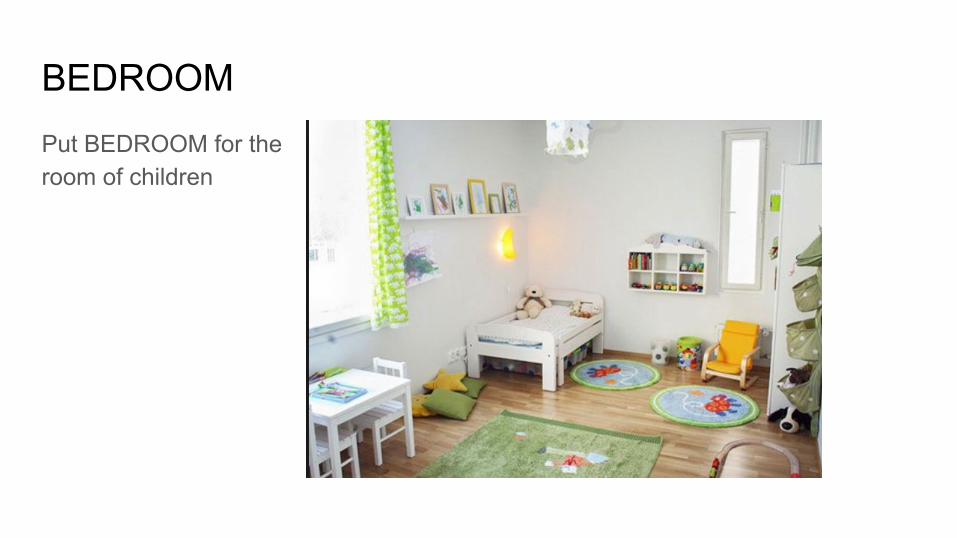
BEDROOM Put BEDROOM for the room of children
BALCONY - DECK - PORCHREAD: http://www.homedit.com/what-is-the-difference-between-a-porch-balcony-verandapatio-and-deck/
PORCH: like Kuisti in Finnish floorplan, in front of entrance
Balcony: in the second floor

Important note
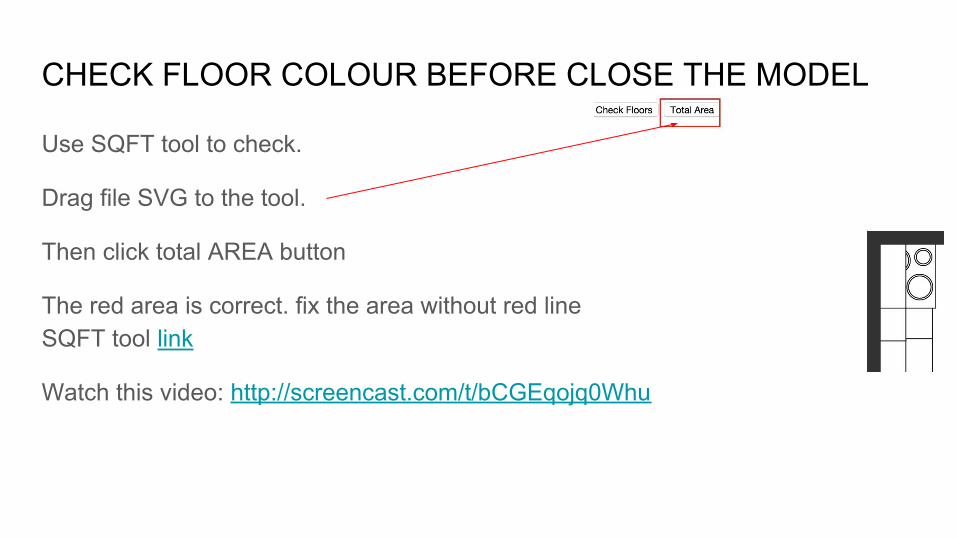
CHECK FLOOR COLOUR BEFORE CLOSE THE MODEL
Use SQFT tool to check.
Drag file SVG to the tool.
Then click total AREA button
The red area is correct. fix the area without red lineSQFT tool link
Watch this video: http://screencast.com/t/bCGEqojq0Whu
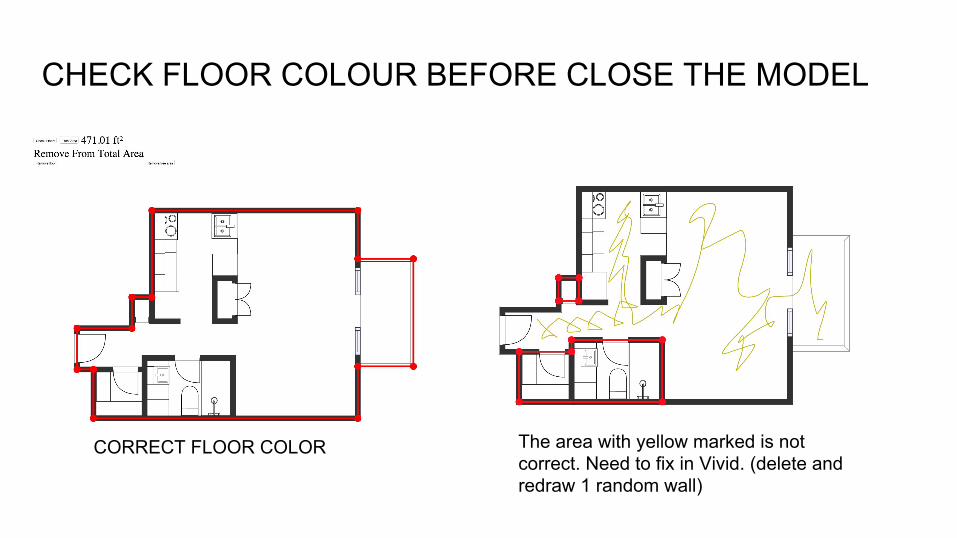
CHECK FLOOR COLOUR BEFORE CLOSE THE MODEL
CORRECT FLOOR COLOR The area with yellow marked is not correct. Need to fix in Vivid. (delete and redraw 1 random wall)
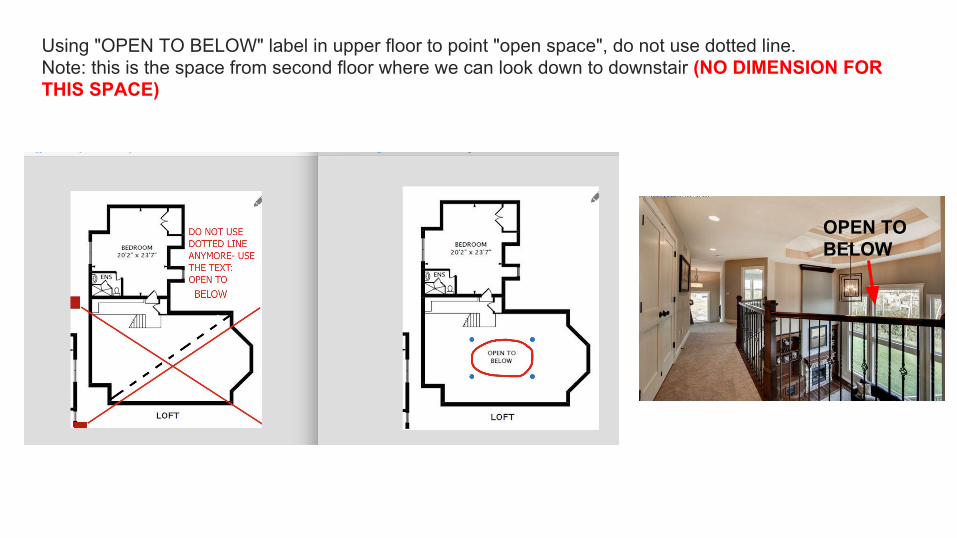
Using "OPEN TO BELOW" label in upper floor to point "open space", do not use dotted line.Note: this is the space from second floor where we can look down to downstair (NO DIMENSION FOR THIS SPACE)
OPEN TO BELOW
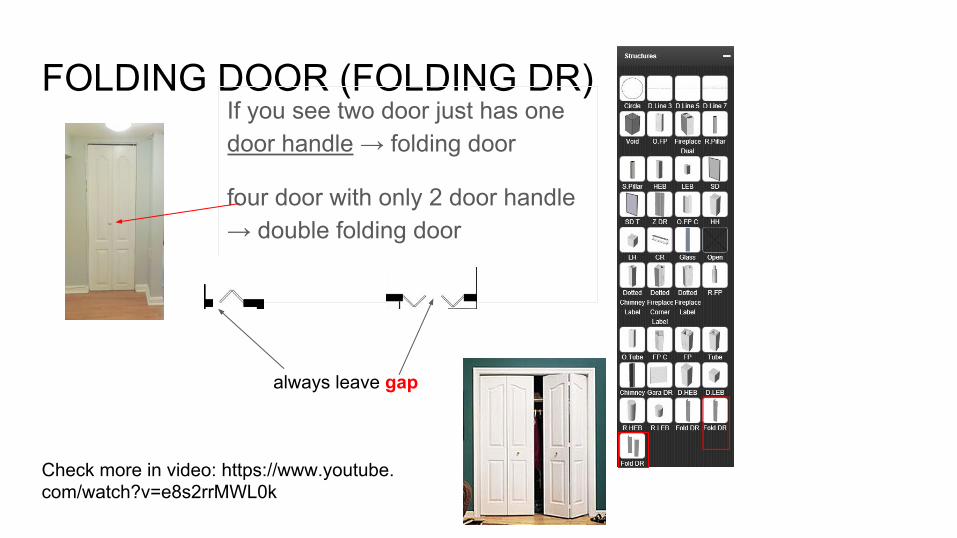
FOLDING DOOR (FOLDING DR)If you see two door just has one door handle → folding door
four door with only 2 door handle → double folding door
always leave gap
Check more in video: https://www.youtube.com/watch?v=e8s2rrMWL0k
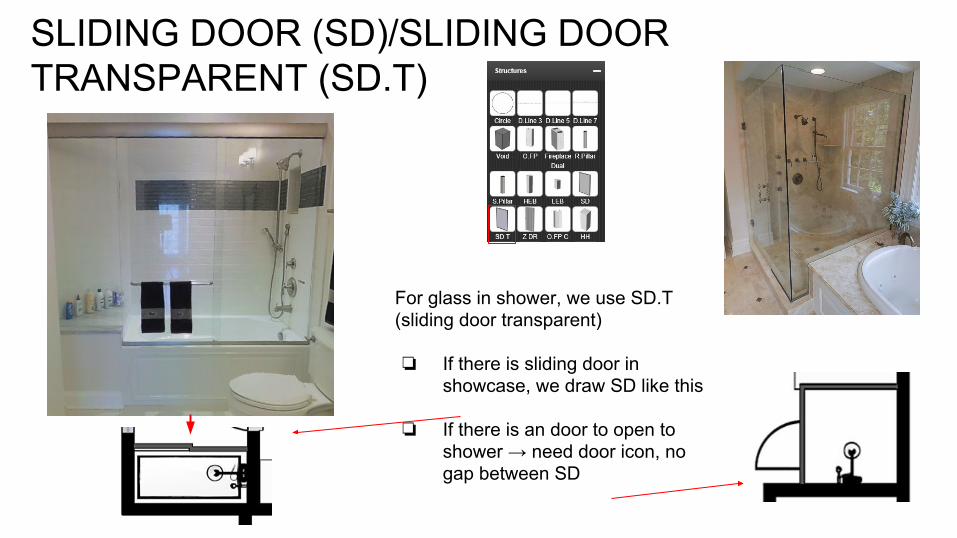
SLIDING DOOR (SD)/SLIDING DOOR TRANSPARENT (SD.T)
For glass in shower, we use SD.T (sliding door transparent)
❏ If there is sliding door in showcase, we draw SD like this
❏ If there is an door to open to shower → need door icon, no gap between SD
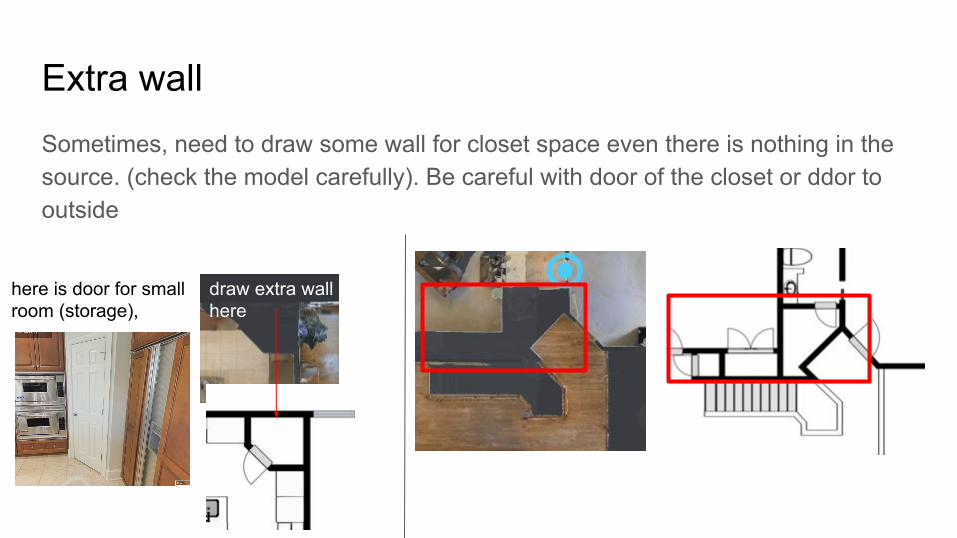
Extra wallSometimes, need to draw some wall for closet space even there is nothing in the source. (check the model carefully). Be careful with door of the closet or ddor to outside
here is door for small room (storage),
draw extra wall here
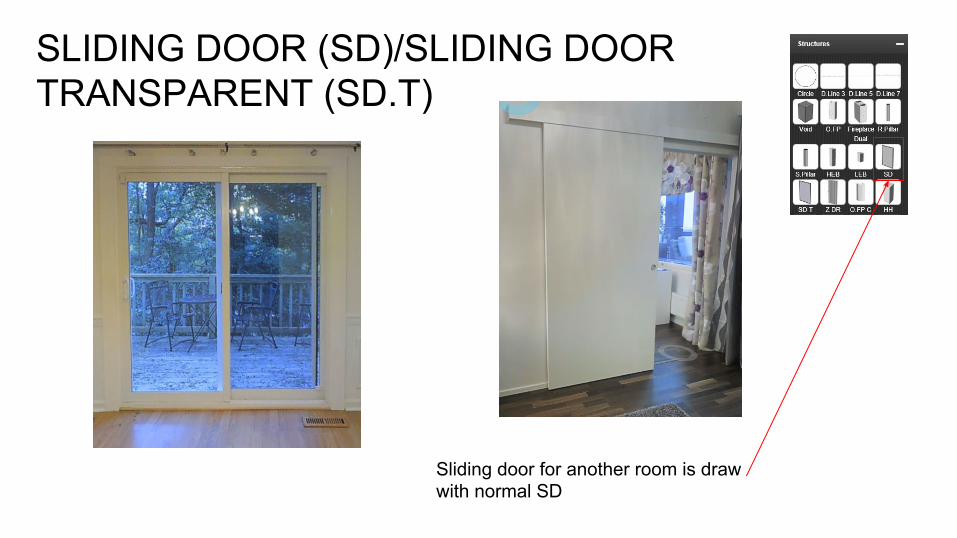
SLIDING DOOR (SD)/SLIDING DOOR TRANSPARENT (SD.T)
Sliding door for another room is draw with normal SD
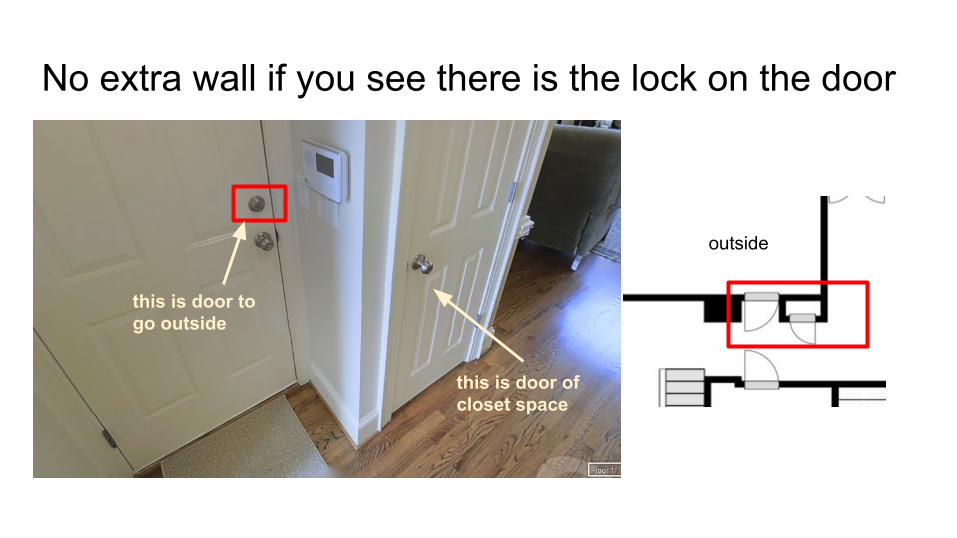
No extra wall if you see there is the lock on the door
this is door of closet space
this is door to go outside
outside
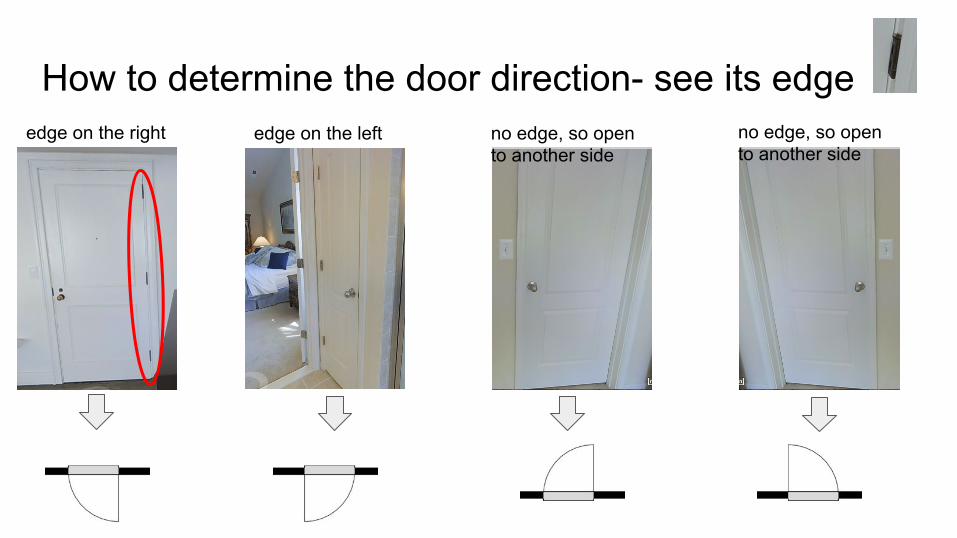
How to determine the door direction- see its edgeedge on the right edge on the left no edge, so open
to another sideno edge, so open to another side
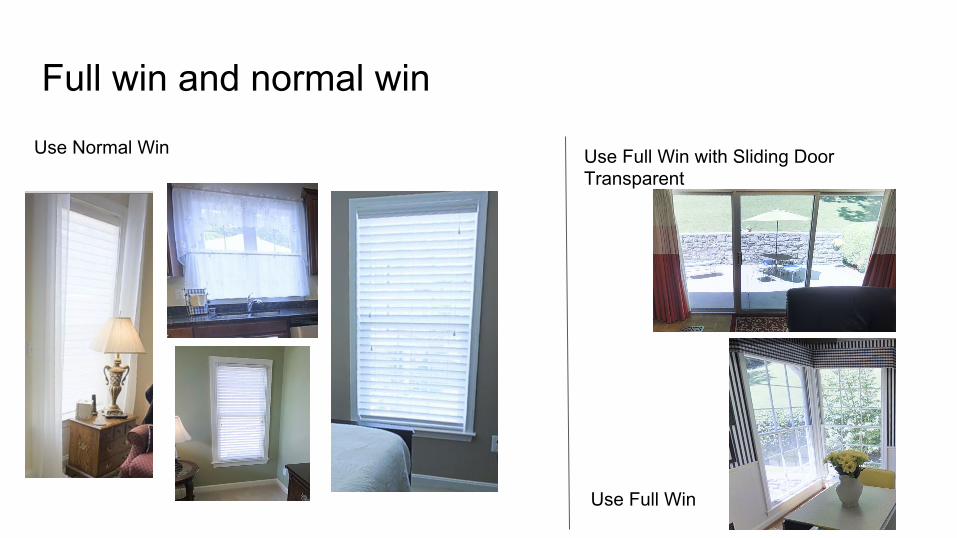
Full win and normal win
Use Normal Win
Use Full Win
Use Full Win with Sliding Door Transparent
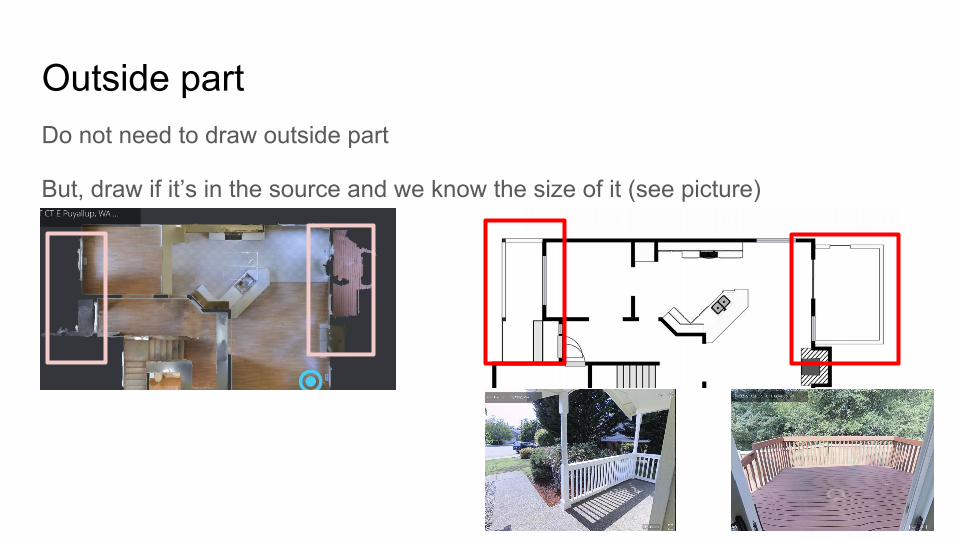
Outside partDo not need to draw outside part
But, draw if it’s in the source and we know the size of it (see picture)
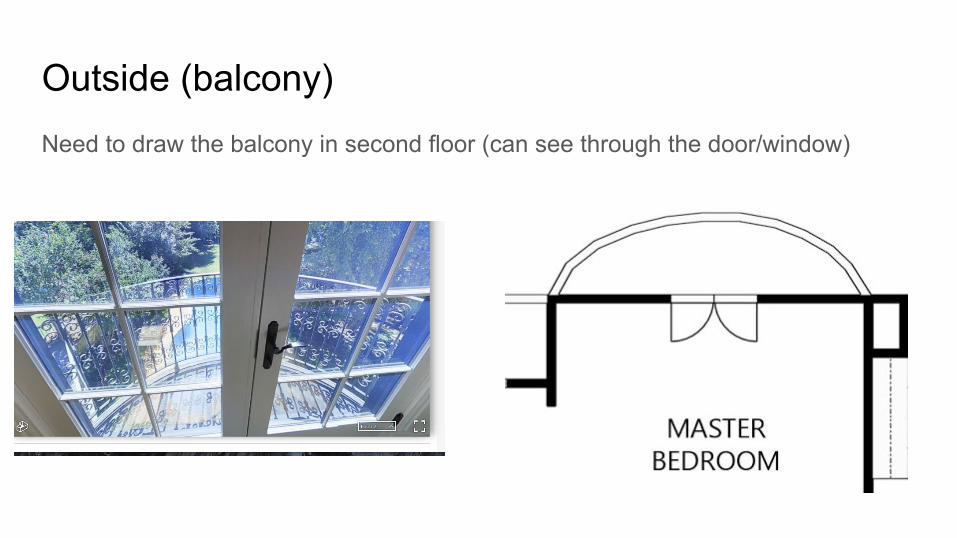
Outside (balcony)Need to draw the balcony in second floor (can see through the door/window)
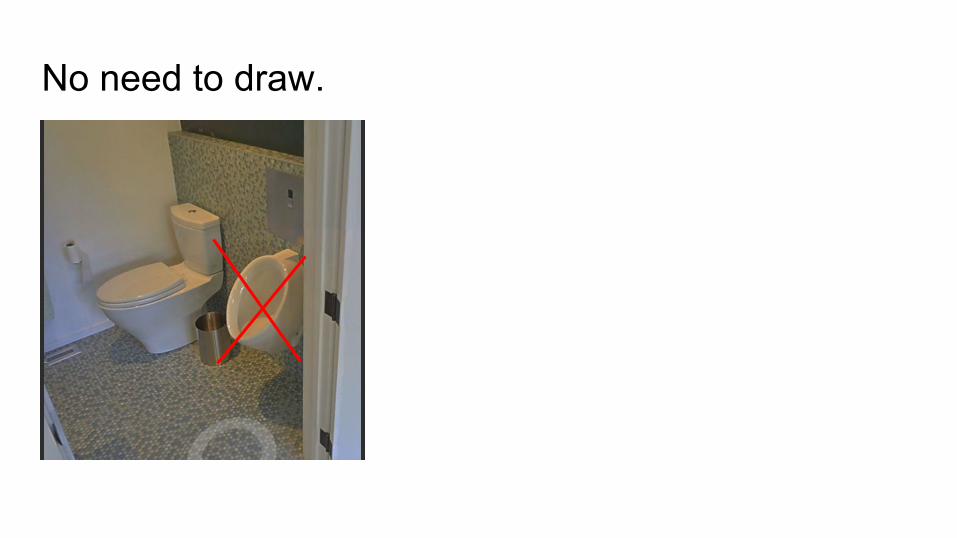
No need to draw.

EXAMPLES
Exampleshttps://docs.google.com/spreadsheets/d/13QgY2Wb6f22xssP2lTWLwEHG-lbv3wcNfa-8FO5hx_k/edit#gid=0

HOW TO DO TOTAL sq ft

HOW TO DO TOTAL sq ftStep 1: get SVG file (from vivid ID, same as SVG file for dimension)
Step 2: drag and drop SVG file to sq ft tool link
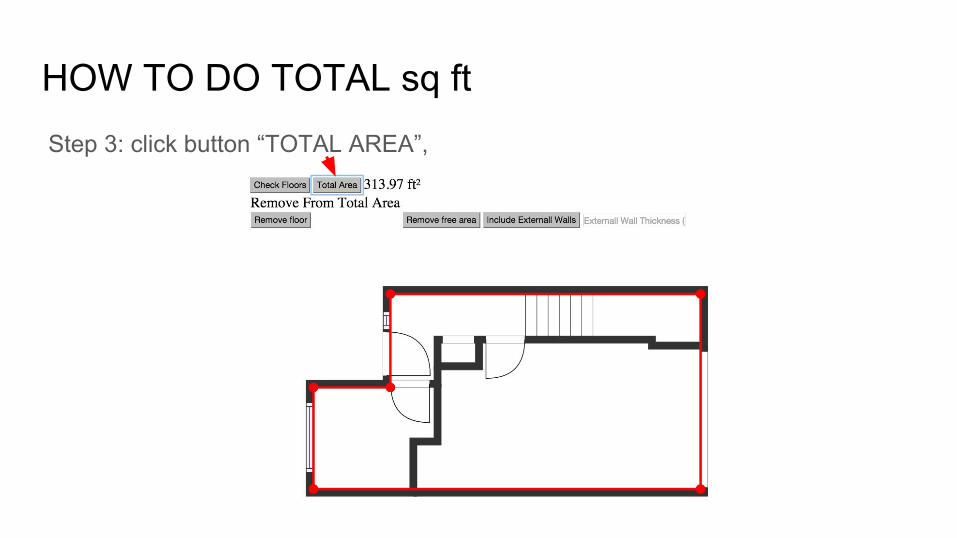
HOW TO DO TOTAL sq ft Step 3: click button “TOTAL AREA”,
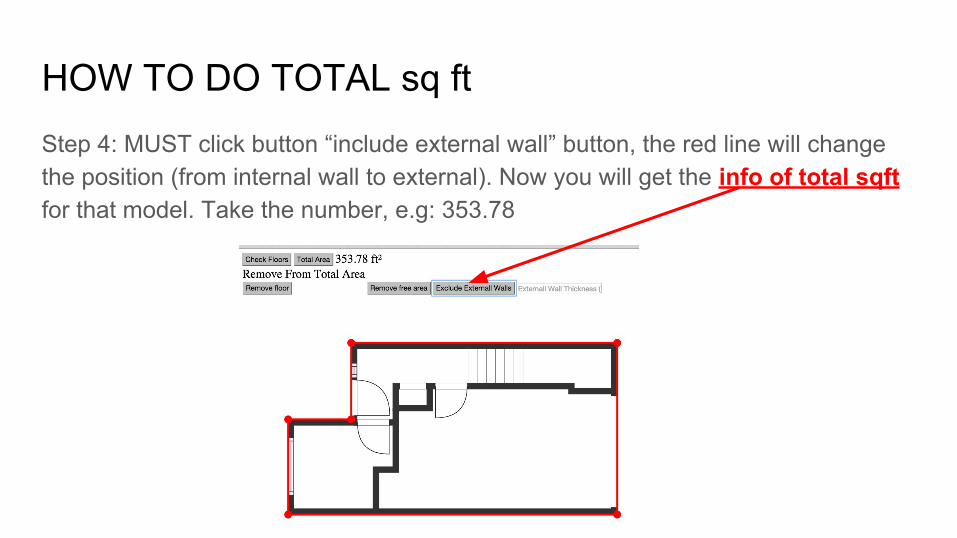
HOW TO DO TOTAL sq ftStep 4: MUST click button “include external wall” button, the red line will change the position (from internal wall to external). Now you will get the info of total sqft for that model. Take the number, e.g: 353.78
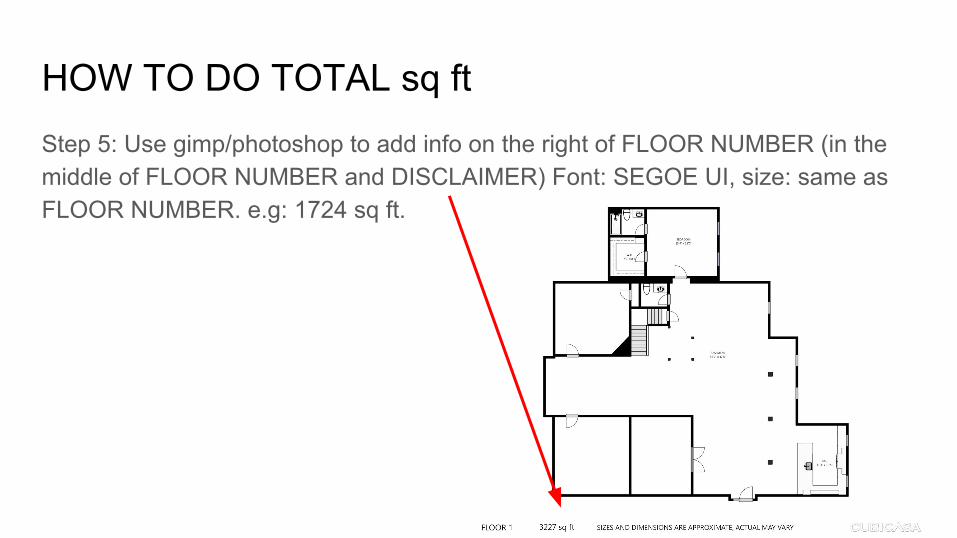
HOW TO DO TOTAL sq ftStep 5: Use gimp/photoshop to add info on the right of FLOOR NUMBER (in the middle of FLOOR NUMBER and DISCLAIMER) Font: SEGOE UI, size: same as FLOOR NUMBER. e.g: 1724 sq ft.
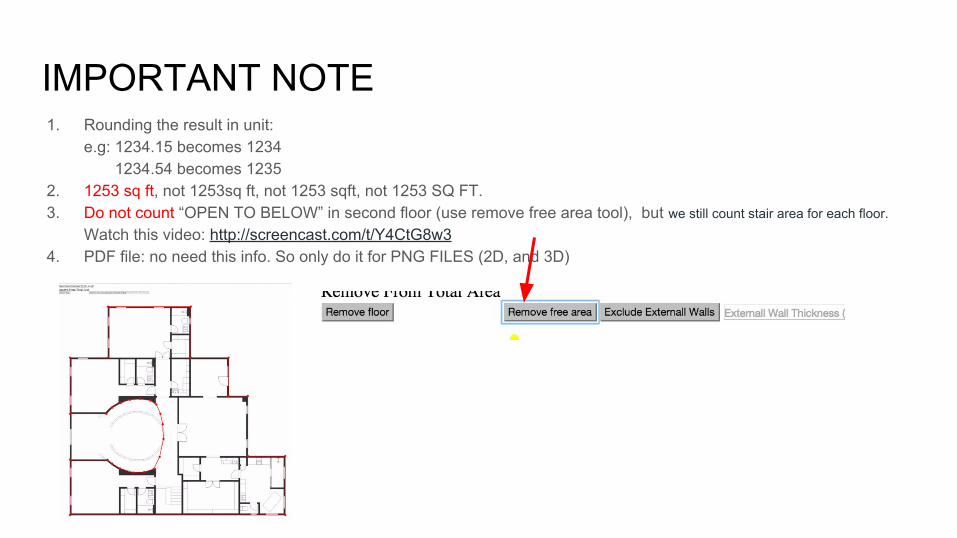
IMPORTANT NOTE1. Rounding the result in unit:
e.g: 1234.15 becomes 1234 1234.54 becomes 1235
2. 1253 sq ft, not 1253sq ft, not 1253 sqft, not 1253 SQ FT.3. Do not count “OPEN TO BELOW” in second floor (use remove free area tool), but we still count stair area for each floor.
Watch this video: http://screencast.com/t/Y4CtG8w34. PDF file: no need this info. So only do it for PNG FILES (2D, and 3D)