Embed Size (px)
Citation preview
Music & Lyrics
Matilda School Resources: Music & Lyrics 1 Introduction ©RSC
Music & Lyrics
By following the steps on the site so far, students will have created their characters and begun to
plot out their scene. The next step is to think how they might add music and songs. For students
who are just writing a scene, this is still an exciting step to fully understand the process of creating
a musical for the theatre.
The activities in this section are aimed at students of all musical abilities. For some students, the
activities may be part of an early introduction to music. Other students may be much more familiar
and so able to tackle the extended tasks where listed.
Using the Music Webpage: The films on the Music web page will give students a real insight into Tim Minchin’s process for
creating lyrics and music. After watching his interview, students can play with the sound buttons
on the site to start to build up their ideas for the music for their song.
Songs don’t have to be set to music but using the buttons and taking part in activities will give
them a good start for thinking about the tone of their song and what kind of music might suit their
lyrics.
The activities outlined in this resource pack are also accompanied by a film showing how they
might be used in the classroom.
The exercises aim to help the students write rhythmically and lyrically. The resources can also act
as standalone activities that can be adapted to other forms of music in your school curriculum.
Useful Starting Points: Getting the students used to describing different styles of music and understanding the function of songs in storytelling.
Matilda School Resources: Music & Lyrics 2 Introduction ©RSC
You will need:
• Examples of different styles of music to play to the students
• Pens and paper
• Before watching the films on the Music page, ask students to get into pairs and discuss the
following:
- Think about any songs from musicals that they know and like.
- Why do they like them, what makes them good songs?
- What job does a song in a musical do?
• Now watch the films on the site for inspiration. The films are all different lengths and none last
more than 10 minutes. Each one been broken down into chapters, and when you click on a tab
you will automatically be taken to the specific chapter point.
• Discuss what Tim says about music being angular or smooth. What do the students understand
by this?
• Play a few different examples of music to the class. As they listen, ask them to volunteer words
they would use to describe each one.
• Now talk through the plot of a well known story: e.g. Cinderella. Split the class into 4 groups and
divide the story into four main sections with each group taking a section: e.g.
1. Cinderella is treated badly by her step-sisters.
2. Cinderella is visited by her Fairy Godmother.
3. Cinderella goes to the ball.
4. The Prince searches for Cinderella.
• Ask the groups to decide which character they would write a song for and why? At which point
in the scene the song be? Ask them to write their ideas down.
• Once they have decided who is singing and what they are singing about, ask the groups to
consider what would the song might sound like? Ask the students to list 4 words to describe the
feeling and sound of their song.
• Now it’s time to start thinking of the music and lyrics they might create for their own scene with
the following activities:
Matilda School Resources: Music & Lyrics 3 Introduction ©RSC
Music and Lyrics: 1. Rhythm Listen Clap An introduction to rhythm patterns: Students listen to a selection of rhythmic patterns, repeat the rhythms and continue their line as other layers are introduced. In this way, students become accustomed to holding a rhythm when another rhythm is being played. (They will need to do this when playing an ostinato later on).
How it works:
• The group starts in a circle. The leader of the group (initially this should be you) claps a simple
background rhythm and after hearing it, the whole group joins in.
• Explain that the leader will change their rhythm, but the students should continue to repeat the
first rhythm until the leader calls out ‘change’. e.g. The leader may change to ‘clap clap-clap
clap’, but the rest of the group continue to clap the original rhythm until the leader says ‘change’.
They then join in and repeat the second rhythm until the word ‘change’ is called out again.
• When students are confident with this activity, you can split the group into more sections: one
group might change their rhythm on ‘change’; another on the word ‘now’; another on ‘go’. This
means up to four different rhythms could be played at the same time as each group waits to
change to the next rhythm.
• Once the groups know which word to listen out for to change their rhythm, ask them to move
around the room, weaving in and out of each other. (If the group are particularly confident with
this exercise, you could introduce background music at this stage).
Reflection:
Matilda School Resources: Music & Lyrics 4 Introduction ©RSC
• Discuss this activity as a group with the following thoughts in mind: How easy was it to hold on
to their rhythms? How hard did they have to concentrate? Did they hear any interesting patterns
when the rhythms were layered on top of each other? What happened when they were allowed
to move?
2. Rhythm Words & Patterns A simple introduction to rhythmic notation, using words as a guide. This allows students to learn to write notation with increased accuracy. (This activity leads to ‘Right Rhythm Wrong Rhythm’ - an exercise for teachers who are confident with notation.)
You will need: Access to the online Sound Buttons on the Music webpage.
An interactive whiteboard.
• Explain to the students that this activity is not about reading music (although pupils will be able
to learn a little about rhythmic notation), it’s more about playing with rhythms and phrases and
understanding different blocks (of 4s, 3s, etc.)
• On an interactive whiteboard or projector screen, show the class the sound buttons from the
Music Page on the website. Explain that each sound button represents a particular rhythm that
adds up to one beat This means that students are able play groups of rhythms which can be
built into a simple time signature of three of four beats to a bar.
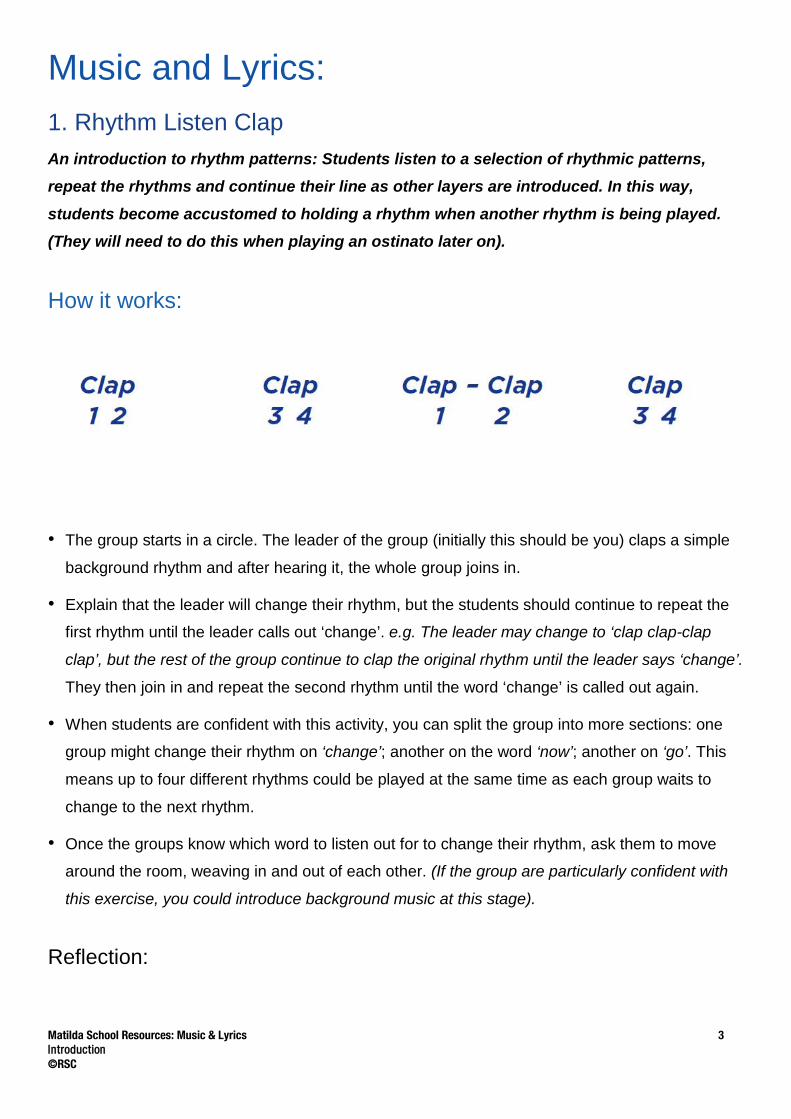
• The students will see the notation for this rhythm and understand how it sounds because a word
will be attached to the rhythm. When words are spoken aloud students create exactly the same
rhythm as the notes: e.g.
Matilda School Resources: Music & Lyrics 5 Introduction ©RSC
• As a group, decide if the rhythm of each word adds up to four or three beats in total and clap
this out for the students.
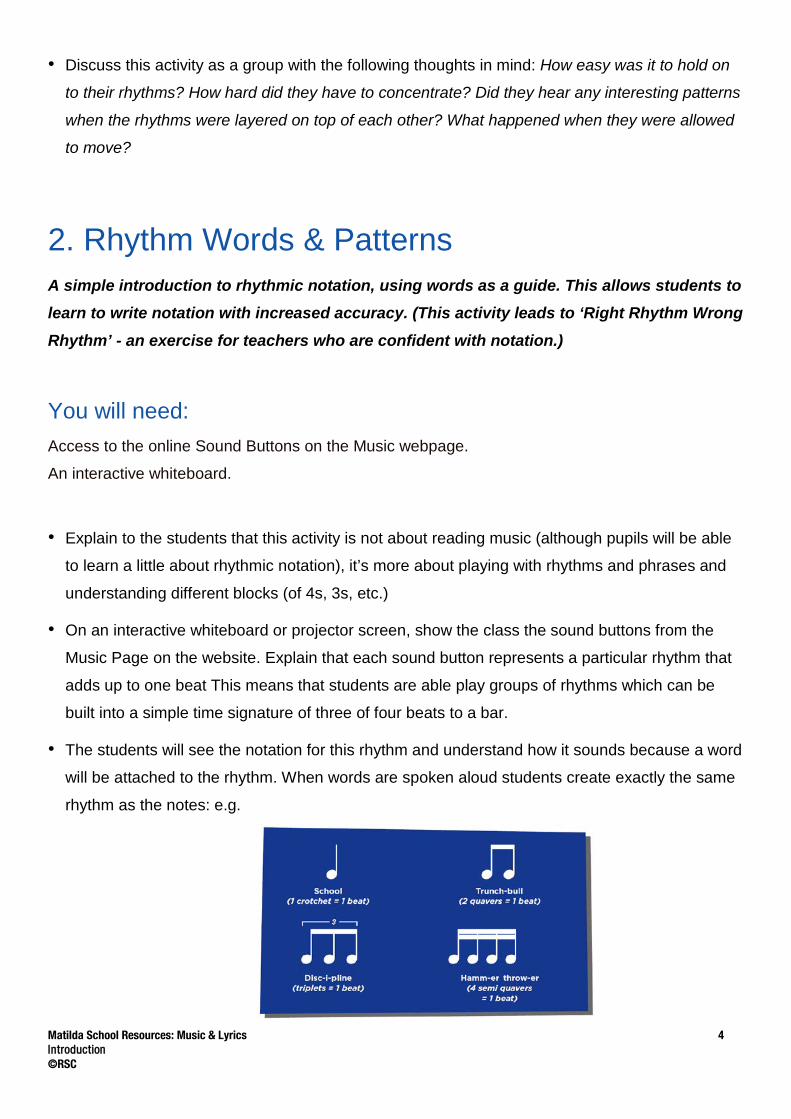
• Clap out the rhythm of the following words: School, Trunchbull, Discipline, Hammer thrower. (Do not tell students which ‘rhythm words’ you have chosen, just clap the rhythm without
words.)
• Ask the students to listen to the rhythm and repeat it. They must then identify the particular
words that match with the rhythm and call them out.
Extension Task: Right Rhythm/Wrong Rhythm An exercise for teachers who are confident with notation.
• On a whiteboard show a collection of rhythmic notation with some notes written incorrectly.
• If the students know the rhythmic notation is correct, ask them to read the notes and clap them
back.
• However, if there is a set of notes written incorrectly (e.g. in the Coughton School film clip, some notes that should be written as triplets have been written as three joined semiquavers) the students do not play them. Instead they call out (in a soulful Bluezy style)
“Hey that’s just the wrong rhythm lady! (Or man!)”
Rhythm Words & Patterns continued… • Once the students are comfortable with reading and clapping a range of different rhythms, give
them a ‘question rhythm’ for which they must create an ‘answer’. Ascertain how many beats you
used in your question phrase so that their answer can include the same number of beats. e.g.
Matilda School Resources: Music & Lyrics 6 Introduction ©RSC
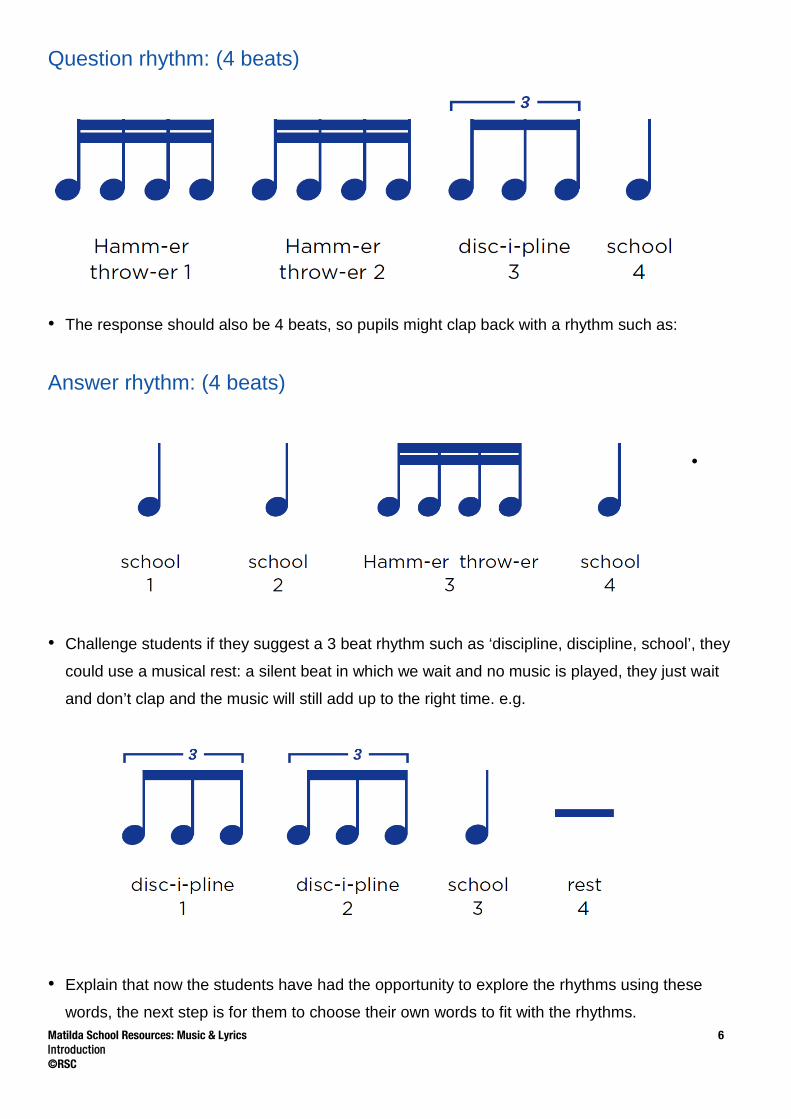
Question rhythm: (4 beats)
• The response should also be 4 beats, so pupils might clap back with a rhythm such as:
Answer rhythm: (4 beats)
•
• Challenge students if they suggest a 3 beat rhythm such as ‘discipline, discipline, school’, they
could use a musical rest: a silent beat in which we wait and no music is played, they just wait
and don’t clap and the music will still add up to the right time. e.g.
• Explain that now the students have had the opportunity to explore the rhythms using these
words, the next step is for them to choose their own words to fit with the rhythms.
Matilda School Resources: Music & Lyrics 7 Introduction ©RSC
• They should refer to any language work they have already created from other packs or in
general and choose alternative words for the rhythmic phrases. e.g.
disc-i-pline could be changed to arr-o-gant
school could be changed to Bruce
3. Creating An Ostinato (a repeated pattern):
Students choose an overall theme for their piece of music. They then create a rhythm for this simple background pattern or theme.
• Now students have understood that words and phrases can also represent rhythms, explain that
they are going now to create a rhythm as a background for their song.
• Eventually, they will create an ‘ostinato’ (a repeated pattern) that will help give their music
theme and atmosphere.
• To help students understand what an ostinato is, you can play some examples for them:
- e.g. there is a strong ostinato in the song, ‘It must be love’ by Madness, which is played on
piano from the very first beat. This repeated pattern is played through most of the song.
- Listen to the James Bond theme music and identify the ostinato in that piece.
• Ask the students to consider the characters and plot they have created and explored so far.
Give them a few minutes to choose one of their characters that they might like to write a song
for.
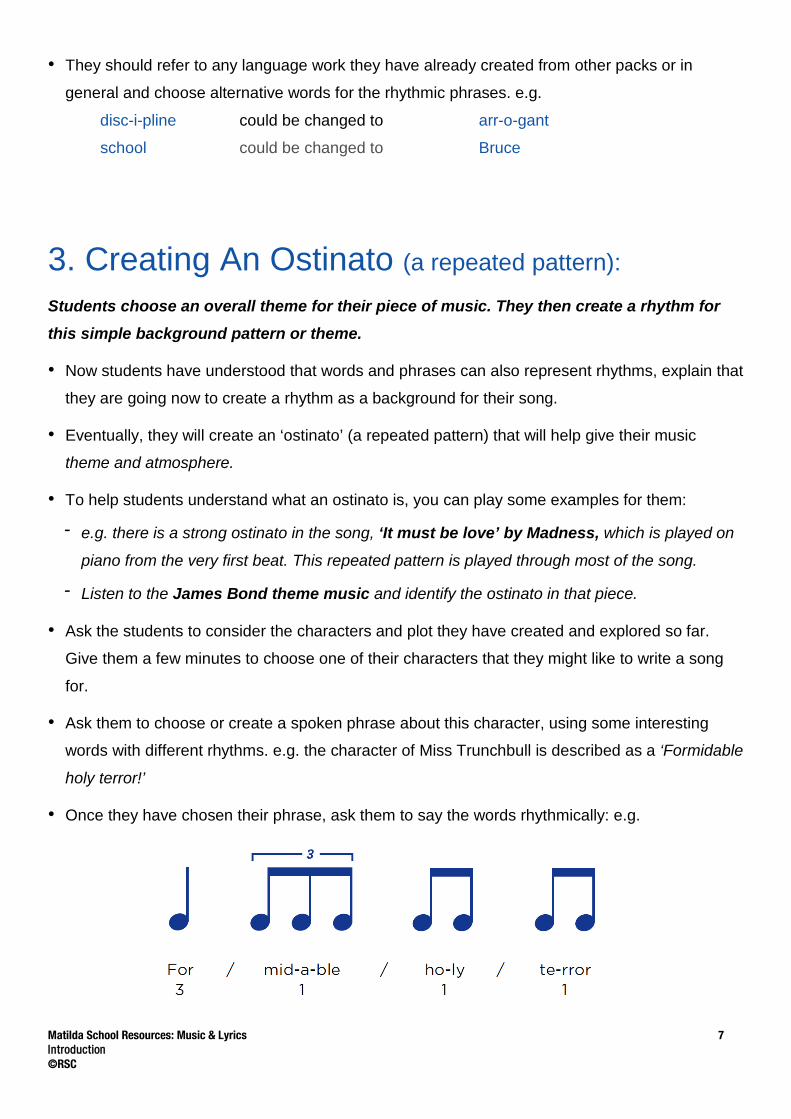
• Ask them to choose or create a spoken phrase about this character, using some interesting
words with different rhythms. e.g. the character of Miss Trunchbull is described as a ‘Formidable
holy terror!’
• Once they have chosen their phrase, ask them to say the words rhythmically: e.g.
Matilda School Resources: Music & Lyrics 8 Introduction ©RSC
(Each slash represents the start of a new beat so the phrase adds up to four
beats).
• If your students are confident with notation, you could ask them to write the notes next to their
phrase.
4. Choosing Notes for your Ostinato What You Will Need: Preferably, you need a selection of keyboards, with students working on them in groups. However,
students could just use their voices.
How It Works:
• Explain to the students that now they have a simple rhythm pattern that can be repeated as a
background theme in their music. The next step is to add notes to this.
• Watch the demonstration school film on the webpage. It shows a teacher explaining to her
pupils how a tune can be written for an ostinato rhythm.
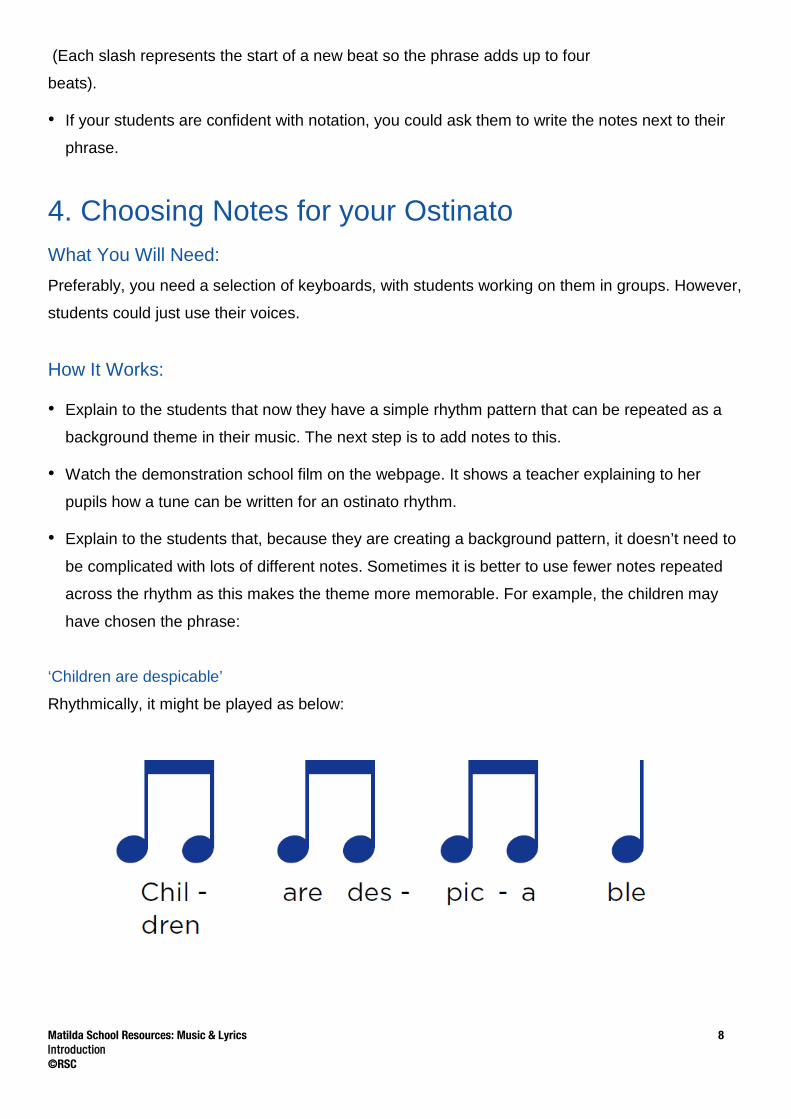
• Explain to the students that, because they are creating a background pattern, it doesn’t need to
be complicated with lots of different notes. Sometimes it is better to use fewer notes repeated
across the rhythm as this makes the theme more memorable. For example, the children may
have chosen the phrase:
‘Children are despicable’
Rhythmically, it might be played as below:
Matilda School Resources: Music & Lyrics 9 Introduction ©RSC
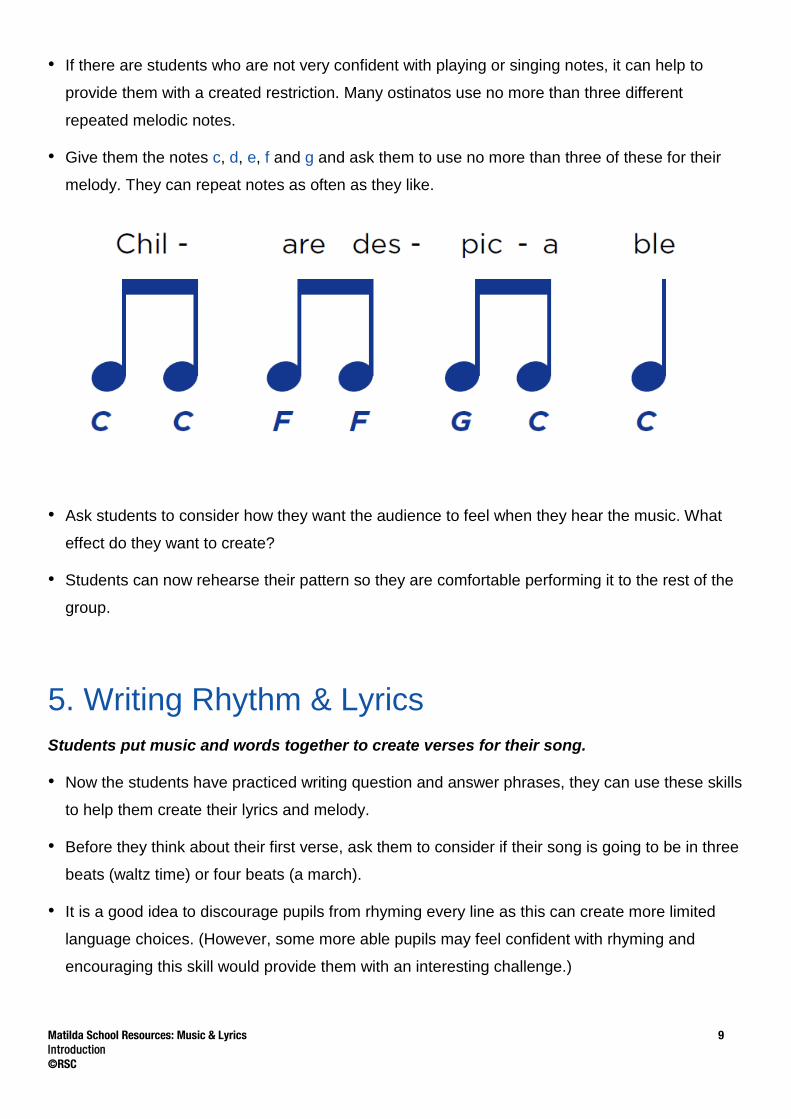
• If there are students who are not very confident with playing or singing notes, it can help to
provide them with a created restriction. Many ostinatos use no more than three different
repeated melodic notes.
• Give them the notes c, d, e, f and g and ask them to use no more than three of these for their
melody. They can repeat notes as often as they like.
• Ask students to consider how they want the audience to feel when they hear the music. What
effect do they want to create?
• Students can now rehearse their pattern so they are comfortable performing it to the rest of the
group.
5. Writing Rhythm & Lyrics Students put music and words together to create verses for their song.
• Now the students have practiced writing question and answer phrases, they can use these skills
to help them create their lyrics and melody.
• Before they think about their first verse, ask them to consider if their song is going to be in three
beats (waltz time) or four beats (a march).
• It is a good idea to discourage pupils from rhyming every line as this can create more limited
language choices. (However, some more able pupils may feel confident with rhyming and
encouraging this skill would provide them with an interesting challenge.)
Matilda School Resources: Music & Lyrics 10 Introduction ©RSC
• Tell them that the groups of notes and phrases they use must add up to blocks of the same
time. In the example below, rhyming has not been used. Each line adds up to three beats:
Watch / the / glass
Tremb-ling / ratt-l-ing / glass
Cover / chil-dren / hide
(The rhythms in this verse are played quite quickly which emphasises the sense of urgency that
members of the school might experience when Miss Trunchbull approaches.)
• Once the verse has been edited and redrafted (see Re-writing Resources for further ideas) the
students can move onto creating other parts of the song.
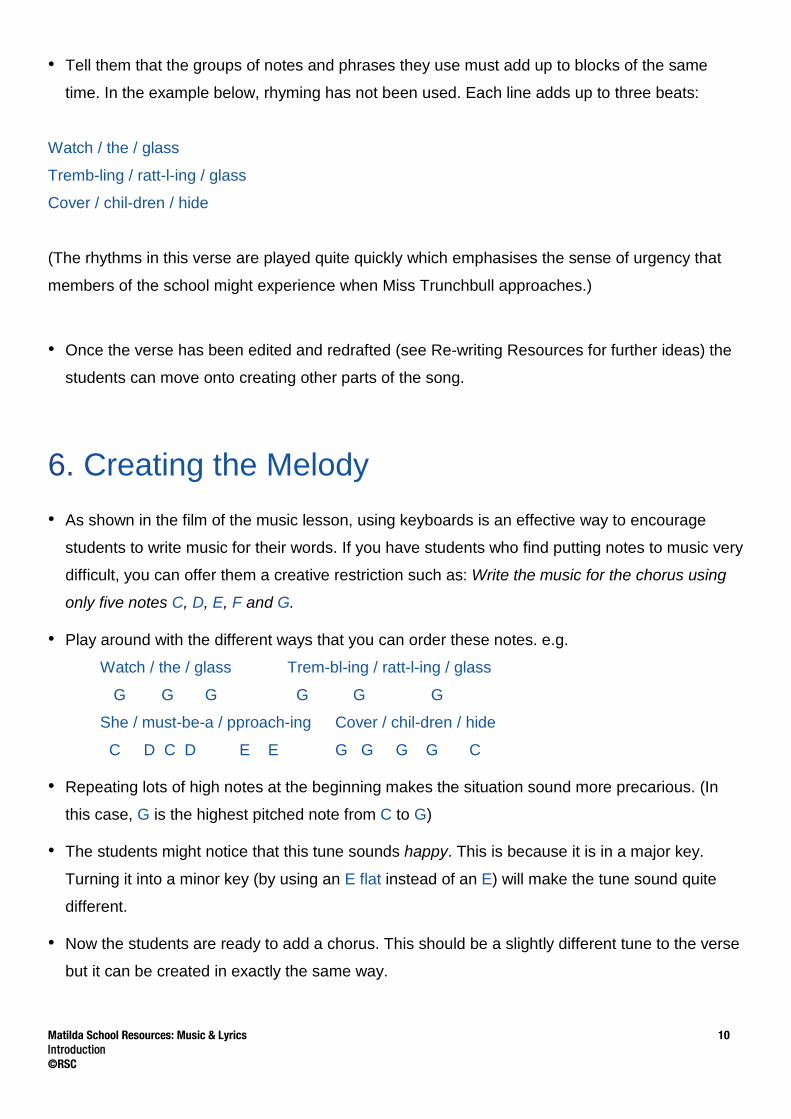
6. Creating the Melody • As shown in the film of the music lesson, using keyboards is an effective way to encourage
students to write music for their words. If you have students who find putting notes to music very
difficult, you can offer them a creative restriction such as: Write the music for the chorus using
only five notes C, D, E, F and G.
• Play around with the different ways that you can order these notes. e.g.
Watch / the / glass Trem-bl-ing / ratt-l-ing / glass
G G G G G G
She / must-be-a / pproach-ing Cover / chil-dren / hide
C D C D E E G G G G C
• Repeating lots of high notes at the beginning makes the situation sound more precarious. (In
this case, G is the highest pitched note from C to G)
• The students might notice that this tune sounds happy. This is because it is in a major key.
Turning it into a minor key (by using an E flat instead of an E) will make the tune sound quite
different.
• Now the students are ready to add a chorus. This should be a slightly different tune to the verse
but it can be created in exactly the same way.
Matilda School Resources: Music & Lyrics 11 Introduction ©RSC
Further Extension of Composition Work
• Once the students have completed their lyrics and melody, you may wish to challenge them
further by encouraging them to consider the atmosphere that they wish to create in the piece.
• The film of the music lesson shows simple activities that enable children to vary the texture of
the music. This is done by playing blocks of sound that are large or small, high or low, smooth
or sharp, sudden or gradual. In doing this, students recognise that they are not just creating
music, but also creating a feeling that can be experienced by their audience.
Now the students have explored adding music and lyrics to their scene, it’s time to take the next
step: Writing Dialogue!