Embed Size (px)
Citation preview

Muse CC 2018 Essential Skills Adobe Muse Creative Cloud 2018
Learning Technologies, Training, Audiovisual, and Outreach
Office of the Chief Information Officer

Copyright © 2018 Kennesaw State University Office of the Chief Information Officer
This document may be downloaded, printed, or copied for educational use without further permission of the Office of the Chief Information Officer provided the content is not modified and this statement is not removed. Any use not stated above requires the written consent of the Office of the Chief Information Officer. The distribution of a copy of this document via the Internet or other electronic medium without the written permission of the Office of the Chief Information Officer is expressly prohibited.
Published by Kennesaw State University – Office of the Chief Information Officer
The publisher makes no warranties as to the accuracy of the material contained in this document and therefore is not responsible for any damages or liabilities incurred from use.

Office of the Chief Information Officer
Muse CC 2018 Essential Skills Adobe Muse Creative Cloud 2018
Table of Contents Introduction .................................................................................................................................... 5
File Naming Conventions ............................................................................................................ 5
Learning Objectives ......................................................................................................................... 6
The Muse CC Environment ............................................................................................................. 7
The Start Window........................................................................................................................ 7
The Workspace Toolbar .............................................................................................................. 8
Planning a Site ................................................................................................................................. 8
Best Practices .............................................................................................................................. 8
Responsive Versus Adaptive Layouts .......................................................................................... 8
Creating a New Site ......................................................................................................................... 9
The Plan Workspace...................................................................................................................... 11
The Control Bar ......................................................................................................................... 11
The Site Map and Masters Panel .................................................................................................. 11
Page Relationships ................................................................................................................. 12
To Add a Page ........................................................................................................................ 13
Rearrange Pages .................................................................................................................... 13
Delete a Page ......................................................................................................................... 14
Master Pages ............................................................................................................................. 14
Create Master Pages .............................................................................................................. 14
Rename Pages........................................................................................................................ 15
Create a New Page from a Master Page ................................................................................ 15
Apply a Master Page to an Existing Page............................................................................... 16
Delete a Master Page ............................................................................................................ 17
Change Page Properties ............................................................................................................ 17

Change Site Properties .............................................................................................................. 18
The Design Workspace .................................................................................................................. 19
The Design Environment ........................................................................................................... 19
The Control Panel ...................................................................................................................... 19
The Tools Panel ......................................................................................................................... 20
The Features Panel .................................................................................................................... 21
Layers ........................................................................................................................................ 22
Create Layers ......................................................................................................................... 22
Modify Layers ............................................................................................................................ 23
Add Elements to a Page ............................................................................................................ 23
Add Text to a Page ................................................................................................................. 23
Formatting text ......................................................................................................................... 24
Create Shapes ............................................................................................................................ 26
Create Frames ........................................................................................................................... 27
Place Images .............................................................................................................................. 28
Place Image on a Canvas ....................................................................................................... 28
Place an Image in a Shape or Frame ...................................................................................... 29
Styling Objects ........................................................................................................................... 30
Alternative Text ......................................................................................................................... 31
Hyperlinks .................................................................................................................................. 31
Create an Internal Hyperlink ................................................................................................. 31
Create an External Hyperlink ................................................................................................. 32
Widgets Library ............................................................................................................................. 33
Insert a Widget .......................................................................................................................... 33
The Preview Workspace ............................................................................................................... 34
Preview Mode ........................................................................................................................... 34
Preview Site in Browser............................................................................................................. 35
Exporting and Publishing a Site ..................................................................................................... 35
Student Web Hosting ................................................................................................................ 36
Upload to StudentWeb via Upload to FTP Host ........................................................................ 36
Backing Up a Site via Export as HTML ....................................................................................... 39

Terminology .................................................................................................................................. 40
Additional Help ............................................................................................................................. 41

Revised: 1/23/2018 Page 5 of 41
Introduction Adobe Muse CC is a useful tool that allows you to create and publish fixed or fluid websites within a visual (WYSIWYG) interface
This booklet is to help students understand the fundamental processes involved with planning, designing and publishing web pages using Muse CC.
Note to Students: Every student with an active NetID has space on StudentWeb, the KSU student server. If you do not have an active NetID, or have forgotten the password, go to https://netid.kennesaw.edu for assistance.
Your web address on StudentWeb is http://studentweb.kennesaw.edu/~yourNetID. Do not put www before this address.
Note: Do not place any sensitive information on your website, even if there are no direct links to it.
File Naming Conventions When naming your files to publish to the KSU student or faculty web servers, always use lowercase letters and use underscores (_) in place of spaces. For example, instead of naming a page “KSU Graduation Rates.html” it would be best to name it “ksugraduationrates.html” or “ksu_graduation_rates.html”.
Other best practices include:
• Use shorter names • Avoid special characters such as question marks, exclamation points, hashtags etc. • Do not use numbers as the initial character

Revised: 1/23/2018 Page 6 of 41
Learning Objectives After completing this booklet, you will be able to:
• Understand the terms and definitions of web spaces • Navigate the three workspace environments within Muse CC • Understand the fundamentals of planning, designing and publishing sites in Muse CC • Create and develop a site map with parent, child and master pages • Understand the concepts of static and responsive layouts • Insert and format text, images, hyperlinks, and widgets • Navigate between and group content within layers • Preview pages in Muse CC and in browser • Publish sites to the KSU student web server, StudentWeb • Create a local site backup

Revised: 1/23/2018 Page 7 of 41
The Muse CC Environment Muse CC is a WYSIWYG (what you see is what you get) website editor. This means that as you design your website, you are creating the final look in a web browser. You do not need to know any code (HTML, CSS, JavaScript) to use Muse CC.
The Start Window The Start Window appears when Muse CC first launches.
1. Recent – Sites that you have recently opened (See Figure 1). 2. CC Files – Access libraries associated with a Creative Cloud Account (See Figure 1). 3. Create New – Create a new site (See Figure 1). 4. Open – Open an existing site (See Figure 1). 5. Work – Access and create sites under this tab (See Figure 1). 6. Learn – View tutorials and guides created by Adobe (See Figure 1). 7. Search – Enter keywords or phrases to search recent files, Adobe Creative Cloud
assets, help links, and stock images (See Figure 1). 8. Adobe ID Management – Launches the Adobe ID Management site in a web
browser (See Figure 1). 9. Thumbnail View – View image previews of recent sites (See Figure 1). 10. List View – View recent sites by file name (See Figure 1). 11. Sort – Arrange recent sites view by last opened, name, size or kind (See Figure 1). 12. Filter – Enter keywords or phrases to search recent sites (See Figure 1). 13. File and Search Results Pane – Displays recent files and search results (See Figure 1).
Figure 1 – The Start Window

Revised: 1/23/2018 Page 8 of 41
The Workspace Toolbar The Workspace Toolbar is located at the top of the Muse CC application window. From the Workspace Toolbar, you can access the Workspace Layouts Plan, Design, and Preview, as well as the option to Publish and Share your site.
Below is a summary of Workspace Layouts, Publish, and Share.
1. Plan – Organize your site through site maps and manage Master Pages (See Figure 2). 2. Design – Create the visual look of your site by adding content, images, fonts, and
widgets (See Figure 2). 3. Preview – View changes to a page or site in Muse CC or in a browser before publishing
(See Figure 2). 4. Publish – Upload a site directly to a server (FTP Host) through Muse CC or export the
site as an HTML file (See Figure 2). 5. Share – Once a site is published, access site URL and In-Browser Editing features (See
Figure 2).
Figure 2 – The Workspace Toolbar
Planning a Site Best Practices Taking steps to plan your site will save time and effort down the line. Some important questions to consider at this stage include:
• Will my site have multiple pages? What will they be? • Will my layout be viewed on tablets and phones? • What is the look and feel I want for my site?
Responsive Versus Adaptive Layouts Web browsing is no longer limited to desktop computers and laptops. Many users view websites on their smartphones or tablets with varied screen sizes. In Muse CC, you can create layouts that remain attractive across devices with either responsive or adaptive/static layouts.

Revised: 1/23/2018 Page 9 of 41
Responsive Layouts – Elements resize and move around as browser size shrinks. To create a responsive layout, select fluid width from the new site dialogue box.
Figure 3 - Enable Fluid Width
Adaptive/Static Layouts – The layout for desktop, tablet and smartphone viewing are created independently, and elements do not resize as the browser window shrinks or expands. To create an adaptive layout, select fixed page width from the new page dialogue box.
Figure 4 - Enable Fixed Width
Creating a New Site The steps below will walk you through creating a new site.
1. After opening Muse CC, navigate to File (See Figure 5). 2. Click New Site (See Figure 5).
Figure 5 – Create a New Site

Revised: 1/23/2018 Page 10 of 41
3. The New Site dialogue box appears. From here, you can configure the settings listed below.
a. Fluid/Fixed Width – Fluid layouts resize with the browser window. Fixed layouts do not resize with the browser window (See Figure 6).
b. Page Width/Max Page Width – the largest width in pixels of a webpage c. Columns – the number of column guidelines per page (See Figure 6). d. Gutter – the space between each column. Gutter only applies to layouts with
two or more columns (See Figure 6). e. Min Width – the minimum width of pixels of each page. Pages will not shrink
beyond this value. This setting only applies to fluid width sites (See Figure 6). f. Min Height – the minimum height in pixels of each page. Pages will
automatically grow taller to accommodate content (See Figure 6). g. Margins – space between columns and the edge of the webpage (See Figure 6). h. Link Margins – make all margin settings the same or adjust each individually
(See Figure 6). i. Padding – the space between content, such as text, and the border of column
(See Figure 6). j. Alignment – center margins and padding or align them to the left of the page
(See Figure 6). k. Resolution – optimize your site for Standard or HiDPI displays (See Figure 6). l. Language – change the language to adjust spellcheck and localize widgets (See
Figure 6). m. Sticky Footer – pin footer elements to the bottom of a page. This improves site
performance for viewers with large desktop monitors (See Figure 6). 4. Click OK to create the site (See Figure 6).
Figure 6 - New Site Dialogue Box
Revised: 1/23/2018 Page 11 of 41
The Plan Workspace In the Plan Workspace, you create the hierarchical structure for your website.
The Control Bar 1. Master Badge – when checked, this option shows the master page template applied to
parent and child pages 2. Thumbnail – toggles visual previews of pages (See Figure 7). 3. Horizontal Site Map Display – displays the site map branching downward, with Master
Pages pinned to the bottom of the window (See Figure 7). 4. Vertical Site Map Display – displays the site map branching to the right, with Master
Pages pinned to the left side of the window. This view is beneficial for structuring complex sites (See Figure 7).
5. Size – scrub to adjust the size of page thumbnails (See Figure 7). 6. Tabbed Document Windows – navigate between open pages (See Figure 7).
Figure 7 - The Control Bar
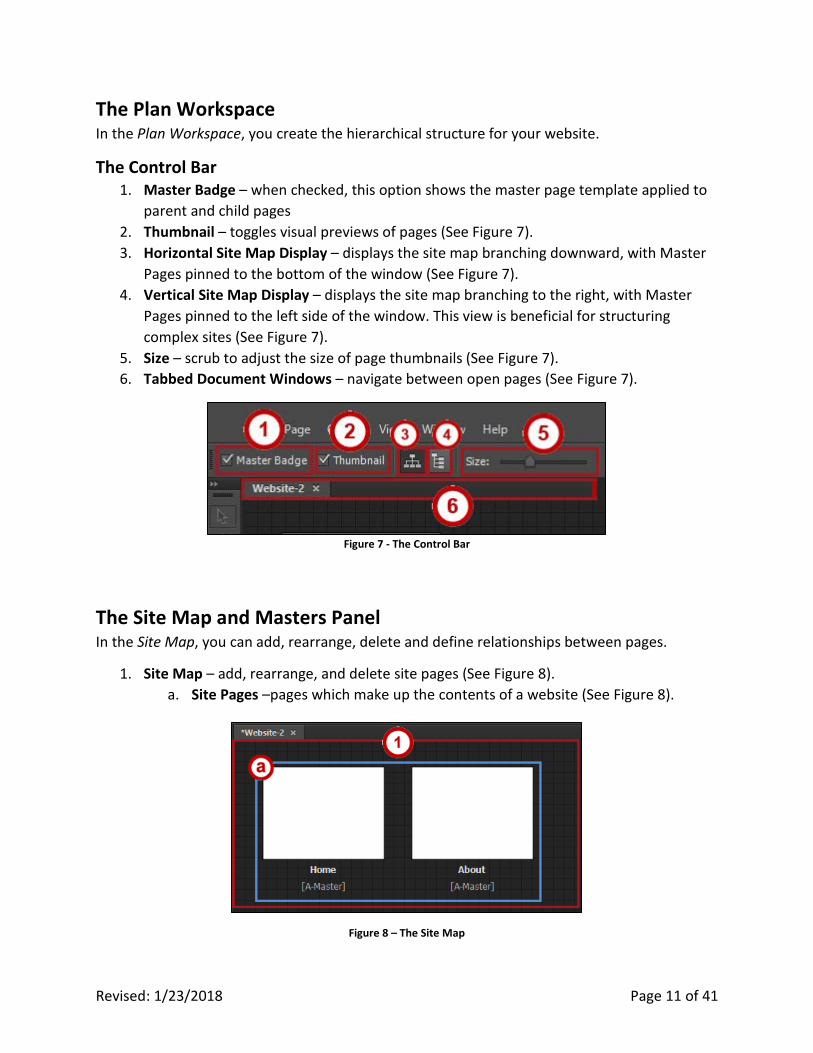
The Site Map and Masters Panel In the Site Map, you can add, rearrange, delete and define relationships between pages.
1. Site Map – add, rearrange, and delete site pages (See Figure 8). a. Site Pages –pages which make up the contents of a website (See Figure 8).
Figure 8 – The Site Map

Revised: 1/23/2018 Page 12 of 41
2. Masters Panel – create and rearrange master pages pages that behave as templates for pages within the Site Map (See Figure 9).
a. Master Pages – pages that act as templates with design elements and content that can be automatically applied to multiple site pages (See Figure 9).
Figure 9 - The Masters Panel
Page Relationships
1. Sibling Pages – Pages that reside at the same level within the hierarchy (Figure 10). 2. Parent/Child Pages - Pages residing at different levels within the hierarchy (Figure 10).
a. Parent Page– Pages that appear within site navigation. Parent pages reside at the top level of the site map (Figure 10).
b. Child Page – Pages that reside below parent pages (Figure 10).
Figure 10 - Page Relationships

Revised: 1/23/2018 Page 13 of 41
To Add a Page 1. Hover over a page. The Add Page icons will appear beside and below the thumbnail. 2. To create a sibling page, click one of the Add Page icons on either side of the thumbnail
(See Figure 11). 3. To create a child page, click the Add Page icon below the thumbnail (See Figure 11).
Figure 11 – Add Pages
Rearrange Pages The directions below show how to rearrange pages on the site map. Note: Rearranging the order of parent pages will automatically update the order of menu widgets.
1. To select the page you would like to move, left click it (See Figure 12). 2. While holding down the left click, you can drag the page onto the gold drop zone
around the desired new location (See Figure 12).
Figure 12 - Rearrange Pages
3. When you are ready to move the page to a new drop zone, release the mouse.

Revised: 1/23/2018 Page 14 of 41
Delete a Page The directions below demonstrate how to delete a page from the site map.
1. Hover over the preview thumbnail of the page you wish to delete. 2. An X appears at the top right corner of the preview thumbnail. Click it to delete the
page.
Figure 13 – Delete a Page
Master Pages Master Pages contain design elements that are consistent to multiple pages. Any changes made to a master page will appear on pages to which the master is applied. This allows you to add elements to multiple pages at once.
Create Master Pages You can create multiple master pages to meet the needs of your site. The default master page is named the A-Master. The directions below demonstrate how to create a master page.
1. Hover over the preview thumbnail of an existing master page.The Add Page Icons appear on either side of the preview thumbnail.
Figure 14 – Add Page Icons to Master Page
2. Click either add page icon to add a master page.

Revised: 1/23/2018 Page 15 of 41
Rename Pages 1. Select the page you would like to rename. 2. Double click the page name. A text field will appear.
Figure 15- Rename Page
3. Enter the new page name. Click outside the thumbnail to save changes.
Note: Any changes made to page names will populate within menu widgets automatically.
Create a New Page from a Master Page 1. Select the master page you would like to use as your template. 2. Click and drag the new page to the desired drop zone.
Figure 16 – Drag Master Page to Drop Zone

Revised: 1/23/2018 Page 16 of 41
3. When the click is released, a new page is created.
Figure 17 – New Page Created From Master Page
Apply a Master Page to an Existing Page
1. Click and drag the master page over the page you have selected.
Figure 18 – Drag Master Page Over Existing Page

Revised: 1/23/2018 Page 17 of 41
2. When the click is released, the master page will automatically be applied to the page (See Figure 19).
Figure 19 – Master Page Applied to Existing Page
Delete a Master Page The directions below demonstrate how to delete a master page.
1. Hover over the preview thumbnail of the page you wish to delete. 2. An X appears at the top right corner of the preview thumbnail. Click it to delete the
page.
Figure 20 – Delete a Master Page
Change Page Properties 1. From Design Mode, select the Page drop down meu from the toolbar (See Figure 23).

Revised: 1/23/2018 Page 18 of 41
2. Select Page Properties (See Figure 23).
Figure 21 - Adjust Page Properties
3. The Page Properties dialogue box launches. Adjust page properties as needed.
Change Site Properties 1. To change properties of an entire site, navigate to the toolbar (See Figure 24). 2. From the File drop down menu, select Site Properties (See Figure 24).
Figure 22 - Adjust Site Properties
3. The Site Properties dialogue box launches. Adjust site properties as needed.

Revised: 1/23/2018 Page 19 of 41
The Design Workspace The Design Environment In the Design Workspace, you create or insert visual elements (images, text, etc.) into your web pages. The following describes the design environment interface.
1. Control Panel – Modify and change the appearance of elements (See Figure 23). 2. Tools Panel – Work with tools such as the selection pointer, magnifier, and so on
(See Figure 23). 3. Features Panel – Access and configure widgets, object states, layers, and Adobe
Creative Cloud Libraries (See Figure 23). 4. Canvas – Visual preview of your site (See Figure 23). 5. Rulers – Set guides to appropriate positions (See Figure 23).
Figure 23 – The Design Environment
The Control Panel The Control Panel houses the tools to allow you to change the appearance of elements within your website. Options in the Control Panel vary depending on the selected element. For example, when you are modifying a blank canvas, as seen in the screenshot below, the Control Panel displays options to configure Browser Fill, Stroke etc. The following items are default elements in the control panel.

Revised: 1/23/2018 Page 20 of 41
1. Selection Indicator - displays the selected element and its current state (See Figure 24). 2. State – edit the properties of an object as users interact with it. Choose between
normal, rollover, mouse down, and active states (See Figure 24). 3. Fill – fills an element with a selected shade (See Figure 24). 4. Stroke – generate a border around the edges of an element (See Figure 24). 5. Corner Radius Tool – format an element with rounded or sharp corners (See Figure 24). 6. Effects – add shadow, bevel or glow to an element (See Figure 24). 7. Element-Dependent Properties – settings unique to certain elements appear here (See
Figure 24).
Figure 24 – Control Panel
The Tools Panel The Tools Panel allows you to work with the following tools.
1. Selection Tool – select elements on the active canvas (See Figure 25). 2. Crop – crop and rotate elements (See Figure 25). 3. Type – create text boxes (See Figure 25). 4. Shape – draw rectangles or ellipses (See Figure 25). 5. Frame – draw shapes that can be filled with text or images. (See Figure 25). 6. Hand – move the canvas position within the open tab (See Figure 25). 7. Magnify – zoom in or out on the canvas (See Figure 25). 8. Anchor Link – creates a region within a webpage links can point to. Useful for single
page websites (See Figure 25). 9. Format Text – choose whether to format text across breakpoints or within current
breakpoint (See Figure 25).
Figure 25 – The Tools Panel

Revised: 1/23/2018 Page 21 of 41
The Features Panel Within the Features Panel, you can access key features. You can add additional tab groups to the features panel if desired. The default tab groups are described below.
1. Text – change font, color and paragraph properties (See Figure 26). 2. Swatches – access, create and save color libraries (See Figure 26). 3. Widgets Library – access, modify and insert Widgets (See Figure 26). 4. States – modify the appearance of objects when users interact with them (See Figure
26). 5. Scroll Effects – set two or more elements to move in the browser at different speeds as
the user scrolls within the page (See Figure 26). 6. Layers – organize elements in your page (See Figure 26). 7. CC Libraries – access your Creative Cloud Libraries (See Figure 26). 8. Assets – access synced Creative Cloud files (See Figure 26). 9. Transform – adjust the size, position, and pinning of objects within the browser (See
Figure 26).
Figure 26 - Features Panel

Revised: 1/23/2018 Page 22 of 41
Layers Layers help you organize elements within your page. The steps below describe how to create and modify layers.
Create Layers 1. From the Features Panel, click Layers. 2. The layers tab expands (See Figure 27).
Note: By default, existing elements will nest under Layer 1 (See Figure 27).
Figure 27 - Layers Tab
3. To add a layer, click the New Layer icon (See Figure 28).
Figure 28 – Create a New Layer
4. A new layer is created.
Figure 29 –New Layer

Revised: 1/23/2018 Page 23 of 41
Modify Layers 1. From the Features Panel, click Layers. 2. Double click the layer you wish to modify. The Layer Options dialogue box appears From
the Layer Options dialogue box, you can modify the layer in several ways (See Figure 30).
a. Rename the layer (See Figure 30). b. Hide the layer from view (See Figure 30). c. Lock – prevents any editing to the layer (See Figure 30). d. Color – assign a shade to the layer. Note: Elements grouped within this layer will
assume corresponding colored guidelines (See Figure 30). 3. Click OK to continue (See Figure 30).
Figure 30 – Layer Options
Add Elements to a Page Elements include text, images and Widgets within a page. The directions below describe how to add different elements to a page.
Add Text to a Page 1. From the Tools Panel, select the text tool.
Figure 31 – The Text Tool

Revised: 1/23/2018 Page 24 of 41
2. Left click within the site canvas and drag to create a text box.
Figure 32 – Create Text Box
3. Type to add text.
Figure 33 – Add Text
Formatting text The following directions explain how to access the Format Text panel.
1. Select the text box from the Layers panel or double click it with the Selection Tool. Once the text box is selected, Text Frame will display in the Control Panel.
Figure 34 – Text Frame
2. Navigate to the Features Panel. Click the Text tab (See Figure 35).
Note: If you do not see the Text tab, you can enable it from the Window dropdown menu in the Toolbar.

Revised: 1/23/2018 Page 25 of 41
3. The Text Formatting Tab expands. The formatting tools are as follows (See Figure 35): a. Font – select between Web Fonts and Standard Fonts (See Figure 35).
Note: System fonts are not recommended, as they export as image files and can slow site loading.
b. Font Size – adjust font size (See Figure 35). c. Font Color - choose font color (See Figure 35). d. Alignment – choose between right and left aligned, justified, or centered text
(See Figure 35). e. Font Style – adjust capitalization, italicize text and more (See Figure 35). f. Tracking – adjust space between characters (See Figure 35). g. Spacing – adjust space between lines of text (See Figure 35). h. Indent – adjust first line indent (See Figure 35). i. Space – adjust space from sides of text box (See Figure 35). j. Margins – adjust space at top and bottom of text box (See Figure 35). k. Hyperlink Style – adjust the appearance of hyperlinks (See Figure 35). l. Paragraph Tag – useful for search engine optimization and accessibility (See
Figure 35).
Figure 35 – Text Formatting Tab

Revised: 1/23/2018 Page 26 of 41
Create Shapes The following directions demonstrate how to add shapes to a page.
1. From the Tools Panel, select the shape tool. Hold down a left click to select between the rectangle tool and the ellipse tool.
Figure 36 – The Text Tool
2. Left click within the site canvas and drag to create a shape.
Figure 37 – Create Shape
3. You can format the shape with options such as fill, stroke and pinning in the toolbar.
Figure 38 – Format Shape

Revised: 1/23/2018 Page 27 of 41
Create Frames Frames can be filled with text or images, or act as content placeholders. The following directions demonstrate how to add frames to a page.
1. From the Tools Panel, select the frame tool. Note: Hold the click to select between the rectangle frame tool and the ellipse frame tool.
Figure 39 – The Frame Tool
2. Click within the site canvas and drag to create a frame.
Figure 40 – Create Frame
3. You can format the frame with options such as fill, stroke and pinning in the toolbar.
Figure 41 – Format Frame

Revised: 1/23/2018 Page 28 of 41
Place Images Images can be placed directly onto a blank canvas, or used to fill existing frames. The steps below detail placing images into each.
Place Image on a Canvas 1. Navigate to the File dropdown menu (See Figure 42). 2. Click Place (See Figure 42).
Figure 42 – Place From File Menu
3. Select an image from the File Explorer, then click Open.
Figure 43 – Select Image

Revised: 1/23/2018 Page 29 of 41
4. The placement tool appears. Left click to place the image. a. If the image is too large, resize it by right clicking and dragging the resize
handles bordering the image.
Figure 44- Place and Resize Image
Place an Image in a Shape or Frame 1. From the Tools Panel, select the frame tool. In this example, we will use the ellipse
frame tool. 2. Create a frame by clicking and dragging on the canvas.
Figure 45 – Create a Frame
3. Following the steps outlined in Placing an Image above, select an image. 4. Hover the placing gun over the frame. When ready, click within the frame to fill it.
Figure 46 – Fill a Frame With an Image

Revised: 1/23/2018 Page 30 of 41
Styling Objects Text, shapes, and images can be styled with options such as stroke, fill, pinning, effects and hyperlinks from the toolbar.
1. Fill – adds color or a shade within an object (See Figure 47). 2. Stroke – create a border around the perimeter of an object (See Figure 47). 3. Corner Radius – choose between rounded and right angle corners on an object (See
Figure 47). 4. Effects – add drop shadow, bevel or glow to an object (See Figure 47). 5. Hyperlinks – make an object link to a page within your website or to an external
webpage (See Figure 47). 6. Pin – fixes an object to a horizontal or vertical axis as the browser window resizes
(See Figure 47). 7. Resize – decide how an object grows larger or smaller in response to varying
browser window sizes (See Figure 47). 8. Align – allows you to align multiple objects to each other or within a content area
(See Figure 47). 9. Footer – when checked, the selected item will move up and down with the bottom
page edge (See Figure 47).
Figure 47 – Styling Objects

Revised: 1/23/2018 Page 31 of 41
Alternative Text To improve your website’s accessibility, you can add alternative text to images.
1. Right click an image. 2. Select Edit Image Properties. 3. The Image Properties window opens (See Figure 48).
a. Tooltip – text that appears when the cursor hovers over the image (See Figure 48).
b. Alternative Text – text describing the contents of an image (See Figure 48).
Figure 48 – Edit Image Properties
Hyperlinks Hyperlinks allow a user to travel between webpages. Links that direct users to a page within your website are called internal hyperlinks. Links that direct users to pages on external websites are called external hyperlinks.
Create an Internal Hyperlink 1. Select the element you want to become a hyperlink.
Figure 49 – Select Element
2. From the toolbar, click the Hyperlinks drop down menu.
Figure 50 – Internal Hyperlinks Drop Down Menu

Revised: 1/23/2018 Page 32 of 41
3. From the menu, select the page to which the element will link (See Figure 51).
Note: Muse CC automatically generates internal hyperlinks as you add pages to your site map.
Figure 51 – Create an Internal Hyperlink
4. The internal hyperlink is created.
Create an External Hyperlink 1. Select the element you want to become a hyperlink.
2. Figure 52 – Select Element
3. From the toolbar, click the Hyperlinks drop down menu.
Figure 53 – External Hyperlinks Drop Down Menu
4. Enter the URL of the external website in the add or filter links text field. Hit enter to create the external link.
Note: To create links to external site that open in a new tab or window of the browser, click Hyperlinks and check Open the link in a new window or tab.
Figure 54 – Add an External Hyperlink

Revised: 1/23/2018 Page 33 of 41
Widgets Library Widgets are preconfigured elements that add additional functionality to a website, such as slideshow galleries, contact forms, and navigation menus.
Insert a Widget 1. Navigate to the Features Panel and click Widgets Library.
Figure 55 – Access the Widgets Library
2. The Widgets Library Panel expands. From here, you can insert and modify many types of widgets. The default options Muse CC offers are described below.
a. Widget Preview – preview the look and feel of a widget (See Figure 56). b. Buttons – interactive hyperlinks that respond to user actions such as hover and
click (See Figure 56). c. Compositions – users interact with an area within a webpage to change the
content in another area (See Figure 56). d. Forms – creates a form users fill out to contact the webmaster (See Figure 56). e. Menus – create a site menu that auto-populates as you add pages to the site
map (See Figure 56). f. Panels – insert panels of content within a site. Only one active panel can be
viewed at a time (See Figure 56). g. Slideshows – image galleries with built in navigation and animation options (See
Figure 56). h. Social – create embedded social media content within Muse CC (See Figure 56).
Figure 56 – Widgets Library Panel

Revised: 1/23/2018 Page 34 of 41
The Preview Workspace In Muse CC, you can preview your site as you build and add elements to it. You can choose between two preview options: Preview Mode, or Preview in Browser
Note: Adobe Muse CC sites are optimized for the most recent version of the following browsers: Chrome, Safari, Internet Explorer 11, Edge, and Firefox.
Preview Mode Preview Mode allows you to preview sites within the Adobe Muse CC platform. This method is best suited for previewing minor changes. To access Preview Mode, follow the steps below.
1. Open the site or page you wish to preview. 2. From the Workspace Toolbar, click Preview.
Figure 57 – Launch Preview Mode
3. Preview Mode launches. From Preview Mode, you have the following options: a. Refresh – reload the site preview after you make changes in Plan or Design
Mode (See Figure 58). b. Preview Hyperlinks – navigate a site through internal hyperlinks (See Figure
58). c. Preview Responsive Elements - test your layout in varying resolutions by
resizing the Adobe Muse CC application window (See Figure 58).
Figure 58 – Features of Preview Mode
Revised: 1/23/2018 Page 35 of 41
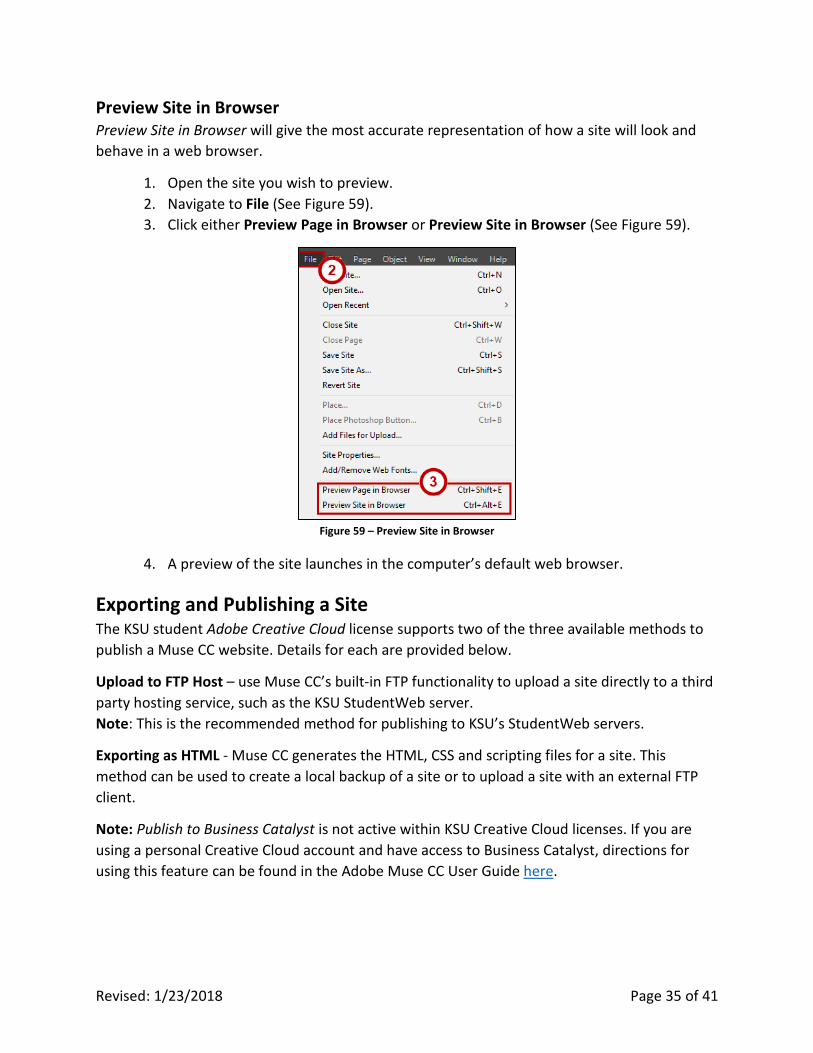
Preview Site in Browser Preview Site in Browser will give the most accurate representation of how a site will look and behave in a web browser.
1. Open the site you wish to preview. 2. Navigate to File (See Figure 59). 3. Click either Preview Page in Browser or Preview Site in Browser (See Figure 59).
Figure 59 – Preview Site in Browser
4. A preview of the site launches in the computer’s default web browser.
Exporting and Publishing a Site The KSU student Adobe Creative Cloud license supports two of the three available methods to publish a Muse CC website. Details for each are provided below.
Upload to FTP Host – use Muse CC’s built-in FTP functionality to upload a site directly to a third party hosting service, such as the KSU StudentWeb server. Note: This is the recommended method for publishing to KSU’s StudentWeb servers.
Exporting as HTML - Muse CC generates the HTML, CSS and scripting files for a site. This method can be used to create a local backup of a site or to upload a site with an external FTP client.
Note: Publish to Business Catalyst is not active within KSU Creative Cloud licenses. If you are using a personal Creative Cloud account and have access to Business Catalyst, directions for using this feature can be found in the Adobe Muse CC User Guide here.

Revised: 1/23/2018 Page 36 of 41
Student Web Hosting All KSU students are provided web hosting on the StudentWeb server. Before you can publish to StudentWeb, your account must be activated. To do so, email the Student Service Desk at [email protected].
Your website address will be https://studentweb.kennesaw.edu/~yourNetID.
Upload to StudentWeb via Upload to FTP Host 1. From the File menu, select Upload to FTP Host. 2. The Connect to FTP Server dialogue box appears.
a. FTP Server – enter the FTP server address (See Figure 60). To connect to StudentWeb, enter studentweb.kennesaw.edu.
b. User Name and Password – enter your NetID and NetID password (See Figure 60).
c. Store Credentials – When checked, saves your NetID and password (See Figure 60). Note: If you are using a public computer, unchecking this option will prevent others from accessing your website.
d. Method – assure SFTP is selected (See Figure 60). 3. Click Next to proceed (See Figure 60).
Figure 60 – Connect to FTP Server

Revised: 1/23/2018 Page 37 of 41
4. The Server Verification dialogue box opens. Check I trust this server and click OK.
Figure 61 –Server Verification Dialogue Box
5. The Upload to FTP Host dialogue box opens. Enter the following information: a. Site URL – enter the site URL (See Figure 62). If uploading to StudentWeb, the
address will be studentweb.kennesaw.edu/~yourNetID b. Folder on Server – points users towards the public portion of a website. The
folder varies depending upon the site host (See Figure 62). If uploading to StudentWeb, enter html/
c. Upload – choose between uploading the entire website or only modified pages. If this is the first time uploading your site, select All Files (See Figure 62).
6. Click OK to proceed (See Figure 62).
Figure 62 – Upload to FTP Host

Revised: 1/23/2018 Page 38 of 41
7. The site upload takes place.
Figure 63 - Site Upload in Progress
8. The FTP Upload completes. a. Errors – Muse CC displays any errors that occurred during upload here (See
Figure 64). b. In-Browser Editing Quick Access – Once a site is published to a host, you can
make changes to text and images through In-Browser Editing (See Figure 64).. c. View Site – launches the published website in your default browser (See Figure
64).
Figure 64 – Upload To FTP Host Complete
9. Once the FTP Upload completes, your site is live and accessible on the web.

Revised: 1/23/2018 Page 39 of 41
Backing Up a Site via Export as HTML While the Upload to FTP Host tool is recommended to publish sites, the Export as HTML tool is useful for creating a local site backup.
Note: Export as HTML does not publish a website to the internet. To publish a site, follow the steps outlined in Upload to FTP Host above.
1. From the File dropdown menu, select Export as HTML. 2. The Export as HTML dialogue box launches.
a. Site URL – enter the site URL If uploading to StudentWeb, the address will be studentweb.kennesaw.edu/~yourNetID (See Figure 65).
b. Location – choose where the site files will be stored (See Figure 65). 3. Click OK to continue (See Figure 65).
Figure 65 – Export Site as HTML
4. Muse CC exports the site. An in-browser preview will launch once the site export is complete.

Revised: 1/23/2018 Page 40 of 41
Terminology Breakpoints – In a responsive layout, you can set breakpoints to represent different browser widths. These breakpoints allow you to test the look and feel of your layout at different browser widths.
Child Page/Subpage – within the site map, a page that resides at lower levels of organization.
Content – the text, images, videos, and audio users experience on a website
CSS (Cascading Style Sheets) – the style sheet language that controls the visual look and feel of your website. The layout, fonts, and colors of a website are examples of content controlled by CSS.
Elements – within Muse CC CC, media including images, text and widgets that can be added and manipulated within site pages.
Fixed Width Layout – as browser size changes, elements do not resize or move when the browser size changes
Fluid Width Layout – as browser size changes, elements resize and move around the page
HTML – the markup language that gives meaning to content on a website, for example embedding images in a page and defining paragraphs, headers, and lists.
Hyperlink or Link – a section of text or image that, when clicked, directs users from one web page to another.
JavaScript – the programming language used to create dynamic content on a website. Examples include content feeds, scrolling effects, and animated images.
Master Page – a page with visual elements that can be applied to other pages.
Parent Page – within the site map, a page that resides at the highest level of organization.
Publish, Upload to FTP Host – the action of uploading your web page(s) to a web server.
Site Map – the visual tool in the Plan workspace used to organize site pages in a hierarchy
Web Address - a URL (Uniform Resource Locator) is the text you type into the address bar of your web browser to access a web page. For example: http://www.kennesaw.edu.
Web page – a document that is connected to the World Wide Web. Web pages are made up of three languages: HTML, CSS and JavaScript. Muse CC automatically generates this code when you create your website.
Web Server – a server, or host, that makes a website available on the web. If you are a student at KSU and have activated your NetID (https://netid.kennesaw.edu), you have web space on the students server http://studentweb.kennesaw.edu.

Revised: 1/23/2018 Page 41 of 41
Website – a collection of related pages linked together with hyperlinks.
Widget – a pre-constructed element, such as a site menu, image gallery, button, or form, that can be added and customized by the website developer.
Workspace – the arrangement of toolbars and panels in the Muse CC CC interface. There are four distinct workspace layouts: Plan, Design, Preview, and Publish. Each of these facilitates the process of designing and publishing sites.
Additional Help For additional support, please contact the KSU Service Desk:
KSU Student Helpdesk
• Phone: 470-578-3555 • Email: [email protected] • Website: http://uits.kennesaw.edu