Embed Size (px)
Citation preview

Smart AC applicationMIM-H03U
Multi Wi-Fi kituser & installation manual
imagine the possibilitiesThank you for purchasing this Samsung product.

2
This product is the Smart Air conditioner which supports Samsung Smart Home Service.
ContentsSafety precautions . . . . . . . . . . . . . . . . . . . . . . . . . . . . . . . . . . . . . . . . . . . . . . . . . . . . . . . . . . . . . . . . . . . . . . . . . . . . . . . . . . . . . . . . . . . . . . . . . . . . . . . 3Check before installing Wi-Fi kit . . . . . . . . . . . . . . . . . . . . . . . . . . . . . . . . . . . . . . . . . . . . . . . . . . . . . . . . . . . . . . . . . . . . . . . . . . . . . . . . . . . . . . . . . . 4
Parts. . . . . . . . . . . . . . . . . . . . . . . . . . . . . . . . . . . . . . . . . . . . . . . . . . . . . . . . . . . . . . . . . . . . . . . . . . . . . . . . . . . . . . . . . . . . . . . . . . . . . . . . . . . . . . . . . . . . . .4Exterior dimension. . . . . . . . . . . . . . . . . . . . . . . . . . . . . . . . . . . . . . . . . . . . . . . . . . . . . . . . . . . . . . . . . . . . . . . . . . . . . . . . . . . . . . . . . . . . . . . . . . . . . . . .4
How to install Wi-Fi kit . . . . . . . . . . . . . . . . . . . . . . . . . . . . . . . . . . . . . . . . . . . . . . . . . . . . . . . . . . . . . . . . . . . . . . . . . . . . . . . . . . . . . . . . . . . . . . . . . . . 5Wi-Fi kit installation. . . . . . . . . . . . . . . . . . . . . . . . . . . . . . . . . . . . . . . . . . . . . . . . . . . . . . . . . . . . . . . . . . . . . . . . . . . . . . . . . . . . . . . . . . . . . . . . . . . . . . .5Checking the Wi-Fi kit. . . . . . . . . . . . . . . . . . . . . . . . . . . . . . . . . . . . . . . . . . . . . . . . . . . . . . . . . . . . . . . . . . . . . . . . . . . . . . . . . . . . . . . . . . . . . . . . . . . 10Initializing user data . . . . . . . . . . . . . . . . . . . . . . . . . . . . . . . . . . . . . . . . . . . . . . . . . . . . . . . . . . . . . . . . . . . . . . . . . . . . . . . . . . . . . . . . . . . . . . . . . . . . 11Updating the Wi-Fi kit by SD card . . . . . . . . . . . . . . . . . . . . . . . . . . . . . . . . . . . . . . . . . . . . . . . . . . . . . . . . . . . . . . . . . . . . . . . . . . . . . . . . . . . . . . . 11
Setting the network . . . . . . . . . . . . . . . . . . . . . . . . . . . . . . . . . . . . . . . . . . . . . . . . . . . . . . . . . . . . . . . . . . . . . . . . . . . . . . . . . . . . . . . . . . . . . . . . . . . . 12Specification of wired/wireless router for Samsung Smart Air conditioner. . . . . . . . . . . . . . . . . . . . . . . . . . . . . . . . . . . . . . . . . . . . . . . . 12
Starting Samsung Smart Home App . . . . . . . . . . . . . . . . . . . . . . . . . . . . . . . . . . . . . . . . . . . . . . . . . . . . . . . . . . . . . . . . . . . . . . . . . . . . . . . . . . . . 13Downloading Samsung Smart Home App. . . . . . . . . . . . . . . . . . . . . . . . . . . . . . . . . . . . . . . . . . . . . . . . . . . . . . . . . . . . . . . . . . . . . . . . . . . . . . . 13Running the Samsung Smart Home App . . . . . . . . . . . . . . . . . . . . . . . . . . . . . . . . . . . . . . . . . . . . . . . . . . . . . . . . . . . . . . . . . . . . . . . . . . . . . . . . 13Connecting the air conditioner to Samsung Smart Home app . . . . . . . . . . . . . . . . . . . . . . . . . . . . . . . . . . . . . . . . . . . . . . . . . . . . . . . . . . . 13
Starting System Air conditioner App . . . . . . . . . . . . . . . . . . . . . . . . . . . . . . . . . . . . . . . . . . . . . . . . . . . . . . . . . . . . . . . . . . . . . . . . . . . . . . . . . . . . 14Controlling the air conditioner with Samsung Smart Home app . . . . . . . . . . . . . . . . . . . . . . . . . . . . . . . . . . . . . . . . . . . . . . . . . . . . . . . . . 14
Troubleshooting . . . . . . . . . . . . . . . . . . . . . . . . . . . . . . . . . . . . . . . . . . . . . . . . . . . . . . . . . . . . . . . . . . . . . . . . . . . . . . . . . . . . . . . . . . . . . . . . . . . . . . . . 15Open Source Announcement . . . . . . . . . . . . . . . . . . . . . . . . . . . . . . . . . . . . . . . . . . . . . . . . . . . . . . . . . . . . . . . . . . . . . . . . . . . . . . . . . . . . . . . . . . . 16
3
ENGLISH
Safety precautionsThis installation manual explains how to install a Wi-Fi kit to an indoor unit of Samsung system air conditioners.Read the installation manual thoroughly before installing the Wi-Fi kit.(Refer to the appropriate manual for installing product or other optional parts.)
WARNING Hazards or unsafe practices that may result in severe personal injury or death.
CAUTION Hazards or unsafe practices that may result in minor personal injury or property damage.
WARNING
Contact service center for installation. - There is a risk of product malfunction, water leakage, electric shock or fire.
Install the Wi-Fi kit securely in a place that can withstand the weight of the product. - If the installation location is not strong enough, Wi-Fi Kit may fall and be damaged.
Connect the power with rated voltage when installing. - If not, there is risk of fire or damage to the Wi-Fi kit.
Do not attempt to move or re-install the Wi-Fi kit that is already installed. - There is risk of electric shock and fire.
Do not attempt to modify or repair the Wi-Fi kit on your own. - There is potential risk of product damage, electric shock or fire. When repair is needed, consult service center.
Check if the installation was done properly according to the installation manual. - If the Wi-Fi kit is installed incorrectly, there is risk of electric shock or fire.
Make sure that all wiring work is done by a qualified person complying with regional standards and instructions in this manual. - If the installation is done by unqualified person, there is risk of product malfunction, electric shock or fire caused by
incorrect installation.Contact the service center if you need to dispose the Wi-Fi kit.
CAUTION
Do not install the product in a place where it is or might be exposed to inflammable gas leakage. - There is risk of fire or explosion.
Do not install the product in a place where it will be exposed to oil or vapor etc. - If the product is used in a place where it is exposed to oil, vapor or sulphur dioxide, parts of the product may get
damaged or product may function abnormally. Make sure that water does not get into the Wi-Fi kit. - There is risk of electric shock and fire.
Make sure there is no tension to the cable during installation. - Cable may get cut and cause fire.
Install the product in a place with temperature between 0 °C~39 °C (32 °F~102 °F) with no direct sunlight. - If not, there is risk of electric shock or abnormal operation.
Do not install the product in a place where special spray or acid/alkali solution is used. - There is risk of electric shock or abnormal operation.
Do not press the button with sharp object. - There is risk of electric shock or damaging the parts.
Do not connect the power cable to the communication cable terminal. - There is risk of fire.
When installing the product in hospitals or other places, make sure that the product does not interrupt with other products. - Abnormal operation may occur.

4
Check before installing Wi-Fi kit
Parts
Assy Wi-Fi kit Cable tie (2) Cable clamp (3) M4×16 screw (5)
User & Installation manual U- terminal (6)
• Wi-Fi kit should be installed by a certified installer.• Before installing a Wi-Fi kit, you should check whether the power of the kit is turned off.• The wire of Wi-Fi kit should be installed in accordance with electric wiring regulation and should also be installed
inside the wall so that it cannot be touched by users.
Exterior dimension
120 (4 3/4)
124
(4 7
/8)
29 (1 1/8)Unit : mm (inches)
CAUTION

5
ENGLISH
How to install Wi-Fi kit
Wi-Fi kit installation
• For smooth operation, install the Wi-Fi kit and the wireless router in open space with no obstacles between them.Operation may not be possible if the distance between the Wi-Fi kit and the wireless router is too far or if there's any obstacle between them.
1. After pushing the two hooks on the bottom of the Wi-Fi kit at the same time, lift the front cover up and then detach it from the rear cover.
❋ Push the two hooks at the same time.
• It might be easier to disassemble the Wi-Fi kit if you put a flat-head screw driver into the square hole above the fixing hook.
2. Place the power wire and communication wire through openings in the rear cover.
<When the cover is not recessed> <When the cover is recessed>
15 cm (5 7/8 inches) 10 cm
(3 15/16 inches)
The opening can be cut and removed if you need more space.
CAUTION
NOTE
6
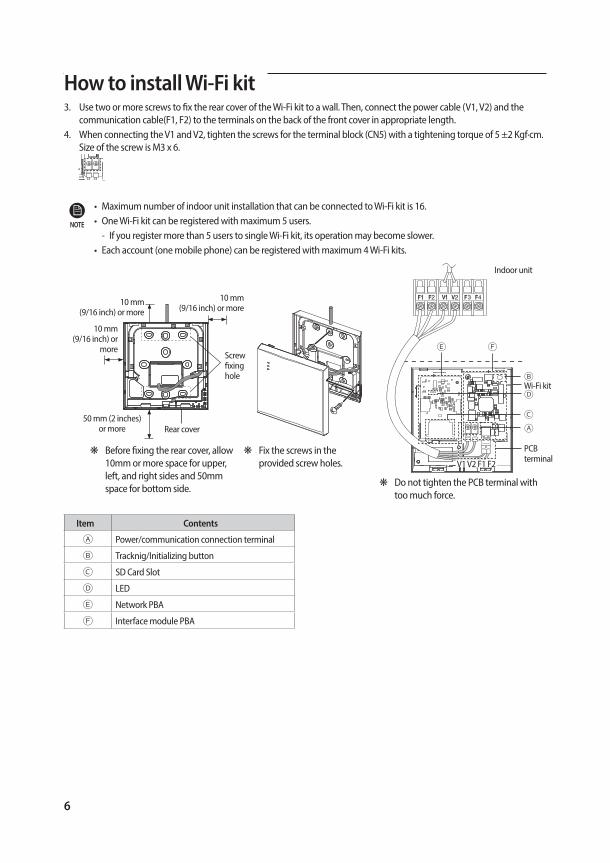
How to install Wi-Fi kit3. Use two or more screws to fix the rear cover of the Wi-Fi kit to a wall. Then, connect the power cable (V1, V2) and the
communication cable(F1, F2) to the terminals on the back of the front cover in appropriate length.4. When connecting the V1 and V2, tighten the screws for the terminal block (CN5) with a tightening torque of 5 ±2 Kgf·cm.
Size of the screw is M3 x 6.
• Maximum number of indoor unit installation that can be connected to Wi-Fi kit is 16.• One Wi-Fi kit can be registered with maximum 5 users.
- If you register more than 5 users to single Wi-Fi kit, its operation may become slower.• Each account (one mobile phone) can be registered with maximum 4 Wi-Fi kits.
Ⓑ
Ⓔ Ⓕ
Ⓐ
Ⓓ
Ⓒ
10 mm (9/16 inch) or
more
10 mm (9/16 inch) or more
50 mm (2 inches) or more
10 mm (9/16 inch) or more
Screw fixing hole
Rear cover
❋ Before fixing the rear cover, allow 10mm or more space for upper, left, and right sides and 50mm space for bottom side.
❋ Fix the screws in the provided screw holes.
❋ Do not tighten the PCB terminal with too much force.
V1 V2 F1 F2
Wi-Fi kit
PCB terminal
Indoor unit
Item Contents
Ⓐ Power/communication connection terminal
Ⓑ Tracknig/Initializing button
Ⓒ SD Card Slot
Ⓓ LED
Ⓔ Network PBA
Ⓕ Interface module PBA
NOTE
7
ENGLISH
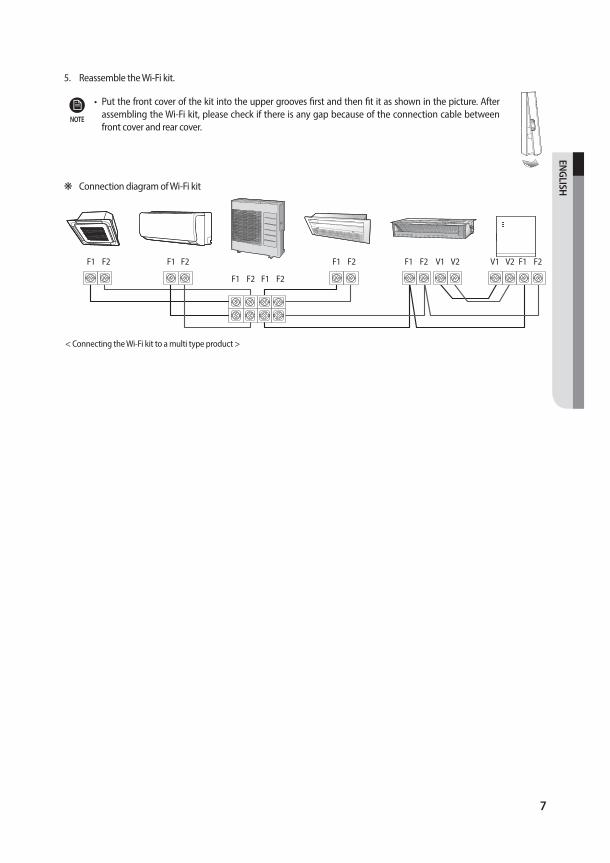
5. Reassemble the Wi-Fi kit.
• Put the front cover of the kit into the upper grooves first and then fit it as shown in the picture. After assembling the Wi-Fi kit, please check if there is any gap because of the connection cable between front cover and rear cover.
❋ Connection diagram of Wi-Fi kit
F1
F1 F1
F1 F1 V1V1 F1F2
F2 F2
F2 F2 V2V2 F2F1 F2
< Connecting the Wi-Fi kit to a multi type product >
NOTE
8
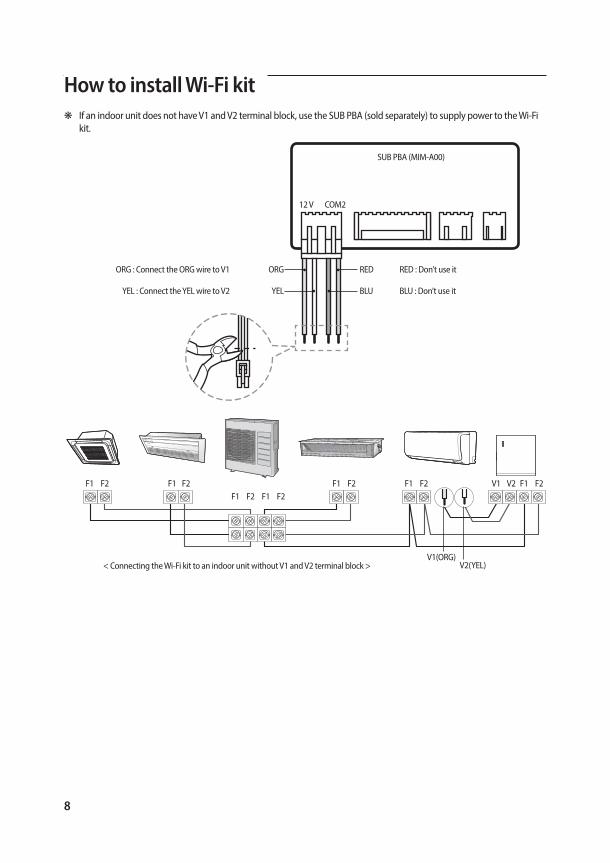
❋ If an indoor unit does not have V1 and V2 terminal block, use the SUB PBA (sold separately) to supply power to the Wi-Fi kit.
ORG : Connect the ORG wire to V1
YEL : Connect the YEL wire to V2
ORG RED RED : Don’t use it
YEL BLU BLU : Don’t use it
SUB PBA (MIM-A00)
12 V COM2
F1F1 F1
F1 F1 V1
V1(ORG)
F1F2F2 F2
F2 F2 V2
V2(YEL)
F2F1 F2
< Connecting the Wi-Fi kit to an indoor unit without V1 and V2 terminal block >
How to install Wi-Fi kit
9
ENGLISH
• When installing a Wi-Fi kit with 10 m (32.8 feet) or more wire, the communication wire and power wire of a Wi-Fi kit should be installed separately. (The Wi-Fi kit will malfunction because of electrical fault. )
• When installing a Wi-Fi kit on the wall, select proper thickness of wires in the consideration of the hole size for wire on the wall.
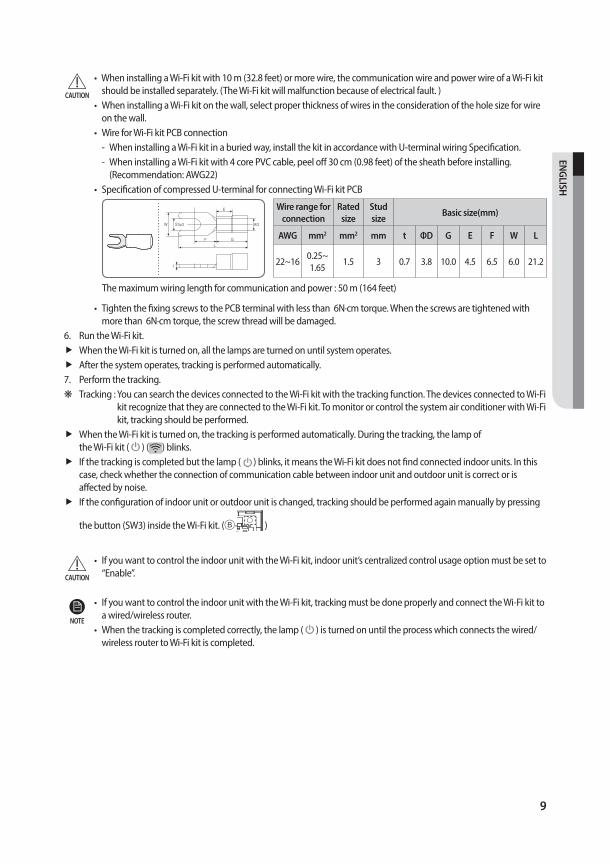
• Wire for Wi-Fi kit PCB connection - When installing a Wi-Fi kit in a buried way, install the kit in accordance with U-terminal wiring Specification. - When installing a Wi-Fi kit with 4 core PVC cable, peel off 30 cm (0.98 feet) of the sheath before installing.
(Recommendation: AWG22)• Specification of compressed U-terminal for connecting Wi-Fi kit PCB
W
t
G
E
FL
Stud D
Wire range for connection
Rated size
Stud size Basic size(mm)
AWG mm2 mm2 mm t ΦD G E F W L
22~160.25~ 1.65
1.5 3 0.7 3.8 10.0 4.5 6.5 6.0 21.2
The maximum wiring length for communication and power : 50 m (164 feet)
• Tighten the fixing screws to the PCB terminal with less than 6N·cm torque. When the screws are tightened with more than 6N·cm torque, the screw thread will be damaged.
6. Run the Wi-Fi kit.When the Wi-Fi kit is turned on, all the lamps are turned on until system operates. After the system operates, tracking is performed automatically.
7. Perform the tracking. ❋ Tracking : You can search the devices connected to the Wi-Fi kit with the tracking function. The devices connected to Wi-Fi
kit recognize that they are connected to the Wi-Fi kit. To monitor or control the system air conditioner with Wi-Fi kit, tracking should be performed.
When the Wi-Fi kit is turned on, the tracking is performed automatically. During the tracking, the lamp of the Wi-Fi kit ( ) ( ) blinks. If the tracking is completed but the lamp ( ) blinks, it means the Wi-Fi kit does not find connected indoor units. In this case, check whether the connection of communication cable between indoor unit and outdoor unit is correct or is affected by noise. If the configuration of indoor unit or outdoor unit is changed, tracking should be performed again manually by pressing
the button (SW3) inside the Wi-Fi kit. (Ⓑ- )
• If you want to control the indoor unit with the Wi-Fi kit, indoor unit’s centralized control usage option must be set to “Enable”.
• If you want to control the indoor unit with the Wi-Fi kit, tracking must be done properly and connect the Wi-Fi kit to a wired/wireless router.
• When the tracking is completed correctly, the lamp ( ) is turned on until the process which connects the wired/wireless router to Wi-Fi kit is completed.
CAUTION
CAUTION
NOTE

10
Checking the Wi-Fi kit
Power LED
AP Button
Wi-Fi Connect LED
Reset
Wi-Fi Configure LED
<Wi-Fi kit front view>
LED display information
NO LED information Power Wi-Fi Connect Wi-Fi Configure
1 Initialized ON ON ON
2 Normal ON ON OFF
3AP Connection OK. But, Internet is not
ConnectedON Blinking OFF
4
Air conditioner searching OK. but
AP connection is not completed.
ON OFF OFF
5 Wi-Fi Modem is in Malfunction
Blinking Blinking Blinking
6 Searching AP (AP mode)
ON OFF ON
7 Searching Air conditioner
Blinking Blinking OFF
8 No Air Conditioner Information
Blinking OFF OFF
9 Inspecting network PBA
ON Blinking Blinking
10 Requesting a token (AP mode)
ON OFF Blinking
How to install Wi-Fi kit
11
ENGLISH
Initializing user dataIf you want to initialize all the user data to set the Wi-Fi kit as factory default status, press and hold the button (SW3) inside the Wi-Fi kit for 5 seconds. After releasing the button, all the lamps on the Wi-Fi kit are turned on and all the user data is deleted.
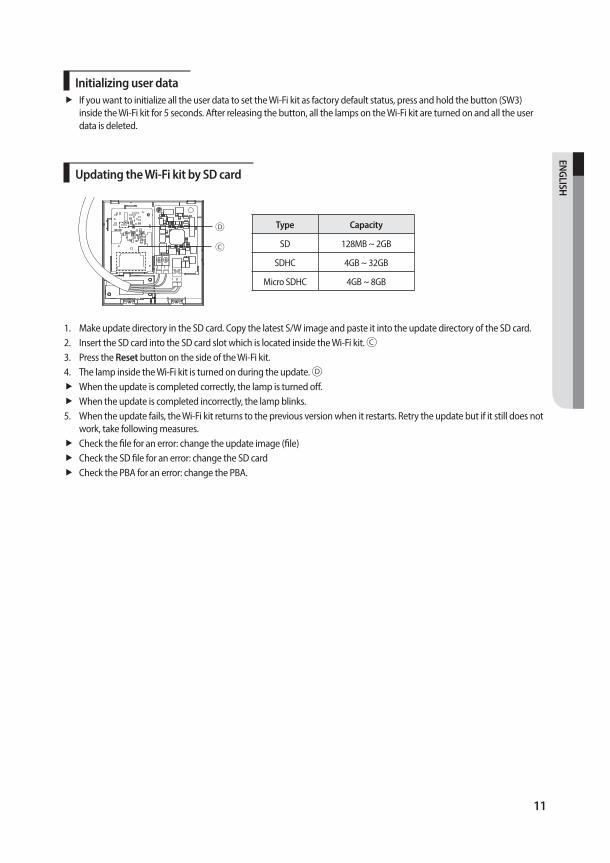
Updating the Wi-Fi kit by SD card
Ⓓ
Ⓒ
Type Capacity
SD 128MB ~ 2GB
SDHC 4GB ~ 32GB
Micro SDHC 4GB ~ 8GB
1. Make update directory in the SD card. Copy the latest S/W image and paste it into the update directory of the SD card.2. Insert the SD card into the SD card slot which is located inside the Wi-Fi kit. Ⓒ3. Press the Reset button on the side of the Wi-Fi kit.4. The lamp inside the Wi-Fi kit is turned on during the update. Ⓓ
When the update is completed correctly, the lamp is turned off. When the update is completed incorrectly, the lamp blinks.
5. When the update fails, the Wi-Fi kit returns to the previous version when it restarts. Retry the update but if it still does not work, take following measures.Check the file for an error: change the update image (file)Check the SD file for an error: change the SD cardCheck the PBA for an error: change the PBA.
12
Setting the network
• This product supports DHCP (Dynamic Host Configuration Protocol) only. Before connecting the router to the Wi-Fi kit, check whether the DHCP server option function of your wired/wireless router is activated.
• Select a channel for wired/wireless router. The channel should be currently not in use.• The cipher mode of wired/wireless router supports Open, WPA/TKIP or WPA2/AES. Except for the above modes, the
Wi-Fi kit may not be connected to wired/wireless router. In case of 802.11n, WPA2/AES mode is recommended. • The quality of wireless network connection can be affected by surrounding wireless circumstance. • If an internet service provider permanently registered the user's PC or MAC address (Identification number) of the
modem, the Wi-Fi kit may not be connected to the internet. Please contact the internet service provider and inquire about the internet connection process to connect a device (e.g. air conditioner) to the internet.
• If the internet service provider requires ID or password to be connected to the internet, the Wi-Fi kit may not be connected to the internet. In this case, you need to enter ID or password every time you connect the internet.
• Internet may not be available due to the firewall. Please contact the internet service provider and request the solution.
• Since some wired/wireless router can send abnormal DNS (Domain Name Server) even though internet is connected, the Wi-Fi kit may not be connected to internet. In this case, contact the suppliers of wired/wireless router or internet service provider.
• If you followed what the internet service provider directed but cannot be still connected to the internet, contact Quietside/Samsung Tech support 888-699-6067.
• If the wired/wireless router is connected to the Wi-Fi kit but the router is not connected to the internet, the lamp of Wi-Fi kit( ) blinks.
Specification of wired/wireless router for Samsung Smart Air conditionerPlease refer to the user manual for installation of your wired/wireless router.Wi-Fi kit supports Wi-Fi 2.4 GHz only.Wi-Fi kit supports the IEEE802.11 b/g/n communication protocol. (Samsung Electronics recommends use of IEEE802.11n.)If the wired/wireless router is not Wi-Fi certified product, it may not be connected to the Wi-Fi kit.The certified wired/wireless router has Wi-Fi CERTIFIED logo on the product package or in the user manual.
NOTE
13
ENGLISH
Starting Samsung Smart Home App
Downloading Samsung Smart Home AppYou can download the Samsung Smart Home App by searching "Samsung Smart Home" on Play store, Galaxy Apps and iPhone App Store.
For android phoneKorean key word : 삼성 스마트 홈English key word : Samsung Smart Home
For iPhoneKorean key word : 스마트 홈English key word : Smart Home
• Samsung Smart Home App supports android operating system 4.0 (ICS) or higher and is optimized with Samsung Smart phones (Galaxy S or Note series). If you run the App using a Smart phone manufactured by other companies, some functions may operate differently.
• For iPhone users, the App supports iOS7 or higher.• The UI of Samsung Smart Home App can be changed for improvement of usability and performance without
advanced notice and may differ from images in this manual.
Running the Samsung Smart Home AppBefore using the Samsung Smart Home App, register the Samsung account.
If you are a Samsung Smart phone user, you can automatically log on to the App with the Samsung account.If you are not a Samsung Smart phone user, the login page appears every time you use the Samsung Smart Home App.Search the country where the product will be used and press the Save button. It appears only one time at the first operation.
• If you are a Samsung Smart phone user but don’t have Samsung account, the Samsung account registration page appears every time you run the Samsung Smart Home App.
• If you don’t have Samsung account, press the Create account button.
Connecting the air conditioner to Samsung Smart Home appTo control the air conditioner remotely, connect the air conditioner to Samsung Smart Home app. Download and install Samsung Smart Home app, then configure settings by following the instructions on the screen.
NOTE
NOTE
14
Starting System Air conditioner App
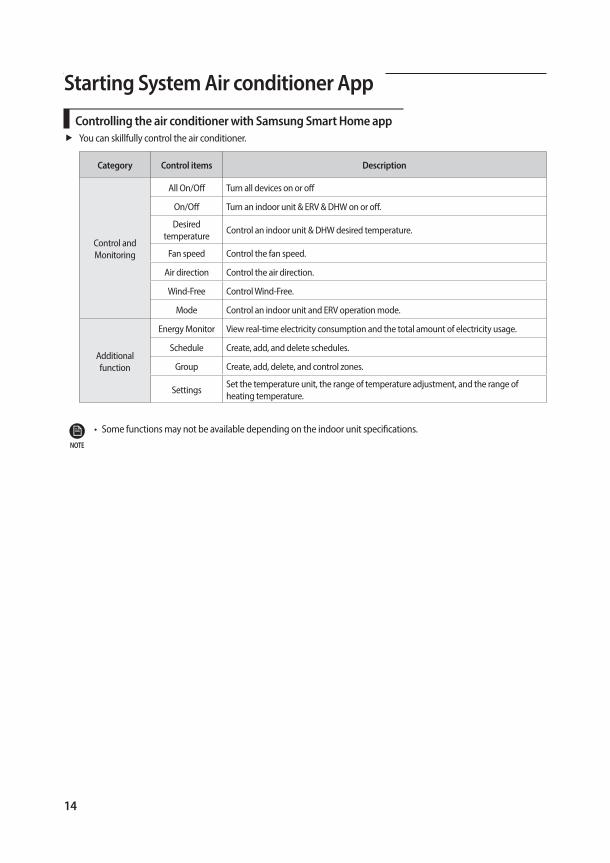
Controlling the air conditioner with Samsung Smart Home appYou can skillfully control the air conditioner.
Category Control items Description
Control and Monitoring
All On/Off Turn all devices on or off
On/Off Turn an indoor unit & ERV & DHW on or off.
Desired temperature
Control an indoor unit & DHW desired temperature.
Fan speed Control the fan speed.
Air direction Control the air direction.
Wind-Free Control Wind-Free.
Mode Control an indoor unit and ERV operation mode.
Additional function
Energy Monitor View real-time electricity consumption and the total amount of electricity usage.
Schedule Create, add, and delete schedules.
Group Create, add, delete, and control zones.
SettingsSet the temperature unit, the range of temperature adjustment, and the range of heating temperature.
• Some functions may not be available depending on the indoor unit specifications.NOTE
15
ENGLISH
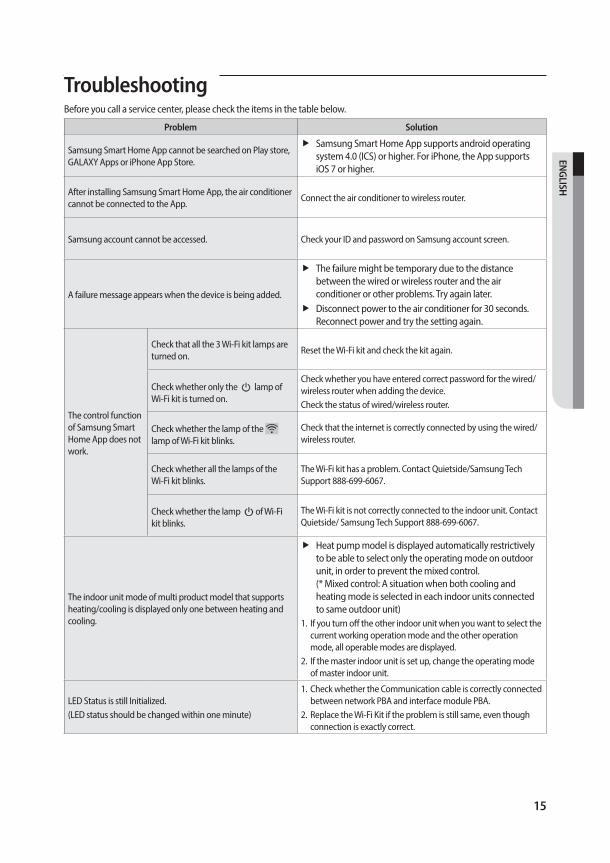
TroubleshootingBefore you call a service center, please check the items in the table below.
Problem Solution
Samsung Smart Home App cannot be searched on Play store, GALAXY Apps or iPhone App Store.
Samsung Smart Home App supports android operating system 4.0 (ICS) or higher. For iPhone, the App supports iOS 7 or higher.
After installing Samsung Smart Home App, the air conditioner cannot be connected to the App.
Connect the air conditioner to wireless router.
Samsung account cannot be accessed. Check your ID and password on Samsung account screen.
A failure message appears when the device is being added.
The failure might be temporary due to the distance between the wired or wireless router and the air conditioner or other problems. Try again later.Disconnect power to the air conditioner for 30 seconds. Reconnect power and try the setting again.
The control function of Samsung Smart Home App does not work.
Check that all the 3 Wi-Fi kit lamps are turned on.
Reset the Wi-Fi kit and check the kit again.
Check whether only the lamp of Wi-Fi kit is turned on.
Check whether you have entered correct password for the wired/wireless router when adding the device. Check the status of wired/wireless router.
Check whether the lamp of the lamp of Wi-Fi kit blinks.
Check that the internet is correctly connected by using the wired/wireless router.
Check whether all the lamps of the Wi-Fi kit blinks.
The Wi-Fi kit has a problem. Contact Quietside/Samsung Tech Support 888-699-6067.
Check whether the lamp of Wi-Fi kit blinks.
The Wi-Fi kit is not correctly connected to the indoor unit. Contact Quietside/ Samsung Tech Support 888-699-6067.
The indoor unit mode of multi product model that supports heating/cooling is displayed only one between heating and cooling.
Heat pump model is displayed automatically restrictively to be able to select only the operating mode on outdoor unit, in order to prevent the mixed control. (* Mixed control: A situation when both cooling and heating mode is selected in each indoor units connected to same outdoor unit)
1. If you turn off the other indoor unit when you want to select the current working operation mode and the other operation mode, all operable modes are displayed.
2. If the master indoor unit is set up, change the operating mode of master indoor unit.
LED Status is still Initialized.(LED status should be changed within one minute)
1. Check whether the Communication cable is correctly connected between network PBA and interface module PBA.
2. Replace the Wi-Fi Kit if the problem is still same, even though connection is exactly correct.
16
Open Source AnnouncementThe software included in this product contains open source software. You may obtain the complete corresponding source code for a period of three years after the last shipment of this product by sending an email to mailto:[email protected].
It is also possible to obtain the complete corresponding source code in a physical medium such as a CD-ROM; a minimal charge will be required.
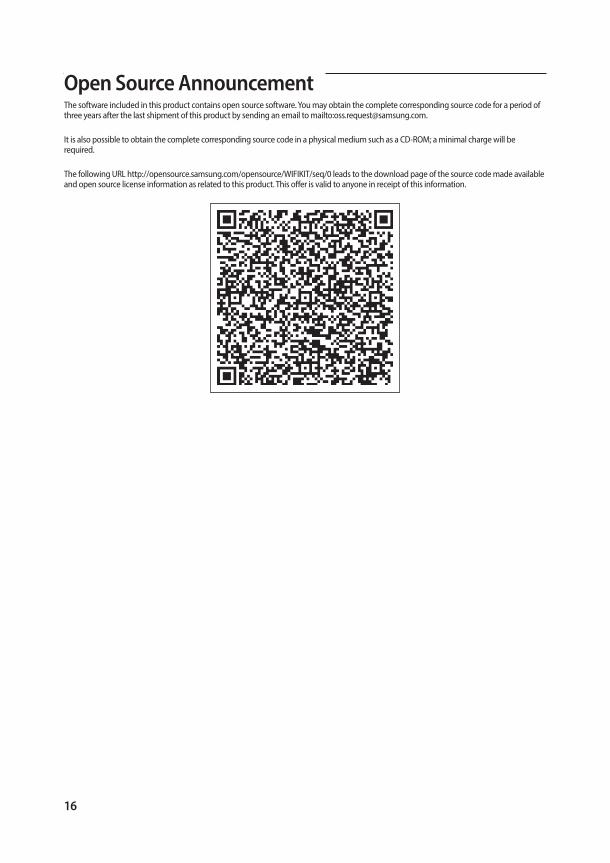
The following URL http://opensource.samsung.com/opensource/WIFIKIT/seq/0 leads to the download page of the source code made available and open source license information as related to this product. This offer is valid to anyone in receipt of this information.

17
ENGLISH
MEMO
Smart air conditioner APP can be altered without notice for quality improvement and also be deleted depending on the circumstances of manufacturing firms.