Embed Size (px)
Citation preview
6802972C35.book Page i Monday, August 16, 2004 9:22 PM
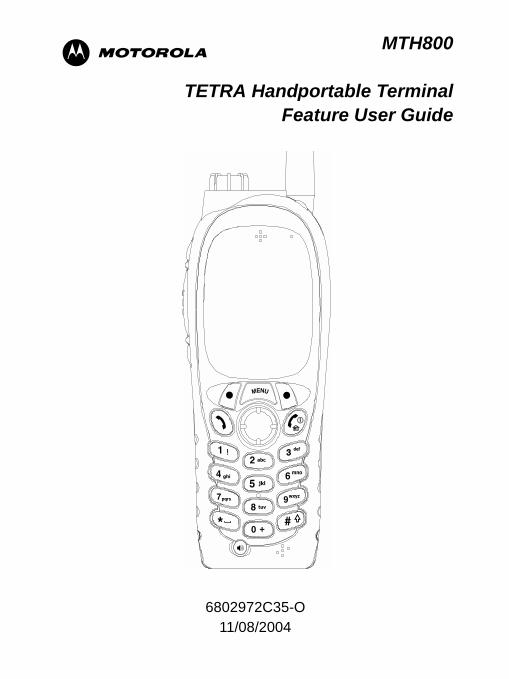
MTH800
TETRA Handportable TerminalFeature User Guide
6802972C35-O11/08/2004

6802972C35.book Page ii Monday, August 16, 2004 9:22 PM
6802972C35.book Page i Monday, August 16, 2004 9:22 PM
Contents
Safety Information . . . . . . . . . . . . . . . . . . . . . . . . . . . . 1General Safety Information . . . . . . . . . . . . . . . . . . . . . . . . . . . . 1Copyright Information . . . . . . . . . . . . . . . . . . . . . . . . . . . . . . . . 1Product Specific Information . . . . . . . . . . . . . . . . . . . . . . . . . . . 2Getting Started . . . . . . . . . . . . . . . . . . . . . . . . . . . . . . . 3How to Use this Guide . . . . . . . . . . . . . . . . . . . . . . . . . . . . . . . 3Installing the Battery . . . . . . . . . . . . . . . . . . . . . . . . . . . . . . . . . 4Replacing the Battery . . . . . . . . . . . . . . . . . . . . . . . . . . . . . . . . 5Charging the Battery . . . . . . . . . . . . . . . . . . . . . . . . . . . . . . . . . 5
Battery Capacity Information . . . . . . . . . . . . . . . . . . . . . . . 6Battery Maintenance . . . . . . . . . . . . . . . . . . . . . . . . . . . . . 6
Attaching the Antenna . . . . . . . . . . . . . . . . . . . . . . . . . . . . . . 8Controls and Indicators . . . . . . . . . . . . . . . . . . . . . . . . . . . . . . . 9Powering On/Off (On-Off/End/Home Key) . . . . . . . . . . . . . . . . 11Powering On (Emergency Button) . . . . . . . . . . . . . . . . . . . . . . 12Powering On with Transmit Inhibit (TXI) Active . . . . . . . . . . . . . 12Unlocking the MTH800 . . . . . . . . . . . . . . . . . . . . . . . . . . . . . . . 12Locking/Unlocking the Keys/Buttons . . . . . . . . . . . . . . . . . . . . . 13Selecting Your Network . . . . . . . . . . . . . . . . . . . . . . . . . . . . . . . 13How to Hold Your MTH800 . . . . . . . . . . . . . . . . . . . . . . . . . . . . 13
Use in Low Audio (Phone, PABX, and Full-duplex Private Calls) . . . . . . . . . . . . . . . . . . . . . . . . . . . . . . . . . . . 14Use in High Audio (Group and Private Calls) . . . . . . . . . . 14Lapel/Shoulder Use . . . . . . . . . . . . . . . . . . . . . . . . . . . . . 14Speakerphone Use . . . . . . . . . . . . . . . . . . . . . . . . . . . . . . 14
Looking after your MTH800 . . . . . . . . . . . . . . . . . . . . . . . . . . . . 14The Display . . . . . . . . . . . . . . . . . . . . . . . . . . . . . . . . . . . . . . . . 15
Home (Idle) Display . . . . . . . . . . . . . . . . . . . . . . . . . . . . . 15Status Icons . . . . . . . . . . . . . . . . . . . . . . . . . . . . . . . . . . . 15
The LED Status Indicator . . . . . . . . . . . . . . . . . . . . . . . . . . . . . 17Key, Knob, and Button Overview . . . . . . . . . . . . . . . . . . . . . . . 17
Soft Keys . . . . . . . . . . . . . . . . . . . . . . . . . . . . . . . . . . . . . . 17Menu Key . . . . . . . . . . . . . . . . . . . . . . . . . . . . . . . . . . . . . 17Rotary Knob . . . . . . . . . . . . . . . . . . . . . . . . . . . . . . . . . . . 18
6802972C35-O
6802972C35.book Page ii Monday, August 16, 2004 9:22 PM
Emergency Button . . . . . . . . . . . . . . . . . . . . . . . . . . . . . . 19Function Keys . . . . . . . . . . . . . . . . . . . . . . . . . . . . . . . . . . . . . . 19Speaker Control Key . . . . . . . . . . . . . . . . . . . . . . . . . . . . . 21
Aliases (Names) . . . . . . . . . . . . . . . . . . . . . . . . . . . . . . . . . . . . 21Screen Saver . . . . . . . . . . . . . . . . . . . . . . . . . . . . . . . . . . . . . . 22Home Display Text Message . . . . . . . . . . . . . . . . . . . . . . . . . . 22Terminal Disable/Enable . . . . . . . . . . . . . . . . . . . . . . . . . . . . . . 23Selecting TMO or DMO Operation . . . . . . . . . . . . . . . . . . . . . . 23
General . . . . . . . . . . . . . . . . . . . . . . . . . . . . . . . . . . . . . . . 23Entering TMO or DMO . . . . . . . . . . . . . . . . . . . . . . . . . . . 24TMO Calls . . . . . . . . . . . . . . . . . . . . . . . . . . . . . . . . . . . . . 24DMO Calls . . . . . . . . . . . . . . . . . . . . . . . . . . . . . . . . . . . . . 25
Making Calls . . . . . . . . . . . . . . . . . . . . . . . . . . . . . . . . . . . . . . . 25Modifying the Type of Call . . . . . . . . . . . . . . . . . . . . . . . . . . . . . 25Receiving Calls . . . . . . . . . . . . . . . . . . . . . . . . . . . . . . . . . . . . . 25Preemptive Calling . . . . . . . . . . . . . . . . . . . . . . . . . . . . . . . . . . 26
Receiving an Emergency Group Call during a Call . . . . . . 27Receiving a Private PPC during a Call . . . . . . . . . . . . . . . 27
Broadcast Call . . . . . . . . . . . . . . . . . . . . . . . . . . . . . . . . . . . . . . 28Ambience Listening (AL) . . . . . . . . . . . . . . . . . . . . . . . . . . . . . . 28Cancelling a Call . . . . . . . . . . . . . . . . . . . . . . . . . . . . . . . . . . . . 29Using In-call Features . . . . . . . . . . . . . . . . . . . . . . . . . . . . . . . . 29Local Area Service . . . . . . . . . . . . . . . . . . . . . . . . . . . . . . . . . . 30TMO Group Call . . . . . . . . . . . . . . . . . . . . . . . . . . . . . . 32General . . . . . . . . . . . . . . . . . . . . . . . . . . . . . . . . . . . . . . . . . . . 32Dual Microphone Feature . . . . . . . . . . . . . . . . . . . . . . . . . . . . . 33Selecting a Group . . . . . . . . . . . . . . . . . . . . . . . . . . . . . . . . . . . 33
Using the Rotary Knob . . . . . . . . . . . . . . . . . . . . . . . . . . . 34Using the Navigation Key . . . . . . . . . . . . . . . . . . . . . . . . . 34Using Alphabetic Search . . . . . . . . . . . . . . . . . . . . . . . . . . 34Using Folder Search . . . . . . . . . . . . . . . . . . . . . . . . . . . . . 34
Selecting a Folder . . . . . . . . . . . . . . . . . . . . . . . . . . . . . . . . . . . 35Using the Navigation Key . . . . . . . . . . . . . . . . . . . . . . . . . 35To Select a Folder . . . . . . . . . . . . . . . . . . . . . . . . . . . . . . . 35
“My Groups” Folder . . . . . . . . . . . . . . . . . . . . . . . . . . . . . . . . . . 35Selecting My Groups . . . . . . . . . . . . . . . . . . . . . . . . . . . . . 35Adding/Deleting Groups from My Groups . . . . . . . . . . . . . 35
ii

Contents
6802972C35.book Page iii Monday, August 16, 2004 9:22 PM
Group Scrolling Configuration . . . . . . . . . . . . . . . . . . . . . . . . . . 35Activating/deactivating Scanning . . . . . . . . . . . . . . . . . . . . . . . 36Making a Group Call . . . . . . . . . . . . . . . . . . . . . . . . . . . . . . . . . 36Receiving a Group Call . . . . . . . . . . . . . . . . . . . . . . . . . . . . . . . 37
General . . . . . . . . . . . . . . . . . . . . . . . . . . . . . . . . . . . . . . . 37Receiving a Group Call in Idle Screen with Scan Off . . . . 38Receiving a Group Call in Idle Screen with Scan On . . . . 38Receiving a Group Call during an On-going Group Call . . 39Receiving an Emergency Group Call . . . . . . . . . . . . . . . . 39Receiving a Broadcast Call . . . . . . . . . . . . . . . . . . . . . . . . 39
Transmit Inhibit . . . . . . . . . . . . . . . . . . . . . . . . . . . . . . . . . . . . . 39Dynamic Group Number Assignment (DGNA) . . . . . . . . . . . . . 40
DGNA Reception with Notification Message . . . . . . . . . . . 40DGNA Reception without Notification Message . . . . . . . . 41
DMO Group Call . . . . . . . . . . . . . . . . . . . . . . . . . . . . . . 42General . . . . . . . . . . . . . . . . . . . . . . . . . . . . . . . . . . . . . . . . . . . 42Dual Microphone Feature . . . . . . . . . . . . . . . . . . . . . . . . . . . . . 42“My Groups” Folder . . . . . . . . . . . . . . . . . . . . . . . . . . . . . . . . . . 42
Selecting the My Groups Folder . . . . . . . . . . . . . . . . . . . . 43Adding/Deleting Groups from the My Groups Folder . . . . 43
Selecting a Group . . . . . . . . . . . . . . . . . . . . . . . . . . . . . . . . . . . 43Selecting a Folder . . . . . . . . . . . . . . . . . . . . . . . . . . . . . . . . . . . 43Making a DMO Group Call without Gateway . . . . . . . . . . . . . . 43Making a DMO Group Call via Gateway . . . . . . . . . . . . . . . . . . 43Receiving a DMO Group Call . . . . . . . . . . . . . . . . . . . . . . . . . . 45Receiving an Emergency Group Call . . . . . . . . . . . . . . . . . . . . 46Transmit Inhibit . . . . . . . . . . . . . . . . . . . . . . . . . . . . . . . . . . . . . 46Exiting DMO . . . . . . . . . . . . . . . . . . . . . . . . . . . . . . . . . . . . . . . 46Private Call . . . . . . . . . . . . . . . . . . . . . . . . . . . . . . . . . . 47General . . . . . . . . . . . . . . . . . . . . . . . . . . . . . . . . . . . . . . . . . . . 47Dual Microphone Feature . . . . . . . . . . . . . . . . . . . . . . . . . . . . . 47Making a Private Call . . . . . . . . . . . . . . . . . . . . . . . . . . . . . . . . . . . . . 47Other Ways of Dialing . . . . . . . . . . . . . . . . . . . . . . . . . . . . . . . . 48
Dialing via Contact List . . . . . . . . . . . . . . . . . . . . . . . . . . . 48Short Number Dial . . . . . . . . . . . . . . . . . . . . . . . . . . . . . . 48Recent Calls List . . . . . . . . . . . . . . . . . . . . . . . . . . . . . . . . 48One-touch Dial . . . . . . . . . . . . . . . . . . . . . . . . . . . . . . . . . 49
iii
6802972C35.book Page iv Monday, August 16, 2004 9:22 PM
Calling a Number in a Message . . . . . . . . . . . . . . . . . . . . 49Receiving a Private Call . . . . . . . . . . . . . . . . . . . . . . . . . . . . . . 49Making a Private PPC (Preemptive Priority Call) . . . . . . . . . . . 49Call Queuing . . . . . . . . . . . . . . . . . . . . . . . . . . . . . . . . . . . . . . . 50Phone and PABX Calls . . . . . . . . . . . . . . . . . . . . . . . . . 51General . . . . . . . . . . . . . . . . . . . . . . . . . . . . . . . . . . . . . . . . . . . 51Dual Microphone Feature . . . . . . . . . . . . . . . . . . . . . . . . . . . . . 51Making a Phone or PABX Call . . . . . . . . . . . . . . . . . . . . . . . . . . . . . 51Other Ways of Dialing . . . . . . . . . . . . . . . . . . . . . . . . . . . . . . . . 52
Dialing via the Contact List . . . . . . . . . . . . . . . . . . . . . . . . 52Speed Dial . . . . . . . . . . . . . . . . . . . . . . . . . . . . . . . . . . . . 52One-touch Dial . . . . . . . . . . . . . . . . . . . . . . . . . . . . . . . . . 52DTMF Overdial . . . . . . . . . . . . . . . . . . . . . . . . . . . . . . . . . 53Recent Calls List . . . . . . . . . . . . . . . . . . . . . . . . . . . . . . . . 53Calling a Number in a Message . . . . . . . . . . . . . . . . . . . . 53
Answering a Phone or PABX Call . . . . . . . . . . . . . . . . . . . . . . . 53Emergency Operation . . . . . . . . . . . . . . . . . . . . . . . . . 54General . . . . . . . . . . . . . . . . . . . . . . . . . . . . . . . . . . . . . . . . . . . 54
Dual Microphone Feature . . . . . . . . . . . . . . . . . . . . . . . . . 54Entering TMO or DMO . . . . . . . . . . . . . . . . . . . . . . . . . . . 54Important Information . . . . . . . . . . . . . . . . . . . . . . . . . . . . 54
Emergency in TMO . . . . . . . . . . . . . . . . . . . . . . . . . . . . . . . . . . 54Overview . . . . . . . . . . . . . . . . . . . . . . . . . . . . . . . . . . . . . . 54Changing Folder or Group . . . . . . . . . . . . . . . . . . . . . . . . 55Entering or Exiting Emergency Mode . . . . . . . . . . . . . . . . 55Sending an Emergency Alarm . . . . . . . . . . . . . . . . . . . . . 56Making an Emergency Group Call . . . . . . . . . . . . . . . . . . . . . 57Hot Microphone Feature . . . . . . . . . . . . . . . . . . . . . . . . . . 57Receiving an Emergency Group Call . . . . . . . . . . . . . . . . 58Making an Emergency Private Call . . . . . . . . . . . . . . . . . . 58Receiving an Emergency Private Call . . . . . . . . . . . . . . . . 59Modifying the Type of Call . . . . . . . . . . . . . . . . . . . . . . . . 59
Emergency in DMO . . . . . . . . . . . . . . . . . . . . . . . . . . . . . . . . . . 59General . . . . . . . . . . . . . . . . . . . . . . . . . . . . . . . . . . . . . . . . . . . 59
Changing Folder or Group . . . . . . . . . . . . . . . . . . . . . . . . 60Making an Emergency Group Call . . . . . . . . . . . . . . . . . . 60Receiving an Emergency Group Call . . . . . . . . . . . . . . . . 60
iv
Contents
6802972C35.book Page v Monday, August 16, 2004 9:22 PM
GPS Location Services . . . . . . . . . . . . . . . . . . . . . . . . 61Enhancing GPS Performance . . . . . . . . . . . . . . . . . . . . . . . . . . 62GPS Icon . . . . . . . . . . . . . . . . . . . . . . . . . . . . . . . . . . . . . . . . . . 63GPS Enable/Disable . . . . . . . . . . . . . . . . . . . . . . . . . . . . . . . . . 63Entering GPS Location Service . . . . . . . . . . . . . . . . . . . . . . . . . 64
Viewing Your Position . . . . . . . . . . . . . . . . . . . . . . . . . . . . 64GPS Testpage . . . . . . . . . . . . . . . . . . . . . . . . . . . . . . . . . 65Entering the Testpage . . . . . . . . . . . . . . . . . . . . . . . . . . . . 66
The Menu . . . . . . . . . . . . . . . . . . . . . . . . . . . . . . . . . . . . 69To Enter the Menu Items . . . . . . . . . . . . . . . . . . . . . . . . . . . . . . 69To Return to the Previous Level . . . . . . . . . . . . . . . . . . . . . . . . 69To Exit the Menu Items . . . . . . . . . . . . . . . . . . . . . . . . . . . . . . . 70Menu Icons . . . . . . . . . . . . . . . . . . . . . . . . . . . . . . . . . . . . . . . . 70List of Menu Items . . . . . . . . . . . . . . . . . . . . . . . . . . . . . . . . . . . 71Messages . . . . . . . . . . . . . . . . . . . . . . . . . . . . . . . . . . . . . . . . . 74Contacts . . . . . . . . . . . . . . . . . . . . . . . . . . . . . . . . . . . . . . . . . . 74
General . . . . . . . . . . . . . . . . . . . . . . . . . . . . . . . . . . . . . . . 74Contact Icons . . . . . . . . . . . . . . . . . . . . . . . . . . . . . . . . . . 74Creating a Contact . . . . . . . . . . . . . . . . . . . . . . . . . . . . . . 75Editing a Contact . . . . . . . . . . . . . . . . . . . . . . . . . . . . . . . . 76Deleting a Number . . . . . . . . . . . . . . . . . . . . . . . . . . . . . . 76Deleting a Contact . . . . . . . . . . . . . . . . . . . . . . . . . . . . . . 76Checking Capacity . . . . . . . . . . . . . . . . . . . . . . . . . . . . . . 76
Security . . . . . . . . . . . . . . . . . . . . . . . . . . . . . . . . . . . . . . . . . . . 77PIN Protect . . . . . . . . . . . . . . . . . . . . . . . . . . . . . . . . . . . . 77Change Code . . . . . . . . . . . . . . . . . . . . . . . . . . . . . . . . . . 78Locking/Unlocking the Keypad . . . . . . . . . . . . . . . . . . . . . 79Air Encryption On/Off . . . . . . . . . . . . . . . . . . . . . . . . . . . . 79Encryption Key Deletion . . . . . . . . . . . . . . . . . . . . . . . . . . 80K Validity . . . . . . . . . . . . . . . . . . . . . . . . . . . . . . . . . . . . . . 80SCK Validity . . . . . . . . . . . . . . . . . . . . . . . . . . . . . . . . . . . 81
Setup . . . . . . . . . . . . . . . . . . . . . . . . . . . . . . . . . . . . . . . . . . . . . 81Entering the Setup Sub-menu . . . . . . . . . . . . . . . . . . . . . . 81Setting the Vibrate Feature . . . . . . . . . . . . . . . . . . . . . . . . 81Setting the Ring Style . . . . . . . . . . . . . . . . . . . . . . . . . . . . 82Setting the Volume . . . . . . . . . . . . . . . . . . . . . . . . . . . . . . 83Setting the Display’s Working Language . . . . . . . . . . . . . 83
v
6802972C35.book Page vi Monday, August 16, 2004 9:22 PM
Setting Up the Data Function . . . . . . . . . . . . . . . . . . . . . . 83Setting Group Audio . . . . . . . . . . . . . . . . . . . . . . . . . . . . . 84Setting Tones . . . . . . . . . . . . . . . . . . . . . . . . . . . . . . . . . . 85Display Features . . . . . . . . . . . . . . . . . . . . . . . . . . . . . . . . 86Setting the Display’s Vertical Flip . . . . . . . . . . . . . . . . . . . 87Setting the Text Size . . . . . . . . . . . . . . . . . . . . . . . . . . . . . 88Setting the Screen Saver . . . . . . . . . . . . . . . . . . . . . . . . . 88Setting the Backlight . . . . . . . . . . . . . . . . . . . . . . . . . . . . . 89Setting the Wallpaper . . . . . . . . . . . . . . . . . . . . . . . . . . . . 89Setting the Contrast . . . . . . . . . . . . . . . . . . . . . . . . . . . . . 90
Entering More... . . . . . . . . . . . . . . . . . . . . . . . . . . . . . . . . . . . . . 90Entering Group Setup . . . . . . . . . . . . . . . . . . . . . . . . . . . . . . . . 90Entering Scan . . . . . . . . . . . . . . . . . . . . . . . . . . . . . . . . . . . . . . 90
Setting Group Scanning . . . . . . . . . . . . . . . . . . . . . . . . . . 91Viewing the Active Scan List . . . . . . . . . . . . . . . . . . . . . . . 92Editing Scan Lists . . . . . . . . . . . . . . . . . . . . . . . . . . . . . . . 93
My Groups (TMO/DMO) . . . . . . . . . . . . . . . . . . . . . . . . . . . . . . 95Selecting a Group from My Groups . . . . . . . . . . . . . . . . . 95Adding a Group to My Groups . . . . . . . . . . . . . . . . . . . . . 95Deleting a Group from My Groups . . . . . . . . . . . . . . . . . . 95Deleting All Groups from My Groups . . . . . . . . . . . . . . . . 96
Viewing/Modifying Personal Information . . . . . . . . . . . . . . . . . . 96Recent Calls . . . . . . . . . . . . . . . . . . . . . . . . . . . . . . . . . . . . . . . 96
Viewing Recent Calls . . . . . . . . . . . . . . . . . . . . . . . . . . . . 97Storing Recent Calls to Contacts . . . . . . . . . . . . . . . . . . . 97Deleting Recent Calls . . . . . . . . . . . . . . . . . . . . . . . . . . . . 98Calling from Recent Calls . . . . . . . . . . . . . . . . . . . . . . . . . 98
Shortcuts . . . . . . . . . . . . . . . . . . . . . . . . . . . . . . . . . . . . . . . . . . 99Help on Creating a Menu Shortcut . . . . . . . . . . . . . . . . . . 99Creating Menu Shortcut . . . . . . . . . . . . . . . . . . . . . . . . . . 99Viewing the Menu Shortcut List . . . . . . . . . . . . . . . . . . . . 99Editing Shortcuts . . . . . . . . . . . . . . . . . . . . . . . . . . . . . . . . 99Deleting Shortcuts . . . . . . . . . . . . . . . . . . . . . . . . . . . . . . . 100Shortcut Display Messages . . . . . . . . . . . . . . . . . . . . . . . 100Menu Shortcut Use . . . . . . . . . . . . . . . . . . . . . . . . . . . . . . 100
Networks . . . . . . . . . . . . . . . . . . . . . . . . . . . . . . . . . . . . . . . . . . 101Entering the Networks Sub-menu . . . . . . . . . . . . . . . . . . . 101
vi
Contents
6802972C35.book Page vii Monday, August 16, 2004 9:22 PM
Selecting Your Network . . . . . . . . . . . . . . . . . . . . . . . . . . 101Selecting Trunked Mode . . . . . . . . . . . . . . . . . . . . . . . . . . 102Selecting Direct Mode . . . . . . . . . . . . . . . . . . . . . . . . . . . . 102Setting Transmit Inhibit (TXI) Mode . . . . . . . . . . . . . . . . . 102
GPS Location Services . . . . . . . . . . . . . . . . . . . . . . . . . . . . . . . 103Messages . . . . . . . . . . . . . . . . . . . . . . . . . . . . . . . . . . . 104General . . . . . . . . . . . . . . . . . . . . . . . . . . . . . . . . . . . . . . . . . . . 104
Sending a Text Message . . . . . . . . . . . . . . . . . . . . . . . . . 104Receiving Messages . . . . . . . . . . . . . . . . . . . . . . . . . . . . . 105Displaying Long Text Messages . . . . . . . . . . . . . . . . . . . . 105
Entering the Messages Sub-menu . . . . . . . . . . . . . . . . . . . . . . 106New Message . . . . . . . . . . . . . . . . . . . . . . . . . . . . . . . . . . . . . . 106
Creating a Message . . . . . . . . . . . . . . . . . . . . . . . . . . . . . 106Sending the Message . . . . . . . . . . . . . . . . . . . . . . . . . . . . 106
Using the Inbox . . . . . . . . . . . . . . . . . . . . . . . . . . . . . . . . . . . . . 107Inbox Icons . . . . . . . . . . . . . . . . . . . . . . . . . . . . . . . . . . . . 107Entering the Inbox . . . . . . . . . . . . . . . . . . . . . . . . . . . . . . . 107Reading a Message in the Inbox . . . . . . . . . . . . . . . . . . . 108New Message Received . . . . . . . . . . . . . . . . . . . . . . . . . . 108Handling Messages . . . . . . . . . . . . . . . . . . . . . . . . . . . . . 108
Calling a Number in a Message . . . . . . . . . . . . . . . . . . . . . . . . 109 User Defined Templates . . . . . . . . . . . . . . . . . . . . . . . . . . . . . 110Predefined Templates . . . . . . . . . . . . . . . . . . . . . . . . . . . . . . . . 110Sending a Status Message to a Group . . . . . . . . . . . . . . . . . . . 112Targeted Status . . . . . . . . . . . . . . . . . . . . . . . . . . . . . . . . . . . . . 112Writing Text . . . . . . . . . . . . . . . . . . . . . . . . . . . . . . . . . . 114Selecting the Text Entry Mode . . . . . . . . . . . . . . . . . . . . . . . . . 114Adding Secondary to the List of Text Entry Modes . . . . . . . . . . 114Selecting the Text Entry Method and Language . . . . . . . . . . . . 114Icons . . . . . . . . . . . . . . . . . . . . . . . . . . . . . . . . . . . . . . . . . . . . . 115TAP Display . . . . . . . . . . . . . . . . . . . . . . . . . . . . . . . . . . . . . . . 116 iTAP Display . . . . . . . . . . . . . . . . . . . . . . . . . . . . . . . . . . . . . . . 116Keys Usage . . . . . . . . . . . . . . . . . . . . . . . . . . . . . . . . . . . . . . . . . . . . . 117
Other Keys . . . . . . . . . . . . . . . . . . . . . . . . . . . . . . . . . . . . 120Writing in iTAP Alphanumeric . . . . . . . . . . . . . . . . . . . . . . . . . . 121
Word Locking . . . . . . . . . . . . . . . . . . . . . . . . . . . . . . . . . . 122Writing in Numeric Mode . . . . . . . . . . . . . . . . . . . . . . . . . . . . . . 122
vii

6802972C35.book Page viii Monday, August 16, 2004 9:22 PM
Writing in Symbol Mode . . . . . . . . . . . . . . . . . . . . . . . . . . . . . . 122Writing in TAP Alphanumeric . . . . . . . . . . . . . . . . . . . . . . . . . . 122Adding Words to the Dictionary . . . . . . . . . . . . . . . . . . . . . . . . . 123What to do if... . . . . . . . . . . . . . . . . . . . . . . . . . . . . . . . . 124Tones . . . . . . . . . . . . . . . . . . . . . . . . . . . . . . . . . . . . . . . 128Appendix A. Accessories . . . . . . . . . . . . . . . . . . . . . . 132Index . . . . . . . . . . . . . . . . . . . . . . . . . . . . . . . . . . . . . . . 134Quick Reference Guide . . . . . . . . . . . . . . . . . . . . . . . . . 139
© Motorola Inc., 2004
MOTOROLA and the Stylized M Logo are registered in the U.S. Patent and Trademark Office. All other product or service names are the property of their respective owners.
viii
Safety
6802972C35.book Page 1 Monday, August 16, 2004 9:22 PM
Safety Information
General Safety Information• This terminal meets the applicable safety standards if
used as prescribed. All operating and safety instructions are to be followed carefully.
• Motorola recommends the usage of Motorola approved accessories only.
• Only specialized workshops should be contacted for installation, maintenance and repair work.
• Keep this User Guide and the Product Safety and RF Exposure booklet in a safe place and make it available to other operators, and in case, that the radio is passed on to other people.
Copyright InformationThe Motorola products described in this manual may include copyrighted Motorola computer programs stored in semicon-ductor memories or other mediums. Laws in the United States and other countries preserve for Motorola certain exclusive rights for copyrighted computer programs, includ-ing the exclusive right to copy or reproduce in any form the copyrighted computer program. Accordingly, any copyrighted Motorola computer programs contained in the Motorola prod-
CAUTION! Before using this product, read the operating instructions for safe usage contained in the Product Safety and RF Exposure booklet, Motorola Publication part number 6866537D38 (for Europe, Middle East and Africa regions) or 6804110J47/6804113J24 (for Asia and Pacific regions), enclosed with your radio.
1

6802972C35.book Page 2 Monday, August 16, 2004 9:22 PM
ucts described in this manual may not be copied or repro-duced in any manner without the express written permission of Motorola. Furthermore, the purchase of Motorola products shall not be deemed to grant either directly or by implication, estoppel, or otherwise, any licence under the copyrights, pat-ents, or patent applications of Motorola, except for the normal non-exclusive royalty-free licence to use that arises by oper-ation of the law in the sale of a product.
Product Specific Information• Max. Voltage 4.2 V
• Max. Current 0.5 A
• Max. RF Power 1 Watt
• Max. Speaker Load 0.5 Watts at 8 Ohms
• Antenna Impedance 50 Ohms
• Operation Temperature Range -20° C to +60° C
• Operating Time Continuous / Intermittent
Note: In general, the radio transmit and receive time (operating cycle time) is determined by the communica-tion system. On overload, respectively on extensive use beyond the systems specifications at high ambient tem-peratures, the radio is protected by its thermal control, which cuts down the RF output power, thus reducing the radio coverage range.
2

Getting Started
6802972C35.book Page 3 Monday, August 16, 2004 9:22 PM
Getting Started
Congratulations on your purchase of the Motorola MTH800. Enhanced TETRA features and state-of-the-art technology help to keep you in constant touch with all of your work and personal contacts.You can operate your MTH800 in English, German, French, Spanish, Dutch, or in a language defined by your Service Provider. The default setting from factory is English. For more information, please see “Setting the Display’s Working Language” on page 83.
How to Use this GuideThis guide describes the MTH800 features as setup and pre-programmed at the factory.Your Service Provider or your organisation may have customised your MTH800 to optimise its use for your individual needs. Check with your Service Provider or organisation to find out the differences from this guide.Throughout the text in this publication, you will notice the following special notations used to highlight certain information or items:
Example Description
or Select Key presses are shown as a key symbol or in bold print for soft key functions.
More...> Networks > TXI Mode > Activate
Indicates navigation in menu items.
Highlighted text indicates the selection.
Indicates the active setting.
Contacts
On
3
6802972C35.book Page 4 Monday, August 16, 2004 9:22 PM
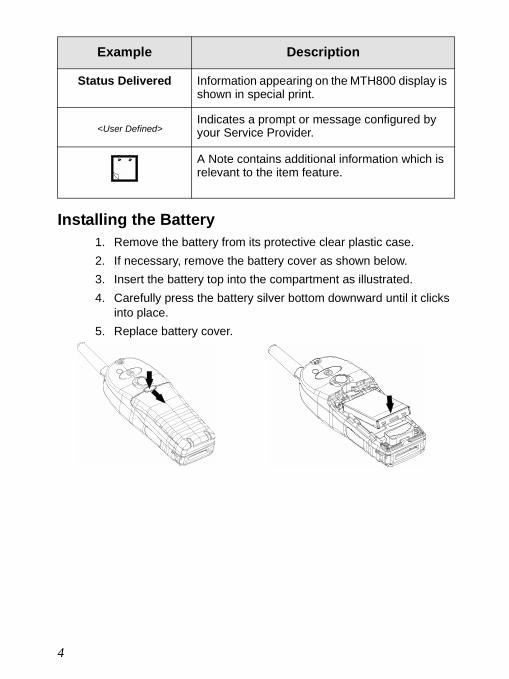
Installing the Battery1. Remove the battery from its protective clear plastic case.2. If necessary, remove the battery cover as shown below.3. Insert the battery top into the compartment as illustrated.4. Carefully press the battery silver bottom downward until it clicks
into place.5. Replace battery cover.
Status Delivered Information appearing on the MTH800 display is shown in special print.
Indicates a prompt or message configured by your Service Provider.
A Note contains additional information which is relevant to the item feature.
Example Description
<User Defined>
4
Getting Started
6802972C35.book Page 5 Monday, August 16, 2004 9:22 PM
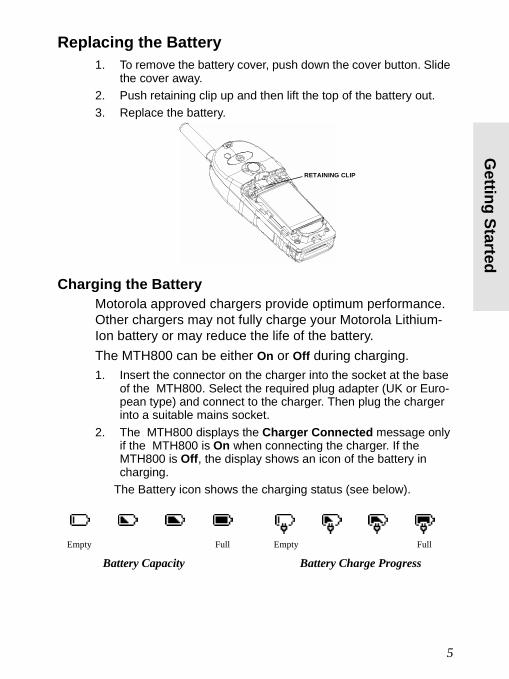
Replacing the Battery1. To remove the battery cover, push down the cover button. Slide
the cover away.2. Push retaining clip up and then lift the top of the battery out. 3. Replace the battery.
Charging the BatteryMotorola approved chargers provide optimum performance. Other chargers may not fully charge your Motorola Lithium-Ion battery or may reduce the life of the battery. The MTH800 can be either On or Off during charging.1. Insert the connector on the charger into the socket at the base
of the MTH800. Select the required plug adapter (UK or Euro-pean type) and connect to the charger. Then plug the charger into a suitable mains socket.
2. The MTH800 displays the Charger Connected message only if the MTH800 is On when connecting the charger. If the MTH800 is Off, the display shows an icon of the battery in charging.
The Battery icon shows the charging status (see below).
RETAINING CLIP
Battery Charge ProgressFullEmpty
Battery CapacityEmpty Full
5
6802972C35.book Page 6 Monday, August 16, 2004 9:22 PM
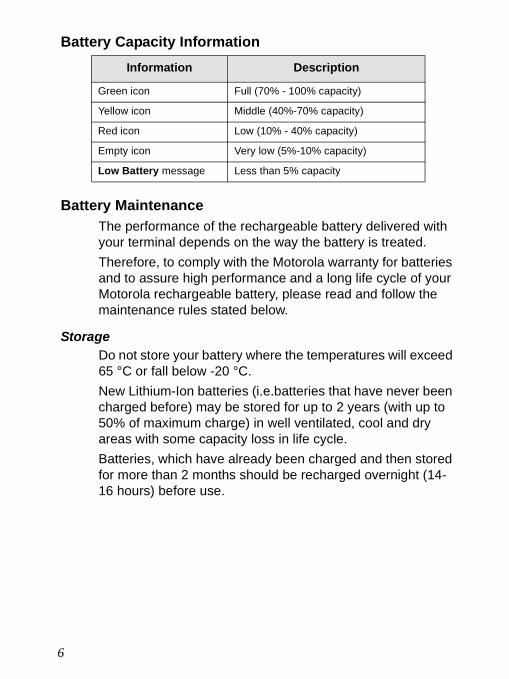
Battery Capacity Information
Battery MaintenanceThe performance of the rechargeable battery delivered with your terminal depends on the way the battery is treated.Therefore, to comply with the Motorola warranty for batteries and to assure high performance and a long life cycle of your Motorola rechargeable battery, please read and follow the maintenance rules stated below.
StorageDo not store your battery where the temperatures will exceed 65 °C or fall below -20 °C.New Lithium-Ion batteries (i.e.batteries that have never been charged before) may be stored for up to 2 years (with up to 50% of maximum charge) in well ventilated, cool and dry areas with some capacity loss in life cycle.Batteries, which have already been charged and then stored for more than 2 months should be recharged overnight (14-16 hours) before use.
Information Description
Green icon Full (70% - 100% capacity)
Yellow icon Middle (40%-70% capacity)
Red icon Low (10% - 40% capacity)
Empty icon Very low (5%-10% capacity)
Low Battery message Less than 5% capacity
6
Getting Started
6802972C35.book Page 7 Monday, August 16, 2004 9:22 PM
Extending Battery LifeA battery is an expendable part and may need replacing during the life of the terminal.To ensure maximum service life of your handset, always replace the battery with a genuine Motorola replacement.In order to ensure maximum life from your battery, do not place the handset and/or battery in the charger, unless you really want to charge the battery.
Battery Charging TemperatureYour charger will only charge your battery when it is at temperature range of 1 °C to 37°C.This is due to the fact that the internal battery cell can be charged in the temperature range of 0 °C to 45 °C.As the temperature gets colder (close to 0 °C) less capacity is stored in the battery. If, during charging, the temperature is out of range, the battery might not be fully charged since the charging is temporarily stopped until the temperature becomes suitable.The range of battery operation is from 0 °C to +45 °C in charger mode and from -10 °C to +60 °C in discharge (application) mode.
First Time Battery ChargingAlways charge your new battery/(whichever type) overnight (14-16 hours) before using it.This is referred to as Initialising and will ensure maximum battery start capacity.
Battery Charging RulesGenerally, to reduce the number of charge cycles as much as you can wait for Low Battery message to charge as this will ensure maximum battery life.Do not use your charger as a terminal stand or leave your terminal and fully charged battery connected to the charger whilst not charging. Continuous charging will shorten the battery life.
7
6802972C35.book Page 8 Monday, August 16, 2004 9:22 PM
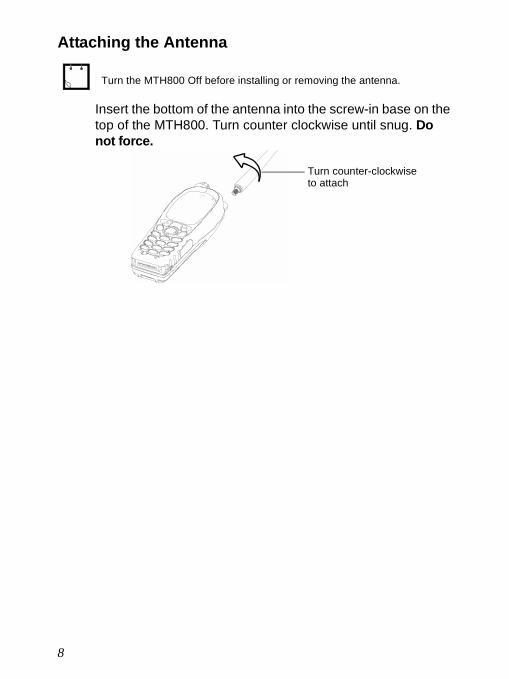
Attaching the Antenna
Insert the bottom of the antenna into the screw-in base on the top of the MTH800. Turn counter clockwise until snug. Do not force.
Turn the MTH800 Off before installing or removing the antenna.
Turn counter-clockwiseto attach
8
Getting Started
6802972C35.book Page 9 Monday, August 16, 2004 9:22 PM
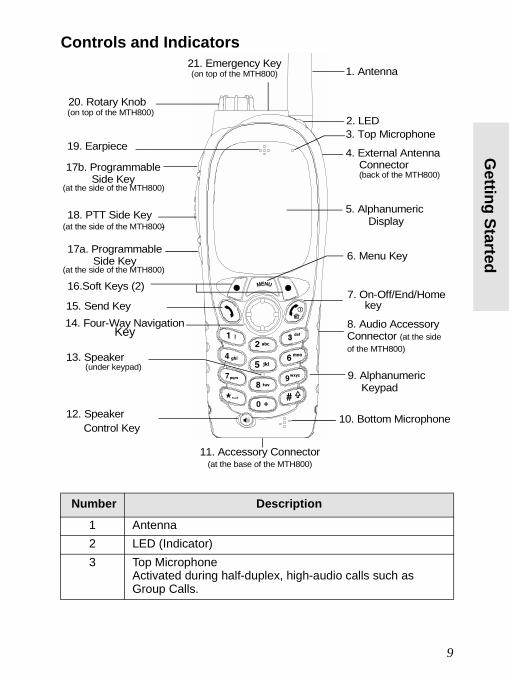
Controls and Indicators
Number Description
1 Antenna2 LED (Indicator)3 Top Microphone
Activated during half-duplex, high-audio calls such as Group Calls.
1. Antenna
3. Top Microphone
5. Alphanumeric
16.Soft Keys (2)
14. Four-Way Navigation
6. Menu Key
7. On-Off/End/Home
13. Speaker9. Alphanumeric
12. Speaker 10. Bottom Microphone
11. Accessory Connector
20. Rotary Knob
2. LED
15. Send Key
18. PTT Side Key Display
Keypad
Control Key
4. External AntennaConnector
(at the base of the MTH800)
(on top of the MTH800)
8. Audio Accessory Connector (at the side of the MTH800)
(back of the MTH800)
Key
19. Earpiece
21. Emergency Key(on top of the MTH800)
17a. Programmable Side Key
(at the side of the MTH800)
(at the side of the MTH800)
17b. Programmable Side Key
(at the side of the MTH800)
(under keypad)
key
9
6802972C35.book Page 10 Monday, August 16, 2004 9:22 PM
4 External Antenna ConnectorUsed with the digital car kit to connect the RF signal to the external antenna.(At the back of the MTH800)
5 Colour DisplayProvides alphanumeric text and images within 65,536 colours and 130 x 130 pixels with backlighting and scalable fonts.
6 Menu KeyUsed to enter the main menu and the context sensitive menu.
7 On-Off/End//Home KeyPress and hold to turn the MTH800 On/Off.Press to end calls.Press to return to the Home display (idle screen).
8 Audio Accessory Connector (At the side of the MTH800)
9 Alphanumeric KeypadUse the keypad to enter alphanumeric characters for dialing, contact entries and text messages.
10 Bottom MicrophoneActivated during half-duplex and full-duplex, low-audio calls such as Phone Calls.
11 Accessory ConnectorProvides connection for accessories.(At the base of the MTH800)
12 Speaker Control KeySelects earpiece (low audio) or speaker (high audio)
13 Speaker (under keypad)14 Four-Way Navigation Key
Press up, down, left or right for list scrolling, while moving around the menu hierarchy, or for alphanumeric text editing.
15 Send Key Used to initiate or answer full-duplex calls (such as Phone Calls), or send status and text messages.
Number Description
10
Getting Started
6802972C35.book Page 11 Monday, August 16, 2004 9:22 PM
Powering On/Off (On-Off/End/Home Key)To power On, press and hold . Your MTH800 performs a self-check and registration routine. After successful registration, the MTH800 is in service.
To power Off, press and hold . You will hear a beep and the Powering Off message is displayed.
16 Soft Key(s)Press to select the option that appears in the display directly above the left or right soft key.
17 Programmable Side Keys 1 and 2Default programming: upper Side key activates/deactivates Backlight; lower Side key activates Screen Saver.(See also No. 19)
18 Push-To-Talk Button (PTT)Press and hold this side button to talk in half-duplex calls, release it to listen.Press to send status and text messages.
19 Earpiece20 Programmable Rotary Knob
Default programming: “Dual” - Press the knob to toggle between “volume” and “list”. Side keys (No. 17) operate as programmed.
21 Programmable Emergency Button (on top of the MTH800)Press and hold to enter Emergency mode, and send Emergency Alarms (as programmed). Press and hold to start an Emergency Private Call (half-duplex or full-duplex).When the MTH800 is Off, press and hold to power on in Emergency Operation or in standard mode (as programmed).
Before using your MTH800 for the first time, remove the plastic lens protector from the display, and charge battery overnight to ensure battery is initialised to it’s full capacity.
Number Description
11

6802972C35.book Page 12 Monday, August 16, 2004 9:22 PM
12
Powering On (Emergency Button)Press and hold the Emergency button to power On. The MTH800 will power On in Emergency Operation or in standard mode (as programmed).
Powering On with Transmit Inhibit (TXI) ActiveTransmit Inhibit is a feature allowing you to switch off transmission before entering a Radio-Frequency (RF) sensitive area. To activate this feature, press and select More...> Networks > TXI Mode > Activate.
The TXI Mode remains active at power On. You will be asked whether to leave the TXI Mode On or not.
Press the Yes key to deactivate the TXI Mode. If the MTH800 was previously used in Trunked Mode, it will register to the network. If the MTH800 was previously used in Direct Mode, it will remain in Direct Mode.Press No in Trunked Mode and the MTH800 powers down; press No in DMO and you remain in DMO with TXI selected.
Unlocking the MTH800Your MTH800 may be locked at power up. To unlock the MTH800 after powering on, enter the code at the prompt. The MTH800 enters the default Home display.The unlock code is originally set to 0000. Your Service Provider may change this number before you receive your terminal.
Pressing the Emergency button, even if Transmit Inhibit is activated, causes the MTH800 to transmit immediately. The MTH800 must NOT be within the RF sensitive area when entering Emergency Operation.
Ensure you have left the RF sensitive area before deactivating Transmit Inhibit.
MENU
!W A R N I N G
!
!W A R N I N G
!
Getting Started
6802972C35.book Page 13 Monday, August 16, 2004 9:22 PM
Locking/Unlocking the Keys/ButtonsPress .
Selecting Your NetworkBefore you start operating your MTH800, you can select the network you want your MTH800 to be registered to. For detailed information, see “Networks” on page 101.
How to Hold Your MTH800The terminal has two microphones: a top microphone for half-duplex dispatcher calls and a bottom microphone for full-duplex telephone-like calls. A call can be placed in high or low audio. To activate low or high audio, see page 21.In high audio the user transmits via the top microphone and listens via the internal speaker.In low audio the user speaks into the bottom microphone and listens via the earpiece.Group and Private Calls are half-duplex calls and can be placed in high or low audio. Phone, PABX, and full-duplex Private Calls are placed in low audio. The speakerphone feature allows to hold Phone, PABX, and full-duplex Private Calls via the MTH800 internal speaker.
When there is an incoming call and the keypad is locked, you can still use
PTT, Rotary knob, , and .
The Emergency button is not locked. Pressing the Emergency button unlocks all keys.
MENU
13
6802972C35.book Page 14 Monday, August 16, 2004 9:22 PM
Use in Low Audio (Phone, PABX, and Full-duplex Private Calls)
When placing or receiving a call and while speaking, hold your MTH800 as you would a telephone. Speak into the bottom microphone. Listen via the earpiece.Keep antenna at least 2.5 centimetres from your head and body.
Use in High Audio (Group and Private Calls)Hold MTH800 in a vertical position with its top microphone 5.0 to 10 centimetres away from your mouth. Speak into the top microphone. Listen via the terminal's internal speaker.Keep antenna at least 2.5 centimetres from your head and body.
Lapel/Shoulder UseFor Group and Private Calls turn your head towards your shoulder/lapel, and speak directly into the top microphone. Listen via the terminal's internal speaker.
Speakerphone UsePlace the MTH800 30 to 60 centimetres away from you. In a noisy environment, you may want to move the MTH800 closer to you for better transmission.
Looking after your MTH800Never leave your MTH800 or battery in extreme temperatures (over 60 °C)—for example, behind windscreen in very hot, direct sunlight. Do not immerse your MTH800 in water.To clean your MTH800, use a moistened or antistatic cloth. DO NOT use a dry or electrostatically charged cloth.
14
Getting Started
6802972C35.book Page 15 Monday, August 16, 2004 9:22 PM
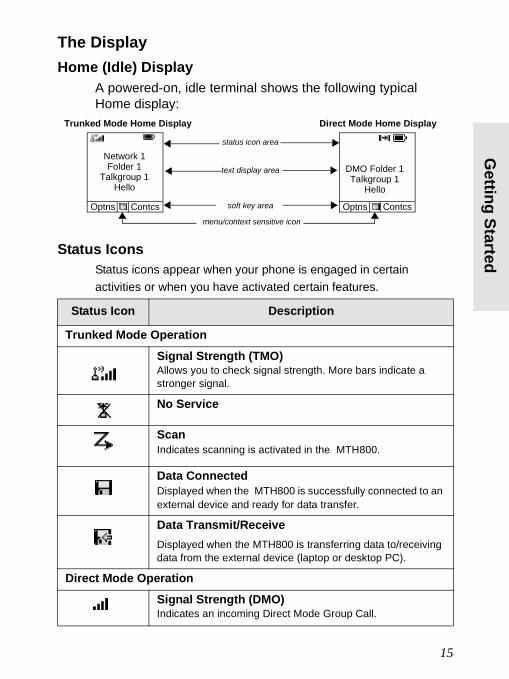
The DisplayHome (Idle) Display
A powered-on, idle terminal shows the following typical Home display:
Status IconsStatus icons appear when your phone is engaged in certain activities or when you have activated certain features.
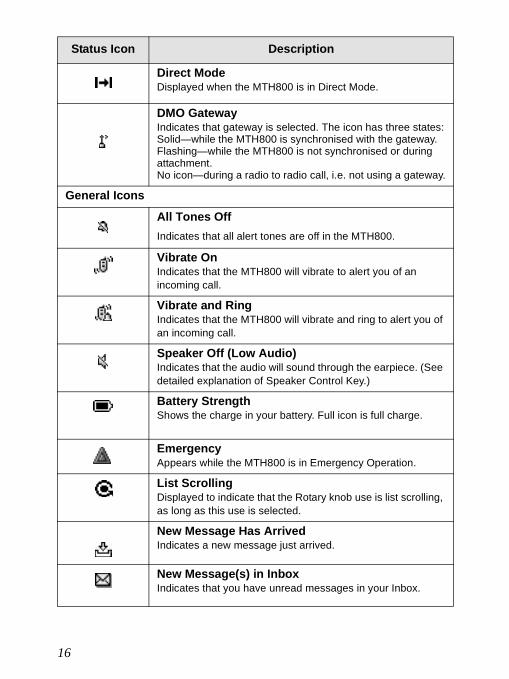
Status Icon Description
Trunked Mode OperationSignal Strength (TMO)Allows you to check signal strength. More bars indicate a stronger signal.
No Service
ScanIndicates scanning is activated in the MTH800.
Data ConnectedDisplayed when the MTH800 is successfully connected to an external device and ready for data transfer.
Data Transmit/ReceiveDisplayed when the MTH800 is transferring data to/receiving data from the external device (laptop or desktop PC).
Direct Mode OperationSignal Strength (DMO)Indicates an incoming Direct Mode Group Call.
Trunked Mode Home Display Direct Mode Home Display
status icon area
text display area
soft key area
menu/context sensitive icon
DMO Folder 1Talkgroup 1
Hello
Network 1
Optns Contcs
Folder 1Talkgroup 1
Hello
Optns Contcs
15
6802972C35.book Page 16 Monday, August 16, 2004 9:22 PM
Direct ModeDisplayed when the MTH800 is in Direct Mode.
DMO GatewayIndicates that gateway is selected. The icon has three states:Solid—while the MTH800 is synchronised with the gateway. Flashing—while the MTH800 is not synchronised or during attachment.No icon—during a radio to radio call, i.e. not using a gateway.
General Icons
All Tones OffIndicates that all alert tones are off in the MTH800.
Vibrate OnIndicates that the MTH800 will vibrate to alert you of an incoming call.
Vibrate and RingIndicates that the MTH800 will vibrate and ring to alert you of an incoming call.
Speaker Off (Low Audio)Indicates that the audio will sound through the earpiece. (See detailed explanation of Speaker Control Key.)
Battery StrengthShows the charge in your battery. Full icon is full charge.
EmergencyAppears while the MTH800 is in Emergency Operation.
List ScrollingDisplayed to indicate that the Rotary knob use is list scrolling, as long as this use is selected.
New Message Has ArrivedIndicates a new message just arrived.
New Message(s) in InboxIndicates that you have unread messages in your Inbox.
Status Icon Description
16
Getting Started
6802972C35.book Page 17 Monday, August 16, 2004 9:22 PM
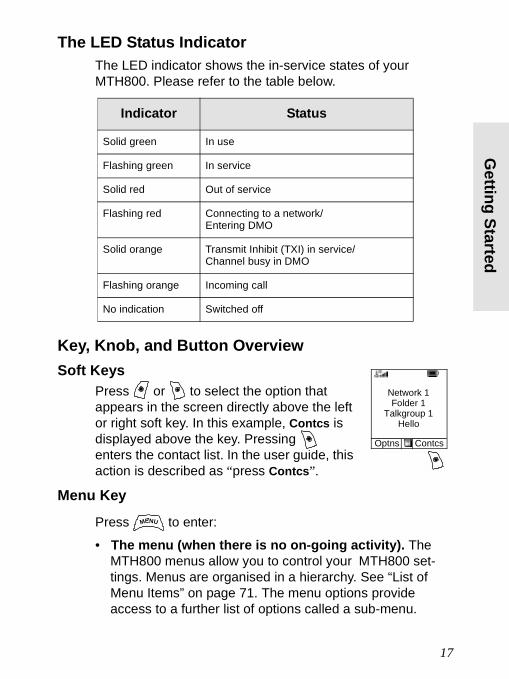
The LED Status IndicatorThe LED indicator shows the in-service states of your MTH800. Please refer to the table below.
Key, Knob, and Button OverviewSoft Keys
Press or to select the option that appears in the screen directly above the left or right soft key. In this example, Contcs is displayed above the key. Pressing enters the contact list. In the user guide, this action is described as “press Contcs”.
Menu Key
Press to enter:
• The menu (when there is no on-going activity). The MTH800 menus allow you to control your MTH800 set-tings. Menus are organised in a hierarchy. See “List of Menu Items” on page 71. The menu options provide access to a further list of options called a sub-menu.
Indicator Status
Solid green In use
Flashing green In service
Solid red Out of service
Flashing red Connecting to a network/Entering DMO
Solid orange Transmit Inhibit (TXI) in service/Channel busy in DMO
Flashing orange Incoming call
No indication Switched off
Network 1
Optns Contcs
Folder 1Talkgroup 1
Hello
MENU
17
6802972C35.book Page 18 Monday, August 16, 2004 9:22 PM
• The context sensitive menu (when icon is on) to view a list of items for the current menu.
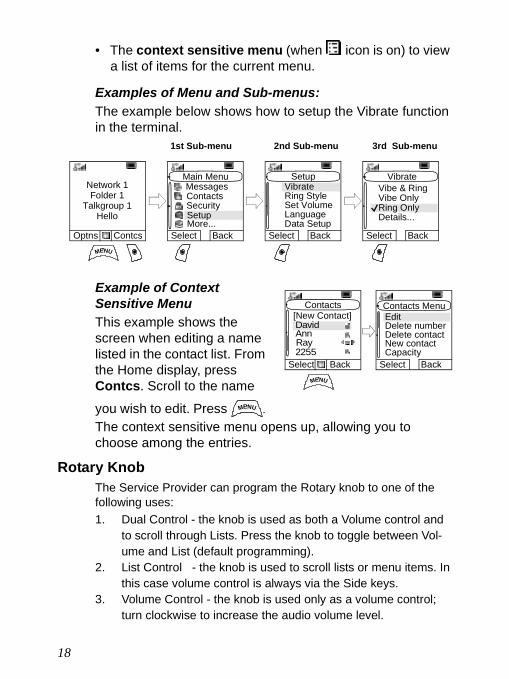
Examples of Menu and Sub-menus:The example below shows how to setup the Vibrate function in the terminal.
Example of Context Sensitive MenuThis example shows the screen when editing a name listed in the contact list. From the Home display, press Contcs. Scroll to the name
you wish to edit. Press . The context sensitive menu opens up, allowing you to choose among the entries.
Rotary KnobThe Service Provider can program the Rotary knob to one of the following uses:1. Dual Control - the knob is used as both a Volume control and
to scroll through Lists. Press the knob to toggle between Vol-ume and List (default programming).
2. List Control - the knob is used to scroll lists or menu items. In this case volume control is always via the Side keys.
3. Volume Control - the knob is used only as a volume control; turn clockwise to increase the audio volume level.
1st Sub-menu 2nd Sub-menu 3rd Sub-menu
MENU
Network 1
Optns Contcs
Folder 1Talkgroup 1
Hello
Main Menu
ContactsSecurity
Messages
SetupMore...
Vibrate
Vibe OnlyRing Only
Vibe & Ring
Details...
Select Back
Setup
Ring StyleSet Volume
Vibrate
LanguageData Setup
Select Back Select Back
Delete numberDelete contact
Edit
New contactCapacity
David[New Contact]
MENU
Select Back
Contacts Contacts Menu
Select Back
AnnRay2255
MENU
18
Getting Started
6802972C35.book Page 19 Monday, August 16, 2004 9:22 PM
Press and hold the Rotary knob to lock it, press and hold it again to unlock. Powering Off also unlocks a locked Rotary knob.
Emergency ButtonPress and hold this button to enter Emergency Operation.When the MTH800 is powered down, press and hold this button to power On in Emergency Operation (if configured by your Service Provider).See “Emergency Operation” on page 54.
Function Keys
Side KeysThe Rotary knob and Side key programming are paired:
When the Rotary knob is programmed to Volume Control or Dual Control, the Side keys support the one-touch feature that allows you to select or activate commonly used features by pressing and holding a single key. By default, the upper side key is set to “Backlight On/Off” and the lower side key is set to “Screen Saver On”. Please check with your Service Provider.
For information on the function assigned to each Side or Numeric key, please refer to your Service Provider.
The required time you need to press the Side or Numeric keys to activate a one-touch function is set as default to 1 second. This time may be set, how-ever, by your Service Provider.
Rotary Knob Programming Side Key ProgrammingDual Control Programmed to a one-touch function
List Control : Volume Up: Volume Down
Volume Control Programmed to a one-touch function
19
6802972C35.book Page 20 Monday, August 16, 2004 9:22 PM
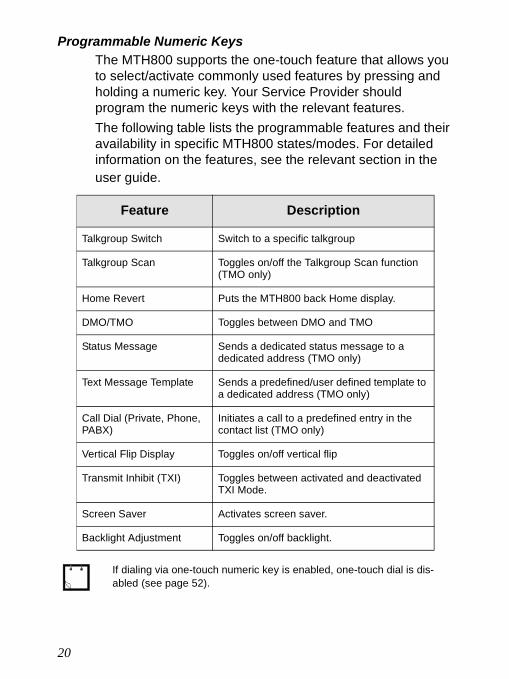
Programmable Numeric KeysThe MTH800 supports the one-touch feature that allows you to select/activate commonly used features by pressing and holding a numeric key. Your Service Provider should program the numeric keys with the relevant features. The following table lists the programmable features and their availability in specific MTH800 states/modes. For detailed information on the features, see the relevant section in the user guide.
Feature Description
Talkgroup Switch Switch to a specific talkgroup
Talkgroup Scan Toggles on/off the Talkgroup Scan function (TMO only)
Home Revert Puts the MTH800 back Home display.
DMO/TMO Toggles between DMO and TMO
Status Message Sends a dedicated status message to a dedicated address (TMO only)
Text Message Template Sends a predefined/user defined template to a dedicated address (TMO only)
Call Dial (Private, Phone, PABX)
Initiates a call to a predefined entry in the contact list (TMO only)
Vertical Flip Display Toggles on/off vertical flip
Transmit Inhibit (TXI) Toggles between activated and deactivated TXI Mode.
Screen Saver Activates screen saver.
Backlight Adjustment Toggles on/off backlight.
If dialing via one-touch numeric key is enabled, one-touch dial is dis-abled (see page 52).
20

Getting Started
6802972C35.book Page 21 Monday, August 16, 2004 9:22 PM
To use the one-touch feature:• Press and hold the required numeric key for a few sec-
onds. • Your MTH800 will display the number and act according
to the programmed feature.
Speaker Control Key
Press to activate the earpiece (low audio) or speaker (high audio), depending on the menu settings.
Aliases (Names)Aliases are optional names that you can assign to stored phone and private numbers (or IDs). To edit an alias, see page 76.Aliases can be up to 12 characters in length and may consist of letters, numbers, and spaces.Aliases are displayed during contact list scrolling or during an incoming call. Aliases are also used in alphanumeric search to retrieve numbers from your memory list.
Type of Call Menu Setting Key UseHalf-duplex call(Group*/Private)
Menu > Setup > Group Audio > Spkr Cntrl
Speaker On/Off for Group and Private Calls
Menu > Setup > Group Audio > Always Loud Speaker On/Off for Private
Call
Full-duplex call(Private/Phone/PABX
-------- Controls speaker/earpiece of the on-going call,
* In an Emergency Group Call, the voice sounds from the speaker regardless of the speaker setting.
21
6802972C35.book Page 22 Monday, August 16, 2004 9:22 PM
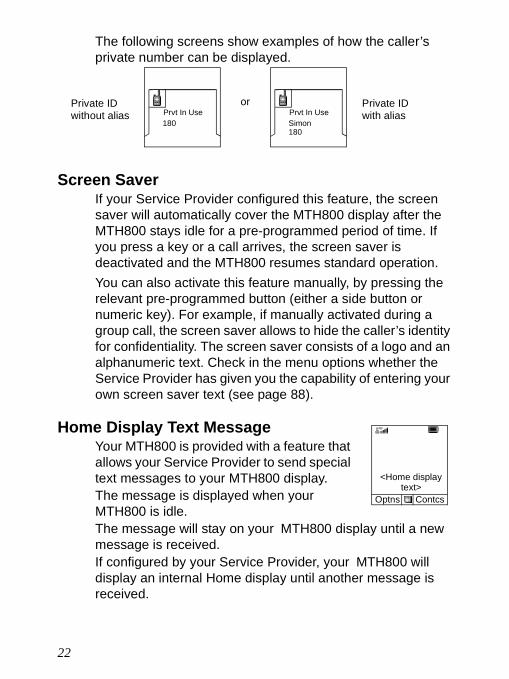
The following screens show examples of how the caller’s private number can be displayed.
Screen SaverIf your Service Provider configured this feature, the screen saver will automatically cover the MTH800 display after the MTH800 stays idle for a pre-programmed period of time. If you press a key or a call arrives, the screen saver is deactivated and the MTH800 resumes standard operation.You can also activate this feature manually, by pressing the relevant pre-programmed button (either a side button or numeric key). For example, if manually activated during a group call, the screen saver allows to hide the caller’s identity for confidentiality. The screen saver consists of a logo and an alphanumeric text. Check in the menu options whether the Service Provider has given you the capability of entering your own screen saver text (see page 88).
Home Display Text MessageYour MTH800 is provided with a feature that allows your Service Provider to send special text messages to your MTH800 display.The message is displayed when your MTH800 is idle.The message will stay on your MTH800 display until a new message is received.If configured by your Service Provider, your MTH800 will display an internal Home display until another message is received.
Prvt In Use180
Private ID Private IDorwithout alias with aliasPrvt In Use
Simon180
<Home display
Optns Contcstext>
22
Getting Started
6802972C35.book Page 23 Monday, August 16, 2004 9:22 PM
Terminal Disable/EnableYour MTH800 is provided with a feature that allows your Service Provider to disable it temporarily in case it is stolen.When your MTH800 is disabled, no calls can be initiated or received.While your MTH800 is disabled, it will look and act like it is turned Off.If you try to turn your MTH800 On, when it is disabled, it will operate as described above.If your MTH800 is found, your Service Provider can re-enable it. After your MTH800 is re-enabled, you may resume normal operation.
Selecting TMO or DMO OperationGeneral
In Trunked Mode Operation (TMO) the MTH800 is used with the infrastructure services within system coverage.In Direct Mode Operation (DMO) the MTH800 is used without infrastructure services required.While operating in DMO the propagation travels directly from the transmit-ting terminal antenna to the receiving terminal antenna, with no assistance from any base station or tower. Therefore, the range is critically dependent on the position of the user and the antenna. To achieve best results, hold the terminal in the hand as high as comfortably possible, and be sure not to obstruct the antenna in any way. Be sure that the antenna is clear from the body, cables, or other obstructions. As there is no tower-mounted base sta-tion to assist, and the two users are usually standing at ground level, the range is usually shorter than that can be achieved towards a tower or hilltop. Any obstructions (hills, buildings, etc.) between the users will further decrease the range. Conversely, raising the terminal higher or moving to a higher location may improve the range.
23
6802972C35.book Page 24 Monday, August 16, 2004 9:22 PM
A MTH800 in DMO can communicate with the trunked system (and vice-versa) through a gateway device. To use that feature, please enable the gateway option in your MTH800 (see “Making a DMO Group Call via Gateway” on page 43).
Entering TMO or DMOEnter TMO or DMO in one of the following ways:• From the Home display press Optns and select Direct Mode
if the MTH800 is in TMO.• From the Home display press Optns and select Trunked
Mode if the MTH800 is in DMO.
• Press and select More...> Networks > Trunked Mode if the MTH800 is in DMO.
• Press and select More...> Networks > Direct Mode if the MTH800 is in TMO.
• Press the TMO/DMO one-touch button (if programmed by your Service Provider).
TMO CallsYou can make and receive the following types of calls when the MTH800 operates in Trunked Mode:• Group Calls • Private Calls• Phone Calls • PABX Calls—local (office) extension calls• Emergency Calls
In DMO it is only possible to place Group calls and Emergency Group Calls.
Your terminal can alert you of an incoming call. Select the alert settings in the Vibrate menu and Tones menu items.
MENU
MENU
24
Getting Started
6802972C35.book Page 25 Monday, August 16, 2004 9:22 PM
DMO CallsYou can make and receive Group Calls when the MTH800 operates in Direct Mode (DMO). This includes Emergency Group Calls.The MTH800 returns to the Home display when there is no activity for a few seconds.
Making CallsSee the relevant sections in the user guide.
Modifying the Type of CallThe infrastructure can modify the type of call you started. For example, you might start a a half-duplex Private Call, and the infrastructure could modify the call to a Group Call. The terminal will alert you of the modification and will display the following messages, depending on the type of call:• Call Modified (to full-duplex)• Call Modified Use PTT (modified to half-duplex)Continue the modified call depending on the type of call.
Receiving CallsThe MTH800 will automatically receive the incoming call. Additionally, if Inactivity Revert Mode is enabled, the MTH800 returns automatically to the Home display, after that call ends.
• Half-duplex Private Call modified from direct setup to hook setup: a ringing tone will alert of the change.
• Half-duplex Private Call modified from hook setup to direct setup: there will be no indication of the change.
Inactivity Revert Mode will occur if configured by your Service Provider.
25
6802972C35.book Page 26 Monday, August 16, 2004 9:22 PM
Your MTH800 will alert you of an incoming call depending on the setting you selected in the Vibrate menu option (see page 81) and the Tones menu option (see page 85).During message editing, you will be alerted of an incoming Group/Emergency/Broadcast Group Call if configured by your Service Provider.
Preemptive CallingPreemptive calling is particularly useful when you need to speak urgently with a user whose terminal is busy in a non-emergency voice call.A preemptive priority call (PPC) is either an Emergency Group Call or a Private PPC (half-duplex or full-duplex call). The feature allows to disconnect the on-going lower priority call and to connect to the incoming higher priority call.To place a PPC, see the Emergency Operation and Private Call sections in the user guide.The MTH800 will receive the call via speaker or earpiece, according to the setting used when the PPC is received.
Receiving a PPC is explained in the following paragraphs. In the screens, <Any> in Use refers to any of the non-emergency voice calls: Group, Private, Phone, or PABX.
For call alert, see settings in the Vibrate menu option (page 81) and the Tones menu option (page 85).
26
Getting Started
6802972C35.book Page 27 Monday, August 16, 2004 9:22 PM
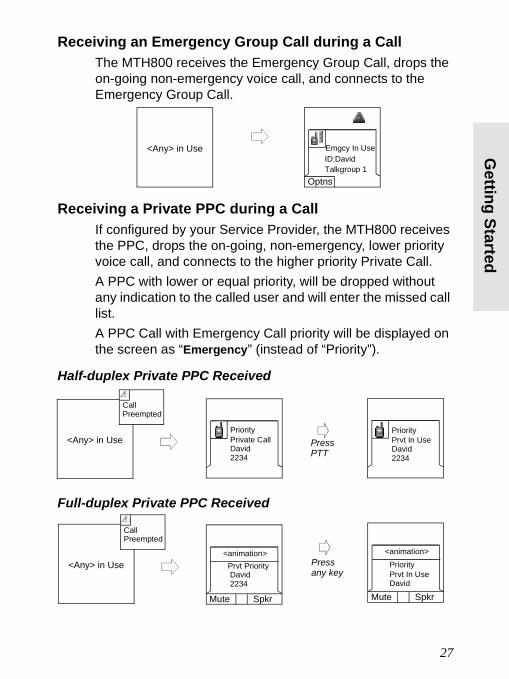
Receiving an Emergency Group Call during a CallThe MTH800 receives the Emergency Group Call, drops the on-going non-emergency voice call, and connects to the Emergency Group Call.
Receiving a Private PPC during a CallIf configured by your Service Provider, the MTH800 receives the PPC, drops the on-going, non-emergency, lower priority voice call, and connects to the higher priority Private Call.A PPC with lower or equal priority, will be dropped without any indication to the called user and will enter the missed call list.A PPC Call with Emergency Call priority will be displayed on the screen as “Emergency” (instead of “Priority”).
Half-duplex Private PPC Received
Full-duplex Private PPC Received
<Any> in Use Emgcy In UseID:DavidTalkgroup 1
Optns
PressPTT
<Any> in Use Prvt In UseDavid2234
CallPreempted
PriorityPrivate CallDavid2234
Priority
Pressany key
Mute Spkr
<Any> in Use
CallPreempted
David2234
Prvt PriorityPrvt In UseDavid
Priority<animation> <animation>
Mute Spkr
27
6802972C35.book Page 28 Monday, August 16, 2004 9:22 PM
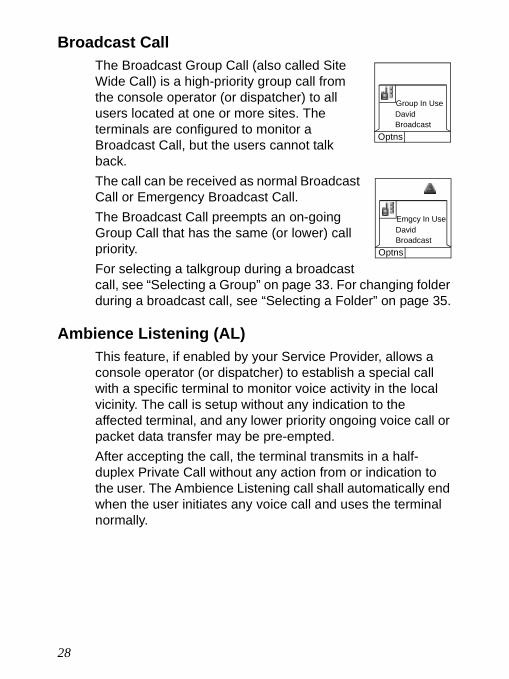
Broadcast CallThe Broadcast Group Call (also called Site Wide Call) is a high-priority group call from the console operator (or dispatcher) to all users located at one or more sites. The terminals are configured to monitor a Broadcast Call, but the users cannot talk back. The call can be received as normal Broadcast Call or Emergency Broadcast Call. The Broadcast Call preempts an on-going Group Call that has the same (or lower) call priority. For selecting a talkgroup during a broadcast call, see “Selecting a Group” on page 33. For changing folder during a broadcast call, see “Selecting a Folder” on page 35.
Ambience Listening (AL)This feature, if enabled by your Service Provider, allows a console operator (or dispatcher) to establish a special call with a specific terminal to monitor voice activity in the local vicinity. The call is setup without any indication to the affected terminal, and any lower priority ongoing voice call or packet data transfer may be pre-empted.After accepting the call, the terminal transmits in a half-duplex Private Call without any action from or indication to the user. The Ambience Listening call shall automatically end when the user initiates any voice call and uses the terminal normally.
Group In UseDavidBroadcast
Optns
Emgcy In UseDavidBroadcast
Optns
28
Getting Started
6802972C35.book Page 29 Monday, August 16, 2004 9:22 PM
Cancelling a CallChoose one of the following, as relevant:• Press . If you wish to make a new call, start it at once.• Wait to answer the call. After a time-out set by your Ser-
vice Provider, the call number will be forwarded to the missed call list.
• Press Reject soft key (displayed in an incoming full-duplex call). The call number will be forwarded to the missed call list.
Using In-call FeaturesHandsfree Speakerphone
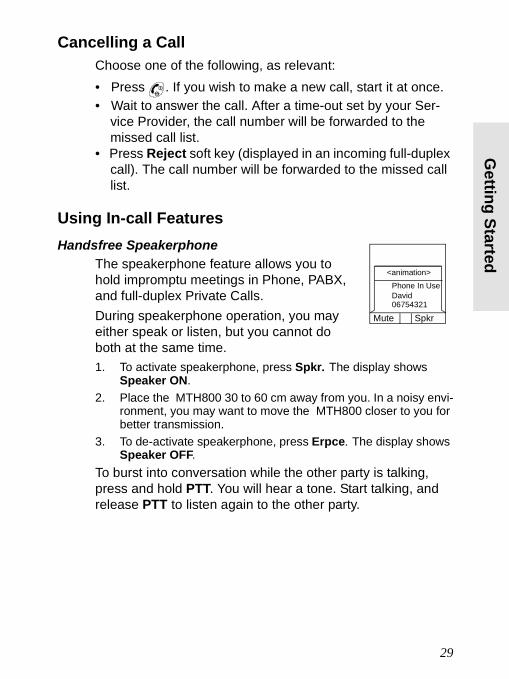
The speakerphone feature allows you to hold impromptu meetings in Phone, PABX, and full-duplex Private Calls.During speakerphone operation, you may either speak or listen, but you cannot do both at the same time.1. To activate speakerphone, press Spkr. The display shows
Speaker ON.2. Place the MTH800 30 to 60 cm away from you. In a noisy envi-
ronment, you may want to move the MTH800 closer to you for better transmission.
3. To de-activate speakerphone, press Erpce. The display shows Speaker OFF.
To burst into conversation while the other party is talking, press and hold PTT. You will hear a tone. Start talking, and release PTT to listen again to the other party.
David06754321
Phone In Use<animation>
Mute Spkr
29
6802972C35.book Page 30 Monday, August 16, 2004 9:22 PM
Muting/Unmuting the Bottom Microphone During a Phone, PABX, or full-duplex Private Call, use the mute feature to:• hold conversation without being heard by the caller• silence possible background noise in your area. 1. Press Mute. The display shows Mute is ON. The microphone is
muted. You can hear the incoming audio, but the caller cannot hear any speech coming from your MTH800.
2. To speak, press Unmut. The display shows Mute is OFF. The microphone is on.
Local Area ServiceThis mode, also called Fallback Mode, allows more than one terminal from the same site to communicate when the link between the site and network central controller fails. Entering and exiting Local Area Service (that is, returning to System Wide Services) is done automatically.
Entering Local Area ServiceWhen the MTH800 receives a Local Area Service indication from the system, the following occurs:• The MTH800 sounds a tone.• The display shows the “Local Area Service” message.• Display icons and soft keys turn brown.• Any call in progress is dropped upon entering Local Area
Service mode.If configured by your Service Provider, this message/alert is periodically repeated to remind you that the MTH800 is still operating in Local Area Service mode.The following features are available while the MTH800 is in Local Area Service:• Registration• Attachment• Group Call• Emergency Call• Emergency Alarm
30
Getting Started
6802972C35.book Page 31 Monday, August 16, 2004 9:22 PM
Exiting Local Area ServiceWhen the link with the central network controller is re-established, the MTH800 exits Local Area Service and the following occurs:• the MTH800 sounds a tone• any call in progress during Local Area Service is dropped.
31
6802972C35.book Page 32 Monday, August 16, 2004 9:22 PM
TMO Group Call
GeneralA Group Call is an instant communication between you and others in a talkgroup that you select. Participants may join (late entry) and leave an on-going Group Call. A talkgroup is a pre-defined set of subscribers enabled to participate in and/or invoke a Group Call, that is set up by your Service Provider. Talkgroups appear on your display as names or numbers (for example: Sales, Service, Electricians, Talkgrp10).Talkgroups are divided into folders. Each folder may contain several talkgroups.For ease of use, your MTH800 also provides the ability to:• Perform an alphabetical search of the talkgroup aliases.
Scroll through the entire talkgroup list.• Organise your favourite groups into one folder called My
Groups (set up by your Service Provider).Your talkgroups may be organized into scan lists (set up by your Service Provider, or by yourself through the Menu). When you activate one of these scan lists, your MTH800 will continuously monitor the activities of the selected talkgroups.By assigning priorities to the talkgroups defined in the scan list, you will be capable of accepting calls that have higher priority than the on-going call.You can start talkgroup, folder, or scanning selection when the terminal is idle or receiving a call. When receiving a call, choose one of the following:• Exit selection screen to join the call. • Join the call from the selection screen by pressing PTT.• Continue selection.
32
TMO
Group C
all
6802972C35.book Page 33 Monday, August 16, 2004 9:22 PM
Each talkgroup may have one associated Announcement Talkgroup (ATG) that it monitors (if set up by your Service Provider).An ATG is a special group which is linked to a number of talkgroups and has the highest priority level, thus enabling broadcast of the call to all these talkgroups.When an ATG is selected, the scanning icon is not displayed. The MTH800 monitors the ATG scan list instead of the selected scan list. The ATG scan list contains all the talkgroups associated with a selected ATG. Your Service Provider should advise what talkgroups are associated with which Announcement Talkgroup.Your MTH800 will always monitor the Group Calls in the ATG scan list. To place an Announcement Call, you must first select the specified Announcement Talkgroup as advised by your Service Provider, otherwise you will only be able to participate when an Announcement Talkgroup is received.Activation and deactivation of talkgroup scanning has no effect on the ATG scan list.
Dual Microphone FeatureSee “How to Hold Your MTH800” on page 13.
Selecting a GroupYou can select a talkgroup in one of the following ways, by using the:• Rotary knob• navigation key• alphabetical search feature• folder searchFor group scrolling configuration, see page 35.When you navigate in the “My Groups” folder and select a DMO group, your terminal will switch between TMO and DMO (and vice-versa).
33
6802972C35.book Page 34 Monday, August 16, 2004 9:22 PM
Using the Rotary Knob(If configured by your Service Provider)From the Home display, press shortly on the Rotary knob and rotate until the requested group appears. Group selection occurs:• After a time-out, • Or, by pressing Select (if configured by your Service Pro-
vider).
Using the Navigation KeyFrom the Home display, scroll left or right until the requested group appears. Then press Select to confirm selection. Pressing the PTT will also choose the group automatically and start transmission.
Using Alphabetic SearchFrom the Home display, press Optns. Select a group by alphabetic search (“TG by abc”). Enter the first character of the group’s name. Select the group.
Using Folder SearchFrom the Home display, press Optns. Select a group by folder search (“TG by Folder”). Select the folder and select the group.
34

TMO
Group C
all
6802972C35.book Page 35 Monday, August 16, 2004 9:22 PM
Selecting a FolderYou can select a folder by using one of the following:• the Rotary knob (if configured by your Service Provider)• the navigation key
Using the Navigation Key When using the navigation key to select a folder, press Select to confirm the selection.
To Select a FolderFrom the Home display, press Optns. Select Folder, and select the desired folder. The display shows the last selected group in that folder.
“My Groups” FolderYou can organise your favourite groups into one folder called “My Groups”.
Selecting My GroupsFrom the Home display, press to quickly access the folder.
Adding/Deleting Groups from My GroupsFor more information, see “My Groups (TMO/DMO)” on page 95.
Group Scrolling ConfigurationYour Service Provider can configure scrolling via rotary knob or navigation key as follows:• Scroll to next folder—when the folder end is reached dur-
ing group scrolling, further scrolling switches to the group list in the next folder.
For example: Folder 1 has Group11 and Group12. Folder 2 has Group21 and Group22. Group11, Group12, Group21, Group22 will appear during scrolling.
OR
35

6802972C35.book Page 36 Monday, August 16, 2004 9:22 PM
• Stay in folder—when the folder end is reached during group scrolling, further scrolling restarts the folder group list. To move to the next Folder, you should select it.
For example: Folder 1 has Group11 and Group12. Folder 2 has Group21 and Group22. Select Folder 1: Group11, Group12, Group11,Group12 will appear during scrolling. Change to Folder 2: Group 21, Group 22, Group 21, and Group 22 will appear during scrolling.
In addition, your Service Provider might configure the rotary knob as follows:• End-Stop Rotary Knob Scrolling—the rotary knob will stop
when it reaches the last group in the folder, and a tone will alert you that you have reached the last group in the folder. Use the navigation key to continue scrolling through the list.
Activating/deactivating ScanningSee “Setting Group Scanning” on page 91.
Making a Group Call1. From the Home display and if this is the
required group, press and hold the PTT. 2. Wait for the talk permit tone (if configured)
and then speak into the microphone. Re-lease the PTT button to listen.
When you start a call, all members of the selected group who have their units turned on, will receive the Group Call.
If you are in an on-going Group Call and wish to make a new call, press to ignore the current call. Start the
new call.
Network 1
Optns Contcs
Folder 1PoliceHello
Group In UseFolder 1
Optns FolderTG4
36
TMO
Group C
all
6802972C35.book Page 37 Monday, August 16, 2004 9:22 PM
Receiving a Group Call General
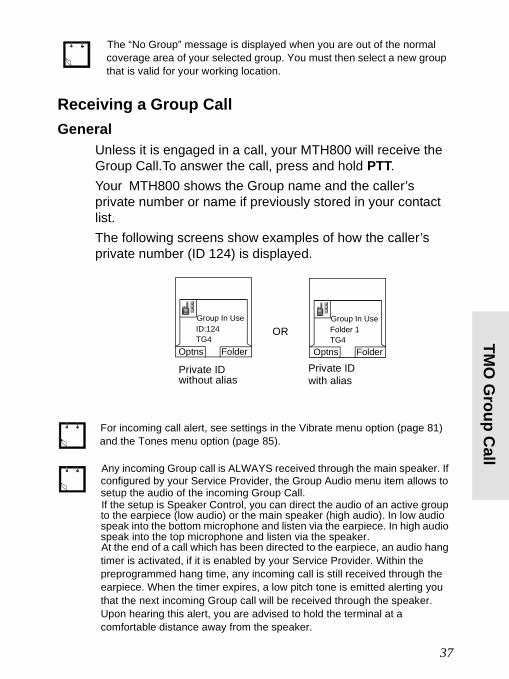
Unless it is engaged in a call, your MTH800 will receive the Group Call.To answer the call, press and hold PTT.Your MTH800 shows the Group name and the caller’s private number or name if previously stored in your contact list. The following screens show examples of how the caller’s private number (ID 124) is displayed.
The “No Group” message is displayed when you are out of the normal coverage area of your selected group. You must then select a new group that is valid for your working location.
For incoming call alert, see settings in the Vibrate menu option (page 81) and the Tones menu option (page 85).
Any incoming Group call is ALWAYS received through the main speaker. If configured by your Service Provider, the Group Audio menu item allows to setup the audio of the incoming Group Call.If the setup is Speaker Control, you can direct the audio of an active group to the earpiece (low audio) or the main speaker (high audio). In low audio speak into the bottom microphone and listen via the earpiece. In high audio speak into the top microphone and listen via the speaker.At the end of a call which has been directed to the earpiece, an audio hang timer is activated, if it is enabled by your Service Provider. Within the preprogrammed hang time, any incoming call is still received through the earpiece. When the timer expires, a low pitch tone is emitted alerting you that the next incoming Group call will be received through the speaker. Upon hearing this alert, you are advised to hold the terminal at a comfortable distance away from the speaker.
Private ID
OR
without alias with alias
Group In UseID:124TG4
Group In UseFolder 1TG4
Optns Folder Optns Folder
Private ID
37
6802972C35.book Page 38 Monday, August 16, 2004 9:22 PM
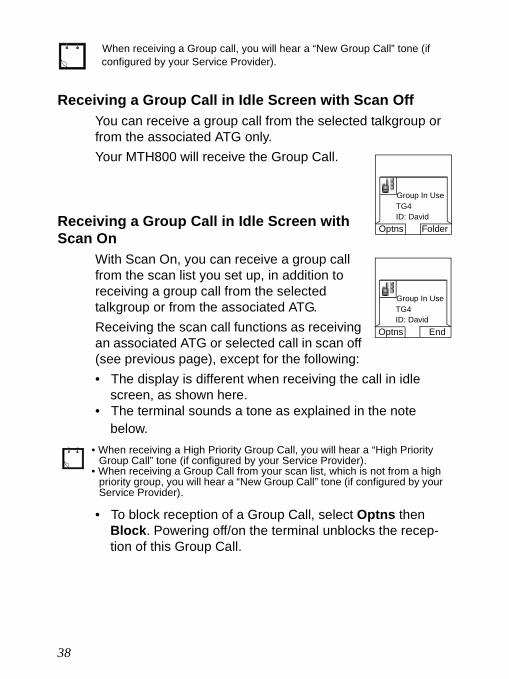
Receiving a Group Call in Idle Screen with Scan OffYou can receive a group call from the selected talkgroup or from the associated ATG only.Your MTH800 will receive the Group Call.
Receiving a Group Call in Idle Screen with Scan On
With Scan On, you can receive a group call from the scan list you set up, in addition to receiving a group call from the selected talkgroup or from the associated ATG.Receiving the scan call functions as receiving an associated ATG or selected call in scan off (see previous page), except for the following:• The display is different when receiving the call in idle
screen, as shown here. • The terminal sounds a tone as explained in the note
below.
• To block reception of a Group Call, select Optns then Block. Powering off/on the terminal unblocks the recep-tion of this Group Call.
When receiving a Group call, you will hear a “New Group Call” tone (if configured by your Service Provider).
• When receiving a High Priority Group Call, you will hear a “High Priority Group Call” tone (if configured by your Service Provider).
• When receiving a Group Call from your scan list, which is not from a high priority group, you will hear a “New Group Call” tone (if configured by your Service Provider).
Group In UseTG4ID: David
Optns Folder
Group In UseTG4ID: David
Optns End
38
TMO
Group C
all
6802972C35.book Page 39 Monday, August 16, 2004 9:22 PM
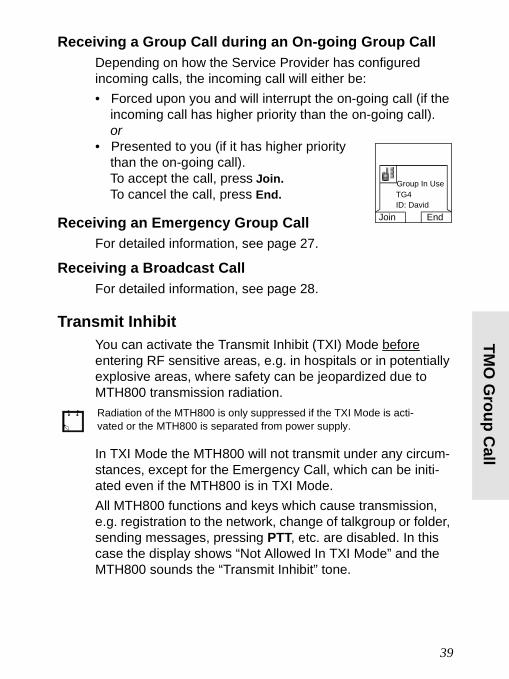
Receiving a Group Call during an On-going Group CallDepending on how the Service Provider has configured incoming calls, the incoming call will either be:• Forced upon you and will interrupt the on-going call (if the
incoming call has higher priority than the on-going call).or
• Presented to you (if it has higher priority than the on-going call).
To accept the call, press Join. To cancel the call, press End.
Receiving an Emergency Group CallFor detailed information, see page 27.
Receiving a Broadcast CallFor detailed information, see page 28.
Transmit InhibitYou can activate the Transmit Inhibit (TXI) Mode before entering RF sensitive areas, e.g. in hospitals or in potentially explosive areas, where safety can be jeopardized due to MTH800 transmission radiation.
In TXI Mode the MTH800 will not transmit under any circum-stances, except for the Emergency Call, which can be initi-ated even if the MTH800 is in TXI Mode. All MTH800 functions and keys which cause transmission, e.g. registration to the network, change of talkgroup or folder, sending messages, pressing PTT, etc. are disabled. In this case the display shows “Not Allowed In TXI Mode” and the MTH800 sounds the “Transmit Inhibit” tone.
Radiation of the MTH800 is only suppressed if the TXI Mode is acti-vated or the MTH800 is separated from power supply.
Group In UseTG4ID: David
Join End
39

6802972C35.book Page 40 Monday, August 16, 2004 9:22 PM
When no danger to safety exists anymore (for instance if you leave the RF sensitive area), the TXI Mode can be deacti-vated and the MTH800 returns to standard operation. Setting the TXI Mode is described in “Setting Transmit Inhibit (TXI) Mode” on page 102.Activated Transmit Inhibit is indicated by the solid orange LED and flashing between the two displays:
Dynamic Group Number Assignment (DGNA)DGNA provides the ability for a network operator or authorised user to dynamically allocate new, or update existing talkgroups to selected terminals over the air interface. Using supplementary services messages (SS-DGNA), the network operator can command your terminal to add talkgroups or to update the existing talkgroups, or to delete talkgroups from the list. This operation is performed by transmitting the data into your MTH800.
DGNA Reception with Notification Message When a DGNA message is received and DGNA notification was configured by your Service Provider, you will get a tone indication and notification message (“Talkgroup list updating”), and then a display of the new assignments.
Your Service Provider can gather some Talkgroups under one Super-group and transmit it to your MTH800 as a DGNA. In such a case, you will be able to participate in calls to/from all the groups in the Super-group.
Optns Contcs
Folder 1PoliceHello
TXI Mode
Contcs
Folder 1PoliceHello
TXI Mode
Activated
Talkgrouplistupdating
40
TMO
Group C
all
6802972C35.book Page 41 Monday, August 16, 2004 9:22 PM
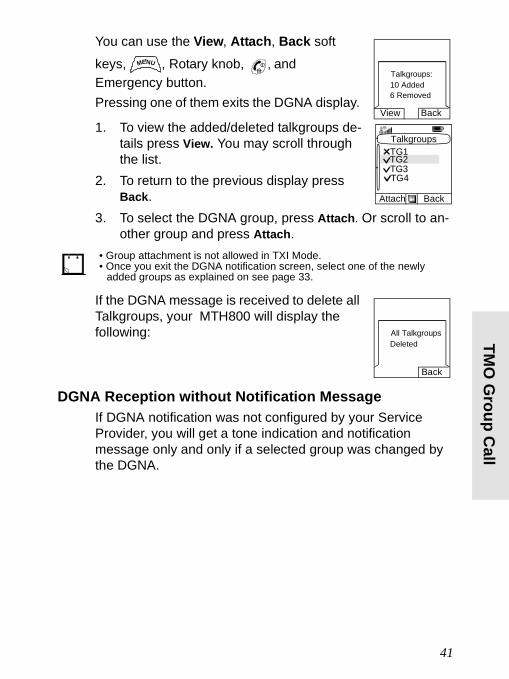
You can use the View, Attach, Back soft keys, , Rotary knob, , and Emergency button. Pressing one of them exits the DGNA display.
1. To view the added/deleted talkgroups de-tails press View. You may scroll through the list.
2. To return to the previous display press Back.
3. To select the DGNA group, press Attach. Or scroll to an-other group and press Attach.
If the DGNA message is received to delete all Talkgroups, your MTH800 will display the following:
DGNA Reception without Notification MessageIf DGNA notification was not configured by your Service Provider, you will get a tone indication and notification message only and only if a selected group was changed by the DGNA.
• Group attachment is not allowed in TXI Mode.• Once you exit the DGNA notification screen, select one of the newly
added groups as explained on see page 33.
Talkgroups:10 Added6 Removed
View Back
MENU
TG2TG1
Attach Back
Talkgroups
TG3TG4
All TalkgroupsDeleted
Back
41
6802972C35.book Page 42 Monday, August 16, 2004 9:22 PM
DMO Group Call
GeneralIn DMO, the MTH800 can be used without your Service Provider’s infrastructure.Direct Mode allows communication with other terminals also operating in Direct Mode, which are on the same frequency and talkgroup as your MTH800.
You can receive a call:• From the selected talkgroup• From other users within talkback range (if configured by
your Service Provider). This is called an InterMNI (Mobile Network identity) call.
• From an open group. (An open group is a super-group to which all DMO groups belong.)
When you start a call, the members of the selected talkgroup who have their units turned on, and are within the group subscriber identity (as configured by the Service Provider), will receive the transmission.In DMO the MTH800 can communicate with the trunking system (and vice-versa) if the Gateway option is enabled in the MTH800.
Dual Microphone FeatureSee “How to Hold Your MTH800” on page 13.
“My Groups” FolderYou can organise your favourite groups into one folder called “My Groups”.
In DMO it is only possible to place Group Calls and Emergency Group Calls.
42
DM
O G
roup Call
6802972C35.book Page 43 Monday, August 16, 2004 9:22 PM
Selecting the My Groups FolderFrom the Home display, press to quickly access the folder.
Adding/Deleting Groups from the My Groups FolderFor more information, see “My Groups (TMO/DMO)” on page 95.
Selecting a GroupSee the Group Call section, page 32.
Selecting a FolderSee the Group Call section, page 32.
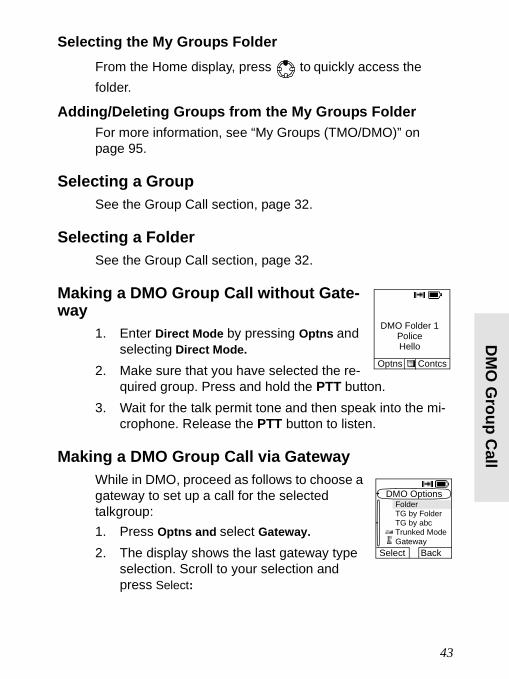
Making a DMO Group Call without Gate-way
1. Enter Direct Mode by pressing Optns and selecting Direct Mode.
2. Make sure that you have selected the re-quired group. Press and hold the PTT button.
3. Wait for the talk permit tone and then speak into the mi-crophone. Release the PTT button to listen.
Making a DMO Group Call via GatewayWhile in DMO, proceed as follows to choose a gateway to set up a call for the selected talkgroup:1. Press Optns and select Gateway. 2. The display shows the last gateway type
selection. Scroll to your selection and press Select:
DMO Folder 1PoliceHello
Optns Contcs
DMO Options
TG by FolderTG by abc
Folder
Trunked ModeGateway
Select Back
43
6802972C35.book Page 44 Monday, August 16, 2004 9:22 PM
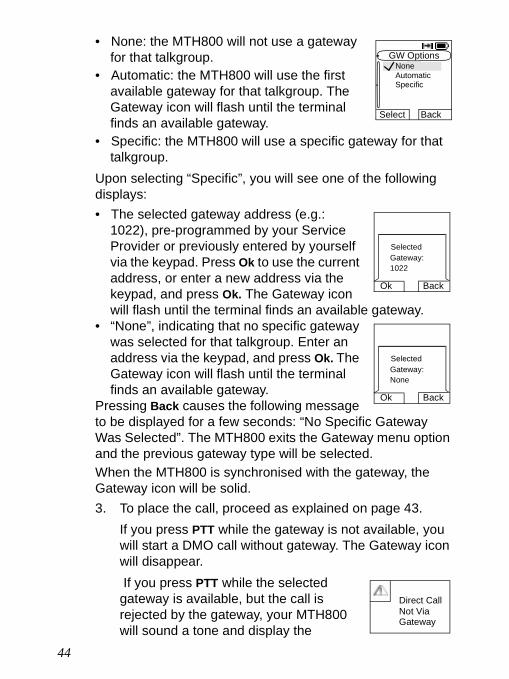
• None: the MTH800 will not use a gateway for that talkgroup.
• Automatic: the MTH800 will use the first available gateway for that talkgroup. The Gateway icon will flash until the terminal finds an available gateway.
• Specific: the MTH800 will use a specific gateway for that talkgroup.
Upon selecting “Specific”, you will see one of the following displays:• The selected gateway address (e.g.:
1022), pre-programmed by your Service Provider or previously entered by yourself via the keypad. Press Ok to use the current address, or enter a new address via the keypad, and press Ok. The Gateway icon will flash until the terminal finds an available gateway.
• “None”, indicating that no specific gateway was selected for that talkgroup. Enter an address via the keypad, and press Ok. The Gateway icon will flash until the terminal finds an available gateway.
Pressing Back causes the following message to be displayed for a few seconds: “No Specific Gateway Was Selected”. The MTH800 exits the Gateway menu option and the previous gateway type will be selected.When the MTH800 is synchronised with the gateway, the Gateway icon will be solid.3. To place the call, proceed as explained on page 43.
If you press PTT while the gateway is not available, you will start a DMO call without gateway. The Gateway icon will disappear. If you press PTT while the selected gateway is available, but the call is rejected by the gateway, your MTH800 will sound a tone and display the
GW Options
AutomaticSpecific
None
Select Back
SelectedGateway:1022
Ok Back
SelectedGateway:None
Ok Back
Direct Call
GatewayNot Via
44
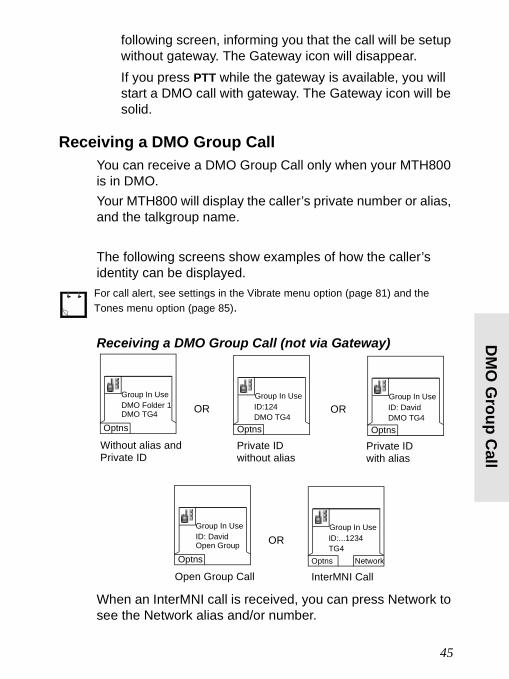
DM
O G
roup Call
6802972C35.book Page 45 Monday, August 16, 2004 9:22 PM
following screen, informing you that the call will be setup without gateway. The Gateway icon will disappear.If you press PTT while the gateway is available, you will start a DMO call with gateway. The Gateway icon will be solid.
Receiving a DMO Group CallYou can receive a DMO Group Call only when your MTH800 is in DMO.Your MTH800 will display the caller’s private number or alias, and the talkgroup name.
The following screens show examples of how the caller’s identity can be displayed.
Receiving a DMO Group Call (not via Gateway)
When an InterMNI call is received, you can press Network to see the Network alias and/or number.
For call alert, see settings in the Vibrate menu option (page 81) and the Tones menu option (page 85).
Private ID Private ID
OR
without alias with aliasWithout alias and
OR
Private ID
Group In UseDMO Folder 1
Optns
Group In UseID:124DMO TG4
Optns
Group In UseID: DavidDMO TG4
Optns
DMO TG4
InterMNI CallOpen Group Call
ORGroup In UseID: David
Optns
Group In UseID:...1234TG4
Optns Network
Open Group
45

6802972C35.book Page 46 Monday, August 16, 2004 9:22 PM
Receiving a Group Call (via Gateway)
The display shows the ID of the TMO caller.Press Optns to select a new gateway type (see page 44).
Receiving an Emergency Group Call For detailed information, see page 27.
Transmit InhibitFor detailed information, see page 39.
Exiting DMOTo exit DMO, press Optns and select Trunked Mode. For other ways, see “Selecting TMO or DMO Operation” on page 23.
Private ID Private ID
OR
without alias with aliasWithout alias and
OR
Private ID
Group In UseFolder 1
Optns
Group In UseID:124TG4
Optns
Group In UseID: DavidTG4
Optns
TG4
46
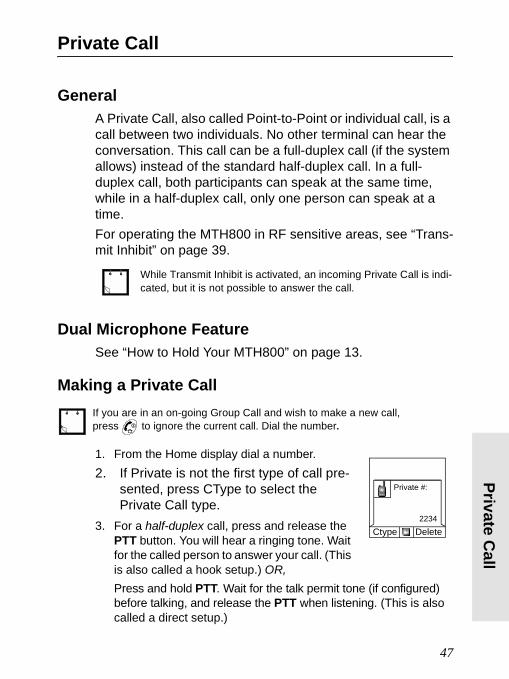
Private Call
6802972C35.book Page 47 Monday, August 16, 2004 9:22 PM
Private Call
GeneralA Private Call, also called Point-to-Point or individual call, is a call between two individuals. No other terminal can hear the conversation. This call can be a full-duplex call (if the system allows) instead of the standard half-duplex call. In a full-duplex call, both participants can speak at the same time, while in a half-duplex call, only one person can speak at a time.For operating the MTH800 in RF sensitive areas, see “Trans-mit Inhibit” on page 39.
Dual Microphone FeatureSee “How to Hold Your MTH800” on page 13.
Making a Private Call
1. From the Home display dial a number.2. If Private is not the first type of call pre-
sented, press CType to select the Private Call type.
3. For a half-duplex call, press and release the PTT button. You will hear a ringing tone. Wait for the called person to answer your call. (This is also called a hook setup.) OR,Press and hold PTT. Wait for the talk permit tone (if configured) before talking, and release the PTT when listening. (This is also called a direct setup.)
While Transmit Inhibit is activated, an incoming Private Call is indi-cated, but it is not possible to answer the call.
If you are in an on-going Group Call and wish to make a new call, press to ignore the current call. Dial the number.
Private #:
2234Ctype Delete
47
6802972C35.book Page 48 Monday, August 16, 2004 9:22 PM
For a full-duplex call, press and release . You will hear a ring-ing tone. Wait for the called person to answer your call.
4. To end the call, press . If the called person or the infrastructure end the call, the Call Ended message is displayed.
Other Ways of DialingDialing via Contact List
You can also use the contact list to select a number you previously stored. Press Contcs and search the stored number by scrolling ( or ) or by entering the first character of the contact name.
If the contact has more than one number stored, pickers surround the contact icon. Use / to select the number.
Short Number DialIf set up by your Service Provider, Short Dial allows you to dial part of the full number of the person you wish to call. Your MTH800 will automatically complete the number and send it over the air based on your own MTH800's identity. For example:1. Dial 456 (instead of 4282456, the full number).2. To place the call, press the PTT or .3. To hang up, press or .
Recent Calls ListSelect the number from the recent call list. See “Recent Calls” on page 96.
While Transmit Inhibit is activated, an incoming Private Call is indi-cated, but you cannot answer the call.
If no name is stored under a letter, the MTH800 automatically searches for-ward, alphabetically, until the next name is found. If more than one name in the list begins with the same letter, scroll to view other names.
48
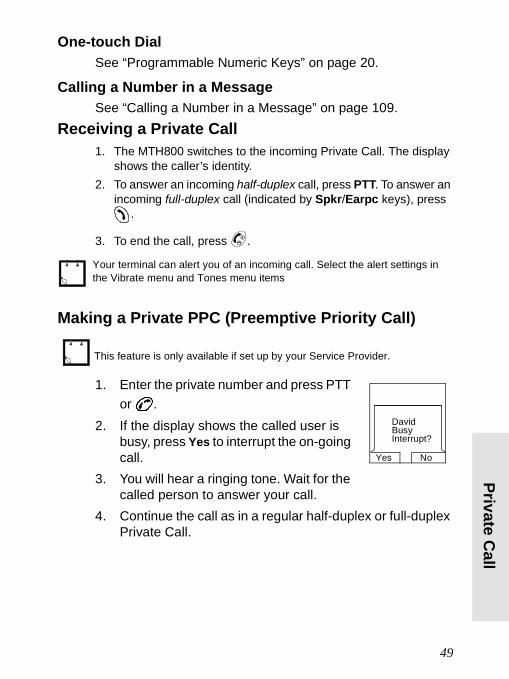
Private Call
6802972C35.book Page 49 Monday, August 16, 2004 9:22 PM
One-touch DialSee “Programmable Numeric Keys” on page 20.
Calling a Number in a MessageSee “Calling a Number in a Message” on page 109.
Receiving a Private Call1. The MTH800 switches to the incoming Private Call. The display
shows the caller’s identity.2. To answer an incoming half-duplex call, press PTT. To answer an
incoming full-duplex call (indicated by Spkr/Earpc keys), press .
3. To end the call, press .
Making a Private PPC (Preemptive Priority Call)
1. Enter the private number and press PTT or .
2. If the display shows the called user is busy, press Yes to interrupt the on-going call.
3. You will hear a ringing tone. Wait for the called person to answer your call.
4. Continue the call as in a regular half-duplex or full-duplex Private Call.
Your terminal can alert you of an incoming call. Select the alert settings in the Vibrate menu and Tones menu items
This feature is only available if set up by your Service Provider.
Yes No
David BusyInterrupt?
49
6802972C35.book Page 50 Monday, August 16, 2004 9:22 PM
Call QueuingWhen there are no available infrastructure resources for a call while in a setup phase, or while in an active call during cell re-selection, the call will be queued. The MTH800 will remain in queue for a pre-programmed period of time. If the resources become available, the call will proceed. If there are no resources after a certain period of time, the MTH800 will end the call.
50
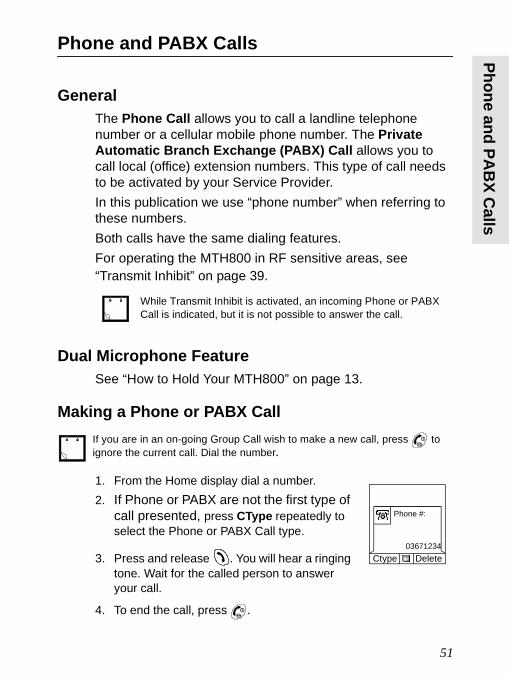
Phone and PAB
X Calls
6802972C35.book Page 51 Monday, August 16, 2004 9:22 PM
Phone and PABX Calls
GeneralThe Phone Call allows you to call a landline telephone number or a cellular mobile phone number. The Private Automatic Branch Exchange (PABX) Call allows you to call local (office) extension numbers. This type of call needs to be activated by your Service Provider.In this publication we use “phone number” when referring to these numbers.Both calls have the same dialing features.For operating the MTH800 in RF sensitive areas, see “Transmit Inhibit” on page 39.
Dual Microphone FeatureSee “How to Hold Your MTH800” on page 13.
Making a Phone or PABX Call
1. From the Home display dial a number.2. If Phone or PABX are not the first type of
call presented, press CType repeatedly to select the Phone or PABX Call type.
3. Press and release . You will hear a ringing tone. Wait for the called person to answer your call.
4. To end the call, press .
While Transmit Inhibit is activated, an incoming Phone or PABX Call is indicated, but it is not possible to answer the call.
If you are in an on-going Group Call wish to make a new call, press to ignore the current call. Dial the number.
Phone #:
03671234Ctype Delete
51
6802972C35.book Page 52 Monday, August 16, 2004 9:22 PM
Other Ways of DialingDialing via the Contact List
You can also use the contact list to select a number you previously stored. Press Contcs and search the stored number by scrolling ( or ) or by entering the first character of the contact name. If the contact has more than one number, use / to select the number.
If the contact has more than one number stored, pickers surround the contact icon. Use / to select the number.
Speed DialSpeed dial allows you to dial a shortened number of up to three digits instead of the full number. The speed dial number is the location of an entry in the contact list.1. Enter the pre-programmed speed dial number (for exam-
ple: 5) and press .
2. To place the call, press .
3. To hang up, press .
One-touch Dial One-touch dialing allows you to place a call by pressing and holding one of the numeric keys (0-9) or side keys. The number is the location of an entry (0-9) in the contact list. 1. Press and hold the required numeric key for a few sec
onds. Your MTH800 will display the number and dial it.
2. To hang up, press .
If no name is stored under a letter, the MTH800 searches forward, alpha-betically, until the next name is found. If more than one name in the list begins with the same letter, scroll to view other names.
If dialing via one-touch numeric key is enabled, one-touch dial is disabled (see page 20).
52
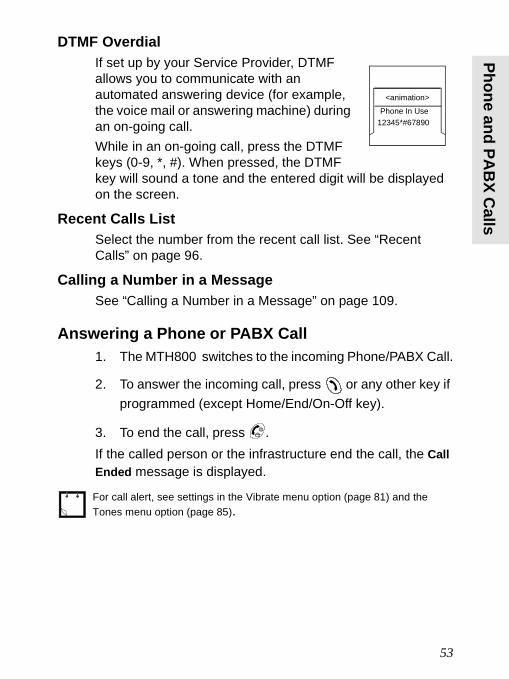
Phone and PAB
X Calls
6802972C35.book Page 53 Monday, August 16, 2004 9:22 PM
DTMF OverdialIf set up by your Service Provider, DTMF allows you to communicate with an automated answering device (for example, the voice mail or answering machine) during an on-going call.While in an on-going call, press the DTMF keys (0-9, *, #). When pressed, the DTMF key will sound a tone and the entered digit will be displayed on the screen.
Recent Calls ListSelect the number from the recent call list. See “Recent Calls” on page 96.
Calling a Number in a MessageSee “Calling a Number in a Message” on page 109.
Answering a Phone or PABX Call1. The MTH800 switches to the incoming Phone/PABX Call.
2. To answer the incoming call, press or any other key if programmed (except Home/End/On-Off key).
3. To end the call, press .If the called person or the infrastructure end the call, the Call Ended message is displayed.
For call alert, see settings in the Vibrate menu option (page 81) and the Tones menu option (page 85).
<animation>Phone In Use
12345*#67890
53
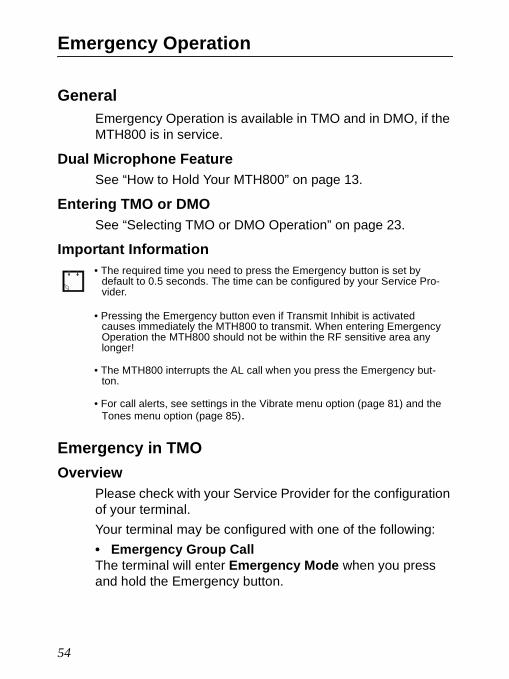
6802972C35.book Page 54 Monday, August 16, 2004 9:22 PM
Emergency Operation
GeneralEmergency Operation is available in TMO and in DMO, if the MTH800 is in service.
Dual Microphone FeatureSee “How to Hold Your MTH800” on page 13.
Entering TMO or DMOSee “Selecting TMO or DMO Operation” on page 23.
Important Information
Emergency in TMOOverview
Please check with your Service Provider for the configuration of your terminal.Your terminal may be configured with one of the following:• Emergency Group CallThe terminal will enter Emergency Mode when you press and hold the Emergency button.
• The required time you need to press the Emergency button is set by default to 0.5 seconds. The time can be configured by your Service Pro-vider.
• Pressing the Emergency button even if Transmit Inhibit is activated causes immediately the MTH800 to transmit. When entering Emergency Operation the MTH800 should not be within the RF sensitive area any longer!
• The MTH800 interrupts the AL call when you press the Emergency but-ton.
• For call alerts, see settings in the Vibrate menu option (page 81) and the Tones menu option (page 85).
54
Emergency O
peration
6802972C35.book Page 55 Monday, August 16, 2004 9:22 PM
The Emergency Mode allows you to use the PTT to transmit with Emergency priority (by either initiating an Emergency Group Call or requesting emergency transmit priority).After entering Emergency Mode, you may send an Emergency Alarm (if configured) and then start the Emergency Group Call and activate Hot Microphone (if configured).The Emergency Alarm is a special Status message sent to the infrastructure before the Emergency Group Call starts. The terminal may wait for infrastructure acknowledge for this Alarm and attempt retries. Each time you press the Emergency button, the terminal will send an Emergency Alarm.Hot Mic (Hot Microphone) allows you to talk without pressing the PTT. Pressing PTT during Hot Mic ends Hot Mic transmission. Pressing the End soft key ends Hot Mic activity. If Hot Mic is disabled, then use PTT to talk.
• Emergency Private Call (half-duplex or full-duplex)The terminal will start an Emergency Private Call to a pre-defined ID when you press and hold the Emergency button.If an Emergency Private Call gets modified to an Emergency Group Call, the terminal will enter Emergency Mode and will leave the Emergency Mode when the call ends.
Changing Folder or GroupSee Group Call section on page 32.
Entering or Exiting Emergency ModeUpon entry into Emergency Mode any existing call or service other than packet data service will be aborted or cleared down.In Emergency Mode, the terminal will automatically reject Phone, PABX and Private Calls, and will not monitor the groups in the user selected scan list. If an ATG is the selected group, however, the terminal will monitor the sub-
55
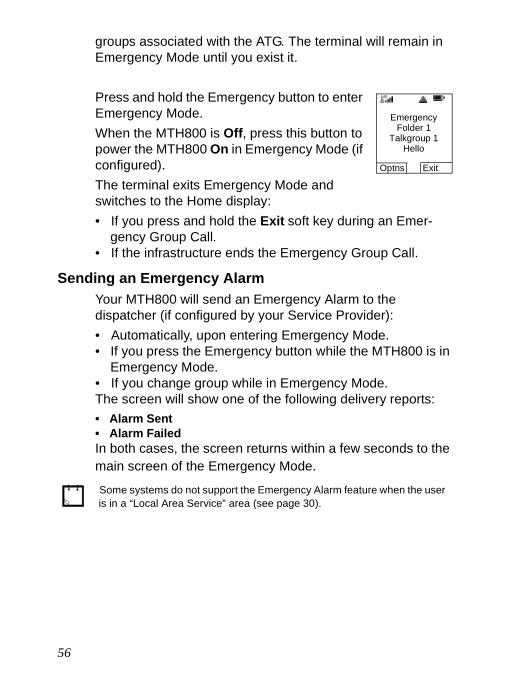
6802972C35.book Page 56 Monday, August 16, 2004 9:22 PM
groups associated with the ATG. The terminal will remain in Emergency Mode until you exist it.
Press and hold the Emergency button to enter Emergency Mode. When the MTH800 is Off, press this button to power the MTH800 On in Emergency Mode (if configured).The terminal exits Emergency Mode and switches to the Home display:• If you press and hold the Exit soft key during an Emer-
gency Group Call.• If the infrastructure ends the Emergency Group Call.
Sending an Emergency Alarm Your MTH800 will send an Emergency Alarm to the dispatcher (if configured by your Service Provider):• Automatically, upon entering Emergency Mode.• If you press the Emergency button while the MTH800 is in
Emergency Mode.• If you change group while in Emergency Mode.The screen will show one of the following delivery reports:• Alarm Sent• Alarm FailedIn both cases, the screen returns within a few seconds to the main screen of the Emergency Mode.
Some systems do not support the Emergency Alarm feature when the user is in a “Local Area Service” area (see page 30).
Emergency
Optns Exit
Folder 1Talkgroup 1
Hello
56
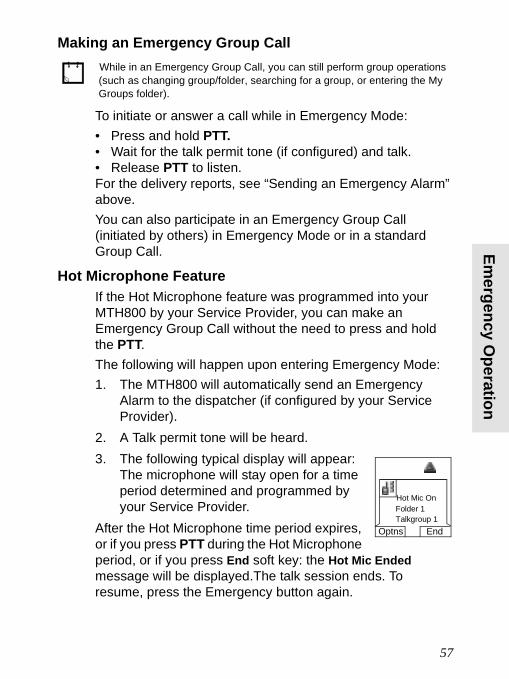
Emergency O
peration
6802972C35.book Page 57 Monday, August 16, 2004 9:22 PM
Making an Emergency Group Call
To initiate or answer a call while in Emergency Mode:• Press and hold PTT.• Wait for the talk permit tone (if configured) and talk. • Release PTT to listen.For the delivery reports, see “Sending an Emergency Alarm” above.You can also participate in an Emergency Group Call (initiated by others) in Emergency Mode or in a standard Group Call.
Hot Microphone FeatureIf the Hot Microphone feature was programmed into your MTH800 by your Service Provider, you can make an Emergency Group Call without the need to press and hold the PTT. The following will happen upon entering Emergency Mode:1. The MTH800 will automatically send an Emergency
Alarm to the dispatcher (if configured by your Service Provider).
2. A Talk permit tone will be heard.3. The following typical display will appear:
The microphone will stay open for a time period determined and programmed by your Service Provider.
After the Hot Microphone time period expires, or if you press PTT during the Hot Microphone period, or if you press End soft key: the Hot Mic Ended message will be displayed.The talk session ends. To resume, press the Emergency button again.
While in an Emergency Group Call, you can still perform group operations (such as changing group/folder, searching for a group, or entering the My Groups folder).
Hot Mic OnFolder 1Talkgroup 1
Optns End
57
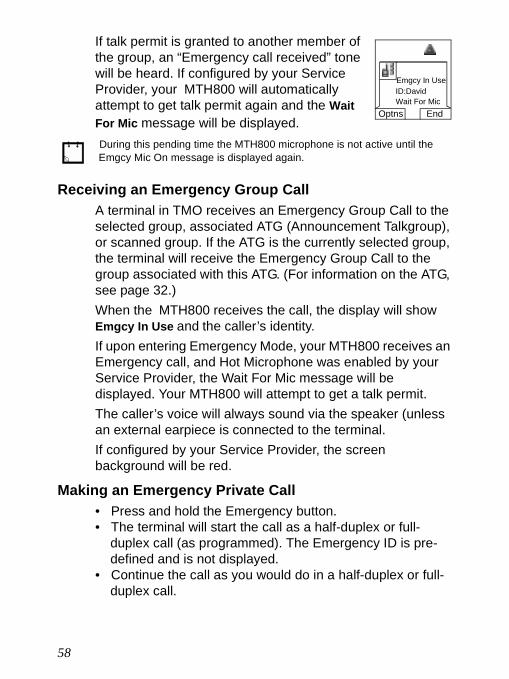
6802972C35.book Page 58 Monday, August 16, 2004 9:22 PM
If talk permit is granted to another member of the group, an “Emergency call received” tone will be heard. If configured by your Service Provider, your MTH800 will automatically attempt to get talk permit again and the Wait For Mic message will be displayed.
Receiving an Emergency Group CallA terminal in TMO receives an Emergency Group Call to the selected group, associated ATG (Announcement Talkgroup), or scanned group. If the ATG is the currently selected group, the terminal will receive the Emergency Group Call to the group associated with this ATG. (For information on the ATG, see page 32.) When the MTH800 receives the call, the display will show Emgcy In Use and the caller’s identity.If upon entering Emergency Mode, your MTH800 receives an Emergency call, and Hot Microphone was enabled by your Service Provider, the Wait For Mic message will be displayed. Your MTH800 will attempt to get a talk permit.The caller’s voice will always sound via the speaker (unless an external earpiece is connected to the terminal.If configured by your Service Provider, the screen background will be red.
Making an Emergency Private Call• Press and hold the Emergency button.• The terminal will start the call as a half-duplex or full-
duplex call (as programmed). The Emergency ID is pre-defined and is not displayed.
• Continue the call as you would do in a half-duplex or full-duplex call.
During this pending time the MTH800 microphone is not active until the Emgcy Mic On message is displayed again.
Emgcy In UseID:DavidWait For Mic
Optns End
58

Emergency O
peration
6802972C35.book Page 59 Monday, August 16, 2004 9:22 PM
Receiving an Emergency Private Call• The tallker’s identity is displayed when the terminal
receives the half-duplex call.• When the terminal receives the call, the display will show
Emergency Prvt In Use and the caller’s identity.• If configured by your Service Provider, the screen back-
ground will be red.• Continue the call as you would do in a half-duplex or full-
duplex call.
Modifying the Type of CallThe infrastructure can modify on-going calls as follows:• Emergency Group Call to Emergency Private Call, and
vice versa.• Anyone of the above to a Phone Call.If Hot Mic is interrupted when the modification occurs, the display will show the Hot Mic Ended message. Continue the modified call depending on the type of call.
Emergency in DMO
GeneralYou can initiate an Emergency Group Call to a group.You can receive an Emergency Group Call:• From the selected talkgroup• From other users within talkback range (if configured by
your Service Provider). This is called an InterMNI call.• From an open group. (An open group is a super-group to
which all DMO groups belong.)Emergency calls can be placed via gateway. For gateway settings, see the DMO section, page 43.
59
6802972C35.book Page 60 Monday, August 16, 2004 9:22 PM
Changing Folder or GroupProceed as explained in the Group Call section, page 32.
Making an Emergency Group CallTo initiate or answer a call:• Enter Emergency Mode by pressing the Emergency but-
ton.• Press and hold PTT.• Wait for the talk permit tone (if configured) and talk. • Release PTT to listen.
Receiving an Emergency Group Call• The display shows “Emrgncy-In Use” and the caller’s iden-
tity as a private number or an alias.• The caller’s voice will always sound via the speaker
(unless an external earpiece is connected to the terminal).• If configured by your Service Provider, the screen back-
ground will be red.• If the incoming call is an InterMNI call in Emergency Mode,
you can view network information by pressing Optns and selecting Network.
• If the incoming call is an InterMNI call not in Emergency Mode, you can view network information by pressing Net-work.
60
GPS Location Services
6802972C35.book Page 61 Monday, August 16, 2004 9:22 PM
GPS Location Services
Your terminal’s GPS Location feature uses information from Global Positioning System (GPS) satellites orbiting the Earth to determine the approximate geographical location of your terminal. The availability and accuracy of this location information (and the amount of time that it takes to calculate it) will vary depending on the environment in which you are using the terminal.For example, GPS location fixes are often difficult to obtain indoors, in covered locations, between high buildings, or in other situations where you have not established a clear broad view of the sky.
SEE: IMPORTANT: Things to Keep in Mind.The GPS location Service can assist your Dispatcher or Colleagues in many ways such as more efficient deployment of resources or locating your terminal if you trigger your emergency service. The terminal can be configured to display location information on the terminal’s display or to send it over the air to your dispatcher where it can be displayed in control center (Please check with your Service Provider on the configuration of your terminal).
IMPORTANT: Things to Keep in MindWhere adequate signals from multiple satellites are not available (usually because your terminal cannot establish a view of a wide area of open sky), the GPS feature of your terminal WILL NOT WORK. Such situations include but are not limited to:• In underground locations• Inside of buildings, trains, or other covered vehicles• Under any other metal or concrete roof or structure• Near a powerful radio or television tower
61
6802972C35.book Page 62 Monday, August 16, 2004 9:22 PM
• When your GPS antenna is covered (for example, by your hand or other object) or facing the ground
• Ιn temperature extremes outside the operating limits of your terminal
Even where location information can be calculated in such situations, it may take longer to do so. Therefore, in any emergency situation, always report your location to your dispatcher.Furthermore, please note that even where adequate signals from multiple satellites are available, your GPS feature will only provide an approximate location, often within 20 - 100 meters from your actual location.
Enhancing GPS PerformanceSometimes the GPS feature of your terminal may be unable to complete a location calculation successfully. You will then see a message indicating that your terminal cannot see enough visible satellites. To maximize the ability of your terminal to determine a location fix please note the following guidelines:• Stay in the open. The GPS feature works best where there
is nothing between your terminal and a large amount of open sky. If possible, go outside, away from tall buildings and foliage. While performance in a building is improved by moving closer to windows, glass with certain sun shielding films may block satellite signals.
• Position your terminal to enhance reception. Signals from GPS satellites are transmitted to your GPS antenna, which is in your terminal antenna. Hold your terminal away from your body, giving the antenna clear access to satellite sig-nals. Do not cover the antenna area with your fingers or anything else.
62
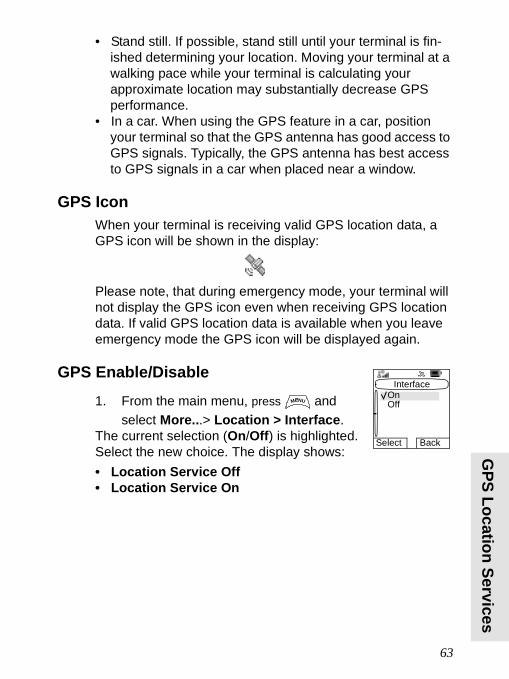
GPS Location Services
6802972C35.book Page 63 Monday, August 16, 2004 9:22 PM
• Stand still. If possible, stand still until your terminal is fin-ished determining your location. Moving your terminal at a walking pace while your terminal is calculating your approximate location may substantially decrease GPS performance.
• In a car. When using the GPS feature in a car, position your terminal so that the GPS antenna has good access to GPS signals. Typically, the GPS antenna has best access to GPS signals in a car when placed near a window.
GPS IconWhen your terminal is receiving valid GPS location data, a GPS icon will be shown in the display:
Please note, that during emergency mode, your terminal will not display the GPS icon even when receiving GPS location data. If valid GPS location data is available when you leave emergency mode the GPS icon will be displayed again.
GPS Enable/Disable1. From the main menu, press and
select More...> Location > Interface.The current selection (On/Off) is highlighted. Select the new choice. The display shows:• Location Service Off• Location Service On
Interface
OffOn
Select Back
MENU
63

6802972C35.book Page 64 Monday, August 16, 2004 9:22 PM
Entering GPS Location ServiceTo enter the GPS sub-menu, press and select More...> Location:• Position provides the actual position infor-
mation.• Interface allows you to enable/disable the
GPS location service.• Testpage provides the actual satellite information.Scroll to your selection and press Select to access the next display.This estimate of accuracy of the calculated location is only a very rough estimate and may vary substantially from the actual accuracy of the approximate location information reported.
Viewing Your Position
1. From the main menu, press and se-lect More...> Location > Position.
2. Scroll to view the entire screen.This displays the following information about the last time your location was calculated (if available):• The time the location was last calculated• The latitude expressed in degrees, minutes, and seconds• The longitude expressed in degrees, minutes, and sec-
onds• The altitude expressed in meters• The number of satellites used to calculate the location. In
general, more satellites make for better accuracy. The maximum is twelve satellites.
To calculate your location again, press Rfrsh.
• The variation will vary in accordance to the GPS Configuration set by your Service Provider.
• The availability of the GPS Location menus is dependent on your termi-nal configuration, please contact your Service Provider for further details.
Location
InterfacePosition
Select Back
Testpage
MENU
Position
<Latitude><Time>
Rfrsh Back
<Longitude><Altitude><Tracked satellites>
MENU
64
GPS Location Services
6802972C35.book Page 65 Monday, August 16, 2004 9:22 PM
It may take your terminal several minutes to complete the process of determining your location. During this time, a message usually appears on your terminal’s display stating:• Insufficient Visible Satellites, or• Insufficient Visible DataFor tips on getting the best location calculation, see “Enhancing GPS Performance” on page 62.The Position screen displays the updated information.To cancel a location calculation before it is completed:Press Back to return to the previous screen.Each time approximate location of your terminal is calculated, the latest location information is stored in your terminal and remains there even when your terminal is powered off. You will see this information the next time you view the Position screen.If you received a terminal call or alert while attempting to determine your location, the Position screen will disappear, but your terminal will continue attempting to determine its location. If it is successful, the new location information will be displayed the next time you view the Position screen.
GPS Testpage
Satellite Almanac DataGovernment officials maintains an almanac of data about where GPS satellites are as they orbit the Earth. This information is available to your terminal. Keeping your satellite almanac up to date helps your terminal determine your location more quickly.The almanac contains information about the location of satellites, their operational status, and other satellite information.
65
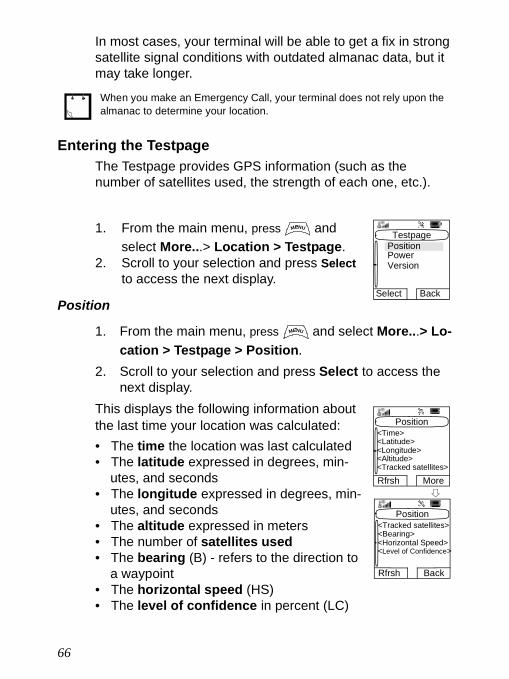
6802972C35.book Page 66 Monday, August 16, 2004 9:22 PM
In most cases, your terminal will be able to get a fix in strong satellite signal conditions with outdated almanac data, but it may take longer.
Entering the TestpageThe Testpage provides GPS information (such as the number of satellites used, the strength of each one, etc.).
1. From the main menu, press and select More...> Location > Testpage.
2. Scroll to your selection and press Select to access the next display.
Position
1. From the main menu, press and select More...> Lo-cation > Testpage > Position.
2. Scroll to your selection and press Select to access the next display.
This displays the following information about the last time your location was calculated:• The time the location was last calculated• The latitude expressed in degrees, min-
utes, and seconds• The longitude expressed in degrees, min-
utes, and seconds• The altitude expressed in meters• The number of satellites used• The bearing (B) - refers to the direction to
a waypoint• The horizontal speed (HS)• The level of confidence in percent (LC)
When you make an Emergency Call, your terminal does not rely upon the almanac to determine your location.
Testpage
PowerPosition
Select Back
Version
MENU
MENU
Position
<Latitude><Time>
Rfrsh More
<Longitude><Altitude><Tracked satellites>
Position
<Bearing><Tracked satellites>
Rfrsh Back
<Horizontal Speed><Level of Confidence>
66
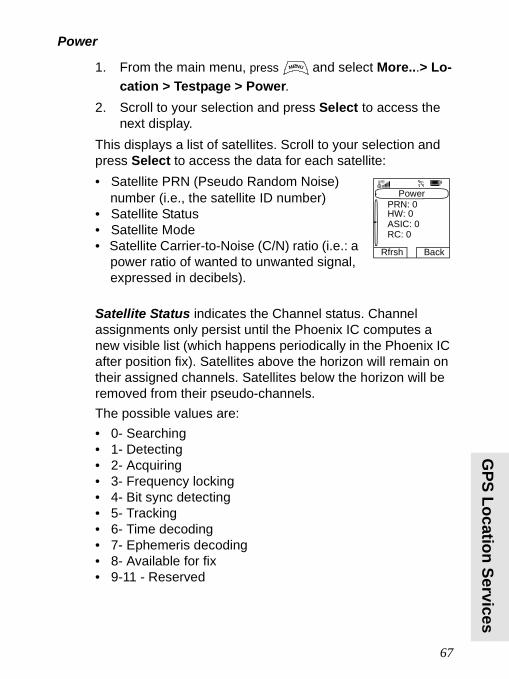
GPS Location Services
6802972C35.book Page 67 Monday, August 16, 2004 9:22 PM
Power
1. From the main menu, press and select More...> Lo-cation > Testpage > Power.
2. Scroll to your selection and press Select to access the next display.
This displays a list of satellites. Scroll to your selection and press Select to access the data for each satellite:• Satellite PRN (Pseudo Random Noise)
number (i.e., the satellite ID number)• Satellite Status• Satellite Mode• Satellite Carrier-to-Noise (C/N) ratio (i.e.: a
power ratio of wanted to unwanted signal, expressed in decibels).
Satellite Status indicates the Channel status. Channel assignments only persist until the Phoenix IC computes a new visible list (which happens periodically in the Phoenix IC after position fix). Satellites above the horizon will remain on their assigned channels. Satellites below the horizon will be removed from their pseudo-channels.The possible values are:• 0- Searching• 1- Detecting• 2- Acquiring• 3- Frequency locking• 4- Bit sync detecting• 5- Tracking• 6- Time decoding• 7- Ephemeris decoding• 8- Available for fix• 9-11 - Reserved
MENU
Power
HW: 0PRN: 0
Rfrsh Back
ASIC: 0RC: 0
67
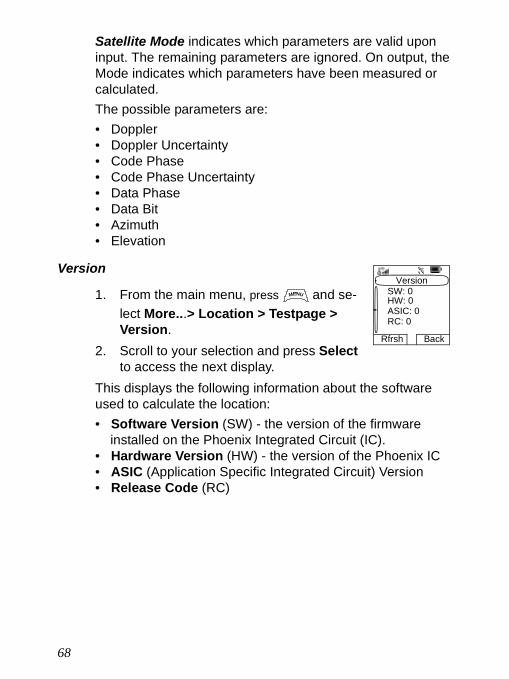
6802972C35.book Page 68 Monday, August 16, 2004 9:22 PM
Satellite Mode indicates which parameters are valid upon input. The remaining parameters are ignored. On output, the Mode indicates which parameters have been measured or calculated.The possible parameters are:• Doppler• Doppler Uncertainty• Code Phase• Code Phase Uncertainty• Data Phase• Data Bit• Azimuth• Elevation
Version
1. From the main menu, press and se-lect More...> Location > Testpage > Version.
2. Scroll to your selection and press Select to access the next display.
This displays the following information about the software used to calculate the location:• Software Version (SW) - the version of the firmware
installed on the Phoenix Integrated Circuit (IC). • Hardware Version (HW) - the version of the Phoenix IC• ASIC (Application Specific Integrated Circuit) Version• Release Code (RC)
Version
HW: 0SW: 0
Rfrsh Back
ASIC: 0RC: 0
MENU
68
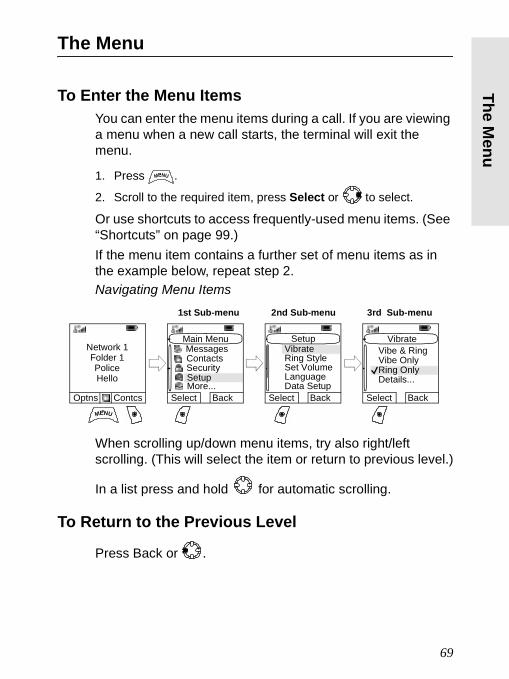
The Menu
6802972C35.book Page 69 Monday, August 16, 2004 9:22 PM
The Menu
To Enter the Menu ItemsYou can enter the menu items during a call. If you are viewing a menu when a new call starts, the terminal will exit the menu.
1. Press .
2. Scroll to the required item, press Select or to select.
Or use shortcuts to access frequently-used menu items. (See “Shortcuts” on page 99.)If the menu item contains a further set of menu items as in the example below, repeat step 2.Navigating Menu Items
When scrolling up/down menu items, try also right/left scrolling. (This will select the item or return to previous level.)
In a list press and hold for automatic scrolling.
To Return to the Previous Level
Press Back or .
MENU
1st Sub-menu 2nd Sub-menu 3rd Sub-menu
MENU
Network 1
Optns Contcs
Folder 1PoliceHello
Main Menu
ContactsSecurity
Messages
SetupMore...
Vibrate
Vibe OnlyRing Only
Vibe & Ring
Details...
Select Back
Setup
Ring StyleSet Volume
Vibrate
LanguageData Setup
Select Back Select Back
69
6802972C35.book Page 70 Monday, August 16, 2004 9:22 PM
To Exit the Menu ItemsPress .
Menu IconsThe following icons make it easy to identify the menu items at first glance.
Your MTH800 may exit if no key presses are detected for a time-out period.
Menu Icon Description
Main Menu Items/Context Sensitive MenuAppears above if the main menu items/context sensitive menu are active.
Messages• Send status messages, • Send short text messages (free text or according to user
defined or predefined templates),• Receive messages in Inbox.
ContactsAdd, search, edit, or erase entries in the contact list.
SecurityLets you turn On/Off and verify security features, and change passwords.
SetupAllows you to customise your MTH800.
More...Contains more customisable menu items.
Scroll BarIndicates navigation among items that occupy more than one screen. If all items appear in one screen, the scroll bar is empty.
MENU
70
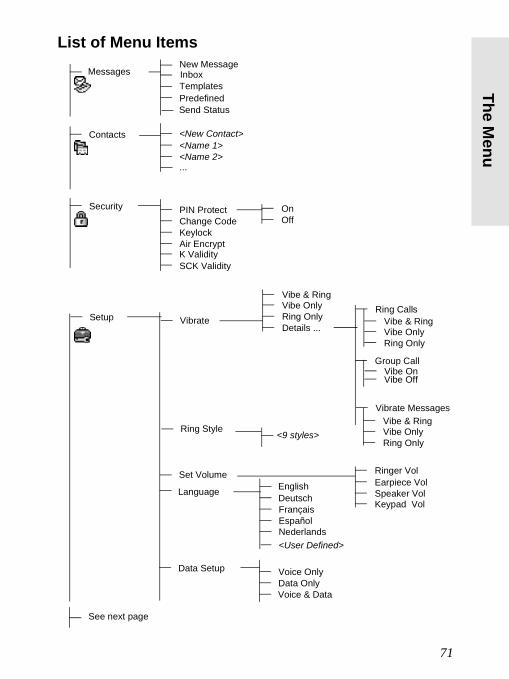
The Menu
6802972C35.book Page 71 Monday, August 16, 2004 9:22 PM
List of Menu Items
Send Status
InboxNew Message
TemplatesPredefined
Messages
Contacts <New Contact><Name 1><Name 2>
Security PIN ProtectChange CodeKeylockAir Encrypt
Language
Ring Style
EnglishDeutschFrançais
Setup
Voice OnlyData OnlyVoice & Data
Español
Data Setup
Vibrate
Set Volume
Nederlands
Ring OnlyDetails ...
Vibe OnlyVibe & Ring
Group Call
Vibrate Messages
Ring Calls
Earpiece VolSpeaker Vol
Ringer Vol
Keypad Vol
See next page
K ValiditySCK Validity
...
Ring OnlyVibe OnlyVibe & Ring
Ring OnlyVibe OnlyVibe & Ring
OnOff
Vibe OffVibe On
<9 styles>
<User Defined>
71
6802972C35.book Page 72 Monday, August 16, 2004 9:22 PM
List of Menu Items (Cont’d)Setup
Keypad ToneTones
All Tones
OnOff
OnOff
(cont’d)
Talk Permit No ToneShort ToneNormal Tone
Display
Flip Display [On/Off]
Screen Saver [Auto/Disabled]Text Size [Zoom/Standard]
Group Audio Always LoudSpkr Cntrl
Backlight [Auto/Disabled]
Wallpaper [On/Off]Contrast
Networks Networks Sel Home Only Select NetTrunked Mode
Direct Mode
TXI Mode ActivateDeactivate
My Info My Private NumMy Phone Num
More...Group Setup
Scanning
Active ListScan List(s)
On/OffSelect List
Scan
My Groups
Recent Calls DialedReceivedMissed
Shortcuts<New Entry><shortcut name>
SelectEdit List
Clear to send Tone OnTone Off
<20 lists>
72
The Menu
6802972C35.book Page 73 Monday, August 16, 2004 9:22 PM
List of Menu items (Cont’d)
This is the standard menu layout. Your Service Provider may enable/disable some menu items or change their names.
More...(cont’d)
Location Position
Interface
Testpage
OnOff
Position
Power
Version
<Time> N:<Latitude>
H:<Altitude>E:<Longitude>
HS:<Horizontal Speed>LC:<Level of Confidence>
<Time> N:<Latitude>
H:<Altitude>E:<Longitude>
Sats Used:<Number of satellites used>B:<Bearing>
<1 Satellite>
SW: <Software Version> HW: <Hardware Version>
RC: <Release Code>ASIC: <ASIC Version>
<Satellite PRN> <Satellite Status><Satellite Mode><Satellite C/N>
Testpage(cont.)
Sats Used:<Tracked satellites>
<2 Satellite>
<4 Satellite>
<3 Satellite>
... <up to 12>
73
6802972C35.book Page 74 Monday, August 16, 2004 9:22 PM
MessagesRefer to “Messages” on page 104 for details.
ContactsGeneral
Contacts stores Private, Phone, and PABX numbers. Each Contacts entry can store several numbers. A Contacts entry contains:• A name—A name is required if you are storing more than
one number to the entry; otherwise, it is optional. Typically, this is the name of the person whose contact information is stored in the entry.
• A Contacts type—Each number stored must be assigned a Contacts type.
• A number—Each Contacts entry must contain a number. This may be any type of phone number and Private ID.
• A Speed Dial number — When you store a phone number, it is assigned a Speed Dial number. You can accept the default Speed Dial number or change it.
Contact IconsIn the contact list display, the following icons may appear next to the contact numbers to indicate the type of stored number.
Contact Icon Description
Private ID Number
Mobile Phone Number
Home Phone Number
Work Phone Number
74
The Menu
6802972C35.book Page 75 Monday, August 16, 2004 9:22 PM
75
Creating a Contact1. From the Home display, press Contcs.
Select [New Contact]. Or - from the main menu select Contacts. Select [New Contact].Or - while editing the list from the Contacts Menu, select [New Contact].
2. Enter name. (For details on text editor use, see “Writing Text” on page 114). Press Ok to confirm.
3. Scroll left or right and select the type of stored number (such as Private).
4. Enter number (#). Press Ok.5. Scroll up and down the entries. Continue to enter other
types and numbers, as you may keep several numbers (Private, Mobile, Home, Work, PABX, Other) for the same person under the same contact name. To correct an entry, press Change.
6. When finished, press Done. Press Back to return to Home display.
PABX Number
Other Phone NumberPickersIndicate more than one number is stored with the contact.
Contact Icon Description
David[New Contact]
Select Back
Contacts
AnnRay2255
6802972C35.book Page 76 Monday, August 16, 2004 9:22 PM
Editing a Contact1. From the contact list, scroll to the entry you want to edit.
2. Press to enter Contacts. Select Edit. The entry de-tails screen displays.
3. Follow the instructions in “Creating a Contact” on page 75 to edit the various fields.
Deleting a Number1. From the contact list, scroll to the entry that contains the
number you want to delete.2. Scroll left or right to display the contact type for the num-
ber you want to delete.
3. Press .
4. Select Delete Number.5. Press Yes to confirm.
Deleting a Contact1. From the contact list, scroll to the entry you want to delete.
2. Press .
3. To delete the entire entry, select Delete Contact.4. Press Yes to confirm.
Checking CapacityTo see how many numbers are stored in Contacts:
1. From the contact list, press .
2. Select Capacity.3. Select the contacts to check. Select Back to exit.
If an entry contains only one number, deleting the number deletes the entry.
MENU
MENU
MENU
MENU
76
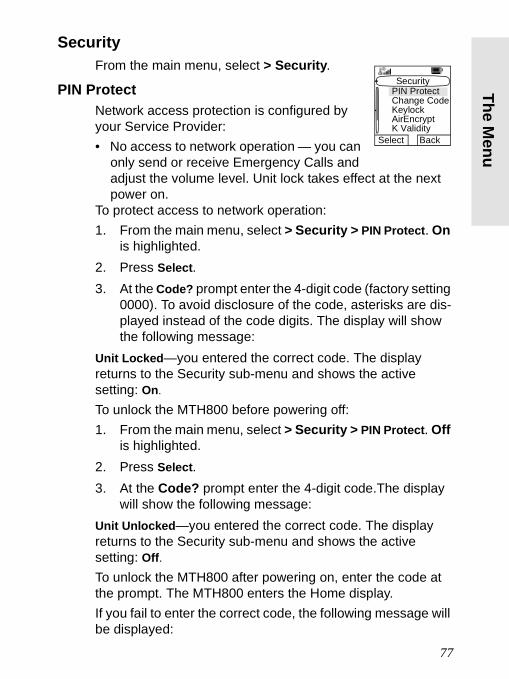
The Menu
6802972C35.book Page 77 Monday, August 16, 2004 9:22 PM
SecurityFrom the main menu, select > Security.
PIN ProtectNetwork access protection is configured by your Service Provider:• No access to network operation — you can
only send or receive Emergency Calls and adjust the volume level. Unit lock takes effect at the next power on.
To protect access to network operation:1. From the main menu, select > Security > PIN Protect. On
is highlighted.2. Press Select.3. At the Code? prompt enter the 4-digit code (factory setting
0000). To avoid disclosure of the code, asterisks are dis-played instead of the code digits. The display will show the following message:
Unit Locked—you entered the correct code. The display returns to the Security sub-menu and shows the active setting: On.
To unlock the MTH800 before powering off:1. From the main menu, select > Security > PIN Protect. Off
is highlighted.2. Press Select.3. At the Code? prompt enter the 4-digit code.The display
will show the following message:Unit Unlocked—you entered the correct code. The display returns to the Security sub-menu and shows the active setting: Off.To unlock the MTH800 after powering on, enter the code at the prompt. The MTH800 enters the Home display.If you fail to enter the correct code, the following message will be displayed:
Security
Change CodeKeylock
PIN Protect
AirEncryptK Validity
Select Back
77
6802972C35.book Page 78 Monday, August 16, 2004 9:22 PM
Incorrect Code Entered—You are prompted to try again. After failing, your MTH800 will be blocked. Please check with your Service Provider how many failed attempts are allowed.
How to unblock the MTH800The display shows Unit Blocked. You send or receive calls an Emergency Call.To unblock the MTH800, enter the PUK (Personal Unblocking Key). The PUK is an eight-digit master code to be obtained from your Service Provider.After entering the PUK successfully, you will be prompted to replace the forgotten code.At the New Code? prompt enter the new 4-digit code, and repeat the code to confirm. If the code does not match, you will be prompted to enter it again until the new code message is accepted.
Change CodeFrom the main menu, select > Security > Change Code.
At the Old Code? prompt, enter the 4-digit code. If the old code does not match the entered code at verification, the display prompts you to re-enter the old code.If the entered code matches the old code, the display prompts you to enter a new 4-digit code and to repeat it for confirmation. If the confirmation code does not match the new code, the display prompts you to re-enter the new code.When the new code is accepted, the display returns to the Security sub-menu.
The default PIN code is 0000.
78
The Menu
6802972C35.book Page 79 Monday, August 16, 2004 9:22 PM
Locking/Unlocking the Keypad To prevent accidental key/button presses:
1. Press OR,
From the main menu, select > Security > Keylock. The
keypad is locked except .
2. To unlock the keypad, press .
Air Encryption On/Off From the main menu, select > Security > AirEncrypt.This sub-menu allows you to view air encryption On/Off state.Call encryption provides service confidentiality between you and the system.If encryption is on and you receive a clear call (unencrypted), the MTH800 will display a Call & Data Not Encrypted message.
When there is an incoming call and the keypad is locked, you can still use
the PTT, rotary knob, , and .
The Emergency button is not locked. Entering Emergency Operation, unlocks all keys.
You cannot manually disable Air Encryption (if fitted) from the menu. This sub-menu only indicates if Air Encryption is enabled at that moment.
The Air Encryption feature is ONLY enabled depending on your Service Pro-vider.
MENU
MENU
79
6802972C35.book Page 80 Monday, August 16, 2004 9:22 PM
Encryption Key DeletionPlease check with your Service Provider whether the terminal is provided with air interface encryption keys.You can delete the air interface encryption keys from the terminal by entering the following sequence from the keypad: **00##
K ValidityFrom the main menu, select Security > K Validity.
K (Key) is a secret key the infrastructure uses to authenticate the MTH800 in the system. It is part of the authentication that provides service confidentiality between your MTH800 and the system.To verify K validity, press Select. The display will show one of the following messages:• K is Valid—the infrastructure can authenticate your
MTH800.• K is Invalid—the infrastructure shall not authenticate your
MTH800. Please call your Service Provider to restore K to your MTH800.
CAUTION! Using this feature will disable the terminal, and your Service Pro-vider will need to re-enable the terminal.
Deletion should be performed in idle TMO/DMO or Emergency Operation.
80
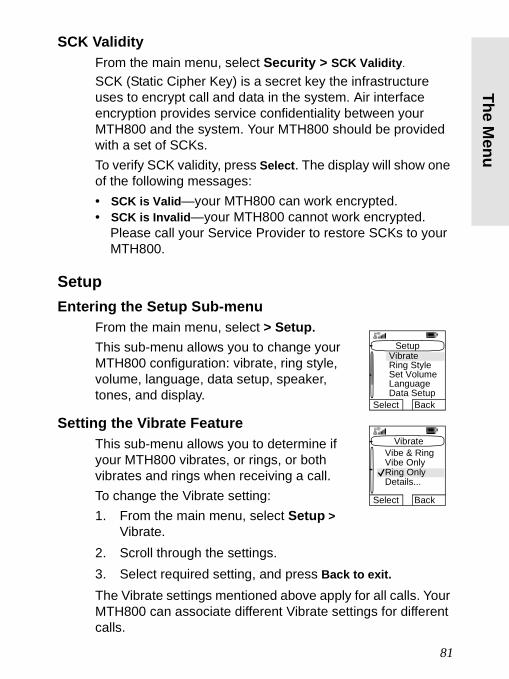
The Menu
6802972C35.book Page 81 Monday, August 16, 2004 9:22 PM
SCK ValidityFrom the main menu, select Security > SCK Validity.
SCK (Static Cipher Key) is a secret key the infrastructure uses to encrypt call and data in the system. Air interface encryption provides service confidentiality between your MTH800 and the system. Your MTH800 should be provided with a set of SCKs.To verify SCK validity, press Select. The display will show one of the following messages:• SCK is Valid—your MTH800 can work encrypted.• SCK is Invalid—your MTH800 cannot work encrypted.
Please call your Service Provider to restore SCKs to your MTH800.
Setup Entering the Setup Sub-menu
From the main menu, select > Setup.This sub-menu allows you to change your MTH800 configuration: vibrate, ring style, volume, language, data setup, speaker, tones, and display.
Setting the Vibrate FeatureThis sub-menu allows you to determine if your MTH800 vibrates, or rings, or both vibrates and rings when receiving a call.To change the Vibrate setting:1. From the main menu, select Setup >
Vibrate.2. Scroll through the settings.3. Select required setting, and press Back to exit. The Vibrate settings mentioned above apply for all calls. Your MTH800 can associate different Vibrate settings for different calls.
Setup
Ring StyleSet Volume
Vibrate
LanguageData Setup
Select Back
Vibrate
Vibe OnlyRing Only
Vibe & Ring
Details...
Select Back
81
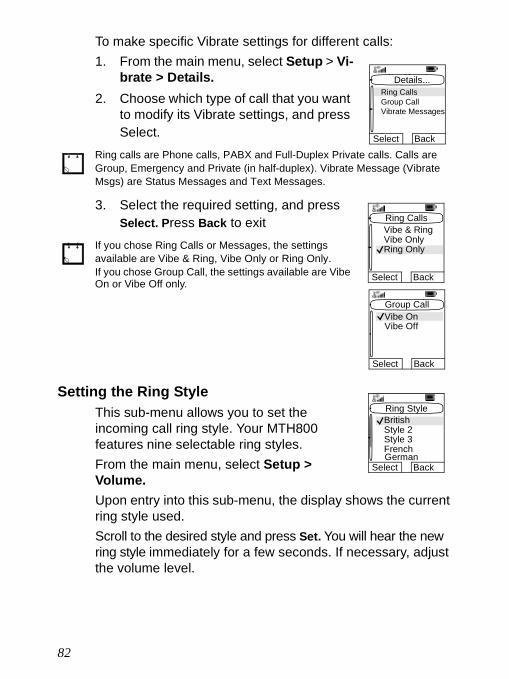
6802972C35.book Page 82 Monday, August 16, 2004 9:22 PM
To make specific Vibrate settings for different calls:1. From the main menu, select Setup > Vi-
brate > Details.2. Choose which type of call that you want
to modify its Vibrate settings, and press Select.
3. Select the required setting, and press Select. Press Back to exit
Setting the Ring StyleThis sub-menu allows you to set the incoming call ring style. Your MTH800 features nine selectable ring styles.From the main menu, select Setup > Volume.Upon entry into this sub-menu, the display shows the current ring style used.Scroll to the desired style and press Set. You will hear the new ring style immediately for a few seconds. If necessary, adjust the volume level.
Ring calls are Phone calls, PABX and Full-Duplex Private calls. Calls are Group, Emergency and Private (in half-duplex). Vibrate Message (Vibrate Msgs) are Status Messages and Text Messages.
If you chose Ring Calls or Messages, the settings available are Vibe & Ring, Vibe Only or Ring Only.If you chose Group Call, the settings available are Vibe On or Vibe Off only.
Details...
Group CallVibrate Messages
Ring Calls
Select Back
Ring Calls
Vibe OnlyRing Only
Vibe & Ring
Select Back
Group Call
Vibe OffVibe On
Select Back
Ring Style
Style 2Style 3
British
French
Select BackGerman
82
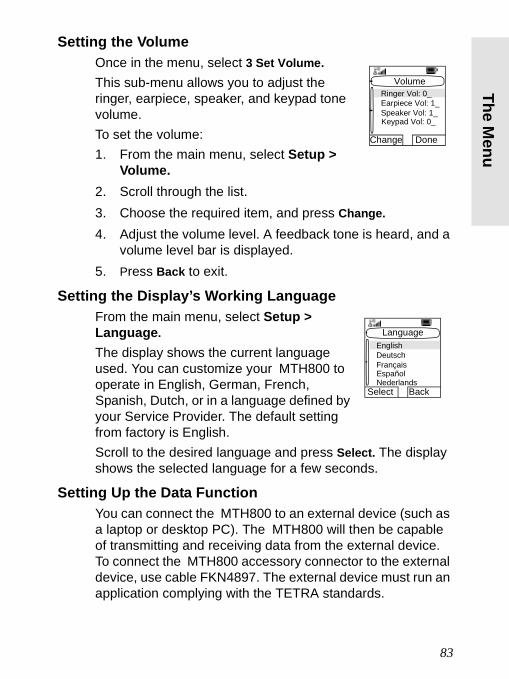
The Menu
6802972C35.book Page 83 Monday, August 16, 2004 9:22 PM
Setting the VolumeOnce in the menu, select 3 Set Volume.This sub-menu allows you to adjust the ringer, earpiece, speaker, and keypad tone volume.To set the volume:1. From the main menu, select Setup >
Volume.2. Scroll through the list.3. Choose the required item, and press Change.4. Adjust the volume level. A feedback tone is heard, and a
volume level bar is displayed.5. Press Back to exit.
Setting the Display’s Working Language From the main menu, select Setup > Language.The display shows the current language used. You can customize your MTH800 to operate in English, German, French, Spanish, Dutch, or in a language defined by your Service Provider. The default setting from factory is English.Scroll to the desired language and press Select. The display shows the selected language for a few seconds.
Setting Up the Data FunctionYou can connect the MTH800 to an external device (such as a laptop or desktop PC). The MTH800 will then be capable of transmitting and receiving data from the external device. To connect the MTH800 accessory connector to the external device, use cable FKN4897. The external device must run an application complying with the TETRA standards.
Volume
Earpiece Vol: 1_Speaker Vol: 1_
Ringer Vol: 0_
Change Done
Keypad Vol: 0_
Language
DeutschFrançais
English
Select Back
EspañolNederlands
83
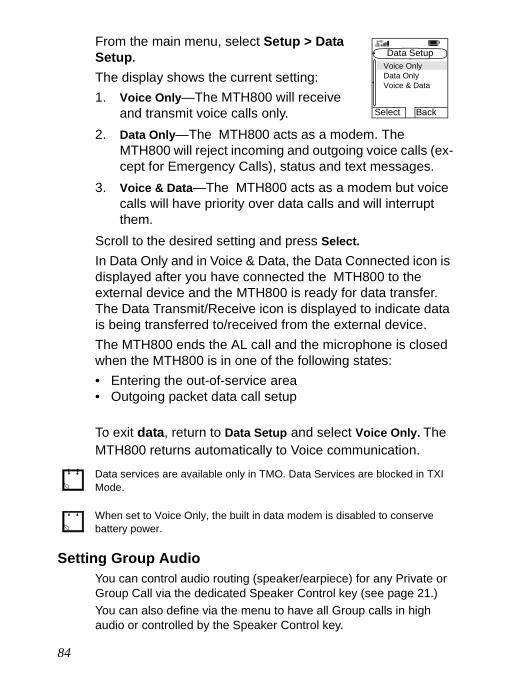
6802972C35.book Page 84 Monday, August 16, 2004 9:22 PM
From the main menu, select Setup > Data Setup. The display shows the current setting:1. Voice Only—The MTH800 will receive
and transmit voice calls only.2. Data Only—The MTH800 acts as a modem. The
MTH800 will reject incoming and outgoing voice calls (ex-cept for Emergency Calls), status and text messages.
3. Voice & Data—The MTH800 acts as a modem but voice calls will have priority over data calls and will interrupt them.
Scroll to the desired setting and press Select.In Data Only and in Voice & Data, the Data Connected icon is displayed after you have connected the MTH800 to the external device and the MTH800 is ready for data transfer. The Data Transmit/Receive icon is displayed to indicate data is being transferred to/received from the external device.The MTH800 ends the AL call and the microphone is closed when the MTH800 is in one of the following states:• Entering the out-of-service area• Outgoing packet data call setup
To exit data, return to Data Setup and select Voice Only. The MTH800 returns automatically to Voice communication.
Setting Group AudioYou can control audio routing (speaker/earpiece) for any Private or Group Call via the dedicated Speaker Control key (see page 21.)You can also define via the menu to have all Group calls in high audio or controlled by the Speaker Control key.
Data services are available only in TMO. Data Services are blocked in TXI Mode.
When set to Voice Only, the built in data modem is disabled to conserve battery power.
Data Setup
Data OnlyVoice & Data
Voice Only
Select Back
84
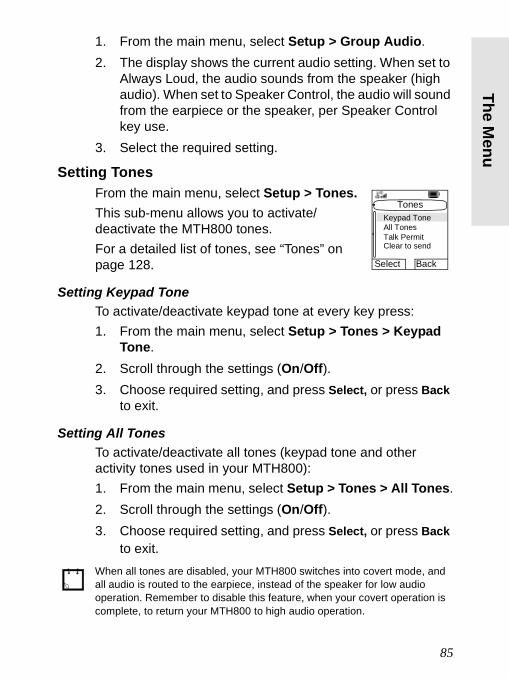
The Menu
6802972C35.book Page 85 Monday, August 16, 2004 9:22 PM
1. From the main menu, select Setup > Group Audio. 2. The display shows the current audio setting. When set to
Always Loud, the audio sounds from the speaker (high audio). When set to Speaker Control, the audio will sound from the earpiece or the speaker, per Speaker Control key use.
3. Select the required setting.
Setting TonesFrom the main menu, select Setup > Tones.This sub-menu allows you to activate/deactivate the MTH800 tones.For a detailed list of tones, see “Tones” on page 128.
Setting Keypad ToneTo activate/deactivate keypad tone at every key press:1. From the main menu, select Setup > Tones > Keypad
Tone.2. Scroll through the settings (On/Off).3. Choose required setting, and press Select, or press Back
to exit.
Setting All TonesTo activate/deactivate all tones (keypad tone and other activity tones used in your MTH800):1. From the main menu, select Setup > Tones > All Tones.2. Scroll through the settings (On/Off).3. Choose required setting, and press Select, or press Back
to exit.When all tones are disabled, your MTH800 switches into covert mode, and all audio is routed to the earpiece, instead of the speaker for low audio operation. Remember to disable this feature, when your covert operation is complete, to return your MTH800 to high audio operation.
Tones
All TonesTalk Permit
Keypad Tone
Select Back
Clear to send
85
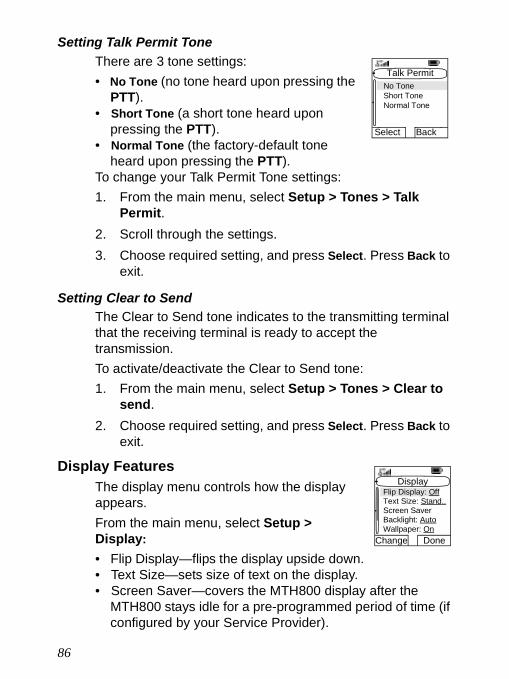
6802972C35.book Page 86 Monday, August 16, 2004 9:22 PM
Setting Talk Permit ToneThere are 3 tone settings: • No Tone (no tone heard upon pressing the
PTT). • Short Tone (a short tone heard upon
pressing the PTT).• Normal Tone (the factory-default tone
heard upon pressing the PTT).To change your Talk Permit Tone settings:1. From the main menu, select Setup > Tones > Talk
Permit.2. Scroll through the settings.3. Choose required setting, and press Select. Press Back to
exit.
Setting Clear to SendThe Clear to Send tone indicates to the transmitting terminal that the receiving terminal is ready to accept the transmission.To activate/deactivate the Clear to Send tone:1. From the main menu, select Setup > Tones > Clear to
send.2. Choose required setting, and press Select. Press Back to
exit.
Display FeaturesThe display menu controls how the display appears.From the main menu, select Setup > Display: • Flip Display—flips the display upside down.• Text Size—sets size of text on the display.• Screen Saver—covers the MTH800 display after the
MTH800 stays idle for a pre-programmed period of time (if configured by your Service Provider).
Talk Permit
Short ToneNormal Tone
No Tone
Select Back
Display
Text Size: Stand..Screen Saver
Flip Display: Off
Backlight: AutoWallpaper: On
Change Done
86
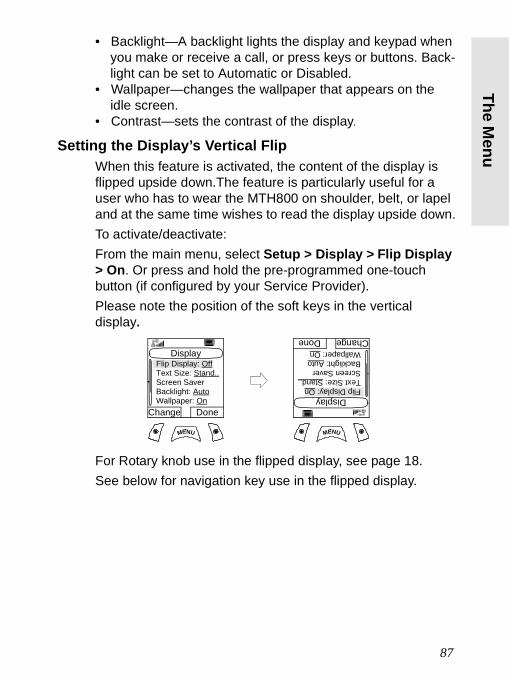
The Menu
6802972C35.book Page 87 Monday, August 16, 2004 9:22 PM
87
• Backlight—A backlight lights the display and keypad when you make or receive a call, or press keys or buttons. Back-light can be set to Automatic or Disabled.
• Wallpaper—changes the wallpaper that appears on the idle screen.
• Contrast—sets the contrast of the display.
Setting the Display’s Vertical FlipWhen this feature is activated, the content of the display is flipped upside down.The feature is particularly useful for a user who has to wear the MTH800 on shoulder, belt, or lapel and at the same time wishes to read the display upside down.To activate/deactivate:From the main menu, select Setup > Display > Flip Display > On. Or press and hold the pre-programmed one-touch button (if configured by your Service Provider).Please note the position of the soft keys in the vertical display.
For Rotary knob use in the flipped display, see page 18.See below for navigation key use in the flipped display.
MENU MENU
Display
Text Size: Stand..Screen Saver
Flip Display: Off
Backlight: AutoWallpaper: On
Change Done
Display
Text Size: Stand..Screen Saver
Flip Display: On
Backlight: AutoWallpaper: On
Change Done
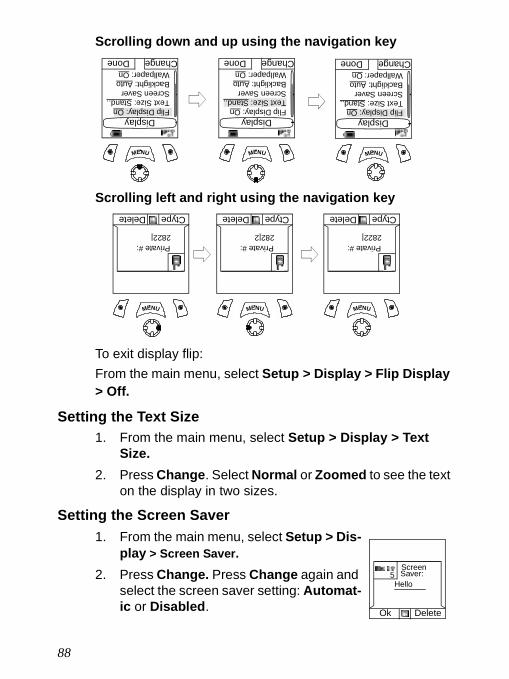
6802972C35.book Page 88 Monday, August 16, 2004 9:22 PM
Scrolling down and up using the navigation key
Scrolling left and right using the navigation key
To exit display flip:From the main menu, select Setup > Display > Flip Display > Off.
Setting the Text Size1. From the main menu, select Setup > Display > Text
Size. 2. Press Change. Select Normal or Zoomed to see the text
on the display in two sizes.
Setting the Screen Saver1. From the main menu, select Setup > Dis-
play > Screen Saver.
2. Press Change. Press Change again and select the screen saver setting: Automat-ic or Disabled.
MENU
Display
Text Size: Stand..Screen Saver
Flip Display: On
Backlight: AutoWallpaper: On
Change Done
MENU
Display
Text Size: Stand..Screen Saver
Flip Display: On
Backlight: AutoWallpaper: On
Change Done
MENU
Display
Text Size: Stand..Screen Saver
Flip Display: On
Backlight: AutoWallpaper: On
Change Done
MENU MENU MENU
Private #:2822|
Ctype Delete
Private #:282|2
Ctype Delete
Private #:2822|
Ctype Delete
Ok Delete
Saver:Screen
Hello5
88
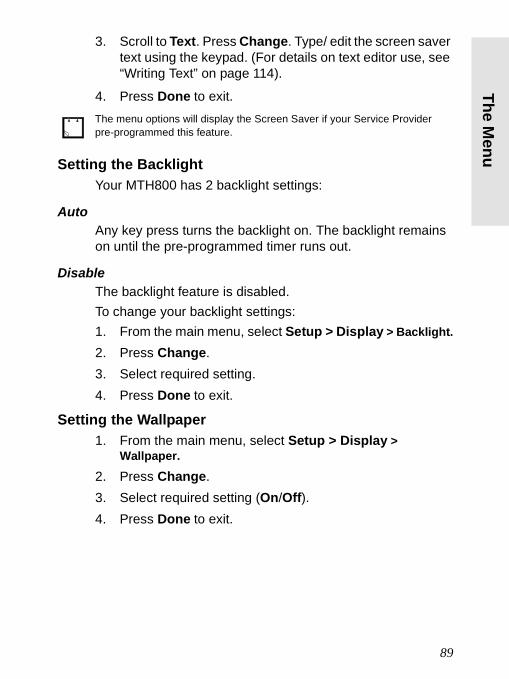
The Menu
6802972C35.book Page 89 Monday, August 16, 2004 9:22 PM
3. Scroll to Text. Press Change. Type/ edit the screen saver text using the keypad. (For details on text editor use, see “Writing Text” on page 114).
4. Press Done to exit.
Setting the BacklightYour MTH800 has 2 backlight settings:
AutoAny key press turns the backlight on. The backlight remains on until the pre-programmed timer runs out.
DisableThe backlight feature is disabled.To change your backlight settings:1. From the main menu, select Setup > Display > Backlight.2. Press Change. 3. Select required setting.4. Press Done to exit.
Setting the Wallpaper1. From the main menu, select Setup > Display >
Wallpaper.2. Press Change. 3. Select required setting (On/Off).4. Press Done to exit.
The menu options will display the Screen Saver if your Service Provider pre-programmed this feature.
89
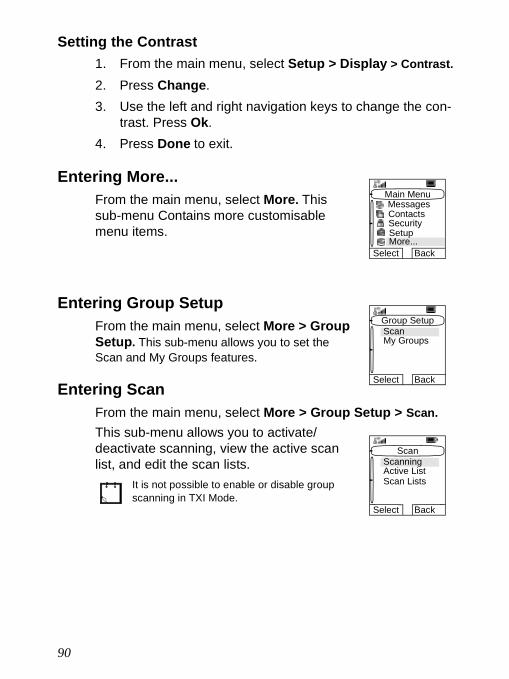
6802972C35.book Page 90 Monday, August 16, 2004 9:22 PM
Setting the Contrast1. From the main menu, select Setup > Display > Contrast.
2. Press Change. 3. Use the left and right navigation keys to change the con-
trast. Press Ok.4. Press Done to exit.
Entering More...From the main menu, select More. This sub-menu Contains more customisable menu items.
Entering Group SetupFrom the main menu, select More > Group Setup. This sub-menu allows you to set the Scan and My Groups features.
Entering ScanFrom the main menu, select More > Group Setup > Scan. This sub-menu allows you to activate/deactivate scanning, view the active scan list, and edit the scan lists.
It is not possible to enable or disable group scanning in TXI Mode.
Main Menu
ContactsSecurity
Messages
SetupMore...
Select Back
Group Setup
My GroupsScan
Select Back
Scan
Active ListScanning
Select Back
Scan Lists
90
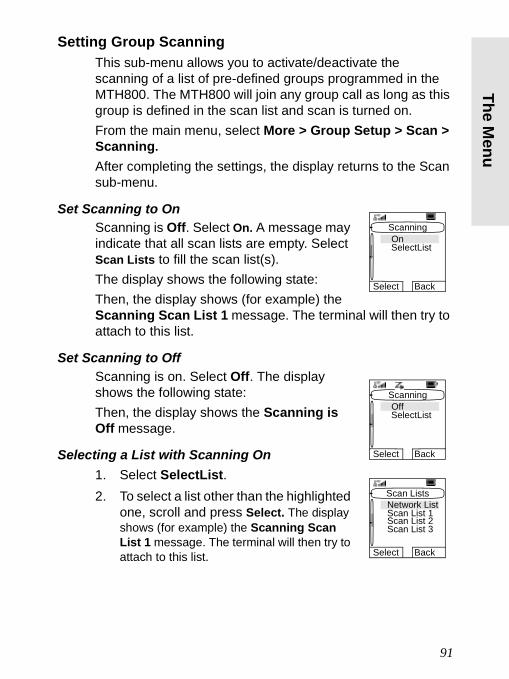
The Menu
6802972C35.book Page 91 Monday, August 16, 2004 9:22 PM
Setting Group Scanning This sub-menu allows you to activate/deactivate the scanning of a list of pre-defined groups programmed in the MTH800. The MTH800 will join any group call as long as this group is defined in the scan list and scan is turned on.From the main menu, select More > Group Setup > Scan > Scanning.After completing the settings, the display returns to the Scan sub-menu.
Set Scanning to OnScanning is Off. Select On. A message may indicate that all scan lists are empty. Select Scan Lists to fill the scan list(s). The display shows the following state:Then, the display shows (for example) the Scanning Scan List 1 message. The terminal will then try to attach to this list.
Set Scanning to OffScanning is on. Select Off. The display shows the following state:Then, the display shows the Scanning is Off message.
Selecting a List with Scanning On1. Select SelectList.2. To select a list other than the highlighted
one, scroll and press Select. The display shows (for example) the Scanning Scan List 1 message. The terminal will then try to attach to this list.
Scanning
SelectListOn
Select Back
Scanning
SelectListOff
Select Back
Scan Lists
Scan List 1Network List
Select Back
Scan List 2Scan List 3
91
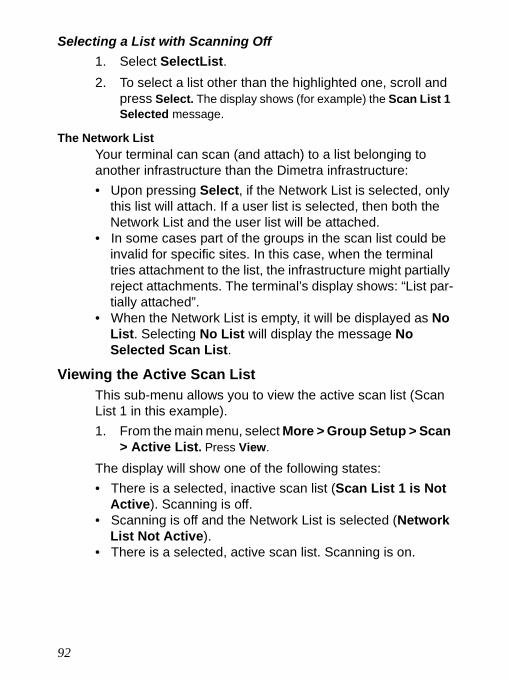
6802972C35.book Page 92 Monday, August 16, 2004 9:22 PM
Selecting a List with Scanning Off1. Select SelectList.2. To select a list other than the highlighted one, scroll and
press Select. The display shows (for example) the Scan List 1 Selected message.
The Network ListYour terminal can scan (and attach) to a list belonging to another infrastructure than the Dimetra infrastructure:• Upon pressing Select, if the Network List is selected, only
this list will attach. If a user list is selected, then both the Network List and the user list will be attached.
• In some cases part of the groups in the scan list could be invalid for specific sites. In this case, when the terminal tries attachment to the list, the infrastructure might partially reject attachments. The terminal’s display shows: “List par-tially attached”.
• When the Network List is empty, it will be displayed as No List. Selecting No List will display the message No Selected Scan List.
Viewing the Active Scan ListThis sub-menu allows you to view the active scan list (Scan List 1 in this example).1. From the main menu, select More > Group Setup > Scan
> Active List. Press View.
The display will show one of the following states:• There is a selected, inactive scan list (Scan List 1 is Not
Active). Scanning is off.• Scanning is off and the Network List is selected (Network
List Not Active).• There is a selected, active scan list. Scanning is on.
92
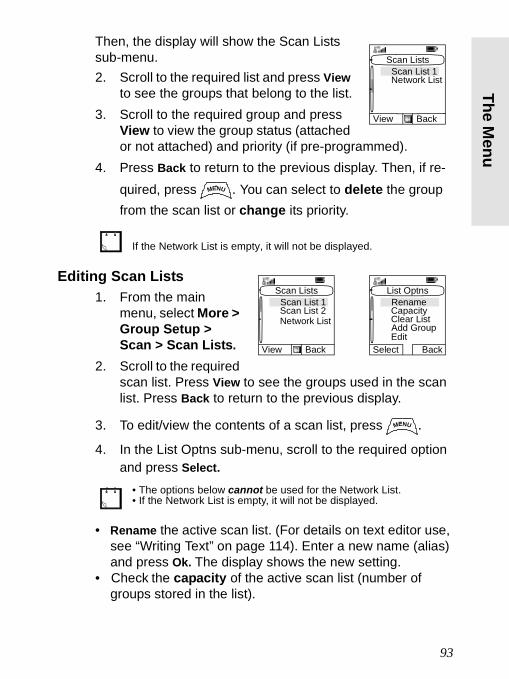
The Menu
6802972C35.book Page 93 Monday, August 16, 2004 9:22 PM
Then, the display will show the Scan Lists sub-menu.2. Scroll to the required list and press View
to see the groups that belong to the list.3. Scroll to the required group and press
View to view the group status (attached or not attached) and priority (if pre-programmed).
4. Press Back to return to the previous display. Then, if re-quired, press . You can select to delete the group from the scan list or change its priority.
Editing Scan Lists 1. From the main
menu, select More > Group Setup > Scan > Scan Lists.
2. Scroll to the required scan list. Press View to see the groups used in the scan list. Press Back to return to the previous display.
3. To edit/view the contents of a scan list, press .4. In the List Optns sub-menu, scroll to the required option
and press Select.
• Rename the active scan list. (For details on text editor use, see “Writing Text” on page 114). Enter a new name (alias) and press Ok. The display shows the new setting.
• Check the capacity of the active scan list (number of groups stored in the list).
If the Network List is empty, it will not be displayed.
• The options below cannot be used for the Network List.• If the Network List is empty, it will not be displayed.
Scan Lists
Network ListScan List 1
View Back
MENU
Scan Lists
Scan List 2Scan List 1
View Back
Network List
List Optns
CapacityRename
Select Back
Clear ListAdd GroupEdit
MENU
93
6802972C35.book Page 94 Monday, August 16, 2004 9:22 PM
• To Clear all groups from the selected scan list, press Yes. You will be prompted to remove all groups from the selected scan list.
• Add a group to the selected scan list. Every added group (including a favourite group) comes with its folder, its name or number, and its priority (if pre-programmed).• To select a folder, scroll through the folder list. The list
does not show folders whose groups are fully used in the selected scan list. Press Ok to select a folder.
• To select a group, scroll through the group list within the selected folder. The list shows groups that are not in the selected scan list. Press Ok.
• To set a priority to a group, scroll through the priority list: high, medium, or low.A call from a high priority group will interrupt an on-going call with a medium and low priority.A call from a medium priority group will interrupt an on-going call with a low priority.A call from a low priority group will not interrupt any on-going call.
• Edit the scan list groups. • Scroll to the group you wish to remove from the selected
scan list, and press Delete. You will be prompted to remove the selected group. After a few seconds, the display shows the updated scan list.
• To change the group priority, press Priority. Scroll to the selected priority and press Select.
94
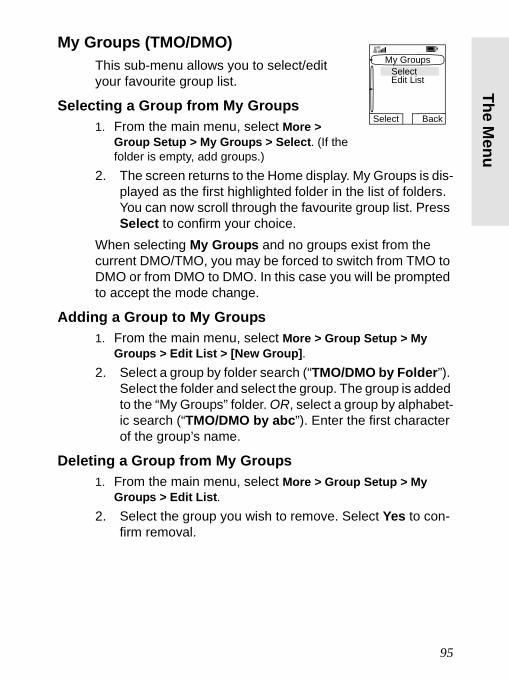
The Menu
6802972C35.book Page 95 Monday, August 16, 2004 9:22 PM
My Groups (TMO/DMO)This sub-menu allows you to select/edit your favourite group list.
Selecting a Group from My Groups1. From the main menu, select More >
Group Setup > My Groups > Select. (If the folder is empty, add groups.)
2. The screen returns to the Home display. My Groups is dis-played as the first highlighted folder in the list of folders. You can now scroll through the favourite group list. Press Select to confirm your choice.
When selecting My Groups and no groups exist from the current DMO/TMO, you may be forced to switch from TMO to DMO or from DMO to DMO. In this case you will be prompted to accept the mode change.
Adding a Group to My Groups1. From the main menu, select More > Group Setup > My
Groups > Edit List > [New Group].2. Select a group by folder search (“TMO/DMO by Folder”).
Select the folder and select the group. The group is added to the “My Groups” folder. OR, select a group by alphabet-ic search (“TMO/DMO by abc”). Enter the first character of the group’s name.
Deleting a Group from My Groups1. From the main menu, select More > Group Setup > My
Groups > Edit List.2. Select the group you wish to remove. Select Yes to con-
firm removal.
My Groups
Edit ListSelect
Select Back
95
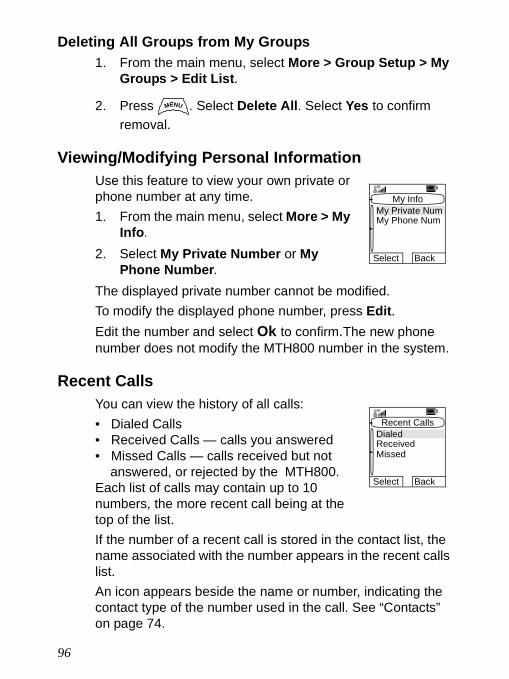
6802972C35.book Page 96 Monday, August 16, 2004 9:22 PM
Deleting All Groups from My Groups1. From the main menu, select More > Group Setup > My
Groups > Edit List.
2. Press . Select Delete All. Select Yes to confirm removal.
Viewing/Modifying Personal InformationUse this feature to view your own private or phone number at any time.1. From the main menu, select More > My
Info.
2. Select My Private Number or My Phone Number.
The displayed private number cannot be modified.To modify the displayed phone number, press Edit. Edit the number and select Ok to confirm.The new phone number does not modify the MTH800 number in the system.
Recent CallsYou can view the history of all calls:• Dialed Calls• Received Calls — calls you answered• Missed Calls — calls received but not
answered, or rejected by the MTH800.Each list of calls may contain up to 10 numbers, the more recent call being at the top of the list. If the number of a recent call is stored in the contact list, the name associated with the number appears in the recent calls list.An icon appears beside the name or number, indicating the contact type of the number used in the call. See “Contacts” on page 74.
MENU
My Info
My Phone NumMy Private Num
Select Back
Recent Calls
ReceivedDialed
Select Back
Missed
96
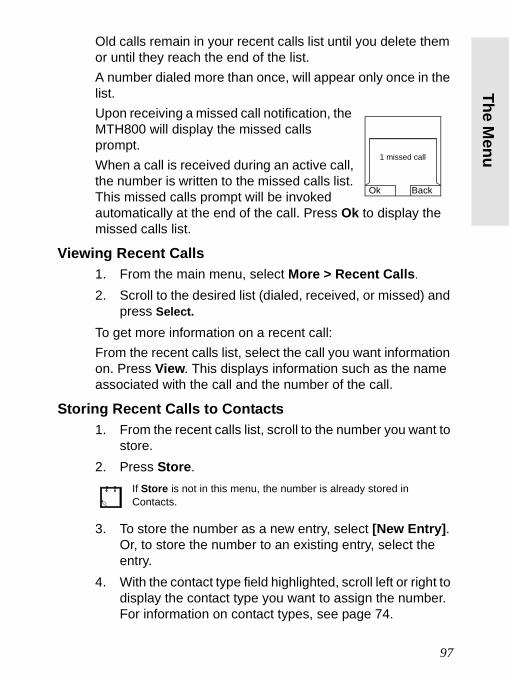
The Menu
6802972C35.book Page 97 Monday, August 16, 2004 9:22 PM
Old calls remain in your recent calls list until you delete them or until they reach the end of the list.A number dialed more than once, will appear only once in the list.Upon receiving a missed call notification, the MTH800 will display the missed calls prompt. When a call is received during an active call, the number is written to the missed calls list. This missed calls prompt will be invoked automatically at the end of the call. Press Ok to display the missed calls list.
Viewing Recent Calls1. From the main menu, select More > Recent Calls.
2. Scroll to the desired list (dialed, received, or missed) and press Select.
To get more information on a recent call:From the recent calls list, select the call you want information on. Press View. This displays information such as the name associated with the call and the number of the call.
Storing Recent Calls to Contacts1. From the recent calls list, scroll to the number you want to
store. 2. Press Store.
3. To store the number as a new entry, select [New Entry]. Or, to store the number to an existing entry, select the entry.
4. With the contact type field highlighted, scroll left or right to display the contact type you want to assign the number. For information on contact types, see page 74.
If Store is not in this menu, the number is already stored in Contacts.
1 missed call
Ok Back
97
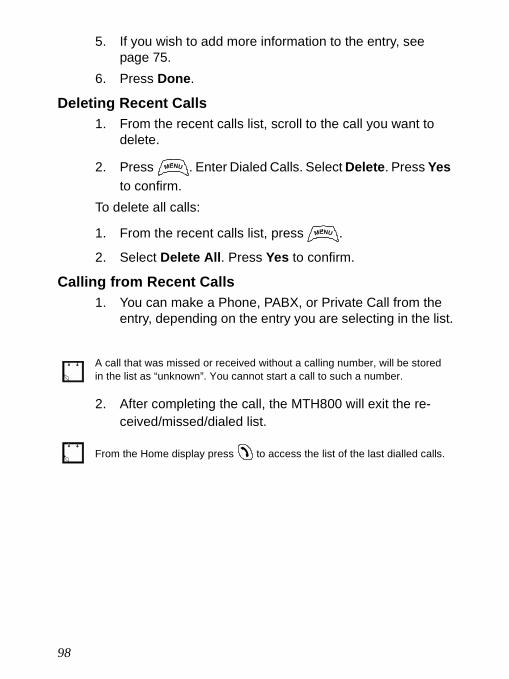
6802972C35.book Page 98 Monday, August 16, 2004 9:22 PM
5. If you wish to add more information to the entry, see page 75.
6. Press Done.
Deleting Recent Calls1. From the recent calls list, scroll to the call you want to
delete.
2. Press . Enter Dialed Calls. Select Delete. Press Yes to confirm.
To delete all calls:
1. From the recent calls list, press .
2. Select Delete All. Press Yes to confirm.
Calling from Recent Calls1. You can make a Phone, PABX, or Private Call from the
entry, depending on the entry you are selecting in the list.
2. After completing the call, the MTH800 will exit the re-ceived/missed/dialed list.
A call that was missed or received without a calling number, will be stored in the list as “unknown”. You cannot start a call to such a number.
From the Home display press to access the list of the last dialled calls.
MENU
MENU
98
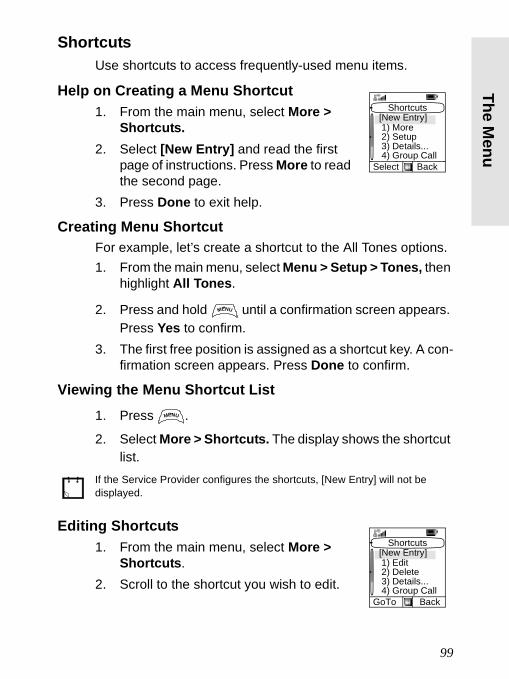
The Menu
6802972C35.book Page 99 Monday, August 16, 2004 9:22 PM
ShortcutsUse shortcuts to access frequently-used menu items.
Help on Creating a Menu Shortcut1. From the main menu, select More >
Shortcuts. 2. Select [New Entry] and read the first
page of instructions. Press More to read the second page.
3. Press Done to exit help.
Creating Menu Shortcut For example, let’s create a shortcut to the All Tones options.1. From the main menu, select Menu > Setup > Tones, then
highlight All Tones.
2. Press and hold until a confirmation screen appears. Press Yes to confirm.
3. The first free position is assigned as a shortcut key. A con-firmation screen appears. Press Done to confirm.
Viewing the Menu Shortcut List1. Press .
2. Select More > Shortcuts. The display shows the shortcut list.
Editing Shortcuts1. From the main menu, select More >
Shortcuts.2. Scroll to the shortcut you wish to edit.
If the Service Provider configures the shortcuts, [New Entry] will not be displayed.
Shortcuts
2) Setup3) Details...
1) More
4) Group CallSelect Back
[New Entry]
MENU
MENU
Shortcuts
2) Delete3) Details...
1) Edit
4) Group CallGoTo Back
[New Entry]
99
6802972C35.book Page 100 Monday, August 16, 2004 9:22 PM
3. Press and select Edit.
4. After a few seconds, you will be prompted to confirm the newly created shortcut. The first free position is assigned as a shortcut key. Press Yes to confirm. Press No to cancel.If the number is already assigned as a shortcut for another option, you will be asked to replace the current shortcut number with a newly created one.
Deleting Shortcuts1. From the main menu, select More > Shortcuts.2. Scroll to the shortcut you wish to delete.
3. Press and select Delete. Press Yes to delete a shortcut. Press No to cancel.
Shortcut Display MessagesThe display might show one the following messages for a few seconds:• Shortcuts Full: the shortcut list is full.
Press Yes to confirm that you wish to assign a shortcut to the option. Enter a new key number. If the number is already assigned as a shortcut for another option, you will be asked to replace the current shortcut number with a newly created one.
• Shortcut not Allowed for this Item• Invalid Shortcut Position: enter a new number from the
number entry screen.
Menu Shortcut UseFrom the Home display, press and the numeric key(s) assigned to the shortcut.
To modify a menu setting or create a new shortcut from this step, highlight the menu option and select GoTo. Otherwise, go to Step 3.
MENU
MENU
MENU
100
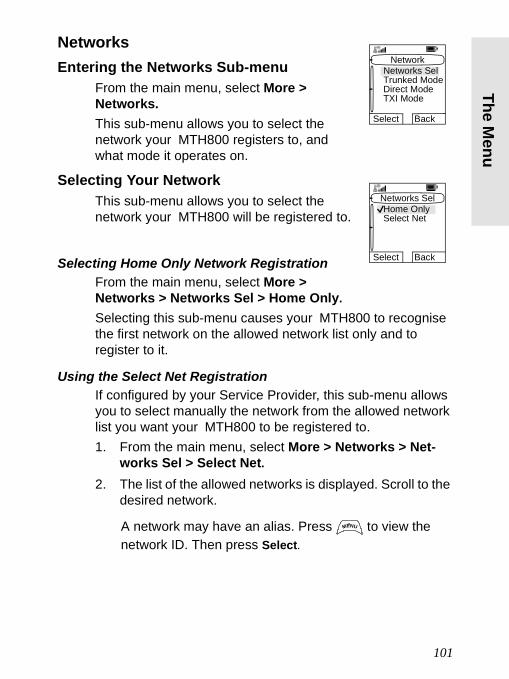
The Menu
6802972C35.book Page 101 Monday, August 16, 2004 9:22 PM
Networks Entering the Networks Sub-menu
From the main menu, select More > Networks.This sub-menu allows you to select the network your MTH800 registers to, and what mode it operates on.
Selecting Your NetworkThis sub-menu allows you to select the network your MTH800 will be registered to.
Selecting Home Only Network RegistrationFrom the main menu, select More > Networks > Networks Sel > Home Only.Selecting this sub-menu causes your MTH800 to recognise the first network on the allowed network list only and to register to it.
Using the Select Net RegistrationIf configured by your Service Provider, this sub-menu allows you to select manually the network from the allowed network list you want your MTH800 to be registered to.1. From the main menu, select More > Networks > Net-
works Sel > Select Net.2. The list of the allowed networks is displayed. Scroll to the
desired network.
A network may have an alias. Press to view the network ID. Then press Select.
Network
Trunked ModeDirect Mode
Networks Sel
TXI Mode
Select Back
Networks Sel
Select NetHome Only
Select Back
MENU
101
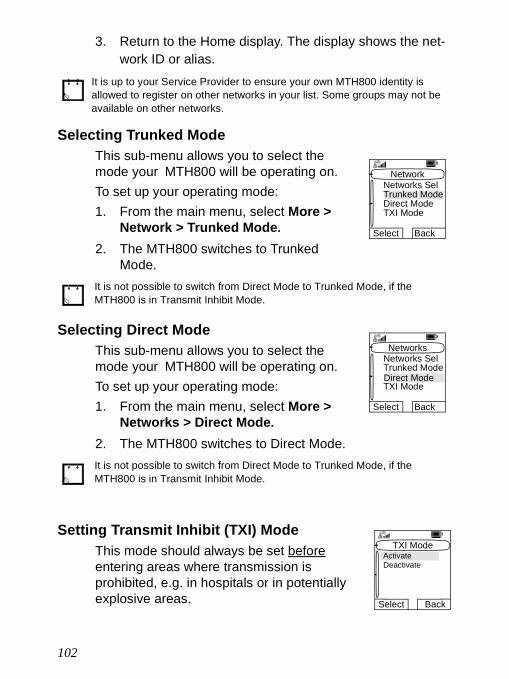
6802972C35.book Page 102 Monday, August 16, 2004 9:22 PM
3. Return to the Home display. The display shows the net-work ID or alias.
Selecting Trunked ModeThis sub-menu allows you to select the mode your MTH800 will be operating on.To set up your operating mode:1. From the main menu, select More >
Network > Trunked Mode.
2. The MTH800 switches to Trunked Mode.
Selecting Direct ModeThis sub-menu allows you to select the mode your MTH800 will be operating on.To set up your operating mode:1. From the main menu, select More >
Networks > Direct Mode.
2. The MTH800 switches to Direct Mode.
Setting Transmit Inhibit (TXI) ModeThis mode should always be set before entering areas where transmission is prohibited, e.g. in hospitals or in potentially explosive areas.
It is up to your Service Provider to ensure your own MTH800 identity is allowed to register on other networks in your list. Some groups may not be available on other networks.
It is not possible to switch from Direct Mode to Trunked Mode, if the MTH800 is in Transmit Inhibit Mode.
It is not possible to switch from Direct Mode to Trunked Mode, if the MTH800 is in Transmit Inhibit Mode.
Network
Trunked ModeDirect Mode
Networks Sel
TXI Mode
Select Back
Networks
Trunked ModeDirect Mode
Networks Sel
TXI Mode
Select Back
TXI Mode
DeactivateActivate
Select Back
102
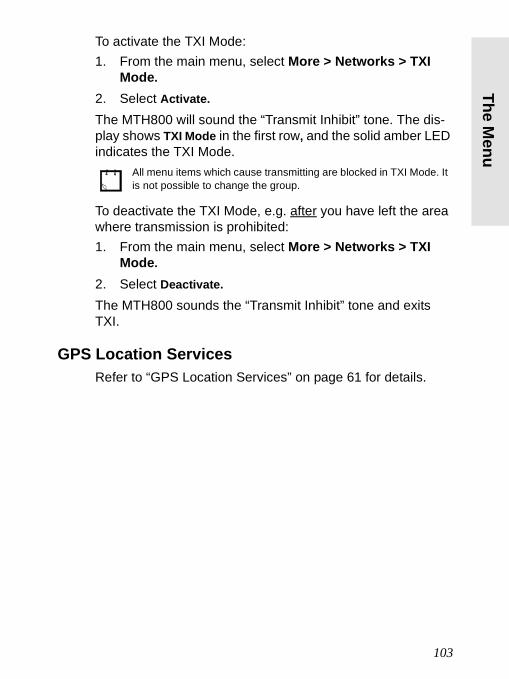
The Menu
6802972C35.book Page 103 Monday, August 16, 2004 9:22 PM
To activate the TXI Mode:1. From the main menu, select More > Networks > TXI
Mode.2. Select Activate.The MTH800 will sound the “Transmit Inhibit” tone. The dis-play shows TXI Mode in the first row, and the solid amber LED indicates the TXI Mode.
To deactivate the TXI Mode, e.g. after you have left the area where transmission is prohibited:1. From the main menu, select More > Networks > TXI
Mode.
2. Select Deactivate.The MTH800 sounds the “Transmit Inhibit” tone and exits TXI.
GPS Location ServicesRefer to “GPS Location Services” on page 61 for details.
All menu items which cause transmitting are blocked in TXI Mode. It is not possible to change the group.
103
6802972C35.book Page 104 Monday, August 16, 2004 9:22 PM
Messages
GeneralThe messaging feature lets you:• send short text messages (free text or according to user
defined or predefined templates),• send status messages, • receive messages.A status is a number corresponding to a pre-programmed message in a list your group recognises. A text message is a short text containing up to 140 characters. Each message is stamped with the date and time it was left in the inbox.
Sending a Text Message
General
You can send new messages, send messages based on user defined templates or send messages based on predefined templates.The predefined templates are programmed into your MTH800 by your Service Provider. The user defined templates are Inbox messages or, new Outbox messages that you choose to store in your MTH800 memory. User defined messages may also be programmed into your MTH800.You are allowed to edit your messages before sending them. You can send a message when the terminal is idle or during a Group/Emergency/Broadcast Call (if configured).
If configured, a message will alert you of an incoming Group/Emergency/Broadcast call, of your joining it, or of its end.
It is not possible to send a status or text message in TXI Mode.
104
Messages
6802972C35.book Page 105 Monday, August 16, 2004 9:22 PM
Sending a text message during a Group Call (if configured)
Press , . One of the following might occur:• The call started before message editing began. The termi-
nal will leave the call and send the message. If the call is still active, the terminal will re-join it.
• The call started after message editing began. The terminal will leave the call and send the message. The terminal will return to the edit screen.
• The call started before or after message editing began. The terminal will send the message while staying in the call.
Sending a text message during Emergency/Broadcast Call (if configured)
Press . One of the following might occur:• The call started before message editing began. The termi-
nal will leave the call and send the message. The terminal will return to the edit screen.
• The call started after message editing began. The terminal will send the message while staying in the call.
Receiving MessagesIf there is no on-going activity in your MTH800, it will enter the Inbox automatically.
Displaying Long Text MessagesIn the message view screen, press More to read the next page, and Back to return to the previous page.
You will hear the “New Mail Received” alert tone when a new message is received while your MTH800 is engaged in a call (if configured by your Service Provider).
• For message alert, see settings in the Vibrate menu option (page 81) and the Tones menu option (page 85).
• If your service provider has enabled the PTT Callback feature, then press-ing PTT will initiate a call to the message originator. Otherwise, PTT will be directed to the currently selected talkgroup.
105
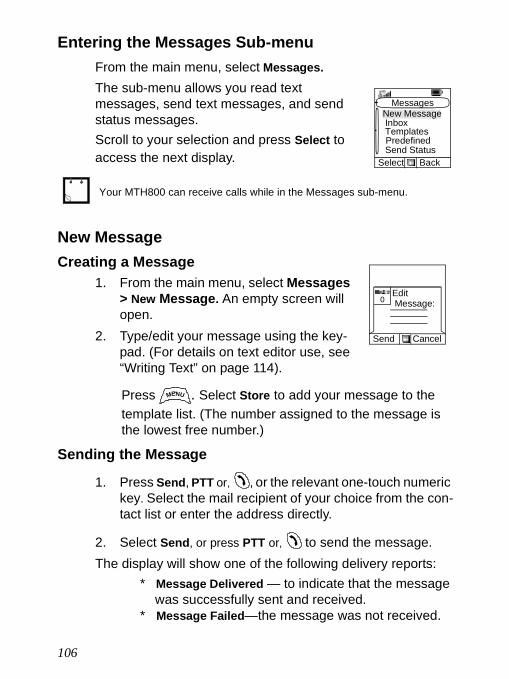
6802972C35.book Page 106 Monday, August 16, 2004 9:22 PM
Entering the Messages Sub-menuFrom the main menu, select Messages.The sub-menu allows you read text messages, send text messages, and send status messages.Scroll to your selection and press Select to access the next display.
New MessageCreating a Message
1. From the main menu, select Messages > New Message. An empty screen will open.
2. Type/edit your message using the key-pad. (For details on text editor use, see “Writing Text” on page 114).
Press . Select Store to add your message to the template list. (The number assigned to the message is the lowest free number.)
Sending the Message
1. Press Send, PTT or, , or the relevant one-touch numeric key. Select the mail recipient of your choice from the con-tact list or enter the address directly.
2. Select Send, or press PTT or, to send the message.The display will show one of the following delivery reports:
* Message Delivered — to indicate that the message was successfully sent and received.
* Message Failed—the message was not received.
Your MTH800 can receive calls while in the Messages sub-menu.
InboxNew Message
Select Back
Messages
TemplatesPredefinedSend Status
Send Cancel
Edit Message:0
MENU
106
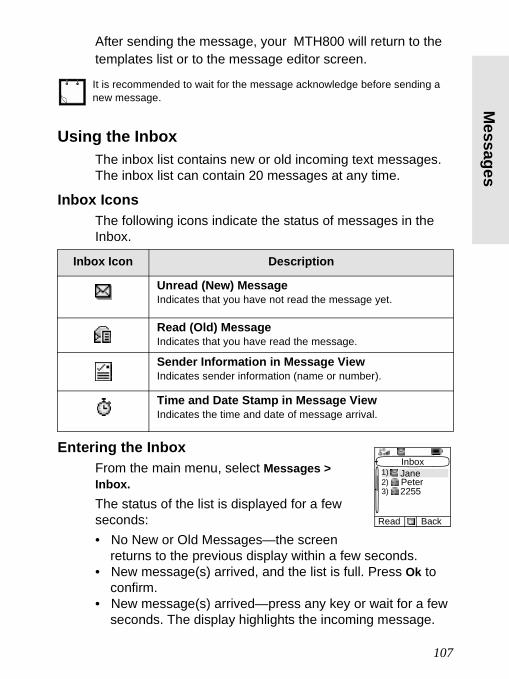
Messages
6802972C35.book Page 107 Monday, August 16, 2004 9:22 PM
After sending the message, your MTH800 will return to the templates list or to the message editor screen.
Using the InboxThe inbox list contains new or old incoming text messages. The inbox list can contain 20 messages at any time.
Inbox IconsThe following icons indicate the status of messages in the Inbox.
Entering the InboxFrom the main menu, select Messages > Inbox. The status of the list is displayed for a few seconds:• No New or Old Messages—the screen
returns to the previous display within a few seconds.• New message(s) arrived, and the list is full. Press Ok to
confirm.• New message(s) arrived—press any key or wait for a few
seconds. The display highlights the incoming message.
It is recommended to wait for the message acknowledge before sending a new message.
Inbox Icon Description
Unread (New) MessageIndicates that you have not read the message yet.
Read (Old) MessageIndicates that you have read the message.
Sender Information in Message ViewIndicates sender information (name or number).
Time and Date Stamp in Message ViewIndicates the time and date of message arrival.
PeterJane
Read Back
Inbox
2255
1)2)3)
107
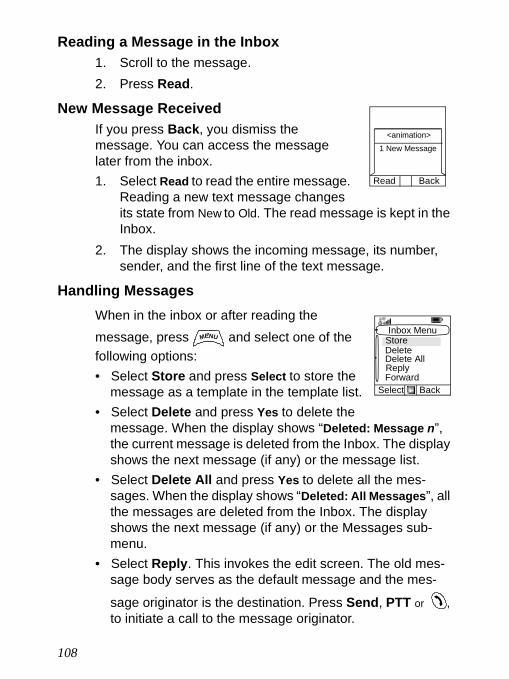
6802972C35.book Page 108 Monday, August 16, 2004 9:22 PM
Reading a Message in the Inbox1. Scroll to the message.2. Press Read.
New Message ReceivedIf you press Back, you dismiss the message. You can access the message later from the inbox.1. Select Read to read the entire message.
Reading a new text message changes its state from New to Old. The read message is kept in the Inbox.
2. The display shows the incoming message, its number, sender, and the first line of the text message.
Handling MessagesWhen in the inbox or after reading the message, press and select one of the following options: • Select Store and press Select to store the
message as a template in the template list.• Select Delete and press Yes to delete the
message. When the display shows “Deleted: Message n”, the current message is deleted from the Inbox. The display shows the next message (if any) or the message list.
• Select Delete All and press Yes to delete all the mes-sages. When the display shows “Deleted: All Messages”, all the messages are deleted from the Inbox. The display shows the next message (if any) or the Messages sub-menu.
• Select Reply. This invokes the edit screen. The old mes-sage body serves as the default message and the mes-
sage originator is the destination. Press Send, PTT or , to initiate a call to the message originator.
1 New Message<animation>
Read Back
DeleteStore
Select Back
Inbox Menu
Delete AllReplyForward
MENU
108
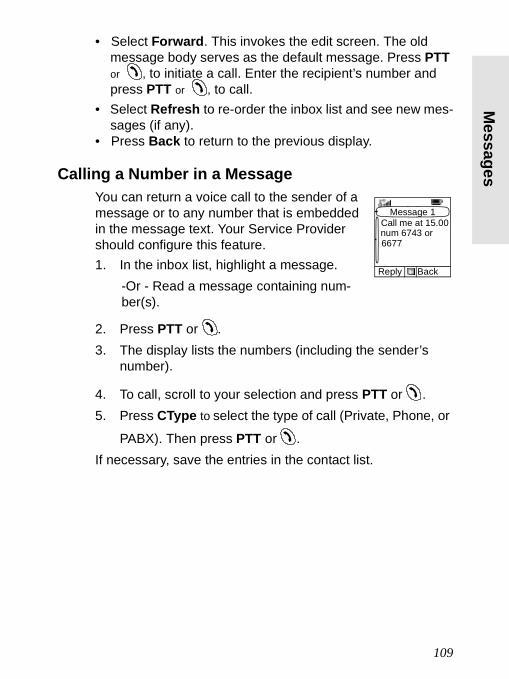
Messages
6802972C35.book Page 109 Monday, August 16, 2004 9:22 PM
• Select Forward. This invokes the edit screen. The old message body serves as the default message. Press PTT or , to initiate a call. Enter the recipient’s number and press PTT or , to call.
• Select Refresh to re-order the inbox list and see new mes-sages (if any).
• Press Back to return to the previous display.
Calling a Number in a MessageYou can return a voice call to the sender of a message or to any number that is embedded in the message text. Your Service Provider should configure this feature. 1. In the inbox list, highlight a message.
-Or - Read a message containing num-ber(s).
2. Press PTT or .3. The display lists the numbers (including the sender’s
number).
4. To call, scroll to your selection and press PTT or .5. Press CType to select the type of call (Private, Phone, or
PABX). Then press PTT or .If necessary, save the entries in the contact list.
num 6743 orCall me at 15.00
Reply Back
Message 1
6677
109
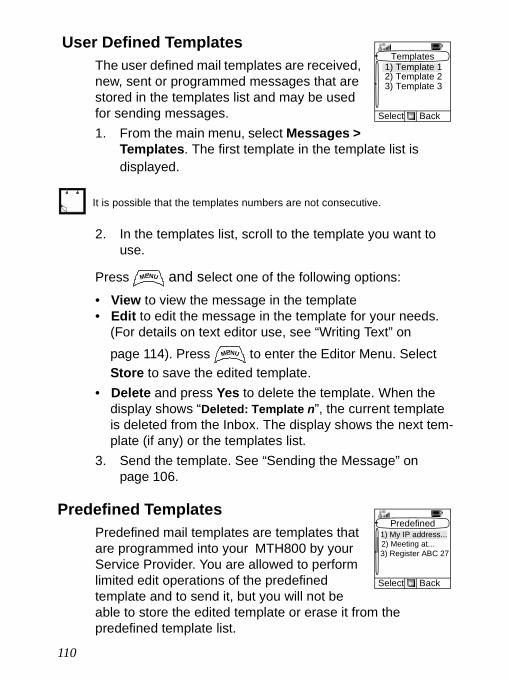
6802972C35.book Page 110 Monday, August 16, 2004 9:22 PM
User Defined TemplatesThe user defined mail templates are received, new, sent or programmed messages that are stored in the templates list and may be used for sending messages.1. From the main menu, select Messages >
Templates. The first template in the template list is displayed.
2. In the templates list, scroll to the template you want to use.
Press and select one of the following options:
• View to view the message in the template• Edit to edit the message in the template for your needs.
(For details on text editor use, see “Writing Text” on page 114). Press to enter the Editor Menu. Select Store to save the edited template.
• Delete and press Yes to delete the template. When the display shows “Deleted: Template n”, the current template is deleted from the Inbox. The display shows the next tem-plate (if any) or the templates list.
3. Send the template. See “Sending the Message” on page 106.
Predefined TemplatesPredefined mail templates are templates that are programmed into your MTH800 by your Service Provider. You are allowed to perform limited edit operations of the predefined template and to send it, but you will not be able to store the edited template or erase it from the predefined template list.
It is possible that the templates numbers are not consecutive.
2) Template 21) Template 1
Select Back
Templates
3) Template 3
MENU
MENU
2) Meeting at...1) My IP address...
Select Back
Predefined
3) Register ABC 27
110
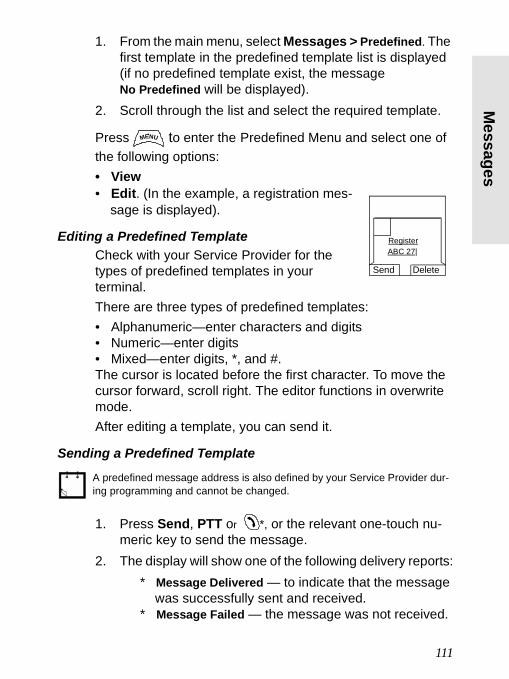
Messages
6802972C35.book Page 111 Monday, August 16, 2004 9:22 PM
1. From the main menu, select Messages > Predefined. The first template in the predefined template list is displayed (if no predefined template exist, the message No Predefined will be displayed).
2. Scroll through the list and select the required template.
Press to enter the Predefined Menu and select one of the following options:• View• Edit. (In the example, a registration mes-
sage is displayed).
Editing a Predefined TemplateCheck with your Service Provider for the types of predefined templates in your terminal. There are three types of predefined templates:• Alphanumeric—enter characters and digits• Numeric—enter digits• Mixed—enter digits, *, and #.The cursor is located before the first character. To move the cursor forward, scroll right. The editor functions in overwrite mode. After editing a template, you can send it.
Sending a Predefined Template
1. Press Send, PTT or *, or the relevant one-touch nu-meric key to send the message.
2. The display will show one of the following delivery reports:* Message Delivered — to indicate that the message
was successfully sent and received.* Message Failed — the message was not received.
A predefined message address is also defined by your Service Provider dur-ing programming and cannot be changed.
MENU
RegisterABC 27|
Send Delete
111
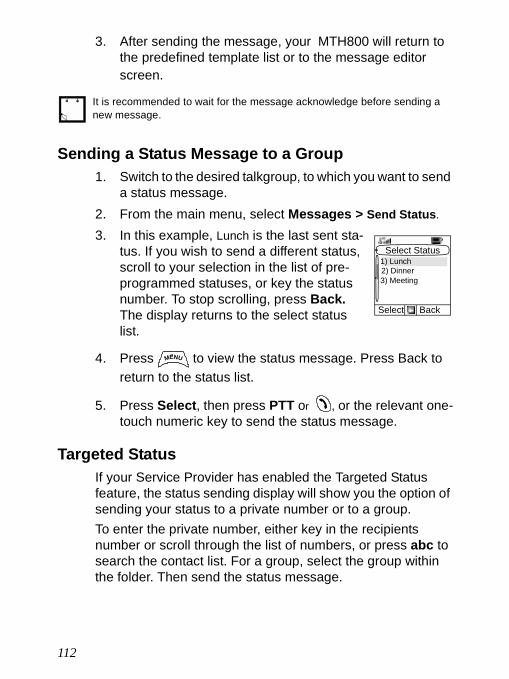
6802972C35.book Page 112 Monday, August 16, 2004 9:22 PM
3. After sending the message, your MTH800 will return to the predefined template list or to the message editor screen.
Sending a Status Message to a Group1. Switch to the desired talkgroup, to which you want to send
a status message.2. From the main menu, select Messages > Send Status.
3. In this example, Lunch is the last sent sta-tus. If you wish to send a different status, scroll to your selection in the list of pre-programmed statuses, or key the status number. To stop scrolling, press Back. The display returns to the select status list.
4. Press to view the status message. Press Back to return to the status list.
5. Press Select, then press PTT or , or the relevant one-touch numeric key to send the status message.
Targeted StatusIf your Service Provider has enabled the Targeted Status feature, the status sending display will show you the option of sending your status to a private number or to a group. To enter the private number, either key in the recipients number or scroll through the list of numbers, or press abc to search the contact list. For a group, select the group within the folder. Then send the status message.
It is recommended to wait for the message acknowledge before sending a new message.
2) Dinner1) Lunch
Select Back
Select Status
3) Meeting
MENU
112
Messages
6802972C35.book Page 113 Monday, August 16, 2004 9:22 PM
The display will show one of the following delivery reports:• Status Sent—the screen exits the status screen.• Sts Failed—the screen returns within a few seconds to
the previous display.Wait for the delivery report before sending a new status.If you enter the status menu from a busy talkgroup, audio is momentarily suspended to allow transmission of your status message.If an Emergency call is received, the MTH800 immediately joins the Emer-gency call.
113
6802972C35.book Page 114 Monday, August 16, 2004 9:22 PM
Writing Text
Selecting the Text Entry ModeText entry modes make it easy for you to enter names, numbers, and messages.
In the text entry screen, select >Entry Mode, and then select one of the following modes: • Primary—for entering alphanumeric characters • Numeric—for entering numbers only • Symbol—for entering symbols only• Secondary—for entering alphanumeric characters. (This
mode is optional and you have to add it to the list.) In the text entry screen, you can also press repeatedly to change to Primary, Numeric, Symbol, or Secondary (if you have set it up).
Adding Secondary to the List of Text Entry Modes Secondary is convenient when you use one language, and sometimes wish to switch to another one. This mode appears in the list only if you set it up first via
> Entry Setup.None is the default programming from factory and indicates no secondary entry mode is selected.
Selecting the Text Entry Method and LanguageThere are two text entry methods:• TAP—Enter letters, numbers and symbols by pressing an
alphanumeric key one or more times.• iTAP—Let the terminal predict each word as you press an
alphanumeric key.You can use these methods in the languages programmed in the terminal.
MENU
MENU
114
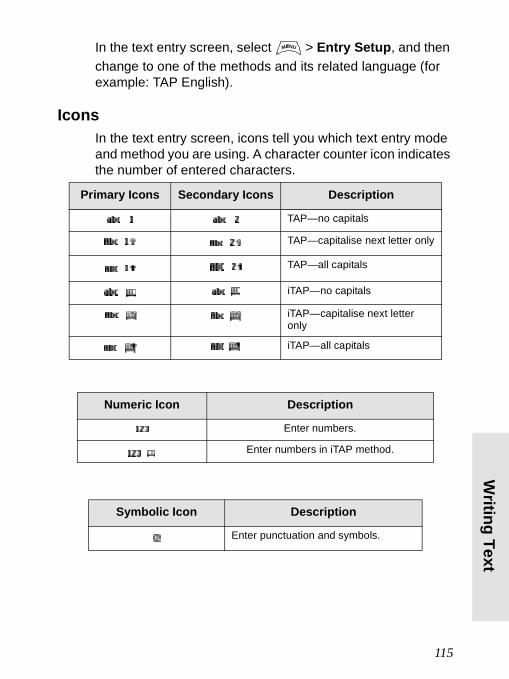
Writing Text
6802972C35.book Page 115 Monday, August 16, 2004 9:22 PM
In the text entry screen, select > Entry Setup, and then change to one of the methods and its related language (for example: TAP English).
IconsIn the text entry screen, icons tell you which text entry mode and method you are using. A character counter icon indicates the number of entered characters.
Primary Icons Secondary Icons Description
TAP—no capitals
TAP—capitalise next letter only
TAP—all capitals
iTAP—no capitals
iTAP—capitalise next letter only
iTAP—all capitals
Numeric Icon Description
Enter numbers.
Enter numbers in iTAP method.
Symbolic Icon Description
Enter punctuation and symbols.
MENU
115
6802972C35.book Page 116 Monday, August 16, 2004 9:22 PM
TAP DisplayPress a key and the display will show the following information:• the icon indicating the current text
writing method—see icons • the main text entry area that will
hold your message after you selected the desired words
iTAP DisplayPress a key and the display will show the following information:• the icon indicating the current text writing method—see
icons • the main text entry area that will
hold your message after you selected the desired words
• a row of suggested characters/words will be displayed.
Send Delete
Message:Edit
A|1
Tap icon
Main text area
Counter
Select Delete
Message:Edit
A|1
iTap icon
Main text area
A B C2
Counter
row Alternative
116
Writing Text
6802972C35.book Page 117 Monday, August 16, 2004 9:22 PM
Keys Usage
List of Keys and Characters in Alphanumeric Mode (TAP/iTAP)
• Except for keys 0 and 1, the top line for each key shows numbers and upper case characters, and the lower line shows numbers and lower case characters.
• Press and hold any numeric key to enter Numeric mode. • To exit Numeric mode in iTAP, select the word.• To exit Numeric mode in TAP, press and hold any numeric
key.
Characters available for a key are examples and differ for each lan-guage setting (see “Setting the Display’s Working Language” on page 83).
Key Alphanumeric Mode (TAP/iTAP)
Press to cycle through single shift, caps lock, and lower case.
. / \ _ - : ~ 1 0 ! ? , @ ‘ ; ( ) & “ ¿ ¡ % £ $ ¥ ¤ + x * [ ] = > < # §
A B C 2a b c 2
D E F 3d e f 3
G H I 4g h i 4
J K L 5j k l 5
117
6802972C35.book Page 118 Monday, August 16, 2004 9:22 PM
List of Keys and Characters in Numeric Mode
List of Keys and Characters in Symbol Mode
M N O 6m n o 6
P Q R S 7p q r s 7
T U V 8t u v 8
W X Y Z 9w x y z 9
Key Numeric Mode
• Press to enter digit at insertion point.• Press and hold any numeric key to
enter TAP alphanumeric mode.• To exit TAP alphanumeric mode, press
and hold any numeric key.
Key Symbol Mode
+ - x * / \ [ ] = > < # §
. ? ! , @ _ & ~ , ; “ - ( ) ‘ ¿ ¡ % £ $ ¥ ¤
@ _ \
Key Alphanumeric Mode (TAP/iTAP)
to
118
Writing Text
6802972C35.book Page 119 Monday, August 16, 2004 9:22 PM
/ , ;
“ & ‘
( ) [ ] { }
¿ ¡ ~
< > =
£ $ ¥ ¤
# % *
Key Symbol Mode
119

6802972C35.book Page 120 Monday, August 16, 2004 9:22 PM
Other Keys
Key Descriptionany numeric key
• In TAP press any key to reject word completion and continue with text entry A new completion will be displayed, if available, after the time-out for TAP expires.
• Press and hold to enter Numeric mode from TAP or iTAP alphanu-meric
• Press to insert a space.• In TAP press to dismiss a word completion and insert a space.• Enter a newly created word into the user dictionary.• Press and hold to enter a carriage return.• Press once to cycle through all entry modes (symbolic, numeric,
primary and secondary if configured).• Press and hold to return to the default entry mode.
Select Press to select the highlighted choice and place it in the main text area.
Delete • Press once to delete the last entered character.• Press and hold for long to clear the entire main text area.• Press to navigate up one line in a long text (several lines). Press
and hold to repeat.• In TAP press to reject word completion and scroll up.
• Press to navigate down one line in a long text (several lines). Press and hold to repeat.
• In TAP press to reject word completion and scroll within the text area.
• Press to navigate to the left. Press and hold to repeat• In TAP, if a word completion is available, press to reject the com-
pletion.
• Press to navigate to the right. Press and hold to repeat.• In TAP if a word completion is available, press to accept the word.
Opens the Context Sensitive Menu if a context sensitive menu is active.MENU
120
Writing Text
6802972C35.book Page 121 Monday, August 16, 2004 9:22 PM
Writing in iTAP AlphanumericFor example, let’s write “David 232!”.
1. In the text entry screen, select > Entry Setup, and then change to iTAP English. Press Back to return to the text entry screen.
2. In the text entry screen, select >Entry Mode, and then select Primary.
3. Press . The alternative row opens up and shows D E F 3. Continue entering the letters by pressing one key for each letter. The row shows the suggested words. Scroll the alternative row to the right until you reach David.
4. Press Select to select the word. It is displayed in the main text area.
5. Enter the numbers by pressing one key for each letter. The row shows the suggested numbers. Scroll the alter-native row to the right until you reach the required combination.
6. To enter the symbol, press . The row shows the suggested symbol. Scroll the alternative row to the right until you reach the required symbol. Press Select to se-lect the numbers. The numbers and symbol are displayed in the main text area.
Automatic shift to upper case is used at the beginning of a message, after punctuation followed by space, or for the first letter of a word created as a new Contact entry.
MENU
MENU
121
6802972C35.book Page 122 Monday, August 16, 2004 9:22 PM
Word LockingYou can use the partial or full word-lock feature to add words that are not in the dictionary and/or to narrow down the list of alternates to those that begin with a particular prefix.1. Try to enter the word. Scroll the alternate line for a word
option. Each option is successively highlighted and par-tially locked.
2. Enter the second part of the word. The first part remains unchanged (locked). The newly entered letters will be highlighted and then locked while you scroll to the next word option.
3. Press . The word is placed in the text area with a space and automatically added to the dictionary.
Writing in Numeric Mode1. Press to scroll to numeric mode. (OR, press and
hold any numeric key to enter Numeric mode.)2. Press the relevant numeric keys to insert the digits.
Writing in Symbol Mode
1. Press to scroll to symbol mode.
2. Press . A series of symbols and punctuations ap-pear on the screen.
3. Scroll to the symbol and press Select.
Writing in TAP Alphanumeric1. In the text entry screen, select > Entry Setup, and
then change to TAP and its related language. Press Back to return to the text entry screen.
MENU
122
Writing Text
6802972C35.book Page 123 Monday, August 16, 2004 9:22 PM
2. In the text entry screen, select >Entry Mode, and then select Primary.
3. Press the key labelled with the desired character, once for the first character, twice for the second, and so on. For ex-ample, to enter “s”, press key four times. To enter “7”, press the key five times. If you do not press a key for a few seconds, the character is accepted, and the cursor moves to the next position.
Adding Words to the DictionaryEach language comes with its own dictionary. You can create words (including alphanumeric abbreviations). Once you create these words and added a space, they will be automatically stored in the dictionary and will appear as choices whenever you press the same key combination in the future.
MENU
123
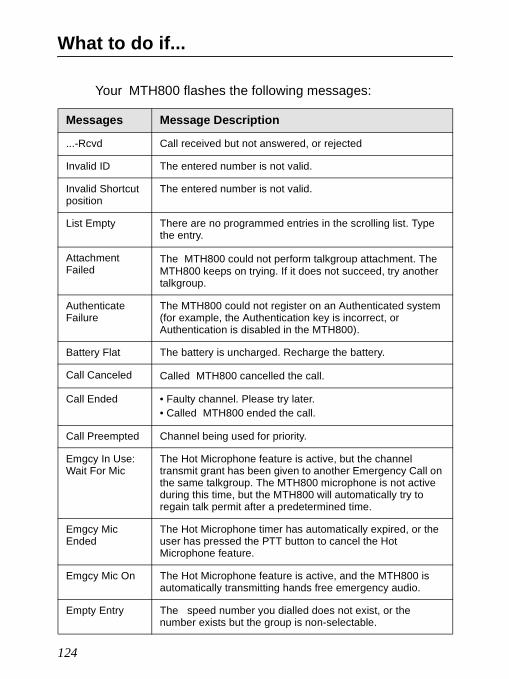
6802972C35.book Page 124 Monday, August 16, 2004 9:22 PM
What to do if...
Your MTH800 flashes the following messages:
Messages Message Description
...-Rcvd Call received but not answered, or rejected
Invalid ID The entered number is not valid.
Invalid Shortcut position
The entered number is not valid.
List Empty There are no programmed entries in the scrolling list. Type the entry.
AttachmentFailed
The MTH800 could not perform talkgroup attachment. The MTH800 keeps on trying. If it does not succeed, try another talkgroup.
Authenticate Failure
The MTH800 could not register on an Authenticated system (for example, the Authentication key is incorrect, or Authentication is disabled in the MTH800).
Battery Flat The battery is uncharged. Recharge the battery.
Call Canceled Called MTH800 cancelled the call.
Call Ended • Faulty channel. Please try later.• Called MTH800 ended the call.
Call Preempted Channel being used for priority.
Emgcy In Use: Wait For Mic
The Hot Microphone feature is active, but the channel transmit grant has been given to another Emergency Call on the same talkgroup. The MTH800 microphone is not active during this time, but the MTH800 will automatically try to regain talk permit after a predetermined time.
Emgcy Mic Ended
The Hot Microphone timer has automatically expired, or the user has pressed the PTT button to cancel the Hot Microphone feature.
Emgcy Mic On The Hot Microphone feature is active, and the MTH800 is automatically transmitting hands free emergency audio.
Empty Entry The speed number you dialled does not exist, or the number exists but the group is non-selectable.
124
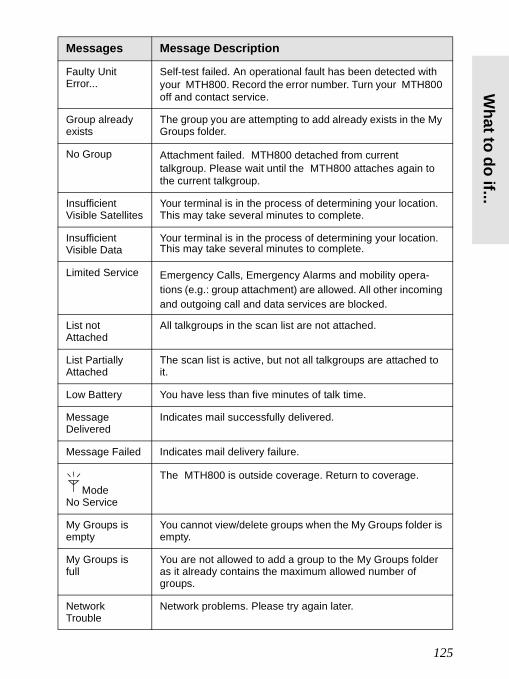
What to do if...
6802972C35.book Page 125 Monday, August 16, 2004 9:22 PM
Faulty Unit Error...
Self-test failed. An operational fault has been detected with your MTH800. Record the error number. Turn your MTH800 off and contact service.
Group already exists
The group you are attempting to add already exists in the My Groups folder.
No Group Attachment failed. MTH800 detached from current talkgroup. Please wait until the MTH800 attaches again to the current talkgroup.
Insufficient Visible Satellites
Your terminal is in the process of determining your location. This may take several minutes to complete.
Insufficient Visible Data
Your terminal is in the process of determining your location. This may take several minutes to complete.
Limited Service Emergency Calls, Emergency Alarms and mobility opera-tions (e.g.: group attachment) are allowed. All other incoming and outgoing call and data services are blocked.
List not Attached
All talkgroups in the scan list are not attached.
List Partially Attached
The scan list is active, but not all talkgroups are attached to it.
Low Battery You have less than five minutes of talk time.
Message Delivered
Indicates mail successfully delivered.
Message Failed Indicates mail delivery failure.
ModeNo Service
The MTH800 is outside coverage. Return to coverage.
My Groups is empty
You cannot view/delete groups when the My Groups folder is empty.
My Groups is full
You are not allowed to add a group to the My Groups folder as it already contains the maximum allowed number of groups.
NetworkTrouble
Network problems. Please try again later.
Messages Message Description
125

6802972C35.book Page 126 Monday, August 16, 2004 9:22 PM
No Answer The called party does not answer.
No Entries This message is displayed when accessing an empty list.
No Group • Displayed when you are out of the normal coverage area of your selected talkgroup. Please select a new talkgroup that is valid for your working location.
• Indicates a favourite group was removed from the My Groups folder.
No List The Network List is empty.
No New or Old Messages
Indicates there are no new or old messages in the Inbox.
No Selected Scan List
You selected an empty Network List (No List).
No Service The MTH800 is out of coverage.
Not AllowedTo Transmit
Release PTT and try again later.
Only OneEntry
There is only one programmed entry in the scrolling list.
Overcharging The MTH800 turns off. Remove MTH800 from charger.
Overheating The MTH800 turns off. Keep it turned off for five minutes.
Party Busy The called MTH800 is busy.
Party NotAvailable
• The called MTH800 is out-of-range. Please try again later.• The called MTH800 is turned off. Please try again later.
Please TryAgain
The MTH800 could not place the call.
Please WaitConnecting
A message during startup.
RegistrationFailure
The MTH800 could not register within the system. Please try again later.
ServiceDenied
Invalid number. Call your Service Provider.
Messages Message Description
126
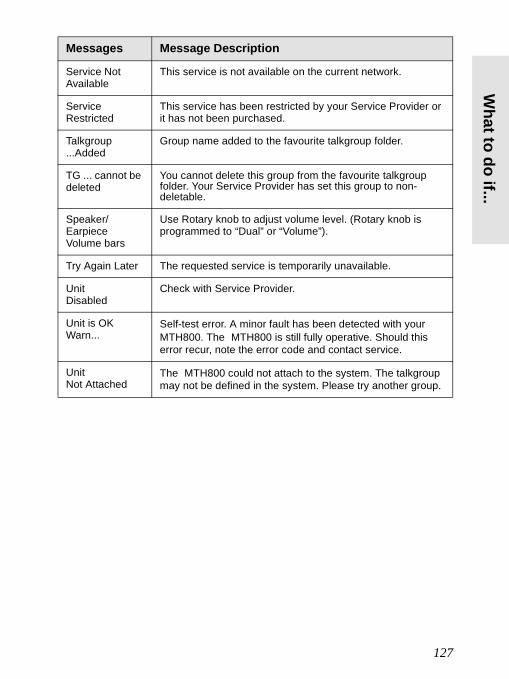
What to do if...
6802972C35.book Page 127 Monday, August 16, 2004 9:22 PM
Service NotAvailable
This service is not available on the current network.
ServiceRestricted
This service has been restricted by your Service Provider or it has not been purchased.
Talkgroup ...Added
Group name added to the favourite talkgroup folder.
TG ... cannot be deleted
You cannot delete this group from the favourite talkgroup folder. Your Service Provider has set this group to non-deletable.
Speaker/Earpiece Volume bars
Use Rotary knob to adjust volume level. (Rotary knob is programmed to “Dual” or “Volume”).
Try Again Later The requested service is temporarily unavailable.
UnitDisabled
Check with Service Provider.
Unit is OKWarn...
Self-test error. A minor fault has been detected with your MTH800. The MTH800 is still fully operative. Should this error recur, note the error code and contact service.
UnitNot Attached
The MTH800 could not attach to the system. The talkgroup may not be defined in the system. Please try another group.
Messages Message Description
127
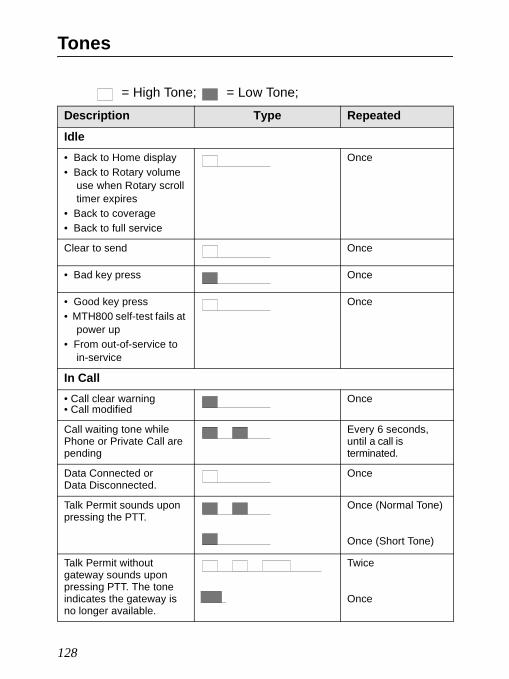
6802972C35.book Page 128 Monday, August 16, 2004 9:22 PM
Tones
= High Tone; = Low Tone;
Description Type RepeatedIdle• Back to Home display• Back to Rotary volume
use when Rotary scroll timer expires
• Back to coverage• Back to full service
Once
Clear to send Once
• Bad key press Once
• Good key press• MTH800 self-test fails at
power up• From out-of-service to
in-service
Once
In Call• Call clear warning • Call modified
Once
Call waiting tone while Phone or Private Call are pending
Every 6 seconds, until a call is terminated.
Data Connected or Data Disconnected.
Once
Talk Permit sounds upon pressing the PTT.
Once (Normal Tone)
Once (Short Tone)
Talk Permit without gateway sounds upon pressing PTT. The tone indicates the gateway is no longer available.
Twice
Once
128
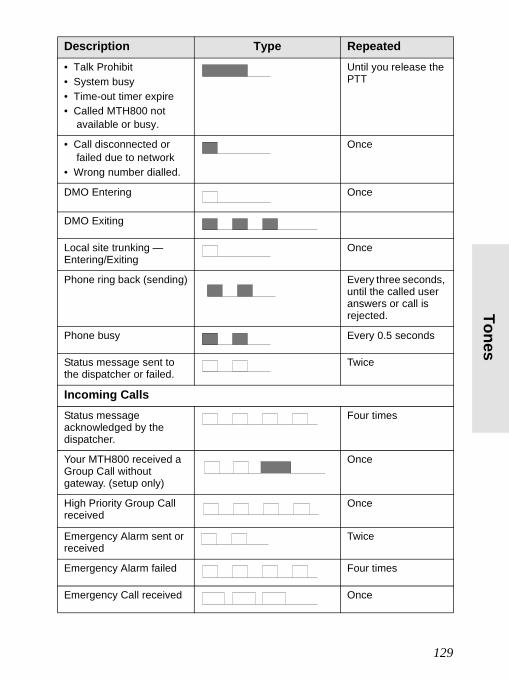
Tones
6802972C35.book Page 129 Monday, August 16, 2004 9:22 PM
• Talk Prohibit • System busy• Time-out timer expire• Called MTH800 not
available or busy.
Until you release the PTT
• Call disconnected or failed due to network
• Wrong number dialled.
Once
DMO Entering
Once
DMO Exiting
Local site trunking —Entering/Exiting
Once
Phone ring back (sending) Every three seconds, until the called user answers or call is rejected.
Phone busy Every 0.5 seconds
Status message sent to the dispatcher or failed.
Twice
Incoming CallsStatus message acknowledged by the dispatcher.
Four times
Your MTH800 received a Group Call without gateway. (setup only)
Once
High Priority Group Call received
Once
Emergency Alarm sent or received
Twice
Emergency Alarm failed Four times
Emergency Call received Once
Description Type Repeated
129
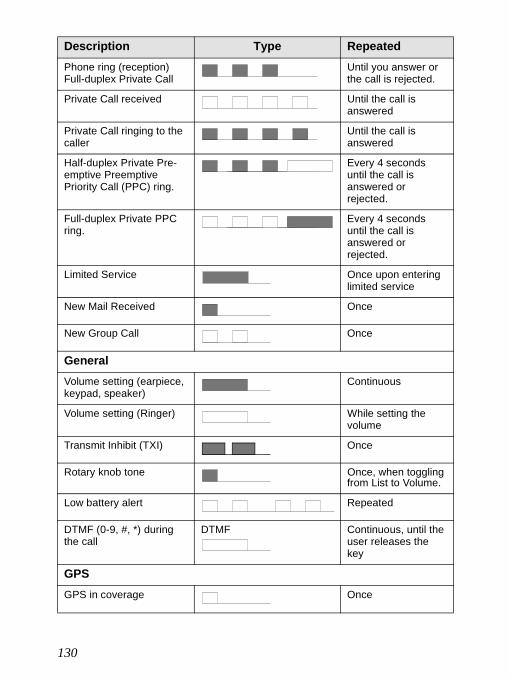
6802972C35.book Page 130 Monday, August 16, 2004 9:22 PM
Phone ring (reception)Full-duplex Private Call
Until you answer or the call is rejected.
Private Call received Until the call is answered
Private Call ringing to the caller
Until the call is answered
Half-duplex Private Pre-emptive Preemptive Priority Call (PPC) ring.
Every 4 seconds until the call is answered or rejected.
Full-duplex Private PPC ring.
Every 4 seconds until the call is answered or rejected.
Limited Service Once upon entering limited service
New Mail Received Once
New Group Call Once
GeneralVolume setting (earpiece, keypad, speaker)
Continuous
Volume setting (Ringer) While setting the volume
Transmit Inhibit (TXI) Once
Rotary knob tone Once, when toggling from List to Volume.
Low battery alert Repeated
DTMF (0-9, #, *) during the call
DTMF Continuous, until the user releases the key
GPSGPS in coverage Once
Description Type Repeated
130
Tones
6802972C35.book Page 131 Monday, August 16, 2004 9:22 PM
GPS out of coverage Once
Description Type Repeated
131
6802972C35.book Page 132 Monday, August 16, 2004 9:22 PM
Appendix A. Accessories
Use only Motorola approved antennas and batteries. Use of non-Motorola approved antennas, batteries, accessories, and applications may result in non-compliance with RF exposure guidelines and regulatory requirements.The table below lists the Motorola approved accessories.
Kit Number DescriptionBatteries SNN5705 Standard battery, 800 mAh, LiIon (without battery door)NNTN4655 Extended battery, 1500 mAh, LiIon (without extended battery
door)0102709K08 1500 mAh battery door 0102709K05 800 mAh battery door ChargersNNTN4250 Travel charger (power supply only)WALN4092 Rapid travel charger kit including UK and Euro plugs (contains
NNTN4250 +SYN7456 +SYN7455)FTN6306 Dual pocket desktop charger base (requires travel charger
WALN4092)FTN6351 Insert for dual pocket desk top charger SYN7456 Plug adapter EU for travel charger NNTN4250SYN7455 Plug adapter UK for travel charger NNTN4250WPLN4175 Multi-unit Charger 6 pockets with Euro cordWPLN4176 Multi-unit Charger 6 pockets with UK plugWPLN4177 Multi-unit Charger 6 pockets with US PlugRLN5643 Wall mount bracket for multi-unit chargerVehicular AdapterFLN9469 Vehicle power adaptorFTN6307 Hands-free Digital Car Kit (including cradle, junction box,
remote speaker, mic, and PTT)Audio Accessories FTN6388 Rx Only Earpiece for terminal (short cable)NNTN4033 Personal Hands Free (PHF) kit with PTTFTN6304 Mini lapel microphone kit (3 Wire kit, long cable, compatible with
earshells and voicetubes)GMLN1081 Audio jack adapter for kits NNTN4033 and FTN6304 (kit
contains 10 pieces)
132
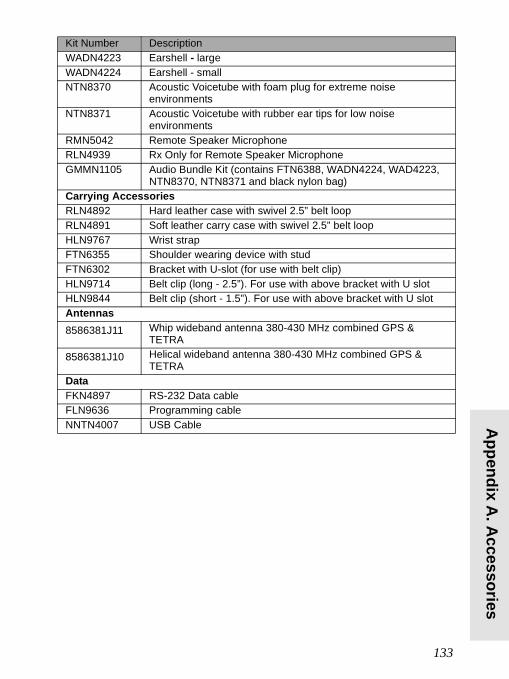
Appendix A
. Accessories
6802972C35.book Page 133 Monday, August 16, 2004 9:22 PM
WADN4223 Earshell - largeWADN4224 Earshell - smallNTN8370 Acoustic Voicetube with foam plug for extreme noise
environments NTN8371 Acoustic Voicetube with rubber ear tips for low noise
environments RMN5042 Remote Speaker MicrophoneRLN4939 Rx Only for Remote Speaker MicrophoneGMMN1105 Audio Bundle Kit (contains FTN6388, WADN4224, WAD4223,
NTN8370, NTN8371 and black nylon bag)Carrying AccessoriesRLN4892 Hard leather case with swivel 2.5” belt loopRLN4891 Soft leather carry case with swivel 2.5” belt loopHLN9767 Wrist strapFTN6355 Shoulder wearing device with studFTN6302 Bracket with U-slot (for use with belt clip)HLN9714 Belt clip (long - 2.5”). For use with above bracket with U slotHLN9844 Belt clip (short - 1.5”). For use with above bracket with U slotAntennas8586381J11 Whip wideband antenna 380-430 MHz combined GPS &
TETRA8586381J10 Helical wideband antenna 380-430 MHz combined GPS &
TETRADataFKN4897 RS-232 Data cableFLN9636 Programming cableNNTN4007 USB Cable
Kit Number Description
133

6802972C35.book Page 134 Monday, August 16, 2004 9:22 PM
Index
AAccessory connector 10adjusting volume 19AL (Ambience Listening) 54alias 21alphanumeric key
entering text (letters and digits) 10Ambience Listening (AL) 28, 54announcement talkgroup 33antenna attaching/detaching 8ATG 33audio
high/low 21, 84Audio Accessory connector 10
BBacklight Adjustment, one-touch 20backlight setup 85, 89battery charging 5, 11bottom microphone 10, 13, 14
mute/unmute 30Broadcast Call 28buttons
Emergency 19Push-To-Talk (PTT) 11
CCall Dial, one-touch 20calls
full-duplex 13half-duplex 13
cleaning your unit 14code changing 78connectors
Accessory 10Audio Accessory 10External Antenna 10
contact list 74Contacts sub-menu 74contrast setup 90
Ddata setup 83DGNA (Dynamic Group Number As-signment) 40dialed call history 96dialed number list 96dictionary 123direct setup 25display
contrast setup 90Home 15language setup 83TAP/iTAP 116text size setup 88vertical flip setup 87wallpaper setup 89
displaying long text messages 105DMO 23, 42DMO Group Call
making 43receiving 45
DMO/TMO, one-touch 20DTMF overdial 53Dynamic Group Number Assignment (DGNA) 40
EEmergency 60Emergency Alarm
sending in TMO 56Emergency button 19Emergency Group Call 54
making in DMO 60making in TMO 57receiving in DMO 60receiving in TMO 58
Emergency Private Call 55encryption 79End-Stop Rotary Knob Scrolling 36External Antenna connector 10
134
Index
6802972C35.book Page 135 Monday, August 16, 2004 9:22 PM
Ffavourite group 32, 94Flip Display, vertical via one-touch 20folder 32
favourite group 32, 42scroll to next 35selection 32, 43stay in 36
forced call 39Four-Way Navigation key 10full-duplex call 13
Ggateway 43GPS enable/disable 63GPS location Service 61Group Audio setup 84Group setup 90
Hhalf-duplex call 13high/low audio 13, 21, 84history
dialed call 96missed call 96received call 96
Home display 15Home Revert, one-touch 20hook setup 25Hot Microphone feature 57
Iicons
contacts 74Direct Mode Operation 15general 16GPS 63Inbox 107menu 70status 15TAP/iTAP 115
Inbox use 107InterMNI call 42, 59
iTAPdisplay 116icons 115selecting 114writing text 114, 121
KK Validity 80keypad 10
locking/unlocking 79usage in alphanumeric mode 117usage in numeric mode 118usage in symbol mode 118
keysFour-Way Navigation 10Menu 17On-Off/End/Home 11programmable numeric 20programmable Side 19Send 10soft 17Speaker Control 21, 85
knobEnd-Stop Rotary Knob Scrolling
36Rotary 18
Llist of menu items 71Local Area Service 30
entering 30exiting 31
Local Site Trunking 30locking/unlocking the keypad 79low/high audio 13, 21, 84
Mmenu 17menu item 69menu item list 71Messages sub-menu 74, 104microphones
bottom 10, 13, 14bottom, mute/unmute 30top 9, 13, 14
missed call history 96
135
6802972C35.book Page 136 Monday, August 16, 2004 9:22 PM
More... sub-menu 90mute/unmute bottom microphone 30My Info sub-menu 96
NNetwork List 92Networks sub-menu 101notations 3numeric key, programmable 20
Oone-touch
Backlight Adjustment 20Call Dial 20DMO/TMO 20Home Revert 20Screen Saver 20Status Message 20Talkgroup Scan 20Talkgroup Switch 20Text Message Template 20TMO/DMO 20Transmit Inhibit (TXI) 20Vertical Flip Display 20
On-Off/End/Home key 11open group 42, 59
PPABX (Private Automatic Branch Ex-change) 51PABX Call 51Phone Call 51
one-touch dialing 52speed dial 52
phone number 21, 51viewing and modifying 96
Phone/PABX Callanswering 53dialing via contact list 52direct dial 51making 51
PIN Protect 77powering on/off 11
PPCmaking a Private PPC 49receiving a Private PPC during a
call 27receiving an Emergency Group
Call during a call 27PPC (preemptive priority call) 26Predefined Template 110preemptive priority call (PPC) 26presented call 39Private Automatic Branch Exchange (PABX) 51Private Call 47
dialing via contact list 48direct dial 47making 47receiving 49Short Number Dial 48
private number 21viewing 96
programmable numeric key 20programmable Side keys 19PUK 78Push-To-Talk button (PTT) 11
Rreceived call history 96receiving calls 25Recent Calls sub-menu 96ring style of incoming call 82Rotary knob 18
End-StopRotary Knob Scrolling 36
Sscan list 32scan on/off in TMO Group Call 38Scan setup 90scanning selection 32SCK Validity 81screen saver 22screen saver setup 88screen saver text 88Screen Saver, one-touch 20Scrolling
End-Stop Rotary Knob 36
136
Index
6802972C35.book Page 137 Monday, August 16, 2004 9:22 PM
Security sub-menu 77Send key 10Setup sub-menu 81Short Number Dial 48Shortcuts sub-menu 99Side keys, programmable 19Site Wide Trunking 30soft keys 17Speaker 10Speaker Control key 21, 85speakerphone 29status message 104
sending 112targeting 112
Status Message, one-touch 20
Ttalkgroup 32Talkgroup Scan, one-touch 20talkgroup selection 32, 43Talkgroup Switch, one-touch 20TAP
display 116icons 115selecting 114writing text 114
templates 104text language 114text message 104
receiving 105sending 104
Text Message Templateone-touch 20
text size setup 88TMO 23TMO Group Call
making 36receiving 37
TMO/DMOone-touch 20
tonessetting all tones 85setting Clear to Send 86setting keypad tone 85setting talk permit tone 86
tones setup 85top microphone 9, 13, 14Transmit Inhibit (TXI) Mode 39Transmit Inhibit (TXI), one-touch 20TXI (Transmit Inhibit) Mode 39
Uunblocking the terminal 78unlocking the terminal 77unmute/mute bottom microphone 30User Defined Template 110
VVertical Flip Display, one-touch 20vibrate setup 81
Wwallpaper setup 89writing text 114
137

6802972C35.book Page 138 Monday, August 16, 2004 9:22 PM
138
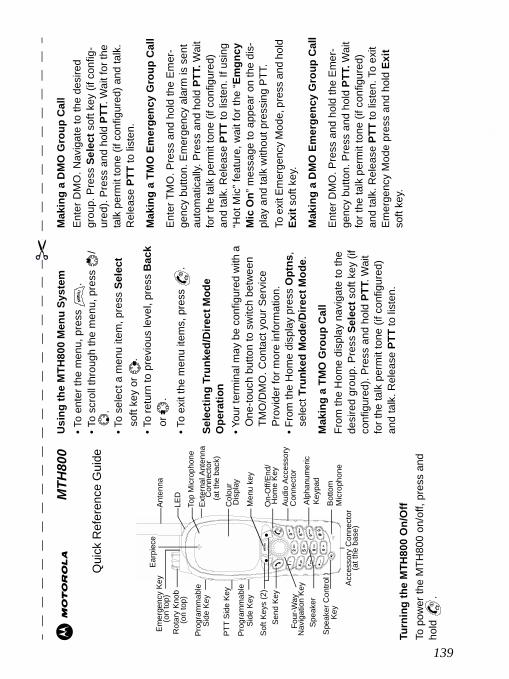
En
glis
h
6802
972C
35.b
ook
Pag
e 13
9 M
onda
y, A
ugus
t 16,
200
4 9
:22
PM
MTH
800
Qui
ck R
efer
ence
Gui
de
Turn
ing
the
MTH
800
On/
Off
To p
ower
the
MTH
800
on/o
ff, p
ress
and
ho
ld.
Usi
ng th
e M
TH80
0 M
enu
Syst
em• T
o en
ter t
he m
enu,
pre
ss.
• To
scro
ll th
roug
h th
e m
enu,
pre
ss/
.• T
o se
lect
a m
enu
item
, pre
ss S
elec
t so
ft ke
y or
.
• To
retu
rn to
pre
viou
s le
vel,
pres
s B
ack
or.
• To
exit
the
men
u ite
ms,
pre
ss.
Sele
ctin
g Tr
unke
d/D
irect
Mod
e O
pera
tion
• You
r ter
min
al m
ay b
e co
nfig
ured
with
a
One
-touc
h bu
tton
to s
witc
h be
twee
n TM
O/D
MO
. Con
tact
you
r Ser
vice
Pr
ovid
er fo
r mor
e in
form
atio
n.• F
rom
the
Hom
e di
spla
y pr
ess
Opt
ns,
sele
ct T
runk
ed M
ode/
Dire
ct M
ode.
Mak
ing
a TM
O G
roup
Cal
lFr
om th
e H
ome
disp
lay
navi
gate
to th
e de
sire
d gr
oup.
Pre
ss S
elec
t sof
t key
(if
conf
igur
ed).
Pres
s an
d ho
ld P
TT. W
ait
for t
he ta
lk p
erm
it to
ne (i
f con
figur
ed)
and
talk
. Rel
ease
PTT
to li
sten
.
Mak
ing
a D
MO
Gro
up C
all
Ente
r DM
O. N
avig
ate
to th
e de
sire
d gr
oup.
Pre
ss S
elec
t sof
t key
(if c
onfig
-ur
ed).
Pre
ss a
nd h
old
PTT.
Wai
t for
the
talk
per
mit
tone
(if c
onfig
ured
) and
talk
. R
elea
se P
TT to
list
en.
Mak
ing
a TM
O E
mer
genc
y G
roup
Cal
l
Ente
r TM
O. P
ress
and
hol
d th
e Em
er-
genc
y bu
tton.
Em
erge
ncy
alar
m is
sen
t au
tom
atic
ally.
Pre
ss a
nd h
old
PTT.
Wai
t fo
r the
talk
per
mit
tone
(if c
onfig
ured
) an
d ta
lk. R
elea
se P
TT to
list
en. I
f usi
ng
“Hot
Mic
” fea
ture
, wai
t for
the
“Em
gncy
M
ic O
n” m
essa
ge to
app
ear o
n th
e di
s-pl
ay a
nd ta
lk w
ithou
t pre
ssin
g PT
T.To
exi
t Em
erge
ncy
Mod
e, p
ress
and
hol
d Ex
it so
ft ke
y.
Mak
ing
a D
MO
Em
erge
ncy
Gro
up C
all
Ente
r DM
O. P
ress
and
hol
d th
e E
mer
-ge
ncy
butto
n. P
ress
and
hol
d PT
T. W
ait
for t
he ta
lk p
erm
it to
ne (i
f con
figur
ed)
and
talk
. Rel
ease
PTT
to li
sten
. To
exit
Emer
genc
y M
ode
pres
s an
d ho
ld E
xit
soft
key.
Ante
nna
Top
Mic
roph
one
Col
our
Soft
Keys
(2)
Four
-Way
Men
u ke
y
On-
Off/
End/
Spea
ker
Alph
anum
eric
Spea
ker C
ontro
lBo
ttom
Acce
ssor
y C
onne
ctor
Rot
ary
Knob
LE
D
Send
Key
PTT
Side
Key
Dis
play
Keyp
ad
Key
Exte
rnal
Ant
enna
Con
nect
or
(at t
he b
ase)
(on
top)
Audi
o Ac
cess
ory
Con
nect
or
(at t
he b
ack)
Nav
igat
ion
Key
Earp
iece
Emer
genc
y Ke
y(o
n to
p)
Prog
ram
mab
le
Side
Key
Prog
ram
mab
le
Side
Key
Mic
roph
one
Hom
e Ke
y
ME
NU
139
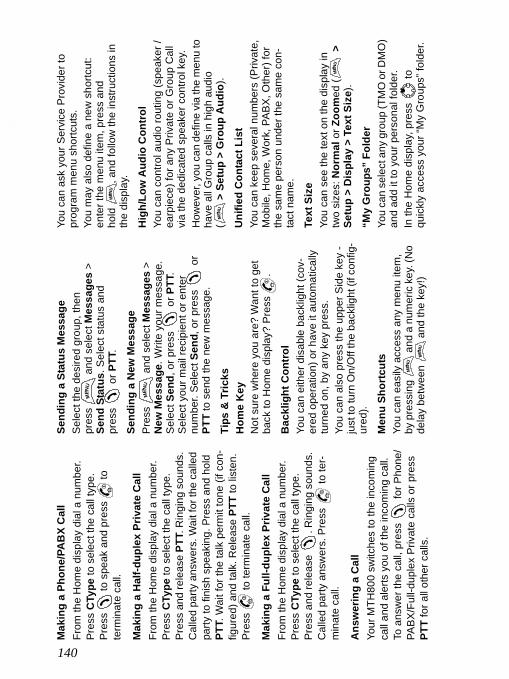
En
glish
6802
972C
35.b
ook
Pag
e 14
0 M
onda
y, A
ugus
t 16,
200
4 9
:22
PM
Mak
ing
a Ph
one/
PAB
X C
all
From
the
Hom
e di
spla
y di
al a
num
ber.
Pres
s C
Type
to s
elec
t the
cal
l typ
e.
Pres
sto
spe
ak a
nd p
ress
to
term
inat
e ca
ll.
Mak
ing
a H
alf-d
uple
x Pr
ivat
e C
all
From
the
Hom
e di
spla
y di
al a
num
ber.
Pres
s C
Type
to s
elec
t the
cal
l typ
e.
Pre
ss a
nd re
leas
e PT
T. R
ingi
ng s
ound
s.
Cal
led
party
ans
wer
s. W
ait f
or th
e ca
lled
party
to fi
nish
spe
akin
g. P
ress
and
hol
d PT
T. W
ait f
or th
e ta
lk p
erm
it to
ne (i
f con
-fig
ured
) and
talk
. Rel
ease
PTT
to li
sten
. Pr
ess
to te
rmin
ate
call.
Mak
ing
a Fu
ll-du
plex
Priv
ate
Cal
lFr
om th
e H
ome
disp
lay
dial
a n
umbe
r. Pr
ess
CTy
pe to
sel
ect t
he c
all t
ype.
Pr
ess
and
rele
ase
. Rin
ging
sou
nds.
C
alle
d pa
rty a
nsw
ers.
Pre
ssto
ter-
min
ate
call.
Ans
wer
ing
a C
all
Your
MTH
800
switc
hes
to th
e in
com
ing
call
and
aler
ts y
ou o
f the
inco
min
g ca
ll.
To a
nsw
er th
e ca
ll, p
ress
for P
hone
/PA
BX/F
ull-d
uple
x Pr
ivat
e ca
lls o
r pre
ss
PTT
for a
ll ot
her c
alls
.
Send
ing
a St
atus
Mes
sage
Sel
ect t
he d
esire
d gr
oup,
then
pr
ess
and
sele
ct M
essa
ges
> Se
nd S
tatu
s. S
elec
t sta
tus
and
pres
sor
PTT
.
Send
ing
a N
ew M
essa
geP
ress
and
sele
ct M
essa
ges
> N
ew M
essa
ge. W
rite
your
mes
sage
. S
elec
t Sen
d, o
r pre
ssor
PTT
. S
elec
t you
r mai
l rec
ipie
nt o
r ent
er
num
ber.
Sele
ct S
end,
or p
ress
or
PTT
to s
end
the
new
mes
sage
.
Tips
& T
ricks
Hom
e K
eyN
ot s
ure
whe
re y
ou a
re?
Wan
t to
get
back
to H
ome
disp
lay?
Pre
ss.
Bac
klig
ht C
ontr
olYo
u ca
n ei
ther
dis
able
bac
klig
ht (c
ov-
ered
ope
ratio
n) o
r hav
e it
auto
mat
ical
ly
turn
ed o
n, b
y an
y ke
y pr
ess.
You
can
also
pre
ss th
e up
per S
ide
key
- ju
st to
turn
On/
Off
the
back
light
(if c
onfig
-ur
ed).
Men
u Sh
ortc
uts
You
can
easi
ly a
cces
s an
y m
enu
item
, by
pre
ssin
gan
d a
num
eric
key
. (N
o de
lay
betw
een
and
the
key!
)
You
can
ask
your
Ser
vice
Pro
vide
r to
prog
ram
men
u sh
ortc
uts.
You
may
als
o de
fine
a ne
w s
hortc
ut:
ente
r the
men
u ite
m, p
ress
and
ho
ld, a
nd fo
llow
the
inst
ruct
ions
in
the
disp
lay.
Hig
h/Lo
w A
udio
Con
trol
You
can
cont
rol a
udio
rout
ing
(spe
aker
/ea
rpie
ce) f
or a
ny P
rivat
e or
Gro
up C
all
via
the
dedi
cate
d sp
eake
r con
trol k
ey.
How
ever
, you
can
def
ine
via
the
men
u to
ha
ve a
ll G
roup
cal
ls in
hig
h au
dio
(>
Setu
p >
Gro
up A
udio
).
Uni
fied
Con
tact
Lis
tYo
u ca
n ke
ep s
ever
al n
umbe
rs (P
rivat
e,
Mob
ile, H
ome,
Wor
k, P
ABX,
Oth
er) f
or
the
sam
e pe
rson
und
er th
e sa
me
con-
tact
nam
e.
Text
Siz
eYo
u ca
n se
e th
e te
xt o
n th
e di
spla
y in
tw
o si
zes:
Nor
mal
or Z
oom
ed (
>
Setu
p >
Dis
play
> T
ext S
ize)
.
“My
Gro
ups”
Fol
der
You
can
sele
ct a
ny g
roup
(TM
O o
r DM
O)
and
add
it to
you
r per
sona
l fol
der.
In th
e H
ome
disp
lay,
pre
ssto
qu
ickl
y ac
cess
you
r “M
y G
roup
s” fo
lder
.
ME
NU
ME
NU
140