Embed Size (px)
Citation preview
1
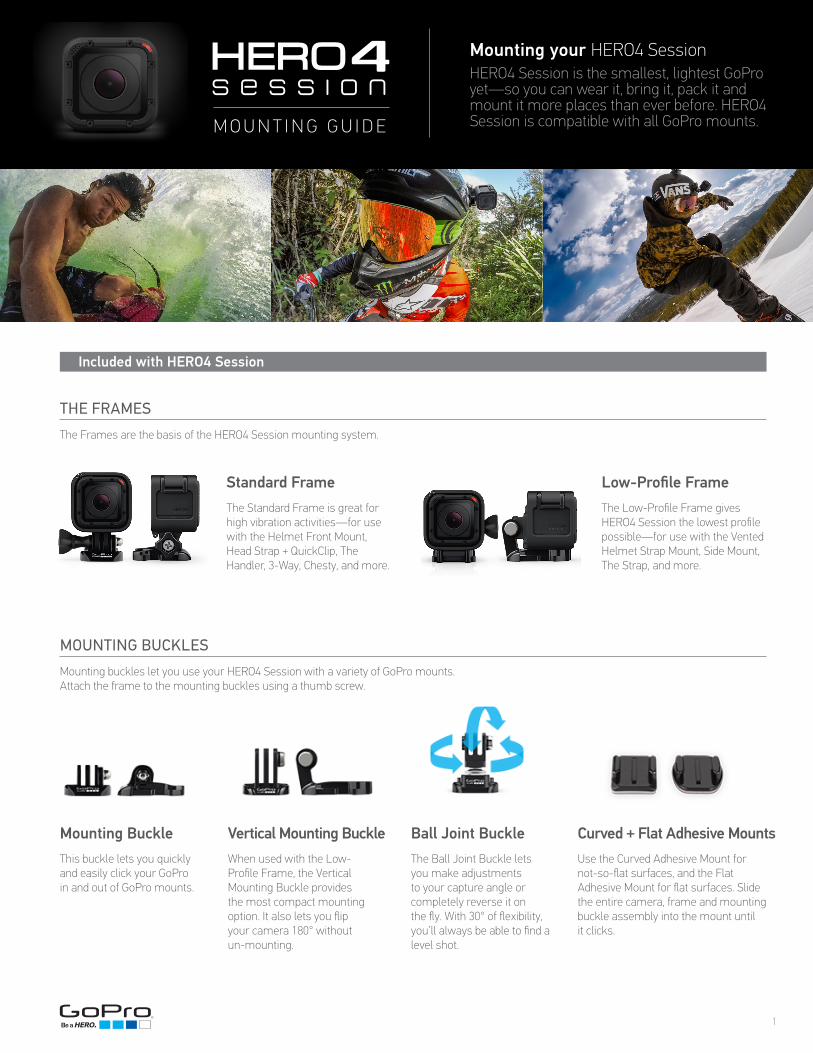
M O U N T I N G G U I D E
Mounting your HERO4 Session
THE FRAMES
MOUNTING BUCKLES
HERO4 Session is the smallest, lightest GoPro yet—so you can wear it, bring it, pack it and mount it more places than ever before. HERO4 Session is compatible with all GoPro mounts.
The Frames are the basis of the HERO4 Session mounting system.
Mounting buckles let you use your HERO4 Session with a variety of GoPro mounts.Attach the frame to the mounting buckles using a thumb screw.
The Standard Frame is great for high vibration activities—for use with the Helmet Front Mount, Head Strap + QuickClip, The Handler, 3-Way, Chesty, and more.
This buckle lets you quickly and easily click your GoPro in and out of GoPro mounts.
When used with the Low-Profile Frame, the Vertical Mounting Buckle provides the most compact mounting option. It also lets you flip your camera 180° without un-mounting.
The Ball Joint Buckle lets you make adjustments to your capture angle or completely reverse it on the fly. With 30° of flexibility, you’ll always be able to find a level shot.
Use the Curved Adhesive Mount for not-so-flat surfaces, and the Flat Adhesive Mount for flat surfaces. Slide the entire camera, frame and mounting buckle assembly into the mount until it clicks.
The Low-Profile Frame gives HERO4 Session the lowest profile possible—for use with the Vented Helmet Strap Mount, Side Mount, The Strap, and more.
Standard Frame
Mounting Buckle Vertical Mounting Buckle Ball Joint Buckle Curved + Flat Adhesive Mounts
Low-Profile Frame
Included with HERO4 Session

M O U N T I N G G U I D E
2
Choose the Low-Profile Frame to keep the camera flush with the mount. The shutter button should be on the same side as the latch.
The Strap (Hand +Wrist + Arm + Leg Mount)
Handheld Mounts
Body Mounts
HELMET MOUNTING
For vertical mounting to the front or back of the helmet, use the Curved Adhesive Mount with the Standard Frame. Attach the camera to the mount using the mounting buckle that works best for the mounting location and the shape of the helmet.
For horizontal mounting to the side or top of the helmet, use the Curved Adhesive Mount with the Low-Profile Frame. Attach the camera to the mount using the Vertical Mounting Buckle or Ball Joint Buckle. When mounted on a curved surface, the Ball Joint Buckle makes it easy to get a level shot.
To position the camera under the visor, use the Flat Adhesive Mount with the Low-Profile Frame and Vertical Mounting Buckle.
Note: Always select a helmet that meets the applicable safety standard when you attach a GoPro to a helmet. Follow the helmet manufacturer’s instructions on safe helmet use.
Use the Standard Frame for a greater range of motion, whether you’re using 3-Way as a camera grip, extension arm or tripod.
3-Way™
(Grip | Arm | Tripod)
LEARN MORE »
Use the Standard Frame. This allows for more angles, better stability and way better selfies.
The Handler(Floating Hand Grip)
LEARN MORE »LEARN MORE »
LEARN MORE »Curved + Flat Adhesive Mounts

M O U N T I N G G U I D E
3
Body Mounts (cont.)
Gear Mounts
Choose the Low-Profile Frame to reduce overall height and create the most compact mounting solution.
When mounted to your dog’s back, the Standard Frame’s taller perspective may help you see over your dog’s head. For chest mounting, the Low-Profile Frame provides the most compact setup.
Vented Helmet Strap Fetch™ (Dog Harness)
LEARN MORE »
LEARN MORE »
LEARN MORE »
For vertical mounting (clipping to the Head Strap, a belt or a backwards hat), the Standard Frame is the most compact choice.
Head Strap + QuickClip
LEARN MORE »
Use the Standard Frame for the lowest profile. The human body is a great vibration dampener. So, for stable shots during high-vibration activities, body mounting is the way to go.
Chesty (Chest Harness)
LEARN MORE »
SURFBOARD MOUNTS
SHORT BOARD: Both frames will work, but the Low-Profile Frame used with the Vertical Mounting Buckle will not get knocked forward when duck diving. Be sure to use the Floaty for HERO4 Session, a camera tether and the surf anchor for added security.
LONGBOARD: Have a little more real estate to work with? Use the Low-Profile Frame and the Vertical Mounting Buckle with the frame flipped open and flat (not stacked on top of the buckle) to get the lowest possible profile.
Floaty for HERO4 Session

M O U N T I N G G U I D E
4
For horizontal mounting, such as the roof of a car, choose the Standard Frame. For vertical mounting, such as the side of a car, use the Low-Profile Frame. In most other instances, the Standard Frame is preferable.
When using Jaws: Flex Clamp and Gooseneck, height typically isn’t a concern. So, grab the Standard Frame to allow the camera to pan completely backwards.
The Standard Frame performs the best in high-vibration scenarios, including mounting to roll bars, the radiator cap of karts, bumper bars, roof racks and more.
When mounting HERO4 Session to a gun, the Low-Profile Frame is required. The fingers in the frame align with the recoil and help prevent the camera from slipping or rotating. If mounted to a bow or rod, the Standard Frame works fine, and may even result in a better shot.
Use the Standard Frame to improve camera stability and minimize vibration when mountain biking, road biking, skiing and more.
Suction Cup
Jaws: Flex Clamp andGooseneck
Roll Bar Mount
Sportsman™ Mount
Handlebar / Seatpost /Pole Mount
LEARN MORE »
LEARN MORE »
LEARN MORE »
LEARN MORE »
LEARN MORE »
Gear Mounts (cont.)
Download the full HERO4 Session User Manual at gopro.com/getstarted.


![CR-1 : @TAWAS B LIB.TAWAS B(SCH 1):PAGE1 TAWASnotebookschematic.org/data/NOTEBOOK/attachments/SC... · resume gp[6] gp[7] gp[8] gp[9] 3.3v 3.3v 3.3v 3.3v gp[23] gp[24] gp[25] gp[26]](https://img.pdfslide.us/doc/110x75/5f812ff679030c23f20de0bd/cr-1-tawas-b-libtawas-bsch-1page1-ta-resume-gp6-gp7-gp8-gp9-33v.jpg)