Embed Size (px)
Citation preview

South Carolina Department of Revenue
Motor Fuel Web-Based Reporting System Monthly Terminal Operator User Guide
1
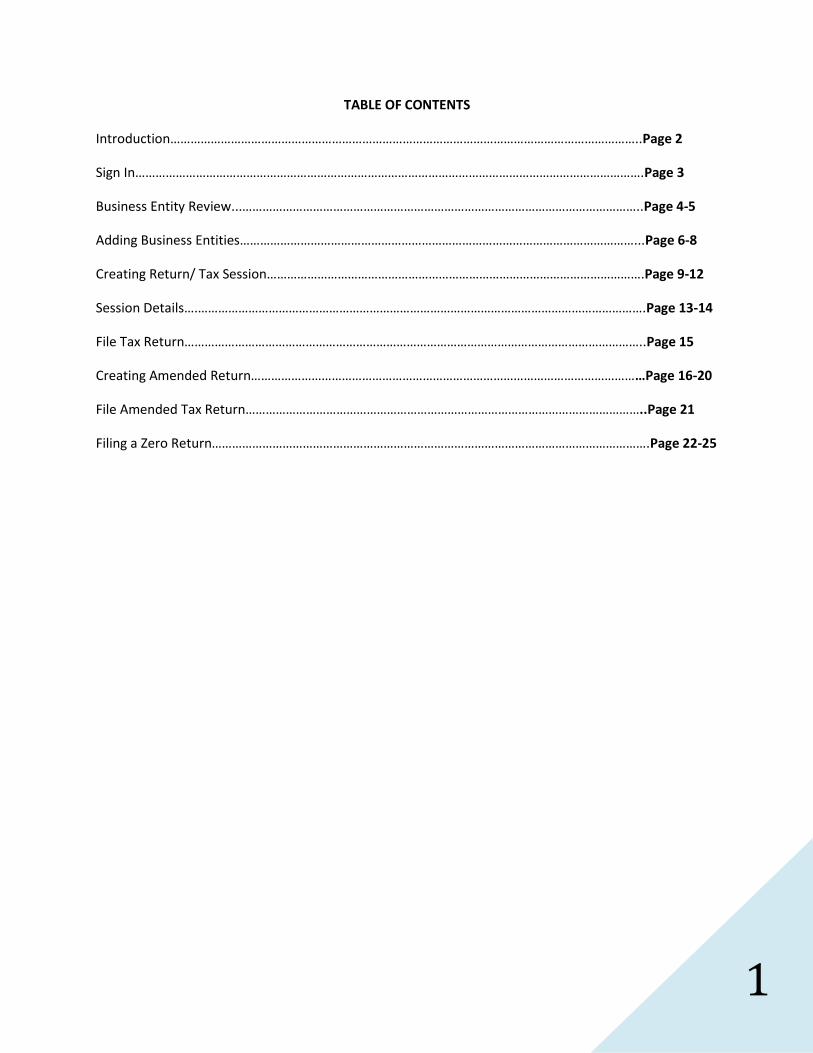
TABLE OF CONTENTS
Introduction…………………………………………………………………………………………………………………………..Page 2
Sign In…………………………………………………………………………………………………………………………………….Page 3
Business Entity Review...………………………………………………………………………………………………………..Page 4-5
Adding Business Entities………………………………………………………………………………………………………...Page 6-8
Creating Return/ Tax Session………………………………………………………………………………………………….Page 9-12
Session Details….…………………………………………………………………………………………………………………….Page 13-14
File Tax Return………………………………………………………………………………………………………………………..Page 15
Creating Amended Return………………………………………………………………………………………………………Page 16-20
File Amended Tax Return………………………………………………………………………………………………………..Page 21
Filing a Zero Return………………………………………………………………………………………………………………….Page 22-25
2
INTRODUCTION
The South Carolina Department of Revenue has implemented a web-based system to provide filers of Motor Fuel User Fee Returns (Supplier, Terminal Operator, and Transporter) the option to file and remit fees electronically at no charge. The web-based system will be available for the filing of June, 2012, user fee returns which are due to be filed on July 22, 2012. Taxpayers may choose this web-based filing option as opposed to filing tax returns via EDI.
Effective July 1, 2012, specific product codes for gasohol and biodiesel will be required. They are as
follows:
Gasohol- E01-E99 replaces “roll-up” product code 124 to reflect the percentage of fuel grade ethanol blended
with gasoline. Pure, unblended fuel grade ethanol should be reported as E00, replacing product code 123.
Biodiesel- B01-B99 replaces “roll-up” product codes 284 and 170 to reflect the percentage of biodiesel blended
with undyed diesel fuel. Pure, unblended biodiesel should be reported as B00.
Biodiesel- D01-D99 replaces “roll-up” product codes 284 and 171 to reflect the percentage of biodiesel blended
with dyed diesel fuel. Pure unblended, dyed biodiesel should be reported as D00.
Per SC Code Section 12-28-1400(A), all Suppliers, Terminal Operators and Transporters are
mandated to file their motor fuel returns “in the manner provided by the Department.”
All Supplier reporting payments accompanying Motor Fuel transactions, via web or EDI, must
be submitted through the Electronic Funds Transfer (EFT) Program. The EFT Program for
Motor Fuel is a separate program from the EDI Program. For further information regarding the
EFT program, please see the EFT Program guide located on our website under Motor Fuel/E-
Services.
Registration
To register for web filing, complete the D-155 Registration application located on our web site at
www.sctax.org, select Motor Fuel/E-Services. If assistance is required with the registration
process, please contact:
Electronic Services
Help Desk (Columbia area) 803-896-1715 Help Desk (Toll Free) 1-800-476-0311
E-mail Address [email protected] FAX 803-896-1779
Mailing Address South Carolina Department of Revenue
EFT/EDI Help Desk
Columbia SC 29214-0016
Filing Returns
If assistance is required for filing motor fuel returns via the web-based system, please contact:
Motor Fuel Section
Filing Assistance 803-896-1990
E-mail Address [email protected]

3
To Sign In, you will need user Id and password from DOR Electronic Services.
Now you will need to change password. Enter current password (password that was given) Enter New password (create) Confirm New Password Click change password
Now change profile. Enter current password (the new password that you choose) Security Question: select from list Enter Security Answer Click update profile
4
Business Entities and the Master Company Data Base
Many business entities are already set up in the Department of Revenue’s motor fuel data base. All
licensed motor fuel accounts that are not sole proprietors will appear in the drop down boxes needed to
schedule transactions.
Only business entities for Master Company ID 0 may be viewed by all users. When a filer adds a
business entity it is not entered into the Master Company. Only the filer and the Department of
Revenue may view business entities entered by a filer.
Before creating a filer business entity, review the Motor Fuel Data Base using the following steps:
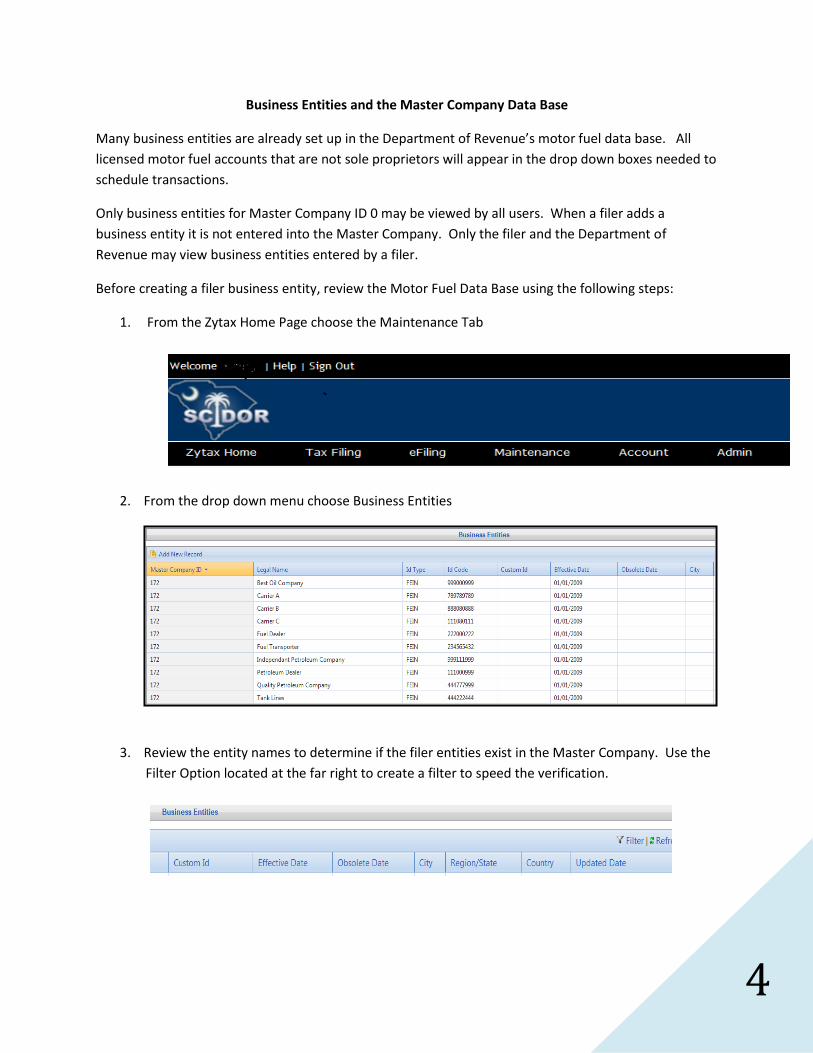
1. From the Zytax Home Page choose the Maintenance Tab
2. From the drop down menu choose Business Entities
3. Review the entity names to determine if the filer entities exist in the Master Company. Use the
Filter Option located at the far right to create a filter to speed the verification.
5
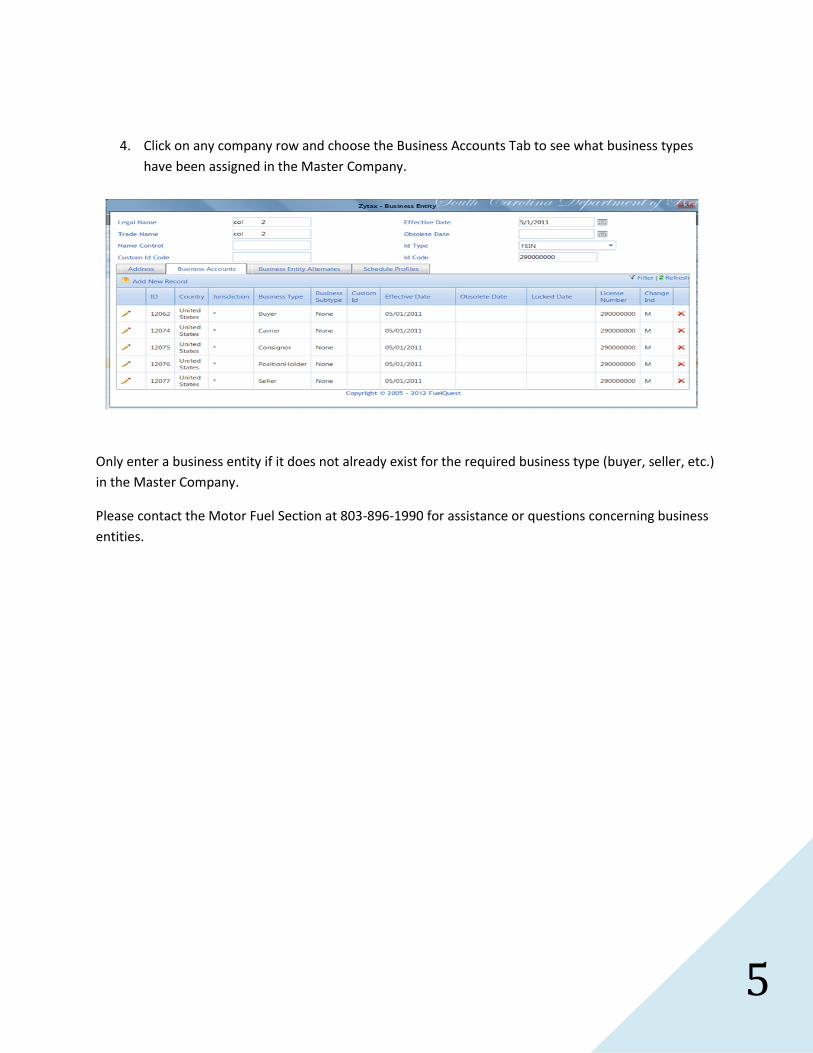
4. Click on any company row and choose the Business Accounts Tab to see what business types
have been assigned in the Master Company.
Only enter a business entity if it does not already exist for the required business type (buyer, seller, etc.)
in the Master Company.
Please contact the Motor Fuel Section at 803-896-1990 for assistance or questions concerning business
entities.
6
Business Entities – Add New Record
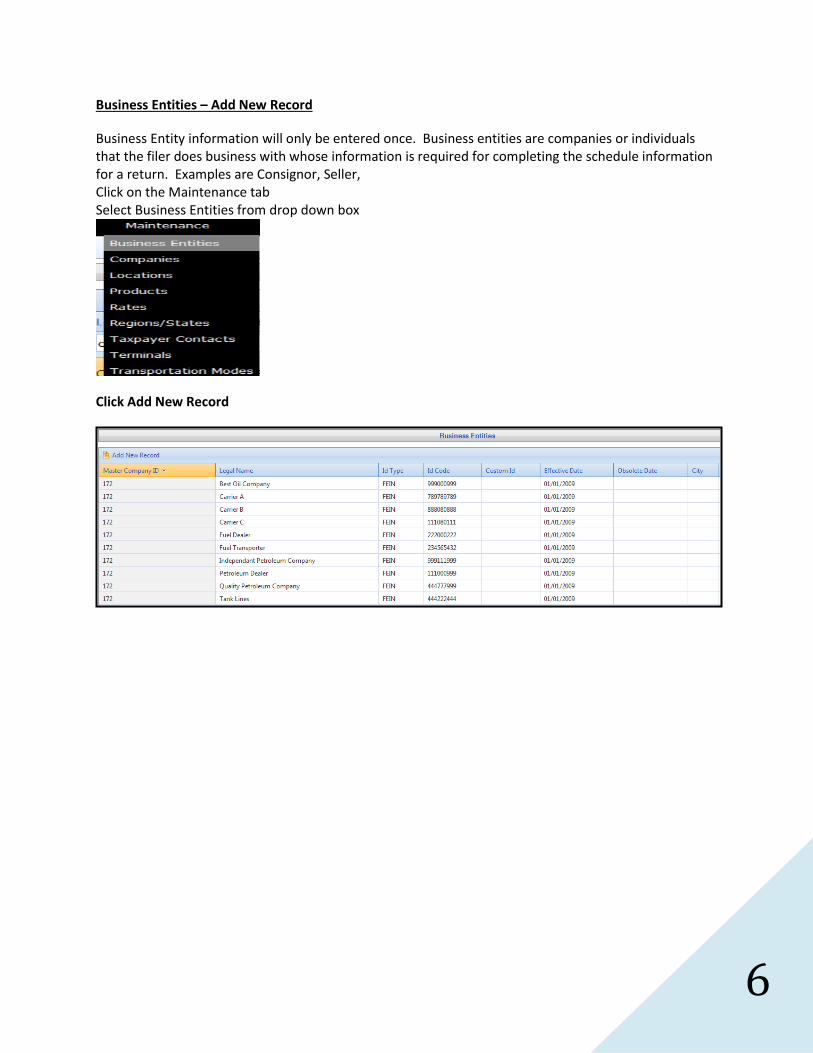
Business Entity information will only be entered once. Business entities are companies or individuals that the filer does business with whose information is required for completing the schedule information for a return. Examples are Consignor, Seller, Click on the Maintenance tab Select Business Entities from drop down box
Click Add New Record

7
Then ‘Add New Record’ icon is used to create a new business entity. In following fields enter: Company Legal Name, Trade name, Effective Date, ID type (click dropdown box to select type) and Id Code (FEIN or Social Security Number) Then click Insert
Determine if the entity will be entered as one or more of the following:
Consignor – Company/individual that hired filer as the carrier/transporter. (If the filer transporters their own product, enter the filer company as a consignor.)
Seller – Terminal supplier that shows as the supplier on the terminal issued bill of lading.
Buyer – Company/Individual to whom the product was delivered.
Next click Business Accounts tab Click Add New Record
8
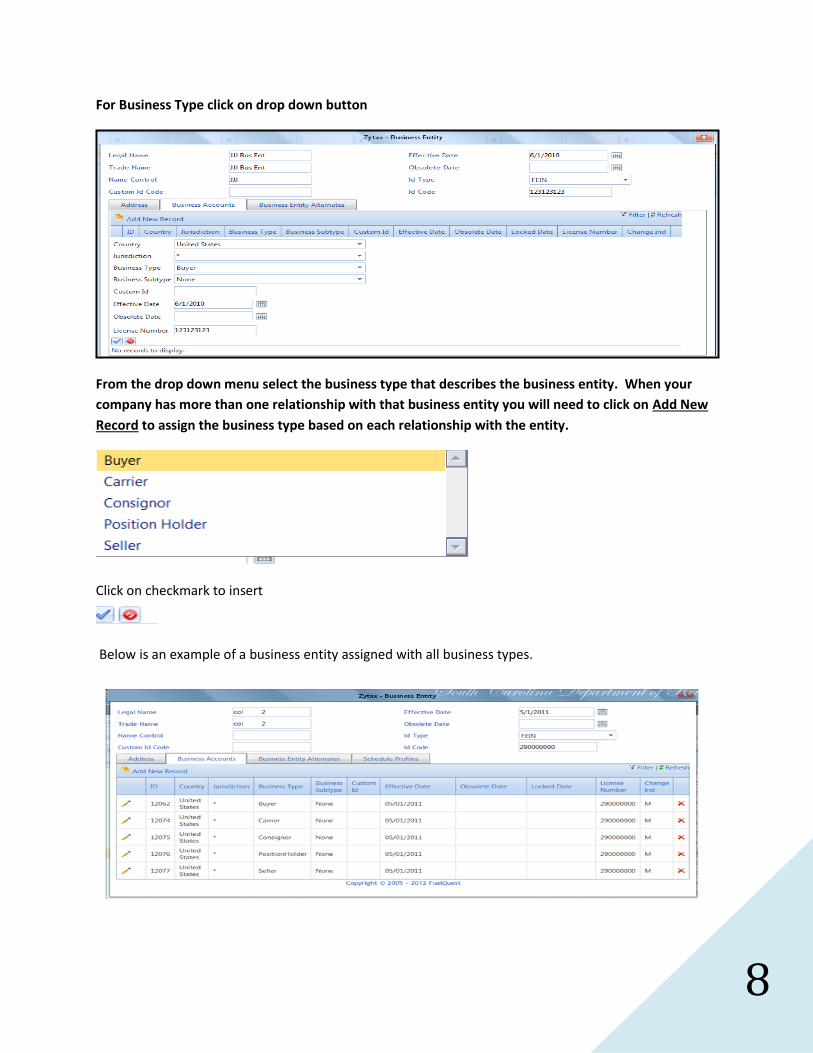
For Business Type click on drop down button
From the drop down menu select the business type that describes the business entity. When your
company has more than one relationship with that business entity you will need to click on Add New
Record to assign the business type based on each relationship with the entity.
Click on checkmark to insert
Below is an example of a business entity assigned with all business types.
9
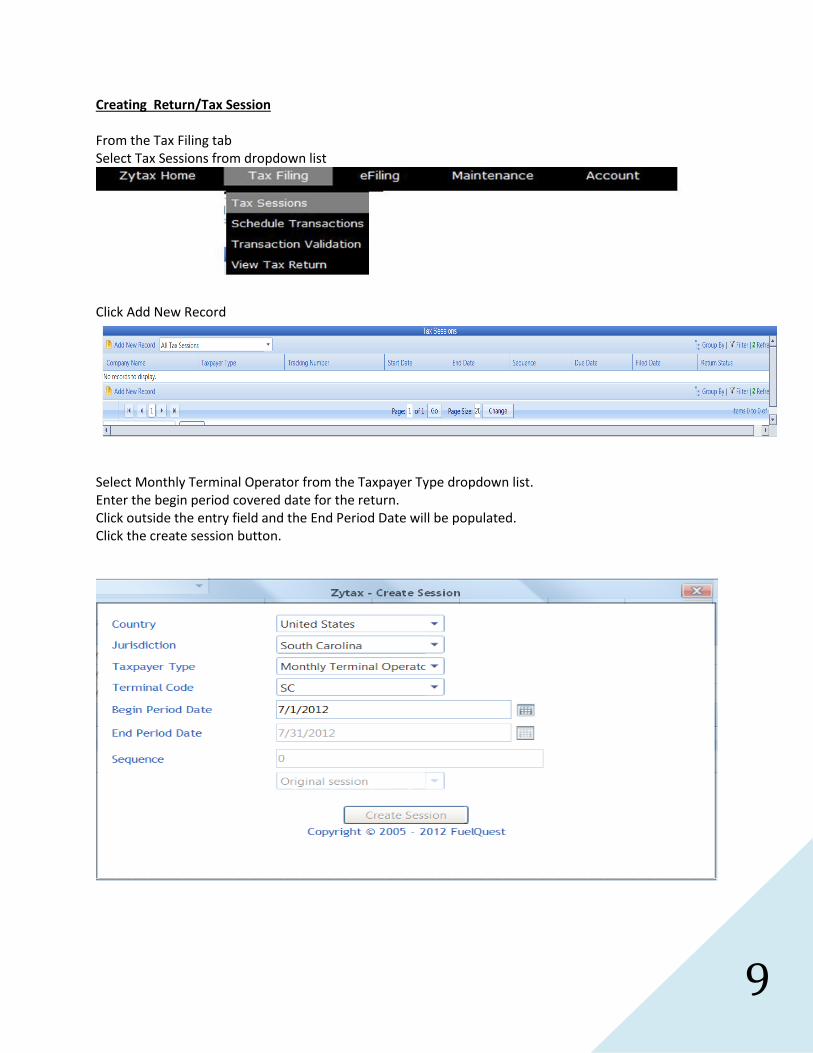
Creating Return/Tax Session From the Tax Filing tab Select Tax Sessions from dropdown list
Click Add New Record
Select Monthly Terminal Operator from the Taxpayer Type dropdown list. Enter the begin period covered date for the return. Click outside the entry field and the End Period Date will be populated. Click the create session button.

10
Close out the Record inserted menu
Right click on the row for the Monthly Terminal session that was added From context menu, select Schedule Transactions

11
Select schedule type from dropdown list to add. Next, click Add New Record If additional schedules are needed for another schedule type, select schedule from dropdown list to add.
Schedule 15 A, enter schedule information requested on the entry screen. Click Insert to accept entry. Some data will remain from the previous transaction to speed the entry process.
If the entity information needed for the schedule transaction does not appear in the drop down box, stop and enter the entity in business entities. Complete the steps for entering a business entity (page4)
and then return to the tax session and begin scheduling transactions again.
12
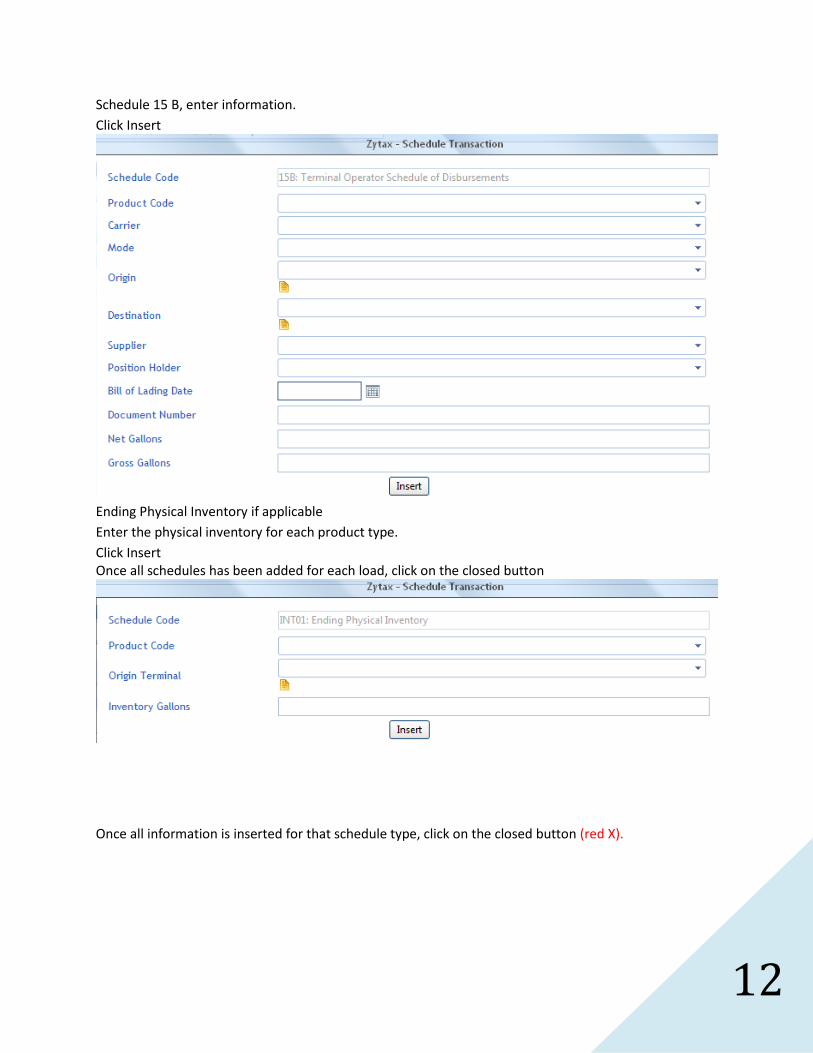
Schedule 15 B, enter information.
Click Insert
Ending Physical Inventory if applicable
Enter the physical inventory for each product type.
Click Insert Once all schedules has been added for each load, click on the closed button
Once all information is inserted for that schedule type, click on the closed button (red X).

13
Session Details From the Tax Filing tab, select Tax Sessions
Right click on the row for the Terminal Operator session that was added From context menu, select Session Details
Select yes, which will include schedules Click Save & Regenerate
14
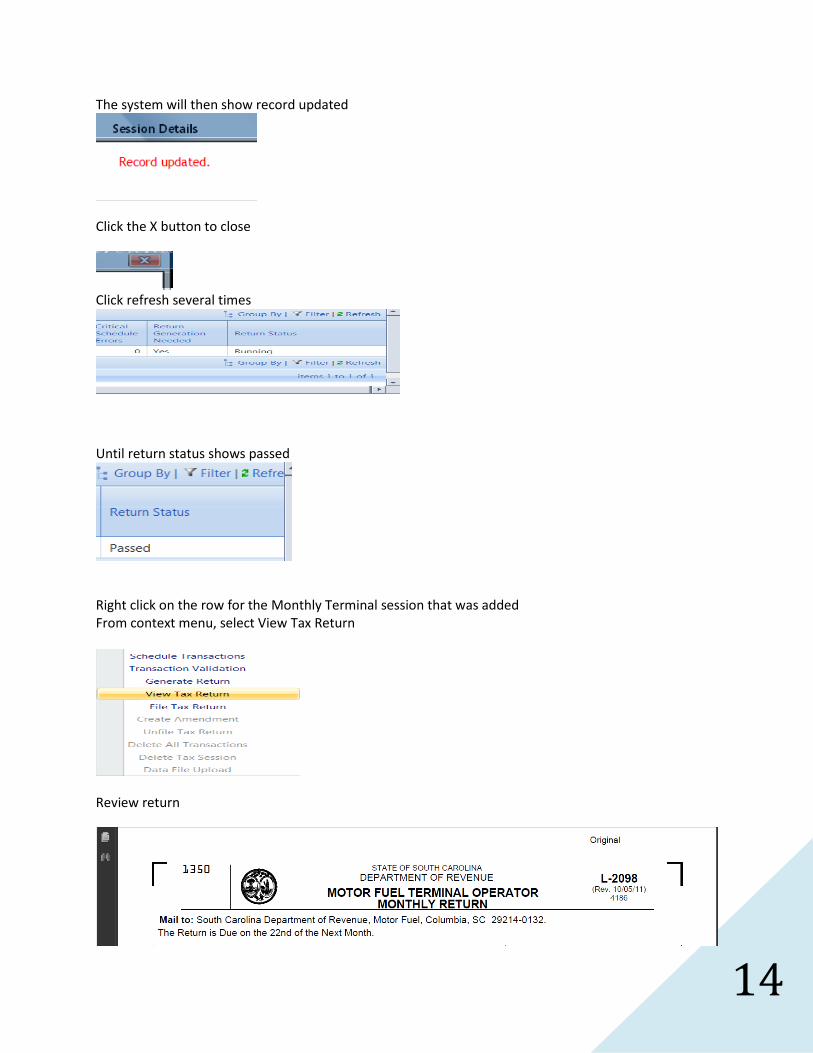
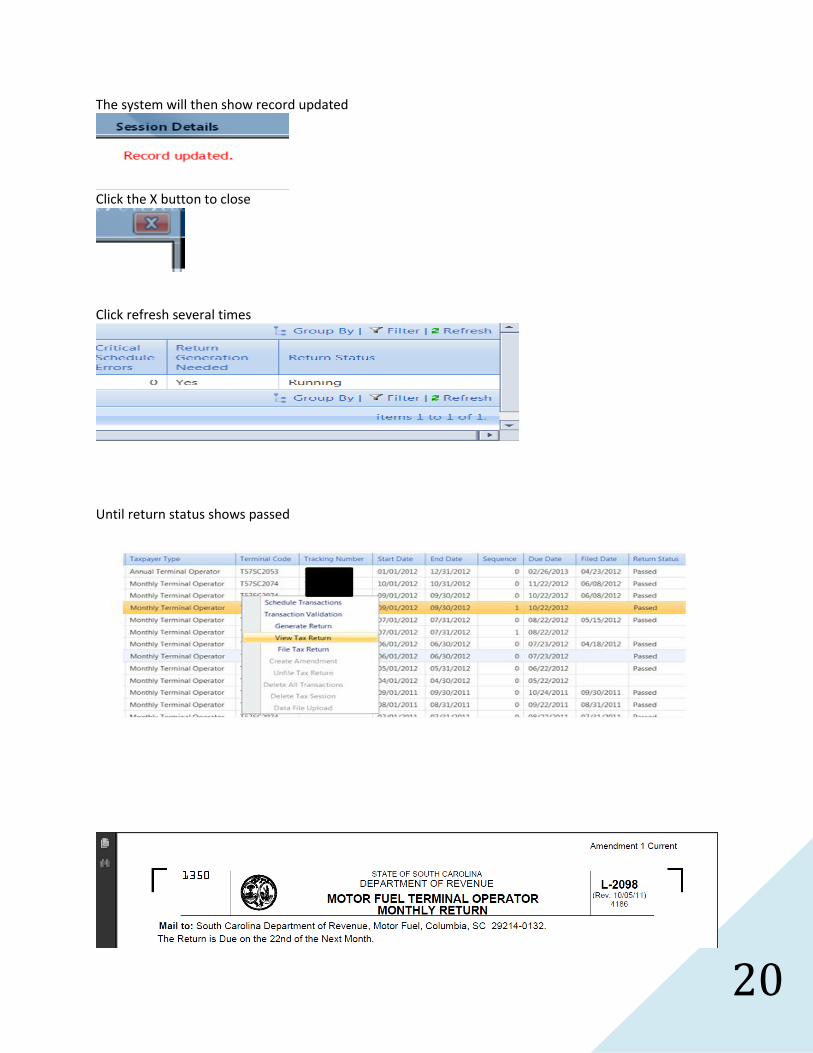
The system will then show record updated
Click the X button to close
Click refresh several times
Until return status shows passed
Right click on the row for the Monthly Terminal session that was added From context menu, select View Tax Return
Review return

15
File Tax Return
From the Tax Filing tab, select Tax Sessions
Right click on the row for the Monthly Terminal Operator session that was added From context menu, select File Tax Return
Check the agree button Click on Submit
Tax Return Confirm and filed
16
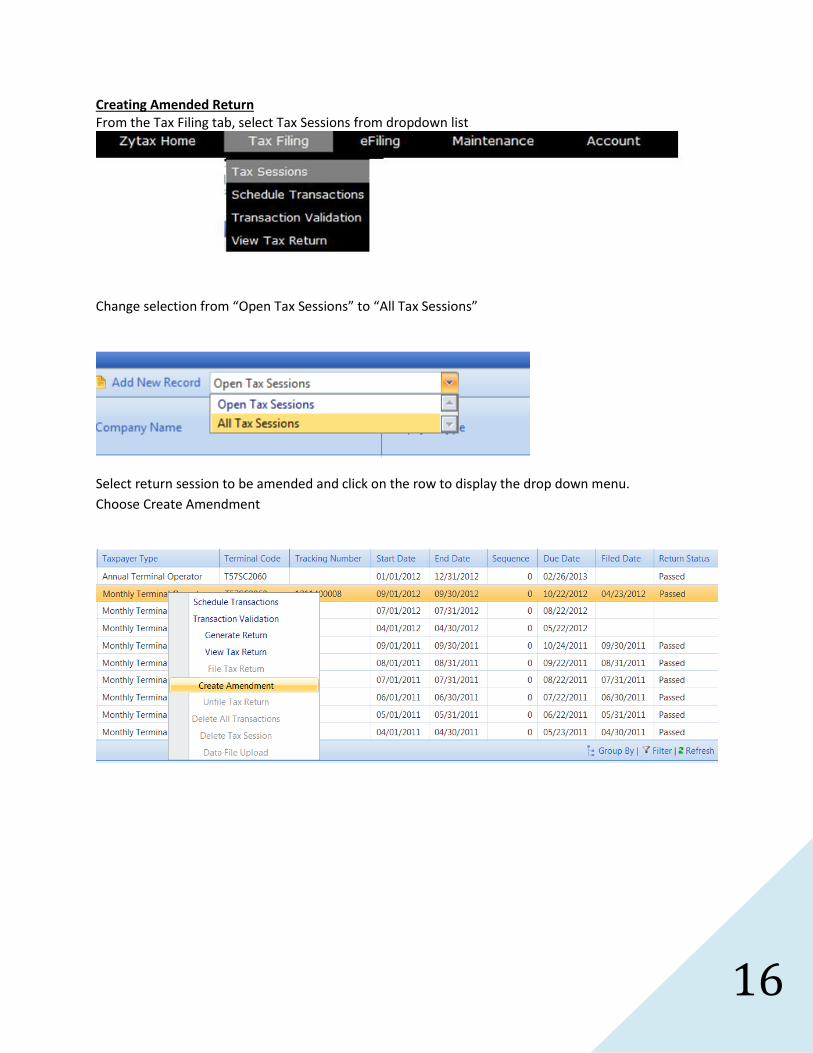
Creating Amended Return From the Tax Filing tab, select Tax Sessions from dropdown list
Change selection from “Open Tax Sessions” to “All Tax Sessions”
Select return session to be amended and click on the row to display the drop down menu.
Choose Create Amendment
17
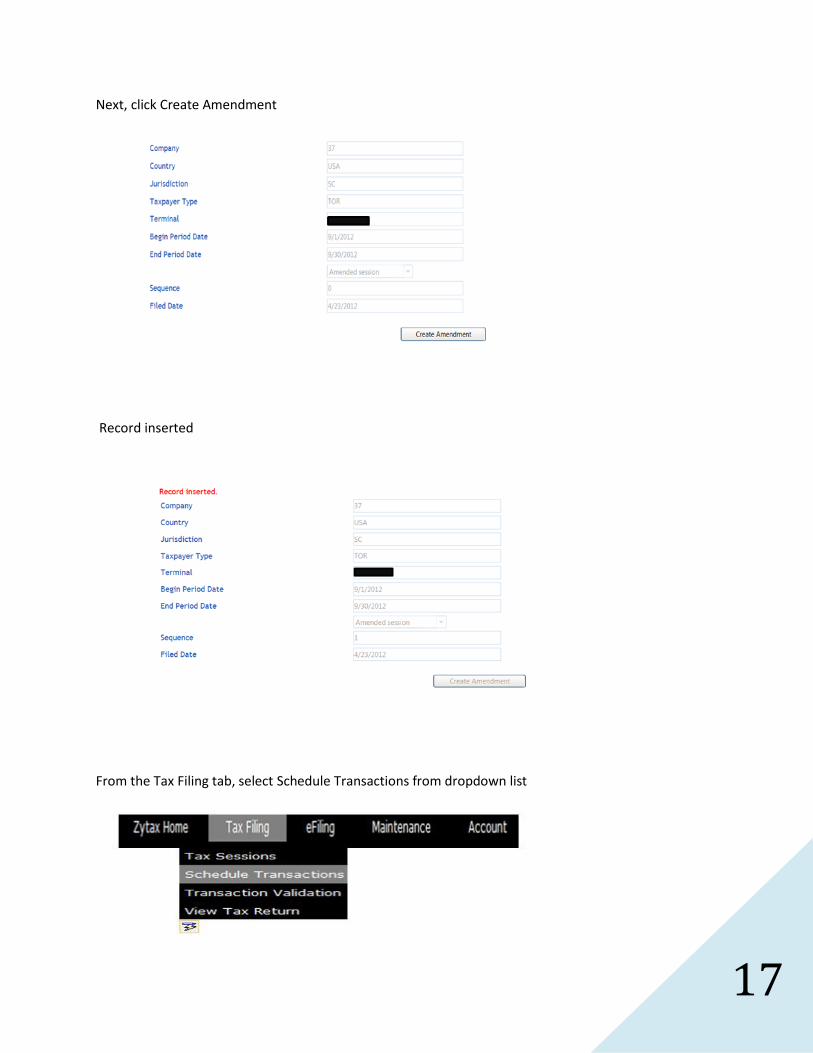
Next, click Create Amendment
Record inserted
From the Tax Filing tab, select Schedule Transactions from dropdown list
18
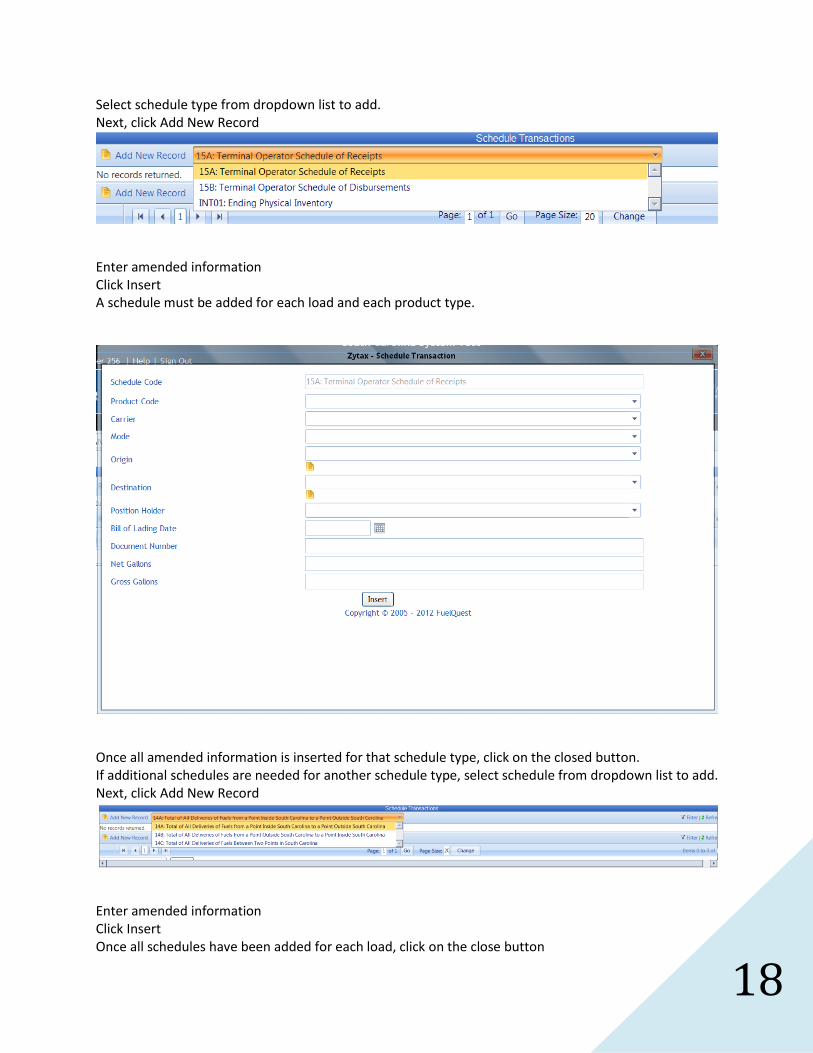
Select schedule type from dropdown list to add. Next, click Add New Record
Enter amended information Click Insert A schedule must be added for each load and each product type.
Once all amended information is inserted for that schedule type, click on the closed button. If additional schedules are needed for another schedule type, select schedule from dropdown list to add. Next, click Add New Record
Enter amended information Click Insert Once all schedules have been added for each load, click on the close button
19
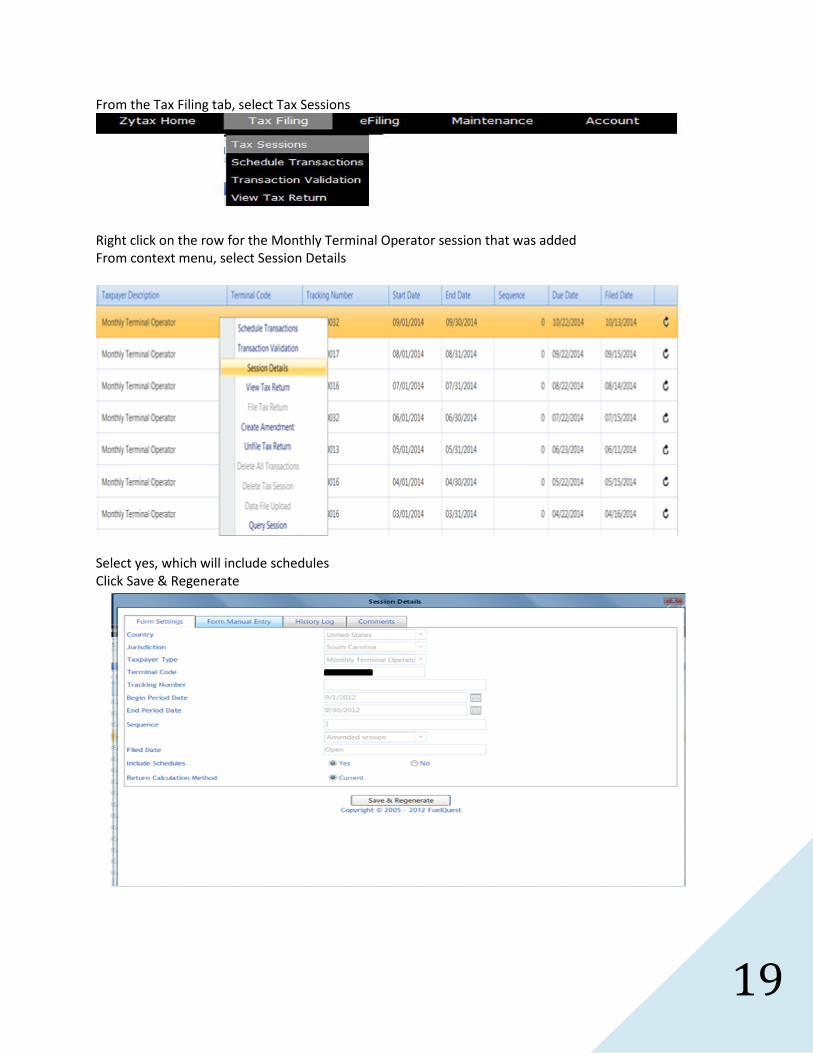
From the Tax Filing tab, select Tax Sessions
Right click on the row for the Monthly Terminal Operator session that was added From context menu, select Session Details
Select yes, which will include schedules Click Save & Regenerate
20
The system will then show record updated
Click the X button to close
Click refresh several times
Until return status shows passed
21
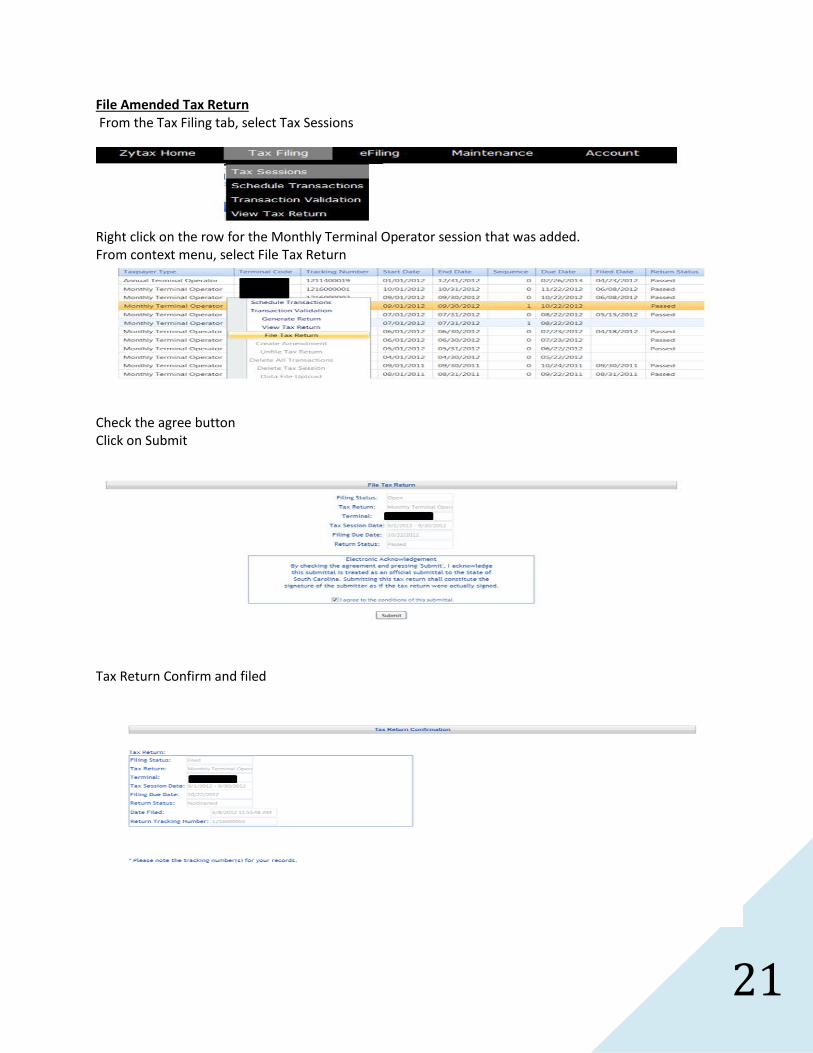
File Amended Tax Return From the Tax Filing tab, select Tax Sessions
Right click on the row for the Monthly Terminal Operator session that was added. From context menu, select File Tax Return
Check the agree button Click on Submit
Tax Return Confirm and filed

22
Filing a Zero Return Click on the Tax Filing tab Select Tax Sessions from dropdown list
Click Add New Record
Select the Monthly Terminal Operator from Taxpayer Type dropdown list Enter the begin period covered date for the return Click create session
23
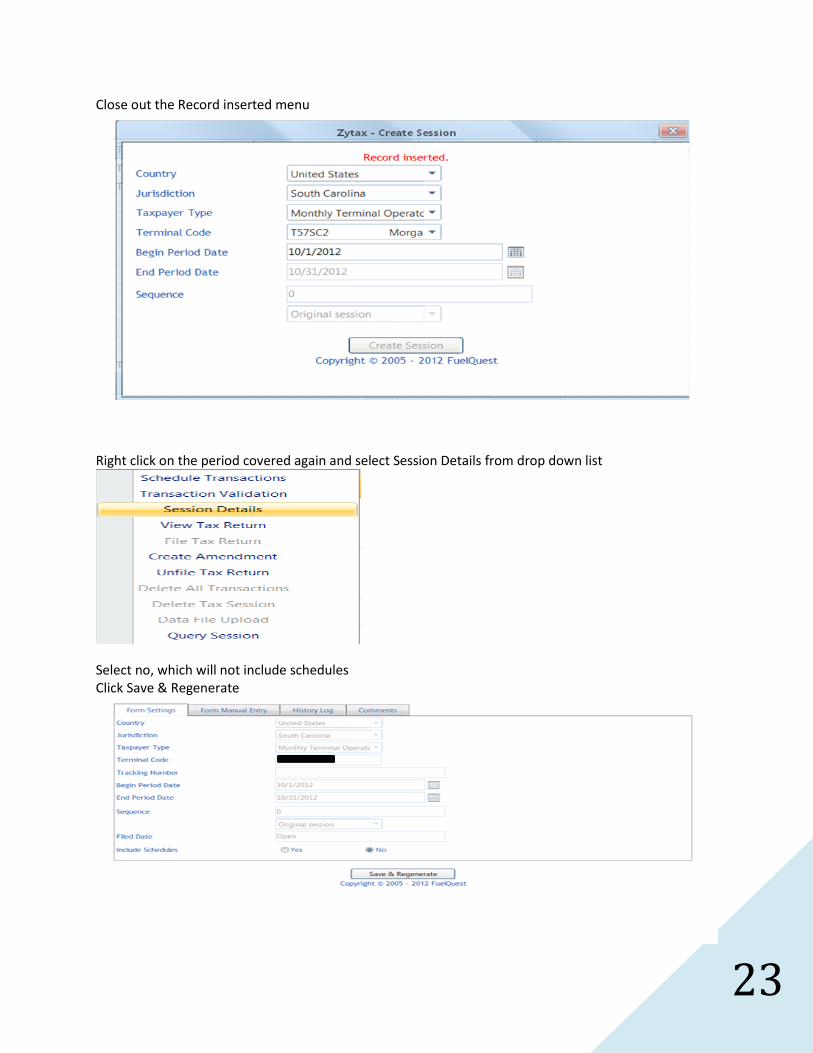
Close out the Record inserted menu
Right click on the period covered again and select Session Details from drop down list
Select no, which will not include schedules Click Save & Regenerate

24
The system will then show record updated
Click the X button to close
Click refresh several times
Until return status shows passed Right click on the row for the Monthly Terminal Operator session that was added From context menu, select View Tax Return
Review return

25
Next, File Tax Return From the Tax Filing tab, select Tax Sessions
Right click on the row for the Terminal Operator session that was added From context menu, select File Tax Return
Check the agree button Click on Submit
Tax Return Confirm and filed