Embed Size (px)
Citation preview

P U B L I S H I N G
community experience dist i l led
Moodle 2.0 E-Learning Course Development
William Rice
Chapter No. 5
"Adding Static Course Material"

In this package, you will find: A Biography of the author of the book
A preview chapter from the book, Chapter NO.5 "Adding Static Course Material"
A synopsis of the book’s content
Information on where to buy this book
About the Author William Rice is a training manager who lives, works, and plays in New York City.
He has written several books for Packt on Moodle. He has a special interest in rapid
e-learning development.
William's indoor hobbies include writing books, spending way too much time reading
sites like slashdot and mashable, and chasing after his sons. His outdoor hobbies include
practicing archery within sight of JFK airport, foraging for edible wild plants in New
York City parks, and chasing after his sons.
William is fascinated by the relationship between technology and society: how we create
our tools, and how our tools in turn shape us. He is married to an incredible woman who
encourages his writing pursuits, and has two amazing sons.
William can be reached through his blog at williamriceinc.blogspot.com, and
his LinkedIn profile at linkedin.com/in/williamrice4.
For More Information: www.packtpub.com/moodle-2-0-elearning-course-development/book
Moodle 2.0 E-Learning Course Development Moodle is the leading open source learning management system. Using Moodle, teachers
can easily construct richly-textured web-based courses. A course can consist of a number
of lessons, with each lesson including reading materials; activities such as quizzes, tests,
surveys, and projects; and social elements that encourage interaction and group work
between students.
Moodle 2.0 E-Learning Course Development shows you how to use Moodle as a tool to
enhance your teaching. It will help you to analyze your students' requirements, and come
to an understanding of what Moodle can do for them. After that, you'll see how to use
every feature of Moodle to meet your course goals. Moodle is relatively easy to install
and use, but the real challenge lies in developing a learning process that leverages its
power and maps effectively onto the established learning situation. This book guides
you through meeting that challenge.
Whether you are the site creator or a course creator, you can use this book as you would a
project plan. As you work your way through each chapter, the book provides guidance on
making decisions that meet your goals for your learning site. This helps you to create the
kind of learning experience that you want for your teachers (if you're the site creator) or
students (if you're the teacher). You can also use this book as a traditional reference
manual, but its main advantages are its step-by-step, project-oriented approach, and the
guidance it gives you on creating an interactive learning experience.
Moodle is designed to be intuitive to use, and its online help is well written. It does a
good job of telling you how to use each of its features. What Moodle's help files don't
tell you is, when and why to use each feature, and what effect the feature will have on
the students' experience. That is what this book provides.
This book shows you how to add static learning material, interactive activities, and social
features to your courses, so that students can reach their full learning potential. This book
is a complete guide to successful teaching using Moodle, focused on course development
and delivery, and using the best educational practices.
For More Information: www.packtpub.com/moodle-2-0-elearning-course-development/book
What This Book Covers Chapter 1, A Guided Tour of Moodle: In this chapter, you will learn what Moodle can do
and what kind of user experiences you can create for your students and teachers. You will
also learn how the Moodle philosophy shapes the user experience. This helps you to
decide how to make the best use of Moodle, and to plan your learning site.
Chapter 2, Installing Moodle: This chapter guides you through the installation of Moodle
on your Web server.
Chapter 3, Configuring Your Site: This chapter helps you to configure your site so that it
behaves in the way that you envision, and helps to create the user experience that you
want. If someone manages your Moodle site for you, you can use this chapter to learn
about configuration options that will make the creation and teaching of courses easier
for you and your teachers.
Chapter 4, Creating Categories and Courses: This chapter shows you how to create
course categories and new courses. It covers course settings that affect the behavior of
the course. It also shows you how to enroll teachers and students in a course.
Chapter 5, Adding Static Course Material: Static course materials are resources that
students view or listen to, but don't interact with. This chapter shows you how to add
web pages, graphics, Adobe Acrobat documents, and media to a course.
Chapter 6, Adding Interaction with Lessons and Assignments: Lessons and Assignments
are Moodle activities that allow the student to interact with Moodle, and with the teacher.
This chapter shows you how to create and use those activities.
Chapter 7, Evaluating Students with Quizzes, Choices, and Feedback: This chapter shows
you how to evaluate your students' knowledge and attitudes to your course.
Chapter 8, Adding Social Activities to Your Course: Moodle excels at peer interaction.
This chapter shows you several tools for making student-to-student interaction an integral
part of your course.
Chapter 9, Blocks: Every block adds functionality to your site or your course. This
chapter describes many of Moodle's blocks, helps you decide which ones will meet your
goals, and tells you how to implement them.
Chapter 10, Features for Teachers: This chapter shows you how to use Moodle's
gradebook and logs to track student activity.
For More Information: www.packtpub.com/moodle-2-0-elearning-course-development/book
Adding Static Course Material Static course materials are resources that students read but don't interact with, such as web pages, graphics, and Adobe Acrobat documents. This chapter teaches you how to add such resources to a course, and how to make the best use of them.
In this chapter, we will cover:
Kinds of static course material that can be addedAdding linksAdding pagesAdding fi les for your studentsAdding mediaOrganizing your courseRestricting access by date or score
Kinds of static course material that can be added Static course material is added from the Add a resource drop-down menu. Using this menu, you can create:
Web pagesLinks to anything on the WebFilesA label that displays any text or imageMultimedia
•
•
•
•
•
•
•
•
•
•
•
•
For More Information: www.packtpub.com/moodle-2-0-elearning-course-development/book
Adding Static Course Material
[ 146 ]
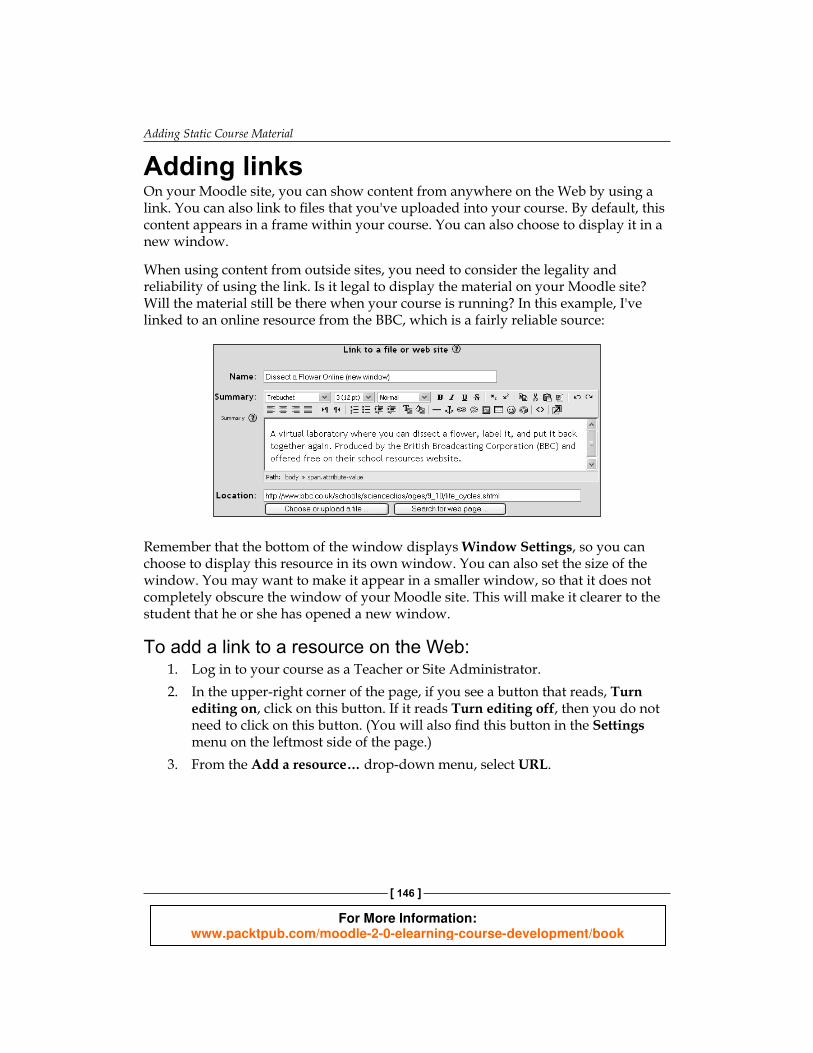
Adding links On your Moodle site, you can show content from anywhere on the Web by using a link. You can also link to fi les that you've uploaded into your course. By default, this content appears in a frame within your course. You can also choose to display it in a new window.
When using content from outside sites, you need to consider the legality and reliability of using the link. Is it legal to display the material on your Moodle site? Will the material still be there when your course is running? In this example, I've linked to an online resource from the BBC, which is a fairly reliable source:
Remember that the bottom of the window displays Window Settings, so you can choose to display this resource in its own window. You can also set the size of the window. You may want to make it appear in a smaller window, so that it does not completely obscure the window of your Moodle site. This will make it clearer to the student that he or she has opened a new window.
To add a link to a resource on the Web:1. Log in to your course as a Teacher or Site Administrator.2. In the upper-right corner of the page, if you see a button that reads, Turn
editing on, click on this button. If it reads Turn editing off, then you do not need to click on this button. (You will also fi nd this button in the Settings menu on the leftmost side of the page.)
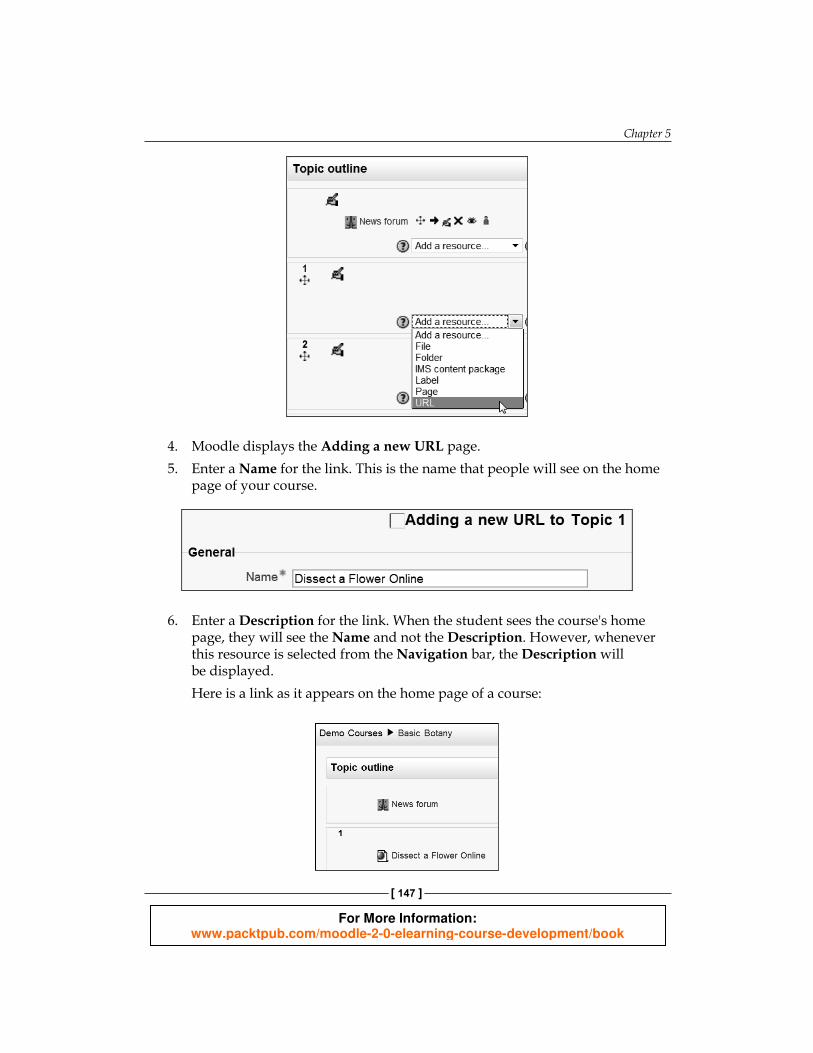
3. From the Add a resource… drop-down menu, select URL.
For More Information: www.packtpub.com/moodle-2-0-elearning-course-development/book
Chapter 5
[ 147 ]
4. Moodle displays the Adding a new URL page.5. En ter a Name for the link. This is the name that people will see on the home
page of your course.
6. Enter a Description for the link. When the student sees the course's home page, they will see the Name and not the Description. However, whenever this resource is selected from the Navigation bar, the Description will be displayed.Here is a link as it appears on the home page of a course:
For More Information: www.packtpub.com/moodle-2-0-elearning-course-development/book
Adding Static Course Material
[ 148 ]
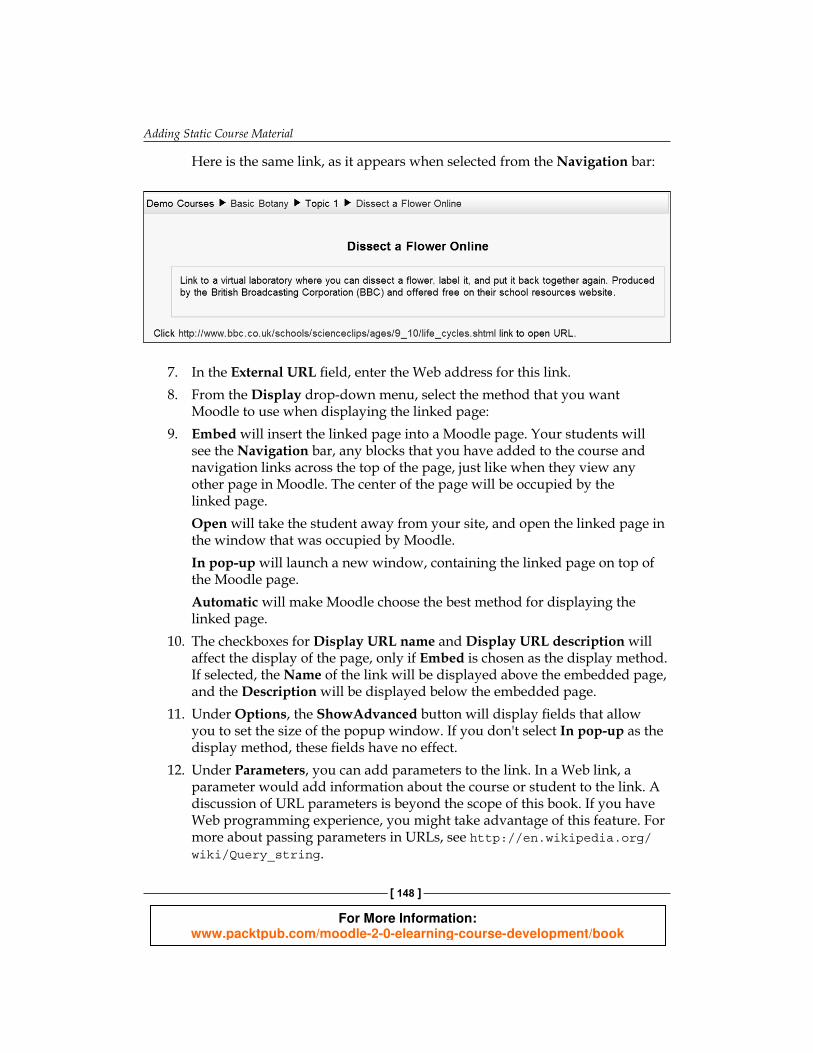
Here is the same link, as it appears when selected from the Navigation bar:
7. In the External URL fi eld, enter the Web address for this link. 8. From the Display drop-down menu, select the method that you want
Moodle to use when displaying the linked page:9. Embed will insert the linked page into a Moodle page. Your students will
see the Navigation bar, any blocks that you have added to the course and navigation links across the top of the page, just like when they view any other page in Moodle. The center of the page will be occupied by the linked page.Open will take the student away from your site, and open the linked page in the window that was occupied by Moodle.In pop-up will launch a new window, containing the linked page on top of the Moodle page.Automatic will make Moodle choose the best method for displaying the linked page.
10. T he checkboxes for Display URL name and Display URL description will affect the display of the page, only if Embed is chosen as the display method. If selected, the Name of the link will be displayed above the embedded page, and the Description will be displayed below the embedded page.
11. Under Options, the ShowAdvanced button will display fi elds that allow you to set the size of the popup window. If you don't select In pop-up as the display method, these fi elds have no effect.
12. Under Parameters, you can add parameters to the link. In a Web link, a parameter would add information about the course or student to the link. A discussion of URL parameters is beyond the scope of this book. If you have Web programming experience, you might take advantage of this feature. For more about passing parameters in URLs, see http://en.wikipedia.org/wiki/Query_string.
For More Information: www.packtpub.com/moodle-2-0-elearning-course-development/book
Chapter 5
[ 149 ]
13. Under Common Module Settings, the Visible setting determines if this resource is visible to students. Teachers and site Administrators can always see the resource. Setting this to Hide will completely hide the resource. Teachers can hide some resources and activities at the beginning of a course, and reveal them as the course progresses.
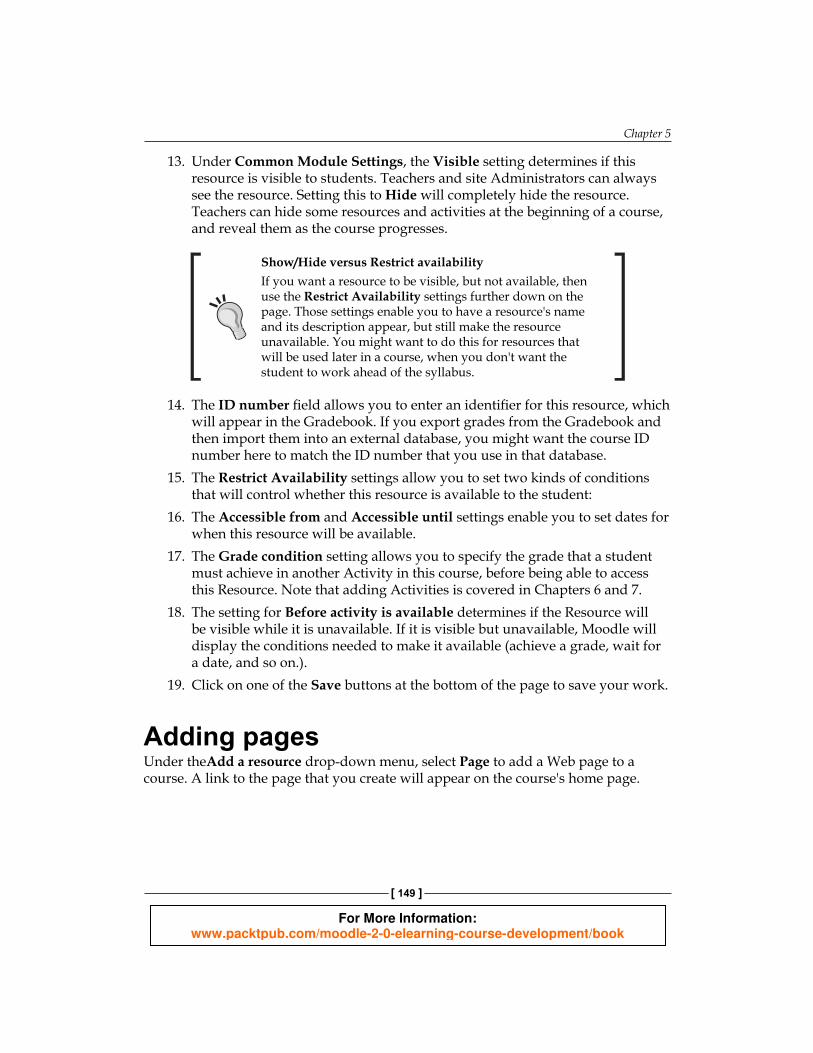
Show/Hide versus Restrict availabilityIf you want a resource to be visible, but not available, then use the Restrict Availability settings further down on the page. Those settings enable you to have a resource's name and its description appear, but still make the resource unavailable. You might want to do this for resources that will be used later in a course, when you don't want the student to work ahead of the syllabus.
14. The ID number fi eld allows you to enter an identifi er for this resource, which will appear in the Gradebook. If you export grades from the Gradebook and then import them into an external database, you might want the course ID number here to match the ID number that you use in that database.
15. The R estrict Availability settings allow you to set two kinds of conditions that will control whether this resource is available to the student:
16. The Accessible from and Accessible until settings enable you to set dates for when this resource will be available.
17. The Grade condition setting allows you to specify the grade that a student must achieve in another Activity in this course, before being able to access this Resource. Note that adding Activities is covered in Chapters 6 and 7.
18. The setting for Before activity is available determines if the Resource will be visible while it is unavailable. If it is visible but unavailable, Moodle will display the conditions needed to make it available (achieve a grade, wait for a date, and so on.).
19. Click on one of the Save buttons at the bottom of the page to save your work.
Adding pagesUnder theAdd a resource drop-down menu, select Page to add a Web page to a course. A link to the page that you create will appear on the course's home page.
For More Information: www.packtpub.com/moodle-2-0-elearning-course-development/book
Adding Static Course Material
[ 150 ]
Moodle's HTML editorWhen you add a Page to your course, Moodle displays a Web page editor. This editor is based on an open source web page editor called TinyMCE. You can use this editor to compose a web page for your course. This page can contain almost anything that a web page outside of Moodle can contain.
A full discussion of the editor's features is beyond the scope of this section. Instead, we will examine a few of the key features that are available in Moodle's HTML editor.
Pasting text into a Moodle pageMany times, we prefer to write text in our favorite word processor instead of writing it in Moodle. Or we may fi nd text that we can legally copy and paste into a Moodle page, somewhere else. Moodle's text editor does allow you to do this.
To paste text into a page, you can just use the appropriate keyboard shortcut. Try Ctrl + V for Windows PCs and Apple + V for Macintoshes. If you use this method, the format of the text will be preserved.
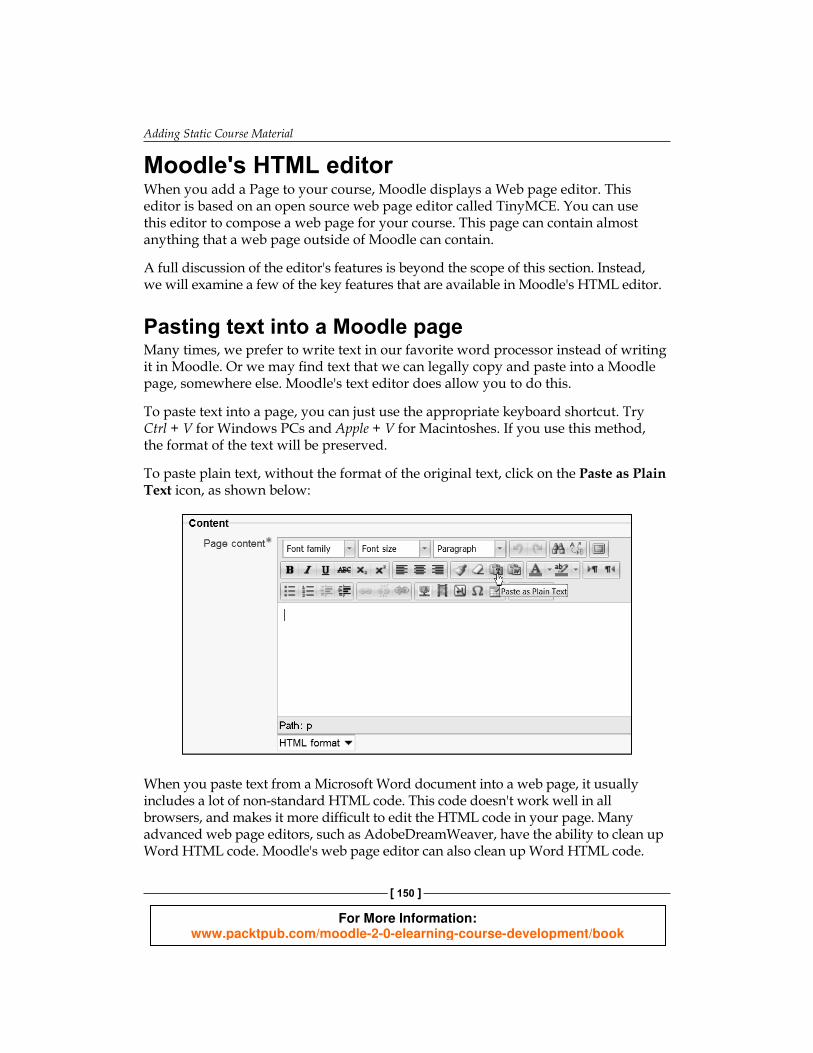
To pa ste plain text, without the format of the original text, click on the Paste as Plain Text icon, as shown below:
When you paste text from a Microsoft Word document into a web page, it usually includes a lot of non-standard HTML code. This code doesn't work well in all browsers, and makes it more diffi cult to edit the HTML code in your page. Many advanced web page editors, such as AdobeDreamWeaver, have the ability to clean up Word HTML code. Moodle's web page editor can also clean up Word HTML code.
For More Information: www.packtpub.com/moodle-2-0-elearning-course-development/book
Chapter 5
[ 151 ]
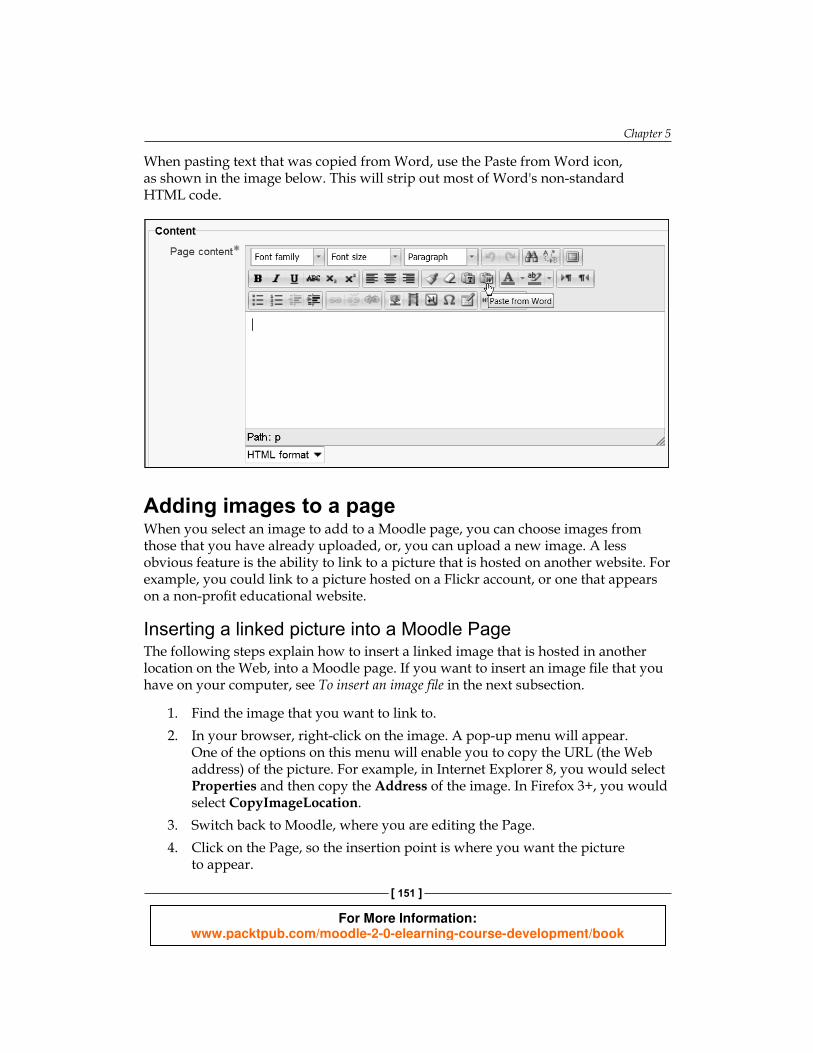
When p asting text that was copied from Word, use the Paste from Word icon, as shown in the image below. This will strip out most of Word's non-standard HTML code.
Adding images to a pageWhen yo u select an image to add to a Moodle page, you can choose images from those that you have already uploaded, or, you can upload a new image. A less obvious feature is the ability to link to a picture that is hosted on another website. For example, you could link to a picture hosted on a Flickr account, or one that appears on a non-profi t educational website.
Inserting a linked picture into a Moodle Page The following steps explain how to insert a linked image that is hosted in another location on the Web, into a Moodle page. If you want to insert an image fi le that you have on your computer, see To insert an image fi le in the next subsection.
1. Find the image that you want to link to.2. In your browser, right-click on the image. A pop-up menu will appear.
One of the options on this menu will enable you to copy the URL (the Web address) of the picture. For example, in Internet Explorer 8, you would select Properties and then copy the Address of the image. In Firefox 3+, you would select CopyImageLocation.
3. Switch back to Moodle, where you are editing the Page.4. Click on the Page, so the insertion point is where you want the picture
to appear.
For More Information: www.packtpub.com/moodle-2-0-elearning-course-development/book
Adding Static Course Material
[ 152 ]
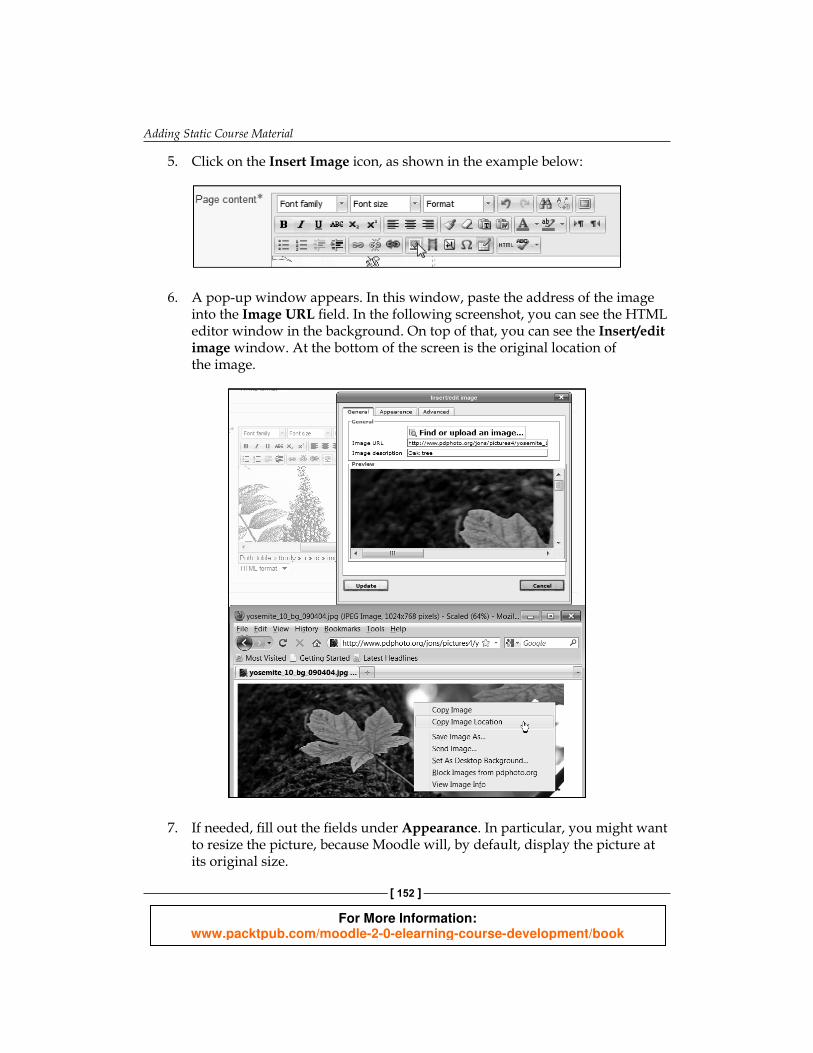
5. Click on the Insert Image icon, as shown in the example below:
6. A pop-up window appears. In this window, paste the address of the image into the Image URL fi eld. In the following screenshot, you can see the HTML editor window in the background. On top of that, you can see the Insert/edit image window. At the bottom of the screen is the original location of the image.
7. If needed , fi ll out the fi elds under Appearance. In particular, you might want to resize the picture, because Moodle will, by default, display the picture at its original size.
For More Information: www.packtpub.com/moodle-2-0-elearning-course-development/book
Chapter 5
[ 153 ]
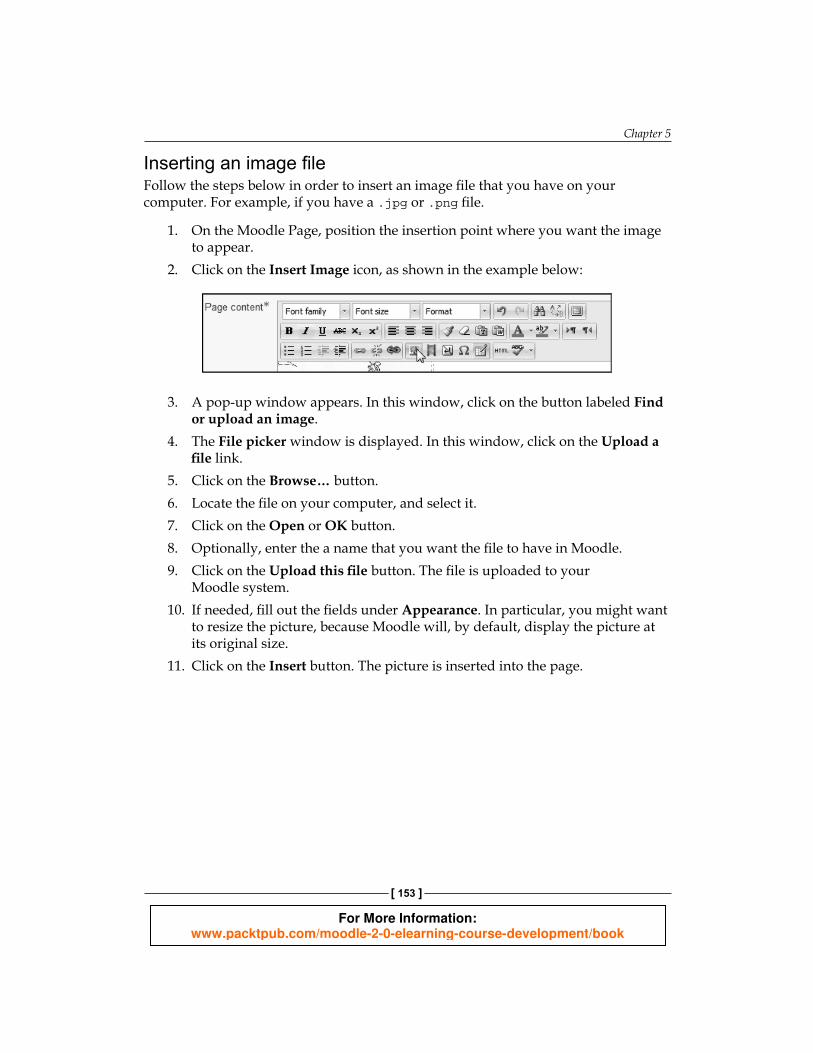
Inserting an image file Follow the steps below in order to insert an image fi le that you have on your computer. For example, if you have a .jpg or .png fi le.
1. On the Moodle Page, position the insertion point where you want the image to appear.
2. Click on the Insert Image icon, as shown in the example below:
3. A pop-up window appears. In this window, click on the button labeled Find or upload an image.
4. The File picker window is displayed. In this window, click on the Upload a fi le link.
5. Click on t he Browse… button.6. Locate the fi le on your computer, and select it.7. Click on the Open or OK button.8. Optionally, enter the a name that you want the fi le to have in Moodle.9. Click on the Upload this fi le button. The fi le is uploaded to your
Moodle system.10. If needed, fi ll out the fi elds under Appearance. In particular, you might want
to resize the picture, because Moodle will, by default, display the picture at its original size.
11. Click on the Insert button. The picture is inserted into the page.
For More Information: www.packtpub.com/moodle-2-0-elearning-course-development/book
Adding Static Course Material
[ 154 ]
Composing in an HTML editor and uploading to MoodleFor long o r complex HTML pages, or just for your own comfort, you might want to compose your web page in an HTML editor like DreamWeaver or FrontP age. This is especially true if you want to take advantage of these editors' ability to insert JavaScript timing, and other advanced features. How, then, do you get that page into your Moodle course? You can copy and paste the HTML code from your web page editor into the Moodle page editing window. To do this you would:
1. Select the HTML view in your web page editor. For example, in DreamWeaver you would select View | Code, and in FrontPage you would select View | Reveal Codes.
2. Select all of the HTML code, between the two body tags. That is, drag from just after the <body> tag near the top, to just before the </body> tag at the end. Copy the code by selecting menu option Edit | Copy or by using the keyboard shortcut Ctrl+C.
3. Switch over to Moodle, and create the new web page.4. Display the HTML code by clicking on the icon.5. Paste the code into the page by pressing Ctrl+V.
A second method is to publish your web page to someplace outside of Moodle, and create a link to it from your course.
Learn more about HTMLTo learn more about HTML code, you can s tart with the organization responsible for defi ning the standards. The World Wide Web Consortium (W3C) maintains the complete standards for HTML online at http:// www.w3.org/TR/html4. W3C also maintains a basic tutorial at http://www.w3.org/MarkUp/Guide/. Everything covered in this basic guide can be done using the WYSIWYG tools in Moodle. The advanced HTML guide at http://www.w3.org/MarkUp/Guide/Advanced.html covers some features that you would need to go into HTML view to add, such as defi ning clickable regions within images, and using roll-overs.
For More Information: www.packtpub.com/moodle-2-0-elearning-course-development/book

Chapter 5
[ 155 ]
Adding files for your students to downloadYou can add fi les to a course, so that your students can download them onto their personal computers. Some examples of fi les you might want students to have are: forms, reading to complete before class, word processing fi les to edit, and more.
What happens when a student selects a file from the course?When a stud ent selects a fi le from your course, the student's computer will attempt to open that fi le. Moodle will only pass the fi le to the student's computer. For example, if it's a PDF fi le, your student's computer will try to use Adobe Acrobat to open the fi le. If it's a word processing fi le, your student's computer will attempt to use Word or some other word processor to open it.
You can override this behavior with a setting called Force download. When you choose that setting, your student's computer will not try to open the fi le. Instead, it will download the fi le and prompt the student to save it.
If you want the student to use a fi le immediately upon accessing the fi le, then indicate to Moodle that you want the fi le to open when the student selects it. If you want the student to save the fi le for future use, then use the Force download setting.
Adding a file to your course1. Log in to your course as a Teacher or Site Administrator.2. In the upper-right corner of the page, if you see a button that reads, Turn
editing on, click on this button. If it reads Turn editing off, then you do not need to click on this button.
3. From the Add a resource… drop-down menu, select File.4. Moodle displays the Adding a new URL page.5. Enter a Name for the fi le. This is the name that people will see on the home
page of your course.6. Enter a Description for the fi le. When the student sees the course's home
page, they will see the Name but not the Description. However, whenever this resource is selected from the Navigation bar, the Description will be displayed.
For More Information: www.packtpub.com/moodle-2-0-elearning-course-development/book
Adding Static Course Material
[ 156 ]
The Site Administrator can turn off the requirement to add a Description for each fi le. By default, this requirement is turned on.
7. Under Content, click on the Add… button. The File picker window displays.8. If the fi le already exists in the system, and you have access to it, you can fi nd
it under Server fi les, Recent fi les, or Private fi les. If you don't fi nd the fi le under one of these areas, then click on Upload a fi le.
9. Click on Browse… and select the fi le.10. In the Save as fi eld, enter a name for this fi le.11. Click on Upload this fi le. The File picker window closes, and you are
returned to the page where you edit the fi le. The options are as follows:12. From the Display drop-down menu, select the method that you want
Moodle to use when displaying the fi le:13. Open and Embed will insert a link to the fi le into a Moodle page. Your
students will see the Navigation Bar, any blocks that you have added to the course, and navigation links across the top of the page, just like when they view any other page in Moodle. The center of the page will have a link to the fi le.In pop-up will launch a new window on top of the Moodle page, containing a link to the fi le.Automatic w ill make Moodle choose the best method for displaying the linked page.Force download will force the fi le to be downloaded to your student's computer.
14. The checkboxes for Display resource name and Display resource description will affect the display of the page, only if Embed is chosen as the display method. If selected, the Name of the fi le will be displayed above the link to the fi le, and the Description will be displayed below the link to the fi le.
15. Under Options, the ShowAdvanced button will display fi elds that allow you to set the size of the pop-up window. If you don't select In pop-up as the display method, these fi elds have no effect.
16. Under Common Module Settings, the Visible setting determines if this resource is visible to students. Teachers and Site Administrators can always see the resource. Setting this to Hide will completely hide the resource.
For More Information: www.packtpub.com/moodle-2-0-elearning-course-development/book
Chapter 5
[ 157 ]
Show/Hide versus Restrict availabilityIf you want a resource to be visible, but not available, then use the Restrict Availability settings further down on the page. Those settings allow you to have a resource's name and its description appear, but still make the resource unavailable. You might want to do this for resources that will be used later in a course, when you don't want the student to work ahead of the syllabus.
17. The ID number fi eld allows you to enter an identifi er for this resource, which will appear in the Gradebook. If you export grades from the Gradebook and then import them into an external database, you might want the course ID number here to match the ID number that you use in that database.
18. The Restrict Availability settings allow you to set two kinds of conditions that will control whether this resource is available to the student. These settings are:
19. The Accessible from and Accessible until settings allow you to set dates for when this resource is available.The Grade condition setting allows you to specify the grade that a student must achieve in another Activity in this course, before being able to access this Resource. Note that adding Activities is covered in Chapter 6 and Chapter 7.
20. The setting for Before activity is available determines if the Resource will be visible while it is unavailable. If it is visible but unavailable, Moodle will display the conditions needed to make it available (achieve a grade, wait for a date, and so on.).
21. Click one of the Save buttons at the bottom of the page to save your work.
Adding media (video and audio)If you want to add video or audio to your course, you have two choices. First, you can add it as a fi le. If you do that, when the student selects the fi le, one of two things will happen. Either the media fi le will be downloaded to the student's computer, and played by the software on the student's computer, or Moodle will try to play that fi le with its built-in media player. If multimedia plugins are enabled under Site Administration | Plugins, then Moodle will try to play the fi le in its built-in media player. If multimedia plugins are not enabled, then the fi le will be played using whatever media player is available on the student's computer (such as Windows Media Player or Quicktime).
For More Information: www.packtpub.com/moodle-2-0-elearning-course-development/book
Adding Static Course Material
[ 158 ]
Second, you can embed the media on a Moodle Page (see the section on Adding pages). That will cause the media to be played on the web page. By default, the media will be played using Moodle's built-in media player.
Adding video or audio to a page Follow the steps below in order to add a video, audio, or applet to a Moodle Page. You must be in possession of the fi le that you are adding. That is, the fi le must be on your computer, and not on another website. If the fi le that you want to appear is on another website, see the procedure for embedding media from another website on a page, earlier in this chapter.
1. On the Moodle Page, position the insertion point where you want the media to appear.
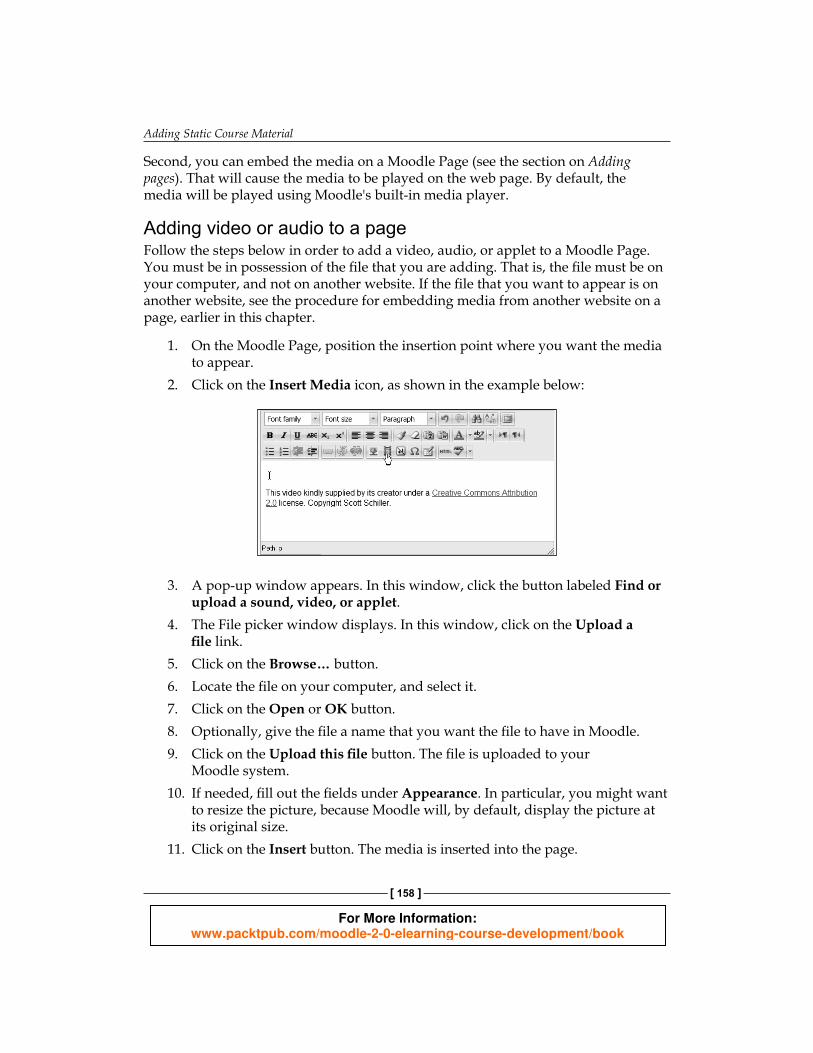
2. Click on the Insert Media icon, as shown in the example below:
3. A pop-up window appears. In this window, click the button labeled Find or upload a sound, video, or applet.
4. The File picker window displays. In this window, click on the Upload a fi le link.
5. Click on the Browse… button.6. Locate the fi le on your computer, and select it.7. Click on the Open or OK button.8. Optionally, give the fi le a name that you want the fi le to have in Moodle.9. Click on the Upload this fi le button. The fi le is uploaded to your
Moodle system.10. If needed, fi ll out the fi elds under Appearance. In particular, you might want
to resize the picture, because Moodle will, by default, display the picture at its original size.
11. Click on the Insert button. The media is inserted into the page.
For More Information: www.packtpub.com/moodle-2-0-elearning-course-development/book
Chapter 5
[ 159 ]
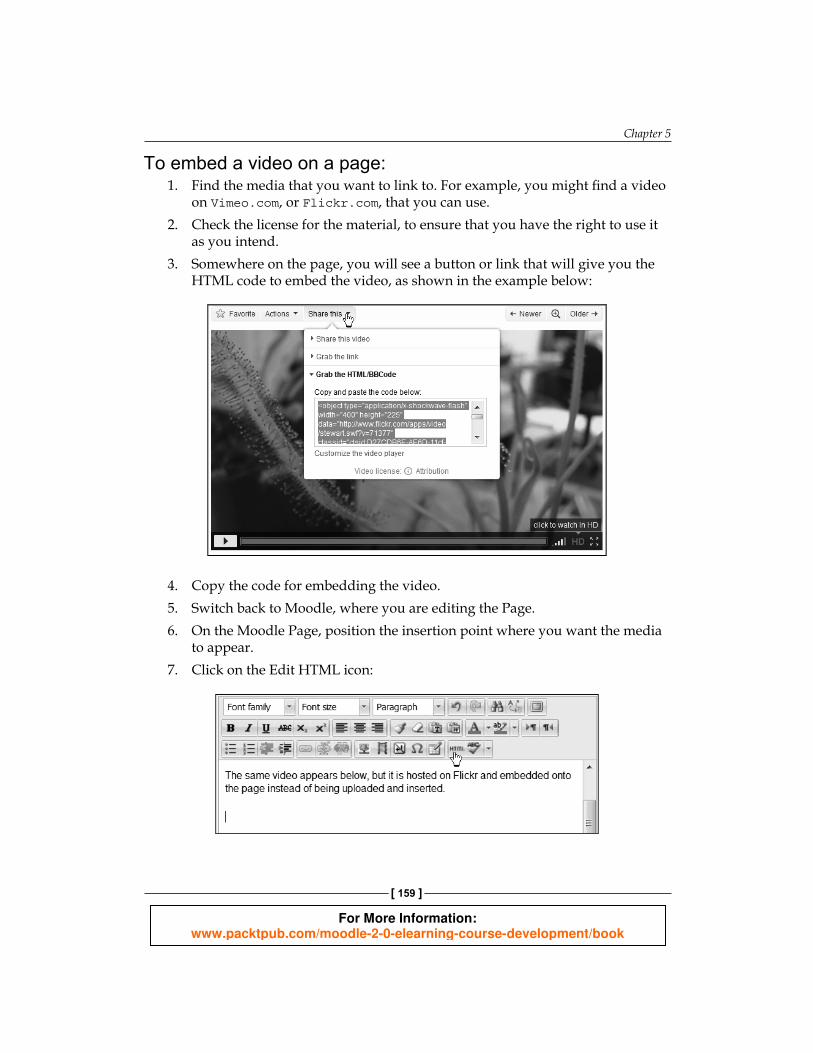
To embed a video on a page:1. F ind the media that you want to link to. For example, you might fi nd a video
on Vimeo.com, or Flickr.com, that you can use.2. Check the license for the material, to ensure that you have the right to use it
as you intend.3. Somewhere on the page, you will see a button or link that will give you the
HTML code to embed the video, as shown in the example below:
4. Copy the code for embedding the video.5. Sw itch back to Moodle, where you are editing the Page.6. On the Moodle Page, position the insertion point where you want the media
to appear.7. Click on the Edit HTML icon:
For More Information: www.packtpub.com/moodle-2-0-elearning-course-development/book
Adding Static Course Material
[ 160 ]
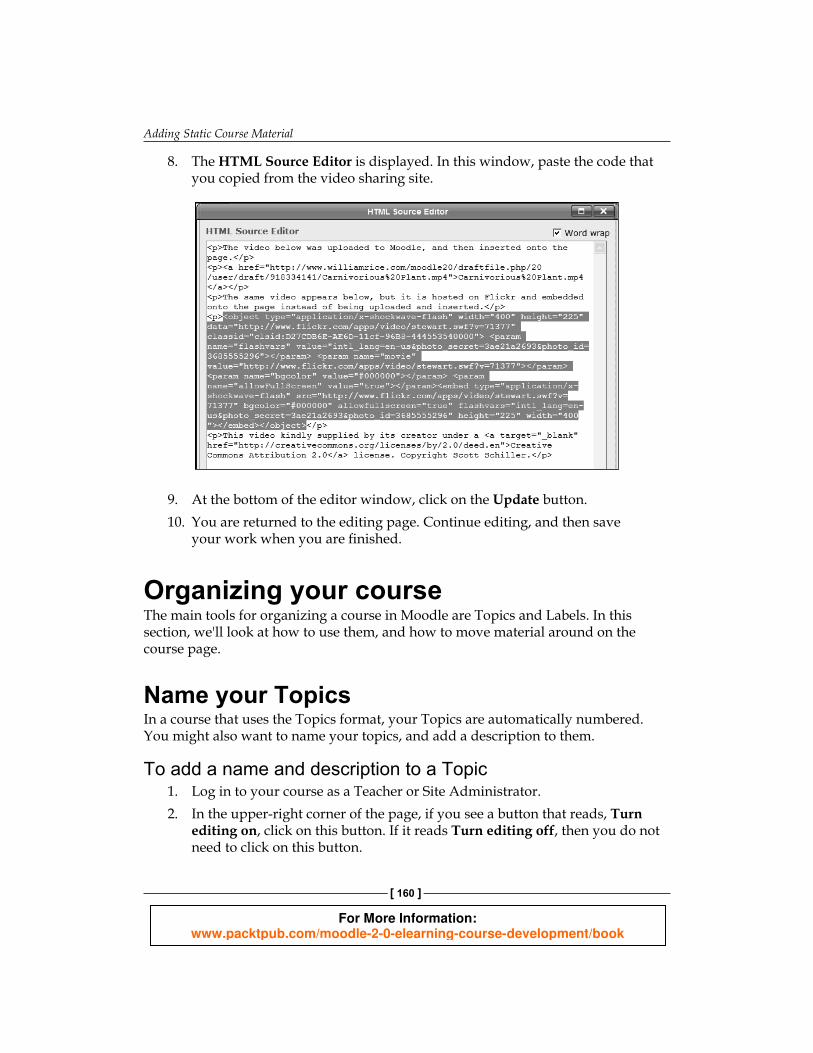
8. The HTML Source Editor is displayed. In this window, paste the code that you copied from the video sharing site.
9. At the bottom of the editor window, click on the Update button.10. You are returned to the editing page. Continue editing, and then save
your work when you are fi nished.
Organizing your courseThe main tools for organizing a course in Moodle are Topics and Labels. In this section, we'll look at how to use them, and how to move material around on the course page.
Name your TopicsIn a course that uses the Topics format, your Topics are automatically numbered. You might also want to name your topics, and add a description to them.
To add a name and description to a Topic1. Log in to your course as a Teacher or Site Administrator.2. In the upper-right corner of the page, if you see a button that reads, Turn
editing on, click on this button. If it reads Turn editing off, then you do not need to click on this button.
For More Information: www.packtpub.com/moodle-2-0-elearning-course-development/book
Chapter 5
[ 161 ]
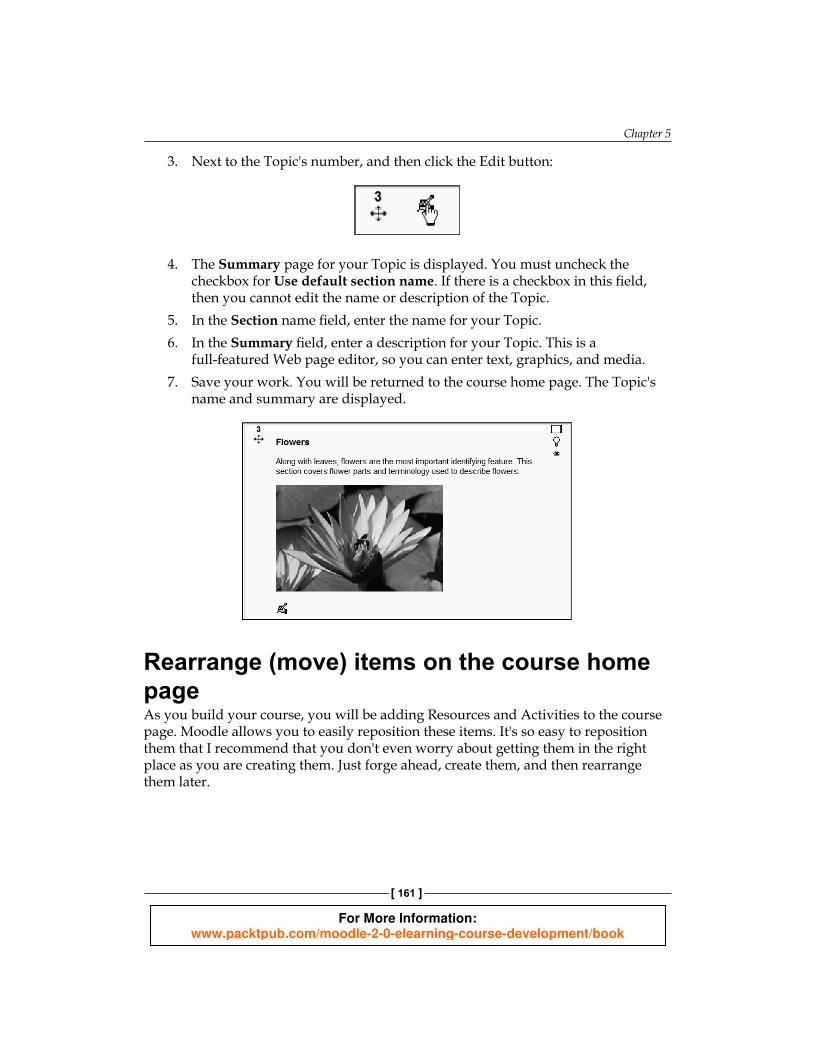
3. Next to the Topic's number, and then click the Edit button:
4. The Summary page for your Topic is displayed. You must uncheck the checkbox for Use default section name. If there is a checkbox in this fi eld, then you cannot edit the name or description of the Topic.
5. In the Section name fi eld, enter the name for your Topic.6. In the Summary fi eld, enter a description for your Topic. This is a
full-featured Web page editor, so you can enter text, graphics, and media.7. Save your work. You will be returned to the course home page. The Topic's
name and summary are displayed.
Rearrange (move) items on the course home pageAs you build your course, you will be adding Resources and Activities to the course page. Moodle allows you to easily reposition these items. It's so easy to reposition them that I recommend that you don't even worry about getting them in the right place as you are creating them. Just forge ahead, create them, and then rearrange them later.
For More Information: www.packtpub.com/moodle-2-0-elearning-course-development/book
Adding Static Course Material
[ 162 ]
Rearranging items on the course page:1. Log in to your course as a Teacher or Site Administrator.2. In the upper-right corner of the page, if you see a button that reads, Turn
editing on, click on this button. If it reads Turn editing off, then you do not need to click on this button.
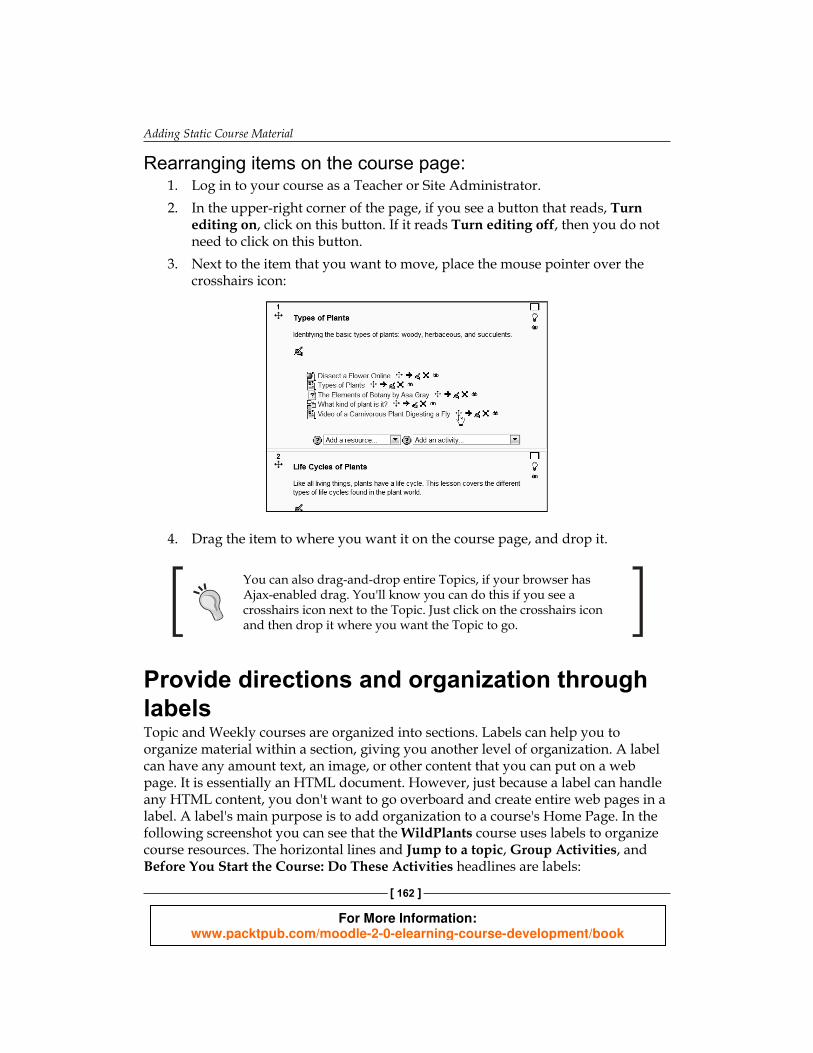
3. Next to the item that you want to move, place the mouse pointer over the crosshairs icon:
4. Drag th e item to where you want it on the course page, and drop it.
You can also drag-and-drop entire Topics, if your browser has Ajax-enabled drag. You'll know you can do this if you see a crosshairs icon next to the Topic. Just click on the crosshairs icon and then drop it where you want the Topic to go.
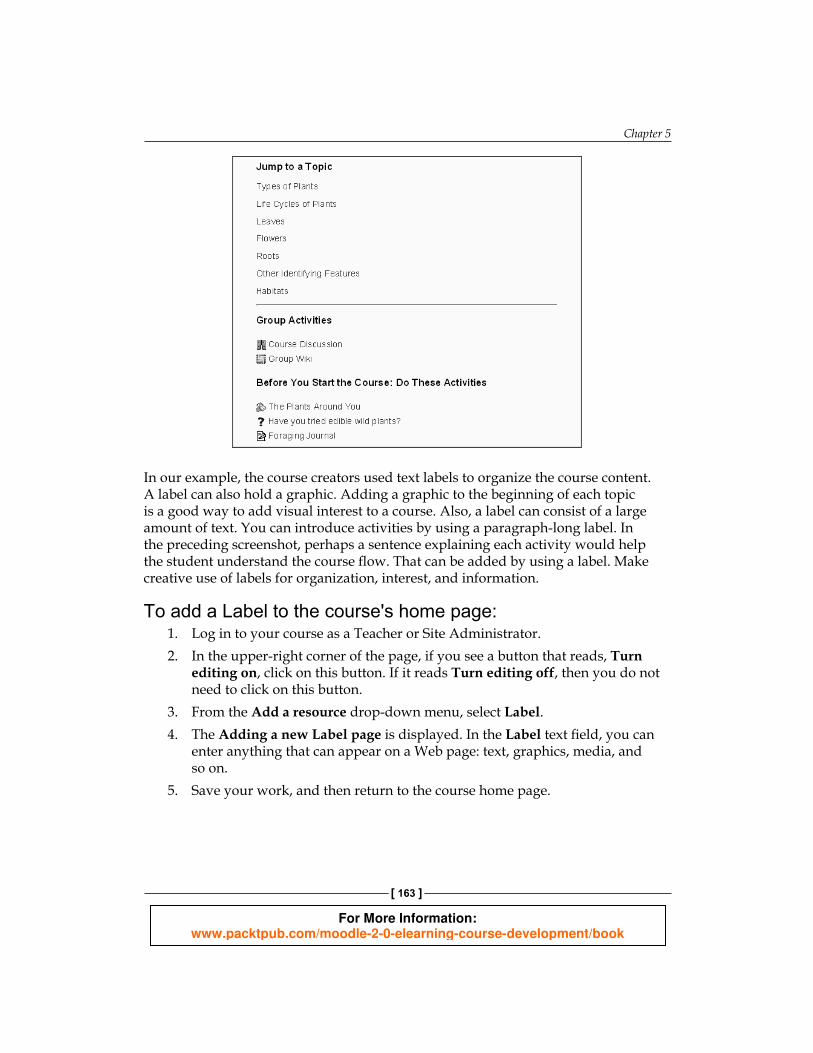
Provide directions and organization through labelsTopic a nd Weekly courses are organized into sections. Labels can help you to organize material within a section, giving you another level of organization. A label can have any amount text, an image, or other content that you can put on a web page. It is essentially an HTML document. However, just because a label can handle any HTML content, you don't want to go overboard and create entire web pages in a label. A label's main purpose is to add organization to a course's Home Page. In the following screenshot you can see that the WildPlants course uses labels to organize course resources. The horizontal lines and Jump to a topic, Group Activities, and Before You Sta rt the Course: Do These Activities headlines are labels:
For More Information: www.packtpub.com/moodle-2-0-elearning-course-development/book
Chapter 5
[ 163 ]
In our example, the course creators used text labels to organize the course content. A label can also hold a graphic. Adding a graphic to the beginning of each topic is a good way to add visual interest to a course. Also, a label can consist of a large amount of text. You can introduce activities by using a paragraph-long label. In the preceding screenshot, perhaps a sentence explaining each activity would help the student understand the course fl ow. That can be added by using a label. Make creative use of labels for organization, interest, and information.
To add a Label to the course's home page:1. Log in t o your course as a Teacher or Site Administrator.2. In the upper-right corner of the page, if you see a button that reads, Turn
editing on, click on this button. If it reads Turn editing off, then you do not need to click on this button.
3. From the Add a resource drop-down menu, select Label.4. The Adding a new Label page is displayed. In the Label text fi eld, you can
enter anything that can appear on a Web page: text, graphics, media, and so on.
5. Save you r work, and then return to the course home page.
For More Information: www.packtpub.com/moodle-2-0-elearning-course-development/book
Adding Static Course Material
[ 164 ]
Restricting access by date or score (restrict availability setting)Moodle allows you to restrict access to an item, by date or by score. That is, you can make the item available only during specifi c dates, and/or only when the student has achieved a specifi c score on some specifi c activities).
This feature is turned on by default. If it's not enabled on your site, you will need to ask your Site Administrator to enable it for you.
You will fi nd the Restrict Availability settings at the bottom of the page, when you are editing a Resource or Activity.
The Restrict Availability settings allow you to set two kinds of conditions that will control whether this resource is available to the student.
The Accessible from and Accessible until settings allow you to set dates for when this resource is available.
The Grade condition setting allows you to specify the grade that a student must achieve in another Activity in this course, before being able to access this Resource. Note that adding Activities is covered in Chapter 6 and Chapter 7.
The setting for Before activity is available determines if the Resource will be visible while it is unavailable. If it is visible but unavailable, Moodle will display the conditions needed to make it available (achieve a grade, wait for a date, and so on).
SummaryStatic course materials (text pages, web pages, links, fi les, and labels) form the core of most online courses. Most student/teacher interaction will be about something that the student has read or viewed. Adding static material fi rst gives you a chance to think about how the material will be discussed and used. In later chapters, you'll see how to add more interactive material. The interactive material will allow the teacher to see student performance, and assess how well they have assimilated the static material.
For More Information: www.packtpub.com/moodle-2-0-elearning-course-development/book
Where to buy this book You can buy Moodle 2.0 E-Learning Course Development from the Packt Publishing
website: http://www.packtpub.com/moodle-2-0-elearning-course-development/book
Free shipping to the US, UK, Europe and selected Asian countries. For more information, please
read our shipping policy.
Alternatively, you can buy the book from Amazon, BN.com, Computer Manuals and
most internet book retailers.
P U B L I S H I N G
community experience dist i l led
www.PacktPub.com
For More Information: www.packtpub.com/moodle-2-0-elearning-course-development/book
![Moodle Presentation [Version 2.0]](https://img.pdfslide.us/doc/110x75/559c40dd1a28abf3508b4650/moodle-presentation-version-20.jpg)