Embed Size (px)
Citation preview

Before You Plug In Your MonnitLink™ USB Gateway• Unpackthecontentsofyourkit(s)andbecomefamiliarwiththetypesofsensorsthatwereincludedanddoublecheckthatallcomponentsareincluded.
• BeforeinsertingtheUSBdongle,youwillneedtocreateaMonnitaccount,assigngatewaysandwirelesssensorstoyouraccount,theninstalltheUSBdriverandgatewaysoftware.
.System Requirements •AnavailableUSBport•Windows8,7orVistawith512MBmemory(1024MBRec.)WindowsXPoroldernotsupported•20MBfreediskspace•ASP.NET3.5
Monnit Wireless Sensors and USB Gateway
User’s GuideFor Use With iMonnit Online Software
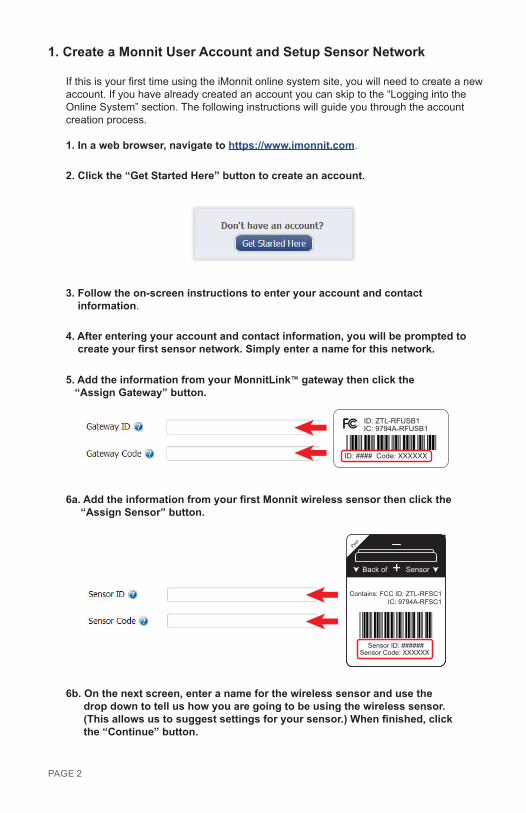
1. Create a Monnit User Account and Setup Sensor Network
IfthisisyourfirsttimeusingtheiMonnitonlinesystemsite,youwillneedtocreateanewaccount.Ifyouhavealreadycreatedanaccountyoucanskiptothe“LoggingintotheOnlineSystem”section.Thefollowinginstructionswillguideyouthroughtheaccountcreationprocess.
1. In a web browser, navigate to https://www.imonnit.com.
2. Click the “Get Started Here” button to create an account.
3. Follow the on-screen instructions to enter your account and contact information.
4. After entering your account and contact information, you will be prompted to create your first sensor network. Simply enter a name for this network.
5. Add the information from your MonnitLink™ gateway then click the “Assign Gateway” button.
ID: ZTL-RFUSB1 IC: 9794A-RFUSB1
ID: #### Code: XXXXXX
6a. Add the information from your first Monnit wireless sensor then click the “Assign Sensor” button.
+_
Back of Sensor
Peel
Contains: FCC ID: ZTL-RFSC1IC: 9794A-RFSC1
Sensor ID: ######Sensor Code: XXXXXX
6b. On the next screen, enter a name for the wireless sensor and use the drop down to tell us how you are going to be using the wireless sensor. (This allows us to suggest settings for your sensor.) When finished, click the “Continue” button.
PAGE2

PAGE3
7. Confirmation Screen.Whenyouhavefinishedaddingthesensor,youwillseeaconfirmationscreen.Atthispointyoucanassignnotificationstothesensor(seeUsing The iMonnit™ Online Wire-less Sensor System),assignadditionalsensorstoyouraccountorclick“Done”togotoyoursensorsoverviewpage.
2. Install the Monnit USB Gateway Software1. MonnitLink™ USB Driver InstallationWhenyouareloggedintoyouraccount,youcandownloadthelatestUSBdriversbyclickingon“Support”fromthemainnavigationbar(https://www.imonnit.com/support).Fromthedownloadspage,clickontheMonnitUSB Gateway Driver forthecorrectver-sionofWindowsthatyouarerunning(32or64bit).Thedriverfileshouldautomaticallystartdownloading.Ifpromptedtosavethefile,selectalocationthatiseasilyaccessibleandclick“Save”.
Whenthefilehascompleteddownloading,browsetothefolderwherethefilewassaved.Doubleclickthesetupfileandselect“Run”.Select“Next”thenfollowtheon-screenguidetoinstallthedrivers.
Whenthesetuphasfinished,theprogramwillautomaticallydeterminewhichdriverstoinstallforyoursystemandanotherguidewilllaunchtowalkyouthroughtheinstallationofthedrivers.Click“Next”toinstallthedrivers.Whenthedriversaredoneinstallingyouwillseeasuccessscreen.Click“Finish”toexittheinstallationprogram.
2. Monnit Gateway Application InstallationTheMonnitGatewayApplicationusesyourcomputersinternetconnectiontopasswirelesssensordatatotheiMonnitonlinesensormonitoringandnotificationsystem.(Theonlinesystemallowsyoutoviewallyoursensordata,sensorstatus’andconfigureallsensorparametersaswellassetupnotificationsoralertsviaSMStextandemail.)
Toinstallthesoftware,click“Support”onthemainnavigationbarorgotohttps://www.imonnit.com/support.Fromthedownloadspage,clickon“USBGatewayInstaller”tolaunchthewebinstallerdownload.Ifpromptedtosavethefile,selectalocationthatiseasilyaccessibleandclick“Save”.
Whenthefilehascompleteddownloading,browsetothefolderwherethefilewassaved.Doubleclickthe“MonnitGatewaySetup.msi”file,select“Run”whenpromptedthenfollowtheon-screeninstructionstocompletetheinstallation.
Wheninstallationiscompletetheprogramwillautomaticallylaunch.Youcannowbeginusingyourwirelesssensorsonline.
Note: Thegatewayapplicationneedstoberunningonyourcomputerinorderforthesensordatatobetransmittedtotheonlinesystem.Ifthegatewayisnotrunningyoursensordataisnotbeingrecordedonlineandnotificationsbasedonsensordatacannotbesentfromthesystem.
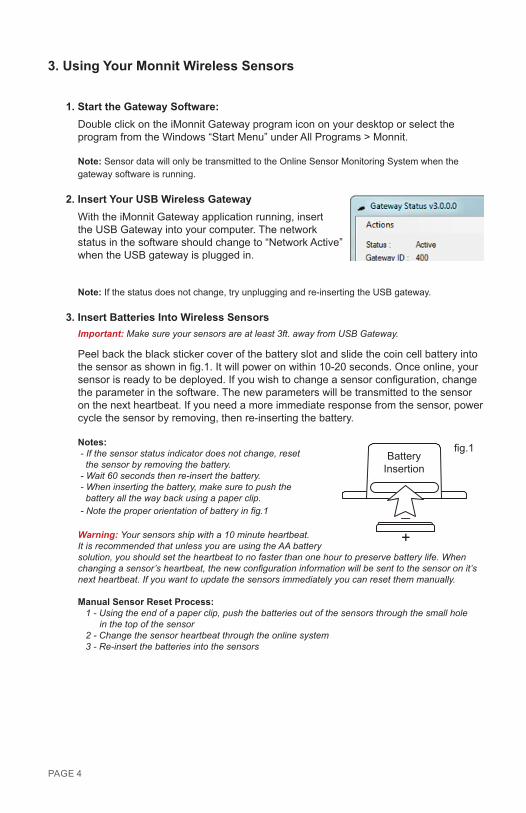
3. Using Your Monnit Wireless Sensors
1. Start the Gateway Software:DoubleclickontheiMonnitGatewayprogramicononyourdesktoporselecttheprogramfromtheWindows“StartMenu”underAllPrograms>Monnit.
Note:SensordatawillonlybetransmittedtotheOnlineSensorMonitoringSystemwhenthegatewaysoftwareisrunning.
2. Insert Your USB Wireless GatewayWiththeiMonnitGatewayapplicationrunning,inserttheUSBGatewayintoyourcomputer.Thenetworkstatusinthesoftwareshouldchangeto“NetworkActive”whentheUSBgatewayispluggedin.
Note:Ifthestatusdoesnotchange,tryunpluggingandre-insertingtheUSBgateway.
3. Insert Batteries Into Wireless SensorsImportant: Make sure your sensors are at least 3ft. away from USB Gateway.
Peelbacktheblackstickercoverofthebatteryslotandslidethecoincellbatteryintothesensorasshowninfig.1.Itwillpoweronwithin10-20seconds.Onceonline,yoursensorisreadytobedeployed.Ifyouwishtochangeasensorconfiguration,changetheparameterinthesoftware.Thenewparameterswillbetransmittedtothesensoronthenextheartbeat.Ifyouneedamoreimmediateresponsefromthesensor,powercyclethesensorbyremoving,thenre-insertingthebattery.
Notes: - If the sensor status indicator does not change, reset the sensor by removing the battery. - Wait 60 seconds then re-insert the battery. - When inserting the battery, make sure to push the battery all the way back using a paper clip. - Note the proper orientation of battery in fig.1
Warning: Your sensors ship with a 10 minute heartbeat. It is recommended that unless you are using the AA battery solution, you should set the heartbeat to no faster than one hour to preserve battery life. When changing a sensor’s heartbeat, the new configuration information will be sent to the sensor on it’s next heartbeat. If you want to update the sensors immediately you can reset them manually.
Manual Sensor Reset Process: 1 - Using the end of a paper clip, push the batteries out of the sensors through the small hole in the top of the sensor 2 - Change the sensor heartbeat through the online system 3 - Re-insert the batteries into the sensors
PAGE4
+_
BatteryInsertion
fig.1
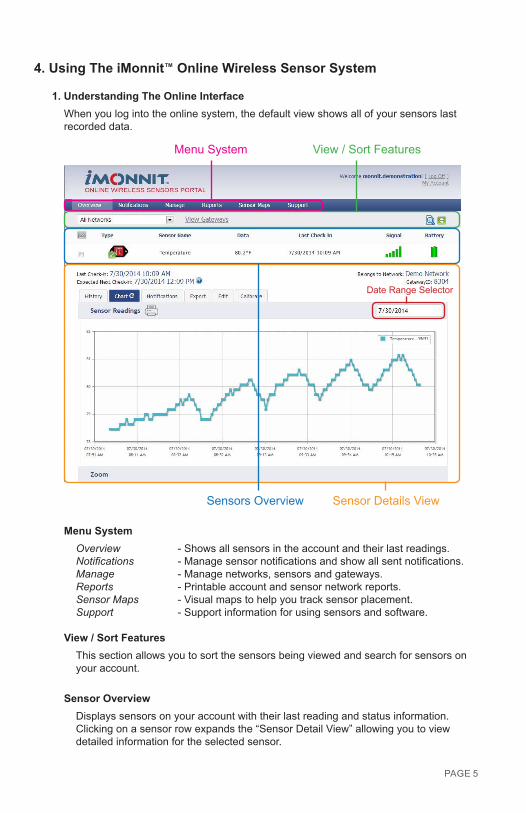
4. Using The iMonnit™ Online Wireless Sensor System
1. Understanding The Online InterfaceWhenyoulogintotheonlinesystem,thedefaultviewshowsallofyoursensorslastrecordeddata.
View/SortFeaturesMenuSystem
SensorDetailsViewSensorsOverview
DateRangeSelector
Menu SystemOverview -Showsallsensorsintheaccountandtheirlastreadings.Notifications -Managesensornotificationsandshowallsentnotifications.Manage -Managenetworks,sensorsandgateways.Reports -Printableaccountandsensornetworkreports.Sensor Maps -Visualmapstohelpyoutracksensorplacement.Support -Supportinformationforusingsensorsandsoftware.
View / Sort FeaturesThissectionallowsyoutosortthesensorsbeingviewedandsearchforsensorsonyouraccount.
Sensor OverviewDisplayssensorsonyouraccountwiththeirlastreadingandstatusinformation.Clickingonasensorrowexpandsthe“SensorDetailView”allowingyoutoviewdetailedinformationfortheselectedsensor.
PAGE5
PAGE6
Totheleftsideofeachsensorrowisanindicatortohelpyouunderstandthecurrentstatusofthesensor.
Sensorischeckinginandwithinuserdefinedsafeparameters.Sensorhasmetorexceededauserdefinedthresholdortriggeredevent.Sensorhasnotcheckedin(inactivityalertsent).Nosensorreadingswillberecorded(Inactive)
Sensor Details ViewClickingonasensorrowonthe“Overview”pageexpandstherowtoincludeade-tailedsensorviewfortheselectedsensor.
Selectatabtochangebetween:
History -Displaysahistoryoftheselectedsensor’sdata.Chart -Displaysagraphicalviewoftheselectedsensor’sdata.Notifications -Allowsyoutomanagenotificationsforthesensor.Export -Allowsyoutoarchivedatabyexportingasa.csvfile.Edit -Allowsyoutomanagesensorsettings.Calibrate -Availableoncertainsensortypestoprovidemoreaccuratedata.
Note:Thedatashownonthechart,notification,historyandexporttabsisbasedonthedaterangeindicatedontheupperrightsideofthesensordetailinformation.Tochangethedaterange,clickinsidethedatebox.
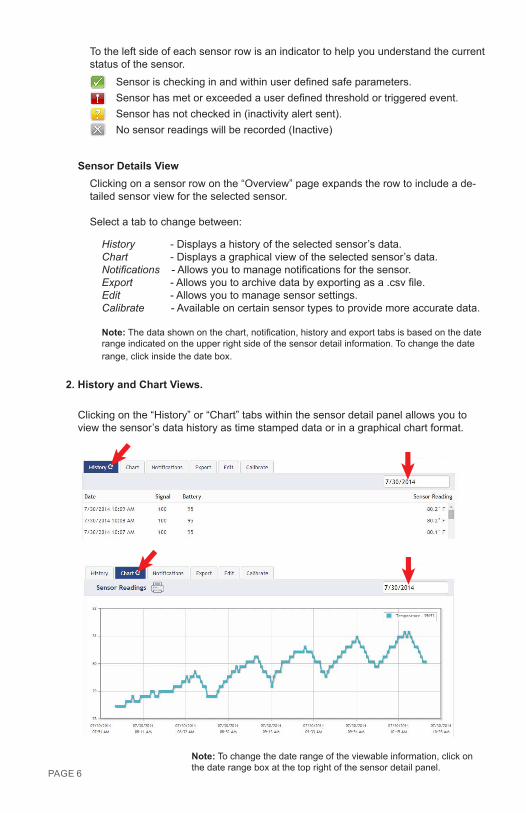
2. History and Chart Views.
Clickingonthe“History”or“Chart”tabswithinthesensordetailpanelallowsyoutoviewthesensor’sdatahistoryastimestampeddataorinagraphicalchartformat.
Note:Tochangethedaterangeoftheviewableinformation,clickon thedaterangeboxatthetoprightofthesensordetailpanel.

PAGE7
3. Configuring Sensor SettingsToeditasensorsoperationsettings,clickonthesensoroverviewrowtodisplaythede-tailsview.Clickonthe“Edit”tabtoaccessthesensorconfigurationpanel.
Thesensoreditpanelallowsyoutosettheprimaryconfigurationsforthesensor.Mousingoverthequestionmarkiconbyeachsettingwillprovideanexplanationofthatsetting.Whenyouhavefinishedmakingchanges,pressthe“Save”buttonatthebottomofthissection.
Note:Besuretoclickthe“Save”buttonanytimeyoumakeachangetoanyofthesensorparameters.All changes made to the sensor settings will be downloaded to the sensor on the next sensor heart-beat (check-in). Once a change has been made and “Saved,” you will not be able to edit that sensor’s configurations again until the sensor has downloaded the new setting.

PAGE8
4. Sensor and/or Gateway Notification(s).Notificationsforasinglesensorcanbecreated,deletedoreditedbyclickingthe“Notifications”tabinasensor’sdetailview.
Notificationscanbecreated,deletedoreditedforanysensororgroupofsensorsbyclickingon“Notifications”inthemainmenu.
ToggleOn/OffClicktoOpenDetailViewSendTestEditDelete
Whencreatinganotification,youwillneedtoselectthetypeofnotificationtocreate.
• Sensor Reading Notification - Readingnotificationsaresensorspecific(i.e.watersensor=triggeralertwhenwaterpresent,tempsensor=triggeralertwhentempisabove70F,etc.).Whencreatingasensorreadingnotification,youwillneedtochoosethesensortypeyouarecreatingthealertfor.Theselectboxwillonlyshowsensortypesthatarecurrentlybeingusedonyoursensornetwork.
• Battery Notification -Allowsuserstodefineabatterypowerpercentagelevelthatwilltriggeranalertfromthesystem,warningthemtoreplacebatteries.
• Inactivity Notification - Set-up“Inactivity”notificationstoalertyouwhenyoursen-sorshavestoppedcommunicatingwiththeservers.Failuretosetupan“Inactivity”notificationwillresultinnoemail/SMStextbeingsentshouldyoursensorsstopcommunicatingwiththeservers.

• Advanced Notifications - Allowstheusertosetnotificationsbasedonadvancedrules,suchascomparingpastdatapointswiththecurrentonetodetermineifanotifi-cationshouldbesent.
• Existing Notifications - Usenotificationsthathavealreadybeencreatedonyouraccountwiththeselectedsensor.
Notification SettingsThisareaallowstheusertosetnotificationparameterssuchasnamingthenotification,customizingthenotificationmessageandsettingsensorconditionsthatwilltriggerthenotification.
People to NotifyThelistontheleftshowsallavailableusersontheaccount.Youcantypeintothesearchboxtofilterlargelistsofusers.Selecttheuser(s)toreceivethenotificationandclickthearrowbuttontoaddthemtotherecipientlist.Bydefault,emailnotificationsareactivated.Clickingthenotificationdeliverymethodicontogglesthemonandoff(greenison,greyisoff).Iftheusershouldreceivetextmessagenotifications,clickonthephoneicontoturnitgreen.
Sent FromAllowsyoutoassigndevices(sensorsandgateways)thatwillcausethenotificationtobesent.Whenanotificationissentfromthesystem,itwillautomaticallyincludethedevicenameandthedatathatcausedthenotificationtobesent.Asinglenotificationcanbeassignedtomultiplesensorsorgateways.Sensorreadingnotificationscanonlybeas-signedtosensorsofthesametype.Generalnotificationssuchas“batterystatus”,canbeassignedtoanyorallsensors.
PAGE9
PAGE10
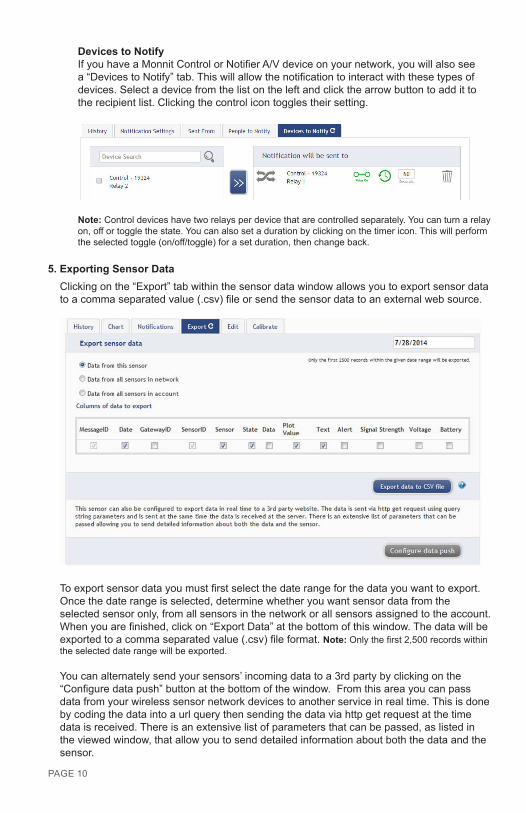
Devices to NotifyIfyouhaveaMonnitControlorNotifierA/Vdeviceonyournetwork,youwillalsoseea“DevicestoNotify”tab.Thiswillallowthenotificationtointeractwiththesetypesofdevices.Selectadevicefromthelistontheleftandclickthearrowbuttontoaddittotherecipientlist.Clickingthecontrolicontogglestheirsetting.
Note:Controldeviceshavetworelaysperdevicethatarecontrolledseparately.Youcanturnarelayon,offortogglethestate.Youcanalsosetadurationbyclickingonthetimericon.Thiswillperformtheselectedtoggle(on/off/toggle)forasetduration,thenchangeback.
5. Exporting Sensor DataClickingonthe“Export”tabwithinthesensordatawindowallowsyoutoexportsensordatatoacommaseparatedvalue(.csv)fileorsendthesensordatatoanexternalwebsource.
Toexportsensordatayoumustfirstselectthedaterangeforthedatayouwanttoexport.Oncethedaterangeisselected,determinewhetheryouwantsensordatafromtheselectedsensoronly,fromallsensorsinthenetworkorallsensorsassignedtotheaccount.Whenyouarefinished,clickon“ExportData”atthebottomofthiswindow.Thedatawillbeexportedtoacommaseparatedvalue(.csv)fileformat.Note:Onlythefirst2,500recordswithintheselecteddaterangewillbeexported.
Youcanalternatelysendyoursensors’incomingdatatoa3rdpartybyclickingonthe“Configuredatapush”buttonatthebottomofthewindow.Fromthisareayoucanpassdatafromyourwirelesssensornetworkdevicestoanotherserviceinrealtime.Thisisdonebycodingthedataintoaurlquerythensendingthedataviahttpgetrequestatthetimedataisreceived.Thereisanextensivelistofparametersthatcanbepassed,aslistedintheviewedwindow,thatallowyoutosenddetailedinformationaboutboththedataandthesensor.
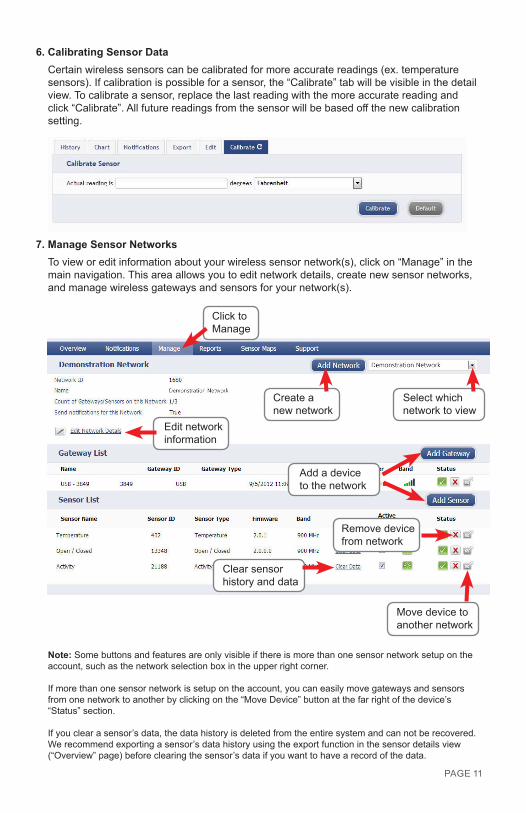
6. Calibrating Sensor DataCertainwirelesssensorscanbecalibratedformoreaccuratereadings(ex.temperaturesensors).Ifcalibrationispossibleforasensor,the“Calibrate”tabwillbevisibleinthedetailview.Tocalibrateasensor,replacethelastreadingwiththemoreaccuratereadingandclick“Calibrate”.Allfuturereadingsfromthesensorwillbebasedoffthenewcalibrationsetting.
7. Manage Sensor NetworksTovieworeditinformationaboutyourwirelesssensornetwork(s),clickon“Manage”inthemainnavigation.Thisareaallowsyoutoeditnetworkdetails,createnewsensornetworks,andmanagewirelessgatewaysandsensorsforyournetwork(s).
PAGE11Movedevicetoanothernetwork
Addadevicetothenetwork
Createanewnetwork
Removedevicefromnetwork
Editnetworkinformation
Clearsensorhistoryanddata
ClicktoManage
Selectwhichnetworktoview
Note:Somebuttonsandfeaturesareonlyvisibleifthereismorethanonesensornetworksetupontheaccount,suchasthenetworkselectionboxintheupperrightcorner.
Ifmorethanonesensornetworkissetupontheaccount,youcaneasilymovegatewaysandsensorsfromonenetworktoanotherbyclickingonthe“MoveDevice”buttonatthefarrightofthedevice’s“Status”section.
Ifyouclearasensor’sdata,thedatahistoryisdeletedfromtheentiresystemandcannotberecovered.Werecommendexportingasensor’sdatahistoryusingtheexportfunctioninthesensordetailsview(“Overview”page)beforeclearingthesensor’sdataifyouwanttohavearecordofthedata.
PAGE11
Error Reporting,Troubleshooting and SupportFortechnicalsupportandtroubleshootingtipspleasevisitoursupportlibraryonlineathttp://www.monnit.com/support/.Ifyouareunabletosolveyourissueusingouronlinesupport,emailMonnitsupportatsupport@monnit.comwithyourcontactinformationandadescriptionoftheproblem,andasupportrepresentativewillcallyouwithinonebusinessday.
Forerrorreporting,[email protected].
Warranty Information(a)MonnitwarrantsthatMonnit-brandedproductswillbefreefromdefectsinmaterialsandworkmanshipforaperiodofone(1)yearfromthedateofdeliverywithrespecttohardwareandwillmateriallyconformtotheirpublishedspecificationsforaperiodofone(1)yearwithrespecttosoftware.Monnitmayresellsensorsmanufacturedbyotherentitiesandaresubjecttotheirindividualwarranties;Monnitwillnotenhanceorextendthosewarranties.Monnitdoesnotwarrantthatthesoftwareoranyportionthereofiserrorfree.MonnitwillhavenowarrantyobligationwithrespecttoProductssubjectedtoabuse,misuse,negli-genceoraccident.IfanysoftwareorfirmwareincorporatedinanyProductfailstoconformtothewarrantysetforthinthisSection,Monnitshallprovideabugfixorsoftwarepatchcorrectingsuchnon-conformancewithinareasonableperiodafterMonnitreceivesfromCustomer(i)noticeofsuchnon-conformance,and(ii)sufficientinformationregardingsuchnon-conformancesoastopermitMonnittocreatesuchbugfixorsoftwarepatch.IfanyhardwarecomponentofanyProductfailstoconformtothewarrantyinthisSection,Monnitshall,atitsoption,refundthepurchasepricelessanydiscounts,orrepairorreplacenon-conformingProductswithconformingProductsorProductshavingsubstantiallyidenticalform,fit,andfunctionanddelivertherepairedorreplacementProducttoacarrierforlandshipmenttocustomerwithinareasonableperiodafterMonnitreceivesfromCustomer(i)noticeofsuchnon-conformance,and(ii)thenon-conformingProductprovided;however,if,initsopinion,Monnitcannotrepairorreplaceoncommerciallyreasonabletermsitmaychoosetorefundthepurchaseprice.Repairpartsandreplacementproductsmaybereconditionedornew.AllreplacementproductsandpartsbecomethepropertyofMonnit.Repairedorreplacementproductsshallbesubjecttothewarranty,ifanyremains,originallyapplicabletotheproductrepairedorreplaced.CustomermustobtainfromMonnitaReturnMaterialAuthorizationNumber(RMA)priortoreturninganyProductstoMonnit.ProductsreturnedunderthisWarrantymustbeunmodified.
CustomermayreturnallProductsforrepairorreplacementduetodefectsinoriginalmate-rialsandworkmanshipifMonnitisnotifiedwithinninety(90)daysofcustomer’sreceiptoftheproduct.Monnitreservestherighttorepairorreplaceproductsatitsownandcompletediscretion.CustomermustobtainfromMonnitaReturnMaterialAuthorizationNumber(RMA)priortoreturninganyproductstoMonnit.ProductsreturnedunderthisWarrantymustbeunmodifiedandinoriginalpackaging.Monnitreservestherighttorefusewarrantyrepairsorreplacementsforanyproductsthataredamagedornotinoriginalform.Forproductsoutsidetheninety-daywarrantyperiodrepairservicesareavailableatMonnitatstandardlaborratesforaperiodofoneyearfromtheCustomer’soriginaldateofreceipt.
PAGE12
(b)AsaconditiontoMonnit’sobligationsundertheimmediatelyprecedingparagraphs,CustomershallreturnProductstobeexaminedandreplacedtoMonnit’sfacilities,inshippingcartonswhichclearlydisplayavalidRMAnumberprovidedbyMonnit.Customeracknowledgesthatreplacementproductsmayberepaired,refurbishedortestedandfoundtobecomplying.Customershallbeartheriskoflossforsuchreturnshipmentandshallbearallshippingcosts.MonnitshalldeliverreplacementsforProductsdeterminedbyMon-nittobeproperlyreturned,shallbeartheriskoflossandsuchcostsofshipmentofrepairedproductsorreplacements,andshallcreditCustomer’sreasonablecostsofshippingsuchreturnedProductsagainstfuturepurchases.
(c)Monnit’ssoleobligationunderthewarrantydescribedorsetforthhereshallbetorepairorreplacenon-conformingproductsassetforthintheimmediatelyprecedingparagraph,ortorefundthedocumentedpurchasepricefornon-conformingProductstoCustomer.Mon-nit’swarrantyobligationsshallrunsolelytoCustomer,andMonnitshallhavenoobligationtocustomersofCustomerorotherusersoftheProducts.
LimitationofWarrantyandRemedies.
THEWARRANTYSETFORTHHEREINISTHEONLYWARRANTYAPPLICABLETOPRODUCTSPURCHASEDBYCUSTOMER.ALLOTHERWARRANTIES,EXPRESSORIMPLIED,INCLUDINGBUTNOTLIMITEDTOTHEIMPLIEDWARRANTIESOFMERCHANTABILITYANDFITNESSFORAPARTICULARPURPOSEAREEXPRESSLYDISCLAIMED.MONNIT’SLIABIITYWHETHERINCONTRACT,INTORT,UNDERANYWARRANTY,INNEGLIGENCEOROTHERWISESHALLNOTEXCEEDTHEPURCHASEPRICEPAIDBYCUSTOMERFORTHEPRODUCT.UNDERNOCIRCUMSTANCESSHALLMONNITBELIABLEFORSPECIAL,INDIRECTORCONSEQUENTIALDAM-AGES.THEPRICESTATEDFORTHEPRODUCTSISACONSIDERATIONINLIMITINGMONNIT’SLIABILITY.NOACTION,REGARDLESSOFFORM,ARISINGOUTOFTHISAGREEMENTMAYBEBROUGHTBYCUSTOMERMORETHANONEYEARAFTERTHECAUSEOFACTIONHASACCRUED.
INADDITIONTOTHEWARRANTIESDISCLAIMEDABOVE,MONNITSPECIFICALLYDISCLAIMSANYANDALLLIABILITYANDWARRANTIES,IMPLIEDOREXPRESSED,FORUSESREQUIRINGFAIL-SAFEPERFORMANCEINWHICHFAILUREOFAPROD-UCTCOULDLEADTODEATH,SERIOUSPERSONALINJURY,ORSEVEREPHYSICALORENVIRONMENTALDAMAGESUCHAS,BUTNOTLIMITEDTO,LIFESUPPORTORMEDICALDEVICESORNUCLEARAPPLICATIONS.PRODUCTSARENOTDESIGNEDFORANDSHOULDNOTBEUSEDINANYOFTHESEAPPLICATIONS.
PAGE13
CertificationsUnited States FCC This equipment has been tested and found to comply with the limits for a Class B digital devices, pursuant to Part 15 of the FCC Rules. These limits are designed to provide reasonable protection against harmful interference in a residential installation. This equipment generates, uses, and can radiate radio frequency energy and, if not installed and used in accordance with the instruction manual, may cause harmful interference to radio communications. However, there is no guarantee that interference will not occur in a particular installation. If this equipment does cause harmful interference to radio or television reception, which can be determined by turning the equipment off and on, the user is encouraged to try to correct the interference by one of more of the following measures:
• Reorient or relocate the receiving antenna • Increase the separation between the equipment and receiver • Connect the equipment into an outlet on a circuit different from that to which the receiver is connected. • Consult the dealer or an experienced radio/TV technician for help.
Warning: Changes or modifications not expressly approved by Monnit could void the user’s authority to operate the equipment.
RF Exposure
Monnit Wireless Sensor Contains: FCC ID: ZTL-RFSC1
This device has been designed to operate with an approved antenna listed below, and having a maximum gain of 5.1 dBi. Antennas not included in this list or having a gain greater than 5.1 dBi are strictly prohibited for use with this device. The required antenna impedance is 50 ohms. To reduce potential radio interference to other users, the antenna type and its gain should be so chosen that the equivalent isotropically radiated power (EIRP) is not more than that required for successful communication.Approved Antennas ThefollowingantennasareapprovedforusewithMonnitdevices. • Hyperlink HG905RD-RSP (5.1 dBi Rubber Duck) • Pulse W1063 (3.0 dBi Rubber Duck) • ChangHong GSM-09 (2.0 dBi Rubber Duck) • Specialized Manufacturing MC-ANT-20/4.0C (4” whip)
Monnit Wireless USB Gateway Contains: FCC ID: ZTL-RFUSB1This device has been designed to operate with the attached non-removable antenna.
WARNING:TosatisfyFCCRFexposurerequirementsformobiletransmittingdevices,theantennausedforthistransmittermustnotbeco-locatedinconjunctionwithanyotherantennaortransmitter.
PAGE14

Canada (IC) EnglishUnder Industry Canada regulations, this radio transmitter may only operate using an antenna of a type and maximum (or lesser) gain approved for the transmitter by Industry Canada. To reduce potential radio interference to other users, the antenna type and its gain should be so chosen that the equivalent isotropically radiated power (e.i.r.p.) is not more than that necessary for successful communication. The radio transmitter (IC: 9794A-RFSC1 and IC: 9794A-RFUSB1) has been approved by Industry Canada to operate with the antenna types listed below with the maximum permis-sible gain and required antenna impedance for each antenna type indicated. Antenna types not included in this list, having a gain greater than the maximum gain indicated for that type, are strictly prohibited for use with this device. This device complies with Industry Canada licence-exempt RSS standard(s). Operation is subject to the following two conditions: (1) this device may not cause interference, and (2) this device must accept any interference, including interference that may cause undesired operation of the device.
FrenchConformément à la réglementation d’Industrie Canada, le présent émetteur radio peut fonctionner avec une antenne d’un type et d’un gain maximal (ou inférieur) approuvé pour l’émetteur par Industrie Canada. Dans le but de réduire les risques de brouillage radioélec-trique à l’intention des autres utilisateurs, il faut choisir le type d’antenne et son gain de sorte que la puissance isotrope rayonnée équivalente (p.i.r.e.) ne dépasse pas l’intensité nécessaire à l’établissement d’une communication satisfaisante. Le présent émetteur radio (IC: 9794A-RFSC1 et IC: 9794A-RFUSB1) a été approuvé par Industrie Canada pour fonctionner avec les types d’antenne énumérés ci-dessous et ayant un gain admissible maximal et l’impédance requise pour chaque type d’antenne. Les types d’antenne non inclus dans cette liste, ou dont le gain est supérieur au gain maximal indi-qué, sont strictement interdits pour l’exploitation de l’émetteur. Le présent appareil est conforme aux CNR d’Industrie Canada applicables aux appareils radio exempts de licence. L’exploitation est autorisée aux deux conditions suivantes : (1) l’appareil ne doit pas produire de brouillage, et (2) l’utilisateur de l’appareil doit accepter tout brouillage radioélectrique subi, méme si le brouillage est susceptible d’en comprom-ettre le fonctionnement.
IndustryCanada
PAGE15

MUG-21-2C(09/15)
Additional Information and Support
ForadditionalinformationormoredetailedinstructionsonhowtouseyourMonnitWirelessSensorsortheiMonnitOnlineSystem,pleasevisitusonthewebathttp://www.monnit.com/support/.
MonnitCorporation4403South500WestMurray,UT84123801-561-5555www.monnit.com
Monnit,MonnitLogoandallothertrademarksarepropertyofMonnit,Corp.©2009-2015MonnitCorp.AllRightsReserved.