Embed Size (px)
Citation preview

MODULE 2: INFRASTRUCTURE FAMILIARIZATION

“Go Slow and Give Way To Pedestrians”Slow down and give way to pedestrians.
Prohibitory Signs Warning Signs
“No Riding”Cycling is not allowed in this area. Areas where riding is prohibited include pedestrian overhead bridges
“Watch Out For Vehicles”Slow down and look out for approachingvehicles.
“Slow”Slow down and ride cautiously beyondthe sign.
“Pedestrian or Cyclist Crossing Prohibition”Pedestrians and cyclists arenot allowed to cross at thislocation. Use the crossingahead instead.
“Caution – Low Headroom”Be cautious of the low headroom ahead.
Prohibitory Signs show actions that are disallowed. Disobeying these signs is punishable by law.
Warning Signs are used to warn cyclists of possible dangers ahead. Cyclists should follow these signs for their own safety.
TYPES OF OFF-ROAD SIGNSMODULE 2

Advisory Signs educate path users on proper shared pathetiquette. Cyclists should follow these signs for a safer ride.
“Stay on Track”Segregated pedestrian andcycling paths are provided.Stay on your respectivepaths.
“Shared Track”The path is to be shared by both cyclistsand pedestrians. Cyclists are to keep leftand give way to pedestrians whenriding.
Information Signs/Markings/Signals
“Cyclist Crossing”
“Bicycle Crossing with ‘Stop’or ‘Look’ box”Cyclists should use the bicyclecrossing provided. Cyclists areto wait behind the solid yellowline when waiting for the lightsto turn green.
“Bicycle Crossing Signal Lights”Proceed when the Green Bicyclelights up.
Do NOT attempt to cross when theRed Bicycle lights up or when theGreen Bicycle light is flashing.
Advisory SignsInformation Signs help to inform you and direct you along thecycling path to points of interest.
MODULE 2 TYPES OF OFF-ROAD SIGNS

Types of Paths
TYPES OF PATHSMODULE 2
Footpath
Shared path
Footpaths do not have any markings or treatments and are generally grey in colour.They are commonly found all around Singapore connecting pedestrians from onelocation to another.
Footpath
Segregated Pedestrian and Cycling path
Shared path
Segregated pedestrian and cycling paths are identified by a bicycle logo. Cyclistsshould stay on the cycling path and avoid riding on the pedestrian path.
Shared paths allow for pedestrians and cyclists to travel on the same path. Cyclistsare to keep left when riding on these paths and give way to pedestrians at all times.
Segregated Pedestrian and Cycling path

OFF-ROAD GROUND MARKINGSMODULE 2
Shared path
Cycling path
Path Identifiers such as the path’s name or colour help to informcyclists that they are on a shared/cycling path. Park ConnectorNetworks, which are shared paths, are typically identified withthe PCN logo imprinted onto the path while riding paths arecoloured in red.
Ground markings provides cyclists with information on the typeof path they are on.
Path Identifiers
Mileage Marking
Speed Regulating Strips
Shared/Cycling Path Ground Markings
Mileage Markings inform path users on the distance to thedestination as indicated on the marking.
Speed Regulating Strips help to reduce the cyclist’s speed suchas on downhill sections of a path, before approaching a junctionor potential areas of conflict with pedestrians or motorists.
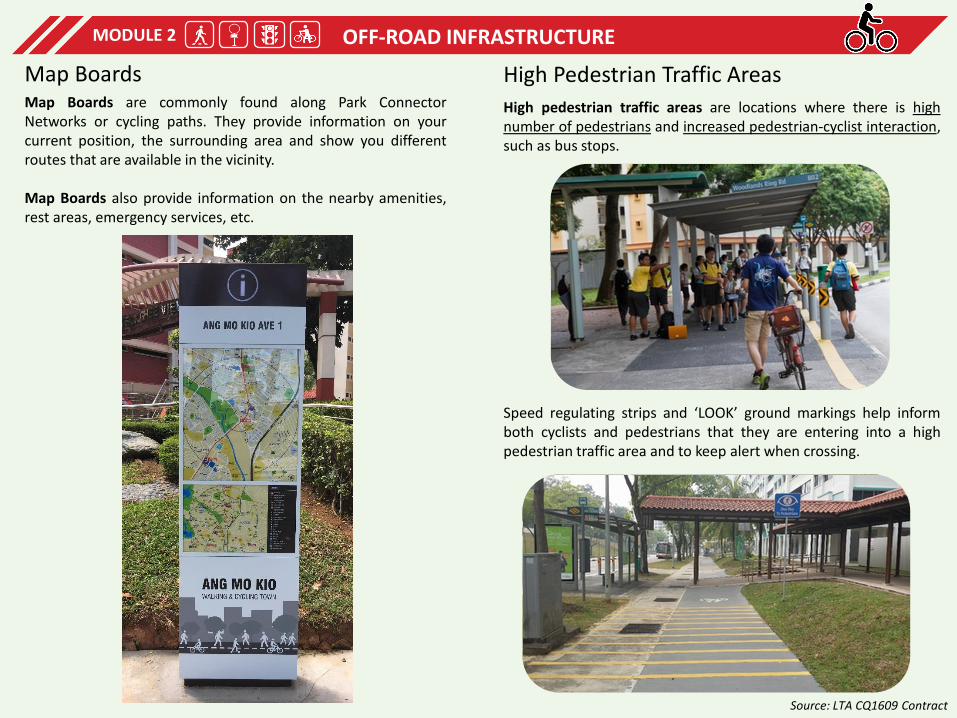
Map Boards are commonly found along Park ConnectorNetworks or cycling paths. They provide information on yourcurrent position, the surrounding area and show you differentroutes that are available in the vicinity.
Map Boards also provide information on the nearby amenities,rest areas, emergency services, etc.
Map Boards
OFF-ROAD INFRASTRUCTUREMODULE 2
Source: LTA CQ1609 Contract
High Pedestrian Traffic Areas
High pedestrian traffic areas are locations where there is highnumber of pedestrians and increased pedestrian-cyclist interaction,such as bus stops.
Speed regulating strips and ‘LOOK’ ground markings help informboth cyclists and pedestrians that they are entering into a highpedestrian traffic area and to keep alert when crossing.

Signalised Crossings
Bicycle Traffic Light Crossings have bicyclecrossings for cyclists and cyclists should keepleft and stay within the bicycle crossing whencrossing the road. Cyclists should cross theroad at walking speed.
Signalised Pedestrian Crossings do NOT havededicated cycling lanes, thus cyclists shouldkeep to the left, and ride in an orderly mannerwhen crossing the road. Cyclists should crossthe road at walking speed. Always look out andgive way to pedestrians who are crossing withyou.
Cyclists are to obey the traffic light signals,denoted by ‘green’ and ‘red’ signal lights.Always look out for vehicles before you crossthe road.
Bicycle Crossing Instruction Sign
Bicycle Crossing button
Pedestrian Crossing button
Pedestrian Crossing Instruction Sign
MODULE 2
Bicycle Traffic Light Crossings
Pedestrian Traffic Light Crossings
TYPES OFF-ROAD CYCLING CROSSINGS
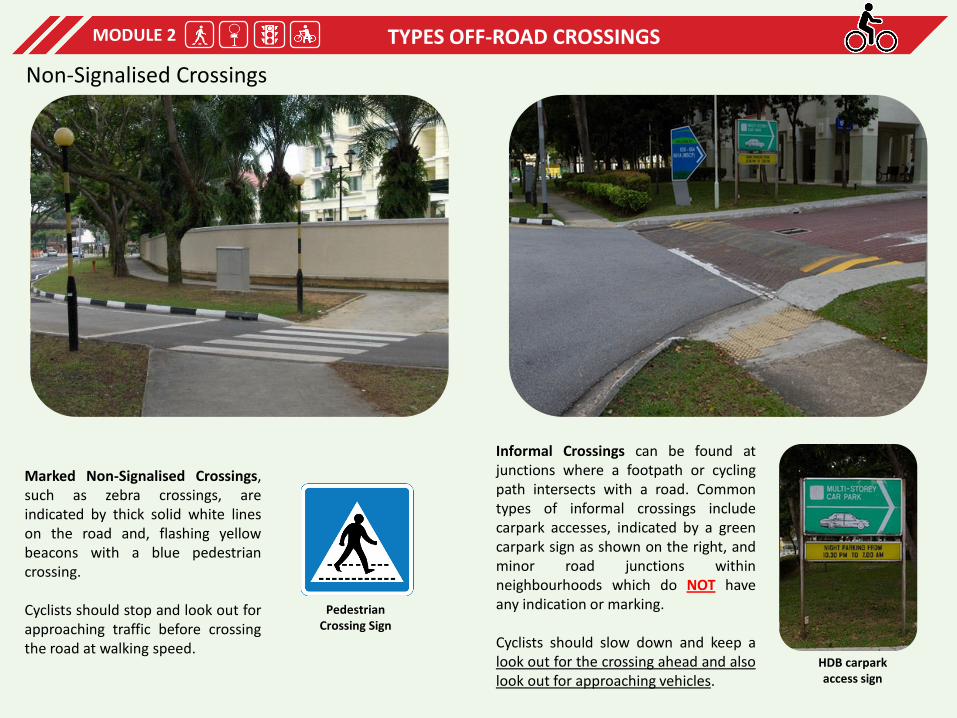
Marked Non-Signalised Crossings,such as zebra crossings, areindicated by thick solid white lineson the road and, flashing yellowbeacons with a blue pedestriancrossing.
Cyclists should stop and look out forapproaching traffic before crossingthe road at walking speed.
Non-Signalised Crossings
Informal Crossings can be found atjunctions where a footpath or cyclingpath intersects with a road. Commontypes of informal crossings includecarpark accesses, indicated by a greencarpark sign as shown on the right, andminor road junctions withinneighbourhoods which do NOT haveany indication or marking.
Cyclists should slow down and keep alook out for the crossing ahead and alsolook out for approaching vehicles.
Pedestrian Crossing Sign
HDB carpark access sign
MODULE 2 TYPES OFF-ROAD CROSSINGS

Cycling is allowed through underpasses unless there is a ‘No Riding’ sign. Please exercise caution around underpasses and take note of lowheadroom, blind spots and steep ramps.
For underpasses with cycling lanes, cyclists should stay within the provided cycling lanes. For underpasses without cycling lanes, cyclistsshould keep left and ride in an orderly manner.
Cyclists should slow down and ride at a walking speed when entering into underpasses and keep a look out for pedestrians and other pathusers.
Underpasses
MODULE 2 TYPES OFF-ROAD CROSSINGS
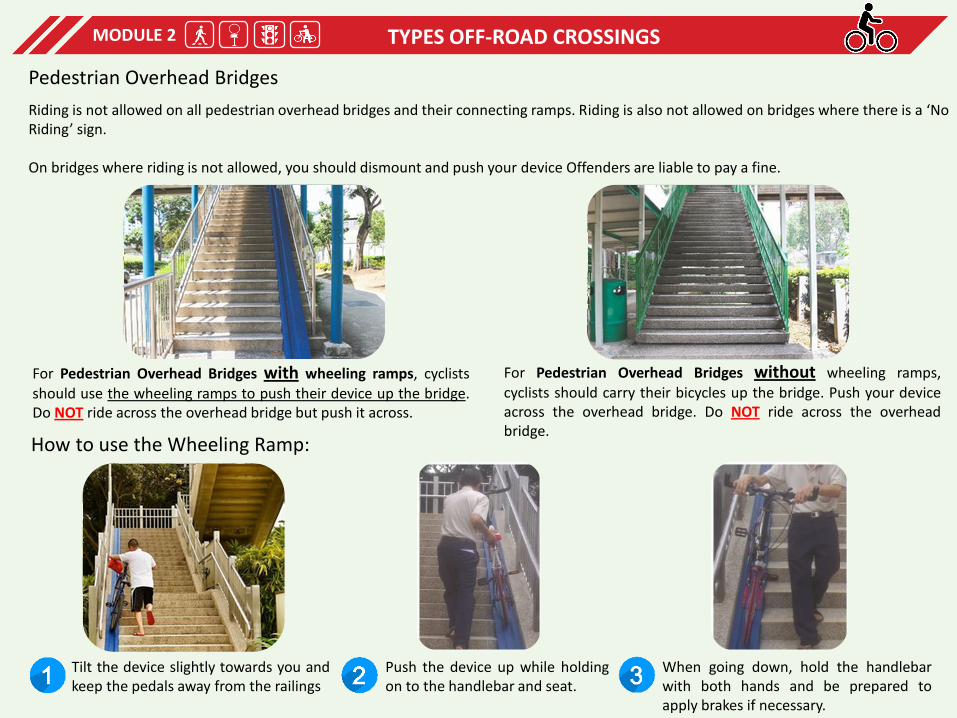
Pedestrian Overhead Bridges
For Pedestrian Overhead Bridges with wheeling ramps, cyclistsshould use the wheeling ramps to push their device up the bridge.Do NOT ride across the overhead bridge but push it across.
Tilt the device slightly towards you andkeep the pedals away from the railings
How to use the Wheeling Ramp:
Push the device up while holdingon to the handlebar and seat.
When going down, hold the handlebarwith both hands and be prepared toapply brakes if necessary.
For Pedestrian Overhead Bridges without wheeling ramps,cyclists should carry their bicycles up the bridge. Push your deviceacross the overhead bridge. Do NOT ride across the overheadbridge.
MODULE 2 TYPES OFF-ROAD CROSSINGS
Riding is not allowed on all pedestrian overhead bridges and their connecting ramps. Riding is also not allowed on bridges where there is a ‘No Riding’ sign.
On bridges where riding is not allowed, you should dismount and push your device Offenders are liable to pay a fine.
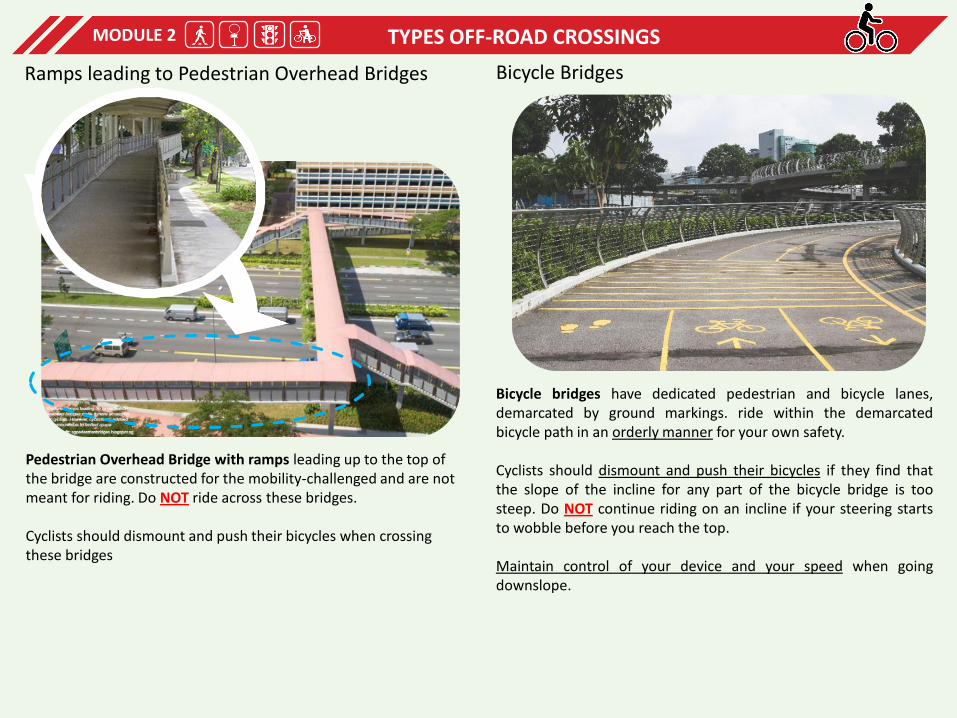
Ramps leading to Pedestrian Overhead Bridges Bicycle Bridges
Pedestrian Overhead Bridge with ramps leading up to the top of the bridge are constructed for the mobility-challenged and are not meant for riding. Do NOT ride across these bridges.
Cyclists should dismount and push their bicycles when crossing these bridges
Bicycle bridges have dedicated pedestrian and bicycle lanes,demarcated by ground markings. ride within the demarcatedbicycle path in an orderly manner for your own safety.
Cyclists should dismount and push their bicycles if they find thatthe slope of the incline for any part of the bicycle bridge is toosteep. Do NOT continue riding on an incline if your steering startsto wobble before you reach the top.
Maintain control of your device and your speed when goingdownslope.
MODULE 2 TYPES OFF-ROAD CROSSINGS

Mandatory signs are meant for all on-road users, including road cyclists, to follow. Disobeying these signs is a prosecutable offence.
“STOP”Stop before the WHITE line. Give way totraffic from the right and the left.
“STOP-CHILDREN”Stop and look out for pedestrianscrossing the road.
“GIVE WAY”Slow down and stop if necessary. Giveway to traffic on major road.
“LEFT TURN ON RED”• Indicate your intention to turn• Stop at the Red Light and give way to
pedestrians crossing• Give way to traffic approaching from
the right• Look out for left-turning vehicles
behind you• Proceed only when it is safe to do so.
Mandatory Signs
AHEADONLY
TURNRIGHT
TURNLEFT
TURNRIGHTAHEAD
KEEPLEFT
PASS EITHER SIDEYou may pass on eitherside of the road. Usethe appropriate handsignals to indicate toother road users onyour intent to keep leftor right.
TURNLEFTAHEAD
MODULE 2 ON-ROAD SIGNAGE

Prohibitory Signs are used to prohibit specific kinds of actions. Disobeying these signs is a prosecutable offence.
NO ENTRY
NO RIGHT TURN
NO LEFT TURN
NO OVERTAKING
Prohibitory Signs
NO ENTRY TO MOTORCYCLES AND PEDAL CYCLES(including bicycle and electric bicycles)
BEND TO THE LEFT AHEADSlow down and keep left.Do NOT overtake, U-turn or park/stopyour bicycle.
BEND TO THE RIGHT AHEADSlow down and keep left.Do NOT overtake, U-turn or park/stopyour bicycle.
DOUBLE BEND AHEADSlow down and keep left.Do NOT overtake, U-turnor park/stop your bicycle.
CROSS ROADS AHEADSlow down. Beware of traffic whenapproaching the junction.
Warning Signs are used to warn on-road users of the possible dangers ahead. Cyclists should slow down and proceed cautiously after seeing these signs.
Warning Signs
MODULE 2 ON-ROAD SIGNAGE
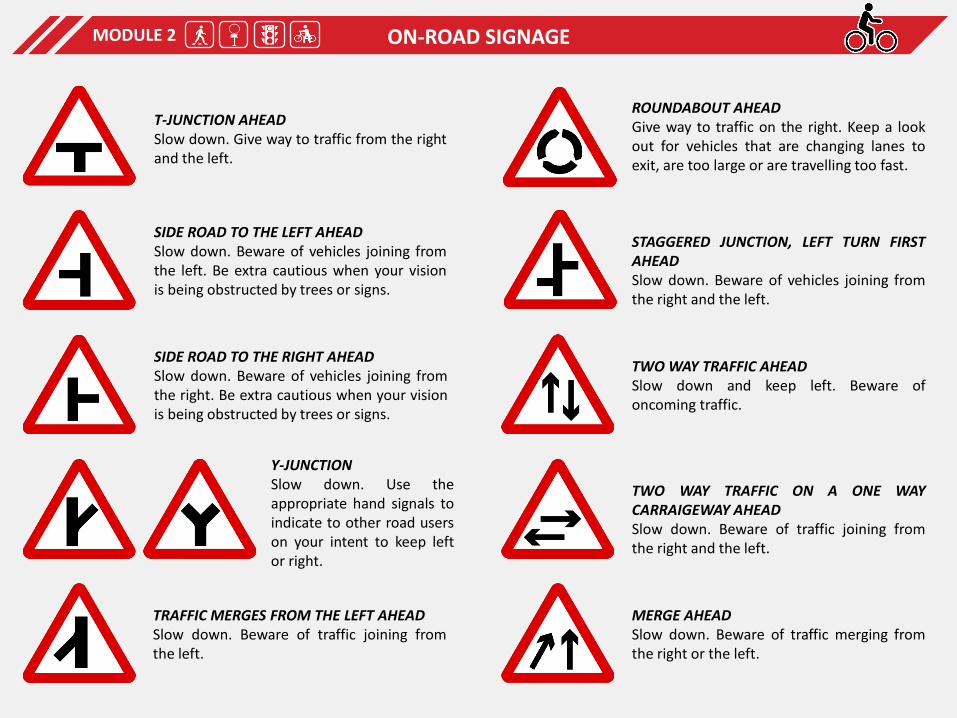
T-JUNCTION AHEADSlow down. Give way to traffic from the rightand the left.
SIDE ROAD TO THE LEFT AHEADSlow down. Beware of vehicles joining fromthe left. Be extra cautious when your visionis being obstructed by trees or signs.
SIDE ROAD TO THE RIGHT AHEADSlow down. Beware of vehicles joining fromthe right. Be extra cautious when your visionis being obstructed by trees or signs.
Y-JUNCTIONSlow down. Use theappropriate hand signals toindicate to other road userson your intent to keep leftor right.
TRAFFIC MERGES FROM THE LEFT AHEADSlow down. Beware of traffic joining fromthe left.
STAGGERED JUNCTION, LEFT TURN FIRSTAHEADSlow down. Beware of vehicles joining fromthe right and the left.
TWO WAY TRAFFIC AHEADSlow down and keep left. Beware ofoncoming traffic.
TWO WAY TRAFFIC ON A ONE WAYCARRAIGEWAY AHEADSlow down. Beware of traffic joining fromthe right and the left.
MERGE AHEADSlow down. Beware of traffic merging fromthe right or the left.
ROUNDABOUT AHEADGive way to traffic on the right. Keep a lookout for vehicles that are changing lanes toexit, are too large or are travelling too fast.
MODULE 2 ON-ROAD SIGNAGE
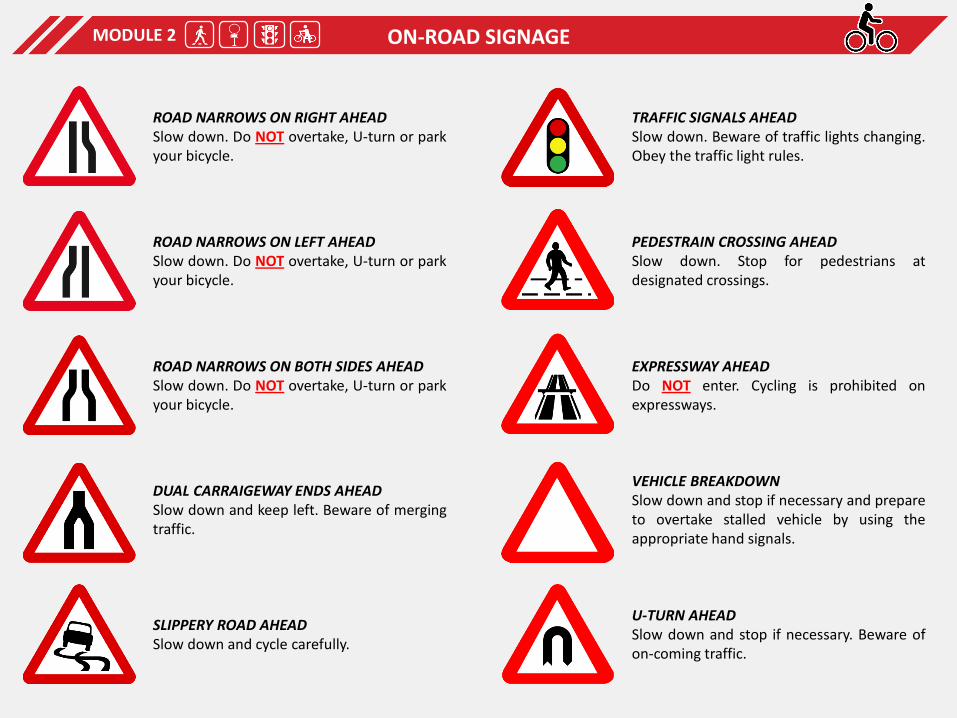
ROAD NARROWS ON RIGHT AHEADSlow down. Do NOT overtake, U-turn or parkyour bicycle.
ROAD NARROWS ON LEFT AHEADSlow down. Do NOT overtake, U-turn or parkyour bicycle.
ROAD NARROWS ON BOTH SIDES AHEADSlow down. Do NOT overtake, U-turn or parkyour bicycle.
DUAL CARRAIGEWAY ENDS AHEADSlow down and keep left. Beware of mergingtraffic.
SLIPPERY ROAD AHEADSlow down and cycle carefully.
TRAFFIC SIGNALS AHEADSlow down. Beware of traffic lights changing.Obey the traffic light rules.
PEDESTRAIN CROSSING AHEADSlow down. Stop for pedestrians atdesignated crossings.
EXPRESSWAY AHEADDo NOT enter. Cycling is prohibited onexpressways.
VEHICLE BREAKDOWNSlow down and stop if necessary and prepareto overtake stalled vehicle by using theappropriate hand signals.
U-TURN AHEADSlow down and stop if necessary. Beware ofon-coming traffic.
MODULE 2 ON-ROAD SIGNAGE

ROAD HUMP AHEADSlow down and keep left. Do NOT overtake.
UNEVEN ROAD AHEADSlow down and keep left. Do NOT overtake.
STEEP HILL UPWARDS AHEADKeep left and change to a lower gear.Dismount and push your bicycle by the leftside of the road if necessary.
STEEP HILL DOWNWARDS AHEADKeep left and change to a lower gear.Maintain control of the speed of your bicycleand do NOT free-wheel.
QUAYSIDE OR RIVER BANK AHEADSlow down. Beware of road ending ahead.
HORSES OR PONIES AHEADSlow down and stop if necessary.Beware of animals.
LOW FLYING AIRCRAFT AHEADBeware of sudden noise from lowflying aircraft.
ELDERLY OR HANDICAPPED PEDESTRIANSAHEADSlow down. Keep a look out for mobility-impaired or elderly pedestrians crossing theroad.
RAISED ZEBRA CROSSINGSlow down. Stop for pedestrianscrossing at the raised zebra crossing.
MODULE 2 ON-ROAD SIGNAGE

Regulatory Signs are used to help regulate traffic movement on the carriageway.
REDUCE SPEED NOW
KEEP LEFT UNLESS OVERTAKINGKeep and stay to the left side of the road andleave the outermost right lane for overtakingvehicles.
ROAD WORKS AHEADSlow down and beware of obstruction aheaddue to road works.
SINGLE LANE TRAFFICSlow down and give way as traffic convergesinto a single lane.
DETOUR AHEAD 50MSlow down and get ready to detour ahead.
DETOUR
Sharp DeviationSlow down and cycle in the direction indicated.
ONE WAY TRAFFICOne-directional movement along this road.Beware of vehicles joining the traffic fromthe left and the right.
ONE WAY STREET TO THE LEFTOne way street begins from this sign. Bewareof vehicles turning into the one way street.
CURVE ALIGNMENT MARKERSlow down and cycle carefully at bends.
Regulatory Signs
MODULE 2 ON-ROAD SIGNAGE

Information Signs provide useful information to cyclists and other motorists on the carriageway.
NO THROUGH ROAD ON SIDE ROAD TO RIGHTRoad on the right does not lead to another road.
NO THROUGH ROADRoad ahead ends within a short distance.
U-TURNU-turn is available ahead. Filter into theappropriate lane in preparation of U-turningmovement.
START OF EXPRESSWAYLook out for and avoid entering into theexpressway. Bicycles are NOT allowed onexpressways.
RAIN SHELTERRain shelter for motorcyclists and on-roadcyclists.
WHITE WALKING STICKSSlow down and be prepared to stop. Giveway to visually-impaired pedestrians in thearea.
TRAFFIC SIGNAL OPERATING HOURSTraffic Signals are operational only during thestated hours.
SPEED REGULATING STRIPS AHEADSlow down.
PEDESTRIAN CROSSINGKeep a look out for pedestrians crossing.Slow down to a stop if there are pedestrianscrossing or about to cross the road.
Information Signs
MODULE 2 ON-ROAD SIGNAGE
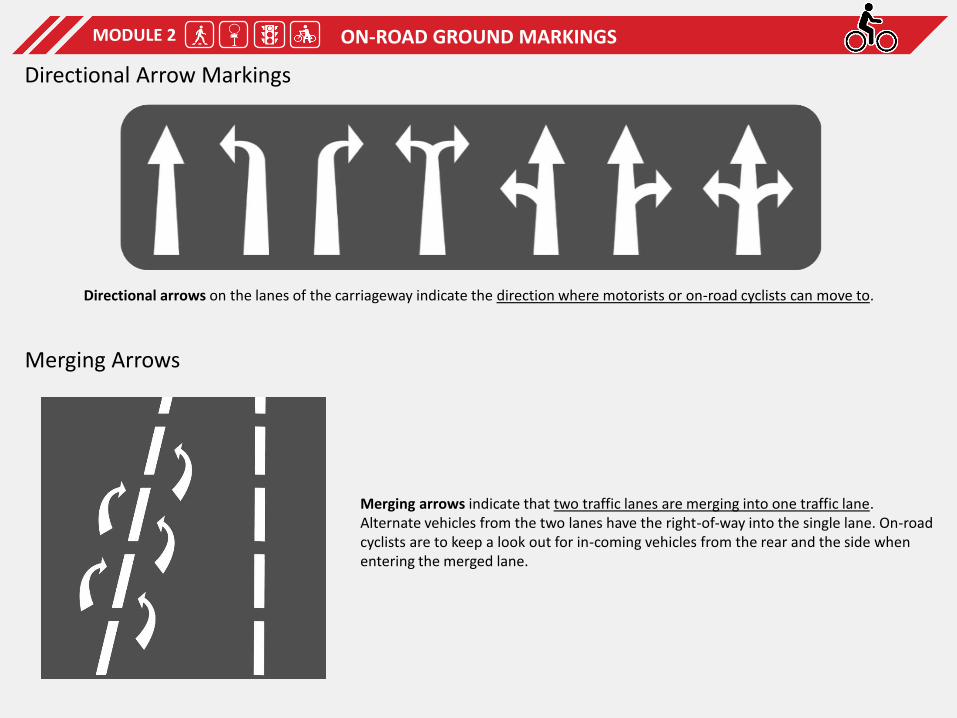
Directional arrows on the lanes of the carriageway indicate the direction where motorists or on-road cyclists can move to.
Merging arrows indicate that two traffic lanes are merging into one traffic lane. Alternate vehicles from the two lanes have the right-of-way into the single lane. On-road cyclists are to keep a look out for in-coming vehicles from the rear and the side when entering the merged lane.
Merging Arrows
Directional Arrow Markings
ON-ROAD GROUND MARKINGSMODULE 2
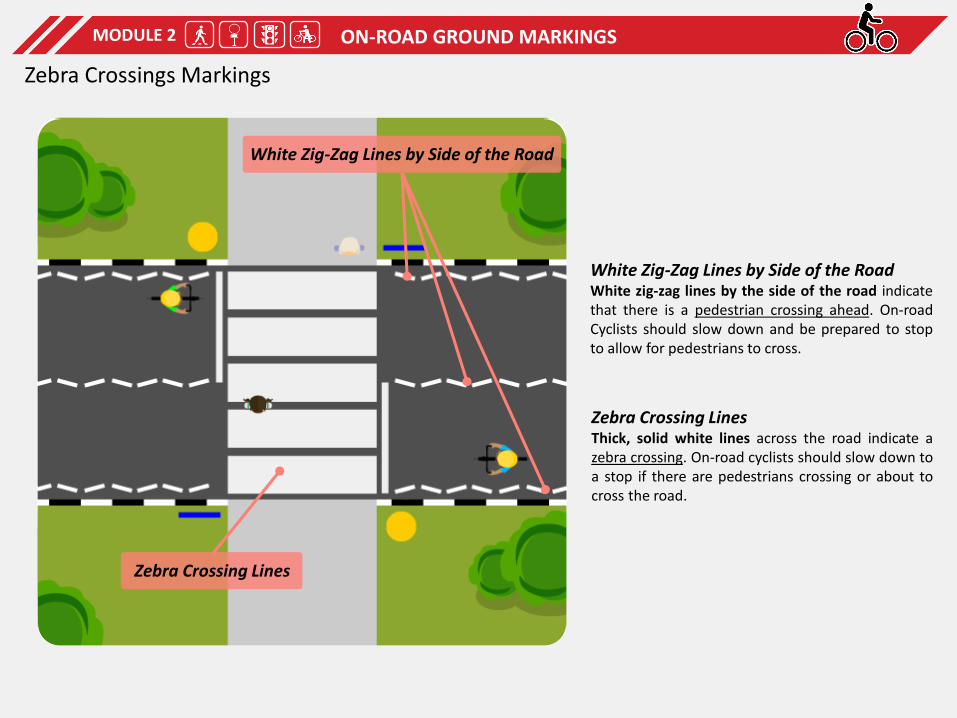
Zebra Crossings Markings
White Zig-Zag Lines by Side of the RoadWhite zig-zag lines by the side of the road indicatethat there is a pedestrian crossing ahead. On-roadCyclists should slow down and be prepared to stopto allow for pedestrians to cross.
Zebra Crossing LinesThick, solid white lines across the road indicate azebra crossing. On-road cyclists should slow down toa stop if there are pedestrians crossing or about tocross the road.
White Zig-Zag Lines by Side of the Road
Zebra Crossing Lines
ON-ROAD GROUND MARKINGSMODULE 2

Raised Zebra Crossings Markings
Raised Zebra Crossing LinesThick, solid white lines with yellow andblack checkered boxes by the side indicate araised zebra crossing. On-road cyclists shouldslow down to a stop if there are pedestrianscrossing or about to cross the road. Bewareof the raised hump.
ON-ROAD GROUND MARKINGS AND INFRASTRUCTURE
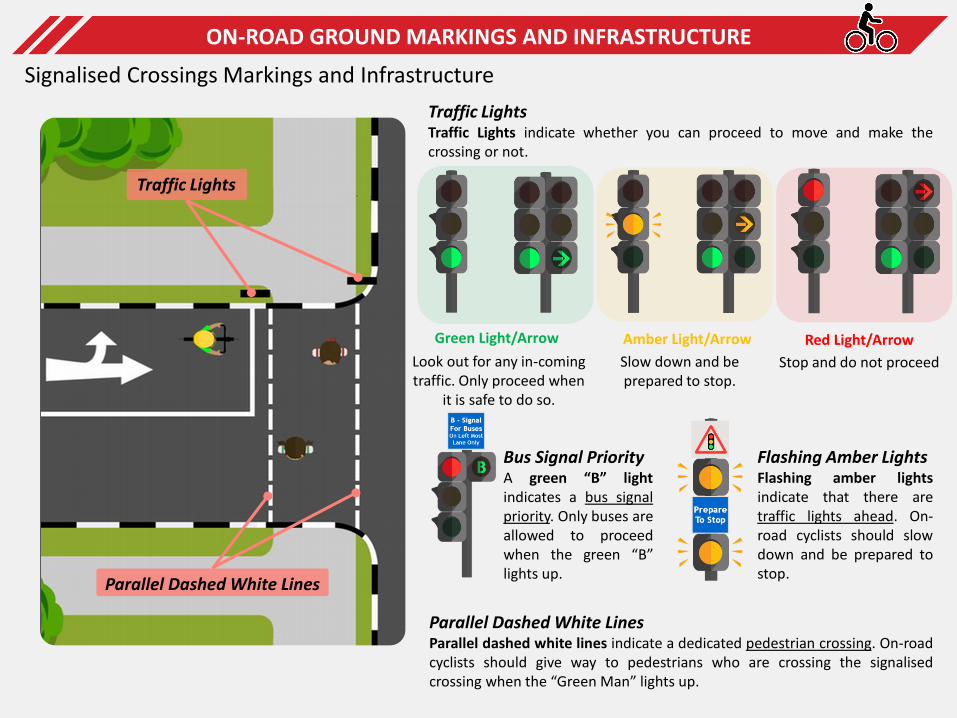
Signalised Crossings Markings and Infrastructure
Parallel Dashed White Lines
Traffic Lights
Bus Signal PriorityA green “B” lightindicates a bus signalpriority. Only buses areallowed to proceedwhen the green “B”lights up.
Flashing Amber LightsFlashing amber lightsindicate that there aretraffic lights ahead. On-road cyclists should slowdown and be prepared tostop.
Red Light/Arrow
Stop and do not proceed
Amber Light/Arrow
Slow down and be prepared to stop.
Green Light/Arrow
Look out for any in-coming traffic. Only proceed when
it is safe to do so.
Traffic LightsTraffic Lights indicate whether you can proceed to move and make thecrossing or not.
Parallel Dashed White LinesParallel dashed white lines indicate a dedicated pedestrian crossing. On-roadcyclists should give way to pedestrians who are crossing the signalisedcrossing when the “Green Man” lights up.
ON-ROAD GROUND MARKINGS AND INFRASTRUCTURE

Pedestrian Crossing Ahead Markings
Pedestrian Crossing Ahead Markings
Pedestrian Crossing Ahead MarkingsThe triangular shaped marking as shown in thediagram above indicates that there is a zebracrossing ahead. On-road cyclists should slow downand be prepared to stop to allow for pedestrians tocross the road.
ON-ROAD GROUND MARKINGS AND INFRASTRUCTURE
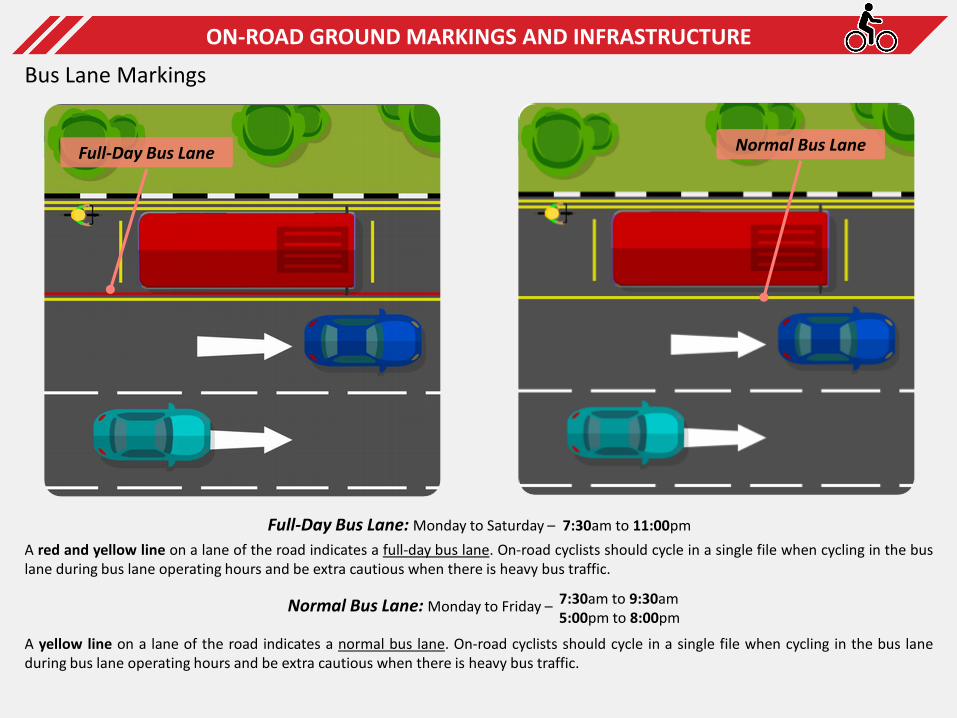
7:30am to 9:30am5:00pm to 8:00pm
Normal Bus Lane: Monday to Friday –
Full-Day Bus Lane: Monday to Saturday – 7:30am to 11:00pm
Bus Lane Markings
Full-Day Bus Lane Normal Bus Lane
A red and yellow line on a lane of the road indicates a full-day bus lane. On-road cyclists should cycle in a single file when cycling in the buslane during bus lane operating hours and be extra cautious when there is heavy bus traffic.
A yellow line on a lane of the road indicates a normal bus lane. On-road cyclists should cycle in a single file when cycling in the bus laneduring bus lane operating hours and be extra cautious when there is heavy bus traffic.
ON-ROAD GROUND MARKINGS AND INFRASTRUCTURE
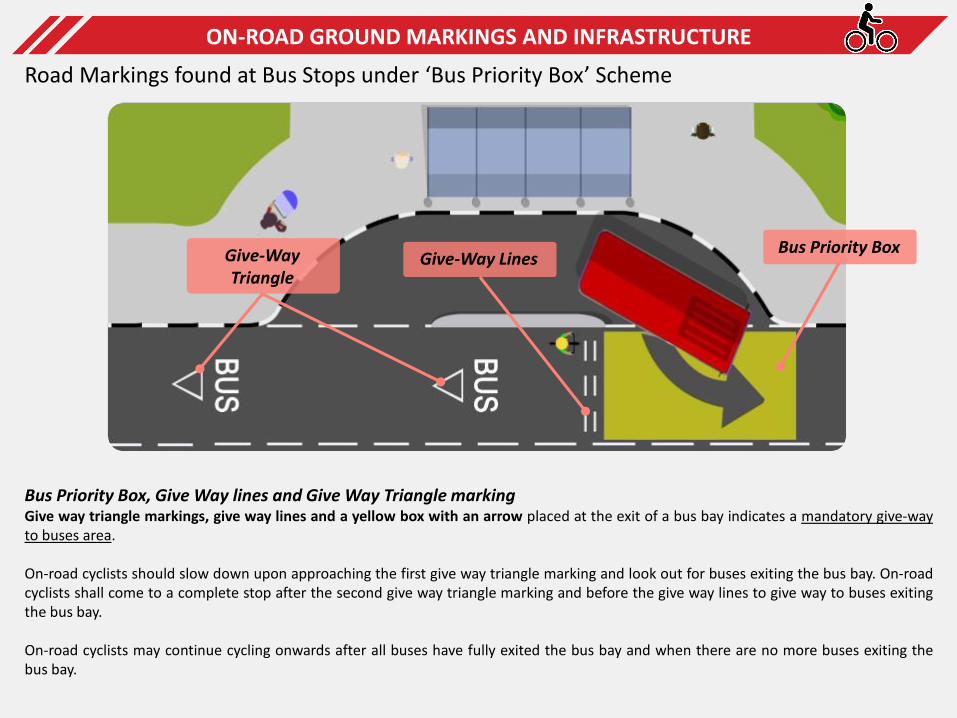
Bus Priority Box, Give Way lines and Give Way Triangle markingGive way triangle markings, give way lines and a yellow box with an arrow placed at the exit of a bus bay indicates a mandatory give-wayto buses area.
On-road cyclists should slow down upon approaching the first give way triangle marking and look out for buses exiting the bus bay. On-roadcyclists shall come to a complete stop after the second give way triangle marking and before the give way lines to give way to buses exitingthe bus bay.
On-road cyclists may continue cycling onwards after all buses have fully exited the bus bay and when there are no more buses exiting thebus bay.
Road Markings found at Bus Stops under ‘Bus Priority Box’ Scheme
Give-Way LinesBus Priority Box
ON-ROAD GROUND MARKINGS AND INFRASTRUCTURE
Give-Way Triangle
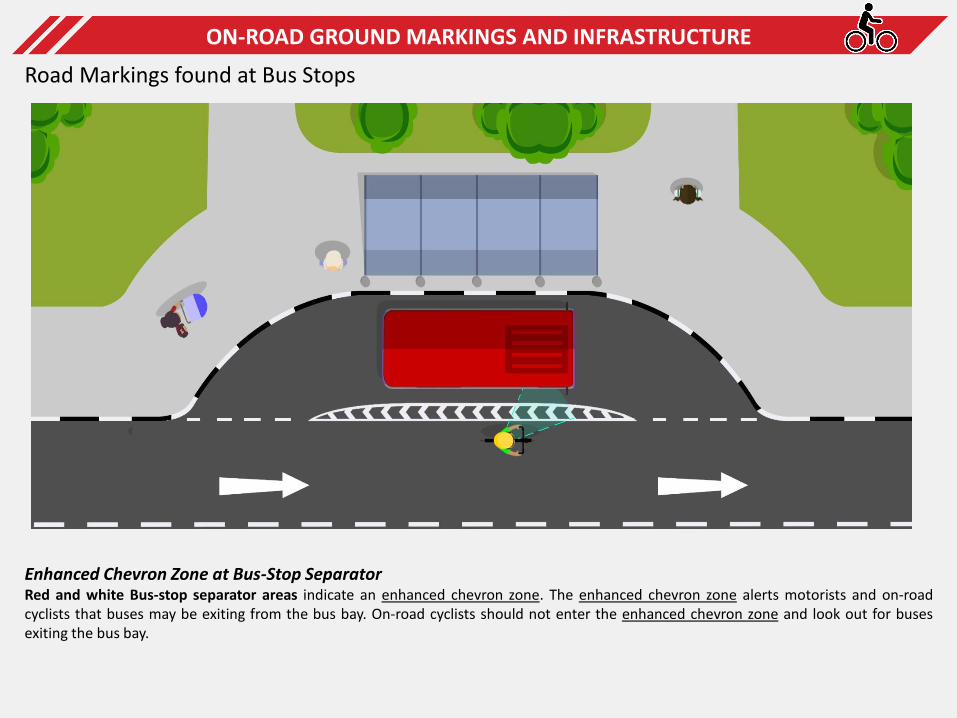
Road Markings found at Bus Stops
Enhanced Chevron Zone at Bus-Stop SeparatorRed and white Bus-stop separator areas indicate an enhanced chevron zone. The enhanced chevron zone alerts motorists and on-roadcyclists that buses may be exiting from the bus bay. On-road cyclists should not enter the enhanced chevron zone and look out for busesexiting the bus bay.
ON-ROAD GROUND MARKINGS AND INFRASTRUCTURE

Road Markings on at Road Junctions
Parallel Broken White Lines2 rows of parallel broken white lines indicate the end of a minorjunction as it joins into the major road.
On-road cyclists should slow down and be prepared to stop whenapproaching. On-road cyclists shall give way to traffic on the majorroad.
Single Solid White LineA single solid white line indicates a stop line. On-road cyclists muststop before the line and look out for traffic along the adjacent road.
Parallel Broken White Lines Single Solid White Line
ON-ROAD GROUND MARKINGS AND INFRASTRUCTURE

Right-Turn PocketBroken white lines that form a box extending from a right turninglane as shown in the diagram above indicates a right-turn pocket.
On-road cyclists turning right at junctions with right-turn pocketsshould stay within the pocket while waiting for on-coming traffic toclear up before proceeding to turn right when it is safe to do so.
Road Markings on at Road Junctions (cont’d)
Yellow BoxA yellow box as shown in the diagram above indicates thatmotorists are not allowed to stop or wait in this box. On-roadcyclists on the major road should not stop within the yellow boxwhen traffic comes to a standstill. Keep a look out for vehiclesturning out from the minor road when crossing the yellow box.
Right-Turn Pocket
ON-ROAD GROUND MARKINGS AND INFRASTRUCTURE
Yellow Box
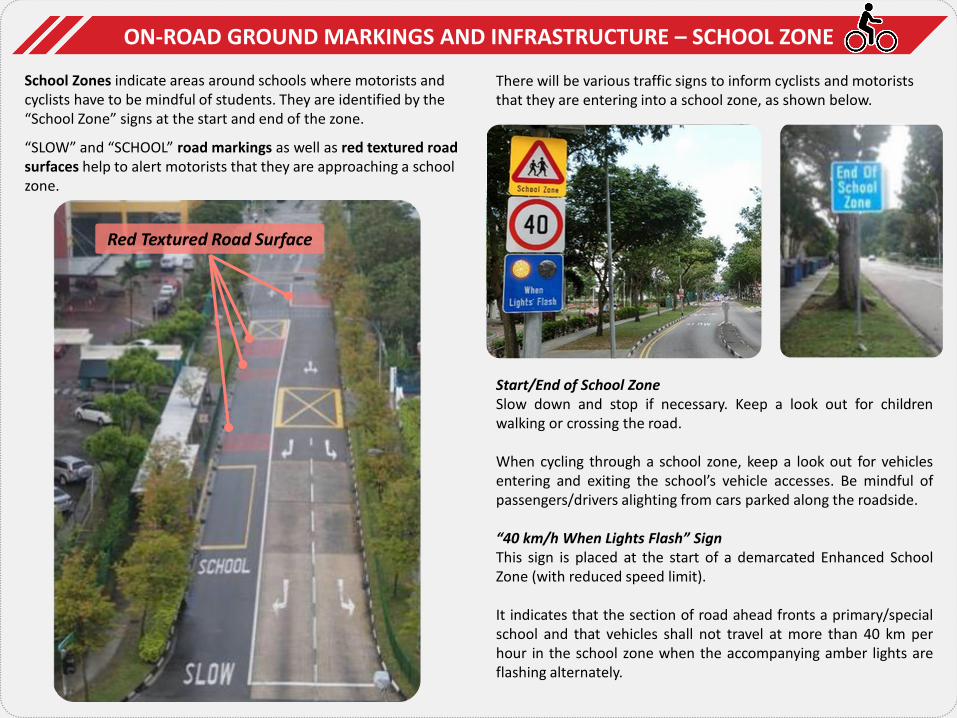
School Zones indicate areas around schools where motorists and cyclists have to be mindful of students. They are identified by the “School Zone” signs at the start and end of the zone.
“SLOW” and “SCHOOL” road markings as well as red textured road surfaces help to alert motorists that they are approaching a school zone.
There will be various traffic signs to inform cyclists and motorists that they are entering into a school zone, as shown below.
Start/End of School ZoneSlow down and stop if necessary. Keep a look out for childrenwalking or crossing the road.
When cycling through a school zone, keep a look out for vehiclesentering and exiting the school’s vehicle accesses. Be mindful ofpassengers/drivers alighting from cars parked along the roadside.
“40 km/h When Lights Flash” SignThis sign is placed at the start of a demarcated Enhanced SchoolZone (with reduced speed limit).
It indicates that the section of road ahead fronts a primary/specialschool and that vehicles shall not travel at more than 40 km perhour in the school zone when the accompanying amber lights areflashing alternately.
Red Textured Road Surface
ON-ROAD GROUND MARKINGS AND INFRASTRUCTURE – SCHOOL ZONE

Silver Zones indicate areas which have received road safety improvements due to a larger population of seniors living in those particular areas. Cyclists in these zones should be alert to senior pedestrians and reduce speeds.
Silver ZoneSign
End of SilverZone Sign
SeniorPedestrians
40km/h SpeedLimit signBeyond thissign, do notexceed 40kmh.
Informal Crossingsare placed at locations to facilitate pedestrian crossing activities without impeding traffic efficiency. At these crossings, vehicles have the right-of-way.
Traffic signs located at the entrance into Silver Zones inform cyclists that they entering a special zone.
Cyclists should observe the posted speed limit within Silver Zone where sign and road markings will be implemented to indicate the speed limit. Road markings, such as three yellow rumble strips,help reduce the cyclists’ speed when entering Silver Zones.
Traffic calming road improvements such as chicanes and reduction of lane widths can be found in Silver Zones.
Chicanes comprises of a series of S-shaped curves, motorists are encourage to drive slowly and carefully. Cyclists should be alert of such infrastructure and position themselves in the centre of the lane for their own safety.
Chicanes
Yellow Rumble Strips
Chicanes
ON-ROAD GROUND MARKINGS AND INFRASTRUCTURE – SILVER ZONE
InformalCrossings