Embed Size (px)
Citation preview
P/N: 09-39-30 Rev D ECO 949 04/06 -1-
M/L-10 MULTI-FIRE CLIP APPLIER INSTRUCTIONS FOR USE
P/N: 09-39-30 Rev D ECO 949 04/06 -2-
P/N: 09-39-30 Rev D ECO 949 04/06 -3-
TABLE OF CONTENTS
ENGLISH .............................................................................4
FRANÇAIS ...........................................................................9
ESPAÑOL ........................................................................... 14
ITALIANO .......................................................................... 19
DEUTSCH ........................................................................... 24
SIMPLIFIED CHINESE..................................................... 29
CHINESE ............................................................................ 33
P/N: 09-39-30 Rev D ECO 949 04/06 -4-
ENGLISH
Fully Squeeze
Trigger
“Non -clip”
side
of cartridge
Cartridge
fully
inserted
Fully Squeeze
Trigger
ENGLISH
M/L-10 REUSABLE MULTI- FIRE CLIP APPLIER
INSTRUCTIONS FOR USE
The M/L-10 Multi-Fire Clip Applier consists of:
1. One reusable autoclaveable handpiece – CAT. #1001/1002. 2. One removable “Stainless Steel” outer tube – CAT. #1201(included with CAT. #1001/1002).
3. Optional sterilization tray(s) - CAT. #3705 (sold separately) & 3707 (included w/clip applier & sold separately).
4. One sterile disposable back-loading slide cartridge - (The cartridge, containing Titanium medium
large clips, is sold separately).
WARNING: If during the inspection of the shipping carton, one of the above items shows any sign of damage D0 NOT USE. Please contact your local distributor.
LOADING CLIP APPLIER
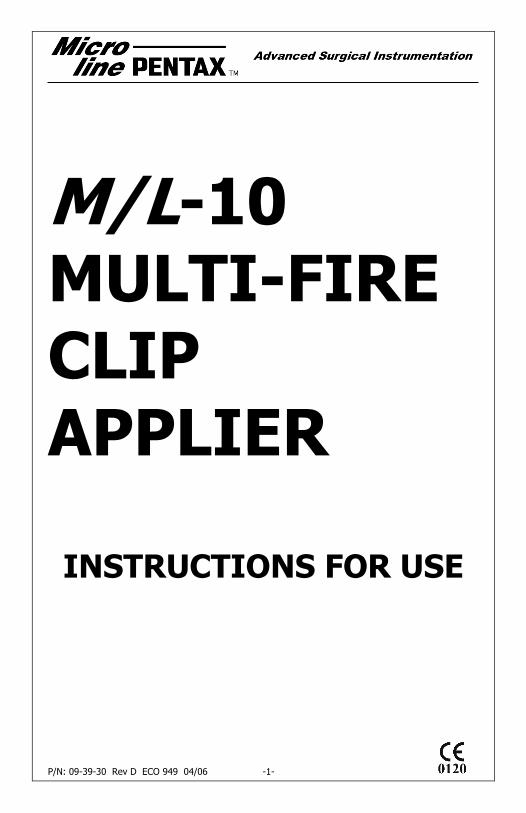
1. Peel the clip cartridge pouch open and remove it from the pouch.
2. Fully squeeze the handpiece trigger against the handle. (Fig. 1) 3. Align the arrow on the back of the clip applier with the arrow of the cartridge as shown in fig 3
(Arrow of the cartridge should be seen on the “non-clip” side of the cartridge).
4. Insert the cartridge all the way in to the back of the handpiece. (Fig. 2), making sure it is handled by its sides or proximal end behind “the ladder” in order to avoid any displacement of clips or
ladder. 5. Release the trigger. (This will immediately engage a clip into the handpiece jaws). 6. The instrument is ready to be used.
OPERATION
NOTE: Before firing a clip, verify that the ligation site is free of any obstructions.
1. Verify that there is a clip properly loaded in the jaws prior to inserting the clip applier through the
cannula.
2. Position the clip carefully around the vessel to be ligated.
Fig. 1
Fig. 3 Fig. 2
P/N: 09-39-30 Rev D ECO 949 04/06 -5-
ENGLISH
Fig. 5
Remove Cartridge
Fully Squeeze
Triger
Fully Squeeze
Trigger
Remove Cartridge
3. With full visualization of the ligation site, squeeze the trigger all the way so that the trigger touches the handle to close the clip around the vessel. The trigger will not reopen until the trigger
is beyond the 7th click (see 5 below). 4. Releasing the trigger will open the clip applier jaws and will automatically engage the next
sequential new clip. Now the clip applier is ready for re-firing. 5. a. For the cholangiogram procedure, whereby a clip is used to temporarily secure the cartheter
inside the common cystic duct without occluding the catheter, the degree of clip closure can be
adjusted. This is accomplished by releasing the trigger anytime after the 7th click at the ratchet mechanism. This earlier release capability allows for the desired amount of clip closure.
b. For maximum vessel occlusion (clip fully closed) simply depress instrument trigger fully so that the trigger and handle are touching and then fully release so that the subsequent clip can be engaged in the jaws.
CAUTIONS: A. If all the clips are to be used, the last two colored clips will warn the surgeon that
cartridge is almost out of clips. The clip applier should be removed from the cavity once the last colored clip has been fired. The cartridge should then be removed and disposed of.
B. Engaging the jaws over a previously applied clip should be avoided as it may cause the handpiece
to misfire
WARNING: Make sure cartridge is removed from the handpiece after use, or prior to cleaning and sterilizing process. Microline PENTAX shall not be responsible of any damage occurring as a result of a non-compliance with this warning.
DISASSEMBLING THE CLIP APPLIER HANDPIECE
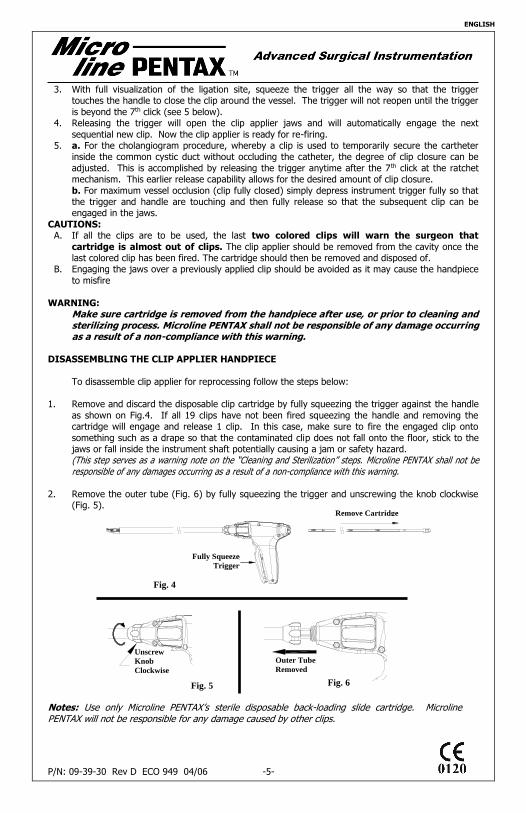
To disassemble clip applier for reprocessing follow the steps below: 1. Remove and discard the disposable clip cartridge by fully squeezing the trigger against the handle
as shown on Fig.4. If all 19 clips have not been fired squeezing the handle and removing the cartridge will engage and release 1 clip. In this case, make sure to fire the engaged clip onto
something such as a drape so that the contaminated clip does not fall onto the floor, stick to the jaws or fall inside the instrument shaft potentially causing a jam or safety hazard. (This step serves as a warning note on the “Cleaning and Sterilization” steps. Microline PENTAX shall not be responsible of any damages occurring as a result of a non-compliance with this warning.
2. Remove the outer tube (Fig. 6) by fully squeezing the trigger and unscrewing the knob clockwise (Fig. 5).
Notes: Use only Microline PENTAX’s sterile disposable back-loading slide cartridge. Microline PENTAX will not be responsible for any damage caused by other clips.
Outer Tube
Removed
Unscrew
Knob
Clockwise
Fig. 6
Fig. 4
Outer Tube
Removed
Unscrew
Knob
Clockwise
P/N: 09-39-30 Rev D ECO 949 04/06 -6-
ENGLISH
RECOMMENDED CLEANING & STERILIZATION STEPS:
Warning: Prior to cleaning the clip applier instrument, make sure that the disposable cartridge is removed and discarded. Microline PENTAX shall not be responsible for any damages occurring as a result of a non-compliance with this warning.
Note: The M/L-10 applier should be stored and reprocessed in a protective sterilization tray.
1. Keeping the instrument moist: Immediately after surgical use, remove the shaft’s outer tube. Immerse instruments in a tray,
basin or appropriate container of sterile distilled water. When the clip applier handpiece and its
outer tube are being transferred to Central Sterile Processing, they should be wrapped in a moistened towel of distilled water.
2. Enzymatic soaking & ultrasonic wash: The instrument and its outer tube should be immersed in an ultrasonic bath filled with a mixture containing 60mL of ENZOL® Enzymatic Detergent per 4 L of water @ 22-40°C. This will aid in
the cleaning, flushing and removal of any debris. Sonicate device for 10 minutes. 3. Rinsing
After the soaking cycle, the clip applier and its outer tube should be removed from the enzyme solution and rinsed with regular tap water.
4. Cleaning Once thoroughly rinsed, the clip applier and its outer tube should be immersed in an approved cleaning solution. The handle, shaft and rotation knob should be cleaned with a soft cloth or
sponge soaked in concentrated ENZOL® Enzymatic Detergent until no further bioload is observed on brush or towel. The distal end of the instrument must be cleaned with a “soft bristle” brush to
avoid any damage. 5. Rinsing
Once the washing cycle is completed, the clip applier handpiece and its outer tube should be
rinsed in normal tap water, and then rinsed 3 times with deionized water. Wipe instrument with a clean soft cloth.
6. Magnifying Lens Inspection After the hospital cleaning procedure is completed, an inspection of the instrument should be done to insure it is thoroughly cleaned.
7. Drying Prior to wrapping instruments for storage, they must be completely dry. Any residual moisture
could result in oxidation and corrosion that could affect the performance, function, and useful life of the instrument.
8. Lubricating It is important, prior to sterilization, that a water-soluble lubricant is employed to preserve the articulation and action of all movable parts of the instrument.
Re- Assembling 9. Re-assemble the outer tube on the instrument. To perform this, squeeze the handpiece trigger,
mount the outer tube over the clip applier shaft, and then secure it by screwing the tube knob counterclockwise until fully threaded.
Note: Your reprocessing protocol may require that the applier and the outer tube be reassembled after the sterilization process.
P/N: 09-39-30 Rev D ECO 949 04/06 -7-
ENGLISH
STERILIZATION:
Warning: Prior to sterilizing the clip applier instrument, make sure cartridge is removed. Microline PENTAX shall not be responsible for any damages occurring as a result of a non-compliance with this warning.
1. Prior to sterilization, the instrument must be thoroughly cleaned. 2. Wrap the instrument or use sterilization tray (Cat #3705/3707).
3. Sterilize the instrument following the protocol provided by the sterilizer manufacturer.
Microline PENTAX recommends the following as minimum sterilization cycle requirements:
Gravity Cycle: 3 minutes @ 270F (132C)
Pre-Vacuum Cycle: 3 minutes @ 270F (132C)
INSPECTION:
NOTE:
M/L-10 Inventory Inspection Procedure (to be performed once a month) An abbreviated inspection should be performed in the OR each time before handing the M/L-10 to
the surgeon for use:
– 1. Check jaws for misalignment, damage and caked on bio- burden.
– 2. Check shaft for straightness. Remove outer tube and check inner shaft for damage and caked on bio-burden.
– 3. Squeeze and release handle 20 plus times to check for sticking. Check handle for damage. Never pry handle and trigger open.
– 4. Fire a minimum of 2 clips to check clip closure, engagement into jaws and clip/jaw alignment.
– 5. In addition to proper and thorough cleaning (see instructions) make sure the M/L-10 is
properly lubricated between cases: » A. Fully immerse the instrument in an approved instrument lubricant.
» B. If unable to fully immerse the instrument make sure to thoroughly lubricate both jaw and rotation knob area.
» C. After lubrication process perform step 3 and 4 of the inspection if the applier handle
was sticking or locking.
WARRANTY:
Microline PENTAX warrants that this instrument is free from defects in both material and
workmanship.
Microline PENTAX shall not be held liable for incidental or consequential damage of any kind. This warranty is valid only to the original purchaser of the instrument and for a period of one (1) year.
Work performed on this instrument by anyone other than a Microline PENTAX Authorized Service Center will void this warranty.
SERVICE AND REPAIR:
Prior to returning this instrument for repair, call your Microline PENTAX Distributor to obtain authorization.
The instrument will be returned un-repaired to the sender if the following conditions are not met:
• The instrument must be given a “Return Goods Authorization” (R.G.A) number.
• The instrument must be cleaned and sterilized prior to returning for repair.
• The R.G.A. Number must be clearly visible on the outside of the box it is shipped in.
P/N: 09-39-30 Rev D ECO 949 04/06 -8-
ENGLISH
For any questions, please call your local Microline PENTAX distributor or Microline PENTAX
Customer Service at:
CONTACT INFORMATION:
Microline PENTAX, Inc. 800 Cummings Center
Suite 157X Beverly, MA 01915
U.S.A. Tel: (978) 922-9810 Fax: (978) 922-9209
Web: www.microlinepentax.com E-mail: [email protected]
EU REPRESENTATIVE:
PENTAX Europe GmbH Julius-Vosseler-Str. 104
22527 Hamburg • Germany Tel: +49-40-56 192 0
Fax: +49-40-56 042 13
IMPORTANT MESSAGE TO OUR VALUED CUSTOMERS
Congratulations on your purchase of the Microline PENTAX Reusable M/L -10 Multi-Fire Clip Applier. This precision, reusable instrument performs a vital surgical function and should be handled with the utmost care. We strongly encourage you to use the protective Microline PENTAX M/L-10 Sterilization Tray, Catalog No. 3707.
For questions related to the care, maintenance, and handling of the M/L-10, please
contact your authorized Microline PENTAX Representative. If you are unsure as to your Representative, contact our website www.microlinepentax.com or Microline PENTAX’s
main office at: +1 (978) 922-9810.
THANK YOU FOR CHOOSING MICROLINE PENTAX
P/N: 09-39-30 Rev D ECO 949 04/06 -9-
FRANÇAIS
Fully Squeeze
Trigger
Face de la cartouche n’ayant
pas de clip
Cartouche
complètement
insérée
FRANÇIAS
M/L-10 PINCE A CLIP REUTILISABLE A DECLENCHEMENT MULTIPLE
MODE D'UTILISATION
La pince à clip à déclenchement multiple M/L-10 comprend :
1. Une poignée réutilisable à encliquetage automatique – N° CAT. 1002 2. Un tube externe démontable en acier inoxydable – N° CAT. 1201(inclus avec la pièce N° CAT.
1001
3. Un ou plusieurs plateaux de stérilisation optionnels – N° CAT. 3705 et 3706 (vendus séparément)
4. Une cartouche jetable à insertion arrière. (La cartouche, contenant des clips en titane de dimension medium large, est vendue séparément)
AVERTISSEMENT:
Si, lors de l'inspection du carton d'emballage, l'une des pièces ci-dessus présente le moindre signe d'endommagement, veuillez NE PAS L'UTILISER. Vous devez, dans ce cas, contacter votre distributeur local.
CHARGEMENT DE LA PINCE A CLIP
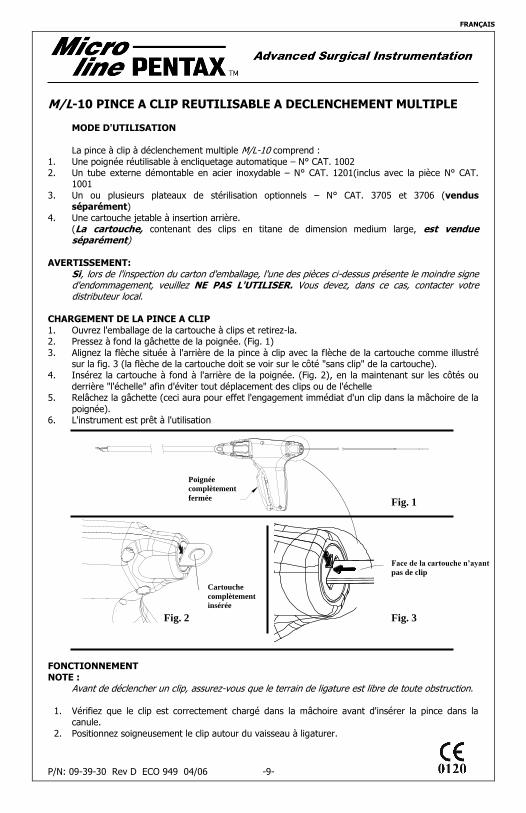
1. Ouvrez l'emballage de la cartouche à clips et retirez-la. 2. Pressez à fond la gâchette de la poignée. (Fig. 1)
3. Alignez la flèche située à l'arrière de la pince à clip avec la flèche de la cartouche comme illustré sur la fig. 3 (la flèche de la cartouche doit se voir sur le côté "sans clip" de la cartouche).
4. Insérez la cartouche à fond à l'arrière de la poignée. (Fig. 2), en la maintenant sur les côtés ou
derrière "l'échelle" afin d'éviter tout déplacement des clips ou de l'échelle 5. Relâchez la gâchette (ceci aura pour effet l'engagement immédiat d'un clip dans la mâchoire de la
poignée). 6. L'instrument est prêt à l'utilisation
FONCTIONNEMENT
NOTE : Avant de déclencher un clip, assurez-vous que le terrain de ligature est libre de toute obstruction.
1. Vérifiez que le clip est correctement chargé dans la mâchoire avant d'insérer la pince dans la
canule.
2. Positionnez soigneusement le clip autour du vaisseau à ligaturer.
Fig. 1
Fig. 3 Fig. 2
Poignée
complètement
fermée
P/N: 09-39-30 Rev D ECO 949 04/06 -10-
FRANÇAIS
Fig. 5
Remove Cartridge
Fully Squeeze
Triger
3. Dans des conditions de visualisation totale du terrain de ligature, pressez la gâchette à fond afin de fermer le clip autour du vaisseau. La gâchette ne se relâchera pas avant que le clip ne soit
complètement fermé. 4. Le relâchement de la gâchette déclenche l'ouverture de la mâchoire de la pince et prépare
automatiquement la séquence d'un nouveau clip. Maintenant, la pince est prête pour un nouveau déclenchement.
PRECAUTIONS : A. Si l'on doit utiliser tous les clips, les deux derniers clips colorés avertiront le chirurgien que
dans la cartouche il ne reste que deux clips. La pince à clips devra être retirée de la cavité lorsque le dernier clip bleu aura été déclenché. La cartouche doit alors être retirée et jetée.
B. Evitez d'engager la mâchoire sur un clip déjà appliqué car cela pourrait entraîner un
déclenchement défectueux de la poignée.
AVERTISSEMENT : Assurez-vous que la cartouche est démontée après utilisation ou avant le processus de nettoyage et de stérilisation. Microline PENTAX ne sera pas tenu responsable de tout dommage résultant du non-respect de cet avertissement.
DEMONTAGE DE LA POIGNEE DE LA PINCE A CLIP Le démontage de la pince à clip pour les besoins du traitement doit être réalisé en respectant les étapes suivantes :
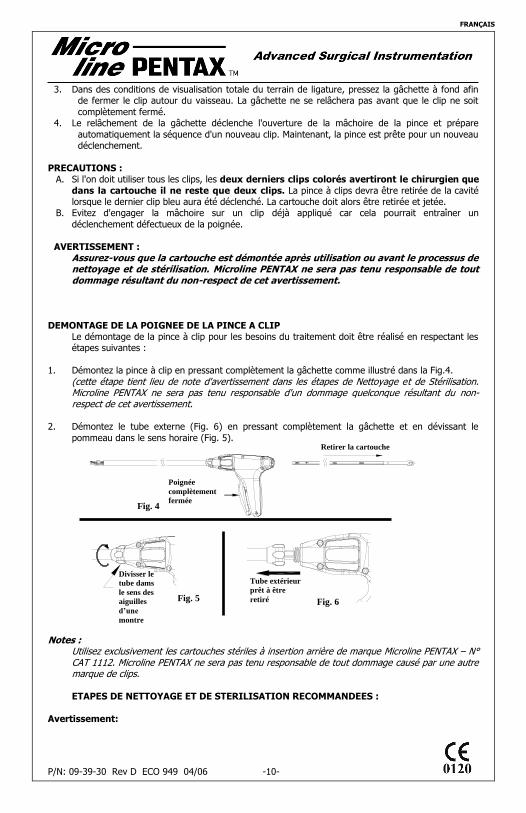
1. Démontez la pince à clip en pressant complètement la gâchette comme illustré dans la Fig.4.
(cette étape tient lieu de note d'avertissement dans les étapes de Nettoyage et de Stérilisation. Microline PENTAX ne sera pas tenu responsable d'un dommage quelconque résultant du non-respect de cet avertissement.
2. Démontez le tube externe (Fig. 6) en pressant complètement la gâchette et en dévissant le
pommeau dans le sens horaire (Fig. 5).
Notes :
Utilisez exclusivement les cartouches stériles à insertion arrière de marque Microline PENTAX – N° CAT 1112. Microline PENTAX ne sera pas tenu responsable de tout dommage causé par une autre marque de clips.
ETAPES DE NETTOYAGE ET DE STERILISATION RECOMMANDEES :
Avertissement:
Outer Tube
Removed
Unscrew
Knob
Clockwise
Fig. 6
Fig. 4
Retirer la cartouche
Divisser le
tube dams
le sens des
aiguilles
d’une
montre
Tube extérieur
prêt à être
retiré
Poignée
complètement
fermée
P/N: 09-39-30 Rev D ECO 949 04/06 -11-
FRANÇAIS
Avant de nettoyer la pince à clip, assurez-vous que la cartouche jetable est bien démontée et jetée. Microline PENTAX ne sera pas
tenu responsable de tout dommage résultant du non-respect de cet avertissement. Note :
La pince M/L-10 doit être stockée et traitée dans un plateau de stérilisation protégé. 1. Maintien de l'humidité de l'instrument :
Immédiatement après l'utilisation chirurgicale, veuillez démonter le tube externe de la crosse. Placez les instruments dans un plateau, une cuvette ou tout autre récipient approprié rempli d'eau
distillée stérilisée. Lorsque la poignée de la pince et son tube sont transférés pour une opération de Traitement de Stérilisation Centralisé, ceux-ci doivent être enveloppés dans une serviette humidifiée avec de l'eau distillée.
2. Trempage aux enzymes et lavage aux ultrasons :
L'instrument ainsi que son tube externe doivent être immergés dans un bain aux ultrasons composé d'un mélange de 60 ml de Détergent Enzymatique ENZOL® pour 4 l d'eau à 22-40°C. Ceci permettra de faciliter le nettoyage, le rinçage et le retrait de tout résidu. Effectuez cette
opération pendant 10 minutes.
3. Rinçage Après le cycle de trempage, la pince à clip ainsi que son tube externe doivent être retirés de la
solution enzymatique et rincés à l'eau courante. 4. Nettoyage
Après les avoir abondamment rincés, la pince à clip et son tube externe doivent être immergés dans une solution de nettoyage homologuée. La poignée, la crosse ainsi que le pommeau de
rotation doivent être nettoyés avec un chiffon doux ou une éponge imbibée de Détergent Enzymatique Concentré ENZOL® jusqu'à ce que la brosse ou la serviette ne présente plus de traces de biocharge. L'extrémité distale de l'instrument doit être nettoyée avec une brosse à poils
souples afin d'éviter tout dommage.
5. Rinçage Lorsque le cycle de lavage est terminé, la poignée de la pince à clip et son tube externe doivent
être rincés à l'eau courante. Ils doivent ensuite être rincés 3 fois avec de l'eau déionisée. Essuyez
l'instrument avec un chiffon doux propre. 6. Inspection à la loupe
Après achèvement de la procédure de nettoyage suivant la pratique hospitalière, il convient de procéder à une inspection de l'instrument pour s'assurer de son état de totale propreté.
7. Séchage Avant d'envelopper les instruments en vue de leur stockage, il convient de les sécher
complètement. En effet, toute humidité résiduelle risque d'entraîner une oxydation et une corrosion pouvant affecter les performances, le fonctionnement et la durée de vie de l'instrument.
8. Lubrification Il est important, avant la stérilisation, d'utiliser un lubrifiant hydrosoluble afin de préserver la
bonne articulation et le bon fonctionnement de toutes les parties mobiles de l'instrument.
9. Remontage Remontage du tube externe sur l'instrument. Pour réaliser cette opération, pressez la gâchette de la poignée, montez le tube externe sur la crosse de la pince et fixez-le en tournant à fond le
pommeau du tube dans le sens anti-horaire.
Note : Il se peut que la procédure de traitement de votre établissement exige que la pince et le tube externe soient remontés après le processus de stérilisation.
P/N: 09-39-30 Rev D ECO 949 04/06 -12-
FRANÇAIS
STERILISATION :
Avertissement : Avant de stériliser la pince à clip, assurez-vous que la cartouche est démontée. Microline PENTAX ne sera pas tenu responsable d'un quelconque dommage résultant du non-respect de cet avertissement.
NOTE : Vos instruments Microline PENTAX sont maintenant prêts pour la stérilisation. Il est recommandé
de suivre les cycles de stérilisation suivants qui ont été validés par Microline PENTAX : Cycle de gravité: 3 minutes @ 270°F (132°C)
Cycle de pré-aspiration: 3 minutes @ 270°F (132°C)
GARANTIE :
Microline PENTAX garantit que cet instrument ne présente aucun défaut de matériel ou de main d'œuvre.
Microline PENTAX ne pourra pas être tenu responsable d'un quelconque dommage, qu'il soit
volontaire ou involontaire, subi par l'instrument. La validité de cette garantie s'applique uniquement au premier acheteur de l'instrument pendant une période de un (1) an.
Tout travail effectué sur cet instrument par une personne n'appartenant pas au Centre de Maintenance Autorisé de Microline PENTAX annulera cette garantie.
MAINTENANCE ET REPARATION :
Avant de retourner cet instrument pour réparation, il convient d'appeler votre Distributeur Microline PENTAX afin d'en obtenir l'autorisation.
L'instrument fera l'objet d'un retour à l'envoyeur si la condition suivante n’est pas remplie :
• L'instrument doit être propre et stérilisé avant son retour pour réparation.
P/N: 09-39-30 Rev D ECO 949 04/06 -13-
FRANÇAIS
Pour toute information complémentaire, veuillez contacter votre Distributeur Microline PENTAX ou le Service Clientèle Microline PENTAX dont les coordonnées figurent ci-après :
INFORMATIONS DE CONTACT:
Microline PENTAX, Inc. 800 Cummings Center
Suite 157X Beverly, MA 01915
U.S.A. Tel: (978) 922-9810 Fax: (978) 922-9209
Web: www.microlinepentax.com E-mail: [email protected]
REPRÉSENTANT LOCAL:
PENTAX Europe GmbH
Julius-Vosseler-Str. 104 22527 Hamburg • Germany Tel: +49-40-56 192 0
Fax: +49-40-56 042 13
MESSAGE IMPORTANT À L’INTENTION DE NOS CHERS CLIENTS
Félicitations pour votre achat de l’applicateur à clip réutilisable M/L-10 Multi-Fire de Microline PENTAX. Cet instrument haute précision réutilisable, dont la fonction chirurgicale est vitale, doit être manipulé avec la plus grande précaution. Nous vous conseillons vivement d’utiliser le plateau de stérilisation M/L-10
de Microline PENTAX (Référence catalogue n° 3707).
Pour toute question relative à l’entretien, à la maintenance et à la manipulation du M/L-10, veuillez contacter votre représentant Microline PENTAX agréé. Si vous
ne connaissez pas l’adresse de votre revendeur le plus proche, consultez notre site Internet www.microlinepentax.com ou contactez le bureau principal
de Microline PENTAX en composant le +1 (978) 922 9810.
MERCI D’AVOIR CHOISI MICROLINE PENTAX
P/N: 09-39-30 Rev D ECO 949 04/06 -14-
ESPAÑOL
Fully Squeeze
Trigger
Cara "sin clips" del cartucho
Insertar el
cartucho h
asta el fondo
ESPAÑOL
APLICADOR DE CLIPS M/L-10 REUTILIZABLE
INSTRUCCIONES PARA SU USO El Aplicador de Clips M/L-10 consta de :
1. Un mango aplicador reutilizable autoclavable-CAT.# 1001/1002 2. Un tubo exterior de "Aceero Inoxidable"-CAT.# 1201 (incluido con CAT. # 1001/1002)
3. Bandejas opcionales para esterilización-CAT.# 3705 (se vende por separado) y 3707 (incluida con el aplicador de clips y también por separado).
4. Un cartucho desechable de carga posterior (EL cartucho, que contiene clips del tamaño
medio/largo de Titanio, se vende por separado).
PRECAUCIÓN: Si durante la inspección del embalaje de cartón., alguno de los elementos anteriores mostrara signos de estar dañado, NO LO USE. Por favor contacte con su distribuidor local.
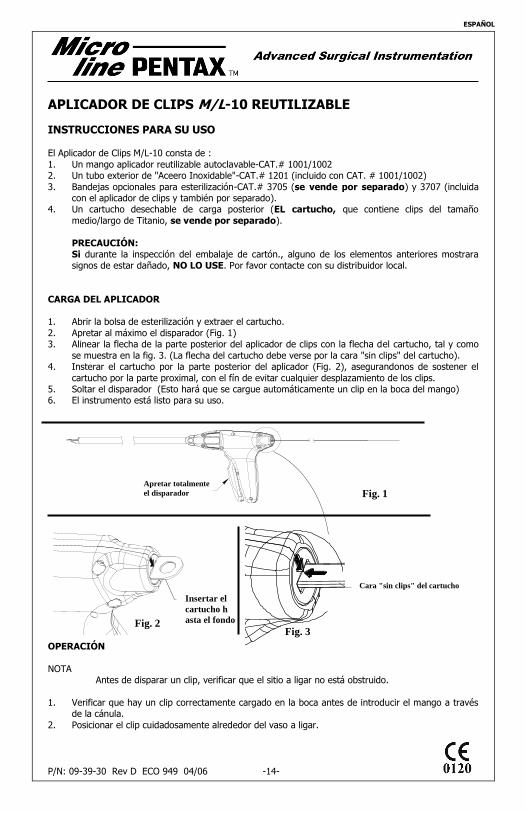
CARGA DEL APLICADOR 1. Abrir la bolsa de esterilización y extraer el cartucho.
2. Apretar al máximo el disparador (Fig. 1) 3. Alinear la flecha de la parte posterior del aplicador de clips con la flecha del cartucho, tal y como
se muestra en la fig. 3. (La flecha del cartucho debe verse por la cara "sin clips" del cartucho). 4. Insterar el cartucho por la parte posterior del aplicador (Fig. 2), asegurandonos de sostener el
cartucho por la parte proximal, con el fín de evitar cualquier desplazamiento de los clips. 5. Soltar el disparador (Esto hará que se cargue automáticamente un clip en la boca del mango) 6. El instrumento está listo para su uso.
OPERACIÓN
NOTA Antes de disparar un clip, verificar que el sitio a ligar no está obstruido.
1. Verificar que hay un clip correctamente cargado en la boca antes de introducir el mango a través de la cánula.
2. Posicionar el clip cuidadosamente alrededor del vaso a ligar.
Fig. 1
Fig. 3 Fig. 2
Apretar totalmente
el disparador
P/N: 09-39-30 Rev D ECO 949 04/06 -15-
ESPAÑOL
Fig. 5
Remove Cartridge
Fully Squeeze
Triger
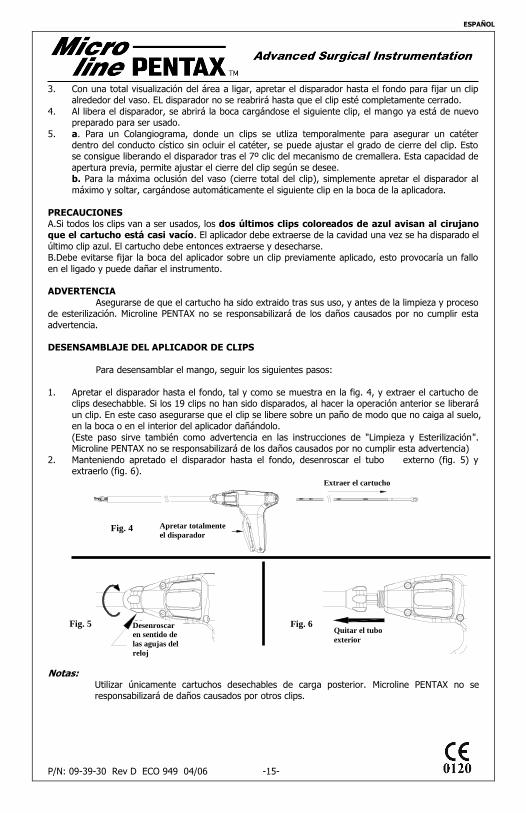
3. Con una total visualización del área a ligar, apretar el disparador hasta el fondo para fijar un clip alrededor del vaso. EL disparador no se reabrirá hasta que el clip esté completamente cerrado.
4. Al libera el disparador, se abrirá la boca cargándose el siguiente clip, el mango ya está de nuevo preparado para ser usado.
5. a. Para un Colangiograma, donde un clips se utliza temporalmente para asegurar un catéter dentro del conducto cístico sin ocluir el catéter, se puede ajustar el grado de cierre del clip. Esto se consigue liberando el disparador tras el 7º clic del mecanismo de cremallera. Esta capacidad de
apertura previa, permite ajustar el cierre del clip según se desee. b. Para la máxima oclusión del vaso (cierre total del clip), simplemente apretar el disparador al
máximo y soltar, cargándose automáticamente el siguiente clip en la boca de la aplicadora.
PRECAUCIONES A.Si todos los clips van a ser usados, los dos últimos clips coloreados de azul avisan al cirujano que el cartucho está casi vacío. El aplicador debe extraerse de la cavidad una vez se ha disparado el
último clip azul. El cartucho debe entonces extraerse y desecharse. B.Debe evitarse fijar la boca del aplicador sobre un clip previamente aplicado, esto provocaría un fallo
en el ligado y puede dañar el instrumento. ADVERTENCIA
Asegurarse de que el cartucho ha sido extraido tras sus uso, y antes de la limpieza y proceso de esterilización. Microline PENTAX no se responsabilizará de los daños causados por no cumplir esta
advertencia. DESENSAMBLAJE DEL APLICADOR DE CLIPS
Para desensamblar el mango, seguir los siguientes pasos:
1. Apretar el disparador hasta el fondo, tal y como se muestra en la fig. 4, y extraer el cartucho de
clips desechabble. Si los 19 clips no han sido disparados, al hacer la operación anterior se liberará
un clip. En este caso asegurarse que el clip se libere sobre un paño de modo que no caiga al suelo, en la boca o en el interior del aplicador dañándolo.
(Este paso sirve también como advertencia en las instrucciones de "Limpieza y Esterilización". Microline PENTAX no se responsabilizará de los daños causados por no cumplir esta advertencia)
2. Manteniendo apretado el disparador hasta el fondo, desenroscar el tubo externo (fig. 5) y extraerlo (fig. 6).
Notas:
Utilizar únicamente cartuchos desechables de carga posterior. Microline PENTAX no se responsabilizará de daños causados por otros clips.
Outer Tube
Removed
Unscrew
Knob
Clockwise
Fig. 6
Fig. 4
Fig. 5
Extraer el cartucho
Apretar totalmente
el disparador
Desenroscar
en sentido de
las agujas del
reloj
Quitar el tubo
exterior
P/N: 09-39-30 Rev D ECO 949 04/06 -16-
ESPAÑOL
PASOS RECOMENDADOS PARA LIMPIEZA Y ESTERILIZACIÓN
Advertencia:
Previo a la limpieza del aplicador de clips, asegurarse que el cartucho desechable ha sido extraido y el tubo exterior desenroscado y extraido. Microline PENTAX no se responsabilizará de los daños causados por no cumplir esta advertencia.
Nota:
El aplicador de clips M/L-10 debe almacenarse y esterilizarse en un contenedor para esterilización.
1. Manteniendo el instrumento mojado/humedo
Imediatamente tras su suo, extraer el cartucho y tubo externo. Sumergir el instrumento en una
bandeja o contenedor apropiado con agua estéril destilada. Cuando el mango aplicador y el tubo externo pasen a la Central de Esterilización, se deben envolver en una toalla humedecida en agua
destilada. 2. Ultrasonidos y baño en solución enzimática:
El instrumento y el tubo externo deben sumergirse en un baño de ultrasonidos conteniendo una mezcla de 60 mL de ENZOL Detergente Enzimático por cada 4 L de agua entre 22-40ºC. Esto
facilitará la limpez y posterior eliminación de restos o residuos. Dejar durante 10 min.
3. Enjuague
Tras el baño anterior, el aplicador y el tubo externo deben enjuagarse con agua del grifo.
4. Limpieza Una vez esté totalmente enjuagado, el aplicador de clips y el tubo externo deben ser sumergidos en una solución limpiadora. El mango, vástago y tambor rotatorio deben ser limpiados con una
esponja o paño suave empapados en ENZOL concentrado Detergente Enzimático hasta eliminar totalmente cualquier resto o residuo. La parte distal del aparato debe ser limpiada con un cepillo
de "cerdas suaves" para evitar daños.
5. Enjuague Una vez completado el paso anterior, el aplicador y el mango deben sumergirse en agua del grifo y limpiarse con un trapo suave.
6. Inspección ocular
Tras el procedimiento de limpieza, debe realizarse una inspección del instrumento para asegurarnos que está totalmente limpio.
7. Secado Antes de envolverlo para su almacenaje, el aplicador debe estar totalmente seco. De lo contrario,
cualquier residuo podría dar como resultado una oxidación y corrosión afectando a la calidad de uso y a la vida útil del instrumento.
8. Lubricado Es importante, previo a la esterilización, que se emplee un lubricante soluble en agua para
preservar la correcta articulación y acción de las partes móviles del instrumental.
9. Re-ensamblaje (se lleva a cabo en quirófano tras la esterilización) Re-ensamblar el tubo externo en el instrumento. Para ello, apretar hasta el fondo el disparador, ensamblar el tubo externo y enroscarlo manteniendo el tambor rotatorio fijo.
Nota:
El protocolo requiere que el aplicador y el tubo sean re-ensamblados tras la esterilización.
P/N: 09-39-30 Rev D ECO 949 04/06 -17-
ESPAÑOL
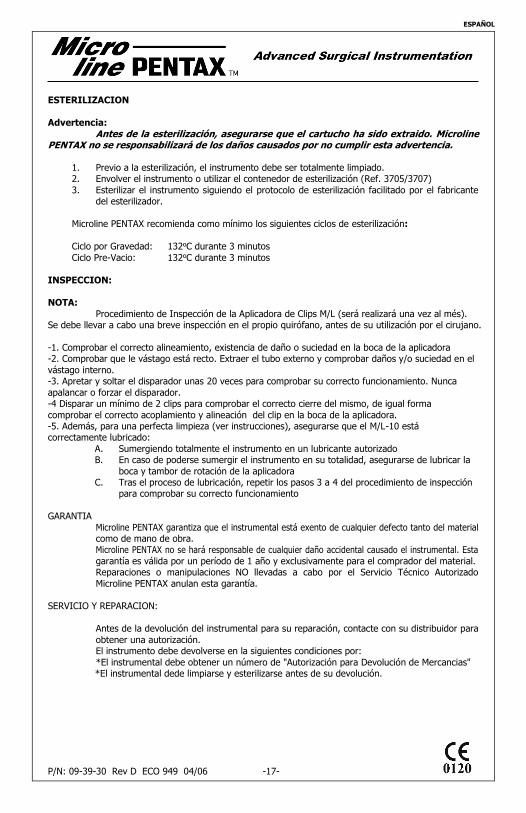
ESTERILIZACION
Advertencia:
Antes de la esterilización, asegurarse que el cartucho ha sido extraido. Microline PENTAX no se responsabilizará de los daños causados por no cumplir esta advertencia.
1. Previo a la esterilización, el instrumento debe ser totalmente limpiado. 2. Envolver el instrumento o utilizar el contenedor de esterilización (Ref. 3705/3707)
3. Esterilizar el instrumento siguiendo el protocolo de esterilización facilitado por el fabricante del esterilizador.
Microline PENTAX recomienda como mínimo los siguientes ciclos de esterilización:
Ciclo por Gravedad: 132ºC durante 3 minutos
Ciclo Pre-Vacio: 132ºC durante 3 minutos
INSPECCION: NOTA:
Procedimiento de Inspección de la Aplicadora de Clips M/L (será realizará una vez al més). Se debe llevar a cabo una breve inspección en el propio quirófano, antes de su utilización por el cirujano.
-1. Comprobar el correcto alineamiento, existencia de daño o suciedad en la boca de la aplicadora -2. Comprobar que le vástago está recto. Extraer el tubo externo y comprobar daños y/o suciedad en el
vástago interno. -3. Apretar y soltar el disparador unas 20 veces para comprobar su correcto funcionamiento. Nunca
apalancar o forzar el disparador. -4 Disparar un mínimo de 2 clips para comprobar el correcto cierre del mismo, de igual forma
comprobar el correcto acoplamiento y alineación del clip en la boca de la aplicadora. -5. Además, para una perfecta limpieza (ver instrucciones), asegurarse que el M/L-10 está correctamente lubricado:
A. Sumergiendo totalmente el instrumento en un lubricante autorizado B. En caso de poderse sumergir el instrumento en su totalidad, asegurarse de lubricar la
boca y tambor de rotación de la aplicadora C. Tras el proceso de lubricación, repetir los pasos 3 a 4 del procedimiento de inspección
para comprobar su correcto funcionamiento
GARANTIA
Microline PENTAX garantiza que el instrumental está exento de cualquier defecto tanto del material como de mano de obra. Microline PENTAX no se hará responsable de cualquier daño accidental causado el instrumental. Esta
garantía es válida por un período de 1 año y exclusivamente para el comprador del material. Reparaciones o manipulaciones NO llevadas a cabo por el Servicio Técnico Autorizado
Microline PENTAX anulan esta garantía. SERVICIO Y REPARACION:
Antes de la devolución del instrumental para su reparación, contacte con su distribuidor para
obtener una autorización. El instrumento debe devolverse en la siguientes condiciones por:
*El instrumental debe obtener un número de "Autorización para Devolución de Mercancias" *El instrumental dede limpiarse y esterilizarse antes de su devolución.
P/N: 09-39-30 Rev D ECO 949 04/06 -18-
ESPAÑOL
Para cualquier pregunta, por favor llame a su servicio local de la distribuidor del Microline PENTAX o servicio del cliente de Microline PENTAX en:
INFORMACIÓN DE CONTACTO:
Microline PENTAX, Inc.
800 Cummings Center Suite 157X
Beverly, MA 01915 U.S.A.
Tel: (978) 922-9810 Fax: (978) 922-9209 Web: www.microlinepentax.com
E-mail: [email protected]
REPRESENTANTE EN LA UE:
PENTAX Europe GmbH
Julius-Vosseler-Str. 104 22527 Hamburg • Germany
Tel: +49-40-56 192 0 Fax: +49-40-56 042 13
MENSAJE IMPORTANTE PARA NUESTROS MEJORES CLIENTES
Le felicitamos por la adquisición del aplicador de clips reutilizable Multi-Fire M/L-10 Microline PENTAX Este instrumento de precisión, reutilizable, lleva a cabo una
función vital en cirugía y debería ser utilizado con la máxima precaución. Le recomendamos encarecidamente que utilice la bandeja protectora para
esterilización M/L-10 Microline PENTAX, Nº de catálogo 3707.
Para cualquier cuestión relativa al cuidado, mantenimiento y utilización del M/L-10, le rogamos se ponga en contacto con el representante autorizado de
Microline PENTAX. Si no está seguro de quién es su representante, visite nuestra página web en www.microlinepentax.com o llame a las oficinas centrals de
Microline PENTAX al +1 (978) 922-9810.
GRACIAS POR ELEGIR MICROLINE PENTAX
P/N: 09-39-30 Rev D ECO 949 04/06 -19-
ITALIANO
Fully Squeeze
Trigger
Lato della Ricarica
privo di Clip
Cartuccia
inserita a
fondo
ITALIANO
APPLICATORE PLURIUSO MICROLINE PENTAX M/L-10
ISTRUZIONI PER L’USO
L’Applicatore Pluriuso Microline PENTAX M/L-10 è composto da:
1. Impugnatura risterilizzabile – Cod. ML1001 – ML1002 2. Involucro esterno rimovibile, in Acciaio – Cod.. ML1201 3. Vassoio per sterilizzazione, in Acciaio – Cod. ML3705
4. Cartuccia sterile-monouso, ad ingresso posteriore – Cod. ML1112 ( La Cartuccia contiene 19 Clip in Titanio, misura M/L, ed è venduta a parte)
ATTENZIONE:
Se tutte le clip devono essere utilizzate, le ultime due, colorate, avvertiranno il Chirurgo che la Ricarica sta per esaurirsi. L’Applicatore deve allora essere rimossa dalla Cavità addominale, la Ricarica deve essere estratta e gettata.
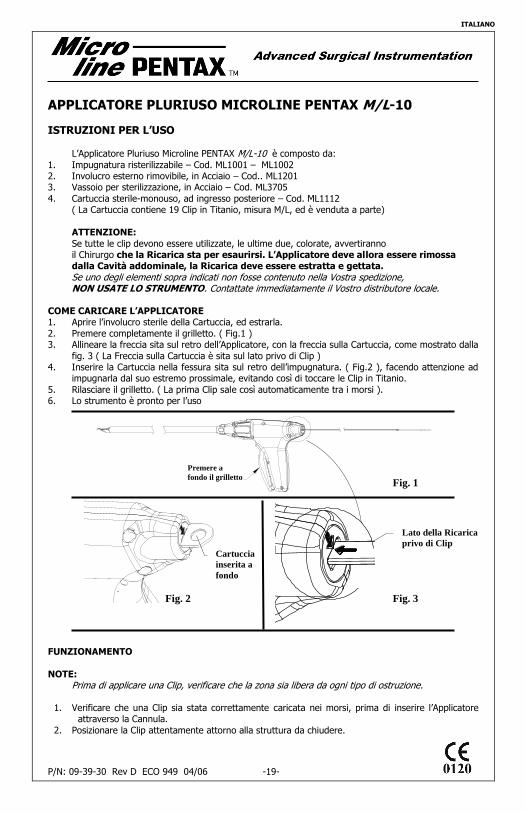
Se uno degli elementi sopra indicati non fosse contenuto nella Vostra spedizione, NON USATE LO STRUMENTO. Contattate immediatamente il Vostro distributore locale. COME CARICARE L’APPLICATORE 1. Aprire l’involucro sterile della Cartuccia, ed estrarla.
2. Premere completamente il grilletto. ( Fig.1 ) 3. Allineare la freccia sita sul retro dell’Applicatore, con la freccia sulla Cartuccia, come mostrato dalla
fig. 3 ( La Freccia sulla Cartuccia è sita sul lato privo di Clip ) 4. Inserire la Cartuccia nella fessura sita sul retro dell’impugnatura. ( Fig.2 ), facendo attenzione ad
impugnarla dal suo estremo prossimale, evitando così di toccare le Clip in Titanio.
5. Rilasciare il grilletto. ( La prima Clip sale così automaticamente tra i morsi ). 6. Lo strumento è pronto per l’uso
FUNZIONAMENTO
NOTE: Prima di applicare una Clip, verificare che la zona sia libera da ogni tipo di ostruzione.
1. Verificare che una Clip sia stata correttamente caricata nei morsi, prima di inserire l’Applicatore attraverso la Cannula.
2. Posizionare la Clip attentamente attorno alla struttura da chiudere.
Fig. 1
Fig. 3 Fig. 2
Premere a
fondo il grilletto
P/N: 09-39-30 Rev D ECO 949 04/06 -20-
ITALIANO
Fig. 5
Remove Cartridge
Fully Squeeze
Triger
3. Con piena visualizzazione della zona operativa, premere a fondo il grilletto, in modo che la Clip, fuoriuscendo, possa circondare completamente la struttura interessata. Il grilletto non si riaprirà,
fino a quando la Clip non sia completamente chiusa. 4. Rilasciando il grilletto, i morsi si aprono, ed automaticamente una nuova Clip si rende disponibile.
A questo punto, l’Applicatore è nuovamente pronto per “sparare”.
PRECAUZIONI: A. Se tutte le Clip devono essere utilizzate, le ultime due Clip, colorate in Blu,
avvertiranno il Chirurgo che la Cartuccia si sta esaurendo. L’Applicatore dunque, deve essere estratto dalla cavità addominale una volta che l’ultima Clip colorata in Blu sia stata “sparata”. La Cartuccia deve essere estratta dallo strumento e
gettata. B. Mai sovrapporre Clip metallica al di sopra di altra Clip metallica, precedentemente
applicata. Ciò potrebbe causare incompleta chiusura e danni alle strutture.
ATTENZIONE:
Assicurarsi della rimozione della Cartuccia dopo l’uso, o comunque prima di ogni procedura di pulizia o di sterilizzazione dello strumento. Il produttore ed il distributore non sono responsabili per danni derivati dal non corretto attenersi a queste normative di manutenzione. SMONTAGGIO DELL’IMPUGNATURA
Per smontare l’impugnatura, per manutenzione o pulizia, procedere come segue:
1 Rimuovere e gettare la Cartuccia monouso, premendo a fondo il grilletto (Fig.4). Qualora la
Cartuccia non fosse esaurita, prestare attenzione alla Clip che rimane tra i morsi dell’Applicatore, dopo l’estrazione. In questo caso, “sparare” la Clip rimasta su di un telo, in modo che tale Clip non più sterile, non vada a cadere su strutture sterili, causando danni.
(Avvertimento importante per le Procedure di “Pulizia e Sterilizzazione” Microline PENTAX non si riterrà responsabile per danni allo strumento derivanti da una non corretta manutenzione per scarsa attenzione a questi avvertimenti).
2 Rimuovere l’involucro esterno dell’Applicatore, premendo a fondo il grilletto
(Fig. 6), e svitando il tubo in senso orario.(Fig. 5).
Note:
Usare solamente Cartucce sterili monouso Microline PENTAX Cod. ML1112-ML1122. Microline PENTAX non è responsabile per danni causati dall’uso di altre Clip.
Outer Tube
Removed
Unscrew
Knob
Clockwise
Fig. 6
Fig. 4
Rimuovere la Cartuccia
Premere a
fondo il grilletto
Svitare in
senso
orario Rimozione del
Tubo esterno
P/N: 09-39-30 Rev D ECO 949 04/06 -21-
ITALIANO
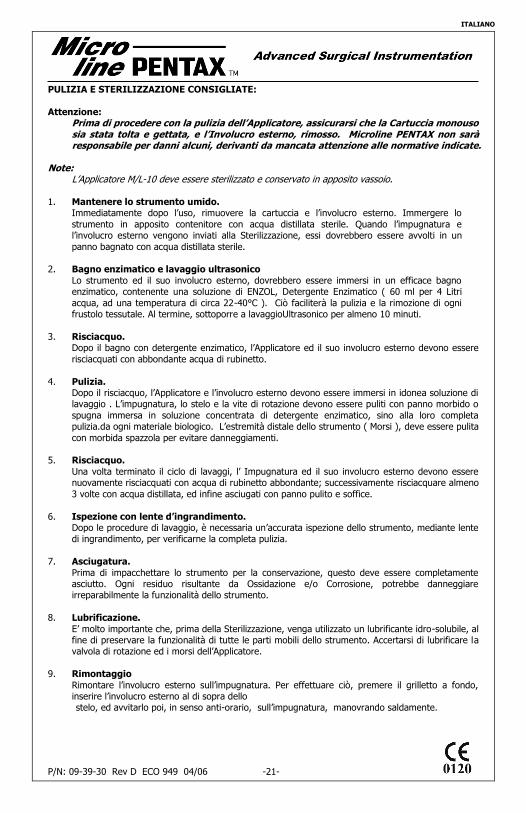
PULIZIA E STERILIZZAZIONE CONSIGLIATE:
Attenzione: Prima di procedere con la pulizia dell’Applicatore, assicurarsi che la Cartuccia monouso sia stata tolta e gettata, e l’Involucro esterno, rimosso. Microline PENTAX non sarà responsabile per danni alcuni, derivanti da mancata attenzione alle normative indicate.
Note: L’Applicatore M/L-10 deve essere sterilizzato e conservato in apposito vassoio.
1. Mantenere lo strumento umido. Immediatamente dopo l’uso, rimuovere la cartuccia e l’involucro esterno. Immergere lo
strumento in apposito contenitore con acqua distillata sterile. Quando l’impugnatura e l’involucro esterno vengono inviati alla Sterilizzazione, essi dovrebbero essere avvolti in un
panno bagnato con acqua distillata sterile. 2. Bagno enzimatico e lavaggio ultrasonico
Lo strumento ed il suo involucro esterno, dovrebbero essere immersi in un efficace bagno enzimatico, contenente una soluzione di ENZOL, Detergente Enzimatico ( 60 ml per 4 Litri
acqua, ad una temperatura di circa 22-40°C ). Ciò faciliterà la pulizia e la rimozione di ogni frustolo tessutale. Al termine, sottoporre a lavaggioUltrasonico per almeno 10 minuti.
3. Risciacquo. Dopo il bagno con detergente enzimatico, l’Applicatore ed il suo involucro esterno devono essere
risciacquati con abbondante acqua di rubinetto.
4. Pulizia. Dopo il risciacquo, l’Applicatore e l’involucro esterno devono essere immersi in idonea soluzione di
lavaggio . L’impugnatura, lo stelo e la vite di rotazione devono essere puliti con panno morbido o
spugna immersa in soluzione concentrata di detergente enzimatico, sino alla loro completa pulizia.da ogni materiale biologico. L’estremità distale dello strumento ( Morsi ), deve essere pulita
con morbida spazzola per evitare danneggiamenti. 5. Risciacquo.
Una volta terminato il ciclo di lavaggi, l’ Impugnatura ed il suo involucro esterno devono essere nuovamente risciacquati con acqua di rubinetto abbondante; successivamente risciacquare almeno
3 volte con acqua distillata, ed infine asciugati con panno pulito e soffice.
6. Ispezione con lente d’ingrandimento. Dopo le procedure di lavaggio, è necessaria un’accurata ispezione dello strumento, mediante lente
di ingrandimento, per verificarne la completa pulizia.
7. Asciugatura.
Prima di impacchettare lo strumento per la conservazione, questo deve essere completamente asciutto. Ogni residuo risultante da Ossidazione e/o Corrosione, potrebbe danneggiare irreparabilmente la funzionalità dello strumento.
8. Lubrificazione.
E’ molto importante che, prima della Sterilizzazione, venga utilizzato un lubrificante idro-solubile, al fine di preservare la funzionalità di tutte le parti mobili dello strumento. Accertarsi di lubrificare la valvola di rotazione ed i morsi dell’Applicatore.
9. Rimontaggio Rimontare l’involucro esterno sull’impugnatura. Per effettuare ciò, premere il grilletto a fondo,
inserire l’involucro esterno al di sopra dello stelo, ed avvitarlo poi, in senso anti-orario, sull’impugnatura, manovrando saldamente.
P/N: 09-39-30 Rev D ECO 949 04/06 -22-
ITALIANO
Note: Il protocollo di rimessa a nuovo dello strumento, può richiedere che l’Applicatore ed il suo involucro esterno debbano essere riassemblati dopo la sterilizzazione.
STERILIZZAZIONE: Attenzione:
Prima della sterilizzazione dell’Applicatore, essere ben certi che la Cartuccia monouso sia stata estratta. Microline PENTAX non si riterrà responsabile per danni derivati dalla inosservanza di questa regola.
a) Prima della sterilizzazione, lo strumento deve essere pulito accuratamente.
b) Avvolgere lo strumento od inserirlo nell’apposito contenitore ( ML 3705/3707) c) Sterilizzare lo strumento seguendo il protocollo del Produttore.
I tuoi strumenti Microline PENTAX sono ora pronti per la Sterilizzazione. Le seguenti procedure di sterilizzazione sono consigliate, e sono state validate da Microline PENTAX:
Ciclo a gravità: 3 minuti @ 270°F (132°C)
Ciclo di pre-vuoto: 3 minuti @ 270°F (132°C)
GARANZIA Microline PENTAX garantisce questo strumento da qualunque difetto di fabbricazione La garanzia decade se il danno è imputabile ad un utilizzo non corretto da parte dell’utilizzatore
La garanzia è valida solo per l’acquirente iniziale dello strumento e per un periodo di 12 mesi Ogni tentativo di riparazione da parte di personale non autorizzato da Microline PENTAX
annulla la condizione di garanzia Microline PENTAX garantisce questo strumento da qualunque difetto di fabbricazione.
ASSISTENZA E RIPARAZIONI Prima di spedire lo strumento per la riparazione, contattare il servizio assistenza al fine di ottenere
il numero di autorizzazione (R.G.A. – Returned Goods Authorization number) Lo strumento verra’ rispedito non riparato se le seguenti condizioni non saranno verificate: 1. Lo strumento deve essere stato pulito e sterilizzato dopo l’ultimo utilizzo
2. La riparazione deve essere stata autorizzata con l’assegnazione del numero R.G.A di riferimento
3. Il numero R.G.A. di autorizzazione deve essere indicato chiaramente sull’imballo di spedizione
P/N: 09-39-30 Rev D ECO 949 04/06 -23-
ITALIANO
Per eventuali problemi rivolgersi al distributore Microline PENTAX locale
INFORMAZIONI DI CONTATTO:
Microline PENTAX, Inc. 800 Cummings Center Suite 157X
Beverly, MA 01915 U.S.A.
Tel: (978) 922-9810 Fax: (978) 922-9209 Web: www.microlinepentax.com
E-mail: [email protected]
RAPPRESENTANTE PER L’UE:
PENTAX Europe GmbH
Julius-Vosseler-Str. 104 22527 Hamburg • Germany
Tel: +49-40-56 192 0 Fax: +49-40-56 042 13
COMUNICAZIONE IMPORTANTE AI NOSTRI STIMATI CLIENTI
Congratulazioni per l’acquisto dell’applicatore di clip riutilizzabile Multifire M/L -10 Microline PENTAX. Lo strumento, riutilizzabile e di alta precisione, svolge una
funzione chirurgica di vitale importanza e deve essere maneggiato con la massima cura. Si consiglia vivamente di utilizzare la vaschetta di
sterilizzazione protettiva Microline PENTAX M/L-10, n. catalogo 3707.
Per domande sulla cura, manutenzione e manipolazione dello strumento M/L-10, si prega di consultare il rappresentante autorizzato Microline PENTAX di zona. Per
maggiori informazioni sul rappresentante di zona, consultare il nostro sito www.microlinepentax.com o la sede centrale Microline PENTAX –
tel. +1 (978) 922-9810.
GRAZIE PER AVER SCELTO MICROLINE PENTAX
P/N: 09-39-30 Rev D ECO 949 04/06 -24-
DEUTSCH
Fully Squeeze
Trigger
Hinterseite
der Patrone Patrone völlig
eingesteckt
DEUTSCH
M/L-10 WIEDERVERWENDBARER MULTI- FIRE CLIP APPLIER
BEDIENUNGSANLEITUNG
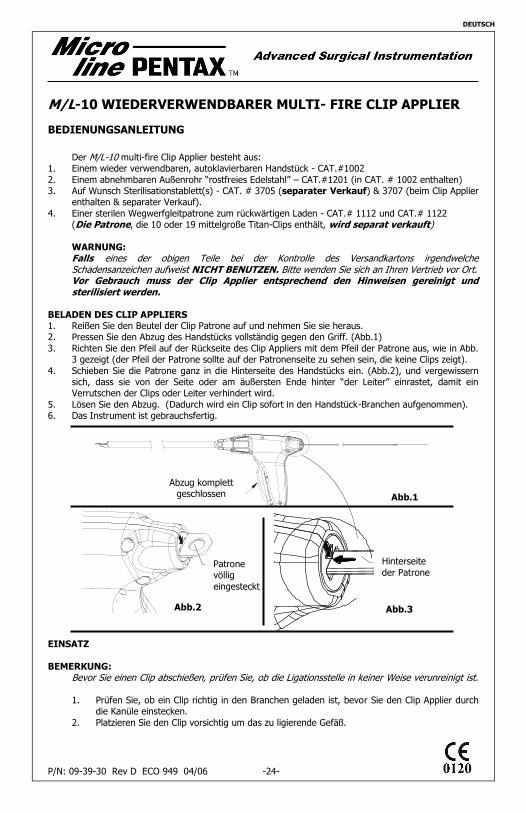
Der M/L-10 multi-fire Clip Applier besteht aus:
1. Einem wieder verwendbaren, autoklavierbaren Handstück - CAT.#1002
2. Einem abnehmbaren Außenrohr “rostfreies Edelstahl” – CAT.#1201 (in CAT. # 1002 enthalten) 3. Auf Wunsch Sterilisationstablett(s) - CAT. # 3705 (separater Verkauf) & 3707 (beim Clip Applier
enthalten & separater Verkauf).
4. Einer sterilen Wegwerfgleitpatrone zum rückwärtigen Laden - CAT.# 1112 und CAT.# 1122 (Die Patrone, die 10 oder 19 mittelgroße Titan-Clips enthält, wird separat verkauft)
WARNUNG: Falls eines der obigen Teile bei der Kontrolle des Versandkartons irgendwelche Schadensanzeichen aufweist NICHT BENUTZEN. Bitte wenden Sie sich an Ihren Vertrieb vor Ort. Vor Gebrauch muss der Clip Applier entsprechend den Hinweisen gereinigt und sterilisiert werden.
BELADEN DES CLIP APPLIERS 1. Reißen Sie den Beutel der Clip Patrone auf und nehmen Sie sie heraus. 2. Pressen Sie den Abzug des Handstücks vollständig gegen den Griff. (Abb.1)
3. Richten Sie den Pfeil auf der Rückseite des Clip Appliers mit dem Pfeil der Patrone aus, wie in Abb. 3 gezeigt (der Pfeil der Patrone sollte auf der Patronenseite zu sehen sein, die keine Clips zeigt).
4. Schieben Sie die Patrone ganz in die Hinterseite des Handstücks ein. (Abb.2), und vergewissern sich, dass sie von der Seite oder am äußersten Ende hinter “der Leiter” einrastet, damit ein Verrutschen der Clips oder Leiter verhindert wird.
5. Lösen Sie den Abzug. (Dadurch wird ein Clip sofort in den Handstück-Branchen aufgenommen). 6. Das Instrument ist gebrauchsfertig.
EINSATZ
BEMERKUNG: Bevor Sie einen Clip abschießen, prüfen Sie, ob die Ligationsstelle in keiner Weise verunreinigt ist. 1. Prüfen Sie, ob ein Clip richtig in den Branchen geladen ist, bevor Sie den Clip Applier durch
die Kanüle einstecken.
2. Platzieren Sie den Clip vorsichtig um das zu ligierende Gefäß.
Abzug komplett geschlossen Abb.1
Abb.3 Abb.2
P/N: 09-39-30 Rev D ECO 949 04/06 -25-
DEUTSCH
Remove Cartridge
Fully Squeeze
Triger
3. Bei vollständiger Sicht der Ligationsstelle pressen Sie den Abzug ganz zum Griff durch, um den Clip um das Gefäß herum zu schließen. Der Abzug wird sich nicht wieder öffnen bis der
Clip vollständig geschlossen ist. 4. Das Lösen des Abzugs wird die Branchen des Clip Appliers öffnen und automatisch wird der
Reihe nach der nächste neue Clip aufgenommen. Jetzt ist der Clip Applier bereit für ein erneutes Abschießen.
5. a. Bei einem Cholangiogramm-Einsatz, wobei ein Clip benutzt wird, um den Katheter
zeitweise innerhalb dem Blasengang zu sichern, ohne den Katheter zu blockieren, kann der Grad der Clip-Schließung angepasst werden. Dies schafft man dadurch, dass man den Abzug
am Ratschenmechanismus jedes mal nach dem 7. Klick löst. Diese Möglichkeit des früheren Lösens, lässt die Weite der gewünschten Clip-Schließung zu.
b. Bei einer maximalen Gefäß-Occlusion (vollständig geschlossener Clip) drücken Sie einfach den Instrumentenabzug vollständig herunter, so dass der Abzug und Griff sich berühren und lösen ihn dann komplett, so dass der folgende Clip in die Branchen eintreten kann.
VORSICHT:
A. Wenn alle Clips verwendet werden sollen, werden die letzten zwei blaufarbigen Clips den Chirurgen warnen, dass die Patrone fast leer ist. Wenn der letzte blaue Clip abgefeuert worden ist, sollte der Clip Applier aus dem Situs genommen werden. Die
Patrone sollte dann entnommen und entsorgt werden. B. Es sollte vermieden werden, die Branchen über einen früher angebrachten Clip anzusetzen,
da es zu einem Fehlschuss des Handstücks führen könnte.
WARNUNG:
Gehen Sie sicher, dass die Patrone nach dem Gebrauch oder vor der Reinigung und dem Sterilisations-Procedere entnommen ist. Microline PENTAX ist für keinerlei Schäden verantwortlich, die aufgrund einer Missachtung dieser Warnung auftreten.
AUSEINANDERBAU DES CLIP APPLIER HANDSTÜCKS
Um den Clip Applier für die Wiederaufbereitung auseinander zu nehmen, befolgen Sie die
folgenden Schritte:
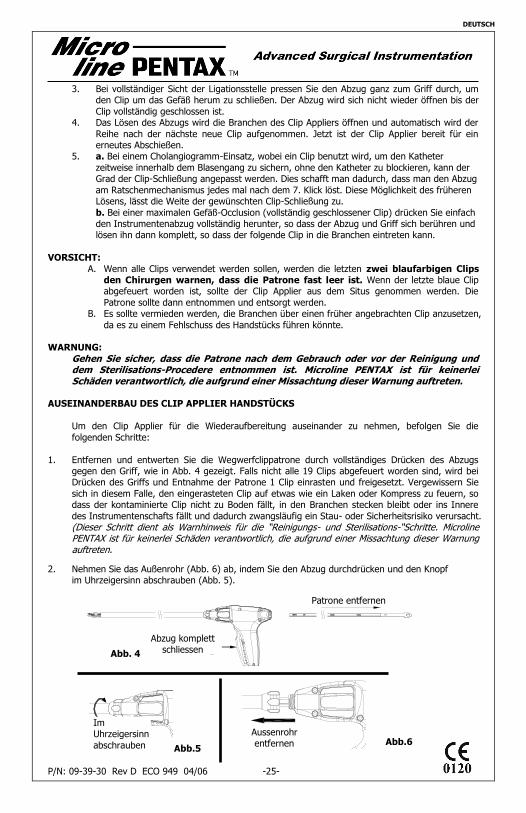
1. Entfernen und entwerten Sie die Wegwerfclippatrone durch vollständiges Drücken des Abzugs gegen den Griff, wie in Abb. 4 gezeigt. Falls nicht alle 19 Clips abgefeuert worden sind, wird bei Drücken des Griffs und Entnahme der Patrone 1 Clip einrasten und freigesetzt. Vergewissern Sie
sich in diesem Falle, den eingerasteten Clip auf etwas wie ein Laken oder Kompress zu feuern, so dass der kontaminierte Clip nicht zu Boden fällt, in den Branchen stecken bleibt oder ins Innere
des Instrumentenschafts fällt und dadurch zwangsläufig ein Stau- oder Sicherheitsrisiko verursacht. (Dieser Schritt dient als Warnhinweis für die “Reinigungs- und Sterilisations-“Schritte. Microline PENTAX ist für keinerlei Schäden verantwortlich, die aufgrund einer Missachtung dieser Warnung auftreten.
2. Nehmen Sie das Außenrohr (Abb. 6) ab, indem Sie den Abzug durchdrücken und den Knopf im Uhrzeigersinn abschrauben (Abb. 5).
Outer Tube
Removed
Unscrew
Knob
Clockwise
Abb. 4
Patrone entfernen
Abzug komplett schliessen
Aussenrohr entfernen
Im Uhrzeigersinn
abschrauben Abb.5
Abb.6
P/N: 09-39-30 Rev D ECO 949 04/06 -26-
DEUTSCH
Bemerkungen: Benutzen Sie nur Microline PENTAX’s sterile Wegwerfgleitpatronen zum rückwärtigen Laden - CAT #1112 und CAT # 1122. Microline PENTAX wird für Schäden, die durch andere Clips entstanden sind, nicht haften.
EMPFOHLENE REINIGUNGS- & STERILISATIONSSCHRITTE: Warnung:
Bevor Sie das Clip Applier Instrument reinigen, vergewissern Sie sich, dass die Wegwerfpatrone entnommen und entwertet ist und das Außenrohr demontiert worden ist. Microline PENTAX ist für keinerlei Schäden verantwortlich, die aufgrund einer Missachtung dieser Warnung auftreten. Bemerkung: Der M/L-10 Applier sollte in einer Sterilisations-Schutzschale aufbewahrt und wiederaufbereitet werden.
1. Das Instrument feucht halten Entnehmen Sie die Patrone und das Außenrohr sofort nach dem chirurgischen Gebrauch. Tauchen Sie die Instrumente in einer Schale, einem Becken oder geeignetem Behälter in steriles,
destilliertes Wasser. Wenn das Clip Applier Handstück und sein Außenrohr zur zentralen Sterilisation überwechseln, sollten sie in ein mit destilliertem Wasser angefeuchtetes Tuch
gewickelt werden. 2. Enzymatisches Einweichen & Ultraschall-Waschmaschine
Das Instrument und sein Außenrohr sollten in eine geeignete enzymhaltige Lösung getaucht
werden. Dies wird die Reinigung, Spülung und Entfernung von jeglichen Rückständen unterstützen. Die Instrumente und das Rohr sollten gemäß den Anweisungen des Lösungsherstellers
eingeweicht werden. Falls Sie mit einer Ultraschallmaschine reinigen, stellen Sie sicher, das Clip Applier Handstück und sein Außenrohr in einen Korb oder eine Reinigungsschale zu legen, die oberhalb des Bodens der
Ultraschallmaschine aufgehängt sind. Es ist wichtig die Anweisungen des Herstellers in Bezug auf Reinigungslösungen und Zykluszeiten usw. zu befolgen.
3. Spülung Nach dem Einweichzyklus sollten der Clip Applier und sein Außenrohr der Enzymlösung
entnommen werden und mit normalem Leitungswasser gespült werden. 4. Reinigung
Gründlich gespült sollten der Clip Applier und sein Außenrohr in eine bewährte Reinigungslösung
getaucht werden. Der Griff, Schaft und Drehknopf sollten mit einem weichen Tuch oder Schwamm gereinigt werden. Das Distalende des Instrumentes muss mit einem Pinsel mit „weichen
Borsten“ gereinigt werden, um jeglichen Schaden zu verhindern. 5. Spülung
Wenn der Spülzyklus beendet ist, sollten das Clip Applier Handstück und sein Außenrohr in
normales Leitungswasser getaucht, dann drei Mal mit demineralisiertem Wasser gespült und mit einem sauberen weichen Tuch abgewischt werden.
6. Überprüfung unter dem Vergrößerungsglas Nachdem das Krankenhaus-Reinigungs-Procedere beendet ist, sollte das Instrument untersucht werden, um sicher zu stellen, dass es gründlich gereinigt ist.
7. Trocknen Bevor Instrumente zur Aufbewahrung eingepackt werden, sollten sie vollständig trocken sein. Jede
Restfeuchtigkeit könnte eine Oxidation und Korrosion zur Folge haben, welche die Leistung, Funktion und Lebensdauer des Instrumentes beeinflussen könnten.
8. Schmieren Es ist wichtig, dass vor der Sterilisation ein wasserlösliches Schmiermittel angewendet wird, um die Gelenkverbindungen und den Einsatz aller beweglichen Teile des Instrumentes zu erhalten.
Gehen Sie sicher, den Drehknopf und die Distal-Branchenbereiche zu schmieren. 9. Erneute Montage (Muss nach der Sterilisation im OP durchgeführt werden)
Befestigen Sie das Außenrohr wieder am Instrument. Um dies auszuführen, schliessen Sie den Handstückabzug, montieren das Außenrohr über den Clip Applier Schaft und sichern es dann durch Schrauben des Rohrknopfes entgegen dem Uhrzeigersinn, bis er ganz angezogen ist.
P/N: 09-39-30 Rev D ECO 949 04/06 -27-
DEUTSCH
Bemerkung:
Ihr Protokoll für die Wiederaufbereitung sieht möglicherweise vor, dass der Applier und das Außenrohr nach der Sterilisation wieder zusammen gebaut werden.
STERILISATION:
Warnung: Bevor Sie das Clip Applier Instrument sterilisieren, vergewissern Sie sich, dass die Patrone entnommen ist. Microline PENTAX ist für keinerlei Schäden verantwortlich, die aufgrund einer Missachtung dieser Warnung auftreten.
1. Vor dem Sterilisieren muss das Instrument gründlich gereinigt sein 2. Das Instrument in einem Tuch oder Sterilisationskontainer (Cat # 3705/3707) einpacken
3. Sterilisation des Instruments durchführen laut Vorschrift des Autoklavenherstellers.
Microline PENTAX empfiehlt die folgenden, minimalen Sterilisationsprotokolle:
US – Schwerkraft Zyklen: 3 Minuten @ 270°F (132°C)
EU – Schwerkraft und Prä-Vakuum Zyklen: 3 Minuten @ 132°C
INSPEKTION: BEMERKUNG:
M/L-10 Inventarüberprüfungsprocedur (einmal im Monat auszuführen) Eine abgekürzte Kontrolle sollte jedes Mal, bevor der M/L-10 dem Chirurgen zum Gebrauch
ausgehändigt wird, im OP durchgeführt werden.
– 1. Prüfen Sie die Branchen auf Fehlausrichtung, Schaden und Verschmutzung durch Bioabfall.
– 2. Prüfen Sie, ob der Schaft gerade ist. Entfernen Sie das Außenrohr und prüfen das Innere des Schaftes auf Schaden und Verschmutzung durch Bioabfall.
– 3. Drücken und lösen Sie den Griff mehr als 20-mal, um zu prüfen, ob er klemmt. Prüfen Sie den Griff auf Schäden. Öffnen Sie niemals den Griff oder Abzug aus Neugier.
– 4. Feuern Sie mindestens 2 Clips ab, um die Clip-Schließung, Fassen in den Branchen und die Clip/Branchen-Übereinstimmung zu prüfen.
– 5. Zusätzlich zu einer richtigen und gründlichen Reinigung (siehe Anweisungen)
vergewissern Sie sich, dass der M/L-10 zwischen den Einsätzen richtig geschmiert wird: » A. Tauchen Sie das Instrument vollständig in ein genehmigtes Instrumentenschmiermittel.
» B. Falls Sie das Instrument nicht vollständig eintauchen können, gehen Sie sicher, sowohl den Branchen- als auch Knopfbereich gründlich zu schmieren.
» C. Nach dem Schmiervorgang führen Sie Schritt 3 und 4 der Kontrolle aus, falls der
Applier Griff klemmte oder blockierte.
GARANTIE: Microline PENTAX gewährleistet, dass dieses Instrument weder Materialfehler noch Mängel in der Arbeitsqualität aufweist.
Microline PENTAX haftet nicht für Neben- oder Folgeschäden jeglicher Art. Diese Garantie gilt nur für den ursprünglichen Käufer des Instrumentes und für einen Zeitraum von
einem (1) Jahr. An diesem Instrument ausgeführte Arbeiten durch andere als von Microline PENTAX autorisierte Service
Zentren macht diese Garantie nichtig. KUNDENSERVICE UND REPARATUR:
Bevor Sie dieses Instrument zur Reparatur zurücksenden, rufen Sie das Microline PENTAX Kundenservice Zentrum an, um eine Rückware-Autorisierungsnummer (R.G.A.) zu erhalten.
P/N: 09-39-30 Rev D ECO 949 04/06 -28-
DEUTSCH
Das Instrument wird an den Absender ohne Reparatur zurück gesandt, wenn die folgenden Bedingungen nicht erfüllt sind:
• Dem Instrument muss eine R.G.A. Nummer zugeteilt sein. • Die R.G.A. Nummer muss auf der Außenseite der Versandkiste deutlich sichtbar sein.
• Das Instrument muss nach der letzten Anwendung gereinigt und sterilisiert sein. Für weitere informationen wenden Sie sich an Ihren Microline PENTAX Vertreter vor Ort oder der
Microline PENTAX Kundendienst:
KONTAKTINFORMATIONEN:
Microline PENTAX, Inc.
800 Cummings Center Suite 157X
Beverly, MA 01915 U.S.A. Tel: +1 (978) 922-9810
Fax: +1 (978) 922-9209 Web: www.microlinepentax.com
E-mail: [email protected]
EU-VERTRETUNG:
PENTAX EuropeGmbH
Julius-Vosseler-Str. 104 22527 Hamburg • Germany Tel: +49-40-56 192 0
Fax: +49-40-56 042 13
WICHTIGE MITTEILUNG AN UNSERE GESCHÄTZTEN KUNDEN
Herzlichen Glückwunsch zum Kauf des Wiederverwendbaren M/L –10 Multi-Fire Clip-Applikators von Microline PENTAX. Dieses wiederverwendbare
Präzisionsinstrument erfüllt eine wichtige chirurgische Funktion und sollte mit größter Vorsicht gehandhabt werden. Wir empfehlen Ihnen dringend die Verwendung des M/L-10 Sterilisationsschutztabletts von Microline
PENTAX, Katalog-Nr. 3707.
Bei Fragen zur Pflege, Wartung und Handhabung des M/L-10 wenden Sie sich
bitte an einen autorisierten Microline PENTAX-Vertreter. Wenn Sie nicht wissen, wer Ihr Vertreter ist, besuchen Sie bitte unsere Website
www.microlinepentax.com oder rufen Sie das Hauptbüro von Microline PENTAX in den USA unter der Rufnummer +1 (978) 922-9810 an.
VIELEN DANK, DASS SIE SICH FÜR
MICROLINE PENTAX ENTSCHIEDEN HABEN.
P/N: 09-39-30 Rev D ECO 949 04/06 -29-
SIMPLIFIED CHINESE
Fully Squeeze
Trigger
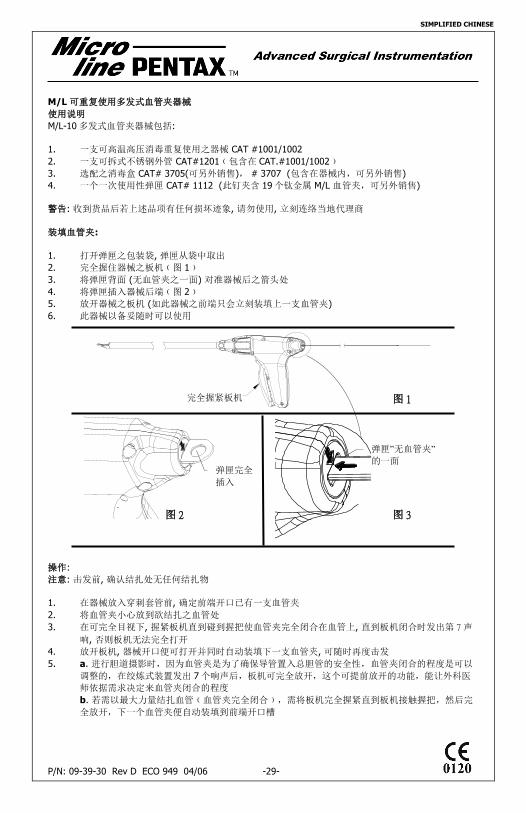
弹匣”无血管夹”
的一面
弹匣完全
插入
Simplified Chinese M/L 可重复使用多发式血管夹器械
使用说明
M/L-10 多发式血管夹器械包括:
1. 一支可高温高压消毒重复使用之器械 CAT #1001/1002
2. 一支可拆式不锈钢外管 CAT#1201﹙包含在 CAT.#1001/1002﹚
3. 选配之消毒盒 CAT# 3705(可另外销售), # 3707 (包含在器械内,可另外销售)
4. 一个一次使用性弹匣 CAT# 1112 (此钉夹含 19 个钛金属 M/L 血管夹,可另外销售)
警告: 收到货品后若上述品项有任何损坏迹象, 请勿使用, 立刻连络当地代理商
装填血管夹:
1. 打开弹匣之包装袋, 弹匣从袋中取出
2. 完全握住器械之板机﹙图 1﹚
3. 将弹匣背面 (无血管夹之一面) 对准器械后之箭头处
4. 将弹匣插入器械后端﹙图 2﹚
5. 放开器械之板机 (如此器械之前端只会立刻装填上一支血管夹)
6. 此器械以备妥随时可以使用
操作:
注意: 击发前, 确认结扎处无任何结扎物
1. 在器械放入穿刺套管前, 确定前端开口已有一支血管夹
2. 将血管夹小心放到欲结扎之血管处
3. 在可完全目视下, 握紧板机直到碰到握把使血管夹完全闭合在血管上, 直到板机闭合时发出第 7 声
响, 否则板机无法完全打开
4. 放开板机, 器械开口便可打开并同时自动装填下一支血管夹, 可随时再度击发
5. a. 进行胆道摄影时,因为血管夹是为了确保导管置入总胆管的安全性,血管夹闭合的程度是可以
调整的,在绞炼式装置发出 7 个响声后,板机可完全放开,这个可提前放开的功能,能让外科医
师依据需求决定来血管夹闭合的程度
b. 若需以最大力量结扎血管﹙血管夹完全闭合﹚,需将板机完全握紧直到板机接触握把,然后完
全放开,下一个血管夹便自动装填到前端开口槽
图 1
图 3 图 2
完全握紧板机
P/N: 09-39-30 Rev D ECO 949 04/06 -30-
SIMPLIFIED CHINESE
图 5
Remove Cartridge
Fully Squeeze
Triger
注意:
A. 最后二个蓝色血管夹是为了提醒医师弹匣即将用尽,当最后一个蓝色血管夹用完后,器械应取出并
将弹匣从器械中抽出丢弃。
B. 应留意不要将血管夹击发在前一个血管夹上,否则会造成不当击发的失误。
警告:弹匣在使用后一定要从器械抽出,不可再清洗及消毒,Microline PENTAX 将不负责因不遵守此警告
所造成的伤害。
器械的拆装
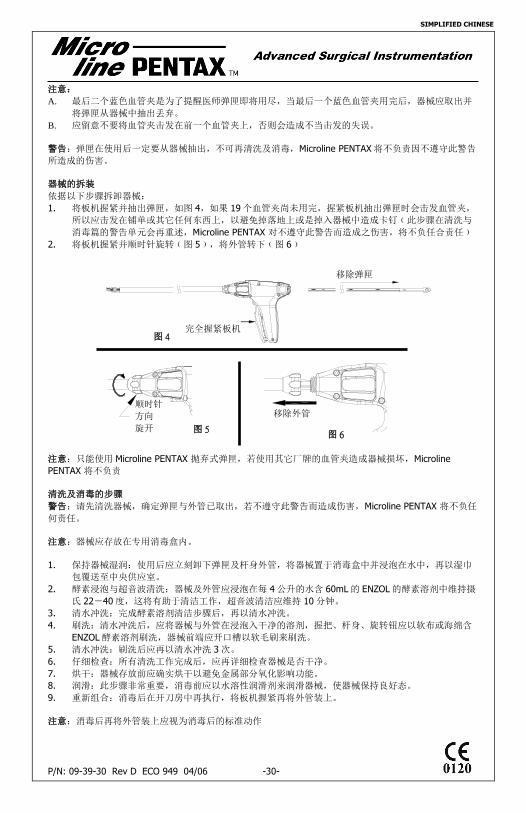
依据以下步骤拆卸器械:
1. 将板机握紧并抽出弹匣,如图 4,如果 19 个血管夹尚未用完,握紧板机抽出弹匣时会击发血管夹,
所以应击发在铺单或其它任何东西上,以避免掉落地上或是掉入器械中造成卡钉﹙此步骤在清洗与
消毒篇的警告单元会再重述,Microline PENTAX 对不遵守此警告而造成之伤害,将不负任合责任﹚
2. 将板机握紧并顺时针旋转﹙图 5﹚,将外管转下﹙图 6﹚
注意:只能使用 Microline PENTAX 抛弃式弹匣,若使用其它厂牌的血管夹造成器械损坏,Microline
PENTAX 将不负责
清洗及消毒的步骤
警告:请先清洗器械,确定弹匣与外管已取出,若不遵守此警告而造成伤害,Microline PENTAX 将不负任
何责任。
注意:器械应存放在专用消毒盒内。
1. 保持器械湿润:使用后应立刻卸下弹匣及杆身外管,将器械置于消毒盒中并浸泡在水中,再以湿巾
包覆送至中央供应室。
2. 酵素浸泡与超音波清洗:器械及外管应浸泡在每 4 公升的水含 60mL 的 ENZOL 的酵素溶剂中维持摄
氏 22-40 度,这将有助于清洁工作,超音波清洁应维持 10 分钟。
3. 清水冲洗:完成酵素溶剂清洁步骤后,再以清水冲洗。
4. 刷洗:清水冲洗后,应将器械与外管在浸泡入干净的溶剂,握把、杆身、旋转钮应以软布或海绵含
ENZOL 酵素溶剂刷洗,器械前端应开口槽以软毛刷来刷洗。
5. 清水冲洗:刷洗后应再以清水冲洗 3 次。
6. 仔细检查:所有清洗工作完成后,应再详细检查器械是否干净。
7. 烘干:器械存放前应确实烘干以避免金属部分氧化影响功能。
8. 润滑:此步骤非常重要,消毒前应以水溶性润滑剂来润滑器械,使器械保持良好态。
9. 重新组合:消毒后在开刀房中再执行,将板机握紧再将外管装上。
注意:消毒后再将外管装上应视为消毒后的标准动作
Outer Tube
Removed
Unscrew
Knob
Clockwise
图 6
图 4
完全握紧板机
顺时针
方向
旋开
移除外管
移除弹匣
P/N: 09-39-30 Rev D ECO 949 04/06 -31-
SIMPLIFIED CHINESE
消毒:
警告:消毒前应确认弹匣以取出,若不遵守此警告而造成伤害,Microline PENTAX 将不负任何责任。
1. 消毒前应将器械完全地清洗干净
2. 将器械置入消毒合﹙Cat#3705/3707﹚
3. 遵照下列程序进行消毒
Microline PENTAX 要求遵照以下标准消毒程序来进行消毒:
1. Gravity Cycle:时间对 3 分钟, 温度 270F (134C)
2. Pre-Vacuum Cycle:时间对 3 分钟, 温度 270F (134C)
检查:
注意:每月应确实检查一次
在开刀房内,每次使用前应依照以下的简化步骤检查一次
1. 检查器械前端开口槽两侧是否对齐﹑损毁或是粘有前一病人之组织物
2. 检查器械杆身是否维持直线无弯曲,拆下外管检查内管是否损毁或是粘有前一病人之组织物
3. 握紧﹑放开握把 20 次确认是否卡住,检查握把是否损毁,不需将握把与板机拆开仔细检查
4. 至少击发 2 个血管夹确定闭合情形与下一个血管夹自动装填到开口槽的情形
5. 每次清洗器械后都应润滑
A. 将器械整个浸泡到润滑剂内
B. 若无法整个浸泡,至少要润滑开口槽与旋转钮
C. 润滑后再依据步骤 3 与 4 确认是否卡住
保证:
Microline PENTAX 保证材质与制造皆无任何瑕疵
Microline PENTAX 保固一年,但对意外造成之损害则无法保固
应由 Microline PENTAX 授权之服务中心来提供维修服务,否则不负保固之责
服务与维修:
送回维修前请先与 Microline PENTAX 代理商联络并取的维修授权号码
若未依照以下情形,会直接将未修复之器械寄回
1. 器械应有一个"送回货品授权号码"﹙R.G.A﹚
2. 送回修理前应先将器械清洗与消毒
3. 器械送回修理在其外包装上应可清楚看到"送回货品授权号码"﹙R.G.A﹚
若有任何问题,请联络你的地区代理商或是联络 Microline PENTAX 客户服务部:
CONTACT INFORMATION :
Microline PENTAX, Inc. 800 Cummings Center
Suite 157X Beverly, MA 01915 U.S.A.
Tel: (978) 922-9810 Fax: (978) 922-9209
Web: www.microlinepentax.com E-mail: [email protected]
EU REPRESENTATIVE:
PENTAX Europe GmbH
Julius-Vosseler-Str. 104 22527 Hamburg • Germany Tel: +49-40-56 192 0
Fax: +49-40-56 042 13
P/N: 09-39-30 Rev D ECO 949 04/06 -32-
SIMPLIFIED CHINESE
致我们尊贵客户的
重要讯息
恭喜您购买 Microline PENTAX Resuable M/L -10Multi-Fire 夹钳。此可重复使用的
精密仪器用于极为重要的手术,应小心操作。我们极力建议您使用具有保护作用
的 Microline PENTAX M/L-10 消毒盘,产品目录编号为 3707。
M/L-10 的保养、维修和使用方面的相关问题,请联系 Microline PENTAX 的授权代
表。如果您不知道您的代表是谁,请浏览我们的网站 www.microlinepentax.com 或
致电 Microline PENTAX 的总公司,电话是 978 922-9810。
感谢您选择 MICROLINE PENTAX

P/N: 09-39-30 Rev D ECO 949 04/06 -33-
CHINESE
Fully Squeeze
Trigger
彈匣”無血管夾”的一面
彈匣完全
插入
Chinese M/L 可重複使用多發式血管夾器械
使用說明
M/L-10 多發式血管夾器械包括:
1. 一支可高溫高壓消毒重覆使用之器械 CAT #1001/1002
2. 一支可拆式不銹鋼外管 CAT#1201﹙包含在 CAT.#1001/1002﹚
3. 選配之消毒盒 CAT# 3705(可另外銷售), # 3707 (包含在器械內,可另外銷售)
4. 一個拋棄式彈匣 CAT# 1112 (此釘夾含 19 個鈦金屬 M/L 血管夾,可另外銷售)
警告: 收到貨品後若上述品項有任何損壞跡象, 請勿使用, 立刻連絡當地代理商
裝填血管夾:
1. 打開彈匣之包裝袋, 彈匣從袋中取出
2. 完全握住器械之板機﹙圖 1﹚
3. 將彈匣背面 (無血管夾之一面) 對準器械後之箭頭處
4. 將彈匣插入器械後端﹙圖 2﹚
5. 放開器械之板機 (如此器械之前端只會立刻裝填上一支血管夾)
6. 此器械以備妥隨時可以使用
操作:
注意: 擊發前, 確認結紮處無任何結紮物
1. 在器械放入穿刺套管前, 確定前端開口已有一支血管夾
2. 將血管夾小心放到欲結紮之血管處
3. 在可完全目視下, 握緊板機直到碰到握把可使血管夾完全閉合在血管上, 直到板機閉合發出 7 個聲
響, 否則板機無法完全打開
4. 放開板機, 器械開口便可打開並同時自動裝填下一支血管夾, 可隨時再度擊發
5. a. 進行膽道攝影時,因為血管夾是為了確保導管置入總膽管的安全性,血管夾閉合的程度是可以
調整的,在絞鍊式裝置發出 7 個響聲後,板機可完全放開,這個可提前放開的功能,能讓外科醫
師依據需求決定來血管夾閉合的程度
b. 若需以最大力量結紮血管﹙血管夾完全閉合﹚,需將板機完全握緊直到板機接觸握把,然後完
全放開,下一個血管夾便自動裝填到前端開口槽
注意:
圖 1
圖 3 圖 2
完全握緊板機

P/N: 09-39-30 Rev D ECO 949 04/06 -34-
CHINESE
圖 5
Remove Cartridge
Fully Squeeze
Triger
A. 最後二個藍色血管夾是為了提醒醫師彈匣即將用盡,當最後一個藍色血管夾用完後,器械應取出並
將彈匣從器械中抽出丟棄。
B. 應留意不要將血管夾擊發在前一個血管夾上,否則會造成不當擊發的失誤。
警告:彈匣在使用後一定要從器械抽出,不可再清洗及消毒, Microline PENTAX 將不負責因不遵守此警
告所造成的傷害。
器械的拆裝
依據以下步驟拆卸器械:
1. 將板機握緊並抽出彈匣,如圖 4,如果 19 個血管夾尚未用完,握緊板機抽出彈匣時會擊發血管夾,
所以應擊發在鋪單或其他任何東西上,以避免掉落地上或是掉入器械中造成卡釘﹙此步驟在清洗與
消毒篇的警告單元會再重述, Microline PENTAX 對不遵守此警告而造成之傷害,將不負任合責任﹚
2. 將板機握緊並順時針旋轉﹙圖 5﹚,將外管轉下﹙圖 6﹚
注意:只能使用 Microline PENTAX 拋棄式彈匣,若使用其它廠牌的血管夾造成器械損壞, Microline
PENTAX 將不負責
清洗及消毒的步驟
警告:請先清洗器械,確定彈匣與外管已取出,若不遵守此警告而造成傷害, Microline PENTAX 將不負
任何責任。
注意:器械應存放在專用消毒盒內。
1. 保持器械濕潤:使用後應立刻卸下彈匣及桿身外管,將器械置於消毒盒中並浸泡在水中,再以濕巾
包覆送至中央供應室。
2. 酵素浸泡與超音波清洗:器械及外管應浸泡在每 4 公升的水含 60mL 的 ENZOL 的酵素溶劑中維持攝
氏 22-40 度,這將有助於清潔工作,超音波清潔應維持 10 分鐘。
3. 清水沖洗:完成酵素溶劑清潔步驟後,再以清水沖洗。
4. 刷洗:清水沖洗後,應將器械與外管在浸泡入乾淨的溶劑,握把、桿身、旋轉鈕應以軟布或海綿含
ENZOL 酵素溶劑刷洗,器械前端應開口槽以軟毛刷來刷洗。
5. 清水沖洗:刷洗後應再以清水沖洗 3 次。
6. 仔細檢查:所有清洗工作完成後,應再詳細檢查器械是否乾淨。
7. 烘乾:器械存放前應確實烘乾以避免金屬部分氧化影響功能。
8. 潤滑:此步驟非常重要,消毒前應以水溶性潤滑劑來潤滑器械,使器械保持良好態。
9. 重新組合:消毒後在開刀房中再執行,將板機握緊再將外管裝上。
注意:消毒後再將外管裝上應視為消毒後的標準動作
消毒:
Outer Tube
Removed
Unscrew
Knob
Clockwise
圖 6
圖 4
移除彈匣
完全握緊板機
順時針
方向旋
開
外管移除
P/N: 09-39-30 Rev D ECO 949 04/06 -35-
CHINESE
警告:消毒前應確認彈匣以取出,若不遵守此警告而造成傷害, Microline PENTAX 將不負任何責任。
1. 消毒前應將器械完全地清洗乾淨
2. 將器械置入消毒合﹙Cat#3705/3707﹚
3. 遵照下列程序進行消毒
Microline PENTAX 要求遵照以下標準消毒程序來進行消毒:
1. Gravity Cycle:時間對 3 分鐘, 溫度 270F (134C)
2. Pre-Vacuum Cycle:時間對 3 分鐘, 溫度 270F (134C)
檢查:
注意:每月應確實檢查一次
在開刀房內,每次使用前應依照以下的簡化步驟檢查一次
1. 檢查器械前端開口槽兩側是否對齊﹑損毀或是粘有前一病人之組織物
2. 檢查器械桿身是否維持直線無彎曲,拆下外管檢查內管是否損毀或是粘有前一病人之組織物
3. 握緊﹑放開握把 20 次確認是否卡住,檢查握把是否損毀,不需將握把與板機拆開仔細檢查
4. 至少擊發 2 個血管夾確定閉合情形與下一個血管夾自動裝填到開口槽的情形
5. 每次清洗器械後都應潤滑
A. 將器械整個浸泡到潤滑劑內
B. 若無法整個浸泡,至少要潤滑開口槽與旋轉鈕
C. 潤滑後再依據步驟 3 與 4 確認是否卡住
保證:
Microline PENTAX 保證材質與製造皆無任何瑕疵
Microline PENTAX 保固一年,但對意外造成之損害則無法保固
應由 Microline PENTAX 授權之服務中心來提供維修服務,否則不負保固之責
服務與維修:
送回維修前請先與 Microline PENTAX 代理商聯絡並取的維修授權號碼
若未依照以下情形,會直接將未修復之器械寄回
1. 器械應有一個"送回貨品授權號碼"﹙R.G.A﹚
2. 送回修理前應先將器械清洗與消毒
3. 寄回維修的器械在包裝盒外需很清楚地看得到"送回貨品授權號碼"﹙R.G.A﹚
若有任何問題,請聯絡你的地區代理商或是聯絡 Microline PENTAX 客戶服務部:
CONTACT INFORMATION :
Microline PENTAX, Inc.
800 Cummings Center Suite 157X Beverly, MA 01915
U.S.A. Tel: (978) 922-9810
Fax: (978) 922-9209 Web: www.microlinepentax.com E-mail: [email protected]
EU REPRESENTATIVE:
PENTAX Europe GmbH
Julius-Vosseler-Str. 104 22527 Hamburg • Germany
Tel: +49-40-56 192 0 Fax: +49-40-56 042 13
P/N: 09-39-30 Rev D ECO 949 04/06 -36-
CHINESE
致我們尊貴客戶的
重要訊息
恭喜您購買 Microline PENTAX Reusable M/L -10 Multi-Fire 夾鉗。這是一個精密、
可重複使用的器材,適合應用於重要的手術中,使用時應非常小心。我們極力建
議您使用具有保護功能的 Microline PENATX M/L-10 消毒盤,産品目錄編號爲
3707。
有關 M/L-10 的保養、維修和操作方面的問題,請聯絡 Microline PENTAX 的授權
代表。如果您不確定您的代表,請參觀我們的網站 www.microlinepentax.com 或致
電 Microline PENTAX 的總部,電話:978 922-9810。
感謝您選擇 MICROLINE PENTAX


![Key benefits... · Technical_data_sheet_MO10[M82000401] Loading possabilities for platform Erlenmeyer clip 50 ml, one drilling per clip Erlenmeyer clip 100 ml, one drilling per clip](https://img.pdfslide.us/doc/110x75/6001d18e30219d723b1faf0b/key-beneits-technicaldatasheetmo10m82000401-loading-possabilities-for.jpg)