Embed Size (px)
Citation preview

MITEL
Your Assistant 5.0
User Guide
NOTICE
The information contained in this document is believed to be accurate in all respects but is not warranted by Mitel™ Corporation. The information is subject to change without notice and should not be construed in any way as a commitment by Mitel or any of its affiliates or subsidiaries. Mitel and its affiliates and subsidiaries assume no responsibility for any errors or omissions in this document. Revisions of this document or new editions of it may be issued to incorporate such changes.
Nothing in this document may be reproduced in any manner, whether wholly or in part for any use whatsoever, without written permission from Mitel Corporation.
Mitel is a registered trademark of Mitel Corporation.
Outlook is a trademark of Microsoft; Lotus Notes is a trademark of IBM. Other product names mentioned in this document may be trademarks of their respective companies and are hereby acknowledged.
Version 5.0 May 2008
®, ™ Trademark of Mitel Corporation © Copyright 2008, Mitel Corporation
All rights reserved
Your Assistant User Guide Version 5.0
Contents
i
M I T E L ............................................................................................................................................. ii
YOUR ASSISTANT 5.0 ....................................................................................................................................... ii
About Your Assistant ................................................................................................................................. 1 About This User Guide .......................................................................................................................... 2
Conventions ..................................................................................................................................... 2 About Your Assistant ............................................................................................................................. 2
Your Assistant Licensed Features ................................................................................................... 3 Your Assistant 5.0 Feature Summary .............................................................................................. 4 About the Softphone Module ........................................................................................................... 6 About Your Assistant Lite Softphone Module .................................................................................. 7 Documentation ................................................................................................................................. 7 Emergency Call Services Support ................................................................................................... 7
Safety .................................................................................................................................................... 8
Getting Started ............................................................................................................................................ 9 Installing Your Assistant ........................................................................................................................ 9
System Requirements ...................................................................................................................... 9 Installation ........................................................................................................................................ 9 Starting Your Assistant Automatically at Login .............................................................................. 11
Starting and Exiting Your Assistant ..................................................................................................... 11 Starting Your Assistant ................................................................................................................... 11 Starting Your Assistant in Offline Mode ......................................................................................... 12 Exiting Your Assistant .................................................................................................................... 14
Configuring Your Assistant .................................................................................................................. 15 Configuring Your Assistant Startup ................................................................................................ 15 Multiline Appearance and Basic Multicall ....................................................................................... 15 Using Both a Softphone and a Deskphone .................................................................................... 16 Configuring Your Headset for the Softphone Module .................................................................... 16
Using Your Assistant in Teleworker Mode .......................................................................................... 18 Teleworker Scenarios .................................................................................................................... 18 Enabling Your Assistant in Teleworker Mode ................................................................................ 19 Teleworker Gateway Settings ........................................................................................................ 20 Canceling Your Assistant in Teleworker Mode .............................................................................. 21
PIM Integration .................................................................................................................................... 21 Configuring the Knowledge Management Feature ............................................................................. 22 Exploring Your Assistant ..................................................................................................................... 26
Main Application Window ............................................................................................................... 26 Showing and Hiding Shutters ......................................................................................................... 30 Manipulating Shutters .................................................................................................................... 30
Using Your Assistant ................................................................................................................................ 32 Using the Interface .............................................................................................................................. 33
Quick Connector ............................................................................................................................ 34 Dial Pad .......................................................................................................................................... 35 Communications Shutter ................................................................................................................ 36 Communication Window ................................................................................................................ 36
Your Assistant User Guide Version 5.0
ii
System Tray Status Icon ................................................................................................................ 38 Making Calls ........................................................................................................................................ 38
Dialing a Number with the Keyboard ............................................................................................. 39 Dialing a Call with the Slide-Out Dial Pad ...................................................................................... 39 Making a Call Using Contacts Entries ............................................................................................ 40 Making a Call from the History Shutter .......................................................................................... 42 Making Calls from Other Applications ............................................................................................ 42 Requesting Call Me Back Notification ............................................................................................ 44
Receiving Calls .................................................................................................................................... 45 During a Call ........................................................................................................................................ 47
Hold Calls ....................................................................................................................................... 47 Call Transfer and Conference Calls ............................................................................................... 48 Adding Annotations ........................................................................................................................ 49 Using the Stopwatch ...................................................................................................................... 49 Taking Notes .................................................................................................................................. 50 Recording a Call ............................................................................................................................. 50 View and Open Related Documents .............................................................................................. 51
Using Other Features .......................................................................................................................... 53 Showing Availability ....................................................................................................................... 53 Presence Types ............................................................................................................................. 54 Using PBX Features ....................................................................................................................... 54 Using Hotdesking ........................................................................................................................... 57 Using Key Lines ............................................................................................................................. 58 Chat Sessions in Your Assistant .................................................................................................... 58 Starting a Microsoft Messenger Chat Session ............................................................................... 61 Starting a Microsoft Office Communicator Chat Session ............................................................... 62 Reviewing Your Call History .......................................................................................................... 63 Reviewing Your Call Log ................................................................................................................ 63 Using Account Codes ..................................................................................................................... 66 Starting a Web Conference ............................................................................................................ 66 Using Automatic Call Distribution (ACD) ........................................................................................ 68 Using the Launchpad ..................................................................................................................... 71
Customizing Your Assistant .................................................................................................................... 74 Setting Your Appearance Preference ................................................................................................. 74 Changing the Device for the Softphone Module ................................................................................. 75 Working with Your Contacts ................................................................................................................ 76
Corporate Contacts ........................................................................................................................ 76 Personal Contacts .......................................................................................................................... 77 Building Your Favorites Menu ........................................................................................................ 80 Importing Contacts from Your PIM ................................................................................................. 80
Creating Call Forwarding Profiles ....................................................................................................... 82 Setting Call Forwarding Destinations ............................................................................................. 84 Setting Call Forwarding Policies .................................................................................................... 85
Setting Advisory Messages ................................................................................................................. 87 Displaying and Hiding Communication Windows ................................................................................ 89 Changing Web Window Settings ......................................................................................................... 90 Changing Event Notification Sounds ................................................................................................... 90 Configuring USB Devices .................................................................................................................... 91
Your Assistant User Guide Version 5.0
iii
Using Custom Ringtones..................................................................................................................... 93 Filtering Missed Calls by Main Extensions .......................................................................................... 95
Frequently Asked Questions (FAQ) ........................................................................................................ 96
Appendix A— Using the International Dialing Format ........................................................................ 101 About Dialing Formats ....................................................................................................................... 101 Using the International Dialing Format .............................................................................................. 102
Your Assistant and the International Dialing Format ................................................................... 102 Setting Up Your Local Dialing Rules ................................................................................................. 103
Telephone number formats .......................................................................................................... 103 To set up local dialing rules ......................................................................................................... 104
Appendix B— Specifying Extension Numbers and Responses to Prompts .................................... 106 Overview ........................................................................................................................................... 106 Rules for using commas .................................................................................................................... 106 Example 1: Using Commas for Specifying an Extension Number .................................................... 107 Example 2: Using Commas for Connecting to a Voice Prompt System ........................................... 107
Appendix C— Using VPNs ..................................................................................................................... 108 Overview ........................................................................................................................................... 108
VPN Configuration ....................................................................................................................... 108 Firewall Configurations ................................................................................................................. 109
Connecting to a PPTP VPN .............................................................................................................. 110 Server Configuration .................................................................................................................... 110 Connecting to a PPTP VPN ......................................................................................................... 110 Creating a PPTP Connection Profile ............................................................................................ 111
Connecting with an IPSec VPN ......................................................................................................... 115
Appendix D— PIM Configuration .......................................................................................................... 116 Outlook Configuration .................................................................................................................. 116 Lotus Configuration ...................................................................................................................... 116 ACT! Configuration ....................................................................................................................... 117
Appendix E— Legal Disclaimers ........................................................................................................... 119 Emergency Call Services Support Legal Disclaimer ................................................................... 119 Do Not Use During Electrical Storm Legal Disclaimer ................................................................. 123 Excessive Volume Legal Disclaimer ............................................................................................ 124
Your Assistant User Guide Version 5.0
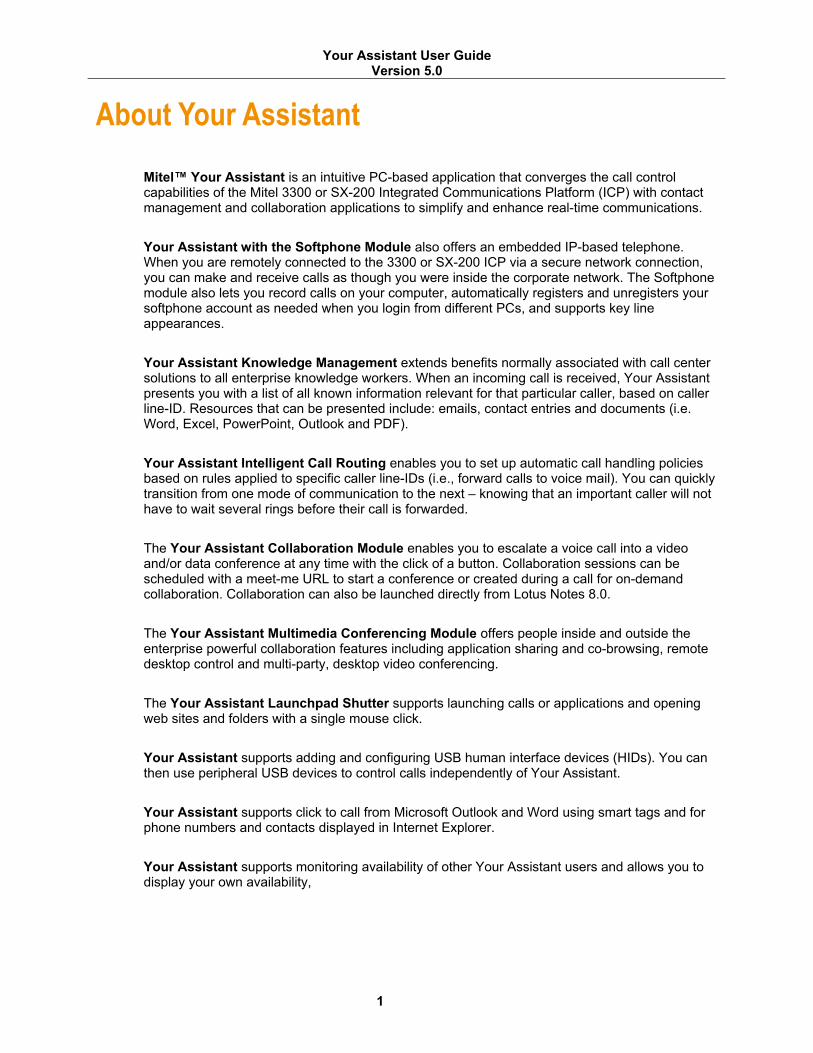
About Your Assistant
1
Mitel™ Your Assistant is an intuitive PC-based application that converges the call control capabilities of the Mitel 3300 or SX-200 Integrated Communications Platform (ICP) with contact management and collaboration applications to simplify and enhance real-time communications.
Your Assistant with the Softphone Module also offers an embedded IP-based telephone. When you are remotely connected to the 3300 or SX-200 ICP via a secure network connection, you can make and receive calls as though you were inside the corporate network. The Softphone module also lets you record calls on your computer, automatically registers and unregisters your softphone account as needed when you login from different PCs, and supports key line appearances.
Your Assistant Knowledge Management extends benefits normally associated with call center solutions to all enterprise knowledge workers. When an incoming call is received, Your Assistant presents you with a list of all known information relevant for that particular caller, based on caller line-ID. Resources that can be presented include: emails, contact entries and documents (i.e. Word, Excel, PowerPoint, Outlook and PDF).
Your Assistant Intelligent Call Routing enables you to set up automatic call handling policies based on rules applied to specific caller line-IDs (i.e., forward calls to voice mail). You can quickly transition from one mode of communication to the next – knowing that an important caller will not have to wait several rings before their call is forwarded.
The Your Assistant Collaboration Module enables you to escalate a voice call into a video and/or data conference at any time with the click of a button. Collaboration sessions can be scheduled with a meet-me URL to start a conference or created during a call for on-demand collaboration. Collaboration can also be launched directly from Lotus Notes 8.0.
The Your Assistant Multimedia Conferencing Module offers people inside and outside the enterprise powerful collaboration features including application sharing and co-browsing, remote desktop control and multi-party, desktop video conferencing.
The Your Assistant Launchpad Shutter supports launching calls or applications and opening web sites and folders with a single mouse click.
Your Assistant supports adding and configuring USB human interface devices (HIDs). You can then use peripheral USB devices to control calls independently of Your Assistant.
Your Assistant supports click to call from Microsoft Outlook and Word using smart tags and for phone numbers and contacts displayed in Internet Explorer.
Your Assistant supports monitoring availability of other Your Assistant users and allows you to display your own availability,
Your Assistant User Guide Version 5.0
2
About This User Guide
This user guide contains information on using the features of Your Assistant on a Mitel 3300 or SX-200 Integrated Communications Platform (ICP), and is organized as follows:
• Getting Started (page 9). • Using Your Assistant (page 32). • Customizing Your Assistant (page 74). • Appendix A— Using the International Dialing Format (page 101). • Appendix B— Specifying Extension Numbers and Responses to Prompts (page 106). • Appendix C— Using VPNs (page 106). • Appendix D— PIM Configuration (page 116) • Appendix E— Legal Disclaimers (page 119).
Note: This user guide assumes that you are familiar with the operation of your computer.
Conventions • The term PIM (Personal Information Manager) means a supported PIM application (for
example, Outlook or Lotus Notes). See your system administrator for more information on the PIMs supported.
• The term softphone refers to the software-based IP phone that is included with the Softphone module.
• The term deskphone refers to the IP phone that sits on your desk and can be controlled by Your Assistant.
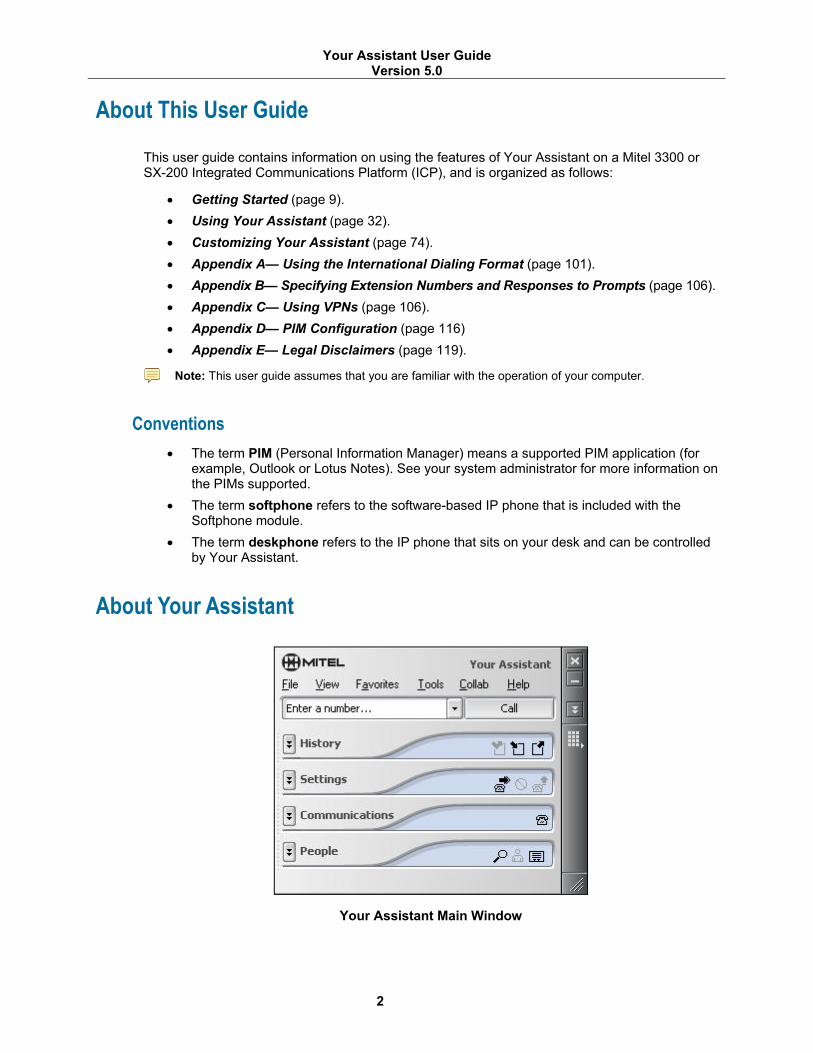
About Your Assistant
Your Assistant Main Window
Your Assistant User Guide Version 5.0
3
Your Assistant is a desktop application that lets you control your Mitel IP deskphone from your computer. With Your Assistant’s intuitive interface, you can:
• Make and receive calls • Forward incoming calls • Set up various call forwarding profiles • Create a Favorites menu • Use drag-and-drop to manage conference calls • Participate in secure chat sessions with other Your Assistant users • Monitor presence availability of other Your Assistant users
As well, Your Assistant provides:
• Call timer and annotation tools • Detailed call history • Integration with Windows Messenger, MSN Messenger, and Windows Live Messenger • Integration with Microsoft Office Communicator • Fully configurable user interface • Calling interface when dialing from your PIM • Knowledge management • Automatic call distribution integration (3300 ICP only) • Intelligent call routing • On-demand web-based conferencing (optional)
Your Assistant Licensed Features
The following features are licensed by your system administrator, and may not be visible within the Your Assistant Client:
• Auto answer • Call forwarding profiles • Chat • Do not disturb • Knowledge management • Microsoft Messenger chat • Microsoft Office Communicator presence and chat • Phone presence • Web window
The following modules are optional purchasable licenses:
• Automatic Call Distribution (ACD) • Collaboration • Softphone
Your Assistant User Guide Version 5.0
4
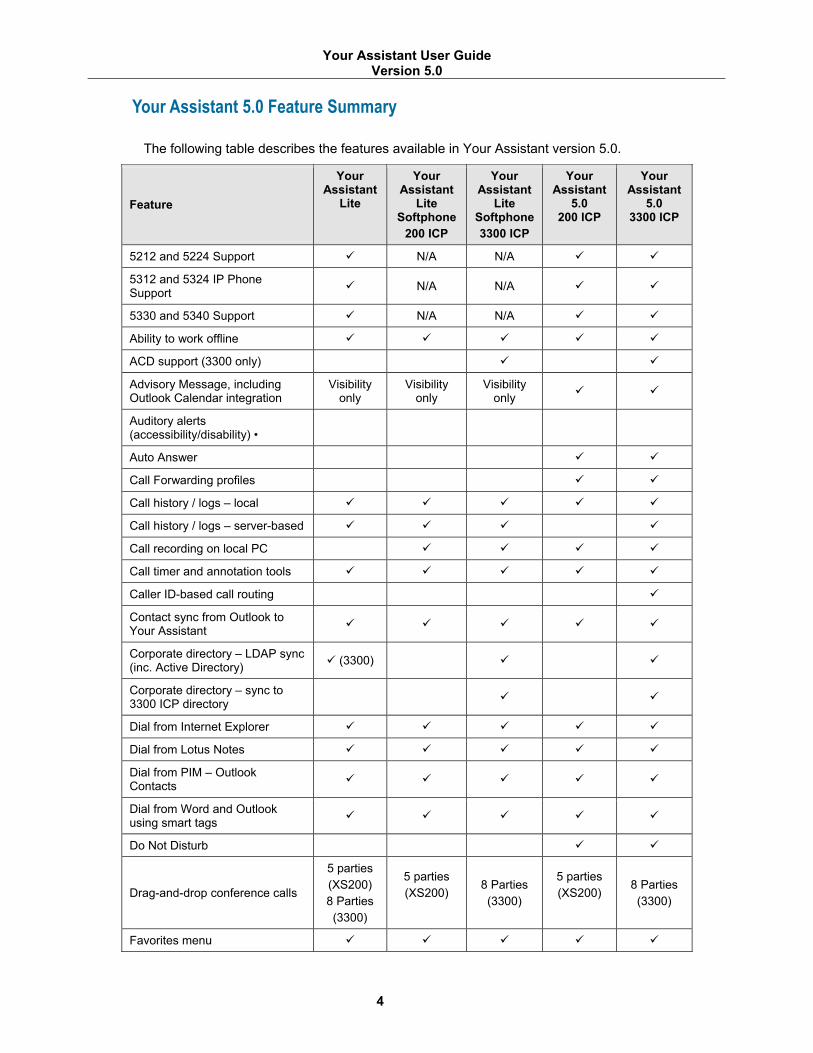
Your Assistant 5.0 Feature Summary
The following table describes the features available in Your Assistant version 5.0.
Feature
Your Assistant
Lite
Your Assistant
Lite Softphone
200 ICP
Your Assistant
Lite Softphone 3300 ICP
Your Assistant
5.0 200 ICP
Your Assistant
5.0 3300 ICP
5212 and 5224 Support N/A N/A
5312 and 5324 IP Phone Support N/A N/A
5330 and 5340 Support N/A N/A
Ability to work offline
ACD support (3300 only)
Advisory Message, including Outlook Calendar integration
Visibility only
Visibility only
Visibility only
Auditory alerts (accessibility/disability) •
Auto Answer
Call Forwarding profiles
Call history / logs – local
Call history / logs – server-based
Call recording on local PC
Call timer and annotation tools
Caller ID-based call routing
Contact sync from Outlook to Your Assistant
Corporate directory – LDAP sync (inc. Active Directory) (3300)
Corporate directory – sync to 3300 ICP directory
Dial from Internet Explorer
Dial from Lotus Notes
Dial from PIM – Outlook Contacts
Dial from Word and Outlook using smart tags
Do Not Disturb
Drag-and-drop conference calls
5 parties (XS200) 8 Parties (3300)
5 parties (XS200)
8 Parties (3300)
5 parties (XS200)
8 Parties (3300)
Favorites menu
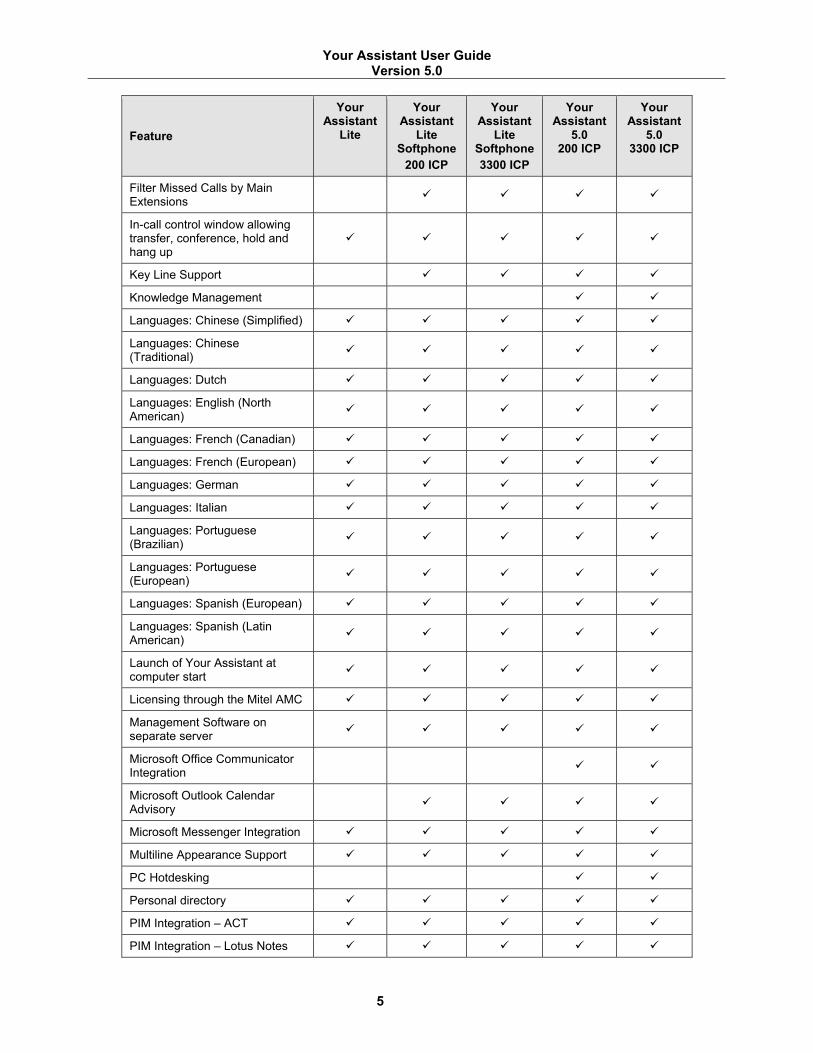
Your Assistant User Guide Version 5.0
5
Feature
Your Assistant
Lite
Your Assistant
Lite Softphone
200 ICP
Your Assistant
Lite Softphone 3300 ICP
Your Assistant
5.0 200 ICP
Your Assistant
5.0 3300 ICP
Filter Missed Calls by Main Extensions
In-call control window allowing transfer, conference, hold and hang up
Key Line Support
Knowledge Management
Languages: Chinese (Simplified)
Languages: Chinese (Traditional)
Languages: Dutch
Languages: English (North American)
Languages: French (Canadian)
Languages: French (European)
Languages: German
Languages: Italian
Languages: Portuguese (Brazilian)
Languages: Portuguese (European)
Languages: Spanish (European)
Languages: Spanish (Latin American)
Launch of Your Assistant at computer start
Licensing through the Mitel AMC
Management Software on separate server
Microsoft Office Communicator Integration
Microsoft Outlook Calendar Advisory
Microsoft Messenger Integration
Multiline Appearance Support
PC Hotdesking
Personal directory
PIM Integration – ACT
PIM Integration – Lotus Notes
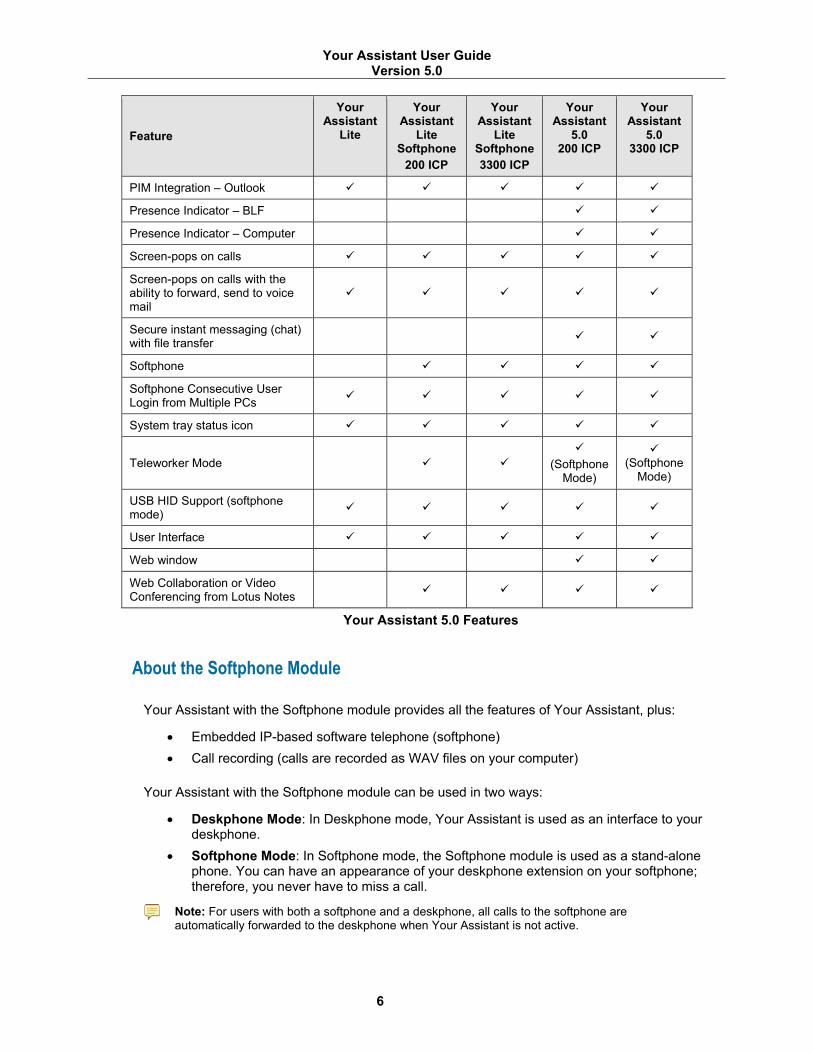
Your Assistant User Guide Version 5.0
6
Feature
Your Assistant
Lite
Your Assistant
Lite Softphone
200 ICP
Your Your Your Assistant
Lite Softphone 3300 ICP
Assistant Assistant 5.0 5.0
200 ICP 3300 ICP
PIM Integration – Outlook
Presence Indicator – BLF
Presence Indicator – Computer
Screen-pops on calls
Screen-pops on calls with the ability to forward, send to voice mail
Secure instant messaging (chat) with file transfer
Softphone
Softphone Consecutive User Login from Multiple PCs
System tray status icon
Teleworker Mode
(Softphone Mode)
(Softphone
Mode)
USB HID Support (softphone mode)
User Interface
Web window
Web Collaboration or Video Conferencing from Lotus Notes
Your Assistant 5.0 Features
About the Softphone Module
Your Assistant with the Softphone module provides all the features of Your Assistant, plus:
• Embedded IP-based software telephone (softphone) • Call recording (calls are recorded as WAV files on your computer)
Your Assistant with the Softphone module can be used in two ways:
• Deskphone Mode: In Deskphone mode, Your Assistant is used as an interface to your deskphone.
• Softphone Mode: In Softphone mode, the Softphone module is used as a stand-alone phone. You can have an appearance of your deskphone extension on your softphone; therefore, you never have to miss a call.
Note: For users with both a softphone and a deskphone, all calls to the softphone are automatically forwarded to the deskphone when Your Assistant is not active.

Your Assistant User Guide Version 5.0
7
When you start Your Assistant, you choose whether you want to use Desktop or Softphone mode. You can also change modes when Your Assistant is running, but you must exit and restart the application for the change to take effect.
When you use both a deskphone and the softphone, each device has its own extension number, but usually only the deskphone has a voice mailbox. Talk to your system administrator for more information.
Note: It is recommended that you keep your softphone extension number private. All unanswered calls to your desktop will be forwarded to your voice mailbox, even when you are working in Softphone mode.
Note: Minimizing and maximizing applications from the Windows Task Bar may cause breaks in the audio. This can be reduced by turning off the Windows transition effects of menus and tool tips. To do this, click Display in the Windows Control Panel. Choose the Appearance tab and click Effects. Clear the transition effect check box.
About Your Assistant Lite Softphone Module
Mitel Your Assistant Lite Softphone combines the flexibility and power of a softphone with a wide range of enhanced business communications features. These features include:
• Drag-and-drop call handling • Local call recording • Automatic call history and times • Basic integration with Microsoft Outlook and Lotus Notes
This document notes which features are not available in Your Assistant Lite with Softphone.
Documentation
The following documentation is available for Your Assistant:
• Online Help: Embedded with the application. To open the online help, select Your Assistant Help in the Help menu.
• User Guide (this document): You can download the User Guide here. • Collaboration Online Help: Accessed from the Your Assistant Collaboration Module client. • Collaboration Guide: You can download the Collaboration Guide here.
Emergency Call Services Support
When used in a remote location, Your Assistant is not suitable for providing reliable access to call for emergency services (for example, 911, 999 or 112). See the Emergency Call Services Support Legal Disclaimer on page 119 for more information.
Your Assistant User Guide Version 5.0
8
Safety
WARNING: Do not use this product during an electrical storm. There is a remote chance of electric shock from lightning. There is also a remote chance of hearing loss in the event of a lightning strike.
Protect Your Hearing
You can adjust the volume of the deskphone handset or headset, and of the softphone headset. Because continuous exposure to loud sounds can contribute to hearing loss, keep the volume at a moderate level.
WARNING: Excessive volume can cause permanent hearing loss. Please adjust the audio device volume to a comfortable level before using the product.
Your Assistant User Guide Version 5.0
Getting Started This section shows you how to set up and start Your Assistant and is organized as follows:
• Installing Your Assistant (below) • Starting and Exiting Your Assistant (page 11) • Configuring Your Assistant (page 15) • Using Your Assistant in Teleworker Mode (page 18) • PIM Integration (page 21) • Configuring the Knowledge Management Feature (page 22) • Exploring Your Assistant (page 26)
Installing Your Assistant
System Requirements
Your Assistant will operate on any computer that has a suitable sound card and headset and that runs one of the following operating systems:
• Microsoft Windows© XP Professional SP2 • Microsoft Windows© Vista Business • Citrix© Presentation Server
Additional System Requirements
Microsoft .NET Framework 2.0 must be installed on your computer before Your Assistant is installed.
Although Your Assistant does not support .NET 1.1 or .NET 3.0, there is no need to uninstall them if they are present.
Note: The screen resolution display must be set at Normal size (96 DPI).
Installation
If Your Assistant is installed and running, its status is displayed in the system tray. (See System Tray Status Icon on page 38). If Your Assistant is not installed, your system administrator may install it using one of five possible methods: software distribution point, IntelliMirror, logon script, SMS, or group policy. The deployment method the administrator used will determine what you see the first time Your Assistant is launched.
Note: An upgrade behaves in the same manner as a new installation. Additionally, an upgrade or re-install of Your Assistant will preserve your preferences and personal contacts, unless you are upgrading from Your Assistant 2.1, in which case Call Forwarding Profiles are not preserved.
Software Distribution Point
With the distribution point deployment method, your system administrator will have placed the installation image on a network share that is accessible to you and you will be notified of its location. Further, the settings for your configuration will also have been provided. However, the administrator may have configured the installation to run silently. If you are prompted for the IP of the Your Assistant server, enter the value provided by your system administrator.
9

Your Assistant User Guide Version 5.0
10
When the installation is complete you may be prompted to restart your computer.
IntelliMirror
If your network uses IntelliMirror, the Your Assistant application and your Your Assistant settings will be available to you on any computer on the domain. If installation is required on a particular computer, you may be prompted to restart the computer once the installation is complete.
Logon Script
You may be required to enter the Your Assistant server IP address in the installation wizard.
SMS
The installation wizard should require no input from you. You may, however, be prompted to restart your computer once installation is complete.
Group Policy
The installation wizard should require no input from you. You may be prompted to restart your computer once the installation is complete.
Confirming a Successful Installation
After Your Assistant installs, a Your Assistant 5.0 shortcut will appear on your desktop and in your Start menu. Select one of these to start Your Assistant. A phone status icon in the Communications shutter should indicate when the handset on your deskphone has been lifted. If any errors occur during startup, check Startup Errors on page 11 for help resolving them.
Phone Status Icons
If the phone status icon correctly shows the state of the lifted handset, replace the handset and place a call with Your Assistant by typing a number in the Quick Connector and clicking Call. The status icons should respond to lifting the handset and the call should be initiated.
The following table describes possible startup errors, their causes and how to fix them
Title Detail Cause Resolution Initialization Error
Network is not available
Network connection problem.
Check cables and switches between the PC and the LAN.
Cannot reach Your Assistant Server.
Confirm that Your Assistant is configured to access the Your Assistant Server. Does the error dialog display the IP of the Your Assistant server?
Confirm that it is not a firewall issue. Check that the required ports are open.

Your Assistant User Guide Version 5.0
11
Title Detail Cause Resolution Your Assistant cannot
find your userid in the Your Assistant directory.
Logged in to wrong domain account.
Log in to your domain user account.
System administrator has not set up your account.
Notify your administrator to update the Your Assistant Directory.
You are not licensed to use Your Assistant.
Your Assistant is installed on a per-machine basis. Logging in to a PC that has Your Assistant installed does not imply that it can be run from your account.
Error Main Window
Error An error occurred at startup.
Installation problem. Notify your system administrator.
Startup Errors
Starting Your Assistant Automatically at Login
It is recommended that you configure Your Assistant to start automatically by configuring Your Assistant startup (see Configuring Your Assistant Startup on page 15). Thereafter, Your Assistant will start when you log in to Windows.
Starting and Exiting Your Assistant
Warning: Your Assistant may not control a softphone extension from more than one location. When planning to use the softphone from another location, ensure that a Your Assistant softphone is not already monitoring the same extension.
Starting Your Assistant
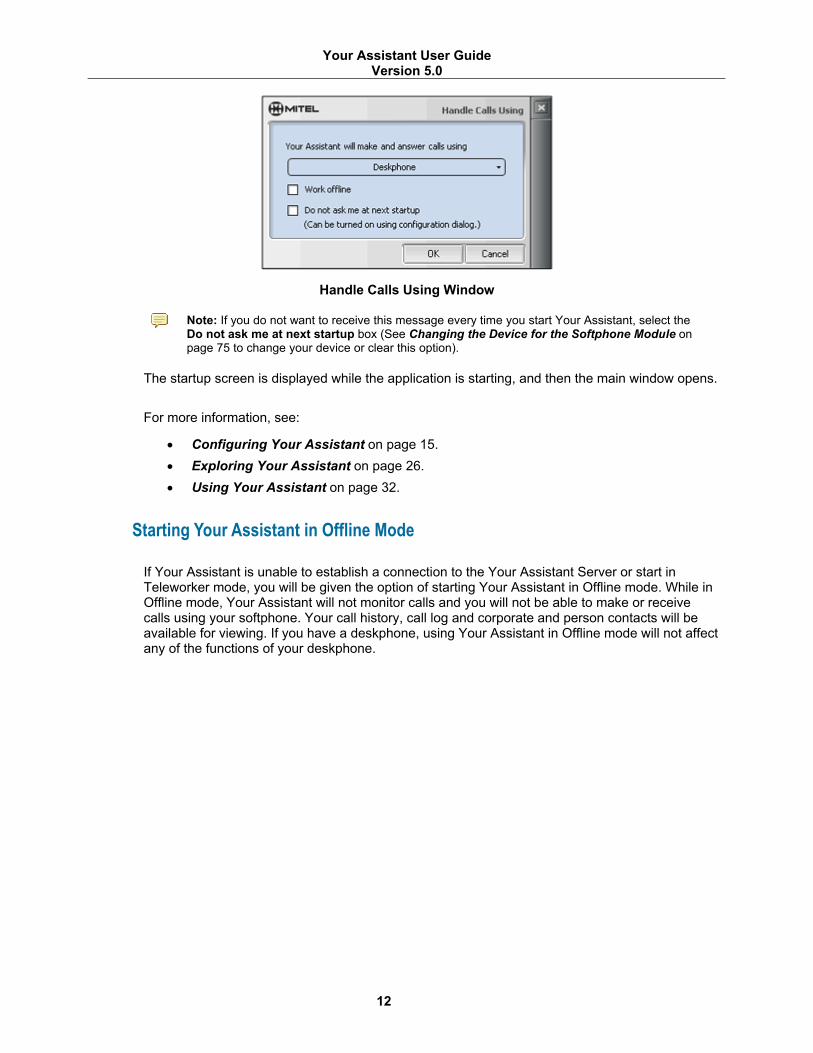
Start the application by double-clicking the icon on your desktop, or by clicking Your Assistant in the Windows Start menu.
If you are using Your Assistant with the Softphone module, you are prompted to select the device you want to use to handle your calls. Use the pull-down menu to select the deskphone or softphone, and click OK.
Your Assistant User Guide Version 5.0
12
Handle Calls Using Window
Note: If you do not want to receive this message every time you start Your Assistant, select the Do not ask me at next startup box (See Changing the Device for the Softphone Module on page 75 to change your device or clear this option).
The startup screen is displayed while the application is starting, and then the main window opens.
For more information, see:
• Configuring Your Assistant on page 15. • Exploring Your Assistant on page 26. • Using Your Assistant on page 32.
Starting Your Assistant in Offline Mode
If Your Assistant is unable to establish a connection to the Your Assistant Server or start in Teleworker mode, you will be given the option of starting Your Assistant in Offline mode. While in Offline mode, Your Assistant will not monitor calls and you will not be able to make or receive calls using your softphone. Your call history, call log and corporate and person contacts will be available for viewing. If you have a deskphone, using Your Assistant in Offline mode will not affect any of the functions of your deskphone.

Your Assistant User Guide Version 5.0
13
Working in Offline Mode
While working in Offline mode the ‘Working Offline’ status message is displayed at the bottom of the Your Assistant main window.
Using Your Assistant in Offline Mode
While using Your Assistant in Softphone mode, Your Assistant may occasionally lose IP connectivity to the Your Assistant server. When Your Assistant is in Offline mode it will not monitor calls and you will not be able to receive or make calls on your softphone. You will still have complete access to your call history, corporate and personal directories. If you have both a deskphone and a softphone, your softphone calls will automatically be forwarded to your deskphone while you are working in Offline mode.
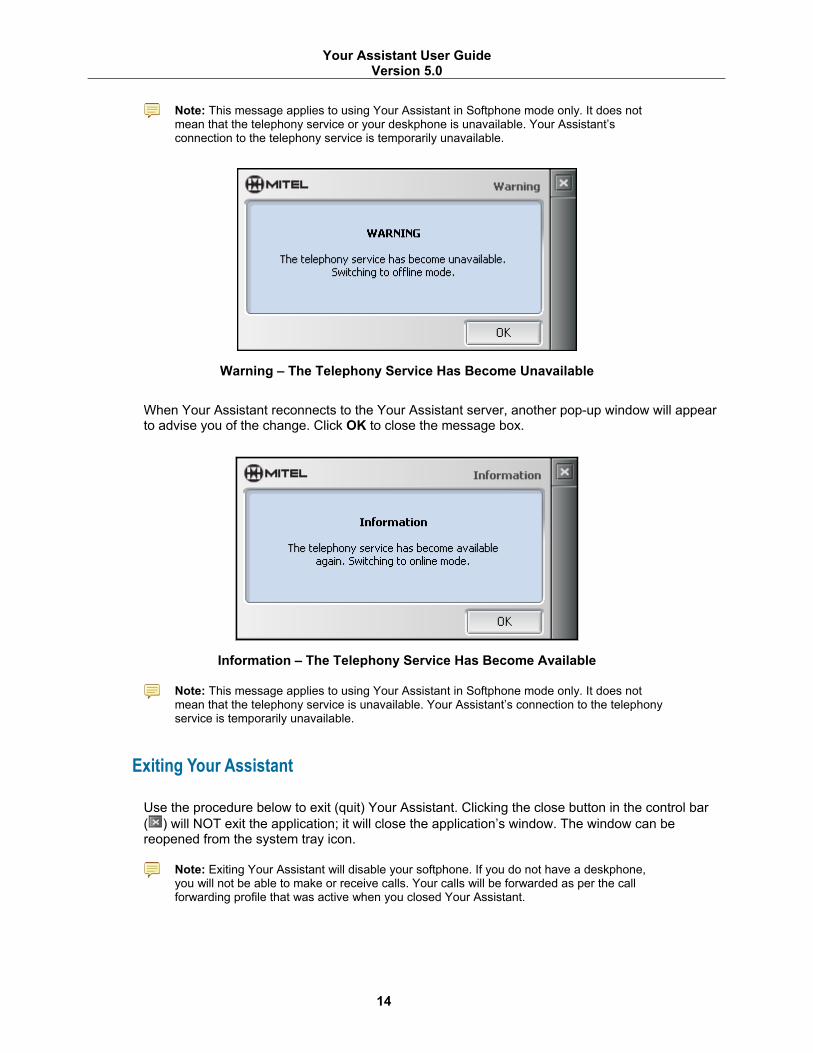
When a Your Assistant client in Softphone mode loses IP connectivity to the Your Assistant server, it generates a pop-up window that contains a message informing you that Your Assistant is switching to Offline mode. Click OK to close the message box.
Your Assistant User Guide Version 5.0
14
Note: This message applies to using Your Assistant in Softphone mode only. It does not mean that the telephony service or your deskphone is unavailable. Your Assistant’s connection to the telephony service is temporarily unavailable.
Warning – The Telephony Service Has Become Unavailable
When Your Assistant reconnects to the Your Assistant server, another pop-up window will appear to advise you of the change. Click OK to close the message box.
Information – The Telephony Service Has Become Available
Note: This message applies to using Your Assistant in Softphone mode only. It does not mean that the telephony service is unavailable. Your Assistant’s connection to the telephony service is temporarily unavailable.
Exiting Your Assistant
Use the procedure below to exit (quit) Your Assistant. Clicking the close button in the control bar ( ) will NOT exit the application; it will close the application’s window. The window can be reopened from the system tray icon.
Note: Exiting Your Assistant will disable your softphone. If you do not have a deskphone, you will not be able to make or receive calls. Your calls will be forwarded as per the call forwarding profile that was active when you closed Your Assistant.
Your Assistant User Guide Version 5.0
15
To Exit Your Assistant
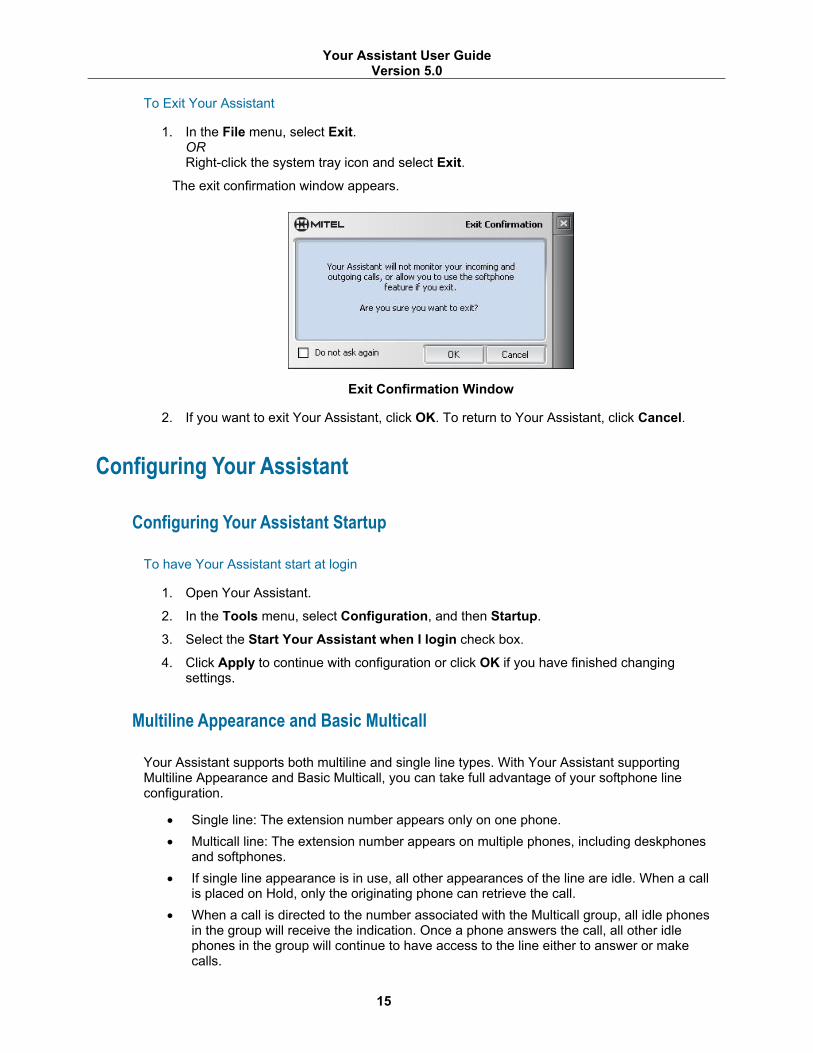
1. In the File menu, select Exit. OR Right-click the system tray icon and select Exit.
The exit confirmation window appears.
Exit Confirmation Window
2. If you want to exit Your Assistant, click OK. To return to Your Assistant, click Cancel.
Configuring Your Assistant
Configuring Your Assistant Startup
To have Your Assistant start at login
1. Open Your Assistant.
2. In the Tools menu, select Configuration, and then Startup.
3. Select the Start Your Assistant when I login check box.
4. Click Apply to continue with configuration or click OK if you have finished changing settings.
Multiline Appearance and Basic Multicall
Your Assistant supports both multiline and single line types. With Your Assistant supporting Multiline Appearance and Basic Multicall, you can take full advantage of your softphone line configuration.
• Single line: The extension number appears only on one phone. • Multicall line: The extension number appears on multiple phones, including deskphones
and softphones. • If single line appearance is in use, all other appearances of the line are idle. When a call
is placed on Hold, only the originating phone can retrieve the call. • When a call is directed to the number associated with the Multicall group, all idle phones
in the group will receive the indication. Once a phone answers the call, all other idle phones in the group will continue to have access to the line either to answer or make calls.
Your Assistant User Guide Version 5.0
16
Note It is the system administrator’s responsibility to configure a softphone to have the line appearance of a deskphone extension. Mitel recommends that all softphones be configured that way.
Using Both a Softphone and a Deskphone
If you have both a deskphone and a softphone, Multicall support allows you to have a line appearance of your deskphone primary number programmed on your softphone. This allows you to distribute one number, your deskphone primary number, and answer incoming calls to this number via both your deskphone and softphone.
When you use both a deskphone and the softphone, each phone has its own extension number. However, all calls to the softphone are automatically forwarded to the deskphone when Your Assistant is not active.
If you have both a deskphone and a softphone, your system administer must reprogram the 3300 such that:
• The deskphone must have the attached voicemail (assuming you have voicemail). • The softphone must have no attached voicemail. • The softphone must have a line appearance of the deskphone.
On startup, Your Assistant detects if the softphone has a line appearance of the deskphone extension. If that is the case, Your Assistant monitors the deskphone voicemail for new messages. When a new message has been recorded in the deskphone voicemail, Your Assistant changes the system tray icon to the message waiting indicator (MWI) icon a few seconds later.
Accessing Voicemail in Softphone Mode
While in Softphone mode you can send a call to voicemail when someone calls the deskphone extension. The messages get recorded in the deskphone voicemail. When retrieving voicemail messages, you must first enter the deskphone extension followed by your deskphone voicemail passcode.
Multiline Appearance and Basic Multicall for 200ICP Users Only
The 200 ICP does not support the programming of multicall lines; in this case, your deskphone cannot be effectively programmed to appear on your softphone. If you use the 200 ICP and have BOTH a deskphone and softphone and you want to be able to answer calls to your deskphone extension, you must manually forward your deskphone to your softphone.
Note For 200 ICP users, your deskphone will not show as a line appearance on your softphone.
Configuring Your Headset for the Softphone Module
To install your headset
1. If required, install the sound card. See your sound card documentation for instructions.
Your Assistant User Guide Version 5.0
17
2. Connect your headset to the appropriate port on your computer (see your computer/sound card documentation for information).
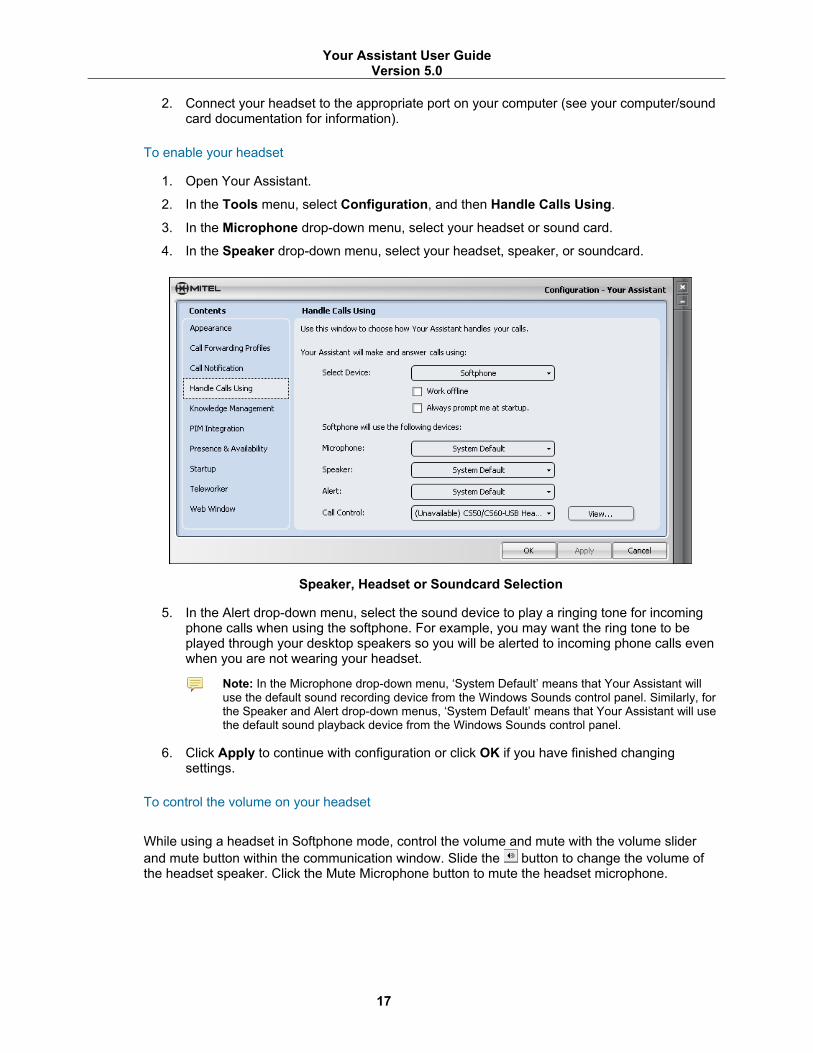
To enable your headset
1. Open Your Assistant.
2. In the Tools menu, select Configuration, and then Handle Calls Using.
3. In the Microphone drop-down menu, select your headset or sound card.
4. In the Speaker drop-down menu, select your headset, speaker, or soundcard.
Speaker, Headset or Soundcard Selection
5. In the Alert drop-down menu, select the sound device to play a ringing tone for incoming phone calls when using the softphone. For example, you may want the ring tone to be played through your desktop speakers so you will be alerted to incoming phone calls even when you are not wearing your headset.
Note: In the Microphone drop-down menu, ‘System Default’ means that Your Assistant will use the default sound recording device from the Windows Sounds control panel. Similarly, for the Speaker and Alert drop-down menus, ‘System Default’ means that Your Assistant will use the default sound playback device from the Windows Sounds control panel.
6. Click Apply to continue with configuration or click OK if you have finished changing settings.
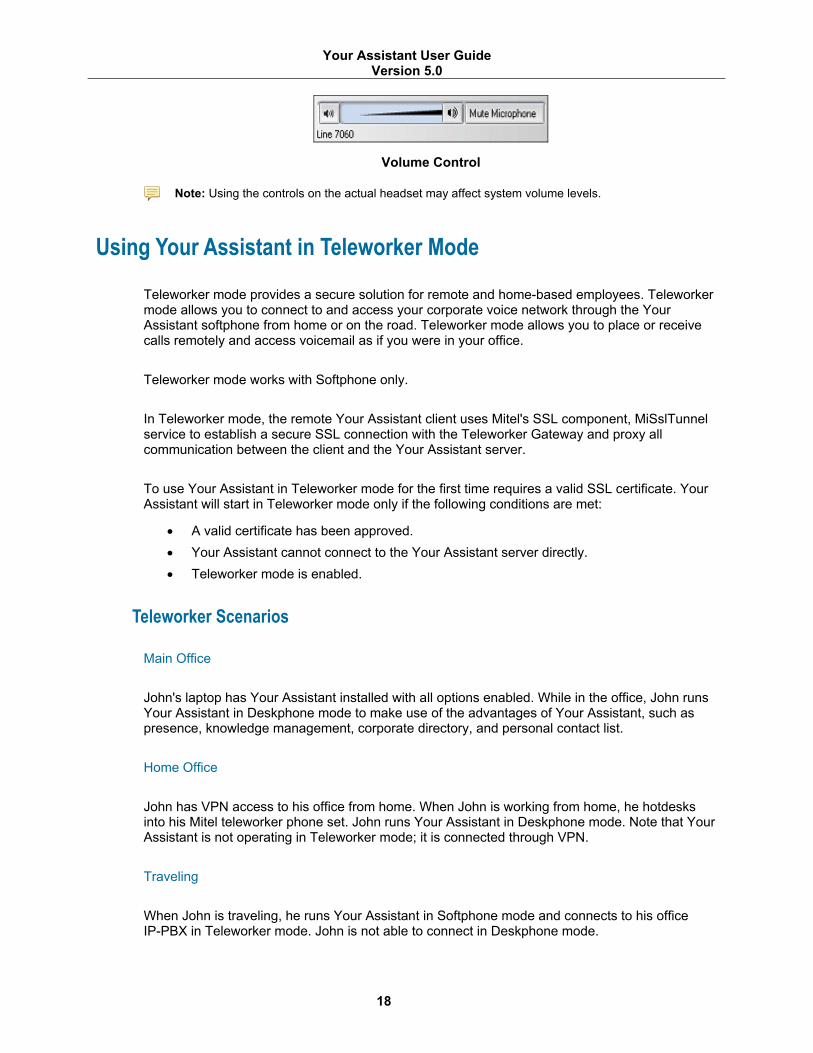
To control the volume on your headset
While using a headset in Softphone mode, control the volume and mute with the volume slider and mute button within the communication window. Slide the button to change the volume of the headset speaker. Click the Mute Microphone button to mute the headset microphone.
Your Assistant User Guide Version 5.0
18
Volume Control
Note: Using the controls on the actual headset may affect system volume levels.
Using Your Assistant in Teleworker Mode
Teleworker mode provides a secure solution for remote and home-based employees. Teleworker mode allows you to connect to and access your corporate voice network through the Your Assistant softphone from home or on the road. Teleworker mode allows you to place or receive calls remotely and access voicemail as if you were in your office.
Teleworker mode works with Softphone only.
In Teleworker mode, the remote Your Assistant client uses Mitel's SSL component, MiSslTunnel service to establish a secure SSL connection with the Teleworker Gateway and proxy all communication between the client and the Your Assistant server.
To use Your Assistant in Teleworker mode for the first time requires a valid SSL certificate. Your Assistant will start in Teleworker mode only if the following conditions are met:
• A valid certificate has been approved. • Your Assistant cannot connect to the Your Assistant server directly. • Teleworker mode is enabled.
Teleworker Scenarios
Main Office
John's laptop has Your Assistant installed with all options enabled. While in the office, John runs Your Assistant in Deskphone mode to make use of the advantages of Your Assistant, such as presence, knowledge management, corporate directory, and personal contact list.
Home Office
John has VPN access to his office from home. When John is working from home, he hotdesks into his Mitel teleworker phone set. John runs Your Assistant in Deskphone mode. Note that Your Assistant is not operating in Teleworker mode; it is connected through VPN.
Traveling
When John is traveling, he runs Your Assistant in Softphone mode and connects to his office IP-PBX in Teleworker mode. John is not able to connect in Deskphone mode.
Your Assistant User Guide Version 5.0
19
Small Branch Office
The company's branch offices have teleworker desks, each of which is equipped with an Internet connection and a Mitel teleworker phone set connected to the main office through the Teleworker Gateway. John hotdesks into the Mitel set and uses his laptop running Your Assistant in Softphone mode. Your Assistant connects to the main office in Teleworker mode. John can answer calls made to his deskphone extension using Your Assistant in Softphone mode. He cannot originate calls from his deskphone extension using Your Assistant; instead, he has to use his softphone extension or his physical phone.
Alternatively, to connect from the branch office, John could use Your Assistant in Deskphone mode through a VPN connection, which would give him access to e-mail and network drives.
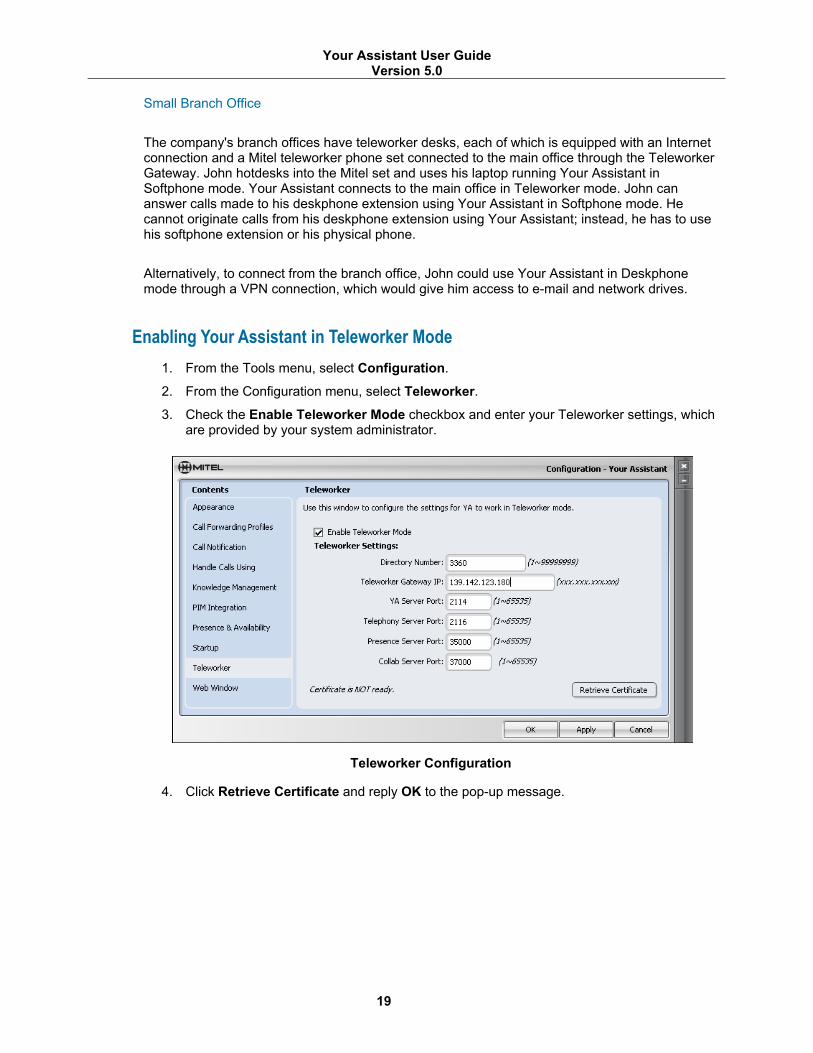
Enabling Your Assistant in Teleworker Mode 1. From the Tools menu, select Configuration.
2. From the Configuration menu, select Teleworker.
3. Check the Enable Teleworker Mode checkbox and enter your Teleworker settings, which are provided by your system administrator.
Teleworker Configuration
4. Click Retrieve Certificate and reply OK to the pop-up message.
Your Assistant User Guide Version 5.0
20
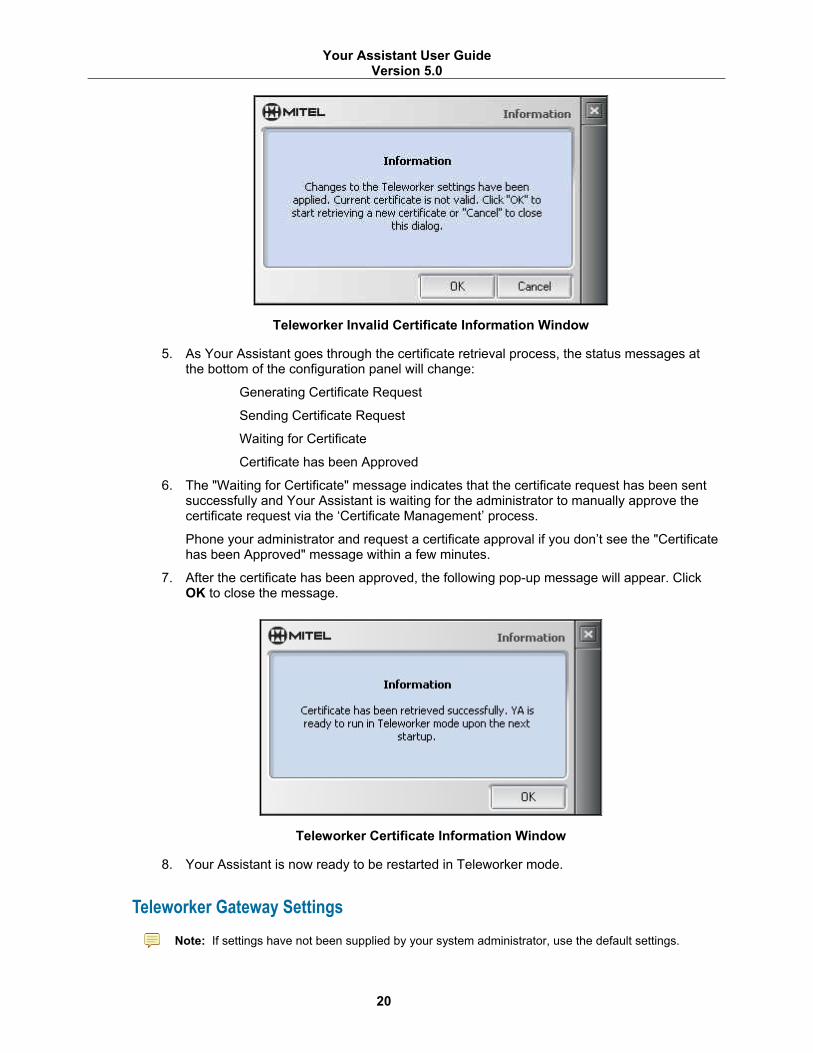
Teleworker Invalid Certificate Information Window
5. As Your Assistant goes through the certificate retrieval process, the status messages at the bottom of the configuration panel will change:
Generating Certificate Request
Sending Certificate Request
Waiting for Certificate
Certificate has been Approved
6. The "Waiting for Certificate" message indicates that the certificate request has been sent successfully and Your Assistant is waiting for the administrator to manually approve the certificate request via the ‘Certificate Management’ process.
Phone your administrator and request a certificate approval if you don’t see the "Certificate has been Approved" message within a few minutes.
7. After the certificate has been approved, the following pop-up message will appear. Click OK to close the message.
Teleworker Certificate Information Window
8. Your Assistant is now ready to be restarted in Teleworker mode.
Teleworker Gateway Settings
Note: If settings have not been supplied by your system administrator, use the default settings.
Your Assistant User Guide Version 5.0
21
Setting Description Directory Number Your softphone number. The input should be a number, range from 1 to 99999999.
Must be a valid softphone number setup in the switch. Teleworker Gateway's IP
The Teleworker Gateway's IP address that MiSslTunnel service will connect to and use to create the SSL connections. It should be in a form of "xxx.xxx.xxx.xxx",
Your Assistant Server Port
The port number mapped to the Your Assistant server. Input should be a number between 1 and 65535. Default value for this field is 2114.
Telephone Server Port
The port number on the Teleworker Gateway that is mapped to the Telephony server. The input should be a number in between 1 and 65535. The default value for this field is 2116.
Presence Server Port
The port number on the Teleworker Gateway that will be mapped to the Presence server. The input should be a number between 1 and 65535. The default value for this field is 35000.
Collaboration Server Port
The port number on the Teleworker Gateway that will be mapped to the Collaboration server. The input should be a number between 1 and 65535. The default value for this field is 37000.
Teleworker Gateway Settings
Canceling Your Assistant in Teleworker Mode
There is no need to cancel or disable Teleworker settings when you no longer want to use Your Assistant in Teleworker mode.
1. When Your Assistant starts, it will always try to connect directly to the Your Assistant server.
2. If Your Assistant is unable to connect directly to the Your Assistant server, it will start in Teleworker mode, provided you have a valid Teleworker certificate.
3. If Your Assistant is unable to determine if you have a valid certificate, it will start in Offline mode.
Note: Contact your system administrator if you encounter any Teleworker startup errors.
PIM Integration
PIM Integration indexes your PIM contacts to create a connection between Your Assistant and your PIM and enables Your Assistant to resolve contact information for your incoming calls. When a call is made to you, Your Assistant attempts to display the contact information in an Incoming Call pop-up window (See Receiving Calls on page 45). Your Assistant retrieves contact information from imported and indexed contacts and from contacts listed in your PIM. The PIM Integration feature can handle contacts from Outlook, ACT!, and Lotus Notes, or from any combination of these PIMs.
You need to re-index Your Assistant when you have new contacts or when your PIM contact information changes. You can set automatic indexing and manually index Your Assistant to get an immediate update. Depending on the size of your PIM contact list, it may take several minutes to index the contact list. Although you can continue to use the program while it is indexing, it is recommended that auto-indexing be configured to take place during off-peak hours.
Your Assistant User Guide Version 5.0
22
Note: Indexing your contacts neither imports contacts into Your Assistant nor indexes your PIM data for the Knowledge Management feature. See those sections for details on the respective features.
To automatically index your contacts:
1. In the Tools menu, select Configuration. The Configuration window will appear. Select PIM Integration.
2. Your Assistant will automatically detect where your default PIM stores contacts. This location will be shown in the Contact Locations list.
If your default PIM is not the PIM you wish to index, or if you have multiple PIMs, you will need to customize your Contact Locations. Before customizing your Contact Locations or indexing, you must first ensure that Your Assistant is properly configured with your PIM or PIMs.
Take time now to ensure that your PIM (or PIMs) is configured. See Appendix D— PIM Configuration on page 116 for the configuration procedures.
3. Once you have configured your PIMs, you may customize the Contact Locations list as desired:
• To add folders to the Contact Locations list, click the Change button. A pop-up window containing all possible contact folders will appear. Select and deselect folders using the checkboxes, and click OK to confirm your changes.
• To remove a PIM from the Contact Locations list, select a PIM in the list and click the Remove button.
• To clear the Contact Locations list, click the Clear All button. • To restore the Contact Locations to their default value, click the Use Defaults button.
4. To configure automatic indexing, select an option from the Index Contacts Every list and change the Starting At time to an acceptable value. Alternately, you may opt to not automatically index contacts by selecting the Never option from the bottom of the Index Contacts Every list.
5. Click OK.
To manually index your contacts:
Once you have configured contact indexing (as described above), you can index your contacts at any time rather than waiting for automatic indexing to occur. In the Tools menu, select the Index Now option. If you have a large number of contacts to index (for example, you are indexing an exchange server), the indexing process may take some time to complete. You may continue to use Your Assistant normally during indexing, but wait until the indexing is complete before exiting Your Assistant.
Configuring the Knowledge Management Feature
You can correlate information in files and Outlook email messages with your contacts through the Knowledge Management feature. When you index files and messages with contacts, Your Assistant can recall the contact-related files and messages in the Knowledge Management window. See To view related documents for a contact on page 51 for details about the window.
Your Assistant User Guide Version 5.0
23
Configuration Window - Knowledge Management Panel
To select and index your computer or Outlook folders for Knowledge Management
Note: The Knowledge Management feature will index only Outlook folders, and not those of any other PIM. However, indexing computer folders operates whether or not Outlook is installed.
1. In the Tools menu, select Configuration…, and then Knowledge Management.
2. Create/edit the Outlook Folders and File Paths to Index list. • Click Add Outlook Folder… to browse for an Outlook folder to add to the list. • Click Add File Path… to browse for a computer folder to add to the list. • With a row highlighted in the list, click Delete to remove it from the list. (It will
continue to be queried until the list is re-indexed.) • With a row highlighted in the list, click Change to select a new Outlook folder or file
path from the browser dialog box. (The change will occur when the list is re-indexed.)
3. Select the Index folders and Outlook every n days check box and choose an interval if you wish to have Your Assistant index at specified intervals.
4. Select the Enable Knowledge Management pop-up window check box to have the Knowledge Management window appear on receipt of an incoming call from a contact.
5. Select All, Outlook, or Files from the index source drop-down list and click Index Now to index immediately.

Your Assistant User Guide Version 5.0
24
Index Source Drop-down List
6. Click Apply to continue with configuration or click OK if you have finished changing settings.
To set the search criteria
1. In the Tools menu, select Configuration…, and then Knowledge Management.
2. Click the Search On… button.
3. Select the data elements to be included as a search criterion for Knowledge Management document matches. Your Assistant looks for the search criteria information within the text of the file and not within the file name.
4. Click Apply to continue with configuration or click OK if you have finished changing settings.
Search Criteria Window
Your Assistant User Guide Version 5.0
25
To create a forced association
Even when a file does not contain the required search criteria, it can be associated with a particular contact. A forced association allows you to connect any file with a contact.
Forced Association Creation
1. In the People shutter, right click on the contact you want to associate the file with, then select Knowledge Management.
2. From the Knowledge Management window drag and drop the document into the grid. OR Select New Association and browse your computer for the document you want to associate with the contact.
3. Click Open to select the document. The document is automatically added to the grid.

Your Assistant User Guide Version 5.0
26
Exploring Your Assistant
Main Application Window
1 2
4
5
6
7
8
9
3
11
10
Main Application Window
1: Main Menu The Main Menu provides menu access to Your Assistant features and functions.
Your Assistant User Guide Version 5.0
27
2: Quick Connector(Dialing Window) The Quick Connector displays the number dialed. Clicking the arrow beside it displays a drop-down list that provides access to the last 20 numbers dialed. For more information, see Making Calls on page 38.
3: Window Control Buttons
Use Window control buttons to close the Your Assistant application window ( ), minimize the application window ( ), or minimize all the shutters ( ).
Note: Closing the application window does not exit Your Assistant. To redisplay the application window, right-click the Your Assistant icon in the system tray, and select Show Your Assistant.
4: Slide-Out Dial Pad
Use the slide-out dial pad to dial a number manually. It also contains lettering associated with the number keys for calls like 1-800-SXMITEL. Click on to display the dial pad. For more information, see Making Calls on page 38.
5: Settings Shutter
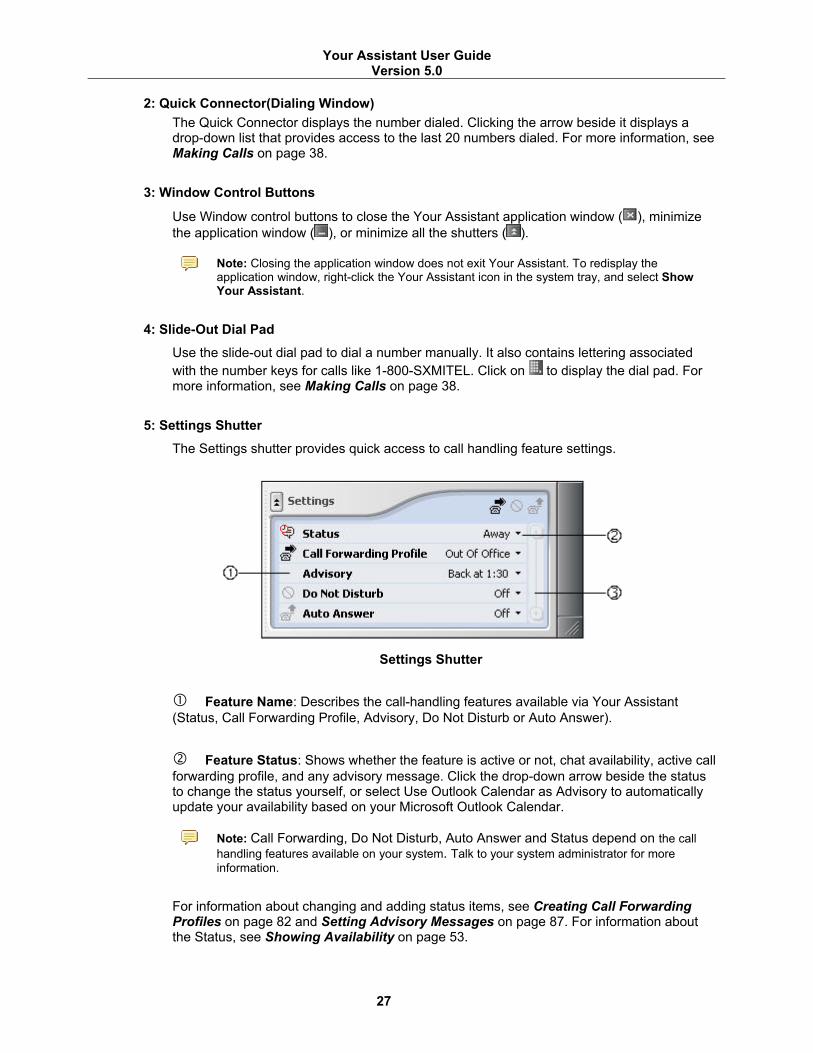
The Settings shutter provides quick access to call handling feature settings.
Settings Shutter
Feature Name: Describes the call-handling features available via Your Assistant (Status, Call Forwarding Profile, Advisory, Do Not Disturb or Auto Answer).
Feature Status: Shows whether the feature is active or not, chat availability, active call forwarding profile, and any advisory message. Click the drop-down arrow beside the status to change the status yourself, or select Use Outlook Calendar as Advisory to automatically update your availability based on your Microsoft Outlook Calendar.
Note: Call Forwarding, Do Not Disturb, Auto Answer and Status depend on the call handling features available on your system. Talk to your system administrator for more information.
For information about changing and adding status items, see Creating Call Forwarding Profiles on page 82 and Setting Advisory Messages on page 87. For information about the Status, see Showing Availability on page 53.
Your Assistant User Guide Version 5.0
28
Scroll bar: Displays other available features that did not fit in the Settings shutter window. If all the features are displayed, the scroll bar is grayed out.
Note: The Settings Shutter is not available in Your Assistant Lite with Softphone.
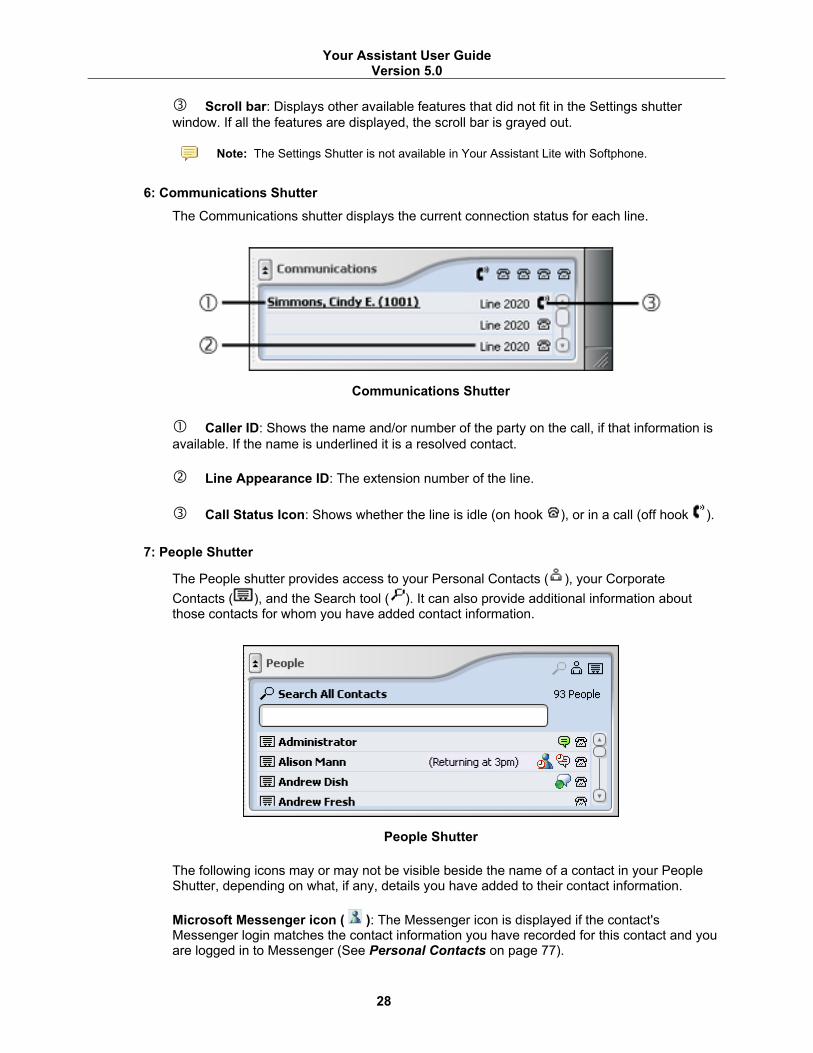
6: Communications Shutter
The Communications shutter displays the current connection status for each line.
Communications Shutter
Caller ID: Shows the name and/or number of the party on the call, if that information is available. If the name is underlined it is a resolved contact.
Line Appearance ID: The extension number of the line.
Call Status Icon: Shows whether the line is idle (on hook ), or in a call (off hook ).
7: People Shutter
The People shutter provides access to your Personal Contacts ( ), your Corporate Contacts ( ), and the Search tool ( ). It can also provide additional information about those contacts for whom you have added contact information.
People Shutter
The following icons may or may not be visible beside the name of a contact in your People Shutter, depending on what, if any, details you have added to their contact information.
Microsoft Messenger icon ( ): The Messenger icon is displayed if the contact's Messenger login matches the contact information you have recorded for this contact and you are logged in to Messenger (See Personal Contacts on page 77).
Your Assistant User Guide Version 5.0
29
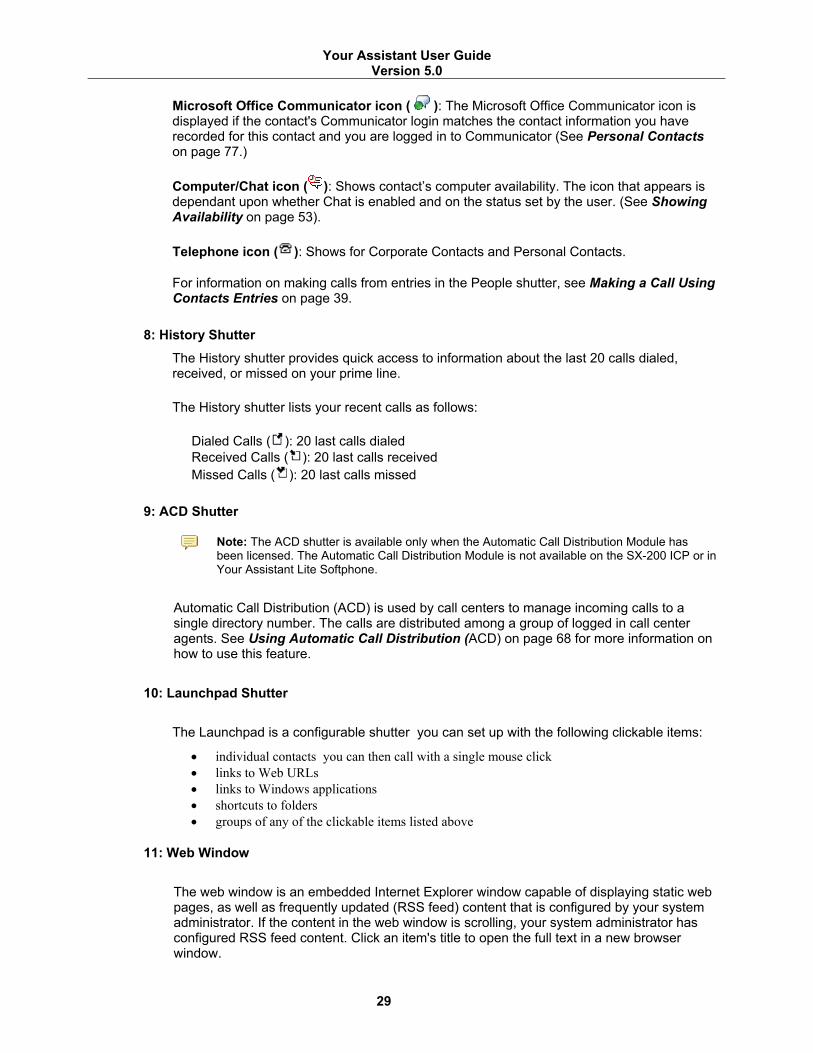
Microsoft Office Communicator icon ( ): The Microsoft Office Communicator icon is displayed if the contact's Communicator login matches the contact information you have recorded for this contact and you are logged in to Communicator (See Personal Contacts on page 77.)
Computer/Chat icon ( ): Shows contact’s computer availability. The icon that appears is dependant upon whether Chat is enabled and on the status set by the user. (See Showing Availability on page 53).
Telephone icon ( ): Shows for Corporate Contacts and Personal Contacts.
For information on making calls from entries in the People shutter, see Making a Call Using Contacts Entries on page 39.
8: History Shutter
The History shutter provides quick access to information about the last 20 calls dialed, received, or missed on your prime line.
The History shutter lists your recent calls as follows:
Dialed Calls ( ): 20 last calls dialed Received Calls ( ): 20 last calls received Missed Calls ( ): 20 last calls missed
9: ACD Shutter
Note: The ACD shutter is available only when the Automatic Call Distribution Module has been licensed. The Automatic Call Distribution Module is not available on the SX-200 ICP or in Your Assistant Lite Softphone.
Automatic Call Distribution (ACD) is used by call centers to manage incoming calls to a single directory number. The calls are distributed among a group of logged in call center agents. See Using Automatic Call Distribution (ACD) on page 68 for more information on how to use this feature.
10: Launchpad Shutter
The Launchpad is a configurable shutter you can set up with the following clickable items:
• individual contacts you can then call with a single mouse click • links to Web URLs • links to Windows applications • shortcuts to folders • groups of any of the clickable items listed above
11: Web Window
The web window is an embedded Internet Explorer window capable of displaying static web pages, as well as frequently updated (RSS feed) content that is configured by your system administrator. If the content in the web window is scrolling, your system administrator has configured RSS feed content. Click an item's title to open the full text in a new browser window.
Your Assistant User Guide Version 5.0
30
See Changing Web Window Settings on page 90 for information on changing the web window display.
Note: The Web Window is not available in Your Assistant Lite Softphone.
Showing and Hiding Shutters
You can use the View menu to show or hide shutters in your main Your Assistant application window. You can also select Hide All to display only the Quick Connector. (Show All displays all sections.)
To hide a single shutter
• In the View menu, select Hide History or any other single shutter.
Manipulating Shutters
Each shutter in the main window can be minimized, detached, resized, and redocked.
Tip: You can re-order shutters by detaching and redocking them.
To collapse a shutter
• Click the button beside the name of the shutter you want to hide.
To detach and move a shutter
1. Click and hold the name of the shutter you want to detach.
2. Drag the shutter to the desired location.
To resize a detached shutter
• Use the resize button ( ).
Note: You cannot re-size a shutter when it is attached.

Your Assistant User Guide Version 5.0
31
Shutter Manipulation
To redock a detached shutter
• Drag the shutter on top the Your Assistant main window.
Note: When redocked, the shutter retains its resized length, even if it is minimized when redocked. Because Your Assistant maintains a height that fits the screen, it automatically detaches an expanded shutter if it is too tall. If necessary, reduce the detached shutter's length, and then redock.

Your Assistant User Guide Version 5.0
Using Your Assistant
32
This section shows you how to make and receive calls with Your Assistant, and how to use its features and tools.
This section is organized as follows:
• Using the Interface (page 33) • Making Calls (page 38) • Receiving Calls (page 45) • During a Call (page 47) • Using Other Features (page 53)
Your Assistant User Guide Version 5.0
33
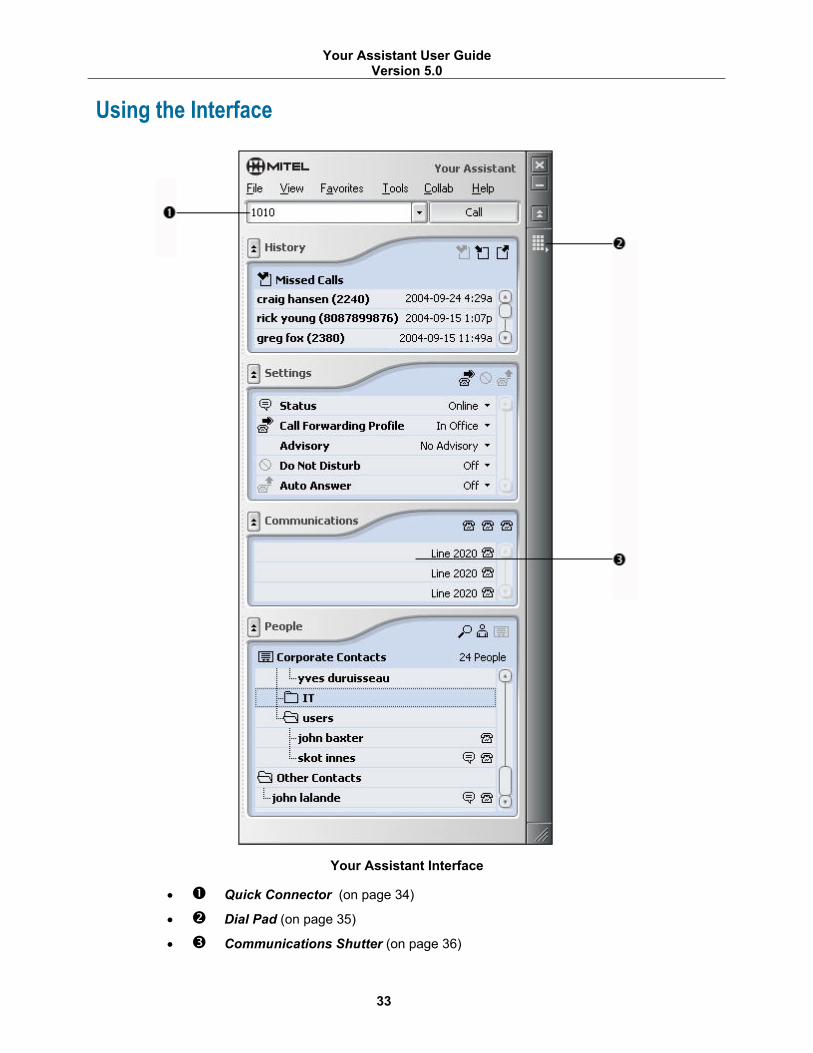
Using the Interface
Your Assistant Interface
• Quick Connector (on page 34)
• Dial Pad (on page 35)
• Communications Shutter (on page 36)
Your Assistant User Guide Version 5.0
34
Quick Connector
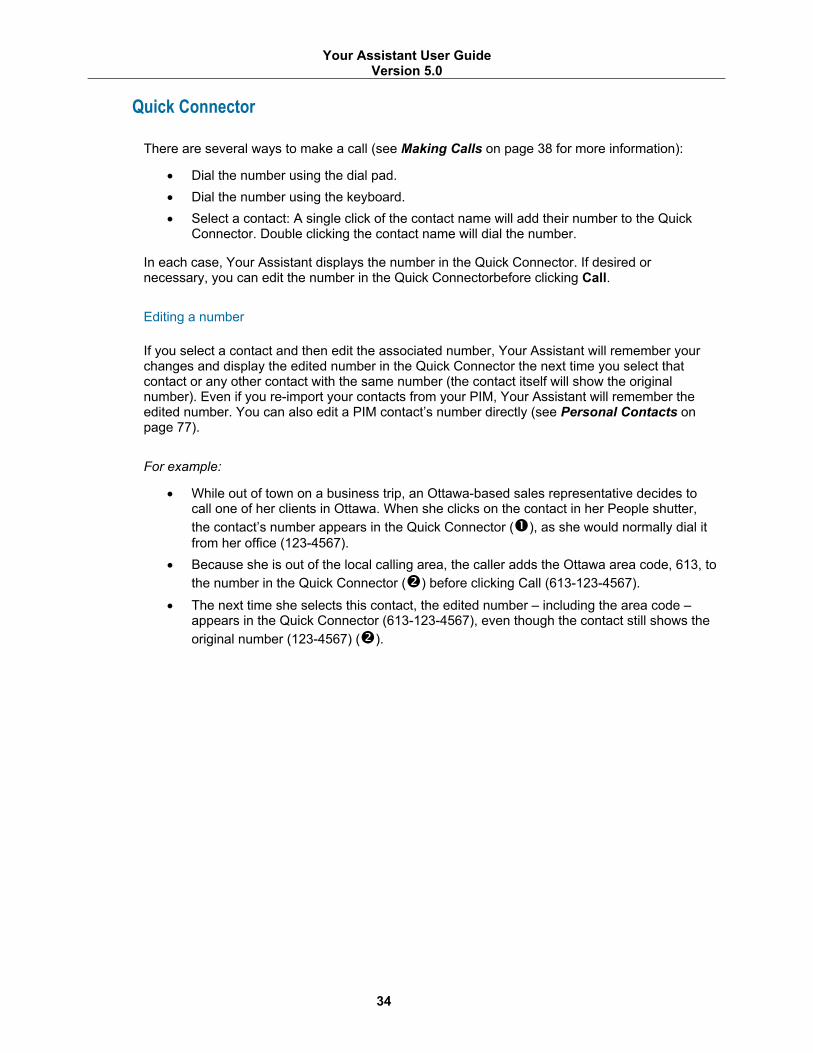
There are several ways to make a call (see Making Calls on page 38 for more information):
• Dial the number using the dial pad. • Dial the number using the keyboard. • Select a contact: A single click of the contact name will add their number to the Quick
Connector. Double clicking the contact name will dial the number.
In each case, Your Assistant displays the number in the Quick Connector. If desired or necessary, you can edit the number in the Quick Connectorbefore clicking Call.
Editing a number
If you select a contact and then edit the associated number, Your Assistant will remember your changes and display the edited number in the Quick Connector the next time you select that contact or any other contact with the same number (the contact itself will show the original number). Even if you re-import your contacts from your PIM, Your Assistant will remember the edited number. You can also edit a PIM contact’s number directly (see Personal Contacts on page 77).
For example:
• While out of town on a business trip, an Ottawa-based sales representative decides to call one of her clients in Ottawa. When she clicks on the contact in her People shutter, the contact’s number appears in the Quick Connector ( ), as she would normally dial it from her office (123-4567).
• Because she is out of the local calling area, the caller adds the Ottawa area code, 613, to the number in the Quick Connector ( ) before clicking Call (613-123-4567).
• The next time she selects this contact, the edited number – including the area code – appears in the Quick Connector (613-123-4567), even though the contact still shows the original number (123-4567) ( ).

Your Assistant User Guide Version 5.0
35
Number Editing
Note: You can also use the international (or canonical) dialing format. See Appendix A— Using the International Dialing Format on page 101 for more information.
You can also use the Quick Connector to redial any one of the last 20 numbers you called.
To redial a recently called number
Quick Connector
1. Click on the arrow beside the Quick Connector.
2. In the drop-down menu, click the number of the person you want to call.
3. Click Call.
Dial Pad
The dial pad lets you dial a number directly from Your Assistant. To show or hide the dial pad, click .
Your Assistant User Guide Version 5.0
36
The dial pad sends out DTMF tones. If you need to navigate a voicemail system or an Interactive Voice Response system (a menu or directory requiring a touch-tone phone), you must use the dial pad, as these systems respond only to DTMF tones.
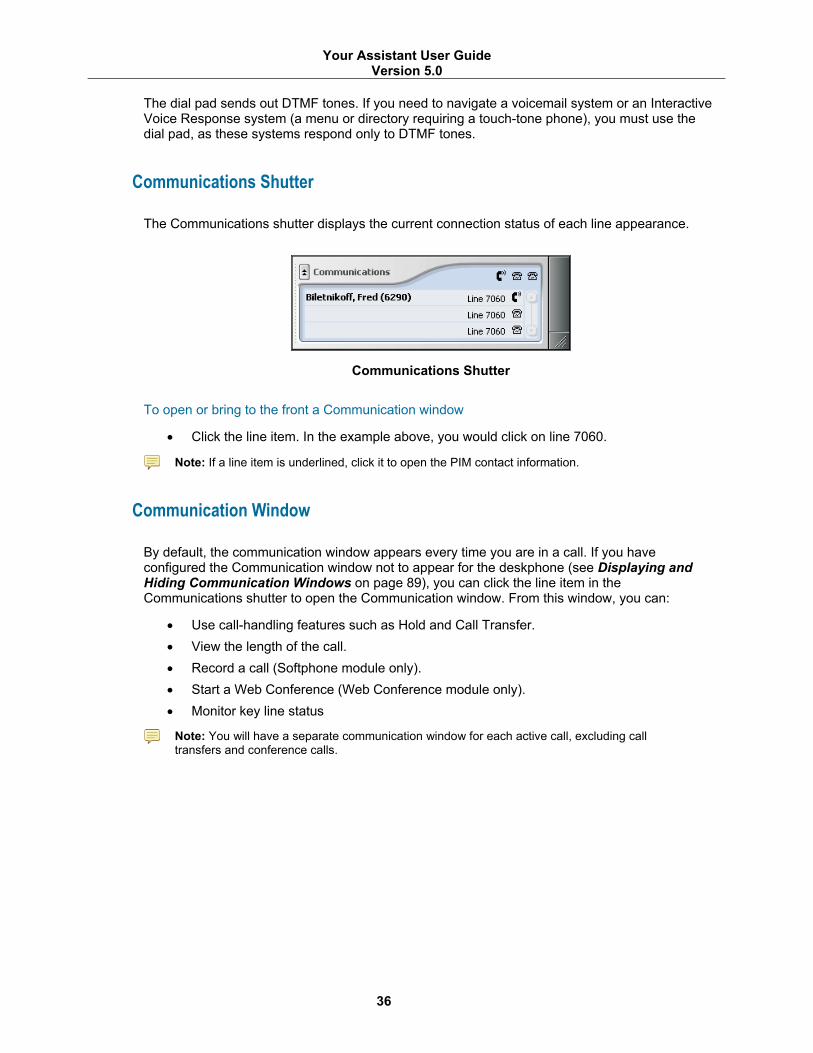
Communications Shutter
The Communications shutter displays the current connection status of each line appearance.
Communications Shutter
To open or bring to the front a Communication window
• Click the line item. In the example above, you would click on line 7060.
Note: If a line item is underlined, click it to open the PIM contact information.
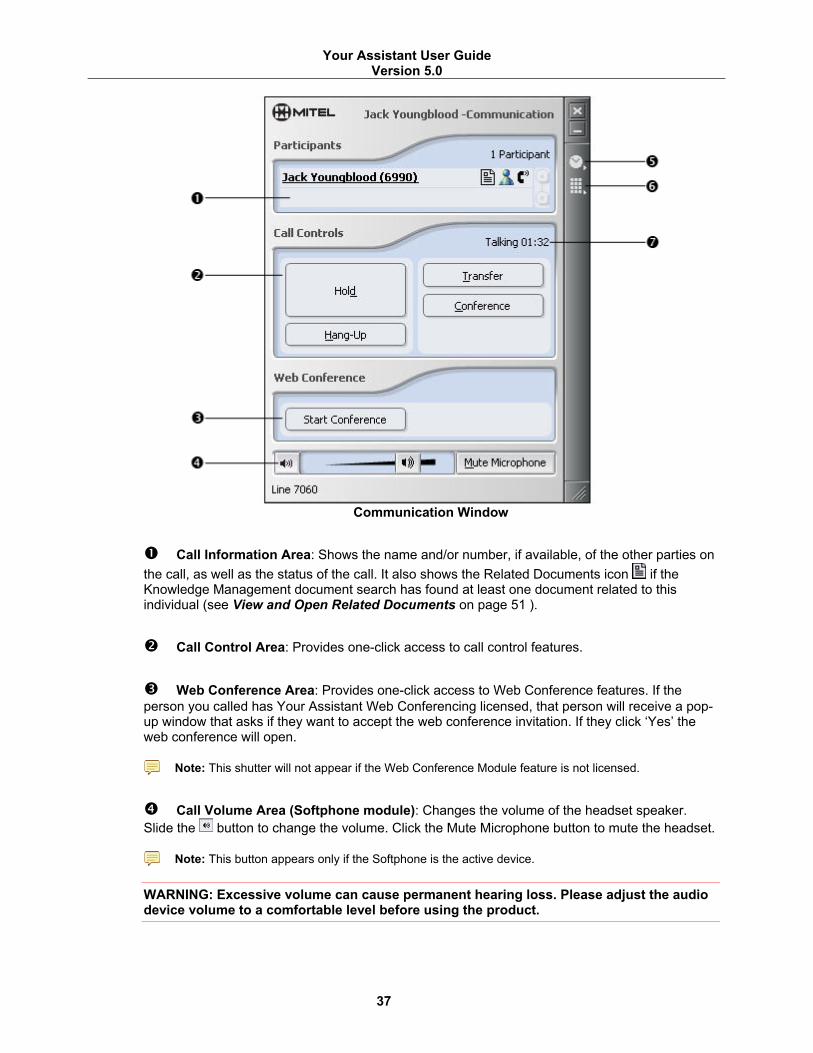
Communication Window
By default, the communication window appears every time you are in a call. If you have configured the Communication window not to appear for the deskphone (see Displaying and Hiding Communication Windows on page 89), you can click the line item in the Communications shutter to open the Communication window. From this window, you can:
• Use call-handling features such as Hold and Call Transfer. • View the length of the call. • Record a call (Softphone module only). • Start a Web Conference (Web Conference module only). • Monitor key line status
Note: You will have a separate communication window for each active call, excluding call transfers and conference calls.
Your Assistant User Guide Version 5.0
37
Communication Window
Call Information Area: Shows the name and/or number, if available, of the other parties on the call, as well as the status of the call. It also shows the Related Documents icon if the Knowledge Management document search has found at least one document related to this individual (see View and Open Related Documents on page 51 ).
Call Control Area: Provides one-click access to call control features.
Web Conference Area: Provides one-click access to Web Conference features. If the person you called has Your Assistant Web Conferencing licensed, that person will receive a pop-up window that asks if they want to accept the web conference invitation. If they click ‘Yes’ the web conference will open.
Note: This shutter will not appear if the Web Conference Module feature is not licensed.
Call Volume Area (Softphone module): Changes the volume of the headset speaker. Slide the button to change the volume. Click the Mute Microphone button to mute the headset.
Note: This button appears only if the Softphone is the active device.
WARNING: Excessive volume can cause permanent hearing loss. Please adjust the audio device volume to a comfortable level before using the product.
Your Assistant User Guide Version 5.0
38
Call Annotation: Provides access to the Stopwatch, Notes, and Recorder. Click the icon to open the call annotation window. (See Adding Annotations on page 49)
Dial Pad: Provides a way to dial numbers. Click the dial pad icon to access the dial pad.
Call Status: Indicates the status of the call (ringing, busy, talking, on hold). During a call, the length of the call, including held time, is displayed beside the call status.
System Tray Status Icon
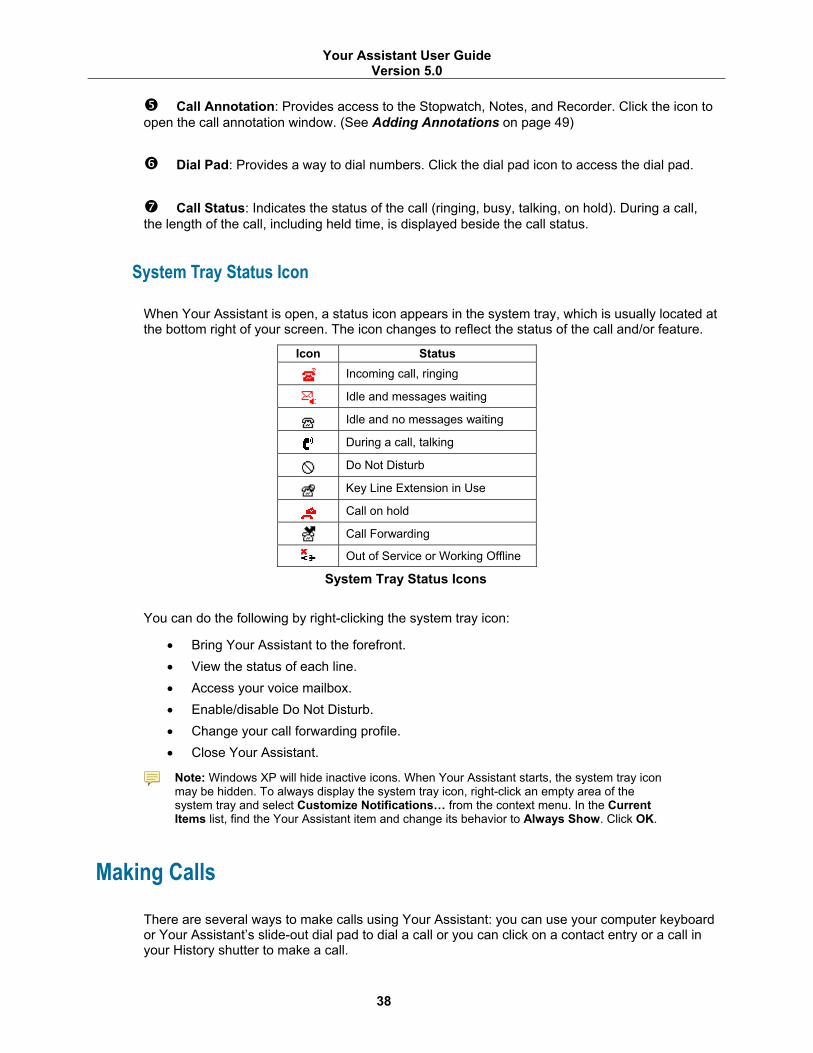
When Your Assistant is open, a status icon appears in the system tray, which is usually located at the bottom right of your screen. The icon changes to reflect the status of the call and/or feature.
Icon Status
Incoming call, ringing
Idle and messages waiting
Idle and no messages waiting
During a call, talking
Do Not Disturb
Key Line Extension in Use
Call on hold
Call Forwarding
Out of Service or Working Offline
System Tray Status Icons
You can do the following by right-clicking the system tray icon:
• Bring Your Assistant to the forefront. • View the status of each line. • Access your voice mailbox. • Enable/disable Do Not Disturb. • Change your call forwarding profile. • Close Your Assistant.
Note: Windows XP will hide inactive icons. When Your Assistant starts, the system tray icon may be hidden. To always display the system tray icon, right-click an empty area of the system tray and select Customize Notifications… from the context menu. In the Current Items list, find the Your Assistant item and change its behavior to Always Show. Click OK.
Making Calls
There are several ways to make calls using Your Assistant: you can use your computer keyboard or Your Assistant’s slide-out dial pad to dial a call or you can click on a contact entry or a call in your History shutter to make a call.

Your Assistant User Guide Version 5.0
39
When you double click a contact name in the People shutter to make a call to an external number that has not been dialed before, the Enter Number to Dial dialog box allows you to edit the number. Review the number and edit if necessary, then click OK to complete the call.
Enter Number To Dial Dialog Box
About the International Dialing Format
You can use numbers in international dialing format (also known as canonical format) with Your Assistant. Your Assistant will dial these numbers based on your local dialing rules, and it will automatically add the appropriate dialing prefix when making external (outside) calls. For more information, see Appendix A— Using the International Dialing Format on page 101.
Specifying Extension Numbers and Responses to Voice Prompts
You can specify additional numbers for Your Assistant to dial following a phone number, such as an extension number or (numeric) responses to voice prompts. For information, see Appendix B— Specifying Extension Numbers and Responses to Prompts on page 106.
Dialing a Number with the Keyboard 1. Click in the Quick Connector.
2. Type the number you want to dial using the keyboard.
3. Click Call or press Enter.
Dialing a Call with the Slide-Out Dial Pad 1. Click on the dial pad icon to access the dial pad.
Slide-Out Dial Pad
2. Click on the numbers to enter the number you want to dial and click Call. • To change to keyboard mode, simply click in the Quick Connector .
Your Assistant User Guide Version 5.0
40
Making a Call Using Contacts Entries
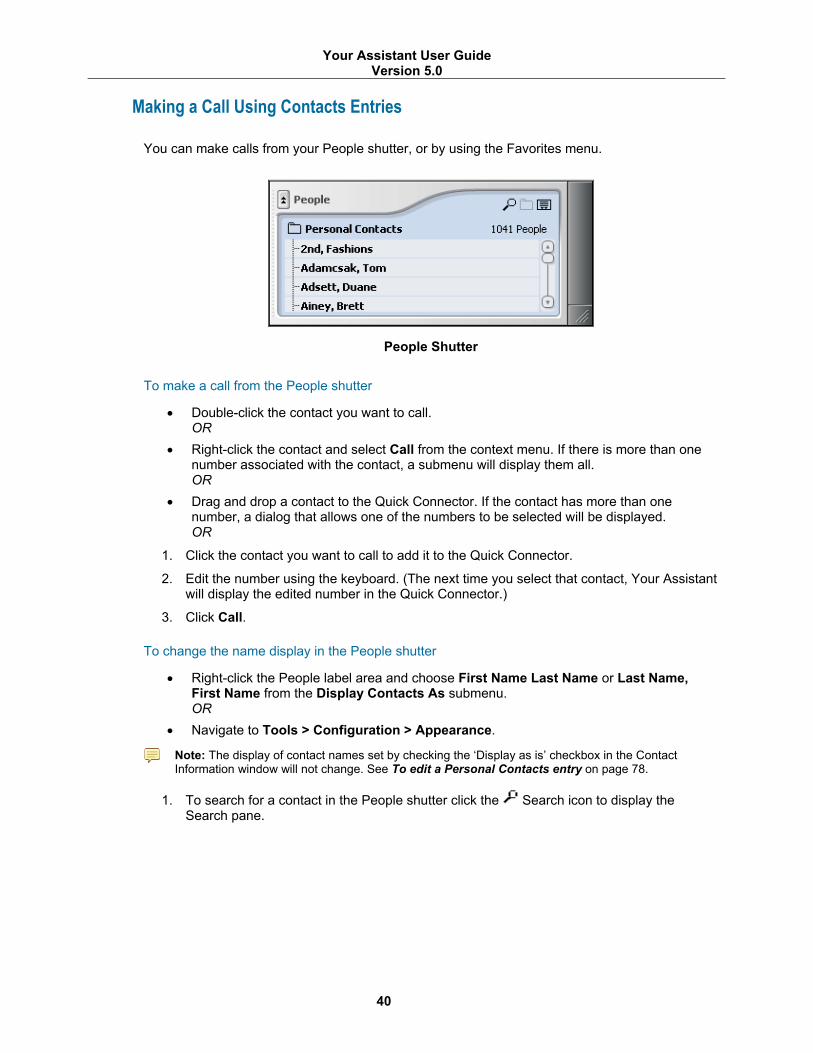
You can make calls from your People shutter, or by using the Favorites menu.
People Shutter
To make a call from the People shutter
• Double-click the contact you want to call. OR
• Right-click the contact and select Call from the context menu. If there is more than one number associated with the contact, a submenu will display them all. OR
• Drag and drop a contact to the Quick Connector. If the contact has more than one number, a dialog that allows one of the numbers to be selected will be displayed. OR
1. Click the contact you want to call to add it to the Quick Connector.
2. Edit the number using the keyboard. (The next time you select that contact, Your Assistant will display the edited number in the Quick Connector.)
3. Click Call.
To change the name display in the People shutter
• Right-click the People label area and choose First Name Last Name or Last Name, First Name from the Display Contacts As submenu. OR
• Navigate to Tools > Configuration > Appearance.
Note: The display of contact names set by checking the ‘Display as is’ checkbox in the Contact Information window will not change. See To edit a Personal Contacts entry on page 78.
1. To search for a contact in the People shutter click the Search icon to display the Search pane.
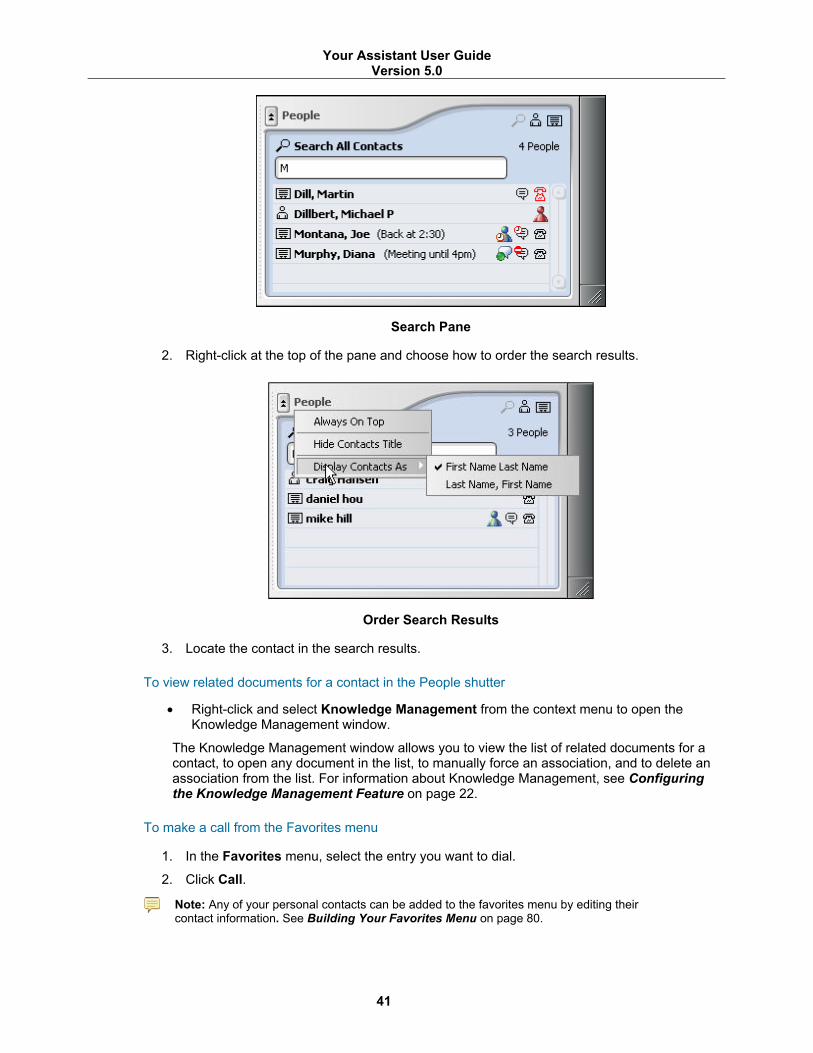
Your Assistant User Guide Version 5.0
41
Search Pane
2. Right-click at the top of the pane and choose how to order the search results.
Order Search Results
3. Locate the contact in the search results.
To view related documents for a contact in the People shutter
• Right-click and select Knowledge Management from the context menu to open the Knowledge Management window.
The Knowledge Management window allows you to view the list of related documents for a contact, to open any document in the list, to manually force an association, and to delete an association from the list. For information about Knowledge Management, see Configuring the Knowledge Management Feature on page 22.
To make a call from the Favorites menu
1. In the Favorites menu, select the entry you want to dial.
2. Click Call.
Note: Any of your personal contacts can be added to the favorites menu by editing their contact information. See Building Your Favorites Menu on page 80.

Your Assistant User Guide Version 5.0
42
Making a Call from the History Shutter 1. Click an entry in any of the History shutter lists (Missed Calls, Received Calls, and Dialed
Calls).
The number is placed in the Quick Connector, where you can edit the number, if necessary. The edited number will be saved for the next time this same number is called, and if this is a Personal Contacts entry, it will be updated with the edited number.
2. Click Call or press Enter.
OR
Double click on the entry in any of the History shutter lists (Missed Calls, Received Calls, and Dialed Calls) to automatically place the call.
Note: If an entry in a list contains an account code (displayed as ’Unknown’) you cannot make a call to that number from the History shutter.
Making Calls from Other Applications
You can dial calls directly from the following applications and have Your Assistant handle the calls. This allows you to manage the calls using the full suite of Your Assistant's call management features.
• Microsoft Outlook • Microsoft Word • Internet Explorer • Lotus Notes
To make a call, you must be logged in to Your Assistant.
Note: If multiple contacts for the person exist, the Choose Contact window opens when you click a call command. Choose a contact with a phone number and click OK.
To set up dialing from Outlook
Before dialing from Outlook for the first time, you must configure Outlook to use the YA Phone Line. Once you have selected the YA Phone Line, any calls you make from Outlook will be handled by Your Assistant.
Note: When dialing from Outlook, you can dial telephone numbers only. You cannot dial SIP addresses.
1. In Outlook, view your Contacts list.
2. Right-click any contact and select Call Contact.
3. Click Dialing Options.
4. Select YA Phone Line from the Connect Using Line drop-down list.
To make a call using Outlook contacts
1. In Outlook, view your Contacts list.
2. Do one of the following:
o Right-click the contact and select Call Contact, OR

Your Assistant User Guide Version 5.0
43
o Select the contact and click the Dial button ( ).
Microsoft Outlook Contacts – New Call Window
3. Select the number you want to dial from the Number drop-down list. Tip: A quicker way to dial is to select the telephone number directly from the drop-down list ( ) beside the Dial button ( ).
4. Click Start Call. If this is the first time you have dialed this number through Your Assistant, the Enter Number to Dial window will open. If necessary, edit the number so that it appears exactly as it should be dialed. The call will dial and a Communication window will open in Your Assistant.
5. Use any of Your Assistant's call management features, such as call transfer or conference.
6. To terminate the call, click End Call in the New Call window. Note: If you terminate the call using one of Your Assistant's methods of ending calls, the call will be disconnected, but Outlook will think that the call is still in progress.
To make a call from Outlook using smart tags
1. Find a person name or phone number in an Outlook message. A purple dotted underline appears under the name, and when you mouse over the name, the Smart Tag Actions button displays. In the following example, "James Brown" is a contact name recognized in Your Assistant.
2. Click the Smart Tag Actions button to display the Smart Tag Actions menu.
3. Click Dial. The Communication Window opens. Use the call controls as required.
Your Assistant User Guide Version 5.0
44
To make a call from Word using smart tags
1. Find a person name or phone number in a Word document. A purple dotted underline appears under the name, and when you mouse over the name, the Smart Tag Actions button displays. In the following example, "James Brown" is a contact name recognized in Your Assistant.
2. Click the Smart Tag Actions button to display the Smart Tag Actions menu.
3. Click Dial. The Communication Window opens. Use the call controls as required.
To make a call from Internet Explorer
1. Open an Internet Explorer web page that lists a phone number.
2. Click the phone number to start the call.
To make a call from Lotus Notes using smart tags
Note: Click to call is only available in Lotus Notes 8.0.
1. From the Contacts window in Lotus Notes, do one of the following: • Select a contact with a phone number and click the Dial button in the Mitel Your Assistant
Plug-in toolbar. • Right-click a contact with a phone number and select the contact name from the menu. A
second flyout menu opens. Select Call Using Your Assistant. The Your Assistant Communication window opens.
2. Handle the call as you normally would using Your Assistant.
Requesting Call Me Back Notification
If you make a call but the call cannot be completed for some reason, you can instruct Your Assistant to monitor the phone line and alert you when it is time to retry the call. This is called Call Me Back notification.
There are three scenarios in which you can request Call Me Back notification:
• You make a call to an extension within your organization and the extension is busy. If you request Call Me Back notification, Your Assistant will alert you when the line is no longer busy.
• You make a call to an extension within your organization and the party does not answer. If you request Call Me Back notification, Your Assistant will alert you after a call has been made or received on that extension and the line is free again.
• You try to make a call to an external number but the phone system does not have any outgoing lines available. If you request Call Me Back notification, Your Assistant will alert you when an outgoing line is available.
Note: The Call Me Back option is not available when Auto Answer is turned on. If you turn on Auto Answer when a Call Me Back notification is pending, your request for Call Me Back notification will be canceled.
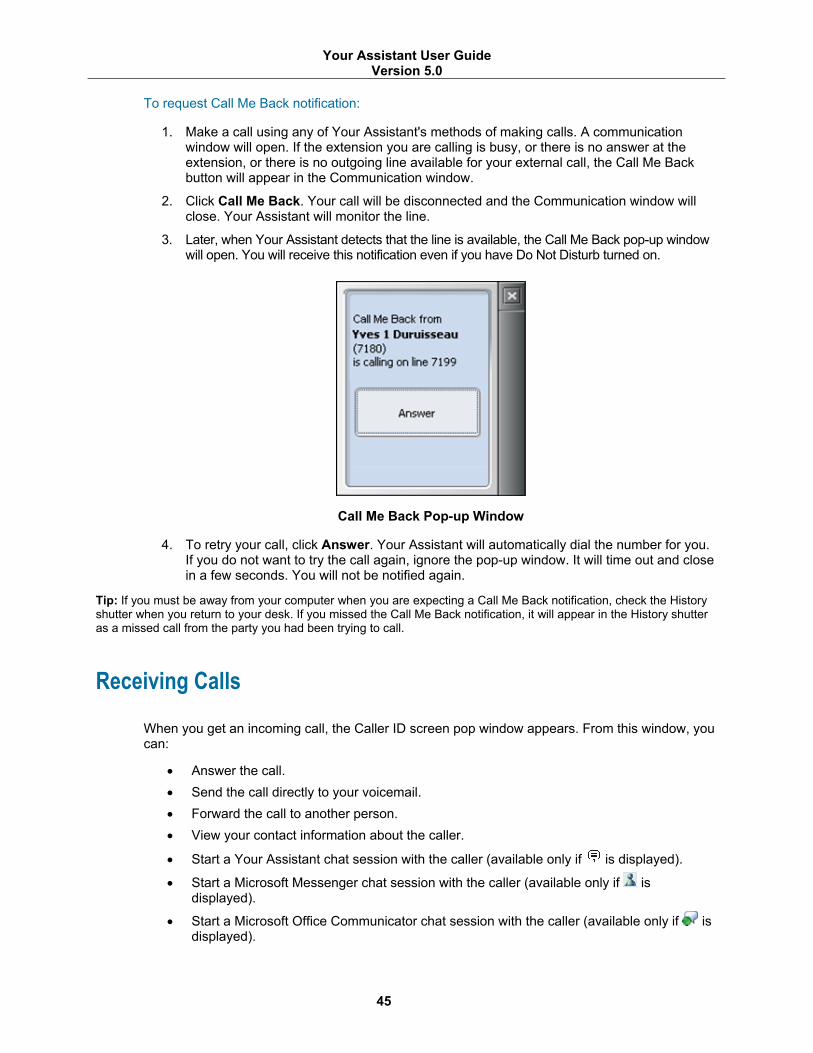
Your Assistant User Guide Version 5.0
45
To request Call Me Back notification:
1. Make a call using any of Your Assistant's methods of making calls. A communication window will open. If the extension you are calling is busy, or there is no answer at the extension, or there is no outgoing line available for your external call, the Call Me Back button will appear in the Communication window.
2. Click Call Me Back. Your call will be disconnected and the Communication window will close. Your Assistant will monitor the line.
3. Later, when Your Assistant detects that the line is available, the Call Me Back pop-up window will open. You will receive this notification even if you have Do Not Disturb turned on.
Call Me Back Pop-up Window
4. To retry your call, click Answer. Your Assistant will automatically dial the number for you. If you do not want to try the call again, ignore the pop-up window. It will time out and close in a few seconds. You will not be notified again.
Tip: If you must be away from your computer when you are expecting a Call Me Back notification, check the History shutter when you return to your desk. If you missed the Call Me Back notification, it will appear in the History shutter as a missed call from the party you had been trying to call.
Receiving Calls
When you get an incoming call, the Caller ID screen pop window appears. From this window, you can:
• Answer the call. • Send the call directly to your voicemail. • Forward the call to another person. • View your contact information about the caller.
• Start a Your Assistant chat session with the caller (available only if is displayed).
• Start a Microsoft Messenger chat session with the caller (available only if is displayed).
• Start a Microsoft Office Communicator chat session with the caller (available only if is displayed).
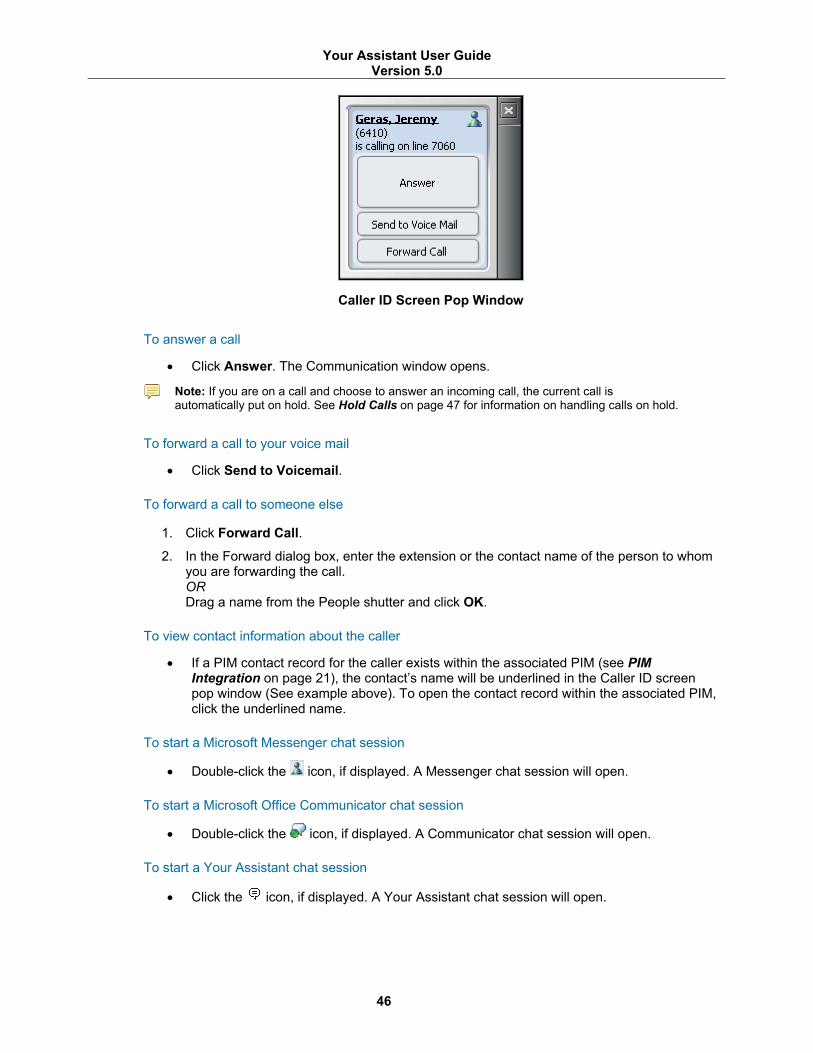
Your Assistant User Guide Version 5.0
46
Caller ID Screen Pop Window
To answer a call
• Click Answer. The Communication window opens.
Note: If you are on a call and choose to answer an incoming call, the current call is automatically put on hold. See Hold Calls on page 47 for information on handling calls on hold.
To forward a call to your voice mail
• Click Send to Voicemail.
To forward a call to someone else
1. Click Forward Call.
2. In the Forward dialog box, enter the extension or the contact name of the person to whom you are forwarding the call. OR Drag a name from the People shutter and click OK.
To view contact information about the caller
• If a PIM contact record for the caller exists within the associated PIM (see PIM Integration on page 21), the contact’s name will be underlined in the Caller ID screen pop window (See example above). To open the contact record within the associated PIM, click the underlined name.
To start a Microsoft Messenger chat session
• Double-click the icon, if displayed. A Messenger chat session will open.
To start a Microsoft Office Communicator chat session
• Double-click the icon, if displayed. A Communicator chat session will open.
To start a Your Assistant chat session
• Click the icon, if displayed. A Your Assistant chat session will open.
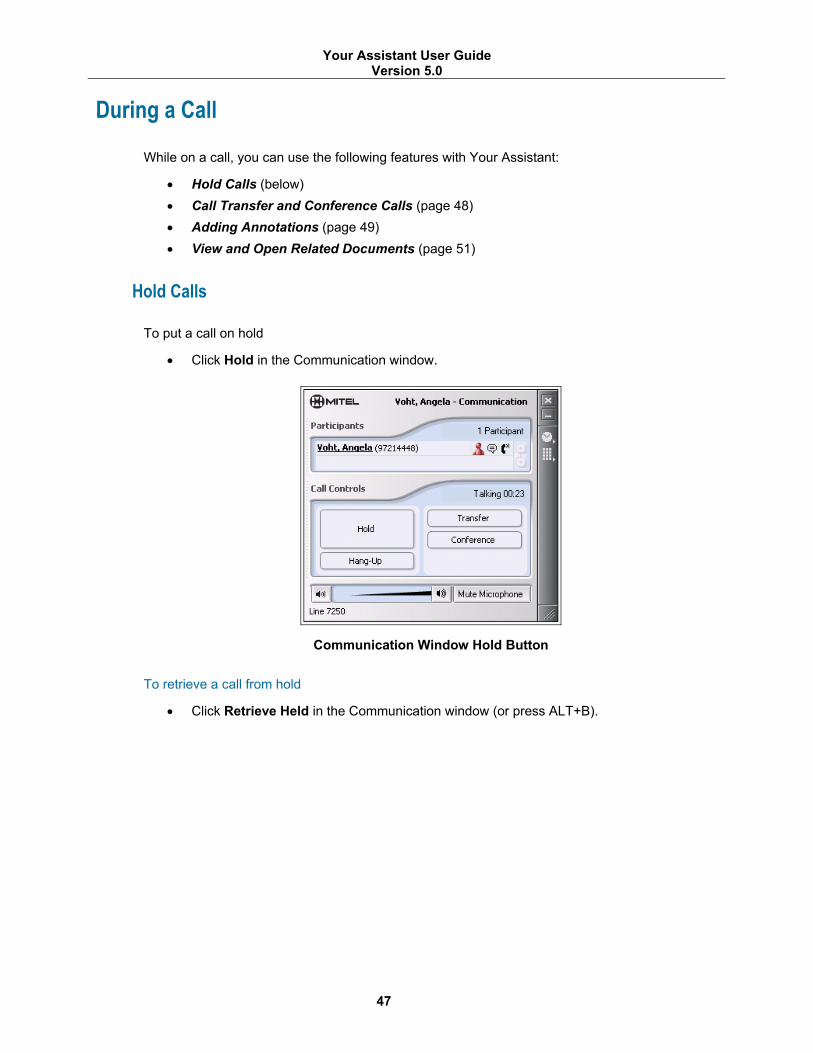
Your Assistant User Guide Version 5.0
47
During a Call
While on a call, you can use the following features with Your Assistant:
• Hold Calls (below) • Call Transfer and Conference Calls (page 48) • Adding Annotations (page 49) • View and Open Related Documents (page 51)
Hold Calls
To put a call on hold
• Click Hold in the Communication window.
Communication Window Hold Button
To retrieve a call from hold
• Click Retrieve Held in the Communication window (or press ALT+B).

Your Assistant User Guide Version 5.0
48
Communication Window Retrieve Held Button
Call Transfer and Conference Calls
Note: The number of people you can have on a conference is determined by the PBX parameters. You cannot set up a conference call between two active calls (calls with separate communication windows).
To transfer a call or make a conference call using the Transfer or Conference buttons
1. While on a call, click Transfer or Conference in the Communication window.
2. The current call is put on hold, and the dialing window opens.
Transfer Dialing Window
3. Enter the number of the new party, click Consult to have the opportunity to speak to the other party before transferring (an attended transfer) or click Transfer (an unattended or blind transfer).
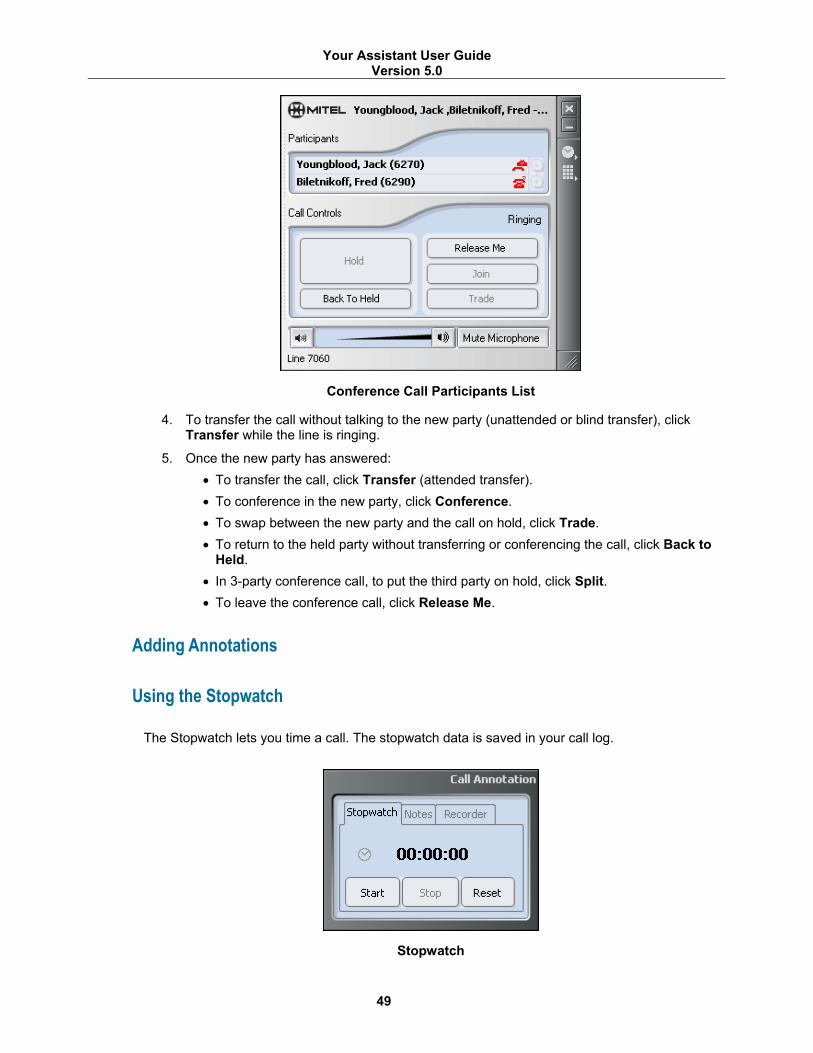
Your Assistant User Guide Version 5.0
49
Conference Call Participants List
4. To transfer the call without talking to the new party (unattended or blind transfer), click Transfer while the line is ringing.
5. Once the new party has answered: • To transfer the call, click Transfer (attended transfer). • To conference in the new party, click Conference. • To swap between the new party and the call on hold, click Trade. • To return to the held party without transferring or conferencing the call, click Back to
Held. • In 3-party conference call, to put the third party on hold, click Split. • To leave the conference call, click Release Me.
Adding Annotations
Using the Stopwatch
The Stopwatch lets you time a call. The stopwatch data is saved in your call log.
Stopwatch

Your Assistant User Guide Version 5.0
50
To access the Stopwatch
1. During an active call, click .
2. Click the Stopwatch tab.
3. Click Start to start timing. Click Stop to stop timing. Click Reset to reset the stopwatch to zero. If the stopwatch is timing when you click Reset, it will restart timing from zero.
Taking Notes
You can take a note during a call. The note is saved in your call log.
Notes
To take a note
1. In the Communication window, click to show the Annotation Tools window.
2. Click the Notes tab.
3. Type in your note. The note is automatically saved when the call ends. To hide the Annotation Tools window again, click .
To review call notes
See Reviewing Your Call Log on page 63.
Recording a Call
Note: When recording a call using the deskphone, the softphone is conferenced into the call and it is from the softphone that the recording is made. For this reason, call recording is only available in Your Assistant if the Softphone Module is available. For the same reason, call recording is unavailable if the call is a conference call that already has the maximum participants.
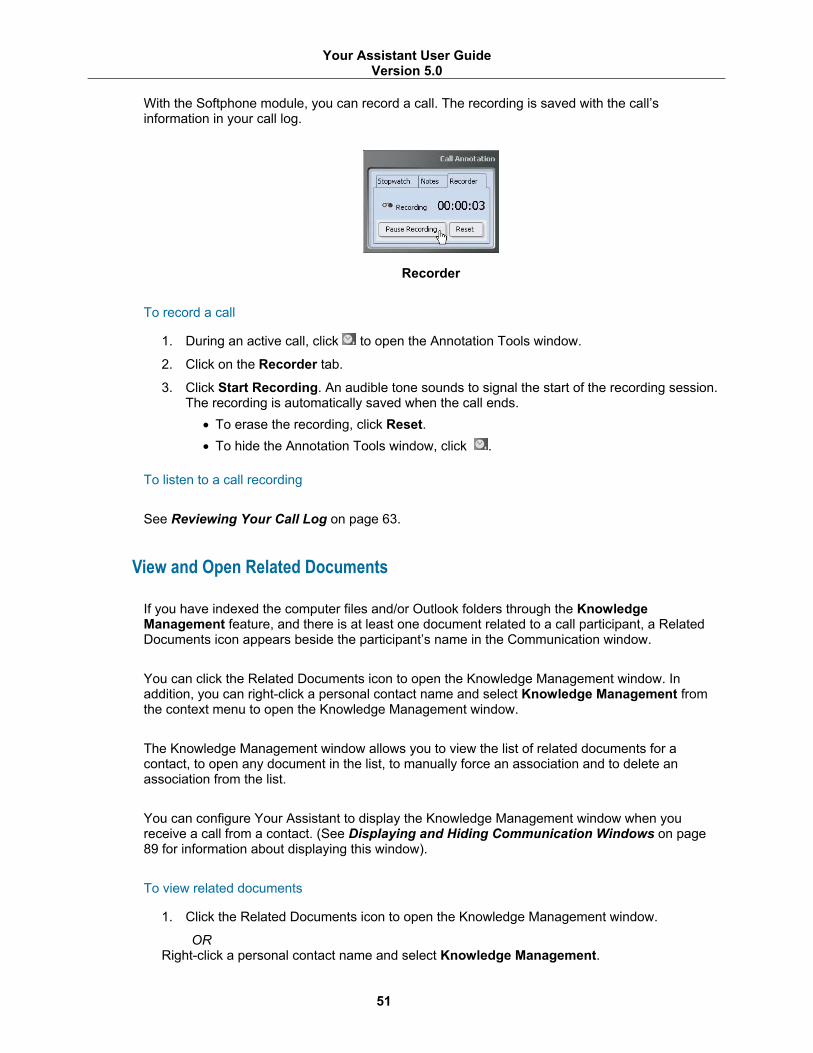
Your Assistant User Guide Version 5.0
51
With the Softphone module, you can record a call. The recording is saved with the call’s information in your call log.
Recorder
To record a call
1. During an active call, click to open the Annotation Tools window.
2. Click on the Recorder tab.
3. Click Start Recording. An audible tone sounds to signal the start of the recording session. The recording is automatically saved when the call ends.
• To erase the recording, click Reset. • To hide the Annotation Tools window, click .
To listen to a call recording
See Reviewing Your Call Log on page 63.
View and Open Related Documents
If you have indexed the computer files and/or Outlook folders through the Knowledge Management feature, and there is at least one document related to a call participant, a Related Documents icon appears beside the participant’s name in the Communication window.
You can click the Related Documents icon to open the Knowledge Management window. In addition, you can right-click a personal contact name and select Knowledge Management from the context menu to open the Knowledge Management window.
The Knowledge Management window allows you to view the list of related documents for a contact, to open any document in the list, to manually force an association and to delete an association from the list.
You can configure Your Assistant to display the Knowledge Management window when you receive a call from a contact. (See Displaying and Hiding Communication Windows on page 89 for information about displaying this window).
To view related documents
1. Click the Related Documents icon to open the Knowledge Management window.
OR Right-click a personal contact name and select Knowledge Management.
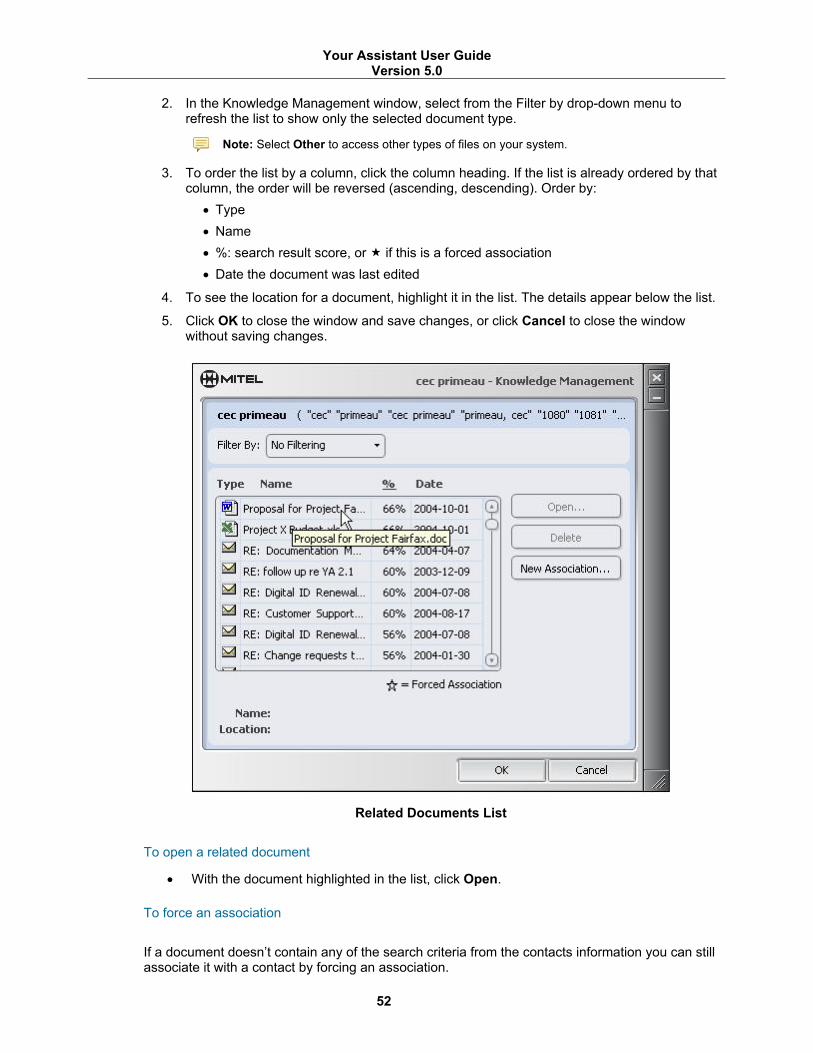
Your Assistant User Guide Version 5.0
52
2. In the Knowledge Management window, select from the Filter by drop-down menu to refresh the list to show only the selected document type.
Note: Select Other to access other types of files on your system.
3. To order the list by a column, click the column heading. If the list is already ordered by that column, the order will be reversed (ascending, descending). Order by:
• Type • Name • %: search result score, or if this is a forced association • Date the document was last edited
4. To see the location for a document, highlight it in the list. The details appear below the list.
5. Click OK to close the window and save changes, or click Cancel to close the window without saving changes.
Related Documents List
To open a related document
• With the document highlighted in the list, click Open.
To force an association
If a document doesn’t contain any of the search criteria from the contacts information you can still associate it with a contact by forcing an association.

Your Assistant User Guide Version 5.0
53
• Click the New Association button and use the browse dialog box to select a new document to associate with this contact.
OR • Drag a document or PIM item from a local or network location into the Related
Documents list. When this is done you will now see a star ( ) beside the document in the % column.
To delete an association
• With the document highlighted in the list, click Delete.
Using Other Features
Showing Availability
Your Computer/Chat presence is shown to other Your Assistant users in your Corporate Contacts. Icons are used to show presence.
The type of icon that appears is dependent upon whether the chat feature has been enabled for you and your corporate contacts.
If you have chat enabled, then:
• For each of your contacts that does not have the chat feature enabled, a Computer Icon is displayed
• For each of your contacts that does have the chat feature enabled and is signed into their Your Assistant, a Chat Icon is displayed.
If the Your Assistant client does not have the chat feature enabled, each of your contacts will display a Computer Icon.
Note: The computer presence icon appears only when a user is licensed for presence, but not for chat.
The contact state is displayed according to the following table:
Computer Icon Status Chat Icon Status
Online Online
Busy Busy
Away Away
none Offline none Offline
Computer Icons Chat Icons
Note: Your Assistant can automatically switch your status from Online to Away after an interval without mouse or keyboard activity. See To set your Away Switch interval on page 88.
Your Assistant User Guide Version 5.0
54
Presence Types
The presence feature can be configured by your system administrator to run in one of two modes: universal or on-demand presence. The presence type is part of the user settings retrieved from the Your Assistant server when the Your Assistant client is started.
Universal Presence
Universal presence mode automatically enables presence for all corporate contacts. Presence information cannot be hidden for any user. Universal presence can be set by the system administrator only.
On-Demand Presence
When On-Demand presence mode is enabled, no presence information is displayed for any corporate contact. You must select those contacts for whom you wish to display presence information.
This type of presence is set by the system administrator. If the administrator enables On-Demand presence, then the user can perform the following from the contact context-menu:
• Select Show Presence For This Session if presence is only to be shown until Your Assistant is closed and restarted.
OR
• Select Show Presence Always if presence is to be shown across Your Assistant restarts.
In either case, presence reporting can be discontinued for a contact by selecting Hide Presence from the contact’s context-menu.
Using PBX Features
Note: Not all features may be available on your system. Talk to your system administrator for information on which features are available.
Note: Not all PBX features are available in Your Assistant Lite Softphone.
Auto Answer
When you enable Auto Answer, incoming calls are automatically answered at the first ring. You can enable/disable Auto Answer from the Settings shutter or the system tray icon.
Call Forwarding
You can change your call forwarding profile from the Settings shutter or the system tray icon. See Creating Call Forwarding Profiles on page 82 for information on creating and editing call forwarding profiles.
Your Assistant User Guide Version 5.0
55
Call Park
In Your Assistant, a Parked Call can be retrieved two ways: In the Quick Connector, enter the Feature Access Code (FAC), the extension number,^ (the caret symbol), then the Slot ID number. For example, enter: *818701^04
Note: The Slot ID is displayed on the deskphone next to the parked call.
OR
1. In the Quick Connector, enter the Feature Access Code (FAC) and the extension number and then click the Call button.
2. Then in the Quick Connector enter the Slot ID number and click the Call button again.
For example enter: *818701 – click Call then enter 04 and click Call.
Note: Parking a call and retrieving a parked call is not available in softphone mode.
Do Not Disturb
When you enable Do Not Disturb, callers get a busy tone, and a message indicating you do not wish to be disturbed (for example, XXXX NO DIST). You can enable/disable Do Not Disturb from the Settings shutter or the system tray icon. Incoming calls are not logged in the call log when Do Not Disturb is active.
Other PBX features
You can access other PBX features using Feature Access Codes. See your system administrator for a list of available Feature Access Codes.
3300 Supported Feature Access Codes
Feature Name Desk phone Softphone
ACD Silent Monitor - ACD Agent Login - ACD Agent Logout - Make Busy Setup - Make Busy Cancel - Call Forwarding - Busy - External Only Call Forwarding - Busy - External and Internal - Call Forwarding - Busy - Internal Only - Cancel Call Forwarding - Busy - External and Internal - Call Forwarding - Follow Me Cancel Call Forwarding - Follow Me

Your Assistant User Guide Version 5.0
56
Feature Name Desk phone Softphone
Call Forwarding - I Am Here Call Forwarding - No Answer - External Only Call Forwarding - No Answer - External and Internal Call Forwarding - No Answer - Internal Only Cancel Call Forwarding - No Answer - External and Internal Cancel All Forwarding Call Hold - Remote Retrieve Call Pickup - Dialed Call Pickup - Directed Do Not Disturb Do Not Disturb - Cancel Do Not Disturb - Cancel Remote Do Not Disturb - Remote Last Number Re-dial Message Waiting - Activate Message Waiting - Deactivate Message Waiting - Inquire
3300 Supported Feature Access Codes
200SX Supported Feature Access Codes
Feature Name Desk Phone Softphone
Auto-answer Activation
Auto-answer Deactivation
Call Forwarding - All Calls
Call Forwarding when Busy
Call Forwarding when No answer
Call Forwarding when No answer / Busy
Cancel Call Forwarding
Call Forwarding - Internal Only - Always
Call Forwarding - Internal Only - Busy
Call Forwarding - Internal Only - No answer
Call Forwarding - Internal Only - No answer / Busy
Call Forwarding - Internal Only - Cancel
Call Forwarding - I'm Here
Call Forwarding - Cancel I'm Here
Directed Call Pickup
Do Not Disturb - Turn On (activate)
Do Not Disturb - Turn Off (de-activate)
extension General Attendant Access
Call Hold Retrieve (Local)
Call Hold Retrieve (Remote)
Abbreviated Dial Access
Call Hold Retrieve (Local)
Call Hold Retrieve (Remote)
Abbreviated Dial Access

Your Assistant User Guide Version 5.0
57
Desk Feature Name Softphone Phone Last Number Redial
Call Park
Send Message - Turn On
Send Message - Turn Off
Call Message Sender of Oldest Message -
Key System - Direct Paging
Key System - Store Personal Speed Call
Key System - Retrieve Personal Speed Call
Call Park Orbit Retrieve
Call Park Remote
200SX Supported Feature Access Codes
Using Hotdesking
Hotdesking allows a number of users to share one or more hotdesk-enabled phone sets. Hotdesking is ideal for telecommuters, sales agents, and other employees who spend only part of their time in the office. Hotdesking allows anyone with a HotDesk DN and PIN to log in to an available hotdesk-enabled telephone. Once logged in, you can:
• Receive incoming calls at the phone • Place outgoing calls • Retrieve voice messages • Program and use feature keys
You will be able to use Your Assistant to control the deskphone as long as you have:
• Logged in to the deskphone first (using your hotdesk extension) • Started Your Assistant in deskphone mode
To change deskphones, you must:
• Close Your Assistant • Log out of the deskphone before moving on to a different station.
Hotdesking is not supported in Softphone mode.
Note: Always close Your Assistant before logging out of the hotdesk extension. If you log out of the hotdesk extension before closing Your Assistant, then Your Assistant does not get notified that you have logged out and your contact information will give the appearance to other Your Assistant users that you are still available.
When you log out of your hotdesk extension, the phone you were using re-assumes its default extension number. If you launch Your Assistant again, without logging back into your hotdesk extension, you will not be able to make or receive calls on that extension.
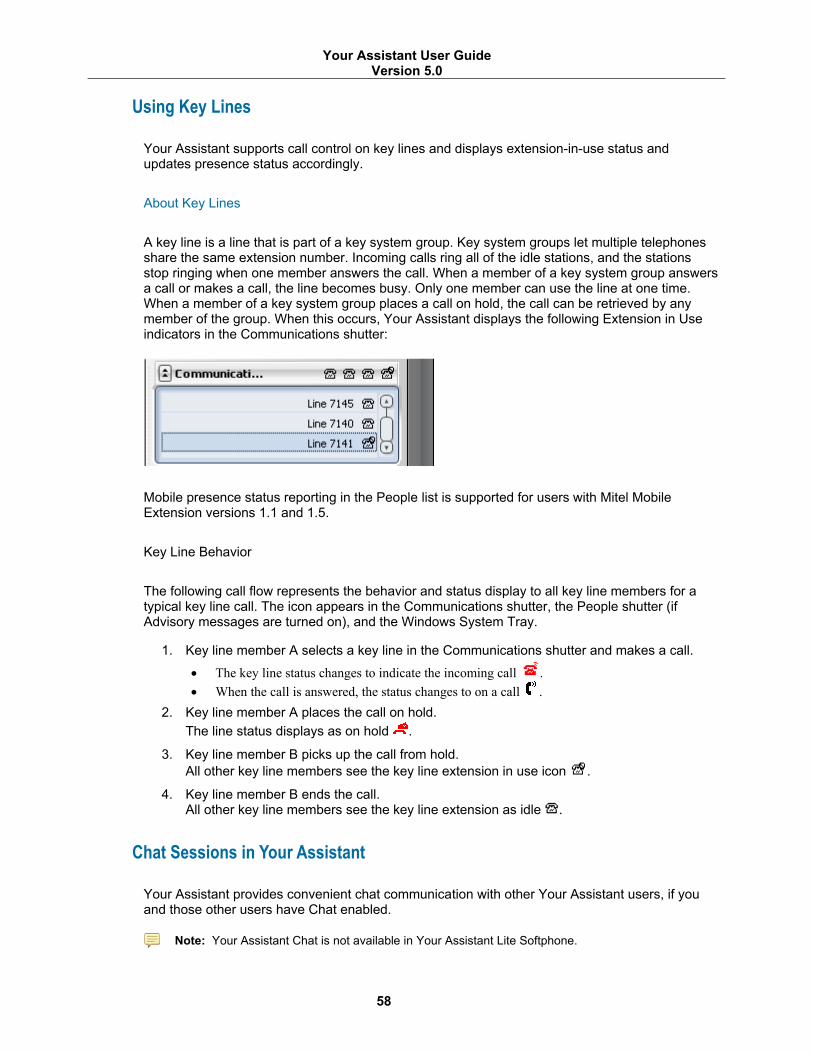
Your Assistant User Guide Version 5.0
58
Using Key Lines
Your Assistant supports call control on key lines and displays extension-in-use status and updates presence status accordingly.
About Key Lines
A key line is a line that is part of a key system group. Key system groups let multiple telephones share the same extension number. Incoming calls ring all of the idle stations, and the stations stop ringing when one member answers the call. When a member of a key system group answers a call or makes a call, the line becomes busy. Only one member can use the line at one time. When a member of a key system group places a call on hold, the call can be retrieved by any member of the group. When this occurs, Your Assistant displays the following Extension in Use indicators in the Communications shutter:
Mobile presence status reporting in the People list is supported for users with Mitel Mobile Extension versions 1.1 and 1.5.
Key Line Behavior
The following call flow represents the behavior and status display to all key line members for a typical key line call. The icon appears in the Communications shutter, the People shutter (if Advisory messages are turned on), and the Windows System Tray.
1. Key line member A selects a key line in the Communications shutter and makes a call.
• The key line status changes to indicate the incoming call . • When the call is answered, the status changes to on a call .
2. Key line member A places the call on hold. The line status displays as on hold .
3. Key line member B picks up the call from hold. All other key line members see the key line extension in use icon .
4. Key line member B ends the call. All other key line members see the key line extension as idle .
Chat Sessions in Your Assistant
Your Assistant provides convenient chat communication with other Your Assistant users, if you and those other users have Chat enabled.
Note: Your Assistant Chat is not available in Your Assistant Lite Softphone.

Your Assistant User Guide Version 5.0
59
Chat Window
Participants Area: Shows the name and/or number of the other participants (up to 15). Use Drag and drop to add participants.
Transcript Area: Displays the participants' remarks and actions.
Text Entry Area: Provides an area for you to type your message. After you have finished typing, click Send.
Chat status icons show availability for Your Assistant chats:
Chat Icon Status Online
Busy
Away
Offline
Chat Icon Status
Your own chat status shows in the Settings shutter (see Showing Availability on page 53).

Your Assistant User Guide Version 5.0
60
The People and Communications shutters and the Communication and pop windows display the chat status of other Your Assistant users who have enabled Chat.
Chat Status in People Shutter
To begin a chat session
• In the People shutter, right-click an entry displaying an Online Chat icon and select Chat from the drop-down menu. OR
• In a Communication window, right-click a participant name displaying an Online Chat icon and select Chat from the drop-down menu.
OR • In the Communications shutter, right-click a line that is not idle and select Chat from the
drop-down menu, if it appears.
Communications Shutter Chat Session
To begin a chat session with multiple participants
•
pre
In the People shutter, highlight the contacts you want to chat with, right-click and select Chat from the drop-down menu.
A Chat window opens with the selected contacts as participants, if they have active chat sence. Other contacts are ignored.
Note: Up to 15 contacts can participate in a chat session. A warning dialog box informs you if you have exceeded the limit in your selection.
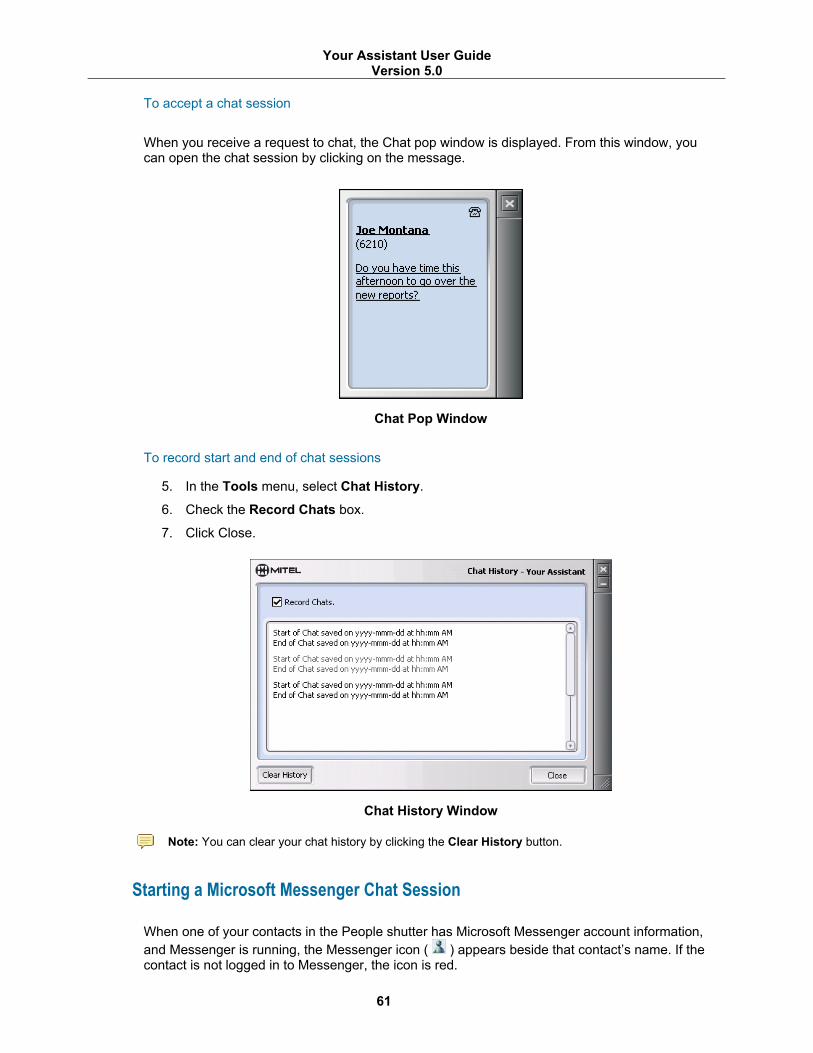
Your Assistant User Guide Version 5.0
61
To accept a chat session
When you receive a request to chat, the Chat pop window is displayed. From this window, you can open the chat session by clicking on the message.
Chat Pop Window
To record start and end of chat sessions
5. In the Tools menu, select Chat History.
6. Check the Record Chats box.
7. Click Close.
Chat History Window
Note: You can clear your chat history by clicking the Clear History button.
Starting a Microsoft Messenger Chat Session
When one of your contacts in the People shutter has Microsoft Messenger account information, and Messenger is running, the Messenger icon ( ) appears beside that contact’s name. If the contact is not logged in to Messenger, the icon is red.
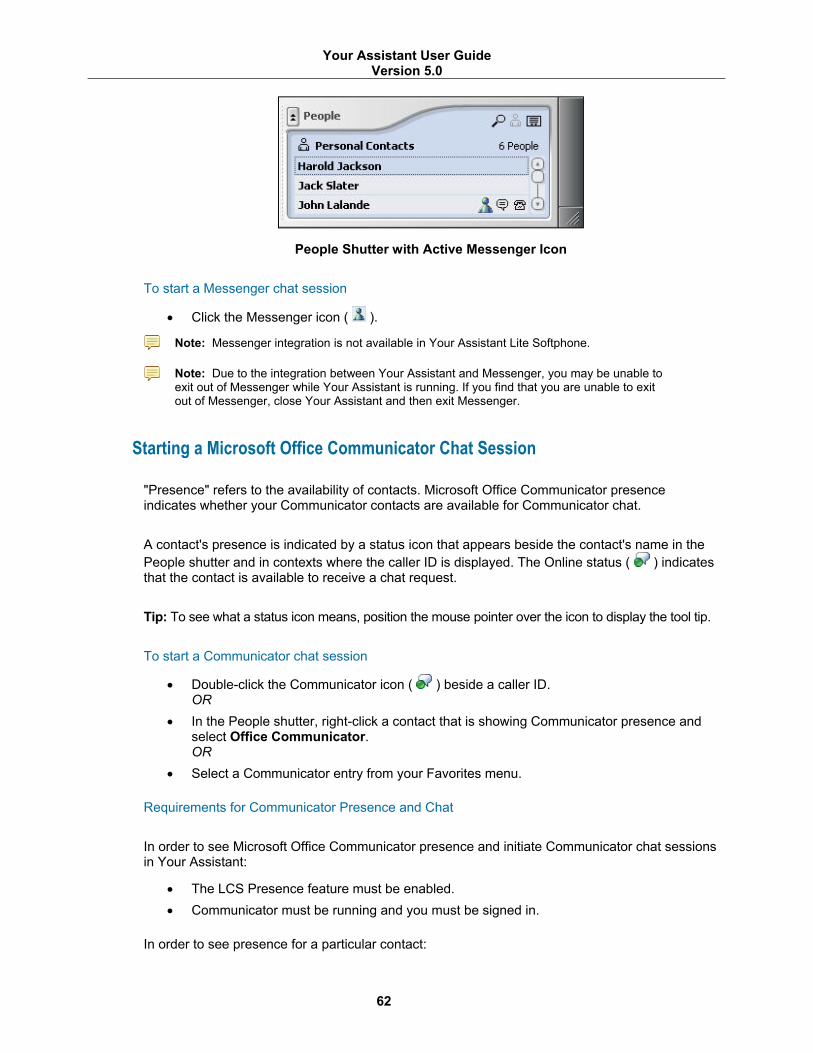
Your Assistant User Guide Version 5.0
62
People Shutter with Active Messenger Icon
To start a Messenger chat session
• Click the Messenger icon ( ).
Note: Messenger integration is not available in Your Assistant Lite Softphone.
Note: Due to the integration between Your Assistant and Messenger, you may be unable to exit out of Messenger while Your Assistant is running. If you find that you are unable to exit out of Messenger, close Your Assistant and then exit Messenger.
Starting a Microsoft Office Communicator Chat Session
"Presence" refers to the availability of contacts. Microsoft Office Communicator presence indicates whether your Communicator contacts are available for Communicator chat.
A contact's presence is indicated by a status icon that appears beside the contact's name in the People shutter and in contexts where the caller ID is displayed. The Online status ( ) indicates that the contact is available to receive a chat request.
Tip: To see what a status icon means, position the mouse pointer over the icon to display the tool tip.
To start a Communicator chat session
• Double-click the Communicator icon ( ) beside a caller ID. OR
• In the People shutter, right-click a contact that is showing Communicator presence and select Office Communicator. OR
• Select a Communicator entry from your Favorites menu.
Requirements for Communicator Presence and Chat
In order to see Microsoft Office Communicator presence and initiate Communicator chat sessions in Your Assistant:
• The LCS Presence feature must be enabled. • Communicator must be running and you must be signed in.
In order to see presence for a particular contact:
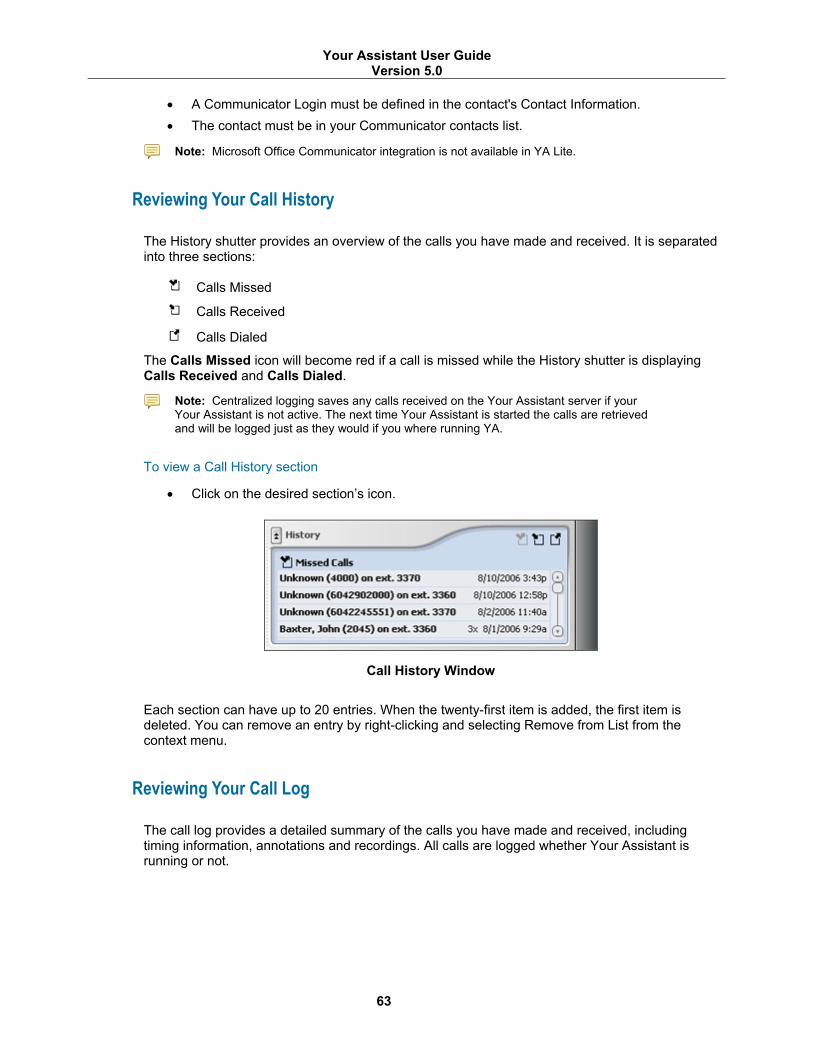
Your Assistant User Guide Version 5.0
63
• A Communicator Login must be defined in the contact's Contact Information. • The contact must be in your Communicator contacts list.
Note: Microsoft Office Communicator integration is not available in YA Lite.
Reviewing Your Call History
The History shutter provides an overview of the calls you have made and received. It is separated into three sections:
Calls Missed
Calls Received
Calls Dialed
The Calls Missed icon will become red if a call is missed while the History shutter is displaying Calls Received and Calls Dialed.
Note: Centralized logging saves any calls received on the Your Assistant server if your Your Assistant is not active. The next time Your Assistant is started the calls are retrieved and will be logged just as they would if you where running YA.
To view a Call History section
• Click on the desired section’s icon.
Call History Window
Each section can have up to 20 entries. When the twenty-first item is added, the first item is deleted. You can remove an entry by right-clicking and selecting Remove from List from the context menu.
Reviewing Your Call Log
The call log provides a detailed summary of the calls you have made and received, including timing information, annotations and recordings. All calls are logged whether Your Assistant is running or not.
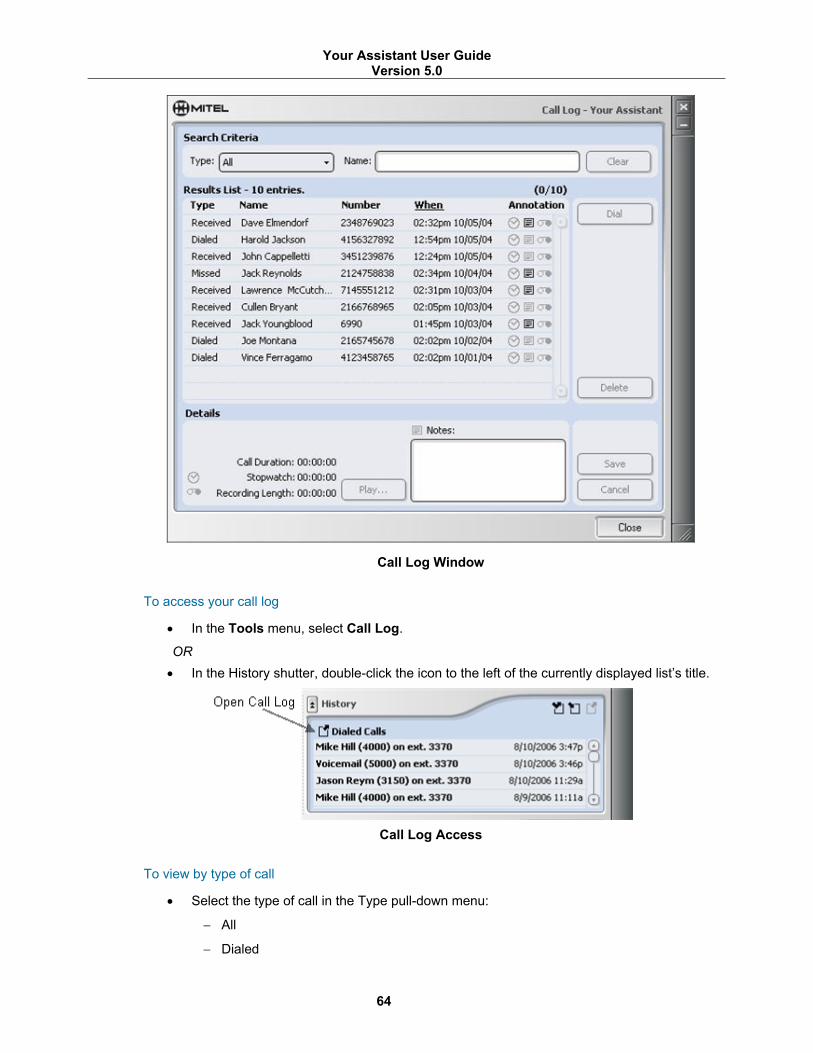
Your Assistant User Guide Version 5.0
64
Call Log Window
To access your call log
• In the Tools menu, select Call Log.
OR • In the History shutter, double-click the icon to the left of the currently displayed list’s title.
Call Log Access
To view by type of call
• Select the type of call in the Type pull-down menu:
− All
− Dialed

Your Assistant User Guide Version 5.0
65
− Received
− Missed
To search for an entry
1. Enter search criteria in the Name field.
A search of the call log entries will be performed.
To view information about an entry
• Select the entry.
For each entry, the following information is displayed:
In Results List: In Details Area:
• Type of call (dialed, received or missed)
• Name of caller
• Name of caller (if available) • Number of caller
• Number of caller • Duration of call
• Time and date call was made/received
• Stopwatch value when call ended
• Annotations for call: Stopwatch, Notes, Recorder (icon grayed out if that type of annotation was not made for the entry)
• Recording length • Call Note contents
Available Call Log Information
For each entry in the call log, you can:
• Call the number (select the entry and click Dial).
Note: If an entry in a list contains an account code (displayed as ‘Unknown’), you cannot call that number from the call log.
• Delete the entry (select the entry and click Delete). • Edit the note (select the entry, type/edit the note in the detail section at the bottom of the
Call Log window and click Save, or Cancel to discard the changes). • Listen to a recording, if any (select the entry and click Play). When listening, you can
pause, fast forward, rewind, or stop the recording, as well as save it as a new file.
To save a recording
Note: The playback device shown in this example is Microsoft Sound Recorder. Most playback devices will have a similar interface.
1. In the call log, click Play to start the playback. The Microsoft Sound Recorder application plays the recording.

Your Assistant User Guide Version 5.0
66
Microsoft Sound Recorder Application Window
2. In the playback device, click Stop.
3. In the playback device File menu, select Save As.
4. Enter a name for the recording, select the destination folder, and click Save.
Note: For information on Save As options, see the help for the Microsoft Sound Recorder.
Using Account Codes
Some sites require a caller to enter an account code before a long distance number can be dialed. Attaching an account code to a call provides a method of tracking phone usage. Account codes can also be used to track calls made to specific numbers, which is particularly useful in situations where phone time is billable.
When dialing from your contacts, the supported format is [dialing prefix][outside phone number]^[account code]# (the # is needed only if the account code is less than 12 digits long or is different from the fixed length determined in programming).
Your Assistant supports forced non-verified account codes.
• Forced non-verified account codes are mandatory, but the account code values are not checked by the switch to ensure the code is valid.
• Forced non-verified accounts codes work with either the Quick Connect or when programmed in contacts for ‘external calls only’.
Your Assistant supports the use of ‘feature access codes’ with account codes in the following manner:
• You can dial the account code before the phone number by using the feature access code *3*12345#93800584, where the *3* is the account code feature access code and 12345# is the account code.
• Feature access codes can only be used by manually entering the complete number in the Quick Connector. This information can be captured in SMDR (Station Message Detail Recording) for both internal and external calls.
Starting a Web Conference
In order to schedule or launch a Web conference, you must be licensed for the Your Assistant Collaboration Module.
To start a Web conference:
1. From the Main window select Collab > Start Web Conference Now.

Your Assistant User Guide Version 5.0
67
Start Web Conference Now Window
2. Type a topic (up to 60 characters) and your password (topics and passwords are optional).
3. Select the Public Web Conference check box if you wish this to be displayed on the Welcome page as a public conference.
4. Click Start and Join. OR
If you are on a call with another licensed user:
1. Click Start Conference in the communication shutter.
2. The other licensed user will receive a pop-up web conference invitation. If they click Yes the web conference will open. OR
1. Right click on a contact and choose the start conference option.
2. The other licensed user will receive a pop-up web conference invitation. If they click Yes the web conference will open. OR
If you are working from Lotus Notes 8.0:
1. Do one of the following: - Select a contact and click the Collaboration button in the Mitel Your Assistant Plug-in toolbar. OR - Right-click a contact and select the contact name from the menu. A second flyout menu opens. Select Collab using Your Assistant. Another flyout menu opens, as shown in the following figure:
2. Choose the collaboration option that you need. The Mitel Your Assistant Collaboration
Module opens and an e-mail message with a link to the conference opens.
3. Begin the collaboration session.
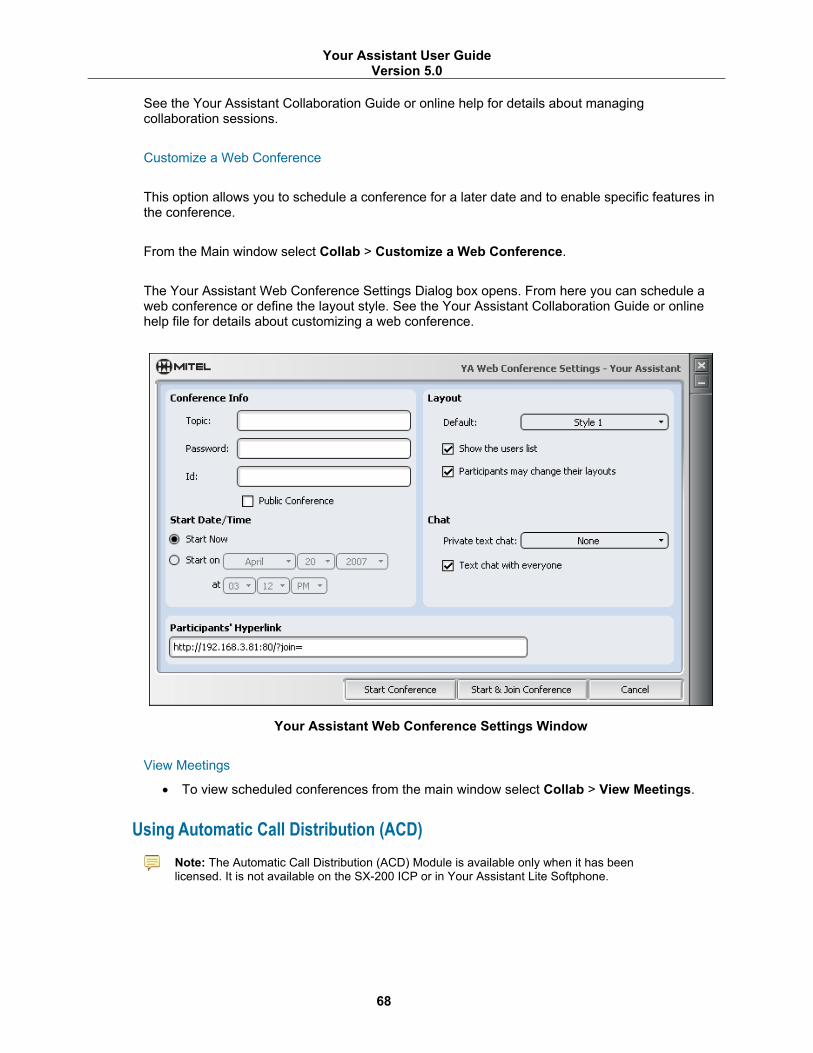
Your Assistant User Guide Version 5.0
68
See the Your Assistant Collaboration Guide or online help for details about managing collaboration sessions.
Customize a Web Conference
This option allows you to schedule a conference for a later date and to enable specific features in the conference.
From the Main window select Collab > Customize a Web Conference.
The Your Assistant Web Conference Settings Dialog box opens. From here you can schedule a web conference or define the layout style. See the Your Assistant Collaboration Guide or online help file for details about customizing a web conference.
Your Assistant Web Conference Settings Window
View Meetings
• To view scheduled conferences from the main window select Collab > View Meetings.
Using Automatic Call Distribution (ACD)
Note: The Automatic Call Distribution (ACD) Module is available only when it has been licensed. It is not available on the SX-200 ICP or in Your Assistant Lite Softphone.

Your Assistant User Guide Version 5.0
69
ACD Agent Calls
Automatic Call Distribution (ACD) is used by call centers to manage incoming calls to a single directory number. The calls are distributed among a group of logged in call center agents.
When you are logged in as an ACD agent and a call comes in for you from the call center queue, your Your Assistant status icon changes to ‘busy,’ and the call is identified by the path name. During the call, you can set an account code and request that a supervisor be conferenced in as a silent listener. After a call, a work timer is set to allow time for you to complete required paperwork before the next call arrives; during this time, ACD calls are not sent to you. However, you still receive non-ACD calls from callers dialing the directory number assigned to the phone Your Assistant is monitoring.
Note: 'ACD Real-Time Events' must be enabled on the 3300 ICP for the WorkTimer feature to function properly.
Call center agents are assigned to one or more groups, and paths are directed to groups. When a call comes in to a group, the call is directed to the logged in agent that has been idle longest. If no agents are idle, the call is directed to the agent whose work timer expires first.
Your Assistant provides a shutter in the main window for ACD agents using the ACD features of the 3300 ICP.
ACD Shutter
The status icon shows availability for ACD calls:
ACD Icon Status Logged in Online
Busy
Logged out
Logged out and busy
ACD Icon Status
ACD Path: ACD calls come from a special directory number, an ACD Path, specifically assigned for that purpose on the 3300 ICP.
Agent: Use the Agent setting to log in as an ACD agent and to add agents to the list.
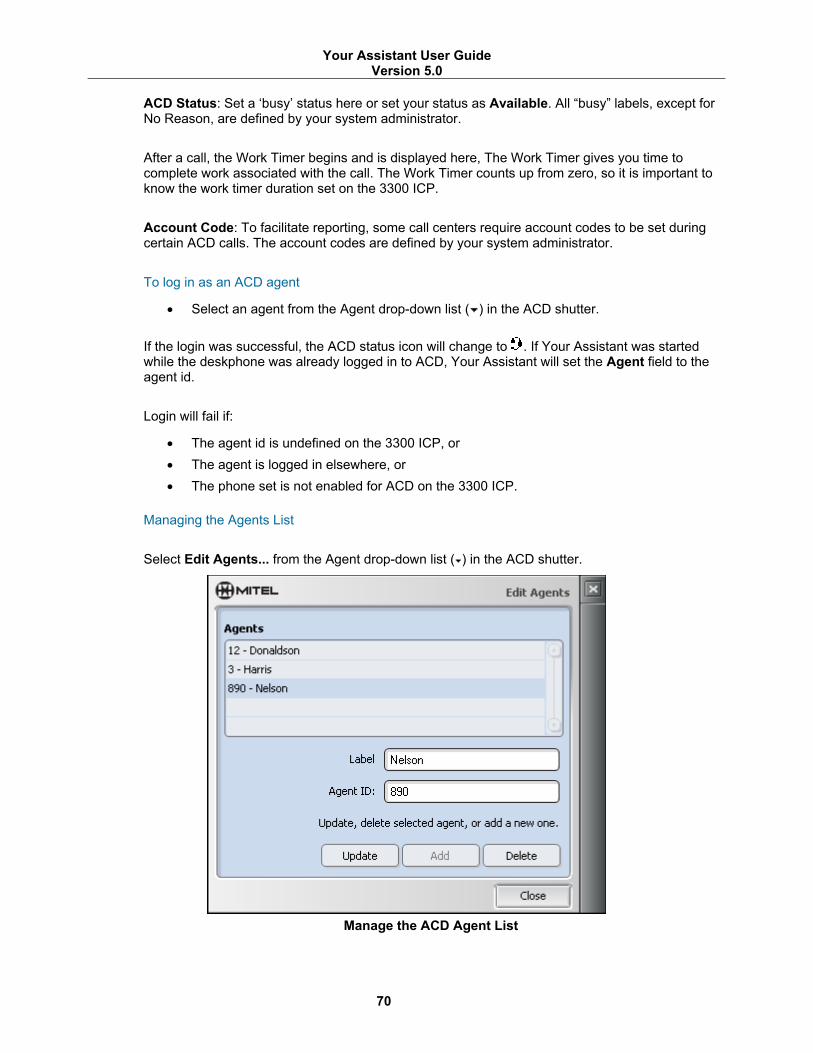
Your Assistant User Guide Version 5.0
70
ACD Status: Set a ‘busy’ status here or set your status as Available. All “busy” labels, except for No Reason, are defined by your system administrator.
After a call, the Work Timer begins and is displayed here, The Work Timer gives you time to complete work associated with the call. The Work Timer counts up from zero, so it is important to know the work timer duration set on the 3300 ICP.
Account Code: To facilitate reporting, some call centers require account codes to be set during certain ACD calls. The account codes are defined by your system administrator.
To log in as an ACD agent
• Select an agent from the Agent drop-down list ( ) in the ACD shutter.
If the login was successful, the ACD status icon will change to . If Your Assistant was started while the deskphone was already logged in to ACD, Your Assistant will set the Agent field to the agent id.
Login will fail if:
• The agent id is undefined on the 3300 ICP, or • The agent is logged in elsewhere, or • The phone set is not enabled for ACD on the 3300 ICP.
Managing the Agents List
Select Edit Agents... from the Agent drop-down list ( ) in the ACD shutter.
Manage the ACD Agent List
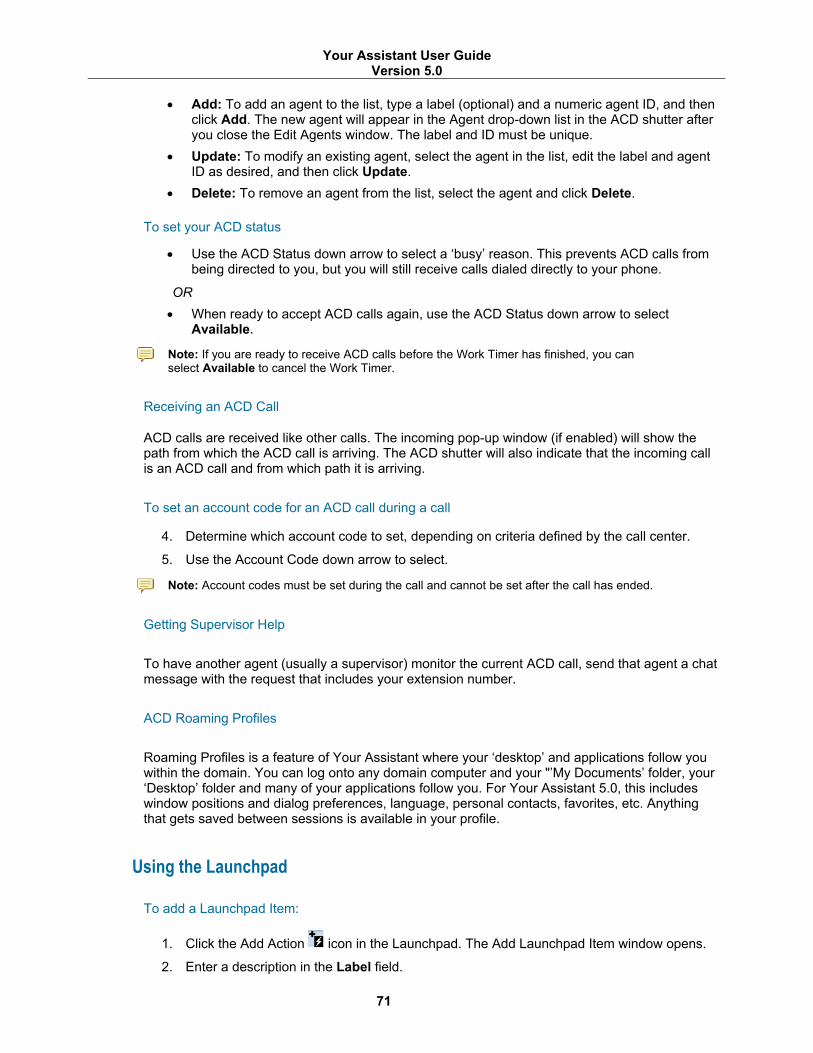
Your Assistant User Guide Version 5.0
71
• Add: To add an agent to the list, type a label (optional) and a numeric agent ID, and then click Add. The new agent will appear in the Agent drop-down list in the ACD shutter after you close the Edit Agents window. The label and ID must be unique.
• Update: To modify an existing agent, select the agent in the list, edit the label and agent ID as desired, and then click Update.
• Delete: To remove an agent from the list, select the agent and click Delete.
To set your ACD status
• Use the ACD Status down arrow to select a ‘busy’ reason. This prevents ACD calls from being directed to you, but you will still receive calls dialed directly to your phone.
OR • When ready to accept ACD calls again, use the ACD Status down arrow to select
Available.
Note: If you are ready to receive ACD calls before the Work Timer has finished, you can select Available to cancel the Work Timer.
Receiving an ACD Call
ACD calls are received like other calls. The incoming pop-up window (if enabled) will show the path from which the ACD call is arriving. The ACD shutter will also indicate that the incoming call is an ACD call and from which path it is arriving.
To set an account code for an ACD call during a call
4. Determine which account code to set, depending on criteria defined by the call center.
5. Use the Account Code down arrow to select.
Note: Account codes must be set during the call and cannot be set after the call has ended.
Getting Supervisor Help
To have another agent (usually a supervisor) monitor the current ACD call, send that agent a chat message with the request that includes your extension number.
ACD Roaming Profiles
Roaming Profiles is a feature of Your Assistant where your ‘desktop’ and applications follow you within the domain. You can log onto any domain computer and your "’My Documents’ folder, your ‘Desktop’ folder and many of your applications follow you. For Your Assistant 5.0, this includes window positions and dialog preferences, language, personal contacts, favorites, etc. Anything that gets saved between sessions is available in your profile.
Using the Launchpad
To add a Launchpad Item:
1. Click the Add Action icon in the Launchpad. The Add Launchpad Item window opens.
2. Enter a description in the Label field.
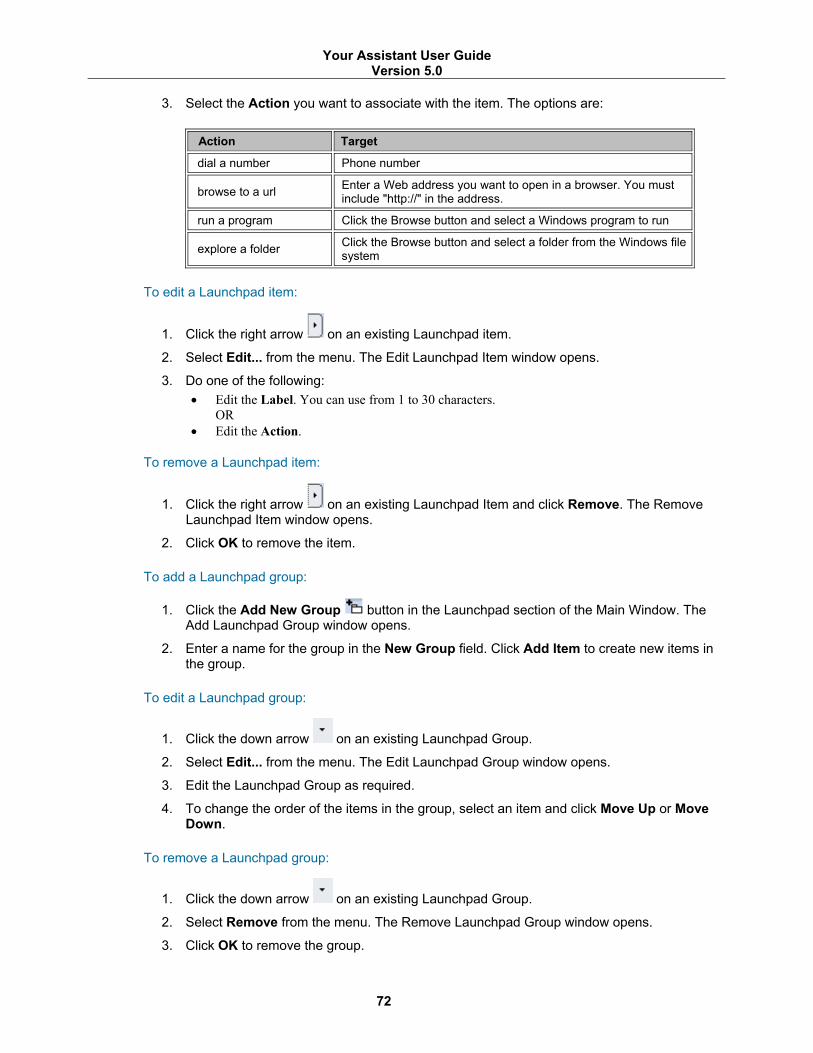
Your Assistant User Guide Version 5.0
72
3. Select the Action you want to associate with the item. The options are:
Action Target
dial a number Phone number
browse to a url Enter a Web address you want to open in a browser. You must include "http://" in the address.
run a program Click the Browse button and select a Windows program to run
explore a folder Click the Browse button and select a folder from the Windows file system
To edit a Launchpad item:
1. Click the right arrow on an existing Launchpad item.
2. Select Edit... from the menu. The Edit Launchpad Item window opens.
3. Do one of the following: • Edit the Label. You can use from 1 to 30 characters.
OR • Edit the Action.
To remove a Launchpad item:
1. Click the right arrow on an existing Launchpad Item and click Remove. The Remove Launchpad Item window opens.
2. Click OK to remove the item.
To add a Launchpad group:
1. Click the Add New Group button in the Launchpad section of the Main Window. The Add Launchpad Group window opens.
2. Enter a name for the group in the New Group field. Click Add Item to create new items in the group.
To edit a Launchpad group:
1. Click the down arrow on an existing Launchpad Group.
2. Select Edit... from the menu. The Edit Launchpad Group window opens.
3. Edit the Launchpad Group as required.
4. To change the order of the items in the group, select an item and click Move Up or Move Down.
To remove a Launchpad group:
1. Click the down arrow on an existing Launchpad Group.
2. Select Remove from the menu. The Remove Launchpad Group window opens.
3. Click OK to remove the group.

Your Assistant User Guide Version 5.0
73
To move a Launchpad group:
1. Click and hold the mouse button on the Grip Area in the top left of a Launchpad Group.
2. Drag the group in the direction you want to move it.
To change the Launchpad layout:
1. Do either of the following:
• Click the Button Layout button and choose Flow from the menu. The items in each Launchpad Group flow into position in each group based on label sizes, optimizing Launchpad space.
• Click the Button Layout button and choose Grid from the menu. The Launchpad Groups are placed in columns.

Your Assistant User Guide Version 5.0
Customizing Your Assistant This section shows you how to customize Your Assistant and is organized as follows:
• Setting Your Appearance Preference (below). • Changing the Device for the Softphone Module (page 75) • Working with Your Contacts (page 76) • Creating Call Forwarding Profiles (page 82) • Setting Advisory Messages (page 87) • Displaying and Hiding Communication Windows (page 89) • Changing Web Window Settings (page 90) • Changing Event Notification Sounds (page 90) • Configuring USB Devices (page 91) • Using Custom Ringtones (page 93) • Filtering Missed Calls by Main Extensions (page 95)
Setting Your Appearance Preference
To change the display scheme of Your Assistant
1. In the Tools menu, select Configuration, and then Appearance.
Configuration Window - Appearance Panel
2. In the Language drop-down menu, select the desired lanuguage for the interface.
3. In the Color Scheme drop-down menu, select a color.
4. In the Surface Style drop-down menu, select a surface style.
74

Your Assistant User Guide Version 5.0
75
5. Click Apply to see the display scheme.
6. Click OK when you have finished changing settings.
To select the way contact names are displayed
In Display Contact Name As, select a name display option as required.
Note: To have company names displayed ’as is’, select Firstname Middlename Lastname format.
Changing the Device for the Softphone Module Warning: Your Assistant may not control a softphone extension from more than one location. When planning to use the softphone from another location, ensure that a Your Assistant softphone is not already monitoring the same extension.
If you checked the Do not ask me at next startup box when selecting your device at startup (See Starting Your Assistant on page 11), you can still change your device or clear that option from within Your Assistant.
1. In the Tools menu, select Configuration,and then Handle Calls Using.
Configuration Window - Handle Calls Using Panel
2. Select the desired device in the Select Device drop-down menu.
3. If desired, check or clear the Always prompt me at Start-Up box.
4. Click Apply. A warning window appears to remind you that you must restart Your Assistant for the changes to take effect.

Your Assistant User Guide Version 5.0
76
Configuration Warning Pop Up
Working with Your Contacts
You can use two types of contact entries in your People shutter:
• Corporate Contacts (see below) • Personal Contacts (see page 77)
In addition, you can build a Favorites menu for quick access and import directly from your PIM by dragging selected contact entries.
• Building Your Favorites Menu (page 80) • Importing Contacts from Your PIM (page 81)
Corporate Contacts
These contacts are automatically imported from the Your Assistant server and cannot be edited. However, a corporate contact can be added to the Personal Contacts list and further information added and edited there.
To access your Corporate Contacts
• Click the icon in the People shutter.
To view Corporate Contact information
1. Right-click the corporate contact.
2. Select Contact Information in the context menu.
To add a corporate contact to the Personal Contacts list
1. Right-click the corporate contact you want to import.
2. In the context menu, select Add to Personal Contacts.
Your Assistant User Guide Version 5.0
77
3. Navigate the submenus until you find the Personal Contact folder to which you would like the contact imported. OR Drag the Corporate Contact to the icon in the People shutter. This will put the contact into the Root group in the Personal Contacts list.
Note: Information added from a Corporate Contact entry cannot be edited. However, you can add further information, which can be edited.
To make calls from your Corporate Contacts
• See Making a Call Using Contacts Entries on page 40.
Personal Contacts
These are the contacts created by you, imported from your PIM by drag-and-drop, or added from your Corporate Contacts.
• With the exception of Outlook, you can edit a personal contact’s phone number from within Your Assistant (this does not modify the contact in your PIM). The edited number will be remembered even if you re-import your PIM contacts.
• Outlook contacts imported from your PIM have an Edit with PIM button in the contact information shutter. This button opens your Outlook contact, which can then be edited. In this way, your Outlook is updated and the change will be reflected in Your Assistant.
• You can view the documents associated with each contact. • You can create group folders to organize your contacts, and move or copy contacts into
groups. Groups can be created within others to form a hierarchy of information. To copy or move multiple contacts simultaneously, hold the Ctrl key down while selecting contacts, and then right-click one of the selections.
Contact Organization
To access your Personal Contacts
• Click on the icon in the People shutter.

Your Assistant User Guide Version 5.0
78
To create a group
1. Right-click the Personal Contacts folder (or any group folder previously created) and choose Add Group. OR Right-click a contact entry and choose New Group.
2. Right-click the New Group and choose Rename Group to name the group.
3. Move or copy contact entries into the new group by right-clicking the entry and choosing Move to Group or Copy to Group. Contacts can be moved between groups using drag and drop also.
To view related documents for a contact
• Right-click and select Knowledge Management from the context menu for a contact to open the Knowledge Management window.
The Knowledge Management window allows you to view the list of related documents for a contact, to open any document in the list, to manually force an association and to delete an association from the list. For information about using this window, see View and Open Related Documents (page 51).
To view Personal Contact information
1. Right-click the personal contact.
2. Select Contact Information in the context menu.
To edit a Personal Contacts entry
1. In the Personal Contact Information dialog box, edit the entry as desired.
2. To enter a phone number, select the phone icon, enter a description and enter the telephone number in the value field (extension numbers cannot be added to the end of the number).
3. Phone numbers can be entered in two different formats: dialable-format and canonical-format.
• Dialable-format numbers do not begin with a ‘+’ o If a number is in dialable-format, the number is dialed as is (including dialing
prefix). Non numeric symbols, excluding FAC and account codes, are stripped before sending. For example, any dashes or brackets included in the phone number are stripped before sending.
• Canonical-format numbers begin with a ‘+’
o If a number is in canonical-format, the canonical rules are applied before displaying and dialing. The canonical rules are a combination of ‘built-in’ rules and those rules specified in the MS Windows Control Panel (Phone and Modem Options). Once the canonical rules have been applied, the number is in dialable-format.
o The canonical address format is intended to be a universally constant directory number. For this reason, numbers in address books are best stored using canonical format.
For more information on dialing formats see Appendix A - Using the International Dialing Format.

Your Assistant User Guide Version 5.0
79
Personal Contact Information Window
4. To add an account code to a phone number, type it in the A.C. field. Your Assistant will automatically add ^ to the beginning of the code and # to the end of the number entered in the A.C. field. The account code field is only for account codes: Do not enter extension numbers or any other numbers in the A.C. field.
5. Account codes are available from your system administrator.
6. Add an MSN login by clicking Add and choosing MSN Login as the Type. The Messenger presence icon will now appear beside the contact name.
7. Add a Microsoft Office Communicator login by clicking Add and choosing Communicator Login as the Type. The Communicator presence icon will now appear beside the contact name.
8. To make a value the contact default, select the value in the list and click Default. This will be the number used if you double-click a contact entry.
9. If there is a PIM index entry for the contact, click Edit in PIM (Outlook only) to open the PIM contact dialog box.
10. Click OK when finished to save the changes.
To add a Personal Contacts entry
1. Select any contact in the group folder where you want to add the entry. OR Select a group folder.
2. Right click and select New Contact from the context menu.
3. Edit the contact information as desired, and click OK.
To make calls from your Personal Contacts
• See Making a Call Using Contacts Entries on page 39.
Your Assistant User Guide Version 5.0
80
Building Your Favorites Menu
Favorites provide speed call functionality for those contacts that you call most often.
To add a Personal or Corporate Contact to your Favorites menu
• In the Corporate or Personal Contact Information dialog box, check the box in the column labeled . (Clear the box to remove it from the menu).
Importing Contacts from Your PIM
Importing contacts from your Personal Information Manager (PIM) provides an efficient method of contact integration. By importing contacts you can populate the People shutter and enable a convenient method of calling contacts.
You can view, edit, and add additional contact information to the contact after it has been imported. However, the changes you make in Your Assistant are not propagated back to your PIM. As changes you make in your PIM are propagated to the imported contacts in Your Assistant, we suggest that you use your PIM to edit imported contacts. If you are using Lotus Notes, contact information is only propagated upon Your Assistant startup.
Re-importing a contact to Your Assistant overwrites the existing contact information with the imported contact information. Any new contact information added to the contact in Your Assistant will not be overwritten.
Note: The Microsoft Outlook Connector for Lotus Notes is not supported in Your Assistant.
Note: Country codes do not import from ACT! If you import an ACT! contact whose phone number contains a country code, the country code will be stripped out when the number is imported into Your Assistant.
Tip: Storing phone numbers in canonical format ensures that any Windows dialing rules you have defined will be applied when you call a contact.
There are three ways to import contacts; dragging and dropping from your PIM, importing all the contacts in a PIM directory as a batch, and importing resolved callers from the Communication window. Note that if you use Microsoft Outlook, contacts may only be imported from your default Outlook email profile.
To import selected contacts using drag-and-drop:
You can drag and drop contacts from Outlook and Lotus Notes into Your Assistant. You cannot drag and drop contacts from ACT!
1. Display your PIM's contacts list: • If you are using Outlook, select the Contacts folder in the Folder List. • If you are using Lotus Notes, open your Contacts window.

Your Assistant User Guide Version 5.0
81
2. Select one or more contacts. To select more than one contact, hold down the Control key as you make your selections. To select a group of contacts, select the first contact, hold down the Shift key and select a second contact; all the contacts between the two contacts will automatically be selected. To select all contacts, press Ctrl-A.
3. Drag and drop the selection into the People shutter in the Main window. The contacts will be added to the People shutter contact list.
To import a batch of contacts:
Your Assistant can batch import contacts from any supported PIM.
1. Click the Tools menu and select Import Contacts...
2. The Import Contacts window will open. Use the check boxes to select the folders from which you want to import contacts.
Note: If the Domino folder does not appear in the Lotus Notes folder, make sure your Lotus Notes location is set to Office (Network). Refer to the Lotus Notes documentation for information on setting your location.
3. Click OK to start importing contacts. All contacts from the selected locations will be added to the contacts list in the People shutter.
Import Contacts Window
To import a resolved caller:
PIM Integration allows Your Assistant to identify callers that exist as contacts in your PIM regardless of whether they have also been imported into Your Assistant. If you wish, such callers can be imported into Your Assistant from the Communication window.
1. During a conversation, right click the name of the caller in the Communication window. The caller must be resolved (the name must be underlined) to import the caller into your contacts directory.
2. Select Add to Personal Contacts from the context menu. A submenu showing the directory structure of your personal contacts directory will appear.
3. Use the submenu to select a location for the imported contact.
Your Assistant User Guide Version 5.0
82
Creating Call Forwarding Profiles Note: Call Forwarding profiles are not available in Your Assistant Lite Softphone.
Call forwarding profiles let you predefine different call forwarding rules, allowing you to change your call forwarding settings with a click of the mouse. The Conditionally Forward controls allow calls to be forwarded under specific circumstances, such as:
• The line is busy (an internal or external caller) • There is no answer (internal or external caller) • The incoming caller’s line ID matches the one you entered in the profile
Note: To prevent conflicts when using Your Assistant with a Mitel IP Phone, use Your Assistant rather than the Desktop Tool to set your call forwarding profile.
Any call forwarding you set via your deskphone will be over-written when you start your Your Assistant client.
If the Your Assistant client is launched and the deskphone is used to configure call forwarding, then the most recently programmed device (Your Assistant or deskphone) determines the method of call forwarding that will be used until Your Assistant is closed and restarted.
To create/edit call forwarding profiles
1. Display the Call Forwarding Profiles configuration page: • In the Settings shutter, double-click Call Forwarding Profile.
OR • In the Settings shutter, click the name of the current call forwarding profile, and
select Edit in the drop-down menu.
OR • From the Tools menu, select Configuration, and then Call Forwarding Profiles.
Configuration Window - Call Forwarding Profiles Panel

Your Assistant User Guide Version 5.0
83
2. To create a new call forwarding profile, click the New button to add a new profile to your Profiles list. Click “New Profile” and rename it.
To assign a Do Not Disturb profile
1. Select the profile you want to edit.
2. Clear the Always Forward To: and the Auto Answer checkboxes.
3. Check the Do Not Disturb checkbox.
4. Click Apply to continue with configuration or click OK if you have finished changing settings.
When The Do Not Disturb profile is selected, calls are forwarded according to your Call Forward When Busy settings.
If no Call Forward When Busy settings are set, callers will hear a fast busy signal and the Your Assistant client will receive no calls. No calls will appear in the call log.
To assign an Auto Answer profile
1. Select the profile you want to edit.
2. Clear the Do Not Disturb and the Always Forward To checkboxes.
3. Check the Auto Answer checkbox.
4. Click Apply to continue with configuration or click OK if you have finished changing settings.
When Auto Answer selected, calls are not forwarded. You will receive one ring and the call will automatically be connected.
To assign an Always Forward To profile
1. Select the profile you want to edit.
2. Clear the Do Not Disturb and the Auto Answer checkboxes.
3. Check the Always forward To: checkbox.
4. Select the call forwarding destination from the pull-down menu (The default is Voicemail). To create other destinations, see Setting Call Forwarding Destinations on page 84.
5. Click Apply to continue with configuration or click OK if you have finished changing settings.
To assign a Conditionally Forward profile
1. Select the profile you want to edit.
2. Clear the Do Not Disturb, Auto Answer, and Always Forward To check boxes to enable Conditionally Forward options.
3. Check the appropriate check boxes and select the call forwarding destination from the drop-down menu (default is Voicemail). To create other destinations, see Setting Call Forwarding Destinations on page 84.
4. Select Forward According to Policies if you want to base the forwarding rule for this profile on a caller’s identity. To create policies, see Setting Call Forwarding Policies on page 85.
Your Assistant User Guide Version 5.0
84
Note: Policies are used in the order in which they appear in the policy list. To re-order the list, select a policy and use the Up or Down arrow to change its position.
5. Click Apply to continue with configuration or click OK if you have finished changing settings.
To change the active call forwarding profile
1. In the Settings shutter, click on the name of the current call forwarding profile.
2. Select the desired call forwarding profile in the drop-down menu.
Profile changes become active only when the profile is listed within the Settings shutter.
Setting Call Forwarding Destinations
To add/edit a call forwarding destination
1. Display the Call Forwarding Profiles configuration page. • In the Settings shutter, double-click Call Forwarding Profile.
OR • In the Settings shutter, select Edit in the drop-down menu.
OR • From the Tools menu, select Configuration, and then Call Forwarding Profiles.
2. Select Edit Destinations… from any one of the destination pull-down menus.
3. To add a new destination, fill in the Description and Number fields, and click Add. Your Assistant warns if a destination with the same name already exists.
• To edit a destination, select the destination from the Destinations list, edit the Description and/or Name fields, and click Update.
• To delete a destination, select the destination from the Destinations list and click Delete.
Your Assistant User Guide Version 5.0
85
Note: You will receive a warning if your destination number cannot be called from your telephone. If you proceed, Your Assistant will display the Configuration window so you can update your destination number. If you accept your invalid number, it will be saved.
Note: If voicemail is available, it is the default destination and cannot be updated or deleted. Voicemail is part of the switch settings and can be changed by the system administrator only.
Edit Destinations Window
Setting Call Forwarding Policies
Note: Your Assistant does not support creating Call Forwarding Policies for "external call forward" on the SX -200 ICP.
To create a policy
1. Display the Call Forwarding Profiles configuration page. • In the Settings shutter, double-click Call Forwarding Profile.
OR • In the Settings shutter, click the name of the current call forwarding profile, and
select Edit in the drop-down menu.
OR • From the Tools menu, select Configuration, and then Call Forwarding Profiles.
2. Select a profile to which the new policy will apply.
OR
1. Select the New button.
2. Name the new policy, using up to 120 characters.
Note: The name must be unique within the call forwarding profile.
3. Caller Identification: choose Everyone or If the caller.
(a) For If the caller, select Is one of or Is not one of from the drop-down menu.
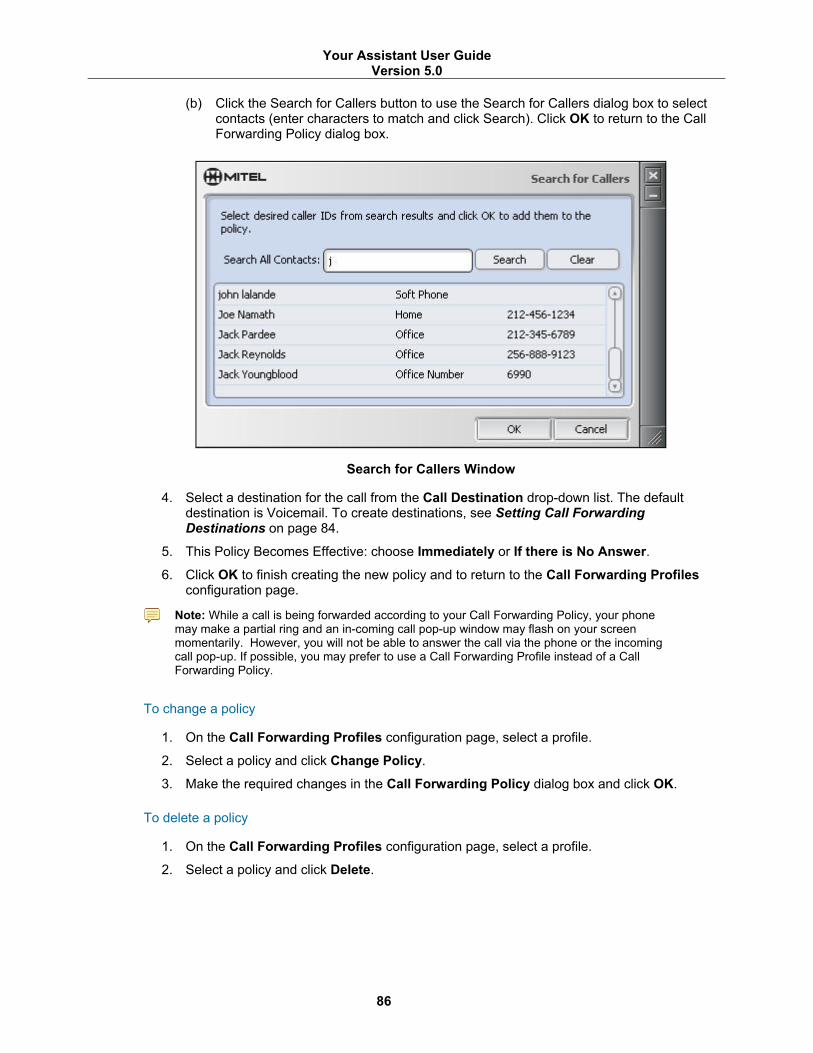
Your Assistant User Guide Version 5.0
86
(b) Click the Search for Callers button to use the Search for Callers dialog box to select contacts (enter characters to match and click Search). Click OK to return to the Call Forwarding Policy dialog box.
Search for Callers Window
4. Select a destination for the call from the Call Destination drop-down list. The default destination is Voicemail. To create destinations, see Setting Call Forwarding Destinations on page 84.
5. This Policy Becomes Effective: choose Immediately or If there is No Answer.
6. Click OK to finish creating the new policy and to return to the Call Forwarding Profiles configuration page.
Note: While a call is being forwarded according to your Call Forwarding Policy, your phone may make a partial ring and an in-coming call pop-up window may flash on your screen momentarily. However, you will not be able to answer the call via the phone or the incoming call pop-up. If possible, you may prefer to use a Call Forwarding Profile instead of a Call Forwarding Policy.
To change a policy
1. On the Call Forwarding Profiles configuration page, select a profile.
2. Select a policy and click Change Policy.
3. Make the required changes in the Call Forwarding Policy dialog box and click OK.
To delete a policy
1. On the Call Forwarding Profiles configuration page, select a profile.
2. Select a policy and click Delete.
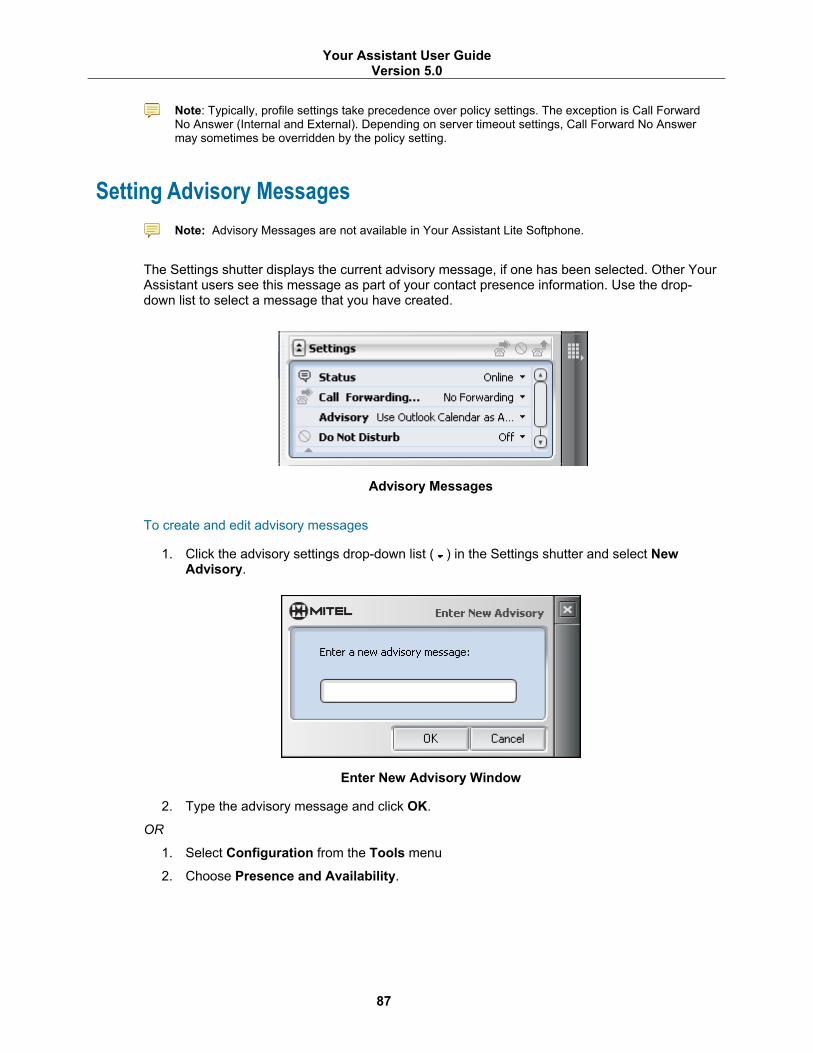
Your Assistant User Guide Version 5.0
87
Note: Typically, profile settings take precedence over policy settings. The exception is Call Forward No Answer (Internal and External). Depending on server timeout settings, Call Forward No Answer may sometimes be overridden by the policy setting.
Setting Advisory Messages Note: Advisory Messages are not available in Your Assistant Lite Softphone.
The Settings shutter displays the current advisory message, if one has been selected. Other Your Assistant users see this message as part of your contact presence information. Use the drop-down list to select a message that you have created.
Advisory Messages
To create and edit advisory messages
1. Click the advisory settings drop-down list ( ) in the Settings shutter and select New Advisory.
Enter New Advisory Window
2. Type the advisory message and click OK.
OR
1. Select Configuration from the Tools menu
2. Choose Presence and Availability.
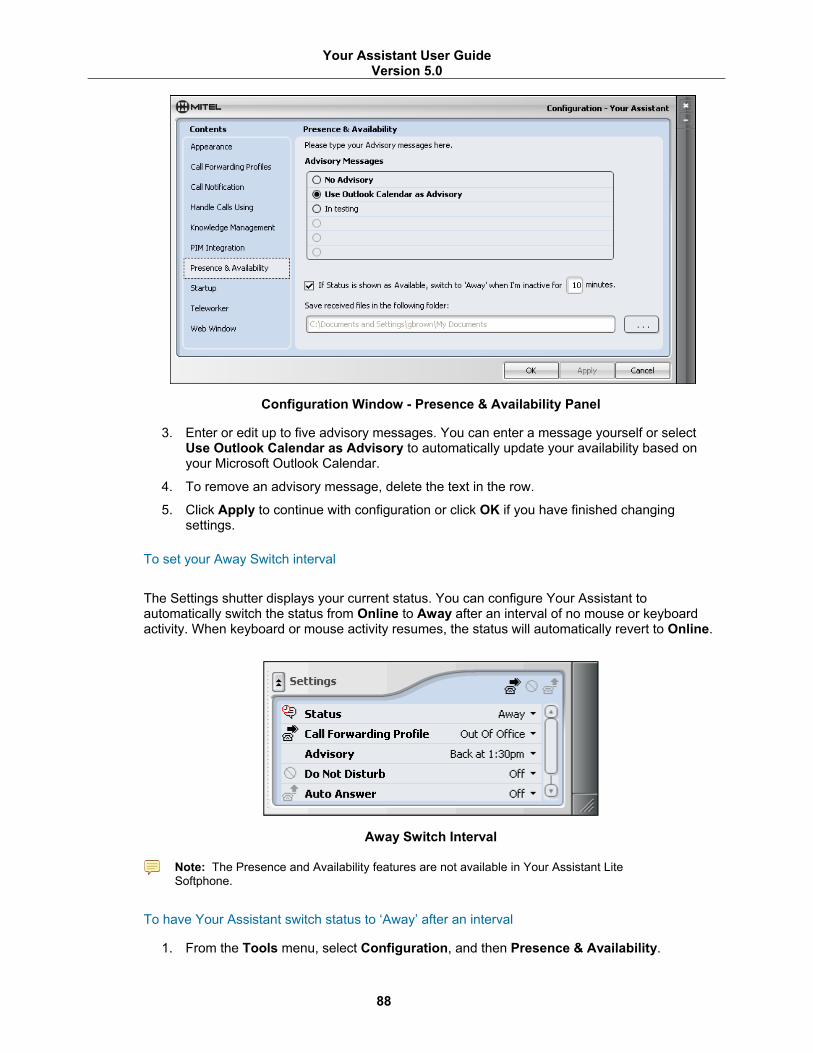
Your Assistant User Guide Version 5.0
88
Configuration Window - Presence & Availability Panel
3. Enter or edit up to five advisory messages. You can enter a message yourself or select Use Outlook Calendar as Advisory to automatically update your availability based on your Microsoft Outlook Calendar.
4. To remove an advisory message, delete the text in the row.
5. Click Apply to continue with configuration or click OK if you have finished changing settings.
To set your Away Switch interval
The Settings shutter displays your current status. You can configure Your Assistant to automatically switch the status from Online to Away after an interval of no mouse or keyboard activity. When keyboard or mouse activity resumes, the status will automatically revert to Online.
Away Switch Interval
Note: The Presence and Availability features are not available in Your Assistant Lite Softphone.
To have Your Assistant switch status to ‘Away’ after an interval
1. From the Tools menu, select Configuration, and then Presence & Availability.
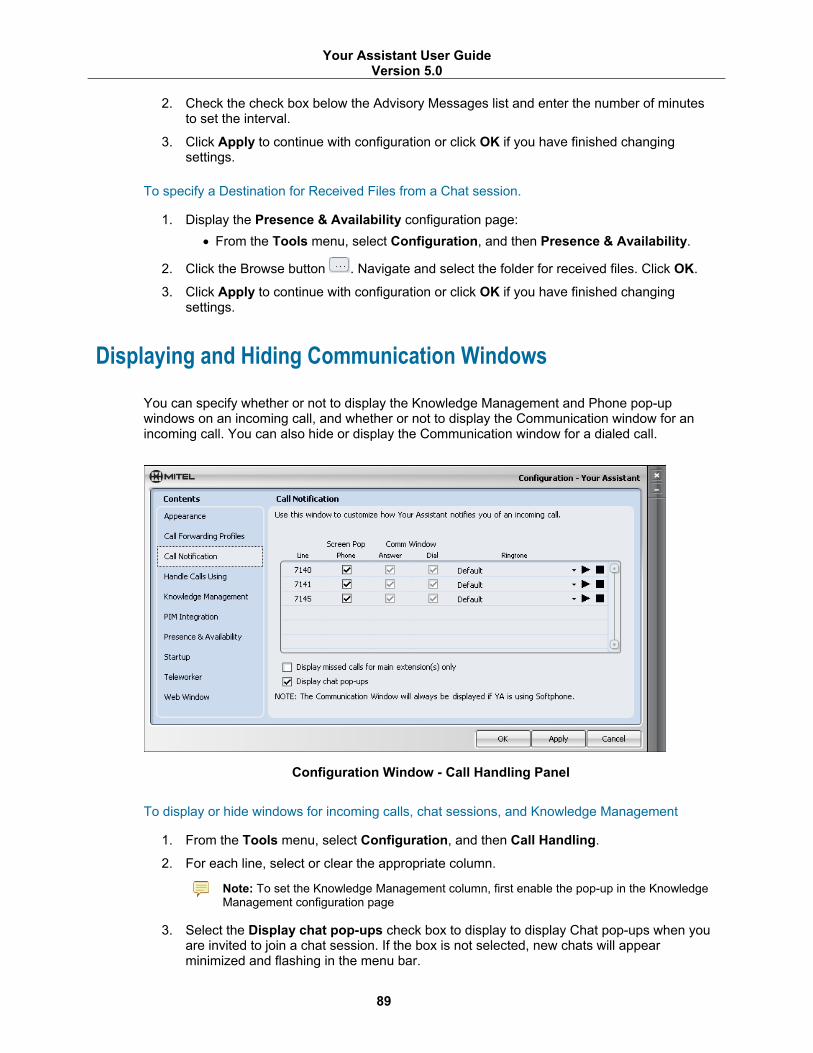
Your Assistant User Guide Version 5.0
89
2. Check the check box below the Advisory Messages list and enter the number of minutes to set the interval.
3. Click Apply to continue with configuration or click OK if you have finished changing settings.
To specify a Destination for Received Files from a Chat session.
1. Display the Presence & Availability configuration page: • From the Tools menu, select Configuration, and then Presence & Availability.
2. Click the Browse button . Navigate and select the folder for received files. Click OK.
3. Click Apply to continue with configuration or click OK if you have finished changing settings.
Displaying and Hiding Communication Windows
You can specify whether or not to display the Knowledge Management and Phone pop-up windows on an incoming call, and whether or not to display the Communication window for an incoming call. You can also hide or display the Communication window for a dialed call.
Configuration Window - Call Handling Panel
To display or hide windows for incoming calls, chat sessions, and Knowledge Management
1. From the Tools menu, select Configuration, and then Call Handling.
2. For each line, select or clear the appropriate column.
Note: To set the Knowledge Management column, first enable the pop-up in the Knowledge Management configuration page
3. Select the Display chat pop-ups check box to display to display Chat pop-ups when you are invited to join a chat session. If the box is not selected, new chats will appear minimized and flashing in the menu bar.
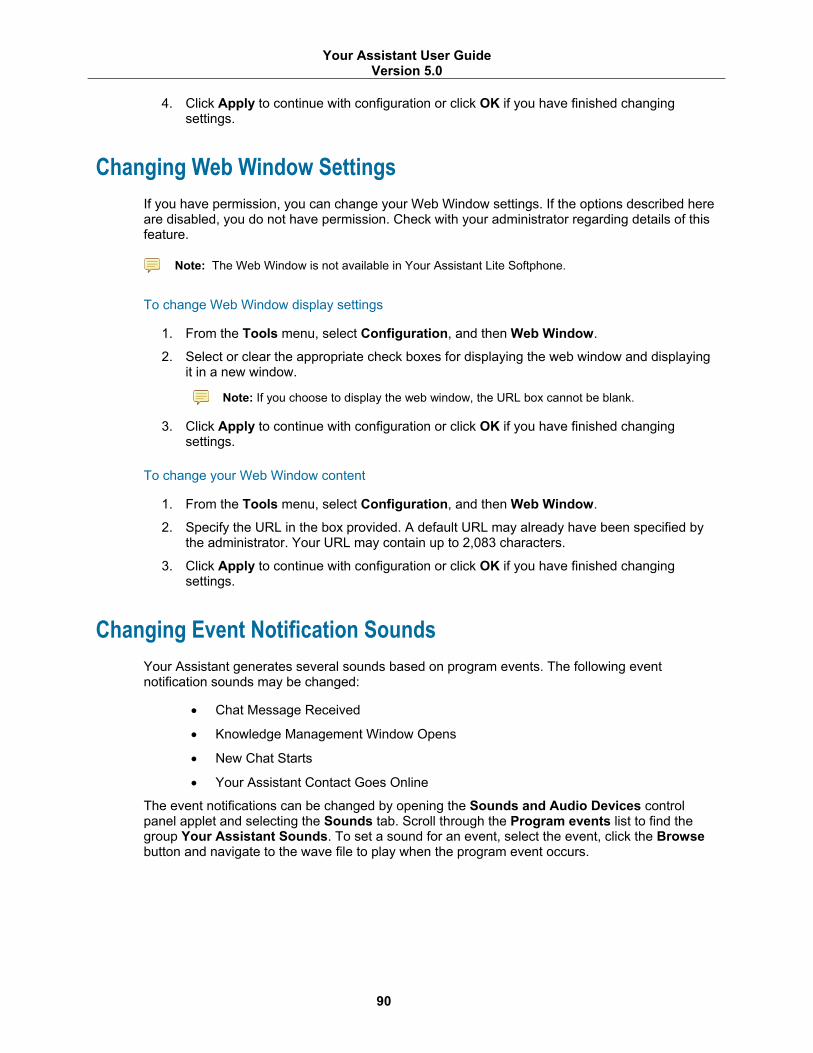
Your Assistant User Guide Version 5.0
90
4. Click Apply to continue with configuration or click OK if you have finished changing settings.
Changing Web Window Settings If you have permission, you can change your Web Window settings. If the options described here are disabled, you do not have permission. Check with your administrator regarding details of this feature.
Note: The Web Window is not available in Your Assistant Lite Softphone.
To change Web Window display settings
1. From the Tools menu, select Configuration, and then Web Window.
2. Select or clear the appropriate check boxes for displaying the web window and displaying it in a new window.
Note: If you choose to display the web window, the URL box cannot be blank.
3. Click Apply to continue with configuration or click OK if you have finished changing settings.
To change your Web Window content
1. From the Tools menu, select Configuration, and then Web Window.
2. Specify the URL in the box provided. A default URL may already have been specified by the administrator. Your URL may contain up to 2,083 characters.
3. Click Apply to continue with configuration or click OK if you have finished changing settings.
Changing Event Notification Sounds Your Assistant generates several sounds based on program events. The following event notification sounds may be changed:
• Chat Message Received
• Knowledge Management Window Opens
• New Chat Starts
• Your Assistant Contact Goes Online
The event notifications can be changed by opening the Sounds and Audio Devices control panel applet and selecting the Sounds tab. Scroll through the Program events list to find the group Your Assistant Sounds. To set a sound for an event, select the event, click the Browse button and navigate to the wave file to play when the program event occurs.
Your Assistant User Guide Version 5.0
91
Configuring USB Devices
The USB device feature supports adding and configuring USB human interface devices (HIDs). You can then use peripheral USB devices to control calls independently of Your Assistant.
To install a USB device
• Plug the USB device into your PC. The first time you plug in the device, Windows plug and play recognizes the new hardware and automatically installs it (see your computer documentation for more information).
To configure a USB device
1. Select Configuration... from the Tools menu. The Configuration window opens.
2. Select Handle Calls Using.
3. Make sure Softphone is selected in the Select Device drop list.
4. Select the entry for the new USB device in the Call Control drop list. Note: If you select a device that has not been configured yet, the USB Device
Configuration window opens.
5. If the device you are using has a headset, select the new USB device in the Microphone and Speaker drop lists.
6. Click Apply to apply your changes without closing the Configuration window. OR Click OK to apply your changes and close the Configuration window.
The ability to customize the Call Controls, Dial Pad configuration, or Volume Controls buttons of USB devices depends on settings controlled by the administrator. If you do not have configuration permissions, click Handle Calls Using > View to see information about configured devices.
To customize a USB device
1. Select Configuration... from the Tools menu in the Main window. The Configuration window opens.
2. Select Handle Calls Using and in the Call Control box, select a USB device to customize.
3. Click Configure. A warning window opens, indicating that Your Assistant will not respond to the USB device while the USB Device Configuration window is open. Click OK to close the warning window.

Your Assistant User Guide Version 5.0
92
4. In the USB Device Configuration window, click any USB device button that you want to customize. A flashing red outline appears around the button and a message flashes in the window advising you to "Press a button now", as shown in the figure.
Note: The Dial button is equivalent to the Call button on the Main Window.
5. Press the button you want to assign on the USB device. The red border on the button
image in the USB Device Configuration window stops flashing and the button label text is highlighted.
6. Change the button label text in the USB Device Configuration window. Use a name that represents the button on the device. For example, type "red" below the Hang Up button to program the device to end a call when you press the red button on the device. If you need to, you can return to the defaults set on the Your Assistant server by clicking Use Defaults.
7. If needed, you can confirm button assignments using the USB Device Configuration window and the device. When you press a programmed button on the device, the corresponding button image in the window flashes a green border.
8. Click OK to apply the changes and close the USB Device Configuration window.
Your Assistant User Guide Version 5.0
93
9. Click Apply to apply your changes and close the Configuration window. OR Click OK to apply your changes and close the Configuration window.
Using Custom Ringtones
Use the procedures in this section to manage custom ringtones.
1. Select Configuration from the Tools menu in the Main window.
2. Click the Call Notification tab.
3. In the Ringtone column of the Configuration > Call Notification window, click the entry for a telephone line that you want to update the ringtone for. A selection menu opens, as shown in the following figure.
4. Do one of the following:
To add a ringtone
1. Click Manage Ringtones > Add Ringtone... A window opens where you can browse for sound files.
2. Select any .wav or .ogg file available to your system. The ringtone is added to the Manage Ringtones window, as shown in the following figure.
3. Click Close to add the ringtone to the line you selected in step 2.
4. Click Apply to apply the changes and keep the window open. OR Click OK to complete the changes and close the window.
Your Assistant User Guide Version 5.0
94
To play a ringtone
• Use the play and stop buttons in the Manage Ringtones or Configuration windows as required to listen to ringtones before you assign them to a line.
To assign a ringtone
1. In the Ringtone column of the Configuration > Call Notification window, click the entry for a telephone line that you want to assign the ringtone to.
2. Select the ringtone to assign it to the line you selected in step 2. The ringtone is listed with the line. In the following example, when you select callmeback.wav, the ringtone is added to the line you selected.
3. Click Apply to apply the changes and keep the window open.
OR Click OK to complete the changes and close the window. Once you assign a ringtone to a line, Your Assistant plays the selected ringtone sound for incoming calls on that line.
To remove a ringtone
1. Click Manage Ringtones > Remove Ringtone...
2. Select the ringtone that you want to remove. The Ringtone is removed from the list.
3. Click Close to close the Manage Ringtones window.
4. Click Apply to apply the changes and keep the window open. OR Click OK to complete the changes and close the window.
Your Assistant User Guide Version 5.0
95
Filtering Missed Calls by Main Extensions
Use this procedure to turn off display of missed calls in the call log and call history from non-prime softphone and deskphone extensions. Your Assistant then only displays missed calls for prime softphone and deskphone DNs.
To filter missed calls by main extensions:
1. Select Configuration from the Tools menu from the Main window. The Configuration window opens.
2. Select Call Notification. The Call Notification screen opens.
3. Enable Display Missed Calls for Main Extension(s) Only.
Your Assistant User Guide Version 5.0
Frequently Asked Questions (FAQ)
96
1. How can I change the Your Assistant server IP address on my client?
Run the Your Assistant client installer and select the Repair option. You will be prompted to enter the Your Assistant server's IP address. Enter the new IP.
2. Why does it take so long to index my Outlook Exchange Contacts?
Access to your Exchange contacts occurs over the network, not on your local machine. Network traffic affects the time it takes to index your contacts. In addition, Exchange databases tend to be large and you must iterate the entire database to find all of the contacts.
3. When I record a call using my Deskphone, my softphone line gets conferenced into the call. Why?
Your softphone provides your computer with access to the call’s voice path. While you are recording a call on your desktop phone, the softphone is conferenced in to the record the call.
4. How can I access the recorded call files?
You can either play recorded call files through the call log, or you can browse them in Windows Explorer:
In Your Assistant 5.0:
C:\Documents and Settings\<username>\Application Data\NewHeights\YA
In Your Assistant 4.1: C:\Documents and Settings\<username>\Application Data\NewHeights\YA4.1\Recorded Calls
In Your Assistant 4.0: C:\Documents and Settings\<username>\Application Data\NewHeights\YA4.0\Recorded Calls
In Your Assistant 3.3: C:\Documents and Settings\<username>\Application Data\NewHeights\YA3.3\Recorded Calls
In Your Assistant 3.1.1:
C:\Documents and Settings\<username>\Application Data\NewHeights\YA3.1\Recorded Calls
Previous versions of Your Assistant:
C:\Documents and Settings\<username>\Local Settings\Application Data\NewHeights\ YA3.1\Recorded Calls
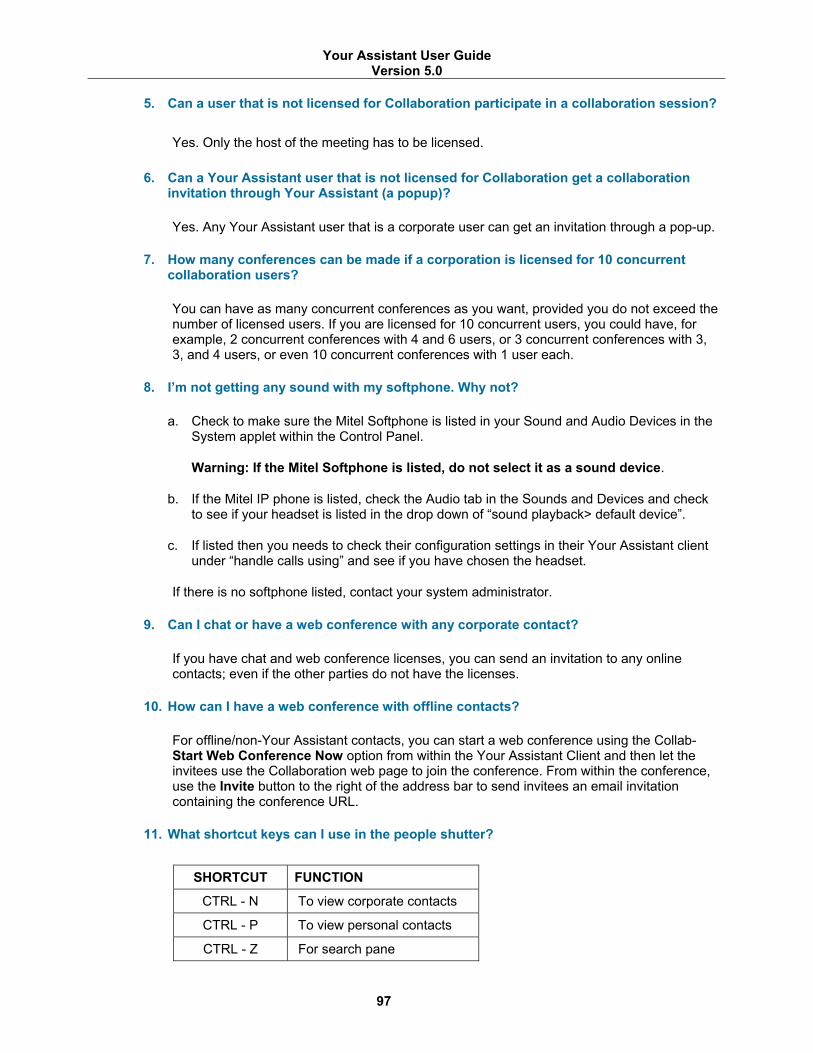
Your Assistant User Guide Version 5.0
97
5. Can a user that is not licensed for Collaboration participate in a collaboration session?
Yes. Only the host of the meeting has to be licensed.
6. Can a Your Assistant user that is not licensed for Collaboration get a collaboration invitation through Your Assistant (a popup)?
Yes. Any Your Assistant user that is a corporate user can get an invitation through a pop-up.
7. How many conferences can be made if a corporation is licensed for 10 concurrent collaboration users?
You can have as many concurrent conferences as you want, provided you do not exceed the number of licensed users. If you are licensed for 10 concurrent users, you could have, for example, 2 concurrent conferences with 4 and 6 users, or 3 concurrent conferences with 3, 3, and 4 users, or even 10 concurrent conferences with 1 user each.
8. I’m not getting any sound with my softphone. Why not?
a. Check to make sure the Mitel Softphone is listed in your Sound and Audio Devices in the System applet within the Control Panel.
Warning: If the Mitel Softphone is listed, do not select it as a sound device.
b. If the Mitel IP phone is listed, check the Audio tab in the Sounds and Devices and check to see if your headset is listed in the drop down of “sound playback> default device”.
c. If listed then you needs to check their configuration settings in their Your Assistant client under “handle calls using” and see if you have chosen the headset.
If there is no softphone listed, contact your system administrator.
9. Can I chat or have a web conference with any corporate contact?
If you have chat and web conference licenses, you can send an invitation to any online contacts; even if the other parties do not have the licenses.
10. How can I have a web conference with offline contacts?
For offline/non-Your Assistant contacts, you can start a web conference using the Collab-Start Web Conference Now option from within the Your Assistant Client and then let the invitees use the Collaboration web page to join the conference. From within the conference, use the Invite button to the right of the address bar to send invitees an email invitation containing the conference URL.
11. What shortcut keys can I use in the people shutter?
SHORTCUT FUNCTION
CTRL - N To view corporate contacts
CTRL - P To view personal contacts
CTRL - Z For search pane
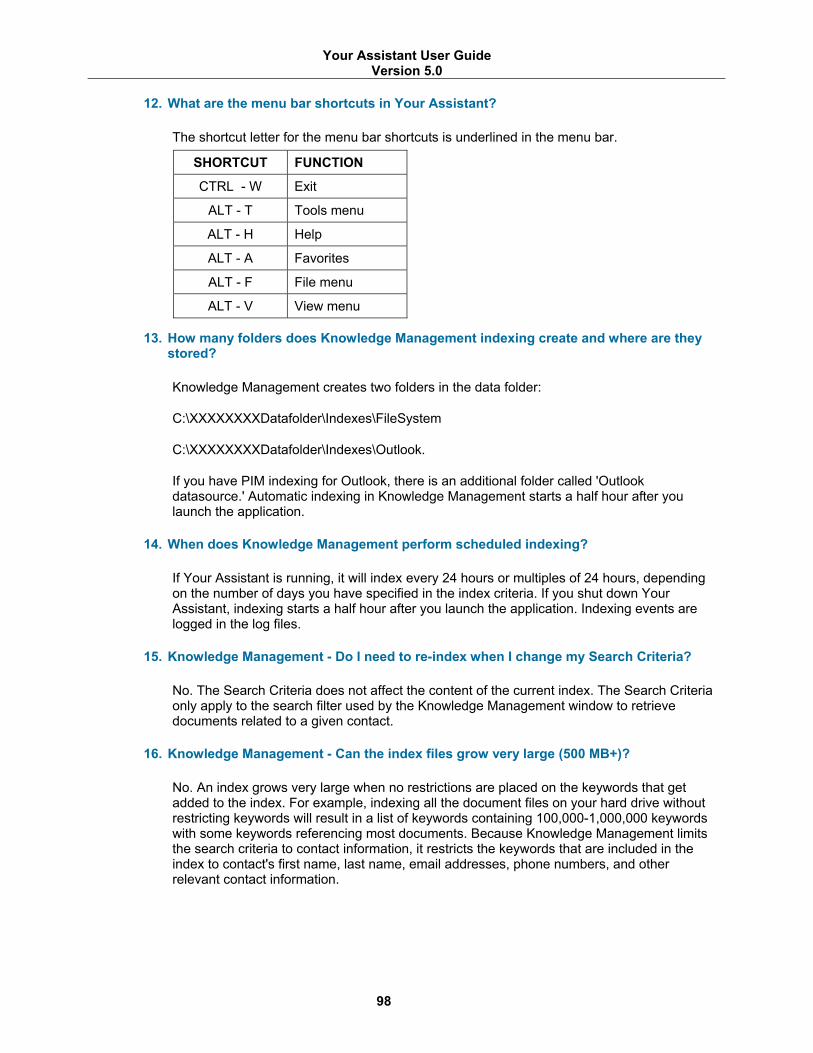
Your Assistant User Guide Version 5.0
98
12. What are the menu bar shortcuts in Your Assistant?
The shortcut letter for the menu bar shortcuts is underlined in the menu bar.
SHORTCUT FUNCTION
CTRL - W Exit
ALT - T Tools menu
ALT - H Help
ALT - A Favorites
ALT - F File menu
ALT - V View menu
13. How many folders does Knowledge Management indexing create and where are they stored?
Knowledge Management creates two folders in the data folder:
C:\XXXXXXXXDatafolder\Indexes\FileSystem
C:\XXXXXXXXDatafolder\Indexes\Outlook.
If you have PIM indexing for Outlook, there is an additional folder called 'Outlook datasource.' Automatic indexing in Knowledge Management starts a half hour after you launch the application.
14. When does Knowledge Management perform scheduled indexing?
If Your Assistant is running, it will index every 24 hours or multiples of 24 hours, depending on the number of days you have specified in the index criteria. If you shut down Your Assistant, indexing starts a half hour after you launch the application. Indexing events are logged in the log files.
15. Knowledge Management - Do I need to re-index when I change my Search Criteria?
No. The Search Criteria does not affect the content of the current index. The Search Criteria only apply to the search filter used by the Knowledge Management window to retrieve documents related to a given contact.
16. Knowledge Management - Can the index files grow very large (500 MB+)?
No. An index grows very large when no restrictions are placed on the keywords that get added to the index. For example, indexing all the document files on your hard drive without restricting keywords will result in a list of keywords containing 100,000-1,000,000 keywords with some keywords referencing most documents. Because Knowledge Management limits the search criteria to contact information, it restricts the keywords that are included in the index to contact's first name, last name, email addresses, phone numbers, and other relevant contact information.
Your Assistant User Guide Version 5.0
99
17. Knowledge Management - I just created a new contact in my personal contact list. Why does the Knowledge Management window show no documents for that contact?
Knowledge Management restricts the keywords that are included in the index to the contact's first name, last name, email addresses, phone numbers and other relevant contact information. The newly created contact's information can not be included in the index since the contact did not exist at the time the index was created. Simply re-index your documents or enable the Knowledge Management automatic indexing option for every one day.
18. Knowledge Management - How can I create a forced association to a folder for a given contact?
Open the contact's Knowledge Management window. Using Explorer, click the folder's icon you wish to associate to the contact. Drag and drop the icon into the document's list. You should see a new forced association for the folder. Click OK to save the changes. OR
4. Select New Association and browse your computer or network for the document you want to associate with the contact.
5. Click Open to select the document. The document is automatically added to the grid.
19. Knowledge Management - How can I create a forced association to a website URL?
From Internet Explorer's Address combo-box, drag and drop the URL onto your desktop to create a shortcut to the website. Open the contact's Knowledge Management window. Drag and drop the URL shortcut's icon into the document's list. You should see a new forced association for the shortcut. Click OK to save the changes.
20. Why is dragging contacts from Outlook different than dragging contacts from other PIMs?
Unlike those in other supported PIMs, contacts dragged from Outlook have an underlying link with Outlook until the contacts are deleted from Outlook. You can use Outlook to edit phone/email items and any changes will appear in Your Assistant automatically.
21. Upon launching Your Assistant, I checked "Don't ask me again" in a dialog box for using the softphone or deskphone. Can I reset this and cause the confirmation to start appearing again?
Yes. You can turn on all confirmation messages again by reverting to the default configuration.
To turn on all confirmation messages:
1. Go to your Settings directory:
C:\Documents and Settings\<your user name>\Application Data\NewHeights\YA
2. Delete the ya.cfg file.
22. Why do some calls get logged with an "unknown" caller name?
If you have the same phone number twice in your Contacts and you are talking to one of the two people who use that number, your communication window will display "2 Contacts" instead of the caller’s name. If you do not click on "2 Contacts" to indicate which of the two contacts you are talking with, the call will be logged with an "unknown" name.
Your Assistant User Guide Version 5.0
100
23. When I am using softphone, the call ‘breaks up’ while I am using other programs in my computer.
Some tasks of the Windows operating system run at elevated priorities, briefly preventing other applications from performing their own tasks. The Windows Desktop is one area where tasks can run at the highest of priorities. A common problem is the animation used when minimizing and maximizing windows to/from the taskbar. This animation takes approximately 200 ms (1/5th of a second) and will produce a noticeable break in a conversation.
To disable the animation, use the System properties in Control Panel:
1. Click the Advanced tab.
2. Click the Performance Settings button.
3. Uncheck the "Animate windows when minimizing and maximizing" option in the Visual Effects tab.
24. Why do I hear clicking noises periodically when I use the softphone?
If you have the Web Window showing and the Web Window content is dynamically refreshing itself, you may hear a "click" each time it refreshes. Windows plays this sound by default when Web navigation starts.
To disable this sound:
1. Open the Windows Sounds Control Panel applet.
2. Click on the Sounds tab.
3. Find the Start Navigation entry in the Sound Events list box.
4. Select that entry and from the Sounds combo box, select None.
25. How can I dial a number from a Web page?
You can simply select the number and then drag it into the Quick Connector or onto a line in Your Assistant Client. This works from any application that supports dragging of plaintext - MS Word, Internet Explorer, etc.
26. How can I sort the calls in the call log?
Click on any column header in the call log to sort calls by that field. Click on the same column header again to reverse the sort order.

Your Assistant User Guide Version 5.0
Appendix A— Using the International Dialing Format
This section provides information about using the International Dialing Format with Your Assistant.
This appendix contains the following information:
• About Dialing Formats (below) • Using the International Dialing Format (page 102) • Setting Up Your Local Dialing Rules (page 103)
About Dialing Formats
A telephone number is made up of the following elements:
IDD CC NDD AC SN
Where:
• IDD is the International Direct Dialing prefix, used when dialing to a different country code.
• CC is the Country Code, used when dialing from a different country code
Note: Canada and the United States share the same country code.
• NDD is the National Direct Dialing prefix, used only when calling between different area codes within a country code. A country may have more than one national direct dialing prefix (may vary between carriers).
• AC is the Area (or city) Code. • SN is the Subscriber Number (local number).
You don’t always have to enter all these elements when making a call. For example, if you are calling a number within the same National Direct Dialing area, you need to dial only the area code and subscriber number.
Examples:
From To Dial IDD CC NDD AC Canada London, UK 011 44 207 XXX XXXX 011 44 — 207 China Vancouver 1 604 XXX-XXXX 00 1 — 604 Manchester, UK London UK 0207 XXX XXXX — — 0 207 New York Montréal 1 514 XXX XXXX — — 1 514
101
Your Assistant User Guide Version 5.0
102
Using the International Dialing Format
The International Dialing Format (also known as canonical format) is a universal telephone dialing standard. A number in international dialing format looks like this:
+CC (AC) SN
Where:
• + replaces the international direct dialing prefix. The + is mandatory, and indicates that the number is in the international dialing format.
• The elements must be separated by spaces. • The area code is mandatory, and must be enclosed in parentheses when used. • The subscriber number can contain standard dialing control characters. • Any formatting character (hyphen, space, etc.) in the subscriber number are ignored.
When you dial a number in international dialing format, Your Assistant compares the number with the local Dialing Rules (See Setting Up Your Local Dialing Rules on page 103), and automatically edits the number as required. For example, it dials only the subscriber number when dialing from the same area code, or adds the international or national direct dialing prefix when making a long-distance call.
For example,
A contact’s number is defined as +1 (613) 998-8805.
• When calling within the 613 area code, Your Assistant dials 998-8805. • When calling from another area code in the same country, Your Assistant dials 1 613
998-8805. • When calling from the UK, Your Assistant dials 00 1 613 998-8805.
Your Assistant and the International Dialing Format
You Assistant also verifies that the number is an internal or external one, and automatically adds the appropriate external dialing digit (as defined in the local dialing rules) if the number is an external one.
For example,
• If you call 1234 (an internal number), Your Assistant will dial 1234. • If you call +1 613 555-1234 (a local external number), Your Assistant will dial 9 555-
1234 (assuming you defined 9 as the external local call prefix). • If you call+1 514 555-1234 (an external number outside your area code), Your
Assistant will dial 8 514 555 1234 (assuming you defined 8 as the external long-distance call prefix).

Your Assistant User Guide Version 5.0
103
Setting Up Your Local Dialing Rules
Telephone number formats
There are two types of telephone number formats: dialable-format and canonical-format.
• Dialable-format numbers do not begin with a “+”.
o If a number is in dialable-format, the number is dialed as is (including dialing prefix). Non numeric (excluding FAC and account code) symbols are stripped before sending.
• Canonical-format numbers begin with a “+”
o If a number is in canonical-format, the canonical rules are applied before displaying and dialing. The canonical results are a combination of “built-in” rules and those rules specified in the MS Windows Control Panel (Phone and Modem Options). Once the canonical rules have been applied, the number is in dialable-format.
o The canonical address format is intended to be a universally constant directory number. For this reason, numbers in address books are best stored using canonical format.
o A canonical phone address is a text string with the following structure: + CountryCode Space [(AreaCode) Space] SubscriberNumber CountryCode A variably sized string containing one or more of the digits "0" through "9". The CountryCode is delimited by the following Space. It identifies the country/region in which the address is located. Space Exactly one space character (hex 20). It is used to delimit the end of the CountryCode part of an address. AreaCode A variably sized string containing zero or more of the digits "0" through "9". AreaCode is the area code part of the address and is optional. If the area code is present, it must be preceded by exactly one left parenthesis character, and be followed by exactly one right parenthesis character and one space character. SubscriberNumber A variably sized string containing one or more of the digits "0" through "9".
Use the Phone and Modem Options control panel to set up your local dialing rules.
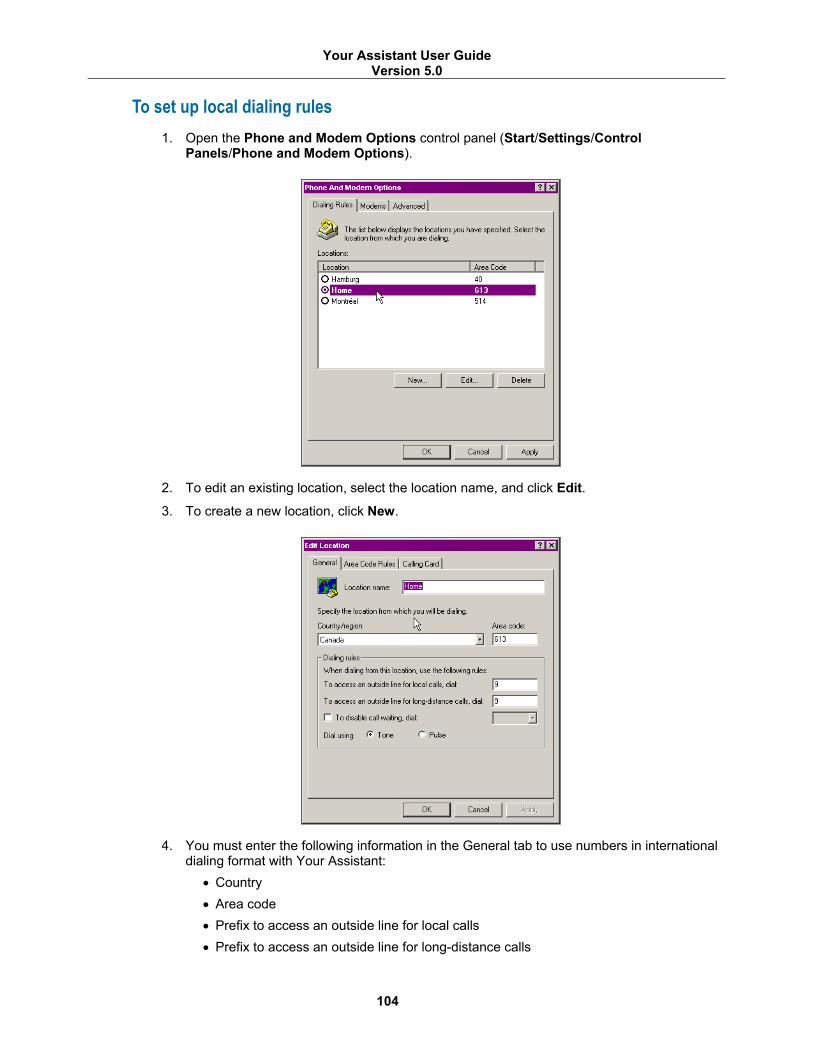
Your Assistant User Guide Version 5.0
104
To set up local dialing rules 1. Open the Phone and Modem Options control panel (Start/Settings/Control
Panels/Phone and Modem Options).
2. To edit an existing location, select the location name, and click Edit.
3. To create a new location, click New.
4. You must enter the following information in the General tab to use numbers in international dialing format with Your Assistant:
• Country • Area code • Prefix to access an outside line for local calls • Prefix to access an outside line for long-distance calls

Your Assistant User Guide Version 5.0
105
5. You can edit the Area Codes and Calling Cards tabs if desired. Refer to your operating system’s online help for more information.
6. Click OK to save and close your settings for this location.
7. Update any other locations if desired, and click OK.
Note: In the phone and modem options, the rules only apply to outgoing calls made from contacts who's numbers are in canonical format. They are not implemented on any incoming or missed calls.
Your Assistant User Guide Version 5.0
Appendix B— Specifying Extension Numbers and Responses to Prompts
106
This appendix contains the following information:
• Overview (below) • Rules for using commas (page 106) • Example 1: Using Commas for Specifying an Extension Number (page 107) • Example 2: Using Commas for Connecting to a Voice Prompt System (page 107)
Overview
You can specify additional numbers for Your Assistant to dial following a phone number, such as an extension number or (numeric) responses to voice prompts. When you specify additional numbers, you must separate the numbers with commas. Commas cause Your Assistant to pause dialing while voice prompts play and switching occurs.
Storing additional numbers with the phone number saves you from having to enter the additional numbers manually using the dial pad or your deskphone every time you call the phone number.
For example, if you have a contact whose phone number is 555-0163, extension 3213, storing the number as 5550163,3213 causes Your Assistant to dial 5550163, pause, and then dial 3213.
Your Assistant interprets commas as pauses regardless of the method you use to make the call: from a contact in the People shutter, by dragging from a PIM or third-party application, or by typing directly in the Quick Connector.
Rules for using commas • Each comma causes Your Assistant to pause for about two seconds. • For longer pauses, use multiple commas. Two commas cause a four-second pause,
three commas cause a six-second pause, and so on. • Your Assistant ignores commas at the beginning of a phone number. • If the phone number has an account code, the account code must be at the end, after the
additional numbers.
If you are not sure how many commas to use, try calling the number and timing how long the voice prompts or switching take. That will give you a starting point to work with. For example, if a prompt lasts five seconds, try using three commas.
Tip: To ensure the prompt has completed when Your Assistant dials an additional number, make the pause slightly longer than the prompt.
To test a number that contains commas, call the number from Your Assistant. If the call connects, you have used the correct number of commas.
Your Assistant User Guide Version 5.0
107
Example 1: Using Commas for Specifying an Extension Number
In his new position as director of sales, Richard will be in frequent contact with the vice president of sales at company headquarters. Richard adds the vice president's contact information to his PIM, with the default phone number specified as +1 (604) 5550183,,2374.
To call the vice president, Richard drags the vice president's PIM entry to the Quick Connector. Your Assistant dials the number as follows:
1. +1 (604) 5550183 is the head office's phone number in canonical format. Your Assistant applies Richard's Windows dialing rules to the number and then dials the number.
2. Your Assistant pauses for about four seconds (two seconds for each comma).
3. Your Assistant dials 2374, the vice president's extension number. Richard hears the tones for the extension number as it is being dialed.
4. Richard's call rings through to the vice president's phone.
Example 2: Using Commas for Connecting to a Voice Prompt System
Jean participates in a weekly audio conference. To save herself from having to enter the bridge number every time she joins the conference, Jean stores the bridge number with the conference number in her Personal Contacts list:
5550112,,,2007#
To join the conference, Jean right-clicks the contact in her People shutter, clicks Call, and selects the number. Your Assistant dials the number as follows:
1. 5550112 is the conference center's phone number. Your Assistant dials the number.
2. Your Assistant pauses for about six seconds (two seconds for each comma) while the bridge number prompt is playing ("Please enter the conference bridge number.")
3. 2007 is the bridge number. The bridge number is terminated by "#". Your Assistant dials the bridge number followed by #. Jean hears the tones for the bridge number and # as they are being dialed.
4. Jean hears the conference service message saying she has successfully joined the conference.
Your Assistant User Guide Version 5.0
Appendix C— Using VPNs
108
This section provides guidelines when using Your Assistant in a remote configuration, such as Mitel Network’s Teleworker.
This appendix contains the following information:
• Overview (below) • Connecting to a PPTP VPN (page 110) • Connecting with an IPSec VPN (page 115)
Overview
This section provides an overview of Virtual Private Network (VPN) configurations supported with Your Assistant. For more information, see your system administrator.
VPN Configuration
You can use Your Assistant in the following remote configurations:
• Teleworker: You are connecting from home or a remote office, and are connected to the corporate LAN directly through the Internet.
• Remote Office: You are connecting from a remote office that is connected to the corporate LAN via a tunnel over the Internet.
• Mobile Worker (‘Road Warrior): You have no dedicated connection to the corporate LAN.
Your Assistant has been tested with the following VPNs:
VPN Name Version Tested Mitel 6000 Managed Application Server (PPTP) 5.6 Mitel Teleworker Solution (PPTP) Note: The Teleworker Solution does not directly support the Your Assistant Softphone but the softphone can work over the VPNs provided in the Teleworker base operating system.
1.1
AT&T VPN Net Client (IPSec) 5.08.1 Encore Bandit with SafeNet client (IPSec) 15535.0200
VPN Requirements
Your Assistant should work on any standards-compliant IPSec or PPTP VPN that meets the following criteria:
• Able to acquire the IP address of the VPN tunnel on the client. • Both voice and data paths travel over the VPN.

Your Assistant User Guide Version 5.0
109
• Able to traverse a corporate firewall. • Able to traverse a NAT device. • Able to traverse a client-side firewall. In particular, the VPN client (or client-side firewall
built into the VPN) must not block outbound or inbound UDP packets.
Network Requirements
To support Your Assistant, the network must be configured as follows:
• G.729 compression for all remote connections • High-speed internet connection (standard cable/DSL minimum) • No client-side hubs (switches or cable/DSL routers only) • The user must be logged in as a licensed user. This would usually require logging in
using a user domain account but could also be accomplished by manually creating a licensed user (see Adding Users Manually in the Your Assistant Administration Guide) where the login ID is of the form <PCName>\<username>, e.g. THETIS\csimmons, where “THETIS” is the name of the VPN client PC and “csimmons” is the account ID the user is logged in as.
Bandwidth Requirements
These bandwidth requirements are bi-directional. If your connection does not have symmetrical upload/download speeds, use the lowest value for your calculations.
• Corporate Bandwidth. The corporate data connection from the VPN concentrator to the internet:
− must have at least 40 kbits/s of available bandwidth per simultaneous G.729 full-duplex call.
− must have at least 256 kbits/s connection speed for quality audio.
− should not be used at more than 40% of maximum capacity to achieve high voice quality, assuming no QoS is available across the Internet.
• Remote Bandwidth. Each remote site must have a minimum bi-directional bandwidth of 256 kbits/s.
• Remote ISP Bandwidth Quotas. Your Assistant with Softphone module operating with G.729a will use approximately 10 MB of data per hour (in each direction). Your Assistant also uses approximately 2kbits/sec for signaling, when idle (or 43 MB per month if Your Assistant is always on). Use your ISP quota to determine your available talk-time.
Note: These figures do not take into account the overhead for the VPN connection, or for other data traffic on the connection. Lack of sufficient bandwidth may cause degraded voice quality, slow response, or loss of service.
Firewall Configurations
The following firewall configurations are supported:
• Corporate Firewall Configurations:
− VPN gateway inside corporate firewall

Your Assistant User Guide Version 5.0
110
− VPN gateway outside corporate firewall, with firewall set up to trust packets from VPN
• Remote Firewall Configurations:
− Remote corporate firewall
− Client-side firewall (software on computer, or built-in a NAT box or cable/DSL router)
Connecting to a PPTP VPN
This section describes the procedure required to use Your Assistant with a Point-to-Point Tunneling Protocol (PPTP) VPN, as tested with the Mitel 6000 Managed Applications Server.
Server Configuration
The following settings must be configured on the VPN server (verify with your system administrator):
• PPTP enabled • External static gateway IP address assigned • Server gateway mode on
Connecting to a PPTP VPN 1. Connect to your ISP, and verify that the connection is established (access a public site on
the Internet).
2. If this is the first time you are connecting, you must create a connection profile (See Creating a PPTP Connection Profile below).
3. Connect to the PPTP VPN using your connection profile.
4. Start Your Assistant.
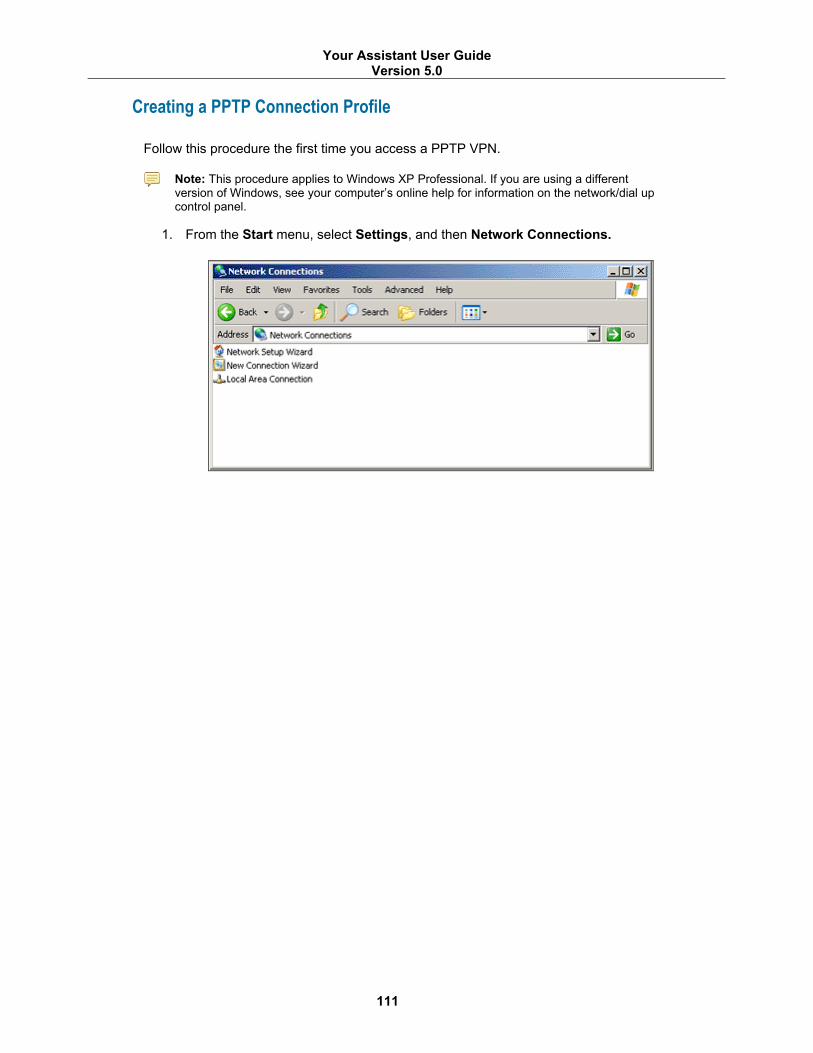
Your Assistant User Guide Version 5.0
111
Creating a PPTP Connection Profile
Follow this procedure the first time you access a PPTP VPN.
Note: This procedure applies to Windows XP Professional. If you are using a different version of Windows, see your computer’s online help for information on the network/dial up control panel.
1. From the Start menu, select Settings, and then Network Connections.
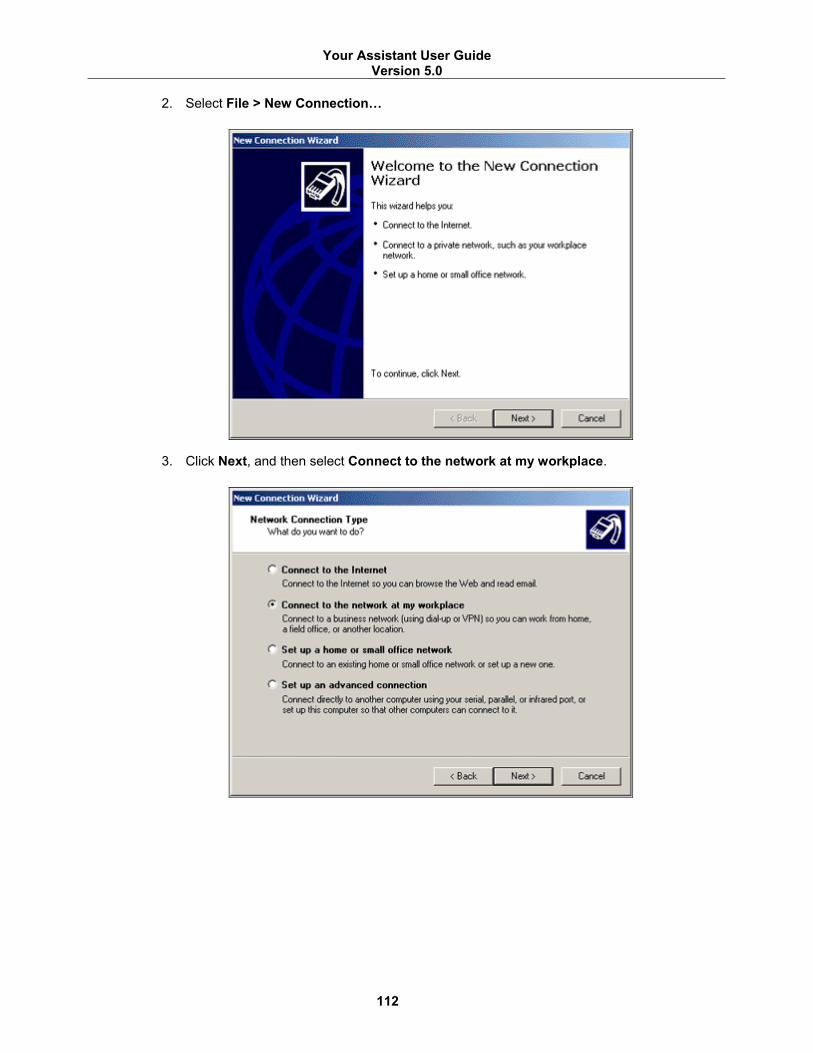
Your Assistant User Guide Version 5.0
112
2. Select File > New Connection…
3. Click Next, and then select Connect to the network at my workplace.
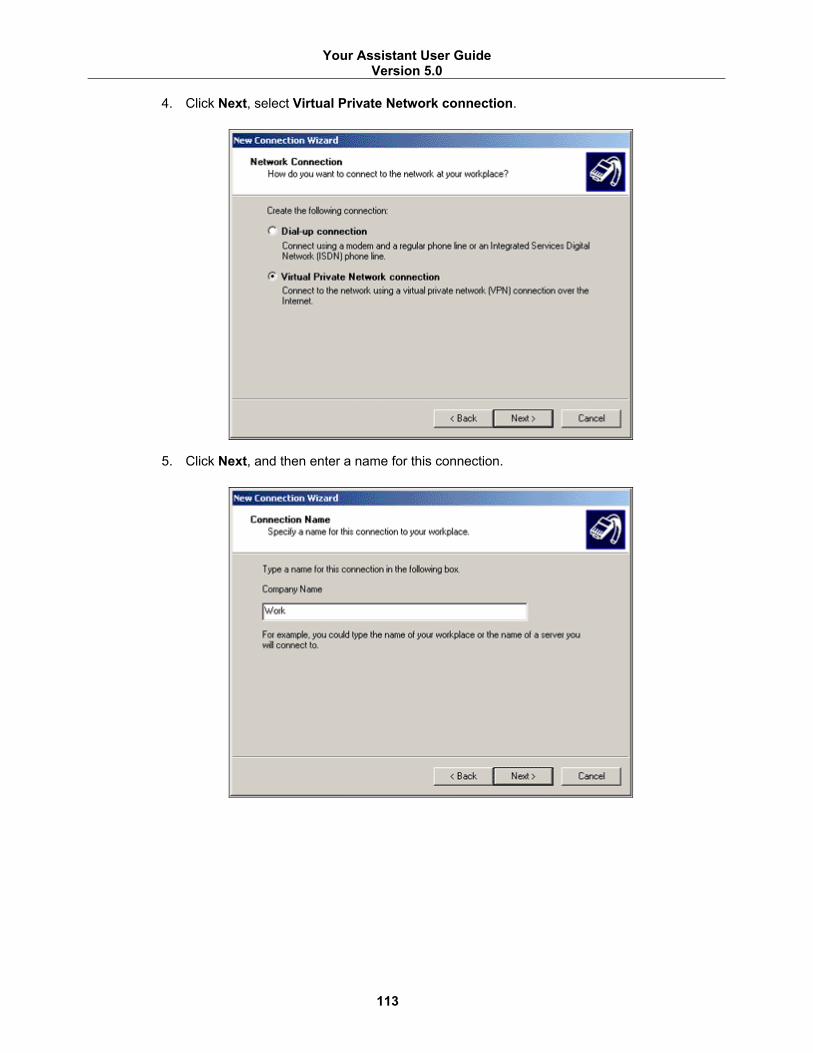
Your Assistant User Guide Version 5.0
113
4. Click Next, select Virtual Private Network connection.
5. Click Next, and then enter a name for this connection.

Your Assistant User Guide Version 5.0
114
6. Click Next, and then enter the host name or IP of the VPN server.
7. Click Next, then Finish.

Your Assistant User Guide Version 5.0
115
8. The connection you just created will now open and the login window appears.
9. Enter your username and password, and then click Connect. Verify that the connection is established properly by accessing an intranet site or a corporate network drive not accessible outside the corporation).
Note: If you cannot connect, verify that your profile settings are correct (click Properties in the login screen), and that your username and password are entered correctly (they are usually case-sensitive). Verify also that an installed firewall is not blocking your PPTP connection.
Connecting with an IPSec VPN
This section shows the procedure to use Your Assistant with an Internet Protocol Security (IPSec) VPN, as tested with AT&T’s VPN Net Client.
1. Connect to your ISP, and verify that the connection is established (access a public site on the Internet).
2. Start your VPN, and verify that the VPN connection is established (access an intranet site or corporate network drive not accessible from outside the corporation).
3. Start Your Assistant.
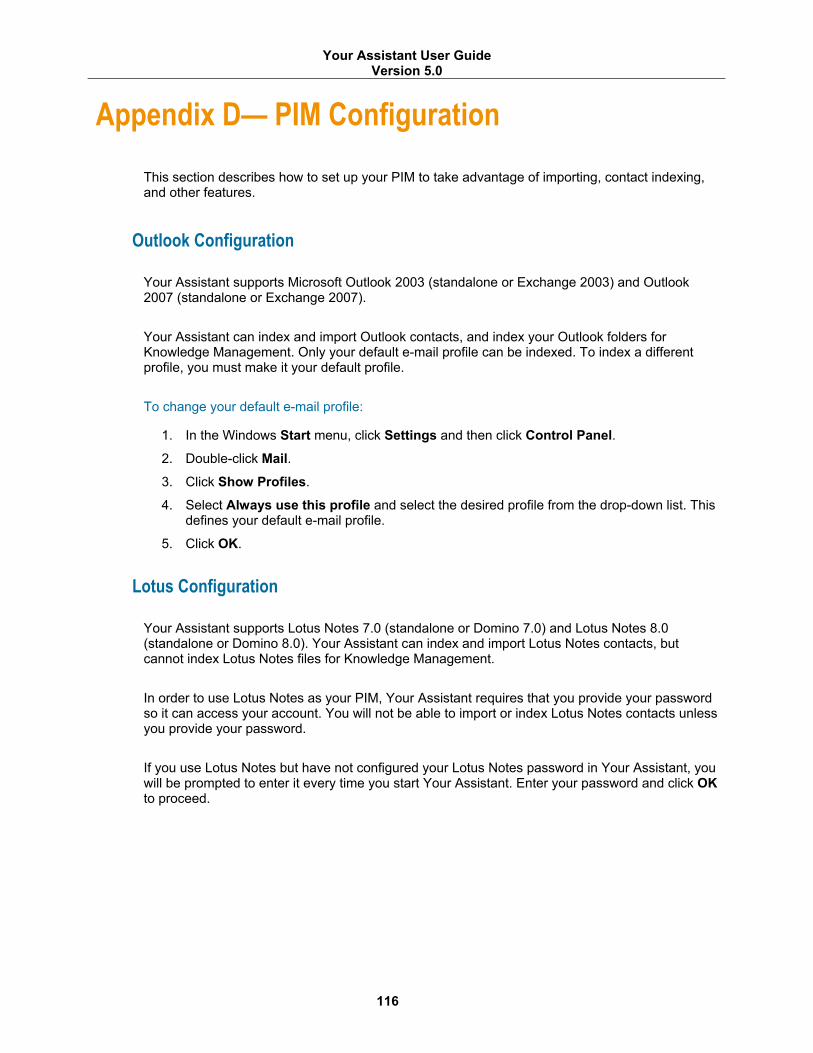
Your Assistant User Guide Version 5.0
Appendix D— PIM Configuration
116
This section describes how to set up your PIM to take advantage of importing, contact indexing, and other features.
Outlook Configuration
Your Assistant supports Microsoft Outlook 2003 (standalone or Exchange 2003) and Outlook 2007 (standalone or Exchange 2007).
Your Assistant can index and import Outlook contacts, and index your Outlook folders for Knowledge Management. Only your default e-mail profile can be indexed. To index a different profile, you must make it your default profile.
To change your default e-mail profile:
1. In the Windows Start menu, click Settings and then click Control Panel.
2. Double-click Mail.
3. Click Show Profiles.
4. Select Always use this profile and select the desired profile from the drop-down list. This defines your default e-mail profile.
5. Click OK.
Lotus Configuration
Your Assistant supports Lotus Notes 7.0 (standalone or Domino 7.0) and Lotus Notes 8.0 (standalone or Domino 8.0). Your Assistant can index and import Lotus Notes contacts, but cannot index Lotus Notes files for Knowledge Management.
In order to use Lotus Notes as your PIM, Your Assistant requires that you provide your password so it can access your account. You will not be able to import or index Lotus Notes contacts unless you provide your password.
If you use Lotus Notes but have not configured your Lotus Notes password in Your Assistant, you will be prompted to enter it every time you start Your Assistant. Enter your password and click OK to proceed.
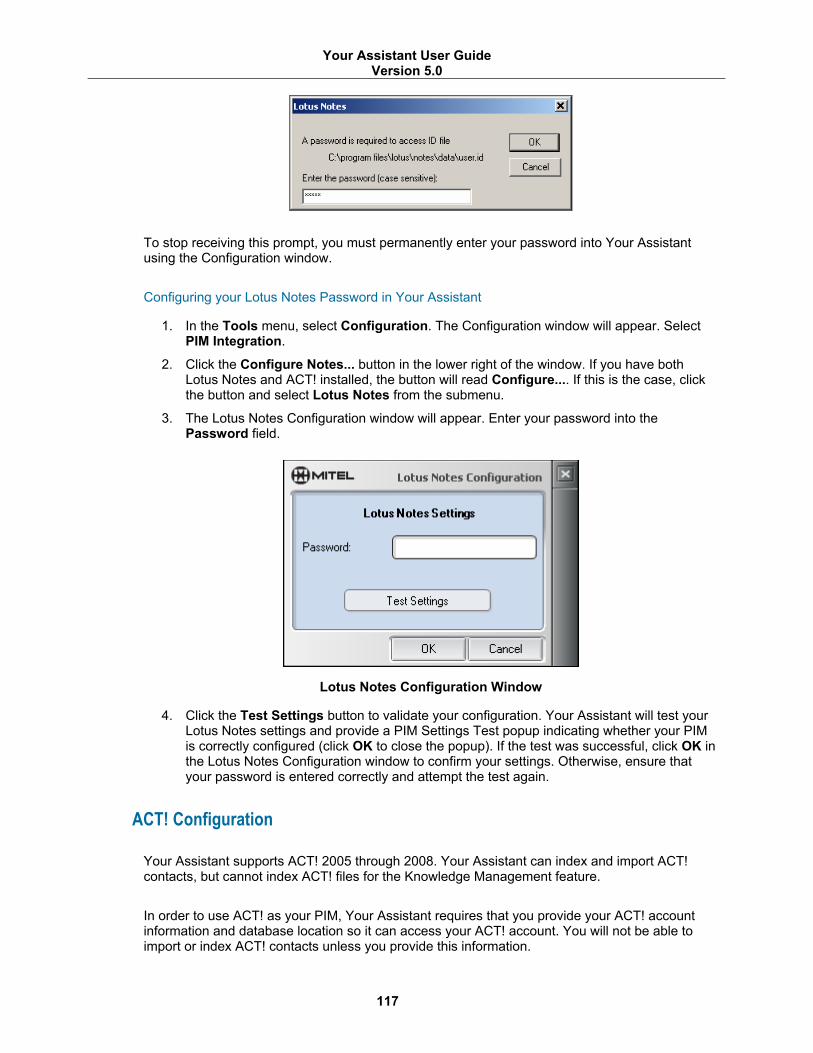
Your Assistant User Guide Version 5.0
117
To stop receiving this prompt, you must permanently enter your password into Your Assistant using the Configuration window.
Configuring your Lotus Notes Password in Your Assistant
1. In the Tools menu, select Configuration. The Configuration window will appear. Select PIM Integration.
2. Click the Configure Notes... button in the lower right of the window. If you have both Lotus Notes and ACT! installed, the button will read Configure.... If this is the case, click the button and select Lotus Notes from the submenu.
3. The Lotus Notes Configuration window will appear. Enter your password into the Password field.
Lotus Notes Configuration Window
4. Click the Test Settings button to validate your configuration. Your Assistant will test your Lotus Notes settings and provide a PIM Settings Test popup indicating whether your PIM is correctly configured (click OK to close the popup). If the test was successful, click OK in the Lotus Notes Configuration window to confirm your settings. Otherwise, ensure that your password is entered correctly and attempt the test again.
ACT! Configuration
Your Assistant supports ACT! 2005 through 2008. Your Assistant can index and import ACT! contacts, but cannot index ACT! files for the Knowledge Management feature.
In order to use ACT! as your PIM, Your Assistant requires that you provide your ACT! account information and database location so it can access your ACT! account. You will not be able to import or index ACT! contacts unless you provide this information.

Your Assistant User Guide Version 5.0
118
Configuring your ACT! Account in Your Assistant
1. In the Tools menu, select Configuration. The Configuration window will appear. Select PIM Integration.
2. Click the Configure ACT!... button in the lower right of the window. If you have both Lotus Notes and ACT! installed, the button will simply read Configure.... If this is the case, click the button and select ACT! from the submenu.
3. The ACT! Configuration window will appear. Enter your ACT! account username and password into the appropriate fields.
ACT! Configuration Window
4. To define your ACT! database, click the Find Database... button. A standard Windows file browser will appear. Use the browser to locate your ACT! database (file extension: .pad), then select the file and click Open. You will be returned to the ACT! Configuration window and your database will be defined.
5. Click the Test Settings button to validate your configuration. Your Assistant will test your ACT! settings and provide a PIM Settings Test popup indicating whether your PIM is correctly configured (click OK to close the popup). If the test was successful, click OK to confirm your settings. Otherwise, ensure that your password is entered correctly and attempt the test again.
Your Assistant User Guide Version 5.0
Appendix E— Legal Disclaimers
119
Emergency Call Services Support Legal Disclaimer
Emergency Call Services Support Legal Disclaimer—English
WARNING: MITEL DISCLAIMS ANY EXPRESS OR IMPLIED WARRANTY OR REPRESENTATION THAT THE SOFTWARE WILL PERMIT OR ALLOW YOU ACCESS TO EMERGENCY CALL SERVICES, SUCH AS 911/999/112 OR SIMILAR EMERGENCY CALL SERVICES (IN THE APPLICABLE TERRITORY WHERE THE SOFTWARE IS USED). MITEL FURTHER DISCLAIMS ANY EXPRESS OR IMPLIED WARRANTY OR REPRESENTATION THAT, IN THE EVENT SUCH ACCESS IS AVAILABLE, THE SOFTWARE WILL RELAY ACCURATELY OR AT ALL, THE DEVICE IDENTIFICATION NUMBER OR PHONE NUMBER (ALSO KNOWN AS AN AUTOMATIC NUMBER IDENTIFICATION (ANI) OR CALLBACK) OR THE LOCATION (ALSO KNOWN AS AUTOMATIC LOCATION INFORMATION (ALI)) YOU ARE CALLING FROM, TO THE APPROPRIATE EMERGENCY RESPONSE CENTER (ALSO KNOWN AS A PUBLIC SAFETY ANSWERING POINT (PSAP)). MITEL RECOMMENDS THAT THE SOFTWARE NOT BE USED IN CONNECTION WITH OR TO UTILIZE EMERGENCY CALL SERVICES, SUCH AS 911/999/112 OR SIMILAR EMERGENCY CALL SERVICES.
Emergency Call Services Support Legal Disclaimer—Dutch
WAARSCHUWING: MITEL WIJST ALLE EXPLICIETE EN IMPLICIETE GARANTIES EN VERKLARINGEN AF DAT DEZE SOFTWARE GESCHIKT IS VOOR HET VERKRIJGEN VAN TOEGANG TOT TELEFONISCHE HULPDIENSTEN ALS 911, 999 EN 112 OF SOORTGELIJKE TELEFONISCHE HULPDIENSTEN (AANWEZIG IN HET GEBIED WAAR DEZE SOFTWARE WORDT GEBRUIKT). MITEL WIJST VOORTS ELKE EXPLICIETE OF IMPLICIETE GARANTIE OF VERKLARING AF DAT WANNEER DERGELIJKE TOEGANG WEL WORDT VERKREGEN HET IDENTIFICATIENUMMER VAN HET TOESTEL OF HET TELEFOONNUMMER (OOK BEKEND ALS AUTOMATIC NUMBER IDENTIFICATION (ANI) OF TERUGBELNUMMER) OF DE LOCATIE WAAR VANDAAN U BELT(OOK BEKEND ALS AUTOMATIC LOCATION INFORMATION (ALI) CORRECT EN IN ALLE GEVALLEN WORDT DOORGEGEVEN AAN HET JUISTE HULPDIENSTCENTRUM (OOK BEKEND ALS OPENBAAR ALARMNUMMER (PSAP)). MITEL RAADT U AAN DE SOFTWARE NIET TE GEBRUIKEN VOOR VERBINDINGEN MET HULPDIENSTEN ALS 911, 999 OF 112 OF SOORTGELIJKE TELEFONISCHE HULPDIENSTEN.

Your Assistant User Guide Version 5.0
120
Emergency Call Services Support Legal Disclaimer—French (Canada)
AVERTISSEMENT : MITEL DÉCLINE TOUTE AUTRE GARANTIE EXPRESSE OU IMPLICITE OU REPRÉSENTATION QUE LE LOGICIEL PERMETTRA L'ACCÈS AUX APPELS DE SERVICES D'URGENCE, COMME LE 911/999/112 OU AUTRES SERVICES D'APPELS D'URGENCE SIMILAIRES (DANS LE TERRITOIRE APPLICABLE OÙ LE LOGICIEL EST UTILISÉ). MITEL DÉCLINE ÉGALEMENT TOUTE AUTRE GARANTIE EXPRESSE OU IMPLICITE OU REPRÉSENTATION QUE, DANS LE CAS OÙ L'ACCÈS À CES SERVICES SERAIT DISPONIBLE, LE LOGICIEL TRANSMETTRA PRÉCISÉMENT, S'IL LES TRANSMET, LE NUMÉRO D'IDENTIFICATION DE L'APPAREIL OU LE NUMÉRO DE TÉLÉPHONE (ÉGALEMENT CONNU SOUS LE NOM D'ENREGISTREMENT AUTOMATIQUE DU NUMÉRO [ANI] OU RECOMPOSITION AUTOMATIQUE) ET L'EMPLACEMENT D'OÙ VOUS APPELEZ (ÉGALEMENT CONNU SOUS LE NOM D'ENREGISTREMENT AUTOMATIQUE DE L'EMPLA-CEMENT [ALI]) AU CENTRE D'INTERVENTIONS D'URGENCE APPROPRIÉ (ÉGALEMENT CONNU SOUS LE NOM DE POINT DE RÉPONSE DE SÉCURITÉ PUBLIQUE [PSAP]). MITEL RECOMMANDE DE NE PAS UTILISER CE LOGICIEL POUR RECOURIR À DES SERVICES D'APPELS D'URGENCE TEL QUE 911/999/112 OU À TOUT AUTRE SERVICE D'URGENCE SIMILAIRE.
Emergency Call Services Support Legal Disclaimer—French (Europe)
AVERTISSEMENT : MITEL NE VOUS GARANTIT AUCUNEMENT, DE FAÇON EXPRESSE OU TACITE, NI NE DECLARE QUE LE LOGICIEL VOUS PERMETTRA OU VOUS AUTORISERA A ACCEDER A DES SERVICES D'APPEL D'URGENCE, TELS LE 911/999/112 OU SERVICES D'APPEL D'URGENCE SIMILAIRES (PROPRES AU TERRITOIRE SUR LEQUEL LE LOGICIEL EST UTILISE). MITEL NE VOUS GARANTIT EN OUTRE EN AUCUN CAS, DE FAÇON EXPRESSE OU TACITE, NI NE DECLARE, QUE MEME DANS L'EVENTUALITE OÙ UN TEL ACCÈS SERAIT POSSIBLE, LE LOGICIEL RETRANSMETTRA PRECISEMENT OU INTE-GRALEMENT LE NUMERO D'IDENTIFICATION DE L'APPAREIL OU LE NUMERO DE TELEPHONE (FONCTION DITE D'IDENTIFICATION AUTOMATIQUE DU NUMERO (EAN) OU DE RAPPEL) OU LE SITE A PARTIR DUQUEL VOUS APPELEZ (IDENTIFICATION AUTO-MATIQUE DU SITE), AU CENTRE DE REPONSE D'URGENCE CONCERNE. MITEL VOUS RECOMMANDE DE NE PAS UTILISER LE LOGICIEL DANS LE CADRE DE OU POUR APPELER DES SERVICES D'URGENCE, TELS LE 911/999/112 OU SERVICES D'APPEL D'URGENCE SIMILAIRES.
Emergency Call Services Support Legal Disclaimer—German
WARNUNG: MITEL SCHLIESST ALLE AUSDRÜCKLICHEN ODER STILLSCHWEIGENDEN GARANTIEN AUS UND BEHAUPTET NICHT, DASS DIE SOFTWARE DEN ZUGRIFF AUF NOTRUFDIENSTE WIE 911/999/112 ODER ENTSPRECHENDE NOTRUFDIENSTE (JE NACH VERWENDUNGSGEBIET DER SOFTWARE) ERMÖGLICHT. WEITERHIN SCHLIESST MITEL SÄMTLICHE AUSDRÜCKLICHEN ODER STILLSCHWEIGENDEN GARANTIEN AUS UND BEHAUPTET NICHT, DASS DIE SOFTWARE IM FALLE EINES MÖGLICHEN ZUGRIFFS DIE GERÄTEIDENTIFIKATIONSNUMMER ODER TELEFONNUMMER (AUCH BEZEICHNET ALS „AUTOMATISCHE RUFNUMMERNIDENTIFIZIERUNG" (ANI) ODER „RÜCKRUF") ODER DEN STANDORT DES ANRUFERS (AUCH BEZEICHNET ALS „AUTOMATIC LOCATION INFORMATION" (ALI)) EXAKT ODER ÜBERHAUPT AN DIE ENTSPRECHENDE NOTRUF-ZENTRALE ÜBERMITTELN WIRD. MITEL EMPFIEHLT, DIE SOFTWARE NICHT IN VERBINDUNG MIT ODER FÜR NOTRUFDIENSTE WIE 911/999/112 ODER ÄHNLICHE NOTRUFDIENSTE ZU VERWENDEN.
Your Assistant User Guide Version 5.0
121
Emergency Call Services Support Legal Disclaimer—Italian
AVVERTENZA: IN NESSUN CASO, MITEL SARÀ RESPONSABILE PER LA VIOLAZIONE DI QUALSIASI GARANZIA O CONDIZIONE ESPRESSA DEI SERVIZI DI EMERGENZA AI QUALI IL SOFTWARE CONSENTIRÀ DI ACCEDERE, AD ESEMPIO 113/112/118 O SERVIZI SIMILI PER CHIAMATE DI EMERGENZA (ALL'INTERNO DEL TERRITORIO IN CUI VIENE UTILIZZATO IL SOFTWARE). INOLTRE, MITEL NON FORNISCE ALCUNA GARANZIA CHE, IN CASO DI TALI ACCESSI, IL SOFTWARE TRASMETTA CORRETTAMENTE IL NUMERO DI IDENTIFI-CAZIONE DEL DISPOSITIVO O IL NUMERO DI TELEFONO ANI (AUTOMATIC NUMBER IDENTIFICATION, IDENTIFICAZIONE AUTOMATICA DEL NUMERO O RICHIAMATA) O LA POSIZIONE ALI (AUTOMATIC LOCATION INFORMATION, IDENTIFICAZIONE AUTOMATICA POSIZIONE) DALLA QUALE SI STA CHIAMANDO AL CENTRO DI RISPOSTA EMERGENZE (PUBLIC SAFETY ANSWERING POINT, PUNTO PSAP). MITEL CONSIGLIA DI NON UTILIZZARE IL SOFTWARE CON CONNESSIONI A SERVIZI PER CHIAMATE DI EMERGENZA, AD ESEMPIO 112/113/118 O SERVIZI PER CHIAMATE DI EMERGENZA SIMILI.
Emergency Call Services Support Legal Disclaimer—Portuguese (Brazil)
ADVERTÊNCIA: A MITEL SE ISENTA DE QUALQUER GARANTIA OU REPRESENTAÇÃO EXPRESSA OU IMPLÍCITA DE QUE O SOFTWARE IRÁ PERMITIR OU POSSIBILITAR ACESSO A SERVIÇOS DE CHAMADAS DE EMERGÊNCIA, COMO 190 OU OUTRO SIMILAR (NO TERRITÓRIO APLICÁVEL EM QUE O SOFTWARE É UTILIZADO). A MITEL TAMBÉM SE ISENTA DE QUALQUER GARANTIA OU REPRESENTAÇÃO, EXPRESSA OU IMPLÍCITA, DE QUE, NO CASO DE TAL ACESSO ESTAR DISPONÍVEL, O SOFTWARE MOSTRARÁ DE FORMA ADEQUADA, NO CENTRO DE RESPOSTA DE EMERGÊNCIA ADEQUADO (TAMBÉM CONHECIDO COMO PONTO DE ATENDIMENTO DE SEGURANÇA PÚBLICA (PSAP), O NÚMERO DE IDENTIFICAÇÃO OU O NÚMERO DE TELEFONE DO DISPOSITIVO (TAMBÉM CONHECIDO COMO IDENTIFICAÇÃO AUTOMÁTICA DE NÚMERO (ANI) OU NÚMERO DE RETORNO) OU A LOCALIZAÇÃO DE ONDE A CHAMADA ESTÁ SENDO FEITA (TAMBÉM CONHECIDA COMO INFORMAÇÃO AUTOMÁTICA SOBRE A LOCALIZAÇÃO (ALI)). A MITEL RECOMENDA QUE O SOFTWARE NÃO SEJA UTILIZADO PARA CONEXÃO A SERVIÇOS DE CHAMADAS DE EMERGÊNCIA, COMO 190 OU OUTROS SERVIÇOS DE EMERGÊNCIA SIMILARES.
Your Assistant User Guide Version 5.0
122
Emergency Call Services Support Legal Disclaimer—Portuguese (Europe)
AVISO: A MITEL NÃO OFERECE NENHUMA GARANTIA OU REPRESENTAÇÃO, EXPRESSA OU IMPLÍCITA, DE QUE O SOFTWARE IRÁ PERMITIR O ACESSO A SERVIÇOS DE CHAMADA DE EMERGÊNCIA COMO O 911/999/112 OU OUTROS SERVIÇOS DE CHAMADA DE EMERGÊNCIA SEMELHANTES (NO TERRITÓRIO APLICÁVEL ONDE O SOFTWARE É UTILIZADO). A MITEL TAMBÉM NÃO OFERECE NENHUMA GARANTIA OU REPRESENTAÇÃO, EXPRESSA OU IMPLÍCITA, DE QUE, NO CASO DE TAL ACESSO ESTAR DISPONÍVEL, O SOFTWARE IRÁ TRANSMITIR, OU FAZÊ-LO DE FORMA PRECISA, O NÚMERO DE IDENTIFICAÇÃO DO DISPOSITIVO OU NÚMERO DE TELEFONE (TAMBÉM DESIGNADO POR IDENTIFICAÇÃO AUTOMÁTICA DE NÚMERO (ANI: AUTOMATIC NUMBER IDENTIFICATION) OU CHAMADA DE RETORNO) OU A LOCALIZAÇÃO (TAMBÉM DESIGNADA POR INFORMAÇÃO AUTOMÁTICA DE LOCALIZAÇÃO (ALI: AUTOMATIC LOCATION INFORMATION)) DE ONDE ESTÁ A LIGAR, PARA O CENTRO DE RESPOSTA DE EMERGÊNCIA APROPRIADO (TAMBÉM DESIGNADO POR PONTO DE ATENDIMENTO DE SEGURANÇA PÚBLICA (PSAP: PUBLIC SAFETY ANSWERING POINT)). A MITEL RECOMENDA QUE O SOFTWARE NÃO SEJA UTILIZADO EM LIGAÇÃO COM OU PARA UTILIZAR SERVIÇOS DE CHAMADA DE EMERGÊNCIA, TAIS COMO O 911/999/112 OU SERVIÇOS DE CHAMADA DE EMERGÊNCIA SEMELHANTES.
Emergency Call Services Support Legal Disclaimer—Spanish (Latin America)
ADVERTENCIA: MITEL RECHAZA TODA GARANTÍA EXPRESA O IMPLÍCITA O REPRE-SENTACIÓN DE QUE EL SOFTWARE AUTORIZARÁ O LE PERMITIRÁ TENER ACCESO A SERVICIOS DE LLAMADAS DE EMERGENCIA, COMO 911/999/112 O SERVICIOS DE LLAMADA DE EMERGENCIA SIMILARES (EN EL TERRITORIO CORRESPONDIENTE DONDE SE UTILIZA EL SOFTWARE). MITEL TAMBIÉN RECHAZA TODA GARANTÍA EXPRESA O IMPLÍCITA O REPRESENTACIÓN QUE, EN CASO QUE DICHO ACCESO ESTÉ DISPONIBLE, EL SOFTWARE TRANSMITIRÁ EN FORMA EXACTA O POR COMPLETO EL NÚMERO DE IDENTIFICACIÓN DEL DISPOSITIVO O NÚMERO TELEFÓNICO (TAMBIÉN CONOCIDO COMO IDENTIFICACIÓN AUTOMÁTICA DE NÚMERO (ANI) O DEVOLUCIÓN DE LLAMADA) O LA UBICACIÓN (TAMBIÉN CONOCIDA COMO INFORMACIÓN AUTOMÁTICA DE UBICACIÓN (ALI)) DESDE DONDE USTED REALIZA LA LLAMADA AL CENTRO DE RESPUESTA DE EMERGENCIA CORRESPONDIENTE (TAMBIÉN CONOCIDO COMO PUNTO DE CONTESTACIÓN DE SEGURIDAD PÚBLICA (PSAP)). MITEL RECOMIENDA QUE EL SOFTWARE NO SE UTILICE JUNTO CON NI PARA USAR SERVICIOS DE LLAMADAS DE EMERGENCIA, COMO 911/999/112 O SERVICIOS DE LLAMADAS DE EMERGENCIA SIMILARES.

Your Assistant User Guide Version 5.0
123
Emergency Call Services Support Legal Disclaimer—Spanish (Europe)
ADVERTENCIA: MITEL SE EXIME DE TODA RESPONSABILIDAD O REPRESENTACION EXPRESA O IMPLICITA ACERCA DE QUE EL SOFTWARE LE PERMITA ACCEDER A SERVICIOS DE LLAMADAS DE EMERGENCIA, COMO LAS 911/999/112 O SIMILARES (EN EL TERRITORIO EN CUESTION EN EL QUE SE UTILICE DICHO SOFTWARE). ASIMISMO, MITEL SE EXIME DE TODA RESPONSABILIDAD O REPRESENTACION EXPRESA O IMPLICITA ACERCA DE QUE, EN EL CASO DE QUE ESTE ACCESO ESTE DISPONIBLE, EL SOFTWARE BRINDE CON NINGUN GRADO DE FIABILIDAD, EL NUMERO DE IDENTIFICACION DEL DISPOSITIVO O NUMERO DE TELEFONO (TAMBIEN LLAMADO IDENTIFICACION AUTOMATICA DEL NUMERO, ANI, O DE DEVOLUCION DE LLAMADA), O LA UBICACION (TAMBIEN LLAMADA INFORMACION AUTOMATICA DE UBICACION, ALI) DESDE LA QUE LLAMA, AL CENTRO DE RESPUESTA DE EMERGENCIAS CORRESPONDIENTE (TAMBIEN CONOCIDO COMO PUNTO DE RESPUESTA DE SEGURIDAD, PSAP). MITEL RECOMIENDA QUE NO UTILICE EL SOFTWARE JUNTO CON O PARA UTILIZAR SERVICIOS DE LLAMADAS DE EMERGENCIA, COMO LAS DE 911/999/112 O SIMILARES.
Do Not Use During Electrical Storm Legal Disclaimer
Do Not Use During Electric Storm Legal Disclaimer—English
WARNING: Do not use this product during an electrical storm. There is a remote chance of electric shock from lightning. There is also a remote chance of hearing loss in the event of a lightning strike.
Do Not Use During Electric Storm Legal Disclaimer—Dutch
WAARSCHUWING: Gebruik dit product niet tijdens onweer. Er bestaat een kleine kans dat u een elektrische schok krijgt door blikseminslag. Er bestaat ook een kleine kans dat u gehoorschade lijdt door blikseminslag.
Do Not Use During Electric Storm Legal Disclaimer—French (Canada)
AVERTISSEMENT : N'utilisez pas ce produit pendant un orage. Bien que les probabilités soient faibles, un choc électrique ou une perte de l'ouïe peuvent se produire en cas d'éclair.
Do Not Use During Electric Storm Legal Disclaimer—French (Europe)
AVERTISSEMENT : ne pas utiliser ce produit pendant un orage. Même si cette probabilité est faible, un éclair peut provoquer une décharge électrique et une perte de l'ouïe.
Your Assistant User Guide Version 5.0
124
Do Not Use During Electric Storm Legal Disclaimer—German
WARNUNG: Verwenden Sie dieses Produkt nicht bei Gewitter. Ein elektrischer Schlag infolge eines Blitzeinschlags kann nicht ausgeschlossen werden, ebenso wenig wie Gehörverlust bei einem Blitzeinschlag.
Do Not Use During Electric Storm Legal Disclaimer—Italian
AVVERTENZA: Non utilizzare il prodotto durante una tempesta elettromagnetica. Anche se si tratta di un'eventualità remota, è possibile prendere scosse elettriche originate dai fulmini oppure perdere l'udito nel caso in cui l'impianto venga colpito da un fulmine.
Do Not Use During Electric Storm Legal Disclaimer—Portuguese (Brazil)
AVISO : Não utilize este produto durante uma tempestade. Existe a possibilidade remota de choque eléctrico devido aos relâmpagos. Também existe a possibilidade remota de perda de audição na presença de relâmpagos.
Do Not Use During Electric Storm Legal Disclaimer—Portuguese (Europe)
AVISO: não utilize esse produto durante uma tempestade. Há uma possibilidade remota de choque e de perda de audição devido aos raios.
Do Not Use During Electric Storm Legal Disclaimer—Spanish (Latin America)
ADVERTENCIA: No use este producto durante una tormenta eléctrica. Existe un leve riesgo de descarga eléctrica debido a rayos. También existe el riesgo de una pérdida de audición en caso de una descarga eléctrica por rayos.
Do Not Use During Electric Storm Legal Disclaimer—Spanish (Europe)
ADVERTENCIA: No use este producto durantes tormentas eléctricas. Existe una posibilidad remota de que se produzca una descarga eléctrica por rayos. Asismismo, existe la posibilidad remota de pérdida de audición debido al impacto de rayos.
Excessive Volume Legal Disclaimer
Excessive Volume Legal Disclaimer—English
WARNING: Excessive volume can cause permanent hearing loss. Please adjust the audio device volume to a comfortable level before using the product.
Your Assistant User Guide Version 5.0
125
Excessive Volume Legal Disclaimer—Dutch
WAARSCHUWING: Een te hard volume kan leiden tot permanente gehoorbeschadiging. Pas het volume van het audioapparaat tot een aangenaam niveau aan voordat u het product gebruikt.
Excessive Volume Legal Disclaimer—French (Canada)
AVERTISSEMENT : Un volume excessif peut entraîner la surdité. Prenez soin d'ajuster le volume de l'appareil avant l'utilisation.
Excessive Volume Legal Disclaimer—French (Europe)
AVERTISSEMENT : un volume excessif peut entraîner une perte permanente de l'ouïe. Réglez le volume de l'appareil audio à votre convenance avant d'utiliser le produit.
Excessive Volume Legal Disclaimer—German
WARNUNG: Eine zu hohe Lautstärke kann einen dauerhaften Gehörverlust verursachen. Stellen Sie bitte die Lautstärke des Audiogeräts auf ein erträgliches Maß ein, bevor Sie das Produkt verwenden.
Excessive Volume Legal Disclaimer—Italian
AVVERTENZA: Un volume troppo alto può provocare la perdita permanente dell'udito.Regolare il volume ad un livello normale prima di usare il prodotto.
Excessive Volume Legal Disclaimer—Portuguese (Brazil)
AVISO : Um volume excessivo pode causar perda de audição permanente. Ajuste o volume do dispositivo de áudio para um nível confortável antes de utilizar o produto.
Excessive Volume Legal Disclaimer—Portuguese (Europe)
AVISO: volume excessivo pode causar perda permanente de audição. Ajuste o volume do dispositivo de áudio para um nível agradável antes de utilizar o produto.
Excessive Volume Legal Disclaimer—Spanish (Latin America)
ADVERTENCIA: El volumen excesivo puede causar pérdida permanente de la audición. Ajuste el volumen del dispositivo de audio a un nivel adecuado antes de usar el producto.

Your Assistant User Guide Version 5.0
126
Excessive Volume Legal Disclaimer—Spanish (Europe)
ADVERTENCIA: El volumen excesivo puede causar pérdida de audición permanente. Antes de usar este producto, ajuste el dispositivo del volumen a un nivel seguro.


![JavaOne: Welcome alexa, your personal assistant [con1700]](https://img.pdfslide.us/doc/110x75/58f18c461a28ab64528b45e1/javaone-welcome-alexa-your-personal-assistant-con1700.jpg)