Embed Size (px)
Citation preview
How to: Programming for FTC (MIT App Inventor)
By: Alyssa Webb and Brittany Comfrey
Programming Helpful Links-Link to App Inventor Training Manuals & Installation Guide
https://frc-events.firstinspires.org/FTCImages/2016 http://www.firstinspires.org/resource-library/ftc/technology-information-and-resources
What is App Inventor?
◇ A program where you use op-modes to
control the robot using a drag-and-drop
feature
◇ You will create your own Robot
Controller app
What is VirtualBox?
◇ It’s almost like the cloud we have for our school.
◇ It is a whole separate desktop within your own.
◇ It allows you to run virtual computers/servers on your personal
computer.
◇ Once properly installed you will be able to run App Inventor
with the FTC palettes that you need for programming.
To Install Virtual Box
◇ First make sure Google Chrome is downloaded.
◇ Then begin downloading VirtualBox (make sure it’s for Windows hosts if
you are using a Windows computer.
https://www.virtualbox.org/wiki/Downloads
◇ Install the program (when opening you may have to right click and run as
administrator).
◇ Go to the VirtualBox Appliance Files and download the appropriate file
(found at the link below).
https://frc-events.firstinspires.org/ftcimages/2016
Installing Virtualbox◇ After downloading the file (it may take a while), in Virtualbox
go to file -> Import Appliance.
◇ When the "Appliance to Import" window appears choose the
file you have just downloaded and select the .ova file.
◇ Click Import when Appliance Settings pops up.
◇ When the Appliance has imported, click on LocalAppInventor
and click the start button under VirtualBox Manager.
◇ Make sure you give it time to load when it starts up.
◇ If the screen ever locks the user shows up as ftc and prompts
for a password the password is ftc
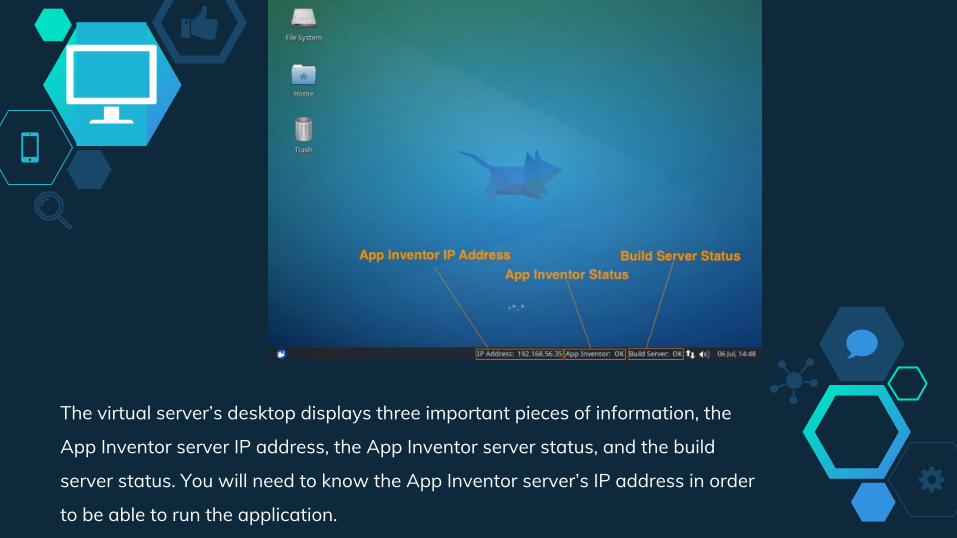
The virtual server’s desktop displays three important pieces of information, the
App Inventor server IP address, the App Inventor server status, and the build
server status. You will need to know the App Inventor server’s IP address in order
to be able to run the application.
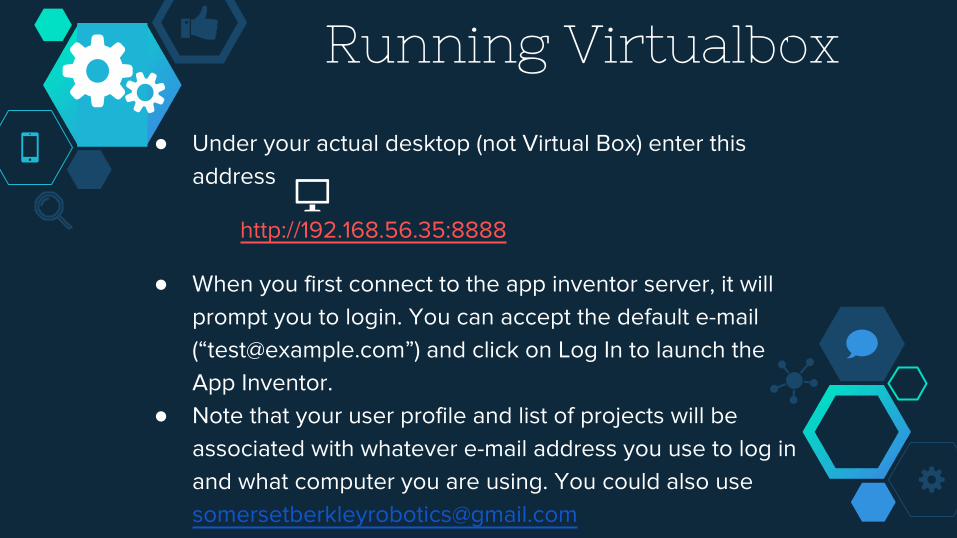
Running Virtualbox
● Under your actual desktop (not Virtual Box) enter this address
http://192.168.56.35:8888
● When you first connect to the app inventor server, it will prompt you to login. You can accept the default e-mail (“[email protected]”) and click on Log In to launch the App Inventor.
● Note that your user profile and list of projects will be associated with whatever e-mail address you use to log in and what computer you are using. You could also use [email protected]
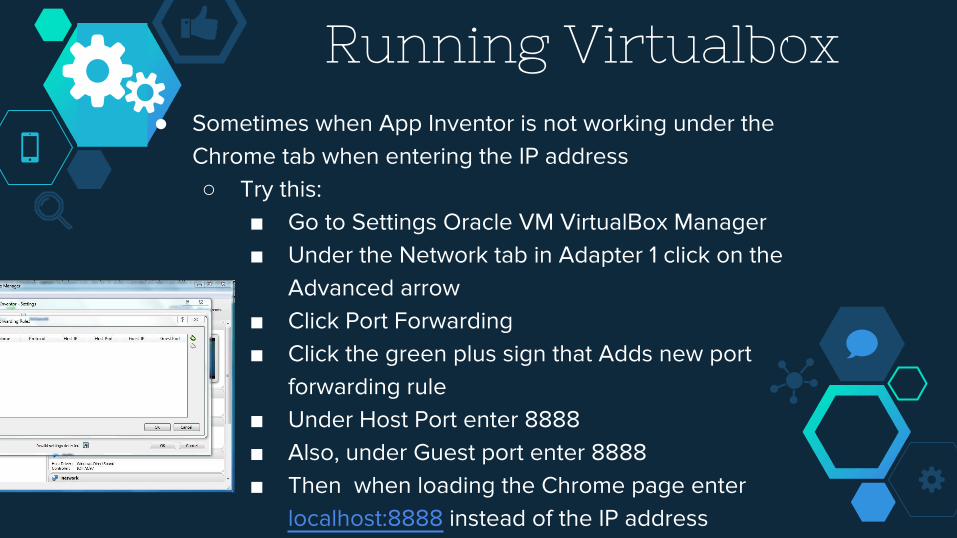
Running Virtualbox● Sometimes when App Inventor is not working under the
Chrome tab when entering the IP address ○ Try this:
■ Go to Settings Oracle VM VirtualBox Manager■ Under the Network tab in Adapter 1 click on the
Advanced arrow■ Click Port Forwarding■ Click the green plus sign that Adds new port
forwarding rule■ Under Host Port enter 8888■ Also, under Guest port enter 8888■ Then when loading the Chrome page enter
localhost:8888 instead of the IP address

Creating an op-mode◇ Make sure you’re in virtualbox and App Inventor and Build servos read
“ok”
◇ Online in another tab, open http://192.168.56.35:8888/
◇ Click start new project
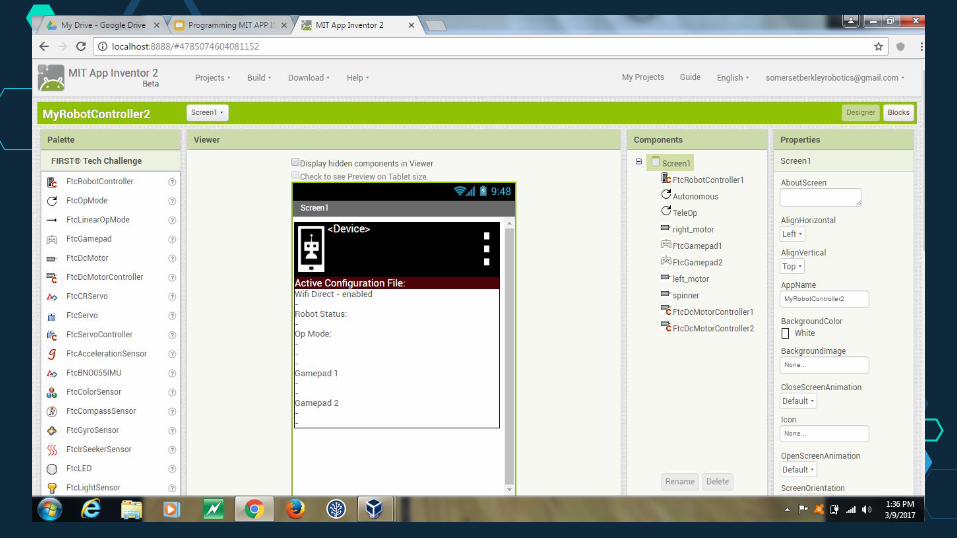
◇ Click on “FIRST Tech Challenge” to expand the palette
◇ Add the FtcRobotController Design component to the empty viewer
plane & specify the name
◇ Go to properties & locate the configuration & name it to match a
configuration file on the phones
◇ Go back to the palette drag on an FtcOpMode & rename it
◇ Switch to blocks mode
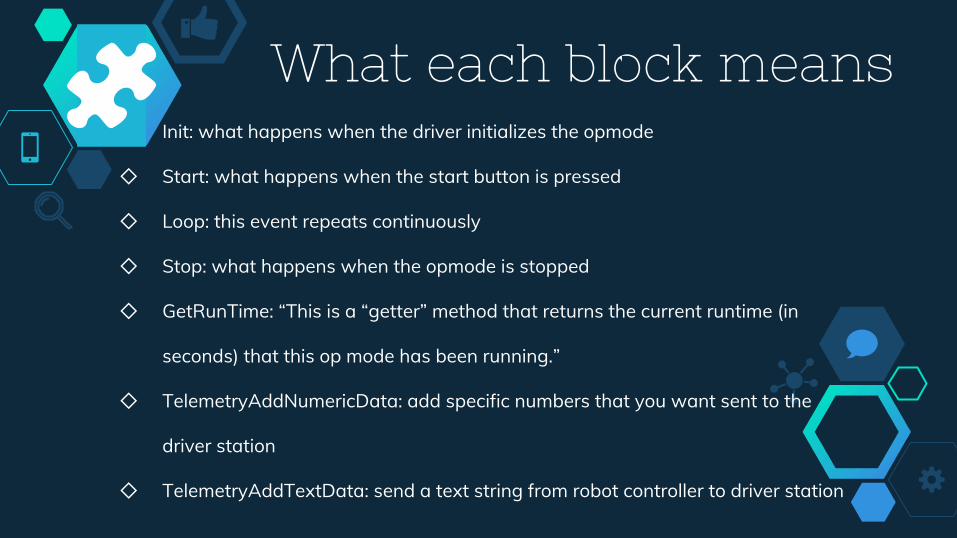
What each block means◇ Init: what happens when the driver initializes the opmode
◇ Start: what happens when the start button is pressed
◇ Loop: this event repeats continuously
◇ Stop: what happens when the opmode is stopped
◇ GetRunTime: “This is a “getter” method that returns the current runtime (in
seconds) that this op mode has been running.”
◇ TelemetryAddNumericData: add specific numbers that you want sent to the
driver station
◇ TelemetryAddTextData: send a text string from robot controller to driver station
Starting a sample op-mode
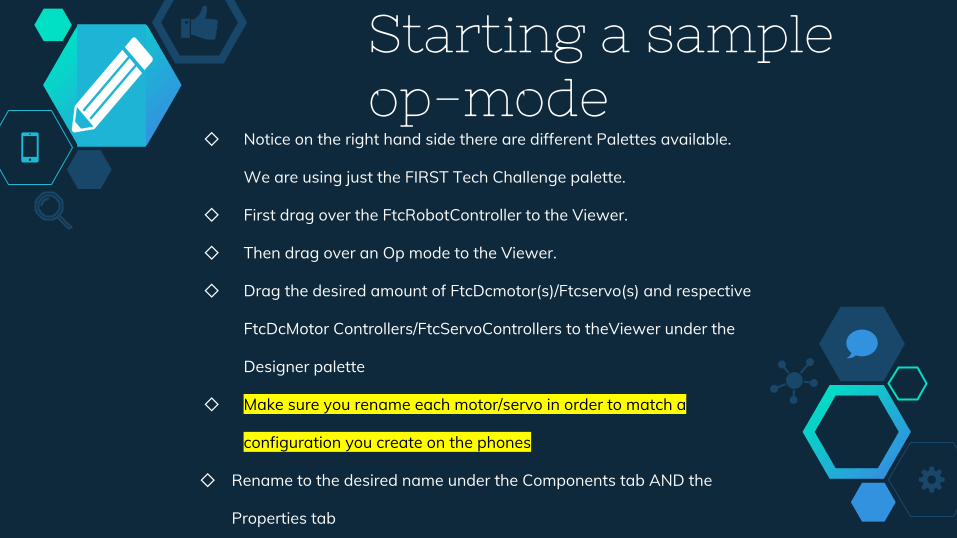
◇ Notice on the right hand side there are different Palettes available.
We are using just the FIRST Tech Challenge palette.
◇ First drag over the FtcRobotController to the Viewer.
◇ Then drag over an Op mode to the Viewer.
◇ Drag the desired amount of FtcDcmotor(s)/Ftcservo(s) and respective
FtcDcMotor Controllers/FtcServoControllers to theViewer under the
Designer palette
◇ Make sure you rename each motor/servo in order to match a
configuration you create on the phones
◇ Rename to the desired name under the Components tab AND the
Properties tab
◇ This is very important that all the names match within the program and
configuration on the phones or else the program will not work and you will
get an error message on the phones.
◇ Drag an FtcGamepad to the Viewer and then drag another since you can
use two gamepads
◇ Make sure that one of the driving motors has the power set to negative with
a neg block from the math Built-in Blocks tab because one motor rotates
the opposite way naturally.
Starting a sample op-mode (ctd)
How to program: blocks mode
◇ Now switch the the Blocks mode located on the top right corner of the
screen next to the Viewer mode.
◇ *Notice on the right hand side of the screen there are also different blocks:
Built-in and Screen 1 (all of the blocks you have added to the Viewer)
◇ Click on Variables then drag it over to the blank Viewer add initialize global
name to (enter in [GlobalStartTime])
◇ Then click on Math then drag the 0 block over to fit in the puzzle piece
◇ Click on the OpMode you have named then drag the When .Init do yellow
block to the screen. This is basically what happens when the driver
initializes the opmode.
*The text that is highlighted like this means that it is under the left panel of Blocks
How to program: blocks mode
◇ Now click on the FtcRobotController1 then scroll down and add the block
that says TelemetryAddTextData key and text
◇ Click on the pink Text block and drag two empty text boxes to key and text
◇ In the key text block type Mode
◇ In the text block type Init
◇ Now click on the OpMode again and drag over when ____ .Start do
◇ Again, click on the FtcRobotController1 then scroll down and add the block
that says TelemetryAddTextData key and text
◇ Click on the pink Text block and drag two empty text boxes to key and text
◇ In the key text block type Mode
◇ In the text block type in Start
How to program: blocks mode
◇ Under the Start blocks we just worked on:
Click on Variables and drag set ____ to underneath the call Ftc
TelemetryAddTextData
◇ Click on the blank drop down arrow and select global GlobalStartTime
◇ Click on the Op Mode then drag over the call ____ GetRuntime
◇ Click on the Op Mode again and drag over when ___ .Loop
◇ Now click on the FtcRobotController1 then scroll down and add the block
that says TelemetryAddTextData key and text
◇ Drag over two blank Text boxes again
◇ In the key text block type Mode
◇ In the text block type Init

How to program: blocks mode
◇ Now click on left motor set left_motor Direction to
◇ Click on Math then drag over neg block
◇ Click on Variables drag over initialize local (name) to
◇ Enter in [leftpower]
◇ Then click on FtcGamepad1 drag over FtcGamepad1 LeftStick Y this
allows you to move the joystick forward and move the left motor forward
◇ Now click on left motor and drag over set leftmotor Power to
◇ Then click on Variables and drag over the get block then click on the arrow
to select get leftpower
How to program: blocks mode
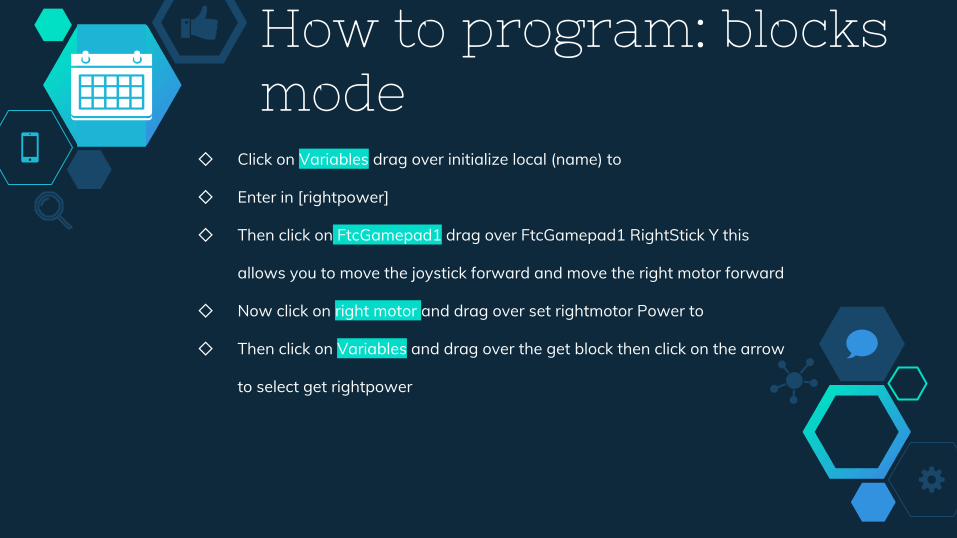
◇ Click on Variables drag over initialize local (name) to
◇ Enter in [rightpower]
◇ Then click on FtcGamepad1 drag over FtcGamepad1 RightStick Y this
allows you to move the joystick forward and move the right motor forward
◇ Now click on right motor and drag over set rightmotor Power to
◇ Then click on Variables and drag over the get block then click on the arrow
to select get rightpower
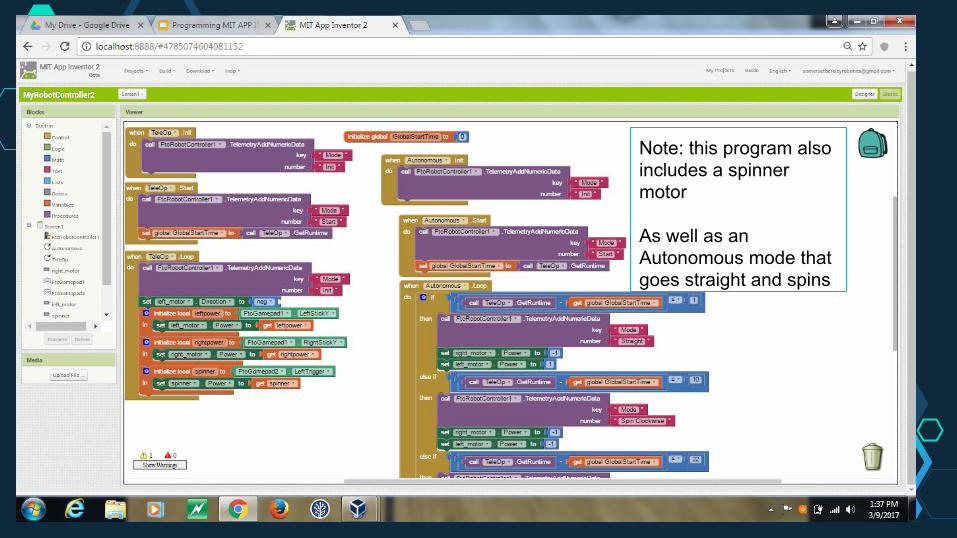
Note: this program also includes a spinner motor
As well as an Autonomous mode that goes straight and spins
Building & Installing the App onto the Phone
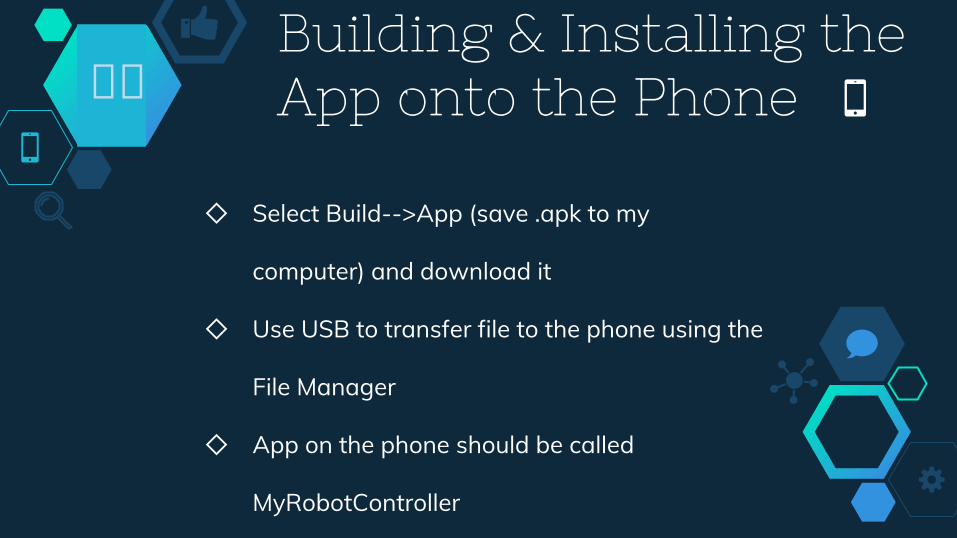
◇ Select Build-->App (save .apk to my
computer) and download it
◇ Use USB to transfer file to the phone using the
File Manager
◇ App on the phone should be called
MyRobotController
��
Phone Settings◇ Make sure when you connect the phones with a USB to the computer they are set as
a Media Device (MTP)
◇ Enable Developer Options by going to settings-> about phone and click on Build
Number 7 times
◇ For configuring the phone to the robot, plug the robot controller phone into the robot
(the core power distribution module), press the three dots in the corner->configure
robot, create a new configuration, then scan to make sure all devices are visible.
◇ You may need to scan multiple times
◇ Once all the devices are found, under each Motor Controller/Servo Controller, add the
devices plugged into each port and name them (make sure they match the program)
◇ When in doubt factory reset the phones and start over
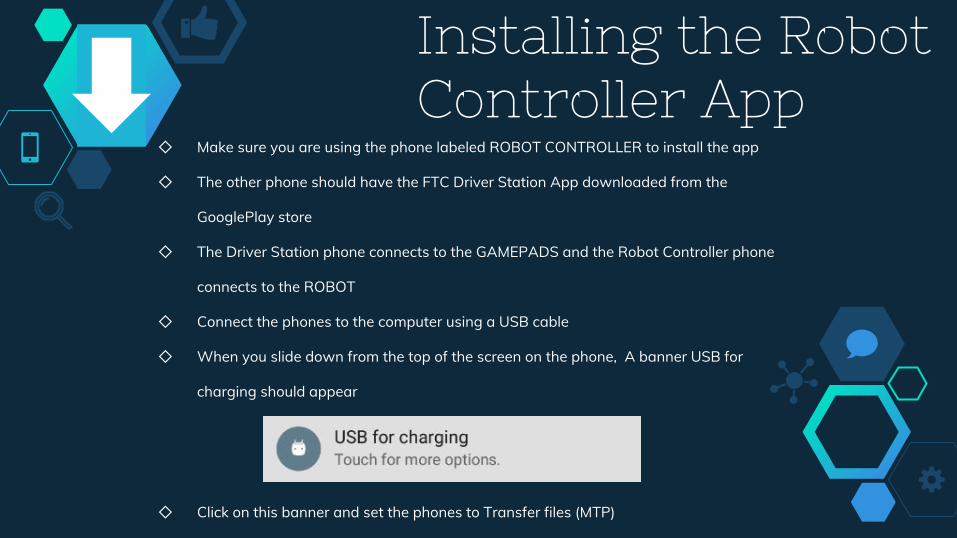
Installing the Robot Controller App
◇ Make sure you are using the phone labeled ROBOT CONTROLLER to install the app
◇ The other phone should have the FTC Driver Station App downloaded from the
GooglePlay store
◇ The Driver Station phone connects to the GAMEPADS and the Robot Controller phone
connects to the ROBOT
◇ Connect the phones to the computer using a USB cable
◇ When you slide down from the top of the screen on the phone, A banner USB for
charging should appear
◇ Click on this banner and set the phones to Transfer files (MTP)
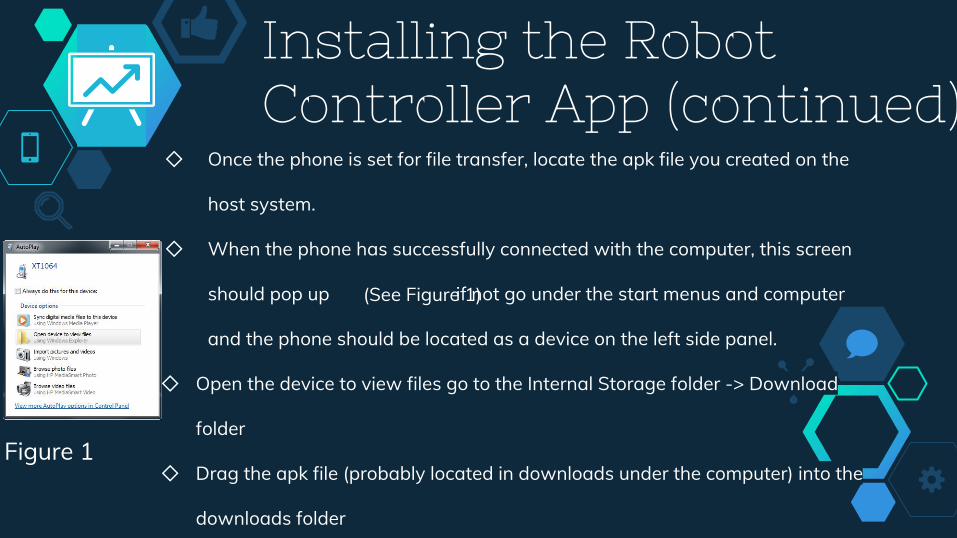
Installing the Robot Controller App (continued)
◇ Once the phone is set for file transfer, locate the apk file you created on the
host system.
◇ When the phone has successfully connected with the computer, this screen
should pop up if not go under the start menus and computer
and the phone should be located as a device on the left side panel.
◇ Open the device to view files go to the Internal Storage folder -> Download
folder
◇ Drag the apk file (probably located in downloads under the computer) into the
downloads folder
Figure 1
(See Figure 1)
Launching FTC Driver Station
◇ Make sure to secure the phone on the robot & plug it into the robot
◇ Go to the upper righthand corner and touch the three white dots to
expand the settings
◇ Make sure to not have “Log Network Traffic” on during a match
◇ If needed, can restart the robot under the settings
◇ Make sure the controllers are connected under wifi, go to advanced,
and then wifi direct
Launching the App & Creating the Configuration File
◇ You’ll get a notification reading “mybot.xml”
◇ Go back to the program to create this configuration file
◇ Touch the three dots in the upper righthand corner to open up the
settings & open up “configure robot”
◇ Make a new file & rename, then save configuration
◇ File must match exactly how it is in the program
◇ Should get a “saved” popup on bottom of screen if done correctly
◇ Press back arrow until you’re back to robot controller screen
Pairing Robot Controller & Driver Station
◇ Connect the phones through WiFi direct
◇ Robot controller phone is the group owner under WiFi direct
◇ Open up settings on the FTC Driver Station App
◇ Click on “Pair robot controllers”
◇ Once you’re connected you should get a message indicating
driver station is connected to a robot controller
Selecting & Running Op-Modes◇ Click on “Select Op Mode”
◇ Select the Op mode you want to use in order to run
the program
◇ On the gamepad controls click Start and A at the
same time for Driver 1 or click Start B for Driver 2
◇ Press Init
◇ Press start to run the op mode
◇ To stop, press the stop button

Flying into App Inventor like...
? ? ? ?