Embed Size (px)
Citation preview
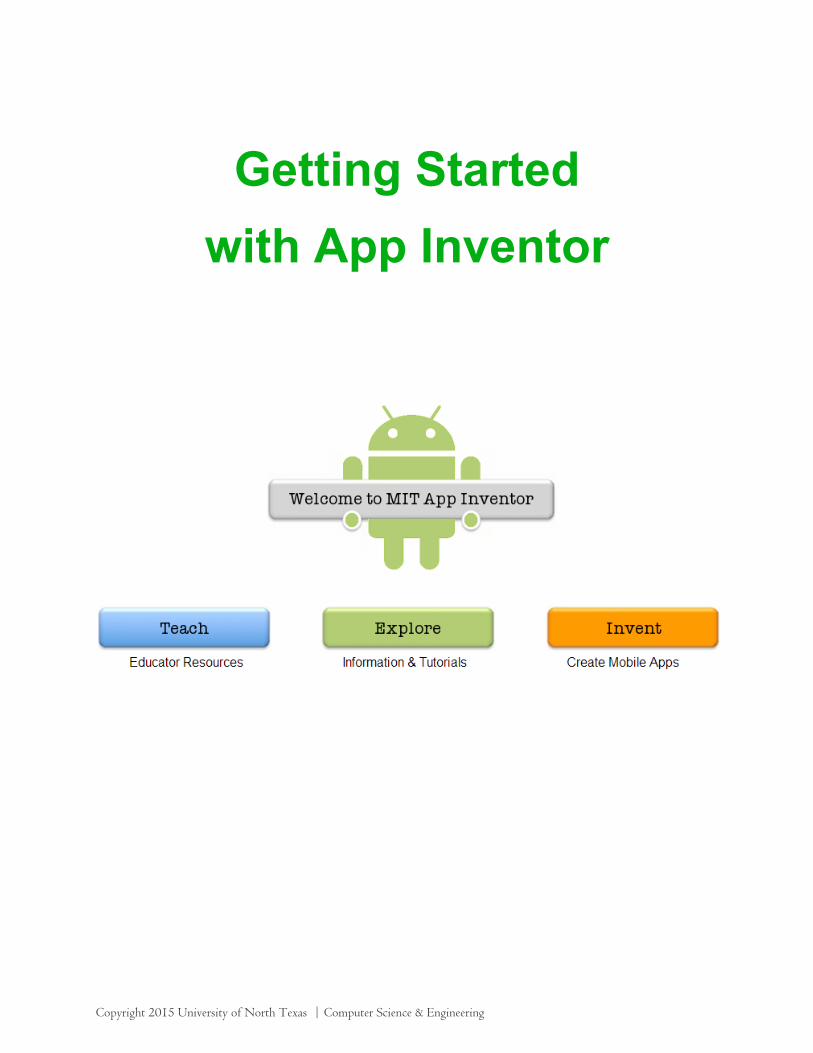
Getting Started with App Inventor
Copyright 2015 University of North Texas | Computer Science & Engineering
Table of Contents
Chapter One: Sensors .................................................................................................................................. 1
What do sensors do? ........................................................................................................................... 1
Chapter Two: Introduction to App Inventor ................................................................................................ 3
What is App Inventor? ......................................................................................................................... 3
Setting up your phone ......................................................................................................................... 3
Getting Started with App Inventor ...................................................................................................... 4
Chapter Three: Creating the Virtual Pet App ............................................................................................... 7
Chapter Four: Magic 8-‐ball ........................................................................................................................ 12
Chapter Five: Creating a Paint Pot App ...................................................................................................... 23
Chapter Six: Creating a Pong App .............................................................................................................. 30
Chapter Seven: Creating a Tilt App ............................................................................................................ 35
Chapter Eight: Dialing the Phone with PicCall ........................................................................................... 38
Phone contact information .................................................................................................................... 39
Using the picker ..................................................................................................................................... 40
Pictures .................................................................................................................................................. 40
Challenges .............................................................................................................................................. 41
Chapter Nine: Sending Texts ...................................................................................................................... 42
How the Blocks Work ............................................................................................................................. 45
Texting a list ........................................................................................................................................... 45
Chapter Ten: Droid, Where's My Car? ....................................................................................................... 49
Chapter Eleven: Creating Your Own App ................................................................................................... 56
Copyright 2015 University of North Texas | Computer Science & Engineering
1
Chapter One: Sensors
What do sensors do? Sensors are your phone's eyes and ears. Without them, you wouldn't be able to interact with it at all. They provide it with information about what's going on in the world and what you want it to do.
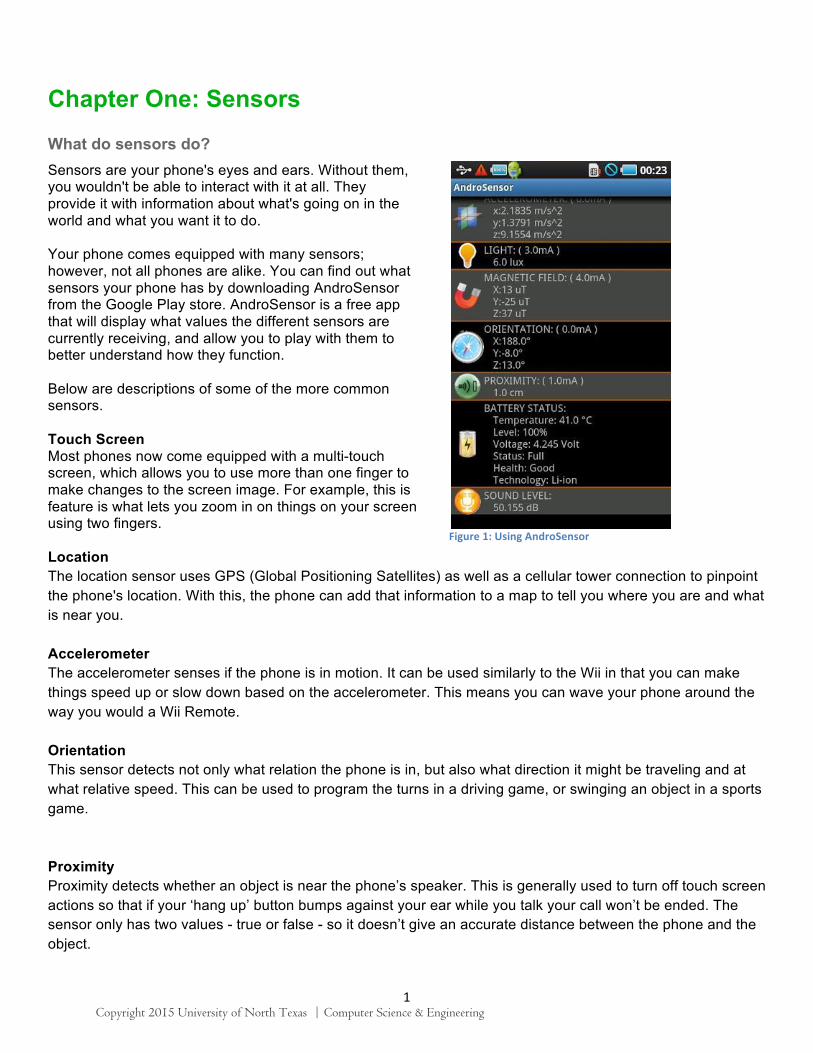
Your phone comes equipped with many sensors; however, not all phones are alike. You can find out what sensors your phone has by downloading AndroSensor from the Google Play store. AndroSensor is a free app that will display what values the different sensors are currently receiving, and allow you to play with them to better understand how they function.
Below are descriptions of some of the more common sensors.
Touch Screen Most phones now come equipped with a multi-touch screen, which allows you to use more than one finger to make changes to the screen image. For example, this is feature is what lets you zoom in on things on your screen using two fingers.
Figure 1: Using AndroSensor
Location The location sensor uses GPS (Global Positioning Satellites) as well as a cellular tower connection to pinpoint the phone's location. With this, the phone can add that information to a map to tell you where you are and what is near you.
Accelerometer The accelerometer senses if the phone is in motion. It can be used similarly to the Wii in that you can make things speed up or slow down based on the accelerometer. This means you can wave your phone around the way you would a Wii Remote.
Orientation This sensor detects not only what relation the phone is in, but also what direction it might be traveling and at what relative speed. This can be used to program the turns in a driving game, or swinging an object in a sports game.
Proximity Proximity detects whether an object is near the phone’s speaker. This is generally used to turn off touch screen actions so that if your ‘hang up’ button bumps against your ear while you talk your call won’t be ended. The sensor only has two values - true or false - so it doesn’t give an accurate distance between the phone and the object.
Copyright 2015 University of North Texas | Computer Science & Engineering
2
Sound Level Your phone can detect the level of sound its microphone picks up. With this sensor you can determine if the sound output level is too high or not, test the ambient sound level in a room, or measure how loud a concert is.
Camera You’ve probably used the camera. Apps can call it to take a picture or a video, which is then stored in the phone’s memory. An app can also use the picture directly, as you'll see in Chapter Four.
Copyright 2015 University of North Texas | Computer Science & Engineering
3
Chapter Two: Introduction to App Inventor
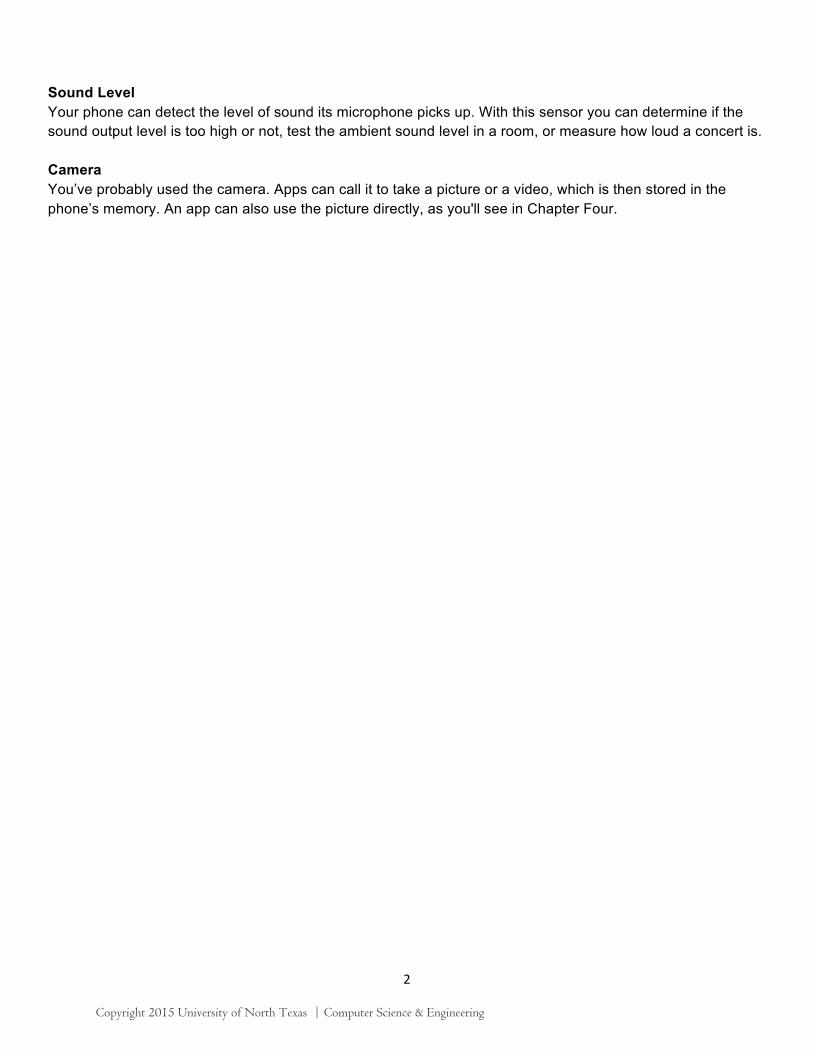
What is App Inventor? Android applications are written in Java, a high-level language which can take a long time to learn. In addition to having expertise in Java, an Android developer must learn how to program for an Android environment. App Inventor is a program which allows you to bypass this difficulty in order to quickly make apps which function just like those in the marketplace. App Inventor works in two parts. One part is in your browser, where you can drag components onto the phone’s screen and arrange them as you'd like them to appear. The second part is a downloadable program called the Blocks Editor where you can write code for these components. App Inventor uses pre-made code blocks which you can drag and drop in relation to each other to write your program.
Figure 2: Two code blocks in the Blocks Editor
Each block is shaped like a puzzle piece, as in Figure 2. If the pieces fit together then your code should work. This speeds up app development greatly since you don’t have to learn Java to program an app with App Inventor; however, there are some programming concepts you should know before you start. The first of these is the way functions work. A function is a piece of code, or a group of blocks, which can be used over and over. If you're familiar with functions in algebra then you may find that this is similar. The reusable blocks are 'passed'—connected to—other blocks, and they then use those blocks to perform a task. The blocks which are passed to a function may vary, but the task remains the same. To use this group of blocks, another block must ‘call’ the function. This is simpler than it sounds, as you'll learn in Chapter Five. Another important concept is logic. You use it all the time, even subconsciously, so it’s usually intuitive. Logic is used to determine if something is true, and your program uses it to make decisions. An example of this is the and block: if the two blocks connected to it have a value of true, then the and block will also be true. If one or neither of the two blocks connected to it are true, it will be false. To use this in real life, think of it this way: if there was a blanket nearby and you were cold, you would probably pull the blanket over yourself. But if there was a blanket nearby and you were warm, you wouldn't need the blanket. Your phone can make decisions the same way you do with the use of these logic blocks.
Setting up your phone Before you can start working with App Inventor, a few things need to happen. Depending on what brand of phone you have, you need to download the drivers for your phone so that the computer and the phone can communicate. The best place to get the drivers for your phone is from the phone manufacturer, so open
Copyright 2015 University of North Texas | Computer Science & Engineering
4
Google and put your phone model and manufacturer into a search and you should find the correct drivers. If you can't find them right away, be sure to ask a counselor for help.
If you don’t have a phone then you should be all set, as App Inventor has a built in emulator that will simulate what you would see on a phone if one was connected to the computer. Just keep in mind that the emulator has limited functionality; you can't use the accelerometer, for example, since your computer doesn't have that sensor and consequently wouldn't know if you picked it up and shook it.
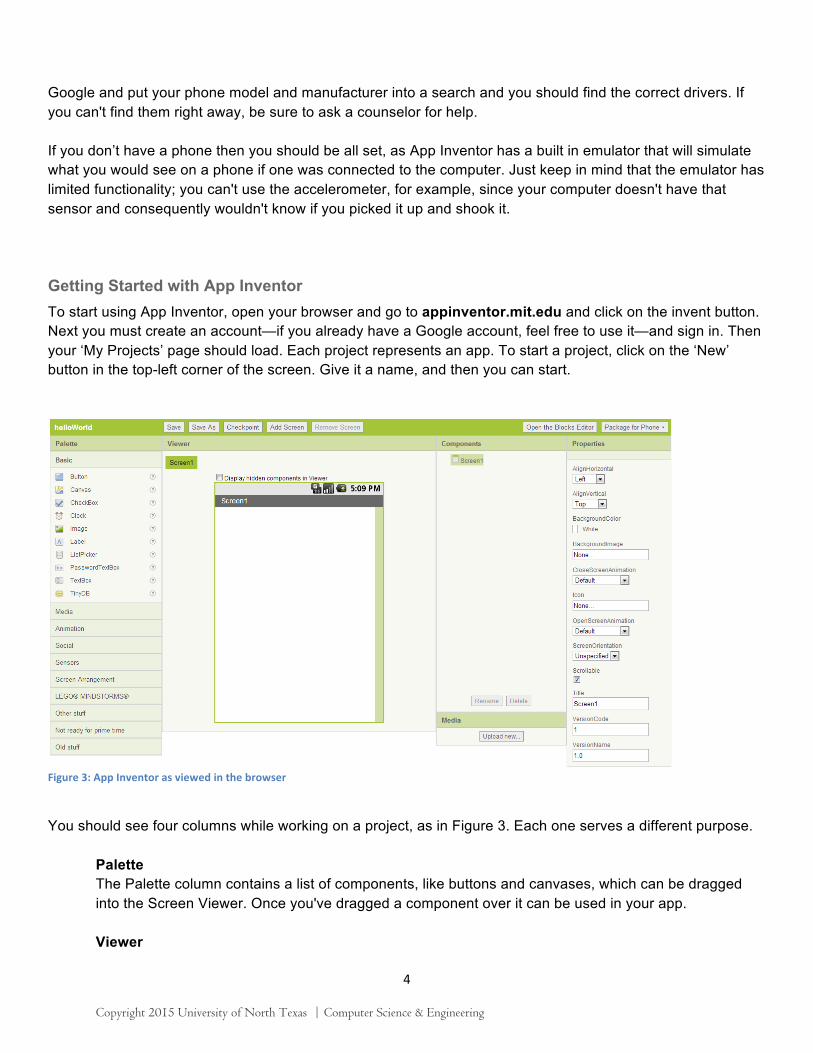
Getting Started with App Inventor To start using App Inventor, open your browser and go to appinventor.mit.edu and click on the invent button. Next you must create an account—if you already have a Google account, feel free to use it—and sign in. Then your ‘My Projects’ page should load. Each project represents an app. To start a project, click on the ‘New’ button in the top-left corner of the screen. Give it a name, and then you can start.
Figure 3: App Inventor as viewed in the browser
You should see four columns while working on a project, as in Figure 3. Each one serves a different purpose.
Palette The Palette column contains a list of components, like buttons and canvases, which can be dragged into the Screen Viewer. Once you've dragged a component over it can be used in your app.
Viewer
Copyright 2015 University of North Texas | Computer Science & Engineering
5
This column contains the Screen Viewer, which helps you picture what your app will look like on the phone. Here you can rearrange components as you see fit.
Components The Components column contains a list of all the components in your app. You can also rename or delete components. It's very strongly recommended that you name your components in a way that makes sense to you—if you don't, programming will be difficult.
Properties When you click on a component in the Screen Viewer its properties should come up in this column. Each component has different kinds of properties based on it's purpose. The ball, for example, has a radius, color, and speed. The canvas needs none of these things; instead it has a size, background image, and line width. Each property can be altered later within the program.
At the top-right of the page should be a button labeled “Open the Blocks Editor.” Click this button to download the program and begin working on your code.
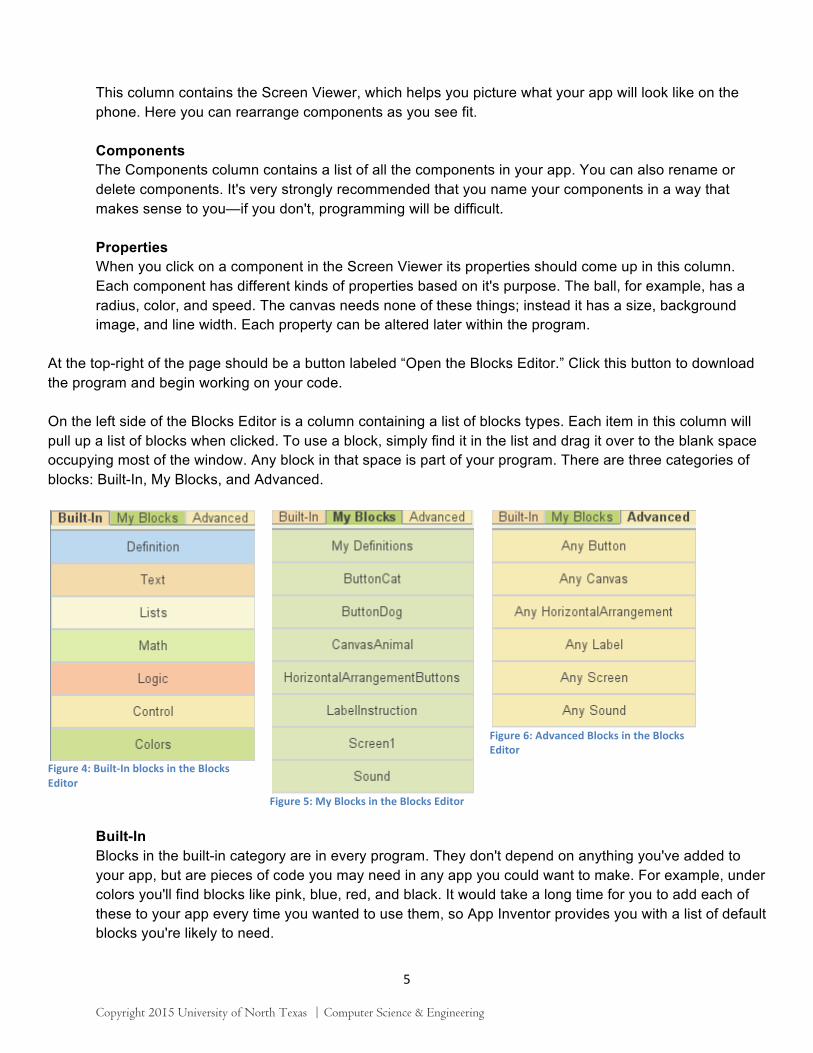
On the left side of the Blocks Editor is a column containing a list of blocks types. Each item in this column will pull up a list of blocks when clicked. To use a block, simply find it in the list and drag it over to the blank space occupying most of the window. Any block in that space is part of your program. There are three categories of blocks: Built-In, My Blocks, and Advanced.
Figure 4: Built-‐In blocks in the Blocks Editor
Figure 5: My Blocks in the Blocks Editor
Figure 6: Advanced Blocks in the Blocks Editor
Built-In Blocks in the built-in category are in every program. They don't depend on anything you've added to your app, but are pieces of code you may need in any app you could want to make. For example, under colors you'll find blocks like pink, blue, red, and black. It would take a long time for you to add each of these to your app every time you wanted to use them, so App Inventor provides you with a list of default blocks you're likely to need.
Copyright 2015 University of North Texas | Computer Science & Engineering
6
My Blocks Whenever you drag a component onto the Screen Viewer, another item should appear in this list. Blocks in the My Blocks category are directly connected to the components you add. For example, whenever you add a button to your screen, you can come here to write the code for it.
Advanced The advanced blocks manipulate more than one component. If you had ten buttons and you wanted a sound to play each time any button is pressed, you would use one of the 'any button' blocks from the advanced tab.
To run a program, connect your phone to the computer with a USB cord. After a few seconds it should appear in the “Connect to Device” drop-down list at the top-right of your screen; click on it to run your app. It may take a while to load.
When coding your app, pay attention to the wording on the blocks. The words should lay out a simple sentence that the computer will follow, so if does not make sense when you read it the computer will not be able to understand it either. If your program has an error, try reading all your blocks and checking to see if any of them don't form a sentence.
Copyright 2015 University of North Texas | Computer Science & Engineering
7
Chapter Three: Creating the Virtual Pet App The Virtual Pet app will start out with a picture of a cat that meows when it’s touched. Eventually, you can make the cat purr after being petted for a long period of time and add a wider selection of pets. This will teach you how to use buttons, how to use the canvas to register a user's touch, and how to use a sound component to control the phone’s speaker and vibrator.
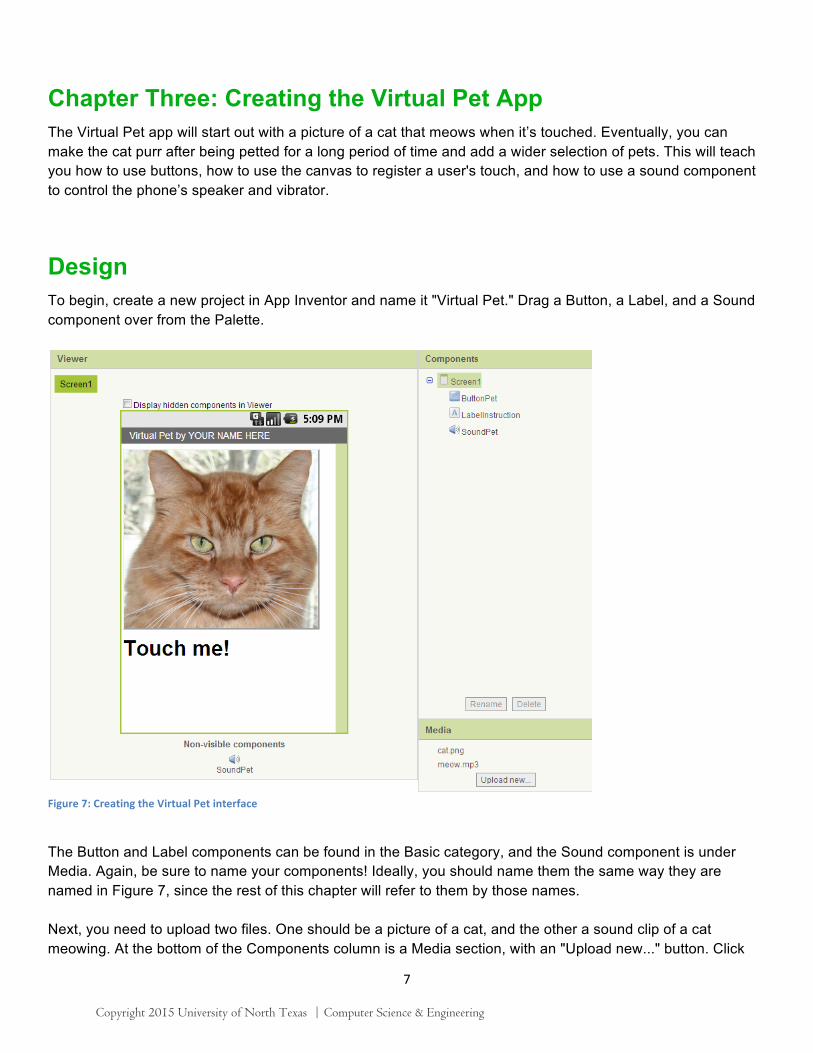
Design To begin, create a new project in App Inventor and name it "Virtual Pet." Drag a Button, a Label, and a Sound component over from the Palette.
Figure 7: Creating the Virtual Pet interface
The Button and Label components can be found in the Basic category, and the Sound component is under Media. Again, be sure to name your components! Ideally, you should name them the same way they are named in Figure 7, since the rest of this chapter will refer to them by those names. Next, you need to upload two files. One should be a picture of a cat, and the other a sound clip of a cat meowing. At the bottom of the Components column is a Media section, with an "Upload new..." button. Click
Copyright 2015 University of North Texas | Computer Science & Engineering
8
that button to upload your media. Then click on your Sound component and look at the Properties column. There should be a box labeled "Source"—click on it and a list of the media you uploaded will appear. Click on the sound file. When the sound component is called, it should now play the sound of a cat meowing.
Click on the Button component and look at the Properties column again. Click on the box labeled "Image" and the same list should come up—this time click on the picture file. Your button should now display that image.
Build Once your screen looks like the one shown in Figure 7 you can start programming. Click on "Open the Blocks Editor" to begin.
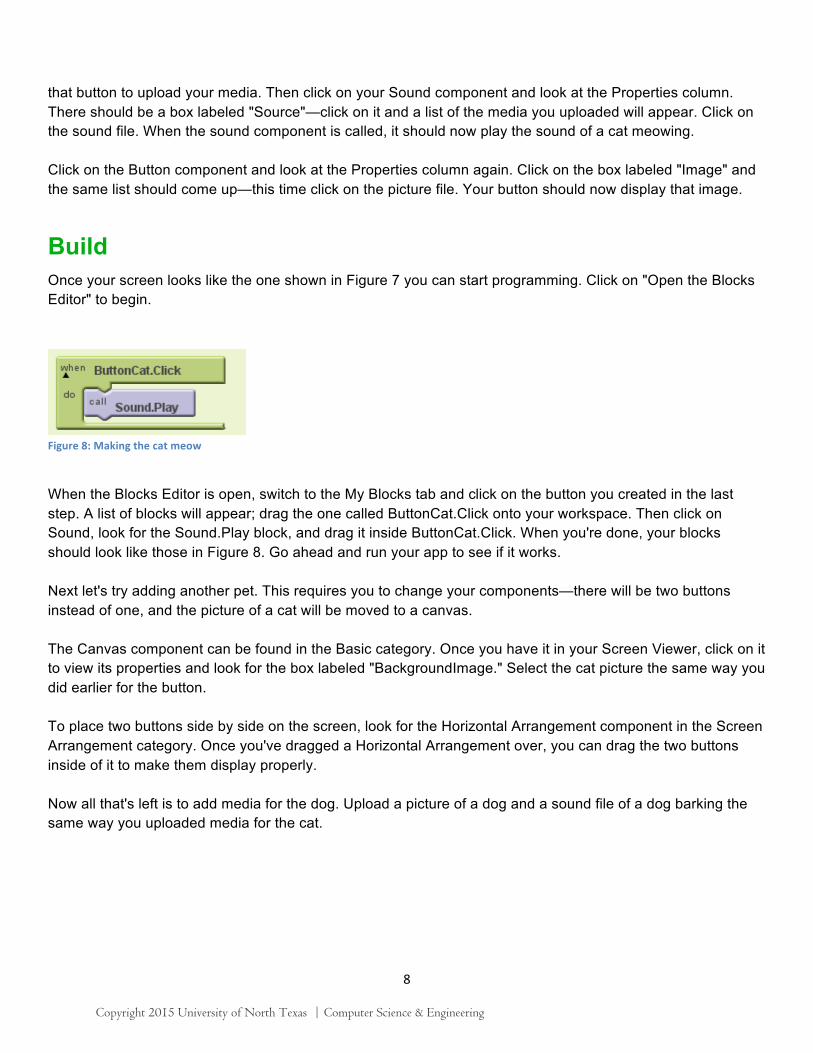
Figure 8: Making the cat meow
When the Blocks Editor is open, switch to the My Blocks tab and click on the button you created in the last step. A list of blocks will appear; drag the one called ButtonCat.Click onto your workspace. Then click on Sound, look for the Sound.Play block, and drag it inside ButtonCat.Click. When you're done, your blocks should look like those in Figure 8. Go ahead and run your app to see if it works.
Next let's try adding another pet. This requires you to change your components—there will be two buttons instead of one, and the picture of a cat will be moved to a canvas.
The Canvas component can be found in the Basic category. Once you have it in your Screen Viewer, click on it to view its properties and look for the box labeled "BackgroundImage." Select the cat picture the same way you did earlier for the button.
To place two buttons side by side on the screen, look for the Horizontal Arrangement component in the Screen Arrangement category. Once you've dragged a Horizontal Arrangement over, you can drag the two buttons inside of it to make them display properly.
Now all that's left is to add media for the dog. Upload a picture of a dog and a sound file of a dog barking the same way you uploaded media for the cat.
Copyright 2015 University of North Texas | Computer Science & Engineering
9
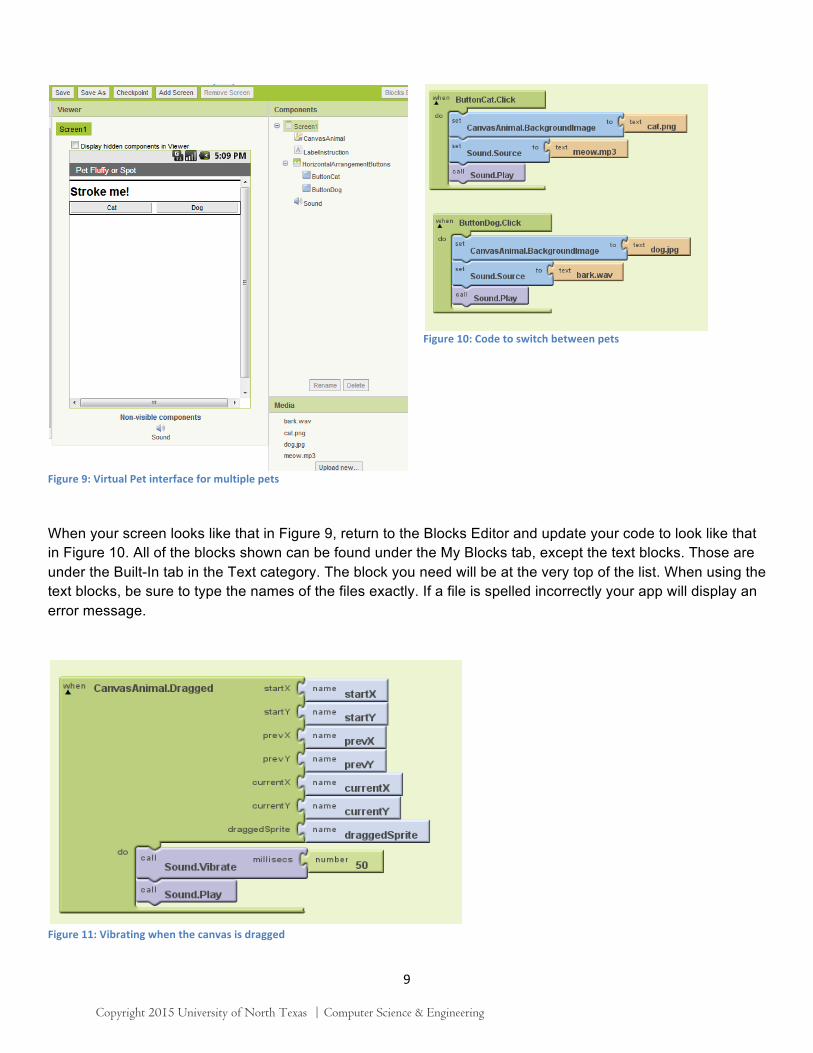
Figure 9: Virtual Pet interface for multiple pets
Figure 10: Code to switch between pets
When your screen looks like that in Figure 9, return to the Blocks Editor and update your code to look like that in Figure 10. All of the blocks shown can be found under the My Blocks tab, except the text blocks. Those are under the Built-In tab in the Text category. The block you need will be at the very top of the list. When using the text blocks, be sure to type the names of the files exactly. If a file is spelled incorrectly your app will display an error message.
Figure 11: Vibrating when the canvas is dragged
Copyright 2015 University of North Texas | Computer Science & Engineering
10
When you have something as complex as this it helps to do it in stages; program a little and then test it to make sure you're getting the desired outcome. Go ahead and run the app on your phone at this point to make sure the buttons work. If they don't, try reading your blocks as sentences to make sure they make sense. To make your pet's sound play when the canvas is touched, find the CanvasAnimal.Dragged block and arrange it as shown in Figure 11. Don’t worry about all the name blocks—they’ll come with the CanvasAnimal.Dragged block automatically. The Sound.Vibrate block in Figure 11 will simulate purring. However, now that you have a dog as well as a cat, it seems a little odd that the dog purrs. While fixing this, let’s also make sure that the cat doesn’t purr right away to make it seem more realistic.
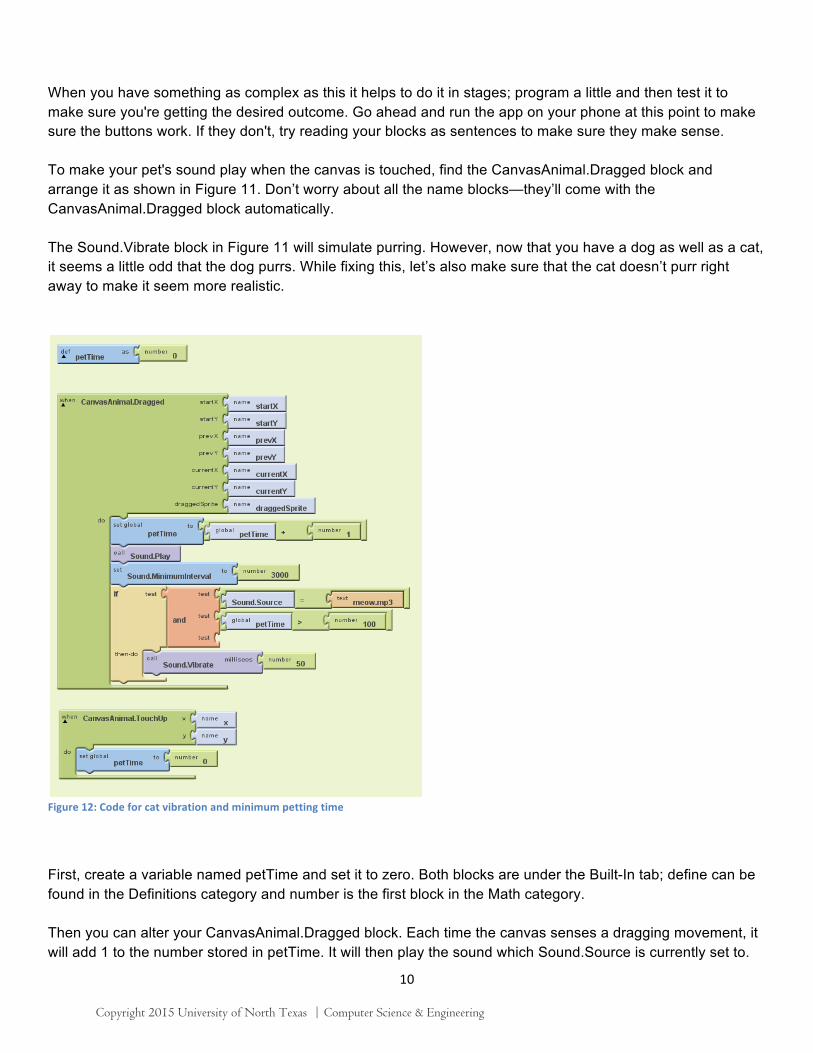
Figure 12: Code for cat vibration and minimum petting time
First, create a variable named petTime and set it to zero. Both blocks are under the Built-In tab; define can be found in the Definitions category and number is the first block in the Math category. Then you can alter your CanvasAnimal.Dragged block. Each time the canvas senses a dragging movement, it will add 1 to the number stored in petTime. It will then play the sound which Sound.Source is currently set to.
Copyright 2015 University of North Texas | Computer Science & Engineering
11
The Sound.MinimumInterval block will prevent the sound from playing over and over too quickly – try playing with the number to see what changes. Lastly, the if block will only call the Sound.Vibrate block if the current pet is a cat and petTime is a number larger than 100. If you run the app at this point, you’ll notice that when you first pet the cat the phone will not vibrate until a short period of time has passed. But then when you let go and start again, it vibrates immediately. To solve this, add the CanvasAnimal.TouchUp block as shown in Figure 12. This will reset petTime to zero each time you lift your finger from the canvas. When adding things to an existing code block, make sure not to remove any old code until you’re sure it will not be needed, or the old and new code is mutually exclusive. It’s best to program small pieces at a time and test often so you know which piece of code isn’t working.
TEST
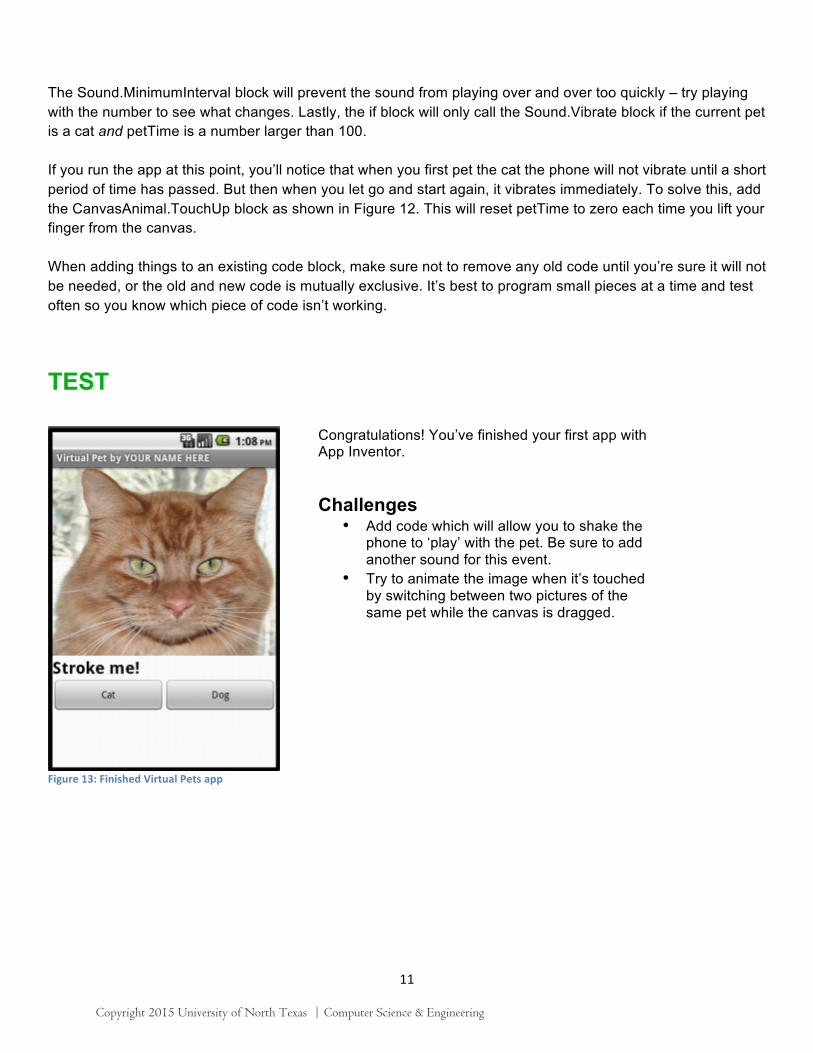
Figure 13: Finished Virtual Pets app
Congratulations! You’ve finished your first app with App Inventor. Challenges
• Add code which will allow you to shake the phone to ‘play’ with the pet. Be sure to add another sound for this event.
• Try to animate the image when it’s touched by switching between two pictures of the same pet while the canvas is dragged.
Copyright 2015 University of North Texas | Computer Science & Engineering
12
Chapter Four: Magic 8-ball
This chapter will guide you through building a “Magic 8-Ball” app with App Inventor. When activated, your 8-ball will deliver one of its classic predictions, such as “It is decidedly so” or “Reply hazy, try again.”
A selection of images and sounds are available at the App Inventor Media Library. http://teach.appinventor.mit.edu/curriculum/media-library
The final Magic 8-Ball App will deliver a prediction from a list that you have designed. To get started, first we'll make a button with a picture on it, and program it to play a sound when the button is clicked.
PART 1: Buttons and Sound
DESIGN: App Inventor Designer
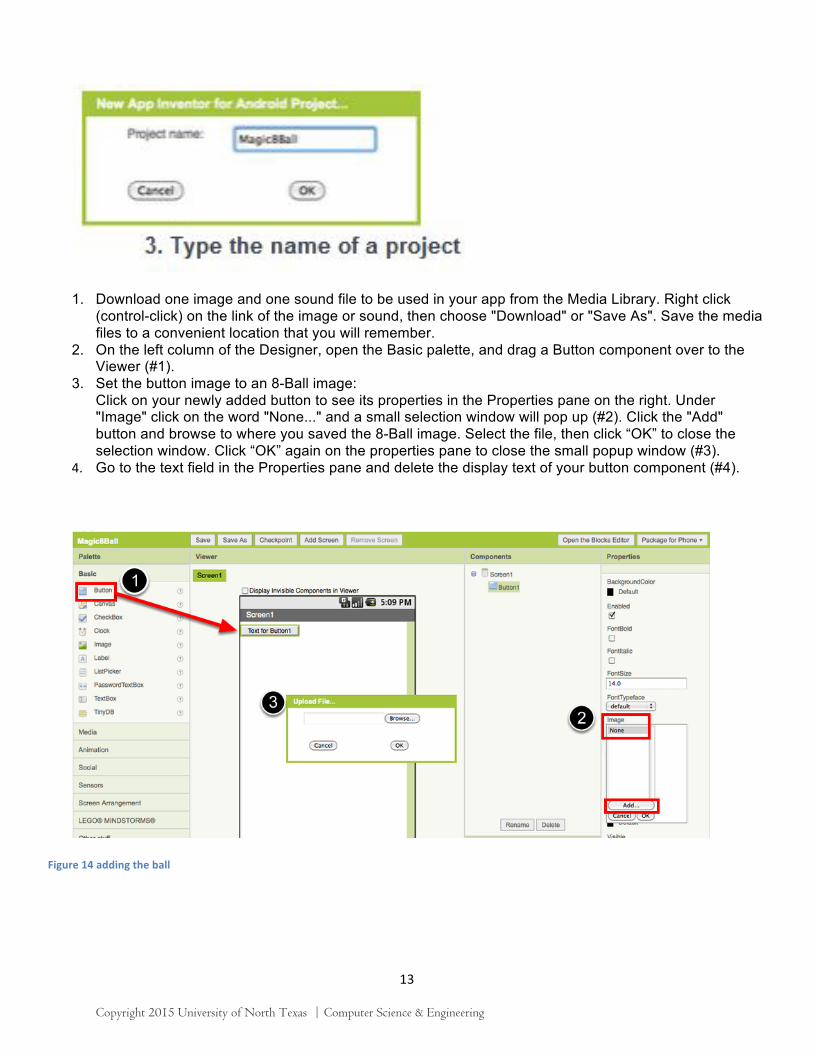
Click "My Projects" in the upper left corner of the screen, which will take you to your list of projects. Click "New" and name your project something like "Magic8Ball"(note: spaces are not allowed).
Copyright 2015 University of North Texas | Computer Science & Engineering
13
1. Download one image and one sound file to be used in your app from the Media Library. Right click (control-click) on the link of the image or sound, then choose "Download" or "Save As". Save the media files to a convenient location that you will remember.
2. On the left column of the Designer, open the Basic palette, and drag a Button component over to the Viewer (#1).
3. Set the button image to an 8-Ball image: Click on your newly added button to see its properties in the Properties pane on the right. Under "Image" click on the word "None..." and a small selection window will pop up (#2). Click the "Add" button and browse to where you saved the 8-Ball image. Select the file, then click “OK” to close the selection window. Click “OK” again on the properties pane to close the small popup window (#3).
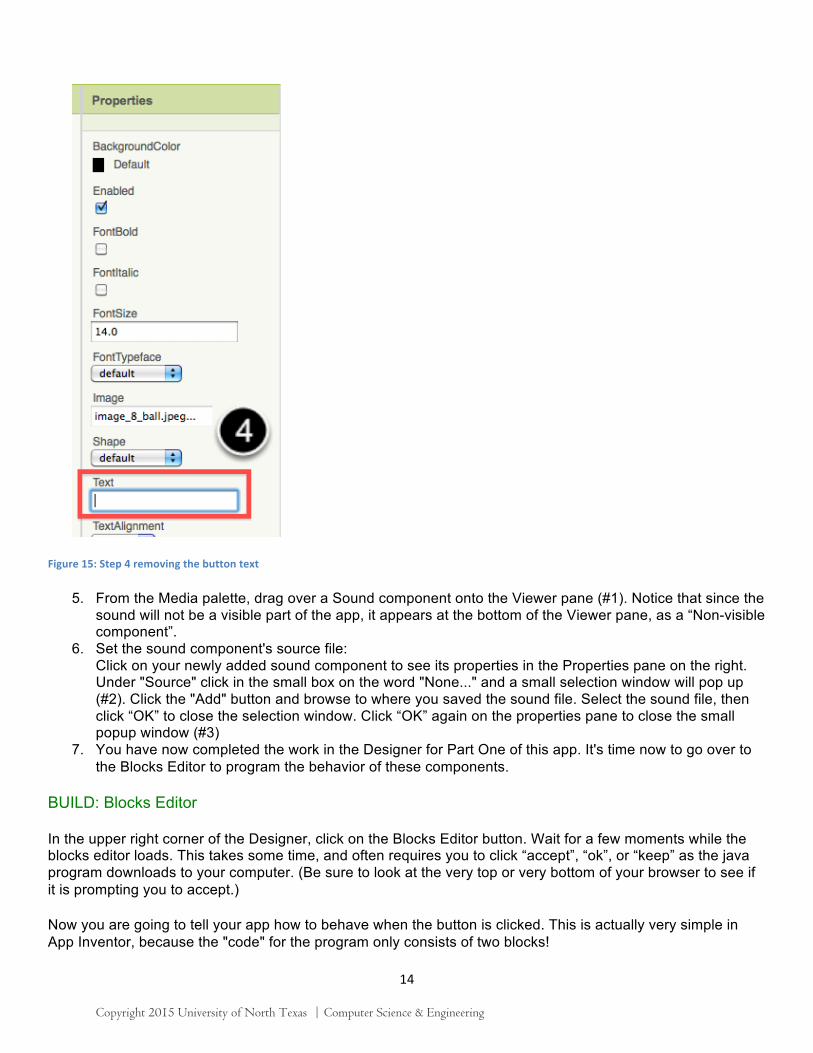
4. Go to the text field in the Properties pane and delete the display text of your button component (#4).
Figure 14 adding the ball
Copyright 2015 University of North Texas | Computer Science & Engineering
14
Figure 15: Step 4 removing the button text
5. From the Media palette, drag over a Sound component onto the Viewer pane (#1). Notice that since the sound will not be a visible part of the app, it appears at the bottom of the Viewer pane, as a “Non-visible component”.
6. Set the sound component's source file: Click on your newly added sound component to see its properties in the Properties pane on the right. Under "Source" click in the small box on the word "None..." and a small selection window will pop up (#2). Click the "Add" button and browse to where you saved the sound file. Select the sound file, then click “OK” to close the selection window. Click “OK” again on the properties pane to close the small popup window (#3)
7. You have now completed the work in the Designer for Part One of this app. It's time now to go over to the Blocks Editor to program the behavior of these components.
BUILD: Blocks Editor
In the upper right corner of the Designer, click on the Blocks Editor button. Wait for a few moments while the blocks editor loads. This takes some time, and often requires you to click “accept”, “ok”, or “keep” as the java program downloads to your computer. (Be sure to look at the very top or very bottom of your browser to see if it is prompting you to accept.)
Now you are going to tell your app how to behave when the button is clicked. This is actually very simple in App Inventor, because the "code" for the program only consists of two blocks!
Copyright 2015 University of North Texas | Computer Science & Engineering
15
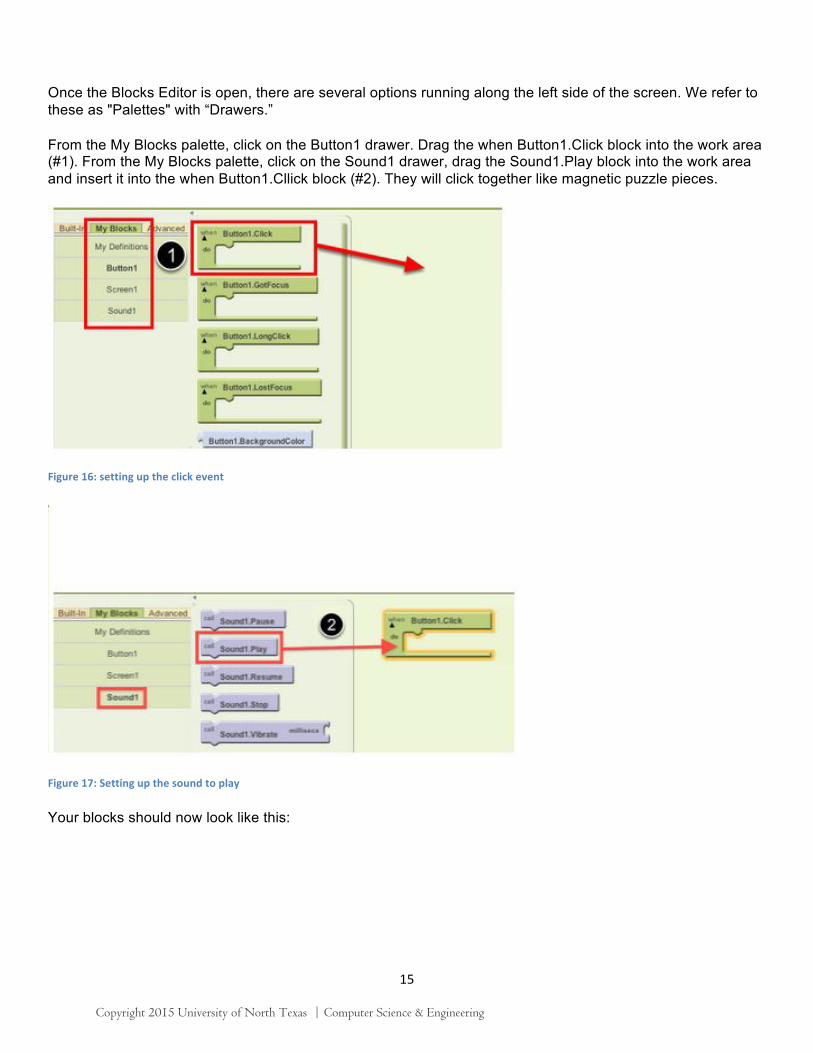
Once the Blocks Editor is open, there are several options running along the left side of the screen. We refer to these as "Palettes" with “Drawers.”
From the My Blocks palette, click on the Button1 drawer. Drag the when Button1.Click block into the work area (#1). From the My Blocks palette, click on the Sound1 drawer, drag the Sound1.Play block into the work area and insert it into the when Button1.Cllick block (#2). They will click together like magnetic puzzle pieces.
Figure 16: setting up the click event
Figure 17: Setting up the sound to play
Your blocks should now look like this:
Copyright 2015 University of North Texas | Computer Science & Engineering
16
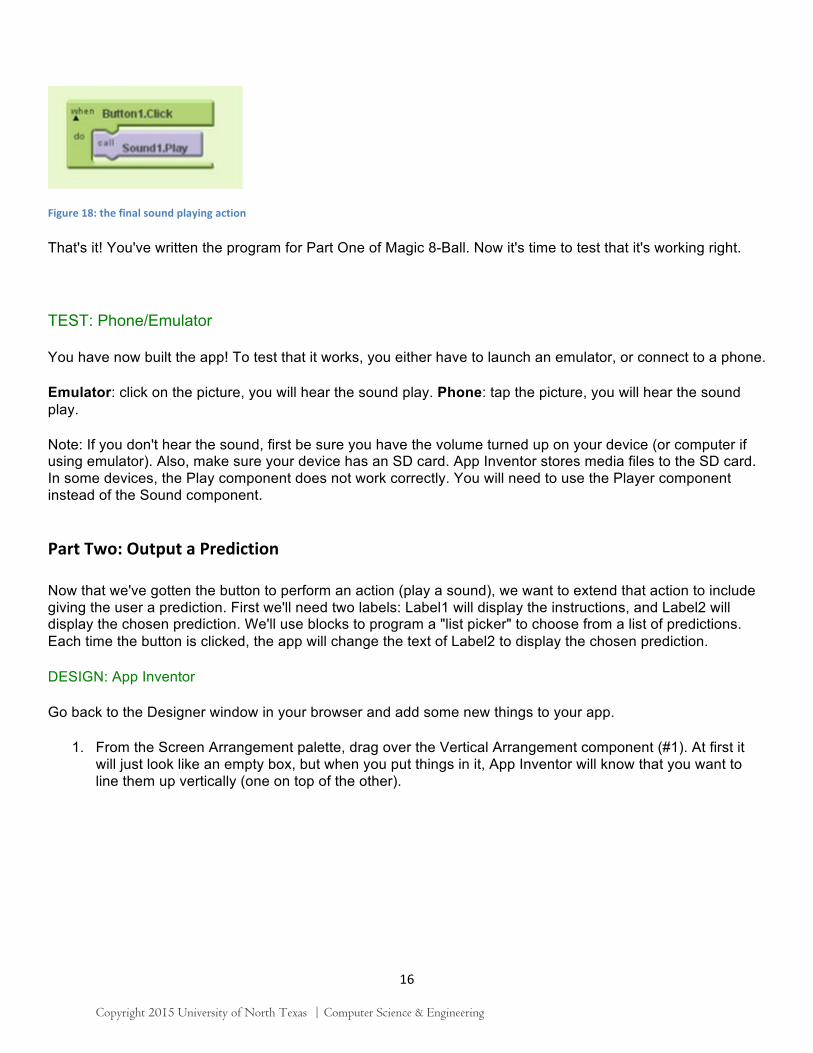
Figure 18: the final sound playing action
That's it! You've written the program for Part One of Magic 8-Ball. Now it's time to test that it's working right.
TEST: Phone/Emulator
You have now built the app! To test that it works, you either have to launch an emulator, or connect to a phone.
Emulator: click on the picture, you will hear the sound play. Phone: tap the picture, you will hear the sound play.
Note: If you don't hear the sound, first be sure you have the volume turned up on your device (or computer if using emulator). Also, make sure your device has an SD card. App Inventor stores media files to the SD card. In some devices, the Play component does not work correctly. You will need to use the Player component instead of the Sound component.
Part Two: Output a Prediction
Now that we've gotten the button to perform an action (play a sound), we want to extend that action to include giving the user a prediction. First we'll need two labels: Label1 will display the instructions, and Label2 will display the chosen prediction. We'll use blocks to program a "list picker" to choose from a list of predictions. Each time the button is clicked, the app will change the text of Label2 to display the chosen prediction.
DESIGN: App Inventor
Go back to the Designer window in your browser and add some new things to your app.
1. From the Screen Arrangement palette, drag over the Vertical Arrangement component (#1). At first itwill just look like an empty box, but when you put things in it, App Inventor will know that you want toline them up vertically (one on top of the other).
Copyright 2015 University of North Texas | Computer Science & Engineering
17
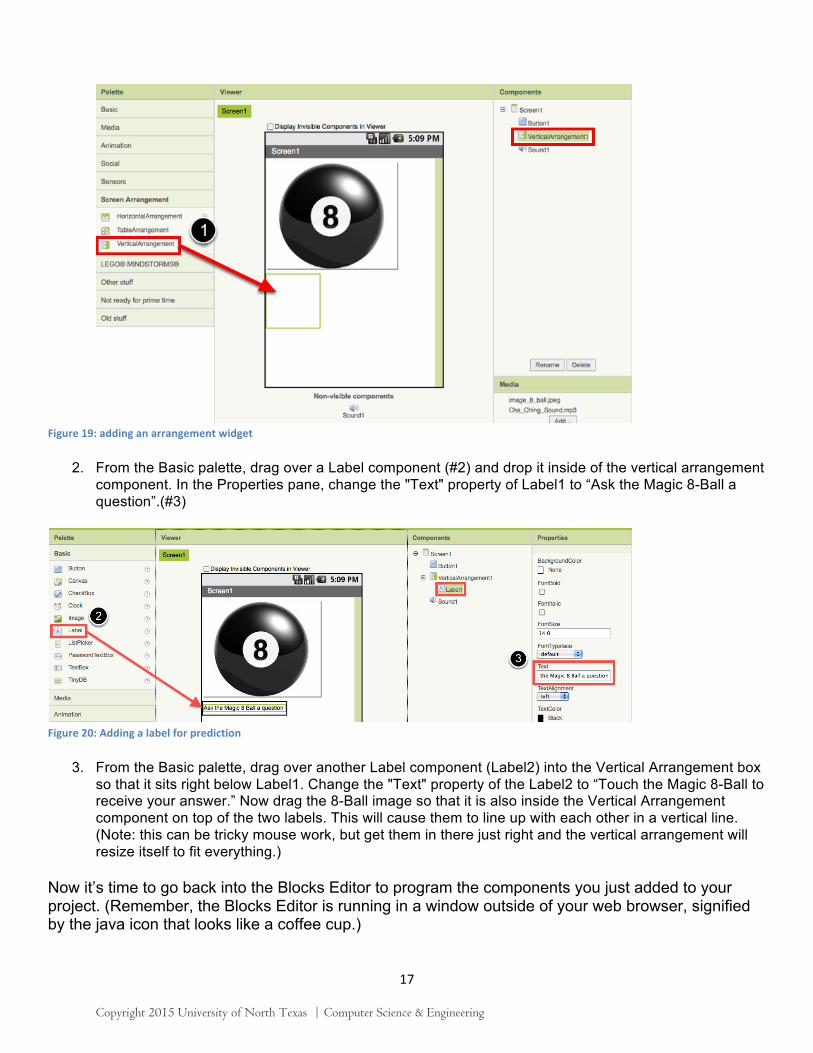
Figure 19: adding an arrangement widget
2. From the Basic palette, drag over a Label component (#2) and drop it inside of the vertical arrangementcomponent. In the Properties pane, change the "Text" property of Label1 to “Ask the Magic 8-Ball aquestion”.(#3)
Figure 20: Adding a label for prediction
3. From the Basic palette, drag over another Label component (Label2) into the Vertical Arrangement boxso that it sits right below Label1. Change the "Text" property of the Label2 to “Touch the Magic 8-Ball toreceive your answer.” Now drag the 8-Ball image so that it is also inside the Vertical Arrangementcomponent on top of the two labels. This will cause them to line up with each other in a vertical line.(Note: this can be tricky mouse work, but get them in there just right and the vertical arrangement willresize itself to fit everything.)
Now it’s time to go back into the Blocks Editor to program the components you just added to your project. (Remember, the Blocks Editor is running in a window outside of your web browser, signified by the java icon that looks like a coffee cup.)
Copyright 2015 University of North Texas | Computer Science & Engineering
18
BUILD: Blocks Editor
Now for the fun part! You're going to make a list of predictions and program the button to pick one item from the list and display it inside Label2. The button will also still play the sound that you programmed in Part One. Here's how to do it...
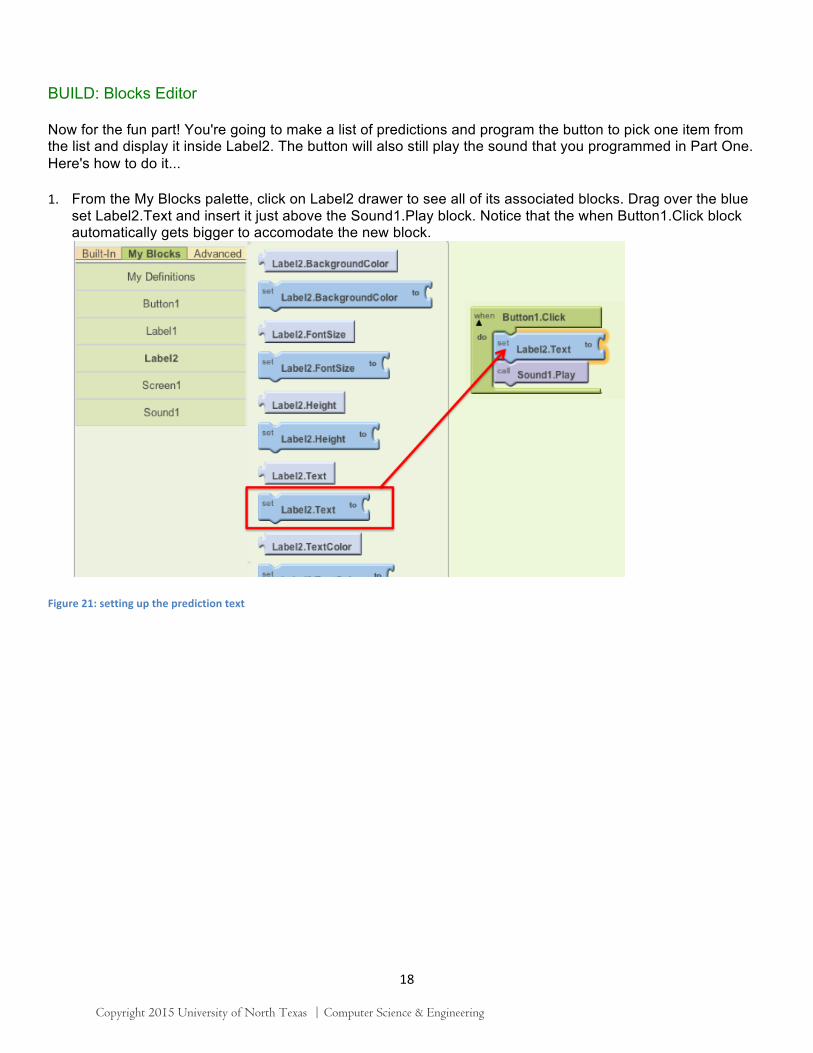
1. From the My Blocks palette, click on Label2 drawer to see all of its associated blocks. Drag over the blueset Label2.Text and insert it just above the Sound1.Play block. Notice that the when Button1.Click blockautomatically gets bigger to accomodate the new block.
Figure 21: setting up the prediction text
Copyright 2015 University of North Texas | Computer Science & Engineering
19
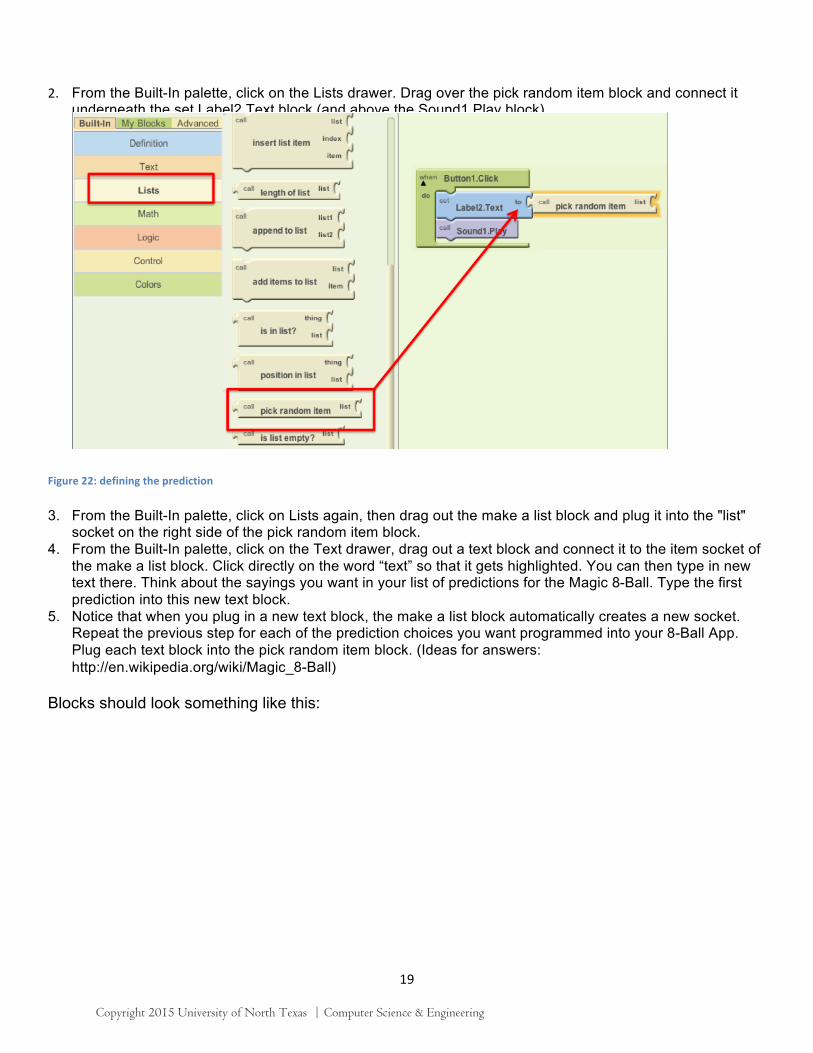
2. From the Built-In palette, click on the Lists drawer. Drag over the pick random item block and connect itunderneath the set Label2.Text block (and above the Sound1.Play block).
Figure 22: defining the prediction
3. From the Built-In palette, click on Lists again, then drag out the make a list block and plug it into the "list"socket on the right side of the pick random item block.
4. From the Built-In palette, click on the Text drawer, drag out a text block and connect it to the item socket ofthe make a list block. Click directly on the word “text” so that it gets highlighted. You can then type in newtext there. Think about the sayings you want in your list of predictions for the Magic 8-Ball. Type the firstprediction into this new text block.
5. Notice that when you plug in a new text block, the make a list block automatically creates a new socket.Repeat the previous step for each of the prediction choices you want programmed into your 8-Ball App.Plug each text block into the pick random item block. (Ideas for answers:http://en.wikipedia.org/wiki/Magic_8-Ball)
Blocks should look something like this:
Copyright 2015 University of North Texas | Computer Science & Engineering
20
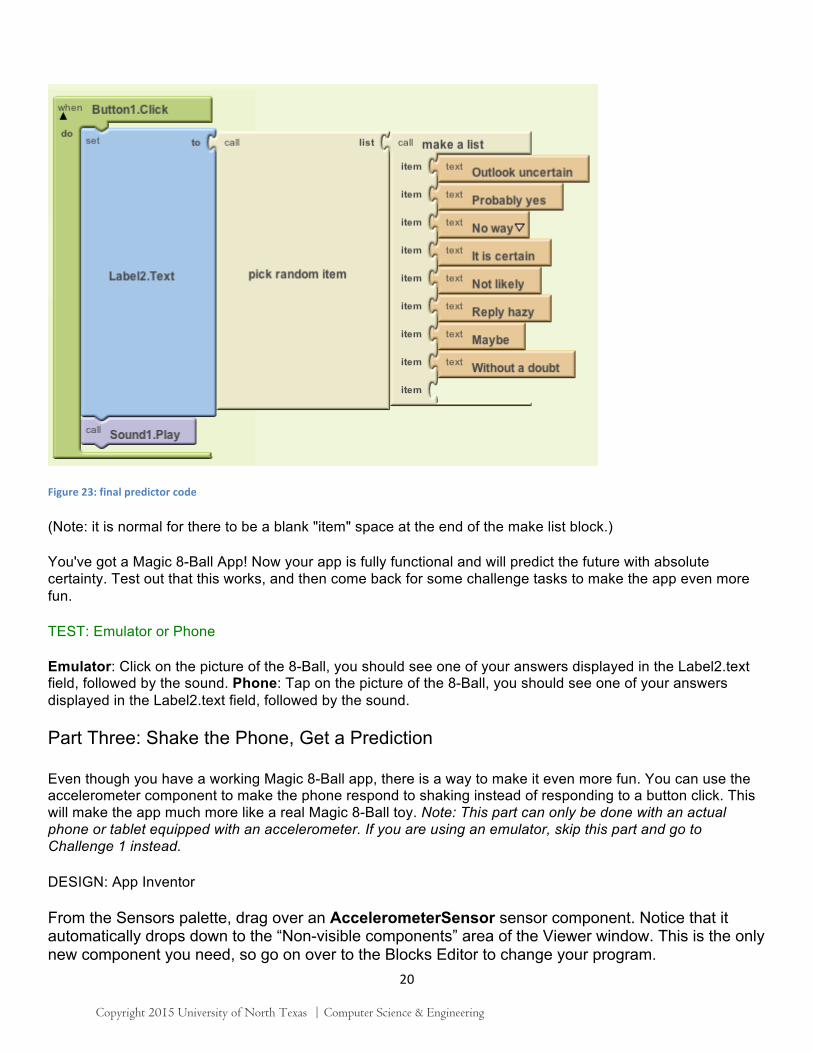
Figure 23: final predictor code
(Note: it is normal for there to be a blank "item" space at the end of the make list block.)
You've got a Magic 8-Ball App! Now your app is fully functional and will predict the future with absolute certainty. Test out that this works, and then come back for some challenge tasks to make the app even more fun.
TEST: Emulator or Phone
Emulator: Click on the picture of the 8-Ball, you should see one of your answers displayed in the Label2.text field, followed by the sound. Phone: Tap on the picture of the 8-Ball, you should see one of your answers displayed in the Label2.text field, followed by the sound.
Part Three: Shake the Phone, Get a Prediction
Even though you have a working Magic 8-Ball app, there is a way to make it even more fun. You can use the accelerometer component to make the phone respond to shaking instead of responding to a button click. This will make the app much more like a real Magic 8-Ball toy. Note: This part can only be done with an actual phone or tablet equipped with an accelerometer. If you are using an emulator, skip this part and go to Challenge 1 instead.
DESIGN: App Inventor
From the Sensors palette, drag over an AccelerometerSensor sensor component. Notice that it automatically drops down to the “Non-visible components” area of the Viewer window. This is the only new component you need, so go on over to the Blocks Editor to change your program.
Copyright 2015 University of North Texas | Computer Science & Engineering
21
BUILD: Blocks Editor
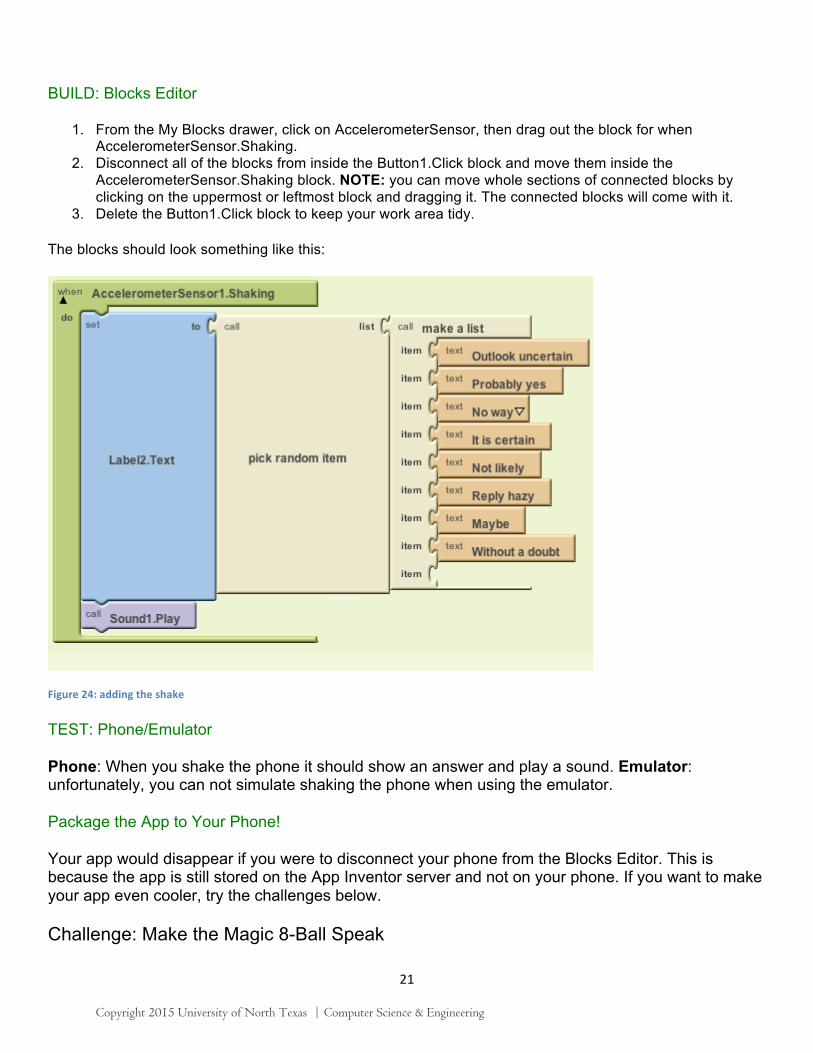
1. From the My Blocks drawer, click on AccelerometerSensor, then drag out the block for whenAccelerometerSensor.Shaking.
2. Disconnect all of the blocks from inside the Button1.Click block and move them inside theAccelerometerSensor.Shaking block. NOTE: you can move whole sections of connected blocks byclicking on the uppermost or leftmost block and dragging it. The connected blocks will come with it.
3. Delete the Button1.Click block to keep your work area tidy.
The blocks should look something like this:
Figure 24: adding the shake
TEST: Phone/Emulator
Phone: When you shake the phone it should show an answer and play a sound. Emulator: unfortunately, you can not simulate shaking the phone when using the emulator.
Package the App to Your Phone!
Your app would disappear if you were to disconnect your phone from the Blocks Editor. This is because the app is still stored on the App Inventor server and not on your phone. If you want to make your app even cooler, try the challenges below.
Challenge: Make the Magic 8-Ball Speak
Copyright 2015 University of North Texas | Computer Science & Engineering

22
Instead of (or in addition to) making the prediction appear as text, can you make the 8-Ball speak it aloud? Hint: the text-to-speech component is under the Other Stuff palette in the Designer. Note: Most Android devices have the text-to-speech (TTS) capability, but if you have trouble getting the TTS component in App Inventor to work, you may need to find out how to install TTS and/or enable TTS on your device.
Copyright 2015 University of North Texas | Computer Science & Engineering
23
Chapter Five: Creating a Paint Pot App This is a simple drawing app. It will start with three colors to choose from, a wipe button to clear the screen, and two brush size options. Later you will add features allowing you to save the drawing and draw on a picture. This app will expand on what you learned about the canvas in the previous chapter to include its drawing capabilities, and will also introduce the accelerometer and the camera.
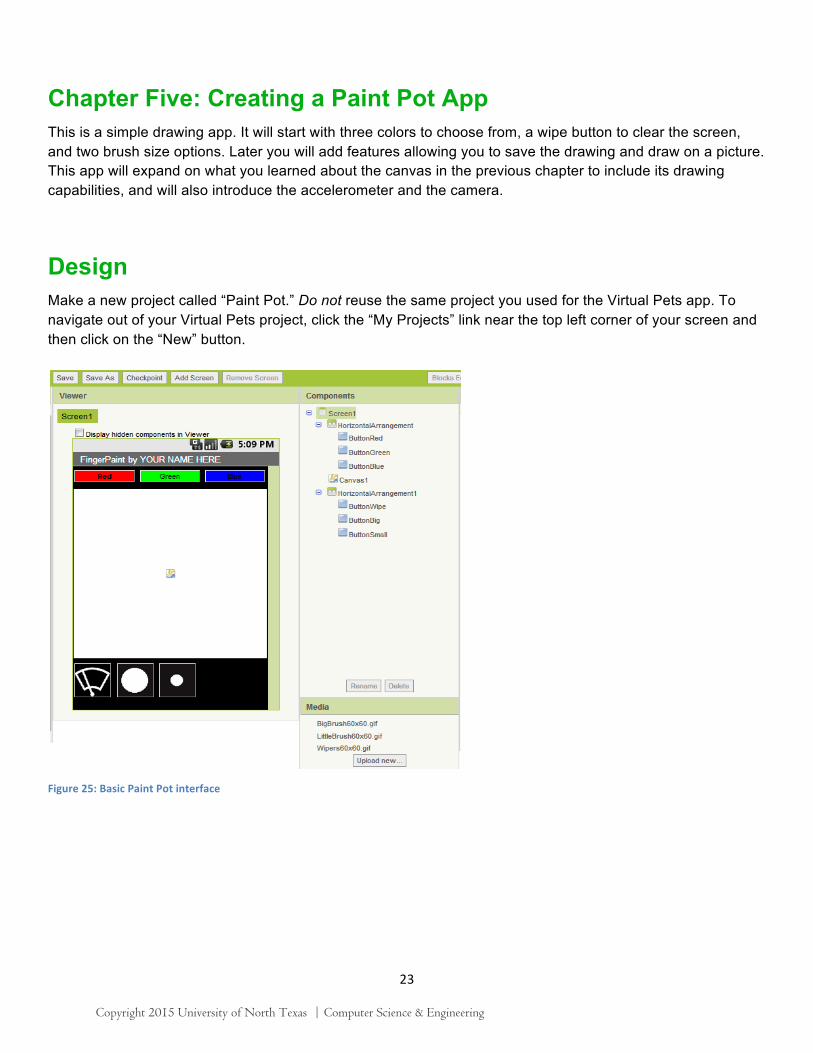
Design Make a new project called “Paint Pot.” Do not reuse the same project you used for the Virtual Pets app. To navigate out of your Virtual Pets project, click the “My Projects” link near the top left corner of your screen and then click on the “New” button.
Figure 25: Basic Paint Pot interface
Copyright 2015 University of North Texas | Computer Science & Engineering
24
To make the Paint Pot app, you will need two Horizontal Arrangements, a Canvas, and six Buttons. You will also need to upload three images for the bottom three buttons.
Build Return to the Blocks Editor. It should update your project automatically, so there’s no need to reopen it. Begin by placing your color selection buttons as shown in Figure 15.
Figure 26: Selecting a color
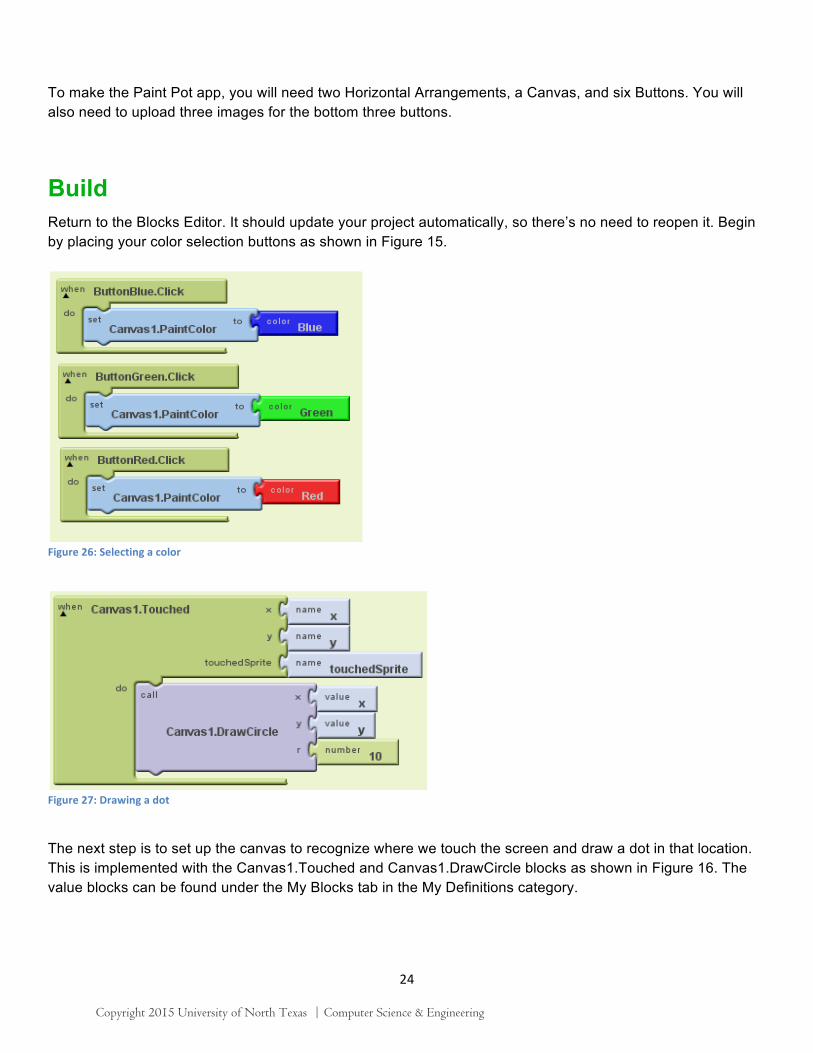
Figure 27: Drawing a dot
The next step is to set up the canvas to recognize where we touch the screen and draw a dot in that location. This is implemented with the Canvas1.Touched and Canvas1.DrawCircle blocks as shown in Figure 16. The value blocks can be found under the My Blocks tab in the My Definitions category.
Copyright 2015 University of North Texas | Computer Science & Engineering
25
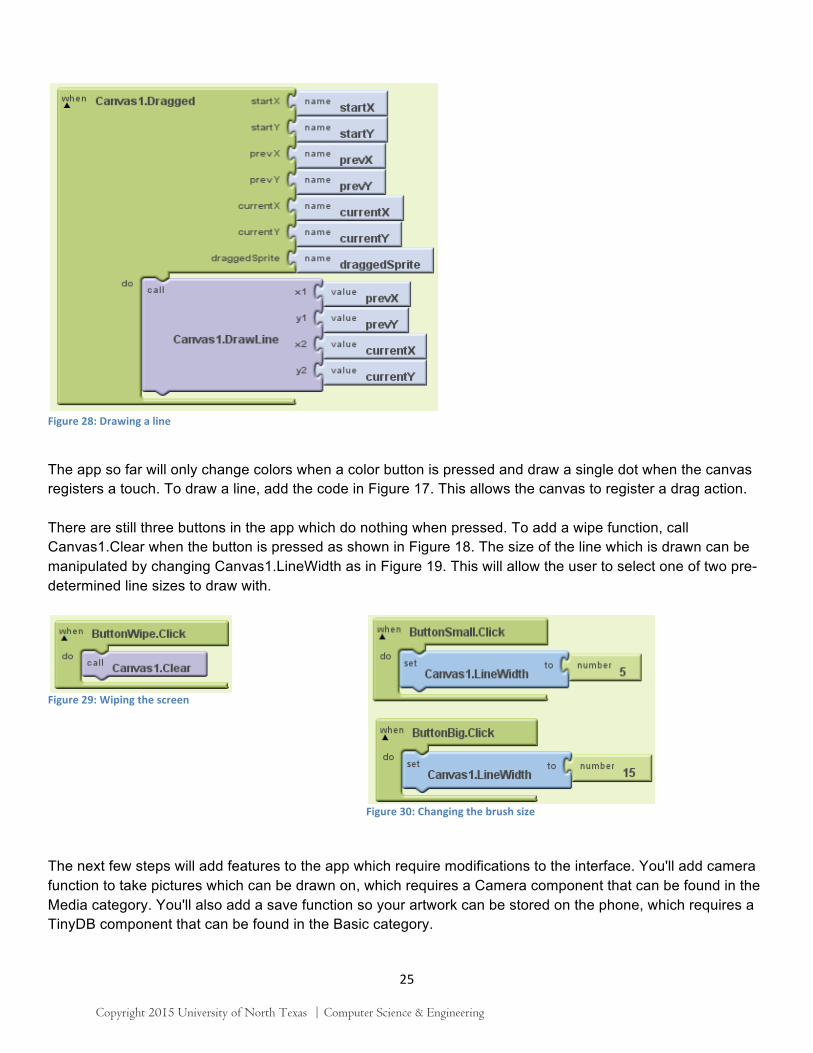
Figure 28: Drawing a line
The app so far will only change colors when a color button is pressed and draw a single dot when the canvas registers a touch. To draw a line, add the code in Figure 17. This allows the canvas to register a drag action. There are still three buttons in the app which do nothing when pressed. To add a wipe function, call Canvas1.Clear when the button is pressed as shown in Figure 18. The size of the line which is drawn can be manipulated by changing Canvas1.LineWidth as in Figure 19. This will allow the user to select one of two pre-determined line sizes to draw with.
Figure 29: Wiping the screen
Figure 30: Changing the brush size
The next few steps will add features to the app which require modifications to the interface. You'll add camera function to take pictures which can be drawn on, which requires a Camera component that can be found in the Media category. You'll also add a save function so your artwork can be stored on the phone, which requires a TinyDB component that can be found in the Basic category.
Copyright 2015 University of North Texas | Computer Science & Engineering
26
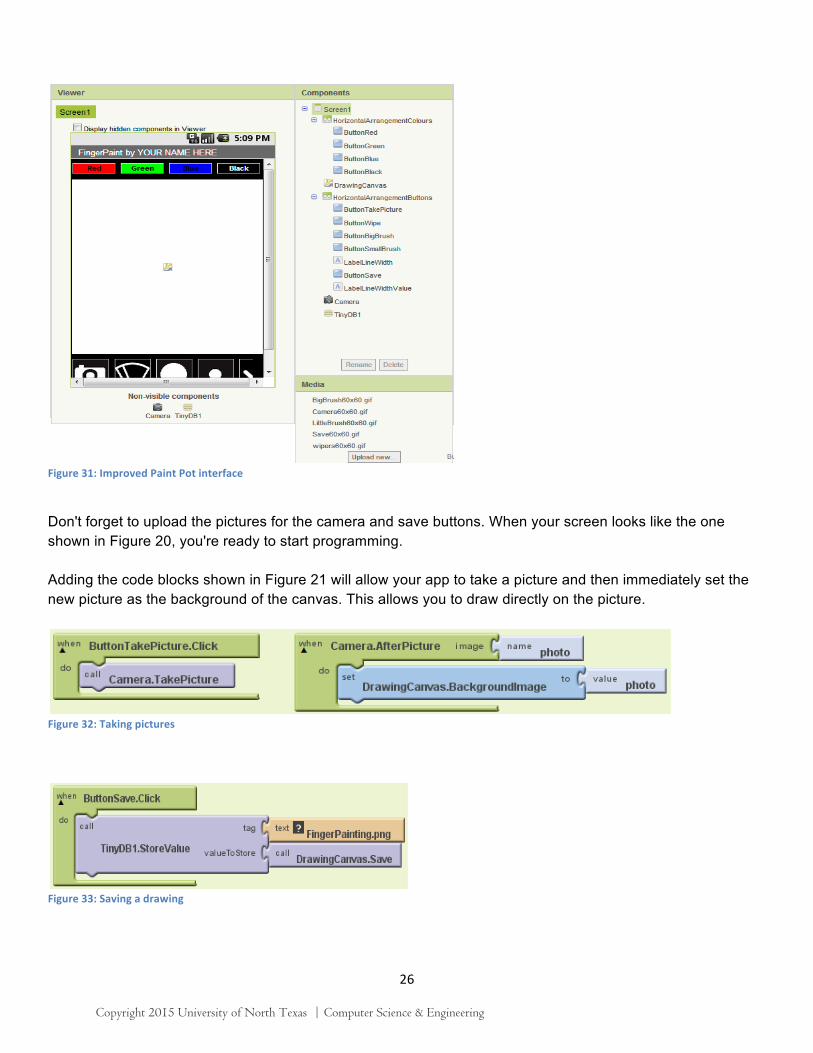
Figure 31: Improved Paint Pot interface
Don't forget to upload the pictures for the camera and save buttons. When your screen looks like the one shown in Figure 20, you're ready to start programming.
Adding the code blocks shown in Figure 21 will allow your app to take a picture and then immediately set the new picture as the background of the canvas. This allows you to draw directly on the picture.
Figure 32: Taking pictures
Figure 33: Saving a drawing
Copyright 2015 University of North Texas | Computer Science & Engineering
27
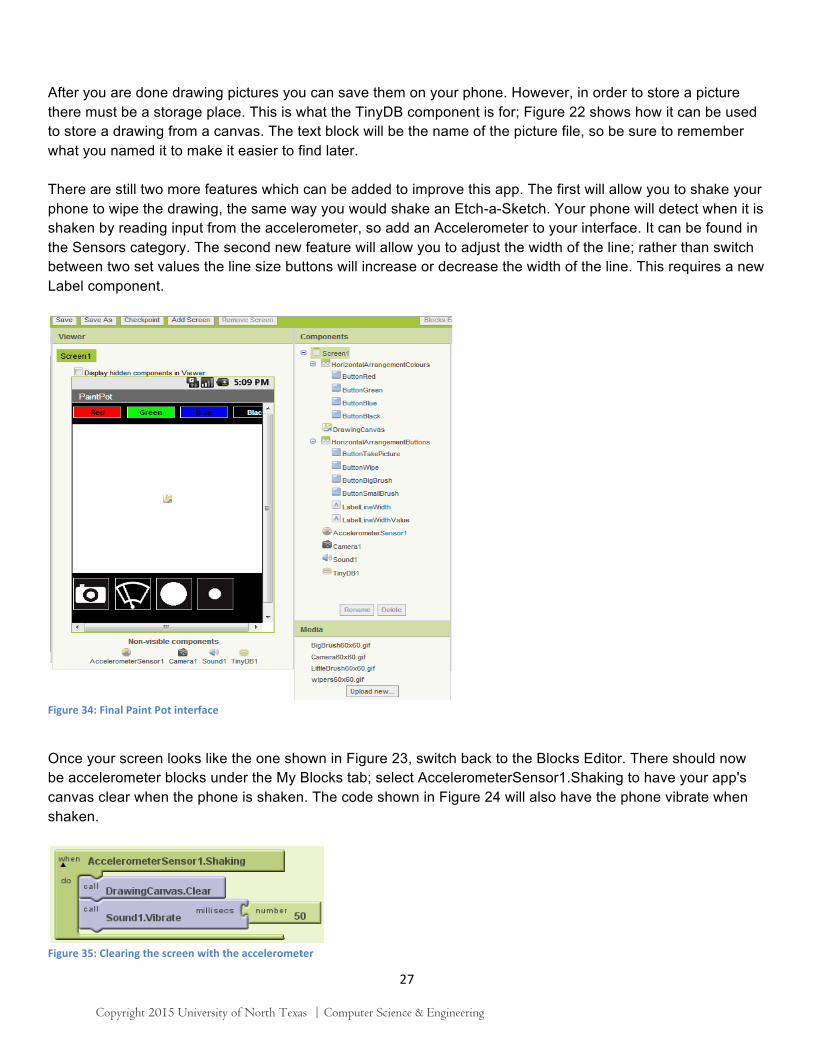
After you are done drawing pictures you can save them on your phone. However, in order to store a picture there must be a storage place. This is what the TinyDB component is for; Figure 22 shows how it can be used to store a drawing from a canvas. The text block will be the name of the picture file, so be sure to remember what you named it to make it easier to find later. There are still two more features which can be added to improve this app. The first will allow you to shake your phone to wipe the drawing, the same way you would shake an Etch-a-Sketch. Your phone will detect when it is shaken by reading input from the accelerometer, so add an Accelerometer to your interface. It can be found in the Sensors category. The second new feature will allow you to adjust the width of the line; rather than switch between two set values the line size buttons will increase or decrease the width of the line. This requires a new Label component.
Figure 34: Final Paint Pot interface
Once your screen looks like the one shown in Figure 23, switch back to the Blocks Editor. There should now be accelerometer blocks under the My Blocks tab; select AccelerometerSensor1.Shaking to have your app's canvas clear when the phone is shaken. The code shown in Figure 24 will also have the phone vibrate when shaken.
Figure 35: Clearing the screen with the accelerometer
Copyright 2015 University of North Texas | Computer Science & Engineering
28
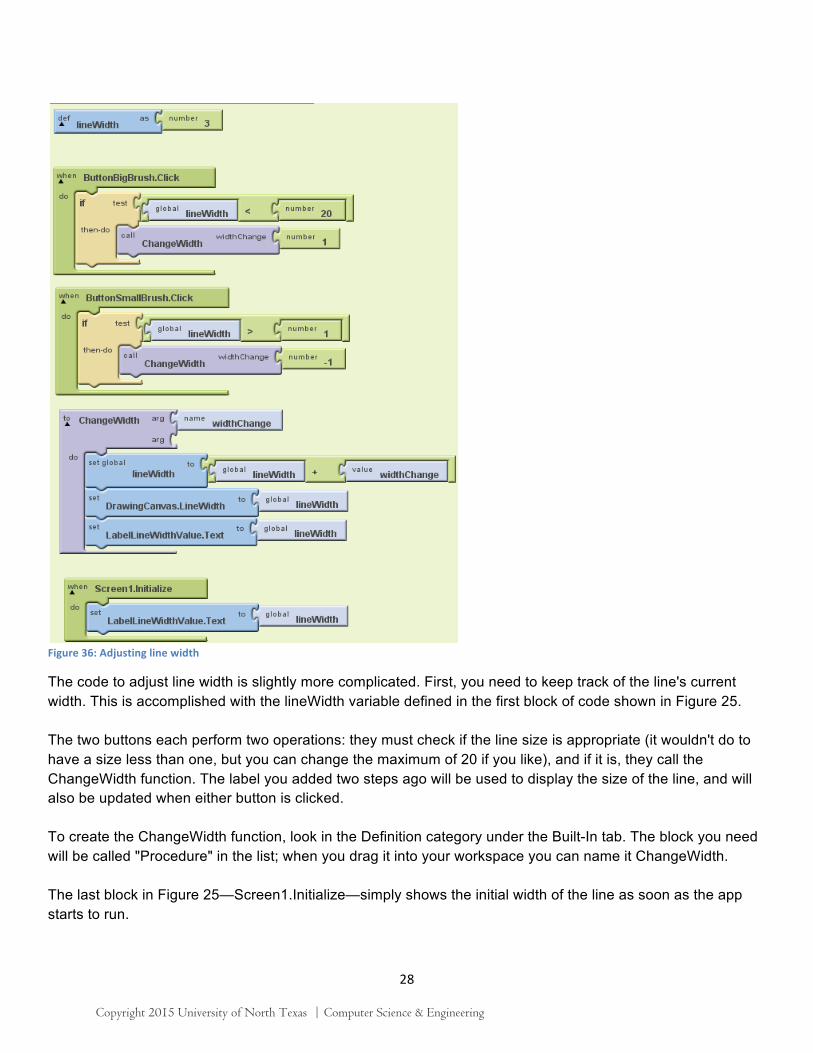
Figure 36: Adjusting line width
The code to adjust line width is slightly more complicated. First, you need to keep track of the line's current width. This is accomplished with the lineWidth variable defined in the first block of code shown in Figure 25.
The two buttons each perform two operations: they must check if the line size is appropriate (it wouldn't do to have a size less than one, but you can change the maximum of 20 if you like), and if it is, they call the ChangeWidth function. The label you added two steps ago will be used to display the size of the line, and will also be updated when either button is clicked.
To create the ChangeWidth function, look in the Definition category under the Built-In tab. The block you need will be called "Procedure" in the list; when you drag it into your workspace you can name it ChangeWidth.
The last block in Figure 25—Screen1.Initialize—simply shows the initial width of the line as soon as the app starts to run.
Copyright 2015 University of North Texas | Computer Science & Engineering
29
Test
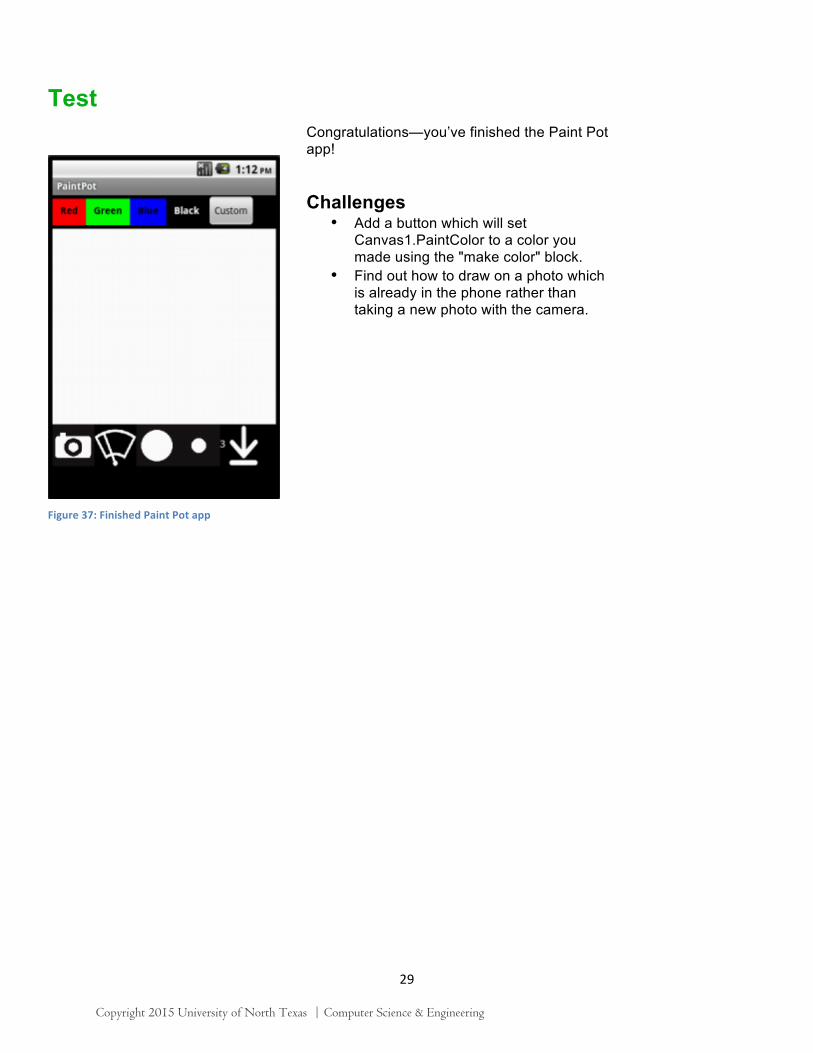
Figure 37: Finished Paint Pot app
Congratulations—you’ve finished the Paint Pot app! Challenges
• Add a button which will set Canvas1.PaintColor to a color you made using the "make color" block.
• Find out how to draw on a photo which is already in the phone rather than taking a new photo with the camera.
Copyright 2015 University of North Texas | Computer Science & Engineering
30
Chapter Six: Creating a Pong App Pong is a classic game in which a ball bounces around the screen and the user controls a paddle. The goal of the game is to prevent the ball from reaching the bottom of the screen by bouncing it off the paddle. The left and right arrows on the bottom of the screen control the direction of the paddle, and a start button in the middle will restart the game. At the top is a label that will keep track of your score. This app serves as an introduction to sprites, collision detection, and basic game design.
Design
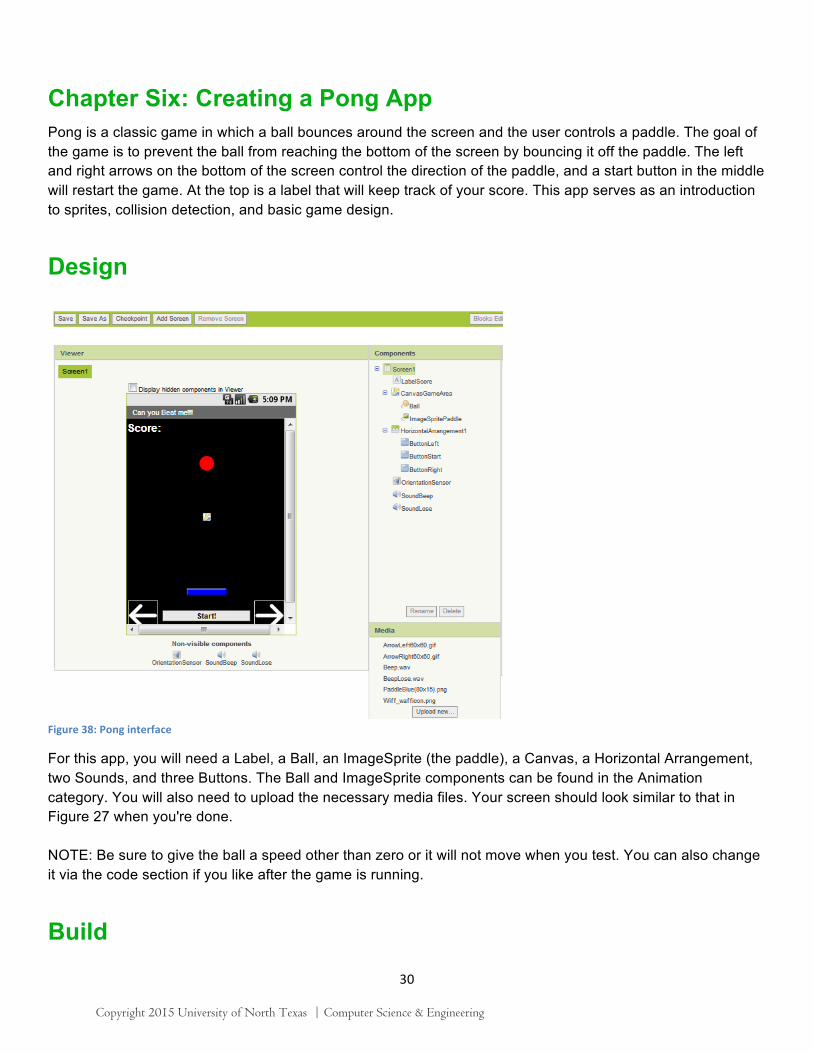
Figure 38: Pong interface
For this app, you will need a Label, a Ball, an ImageSprite (the paddle), a Canvas, a Horizontal Arrangement, two Sounds, and three Buttons. The Ball and ImageSprite components can be found in the Animation category. You will also need to upload the necessary media files. Your screen should look similar to that in Figure 27 when you're done.
NOTE: Be sure to give the ball a speed other than zero or it will not move when you test. You can also change it via the code section if you like after the game is running.
Build
Copyright 2015 University of North Texas | Computer Science & Engineering
31
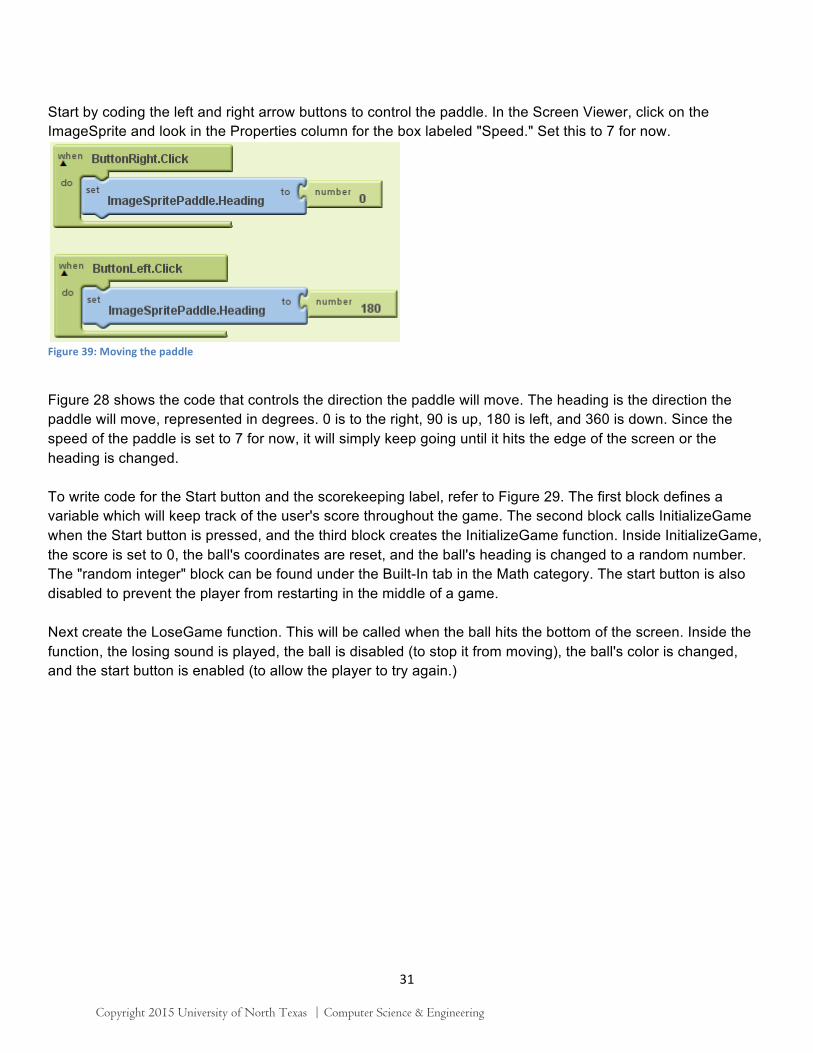
Start by coding the left and right arrow buttons to control the paddle. In the Screen Viewer, click on the ImageSprite and look in the Properties column for the box labeled "Speed." Set this to 7 for now.
Figure 39: Moving the paddle
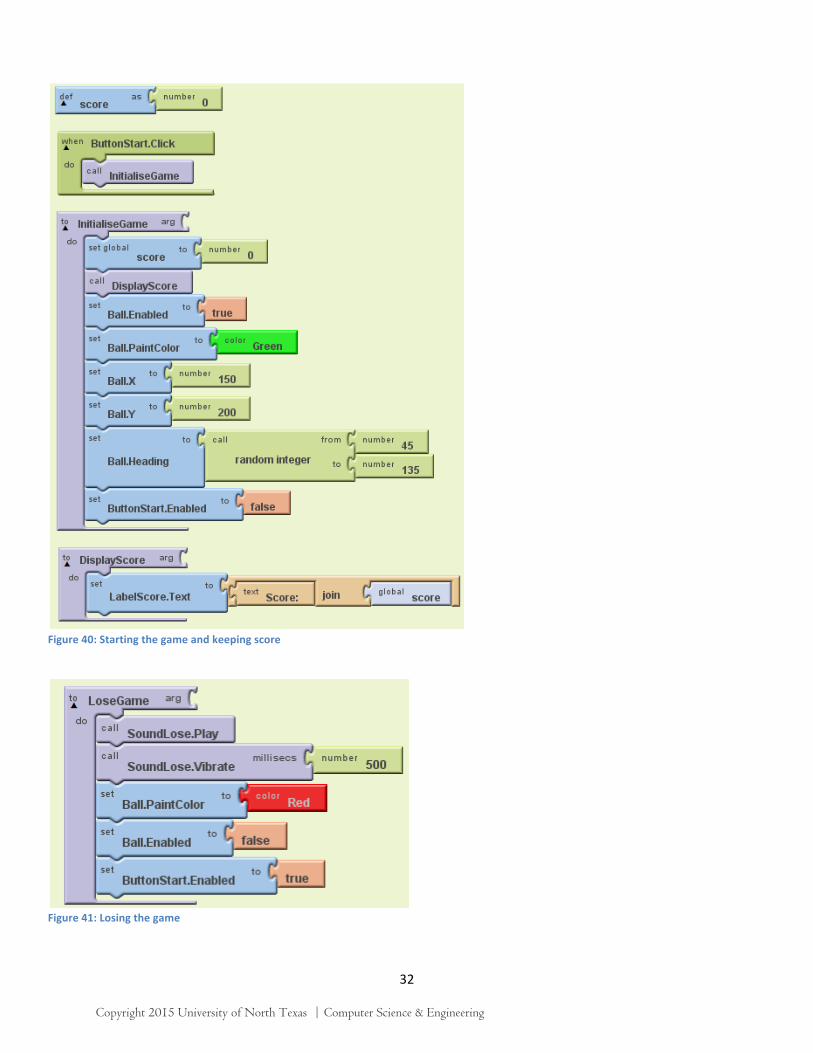
Figure 28 shows the code that controls the direction the paddle will move. The heading is the direction the paddle will move, represented in degrees. 0 is to the right, 90 is up, 180 is left, and 360 is down. Since the speed of the paddle is set to 7 for now, it will simply keep going until it hits the edge of the screen or the heading is changed. To write code for the Start button and the scorekeeping label, refer to Figure 29. The first block defines a variable which will keep track of the user's score throughout the game. The second block calls InitializeGame when the Start button is pressed, and the third block creates the InitializeGame function. Inside InitializeGame, the score is set to 0, the ball's coordinates are reset, and the ball's heading is changed to a random number. The "random integer" block can be found under the Built-In tab in the Math category. The start button is also disabled to prevent the player from restarting in the middle of a game. Next create the LoseGame function. This will be called when the ball hits the bottom of the screen. Inside the function, the losing sound is played, the ball is disabled (to stop it from moving), the ball's color is changed, and the start button is enabled (to allow the player to try again.)
Copyright 2015 University of North Texas | Computer Science & Engineering
32
Figure 40: Starting the game and keeping score
Figure 41: Losing the game
Copyright 2015 University of North Texas | Computer Science & Engineering
33
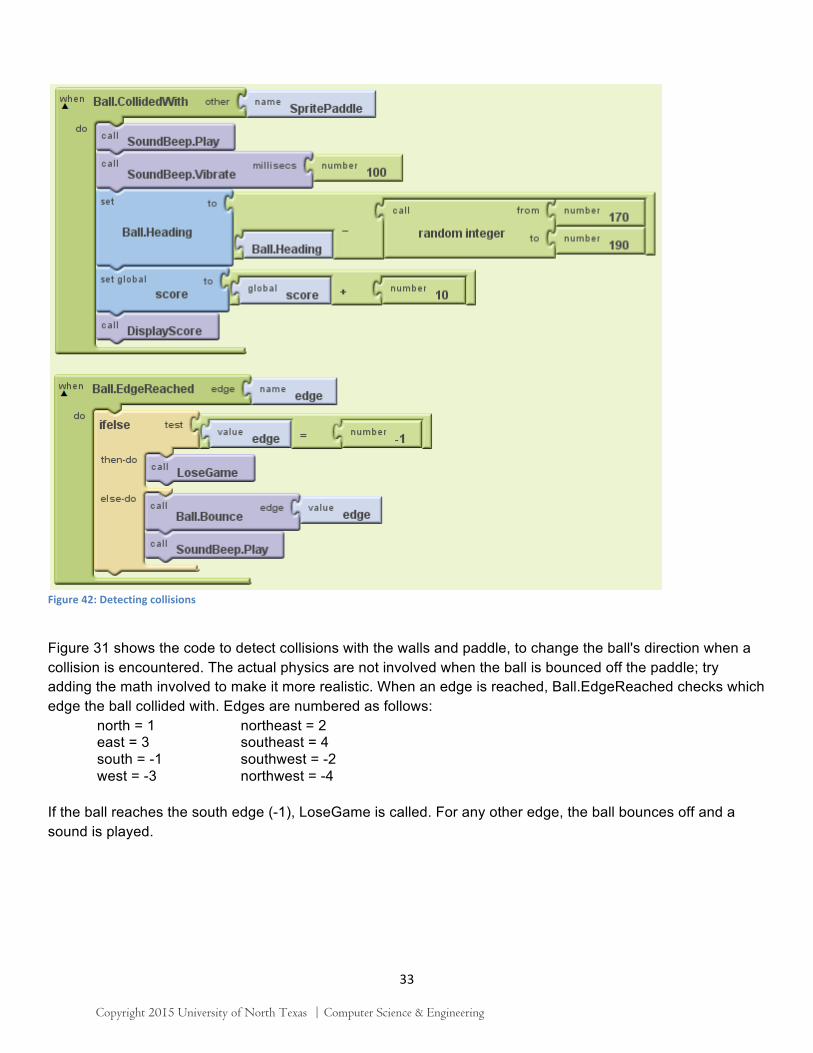
Figure 42: Detecting collisions
Figure 31 shows the code to detect collisions with the walls and paddle, to change the ball's direction when a collision is encountered. The actual physics are not involved when the ball is bounced off the paddle; try adding the math involved to make it more realistic. When an edge is reached, Ball.EdgeReached checks which edge the ball collided with. Edges are numbered as follows:
north = 1 northeast = 2 east = 3 southeast = 4 south = -1 southwest = -2 west = -3 northwest = -4
If the ball reaches the south edge (-1), LoseGame is called. For any other edge, the ball bounces off and a sound is played.
Copyright 2015 University of North Texas | Computer Science & Engineering
34
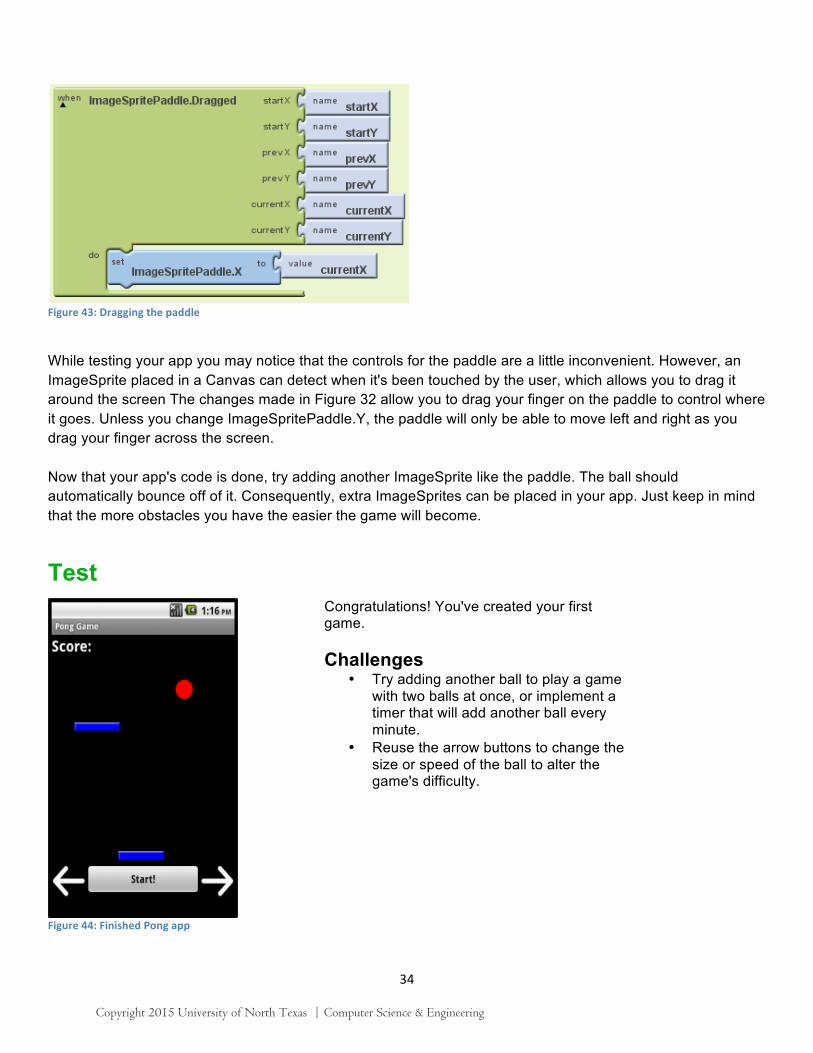
Figure 43: Dragging the paddle
While testing your app you may notice that the controls for the paddle are a little inconvenient. However, an ImageSprite placed in a Canvas can detect when it's been touched by the user, which allows you to drag it around the screen The changes made in Figure 32 allow you to drag your finger on the paddle to control where it goes. Unless you change ImageSpritePaddle.Y, the paddle will only be able to move left and right as you drag your finger across the screen.
Now that your app's code is done, try adding another ImageSprite like the paddle. The ball should automatically bounce off of it. Consequently, extra ImageSprites can be placed in your app. Just keep in mind that the more obstacles you have the easier the game will become.
Test
Figure 44: Finished Pong app
Congratulations! You've created your first game.
Challenges • Try adding another ball to play a game
with two balls at once, or implement a timer that will add another ball every minute.
• Reuse the arrow buttons to change thesize or speed of the ball to alter the game's difficulty.
Copyright 2015 University of North Texas | Computer Science & Engineering
35
Chapter Seven: Creating a Tilt App Most phones have an accelerometer, which can sense when the phone has been tipped to one side. This is what allows you to change from picture style to landscape style with a simple twist of your phone. In this game, the ball will move at a rate comparable to the angle the screen is at. If the screen is flat then the ball will move slowly or not at all, but if the angle is steep the ball will accelerate and travel down the screen at a much faster rate. The goal of the game is to direct the ball to a "goal" ImageSprite.
Design For this app you will need a Ball, an ImageSprite (for the goal), an Accelerometer, and two Labels.
Build
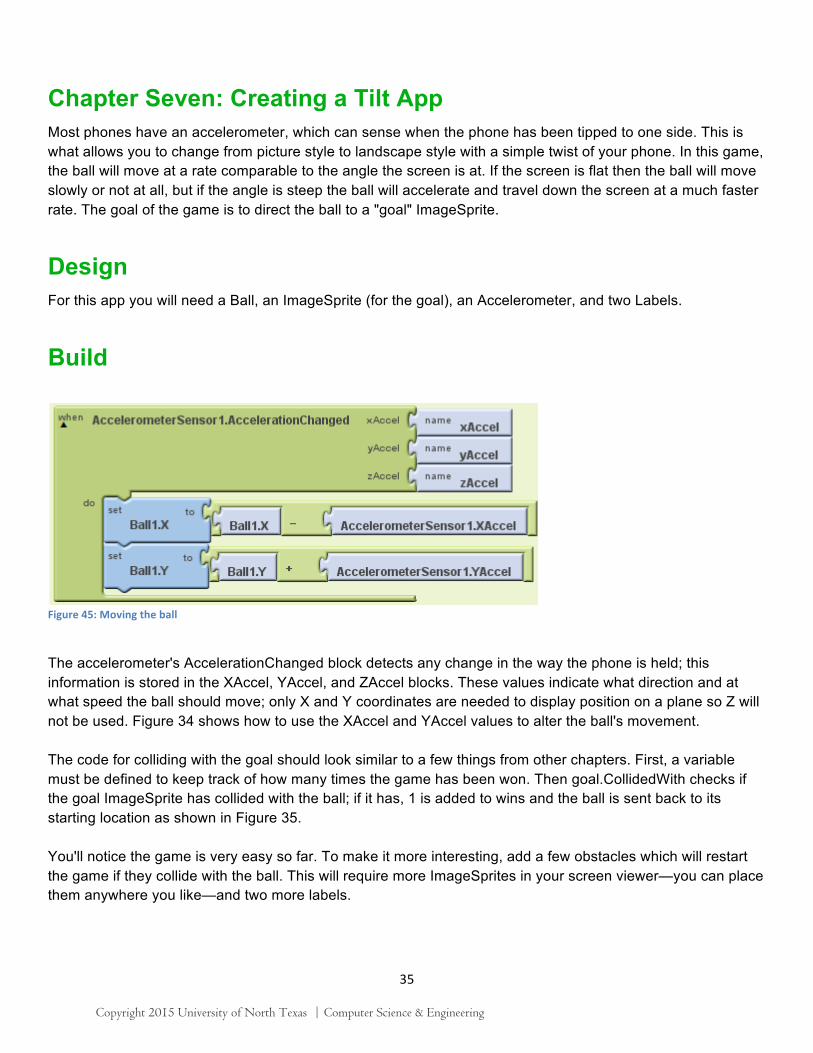
Figure 45: Moving the ball
The accelerometer's AccelerationChanged block detects any change in the way the phone is held; this information is stored in the XAccel, YAccel, and ZAccel blocks. These values indicate what direction and at what speed the ball should move; only X and Y coordinates are needed to display position on a plane so Z will not be used. Figure 34 shows how to use the XAccel and YAccel values to alter the ball's movement. The code for colliding with the goal should look similar to a few things from other chapters. First, a variable must be defined to keep track of how many times the game has been won. Then goal.CollidedWith checks if the goal ImageSprite has collided with the ball; if it has, 1 is added to wins and the ball is sent back to its starting location as shown in Figure 35. You'll notice the game is very easy so far. To make it more interesting, add a few obstacles which will restart the game if they collide with the ball. This will require more ImageSprites in your screen viewer—you can place them anywhere you like—and two more labels.
Copyright 2015 University of North Texas | Computer Science & Engineering
36
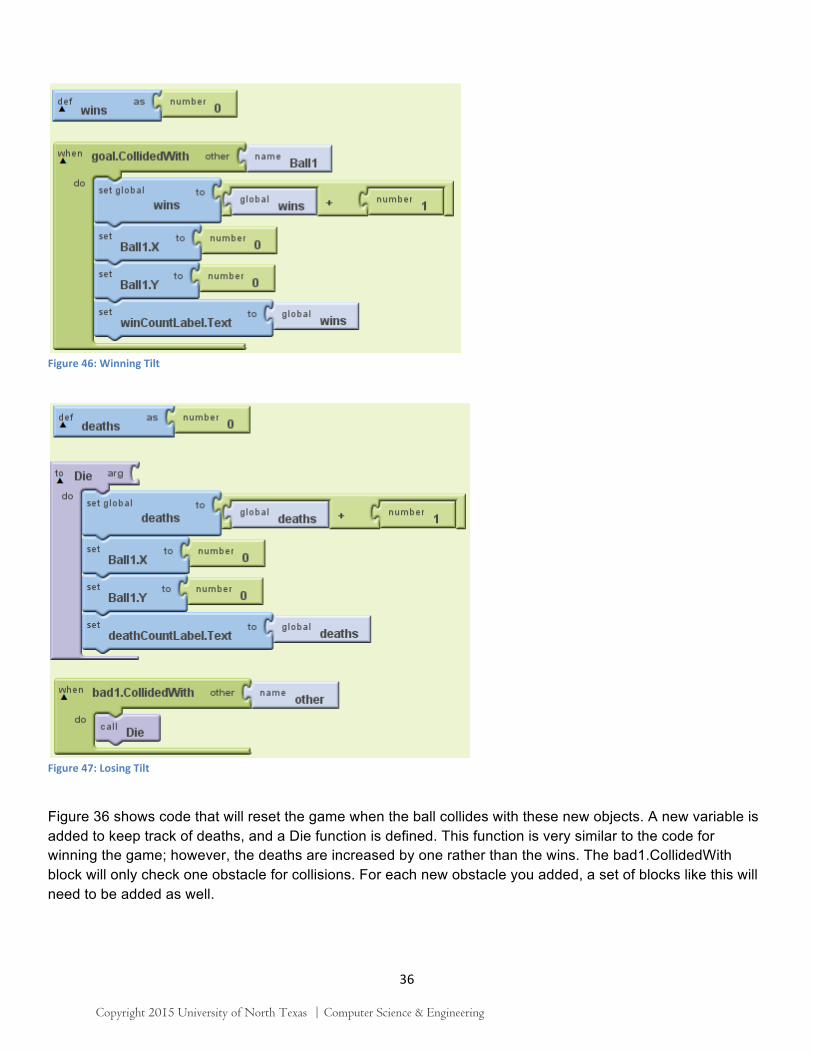
Figure 46: Winning Tilt
Figure 47: Losing Tilt
Figure 36 shows code that will reset the game when the ball collides with these new objects. A new variable is added to keep track of deaths, and a Die function is defined. This function is very similar to the code for winning the game; however, the deaths are increased by one rather than the wins. The bad1.CollidedWith block will only check one obstacle for collisions. For each new obstacle you added, a set of blocks like this will need to be added as well.
Copyright 2015 University of North Texas | Computer Science & Engineering
37
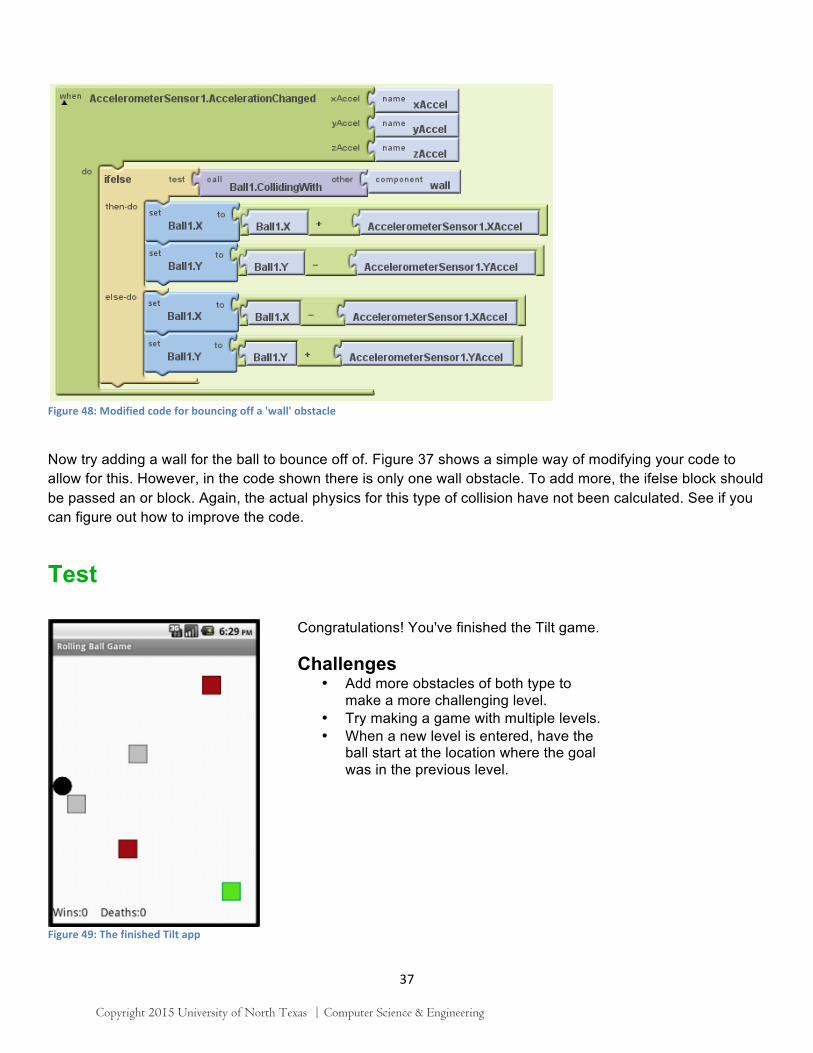
Figure 48: Modified code for bouncing off a 'wall' obstacle
Now try adding a wall for the ball to bounce off of. Figure 37 shows a simple way of modifying your code to allow for this. However, in the code shown there is only one wall obstacle. To add more, the ifelse block should be passed an or block. Again, the actual physics for this type of collision have not been calculated. See if you can figure out how to improve the code.
Test
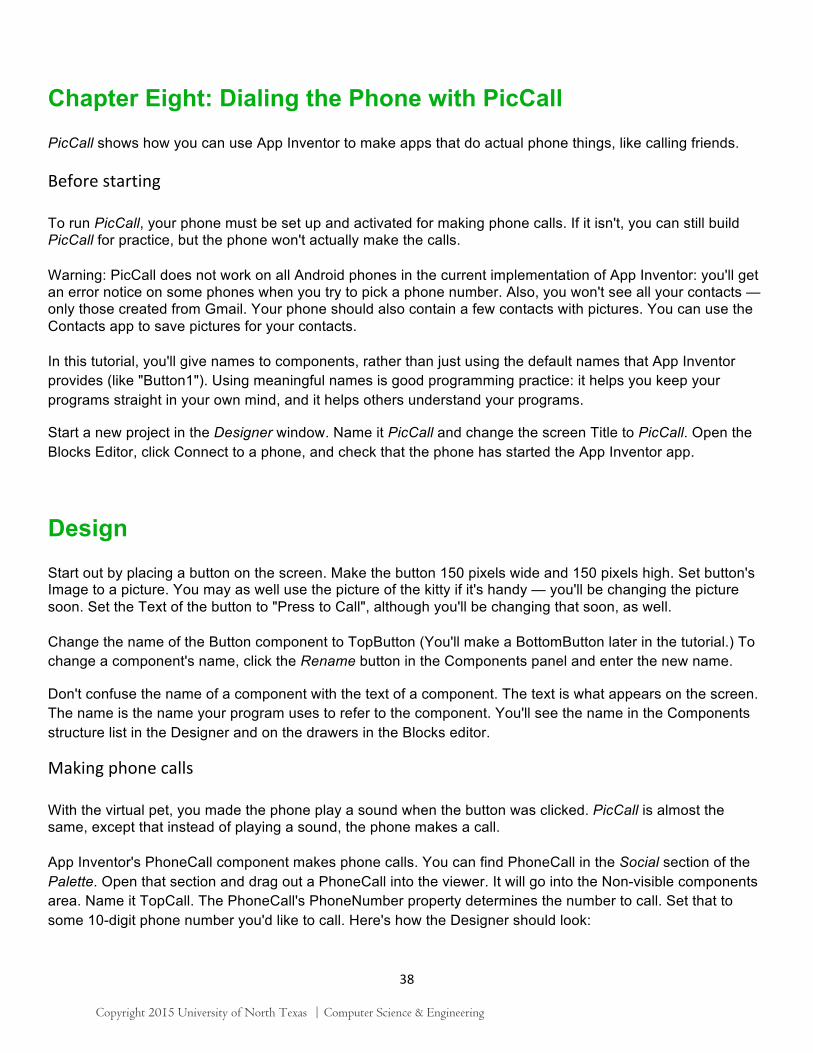
Figure 49: The finished Tilt app
Congratulations! You've finished the Tilt game. Challenges
• Add more obstacles of both type to make a more challenging level.
• Try making a game with multiple levels. • When a new level is entered, have the
ball start at the location where the goal was in the previous level.
Copyright 2015 University of North Texas | Computer Science & Engineering
38
Chapter Eight: Dialing the Phone with PicCall PicCall shows how you can use App Inventor to make apps that do actual phone things, like calling friends.
Before starting
To run PicCall, your phone must be set up and activated for making phone calls. If it isn't, you can still build PicCall for practice, but the phone won't actually make the calls.
Warning: PicCall does not work on all Android phones in the current implementation of App Inventor: you'll get an error notice on some phones when you try to pick a phone number. Also, you won't see all your contacts — only those created from Gmail. Your phone should also contain a few contacts with pictures. You can use the Contacts app to save pictures for your contacts.
In this tutorial, you'll give names to components, rather than just using the default names that App Inventor provides (like "Button1"). Using meaningful names is good programming practice: it helps you keep your programs straight in your own mind, and it helps others understand your programs.
Start a new project in the Designer window. Name it PicCall and change the screen Title to PicCall. Open the Blocks Editor, click Connect to a phone, and check that the phone has started the App Inventor app.
Design Start out by placing a button on the screen. Make the button 150 pixels wide and 150 pixels high. Set button's Image to a picture. You may as well use the picture of the kitty if it's handy — you'll be changing the picture soon. Set the Text of the button to "Press to Call", although you'll be changing that soon, as well.
Change the name of the Button component to TopButton (You'll make a BottomButton later in the tutorial.) To change a component's name, click the Rename button in the Components panel and enter the new name.
Don't confuse the name of a component with the text of a component. The text is what appears on the screen. The name is the name your program uses to refer to the component. You'll see the name in the Components structure list in the Designer and on the drawers in the Blocks editor.
Making phone calls
With the virtual pet, you made the phone play a sound when the button was clicked. PicCall is almost the same, except that instead of playing a sound, the phone makes a call.
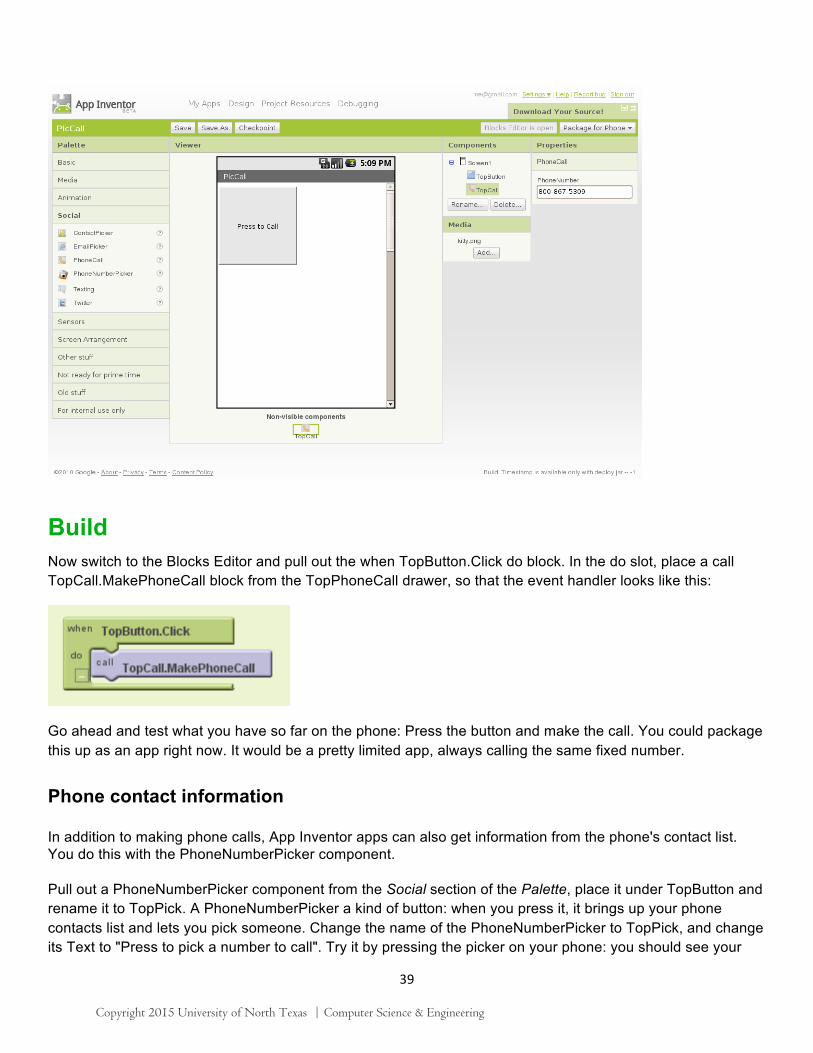
App Inventor's PhoneCall component makes phone calls. You can find PhoneCall in the Social section of the Palette. Open that section and drag out a PhoneCall into the viewer. It will go into the Non-visible components area. Name it TopCall. The PhoneCall's PhoneNumber property determines the number to call. Set that to some 10-digit phone number you'd like to call. Here's how the Designer should look:
Copyright 2015 University of North Texas | Computer Science & Engineering
39
Build Now switch to the Blocks Editor and pull out the when TopButton.Click do block. In the do slot, place a call TopCall.MakePhoneCall block from the TopPhoneCall drawer, so that the event handler looks like this:
Go ahead and test what you have so far on the phone: Press the button and make the call. You could package this up as an app right now. It would be a pretty limited app, always calling the same fixed number.
Phone contact information
In addition to making phone calls, App Inventor apps can also get information from the phone's contact list. You do this with the PhoneNumberPicker component.
Pull out a PhoneNumberPicker component from the Social section of the Palette, place it under TopButton and rename it to TopPick. A PhoneNumberPicker a kind of button: when you press it, it brings up your phone contacts list and lets you pick someone. Change the name of the PhoneNumberPicker to TopPick, and change its Text to "Press to pick a number to call". Try it by pressing the picker on your phone: you should see your
Copyright 2015 University of North Texas | Computer Science & Engineering
40
contacts come up, and you can pick one. Nothing will happen after you pick, because you haven't yet told the components to do anything. You'll do that next.
Using the picker
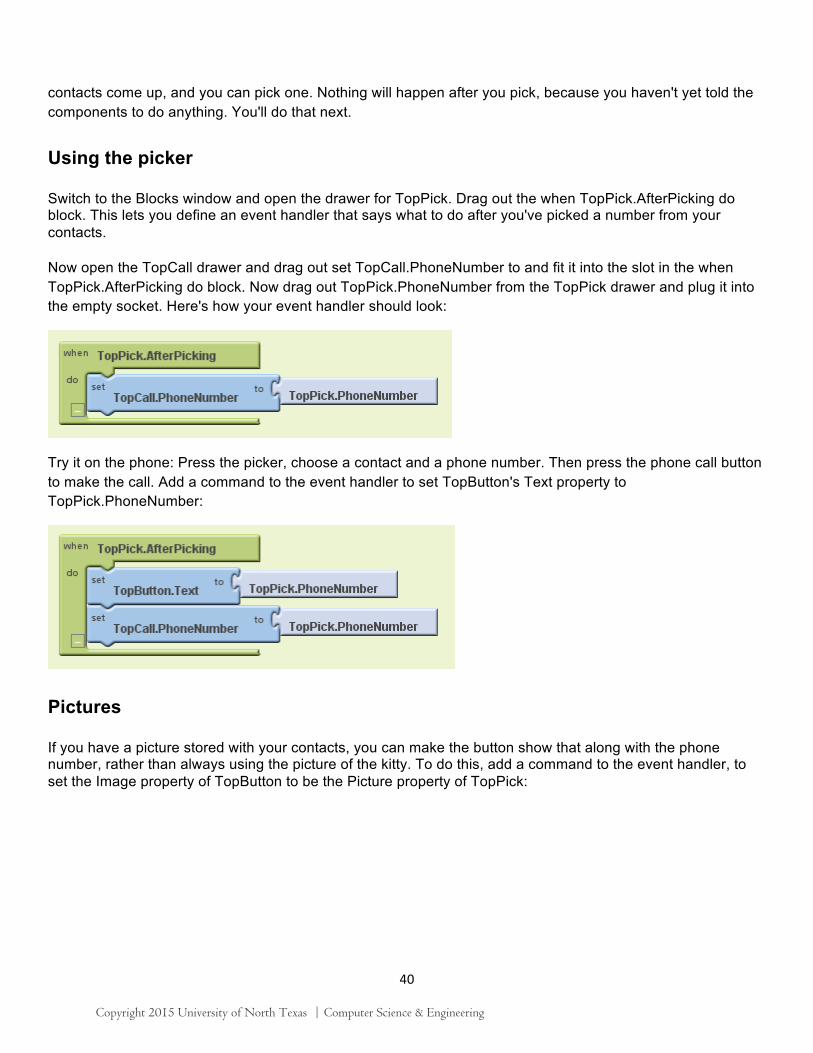
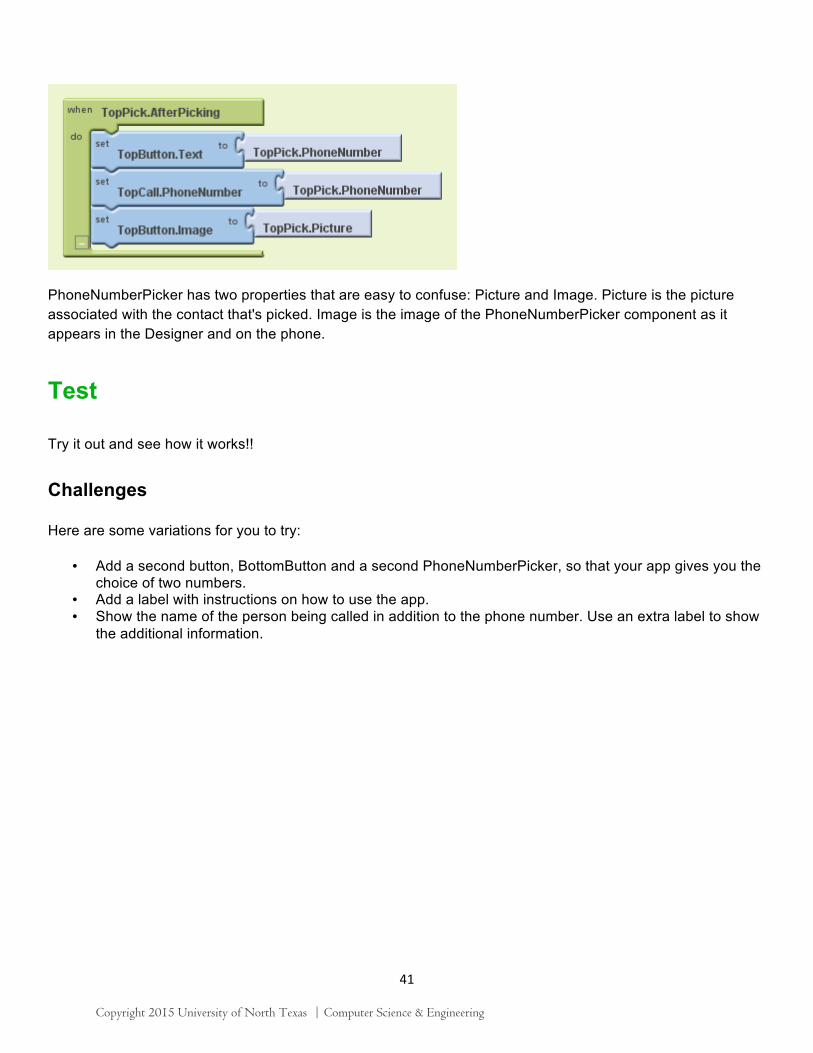
Switch to the Blocks window and open the drawer for TopPick. Drag out the when TopPick.AfterPicking do block. This lets you define an event handler that says what to do after you've picked a number from your contacts.
Now open the TopCall drawer and drag out set TopCall.PhoneNumber to and fit it into the slot in the when TopPick.AfterPicking do block. Now drag out TopPick.PhoneNumber from the TopPick drawer and plug it into the empty socket. Here's how your event handler should look:
Try it on the phone: Press the picker, choose a contact and a phone number. Then press the phone call button to make the call. Add a command to the event handler to set TopButton's Text property to TopPick.PhoneNumber:
Pictures
If you have a picture stored with your contacts, you can make the button show that along with the phone number, rather than always using the picture of the kitty. To do this, add a command to the event handler, to set the Image property of TopButton to be the Picture property of TopPick:
Copyright 2015 University of North Texas | Computer Science & Engineering
41
PhoneNumberPicker has two properties that are easy to confuse: Picture and Image. Picture is the picture associated with the contact that's picked. Image is the image of the PhoneNumberPicker component as it appears in the Designer and on the phone.
Test Try it out and see how it works!!
Challenges
Here are some variations for you to try:
• Add a second button, BottomButton and a second PhoneNumberPicker, so that your app gives you the choice of two numbers.
• Add a label with instructions on how to use the app. • Show the name of the person being called in addition to the phone number. Use an extra label to show
the additional information.
Copyright 2015 University of North Texas | Computer Science & Engineering
42
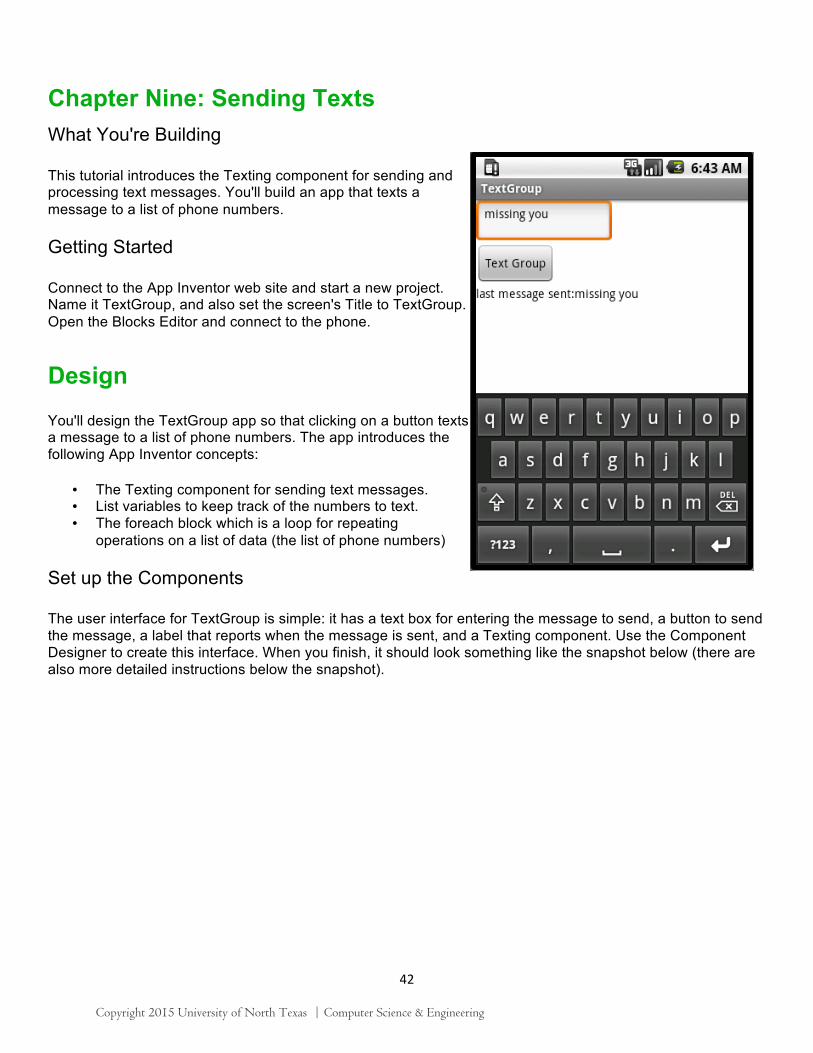
Chapter Nine: Sending Texts What You're Building
This tutorial introduces the Texting component for sending and processing text messages. You'll build an app that texts a message to a list of phone numbers.
Getting Started
Connect to the App Inventor web site and start a new project. Name it TextGroup, and also set the screen's Title to TextGroup. Open the Blocks Editor and connect to the phone.
Design
You'll design the TextGroup app so that clicking on a button texts a message to a list of phone numbers. The app introduces the following App Inventor concepts:
• The Texting component for sending text messages. • List variables to keep track of the numbers to text. • The foreach block which is a loop for repeating
operations on a list of data (the list of phone numbers)
Set up the Components
The user interface for TextGroup is simple: it has a text box for entering the message to send, a button to send the message, a label that reports when the message is sent, and a Texting component. Use the Component Designer to create this interface. When you finish, it should look something like the snapshot below (there are also more detailed instructions below the snapshot).
Copyright 2015 University of North Texas | Computer Science & Engineering
43
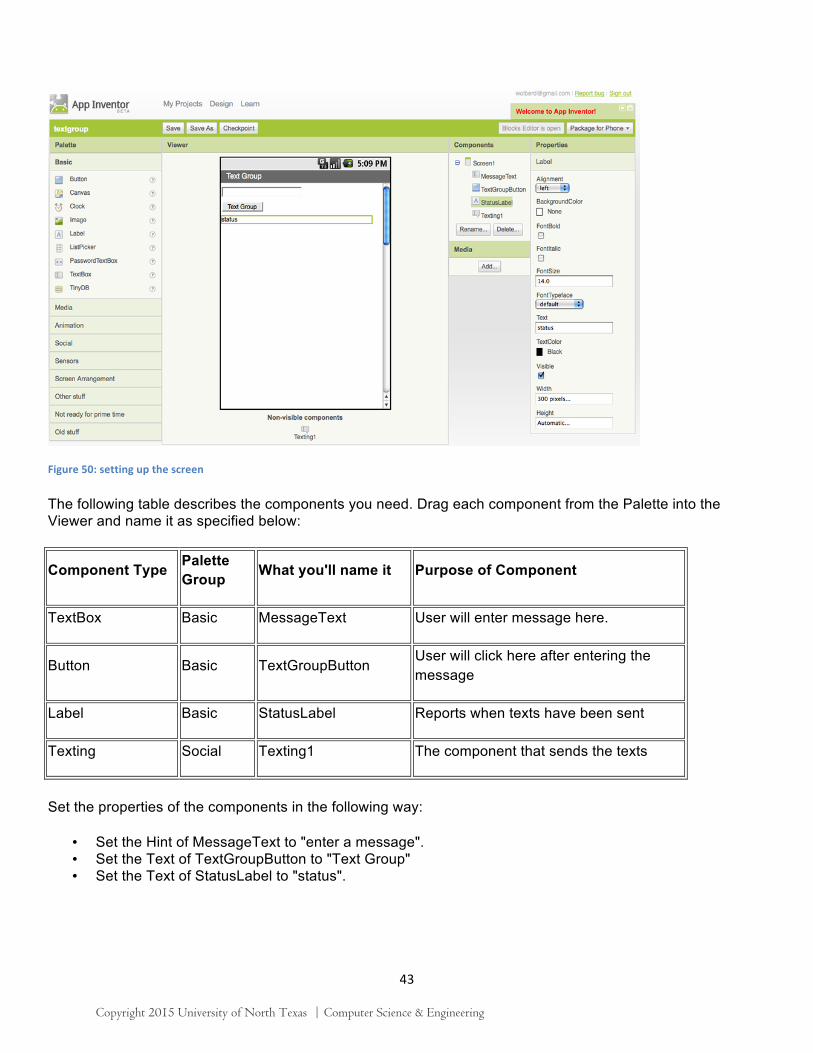
Figure 50: setting up the screen
The following table describes the components you need. Drag each component from the Palette into the Viewer and name it as specified below:
Component Type Palette Group What you'll name it Purpose of Component
TextBox Basic MessageText User will enter message here.
Button Basic TextGroupButton User will click here after entering the message
Label Basic StatusLabel Reports when texts have been sent
Texting Social Texting1 The component that sends the texts
Set the properties of the components in the following way:
• Set the Hint of MessageText to "enter a message". • Set the Text of TextGroupButton to "Text Group" • Set the Text of StatusLabel to "status".
Copyright 2015 University of North Texas | Computer Science & Engineering
44
Build TextGroup's behavior is as follows: when the user clicks the TextGroupButton, the app should text the message entered by the user in MessageText to all the numbers in a list of phone numbers. When all are sent, it should report the last message sent in the StatusLabel. Text the entered message to one phone number.
To introduce yourself to the Texting component, begin by creating a simplified version that texts the message entered by the user to your own phone. To send a text, you need to set two properties of the Texting component: the PhoneNumber and the Message. Once these properties are set, you call the SendMessage function to actually send the text.
Open the Blocks Editor and drag out the following blocks:
Block Type Drawer Purpose
TextGroupButton.Click TextGroupButton When the user clicks the button, this is triggered.
set Texting1.Message to Texting1 set the Message property before sending
MessageText.Text MessageText This is the message the user has entered.
set Texting1.PhoneNumber to
Texting1 set the PhoneNumber property before sending
text ("1112222") Text put your own phone number as the text.
Texting1.SendMessage Texting send the message
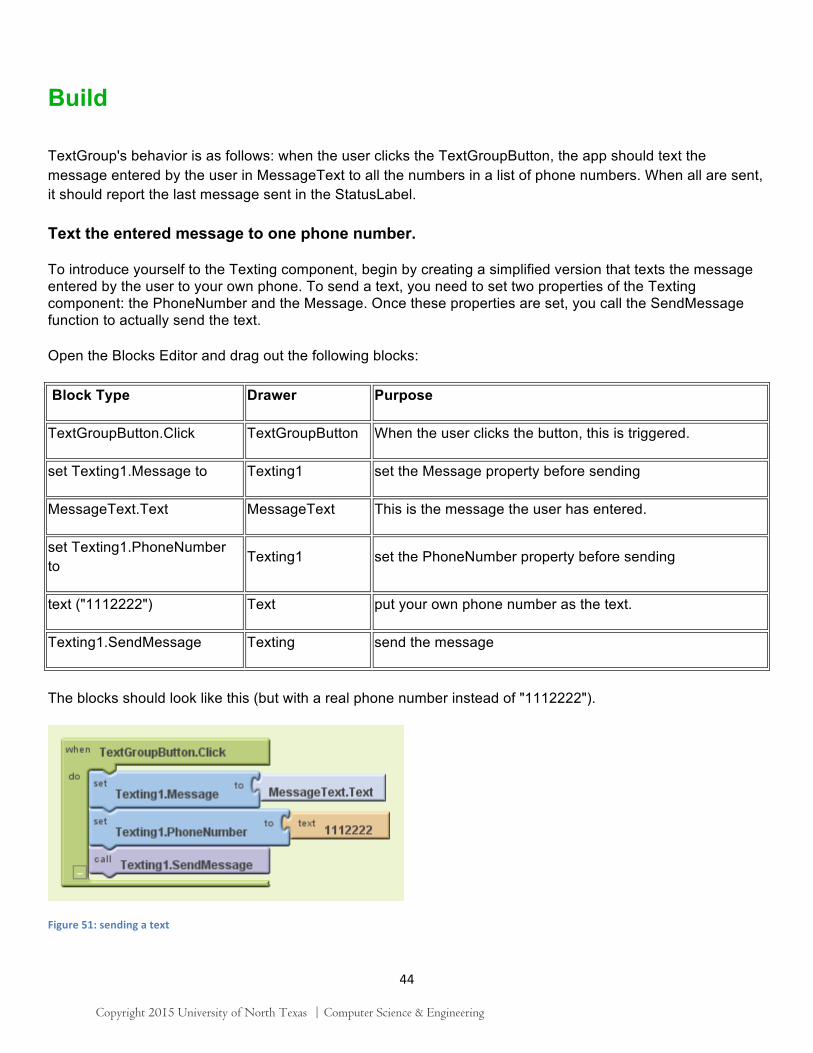
The blocks should look like this (but with a real phone number instead of "1112222").
Figure 51: sending a text
Copyright 2015 University of North Texas | Computer Science & Engineering
45
How the Blocks Work
When the user clicks the TextGroupButton, the block (or event-handler) is triggered. The first row of blocks gets the text entered by the user (MessageText.Text) and places it into the Message property of the Texting1 component. The second row of blocks sets the PhoneNumber property of the Texting1 component. After the first two rows of blocks, Texting1 knows what to send and who to send it to; the last block just instructs Texting1 to actually send the message.
Test this behavior. If your phone is connected, the app should appear with the MessageText box and button. Enter a message and click on the TextGroupButton. Does the text get sent? Check your phone (or the phone you sent the text to) to see.
Texting a list
Next, you'll modify the blocks to text more than one number at a time. You'll first define a global variable to store the data for the app: the phone numbers. Global variables are not seen by the user; they are the app's "hidden" memory. In this case, you'll define the list of phone numbers to which the text is sent.
You'll need the following blocks to build a list of phone numbers:
Block Type Drawer Purpose
def variable Definitions Defines the PhoneNumbers variable (rename it)
make a list Lists Used to define the items of the list
text (3) Text The actual phone numbers
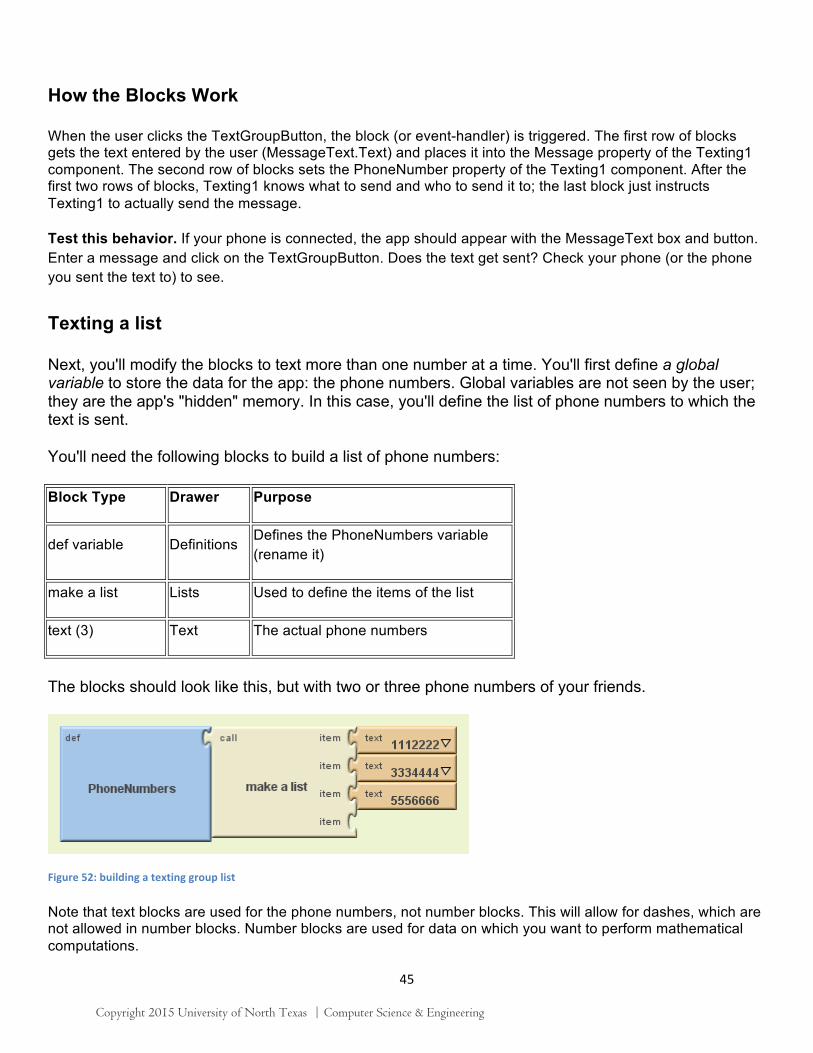
The blocks should look like this, but with two or three phone numbers of your friends.
Figure 52: building a texting group list
Note that text blocks are used for the phone numbers, not number blocks. This will allow for dashes, which are not allowed in number blocks. Number blocks are used for data on which you want to perform mathematical computations.
Copyright 2015 University of North Texas | Computer Science & Engineering
46
Now you're ready to modify TextGroupButton so that it texts each number in the variable PhoneNumbers. You'll use a foreach loop block to specify that you want to send the text to each phone number in the list.
The foreach looping block allows you to specify blocks that should be repeated for every item in a list.
Any blocks you place within the foreach block will be repeated on all of the items in the specified list.
There are two slots (arguments) in the foreach block, variable and in list . The slot named "variable" is filled in by App Inventor with a name var block. The name is by default "var", but you can change it to "item" or some other name. It represents the "current item" being processed as the foreach processes the items in a list. Do not remove this block.
You should fill in the list slot with the list variable you want to process (e.g., PhoneNumbers).
You'll reconfigure the blocks already in TextGroupButton.Click, and you'll need the following additional blocks:
Block Type Drawer Purpose
foreach Control Encloses the operations to be repeated
value var My Definitions
This block appears in My Definitions after you drag in the foreach ; it represents the current item being processed. Plug it into the Texting1.PhoneNumber block.
global PhoneNumbers
My Definitions
The list being processed, plug it into the in list argument near the bottom of the foreach.
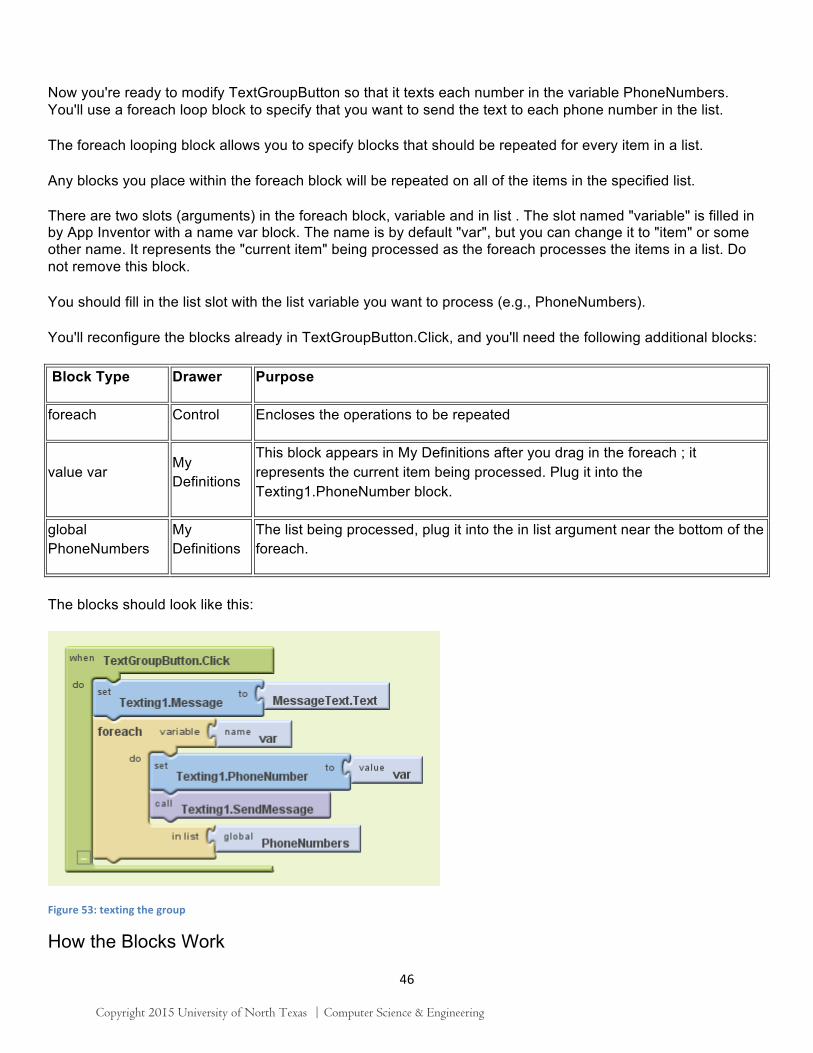
The blocks should look like this:
Figure 53: texting the group
How the Blocks Work
Copyright 2015 University of North Texas | Computer Science & Engineering
47
When the TextGroupButton is clicked, the Texting1.Message property is set to the message entered by the user in MessageText. Then the foreach loop block begins running. The two lines of blocks nested inside the foreach will run three times, because there are three items in the list PhoneNumbers. The first time they run, the value var will hold the value "1112222", and the message will be sent to that number. As soon as the message is sent, the app will "loop up" and repeat the foreach blocks. The second time through, the value var will hold "3334444", and the message will be sent to it. On the third iteration, var will hold "5556666", and the third text will be sent out.
Test the behavior. Click the TextGroupButton on the phone. Is the text sent to all the numbers in the list?
Reporting the Status of the app
It's always a good idea to give the user feedback when they initiate an operation. In the app you've built thus far, the user clicks on the TextGroupButton and nothing changes in the app's user interface. Though the user might hear the phone's chime for transmitting the text, it's still better to report a status directly in the app.
Modify the blocks so that the status label reports the last message sent. You'll need the following blocks:
Block Type Drawer Purpose
set StatusLabel.Text to StatusLabel this is where status will appear
join Text to concatenate (or join) the two parts of the status message
text Text put "last message sent:" in this text.block
MessageText.Text MessageText the message just sent.
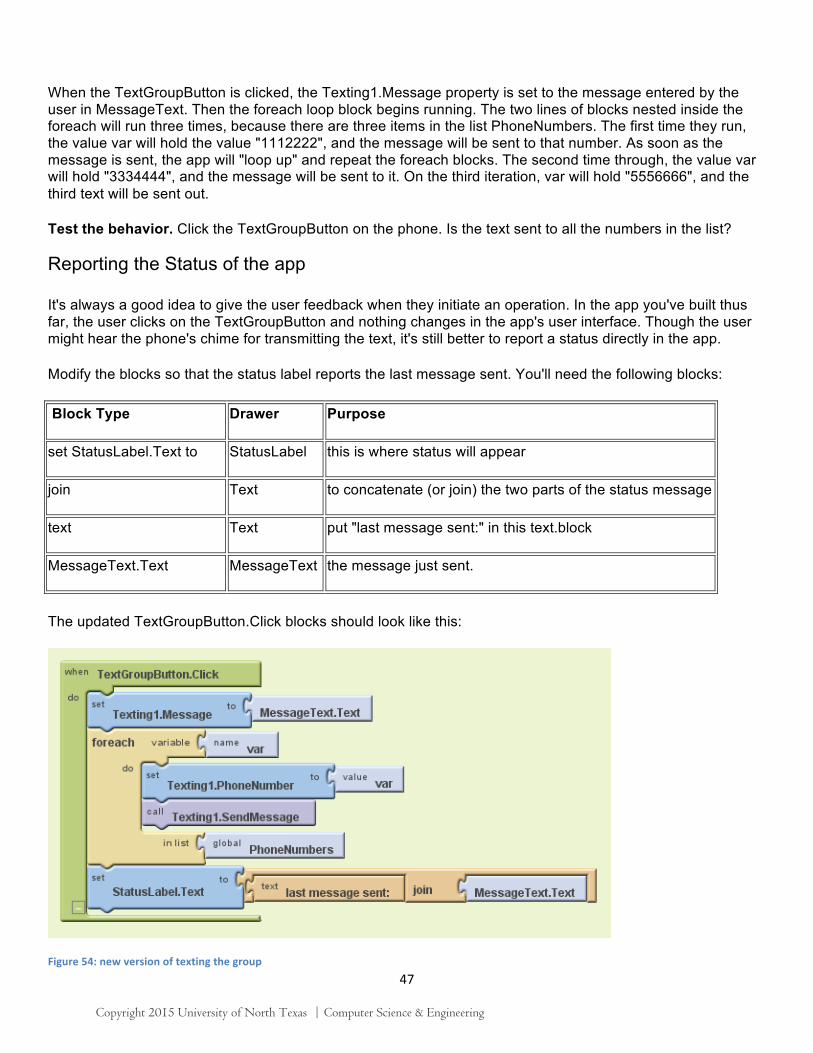
The updated TextGroupButton.Click blocks should look like this:
Figure 54: new version of texting the group
Copyright 2015 University of North Texas | Computer Science & Engineering
48
How the Blocks Work
The join block is used to join together two pieces of text. You need it when you want to join data from a variable or property with some other text. If you want to piece together more than two texts, there is also a make text block.
Test the status behavior. Does the status message report the message that was sent?
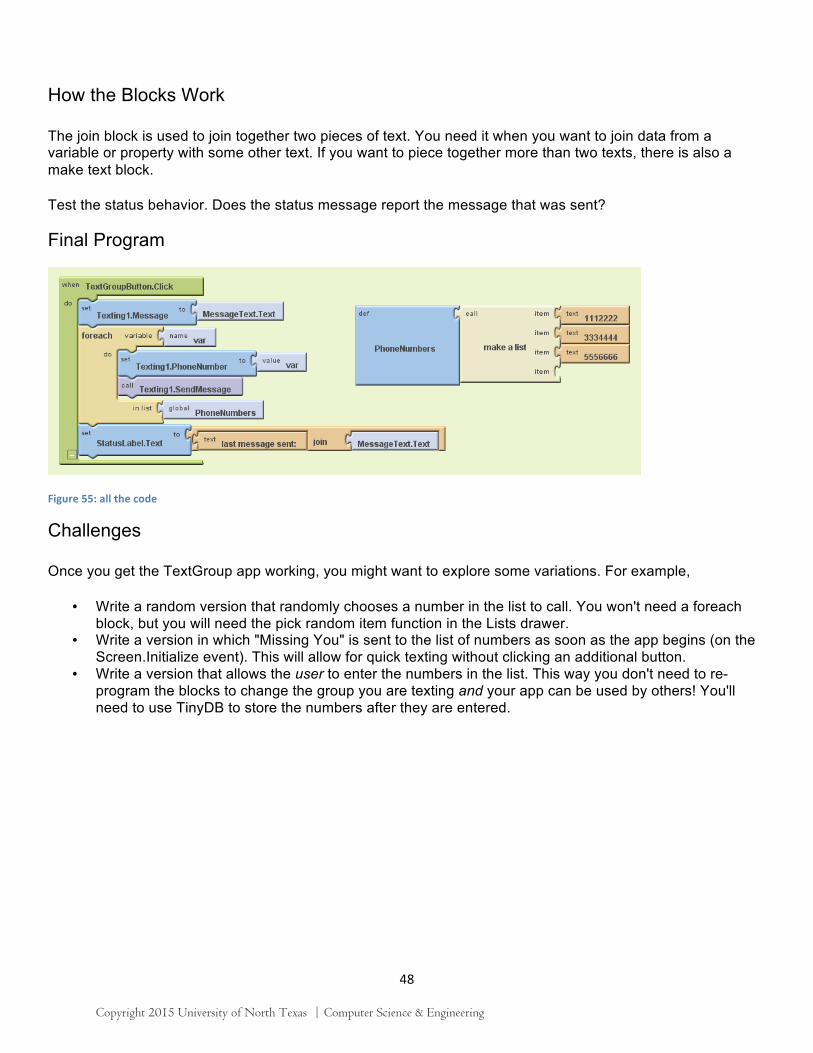
Final Program
Figure 55: all the code
Challenges
Once you get the TextGroup app working, you might want to explore some variations. For example,
• Write a random version that randomly chooses a number in the list to call. You won't need a foreach block, but you will need the pick random item function in the Lists drawer.
• Write a version in which "Missing You" is sent to the list of numbers as soon as the app begins (on the Screen.Initialize event). This will allow for quick texting without clicking an additional button.
• Write a version that allows the user to enter the numbers in the list. This way you don't need to re-program the blocks to change the group you are texting and your app can be used by others! You'll need to use TinyDB to store the numbers after they are entered.
Copyright 2015 University of North Texas | Computer Science & Engineering
49
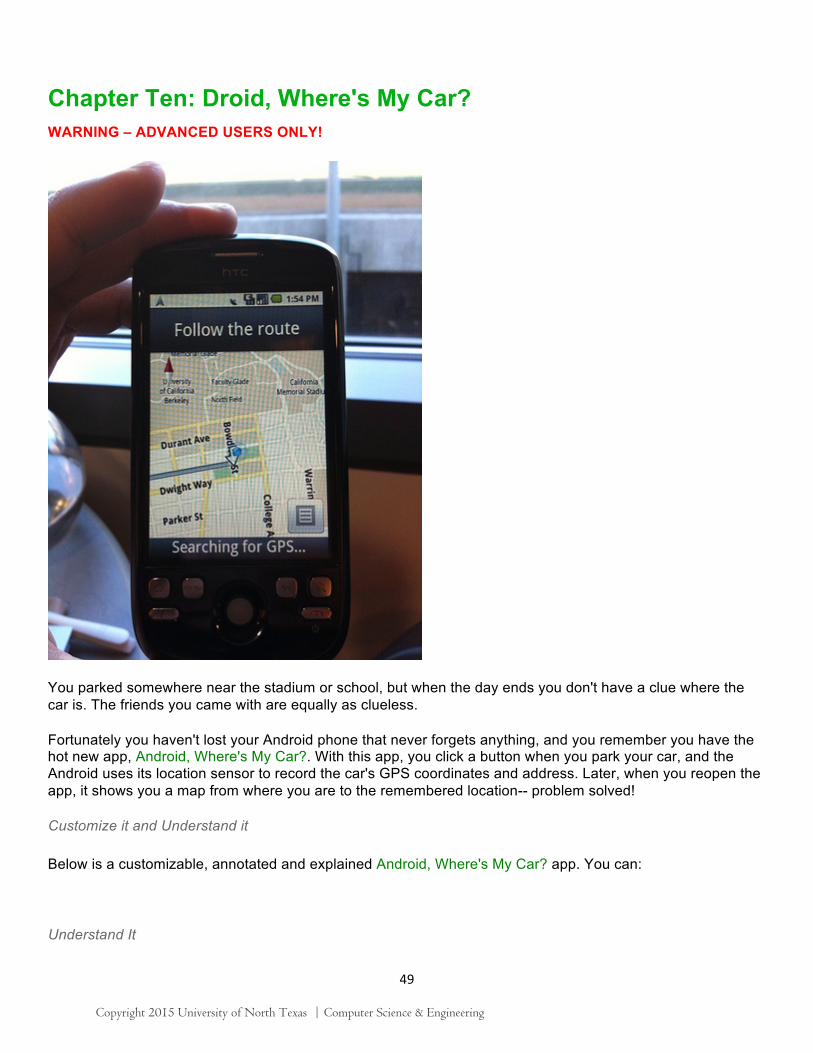
Chapter Ten: Droid, Where's My Car? WARNING – ADVANCED USERS ONLY!
You parked somewhere near the stadium or school, but when the day ends you don't have a clue where the car is. The friends you came with are equally as clueless.
Fortunately you haven't lost your Android phone that never forgets anything, and you remember you have the hot new app, Android, Where's My Car?. With this app, you click a button when you park your car, and the Android uses its location sensor to record the car's GPS coordinates and address. Later, when you reopen the app, it shows you a map from where you are to the remembered location-- problem solved!
Customize it and Understand it
Below is a customizable, annotated and explained Android, Where's My Car? app. You can:
Understand It
Copyright 2015 University of North Texas | Computer Science & Engineering
50
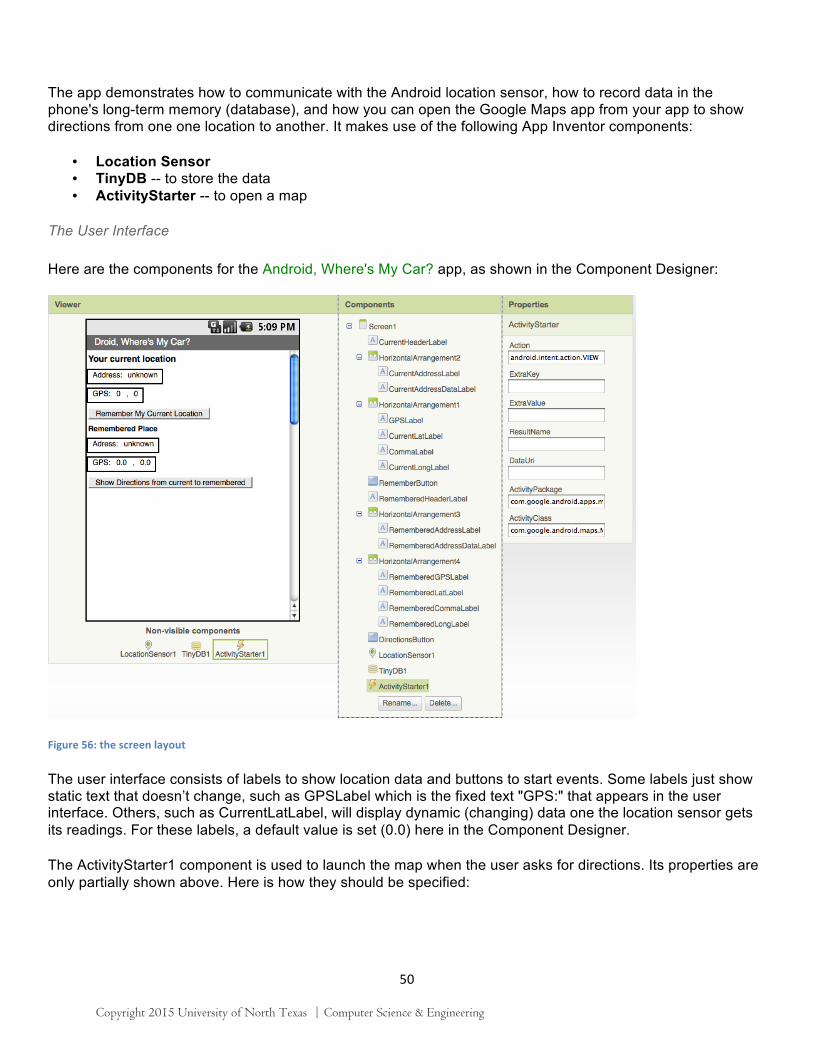
The app demonstrates how to communicate with the Android location sensor, how to record data in the phone's long-term memory (database), and how you can open the Google Maps app from your app to show directions from one one location to another. It makes use of the following App Inventor components:
• Location Sensor • TinyDB -- to store the data • ActivityStarter -- to open a map
The User Interface
Here are the components for the Android, Where's My Car? app, as shown in the Component Designer:
Figure 56: the screen layout
The user interface consists of labels to show location data and buttons to start events. Some labels just show static text that doesn’t change, such as GPSLabel which is the fixed text "GPS:" that appears in the user interface. Others, such as CurrentLatLabel, will display dynamic (changing) data one the location sensor gets its readings. For these labels, a default value is set (0.0) here in the Component Designer.
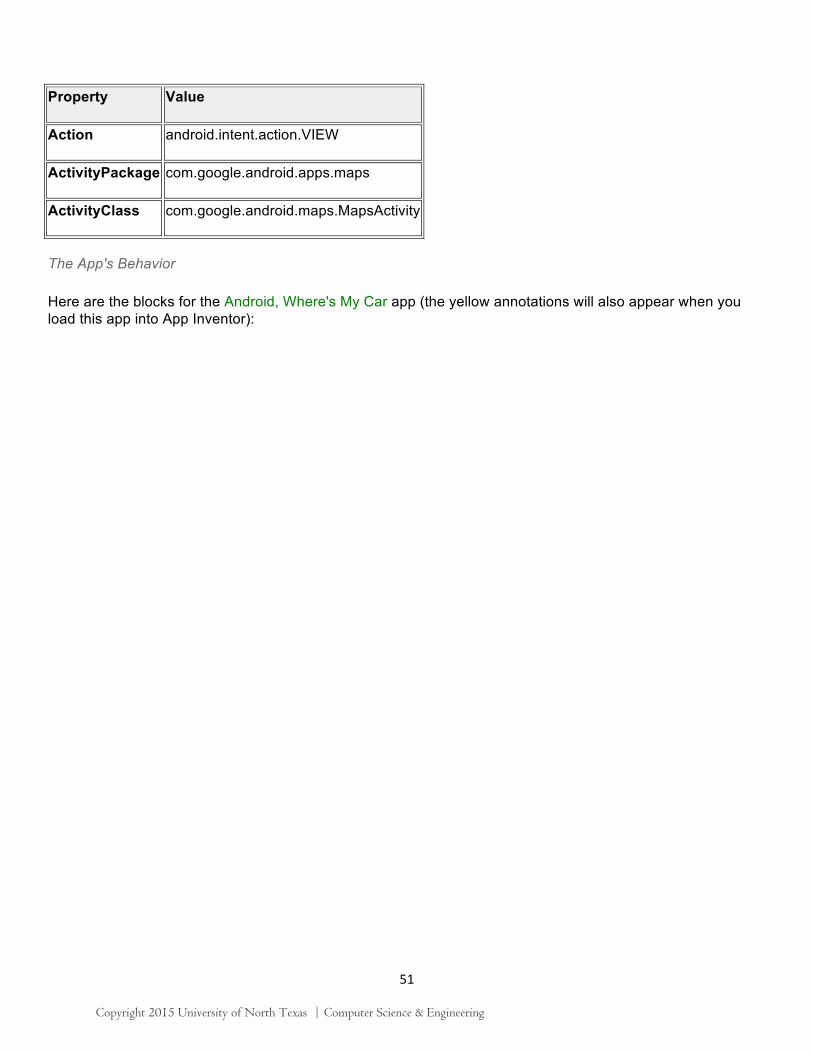
The ActivityStarter1 component is used to launch the map when the user asks for directions. Its properties are only partially shown above. Here is how they should be specified:
Copyright 2015 University of North Texas | Computer Science & Engineering
51
Property Value
Action android.intent.action.VIEW
ActivityPackage com.google.android.apps.maps
ActivityClass com.google.android.maps.MapsActivity
The App's Behavior
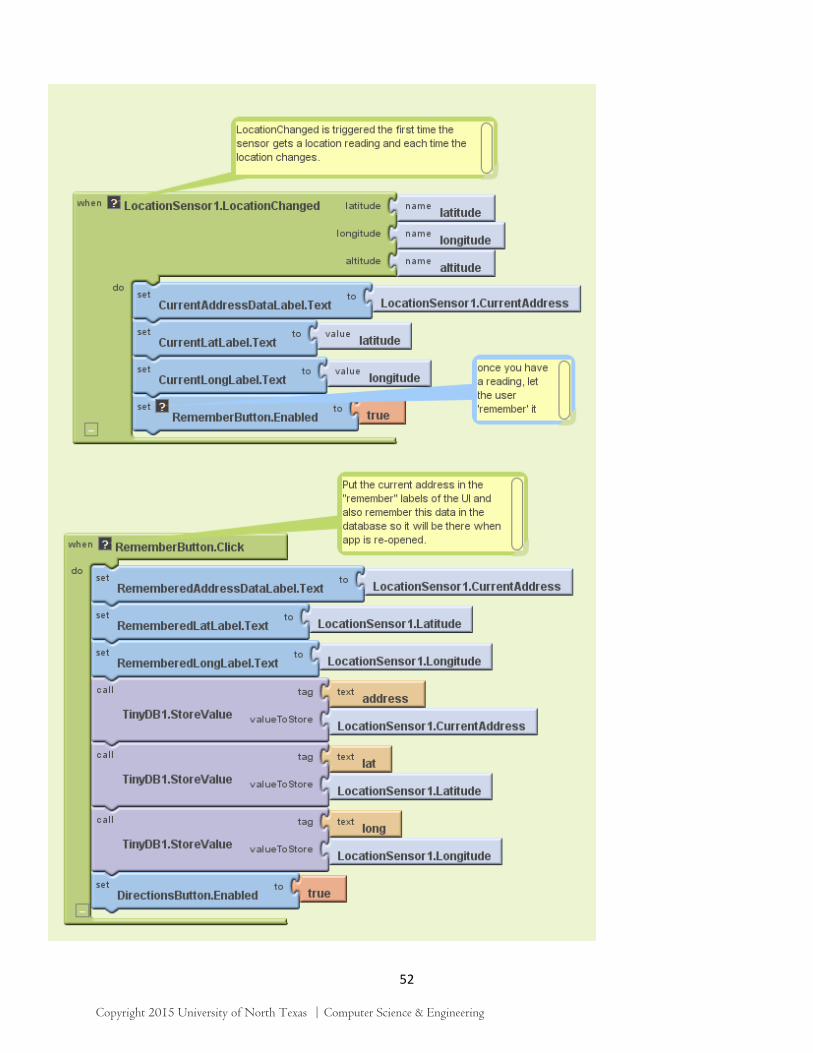
Here are the blocks for the Android, Where's My Car app (the yellow annotations will also appear when you load this app into App Inventor):
Copyright 2015 University of North Texas | Computer Science & Engineering
52
Copyright 2015 University of North Texas | Computer Science & Engineering
53
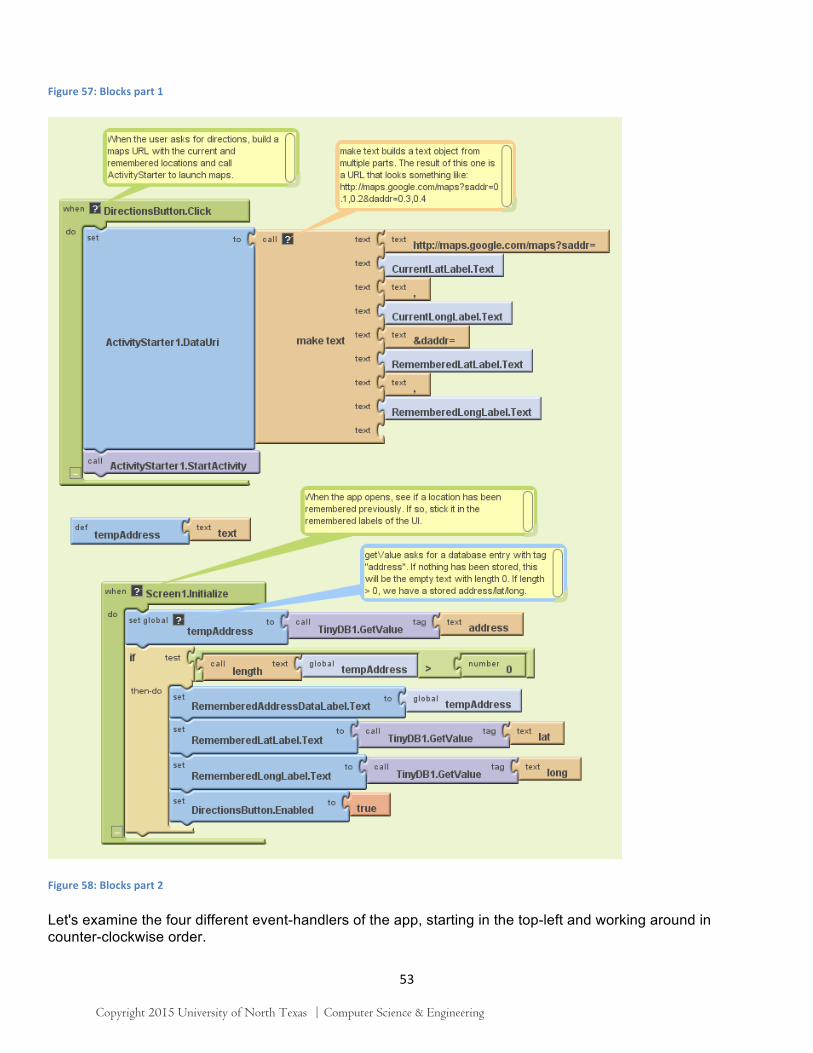
Figure 57: Blocks part 1
Figure 58: Blocks part 2
Let's examine the four different event-handlers of the app, starting in the top-left and working around in counter-clockwise order.
Copyright 2015 University of North Texas | Computer Science & Engineering
54
LocationSensor1.LocationChanged: This event occurs when the phone's location sensor first gets a reading, or when the phone is moved to produce a new reading, The event-handler just places the readings--latitude, longitude, and current (street) address-- into the corresponding "Current" labels so that they appear on the phone.The RememberButton is also enabled in this event-handler. Its enabled setting should be unchecked in the Component Designer because there is nothing for the user to remember until the sensor gets a reading.
RememberButton.Click: When the user clicks the RememberButton , the location sensor's current readings are put into the "remember" labels and stored to the database as well. The DirectionsButton is enabled as it now makes sense for the user click on it to see a map (though it will make more sense once the user changes location).
DirectionsButton.Click: When the user clicks the DirectionsButton, the event-handler builds a URL for a map and calls ActivityStarter to launch the Maps application and load the map. Make text is used to build the URL to send to the Maps application. The resulting URL consists of the Maps domain along with two crucial parameters, saddr and daddr , which specify the start and destination for the directions. For this app, the saddr is set to the latitude and longitude of the current location, and the daddr is set to the latitude and longitude of the location that was "remembered" (the location of your car!).
Screen1.Initialize: This event is always triggered when an app opens. To understand it, you have to envision the user recording the location of the car, then closing the app, then later re-opening the app. When the app re-opens, the user expects that the location remembered earlier should appear on the phone. To facilitate this, the event-handler looks to the database (TinyDB.GetValue). If there is indeed a remembered address stored in the database-- the length of the stored address is greater than zero--the remembered latitude, longitude, and street addres are placed in the corresponding labels.
Variations
• Create "Android, Where is Everyone?", an app that lets a group of people track each other's whereabouts. Whether you’re hiking or at the park, this app could help save time and even lives.
• Create a "breadcrumb" app that tracks your (phone's) whereabouts by recording each location change. One interesting refinement would be to only record a new "breadcrumb" if the location has changed by a certain amount.
Review
Here are some of the ideas covered in this tutorial:
• The LocationSensor component can report the phone's latitude, longitude, and current street address. Its LocationChanged event is triggered when sensor gets its first reading and when the reading changes (the phone has moved).
• The ActivityStarter component can launch any app including Google Maps. For Maps, you set the DataUri property to the URL of the map you want to display. If you want to show directions, the URL will be of the form: http://maps.google.com/maps/?saddr=0.1,0.1&daddr=0.2,0.2, where the numbers are GPS coordinates.
• make text is used to piece together (concatenate) separate text items into a single text object. It allows you to concatenate dynamic data with static text. With the Maps URL, the GPS coordinates are the dynamic data.
• TinyDB allows you to store data persistently in the phone's database. Whereas the data in a variable or property is lost when an app closes, the data you store in the database can be loaded into your app each time it is opened.
Copyright 2015 University of North Texas | Computer Science & Engineering

55
Thanks to Professor David Wolber, CS Professor at The University of San Francisco, for developing this tutorial.
Copyright 2015 University of North Texas | Computer Science & Engineering
56
Chapter Eleven: Creating Your Own App Now that you have seen how to build apps using App Inventor and some of the sensors on the phone, try to come up with an app of your own. Be creative—what app have you always wanted? How many features can you add to it? How many sensors can you use? Start by listing what you want on your interface, using buttons, screens, features etc. Then sketch it out on a piece of paper to see what it would look like. This is called proof of concept. Once you have your basic design figured out it’s time to start building your app. Don’t forget that anything you used in your drawing will need to be defined in the Screen Viewer and programmed in the Blocks Editor.
Useful Notes
1. To add “levels” to an app or game, create new screens 2. To change “levels” or screens in the Blocks look under the “Control” section for the code pieces 3. In order to test changing screens you must package the app to the phone, not just download.
Copyright 2015 University of North Texas | Computer Science & Engineering