Embed Size (px)
Citation preview
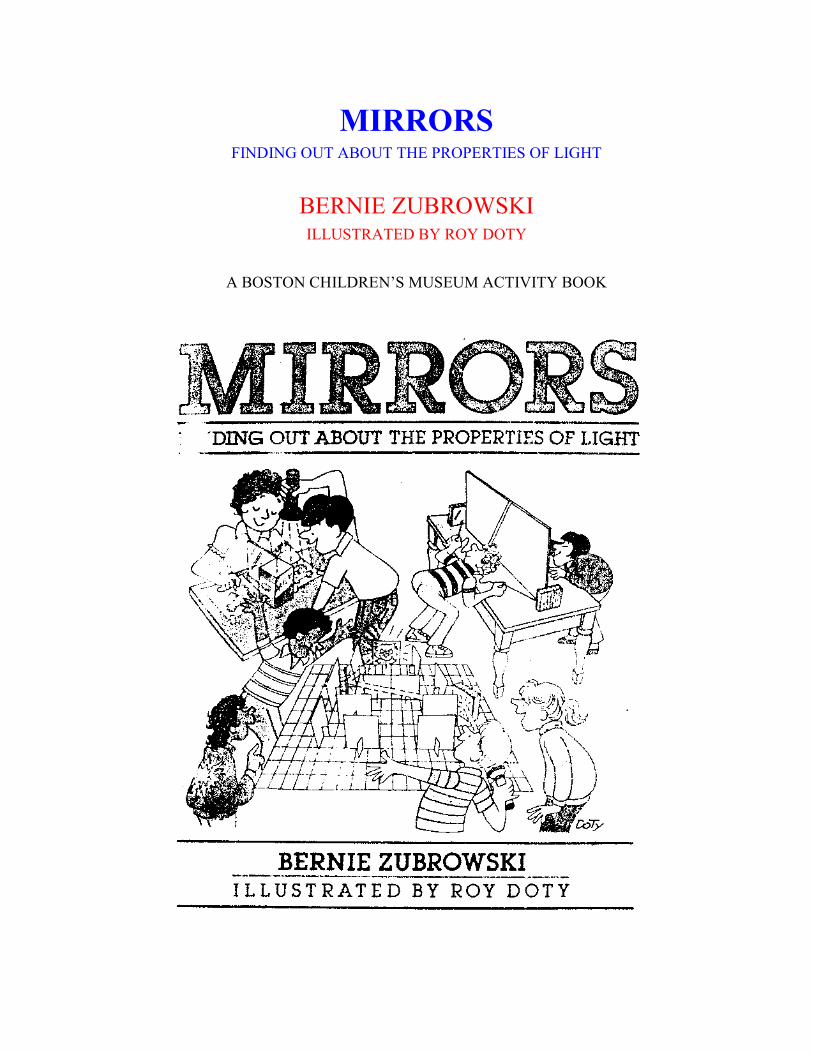
MIRRORS FINDING OUT ABOUT THE PROPERTIES OF LIGHT
BERNIE ZUBROWSKI ILLUSTRATED BY ROY DOTY
A BOSTON CHILDREN’S MUSEUM ACTIVITY BOOK
INTRODUCTION
The first mirror was probably a pool of water. A Greek myth tells the story of a
handsome young man named Narcissus, who grew so fond of his own reflection that he
fell into the water and drowned.
When you want to look at yourself in a mirror, you probably head for the nearest
bathroom. Maybe you carry a pocket-sized mirror around with you or have a mirror
hanging in your bedroom or on the door of your locker at school. Although these are
among the more familiar kinds of mirrors, other shiny surfaces can produce the same
effects as these mirrors.
When you walk down the street, do you ever stop to check out your reflection in the
large windows of stores or office buildings? Depending on the way light strikes the glass,
you can often see a clear reflection in these windows, even if the glass is tinted.
If you look down at the sidewalk, you may also see light reflecting off these windows
onto the pavement. These patches of light form many interesting and beautiful shapes.
Mirror like surfaces can be found in the country as well as in the city. Just as a puddle
of water in the city may reflect a skyscraper, lakes and ponds in the country may reflect
the trees and sky. When the wind or a passing boat makes waves on the surface of the
water, the reflected images are distorted into patterns that can be both strange and lovely.
As you continue looking around, you will see many examples of both natural and
man-made mirrors. In your home, for instance, you will notice that objects ranging from
dishes to doorknobs can produce mirror-like reflections.
No one knows when people first started using shiny materials as mirrors because it
happened before writing was invented. However, the oldest mirror was uncovered in
Egypt. It is made of selenite, a mineral with a shiny surface, and it dates back to 4500
B.C. Bronze, a metal that is still used to make plaques and statues, may also have been
used for mirrors thousands of years ago.
The Romans were the first to produce glass mirrors in large quantities. People from all
classes of society probably used them. Glass mirrors are different from metal mirrors.
While older mirrors were metal having a very shiny surface, glass mirrors were and are
sheets of glass having a shiny metallic coating.
Once mirrors with a metallic backing could be produced in large quantities, they
became quite popular. They began to be used not only for grooming, as the early mirrors
were, but also for decoration and amusement. In sixteenth-century France, Catherine de
Medici built a large room that had 119 glass mirrors in it. Another very wealthy person
constructed a mirrored maze that is still on exhibit in Lucerne. Switzerland. The many
reflections in the mirrors are so confusing that you need a map to find your way out of the
maze!
Today’s artists and builders continue to use mirrors to produce special effects. In a
passenger terminal at Boston’s Logan Airport, there is a long wall made of many mirrors
placed at different angles. As people rush by, they see many images of themselves in
lively, moving patterns.
Mirrors also serve practical purposes. They are used in many scientific instruments.
Your dentist uses a tiny mirror to check your teeth for cavities. Some cameras contain
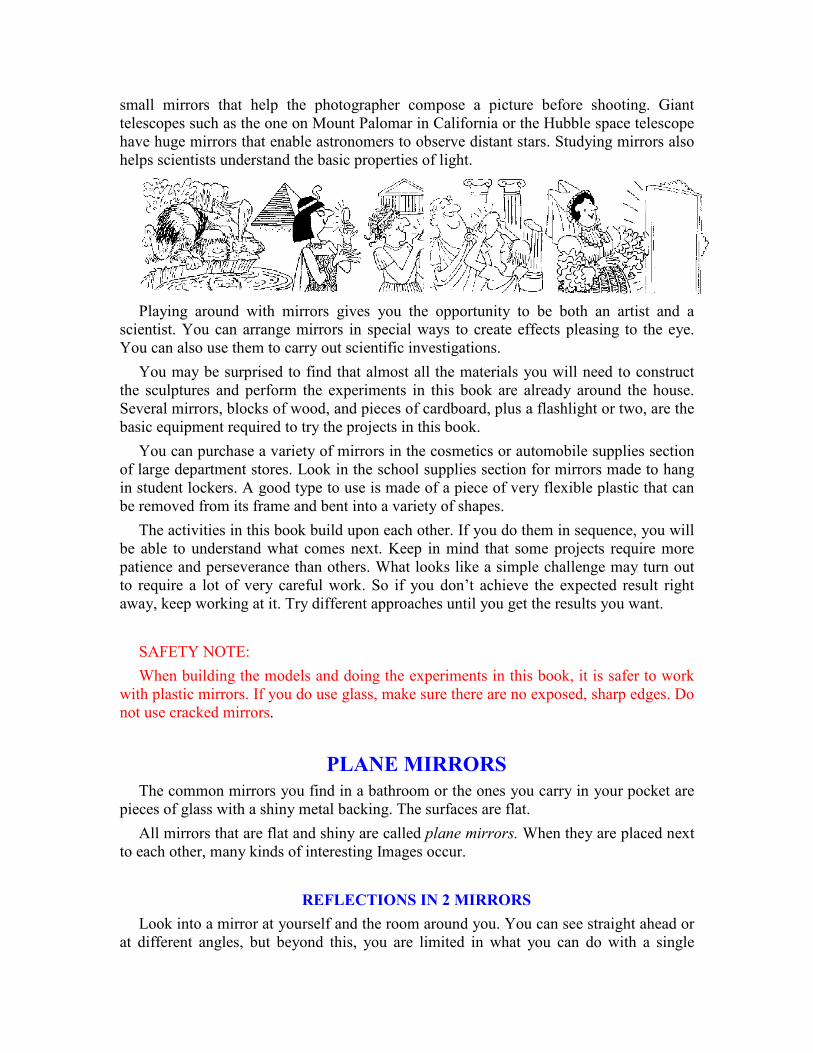
small mirrors that help the photographer compose a picture before shooting. Giant
telescopes such as the one on Mount Palomar in California or the Hubble space telescope
have huge mirrors that enable astronomers to observe distant stars. Studying mirrors also
helps scientists understand the basic properties of light.
Playing around with mirrors gives you the opportunity to be both an artist and a
scientist. You can arrange mirrors in special ways to create effects pleasing to the eye.
You can also use them to carry out scientific investigations.
You may be surprised to find that almost all the materials you will need to construct
the sculptures and perform the experiments in this book are already around the house.
Several mirrors, blocks of wood, and pieces of cardboard, plus a flashlight or two, are the
basic equipment required to try the projects in this book.
You can purchase a variety of mirrors in the cosmetics or automobile supplies section
of large department stores. Look in the school supplies section for mirrors made to hang
in student lockers. A good type to use is made of a piece of very flexible plastic that can
be removed from its frame and bent into a variety of shapes.
The activities in this book build upon each other. If you do them in sequence, you will
be able to understand what comes next. Keep in mind that some projects require more
patience and perseverance than others. What looks like a simple challenge may turn out
to require a lot of very careful work. So if you don’t achieve the expected result right
away, keep working at it. Try different approaches until you get the results you want.
SAFETY NOTE:
When building the models and doing the experiments in this book, it is safer to work
with plastic mirrors. If you do use glass, make sure there are no exposed, sharp edges. Do
not use cracked mirrors.
PLANE MIRRORS
The common mirrors you find in a bathroom or the ones you carry in your pocket are
pieces of glass with a shiny metal backing. The surfaces are flat.
All mirrors that are flat and shiny are called plane mirrors. When they are placed next
to each other, many kinds of interesting Images occur.
REFLECTIONS IN 2 MIRRORS
Look into a mirror at yourself and the room around you. You can see straight ahead or
at different angles, but beyond this, you are limited in what you can do with a single
mirror. As soon as you add a second mirror, however, you multiply the possibilities for
creating and observing curious reflections. You may have noticed one very special effect
in a hotel lobby or shopping center where 2 mirrors are located directly across from each
other. When you stand between 2 parallel mirrors and look into I of them, it appears as if
you are standing in a series of rooms that goes on forever.
Many other strange effects can occur when 2 mirrors are placed at various angles and
positions in relation to each other. To discover these interesting effects, all you need are
some simple materials and a sense of adventure.
Making Mirror Supports
No matter what kind of mirrors you use. it is helpful to back them with blocks of
wood. The mirrors will then be able to stand vertically by themselves.
You will need:
2 mirrors, approximately 6 inches square, 2 blocks of wood, approximately 6 inches
square, or 2 empty paper half-gallon milk cartons double-stick tape or masking tape
scissors
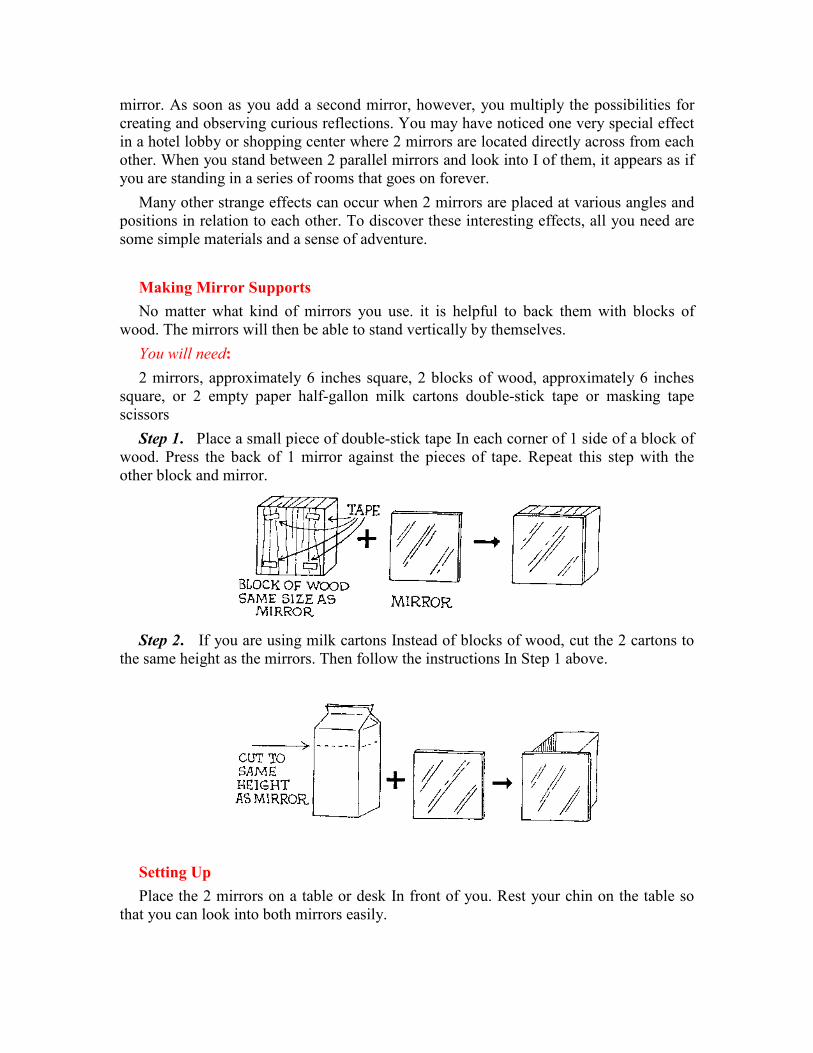
Step 1. Place a small piece of double-stick tape In each corner of 1 side of a block of
wood. Press the back of 1 mirror against the pieces of tape. Repeat this step with the
other block and mirror.
Step 2. If you are using milk cartons Instead of blocks of wood, cut the 2 cartons to
the same height as the mirrors. Then follow the instructions In Step 1 above.
Setting Up
Place the 2 mirrors on a table or desk In front of you. Rest your chin on the table so
that you can look into both mirrors easily.
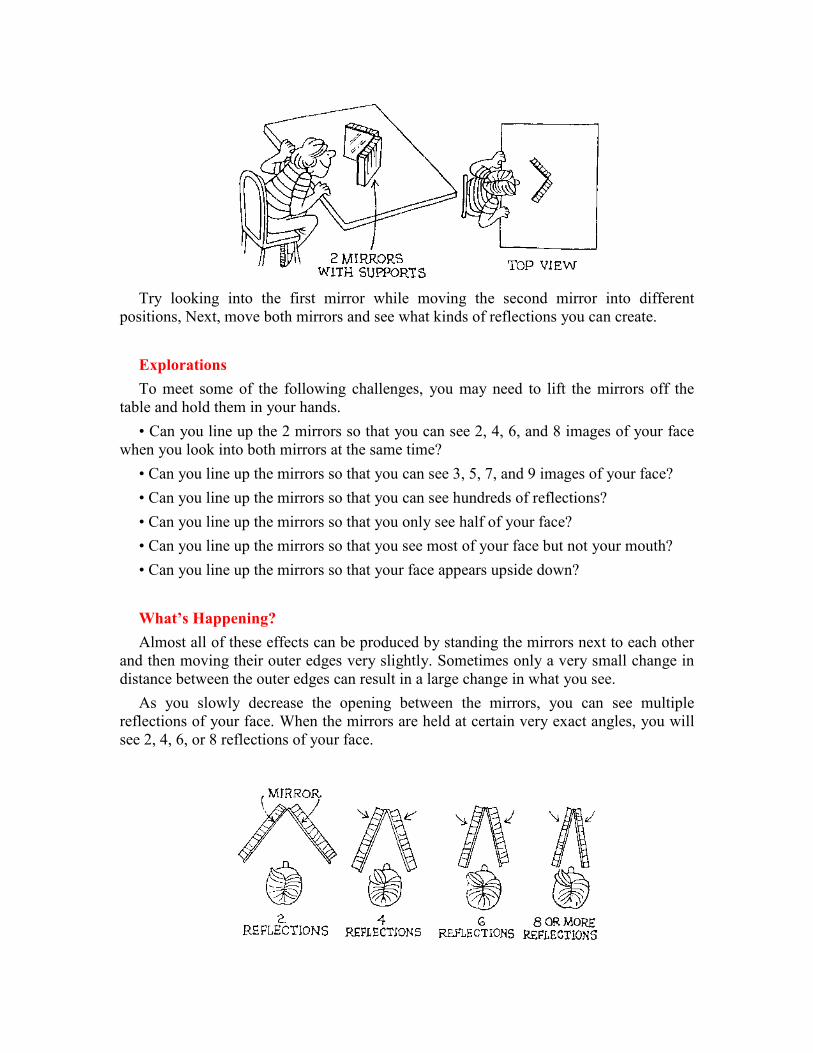
Try looking into the first mirror while moving the second mirror into different
positions, Next, move both mirrors and see what kinds of reflections you can create.
Explorations
To meet some of the following challenges, you may need to lift the mirrors off the
table and hold them in your hands.
• Can you line up the 2 mirrors so that you can see 2, 4, 6, and 8 images of your face
when you look into both mirrors at the same time?
• Can you line up the mirrors so that you can see 3, 5, 7, and 9 images of your face?
• Can you line up the mirrors so that you can see hundreds of reflections?
• Can you line up the mirrors so that you only see half of your face?
• Can you line up the mirrors so that you see most of your face but not your mouth?
• Can you line up the mirrors so that your face appears upside down?
What’s Happening?
Almost all of these effects can be produced by standing the mirrors next to each other
and then moving their outer edges very slightly. Sometimes only a very small change in
distance between the outer edges can result in a large change in what you see.
As you slowly decrease the opening between the mirrors, you can see multiple
reflections of your face. When the mirrors are held at certain very exact angles, you will
see 2, 4, 6, or 8 reflections of your face.
If the mirrors are small, it may become difficult to place your head between them to
see these reflections. Instead, look at the bottom of each mirror. You will see a reflection
of the edge of the mirror. Count the number of edges that appear in each mirror. You will
see an odd or an even number of reflections in each mirror, but you will always see an
even number when you add up the total number of reflections in both mirrors.
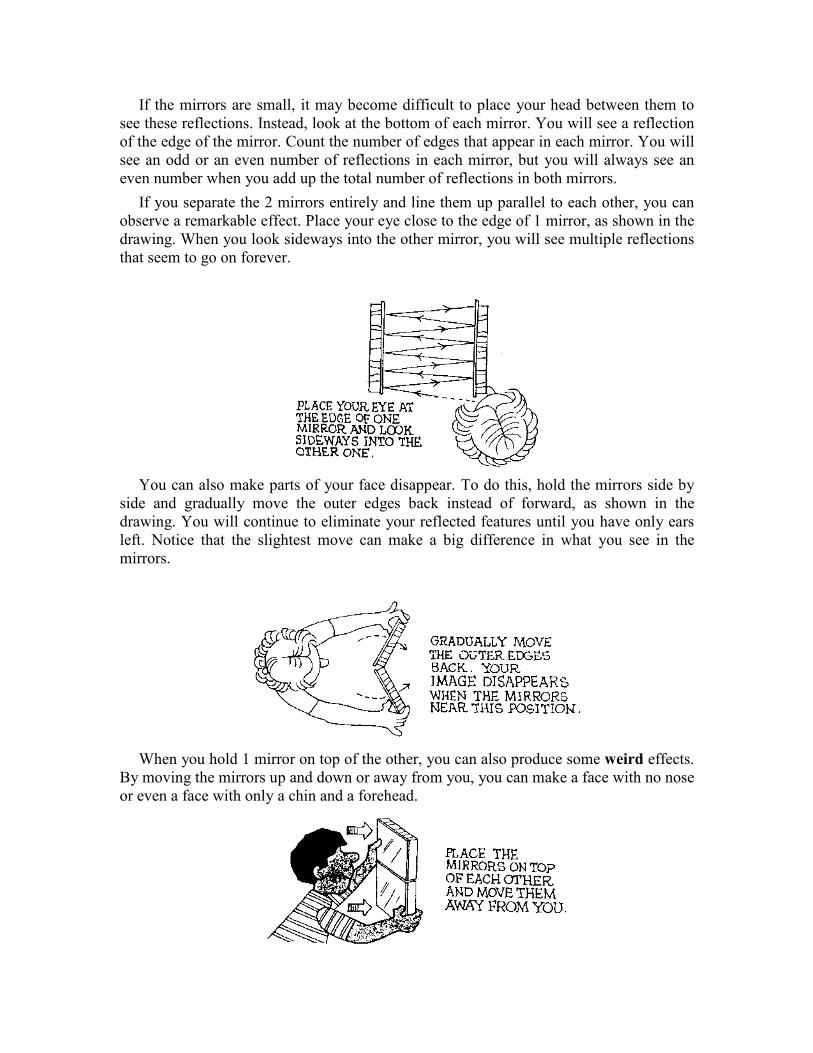
If you separate the 2 mirrors entirely and line them up parallel to each other, you can
observe a remarkable effect. Place your eye close to the edge of 1 mirror, as shown in the
drawing. When you look sideways into the other mirror, you will see multiple reflections
that seem to go on forever.
You can also make parts of your face disappear. To do this, hold the mirrors side by
side and gradually move the outer edges back instead of forward, as shown in the
drawing. You will continue to eliminate your reflected features until you have only ears
left. Notice that the slightest move can make a big difference in what you see in the
mirrors.
When you hold 1 mirror on top of the other, you can also produce some weird effects.
By moving the mirrors up and down or away from you, you can make a face with no nose
or even a face with only a chin and a forehead.
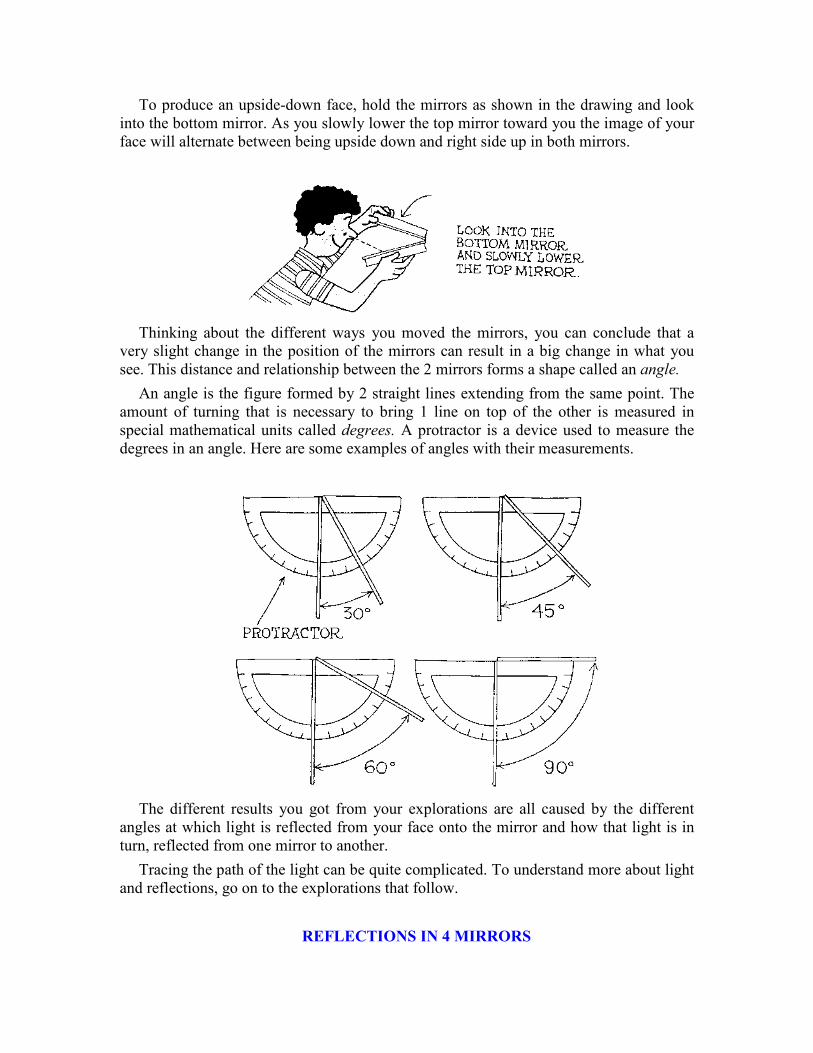
To produce an upside-down face, hold the mirrors as shown in the drawing and look
into the bottom mirror. As you slowly lower the top mirror toward you the image of your
face will alternate between being upside down and right side up in both mirrors.
Thinking about the different ways you moved the mirrors, you can conclude that a
very slight change in the position of the mirrors can result in a big change in what you
see. This distance and relationship between the 2 mirrors forms a shape called an angle.
An angle is the figure formed by 2 straight lines extending from the same point. The
amount of turning that is necessary to bring 1 line on top of the other is measured in
special mathematical units called degrees. A protractor is a device used to measure the
degrees in an angle. Here are some examples of angles with their measurements.
The different results you got from your explorations are all caused by the different
angles at which light is reflected from your face onto the mirror and how that light is in
turn, reflected from one mirror to another.
Tracing the path of the light can be quite complicated. To understand more about light
and reflections, go on to the explorations that follow.
REFLECTIONS IN 4 MIRRORS

You have discovered that a variety of interesting images can be created by placing 1
mirror next to another. What might happen if you added 2 more mirrors to your
explorations? Could you produce some of the same effects you created in the previous
activities? What new Images do you think you could create with 4 mirrors that you
couldn’t create with 2 mirrors?
You can build on your explorations with 2 mirrors by playing some games with 4.
To make these explorations more fun, have a friend join you.
Try the following hide-and-seek games first: then see what other types of games you
and your friend can create using 4 mirrors.
Game 1: Finding the Other Person
You will need:
4 mirrors with supports, desk or table
Setting Up
Step 1. Find a desk or table large enough so that the 4 mirrors can be moved arcund
without bumping into each other.
Step 2. Line up the mirrors approximately as shown in the drawing. Position yourself
and your friend at opposite ends of the table.
Playing the Game
The object of the game is for the “seeker” to line up the 4 mirrors so that he or she can
find the “hider” at the other end of the table.
Rule 1. The hider and the seeker must keep their chins somewhere on the edge of the
table.
Rule 2. The seeker must move each mirror around until he or she can see the hider in
the mirror closest to the seeker.
Rule 3. All 4 mirrors must be used in the search. (To check if this has been done,
move each of the mirrors slightly, one at a time, after the hider has been found. If a
mirror is really being used, the seeker will lose sight of the hider as the mirror changes
position.)
Take turns playing hider and seeker. To vary the game, try placing your heads in
different positions on the table. This will force you to realign the mirrors. Try this game
several times to see how many ways you and your friend can line up the 4 mirrors and
still find each other.
Game 2: Making a Face
You will need:
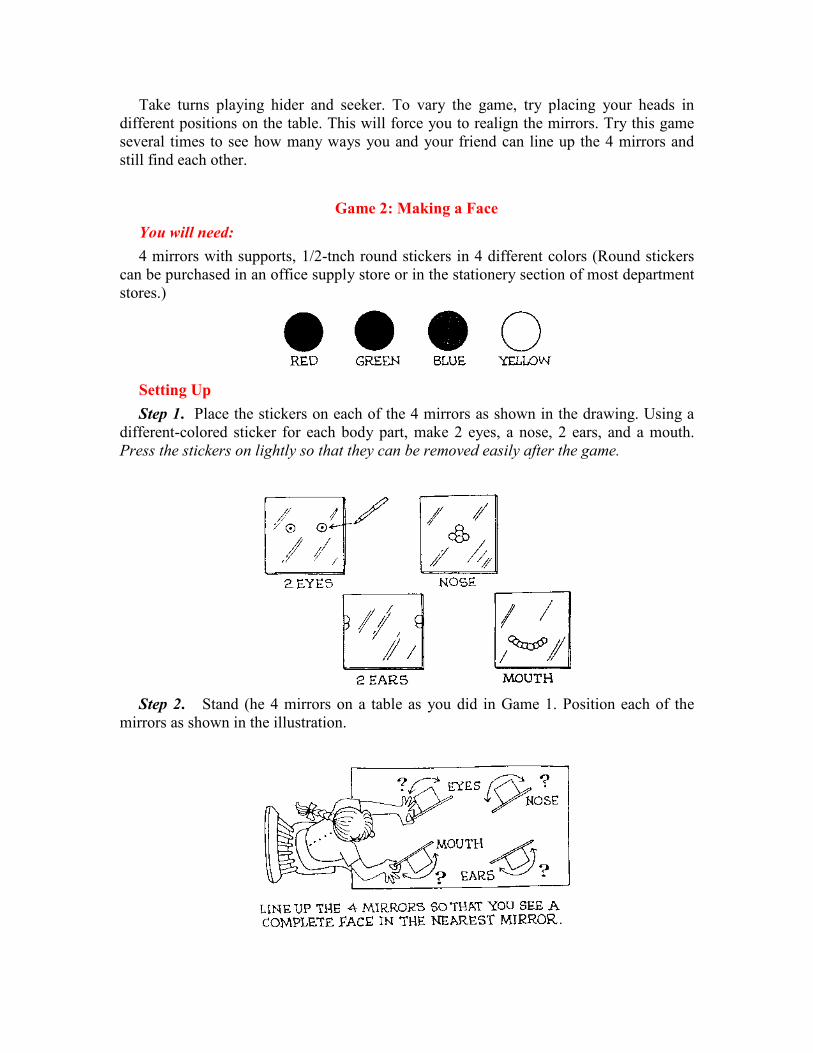
4 mirrors with supports, 1/2-tnch round stickers in 4 different colors (Round stickers
can be purchased in an office supply store or in the stationery section of most department
stores.)
Setting Up
Step 1. Place the stickers on each of the 4 mirrors as shown in the drawing. Using a
different-colored sticker for each body part, make 2 eyes, a nose, 2 ears, and a mouth.
Press the stickers on lightly so that they can be removed easily after the game.
Step 2. Stand (he 4 mirrors on a table as you did in Game 1. Position each of the
mirrors as shown in the illustration.
Playing the Game
The object of the game Is to line up the 4 mirrors so that you see a complete sticker
face in the mirror nearest you.
Rule 1. You must keep your chin on the edge of the table at one end.
Rule 2. You must see a complete sticker face in the mirror closest to you. You may
change the position of both your head and the mirrors.
Rule 3. The face you create must be similar to a normal face—the eyes. ears. nose,
and mouth must be in their usual positions.
See if you or your friend can line up the 4 mirrors in more than one way to make a
normal sticker face. Play around and see what kinds of funny faces you can make. Can
you make a face that has the nose directly under one of the eyes? Challenge your friend
to create different funny faces from the normal ones you made.
Game 3: Lining Up the Stickers
Games 1 and 2 did not require a great deal of precision. Game 3 requires more
patience and skill. See how well you can meet the challenge.
You will need:
4 mirrors with supports (See pages 11-12 for assembly instructions.), 1/2-inch round
stickers in 4 different colors (See page 20 for suggestions on where to purchase them),
ruler
Setting Up
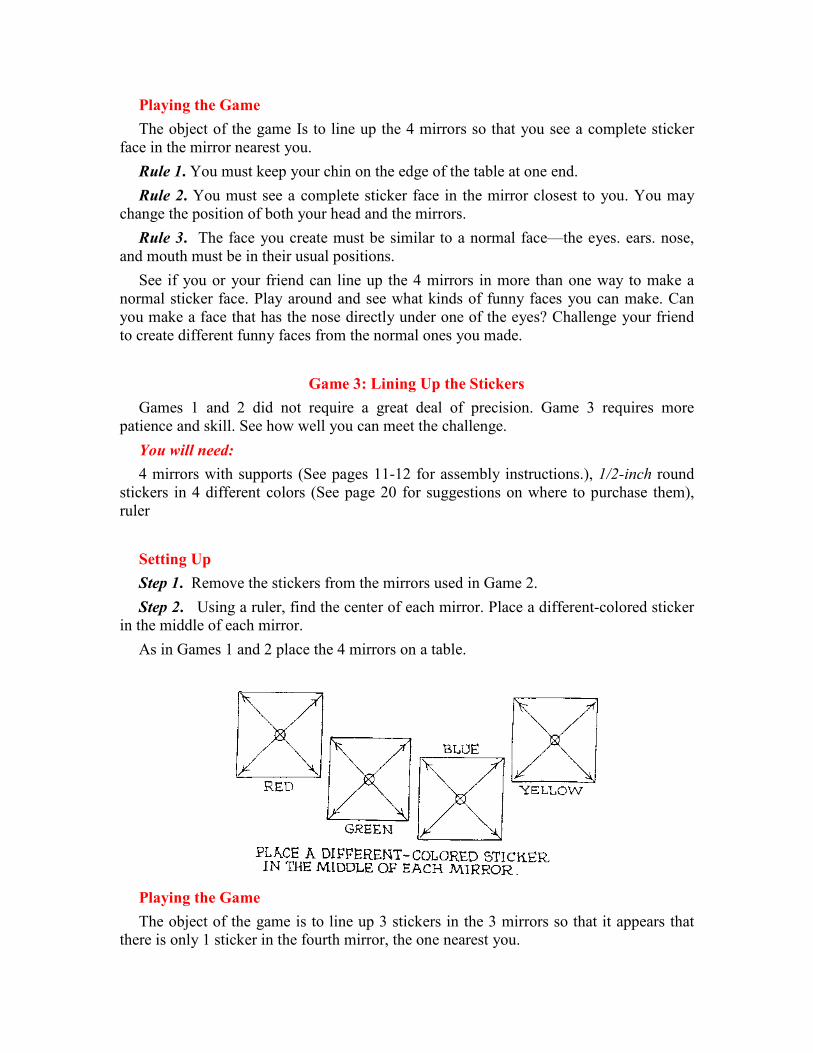
Step 1. Remove the stickers from the mirrors used in Game 2.
Step 2. Using a ruler, find the center of each mirror. Place a different-colored sticker
in the middle of each mirror.
As in Games 1 and 2 place the 4 mirrors on a table.
Playing the Game
The object of the game is to line up 3 stickers in the 3 mirrors so that it appears that
there is only 1 sticker in the fourth mirror, the one nearest you.
Rule 1. You must keep your chin on the edge of the table at one end.
Rule 2. You must see only 1 sticker in the mirror closest to you. You may change the
position of both your head and the mirrors until 3 stickers are lined up behind the fourth
sticker. (If you move your eyes slightly to the left or right or up and down, you will see
the other stickers. Therefore, your alignment must be very precise.)
Once you have mastered this game with one alignment of your eyes and the mirrors,
try making a different arrangement. Remember, the stickers must be lined up exactly be-
hind one another.
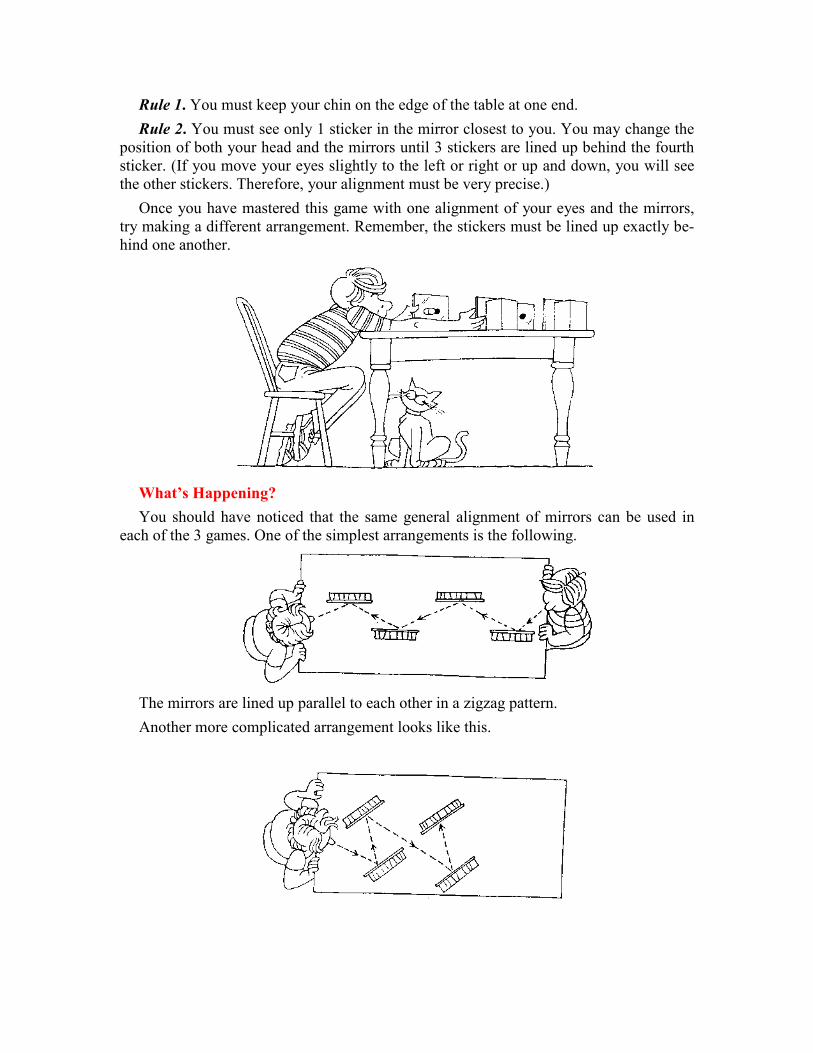
What’s Happening?
You should have noticed that the same general alignment of mirrors can be used in
each of the 3 games. One of the simplest arrangements is the following.
The mirrors are lined up parallel to each other in a zigzag pattern.
Another more complicated arrangement looks like this.
Although both of these arrangements can be used for all 3 games, you had to be more
careful and accurate when you were lining up the stickers in Game 3. Did you come up
with any other arrangements that worked as well as these 2 did?
What you have observed in all 3 situations, especially the last, is the precision of the
path of light. Usually, it seems as if light is all over the place. At times, light may even
appear to bend around corners. In reality, however light travels in a straight line. This is a
simple observation, but it has important consequences, as you will discover later.
Scientists use the term fight ray to describe the path of light. Drawings that show how
light travels use lines to represent the path.
When you lined up the stickers in Game 3, you limited your vision to a very narrow
area of the mirror, which in turn was reflecting only a very small portion of the light. As
you lined up each sticker in front of the other, you were mapping the path the light was
taking as it was reflected from 1 mirror to another in this narrow area. The light from the
sticker farthest from your eye traveled along the path that was marked by the other 3
stickers.
The manner in which light is reflected off each mirror is very exact. You will discover
more about this in the next set of games.
HOW LIGHT RAYS TRAVEL
In the previous activities, you had to look directly into a mirror to find or arrange faces
and stickers. To do this, you needed lots of light reflecting off the faces and stickers and
traveling to and from the mirrors.
Another way of investigating the reflective properties of mirrors is to observe the light
from a flashlight.
In a dark room, you can make small spots of light dance around the walls by shining
the light from a flashlight onto a small mirror and moving the mirror around with your
hand. The path of the light reflecting off the mirror will be very noticeable because the
only things you will be able to see are the beam of light from the flashlight and that light
beam reflecting off the mirror.
Try adding a second or third mirror. It becomes a real challenge to line up all the
mirrors in the right positions to keep reflecting the light. The next games and challenges
are designed (o help you discover more about how light travels.
Game 1: Mirror Monsters
You can just go into a dark room, shine a flashlight on some mirrors, and eventually
you will figure out how light rays travel. You can get the same result but have more fun,
however, if your friends join you in a mirror-monster game. You can also accumulate lots
of observations about how light reflects off mirrors by playing this game. It starts out
with simple challenges but can be gradually changed so that much more skill is needed to
play it.
You will need:
20 pieces of cardboard, 6 Inches square 20 pieces of cardboard. 2 inches square
1 large piece of heavy paper or poster board, approximately 24 inches wide and 30
inches long
2 to 4 mirrors with supports, flashlight pencil, yardstick, scissors or mat knife
Setting Up
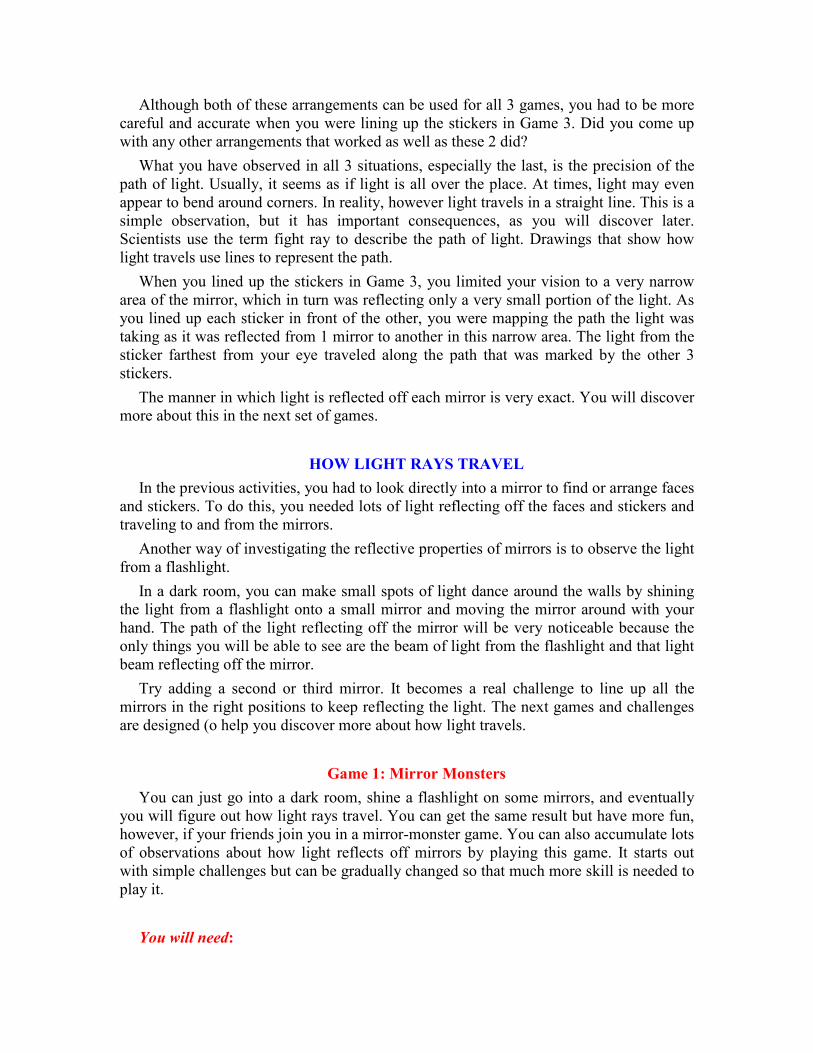
Step 1. With scissors or a mat knife, cut a slot about 1 inch long in 1 side of a 6-inch
piece of cardboard. Cut another 1-inch slot in a 2-inch piece of cardboard.
SAFETY NOTE:
Be very careful when using a mat knife. Remember to keep the hand holding down the
cardboard as far away as possible from the path of the knife.
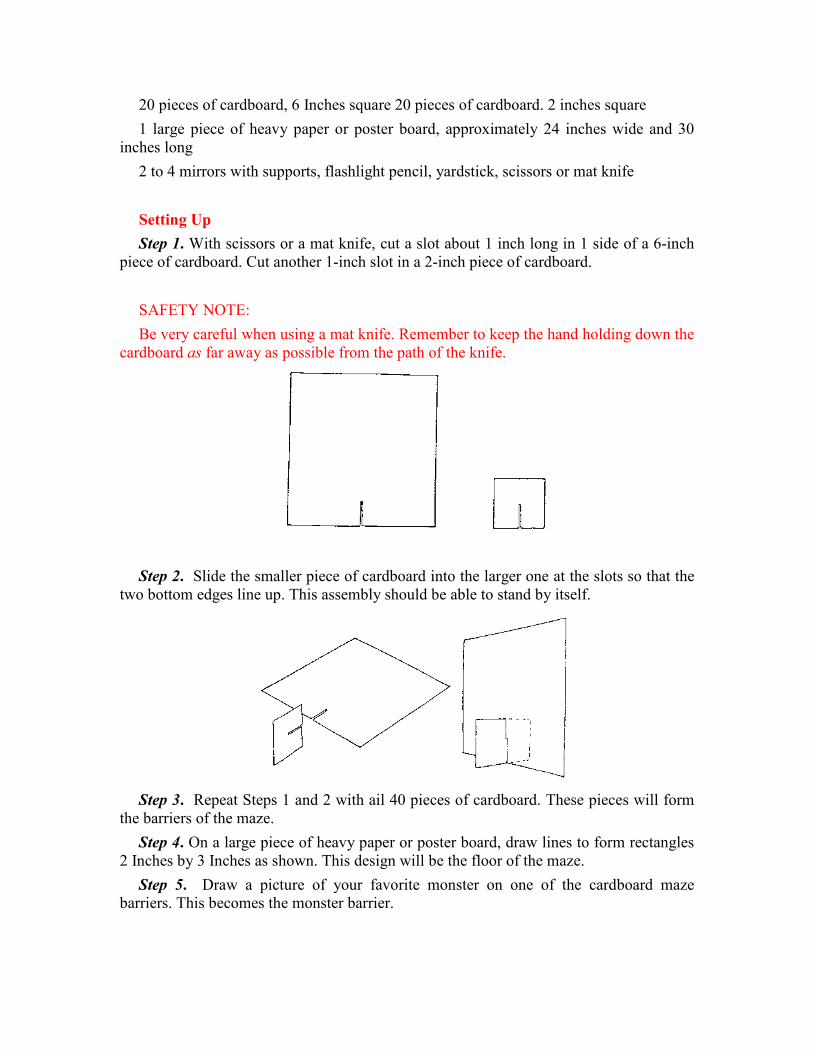
Step 2. Slide the smaller piece of cardboard into the larger one at the slots so that the
two bottom edges line up. This assembly should be able to stand by itself.
Step 3. Repeat Steps 1 and 2 with ail 40 pieces of cardboard. These pieces will form
the barriers of the maze.
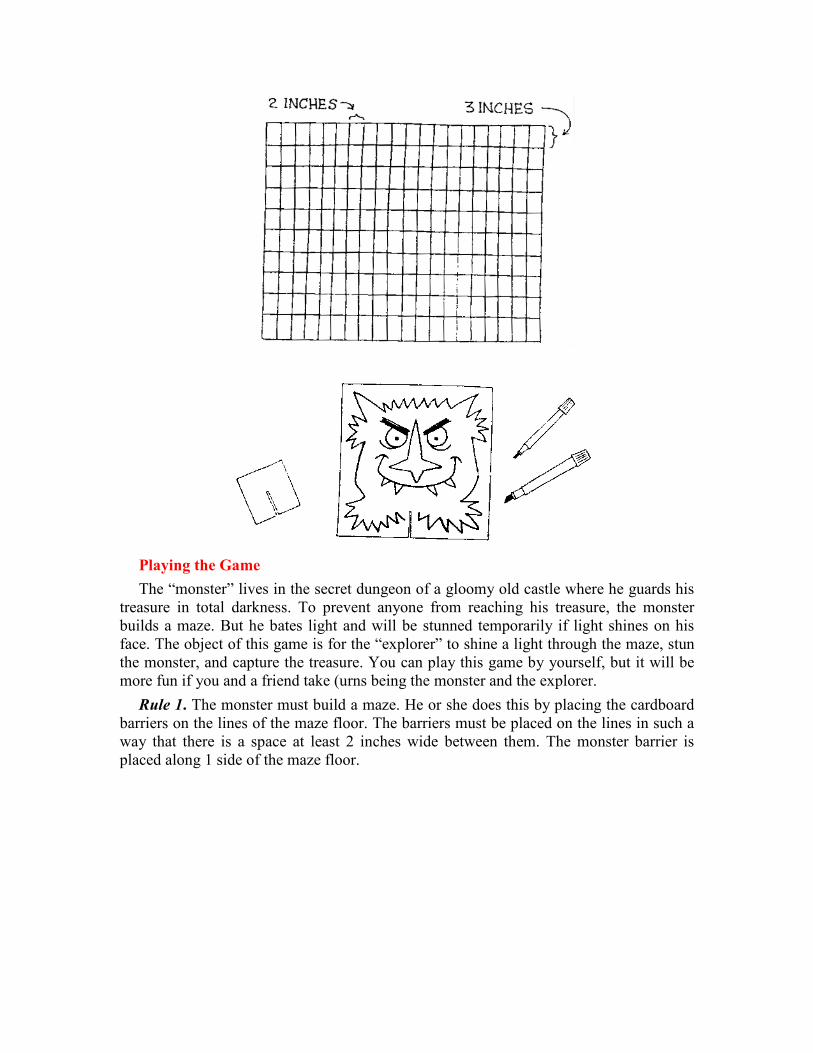
Step 4. On a large piece of heavy paper or poster board, draw lines to form rectangles
2 Inches by 3 Inches as shown. This design will be the floor of the maze.
Step 5. Draw a picture of your favorite monster on one of the cardboard maze
barriers. This becomes the monster barrier.
Playing the Game
The “monster” lives in the secret dungeon of a gloomy old castle where he guards his
treasure in total darkness. To prevent anyone from reaching his treasure, the monster
builds a maze. But he bates light and will be stunned temporarily if light shines on his
face. The object of this game is for the “explorer” to shine a light through the maze, stun
the monster, and capture the treasure. You can play this game by yourself, but it will be
more fun if you and a friend take (urns being the monster and the explorer.
Rule 1. The monster must build a maze. He or she does this by placing the cardboard
barriers on the lines of the maze floor. The barriers must be placed on the lines in such a
way that there is a space at least 2 inches wide between them. The monster barrier is
placed along 1 side of the maze floor.
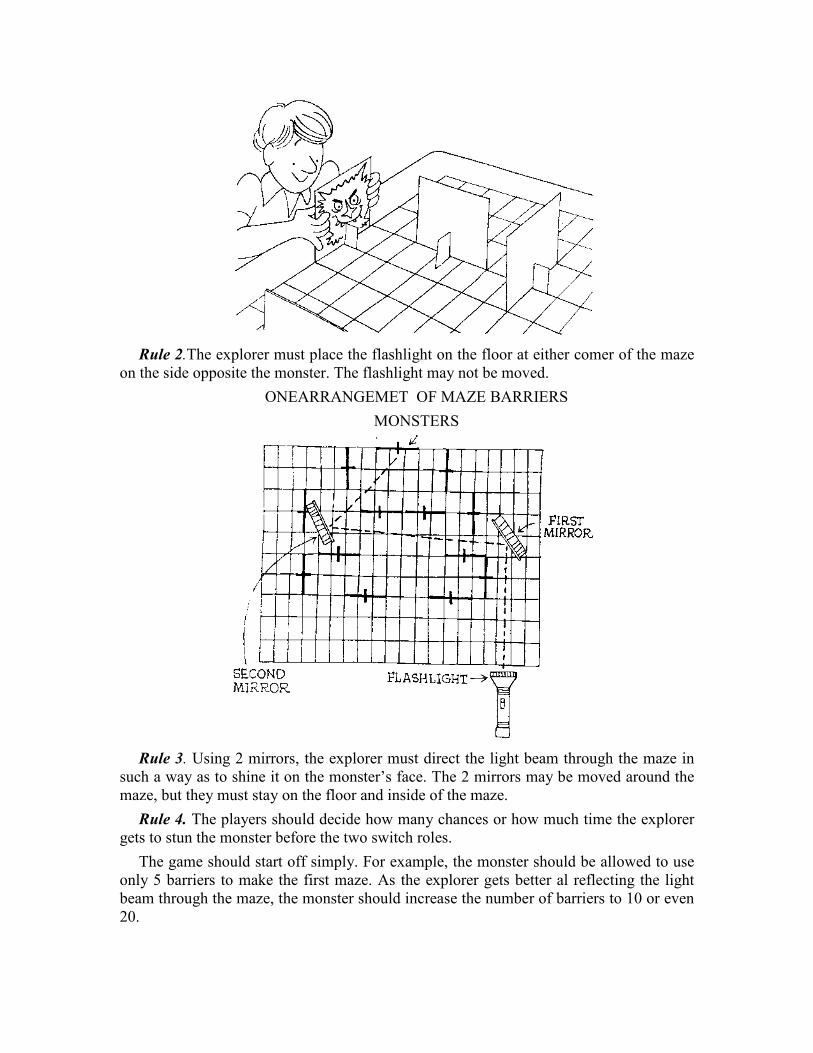
Rule 2.The explorer must place the flashlight on the floor at either comer of the maze
on the side opposite the monster. The flashlight may not be moved.
ONEARRANGEMET OF MAZE BARRIERS
MONSTERS
Rule 3. Using 2 mirrors, the explorer must direct the light beam through the maze in
such a way as to shine it on the monster’s face. The 2 mirrors may be moved around the
maze, but they must stay on the floor and inside of the maze.
Rule 4. The players should decide how many chances or how much time the explorer
gets to stun the monster before the two switch roles.
The game should start off simply. For example, the monster should be allowed to use
only 5 barriers to make the first maze. As the explorer gets better al reflecting the light
beam through the maze, the monster should increase the number of barriers to 10 or even
20.
The explorer’s task should also be made more challenging by having him or her use 4
mirrors to direct the beam of light.
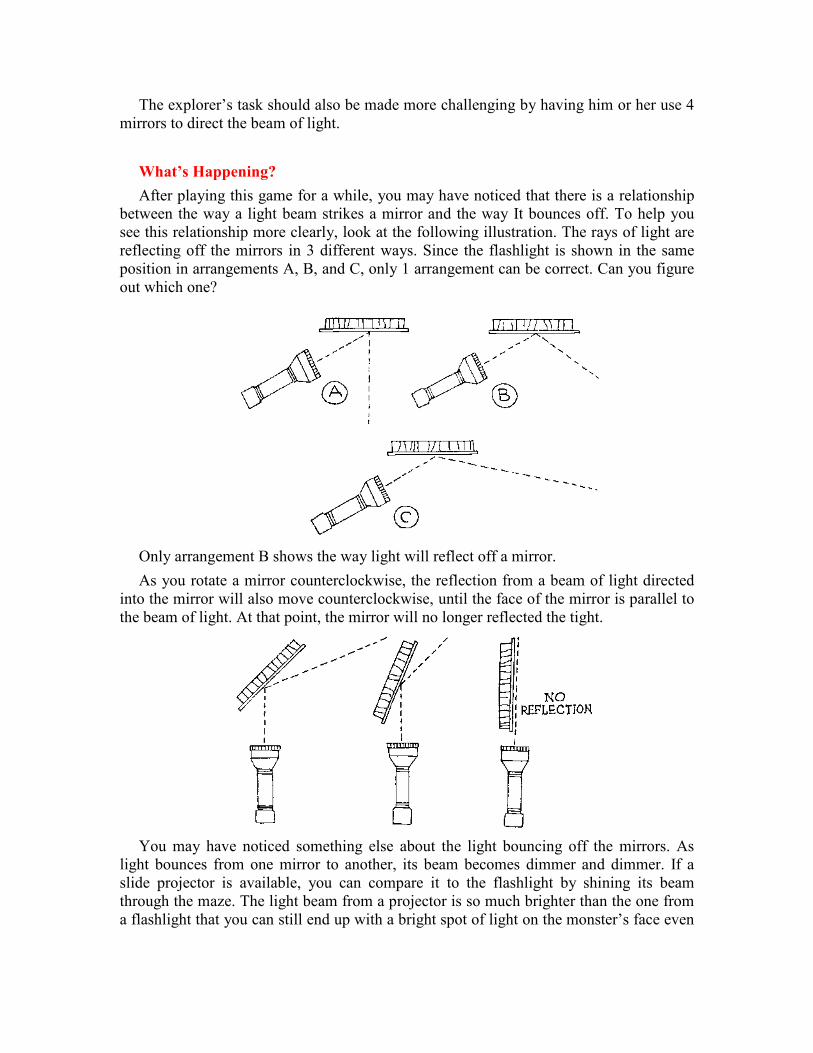
What’s Happening?
After playing this game for a while, you may have noticed that there is a relationship
between the way a light beam strikes a mirror and the way It bounces off. To help you
see this relationship more clearly, look at the following illustration. The rays of light are
reflecting off the mirrors in 3 different ways. Since the flashlight is shown in the same
position in arrangements A, B, and C, only 1 arrangement can be correct. Can you figure
out which one?
Only arrangement B shows the way light will reflect off a mirror.
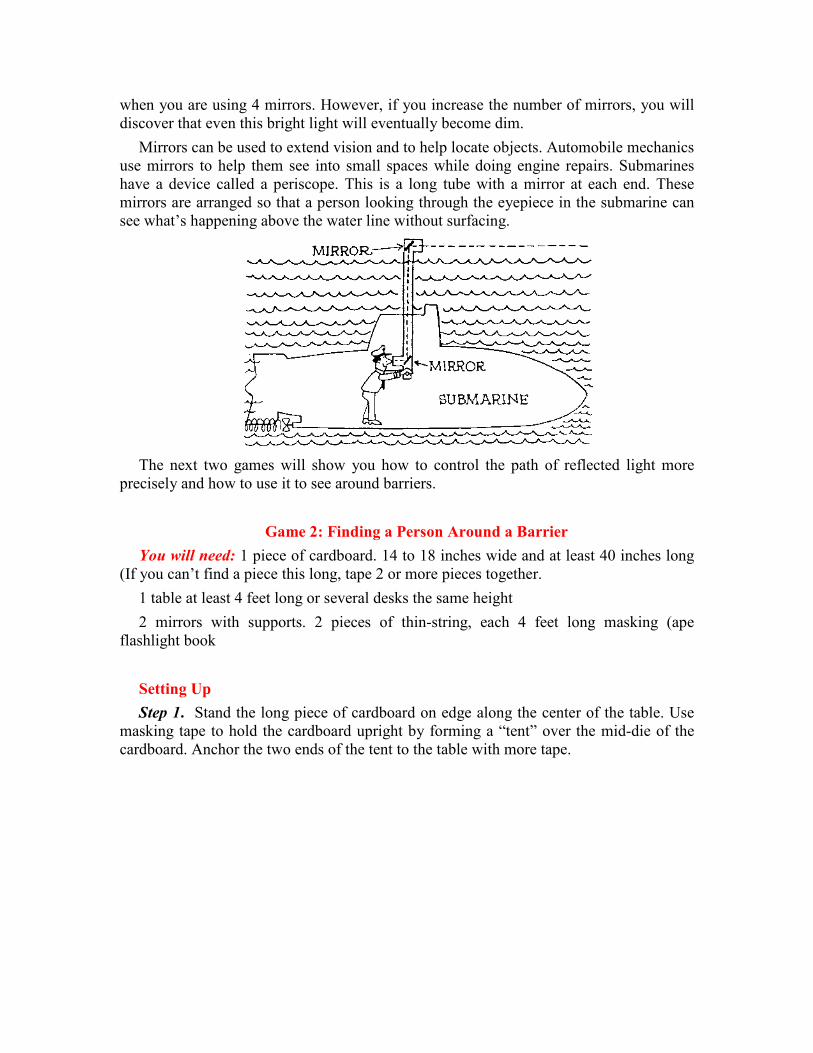
As you rotate a mirror counterclockwise, the reflection from a beam of light directed
into the mirror will also move counterclockwise, until the face of the mirror is parallel to
the beam of light. At that point, the mirror will no longer reflected the tight.
You may have noticed something else about the light bouncing off the mirrors. As
light bounces from one mirror to another, its beam becomes dimmer and dimmer. If a
slide projector is available, you can compare it to the flashlight by shining its beam
through the maze. The light beam from a projector is so much brighter than the one from
a flashlight that you can still end up with a bright spot of light on the monster’s face even
when you are using 4 mirrors. However, if you increase the number of mirrors, you will
discover that even this bright light will eventually become dim.
Mirrors can be used to extend vision and to help locate objects. Automobile mechanics
use mirrors to help them see into small spaces while doing engine repairs. Submarines
have a device called a periscope. This is a long tube with a mirror at each end. These
mirrors are arranged so that a person looking through the eyepiece in the submarine can
see what’s happening above the water line without surfacing.
The next two games will show you how to control the path of reflected light more
precisely and how to use it to see around barriers.
Game 2: Finding a Person Around a Barrier
You will need: 1 piece of cardboard. 14 to 18 inches wide and at least 40 inches long
(If you can’t find a piece this long, tape 2 or more pieces together.
1 table at least 4 feet long or several desks the same height
2 mirrors with supports. 2 pieces of thin-string, each 4 feet long masking (ape
flashlight book
Setting Up
Step 1. Stand the long piece of cardboard on edge along the center of the table. Use
masking tape to hold the cardboard upright by forming a “tent” over the mid-die of the
cardboard. Anchor the two ends of the tent to the table with more tape.
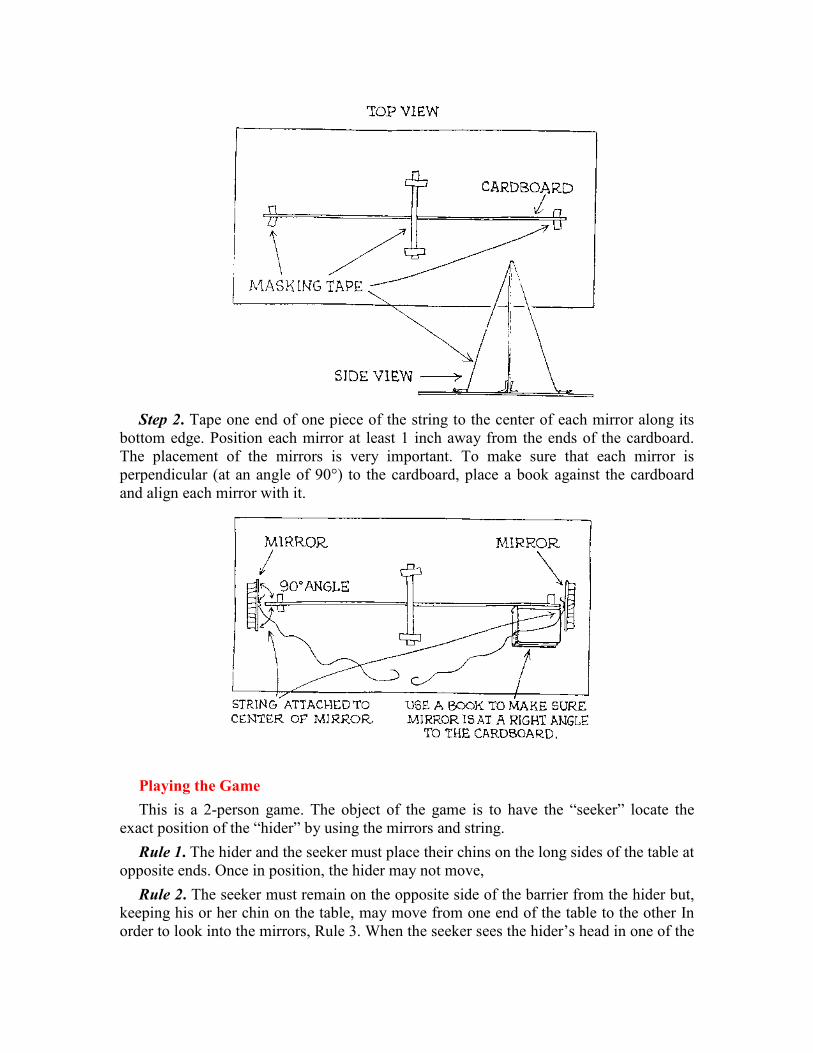
Step 2. Tape one end of one piece of the string to the center of each mirror along its
bottom edge. Position each mirror at least 1 inch away from the ends of the cardboard.
The placement of the mirrors is very important. To make sure that each mirror is
perpendicular (at an angle of 90°) to the cardboard, place a book against the cardboard
and align each mirror with it.
Playing the Game
This is a 2-person game. The object of the game is to have the “seeker” locate the
exact position of the “hider” by using the mirrors and string.
Rule 1. The hider and the seeker must place their chins on the long sides of the table at
opposite ends. Once in position, the hider may not move,
Rule 2. The seeker must remain on the opposite side of the barrier from the hider but,
keeping his or her chin on the table, may move from one end of the table to the other In
order to look into the mirrors, Rule 3. When the seeker sees the hider’s head in one of the
mirrors, the seeker must draw the string from that mirror toward himself or herself and
fasten the end to the table at that point.
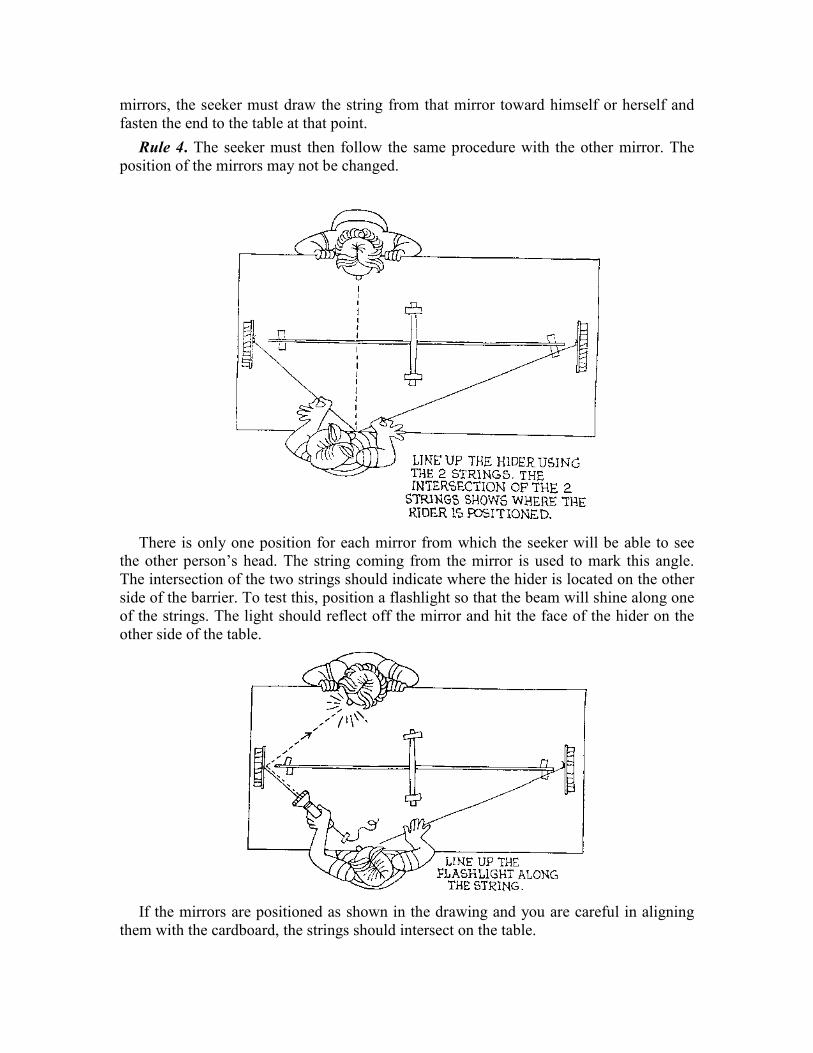
Rule 4. The seeker must then follow the same procedure with the other mirror. The
position of the mirrors may not be changed.
There is only one position for each mirror from which the seeker will be able to see
the other person’s head. The string coming from the mirror is used to mark this angle.
The intersection of the two strings should indicate where the hider is located on the other
side of the barrier. To test this, position a flashlight so that the beam will shine along one
of the strings. The light should reflect off the mirror and hit the face of the hider on the
other side of the table.
If the mirrors are positioned as shown in the drawing and you are careful in aligning
them with the cardboard, the strings should intersect on the table.
You can make this game more challenging by selling up an even longer barrier. This
will result in more places to hide.
Game 3: Finding the Location of an Object
In Game 2, the hider’s chin had to remain on the edge of the table. The seeker’s only
task was to find how far the hider was from either end of the table. You can make this
game more challenging by hiding an object such as a pencil somewhere on the table
behind the barrier and then trying to find its exact position on the table.
You will need: same mirror and barrier assembly as in Game 1, pencil, spool of thread
flashlight ruler or tape measure
Setting Up
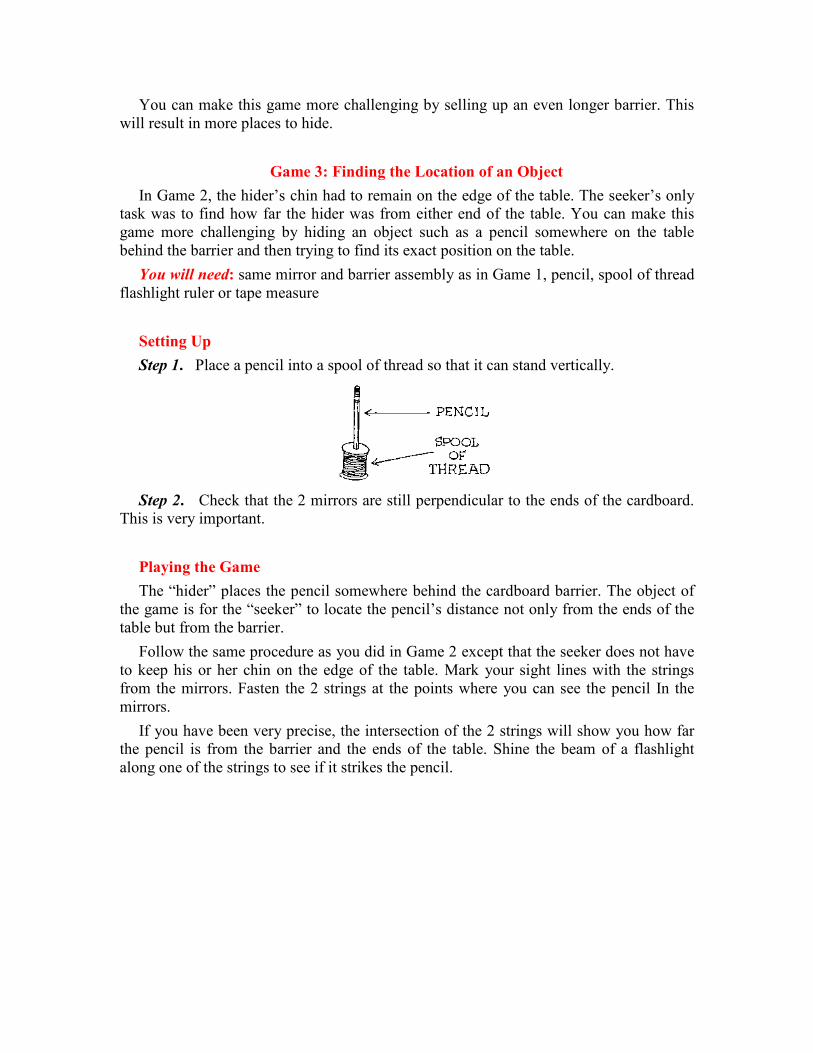
Step 1. Place a pencil into a spool of thread so that it can stand vertically.
Step 2. Check that the 2 mirrors are still perpendicular to the ends of the cardboard.
This is very important.
Playing the Game
The “hider” places the pencil somewhere behind the cardboard barrier. The object of
the game is for the “seeker” to locate the pencil’s distance not only from the ends of the
table but from the barrier.
Follow the same procedure as you did in Game 2 except that the seeker does not have
to keep his or her chin on the edge of the table. Mark your sight lines with the strings
from the mirrors. Fasten the 2 strings at the points where you can see the pencil In the
mirrors.
If you have been very precise, the intersection of the 2 strings will show you how far
the pencil is from the barrier and the ends of the table. Shine the beam of a flashlight
along one of the strings to see if it strikes the pencil.
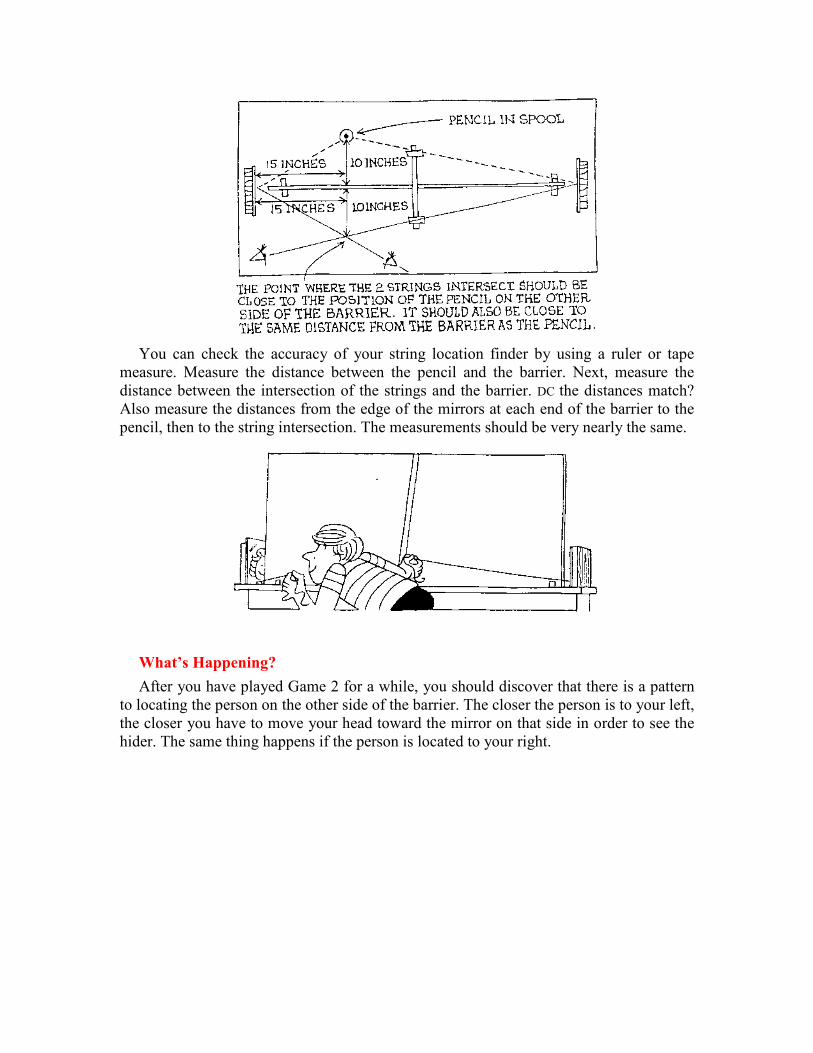
You can check the accuracy of your string location finder by using a ruler or tape
measure. Measure the distance between the pencil and the barrier. Next, measure the
distance between the intersection of the strings and the barrier. DC the distances match?
Also measure the distances from the edge of the mirrors at each end of the barrier to the
pencil, then to the string intersection. The measurements should be very nearly the same.
What’s Happening?
After you have played Game 2 for a while, you should discover that there is a pattern
to locating the person on the other side of the barrier. The closer the person is to your left,
the closer you have to move your head toward the mirror on that side in order to see the
hider. The same thing happens if the person is located to your right.
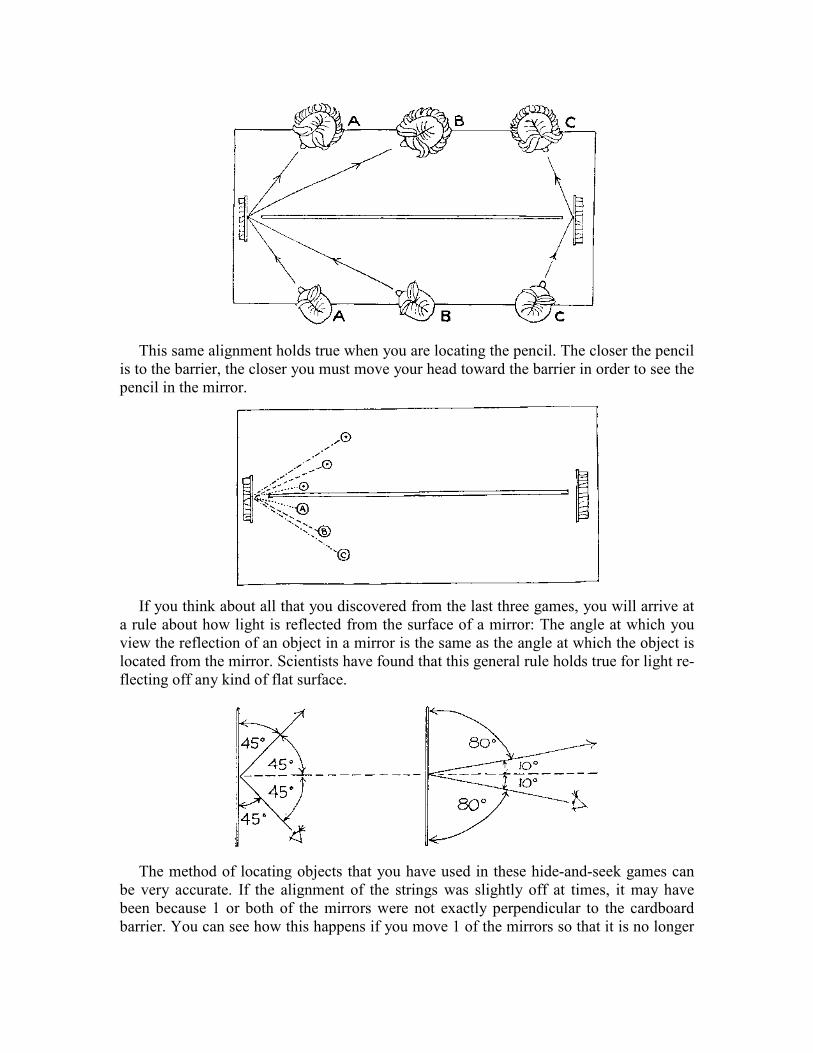
This same alignment holds true when you are locating the pencil. The closer the pencil
is to the barrier, the closer you must move your head toward the barrier in order to see the
pencil in the mirror.
If you think about all that you discovered from the last three games, you will arrive at
a rule about how light is reflected from the surface of a mirror: The angle at which you
view the reflection of an object in a mirror is the same as the angle at which the object is
located from the mirror. Scientists have found that this general rule holds true for light re-
flecting off any kind of flat surface.
The method of locating objects that you have used in these hide-and-seek games can
be very accurate. If the alignment of the strings was slightly off at times, it may have
been because 1 or both of the mirrors were not exactly perpendicular to the cardboard
barrier. You can see how this happens if you move 1 of the mirrors so that it is no longer
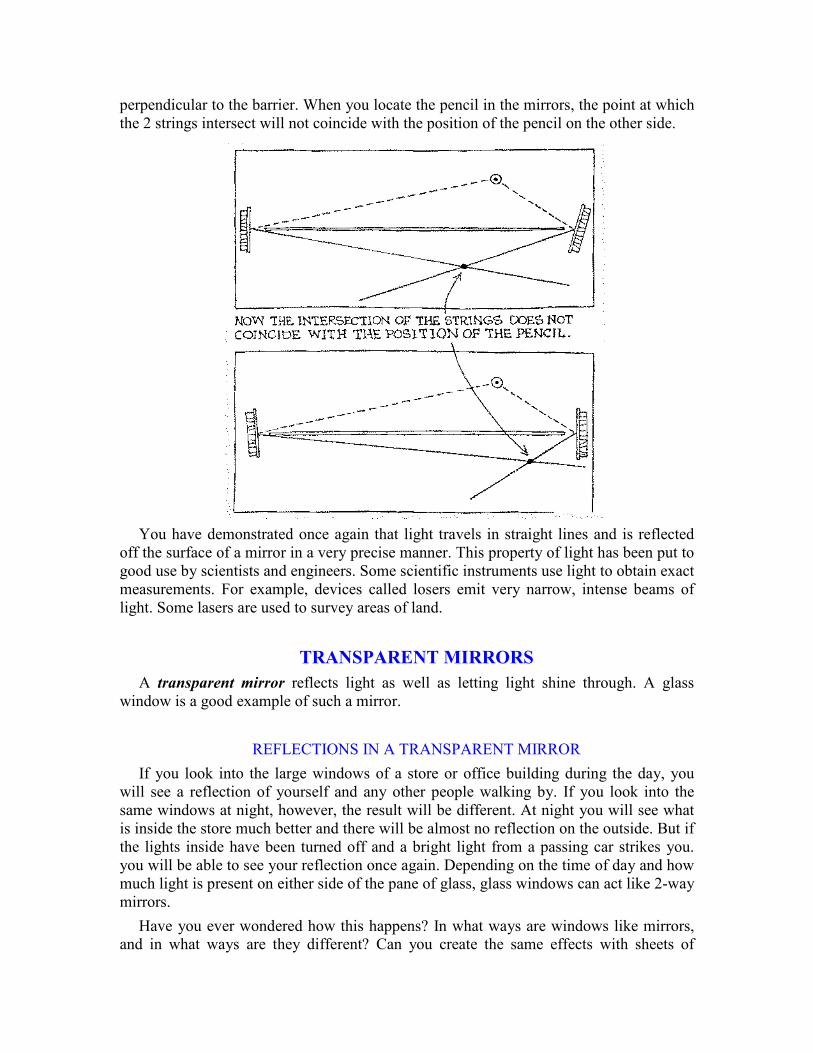
perpendicular to the barrier. When you locate the pencil in the mirrors, the point at which
the 2 strings intersect will not coincide with the position of the pencil on the other side.
You have demonstrated once again that light travels in straight lines and is reflected
off the surface of a mirror in a very precise manner. This property of light has been put to
good use by scientists and engineers. Some scientific instruments use light to obtain exact
measurements. For example, devices called losers emit very narrow, intense beams of
light. Some lasers are used to survey areas of land.
TRANSPARENT MIRRORS
A transparent mirror reflects light as well as letting light shine through. A glass
window is a good example of such a mirror.
REFLECTIONS IN A TRANSPARENT MIRROR
If you look into the large windows of a store or office building during the day, you
will see a reflection of yourself and any other people walking by. If you look into the
same windows at night, however, the result will be different. At night you will see what
is inside the store much better and there will be almost no reflection on the outside. But if
the lights inside have been turned off and a bright light from a passing car strikes you.
you will be able to see your reflection once again. Depending on the time of day and how
much light is present on either side of the pane of glass, glass windows can act like 2-way
mirrors.
Have you ever wondered how this happens? In what ways are windows like mirrors,
and in what ways are they different? Can you create the same effects with sheets of

plastic as you did with glass or plastic mirrors backed with a metallic coating? The next
set of activities will help you answer these questions while observing some curious
happenings.
Finding and Using Materials
SAFETY NOTE: Do not use real glass in the following activities. It would be safer for
you to use sheets of plastic.
Using some simple materials, you can extend your investigation of how light reflects
off different surfaces.
Thin sheets of plastic called Plexiglas can be purchased from most hardware or
building supplies stores. Some Plexiglas comes in sheets too large for these experiments.
You will have to ask the people in the store to cut it into smaller pieces.
One alternative is heavy acetate sheets that are used for overhead projectors. These
sheets can be purchased from art supply stores.
Another alternative is the clear, shiny plastic from containers used to hold salads or
pastries. The tops and bottoms of these plastic containers can be cut into flat, rectangular
shapes.
No matter what material you use you will need at least 6 sheets, each approximately 6
inches square. For some activities that you will be doing, it is easier to have 8 or more
sheets available.
Multiplying Ghostly Images
The entrances to some stores and buildings have sets of glass doors, if you look
carefully as you walk through these doors, you can sometimes see several reflections of
yourself. They may be faint images appearing in the next door or on the panes of glass
that divide the doors. You can also notice this effect at home if you have double
windows. These reflections occur only when the light outside and inside is of a certain
Intensity.
Other strange reflections may appear where sheets of glass meet to form corners.
Magicians take advantage of these effects in creating illusions to fool our vision. Some
artists have made sculptures which also create unusual and beautiful illusions.
Scientists and engineers have studied reflections to understand how light travels
through transparent materials. Investigating transparent mirrors offers many opportunities
for you to make new discoveries about the properties of light.
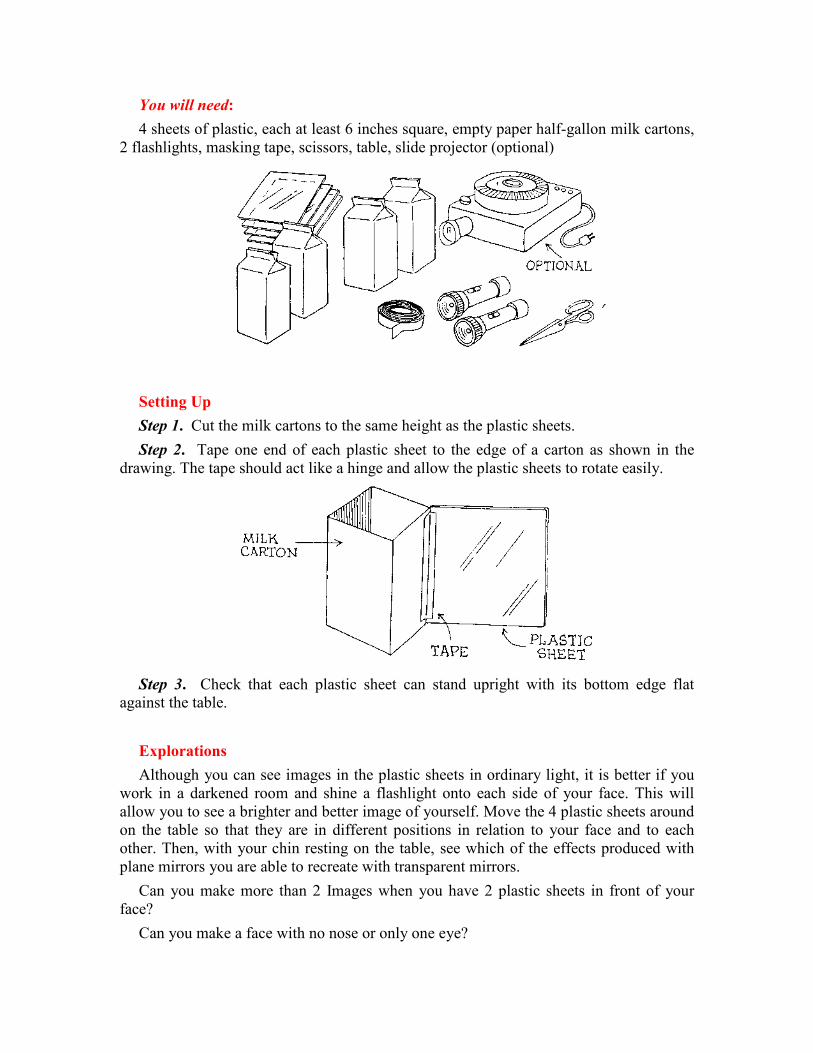
You will need:
4 sheets of plastic, each at least 6 inches square, empty paper half-gallon milk cartons,
2 flashlights, masking tape, scissors, table, slide projector (optional)
Setting Up
Step 1. Cut the milk cartons to the same height as the plastic sheets.
Step 2. Tape one end of each plastic sheet to the edge of a carton as shown in the
drawing. The tape should act like a hinge and allow the plastic sheets to rotate easily.
Step 3. Check that each plastic sheet can stand upright with its bottom edge flat
against the table.
Explorations
Although you can see images in the plastic sheets in ordinary light, it is better if you
work in a darkened room and shine a flashlight onto each side of your face. This will
allow you to see a brighter and better image of yourself. Move the 4 plastic sheets around
on the table so that they are in different positions in relation to your face and to each
other. Then, with your chin resting on the table, see which of the effects produced with
plane mirrors you are able to recreate with transparent mirrors.
Can you make more than 2 Images when you have 2 plastic sheets in front of your
face?
Can you make a face with no nose or only one eye?
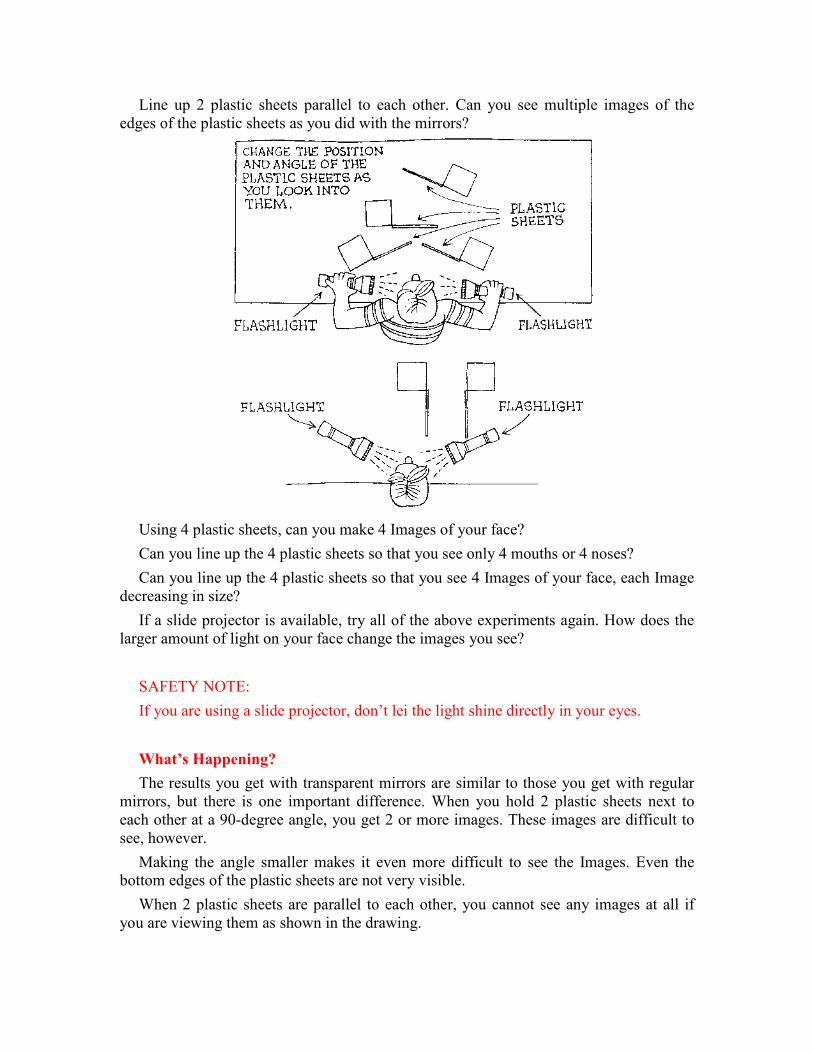
Line up 2 plastic sheets parallel to each other. Can you see multiple images of the
edges of the plastic sheets as you did with the mirrors?
Using 4 plastic sheets, can you make 4 Images of your face?
Can you line up the 4 plastic sheets so that you see only 4 mouths or 4 noses?
Can you line up the 4 plastic sheets so that you see 4 Images of your face, each Image
decreasing in size?
If a slide projector is available, try all of the above experiments again. How does the
larger amount of light on your face change the images you see?
SAFETY NOTE:
If you are using a slide projector, don’t lei the light shine directly in your eyes.
What’s Happening?
The results you get with transparent mirrors are similar to those you get with regular
mirrors, but there is one important difference. When you hold 2 plastic sheets next to
each other at a 90-degree angle, you get 2 or more images. These images are difficult to
see, however.
Making the angle smaller makes it even more difficult to see the Images. Even the
bottom edges of the plastic sheets are not very visible.
When 2 plastic sheets are parallel to each other, you cannot see any images at all if
you are viewing them as shown in the drawing.
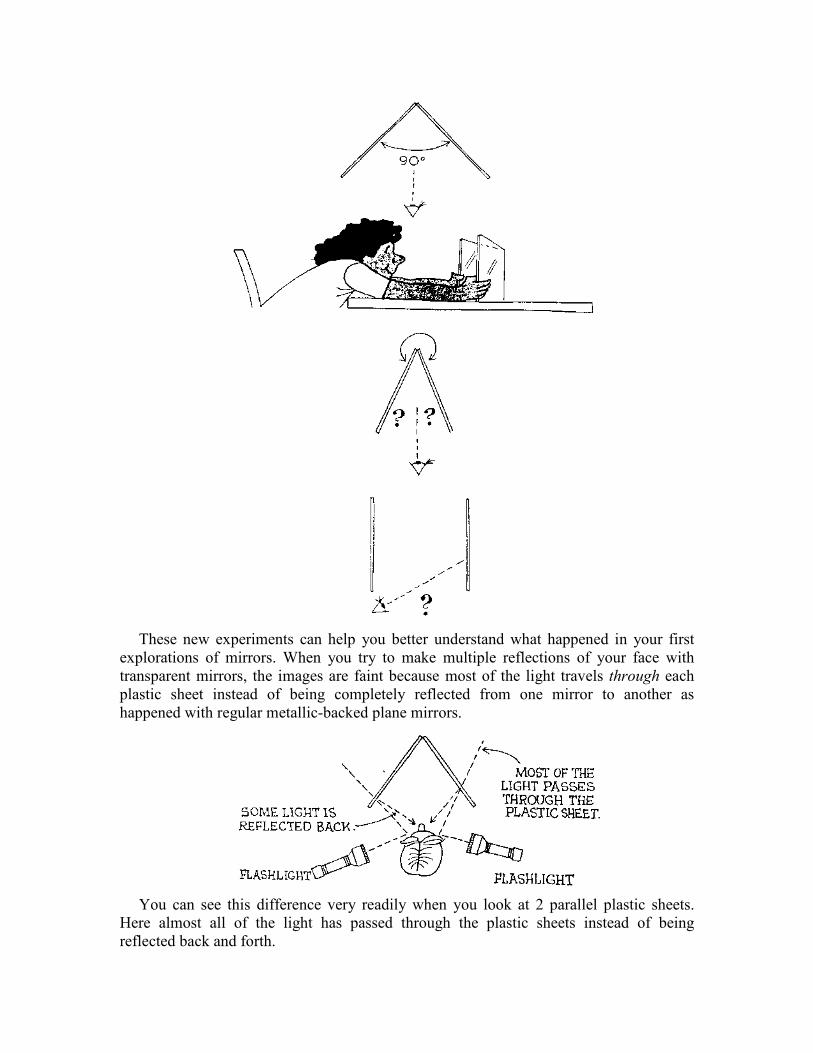
These new experiments can help you better understand what happened in your first
explorations of mirrors. When you try to make multiple reflections of your face with
transparent mirrors, the images are faint because most of the light travels through each
plastic sheet instead of being completely reflected from one mirror to another as
happened with regular metallic-backed plane mirrors.
You can see this difference very readily when you look at 2 parallel plastic sheets.
Here almost all of the light has passed through the plastic sheets instead of being
reflected back and forth.
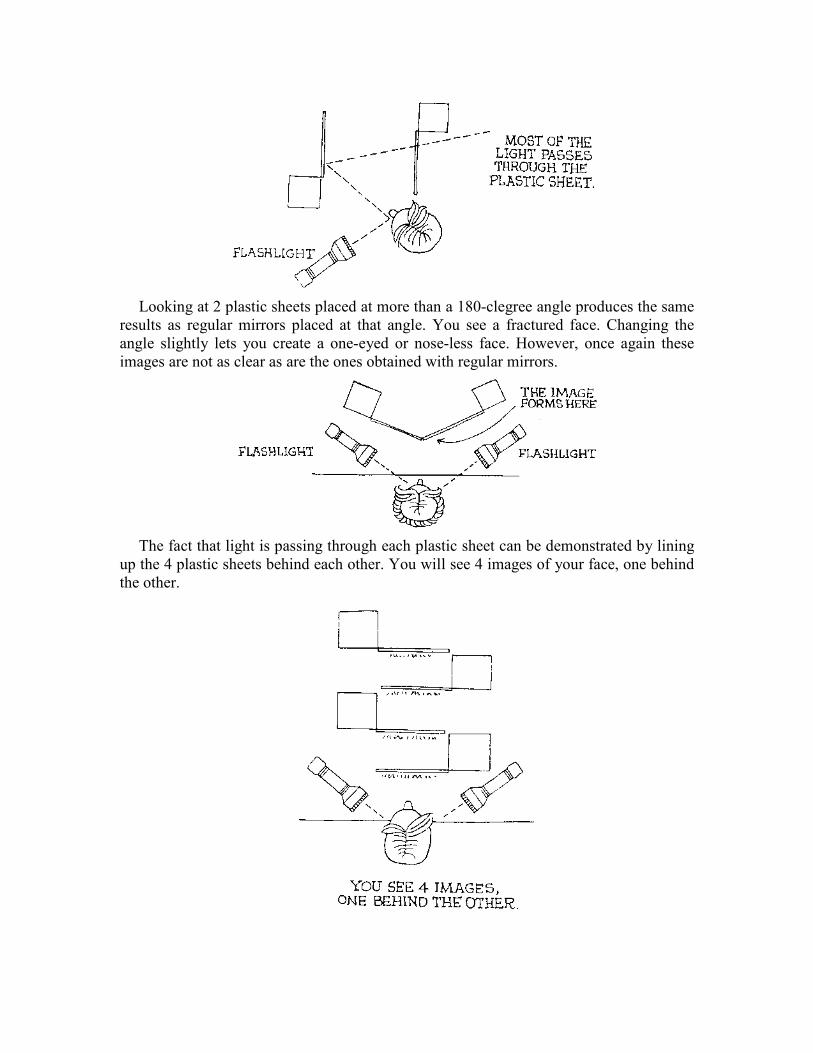
Looking at 2 plastic sheets placed at more than a 180-clegree angle produces the same
results as regular mirrors placed at that angle. You see a fractured face. Changing the
angle slightly lets you create a one-eyed or nose-less face. However, once again these
images are not as clear as are the ones obtained with regular mirrors.
The fact that light is passing through each plastic sheet can be demonstrated by lining
up the 4 plastic sheets behind each other. You will see 4 images of your face, one behind
the other.
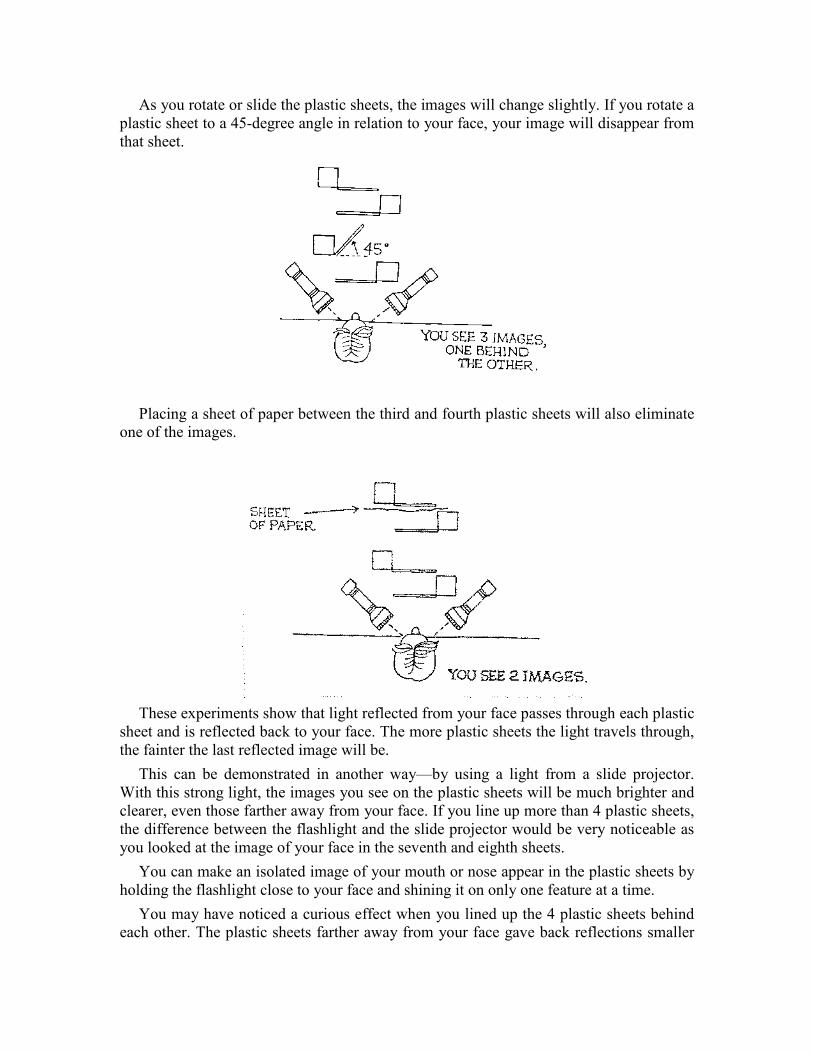
As you rotate or slide the plastic sheets, the images will change slightly. If you rotate a
plastic sheet to a 45-degree angle in relation to your face, your image will disappear from
that sheet.
Placing a sheet of paper between the third and fourth plastic sheets will also eliminate
one of the images.
These experiments show that light reflected from your face passes through each plastic
sheet and is reflected back to your face. The more plastic sheets the light travels through,
the fainter the last reflected image will be.
This can be demonstrated in another way—by using a light from a slide projector.
With this strong light, the images you see on the plastic sheets will be much brighter and
clearer, even those farther away from your face. If you line up more than 4 plastic sheets,
the difference between the flashlight and the slide projector would be very noticeable as
you looked at the image of your face in the seventh and eighth sheets.
You can make an isolated image of your mouth or nose appear in the plastic sheets by
holding the flashlight close to your face and shining it on only one feature at a time.
You may have noticed a curious effect when you lined up the 4 plastic sheets behind
each other. The plastic sheets farther away from your face gave back reflections smaller
than the ones closer to you. (You will examine this effect more closely in the section that
explores the location of the reflected image)
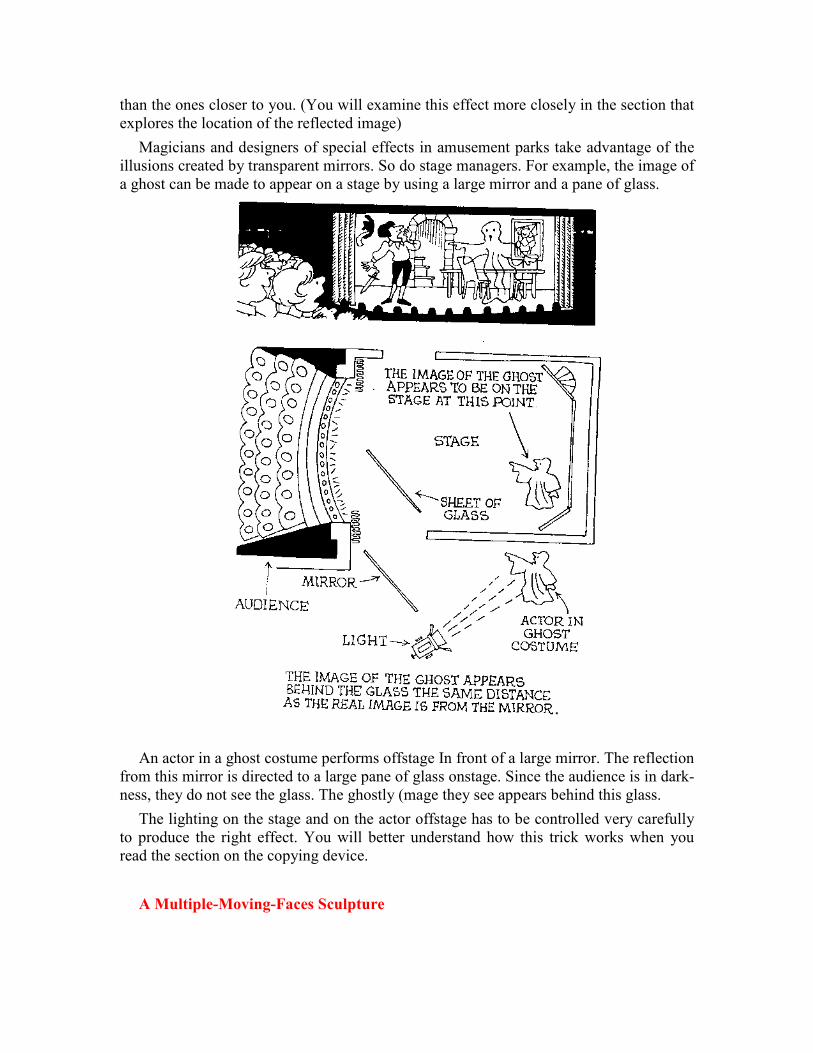
Magicians and designers of special effects in amusement parks take advantage of the
illusions created by transparent mirrors. So do stage managers. For example, the image of
a ghost can be made to appear on a stage by using a large mirror and a pane of glass.
An actor in a ghost costume performs offstage In front of a large mirror. The reflection
from this mirror is directed to a large pane of glass onstage. Since the audience is in dark-
ness, they do not see the glass. The ghostly (mage they see appears behind this glass.
The lighting on the stage and on the actor offstage has to be controlled very carefully
to produce the right effect. You will better understand how this trick works when you
read the section on the copying device.
A Multiple-Moving-Faces Sculpture
In the previous explorations the multiple reflections of your face were all stationary.
Imagine what would happen if the plastic sheets could rotate freely. You would have
multiple images of your face moving past each other in an eerie manner.
It doesn’t take much to create this strange effect. This is a fun project you could use to
entertain your friends on Halloween.
You will need:
4 plastic sheets, each about 6 inches square
4 pieces of ribbon, each about 1/4 inch wide and 3 inches long 4 pieces of wood, each
about 1/2 Inch wide and 12 inches long
1 or 2 flashlights tape
2 chairs or 2 tables the same height ruler or yardstick
Setting Up
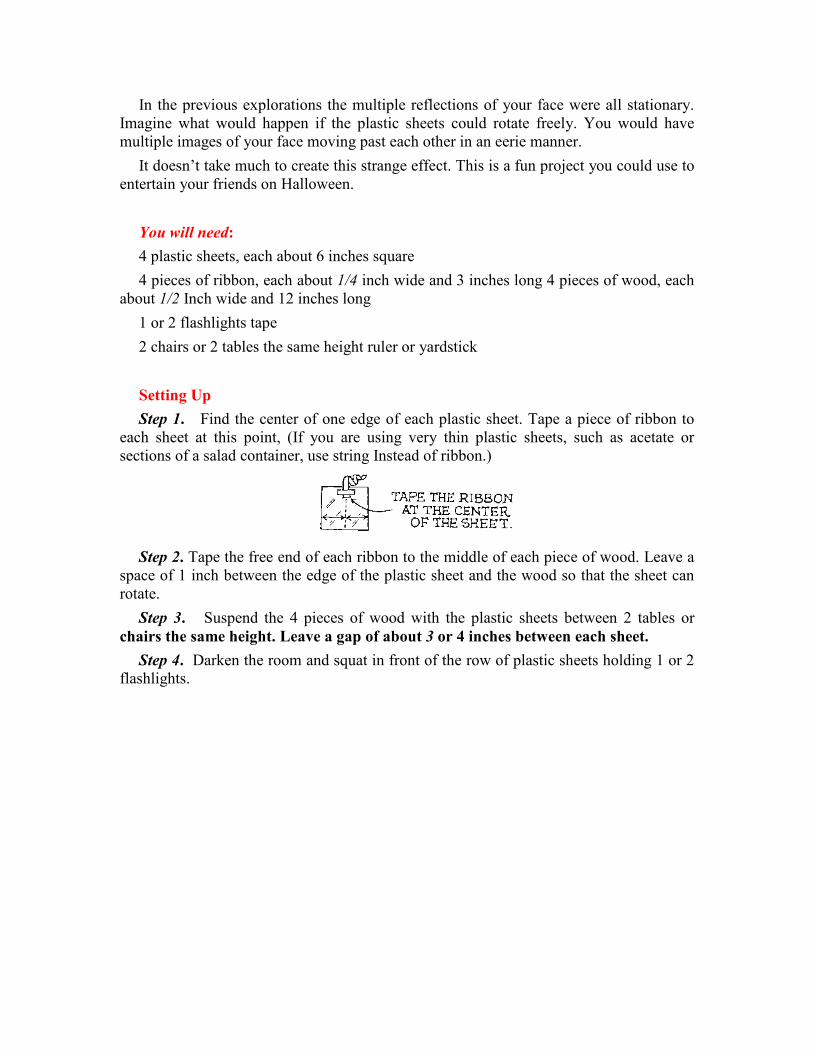
Step 1. Find the center of one edge of each plastic sheet. Tape a piece of ribbon to
each sheet at this point, (If you are using very thin plastic sheets, such as acetate or
sections of a salad container, use string Instead of ribbon.)
Step 2. Tape the free end of each ribbon to the middle of each piece of wood. Leave a
space of 1 inch between the edge of the plastic sheet and the wood so that the sheet can
rotate.
Step 3. Suspend the 4 pieces of wood with the plastic sheets between 2 tables or
chairs the same height. Leave a gap of about 3 or 4 inches between each sheet.
Step 4. Darken the room and squat in front of the row of plastic sheets holding 1 or 2
flashlights.
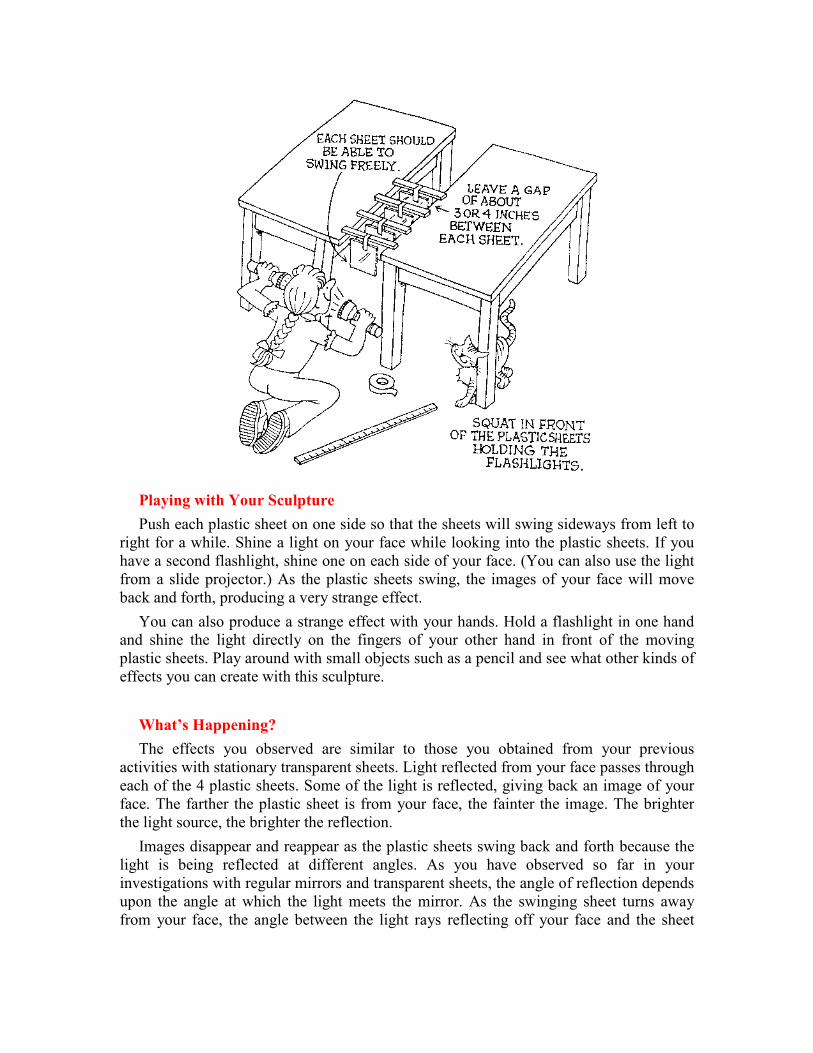
Playing with Your Sculpture
Push each plastic sheet on one side so that the sheets will swing sideways from left to
right for a while. Shine a light on your face while looking into the plastic sheets. If you
have a second flashlight, shine one on each side of your face. (You can also use the light
from a slide projector.) As the plastic sheets swing, the images of your face will move
back and forth, producing a very strange effect.
You can also produce a strange effect with your hands. Hold a flashlight in one hand
and shine the light directly on the fingers of your other hand in front of the moving
plastic sheets. Play around with small objects such as a pencil and see what other kinds of
effects you can create with this sculpture.
What’s Happening?
The effects you observed are similar to those you obtained from your previous
activities with stationary transparent sheets. Light reflected from your face passes through
each of the 4 plastic sheets. Some of the light is reflected, giving back an image of your
face. The farther the plastic sheet is from your face, the fainter the image. The brighter
the light source, the brighter the reflection.
Images disappear and reappear as the plastic sheets swing back and forth because the
light is being reflected at different angles. As you have observed so far in your
investigations with regular mirrors and transparent sheets, the angle of reflection depends
upon the angle at which the light meets the mirror. As the swinging sheet turns away
from your face, the angle between the light rays reflecting off your face and the sheet
increase. The greater this angle becomes, the more difficult it is to see your reflected
image.
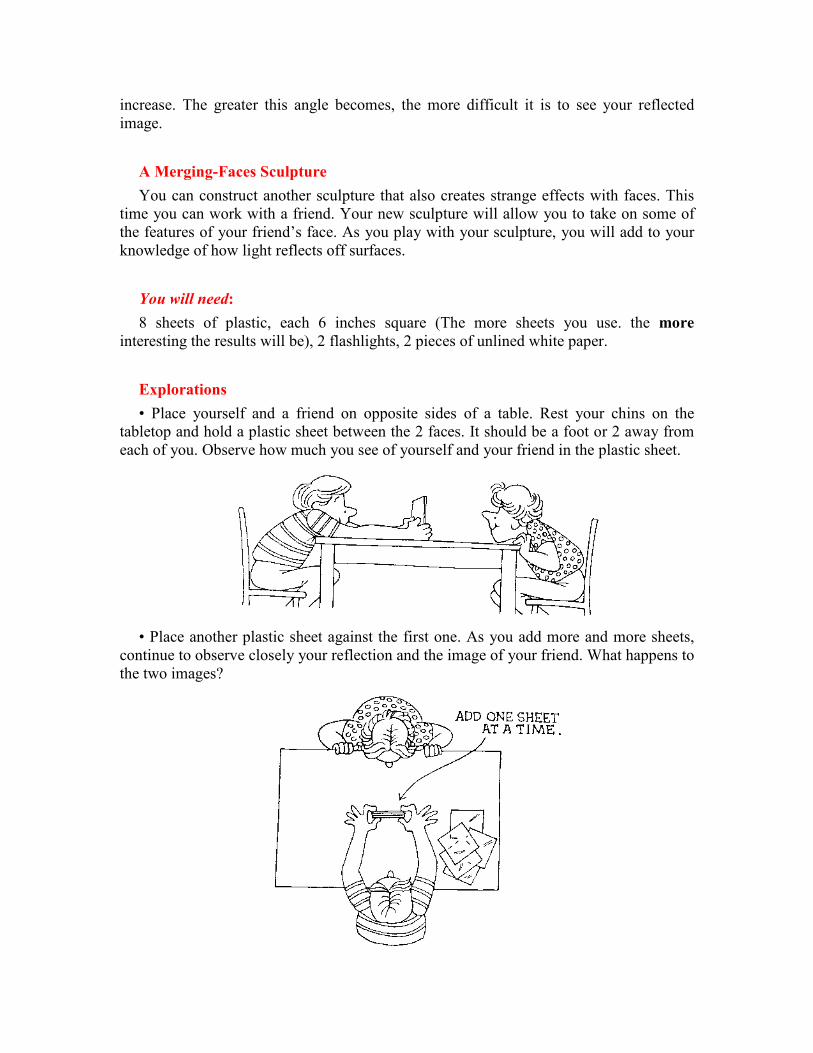
A Merging-Faces Sculpture
You can construct another sculpture that also creates strange effects with faces. This
time you can work with a friend. Your new sculpture will allow you to take on some of
the features of your friend’s face. As you play with your sculpture, you will add to your
knowledge of how light reflects off surfaces.
You will need:
8 sheets of plastic, each 6 inches square (The more sheets you use. the more
interesting the results will be), 2 flashlights, 2 pieces of unlined white paper.
Explorations
• Place yourself and a friend on opposite sides of a table. Rest your chins on the
tabletop and hold a plastic sheet between the 2 faces. It should be a foot or 2 away from
each of you. Observe how much you see of yourself and your friend in the plastic sheet.
• Place another plastic sheet against the first one. As you add more and more sheets,
continue to observe closely your reflection and the image of your friend. What happens to
the two images?
• Find a person with a beard or long hair. See if you can put the beard or long hair on
the reflection of your face in the set of plastic sheets.
• Keep adding more sheets. Do you reach a point where you can see only your own
reflection and not the face of your friend?
• In a darkened room, repeat the same procedures as before. Have your friend shine a
beam of light on his or her face. Does this new situation change how you see your own
face or your friend’s? What happens when both of you shine lights on your faces and add
plastic sheets to the set?
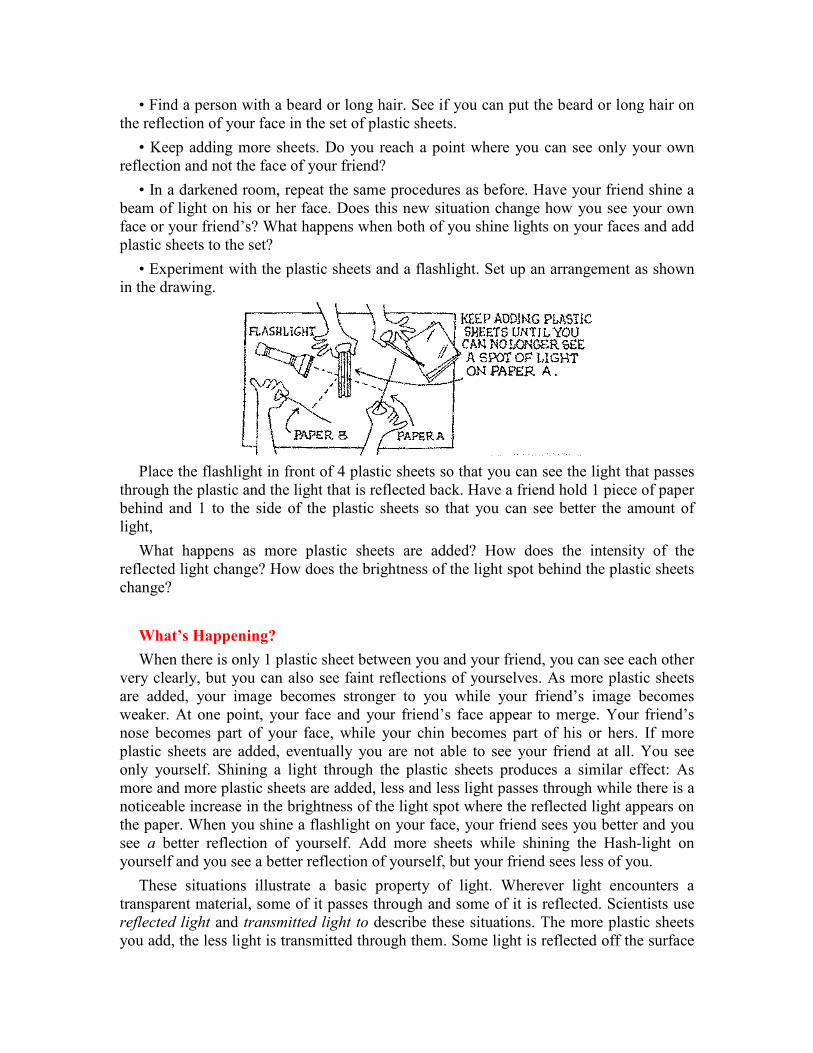
• Experiment with the plastic sheets and a flashlight. Set up an arrangement as shown
in the drawing.
Place the flashlight in front of 4 plastic sheets so that you can see the light that passes
through the plastic and the light that is reflected back. Have a friend hold 1 piece of paper
behind and 1 to the side of the plastic sheets so that you can see better the amount of
light,
What happens as more plastic sheets are added? How does the intensity of the
reflected light change? How does the brightness of the light spot behind the plastic sheets
change?
What’s Happening?
When there is only 1 plastic sheet between you and your friend, you can see each other
very clearly, but you can also see faint reflections of yourselves. As more plastic sheets
are added, your image becomes stronger to you while your friend’s image becomes
weaker. At one point, your face and your friend’s face appear to merge. Your friend’s
nose becomes part of your face, while your chin becomes part of his or hers. If more
plastic sheets are added, eventually you are not able to see your friend at all. You see
only yourself. Shining a light through the plastic sheets produces a similar effect: As
more and more plastic sheets are added, less and less light passes through while there is a
noticeable increase in the brightness of the light spot where the reflected light appears on
the paper. When you shine a flashlight on your face, your friend sees you better and you
see a better reflection of yourself. Add more sheets while shining the Hash-light on
yourself and you see a better reflection of yourself, but your friend sees less of you.
These situations illustrate a basic property of light. Wherever light encounters a
transparent material, some of it passes through and some of it is reflected. Scientists use
reflected light and transmitted light to describe these situations. The more plastic sheets
you add, the less light is transmitted through them. Some light is reflected off the surface
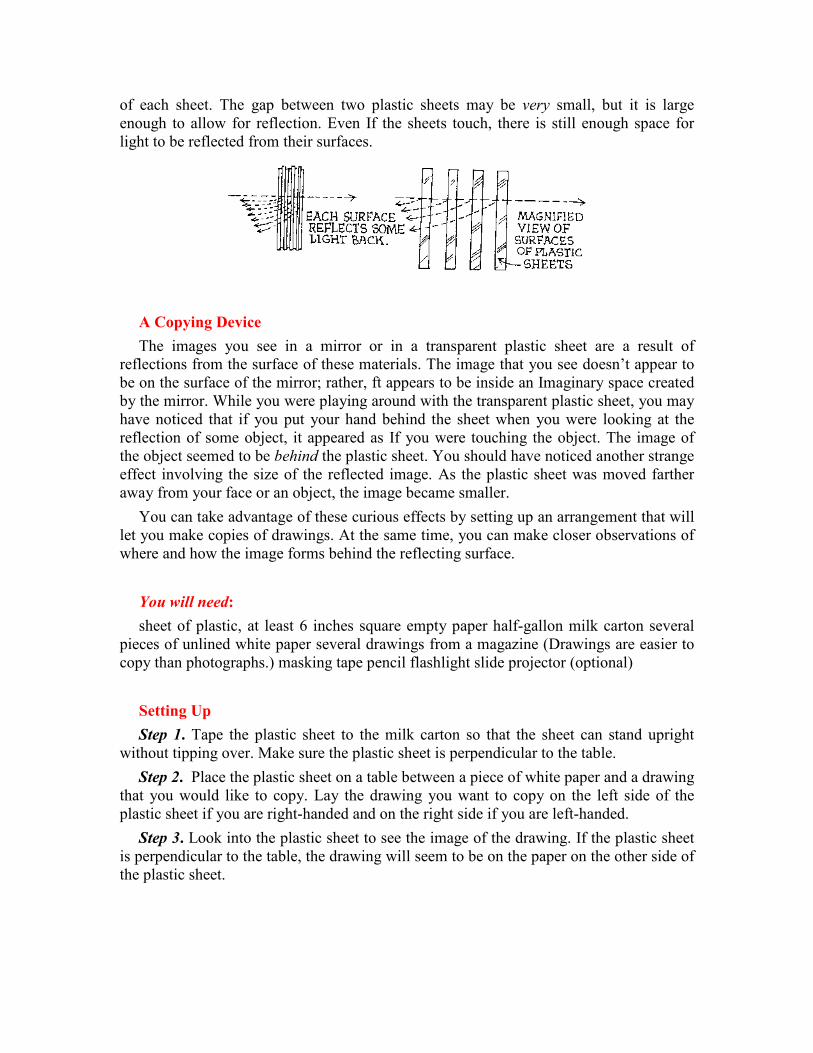
of each sheet. The gap between two plastic sheets may be very small, but it is large
enough to allow for reflection. Even If the sheets touch, there is still enough space for
light to be reflected from their surfaces.
A Copying Device
The images you see in a mirror or in a transparent plastic sheet are a result of
reflections from the surface of these materials. The image that you see doesn’t appear to
be on the surface of the mirror; rather, ft appears to be inside an Imaginary space created
by the mirror. While you were playing around with the transparent plastic sheet, you may
have noticed that if you put your hand behind the sheet when you were looking at the
reflection of some object, it appeared as If you were touching the object. The image of
the object seemed to be behind the plastic sheet. You should have noticed another strange
effect involving the size of the reflected image. As the plastic sheet was moved farther
away from your face or an object, the image became smaller.
You can take advantage of these curious effects by setting up an arrangement that will
let you make copies of drawings. At the same time, you can make closer observations of
where and how the image forms behind the reflecting surface.
You will need:
sheet of plastic, at least 6 inches square empty paper half-gallon milk carton several
pieces of unlined white paper several drawings from a magazine (Drawings are easier to
copy than photographs.) masking tape pencil flashlight slide projector (optional)
Setting Up
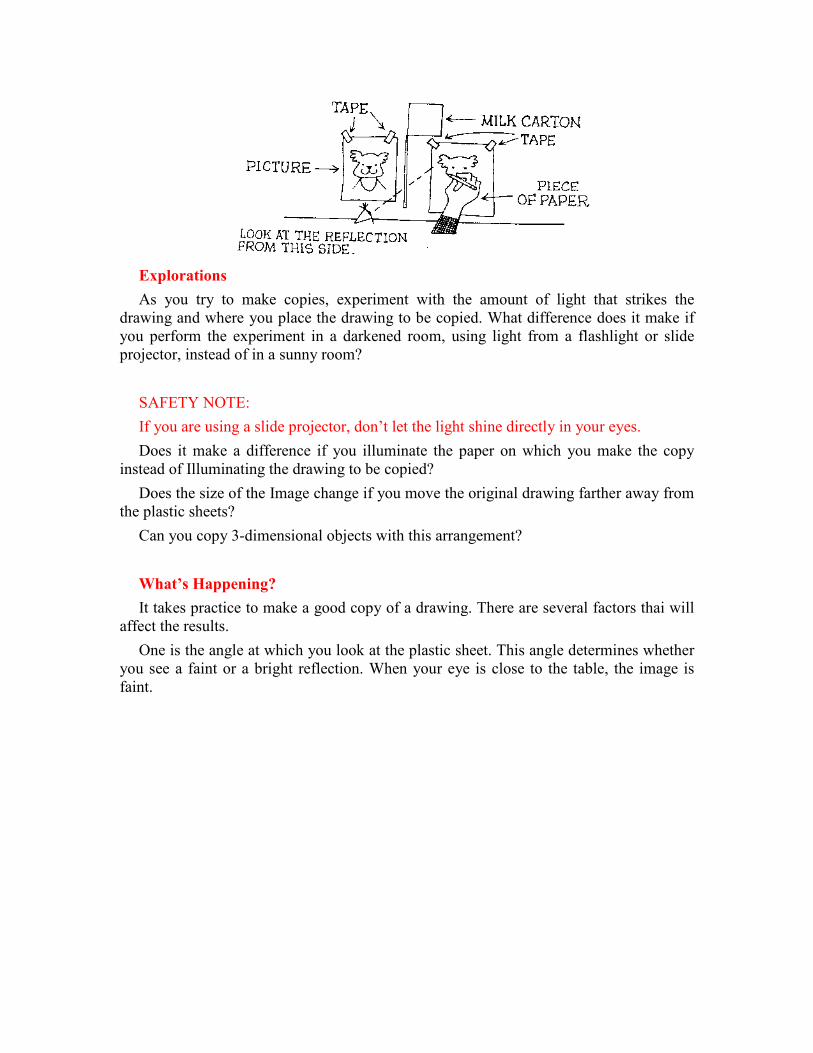
Step 1. Tape the plastic sheet to the milk carton so that the sheet can stand upright
without tipping over. Make sure the plastic sheet is perpendicular to the table.
Step 2. Place the plastic sheet on a table between a piece of white paper and a drawing
that you would like to copy. Lay the drawing you want to copy on the left side of the
plastic sheet if you are right-handed and on the right side if you are left-handed.
Step 3. Look into the plastic sheet to see the image of the drawing. If the plastic sheet
is perpendicular to the table, the drawing will seem to be on the paper on the other side of
the plastic sheet.
Explorations
As you try to make copies, experiment with the amount of light that strikes the
drawing and where you place the drawing to be copied. What difference does it make if
you perform the experiment in a darkened room, using light from a flashlight or slide
projector, instead of in a sunny room?
SAFETY NOTE:
If you are using a slide projector, don’t let the light shine directly in your eyes.
Does it make a difference if you illuminate the paper on which you make the copy
instead of Illuminating the drawing to be copied?
Does the size of the Image change if you move the original drawing farther away from
the plastic sheets?
Can you copy 3-dimensional objects with this arrangement?
What’s Happening?
It takes practice to make a good copy of a drawing. There are several factors thai will
affect the results.
One is the angle at which you look at the plastic sheet. This angle determines whether
you see a faint or a bright reflection. When your eye is close to the table, the image is
faint.

When your eye is close to the top edge of the plastic sheet, a much brighter image
appears.
The results you get in these two situations are similar to the results you got in the
arrangement of the first exploration, where 4 mirrors were lined up parallel to each other.
Changing the angle of 1 mirror changed the intensity of the image. The angle of
maximum brightness and the angle at which the maximum amount of light will strike the
plastic sheet are the same. By moving your head around, you can find the angle at which
the brightest light will be reflected from the plastic sheet.
The amount of light that falls on the drawing also makes a difference in how well you
see the image to be copied. The more light on the drawing, the better its reflected image
will be. If the side where you place your pencil is very dark, you won’t be able to trace
the drawing. The light on the two sides of the plastic sheet has to be balanced so that the
drawing is well lit and you have enough light to see your pencil on the paper. This can be
achieved by placing books on the copying side to block out part of the light.
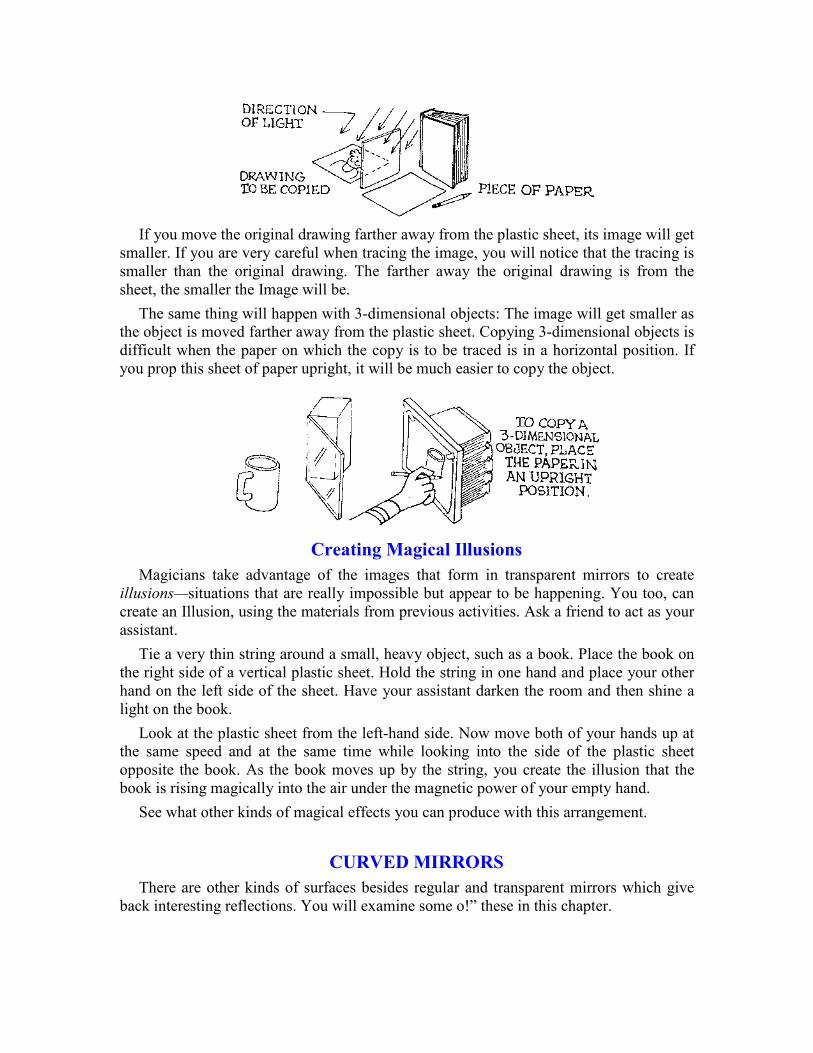
If you move the original drawing farther away from the plastic sheet, its image will get
smaller. If you are very careful when tracing the image, you will notice that the tracing is
smaller than the original drawing. The farther away the original drawing is from the
sheet, the smaller the Image will be.
The same thing will happen with 3-dimensional objects: The image will get smaller as
the object is moved farther away from the plastic sheet. Copying 3-dimensional objects is
difficult when the paper on which the copy is to be traced is in a horizontal position. If
you prop this sheet of paper upright, it will be much easier to copy the object.
Creating Magical Illusions
Magicians take advantage of the images that form in transparent mirrors to create
illusions—situations that are really impossible but appear to be happening. You too, can
create an Illusion, using the materials from previous activities. Ask a friend to act as your
assistant.
Tie a very thin string around a small, heavy object, such as a book. Place the book on
the right side of a vertical plastic sheet. Hold the string in one hand and place your other
hand on the left side of the sheet. Have your assistant darken the room and then shine a
light on the book.
Look at the plastic sheet from the left-hand side. Now move both of your hands up at
the same speed and at the same time while looking into the side of the plastic sheet
opposite the book. As the book moves up by the string, you create the illusion that the
book is rising magically into the air under the magnetic power of your empty hand.
See what other kinds of magical effects you can produce with this arrangement.
CURVED MIRRORS
There are other kinds of surfaces besides regular and transparent mirrors which give
back interesting reflections. You will examine some o!” these in this chapter.
REFLECTIONS IN A CURVED MIRROR
As you have observed, display windows on stores and office buildings, as well as
smaller windows in your home, can act as mirrors. However, if you look closely at the
images formed on these windows, you will see that they are usually not as true to life as
are the ones which appear in plane mirrors. There are always distortions of some kind.
Sometimes these distortions are so great that the original object cannot be recognized
at all. Sometimes only one part of the object is distorted. Very large windows tend to
distort less, so that a reflection of a nearby street lamp or utility pole may still be
recognizable but may look like a wavy line. In a smaller window, a street lamp may look
like a lot of fuzzy lines.
Walk down the street alongside a building with large windows and watch what
happens to your reflection. As you move along, your image may appear, disappear, and
change shape in all sorts of strange, unpredictable ways. This happens because these
sheets of glass are not perfectly flat. They have slight curvatures or indentations that
cause the light to be reflected differently than It would be from a perfectly flat surface.
You can also observe this result in mirrors that have been deliberately curved.
Sometimes mirrors in hotels or shopping centers have curved surfaces for a decorative
effect. They make your body or face look fatter or skinnier than normal. Some small
mirrors used for applying makeup or shaving also make your face appear fatter or
thinner. Some cars have a second mirror on the right side to help the driver get a broader
view of the road. Curved mirrors are also put to practical use by scientists and engineers.
The Hubble telescope that is in a space station above the earth has a very large curved
mirror.
You have already explored the properties of plane and transparent mirrors. Now you
can use this information to help you understand what happens with curved mirrors. Al-
though the reflections from curved surfaces are very complex, they will help you
continue to make some basic discoveries about how light behaves.
CURVED MIRRORS AROUND YOUR HOME
You can start your investigation of curved mirrors right in your own home. Look
around. You may be surprised by the number of objects that act like curved mirrors. For
example, look al your face in the side of a shiny frying pan or kettle. What does your
reflection look like? How many other objects around the house give back strange
reflections?
Crab a pencil and paper and go around exploring. Make a list of all the things in which
you see a distorted reflection of yourself. Record what your face looks like. Note whether
it appears fatter or thinner than it is. How long a list can you make?
Now divide your list into two categories. In one column, write all of the objects that
made your face look long and skinny, [n the other column, list all the objects that made
your face look fat or wide. (Some objects may appear on both lists.) Your completed list
should look something like this:

A B
television screen shaving mirror
spoon spoon
side of drinking glass bottom of shaving-cream can
shiny pot and lid underside of shiny pot lid
camera lens
side of plastic soda bottle
side of glass Jar
side of plastic flowerpot
doorknob
What’s Happening?
All of the objects in column A make your face look thinner or longer. All the objects
in column B make your face look slightly fatter. The spoon and the pot lid appear in both
columns depending on which side you look into. You will discover that your face is
upside down when you look into the hollowed part of a spoon. You should also notice
that your reflection changes as you move your face closer or farther away from any of
these surfaces. Scientists have given names to these two types of surfaces. The objects in
column A are called convex surfaces. The objects in column B are called concave
surfaces.
Concave surfaces give off reflections that make you look bigger: convex surfaces
make you look elongated or squashed.
Have you ever been to a carnival or circus that has a large mirror display in which you
can see your whole body? One mirror probably makes you look skinny and tall while the
other mirror makes you look fat and short. The next time you are In front of one of these
mirrors, check to see which mirror is concave and which is convex.
FLEXIBLE CURVED MIRRORS
Since your observations of convex or concave mirrors are limited to just those few
examples you can find at home, you can’t be sure if the way that they reflect an image
holds true for curved surfaces with varying degrees of convexity or concavity. You need
a flexible surface that can be bent into many kinds of curves in order to determine if all
concave and convex surfaces act the same way.
Practically all the objects with curved surfaces that you have observed so far are rigid:
they do not bend. This prevents you from further experimentation. What happens to an
image when the curvature of a surface is changed slightly? Try pushing against a plastic
soda bottle and see what happens to the reflection. Slight changes in the surface of the
bottle can produce large changes in the reflected image.
If you used acetate sheets or the plastic from salad containers in previous explorations,
you saw that they gave back reflections. They can also be bent easily. These same mate-
rials can be used in this next exploration.
The best material, however, is a flexible plastic sheet called mylar. Mylar has a
metallic surface on one side. Art supplies stores sometimes carry it. Some Inexpensive
mirrors used in student lockers are made of mylar. One type used for this purpose has a
sheet of mylar that can be removed from its holder. This mirror would be excellent for
the explorations in this section. Check the school supplies section in your local
department store.
Making Funny Faces
If you find a reflective material that can be easily bent, you can take another step in
your exploration of reflected light. You can also have some fun creating amusing Images.
You will need:
2 to 4 sheets of flexible plastic material,
6 Inches square flashlight rubber bands slide projector (optional)
Explorations
If you are using flexible mylar to conduct the following investigations, you can work
in ordinary light. If you are using flexible, transparent plastic sheets, you will have to
work in a darkened room and shine a light on your face. You can use either a flashlight or
a slide projector.
SAFETY NOTE:
If you are using a slide projector, don’t let the light shine directly in your eyes.
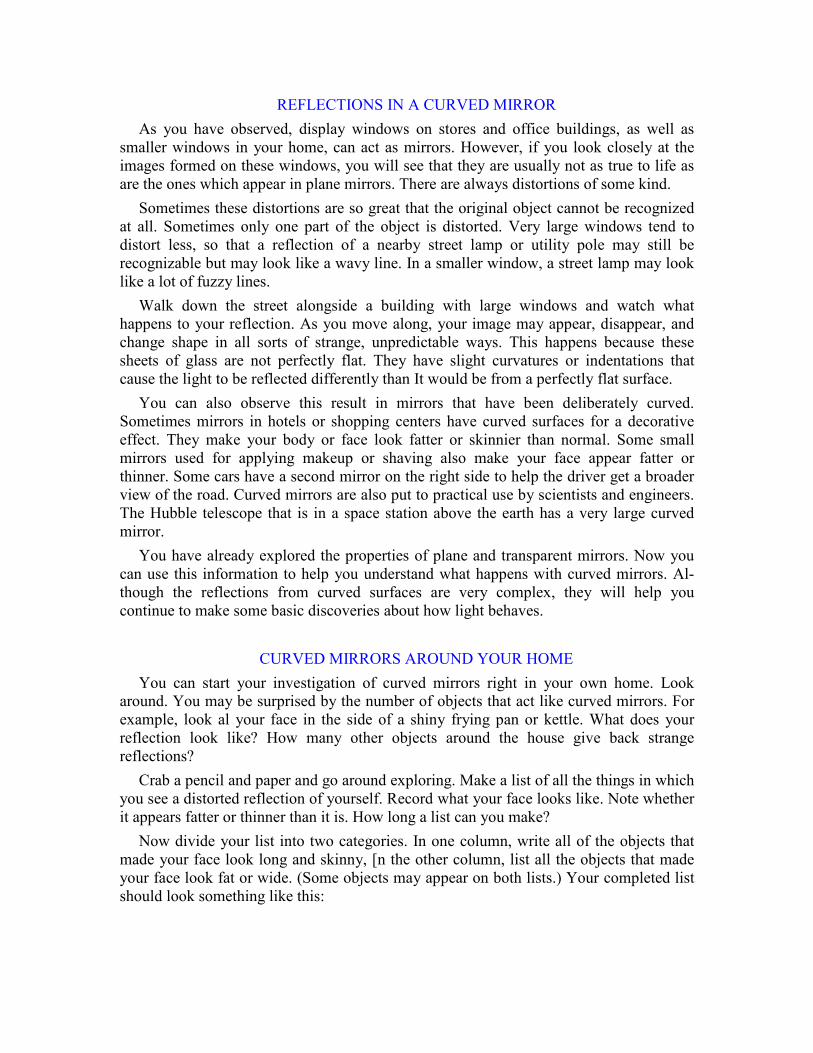
• Hold the sheet of flexible plastic material or mirror in both hands and bend the left
and right sides toward you into a concave curve. How does the image of your fate change
as you continue to bend the sides of this concave surface inward?
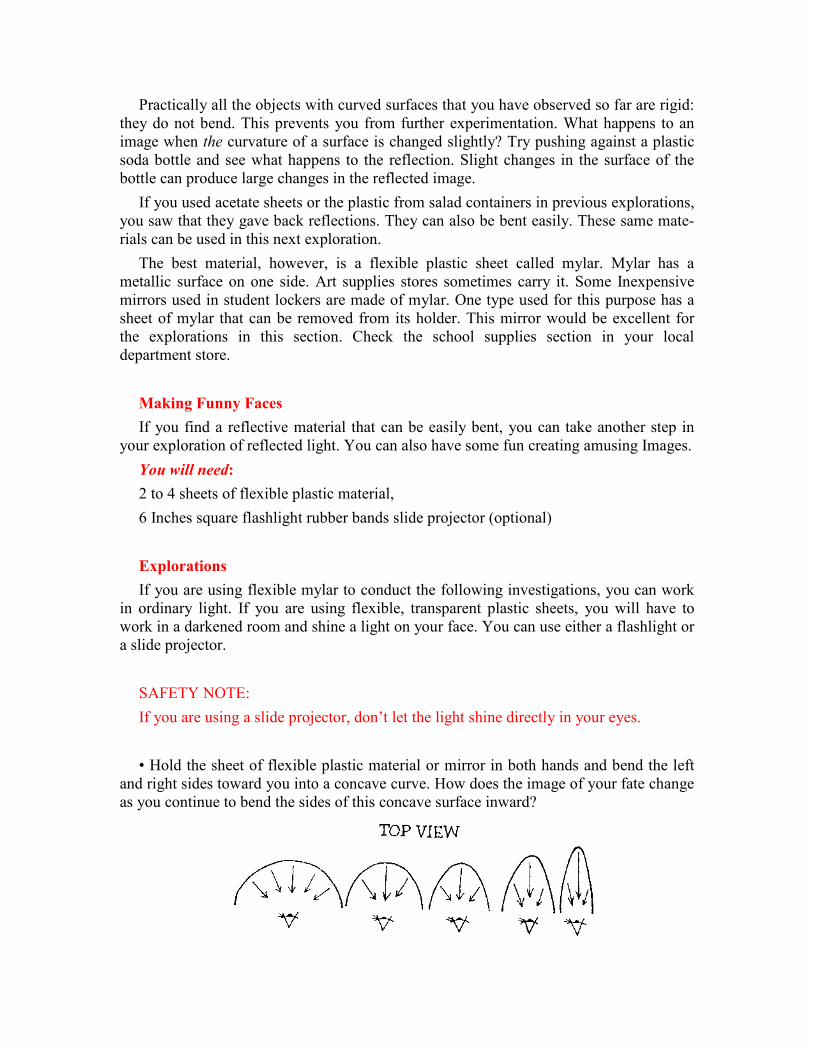
• Next, bend the left and right sides of the sheet of flexible plastic material away from
you into a convex curve. How does your image change as you continue to bend the sides
of this convex surface back?
• Hold the top and bottom edges of the sheet of flexible plastic material and bend them
away from your face into a convex curve. How does your image change as you continue
to increase this convex curvature?
• Hold the sheet of flexible plastic material vertically and bend the top and bottom
edges toward your face. How does the image of your face change as you increase the
concave curve?
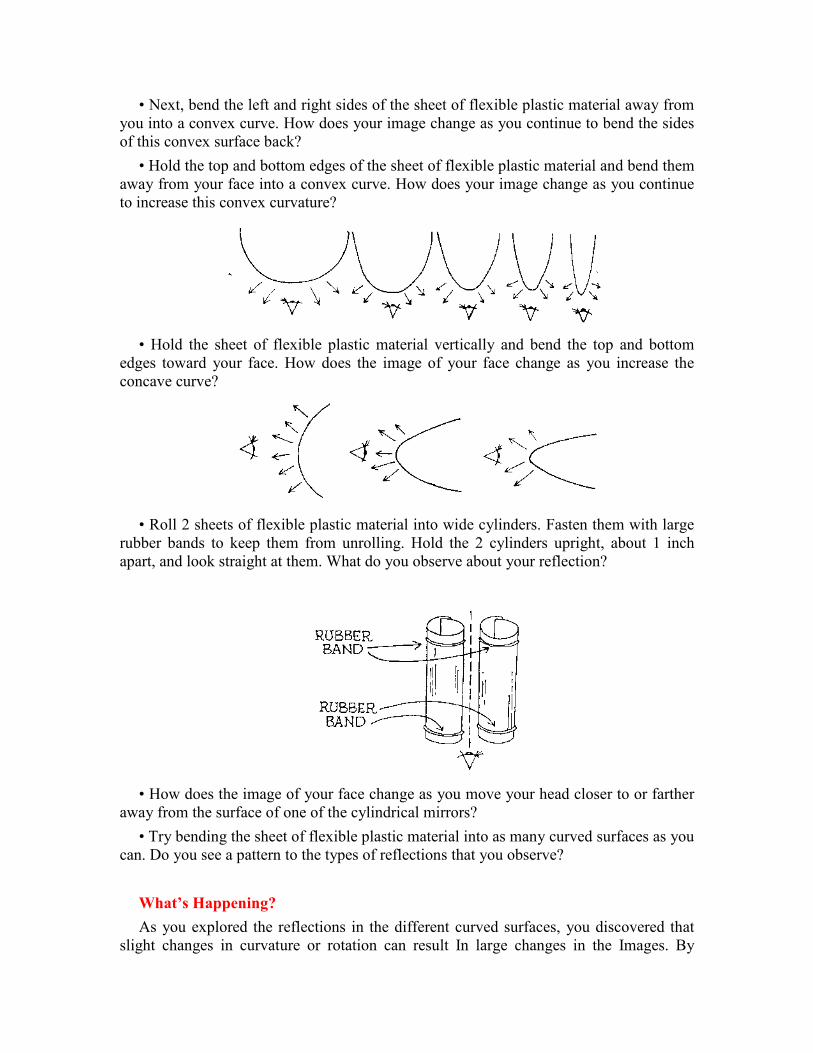
• Roll 2 sheets of flexible plastic material into wide cylinders. Fasten them with large
rubber bands to keep them from unrolling. Hold the 2 cylinders upright, about 1 inch
apart, and look straight at them. What do you observe about your reflection?
• How does the image of your face change as you move your head closer to or farther
away from the surface of one of the cylindrical mirrors?
• Try bending the sheet of flexible plastic material into as many curved surfaces as you
can. Do you see a pattern to the types of reflections that you observe?
What’s Happening?
As you explored the reflections in the different curved surfaces, you discovered that
slight changes in curvature or rotation can result In large changes in the Images. By
slowly bending the concave mirror inward, you go from a stretched, fat image of your
face to increasingly skinny ones. If you make the bends into a sharp angle, you end up
with multiple reflections like the ones you observed with plane mirrors. Bending the
convex shape more and more results in an image that becomes thinner and eventually
looks like a very skinny face that is almost a line.
Rotating the concave mirror gives the most curious results of all. The image of your
face appears upside down. This doesn’t happen with the convex mirror. Bending the
convex surface vertically results in your face changing from tall and skinny to wide and
flat,
When you look into 2 cylindrical mirrors, you only see 2 skinny faces and the 2
surfaces of the cylinders reflected in each other. Depending on how close your face is to
the cylinders, you can also observe more reflections of yourself. However, these images
are so skinny they are barely recognizable. Moving your face closer to or farther away
from A cylindrical mirror changes the size of the image but not Its shape.
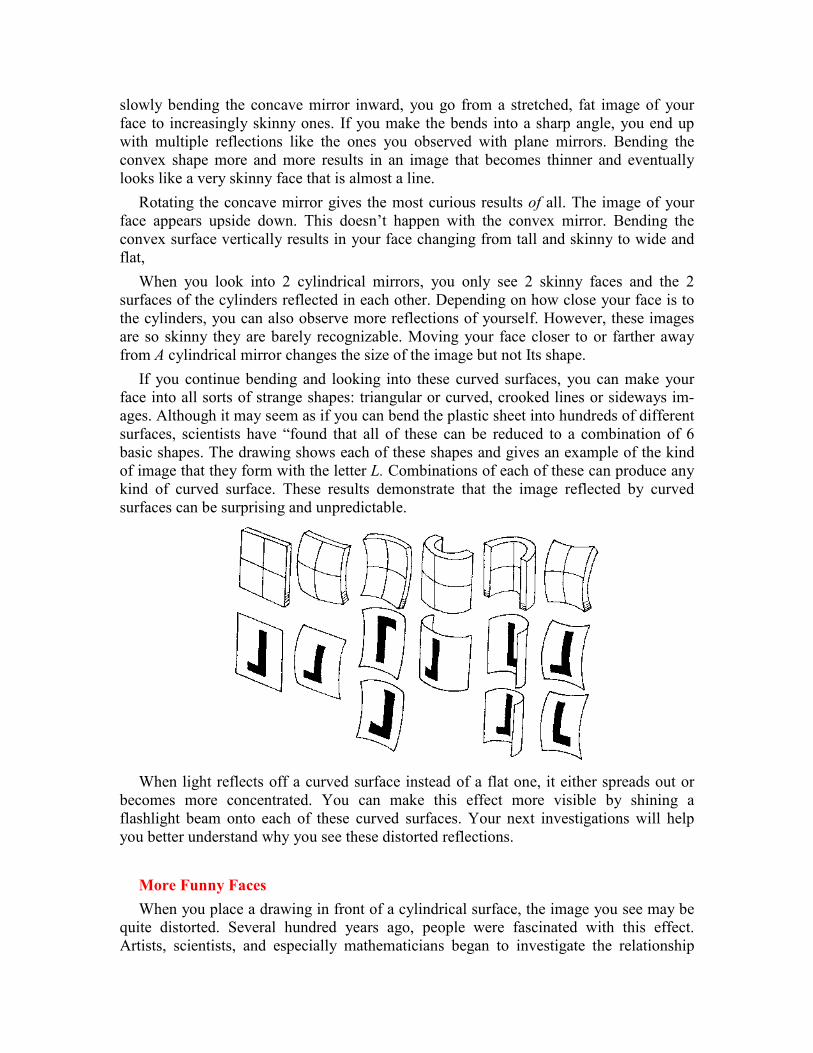
If you continue bending and looking into these curved surfaces, you can make your
face into all sorts of strange shapes: triangular or curved, crooked lines or sideways im-
ages. Although it may seem as if you can bend the plastic sheet into hundreds of different
surfaces, scientists have “found that all of these can be reduced to a combination of 6
basic shapes. The drawing shows each of these shapes and gives an example of the kind
of image that they form with the letter L. Combinations of each of these can produce any
kind of curved surface. These results demonstrate that the image reflected by curved
surfaces can be surprising and unpredictable.
When light reflects off a curved surface instead of a flat one, it either spreads out or
becomes more concentrated. You can make this effect more visible by shining a
flashlight beam onto each of these curved surfaces. Your next investigations will help
you better understand why you see these distorted reflections.
More Funny Faces
When you place a drawing in front of a cylindrical surface, the image you see may be
quite distorted. Several hundred years ago, people were fascinated with this effect.
Artists, scientists, and especially mathematicians began to investigate the relationship
between the kind of picture they drew on paper and the image of this picture that they
saw in the cylindrical mirror. This imagery was called anamorphic an.
You can have fun investigating this type of art for yourself using the materials you
needed in the previous activity plus a few other simple ones. You will be working both as
an artist and as a scientist. It will also help you observe in a more systematic way how
real objects are reflected from curved surfaces.
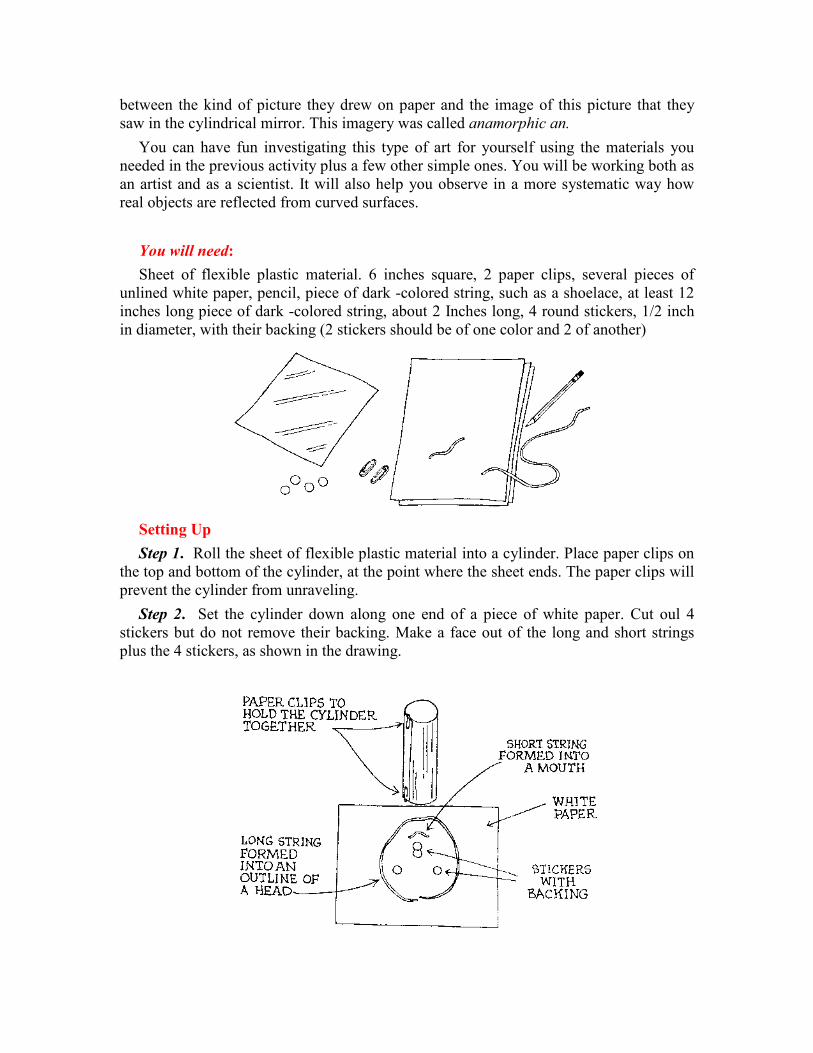
You will need:
Sheet of flexible plastic material. 6 inches square, 2 paper clips, several pieces of
unlined white paper, pencil, piece of dark -colored string, such as a shoelace, at least 12
inches long piece of dark -colored string, about 2 Inches long, 4 round stickers, 1/2 inch
in diameter, with their backing (2 stickers should be of one color and 2 of another)
Setting Up
Step 1. Roll the sheet of flexible plastic material into a cylinder. Place paper clips on
the top and bottom of the cylinder, at the point where the sheet ends. The paper clips will
prevent the cylinder from unraveling.
Step 2. Set the cylinder down along one end of a piece of white paper. Cut oul 4
stickers but do not remove their backing. Make a face out of the long and short strings
plus the 4 stickers, as shown in the drawing.
Step 3. If you are using mylar, you can work in ordinary-light. If you are using
transparent plastic sheets, work in a darkened room, and have a friend hold a flashlight
directly above the drawing.
Explorations
• Look at the surface of the cylinder. How is the image in the plastic surface different
from the face on the paper? Play around with the arrangement of the string and the
stickers for a while to see what kinds of funny faces you can make In the cylindrical
mirror.
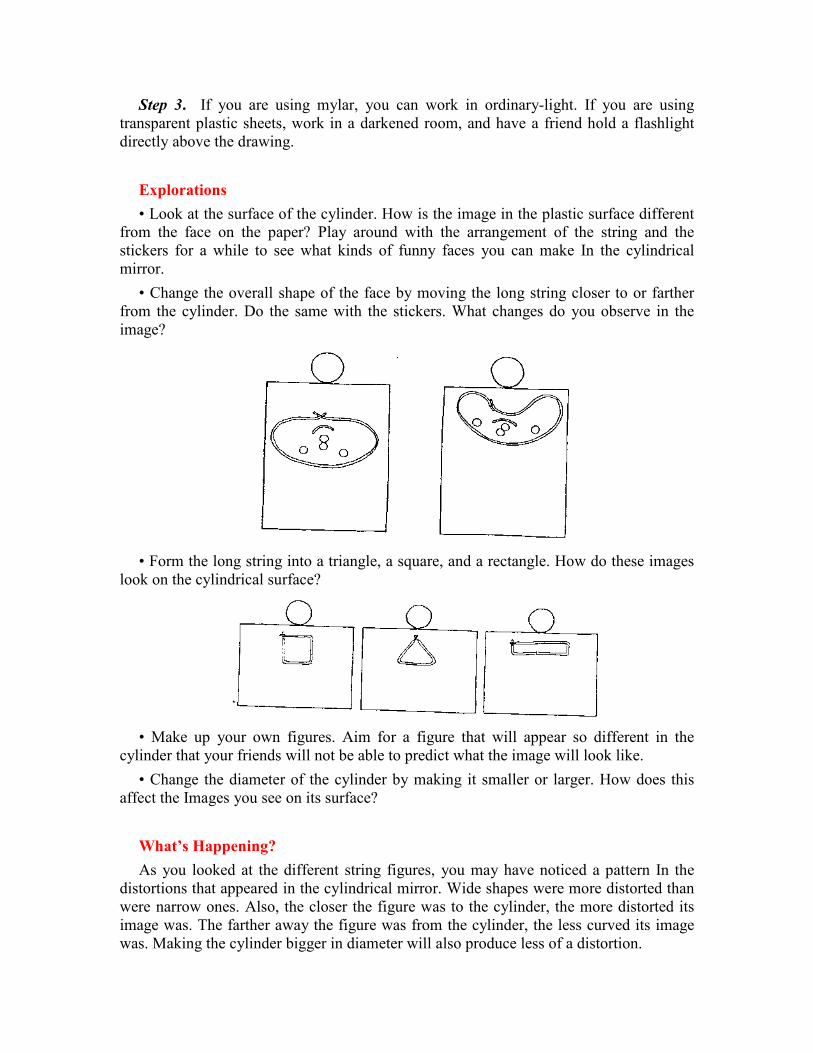
• Change the overall shape of the face by moving the long string closer to or farther
from the cylinder. Do the same with the stickers. What changes do you observe in the
image?
• Form the long string into a triangle, a square, and a rectangle. How do these images
look on the cylindrical surface?
• Make up your own figures. Aim for a figure that will appear so different in the
cylinder that your friends will not be able to predict what the image will look like.
• Change the diameter of the cylinder by making it smaller or larger. How does this
affect the Images you see on its surface?
What’s Happening?
As you looked at the different string figures, you may have noticed a pattern In the
distortions that appeared in the cylindrical mirror. Wide shapes were more distorted than
were narrow ones. Also, the closer the figure was to the cylinder, the more distorted its
image was. The farther away the figure was from the cylinder, the less curved its image
was. Making the cylinder bigger in diameter will also produce less of a distortion.
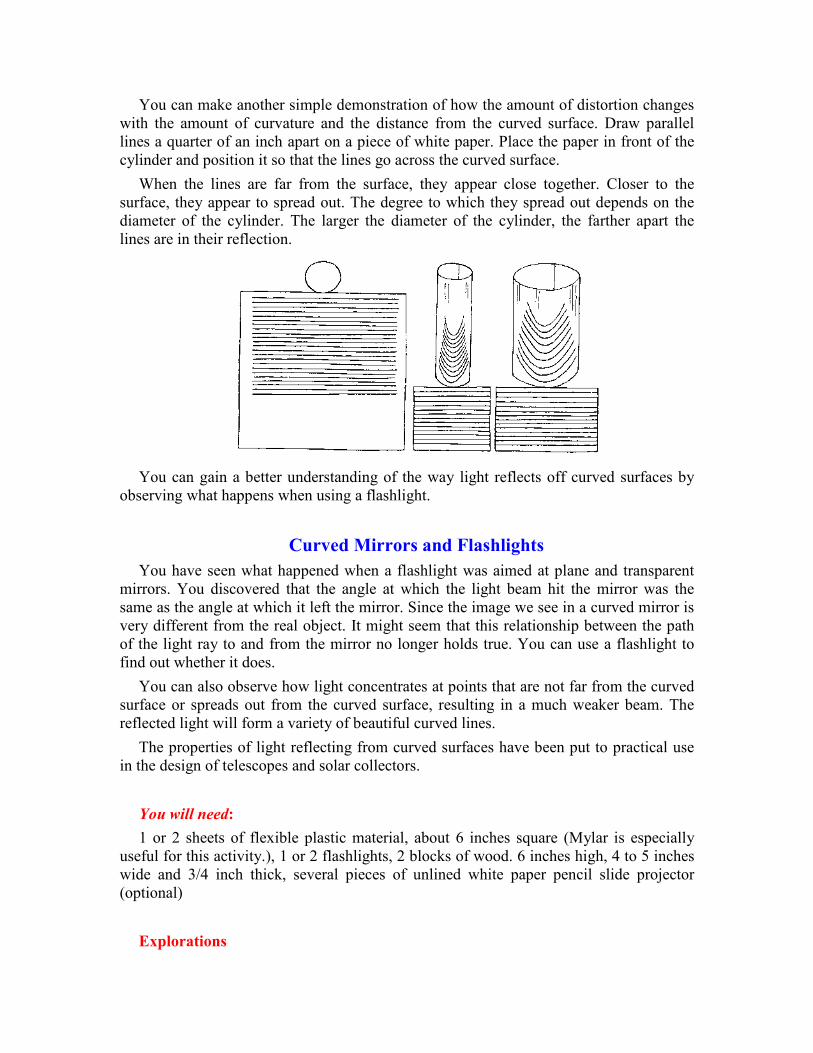
You can make another simple demonstration of how the amount of distortion changes
with the amount of curvature and the distance from the curved surface. Draw parallel
lines a quarter of an inch apart on a piece of white paper. Place the paper in front of the
cylinder and position it so that the lines go across the curved surface.
When the lines are far from the surface, they appear close together. Closer to the
surface, they appear to spread out. The degree to which they spread out depends on the
diameter of the cylinder. The larger the diameter of the cylinder, the farther apart the
lines are in their reflection.
You can gain a better understanding of the way light reflects off curved surfaces by
observing what happens when using a flashlight.
Curved Mirrors and Flashlights
You have seen what happened when a flashlight was aimed at plane and transparent
mirrors. You discovered that the angle at which the light beam hit the mirror was the
same as the angle at which it left the mirror. Since the image we see in a curved mirror is
very different from the real object. It might seem that this relationship between the path
of the light ray to and from the mirror no longer holds true. You can use a flashlight to
find out whether it does.
You can also observe how light concentrates at points that are not far from the curved
surface or spreads out from the curved surface, resulting in a much weaker beam. The
reflected light will form a variety of beautiful curved lines.
The properties of light reflecting from curved surfaces have been put to practical use
in the design of telescopes and solar collectors.
You will need:
1 or 2 sheets of flexible plastic material, about 6 inches square (Mylar is especially
useful for this activity.), 1 or 2 flashlights, 2 blocks of wood. 6 inches high, 4 to 5 inches
wide and 3/4 inch thick, several pieces of unlined white paper pencil slide projector
(optional)
Explorations
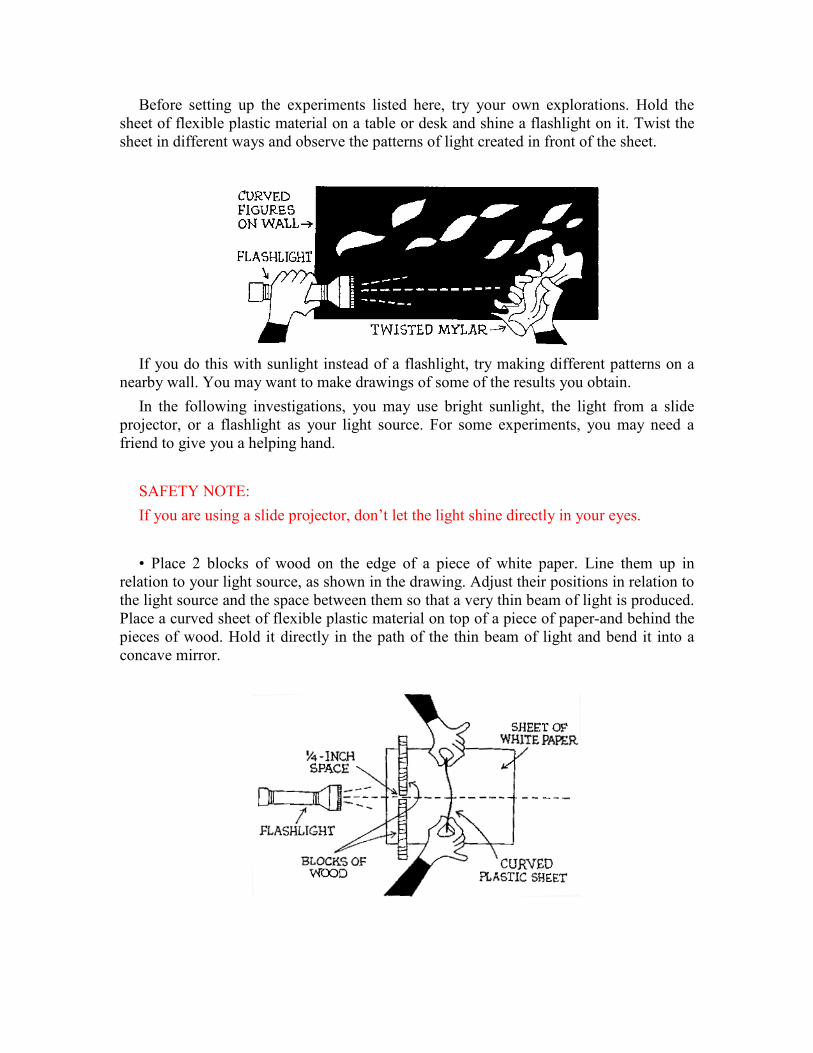
Before setting up the experiments listed here, try your own explorations. Hold the
sheet of flexible plastic material on a table or desk and shine a flashlight on it. Twist the
sheet in different ways and observe the patterns of light created in front of the sheet.
If you do this with sunlight instead of a flashlight, try making different patterns on a
nearby wall. You may want to make drawings of some of the results you obtain.
In the following investigations, you may use bright sunlight, the light from a slide
projector, or a flashlight as your light source. For some experiments, you may need a
friend to give you a helping hand.
SAFETY NOTE:
If you are using a slide projector, don’t let the light shine directly in your eyes.
• Place 2 blocks of wood on the edge of a piece of white paper. Line them up in
relation to your light source, as shown in the drawing. Adjust their positions in relation to
the light source and the space between them so that a very thin beam of light is produced.
Place a curved sheet of flexible plastic material on top of a piece of paper-and behind the
pieces of wood. Hold it directly in the path of the thin beam of light and bend it into a
concave mirror.
• Move the sheet of flexible plastic material around so that the beam of light strikes
different parts of the curved surface. On a separate piece of paper, make drawings of the
patterns that appear in these different positions.
• Continue to hold the curved sheet of flexible plastic material a few inches from the
pieces of wood and move the plastic sheet around. Observe carefully where the light
seems to be the brightest. Draw the particular shape it makes.
• Reverse the curvature of the sheet of flexible plastic material, making it convex.
Repeat the above experiments. Remember to make drawings of everything you observe.
Fold the sheet of flexible plastic material several times so that it will have various
kinds of permanent creases. Repeat the first experiment, moving the plastic sheet so that
the chin light beam will strike different parts of the surface. Notice what happens to the
thin beam of light when it hits the creased part of the plastic sheet.
What’s Happening?
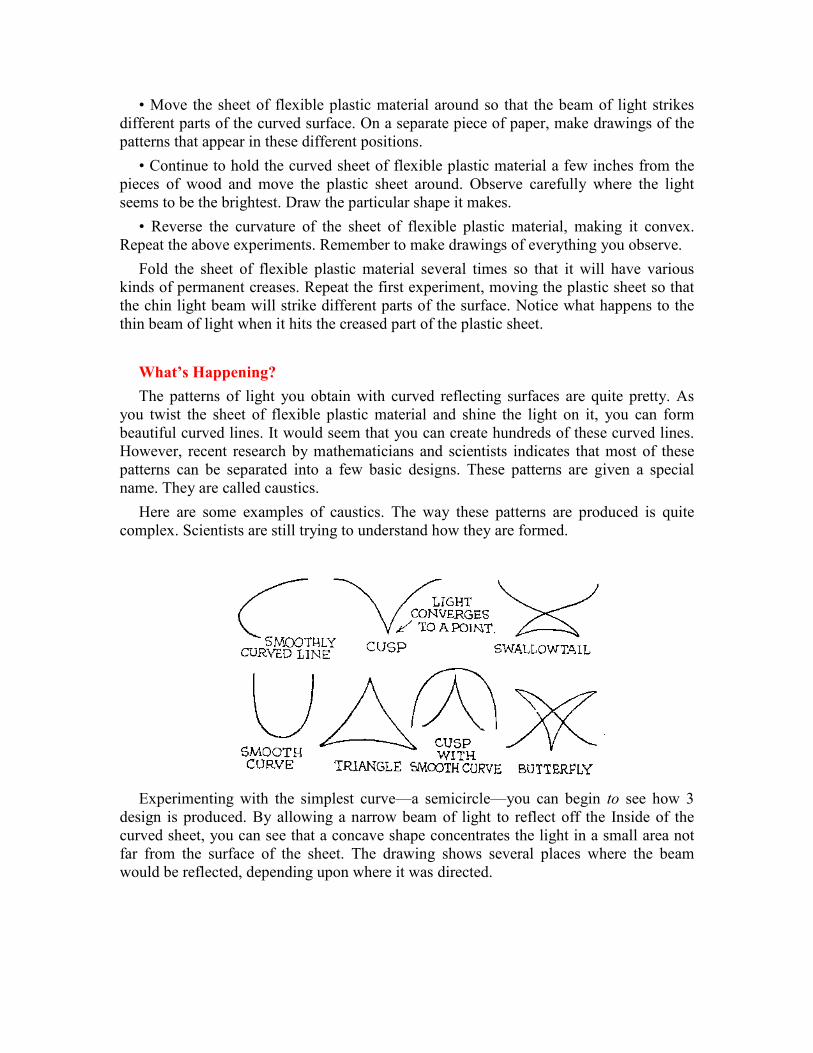
The patterns of light you obtain with curved reflecting surfaces are quite pretty. As
you twist the sheet of flexible plastic material and shine the light on it, you can form
beautiful curved lines. It would seem that you can create hundreds of these curved lines.
However, recent research by mathematicians and scientists indicates that most of these
patterns can be separated into a few basic designs. These patterns are given a special
name. They are called caustics.
Here are some examples of caustics. The way these patterns are produced is quite
complex. Scientists are still trying to understand how they are formed.
Experimenting with the simplest curve—a semicircle—you can begin to see how 3
design is produced. By allowing a narrow beam of light to reflect off the Inside of the
curved sheet, you can see that a concave shape concentrates the light in a small area not
far from the surface of the sheet. The drawing shows several places where the beam
would be reflected, depending upon where it was directed.
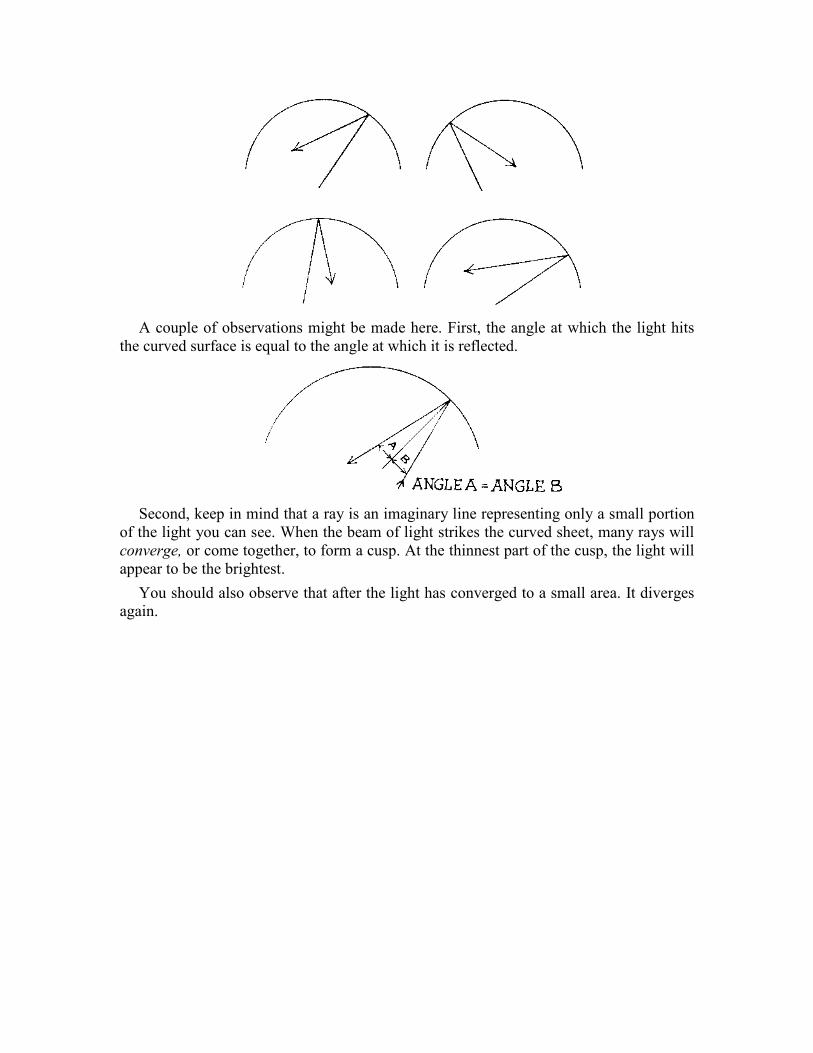
A couple of observations might be made here. First, the angle at which the light hits
the curved surface is equal to the angle at which it is reflected.
Second, keep in mind that a ray is an imaginary line representing only a small portion
of the light you can see. When the beam of light strikes the curved sheet, many rays will
converge, or come together, to form a cusp. At the thinnest part of the cusp, the light will
appear to be the brightest.
You should also observe that after the light has converged to a small area. It diverges
again.
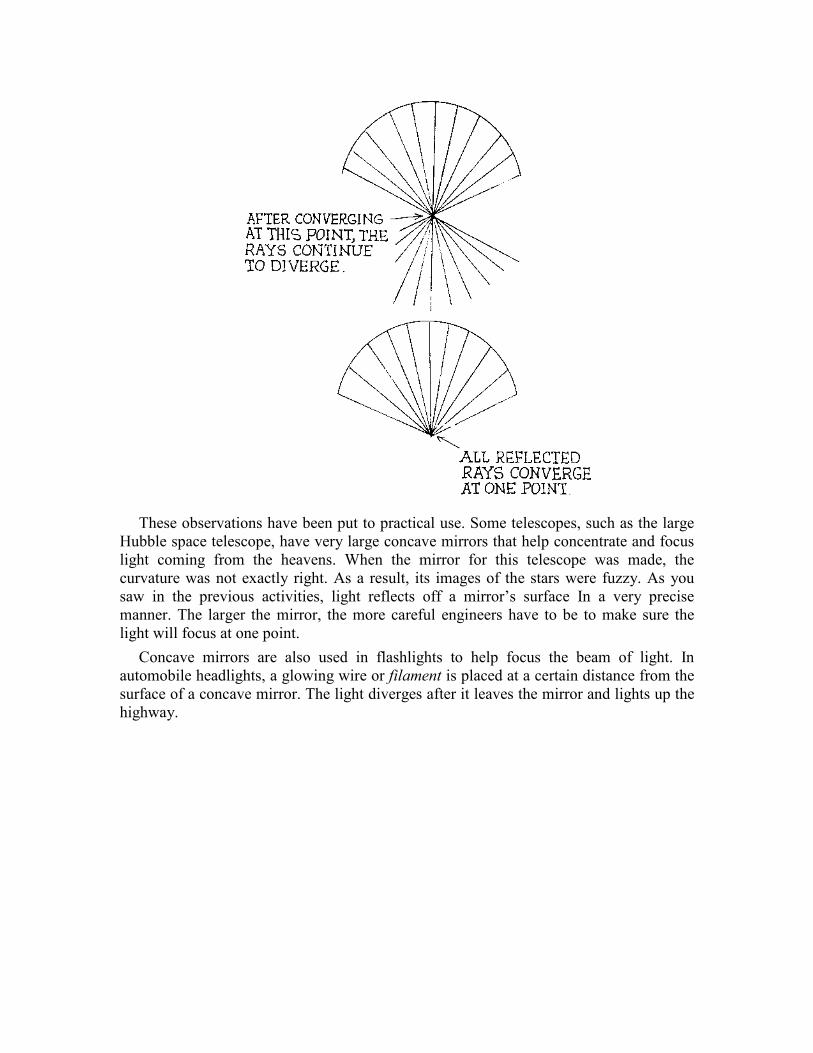
These observations have been put to practical use. Some telescopes, such as the large
Hubble space telescope, have very large concave mirrors that help concentrate and focus
light coming from the heavens. When the mirror for this telescope was made, the
curvature was not exactly right. As a result, its images of the stars were fuzzy. As you
saw in the previous activities, light reflects off a mirror’s surface In a very precise
manner. The larger the mirror, the more careful engineers have to be to make sure the
light will focus at one point.
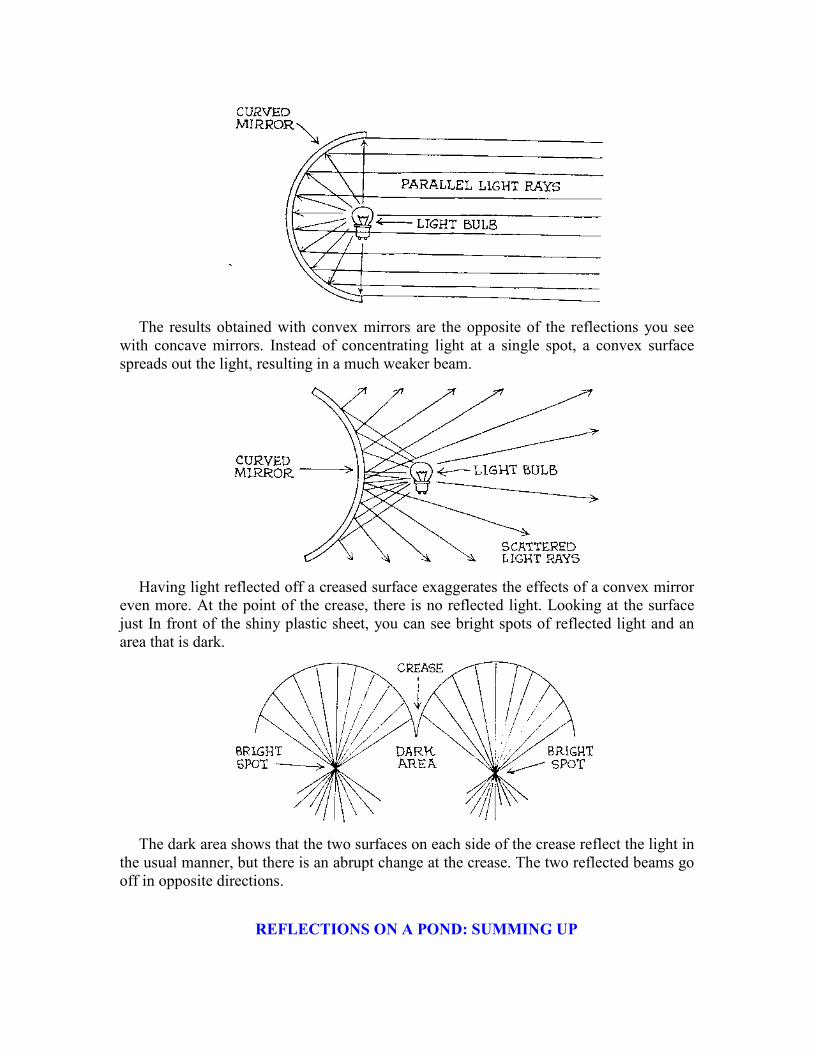
Concave mirrors are also used in flashlights to help focus the beam of light. In
automobile headlights, a glowing wire or filament is placed at a certain distance from the
surface of a concave mirror. The light diverges after it leaves the mirror and lights up the
highway.
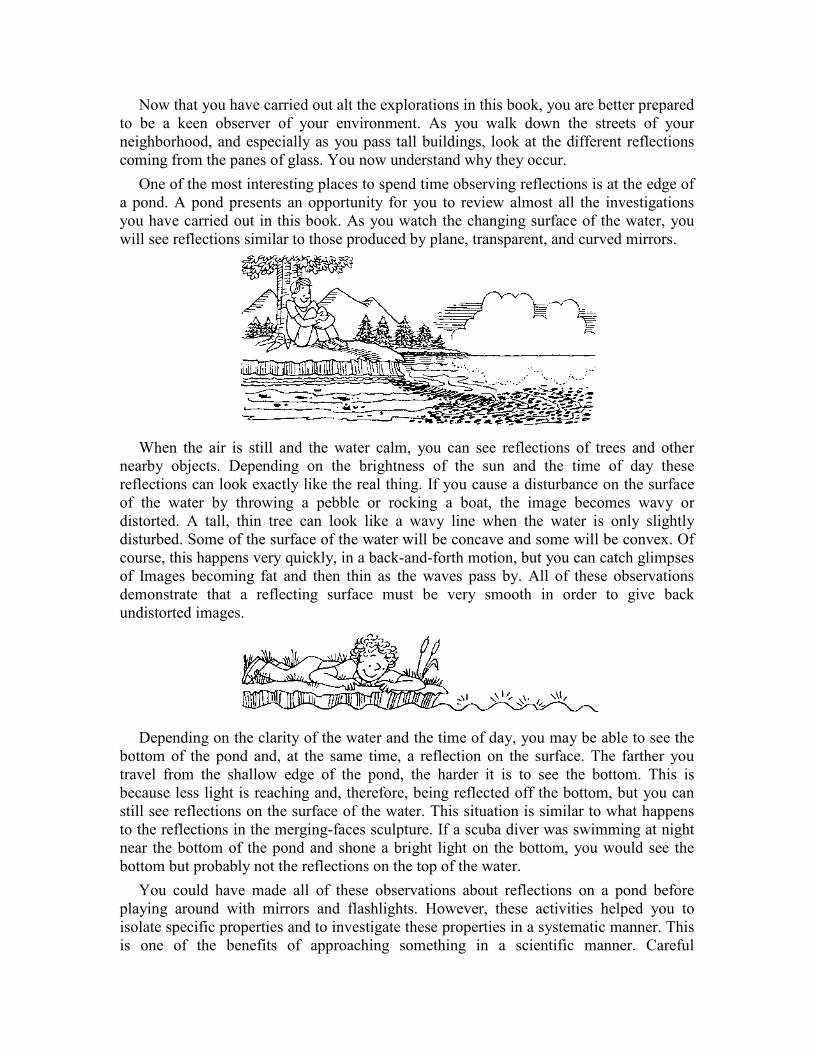
The results obtained with convex mirrors are the opposite of the reflections you see
with concave mirrors. Instead of concentrating light at a single spot, a convex surface
spreads out the light, resulting in a much weaker beam.
Having light reflected off a creased surface exaggerates the effects of a convex mirror
even more. At the point of the crease, there is no reflected light. Looking at the surface
just In front of the shiny plastic sheet, you can see bright spots of reflected light and an
area that is dark.
The dark area shows that the two surfaces on each side of the crease reflect the light in
the usual manner, but there is an abrupt change at the crease. The two reflected beams go
off in opposite directions.
REFLECTIONS ON A POND: SUMMING UP
Now that you have carried out alt the explorations in this book, you are better prepared
to be a keen observer of your environment. As you walk down the streets of your
neighborhood, and especially as you pass tall buildings, look at the different reflections
coming from the panes of glass. You now understand why they occur.
One of the most interesting places to spend time observing reflections is at the edge of
a pond. A pond presents an opportunity for you to review almost all the investigations
you have carried out in this book. As you watch the changing surface of the water, you
will see reflections similar to those produced by plane, transparent, and curved mirrors.
When the air is still and the water calm, you can see reflections of trees and other
nearby objects. Depending on the brightness of the sun and the time of day these
reflections can look exactly like the real thing. If you cause a disturbance on the surface
of the water by throwing a pebble or rocking a boat, the image becomes wavy or
distorted. A tall, thin tree can look like a wavy line when the water is only slightly
disturbed. Some of the surface of the water will be concave and some will be convex. Of
course, this happens very quickly, in a back-and-forth motion, but you can catch glimpses
of Images becoming fat and then thin as the waves pass by. All of these observations
demonstrate that a reflecting surface must be very smooth in order to give back
undistorted images.
Depending on the clarity of the water and the time of day, you may be able to see the
bottom of the pond and, at the same time, a reflection on the surface. The farther you
travel from the shallow edge of the pond, the harder it is to see the bottom. This is
because less light is reaching and, therefore, being reflected off the bottom, but you can
still see reflections on the surface of the water. This situation is similar to what happens
to the reflections in the merging-faces sculpture. If a scuba diver was swimming at night
near the bottom of the pond and shone a bright light on the bottom, you would see the
bottom but probably not the reflections on the top of the water.
You could have made all of these observations about reflections on a pond before
playing around with mirrors and flashlights. However, these activities helped you to
isolate specific properties and to investigate these properties in a systematic manner. This
is one of the benefits of approaching something in a scientific manner. Careful
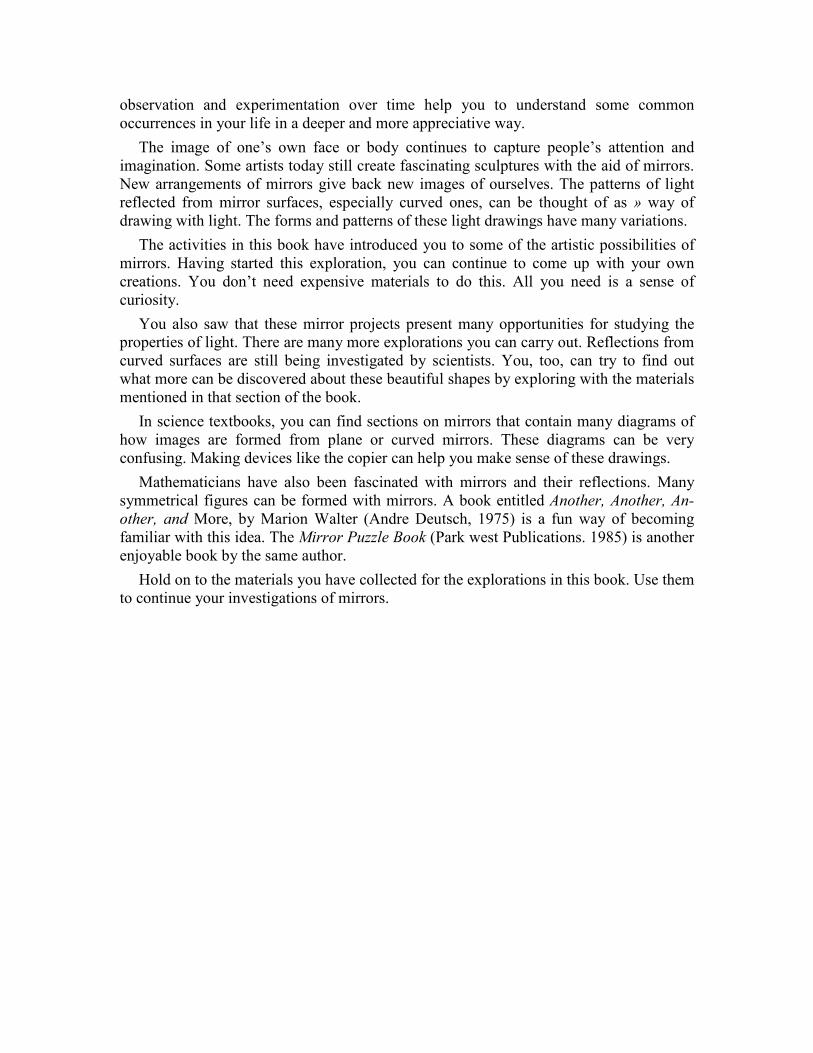
observation and experimentation over time help you to understand some common
occurrences in your life in a deeper and more appreciative way.
The image of one’s own face or body continues to capture people’s attention and
imagination. Some artists today still create fascinating sculptures with the aid of mirrors.
New arrangements of mirrors give back new images of ourselves. The patterns of light
reflected from mirror surfaces, especially curved ones, can be thought of as » way of
drawing with light. The forms and patterns of these light drawings have many variations.
The activities in this book have introduced you to some of the artistic possibilities of
mirrors. Having started this exploration, you can continue to come up with your own
creations. You don’t need expensive materials to do this. All you need is a sense of
curiosity.
You also saw that these mirror projects present many opportunities for studying the
properties of light. There are many more explorations you can carry out. Reflections from
curved surfaces are still being investigated by scientists. You, too, can try to find out
what more can be discovered about these beautiful shapes by exploring with the materials
mentioned in that section of the book.
In science textbooks, you can find sections on mirrors that contain many diagrams of
how images are formed from plane or curved mirrors. These diagrams can be very
confusing. Making devices like the copier can help you make sense of these drawings.
Mathematicians have also been fascinated with mirrors and their reflections. Many
symmetrical figures can be formed with mirrors. A book entitled Another, Another, An-
other, and More, by Marion Walter (Andre Deutsch, 1975) is a fun way of becoming
familiar with this idea. The Mirror Puzzle Book (Park west Publications. 1985) is another
enjoyable book by the same author.
Hold on to the materials you have collected for the explorations in this book. Use them
to continue your investigations of mirrors.
END