Embed Size (px)
Citation preview

GB
miniclave 21EOPERATING INSTRUCTIONS
�2�E-0-00.ING
GB
22�E-0-00.ING
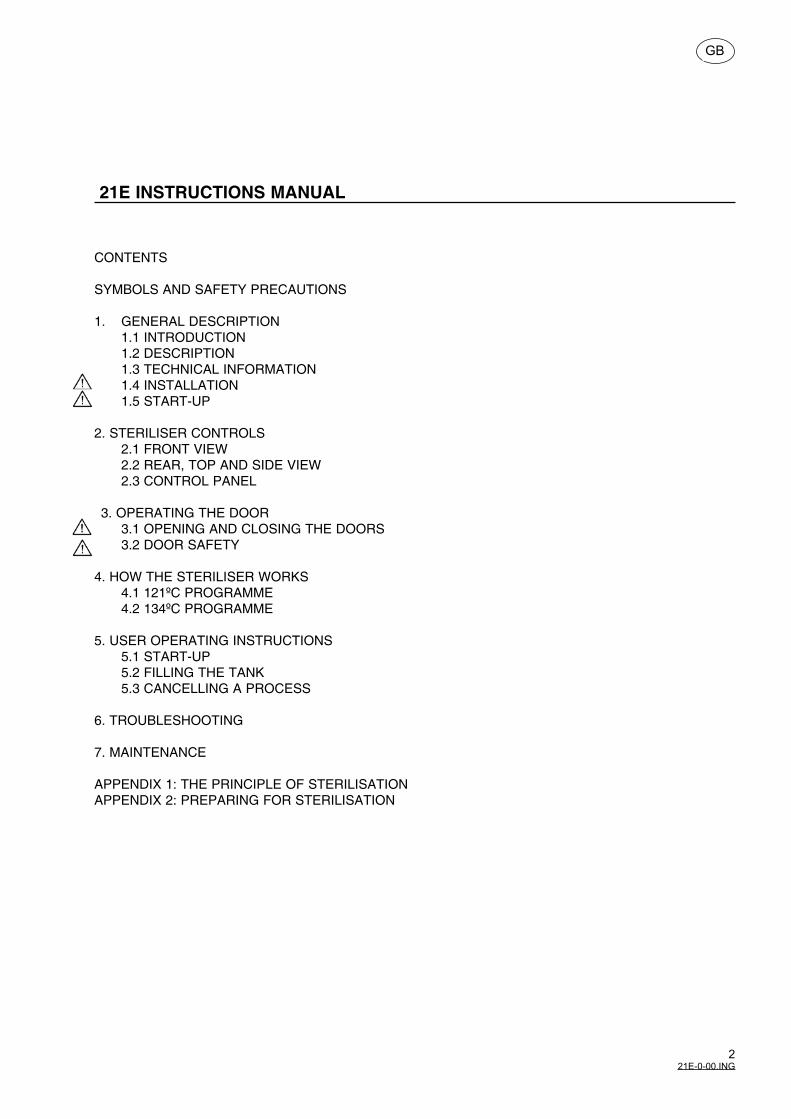
21E INSTRUCTIONS MANUAL
CONTENTS
SYMBOLS AND SAFETY PRECAUTIONS
1. GENERAL DESCRIPTION 1.1 INTRODUCTION 1.2 DESCRIPTION 1.3 TECHNICAL INFORMATION 1.4 INSTALLATION 1.5 START-UP
2. STERILISER CONTROLS 2.1 FRONT VIEW 2.2 REAR, TOP AND SIDE VIEW 2.3 CONTROL PANEL
3. OPERATING THE DOOR 3.1 OPENING AND CLOSING THE DOORS 3.2 DOOR SAFETY
4. HOW THE STERILISER WORKS 4.1 121ºC PROGRAMME 4.2 134ºC PROGRAMME
5. USER OPERATING INSTRUCTIONS 5.1 START-UP 5.2 FILLING THE TANK 5.3 CANCELLING A PROCESS
6. TROUBLESHOOTING
7. MAINTENANCE
APPENDIX 1: THE PRINCIPLE OF STERILISATION APPENDIX 2: PREPARING FOR STERILISATION
SYMBOLS AND SAFETY PRECAUTIONS
SYMBOLS
Throughout the manual, this symbol is used to draw attention to instructions, failure to implement which might put the appliance or people in some danger.
This symbol indicates that the personnel using the appliance must take precautions to protect them-selves from the temperature of certain parts of the appliance. See Fig. 1 and Fig. 2.
This symbol identifies earthing terminals used to make the appliance safe.
ATTENTION Paragraphs preceded by this symbol must be read carefully to ensure the appliance is used properly.
SAFETY INSTRUCTIONS
• Read all the safety instructions in this section.
• Follow the instructions marked in this manual with the symbol and the word ATTENTION.
• Make sure that all the installation conditions in paragraph 1.4 are fully complied with.
• Make sure that the electrical voltage accords with the characteristics on the appliance’s character-istics plate.
• Use only distilled or demineralised water (See section 5.2).
• Before starting up the appliance, check that all the accessories are in good condition.
• The safety conditions for opening and closing the doors are given in chapter 3.
• Never open the appliance if the light is off or if the pressure shown on the manometer is +0 bar.
• Use the optional programmes only in accordance with the settings indicated in chapter 4.
• The manufacturer has tested and approved the efficiency of the sterilisation cycles only for the settings indicated in chapter 4.
• Never must put into the sterilizer inflammables or explosives products.
• Whenever a process is cancelled, it must be treated as incorrect and repeated from the beginning of the sterilisation process.
• The protection fuse must be of the same type, size and characteristics as stipulated by the manu-facturer, i.e. 15A delayed action F-32.
�SIMB-2�E.ING
GB
• The mains lead used must be the original one approved by the manufacturer. It must be in perfect condition and must not have been tampered with in any way.
• The outer surfaces of the appliance can be cleaned using a damp cloth and a neutral detergent.
• Periodically empty the water tank.
• Carry out the preventive maintenance operations and the periodical testing of the sterilisation cycles, safety items and control elements.
• The manufacturer declines responsibility for any problems resulting from failure to carry out, or incorrectly carrying out, the preventive maintenance operations or due to replacing original parts by items which have not been approved by the manufacturer.
• If the appliance is used without following the instructions in this manual, the protective devices cannot be guaranteed.
• The sterilizer must be only used by qualified persons with knowing of sterilization procedures.
�SIMB-2�E.ING
GB
GB
�2�E-�-00.ING
1.- GENERAL DESCRIPTION
1.1- INTRODUCTION
Dear Customer,
MATACHANA would like to thank you for choosing one of our products. We hope you find it to your complete satisfaction.
The 21E steriliser will not present any risk to the operator provided the instructions listed below are adhered to.
The user shall be responsible for ensuring that the appliance is used only to process products as specified by the manufacturer. The manufacturer declines all liability in the event of the steriliser being used for any purpose other than the one intended for each cycle.
The main object of this manual is to provide a simple and easily understandable guide for installing and operating the appliance.
NOTES:
The user is responsible for complying with the legal requirements regarding the installation and opera-tion of the appliance
The manufacturer declines all liability for any breakages, faults or damage due to incorrect handling or maintenance of the appliance.
Upon taking reception of the steriliser, the user should make sure that the appliance:
• is the one that was ordered (see the delivery document)• it has not suffered any obvious damage• it includes all the accessories.
If you find there is a problem with one or more of the above points, please inform MATACHANA or its area representative.
SERVICIO ASISTENCIA TECNICAANTONIO MATACHANA, S.A.C/ Almogávares, 174-17608018 BarcelonaTel. +34 93 300 80 12Fax +34 93 300 59 24
1.2.- DESCRIPTION
The 21E autoclave comprises a 250 mm diameter cylindrical chamber and a door with a bayonet-type revolving lock. Steam is generated inside the chamber by means of a resistance immersed in water. The appliance has an auxiliary water tank which makes it independent of the water and drain connections. It has all the safety and control items required by current regulations and standards and performs sterilization programmes at a temperature of 121ºC and 134ºC.
1.3.- TECHNICAL INFORMATION
The main construction features are as follows:
a) DESIGN SPECIFICATIONS.
• Construction code: ASME SECTION VIII.• Max. pressure: 3 bar.• Max. working temperature: 150ºC.• Type registration in accordance with ICIT pressure vessels regulations.• Approved in accordance with machine electrical safety standard 61010.• Marked as a health product: CE 0318.• Installation category III.
b) MATERIALS
• Chamber: stainless steel 316L• Door: stainless steel 316L• Outer door: steel A42b or HII• Housing: stainless steel 304• Front panel: polycarbonate
c) DIMENSIONS
Model Useable space Chamber size (mm) Total Size (mm) Weight (kg) (Width x Height x Depth) (Diameter x Depth) (Width x Height x Depth) 21E 170 x 150 x 360 Ø250 x 420 550 x 410 x 500 50 d) ELECTRICITY
• Voltage: 220-240 II + Earth• Frequency: 50-60 Hz• Power: 2,500 W ± 2%• Mains lead: 16A shuco-type jack, 1.85 m long, 1.5 mm2 section, double insulation.• Protection: 15A, 250V, delayed action fuse.
e) WATER
• Tank capacity: 6 litres• Consumption per cycle: 0.2 litres• Minimum level: 2 litres• Distilled or demineralised water only.
�2�E-�-00.ING
GB
f) ENVIRONMENTAL CONDITIONS
• Temperature: ��ºC
• Relative humidity: 8�% without condensation
• Pressure: 990 < P < �080 bar
• Noise level < �0 dBA.
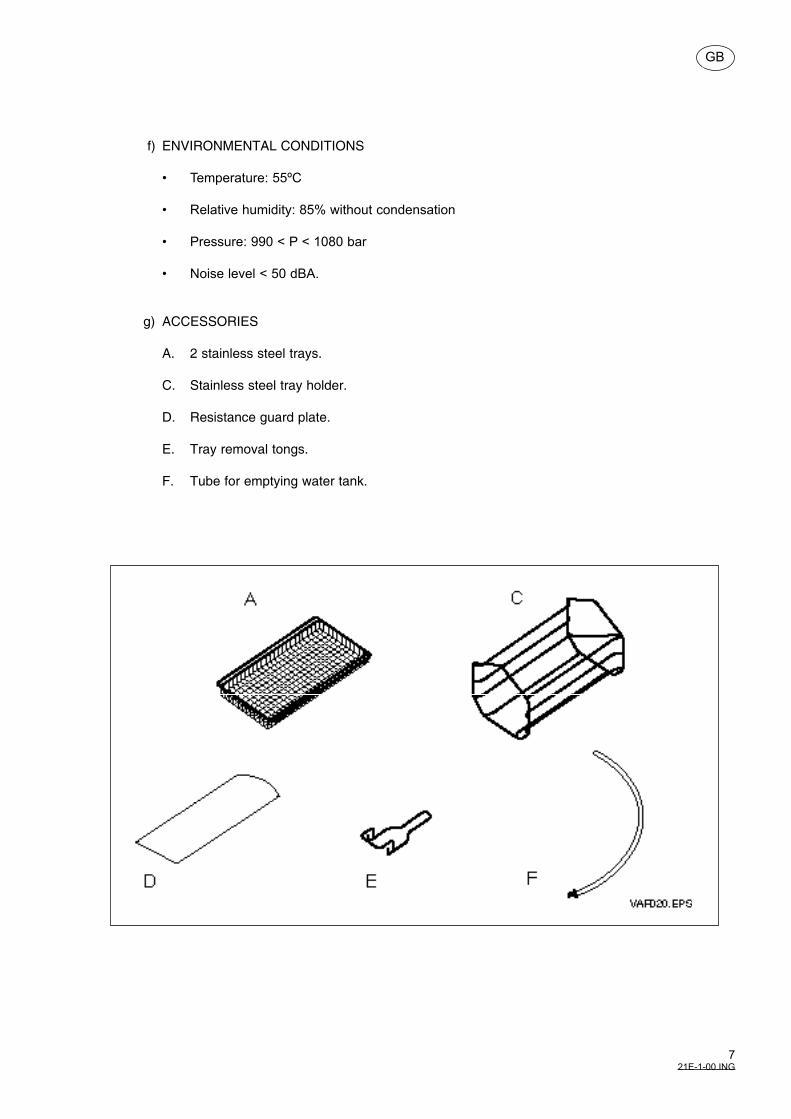
g) ACCESSORIES
A. 2 stainless steel trays.
C. Stainless steel tray holder.
D. Resistance guard plate.
E. Tray removal tongs.
F. Tube for emptying water tank.
�2�E-�-00.ING
GB
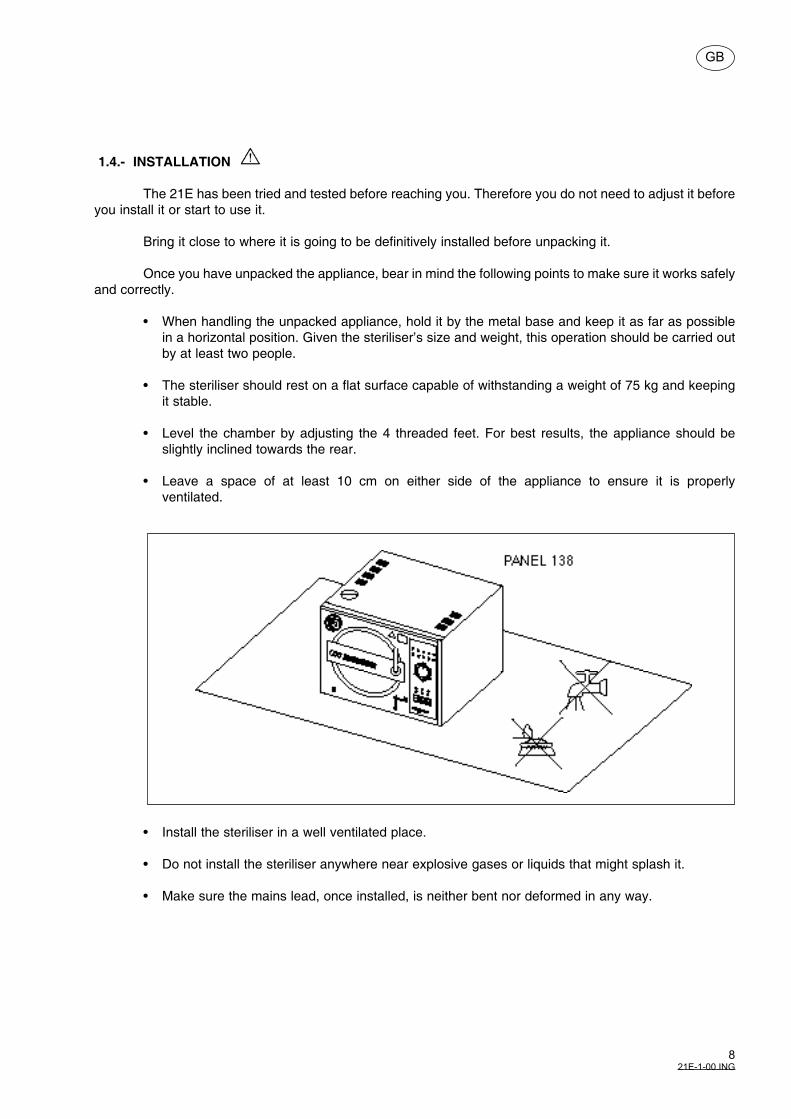
1.4.- INSTALLATION
The 21E has been tried and tested before reaching you. Therefore you do not need to adjust it before you install it or start to use it.
Bring it close to where it is going to be definitively installed before unpacking it.
Once you have unpacked the appliance, bear in mind the following points to make sure it works safely and correctly.
• When handling the unpacked appliance, hold it by the metal base and keep it as far as possible in a horizontal position. Given the steriliser’s size and weight, this operation should be carried out by at least two people.
• The steriliser should rest on a flat surface capable of withstanding a weight of 75 kg and keeping it stable.
• Level the chamber by adjusting the 4 threaded feet. For best results, the appliance should be slightly inclined towards the rear.
• Leave a space of at least 10 cm on either side of the appliance to ensure it is properly ventilated.
• Install the steriliser in a well ventilated place.
• Do not install the steriliser anywhere near explosive gases or liquids that might splash it.
• Make sure the mains lead, once installed, is neither bent nor deformed in any way.
82�E-�-00.ING
GB
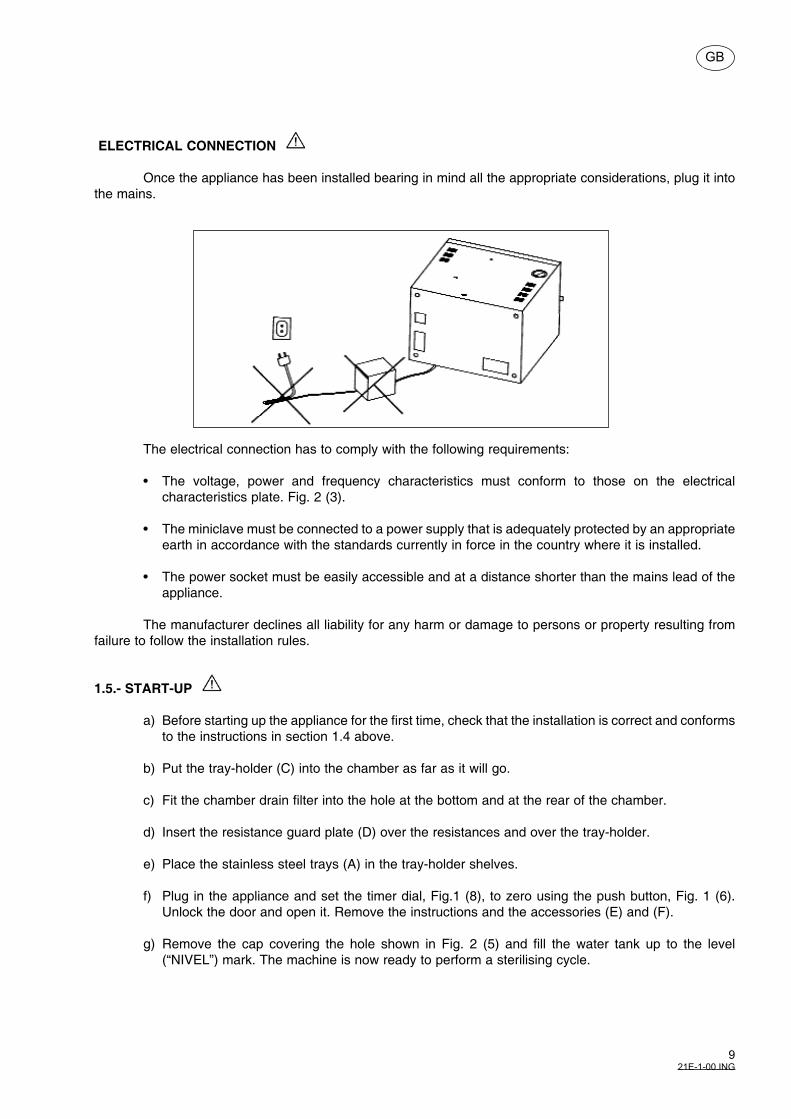
ELECTRICAL CONNECTION
Once the appliance has been installed bearing in mind all the appropriate considerations, plug it into the mains.
The electrical connection has to comply with the following requirements:
• The voltage, power and frequency characteristics must conform to those on the electrical characteristics plate. Fig. 2 (3).
• The miniclave must be connected to a power supply that is adequately protected by an appropriate earth in accordance with the standards currently in force in the country where it is installed.
• The power socket must be easily accessible and at a distance shorter than the mains lead of the appliance.
The manufacturer declines all liability for any harm or damage to persons or property resulting from failure to follow the installation rules.
1.5.- START-UP
a) Before starting up the appliance for the first time, check that the installation is correct and conforms to the instructions in section 1.4 above.
b) Put the tray-holder (C) into the chamber as far as it will go.
c) Fit the chamber drain filter into the hole at the bottom and at the rear of the chamber.
d) Insert the resistance guard plate (D) over the resistances and over the tray-holder.
e) Place the stainless steel trays (A) in the tray-holder shelves.
f) Plug in the appliance and set the timer dial, Fig.1 (8), to zero using the push button, Fig. 1 (6). Unlock the door and open it. Remove the instructions and the accessories (E) and (F).
g) Remove the cap covering the hole shown in Fig. 2 (5) and fill the water tank up to the level (“NIVEL”) mark. The machine is now ready to perform a sterilising cycle.
92�E-�-00.ING
GB
GB
�02�E-2-00.ING
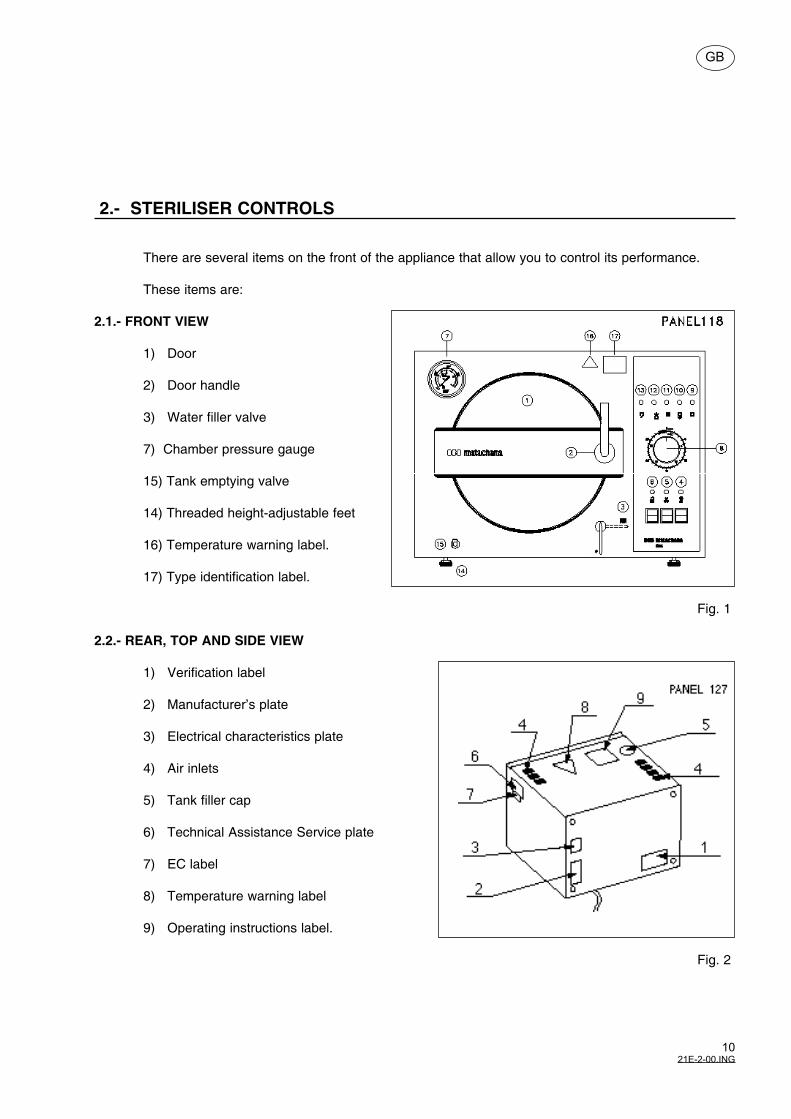
2.- STERILISER CONTROLS
There are several items on the front of the appliance that allow you to control its performance.
These items are:
2.1.- FRONT VIEW
1) Door
2) Door handle
3) Water filler valve
7) Chamber pressure gauge
15) Tank emptying valve
14) Threaded height-adjustable feet
16) Temperature warning label.
17) Type identification label.
Fig. 1
2.2.- REAR, TOP AND SIDE VIEW
1) Verification label
2) Manufacturer’s plate
3) Electrical characteristics plate
4) Air inlets
5) Tank filler cap
6) Technical Assistance Service plate
7) EC label
8) Temperature warning label
9) Operating instructions label.
Fig. 2
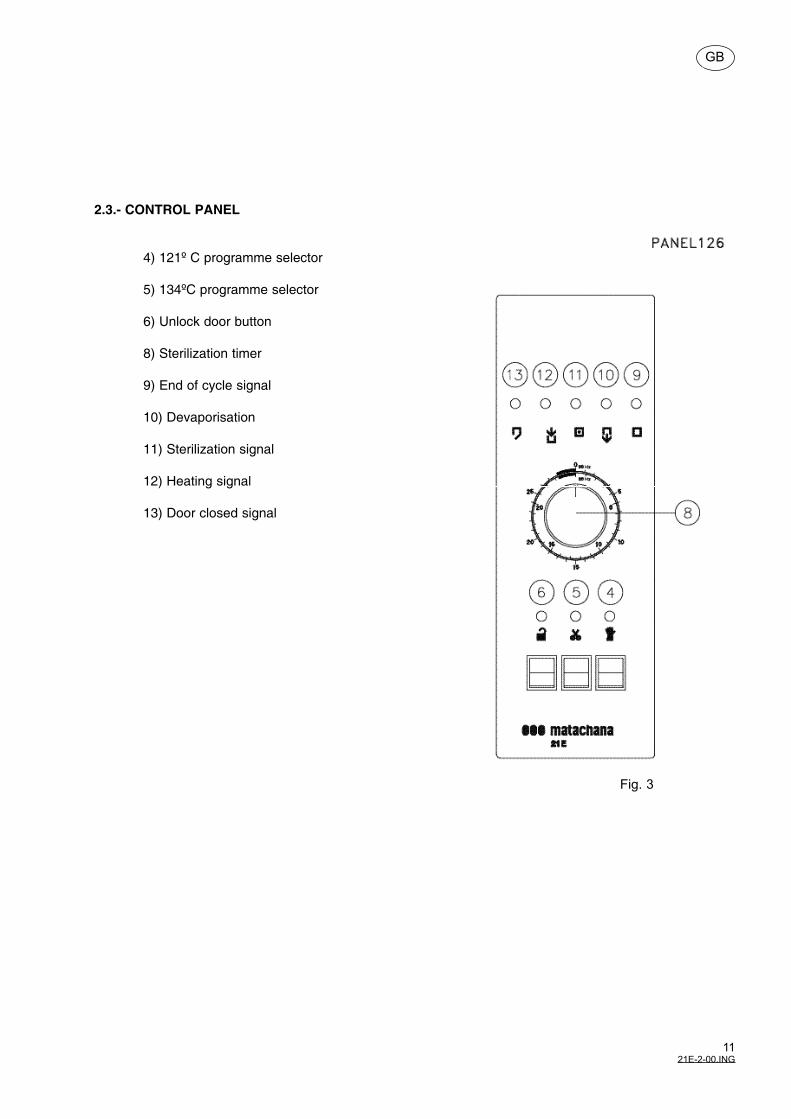
2.3.- CONTROL PANEL
4) 121º C programme selector
5) 134ºC programme selector
6) Unlock door button
8) Sterilization timer
9) End of cycle signal
10) Devaporisation
11) Sterilization signal
12) Heating signal
13) Door closed signal
��2�E-2-00.ING
GB
Fig. �
GB
�22�E-�-00.ING
3.- OPERATING THE DOORS
3.1.- OPENING AND CLOSING THE DOOR
The door has a bayonet closing mechanism that is operated by turning a handle, Fig. 2 (2).To close the door, turn the handle clockwise. To shut it, turn the handle anti-clockwise. The door has
a locking system that prevents it from being opened. It also has ends-of-stroke indicating when the door is completely closed and when it is unlocked .
CLOSING THE DOOR
When the door is open, it can be closed at any time. If the machine is turned on, the light at the front will come on to show the door has been completely closed.
OPENING THE DOOR
To open the door, all three of the following conditions must be fulfilled at the same time:
a) The appliance must be switched on. You cannot open the door unless the appliance is switched on.
b) Any cycle must be completed. Once a cycle has started, you cannot open the door until the total cycle time has elapsed.
c) The pressure must be less than 50 mbar. You cannot open the door if the pressure in the chamber is higher than 50 mbar.
If all three of the above conditions are fulfilled, the green light will illuminate and the door will be unlocked for 30 seconds. After this time the light will go off and the door will be locked again
To open the door, press the button, Fig. 3 (6). The green light will come on again and the door will be unlocked for another 30 seconds.
When you turn the handle to open the door, the green light will go off. Although the locking mecha-nism is activated, the door will not actually be locked until it is closed again.
ATTENTION: TO OPEN THE DOOR, THE GREEN LIGHT MUST BE ILLUMINATED.
3.2.- DOOR SAFETY
• You cannot start any of the cycles unless the door is completely closed. • The resistances will not begin to heat up unless the door is completely closed and locked. • Opening the door by force at any time during a sterilisation cycle will stop the resistances heating
up and bring the cycle to a halt.
GB
��2�E-�-00.ING
4.- HOW THE STERILISER WORKS
The Matachana 21E semi-automatic steriliser is intended for sterilising unwrapped solid material only. The cycles have been tested and validated in accordance with European pre-standard pr(EN 13060).
The appliance has two sterilisation programmes:
4.1.- 121ºC PROGRAMME
This programme is for sterilising rubber, latex or thermoplastic products capable of withstanding a temperature of 125ºC. It must not be used for tubes or other objects with narrow concavities that might make it difficult for the steam to enter by gravity.
DESCRIPTION OF CYCLE
Once the chamber has been filled manually with water, the cycle progresses as follows:
1 Start Close the door and select the programme.
2 Heating up The resistances are connected. They produce steam and heat the load until sterilisation pressure is reached. Air is eliminated by means of a thermostatic trap.
3 Sterilisation The sterilisation temperature is maintained during the pre-set time.
4 Devaporisation The steam and water are removed from the chamber to the auxiliary tank.
5 End of cycle The door is unlocked and can be opened.
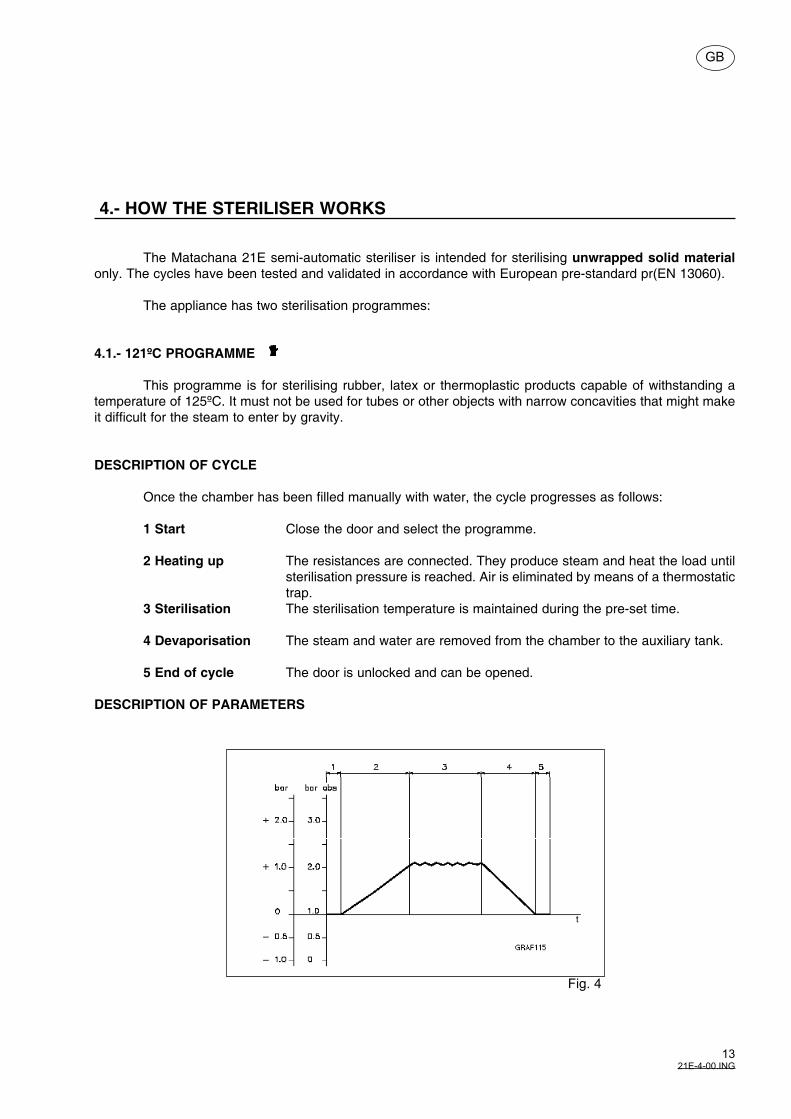
DESCRIPTION OF PARAMETERS
Fig. �
Sterilisation temperature: 121ºC < T < 125ºCSterilisation time: > 20 minutesMaximum load: 2 trays rubber 250 g/tray metal 1000 g/tray
4.2.- 134ºC PROGRAMME
This programme is for sterilising non-porous solid products capable of withstanding temperatures of more than 138ºC.
Under no circumstances must it ever be used for sterilising cannulae, bottles or other objects with narrow concavities that might make it difficult for the steam to enter by gravity.
DESCRIPTION OF CYCLE
Once the chamber has been filled manually with water, the cycle progresses as follows:
1 Start Close the door and select the programme.
2 Heating up The resistances are connected. They produce steam and heat the load until sterilisation pressure is reached. Air is eliminated by means of a thermostatic trap.
3 Sterilisation The sterilisation temperature is maintained during the pre-set time.
4 Devaporisation The steam and water are removed from the chamber to the auxiliary tank.
5 End of cycle The door is unlocked and can be opened.
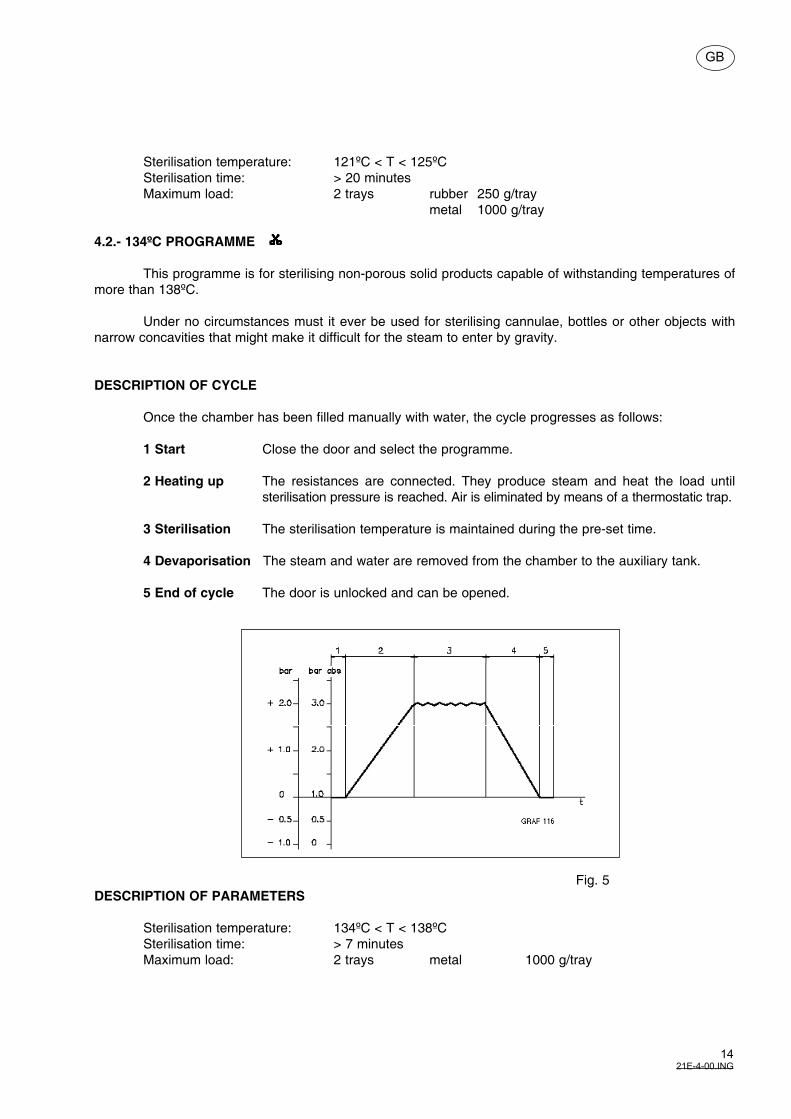
DESCRIPTION OF PARAMETERS
Sterilisation temperature: 134ºC < T < 138ºCSterilisation time: > 7 minutesMaximum load: 2 trays metal 1000 g/tray
��2�E-�-00.ING
GB
Fig. 5
GB
��2�E-�-00.ING
5.- USER OPERATING INSTRUCTIONS
This chapter describes what you have to do to ensure that the appliance functions correctly.
5,1- START-UP
1) Check that there is sufficient water in the auxiliary tank. If there is not, fill the tank up to the mark described in section 5.2 below.
2) With the door open, fill the chamber up to the level mark (“NIVEL”) by turning the knob, Fig. 1 (3), from “0” to .. When there is enough water in the chamber, turn the knob back to “0”.
3) Put the materials you want to sterilise in the chamber (see appendices 1 and 2).
4) Close the door by turning the handle, Fig. 1 (2), to the vertical position. The door closed light will come on.
5) Select the programme and sterilisation time required in accordance with the parameters given in chapter 4.
ATTENTION: If you select parameters different from those given in chapter 4, the efficiency of the sterili-sation cycle cannot be guaranteed.
From now on the cycle is performed automatically as follows:
• The chamber is heated and the air removed by means of a thermostatic trap. The heating light comes on.
• The pressure inside the chamber increases until the temperature and pressure you have selected are reached.
• The sterilisation time selected on the timer at the front of the appliance begins to elapse and the light comes on. The light lights up whenever the heating resistance is connected.
• Once the sterilisation time has elapsed, the devaporisation valve opens. The lights and go out and the devaporisation light comes on.
• When the pressure drops to +0.05 bar, the light comes on again. Very soon afterwards the green END OF CYCLE light lights up and the timer light goes out. The devaporisation light
remains on.
• When the end of cycle is reached, the green door unlocked light comes on for 30 seconds. After this time the light goes out and you have to press the button, Fig. 1 (6), if you want to unlock the door again.
ATTENTION: NEVER TRY TO OPEN THE DOOR UNLESS THE DOOR UNLOCKED LIGHT IS ON.
ATTENTION: BEFORE USING THE APPLIANCE EVERY DAY:
• Run an empty sterilisation cycle to warm up the machine.
• Prepare a representative load as described in chapter 4 and put it in the chamber together with a chemical test substance.
• Start a standard sterilisation cycle suitable for the chemical substance you have put in and check that it changes colour in accordance with the manufacturer’s specifications. If the result of the chemical test is not satisfactory, notify the technical service.
5.2.- FILLING THE WATER TANK
Here are the steps you must take to fill the water tank:
1) Remove the filler cap, Fig. 2 (5), at the top of the appliance.
2) Fill the tank up to the maximum level indicated by the word “NIVEL” (never fill it above this mark).
3) Replace the cap, Fig. 2 (5).
ATTENTION: It is recommended that you use distilled or demineralised water with a resistivity of less than 4.7 megaohms.
Do not use chemically treated water. Using unsuitable water may cause problems in the machine’s operation and shorten the life of some of its components.
5.3.- CANCELLING A PROCESS
You can cancel the automatic process in progress at any time. If you do so, the cycle must be regar-ded as invalid and the material will have to be re-processed.
To cancel a process that is in progress, proceed as follows:
• Turn off the selected programme at the corresponding switch, Fig. 1 (4 or 5).
• Set the timer dial, Fig. 1 (8), to zero.
• Wait until the pressure on the pressure gauge goes down to ± 0 bar.
• Wait 2 minutes until the green lights and light up. If the light fails to come on, press the button, Fig. 1 (6).
• When the door unlocked light comes on, open the door. (See chapter 3).
��2�E-�-00.ING
GB

GB
��2�E-�-00.ING
6.- TROUBLESHOOTING
This chapter provides a guide for users on how to deal with the commonest problems that might arise when using the sterilizer. If the appliance doesn’t work, before calling our Technical Assistance Service, check the following points:
PROBLEM SOLUTION
The chamber does not fill up with water or does so only very slowly.
The door will not close or does so only with difficulty.
The door closed light does not come on.
The chamber does not heat up.
The chamber heats up but does not reach working pressure.
The pressure does not drop at the end of the sterilisation period.
The door remains locked and the green end-of-cycle light does not light up.
The door remains locked and the end-of-cycle light and the unlocked light both light up.
The door is hard to open.
- Check the water level in the tank.- Check the drain filter at the back of the chamber.- Check the manual filling tap, Fig. 1 (3).
- Check the rod mechanism.- Check the ends-of-stroke of the handle movement.- Make sure that the seal is properly in its slot.
- Check the end-of-stroke position (and adjust if necessary).- Check the travel of the door.
- Check that the programme switch has been pressed.- Check that the locking pin is totally free.- Check the locking microswitch.
- Check that the thermostatic trap closes correctly.- Check that it has filled with water up to the level mark.- Make sure the filler valve closes correctly and is in fact
closed.- Check that the resistance safety thermostat is correctly
graduated.
- Make sure the drain filter is not blocked.- Make sure the vaporisation valve is not blocked and that it
is working correctly.
- Check the devaporisation pressurestat.
- Mechanically check the locking rod.- Press the button if its light is off.
- Check the electrically operated pressure equalising valve.- Make sure that the seal is properly in its slot.
PROBLEM SOLUTION
�82�E-�-00.ING
GB
There is still some water in the chamber when you open the door.
Water leaks out of the door during the cycle.
The chemical or biological test results are not correct.
- Make sure the front suction tube is not blocked.
- Make sure the seal is correctly housed.- Check the condition of the lip of the seal.
- Check that the sterilisation times are those stipulated by the manufacturer for each programme.
- Check that the cycle pressure and temperature are correct.- Make sure the thermostatic trap is working properly.

GB
�92�E-�-00.ING
7.- MAINTENANCE
As with any electrical appliance, this machine requires not only that you use it correctly, but also that you carry out periodical checks and maintenance. Taking this precaution will ensure that the steriliser works reliably, safely and efficiently.
To avoid any risk to the user, the appliance must be checked regularly and serviced by the MATACHANA Technical Assistance Service.
The checks and services:
• ordinary maintenance carried out by the user.• preventive or corrective maintenance carried out only by MATACHANA’s Technical Assistance
Service or MATACHANA-approved personnel.
ORDINARY MAINTENANCE
MAINTENANCE PROGRAMME
DAILY General cleaning of external surfaces.
WEEKLY Clean door seal and replace if necessary. Clean trays, bag racks, resistance guard plate, tray holder and tray holder top
cover. Clean chamber and condensate filter.
FORTNIGHTLY Empty the water tank and refill it up to the level mark.
The formation of white stains at the bottom of the chamber indicates that the distilled water you are using is not of a sufficiently good quality.
Do not use abrasive cloths, brushes or scourers to clean the metal parts.
NOTE: Since the sterilizer’s pressure and temperature sensors are essential for it to operate correctly, they must be periodically calibrated as indicated in the preventive maintenance instructions.
Cleaning external surfaces
To maintain the appliance in good condition, periodically clean all external parts with a neutral deter-gent and a damp cloth.
ATTENTION: To prevent water from getting into the electrical components, never clean the machine using direct or high pressure jets of water.
Cleaning the door seal
Cleaning the seal and the door to remove the lime scale deposits. To clean the inside of the door, use a non-abrasive cloth impregnated with a common detergent for use on stainless steel.
Cleaning the trays, bag racks, resistance guard plates, tray holder and tray holder top cover.
Thoroughly clean the sterilisation chamber, the trays, the bag racks, the resistance guard plate, the tray holder and its top cover using a cloth dipped in water or detergent for stainless steel and wrung out until it is just damp. Then rinse with alcohol followed by water.
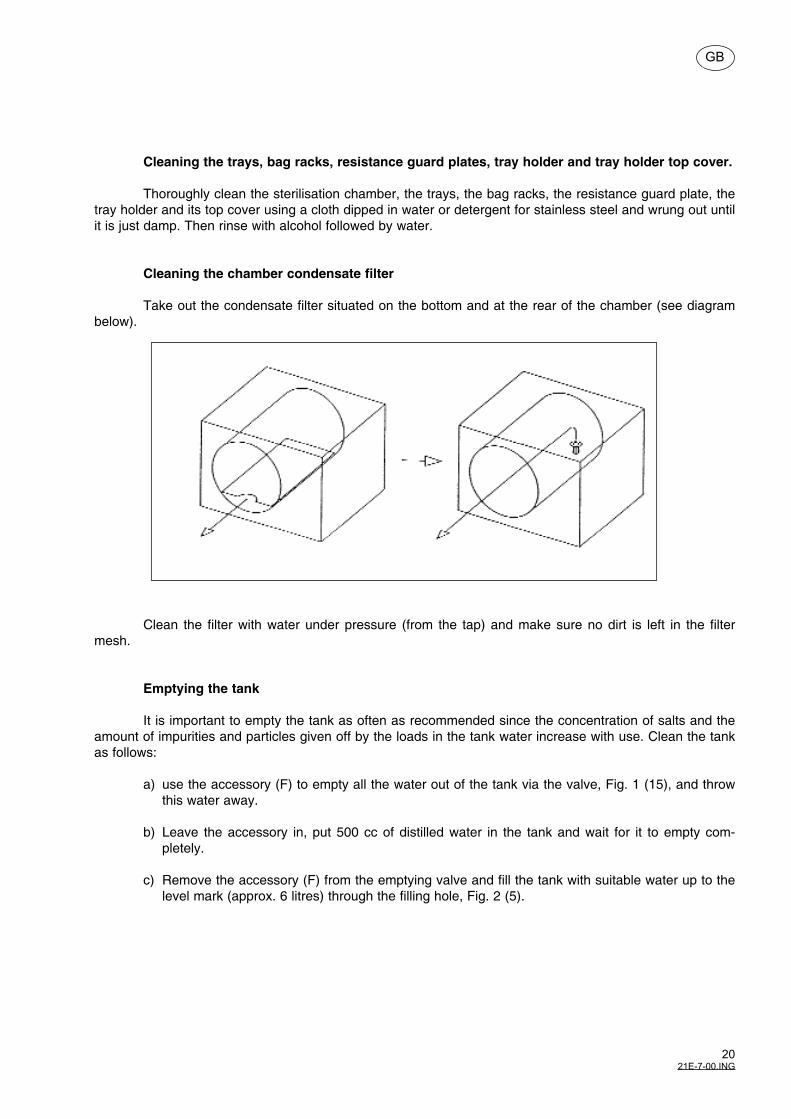
Cleaning the chamber condensate filter
Take out the condensate filter situated on the bottom and at the rear of the chamber (see diagram below).
Clean the filter with water under pressure (from the tap) and make sure no dirt is left in the filter mesh.
Emptying the tank
It is important to empty the tank as often as recommended since the concentration of salts and the amount of impurities and particles given off by the loads in the tank water increase with use. Clean the tank as follows:
a) use the accessory (F) to empty all the water out of the tank via the valve, Fig. 1 (15), and throw this water away.
b) Leave the accessory in, put 500 cc of distilled water in the tank and wait for it to empty com-pletely.
c) Remove the accessory (F) from the emptying valve and fill the tank with suitable water up to the level mark (approx. 6 litres) through the filling hole, Fig. 2 (5).
202�E-�-00.ING
GB
PREVENTIVE MAINTENANCE
MAINTENANCE PROGRAMME
ANNUAL: General service by the Matachana Technical Assistance Service or Matachana-approved person-nel.
• Replace door seal.• Thoroughly clean water tank.• Check resistance consumption and electrical insulation.• Clean housings, valves and traps.
Calibrate the following safety and control items:
• Chamber pressure gauge.• Temperature control for each programme.• Door travel and door lock ends-of-stroke.• Resistance safety thermostat.• Thermometric tests for classifying cycles according to verification protocol.
ATTENTION: The safety and control items should be checked after each preventive maintenance opera-tion, whenever any anomalies or operational faults are detected and after the thermometric cycle classification tests.
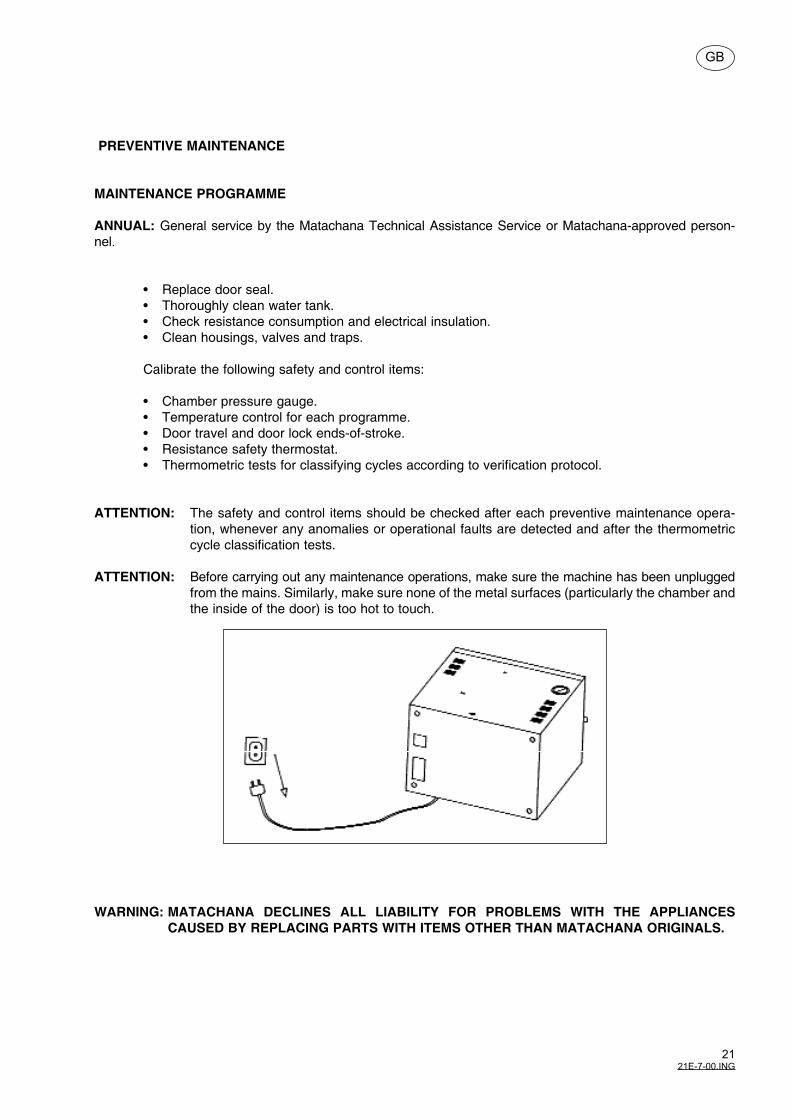
ATTENTION: Before carrying out any maintenance operations, make sure the machine has been unplugged from the mains. Similarly, make sure none of the metal surfaces (particularly the chamber and the inside of the door) is too hot to touch.
WARNING: MATACHANA DECLINES ALL LIABILITY FOR PROBLEMS WITH THE APPLIANCES CAUSED BY REPLACING PARTS WITH ITEMS OTHER THAN MATACHANA ORIGINALS.
2�2�E-�-00.ING
GB
GB
22APDC-1.ING
APPENDIX 1
PRINCIPLE OF STERILIZATION
One of the various sterilization methods available, the treatment using saturated water vapour. The water vapour sterilizer is essentially a pressure recipient - also called Autoclave - that by controlling tempera-ture, pressure and time, manages to completely eliminate all the existing micro-organisms in the material. For this reason, they should not be called Autoclaves, but sterilizers.
Technical progress registered by the industries specializing in the making of sterilizers, have placed them in first place amongst sterilization machines, making them an indispensable element in the field of medi-cine and other relating areas.
The fundamental principle of the sterilizer is regulated by the Boyle-Mariotte law which relates pres-sure, temperature and volume.
Steam sterilizers base the sterilization process on the perfect distribution of heat, by the presence of saturated water vapour, which allows heat interchange with the material in a rapid and uniform way.
The main reason for sterilization by way of saturated vapour at pressure, is that all materials, liquid and solid alike, are treated at the required temperature and for the necessary amount of time, in a humid atmosphere. The pressure does not contribute to the process which destroys micro-organisms, but acts exclu-sively to allow the vapour to reach the correct temperature for the required process.
When the vapour is placed in contact with any material or body that is colder, the vapour gives out a certain amount of heat, condenses and raises the temperature of the object. This action continues until a heat balance is reached; at this point the interchanges of heat and condensation stop. Therefore, regardless of the nature of the material, solid or liquid, the sterilization takes place in a humid atmosphere.
The heating process is not instantaneous and the time needed to reach the required temperature balance varies according to the size of the chamber, the materials and the speed of the penetration. These are fundamental elements in choosing the sterilization program.
The European Scientific Community, as the American, has determined and defined, amongst other things, three temperatures 1115 °C, 121°C, 134°C and their respective exposure times for the treatment of different materials according to their heat properties.
GB
2321E APDC-2.ING
APPENDIX 2
PRE - STERILIZATION PREPARATION
CLEANING THE INSTRUMENTS
The instruments which are to be sterilized must be clean, free from all residue, that is fragments, blood and stoppers and allow the vapours full access.
General recommendations for cleaning:
1. Clean the instruments after use to remove all residue.
2. Use, if possible, an ultrasound apparatus with a detergent solution and distilled water.
3. Follow the instructions indicated by the manufacturer on the use of cleaning and lubrication prod-ucts of the instruments after the ultrasound treatment.
4. After washing, the instruments must be rinsed and dried carefully.
POSITIONING ON THE TRAYS (UNPACKED MATERIAL)
The materials without their packaging, it must be kept in mind that their use must be immediate, as they cannot be stored for future use owing to a high probability of recontamination.
Recommendations to achieve correct sterilization and to preserve the instruments and objects used.
* Before placing the instruments in bags, packets or on the tray itself, they must be well dried.
* Do not sterilize chrome objects or materials susceptible to oxidation when in contact with steam.
* Do not sterilize already oxidised instruments as they can cause the oxidation of other metal objects that they come into contact with.
* Instruments of different metals must be separated and placed on different trays. This is due to the corrosive action that occurs amongst certain metal elements.
* For metal instruments that are not stainless steel, place paper between the tray and the instrument so as to avoid direct contact between to different materials.
2421E APDC-2.ING
GB
* All instruments similar to scissors, must be sterilized in the open position, so that the vapour can reach all parts of the instrument.
* Leave a sufficient gap between the objects, so that they will remain separate throughout the steri-lization cycle.
* Empty containers must be placed on their side so that no water will accumulate in them.
* Do not overload the trays to ensure a perfect sterilization and drying. (See chap. 5)
CONTROL OF STERILIZATION PROCESSES
It is important that the sterilization systems can be controlled so as to assure the reliability of the proc-esses.
Different methods of control exist that allow us to monitor the sterilization processes.
Physical Methods: are built into the machine e.g. temperature control, time control and pressure con-trol.
Chemical Methods: the effectiveness of a sterilization process can be measured by chemical con-trols that react when the conditions of the process are correct.
Biological Methods: these controls, which for each sterilization method contain specific bacterial spores, allow us to verify the destruction of the microorganisms during the cycle, therefore guaranteeing the sterilization process.
For vapour sterilization, the spores used in the biological control are those of “Bacillus Stearothermophilus”.
The biological control is positioned over the trays and the sterilization process takes place. This having finished, and depending on the type of biological control used, it will be sent to an external laboratory for analysis or incubated in the user’s laboratory so as to verify the destruction of the spores.
The control of the sterilization process must be carried out in a systematic way, establishing a protocol which indicates the periodicity, and the type of controls to be carried out, which must be written in a register of results.


![[PPT]Crafting & Executing Strategy 21e - University at … · Web viewCrafting & Executing Strategy 21e Subject Chapter 10 Last modified by teresaward Company The McGraw-Hill Companies,](https://img.pdfslide.us/doc/110x75/5b054f3a7f8b9a0a548eb04d/pptcrafting-executing-strategy-21e-university-at-viewcrafting-executing.jpg)