Embed Size (px)
Citation preview

INSTRUCTION BOOKLET
Model: 31556
MINI CHOPPER PLUS
2
LAKELAND MINI CHOPPER PLUSThank you for choosing the Lakeland Mini Chopper Plus.
Please take a little time to read this booklet before getting started and keep it in a safe place for future reference.
The Mini Chopper Plus is great for prepping smaller amounts of ingredients which are hard work with a knife. It’s perfect for garlic, onion, herbs, vegetables, making breadcrumbs, chopping nuts, cheese, meat and fish; and saves you using a larger food processor. There’s a feed hole in the lid so you can add oil, seasoning and other ingredients when making dips and sauces. It’s compact size means it’s also easy to store and keep on your worktop.
Here at Lakeland, our award-winning family-owned business still offers the same excellent quality, value for money and exceptional customer service as when we founded the company back in the 1960s.
Our products are hand-picked and thoroughly tested so you can be sure that everything you purchase will be a pleasure to use for many years to come.
CONTENTSProduct features ............................................................................................................. 3
Safety cautions ............................................................................................................ 4-5
Assembling your Mini Chopper Plus and using for the first time ................................... 6-7
Instructions for use ......................................................................................................... 8
A guide to ingredients, hints and tips .............................................................................. 9
Recipes ................................................................................................................... 10-12
Frequently asked questions ........................................................................................... 13
Care and cleaning ........................................................................................................ 14
Electrical connections ................................................................................................... 15
Recycling your electricals .............................................................................................. 15
3
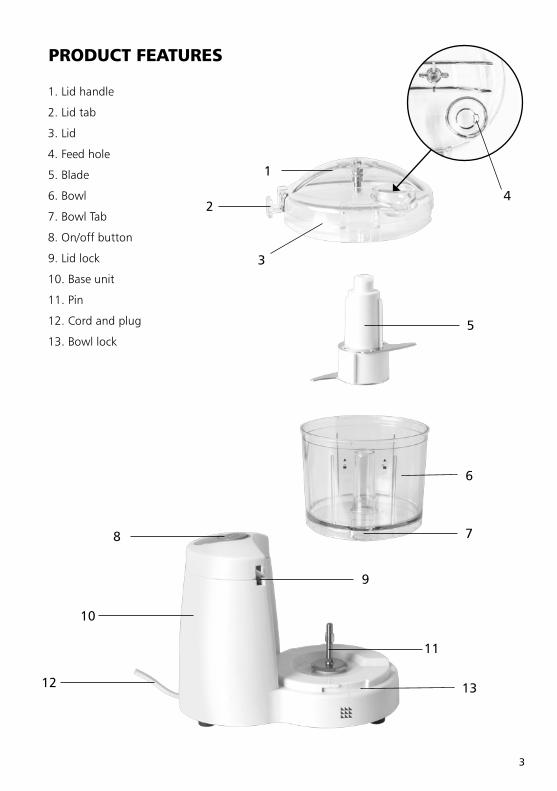
1. Lid handle
2. Lid tab
3. Lid
4. Feed hole
5. Blade
6. Bowl
7. Bowl Tab
8. On/off button
9. Lid lock
10. Base unit
11. Pin
12. Cord and plug
13. Bowl lock
PRODUCT FEATURES
8
10
11
6
7
5
3
4
12
2
1
13
9
4
SAFETY CAUTIONSCarefully read all the instructions before using the appliance and keep in a safe place for future reference. Always follow these safety cautions when using the appliance to avoid personal injury or damage to the appliance. This appliance should be used only as described in this instruction book.
• This appliance can be used by children aged from 8 years and above and persons with reduced physical, sensory or mental capabilities or lack of experience and knowledge if they have been given supervision or instruction concerning use of the appliance in a safe way and understand the hazards involved. Children shall not play with the appliance. Cleaning and user maintenance shall not be done by children unless they are older than 8 and supervised.
• Make sure your electricity supply matches the voltage shown on the appliance.
• Ensure all packaging materials and any promotional labels or stickers are removed from the appliance before the first use.
• Always inspect the appliance before use for noticeable signs of damage. Do not use if damaged or has been dropped. In the event of damage, or if the appliance develops a fault contact the Lakeland customer care team on 015394 88100.
• Do not use this appliance if the lead is damaged. If the lead is damaged it must be replaced with a special lead. Contact the Lakeland customer care team on 015394 88100.
• Always use the appliance on a dry, level, heat resistant surface.
• Unplug from the mains when not in use and before cleaning. To disconnect, turn the socket to “off “and remove the plug from the mains socket.
• Do not use any accessories or attachments with this appliance other than those recommended by Lakeland.
• To protect against fire, electric shock or personal injury, do not immerse cord, plug or base in water or other liquids.
• Do not leave the lead hanging over the edge of a kitchen table or worktop. Avoid contact between the lead and hot surfaces.
• For indoor use only.
• For domestic use only.
• This appliance should be used for preparation of food as described within the instructions for use that accompany it.
• Always ensure that your hands are dry before removing the plug from the mains socket. Never pull the plug out of the mains socket by its lead.
• To avoid injury or possible fire, do not cover the appliance when in use.
5
• Do not connect this appliance to an external timer or remote control system.
• An extension cable may be used with care. The electrical rating of the cable should be at least as great as the appliance. Do not allow the cable to hang over the edge of the worktop or touch any hot surfaces.
• This appliance complies with the basic requirements of Directives 04/108/EC (Electromagnetic Compatibility) and 06/95/EC (Safety of Domestic Electrical Appliances).
• WARNING: A cut off plug inserted into a 13 amp socket is a serious safety (shock) hazard. Ensure the cut off plug is disposed of safely.
• CAUTION: The plastic bags used to wrap this appliance or the packaging may be dangerous. To avoid risk of suffocation, keep these bags out of reach of babies and children. These bags are not toys.
• CAUTION: The blade is very sharp. Care must be taken when handling the blade, emptying the bowl and during cleaning. Hold by the plastic spindle, well away from the cutting edges.
• DO NOT operate the Mini Chopper Plus empty.
• When you have stopped chopping, wait for the blade to come to a complete stop before taking off and removing the lid. Remove the blade before taking the bowl off the base unit and emptying.
• DO NOT use the Mini Chopper Plus with hot food or liquids. Allow cooked food to cool to room temperature before chopping.
6
ASSEMBLING THE MINI CHOPPER PLUS AND USING FOR THE FIRST TIME• Unpack the Mini Chopper Plus, remove all the packaging materials.
• Before first use, wipe the base unit with a clean damp cloth.
• Remove the lid, blade and bowl from the base unit. Hold the lid handle and turn the lid anticlockwise to unlock and remove. Lift the blade out of the bowl holding the spindle, remove and discard the plastic blade guard. Twist the bowl anticlockwise to unlock and remove it from the base.
• Wash the lid, blade and bowl in warm soapy water, rinse and dry thoroughly. The blade is sharp, when washing by hand, hold by the plastic spindle and clean with a brush.
• The bowl and lid are dishwasher safe, the blade is not.
• Make sure that all parts are clean and dry before assembling the product.
WARNING: Do not insert the plug into a socket, or turn on the Mini Chopper Plus before you have fully assembled.
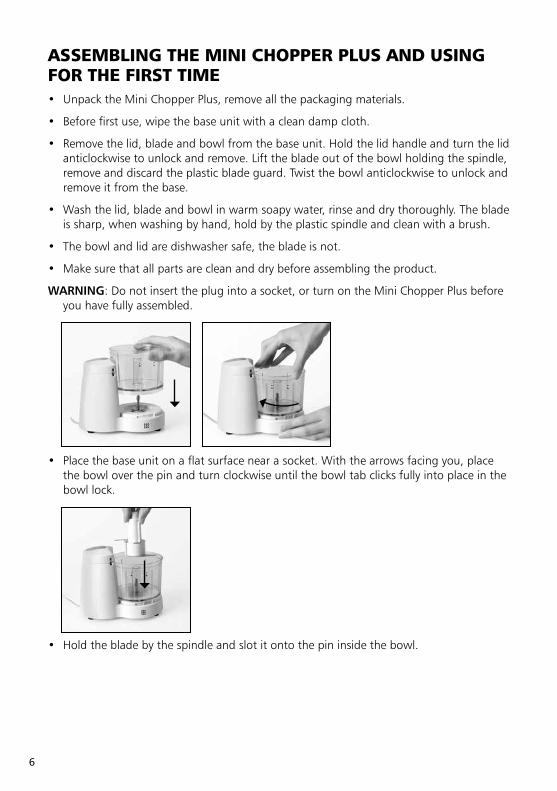
• Place the base unit on a flat surface near a socket. With the arrows facing you, place the bowl over the pin and turn clockwise until the bowl tab clicks fully into place in the bowl lock.
• Hold the blade by the spindle and slot it onto the pin inside the bowl.
7
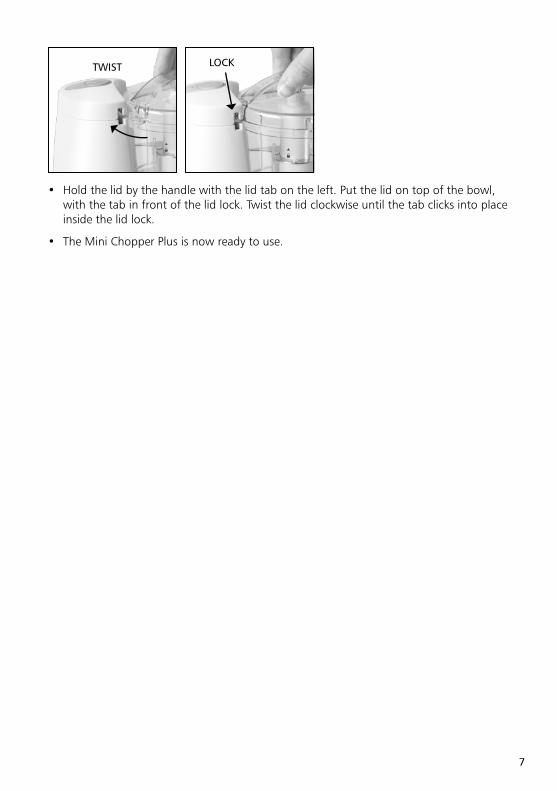
• Hold the lid by the handle with the lid tab on the left. Put the lid on top of the bowl, with the tab in front of the lid lock. Twist the lid clockwise until the tab clicks into place inside the lid lock.
• The Mini Chopper Plus is now ready to use.
TWIST LOCK
8
INSTRUCTIONS FOR USE• Remove the lid, holding the lid handle and twisting it anticlockwise so the tab is
released from the lid lock.
• Chop your ingredients into small pieces (around 2cm) and add them to the bowl.
Make sure there’s a minimum of 50ml/grams inside the bowl. DO NOT fill the bowl beyond the ‘MAX’ mark (350ml). As a guide, the appliance works best with 250g of soft ingredients, 200g of hard ingredients and 150ml of liquid. (See ‘A guide to ingredients’ for more detail.)
• Put the lid on top of the bowl, with the tab in front of the lid lock. Twist the lid clockwise until the tab clicks into place inside the lid lock.
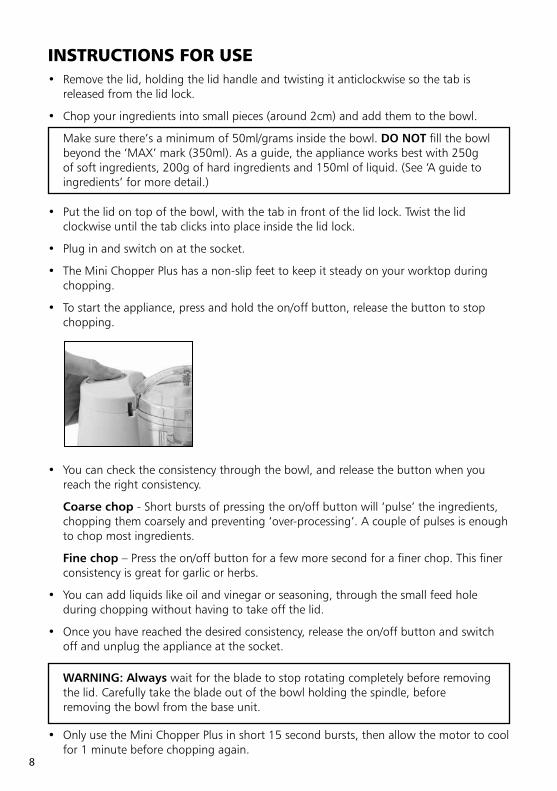
• Plug in and switch on at the socket.
• The Mini Chopper Plus has a non-slip feet to keep it steady on your worktop during chopping.
• To start the appliance, press and hold the on/off button, release the button to stop chopping.
• You can check the consistency through the bowl, and release the button when you reach the right consistency.
Coarse chop - Short bursts of pressing the on/off button will ‘pulse’ the ingredients, chopping them coarsely and preventing ‘over-processing’. A couple of pulses is enough to chop most ingredients.
Fine chop – Press the on/off button for a few more second for a finer chop. This finer consistency is great for garlic or herbs.
• You can add liquids like oil and vinegar or seasoning, through the small feed hole during chopping without having to take off the lid.
• Once you have reached the desired consistency, release the on/off button and switch off and unplug the appliance at the socket.
• Only use the Mini Chopper Plus in short 15 second bursts, then allow the motor to cool for 1 minute before chopping again.
WARNING: Always wait for the blade to stop rotating completely before removing the lid. Carefully take the blade out of the bowl holding the spindle, before removing the bowl from the base unit.
9
A GUIDE TO INGREDIENTS, HINTS AND TIPS
• Cut ingredients into small even pieces about 2cm in size for soft ingredients and 1.5cm for hard ingredients before adding to the bowl. Uneven sized pieces will not give an even chop. Chop small quantities at a time.
• Always insert the blade before adding food to the bowl, and carefully lift it out before removing food from the bowl.
• Before chopping breads or nuts, make sure the blade and bowl are completely dry.
• Wash and dry fresh herbs and peel vegetables and garlic before chopping.
• To ensure food is evenly chopped, you may need to scrape down food from the sides of the bowl with a wooden, plastic or silicone spatula, then continue processing. Always switch off and unplug the appliance first.
• Take care not to over-process wet ingredients. Use short bursts and check the consistency at regular intervals.
• DO NOT use the Mini Chopper Plus with hot foods or liquids. Allow cooked food to cool to room temperature before chopping.
• This appliance is not suitable for processing very hard foods e.g. ice cubes, coffee beans, spices, grinding granulated sugar to caster sugar or frozen food. This may damage the blade or motor.
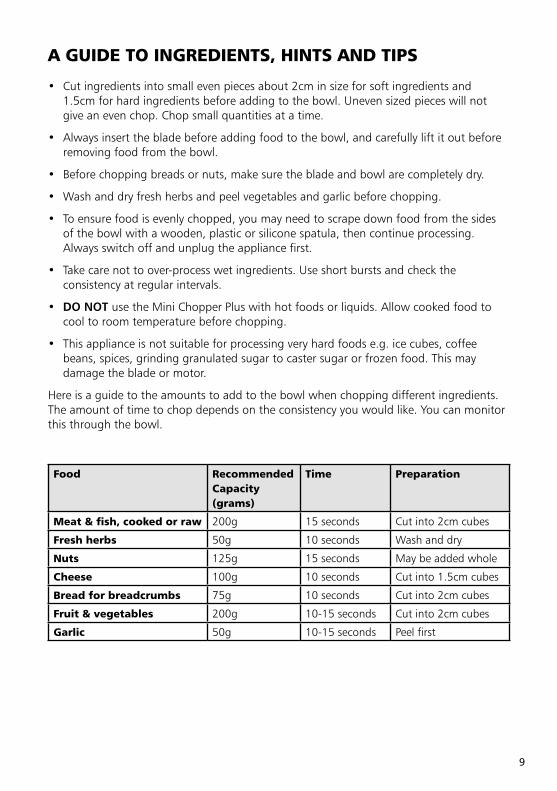
Here is a guide to the amounts to add to the bowl when chopping different ingredients. The amount of time to chop depends on the consistency you would like. You can monitor this through the bowl.
Food RecommendedCapacity (grams)
Time Preparation
Meat & fish, cooked or raw 200g 15 seconds Cut into 2cm cubes
Fresh herbs 50g 10 seconds Wash and dry
Nuts 125g 15 seconds May be added whole
Cheese 100g 10 seconds Cut into 1.5cm cubes
Bread for breadcrumbs 75g 10 seconds Cut into 2cm cubes
Fruit & vegetables 200g 10-15 seconds Cut into 2cm cubes
Garlic 50g 10-15 seconds Peel first
10
RECIPESPLEASE NOTE: That all spoon measurements are standard metric, so 1 tsp is 5ml and 1 tbsp is 15ml. We recommend using measuring spoons for accurate results.
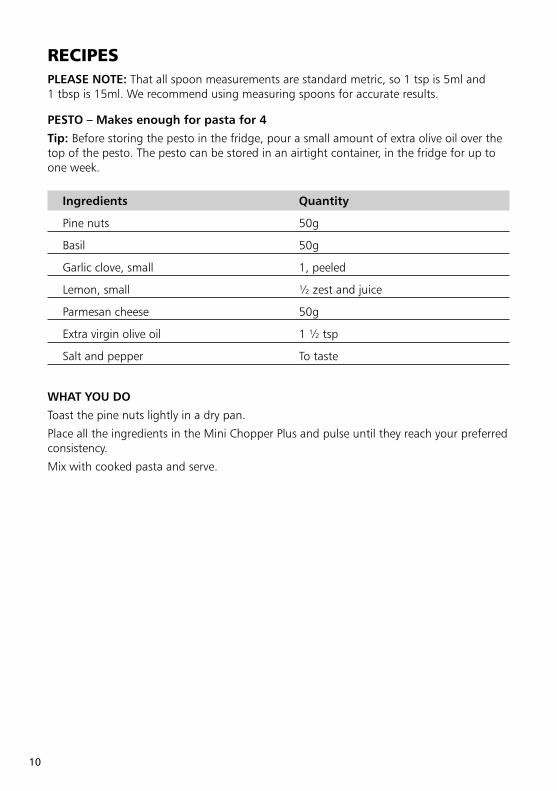
PESTO – Makes enough for pasta for 4
Tip: Before storing the pesto in the fridge, pour a small amount of extra olive oil over the top of the pesto. The pesto can be stored in an airtight container, in the fridge for up to one week.
Ingredients Quantity
Pine nuts 50g
Basil 50g
Garlic clove, small 1, peeled
Lemon, small ½ zest and juice
Parmesan cheese 50g
Extra virgin olive oil 1 ½ tsp
Salt and pepper To taste
WHAT YOU DO
Toast the pine nuts lightly in a dry pan.
Place all the ingredients in the Mini Chopper Plus and pulse until they reach your preferred consistency.
Mix with cooked pasta and serve.
11
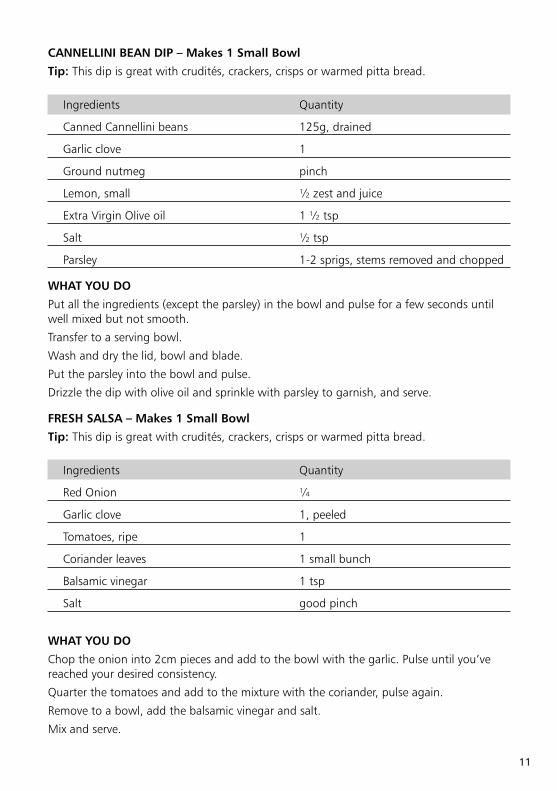
CANNELLINI BEAN DIP – Makes 1 Small Bowl
Tip: This dip is great with crudités, crackers, crisps or warmed pitta bread.
Ingredients Quantity
Canned Cannellini beans 125g, drained
Garlic clove 1
Ground nutmeg pinch
Lemon, small ½ zest and juice
Extra Virgin Olive oil 1 ½ tsp
Salt ½ tsp
Parsley 1-2 sprigs, stems removed and chopped
WHAT YOU DO
Put all the ingredients (except the parsley) in the bowl and pulse for a few seconds until well mixed but not smooth.
Transfer to a serving bowl.
Wash and dry the lid, bowl and blade.
Put the parsley into the bowl and pulse.
Drizzle the dip with olive oil and sprinkle with parsley to garnish, and serve.
FRESH SALSA – Makes 1 Small Bowl
Tip: This dip is great with crudités, crackers, crisps or warmed pitta bread.
Ingredients Quantity
Red Onion ¼
Garlic clove 1, peeled
Tomatoes, ripe 1
Coriander leaves 1 small bunch
Balsamic vinegar 1 tsp
Salt good pinch
WHAT YOU DO
Chop the onion into 2cm pieces and add to the bowl with the garlic. Pulse until you’ve reached your desired consistency.
Quarter the tomatoes and add to the mixture with the coriander, pulse again.
Remove to a bowl, add the balsamic vinegar and salt.
Mix and serve.
12
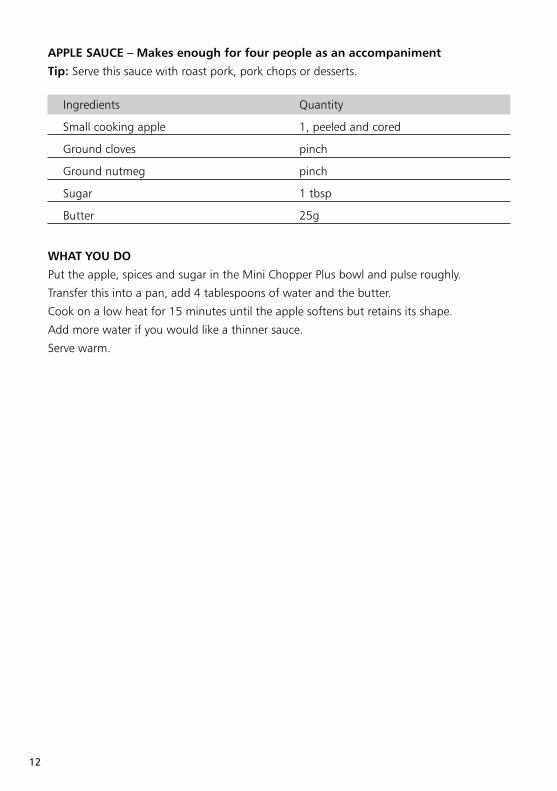
APPLE SAUCE – Makes enough for four people as an accompaniment
Tip: Serve this sauce with roast pork, pork chops or desserts.
Ingredients Quantity
Small cooking apple 1, peeled and cored
Ground cloves pinch
Ground nutmeg pinch
Sugar 1 tbsp
Butter 25g
WHAT YOU DO
Put the apple, spices and sugar in the Mini Chopper Plus bowl and pulse roughly.
Transfer this into a pan, add 4 tablespoons of water and the butter.
Cook on a low heat for 15 minutes until the apple softens but retains its shape.
Add more water if you would like a thinner sauce.
Serve warm.
13
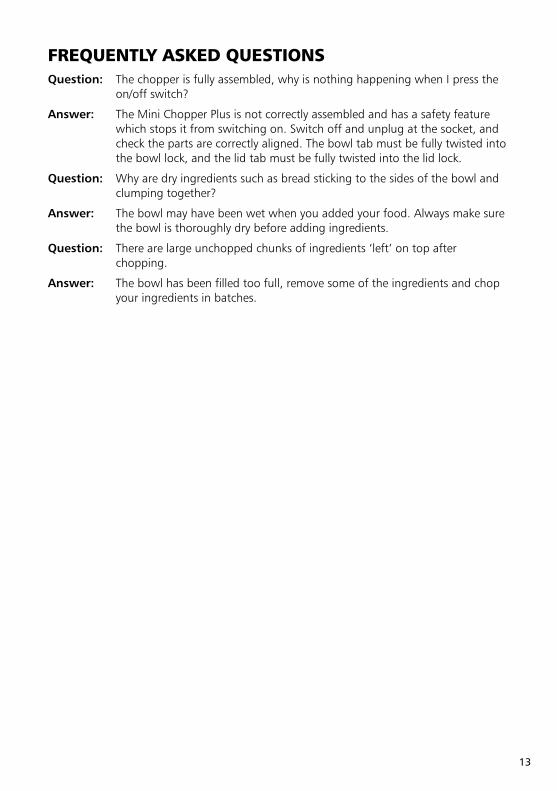
FREQUENTLY ASKED QUESTIONSQuestion: The chopper is fully assembled, why is nothing happening when I press the
on/off switch?
Answer: The Mini Chopper Plus is not correctly assembled and has a safety feature which stops it from switching on. Switch off and unplug at the socket, and check the parts are correctly aligned. The bowl tab must be fully twisted into the bowl lock, and the lid tab must be fully twisted into the lid lock.
Question: Why are dry ingredients such as bread sticking to the sides of the bowl and clumping together?
Answer: The bowl may have been wet when you added your food. Always make sure the bowl is thoroughly dry before adding ingredients.
Question: There are large unchopped chunks of ingredients ‘left’ on top after chopping.
Answer: The bowl has been filled too full, remove some of the ingredients and chop your ingredients in batches.
14
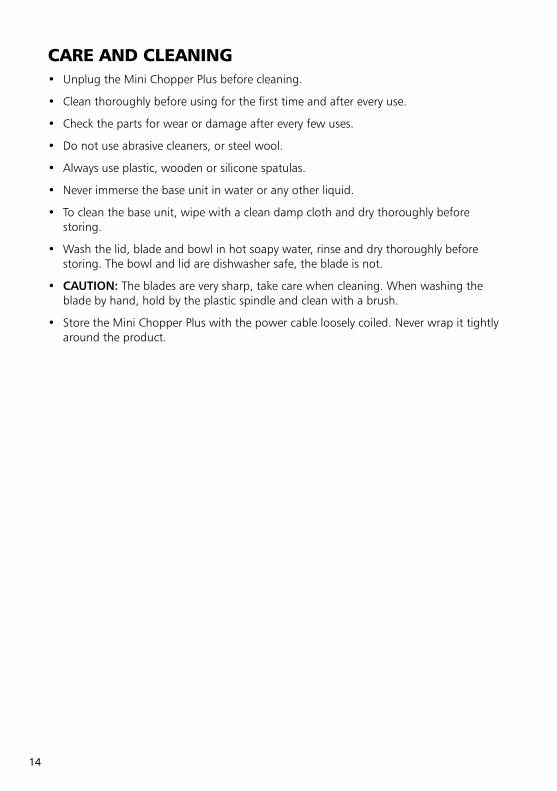
CARE AND CLEANING• Unplug the Mini Chopper Plus before cleaning.
• Clean thoroughly before using for the first time and after every use.
• Check the parts for wear or damage after every few uses.
• Do not use abrasive cleaners, or steel wool.
• Always use plastic, wooden or silicone spatulas.
• Never immerse the base unit in water or any other liquid.
• To clean the base unit, wipe with a clean damp cloth and dry thoroughly before storing.
• Wash the lid, blade and bowl in hot soapy water, rinse and dry thoroughly before storing. The bowl and lid are dishwasher safe, the blade is not.
• CAUTION: The blades are very sharp, take care when cleaning. When washing the blade by hand, hold by the plastic spindle and clean with a brush.
• Store the Mini Chopper Plus with the power cable loosely coiled. Never wrap it tightly around the product.
15
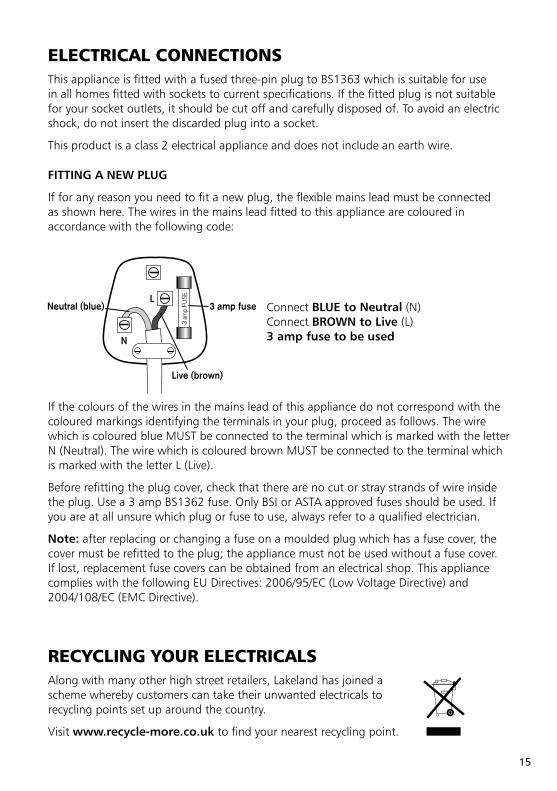
ELECTRICAL CONNECTIONSThis appliance is fitted with a fused three-pin plug to BS1363 which is suitable for use in all homes fitted with sockets to current specifications. If the fitted plug is not suitable for your socket outlets, it should be cut off and carefully disposed of. To avoid an electric shock, do not insert the discarded plug into a socket.
This product is a class 2 electrical appliance and does not include an earth wire.
FITTING A NEW PLUG
If for any reason you need to fit a new plug, the flexible mains lead must be connected as shown here. The wires in the mains lead fitted to this appliance are coloured in accordance with the following code:
Connect BLUE to Neutral (N)Connect BROWN to Live (L)3 amp fuse to be used
If the colours of the wires in the mains lead of this appliance do not correspond with the coloured markings identifying the terminals in your plug, proceed as follows. The wire which is coloured blue MUST be connected to the terminal which is marked with the letter N (Neutral). The wire which is coloured brown MUST be connected to the terminal which is marked with the letter L (Live).
Before refitting the plug cover, check that there are no cut or stray strands of wire inside the plug. Use a 3 amp BS1362 fuse. Only BSI or ASTA approved fuses should be used. If you are at all unsure which plug or fuse to use, always refer to a qualified electrician.
Note: after replacing or changing a fuse on a moulded plug which has a fuse cover, the cover must be refitted to the plug; the appliance must not be used without a fuse cover. If lost, replacement fuse covers can be obtained from an electrical shop. This appliance complies with the following EU Directives: 2006/95/EC (Low Voltage Directive) and 2004/108/EC (EMC Directive).
3 amp fuse
3 am
p FU
SE
RECYCLING YOUR ELECTRICALSAlong with many other high street retailers, Lakeland has joined a scheme whereby customers can take their unwanted electricals to recycling points set up around the country.
Visit www.recycle-more.co.uk to find your nearest recycling point.

16
MINI-HACKER PLUS
17
GEBRAUCHSANWEISUNG
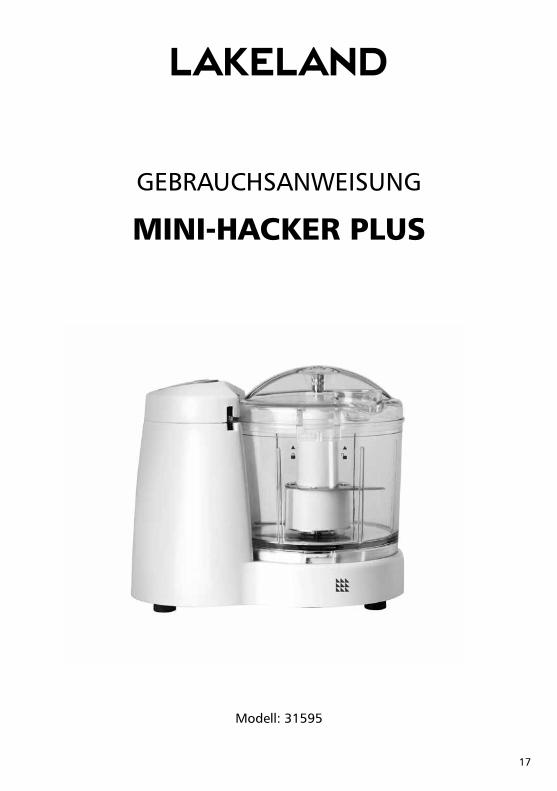
Modell: 31595
MINI-HACKER PLUS
18
LAKELAND MINI-HACKER PLUSVielen Dank, dass Sie sich für den Kauf des Mini-Hackers Plus von Lakeland entschieden haben.
Bitte lesen Sie sich diese Anleitung vor der Inbetriebnahme Ihres neuen Geräts aufmerksam durch und bewahren Sie sie gut auf, falls Sie später auf die hier enthaltenen Informationen zurückgreifen möchten.
Der Mini-Hacker Plus ist perfekt für die Zubereitung kleinerer Mengen von Zutaten, die sich mit einem Messer nur schwer zerkleinern lassen, geeignet. Er ist ideal für Knoblauch, Zwiebeln, Kräuter, Gemüse, für die Zubereitung von Brotkrumen, zum Hacken von Nüssen, für Käse, Fleisch und Fisch und macht somit den Einsatz einer größeren Küchenmaschine überflüssig. Im Deckel befindet sich eine Öffnung zum Einfüllen von Öl, Würze und anderen Zutaten für die Zubereitung von Dips und Saucen. Dank seiner kompakten Größe lässt er sich einfach aufbewahren und stört auch auf der Arbeitsfläche nicht.
Unser mehrfach ausgezeichnetes Familienunternehmen legt heute genauso viel Wert auf ein Höchstmaß an Qualität, ein gutes Preis-Leistungs-Verhältnis und einen hervorragenden Kundenservice wie damals in den 1960er Jahren, als Lakeland gegründet wurde.
Unsere Artikel werden mit größter Sorgfalt ausgewählt und gründlich geprüft. So haben Sie die Gewähr, dass Ihnen jeder Artikel, den Sie bei uns kaufen, jahrelang Freude bereiten wird.
INHALTAusstattungsmerkmale ................................................................................................. 19
Sicherheitshinweise ................................................................................................. 20-21
Montage Ihres Mini-Hackers Plus und erste Ingebrauchnahme ................................. 22-23
Gebrauchshinweise ....................................................................................................... 24
Zutaten, Tipps und Tricks ............................................................................................... 25
Häufig gestellte Fragen ................................................................................................. 26
Pflege und Reinigung ................................................................................................... 27
19
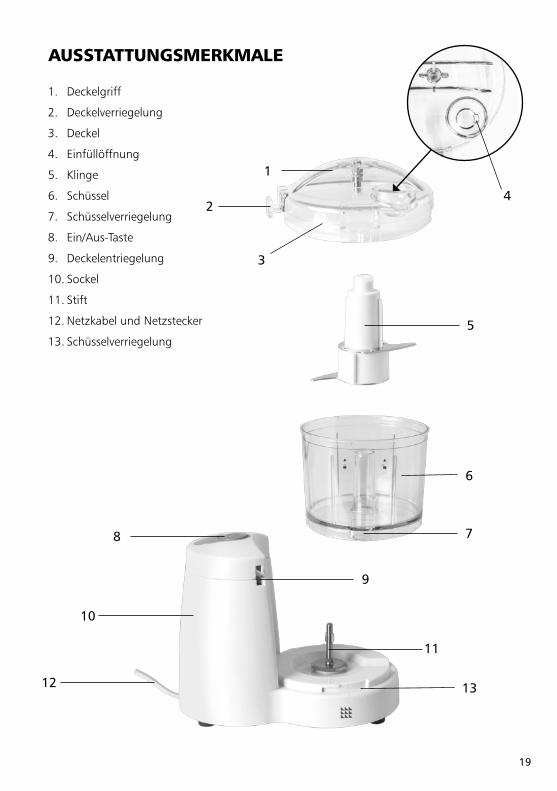
1. Deckelgriff
2. Deckelverriegelung
3. Deckel
4. Einfüllöffnung
5. Klinge
6. Schüssel
7. Schüsselverriegelung
8. Ein/Aus-Taste
9. Deckelentriegelung
10. Sockel
11. Stift
12. Netzkabel und Netzstecker
13. Schüsselverriegelung
AUSSTATTUNGSMERKMALE
8
10
11
6
7
5
3
4
12
2
1
13
9
20
SICHERHEITSHINWEISELesen Sie sich die Gebrauchsanweisung vor Inbetriebnahme des Geräts sorgfältig durch und bewahren Sie diese für den weiteren Gebrauch sicher auf. Befolgen Sie beim Gebrauch des Geräts stets diese Sicherheitshinweise, um Körperverletzungen oder Schäden am Gerät zu vermeiden. Dieses Produkt ist nur für den vorgesehenen Zweck gemäß der Beschreibung in dieser Gebrauchsanweisung bestimmt.
• Dieses Gerät darf von Kindern ab 8 Jahren und Personen mit verminderter körperlicher, sensorischer oder geistiger Fähigkeit oder mit fehlenden Erfahrungen und Kenntnissen nur dann verwendet werden, wenn sie von einer Person, die für ihre Sicherheit verantwortlich ist, beaufsichtigt werden und sie im Gebrauch und hinsichtlich der potentiellen Gefahren des Geräts unterwiesen wurden. Dieses Gerät ist kein Spielzeug. Die Reinigung und Wartung des Geräts darf nicht von Kindern unter acht Jahren und nicht ohne Aufsicht Erwachsener durchgeführt werden.
• Stellen Sie sicher, dass Ihre Stromversorgung mit der auf dem Gerät angegebenen Spannung übereinstimmt.
• Entfernen Sie vor der ersten Ingebrauchnahme alle Verpackungsmaterialien sowie Werbeetiketten vom Gerät.
• Vergewissern Sie sich stets vor Gebrauch des Geräts, dass es keine erkennbaren Schäden aufweist. Verwenden Sie das Produkt nicht, falls es Schäden aufweist oder versehentlich fallen gelassen wurde. Wenden Sie sich im Falle von Schäden oder Defekten am Gerät an den Kundenservice von Lakeland unter der Rufnummer 0800 444 1500.
• Verwenden Sie das Produkt nicht, falls das Netzkabel beschädigt ist. Falls das Netzkabel beschädigt ist, muss es durch ein Spezialkabel ersetzt werden. Kontaktieren Sie den Kundenservice von Lakeland unter der Rufnummer 0800 444 1500.
• Stellen Sie das Gerät zum Gebrauch stets auf eine trockene, ebene und hitzebeständige Fläche.
• Ziehen Sie den Netzstecker bei Nichtgebrauch und vor der Reinigung des Geräts aus der Steckdose. Um das Gerät auszuschalten, bedienen Sie die Ein/Aus-Taste und ziehen Sie den Netzstecker aus der Netzsteckdose.
• Verwenden Sie nur die von Lakeland empfohlenen Zubehörteile oder Einsätze.
• Tauchen Sie Netzkabel, Netzstecker oder Gerät nicht in Wasser oder andere Flüssigkeiten ein. Es besteht Brand-, Stromschlag- und Verletzungsgefahr!
• Lassen Sie das Netzkabel nicht vom Küchentisch oder von der Arbeitsplatte herunterhängen. Sorgen Sie dafür, dass das Netzkabel nicht mit heißen Oberflächen in Berührung kommt.
• Nur für den Gebrauch in Innenräumen.
21
• Nur für den privaten Gebrauch.
• Dieses Gerät ist nur für die Zubereitung von Lebensmitteln gemäß der Beschreibung in der mitgelieferten Gebrauchsanweisung vorgesehen.
• Ziehen Sie den Netzstecker ausschließlich mit trockenen Händen aus der Netzsteckdose. Ziehen Sie den Netzstecker nie am Netzkabel aus der Netzsteckdose heraus.
• Decken Sie das Gerät während des Gebrauchs nicht ab. Es besteht Verletzungs- und möglicherweise Brandgefahr!
• Schließen Sie das Gerät nicht an eine externe Zeitschaltuhr oder an ein System mit Fernbedienung an.
• Lassen Sie bei der Verwendung von Verlängerungskabeln Vorsicht walten. Die elektrischen Nennwerte des Kabels müssen mindestens so hoch wie die des Geräts sein. Achten Sie darauf, dass das Kabel nicht von der Arbeitsplatte herunterhängt und nicht mit heißen Flächen in Berührung kommt.
• Dieses Produkt entspricht den Grundanforderungen der EMV-Richtlinie 2004/108/EG (elektromagnetische Verträglichkeit) und der Niederspannungsrichtlinie 2006/95/EG (Sicherheit elektrischer Betriebsmittel).
• WARNHINWEISE: Bei einem abgeschnittenen Netzstecker in einer 13 A-Netzsteckdose besteht schwere Verletzungsgefahr (elektrischer Schlag)! Sorgen Sie dafür, dass der abgeschnittene Stecker ordnungsgemäß entsorgt wird.
• ACHTUNG: Die Kunststoff-Verpackungsmaterialien stellen eine Gefahr dar. Sie dürfen nicht in die Hände von Babys und Kindern gelangen, da Erstickungsgefahr besteht. Diese Verpackungsmaterialien sind kein Spielzeug.
• ACHTUNG: Die Klinge ist extrem scharf. Gehen Sie beim Umgang mit der Klinge, beim Leeren des Behälters und beim Reinigen äußerst vorsichtig vor. Fassen Sie es an der Kunststoffspindel sowie in ausreichender Entfernung von den scharfen Kanten an.
• NEHMEN Sie den Mini-Hacker Plus NICHT leer in Betrieb.
• Warten Sie nach dem Hacken, bis die Klinge komplett zum Stillstand gekommen ist, bevor Sie den Deckel abnehmen. Entfernen Sie die Klinge, bevor Sie die Schüssel zum Leeren vom Sockel nehmen.
• VERWENDEN Sie den Mini-Hacker Plus NICHT mit heißen Zutaten oder Flüssigkeiten. Lassen Sie heiße Speisen vor dem Zerkleinern auf Zimmertemperatur abkühlen.
22
MONTAGE DES MINI-HACKERS PLUS UND ERSTE INGEBRAUCHNAHME• Packen Sie den Mini-Hacker Plus aus und entfernen Sie sämtliche
Verpackungsmaterialien.
• Wischen Sie das Gehäuse vor dem ersten Gebrauch mit einem sauberen, feuchten Tuch ab.
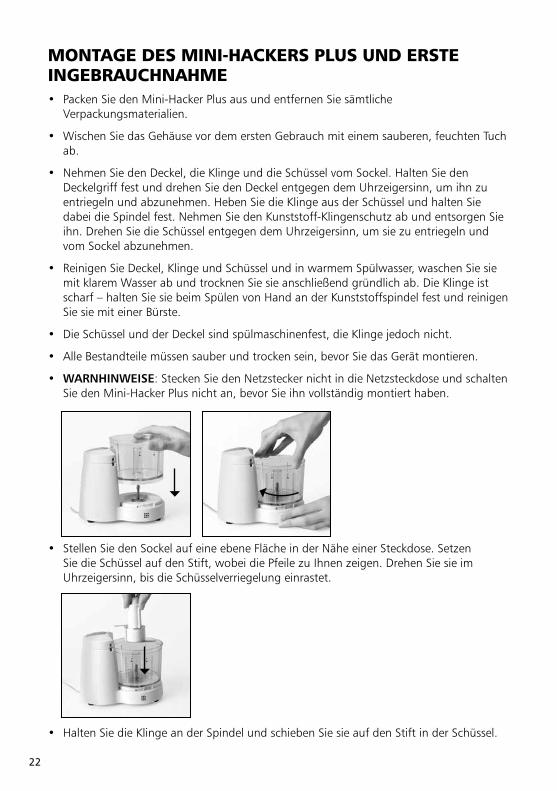
• Nehmen Sie den Deckel, die Klinge und die Schüssel vom Sockel. Halten Sie den Deckelgriff fest und drehen Sie den Deckel entgegen dem Uhrzeigersinn, um ihn zu entriegeln und abzunehmen. Heben Sie die Klinge aus der Schüssel und halten Sie dabei die Spindel fest. Nehmen Sie den Kunststoff-Klingenschutz ab und entsorgen Sie ihn. Drehen Sie die Schüssel entgegen dem Uhrzeigersinn, um sie zu entriegeln und vom Sockel abzunehmen.
• Reinigen Sie Deckel, Klinge und Schüssel und in warmem Spülwasser, waschen Sie sie mit klarem Wasser ab und trocknen Sie sie anschließend gründlich ab. Die Klinge ist scharf – halten Sie sie beim Spülen von Hand an der Kunststoffspindel fest und reinigen Sie sie mit einer Bürste.
• Die Schüssel und der Deckel sind spülmaschinenfest, die Klinge jedoch nicht.
• Alle Bestandteile müssen sauber und trocken sein, bevor Sie das Gerät montieren.
• WARNHINWEISE: Stecken Sie den Netzstecker nicht in die Netzsteckdose und schalten Sie den Mini-Hacker Plus nicht an, bevor Sie ihn vollständig montiert haben.
• Stellen Sie den Sockel auf eine ebene Fläche in der Nähe einer Steckdose. Setzen Sie die Schüssel auf den Stift, wobei die Pfeile zu Ihnen zeigen. Drehen Sie sie im Uhrzeigersinn, bis die Schüsselverriegelung einrastet.
• Halten Sie die Klinge an der Spindel und schieben Sie sie auf den Stift in der Schüssel.

23
• Halten Sie den Deckel am Griff, mit der Deckelverriegelung auf der linken Seite. Setzen Sie den Deckel auf die Schüssel und richten Sie dabei die beiden Teile der Verriegelung aus. Drehen Sie den Deckel im Uhrzeigersinn, bis die Deckelverriegelung einrastet.
• Der Mini-Hacker Plus kann jetzt verwendet werden.
DREHEN VERRIEGELN
24
GEBRAUCHSANWEISUNG• Nehmen Sie den Deckel ab, wobei Sie den Deckelgriff festhalten, und drehen Sie ihn
entgegen dem Uhrzeigersinn, damit die Deckelverriegelung entriegelt wird.
• Zerkleinern Sie Ihre Zutaten in kleine Stücke (circa 2 cm) und geben Sie diese in die Schüssel.
Achten Sie darauf, dass die Schüssel mit mindestens 50 ml/g gefüllt ist. Füllen Sie die Schüssel NICHT über „MAX“ (350 ml) hinaus. Als Richtlinie funktioniert das Gerät am besten mit 250 g weichen Zutaten, 200 g harten Zutaten und 150 ml Flüssigkeit. (Weitere Einzelheiten siehe „Zutaten“.)
• Setzen Sie den Deckel auf die Schüssel und richten Sie dabei die beiden Teile der Verriegelung aus. Drehen Sie den Deckel im Uhrzeigersinn, bis die Deckelverriegelung einrastet.
• Stecken Sie den Netzstecker in die Steckdose.
• Der Mini-Hacker Plus hat einen rutschfesten Fuß, sodass er beim Hacken stabil auf der Arbeitsfläche steht.
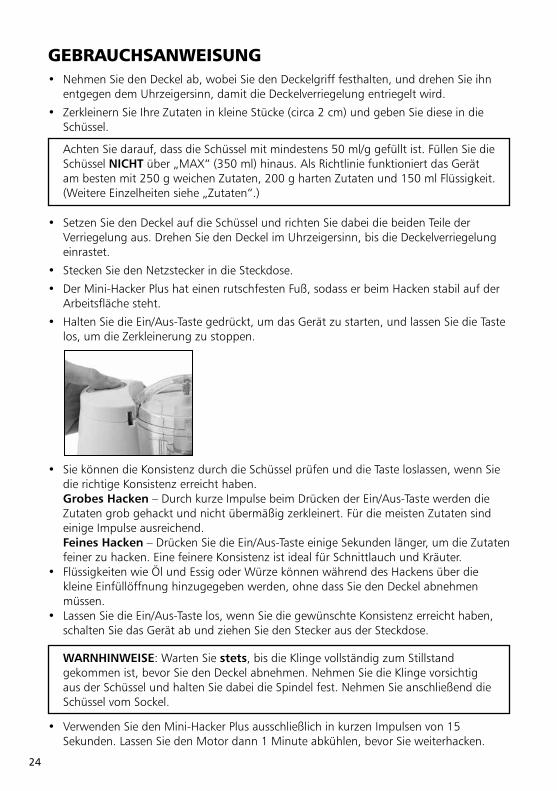
• Halten Sie die Ein/Aus-Taste gedrückt, um das Gerät zu starten, und lassen Sie die Taste los, um die Zerkleinerung zu stoppen.
• Sie können die Konsistenz durch die Schüssel prüfen und die Taste loslassen, wenn Sie die richtige Konsistenz erreicht haben.
Grobes Hacken – Durch kurze Impulse beim Drücken der Ein/Aus-Taste werden die Zutaten grob gehackt und nicht übermäßig zerkleinert. Für die meisten Zutaten sind einige Impulse ausreichend.
Feines Hacken – Drücken Sie die Ein/Aus-Taste einige Sekunden länger, um die Zutaten feiner zu hacken. Eine feinere Konsistenz ist ideal für Schnittlauch und Kräuter.
• Flüssigkeiten wie Öl und Essig oder Würze können während des Hackens über die kleine Einfüllöffnung hinzugegeben werden, ohne dass Sie den Deckel abnehmen müssen.
• Lassen Sie die Ein/Aus-Taste los, wenn Sie die gewünschte Konsistenz erreicht haben, schalten Sie das Gerät ab und ziehen Sie den Stecker aus der Steckdose.
• Verwenden Sie den Mini-Hacker Plus ausschließlich in kurzen Impulsen von 15 Sekunden. Lassen Sie den Motor dann 1 Minute abkühlen, bevor Sie weiterhacken.
WARNHINWEISE: Warten Sie stets, bis die Klinge vollständig zum Stillstand gekommen ist, bevor Sie den Deckel abnehmen. Nehmen Sie die Klinge vorsichtig aus der Schüssel und halten Sie dabei die Spindel fest. Nehmen Sie anschließend die Schüssel vom Sockel.
25
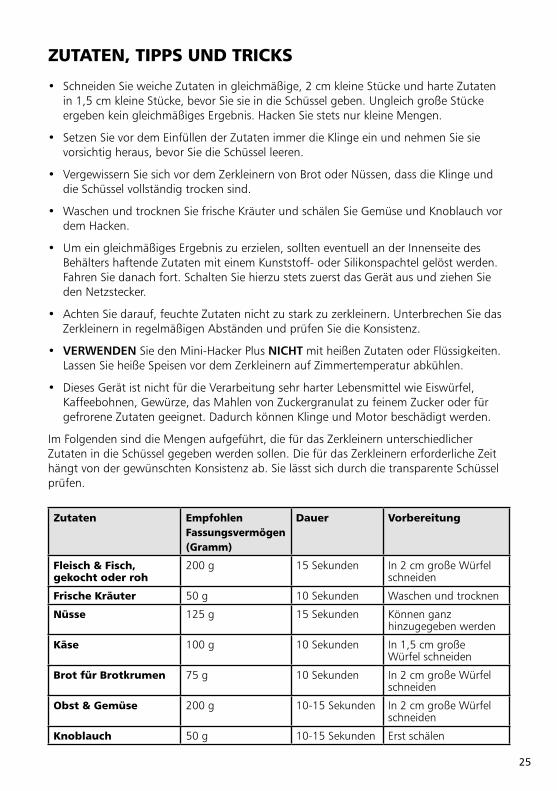
ZUTATEN, TIPPS UND TRICKS
• Schneiden Sie weiche Zutaten in gleichmäßige, 2 cm kleine Stücke und harte Zutaten in 1,5 cm kleine Stücke, bevor Sie sie in die Schüssel geben. Ungleich große Stücke ergeben kein gleichmäßiges Ergebnis. Hacken Sie stets nur kleine Mengen.
• Setzen Sie vor dem Einfüllen der Zutaten immer die Klinge ein und nehmen Sie sie vorsichtig heraus, bevor Sie die Schüssel leeren.
• Vergewissern Sie sich vor dem Zerkleinern von Brot oder Nüssen, dass die Klinge und die Schüssel vollständig trocken sind.
• Waschen und trocknen Sie frische Kräuter und schälen Sie Gemüse und Knoblauch vor dem Hacken.
• Um ein gleichmäßiges Ergebnis zu erzielen, sollten eventuell an der Innenseite des Behälters haftende Zutaten mit einem Kunststoff- oder Silikonspachtel gelöst werden. Fahren Sie danach fort. Schalten Sie hierzu stets zuerst das Gerät aus und ziehen Sie den Netzstecker.
• Achten Sie darauf, feuchte Zutaten nicht zu stark zu zerkleinern. Unterbrechen Sie das Zerkleinern in regelmäßigen Abständen und prüfen Sie die Konsistenz.
• VERWENDEN Sie den Mini-Hacker Plus NICHT mit heißen Zutaten oder Flüssigkeiten. Lassen Sie heiße Speisen vor dem Zerkleinern auf Zimmertemperatur abkühlen.
• Dieses Gerät ist nicht für die Verarbeitung sehr harter Lebensmittel wie Eiswürfel, Kaffeebohnen, Gewürze, das Mahlen von Zuckergranulat zu feinem Zucker oder für gefrorene Zutaten geeignet. Dadurch können Klinge und Motor beschädigt werden.
Im Folgenden sind die Mengen aufgeführt, die für das Zerkleinern unterschiedlicher Zutaten in die Schüssel gegeben werden sollen. Die für das Zerkleinern erforderliche Zeit hängt von der gewünschten Konsistenz ab. Sie lässt sich durch die transparente Schüssel prüfen.
Zutaten EmpfohlenFassungsvermögen (Gramm)
Dauer Vorbereitung
Fleisch & Fisch, gekocht oder roh
200 g 15 Sekunden In 2 cm große Würfel schneiden
Frische Kräuter 50 g 10 Sekunden Waschen und trocknen
Nüsse 125 g 15 Sekunden Können ganz hinzugegeben werden
Käse 100 g 10 Sekunden In 1,5 cm große Würfel schneiden
Brot für Brotkrumen 75 g 10 Sekunden In 2 cm große Würfel schneiden
Obst & Gemüse 200 g 10-15 Sekunden In 2 cm große Würfel schneiden
Knoblauch 50 g 10-15 Sekunden Erst schälen
26
HÄUFIG GESTELLTE FRAGENFrage: Der Hacker ist komplett zusammengesetzt. Warum passiert nichts, wenn ich
auf den Ein-/Ausschalter drücke?
Antwort: Der Mini-Hacker Plus wurde nicht ordnungsgemäß zusammengesetzt und hat eine Sicherheitsfunktion, sodass er nicht eingeschaltet werden kann. Schalten Sie das Gerät aus und ziehen Sie den Netzstecker. Prüfen Sie, dass alle Teile richtig angeordnet sind. Die Schüsselverriegelung muss so gedreht werden, dass sie einrastet, und die Deckelverriegelung muss so gedreht werden, dass sie einrastet.
Frage: Warum kleben trockene Zutaten (wie z. B. Brot) an den Seiten der Schüssel und verklumpen miteinander?
Antwort: Es kann sein, dass die Schüssel feucht war, bevor Sie die Zutaten hinzugefügt haben. Vergewissern Sie sich stets, dass die Schüssel vollständig trocken ist, bevor Sie Zutaten hinzugeben.
Frage: Nach dem Hacken verbleiben an der Oberfläche große, nicht zerkleinerte Zutaten.
Antwort: Die Schüssel wurde zu voll gefüllt. Nehmen Sie einen Teil der Zutaten heraus und zerkleinern Sie sie nacheinander.
27
PFLEGE UND REINIGUNG• Ziehen Sie vor der Reinigung des Mini-Hackers Plus den Netzstecker.
• Reinigen Sie das Gerät vor der ersten Inbetriebnahme und nach jedem Gebrauch gründlich.
• Überprüfen Sie die einzelnen Teile regelmäßig auf Verschleiß oder Schäden.
• Verwenden Sie keine Scheuermittel oder Stahlwolle.
• Verwenden Sie stets Küchenutensilien aus Kunststoff, Holz oder Silikon.
• Tauchen Sie das Gehäuse niemals in Wasser oder andere Flüssigkeiten ein.
• Wischen Sie das Gehäuse mit einem sauberen, feuchten Tuch ab und trocken Sie das Gerät danach gründlich, bevor Sie es verstauen.
• Reinigen Sie Deckel, Klinge und Schüssel und in heißem Seifenwasser, waschen Sie sie mit klarem Wasser ab und trocknen Sie sie anschließend vor der Aufbewahrung gründlich ab. Die Schüssel und der Deckel sind spülmaschinenfest, die Klinge jedoch nicht.
• ACHTUNG: Bitte gehen Sie bei der Reinigung der Klingen sehr vorsichtig vor, da sie extrem scharf sind. Halten Sie die Klinge beim Spülen von Hand an der Kunststoffspindel fest und reinigen Sie sie mit einer Bürste.
• Verstauen Sie den Mini-Hacker Plus so, dass das Netzkabel lose um das Gerät herumgewickelt ist. Wickeln Sie das Netzkabel nie zu fest um das Gerät.

28
LakelandAlexandra Buildings, Windermere, Cumbria, UK LA23 1BQ
Tel: +44(0)15394 88100 www.lakeland.co.uk Tel: 0800 444 1500 www.lakeland.deD