Embed Size (px)
Citation preview
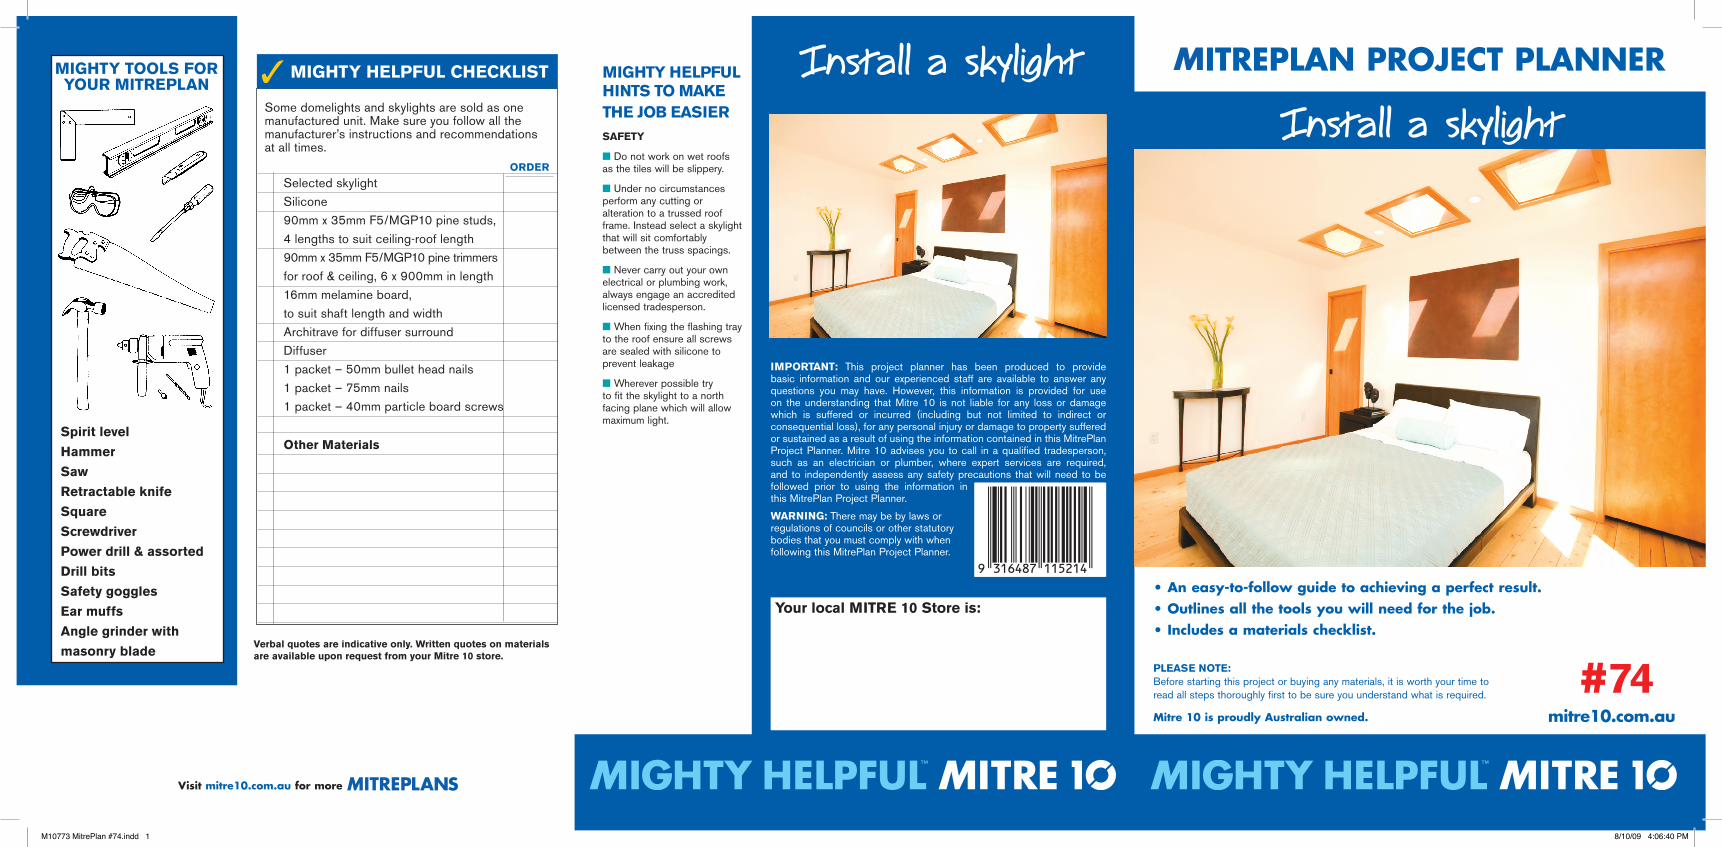
• An easy-to-follow guide to achieving a perfect result. • Outlines all the tools you will need for the job.• Includes a materials checklist.
PLEASE NOTE: Before starting this project or buying any materials, it is worth your time to read all steps thoroughly first to be sure you understand what is required.
mitre10.com.auMitre 10 is proudly Australian owned.
MItrePlAn PrOJeCt PlAnner
Your local MITRE 10 Store is:
IMPORTANT: This project planner has been produced to provide basic information and our experienced staff are available to answer any questions you may have. However, this information is provided for use on the understanding that Mitre 10 is not liable for any loss or damage which is suffered or incurred (including but not limited to indirect or consequential loss), for any personal injury or damage to property suffered or sustained as a result of using the information contained in this MitrePlan Project Planner. Mitre 10 advises you to call in a qualified tradesperson, such as an electrician or plumber, where expert services are required, and to independently assess any safety precautions that will need to be followed prior to using the information in this MitrePlan Project Planner.
WARNING: There may be by laws or regulations of councils or other statutory bodies that you must comply with when following this MitrePlan Project Planner.
Install a skylight
Install a skylight Some domelights and skylights are sold as one manufactured unit. Make sure you follow all the manufacturer’s instructions and recommendations at all times.
Selected skylight Silicone 90mm x 35mm F5/MGP10 pine studs, 4 lengths to suit ceiling-roof length 90mm x 35mm F5/MGP10 pine trimmers for roof & ceiling, 6 x 900mm in length 16mm melamine board, to suit shaft length and width Architrave for diffuser surround Diffuser 1 packet – 50mm bullet head nails 1 packet – 75mm nails 1 packet – 40mm particle board screws
Other Materials
MIGhTY TOOLS fOR YOuR MITREPLAN
Verbal quotes are indicative only. Written quotes on materials are available upon request from your Mitre 10 store.
ORDER
#74
MIGhTY hELPfuL chEckLIST✓ MIGhTY hELPfuL hINTS TO MAkE ThE jOb EASIERSAfETY
■ Do not work on wet roofs as the tiles will be slippery.
■ Under no circumstances perform any cutting or alteration to a trussed roof frame. Instead select a skylight that will sit comfortably between the truss spacings.
■ Never carry out your own electrical or plumbing work, always engage an accredited licensed tradesperson.
■ When fixing the flashing tray to the roof ensure all screws are sealed with silicone to prevent leakage
■ Wherever possible try to fit the skylight to a north facing plane which will allow maximum light. Spirit level
hammer
Saw
Retractable knife
Square
Screwdriver
Power drill & assorted
Drill bits
Safety goggles
Ear muffs
Angle grinder with
masonry blade
Visit mitre10.com.au for more S
M10773 MitrePlan #74.indd 1 8/10/09 4:06:40 PM

fig. 7
fig. 6
skylight location. Mark the length of duct needed and remove and cut any excess off to the correct length. Replace the duct onto the diffuser and fit while fitting the duct to the skylight collar. Complete any required fitting of the domelight to the flashing tray, and finally check that all components are securely fixed and held down in accordance with the manufacturer’s recommendations.
ON-SITE SkYLIGhT INSTALLATIONStep 1: Set outOnce the location and size of the ceiling opening has been decided, mark the centre of the proposed opening. Drive a 50mm nail into the ceiling at this point and inspect the location in the ceiling space to ensure that the way is clear of all obstructions. You may need to adjust the location to suit existing conditions.
From the centre nail mark, locate where the actual skylight will fit on the roof. Remove enough tiles so that the whole skylight and flashing can lay on the roof battens (Fig. 3).
Step 2: frameworkThe skylight will have a top and bottom edge to the flashing; the bottom edge is generally of a malleable substance and the top has a rigid flashing tray. Locate the skylight so that one side of the shaft will sit alongside a rafter and the top of the metal frame is just below the nose of a full tile (Fig. 4).
If a rafter runs through the centre of the skylight mark the inside edge of top and bottom of the flashing tray, measure an extra 35mm on the top and bottom (so cut section of rafter will be 70mm total oversize). Using the spirit level, mark a plumb line down from these marks and cut the rafter section out. Measure the distance between the rafters and cut trimming pieces (Fig. 5), nail securely with 2 x 75mm nails per join. This ensures the roof structure remains intact. If you are unsure check with a qualified tradesperson for advice. Your local Mitre 10 store can help you find the right person for the right advice.
Next cut off the roof battens that run across the opened area.
Step 3: The skylightPosition the skylight on the framing and screw the flashing tray down to the roof battens. Seal the screws with a generous amount of silicone, and replace the roof tiles on top of the flashing tray and roof battens. Some tiles may need cutting to give full lap onto the flashing tray. Press the bottom flashing to mould it to the profile of the roof tiles. Now the roof is sealed and weatherproof. Remove all debris and clean down roof and gutters.
Step 4: The shaftThe dimension of the diffuser in the room is dependant on the angle of the shaft from the skylight (Fig. 6). Careful use of a spirit level and ruler is needed here to determine the dimension of the shaft. From inside the ceiling space transfer the shaft dimensions down to the ceiling around the centre nail location done earlier (Step 1).
Cut the plaster ceiling to these marks, then mark any ceiling joist that is in the way, add 35mm to each side of the opening, cut the joist and then measure the distance between the joists and cut trimming pieces (Fig. 5), nail securely with 2 x 75mm nails per join.
fig. 1
fig. 4
fig. 3
Skylights provide an economical and very practical way of lightening up a dull or dark room or passageway with the added benefit of saving on energy costs.
In this MitrePlan we look at two types, the rectangular style which requires a light shaft to be constructed to suit the roof and ceiling conditions and the circular style commonly known as a ‘domelight’ which has a prefabricated shaft as a part of the kit (fig. 1). And they do both differ as the ‘domelight’ is easier to install but does not throw as much light into the room, whilst the rectangular skylight will require some extra work by way of structural alteration and fitting the light shaft but gives more added light per unit.
Of course the effect of the ‘domelight’ can be increased by strategically placing more than one into a room, and with their simple circular diffuser this may just be the effect you are after.
fig. 5Light up your home life – with a little help from Mitre 10.
bEfORE YOu STARTLook at the room or area that you want to add light to and with the available natural light from an existing window source decide the skylight location which will give the best lighting benefit.
Available external light will vary depending upon the compass orientation of your roof plane (Fig. 2). A skylight fixed to a south facing roof plane is going to have very limited effect, one fitted to a north facing plane will have best lighting effect for most of the day, one on the east best in the morning, and a skylight on the west will be of benefit in the afternoon.
Skylights are also available with fixed ventilation incorporated around the dome. You will need to specify whether you want a ventilated or sealed skylight at the time of ordering your skylight at your Mitre 10 store.
Now that the preferred location is identified inspect the space between the ceiling and roof for obvious obstructions such as electrical, plumbing, air conditioning ducts etc. If there are any of these are in the way and you are unable to re-position the skylight location then call in the appropriate trade experts before proceeding with the job.
PRE fAbRIcATED SkYLIGhT INSTALLATIONDomelite and room diffuser location need to be positioned in as direct a line as possible so the shaft is free of any excessive bends.
Locate on the roof where the skylight is to be installed and remove six tiles (Fig. 3). Check once more that the way for the shaft to the ceiling is clear of obstructions. Place the flashing tray on the roof battens in the final location and secure it to the roof battens with the provided fixing method. Next mark the location of the diffuser between ceiling joists on the ceiling and cut out the plaster to the required size.
From in the room fix the diffuser into position. Now get back into the ceiling space and run the duct from the diffuser up to the
fig. 2
DOMELIGhT
REcTANGuLARSkYLIGhT
Measure the width of the side panels to the shaft at the top and the bottom, also measure the length. At this point use the length measurement as a reference point at which to mark top and bottom widths. Cut the sheet to width. Position the sheet in the shaft and mark the top cut to suit the angle of the skylight (Fig.7), remove the sheet and cut the top to this dimension.
Replace the sheet into the shaft in position against the underside of the skylight and mark the overall length of the shaft side to the underside of the ceiling lining with a pencil. Repeat this measuring and cutting procedure for the opposite shaft side. Remove the sheet and cut to length. Now place both shaft sides into the ceiling space and securely fix with 40mm screws to the framework at the top and bottom.
The remaining two sides are measured and cut to fit in between the two fitted shaft sheets. These should be parallel and have two square ends so pre-fitting will not be necessary. Place the sides in between the fitted sheets and fix to the framework at the top and the bottom with 40mm screws and also along the edges at 300mm spacings.
Step 5: The diffuserThe base of the skylight at the ceiling is finished off with 70mm x 16mm architrave, which is placed overhanging into the shaft by 25mm. This is for the perspex to sit on and with mitre cut corner joints. Fix the architrave to the framework with 50mm bullet head nails.
Measure at the base in between the shaft walls for the perspex diffuser and deduct 10mm off the measurement. Order the perspex in your desired finish. You have a wide range of choices including opaque, prismatic, clear etc., or you could even use some decorative style leadlight glazing.
Now all that is left is to paint the architraves, and while you’re at it you may even want to freshen up the room by repainting the walls and ceiling to maximize the new feeling created by the skylight. Of course with assistance from Mitre 10.
M10773 MitrePlan #74.indd 2 8/10/09 4:06:42 PM