Embed Size (px)
Citation preview

MS Word 2007 Basics PRC Student Guide
Microsoft Word 2007 BasicsWelcome to the Word 2007 Basics Course. In the course, you will learn how to use the many word processing features that will make creating, editing, and printing documents quick and easy.
This Student Guide contains information on how to use Word, including class exercises, and homework assignments.
Refer to the next page for a list of learning objectives for the training and computer procedures for on-going reference.
This 7-week course contains 6 modules:
Module 1 – Getting Started with WordModule 2 – Create and Save DocumentsModule 3 – Format DocumentsModule 4 – Insert, Copy, Move Text in a DocumentModule 5 – Enhancing DocumentsModule 6 – Other Features
04/22/2016 1 PRC Computer Literacy Program

MS Word 2007 Basics PRC Student Guide
Word Basics Learning Objectives
Getting Started with Word Explain different software packages (Word, Open Office, etc.) Launch Word Open a document Practice using the mouse Review basic screen layout (differences from previous versions of Word) Minimize and maximize windows Close a window
Create and Save Documents Create and save a new document Enter text into a document Move around in a document Insert and deleting text Undo and redo typing Use the on-line help
Format Text Use the Bold, Underline, and Italicize features Change the Font size, Style, Color Use Text Highlighting feature Change text spacing
Copy, Move & Paste Text Understanding the Clipboard Cut and Paste to move text Copy and Paste to copy text Move and copy text by dragging
Enhance Documents Document formatting Change text/paragraph alignment Tabs and Indents Create bulleted and numbered lists Spell check a document Use the Find/Replace feature Insert a page break Headers and Footers Add page numbers to a document
Other Tools Create a table Using text boxes
04/22/2016 2 PRC Computer Literacy Program

MS Word 2007 Basics PRC Student Guide
Borders and Shading Insert and format graphics Create a document from a template Print a range of pages
04/22/2016 3 PRC Computer Literacy Program
MS Word 2007 Basics PRC Student Guide
Module 1 – Getting Started with Word
Performance Objectives: Open Word from the Start Menu
Describe the basic screen layout of a Word 2007 screen (the title bar, status bar, ribbon, icons). Understand changes from previous versions of Word.
Locate and open a document
Minimize and maximize windows
Close a document.
OverviewWindows applications have a similar look and feel. The status bar, title bar, icons, and mouse are all used in similar ways. The commands for Word 2007 (and other Microsoft Office programs such as Excel and PowerPoint) are on a Ribbon. The Office Button in the upper left corner of the screen acts much like the classic File menu from previous versions. Also, the Quick Access Toolbar, can be customized to meet your needs.
There are some fundamental features you need to be familiar with in order to use Word 2007. These are covered in this module.
Getting Started with Word
Class Walkthrough 1.1
1. Launch MS Word from the START/Programs menu. A blank new document screen displays. You can begin to type or open a file.
2. Instructor will walkthrough opening the following Word file: C:\My Documents\Word 2007 Basics\Master Walkthrough
3. Walkthrough how to use the title bar, status bar, ribbon, icons, scroll bar, and other areas of the Word screen layout.
4. Place the mouse on an icon to get a description of the function. This is referred to a tool tip or a screen tip.
5. Minimize and maximize the window
6. Close a document.
7. Close Word
04/22/2016 4 PRC Computer Literacy Program

MS Word 2007 Basics PRC Student Guide
The ribbon has a series of Command Tabs (Home, etc.). If you click on any Command Tab and look at the detail of the ribbon, you will see that it is divided into groups such as the Font Group and Paragraph Group in the case of the Home tab.
04/22/2016 5 PRC Computer Literacy Program
Word 2007Office Button
Ribbon
Quick Access toolbarCommand Tabs

MS Word 2007 Basics PRC Student Guide
Detail of the Home Command Tab on the Ribbon
Some groups have arrows at the bottom, right. When one of these is clicked, a dialog box appears with more options
Example Dialog for the Font Group in the Home command tab
04/22/2016 6 PRC Computer Literacy Program
Paragraph GroupArrowFont Group

MS Word 2007 Basics PRC Student Guide
Student Practice 1.2
1. Launch Word. Click START/All Programs/Microsoft Office/Microsoft Word 2007.
2. Open the document: c:\My Documents\Word 2007 Basics\Master Walkthrough. Click on the Office Button. Is Print an option?_______
3. Click on the Insert Command Tab. Is Picture an option? _______
4. Scroll up and down the document using the scroll bar.
5. Go back to the Home Command Tab. What is the function of the I icon?
6. Minimize the document.
7. Maximize it from the task bar.
8. Close the document and Word. You should be back on the Desktop.
04/22/2016 7 PRC Computer Literacy Program

MS Word 2007 Basics PRC Student Guide
Module 2 - Creating & Saving Documents
Performance Objectives: Create a new blank document
Enter text into a document
Display paragraph markers
Type, wrap, insert, remove text
Undo/redo typing
Select Text
Move around in a document
Save files from with same or different names
Save files from one drive to another
Use the Help feature
Overview
There are several ways to create new documents in Word:
1. Documents can be created “from scratch” when you display a new document screen, enter text, and ultimately save the document.
2. Existing documents can be edited and saved with a new name
3. Templates can be used which provide a pre-existing format in which you simply type in the text (i.e. letter, memo, fax formats)
When working with documents, you can have more than one document open (available to view/edit) at the same time. The Window task bar lets you switch between different open documents.
Create a New Document
Class Walkthrough 2.1
04/22/2016 8 PRC Computer Literacy Program

MS Word 2007 Basics PRC Student Guide
Instructor will walk through two ways to create a new blank document: 1. Launch Word--a black document screen appears.
2. Click the Office Button. Select New. Make sure Blank document is selected and hit the Enter key on the keyboard. Alternately, double click Blank document or with Blank document selected, click on Create (bottom right).
Entering Text into a Document
Class Walkthrough 2.2
1. Open Master Walkthrough
2. Display the paragraph markers.
3. Follow the instructor’s prompts as the various document text entry elements are explained.
4. Minimize the document (leave open for the Student Exercise later).
Lines of Text vs. ParagraphsIf you simply type lines of text, the text will automatically wrap to the next line. However, if you press the Enter key on your keyboard anywhere in the text, it starts a new line and automatically creates a “paragraph.” A paragraph can be a single line, many lines, a bullet or numbered item, even a single word--as long as it is followed by the a paragraph marker set by the Enter key.
To view paragraph markers (so you can tell when paragraphs begin and end), click on the Show/Hide button.
Knowing the location of the paragraph markers is important when formatting text. The paragraph marker at the end of a block of text holds the formatting. This will be very important when cutting and pasting text.
Insertion PointThe vertical blinking line on the screen is called the Insertion Point. The insertion point indicates where text is typed, deleted, moved, etc. To place the Insertion Point, move the mouse to the location and single left click.
Word WrapWhen you type text that is more than one line, the text will automatically wrap to the next line. You don’t need to press Enter.
Remove TextTo delete text to the right of the Insertion Point, press the Delete key. To delete text to the left of the insertion point, press the Backspace key.
04/22/2016 9 PRC Computer Literacy Program

MS Word 2007 Basics PRC Student Guide
Insert TextThe Insertion Point tells you where Microsoft Word will insert text. When you type, it moves the existing text to the right.
Undo/RedoTo correct a mistake (or action), click on the Undo button in the Quick Access toolbar. This reverses the last action you performed. You can reverse many previous actions by continuing to click on the Undo button. If you then determine you didn't want to undo the last action, click Redo.
Note: The Redo can only be used if the Undo feature has been used. In other words, you can Redo only what you have undone with Undo.
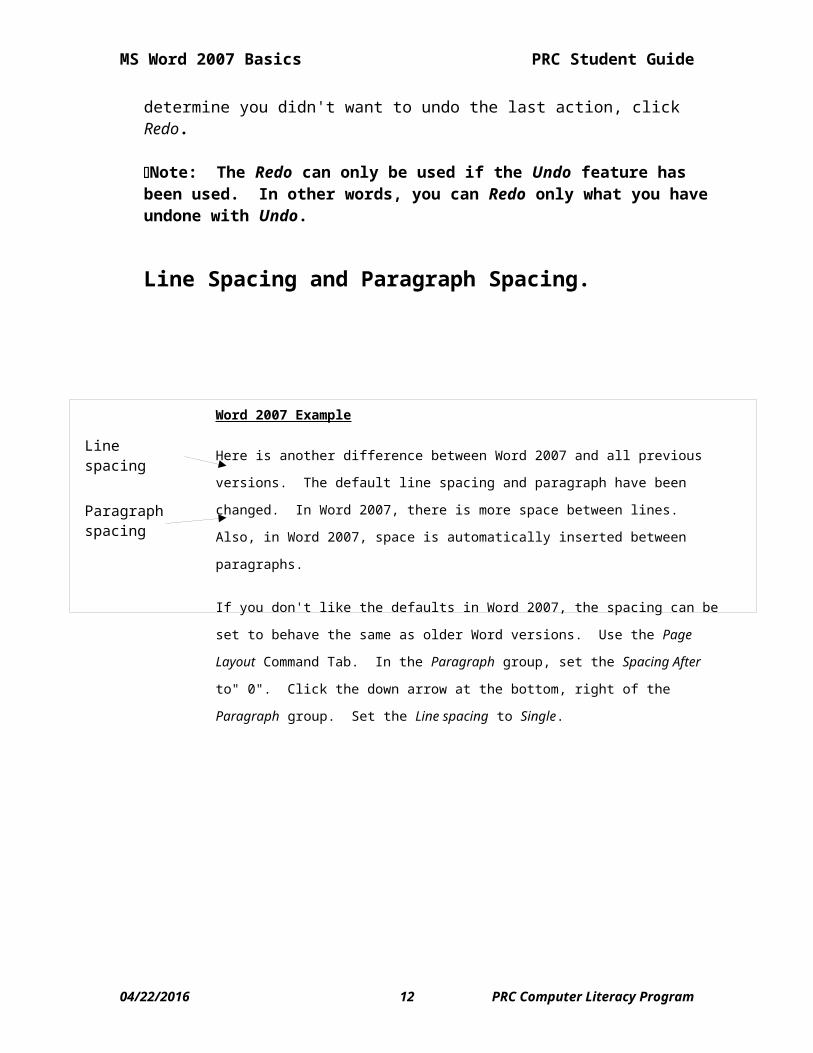
Line Spacing and Paragraph Spacing.
Word 2007 Example
Here is another difference between Word 2007 and all previous versions. The default line
spacing and paragraph have been changed. In Word 2007, there is more space between lines.
Also, in Word 2007, space is automatically inserted between paragraphs.
If you don't like the defaults in Word 2007, the spacing can be set to behave the same as older
Word versions. Use the Page Layout Command Tab. In the Paragraph group, set the
Spacing After to" 0". Click the down arrow at the bottom, right of the Paragraph group. Set
the Line spacing to Single.
04/22/2016 10 PRC Computer Literacy Program
Line spacing
Paragraph spacing

MS Word 2007 Basics PRC Student Guide
Selecting Text
There are many ways to select text—either using the mouse or the keyboard or a combination of both. You select text to:
1. delete text
2. modify the content of the text – replace the text with new text
3. change the format of the text - font, size, etc.
4. move or copy text.
Class Walkthrough 2.3
1. Open Master Walkthrough.
2. Use the selection methods below to select and remove text.
To select any block of text, click and drag the mouse over the text
To select a word, double click on it.
To select a sentence, while holding the Ctrl key on the keyboard (bottom row, left or right), click anywhere in the sentence.
To select a paragraph, click three times anywhere within the paragraph. Or, move the cursor to the left of a paragraph until it will become an arrow and double click.
To select the entire document, move the cursor to the left until an arrow appears and triple click.
Place the insertion pointer at the starting location, navigate to the ending location in any manner, then hold down the shift key and left click at the end point.
Student Practice 2.4
1. Open Student Practice 2.4 from c:\My Documents\Word 2007 Basics\Module 2.
2. Follow the instructions for deleting words, lines, paragraphs and selected blocks of text.
3. When done, wait for instructor review.
04/22/2016 11 PRC Computer Literacy Program
MS Word 2007 Basics PRC Student Guide
Moving Around in a Document
You can use the mouse and/or keyboard functions to move easily and quickly in Word. The following Walkthrough demonstrates a series of shortcuts.
Class Walkthrough 2.5
1. Open Master Walkthrough
2. Use the up/down arrow keys to move to the previous and next lines.
3. Use the left/right arrow keys to move across text on a line.
4. Use the Home key to move to the beginning of the line. Use the End key to move to the end of the line.
5. Press Ctrl + End to move to the end of the document.
6. Press Ctrl + Home to move to the top of the document
7. Place the insertion point in the second paragraph. Press Ctrl + Up Arrow to move to the previous paragraph.
8. Press Ctrl + Down Arrow to move to the next paragraph
9. Use the Page Up and Page Down keys to scroll between screens.
10. Use the scroll bar to move the text up/down the screen, or practice using the scroll wheel on the mouse if you have one.
11. Use the double arrows at the bottom of the vertical scroll bar to move up or down 1 page per click.
12. Double click on the Page Number in the lower left corner of the task bar. Go to a different page. Try again going to a different page.
13. Practice using these navigation keys.
Student Practice 2.6
1. Open Master Walkthrough.
2. Turn on the paragraph markers. Turn them off. Turn back on.
3. Go to the end of the document.
4. Type your name.
5. Go back to the top of the document. Type your name at the top of the page (above the title) and add an extra blank line after your name. (Hint: Type your name immediately before the word “Master” and then hit the Enter key.)
6. Go to the page which begins with “Changing Font Attributes” (should be page 5).
04/22/2016 12 PRC Computer Literacy Program
MS Word 2007 Basics PRC Student Guide
7. Type your name at the top of the page (above the title) and add an extra blank line after your name. (Hint: Type your name immediately before the word “Changing” and then hit the Enter key twice.)
8. How many pages are in this document? ___
9. Go back to the beginning of the document. Select a paragraph on this page
10. Delete it.
11. Undo the delete.
12. Select a sentence on this page.
13. Delete it.
14. Undo the delete.
15. When done, wait for instructor review.
Student Practice 2.7
1. Open Practice 2.7
2. Make the following changes so the document matches with the letter below.
3. When done, close the document. When asked to save the document, click No.
(enter today’s date here)
The Chicago Sun Times100 Michigan AvenueChicago, IL 60601
Attn: Human Resources Department Re: Job Code #9090
I read your ad for a CASHIER SUPERVISOR position in the Sun Times dated 4/10/04 and would like to apply for the job. I have several years experience in the retail business.
I would like to discuss my skills with you at your earliest convenience. I can be reached at (enter your phone number) after 7:00pm.
I look forward to your call.
Sincerely,
(your name) (your street address)(your City, State, Zip Code)
04/22/2016 13 PRC Computer Literacy Program

MS Word 2007 Basics PRC Student Guide
Creating and Saving Files
A document is also referred to as a file. When you save a file, you save it to a folder. Within a folder, you can have subfolders. Files are always stored in folders.
For this class, we will be saving all files to your Personal Folder. By doing this, we keep the original documents intact.
Class Walkthrough 2.8 1. The instructor will walkthrough how folders are set up in Word.
2. Access My Documents. Notice the subfolders already exist.
3. Locate the Word Basics subfolder.
4. Click on the Make a New Folder option to the left of the screen.
5. Name the folder with your first initial and last name (i.e. JSmith) and press Enter. This will be your personal folder for this course.
6. Return to MS Word.
Note It is important to understand how to move through the file structure. Instructor will walk through moving up and down through the file folders (i.e. from the Personal Folder back up to Word Basics to My Documents and back down through the various modules.
7. Create a new blank document.
8. Instructor will walk through Save As. a. Only Save As creates a new document. You must use Save As the first
time you save a new document to disk.b. Save As allows you to establish three important things:
i. The name of the documentii. Where the document will be stored
iii. The type of documentc. Save does not create a new document. It allows an existing document to
be updated with the latest changes.d. Other uses of Save As:
i. To save a copy of an existing document in a new placeii. To save a copy of an existing document with a new name
iii. To save an existing document as a different document type
If you are creating a document from scratch and you use the save icon in the Quick Access toolbar to save it (icon looks like a floppy disk), the first time a Save As dialog will be generated. Subsequent use of the same icon will just do a Save. The Save and Save As commands are also available through the Office Button.
9. Type your name on the screen.
04/22/2016 14 PRC Computer Literacy Program

MS Word 2007 Basics PRC Student Guide
10. Save the document as Save1 in your personal folder.
11. Create another new document, type your address and save that as Save2 in your personal folder.
12. Instructor will walkthrough opening files in Word Basics folder and saving to personal folder. Open Student Practice 2.4 from Module 2. Save it as Save4 in your personal folder.
13. Repeat this with Student Practice 2.7.
Note: It is very important to know when to save over existing versions of a document. When you replace an existing document with Save, you are updating the information in the document with the new changes.
Default Document Type - Another Change in Word 2007Starting with Microsoft Office 2007, Microsoft created a new set of default document types. For Word 2007, the type is labeled .docx. What does this mean to you? If you are creating a document that will be opened only on your computer - nothing! However, you may send the file to someone else and this could cause a problem:
1. If the receiver of the document has Word 2007 (or soon, Word 2010), on their computer, no problem, they can open the document.
2. If the receiver has an older version of Word, they cannot open the document unless they download and install the free Office Compatibility package from Microsoft. You can avoid the problem by using Save As to create a copy of the document in the old document type and send that copy.
3. This should not be a problem when sending out a resume. Any reasonable perspective employer will be equipped to read the new format.
Student Practice 2.9
You are going to save 2 documents from Word Basics\Module4 to your personal folder.
1. Access My Documents\Word 2007 Basics\Module4
2. Locate Homework 4.1and open it.
3. Click the Office Button/Save As. You will keep the name the same.
4. Go to My Documents\Word 2007 Basics
5. Double click on your personal folder and click Save.
6. Repeat this for the Practice 4.2.
Saving documents between drivesThe computer has several different drives from which you can copy, save, and retrieve files :
04/22/2016 15 PRC Computer Literacy Program
MS Word 2007 Basics PRC Student Guide
c: The hard disk (the main drive)a: The floppy disk drive. (Many new computers don't have floppy drives.)d: Typically the CD driveother A flash drive (also called a jump drive or thumb drive) plugged into a USB
port.
You can save or copy documents from one drive (i.e c: drive) to another (i.e. a: drive)..
Class Walkthrough 2.101. Open Word
2. Open your personal folder (in the Word Basics folder).
3. The instructor will walkthrough how to save Master Walkthrough to the a: drive or a flash drive. (File will maintain the same name).
4. Repeat for adding the Master Walkthrough to the a: drive or flash drive with a different name (New Walkthrough)
5. To view documents from Word, click on File/Open.
6. Click on the a: drive (or appropriate letter designation for a flash drive). Confirm that the files were saved.
7. Review how to look up files via My Computer (vs. Word).
Student Practice 2.111. Open Welcome from Module 1 in My Documents.
2. Save it to your personal folder.
3. Enter your three goals for this class at the bottom of the page.
4. Save the file with a different name. In the File Name field, type Course Goals as the file name and save to your personal folder. You should now have a Welcome document and a Course Goals document.
5. To verify, click File/Open. Open your personal folder. Both documents should be listed.
6. Open Course Goals. Save it to the a: drive or a flash drive with the same name.
04/22/2016 16 PRC Computer Literacy Program

MS Word 2007 Basics PRC Student Guide
Using the Help feature
There are several ways to get “help” or instructions on how to use MS Word. They are:
Screen tips On-Line Help Technical Support
Class Walkthrough 2.12
Open Master Walkthrough.
Screen Tips (aka Tool Tips or Button Descriptions)
You can quickly find out a button function by placing the cursor on the button (in the ribbon) and waiting for 2 seconds. The Button Description appears.
On-Line Help
1. Click on Help (which for Office 2007 is the question mark icon at the upper right-hand corner of the screen, under the red X (close icon).
2. For example, type indent a paragraph. Text in blue indicates that more information on that topic is available.
3. Click on one of the blue article titles to learn about the topic.
4. Continue to search on different topics. When done, click on Close.
Technical Support:
Attend an open training session at PRC. Ask your instructor for information on when and where these sessions are held.
04/22/2016 17 PRC Computer Literacy Program
Click here for Help
MS Word 2007 Basics PRC Student Guide
Student Practice 2.13
1. Open Master Walkthrough..
2. Click on the Help (the question mark in the upper right-hand corner).
3. Search for the word Save.
4. Click on Save a File option.
5. Notice the topics such as Save a file for use in an earlier version of Office.
6. When done, close the help window
04/22/2016 18 PRC Computer Literacy Program