Embed Size (px)
Citation preview

Microsoft Office
Word 2016 for Mac Formatting Your Document
Learning Technologies, Training & Audiovisual Outreach
University Information Technology Services

Copyright © 2016 KSU Division of University Information Technology Services
This document may be downloaded, printed, or copied for educational use without further permission
of the University Information Technology Services Division (UITS), provided the content is not modified
and this statement is not removed. Any use not stated above requires the written consent of the UITS
Division. The distribution of a copy of this document via the Internet or other electronic medium
without the written permission of the KSU - UITS Division is expressly prohibited.
Published by Kennesaw State University – UITS 2016
The publisher makes no warranties as to the accuracy of the material contained in this document and
therefore is not responsible for any damages or liabilities incurred from UITS use.
Microsoft product screenshot(s) reprinted with permission from Microsoft Corporation.
Microsoft, Microsoft Office, and Microsoft Word are trademarks of the Microsoft Corporation.
University Information Technology Services
Microsoft Office: Word 2016 for Mac
Formatting Your Document
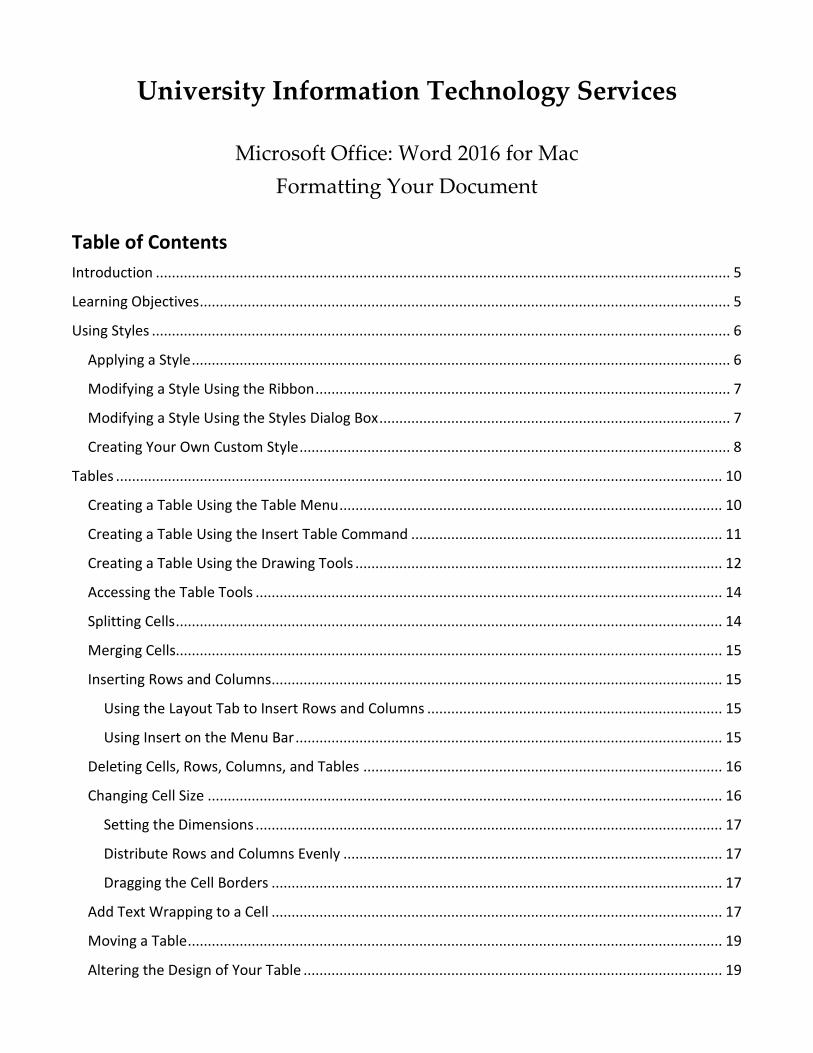
Table of Contents
Introduction ................................................................................................................................................ 5
Learning Objectives ..................................................................................................................................... 5
Using Styles ................................................................................................................................................. 6
Applying a Style ....................................................................................................................................... 6
Modifying a Style Using the Ribbon ........................................................................................................ 7
Modifying a Style Using the Styles Dialog Box ........................................................................................ 7
Creating Your Own Custom Style ............................................................................................................ 8
Tables ........................................................................................................................................................ 10
Creating a Table Using the Table Menu ................................................................................................ 10
Creating a Table Using the Insert Table Command .............................................................................. 11
Creating a Table Using the Drawing Tools ............................................................................................ 12
Accessing the Table Tools ..................................................................................................................... 14
Splitting Cells ......................................................................................................................................... 14
Merging Cells......................................................................................................................................... 15
Inserting Rows and Columns................................................................................................................. 15
Using the Layout Tab to Insert Rows and Columns .......................................................................... 15
Using Insert on the Menu Bar ........................................................................................................... 15
Deleting Cells, Rows, Columns, and Tables .......................................................................................... 16
Changing Cell Size ................................................................................................................................. 16
Setting the Dimensions ..................................................................................................................... 17
Distribute Rows and Columns Evenly ............................................................................................... 17
Dragging the Cell Borders ................................................................................................................. 17
Add Text Wrapping to a Cell ................................................................................................................. 17
Moving a Table ...................................................................................................................................... 19
Altering the Design of Your Table ......................................................................................................... 19
Adding Table Styles ........................................................................................................................... 20
Headers and Footers ................................................................................................................................. 20
Inserting Page Numbers ........................................................................................................................ 21
Section Breaks ........................................................................................................................................... 22
Inserting a Section Break ...................................................................................................................... 23
Using Section Breaks to Alter Page Numbering .................................................................................... 24
Removing a Section Break .................................................................................................................... 27
Columns .................................................................................................................................................... 27
Creating Columns .................................................................................................................................. 27
Accessing Additional Column Options .................................................................................................. 28
Additional Help ......................................................................................................................................... 29
Revised: 11/30/2017 Page 5 of 29
Introduction
This booklet is the companion document to the Word 2016: Formatting Your Document workshop. The
booklet will show users how to apply preset styles and modify them, how to insert tables, headers,
footers, and page numbers, and how to use section breaks in your document.
Learning Objectives
After completing the instructions in this booklet, you will be able to:
Create styles and use them to format document text
Create and modify tables
Insert section breaks in a document
Format the document text as columns
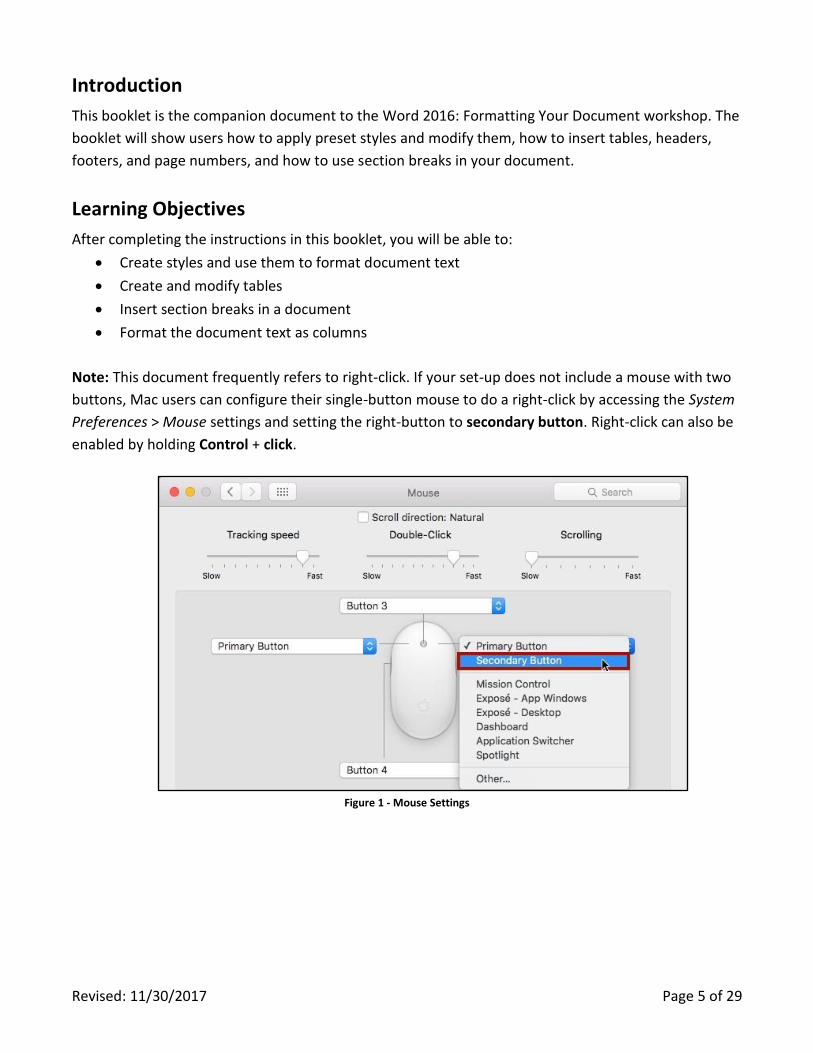
Note: This document frequently refers to right-click. If your set-up does not include a mouse with two
buttons, Mac users can configure their single-button mouse to do a right-click by accessing the System
Preferences > Mouse settings and setting the right-button to secondary button. Right-click can also be
enabled by holding Control + click.
Figure 1 - Mouse Settings
Page 6 of 29
Using Styles
A Style is a predefined combination of font style, color, and size that you can use to format the text in
your document. Using styles can help you create documents that have a more professional, and
consistent, appearance. Some styles (like the built-in heading styles) can be used to easily navigate
your document, or insert a table of contents.
You can use the styles available in Word, modify them, or create your own style and save it to use
every time you need it.
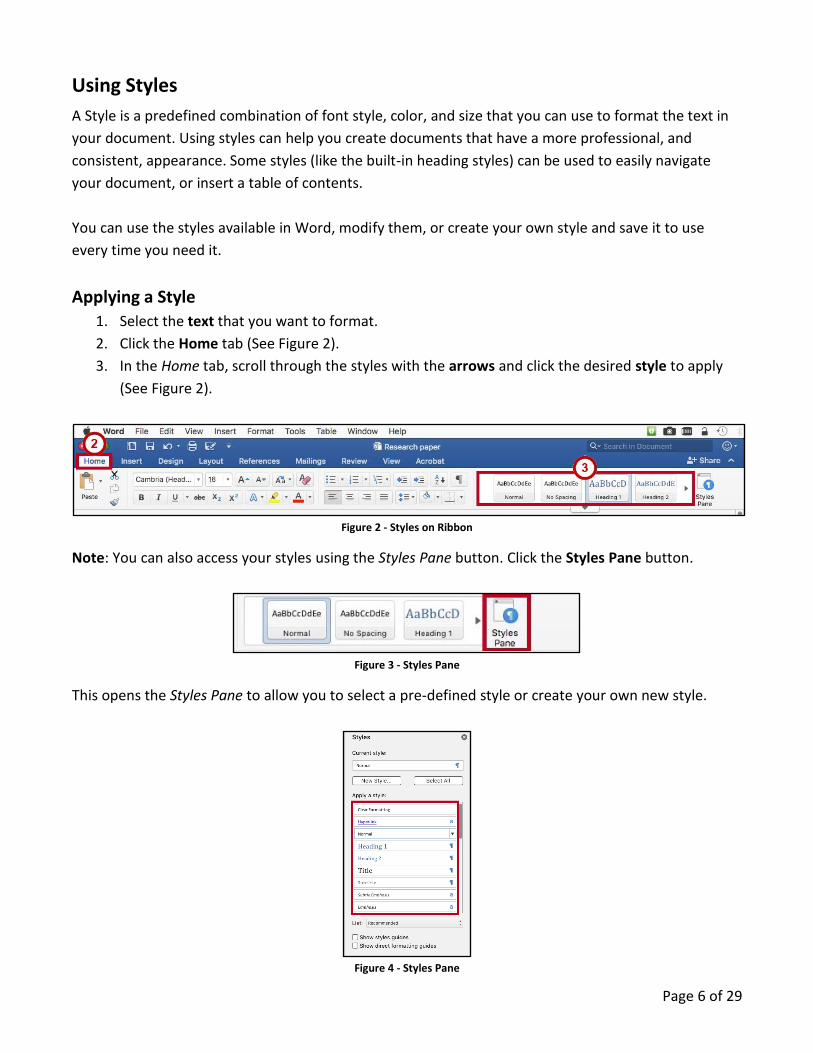
Applying a Style
1. Select the text that you want to format.
2. Click the Home tab (See Figure 2).
3. In the Home tab, scroll through the styles with the arrows and click the desired style to apply
(See Figure 2).
Figure 2 - Styles on Ribbon
Note: You can also access your styles using the Styles Pane button. Click the Styles Pane button.
Figure 3 - Styles Pane
This opens the Styles Pane to allow you to select a pre-defined style or create your own new style.
Figure 4 - Styles Pane
Page 7 of 29
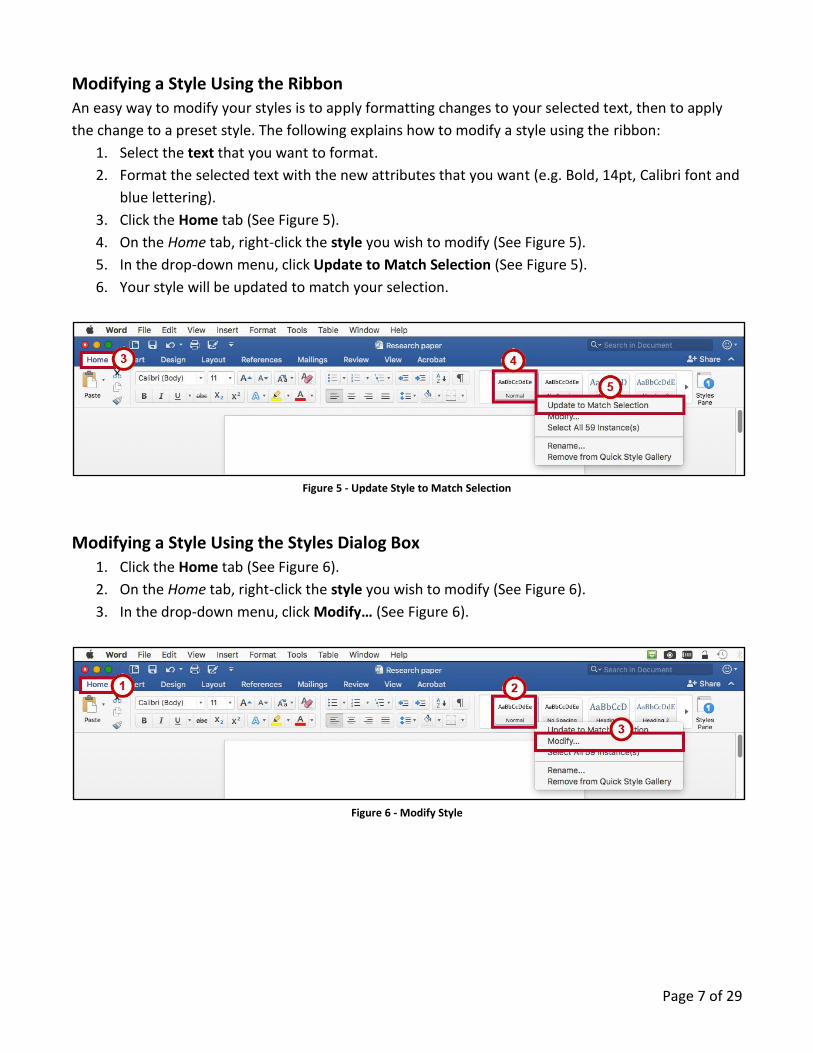
Modifying a Style Using the Ribbon
An easy way to modify your styles is to apply formatting changes to your selected text, then to apply
the change to a preset style. The following explains how to modify a style using the ribbon:
1. Select the text that you want to format.
2. Format the selected text with the new attributes that you want (e.g. Bold, 14pt, Calibri font and
blue lettering).
3. Click the Home tab (See Figure 5).
4. On the Home tab, right-click the style you wish to modify (See Figure 5).
5. In the drop-down menu, click Update to Match Selection (See Figure 5).
6. Your style will be updated to match your selection.
Figure 5 - Update Style to Match Selection
Modifying a Style Using the Styles Dialog Box
1. Click the Home tab (See Figure 6).
2. On the Home tab, right-click the style you wish to modify (See Figure 6).
3. In the drop-down menu, click Modify… (See Figure 6).
Figure 6 - Modify Style
Page 8 of 29
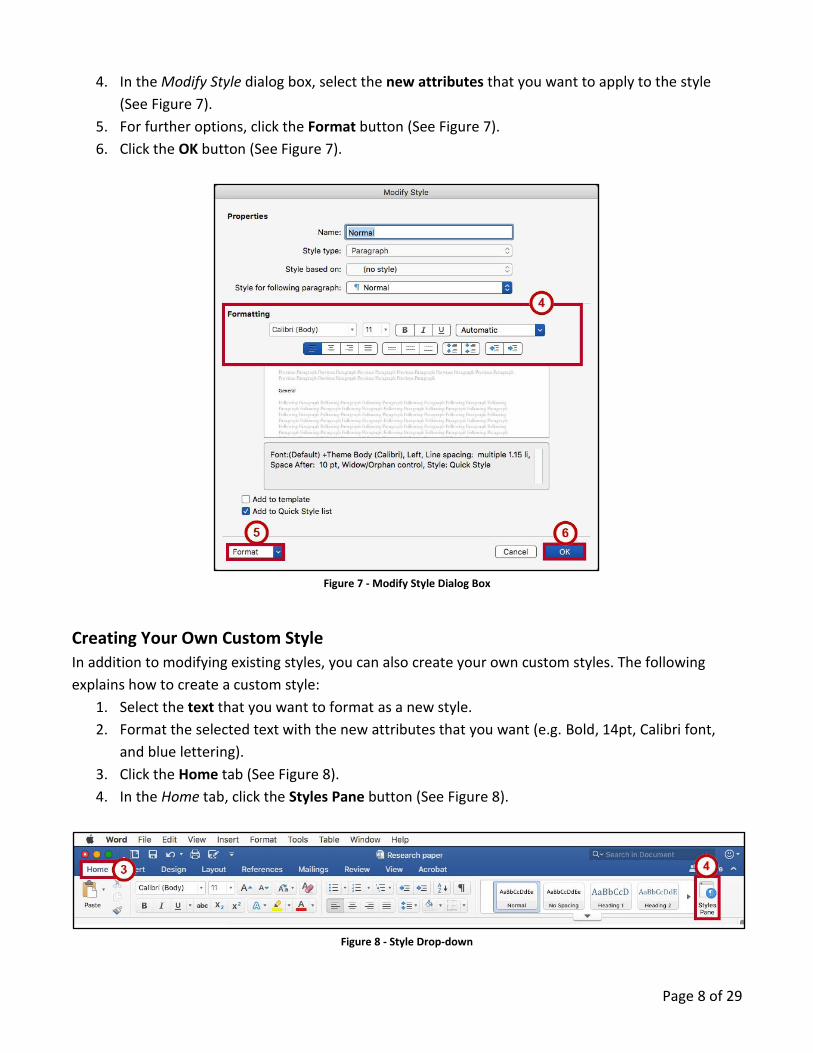
4. In the Modify Style dialog box, select the new attributes that you want to apply to the style
(See Figure 7).
5. For further options, click the Format button (See Figure 7).
6. Click the OK button (See Figure 7).
Figure 7 - Modify Style Dialog Box
Creating Your Own Custom Style
In addition to modifying existing styles, you can also create your own custom styles. The following
explains how to create a custom style:
1. Select the text that you want to format as a new style.
2. Format the selected text with the new attributes that you want (e.g. Bold, 14pt, Calibri font,
and blue lettering).
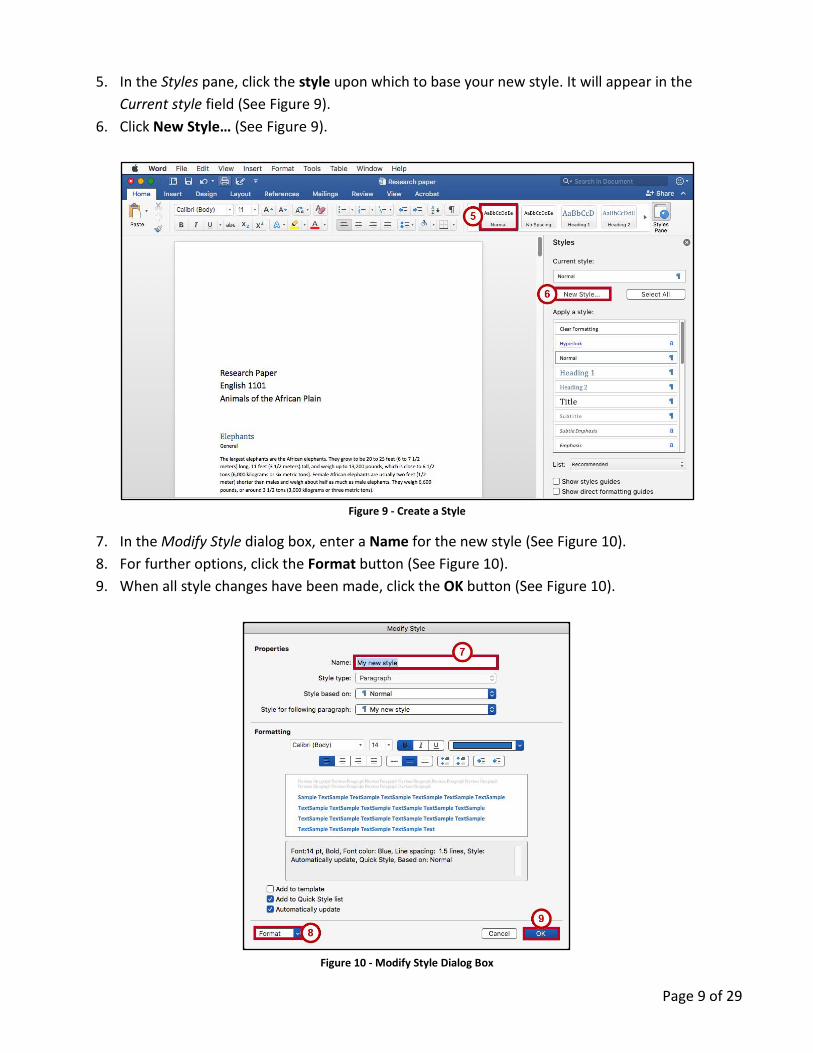
3. Click the Home tab (See Figure 8).
4. In the Home tab, click the Styles Pane button (See Figure 8).
Figure 8 - Style Drop-down
Page 9 of 29
5. In the Styles pane, click the style upon which to base your new style. It will appear in the
Current style field (See Figure 9).
6. Click New Style… (See Figure 9).
Figure 9 - Create a Style
7. In the Modify Style dialog box, enter a Name for the new style (See Figure 10).
8. For further options, click the Format button (See Figure 10).
9. When all style changes have been made, click the OK button (See Figure 10).
Figure 10 - Modify Style Dialog Box
Page 10 of 29
10. Your new style can be selected from within Styles on the Home tab.
Figure 11 - My New Style
Tables
Tables are useful for presenting text information and numerical data in a neat and orderly fashion. A
Table consists of rows and columns that intersect to form boxes called cells, which you can then fill
with text, numbers, or graphics. You can also format your table for added effect (e.g. make the lines
within the table visible or invisible).
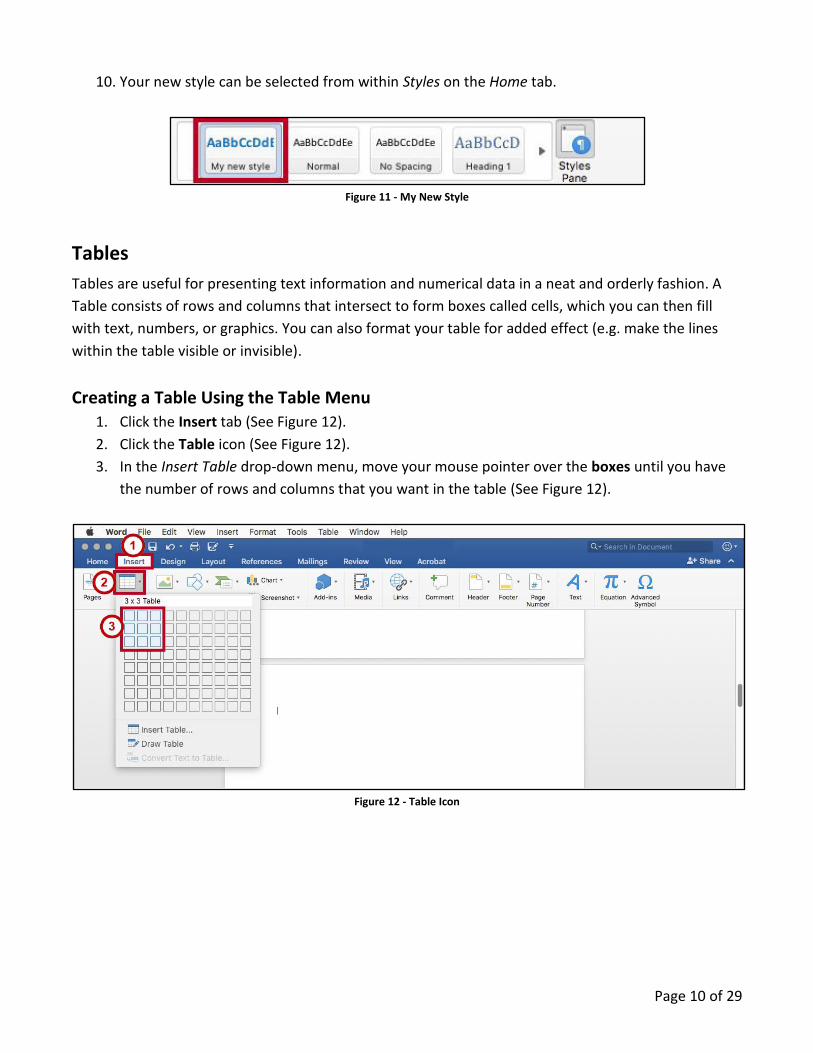
Creating a Table Using the Table Menu 1. Click the Insert tab (See Figure 12).
2. Click the Table icon (See Figure 12).
3. In the Insert Table drop-down menu, move your mouse pointer over the boxes until you have
the number of rows and columns that you want in the table (See Figure 12).
Figure 12 - Table Icon
Page 11 of 29
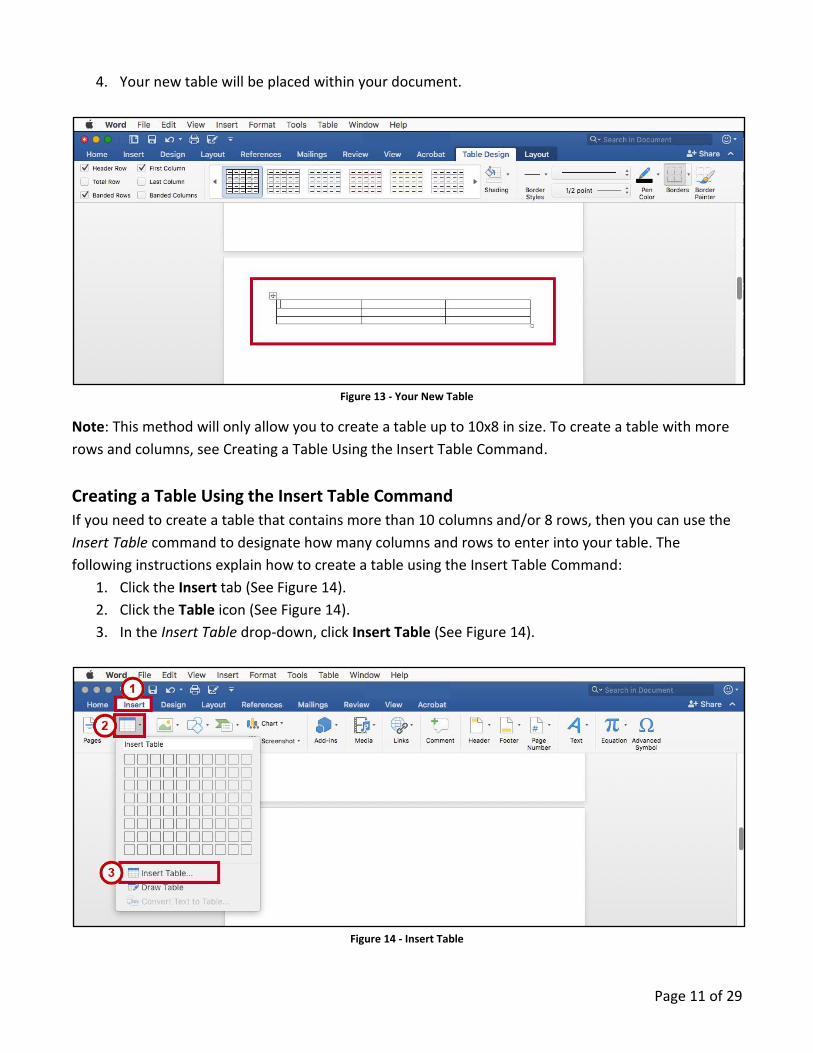
4. Your new table will be placed within your document.
Figure 13 - Your New Table
Note: This method will only allow you to create a table up to 10x8 in size. To create a table with more
rows and columns, see Creating a Table Using the Insert Table Command.
Creating a Table Using the Insert Table Command If you need to create a table that contains more than 10 columns and/or 8 rows, then you can use the
Insert Table command to designate how many columns and rows to enter into your table. The
following instructions explain how to create a table using the Insert Table Command:
1. Click the Insert tab (See Figure 14).
2. Click the Table icon (See Figure 14).
3. In the Insert Table drop-down, click Insert Table (See Figure 14).
Figure 14 - Insert Table
Page 12 of 29
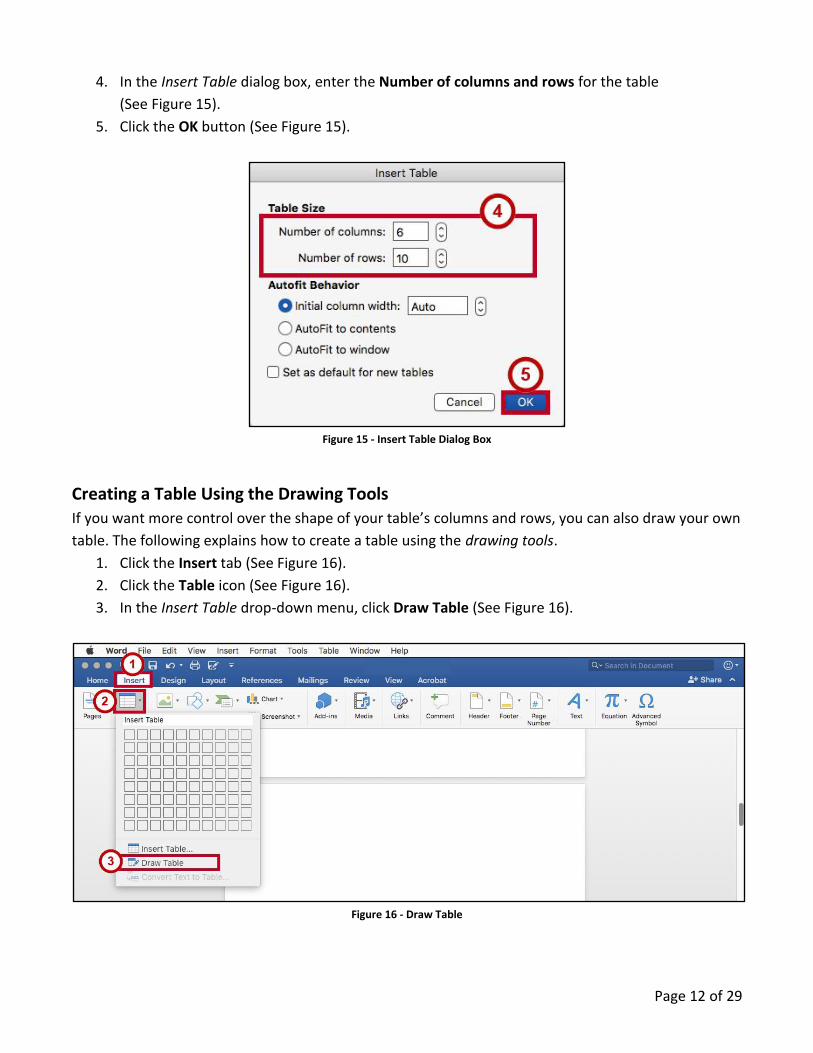
4. In the Insert Table dialog box, enter the Number of columns and rows for the table
(See Figure 15).
5. Click the OK button (See Figure 15).
Figure 15 - Insert Table Dialog Box
Creating a Table Using the Drawing Tools
If you want more control over the shape of your table’s columns and rows, you can also draw your own
table. The following explains how to create a table using the drawing tools.
1. Click the Insert tab (See Figure 16).
2. Click the Table icon (See Figure 16).
3. In the Insert Table drop-down menu, click Draw Table (See Figure 16).
Figure 16 - Draw Table
Page 13 of 29
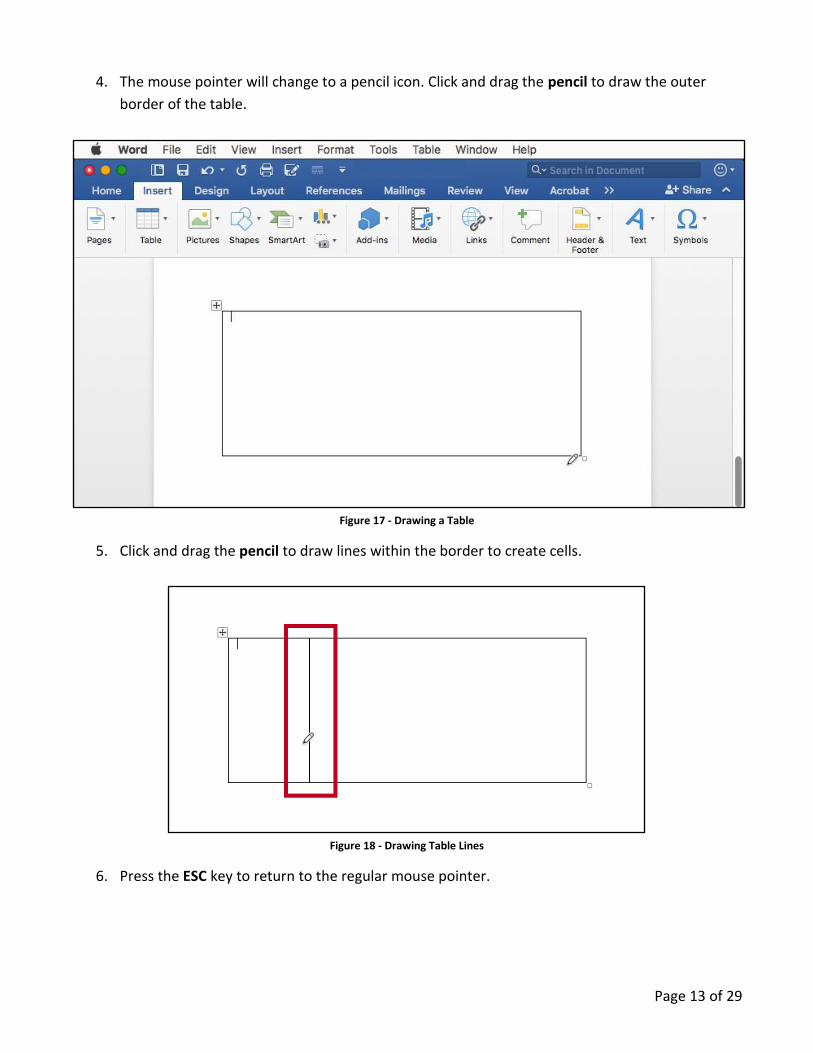
4. The mouse pointer will change to a pencil icon. Click and drag the pencil to draw the outer
border of the table.
Figure 17 - Drawing a Table
5. Click and drag the pencil to draw lines within the border to create cells.
Figure 18 - Drawing Table Lines
6. Press the ESC key to return to the regular mouse pointer.

Page 14 of 29
Accessing the Table Tools
Tables have their own set of editing tools accessible by context sensitive tabs on the Ribbon. To access
these tabs, click a table in your document and the Table Design and Layout tabs will appear in the
Ribbon. From these tabs, you can modify the Design or the Layout of your tables.
Figure 19 - Table Tools
Splitting Cells
1. Click in the cell that you want to split.
2. Click the Layout tab (See Figure 20).
3. In the Layout tab, click the Split Cells button (See Figure 20).
Figure 20 - Split Cells
4. In the Split Cells dialog box, enter the Number of rows and columns into which you want to
split the cells (See Figure 21).
5. Click OK button (See Figure 21).
Figure 21 - Split Cells Dialog Box
Page 15 of 29
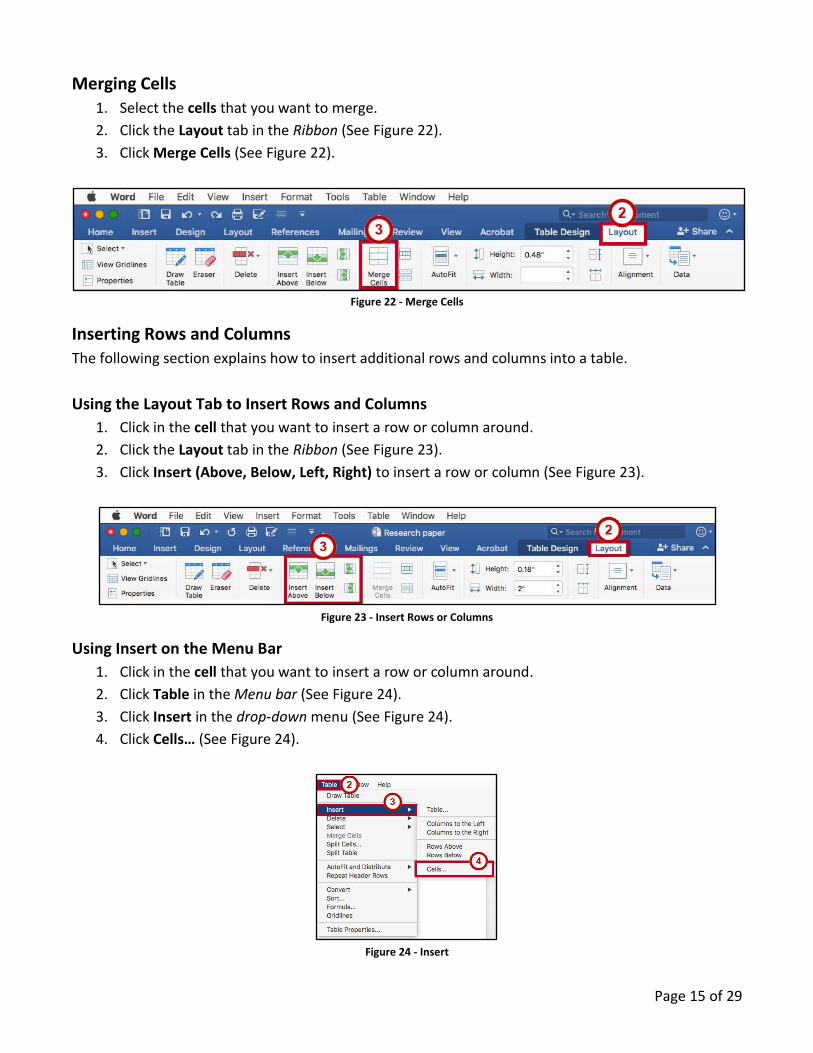
Merging Cells
1. Select the cells that you want to merge.
2. Click the Layout tab in the Ribbon (See Figure 22).
3. Click Merge Cells (See Figure 22).
Figure 22 - Merge Cells
Inserting Rows and Columns
The following section explains how to insert additional rows and columns into a table.
Using the Layout Tab to Insert Rows and Columns
1. Click in the cell that you want to insert a row or column around.
2. Click the Layout tab in the Ribbon (See Figure 23).
3. Click Insert (Above, Below, Left, Right) to insert a row or column (See Figure 23).
Figure 23 - Insert Rows or Columns
Using Insert on the Menu Bar
1. Click in the cell that you want to insert a row or column around.
2. Click Table in the Menu bar (See Figure 24).
3. Click Insert in the drop-down menu (See Figure 24).
4. Click Cells… (See Figure 24).
Figure 24 - Insert
Page 16 of 29
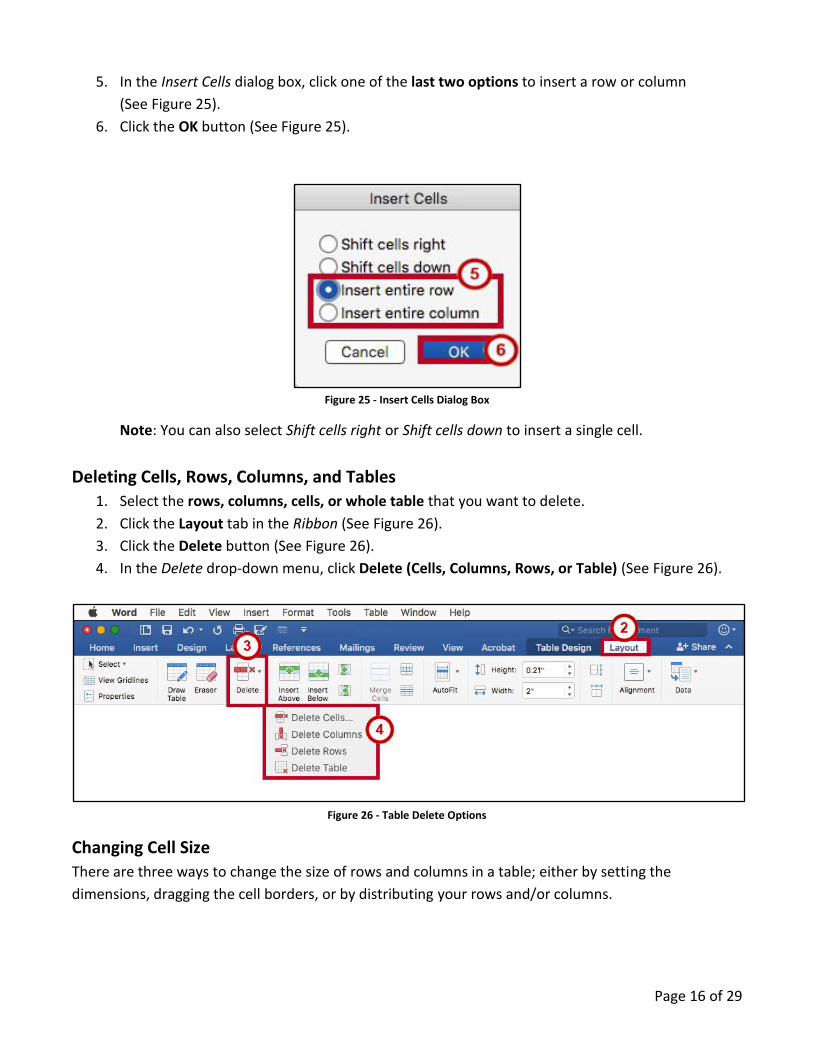
5. In the Insert Cells dialog box, click one of the last two options to insert a row or column
(See Figure 25).
6. Click the OK button (See Figure 25).
Figure 25 - Insert Cells Dialog Box
Note: You can also select Shift cells right or Shift cells down to insert a single cell.
Deleting Cells, Rows, Columns, and Tables
1. Select the rows, columns, cells, or whole table that you want to delete.
2. Click the Layout tab in the Ribbon (See Figure 26).
3. Click the Delete button (See Figure 26).
4. In the Delete drop-down menu, click Delete (Cells, Columns, Rows, or Table) (See Figure 26).
Figure 26 - Table Delete Options
Changing Cell Size
There are three ways to change the size of rows and columns in a table; either by setting the
dimensions, dragging the cell borders, or by distributing your rows and/or columns.
Page 17 of 29
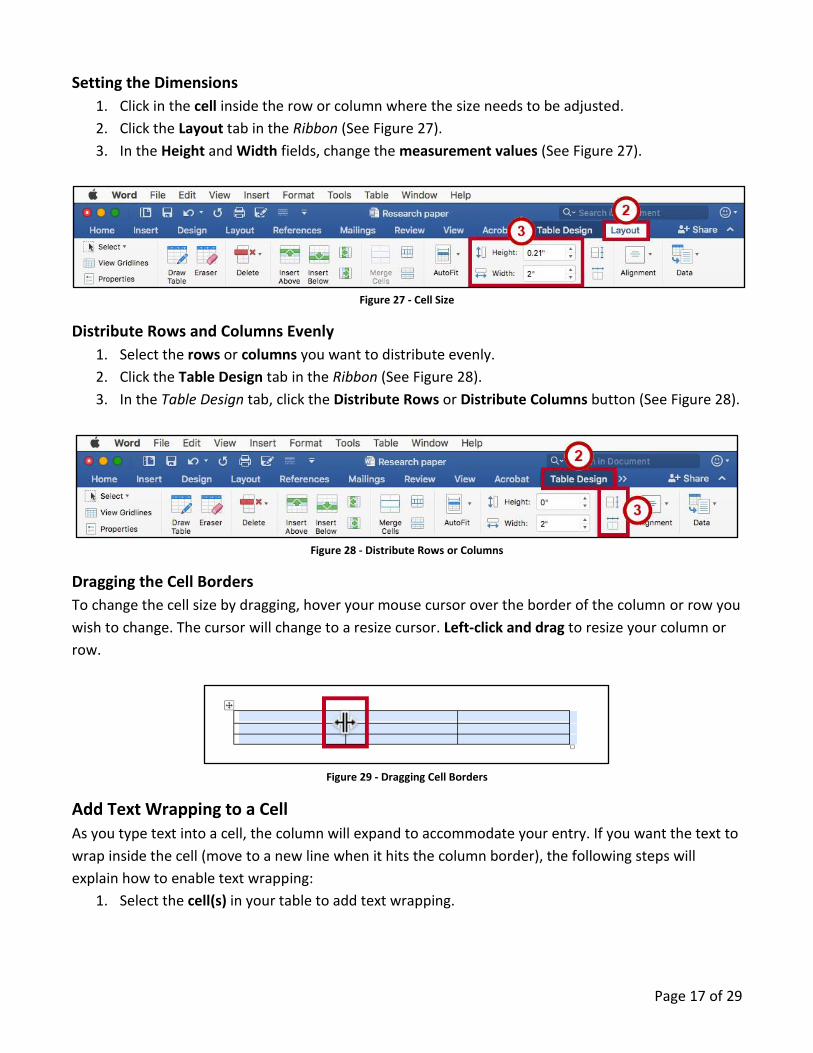
Setting the Dimensions
1. Click in the cell inside the row or column where the size needs to be adjusted.
2. Click the Layout tab in the Ribbon (See Figure 27).
3. In the Height and Width fields, change the measurement values (See Figure 27).
Figure 27 - Cell Size
Distribute Rows and Columns Evenly
1. Select the rows or columns you want to distribute evenly.
2. Click the Table Design tab in the Ribbon (See Figure 28).
3. In the Table Design tab, click the Distribute Rows or Distribute Columns button (See Figure 28).
Figure 28 - Distribute Rows or Columns
Dragging the Cell Borders
To change the cell size by dragging, hover your mouse cursor over the border of the column or row you
wish to change. The cursor will change to a resize cursor. Left-click and drag to resize your column or
row.
Figure 29 - Dragging Cell Borders
Add Text Wrapping to a Cell
As you type text into a cell, the column will expand to accommodate your entry. If you want the text to
wrap inside the cell (move to a new line when it hits the column border), the following steps will
explain how to enable text wrapping:
1. Select the cell(s) in your table to add text wrapping.
Page 18 of 29
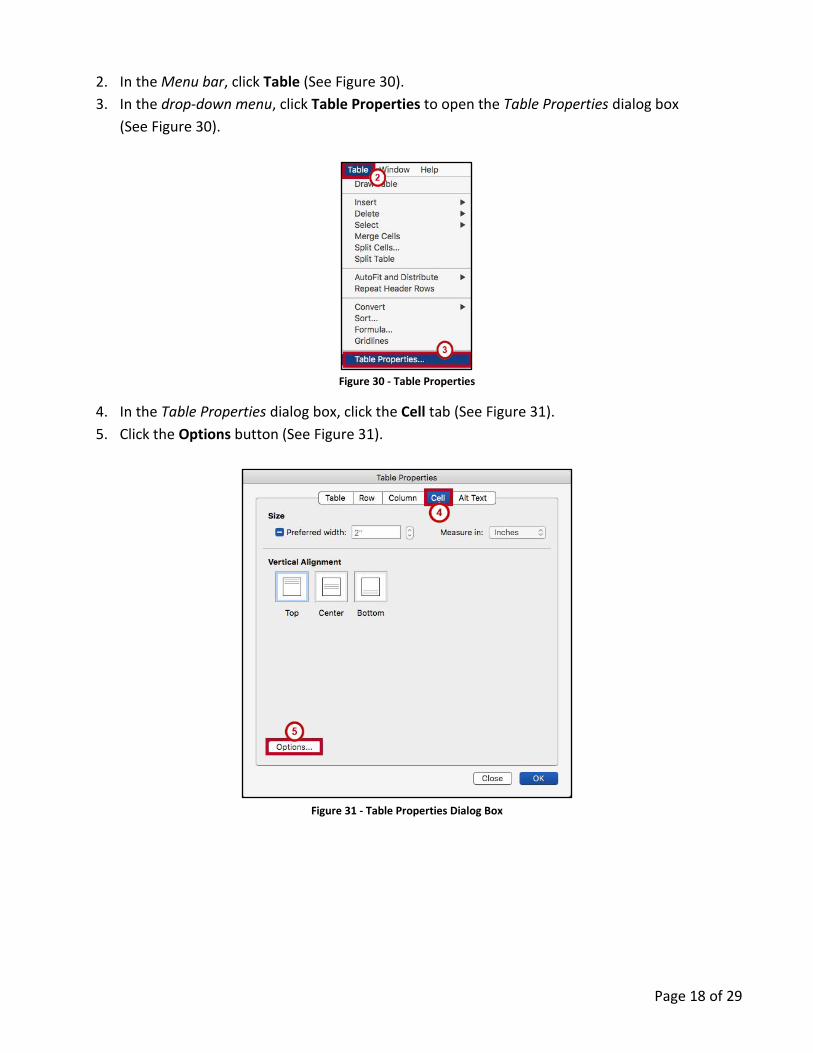
2. In the Menu bar, click Table (See Figure 30).
3. In the drop-down menu, click Table Properties to open the Table Properties dialog box
(See Figure 30).
Figure 30 - Table Properties
4. In the Table Properties dialog box, click the Cell tab (See Figure 31).
5. Click the Options button (See Figure 31).
Figure 31 - Table Properties Dialog Box
Page 19 of 29
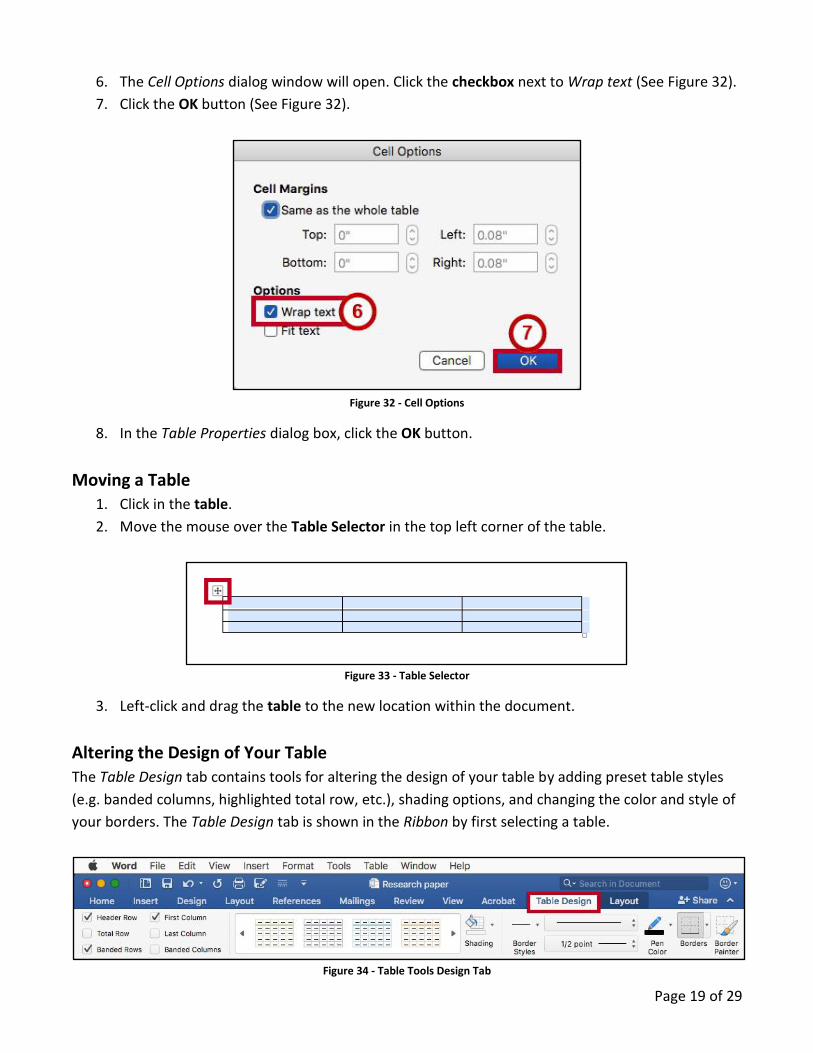
6. The Cell Options dialog window will open. Click the checkbox next to Wrap text (See Figure 32).
7. Click the OK button (See Figure 32).
Figure 32 - Cell Options
8. In the Table Properties dialog box, click the OK button.
Moving a Table 1. Click in the table.
2. Move the mouse over the Table Selector in the top left corner of the table.
Figure 33 - Table Selector
3. Left-click and drag the table to the new location within the document.
Altering the Design of Your Table
The Table Design tab contains tools for altering the design of your table by adding preset table styles
(e.g. banded columns, highlighted total row, etc.), shading options, and changing the color and style of
your borders. The Table Design tab is shown in the Ribbon by first selecting a table.
Figure 34 - Table Tools Design Tab
Page 20 of 29
Adding Table Styles
1. Click in the table.
2. Click the Table Design tab in the Ribbon (See Figure 35).
3. In the Table Design tab, scroll through the styles using the side-to-side and drop-down arrows
(See Figure 35).
4. Click the desired table style to apply (See Figure 35).
Figure 35 - Table Styles
5. You can further customize the Table Style by selecting options under the Table Style Options.
Figure 36 - Table Style Options
Headers and Footers
Headers and Footers allow you to add information (e.g. name, title of document, etc.) within the top or
bottom margins of your document, and will repeat on every page for your document. The following
explains how to insert a simple header:
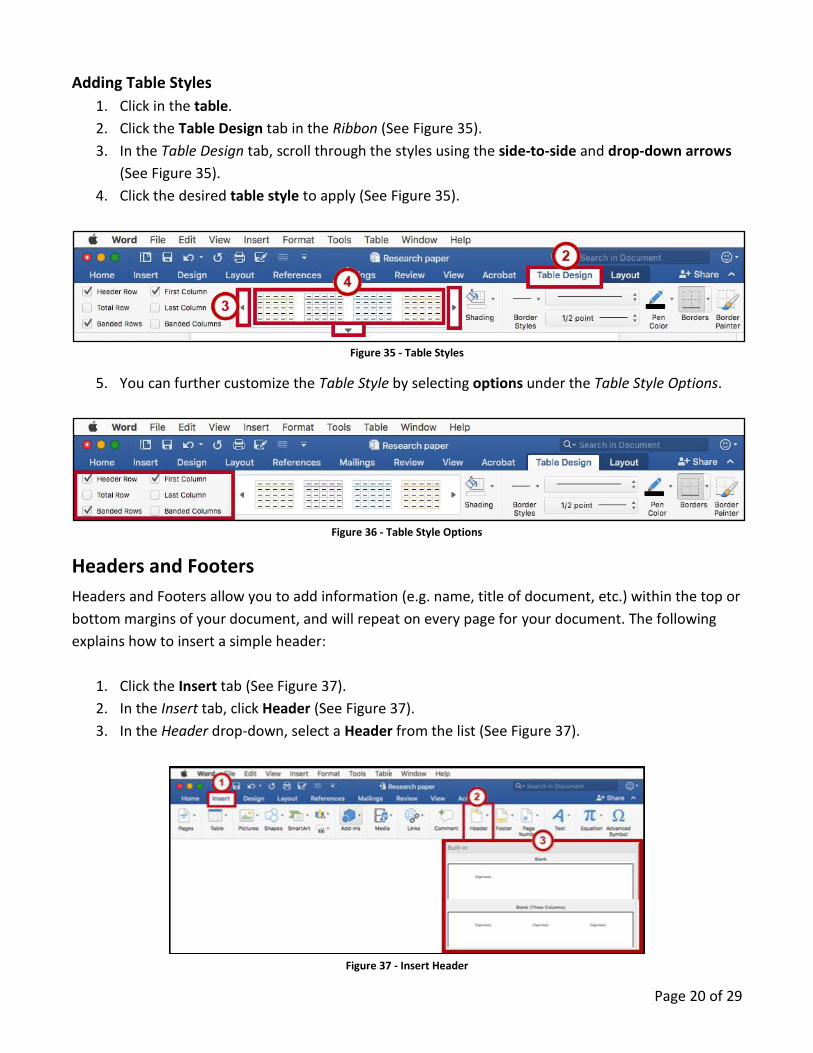
1. Click the Insert tab (See Figure 37).
2. In the Insert tab, click Header (See Figure 37).
3. In the Header drop-down, select a Header from the list (See Figure 37).
Figure 37 - Insert Header
Page 21 of 29
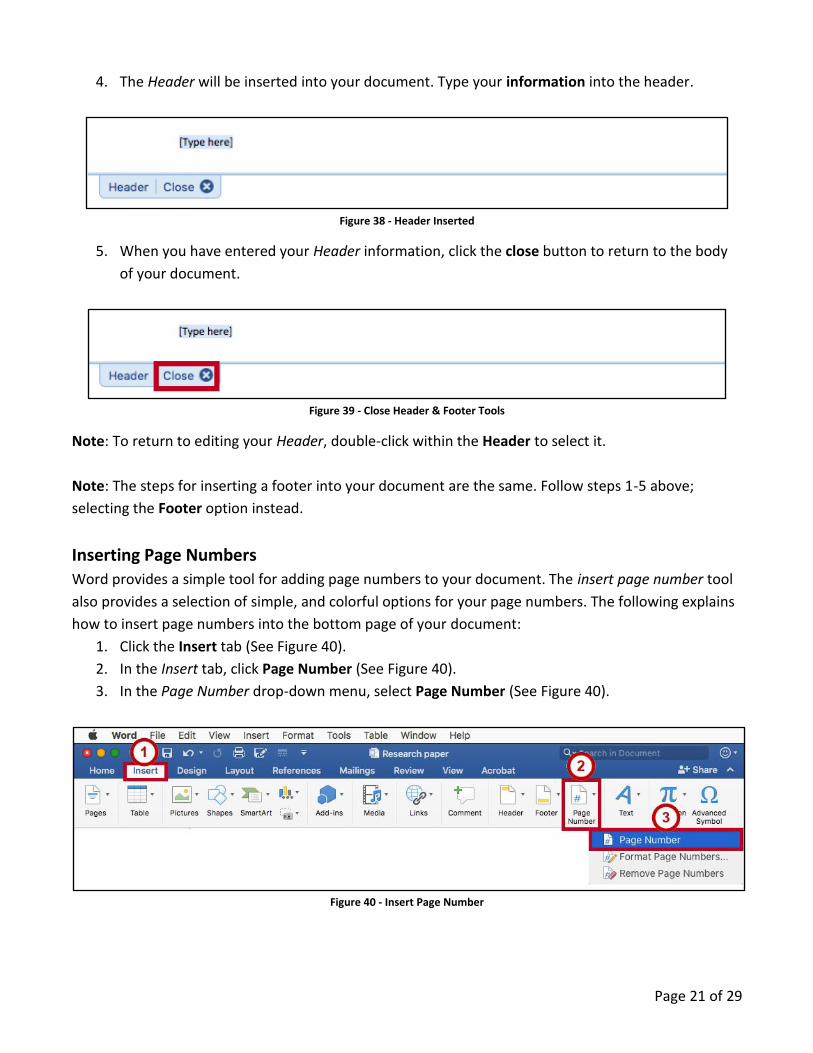
4. The Header will be inserted into your document. Type your information into the header.
Figure 38 - Header Inserted
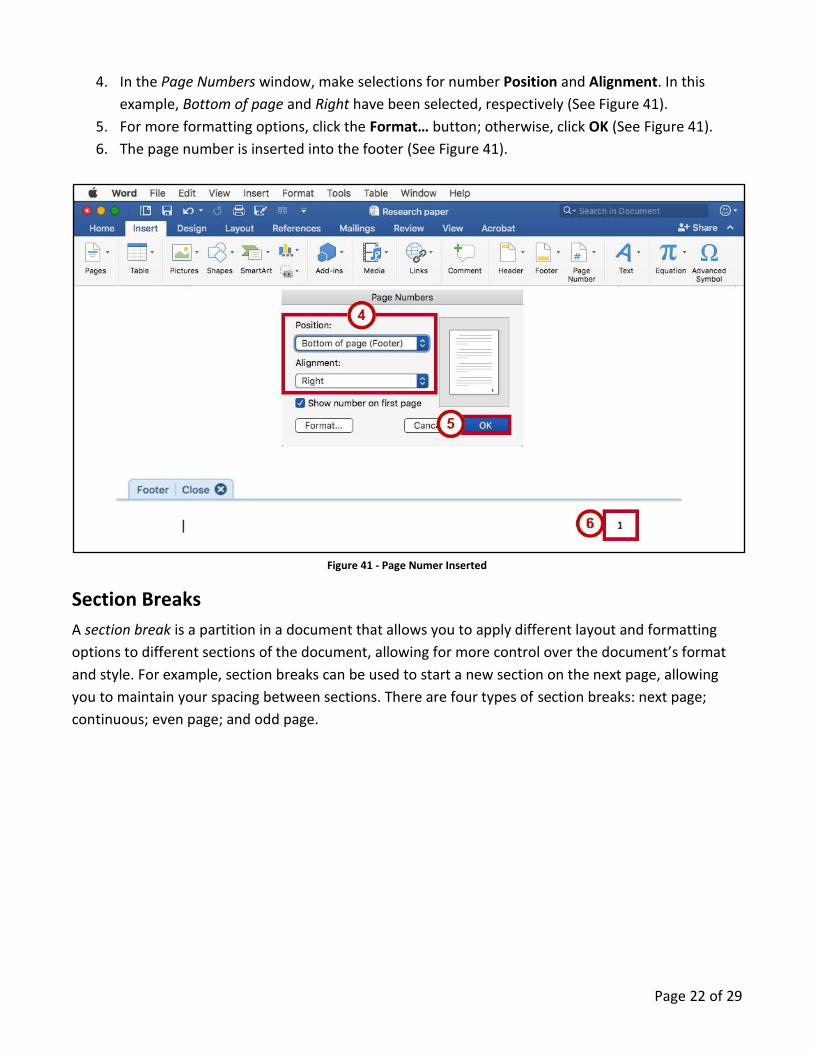
5. When you have entered your Header information, click the close button to return to the body
of your document.
Figure 39 - Close Header & Footer Tools
Note: To return to editing your Header, double-click within the Header to select it.
Note: The steps for inserting a footer into your document are the same. Follow steps 1-5 above;
selecting the Footer option instead.
Inserting Page Numbers Word provides a simple tool for adding page numbers to your document. The insert page number tool
also provides a selection of simple, and colorful options for your page numbers. The following explains
how to insert page numbers into the bottom page of your document:
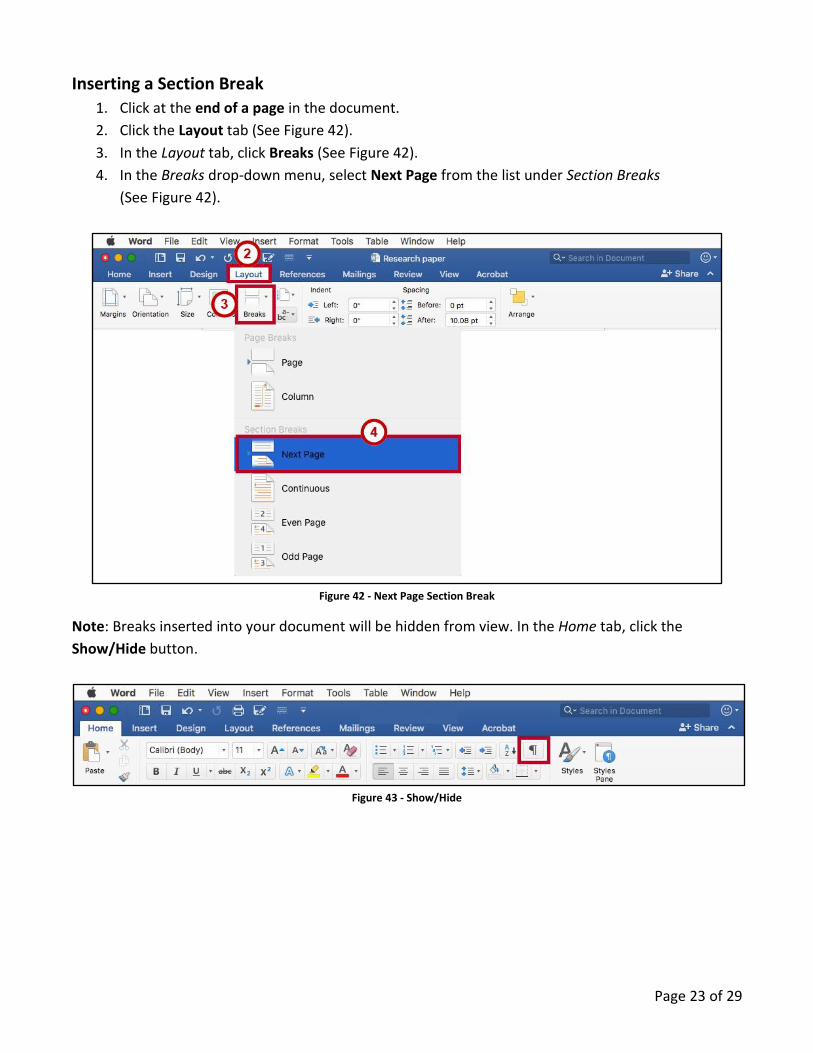
1. Click the Insert tab (See Figure 40).
2. In the Insert tab, click Page Number (See Figure 40).
3. In the Page Number drop-down menu, select Page Number (See Figure 40).
Figure 40 - Insert Page Number
Page 22 of 29
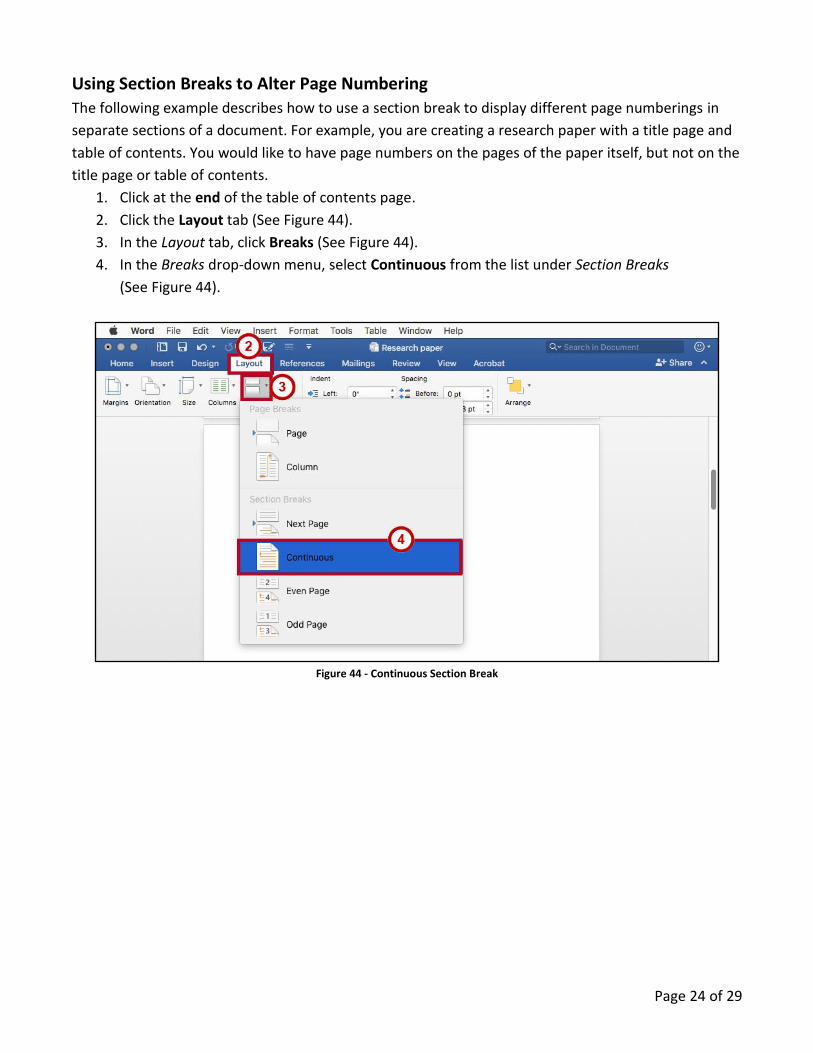
4. In the Page Numbers window, make selections for number Position and Alignment. In this
example, Bottom of page and Right have been selected, respectively (See Figure 41).
5. For more formatting options, click the Format… button; otherwise, click OK (See Figure 41).
6. The page number is inserted into the footer (See Figure 41).
Figure 41 - Page Numer Inserted
Section Breaks
A section break is a partition in a document that allows you to apply different layout and formatting
options to different sections of the document, allowing for more control over the document’s format
and style. For example, section breaks can be used to start a new section on the next page, allowing
you to maintain your spacing between sections. There are four types of section breaks: next page;
continuous; even page; and odd page.
Page 23 of 29
Inserting a Section Break
1. Click at the end of a page in the document.
2. Click the Layout tab (See Figure 42).
3. In the Layout tab, click Breaks (See Figure 42).
4. In the Breaks drop-down menu, select Next Page from the list under Section Breaks
(See Figure 42).
Figure 42 - Next Page Section Break
Note: Breaks inserted into your document will be hidden from view. In the Home tab, click the
Show/Hide button.
Figure 43 - Show/Hide
Page 24 of 29
Using Section Breaks to Alter Page Numbering
The following example describes how to use a section break to display different page numberings in
separate sections of a document. For example, you are creating a research paper with a title page and
table of contents. You would like to have page numbers on the pages of the paper itself, but not on the
title page or table of contents.
1. Click at the end of the table of contents page.
2. Click the Layout tab (See Figure 44).
3. In the Layout tab, click Breaks (See Figure 44).
4. In the Breaks drop-down menu, select Continuous from the list under Section Breaks
(See Figure 44).
Figure 44 - Continuous Section Break
Page 25 of 29
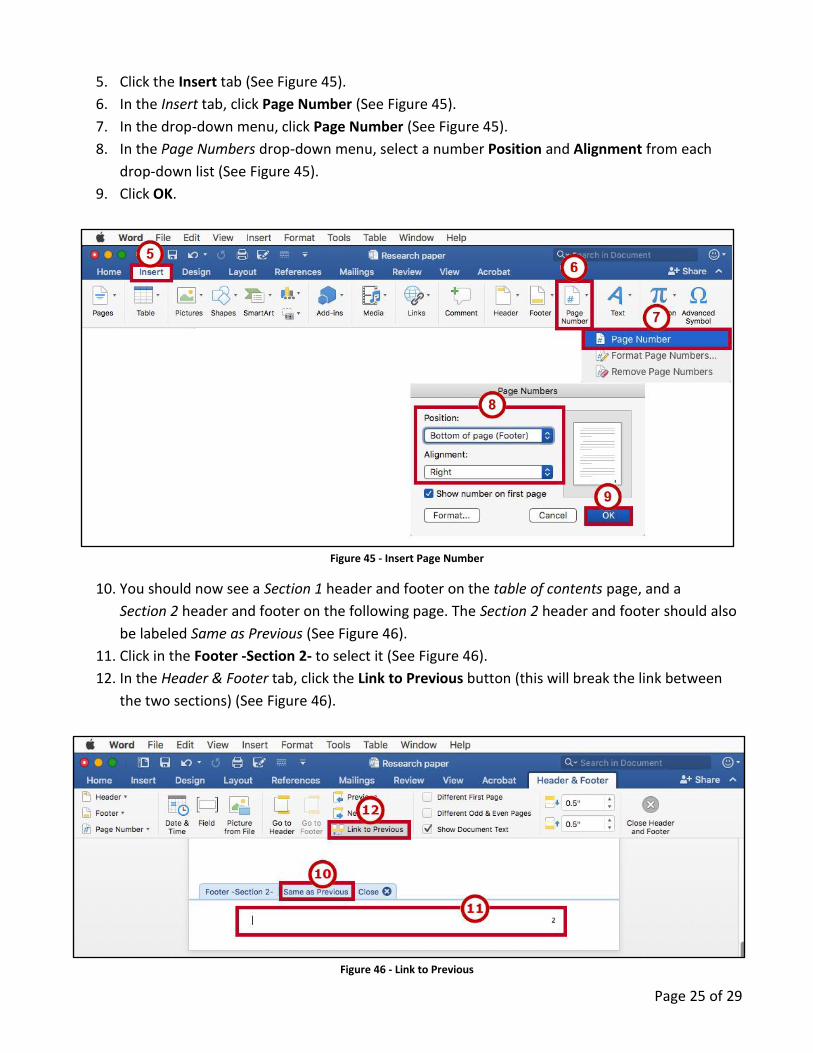
5. Click the Insert tab (See Figure 45).
6. In the Insert tab, click Page Number (See Figure 45).
7. In the drop-down menu, click Page Number (See Figure 45).
8. In the Page Numbers drop-down menu, select a number Position and Alignment from each
drop-down list (See Figure 45).
9. Click OK.
Figure 45 - Insert Page Number
10. You should now see a Section 1 header and footer on the table of contents page, and a
Section 2 header and footer on the following page. The Section 2 header and footer should also
be labeled Same as Previous (See Figure 46).
11. Click in the Footer -Section 2- to select it (See Figure 46).
12. In the Header & Footer tab, click the Link to Previous button (this will break the link between
the two sections) (See Figure 46).
Figure 46 - Link to Previous
Page 26 of 29
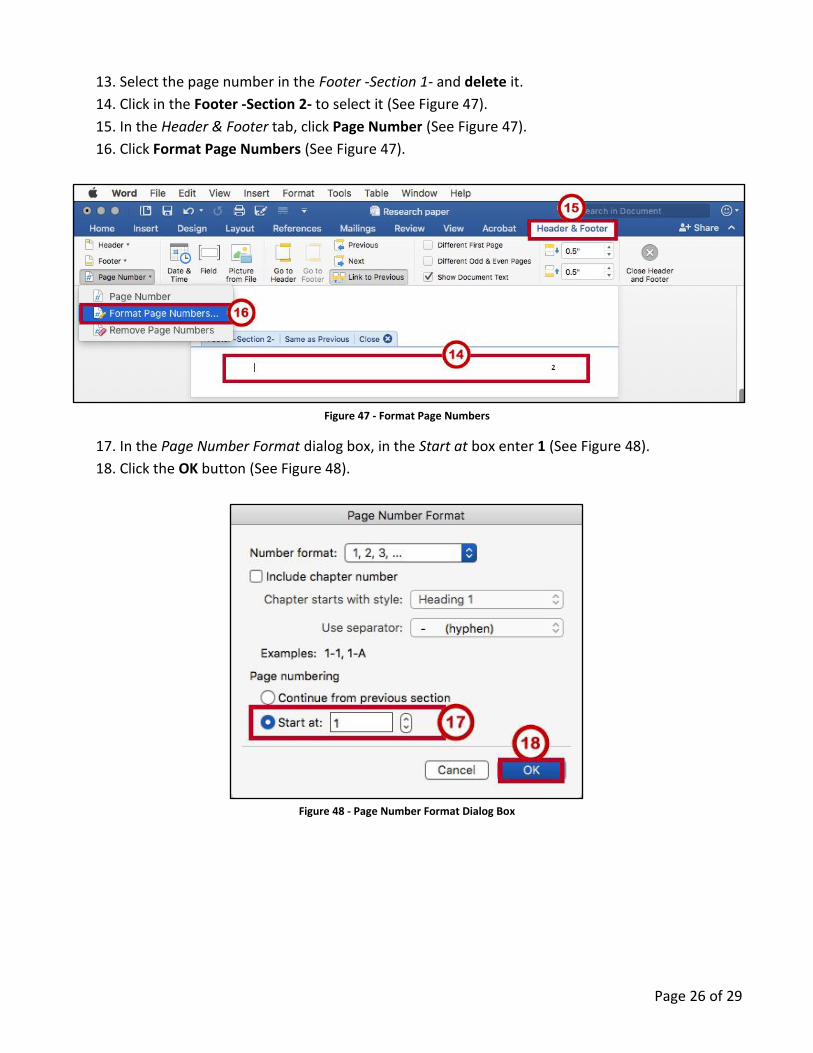
13. Select the page number in the Footer -Section 1- and delete it.
14. Click in the Footer -Section 2- to select it (See Figure 47).
15. In the Header & Footer tab, click Page Number (See Figure 47).
16. Click Format Page Numbers (See Figure 47).
Figure 47 - Format Page Numbers
17. In the Page Number Format dialog box, in the Start at box enter 1 (See Figure 48).
18. Click the OK button (See Figure 48).
Figure 48 - Page Number Format Dialog Box
Page 27 of 29
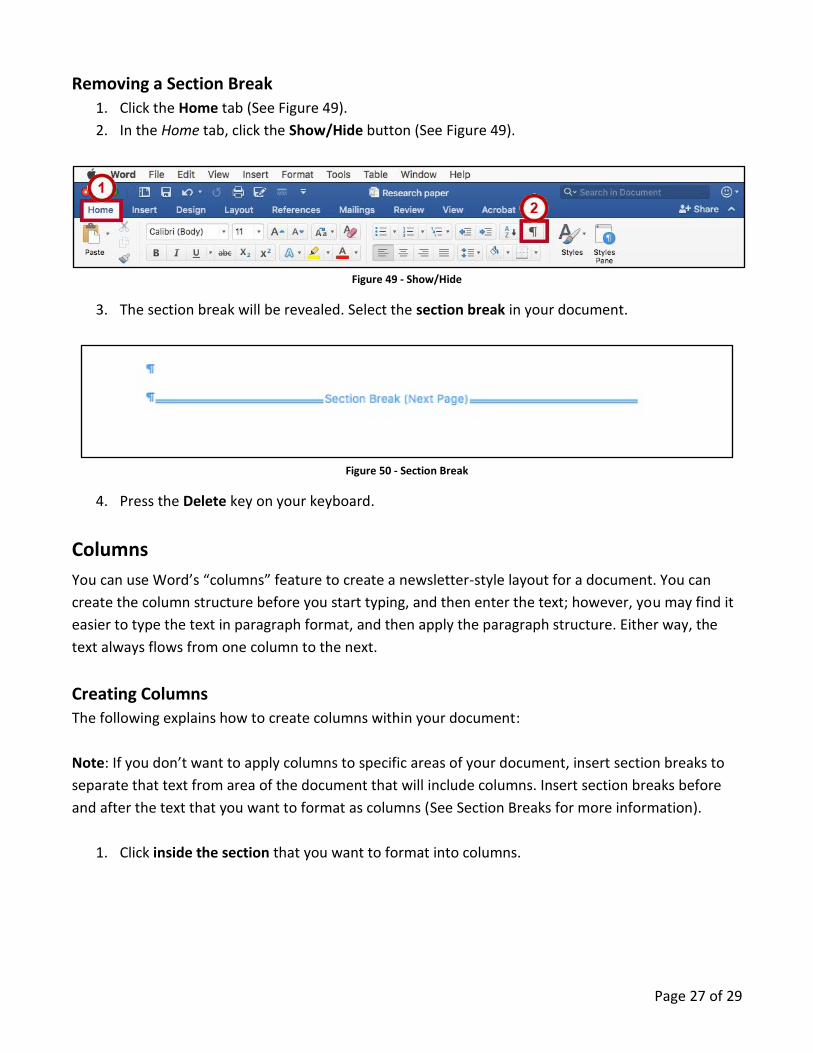
Removing a Section Break
1. Click the Home tab (See Figure 49).
2. In the Home tab, click the Show/Hide button (See Figure 49).
Figure 49 - Show/Hide
3. The section break will be revealed. Select the section break in your document.
Figure 50 - Section Break
4. Press the Delete key on your keyboard.
Columns
You can use Word’s “columns” feature to create a newsletter-style layout for a document. You can
create the column structure before you start typing, and then enter the text; however, you may find it
easier to type the text in paragraph format, and then apply the paragraph structure. Either way, the
text always flows from one column to the next.
Creating Columns The following explains how to create columns within your document:
Note: If you don’t want to apply columns to specific areas of your document, insert section breaks to
separate that text from area of the document that will include columns. Insert section breaks before
and after the text that you want to format as columns (See Section Breaks for more information).
1. Click inside the section that you want to format into columns.
Page 28 of 29
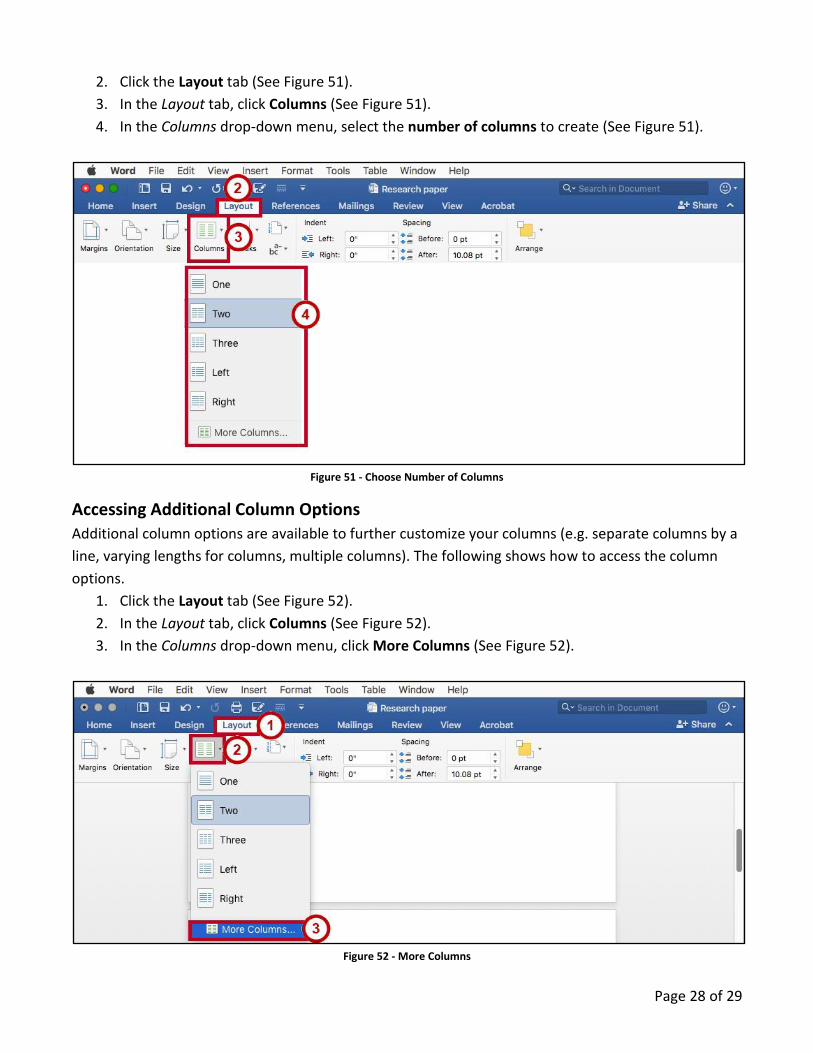
2. Click the Layout tab (See Figure 51).
3. In the Layout tab, click Columns (See Figure 51).
4. In the Columns drop-down menu, select the number of columns to create (See Figure 51).
Figure 51 - Choose Number of Columns
Accessing Additional Column Options
Additional column options are available to further customize your columns (e.g. separate columns by a
line, varying lengths for columns, multiple columns). The following shows how to access the column
options.
1. Click the Layout tab (See Figure 52).
2. In the Layout tab, click Columns (See Figure 52).
3. In the Columns drop-down menu, click More Columns (See Figure 52).
Figure 52 - More Columns
Page 29 of 29
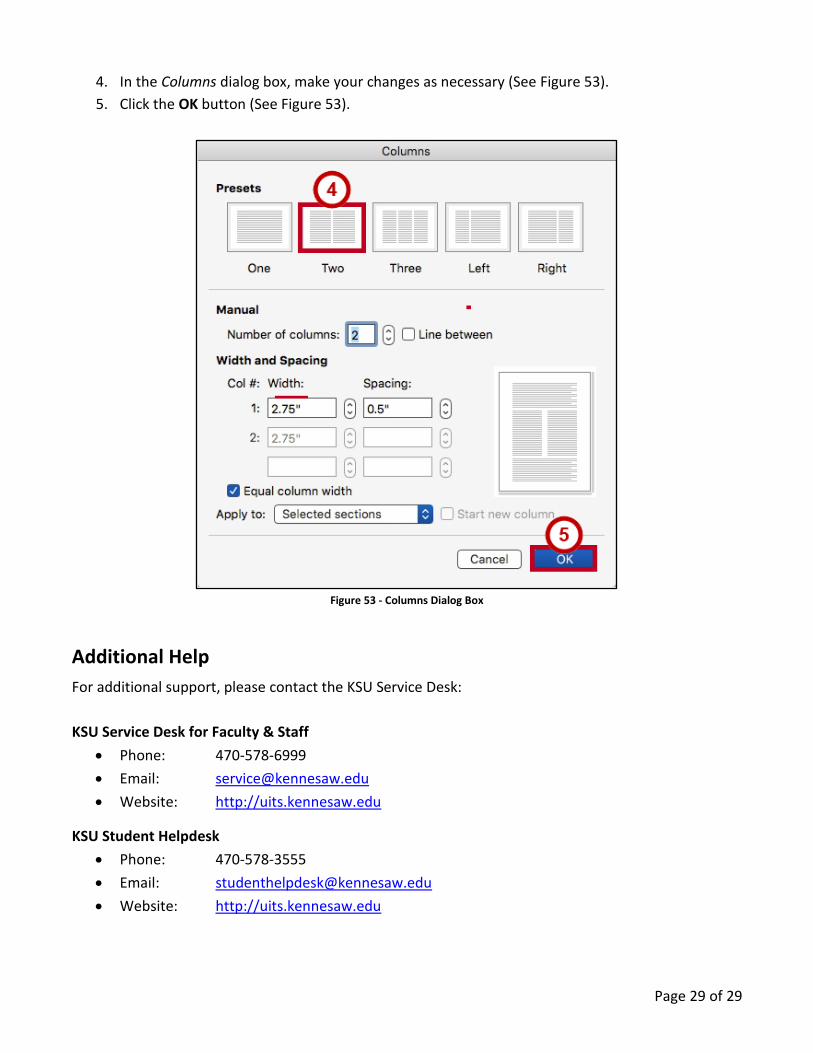
4. In the Columns dialog box, make your changes as necessary (See Figure 53).
5. Click the OK button (See Figure 53).
Figure 53 - Columns Dialog Box
Additional Help
For additional support, please contact the KSU Service Desk:
KSU Service Desk for Faculty & Staff
Phone: 470-578-6999
Email: [email protected]
Website: http://uits.kennesaw.edu
KSU Student Helpdesk
Phone: 470-578-3555
Email: [email protected]
Website: http://uits.kennesaw.edu