Embed Size (px)
Citation preview
Microsoft Office
Word 2007
For Students of Master Academic Studies - Master in European Integration
Faculty of Law University of Belgrade
Belgrade, 2014

1
Table of Content
TABLE OF CONTENT 1
RIBBONS 3
CHANGE THE MEASUREMENT UNITS 4
FORMAT THE (DEFAULT) PAPER SIZE 5
CHANGE OR SET PAGE MARGINS 6
VIEW PAGE MARGINS 6
SET THE DEFAULT FONT 7
PARAGRAPH 8
CHANGE THE HORIZONTAL ALIGNMENT OF TEXT ON A PAGE 8
ALIGN THE TEXT LEFT OR RIGHT 8
CENTER THE TEXT 8
JUSTIFY THE TEXT 8
PARAGRAPH DIALOG BOX LAUNCHER 8
INDENT PARAGRAPHS 9
INDENT ONLY THE FIRST LINE OF A PARAGRAPH 9
INCREASE OR DECREASE THE LEFT INDENT OF AN ENTIRE PARAGRAPH 9
INCREASE OR DECREASE THE RIGHT INDENT OF AN ENTIRE PARAGRAPH 9
INDENT ALL BUT THE FIRST LINE OF A PARAGRAPH 9
USE PRECISE MEASUREMENTS TO SET A HANGING INDENT 10
CREATE A NEGATIVE INDENT 10
ADJUST THE SPACES BETWEEN LINES OR PARAGRAPHS 10
CHANGE THE LINE SPACING 10
LINE SPACING OPTIONS 10
CHANGE THE SPACING BEFORE OR AFTER PARAGRAPHS 11
BULLETS AND NUMBERING 11
CREATE A BULLETED OR NUMBERED LIST 11
LISTS: ONE LEVEL OR MANY LEVELS 11
CREATE A ONE-LEVEL BULLETED OR NUMBERED LIST 12
IF BULLETS AND NUMBERING DO NOT BEGIN AUTOMATICALLY 12
ADD BULLETS OR NUMBERING TO A LIST 12
2
TURN A ONE-LEVEL LIST INTO A MULTILEVEL LIST 12
CHOOSE A MULTILEVEL LIST STYLE FROM THE GALLERY 12
STYLES 13
CREATE A TABLE OF CONTENTS 13
MARK ENTRIES FOR A TABLE OF CONTENTS 13
MARK ENTRIES BY USING BUILT-IN HEADING STYLES 13
CREATE A TABLE OF CONTENTS 14
CREATE A TABLE OF CONTENTS FROM CUSTOM STYLES THAT YOU APPLIED 14
UPDATE THE TABLE OF CONTENTS 14
DELETE A TABLE OF CONTENTS 14
CREATE NEW, MODIFY EXISTING STYLES 15
CREATE A NEW QUICK STYLE 15
MODIFY EXISTING STYLES 15
PAGE NUMBERS (DOCUMENT SECTIONS, HEADER AND FOOTER) 17
STRUCTURE 17
HOW TO ADD PAGE NUMBERING 18
STEP 1: FIRST PAGE DON'T HAVE PAGE NUMBER 18
STEP 2: ADD PAGE NUMBERING IN PRELIMINARIES SECTION 18
STEP 3: FORMAT THE PAGE NUMBER SO IT DISPLAYS IN LOWERCASE ROMAN NUMERAL 19
STEP 4: HOW TO ADD ARABIC PAGE NUMBERS TO CHAPTERS FOLLOWING THE PRELIMINARY PAGES (TEXT PART)
20
STEP 4.1: ADDING SECTION BREAK 20
STEP 4.2: TEXT PART MUST HAVE A NUMBER ON THE FIRST PAGE 21
STEP 4.3: UNLINKING SECTIONS 21
STEP 4.4: INSERTING ARABIC NUMBER IN FOOTER OF FIRST PAGE OF THE TEXT PART 21
3
Ribbons
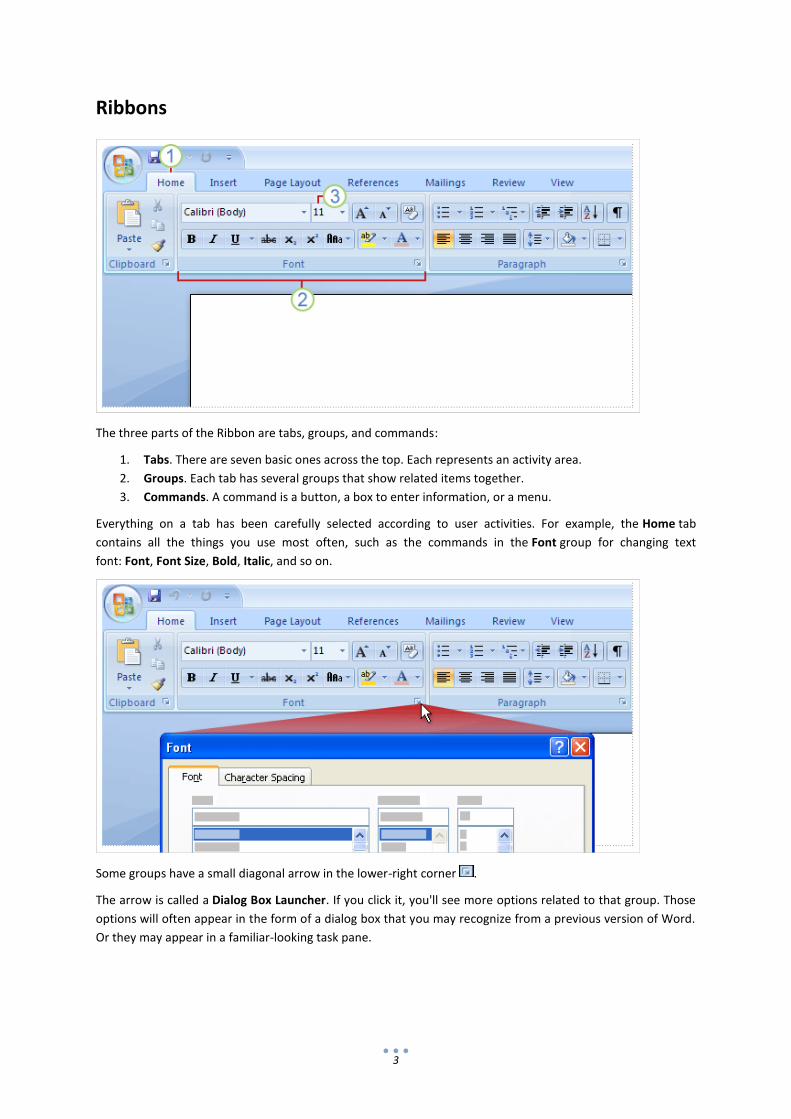
The three parts of the Ribbon are tabs, groups, and commands:
1. Tabs. There are seven basic ones across the top. Each represents an activity area.
2. Groups. Each tab has several groups that show related items together.
3. Commands. A command is a button, a box to enter information, or a menu.
Everything on a tab has been carefully selected according to user activities. For example, the Home tab
contains all the things you use most often, such as the commands in the Font group for changing text
font: Font, Font Size, Bold, Italic, and so on.
Some groups have a small diagonal arrow in the lower-right corner .
The arrow is called a Dialog Box Launcher. If you click it, you'll see more options related to that group. Those
options will often appear in the form of a dialog box that you may recognize from a previous version of Word.
Or they may appear in a familiar-looking task pane.

4
Change the Measurement Units
Sometimes other applications can change the measurement units in Word from their default setting. You can
change these back to their default (or change them to another setting) by doing the following:
1. Click the Office Button.
2. Click the Word Options button.
3. Select Advanced in the left pane.
4. Scroll down to the Display section.
5. Use the Show measurements in units of dropdown to select from Inches, Centimeters, Millimeters, Points,
or Picas.
6. Click OK.

5
Format the (default) Paper Size
To format or change paper size of a Word document, go to the Paper tab of the Page Setup Dialog box, which
is on the Page Layout tab (click the lower-right arrow in the Page Setup group). The Paper tab lets you set your
page size, use paper source controls, or apply these settings to specific parts of your documents.
The Paper tab includes the following options for setting your paper size:
Paper Size: Sets the paper size. The drop-down list allows you to pick from a variety of paper sizes,
including Letter, Legal, and various other envelope sizes.
Width: Sets the width of the paper. This field is automatically set when you choose a Paper Size. If you
change the value of this field, the Paper Size field changes to Custom Size.
Height: Sets the height of the paper. This field is also set automatically according to the Paper Size
you select, and changing the height automatically changes Paper Size to Custom Size.
Applying your formatting changes
You can use the Apply to control to decide which parts of your document — Whole Document, This Point
Forward, and This Section — are formatted with the new settings.
Setting a default page settings ensures that every new document you open will use the settings that you
selected and set as the default. The default settings applies to new documents that are based on the active
template (A file or files that contain the structure and tools for shaping such elements as the style and page
layout of finished files. For example, Word templates can shape a single document, and FrontPage templates
can shape an entire Web site), usually Normal.dotx.

6
Change or set page margins
Page margins are the blank space around the edges of the page. In general, you insert text and graphics in the
printable area between the margins. However, you can position some items in the margins — for example,
headers, footers, and page numbers.
On the Page Layout tab, in the Page Setup group, click Margins.
Click the margin type that you want. For the most common margin width, click Normal.
When you click the margin type that you want, your entire document automatically changes to the
margin type that you have selected.
You can also specify your own margin settings. Click
Margins, click Custom Margins, and then in the Top,
Bottom, Left, and Right boxes, enter new values for
the margins.
To change the default margins, click Margins after you
select a new margin, and then click Custom Margins.
In the Page Setup dialog box, click the Default button,
and then click Yes. The new default settings are saved
in the template on which the document is based. Each
new document based on that template automatically
uses the new margin settings.
View page margins
1. Click the Microsoft Office Button , and then click
Word Options.
2. Click Advanced, and then click the Show text
boundaries check box under Show document content.
The page margins appear in your document as dotted lines.

7
Set the default font
Setting a default font ensures that every new document you open will use the font settings that you selected
and set as the default. The default font applies to new documents that are based on the active template
1. If your document already contains text that is formatted with the properties that you want to use,
select that text.
If you are starting from a blank document, go to step 2.
2. On the Home tab, click the Font Dialog Box Launcher, and then click the Font tab.
3. Select the options that you want to apply to the default font, such as font style and font size. If you
selected text in step 1, the properties of the selected text are set in the dialog box.
4. Click Default, and then click Yes.
8
Paragraph
Change the horizontal alignment of text on a page
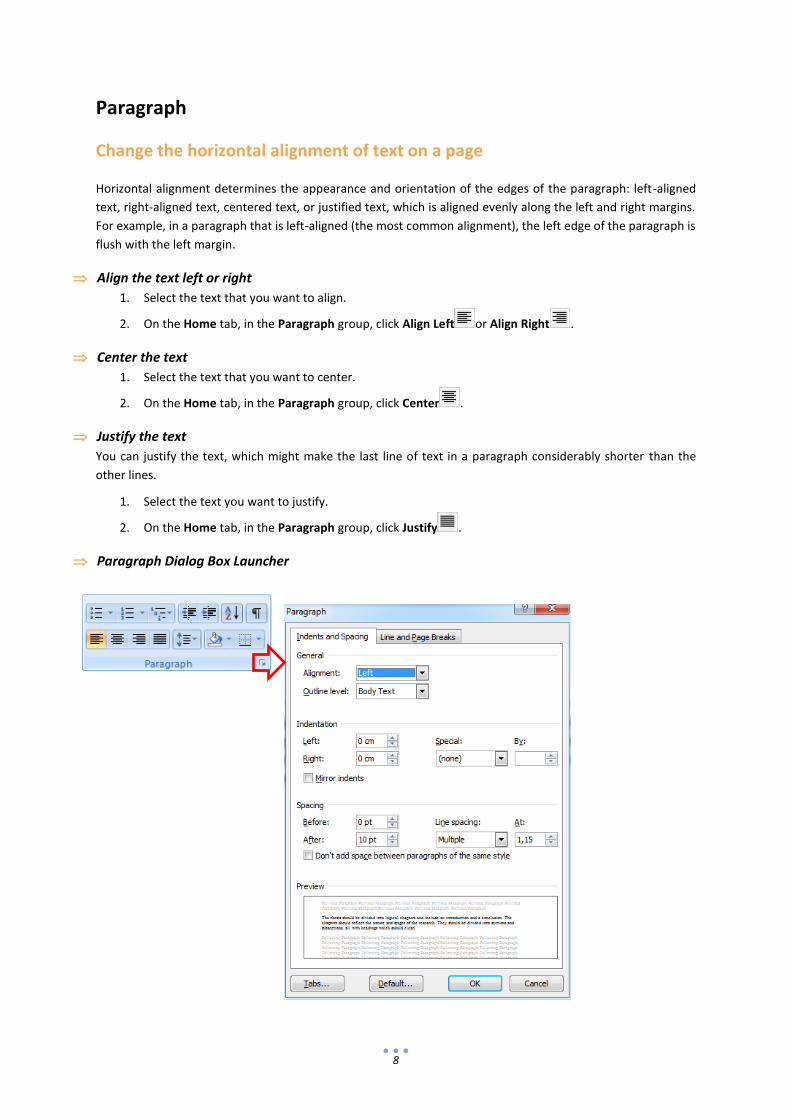
Horizontal alignment determines the appearance and orientation of the edges of the paragraph: left-aligned
text, right-aligned text, centered text, or justified text, which is aligned evenly along the left and right margins.
For example, in a paragraph that is left-aligned (the most common alignment), the left edge of the paragraph is
flush with the left margin.
Align the text left or right
1. Select the text that you want to align.
2. On the Home tab, in the Paragraph group, click Align Left or Align Right .
Center the text
1. Select the text that you want to center.
2. On the Home tab, in the Paragraph group, click Center .
Justify the text
You can justify the text, which might make the last line of text in a paragraph considerably shorter than the
other lines.
1. Select the text you want to justify.
2. On the Home tab, in the Paragraph group, click Justify .
Paragraph Dialog Box Launcher
9
Indent paragraphs
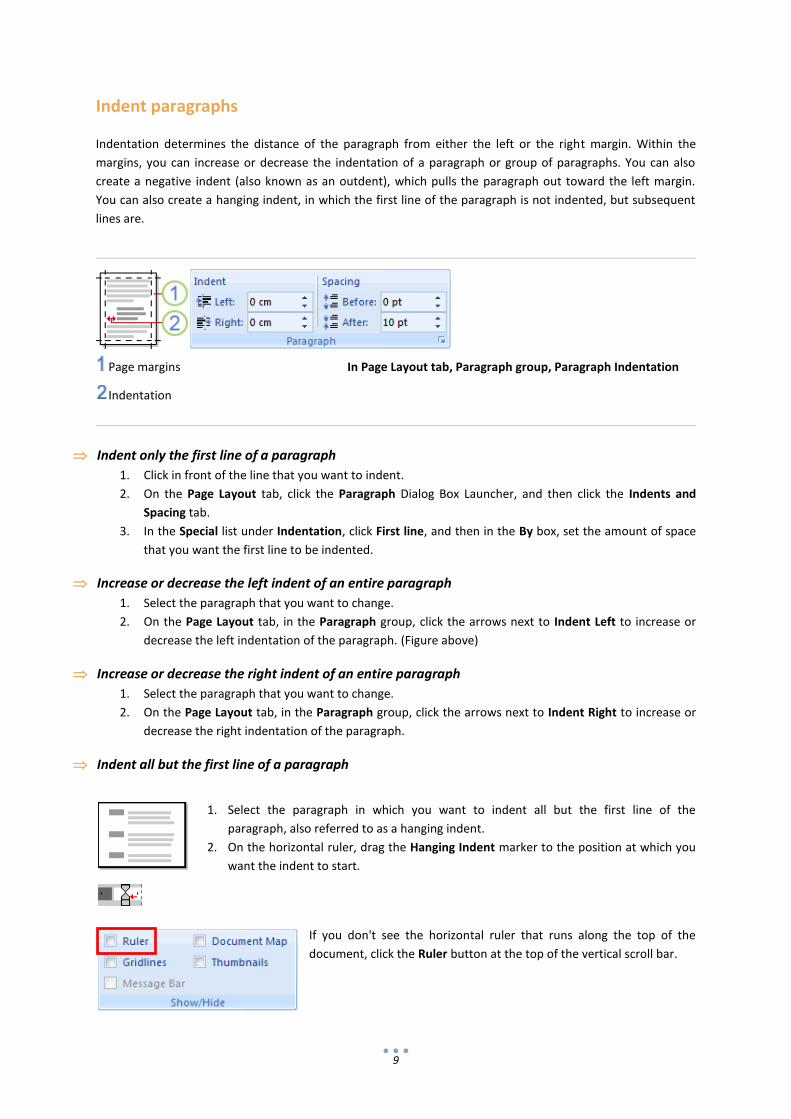
Indentation determines the distance of the paragraph from either the left or the right margin. Within the
margins, you can increase or decrease the indentation of a paragraph or group of paragraphs. You can also
create a negative indent (also known as an outdent), which pulls the paragraph out toward the left margin.
You can also create a hanging indent, in which the first line of the paragraph is not indented, but subsequent
lines are.
Page margins In Page Layout tab, Paragraph group, Paragraph Indentation
Indentation
Indent only the first line of a paragraph
1. Click in front of the line that you want to indent.
2. On the Page Layout tab, click the Paragraph Dialog Box Launcher, and then click the Indents and
Spacing tab.
3. In the Special list under Indentation, click First line, and then in the By box, set the amount of space
that you want the first line to be indented.
Increase or decrease the left indent of an entire paragraph
1. Select the paragraph that you want to change.
2. On the Page Layout tab, in the Paragraph group, click the arrows next to Indent Left to increase or
decrease the left indentation of the paragraph. (Figure above)
Increase or decrease the right indent of an entire paragraph
1. Select the paragraph that you want to change.
2. On the Page Layout tab, in the Paragraph group, click the arrows next to Indent Right to increase or
decrease the right indentation of the paragraph.
Indent all but the first line of a paragraph
1. Select the paragraph in which you want to indent all but the first line of the
paragraph, also referred to as a hanging indent.
2. On the horizontal ruler, drag the Hanging Indent marker to the position at which you
want the indent to start.
If you don't see the horizontal ruler that runs along the top of the
document, click the Ruler button at the top of the vertical scroll bar.
10
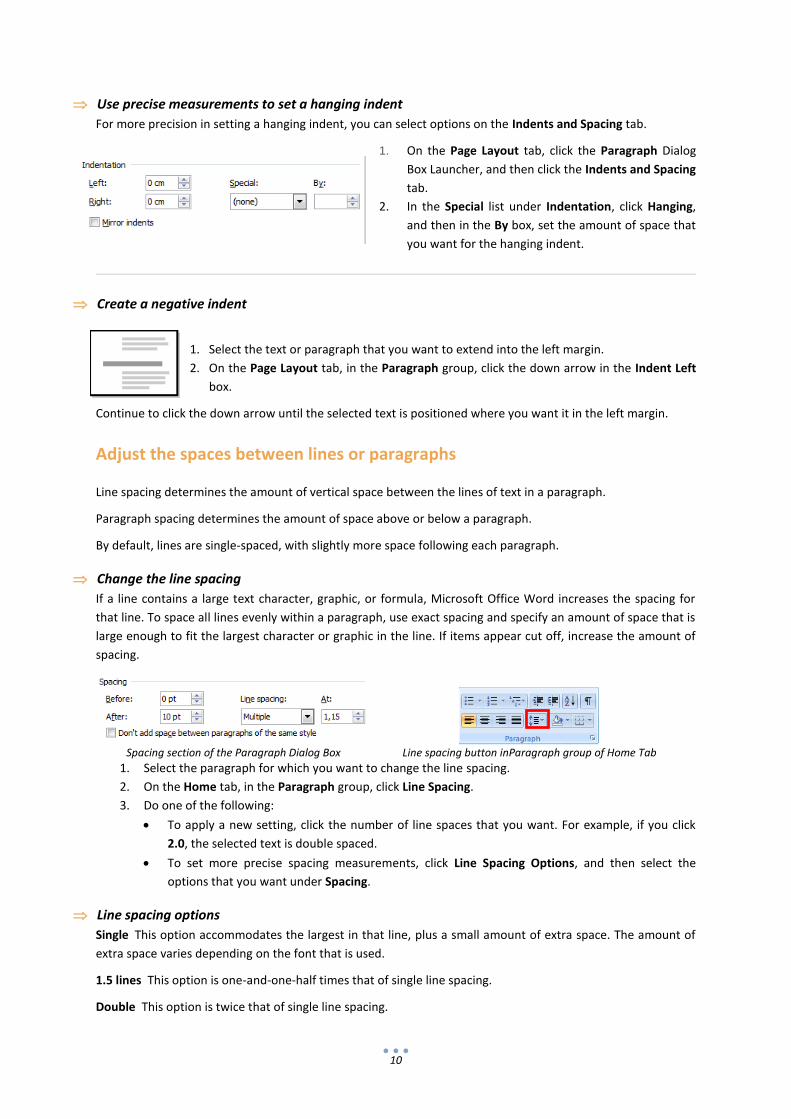
Use precise measurements to set a hanging indent
For more precision in setting a hanging indent, you can select options on the Indents and Spacing tab.
1. On the Page Layout tab, click the Paragraph Dialog
Box Launcher, and then click the Indents and Spacing
tab.
2. In the Special list under Indentation, click Hanging,
and then in the By box, set the amount of space that
you want for the hanging indent.
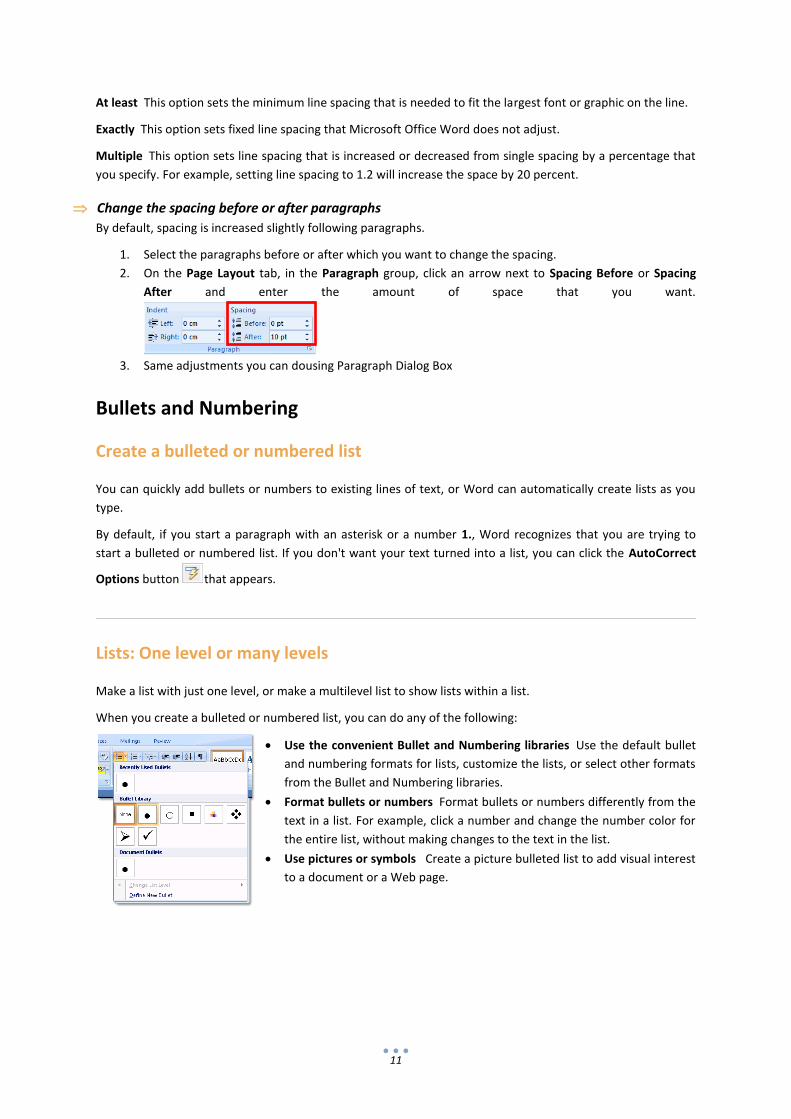
Create a negative indent
1. Select the text or paragraph that you want to extend into the left margin.
2. On the Page Layout tab, in the Paragraph group, click the down arrow in the Indent Left
box.
Continue to click the down arrow until the selected text is positioned where you want it in the left margin.
Adjust the spaces between lines or paragraphs
Line spacing determines the amount of vertical space between the lines of text in a paragraph.
Paragraph spacing determines the amount of space above or below a paragraph.
By default, lines are single-spaced, with slightly more space following each paragraph.
Change the line spacing
If a line contains a large text character, graphic, or formula, Microsoft Office Word increases the spacing for
that line. To space all lines evenly within a paragraph, use exact spacing and specify an amount of space that is
large enough to fit the largest character or graphic in the line. If items appear cut off, increase the amount of
spacing.
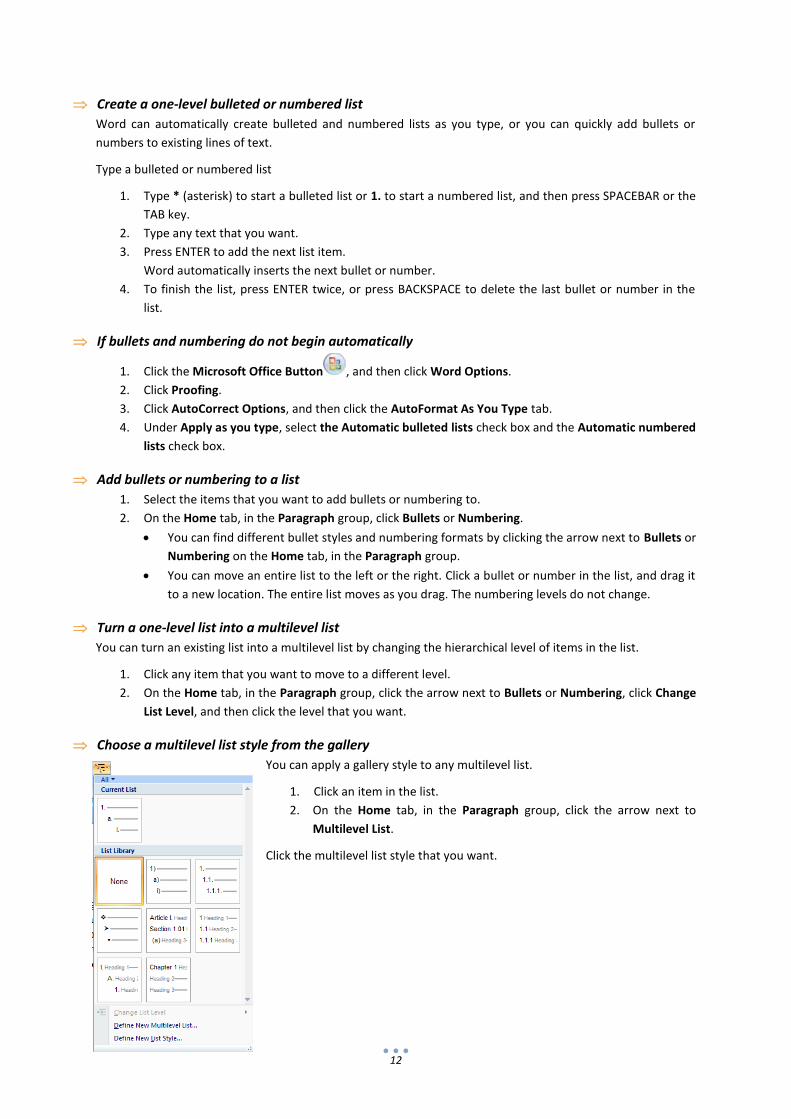
Spacing section of the Paragraph Dialog Box Line spacing button inParagraph group of Home Tab
1. Select the paragraph for which you want to change the line spacing.
2. On the Home tab, in the Paragraph group, click Line Spacing.
3. Do one of the following:
To apply a new setting, click the number of line spaces that you want. For example, if you click
2.0, the selected text is double spaced.
To set more precise spacing measurements, click Line Spacing Options, and then select the
options that you want under Spacing.
Line spacing options
Single This option accommodates the largest in that line, plus a small amount of extra space. The amount of
extra space varies depending on the font that is used.
1.5 lines This option is one-and-one-half times that of single line spacing.
Double This option is twice that of single line spacing.
11
At least This option sets the minimum line spacing that is needed to fit the largest font or graphic on the line.
Exactly This option sets fixed line spacing that Microsoft Office Word does not adjust.
Multiple This option sets line spacing that is increased or decreased from single spacing by a percentage that
you specify. For example, setting line spacing to 1.2 will increase the space by 20 percent.
Change the spacing before or after paragraphs
By default, spacing is increased slightly following paragraphs.
1. Select the paragraphs before or after which you want to change the spacing.
2. On the Page Layout tab, in the Paragraph group, click an arrow next to Spacing Before or Spacing
After and enter the amount of space that you want.
3. Same adjustments you can dousing Paragraph Dialog Box
Bullets and Numbering
Create a bulleted or numbered list
You can quickly add bullets or numbers to existing lines of text, or Word can automatically create lists as you
type.
By default, if you start a paragraph with an asterisk or a number 1., Word recognizes that you are trying to
start a bulleted or numbered list. If you don't want your text turned into a list, you can click the AutoCorrect
Options button that appears.
Lists: One level or many levels
Make a list with just one level, or make a multilevel list to show lists within a list.
When you create a bulleted or numbered list, you can do any of the following:
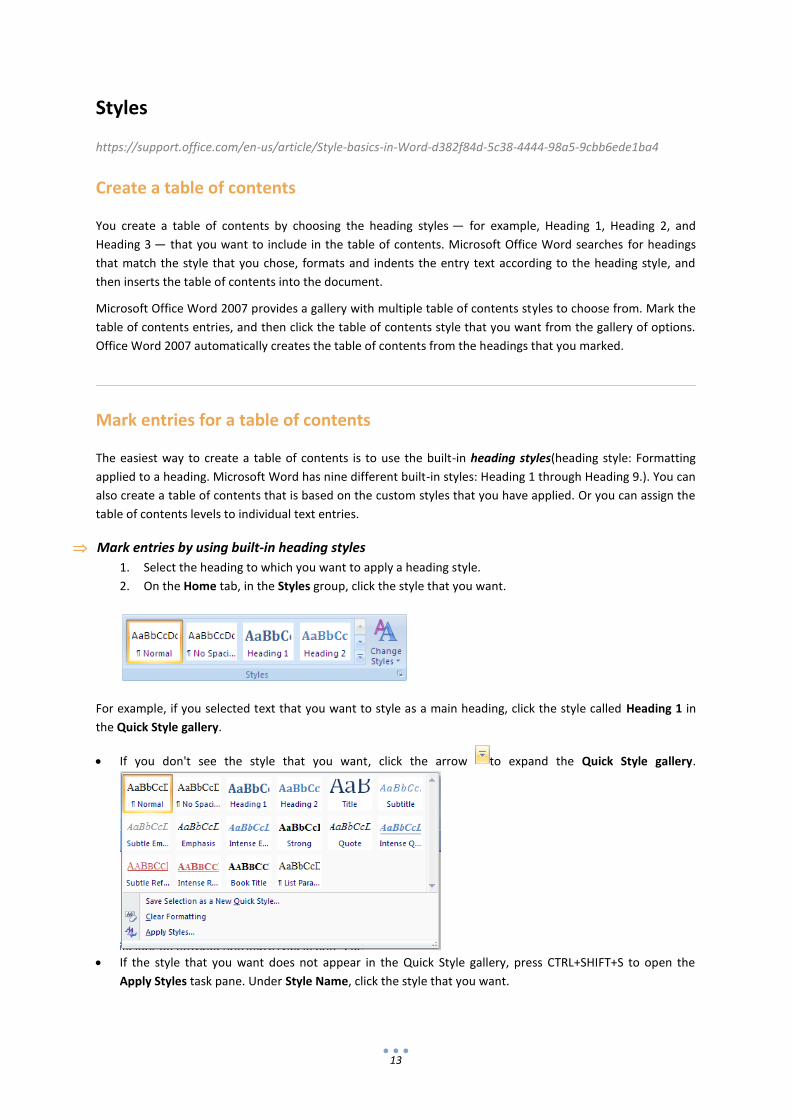
Use the convenient Bullet and Numbering libraries Use the default bullet
and numbering formats for lists, customize the lists, or select other formats
from the Bullet and Numbering libraries.
Format bullets or numbers Format bullets or numbers differently from the
text in a list. For example, click a number and change the number color for
the entire list, without making changes to the text in the list.
Use pictures or symbols Create a picture bulleted list to add visual interest
to a document or a Web page.
12
Create a one-level bulleted or numbered list
Word can automatically create bulleted and numbered lists as you type, or you can quickly add bullets or
numbers to existing lines of text.
Type a bulleted or numbered list
1. Type * (asterisk) to start a bulleted list or 1. to start a numbered list, and then press SPACEBAR or the
TAB key.
2. Type any text that you want.
3. Press ENTER to add the next list item.
Word automatically inserts the next bullet or number.
4. To finish the list, press ENTER twice, or press BACKSPACE to delete the last bullet or number in the
list.
If bullets and numbering do not begin automatically
1. Click the Microsoft Office Button , and then click Word Options.
2. Click Proofing.
3. Click AutoCorrect Options, and then click the AutoFormat As You Type tab.
4. Under Apply as you type, select the Automatic bulleted lists check box and the Automatic numbered
lists check box.
Add bullets or numbering to a list
1. Select the items that you want to add bullets or numbering to.
2. On the Home tab, in the Paragraph group, click Bullets or Numbering.
You can find different bullet styles and numbering formats by clicking the arrow next to Bullets or
Numbering on the Home tab, in the Paragraph group.
You can move an entire list to the left or the right. Click a bullet or number in the list, and drag it
to a new location. The entire list moves as you drag. The numbering levels do not change.
Turn a one-level list into a multilevel list
You can turn an existing list into a multilevel list by changing the hierarchical level of items in the list.
1. Click any item that you want to move to a different level.
2. On the Home tab, in the Paragraph group, click the arrow next to Bullets or Numbering, click Change
List Level, and then click the level that you want.
Choose a multilevel list style from the gallery
You can apply a gallery style to any multilevel list.
1. Click an item in the list.
2. On the Home tab, in the Paragraph group, click the arrow next to
Multilevel List.
Click the multilevel list style that you want.
13
Styles
https://support.office.com/en-us/article/Style-basics-in-Word-d382f84d-5c38-4444-98a5-9cbb6ede1ba4
Create a table of contents
You create a table of contents by choosing the heading styles — for example, Heading 1, Heading 2, and
Heading 3 — that you want to include in the table of contents. Microsoft Office Word searches for headings
that match the style that you chose, formats and indents the entry text according to the heading style, and
then inserts the table of contents into the document.
Microsoft Office Word 2007 provides a gallery with multiple table of contents styles to choose from. Mark the
table of contents entries, and then click the table of contents style that you want from the gallery of options.
Office Word 2007 automatically creates the table of contents from the headings that you marked.
Mark entries for a table of contents
The easiest way to create a table of contents is to use the built-in heading styles(heading style: Formatting
applied to a heading. Microsoft Word has nine different built-in styles: Heading 1 through Heading 9.). You can
also create a table of contents that is based on the custom styles that you have applied. Or you can assign the
table of contents levels to individual text entries.
Mark entries by using built-in heading styles
1. Select the heading to which you want to apply a heading style.
2. On the Home tab, in the Styles group, click the style that you want.
For example, if you selected text that you want to style as a main heading, click the style called Heading 1 in
the Quick Style gallery.
If you don't see the style that you want, click the arrow to expand the Quick Style gallery.
If the style that you want does not appear in the Quick Style gallery, press CTRL+SHIFT+S to open the
Apply Styles task pane. Under Style Name, click the style that you want.

14
Create a table of contents
After you mark the entries for your table of contents, you are ready to build it.
1. Click where you want to insert the table of contents, usually at the beginning of a document.
2. On the References tab, in the Table of Contents group, click Table of Contents, and then click the
table of contents style that you want.
NOTE For more options, click Insert Table of Contents to open the Table of Contents dialog box.
Create a table of contents from custom styles that you applied
Use this procedure if you already applied custom styles to your headings. You can choose the style settings
that you want Word to use when it builds the table of contents.
1. Click where you want to insert the table of contents.
2. On the References tab, in the Table of Contents group, click Table of Contents, and then click Insert
Table of Contents.
3. Click Options.
4. Under Available styles, find the style that you applied to the headings in your document.
5. Under TOC level, next to the style name, type a number from 1 to 9 to indicate the level that you
want the heading style to represent.
NOTE If you want to use only custom styles, delete the TOC level numbers for the built-in styles, such as
Heading 1.
6. Repeat step 4 and step 5 for each heading style that you want to include in the table of contents.
7. Click OK.
8. Choose a table of contents to fit the document type:
Update the table of contents
If you added or removed headings or other table of contents entries in your document, you can quickly update
the table of contents.
1. On the References tab, in the Table of Contents group, click Update Table.
2. Click Update page numbers only or Update entire table.
Delete a table of contents
1. On the References tab, in the Table of Contents group, click Table of Contents.
2. Click Remove Table of Contents.
15
Create new, modify existing styles
Create a new Quick Style
Quick Styles are sets of styles created to work together. Although a Quick Style set likely contains all of the
styles that you need to build a document, you may want to add a brand new style, such as aquotation style,
figure caption style etc.
1. Select the text that you want to create as a new style (e.g. for large quotation).
2. Using standard tools for paragraph formating indent text 1.27cm from left and right, and set 18pt for
spacing before and after.
3. Right-click the selection, point to Styles, and then click Save Selection as a New Quick Style.
4. Give the style a name — for example, Quotation — and then click OK.
The Quotation style that you created appears in the Quick Styles gallery with the name you gave it, ready for
you to use whenever you want text to be bold and red.
Modify existing styles
Although a Quick Style set likely contains all of the styles that you need to build a document, you might want
to change the attributes of a style in a Quick Style set.
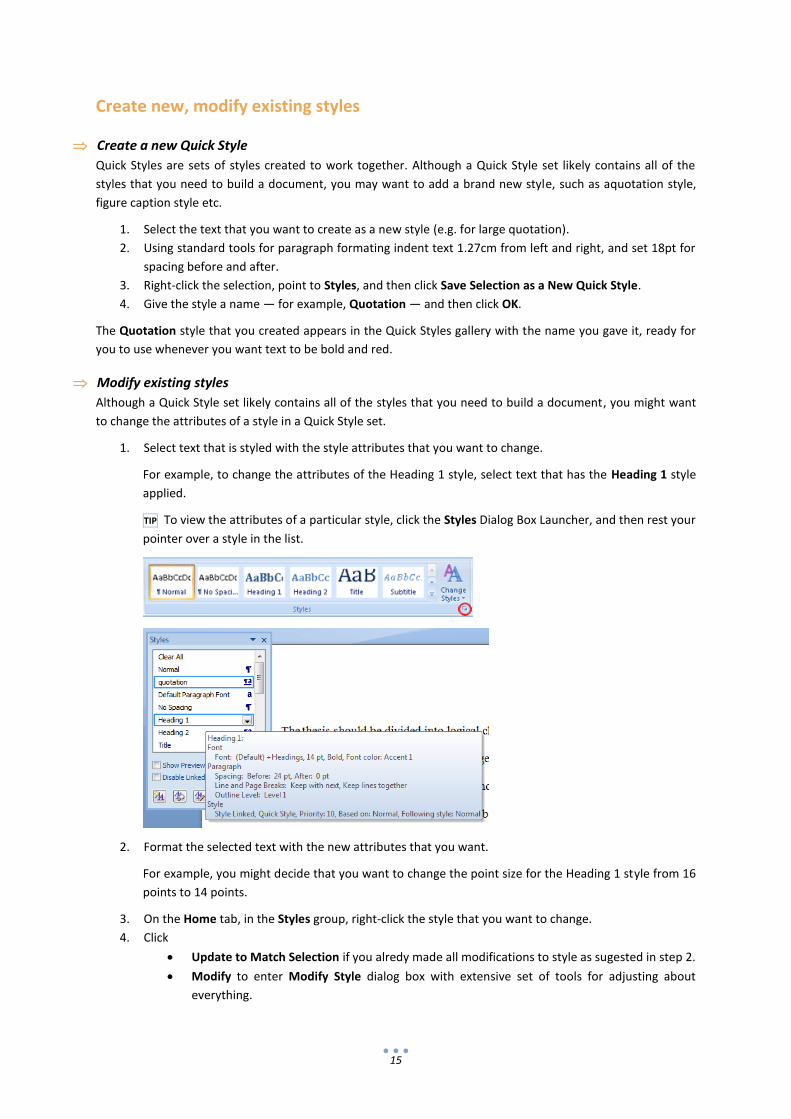
1. Select text that is styled with the style attributes that you want to change.
For example, to change the attributes of the Heading 1 style, select text that has the Heading 1 style
applied.
TIP To view the attributes of a particular style, click the Styles Dialog Box Launcher, and then rest your
pointer over a style in the list.
2. Format the selected text with the new attributes that you want.
For example, you might decide that you want to change the point size for the Heading 1 style from 16
points to 14 points.
3. On the Home tab, in the Styles group, right-click the style that you want to change.
4. Click
Update to Match Selection if you alredy made all modifications to style as sugested in step 2.
Modify to enter Modify Style dialog box with extensive set of tools for adjusting about
everything.

16
Formatting section offers you some of
commonformatting commands
Format button (bottom-left corner) expands
to give you all other advanced formatting
posibilities (Font, Paragraph, Tabs, Bordes,
Language, Frame…)
Automatically update check box, if selected,
changes on selected style, using any standard
formatting methods,propagate to all other
occurences of the same style
TIP It is good practice, before you start entering
larger amounts of text, to set the default
parametersforall needed styles.
17
Page numbers (Document Sections, Header and Footer)
Rules for page numbering in MA Thesis Writing Guidelines:
TIP Add Page Numbering to your document after you are finished making all edits. After the page numbering
has been added, then add the Table of Contents and/or update the Table of Contents.
Structure
A typical document consist of three main parts:
1. Preliminaries
2. Text (chapters)
3. Supplementaries
The preliminary pages with the exception of the Title page use lowercase Roman numerals, which are
centered and at least 1.27cm from the bottom of the page (in the footer).
The text and supplementary pages uses Arabic numerals for page numbering and start with the page number
1. Page numbers are centered and at least 1.27cm from the bottom of the page (in the footer).
The Cover Page should not include any page numbering.
The Abstract Page is the first page in your document that should include a page number and it starts with
lowercase Roman numeral ii
All other required and/or optional preliminary pages will use the lowercase Roman numeral and continue
numbering from the previous page(s).
The text of a thesis/dissertation features an introduction and several chapters, sections, and subsections. Text
pages will use the Arabic numbering and start with Page 1.
1. Arabic numerals (1, 2, 3), bottom right, starting from the first page of the body of the text
2. lowercase Roman numerals (i, ii, iii) pages prior to the main body of the text.
3. There should not be a reference to page number visible on the cover page.

18
How to Add Page Numbering
Step 1: First page don't have page number
Double click with the mouse in the footer area of your Title page to access the Header/Footer tools:
Tip: you could also select the Insert Tab of the Ribbon and choose Insert Page Number to access the
Header/Footer tools.
Once in the Footer, the Ribbon at the top of the screen should reflect Header/Footer tools:
Select the check box for Different First Page in the Options group of the Header/Footer Tools | Design tab:
Click on the Close Header and Footer button to switch out of the footer and move back into the document.
Step 2: Add page numbering in Preliminaries section
Next, navigate to the Table of Content page and double click with the mouse in the Footer.
From the Header/Footer tools, select the Page Number Icon drop-down list, Bottom of Page, and the Right
option.
This will add a page number of “2” to the TOC page and leave the Title page without a page number since we
turned on Different First Page.

19
Step 3: Format the page number so it displays in lowercase Roman numeral
Start by double clicking with the mouse in the footer and selecting the page number. Left click the mouse and
drag it over the page number so that it’s highlighted in “blue”.
From the Header/Footer tools Design tab in the Ribbon, select the drop-down menu for Page Number, Format
Page Numbers.
From the Page Number Format dialog box, select the formatting style for Roman numeral.
Make sure “continue from previous section” is selected so Word knows what
page number to start with; in this case “ii”.
Tip: If you wish that your numbering starts with number other then this page
number that you get, you can adjust it with double click it in your footer, select
the page number so that it’s blue, navigate back into the Page Number Format
dialog box and change the Page Numbering option to Start at: your desired
value.
Result
20
Step 4: How to Add Arabic Page Numbers to Chapters following the preliminary pages (Text Part)
Step 4.1: Adding Section Break
A Section Break must be added in order to change the page numbering from lowercase Roman numeral to
Arabic page numbers for the remainder of the text.
Tip: section breaks are necessary in a document when margins, page orientation, and headers/footers need to
vary.
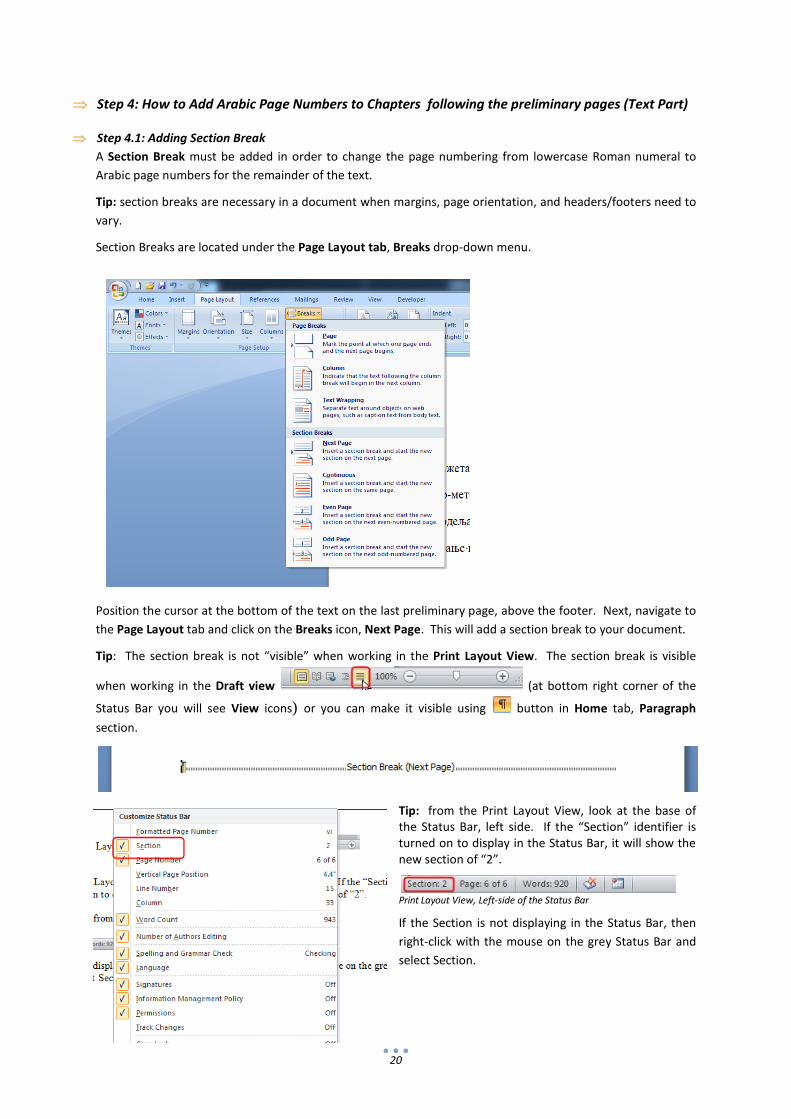
Section Breaks are located under the Page Layout tab, Breaks drop-down menu.
Position the cursor at the bottom of the text on the last preliminary page, above the footer. Next, navigate to
the Page Layout tab and click on the Breaks icon, Next Page. This will add a section break to your document.
Tip: The section break is not “visible” when working in the Print Layout View. The section break is visible
when working in the Draft view (at bottom right corner of the
Status Bar you will see View icons) or you can make it visible using button in Home tab, Paragraph
section.
Tip: from the Print Layout View, look at the base of the Status Bar, left side. If the “Section” identifier is turned on to display in the Status Bar, it will show the new section of “2”.
Print Layout View, Left-side of the Status Bar
If the Section is not displaying in the Status Bar, then
right-click with the mouse on the grey Status Bar and
select Section.

21
Step 4.2: Text Part Must Have a Number on the First Page
Once the Section Break is in place, go to the first page of your text (chapter 1), which is the page after the last
preliminary page in your document.
Double click in the footer to display the Header & Footer Tools. In Options group uncheck the Different First
Page check box.
Note: In the first section Different first page option was used to differ numbering of first page (Cover page)
from rest of section. Second section requires number on first page so it is necessary to uncheck this.
Step 4.3: Unlinking Sections
From the Header & Footer Tools, Design tab, notice the Link to Previous button in the Navigation Group is
turned on or highlighted “orange”.
Click on the Link to Previous icon to turn the linking tool off (the highlight should be off). Unlinking the two
sections is required so that you can vary the formatting from Roman numeral to Arabic.
Step 4.4: Inserting Arabic Number in Footer of First Page of the Text Part
Highlight the Roman numeral page number.
From the Header/Footer Tools Design tab, click on the Page Number icon drop-down menu and choose
Format Page Numbers
From the Page Number Format dialog box, set Number format: "1,2,3,..." and Start at: "1"
Close Header and Footer View.
The Arabic Page numbering should continue through the rest of the document.
![Indent · In version 1.2 and more recent versions, the GNU style of indenting is the default. 1.1 Invoking indent As of version 1.3, the format of the indent command is: indent [options]](https://img.pdfslide.us/doc/110x75/5f0b95c87e708231d4313c27/indent-in-version-12-and-more-recent-versions-the-gnu-style-of-indenting-is-the.jpg)