Embed Size (px)
Citation preview
7/27/2019 Microsoft Access Tables Chapt 2
http://slidepdf.com/reader/full/microsoft-access-tables-chapt-2 1/16
Chapter 2 – Tables. Creating, Browsing, Importing, Linking
Creating and Opening, browsing, Updating, Printing, Linking a Table
Loading Access.
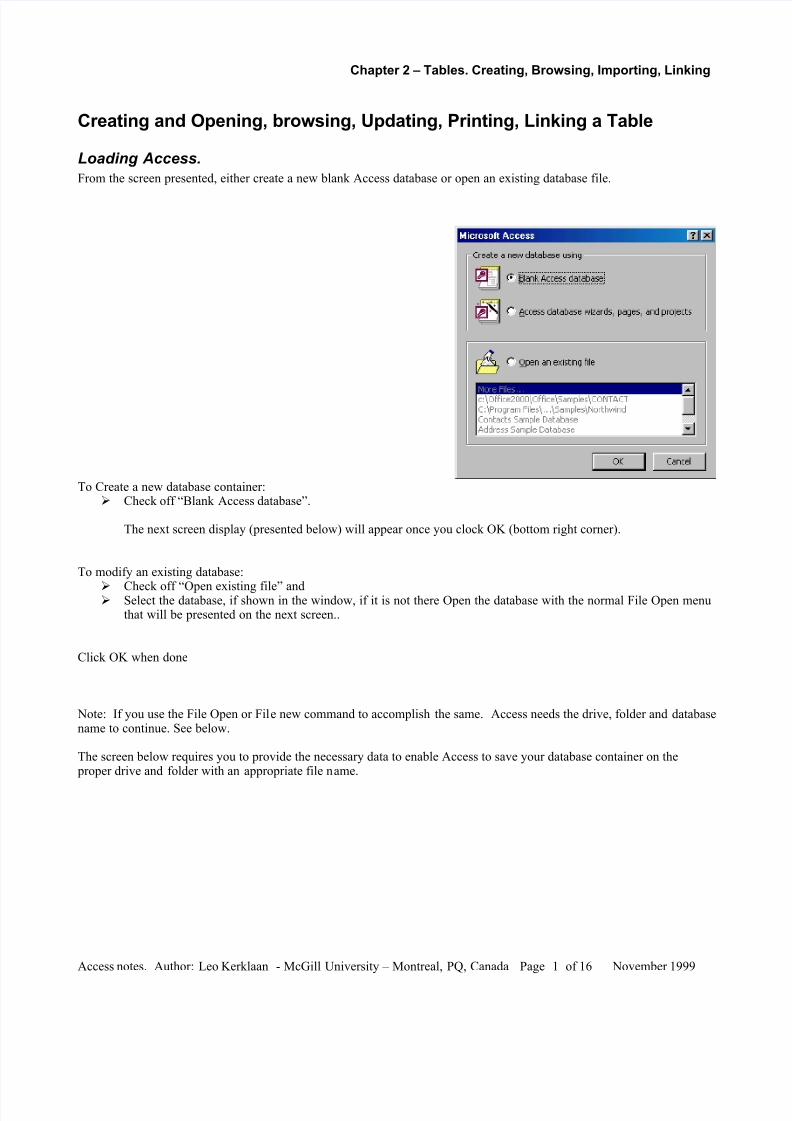
From the screen presented, either create a new blank Access database or open an existing database file.
To Create a new database container: Check off “Blank Access database”.
The next screen display (presented below) will appear once you clock OK (bottom right corner).
To modify an existing database:
Check off “Open existing file” and Select the database, if shown in the window, if it is not there Open the database with the normal File Open menu
that will be presented on the next screen..
Click OK when done
Note: If you use the File Open or File new command to accomplish the same. Access needs the drive, folder and databasename to continue. See below.
The screen below requires you to provide the necessary data to enable Access to save your database container on the proper drive and folder with an appropriate file name.
Access notes. Author: Leo Kerklaan - McGill University – Montreal, PQ, Canada Page 1 of 16 November 1999
7/27/2019 Microsoft Access Tables Chapt 2
http://slidepdf.com/reader/full/microsoft-access-tables-chapt-2 2/16
Chapter 2 – Tables. Creating, Browsing, Importing, Linking
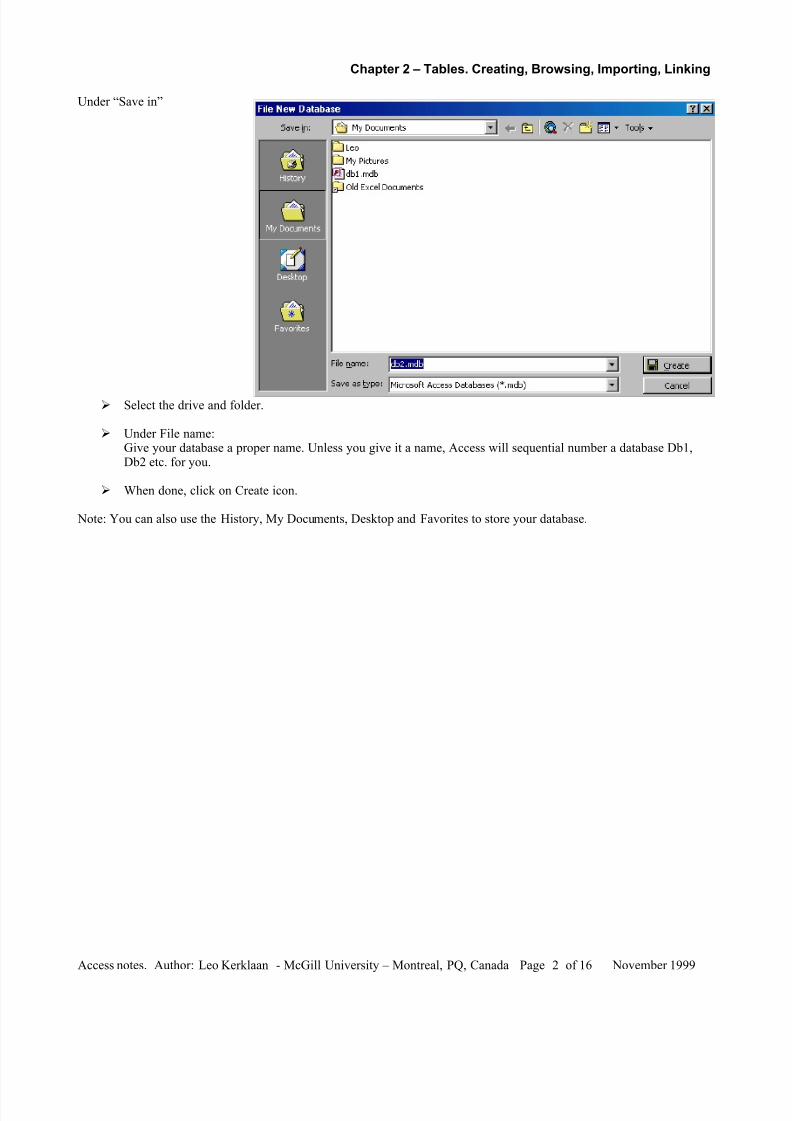
Under “Save in”
Select the drive and folder.
Under File name:Give your database a proper name. Unless you give it a name, Access will sequential number a database Db1,Db2 etc. for you.
When done, click on Create icon.
Note: You can also use the History, My Documents, Desktop and Favorites to store your database.
Access notes. Author: Leo Kerklaan - McGill University – Montreal, PQ, Canada Page 2 of 16 November 1999
7/27/2019 Microsoft Access Tables Chapt 2
http://slidepdf.com/reader/full/microsoft-access-tables-chapt-2 3/16
Chapter 2 – Tables. Creating, Browsing, Importing, Linking
The following screen is presented.
The Objects area indicates you are active in Tables section. To go elsewhere click on one of the the Object name such asQueries or Reports.
As this was a new database, no existing Tables, Queries, Reports and Forms will appear. Each item will have to becreated.
From this panel you would normally Create a new table design Modify an existing table design Open an existing table and display its content.
To create a new table, click on “Create table in Design view”.
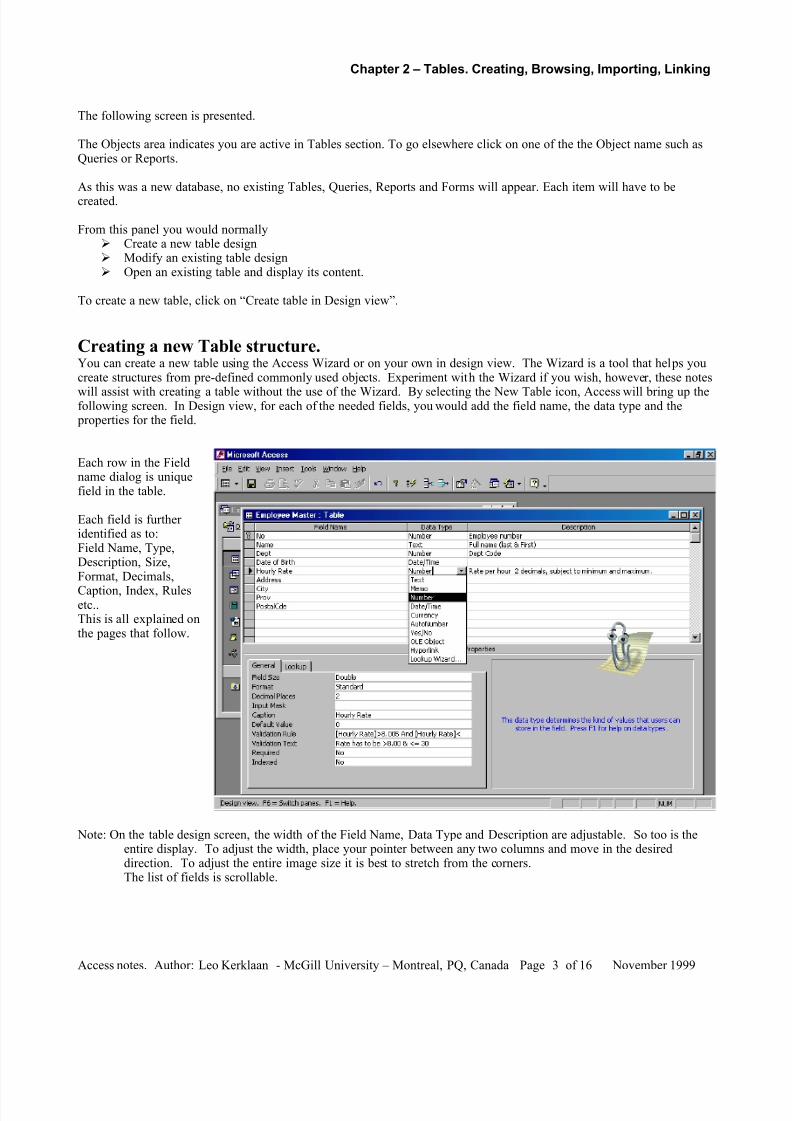
Creating a new Table structure.You can create a new table using the Access Wizard or on your own in design view. The Wizard is a tool that helps youcreate structures from pre-defined commonly used objects. Experiment with the Wizard if you wish, however, these notes
will assist with creating a table without the use of the Wizard. By selecting the New Table icon, Access will bring up thefollowing screen. In Design view, for each of the needed fields, you would add the field name, the data type and the properties for the field.
Each row in the Fieldname dialog is uniquefield in the table.
Each field is further identified as to:Field Name, Type,Description, Size,Format, Decimals,
Caption, Index, Rulesetc..This is all explained onthe pages that follow.
Note: On the table design screen, the width of the Field Name, Data Type and Description are adjustable. So too is theentire display. To adjust the width, place your pointer between any two columns and move in the desireddirection. To adjust the entire image size it is best to stretch from the corners.The list of fields is scrollable.
Access notes. Author: Leo Kerklaan - McGill University – Montreal, PQ, Canada Page 3 of 16 November 1999
7/27/2019 Microsoft Access Tables Chapt 2
http://slidepdf.com/reader/full/microsoft-access-tables-chapt-2 4/16
Chapter 2 – Tables. Creating, Browsing, Importing, Linking
Information on the screen above.
Field Name. Choose as descriptive a name as possible, but a good guide is to keep the name short if the field is of short length, as the field name by default becomes the column title in a Query, Form and or Report. Up to 64characters long, made up of letters, numbers, spaces and most special symbols except a period, exclamation mark andsquare brackets. The field name must not start with a space.
Data Type. This determines what can be entered into a field. The ten data types supported are:• Text (up to 255 characters).
• Number (digits, + , - and .). Supports whole numbers e.g. 256 and very large and small numbers with up to 28
decimal places.
• Currency (stores accurate values with cents) and assigns the currency symbol ($).
• Date/time in MM/DD/YY (Month/Day/Year) format performs accurate date and time arithmetic.
• Memo Data is much like text, however it is used for long comments (64,000 characters long).
• Autonumber consists of a number (no decimals) that is automatically incremented by 1 in Access. This can
guarantee uniqueness, for you cannot edit this field. As far as I can tell it can only start at 1 and is alwaysincremented by 1. However a variation exists where one can specify that the autonumber is a random number inthe - 2 billion to plus 2 billion number range (long integer type).
• Yes/No Limits the values stored to Yes or No.
• OLE object data allows fields created in other software (e.g. pictures, drawings, voice messages etc.) to be
stored, but not modified in Access.
Two additional, rather complex but very powerful data types are possible. They are:
• Hyperlink (The following was copied from Access help – Function key F1).
Text or combinations of text and numbers stored as text and used as ahyperlink address. A hyperlink address can have up to three parts:
text to display — the text that appears in a field orcontrol.
address — the path to a file (UNC path) or page (URL).
subaddress — a location within the file or page.
screentip — the text displayed as a tooltip.
The easiest way to insert a hyperlink address in a fieldor control is to click Hyperlink on the Insert menu.
For more information, see Type a hyperlink address inForm view or Datasheet view.
Each part of the three parts of aHyperlink data type can contain up to2048 characters
• Lookup wizard (The following was copied from Access)
LookupWizard
Creates a field that allows you to choose a value from another table or from a list of values by using a list box or combo box. Clicking thisoption starts the Lookup Wizard, which creates a Lookup field. After
you complete the wizard, Microsoft Access sets the data type based onthe values selected in the wizard.
The same size as the primarykey field used to perform thelookup, typically 4 bytes
Field Description. This is an optional field that can be up to 255 characters long. Use this to document your tablestructure.
Field Size. Assigns maximum field length, but is only used for Text and Number fields. However you really onlyneed to concern yourself with length for Text fields. For number fields: If a whole number like social insurancenumber, use Long Integer. For a value that has decimal places use Double. For more information turn to Data typesand Field sizes under Access help.
Format. Enables you to specify how the data is to be displayed and or printed e.g. Currency - 2 decimal places, Shortor Long Date format.
Access notes. Author: Leo Kerklaan - McGill University – Montreal, PQ, Canada Page 4 of 16 November 1999
7/27/2019 Microsoft Access Tables Chapt 2
http://slidepdf.com/reader/full/microsoft-access-tables-chapt-2 5/16
Chapter 2 – Tables. Creating, Browsing, Importing, Linking
Input Mask . Specifies how the data is be entered over a mask.Examples: (000)-000-0000. “A” letter or digit entry required. “C” any character or space, but nothing else.
Caption. Label that will be used as column heading in a query and or report instead of the field name. Default value. Access will automatically insert whatever is specified. e.g. today’s date (=Date()). Validation Rule. Data must meet the limitations as per specified rules. e.g. Value must not be less than $6.00.
More examples follow. Validation Text. The message that will be displayed if validation rule is violated. Required. If yes then user must enter a value, i.e. field cannot be left blank. Allow zero length. If allowed, text with no length e.g. “” is permitted. Indexed. Maintains an index on all the values of this field to speed up searches and links.
A good rule of thumb as to whether or not to assign an index is:
• It must be assigned to all primary key and linked fields in a relationship.
• If one does frequent searches and or sorts on this field.
Note: If you index a field, you will be prompted as to whether or not duplicate keys are allowed. If noduplicate values are permitted then the field can be assigned a primary key.
Additional Field property notes. Acceptable data entry formats are: 5/14/94, 5/14/1994, May 14, 1994, May 4, 1994, May 14. Note: 5/14/00 is
assumed to be May 14, 2000. Time is entered as 16:00:00 or 16:00. All dates and times can be formatted
(displayed) with a number of short and long date and time formats. Validation rules examples: <> 0 ; 10 OR 900 ; Like “Montr???” ; <= #12/31/96# etc.. Null Values. If you do not type a value, Access stores a “Null” value in the field. Note: To seek out a null value, in
the criteria cell of the query specify Null. See example in the Query chapter.
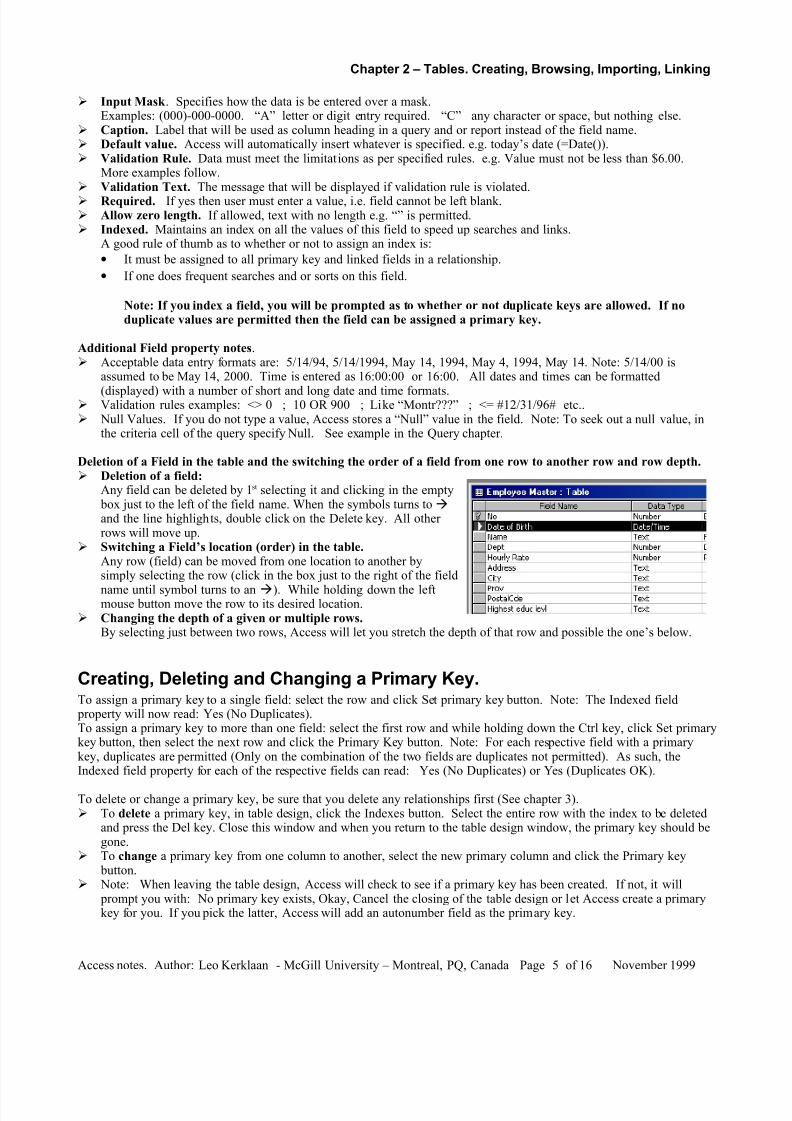
Deletion of a Field in the table and the switching the order of a field from one row to another row and row depth.
Deletion of a field:Any field can be deleted by 1st selecting it and clicking in the empty box just to the left of the field name. When the symbols turns to and the line highlights, double click on the Delete key. All other rows will move up.
Switching a Field’s location (order) in the table.Any row (field) can be moved from one location to another bysimply selecting the row (click in the box just to the right of the field
name until symbol turns to an ). While holding down the leftmouse button move the row to its desired location.
Changing the depth of a given or multiple rows.By selecting just between two rows, Access will let you stretch the depth of that row and possible the one’s below.
Creating, Deleting and Changing a Primary Key.To assign a primary key to a single field: select the row and click Set primary key button. Note: The Indexed field property will now read: Yes (No Duplicates).To assign a primary key to more than one field: select the first row and while holding down the Ctrl key, click Set primarykey button, then select the next row and click the Primary Key button. Note: For each respective field with a primarykey, duplicates are permitted (Only on the combination of the two fields are duplicates not permitted). As such, theIndexed field property for each of the respective fields can read: Yes (No Duplicates) or Yes (Duplicates OK).
To delete or change a primary key, be sure that you delete any relationships first (See chapter 3). To delete a primary key, in table design, click the Indexes button. Select the entire row with the index to be deleted
and press the Del key. Close this window and when you return to the table design window, the primary key should begone.
To change a primary key from one column to another, select the new primary column and click the Primary key button.
Note: When leaving the table design, Access will check to see if a primary key has been created. If not, it will prompt you with: No primary key exists, Okay, Cancel the closing of the table design or let Access create a primarykey for you. If you pick the latter, Access will add an autonumber field as the primary key.
Access notes. Author: Leo Kerklaan - McGill University – Montreal, PQ, Canada Page 5 of 16 November 1999
7/27/2019 Microsoft Access Tables Chapt 2
http://slidepdf.com/reader/full/microsoft-access-tables-chapt-2 6/16
Chapter 2 – Tables. Creating, Browsing, Importing, Linking
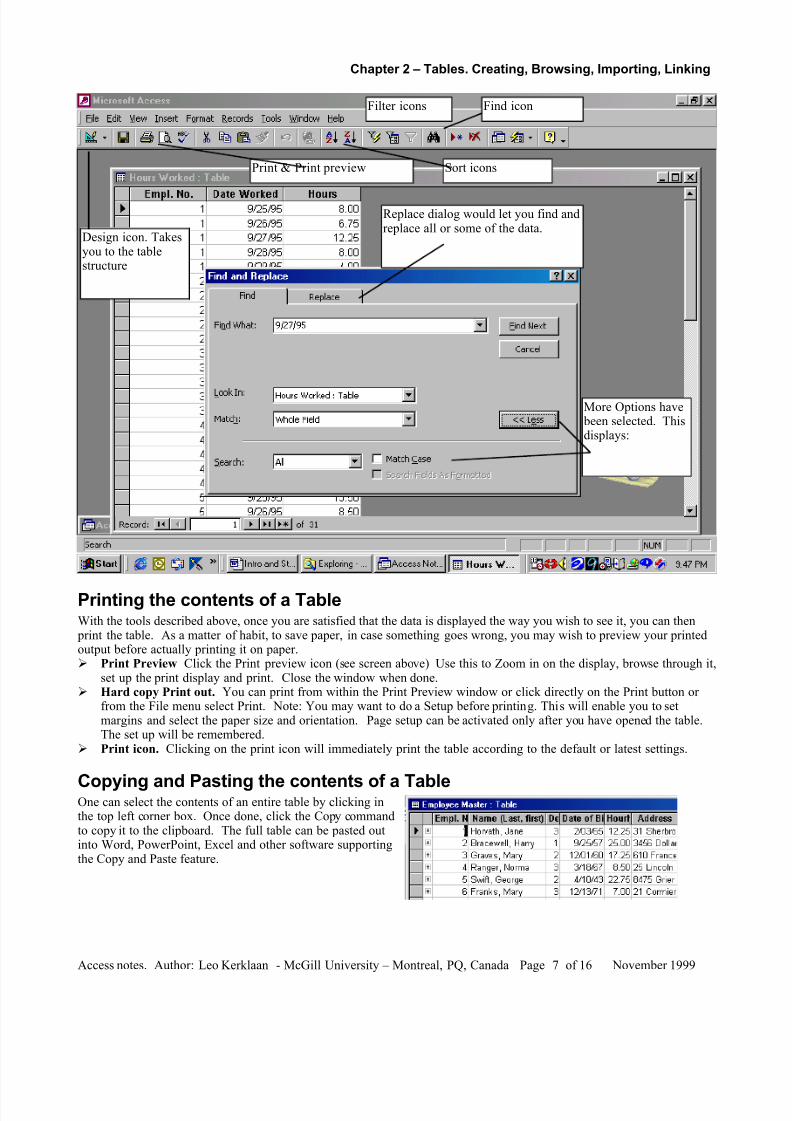
Viewing the contents of a TableFrom the Database - Table dialog, Open the required table. This presents the Datasheet View window. This windowdisplays the contents of the table in spreadsheet like format. The Menu and icons displayed also take on a display to assistyou with scrolling through the table. As well, you can filter the data you may wish to display. Navigation button: You will find navigation buttons at the bottom of the screen to move through the records
quickly. The following symbols do the following:
|< First record < Previous > Next >| Last record Scroll up and down the table. If the table has enough rows, you can utilize the scroll bars to the right to move up
and down. Add a New Record. Use the “>*” icon to add a new record to the table. You can also use menu Records - Go To -
New. Delete a Record. There are numerous ways of deleting a record. Note: The record is not physically deleted, but
flagged as having been deleted. The methods to delete are: First select the entire record (click leftmost column).Use the Cut icon From the menu select Edit - Delete Hit the Del keyUsing the right mouse button, select Cut.
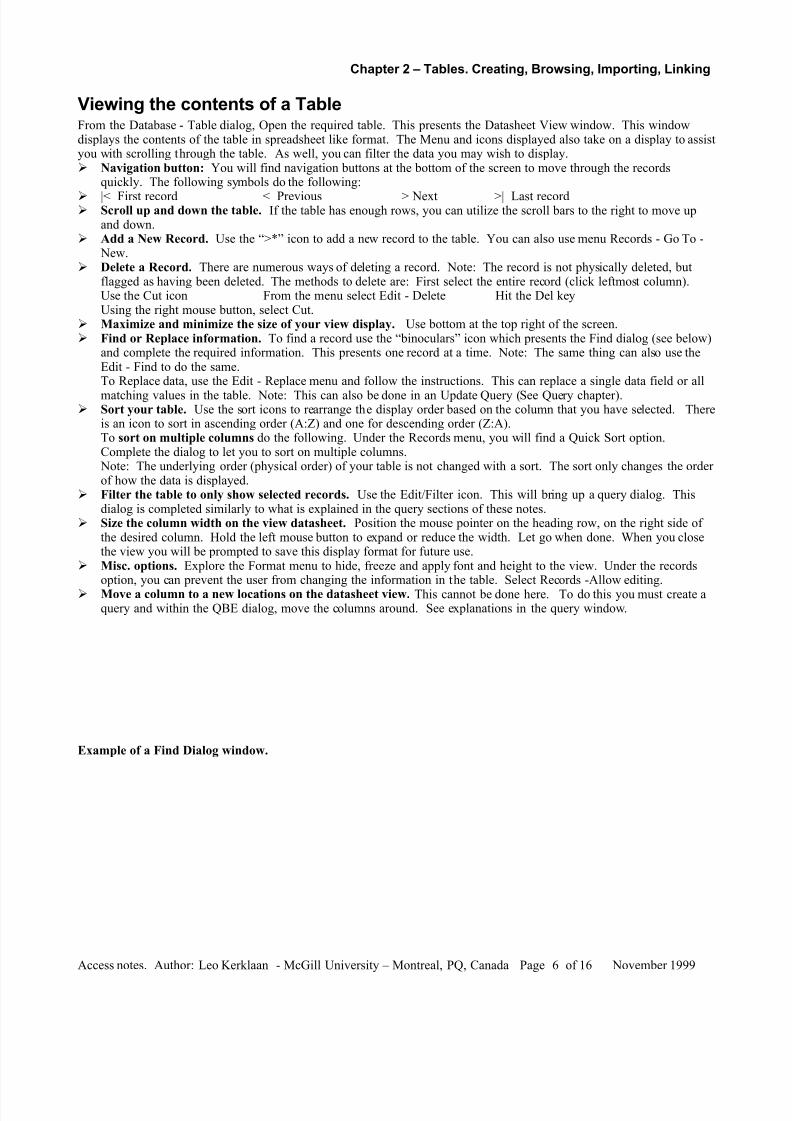
Maximize and minimize the size of your view display. Use bottom at the top right of the screen. Find or Replace information. To find a record use the “binoculars” icon which presents the Find dialog (see below)
and complete the required information. This presents one record at a time. Note: The same thing can also use theEdit - Find to do the same.To Replace data, use the Edit - Replace menu and follow the instructions. This can replace a single data field or all
matching values in the table. Note: This can also be done in an Update Query (See Query chapter). Sort your table. Use the sort icons to rearrange the display order based on the column that you have selected. There
is an icon to sort in ascending order (A:Z) and one for descending order (Z:A).To sort on multiple columns do the following. Under the Records menu, you will find a Quick Sort option.Complete the dialog to let you to sort on multiple columns. Note: The underlying order (physical order) of your table is not changed with a sort. The sort only changes the order of how the data is displayed.
Filter the table to only show selected records. Use the Edit/Filter icon. This will bring up a query dialog. Thisdialog is completed similarly to what is explained in the query sections of these notes.
Size the column width on the view datasheet. Position the mouse pointer on the heading row, on the right side of the desired column. Hold the left mouse button to expand or reduce the width. Let go when done. When you closethe view you will be prompted to save this display format for future use.
Misc. options. Explore the Format menu to hide, freeze and apply font and height to the view. Under the recordsoption, you can prevent the user from changing the information in the table. Select Records -Allow editing.
Move a column to a new locations on the datasheet view. This cannot be done here. To do this you must create aquery and within the QBE dialog, move the columns around. See explanations in the query window.
Example of a Find Dialog window.
Access notes. Author: Leo Kerklaan - McGill University – Montreal, PQ, Canada Page 6 of 16 November 1999
7/27/2019 Microsoft Access Tables Chapt 2
http://slidepdf.com/reader/full/microsoft-access-tables-chapt-2 7/16
Chapter 2 – Tables. Creating, Browsing, Importing, Linking
Printing the contents of a TableWith the tools described above, once you are satisfied that the data is displayed the way you wish to see it, you can then print the table. As a matter of habit, to save paper, in case something goes wrong, you may wish to preview your printedoutput before actually printing it on paper. Print Preview Click the Print preview icon (see screen above) Use this to Zoom in on the display, browse through it,
set up the print display and print. Close the window when done. Hard copy Print out. You can print from within the Print Preview window or click directly on the Print button or
from the File menu select Print. Note: You may want to do a Setup before printing. This will enable you to setmargins and select the paper size and orientation. Page setup can be activated only after you have opened the table.The set up will be remembered.
Print icon. Clicking on the print icon will immediately print the table according to the default or latest settings.
Copying and Pasting the contents of a TableOne can select the contents of an entire table by clicking inthe top left corner box. Once done, click the Copy commandto copy it to the clipboard. The full table can be pasted outinto Word, PowerPoint, Excel and other software supportingthe Copy and Paste feature.
Access notes. Author: Leo Kerklaan - McGill University – Montreal, PQ, Canada Page 7 of 16 November 1999
More Options have been selected. Thisdisplays:
Replace dialog would let you find andreplace all or some of the data.
Find icon
Sort icons
Filter icons
Design icon. Takesyou to the tablestructure
Print & Print preview
7/27/2019 Microsoft Access Tables Chapt 2
http://slidepdf.com/reader/full/microsoft-access-tables-chapt-2 8/16
Chapter 2 – Tables. Creating, Browsing, Importing, Linking
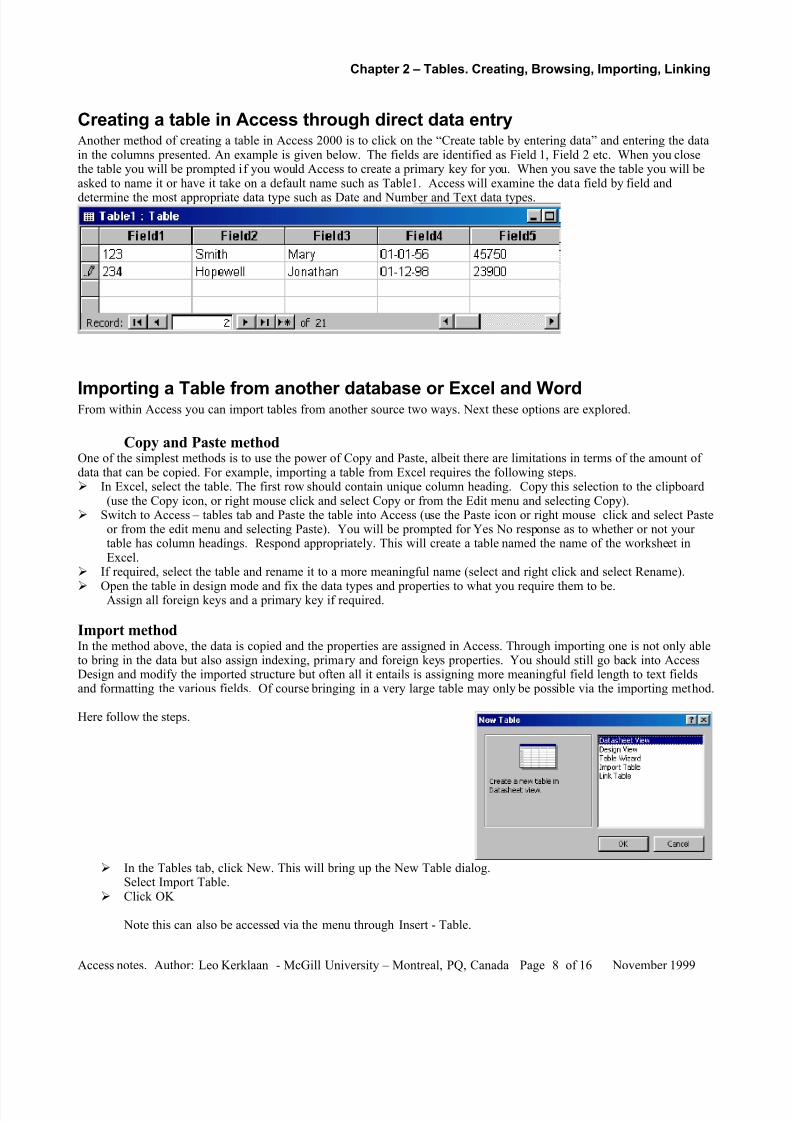
Creating a table in Access through direct data entryAnother method of creating a table in Access 2000 is to click on the “Create table by entering data” and entering the datain the columns presented. An example is given below. The fields are identified as Field 1, Field 2 etc. When you closethe table you will be prompted if you would Access to create a primary key for you. When you save the table you will beasked to name it or have it take on a default name such as Table1. Access will examine the data field by field and
determine the most appropriate data type such as Date and Number and Text data types.
Importing a Table from another database or Excel and WordFrom within Access you can import tables from another source two ways. Next these options are explored.
Copy and Paste methodOne of the simplest methods is to use the power of Copy and Paste, albeit there are limitations in terms of the amount of data that can be copied. For example, importing a table from Excel requires the following steps. In Excel, select the table. The first row should contain unique column heading. Copy this selection to the clipboard
(use the Copy icon, or right mouse click and select Copy or from the Edit menu and selecting Copy). Switch to Access – tables tab and Paste the table into Access (use the Paste icon or right mouse click and select Paste
or from the edit menu and selecting Paste). You will be prompted for Yes No response as to whether or not your table has column headings. Respond appropriately. This will create a table named the name of the worksheet inExcel.
If required, select the table and rename it to a more meaningful name (select and right click and select Rename).
Open the table in design mode and fix the data types and properties to what you require them to be.Assign all foreign keys and a primary key if required.
Import methodIn the method above, the data is copied and the properties are assigned in Access. Through importing one is not only ableto bring in the data but also assign indexing, primary and foreign keys properties. You should still go back into AccessDesign and modify the imported structure but often all it entails is assigning more meaningful field length to text fieldsand formatting the various fields. Of course bringing in a very large table may only be possible via the importing method.
Here follow the steps.
In the Tables tab, click New. This will bring up the New Table dialog.Select Import Table.
Click OK
Note this can also be accessed via the menu through Insert - Table.
Access notes. Author: Leo Kerklaan - McGill University – Montreal, PQ, Canada Page 8 of 16 November 1999

7/27/2019 Microsoft Access Tables Chapt 2
http://slidepdf.com/reader/full/microsoft-access-tables-chapt-2 9/16
Chapter 2 – Tables. Creating, Browsing, Importing, Linking
Access notes. Author: Leo Kerklaan - McGill University – Montreal, PQ, Canada Page 9 of 16 November 1999
7/27/2019 Microsoft Access Tables Chapt 2
http://slidepdf.com/reader/full/microsoft-access-tables-chapt-2 10/16
Chapter 2 – Tables. Creating, Browsing, Importing, Linking
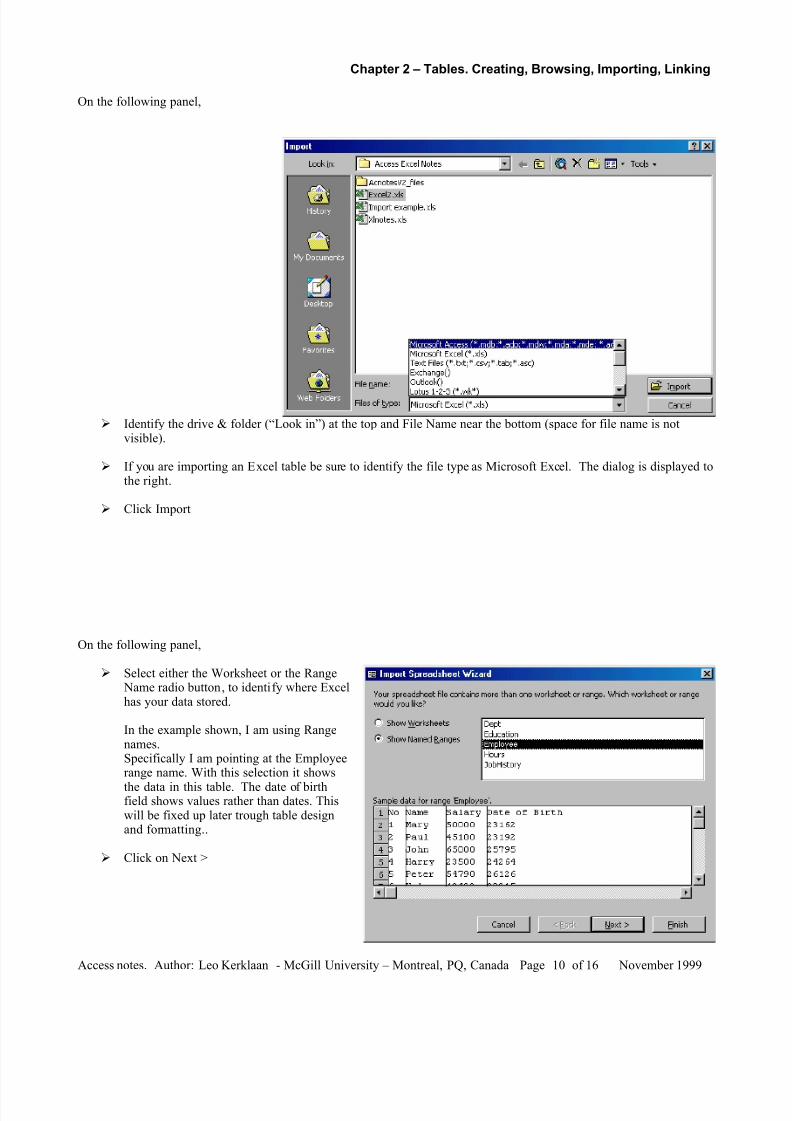
On the following panel,
Identify the drive & folder (“Look in”) at the top and File Name near the bottom (space for file name is notvisible).
If you are importing an Excel table be sure to identify the file type as Microsoft Excel. The dialog is displayed tothe right.
Click Import
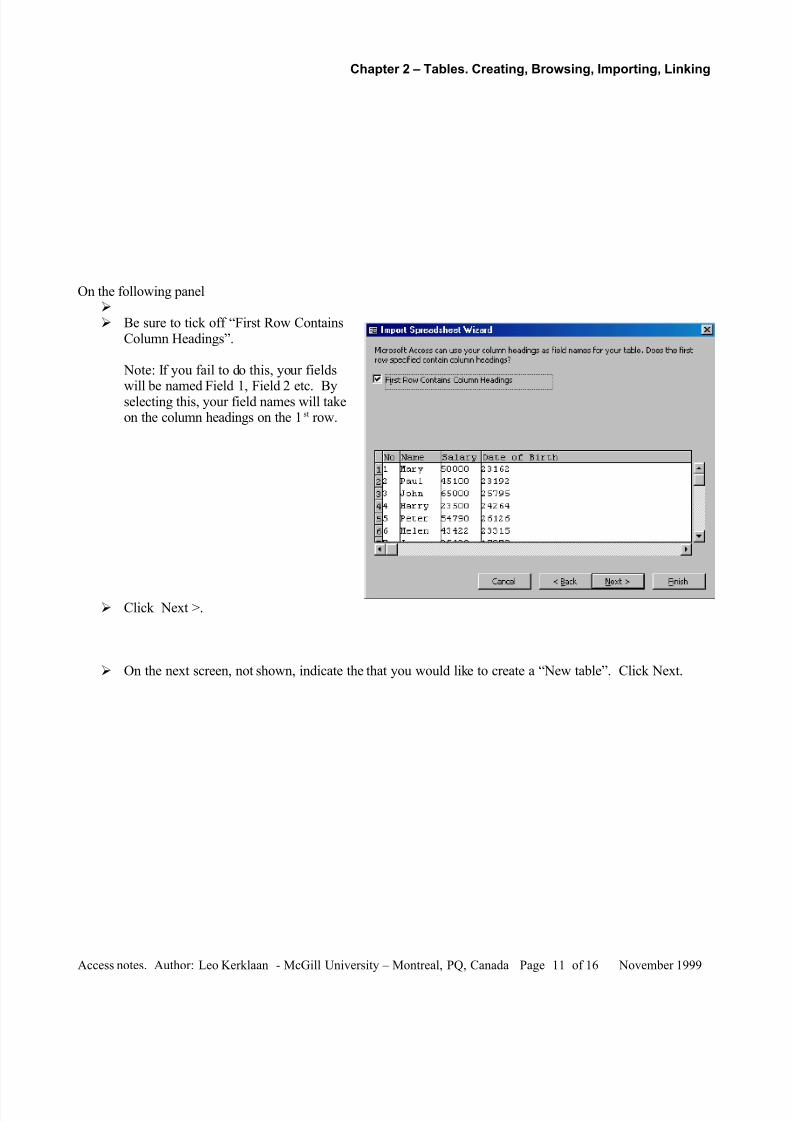
On the following panel,
Select either the Worksheet or the Range Name radio button, to identify where Excelhas your data stored.
In the example shown, I am using Rangenames.Specifically I am pointing at the Employeerange name. With this selection it shows
the data in this table. The date of birthfield shows values rather than dates. Thiswill be fixed up later trough table designand formatting..
Click on Next >
Access notes. Author: Leo Kerklaan - McGill University – Montreal, PQ, Canada Page 10 of 16 November 1999
7/27/2019 Microsoft Access Tables Chapt 2
http://slidepdf.com/reader/full/microsoft-access-tables-chapt-2 11/16
Chapter 2 – Tables. Creating, Browsing, Importing, Linking
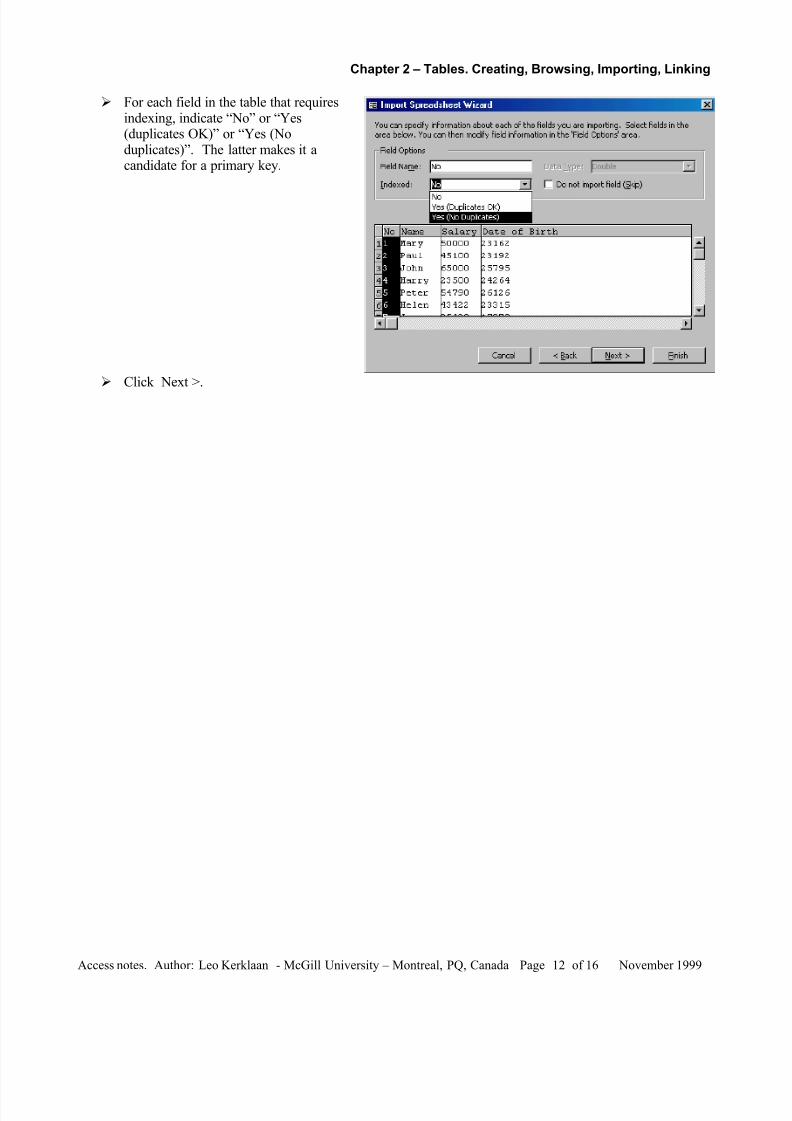
On the following panel
Be sure to tick off “First Row ContainsColumn Headings”.
Note: If you fail to do this, your fields
will be named Field 1, Field 2 etc. Byselecting this, your field names will takeon the column headings on the 1st row.
Click Next >.
On the next screen, not shown, indicate the that you would like to create a “New table”. Click Next.
Access notes. Author: Leo Kerklaan - McGill University – Montreal, PQ, Canada Page 11 of 16 November 1999
7/27/2019 Microsoft Access Tables Chapt 2
http://slidepdf.com/reader/full/microsoft-access-tables-chapt-2 12/16
Chapter 2 – Tables. Creating, Browsing, Importing, Linking
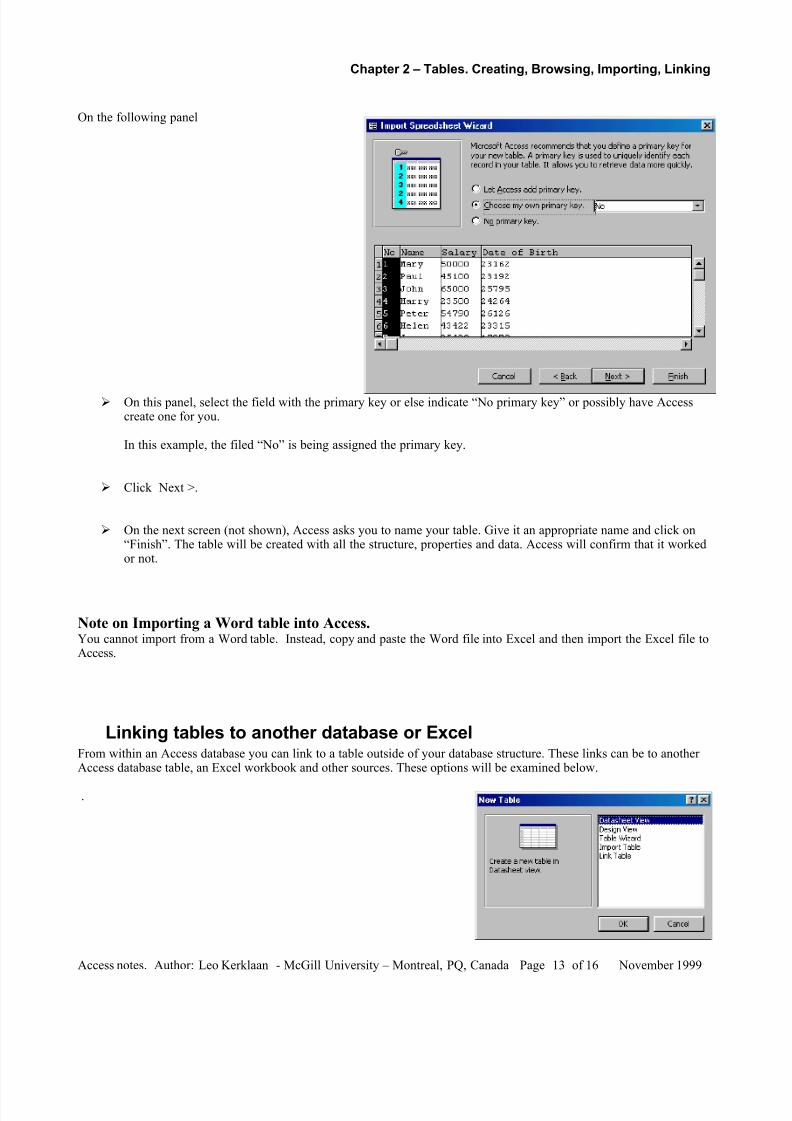
For each field in the table that requiresindexing, indicate “No” or “Yes(duplicates OK)” or “Yes (Noduplicates)”. The latter makes it acandidate for a primary key.
Click Next >.
Access notes. Author: Leo Kerklaan - McGill University – Montreal, PQ, Canada Page 12 of 16 November 1999
7/27/2019 Microsoft Access Tables Chapt 2
http://slidepdf.com/reader/full/microsoft-access-tables-chapt-2 13/16
Chapter 2 – Tables. Creating, Browsing, Importing, Linking
On the following panel
On this panel, select the field with the primary key or else indicate “No primary key” or possibly have Accesscreate one for you.
In this example, the filed “No” is being assigned the primary key.
Click Next >.
On the next screen (not shown), Access asks you to name your table. Give it an appropriate name and click on“Finish”. The table will be created with all the structure, properties and data. Access will confirm that it workedor not.
Note on Importing a Word table into Access.You cannot import from a Word table. Instead, copy and paste the Word file into Excel and then import the Excel file toAccess.
Linking tables to another database or ExcelFrom within an Access database you can link to a table outside of your database structure. These links can be to another Access database table, an Excel workbook and other sources. These options will be examined below.
.
Access notes. Author: Leo Kerklaan - McGill University – Montreal, PQ, Canada Page 13 of 16 November 1999

7/27/2019 Microsoft Access Tables Chapt 2
http://slidepdf.com/reader/full/microsoft-access-tables-chapt-2 14/16
Chapter 2 – Tables. Creating, Browsing, Importing, Linking
In the Tables tab, click New. This will bring up the New Table dialog.Select Link table.
Click OK
Note this can also be accessed via the menu through Insert - Table.
Access notes. Author: Leo Kerklaan - McGill University – Montreal, PQ, Canada Page 14 of 16 November 1999
7/27/2019 Microsoft Access Tables Chapt 2
http://slidepdf.com/reader/full/microsoft-access-tables-chapt-2 15/16
Chapter 2 – Tables. Creating, Browsing, Importing, Linking
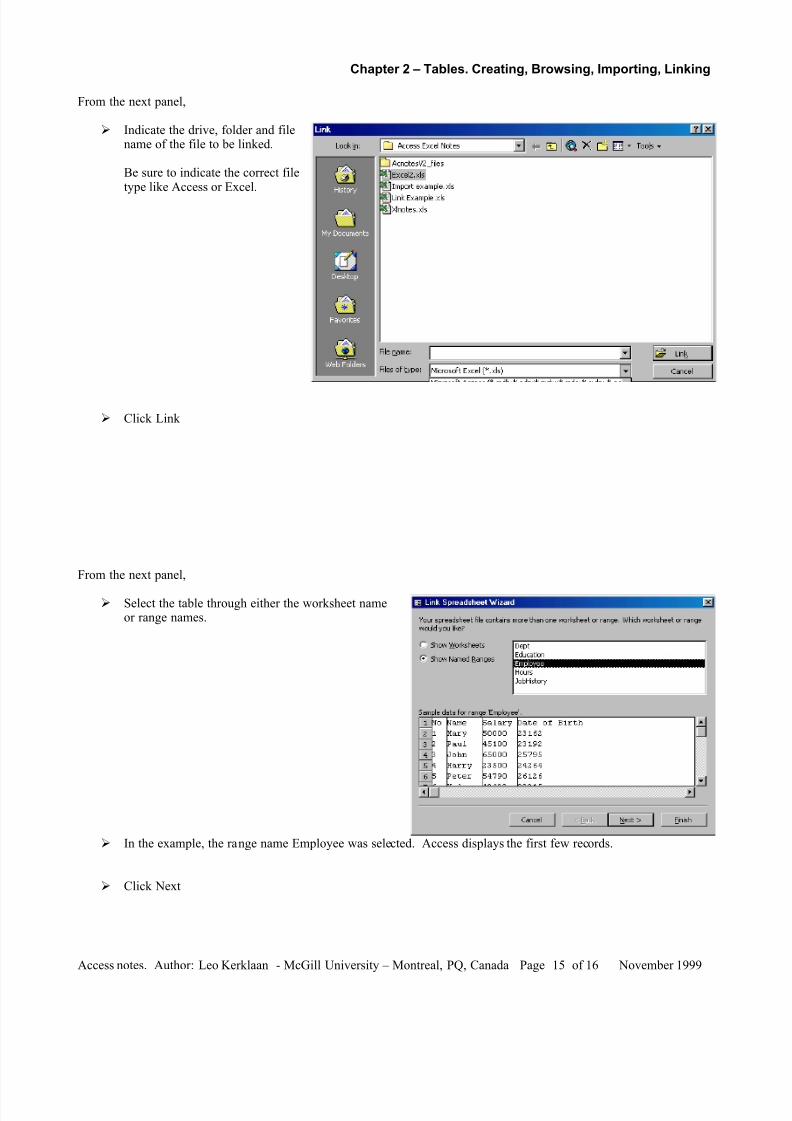
From the next panel,
Indicate the drive, folder and filename of the file to be linked.
Be sure to indicate the correct filetype like Access or Excel.
Click Link
From the next panel,
Select the table through either the worksheet nameor range names.
In the example, the range name Employee was selected. Access displays the first few records.
Click Next
Access notes. Author: Leo Kerklaan - McGill University – Montreal, PQ, Canada Page 15 of 16 November 1999
7/27/2019 Microsoft Access Tables Chapt 2
http://slidepdf.com/reader/full/microsoft-access-tables-chapt-2 16/16
Chapter 2 – Tables. Creating, Browsing, Importing, Linking
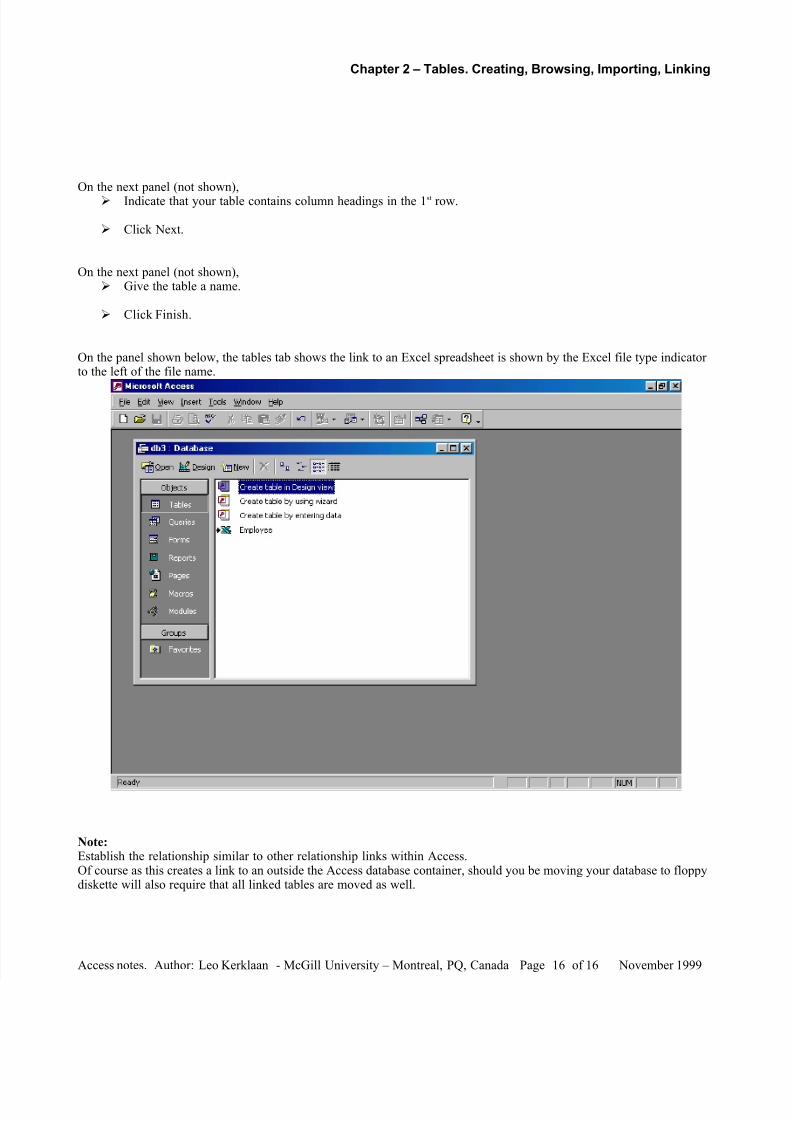
On the next panel (not shown), Indicate that your table contains column headings in the 1 st row.
Click Next.
On the next panel (not shown), Give the table a name.
Click Finish.
On the panel shown below, the tables tab shows the link to an Excel spreadsheet is shown by the Excel file type indicator to the left of the file name.
Note:Establish the relationship similar to other relationship links within Access.Of course as this creates a link to an outside the Access database container, should you be moving your database to floppydiskette will also require that all linked tables are moved as well.
Access notes. Author: Leo Kerklaan - McGill University – Montreal, PQ, Canada Page 16 of 16 November 1999