Embed Size (px)
Citation preview

1
Owner’s Manual
Mini 40
Micro 30L

TA
BL
E O
F C
ON
TE
NT
S
TABLE OF CONTENTS Important Safety Instructions 3-5 Parts—Exploded View & Identification Micro 30L 6 Mini 40 7 Introduction Micro 30L 8-9 Mini 40 10-11 Micro 30L Cabinet Stand Cabinet Panels 12 Hardware Included 13 Instructions 14-21 Mini 40 Cabinet Stand Cabinet Panels 22 Hardware Included 23 Instructions 24-31 Maintenance Procedures 32-33 Warranty Information 34 Owners Product Information 35
2

IMP
OR
TA
NT
SA
FE
TY
IN
ST
RU
CT
ION
S
3
WARNING To guard against injury, basic safety precautions should be observed including the following: READ ALL SAFETY INSTRUCTIONS BEFORE USE. To avoid electric shock, special care should be taken since water is employed in the use of aquarium equipment. For each of the following situations, do not attempt to repair yourself. Return the appliance to an authorized service facility for service or discard the appliance. If the appliance falls into water, DO NOT reach for it! First unplug
it and then retrieve it. If the electrical components of the appli-ance get wet, unplug the appliance immediately.
Carefully examine the appliance after installation. It should not be plugged in if there is water on parts not intended to be wet.
Do not operate any appliance if it has a damaged cord or plug, or if it is malfunctioning or if it is dropped or damaged in any man-ner.
To avoid the possibility of the appliance plug or receptacle getting wet, position aquarium to one side of a wall mounted receptacle to prevent water from dripping onto the receptacle plug. A “Drip Loop” should be arranged by the user for EACH cord connecting an aquarium appliance to a recepta-cle. The “Drip Loop” is that part of the cord below the level of the re-ceptacle or the connector if an ex-tension cord is used. This “Drip Loop” prevents water travelling along the cord and coming in con-tact with the receptacle. If the plug or the receptacle do get wet DO NOT unplug the cord. Disconnect the fuse to the circuit breaker that supplies power to the appliance. Then unplug and examine for the presence of water in the receptacle.
Close supervision is necessary when any appliance is used by or near children.
To avoid injury, do not contact moving parts or hot parts such as heaters, reflectors, lamps bulbs and etc.
Always unplug an appliance from the outlet when not in use, be-fore putting on or taking off parts, and before cleaning. Never yank the cord to pull plug from outlet. Grasp the plug and pull to disconnect.

4
IMP
OR
TA
NT
SA
FE
TY
IN
ST
RU
CT
ION
S
Do not use an appliance for other than intended use. The use of attachments not recommended or sold by the appliance manufacturer may cause an unsafe condition.
Make sure an appliance mounted on a tank is securely installed before operating it.
Read and observe all the important notices on the appliance. This appliance has a polarized plug (one blade is wider than
the other). As a safety feature, this plug will fit in a polarized outlet only one way. If the plug does not fit fully in the outlet, reverse the plug. If it still does not fit, contact a qualified electri-cian. Never use with an extension cord unless plug can be fully inserted. Do not attempt to defeat this safety feature.
This appliance is intended FOR HOUSEHOLD USE ONLY. FINDING A LOCATION Find a location that can handle the weight of your NUVO Fusion Do not install or store the aquarium where it will be exposed to
the weather or to temperatures below freezing. Do not place aquarium in direct sunlight or near heater vents. We recommend ambient room temperature around 25° C/ 77° F. Place aquarium 5-6” away from the wall to allow access to the
back if needed Make sure surrounding appliances are waterproof and move
anything that might be damaged by salt creep. ASSEMBLY Upon arrival please check tank and/or stand for missing parts If
parts are missing, please contact Innovative Marine for further assistance. 1-866-368-7941.

IMP
OR
TA
NT
SA
FE
TY
IN
ST
RU
CT
ION
S
PLACING AND LEVELING YOUR NUVO AQUARIUM Make sure your NUVO is set on a level surface to prevent undue
stress on the aquarium tank from stress and leaks. It is not recommended that this aquarium is set upon coffee ta-
bles, end tables, TV stands, or night stands unless the structure has been properly tested to withstand the weight limits of the aquarium.
Please pay special attention when leveling your aquarium on car-pet.
Before lifting your aquarium, make sure your stand is in position and your leveling mat is properly adhered to the top of your stand.
Lifting the glass aquarium onto its stand will require more than two people. Please use proper lifting techniques when lifting large heavy objects.
Lift from the bottom of the aquarium DO NOT lift using the aquari-ums’ glass edges this will cause stress on the glass and seals and may cause leakage.
The back of the aquarium should be flush with your stand and all four corners are not overhanging the edges.
Once you have placed your aquarium atop your stand, make sure your stand has not moved from its position.
Place a level on edge of tank, if necessary readjust and reposi-tion tank and stand.
LEAK TESTING AND FILLING YOUR NUVO AQUARIUM Find a good location to test your aquarium. Your location should be level, flat and should not be in a place
where can be damaged in case of a leak. (Garage or covered patio)
Slowly fill your aquarium from the display portion of the tank and let the water naturally enter the overflows.
Plug in your pumps and continue adding water until your water line reaches about 1” under the last baffle wall in the back of the aquarium
Check every 8 hours over the next 24 hours for leaks. If any leaks have been detected please contact your authorized Innovative Marine Dealer immediately.
5

PA
RT
S
Exp
lod
ed V
iew
Micro 30L
# Description Item Code
1 Glass Tank 30 Gallons 040501
2 Filter Basket Door 000008
3 Phosphate Filter Sponge 000010
4 Activated Carbon Sponge 000010
5 Mechanical Filter Sponge 000010
6 Filter Basket 000008
7 Mesh Screen Clips 000015
8 30 Gallon Pump 040001
9 “Y” Connector 030002
10 Return Hose 030002
11 Return Elbows 030002
12 Return Nozzle 000012
13 Mesh Screen Top 040504
Model #: 0405
6

PA
RT
S
Exp
lod
ed V
iew
Mini 40
Model #: 0505
# Description Item Code
1 Glass Tank 40 Gallons 050501
2 Filter Basket Door 000008
3 Phosphate Filter Sponge 000010
4 Activated Carbon Sponge 000010
5 Mechanical Filter Sponge 000010
6 Filter Basket 000008
7 Mesh Screen Clips 000015
8 40 Gallon Pump 040001
9 “Y” Connector 030002
10 Return Hose 030002
11 Return Elbows 030002
12 Return Nozzle 000012
13 Mesh Screen Top 050404
7

Micro 30L
Features: DIMS: Length 35.43” Width: 14.96” Height: 12.99” 8mm High Clarity Low Iron Glass Mesh Screen Top with Clips Dual Built-in Overflows Rubber Leveling Mat (2) - Removable 3 Stage Filter Baskets (1) - 45W 110v/60Hz 476 GPH Return Pump Includes flexible hose and return elbows with Dual Directional Flow Nozzle
INT
RO
DU
CT
ION
Channel your inner artist and expand your reef keeping possibilities with the NUVO Fusion 30L. 36 inches of unobstructed viewing allows you to create panoramic aquascapes never seen before. Elegance and beauty come together with a purpose to stand apart. We have upscaled our luxurious midsize aquariums by merging the premium features of our Full Size SR-Series aquariums with the Award Winning customizable filtration system of our NUVOs. This perfect blend gives you 10-15% more room for aquascaping, the highest clarity viewing, a screen lid that removes excess heat and provides maximum light penetration, and the cleanest and clearest water possible.
8

INT
RO
DU
CT
ION
Micro 30L FILTRATION
2
3
4
1 1 2
1. 3 Stage Filter Column 2. Skimmer & Media Reactor Column 3. Return Pump/Water Reservoir Column (ATO Sensor Column) 4. Removable 3 Stage Filter Media Basket (Heater, Skimmer, Media Reactor not included)
2
2
3
4
1 1
9

Mini 40
10
Features: DIMS: Length: 23.62” Width: 19.68” Height: 18.89” 8mm High Clarity Low Iron Glass Mesh Screen Top with Clips Dual Built-in Overflows Rubber Leveling Mat (2) - Removable 3 Stage Filter Baskets (1) - 45W 110v/60Hz 476 GPH Return Pump Includes flexible hose and return elbows with Dual Directional Flow Nozzles
INT
RO
DU
CT
ION
The NUVO Fusion 40 represents everything we love about Reef Keeping and features that will boost your hobby’s experience to the next level; it’s not just the next aquarium, but what the next aquarium should be. We have upscaled our luxurious midsize aquariums by merging the premium features of our Full Size SR-Series aquariums with the Award Winning customizable filtration system of our NUVOs. This perfect blend gives you 10-15% more room for aquascaping, the highest clarity viewing, a screen lid that removes excess heat and provides maximum light penetration, and the cleanest and clearest water possible.

INT
RO
DU
CT
ION
Mini 40 FILTRATION
2
3
4
1 1 2
2
2
3
1. 3 Stage Filter Column 2. Skimmer & Media Reactor Column 3. Return Pump/Water Reservoir Column (ATO Sensor Column) 4. Removable 3 Stage Filter Media Basket (Heater, Skimmer, Media Reactor not included)
4
1 1
11

Mic
ro 3
0L
CA
BIN
ET
ST
AN
D
Micro 30L Cabinet Stand
# Description
1 Upper Back Panel
2 Lower Back Panel
3 Left Side Panel
4 Center Panel
5 Right Side Panel
6 Front Support Beam
7 Top Panel
8 Bottom Panel
9 Left Storage Shelf
10 Right Storage Shelf
11 Left Cabinet Door
12 Right Cabinet Door
12
Micro
30L
CA
BIN
ET
ST
AN
D
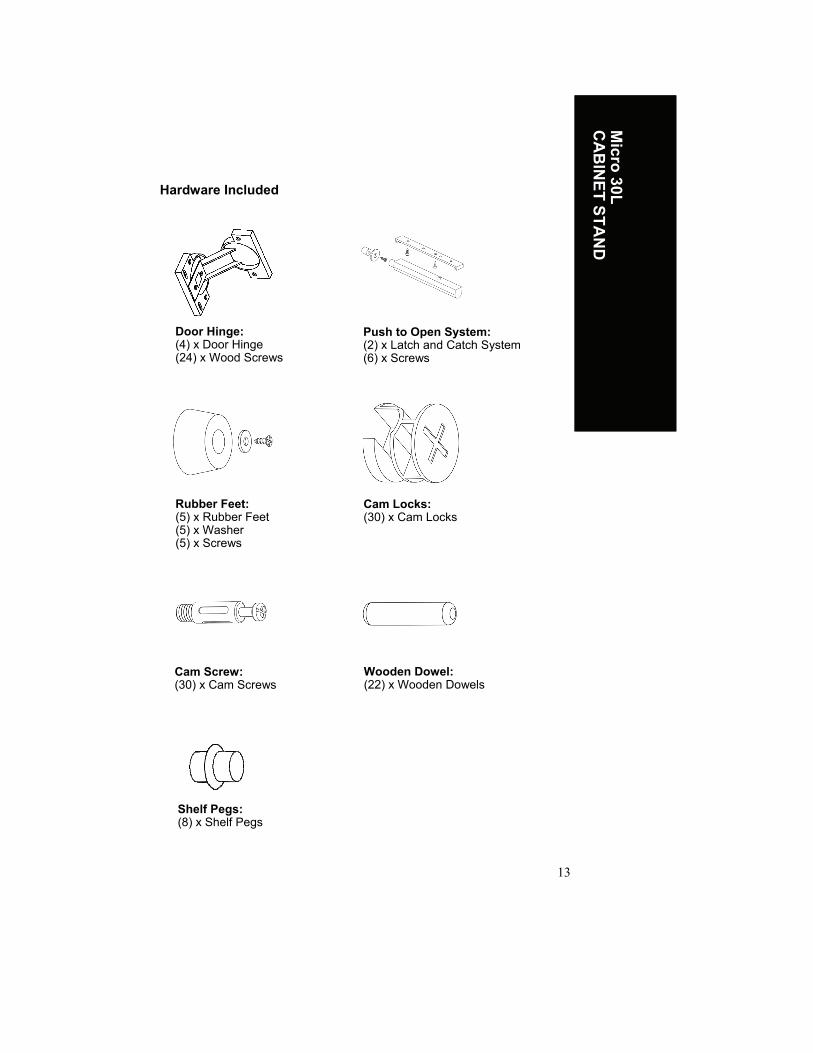
Hardware Included
Door Hinge: (4) x Door Hinge (24) x Wood Screws
Push to Open System: (2) x Latch and Catch System (6) x Screws
Cam Locks: (30) x Cam Locks
Rubber Feet: (5) x Rubber Feet (5) x Washer (5) x Screws
Cam Screw: (30) x Cam Screws
Wooden Dowel: (22) x Wooden Dowels
Shelf Pegs: (8) x Shelf Pegs
13

Assembled Stands M
icro
30L
C
AB
INE
T S
TA
ND
Step 1: Connect upper back panel to lower back panel.
Step 2: Screw in cam screws into the left side panel.
14

Micro
30L
CA
BIN
ET
ST
AN
D
Step 3: Attach left side panel onto back panel, insert cam locks and tighten clockwise.
Step 4: Screw in cam screws into the right side panel.
15

Mic
ro 3
0L
CA
BIN
ET
ST
AN
D
Step 5: Attach front support beam and right side panels insert cam locks and tighten clockwise.
Assembled Stands
Step 6: Insert wooden dowels and cam screws into top panel
16
Micro
30L
CA
BIN
ET
ST
AN
D
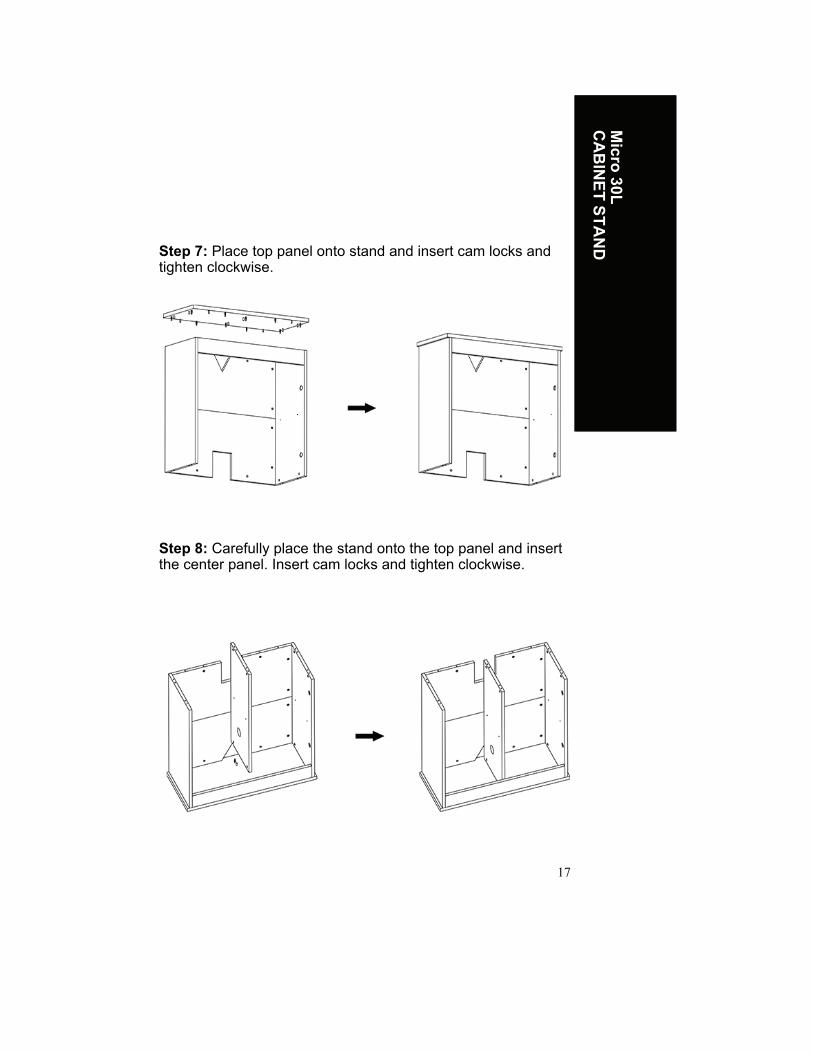
Step 8: Carefully place the stand onto the top panel and insert the center panel. Insert cam locks and tighten clockwise.
Step 7: Place top panel onto stand and insert cam locks and tighten clockwise.
17

Assembled Stands M
icro
30L
C
AB
INE
T S
TA
ND
Step 9: Insert wooden dowels and cam screws into bottom panel
Step 10: Place top panel onto stand and insert cam locks and tighten clockwise.
18

Micro
30L
CA
BIN
ET
ST
AN
D Step 11: Attach rubber feet to the bottom of the stand.
Step 12: Place stand on its rubber feet and attach push open latch to the interior of the stand.
19

Assembled Stands M
icro
30L
C
AB
INE
T S
TA
ND
Step 13: Insert shelf pegs and place left and right storage shelves a top of them.
Step 14: Attach door hinges and door catch to left and right doors.
20

Micro
30L
CA
BIN
ET
ST
AN
D Step 15: Attach the left and right cabinet door using wood
screws.
Step 16: Place your NUVO atop the stand
21

Min
i 40
CA
BIN
ET
ST
AN
D
Mini 40 Cabinet Stand
# Description
1 Back Panel
2 Left Side Panel
3 Center Panel
4 Right Side Panel
5 Front Support Beam
6 Top Panel
7 Bottom Panel
8 Left Storage Shelf
9 Right Storage Shelf
10 Left Cabinet Door
11 Right Cabinet Door
22

Min
i 40 C
AB
INE
T S
TA
ND
Hardware Included
Door Hinge: (4) x Door Hinge (24) x Wood Screws
Push to Open System: (2) x Latch and Catch System (6) x Screws
Cam Locks: (20) x Cam Locks
Rubber Feet: (4) x Rubber Feet (4) x Washer (4) x Screws
Cam Screw: (20) x Cam Screws
Wooden Dowel: (20) x Wooden Dowels
23
Shelf Pegs: (8) x Shelf Pegs

Assembled Stands M
ini 4
0
CA
BIN
ET
ST
AN
D
Step 1: Screw in cam screws into the left side panel.
Step 2: Attach left side panel onto back panel, insert cam locks and tighten clockwise.
24

Min
i 40 C
AB
INE
T S
TA
ND
Step 3: Screw in cam screws into the right side panel.
Step 4: Attach front support beam and right side panels insert cam locks and tighten clockwise.
25

Min
i 40
C
AB
INE
T S
TA
ND
Step 5: Insert wooden dowels and cam screws into top panel.
Assembled Stands
Step 6: Place top panel onto stand and insert cam locks and tighten clockwise.
26

Min
i 40 C
AB
INE
T S
TA
ND
Step 8: Insert wooden dowels and cam screws into bottom panel.
Step 7: Carefully place the stand onto the top panel and insert the center panel. Insert cam locks and tighten clockwise.
27
Assembled Stands M
ini 4
0
CA
BIN
ET
ST
AN
D
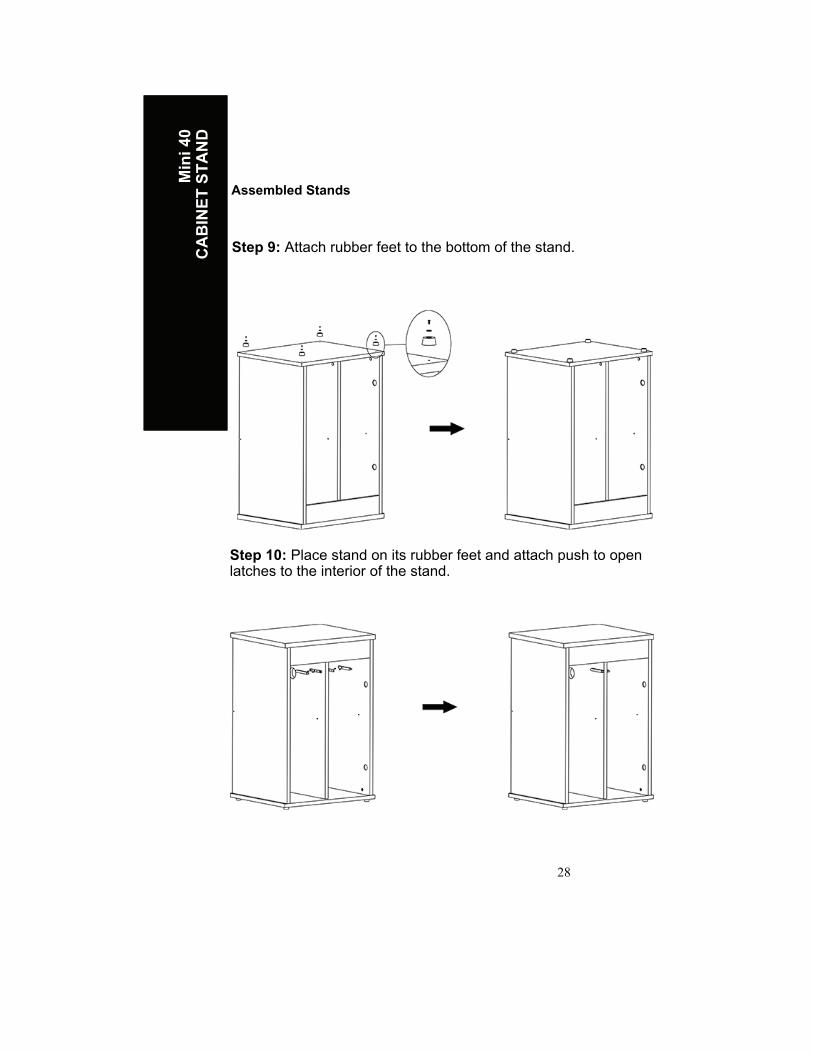
Step 9: Attach rubber feet to the bottom of the stand.
Step 10: Place stand on its rubber feet and attach push to open latches to the interior of the stand.
28

Step 11: Insert shelf pegs and place left and right storage shelves a top of them.
Min
i 40 C
AB
INE
T S
TA
ND
Step 12: Attach door hinges and door catch to left and right doors.
29

Assembled Stands M
ini 4
0
CA
BIN
ET
ST
AN
D
Step 13: Attach the left and right cabinet door using wood screws.
Step 14: Place your NUVO atop the stand
30

Min
i 40 C
AB
INE
T S
TA
ND
31

MA
INT
EN
AN
CE
WATER CHANGES
REPLACING FILTER MEDIA
Water changes should be performed once every 2 to 4 weeks depending on the bio-load. A minimum of a 25% water change is essential to keep dissolved organic to a minimum.
Filter Media should be replaced every month to remove trapped debris and free floating particulate matter.
Regular maintenance is necessary to keep successful aquarium. PLEASE NOTE: Unplug pump before water changes or replacing media.
Lift the Filter Basket out from the Filter Column. Slide the cover off of the filter basket Replace with the NUVO Aquarium Filter Media Pack.
We recommend using Innovative Marine’s Filter Media Pack (Part #000010 or #000011) for optimal fit and to prevent bypass that may occur by other manufactures filter media. PLEASE NOTE: Please rinse media under RO water to re-move any dust or debris that might have been collected while stored. First time use of a brand new filter media may cause increased protein skimming. Please monitor your protein skimmer so overflowing of your collection cup does not happen.
32

REPLACING/CLEANING PUMP & PUMP IMPELLER M
AIN
TE
NA
NC
E
Micro 30L & Mini 40 continued. Remove bottom pump cover. Disassemble the impeller holder coupling from pump
motor Lift out the impeller & shaft from pump motor
In order to maximize the life of your pump, it is crucial to perform the proper periodic maintenance at designated intervals. We recommend cleaning your pump and impellers every 2-4 weeks.
Micro 30L & Mini 40 Unplug pump from power strip Unplug both return elbows out from the return hole on filter
wall Raise each return elbow upward and remove pump from
filter chamber
33
LIM
ITE
D W
AR
RA
NT
Y
The Micro 30L & Mini 40 have a 1 YEAR limited warranty. The Micro 30L & Mini 40 is warranted to the original purchaser against defective material and workmanship for 1 YEAR from the date of original purchase. This warranty is valid only under the following conditions: additions, modifications, or changes made to the product by the purchaser and not by the manufacturer shall void this warranty. Damages brought on by abuse, misapplication, or mishandling also voids this warranty. This warranty is limited to the repair or replacement of the product at the discretion of the manufacturer. This warranty does not cover personal injury, property loss, including livestock or damage (direct, incidental, or consequential) arising out of use of this product. This warranty gives you specific rights and you may also have other rights, which may vary from state to state. The Product Registration Card must be filled out completely and returned within (14) days from the date of purchase. Failure to do so will void this warranty. A proof of purchase from an authorized dealer must be provided when making a warranty claim.
WARRANTY INFORMATION
LIMITED 1 YEAR WARRANTY - Micro 30L & Mini 40 Aquariums
For Warranty Claims please contact our Customer Care Department. 866-368-7941 A RMA# must be issued before sending any product back to Innovative Marine. Products sent back to Innovative Marine without a RMA# will not be accepted. Service on products will not extend the original warranty period.
Email: [email protected]
34

OW
NE
R’S
PR
OD
UC
T
INF
OR
MA
TIO
N
PRODUCT INFORMATION
MODEL #
AQUARIUM SERIAL #
DATE OF PURCHASE
Please keep your receipt in a safe place to ensure you have this information.
35

36
WWW.INNOVATIVE-MARINE.COM
A Division of