Embed Size (px)
Citation preview

A14858900A(8/99).00
355ProgrammablePrinterUser’s Guide

©Mettler-Toledo, Inc. 1999
No part of this manual may be reproduced or transmitted in any form or by any means, electronic ormechanical, including photocopying and recording, for any purpose without the express writtenpermission of Mettler-Toledo, Inc.
U.S. Government Restricted Rights: This documentation is furnished with Restricted Rights.

Part / Product Name:Part / Model Number: Date:
Provided By:
Customer Name:
Address:
Phone Number: Fax Number:
Your comments:
Do not write in space below. For METTLER TOLEDO use only. Response (if appropriate) and corrective action taken.
METTLER TOLEDO 355 User's Guide A14858900A 8/99
A12745800A
METTLER TOLEDOScales & Systems1900 Polaris ParkwayColumbus, Ohio 43240METTLER TOLEDO® is a registered trademark of Mettler-Toledo, Inc.
©1999 Mettler-Toledo, Inc.Printed in USA
If you have a problem with one of our products or publications, or just asuggestion on how we can serve you better, please fill out this form andsend it to the address on the opposite side of this page (U.S. postage paid),or fax it to us at (614) 438-4355. Your feedback will help us to improveproduct performance, quality, and service.
METTLER TOLEDO®
Customer Feedback Attention: Retail Quality Manager - MTWR

FOLD THIS FLAP FIRST
BUSINESS REPLY MAILFIRST CLASS PERMIT NO. 414 COLUMBUS, OH
POSTAGE WILL BE PAID BY ADDRESSEE
Mettler-Toledo, Inc.Retail Quality Manager - MTWRP.O. Box 1705Columbus, OH 43216USA
NO POSTAGENECESSARY IFMAILED IN THEUNITED STATES
Please seal with tape.

FCC NoticeThis device complies with Part 15 of the FCC Rules and the Radio InterferenceRequirements of the Canadian Department of Communications. Operation is subject tothe following conditions: (1) this device may not cause harmful interference, and (2)this device must accept any interference received, including interference that may causeundesired operation.
This equipment has been tested and found to comply with the limits for a Class A digitaldevice, pursuant to Part 15 of FCC Rules. These limits are designed to providereasonable protection against harmful interference when the equipment is operated in acommercial environment. This equipment generates, uses, and can radiate radiofrequency energy and, if not installed and used in accordance with the instructionmanual, may cause harmful interference to radio communications. Operation of thisequipment in a residential area is likely to cause harmful interference in which case theuser will be required to correct the interference at his own expense.
Publication RevisionHistory
Part Number Date Revisions
A14858900A 8/99 Add new features and Ethernet Information.

PRECAUTIONS
WARNINGFOR CONTINUED PROTECTION AGAINST SHOCK HAZARDCONNECT TO PROPERLY GROUNDED OUTLET ONLY. DO NOTREMOVE THE GROUND PRONG.
WARNINGDISCONNECT ALL POWER TO THIS UNIT BEFORE REMOVINGTHE FUSE OR SERVICING.
READ this manual BEFORE operating orservicing this equipment.
FOLLOW these instructions carefully.
SAVE this manual for future reference.
DO NOT allow untrained personnel tooperate, clean, inspect, maintain, service,or tamper with this equipment.
ALWAYS DISCONNECT this equipment fromthe power source before cleaning orperforming maintenance.
CALL METTLER TOLEDO for parts,information, and service.
CONTENTS
1 Introduction ..................................................................................................1-1General Description ............................................................................................................ 1-1Power Up ........................................................................................................................... 1-1Component and Control Locations........................................................................................ 1-2Displays............................................................................................................................. 1-3Keyboard ........................................................................................................................... 1-4
2 Labels ..........................................................................................................2-1Label Installation................................................................................................................ 2-1
3 Unit Set Up ...................................................................................................3-1Setup Overlay..................................................................................................................... 3-1Programming with the Preset/Setup Keyboard ...................................................................... 3-2Enter Unit Setup ................................................................................................................. 3-2Exit Unit Setup ................................................................................................................... 3-2Set the Time, Date, and Department .................................................................................... 3-3
Date Change....................................................................................................................... 3-3Time Change ...................................................................................................................... 3-3Department Change ............................................................................................................. 3-3
Time and Date Format......................................................................................................... 3-3Date Format........................................................................................................................ 3-3Time Format ....................................................................................................................... 3-4Date Separator .................................................................................................................... 3-4
PLU Preset ......................................................................................................................... 3-4Programming a Preset Key .................................................................................................... 3-4Preset Reaction ................................................................................................................... 3-4
Marquee ............................................................................................................................ 3-5Selecting Messages ............................................................................................................. 3-5Changing the Speed............................................................................................................. 3-5
Label Format ...................................................................................................................... 3-5Label Format Key................................................................................................................. 3-5Label Size Key .................................................................................................................... 3-7Quick Label Specification Keys .............................................................................................. 3-8
Enable Modify Functions ..................................................................................................... 3-9Verify Labels ...................................................................................................................... 3-9Programming Unit Password ............................................................................................. 3-10
4 Operation......................................................................................................4-1Basic Functions .................................................................................................................. 4-1
Zero (With optional scale) .................................................................................................... 4-1Clear.................................................................................................................................. 4-1Label Feed.......................................................................................................................... 4-1Time, Date, Department........................................................................................................ 4-2Calling a PLU and Printing Labels .......................................................................................... 4-3Tare (with Optional Scale) .................................................................................................... 4-9Memory Mode................................................................................................................... 4-10Void................................................................................................................................. 4-10

Manual Override Functions................................................................................................ 4-11Tare Override .................................................................................................................... 4-11Price Override ................................................................................................................... 4-11ET, NF Record Override....................................................................................................... 4-12Net Weight, Count.............................................................................................................. 4-12Override ........................................................................................................................... 4-12Shelf Life Override .............................................................................................................. 4-13Blank Label Fields ............................................................................................................. 4-13
Master Off Line................................................................................................................. 4-14
5 Standalone Database Functions......................................................................5-1General Description ............................................................................................................ 5-1
Standalone Database Functions............................................................................................. 5-2Database Setup Mode ......................................................................................................... 5-3
Passwords ......................................................................................................................... 5-3Edit.................................................................................................................................... 5-3Quick Change ..................................................................................................................... 5-9Print .................................................................................................................................. 5-9Clear.................................................................................................................................. 5-9
6 Maintenance .................................................................................................6-1External Cleaning ............................................................................................................... 6-1Internal Printer Cleaning....................................................................................................... 6-2
7 Label Formats ...............................................................................................7-1
8 Error Messages .............................................................................................8-1

Chapter 1: IntroductionGeneral Description
(8/99) 1-1
Figure 1-1: Model 355 and Optional Model 8270 Scale
1 Introduction
General DescriptionThis manual covers operation for all versions of the Model 355 Programmable Printer.
The Model 355 Printer, like all Mettler Toledo products, is designed for maximumdurability and reliability in a variety of application environments. The Model 355 ismanufactured in a METTLER TOLEDO® ISO 9000 certified facility to assure that you arereceiving a high-quality product.
The Mettler Toledo Model 355 (right) is a Programmable PLU thermal label printer suitedespecially for backroom and bakery printing needs. The Model 355 can be connected(with an optional kit) to the Model 8270 Scale Base for weight input (below). Theweighing capacity of the Model 355 with the optional Model 8270 base, is 50 x .01 lbor 20 x .005 kg.
Power UpThe Model 355 is powered up using the Power switch on the front left side of the scale(H in Figure 1-2). Press the “-” to turn the scale on; the “o” is an off position.
Upon being powered up, the scale performs an initial test, then all segments of thedisplay are tested. After a short period of time, the display shows the READY prompt.Should the scale not show a weight of 0.00, simply press the [ZERO] key. For thesatellite models, the “Online” cursor will appear when master-satellite communicationsare established.
ISO9001This product was developed, produced andtested in a Mettler Toledo facility that has beenaudited and registered according to international(ISO 9001) quality standards.

METTLER TOLEDO Model 355 User's Guide
(8/99)1-2
Component and ControlLocations
Figure 1-2: Model 355 Controls and Components
Ref DescriptionA Preset/Setup KeypadB Numeric KeypadC PrintheadD Label Supply SpoolE Liner Take Up SpoolF Take Up Retainer RodG Label GuideH Power SwitchI Keyboard JackJ Host/Aux PortK Setup/CAL Button Access HoleL TNet Network connectorM Scale Interface connector and/or Ethernet JackN Power Cord Jack
A
B
CH
I
J
K
L
M
N
Rear View
D
E
FG

Chapter 1: IntroductionDisplays
(8/99) 1-3
Displays
Not printed on the lens.Illuminates when standalone isonline with a host PC. Access tothe standalone database is notavailable when illuminated.
Weight Unit Price $ Total Price $
99.999 9999.99 99.999 9999.99 99.999 9999.99 99.999 9999.99 9999.999999.999999.999999.99 Zero (*Motion) Net ¼ ½ Take Label
ABCDEFGHI0123456789ABCDEFGHI0123456789ABCDEFGHI0123456789ABCDEFGHI0123456789Prepack Online Memory (*Host) Setup
The Zero cursorindicates the scale iswithin the zero range,either net or gross zero.If the display does notread 00.00 at ready,press the ZERO key.
Not printed on the lens.The Motion cursorilluminates when thescale does not have astable weight.
Indicates a tare hasbeen entered and theweight is net (gross,minus container andoverwrap weight).
Top Display showsWeight/Count, Unit Price,and Total Price in normalmode.
Indicatespricing per¼ pound.
Indicatespricing per½ pound.
Indicates alabel ispresent on theprinter.
Indicates Prepackmode has beenselected.
Indicates Satellite iscommunicating withthe master.
Indicates that the unitis in setup mode.
Indicates there aretransactions in thememory accumulator.
Lower Display showsPLU description andscrolling marqueemessages.
Figure 1-3: Display and Lens
METTLER TOLEDO Model 355 User's Guide
(8/99)1-4
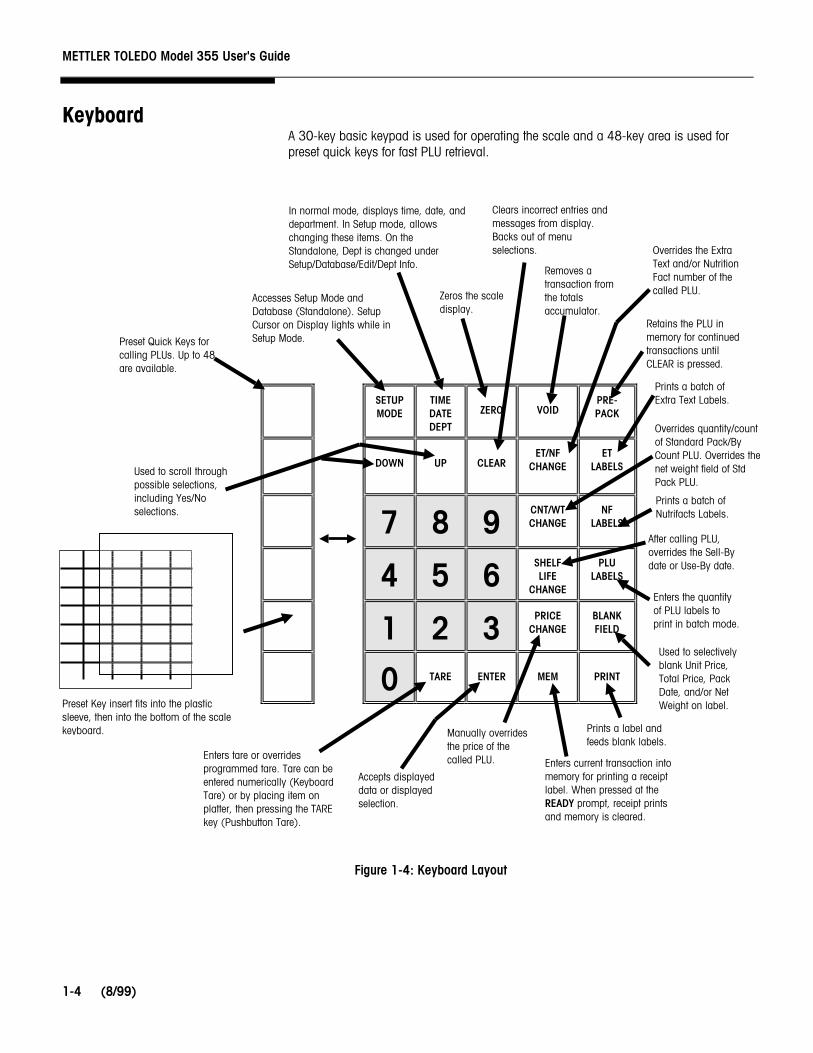
KeyboardA 30-key basic keypad is used for operating the scale and a 48-key area is used forpreset quick keys for fast PLU retrieval.
Figure 1-4: Keyboard Layout
SETUPMODE
TIMEDATEDEPT
ZERO VOIDPRE-PACK
DOWN UP CLEARET/NF
CHANGEET
LABELS
7 8 9CNT/WTCHANGE
NFLABELS
4 5 6SHELFLIFE
CHANGE
PLULABELS
1 2 3PRICE
CHANGEBLANKFIELD
0 TARE ENTER MEM PRINT
Preset Quick Keys forcalling PLUs. Up to 48are available.
Enters the quantityof PLU labels toprint in batch mode.
Used to selectivelyblank Unit Price,Total Price, PackDate, and/or NetWeight on label.
Removes atransaction fromthe totalsaccumulator.
Clears incorrect entries andmessages from display.Backs out of menuselections.
After calling PLU,overrides the Sell-Bydate or Use-By date.
Prints a label andfeeds blank labels.
Overrides the ExtraText and/or NutritionFact number of thecalled PLU.
Used to scroll throughpossible selections,including Yes/Noselections.
Manually overridesthe price of thecalled PLU. Enters current transaction into
memory for printing a receiptlabel. When pressed at theREADY prompt, receipt printsand memory is cleared.
Zeros the scaledisplay.
Accepts displayeddata or displayedselection.
Enters tare or overridesprogrammed tare. Tare can beentered numerically (KeyboardTare) or by placing item onplatter, then pressing the TAREkey (Pushbutton Tare).
Prints a batch ofExtra Text Labels.
Overrides quantity/countof Standard Pack/ByCount PLU. Overrides thenet weight field of StdPack PLU.
Accesses Setup Mode andDatabase (Standalone). SetupCursor on Display lights while inSetup Mode.
In normal mode, displays time, date, anddepartment. In Setup mode, allowschanging these items. On theStandalone, Dept is changed underSetup/Database/Edit/Dept Info.
Retains the PLU inmemory for continuedtransactions untilCLEAR is pressed.
Prints a batch ofNutrifacts Labels.
Preset Key insert fits into the plasticsleeve, then into the bottom of the scalekeyboard.
Chapter 2: LabelsLabel Installation
(8/99) 2-1
2 Labels
Label Installation
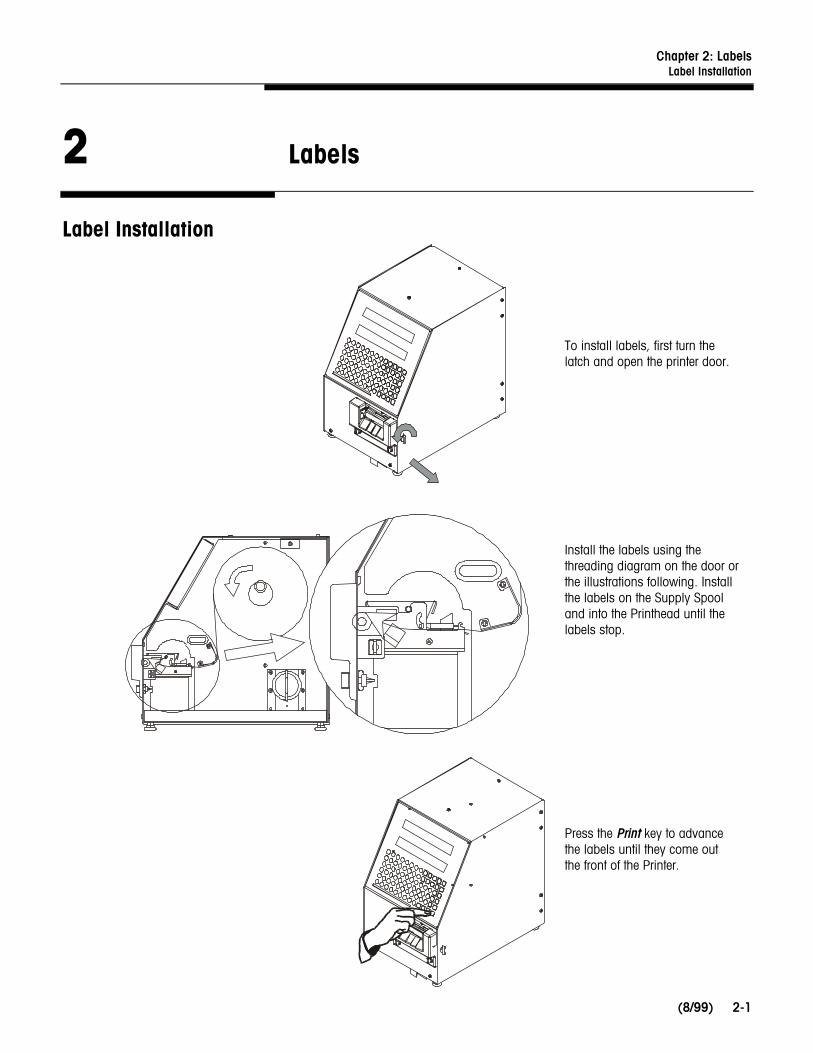
Install the labels using thethreading diagram on the door orthe illustrations following. Installthe labels on the Supply Spooland into the Printhead until thelabels stop.
To install labels, first turn thelatch and open the printer door.
Press the Print key to advancethe labels until they come outthe front of the Printer.

METTLER TOLEDO Model 355 User's Guide
(8/99)2-2
If the labels are to be setup forstripped operation, advance thelabels for about 12 inches.Remove the front bezel from thePrinter. Remove the labels fromthe liner, and then thread theliner back into the Printer asshown in Figure 2-4. Re-installthe bezel.
Remove the retainer from theTakeup Spool and wind the lineraround the spool one time.Install the retainer to hold theliner.
After the labels have been installed, press theSETUP MODE key (1). Using the Setup ModeOverlay, set the label size by the pressing LABELSIZE key (2). Use the UP/DOWN keys to displaythe correct label size, then press the ENTER key.
Next, set the label delivery mode by pressing theLABEL FORMAT key (3). Press CLEAR (4) to returnto Select Function display. Perform any additionalsetup, then press CLEAR again to return to Ready.
After setup is complete, press the PRINT key (5)before calling up a PLU and printing a label. Theprinter compares the actual label size with theprogrammed size. A LABEL SIZE ERROR occurs ifthey do not match.
SETUPMODE
TIMEDATEDEPT
ZERO VOIDPRE-PACK
DOWN UP CLEARET/NF
CHANGEET
LABELS
7 8 9CNT/WTCHANGE
NFLABELS
4 5 6SHELFLIFE
CHANGE
PLULABELS
1 2 3PRICE
CHANGEBLANKFIELD
0 TARE ENTER MEM PRINT
14551300A
PLUPRESET UNIT ID
RESETLABELS
LABELPRINTER
LABELSIZE
ENABLEMODIFY
VERIFYLABELS
PASS-WORDS
PRESETREACT.
CAL DEFAULTS HOST LABELFORMAT
ENABLEFUNC
EDIT BEEPER
IDPRESET
CURRENCY RESETRAMUNIT
STRIP QUICKCHANGE
MARQUEE PLUSETTING
GAPLENGTH
MARQUEE
SPEED
BARCODE
SETTING
IMAGEOFFSET
CLEAR
EJECTLENGTH
TIMEDATE
FORMAT
2 - Then set label size.Use UP/DOWN keys toselect the size, thenpress ENTER.
1 - Press SETUPMODE key
4 - Press CLEARtwice to return toREADY.
5 - Press PRINTto feed a label.
3 - Set the deliverymode (Stripped orUnstripped). PressLABEL FORMAT, thenUP/DOWN to displayselection. Press ENTERto accept.
Setup Mode Overlay UP/DOWN keys

Chapter 3: Unit Set UpSetup Overlay
(8/99) 3-1
3 Unit Set Up
Setup OverlayUnit Setup mode is used to configure functional options of the unit. During this mode,the “Setup” cursor will be lit on the lower display.
Before entering Setup Mode, remove the standard preset insert and install the Setupoverlay in the slit below the preset keys. This overlay identifies which preset keyscorrespond with the functional options. The four keys in Italics are database setupfunctions only available in the Stand Alone unit and are discussed in Database Setup.
14551300A
PLUPRESET UNIT ID
RESETLABELS
LABELPRINTER
LABELSIZE
ENABLEMODIFY
VERIFYLABELS
PASS-WORDS
PRESETREACT.
CAL DEFAULTS HOST LABELFORMAT
ENABLEFUNC
EDIT BEEPER
IDPRESET
CURRENCY RESETRAMUNIT
STRIP QUICKCHANGE
MARQUEE PLUSETTING
GAPLENGTH
MARQUEE
SPEED
BARCODE
SETTING
IMAGEOFFSET
CLEAR
EJECTLENGTH
TIMEDATE
FORMAT
Figure 3-1: Setup Mode Overlay
Prompts that appear onthe display will be shownhere in BOLD type.

METTLER TOLEDO Model 355 User's Guide
(8/99)3-2
Programming with thePreset/Setup Keyboard
The Preset/Setup Keyboard can be used to program the descriptions, store address, etc.,except Extra Text, which requires the external programming keyboard. The CLEAR key isused to move to the next line or save.
Figure 3-2: Programming Keyboard Layout
Enter Unit SetupTo enter the Unit Setup mode, press the SETUP MODE key. If a password has been set,key in the password, then press ENTER.
Stand Alone OnlyThere will be 2 options upon pressing the SETUP MODE key. Pressing the DOWN or UPkeys will scroll through the two options, UNIT and DATABASE. Press ENTER when UNITdisplays to enter unit Setup Mode (enter the unit setup password if required). Separatepasswords can be assigned to unit and database setup modes. The database setupmode is discussed in the following chapter. This chapter discusses the unit setup mode.
Exit Unit SetupTo exit Setup Mode, press the CLEAR key to return to the first option in the current menu;press CLEAR again to return to the previous menu or the SELECT FUNCTION prompt. Toexit Setup Mode, press CLEAR when the display shows SELECT FUNCTION. The displaywill then read READY, and the unit is ready for operation.
# $ % ( ) - + =
[ ] / \ , . O P
Q W E R T Y U I
A S D F G H J K
Z X C V B N M L
<Shift> <Space> ~ < > *
Chapter 3: Unit Set UpSet the Time, Date, and Department
(8/99) 3-3
Set the Time, Date,and Department
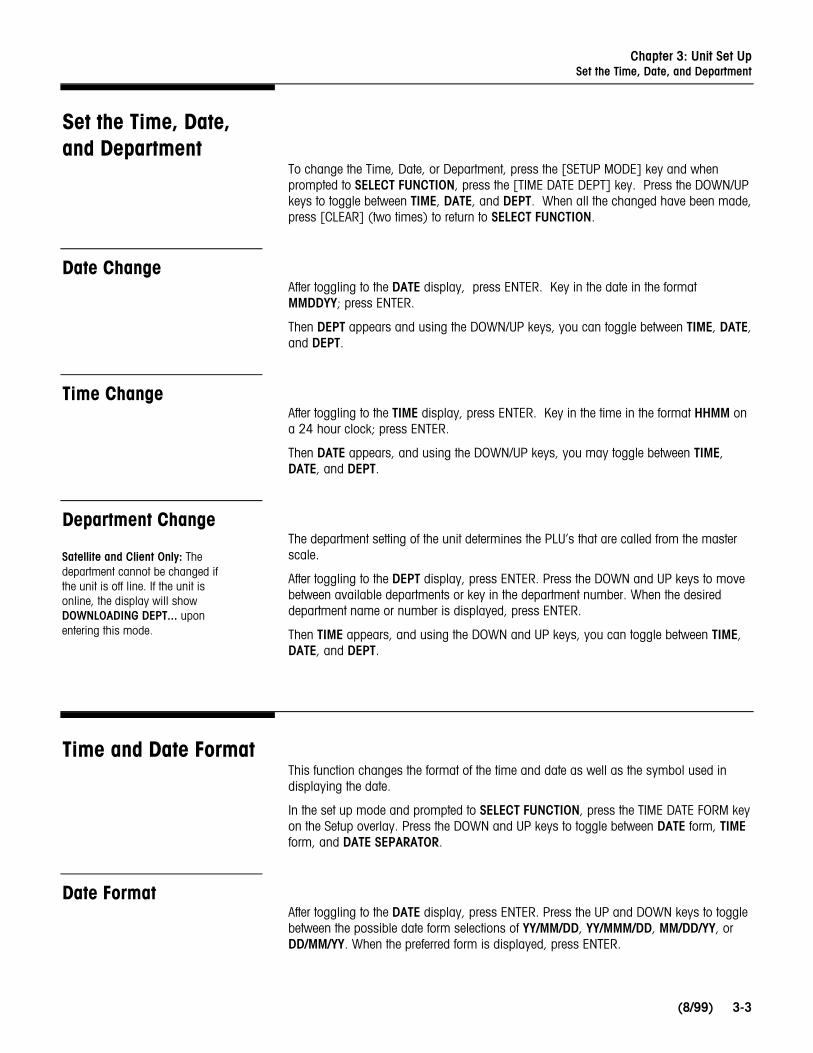
To change the Time, Date, or Department, press the [SETUP MODE] key and whenprompted to SELECT FUNCTION, press the [TIME DATE DEPT] key. Press the DOWN/UPkeys to toggle between TIME, DATE, and DEPT. When all the changed have been made,press [CLEAR] (two times) to return to SELECT FUNCTION.
Date ChangeAfter toggling to the DATE display, press ENTER. Key in the date in the formatMMDDYY; press ENTER.
Then DEPT appears and using the DOWN/UP keys, you can toggle between TIME, DATE,and DEPT.
Time ChangeAfter toggling to the TIME display, press ENTER. Key in the time in the format HHMM ona 24 hour clock; press ENTER.
Then DATE appears, and using the DOWN/UP keys, you may toggle between TIME,DATE, and DEPT.
Department ChangeThe department setting of the unit determines the PLU’s that are called from the masterscale.
After toggling to the DEPT display, press ENTER. Press the DOWN and UP keys to movebetween available departments or key in the department number. When the desireddepartment name or number is displayed, press ENTER.
Then TIME appears, and using the DOWN and UP keys, you can toggle between TIME,DATE, and DEPT.
Time and Date FormatThis function changes the format of the time and date as well as the symbol used indisplaying the date.
In the set up mode and prompted to SELECT FUNCTION, press the TIME DATE FORM keyon the Setup overlay. Press the DOWN and UP keys to toggle between DATE form, TIMEform, and DATE SEPARATOR.
Date FormatAfter toggling to the DATE display, press ENTER. Press the UP and DOWN keys to togglebetween the possible date form selections of YY/MM/DD, YY/MMM/DD, MM/DD/YY, orDD/MM/YY. When the preferred form is displayed, press ENTER.
Satellite and Client Only: Thedepartment cannot be changed ifthe unit is off line. If the unit isonline, the display will showDOWNLOADING DEPT... uponentering this mode.

METTLER TOLEDO Model 355 User's Guide
(8/99)3-4
TIME then appears, and using the DOWN and UP keys, you can toggle between DATEform, TIME form, and DATE SEPARATOR.
Time FormatAfter toggling to the TIME form display, press ENTER. Press DOWN/UP to toggle betweena 12-hour and a 24 hour clock. When the desired clock is displayed, press ENTER.
DATE SEPARATOR will then appear, and using the DOWN/UP keys, you can togglebetween DATE form, TIME form, and DATE SEPARATOR.
Date SeparatorAfter toggling to the DATE SEPARATOR display, press ENTER. Press the DOWN/UP keysto toggle between a comma (,), dash (-), and slash (/). When the preferred dateseparator is displayed, press ENTER.
DATE will then appear, and using the DOWN/UP keys, you can toggle between DATEform, TIME form, and DATE SEPARATOR.
PLU PresetForty-eight (48) keys are provided for use as PLU Preset keys used for one key call upof PLU records. Several paper overlays and a clear plastic envelope are provided to labeland protect the preset keys. Templates are available.
Programming a Preset KeyTo assign a PLU to a Preset Key, enter the Setup mode and when prompted to SELECTFUNCTION, press the PLU PRESET key on the Setup Overlay. You are prompted toPRESS PRESET KEY. Press the preset key you would like to use and the prompt PLU isthen displayed. Key in the PLU number, then press ENTER.
PRESS PRESET KEY is displayed again prompting you to program another preset key.This message will appear each time you complete entering a preset number. To exitfrom this mode, press CLEAR to return to the SELECT FUNCTION display.
Preset ReactionThe way a preset key functions can be selected using Preset Reaction. To change thepreset key reaction, while in Setup mode and prompted to SELECT FUNCTION, press thePRESET REACT key on the Setup overlay. Use the DOWN/UP keys to toggle betweenPRINT and ENTER. If the PRINT option is selected, the unit will automatically print a labelafter a preset key is pressed. When the ENTER option is selected, the unit will wait untilthe operator presses PRINT to print a label. When using By-Weight PLUs, a label will notprint until a weight is on the scale even if the PRESET REACT is set to PRINT (withoptional scale).
When PRINT is selected, thiseliminates keystrokes, however,the operator may not use theoverride functions for PLU’sretrieved using the preset keys.

Chapter 3: Unit Set UpMarquee
(8/99) 3-5
MarqueeA marquee is an Action message that scrolls across the display if there is no activity forabout five seconds and no PLU is displayed. The marquee texts are programmed at themaster, while the marquees in the standalone are programmed in the EDIT function. Youmay choose up to ten Marquee messages, numbered 0 through 9 that will sequentiallyscroll across the display.
Selecting MessagesWhen in the Unit Setup mode and prompted to SELECT FUNCTION, press MARQUEE onthe Setup overlay. You may select up to ten (0-9) action codes to scroll across thescreen. Use the DOWN/UP keys to toggle between these.
To select a marquee, toggle to the marquee number you wish to change and pressENTER. Key in the desired Action code number (or “0” for no marquee), then pressENTER.
You may now change more marquees, or press CLEAR two times to finish. The marqueemessages will then scroll across the display in their respective numbered order when thescale is idle.
Changing the SpeedIn the set up mode and prompted to SELECT FUNCTION, press the MARQUEE SPEED keyon the Setup overlay. Key in a digit, 0 through 9 with 0 corresponding to the slowestspeed and 9 corresponding to the fastest speed. Press ENTER to accept this value.
Label FormatThe label formats are entered using the first nine options from the LABEL FORMAT menu.The last eight options are label specifications. Complete label setups can beprogrammed using the LABEL SIZE key. If a single label specification needs to bechanged, this can be done quickly using the single specification keys on the Setupoverlay; these keys are STRIP, GAP LENGTH, IMAGE OFFSET, and EJECT LENGTH on theSetup overlay.
Label Format KeyFirst set the label size, then select the label format. Only change the label specificationsif you are familiar with these functions. If not, contact your service department. The scalewill auto-measure two labels if necessary. To set the label size see the MEASURE LABELprompt under the LABEL FORMATS key or the LABEL SIZE key.
Label FormatsThe following label formats are available for each of the following label types:
Satellite: By Weight, Prepack, By Count, Standard Pack, Receipt, Verification, Run Total,Nutrition Facts (second label), and Extra Text.
The Marquee will not function ifscale is off line.
Note: Refer to Chapter 7 for LabelFormat Codes. Refer to the Model8450 Service Manual, P/NA14715500A for illustrations of thelabel formats.

METTLER TOLEDO Model 355 User's Guide
(8/99)3-6
Stand Alone: By Weight, Prepack, By Count, Standard Pack, Receipt, Verification, RunTotal, Report Totals, Nutrition Facts (second label), Extra Text and Graphics.
There are several default label formats for each label size. Chapter 7 contains a list ofeach of the label formats and their corresponding numbers. Custom label formats maybe created using a Model 8461 and DATABACK software.
To specify a format for a particular label type, when prompted to SELECT FUNCTION,press LABEL FORMAT on the Setup overlay. Using the DOWN and UP keys, you cantoggle between several options. The first nine options for Satellite and the first 11 optionsfor Stand Alone are label types. When the label type you wish to change is displayed,press ENTER. Key in the desired format number and press ENTER.
Label SpecificationsToggle through the Label Format menu until you get to the following label specificationoptions: LABEL LENGTH, GAP LENGTH, DELIVERY, LABEL TYPE (CONTINUOUS OR DIECUT), MEASURE LABEL, EJECT LENGTH, LABEL WIDTH, and IMAGE OFFSET. Each ofthe specifications are explained below.
LABEL LENGTHThis function is used to select the default label length.
When LABEL LENGTH appears on the screen, press ENTER. Key in your label length(mm), press ENTER. Standard lengths are listed below.
• 40.0 mm (= 1.5 in)• 48.3 mm (= 1.9 in)• 53.3 mm (= 2.1 in)• 61.0 mm (= 2.4 in)• 83.8 mm (= 3.3 in)• 94.0 mm (= 3.7 in)• 106.7 mm (= 4.2 in)• 119.4 mm (=4.7 in)• 129.5 mm (= 5.1 in)
GAP LENGTHThe gap length of the label (mm) can be adjusted to compensate for variances indifferent label suppliers. To change the gap length, use the DOWN/UP keys until GAPLENGTH appears on the display. Press ENTER. Key in the desired gap length (mm),press ENTER. (Normal gap length for METTLER TOLEDO specified labels is 3.2 mm).
DELIVERYThis function is used to select the delivery mode of the label printer. Stripped will deliverthe label to the operator without the label backing. Unstripped will deliver the label to theoperator on the label backing. Unstripped mode also turns the label taken sensor offallowing you to print another label before the first is removed from the printer.
Use the DOWN/UP keys until DELIVERY appears on the display. Press ENTER. UseDOWN/UP to select either STRIPPED or UNSTRIPPED. When the desired delivery mode isdisplayed, press ENTER.
LABEL TYPEThis selection is used to enter in the type of labels being used, either continuous or diecut labels. To change this entry, press ENTER when LABEL TYPE is displayed. Use theDOWN/UP keys to toggle between DIE CUT and CONTINOUS. When the correct labeltype is displayed, press ENTER.
Continuous label stock can beselected using the [LABEL SIZE]key, see Quick Label SpecificationKeys.

Chapter 3: Unit Set UpLabel Format
(8/99) 3-7
MEASURE LABELTo measure the current label and gap length, toggle to MEASURE LABEL and pressENTER. Two labels will be ejected. The measured values will be set as the LABELLENGTH and GAP LENGTH, replacing the current settings, however these values will notappear in the setup menu until setup is exited and re-entered.
EJECT LENGTHThe Eject Length is the distance the label is ejected out beyond the print head. Thedefault value is 5.5 mm. If this value is set higher, the labels will eject further, and if instripped mode, the labels may even fall completely off the stripper bar. If this value is settoo high, printing in this region may be lost or printed on the bottom of the next label.
If Eject Length value is set too low, too much of the die cut label may remain on thestripper bar, and it may be difficult to peel off the label.
To change this value, when EJECT LENGTH is displayed, press ENTER. Key in the value(mm) then press ENTER.
LABEL WIDTHThis function is used to select the default label width. Increasing the width will shift textto the left of the label. Decreasing the width will shift text to the right of the label.
To change this setting, press ENTER when LABEL WIDTH appears on the display. Key inthe new width (mm) and press ENTER.
IMAGE OFFSETThe image offset adjustment (mm) is used to offset the printed image on the labels. Thedefault is 5.2 mm. To raise the image on a label, lower the Image Offset value. To lowerthe image on a label, increase the Image Offset value.
To change the Image Offset value, press ENTER when IMAGE OFFSET is displayed; keyin the desired value (mm); press ENTER.
Label Size KeyLabel SizeThe LABEL SIZE key is used to change the default label size. Along with the size beingchanged, all the settings associated with that size under the LABEL FORMAT key arechanged also. Any changes you make under the LABEL FORMAT key will be retainedwith the current size selected under the LABEL SIZE key. For example, if you are on 48.3mm in the LABEL SIZE menu and change the By Weight Format to number 99 and ejectlength to 3.0, whenever you return to label size 48.3 mm the By Weight Format is 99and eject length is 3.0.
When in the Unit Setup mode and prompted to SELECT FUNCTION, press the LABEL SIZEkey on the Setup overlay.
Using the DOWN/UP keys, you may choose between the following selections. PressENTER on your selection.
• 48.3 mm (= 1.9 in)• 53.3 mm (= 2.1 in)• 61.0 mm (= 2.4 in)• 83.8 mm (= 3.3 in)• 94.0 mm (= 3.7 in)• 106.7 mm (= 4.2 in)• 119.4 mm (=4.7 in)• 129.5 mm (= 5.1 in)CONT (Roll Stock)

METTLER TOLEDO Model 355 User's Guide
(8/99)3-8
Quick Label SpecificationKeys
These keys allow you to go quickly to a label specification without toggling through theLABEL FORMAT menu.
Label SizeThe LABEL SIZE key is used to quickly change the default label size.
When in the Unit Setup mode and prompted to SELECT FUNCTION, press the LABEL SIZEkey on the Setup overlay.
Using the DOWN/UP keys, you may choose between the following selections.
• 48.3 mm (= 1.9 in)• 53.3 mm (= 2.1 in)• 61.0 mm (= 2.4 in)• 83.8 mm (= 3.3 in)• 94.0 mm (= 3.7 in)• 106.7 mm (= 4.2 in)• 119.4 mm (=4.7 in)• 129.5 mm (= 5.1 in)• CONT (Roll Stock)
After toggling to the correct label size, press ENTER.
Label DeliveryThe STRIP key is used to quickly change the delivery mode of the label printer; Strippedwill deliver the label to the operator without the label backing. Unstripped will deliver thelabel to the operator with the label backing.
In the Setup mode and prompted to SELECT FUNCTION, press STRIP on the Setupoverlay. Press the DOWN/UP key to toggle between STRIPPED and UNSTRIPPED. Whenthe desired delivery mode is selected, press ENTER.
Gap LengthThe gap length is the distance (mm) between die cut labels. This length can be adjustedto compensate for variances in different label suppliers. The gap length may be changedin the Setup mode. When prompted to SELECT FUNCTION, press GAP LENGTH on theSetup overlay. Key in the desired gap length (mm), press ENTER. (Normal gap lengthfor METTLER TOLEDO specified labels is 3.2 mm).
Image OffsetThe Image Offset (mm) is used to offset the printed image on the labels. The default is5.2 mm. To raise the image on a label, lower the Image Offset value. To lower theimage on a label, increase the Image Offset value.
To change this value, go to the Setup mode and when prompted to SELECT FUNCTION,press the IMAGE OFFSET key on the Setup overlay. Key in the desired value (mm), pressENTER.
Eject LengthThe default Eject Length value is 5.5 mm. If this value is set higher, the labels will ejectfurther, and if in stripped mode, the labels may even fall completely off the stripper bar.If this value is set too high, printing in this region may be lost or printed on the bottom ofthe next label.
In addition to changing the labeldelivery softswitch, a differentlabel installation procedure isrequired for stripped andunstripped delivery, see chapter2.

Chapter 3: Unit Set UpEnable Modify Functions
(8/99) 3-9
If the Eject Length value is set too low, too much of the label may remain on the stripperbar, and it may be difficult to peel off the label.
To change this value, go to Setup mode and when prompted to SELECT FUNCTION,press the EJECT LENGTH key on the Setup overlay. Key in the new value (mm) andpress ENTER.
Enable ModifyFunctions
The ENABLE MODIFY setup key controls whether the operator may or may not modify thefollowing values during a transaction: shelf life, use by date, net weight, price,quantity/count, or extra text/nutrition fact number.
To change these settings, enter the Unit Setup mode, and when prompted to SELECTFUNCTION, press the ENABLE MODIFY key on the Setup overlay.
You are now able to toggle between the following: SHELF LIFE, USE BY (use by date),NET WEIGHT, PRICE, QTY/COUNT, and EX/NF# (Extra Text/Nutrition Fact Number). YESallows the operator to override the programmed value; NO does not allow the operator tooverride the programmed value.
When the field you wish to change appears on the display, press ENTER. Press the[DOWN] key to toggle between YES and NO. When the desired appears on the display,press ENTER. You may now continue with more fields. When completed, press CLEAR toescape.
Verify LabelsThis function allows the user to print out labels of all (or selected) PLU’s in a particulardepartment. The format of these labels is determined in the LABEL FORMAT Setup.
When prompted to SELECT FUNCTION, press the VERIFY LABELS key on the Setupoverlay.
Stand Alone OnlyIn the Stand Alone model, a list of which type of labels can be verified will be presented.This includes PLU/ITEM, EXTRA TEXT, NUTRIFACT, and GRAPHIC. Toggle through theoptions with the DOWN/UP keys and select one by pressing ENTER. The format of theselabels is determined in the LABEL FORMAT setup. No department needs to be specifiedwhen verifying Extra Text, Nutrifacts or Graphics since they are not associated with anydepartment but are available to all departments. Follow the directions below to printverification labels.
Key in the department number. Press ENTER. Key in the number of the first PLU youwould like printed (default is 1). Press ENTER. Key in the number of the last PLU youwould like printed (default is 999999). Press ENTER. You will then be asked if you wantto start printing. Press ENTER to begin printing. Press CLEAR to cancel.
In the Satellite/Client version, if the unit is off line, the back-up PLU’s will be printed. If theunit is on line, the PLU’s from the master database will be printed.

METTLER TOLEDO Model 355 User's Guide
(8/99)3-10
Programming UnitPassword
When prompted to SELECT FUNCTION, press the PASSWORDS key on the Setup overlay.The existing unit password will be displayed. To change the password, key in the newpassword, a number between 1 and 9999. If no password is desired, key in 0, thenpress ENTER.
This password is different from the Stand Alone model’s Database Setup password. Ifyou are in database setup, the PASSWORDS key functions in the same manner butprograms a password for entering Database Setup.

Chapter 4: OperationBasic Functions
(8/99) 4-1
4 Operation
Basic Functions
Zero (With optional scale)If the Model 355 is connected to a scale base, and the weight is not zero, press theZERO key.
ClearTo clear an incorrect entry or to clear a PLU and return to the READY prompt, press theCLEAR key.
Manual Clear
Automatic Clear
In the Service Mode, after a label is printed for a By Weight PLU, and the item isremoved from the platter, the display will automatically clear the PLU and return to theREADY prompt.
Label FeedTo feed a blank label:
UNDER READY + = READYZERO
CLEAR+ = READY12345
PRINT+ =READY
NET WT UNIT PRICE **TOTAL PRICE**

METTLER TOLEDO Model 355 User's Guide
(8/99)4-2
Time, Date, DepartmentView Only
Change
+ = 8:13am9/19/01MEAT
ENTER
ENTER ENTER
ENTER1
0
3
9
0
1 0
0
9 1
8:13 AM
9/9/99
1:00 PM
9/19/01
++
+
+
+
+
=
=
=
8:139/19/01MEAT
ENTER ENTERMEAT DELI DELI++ += =
CLEAR CLEAR = READY
Chapter 4: OperationBasic Functions
(8/99) 4-3
Calling a PLU and PrintingLabels
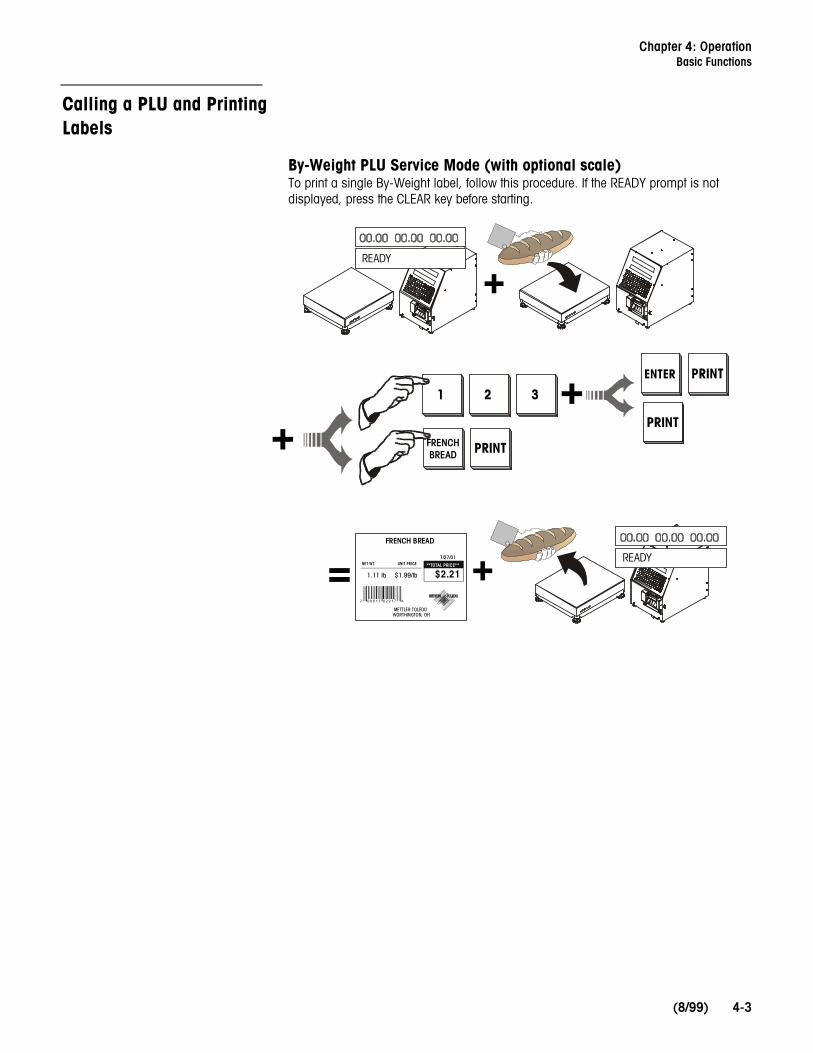
By-Weight PLU Service Mode (with optional scale)To print a single By-Weight label, follow this procedure. If the READY prompt is notdisplayed, press the CLEAR key before starting.
=
++
FRENCH BREAD
1.11 lb $1.99/lb
7/27/01NET WT UNIT PRICE **TOTAL PRICE**
$2.21
METTLER TOLEDOWORTHINGTON, OH
+
+
READY
1
FRENCHBREAD
ENTER
2
3
READY

METTLER TOLEDO Model 355 User's Guide
(8/99)4-4
By-Weight PLU Prepack Mode (with optional scale)To print a run of labels (multiple labels of the same PLU number), use the PrepackMode. Prepack mode retains the PLU in memory until you press the CLEAR key to endthe run. If the READY prompt is not displayed, press the CLEAR key before starting.
FRENCH BREAD
1.11 lb $1.99/lb
7 /27/01NET WT UNIT PRICE **TOTAL PRICE**
$2.21=
=
METTLER TOLEDOWORTHINGTON, OH
+
++
READY
1
FRENCHBREAD
CLEAR
ENTER2
PRE-PACK
PRE-PACK
3
FRENCH BREAD
FRENCH BREADFRENCH BREAD
READY
Chapter 4: OperationBasic Functions
(8/99) 4-5
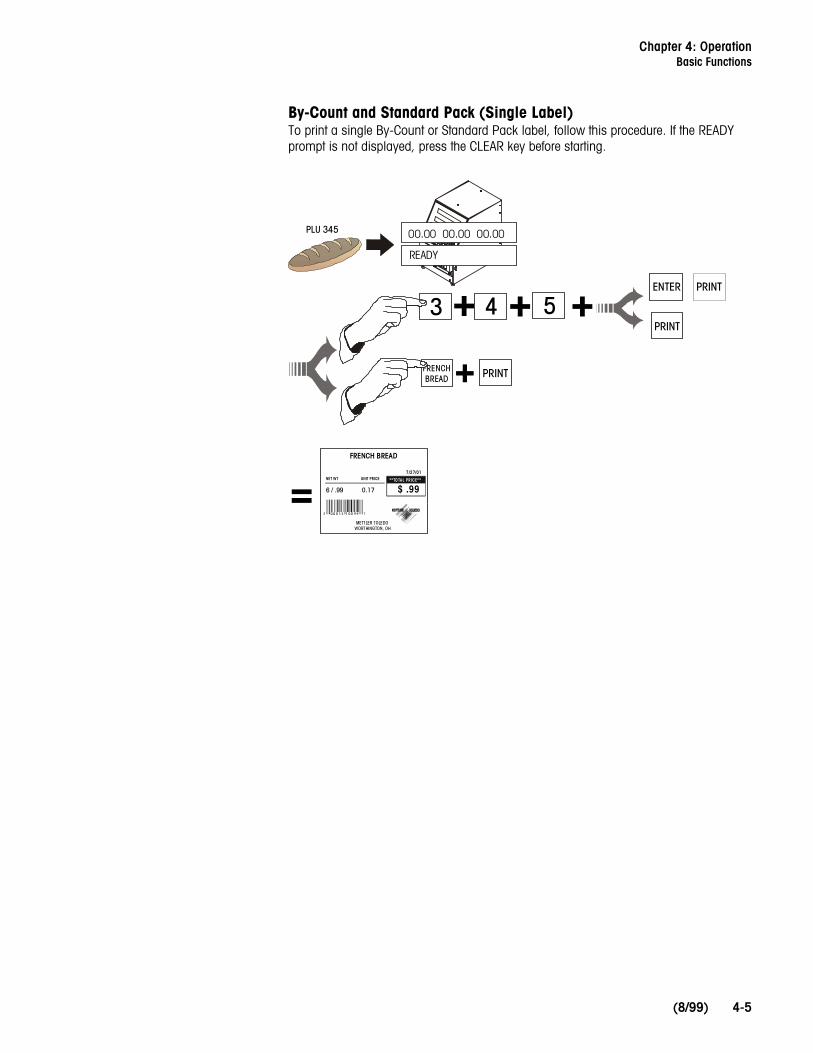
By-Count and Standard Pack (Single Label)To print a single By-Count or Standard Pack label, follow this procedure. If the READYprompt is not displayed, press the CLEAR key before starting.
=
3 + 4 + 5ENTER
FRENCHBREAD + PRINT
PLU 345
FRENCH BREAD
6 / .99 0.17
7/27/01NET WT UNIT PRICE **TOTAL PRICE**
$ .99
METTLER TOLEDOWORTHINGTON, OH
00.00 00.00 00.00
READY

METTLER TOLEDO Model 355 User's Guide
(8/99)4-6
Batch Printing (By-Count and Standard Pack Only)To print a certain quantity of By-Count or Standard Pack Labels:
=
+ 6 + 7 + 8 +
PLU 678
QTYLABELS
=+ NFLABELS
ETLABELS
PLU? 0
READY
QTY? 0= + 6 +
WHOLE WHEAT BREAD
ADDRESS 1ADDRESS 2
2 / .99 0.495
GRADE 1 TEXT 7/27/01NET WT UNIT PRICE **TOTAL PRICE**
$ .99

Chapter 4: OperationBasic Functions
(8/99) 4-7
Manual Mode PLU Label PrintingIf a PLU number is not available, a temporary pricing mode is available, as follows.

METTLER TOLEDO Model 355 User's Guide
(8/99)4-8
Manual OverrideFor a temporary price change, press the PRICE CHANGE key after entering the PLUnumber. For a temporary override of other values, press the appropriate key (if notdisabled in setup mode). This does not change any data in the PLU record stored in thePLU database. The next time the PLU is called, the original values are used.
ET/NF CHANGE Extra Text or Nutrition Facts
CT/WT CHANGE Change the Count on a By-Count PLU, or the Net Weight on aStandard Pack label
SHELF LIFECHANGE
Change the number of days in the Shelf Life field.
PRICE CHANGE Change the Price for the PLU.
+PLU 123
FRENCH BREAD
1 $1.59
7/27/02NET WT/CT UNIT PRICE **TOTAL PRICE**
$1.59
= FRENCH BREAD
+ = PRICE? 1.99
+ = FRENCH BREAD
+ =
READY
+ 1
1 5 9
ENTER2 3
PRICECHANGE
ENTER

Chapter 4: OperationBasic Functions
(8/99) 4-9
Tare (with Optional Scale)
PLU Stored TareA tare may be stored with a PLU. In this case, when the PLU is called and no weight ison the platter, the weight display will show a negative number (the tare weight) and acursor will appear over Net.
Proportional TareProportional tares may be used when supported by the master scale and the PLU isprogrammed for a proportional tare. This calculation is done automatically by the scale.
Forced TareSome items will require the operator to enter a tare to complete a transaction. This iscalled a “forced tare.”
Select the PLU.
The bottom display will show TARE. You can either key in the tare and press ENTER, orplace the tare on the platter and press ENTER. If no tare is desired, press TARE, thenENTER, then place the item on the platter.
Pushbutton TareA tare can be manually entered by the following procedure using the TARE button.
Select the PLU (either by entering the number or pressing the preset key).
Press the TARE key.
Place the container on the platter and press TARE.
Keyboard TareSelect the PLU (either by entering the number or pressing the preset key).
Press the TARE key.
Key in the tare weight. Press ENTER.
Place the item on platter.
If the Canadian Tare is set to YESin the Calibration Settings thenthe platter must be empty whenkeying in the tare, and youcannot clear the Tare by entering0.00.

METTLER TOLEDO Model 355 User's Guide
(8/99)4-10
Memory ModeWhen enabled, the Memory mode feature is an alternative to printing individual labelsand allows accumulating multiple items for a customer. A receipt label can be printedshowing the grand total and a department bar code.
Call the PLU, and place the item on the scale.
Press the MEM key to enter the current transaction into memory. The cursor over“Memory” on the Display tower will light.
Remove the item from the platter and repeat for the desired number of transactions,pressing the MEM key after each transaction.
When all items are entered for a particular customer, clear the platter and press the MEMkey.
You will be prompted to print the total. Press the ENTER key to print the accumulatedtotal price.
You are then asked PRINT OK? If the printing was successful, press the DOWN key toanswer YES, then press the ENTER KEY. The memory is now cleared and the cursor over“Memory” will turn off.
If the printing was not okay, or you do not want to clear the memory, press the DOWNkey until NO appears, then press ENTER. You may then either print again or addadditional transactions to the accumulator.
At the initial PRINT? prompt after pressing MEM with an empty platter, you can scrollwith the UP and DOWN keys to CANCEL? or CONTINUE?. At the CANCEL? prompt,pressing ENTER will bring up the CLEAR MEMORY? NO prompt. Toggle between YESand NO here to clear the memory. At the CONTINUE? prompt, pressing ENTER willretain the current memory as is so that more items can be added.
VoidThe last ten transactions can be voided from the totals accumulators using this function.
Press the VOID key and use the DOWN and UP keys to display previous transactions.
The transactions will be displayed as follows: the top display will show the number oftransactions/labels printed, item number, and total price.
The lower display will show the product description and whether it has been voided ornot (Y/N). When the transaction you wish to void is displayed, press ENTER.
The display will ask if you want to void the transaction. Use the DOWN key to changeyour response to Y, then press the ENTER KEY.
You may either continue to void other transactions or press CLEAR to return to theREADY prompt.
If Continuous stock is used the labelshows a line of description and theprice information for up to 15 items.
The MEM key can act as anENTER/MEM key. To eliminatekeystrokes, press MEM after keying inthe PLU to immediately enter thetransaction into the scale’s memory.

Chapter 4: OperationManual Override Functions
(8/99) 4-11
Manual OverrideFunctions
Certain information can be overridden after the PLU has been called. These changes aretemporary and last only for a single transaction or a single “run” in Prepack mode.Some or all of these overrides may be disabled through Unit Setup.
Tare OverrideWhen the unit setup allows for programmed tares to be overridden, the desired tare canbe entered as if there were no preprogrammed tare.
Keypad TareCall the PLU. If a tare is programmed in the PLU the Weight display will show the tare asa negative number and the “Net” cursor will light.
Press TARE.
Enter in the desired tare weight, then press ENTER.
Pushbutton TareCall the PLU.
Press TARE.
Place the container on the platter, then press TARE.
Place the item on the platter.
Price OverrideWhen allowed by the unit set up, prices may be overridden by the operator with either ofthe following procedures:
Place the item on the platter.
Select the PLU.
Key in the new price, and press ENTER.
or
Call the PLU.
Press PRICE CHANGE.
Key in the new price. Press ENTER.
Place the item on the platter.

METTLER TOLEDO Model 355 User's Guide
(8/99)4-12
ET, NF Record OverrideExtra Text and Nutrition Facts records are linked to a PLU using Extra text and NutritionFact record numbers programmed into the PLU record in the master database. TheseRecord numbers can be overridden using the ET/NF CHANGE key.
Extra Text ChangeWhen allowed by the unit set up, the Extra Text for a single transaction or Prepack “run”may be changed.
Call the PLU.
Press the ET/NF CHANGE key.
Using the DOWN and UP keys, you will be able to toggle between ET (Extra Text) andNF (Nutrition Facts). When ET is displayed, press ENTER.
The current Extra Text number will be displayed. Key in the new Extra Text number, thenpress ENTER.
Place the item on the platter (if By Weight item).
Press PRINT to print the label (if in Service mode).
Nutrition Fact ChangeWhen allowed by the unit set up, the Nutrition Facts may be changed.
Call the PLU.
Press the ET/NF CHANGE key.
Using the DOWN and UP keys, you will be able to toggle between ET (Extra Text) andNF (Nutrition Facts). When NF is displayed, press ENTER.
The current Nutrition Fact number will be displayed. Key in the new Nutrition Factnumber, then press ENTER.
Place the item on the platter (if By Weight item).
Press PRINT to print the label (if in Service mode).
Net Weight, CountOverride
Standard Pack Weight/Count ChangeFor Standard Pack items, the count and/or the Net weight may be changed. When thecount is changed a new total price and net weight will be calculated from the unit priceand new count value. When the Net weight is changed, the total price does not change,however a new unit price is calculated from the total price and new Net weight.
To change the quantity or weight of the item, press the CNT/WT CHANGE key.
Use the DOWN and UP keys to toggle between QTY (quantity, count) and WEIGHT.
To change the quantity of the pack, press ENTER when QTY is displayed. Key in thenew quantity, then press ENTER.
To change the total weight, press ENTER when WEIGHT is displayed.
Key in the new weight (in ounces), then press ENTER.
Press CLEAR to return to the Item Description display.
Chapter 4: OperationManual Override Functions
(8/99) 4-13
Press PRINT to print a label.
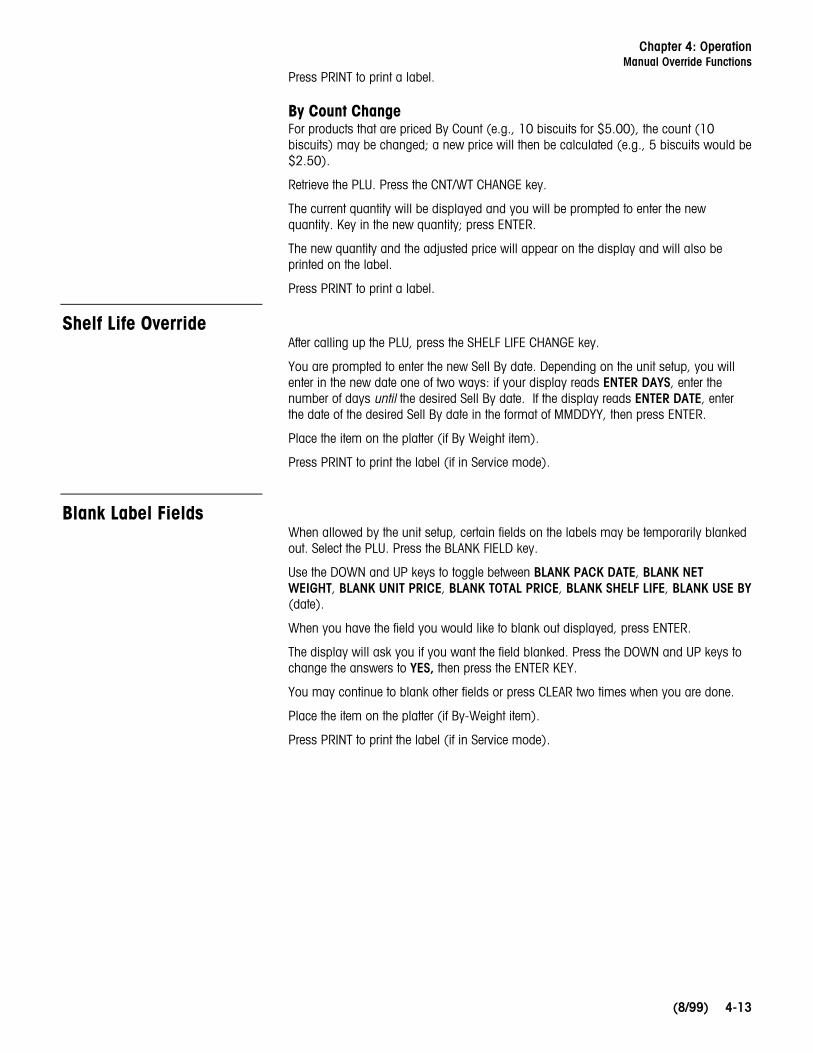
By Count ChangeFor products that are priced By Count (e.g., 10 biscuits for $5.00), the count (10biscuits) may be changed; a new price will then be calculated (e.g., 5 biscuits would be$2.50).
Retrieve the PLU. Press the CNT/WT CHANGE key.
The current quantity will be displayed and you will be prompted to enter the newquantity. Key in the new quantity; press ENTER.
The new quantity and the adjusted price will appear on the display and will also beprinted on the label.
Press PRINT to print a label.
Shelf Life OverrideAfter calling up the PLU, press the SHELF LIFE CHANGE key.
You are prompted to enter the new Sell By date. Depending on the unit setup, you willenter in the new date one of two ways: if your display reads ENTER DAYS, enter thenumber of days until the desired Sell By date. If the display reads ENTER DATE, enterthe date of the desired Sell By date in the format of MMDDYY, then press ENTER.
Place the item on the platter (if By Weight item).
Press PRINT to print the label (if in Service mode).
Blank Label FieldsWhen allowed by the unit setup, certain fields on the labels may be temporarily blankedout. Select the PLU. Press the BLANK FIELD key.
Use the DOWN and UP keys to toggle between BLANK PACK DATE, BLANK NETWEIGHT, BLANK UNIT PRICE, BLANK TOTAL PRICE, BLANK SHELF LIFE, BLANK USE BY(date).
When you have the field you would like to blank out displayed, press ENTER.
The display will ask you if you want the field blanked. Press the DOWN and UP keys tochange the answers to YES, then press the ENTER KEY.
You may continue to blank other fields or press CLEAR two times when you are done.
Place the item on the platter (if By-Weight item).
Press PRINT to print the label (if in Service mode).

METTLER TOLEDO Model 355 User's Guide
(8/99)4-14
Master Off LineDuring normal operation, the satellite/client relies on the master (SmartTouch® Masteror Scale Server) to supply PLU files and record the PLU accumulators after a transaction.When PLU’s are retrieved from the master, the satellite/client scale makes a backuprecord of the PLU information.
If the master is turned off, or the connecting cables to the master are disconnected orbroken the unit will be off line.
When the master is off line and a PLU is called, the display shows SEARCHING... for afew seconds, the Online cursor is removed, and the unit searches its backup files for thePLU record.
If a PLU is called and no backup file exists, the unit will default to “manual PLU.” ThePLU is then treated as a “Manual PLU.”
The display will show MANUAL MODE BY WGT. Use the DOWN and UP keys to selectbetween BY WEIGHT, LB FOR, ¼ LB, ½ LB, BY COUNT, or STD PACK pricing. Place theitem on the platter. (For Standard Pack items, the weight must first be entered, inounces, then press ENTER). Key in the price, then press ENTER.
To print a label, press PRINT. A label will be printed with the department name in theproduct description field and department UPC in the Item number field of the bar code.
The satellite does not store the PLUaccumulators for later transmissionto the master during off lineoperation.
Not Applicable to StandAlone model.

Chapter 5: Standalone Database FunctionsGeneral Description
(8/99) 5-1
5 Standalone Database Functions
General DescriptionThe standalone version stores and maintains a database of PLU information, extra text,nutrifacts, and graphics. It is available with 256K, 512K or 1M capacity memory. Thefollowing table details the amount of records each size of memory can hold.
PLUs(223 bytes each)
ET Records(540 bytes each)
NF Records(383 bytes each)
1 Meg 4600 0 01350 1350 0900 900 900
1700 0 1700512K 2300 0 0
675 675 0450 450 450850 0 850
256K 1150 0 0335 335 0225 225 225425 0 425
ET recs + NF Recs + Graphic Recs = 7280 Max
Table 4-1: Approximate Memory Capacities
More than one department of information can be stored in memory but only the currentdepartment’s information can be accessed at a time. For example, if department 1 is thecurrent department, only PLUs entered in department 1 will be accessible. Thedepartment can be changed in either the Unit Setup Mode or in the Database SetupMode.
METTLER TOLEDO Model 355 User's Guide
(8/99)5-2
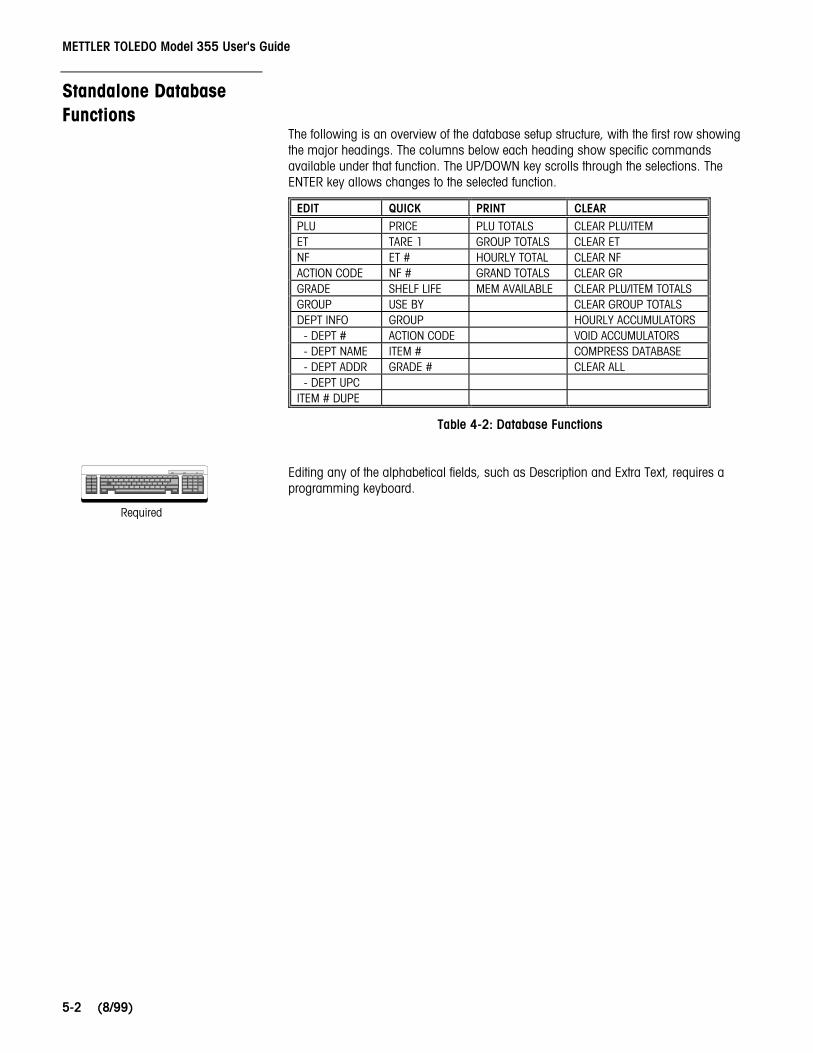
Standalone DatabaseFunctions
The following is an overview of the database setup structure, with the first row showingthe major headings. The columns below each heading show specific commandsavailable under that function. The UP/DOWN key scrolls through the selections. TheENTER key allows changes to the selected function.
EDIT QUICK PRINT CLEARPLU PRICE PLU TOTALS CLEAR PLU/ITEMET TARE 1 GROUP TOTALS CLEAR ETNF ET # HOURLY TOTAL CLEAR NFACTION CODE NF # GRAND TOTALS CLEAR GRGRADE SHELF LIFE MEM AVAILABLE CLEAR PLU/ITEM TOTALSGROUP USE BY CLEAR GROUP TOTALSDEPT INFO GROUP HOURLY ACCUMULATORS - DEPT # ACTION CODE VOID ACCUMULATORS - DEPT NAME ITEM # COMPRESS DATABASE - DEPT ADDR GRADE # CLEAR ALL - DEPT UPCITEM # DUPE
Table 4-2: Database Functions
Editing any of the alphabetical fields, such as Description and Extra Text, requires aprogramming keyboard.
Required

Chapter 5: Standalone Database FunctionsDatabase Setup Mode
(8/99) 5-3
Database Setup ModeTo access database setup, press the SETUP MODE key. Use UP/DOWN to toggle toDATABASE, then press ENTER. If a password has been set up for the database mode,key in the password and press the ENTER KEY.
PasswordsTo change the password for database access, press the PASSWORDS key. At thePASSWORD prompt, enter a number between 1 and 9999. To disable the passwordenter a zero (0).
EditThis function allows you to edit records in the database. The fields which are editablevary depending on the type of PLU. For example, a Standard Pack PLU will not need aTare or Unit Price field.
PLUPress ENTER at the PLU prompt to change or to add a new PLU record. Enter the PLUyou wish to edit or add. If it is a new PLU, the prompt PLU NT FD! ADD ACTV willappear. To continue and add a new active record press ENTER, otherwise press CLEAR.Respond to each of the following prompts by pressing ENTER to update it, or DOWN orUP to scroll to the next.
PLU NUMBER:Enter a new PLU number from 1 - 999999.
ITEM:Enter an item number between 0 - 9999999999. This number is used in the BarCode symbol.
DESC 1 and DESC 2:These fields are edited by pressing ENTER at the DESC1 or DESC2 prompt.Changes must be made on the programming keyboard which is connected to thejack on the bottom of the Model 8450. The Desc1 line displays when that PLU iscalled up. There is a maximum of 32 alphanumeric characters per description field.
PLU TYPE:Choose BY WGT, LB FOR, BY 1/2, BY 1/4, BY CNT, STD PACK or MANUAL bytoggling to that prompt and pressing ENTER.
TARE1/COUNT:Toggle between FORCED or a numeric value. For the numeric value, enter the valueof these tares with the numeric keypad and press ENTER. For a forced tare, toggleto FORCED and press ENTER.
TARE/PROP TARE:Toggle between FORCED, PROP, or a numeric value. For the numeric value, enterthe value of these tares with the numeric keypad and press ENTER. For a forcedtare, toggle to FORCED and press ENTER. For PROP proportional tare, press ENTERand then enter the percentage for the proportional tare as a value between 0 and99.99. For example, if 10.00 is entered, the proportional tare is 10%.
Required

METTLER TOLEDO Model 355 User's Guide
(8/99)5-4
UNIT/TOTAL PRICE:Enter 6 digits 0 - 999999 or FORCED price for By-Weight, lb/for, ¼, ½, total pricefor By-Count, and Standard Pack. To change the currency increments, enter thecurrency function under Unit Setup.
SHELF LIFE:0 - 999 days used to calculate Sell By date printed on the label.
USE BY:0 - 999 days used to calculate Use By date printed on the label.
GROUP #:Items can be categorized by groups within a department. For example, in a bakerythere could be a group for cookies and a group for pies. This allows variousreports to be printed based on each group. To change this enter a new valuebetween 0 - 500 with the numeric keypad and press ENTER.
GRADE #:Lines of text with grade information can be linked to each PLU. Enter the number ofthe Grade text between 0 - 16 to be linked to this PLU with the numeric keypad andpress ENTER. 0 means no grade is selected.
ET #:Lines of extra text can be linked to each PLU. Enter the number of the Extra Textrecord between 0 - 999999 to be linked with this PLU with the numeric keypad andpress ENTER. 0 means no ET is selected.
NF #:Nutrition Fact information can be linked to each PLU. Enter the number of theNutrition Fact record between 0 - 999999 to be linked with this PLU with thenumeric keypad and press ENTER. 0 means no NF is selected.
GRAPHIC:Graphics can be linked to each PLU and will be printed if a label format which printsa graphic is selected. Enter the number of the graphic record between 0 - 999999to be linked with this PLU with the numeric keypad and press ENTER. 0 means noGraphic is selected.
ACTION CODE #:Action codes can be linked to each PLU which will replace the store address,display a different PLU description, or can be used to scroll a marquee. Enter thenumber of the Action Code record between 0 - 50 to be linked with this PLU with thenumeric keypad and press ENTER. 0 means no Action Code is selected.

Chapter 5: Standalone Database FunctionsDatabase Setup Mode
(8/99) 5-5
BARCODE:The barcode to be printed on the label is determined by this setting. This menu isdifferent depending on the Unit Setup for barcode type, EAN or UPC.
At the prompt you can choose from USE SCL SETTING or choose a type from theTYPE? List. These types include GEN MERCH (0), NOT IDENT (1), RAND WT (2),DRUG & HEALTH (3), STORE MARK (4), COUPONS (5), PRICE ENCODED (6) andNOT IDENT (7). (The numbers in parentheses correspond to the values of these barcode types in the master units.) If RAND WT or PRICE ENCODED types are selected,a format string can be selected from the FORMAT? prompt list. For RAND WT andPRICE ENCODED these format strings are:
0: NNNNN C$$$$ X1: NNNNN 0$$$$ X2: NNNNN N$$$$ X3: NNNNN $$$$$ X4: NNNNN W#### X5: NNNNN 0#### X6: NNNNN N#### X7: NNNNN ##### X
If the Unit Setup barcode type is EAN, you can first choose USE SCL SETTING. Thereis an additional field called PREFIX. There will be BY_WGT_PREFIX,BY_CNT_PREFIX, STD_PACK_PREFIX, AND RUN_TOT_PREFIX. Both the first andsecond digit of the EAN barcode can be changed. To change the prefix, follow theexample below.
DisplayBY_WGT_PREFIX: 5_3
Press ENTER BY_WGT_PREFIX? 5_3Enter digits 2 and 4 BY_WGT_PREFIX? 2_4Press ENTER
The digits 2 and 4 are now set as the first and second digit of the“BY_WGT_PREFIX” prompt. The display now shows the next prompt“BY_CT_PREFIX 5_3: 2_1”. Use the same procedure to set the other barcode prefixfor the other PLU types.
BLANK:This allows you to blank one of the following fields on a label: PACK DATE, NETWEIGHT, UNIT PRICE, or TOTAL PRICE. To blank one of these fields, press ENTERat that prompt and toggle YES or NO. When these fields are blanked, only thevalues are blanked not the legends.
Note:N = Item NumberC = Price Check Digit$= Total Price# = WeightW = Weight Check DigitX = Bar Code Check Digit.

METTLER TOLEDO Model 355 User's Guide
(8/99)5-6
Extra TextThis allows you to add a new or edit an existing extra text record. Press ENTER at theEXTRA TEXT prompt. With the numeric keypad enter the number of the extra text recordto be edited (6 digit number 1-999999).
New Extra Text RecordsIf the record is new, the prompt will display XT NT FD! ADD XT. To add the newextra text, press ENTER, otherwise press CLEAR. At the CHAR PER LINE prompt,enter a number between 1 and 99. 54 is the maximum number of characters perline without wrapping the line around. The most common numbers are 32, 42 and54 characters per line.
Entering the Extra TextNow you should be able to begin typing in the extra text with the programmingkeyboard. If the extra text was not a new record, the current text will be displayed onthe screen and ready for editing. Otherwise, type in the new extra text. Press [F10]on the keyboard when finished. You will be prompted to SAVE CHANGES. PressingENTER will result in a SURE? YES prompt and require one more ENTER to save orCLEAR to exit without saving. Pressing CLEAR at the SAVE CHANGES prompt willexit without saving.
Nutrition FactsThis allows you to edit a current or add a new nutrition facts record. The first promptrequests a nutrition facts record number (6 digit number 1-999999). If it is a newNutrition Facts record, the display will read NF NT FD! ADD NF. Pressing ENTER here willcontinue and add a new record as the following describes. Pressing CLEAR will leavethe nutrition facts editing.
LABEL?At this prompt, choose the type of label for the nutrition facts to be printed on bytoggling through the choices and pressing ENTER. SINGLE will print the nutritionfacts on the label with all the rest of the PLU information. ALT PLU/NF will print aPLU label followed by a nutrition facts label, while ALT NF/PLU will print a nutritionfacts label followed by a PLU label. BATCH PLU/NF and BATCH NF/PLU will do thesame but in a batch process. The second nutrition facts only label will be printedaccording to the label format selected in the Unit Setup Label Format menu.
FORMAT?The format for the nutrition facts record can be chosen by toggling through thefollowing choices and pressing ENTER: VRT STD (vertical standard), VERT SIMP(vertical simplified), TABULAR, LINR LND (linear landscape), and LINR PRT (linearportrait).
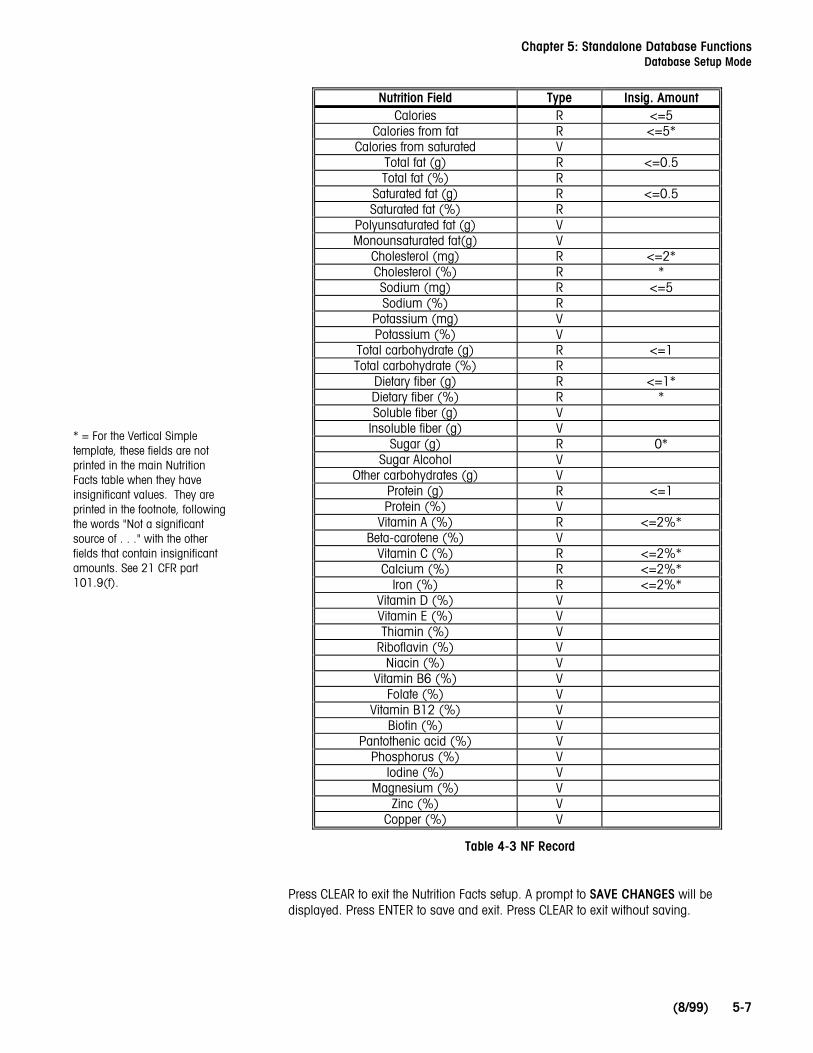
SERV UNITS?This will select the serving units used to calculate servings per container by togglingthrough the following prompts: OZ (numeric entry for By Weight and Standard PackPLUs only), PIECES (numeric entry for by Count or Standard Pack PLUs ony), orTEXT (alphanumeric entry, entered for both serving units and servings percontainer). This is done by pressing ENTER on the prompt and entering in therequested information followed by ENTER. Table 4-3 lists the fields that are required(R) and voluntary (V) along with the insignificant value (when applicable).
Required
Required
Chapter 5: Standalone Database FunctionsDatabase Setup Mode
(8/99) 5-7
Nutrition Field Type Insig. AmountCalories R <=5
Calories from fat R <=5*Calories from saturated V
Total fat (g) R <=0.5Total fat (%) R
Saturated fat (g) R <=0.5Saturated fat (%) R
Polyunsaturated fat (g) VMonounsaturated fat(g) V
Cholesterol (mg) R <=2*Cholesterol (%) R *Sodium (mg) R <=5Sodium (%) R
Potassium (mg) VPotassium (%) V
Total carbohydrate (g) R <=1Total carbohydrate (%) R
Dietary fiber (g) R <=1*Dietary fiber (%) R *Soluble fiber (g) V
Insoluble fiber (g) VSugar (g) R 0*
Sugar Alcohol VOther carbohydrates (g) V
Protein (g) R <=1Protein (%) V
Vitamin A (%) R <=2%*Beta-carotene (%) V
Vitamin C (%) R <=2%*Calcium (%) R <=2%*
Iron (%) R <=2%*Vitamin D (%) VVitamin E (%) VThiamin (%) V
Riboflavin (%) VNiacin (%) V
Vitamin B6 (%) VFolate (%) V
Vitamin B12 (%) VBiotin (%) V
Pantothenic acid (%) VPhosphorus (%) V
Iodine (%) VMagnesium (%) V
Zinc (%) VCopper (%) V
Table 4-3 NF Record
Press CLEAR to exit the Nutrition Facts setup. A prompt to SAVE CHANGES will bedisplayed. Press ENTER to save and exit. Press CLEAR to exit without saving.
* = For the Vertical Simpletemplate, these fields are notprinted in the main NutritionFacts table when they haveinsignificant values. They areprinted in the footnote, followingthe words "Not a significantsource of . . ." with the otherfields that contain insignificantamounts. See 21 CFR part101.9(f).

METTLER TOLEDO Model 355 User's Guide
(8/99)5-8
Action CodeAction Code records can be linked to a PLU to do one of three things, print a storeaddress line, print a PLU description or scroll a marquee. Press ENTER at the ACTIONCODE prompt to enter into this function. Type a current action code record number or anew record number and press ENTER (2 digit number 1-50). The next prompt, TYPE?,will toggle through the three types. Press ENTER to choose one of the types describedbelow.
STORE ADDRThis type will print a store address at the bottom of a label. After pressing ENTER,the prompt LINE 1 will appear. Press ENTER and type the LINE 1 text on theprogramming keyboard, followed by ENTER. The prompt LINE 2 will then appear.Enter the LINE 2 text followed by ENTER. At the SAVE CHANGES prompt, pressENTER to save and exit, or press CLEAR to exit without saving.
PLU DESCRThis type will override the PLU description that is normally displayed on the lowerscale display. It does not change the description printed on the label. It can be usedto display a special message for the customer or operator. After pressing ENTER,the prompt LINE 1 will appear. Press ENTER here and type the text on theprogramming keyboard followed by ENTER. At the SAVE CHANGES prompt, pressENTER to save and exit, or press CLEAR to exit without saving.
MARQUEEThis type of action code will define the text for a scrolling marquee. After pressingENTER, a cursor will appear waiting for text input from the PCAT keyboard. Enter themarquee text and press ENTER. At the SAVE CHANGES prompt, press ENTER tosave and exit, or press CLEAR to exit without saving.
GradeThis function is used to program Grade Text. After pressing ENTER, enter the recordnumber of the grade text to be edited (2 digit number 0-16). A cursor will appearwaiting for text input from the programming keyboard. Enter the grade text and pressENTER. At the SAVE CHANGES prompt, press ENTER to save and exit and CLEAR to exitwithout saving.
GroupThis function will assign a text string to a group number. This text string will then beprinted on the Group Totals report heading. After pressing ENTER, enter the recordnumber of the group text to be edited. A cursor will appear waiting for text input from theprogramming keyboard. Enter the group text and press ENTER. At the SAVE CHANGESprompt, press ENTER to save and exit and CLEAR to exit without saving.
Department InfoThis allows information about the department to be entered. At each of the prompts,enter the requested information followed by ENTER. DEPT NAME and DEPT ADDR arealphanumeric entries from the programming keyboard. The DEPT ADDR can have 2lines. The DEPT UPC is a generic UPC number for totals labels for that department.
Item # DuplicationThis function simply toggles YES and NO entries. Selecting YES allows different PLUrecords to have the same item number. Selecting NO does not allow this.
Required
Required
Required

Chapter 5: Standalone Database FunctionsDatabase Setup Mode
(8/99) 5-9
Quick ChangeThis function allows you to change one of the following fields of a PLU without having togo through all of the other fields at the same time: PRICE, TARE, ET #, NF #, SHELFLIFE, USE BY, GROUP #, ACTION CODE, ITEM, and GRADE #. The QUICK PRICEchanges the UNIT PRICE field for By Weight PLUs and the TOTAL PRICE field forStandard Pack and By Count PLUs. The QUICK TARE changes the TARE1 field.
PrintThis function will print reports for the following: PLU TOTALS, GROUP TOTALS, HOURLYTOTALS, GRAND TOTALS, and MEMORY AVAILABLE. The reports are printed on labelsthe format of which are chosen in the Unit Setup Label Format function. Refer toAppendix 2 for the label formats for reports. To print one of these reports, press ENTER atthat prompt. The results are displayed on the tower display. To print, press the PRINTkey (exception: Hourly totals will print automatically). To stop printing in the middle of arun, press the CLEAR key.
ClearThis function allows you to clear out or delete various parts of the database. The first 4choices, CLEAR PLU\ITEM, CLEAR EXTRA TEXT, CLEAR NUTRIFACT, and CLEARGRAPHIC, will clear individual records in each of those areas. Press ENTER at theprompt. The next prompt can be toggled between ALL and the record type. For example,press ENTER at the CLEAR PLU/ITEM prompt. Now you can toggle between PLU/ITEMand ALL. Pressing ENTER at PLU/ITEM, will request a PLU number to delete. PressingENTER at ALL will clear all PLU records. Both cases will prompt with SURE?? NO beforecontinuing. The other 3 choices work the same way but with the other record types ofextra text, nutrifact, and graphic.
The next four choices, CLEAR PLU\ITEM TOT, CLR GROUP TOTALS, HOURLYACCUMULATORS, and VOID ACCUMULATORS, will clear the totals for each of thoseareas. CLEAR PLU/ITEM TOT works as described in the above paragraph where there isa choice between clearing totals for ALL PLUs or for just one PLU. CLR GROUP TOTALSrequests a group number to be entered. Both end with a SURE?? NO prompt. The twoaccumulators display a prompt with the current department number and a togglebetween YES and NO. There is no SURE? prompt to double check on clearingaccumulators.
The next choice, COMPRESS DATABASE, should be used if any ‘Out of Memory’ errorsare displayed. Press ENTER at the prompt and toggle YES and NO at the SURE??prompt to continue.
The final choice, CLEAR ALL, will clear everything from the database completelyincluding all PLU, Extra Text, Nutrition Facts and Graphic records and accumulators.There is a SURE?? NO prompt to make sure this is what you want to do.

METTLER TOLEDO Model 355 User's Guide
(8/99)5-10
For your notes

Chapter 6: MaintenanceExternal Cleaning
(8/99) 6-1
6 Maintenance
External Cleaning
WARNINGDO NOT SPRAY OR WASH DOWN. HAZARD OFELECTRICAL SHOCK OR BURN.
WARNINGDISCONNECT ALL POWER TO THIS UNIT BEFOREREMOVING THE FUSE OR SERVICING.
Turn the scale power off by placing the power switch to the OFF position (press the “o”on the power switch). Disconnect the power cord from the outlet.
Use a soft clean cloth dampened with a mild detergent and water (or a mild cleaner) towipe the exterior surfaces. Do not spray liquid directly on the unit. A mild spray cleanercan be used by spraying the cleaning cloth.
=

METTLER TOLEDO Model 355 User's Guide
(8/99)6-2
Internal PrinterCleaning
WARNINGDISCONNECT ALL POWER TO THIS UNIT BEFOREREMOVING THE FUSE OR SERVICING.
Turn the power off by placing the power switch to the OFF position (press the “o” on thepower switch). Disconnect the power cord from the outlet.
Open the printer door. Clean any adhesive or debris buildup from the stripper bar, platenroller, and printhead using METTLER TOLEDO liquid cleaner or equivalent or theMETTLER TOLEDO Clean Pen. DO NOT USE A METAL DEVICE TO REMOVE LABELSFROM COMPONENTS OR SEVERE DAMAGE MAY RESULT. DO NOT SCRAPE THEPRINTHEAD WITH ANY OBJECT TO REMOVE GLUE OR LABEL DEBRIS.
To clean the printhead, unlock the printhead by lifting the rear of the printhead assemblyforward and up at the same time. Once the rear of the assembly is unlocked then lift thefront of the printhead assembly. Refer to Figure 6-1. Remove the paper stock and cleanthe printhead and paper path with a soft, clean cloth soaked in isopropyl alcohol,METTLER TOLEDO liquid cleaner or equivalent, or the METTLER TOLEDO Cleaning Pen.
Figure 6-1: Unlocking the Printhead Figure 6-2: Locking the Printhead
To lock the printhead back down when complete, see Figure 6-2.
Platen Roller
Printhead
Paperpath
=

Chapter 7: Label Formats
(8/99) 7-1
7 Label FormatsLabel
Number Size Type DateOtherInfo
BCPosition
LabelNumber Size Type Date
OtherInfo
BCPosition
31 1.9" By Wght Sell Grd 80 3.7" By Cnt Sell NF32 1.9" By Cnt Sell Grd 81 4.2" By Wght Sell Grd33 1.9" Std Pck Sell Grd 82 4.2" By Cnt Sell Grd34 1.9" By Wght 83 4.2" Std Pck Sell Grd35 1.9" By Cnt 84 4.2" By Wght Sell Grd BCB36 1.9" Std Pck 85 4.2" By Cnt Sell Grd BCB37 1.9" By Wght Pack Grd 86 4.2" Std Pck Sell Grd BCB38 1.9" By Cnt Pack Grd 87 4.2" By Wght Sell Grd SH39 1.9" Std Pck Pack Grd 88 4.2" By Wght Sell Grd SHS40 2.1" By Wght Sell Grd 89 4.2" By Wght Sell Grd NF41 2.1" By Cnt Sell Grd 90 4.2" By Cnt Sell Grd NF42 2.1" Std Pck Sell Grd 91 4.2" Std Pck Sell NF43 2.1" By Wght 92 4.7" By Wght Sell Grd44 2.1" By Cnt 93 4.7" By Cnt Sell Grd45 2.1" Std Pck 94 4.7" Std Pck Sell Grd46 2.1" By Wght Pack Grd 95 4.7" By Wght Sell Grd BCB47 2.1" By Cnt Pack Grd 96 4.7" By Cnt Sell Grd BCB48 2.1" Std Pck Pack Grd 97 4.7" Std Pck Sell Grd BCB49 2.4" By Wght Sell Grd 98 4.7" By Wght Sell Grd SH50 2.4" By Cnt Sell Grd 99 4.7" By Wght Sell Grd SHS51 2.4" Std Pck Sell Grd 100 4.7" By Wght Sell Grd NF52 2.4" By Wght Sell Grd BCB 101 4.7" By Cnt Sell Grd NF53 2.4" By Cnt Sell Grd BCB 102 4.7" Std Pck Sell Grd NF54 2.4" Std Pck Sell Grd BCB 103 5.1" By Wght Sell Grd55 2.4" By Wght Sell Grd 104 5.1" By Cnt Sell Grd56 2.4" By Cnt Sell Grd 105 5.1" Std Pck Sell Grd57 2.4" Std Pck Sell 106 5.1" By Wght Sell Grd BCB58 2.4" BW Sell Grd BCB 107 5.1" By Cnt Sell Grd BCB59 2.4" By Cnt Sell Grd BCB 108 5.1" Std Pck Sell Grd BCB60 2.4" Std Pck Sell BCB 109 5.1" By Wght Sell Grd SH61 2.4" By Wght Sell Grd SH 110 5.1" By Wght Sell Grd SHS62 2.4" By Wght Sell Grd SHS 111 5.1" By Wght Sell Grd NF63 3.3" By Wght Sell Grd 112 5.1" By Cnt Sell Grd NF64 3.3" By Cnt Sell Grd 113 5.1" Std Pck Sell Grd NF65 3.3" Std Pck Sell Grd 114 Con By Wght Sell BCB66 3.3" By Wght Sell Grd BCB 115 Con By Cnt Sell BCB67 3.3" By Cnt Sell Grd BCB 116 Con Std Pck Sell BCB68 3.3" Std Pck Sell Grd BCB 117 Con By Wght Sell SH BCB69 3.3" By Wght Sell Grd SH 118 Con By Wght Sell NF BCB70 3.3" By Wght Sell Grd SHS 119 Con By Cnt Sell NF BCB71 3.7" By Wght Sell Grd 120 Con Std Pck Sell NF BCB72 3.7" By Cnt Sell Grd 121 Rec73 3.7" Std Pck Sell Grd74 3.7" By Wght Sell Grd BCB75 3.7" By Cnt Sell Grd BCB76 3.7" Std Pck Sell Grd BCB77 3.7" By Wght Sell Grd SH78 3.7" By Wght Sell Grd SHS79 3.7" By Wght Sell NF
BCB Bar Code on BottomBy Cnt By Count PricingBy Wght By Weight PricingCont Continuous Strip LabelGrd GradeNF Nutrifact TextPack Pack DateSell Sell By DateSH Safe Handling Text Printed by 8461.SHS Safe Handling Space on Preprinted labels.Std Pck Standard Pack Pricing
Refer to the Model 8450 or Model355 Service Manual for illustrationsof the label formats.

METTLER TOLEDO Model 355 User's Guide
(8/99)7-2
For your notes

Chapter 8: Error Messages
(8/99) 8-1
8 Error Messages
The following is a list of “Operator” errors that may occur. These errors are an “invalidoperation” type and are displayed in order to explain the problem:
Error Message Description
*DOWNLOAD ERROR* Indicates an error during the backup download fromthe master. The master may be off-line. Check themaster and the communication cable on the scale.
BAD PRINTER COMM This is a printer error. Turn power off, then on. Tryprinting another PLU. If problem persists, call forservice.
CHECK LABEL STOCK Scale may be out of labels or incorrectly threaded.
COMMUNICATION ERROR Indicates the satellite has lost communication with themaster scale. This could occur during a downloadPLU routine. The cause could be the master scalebeing turned off, a loose or broken communicationline, or a failure in the master scale. Also check powerto the master scale and the fuse.
INVALID ENTRY Incorrect entry made when making an accumulatoradjustment, under zero, or overflow.
INVALID PRICE MODE Incorrect entry found in modifier or package code fieldsduring a price entry (or change). When the packagecode is “2”, the modifier must be a “2” or a “4”indicating ½ or ¼ lb pricing. When the package codeis “1” (By Count), the modifier must be greater than“0”. When in Pound For or By Count mode, thenumber of pounds or the count is too many digits.
INVALID PRICE MODE Invalid date found in modification or package codefields in the PLU record.
INVALID TARE Invalid tare entry.
ITEM # NOT FOUND The entered Item number was not found (does notexist).
MEMORY IS FULL The satellite memory is full.
NO EXTRA TEXT FOUND The entered Extra Text number was not found (doesnot exist).
OVER READY Scale is over capacity.
PLU # NOT FOUND The entered PLU number was not found (does notexist).

METTLER TOLEDO Model 355 User's Guide
(8/99)8-2
Error Message Description
PROP TARE 2 ERROR The Tare 2 field in the PLU record is set to aproportional tare and the satellite is set up to use Tare2. However, the satellite is also set up to prohibit theuse of proportional tare. Change the setup to allowproportional tare.
RECORD NOT FOUND The Extra Text, Nutrition Fact, or Graphics numberdoes not exist in the master database.
TEXT FILE TOO LARGE Extra Text file is too big to fit in memory.
TOTAL$>$999.99 Total dollar amount exceeds the ability of the printer toprint the value.
UNDER READY Scale is under capacity.


METTLER TOLEDO1900 Polaris ParkwayColumbus, Ohio 43240
P/N: A14858900A
(8/99)
METTLER TOLEDO® and SmartTouch® are registered Trademarks of Mettler-Toledo, Inc.©1997, 1998, 1999 Mettler-Toledo, Inc.Printed in USA
A14858900A