Embed Size (px)
Citation preview
AgEnt 71-94 AgEnt Consultant Report No 32
AgEnt Technical Notes No 5
Methods for Producing Vegetable Seedlings
with Containerized Technology
Phillip Mowbray Gamini Kumarage
George A Marlowe
The Agro-Enterprise Development Project Co lormbo Sri Lanka
September 1994
I
TABLE OF CONITENTS
Page No
1 Introduction I a Advantages 1 b Characteristics 1
2 Location of Seedling Production 2 a Outdoor Production 2 b Sheltered Production 2
3 Climatic Requirements 3 a Temperature 3
4 Soil Moisture Management 5 a Soil 6
5 Containers 15 a Outdoor Plant Beds 15 b Growing in Containers 16
6 Planting 19 a Planting Rates 19 b Germination 21 c Seedling Development 23
7 Nutrient Management 24 a Seed bed or Seed box 24 b Feeding Seedlings 24 c Preparation for the Field 26
8 Pest Management 26 a Insects 26 b Diseases 26 c Seedling Disorders 27 d Symptoms Associated with Nutrient Shortage 30
LIST OF TABLES AND FIGURES
Table No Topic Page No
1 Some Important Time-temperatures Relations for Vegetable Transplant Production 5
2 Thermal Death Points of Some of the Most Important Problem Organisms in Seedling Production 7
3 Comparison of Soil and Media 13
4 Metric Measurements of Popular mix in the USA 14
5 Partial Chemical Analysis of a Typical Seedling Production 14
6 Partial Physical Analysis of a Typical Seedling 15
Production
Medium
7 Some Common Containers Used in Containerized Production 16
8 Some Common Spacings Used in Contain-erized Plant 20
9 Seed Needed to Produce Transplants for Hectare of Vegetable Crop 21
10 Stages in Seed Germination 22
11 Some Development Characteristics of Field Ready Transplants 23
Figure Illustration
1 Types of Plastic Covered Plant Growing Structures 4
2 Practical Soil Cleansing Methods 9
3 Methods of Container Support 18
1 INTRODUCTION
a Advantages
Profitable vegetable production starts with a satisfactory stand of healthy young plants in the field Healthy high yielding crops can be grown from seed planteddirectly in thefield or from young seedlingswhich may be one ortwo months of age when placed in thefield These young plants are often called transplants or sets
The use of seedling plants often gives the vegetable grower a months earlier market maturity over the direct seed method This earlier maturity is often associated with higher prices for the crop thus the extra effort and cost to grow or purchase good seedling plants is usually cost effective
When seeds are planted directly in the field the emerging seedlings may be too few or too many to produce a high yielding crop if emergence is sparse replanting may be necessaryif emergence is too thick thinning may be required The placement of healthy youngseedling plants establishes the desired plant population in one sure operation
It is much easier to manage the water fertilizer pests and rate of growth of a thousand plants in a seedling production area than the same thousand spread out over a half hectare of crop area This feature of being able to control the development of the early seedlings saves time water pesticides and labour
Growers may buy seedlings produced by other farmers or grow their own Growers should not grow their own seedlings unless they are willing to give the time and effort required to produce quality seedlings Good seedlings require know-how time and tender loving care The savings in cost may be negligible but there are many other advantages
By growing their own seedlings the grower can be sure of the soil used the variety and can control the date of seeding and maturity for setting in the field Home grown plants are less likely to import insects and diseases If rain or bad weather develops at planting time home grown plants can be delayed under the growers care
The information provided in this bulletin can be easily adapted to the production of flower ornamentals fruit and forest tree seedlings
b Characteristics
The objective of this publication is to assist Sri Lankan farmers to produce high qualityseedlings As an examples what are the characteristicsof a quality tomato seedling plant
bull The seedling should have a fairly thick stem andstrong root system The above ground part the stem and leaves should be only sl~ghtly larger ihan the root mass
The leaves should be light green in colour with a slight purplish tinge of the mid ribs to indicate their hardiness for settinig in the field
The seedlings should have the seed leaves attached If shaded over-watered or over fertilized these seed leaves usually drop Their presence indicates that the seedling has enjoyed continuous development
The seedlings should have 5 to 7 leaves including a healthy terminal growing point
The seedlings should be free of insect diseases and nematodes
The most common vegetables grown from seedling plants are cabbage tomato and onion By using some type of small container that will allow roots to grow freely seedlings can be produced for a great number of vegetables Examples of other vegetables which are often grown from seedling transplants are
Peppers Eggplant Pumpkin Cauliflower Water melon Cucumber Lettuce Sweet melon Broccoli Celery Squash Asparagus
Some farmers become full time plant growers They grow for other farmers home gardeners and for their own use City people who have small gardens usually purchase their seedlings from stores supplied from the specialized farmers
2LOCATION OF SEEDLING PRODUCTION
a Outdoor Production
Vegetables seedlings can be produced outdoors or in covered structures The outdoor plant growing area should be in a place shielded from hot and cold winds be accessible to a dependable supply of water it should be well drained so that water will not saturate the bed and the soil should be as free of weeds insects nematode and diseases as possible
There are a variety of protective structures vhich can be used to make an outdoor plant bed more weather-safe for seedlings Polyethylene or Polyvinyl plastic film over metal hoops can be used to shield the plant bed Wood or stone boxes with clear plastic or glass lids can be used as cold frames for plant production These outdoor structures can also be heated by simple stoves manure electric cable or electric lights Thatch-grass windbreaks also help to improve outdoor bed protection
The purpose of the protective cover is to lengthen the period of control over the seedlings Out-in-the-open seedlings experience the full effect of cold winds and hot temperatures Covered structures over the bed may provide several degrees of warmth as well as shield the seedlings from the cold winds and rain
b Sheltered Production
Simple framed structures over which clear plastic sheeting has been attached provide suitable shelters for protected plant production The frame can be made from wood poles and wire
2
pipes bent into half circles or sawn lumber joined to form a pitched roof Examples of some common shelters or plastic covered greenhouses are nresented in Figure 1
A single layer of plastic film stretched over a framework provides a simple greenhouse which will shield seedling plants from cold wind and rain and provide a warmer-than-outside temperature during the daylight hours If the greenhouse is tall enough for workers to walk upright their working comfort would be much improved
A simple hot air furnace of the coal or wood burning type adds protection from low outside temperatures at night Fireburning heating units must be ventilated so that the smoke and gases of combustion are released to the outside These gases can be highly toxic to young seedlings
The type of selected heating unit selected depends on costs materials available and temperature range desired In very small greenhouses a small paraffin electric or gas heater may be adequate In bigger greenhouses larger units are required to maintain adequateinterior temperatures The temperature requirements of the various vegetable seedlings is discussed under Climatic requirements In large greenhouses it is generally necessary to distribute the heated air in plastic tubes or by fans which help circulate the warm air throughout the structure
3 CLIMATIc REQUIREMENTS
a Temperature
Transplant growers need to know the temperature requirements of each vegetable they plan to produce Small-scale seedling growers may have little or no control over the temperature they provide their seedlings if grown outdoors
With some type of covering they may reduce cold wind damage and provide a moderately warm atmosphere during the daylight hours but at night the temperature may drop considerably
Plant growers who have heated structures can exert more control over the temperature and their plant production can be more reliable In greenhouses with well controlled temperaturemoisture and nutrient management seedling production becomes reliable and predictable For example tomato seedlings can be grown to a field ready stage in 28 days year round if suitable controlled management is available
There are three temperature requirements for each vegetable seedling Growers who can provide all three components greatly increase their chances of success There is a best temperature for seed germination There is a best temperature for the daylight growth of the seedling and a best temperature for night time maintenance of the seedlings If these temperatures are provided the production cycle can be programmed within rather predictable timc requirclnents as shown in Table 1
If temperatures below these best temperatures are provided to the seedlings growth will be slower and less prcdictable production will result
3
FIGURE I TYPES OF PIASTIC COVEREE) GROWING SIRUCIURI -S
HALF CIRCLE PIPE STRUCTURE
SIMPLE LEAN TO WOOD OR PIPE
STRUCTURE
0
SIZE DEPENDENT ON NEEDS AND MATERIALS COVERING MATERIAL POLYETHYENE POLYETHENE HEATING DEPENDENT ON NEEDS AND RESOURCES
4(ABHl ROOFsTRSI i ~
Table 1
Some Important Time-temperature Relations for Vegetable Transplant Production
Vegetable Germination Temp Days to Plant Growing Time to Responses degC Emerge Temp 0C Grow
Min Max Optimum Opt Temp Day Night Weeks
Asparagus 10 35 27 15-17 27 20 8-10 Broccoli
Brussel Sprouts 7 7
38 38
29 26
5-7 5-7
18 18
17 17
5-7 5-7
Cabbage Cauliflower
7 7
24 38
26 27
5-7 5-7
18 18
17 17
5-7 6-8
Celery Collards-kale
7 7
29 24
22 26
7-9 5-7
22 18
17 17
10-12 5-7
Cucumber Eggplant
17 17
41 35
35 29
4-5 5-7
24 24
18 20
4-5 6-8
Lettuce Melon Sweet
3 17
29 38
24 33
2-3 4-5
15 24
12 18
5-7 3-5
Onion 7 29 18 4-5 18 16 10-12 Pepper
Pumpkin 17 17
35 38
24 35
8-10 4-5
22 24
18 18
6-8 7-5
Squash 17 38 35 4-5 24 18 3-4 Tomato 18 27 27 6-8 22 18 5-7
Water Melon 17 38 35 4-5 24 20 4-5
4 SOIL MOISTURE MANAGEMENT
There is a rather delicate balance between enough water for germination and plantgrowth and too little for effective development Some seeds will germinate readily from slightly above wilting point up to field capacity These include
Cabbage Sweet melon Cucumber PepperSquash Water melon Tomato Onion
Seeds that will germinate best at the high range of field capacity or near field capacityinclude lettuce and endive Celery requires soil moisture to be at field capacity whereas the Spinaches do better at the lower moisture levels well below field capacity
The water used for seedling production should be of good quality free from pesticide runshyoff and should be available and easy to obtain How the water is applied is not importantit can be applied by sprinkling can hose or sprinkler irrigation The plant bed recently sown should be watered gently to avoid washing up the seed Young seedlings should be watered carefully with low pressure or a fine mist and if possible the water should be placed on the soil or soil substitute dtler than on the leaves Wet leaves encouragesfoliardiseases
Seed flats maybe watered by sub-irrigation soft sprinkling or mist spray Seed flats should not be allowed to dry out but over-watering must be avoided The flat may be covered with clear plastic file placed ithe shade for a Few days to hasten germination and removed as soon as firstsecdlings emerge
5
As a rule over-watering of seedlings in containers is more likely than under-wateringKeeping soil excessively wet increases the danger of damping-off poor root systemdevelopment and soft weak plants If the seed flats become leached the plants may corue hard and pale in color
Plants should be watered thoroughly but only as often as needed Watering should be done early enough in the day that leaves will be dry during the night if possible
Soil moisture control is one of the most important steps in seedling production If small seedlings are allowed to wilt severe shock may result and the seed leaves may fall off indicating that the plant will be out of balance in the future
Water management of seedlings grown in open beds is sometimes difficult because of rain A simple plastic cover helps to shield the seedlings from excess water but this does add to the expense of production
Seedlings can be shifted out of balance very quickly by excess soil moisture The soft stems that are associated with excess water also encourage fungal invasion and stem or root rot As a general rule it is desirable to maintain a low constant supply of soil moisture toseedlings without encouraging wilting Some wilting during the hot part of the day is permissible provided the plants perk up quickly when watered The feel method is one of the most reliable methods to check soil moisture If the soil feels dry water If the soil feels damp hold back the watering The ideal would be to maintain a slightly damp soil at all times
a Soil
Excellent seedlings can be grown in sandy loam or clay loam soils that have been improvedwith organic matter Soil is available low in cost and most farmers are familiar with their soils moisture and nutrient holding characteristics -The biggest disadvantage to using soil in plant production is that one batch of soil may be very different from another batch it maycontain weeds nenatodes insects and diseases
Plant growers using soil should make each bach as uniform as possible so they will be able to repeat production cycles more easily
The reduction of bacterial fungal nematode and weed levels in soil or soilless media byvarious treatments is very important
There are a wide range of practices and materials which can be used to help reduce the level or troublesome organisms from the seedling production operation Sri Lankan growersshould consider non-chemical measures first rather than chemicals because
Non-chemical methods are usually cheaper Non-chemical methods are usually less dangerous Non-chemical mcthods are usually require less equipment o Non-chemical methods can usually be done with materials already on the farm Non-chemical methods are less damaging to the environment due to the absence of
leaching chemicals in the underground water etc
6
The ideal soil clean-up procedure would be to kill harmful organisms but allow beneficial organisms to survive
Some of the most important non-chemical clean-up procedures involve heating of the soil or media A brief review of how temperature can be used to reduce soil or media problemsrequires an understanding of Thermal Death Points of various organisms as given in Table 2
Table 2
Thermal Death Points of Some of the Most Important Problem Organisms in Seedling Production
From University of California Propagation Manual 23 1Organisms Killed Soil Moist (Various Time)
Temperature OC Required C I
Resistant Weed Seeds Resistant Plant Viruses
930 -1000 200-212
Most weed seeds All plant pathogenic bacterial Most plant viruses
711 - 822 160 - 180
All soil insects Most plant pathogenic fungi Most plant pathogenic bacterial All worms slugs All centipedes
600 - 711 140 - 160
Botrytis gray mold 544 - 600 130 - 140
Rhizoctonia Solani Sclerotium Rolfsii Sclerotinia Sclerotiorum All nematodes
489 - 544 120 - 130
Water Molds -56 110 - 120
1 Common Heat Methods Used to Sterilize Soil
There are many ways to heat soil Electric heating is one of the most expensive but even a kitchen micro-wave can be used to sterilize small batches Some growers can afford soil ovens auto-claves and pressure cookers but most must use cheaper methods
7
An old dump truck body can be used for many years as a low cost cooker or steamer The bodies can be taken from wrecked trucks or purchased new The body needs to be placed on concrete blocks or stones to elevate it at least 55 or 60 cms off the ground examples of heat treatments are shown in Figure 2
For dry heating moist soils placed into the truck body and covered with sheet metal The depth of the moist soil should not exceed 1 meter An uncooked potato should be packed 7-8 cms from the top of the pile before covering A fire built under the truck body should be maintained for 3 to 312 hours If the potato is cooked the soil mass may be considered sterilized
For steam heating a mesh grill or some type should elevate the soil mass from the bottom of the truck bed at least 10-15 cms Water is placed into the area between base and grill before soil (and uncooked potato) are loaded on to the truck bed The steaming method onlyrequires 2-21 hours of under fire thus uses less fuel Also a layer of Jute sacks or old rugshylike clothes can be used to hold in the steamed heat instead of a metal cover
8
FIGURE 2 PRACTICAL SOIL CLEANSING METHODS
(~J~ METAL BOX
INDICATOR DRY BAKING POTATOES SOURCE OF HEAT METHOD
METAL COVER
lt SOIL Mr O
SOURCE OF HEAT STEAMING METHOD
SUN OR SOLAR PASTEURIZATION METHOD
UPPER COVER OF CLEAR POLYETHYLENE FILM
At I (I (() l-I()11I1A(K I)I 1i (IIYINkI NI
For growers in areas where hot sun and minimum cloudiness can be expected for three to four weeks sun-cooking can be used If a concrete floor out of shaded areas is available the soil or media to be cooked should be placed on the floor in a flat layer no deeper than 25-30 cm If a concrete floor is not available a black plastic sheet will do as long as the soil is protected from non-treated soil beneath
After the soil or media is placed onto the floor or plastic sheet it should be well moistened with a hose or sprinkling can A clear or slightly milky plastic tarp should then be placed over the 25-30 cm deep mass and the edges should pressed down with stones or bricks to help retain the moist hot heat generated during the daylight suimy hour
The sun cooking method is also called solarpasteurization A minimum of fourteen days of hot sunny days should be allowed before removing the cover and using the soil or media A twenty one day period may be needed if the sun hides for extended periods
Solar sterilization is low cost avoids dangerous chemicals and the plastic film or tarp can be used for may seasons
2 Common Chemical Methods Used to Sterilize Soil
Clean-up methods using chemicals should ony be attempted by persons willing to understand the chemical the dangers associated with these poisonous materials and how they may be applied safely Users must read the label directions carefully follow them exactly and always have another person present in case something goes wrong
Improper use of soil treatment chemicals can be dangerous as well as ineffective Some of these chemicals are liquids gases or rarely dry materials Some of the most common soil fumigants are Methyl Bromide Chloropicrin (tear gas) Vaoan (Sodium N-Methyl Dithiocarbamate Dihydrate)
Growers should seek professional advice before using chemical methods to fumigate soil
Physical Factors Should Provide mechanical support for seedling Be readily available Be low in cost Be highly uniform Hold moisture well Drain freely Be arable Be light in weight Maintain constant volume wet or dry Not shrink in storage Be easy to mix Be free of pathogens insects nematodes and weeds
Chemical Factors Should Be relatively inert Be free from harmful chemical residues
10
Not deteriorate rapidly Resist leaching Be low in initial fertility Hold nutrients readily Be stable to soil fumigants Be chemically uniform
Plant growers can make thcir own media from local materials but they need to develop a Recipe or formula of quantities so they can duplicate their mix and increase their uniformityof production The following list describes some commonly used ingredients
Some Characteristics of Common Plant Growing Media
Sand Heavy 100 lbs per cubic foot Little or no mineral supply or buffering capacity 005 to about 20 mm in diameter Quartz sand most useful
Vermiculite Light weight 6 to 10 lbs per cubic foot Neutral in reaction sterile Good buffering capacity Holds 3 to 4 gallons water per cubic foot Supplies some magnesium and potassium Expanded mica many layers when heated Should not be squeezed when wet GradLs 1 5-8 mm3 1-2 mm 2 2-3 mm4 less than 1 mm
Peat Moss Least composed of peat materials Derived from sphagnum hypnum etc High in moisture holding capacity (10 x dry weight) High in acidity pH 38 to 45 Small amount N low in P nd K Light tan to dark brown in color
Reed Sedge Peat Partially decomposed grasses reeds sedges Varies greatly in decomposition pH1 ranges from 45 to 70 Reddish-brown to black in color
Peat lhunus Very advanced stge of decomposition Relatively low watcr holding capacity Contains about 20 to 35 N
I1
Perlite Very light weight 5 to 8 lbs per cubic foot Volcanic origin mined from lava Size 3 to 6 mm most used Holds 3 to 4 times weight in water Neutral pH 60 to 80 Used to increase aeration No buffering capacity no mineral value
Compost High moisture holding capacity Limited nutrient value May be highly variable in composition Good buffering capacity May contain pests needs sterilization
A comparison of soil and media shows the following (Table 3)
12
Table 3
Comparison of Soil and Media
Characteristic Field Soil
Soil 50 Compost 50
Full Compost
Sand 25 Compost 75
Peat 505 Vermiculite 50
Anchors Seedlings
Good Good Fair Fair Good
Readily Available
Yes Yes Yes Yes Purchased
Low in Cost Yes Yes Yes Yes Moderately
Light in Weight
No Moderate Yes Mod Yes
Easy to Mix Yes Yes Yes Yes Moderately
Uniform Chemically
No No No No Yes
Uniform Physically
No No Yes Yes Yes
Holds Moisture
Yes Yes Yes Fair Yes
Drains Freely Varies Usually Fair Yes
Low in Fertility (lnit)
Varies Mod Mod Mod Yes
Holds Nutrients
Yes Mod Yes Mod Yes
Resists Leaching
Yes Mod Yes Mod Yes
Maintains keration
No Mod Yes Mod Yes
Resists Compaction
No Mod Yes Mod Yes
Free of Pests No No Usually Yes Yes
Free of Toxic Resid
Possibly Possibly Usually Usually Yes
The formula for the most popular plant growing mix in the USA is presented In Sri Lanka Coconut Coir Dust or some other material could easily be substituted (Table 4)
13
Table 4
Metric Measurements of Popular mix in the USA
Peat
Vermiculite
Dolomite Ground
Superphosphate 20
Micronutrient Mix
Wetting Agent
Total
05 meter
05 cu meter
20 liters
14 liters
74 gms
85 gms
10 cubic meter
720 kg
64 kg
50 kg
12 kg
74 gms
85 gjms
1773 kg
The chemical and physical qualities of this much used media is shown in Table 5
Table 5
Partial Chemical Analysis of a Typical Seedling Production Medium
(Plant growing Mix)
Characteristic Range Characteristic Range
pH -03 Magnesium -18
Soluble Salts pm
128 - 640 Manganese ppm -022
Nitrate Nitrogen ppm
14 - 50 Iron ppm 014-030
Phosphorus ppm
20 - 45 Boron ppm 007 - 030
Potassium ppm 15 - 30 Molybdenum ppm -0016
14
Table 6
Partial Physical Analysis of a Typical Seedling
Production Medium (Plant growing Mix)
Characteristic Range
Wettability grams5min 25 - 30
Moisture 20 - 30
pH -19
Soluble Salts ppm 119 - 280
Percolation insec 20 - 25
Water Retained by Volume 40 - 50
Bulk Density lbcu ft -1
Air Porosit -86
Wet Shrinkage 42 - 102
Water Retention by -98 Volume
5 CONTAINERS
a Outdoor Plant Beds
Excellent seedlings can be grown in well drained outdoor plant beds If grown without cover the seedlings may be exposed to excess rain wind or blown sand The uniformity of the seedlings produced would depend on the uniformity of the soil and soil-water-nutrient relationships
The spacing dates of planting and relative time to produce field ready transplant is similar to seedlings grown in containers
The biggest disadvantage of field grown plants is in the transfer of the seedling from the bed to the planting field When a young seedling is removed from the plant bed small roots are often broken or severed This removal creates a shock to the young seedling delays establishment in the field and provides entry for disease organisms into the broken roots
15
b Growing in Containers
The growing of vegetable and flower plant seedlings in small containers helps to eliminate this transplant shock because the roots are not disturbed There are a wide range of materials used in containers such as paper thin wood plastic clay manure and plant fibers Sizes are available from 2 cm by 2 cm squares to pots 30 cm in diameter Containers may be attached as in trays comprised of 24 to 200 individual cells or they may be separate units
The containers made of natural materials such as manure fibre or peat pots are usually planted with the plant the man-made containers are usually re-used for 15 to 30 times as the seedling is removed from the container before planting
Containers may be made from strips of asbestos paper roofing rolls that are stapled together to form open end cylinders In the tropics plant growers use the wide leaves of the banana to make seedling containers many use small plastic bags
Characteristics of some common containers that may be purchased are presented in Table 7
Table 7
Some Common Containers Used in Containerized Plant Production
Characteristics of Clay Plastic Peat TMa~nure IFibre FoamContainer Pots Posts Pots Pots Pots Tray
Durability (Reuse) Good Good Single Single Single Fair
Breakability Fair Good Poor Poor Fair Fair
Resists Decay Fair Excellent Poor Poor Poor Excellent
Inhibits Plants Growth No No Some No Yes No
Weight Heavy Light Light Light Light Light
Plant Removal Easy Easy Poor Poor Poor Easy
Relative Cost Moderate Moderate Low Low Low Moderate
Sterilize Steam Yes No No No No No
Retains Disease Yes No Yes Yes Yes Moderate
Single used one time only
Seed may be sown directly into pots or cells of a seedling tray and then grown to field ready size without being moved An alternate method is to start seed in a planter seed box and then transfer the young seedlings to the grow-out pots or cells when the first true leaf is evident The first leaves observed after emergence are called the seed leaves or Cotyledons of non-grass crops the leaves that follow reflect the true leaf shape or character leaves typical of the future mature crop
16
The ideal seedling containers would have some or all of the following characteristics
Low in cost portable Seedling easily removed Free of disease organisms 0 Neutral in pH free of toxins bull Light in weight strong Non-competitive for nitrogen Allow free drainage of water 0 Large enough to allow growth of a balanced Allow free development of roots seedling
A modern container either separate pot or cellular tray has a fairly large bottom hole which serves two very important functions The most obvious reason is to allow water to drain freely from the container The second reason is to allow the top root of the seedling to growdown and out of the bottom of the pot If the pot is suspended from the floor or bench so that air can pass under the container a very important development can take place
If the top root hangs in the air it dies rather quickly This is called air pruning The air pruning of the top root stimulates the development of many many fibrous roots within the pot or cell The strong fibrous root development helps the seedling to be more hardy faster growing and earlier yielding than if the small roots were disturbed Examples of how air pruning of the container tray may be promoted are presented in Figure 3
17
FIGIIIE 3 lI11OI)S OF( ()NTAINI IIt III()RT
TRAY RESTING ON FLOOR TRAP
ROOTS DEVELOP ON TARP TEAR LOOSE ON REMOVAL
TRAY SUSPENDEDON BLOCKS AIR PRUNING OCCUI
TRAY SUSPENDED t ON POSTS
50 - 80 CM POST AIR RUNING EXCELLENI
TRAY SUSPENDED ONWIRE MI-S1 ON POSTS
AIR RUtNING llEXC FN I)
18
6 PLANTING
a Planting Rates
A container grown seedling is almost a transplant shock free A vegetable grower usuallyfinds that these seedlings are quicker to mature and therefore more profitable than bed grown seedlings
Each vegetable seedling has a best spacing for earliness In general the larger the growing space provided a seedling the earlier it matures providing other management factors are satisfactory including nutrients water pest management Wide spacing usually results inlarger seedlings than is found with close spacing The space given has more influence on early development than on later development as yields are usually found to be about the same at the end of harvest season for large seedlings and small seedlings
The volume of soil or soil mix which are used to grow the seedling determines root-to-topratio root mass and density and also shading or light competition If a sweet melon seedling is crowded and the seed leaves shade each other small fruit size can be expectedIf a pepper plant is shaded and the seed leaves are unable to get enough light the harvest may be delayed as much as two weeks
A commercial vegetable grower usually has to compromise on space provided for eachseedling Although a 10cm x 10cm spacing for tomatoes may give the earliest yields most growers have to use 6 x 6 5 x 5 or even 4 x 4cm spacings to keep costs of production within a sound economic range Listed are some of the safe spacings needed to produce qualityvegetable transplants It may be noted that some vegetables should be sown directly into acontainer and must remain there until removal for field setting Examples of these sensitive vegetables are members of the pumpkin family Most of the others can be germinated in a tray of sand seed flat and when the first true leaves have developed they can be moved to a final bed or container spacing
When close spacings are used for seedling production the grower must move the seedlingsto the field as soon as the proper stage for field setting has been reached If the plant growermust hold the seedlings for a week or so after this best stage ha- been reached spindly soft tissue seedlings may result due to the crowding
If seedlings must be held beyond the best stage for field setting water can be reduced temperature dropped and all nutrient feeding withheld until a day or so before field setting
The space in which seedlings are grown is very important Crowding in the plant bed or seed flat encourages weak plants and diseases
The following space relations are often used as in Table 8
19
Table 8
Some Common Spacings Used in Containerized Plant Production
Vegetable Seed Flat Spacing Planting Length Width DepthCrop Between Rows Between Depth mm cm Plants
Asparagus Container Only 1-20 4 4 10
Broccoli 5-7 3-4 5-12 4 4 9
Brussel Sprouts 5-7 3-4 5-12 4 4 5
Cabbage 5-7 3-4 7-12 3 3 5
Cauliflower 5-7 4-5 5-12 4 4 5
Celery 8-10 2-3 0-2 3 3 6
Collards-kale 5-7 3-7 5-12 4 4 5
Cucumber Container Only 17-25 5 5 5
Eggplant 5-7 3-7 5-12 5 5 5
U tuce 5-7 4-5 3-4 3 3 5
Melon Sweet Container Only 17-25 5 5 5
Onion 7-9 7-8 7-12 3 3 5
Pepper 5-7 3-4 5-12 5 5 5
Pumpkin Container Only 17-25 6 6 5
Squash Container Only 17-25 6 6 5
Tomato 5-7 3-7 5-12 5 5 5
Water Melon Container Only 17-25 6 6 5
The grower should be aware that the size of the container has a strong influence on the early crop performance of many vegetables In general a tomato plant provided unchecked growth and kept in favorable root-top balance will give the highest yield of early fruit If the plantis grown under crowded conditions in severe competition with other plants a thin-leaved thin-stemmed plant with few lateral branches may result
Tall thin plants are more difficult to handle plant and maintain Spindly plants are more easily broken are more subject to disease and usually less able to withstand unfavorable environmental conditions The plant should not be too old or woody either In the case of broccoli and cauliflower for instance young plants with 4-5 leaves are much less likely to form premature seed stalks than are older larger plants
The ideal plant of most vegetables is usually the medium-sized well balanced plant If a grower must make a choice between large or small he would generally be safer to use the smaller plant Size sorted plants planted in uniform soils help to provide more uniform growth and yield
20
Seedling growers should keep good records regarding composition of media used dates of
planting response time required to produce good seedlings and seed needed as follows
Table 9
Seed Needed to Produce Transplants for Hectare of Vegetable Crop
Vegetable Field Spacing Plants Seed Usable Grams Seed to Crops Plants Between
Plants cmns Rows
Hectare Thousands
per Gram
Plants per Gram Seed
Produce Plantshectare
Asparagus 70 170 147 35 20 700-900
Broccoli 75 70 317 300 225 90-170
Brussel sprouts 25 90 222 300 175 150-275
Cabbage 50 60 666 300 225 250-300
Cauliflower 20 80 25 350 225 150-225
Celery 50 60 833 2300 1800 50-60
Collards-kale 50 80 25 700 225 100-175
Cucumber 70 120 208 35 25 700-800
Eggplant 75 100 133 275 175 80-150
Lettuce 25 50 80 900 450 90-180
Melon Sweet 30 180 185 35 25 600-800
Onion 8 70 310 250 200 1500-2500
Pepper 60 85 196 160 100 160-200
Pumpkin 125 200 7 5 3 1300-1600
Squash 65 120 128 7 5 2200-2600
Tomato 50 120 167 325 250 65-125
Water melon 70 200 71 8 7 1700-2500
Range provides information for open bed as well as container sheltered production The higher rates apply to open bed seedling production the lower rates for container growing It should be reminded that squash familyplants do not easily survive bare rooted methods and should be container grown
b Germination
A skilled plant grower requires a rather broad range of knowledge in order to maintain control over the crop of trans plants at all times Germination needs to be understood and appreciated in the broad sense the following information should be helpful as background material
21
The sprouting of seed and carrying the young seedlings through to field readiness are important steps in effective plant production An understanding of how the germination process works gives the plant grower greater control over his operation when he knows when temperature water and aeration are most critical A brief review of the stages of development in germination is presented
Optimum germination requires a delicate balance of suitable temperature good aeration at all times and adequate but not excessive water Over-watering often reduces aeration and stimulates sparse roots spindly stems and thin leaves Over-watering is a common cause of poor germination with may types of vegetables Adequate space between emerging seedlings helps to prevent soft watery seedlings
Table 10
Stages ip Seed Germination
No Stage Process
1 Absorption of water by Seed Water pressure develops inside the seed Stored food begins to swell
2 Softening of Seed Coat Allows oxygen to enter seed carbon dioxide to exit Stored food begins to dissolve water used in growth process Seed coat swells and softens
3 Activation of Enzymes Starches fats and proteins each have chemicals activators (enzymes) which must be released for activity
4 Digestion of Stored Food Stored food acted upon by enzymes releasing simple fractions for the starches fats and proteins Respiration increased
5 Transport of Simple Food Fractions
Simple food fractions move in moisture of seed Temperature very important in this stage
6 Absorption of Simpie Food Fractions by Embryo
Stored energy released central portion of embryo (axis) becomes center of activity high oxygen requirement Temperature very important in this stage
7 Enlargement of Cells of Embryo
Cells of embryo increase in length width and volume High oxygen and water requirement at this stage
8 Bursting of seed Coat Inside swollen cells develop strong pressure as they enlarge causing softened swollen seed coat to crack and iurst
9 Emergence of Young Root First small root tip breaks out of seed soon develops hairs and begins to branch Excess water at this time very haamful Ammonium fertilizer near seed can be very harmful at this stage
10 Cells Begin to Divide Area of embryo between root and shoot (leaves and stem) begin to divide and form specialized tissues which become the true root leaves and stem
I I Emergence of shoot (Stem and Leaves)
Seed leaves and young stem begin the process of manufacturing sugars from air water and sunlight True leaves develop rapidly and expand to form major role of photosynthesis and independent existence
22
c Seedling Development
As the seedlings emerge and soon after develop a true leaf except Onions which all appear as tubular leaves the stems begin to thicken hnd extend upward As a general rule most seedlings if grown without interruption seedlings add one leaf every 7 to 10 days A seedlings has a best stage for transfer to the field The time to expect for production and best stage for field setting is presented as follows
Table 11
Some Development Characteristics of Field Ready Transplants
Vegetable Formation Ease of Good Sthge Weeks to Good Stage forCrop of New Transp for Tranmp Grow Field SettingRoots I I -
Asparagus Moderate Fair Contonly 8-10 5-6 Fern leaf
Broccoli Rapid Good First True 5-7 3-7 True leaf Leaf
Brussel Rapid Good 5-7
sprouts
Cabbage
Cauli-flower Moderate Fair 6-8
Celery 3-5 cm tall 10-12 3-7 Stalk Leaf
Collards-kale Rapid First true leaf 5-7 True leaf
Cucumber Slowly Poor Cent only 4-5 3-7
Eggplant Moderate Fair First true leaf 6-8
Lettuce Rapidly Good 5-7
Melon sweet Slowly Fair After net 3-5 3-5
Onion Moderate Good First true leaf 10-12 5-8 mm Stem diam
Pepper Moderate Fair First true leaf 6-8 5-7 True leaf
Pumpkin Slowly Poor Cononly 4-5 3-7
Squash 3-4 3-4
Tomato Rapid Good First true leaf 5-7 5-7
Water melon Slowly Poor Cont only 4-5 3-7
Container only movenent of snall seedlings not usually successful
Transplant shock may delay development as much as three weeks depending on conditions in the soil which promote root growth and extensions This may delay the first harvest of high value crops and reduce the profitability of the vegetable enterprise
23
7 NUTRIENT MANAGEMENT
a Seed Bed or Seed Box
The soil or media used to germinate seed should be very low in plant nutrients Many growers use washed sand as a seed germination medium The seed usually contains enough nutrients to carry the young emerging seedling to the true leaf stage
The goal of container production is to maintain control over seedling development Important steps include
Uniform depth of planting Uniform covering of seed Uniform pressure on covering media Level placement of seed tray to avoid low spots and high dry areas in tray Low fertility during emergence bull Uniform light distribution Uniform water application
The moisture in the seed bed or tray should be kept moist but not wet Drying out of germination media should be prevented
b Feeding Seedlings
Most plant growers do not apply any fertilizer during thefirst ten day aftergerminationand the last week before removal from the plant bed or shelteredproductionsite
Some plant growing operations apply a dilute nutrient solution at each watering others apply only at timed intervals The frequency depends on the plant growth needs rather than by schedule
High analysis complete water-soluble starter type fertilizers are often used Typical materials such as 10-52-17 16-32-16 5-25-15 are often applied as follows in weekly applications The seed flat does not usually require feeding
Five grams of above fertilizer per gallon of water (38 liter) for plants during first three weeks after transplanting into containers
Twenty five grams of above fertilizer per gallon of water for plants three weeks after transplanting into containers
Leaves should be rinsed off with clear water after application
High salt index fertilizer materials such as KCI NaNo 3 should be avoided if possible to help minimize salt accumulation Soluble salt injury can be a serious problem and should be avoided whenever possible Injury may be detected at levels as low as 1000 ppm soluble salt at full moisture capacity
24
As growers gain experience in transplant production they learn from mistakes determine what is most cost effective and appreciate the importance of the concept of control Just one excess nitrogen application can put seedlings into a spindly almost unsalable condition
To help new growers develop their own nutrient feeding program some well known programs are presented
1 Methods
There are two methods of nutrient control One is to add a very dilute low level fertilizer solution at every watering the other method is to add slightly higher levels once a week or ten days
Ammonium nitrate and urea are seldom used in seedling feeding systems because they areacid-forming and can bum young seedlings The best nitrogen sources are calcium nitrate and potassium nitrate A brief outline of the two methods of supply are presented
Constant Dilute Feeding Program
a High sunshineperiods (50ppm N) 11 gram calcium nitrate per 4 liters of water
b Low sunshineperiods (50ppm N 250ppm K) 14 grams Potassium nitrate per 4 liters of water
Once a Week Feeding Program
a Early growth 0-3 weeks (100ppmN 100ppm K) Calcium nitrate 14 gms per 4 liters of water and Potassium nitrate 11 gms per 4 liters of water
b Later growth 4-8 weeks Calcium nitrate 30 gms per 4 liters of water and Potassium nitrate 22 gins per 4 liters of water
Soils vary in their content of available phosphorus and potassium A soil test is needed todetermine this composition The various soil-mix materials generally contain some phosphorus and potassium too
2 Amounts
Complete fertilizers can be used in nutrient feeding but safe levels need to be used A material such as 2-3-2 (22) can be added at the rate of 100 gms per four liters of water orapproximately 3 cup per four liters of water This solution should stand for one or two daysand the insoluble fraction discarded The solution should be directed on the soil not plantsand a fresh water rinse should be applied after applying thamp nutrient solution
25
3 Preparation for the Field
Most plant growers of shelter grown seedlings withhold nutrient feeding about 5 to 6 days before sending the plants to the field for setting in order to prepare them for outdoor conditions This process is called hardening aid can be achieved by decreasing the water supply nutrients or lowering the temperature
In outdoor grown seedlings decreasing water about 6 to 8 days before removing from the plant bed is generally used
Just before field setting a thorough application of a dilute nutrient solution to the roots helps to insure field survival If plants can be watered-in with a dilute starter solution field adaption would be improved
8 PEST MANAGEMENT
a Insects
The plant grower should check his seedling production two or more times each day for insect invasion Early detection is the best management tool The use of proper chemical application and proper material depends on which insect is present its stage of development and potential harm Inexperienced growers should consult their local extension officer for advice on this important matter
b Diseases
General preventative measures
The production of disease free seedlings is a serious responsibility Customers of a plant grower trust that the seedlings they purchase will be healthy and well balanced true to variety and free from insects diseases and nematodes
Disease management is more than spraying and removal of diseased plants from the plant growing area Good disease management is a program of small important details and a careful attention to seeing that these steps are carried out An outline of an effective program is presented
Seedling production area should be located on high well drained soil flooding can be disastrous
Seedling production areas should be at least 1500 meters from the nearest cabbage tormato potato or onion growing fields
The area near the outdoor seeded or sheltered production should be kept as we ed free as possible
Soil or soil substitutes should be solar treated heat treated chemical treated or fumigated to kill harmful disease pathogens insects nematodes and weeds
26
Several small seed beds are less risky than one large bed in case pest problems do develop
Equipmentfor seedling production should be kept only for the seedling operation and should not go to the field Equipment and tools should be cleaned after use to reduce harbored pests
Resistant varieties should be used whenever possible
Seed should be treated by hot water treatment when necessary and a follow-up antishyfungal dust or slurry should be applied too unless directions state otherwise Growers should try to buy treated seed
Seedling operations should be inspected once a week for diseases and insect presence All suspected infected or infested seedlings should be removed and burned
Watering seedlings from the top is not a- safe as placing water on the soilbetween rows but this practice is sometimes difficult to follow
Watering should be completed early enough in the day so that leaves can dry before the cooler night period arrives
Well or sub-surface water sources are safer than water from open ditches as many ditches have washings from infected fields
A regular scheduled spray program of a general purpose fungicide (such as maneb) and insecticide (such as malathion) should be applied
Seedlings should not be dipped or soil washed from roots as part of field preparations as this could spread pests rapidly
c Seedling Disorders
In spite of a growers best efforts to maintain a carefully controlled plant growing operation unexpected problems can occur The following list of symptoms and their obvious correction is presented
Poor Germination Excess heat or cold temperature Excess soluble salts Damaged seed-age storage injury Possible fumigant injury Possible herbicide injury
Uneven Growth of Seedlings Excess or deficit of soil moisture Excess fertilizer salts Early severe nutrient deficiencies
27
Early severe nutrient deficiencies Dry areas in flat Poor mixing of media and fertilizer Uneven fertilizer application
Slow Growth of Seedlings Low temperature Inadequate nutrition N amp P low Low soil moisture Poor root aeration
Wilting of Seedlings Inadequate moisture supply Excess temperature When media wet possible soluble-salt injury Root injury
Stunted Erratic Growth Deficiency of N P Mg or calcium Excess ammonium fertilizer Poor root system rot or damage Excess light Low soil moisture Possible herbicide or air pollution injury
Premature Cotyledon Drop Low light or shading Excess water Poor root aeration Deficiency of phosphorus Excess nitrogen
Premature Leaf Fall Over watering Poor aeration Air pollution
Reduced Leaf Size Low light plus high temperature Poor aeration tight soil mix Excess of potassium feilizer
28
Yellowing of Leaves Low nitrogen Excess soluble salts Poor root aeration Excess or deficient moisture Root injury Media pH (tuo low or too high) Low temperature Chemical injury (fumes or herbicides)
Lesions on Stem Excess ammonium nitrogen Excess soluble salts (soil line)
Roots Discolored Root decay due to chilling Calcium deficiency Light brown and thin Low p
Root growth Retarded not Discolored Phosphorus deficiency Short many branches calcium deficiency Low temperature (below 57 F) Poor soil aeration Short stubby Magnesium deficiency Low nitrogen
Dark Green Leaf Color Excess N or K fertilizer
Speckling of Leaves Pesticide damage (sprays or dusts) Air pollution injury
Purpling of Leaves Low temperature Deficiency of phosphorus
Marginal Leaf Tip Burn Excess fertilizer salts Erratic moisture supply Possible air pollution
Marginal Cupping of Leaves Downward curling Def of calcium Excess boron fertilizer Gas combustion toxicants
29
Unfavorable Root to Top Ratio Excess soil moisture larger tops smaller root growthRoot growth increases with decreases in soil moisture (above wilting)
Root Symptoms Associated wit Excess Roots white and stubby excess Mg water shading Roots dark brown excess k excess ca Roots light brown thin excess N
Tall Spindly Growth High temperature High nitrogen nutrition Excess moisture
Hard Brittle Stems Excess k fertilizer High temperature plus highlight Deficiency of ca or Mg
d Symptoms Associated with Nutrient Shortage
Whole Plant Shows Symptoms
Stunted plants leaves yellow but do not drop Nitrogen (N)Stunted plants leaves purple leaves drop Phosphorus (p)
Oldest leaves Show symptoms Mostly
Leaf tips and leaf edges turn brown and drop Potassium (K)Leaf edges pucker yellowing between veins Magnesium (Mg)
Newest youngest Growth Shows Symptoms
Tips remain alive
Yellowing between veins veins stay green Iron (Fe) Dead spots between green veins (Mn) Leaves pale yellow spotted veins yellow Sulfur (S) Leaf tip withers remains green copper (Cu)
Tips die
Tip dead spots hook roots brown Calcium (Ca)Base of tip dies leaves harden root brown Boron (B)
30
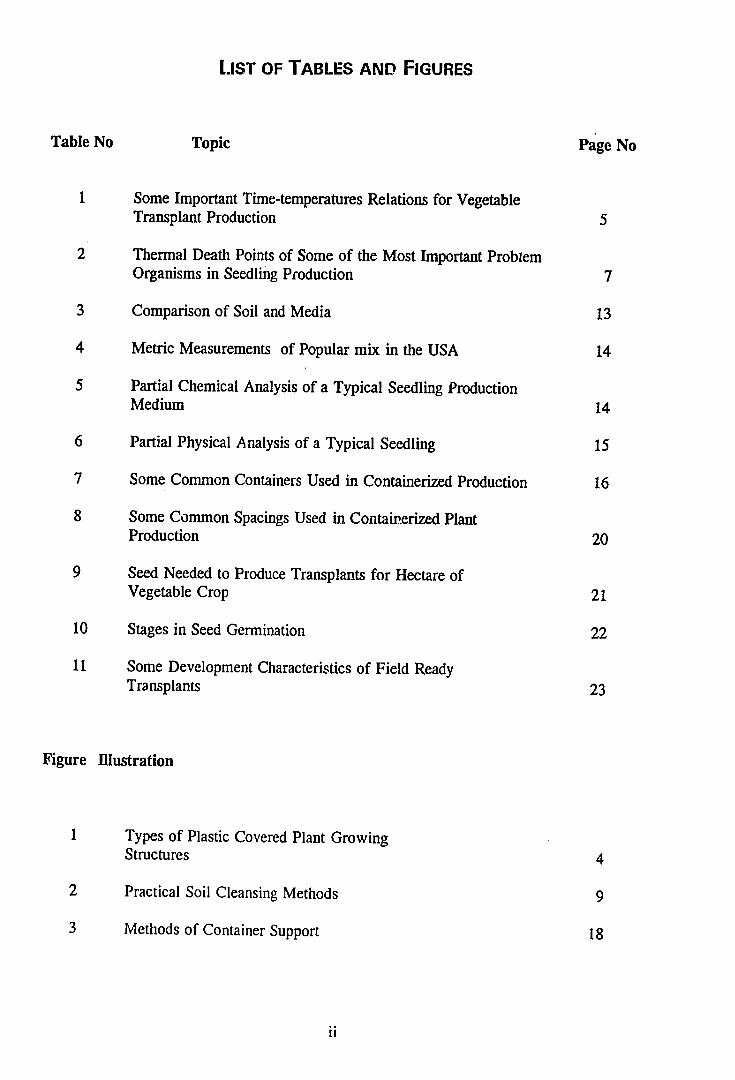
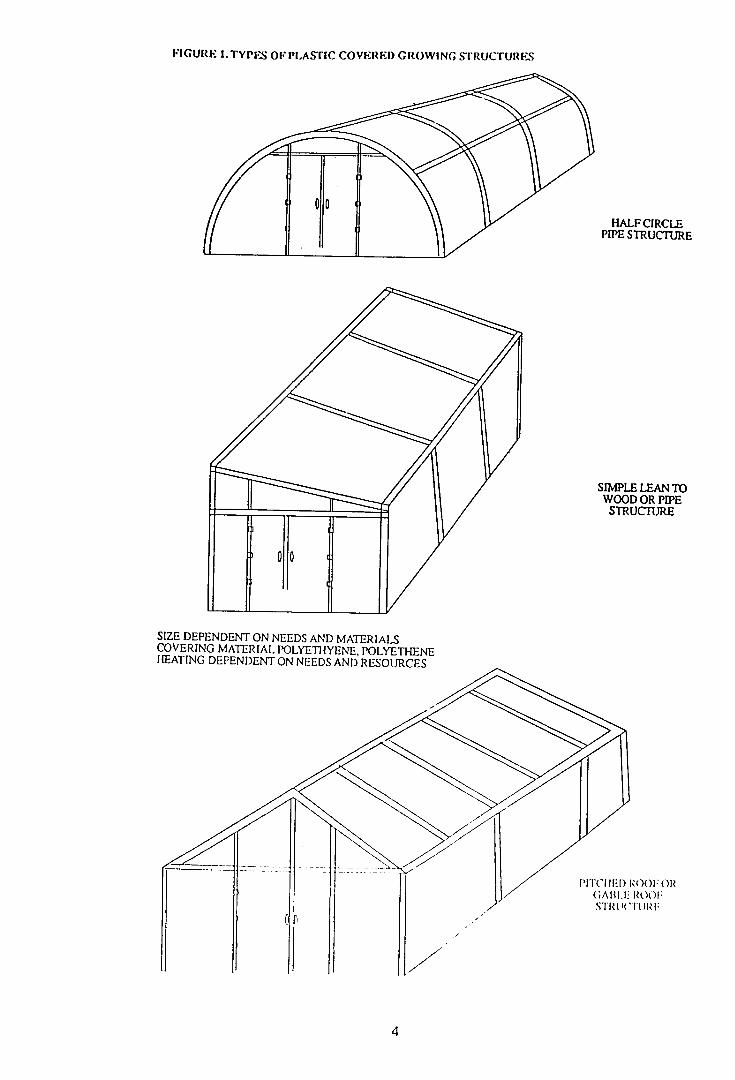
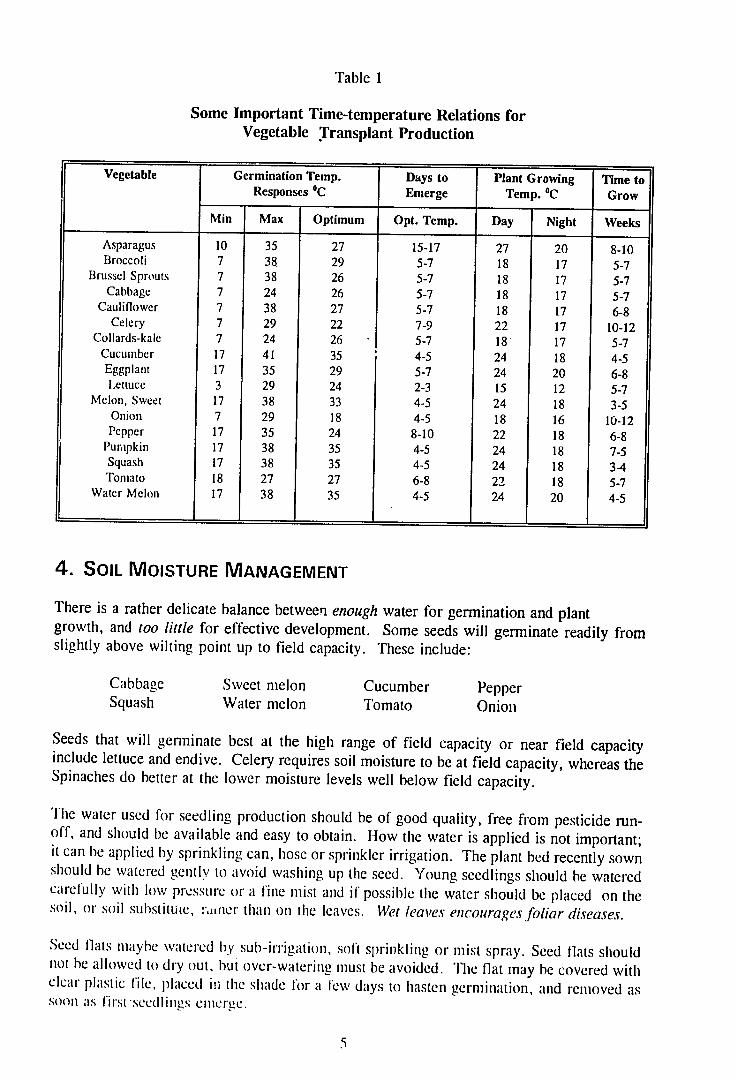
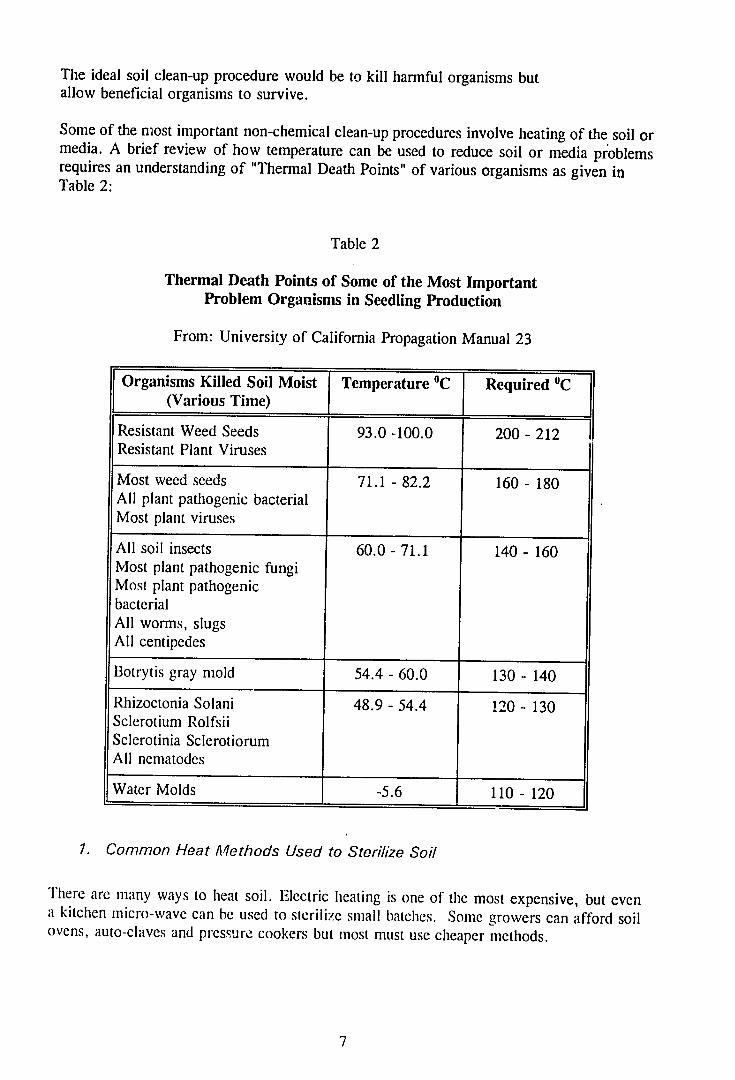
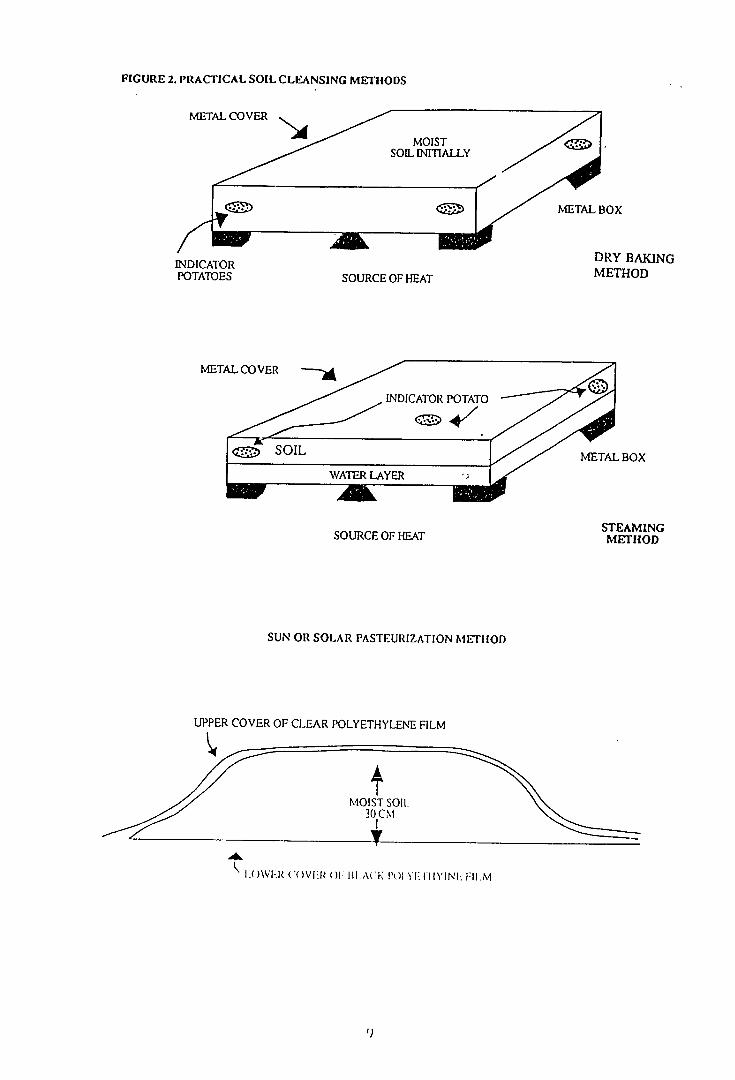
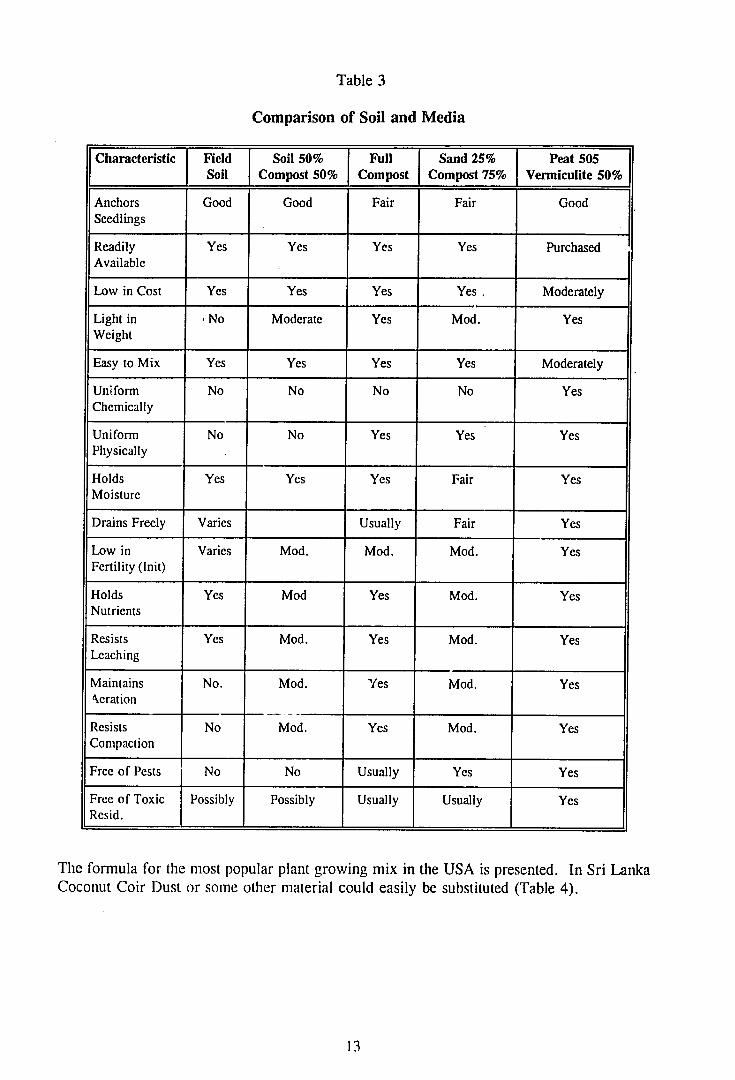
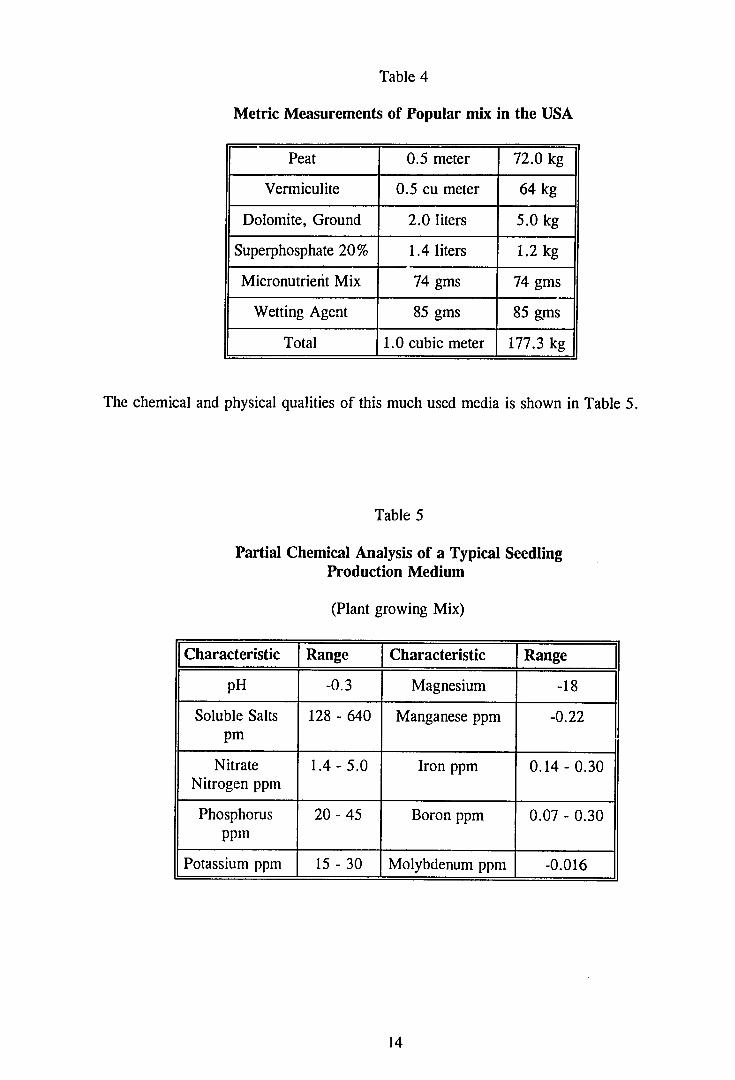
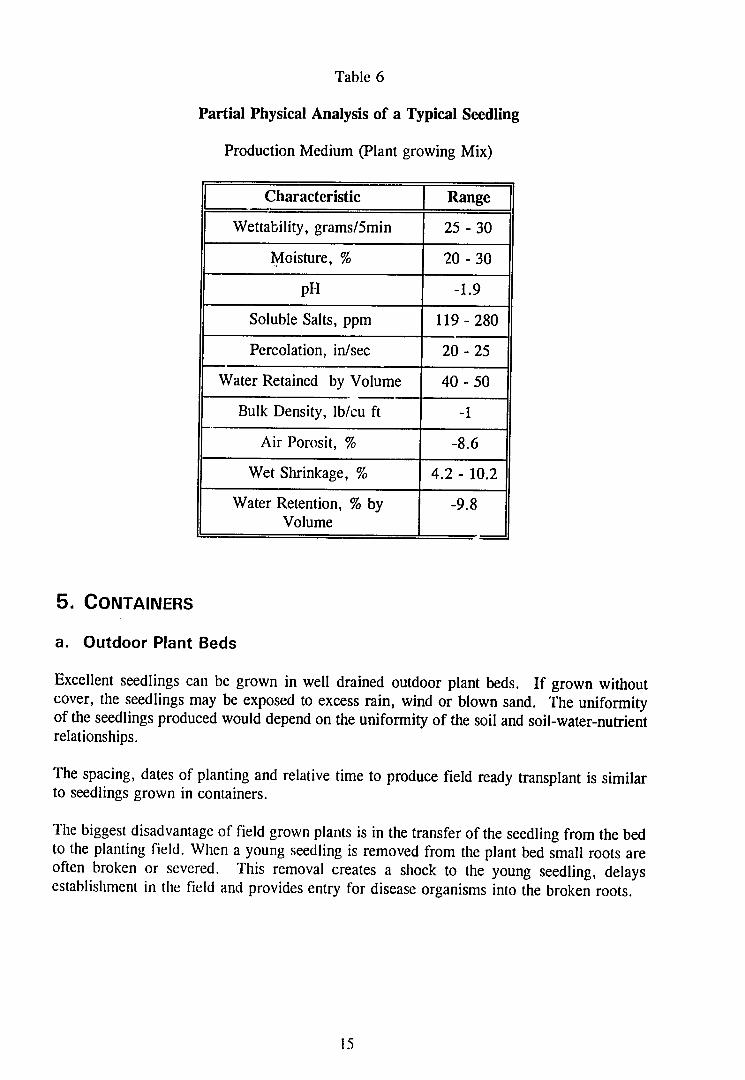
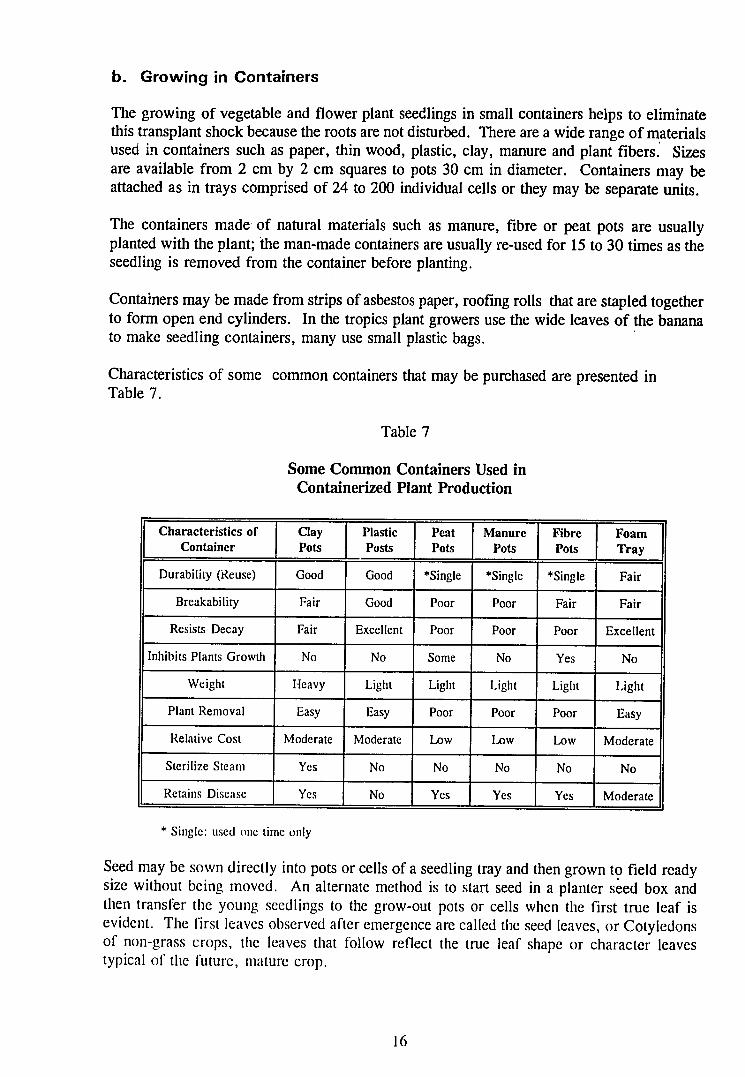
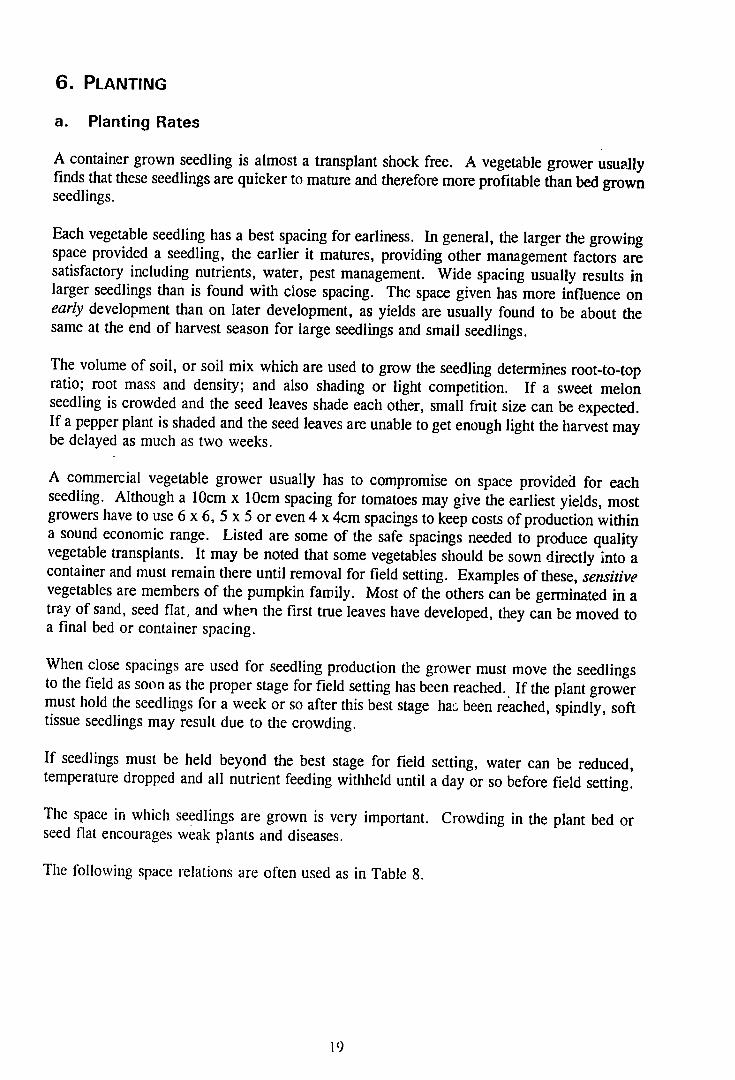
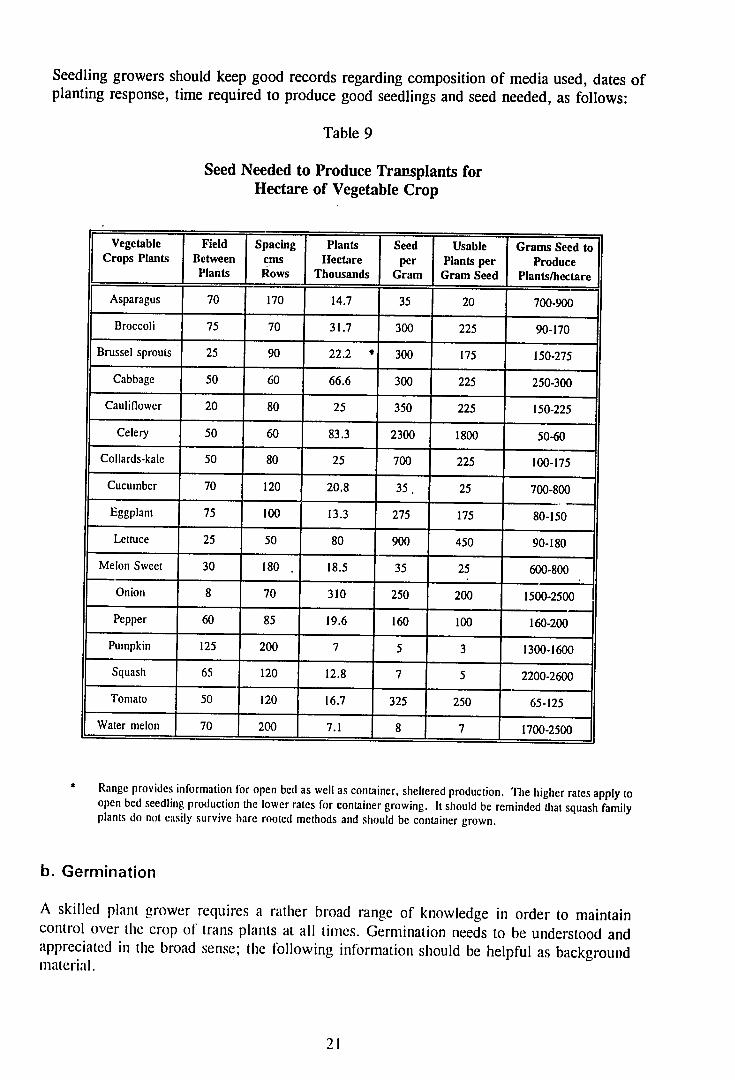
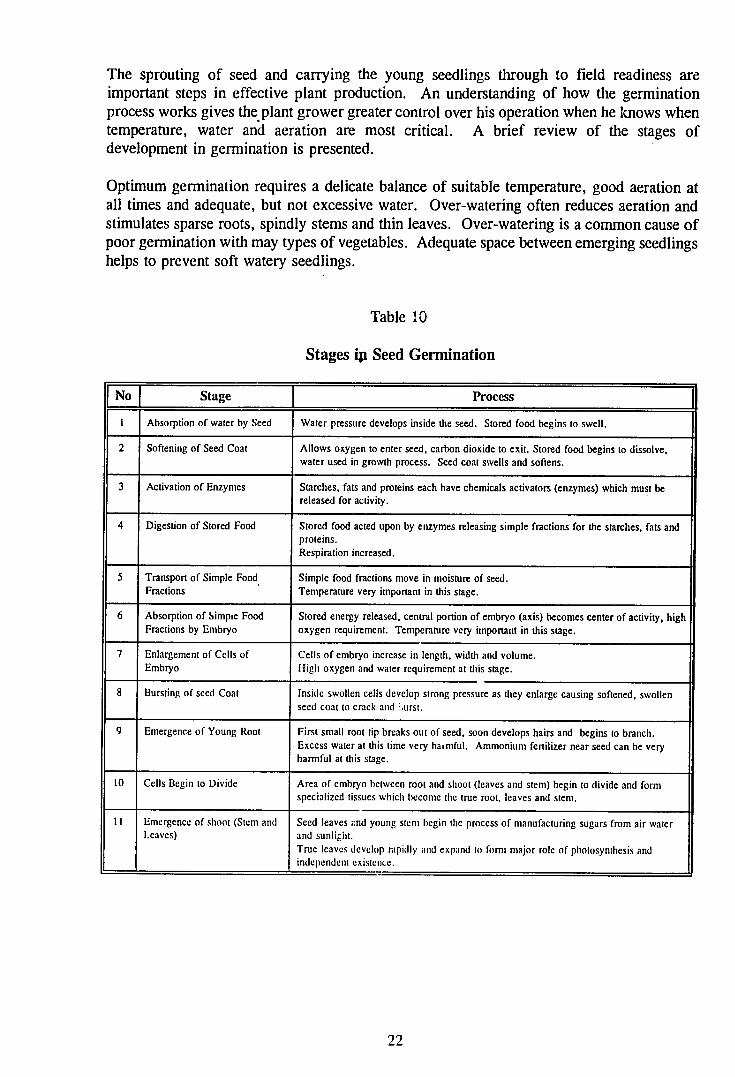
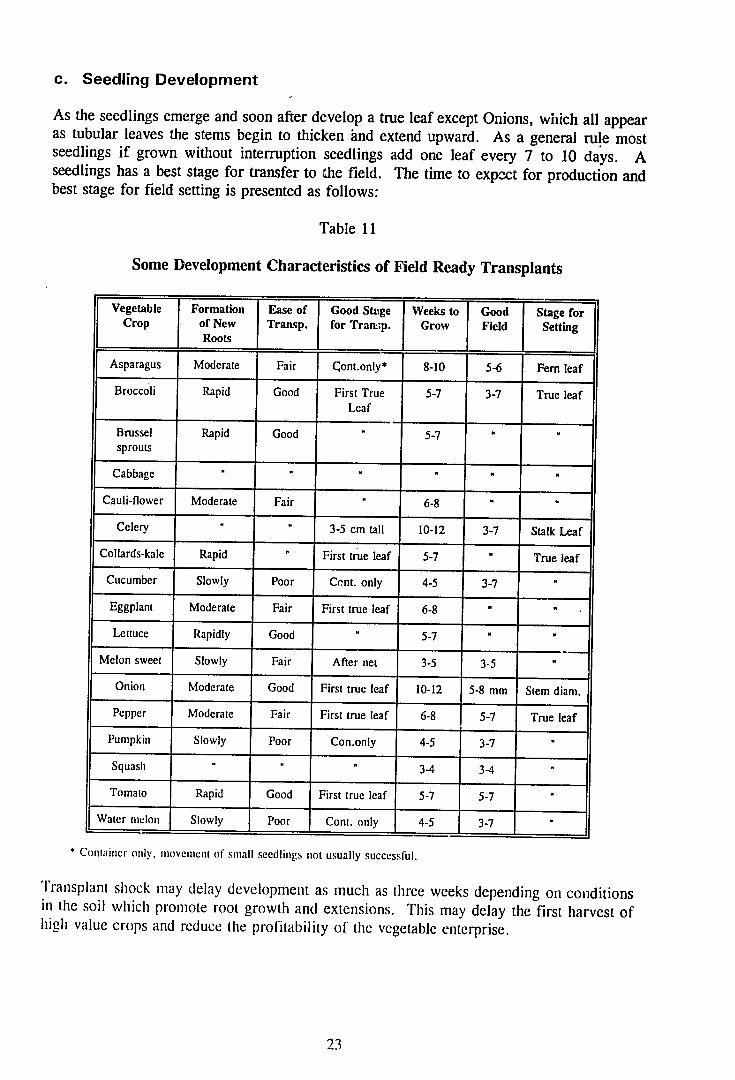
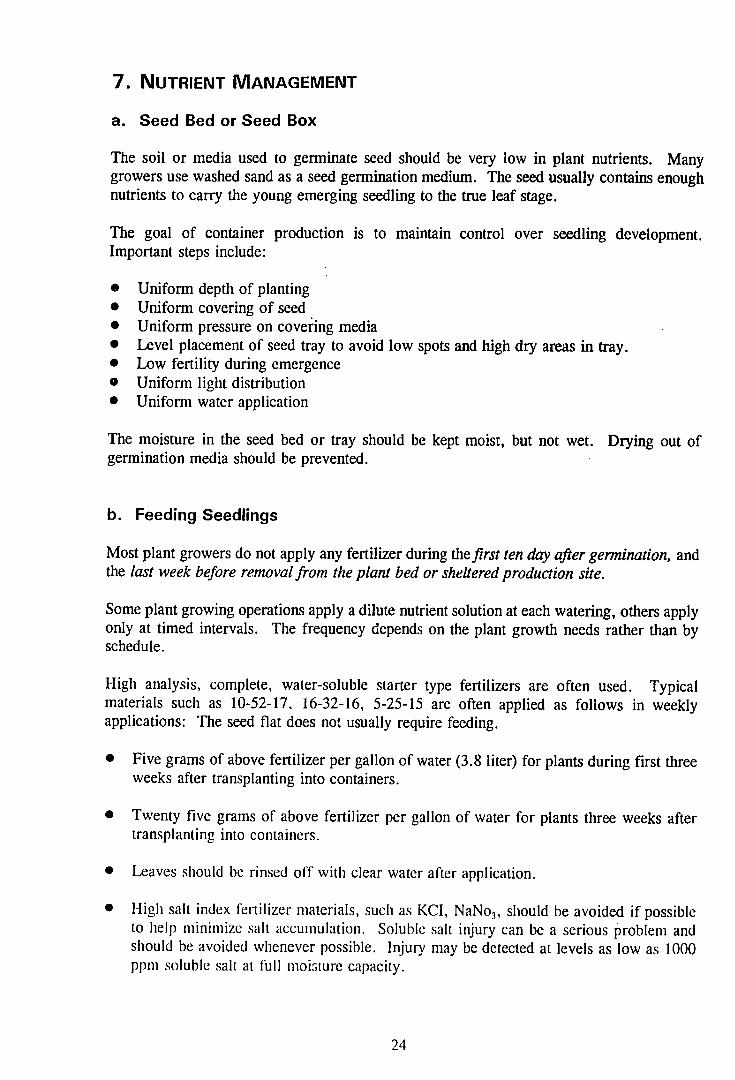
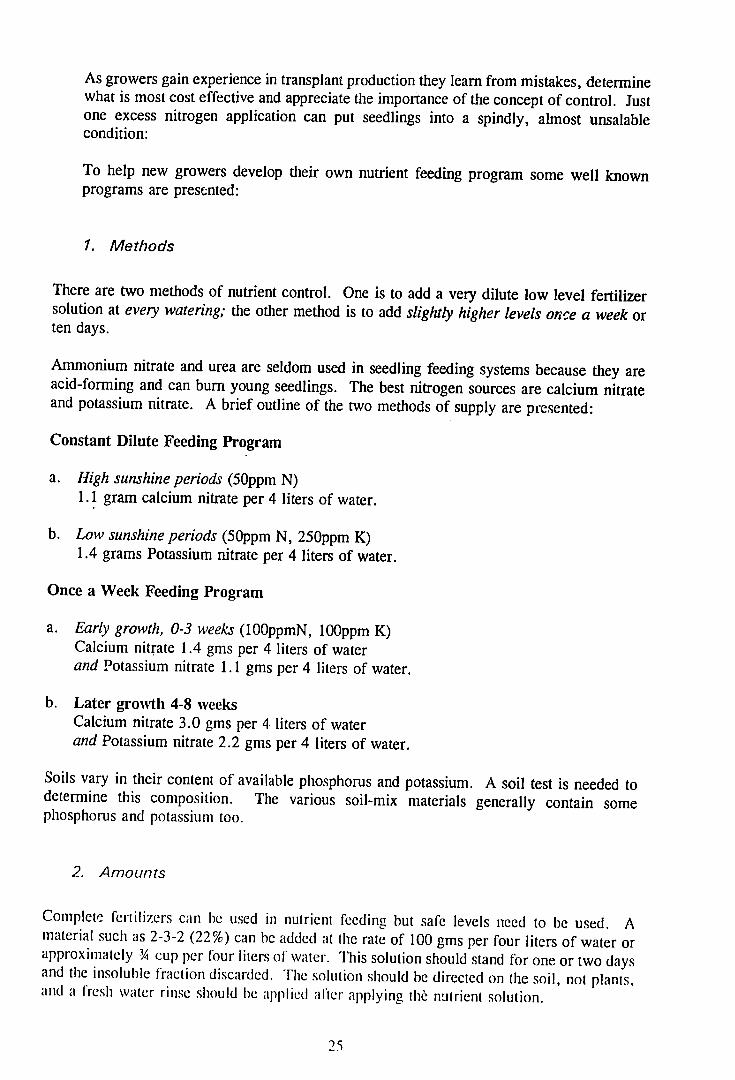
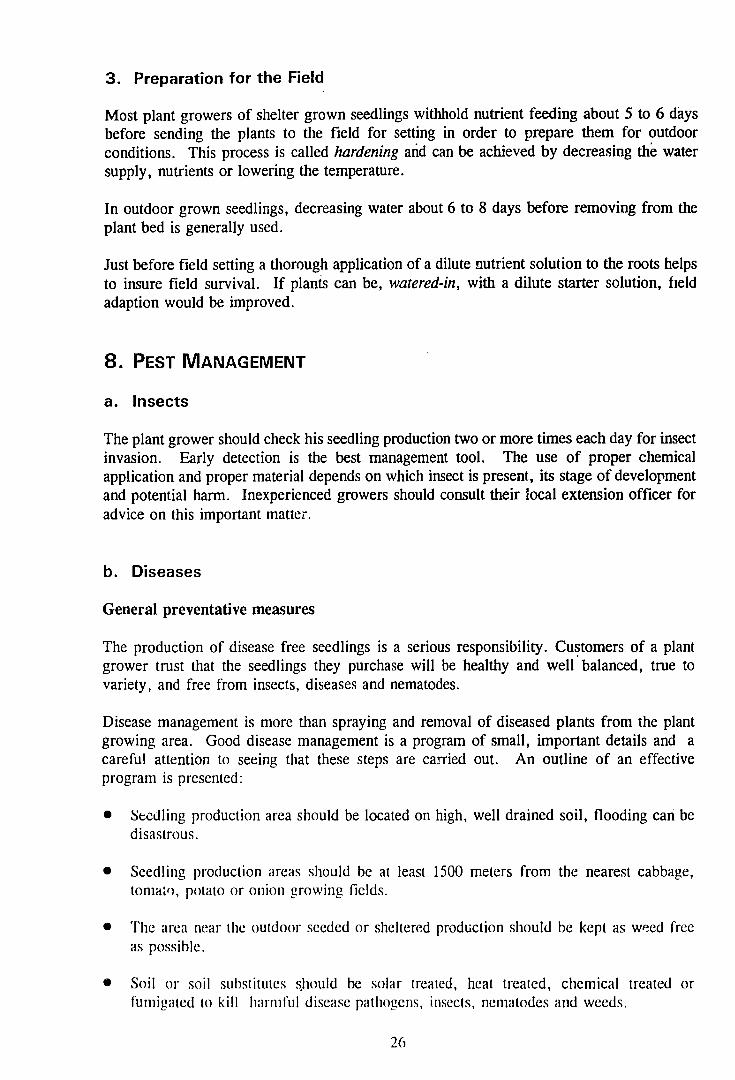
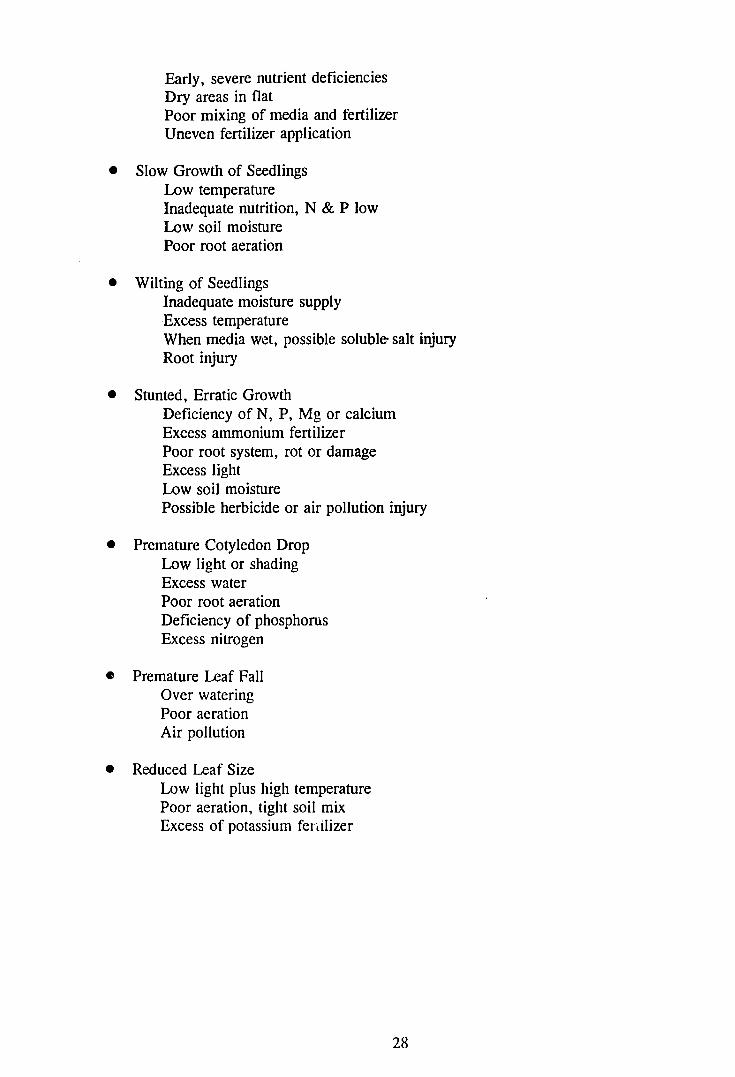
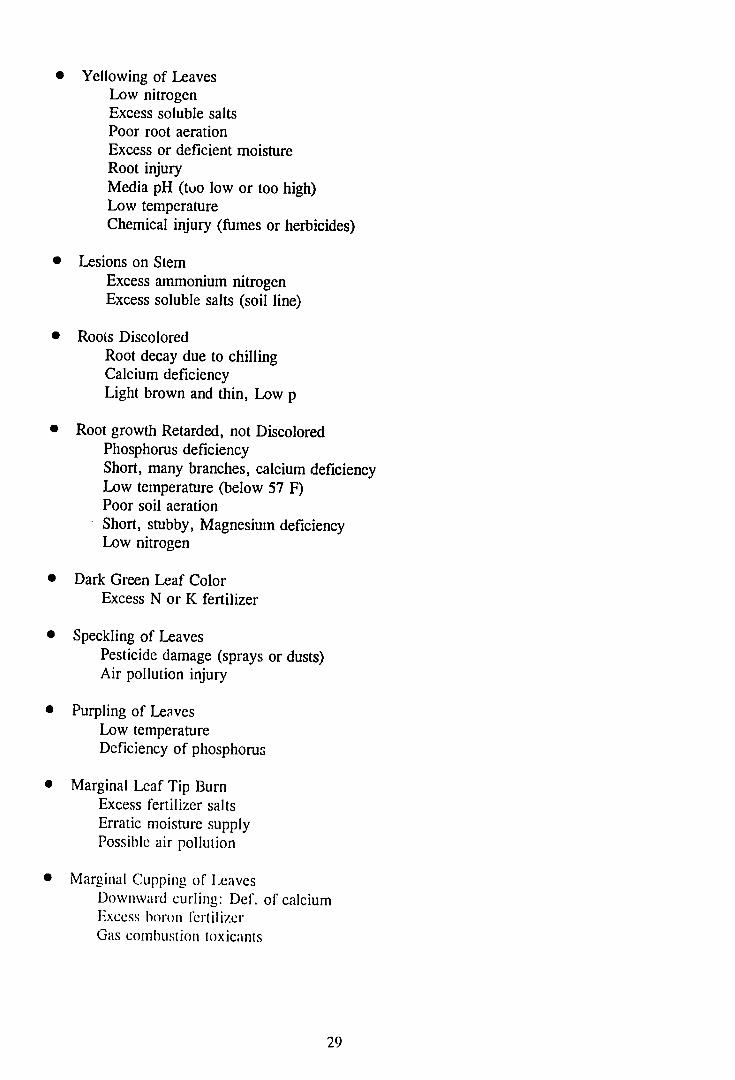
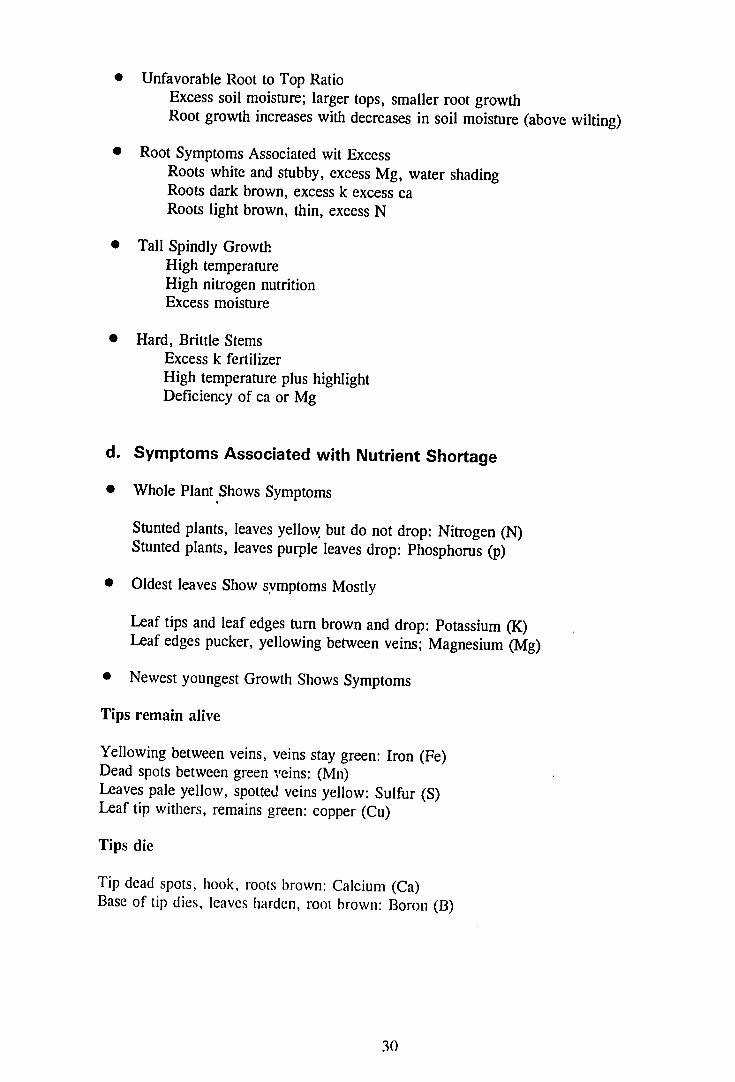