Embed Size (px)
Citation preview

Medicaid 101 Medical Record Company
(MRC) Providers
Provider Relations UnitJanuary 2020

Getting Started
2
ProviderOne is used by Washington Apple Health providers to submit claims and manage their provider accounts. It is compatible with the most commonly used internet browsers: Google Chrome, Firefox, Microsoft Edge, Internet Explorer (IE) for Windows, and Safari for Windows and MAC.
In order for ProviderOne to work on your computer, verify your browser allows popups, as these are vital to successful claims submission.

Getting Started
• Use web address: https://www.waproviderone.org
• Complete the Domain, Username, and Passwordfields.
• Click on the Login button.
3

Managing Profiles
4

Adding User Profiles
5
• A profile describes the level of access a user has in your domain.• You will initially be assigned the EXT Provider System Administrator profile which
can only set up and manage other users and profiles (including your own).• You must assign at least one user (usually yourself) the EXT Provider Super User in
order to have full access to ProviderOne functionality.• Choose the EXT Provider System Administrator profile and click GO.

Adding User Profiles
6
• Scroll down on the left hand side of the Provider Portal and click Maintain Users.
• The system will display all past and present users associated to your domain.
• Click on the name of the person to be updated.

Adding User Profiles
7
• ProviderOne displays the User Details page for this selected user.• Choose Associated Profiles from the Show menu.

Adding User Profiles
8
• The Manage User Profiles page is displayed.• If you are new to ProviderOne you will see only the EXT
Provider System Administrator profile is active.• Click the Add button.

Adding User Profiles
9
ProviderOne will display a popup with a list of Available Profiles:
• Choose the EXT Provider Social Services Medicalprofile from the Available Profiles list.
• Use the arrows to move the profile to the Associated Profiles list.
• Do not change the Start Date or End Date.
• Click the OK button in the lower right corner.

Adding User Profiles
10
• You will return to the Manage User Profiles page.• The EXT Provider Social Services Medical profile you added will
have a status of In Review.• Check the box on the left of the In Review profile and select the
Approve button in the upper left corner.

Adding User Profiles
11
• The Update Status box appears.• The Remarks field can be skipped.• Click OK to approve the EXT Provider Social Services Medical
profile and return to the Manage User Profiles page.

Adding User Profiles
12
• The EXT Provider Social Service Medical profile is now showing Approvedstatus.
• Today’s date will be listed under the Start Date.• The End Date will show as 12/31/2999 to indicate the profile currently has no
end date.• To inactivate a user, follow the steps above but enter the date you wish to end
the user’s access.• Click on the Close button in the upper left of the screen.

Adding User Profiles
13
• You will return to the User Details page.• Log out of ProviderOne using the power button on the top left hand
corner.• You will have access to the EXT Provider Social Services Medical
profile next time you log into ProviderOne.

Claim Submission
14

Claim Submission
15
• Select the EXT Provider Social Services Medical profile to submit claims using Direct Data Entry (DDE) and click GO.

Claim Submission
16
• From the Provider Portal, select the Online Claims Entry option located under the Claims heading.

Claim Submission
17
• Select the Submit Professional option for medical claims, which is equivalent to the submission of a CMS-1500 claim form.
Claim Submission
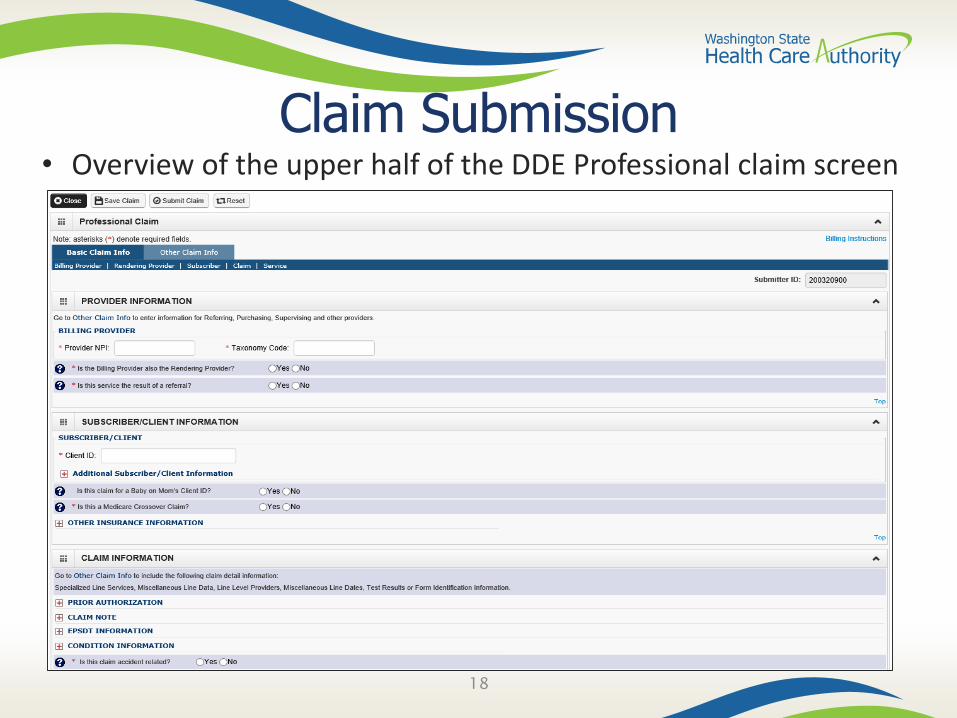
18
• Overview of the upper half of the DDE Professional claim screen

Claim Submission
19
• Overview of the lower half of the DDE Professional claim screen

Claim Level: Billing Provider Details
20
• The claim level information applies to the entire claim. These fields describe the provider and the specialty (taxonomy), as well as whether the claim is the result of a referral.
Note: These are the questions and areas to be completed in this section of the claim form. The next slides will show each question individually.
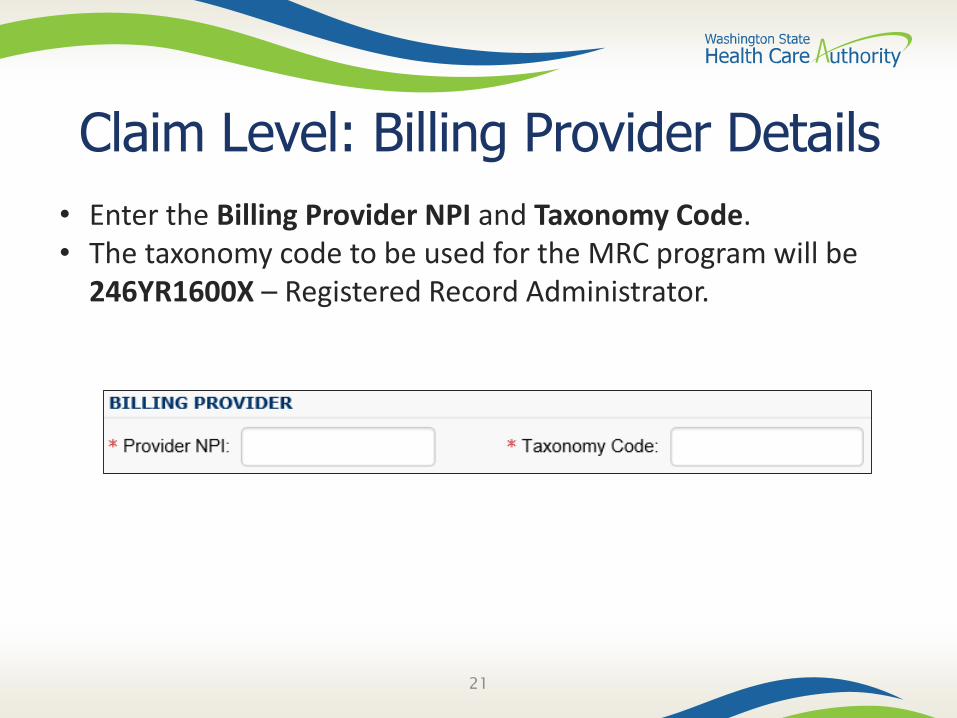
Claim Level: Billing Provider Details
21
• Enter the Billing Provider NPI and Taxonomy Code.• The taxonomy code to be used for the MRC program will be
246YR1600X – Registered Record Administrator.

Claim Level: Rendering Provider Information
22
• This question should always be answered Yes for your billing.

Claim Level: Referring Provider Information
23
• This question should always be answered No.

Claim Level: Subscriber/Client Details
24
• The Subscriber/Client Information of the claim screen is where you enter the detail of the client you are billing for.
Note: These are the questions to be answered in this area of the claim form. The next slides will show each question individually.

Claim Level: Subscriber/Client Details
25
• Enter the Subscriber/Client ID found on the ProviderOne Services card. This ID is a 9 digit number followed by “WA”.
• Click on the red + to expand the Additional Subscriber/Client Information field.

Claim Level: Subscriber/Client Details
26
• Once the field is expanded enter the Patient’s Last Name, Date of Birth, andGender.o The date of birth must be in the following format: MM/DD/CCYY.o Additional shown information fields are not required for entry.

Claim Level: Baby on Mom’s Client ID/Medicare Crossover Claims
27
• These questions should always be answered No.
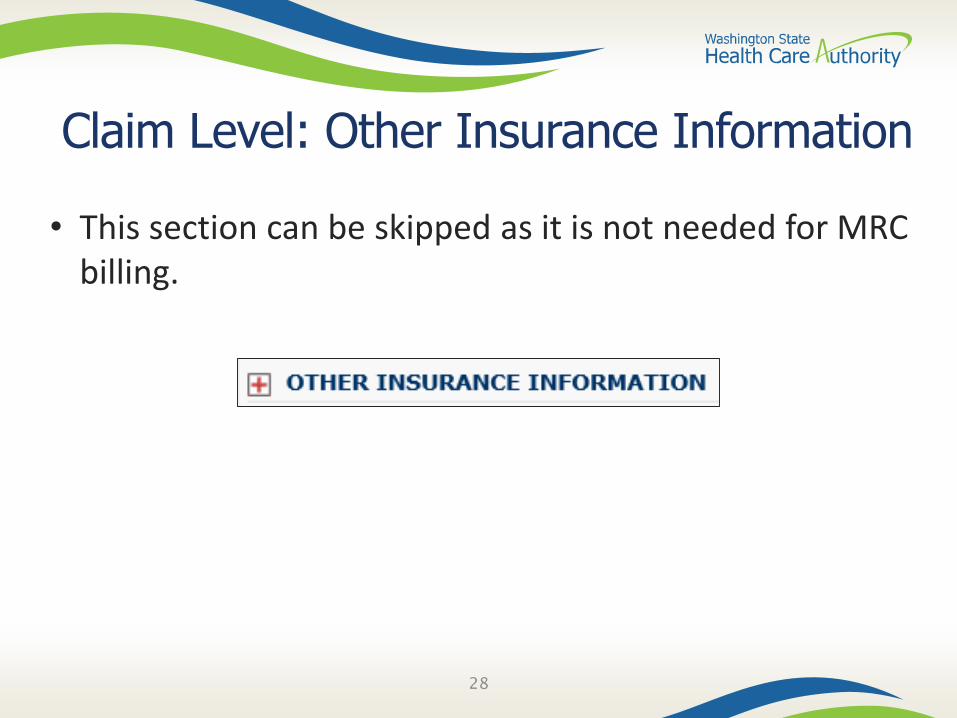
Claim Level: Other Insurance Information
28
• This section can be skipped as it is not needed for MRC billing.

29
Claim Level: Claim Information Section
Note: These slides will describe the questions and fields to be answered in the claim information area. The next slides will show each topic individually.

30
Claim Level: Prior Authorization, Claim Note, EPSDT Information, Condition Information
• All of these areas should be skipped as they are not needed for MRC billing.

31
Claim Level: Is this claim accident related?
• This question will always be answered No as Washington Apple Health has a specific casualty office that handles claims where another casualty insurance may be the primary payer.

32
Claim Level: Patient Account Number
• The Patient Account No. field allows entry of a client’s internal patient account number assigned by a provider’s practice management system.
• This field is not required.
Note: Entering internal patient account numbers may make it easier to reconcile the weekly remittance and status report (RA) as these numbers will be included on the RA.

33
Claim Level: Place of Service
• The Place of Service code is required. For the MRC service you will choose option 11-OFFICE.

34
Claim Level: Additional Claim Data
• This area can be skipped as it is not needed for MRC billing.

35
Claim Level: Diagnosis Codes
• Diagnosis code R69 will be the only code used for MRC billing. Enter this diagnosis in box 1 of the diagnosis area.
• Enter this diagnosis without a decimal point.

36
Line Level: Basic Service Line Information• Overview of the Basic Line Item Information
Note: These slides will describe the fields required in the line level information area. The next slides will show each area individually.

37
Line Level: Service Dates
Note: The dates of service must be entered in the following format: MM/DD/CCYY.
• Enter the Service Date From fields.
• Enter the Service Date To fields.

38
Line Level: Place of Service
• The Place of Service code is optional at the service line level as it was previously entered. For the MRC service you will choose option 11-OFFICE.

39
Line Level: Procedure Code
• Enter the Procedure Code.• The following procedure codes that will be used for the MRC
program are:o S9981 – Medical records copying fee, administrationo S9982 – Medical records copying fee, per pageo S9999 – Sales tax

40
Line Level: Modifiers
• For the MRC program no modifiers will be needed for billing.

41
Line Level: Submitted Charges
• Enter the Submitted Charges.
Note: If the dollar amount is a whole number, no decimal point is needed.
42
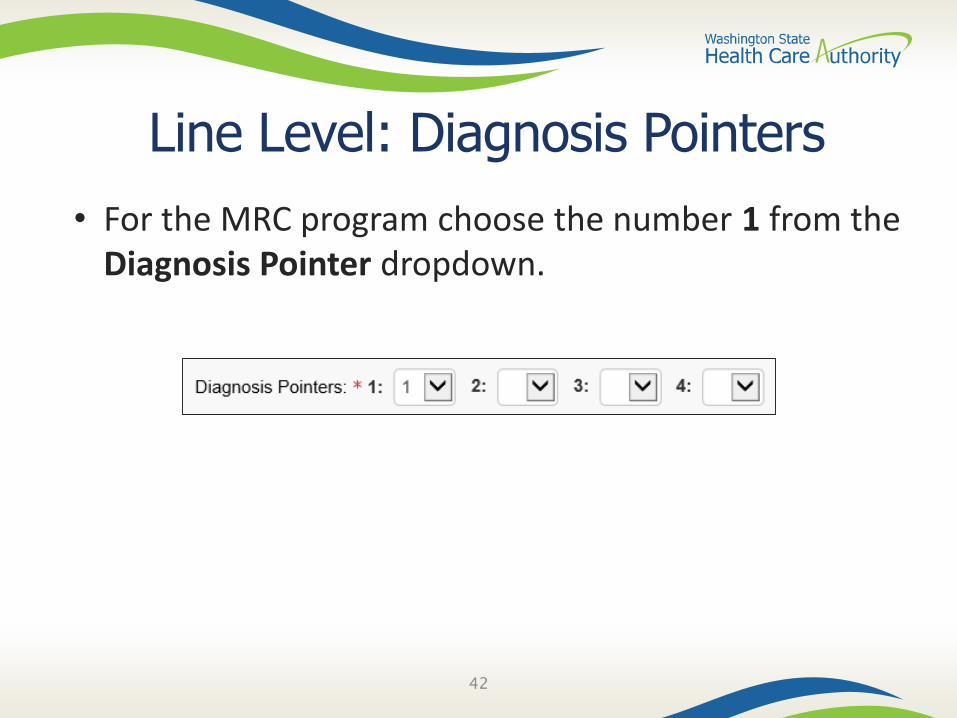
Line Level: Diagnosis Pointers
• For the MRC program choose the number 1 from the Diagnosis Pointer dropdown.

43
Line Level: Units
• Enter the procedure Units. Each unit is equal to 1 medical record page.
• ProviderOne will allow up to 150 units for the MRC program.

44
Line Level: Medicare Crossover Items, Drug Identification, Prior Authorization, and Additional Service Line Information
• The following areas are not required for the MRC program billing.

45
Line Level: Service Details• Click on the Add Service Line Item button to add the procedure
line on the claim.
Note: Please ensure all necessary claim information has been entered before clicking the button to add the service line to the claim.
Note: Once the procedure line item is added, ProviderOne will refresh and return to the top of the claim form.

46
Add Additional Service Line Items• If additional service lines need to be added, click on the Service
hyperlink at the top of the page to get quickly back to the Basic Service Line Items section.
• Follow the same steps as outlined on previous slides for entering data for each additional service.

47
Update Service Line Items
• Update a previously added service line item by clicking on the line number of the line that needs to be updated. This will repopulate the service line item boxes for changes to be made.

48
Update Service Line Items• Once the service line is updated, click on the Update Service Line
Item button to add the corrected information to the service line.
Note: Once the Update Service Line Item button is chosen, ProviderOne will refresh the screen and return to the top of the claim form. Use the Service hyperlink to quickly return to the service line item section to view and verify that the changes were completed.

49
Submitting Claim for Processing
• When the claim is ready to submit into ProviderOne for processing, use the Submit Claim button on the top left header bar.

50
Submitting Claim for Processing
• After the Submit Claim button is pushed, the following pop up window is displayed.
• Click on the Cancel button if no backup is being sent

51
Submitting Claim for Processing• The Submitted Professional Claim Details confirmation page is displayed. It
will display a summary of the basic claim information, as well as the assigned claim number (TCN).
• ProviderOne displays No Records Found if no backup documents have been attached.
• Click the final Submit button to send your claim to ProviderOne

Claim Status
52

53
Checking Claim Status• Log into ProviderOne and choose the EXT Provider Social Service
Medical profile.• Choose Claim Inquiry under the Claims section of the Provider
Portal.
54
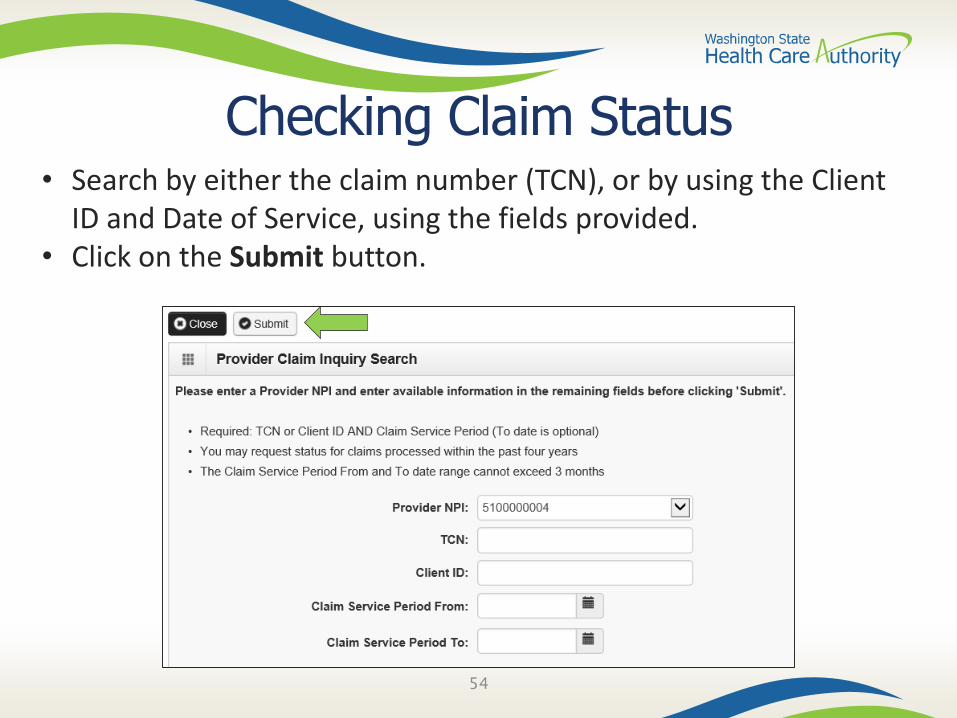
Checking Claim Status• Search by either the claim number (TCN), or by using the Client
ID and Date of Service, using the fields provided.• Click on the Submit button.
55
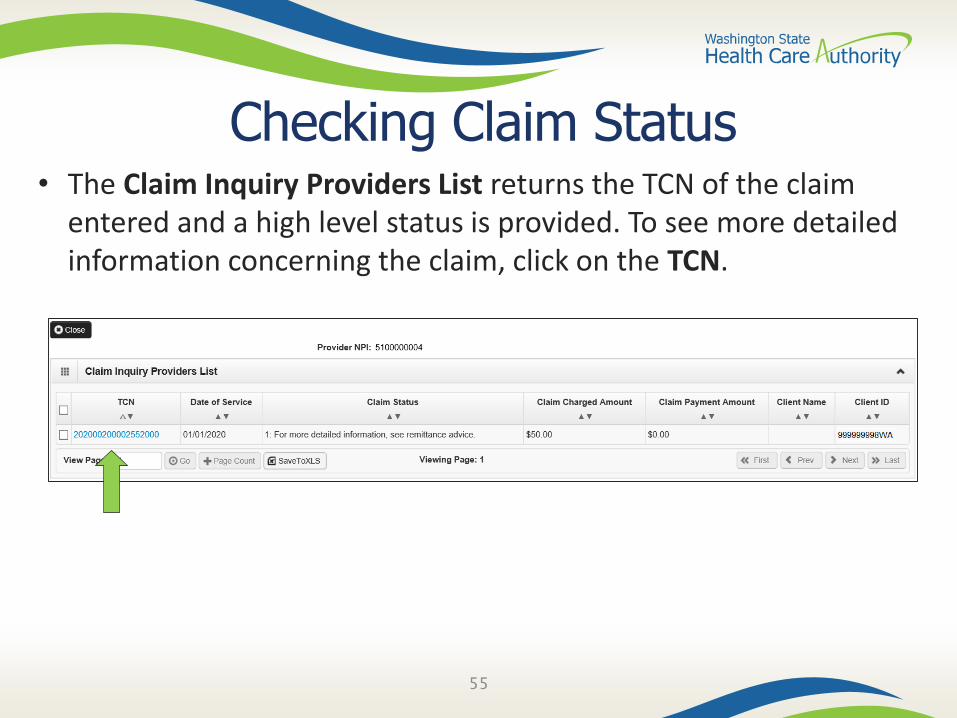
Checking Claim Status• The Claim Inquiry Providers List returns the TCN of the claim
entered and a high level status is provided. To see more detailed information concerning the claim, click on the TCN.
56
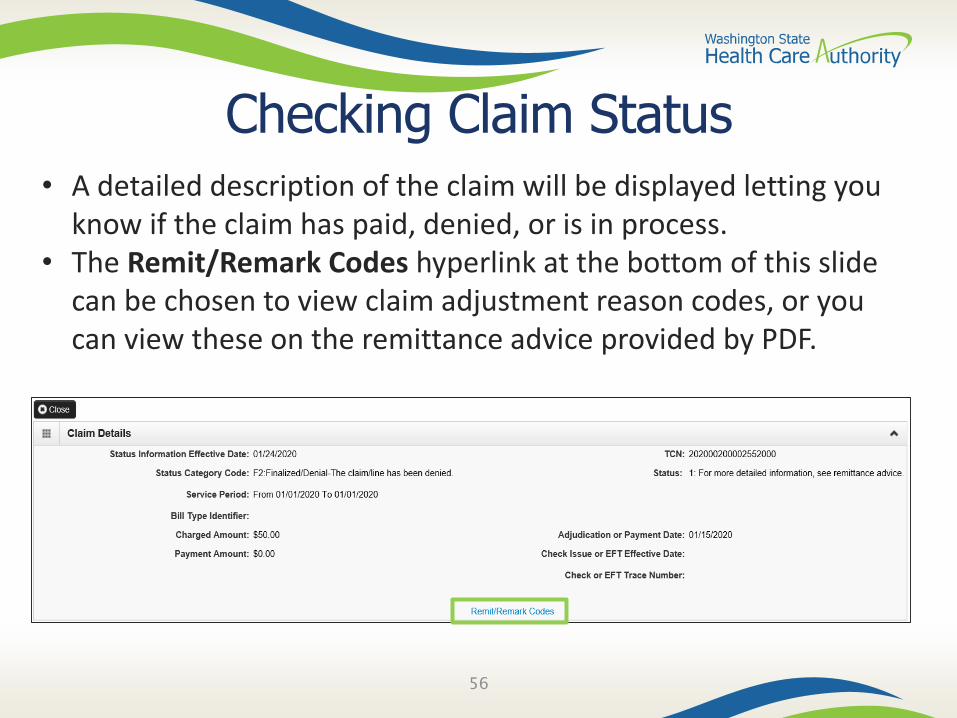
Checking Claim Status• A detailed description of the claim will be displayed letting you
know if the claim has paid, denied, or is in process.• The Remit/Remark Codes hyperlink at the bottom of this slide
can be chosen to view claim adjustment reason codes, or you can view these on the remittance advice provided by PDF.

Remittance Advice (RA)
57

58
Remittance Advice (RA)• If you wish to see a summary of any given weeks’ claims, rather
than searching for an individual claim, use the Remittance Advice rather than the Claim Status function by clicking on View Payment.

59
Remittance Advice (RA)• The resulting list will display each of your weekly RAs which you can
sort using the up and down arrows in each column.• Click on the RA/ETRR Number to open up a PDF copy of the RA.
o Your RA will have a section each for Paid, Denied, In Process, and Adjustedclaims, so be sure to search in each if you can’t find a specific TCN.
o The last page of the RA will include a description of any denial codes listed in the Denied section.

60
Contact and Support
• To contact the Health Care Authority’s Customer Service, use the Contact Us web form or call 1-800-562-3022, and follow the prompts for providers and claims.
• Training materials (such as this slideshow) and much more information about Health Care Authority, Washington Apple Health (Medicaid), and ProviderOne can be found on the Billers and Providers webpage.
• If you prefer to submit claims through electronic HIPAA file transactions, contact our HIPAA Help Desk.
• Visit the MRC provider webpage.

![C-MRC it gb de Ed01 2007reducta-im.hr/katalozi/zupcasti_reduktori_rc.pdfSELEZIONE RIDUTTORE - MRC 1400 [min-1] SPEED REDUCER SELECTION - MRC GETRIEBEAUSWAHL - MRC 0.09 kW (0.12 HP)](https://img.pdfslide.us/doc/110x75/6108c986e8f90f642023ce89/c-mrc-it-gb-de-ed01-2007reducta-imhrkatalozizupcastireduktorircpdf-selezione.jpg)