Embed Size (px)
Citation preview

S
MD 24089a ES EN DE Aldi Final Content.book Seite 1 Mittwoch, 5. August 2009 3:36 15
EÍndice
Vista general . . . . . . . . . . . . . . . . . . . . . . . . . . . . . . . . 3Parte delantera . . . . . . . . . . . . . . . . . . . . . . . . . . . . . . . . . . 3Parte trasera . . . . . . . . . . . . . . . . . . . . . . . . . . . . . . . . . . . . 4Mando a distancia . . . . . . . . . . . . . . . . . . . . . . . . . . . . . . . . 5
Advertencias de seguridad . . . . . . . . . . . . . . . . . . . . . . . 6
Preparación . . . . . . . . . . . . . . . . . . . . . . . . . . . . . . . . . 9Desembalar el aparato . . . . . . . . . . . . . . . . . . . . . . . . . . . . . 9
Conectar el aparato . . . . . . . . . . . . . . . . . . . . . . . . . . . .10Indicaciones relativas a la conexión . . . . . . . . . . . . . . . . . . . 10Conexión de la antena de satélite . . . . . . . . . . . . . . . . . . . . 11Conectar un aparato de TV . . . . . . . . . . . . . . . . . . . . . . . . . . 11Conexión de un receptor de audio digital . . . . . . . . . . . . . . . 15
Poner en marcha el aparato . . . . . . . . . . . . . . . . . . . . . .17Conexión a la red . . . . . . . . . . . . . . . . . . . . . . . . . . . . . . . . 17Colocación de las pilas en el mando a distancia . . . . . . . . . . . 18Encender . . . . . . . . . . . . . . . . . . . . . . . . . . . . . . . . . . . . . . 18
Manejar el aparato . . . . . . . . . . . . . . . . . . . . . . . . . . . .19Utilizar las funciones básicas . . . . . . . . . . . . . . . . . . . . . . . . 19Seleccionar programas . . . . . . . . . . . . . . . . . . . . . . . . . . . . 20Teletexto . . . . . . . . . . . . . . . . . . . . . . . . . . . . . . . . . . . . . . 21Pasar a la señal AV . . . . . . . . . . . . . . . . . . . . . . . . . . . . . . . 22
Funciones de menú . . . . . . . . . . . . . . . . . . . . . . . . . . . .23Navegación por el menú . . . . . . . . . . . . . . . . . . . . . . . . . . . 23Resumen de los ajustes del menú principal . . . . . . . . . . . . . . 24Realizar ajustes en los menús . . . . . . . . . . . . . . . . . . . . . . . 25
Modificar el ajuste de la emisora . . . . . . . . . . . . . . . . . . .27Clasificar la lista de emisoras . . . . . . . . . . . . . . . . . . . . . . . . 27Búsqueda de emisoras . . . . . . . . . . . . . . . . . . . . . . . . . . . . 29Almacenar la emisora en la lista de emisoras . . . . . . . . . . . . . 31Lista de favoritos . . . . . . . . . . . . . . . . . . . . . . . . . . . . . . . . 32
MD 24089a 1

MD 24089a ES EN DE Aldi Final Content.book Seite 2 Mittwoch, 5. August 2009 3:36 15
Modificar los ajustes básicos . . . . . . . . . . . . . . . . . . . . . 35Modificar los ajustes generales . . . . . . . . . . . . . . . . . . . . . . . 35OSD/EPG . . . . . . . . . . . . . . . . . . . . . . . . . . . . . . . . . . . . . . . 37Recepción . . . . . . . . . . . . . . . . . . . . . . . . . . . . . . . . . . . . . 38Sistema de satélite . . . . . . . . . . . . . . . . . . . . . . . . . . . . . . . 40Reproducción . . . . . . . . . . . . . . . . . . . . . . . . . . . . . . . . . . . 40Volume-Bypass . . . . . . . . . . . . . . . . . . . . . . . . . . . . . . . . . . 41Ajustes de fábrica . . . . . . . . . . . . . . . . . . . . . . . . . . . . . . . . 42Memorizar configuraciones . . . . . . . . . . . . . . . . . . . . . . . . . . 42
Extras del menú . . . . . . . . . . . . . . . . . . . . . . . . . . . . . 43Intensidad de señales . . . . . . . . . . . . . . . . . . . . . . . . . . . . . 43Motor DiSEqC . . . . . . . . . . . . . . . . . . . . . . . . . . . . . . . . . . . 44Desconexión automática . . . . . . . . . . . . . . . . . . . . . . . . . . . 44Calendario . . . . . . . . . . . . . . . . . . . . . . . . . . . . . . . . . . . . . 44Juegos . . . . . . . . . . . . . . . . . . . . . . . . . . . . . . . . . . . . . . . . 44
Temporizador . . . . . . . . . . . . . . . . . . . . . . . . . . . . . . . 45
Actualización del satélite . . . . . . . . . . . . . . . . . . . . . . . 46
Ayuda en caso de averías . . . . . . . . . . . . . . . . . . . . . . . 47Interferencias de la recepción con algunas emisoras . . . . . . . . 48
Limpieza y cuidado . . . . . . . . . . . . . . . . . . . . . . . . . . . 49
Eliminación . . . . . . . . . . . . . . . . . . . . . . . . . . . . . . . . 49
Especificaciones técnicas . . . . . . . . . . . . . . . . . . . . . . . 50
2

S
MD 24089a ES EN DE Aldi Final Content.book Seite 3 Mittwoch, 5. August 2009 3:36 15
EVista general
Parte delantera
1. Botón de standby2. Luz de control3. Luz de control de radio4. Pantalla/ indicación de la hora5. Sensor para mando a distancia
6. Botones de expulsión para Tarjetas COMMON INTERFACE7. Compartimento para Tarjetas COMMON INTERFACE8. V+: Para aumentar el volumen9. V-: Para bajar el volumen10. Botón de INFO11. P- botón de selección para bajo12. P- botón de selección para alto
3

MD 24089a ES EN DE Aldi Final Content.book Seite 4 Mittwoch, 5. August 2009 3:36 15
Parte trasera
1. Salida SPDIF Coaxial2. Salida VIDEO Cinch3. Salida AUDIO E (izquierda)4. Cable de red5. Salida VCR SCART para DVD- o grabador de vídeo6. Salida TV SCART para aparato de TV7. Salida AUDIO D (derecha)8. Salida SVIDEO Composite9. Salida SPDIF Optical10.Interfaz de servicio RS 23211. Entrada de antena
4

S
MD 24089a ES EN DE Aldi Final Content.book Seite 5 Mittwoch, 5. August 2009 3:36 15
EMando a distancia
5

MD 24089a ES EN DE Aldi Final Content.book Seite 6 Mittwoch, 5. August 2009 3:36 15
Advertencias de seguridad
Uso
El receptor de satélite digital MD 24089sirve para la recepción por satélite de programas de televisión y radio digital en el ámbito particular. No está previsto para el uso en instalaciones de la red de telecomunicación pública o en ámbitos industriales.
¡Mantenga los aparatos eléctricos fuera del alcance de los niños!
No deje los aparatos eléctricos al alcance de niños pequeños sin vigilancia. Mantenga también alejados de los niños los plásticos del embalaje. Existe pe-ligro de asfixia.
Emplazamiento seguro
Utilice el aparato exclusivamente en espacios secos.Si cambia el receptor de un ambiente frío a un ambiente caliente, puede condensarse humedad en el interior del receptor. En este caso, espere entre dos y tres horas antes de ponerlo en funcionamiento. Coloque el aparato sobre una superficie firme y nivelada. Coloque el aparato a una distancia de la pared de cómo mínimo 10 cm. No tape los orificios de ventilación. Evite la cercanía de:– Fuentes de calor, como, por ejemplo, radiadores,– aparatos con fuertes campos magnéticos, como, por ejemplo, los altavo-
ces.
Antes de la puesta en marcha, lea atentamente las presentes advertencias de seguridad. Preste atención a las advertencias que aparecen en el propio aparato y en las instrucciones de funciona-miento. Guarde siempre las instrucciones cerca del aparato para tenerlas a mano en caso de consultas posterioreso. Si vende o cede el apa-rato. a otra persona, entréguele sin falta también las presentes indi-caciones.
6

S
MD 24089a ES EN DE Aldi Final Content.book Seite 7 Mittwoch, 5. August 2009 3:36 15
ENo coloque ninguna fuente de fuego como, p.ej., velas sobre el aparato.No coloque el aparato sobre una superficie delicada. Evite que el receptor esté expuesto a gotas de agua o salpicaduras. No colo-que objetos llenos de líquido sobre, al lado o por encima del receptor, como, p. ej., floreros. Existe el peligro de recibir una descarga eléctrica.No coloque ningún objeto pesado sobre el receptor.
Conexión segura
Conecte el aparato solamente a una toma de corriente bien accesible e ins-talada por un profesiona de 230 V ~ 50/60 Hz. La clavija debe ser accesible para que en caso de emergencia, se pueda desenchufar rápida y fácilmente de la red.Coloque el cable de conexión a la red de forma que nadie pueda pisarlo ni tropezar con él. No utilice cables de prolongación.No doble o aplaste el cable de la red. Desenchufe el cable de la red, tirando siempre de la clavija.
Uso correcto
No deje que los aparatos eléctricos funcionen sin vigilancia. Retire el enchufe de alimentación toma de corriente y el cable de antena del aparato si no lo ha de usar por un período prolongado o si hay posibilidades de tormenta.Durante el funcionamiento el cable de alimentación no debe estar enrollado alrededor del aparato, ni tocar superficies calientes.No deje que entre humedad al aparato. Nunca toque el aparato, el cable de alimentación o el enchufe de alimentación con las manos mojadas. Hay peligro para la vida por descarga eléctrica.Si entraran cuerpos extraños o líquidos al interior del aparato, retirar de inmediato el enchufe de alimentación del tomacorriente. El aparato debe ser verificado por personal técnico cualificado, antes de volver a ponerlo en funcionamiento. De lo contrario, habría peligro de descarga eléctrica.Nunca utilice el aparato si está dañado o si se detectan daños en el cable de red o en el enchufe. En caso de daños al aparato, retire de inmediato el enchufe de la toma corriente. Nunca abra el aparato. En caso de avería, diríjase a nuestro servicio de asistencia técnica o a una tienda especializada. Las pilas no se deben exponer a calor excesivo, como la luz de sol, fuego, etc. En consecuencia, no coloque el mando a distancia encima de calentadores o bajo la luz solar directa.
7

MD 24089a ES EN DE Aldi Final Content.book Seite 8 Mittwoch, 5. August 2009 3:36 15
El mando a distancia universal cuenta con un diodo infrarrojo de clase 1M. No observe el láser con instrumentos ópticos.
Manipulación de las pilas
Es posible que las pilas contengan material inflamable. Si no se las trata correctamente, pueden presentar fugas, calentar demasiado, inflamarse e incluso explotar, con los daños consiguientes a su equipo y su salud.Siga al pie de la letra las instrucciones siguientes:
En caso de ingestión accidental de una pila hay que avisar inmediatamente a un médico.Utilice siempre pilas nuevas y solamente del mismo tipo y fabricante.¡Así se evita que las pilas con una carga diferente se descarguen entre sí y que puedan derramar líquido.¡No recargar nunca las pilas! ¡Peligro de explosión!Mantener las pilas alejadas de los niños, no tirarlas al fuego, cortocircuitaras o abrirlas.Antes de colocarlas, limpiar los contactos de las pilas y del aparato, en caso de que sea necesario.¡No exponer las pilas a condiciones extremas, p.ej., no ponerlas sobre radiadores! ¡Alto peligro de derrame!No tire las pilas gastadas a la basura doméstica. Entréguele las pilas a su comerciante o a un punto de recogida público.Si una pila se ha derramado, póngase guantes protectores y limpie el compartimento para las pilas con un paño seco.Al colocarlas, prestar atención a la polaridad correcta. Sustituir siempre todas las pilas al mismo tiempo.
8

S
MD 24089a ES EN DE Aldi Final Content.book Seite 9 Mittwoch, 5. August 2009 3:36 15
EPreparación
Desembalar el aparato
Retire completamente el material de embalaje de todas las piezas del aparato.
¡PELIGRO! No permita que los niños pequeños jueguen con el plástico. ¡Existe peligro de asfixia!
Volumen de suministroAl desembalar el aparato asegúrese de que le hayan suministrado todas las piezas:
receptor satélite,mando a distancia,un cable Euroconector,dos pilas (1,5 V Micro, do tipo AAA/LR03),el manual de instruccionesla tarjeta de garantía
9

MD 24089a ES EN DE Aldi Final Content.book Seite 10 Mittwoch, 5. August 2009 3:36 15
Conectar el aparato
Indicaciones relativas a la conexión
Para el funcionamiento correcto de este aparato se necesita una antena ins-talada por un profesional y orientada de forma óptima para la recepción por satélite.
Preste atención a – no doblar nunca los cables y que no toquen objetos cortantes o calientes
y que– en todos los aparatos en los que se realizan trabajos de conexión esté
desenchufada la clavija.Con ello se impedirá que en caso de una conexión incorrecta se produzcan daños por un cortocircuito y evitará el peligro de una descarga eléctrica.
¡PELIGRO! ¡No realice nunca trabajos de conexión durante una tormenta! A través de la antena o el cable de corriente pueden producirse ya sobrecargas pe-ligrosas en las piezas de metal de los aparatos cuando se avecinen tor-mentas. Existe el peligro de recibir una descarga eléctrica.
¡ATENCIÓN!La conexión “RX/TX”“ (D-SUB) de nueve polos está prevista exclusiva-mente para el servicio técnico, p. ej., si su aparato debe ser revisado a causa de un fallo por el servicio posventa.¡No experimente con este puerto! La disposición de los cables de conexión y el protocolo de datos no coinciden con los estándares de PC normales. Si para ello no se conecta un aparato es-pecial previsto para ello a este interfaz, el receptor podría dañarse.
10

S
MD 24089a ES EN DE Aldi Final Content.book Seite 11 Mittwoch, 5. August 2009 3:36 15
EConexión de la antena de satélite
El receptor se conecta mediante un cable LNB con la entrada de su antena de satélite. Para ello se necesita una antena de satélite con LNB universal para la recepción digital. Antes de poder conectar el receptor, en caso necesario, se deberá montar el ca-ble LNB.
Observe las instrucciones de montaje de la antena de satélite y del cable LNB.
Conectar una sola antena Para la recepción de la mayoría de los programas de habla alemana y de muchos más programas de Europa será suficiente una sola antena que esté orientada a los satélites ASTRA 19,2° Este.
Enchufe el cable de antena en la conexión “RF IN“.
Conectar varias antenasA través de una caja de conmutación se pueden conectar varias antenas o un LNB de varias salidas al receptor. Esto tiene sentido, p. ej., en caso de instala-ciones de varios abonados o en caso de interconectar satélites a través de an-tenas de satélite de diferente orientación.
Conecte la caja de conmutación según la documentación de la caja de con-mutación. Enchufe la caja de conexión en la conexión “RF IN“.
Conectar un aparato de TV
El aparato dispone de dos tipos de salidas para vídeo con una calidad de señal y asignación diferente.
En el Euroconector “TV“ están disponibles señales de vídeo y de audio de buena calidad. En particular las señales de color (RGB) están disponibles allí por separado. Utilice esta conexión si su televisor o reproductor la posee. En la conexión cinch “VIDEO“ solamente están disponibles las señales de ví-deo con señales de color integradas (FBAS). Utilice esta conexión para apa-ratos con una entrada de vídeo sencilla.
11

MD 24089a ES EN DE Aldi Final Content.book Seite 12 Mittwoch, 5. August 2009 3:36 15
Conexión con un EuroconectorConecte el cable Euroconector con la conexión para Euroconector “TV“ del aparato.Conecte el Euroconector con la conexiónpara Euroconector del televisor.Si desea conectar un equipo de audio adicional, conecte las conexiones “L“ y “R“ en el aparato con las salidas AUX del equipo de audio.
Esquema de conexión para la conexión del Euroconector:
Observe el manual de instrucciones del televisor.
12

S
MD 24089a ES EN DE Aldi Final Content.book Seite 13 Mittwoch, 5. August 2009 3:36 15
EConexión con un cable cinchSi posee un televisor que no dispone de una conexión para euroconector, tam-bién puede conectar su receptor de satélite mediante un cable cinch (no incluido en el volumen de suministro).
En este caso no se puede conectar un equipo de audio adicional.
Conecte la conexión “VIDEO“ del aparato con la entrada de vídeo del televisor.Conecte las conexiones “L“ y “R“ del aparato con las entradas de audio del televisor
Esquema de conexión para conexiones cinch:
Observe las indicaciones del manual de instrucciones del televisor.
13

MD 24089a ES EN DE Aldi Final Content.book Seite 14 Mittwoch, 5. August 2009 3:36 15
Conexión con un cable compositeSi posee un televisor que no dispone de una conexión para Euroconector, tam-bién puede conectar su receptor de satélite mediante un cable composite (no incluido en el volumen de suministro).
Conecte la conexión “SVIDEO“ del aparato con la entrada de SVideo del te-levisor.
Esquema de conexión con un cable composite:
Observe las indicaciones del manual de instrucciones del televisor.
14

S
MD 24089a ES EN DE Aldi Final Content.book Seite 15 Mittwoch, 5. August 2009 3:36 15
EConexión de un receptor de audio digital
Aunque su receptor recibe las señales de forma digital, el receptor tiene que convertirlas primero en señales analógicas para los equipos HiFi convenciona-les. Con ello se puede perder un poco de calidad. Si se trata de equipos con una entrada digital no se produce ninguna pérdida de calidad.
Conexión a las salidas SPDIF COAXIALSi desea conectar un amplificador o un descodificador Dolby-Surround con una entrada digital, siga los siguientes pasos:
Conecte la conexión “SPDIF COAXIAL“ mediante un cable cinch con la en-trada digital de su amplificador o con el sistema Dolby-Surround.
Esquema de conexión SPDIF COAXIAL:
15

MD 24089a ES EN DE Aldi Final Content.book Seite 16 Mittwoch, 5. August 2009 3:36 15
Conexión en las salidas SPDIF-OPTICALSi el aparato de audio dispone de entrada óptica digital:
Conecte una conexión "SPDIF OPTICAL" a través de un cable óptico con entrada óptica digital al amplificador o a un sistema Dolby-Surround.
Esquema de conexión SPDIF OPTICAL:
16

S
MD 24089a ES EN DE Aldi Final Content.book Seite 17 Mittwoch, 5. August 2009 3:36 15
EPoner en marcha el aparato
Conexión a la red
¡Peligro! Utilice solamente tomas de corriente que están en perfecto estado. Las clavijas o enchufes flojos pueden causar incendios. En caso de clavijas o enchufes defectuosos también pueden producirse interferencias en la re-cepción. No se deben utilizar enchufes defectuosos. Pida que un profesio-nal repare las clavijas o los enchufes, antes de poner el aparato en funcio-namiento.
¡Peligro! Desenchufe el aparato inmediatamente si la clavija o el cable de red están dañados. Cambie el cable de red a través del servicio posventa por un ca-ble nuevo con una clavija sellada en caucho. No conecte el aparato bajo ningún concepto a la corriente si los daños no han sido reparados. En caso contrario existe peligro de muerte por una descarga eléctrica.
Enchufe la clavija en un enchufe debidamente instalado de 230V ~ 50Hz.
En la parte frontal del aparato se ilumina el indicador de hora. Según el ajuste actual (véase página 42) se conecta el aparato con la tecla “Standby“ " o se pondrá el aparato en el modo Standby. En el modo Standby se ilumina el indicador de hora.
17

MD 24089a ES EN DE Aldi Final Content.book Seite 18 Mittwoch, 5. August 2009 3:36 15
Colocación de las pilas en el mando a distancia
Introduzca dos pilas (1,5 V Micro (AAA/LR03) en el compartimento para pilas.
Encender
Este aparato, como todos los aparatos actuales, no tiene interruptor de alimentación. En cuanto el enchufe está en la toma, recibe corriente. Esto significa que se genera calor constantemente en el aparato, lo que es normal y no representa peligro alguno con la ventilación correcta.
PELIGO!Nunca cubra las aberturas de ventilación en la base del aparato ni en su parte superior. El aparato también genera calor en el modo Standby. Si las aberturas de ventilación están cubiertas, pueden producirse incendios.No deje aparatos eléctricos encendidos y sin vigilancia. Retire el enchufe de red si no puede vigilar el aparato por un período prolongado (por ejemplo durante las vacaciones).Retire el enchufe de red y el cable de antena si se avecina una tormenta. De esta forma, evita que un rayo en las proximidades dañe sus aparatos.
Después de conectar por primera vez el aparato nuevo, se consultan las configuraciones siguientes:
El idioma operativo (alemán, inglés, portugués, español, turco, polaco), La ubicación: continenteLa ubicación: país en el continente seleccionado.
A partir de estas configuraciones, el aparato elabora la lista de programas de fábrica. Para la recepción en Portugal, las configuraciones ya vienen de fábrica.
18

S
MD 24089a ES EN DE Aldi Final Content.book Seite 19 Mittwoch, 5. August 2009 3:36 15
EManejar el aparato
El aparato se entrega ya programado. Para el manejo de este aparato, no son necesarios conocimientos técnicos. Adi-cionalmente a este manual de instrucciones, muchas de las funciones se expli-can mediante textos explicativos que aparecen en pantalla.
Utilizar las funciones básicas
Encender el aparato – StandbyEncienda su televisor y seleccione el modo AV.Pulse la tecla "STANDBY ". En la pantalla aparece el número del canal y se ilumina la lámpara de control azul.
Como en el caso de un ordenador, al iniciarse un receptor digital primero tiene que cargar el sistema operativo. Puede tardar unos segundos hasta que el aparato reaccione. Mientras tanto, en la pantalla aparece el logo-tipo del fabricante.
Para pasar al modo Standby pulse la tecla “Standby“. Se ilumina el indicador de hora.
Ajustar el volumenLas modificaciones del volumen pueden perjudicar una grabación de ví-deo en marcha. En este caso, ajuste el volumen en el televisor.
Para aumentar el volumen, pulse la tecla " +".Para bajar el volumen, pulse la tecla " -".
La intensidad de volumen se indica mediante una barra que aparece en la pantalla.
Para apagar la voz, pulse la tecla " ". En pantalla aparecerá el símbolo.Para volver a poner la voz, vuelva a pulsar la tecla " o pulse las teclas " +" o " – ", volverá a aparecer la barra para el volumen.
Si la opción “Volume-Bypass“ está activada (véase página 49), ya no se puede ajustar el volumen mediante el mando a distancia del receptor.
19

MD 24089a ES EN DE Aldi Final Content.book Seite 20 Mittwoch, 5. August 2009 3:36 15
Ajustar la recepción de televisión y de radio
Para cambiar a la recepción de emisiones de radio digitales, pulse la tecla “Radio“. El LED de control de la radio de la parte frontal del aparato se ilumina de color verde y aparece el número del canal.
Para cambiar a una recepción de emisiones de televisión, pulse la tecla “TV“.
Seleccionar programas
Su receptor ha sido programado de fábrica para algunos satélites . A partir de la página 31 se indica cómo podrá añadir otros programas.
Para cambiar a la siguiente emisora ya programada, pulse la tecla “P+“.Para cambiar a la emisora anterior ya programada, pulse la tecla “P–“.Para seleccionar una emisora directamente, introduzca el número de la po-sición de memoria correspondiente mediante las cifras numéricas.Para cambiar a la última emisora ajustada, pulse la tecla “SWAP“.
Si desea seleccionar una emisora a través de la lista de programas, siga los si-guientes pasos:
Durante la recepción pulse la tecla LIST. Aparece la lista de emisoras.Para seleccionar una emisora, pulse la tecla "P+" o "P-".Para que aparezca más información acerca del programa de la emisora se-leccionada, pulse la tecla “INFO“.Para cambiar a la emisora marcada, pulse la tecla “OK“.Para cerrar la lista de emisoras y para cambiar a la emisora ajustada, pulse la tecla ”EXIT“.
20

S
MD 24089a ES EN DE Aldi Final Content.book Seite 21 Mittwoch, 5. August 2009 3:36 15
ETeletexto
Las ofertas de teletexto son diferentes según el proveedor del programa. Seleccione el programa del cual desea acceder al teletexto.
Iniciar o terminar el teletextoPara que el teletexto aparezca en la pantalla, pulse la tecla “TEXT“.Para volver a cambiar a la pantalla normal, pulse la tecla “EXIT“.
Seleccionar las páginas de teletextoEl número de la página actual y de la página que se busca, se indican a través del teletexto.
El índice se encuentra normalmente en la página ”100“.Introduzca el número de la página deseada mediante las teclas numéricas.También se pueden pasar las páginas hacia delante o detrás con las te-clas"P+" o "P-" .Para que aparezca el índice, pulse la tecla "MENU".
En caso de páginas muy largas, estas se dividirán en las denominadas "SUBPÁGINAS". En estos casos aparece la indicación "01 02 ..." por debajo del número de la página. La aparición de estas subpáginas cambia au-tomáticamente después de aproximadamente un minuto.
Para detener el cambio automático, pulse la tecla "OK". Aparecerá una “>“ cuando se ha detenido el cambio automático.Para pasar por las subpáginas, pulse la tecla"P+" o "P-".Para volver al cambio automático, vuelva a pulsar la tecla "OK".
Opciones de visualizaciónPara aumentar el tamaño de la visualización del teletexto, pulse la tecla "SWAP". Para que aparezca la mitad inferior del teletexto, vuelva a pulsar la tecla "SWAP".Para que el teletexto vuelva a aparecer de tamaño normal, pulse la tecla “SWAP“ una tercera vez.Para que aparezca el texto escondido (p. ej., en caso de páginas de crucigra-mas), pulse la tecla "INFO".
Puede elegir que el teletexto aparezca en cuatro formas diferentes.Para cambiar la forma, pulse la tecla “TEXT“ varias veces hasta quede ajus-tada la forma deseada.
21

MD 24089a ES EN DE Aldi Final Content.book Seite 22 Mittwoch, 5. August 2009 3:36 15
El algunas circunstancias puede tardar algo hasta que aparezca la página deseada o la subpágina del teletexto. Durante el periodo de espera se puede ver la imagen de televisión normal como se indica a continuación.
Pulse la tecla "LIST". Ahora el teletexto desaparece hasta que aparezca la si-guiente subpágina o la página seleccionada.
Para que el teletexto desaparezca, pulse la tecla "EXIT". Aparecerá la pantalla normal.Para que el teletexto oculto vuelva a mostrarse, pulse la tecla "TEXT". Aparecerá la última página de teletexto seleccionada.
Leer nuevamente el teletextoLas páginas con contenidos modificados se leen automáticamente de nuevo, pero solamente después de cierto tiempo.
Pasar a la señal AV
Con esta función se determina qué señales deben ser transmitidas en la conexión "TV SCART" a otro aparato.
Esta función sólo se activa cuando se conectan los aparatos con las conexiones SCART "TC SCART" y VCR" SCART.
Oprima el botón "AV". Si aparece la indicación "AV" en la pantalla, las señales de conexión "VCR-SCART" se transmiten al televisor (por ejemplo, para reproducción de grabaciones de vídeo).
Para ver los programas a través del receptor, oprima nuevamente el botón "AV". El número de la memoria aparece en pantalla. Las señales del receptor se transmiten al televisor.
22

S
MD 24089a ES EN DE Aldi Final Content.book Seite 23 Mittwoch, 5. August 2009 3:36 15
EFunciones de menú
De fábrica se entrega ya el aparato programado de forma óptima para que casi no se necesiten los trabajos de ajuste aquí descritos. Si no se atreve a realizar los ajustes Usted mismo, consulte a un especialista.En la página 50 está explicado cómo se pueden restablecer los ajustes de fá-brica del aparato.Todas las posibilidades de ajuste aparecen en forma de menú en pantalla (OSD, "ON-SCREEN-DISPLAY").
Navegación por el menú
Acceder al menúPara acceder al menú OSD, pulse la tecla "MENU".
Ahora puede elegir los siguientes menús:Selección de imagen/sonido,TeletextoEPGListas de favoritos y menú principalSeleccione el menú deseado con las teclas "P+" y "P-".A continuación, pulse la tecla "OK". Se abrirá el menú seleccionado.Para acceder directamente al menú principal, también puede pulsar la tecla “MENU“ rápidamente dos veces seguidas.Encontrará un resumen de los ajustes del menú principal en página 28.
Seleccionar un menúPara hojear en el menú hacia arriba o abajo, pulse la tecla "P+" o "P-".Para cambiar dentro de un submenú hacia la izquierda o derecha, pulse las teclas "+" o "-". Se marcará el menú seleccionado, el submenú o la función.Para acceder al punto de menú seleccionado, o para abrir un menú, pulse la tecla “OK“.
Abandonar el menúPara abandonar un menú e interrumpir una función, pulse la tecla "EXIT".
23

MD 24089a ES EN DE Aldi Final Content.book Seite 24 Mittwoch, 5. August 2009 3:36 15
Resumen de los ajustes del menú principal
Menú principal
Lista de emisoras
Lista de favoritos
Clasificar emisoras
Búsqueda de emisorasBúsqueda profesional
Editar las listas de favoritos 1-9 Editar la lista de emisorasBuscar por el satéliteBuscar por el satélite o transponder
página 32
página 27
página 29página 30
Configuración Características generales
OSD / EPG
Recepción
Sistema de satélite
Reproducción
Ajustes de fábrica
Memorizarlos ajustes
Ajustes generales (hora, idioma, ajustes de inicio, emisoras codificadas)Ajuste de la ventana OSD / EPGConfiguración del receptorSelección del/ de los satélite/sAjuste de la reproducción de imagen y sonidoRestablecer los ajustes de fábricaMemorizarlos ajustes y abandonar el menú
página 35
página 37
página 38
página 40
página 40
página 42
página 42
Extras Información del sistemaIntensidad de señales
Motor DISEqC
Desconexión automáticaCalendarioJuego: BloquesJuego: Serpiente
Muestra la información del sistemaIndicación de la intensidad de señalAjuste al usar un control por motorDesconexiónautomática del receptor Indicación del calendarioJuego en pantalla 1Juego en pantalla 2
página 43
página 43
página 44
página 44
página 44página 44página 44
Temporizador Lista de temporizador 1-12
Ajuste y activación de la función de temporizador
página 45
Codificación Descodificador C:1 y C:2
Indicación y ajuste de la opción Play-TV (solamente disponible con el módulo Common Interface instalado)
página 36
Ayuda breve Indicación en pantalla de la ayuda breve
24

S
MD 24089a ES EN DE Aldi Final Content.book Seite 25 Mittwoch, 5. August 2009 3:36 15
ERealizar ajustes en los menús
Seleccionar el idiomaAlgunos programas se emiten de forma multilingüe. Con este ajuste se puede ajustar otro idioma para el sonido.
Pulse la tecla "MENU".Seleccione el submenú "SELECCIÓN DE IMAGEN/SONIDO" y pulse la tecla "OK". El idioma seleccionado queda ajustado hasta que se seleccione otro programa o hasta que se apague el aparato.Para cambiar el idioma de forma permanente, seleccione el idioma tal y como se indica arriba.A continuación pulse la tecla “OK“ y manténgala pulsada durante aprox. tres segundos.Al pulsar la tecla "LIST" se puede conmutar la reproducción del sonido entre canal A, canal B, y estéreo. En el submenú "selección de imagen/sonido" se puede conectar indivi-dualmente el canal A con el botón "1" y con el botón "2" el canal B. "A" es para la salida analógica; "D" para la salida SPDIF. No se emite sonido Dolby Digital por la salida analógica.
Mostrar el teletextoSeleccione este punto de menú "TELETEXT" para que aparezca el teletexto.
También se puede acceder al teletexto directamente a través de la tecla "TEXT" (véase página 24).
25
MD 24089a ES EN DE Aldi Final Content.book Seite 26 Mittwoch, 5. August 2009 3:36 15
Punto del menú EPGAl seleccionar el punto del menú "EPG" se muestra la información de los pro-gramas de la emisora ajustada. El acceso al menú también se puede realizar pulsando la tecla "INFO" del mando a distancia.
Observe que no todos los proveedores de programas emiten información del programa.
Lista de favoritosEn este menú se puede acceder a una de las listas de favoritos y activarla. El acceso al menú también se puede realizar pulsando la tecla numérica "0" del mando a distancia (página 39).
26

S
MD 24089a ES EN DE Aldi Final Content.book Seite 27 Mittwoch, 5. August 2009 3:36 15
EModificar el ajuste de la emisora
Las emisoras de los diferentes satélites ya están preajustadas y resumidas en una lista de emisoras. Se pueden editar estas emisoras y añadir emisoras nue-vas.
Ya que la asignación de emisoras de algunos satélites cambia con frecu-encia, recomendamos una búsqueda. Para ello proceda como se indica en el apartado „BÚSQUEDA DE EMISORAS” a partir página 29.
Abra el menú principal y seleccione el submenú "BÚSQUEDA DE EMISO-RAS".
Clasificar la lista de emisoras
Con esta función se pueden desplazar o suprimir las emisoras dentro de la lista de emisoras.
Seleccione el punto de menú “CLASIFICAR EMISORAS“.Seleccione la línea en la que aparece la emisora deseada. A continuación, pulse la tecla “OK“.En la pantalla aparece la opción „Directo“ o “MARCAR BLOQUE“. Para modificar las características de una emisora, seleccione la opción “Di-recto“.Para modificar las características de varias emisoras, seleccione la opción “MARCAR BLOQUE“.
Para modificar una sola emisoraSeleccione la opción "DIRECTO". Ahora se pueden seleccionar diferentes funciones para modificar la emisora deseada.
Para copiar una emisora en otro lugar de la lista de emisoras, siga los siguientes pasos:
Seleccione la función "COPIAR".A continuación, seleccione con las teclas "P+" y "P-" la posición deseada.Pulse la tecla "OK". La emisora seleccionada se introducirá en la posición deseada.
Para desplazar una emisora a otro lugar de la lista de emisoras, siga los siguien-tes pasos:
Seleccione la función "DESPLAZAR".A continuación, seleccione con las teclas "P+" y”P-" la posición deseada.
27

MD 24089a ES EN DE Aldi Final Content.book Seite 28 Mittwoch, 5. August 2009 3:36 15
Pulse la tecla "OK". Ahora se introducirá la emisora en la posición nueva y se suprime la entrada antigua.
Para reemplazar una emisora por una memoria de emisora libre, seleccione la función "SUPRIMIR".
Para suprimir una emisora, seleccione la función "RECORTAR". Ahora se numerarán de nuevo las siguientes entradas.Para introducir una memoria libre para emisoras, seleccione la función "IN-TRODUCIR LIBRE".Si desea interrumpir la función"CLASIFICAR EMISORAS" , pulse la tecla "EXIT". En la pantalla aparece una consulta.Para memorizar las modificaciones realizadas, pulse la tecla “OK“.Para rechazar las modificaciones realizadas, pulse la tecla “SWAP“.Para seguir editando la lista de emisoras, pulse la tecla ”EXIT“. Modificaz va-rias emisoras.Para modificar varias emisoras, seleccione la opción "EDITAR BLOQUE". Ahora la emisora seleccionada se encuentra marcada.Para marcar las otras emisoras deseadas, pulse la tecla "P+" o "P-".Pulse la tecla "OK".
Ahora están marcadas todas las emisoras incluidas la primera y segunda selec-ción. Ahora se pueden modificar los ajustes de las emisoras marcadas como en caso de una sola emisora.Adicionalmente se puede seleccionar la función "CONDENSAR" . Con ello se borran todas las líneas no utilizadas de la lista de emisoras. Con ello, se vuelven a numerar las emisoras de la lista.
28

S
MD 24089a ES EN DE Aldi Final Content.book Seite 29 Mittwoch, 5. August 2009 3:36 15
EBúsqueda de emisoras
Las emisoras de televisión digitales pueden transmitir varios programas a un único canal de televisión; estas emisoras múltiples se llaman “TRANSPON-DER“. Durante la búsqueda se examinan todos los canales de televisión tam-bién según las ofertas digitales que puedan contener. Este proceso puede durar unos minutos.
Búsqueda sencillaCon esta función el receptor puede buscar en todos los canales de televisión conocidos si disponen de programas digitales y los podrá incluir automática-mente en la lista de emisoras.
Abra el menú principal y seleccione el submenú “LISTA EMISORAS“.¡ATENCIÓN! Si durante la búsqueda se interrumpe la alimentación eléctrica, al alma-cenar las emisoras se pueden producir errores. En tal caso repita la bús-queda.
Seleccione la función “BÚSQUEDA DE EMISORAS“ y pulse la tecla “OK“. Ahora se inicia la búsqueda.
En caso de un único receptor de satélite fijo la búsqueda de emisoras se inicia directamente sin la posibilidad para seleccionar un transponder o un satélite. Si se ha instalado un receptor de satélite motorizado o varios receptores, ahora aparecerá una lista con los satélites disponibles.
En este caso seleccione aquel satélite con el cual desea buscar y pulse la tecla "OK". Ahora se inicia la búsqueda. Se buscará consecutivamente en los dife-rentes transponders. Para saltar al siguiente transponder antes de tiempo, pulse la tecla “OK“.Para interrumpir la búsqueda, pulse la tecla “EXIT“.
Después de la búsqueda aparecerá la ventanilla de selección “SELECCIÓN DEL CANAL “. En esta se puede almacenar en la lista de emisoras las emisoras en-contradas.
29

MD 24089a ES EN DE Aldi Final Content.book Seite 30 Mittwoch, 5. August 2009 3:36 15
Búsqueda profesionalEsta posibilidad de búsqueda solamente se debería utilizar, si se dispone de suficiente experiencia.
Abra el menú principal y seleccione el submenú "LISTA DE EMISORAS".Seleccione la función"BÚSQUEDA PROFESIONAL". Pulse la tecla "OK".Seleccione con las teclas "P+" y "P-" el ajuste deseado.Pulse la tecla "OK". En la pantalla aparece un submenú en el que se puede realizar los ajustes exactos para el satélite deseado.Seleccione el ajuste que desea modificar con las teclas de flecha "P+" o "P-".Para modificar un ajuste pulse las teclas de flecha "+" o "-".
Se puede introducir la frecuencia también con las teclas numéricas. La informa-ción sobre la frecuencia del transponder la obtendrá del proveedor de progra-mas correspondiente.Para acceder al modo de búsqueda deseado, siga los siguientes pasos:
Si en caso de la búsqueda automática de emisoras desea buscar en todos los canales de televisión, seleccione "TODOS LOS TRANSPONDER".Si solamente desea buscar en el transponder, cuya frecuencia se indica, sel-eccione "TRANSPONDER INDIVIDUAL".Si solamente desea buscar nuevas emisoras de los transponders ya alma-cenados, seleccione "LISTA DE EMISORAS"Para iniciar la búsqueda con los ajustes realizados, seleccione el recuadro "SEGUIR CON OK".A continuación, pulse la tecla "OK. Ahora se inicia la búsqueda.Para determinar durante la búsqueda de emisoras si se desea saltar o incluir programas codificados en la búsqueda, proceda como se describe en la pá-gina 43 .
Después de la búsqueda aparecerá la ventanilla de selección “SELECCIÓN DEL CANAL“. En esta se puede almacenar en la lista de emisoras las emisoras encon-tradas.
30

S
MD 24089a ES EN DE Aldi Final Content.book Seite 31 Mittwoch, 5. August 2009 3:36 15
EAlmacenar la emisora en la lista de emisoras
Después de la búsqueda aparecerá la ventanilla de selección “SELECCIÓN DEL CANAL". En esta ventanilla de selección aparecen las emisoras encontradas du-rante la búsqueda en la mitad de la derecha. En la mitad a la izquierda se indica la lista de emisoras actual.
Para cambiar entre emisoras de televisión y de radio, pulse la tecla "TV" o "RADIO".Seleccione con las teclas "P+" y "P-" la emisora deseada.Para cambiar rápidamente entre las emisoras encontradas, pulse la tecla "+" o "-".Pulse la tecla "OK". El menú de opciones se abre debajo de la lista de las emisoras encontradas.
Mostrar el programa de una emisora encontradaPara poder ver el programa de una emisora encontrada, pulse la tecla “OK“ y seleccione la opción “ACTIVAR“.Pulse la tecla “OK“.
Almacenar las emisoras encontradasPara copiar la emisora seleccionada a la lista de emisoras, seleccione la op-ción “COPIAR DELANTE“ y pulse la tecla “OK“. Se marca la lista de emisoras actual.A continuación seleccione en la lista de emisoras aquella emisora, delante de la cual se desea introducir la emisora seleccionada.Pulse la tecla "OK". Ahora se introducirá la emisora seleccionada en la posi-ción de la emisora antigua de la lista de emisoras. Se marca la lista de las emisoras encontradas.Repita estos pasos para todas las demás emisoras deseadas.Para sustituir una emisora de la lista de emisoras por una emisora seleccio-nada, seleccione la opción “COPIAR SOBRE“ y pulse la tecla “OK“.A continuación seleccione en la lista de emisoras aquella emisora, que se desea sustituir por la emisora seleccionada.Pulse la tecla"OK". Ahora se introducirá la emisora seleccionada en la posi-ción de la emisora antigua de la lista de emisoras. Se marca la lista de las emisoras encontradas.Repita estos pasos para todas las demás emisoras deseadas.
Con el botón "SWAP" durante estos procedimientos puede pasar a la lista de emisoras (lado izquierdo del menú) y continuar procesando las emiso-ras.
31

MD 24089a ES EN DE Aldi Final Content.book Seite 32 Mittwoch, 5. August 2009 3:36 15
Para cerrar la ventanilla de selección, pulse la tecla "EXIT". Aparecerá una consulta.Para volver a la ventanilla de selección y para seguir editando la lista de emisoras, vuelva a pulsar la tecla "EXIT".Para rechazar las modificaciones de la lista de emisoras, pulse la tecla "SWAP".Para almacenar la lista de emisoras modificada, pulse la tecla "OK".
Lista de favoritos
Se pueden memorizar sus programas de televisión o de radio en una lista de favoritos. Para ello están disponibles nueve listas de favoritos. Así siempre se podrá acceder rápidamente a este programa.
Memorizar el programa en la lista de favoritosPara memorizar un programa en una lista de favoritos, proceda de la siguiente manera:
Abra el menú principal y el submenú "LISTA DE EMISORAS".Seleccione el punto de menú "LISTA DE FAVORITOS" y pulse la tecla "OK".Seleccione la lista de favoritos deseada y pulse la tecla "OK". Ahora aparece la lista de favoritos deseada en la mitad izquierda de la pantalla. En la mitad derecha aparece la lista de emisoras.
Ahora se puede introducir programas de la lista de emisoras delante de un pro-grama memorizado en la lista de favoritos o borrar programas de la lista de fa-voritos (véase página 40).
Seleccione aquel programa, delante del cual desea introducir otro pro-grama, de la lista de favoritos.Pulse la tecla "OK". Aparecerá un menú de selección.
Para introducir un programa en la lista de favoritos, seleccione la opción "IN-TRODUCIR DELANTE" y pulse la tecla "OK". Ahora la primera entrada de la lista de emisoras está marcada.Seleccione el programa de la lista de emisoras y pulse la tecla "OK". Apare-cerá un menú de selección. En este menú de selección se puede determinar, si se desea– introducir un único,– programa, varios programas en grupo de la lista de emisoras o– varios programas sueltos de la lista de favoritos.Para introducir un único programa, seleccione la opción “ÚNICO“ y pulse la tecla "OK". Ahora se introducirá la emisora seleccionada delante de la posi-ción determinada de la lista de favoritos.
32

S
MD 24089a ES EN DE Aldi Final Content.book Seite 33 Mittwoch, 5. August 2009 3:36 15
ESi desea introducir varios programas consecutivos, seleccione la opción “BLOQUE“ y pulse la tecla "OK". Ahora el primer programa del bloque está marcado.A continuación seleccione el último de los programas deseados y vuelva a pulsar la tecla "OK". Ahora el bloque con los programas deseados se intro-ducirá delante de la posición seleccionada en la lista de favoritos.Si desea introducir varios programas sueltos, seleccione la opción “VARIOS“ y pulse la tecla "OK". El programa seleccionado se copia en la lista de favori-tos. La entrada de la lista de emisoras está marcada.A continuación seleccione el siguiente programa deseado y pulse la tecla "OK". El siguiente programa seleccionado se copia en la lista de favoritos.Repita estos pasos hasta que se han copiado todos los programas deseados a la lista de favoritos.Para finalizar de copiar, pulse la tecla "EXIT".Para salir del submenú "LISTA DE FAVORITOS" vuelva a pulsar la tecla "EXIT". Aparecerá una ventanilla de consulta.Se desea rechazar las modificaciones realizadas, pulse la tecla "SWAP".Para memorizar las modificaciones, pulse la tecla "OK".Para volver al punto de menú "LISTA DE FAVORITOS" y para realizar más mo-dificaciones, vuelva a pulsar la tecla "EXIT".
Se puede memorizar un programa varias veces en una lista de favoritos. Solamente en la lista de emisoras se puede memorizar cada programa sólo una vez.
Acceder al programa de la lista de favoritosPara acceder a un programa que está memorizado en la lista de favoritos, pulse la tecla numérica"0". Aparece el resumen de la lista de favoritos.Seleccione la lista de favoritos deseada con las teclas "P+" y "P-" y pulse la tecla "OK". Ahora solamente se indican las emisoras de la lista de favoritos seleccionada.
También se puede seleccionar la lista de favoritos, como se indica a continua-ción, directamente con las teclas numéricas:
Pulse la tecla numérica “0“ y directamente después la tecla con el número de lista.Ejemplo: Para abrir la lista de favoritos 8, pulse las teclas numéricas "0" y"8".Para que aparezca la lista de favoritos actualmente seleccionada, pulse la tecla "LIST".Seleccione dentro de la lista el programa deseado y pulse la tecla "OK".
33

MD 24089a ES EN DE Aldi Final Content.book Seite 34 Mittwoch, 5. August 2009 3:36 15
Se pueden seleccionar los programas, como de costumbre, con las teclas numéricas. Con ella también se pueden seleccionar todos los programas que se encuentran en la lista de emisoras. También se pueden seleccionar rápidamente aquellos programas que no se encuentren en la lista de fa-voritos actual.
Para volver a la lista de programas normal, pulse la tecla “0“, seleccione el campo “NINGUNO“ y confirme con "OK".Para interrumpir la indicación de la lista de favoritos, pulse la tecla "EXIT".
Borrar un programa de la lista de favoritosAbra el menú principal y el submenú "LISTA DE EMISORAS".Seleccione el punto de menú "LISTA DE FAVORITOS" y pulse la tecla "OK".Seleccione la lista de favoritos deseada y pulse la tecla "OK".Seleccione el programa que desea borrar y pulse la tecla "OK". Aparecerá un menú de selección. En este menú de selección se puede determinar, si se desea– borrar solamente un programa, varios programas en grupo de la lista de favoritos,– varios programas sueltos de la lista de favoritos o– todos los programas de la lista de favoritos.Para borrar el programa marcado, seleccione la opción deseada y pulse la te-cla "OK".Para borrar varios archivos proceda como se indica en el apartado "MEMORI-ZAR EL PROGRAMA EN LA LISTA DE FAVORITOS", a partir de página 37.Para salir de la función "BORRAR", pulse la tecla "EXIT".Para salir del submenú "LISTA DE FAVORITOS" vuelva a pulsar la tecla "EXIT". Aparecerá una ventanilla de consulta.Si desea rechazar las modificaciones realizadas, pulse la tecla "SWAP".Para memorizar las modificaciones, pulse la tecla "OK".Para volver al punto de menú "LISTA DE FAVORITOS" y para realizar más mo-dificaciones, vuelva a pulsar la tecla "EXIT".
34

S
MD 24089a ES EN DE Aldi Final Content.book Seite 35 Mittwoch, 5. August 2009 3:36 15
EModificar los ajustes básicos
El aparato está ajustado correctamente de fábrica para la mayoría de los casos de aplicaciones. No obstante, si se desea realizar modificaciones en los ajustes, por lo menos necesitará conocimientos básicos de los tecnicismos de la elec-trónica recreativa. Si no dispone de estos conocimientos, es mejor que un pro-fesional realice estos trabajos.
Abra el menú principal y seleccione el submenú "CONFIGURACIÓN".En este submenú se pueden realizar los siguientes ajustes:
Características generalesOSD / EPGRecepciónSistemas de satélite ReproducciónAjustes de fábricaSeleccione el punto de menú deseado con la tecla "P+"o "P-" y pulse la tecla"OK". Seleccione el ajuste deseado con las teclas "P+" o "P-".
En el margen inferior del OSD aparece una explicación breve referente al ajuste seleccionado.
Modifique el ajuste con las teclas "+" o "-".Para abandonar el punto de menú, pulse la tecla "EXIT".Para memorizar los ajustes modificados seleccione el punto de menú "MEMORIZAR AJUSTES" y pulse la tecla "OK".
Modificar los ajustes generales
En el punto de menú "GENERAL" se pueden realizar los siguientes ajustes bá-sicos:
Zona horaria – 12 a + 12 horas
Control automático del horario de verano
“Desconectar” o diferentes regiones
Idioma de funcionamiento Alemán, inglés, turco
Volumen de inicio 00 hasta 28
Modo Power-on Estándar, Standby
Búsqueda de emisoras Emisor Activada, desactivada
35

MD 24089a ES EN DE Aldi Final Content.book Seite 36 Mittwoch, 5. August 2009 3:36 15
Zona horariaAquí se puede ajustar el cambio de hora relativo a la hora universal – 12 bis + 12 horas. En España el cambio de hora relativo a la hora universal (GMT) es de + 1 hora.
Control automático del horario de veranoAquí se pueden fijar las distintas determinaciones en todo el mundo para el horario de verano o desactivar el control automático del horario de verano.
Idioma de funcionamientoAquí se puede ajustar el idioma para el menú en pantalla.
Volumen de inicioAquí se puede ajustar el volumen con el que se conecta el receptor.
Modo Power-onEn lugar de colocar el modo Standby normal es posible colocar el " modo Low Power Standby" para ahorrar energía.Ajuste "ESTÁNDER": Modo Standby normal con indicación de la hora en pantalla (el consumo de energía en modo Standby es inferior a 10 W);Ajuste "Conectado": En la pantalla aparece cualquier indicación (el consumo de energia en modo Standby es inferior a 2 vatios).
Búsqueda de emisoras EmisorAquí se puede determinar, si durante la búsqueda se desea saltar o buscar programas codificados. (véase también Common Interface)
Common InterfaceEn la parte frontal del aparato (abrir la tapa) se encuentran dos ranuras previs-tas para alojar módulos para la descodificación de programas codificados. Para evitar daños, solamente se deben insertar módulos que lleven el logo “PC Card“. Todos los demás módulos pueden causar daños irreparables en el re-ceptor. No intente introducir los módulos a la fuerza. Vuelva a retirar el módulo de la ranura y vuelva a introducirlo otra vez. Preste atención a insertarlo con el lado correcto hacia arriba.Las smartcards a veces llevan un impreso desconcertante porque frecuente-mente han sido diseñadas para el empleo en otros decodificadores. Los módu-los Common Interface más usuales deben ser introducidos con los contactos de brillo dorado hacia arriba.
36

S
MD 24089a ES EN DE Aldi Final Content.book Seite 37 Mittwoch, 5. August 2009 3:36 15
ESi se ha reconocido un módulo codificado correctamente, aparece su nombre en el listado del punto de menú "CODIFICACIÓN" en el menú principal. Si se desplaza en esta lista a la entrada para este módulo y pulsa sobre "OK" apare-cerá el menú emergente del módulo de descodificación correspondiente. En caso de dudas diríjase por favor al fabricante del módulo.
Advertencia: Algunos módulos solamente se registran completamente y ofrecen un sistema de menú cuando se ha introducido una tarjetaválida.
Durante la navegación dentro de los menús del fabricante se utilizan las teclas "OK" y "EXIT". Si un menú no reacciona a la entrada de "OK" o "EXIT" , se puede forzar una interrupción del diálogo con la tecla de menú. Entonces el receptor interrumpe la conexión con el sistema de menú del módulo.
OSD/EPG
"OSD" significa On Screen Display, o sea para el manejo por el usuario a través de un menú en pantalla. Aquí se pueden realizar los ajustes para la visualización del menú y de los re-cuadros de información de la pantalla:
Estado duración de reproducciónAquí se puede ajustar el tiempo e que tarda en desaparecer automáticamente el recuadro de información.
Número de canal TimeoutAquí se puede ajustar el tiempo durante el que un número de canal introdu-cido de menos de tres dígitos aparecerá automáticamente.
Transparencia OSDAquí se puede ajustar el grado de transparencia de la imagen de fondo a través de la ventana OSD.
Ayuda breve con OKActivándola se podrá acceder, a través de la tecla "OK", a la ayuda breve du-rante el vídeo que se está reproduciendo.
Estado duración de reproducción 00 hasta 99 segundos
Número de canal Timeout 00,0 hasta 10,0 segundos
Transparencia OSD 00 hasta 16
Ayuda breve con OK Activada, desactivada
37

MD 24089a ES EN DE Aldi Final Content.book Seite 38 Mittwoch, 5. August 2009 3:36 15
Recepción
Aquí se pueden determinar los parámetros de recepción, p. ej. los ajustes para el control de hasta 4 satélites con una antena de satélite motorizada.
¡ATENCIÓN!Modifique los ajustes en este menú solamente cuando disponga de los conocimientos técnicos necesarios. En caso de duda diríjase a un taller es-pecializado.
Seleccione la opción deseada con las teclas "P+" o "P-".Seleccione el ajuste deseado con la tecla "+" o "-" y pulse la tecla "OK".
Control del aparatoAquí se puede seleccionar el ajuste para el control de la antena de satélite del receptor desatélite.
DiSEqC easy facilita la orientación de la antena a uno de hasta cuatro satéli-tes mediante interruptores conectados DiSEqC. Tone Burst es un modo de control alternativo para conmutar relés especiales ("Tone-Burst-Relais").Sat A/B controla hasta dos satélites a través de la señal 22 kHz.Con el ajuste "DESCONECTAR" la regulación por motor está desconectada.
Satélite A, B, C o DEn estos cuatro puntos de menú se pueden seleccionar los satélites deseados para la regulación por motor.
Control del aparato DiSEqC easy, DiSEqC easymotor, Tone Burst, Sat A/B 22 kHz, Del
satélite A, B, C o D Determinar el satélite
Ajustar la posición del motor Lista de satélites
Recepción móvil Activada, desactivada
38

S
MD 24089a ES EN DE Aldi Final Content.book Seite 39 Mittwoch, 5. August 2009 3:36 15
EAjustar la posición del motor La regulación por motor de la antena de satélite puede memorizar el ajuste de posición para varios satélites. Para ello se puede adjudicar al satélite deseado un espacio de memoria para el control de la antena. Para adjudicar un espacio de memoria, proceda como sigue:
Seleccione el punto de menú "AJUSTAR LA POSICIÓN DEL MOTOR" y pulse la tecla "OK". Aparece la lista de satélite.Seleccione el satélite deseado con la tecla "P+" o "P-".Seleccione con la tecla "+" o "-" el espacio de memoria deseado. Ahora se pueden modificar los ajustes de la antena de satélite.Para acceder a la regulación por motor, vuelva a pulsar la tecla "OK". Se abre el menú para la regulación por motor. En la mitad izquierda de la pantalla aparecen los comandos que están disponibles. Seleccione con la opción "POSICIÓN" el satélite cuya posición desea ajustar mediante el motor. En la mitad derecha de la pantalla aparece la calidad de recepción actual.Para seleccionar un comando, pulse la tecla correspondiente del mando a distancia.Para ejecutar el comando seleccionado, seleccione "EJECUTAR COMANDO DE MOTOR" y pulse la tecla "OK".Para volver al submenú "RECEPCIÓN", pulse la tecla "EXIT".
Cuando se han realizado modificaciones aparecerá una consulta.Para rechazar las modificaciones, pulse la tecla "SWAP".Para volver al ajuste pulse la tecla "EXIT".Para almacenar las modificaciones, pulse la tecla "OK". La ventara de consulta está cerrada.
Recepción móvilAquí se puede modificar el ajuste en caso de posiciones de antena variables, para mejorar la recepción.
En caso de unas posiciones de antena variables, seleccione la opción "LIGAR".
39

MD 24089a ES EN DE Aldi Final Content.book Seite 40 Mittwoch, 5. August 2009 3:36 15
Sistema de satélite
Aquí se puede determinar qué satélite se puede recibir con su antena de sa-télite (según orientación) y qué emisoras aparecen en la lista de emisoras que se pueden recibir.
Seleccione el satélite deseado de la lista. Para poner o retirar una marca, pulse la tecla "OK".
Reproducción
Aquí se pueden modificar otros ajustes de pantalla, así como los ajustes de audio:
TelevisorAquí se puede ajustar cómo se adaptará su televisor al formato de imagen.
Si posee un televisor debidamente equipado, seleccione el ajuste 16:9. Entonces una emisión en formato depantalla panorámica se reproducirá correctamente.Si posee un televisor convencional, seleccione el ajuste 4:3 "LETTERBOX". Entonces una emisión en formato de pantalla panorámica se reproducirá de forma reducida. En la pantalla se verán arriba y abajo barras negras. Si posee un televisor convencional y no desea ver Una emisión en formato de pantalla panorámica queda recortada por la izquierda y derecha para que llene la pantalla.
Televisor 4:3 (Letterbox),4:3 (Imagen completa), 16:9
Formato de vídeo RGB, YUV, FBAS
Volume-Bypass Activada, desactivada
Audio digital PCM,PCM, AC-3, PCM, dts, PCM, AC-3, dts
40

S
MD 24089a ES EN DE Aldi Final Content.book Seite 41 Mittwoch, 5. August 2009 3:36 15
EFormato de vídeoAquí se puede ajustar el formato de vídeo en las conexiones del Euroconector.
Aquí se puede ajustar el formato de vídeo solamente para la conexión de Euroconector. En la conexión cinch "VÍDEO" sólo está disponible una señal FBAS.
Si su televisor o grabadora está conectado mediante un cable Euroconector, seleccione el ajuste "RGB" o "YUV".Si su televisor no está conectado a la conexión Euroconector, seleccione el ajuste "FBAS".
Volume-Bypass
Aquí se puede determinar si el ajuste del volumen también es válido para las conexiones en el receptor o si siempre se desea el volumen pleno.
Ajuste el volumen más bajo en el aparato conectado antes de cambiar la opción "VOLUME-BYPASS".Ajuste "DESCONECTAR": El volumen se ajusta como es habitual en el receptor.Ajuste "DESCONECTAR": Se fija el volumen actual del receptor. De esta forma, se puede regular el volumen solamente en el aparato conectado.
Los altavoces del aparato conectado pueden dañarse si están ajustados a un volumen muy alto.
Pulse dos veces la tecla "OK".
Áudio DigitalAquí se pueden ajustar las señales de salida en la salida de audio digital SPDIF del receptor. Se pueden realizar los siguientes ajustes (también combinados):
PCM Sonido (estéreo) del canal 1 ó 2AC-3 Sonido multicanal dts Sonido multicanal
Observe que el sonido multicanal no está disponible con todos los pro-veedores de programas y que solamente se puede reproducir en apara-tos de audio con un descodificador.
41

MD 24089a ES EN DE Aldi Final Content.book Seite 42 Mittwoch, 5. August 2009 3:36 15
Ajustes de fábrica
Con esta función puede restablecer los ajustes de fábrica del aparato. Con ello se anulan todos los ajustes realizados por Usted. En ello también están incluidos la lista de emisoras y todos los ajustes del temporizador.
Seleccione en el submenú „CONFIGURACIÓN“ esta función y pulse la tecla “OK“. Se realiza una pregunta de seguridad. Si desea abandonar el menú y conservar los ajustes anteriores, pulse la tecla "EXIT".Si desea restablecer los ajustes de fábrica del aparato, vuelva a pulsar la tecla "OK". Se restablecen los ajustes.Realice los ajustes básicos como se indica en la página 20.
Memorizar configuraciones
Los ajustes modificados en el submenú "CONFIGURACIÓN" ólo se admiten pro-visionalmente. Para memorizar estos ajustes de forma permanente, proceda de la siguiente forma:
Seleccione la función "MEMORIZAR CONFIGURACIONES".Pulse la tecla "OK". Ahora los ajustes están memorizados. Se cierra el menú en pantalla.
42

S
MD 24089a ES EN DE Aldi Final Content.book Seite 43 Mittwoch, 5. August 2009 3:36 15
EExtras del menú
Seleccione en el menú principal el submenú "EXTRAS" y pulse la tecla"OK". Ahora puede elegir los siguientes puntos de menús:Información del sistema,intensidad de señalesMotor DiSEqC,desconexión automática,calendario,Juego: Bloques,Juego: Serpiente.información del sistema
Información del sistemaMediante esta función puede ver el número de la versión así como las indacio-nes diagnósticas del aparato en la pantalla. De este modo tendrá todas las in-formaciones a mano que necesitará para la conversación telefónica con el ser-vicio técnico.
Seleccione la función "INFORMAÇÃO DO SISTEMA".Pulse la tecla "OK" y se visualizarán las informaciones del sistema.Para volver a ocultar las informaciones del sistema, pulse la tecla "EXIT".
Intensidad de señales
Con esta función puede ver la intensidad y la calidad de las señales (C/N) de recepción de la antena.
Seleccione la función "INTENSIDAD DE SEÑALES".Pulse la tecla "OK".
Si la intensidad de señales se encuentra por debajo del 50 % o si en la ca-lidad de señales se indica un valor de menos de 10,0 la recepción puede sufrir interferencias. En este caso proceda como sigue:
Compruebe el montaje y la orientación de la antena (véase el manual de ins-trucciones de la antena). Compruebe la conexión de antena en su aparato (véase página 11).
43

MD 24089a ES EN DE Aldi Final Content.book Seite 44 Mittwoch, 5. August 2009 3:36 15
Motor DiSEqC
Las antenas de satélite con regulación por motor se pueden orientar con el mando a distancia. Proceda de la siguiente forma:
Seleccione la función "MOTOR DISEQC" y pulse la tecla "OK". Se abre el menú de control.
Oriente la antena de satélite con las teclas "P+", "P-", "+" o "-" de tal manera que se consiga una recepción óptima.Se pueden memorizar las posiciones de satélite encontradas y los ajustes. Para ello observe la información del menú OSD.
Desconexión automática
Siga las instrucciones en pantalla para ajustar el sleeptimer (desconexión au-tomática según el tiempo ajustado) en pasos de 10 minutos, entre 10 y 180 mi-nutos.
Calendario
En este punto de menú aparece la indicación del calendario. Los ajustes de hora y calendario se ajustan automáticamente al recibir una señal de satélite.
Juegos
BloquesEl objetivo del juego "BLOQUES" es colocar los bloques que caen con las teclas "P+", "P-", "+" o "-" de tal manera que encajen entre sí en el campo, si es posible sin dejar huecos. Siempre que se llene por completo una línea, esta desapa-rece y las líneas superiores bajan. Usted recibe puntos por cada bloque que coloca y por cada línea eliminada. El juego ha terminado si no hay más espacio para colocar los bloques.
SerpienteCon el juego "SERPIENTE" se maneja con las teclas "P+", "P-", "+" o "-" una ser-piente que debe comerse los dados que aparecen en el campo de juego. La ser-piente no debe morderse a ella misma ni chocar contra una pared. Después de cada dado "COMIDO" la serpiente crece y la navegación se vuelve cada vez más difí-cil.
44

S
MD 24089a ES EN DE Aldi Final Content.book Seite 45 Mittwoch, 5. August 2009 3:36 15
ETemporizador
A través del temporizador se tiene la posibilidad de preajustar hasta 12 emisio-nes a las que se accede automáticamente.
Abra el menú principal y seleccione el submenú "TEMPORIZADOR".Seleccione una entrada de temporizador de la lista. Para editarla pulse la tecla "OK".
Las entradas de temporizador solamente están disponibles en el modo Standby. Se puede interrumpir una grabación con temporizador en mar-cha, si mantiene pulsada la tecla STANDBY más tiempo.
Ahora se pueden realizar los siguientes ajustes- Canal;- Fecha;- Inicio;- Detener y- Activado.Para la introducción siga las indicaciones que aparecen en la pantalla.Después de la introducción, pulse la tecla "EXIT". Aparece la lista del tempo-rizador.Vuelva a pulsar la tecla "EXIT". Con "OK", se puede memorizar la entrada, con "SWAP" no se memoriza o con "EXIT" e puede realizar otra entrada de temporizador.
Ajuste directo del temporizador mediante la tecla "INFO"Pulse 2 veces la tecla "INFO". Aparecerá un resumen de programas de la emisora que se está sintonizando.Seleccione una emisión que desea grabar en el temporizador. Con la tecla “LIST“ la emisión se transmite al temporizador.
45

MD 24089a ES EN DE Aldi Final Content.book Seite 46 Mittwoch, 5. August 2009 3:36 15
Actualización del satélite
A veces, las actualizaciones de software solamente están disponibles a través de los satélites para el receptor.
Ninguna actualizaciónSi no hay actualizaciones disponibles, aparece un mensaje: "El software es la versión más reciente”.
Oculte el mensaje con el botón "EXIT".
Nuevas actualizacionesSi hay actualizaciones disponibles, se pide que realice la instalación.
Siga las instrucciones en pantalla.Espere hasta que el software esté completamente instalado.
¡ATENCIÓN!No interrumpa el proceso de actualización. No presione ningún botón durante la instalación del software nuevo. El receptor SAT se dañaría y sería imposible repararlo
46

S
MD 24089a ES EN DE Aldi Final Content.book Seite 47 Mittwoch, 5. August 2009 3:36 15
EEl mando a distancia universal
AplicacionesCon el mando a distancia universal suministrado se puede controlar, aparte del receptor satélite MD 24089a, un televisor y otros tres tipos de aparatos.
Teclas necesarias
Instrucciones de seguridad
No intente reparar el mando a distancia Ud. mismo.El mando a distancia universal dispone de un diodo de infrarrojos de la clase 1M. ¡No mire hacia el diodo luminiscente con instrumentos ópticos!No exponga el mando a distancia al polvo, luz solar intensa, humedad, altas temperaturas o sacudidas fuertes.No utilice productos de limpieza corrosivos o agresivos.
N.º detecla
Tecla Tipo de aparato
1 TV Televisor2 STB Receptor satélite MD 24089a34,5
DVD, VCR, AUX
Otros aparatos (p. ej., grabadora/reproductor de DVD, grabadora de vídeo, amplificador, sintonizador, etc.). El nombre no se refiere al tipo de aparato que se va a programar. Sólo sirve para simplificar la vista general.
6 CODE Para la introducción del códigos
47

MD 24089a ES EN DE Aldi Final Content.book Seite 48 Mittwoch, 5. August 2009 3:36 15
Programación de códigos de aparato
Aspectos generalesTome nota de los códigos que haya utilizado para la programación.Así, en caso de que los códigos ya no estén guardados (p. ej., después de cambiar las pilas), podrá programar el mando a distancia más rápidamente.La programación del mando a distancia no funciona en el modo STB.Deberá programar un código de cuatro cifras para cada aparato que desee controlar con el mando a distancia universal en una tecla de fuente (TV, DVD, VCR, AUX).Grabadora de vídeo: Realice la búsqueda del código con la cinta puesta.
PreprogramaciónEl mando a distancia está preprogramado para algunos aparatos de Medion. De este modo podrá, p. ej., ejecutar funciones básicas de los televisores Medion directamente y sin tener que haber programado un código de aparato.
Introducción del código de aparato de la lista de códigosLos códigos de los aparatos correspondientes aparecen en la lista de códigos adjunta a este manual de instrucciones. Proceda del siguiente modo:1. Encienda manualmente el aparato en cuestión.2. Pulse brevemente la tecla de fuente que desee (TV, DVD, VCR, AUX). 3. Mantenga pulsada la tecla CODE durante aprox. 3 segundos hasta que el
LED azul se quede encendido. 4. Introduzca el código de cuatro cifras indicado en la tabla de códigos.
Para confirmar cada pulsación de tecla, el LED azul se apaga un momento.Si la introducción del código es correcta, se apagará el LED azul tras introducir la última cifra. Si se ha introducido un código no válido, el LED
azul parpadeará durante unos dos segundos antes de apagarse. Si el aparato no reacciona como se espera, repita la programación con otro código si es necesario. Pruebe con todos los códigos indicados para su marca. Seleccione el código con el que el mando a distancia reaccione correctamente a todos los comandos disponibles.Si continúa sin tener resultados positivos, inténtelo con el método de búsqueda descrito en el capítulo "Búsqueda automática".
48

S
MD 24089a ES EN DE Aldi Final Content.book Seite 49 Mittwoch, 5. August 2009 3:36 15
EBúsqueda manual de códigosPara ejecutar una búsqueda manual: 1. Encienda manualmente el aparato en cuestión.2. Pulse brevemente la tecla de fuente que desee (TV, DVD, VCR, AUX). 3. Mantenga pulsada la tecla CODE durante aprox. 3 segundos hasta que el
LED azul se quede encendido. 4. Pulse varias veces seguidas (hasta 350) la tecla POWER, P+ o P– o (sólo
con VCR) hasta que se apague el aparato que deba controlarse, cambie de canal o reaccione como se espera.La búsqueda del código empezará con el número de cuatro cifras que haya guardado en ese momento.
5. A continuación, pulse brevemente OK para guardar el código.Debido a la gran cantidad de números de código distintos, por cada tipo de aparato hay hasta 350 códigos preprogramados. En determinados casos es posible que sólo estén disponibles las funciones principales más usuales. En algunos modelos especiales de aparato puede suceder que el procedimiento descrito no sirva.
Búsqueda automáticaSi el aparato no responde al mando a distancia incluso después de haber probado todos los códigos correspondientes al tipo de aparato y a la marca en cuestión, inténtelo con la búsqueda automática. Con este método también puede encontrar códigos para estas marcas que no consten en la lista de códigos de aparato. 1. Encienda manualmente el aparato en cuestión.2. Pulse brevemente la tecla de fuente que desee (TV, DVD, VCR, AUX). 3. Mantenga pulsada la tecla CODE durante aprox. 3 segundos hasta que el
LED azul se quede encendido. 4. Apunte el mando a distancia al aparato y pulse brevemente una vez la tecla
P+.Si el aparato no tiene ninguna función de programación, en lugar de P+ deberá pulsar o POWER. El mando a distancia inicia la búsqueda de códigos tras 6 segundos y emite cada segundo (véase también el apartado siguiente) todos los códigos seguidos. Con cada emisión se enciende el LED azul.
5. En cuanto el aparato reaccione al mando a distancia, pulse OK . Si no ha pulsado OK a tiempo, podrá regresar manualmente con la tecla P– al código al cual haya reaccionado el aparato.
Para interrumpir la búsqueda, pulse EXIT.
49

MD 24089a ES EN DE Aldi Final Content.book Seite 50 Mittwoch, 5. August 2009 3:36 15
Cada segundo o cada 3 segundosSi el mando a distancia debe emitir un nuevo código cada 3 segundos y no una vez por segundo, proceda del siguiente modo:Después de pulsar la tecla P+ (o bien o POWER) como se indica en el punto 4, pulse de nuevo la tecla P+ o P– antes de que transcurran 6 segundos. El mando a distancia emitirá ahora un nuevo código sólo cada 3 segundos. Con ello tendrá más tiempo, aunque el proceso también durará más.
Búsqueda de códigos por marcasEsta función le ofrece la posibilidad de buscar por marcas comerciales (véase la lista de códigos). Proceda del siguiente modo:1. Encienda manualmente el aparato en cuestión.2. Pulse brevemente la tecla de fuente que desee (TV, DVD, VCR, AUX). 3. Mantenga pulsada la tecla CODE durante aprox. 3 segundos hasta que el
LED azul se quede encendido. 4. Introduzca el código de una cifra de acuerdo con la siguiente tabla:
Tecla 1 = Medion, Lifetec, Micromaxx, Microstar, Tevion, Videon, TCM (Tchibo), General Technic, Innovation, MagnumTecla 2 = Philips, Erres, Pye, Philco, RodiolaTecla 3 = Sony, Akai, Panasonic, Sharp, Toshiba, JVC, Daewo Tecla 4 = Thomson, Brandt Tecla 5 = Telefunken, Saba, Nordmende, Fergusson, BairdTecla 6 = Grundig, BlaupunktTecla 7 = Nokia, Finlux, ITTTecla 0 = todas las marcas
5. Pulse varias veces la tecla P+ (o, en grabadoras de vídeo, POWER o ) hasta que el aparato responda correctamente. Proceda con rapidez, ya que, de lo contrario, se iniciará la búsqueda automática de códigos.
6. Guarde el código pulsando OK.Si se han buscado todos los códigos, el LED azul parpadeará durante aprox. 3 segundos.
Identificación del códigoLa identificación del código le ofrece la posibilidad de definir los códigos introducidos que están guardados en el mando a distancia. Proceda del siguiente modo:1. Encienda manualmente el aparato en cuestión.2. Pulse brevemente la tecla de fuente que desee (TV, DVD, VCR, AUX).
50

S
MD 24089a ES EN DE Aldi Final Content.book Seite 51 Mittwoch, 5. August 2009 3:36 15
E3. Mantenga pulsada la tecla CODE durante aprox. 3 segundos hasta que el LED azul se quede encendido.
4. Pulse brevemente la tecla CODE. El LED azul se apagará un momento al pulsar la tecla.
5. Para encontrar el primer número, pulse las teclas numéricas del 0 al 9. Si el LED azul se apaga un momento, se trata de la primera cifra guardada.
6. Para definir la segunda cifra, vuelva a pulsar las teclas numéricas del 0 al 9. Repita el proceso para la tercera y cuarta cifras.
7. El LED azul se apagará en cuanto se haya pulsado la tecla de la cuarta cifra.Ahora se habrá concluido la identificación del código.
Funcionamiento normal
Cuando haya concluido la programación del mando a distancia para sus aparatos de audio y vídeo, el mando a distancia controlará las funciones principales más usuales, igual que el mando original del respectivo aparato. Oriente el mando a distancia hacia el aparato deseado y pulse la tecla de selección de fuentes correspondiente. A continuación, puede activar las funciones pulsando las teclas de función correspondientes de su mando a distancia universal.
- eventualmente no todas las funciones del mando a distancia original están directamente disponibles en el mando a distancia universal. - especialmente, en el caso de aparatos más modernos, puede suceder que las funciones no estén asignadas a las teclas en las que se espera encontrarlas o que no estén disponibles.
Funciones especiales
Función APAGAR TODOPuede apagar todos los aparatos preprogramados a la vez. Proceda del siguiente modo:
Antes de que transcurra un segundo, pulse dos veces la tecla POWER y manténgala pulsada durante 3 segundos. Ahora se apagarán todos los aparatos preprogramados seguidos. Este proceso dura aprox. 3 segundos. A continuación, se apagará el LED.
El mando a distancia debe seguir apuntando a los aparatos bajo control hasta que se haya apagado el LED azul.
51

MD 24089a ES EN DE Aldi Final Content.book Seite 52 Mittwoch, 5. August 2009 3:36 15
Algunos aparatos se pueden encender y apagar con la tecla POWER/ALL OFF. Los aparatos apagados de esta manera se encenderán con la ejecución de la función ALL OFF.
EPG – Programación electrónicaLa tecla EPG (“EPG“ = „Electronic Program Guide“) tiene varias funciones según qué código se ejecute:En el caso de códigos de DVD, la tecla abre el menú de títulos.En el caso de los códigos SAT o VCR, se puede realizar una preprogramación con la tecla siempre que el grabador de vídeo disponga de una función SHOWVIEW.
Funciones universales ("Punch Through")
Las funciones universales (también denominadas funciones "Punch Through") le permiten ejecutar algunas funciones para un tipo de aparato diferente del que tenga seleccionado actualmente. Estas son las funciones volumen, sin sonido, así como las funciones de reproducción.
Si el mando a distancia está en modo VCR, DVD, SAT o CBL, las teclas controlarán el volumen y la desactivación del sonido ( ) del televisor (siempre que los demás aparatos no dispongan de una regulación propia del volumen).Si el mando a distancia en modo TV o en otro modo de funcionamiento no tiene funciones de reproducción, las teclas de reproducción, pausa, parada y, dado el caso, grabación permitirán controlar un grabador de vídeo, un reproductor de DVD o una grabadora de DVD. Siempre se controla el último aparato que se haya seleccionado.
Programar la función universal de volumen y desactivación del sonido en otro tipo de aparatoEl mando a distancia universal está ajustado de fábrica de tal modo que las funciones de volumen y desactivación del sonido controlan automáticamente el televisor cuando se ha pulsado una tecla de fuente correspondiente a un aparato con transmisión de imágenes (DVD, grabador de vídeo, etc.).También es posible ajustar el mando a distancia universal de forma que las funciones universales de volumen y desactivación del sonido controlen otro tipo de aparato que no sea el televisor.1. Mantenga pulsada la tecla CODE durante aprox. 3 segundos hasta que el
LED azul se quede encendido.
52

S
MD 24089a ES EN DE Aldi Final Content.book Seite 53 Mittwoch, 5. August 2009 3:36 15
E2. Pulse la tecla de desactivación del sonido ( ) hasta que el LED azul se apague un momento.
3. Pulse una tecla de fuente para el aparato al que debe transmitirse la función de volumen y desactivación del sonido. El LED azul se queda encendido.
4. Pulse la tecla de desactivación del sonido ( ); el LED azul se apaga. Si por accidente ha seleccionado un aparato que no tenga una regulación propia del volumen, el LED azul parpadeará durante 3 segundos.
Programación de la función universal de volumen y desactivación del sonido para un aparato determinadoPuede ajustar el mando a distancia universal de tal forma que para un determinado aparato sólo se utilicen las funciones propias de volumen y desactivación del sonido. Con ello, la función universal estará desactivada para este modo o tipo de aparato.1. Mantenga pulsada la tecla CODE durante aprox. 3 segundos hasta que el
LED azul se quede encendido. 2. Pulse la tecla de desactivación del sonido ( ) hasta que el LED azul se
apague un momento.3. Pulse la tecla de fuente correspondiente al aparato que sólo deba tener su
propia función de volumen y desactivación del sonido.4. Presione una tecla de volumen. El LED azul se queda encendido.5. Pulse la tecla de desactivación del sonido ( ); el LED azul se apaga.
Volver a ajustar la función universal de volumen y desactivación del sonidoSi ha modificado las funciones universales de volumen y desactivación del sonido como se describe en los dos apartados anteriores, podrá devolver las funciones a sus ajustes de fábrica y restablecer así el efecto "Punch Through".1. Mantenga pulsada la tecla CODE durante aprox. 3 segundos hasta que el
LED azul se quede encendido. 2. Mantenga pulsada la tecla de desactivación del sonido ( ) hasta que el
LED azul se apague un momento.3. Pulse de nuevo la tecla de desactivación del sonido ( ). El LED azul se
apagará del todo. Las funciones de volumen y desactivación del sonido estarán ahora en la configuración original.
53

MD 24089a ES EN DE Aldi Final Content.book Seite 54 Mittwoch, 5. August 2009 3:36 15
Ayuda en caso de averías
En caso de otras averías diríjase a nuestro centro de servicio de potventa.
Síntoma Causa/Solución
Ninguna indicación en la pantalla
El cable eléctrico no está conectado.Conecte el cable eléctrico con la toma de corriente.
Ningún sonido o imagen, el indicador de hora está iluminado en la pantalla.
El receptor se encuentra en el modo Standby.Pulse la tecla “STANDBY“. El receptor se conecta y el programa aparece en la pantalla del televisor.
Ningún sonido o imagen,imagen deficiente.
La antena no está orientada hacia el satélite. Oriente la antena correctamente. Observe las indicacio-nes del manual de instrucciones para la antena de saté-lite.
El LNB está defectuoso. Sustituya el LNB.
Ninguna señal o una señal débil.
Compruebe la conexión por cable desde el LNB hasta el receptor y desde el receptor hasta los aparatos conecta-dos.
El televisor no da ninguna imagen.
El sistema no está conectado correctamente.Compruebe la conexión del Euroconector o del cable HF.El televisor no se encuentra en el modo AV.Conmute el televisor a la entrada AVcorrespondiente.
El mando a distancia no funciona
Las pilas están gastadas.Sustituya las pilas por unas nuevas.
El mando a distancia no está bien orientado.Oriente el mando a distancia hacia la parte frontal del receptor y asegúrese de que nada se encuentre entre el mando a distancia y el receptor.
El aparato no reacciona. Se ha oprimido un botón de selección incorrecto. Oprima el botón de selección "STB" para el receptor de satélites.
54

S
MD 24089a ES EN DE Aldi Final Content.book Seite 55 Mittwoch, 5. August 2009 3:36 15
EInterferencias de la recepción con algunas emisoras
Al utilizar un teléfono DECT inalámbrico puede producirse en algunos casos in-terferencias de la recepción con las emisoras Sat1, ProSieben, KABEL1, NEUN LIVE Television, TELE5, DSF, N24 o Home Shopping Europe. Estos teléfonos tra-bajan con una gama de frecuencia sobre la que las señales de las emisoras mencionadas se transmiten con los LNBs usuales desde la antena hasta el re-ceptor.Si este fuera el caso, proceda como sigue:
Compruebe el montaje y la conexión de la antena. En caso necesario deje que un profesional compruebe la antena, las conexiones de antena y el cableado de la antena. Coloque la estación base del teléfono DECT lo más lejos posible del receptor y de los cables de la antena.
55

MD 24089a ES EN DE Aldi Final Content.book Seite 56 Mittwoch, 5. August 2009 3:36 15
Limpieza y cuidado
¡ATENCIÓN!Antes de limpiar el aparato debe desenchufarlo de la corriente.No debe entrar ninguna humedad en la carcasa. Existe el peligro de reci-bir una descarga eléctrica.
Limpie las partes externas del aparato y las piezas de accesorio con un paño suave y húmedo. No limpie nunca el receptor con detergentes agresivos o corrosivos.
Eliminación
EmbalajeSu aparato está embalado para protegerlo contra eventuales daños durante el transporte. Los embalajes son materias primas y por ello reutilizables y aptos para ser integrados en el ciclo de reciclaje de
materias primas.
AparatoNo tire bajo ningún concepto el aparato al final de su vida útil a la ba-sura doméstica normal. Infórmese de las posibilidades para una eli-minación apropiada y respetuosa con el medio ambiente.
Pilas¡Se deben tirar las pilas gastadas en la basura especial, no en la basura doméstica! Entregue las pilas a su comerciante o a un punto de re-cogida público.
56

S
MD 24089a ES EN DE Aldi Final Content.book Seite 57 Mittwoch, 5. August 2009 3:36 15
EEspecificaciones técnicas
SintonizadorEntrada SAT-ZF: Toma FMargen de entrada: 950 hasta 2150 MHzImpedancia: 75 Ohmios
AntenaAlimentación LNB: 14 / 18 V, max. 400mASeñales de conmutación: DiSEqC 1.0 / DiSEqC 1.2 regulación por
motor, Tone Burst 22 kHz
VídeoConexión: EUROCONECTOR (FBAS , RGB e YUV),
EUROCONECTOR VCR (RGB), Video-Cinch (FBAS)S-Video
Impedancia: 75 OhmiosFormatos de pantalla: 4:3 / 16:9 / letterbox / imagen completaFormatos de vídeo: RGB, FBAS, YUV
AudioSalidas: Estéreo analógico, SPDIF digitalConexiones: 3 x conexiones Cinch (RCA)
1 x SPDIF optical, 1 x SPDIF coaxialAudio digital: PCM / AC-3 / dts
OtrosAlimentación de corriente: 230 V~ 50 HzPilas para el mando a distancia: 2 x 1,5 V Micro AAA, LR03Potencia: 30 vatiosConsumo del modo Standby < 10 vatiosConsumo de Low Power Standby: < 2 vatiosDimensiones (anchura x: aprox. 280 x 45 x 210 mmaltura x profundidadPeso: aprox. 1,5 kgTemperatura de servicio: +5 °C hasta +40 °C
¡Las especificaciones técnicas están sujetas a cambios sin previo aviso!
57

MD 24089a ES EN DE Aldi Final Content.book Seite 58 Mittwoch, 5. August 2009 3:36 15
58

K
MD 24089a ES EN DE Aldi Final Content.book Seite 1 Mittwoch, 5. August 2009 3:36 15
UContent
Controls . . . . . . . . . . . . . . . . . . . . . . . . . . . . . . . . . . . . 3Front . . . . . . . . . . . . . . . . . . . . . . . . . . . . . . . . . . . . . . . . . 3Back . . . . . . . . . . . . . . . . . . . . . . . . . . . . . . . . . . . . . . . . . 4Remote control . . . . . . . . . . . . . . . . . . . . . . . . . . . . . . . . . . 5
Safety instructions . . . . . . . . . . . . . . . . . . . . . . . . . . . . . 6
Getting started . . . . . . . . . . . . . . . . . . . . . . . . . . . . . . . 9Unpacking . . . . . . . . . . . . . . . . . . . . . . . . . . . . . . . . . . . . . . 9
Connecting the device . . . . . . . . . . . . . . . . . . . . . . . . . .10Information on connection . . . . . . . . . . . . . . . . . . . . . . . . . 10Connect satellite aerial . . . . . . . . . . . . . . . . . . . . . . . . . . . . 11Connect the TV . . . . . . . . . . . . . . . . . . . . . . . . . . . . . . . . . . 11Connecting a digital audio receiver . . . . . . . . . . . . . . . . . . . . 15
Operating the appliance . . . . . . . . . . . . . . . . . . . . . . . . .17Mains connection . . . . . . . . . . . . . . . . . . . . . . . . . . . . . . . . 17Inserting the batteries in the remote control . . . . . . . . . . . . . 18Switching on . . . . . . . . . . . . . . . . . . . . . . . . . . . . . . . . . . . 18
Operating the appliance . . . . . . . . . . . . . . . . . . . . . . . . .19Using the basic functions . . . . . . . . . . . . . . . . . . . . . . . . . . 19Select channel . . . . . . . . . . . . . . . . . . . . . . . . . . . . . . . . . . 20Teletext . . . . . . . . . . . . . . . . . . . . . . . . . . . . . . . . . . . . . . . 21Switching to AV signal . . . . . . . . . . . . . . . . . . . . . . . . . . . . . 22
Menu functions . . . . . . . . . . . . . . . . . . . . . . . . . . . . . . .23Navigating in the menu . . . . . . . . . . . . . . . . . . . . . . . . . . . 23Summary of the settings in the man menu . . . . . . . . . . . . . . 24Making settings in the menus . . . . . . . . . . . . . . . . . . . . . . . 25
Changing channel settings . . . . . . . . . . . . . . . . . . . . . . .26Sorting the channel list . . . . . . . . . . . . . . . . . . . . . . . . . . . . 26Searching for a station . . . . . . . . . . . . . . . . . . . . . . . . . . . . 28Transfer channel to the channel list . . . . . . . . . . . . . . . . . . . 30Favourites list . . . . . . . . . . . . . . . . . . . . . . . . . . . . . . . . . . 31
MD 24089a 1

MD 24089a ES EN DE Aldi Final Content.book Seite 2 Mittwoch, 5. August 2009 3:36 15
Modify basic settings . . . . . . . . . . . . . . . . . . . . . . . . . . 34Modifying general settings . . . . . . . . . . . . . . . . . . . . . . . . . . 34OSD / EPG . . . . . . . . . . . . . . . . . . . . . . . . . . . . . . . . . . . . . . 36Reception . . . . . . . . . . . . . . . . . . . . . . . . . . . . . . . . . . . . . . 36Satellite systems . . . . . . . . . . . . . . . . . . . . . . . . . . . . . . . . . 39Play . . . . . . . . . . . . . . . . . . . . . . . . . . . . . . . . . . . . . . . . . . 39Factory settings . . . . . . . . . . . . . . . . . . . . . . . . . . . . . . . . . . 41Save settings . . . . . . . . . . . . . . . . . . . . . . . . . . . . . . . . . . . 41
Extras menu . . . . . . . . . . . . . . . . . . . . . . . . . . . . . . . . 42System info . . . . . . . . . . . . . . . . . . . . . . . . . . . . . . . . . . . . 42Signal strength, . . . . . . . . . . . . . . . . . . . . . . . . . . . . . . . . . 42DISEqC motor . . . . . . . . . . . . . . . . . . . . . . . . . . . . . . . . . . . 43Sleep timer . . . . . . . . . . . . . . . . . . . . . . . . . . . . . . . . . . . . . 43Calendar . . . . . . . . . . . . . . . . . . . . . . . . . . . . . . . . . . . . . . 43Games . . . . . . . . . . . . . . . . . . . . . . . . . . . . . . . . . . . . . . . . 43
Timer . . . . . . . . . . . . . . . . . . . . . . . . . . . . . . . . . . . . . 44
Satellite update . . . . . . . . . . . . . . . . . . . . . . . . . . . . . 45
The universal remote control . . . . . . . . . . . . . . . . . . . . . 46Summary of key functions . . . . . . . . . . . . . . . . . . . . . . . . . . 46Safety instructions . . . . . . . . . . . . . . . . . . . . . . . . . . . . . . . . 47Scope of application . . . . . . . . . . . . . . . . . . . . . . . . . . . . . . 47Programming device codes . . . . . . . . . . . . . . . . . . . . . . . . . . 47Normal operation . . . . . . . . . . . . . . . . . . . . . . . . . . . . . . . . 50Special functions . . . . . . . . . . . . . . . . . . . . . . . . . . . . . . . . . 51Universal functions ("Punch Through”) . . . . . . . . . . . . . . . . . 51Troubleshooting . . . . . . . . . . . . . . . . . . . . . . . . . . . . . . . . . 53Universal remote control technical specifications . . . . . . . . . . 53
Help in case of problems . . . . . . . . . . . . . . . . . . . . . . . 54Reception problems for some channels . . . . . . . . . . . . . . . . . 54
Cleaning . . . . . . . . . . . . . . . . . . . . . . . . . . . . . . . . . . . 55
Disposal . . . . . . . . . . . . . . . . . . . . . . . . . . . . . . . . . . . 55
Technical specifications . . . . . . . . . . . . . . . . . . . . . . . . 56
2

K
MD 24089a ES EN DE Aldi Final Content.book Seite 3 Mittwoch, 5. August 2009 3:36 15
UControls
Front
1. STANDBY button2. Control light3. Radio control light4. Display/Time indicator5. Remote control sensor
6. Ejection button for COMMON INTERFACE cards7. Cardslot for COMMON INTERFACE cards8. V+: Increase Volume9. V-: Decrease Volume10. INFO button11. P- selection button down12. P+ selection button up
MD 24089a 3

MD 24089a ES EN DE Aldi Final Content.book Seite 4 Mittwoch, 5. August 2009 3:36 15
Back
1. SPDIF coaxial output2. VIDEO cinchoutput3. AUDIO L: Audio output left4. Power cable5. VCR SCART: output for DVD or video recorder6. TV SCART: output for TV7. AUDIO R: Audio output right8. SVIDEO Composite output9. SPDIF optical output10.Service interface RS 23211. Aerial input
4

K
MD 24089a ES EN DE Aldi Final Content.book Seite 5 Mittwoch, 5. August 2009 3:36 15
URemote control
MD 24089a 5

MD 24089a ES EN DE Aldi Final Content.book Seite 6 Mittwoch, 5. August 2009 3:36 15
Safety instructions
Proper use
The digital satellite receiver MD 24089a is used to privately receive digital satellite TV and radio channels. It is not designed for use in establishments belonging to public telecommunications networks or industrial areas.
Electrical appliances are not intended for children’s use!
Never allow children to use electrical devices without supervision. Keep plastic packaging out of the reach of children. There is a risk of suffocation.
Safe set-up
Only use the appliance in dry rooms.If you move the receiver from a cold to a warm environment, condensation may build up on the inside of the receiver. If this occurs wait around two to three hours before using the receiver.Place the appliance on a sturdy, level surface. Set the appliance up at least 10 cm from the wall. Do not cover the ventilation holes. Avoid placing close to:– sources of heat such as radiators,– devices with strong magnetic fields such as speakers.Do not place any open sources of fire, e.g. burning candles, on the appliance.Do not place the appliance on delicate surfaces.
About these instructionsRead the safety instructions carefully before use. Note the warnings on the device and in the operating instructions.Always keep the operating instructions close to hand. If you sell the appliance or give it away, please ensure that you also pass on these instructions.
6

K
MD 24089a ES EN DE Aldi Final Content.book Seite 7 Mittwoch, 5. August 2009 3:36 15
UAvoid exposing the receiver to water drops or sprayed water. Do not place objects that are filled with water, e.g. vases, on, above or next to the receiver. There is a risk of electric shock.Do not place any heavy objects on the receiver.
Safe connection
Only connect the appliance to a freely accessible, properly installed power socket with 230V~50Hz. The plug must be freely accessible so that you can pull the plug quickly and easily from the mains supply in cases of emergency.Lay the cable so that nobody is able to step on it or trip over it. Do not use an extension cable.Do not kink or crush the mains cable. Always remove the mains plug from the socket.
Safe use
Pull the plug out of the mains socket and remove the aerial cable from the appliance if you are not planning to use the appliance for a longer period of time or if a storm is approaching.The mains cable should not be wrapped around the appliance or be in contact with hot surfaces during use.Do not permit moisture to penetrate the casing. Never touch the appliance, mains cable or plug with wet hands. There is a risk of electric shock.If foreign bodies or liquids enter the appliance pull the mains plug from the socket immediately. Arrange for a qualified specialist to check the appliance before using it again. There is a risk of electric shock.Never use the appliance if it has been damaged or if the mains cable or plug shows signs of damage. Pull the mains plug out of the socket immediately if the appliance is damaged. Never open the appliance. If there is a fault, contact our Service Centre or another suitable professional repair shop. The remote control has a Class 1 infra-red diode. Do not view the LED with optical devices.
MD 24089a 7

MD 24089a ES EN DE Aldi Final Content.book Seite 8 Mittwoch, 5. August 2009 3:36 15
Battery handling
Batteries can contain combustible materials. If not handled correctly batteries can leak, become very hot, ignite or even explode, which could damage your appliance or/and your health.Please note the following:
Keep batteries away from children.Contact your doctor immediately if a battery is swallowed.Never charge batteries (unless it is clearly indicated).Never discharge batteries by high power output.Never short-circuit the batteries.Never expose the batteries to excessive heat such as sunshine, fire or similar.Do take apart or deform the batteries. Your hands or fingers could get injured or battery fluids could get into your eyes or onto your skin. If this should happen then rinse the affected areas immediately with a large amount of clean water and contact your doctor immediately.Avoid heavy impacts and vibrations.Always observe the correct polarity. Make sure that the plus (+) and minus (-) poles are correctly inserted in order to avoid short circuits.Clean the contacts on the battery and appliance before inserting.Never mix new and old batteries or different types of batteries. This could cause your appliance to malfunction. In addition, the weaker batteries would discharge too much.Immediately remove used batteries from the appliance.Remove the batteries from the appliance if you do not intend to use it for a long period of time.Replace all the old batteries in an appliance with new batteries of the same type.Isolate the contacts of the batteries with sticky tape if you want to store or dispose of them.
8

K
MD 24089a ES EN DE Aldi Final Content.book Seite 9 Mittwoch, 5. August 2009 3:36 15
UGetting started
Unpacking
Remove the packaging materials completely from all the parts of the appliance.
DANGER! Do not let children play with the plastic film. There is a -risk of suffocation.
Check package contentsUnpack the unit and ensure that the following parts are included:
Satellite receiverRemote controla SCART cable2 batteries (1.5V Micro, Type AAA/LR03)Operating instructions and guarantee documents
MD 24089a 9

MD 24089a ES EN DE Aldi Final Content.book Seite 10 Mittwoch, 5. August 2009 3:36 15
Connecting the device
Information on connection
In order for the appliance to work correctly it is essential that the aerial is installed properly and aligned to the best possible position.
Always ensure thatthe cable is not caught in anything, that it is not touching any sharp or hot objects andthat the mains plug has been removed from all appliances whenever you are making connections.
This prevents damage occurring due to short circuits or the risk of an electric shock if you make incorrect connections.
DANGER! Never make connections during a thunder storm! Power surges in the metal parts of the appliance may occur via the external aerial or power lines during a thunderstorm. There is a risk of electric shock.
WARNING! The nine-pole connection "RX/TX" (D-SUB) is only to be used for service purposes, e.g. for customer services to check your appliance because of a defect.Do not experiment with this interface! The connections and data protocol do not correspond with the usual PC standard. If you connect an appliance that has not been especially designed for this use to this interface it is possible to damage the receiver.
10

K
MD 24089a ES EN DE Aldi Final Content.book Seite 11 Mittwoch, 5. August 2009 3:36 15
UConnect satellite aerial
You connect the receiver to your satellite aerial using the LNB cable. To do so you require a satellite aerial with universal LNB for digital reception. Before connecting the receiver you may need to assemble the LNB cable.
Observe the assembly instructions relating to the satellite aerial and LNB cable.
Connect the individual aerial.To receive most German-language channels and most others in Europe, you need a single aerial that is directed at the ASTRA satellite 19.2° east.
Connect the aerial cable to the "RF IN” connection.
Connect several aerialsVia a switching box, you can connect several aerials or an LNB with several outputs to the receiver. This is for example suitable for multiple subscriber systems or when switching satellites via satellite aerials with different alignments.
Connect the switching box using the switching box documents. Connect the switching box to the "RF IN” connection.
Connect the TV
The appliance has two types of video output with various signal qualities and allocations.
On the "TV SCART" connection there are good quality video and audio signals. In particular the colour signals (RGB) are provided separately from each other. Use this connection if your TV or recorder has one available.The "VIDEO” cinch connection provides only video signals with integrated colour signals (FBAS) available. Use this connection for devices with a simple video input. Use this connection for devices with a simple video input.
MD 24089a 11

MD 24089a ES EN DE Aldi Final Content.book Seite 12 Mittwoch, 5. August 2009 3:36 15
Connecting with a SCART cableConnect the SCART cable to the SCART slot TV SCART on the device and the corresponding SCART slot on the TV.Use another SCART slot VCR-SCART for another video device (e.g. DVD player or video recorder). If you also want to connect an audio system connect the "L” and "R” on the appliance with the AUX inputs on the audio system.
Connection scheme for the SCART connection:
Please note the operating instructions for the TV or audio device if necessary.
12

K
MD 24089a ES EN DE Aldi Final Content.book Seite 13 Mittwoch, 5. August 2009 3:36 15
UConnecting with cinch cableIf you have a TV that does not have a SCART connection you can also connect the satellite receiver using a cinch cable (not supplied).
In this case it will not be possible to connect an additional audio system.
Connect the appliance’s "VIDEO” connection to the TV’s video input.Connect the device's "L" and "R" sockets to the audio inputs on the TV.
Connection scheme for the cinch connections:
If appropriate, please note the TV's operating instructions
MD 24089a 13

MD 24089a ES EN DE Aldi Final Content.book Seite 14 Mittwoch, 5. August 2009 3:36 15
Connecting with a composite cableIf you have a TV that does not have a SCART connection you can also connect the receiver using a cinch cable (not supplied).
Connect the device's "SVIDEO" connection to the TV's S-Video input.
Connection scheme for composite cable:
If appropriate, please note the TV's operating instructions
14

K
MD 24089a ES EN DE Aldi Final Content.book Seite 15 Mittwoch, 5. August 2009 3:36 15
UConnecting a digital audio receiver
Although your receiver receives the signals digitally it has to convert them first to analogue signals for traditional HiFi systems. This may affect the quality somewhat. This loss of quality does not occur for HiFi systems that have a digital input.
Connecting to a digital SPDIF-COAXIAL outputIf you want to connect an amplifier or Dolby Surround decoder with digital input, you do so as follows:
Connect the "SPDIF COAXIAL” connection via a cinch cable to the digital input on your amplifier or Dolby Surround system.
Connection scheme SPDIF COAXIAL:
MD 24089a 15

MD 24089a ES EN DE Aldi Final Content.book Seite 16 Mittwoch, 5. August 2009 3:36 15
Connection to an SPDIF-OPTICAL outputIf your audio device has a digital optical input:
Connect the "SPDIF OPTICAL” connection via an optical cable to the digital optical input on your amplifier or Dolby Surround system.
Connection scheme SPDIF OPTICAL:
16

K
MD 24089a ES EN DE Aldi Final Content.book Seite 17 Mittwoch, 5. August 2009 3:36 15
UOperating the appliance
Mains connection
DANGER! Only use sockets that are in perfect condition. Wobbly plugs or sockets can lead to fires. Reception may be impaired if the plugs or sockets are defective. You may not use a defective socket. Get defective plugs or sockets repaired by a specialist before using the appliance.
DANGER! Pull the plug out of the socket immediately if the plug or power cable is damaged. Get customer services to exchange the mains cable for a new one with a sealed plug. Do not connect the appliance to the mains power until the damage has been repaired. Otherwise there is a risk of an electric shock.
Plug the mains plug into a properly installed socket (230V ~ 50Hz).
The clock and control light are lit on the front of the device. Depending on the current setting (refer to page 35) the appliance is switched on or into standby mode using the "STANDBY” key.In standby operation the clock is displayed and the control light still shines blue. In "Low-Power-Standby-Mode" (cf. page 35) the screen is switched off and the control light is lit amber.
The clock is only shown on the screen after a channel is received.
MD 24089a 17

MD 24089a ES EN DE Aldi Final Content.book Seite 18 Mittwoch, 5. August 2009 3:36 15
Inserting the batteries in the remote control
Insert two batteries (1.5V Micro (AAA/LR03) into the battery compartment.
Switching on
As with almost all modern appliances, this appliance has no mains switch. Power is supplied whenever it is connected to a mains socket. This creates continuous heat in the appliance, which is completely normal and is not dangerous when there is proper ventilation.
DANGER! Never cover the ventilation openings on the base and upper side of the appliance. The appliance produces heat even when in standby mode. Covered ventilation openings may cause fires. Do not leave electrical appliances that are switched on without supervision. If you intend to leave the appliance without supervision for a longer period of time (e.g. holiday) pull the plug from the socket. Pull the plug from the socket and remove the aerial cable if a thunderstorm is expected. This prevents a lightening strike from damaging your appliances.
When you switch the appliance on for the first time the following settings are queried:
operating language (German, English, Spanish, Turkish, Portuguese, Polish), location: continent,location: country in the selected continent.
The appliance uses these settings to produce a channel list that was selected at the factory. For reception in Germany all the necessary settings have already been made by the factory.
If you are using the appliance in Germany confirm the queries with the "OK” key.
18

K
MD 24089a ES EN DE Aldi Final Content.book Seite 19 Mittwoch, 5. August 2009 3:36 15
UOperating the appliance
The appliance is supplied pre-channelled.No specialist knowledge is required to simply use the appliance. In addition to these user instructions many functions are explained in the on-screen notes.
Using the basic functions
Starting the appliance - standbyIf the device is connected to the power, the control lit is lit.
Switch your TV on and select the AV mode.Press the "STANDBY " key. The channel number is shown on the screen.
Just like a computer, when you start the digital receiver it first has to load an operating program. The appliance may take a few seconds to respond. At the same time the manufacturer's logo is shown on the -screen.
To switch to standby operation press the "STANDBY” key. The time indicator lights up.
Setting volumeVolume changes also affect any video recording that is currently taking place. In this case change the volume directly on the TV.
To increase the volume press the " +" key.To decrease the volume press the "–” key.
The volume level is shown by a bar on the screen.To mute the sound press the " ” key. The symbol is shown on the screen.To hear the sound again press the " " key again or press the " +" or " –" keys; the volume bar is shown again.
If the "Volume-Bypass" option is activated (refer to page 40) it is not possible to set the volume from the receiver's remote control.
MD 24089a 19

MD 24089a ES EN DE Aldi Final Content.book Seite 20 Mittwoch, 5. August 2009 3:36 15
Setting TV and radio receptionTo switch to receiving digital radio channels press the "RADIO” key. The radio control LED on the front of the device is shown amber and the channel number is displayed.To switch to receiving TV channels press the "TV” key. The radio control LED is switched off; the screen briefly shows a screen icon and then the channel number set.
Select channel
Your receiver is already channelled in the factory for some satellites. Page page 26 onwards describes how to add other channels.
To switch to the next channel programmed press the "P+" key.To switch to the previous programmed channel press the "P–" key.In order to directly select a channel enter the corresponding memory space using the number keys.
To switch back to the previously viewed channel press the "SWAP” key.If you want to select a channel via the channel list, you do so as follows:
During reception press the LIST key. The channel list is displayed.To select a channel select the desired channel using the arrow keys .To display information on the highlighted channel press the "INFO” key.To change to the highlighted channel press the "OK” key.To close the channel list and change to the selected channel press the "EXIT” key.
20

K
MD 24089a ES EN DE Aldi Final Content.book Seite 21 Mittwoch, 5. August 2009 3:36 15
UTeletext
Teletext services vary with channel suppliers. Select the channel for which you want to open the teletext.
Start/end teletextTo view teletext on the screen press the "TEXT” key.To return to normal image display press the "EXIT” key.
Select teletext pagesThe number of the current page and the page that is being loaded is shown above the text. The content summary is usually located on page 100.
Enter the number of the desired page using the number keys.You can also scroll the pages up or down using the keys.To display the contents summary press the "MENU” key again.
Very long pages are subdivided into so-called "sub-pages”. Then "01, 02 ...” is displayed below the page number.The sub-pages are displayed automatically after about a minute.
In order to stop the automatic changing of sub-pages press the "OK” key. A ">" is displayed when the automatic switching stops.To scroll through the sub-pages press the or keys.To restart the automatic changing of pages press the "OK” key.
Display optionsTo enlarge the display of teletext press the "SWAP” key. The top half of the teletext page will be displayed in a larger format.To display the lower half of the teletext page press the "SWAP” key again.To display the teletext again in the normal size press "SWAP” a third time.In order to display hidden text (e.g for games) press the "INFO” key.
You can display the teletext in four different display formats.In order to change the display form press the "TEXT” key until you have selected the required display format.
It may sometimes take quite a long time to display the desired teletext page or sub-page. You can display the normal TV picture while you are waiting.
Press the " LIST” key. The teletext is now hidden until the next sub-page or the selected page is displayed.To hide the system information press the "EXIT” key. The normal TV image is shown.
MD 24089a 21

MD 24089a ES EN DE Aldi Final Content.book Seite 22 Mittwoch, 5. August 2009 3:36 15
In order to show the hidden text again press the "TEXT” key. The most recently selected teletext page is displayed again.
Reading updated teletextPages where the content has been changed will be updated automatically – however, it takes a few minutes.
Switching to AV signal
This function determines which signals are to be transferred from the "TV-SCART” connection to another device.
This function is only active if you have devices connected to the "TV-SCART” and "VCR-SCART” connections.
Press the " AV” key. If "AV” is displayed on the screen the signals from the "VCR-SCART” connection are being transferred to the TV (e.g. to playback video recordings).
In order to view programmes via the receiver press the "AV” key again. The preset number is shown on the display. The receiver signals are transferred to the TV.
22

K
MD 24089a ES EN DE Aldi Final Content.book Seite 23 Mittwoch, 5. August 2009 3:36 15
UMenu functions
The device is delivered from the factory with the ideal programming so that you may not need to undertake the setting work described here. page 41 describes how to reset the device again to the factory settings.All setting options are presented on the screen as a menu (OSD – "on-screen display”).
Navigating in the menu
Open menuIn order to open the OSD menu press the "MENU” key.
You can now choose from the following menus:Image/sound selectionTeletextEPGFavourites listMain menuSelect the desired menu with the and keys.Then press the " OK” key. The selected menu is opened.To open the main menu directly you can press the "MENU" key twice in succession.You will find a summary of the settings in the main menu on page 24.
Selecting a menuTo scroll upwards or downwards in the menu, press the or keys.To switch to a sub-menu to the left or right press the or keys. The selected menu, submenu or function is highlighted.To open the select menu option or menu press the "OK" key.
Exit menuIn order to leave a menu or to end a function press the "EXIT”.
MD 24089a 23

MD 24089a ES EN DE Aldi Final Content.book Seite 24 Mittwoch, 5. August 2009 3:36 15
Summary of the settings in the man menuMain menu Channel list Favourites list
Sort channelsSearching for a stationAdvanced search
Edit favourite lists 1-9
Edit channel listSearch satellite
Search satellite or transponder
page 31
page 26page 28
page 29
Configuration
General
OSD / EPG
Reception
Satellite systemsPlay
Factory settingsSave settings
General settings (time, language, initial settings, encrypted channels)Setting the OSD / EPG windowConfiguring the reception systemSelecting the satellite(s)Setting the image and sound playbackReset to factory settingsSavesettings and close menu
page 34
page 36
page 36
page 39page 39
page 41
page 41Extras System info
Signal strength,DISEqC motor
Sleep timer
CalendarGame: BlocksGame: Snake
Displays system informationDisplays signal strengthSetting when using motor controlAutomatic receiver switch offDisplay calendarScreen game 1Screen game 2
page 42
page 42page 43
page 43
page 43page 43page 43
Timer Timer list 1-12 Setting and activating the timer function
page 44
Satellite update
Update for the software on the SAT receiver
page 45
Encryption Decoder C:1 and C:2
Display and set the Pay-TV options (only available when Common Interface Module is used)
page 35
Brief assistance
Screen display for brief assistance
24

K
MD 24089a ES EN DE Aldi Final Content.book Seite 25 Mittwoch, 5. August 2009 3:36 15
UMaking settings in the menus
Selecting languageSome channels are transmitted in several languages. You can set a different language for the sound here.
Press the "MENU” key.Select the "Image/sound” sub-menu and press the "OK” key.Select the language you require and press the "OK” key. The newly selected language is set until you choose another channel or switch off the appliance.To change the language permanently select the desired language as described above.Then press the "OK” and hold it down for around three seconds. The newly selected language is now permanently selected for this channel.By pressing the "LIST” key you can switch the sound playback between Channel A, Channel B and Stereo. In the "Image/sound selection" sub-menu you can press Key "1" to switch on channel A and Key "2" to switch on channel B. "A" stands for analogue output, "D" for the SPDIF output. Dolby Digital sound can not be output to the analogue output.
Display teletextSelect the "TELETEXT” menu option to view teletext.
You can also open the teletext directly by pressing the "TEXT" key (see page 21).
EPB menu optionWhen selecting the "EPG" menu option the programme information for the set channel is displayed. It is also possible to open the menu with the "INFO" key on the remote control.
Please note that not all programme suppliers broadcast channel information.
Favourites listIn this menu it is possible to select and activate the favourites list. You can also open the menu with the "0" number key on the remote control (page 32).
MD 24089a 25
MD 24089a ES EN DE Aldi Final Content.book Seite 26 Mittwoch, 5. August 2009 3:36 15
Changing channel settings
The channels on various satellites have been preset and summarised into a channel list. You can edit these channels and add new ones.
As the channels set on some satellites are changed frequently, we recommend a search. Follow the instructions in the "Searching for a station" section on page page 28.
Open the main menu and select the "Channel list” sub-menu.
Sorting the channel list
You can use this function to move and delete the channels within the channel list.
Select the "Sort channel” menu option.Highlight the desired channel. Then press the " OK” key. The screen shows "Direct” or "Highlight block” as options. To change the properties for a single channel select the "Direct” option.To change the properties for several channels select the "Highlight block” option.
Modify an individual channelSelect the "Direct” option. Now you can select various functions to modify the desired channel.
To copy a channel to another location in the channel list, please do the following:
Select the "Copy” function.Then select the desired position using the or keys.Press the " OK” key. The selected channel is inserted in the desired position.
To move a channel to another location in the channel list, please do the following:
Select the "Move” function.Then select the desired position using the or keys.Press the " OK” key. The channel is then inserted in the new position and the old entry is deleted.
26

K
MD 24089a ES EN DE Aldi Final Content.book Seite 27 Mittwoch, 5. August 2009 3:36 15
UTo replace a channel by a free space do the following:
Select the "Delete" function.To delete a channel select the "Cut” function. The following entries are now renumbered.In order to insert an empty channel preset select the "Insert free space” function.If you want to end the "Sort channel” function press the "EXIT” key. An enquiry is displayed on the screen.To save the changes you have made press the "OK” key.To cancel the changes you have made press the "SWAP” key.To continue editing the channel list press the "EXIT” key.
Editing several channelsTo edit several channels select the "Edit block” option. The selected channel is now highlighted.To highlight the other desired channels press the or key.Then press the " OK” key.
All channels between the first and second choice are now highlighted. You can now modify the settings of the highlighted channels in the same way as for an individual channel.In addition you can also select the "Pack” function. This deletes all of the unused lines in the channel list. Then the channels in the list are stored.
MD 24089a 27

MD 24089a ES EN DE Aldi Final Content.book Seite 28 Mittwoch, 5. August 2009 3:36 15
Searching for a station
Digital broadcasters can transmit several programmes on a single television channel, and these multiple transmitters are called "transponders”. When searching, all television channels are searched for the digital channels they contain. This process may take several minutes to complete.
Simple searchWith this function you can search through all the TV channels known to the receiver for digital channels and insert them automatically into the channel list.
Open the main menu and select the "Channel list” sub-menu.CAUTION! If the power supply is interrupted during the channel search the channels may not be saved correctly. If this happens, repeat the channel search.
Select the "Channel search” function and press the "OK” key. The search process starts now.
For an individual, unmovable channel search, the channel search now starts directly without the option to select a transponder or satellite.If you have installed a motorised or several satellites a list of available satellites is now displayed.
In this case select the satellite on which you wish to search and press the "OK” key. The search process starts now. The individual transponders are searched in succession. In order to jump ahead of time to the next transponder press the "OK” key.To pause the search press the "EXIT” key.
After the search the "Channel selection” selection window is displayed. You can transfer the found channels to the channel list here.
28

K
MD 24089a ES EN DE Aldi Final Content.book Seite 29 Mittwoch, 5. August 2009 3:36 15
UAdvanced searchYou should only use this search option if you have adequate experience.
Open the main menu and select the "Channel list” sub-menu.Select the "Advanced search” function. Press the "OK” key.Use the or keys to select the desired satellite setting.Press the OK key. A submenu is shown on the screen and this enables you to make the precise settings for the desired satellite.Select the setting you want to change with the or keys.To change a setting press the or keys.
You can also enter the frequency using the number keys. You can find the transponder frequency via the appropriate channel supplier.To enter the selected search mode, please do the following:
If you would like to search through all television channels during the automatic channel search please select "All transponders”.If you only want to search through the transponder whose frequency is displayed please select "Individual transponder”.If you only want to search for new channels on the transponder that has been saved please select "Channel list”.To start the search with the settings you have made highlight the "Continue with OK” display field.Then press the " OK” key. The search will now start.
In order to stipulate whether scrambled channels should be skipped or includes in the channel search, refer to page 35.
After the search the "Channel selection” selection window is displayed. You can transfer the found channels to the channel list here.
MD 24089a 29

MD 24089a ES EN DE Aldi Final Content.book Seite 30 Mittwoch, 5. August 2009 3:36 15
Transfer channel to the channel list
After the search the "Channel selection” selection window is displayed. In this selection window the channels found during the search are displayed on the right side. The current channel list is shown on the left side.
In order to switch between TV and radio channels press the "TV” or "RADIO” key.Use the "P+” and "P–” keys to select the desired channel.To switch quickly between the channels found press the or keys.Press the " OK” key. An option menu is opened under the list of channels found.
Display channel for a found channelIn order to view the programme on the selected channel press the "OK” key and select the "Activate” option.Press the " OK” key.
Transfer found channelsTo copy the selected channel into the channel list select the "Copy in front of" option and press the "OK" key. The current channel list is highlighted.Then in the channel list select the channel before which the selected channel is to be inserted.Press the " OK” key. The selected channel is now inserted into the set position in the channel list. The list of found channels is highlighted.Repeat these steps for all of the other desired channels.To replace a channel in the channel list by a selected channel choose the "Copy to" option and press the "OK" key.Then in the channel list select the channel that is to be replaced by the selected channel.Press the " OK” key. The selected channel now replaces the old channel in the channel list. The list of found channels is highlighted.Repeat these steps for all of the other desired channels.
Press the "SWAP" key to switch to the channel list during these processes (left side of the menu) and to edit the channels more.
To close the selection window press the "EXIT” key. A confirmation prompt will appear.To return to the selection window press the "EXIT” key again.To cancel the changes in the channel list press the "SWAP” key.To transfer the modified channel list press the "OK” key.
30

K
MD 24089a ES EN DE Aldi Final Content.book Seite 31 Mittwoch, 5. August 2009 3:36 15
UFavourites list
You can save your preferred TV or radio channels in a favourite list. You have the choice of nine favourites lists. You can always access these channels quickly in this way.
Saving channels in a favourites list.To store a station, proceed as follows:
Open the main menu and the "channel list" submenu.Select the "favourites lists" menu option and press the "OK" key.Select the favourites list you require and press the "OK” key. The desired favourites list is now displayed on the left side of the screen. The channel list is shown on the right side.
You can now insert programmes from the channel list in front of a saved programme or delete programmes from the favourite list (see page 32).
Select the programme before which you want to insert another programme in the favourites list.Press the " OK” key. A selection menu is displayed.To insert a programme into the favourite list select the "Insert before" option and press the "OK" key. The first entry in the channel list is now highlighted.Select the desired programme from the channel list and press the "OK" key. A selection menu is displayed. In this selection menu you can choose whether to insert– an individual programme,– several programmes in succession in the channel list or– several programmes distributed around the channel list.If you want to insert an individual programme select the "Individual" option and press the "OK" key. The selected channel is no inserted into the favourite list in front of the highlighted position.If you want to insert several successive programmes select the "Block" option and press the "OK" key. The first programme of the block is now highlighted.Select the last desired channel and press the "OK” key. The block with the desired channels is now inserted before the selected position in the favourites list.In order to insert several distributed channels into the favourites list select the "Several” option and press the "OK” key. The selected channel is inserted into the favourites list. The entry in the channel list is highlighted.Select the next desired channel and press the "OK” key. The next channel is inserted into the favourites list.
MD 24089a 31

MD 24089a ES EN DE Aldi Final Content.book Seite 32 Mittwoch, 5. August 2009 3:36 15
Repeat these steps until you have copied all of the desired channels into the favourites list.To complete copying press the "EXIT” key.In order to leave the "Favourites list” sub-menu press the "Exit” key again. A confirmation window will then be displayed.If you want to reject the changes you have made, press the "Swap” key.To save the changes you have made press the "OK” key.To return to the "Favourite lists" menu option and make other changes press the "EXIT" key again.
You can save a channel several times in the favourites list. Each channel can only be saved once in the channel list.
Open channel from favourites list.In order to open a channel that is saved in a favourites list, press the "0” number key. The favourites list summary is displayed.Select the desired favourite list using the or keys and press the "OK" key. Only the channels from the selected favourites list are displayed.
You can also select the desired favourites list as follows directly from the number keys:
Press the "0" number key and then the key with the list number.Example: To open favourite list 8 press the number keys "0" and "8".In order to display the currently selected favourites list press the "LIST” key.Select the next desired channel in the list and press the "OK” key.
You can also select the channels with the number keys as usual. You can thus select all channels that are in the channel list. In this way you can also quickly select channels that are not in the current favourites list.
To go back to the normal channel list press the "0” key, select the "NONE” field and confirm by pressing "OK”.To finish displaying the favourite list press the "EXIT" key.
Delete channel from favourites list.Open the main menu and the "channel list" submenu.Select the "favourites lists" menu option and press the "OK" key.Select the favourites list you require and press the "OK” key.
Select the channel to be deleted from the favourites list and press the "OK” key. A selection menu is displayed. In this selection menu you can set -whether to delete– only one programme,– several successive programmes in the favourite list,– Several programmes distributed around the favourite list or
32

K
MD 24089a ES EN DE Aldi Final Content.book Seite 33 Mittwoch, 5. August 2009 3:36 15
U– all programmes in the favourite list.
In order to delete the highlighted channel select the desired option and press the "OK”key.To delete several files proceed as described in Section "Saving channels in a favourites list." from page 31.To leave the "Delete" function press the "EXIT" key.In order to leave the "Favourites list” sub-menu press the "Exit” key again. A confirmation window will then be displayed.If you want to reject the changes you have made, press the "Swap” key.To save the changes you have made press the "OK” key.To return to the "Favourites list" menu option and make other changes press the "EXIT" key again.
MD 24089a 33

MD 24089a ES EN DE Aldi Final Content.book Seite 34 Mittwoch, 5. August 2009 3:36 15
Modify basic settings
The factory pre-programmes the settings correctly for most user requirements. If, however, you still want to change the settings you require at least a basic understanding of technical terms used in consumer electronics. If you do not have this understanding then allow a specialist to undertake the work.
Open the main menu and select the "Configuration” sub-menu.The following settings are available on this sub-menu:
GeneralOSD / EPGReceptionSatellite systemsPlayFactory settingsSave settingsSelect the desired menu option with the or key and press the "OK" key.Select the desired setting with the or key.
A short explanation on the selected setting is displayed in the lower OSD area.
Modify the setting using the " " or " " key .To leave the menu option press the "EXIT” key.To save the modified settings select the "Save settings" menu option and press the "OK" key.
Modifying general settings
In the "General" menu option you can make the following basic settings:
Time zoneHere you can set the time difference to GMT of – 12 to + 12 hours. For Germany the time difference to GMT is + 1 hour.
Time zone – 12 to + 12 hoursAutomatic change to summer time
"Off” or various regions
Operating language German, English, Spanish, Portuguese, Turkish, PolishStarting volume 00 to 30 mmLow Power Standby On, offLook for various channels On, off
34

K
MD 24089a ES EN DE Aldi Final Content.book Seite 35 Mittwoch, 5. August 2009 3:36 15
UAutomatic change to summer timeHere you can select the various different global settings for summer time or deactivate the automatic change to summer time.
Operating languageHere you can set the language for the on-screen menu.
Starting volumeHere you can set the volume that is used when the receiver is switched on.
Low Power StandbyInstead of the normal standby mode you can set the "Low Power Standby Mode" to save electricity."Off" setting: Normal standby mode with clock displayed (power consumption in standby mode is less than 10 W and the control light is lit blue);"On" setting: The screen does not display anything (power consumption in standby mode is less than 1 W and the control light is lit amber).
Search for various channelsYou can set here whether the search process skips encrypted programmes are also finds them. (See also the next paragraph: "Common Interface".)
Common InterfaceOn the front side of the appliance (open flap) there are two slots that are to be used to insert modules for decoding encrypted channels.In order to avoid damage only modules that bear the "PC Card” logo may be inserted. Other modules can cause irreparable damage to the receiver.Do not attempt to forcefully insert the modules. Instead remove the module from slot and insert it again. Ensure that the correct side is pointing upwards.Smartcards often have irritating writing as they are frequently designed for other decoders. Most common interface modules expect the cards to be inserted with the shiny, gold contacts pointing upwards.If an encryption model has been detected properly its name appears in the list in the "Encryption” menu option in the main menu. If you go to an entry for this module in this list and press "OK” a menu is displayed that is produced from the relevant encryption module. If you have any questions please refer to the module’s manufacturer.
Note: Some modules only fully register and provide a menu system if a valid card has been inserted.
MD 24089a 35

MD 24089a ES EN DE Aldi Final Content.book Seite 36 Mittwoch, 5. August 2009 3:36 15
For navigating in manufacturer-specific menus use the "OK” and "EXIT” keys. If a menu does not respond to the "OK” or "EXIT” entry you can force the dialogue to cancel by pressing the menu key. The receiver then ends the connection to the module’s menu system.
OSD / EPG
"OSD" stands for On Screen Display, i.e. user guidance via a screen menu.Here you can make the settings for displaying the menu and the info boxes on the screen:
Duration that status is displayedHere you can set the time for which the info box is displayed.
Channel number time outHere you can set the time after which a channel number that has been entered with less than three digits is automatically accepted.
OSD transparencyHere you can set how much of the background image should be displayed through the OSD window.
Short help with OKIf activated you can open the brief help in the ongoing video via the "OK” key.
Reception
You can set the reception parameters here, e. g. the settings to control up to 4 satellites for a motorised satellite aerial.
CAUTION! Only change the settings in this menu if you have the required specialist knowledge. If in doubt please refer to a specialist workshop.
Select the desired option with the or key.
Duration that status is displayed 00 to 99 secondsChannel number time out 00.0 to 10.0 secondsOSD transparency 00 to 30 mmShort help with OK On, off
36

K
MD 24089a ES EN DE Aldi Final Content.book Seite 37 Mittwoch, 5. August 2009 3:36 15
USelect the desired setting with the or key and press the "OK" key.
Appliance controlYou can set the settings for controlling the satellite area from the satellite receiver here.
DiSEqCeasy enables the aerial to be aligned to one of four satellites using the connected DiSEqC switch. Tone Burst is an alternative control method for switching special relays ("Tone Burst relay”).Sat A/B controls up to two satellites via the 22 kHz signal.Device control is switched off in the "off" setting. Programme switching accelerates this in systems with only one satellite.
Satellite A, B, C or DA, B, C and D are the four positions for the DiSEqC swith.
Set motor positionThe motor control of the satellite aerial can save the position settings for several satellites. Here you can set a memory space for the aerial control for the desired satellite. Proceed as follows to assign a memory space:
Select the "Motor position” menu option and press the "OK” key. The satellite list is displayed.Select the desired satellites with the or key.Then select the desired memory space using the or key. You can now modify the settings for the satellite aerial.To open the motor control, press the "OK” key again. The motor control menu is opened. The available commands are displayed in the left side of the screen. Use the "Position” option to select the satellites whose position you want to set via the motor. The current reception quality is shown on the right side of the screen.
Appliance control DiSEqC easy, DiSEqC easymotor, Tone Burst, Sat A/B 22 kHz, Pff
Satellite A, B, C or D Set satelliteSet motor position Satellite listMobile reception Off, on
MD 24089a 37

MD 24089a ES EN DE Aldi Final Content.book Seite 38 Mittwoch, 5. August 2009 3:36 15
In order to select a command press the corresponding key on the remote control.To execute the selected command, select the "Execute motor command” and press the "OK” key.In order to return to the "Reception” function press the "Exit” key.
If you have made changes a confirmation is displayed.To cancel the changes you have made press the "SWAP” key.To return to the setting press the "EXIT” key.To save the changes you have made press the "OK” key. The confirmation window closes.
Mobile receptionHere you can change the setting if the aerial position changes in order to improve the reception.
Select the "On” option if the aerial position has changed.
38

K
MD 24089a ES EN DE Aldi Final Content.book Seite 39 Mittwoch, 5. August 2009 3:36 15
USatellite systems
You can set here which satellite you can receive with your satellite aerial (depending on the direction) and which receivable channels should be displayed in the channel list.
Select the desired satellite in the list.In order to set or remove a highlight, press the "OK” key.
Play
Here you can change the other screen and audio settings:
TelevisionHere you can adjust the display on the TV to fit the image format.
If your TV has the right setting choose the 16:9 setting. Channels in wide screen format will then be displayed properly.If you have a conventional TV select the 4:3 "letterbox" setting. Transmissions in wide-screen format are then shown smaller. Black bars can be seen at the top and bottom of the screen. If you have a conventional TV and do not want to watch the transmission smaller select the 4:2 "full screen" setting . Transmissions in wide-screen format are then shown to fill the screen and cut to the left and right.
Television 4:3 (Letterbox),4:3 (Full screen), 16:9
Video format RGB, YUV, FBASVolume bypass On, offDigital Audio PCM,
PCM, AC-3, PCM, dts, PCM, AC-3, dts
MD 24089a 39

MD 24089a ES EN DE Aldi Final Content.book Seite 40 Mittwoch, 5. August 2009 3:36 15
Video formatHere you can set the video format on the SCART connection.
You can only change the video format for the SCART connection. At the "video” cinch connection only an FBAS signal is available.
If your TV or recorder is connected via a SCART cable select the "RGB” or "YUV” setting.If your TV is not connected to the SCART connection, select the "FBAS” setting.
Volume bypassHere you can set whether the volume should be controlled on the receiver or connected devices.
On the connected appliance set the volume to low before modifying the "Volume bypass” option."Off" setting: The volume is set as before on the receiver."On" setting: The current receiver volume is fixed. The volume can now only be changed on the connected device.
Please note that the speaker of the connected device could be damaged if the volume is set high.
Confirm the setting by pressing "OK" twice.
Digital AudioHere you can set the output signal for the receiver's digital audio output SPDIF.You can make the following settings (also in combination):
PCM: 1- or 2-channel (stereo) soundAC-3: Multiple channel sounddts: Multiple channel sound
Please note that multi-channel sound is not available from all channel suppliers and can only be played back with audio appliances that have the relevant decoder.
40

K
MD 24089a ES EN DE Aldi Final Content.book Seite 41 Mittwoch, 5. August 2009 3:36 15
UFactory settings
You can reset the appliance to the factory settings using this function. Any settings that you have made will be deleted. This also includes the channel list and all timer settings.
Select this function in the "Configuration” sub-menu and press "OK”. A new confirmation query is displayed. If you leave the menu without changing the existing settings press the "EXIT” key.If you want to reset the appliance to the factory settings press the "OK” key again. The settings will be reset.Make the basic settings as described above in page 18.
Save settings
The settings changed in the "Configuration” sub-menu are adopted temporarily. To save these settings permanently, proceed as follows:
Select the "Save settings” function.Press the " OK” key. The settings have now been saved. The screen menu will be closed.
MD 24089a 41

MD 24089a ES EN DE Aldi Final Content.book Seite 42 Mittwoch, 5. August 2009 3:36 15
Extras menu
Select this function in the "Extras” sub-menu and press "OK”. You can choose from the following menu options:System infoSignal strength,DiSEqC-MotorSleep timerCalendarGame: BlocksGame: Snake
System info
This function enables you to display the version number of the appliance’s software and diagnosis details from the appliance on the screen. This provides all the information that you need if you contact customer services by telephone.
Select the "System info” function.Press the " OK” key. The system information is displayed.To hide the system information press the "EXIT” key.
Signal strength,
This function enables you to display the signal strength and quality (C/N) of the reception signal from the aerial.
Select the "Signal strength” function.Press the " OK” key.
If the signal strength is under 50% or the signal quality value is less than 10.0 reception may be adversely affected by disturbances. If this occurs, follow this procedure:
Check the assembly and direction of the aerial (refer to aerial operating instructions).Check the aerial connection for your device (see page 11).
42

K
MD 24089a ES EN DE Aldi Final Content.book Seite 43 Mittwoch, 5. August 2009 3:36 15
UDISEqC motor
You can align the satellite aerial with motor control using the remote control. Proceed as follows:
Select the "DiSEqC motor” function and press the "OK” key. The control menu is opened.Align the satellite aerial with the keys in order to achieve ideal reception.The satellite positions and settings found can be saved. Observe the information in the OSD menu.
Sleep timer
Follow the instructions on the screen to set the sleep time (automatic switch off after a set time) in 10 minute steps between 10 and 180 minutes.
Calendar
The calendar display is inserted in this menu option. Time and calendar settings are updated automatically when receiving a satellite signal.
Games
BlocksThe aim of the "Blocks" game is to sort the falling blocks using the keys in such a way that the field is filled up with as few gaps as possible. Only when a line is filled completely does it disappear and the lines above move down. You receive points for each block that you insert and for each eliminated line. The game ends when you have no more space to insert blocks.
SnakeFort the "Snake" game you use the keys to control a snake that has to eat the square that appear on the board. The snake should not bite itself or hit a wall. After eating each square the snake grows and it becomes increasingly difficult to navigate.
MD 24089a 43

MD 24089a ES EN DE Aldi Final Content.book Seite 44 Mittwoch, 5. August 2009 3:36 15
Timer
Using the timer you can preset up to 12 channels that can be opened automatically.
Open the main menu and select the "Timer” sub-menu.Select a timer entry from the list.Press the "OK” key to edit.
The timer entries are only ready in standby mode. You can pause a current timer recording by holding down the STANDBY key for a longer time.
You can now make the following settings:- Channel;- Date;- Start;- Stop and- Activated.Then follow the instructions on the screen to make your entry.Press the " EXIT” key after making your entry. The timer list is displayed.Press the "EXIT” key again. Use the "OK” key to save the entry, cancel the entry using "SWAP” or press "EXIT” to make an additional timer entry.
Direct timer setting via the "INFO” keyPress the "INFO" twice. The channel summary of the current channel is displayed.Select the channel that you want to insert into the timer.Use the "LIST” key to transfer the channel to the timer.
44

K
MD 24089a ES EN DE Aldi Final Content.book Seite 45 Mittwoch, 5. August 2009 3:36 15
USatellite update
Occasionally software updates are provided for the receiver via the satellite.
No updatesIf no updates are available you will see the message: "Your software is up-to-date."
Hide this message with the "EXIT" key.
New updatesIf updates are available you are requested to install them.
Follow the instructions on the screen.Wait until the software has been fully installed.
CAUTION! Do not pause the update process. Do not press any key when the new software is installing. This could irreparably damage your satellite receiver-.
MD 24089a 45

MD 24089a ES EN DE Aldi Final Content.book Seite 46 Mittwoch, 5. August 2009 3:36 15
The universal remote control
Summary of key functions
46

K
MD 24089a ES EN DE Aldi Final Content.book Seite 47 Mittwoch, 5. August 2009 3:36 15
USafety instructions
Do not repair the device yourselfThe universal remote control has a class 1M infra-red diode. Do not view the light diode with optical instruments!Do not subject your remote control to dust, strong sunlight, moisture, high temperatures or strong vibrations.Do not use any corrosive or aggressive cleaning products.
Scope of applicationThis universal remote control can operate the following types of devices:
TV televisionSTB Receiver MD 24089aDVD/VCR/AUX Other devices
(e. g. DVD recorder/player, video recorder, amplifier, tuner, etc.).
The label indicates the device type to be programmed. It is used to provide an easier overview.
Programming device codes
General informationPlease note the codes that you have used for the programming.If the codes are no longer saved, e.g. after changing the battery, it will be quicker to programme the remote control.It is not possible to programme the remote control in STB mode.For every device that you would like to operate using the universal remote control, you must program a four-digit device code to a source
key (TV, DVD, VCR, AUX).Video recorder: Search for the code with a tape inserted.
Pre-programmingThe remote control has been pre-programmed for several devices produced by Medion. Because of this you can use certain basic functions for, for example, a Medion television directly and without having to programme in the device code.
MD 24089a 47

MD 24089a ES EN DE Aldi Final Content.book Seite 48 Mittwoch, 5. August 2009 3:36 15
Enter the device code according to the code listThe codes of the corresponding devices can be found in the Code List enclosed with these operating instructions. Proceed as follows:1. Switch the relevant device on manually.2. Briefly press the required source key (TV, DVD, VCR, AUX). 3. Keep the CODE key pressed for approx. 3 seconds until the blue LED
remains permanently lit.4. Enter the four-digit code from the Code Table.
The blue LED will extinguish briefly each time the key is pressed.If the entered code was valid, the blue LED will extinguish after the last digit has been entered. If an invalid code was entered, the blue LED flashes for approx. two seconds before extinguishing.
If the device does not respond as expected, repeat the programming, or try a different code. Please try out all codes stated for your brand. Select the code for which all the available -commands work on your remote control.If this is not successful either, then try using the search method described in the chapter "Automatic Search".
Manual code searchCarry out a manual search as follows:1. Switch the relevant device on manually.2. Briefly press the required source key (TV, DVD, VCR, AUX). 3. Keep the CODE key pressed for approx. 3 seconds until the blue LED
remains permanently lit.4. Keep pressing the (up to 350 times) POWER, P+ or P– or (VCR only) until
the device that is to be controlled switches off, changes channels, or responds accordingly. The code search begins at the currently stored number.
5. Briefly press OK to save the code.Due to the considerable quantity of different code numbers, up to 350 different codes are pre-programmed per device type. In individual cases it may be possible that only the most common main functions are available. The process described here may not work for some special models.
48

K
MD 24089a ES EN DE Aldi Final Content.book Seite 49 Mittwoch, 5. August 2009 3:36 15
UAutomatic searchIf your device does not respond to the remote control, even though you have tried all of the codes listed for your device type and the relevant brand, then try using the automatic search. This will enable you to find codes for brands that were not listed in the device Code List. 1. Switch the relevant device on manually.2. Briefly press the required source key (TV, DVD, VCR, AUX). 3. Keep the CODE key pressed for approx. 3 seconds until the blue LED
remains permanently lit. 4. Point the remote control at the device and briefly press the key P+ once.
If the device has no program function, press or POWER in stead. The remote control starts the code search after 6 seconds and transmits all codes consecutively at 1-second intervals (see also next section). The blue LED will light up for each transmission.
5. As soon as the device responds to the remote control, press OK. – If you did not press OK at the right time, you can return to the code to which the device responded step by step by pressing P– key.
To cancel the search, press EXIT.
1 second or 3 second intervalsIf you want the remote control to transmit a new code every 3 seconds instead of every second, proceed as follows:Within 6 seconds of pressing the P+ (or or POWER) key as described in point 4 press the P+ or P– key again. The remote control will now only transmit a new code every 3 seconds. This gives you more time, but the procedure will also take longer.
Code searching by brand nameThis function gives you the option of searching by brand name (see code list). This is done as follows:1. Switch the relevant device on manually.2. Briefly press the required source key (TV, DVD, VCR, AUX). 3. Keep the CODE key pressed for approx. 3 seconds until the blue LED
remains permanently lit. 4. Type in the 1-digit code according to the following table:
Key 1 = Medion, Lifetec, Micromaxx, Microstar, Tevion, Videon, TCM (Tchibo), General Technic, Innovation, MagnumKey 2 = Philips, Erres, Pye, Philco, RodiolaKey 3 = Sony, Akai, Panasonic, JVC, Sharp, Toshiba, JVC, Daewo
MD 24089a 49

MD 24089a ES EN DE Aldi Final Content.book Seite 50 Mittwoch, 5. August 2009 3:36 15
Key 4 = Thomson, Brandt Key 5 = Telefunken, Saba, Nordmende, Fergusson, BairdKey 6 = Grundig, BlaupunktKey 7 = Nokia, Finlux, ITTKey 0 = all brands.
5. Continue pressing the P+ key (or for video recorders POWER or ), until the device responds accordingly. Proceed quickly, otherwise the automatic code search will start.
6. Save the code by pressing OK.If all the codes have been searched, the blue LED will flash for approx. 3 seconds.
Code identificationCode identification gives you the opportunity to determine codes that have already been entered and stored in the remote control. Proceed as follows:1. Switch the relevant device on manually.2. Briefly press the required source key (TV, DVD, VCR, AUX). 3. Keep the CODE key pressed for approx. 3 seconds until the blue LED
remains permanently lit. 4. Briefly press the CODE key. The blue LED will briefly extinguish after the
key has been pressed.5. To find the first number, press the number keys from 0 to 9. If the blue LED
extinguishes briefly, then it is the first stored number.6. To determine the second number, press the number keys again from 0 to 9.
Repeat the procedure for the third and fourth number.7. The blue LED will extinguish as soon as the key for the fourth number has
been pressed.Code identification has now been completed.
Normal operation
After you have finished programming your remote control for your audio/video devices, the remote control will work in the common main functions just like the original remote control of the respective device. Point your remote control at the desired device and press the relevant source key. The blue LED will light up briefly but will not remain lit. Activate the functions by pressing the corresponding function key of your universal remote control. The blue LED will light up briefly each time the key is pressed.
50

K
MD 24089a ES EN DE Aldi Final Content.book Seite 51 Mittwoch, 5. August 2009 3:36 15
UPlease note: - In some circumstances not every function from your original remote control will be directly available on the universal remote control. - In particular for newer devices some functions may be stored on other keys than the expected ones or not available at all.
Special functions
"All off” functionYou can switch off all pre-programmed devices at the same time. This is done as follows:
Within one second press the POWER key twice and hold it down for 3 seconds. Now all pre-programmed devices will be switched off consecutively. This takes about 3 seconds. The LED will extinguish afterwards.
Keep the remote control pointed at the devices to be operated until the blue LED extinguishes. Some devices can be switched on and off with the POWER Key. Such switched off devices are switched on using the all off function.
EPG – Electronic Programme GuideThe EPG ("EPG" = "Electronic Programme Guide") key has various functions depending on which code has been used:For DVD codes the key opens the title menu.For VCR codes you can use the key for programming, if your video recorder has a SHOWVIEW function.
Universal functions ("Punch Through”)
The universal functions (also called "Punch Through” functions) enable you to carry out certain functions on a different device type than the programmed one. These are the volume, mute and playback functions.
If the remote control is in VCR-, DVD-, SAT- or CBL mode, the volume and mute key ( ) control the TV set (provided the other devices do not have their own volume control).If the remote control is in TV mode or in another mode without playback function, the Play, Pause, Stop and perhaps Record will actuate any video recorder, DVD player or DVD recorder which is connected. The last selected device is actuated.
MD 24089a 51

MD 24089a ES EN DE Aldi Final Content.book Seite 52 Mittwoch, 5. August 2009 3:36 15
Programming the volume/mute universal functions for another type of unitIn its delivered state, the universal remote control is programmed in such a way that the volume and mute functions automatically control the TV set if a source key for a device with image transmission (DVD, video recorder) is pressed.You can program the universal remote control so that the universal functions "Volume” and "Mute” will actuate another device type than the TV set.1. Keep the CODE key pressed for approx. 3 seconds until the blue LED
remains permanently lit. 2. Keep the key pressed down until the blue LED goes off.3. Press a source key for the device to which the volume and mute functions
should be transferred to. The blue LED stays on.4. Press the key; the blue LED foes off. If you select a device by mistake that
has no volume control of its own the blue LED flashes for 3 seconds.
Programming the volume/mute universal functions to a particular deviceYou can program the universal remote control in such a way that it will use only that particular device’s own volume and mute functions. The universal function for this mode or device type is therefore switched off.1. Keep the CODE key pressed for approx. 3 seconds until the blue LED
remains permanently lit. 2. Press the key until the blue LED goes out.3. Press the source key for the device that is only to have its own volume and
mute functions.4. Press a volume key. The blue LED stays on.5. Press again and the blue LED goes off.
Restoring the universal volume/mute functionsIf you have changed the universal volume and mute functions, as described in the previous two sections, you can reset the functions back to the factory settings and thus restore the "Punch Through” effect.1. Keep the CODE key pressed for approx. 3 seconds until the blue LED
remains permanently lit. 2. Hold down the key until the blue LED goes off.3. Press again. The blue LED light will extinguish completely. The volume
and mute functions are now restored to their factory defaults.
52
K
MD 24089a ES EN DE Aldi Final Content.book Seite 53 Mittwoch, 5. August 2009 3:36 15
UTroubleshooting
The remote control does not work:Check whether your devices have been properly connected and are switched on.Check whether the remote control batteries have been correctly inserted and have matching +/– polarity.If the batteries are too weak then replace them with new ones.
There are several device codes listed under the brand name of my device. How do I determine the correct device code?
To determine the correct device code for your device, try each consecutive code until most of the functions of the device function properly.
The devices only respond to a few remote control commands:Continue testing further codes until the devices respond to the commands accordingly.If manual code entry and automatic code search are unsuccessful, it may be that the device is not compatible to your universal remote control.
Universal remote control technical specifications
Batteries: 2 x 1,5 V Micro (LR03/AAA) – alkaline recommended
LED class: 1M
MD 24089a 53
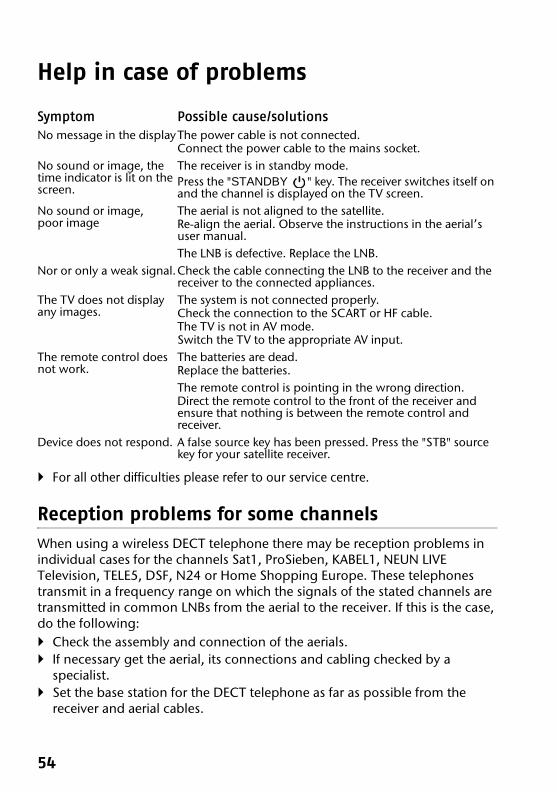
MD 24089a ES EN DE Aldi Final Content.book Seite 54 Mittwoch, 5. August 2009 3:36 15
Help in case of problems
For all other difficulties please refer to our service centre.
Reception problems for some channels
When using a wireless DECT telephone there may be reception problems in individual cases for the channels Sat1, ProSieben, KABEL1, NEUN LIVE Television, TELE5, DSF, N24 or Home Shopping Europe. These telephones transmit in a frequency range on which the signals of the stated channels are transmitted in common LNBs from the aerial to the receiver. If this is the case, do the following:
Check the assembly and connection of the aerials.If necessary get the aerial, its connections and cabling checked by a specialist.Set the base station for the DECT telephone as far as possible from the receiver and aerial cables.
Symptom Possible cause/solutionsNo message in the displayThe power cable is not connected.
Connect the power cable to the mains socket.No sound or image, the time indicator is lit on the screen.
The receiver is in standby mode.Press the "STANDBY " key. The receiver switches itself on and the channel is displayed on the TV screen.
No sound or image, poor image
The aerial is not aligned to the satellite.Re-align the aerial. Observe the instructions in the aerial’s user manual.The LNB is defective. Replace the LNB.
Nor or only a weak signal.Check the cable connecting the LNB to the receiver and the receiver to the connected appliances.
The TV does not display any images.
The system is not connected properly.Check the connection to the SCART or HF cable.The TV is not in AV mode.Switch the TV to the appropriate AV input.
The remote control does not work.
The batteries are dead.Replace the batteries.The remote control is pointing in the wrong direction.Direct the remote control to the front of the receiver and ensure that nothing is between the remote control and receiver.
Device does not respond. A false source key has been pressed. Press the "STB" source key for your satellite receiver.
54
K
MD 24089a ES EN DE Aldi Final Content.book Seite 55 Mittwoch, 5. August 2009 3:36 15
UCleaning
WARNING! Before cleaning the appliance pull the plug out of the mains socket.Do not permit moisture to penetrate the casing. There is a risk of electric shock.
Use a soft damp cloth to clean the outside of the appliance and accessories. Never clean the receiver with aggressive, abrasive or corrosive cleaning materials.
Disposal
PackagingThe appliance is packaged to protect it against transportation damage. Packaging is raw material and can be re-used or added to the recycling system.
ApplianceAt the end of its life, the appliance should not be disposed of in household rubbish. Enquire about the options for environmentally-friendly and appropriate disposal.
BatteriesOld batteries belong in special disposal containers and not in household rubbish! Dispose of used batteries at dealers or public collection points.
MD 24089a 55

MD 24089a ES EN DE Aldi Final Content.book Seite 56 Mittwoch, 5. August 2009 3:36 15
Technical specifications
TunerSAT-ZF input: F-socketInput range: 950 to 2150MHzImpedance: 75Ohms
AerialLNB supply: 14 / 18 V, max. 400mASwitching signals: DiSEqC 1.0 / DiSEqC 1.2 motor control,
Tone Burst 22 kHz
VideoConnection: TV-SCART (FBAS , RGB and YUV),
VCR SCART (RGB), Video-Cinch (FBAS)S-Video
Impedance: 75OhmsScreen formats: 4:3 / 16:9 / Letterbox / Full screenVideo formats: RGB, FBAS, YUV
AudioOutputs: Analogue stereo, digital SPDIFConnections: 3 x Cinch connections (RCA)
1 x SPDIF optical1 x SPDIF coaxial
Digital audio: PCM / AC-3 / dts
Other featuresPower supply: 230V ~ /50HzBatteries for the remote control:2 x 1.5 Micro AAA, LR03Power consumption: 25 WConsumption standby mode: < 10 Wconsumption on Low Power Standby: < 1 WDimensions (W x H x D): approx. 280 x 45 x 210 mm Weight: approx 1.5 kg Working temperature: +5°C to +40°C
Subject to technical modifications.
56

E
MD 24089a ES EN DE Aldi Final Content.book Seite 1 Mittwoch, 5. August 2009 3:36 15
D
Inhaltsverzeichnis
Bedienelemente . . . . . . . . . . . . . . . . . . . . . . . . . . . . . . 3Vorderseite . . . . . . . . . . . . . . . . . . . . . . . . . . . . . . . . . . . . 3Parte trasera . . . . . . . . . . . . . . . . . . . . . . . . . . . . . . . . . . . . 4Fernbedienung . . . . . . . . . . . . . . . . . . . . . . . . . . . . . . . . . . 5
Sicherheitshinweise . . . . . . . . . . . . . . . . . . . . . . . . . . . . 6
Vorbereitung . . . . . . . . . . . . . . . . . . . . . . . . . . . . . . . . 9Auspacken . . . . . . . . . . . . . . . . . . . . . . . . . . . . . . . . . . . . . . 9
Gerät anschließen . . . . . . . . . . . . . . . . . . . . . . . . . . . . .10Hinweise zum Anschluss . . . . . . . . . . . . . . . . . . . . . . . . . . . 10Satelliten-Antenne anschließen . . . . . . . . . . . . . . . . . . . . . . 11TV-Gerät anschließen . . . . . . . . . . . . . . . . . . . . . . . . . . . . . 11Anschluss eines Audio-Digital-Receivers . . . . . . . . . . . . . . . . 15
Gerät in Betrieb nehmen . . . . . . . . . . . . . . . . . . . . . . . .17Netzanschluss . . . . . . . . . . . . . . . . . . . . . . . . . . . . . . . . . . 17Batterien in die Fernbedienung einlegen . . . . . . . . . . . . . . . 18Einschalten . . . . . . . . . . . . . . . . . . . . . . . . . . . . . . . . . . . . 18
Gerät bedienen . . . . . . . . . . . . . . . . . . . . . . . . . . . . . . .19Grundfunktionen nutzen . . . . . . . . . . . . . . . . . . . . . . . . . . . 19Programme wählen . . . . . . . . . . . . . . . . . . . . . . . . . . . . . . 20Teletext . . . . . . . . . . . . . . . . . . . . . . . . . . . . . . . . . . . . . . . 21Auf AV-Signal umschalten . . . . . . . . . . . . . . . . . . . . . . . . . . 22
Menüfunktionen . . . . . . . . . . . . . . . . . . . . . . . . . . . . . .23Im Menü navigieren . . . . . . . . . . . . . . . . . . . . . . . . . . . . . . 23Übersicht über die Einstellungen im Hauptmenü . . . . . . . . . . 24Einstellungen in den Menüs vornehmen . . . . . . . . . . . . . . . . 25
Sender-Einstellungen ändern . . . . . . . . . . . . . . . . . . . . .26Senderliste sortieren . . . . . . . . . . . . . . . . . . . . . . . . . . . . . . 26Sender suchen . . . . . . . . . . . . . . . . . . . . . . . . . . . . . . . . . . 28Sender in die Senderliste übernehmen . . . . . . . . . . . . . . . . . 30Favoritenlisten . . . . . . . . . . . . . . . . . . . . . . . . . . . . . . . . . . 31
MD 24089a 1

MD 24089a ES EN DE Aldi Final Content.book Seite 2 Mittwoch, 5. August 2009 3:36 15
Grundeinstellungen ändern . . . . . . . . . . . . . . . . . . . . . 34Allgemeine Einstellungen ändern . . . . . . . . . . . . . . . . . . . . . 34OSD/EPG . . . . . . . . . . . . . . . . . . . . . . . . . . . . . . . . . . . . . . . 36Empfang . . . . . . . . . . . . . . . . . . . . . . . . . . . . . . . . . . . . . . 37Satellitensysteme . . . . . . . . . . . . . . . . . . . . . . . . . . . . . . . . 39Wiedergabe . . . . . . . . . . . . . . . . . . . . . . . . . . . . . . . . . . . . 39Werkseinstellungen . . . . . . . . . . . . . . . . . . . . . . . . . . . . . . . 41Einstellungen speichern . . . . . . . . . . . . . . . . . . . . . . . . . . . . 41
Menü Extras . . . . . . . . . . . . . . . . . . . . . . . . . . . . . . . . 42Systeminfo . . . . . . . . . . . . . . . . . . . . . . . . . . . . . . . . . . . . . 42Signalstärke . . . . . . . . . . . . . . . . . . . . . . . . . . . . . . . . . . . . 42DiSEqC-Motor . . . . . . . . . . . . . . . . . . . . . . . . . . . . . . . . . . . 43Sleeptimer . . . . . . . . . . . . . . . . . . . . . . . . . . . . . . . . . . . . . 43Kalender . . . . . . . . . . . . . . . . . . . . . . . . . . . . . . . . . . . . . . 43Spiele . . . . . . . . . . . . . . . . . . . . . . . . . . . . . . . . . . . . . . . . 43
Timer . . . . . . . . . . . . . . . . . . . . . . . . . . . . . . . . . . . . . 44
Satellitenupdate . . . . . . . . . . . . . . . . . . . . . . . . . . . . . 45
Die Universalfernbedienung . . . . . . . . . . . . . . . . . . . . . 46Übersicht der Tastenfunktionen . . . . . . . . . . . . . . . . . . . . . . 46Sicherheitshinweise . . . . . . . . . . . . . . . . . . . . . . . . . . . . . . . 47Anwendungsumfang . . . . . . . . . . . . . . . . . . . . . . . . . . . . . . 47Gerätecodes programmieren . . . . . . . . . . . . . . . . . . . . . . . . . 47Normaler Betrieb . . . . . . . . . . . . . . . . . . . . . . . . . . . . . . . . . 50Sonderfunktionen . . . . . . . . . . . . . . . . . . . . . . . . . . . . . . . . 51Universal-Funktionen („Punch Through“) . . . . . . . . . . . . . . . . 51Fehlerbehebung . . . . . . . . . . . . . . . . . . . . . . . . . . . . . . . . . 53Technische Daten Universal-Fernbedienung . . . . . . . . . . . . . . 53
Hilfe bei Störungen . . . . . . . . . . . . . . . . . . . . . . . . . . . 54Empfangsstörungen bei einigen Sendern . . . . . . . . . . . . . . . . 54
Reinigung . . . . . . . . . . . . . . . . . . . . . . . . . . . . . . . . . 55
Entsorgung . . . . . . . . . . . . . . . . . . . . . . . . . . . . . . . . . 55
Technische Daten . . . . . . . . . . . . . . . . . . . . . . . . . . . . 56
2

E
MD 24089a ES EN DE Aldi Final Content.book Seite 3 Mittwoch, 5. August 2009 3:36 15
D
Bedienelemente
Vorderseite
1. Taste STANDBY2. Kontrollleuchte3. Kontrolleuchte für Radio4. Display/Uhrzeitanzeige5. Sensor für Fernbedienung
6. Auswurftasten für COMMON INTERFACE Karten7. Kartenschacht für COMMON INTERFACE8. V+: Lautstärke erhöhen9. V-: Lautstärke verringern10. INFO Taste11. P- Wahltaste abwärts12. P- Wahltaste aufwärts
MD 24089a 3

MD 24089a ES EN DE Aldi Final Content.book Seite 4 Mittwoch, 5. August 2009 3:36 15
Parte trasera
1. SPDIF Coaxial Ausgang2. VIDEO CinchAusgang3. AUDIO L: Audioausgang links4. Netzkabel5. VCR SCART: Anschluss für DVD-Player oder Videorekorder6. TV SCART: Anschluss für ein TV-Gerät7. AUDIO R: Audioausgang rechts8. SVIDEO Composit Ausgang9. SPDIF Optischer Ausgang10.Service Schnittstelle RS 23211. Antenneneingang
4

E
MD 24089a ES EN DE Aldi Final Content.book Seite 5 Mittwoch, 5. August 2009 3:36 15
D
Fernbedienung
MD 24089a 5

MD 24089a ES EN DE Aldi Final Content.book Seite 6 Mittwoch, 5. August 2009 3:36 15
Sicherheitshinweise
Bestimmungsgemäßer Gebrauch
Der digitale Satelliten-Receiver MD 24089a dient zum Satellitenempfang von digitalen Fernseh- und Radioprogrammen im Privatbereich. Er ist nicht für die Verwendung an Einrichtungen des öffentlichen Tele-kommunikationsnetzes in Industriebereichen vorgesehen.
Elektrogeräte nicht in Kinderhand!
Lassen Sie Kinder niemals unbeaufsichtigt elektrische Geräte benutzen. Halten Sie auch die Verpackungsfolien von Kindern fern. Es besteht Erstickungsgefahr.
Sicheres Aufstellen
Verwenden Sie das Gerät ausschließlich in trockenen Räumen.Wenn Sie den Receiver von einer kalten in eine warme Umgebung bringen, kann sich im Inneren des Receivers Feuchtigkeit niederschlagen. Warten Sie in diesem Fall etwa zwei bis drei Stunden, bevor Sie ihn in Betrieb nehmen.Stellen Sie das Gerät auf eine feste und ebene Oberfläche. Stellen Sie das Gerät mit mindestens 10 cm Abstand zur Wand auf. Decken Sie die Belüftungsöffnungen nicht ab. Vermeiden Sie die Nähe von:– Wärmequellen, wie z. B. Heizkörpern,– Geräten mit starken Magnetfeldern, wie z. B. Lautsprechern.Stellen Sie keine offenen Brandquellen, wie z.B. brennende Kerzen, auf das Gerät.Stellen Sie das Gerät nicht auf empfindliche Oberflächen.
Zu dieser AnleitungLesen Sie vor Inbetriebnahme die Sicherheitshinweise aufmerk-sam durch. Beachten Sie die Warnungen auf dem Gerät und in der Bedienungsanleitung.Bewahren Sie die Bedienungsanleitung immer in Reichweite auf. Wenn Sie das Gerät verkaufen oder weitergeben, händigen Sie unbedingt auch diese Anleitung aus.
6

E
MD 24089a ES EN DE Aldi Final Content.book Seite 7 Mittwoch, 5. August 2009 3:36 15
D
Vermeiden Sie, dass der Receiver Tropf- oder Spritzwasser ausgesetzt wird. Stellen Sie keine mit Flüssigkeiten gefüllten Gegenstände, wie z. B. Vasen auf, über oder neben den Receiver. Andernfalls besteht die Gefahr eines elek-trischen Schlags.Stellen Sie keine schweren Gegenstände auf den Receiver.
Sicheres Anschließen
Schließen Sie das Gerät nur an eine gut erreichbare und fachgerecht instal-lierte Steckdose mit 230 V ~ 50 Hz an. Der Netzstecker muss frei zugänglich sein, damit Sie das Gerät im Notfall ein-fach und schnell vom Stromnetz trennen können.Verlegen Sie das Netzkabel so, dass niemand darüber stolpern oder darauf treten kann. Verwenden Sie keine Verlängerungskabel.Knicken oder quetschen Sie das Netzkabel nicht. Ziehen Sie das Netzkabel stets am Stecker aus der Steckdose.
Sicherer Gebrauch
Ziehen Sie den Netzstecker aus der Steckdose und entfernen Sie das Anten-nenkabel vom Gerät, wenn Sie das Gerät längere Zeit nicht benutzen oder wenn sich ein Gewitter nähert.Das Netzkabel darf während des Betriebs nicht um das Gerät gewickelt sein oder heiße Oberflächen berühren.Lassen Sie keine Feuchtigkeit in das Gehäuse gelangen. Fassen Sie das Gerät, das Netzkabel und den Netzstecker nie mit nassen Händen an. Es besteht die Gefahr eines elektrischen Schlags.Sollten Fremdkörper oder Flüssigkeit in das Gerät gelangen, ziehen Sie so-fort den Netzstecker aus der Steckdose. Lassen Sie das Gerät von qualifizier-tem Fachpersonal überprüfen, bevor Sie es wieder in Betrieb nehmen. An-dernfalls besteht die Gefahr eines elektrischen Schlags.Benutzen Sie das Gerät nie, wenn es beschädigt ist, oder Sie Schäden am Netzkabel oder Stecker feststellen. Ziehen Sie bei Beschädigungen des Ge-räts sofort den Stecker aus der Steckdose. Öffnen Sie nie das Gerät. Wenden Sie sich im Störungsfall an unser Service Center oder eine andere geeignete Fachwerkstatt. Die Fernbedienung besitzt eine Infrarot-Diode der Klasse 1. Betrachten Sie die LED nicht mit optischen Geräten.
MD 24089a 7

MD 24089a ES EN DE Aldi Final Content.book Seite 8 Mittwoch, 5. August 2009 3:36 15
Umgang mit Batterien
Batterien können brennbare Stoffe enthalten. Bei unsachgemäßer Behandlung können Batterien auslaufen, sich stark erhitzen, entzünden oder gar explodie-ren, was Schäden für Ihr Gerät und Ihre Gesundheit zur Folge haben könnte.Befolgen Sie folgende Hinweise:
Halten Sie Kinder von Batterien fern.Sollten Batterien verschluckt worden sein, melden Sie dies sofort Ihrem Arzt.Laden Sie niemals Batterien (es sei denn, dies ist ausdrücklich angegeben).Entladen Sie Batterien niemals durch hohe Leistungsabgabe.Schließen Sie Batterien niemals kurz.Setzen Sie Batterien niemals übermäßiger Wärme wie durch Sonnenschein, Feuer oder dergleichen aus!Zerlegen oder verformen Sie Batterien nicht. Ihre Hände oder Finger könnten verletzt werden oder Batterieflüssigkeit könnte in Ihre Augen oder auf Ihre Haut gelangen. Sollte dies passieren, spü-len Sie die entsprechenden Stellen mit einer großen Menge klaren Wassers und informieren Sie umgehend Ihren Arzt.Vermeiden Sie starke Stöße und Erschütterungen.Vertauschen Sie niemals die Polarität. Achten Sie darauf, dass die Pole Plus (+) und Minus (-) korrekt eingesetzt sind, um Kurzschlüsse zu vermeiden.Reinigen Sie bei Bedarf Batterie- und Gerätekontakte vor dem Einlegen.Vermischen Sie keine neuen und alten Batterien oder Batterien unterschied-lichen Typs. Dies könnte bei Ihrem Gerät zu Fehlfunktionen führen. Darüber hinaus würde sich die schwächere Batterie zu stark entladen.Entfernen Sie verbrauchte Batterien sofort aus dem Gerät.Entfernen Sie die Batterien aus Ihrem Gerät, wenn dieses über einen länge-ren Zeitraum nicht benutzt wird.Ersetzen Sie alle verbrauchten Batterien in einem Gerät gleichzeitig mit neuen Batterien des gleichen Typs.Isolieren Sie die Kontakte der Batterien mit einem Klebestreifen, wenn Sie Batterien lagern oder entsorgen wollen.
8

E
MD 24089a ES EN DE Aldi Final Content.book Seite 9 Mittwoch, 5. August 2009 3:36 15
D
Vorbereitung
Auspacken
Entfernen Sie das Verpackungsmaterial vollständig von allen Teilen des Ge-räts.
GEFAHR! Lassen Sie kleine Kinder nicht mit Folie spielen. Es besteht Erstickungs-gefahr!
Lieferumfang prüfenVergewissern Sie sich beim Auspacken, dass folgende Teile mitgeliefert wurden:
Satelliten-ReceiverFernbedienungein SCART-Kabelzwei Batterien (1,5 V Micro, Typ AAA/LR03)die Bedienungsanleitung und Garantiedokumente.
MD 24089a 9

MD 24089a ES EN DE Aldi Final Content.book Seite 10 Mittwoch, 5. August 2009 3:36 15
Gerät anschließen
Hinweise zum Anschluss
Für die einwandfreie Funktion dieses Geräts ist eine fachgerecht montierte und optimal ausgerichtete Antenne für den digitalen Satellitenempfang erforderlich.
Achten Sie darauf,– dass die Kabel niemals eingeklemmt werden und keine scharfen oder hei-
ßen Gegenstände berühren und– dass bei allen Geräten, an denen Sie Anschlussarbeiten ausführen, der
Netzstecker gezogen ist.Sie verhindern damit, dass bei einem falschen Anschluss Schäden durch Kurz-schluss oder Gefahren durch elektrischen Schlag entstehen können.
GEFAHR! Führen Sie niemals Anschlussarbeiten während eines Gewitters aus! Über die Außenantennen und Stromleitungen können schon bei aufziehendem Gewitter gefährliche Überspannungen an den Metallteilen der Geräte auf-treten. Es besteht die Gefahr eines elektrischen Schlags.
ACHTUNG! Der neunpolige Anschluss „RX/TX“ (D-SUB) ist ausschließ-lich für Servicezwecke vorgesehen, z. B. wenn Ihr Gerät wegen eines Fehlers vom Kundendienst überprüft werden soll.Experimentieren Sie nicht mit dieser Schnittstelle! Die Anschlussbele-gung und das Datenprotokoll stimmen nicht mit den üblichen PC-Standards überein. Wenn ein nicht speziell dafür vorgesehenes Ge-rät an diese Schnittstelle angeschlossen wird, kann der Receiver beschädigt werden.
10

E
MD 24089a ES EN DE Aldi Final Content.book Seite 11 Mittwoch, 5. August 2009 3:36 15
D
Satelliten-Antenne anschließen
Der Receiver wird über ein LNB-Kabel mit dem Anschluss Ihrer Satelliten-An-tenne verbunden. Dazu benötigen Sie eine Satelliten-Antenne mit Universal-LNB für den Digital-Empfang. Bevor Sie den Receiver anschließen können, müssen Sie gegebenenfalls das LNB-Kabel montieren.
Beachten Sie die Montageanweisung zur Satellitenantenne und zum LNB-Kabel.
Einzelne Antenne anschließenFür den Empfang der meisten deutschsprachigen und von vielen weiteren Pro-grammen aus Europa reicht eine einzelne Antenne aus, die auf die ASTRA-Sa-telliten 19,2° Ost ausgerichtet ist.
Schließen Sie das Antennenkabel am Anschluss „RF IN“ an.
Mehrere Antennen anschließenÜber eine Umschaltbox können Sie mehrere Antennen oder ein LNB mit meh-reren Ausgängen an den Receiver anschließen. Dies ist z. B. in Mehrteilnehmer-Anlagen oder beim Zusammenschalten von Satelliten über verschieden ausge-richtete Satelliten-Antennen sinnvoll.
Schließen Sie die Umschaltbox gemäß der Unterlagen zur Umschaltbox an. Schließen Sie die Umschaltbox am Anschluss „RF IN“ an.
TV-Gerät anschließen
Das Gerät verfügt über zwei Arten von Videoausgängen mit unterschiedlicher Signalqualität und Belegung.
Am SCART-Anschluss „TV SCART“ stehen Video- und Audiosignale in guter Qualität zur Verfügung. Insbesondere die Farbsignale (RGB) werden dort getrennt bereitgestellt. Verwenden Sie diesen Anschluss, wenn Ihr TV-Gerät oder Recorder darüber verfügt.Am Cinch-Anschluss „VIDEO“ stehen nur die Videosignale mit integrierten Farbsignalen (FBAS) zur Verfügung. Verwenden Sie diesen Anschluss für Geräte mit einem einfachen Video-Eingang.
MD 24089a 11

MD 24089a ES EN DE Aldi Final Content.book Seite 12 Mittwoch, 5. August 2009 3:36 15
Anschluss mit SCART-KabelVerbinden Sie das SCART-Kabel mit dem SCART-Anschluss TV SCART am Ge-rät und dem entsprechenden SCART-Anschluss am TV-Gerät.Für ein weiteres Videogerät (z. B. DVD-Spieler oder Videorecorder) benutzen Sie den anderen SCART-Anschluss VCR-SCART. Falls Sie zusätzlich eine Audio-Anlage anschließen möchten, verbinden Sie die Anschlüsse „L“ und „R“ am Gerät mit den AUX-Eingängen der Audio-An-lage.
Anschluss-Schema für den SCART-Anschluss:
Beachten Sie ggf. die Bedienungsanleitungen des TV-Geräts bzw. der Au-dioanlage.
12

E
MD 24089a ES EN DE Aldi Final Content.book Seite 13 Mittwoch, 5. August 2009 3:36 15
D
Anschluss mit Cinch-KabelWenn Sie ein TV-Gerät besitzen, das nicht über einen SCART-Anschluss verfügt, können Sie Ihren Satelliten-Receiver auch über Cinch-Kabel (nicht im Lieferum-fang) anschließen.
In diesem Fall können Sie keine zusätzliche Audio-Anlage anschließen.
Verbinden Sie den Anschluss „VIDEO“ am Gerät mit dem Video-Eingang am TV-Gerät.Verbinden Sie die Anschlüsse „L“ und „R“ am Gerät mit den Audio-Eingän-gen des TV-Geräts.
Anschluss-Schema für Cinch-Anschlüsse:
Beachten Sie ggf. die Bedienungsanleitung des TV-Geräts.
MD 24089a 13

MD 24089a ES EN DE Aldi Final Content.book Seite 14 Mittwoch, 5. August 2009 3:36 15
Anschluss mit Composite-KabelWenn Sie ein TV-Gerät besitzen, das nicht über einen SCART-Anschluss verfügt, können Sie Ihren Satelliten-Receiver auch über Composite-Kabel (nicht im Lie-ferumfang) anschließen.
Verbinden Sie den Anschluss „SVIDEO“ am Gerät mit dem S-Video-Eingang am TV-Gerät.
Anschluss-Schema mit Composite-Kabel:
Beachten Sie ggf. die Bedienungsanleitung des TV-Geräts.
14

E
MD 24089a ES EN DE Aldi Final Content.book Seite 15 Mittwoch, 5. August 2009 3:36 15
D
Anschluss eines Audio-Digital-Receivers
Ihr Receiver empfängt die Signale zwar digital, muss diese aber für herkömm-liche HiFi-Anlagen erst in analoge Signale umwandeln. Dabei kann etwas an Qualität verloren gehen. Bei Anlagen mit einem Digital-Eingang entsteht dieser Qualitätsverlust hingegen nicht.
Anschluss am digitalen SPDIF-COAXIAL-AusgangWenn Sie einen Verstärker oder einen Dolby-Surround-Decoder mit Digital-Ein-gang anschließen wollen, gehen Sie wie folgt vor:
Verbinden Sie den Anschluss „SPDIF COAXIAL“ über ein Cinch-Kabel mit dem Digital-Eingang an Ihrem Verstärker oder am Dolby-Surround-System.
Anschluss-Schema SPDIF COAXIAL:
MD 24089a 15

MD 24089a ES EN DE Aldi Final Content.book Seite 16 Mittwoch, 5. August 2009 3:36 15
Anschluss am SPDIF-OPTICAL-AusgangFalls Ihr Audio-Gerät über einen digitalen optischen Eingang verfügt:
Verbinden Sie den Anschluss „SPDIF OPTICAL“ über ein optisches Kabel mit dem digitalen optischen Eingang an Ihrem Verstärker oder am Dolby-Surround-System.
Anschluss-Schema SPDIF OPTICAL:
16

E
MD 24089a ES EN DE Aldi Final Content.book Seite 17 Mittwoch, 5. August 2009 3:36 15
D
Gerät in Betrieb nehmen
Netzanschluss
GEFAHR! Benutzen Sie nur Steckdosen in einwandfreiem Zustand. Wackelige Ste-cker oder Steckdosen können zu Bränden führen. Bei defekten Steckern oder Steckdosen kann auch der Empfang gestört sein. Sie dürfen keine de-fekten Steckdosen benutzen. Lassen Sie diese von einem Fachmann reparieren, bevor Sie das Gerät in Betrieb nehmen.
GEFAHR! Ziehen Sie sofort den Netzstecker aus der Steckdose, wenn der Netzstecker oder das Netzkabel beschädigt ist. Lassen Sie das Netzkabel durch den Kundendienst gegen ein neues mit vergossenem Netzstecker austauschen. Schließen Sie das Gerät auf keinen Fall an das Stromnetz an, solange diese Schäden nicht repariert sind. Andernfalls besteht Lebensgefahr durch elek-trischen Schlag.
Stecken Sie den Netzstecker in eine vorschriftsmäßig installierte Netzsteck-dose mit 230 V ~ 50 Hz.
Vorne am Gerät leuchten die Uhrzeitanzeige und die Kontrollleuchte. Je nach der aktuellen Einstellung (siehe Seite 35) wird das Gerät mit der Taste „STANDBY “ eingeschaltet oder in den Standby-Modus geschaltet. Im Standby-Betrieb erscheint die Uhrzeitanzeige und die Kontrollleuchte leuchtet weiterhin blau. Im "Low-Power-Standby-Modus" (vgl. Seite 35) ist das Display abgeschaltet und die Kontrollleuchte leuchtet bernsteinfarben.
Die Uhrzeit wird im Display erst angezeigt, nachdem erstmals ein Sender empfangen wurde.
MD 24089a 17

MD 24089a ES EN DE Aldi Final Content.book Seite 18 Mittwoch, 5. August 2009 3:36 15
Batterien in die Fernbedienung einlegen
Setzen Sie zwei Batterien (1,5 V Micro (AAA/LR03) in das Batteriefach ein.
Einschalten
Dieses Gerät hat – wie fast alle heutigen Geräte – keinen Netzschalter mehr. So lange der Stecker in der Steckdose ist, wird es mit Strom versorgt. Dadurch ent-steht ständig etwas Wärme im Gerät, was aber völlig normal und bei ord-nungsgemäßer Belüftung ungefährlich ist.
GEFAHR!Verdecken Sie nie die Belüftungsöffnungen am Geräteboden und auf der Oberseite des Gerätes. Das Gerät erzeugt auch im Standby-Modus Wärme. Bei verdeckten Lüftungsöffnungen kann es zu Bränden kommen.Lassen Sie eingeschaltete elektrische Geräte nicht unbeaufsichtigt. Ziehen Sie den Netzstecker aus der Steckdose, wenn Sie das Gerät länger nicht be-aufsichtigen können (z. B. im Urlaub).Ziehen Sie den Netzstecker aus der Steckdose und entfernen Sie das Anten-nenkabel vom Gerät, wenn ein Gewitter aufzieht. So verhindern Sie, dass bei einem Blitzeinschlag in der Umgebung Ihre Ge-räte beschädigt werden.
Nach dem ersten Einschalten eines neuen Gerätes werden zunächst folgende Einstellungen abgefragt:
die Bediensprache (Deutsch, Englisch, Spanisch, Türkisch, Portugiesisch, Polnisch), der Standort: Erdteil,der Standort: Land in dem gewählten Erdteil.
Aus diesen Einstellungen erstellt das Gerät seine werkseitige Programmliste. Für den Empfang in Deutschland sind bereits alle erforderlichen Einstellungen werkseitig vorgenommen.
Wenn Sie das Gerät in Deutschland in Betrieb nehmen, bestätigen Sie die Abfragen mit der Taste „OK“.
18

E
MD 24089a ES EN DE Aldi Final Content.book Seite 19 Mittwoch, 5. August 2009 3:36 15
D
Gerät bedienen
Das Gerät wird bereits programmiert ausgeliefert.Für die reine Bedienung dieses Geräts sind keine Fachkenntnisse erforderlich. Zusätzlich zu dieser Bedienungsanleitung sind viele Funktionen zusätzlich in Erläuterungstexten auf dem Bildschirm erklärt.
Grundfunktionen nutzen
Gerät starten – StandbyWenn das Gerät ans Netz angeschlossen ist, leuchtet die Kontrollleuchte.
Schalten Sie Ihr TV-Gerät ein und wählen Sie den AV-Modus.Drücken Sie die Taste „STANDBY “. Die Kanalnummer erscheint im Dis-play.
Wie bei einem Computer muss ein Digitalreceiver beim Starten erst das Betriebsprogramm laden. Es kann ein paar Sekunden dauern, bis das Ge-rät reagiert. Währenddessen wird das Logo des Herstellers auf dem Bild-schirm angezeigt.
Um in den Standby-Betrieb zu wechseln, drücken Sie auf die Taste „STANDBY “. Die Uhrzeitanzeige leuchtet.
Lautstärke einstellenÄnderungen an der Lautstärke wirken sich auch auf eine eventuell lau-fende Videoaufnahme aus. Regeln Sie die Lautstärke in diesem Fall direkt am TV-Gerät.
Um die Lautstärke zu erhöhen, drücken Sie die Taste „ +“.Um die Lautstärke zu verringern, drücken Sie die Taste „ –“.
Die Höhe der Lautstärke wird durch einem Balken am Bildschirm angezeigt.Um den Ton stummzuschalten, drücken Sie die Taste „ “. Auf dem Bild-schirm wird das Symbol angezeigt.Um den Ton wieder hörbar zu schalten, drücken Sie erneut die Taste „ “, oder drücken Sie die Tasten „ +“ oder „ –“, es erscheint wieder der Balken für die Lautstärke.
Wenn die Option „Volume-Bypass“ aktiviert ist (siehe Seite 40), kann die Lautstärke nicht mehr über die Fernbedienung des Receivers einge-stellt werden.
MD 24089a 19

MD 24089a ES EN DE Aldi Final Content.book Seite 20 Mittwoch, 5. August 2009 3:36 15
Fernseh- und Radio-Empfang einstellenUm auf den Empfang digitaler Radiosendungen umzuschalten, drücken Sie die Taste „RADIO“. Die Radiokontroll-LED an der Gerätevorderseite leuchtet bernsteinfarben und die Kanalnummer wird angezeigt.Um auf den Empfang von Fernsehsendungen umzuschalten, drücken Sie die Taste „TV“. Die Radiokontroll-LED wird ausgeschaltet, auf dem Display erscheint kurzzeitig ein Bildschirmsymbol und anschließend die eingestellte Kanalnummer.
Programme wählen
Ihr Receiver ist werkseitig bereits auf einige Satelliten programmiert. Ab Seite 26 ist beschrieben, wie Sie weitere Programme hinzufügen können.
Um zum nächsten programmierten Sender zu wechseln, drücken Sie die Ta-ste „P+“.Um zum vorherigen programmierten Sender zu wechseln, drücken Sie die Taste „P–“.Um einen Sender direkt zu wählen, geben Sie mit den Zifferntasten die Nummer des entsprechenden Speicherplatzes ein.
Um zum vorher eingestellten Sender zu wechseln, drücken Sie die Taste „SWAP“.
Wenn Sie einen Sender über die Programmliste auswählen wollen, gehen Sie wie folgt vor:
Drücken Sie während des Empfangs die Taste „LIST“. Die Senderliste wird angezeigt.Um einen Sender auszuwählen, wählen Sie mit den Pfeiltasten den ge-wünschten Sender.Um Informationen zum Programm des markierten Senders anzuzeigen, drücken Sie die Taste „INFO“.Um zum markierten Sender zu wechseln, drücken Sie die Taste „OK“.Um die Senderliste zu schließen und zum eingestellten Sender zu wechseln, drücken Sie die Taste „EXIT“.
20

E
MD 24089a ES EN DE Aldi Final Content.book Seite 21 Mittwoch, 5. August 2009 3:36 15
D
Teletext
Die Teletext-Angebote sind je nach Programmanbieter unterschiedlich. Wählen Sie das Programm, von dem Sie den Teletext aufrufen wollen.
Teletext starten oder beendenUm Teletext am Bildschirm einzublenden, drücken Sie die Taste „TEXT“.Um zur normalen Bildschirmanzeige zurück zu wechseln, drücken Sie die Taste „EXIT“.
Teletext-Seiten wählenDie Nummer der aktuellen Seite und der Seite, die gesucht wird, werden über dem Teletext angezeigt. Die Inhaltsübersicht befindet sich meistens auf der Seite „100“.
Geben Sie die Nummer der gewünschten Seite über die Zifferntasten ein.Sie können auch mit den Tasten vorwärts oder rückwärts in den Seiten blättern.Um die Inhaltsübersicht anzuzeigen, drücken Sie die Taste „MENU“.
Bei sehr langen Seiten werden diese auf so genannte „Unterseiten“ ver-teilt. Dann erscheint die Anzeige „01 02 ...“ unter der Seitenzahl.Die Darstellung dieser Unterseiten werden automatisch nach etwa einer Minute gewechselt.
Um das automatische Wechseln zu stoppen, drücken Sie die Taste „OK“. Ein „>“ wird angezeigt, wenn das automatische Wechseln gestoppt ist.Um durch die Unterseiten zu blättern, drücken Sie dann die Tasten oder
.Um das automatische Wechseln wieder freizugeben, drücken Sie erneut die Taste „OK“.
AnzeigeoptionenUm die Anzeige des Teletexts zu vergrößern, drücken Sie die Taste „SWAP“.Die obere Hälfte des Teletexts wird jetzt vergrößert dargestellt.Um die untere Hälfte des Teletexts anzuzeigen, drücken Sie erneut die Taste „SWAP“.Um den Teletext wieder in normaler Größe anzuzeigen, drücken Sie die Taste „SWAP“ ein drittes Mal.Um versteckten Text (z. B. bei Rätselseiten) anzuzeigen, drücken Sie die Taste „INFO“.
Sie können den Teletext in vier verschiedenen Anzeigeformen darstellen las-sen.
MD 24089a 21

MD 24089a ES EN DE Aldi Final Content.book Seite 22 Mittwoch, 5. August 2009 3:36 15
Um die Anzeigeform zu wechseln, drücken Sie so oft die Taste „TEXT“, bis die gewünschte Anzeigeform eingestellt ist.
Unter Umständen kann es lange dauern, bis die gewünschte Seite oder Unter-seite des Teletexts angezeigt wird. Sie können während der Wartezeit das normale Fernsehbild wie folgt anzeigen.
Drücken Sie die Taste „LIST“. Der Teletext wird jetzt ausgeblendet, bis die nächste Unterseite oder die gewählte Seite angezeigt wird.Um den Teletext auszublenden, drücken Sie die Taste „EXIT“. Das normale Fernsehbild wird angezeigt.Um den ausgeblendeten Teletext wieder einzublenden, drücken Sie die Ta-ste „TEXT“. Die zuletzt angewählte Teletextseite wird angezeigt.
Teletext neu einlesenSeiten mit geänderten Inhalten werden automatisch neu eingelesen – aller-dings erst nach einiger Zeit.
Auf AV-Signal umschalten
Mit dieser Funktion bestimmen Sie, welche Signale am Anschluss „TV-SCART“ auf ein anderes Gerät übertragen werden sollen.
Diese Funktion ist nur aktiv, wenn Sie Geräte mit den SCART-Anschlüssen „TV-SCART“ und „VCR-SCART“ verbunden haben.
Drücken Sie die Taste „AV“. Wenn im Display die Anzeige „AV“ erscheint, werden die Signale vom An-schluss „VCR-SCART“ zum TV-Gerät übertragen (z. B. für die Wiedergabe von Videoaufzeichnungen).
Um Programme über den Receiver zu betrachten, drücken Sie erneut die Ta-ste „AV“. Die Speicherplatz-Nummer wird im Display angezeigt. Die Signale des Receivers werden zum TV-Gerät geleitet.
22

E
MD 24089a ES EN DE Aldi Final Content.book Seite 23 Mittwoch, 5. August 2009 3:36 15
D
Menüfunktionen
Das Gerät wird werksseitig bereits optimal programmiert ausgeliefert, so dass Sie die hier beschriebenen Einstellarbeiten nicht unbedingt benötigen. Auf Seite 41 ist beschrieben, wie Sie das Gerät wieder auf die werkseitigen Vorein-stellungen zurücksetzen können.Alle Einstellmöglichkeiten werden als Menü auf dem Bildschirm angeboten (OSD, „On-Screen-Display“).
Im Menü navigieren
Menü aufrufenUm das OSD-Menü aufzurufen, drücken Sie die Taste „MENU“.
Sie können jetzt folgende Menüs auswählen:Bild-/TonauswahlTeletext EPGFavoritenlistenHauptmenü
Wählen Sie das gewünschte Menü mit den Tasten und aus.Drücken Sie dann die Taste „OK“. Das ausgewählte Menü wird geöffnet.Um das Hauptmenü direkt aufzurufen, können Sie auch zwei Mal hinterein-ander die Taste „MENU“ drücken.Eine Übersicht über die Einstellungen im Hauptmenü finden Sie auf Seite 24.
Menü auswählenUm im Menü aufwärts oder abwärts zu blättern, drücken Sie die Tasten oder .Um in ein Untermenü nach links oder rechts zu wechseln, drücken Sie die Tasten oder . Das gewählte Menü, Untermenü oder die Funktion wird markiert.Um den gewählten Menüpunkt aufzurufen, oder ein Menü zu öffnen, drü-cken Sie die Taste „OK“.
Menü verlassenUm ein Menü zu verlassen oder eine Funktion zu beenden, drücken Sie die Taste „EXIT“.
MD 24089a 23

MD 24089a ES EN DE Aldi Final Content.book Seite 24 Mittwoch, 5. August 2009 3:36 15
Übersicht über die Einstellungen im HauptmenüHauptmenü Senderliste Favoritenliste
Sender sortierenSender suchenProfisuche
Favoritenlisten 1-9 bearbeitenSenderliste bearbeitenSatellit durchsuchenSatellit oder Transpon-der durchsuchen
Seite 31
Seite 26Seite 28Seite 29
Konfigura-tion
Allgemein
OSD / EPG
Empfang
Satellitensysteme
Wiedergabe
Werkseinstellun-genEinstellungen speichern
Allgemeine Einstellun-gen (Zeit, Sprache, Start-einstellungen, verschlüs-selte Sender)Einstellung des OSD / EPG-FenstersKonfiguration der Emp-fangsanlageAuswahl des/der Satelli-tenEinstellung der Bild- und TonwiedergabeAuf Werkseinstellungen zurücksetzenEinstellungen speichern und Menü verlassen
Seite 34
Seite 36
Seite 37
Seite 39
Seite 39
Seite 41
Seite 41
Extras Systeminfos
SignalstärkeDISEqC-Motor
Sleeptimer
KalenderSpiel: BlöckeSpiel: Schlange
Zeigt Systeminformatio-nen anAnzeige SignalstärkeEinstellung bei Verwen-dung einer Motorsteue-rungAutomatische ReceiverabschaltungKalenderanzeigeBildschirmspiel 1Bildschirmspiel 2
Seite 42
Seite 42Seite 43
Seite 43
Seite 43Seite 43Seite 43
Timer Timerliste 1-12 Einstellung und Aktivie-rung der Timerfunktion
Seite 44
Satelliten-update
Update für die Software des SAT-Receivers
Seite 45
Verschlüsse-lung
Decoder C:1 und C:2
Anzeige und Einstellung der Pay-TV-Optionen (nur bei eingesetzem Common Interface Modul verfügbar)
Seite 35
Kurzhilfe Bildschirm-Anzeige der Kurzhilfe
24

E
MD 24089a ES EN DE Aldi Final Content.book Seite 25 Mittwoch, 5. August 2009 3:36 15
D
Einstellungen in den Menüs vornehmen
Sprache wählenManche Programme werden mehrsprachig gesendet. Mit dieser Funktion kön-nen Sie eine andere Sprache für den Ton einstellen.
Drücken Sie die Taste „MENU“.Wählen Sie das Untermenü „Bild-/Tonauswahl“ und drücken Sie die Taste „OK“.Wählen Sie die gewünschte Sprache und drücken Sie die Taste „OK“. Die neu gewählte Sprache wird eingestellt, bis Sie ein anderes Programm wäh-len oder das Gerät ausschalten.Um die Sprache dauerhaft zu ändern, wählen Sie die gewünschte Sprache wie oben beschrieben aus.Drücken Sie dann die Taste „OK“ und halten diese etwa drei Sekunden ge-drückt. Die neu gewählte Sprache wird jetzt für dieses Programm dauerhaft eingeschaltet.Durch Drücken der Taste „LIST“ können Sie die Tonwiedergabe zwischen Kanal A, Kanal B und Stereo umschalten. Im Untermenü „Bild-/Tonauswahl“ können Sie mit der Taste „1“ den Kanal A und mit der Taste „2“ Kanal B einzeln einschalten. "A" steht für Analogaus-gang, "D" für den SPDIF Ausgang. Der Dolby Digital Ton kann nicht auf dem Analogausgang ausgegeben werden.
Teletext anzeigenWählen Sie den Menüpunkt „TELETEXT“ , um Teletext einzublenden.
Sie können den Teletext auch direkt über die Taste „TEXT“ aufrufen (siehe Seite 21).
Menüpunkt EPGBei der Auswahl des Menüpunktes „EPG“ werden die Programminformationen des eingestellten Senders angezeigt. Der Aufruf des Menüs kann auch mit der „INFO“-Taste auf der Fernbedienung erfolgen.
Beachten Sie, dass nicht alle Programmanbieter Programminformationen ausstrahlen.
FavoritenlistenIn diesem Menü kann eine der Favoritenlisten ausgewählt und aktiviert werden. Der Aufruf des Menüs kann auch mit der Zifferntaste „0“ auf der Fernbedie-nung erfolgen (Seite 32).
MD 24089a 25

MD 24089a ES EN DE Aldi Final Content.book Seite 26 Mittwoch, 5. August 2009 3:36 15
Sender-Einstellungen ändern
Die Sender verschiedener Satelliten sind bereits voreingestellt und in einer Sen-derliste zusammengefasst. Sie können diese Sender bearbeiten und neue Sen-der hinzufügen.
Da die Senderbelegung einiger Satelliten häufig geändert wird, empfeh-len wir einen Suchlauf. Gehen Sie dabei wie im Abschnitt "Sender su-chen" ab Seite 28 beschrieben vor.
Öffnen Sie das Hauptmenü und wählen Sie das Untermenü „Senderliste“.
Senderliste sortieren
Mit dieser Funktion können Sie die Sender innerhalb der Senderliste verschie-ben oder löschen.
Wählen Sie den Menüpunkt „Sender sortieren“.Markieren Sie den gewünschten Sender. Drücken Sie dann die Taste „OK“. Auf dem Bildschirm wird die Auswahl „Di-rekt“ oder „Block markieren“ angezeigt. Um die Eigenschaften eines Senders zu ändern , wählen Sie die Option „Di-rekt“.Um die Eigenschaften mehrerer Sender zu ändern, wählen Sie die Option „Block markieren“.
Einen einzelnen Sender ändernWählen Sie die Option „Direkt“. Sie können jetzt verschiedene Funktionen zum Ändern des gewünschten Senders wählen.
Um einen Sender an eine andere Stelle der Senderliste zu kopieren, gehen Sie wie folgt vor:
Wählen Sie die Funktion „Kopieren“.Wählen Sie dann mit den Tasten oder die gewünschte Position aus.Drücken Sie die Taste „OK“. Der ausgewählte Sender wird an der gewünsch-ten Position eingefügt.
Um einen Sender an eine andere Stelle der Senderliste zu verschieben, gehen Sie wie folgt vor:
Wählen Sie die Funktion „Verschieben“.Wählen Sie dann mit den Tasten oder die gewünschte Position aus.Drücken Sie die Taste „OK“. Der Sender wird jetzt an der neuen Position ein-gefügt und der alte Eintrag wird gelöscht.
26

E
MD 24089a ES EN DE Aldi Final Content.book Seite 27 Mittwoch, 5. August 2009 3:36 15
D
Um einen Sender durch einen freien Senderspeicher zu ersetzen, gehen Sie wie folgt vor:
Wählen Sie die Funktion „Löschen“.Um einen Sender zu löschen, wählen Sie die Funktion „Ausschneiden“. Die folgenden Einträge werden jetzt neu nummeriert.Um einen freien Senderspeicher einzufügen, wählen Sie die Funktion „Freie Einfügen“.Wenn Sie die Funktion „Sender sortieren“ beenden wollen, drücken Sie die Taste „EXIT“. Auf dem Bildschirm wird eine Abfrage angezeigt.Um die vorgenommenen Änderungen zu speichern, drücken Sie die Taste „OK“.Um die vorgenommenen Änderungen zu verwerfen, drücken Sie die Taste „SWAP“.Um die Senderliste weiter zu bearbeiten, drücken Sie die Taste „EXIT“.
Mehrere Sender ändernUm mehrere Sender zu ändern, wählen Sie die Option „Block bearbeiten“. Der gewählte Sender ist jetzt markiert.Um die anderen gewünschten Sender zu markieren, drücken Sie die Taste oder .Drücken Sie dann die Taste „OK“.
Alle Sender einschließlich der ersten und zweiten Auswahl sind nun markiert. Sie können die Einstellungen der markierten Sender jetzt wie bei einem einzel-nen Sender ändern.Zusätzlich können Sie die Funktion „Packen“ auswählen. Damit löschen Sie alle ungenutzten Zeilen in der Senderliste. Die Sender in der Liste werden dadurch neu nummeriert.
MD 24089a 27

MD 24089a ES EN DE Aldi Final Content.book Seite 28 Mittwoch, 5. August 2009 3:36 15
Sender suchen
Digitale Fernsehsender können mehrere Programme auf einem einzigen Fern-sehkanal übertragen, solche Mehrfachsender werden als „Transponder“ be-zeichnet. Beim Suchlauf werden alle Fernsehkanäle auch auf darin enthaltene digitale Angebote untersucht. Dieser Vorgang kann einige Minuten dauern.
Einfache SucheMit dieser Funktion können Sie den Receiver alle bekannten Fernsehkanäle nach digitalen Programmen absuchen und diese automatisch in die Senderliste aufnehmen lassen.
Öffnen Sie das Hauptmenü und wählen Sie das Untermenü „Senderliste“.ACHTUNG! Wenn während des Suchlauf die Stromversorgung unterbrochen wird, kann das Abspeichern der Sender fehlerhaft sein. Wiederholen Sie in die-sem Fall den Suchlauf.
Wählen Sie die Funktion „Sendersuche“ und drücken Sie die Taste „OK“. Der Suchlauf startet jetzt.
Bei einer einzelnen, unbeweglichen Satellitenschüssel startet nun die Sendersuche direkt, ohne eine Möglichkeit zur Auswahl eines Transpon-ders oder Satelliten.Wenn Sie eine motorisierte oder mehrere Satellitenschüsseln installiert haben, wird nun eine Liste mit den verfügbaren Satelliten angezeigt.
Wählen Sie in diesem Fall den Satelliten aus, auf dem Sie suchen wollen, und drücken Sie die Taste „OK“. Der Suchlauf startet jetzt. Die einzelnen Trans-ponder werden nacheinander durchsucht. Um vorzeitig zum nächsten Transponder zu springen, drücken Sie die Taste „OK“.Um den Suchlauf abzubrechen, drücken Sie die Taste „EXIT“.
Nach dem Suchlauf wird das Auswahlfenster „Kanalauswahl“ angezeigt. In diesem können Sie die gefundenen Sender in die Senderliste übernehmen.
28

E
MD 24089a ES EN DE Aldi Final Content.book Seite 29 Mittwoch, 5. August 2009 3:36 15
D
ProfisucheDiese Suchmöglichkeit sollten Sie nur nutzen, wenn Sie über ausreichende Er-fahrungen verfügen.
Öffnen Sie das Hauptmenü und wählen Sie das Untermenü „Senderliste“.Wählen Sie die Funktion „Profisuche“. Taste „OK“ drücken.Wählen Sie mit den Tasten oder die gewünschte Satelliten-Einstellung.Drücken Sie die Taste „OK“. Auf dem Bildschirm wird ein Untermenü ange-zeigt, in dem Sie genaue Einstellungen für den gewünschten Satelliten vor-nehmen können.Wählen Sie die Einstellung, die Sie ändern wollen, mit den Tasten oder aus.Um eine Einstellung zu ändern, drücken Sie die Tasten oder .
Sie können die Frequenz auch mit den Zifferntasten eingeben. Die Transpon-derfrequenz erfahren Sie über den jeweiligen Programmanbieter.Um in den gewünschten Suchmodus zu gelangen, gehen Sie wie folgt vor:
Wenn Sie bei der automatischen Sendersuche alle Fernsehkanäle absuchen wollen, wählen Sie „Alle Transponder“.Wenn Sie nur den Transponder absuchen wollen, dessen Frequenz ange-zeigt wird, wählen Sie „Einzeltransponder“.Wenn Sie nur die bereits gespeicherten Transponder auf neue Sender absu-chen wollen, wählen Sie „Senderliste“.Um den Suchlauf mit den vorgenommenen Einstellungen zu starten, mar-kieren Sie das Anzeigefeld „Weiter mit OK“.Drücken Sie dann die Taste „OK“. Der Suchlauf wird jetzt gestartet.
Um bei der Sendersuche zu bestimmen, ob verschlüsselte Programme über-sprungen oder in den Suchlauf einbezogen werden sollen, gehen Sie wie auf Seite 35 beschrieben vor.
Nach dem Suchlauf wird das Auswahlfenster „Kanalauswahl“ angezeigt. In diesem können Sie die gefundenen Sender in die Senderliste übernehmen.
MD 24089a 29
MD 24089a ES EN DE Aldi Final Content.book Seite 30 Mittwoch, 5. August 2009 3:36 15
Sender in die Senderliste übernehmen
Nach dem Suchlauf wird das Auswahlfenster „Kanalauswahl“ angezeigt. In diesem Auswahlfenster werden die beim Suchlauf gefundenen Sender in der rechten Hälfte angezeigt. In der linken Hälfte wird die aktuelle Senderliste an-gezeigt.
Um zwischen TV- und Radiosendern zu wechseln, drücken Sie die Taste „TV“ bzw. „RADIO“.Wählen Sie mit den Tasten „P+“ und „P–“ den gewünschten Sender.Um schnell zwischen den gefundenen Sendern zu wechseln, drücken Sie die Taste oder .Drücken Sie die Taste „OK“. Ein Optionsmenü wird unter der Liste der ge-fundenen Sender geöffnet.
Programm eines gefundenen Senders anzeigenUm das Programm des ausgewählten Senders zu betrachten, drücken Sie die Taste „OK“ und wählen die Option „Aktivieren“.Drücken Sie die Taste „OK“.
Gefundenen Sender übernehmenUm den ausgewählten Sender in die Senderliste zu kopieren, wählen Sie die Option „Kopieren vor“ und drücken die Taste „OK“. Die aktuelle Senderliste wird markiert.Wählen Sie dann in der Senderliste den Sender, vor den der ausgewählte Sender eingefügt werden soll.Drücken Sie die Taste „OK“. Der ausgewählte Sender wird jetzt an der fest-gelegten Position in die Senderliste eingefügt. Die Liste der gefundenen Sen-der wird markiert.Wiederholen Sie diese Schritte für alle weiteren gewünschten Sender.Um einen Sender der Senderliste durch den ausgewählten Sender zu erset-zen, wählen Sie die Option „Kopieren auf“ und drücken die Taste „OK“.Wählen Sie dann in der Senderliste den Sender, der durch den ausgewählten Sender ersetzt werden soll.Drücken Sie die Taste „OK“. Der ausgewählte Sender wird jetzt an Stelle des alten Senders in die Senderliste eingefügt. Die Liste der gefundenen Sender wird markiert.Wiederholen Sie diese Schritte für alle weiteren gewünschten Sender.
Mit der Taste „SWAP“ können Sie während dieser Vorgänge in die Sen-derliste selbst wechseln (linke Seite des Menüs) und die Sender weiter be-arbeiten.
30

E
MD 24089a ES EN DE Aldi Final Content.book Seite 31 Mittwoch, 5. August 2009 3:36 15
D
Um das Auswahlfenster zu schließen, drücken Sie die Taste „EXIT“. Eine Ab-frage wird angezeigt.Um zum Auswahlfenster zurückzukehren und die Senderliste weiter zu be-arbeiten, drücken Sie erneut die Taste „EXIT“.Um die Änderungen der Senderliste zu verwerfen, drücken Sie die Taste „SWAP“.Um die geänderte Senderliste zu übernehmen, drücken Sie die Taste „OK“.
Favoritenlisten
Sie können Ihre bevorzugten TV- oder Radio-Programme in einer Favoritenliste speichern. Dazu stehen Ihnen neun Favoritenlisten zur Verfügung. So können Sie immer schnell auf diese Programme zugreifen.
Programm in Favoritenliste speichernUm ein Programm in einer Favoritenliste zu speichern, gehen Sie wie folgt vor:
Öffnen Sie das Hauptmenü und das Untermenü „Senderliste“.Wählen Sie den Menüpunkt „Favoritenlisten“ und drücken Sie die Taste „OK“.Wählen Sie die gewünschte Favoritenliste aus und drücken Sie die Taste „OK“. Die gewünschte Favoritenliste wird jetzt in der linken Bildschirmhälfte angezeigt. In der rechten Hälfte wird die Senderliste angezeigt.
Sie können jetzt Programme aus der Senderliste vor einem gespeicherten Pro-gramm in die Favoritenliste einfügen oder Programme aus der Favoritenliste lö-schen (siehe Seite 33).
Wählen Sie das Programm, vor das Sie ein anderes Programm einfügen wol-len, in der Favoritenliste aus.Drücken Sie die Taste „OK“. Ein Auswahlmenü wird angezeigt.Um ein Programm in die Favoritenliste einzufügen, wählen Sie die Option „Einfügen vor“ und drücken die Taste „OK“. Der erste Eintrag in der Sender-liste ist jetzt markiert.Wählen Sie das gewünschte Programm aus der Senderliste aus und drücken Sie die Taste „OK“. Ein Auswahlmenü wird angezeigt. In diesem Auswahl-menü können Sie festlegen, ob Sie– ein einzelnes Programm,– mehrere in der Senderliste zusammenhängende Programme oder– mehrere in der Senderliste verteilte Programme einfügen wollen.Wenn Sie ein einzelnes Programm einfügen wollen, wählen Sie die Option „Einzeln“ und drücken die Taste „OK“. Der ausgewählte Sender wird jetzt vor der markierten Position in der Favoritenliste eingefügt.
MD 24089a 31

MD 24089a ES EN DE Aldi Final Content.book Seite 32 Mittwoch, 5. August 2009 3:36 15
Wenn Sie mehrere aufeinanderfolgende Programme einfügen wollen, wäh-len Sie die Option „Block“ und drücken Sie die Taste „OK“. Das erste Pro-gramm des Blocks ist jetzt markiert.Wählen Sie dann das letzte der gewünschten Programme und drücken Sie erneut die Taste „OK“. Der Block mit den gewünschten Programmen wird jetzt vor die ausgewählte Position in die Favoritenliste eingefügt.Wenn Sie mehrere verteilte Programme einfügen wollen, wählen Sie die Op-tion „Mehrere“ und drücken die Taste „OK“. Das ausgewählte Programm wird in die Favoritenliste kopiert. Der Eintrag in der Senderliste ist markiert.Wählen Sie dann das nächste gewünschte Programm aus und drücken die Taste „OK“. Das nächste Programm wird in die Favoritenliste kopiert.Wiederholen Sie diese Schritte, bis Sie alle gewünschten Programme in die Favoritenliste kopiert haben.Um das Kopieren zu beenden, drücken Sie die Taste „EXIT“.Um das Untermenü „Favoritenlisten“ zu verlassen, drücken Sie erneut die Taste „EXIT“. Ein Abfragefenster wird angezeigt.Wenn Sie die vorgenommenen Änderungen verwerfen wollen, drücken Sie die Taste „SWAP“.Um die Änderungen zu speichern, drücken Sie die Taste „OK“.Um zum Menüpunkt „Favoritenlisten“ zurückzukehren und weitere Ände-rungen vorzunehmen, drücken Sie erneut die Taste „EXIT“.
Sie können ein Programm mehrfach in einer Favoritenliste speichern. Nur in der Senderliste kann jedes Programm nur einmal gespeichert wer-den.
Programm aus Favoritenliste aufrufenUm ein Programm aufzurufen, das in einer Favoritenliste gespeichert ist, drücken Sie die Zifferntaste „0“. Die Übersicht der Favoritenlisten wird ange-zeigt.Wählen Sie die gewünschte Favoritenliste mit den Tasten oder aus und drücken Sie die Taste „OK“. Es werden jetzt nur noch die Sender aus der ausgewählten Favoritenliste angezeigt.
Sie können die gewünschte Favoritenliste auch wie folgt direkt mit den Ziffern-tasten auswählen:
Drücken Sie die Zifferntaste „0“ und direkt danach die Taste mit der Listen-nummer.Beispiel: Um die Favoritenliste 8 zu öffnen, drücken Sie die Zifferntasten „0“ und „8“.Um die aktuell gewählte Favoritenliste anzuzeigen, drücken Sie die Taste „LIST“.
32

E
MD 24089a ES EN DE Aldi Final Content.book Seite 33 Mittwoch, 5. August 2009 3:36 15
D
Wählen Sie in der Liste das gewünschte Programm aus und drücken Sie die Taste „OK“.
Sie können wie gewohnt mit den Zifferntasten Programme auswählen. Dabei können Sie auch alle Programme auswählen, die in der Senderliste stehen. So können Sie auch Programme, die nicht in der aktuellen Favo-ritenliste stehen, schnell auswählen.
Um in die normale Programmliste zurückzukehren, drücken Sie die Taste „0“, wählen Sie das Feld „KEINE“ und bestätigen Sie mit „OK“.Um die Anzeige der Favoritenliste zu beenden, drücken Sie die Taste „EXIT“.
Programm aus Favoritenliste löschenÖffnen Sie das Hauptmenü und das Untermenü „Senderliste“.Wählen Sie den Menüpunkt „Favoritenlisten“ und drücken Sie die Taste „OK“.Wählen Sie die gewünschte Favoritenliste aus und drücken Sie die Taste „OK“.
Wählen Sie das zu löschende Programm aus und drücken Sie die Taste „OK“. Ein Auswahlmenü wird angezeigt. In diesem Auswahlmenü können Sie fest-legen, ob Sie– nur ein Programm,– mehrere in der Favoritenliste zusammenhängende Programme,– mehrere in der Favoritenliste verteilte Programme oder– alle Programme der Favoritenlistelöschen wollen.
Um das markierte Programm zu löschen, wählen Sie die gewünschte Option und drücken die Taste „OK“.Um mehrere Dateien zu löschen gehen Sie vor, wie im Abschnitt "Programm in Favoritenliste speichern" ab Seite 31 beschrieben.Um die Funktion „Löschen“ zu verlassen, drücken Sie die Taste „EXIT“.Um das Untermenü „Favoritenlisten“ zu verlassen, drücken Sie erneut die Taste „EXIT“. Ein Abfragefenster wird angezeigt.Wenn Sie die vorgenommenen Änderungen verwerfen wollen, drücken Sie die Taste „SWAP“.Um die Änderungen zu speichern, drücken Sie die Taste „OK“.Um zum Menüpunkt „Favoritenliste“ zurückzukehren und weitere Ände-rungen vorzunehmen, drücken Sie erneut die Taste „EXIT“.
MD 24089a 33

MD 24089a ES EN DE Aldi Final Content.book Seite 34 Mittwoch, 5. August 2009 3:36 15
Grundeinstellungen ändern
Ab Werk ist das Gerät für die meisten Anwendungsfälle korrekt eingestellt. Wenn Sie dennoch Änderungen an den Einstellungen vornehmen wollen, be-nötigen Sie zumindest grundlegende Kenntnisse von Fachbegriffen der Unter-haltungselektronik. Lassen Sie die Arbeiten von einem Fachmann ausführen, wenn Sie nicht über diese Kenntnisse verfügen.
Öffnen Sie das Hauptmenü und wählen Sie das Untermenü „Konfigura-tion“.
In diesem Untermenü sind folgende Einstellungen möglich:AllgemeinOSD/EPGEmpfangSatellitensystemeWiedergabeWerkseinstellungenEinstellungen speichernWählen Sie den gewünschten Menüpunkt mit der Taste oder aus und drücken Sie die „OK“ Taste.Wählen Sie die gewünschte Einstellung mit der Taste oder aus.
Im unteren Bereich des OSD wird eine kurze Erläuterung zur gewählten Einstellung angezeigt.
Ändern Sie die Einstellung mit den Tasten „ “ oder „ “ .Um den Menüpunkt zu verlassen, drücken Sie die Taste „EXIT“.Um die geänderten Einstellungen zu speichern, wählen Sie den Menüpunkt „Einstellungen speichern“ und drücken die Taste „OK“.
Allgemeine Einstellungen ändern
Im Menüpunkt „Allgemein“ können Sie folgende grundlegende Einstellungen vornehmen:
Zeitzone – 12 bis + 12 StundenSommerzeitautomatik „Aus“ oder verschiedene RegionenBediensprache Deutsch, Englisch, Spanisch, Portugiesisch, Türkisch,
PolnischStartlautstärke 00 bis 28Low Power Standby An, AusSuche verschl. Sender An, Aus
34

E
MD 24089a ES EN DE Aldi Final Content.book Seite 35 Mittwoch, 5. August 2009 3:36 15
D
ZeitzoneHier können Sie den Zeitversatz zur Weltzeit von – 12 bis + 12 Stunden einstel-len. Für Deutschland beträgt der Zeitversatz gegenüber der Weltzeit (GMT) + 1 Stunde.
SommerzeitautomatikHier können Sie die weltweit unterschiedlichen Festlegungen für die Sommer-zeit wählen oder die Sommerzeitautomatik ausschalten.
BedienspracheHier können Sie die Sprache für das Bildschirmmenü einstellen.
StartlautstärkeHier können Sie die Lautstärke einstellen, mit der der Receiver eingeschaltet wird.
Low Power StandbyStatt des normalen Standby-Modus können Sie einen „Low Power Standby-Modus“ einstellen, um Strom zu sparen.Einstellung „Aus“: Normaler Standby-Modus mit Anzeige der Uhrzeit im Dis-play (der Stromverbrauch ist dann im Standby-Modus kleiner als 10 W und die Kontrollleuchte leuchtet blau);Einstellung „Ein“: Im Display erscheint keine Anzeige (der Stromverbrauch ist dann im Standby-Modus kleiner als 1 W und die Kontrollleuchte leuchtet bern-steinfarben).
Suche verschl. SenderHier können Sie festlegen, ob beim Suchlauf verschlüsselte Programme über-sprungen oder ebenfalls gesucht werden sollen. (Siehe auch nächsten Absatz: „Common Interface“.)
Common InterfaceAn der Frontseite des Gerätes (Klappe öffnen) finden sich zwei Einschübe, die zur Aufnahme von Modulen zur Dekodierung verschlüsselter Programme vor-gesehen sind.Um eine Beschädigung zu vermeiden, dürfen ausschließlich Module gesteckt werden, die das „PC Card“ Logo tragen. Andere Module können irreparable Schäden am Receiver verursachen.Versuchen Sie nicht, die Module gewaltsam zu stecken. Ziehen Sie stattdessen das Modul nochmal aus dem Schacht und stecken Sie es erneut. Achten Sie auch darauf, dass Sie es mit der richtigen Seite nach oben stecken.
MD 24089a 35

MD 24089a ES EN DE Aldi Final Content.book Seite 36 Mittwoch, 5. August 2009 3:36 15
Smartcards sind gelegentlich irritierend bedruckt, da sie oft für den Einsatz in anderen Decodern entworfen wurden. Die meisten gängigen Common Inter-face-Module erwarten, dass die Karten mit den golden glänzenden Kontakten nach oben gesteckt werden.Wenn ein Verschlüsselungsmodul korrekt erkannt wurde, erscheint dessen Name in der Auflistung im Menüpunkt „Verschlüsselung“ im Hauptmenü. Wenn Sie in dieser Liste auf den Eintrag für dieses Modul gehen und auf „OK“ drücken, wird ein Menü angezeigt, welches vom jeweiligen Verschlüsselungs-modul erzeugt wird. Bei Fragen dazu wenden Sie sich bitte an den Modulher-steller.
Hinweis: Einige Module melden sich erst vollständig an und stellen ein Menüsystem erst bereit, wenn eine gültige Karte gesteckt wurde.
Bei der Navigation in den herstellerspezifischen Menüs werden die Tasten „OK“ und „EXIT“ verwendet. Falls ein Menü auf die Eingabe von „OK“ oder „EXIT“ nicht reagiert, können Sie mit der Menü-Taste einen Abbruch des Dia-logs erzwingen. Der Receiver beendet dann die Verbindung zum Menüsystem des Moduls.
OSD/EPG
„OSD“ steht für On Screen Display, also für die Benutzerführung durch ein Bildschirm-Menü.Hier können Sie Einstellungen für die Darstellung des Menüs und der Infobo-xen auf dem Bildschirm vornehmen:
Status EinblendedauerHier können Sie die Zeit einstellen, nach der die Infobox automatisch ausge-blendet wird.
Kanalnum. TimeoutHier können Sie die Zeit einstellen, nach der eine weniger als dreistellig einge-gebene Kanalnummer automatisch übernommen wird.
OSD TransparenzHier können Sie einstellen, wie viel vom Hintergrundbild durch die OSD-Fen-ster durchscheinen soll.
Status Einblendedauer 00 bis 99 SekundenKanalnum. Timeout 00,0 bis 10,0 Sekunden OSD Transparenz 00 bis 16Kurzhilfe mit OK An, Aus
36

E
MD 24089a ES EN DE Aldi Final Content.book Seite 37 Mittwoch, 5. August 2009 3:36 15
D
Kurzhilfe mit OKHier können Sie bei Aktivierung, über die „OK“ Taste, im laufenden Video die Kurzhilfe aufrufen.
Empfang
Hier können Sie Empfangsparameter festlegen, z. B. die Einstellungen zur An-steuerung von bis zu 4 Satelliten bei einer motorisierten Satellitenantenne.
ACHTUNG!Verändern Sie die Einstellungen in diesem Menü nur, wenn Sie die erfor-derlichen Fachkenntnisse besitzen. Wenden Sie sich im Zweifelsfall an eine Fachwerkstatt.
Wählen Sie die gewünschte Option mit der Taste oder .Wählen Sie die gewünschte Einstellung mit der Taste oder und drücken Sie die Taste „OK“.
GerätesteuerungHier können Sie die Einstellungen für die Steuerung der Satellitenantenne vom Satellitenreceiver auswählen.
DiSEqC easy ermöglicht das Ausrichten der Antenne auf einen von bis zu vier Satelliten durch angeschlossene DiSEqC-Schalter. Tone Burst ist eine alternative Steuerungsart zum Umschalten spezieller Re-lais („Tone-Burst-Relais“).Sat A/B steuert bis zu zwei Satelliten über das 22 kHz-Signal.In der Einstellung „Aus“ ist die Gerätesteuerung ausgeschaltet. In Anlagen mit nur einem Satelliten beschleunigt das die Programmumschaltung.
Satellit A, B, C oder DA, B, C und D sind die vier Positionen für den DiSEqC-Schalter.
Gerätesteuerung DiSEqC easy, DiSEqC easymotor, Tone Burst, Sat A/B 22 kHz, Aus
Satellit A, B, C oder D Satelliten festlegenMotorposition einstellen SatellitenlisteMobilempfang Aus, An
MD 24089a 37

MD 24089a ES EN DE Aldi Final Content.book Seite 38 Mittwoch, 5. August 2009 3:36 15
Motorposition einstellenDie Motorsteuerung der Satellitenantenne kann die Positionseinstellungen für mehrere Satelliten speichern. Hier können Sie dafür dem gewünschten Satelli-ten einen Speicherplatz für die Antennensteuerung zuweisen. Um einen Speicherplatz zuzuweisen, gehen Sie wie folgt vor:
Wählen Sie den Menüpunkt „Motorposition einstellen“ und drücken Sie die Taste „OK“. Die Satellitenliste wird angezeigt.Wählen Sie den gewünschten Satelliten mit der Taste oder aus.Wählen Sie dann mit der Taste oder den gewünschten Speicherplatz. Sie können jetzt die Einstellungen der Satellitenantenne ändern.Um die Motorsteuerung aufzurufen, drücken Sie erneut die Taste „OK“. Das Menü zur Motorsteuerung wird geöffnet. In der linken Bildschirmhälfte wer-den die zur Verfügung stehenden Befehle angezeigt. Wählen Sie mit der Option „Position“ den Satelliten aus, dessen Position Sie über den Motor einstellen wollen. In der rechten Bildschirmhälfte wird die aktuelle Empfangsqualität angezeigt.Um einen Befehl zu wählen, drücken Sie die entsprechende Taste der Fern-bedienung.Um den gewählten Befehl auszuführen, wählen Sie „Motorbefehl ausfüh-ren“ und drücken auf die Taste „OK“.Um zum Untermenü „Empfang“ zurückzukehren, drücken Sie die Taste „EXIT“.
Wenn Sie Änderungen vorgenommen haben, wird eine Abfrage angezeigt.Um die Änderungen zu verwerfen, drücken Sie die Taste „SWAP“.Um zur Einstellung zurückzukehren, drücken Sie die Taste „EXIT“.Um die Änderungen zu übernehmen, drücken Sie die Taste „OK“. Das Ab-fragefenster wird geschlossen.
MobilempfangHier können Sie die Einstellung bei wechselnden Antennenpositionen ändern, um den Empfang zu verbessern.
Wählen Sie bei wechselnden Antennenpositionen die Option „An“.
38

E
MD 24089a ES EN DE Aldi Final Content.book Seite 39 Mittwoch, 5. August 2009 3:36 15
D
Satellitensysteme
Hier können Sie festlegen, welche Satelliten Sie mit Ihrer Satellitenantenne empfangen können (je nach Ausrichtung) und welche empfangbaren Sender in der Senderliste angezeigt werden.
Wählen Sie den gewünschten Satelliten in der Liste.Um eine Markierung zu setzen oder zu entfernen, drücken Sie die Taste „OK“.
Wiedergabe
Hier können Sie weitere Bildschirmeinstellungen sowie die Audio-Einstellun-gen verändern:
FernseherHier können Sie die Anzeige auf dem TV-Gerät an das Bildformat anpassen.
Wenn Sie ein entsprechend ausgestattetes TV-Gerät besitzen, wählen Sie die Einstellung 16:9. Eine Sendung im Breitbildformat wird dann richtig wiedergegeben.Wenn Sie ein herkömmliches TV-Gerät besitzen, wählen Sie die Einstellung 4:3 „Letterbox“. Eine Sendung im Breitbildformat wird dann verkleinert wie-dergegeben. Auf dem Bildschirm sind oben und unten schwarze Balken zu sehen. Wenn Sie ein herkömmliches TV-Gerät besitzen und die Sendung nicht ver-kleinert betrachten wollen, wählen Sie die Einstellung 4:3 „Vollbild“. Eine Sendung im Breitbildformat wird dann links und rechts beschnitten bild-schirmfüllend angezeigt.
Fernseher 4:3 (Letterbox),4:3 (Vollbild), 16:9
Videoformat RGB, YUV, FBASVolume-Bypass An, AusDigital Audio PCM,
PCM, AC-3, PCM, dts, PCM, AC-3, dts
MD 24089a 39

MD 24089a ES EN DE Aldi Final Content.book Seite 40 Mittwoch, 5. August 2009 3:36 15
VideoformatHier können Sie das Videoformat am SCART-Anschluss einstellen.
Sie können das Videoformat nur für den SCART-Anschluss einstellen. Am Cinch-Anschluss „Video“ steht nur ein FBAS-Signal zur Verfügung.
Wenn Ihr TV-Gerät oder Recorder über ein SCART-Kabel angeschlossen ist, wählen Sie die Einstellung „RGB“ oder „YUV“.Wenn Ihr TV-Gerät nicht an den SCART-Anschluss angeschlossen ist, wählen Sie die Einstellung „FBAS“.
Volume-BypassHier können Sie festlegen, ob die Lautstärkeregelung am Receiver oder an den angeschlossenen Geräte ausgegeben werden soll.
Stellen Sie am angeschlossenen Gerät eine geringe Lautstärke ein, bevor Sie die Option „Volume-Bypass“ ändern.Einstellung „Aus“: Die Lautstärke wird wie gewohnt am Receiver eingestellt.Einstellung „An“: Die aktuelle Lautstärke des Receivers wird fixiert. Die Laut-stärke kann jetzt nur noch am angeschlossenen Gerät geregelt werden.
Bitte beachten Sie, dass die Lautsprecher des angeschlossenen Geräts bei Einstellung auf hohe Lautstärke beschädigt werden können.
Bestätigen Sie die Einstellung jeweils durch zwei Mal „OK“.
Digital AudioHier können Sie das Ausgangssignal am digitalen Audioausgang SPDIF des Re-ceivers einstellen.Es können folgende Einstellungen (auch kombiniert) vorgenommen werden:
PCM: 1- oder 2-Kanal (Stereo)-TonAC-3: Mehrkanaltondts: Mehrkanalton
Beachten Sie, dass Mehrkanalton nicht bei allen Programmanbietern ver-fügbar ist und nur mit Audiogeräten mit entsprechendem Decoder wie-dergegeben werden kann.
40

E
MD 24089a ES EN DE Aldi Final Content.book Seite 41 Mittwoch, 5. August 2009 3:36 15
D
Werkseinstellungen
Mit dieser Funktion können Sie das Gerät auf die werkseitigen Einstellungen zurücksetzen.
Alle von Ihnen vorgenommenen Einstellungen werden dabei gelöscht. Dazu gehören auch die Senderliste und alle Timer-Einstellungen.
Wählen Sie im Untermenü „Konfiguration“ diese Funktion und drücken Sie die Taste „OK“. Es erfolgt eine Sicherheitsabfrage. Wenn Sie das Menü verlassen und die bisherigen Einstellungen beibehalten wollen, drücken Sie die Taste „EXIT“.Wenn Sie das Gerät auf die werkseitigen Einstellungen zurücksetzen wollen, drücken Sie erneut die Taste „OK“. Die Einstellungen werden zurückgesetzt.Nehmen Sie die Grundeinstellungen wie auf Seite 18 beschrieben vor.
Einstellungen speichern
Die im Untermenü „Konfiguration“ geänderten Einstellungen werden nur vor-läufig übernommen. Um diese Einstellungen dauerhaft zu speichern, gehen Sie wie folgt vor:
Wählen Sie die Funktion „Einstellungen speichern“.Drücken Sie die Taste „OK“. Die Einstellungen sind jetzt gespeichert. Das Bildschirmmenü wird geschlossen.
MD 24089a 41

MD 24089a ES EN DE Aldi Final Content.book Seite 42 Mittwoch, 5. August 2009 3:36 15
Menü Extras
Wählen Sie im Hauptmenü das Untermenü „Extras“ und drücken Sie die Taste „OK“. Sie können jetzt folgende Menüpunkte auswählen:SysteminfoSignalstärkeDiSEqC-MotorSleeptimerKalenderSpiel: BlöckeSpiel: Schlange
Systeminfo
Mit dieser Funktion können Sie die Versionsnummer der Gerätesoftware und Diagnoseangaben vom Gerät auf dem Bildschirm anzeigen lassen. Im Telefon-gespräch mit dem Kundendienst haben Sie dann alle benötigten Angaben zur Verfügung.
Wählen Sie die Funktion „Systeminfo“.Drücken Sie die Taste „OK“. Die Systeminformationen werden angezeigt.Um die Systeminformationen auszublenden, drücken Sie die Taste „EXIT“.
Signalstärke
Mit dieser Funktion können Sie sich Signalstärke und Signalqualität (C/N) des Empfangssignals der Antenne anzeigen lassen.
Wählen Sie die Funktion „Signalstärke“.Drücken Sie die Taste „OK“.
Wenn die Signalstärke unter 50 % liegt oder bei der Signalqualität ein Wert von weniger als 10,0 angezeigt wird, kann der Empfang durch Stö-rungen beeinträchtigt werden. Gehen Sie in diesem Fall wie folgt vor:
Überprüfen Sie die Montage und Ausrichtung der Antenne (siehe Bedie-nungsanleitung zur Antenne).Überprüfen Sie den Antennenanschluss an Ihrem Gerät (siehe Seite 11).
42

E
MD 24089a ES EN DE Aldi Final Content.book Seite 43 Mittwoch, 5. August 2009 3:36 15
D
DiSEqC-Motor
Satellitenantennen mit Motorsteuerung können Sie mit der Fernbedienung ausrichten. So gehen Sie vor:
Wählen Sie die Funktion „DiSEqC-Motor und drücken Sie die Taste „OK“. Das Steuerungsmenü wird geöffnet.Richten Sie die Satellitenantenne mit den Tasten so aus, dass der optimale Empfang erzielt wird.Die gefundenen Satelliten-Positionen und Einstellungen können abgespei-chert werden. Beachten Sie dazu die Informationen im OSD-Menü.
Sleeptimer
Folgen Sie den Anweisungen auf dem Bildschirm, um den Sleeptimer (Auto-matische Ausschaltung nach einer eingestellten Zeit) in 10-Minutenschritten zwischen 10 und 180 Minuten einzustellen.
Kalender
In diesem Menüpunkt wird die Kalenderanzeige eingeblendet. Zeit- und Kalen-dereinstellungen werden beim Empfang eines Satellitensignals automatisch aktualisiert.
Spiele
BlöckeZiel des Spiels „Blöcke“ ist es, die herabfallenden Blöcke mit den Tasten
so einzusortieren, dass das Feld möglichst lückenlos ausgefüllt ist. Im-mer wenn eine Zeile vollständig gefüllt ist, verschwindet diese und die darüber liegenden Zeilen rücken nach unten. Sie erhalten Punkte für jeden Stein, den Sie einsortieren und für jede eliminierte Zeile. Das Spiel ist beendet, wenn Sie keinen Platz mehr haben, um die Blöcke einzusortieren.
SchlangeBeim Spiel „Schlange“ steuen Sie mit den Tasten eine Schlange, die die im Spielfeld erscheinenden Würfel fressen soll. Die Schlange soll sich nicht selber beißen oder auf eine Wand treffen. Nach jedem „gefressenen“ Würfel wächst die Schlange und es wird zunehmend schwieriger zu navigieren.
MD 24089a 43

MD 24089a ES EN DE Aldi Final Content.book Seite 44 Mittwoch, 5. August 2009 3:36 15
Timer
Über den Timer haben Sie die Möglichkeit, bis zu 12 Sendungen voreinzustel-len, die automatisch aufgerufen werden.
Öffnen Sie das Hautpmenü und wählen Sie das Untermenü „Timer“.Wählen Sie aus der Liste einen Timereintrag aus.Drücken Sie zum Bearbeiten „OK“.
Die Timereinträge sind nur im Stand-by-Modus in Bereitschaft. Eine lau-fenden Timeraufnahme können Sie unterbrechen, indem Sie die STANDBY-Taste länger gedrückt halten.
Sie können nun folgende Einstellungen vornehmen:- Kanal;- Datum;- Start;- Stopp und- Aktiviert.Folgen Sie zur Eingabe den Anweisungen auf dem Bildschirm.Nach erfolgter Eingabe, drücken Sie die Taste „EXIT“. Die Timer Liste wird angezeigt.Drücken Sie erneut die Taste „EXIT“. Sie können mit „OK“ die Eingabe speichern, mit „SWAP“ die Eingabe nicht speichern oder mit „EXIT“ eine weitere Timereingabe vornehmen.
Direkte Timereinstellung über die Taste „INFO“Drücken Sie zweimal die Taste „INFO“. Es wird die Programmübersicht des laufenden Senders angezeigt.Wählen Sie die Sendung aus, die Sie in den Timer aufnehmen möchten.Mit der Taste „LIST“ wird die Sendung in den Timer übernommen.
44

E
MD 24089a ES EN DE Aldi Final Content.book Seite 45 Mittwoch, 5. August 2009 3:36 15
D
Satellitenupdate
Gelegentlich werden über die Satelliten Softwareupdates für den Receiver zur Verfügung gestellt.
Keine UpdatesWenn keine Updates zur Verfügung stehen, erhalten sie die Meldung: „Ihre Software ist auf dem neuesten Stand.“
Blenden Sie die Meldung mit der Taste „EXIT“ aus.
Neue UpdatesWenn Updates zur Verfügung stehen, werden Sie zur Installation aufgefordert.
Folgen Sie dabei den Anweisungen auf dem Bildschirm.Warten Sie ab, bis die Software ganz installiert ist.
VORSICHT!Unterbrechen Sie den Update-Vorgang nicht. Drücken Sie keine Taste, während die neue Software installiert wird. Ihr SAT-Receiver würde irre-parabel beschädigt.
MD 24089a 45

MD 24089a ES EN DE Aldi Final Content.book Seite 46 Mittwoch, 5. August 2009 3:36 15
Die Universalfernbedienung
Übersicht der Tastenfunktionen
46

E
MD 24089a ES EN DE Aldi Final Content.book Seite 47 Mittwoch, 5. August 2009 3:36 15
D
Sicherheitshinweise
Reparieren Sie die Fernbedienung nicht selbst!Die Universal-Fernbedienung besitzt eine Infrarot-Diode der Klasse 1M. Be-trachten Sie die Leuchtdiode nicht mit optischen Instrumenten!Setzen Sie die Fernbedienung keinem Staub, starker Sonneneinstrahlung, Feuchtigkeit, hohen Temperaturen oder starken Erschütterungen aussetzen.Verwenden Sie keine ätzenden oder aggressiven Reingungsmittel.
AnwendungsumfangDiese Universal-Fernbedienung kann folgende Gerätetypen bedienen:
TV FernsehgerätSTB Receiver MD 24089aDVD/VCR/AUX Andere Geräte
(z. B. DVD-Recorder/Player, Videorecorder, Verstärker, Tuner, etc.).
Die Beschriftung bezeichnet nicht den zu programmierenden Gerätetyp. Sie dient der leichteren Übersicht.
Gerätecodes programmieren
AllgemeinesNotieren Sie sich bitte die Codes, die Sie für die Programmierung ver-wendet haben.Falls die Codes z. B. nach einem Batteriewechsel nicht mehr gespeichert sein sollten, können Sie die Fernbedienung so schneller programmieren.Die Programmierung der Fernbedienung funktioniert nicht im STB-Mo-dus.
Sie müssen einen vierstelligen Gerätecode für jedes Gerät, das Sie mit der Uni-versal-Fernbedienung bedienen möchten, auf eine Quellentaste (TV, DVD, VCR, AUX) programmieren.Videorecorder: Führen Sie die Codesuche mit eingelegtem Band durch.
VorprogrammierungDie Fernbedienung ist für einige Geräte des Herstellers Medion vorprogram-miert. Auf diese Weise können Sie z. B. Grundfunktionen von Medion-Fernse-hern direkt und ohne eigene Programmierung eines Gerätecodes ausführen.
MD 24089a 47

MD 24089a ES EN DE Aldi Final Content.book Seite 48 Mittwoch, 5. August 2009 3:36 15
Gerätecode nach Code-Liste eingebenDie Codes der entsprechenden Geräte sind der Codeliste, die dieser Bedie-nungsanleitung beiliegt, zu entnehmen. So gehen Sie vor:1. Schalten Sie das betreffende Gerät manuell ein.2. Drücken Sie die gewünschte Quellentaste (TV, DVD, VCR, AUX) kurz. 3. Halten Sie die Taste CODE für ca. 3 Sekunden gedrückt, bis die blaue LED
dauerhaft aufleuchtet. 4. Geben Sie den vierstelligen Code aus der Code-Tabelle ein.
Zur Bestätigung jedes Tastendrucks geht die blaue LED kurz aus.Wenn die Codeeingabe gültig war, erlischt die blaue LED nach der Ein-gabe der letzten Stelle. Wenn ein ungültiger Code eingegeben wurde, blinkt die blaue LED ca. zwei Sekunden lang, bevor sie erlischt.
Wenn das Gerät nicht erwartungsgemäß reagiert, wiederholen Sie die Pro-grammierung ggf. mit einem anderen Code. Bitte probieren Sie alle zu Ihrer Marke angegebenen Codes aus. Wählen Sie den Code aus, auf den alle verfüg-baren Befehle Ihrer Fernbedienung korrekt reagieren.Wenn Sie damit auch keinen Erfolg haben, dann versuchen Sie es mit der im Kapitel "Automatischer Suchlauf" beschriebenen Suchmethode.
Manueller Code-SuchlaufSo führen Sie einen manuellen Suchlauf durch: 1. Schalten Sie das betreffende Gerät manuell ein.2. Drücken Sie die gewünschte Quellentaste (TV, DVD, VCR, AUX) kurz. 3. Halten Sie die Taste CODE für ca. 3 Sekunden gedrückt, bis die blaue LED
dauerhaft aufleuchtet. 4. Drücken Sie mehrmals nacheinander (bis zu 350 Mal) die Taste POWER, P+
oder P– oder (nur bei VCR), bis das Gerät, das gesteuert werden soll, ausgeschaltet, den Kanal wechselt oder entsprechend reagiert.Die Code-Suche wird bei der momentan gespeicherten vierstellen Nummer begonnen.
5. Drücken Sie kurz OK, um den Code zu speichern.Aufgrund der umfangreichen Anzahl der verschiedenen Code-Nummern sind pro Gerätetyp bis zu 350 unterschiedliche Codes vorpogrammiert. In Einzelfällen ist es möglich, dass nur die gebräuchlichsten Hauptfunk-tionen verfügbar sind. Bei einigen speziellen Gerätemodellen kann es sein, dass die beschriebene Vorgehensweise nicht zum Erfolg führt.
48

E
MD 24089a ES EN DE Aldi Final Content.book Seite 49 Mittwoch, 5. August 2009 3:36 15
D
Automatischer SuchlaufWenn Ihr Gerät nicht auf die Fernbedienung anspricht, obwohl Sie alle für Ih-ren Gerätetyp und die entsprechende Marke aufgeführten Codes ausprobiert haben, versuchen Sie es mit dem automatischen Suchlauf. Hierdurch können Sie auch solche Codes solcher Marken finden, die in der Gerätecode-Liste nicht aufgeführt sind. 1. Schalten Sie das betreffende Gerät manuell ein.2. Drücken Sie die gewünschte Quellentaste (TV, DVD, VCR, AUX) kurz. 3. Halten Sie die Taste CODE für ca. 3 Sekunden gedrückt, bis die blaue LED
dauerhaft aufleuchtet. 4. Richten Sie die Fernbedienung auf das Gerät und drücken Sie einmal kurz
die Taste P+.Hat das Gerät keine Programm-Funktion, drücken Sie statt P+ die Taste oder POWER. Die Fernbedienung startet nach 6 Sekunden die Code-Suche und sendet im Sekundentakt (siehe auch nächsten Abschnitt) nacheinander alle Codes. Bei jedem Senden leuchtet die blaue LED auf.
5. Sobald das Gerät auf die Fernbedienung reagiert, drücken Sie OK . – Haben Sie es verpasst, rechtzeitig OK zu drücken, können Sie mit der Taste P– schrittweise zum Code zurückspringen, auf den das Gerät reagiert hat.
Um die Suche abzubrechen, drücken Sie EXIT.
1-Sekunden- oder 3-SekundentaktWenn die Fernbedienung statt sekündlich nur alle 3 Sekunden einen neuen Code senden soll, gehen Sie folgendermaßen vor:Drücken Sie innerhalb von 6 Sekunden nach Drücken der Taste P+ (bzw. oder POWER) wie in Punkt 4 beschrieben, die Taste P+ oder P– noch einmal. Die Fernbedienung sendet jetzt nur alle 3 Sekunden einen neuen Code. Da-durch gewinnen Sie mehr Zeit, der Vorgang dauert aber auch länger.
Codesuche nach HandelsnameDiese Funktion bietet Ihnen die Möglichkeit, nach Handelsnamen zu suchen (siehe Code-Liste). Gehen Sie wie folgt vor:1. Schalten Sie das betreffende Gerät manuell ein.2. Drücken Sie die gewünschte Quellentaste (TV, DVD, VCR, AUX) kurz. 3. Halten Sie die Taste CODE für ca. 3 Sekunden gedrückt, bis die blaue LED
dauerhaft aufleuchtet. 4. Geben Sie den einstelligen Code laut folgender Tabelle ein:
Taste 1 = Medion, Lifetec, Micromaxx, Microstar, Tevion, Videon,
MD 24089a 49

MD 24089a ES EN DE Aldi Final Content.book Seite 50 Mittwoch, 5. August 2009 3:36 15
TCM (Tchibo), General Technic, Innovation, MagnumTaste 2 = Philips, Erres, Pye, Philco, RodiolaTaste 3 = Sony, Akai, Panasonic, JVC, Sharp, Toshiba, JVC, Daewo Taste 4 = Thomson, Brandt Taste 5 = Telefunken, Saba, Nordmende, Fergusson, BairdTaste 6 = Grundig, BlaupunktTaste 7 = Nokia, Finlux, ITTTaste 0 = alle Marken.
5. Drücken Sie mehrfach die Taste P+ (oder bei Videorecordern POWER oder ), bis das Gerät entsprechend reagiert. Gehen Sie dabei zügig vor, da
sonst die automatische Codesuche gestartet wird.6. Speichern Sie den Code durch Drücken von OK.
Wurden alle Codes durchsucht, blinkt die blaue LED für ca. 3 Sekunden.
Code-IdentifizierungDie Code-Identifizierung bietet Ihnen die Möglichkeit, bereits eingegebene Co-des, die in der Fernbedienung gespeichert sind, zu bestimmen. So gehen Sie vor:1. Schalten Sie das betreffende Gerät manuell ein.2. Drücken Sie die gewünschte Quellentaste (TV, DVD, VCR, AUX) kurz. 3. Halten Sie die Taste CODE für ca. 3 Sekunden gedrückt, bis die blaue LED
dauerhaft aufleuchtet. 4. Drücken Sie kurz die CODE-Taste. Die blaue LED erlischt kurz beim
Tastendruck.5. Um die erste Zahl zu finden, drücken Sie die Zifferntasten von 0 bis 9.
Wenn die blaue LED kurz ausgeht, ist es die erste gespeicherte Zahl. 6. Um die zweite Zahl festzustellen, drücken Sie wiederum die Zifferntasten
von 0 bis 9. Wiederholen Sie den Vorgang für die dritte und vierte Zahl.7. Die blaue LED erlischt, sobald die Taste für die vierte Zahl gedrückt wurde.Die Code-Identifizierung ist jetzt abgeschlossen.
Normaler Betrieb
Nachdem Sie die Programmierung Ihrer Fernbedienung für Ihre Audio/Video-Geräte vorgenommen haben, arbeitet die Fernbedienung in den gebräuchlich-sten Hauptfunktionen wie die Original-Fernbedienung des jeweiligen Gerätes. Richten Sie Ihre Fernbedienung auf das gewünschte Gerät und drücken Sie die entsprechende Quellentaste. Die blaue LED leuchtet kurz auf, bleibt aber nicht beleuchtet.
50

E
MD 24089a ES EN DE Aldi Final Content.book Seite 51 Mittwoch, 5. August 2009 3:36 15
D
Sie aktivieren die Funktionen nun durch Drücken der entsprechenden Funkti-onstaste Ihrer Universal-Fernbedienung. Bei jedem Tastendruck leuchtet die blaue LED kurz auf.
Bitte beachten Sie: - Unter Umständen ist nicht jede Funktion Ihrer Original-Fernbedienung auf der Universal-Fernbedienung direkt verfügbar. - Insbesondere bei neueren Geräten ist es möglich, dass die Funktionen zunächst unter anderen Tasten als erwartet abgelegt oder gar nicht ver-fügbar sind.
Sonderfunktionen
„Alles-aus“-FunktionSie können alle vorprogrammierten Geräte gleichzeitig auszuschalten. Gehen Sie wie folgt vor:
Drücken Sie innerhalb einer Sekunde zweimal die Power-Taste und hal-ten Sie diese für 3 Sekunden gedrückt. Jetzt werden alle vorprogrammierten Geräte nacheinander ausgeschaltet. Dieses dauert ca. 3 Sekunden. Anschlie-ßend erlischt die LED.
Die Fernbedienung muss solange auf die zu bedienenden Geräte ausgerichtet werden, bis die blaue LED erlischt. Einige Geräte lassen sich mit der POWER -Taste ein- und ausschalten. Solche ausgeschalteten Geräte werden mit dern Alles-aus-funktion eingeschaltet.
EPG – Elektronisches ProgrammDie Taste EPG („EPG“ = „Electronic Program Guide“) hat verschiedene Funk-tionen je nachdem, auf welchen Code sie angewendet wird:Bei DVD-Codes öffnet die Taste das Titel-Menü.Bei SAT- oder VCR-Codes können Sie mit der Taste eine Programmierung vor-nehmen, sofern Ihr Videorecorder über eine SHOWVIEW-Funktion verfügt.
Universal-Funktionen („Punch Through“)
Die Universal-Funktionen (auch „Punch Through“-Funktionen genannt) er-möglichen Ihnen, bestimmte Funktionen an einem anderen Gerätetyp als dem eingestellten auszuführen. Dies sind die Funktionen Lautstärke, Stummschal-tung sowie die Abspielfunktionen.
Wenn die Fernbedienung im VCR-, DVD-, SAT- oder CBL-Betrieb ist, steuern die Tasten Lautstärke und Stummschaltung ( ) das TV-Gerät an (sofern die anderen Geräte nicht über eine eigene Lautstärkeregelung verfügen).
MD 24089a 51

MD 24089a ES EN DE Aldi Final Content.book Seite 52 Mittwoch, 5. August 2009 3:36 15
Wenn die Fernbedienung im TV-Betrieb oder in einem anderen Betrieb ohne Abspielfunktionen ist, steuern die Tasten Wiedergabe, Pause, Stopp und ggf. Aufnahme einen angeschlossenen Videorecorder, DVD-Player oder DVD-Rekorder an. Es wird immer das zuletzt gewählte Gerät angesteuert.
Universal-Funktion Lautstärke/Stummschaltung auf einen anderen Gerätetyp programmierenIm Auslieferungszustand ist die Universal-Fernbedienung so eingestellt, dass die Funktionen Lautstärke und Stummschaltung automatisch das TV-Gerät steuern, wenn gerade eine Quellentaste für ein Gerät mit Bildübertragung (DVD, Videorecorder etc.) gedrückt ist.Sie können die Universal-Fernbedienung auch so einstellen, dass die Universal-Funktionen Lautstärke und Stummschaltung einen anderen Gerätetyp als das TV-Gerät ansteuern.1. Halten Sie die CODE-Taste für ca. 3 Sekunden gedrückt, bis die blaue LED
dauerhaft aufleuchtet. 2. Drücken Sie die -Taste, bis die blaue LED kurz ausgeht.3. Drücken Sie eine Quellentaste für das Gerät, auf das die Lautstärke- und
Stummschaltung-Funktion übertragen werden soll. Die blaue LED bleibt an.
4. Drücken Sie die -Taste; die blaue LED geht aus. Wenn Sie aus Versehen ein Gerät gewählt haben, das keine eigene Lautstärkeregelung besitzt, blinkt die blaue LED für 3 Sekunden.
Universal-Funktion Lautstärke/Stummschaltung auf ein bestimmtes Gerät programmierenSie können die Universal-Fernbedienung so einstellen, dass sie auf ein be-stimmtes Gerät nur dessen eigene Funktionen Lautstärke und Stummschal-tung anwendet. Die Universal-Funktion ist damit für diesen Modus bzw. Ge-rätetyp ausgeschaltet.1. Halten Sie die CODE-Taste für ca. 3 Sekunden gedrückt, bis die blaue LED
dauerhaft aufleuchtet. 2. Drücken Sie die -Taste, bis die blaue LED kurz erlischt.3. Drücken Sie die Quellentaste für das Gerät, das nur seine eigene
Lautstärke- und Stummschaltungsfunktion haben soll.4. Drücken Sie eine Lautstärke-Taste. Die blaue LED bleibt an.5. Drücken Sie erneut , und die blaue LED geht aus.
52

E
MD 24089a ES EN DE Aldi Final Content.book Seite 53 Mittwoch, 5. August 2009 3:36 15
D
Universal-Funktion Lautstärke/Stummschaltung wieder einstellenFalls Sie die Universal-Funktionen Lautstärke und Stummschaltung wie in den vorangehenden zwei Abschnitte beschrieben verändert haben, können Sie die Funktionen wieder auf ihre Werkseinstellung zurückstellen und so den „Punch-Through“-Effekt wiederherstellen.1. Halten Sie die CODE-Taste für ca. 3 Sek. gedrückt, bis die blaue LED
dauerhaft aufleuchtet. 2. Halten Sie die -Taste gedrückt, bis die blaue LED kurz erlischt.3. Drücken Sie noch einmal . Die blaue LED erlischt ganz. Die Funktionen
Lautstärke und Stummschaltung sind jetzt im Auslieferungszustand.
Fehlerbehebung
Die Fernbedienung funktioniert nicht:Überprüfen Sie, ob Ihre Geräte korrekt angeschlossen und eingeschaltet sind.Überprüfen Sie, ob die Batterien der Fernbedienung korrekt eingelegt sind und die Polung +/– übereinstimmt.Falls die Batterien zu schwach sind, tauschen Sie diese durch neue aus.
Es sind mehrere Gerätecodes unter dem Markennamen meines Geräts aufgeführt. Wie ermittle ich den richtigen Gerätecode?
Um den richtigen Gerätecode für Ihr Gerät zu bestimmen, probieren Sie die Codes nacheinander aus, bis die meisten Funktionen des Gerätes ordnungs-gemäß funktionieren.
Die Geräte reagieren nur auf einige Befehle der Fernbedienung:Testen Sie weitere Codes, bis die Geräte auf die Befehle entsprechend rea-gieren.Wenn die manuelle Codeeingabe und die automatische Codesuche nicht zum Erfolg führt, kann es in besonderen Einzelfällen vorkommen, dass das Gerät nicht kompatibel zu Ihrer Universal-Fernbedienung ist.
Technische Daten Universal-Fernbedienung
Batterien: 2 x 1,5 V Micro (LR03/AAA) – Alkaline empfohlen
LED-Klasse: 1M
MD 24089a 53

MD 24089a ES EN DE Aldi Final Content.book Seite 54 Mittwoch, 5. August 2009 3:36 15
Hilfe bei Störungen
Wenden Sie sich bei allen weitergehenden Störungen an unser Service-Center.
Empfangsstörungen bei einigen Sendern
Bei Verwendung eines schnurlosen DECT-Telefons kann es in Einzelfällen zu Empfangsstörungen bei den Sendern Sat1, ProSieben, KABEL1, NEUN LIVE Te-levision, TELE5, DSF, N24 oder Home Shopping Europe kommen. Diese Tele-fone senden in einem Frequenzbereich, auf dem die Signale der genannten Sender bei handelsüblichen LNBs von der Antenne zum Receiver übertragen werden. Wenn dies der Fall ist, gehen Sie wie folgt vor.
Prüfen Sie die Montage und den Anschluss der Antennen.Lassen Sie ggf. die Antenne, die Antennenanschlüsse und die Antennenver-kabelung von einem Fachmann prüfen.Stellen Sie die Basisstation des DECT-Telefons möglichst weit vom Receiver und den Antennenkabeln auf.
Symptom Ursache/AbhilfeKeine Anzeige im Display Das Stromkabel ist nicht angeschlossen.
Schließen Sie das Stromkabel an die Netz-Steckdose an.Kein Ton oder Bild, die Uhrzeitanzeige leuchtet im Display.
Der Receiver ist im Standby-Betrieb.Drücken Sie die Taste „STANDBY “. Der Receiver schaltet sich ein und das Programm wird am TV-Bildschirm angezeigt.
Kein Ton oder Bild, schlechtes Bild.
Die Antenne ist nicht auf den Satelliten ausgerichtet.Richten Sie die Antenne richtig aus. Beachten Sie die Anwei-sung in der Bedienungsanleitung zur Satellitenantenne.Der LNB ist defekt. Ersetzen Sie den LNB.
Kein oder nur ein schwaches Signal.
Prüfen Sie die Kabelverbindung vom LNB zum Receiver und vom Receiver zu den angeschlossenen Geräten.
Das TV-Gerät zeigt kein Bild an.
Das System ist nicht korrekt angeschlossen.Prüfen Sie den Anschluss des SCART- oder HF-Kabels.Das TV-Gerät ist nicht im AV-Modus.Schalten Sie das TV-Gerät auf den jeweiligen AV-Eingang.
Die Fernbedienung funktioniert nicht.
Die Batterien sind verbraucht.Ersetzen Sie die Batterien durch frische.Die Fernbedienung ist falsch ausgerichtet.Richten Sie die Fernbedienung auf die Vorderseite des Recei-vers und stellen Sie sicher, dass nichts zwischen Fernbedie-nung und Receiver steht.
Gerät reagiert nicht. Es ist eine falsche Quellentaste gedrückt. Drücken Sie die Quellentaste „STB“ für Ihren Satelliten-Receiver.
54

E
MD 24089a ES EN DE Aldi Final Content.book Seite 55 Mittwoch, 5. August 2009 3:36 15
D
Reinigung
ACHTUNG!Bevor Sie das Gerät reinigen, müssen Sie den Netzstecker aus der Netz-steckdose ziehen.Lassen Sie keine Feuchtigkeit in das Gehäuse gelangen. Es besteht die Ge-fahr eines elektrischen Schlags.
Reinigen Sie die Geräteaußenseite und die Zubehörteile mit einem weichen feuchten Tuch. Reinigen Sie den Satelliten-Receiver nie mit aggressiven, scheuernden oder ätzenden Reinigungsmitteln.
Entsorgung
VerpackungDas Gerät befindet sich zum Schutz vor Transportschäden in einer Verpackung. Verpackungen sind Rohstoffe, somit wiederverwen-dungsfähig und können dem Rohstoffkreislauf zugeführt werden.
GerätWerfen Sie das Gerät am Ende seiner Lebenszeit keinesfalls in den normalen Hausmüll. Erkundigen Sie sich nach Möglichkeiten einer umwelt- und sachgerechten Entsorgung.
BatterienAlte Batterien gehören in den Sondermüll, nicht zu den Hausabfällen! Entsorgen Sie alte Batterien beim Händler oder einer öffentlichen Sammelstelle.
MD 24089a 55

MD 24089a ES EN DE Aldi Final Content.book Seite 56 Mittwoch, 5. August 2009 3:36 15
Technische Daten
TunerSAT-ZF Eingang: F-BuchseEingangsbereich: 950 bis 2150 MHzImpedanz: 75 Ohm
AntenneLNB-Versorgung: 14 / 18 V, max. 400mAUmschaltsignale: DiSEqC 1.0 / DiSEqC 1.2 Motorsteuerung,
Tone Burst 22 kHz
VideoAnschluss: TV-SCART (FBAS , RGB und YUV),
VCR SCART (RGB), Video-Cinch (FBAS)S-Video
Impedanz: 75 OhmBildschirmformate: 4:3 / 16:9 / Letterbox / VollbildVideoformate: RGB, FBAS, YUV
AudioAusgänge: Analog Stereo, Digital SPDIFAnschlüsse: 3 x Cinch-Anschluss (RCA)
1 x SPDIF optical1 x SPDIF coaxial
Digital-Audio: PCM / AC-3 / dts
SonstigesStromversorgung: 230 V~ 50 HzBatterien Fernbedienung: 2 x 1,5 V Micro AAA, LR03Leistungsaufnahme: 25 WVerbrauch Standby-Modus: < 10 WVerbrauch Low Power Standby: < 1 WMaße (B x H x T): ca. 280 x 45 x 210 mmGewicht: ca. 1,5 kgArbeitstemperatur: +5 °C bis +40 °C
Technische Änderungen vorbehalten!
56

CODE
S
MD 24089a ES EN DE Aldi Final Content.book Seite 3 Mittwoch, 5. August 2009 3:36 15
Lista de elementos de código/Code list/Codeliste
Índice/Overview/Inhalt
TV . . . . . . . . . . . . . . . . . . . . . . . . . . . . . . . . . . . . . . . . . . . . . 3VCR . . . . . . . . . . . . . . . . . . . . . . . . . . . . . . . . . . . . . . . . . . . 15DVD . . . . . . . . . . . . . . . . . . . . . . . . . . . . . . . . . . . . . . . . . . . 20CD Players . . . . . . . . . . . . . . . . . . . . . . . . . . . . . . . . . . . . . . . 28Satellite Receivers . . . . . . . . . . . . . . . . . . . . . . . . . . . . . . . . . 31DVD Recorders (DVD-R, DVD-RW, etc) . . . . . . . . . . . . . . . . . . . . 40Decoders . . . . . . . . . . . . . . . . . . . . . . . . . . . . . . . . . . . . . . . 42HDD-DVR . . . . . . . . . . . . . . . . . . . . . . . . . . . . . . . . . . . . . . . 43TV/VCR Combos . . . . . . . . . . . . . . . . . . . . . . . . . . . . . . . . . . . . 46TV/DVD Combos . . . . . . . . . . . . . . . . . . . . . . . . . . . . . . . . . . . 48DVD/VCR Combos . . . . . . . . . . . . . . . . . . . . . . . . . . . . . . . . . . 50HTIB . . . . . . . . . . . . . . . . . . . . . . . . . . . . . . . . . . . . . . . . . . . 52Descodificadores adicionales/Auxiliary Set-Top Boxes/Weitere Set-Top Boxen . . . . . . . . . . . . . . . . . . . . . . . . . . . . . . 55LD . . . . . . . . . . . . . . . . . . . . . . . . . . . . . . . . . . . . . . . . . . . . 56DVB-T . . . . . . . . . . . . . . . . . . . . . . . . . . . . . . . . . . . . . . . . . . 56AUX . . . . . . . . . . . . . . . . . . . . . . . . . . . . . . . . . . . . . . . . . . . 59Code Searching By Brand Name . . . . . . . . . . . . . . . . . . . . . . . . 61
TV
AACER 1484ACME 0013ADA 0008ADC 0012 0008ADMIRAL 0019 0108 0002 0001 0047 0000ADYSON 0003AGAZI 0002AGB 0123AIKO 0003 0009 0004AIWA 0184 0248 0291AKAI 1410 0011 0086 0009 0068 0004 0006 0008 0051 0061
0088 0169 0200 0133 0141 0069AKIBA 0011AKURA 0169 0074 0002 0009 0011 0071
MD 24089a 3

MD 24089a ES EN DE Aldi Final Content.book Seite 4 Mittwoch, 5. August 2009 3:36 15
ALBA 0028 0027 0009 0011 0003 0068 0083 0169 0047 02450248 0162 0062
ALBIRAL 0037ALKOS 0164ALLORGAN 0157 0026ALLSTAR 0051ALTUS 0042AMPLIVISION 0003AMSTRAD 0011 0009 0068 0074 0002 0108 0071 0069 0030 0123
0013ANAM 0009 0065 0109ANGLO 0009ANITECH 0009 0002 0043 0109ANSONIC 0009 0014AOC 0134ARC EN CIEL 0126 0045 0139ARCAM 0003ARISTONA 0169 0051ARTHUR MARTIN 0158ASA 0017 0110 0016 0018 0000 0021ASBERG 0051 0043ASTRA 0009ASUKA 0011 0002 0003ATLANTIC 0169 0003 0051 0157ATORI 0009AUDIOSONIC 0009 0003 0169 0011 0051 0139 0157 0090AUDIOTON 0003AUSIND 0043AUTOVOX 0003 0002 0101 0157 0000 0125 0043
BBAIRD 0111 0139 0245BANG & OLUFSON 0199 0000BARCO 0112BASIC LINE 0009 0011 0051 0245BASTIDE 0003BAUR 0169 0118 0076 0141 0132BEKO 0042 0083 0034 0095 1064 0007BEON 0169 0051BEST 0113BESTAR 0051 0245BINATONE 0003BLACK DIAMOND 0171BLACK PANTHER LINE0245BLACK STAR 0129BLAUPUNKT 0117 0202 0135 0008 0022 0100BLOOM 0015BLUE SKY 1485 0156 0011BLUE STAR 0120BONDSTEC 0129BOOTS 0003BPL 0120BRANDT 0127 0045 0022 0036 0126 0139 0046BRION VEGA 0051 0169 0000BRITANNIA 0003
4

CODE
S
MD 24089a ES EN DE Aldi Final Content.book Seite 5 Mittwoch, 5. August 2009 3:36 15
BROKSONIC 0920BRUNS 0000 0007BSR 0131 0026BTC 0011BUSH 0028 0027 0032 0009 0011 0019 0205 0039 0051 0068
0169 0107 0115 0131 0139 0167 0245 0248 0024 01320120 0062
CCAPSONIC 0002CARREFOUR 0027CASCADE 0009CATHAY 0051 0169CENTRUM 0168 0205CENTURION 0051 0169CENTURY 0000CGE 0129 0047 0131 0043CIMLINE 0009 0028CITY 0009CLARIVOX 0169 0037CLATRONIC 0009 0011 0051 0002 0083 0003 0129 0030 0043COMBITECH 0248CONCORDE 0009CONDOR 0198 0051 0083 0003 0245CONRAC 0038 1395CONTEC 0003 0009 0027 0030 0029CONTINENTAL EDISON00220111 0036 0045 0126 0139 0046COSMEL 0009CPRTEC 0156CROSLEY 0129 0131 0000 0043CROWN 0009 0169 0083 0047 0051 0245 0121 0043CS ELECTRONICS 0011 0129 0003CTC 0129CTC CLATRONIC 0014CYBERCOM 0177 0038 0171 0002 0009 0206 0205 0207 0208 0210
0169 0042 0044 0127 0047 0061 0063 0067 0068 01030107 0115 0154 0168 0185 0228 0209 0343 0924 09330248 0291
CYBERMAXX 0177 0038 0171 0002 0009 0206 0200 0205 0207 02080210 0211 0169 0015 0042 0044 0047 0048 0049 00610063 0067 0068 0087 0103 0107 0115 0127 0154 01550168 0170 0185 0228 0229 0209 0218 1005 0894 03430924 0933 0248 0291
CYBERTRON 0011CYTRON 0177 0038 0171 0002 0009 0206 0200 0205 0207 0208
0210 0211 0169 0015 0042 0044 0047 0048 0049 00610063 0067 0068 0087 0103 0107 0115 0127 0154 01550168 0170 0185 0228 0229 0209 0218 1005 0894 03430924 0933 0248 0291
DDAEWOO 0094 0009 0191 0003 0051 0115 0245DAINICHI 0011DANSAI 0002 0169 0051DANTAX 0171 0161 0169 0088 0034 0113
MD 24089a 5

MD 24089a ES EN DE Aldi Final Content.book Seite 6 Mittwoch, 5. August 2009 3:36 15
DATSURA 0121DAYTON 0009DAYTRON 0245DCE 0205 0042DE GRAAF 0019 0006 0033DECCA 0003 0169 0004 0051 0123 0030DECCACOLOR 0015DELL 0025DESMET 0051 0169DIGITOR 0227 0228DISNEY 0148DIXI 0009 0169 0051DTS 0009DUAL 0177 0038 0171 0002 0009 0206 0207 0208 0169 0042
0044 0127 0047 0061 0063 0067 0068 0003 0103 01070115 0126 0131 0139 0154 0160 0168 0210 0228 03430924 0933 0248 0291 0125 0089
DUAL-TEC 0009 0131 0003DUMONT 0003 0014 0017 0018 0000DURABRAND 0228 1006 1007 1008 1009 0933 1088DUX 0169DYNATRON 0051 0169
EELBE 0108 0157 0037ELCIT 0000ELECTRO TECH 0009ELEKTA 0120ELIN 0051 0003 0169 0016 0018ELITE 0011 0051ELMAN 0014 0131ELTA 0009EMERSON 0141 0127 0000ERAE 1003ERRES 0169 0051ESC 0245ETRON 0009EURO-FEEL 0002EUROLINE 0149 0169 0088EUROMANN 0002 0051 0003EUROPHON 0003 0014 0051 0131 0123EXPERT 0157
FFAIRTEC 1485 1416 0204 0156FENNER 0009 0115FERGUSON 0127 0166 0035 0169 0036 0050 0052 0111 0163 0037FIDELITY 0003 0019 0068 0074 0096FINLANDIA 0019 0006 0110 0128FINLUX 0061 0087 0063 0003 0004 0016 0167 0110 0131 0157
0169 0051 0017 0018 0014 0042 0000 0123 0043FIRSTLINE 0156 0003 0129 0009 0051 0062 0026FISHER 0006 0003 0018 0083 0131 0000 0027 0029 0040FLINT 0051 0113FORMENTI 0001 0169 0003 0131 0133 0000 0043 0125
6

CODE
S
MD 24089a ES EN DE Aldi Final Content.book Seite 7 Mittwoch, 5. August 2009 3:36 15
FORTRESS 0001 0000FRONTECH 0019 0002 0009 0068 0118 0129 0120 0021FUJITSU 0116 0004 0157FUNAI 0002 0026
GGALAXY 0047 0083GBC 0009 0027 0131GEC 0169 0003 0004 0041 0051 0141 0123 0132GELOSO 0019 0009 0131GENERAL TECHNIC 0009 0248GENEXXA 0011 0051 0021GERICOM 1064 0049 1022 1023GOLDSTAR 0084 0129 0003 0009 0019 0051 0131 0169 0171 0261
0012 0093GOODMANS 0009 0111 0002 0004 0027 0169 0028 0051 0068 0115
0127 0171 0245 0283 0093GORENJE 0083GPM 0011GRAETZ 0141 0142 0021GRANADA 0127 0019 0003 0006 0169 0027 0031 0051 0054 0004
0064 0133 0138 0128 0040 0043 0123GRANDIN 0009 0169 0011 0245 0120GRUNDIG 0117 0091 0114 0101 0135 0008 0017 0136 0043
HH & B 0343 0228HB 1003 0168 0095 0015 0042 1011 1020 1389HAAZ 0228HALIFAX 0002 0003HAMPTON 0003HANSEATIC 0009 0003 0027 0169 0051 0083 0118 0131 0141 0007
0026HANSOL 1019HANTAREX 0009 0123HARWOOD 0171HCM 0002 0003 0009 0074 0120HIFIVOX 0139HINARI 0171 0009 0011 0027 0051 0006 0169 0248 0043 0137HISAWA 0011 0113 0120HISENSE 1486 1485 1417 1416 1415 0204 0156HITACHI 0027 0019 0085 0134 0153 0213 0140 0144 0003 0118
0004 0016 0023 0041 0045 0047 0131 0133 0138 01390141 1013 0021 0046 0033 0123 0142
HORNYPHON 0051HOSHAI 0011HUANYU 0003 0115HYGASHI 0003HYPER 0003 0009 0129 0131HYPSON 0002 0003 0051 0169 0120HYUNDAI 1010
IICE 0009 0002 0003 0011 0051 0068
MD 24089a 7

MD 24089a ES EN DE Aldi Final Content.book Seite 8 Mittwoch, 5. August 2009 3:36 15
IIYAMA 1414IMPERIAL 0047 0051 0083 0129 0131 0021 0043INDESIT 0024 0101INDIANA 0051 0169INGELEN 0021INGERSOL 0009INNO HIT 0009 0011 0003 0004 0051 0169 0245 0093 0123INNOVATION 0171 0111 0002 0009 0169 0061 0067 0068 0103 0107
0115 0154 0168 0177 0248 0291INTERBUY 0009 0129 0109INTERFUNK 0051 0129 0169 0139 0141 0000 0021INTERTRONIC 0894INTERVISION 0002 0003 0014 0109IRRADIO 0009 0011 0051 0169 0068ISUKAI 0011ITC 0003 0131ITS 0011 0051 0068 0120ITT 0061 0009 0143 0031 0133 0141 0021 0142 0132ITT/NOKIA 0133 0142 0021ITV 0169 0171 0009 0088 0245
JJEC 0164JVC 0051 0053 0027 0068
KKAISUI 0009 0011 0003 0120KAMOSONIC 0003KAMP 0003KAPSCH 0157 0021KARCHER 0169 0003 0009 0016 0037KENDO 0019 0014 0028 0108 0245KENNEDY 0131 0157KING TV 0015KINGSLEY 0003KNEISSEL 0174KOLSTER 0051KONKA 0047 0068 0229 0011KORPEL 0051 0169KORTING 0000KOYODA 0009KTV 0003KURO 0121KYOTO 0037
LLENCO 0009 0245LENOIR 0003 0009LESA 0129LEYCO 0169 0002 0004 0051 0026LG 0084 0119 0129 0149 0019 0003 0051 0088 0131 0169
0171 0009 0261 0093LIESENK 0169
8

CODE
S
MD 24089a ES EN DE Aldi Final Content.book Seite 9 Mittwoch, 5. August 2009 3:36 15
LIFE 0002 0009 0061 0067 0068 0103 0107 0111 0115 01540168 0169 0171 0177 0205 0291
LIFETEC 0177 0038 0171 0002 0009 0206 0205 0207 0208 02100211 0169 0015 0042 0044 0047 0048 0049 0061 00630067 0068 0087 0103 0107 0115 0127 0154 0155 01680170 0185 0228 0229 0209 0218 1005 0894 0343 09240933 0248 0291
LOEWE 1399 0097 0098 0051 0169 0000LOGIK 0030LS ELECTRONIK 0042LUMA 0019 0169 0141 0157LUMATRON 0002 0171 0019 0088 0051 0074 0169 0107 0141 0157
0245LUX MAY 0051LUXOR 0141 0019 0047 0003 0077 0138 0093 0132
MM+P 0133MAGNADYNE 0014 0129 0131 0169 0000 0123MAGNAFON 0003 0014 0043 0123MAGNUM 0002 0111 0009 0169 0171 0061 0067 0068 0103 0107
0115 0154 0168 0177 0200 0291MANDOR 0002MANESTH 0002 0169 0003 0028 0051MARANTZ 1482 0051 0169MARELLI 0000MARK 0051 0169MATSUI 0173 0099 0091 0027 0180 0028 0147 0003 0004 0009
0019 0051 0068 0101 0164 0169 0248 0113 0123 00130062 0026 0030
MATSUSHITA 0065MAXMEDIA 0115MCMICHAEL 0041MEDIATOR 0051 0169MEDION 1419 1397 1395 1002 1001 0177 0038 0171 0002 0009
0206 1015 0200 0205 0207 0208 0210 0211 0169 00150042 0044 0047 0048 0049 0061 0063 0067 0068 00870103 0107 0115 0127 0148 0154 0155 0168 0170 01850228 0229 0209 0218 1005 0894 0343 0924 0933 02480291 1014
MELECTRONIC 0009 0016 0169 0018 0003 0036 0051 0068 0110 01150139 0021 0109
MEMOREX 0009 0920MEMPHIS 0004 0009METZ 1398 0205 0058 0038 0201 0135 0107 0151 0152 0000
0075MICROMAXX 0177 0038 0171 0002 0009 0206 0200 0205 0207 0208
0210 0211 0169 0015 0042 0044 0047 0048 0049 00610063 0067 0068 0087 0103 0107 0115 0127 0154 01550168 0170 0185 0228 0229 0209 0218 1005 0894 03430924 0933 0248 0291
MICROSTAR 0177 0038 0171 0002 0009 0206 0200 0205 0207 02080210 0211 0169 0015 0042 0044 0047 0048 0049 00610063 0067 0068 0087 0103 0107 0115 0127 0154 0155
MINERVA 1015 0101 0135
MD 24089a 9

MD 24089a ES EN DE Aldi Final Content.book Seite 10 Mittwoch, 5. August 2009 3:36 15
MINOKA 0051MITSUBISHI 0000 0027 0030 0051 0054 0057 0060 0098 0101 0135
0205MIVAR 0055 0083 0003 0093 0123 0043MOTION 0043MT LOGIC 0090MTC 0132MULTI SYSTEM 0169MULTITECH 0003 0009 0014 0019 0169 0027 0045 0129 0131 0043MURPHY 0003 0133 0018
NNAD 0141NAIKO 0099NAONIS 0019 0108NATIONAL 0064 0101NEC 1482 1483 0185 0027 0056NECKERMANN 0003 0169 0008 0019 0022 0051 0083 0118 0132 0000NEI 0051 0068 0169 0113NEOVIA 1019NESCO 0129NEW WORLD 0011NEWTECH 0009 0051NEXIUS 0015NICAMAGIC 0003NIKKAI 0002 0003 0164 0004 0011 0051 0169NOBLIKO 0003 0014 0043NOGAMATIC 0139NOKIA 0061 0143 0063 0141 0077 0133 0031 0021 0132 0142NORDMENDE 1391 1392 1394 0111 0127 0036 0045 0051 0126 0139
0046 0000 0021 0024NORDVISION 0169
OOCEANIC 0141 1011 0142 0021 1089OKANO 0083ONCEAS 0003ONWA 0069ORBIT 0051ORION 0099 0147 0159 0009 0212 0028 0051 0154 0169 0171
0920 0248 0283 0123 0142 0030 0013 0062 0075 0026ORMOND 0205OSAKI 0011 0002 0003 0004 0074OSO 0011OSUME 0004 0029OTTO VERSAND 0003 0169 0008 0001 0027 0051 0076 0111 0118 0131
0139 0141 0120 0121 0132
PPACKARD BELL 0204 0203PAEL 0003PALLADIUM 0003 0083 0012PANAMA 0002 0003 0009
10

CODE
S
MD 24089a ES EN DE Aldi Final Content.book Seite 11 Mittwoch, 5. August 2009 3:36 15
PANASONIC 0065 0067 0064 0197 0072 0186 0101 0141 0021 01510142 0124 0152
PATHE CINEMA 0003 0083 0131 0037PATHE MARCONI 0022 0045 0126 0139 0037 0046PAUSA 0009PERDIO 0004PHILCO 0047 0129 0131 0000 0043PHILHARMONIC 0003PHILIPS 0200 0088 0217 0202 0020 0169 0003 0041 0181 0051
0083 0111 0115 0131 0141 0154 0000 0043 0089PHOCUS 0042 0095 1064PHOENIX 0051 0169 0000PHONOLA 0051 0169 0000PIONEER 1482 1418 0010 0145 0036 0051 0139 0169 0021PLANTRON 0002 0051POPPY 0009PORTLAND 0245PRANDONI-PRINCE 0019 0141 0123PRECISION 0003PRIMA 0009 0021PRINZ 0047PRO2 0177 0038 0171 0002 0009 0206 0200 0205 0207 0208
0210 0211 0169 0015 0042 0044 0047 0048 0049 00610063 0067 0068 0087 0103 0107 0115 0127 0154 01550168 0170 0185 0228 0229 0209 0218 1005 0894 03430924 0933 0248 0291
PROFEX 0009 0141 0043PROFILO 0171PROFI-TRONIC 0051PROLINE 0004 0051 0062PROSONIC 0161 0169 0003 0015 0042 0088 0107 0200 0068 0245PROTECH 0002 0003 0009 0169 0014 0051 0129 0131 0132 0113PROVIEW 1419 1002 1001PROVISION 0169 0171 0015PYE 0169 0051 0068PYMI 0009
QQUADRO 0205QUASAR 0129QUELLE 0169 0205 0002 0003 0016 0022 0051 0129 0131 0135
0141 0017 0018 0026 0030QUESTA 0027
RRADIOLA 0051 0169RADIOMARELLI 0129 0000 0123RADIONETTE 0016 0018RADIOTONE 0051 0007RANK 0017 0027RBM 0017RCA 0031REDIFFUSION 0141REVOX 0051 0169REX 0019 0002 0108 0157 0021
MD 24089a 11

MD 24089a ES EN DE Aldi Final Content.book Seite 12 Mittwoch, 5. August 2009 3:36 15
RFT 0000 0007R-LINE 0051 0169ROADSTAR 0002 0009 0011 0245ROBOTRON 0000RTF 0000
SSABA 0127 0111 0126 0036 0045 0139 0141 0245 0142 0046
0000 0123 0021SACCS 0037SAISHO 0028 0002 0003 0009 0248 0030 0123 0013SALORA 0019 0031 0047 0061 0107 0108 0118 0131 0138 0141
0093 0121 0128 0132 0021SAMBERS 1411 0014 0169 0043 0123SAMSUNG 0090 0105 0104 0009 0051 0172 0083 0002 0160 0003
0004 0312 0030 0093SANDRA 0003 0009SANSUI 0051 0920SANYO 0004 0006 0031 0003 0027 0016 0018 0083 0127 0160
0131 0029 0030 0040 0043SAVILLE 0248SBR 0041 0169SCHAUB LORENZ 0141 0202 0205 1003 0168 0095 0015 0042 1011 1020
1385 1386 1387 1388 1389 1390 0021 0142SCHNEIDER 0177 0003 0169 0011 0051 0068 0131 0139 0160 0245
0264 0071 0125SCHWAIGER 1024SEG 0171 0002 0205 0003 0169 0009 0014 0027 0088 0129
0131 1014 0168 0043SEI-SINUDYNE 0014 0013 0021 0026 0075 0123 0000SEITECH 0015SELECO 0019 0027 0131 0108 0157 0021SENCORA 0009SENTRA 0164SHARP 0001 0059 0005 0027 0187 0188 0029SHORAI 0026SIAREM 0014 0131 0000 0123SICATEL 0037SIEMENS 0008 0022 0200 0135 0029SIERRA 0051SIESTA 0160SILVER 0027SINGER 0014 0131 0129 0228 0000SINUDYNE 0014 0131 0169 0028 0015 0000 0075 0013 0026SKANTIC 0138 0021SKYMASTER 0016SKYWORTH 0228SLIDING 0015SOLAVOX 0092 0021SONITRON 0006 0031SONOKO 0009 0002 0169 0003 0051 0245SONOLOR 0006 0021SONTEC 0051 0169 0160SONY 0165 0130 0183 0106 0076 0027 0127 0009 0004 0182
0029 0030
12

CODE
S
MD 24089a ES EN DE Aldi Final Content.book Seite 13 Mittwoch, 5. August 2009 3:36 15
SOUND & VISION 0011 0014SOUNDWAVE 0051 0169STANDARD 0003 0009 0011 0051 0245STARLIGHT 0169STENWAY 0120STERN 0019 0157 0021SUNGOO 1415 1015 0206SUNKAI 0009 0026 0062SUNWOOD 0009 0051SUPERLA 0003SUPERTECH 0118SUPRA 0009SUSUMU 0011SUTRON 0009SYDNEY 0003SYSLINE 0169
TTANDBERG 0157 0026TANDY 0001 0003 0004 0011 0133 0021TARGA 0185 1018 1003 1004TASHIKO 0003 0019 0027 0041 0056 0128TATUNG 0051 0003 0004 0169 0123TCM 1413 0177 0038 0171 0002 0009 0206 1015 1017 1119
0205 0207 0208 0210 0169 0042 0044 0047 0061 00630067 0068 0103 0107 0115 0127 0154 0168 0185 02110228 0209 1005 0343 0924 0933 0248 0291
TEC 0003 0009 0129 0131 0133TECHNICS 0065TECHNISAT 0088 0099 0154TECHNISSON 0042TELEAVIA 0022 0036 0045 0111 0126 0139TELEFUNKEN 0166 0111 0127 0190 0022 0035 0163 0101 0102 0036
0050 0051 0052 0078 0108 0126 0139 0079TELETECH 0169 0009 0088 0129 0113TELETON 0003 0157 0118 0132TENSAI 0011 0168 0018 0051 0026TESMET 0051TEVION 0177 0038 0171 0002 0009 0206 1015 0200 0205 0207
0208 0210 0211 0169 0015 0042 0044 0047 0048 00490061 0063 0067 0068 0087 0103 0107 0115 0127 01540155 0168 0170 0185 0228 0229 0209 0214 0218 10051016 0894 0343 0924 0933 0248 0291 1064
TEXET 0003THOMSON 1393 0166 0127 0111 0003 0022 0036 0045 0176 0101
0102 0050 0051 0052 0126 0139 0163 0185 0245 0046THORN 0004 0018 0169 0035 0054 0111 0127 0141 0164 0037TOKAI 0004 0051TOKYO 0003TOMASHI 0120TOSHIBA 1482 0117 0164 0189 0027 0146 0017 0920 0082TOWADA 0131 0021TRIUMPH 0013 0123 0082
MD 24089a 13
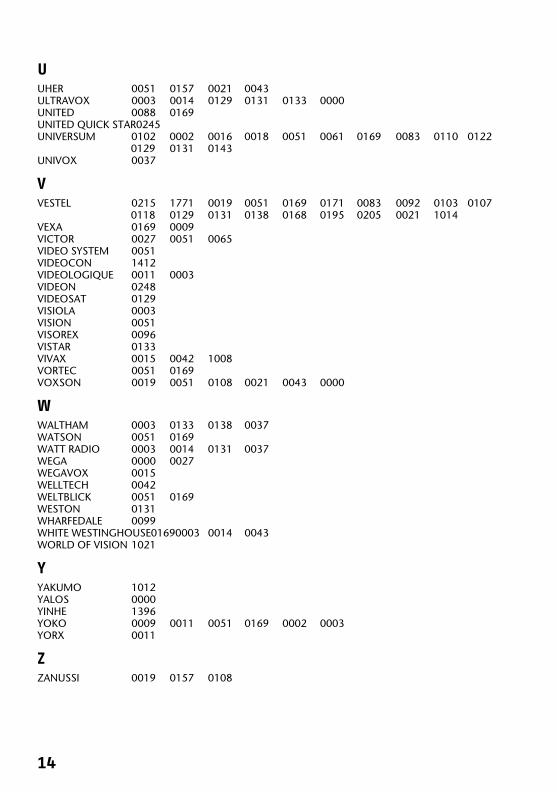
MD 24089a ES EN DE Aldi Final Content.book Seite 14 Mittwoch, 5. August 2009 3:36 15
UUHER 0051 0157 0021 0043ULTRAVOX 0003 0014 0129 0131 0133 0000UNITED 0088 0169UNITED QUICK STAR0245UNIVERSUM 0102 0002 0016 0018 0051 0061 0169 0083 0110 0122
0129 0131 0143UNIVOX 0037
VVESTEL 0215 1771 0019 0051 0169 0171 0083 0092 0103 0107
0118 0129 0131 0138 0168 0195 0205 0021 1014VEXA 0169 0009VICTOR 0027 0051 0065VIDEO SYSTEM 0051VIDEOCON 1412VIDEOLOGIQUE 0011 0003VIDEON 0248VIDEOSAT 0129VISIOLA 0003VISION 0051VISOREX 0096VISTAR 0133VIVAX 0015 0042 1008VORTEC 0051 0169VOXSON 0019 0051 0108 0021 0043 0000
WWALTHAM 0003 0133 0138 0037WATSON 0051 0169WATT RADIO 0003 0014 0131 0037WEGA 0000 0027WEGAVOX 0015WELLTECH 0042WELTBLICK 0051 0169WESTON 0131WHARFEDALE 0099WHITE WESTINGHOUSE01690003 0014 0043WORLD OF VISION 1021
YYAKUMO 1012YALOS 0000YINHE 1396YOKO 0009 0011 0051 0169 0002 0003YORX 0011
ZZANUSSI 0019 0157 0108
14

CODE
S
MD 24089a ES EN DE Aldi Final Content.book Seite 15 Mittwoch, 5. August 2009 3:36 15
VCR
AAIWA 0230 0233 0256 0293 0231 0248 0291AKAI 0300 0329 0307 0237 0236 0238 0239 0293AKIBA 0275AKURA 0275 0244 0293ALBA 0275 0233 0250 0245 0248 0246 0247ALLORGAN 0311AMBASSADOR 0250AMSTRAD 0253 0231 0254ANITECH 0275APEX 0949ASA 0257 0256ASUKA 0275 0257 0231 0256
BBAIRD 0259 0231 0258 0245 0237 0293BASIC LINE 0275 0233 0250 0245BAUR 0263 0257BESTAR 0250 0245BLACK PANTHER LINE0245BLAUPUNKT 0263 0257 0262 0260 0309 0325 0271BLUESKY 0248BONDSTEC 0250BRANDT 0303 0305BROKSONIC 0277 0967BUSH 0275 0233 0245 0248 0246 0247 0288
CCATRON 0250CGE 0231 0293CIMLINE 0275 0233CINEVISION 0256CLATRONIC 0250COMBITECH 0248CONDOR 0250 0245CROWN 0275 0250 0245CYBERCOM 0233 0311 0262 0269 0319 0256 0248 0291 0338 0905
0906CYBERMAXX 0233 0311 0262 0269 0319 0256 0248 0291 0338 0905
0906CYTRON 0233 0311 0262 0269 0319 0256 0248 0291 0338 0905
0906
DDAEWOO 0274 0250 0265 0319 0245 0971DANSAI 0275DANTAX 0233DAYTRON 0245DE GRAAF 0266 0257DECCA 0257 0231 0293
MD 24089a 15
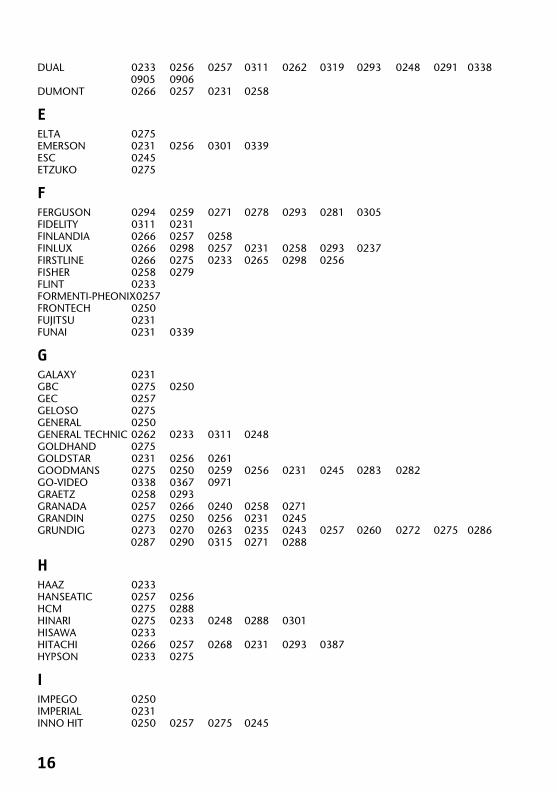
MD 24089a ES EN DE Aldi Final Content.book Seite 16 Mittwoch, 5. August 2009 3:36 15
DUAL 0233 0256 0257 0311 0262 0319 0293 0248 0291 03380905 0906
DUMONT 0266 0257 0231 0258
EELTA 0275EMERSON 0231 0256 0301 0339ESC 0245ETZUKO 0275
FFERGUSON 0294 0259 0271 0278 0293 0281 0305FIDELITY 0311 0231FINLANDIA 0266 0257 0258FINLUX 0266 0298 0257 0231 0258 0293 0237FIRSTLINE 0266 0275 0233 0265 0298 0256FISHER 0258 0279FLINT 0233FORMENTI-PHEONIX0257FRONTECH 0250FUJITSU 0231FUNAI 0231 0339
GGALAXY 0231GBC 0275 0250GEC 0257GELOSO 0275GENERAL 0250GENERAL TECHNIC 0262 0233 0311 0248GOLDHAND 0275GOLDSTAR 0231 0256 0261GOODMANS 0275 0250 0259 0256 0231 0245 0283 0282GO-VIDEO 0338 0367 0971GRAETZ 0258 0293GRANADA 0257 0266 0240 0258 0271GRANDIN 0275 0250 0256 0231 0245GRUNDIG 0273 0270 0263 0235 0243 0257 0260 0272 0275 0286
0287 0290 0315 0271 0288
HHAAZ 0233HANSEATIC 0257 0256HCM 0275 0288HINARI 0275 0233 0248 0288 0301HISAWA 0233HITACHI 0266 0257 0268 0231 0293 0387HYPSON 0233 0275
IIMPEGO 0250IMPERIAL 0231INNO HIT 0250 0257 0275 0245
16

CODE
S
MD 24089a ES EN DE Aldi Final Content.book Seite 17 Mittwoch, 5. August 2009 3:36 15
INNOVATION 0233 0311 0262 0248 0291INTERBUY 0256INTERFUNK 0257 0258INTERVISION 0231IRRADIO 0275 0256ITT 0237 0293 0258 0292ITV 0256 0245
JJVC 0294 0295 0293 0400
KKAISUI 0275KARCHER 0257KENDO 0233 0250 0265 0300 0245 0236 0237KENWOOD 0293KORPEL 0275
LLENCO 0245LEYCO 0275LG 0231 0256 0261 0907LIFE 0291 0256LIFETEC 0233 0311 0262 0269 0319 0256 0248 0291 0338 0905
0906LOEWE 0267 0325 0262 0257 0256 0271LOGIK 0275LUMATRON 0274 0245LUXOR 0298 0258 0237 0281
MMAGNASONIC 0258MAGNAVOX 0914 0285MAGNUM 0291MANESTH 0275 0265MARANTZ 0257 0271 0281 0299MATSUI 0233 0256 0248 0301MEDIATOR 0257MEDION 0233 0311 0262 0269 0319 0256 0248 0291 0338 0905
0906MELECTRONIC 0231MEMOREX 0240 0256 0231 0258 0279MEMPHIS 0275METZ 0262 0263 0267 0273 0325 0271MICROMAXX 0233 0311 0262 0269 0319 0256 0248 0291 0338 0905
0906MICROSTAR 0233 0311 0262 0269 0319 0256 0248 0291 0338 0905
0906MIGROS 0231MINERVA 0263 0271MITSUBISHI 0298 0257 0289 0294 0231MULTITECH 0275 0250 0257 0231MURPHY 0231
MD 24089a 17

MD 24089a ES EN DE Aldi Final Content.book Seite 18 Mittwoch, 5. August 2009 3:36 15
NNATIONAL 0262 0260NEC 0294 0293 0299NECKERMANN 0257 0293 0301NEI 0257NESCO 0275NIKKAI 0250 0302NOKIA 0240 0300 0307 0258 0237 0292 0293NORDMENDE 0294 0293 0303 0305
OOCEANIC 0240 0231 0293OKANO 0233 0300ORION 0234 0233 0304 0248 0283 0301 0246ORSON 0231OSAKI 0275 0231 0256OTTO VERSAND 0257
PPALLADIUM 0275 0300 0256 0271 0293PANASONIC 0262 0267 0260 0314 0321 0325 0970PATHE CINEMA 0301PATHE MARCONI 0293PENTAX 0266PERDIO 0231PHILCO 0299PHILIPS 0235 0257 0290 0315 0327 0286 0285 0242 0271 0293
0969PHONOLA 0257PIONEER 0294 0257 1084POLAROID 0949PORTLAND 0250 0245PRINZ 0231PRO2 0233 0311 0262 0269 0319 0256 0248 0291 0338 0905
0906PROFEX 0275PROLINE 0231 0288PROSONIC 0233 0245PYE 0257
QQUARTZ 0258QUELLE 0257 0263 0258 0231 0271 0301
RRADIOLA 0257REX 0293RFT 0250 0257ROADSTAR 0275 0256 0245
SSABA 0324 0245 0281 0293 0303 0305
18
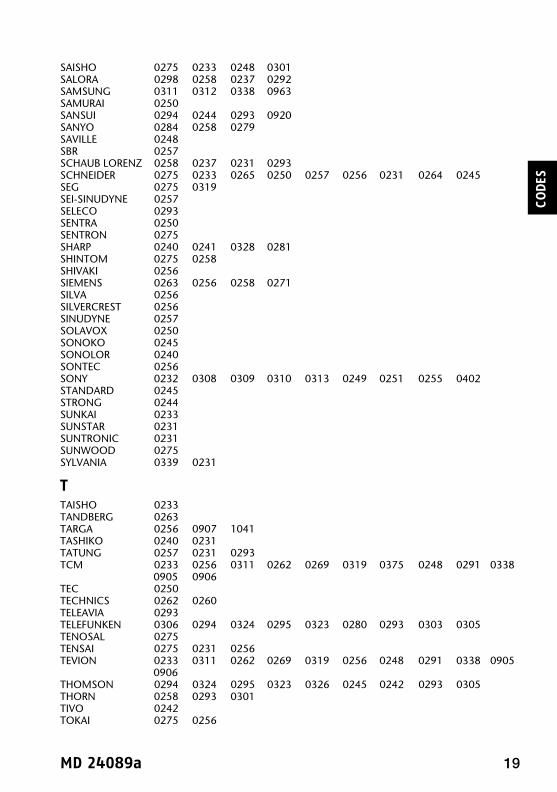
CODE
S
MD 24089a ES EN DE Aldi Final Content.book Seite 19 Mittwoch, 5. August 2009 3:36 15
SAISHO 0275 0233 0248 0301SALORA 0298 0258 0237 0292SAMSUNG 0311 0312 0338 0963SAMURAI 0250SANSUI 0294 0244 0293 0920SANYO 0284 0258 0279SAVILLE 0248SBR 0257SCHAUB LORENZ 0258 0237 0231 0293SCHNEIDER 0275 0233 0265 0250 0257 0256 0231 0264 0245SEG 0275 0319SEI-SINUDYNE 0257SELECO 0293SENTRA 0250SENTRON 0275SHARP 0240 0241 0328 0281SHINTOM 0275 0258SHIVAKI 0256SIEMENS 0263 0256 0258 0271SILVA 0256SILVERCREST 0256SINUDYNE 0257SOLAVOX 0250SONOKO 0245SONOLOR 0240SONTEC 0256SONY 0232 0308 0309 0310 0313 0249 0251 0255 0402STANDARD 0245STRONG 0244SUNKAI 0233SUNSTAR 0231SUNTRONIC 0231SUNWOOD 0275SYLVANIA 0339 0231
TTAISHO 0233TANDBERG 0263TARGA 0256 0907 1041TASHIKO 0240 0231TATUNG 0257 0231 0293TCM 0233 0256 0311 0262 0269 0319 0375 0248 0291 0338
0905 0906TEC 0250TECHNICS 0262 0260TELEAVIA 0293TELEFUNKEN 0306 0294 0324 0295 0323 0280 0293 0303 0305TENOSAL 0275TENSAI 0275 0231 0256TEVION 0233 0311 0262 0269 0319 0256 0248 0291 0338 0905
0906THOMSON 0294 0324 0295 0323 0326 0245 0242 0293 0305THORN 0258 0293 0301TIVO 0242TOKAI 0275 0256
MD 24089a 19

MD 24089a ES EN DE Aldi Final Content.book Seite 20 Mittwoch, 5. August 2009 3:36 15
TONSAI 0275TOSHIBA 0320 0257 0265 0298 0319 0362 0293TOWADA 0275TOWIKA 0275TRIUMPH 0301TVA 0250
UUHER 0256UNITED QUICK STAR0245UNIVERSUM 0290 0235 0263 0257 0315 0256 0231 0237 0239 0253
0271
VVICTOR 0294 0295VIDEON 0233 0262 0311 0248
WWELTBLICK 0256
YYAMISHI 0275YOKAN 0275YOKO 0275 0250 0256
ZZENITH 0256
DVD
AACCOUSTIC SOLUTIONS03830350AEG 0894 0333AFREEY 0386AIRIS 0357AIWA 0383 0377AKAI 0369 0333 0382 0350 0894 1082AKASHI 0346ALBA 0384 0350 0381 0357 0370 0351ALL-TEL 0333AMES 0383AMSTRAD 0350AMW 1053 1054ANABA 0961ANSONIC 0356APEX 0921 0384 0357 0911 0390 0913 1083 0949ARENA 0923ASPIRE 0952A-TREND 0347AUDIOSONIC 0382 1062
20

CODE
S
MD 24089a ES EN DE Aldi Final Content.book Seite 21 Mittwoch, 5. August 2009 3:36 15
AUDIOVOX 0942AXION 0942
BB & K 0978BAIER 0349BAZE 0357BEKO 1064BLACK DIAMOND 0350BLAUPUNKT 0384BLU-RAY 1796 1109 1108 1107 1113 1081 0375BLUE NOVA INTERNATIONAL1051BLUE SKY 0375 0373 0357 0350BOMAN 0894 0351BRANDT 0373 0360 0362BRITANIA 1795BROKSONIC 0920 0967BUSH 0384 0382 0350 0381 0356
CCAMBRIDGE 0376CELESTIAL 0357CENTREX 0357CENTRIOS 0932 0951 0954 0955CENTRON 0932CENTRUM 0346 0926 0928 0350 0927CINETEC 0350CINEVISION 0375CLASSIC 0383CLATRONIC 0357 0894CMI 0923COBY 0332 0916 0946 0947 0357 1051 0948CONTEL 1772 0894CRITERION 0344CROWN 0373 0382C-TECH 0341CURTIS 0950 0948CYBERCOM 0356 0930 0932 0330 0335 0339 0340 0341 0342 0345
0352 0358 0371 0923 0375 0343 0924 0933 0338 03340344 0664 0372 0373
CYBERHOME 0347 0912 0985 1075CYBERLINK 1101CYBERMAXX 0356 0930 0373 0932 0330 0335 0339 0340 0341 0342
0345 0352 0358 0371 0895 0896 0897 0898 0899 09000901 0902 0903 0904 0923 0893 0959 1069 1070 10711067 1066 1068 1117 1118 0905 0343 0924 0933 03750906 0338 0372 0334 0344 0664 0894
CYTRON 0356 0930 0373 0932 0330 0335 0339 0340 0341 03420345 0352 0358 0371 0380 0895 0896 0897 0898 08990900 0901 0902 0903 0904 0923 0893 0959 1069 10701071 1067 1066 1068 1117 1118 0905 0343 0924 09330375 0906 0338 0372 0334 0344 0664 0894
CYBERVISION 1791
MD 24089a 21

MD 24089a ES EN DE Aldi Final Content.book Seite 22 Mittwoch, 5. August 2009 3:36 15
DDAEWOO 0353 0354 0965 0355 0347 0380 0925 0971DANSAI 0351DAYTRON 0925DCE 0356DENON 0364 0389DENVER 0381 1051 0894DENZEL 0392DESAY 0958DIAMOND 0373 0341DIGIFRAME 0930DIGIHOME 0350DIGITOR 0382DIGITREX 0357DIGITRON 0386DIGIX 0962DIK 0356DISNEY 0339 0902DiViDo 0380DIVX 0375 0932DK DIGITAL 0356DMTECH 0351 0333DRAGON SYSTEMS 0356DUAL 0350 0356 0984 0383 0956 0373 0330 0335 0337 0340
0392 0341 0342 0345 0352 0358 0371 0923 0351 03330343 0338 0372 0334 0344 0664 0375 0924 0933
DURABRAND 0333 0375 0356 0933 1085 1086 1087 1088DVD 1024 0929
EE-BENCH 0341ELTA 0365 0382 0894 0333ELTAX 1051EMERSON 0380 1057 0339 0375ENCORE 0386ENZER 0392ESA 0956EUROLINE 0894
FFARENHEIT 0960FERGUSON 0373FINLUX 0375 0357 0351FINTEC 0350FIRSTLINE 0373FISHER 0378FUNAI 0339
GGE 0384GERICOM 1064GOLDEN SPHERE 0341GOLDSTAR 0375 0907 0972
22

CODE
S
MD 24089a ES EN DE Aldi Final Content.book Seite 23 Mittwoch, 5. August 2009 3:36 15
GOODMANS 0373 0382 0350 0333 0351GO-VIDEO 0383 1059 1061 0338 0367 0971 0351GPX 0910GRADIENTE 1794 1793 0373GRAETZ 0392GRAN PRIX 0356GRANDIN 0357GRUNDIG 0385 0370 0380 0373 0378 0376 0350 0333
HH & B 0350 0343HAAZ 0341 0342HANSEATIC 0375 0351 0333HARMON/KARDON0395HB 1095 1089HCM 0894HD-DVD 1796 1110 1109 1108 1107 1081 0375HE 0383HITACHI 0367 0368 0392 0387 0350HITEKER 0357HOHER 0356HOME ELECTRONICS0383HOMITA 0934 0935 0936 0937 0938HOYO 0392HYUNDAI 0351
IILO 0959INITIAL 0384INTEGRA 0374INTERTRONIC 0893 0933 0894
JJATON 0392JBL 0395JDB 0383JVC 0361 1058 0362 0400 0964 0662 1072JWIN 1076 1083
KKARCHER 0351KAWASHI 0333KENDO 0356 0923 0350KENNEX 0350KENWOOD 0393 0364KISS 0392KLH 0384KONKA 0908 0909KOSS 0358 0373
LLASONIC 0341LAWSON 0341 0380
MD 24089a 23

MD 24089a ES EN DE Aldi Final Content.book Seite 24 Mittwoch, 5. August 2009 3:36 15
LECSON 0376LENCO 1774 0373 0350 0356LENOXX 0931 0346 0382LG 1800 1798 1797 1117 0375 0907 0972LIFE 0900 0373 1117 1118 0372LIFETEC 0356 0930 0373 0932 0330 0335 0339 0340 0341 0342
0345 0352 0358 0371 0895 0896 0897 0898 0899 09000901 0902 0903 0904 0923 0893 0959 1069 1070 10711067 1066 1068 1117 1118 0905 0343 0924 0933 03750906 0338 0372 0334 0344 0664 0894
LIMIT 0341LINN 0336LITEON 0982 1056 1059 0959LODOS 0350LOEWE 0370 0375LOGIX 0351 0380LUMATRON 0332 0342 1051 0350 0383 0380LUXMAN 0367LUXOR 0350 0383
MMAGNAVOX 0362 0379 0979 0980 0981 0370 0350 0914MANHATTAN 0350 0380MARANTZ 1079 0370 0379 0981 0375 0362MARK 0350MASTEC 0335MATSUI 0373 0357 0350MAXDORF 0894MAXIM 0331 0350MBO 0396 0383 0382MEDIENCOM 0342MEDION 1800 1798 1001 0356 0930 0373 0932 0330 0335 0339
0340 0341 0342 0345 0352 0358 0371 0351 0895 08960897 0898 0899 0900 0901 0902 0903 0904 0923 08930959 1069 1070 1071 1067 1066 1068 1115 1116 11171118 0905 0343 0924 0933 0375 0906 0338 0372 03340344 0664 0894
MEMOREX 0356 0339 0920MERIDIAN 0362METZ 0368 0350 0922MICROMAXX 0356 0893 0930 0373 0932 0330 0335 0339 0340 0341
0342 0345 0352 0358 0371 0895 0896 0897 0898 08990900 0901 0902 0903 0904 0923 0959 1069 1070 10711067 1066 1068 1117 1118 0905 0343 0924 0933 03750906 0338 0372 0334 0344 0664 0894
MICROMEGA 0370MICROSOFT 0399 1100MICROSTAR 0356 0930 0373 0932 0330 0335 0339 0340 0341 0342
0345 0352 0358 0371 0895 0896 0897 0898 0899 09000901 0902 0903 0904 0923 0893 0959 1069 1070 10711067 1066 1068 1117 1118 0905 0343 0924 0933 03750906 0338 0372 0334 0344 0664 0894
MINATO 0349MINERVA 0380MINTEK 0384
24

CODE
S
MD 24089a ES EN DE Aldi Final Content.book Seite 25 Mittwoch, 5. August 2009 3:36 15
MIRROR 0349MITSUBISHI 0350 0366MONYKA 0392MT LOGIC 1062MUSTEK 0383MXONDA 0373MYSTRAL 0356
NNAD 0375 0394NAKAMICHI 0398NEC 0375NEOTEK 0386NEUFUNK 0392NEVIR 0356NEXXTECH 1772 0932 0954 0955 0956NORCENT 0332 0982 0944 0945 0948NORDMENDE 0356NORIKO 0349
OOCEANIC 1089OKANO 0349 0362OMNI 0382ONIX 0346ONKYO 0374 0975OPTIMUS 0368 0922ORION 0920 0335ORITRON 0373
PPACIFIC 0356 0350 0333PACKARD BELL 0939 0940 1101 1052PALSONIC 0357PANASONIC 1107 0401 0364 0403 0970 0974PANDA 0351PHILCO 1792PHILIPS 1775 0370 0379 0979 0980 0981 0362 1080 1123 1128
0969 0339PHOCUS 1063 1064PHONOTREND 0916PIONEER 1109 1108 0368 0977 0922 0968 0976 1084POLAROID 0957 0949PORTLAND 0382PRINZ 0356PRISM 0335PRO2 0356 0930 0373 0932 0330 0335 0339 0340 0341 0342
0345 0352 0358 0371 0895 0896 0897 0898 0899 09000901 0902 0903 0904 0923 0893 0959 1069 1070 10711067 1066 1068 0905 0343 0924 0933 0375 0906 03380372 0334 0344 0664 0894
PROCASTER 0905PROLINE 0373 0357 0333 0376 0397PROSCAN 0399
MD 24089a 25

MD 24089a ES EN DE Aldi Final Content.book Seite 26 Mittwoch, 5. August 2009 3:36 15
PROSON 0350PROSONIC 0332 0341 0349PROVIEW 1001PROVISION 0381 1051
QQUADRO 0928QUARTEK 1077
RRADIONETTE 0375RAITE 0392RCA 0399 0384REDSTAR 0894 0965RELISYS 0923 0895REOC 0341REX 0346ROADSTAR 0350 0383 0382RONIN 0397ROTEL 0361ROWA 0384 0922RTL 0923
SSABA 0373 0915 0360SAIVOD 0356SALORA 0375SAMPO 0341 0386 0923 0895 1051SAMSUNG 1122 1114 1113 1112 0367 1050 0338 0963 0919SANSUI 0341 0920SANYO 0350 0333 1060 0378SCAN 0380SCHAUB LORENZ 1095 0894 1089SCHNEIDER 0350 0352 0356 0373 0351 0894 0333 0380SCHWAIGER 0349SCIENTIFIC LABS 0341SCOTT 0373 0357SEG 0350 0341 0392SHARP 1796 0371 0394 1055 0350SHERWOOD 0391SHINCO 0384SHINSONIC 0384SILVA 0894SILVA SCHNEIDER 0356SILVERCREST 0341 1093 1090 1091 1092SINGER 0341 0382SKYMASTER 0382 0383SM ELECTRONIC 0382 0383 0341SMART 0350 0380SONY 1081 0363 0987 0988 0989 0402 0986SOUNDMASTER 0341SOUNDMAX 0341SOUNDSTORM 0330SOUNDWAVE 0351
26

CODE
S
MD 24089a ES EN DE Aldi Final Content.book Seite 27 Mittwoch, 5. August 2009 3:36 15
STANDARD 0373STRONG 0350SUNGALE 0953SUPERVISION 0382 0383SVA 0349SYLVANIA 0339SYNN 0341
TTANDBERG 0350TANGENT 1051TARGA 0375 1115 0959 0891 1117 0972 1094 1121 0907TCM 0900 0356 0930 0373 0932 0330 0335 0339 0340 0333
0341 0342 0345 0352 0358 0371 0923 1119 0343 09240933 0338 0372 0334 0344 0664
TEAC 0368 0333 0341 0384 0375TECHNICS 0364 0399TECHNIKA 0356TECHWOOD 0394 0350 0370TECO 0923 0895TEDELEX 0382TELEDEVICE 1051TELEFUNKEN 0894 0333TELETECH 0350TENSAI 0373 0382TERAPIN 0943TEVION 0356 0930 0373 0932 0330 0335 0337 0339 0340 0341
0342 0345 0352 0358 0371 0891 0892 0895 0896 08970898 0899 0900 0901 0902 0903 0904 0923 0966 08930959 1065 1068 1069 1070 1071 1067 1066 1117 11180890 0905 0343 0924 0933 0375 0906 0338 0917 09180372 0334 0344 0664 0894 1064
THETA DIGITAL 0368THOMSON 0360 0359 0399 1078TINY 1051TOKAI 0894 0392TOKIWA 0380TOSHIBA 0973 1110 1120 0362 0983 0920 1111TRANS-CONTINENTS0356 1051TRANSONIC 0357TREDEX 0941TRUTECH 1075
UUMAX 0382UNITED 0333 0348 0357 0894UNIVERSUM 0350 0375 0333
VVENTURER 0333VESTEL 1771 0350VIETA 0380VOXSON 0383 0356 0382
MD 24089a 27

MD 24089a ES EN DE Aldi Final Content.book Seite 28 Mittwoch, 5. August 2009 3:36 15
WWALKVISION 0384WELKIN 0356WELLTECH 1098 1105 1106WESTAR 0350WHARFEDALE 0376 0349 0341 0386WILSON 0356
XX-BOX 0399XENIUS 0373 0358XLOGIC 0341XMS 0894
YYAKUMO 0357 1083 0905YAMAHA 1773 0364 0388 0979 0980 0370YAMAKAWA 0397 0392 0382YUKAI 0383
ZZENITH 0375 0907
CD Players
AADCOM 0848AIWA 0849 0850 0851 0751AKAI 0853 0854 0855ALBA 0856ARCAM 0732
BBESTAR 0859BSR 0860BUSH 0661
CCARRERA 0663CLASSIC 0807CONDOR 0860CYBERCOM 0843 0664 0668 0674 0675 0694 0730 0742 0743 0744
0745 0746 0747 0801 0802 0803 0807 0809 0818 0819CYBERMAXX 0843 0664 0668 0674 0675 0694 0730 0742 0743 0744
0745 0746 0747 0801 0802 0803 0807 0809 0818 0819CYTRON 0843 0664 0668 0674 0675 0694 0730 0742 0743 0744
0745 0746 0747 0801 0802 0803 0807 0809 0818 0819
28

CODE
S
MD 24089a ES EN DE Aldi Final Content.book Seite 29 Mittwoch, 5. August 2009 3:36 15
DDENON 0665 0666DUAL 0843 0848 0664 0668 0675 0694 0730 0742 0743 0744
0745 0746 0747 0798 0801 0802 0803
EE-BENCH 0811ELTA 0878 0667 0668 0693 0694 0745EMERSON 0848 0859
FFISHER 0669
GGENEXXA 0859 0671 0672 0673 0675 0676 0677GOLDSTAR 0663GOODMANS 0678 0679GRUNDIG 0680 0697 0698 0732
HHARMON/KARDON0683HITACHI 0848 0685 0686
IINNOVATION 0730 0742 0743 0744 0745 0746 0747
JJVC 0662 0687
KKENWOOD 0669 0688 0689 0690 0762
LLIFE 0823LIFETEC 0823 0843 0664 0668 0674 0675 0694 0730 0742 0743
0744 0745 0746 0747 0801 0802 0803 0807 0809 08180819
LG 0663LINN 0732LUXMAN 0691
MMAGNUM 0730 0742 0743 0744 0745 0746 0747MARANTZ 0695 0732MATSUI 0696 0732MEDION 0823 0843 0728 0664 0668 0674 0675 0694 0730 0742
0743 0744 0745 0746 0747 0801 0802 0803 0807 08090818 0819
MEMOREX 0848 0859 0677MERIDIAN 0732
MD 24089a 29

MD 24089a ES EN DE Aldi Final Content.book Seite 30 Mittwoch, 5. August 2009 3:36 15
MICROMAXX 0843 0664 0668 0674 0675 0694 0730 0742 0743 07440745 0746 0747 0801 0802 0803 0807 0809 0818 0819
MICROMEGA 0732MICROSTAR 0843 0664 0668 0674 0675 0694 0730 0742 0743 0744
0745 0746 0747 0801 0802 0803 0807 0809 0818 0819MISSION 0732
NNAD 0671 0733 0735 0736 0737 0800NAIM 0732NAKAMICHI 0699 0700NUVO 0866
OONKYO 0840 0701 0702 0703 0785 0792
PPANASONIC 0661 0705PHILIPS 0847 0706 0732PHILIPS CD-V 0840PIONEER 0673 0677 0753PRO2 0843 0664 0668 0674 0675 0694 0730 0742 0743 0744
0745 0746 0747 0801 0802 0803 0807 0809 0818 0819PROTON 0732
QQUAD 0732
RREALISTIC 0848 0859 0675ROADSTAR 0706 0708ROTEL 0732
SSABA 0848SAE 0732SAMSUNG 0768SANSUI 0847 0709 0710 0711 0732SCHNEIDER 0860 0732SCOTT 0859SHARP 0672 0712 0713 0714SHERWOOD 0782SINGER 0803SKYMASTER 0778SONY 0671 0716 0717 0718 0741 0748 0749 0750
TTANDBERG 0732TCM 0880 0843 0664 0668 0674 0675 0694 0730 0742 0743
0744 0745 0746 0747 0801 0802 0803 0807 0809 08230824 0825
TEAC 0795
30

CODE
S
MD 24089a ES EN DE Aldi Final Content.book Seite 31 Mittwoch, 5. August 2009 3:36 15
TECHNICS 0705 0721 0763 0787TELEFUNKEN 0848TEVION 0823 0843 0664 0668 0674 0675 0694 0730 0742 0743
0744 0745 0746 0747 0801 0802 0803 0807 0809 08130814 0816 0818 0819 0821 0822
THEORIE & ANWENDING0804THOMSON 0842 0848TOSHIBA 0722 0723
UUNIVERSUM 0732
VVECTOR RESEARCH 0663VICTOR 0687
WWELLTECH 0675 0694 0744
YYAMAHA 0712 0720 0725 0771YORX 0708
Satellite Receivers
A@SAT 1147@SKY 1138ADECQ 1340AKAI 0552ALBA 0508 0562 0405 0407ALDES 0408 0409ALLSAT 0462 0410 0552ALLSONIC 0408 0428AMPERE 0422AMSTRAD 0584 0555 0541 0415 0416 0417 0419ANKARO 0408 0428 0424ANTTRON 0405 0407APOLLO 0405ARCOM 1174 1165ARCON 0415 0422 1155 1144 1153 0424 0463 1154ARENA 1222ARION 1238ARMSTRONG 0419ARNION 1147ASAT 0552ASCI 1138AST 0435ASTON 0594 0406ASTRA 0429 0419 0431 0432 0502ASTRO 0428 0439 0569 0407 0409
MD 24089a 31
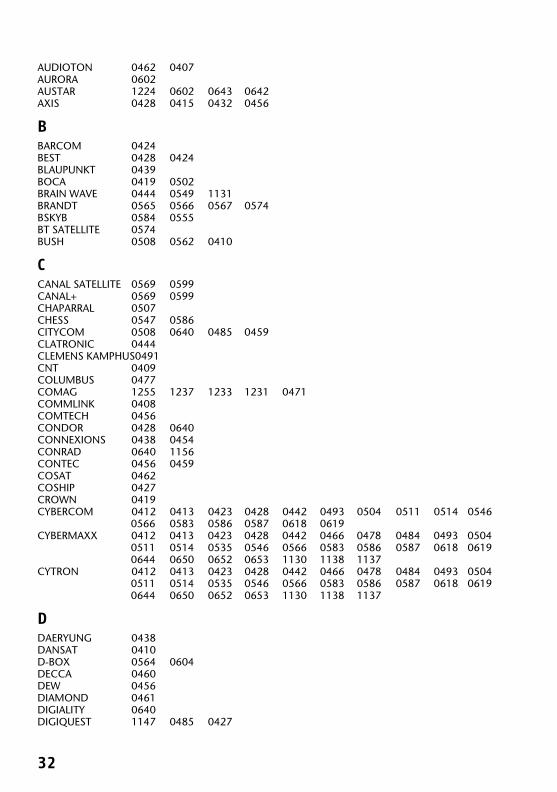
MD 24089a ES EN DE Aldi Final Content.book Seite 32 Mittwoch, 5. August 2009 3:36 15
AUDIOTON 0462 0407AURORA 0602AUSTAR 1224 0602 0643 0642AXIS 0428 0415 0432 0456
BBARCOM 0424BEST 0428 0424BLAUPUNKT 0439BOCA 0419 0502BRAIN WAVE 0444 0549 1131BRANDT 0565 0566 0567 0574BSKYB 0584 0555BT SATELLITE 0574BUSH 0508 0562 0410
CCANAL SATELLITE 0569 0599CANAL+ 0569 0599CHAPARRAL 0507CHESS 0547 0586CITYCOM 0508 0640 0485 0459CLATRONIC 0444CLEMENS KAMPHUS0491CNT 0409COLUMBUS 0477COMAG 1255 1237 1233 1231 0471COMMLINK 0408COMTECH 0456CONDOR 0428 0640CONNEXIONS 0438 0454CONRAD 0640 1156CONTEC 0456 0459COSAT 0462COSHIP 0427CROWN 0419CYBERCOM 0412 0413 0423 0428 0442 0493 0504 0511 0514 0546
0566 0583 0586 0587 0618 0619CYBERMAXX 0412 0413 0423 0428 0442 0466 0478 0484 0493 0504
0511 0514 0535 0546 0566 0583 0586 0587 0618 06190644 0650 0652 0653 1130 1138 1137
CYTRON 0412 0413 0423 0428 0442 0466 0478 0484 0493 05040511 0514 0535 0546 0566 0583 0586 0587 0618 06190644 0650 0652 0653 1130 1138 1137
DDAERYUNG 0438DANSAT 0410D-BOX 0564 0604DECCA 0460DEW 0456DIAMOND 0461DIGIALITY 0640DIGIQUEST 1147 0485 0427
32

CODE
S
MD 24089a ES EN DE Aldi Final Content.book Seite 33 Mittwoch, 5. August 2009 3:36 15
DIGITAL M SERIE 1249DISKXPRESS 0424 0454DITRISTRAD 0462DMT 0412DNT 0438 0552DONG WOO 0501DRAKE 0557 0463DREAM MULTIMEDIA0685DREAMBOX 0658DStv 0602DUAL 0412 0413 0423 0428 0493 0504 0511 0566 0583 0586
0587 0618 0514
EECHOSTAR 0640 0581 0586 0425 0481 0578 0579 0580 0657 0659
0464 0465 0467EINHELL 0408 0417 0405 0419ELEKTA 0409ELTA 0428 0462 0405 0552EMANON 0405EMME ESSE 0428 0508 0491EMTECH 1162ENIGMA 1248EP SAT 0508 0491E-TEK 1140EUROPHON 0640EUROSAT 0419EUROSKY 0428 0640 1156 0419EUROSPACE 0468EUROSTAR 0438 0419EVA 0588 0589EXATOR 0405 0407
FFERGUSON 0508 0472 0603 0410 0473FIDELITY 0415 0417FINLANDIA 0508FINLUX 0508 0429 0608 0475 0480 0487FINNSAT 0603 0456FORCE 0577 0553 0535FORTEC STAR 0470FOXTEL 1224 1225 0602FOXTEL IQ 1225FRACARRO 0562FRANCE SATELLITE/TV0477FREECOM 0405 0489FTE 0422 0496FUBA 0548 0439 0428 0438 0405 0424 0431 0477 0480 0552FUNTACH 0587
GGALAXIS 0428 0408 0462 0478 0484 0485 0535 0582 0583 0602
0619 0432 0456GALAXY 0424
MD 24089a 33

MD 24089a ES EN DE Aldi Final Content.book Seite 34 Mittwoch, 5. August 2009 3:36 15
GLOBECAST 1141GLOBO 1156GMI 0419GOLDSTAR 0489GOODING 0483GOODMANS 0508GRANADA 0429GRANVISION 1235 1234GROTHUSEN 0405 0489GRUNDIG 0439 0436 0483 0495 0508 0544 0469 0602 0584 0407
0550
HHANDAN 0547 1167HANSEATIC 0504HANTOR 0444 0405HANURI 0409HB 1162 0413 1214 1215 1216HEAD 1253 1252 1251HELIOCOM 0422HIRSCHMANN 0439 0522 0547 0548 1156 1165 1174 0487 0488 0491
0558HISAWA 0444HITACHI 0508 0537HOMECAST 1222 1223 1162HOUSTON 0462HUMAX 1260 1259 1258 1250 0485 0517 0582HUTH 0408 0411 0444 0462 0419 0491HYUNDAI 0486
IID DIGITAL 0485IMPERIAL 0562INNOVATION 0428 0493 0504 0511 0583 0586 0587 0618INTERTRONIC 0419INTERVISION 0462IRDETO 0602ITT/NOKIA 0429 0508 0548 0454 0487 0537
JJOHANSSON 0444JSR 0462JVC 0483
KKAON 1147KATHREIN 1221 1197 0549 0617 0631 0607 0635 0439 0459 0496
0507 0552KOSCOM 1144KOSMOS 0489 0491 0496KR 0407KREILING 0549 0631 1137 1232KREISELMEYER 0439
34

CODE
S
MD 24089a ES EN DE Aldi Final Content.book Seite 35 Mittwoch, 5. August 2009 3:36 15
KYOSTAR 0405
LLASAT 0428 0565 0566 0567 0630 1156 1157 0409 0502LENCO 0405 0489 0503LENG 0444LENNOX 0462LENSON 0479LG 0489LIFE 0583LIFESAT 0412 0413 0423 0428 0442 0493 0504 0511 0514 0546
0566 0583 0586 0587 0618 0619LIFETEC 0412 0413 0423 0428 0442 0466 0478 0484 0493 0504
0511 0514 0535 0546 0566 0583 0586 0587 0618 06190644 0650 0652 0653 1130 1138 1137
LION 0468LORENTZEN 1156LORRAINE 0489LUPUS 0428LUXOR 0417 0429 0548 0537
MMACAB 0603MANHATTAN 0462 0508 0557 0633 0421 0409MARANTZ 0552MARMITEK 0641MARMITEK OCTOPUS0655MASCOM 0409MASPRO 0483 0508 0507 0558MATSUI 0483 0574MB 0504MBOX 0442MEDIABOX 0569MEDIACOM 0506MEDIAMARKT 0419MEDIASAT 0569 0432MEDION 1257 1217 0412 0413 0423 0428 0442 0466 0478 0484
0493 0504 0511 0514 0535 0546 0566 0583 0586 05870618 0619 0644 0650 0652 0653 1130 1139 1138 11371181
MEGA 0552METRONIC 0408 0575 0612 0613 0614 0615 0632 0409 0424 0405
0407METZ 0439MICRO TECHNOLOGY0468MICROMAXX 0412 0413 0423 0428 0442 0466 0478 0484 0493 0504
0511 0514 0535 0546 0566 0583 0586 0587 0618 06190644 0650 0652 0653 1130 1139 1138 1137
MICROSTAR 0412 0413 0423 0428 0442 0466 0478 0484 0493 05040511 0514 0535 0546 0566 0583 0586 0587 0618 06190644 0650 0652 0653 1130 1138 1137
MINERVA 0483 0439MITSUBISHI 0508 0439 0574MITSUMI 0502MORETV 0644 0423 1130 1181
MD 24089a 35

MD 24089a ES EN DE Aldi Final Content.book Seite 36 Mittwoch, 5. August 2009 3:36 15
MORGAN SYDNEY 0611MORGANS 0611 0419 0502 0552MULTICHOICE 0602MULTISTAR 0496MULTITEC 0586 0587MURATTO 0437 0489
NNAVEX 0444NEC 0509 0510NEOTION 1138NEUHAUS 0462 0479 0432NEXTWAVE 0414 0585NIKKO 0419NOKIA 0530 0564 0425 0429 0508 0548 0563 0531 0454 0487
0604NOMEX 0622NORDMENDE 0549 0472 0508 0603 0405 0409NOVIS 0444
OOAK 0424OCEANIC 0461 0468OCTAGON 0405 0407 0456OKANO 0419 0491 0496OPTEX 0462 0459 0656OPTUS 1224 0602ORBIT 0435ORBITECH 0405ORIGO 0468OSAT 0407OTTO VERSAND 0439
PPACE 0584 0555 0439 0559 0527 0508 0410 0617 1225PACIFIC 0461PALCOM 0479 0431 0477PALLADIUM 0483 0419PALTEC 0431PANASONIC 0584 0508 0542PANDA 0508 0410PANSAT 0490PANTECH 0591PBI 1138PHILIPS 0552 0436 0483 0493 0495 0508 0543 0434 0569 0574
0605 0618 0455 0561 0550 0456 0515 0604PHOENIX 0456PHONOTREND 0408 0462 0491 0652PILOTIME 0599PINNACLE 0654PIONEER 0569POLSAT 0603POLYTRON 0459PREDKI 0444
36
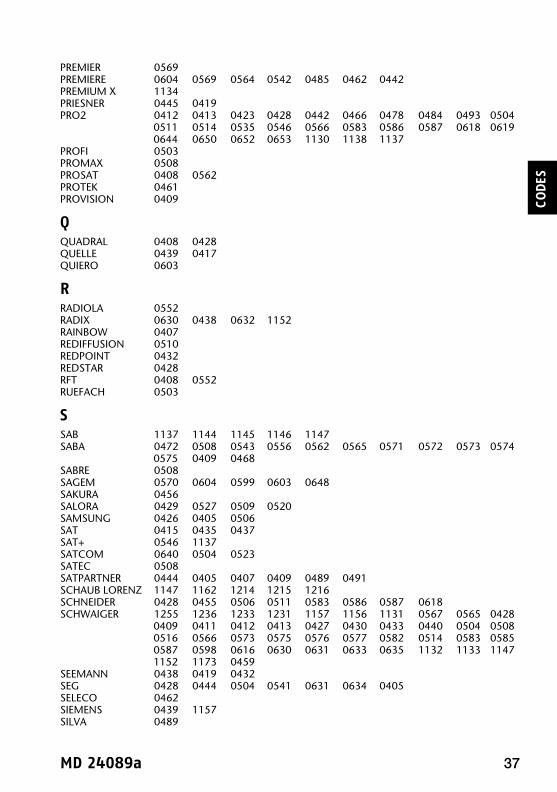
CODE
S
MD 24089a ES EN DE Aldi Final Content.book Seite 37 Mittwoch, 5. August 2009 3:36 15
PREMIER 0569PREMIERE 0604 0569 0564 0542 0485 0462 0442PREMIUM X 1134PRIESNER 0445 0419PRO2 0412 0413 0423 0428 0442 0466 0478 0484 0493 0504
0511 0514 0535 0546 0566 0583 0586 0587 0618 06190644 0650 0652 0653 1130 1138 1137
PROFI 0503PROMAX 0508PROSAT 0408 0562PROTEK 0461PROVISION 0409
QQUADRAL 0408 0428QUELLE 0439 0417QUIERO 0603
RRADIOLA 0552RADIX 0630 0438 0632 1152RAINBOW 0407REDIFFUSION 0510REDPOINT 0432REDSTAR 0428RFT 0408 0552RUEFACH 0503
SSAB 1137 1144 1145 1146 1147SABA 0472 0508 0543 0556 0562 0565 0571 0572 0573 0574
0575 0409 0468SABRE 0508SAGEM 0570 0604 0599 0603 0648SAKURA 0456SALORA 0429 0527 0509 0520SAMSUNG 0426 0405 0506SAT 0415 0435 0437SAT+ 0546 1137SATCOM 0640 0504 0523SATEC 0508SATPARTNER 0444 0405 0407 0409 0489 0491SCHAUB LORENZ 1147 1162 1214 1215 1216SCHNEIDER 0428 0455 0506 0511 0583 0586 0587 0618SCHWAIGER 1255 1236 1233 1231 1157 1156 1131 0567 0565 0428
0409 0411 0412 0413 0427 0430 0433 0440 0504 05080516 0566 0573 0575 0576 0577 0582 0514 0583 05850587 0598 0616 0630 0631 0633 0635 1132 1133 11471152 1173 0459
SEEMANN 0438 0419 0432SEG 0428 0444 0504 0541 0631 0634 0405SELECO 0462SIEMENS 0439 1157SILVA 0489
MD 24089a 37

MD 24089a ES EN DE Aldi Final Content.book Seite 38 Mittwoch, 5. August 2009 3:36 15
SKARDIN 0432 0586 0546 1160SKY 0555 0584 1151SKY DIGITAL 0584 0555SKY+ 0555SKY HD 1151SKY ITALIA 0584 0555SKYMASTER 0408 0412 0504 0506 0546 0547 0586 0587 0588 0589
0590 0591 0592 0621 1140 1138 1159 1161 1160 11621167 1244
SKYMAX 0552SKYPEX 1156SKYPLUS 1138SKYVISION 0462SMART 1249 1248 1247 1246 1244 1243 1241 1240 1234 1174
1165 1133SM ELECTRONIC 0408 0412 0504 0506 0546 0547 0586 0587 0588 0589
0591 0621 1140 1138 0592 1159 1161 1160 1162 1167SONY 0584 0569 0418 0446SR 0472 0419 0502STARBOX 0427STAR TRAK 0405STARLAND 0586STARRING 0444STRONG 0562 0428 0602 0545 0454 0489 0405 0407SUMIDA 0419SUNSTAR 0527 0419 0502
TTANDBERG 0603TANDY 0407TANTEC 0508 0479 0477TARGA 1195TATUNG 0460TCM 0412 0413 0423 0428 0442 493 0504 0511 0514 0546
0566 0583 0586 0587 0618 619TECHNIHALL 0416TECHNISAT 1219 1220 0506 0438 0479 569 0623 0528 0529TECHNOMATE 0441 1142TECHNOTREND 1230 1173 1147 1131TECO 0419 0502TELASAT 0640TELEFUNKEN 0560 0508 0565 0566 0567 574 0405TELEKA 0438 0640 0407 0419TELEMASTER 0409TELESAT 0504TELESTAR 1138 0479 0569TELEVES 0508 0610 0611TELEWIRE 0462TEN HAAFT 0423TEVION 0412 0413 0423 0428 0442 466 0478 0484 0493 0504
0511 0514 0535 0546 0566 583 0586 0587 0618 06190644 0650 0652 0653 1130 140 1138 1137
THOMSON 0472 0601 0570 0574 0492 508 0560 0568 0569 06030427 1156
THORENS 0461
38

CODE
S
MD 24089a ES EN DE Aldi Final Content.book Seite 39 Mittwoch, 5. August 2009 3:36 15
THORN 0508 0410 0473TIOKO 0459TONBURY 0445 1159TONNA 0546 0508 0462TOPFIELD 1205 1204 1203 0497 0505 506TPS 0570TPS PLATINUM 1178TRIAD 0435 0437 0533 0489TRIASAT 0480TRIAX 0439 0479 0565 0609 0619TWINNER 0610 0611
UUNIDEN 0534UNISAT 0419 0456UNITOR 0444 0424UNIVERSUM 0439 0483 1156 0475 0487
VVANTAGE 1254VARIOSTAT 0439VECTOR 0468VENTANA 0552VIA DIGITAL 0568VIA SAT 0568VISIOSAT 0594 0444 0462 0586 0593 595 0596 0597VIVANCO 0536 0624VORTEC 0405V-TECH 0437 0435 0515 0537
WWEVASAT 0508WEWA 0508WINERSAT 0444WISI 0435 0437 0438 0439 0508 533 0538 0539 0540 0597
0625 0626 0627 0628 0629WITTENBERG 0415WOORISAT 0409WORLDSAT 0631WYSI 1156
XXTREME 1147
ZZEHNDER 1137 1235 1234 1138 0428 437 0635 0541 0631 0632
0409 0424 0496ZINWELL 0485ZODIAC 0407
MD 24089a 39

MD 24089a ES EN DE Aldi Final Content.book Seite 40 Mittwoch, 5. August 2009 3:36 15
DVD Recorders (DVD-R, DVD-RW, etc)
AAPEX 0911ARENA 0923ASPIRE 0952
BBLUE NOVA INTERNATIONAL1051
CCENTRIOS 0951CMI 0923COBY 1051CYBERCOM 0923CYBERHOME 0912CYBERMAXX 0895 0905 0906 0923 0959 071 1117CYTRON 0895 0905 0906 0923 0959 071 1117
DDENVER 1051DUAL 0923
EELTAX 1051EMERSON 1057
GGO-VIDEO 0383 1059 1061
HHB 1089HITACHI 0387
IILO 0959
JJVC 1058 1072
KKENDO 0923
LLG 0907LIFE 1117LIFETEC 0895 0905 0906 0923 0959 071 1117LITEON 1056 1059 0959
40

CODE
S
MD 24089a ES EN DE Aldi Final Content.book Seite 41 Mittwoch, 5. August 2009 3:36 15
LUMATRON 1051
MMAGNAVOX 0979 0980MEDION 0895 0905 0906 0923 0959 071 1117MICROMAXX 0895 0905 0906 0923 0959 071 1117MICROSTAR 0895 0905 0906 0923 0959 071 1117MUSTEK 0383
OOCEANIC 1089
PPACKARD BELL 0940 1052PANASONIC 0403PHILIPS 0979 0980 1080 1128PHOCUS 1063PIONEER 0977 1084PRO2 0895 0905 0906 0923 0959 071PROVISION 1051
RRTL 0923
SSAMPO 1051SAMSUNG 1112 1050SANYO 1060SCHAUB LORENZ 1089SHARP 1055SONY 0987 0988 0989
TTANGENT 1051TARGA 1115 0959 0891 1117 0907 121TCM 0923TELEDEVICE 1051TEVION 0890 0891 0895 0905 0906 923 0959 1065 1071 1117THOMSON 0360 0359 1078TINY 1051TOSHIBA 0973 0983 0362 1111TRANS-CONTINENTS1051
YYAKUMO 0905YAMAHA 0979 0980
ZZENITH 0907
MD 24089a 41

MD 24089a ES EN DE Aldi Final Content.book Seite 42 Mittwoch, 5. August 2009 3:36 15
Decoders
AAUSTAR 1224 0494
BBMB 0636BT 0554
CCABLE AND WIRELESS0606CABLECRYPT 0474CABLETIME 0448 0449 0450CANAL PLUS 0474CLYDE CABLEVISION0452COMCRYPT 0474CRYPTOVISION 0458
EEURODEC 0603
FFILMNET 0474FILMNET CABLECRYPT0474FILMNET COMCRYPT0474FOXTEL 1224 0602FOXETL IQ 1225
GGEC 0452GI 0494 0554
IIMPULSE 0554
JJERROLD 0554 0494
KKABELVISION 0554
LLYONNAISE 1183
MMARMITEK 0636MELITA 0554MNET 0602 0474
42

CODE
S
MD 24089a ES EN DE Aldi Final Content.book Seite 43 Mittwoch, 5. August 2009 3:36 15
MOTOROLA 0494MOVIE TIME 0551MULTICHOICE 0474 0602
NNOKIA 0564NOOS 1143 1158 1175 1183NTL 0606 1200NUMERICABLE 0603
OOPTUS 1224 0494
PPACE 0606PHILIPS 0487PIONEER 0518 0521PVP 0554
SSAGEM 0604SAMSUNG 1148SCIENTIFIC ATLANTA0524 0525SMART 1174STS 0551
TTELE+1 0474TELEPIU 0474TELEWEST 0606 0554THOMSON 1189
UUNITED 0554UPC 1143 1175 1184
VVIRGIN MEDIA 0606VISIONETICS 1185VISIOSAT 0487
HDD-DVR
Grabadora de vídeo digital HDD, HDD Digital Video Recorders, HDD-Rekorder (Hard Disk Drive, DVR, PVR, etc)
AAMSTRAD 0555ARCON 1144ARION 1238
MD 24089a 43

MD 24089a ES EN DE Aldi Final Content.book Seite 44 Mittwoch, 5. August 2009 3:36 15
BBSKYB 0555BUSH 1261
CCANAL SATELLITE 0599CANAL+ 0599COMAG 1231CONRAD 1156CYBERCOM 0412 0423 0514CYBERMAXX 0905 0412 0423 0514 0644 653 1130 0959 1071 1117CYTRON 0905 0412 0423 0514 0644 653 1130 0959 1071 1117
DDIGIFUSION 0647DIGIHOME 1262DMT 0412DREAMBOX 0658DUAL 0412 0423 0514
EECHOSTAR 0659EMTEC 1096 1097EUROSKY 1156
FFORCE 0553FORTEC STAR 0470FOXTEL IQ 1225FREEBOX 1182
GGLOBO 1156GOODMANS 1261
HHB 1214HIRSCHMANN 1156HITACHI 1262HOMECAST 1223HUMAX 1260 1259 1250 0651HYUNDAI 0486
IILO 0959
JJVC 1072
44

CODE
S
MD 24089a ES EN DE Aldi Final Content.book Seite 45 Mittwoch, 5. August 2009 3:36 15
KKATHREIN 1221 1197KOSCOM 1144
LLASAT 1156 1157LIFE 1117LIFESAT 0412 0423 0514LIFETEC 0905 0412 0423 0514 0644 653 1130 0959 1071 1117LG 1800 1798 1117LITEON 0959LOGIK 1263LORENTZEN 1156LOEWE 1399
MMARMITEK OCTOPUS0655MEDION 1800 1798 1257 0905 0412 423 0514 0644 0653 1130
0959 1071 1139 1115 1181 117MICROMAXX 0905 0412 0423 0514 0644 653 1130 0959 1071 1139
1117MICROSTAR 0905 0412 0423 0514 0644 653 1130 0959 1071 1117MORETV 0644 1130 1181
NNEUF TELECOM 1196NEUF TV 1196
PPACE 1225 0555 0453PACKARD BELL 1052PANASONIC 0403PHILIPS 1775 1128 0242PHOCUS 1063PINNACLE 0654PIONEER 0977PRO2 0905 0412 0423 0514 0644 653 1130 0959 1071PROCASTER 0905
RRADIX 1152
SSAGEM 0599 1143 1158SAMSUNG 1112SCHAUB LORENZ 1214SCHWAIGER 1231 1157 1156 1152 1132 514 0412SIEMENS 1157SKARDIN 1160SKY 1151SKY DIGITAL 0555SKY+ 0555
MD 24089a 45

MD 24089a ES EN DE Aldi Final Content.book Seite 46 Mittwoch, 5. August 2009 3:36 15
SKYMASTER 0412 0506 1165 1159 1160SKYPEX 1156SMART 1246 1244SM ELECTRONIC 0412 0506 1165 1159 1160SONY 0987 0988 0989
TTARGA 1115 1117 1195TCM 0412 0423 0514TECHNIKA 1262TECHNOTREND 1230TELEFONICA 1227TEVION 0890 0905 0412 0423 0514 644 0653 1130 0959 1065
1071 1117THOMSON 0532 0242 0326 1156 1078TIVO 0242TONBURY 1159TOPFIELD 1204 1203 0506TOSHIBA 0983 1111TVONICS 1263
UUNIVERSUM 1156
WWHARFEDALE 1262WYSI 1156
YYAKUMO 0905
TV/VCR Combos
AAIWA 0248 0291ALBA 0245 0248
BBAIRD 0245BASIC LINE 0245BESTAR 0245BLACK PANTHER LINE0245BUSH 0245 0248
CCOMBITECH 0248CONDOR 0245CROWN 0245CYBERCOM 0248 0291CYBERMAXX 0248 0291
46
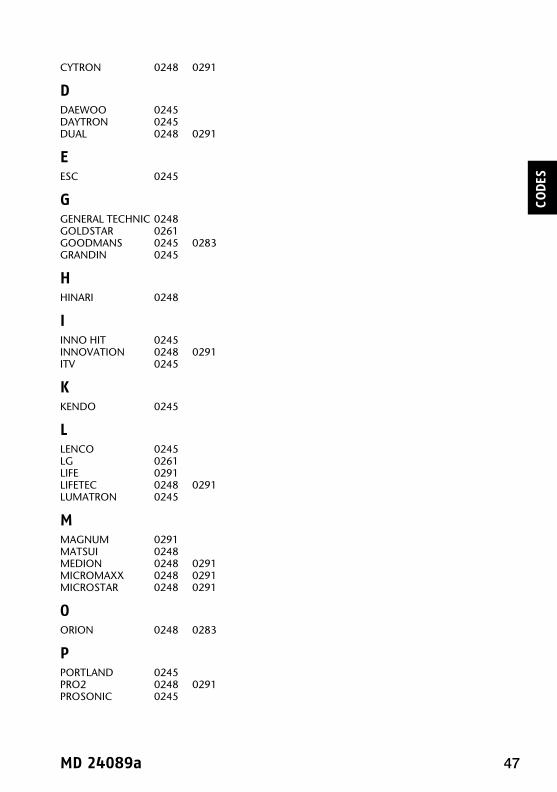
CODE
S
MD 24089a ES EN DE Aldi Final Content.book Seite 47 Mittwoch, 5. August 2009 3:36 15
CYTRON 0248 0291
DDAEWOO 0245DAYTRON 0245DUAL 0248 0291
EESC 0245
GGENERAL TECHNIC 0248GOLDSTAR 0261GOODMANS 0245 0283GRANDIN 0245
HHINARI 0248
IINNO HIT 0245INNOVATION 0248 0291ITV 0245
KKENDO 0245
LLENCO 0245LG 0261LIFE 0291LIFETEC 0248 0291LUMATRON 0245
MMAGNUM 0291MATSUI 0248MEDION 0248 0291MICROMAXX 0248 0291MICROSTAR 0248 0291
OORION 0248 0283
PPORTLAND 0245PRO2 0248 0291PROSONIC 0245
MD 24089a 47

MD 24089a ES EN DE Aldi Final Content.book Seite 48 Mittwoch, 5. August 2009 3:36 15
RROADSTAR 0245
SSABA 0245SAISHO 0248SAMSUNG 0312SAVILLE 0248SCHNEIDER 0245 0264SONOKO 0245STANDARD 0245
TTCM 0248 0291TEVION 0248 0291THOMSON 0245
UUNITED QUICK STAR0245
VVIDEON 0248
TV/DVD Combos
DVD & TV
AAKAI 1082 & 1410AUDIOSONIC 1062 & 0090
BBEKO 1064BROKSONIC 0920
CCYBERCOM 0343 & 0228
0924 & 02100933 & 0228
CYBERMAXX 08940343 & 02280924 & 02100933 & 0228
CYTRON 08940343 & 02280924 & 02100933 & 0228
48

CODE
S
MD 24089a ES EN DE Aldi Final Content.book Seite 49 Mittwoch, 5. August 2009 3:36 15
DDUAL 0343 & 0228
0924 & 02100933 & 0228
DURABRAND 0933 & 02281085 & 10061085 & 10071086 & 10081087 & 10081088 & 1009
GGERICOM 1064
HH & B 0343 & 0228HB 1089 & 1011
IINTERTRONIC 0894
LLIFETEC 0894
0343 & 02280924 & 02100933 & 0228
MMEDION 0894
0343 & 02280924 & 02100933 & 02281001
MEMOREX 0920MICROMAXX 0894
0343 & 02280924 & 02100933 & 0228
MICROSTAR 08940343 & 02280924 & 02100933 & 0228
MT LOGIC 1062 & 0090
OOCEANIC 1089 & 1011ORION 0920
PPHILIPS 0339 & 0181PHOCUS 1064
MD 24089a 49

MD 24089a ES EN DE Aldi Final Content.book Seite 50 Mittwoch, 5. August 2009 3:36 15
PRO2 08940343 & 02280924 & 02100933 & 0228
PROVIEW 1001
SSANSUI 0920SCHAUB LORENZ 1089 & 1011
TTCM 0343 & 0228
0924 & 02100933 & 02281119
TEVION 08940343 & 02280924 & 02100933 & 02281064
TOSHIBA 0920
VVESTEL 1771 & 0215
DVD/VCR Combos
AAPEX 0949
BBROKSONIC 0920
0967
CCINEVISION 0375 & 0256CYBERCOM 0338
0375 & 0256CYBERMAXX 0338
089609060375 & 0256
CYTRON 0338089609060375 & 0256
DDAEWOO 0971
50

CODE
S
MD 24089a ES EN DE Aldi Final Content.book Seite 51 Mittwoch, 5. August 2009 3:36 15
DUAL 03380375 & 0256
EEMERSON 0339 & 0231
0375 & 0256
FFUNAI 0339 & 0231
GGO-VIDEO 0338
03670971
GOLDSTAR 0375 & 0256
HHITACHI 0387 & 0231
JJVC 0400
LLG 0907
0375 & 0256LIFETEC 0338
089609060375 & 0256
MMAGNAVOX 0914 & 0285MEDION 0338
089609060375 & 0256
MICROMAXX 0338089609060375 & 0256
MICROSTAR 0338089609060375 & 0256
PPANASONIC 0970PHILIPS 0969 & 0285PIONEER 1084POLAROID 0949PRO2 0338
MD 24089a 51

MD 24089a ES EN DE Aldi Final Content.book Seite 52 Mittwoch, 5. August 2009 3:36 15
089609060375 & 0256
SSAMSUNG 0338
0963SANSUI 0920SANYO 0378 & 0258SILVERCREST 0256SONY 0402SYLVANIA 0339 & 0231
TTARGA 0375 & 0256
09070375 & 1041
TCM 03380375 & 0256
TEVION 0338089609060375 & 0256
TOSHIBA 0362
ZZENITH 0375 & 0256
HTIB
(Los sistemas de Home Cinema necesitan un código DVD único o un código DVD & AUDIO)(Home Cinema Systems operate with either a single DVD code or some require both DVD & AUDIO codes)(Heimkinosysteme werden entweder nur mit dem DVD-Code gesteuert oder benötigen sowohl den DVD- als auch den AUDIO-Code)
DVD &AUDIO
AAIWA 0377AMW 1054
CCENTRUM 0927COBY 0948CRITERION 0344 & 0775CURTIS 0948CYBERCOM 0334
52

CODE
S
MD 24089a ES EN DE Aldi Final Content.book Seite 53 Mittwoch, 5. August 2009 3:36 15
03720344 & 0775
CYBERMAXX 033403720344 & 0775106910661118
CYTRON 033403720344 & 0775106910661118
DDUAL 0334
03720344 & 0775
DURABRAND 0375
FFISHER 0378
JJVC 0662
0964
KKOSS 0373
LLENCO 1774LENOXX 0931LG 0972LIFE 1118LIFETEC 0334
03720344 & 0775106910661118
MMEDION 0334
03720344 & 0775106910661118
MICROMAXX 03340372
MD 24089a 53

CODE
S
MD 24089a ES EN DE Aldi Final Content.book Seite 54 Mittwoch, 5. August 2009 3:36 15
0344 & 0775106910661118
MICROSTAR 033403720344 & 0775106910661118
NNORCENT 0948
OONKYO 0975
PPANASONIC 0974PHILIPS 0370 & 0734PIONEER 0968
0976PRO2 0334
03720344 & 077510691066
SSAMSUNG 0919SONY 0986
TTARGA 0972
0375 & 1041TCM 0334
0344 & 0775TEVION 0334
03720892091709180344 & 0775106910661118
WWELLTECH 1098
1105
MD 24089a 54

MD 24089a ES EN DE Aldi Final Content.book Seite 55 Mittwoch, 5. August 2009 3:36 15
Descodificadores adicionales/Auxiliary Set-Top Boxes/Weitere Set-Top Boxen
TV Web & ordenador/Web & Computer TVBUSH 0039CYBERLINK 1101GERICOM 0443HAUPPAUGE 1198NOW TV 1186PACKARD BELL 1101PANASONIC 0542PINNACLE 1199 1201 1202PREMIERE 0542TELEFONICA 1227THOMSON 0603
Receptor de medios de comunicación/Media ReceiverSONY NETWORK MEDIA RECEIVER0446
Caja de distribución Scart/Scart Switch BoxesCOUNTRYMAN 1168FUNK 1170MARMITEK 0641SKARDIN 1169SKYMASTER 1169VIVANCO 0684
Digitale Set Top Box/Digital Set Top BoxesADECQ 1340ECHOSTAR 0657SKYMASTER 1166TEVION 0650 0645 0423YUNG FU 1166
Descodificador digital/Misc. Set Top BoxesPARDY LIGHT BOX 1171
Entertainment BoxEMTEC 1096 1097HOME SERVER 1228DMA 1228MEDION 1228
Video On DemandMAXDOME 1239
55

CODE
S
MD 24089a ES EN DE Aldi Final Content.book Seite 56 Mittwoch, 5. August 2009 3:36 15
LD
DDENON 0252 0318
GGRUNDIG 0318
MMITSUBISHI 0318
NNAD 0318
PPIONEER 0318
TTELEFUNKEN 0318THORN 0322
DVB-T
Receptor DVB-T, DVB-T Terrestrial Digital Television, DVB-T Receiver (DTV, Freeview, iDTV, etc)
AADECQ 1226ALBA 0451 0646ARCOM 1242
BBUSH 1261 0647 0451 0032BRAIN WAVE 0476
CCANAL + 1177COMAG 1229CYBERMAXX 0645 0650CYTRON 0645 0650
DDIGENIUS 0645DIGIFUSION 0647DIGIHOME 1262
MD 24089a 56

MD 24089a ES EN DE Aldi Final Content.book Seite 57 Mittwoch, 5. August 2009 3:36 15
DIGIO2 1150DIGIPAL 1218DMT 0412DURABRAND 0526
EECHOSTAR 0657EMTECH 0476
FFREEBOX 1182FREEVIEW 0447 0451 0453 0457 0482 051205130519 0526 0532 0600
0646 0647 0648 0649 0651
GGbSAT 0476GERICOM 0443GOODMANS 1261 0526 0451GOODWAY 1163 1164GRUNDIG 0512 1172
HHAUPPAUGE 0482HB 1011 1211 1213 0476HITACHI 1262 0526HOMECAST 0476HUMAX 0651
IINTERSTAR 0476
JJEPSSEN 0476JVC 0526
KKATHREIN 1197
LLABGEAR 0513LASAT 1156LIDCOM 0451LIFETEC 0645 0650LOGIK 1263
MMARMITEK OCTOPUS0655MATSUI 0649 0526 0451MEDION 0645 0650MICO 1135MICROMAXX 0645 0650
57

CODE
S
MD 24089a ES EN DE Aldi Final Content.book Seite 58 Mittwoch, 5. August 2009 3:36 15
MICROSTAR 0645 0650
NNOKIA 0519 0531NOOS 1183
OOCEANIC 1011OGGLE 1136ON-DIGITAL 0527 0531 0620OPTEX 0656
PPACE 0453 0527PACIFIC 0526PANASONIC 0072 0403PHILIPS 0600PIONEER 0457 0620PREMIERE 0600 0519PRO2 0645 0650
RREBOX 0476
SSAGEM 0648 1143SCHAUB LORENZ 1011 1211 1212 1213 0476SCHWAIGER 1156 1229 1173 0630SHARP 0059SKARDIN 0656SKYMASTER 1166 1165 1164 1163 1140 0656 0412SMART 1247 1245 1242 1165 1133SM ELECTRONIC 0412 0656 1165 1163 1164SONY 0447
TTCM 1413 1017 1119TECHNIKA 1262TECHNISAT 1218TECHNOTREND 1173TELEVES 0476TEVION 0645 0650THOMSON 0427 0532TOPFIELD 1204 0506TOP-UP TV 0527 0531 0657TVONICS 1263
WWHARFEDALE 1262WORLDSAT 0476
MD 24089a 58

MD 24089a ES EN DE Aldi Final Content.book Seite 59 Mittwoch, 5. August 2009 3:36 15
YYUNG FU 1166
AUX
Audio Amplifiers/Tuners/ReceiversCENTRUM 0692CRITERION 0775CYBERCOM 0841 0775 0776CYBERMAXX 0841 0775 0776CYTRON 0841 0775 0776DENON 1048 0779 0781DUAL 0841 0775 0797ELTA 0667 0668GRUNDIG 0697 0698 0727HARMON/KARDON0682KENWOOD 0761LIFETEC 0841 0775 0776LINN 0857MARANTZ 0727MEDION 0841 0775 0776MICROMAXX 0841 0775 0776MICROSTAR 0841 0775 0776NAD 0735 0736 0737 0738 0799 0800NUVO 0862 0863 0864 0865ONKYO 0785 0792 0793 0826PHILIPS 0734 0846 0727PRO2 0841 0775 0776SANSUI 0727SCHNEIDER 0791SHERWOOD 0782SONY 0739 0740 0755 0757 0758 0759 0760TCM 0841 0775 0776 0806TEAC 0794 0796TECHNICS 0764 0777 0788TEVION 0775 0776 0815 0817 0841THEORIE & ANWENDING0805THOMSON 0842 0766XANTECH 0867YAMAHA 0883 0882 0839 0838 0724 0752 0770 0771 0772
Audio Tape PlayersAIWA 0790DENON 0780GRUNDIG 0729 0698HARMON KARDON 0681KENWOOD 0761MAGNAVOX 0729MARANTZ 0729NAD 0799ONKYO 0784PHILIPS 0729
59

CODE
S
MD 24089a ES EN DE Aldi Final Content.book Seite 60 Mittwoch, 5. August 2009 3:36 15
SANSUI 0729SHERWOOD 0783SONY 0754 0755 0756TEAC 0794TECHNICS 0764 0777 0786THOMSON 0842YAMAHA 0724 0772
MINI SystemsAIWA 0773 0774CYBERCOM 0852 0858 0704 0745 0808 0810 0820 0819CYBERMAXX 0852 0858 0704 0745 0808 0810 0811 0812 0820 0819CYTRON 0852 0858 0704 0745 0808 0810 0811 0812 0820 0819DUAL 0852 0858 0704 0745 0797^ 0820 0819E-BENCH 0811ELTA 0693 0745GRUNDIG 0707INSIGNIA 0731INTERTRONIC 0811LIFE 0879 0823 0811LIFETEC 0879 0823 0852 0858 0704 0745 0808 0810 0811 0812
0820 0819MEDION 0879 0823 0731 0728 0852 0858 0704 0745 0808 0810
0811 0812 0820 0819MICROMAXX 0852 0858 0704 0745 0808 0810 0811 0812 0820 0819MICROSTAR 0852 0858 0704 0745 0808 0810 0811 0812 0820 0819PIONEER 0753PRO2 0852 0858 0704 0745 0808 0810 0811 0812 0820 0819SAMSUNG 0768SHARP 0789SILVERCREST 0828 0811 0829 0868SONY 0741TCM 0879 0880 0852 0858 0704 0745 0808 0810 0811 0820
0819 0694 0823 0824 0825TEVION 0879 0823 0852 0858 0704 0745 0808 0810 0811 0812
0820 0819 0821 0822WELLTECH 0881 0852 0810 0820 0819 0694 0803 0811 0827
Misc.APPLE iPOD 0885AUDIO COMBI 0844CAR RADIO 0861CDR 0847 0675DBS 0845INTERNET RADIO 0670iPOD 0884SWITCH BOX 0684VIDEO CD 0840
MD 24089a 60

MD 24089a ES EN DE Aldi Final Content.book Seite 61 Mittwoch, 5. August 2009 3:36 15
Code Searching By Brand Name
TV1 MEDION / LIFETEC / MICROMAXX / MICROSTAR / TEVION / VIDEON / TCM / GENERAL
TECHNIC / INNOVATION/MAGNUM2 PHILIPS / ERRES / PYE / PHILCO / RADIOLA3 SONY / AKAI / PANASONIC / SHARP / TOSHIBA / JVC / DAEWOO4 THOMSON / BRANDT5 TELEFUNKEN / SABA / NORMENDE / FERGUSON / BAIRD6 GRUNDIG / BLAUPUNKT7 NOKIA / FINLUX / ITT
VCR1 MEDION / LIFETEC / MICROMAXX / MICROSTAR / TEVION / TCM / GENERAL TECHNIC /
INNOVATION2 PHILIPS / PHILCO3 SONY / AKAI / PANASONIC / SHARP / TOSHIBA / JVC / DAEWOO4 THOMSON / BRANDT5 TELEFUNKEN / SABA / CORMENDE / FERGUSON6 GRUNDIG / BLAUPUNKT7 NOKIA / FINLUX / ITT
SAT1 MEDION / LIFETEC / MICROMAXX / MICROSTAR / INNOVATION / GALAXIS2 PHILIPS / PHILCO3 PACE / ECHOSTAR4 THOMSON / UNIVERSUM / BRANDT5 TELEFUNKEN / SABA / NORMENDE / FERGUSON6 GRUNDIG7 NOKIA / FINLUX / ITT / HIRSCHMANN
61