Embed Size (px)
Citation preview

Jawaharlal Nehru Engineering College
Laboratory Manual
MTL-II (ASP.NET)
For
S.Y (M.C.A) Students
20, May 2010 – Rev 00 – MCA – ISO 9000 Tech Document
Author JNEC, Aurangabad

FORWARD
It is my great pleasure to present this laboratory manual for S.Y (M.C.A)engineering students for the subject of MTL-II(Microsoft Technology lab tools).Subject name itself is expecting what are the advance controls and services that might be used to develop web applications using Microsoft technology i.e. ASP.NET with code behind language VB.NET . As a student, many of you may be wondering with some of the questions in your mind regarding the subject and exactly what has been tried is to answer through this manual. As you may be aware that MGM has already been awarded with ISO 9000 certification and it is our endure to technically equip our students taking the advantage of the procedural aspects of ISO 9000 Certification. Faculty members are also advised that covering these aspects in initial stage itself, will greatly relived them in future as much of the load will be taken care by the enthusiasm energies of the students once they are conceptually clear.
Prof. S.D.DESHMUKH Principal
LABORATORY MANUAL CONTENTS
This manual is intended for the students S.Y (M.C.A) engineering for the subject of MTL-II (Microsoft Technology Lab). Subject name itself is expecting what are the advance controls and services that might be used to develop web applications using Microsoft technology i.e. ASP.NET with code behind language VB.NET. In the subject of this manual typically contains practical/Lab Sessions we have dealt with ASP.NET.
ASP.NET is the next generation ASP, but it's not an upgraded version of ASP. ASP.NET is an entirely new technology for server-side scripting. It was written from the ground up and is not backward compatible with classic ASP.
Students are advised to thoroughly go through this manual rather than only topics mentioned are the key to understanding and conceptual visualization of theoretical aspects covered in the books. Good Luck for your Enjoyable Laboratory Sessions Lect. J. D. Harne
SUBJECT INDEX:
1. Introduction to Client side scripting. 2. ASP.NET page life cycle. 3. State management technique. 4. Use of advance web controls like File upload, Hyperlink, Linkbutton etc. 5. Ad-rotator control. 6. Validation controls. 7. Grid view control (showing records from Database). 8. ADO.NET application to insert, delete, update records in database. 9. Data List and Repeater control. 10. Introduction to Web services.
DOs and DON’T DOs in Laborary: 1. Do not handle any equipment before reading the instructions/Instruction manuals
2. Read carefully the power ratings of the equipment before it is switched on whether ratings 230
V/50
Hz or 115V/60 Hz. For Indian equipments, the power ratings are normally 230V/50Hz. If you
have equipment with 115/60 Hz ratings, do not insert power plug, as our normal supply is
230V/50 Hz, which will damage the equipment.
3. Observe type of sockets of equipment power to avoid mechanical damage
4. Do not forcefully place connectors to avoid the damage
5. Strictly observe the instructions given by the teacher/Lab Instructor
Instruction for Laboratory Teachers::
1. Submission related to whatever lab work has been completed should be done during the next lab
session. The immediate arrangements for printouts related to submission on the day of practical
assignments.
2. Students should be taught for taking the printouts under the observation of lab teacher.
3. The promptness of submission should be encouraged by way of marking and evaluation patterns
that will benefit the sincere students.

WARMUP EXCERCISES:
What is Internet,web server,browser? What is client side scripting and serverside scripting?
What is DOM(Document Object Modelling). .NET Framework,namespaces,page life cycle, HTML and web controls. State management techniques. What are View state,Cookies,Hidden,Querystring? Request and Response objects. Difference Session and Application state management technique.
Validation controls. Rich controls.
What is ADO.NET. Different types of ADO.NET Objects? Difference dataset and data reader. Connected and Disconnected architecture. What are Web services? What is SOAP,WSDL,UDDI,DISCO.
Difference Server.Transer() and Response.Redirect().

1. Lab Exercises:
[Purpose this exercise is to introduce Client side scripting. Differentiate between client side
scripting and server side scripting. Steps:
1. Write a program in either NOTEPAD or VISUAL STUDIO.NET environment.
2. If VISUAL STUDIO .NET environment then
(i) Right click on Solution Explorer and Select Add New Item.
(ii) Select HTMLPage.htm.
(iii) Write the code (only use HTML Controls from Toolbox).
(iv) Select HTML page in Solution Explorer =>Right click=>Select View in Browser
to execute.
OR
Press F5 button for execution.
3. If NOTEPAD then
(i) Save the file with extension .HTML.
(ii) Click the HTML file for execution.
Exercise No1: ( 2 Hours) – 1 Practical
<HTML>
<HEAD>
<TITLE> Greetings from the web</TITLE>
<script language="javascript" type="text/javascript">
function CheckLogin() {
if ( form1.txtUname .value =="" && form1 .txtPwd.value =="")
{
alert ("Please Enter username and password")
form1.txtUname .focus ();
}else if ( form1.txtUname .value =="JNEC" && form1.txtPwd.value =="MCA")
{
alert ("Login Success")
}
else
{
alert ("Login failed please try again..")
form1 .txtUname .value="";
form1.txtPwd .value ="";
form1 .txtUname .focus ();
}
}
</script>
</Head>
<body>
<form id="form1" name="f1" action ="">
<table style="width: 34%; height: 220px;">
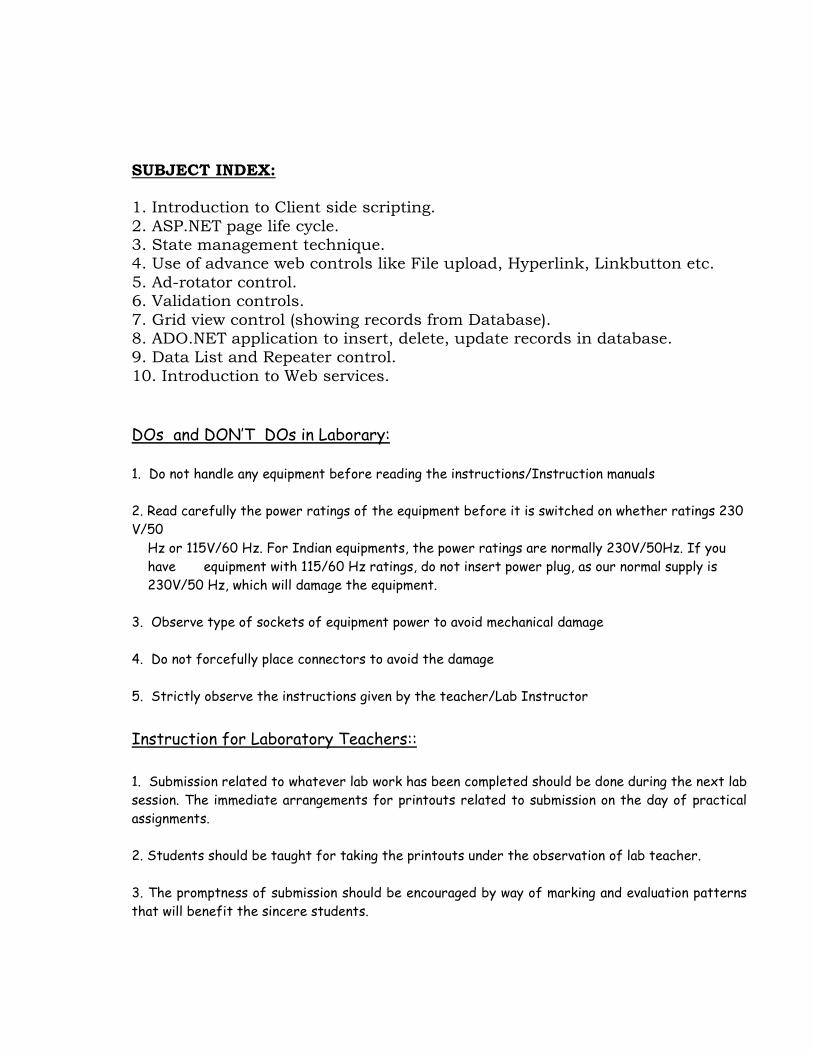
<tr>
<td class="style2">
Username :
</td>
<td>
<input id="txtUname" type="text" />
</td>
</tr>
<tr>
<td class="style2">
Password :
</td>
<td>
<input id="txtPwd" type="password" />
</td>
</tr>
<tr>
<td class="style1" colspan="2">
<input id="Button1" type="Button" value="Login" onclick="CheckLogin()" />
</td>
</tr>
</table>
</form>
</body>
<HTML>

2. Lab Exercises: [Purpose of this exercise is to introduce ASP.NET page life cycle. You can use Visual Studio .NET
environment to type the program. Execution of program in two ways.
1. Press F5 button OR
2. Right click on ASP.NET page (for e.g.: Default.aspx) and Select “View Browser” option and
select any browser for execution.
Exercise No2: ( 2 Hours) – 1 Practical Lab Assignment 2: Page Life cycle( different page events)
Program:
'Inline Code ( Default.aspx.vb)
Partial Class _Default
Inherits System.Web.UI.Page
Protected Sub Page_Init(ByVal sender As Object, ByVal e As System.EventArgs) Handles
Me.Init
lblInfo.Text += "Page.Init event handled.<br />"
End Sub
Protected Sub Page_Load(ByVal sender As Object, ByVal e As System.EventArgs) Handles
Me.Load
lblInfo.Text += "Page.Load event handled.<br />"
If (Page.IsPostBack) Then
lblinfo.Text += "<b>This is the second time you've seen this page.</b><br />"
End If
End Sub
Protected Sub Page_PreRender(ByVal sender As Object, ByVal e As System.EventArgs) Handles
Me.PreRender
lblinfo.Text += "Page.PreRender event handled.<br />"
End Sub
Protected Sub Page_Unload(ByVal sender As Object, ByVal e As System.EventArgs) Handles
Me.Unload
' This text never appears because the HTML is already
' rendered for the page at this point.
lblinfo.Text += "Page.Unload event handled.<br />"
End Sub
End Class
3. Lab Exercises: [Purpose of this exercise is to introduce ASP.NET State management techniques. You can use
Visual Studio .NET environment to type the program. Execution of program in two ways.
1. Press F5 button OR
2. Right click on ASP.NET page (for eg: Default.aspx) and Select “View Browser” option and
select any browser for execution.
Exercise No3: ( 2 Hours) – 1 Practical Lab Assignment 3: State management techniques
Program:
Steps: 1. Start a new web site with two web forms. Let Default.aspx and Success.aspx are two web
forms.
2. Design Default.aspx page with fields Employee name, address, contact no, email id and
a submit button.
3. After filling all information, it should be displayed on Success.aspx page using Query String
or Session state management technique.
4. Code using Query String as shown below:
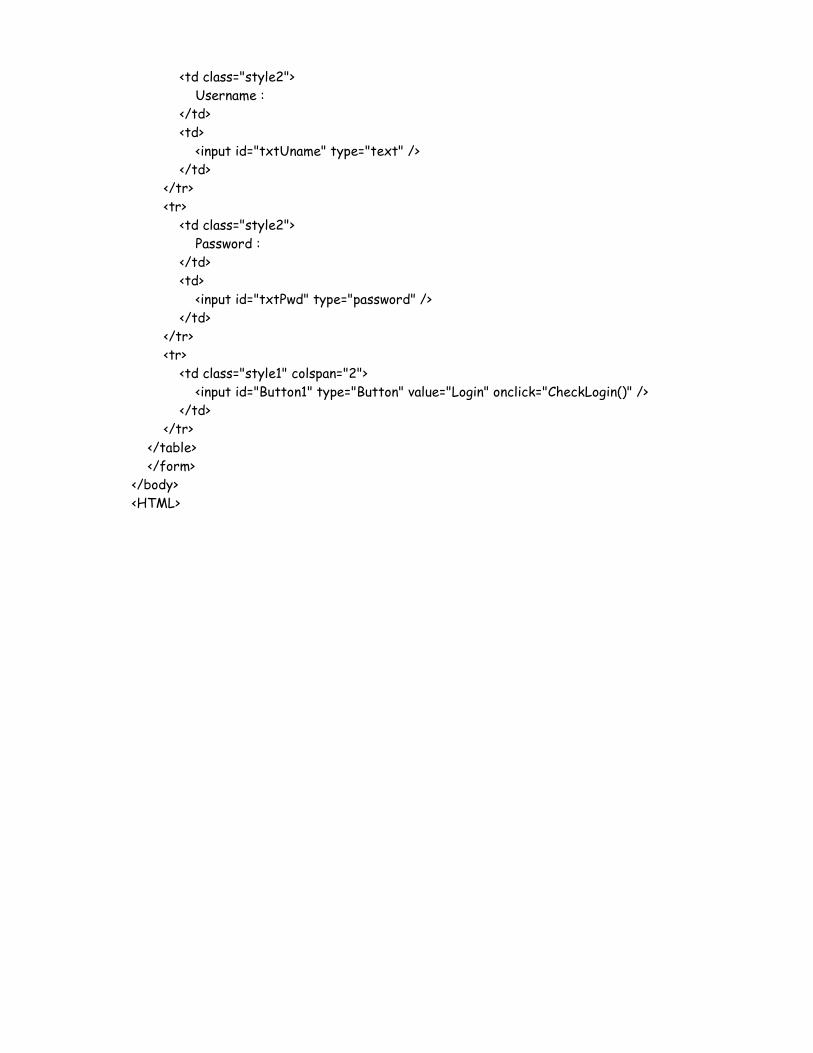
( Default.aspx)
<%@ Page Language="VB" AutoEventWireup="false" CodeFile="Default.aspx.vb"
Inherits="_Default" %>
<!DOCTYPE html PUBLIC "-//W3C//DTD XHTML 1.0 Transitional//EN"
"http://www.w3.org/TR/xhtml1/DTD/xhtml1-transitional.dtd">
<html xmlns="http://www.w3.org/1999/xhtml">
<head runat="server">
<title>Registration</title>
</head>
<body>
<form id="form1" runat="server">
<table>
<tr>
<td>
Employee Name :
</td>
<td>
<asp:TextBox ID="txtEmpName" runat="server"></asp:TextBox>
</td>
</tr>
<tr>
<td>
Address :
</td>
<td>

<asp:TextBox ID="txtAddress" runat="server"></asp:TextBox>
</td>
</tr>
<tr>
<td>
Phone No:
</td>
<td>
<asp:TextBox ID="txtPhNo" runat="server"></asp:TextBox>
</td>
</tr>
<tr>
<td>
Email Id:
</td>
<td>
<asp:TextBox ID="txtEmail" runat="server"></asp:TextBox>
</td>
</tr>
</table>
<asp:Button ID="Button1" runat="server" Text="Submit" Style="top: 157px; left: 118px;
position: absolute; height: 26px; width: 61px" />
</form>
</body>
</html>
Inline Code (Default.aspx.vb)
Partial Class _Default
Inherits System.Web.UI.Page
Public imgString As String
Protected Sub Button1_Click(ByVal sender As Object, ByVal e As System.EventArgs) Handles
Button1.Click
Response.Redirect("Success.aspx?name=" & txtEmpName.Text & "&address=" &
txtAddress.Text & "&phno=" & txtPhNo.Text & "&email=" & txtEmail.Text & "&photo=" &
Image1.ImageUrl)
End Sub
End Class
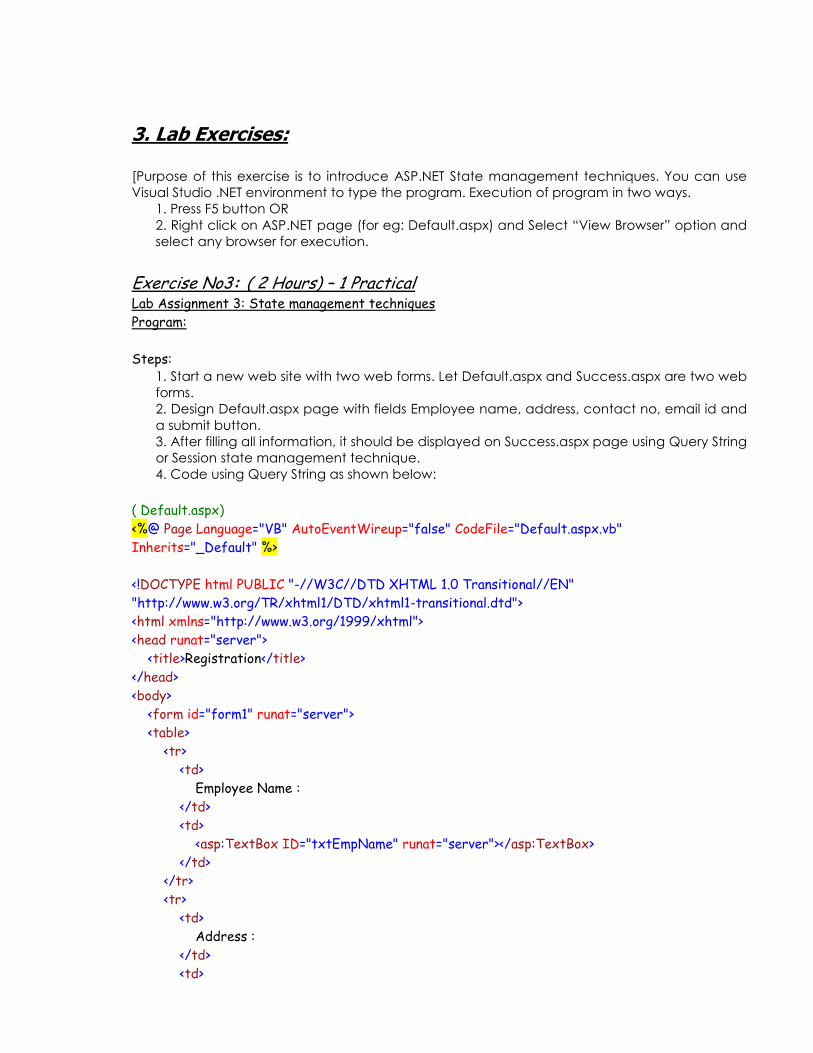
(Success.aspx)
<%@ Page Language="VB" AutoEventWireup="false" CodeFile="Success.aspx.vb"
Inherits="Succcess" %>
<!DOCTYPE html PUBLIC "-//W3C//DTD XHTML 1.0 Transitional//EN"
"http://www.w3.org/TR/xhtml1/DTD/xhtml1-transitional.dtd">
<html xmlns="http://www.w3.org/1999/xhtml">
<head runat="server">
<title>Second Page</title>
</head>
<body>
<form id="form1" runat="server">
<table>
<tr>
<td>
Name:
</td>
<td>
<%=Request.QueryString("name")%>
</td>
</tr>
<tr>
<td>
Address :
</td>
<td>
<%=Request.QueryString("address")%>
</td>
</tr>
<tr>
<td>
Phno:
</td>
<td>
<%=Request.QueryString("phno")%>
</td>
</tr>
<tr>
<td>
Email :
</td>
<td>
<%=Request.QueryString("email")%>
</td>
</tr>
</table>
</form>
</body>
</html>
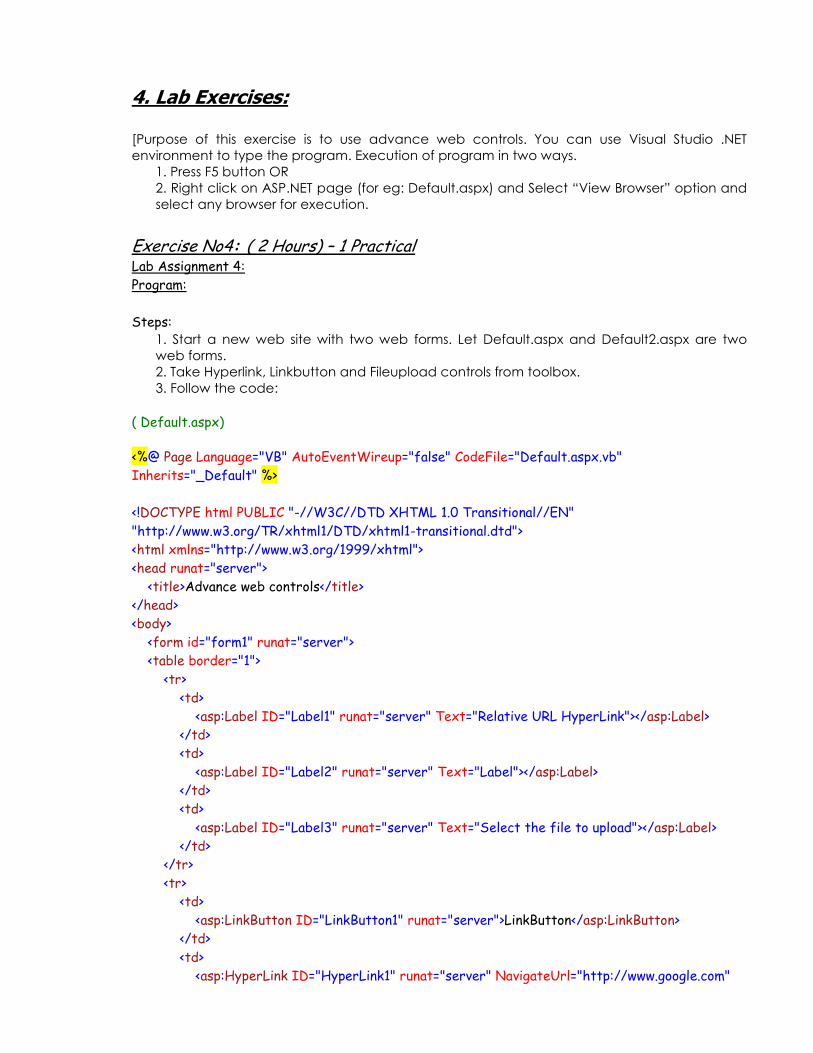
4. Lab Exercises: [Purpose of this exercise is to use advance web controls. You can use Visual Studio .NET
environment to type the program. Execution of program in two ways.
1. Press F5 button OR
2. Right click on ASP.NET page (for eg: Default.aspx) and Select “View Browser” option and
select any browser for execution.
Exercise No4: ( 2 Hours) – 1 Practical Lab Assignment 4:
Program:
Steps: 1. Start a new web site with two web forms. Let Default.aspx and Default2.aspx are two
web forms.
2. Take Hyperlink, Linkbutton and Fileupload controls from toolbox.
3. Follow the code:
( Default.aspx)
<%@ Page Language="VB" AutoEventWireup="false" CodeFile="Default.aspx.vb"
Inherits="_Default" %>
<!DOCTYPE html PUBLIC "-//W3C//DTD XHTML 1.0 Transitional//EN"
"http://www.w3.org/TR/xhtml1/DTD/xhtml1-transitional.dtd">
<html xmlns="http://www.w3.org/1999/xhtml">
<head runat="server">
<title>Advance web controls</title>
</head>
<body>
<form id="form1" runat="server">
<table border="1">
<tr>
<td>
<asp:Label ID="Label1" runat="server" Text="Relative URL HyperLink"></asp:Label>
</td>
<td>
<asp:Label ID="Label2" runat="server" Text="Label"></asp:Label>
</td>
<td>
<asp:Label ID="Label3" runat="server" Text="Select the file to upload"></asp:Label>
</td>
</tr>
<tr>
<td>
<asp:LinkButton ID="LinkButton1" runat="server">LinkButton</asp:LinkButton>
</td>
<td>
<asp:HyperLink ID="HyperLink1" runat="server" NavigateUrl="http://www.google.com"

Target="_blank" ToolTip="Visit Google.com">Visit Google.com</asp:HyperLink>
<asp:HyperLink ID="HyperLink2" runat="server" NavigateUrl="~/Default2.aspx"
Target="_self">Click here to open Default2.aspx</asp:HyperLink>
</td>
<td>
<asp:FileUpload ID="FileUpload1" runat="server" /><asp:Button ID="Button1"
runat="server"
Text="Upload File" />
</td>
</tr>
</table>
</form>
</body>
</html>
( Default.aspx.vb)
Partial Class _Default
Inherits System.Web.UI.Page
Protected Sub LinkButton1_Click(ByVal sender As Object, ByVal e As System.EventArgs)
Handles LinkButton1.Click
Label1.Text = "PostBack operation performed on clicking link button"
End Sub
Protected Sub Page_Load(ByVal sender As Object, ByVal e As System.EventArgs) Handles
Me.Load
If Not Page.IsPostBack Then
Label2.Text = "Page loaded first time."
Else
Label2.Text = "PostBack operation is completed."
End If
End Sub
Protected Sub Button1_Click(ByVal sender As Object, ByVal e As System.EventArgs) Handles
Button1.Click
If FileUpload1.HasFile Then
FileUpload1.SaveAs("C:\" & FileUpload1.FileName)
Label3.Text = "File Uploaded"
Else
Label3.Text = "No uploaded file"
End If
End Sub
End Class
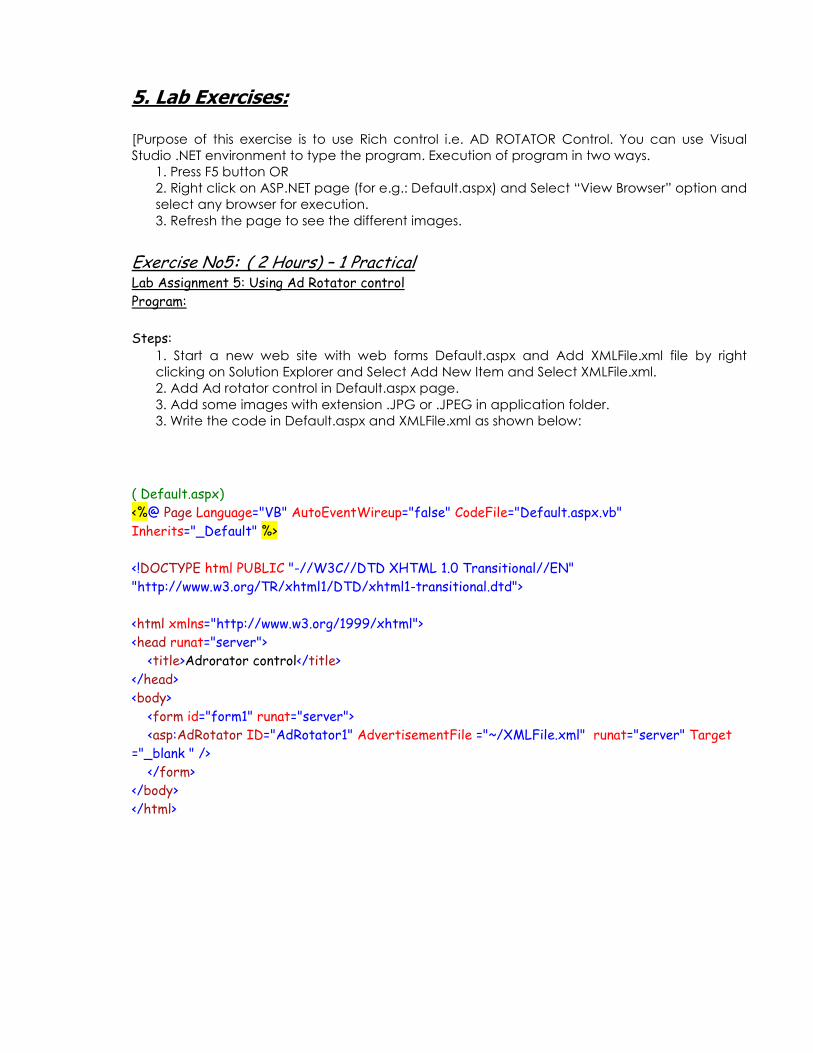
5. Lab Exercises: [Purpose of this exercise is to use Rich control i.e. AD ROTATOR Control. You can use Visual
Studio .NET environment to type the program. Execution of program in two ways.
1. Press F5 button OR
2. Right click on ASP.NET page (for e.g.: Default.aspx) and Select “View Browser” option and
select any browser for execution.
3. Refresh the page to see the different images.
Exercise No5: ( 2 Hours) – 1 Practical Lab Assignment 5: Using Ad Rotator control
Program:
Steps: 1. Start a new web site with web forms Default.aspx and Add XMLFile.xml file by right
clicking on Solution Explorer and Select Add New Item and Select XMLFile.xml.
2. Add Ad rotator control in Default.aspx page.
3. Add some images with extension .JPG or .JPEG in application folder.
3. Write the code in Default.aspx and XMLFile.xml as shown below:
( Default.aspx)
<%@ Page Language="VB" AutoEventWireup="false" CodeFile="Default.aspx.vb"
Inherits="_Default" %>
<!DOCTYPE html PUBLIC "-//W3C//DTD XHTML 1.0 Transitional//EN"
"http://www.w3.org/TR/xhtml1/DTD/xhtml1-transitional.dtd">
<html xmlns="http://www.w3.org/1999/xhtml">
<head runat="server">
<title>Adrorator control</title>
</head>
<body>
<form id="form1" runat="server">
<asp:AdRotator ID="AdRotator1" AdvertisementFile ="~/XMLFile.xml" runat="server" Target
="_blank " />
</form>
</body>
</html>

(XMLFile.xml)
<?xml version="1.0" encoding="utf-8" ?>
<Advertisements>
<Ad>
<ImageUrl>f2f53cf6.jpg</ImageUrl>
<NavigateUrl>www.gmail.com</NavigateUrl>
<Impressions>2</Impressions>
</Ad>
<Ad>
<ImageUrl>3-idiots-13h.jpg</ImageUrl>
<NavigateUrl>www.yahoo.com</NavigateUrl>
<Impressions>2</Impressions>
</Ad>
</Advertisements>

6. Lab Exercises: [Purpose of this exercise is to use Validation controls .You can use Visual Studio .NET
environment to type the program. Execution of program in two ways.
1. Press F5 button OR
2. Right click on ASP.NET page (for e.g.: Default.aspx) and Select “View Browser” option and
select any browser for execution.
Exercise No6: ( 2 Hours) – 1 Practical Lab Assignment 6: Using Validation controls
Program:
Steps:
1. Design a Registration form Default.aspx page with fields Username, choose password,
confirm password, age, email id, city and a submit button.
2. Use:
a) RequiredFieldValidator - for Username, Choose password, Age, Email Id fields.
b) CompareValidator - for Confirm password field.
c) RangeValidator - for Age field.
d) RegularExpressionValidator - for Email field.
e) CustomValidator - for City field.
3. Set the properties for:
a) RequiredFieldValidator - ControlToValidate, ErrorMessage.
b) CompareValidator - ControlToCompare, ControlToValidate, ErrorMessage.
c)RangeValidator - ControlToValidate, ErrorMessage, MaximumValue, MinimumValue,
Type.
d) RegularExpressionValidator - ControlToValidate, ErrorMessage ,ValidationExpression.
e) CustomValidator - ControlToValidate, ErrorMessage, ClientValidationFunction.
4. Write a Client side script to use CustomValidator control (either JavaScript or VBScript).
5. Display message “Successfully Submitted” after Clicking Submit button i.e after successful
validation of registration page.

( Default.aspx)
<%@ Page Language="VB" AutoEventWireup="false" CodeFile="Default.aspx.vb"
Inherits="_Default" %>
<!DOCTYPE html PUBLIC "-//W3C//DTD XHTML 1.0 Transitional//EN"
"http://www.w3.org/TR/xhtml1/DTD/xhtml1-transitional.dtd">
<html xmlns="http://www.w3.org/1999/xhtml">
<head runat="server">
<title>Registration</title>
<script language="JavaScript" type="text/javascript">
function CityValidate(ctl, args)
{
args.IsValid=(args.Value != "Select");
}
function window_onload() {
CityValidate ();
}
</script>
</head>
<body onload="return window_onload()">
<form id="form1" runat="server">
<table>
<tr>
<td>
UserName :
</td>
<td>
<asp:TextBox ID="txtUserName" runat="server"></asp:TextBox>
</td>
<td>
<asp:RequiredFieldValidator ID="RequiredFieldValidator1" runat="server"
ControlToValidate="txtUserName" ErrorMessage="*"></asp:RequiredFieldValidator>
</td>
</tr>
<tr>
<td>
Choose Password :
</td>
<td>
<asp:TextBox ID="txtChoosePwd" runat="server"></asp:TextBox>
</td>
<td>
<asp:RequiredFieldValidator ID="RequiredFieldValidator2" runat="server"
ControlToValidate="txtChoosePwd" ErrorMessage="*"></asp:RequiredFieldValidator>
</td>
</tr>
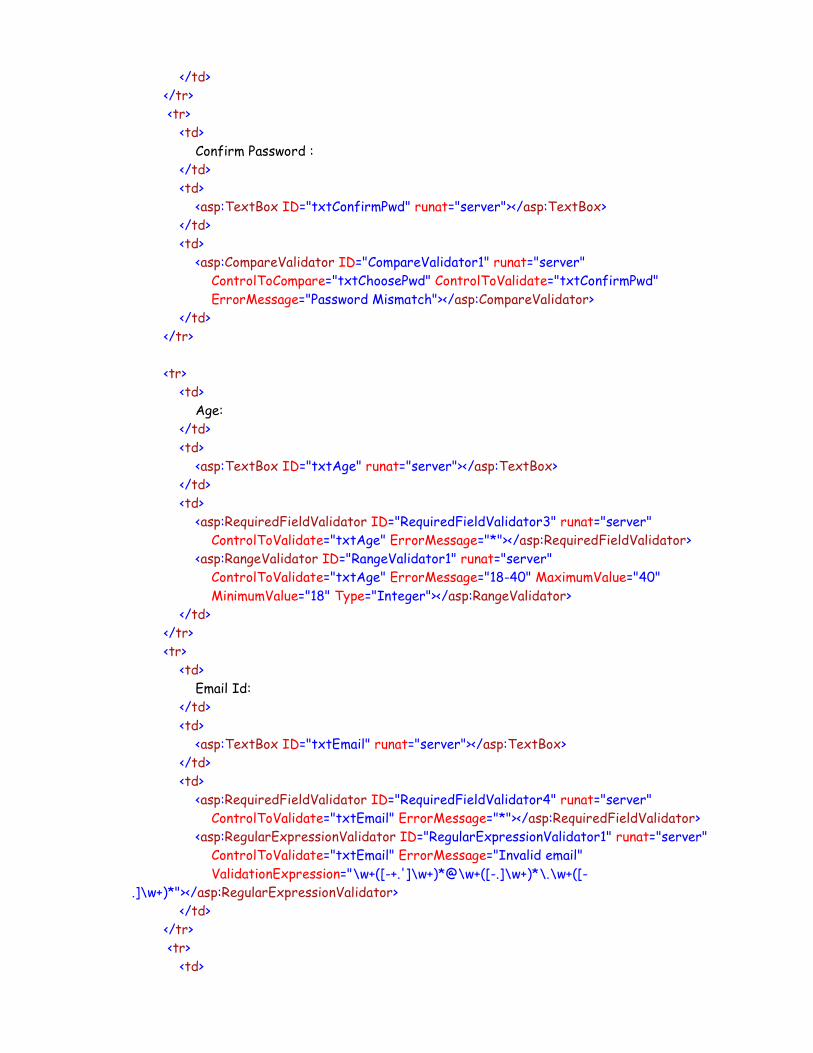
<tr>
<td>
Confirm Password :
</td>
<td>
<asp:TextBox ID="txtConfirmPwd" runat="server"></asp:TextBox>
</td>
<td>
<asp:CompareValidator ID="CompareValidator1" runat="server"
ControlToCompare="txtChoosePwd" ControlToValidate="txtConfirmPwd"
ErrorMessage="Password Mismatch"></asp:CompareValidator>
</td>
</tr>
<tr>
<td>
Age:
</td>
<td>
<asp:TextBox ID="txtAge" runat="server"></asp:TextBox>
</td>
<td>
<asp:RequiredFieldValidator ID="RequiredFieldValidator3" runat="server"
ControlToValidate="txtAge" ErrorMessage="*"></asp:RequiredFieldValidator>
<asp:RangeValidator ID="RangeValidator1" runat="server"
ControlToValidate="txtAge" ErrorMessage="18-40" MaximumValue="40"
MinimumValue="18" Type="Integer"></asp:RangeValidator>
</td>
</tr>
<tr>
<td>
Email Id:
</td>
<td>
<asp:TextBox ID="txtEmail" runat="server"></asp:TextBox>
</td>
<td>
<asp:RequiredFieldValidator ID="RequiredFieldValidator4" runat="server"
ControlToValidate="txtEmail" ErrorMessage="*"></asp:RequiredFieldValidator>
<asp:RegularExpressionValidator ID="RegularExpressionValidator1" runat="server"
ControlToValidate="txtEmail" ErrorMessage="Invalid email"
ValidationExpression="\w+([-+.']\w+)*@\w+([-.]\w+)*\.\w+([-
.]\w+)*"></asp:RegularExpressionValidator>
</td>
</tr>
<tr>
<td>
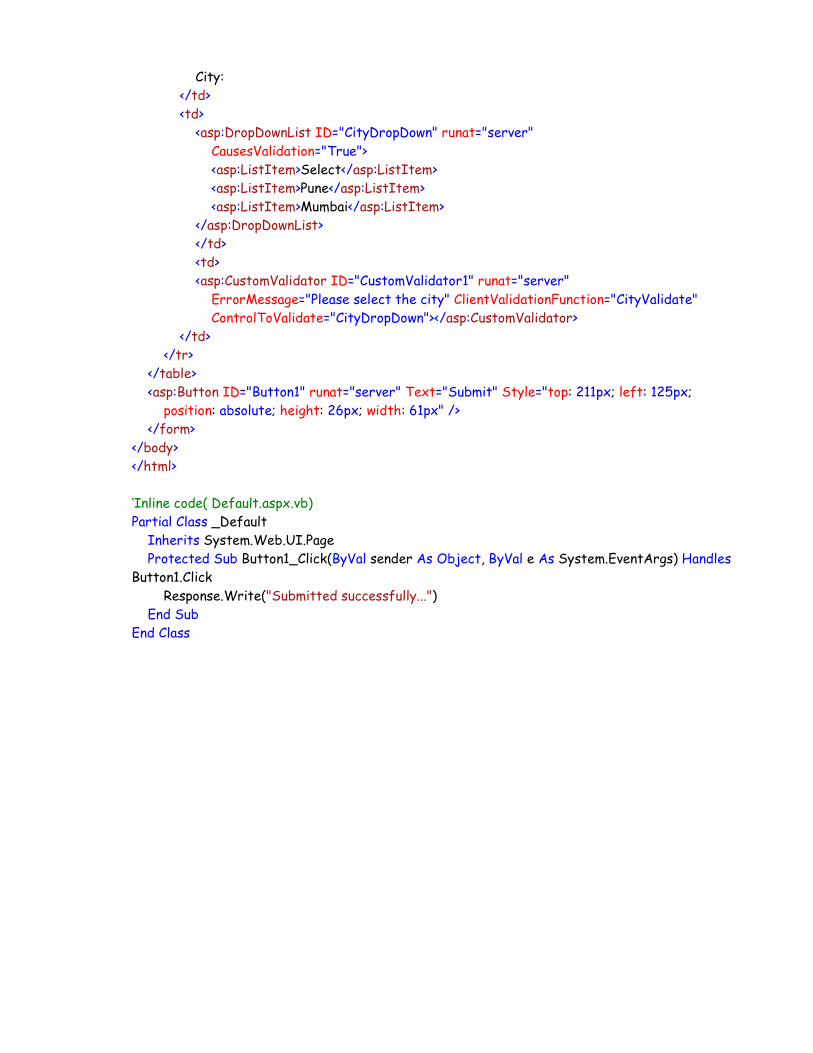
City:
</td>
<td>
<asp:DropDownList ID="CityDropDown" runat="server"
CausesValidation="True">
<asp:ListItem>Select</asp:ListItem>
<asp:ListItem>Pune</asp:ListItem>
<asp:ListItem>Mumbai</asp:ListItem>
</asp:DropDownList>
</td>
<td>
<asp:CustomValidator ID="CustomValidator1" runat="server"
ErrorMessage="Please select the city" ClientValidationFunction="CityValidate"
ControlToValidate="CityDropDown"></asp:CustomValidator>
</td>
</tr>
</table>
<asp:Button ID="Button1" runat="server" Text="Submit" Style="top: 211px; left: 125px;
position: absolute; height: 26px; width: 61px" />
</form>
</body>
</html>
‘Inline code( Default.aspx.vb)
Partial Class _Default
Inherits System.Web.UI.Page
Protected Sub Button1_Click(ByVal sender As Object, ByVal e As System.EventArgs) Handles
Button1.Click
Response.Write("Submitted successfully...")
End Sub
End Class
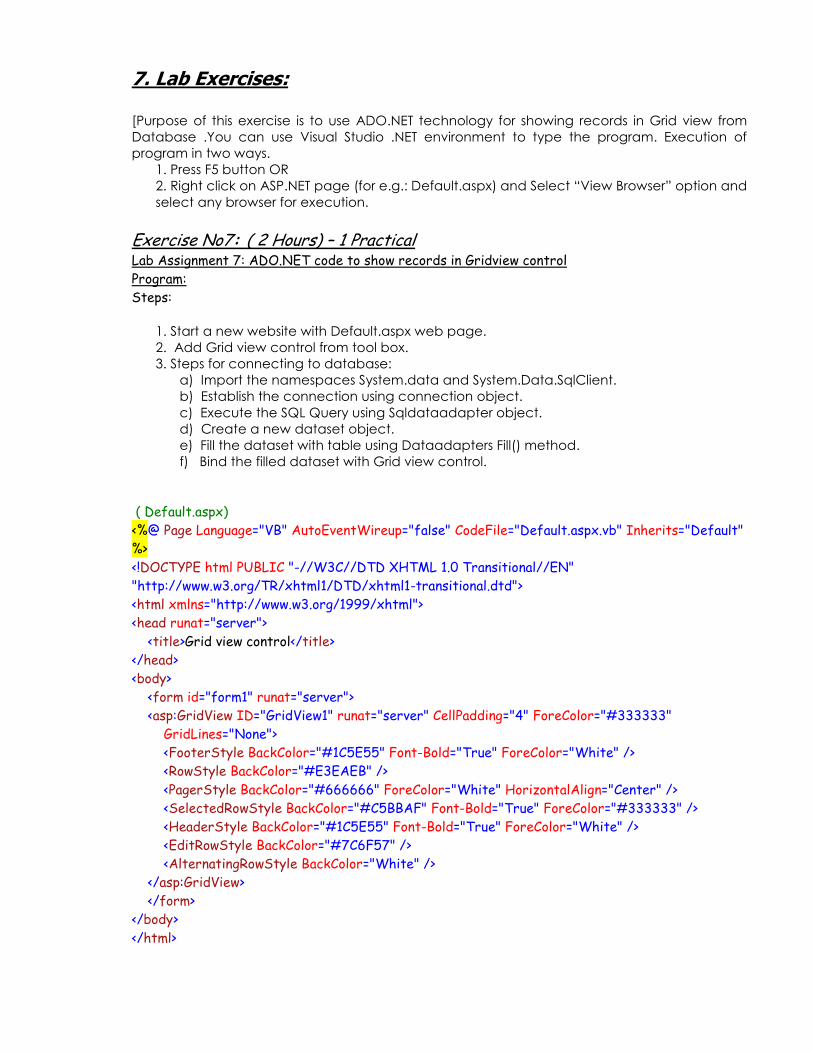
7. Lab Exercises: [Purpose of this exercise is to use ADO.NET technology for showing records in Grid view from
Database .You can use Visual Studio .NET environment to type the program. Execution of
program in two ways.
1. Press F5 button OR
2. Right click on ASP.NET page (for e.g.: Default.aspx) and Select “View Browser” option and
select any browser for execution.
Exercise No7: ( 2 Hours) – 1 Practical Lab Assignment 7: ADO.NET code to show records in Gridview control
Program:
Steps:
1. Start a new website with Default.aspx web page.
2. Add Grid view control from tool box.
3. Steps for connecting to database:
a) Import the namespaces System.data and System.Data.SqlClient.
b) Establish the connection using connection object.
c) Execute the SQL Query using Sqldataadapter object.
d) Create a new dataset object.
e) Fill the dataset with table using Dataadapters Fill() method.
f) Bind the filled dataset with Grid view control.
( Default.aspx)
<%@ Page Language="VB" AutoEventWireup="false" CodeFile="Default.aspx.vb" Inherits="Default"
%>
<!DOCTYPE html PUBLIC "-//W3C//DTD XHTML 1.0 Transitional//EN"
"http://www.w3.org/TR/xhtml1/DTD/xhtml1-transitional.dtd">
<html xmlns="http://www.w3.org/1999/xhtml">
<head runat="server">
<title>Grid view control</title>
</head>
<body>
<form id="form1" runat="server">
<asp:GridView ID="GridView1" runat="server" CellPadding="4" ForeColor="#333333"
GridLines="None">
<FooterStyle BackColor="#1C5E55" Font-Bold="True" ForeColor="White" />
<RowStyle BackColor="#E3EAEB" />
<PagerStyle BackColor="#666666" ForeColor="White" HorizontalAlign="Center" />
<SelectedRowStyle BackColor="#C5BBAF" Font-Bold="True" ForeColor="#333333" />
<HeaderStyle BackColor="#1C5E55" Font-Bold="True" ForeColor="White" />
<EditRowStyle BackColor="#7C6F57" />
<AlternatingRowStyle BackColor="White" />
</asp:GridView>
</form>
</body>
</html>

‘Inline code( Default.aspx.vb)
Imports System.Data
Imports System.Data.SqlClient
Partial Class Default
Inherits System.Web.UI.Page
Dim con As String
Dim conn As SqlConnection
Dim da As SqlDataAdapter
Dim ds As New DataSet
Protected Sub Page_Load(ByVal sender As Object, ByVal e As System.EventArgs) Handles
Me.Load
Try
con =
System.Configuration.ConfigurationManager.ConnectionStrings("myConnection").ConnectionString
' Taking connectionstring from Web.config file
conn = New SqlConnection(con) 'Establishing Connection with database
da = New SqlDataAdapter("Select * from Item", conn) 'Executing SQL query
da.Fill(ds, "Item") 'Filling dataset with Item table
GridView1.DataSource = ds
GridView1.DataBind() ' Binding dataset with Grid view control
Catch ex As Exception
Response.Write("Error:" & ex.Message)
End Try
End Sub
End Class
(Web.config)
<connectionStrings>
<add name="myConnection" connectionString="Data Source=JNEC02;Initial Catalog=JNEC;User
ID=sa;Password=sa"/>
</connectionStrings>

8. Lab Exercises: [Purpose of this exercise is to use ADO.NET technology for inserting, updating and deleting
records from Database .You can use Visual Studio .NET environment to type the program.
Execution of program in two ways.
1. Press F5 button OR
2. Right click on ASP.NET page (for e.g.: Default.aspx) and Select “View Browser” option and
select any browser for execution.
Exercise No8: ( 2 Hours) – 1 Practical Lab Assignment 8: ADO.NET code to insert,update and delete records from database
Program:
Steps:
1. Start a new website with Default.aspx web page.
2. Add textboxes for username, password, date of birth, email, gender, contact no and
Button controls for Insert, Update and Delete.
3. Steps for connecting to database:
a) Import the namespaces System.data and System.Data.SqlClient.
b) Establish the connection using connection object.
c) Open the connection.
d) Write SQL query in lCommand object.
e) Use Command methods for executing sql query.
f) Close the connection.
4. Use the validation controls for validation.
( Default.aspx)
<%@ Page Language="VB" AutoEventWireup="false" CodeFile="Default.aspx.vb"
Inherits="_Default" %>
<!DOCTYPE html PUBLIC "-//W3C//DTD XHTML 1.0 Transitional//EN"
"http://www.w3.org/TR/xhtml1/DTD/xhtml1-transitional.dtd">
<html xmlns="http://www.w3.org/1999/xhtml">
<head id="Head1" runat="server">
<title>Registration</title>
</head>
<body>
<form id="form1" runat="server">
<table border="1" style="width: 408px">
<tr>
<td>
UserName:
</td>
<td>
<asp:TextBox ID="txtName" runat="server" Width="269px"></asp:TextBox>
</td>
</tr>
<tr>
<td>

Password:
</td>
<td>
<asp:TextBox ID="txtPwd" runat="server" Width="269px"></asp:TextBox>
</td>
</tr>
<tr>
<td>
Date of Birth(mm/dd/yyyy) :
</td>
<td>
<asp:TextBox ID="txtDOB" runat="server" Width="269px"></asp:TextBox>
</td>
</tr>
<tr>
<td>
Contact no:
</td>
<td>
<asp:TextBox ID="txtContact" runat="server" Width="269px"></asp:TextBox>
</td>
</tr>
<tr>
<td>
Email Id :
</td>
<td>
<asp:TextBox ID="txtEmail" runat="server" Width="269px"></asp:TextBox>
</td>
</tr>
<tr>
<td>
Gender :
</td>
<td>
<asp:RadioButtonList ID="RBL1" runat="server">
<asp:ListItem>Male</asp:ListItem>
<asp:ListItem>Female</asp:ListItem>
</asp:RadioButtonList>
</td>
</tr>
<tr>
<td colspan="3" align="center">
<asp:Button ID="btnInsert" runat="server" Text="Insert" />
<asp:Button ID="btnUpdate" runat="server" Text="Update" />
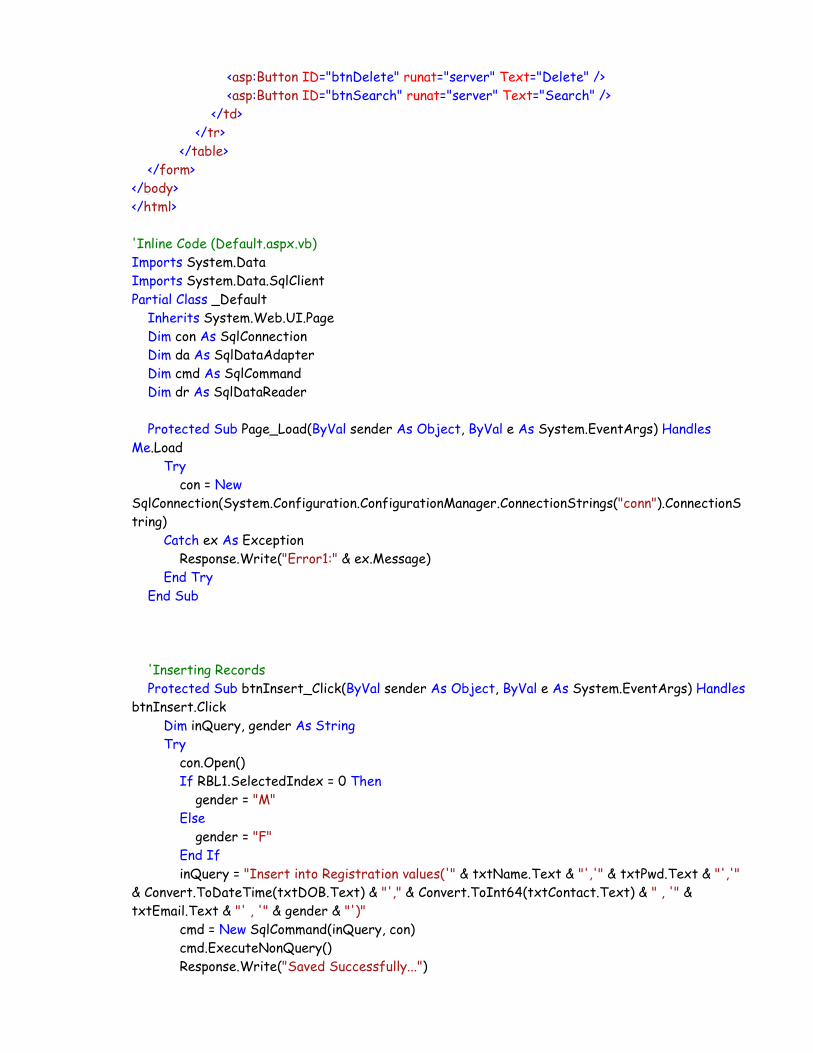
<asp:Button ID="btnDelete" runat="server" Text="Delete" />
<asp:Button ID="btnSearch" runat="server" Text="Search" />
</td>
</tr>
</table>
</form>
</body>
</html>
'Inline Code (Default.aspx.vb)
Imports System.Data
Imports System.Data.SqlClient
Partial Class _Default
Inherits System.Web.UI.Page
Dim con As SqlConnection
Dim da As SqlDataAdapter
Dim cmd As SqlCommand
Dim dr As SqlDataReader
Protected Sub Page_Load(ByVal sender As Object, ByVal e As System.EventArgs) Handles
Me.Load
Try
con = New
SqlConnection(System.Configuration.ConfigurationManager.ConnectionStrings("conn").ConnectionS
tring)
Catch ex As Exception
Response.Write("Error1:" & ex.Message)
End Try
End Sub
'Inserting Records
Protected Sub btnInsert_Click(ByVal sender As Object, ByVal e As System.EventArgs) Handles
btnInsert.Click
Dim inQuery, gender As String
Try
con.Open()
If RBL1.SelectedIndex = 0 Then
gender = "M"
Else
gender = "F"
End If
inQuery = "Insert into Registration values('" & txtName.Text & "','" & txtPwd.Text & "','"
& Convert.ToDateTime(txtDOB.Text) & "'," & Convert.ToInt64(txtContact.Text) & " , '" &
txtEmail.Text & "' , '" & gender & "')"
cmd = New SqlCommand(inQuery, con)
cmd.ExecuteNonQuery()
Response.Write("Saved Successfully...")
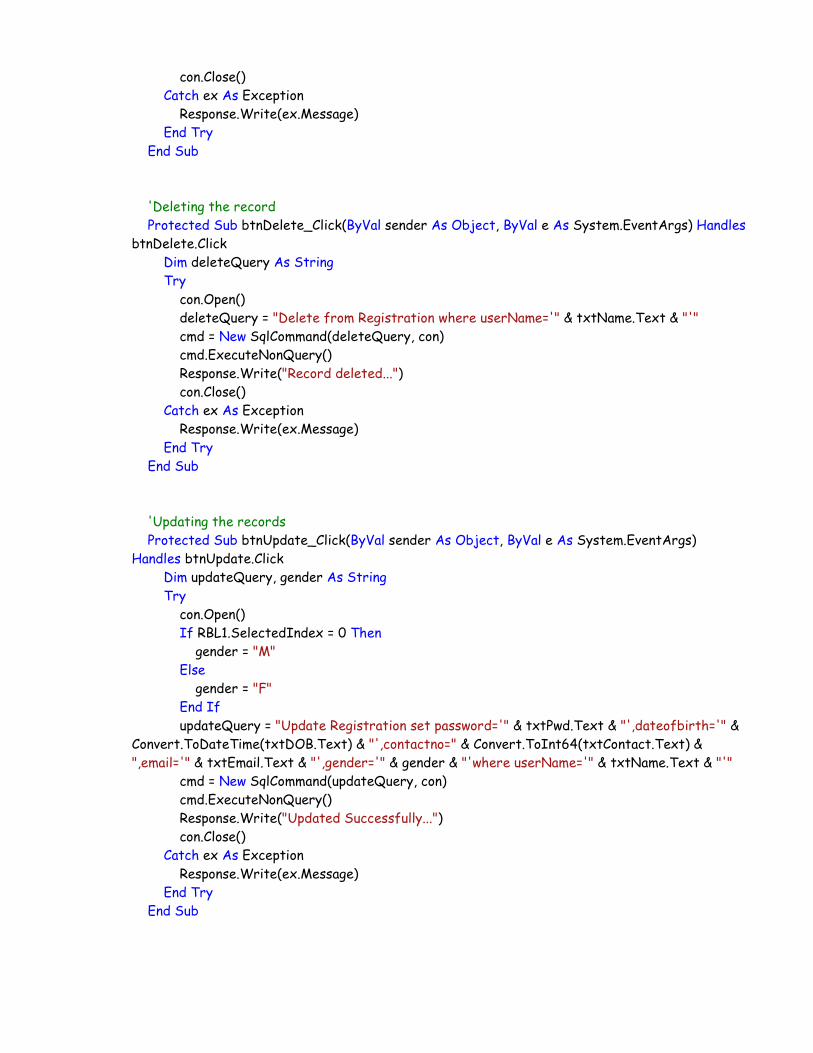
con.Close()
Catch ex As Exception
Response.Write(ex.Message)
End Try
End Sub
'Deleting the record
Protected Sub btnDelete_Click(ByVal sender As Object, ByVal e As System.EventArgs) Handles
btnDelete.Click
Dim deleteQuery As String
Try
con.Open()
deleteQuery = "Delete from Registration where userName='" & txtName.Text & "'"
cmd = New SqlCommand(deleteQuery, con)
cmd.ExecuteNonQuery()
Response.Write("Record deleted...")
con.Close()
Catch ex As Exception
Response.Write(ex.Message)
End Try
End Sub
'Updating the records
Protected Sub btnUpdate_Click(ByVal sender As Object, ByVal e As System.EventArgs)
Handles btnUpdate.Click
Dim updateQuery, gender As String
Try
con.Open()
If RBL1.SelectedIndex = 0 Then
gender = "M"
Else
gender = "F"
End If
updateQuery = "Update Registration set password='" & txtPwd.Text & "',dateofbirth='" &
Convert.ToDateTime(txtDOB.Text) & "',contactno=" & Convert.ToInt64(txtContact.Text) &
",email='" & txtEmail.Text & "',gender='" & gender & "'where userName='" & txtName.Text & "'"
cmd = New SqlCommand(updateQuery, con)
cmd.ExecuteNonQuery()
Response.Write("Updated Successfully...")
con.Close()
Catch ex As Exception
Response.Write(ex.Message)
End Try
End Sub
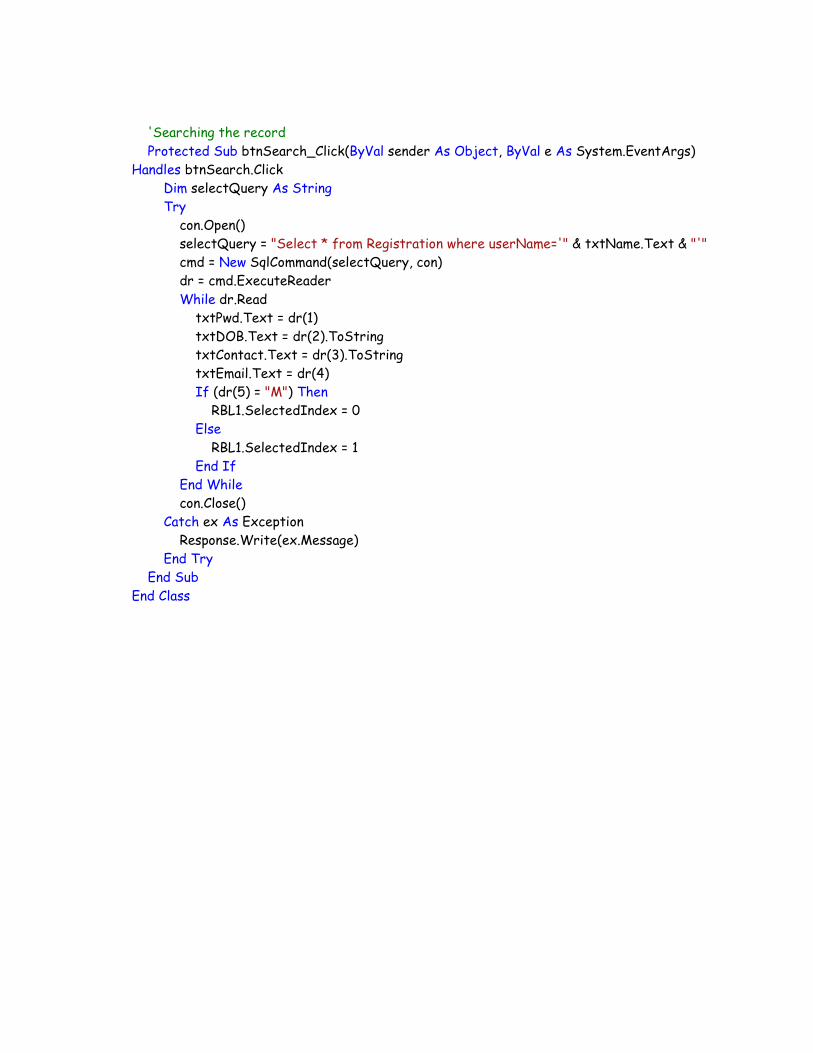
'Searching the record
Protected Sub btnSearch_Click(ByVal sender As Object, ByVal e As System.EventArgs)
Handles btnSearch.Click
Dim selectQuery As String
Try
con.Open()
selectQuery = "Select * from Registration where userName='" & txtName.Text & "'"
cmd = New SqlCommand(selectQuery, con)
dr = cmd.ExecuteReader
While dr.Read
txtPwd.Text = dr(1)
txtDOB.Text = dr(2).ToString
txtContact.Text = dr(3).ToString
txtEmail.Text = dr(4)
If (dr(5) = "M") Then
RBL1.SelectedIndex = 0
Else
RBL1.SelectedIndex = 1
End If
End While
con.Close()
Catch ex As Exception
Response.Write(ex.Message)
End Try
End Sub
End Class
9. Lab Exercises: [Purpose of this exercise is to use data list and repeater controls .You can use Visual Studio .NET
environment to type the program. Execution of program in two ways.
1. Press F5 button OR
2. Right click on ASP.NET page (for e.g.: Default.aspx) and Select “View Browser” option and
select any browser for execution.
Exercise No9: ( 2 Hours) – 1 Practical Lab Assignment 9: Using Data List and repeater controls
Program:
Steps:
1. Start a new website with Default.aspx web page.
2. Add data list and repeater controls.
3. Add XML file (Player.xml) and use it as data source.
4. If Not Page.IsPostBack Then a) Take new data set objects.
b) Use ReadXml method of data set object to map XML file.
c) Bind the new dataset objects with both DataList and Repeater control.
End if
( Default.aspx)
<%@ Page Language="VB" AutoEventWireup="false" CodeFile="Default.aspx.vb"
Inherits="_Default" %>
<!DOCTYPE html PUBLIC "-//W3C//DTD XHTML 1.0 Transitional//EN"
"http://www.w3.org/TR/xhtml1/DTD/xhtml1-transitional.dtd">
<html xmlns="http://www.w3.org/1999/xhtml">
<head runat="server">
<title>DataList and Repeater control</title>
</head>
<body>
<form id="form1" runat="server">
Data List control :
<asp:DataList ID="Player" runat="server">
<HeaderTemplate>
Team Ranking</HeaderTemplate>
<ItemTemplate>
<%#Container.DataItem("Name")%>
= ><%#Container.DataItem("Rank")%>
</ItemTemplate>
<FooterTemplate>
Copywrite 2010</FooterTemplate>
</asp:DataList>
<br />

Repeater control:
<asp:Repeater ID="Game" runat="server">
<HeaderTemplate>
<table border="1" width="40%">
<tr>
<th>
Name
</th>
<th>
Rank
</th>
</tr>
</HeaderTemplate>
<ItemTemplate>
<tr>
<td>
<%#Container.DataItem("Name")%>
</td>
<td>
<%#Container.DataItem("Rank")%>
</td>
</tr>
</ItemTemplate>
<FooterTemplate>
</table>
</FooterTemplate>
</asp:Repeater>
</form>
</body>
</html>

‘Inline code( Default.aspx.vb)
Imports System.Data
Partial Class _Default
Inherits System.Web.UI.Page
Protected Sub Page_Load(ByVal sender As Object, ByVal e As System.EventArgs) Handles
Me.Load
If Not Page.IsPostBack Then
Dim info = New DataSet
info.ReadXml(MapPath("Player.xml"))
Player.DataSource = info
Player.DataBind()
End If
If Not Page.IsPostBack Then
Dim info1 = New DataSet
info1.ReadXml(MapPath("Player.xml"))
Game.DataSource = info1
Game.DataBind()
End If
End Sub
End Class
( Player.xml)
<?xml version="1.0" encoding="utf-8" ?>
<Cricket>
<Team>
<Name>India</Name>
<Rank>1</Rank>
</Team >
<Team>
<Name>Australia</Name>
<Rank>2</Rank>
</Team >
</Cricket>

Exercise No10: ( 2 Hours) – 1 Practical Lab Assignment 10: Web Services Demo.
Program:
Steps:
1. Start a new website with Default.aspx web page.
2. Right click in Solution explorer => Add New item => Select Web Service.
a) Give the name myWebService to the web service.
b) (i) One file gets created in App_Code folder with extension .vb.
(ii) Second gets created in application folder with extension .asmx.
3. Steps for creating web services:
a) Write a user defined methods in myWebService.vb.
For e.g.:
<WebMethod()> _
Public Function myFunction() As String
Return "This myFunction in Webservice"
End Function
b) (i) Right click in solution explorer => Add Web Reference=> Select browser to
option as “Web Services in this solution”.It will display the number of web services in
the solution.
(ii) Select the web service you want to use.
(iii) It will display all the methods.
(iv) Select the method you want to use and Click “Invoke” button to see the xml
message returned by the method.
c) Give the web reference name (by default “localhost”) and click Add Reference
button.
d) Web reference with name local host gets created in App_WebReferences folder.
e) Check if files with extensions .disco and .wsdl gets generated in localhost.
4. In code file (Default.aspx.vb):
a. Import the namespace System.Web.Services.
b. Create an object of web service.(i.e myWebService)
c. Use the methods of respective web service.
5. Click the “Build” menu in application => select “Build web site”.
If “Build succeeded” message comes in status bar.
Execute the application and view the results
Else
Find out the errors and solve the errors.
End if

‘Inline code( Default.aspx.vb)
Imports System.Web.Services
Partial Class _Default
Inherits System.Web.UI.Page
Dim mt As New myWebService 'Creating an object webservice
Protected Sub Page_Load(ByVal sender As Object, ByVal e As System.EventArgs) Handles
Me.Load
Response.Write(mt.myFunction()) 'Using the method of respective web service
End Sub
End Class
‘Webservice( myWebSerivce.vb)
Imports System.Web
Imports System.Web.Services
Imports System.Web.Services.Protocols
<WebService(Namespace:="http://tempuri.org/")> _
<WebServiceBinding(ConformsTo:=WsiProfiles.BasicProfile1_1)> _
<Global.Microsoft.VisualBasic.CompilerServices.DesignerGenerated()> _
Public Class myWebService
Inherits System.Web.Services.WebService
<WebMethod()> _
Public Function HelloWorld() As String
Return "Hello World"
End Function
<WebMethod()> _
Public Function myFunction() As String
Return "This is myFunction in Webservice"
End Function
End Class

4. Quiz on the subject:
Quiz should be conducted on tips in the laboratory, recent trends and subject knowledge of the
subject. The quiz questions should be formulated such that questions are normally are from the
scope outside of the books. However twisted questions and self formulated questions by the
faculty can be asked but correctness of it is necessarily to be thoroughly checked before the
conduction of the quiz.
5. Conduction of Viva-Voce Examinations:
Teacher should oral exams of the students with full preparation. Normally, the objective questions
with guess are to be avoided. To make it meaningful, the questions should be such that depth of
the students in the subject is tested Oral examinations are to be conducted in co-cordial
environment amongst the teachers taking the examination. Teachers taking such examinations
should not have ill thoughts about each other and courtesies should be offered to each other in
case of difference of opinion, which should be critically suppressed in front of the students.
6. Submission:
Document Standard:
A] Page Size A4 Size
B] Running text Justified text
C] Spacing 1 Line
D] Page Layout and Margins (Dimensions in Cms)
Normal Page Horizantal
2.0
2.5
2.0
2.5 2.0
2.0
0.7”
0.7”
2.0
2.0

Desription Font Size Boldness Italics Underline Capitalize
College Name Arial 24 ----- ------ Yes ----------
Document Title Tahoma 22 ----- ------ --------- ----------
Document Subject Century Gothic 14 ----- ------ --------- Capital
Class Bookman old Slyle 12 ----- ------ --------- ----------
Document No Bookman old Slyle 10 ----- ------ --------- ----------
Copy write inf Bookman old Slyle 9 ----- ------ --------- ----------
Forward heading Bookman old Slyle 12 ----- ------ Yes Capital
Forward matter Bookman old Slyle 12 ----- ------ --------- ----------
Lab man Contents title Bookman old Slyle 12 ----- ------ Yes Capital
Index title Bookman old Slyle 12 Yes ------ Yes Capital
Index contents Bookman old Slyle 12 ----- ------ --------- ----------
Heading Tahoma 14 Yes Yes Yes ----------
Running Matter Comic Sans MS 10 ----- ------ --------- ----------
7. Evaluation and marking system:
Basic honesty in the evaluation and marking system is absolutely essential and in the process
impartial nature of the evaluator is required in the examination system to become popular amongst
the students. It is a wrong approach or concept to award the students by way of easy marking to
get cheap popularity among the students to which they do not deserve. It is a primary
responsibility of the teacher that right students who are really putting up lot of hard work with
right kind of intelligence are correctly awarded.
The marking patterns should be justifiable to the students without any ambiguity and teacher
should see that students are faced with unjust circumstances.


![Lab Manual I Yeargpcsikar.webs.com/Lab Manual[105].pdf · Lab Manual I Year Subject: Computer and Information Technology Fundamentals BY- Rachit Jangir Lecturer Computer Science &](https://img.pdfslide.us/doc/110x75/5b5e99777f8b9a310a8cbc16/lab-manual-i-manual105pdf-lab-manual-i-year-subject-computer-and-information.jpg)