Embed Size (px)
Citation preview
6/21/2012
Materials and Appearances
Autodesk Inventor 2013 Materials and Appearances
Contents As an End-User, how do I benefit from the switch to Material and Appearance Libraries? ................... 2
What is the impact to me? ................................................................................................................... 2
The Realistic Appearance Color Style option ........................................................................................ 4
Inventor 2013 Frequently Asked Questions ......................................................................................... 5
Why do I see so many appearances in the Document Appearances section of the Appearance
Browser? ......................................................................................................................................... 5
What do I do to keep my custom color styles as Appearances? ........................................................ 5
How do I purge the unused Appearances? ....................................................................................... 6
Appendix 1 Inventor 2013 Materials Migration .................................................................................... 9
How do I manage my Materials and Appearances? ................................................................................ 11
“As is” ............................................................................................................................................ 11
Style Libraries ................................................................................................................................ 11
Document Templates ..................................................................................................................... 14
Preparing to Migrate Models and Styles ............................................................................................ 15
Materials ....................................................................................................................................... 15
Appearances .................................................................................................................................. 15
Migrating Models .............................................................................................................................. 15
Migrating Content Center custom materials/appearances ................................................................. 18
STEP 1: Migrating your custom materials ....................................................................................... 18
STEP 2 Add custom library to project file ........................................................................................ 19
STEP 3 Update the content center library....................................................................................... 19
Migrating Documents Using Task Scheduler....................................................................................... 20
Where can I learn more about Material and Appearance libraries and the associated definitions? .... 21
2013 Library Management Methods ...................................................................................................... 22
Overwrite method ......................................................................................................................... 22
Versioning method ........................................................................................................................ 26
Important information....................................................................................................................... 28
Migration Mapping ................................................................................................................................ 30
Materials ........................................................................................................................................... 30
Appearances...................................................................................................................................... 32
Autodesk Inventor 2013 Materials and Appearances
As an End-User, how do I benefit from the switch to Material and Appearance
Libraries? There were two main objectives for the materials improvement project in Inventor 2013. The first was to simplify applying and editing both physical and visual properties in Inventor 2013. The second was to have a common material library that works across several Autodesk products that can be used without the need of translation. This is intended to improve the quality of data transfer between products in a Suite Beyond these high level objectives, we also provide numerous workflow improvements.
1. Improved visibility of current physical and visual materials settings (always available in the Quick Access Toolbar (QAT)
a. As a result of QAT Access, fewer clicks to apply physical materials b. Easier to see what physical material is being used and if there is visual override
2. Easier to apply visual overrides per part/feature/face 3. Easier to strip visual overrides – (great for imported geometry) 4. Better ability to arrange texture for more realistic image, including the ability to engage texture
mapping patterns below, a. Box b. Planar c. Cylindrical d. Spherical e. Aligned
5. Standardized visual controls and enhanced feedback a. RGB & HSB control b. Real time previews c. Dynamic texture manipulation
The common material and appearance libraries enable an Inventor model to bring its physical material
and appearance definitions along with the geometry into Revit, AutoCAD, or Showcase. The host
application then displays the material and appearance just as you see it in Inventor.
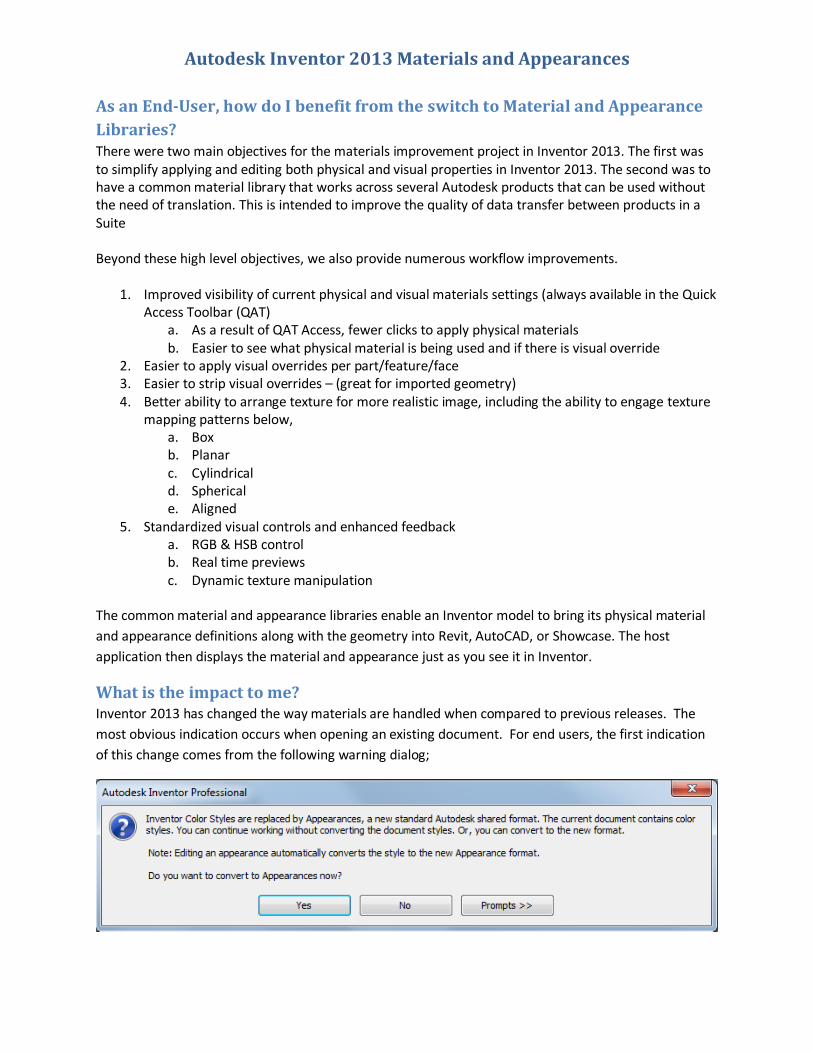
What is the impact to me? Inventor 2013 has changed the way materials are handled when compared to previous releases. The
most obvious indication occurs when opening an existing document. For end users, the first indication
of this change comes from the following warning dialog;
Autodesk Inventor 2013 Materials and Appearances
NOTE: Materials and Appearances are no longer managed using the Style Manager. Also, the Style
Management Wizard is no longer available.
How should I answer this question?
First, because of the move to a set of unified physical and visual materials libraries, ALL older files will be
updated when opened in Inventor 2013. This dialog controls how the appearances set in older versions
will be converted to the new Inventor 2013 appearances.
No matter which selection you make in the above dialog box, in general, Inventor handles the transition
to the new appearance library seamlessly. If you have customized materials in your legacy models,
these custom materials are created and added to a new custom appearance library in 2013. If you are
using pre-defined Inventor supplied materials, we make sure to use its equivalent in Inventor 2013.
This question refers to how you would like Inventor to interpret the ‘REALISTIC APPEARANCE’ check box
in legacy models and colors upon your initial opening in Inventor 2013
You would expect that these two settings would result in nearly identical models, but some of the
realistic materials take advantage of texture mapping and other effects, so it is possible that a complete
migration to the new materials will give you different appearances as compared to older Inventor
versions. This switch lets you defer this full transition (however, you must expect that ultimately a full
migration to the new, realistic-based appearances will occur).
Here is how the combination of Realistic Appearance and the conversion dialog box above interact when
opening a legacy models.
When the…
Realistic Appearance option was…
And, I respond with “Yes”? And, I respond with “No”?
Checked in 2012 or prior
The color style is migrated using the assigned Realistic Appearance.
The color style is migrated using the assigned Realistic Appearance. The process is not complete. You need to add any custom appearances to your custom library to complete the migration. If you do not have a custom material or appearance library, one must be created.
Unchecked in 2012 or prior
The color style definition is used to create a new custom Realistic Appearance.
The color style definition is used to create a new custom Realistic Appearance. The process is not complete. You need to add any custom appearances to your custom library to complete the migration. If you do not have a custom material or appearance library, one must be created.
Autodesk Inventor 2013 Materials and Appearances
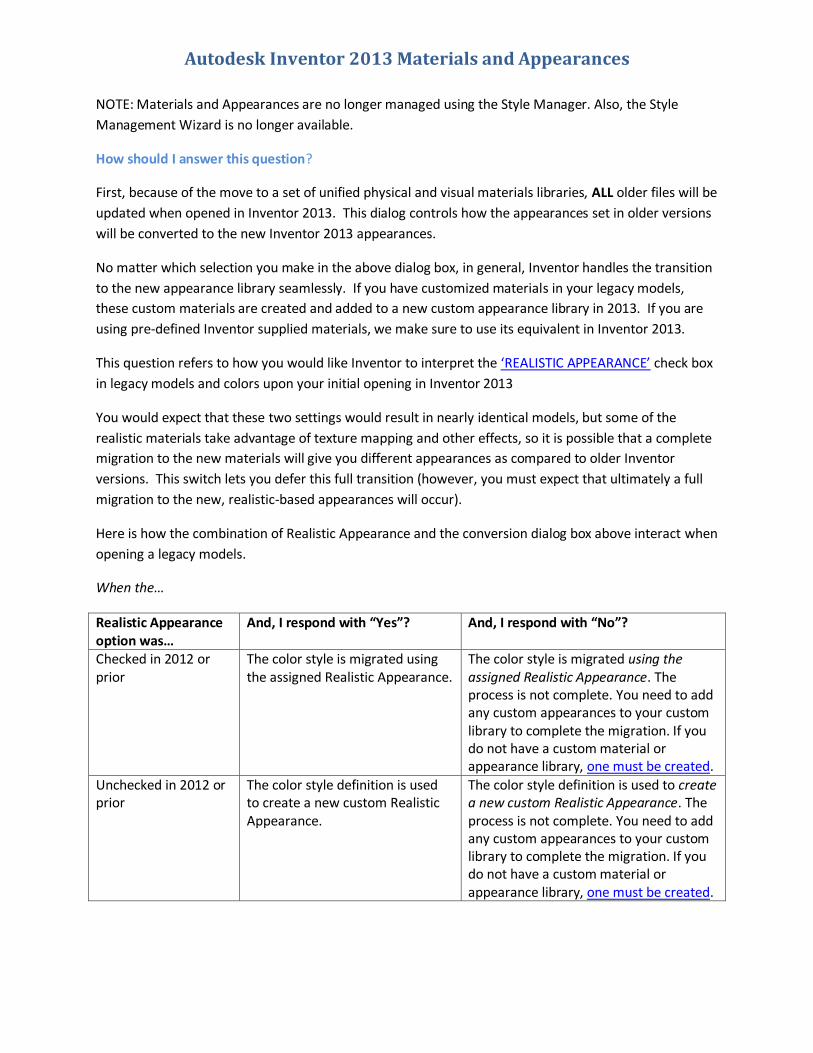
The Realistic Appearance Color Style option In Inventor 2012 the Realistic Appearance color style option was introduced and each style had an
assigned appearance. You could change which appearance was assigned, but could neither create nor
edit Appearances. When checked, the Realistic Appearance was used for the Realistic Visual Style
display. When unchecked, the Color Style definition was used for the Realistic Visual Style display. The
following image contrasts the results of the option state OFF/ON.
Figure 1 Autodesk Inventor 2012 – effect of the Realistic Appearance option
In Inventor 2013 Appearances replace color styles. The Appearance Browser and Editor provide the tools
to create new and edit existing appearances. Migration uses the legacy color style definition to move
your styles from a prior release to Inventor 2013. As was mentioned before, the option state
(checked/unchecked) dictates which part of the color style definition is migrated. To help in making the
choice we provide the following:
Condition Action
You prefer or use the Realistic Appearance, including changing assignments. You left the option checked (ON).
No action is required. Your assigned appearance will migrate.
Autodesk Inventor 2013 Materials and Appearances
You did not use the Realistic Visual Style display mode and/or prefer the Shaded Visual Style appearance. The option Realistic Appearance option may be checked (ON).
1) Edit all color styles you want to maintain and Uncheck the Realistic Appearance option.
2) Save the style change. Note: if you maintain unique color styles in models and not in a library, you must open every model having a custom color style and modify the style before migrating the model.
3) Migrate the models. If you do not, color styles will migrate using the realistic appearance and not the color style properties.
You unchecked (OFF) the Realistic Appearance option for color styles.
No action is required. The Realistic Appearance assignment is ignored.
You have some color styles with the Realistic Appearance ON and some with it OFF.
No Action is required. You have already specified your preference and migration will respect it.
Inventor 2013 Frequently Asked Questions
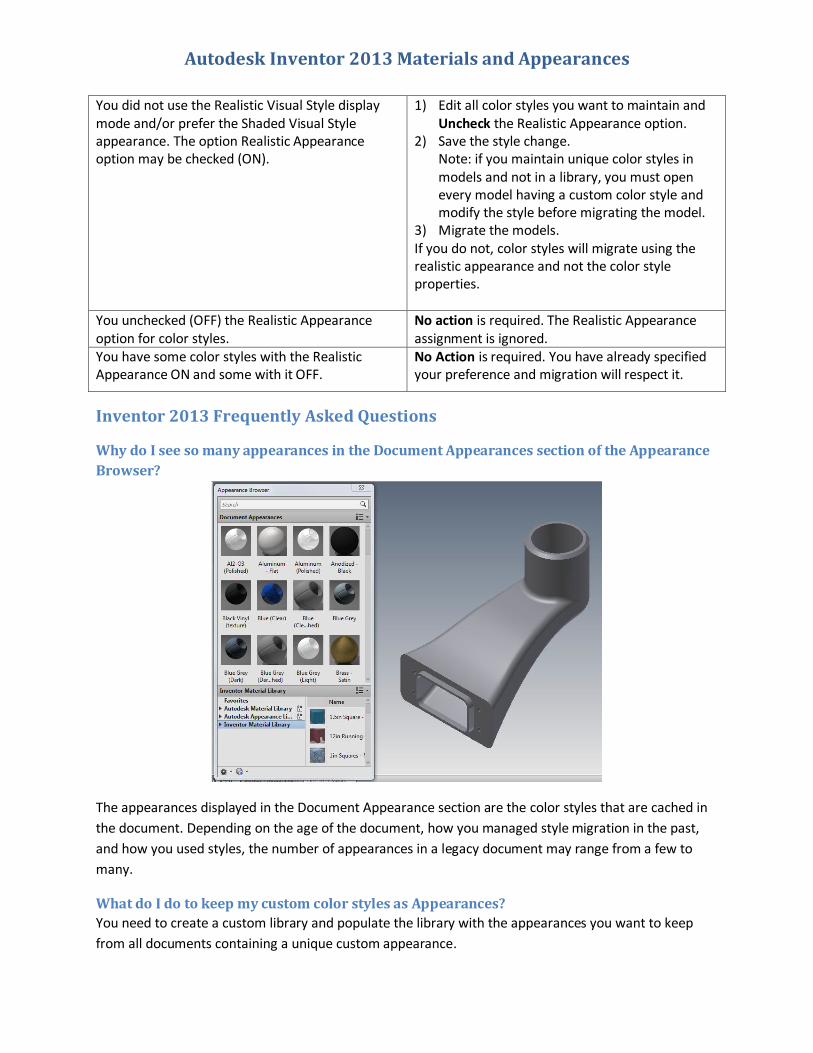
Why do I see so many appearances in the Document Appearances section of the Appearance
Browser?
The appearances displayed in the Document Appearance section are the color styles that are cached in
the document. Depending on the age of the document, how you managed style migration in the past,
and how you used styles, the number of appearances in a legacy document may range from a few to
many.
What do I do to keep my custom color styles as Appearances?
You need to create a custom library and populate the library with the appearances you want to keep
from all documents containing a unique custom appearance.
Autodesk Inventor 2013 Materials and Appearances
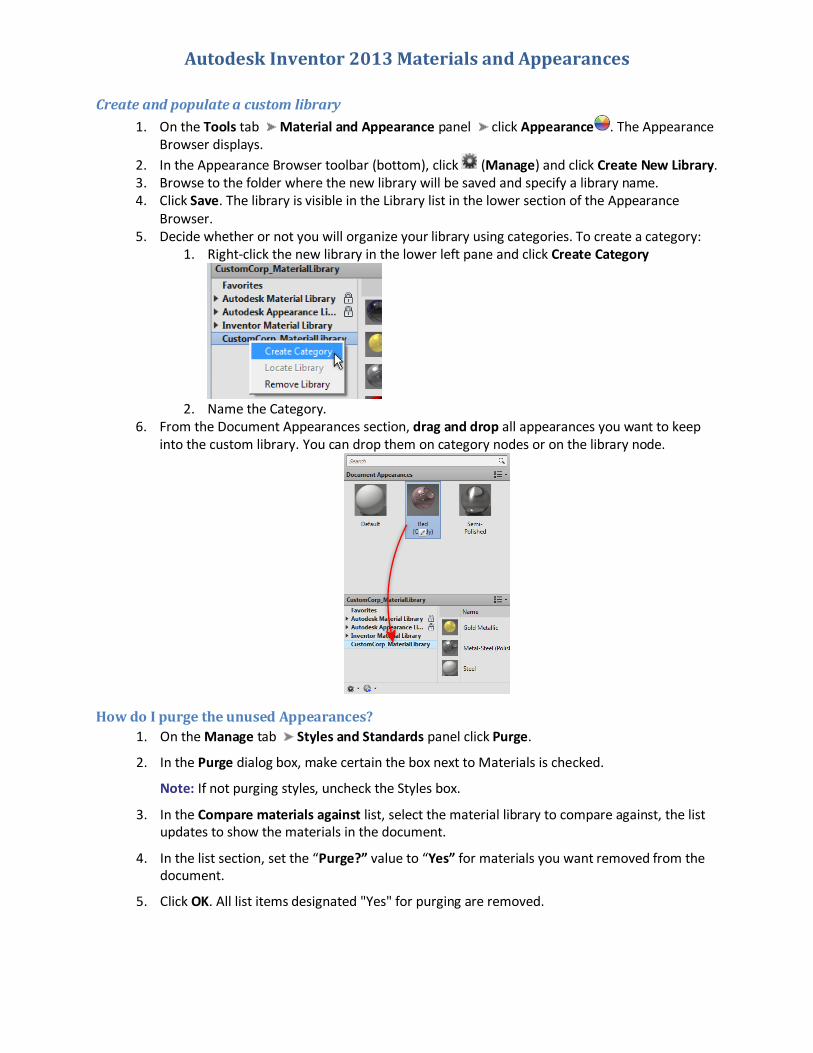
Create and populate a custom library
1. On the Tools tab Material and Appearance panel click Appearance . The Appearance Browser displays.
2. In the Appearance Browser toolbar (bottom), click (Manage) and click Create New Library. 3. Browse to the folder where the new library will be saved and specify a library name. 4. Click Save. The library is visible in the Library list in the lower section of the Appearance
Browser. 5. Decide whether or not you will organize your library using categories. To create a category:
1. Right-click the new library in the lower left pane and click Create Category
2. Name the Category.
6. From the Document Appearances section, drag and drop all appearances you want to keep into the custom library. You can drop them on category nodes or on the library node.
How do I purge the unused Appearances?
1. On the Manage tab Styles and Standards panel click Purge.
2. In the Purge dialog box, make certain the box next to Materials is checked.
Note: If not purging styles, uncheck the Styles box.
3. In the Compare materials against list, select the material library to compare against, the list updates to show the materials in the document.
4. In the list section, set the “Purge?” value to “Yes” for materials you want removed from the document.
5. Click OK. All list items designated "Yes" for purging are removed.
Autodesk Inventor 2013 Materials and Appearances
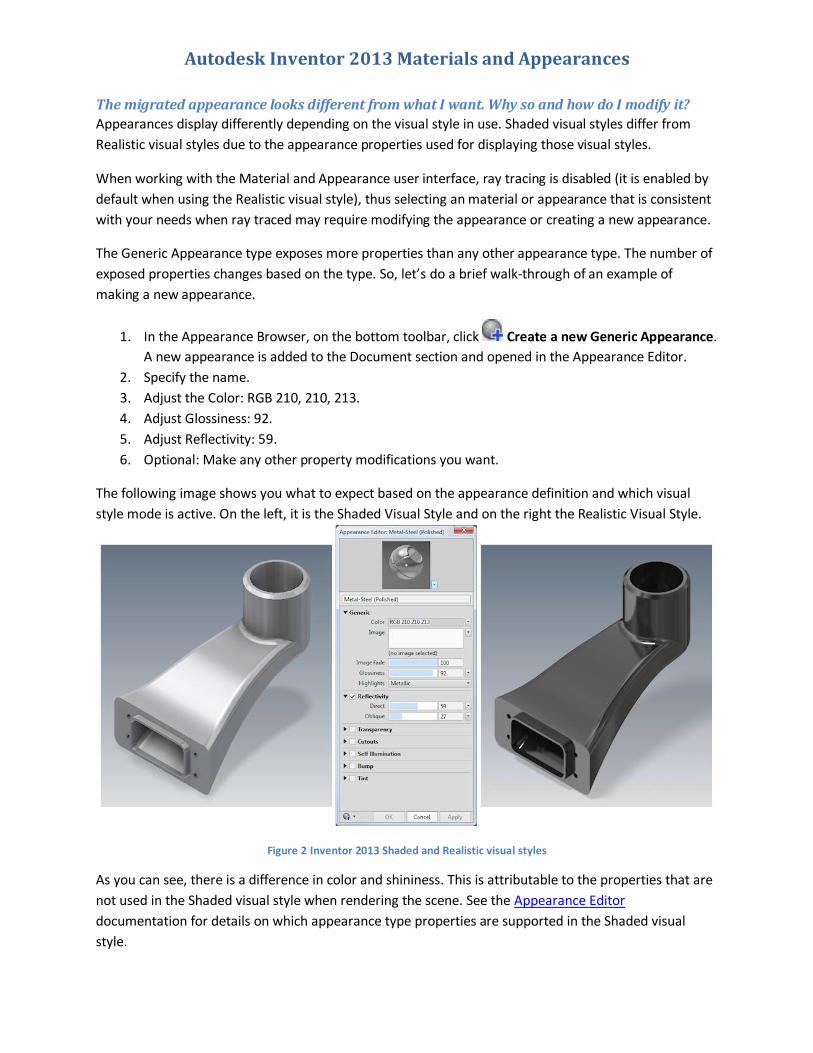
The migrated appearance looks different from what I want. Why so and how do I modify it?
Appearances display differently depending on the visual style in use. Shaded visual styles differ from
Realistic visual styles due to the appearance properties used for displaying those visual styles.
When working with the Material and Appearance user interface, ray tracing is disabled (it is enabled by
default when using the Realistic visual style), thus selecting an material or appearance that is consistent
with your needs when ray traced may require modifying the appearance or creating a new appearance.
The Generic Appearance type exposes more properties than any other appearance type. The number of
exposed properties changes based on the type. So, let’s do a brief walk-through of an example of
making a new appearance.
1. In the Appearance Browser, on the bottom toolbar, click Create a new Generic Appearance.
A new appearance is added to the Document section and opened in the Appearance Editor.
2. Specify the name.
3. Adjust the Color: RGB 210, 210, 213.
4. Adjust Glossiness: 92.
5. Adjust Reflectivity: 59.
6. Optional: Make any other property modifications you want.
The following image shows you what to expect based on the appearance definition and which visual
style mode is active. On the left, it is the Shaded Visual Style and on the right the Realistic Visual Style.
Figure 2 Inventor 2013 Shaded and Realistic visual styles
As you can see, there is a difference in color and shininess. This is attributable to the properties that are
not used in the Shaded visual style when rendering the scene. See the Appearance Editor
documentation for details on which appearance type properties are supported in the Shaded visual
style.

Autodesk Inventor 2013 Materials and Appearances
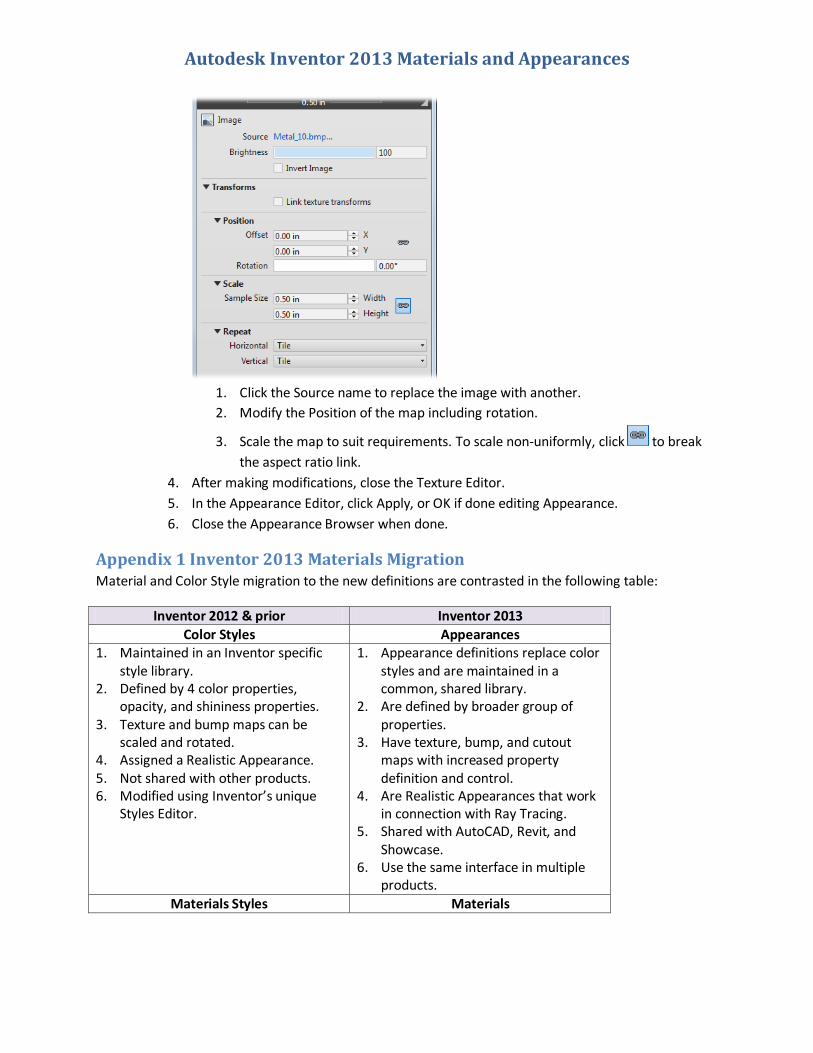
My appearance texture looks incorrect. How do I adjust it?
Custom color styles with texture maps may require some additional texture modifications. Adjusting
textures requires being in the Appearance Editor or using the Adjust Appearance in-canvas tools. We will
consider how this is done using the Appearance Editor and picking up the process from where it was in
the previous question.
1. In the Appearance Browser, edit the custom appearance.
2. In the Appearance editor, click the Image preview to access the Texture Editor.
3. In the Texture Editor you can: switch images, modify the Position, Scale, and Repeat
values. In this instance, Scale needs to be modified.
Autodesk Inventor 2013 Materials and Appearances
1. Click the Source name to replace the image with another.
2. Modify the Position of the map including rotation.
3. Scale the map to suit requirements. To scale non-uniformly, click to break
the aspect ratio link.
4. After making modifications, close the Texture Editor.
5. In the Appearance Editor, click Apply, or OK if done editing Appearance.
6. Close the Appearance Browser when done.
Appendix 1 Inventor 2013 Materials Migration Material and Color Style migration to the new definitions are contrasted in the following table:
Inventor 2012 & prior Inventor 2013
Color Styles Appearances 1. Maintained in an Inventor specific
style library. 2. Defined by 4 color properties,
opacity, and shininess properties. 3. Texture and bump maps can be
scaled and rotated. 4. Assigned a Realistic Appearance. 5. Not shared with other products. 6. Modified using Inventor’s unique
Styles Editor.
1. Appearance definitions replace color styles and are maintained in a common, shared library.
2. Are defined by broader group of properties.
3. Have texture, bump, and cutout maps with increased property definition and control.
4. Are Realistic Appearances that work in connection with Ray Tracing.
5. Shared with AutoCAD, Revit, and Showcase.
6. Use the same interface in multiple products.
Materials Styles Materials
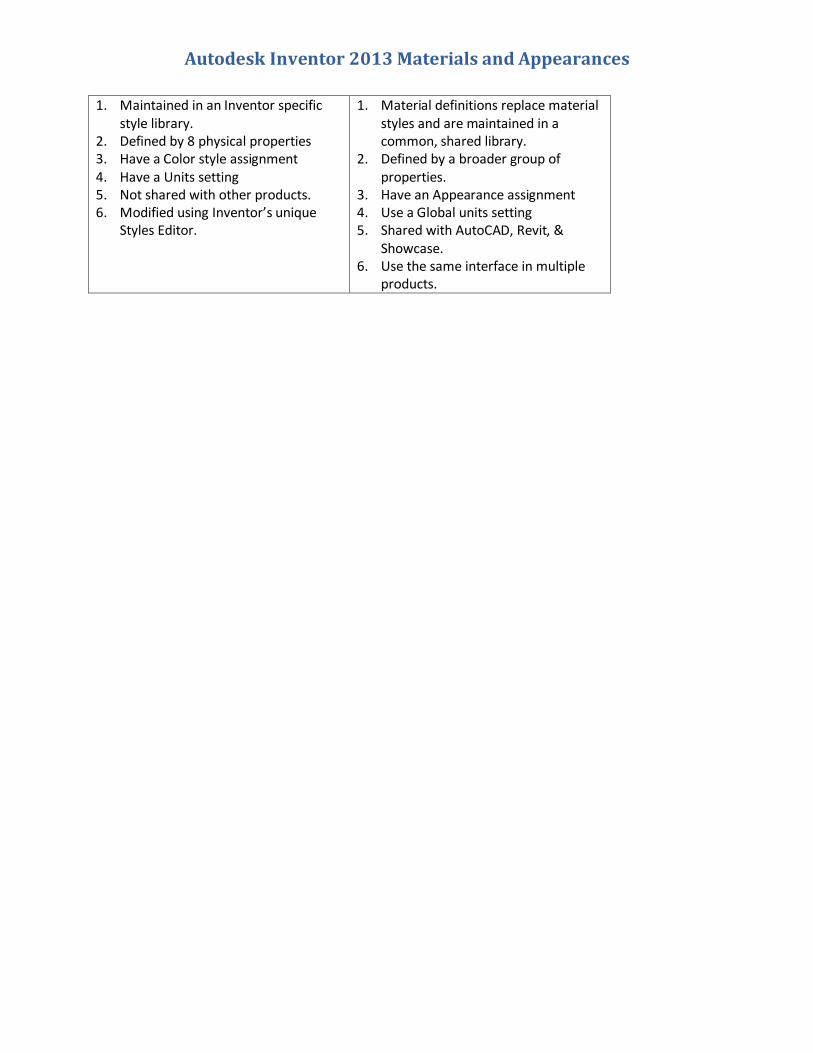
Autodesk Inventor 2013 Materials and Appearances
1. Maintained in an Inventor specific style library.
2. Defined by 8 physical properties 3. Have a Color style assignment 4. Have a Units setting 5. Not shared with other products. 6. Modified using Inventor’s unique
Styles Editor.
1. Material definitions replace material styles and are maintained in a common, shared library.
2. Defined by a broader group of properties.
3. Have an Appearance assignment 4. Use a Global units setting 5. Shared with AutoCAD, Revit, &
Showcase. 6. Use the same interface in multiple
products.

Autodesk Inventor 2013 Materials and Appearances
How do I manage my Materials and Appearances? In Inventor 2012, the Realistic Appearance option was checked as a default. As previously noted, the
option setting has migration ramifications. Notably, any color style that has been touched at one time is
considered different from the standard Inventor color style, and is migrated as a custom appearance.
Custom appearances populate the document and are displayed in the Appearance Browser, Document
Appearances section.
Let’s consider the four most common ways customers have interacted with material and color styles in
previous releases.
“As is”
Condition Action
You do not modify Inventor color styles. You prefer the Shaded visual style display over the Realistic visual style display. As a result, you do not use the Realistic visual style display mode.
In Inventor 2012, in the Style Editor, edit all color styles you want to retain. Ensure the Realistic Appearance option is OFF (unchecked).
You do not modify Inventor color styles. You prefer the Realistic visual style display over the Shaded visual style display. As a result, you use the Realistic visual style display mode.
No action is required. The Realistic Appearance option is ON by default and color styles will migrate using those appearance assignments.
Note: You are able to use Task Scheduler to migrate multiple datasets. See Migrating using Task
Scheduler later in this document.
Style Libraries
If you maintain custom Style Libraries or modify those delivered with Inventor and want to retain the
changes, you can do so by modifying the 2012 color style use of the Realistic Appearance option. The
following table assists in determining the setting you would want to use in Inventor 2012 Color Styles.
Condition Action
You do not modify Inventor color styles. You prefer the Shaded visual style display, not the Realistic visual style display. As a result, you do not use the Realistic visual style display mode.
In Inventor 2012, in the Style Editor, edit all color styles you want to retain. Ensure the Realistic Appearance option is OFF (unchecked). Save all changes.
You do not modify Inventor color styles. You prefer the Realistic visual style display over the Shaded visual style display. As a result, you use the Realistic visual style display mode.
No action is required. The Realistic Appearance option is ON by default and color styles will migrate using those appearance assignments.
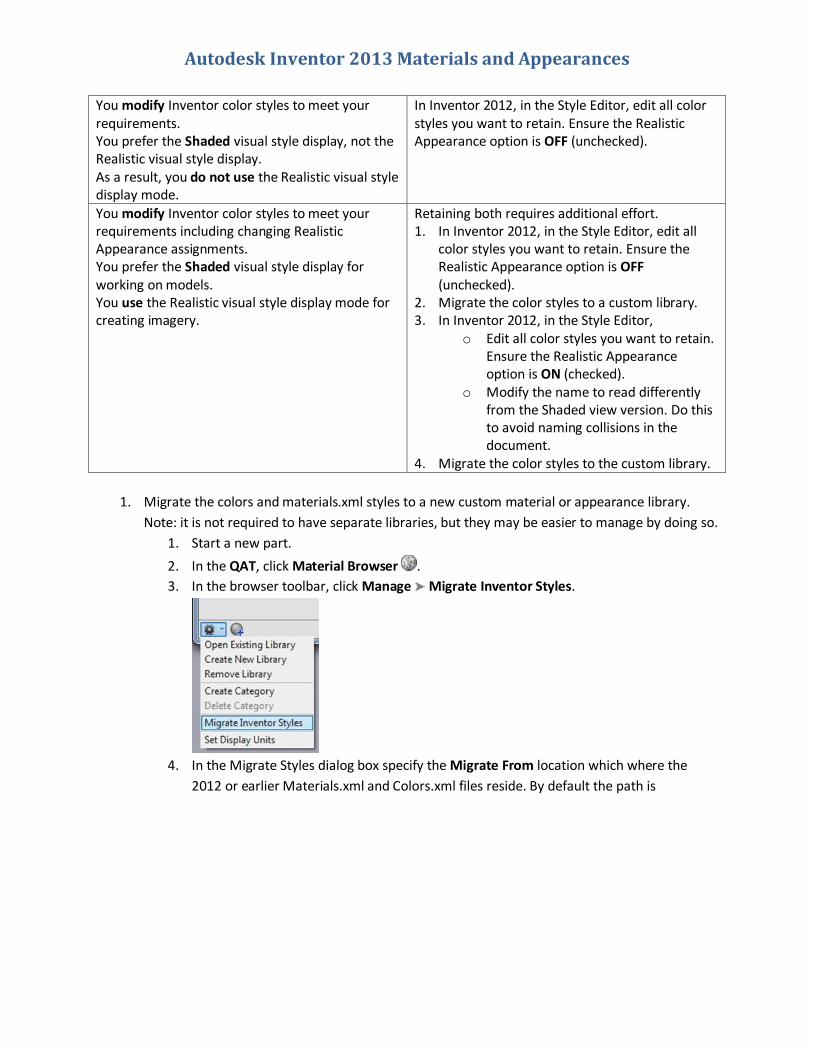
Autodesk Inventor 2013 Materials and Appearances
You modify Inventor color styles to meet your requirements. You prefer the Shaded visual style display, not the Realistic visual style display. As a result, you do not use the Realistic visual style display mode.
In Inventor 2012, in the Style Editor, edit all color styles you want to retain. Ensure the Realistic Appearance option is OFF (unchecked).
You modify Inventor color styles to meet your requirements including changing Realistic Appearance assignments. You prefer the Shaded visual style display for working on models. You use the Realistic visual style display mode for creating imagery.
Retaining both requires additional effort. 1. In Inventor 2012, in the Style Editor, edit all
color styles you want to retain. Ensure the Realistic Appearance option is OFF (unchecked).
2. Migrate the color styles to a custom library. 3. In Inventor 2012, in the Style Editor,
o Edit all color styles you want to retain. Ensure the Realistic Appearance option is ON (checked).
o Modify the name to read differently from the Shaded view version. Do this to avoid naming collisions in the document.
4. Migrate the color styles to the custom library.
1. Migrate the colors and materials.xml styles to a new custom material or appearance library.
Note: it is not required to have separate libraries, but they may be easier to manage by doing so.
1. Start a new part.
2. In the QAT, click Material Browser .
3. In the browser toolbar, click Manage Migrate Inventor Styles.
4. In the Migrate Styles dialog box specify the Migrate From location which where the
2012 or earlier Materials.xml and Colors.xml files reside. By default the path is

Autodesk Inventor 2013 Materials and Appearances
C:\Users\Public\Documents\Autodesk\Inventor 2012\Design Data in Windows 7.
s
5. Click Create New Library.
6. Specify the Migrate To location, typically the same location as the
InventorMaterialsLibrary.adsk file. By default the path is
C:\Users\Public\Documents\Autodesk\Inventor 2013\Design Data\Materials in
Windows 7.
7. Click OK. The library is created and populates the library section of the
Material/Appearance Browser.
8. Drag and drop custom appearances or materials from the Document section or from
other libraries into your custom library.
9. Close the Browser.
2. Add the custom library to the active and appropriate projects file.
1. Select the project to which you will add the library.
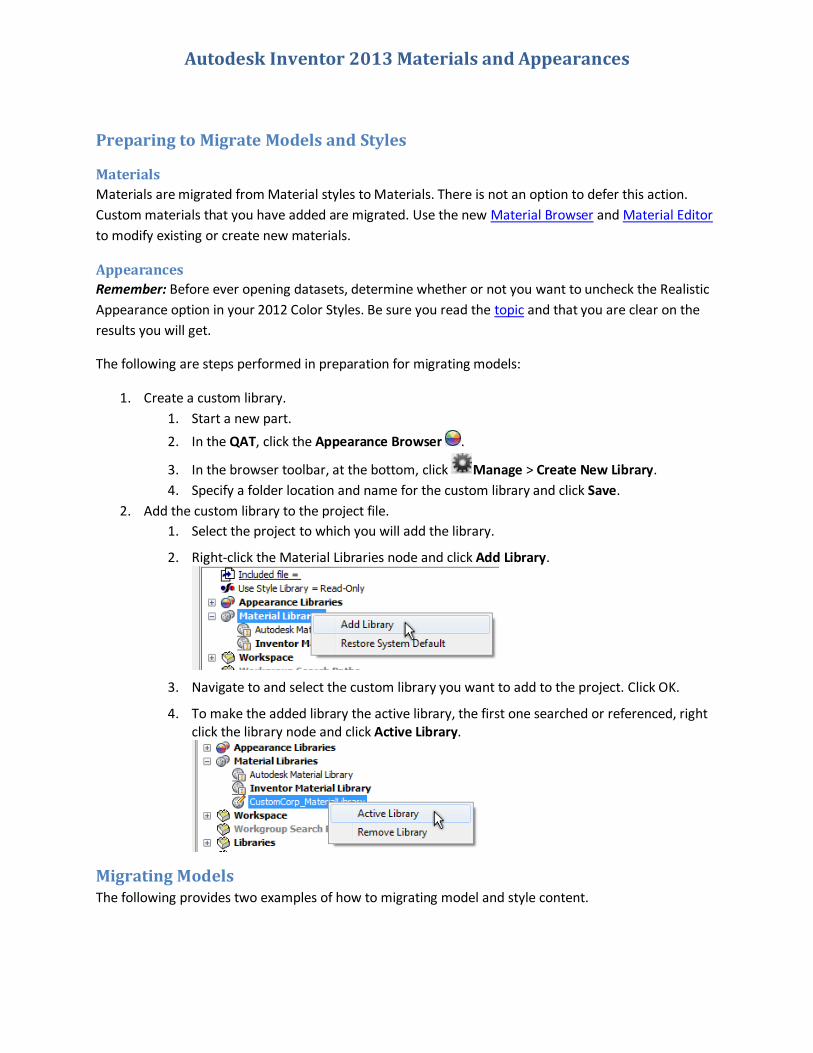
2. Right-click the Material Libraries node and click Add Library.
3. Navigate to and select the custom library you want to add to the project. Click OK.
Autodesk Inventor 2013 Materials and Appearances
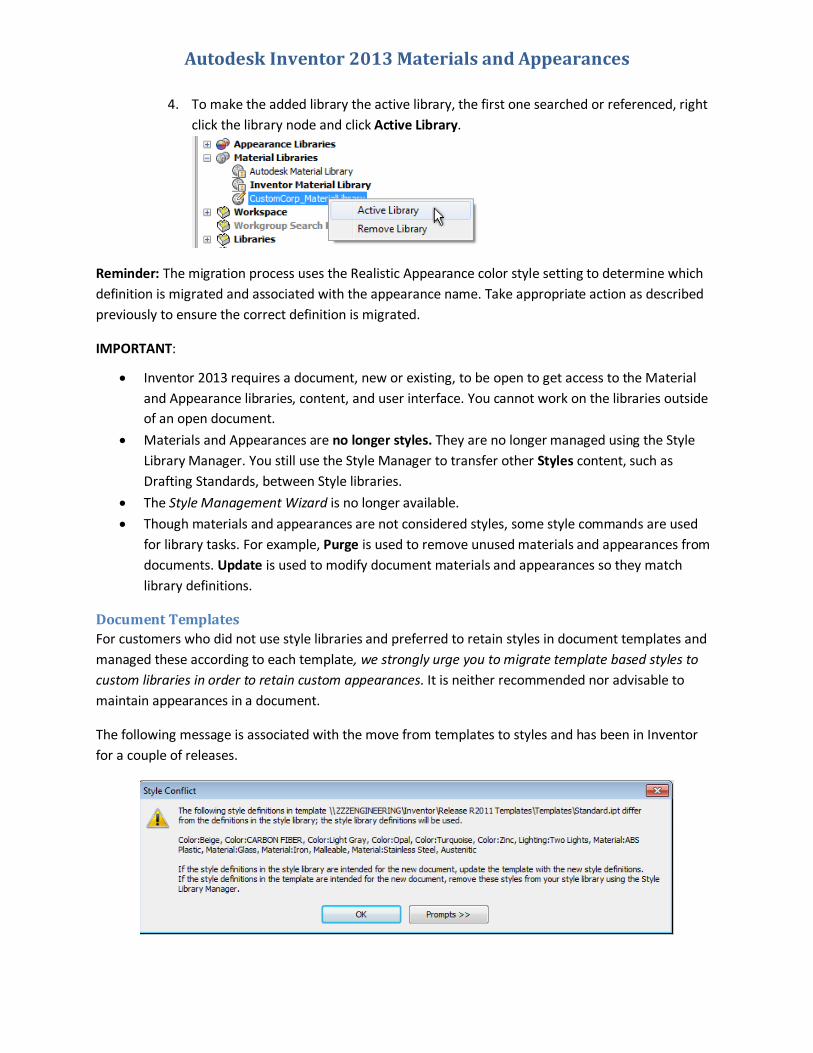
4. To make the added library the active library, the first one searched or referenced, right
click the library node and click Active Library.
Reminder: The migration process uses the Realistic Appearance color style setting to determine which
definition is migrated and associated with the appearance name. Take appropriate action as described
previously to ensure the correct definition is migrated.
IMPORTANT:
Inventor 2013 requires a document, new or existing, to be open to get access to the Material
and Appearance libraries, content, and user interface. You cannot work on the libraries outside
of an open document.
Materials and Appearances are no longer styles. They are no longer managed using the Style
Library Manager. You still use the Style Manager to transfer other Styles content, such as
Drafting Standards, between Style libraries.
The Style Management Wizard is no longer available.
Though materials and appearances are not considered styles, some style commands are used
for library tasks. For example, Purge is used to remove unused materials and appearances from
documents. Update is used to modify document materials and appearances so they match
library definitions.
Document Templates
For customers who did not use style libraries and preferred to retain styles in document templates and
managed these according to each template, we strongly urge you to migrate template based styles to
custom libraries in order to retain custom appearances. It is neither recommended nor advisable to
maintain appearances in a document.
The following message is associated with the move from templates to styles and has been in Inventor
for a couple of releases.
Autodesk Inventor 2013 Materials and Appearances
Preparing to Migrate Models and Styles
Materials
Materials are migrated from Material styles to Materials. There is not an option to defer this action.
Custom materials that you have added are migrated. Use the new Material Browser and Material Editor
to modify existing or create new materials.
Appearances
Remember: Before ever opening datasets, determine whether or not you want to uncheck the Realistic
Appearance option in your 2012 Color Styles. Be sure you read the topic and that you are clear on the
results you will get.
The following are steps performed in preparation for migrating models:
1. Create a custom library.
1. Start a new part.
2. In the QAT, click the Appearance Browser .
3. In the browser toolbar, at the bottom, click Manage > Create New Library.
4. Specify a folder location and name for the custom library and click Save.
2. Add the custom library to the project file.
1. Select the project to which you will add the library.
2. Right-click the Material Libraries node and click Add Library.
3. Navigate to and select the custom library you want to add to the project. Click OK.
4. To make the added library the active library, the first one searched or referenced, right click the library node and click Active Library.
Migrating Models The following provides two examples of how to migrating model and style content.
Autodesk Inventor 2013 Materials and Appearances
Scenario 1 Migrating to a custom .adsklib file
The custom material is defined as part of your Materials.xml and Colors.xml file in 2012. For 2013, you
want to migrate the custom material into a custom .adsklib library.
1. Start a new part.
2. In the QAT, click Material Browser .
3. In the browser toolbar, click Manage Migrate Inventor Styles.
4. In the Migrate Styles dialog box, specify the Migrate From location which where the
Materials.xml and Colors.xml files reside. By default the path is
C:\Users\Public\Documents\Autodesk\Inventor 2012\Design Data in Windows 7.
5. Specify the Migrate To location which is typically the InventorMaterialsLibrary.adsk file or a
custom library you create. By default the path is C:\Users\Public\Documents\Autodesk\Inventor
2013\Design Data\Materials in Windows 7.
Autodesk Inventor 2013 Materials and Appearances
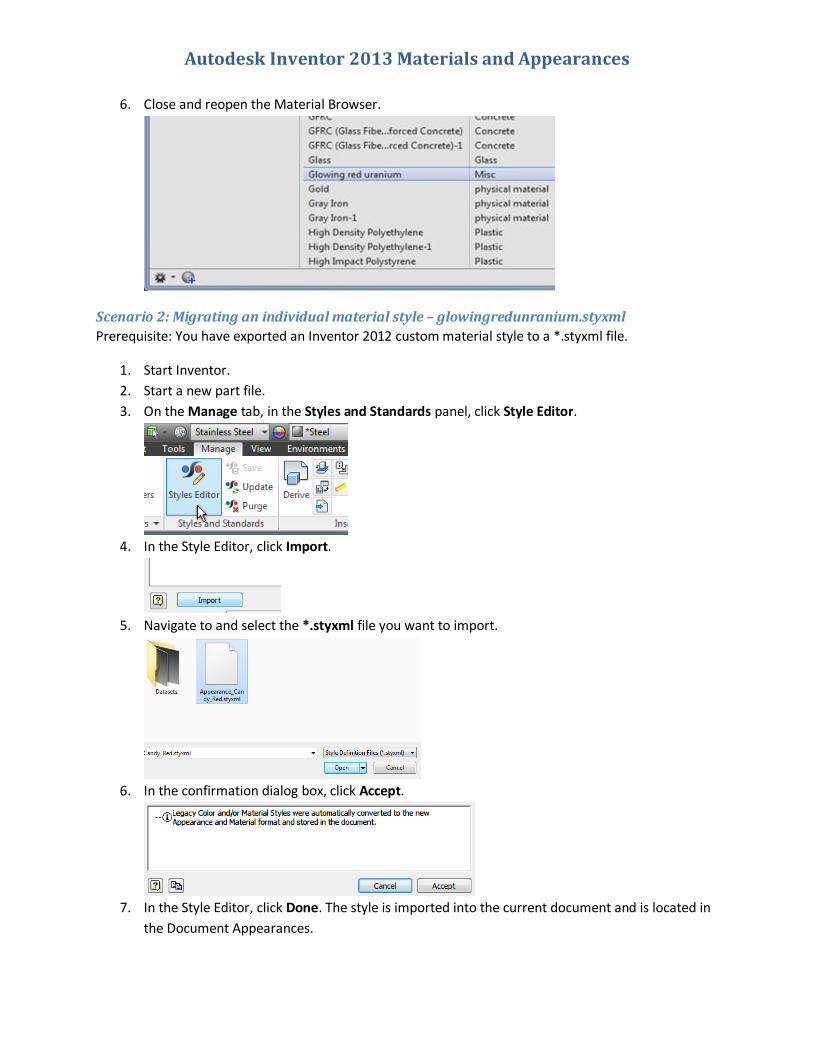
6. Close and reopen the Material Browser.
Scenario 2: Migrating an individual material style – glowingredunranium.styxml
Prerequisite: You have exported an Inventor 2012 custom material style to a *.styxml file.
1. Start Inventor.
2. Start a new part file.
3. On the Manage tab, in the Styles and Standards panel, click Style Editor.
4. In the Style Editor, click Import.
5. Navigate to and select the *.styxml file you want to import.
6. In the confirmation dialog box, click Accept.
7. In the Style Editor, click Done. The style is imported into the current document and is located in
the Document Appearances.
Autodesk Inventor 2013 Materials and Appearances
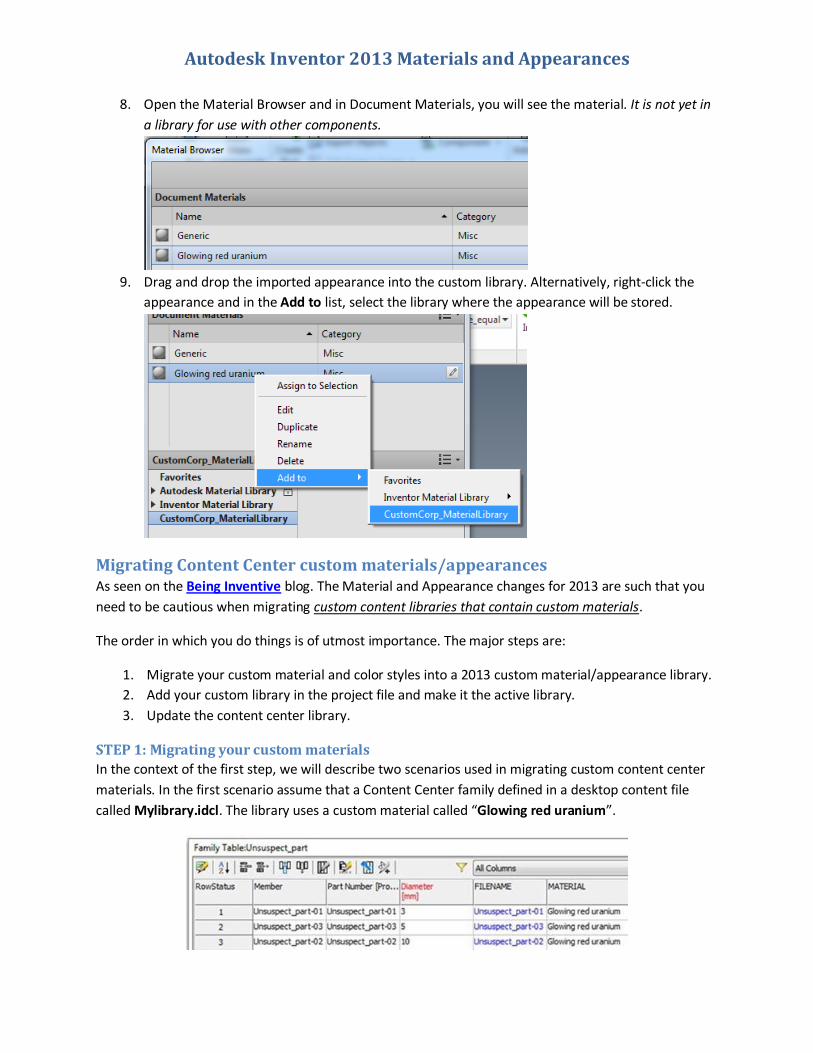
8. Open the Material Browser and in Document Materials, you will see the material. It is not yet in
a library for use with other components.
9. Drag and drop the imported appearance into the custom library. Alternatively, right-click the
appearance and in the Add to list, select the library where the appearance will be stored.
Migrating Content Center custom materials/appearances As seen on the Being Inventive blog. The Material and Appearance changes for 2013 are such that you
need to be cautious when migrating custom content libraries that contain custom materials.
The order in which you do things is of utmost importance. The major steps are:
1. Migrate your custom material and color styles into a 2013 custom material/appearance library.
2. Add your custom library in the project file and make it the active library.
3. Update the content center library.
STEP 1: Migrating your custom materials
In the context of the first step, we will describe two scenarios used in migrating custom content center
materials. In the first scenario assume that a Content Center family defined in a desktop content file
called Mylibrary.idcl. The library uses a custom material called “Glowing red uranium”.
Autodesk Inventor 2013 Materials and Appearances
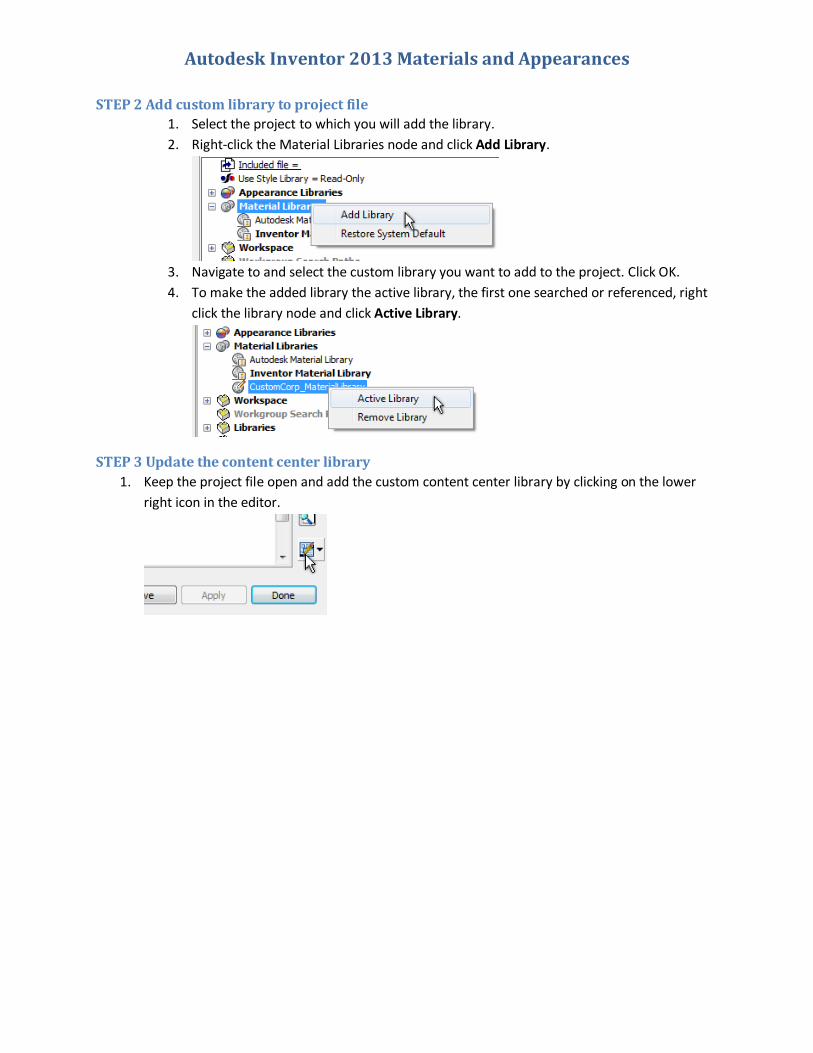
STEP 2 Add custom library to project file
1. Select the project to which you will add the library.
2. Right-click the Material Libraries node and click Add Library.
3. Navigate to and select the custom library you want to add to the project. Click OK.
4. To make the added library the active library, the first one searched or referenced, right
click the library node and click Active Library.
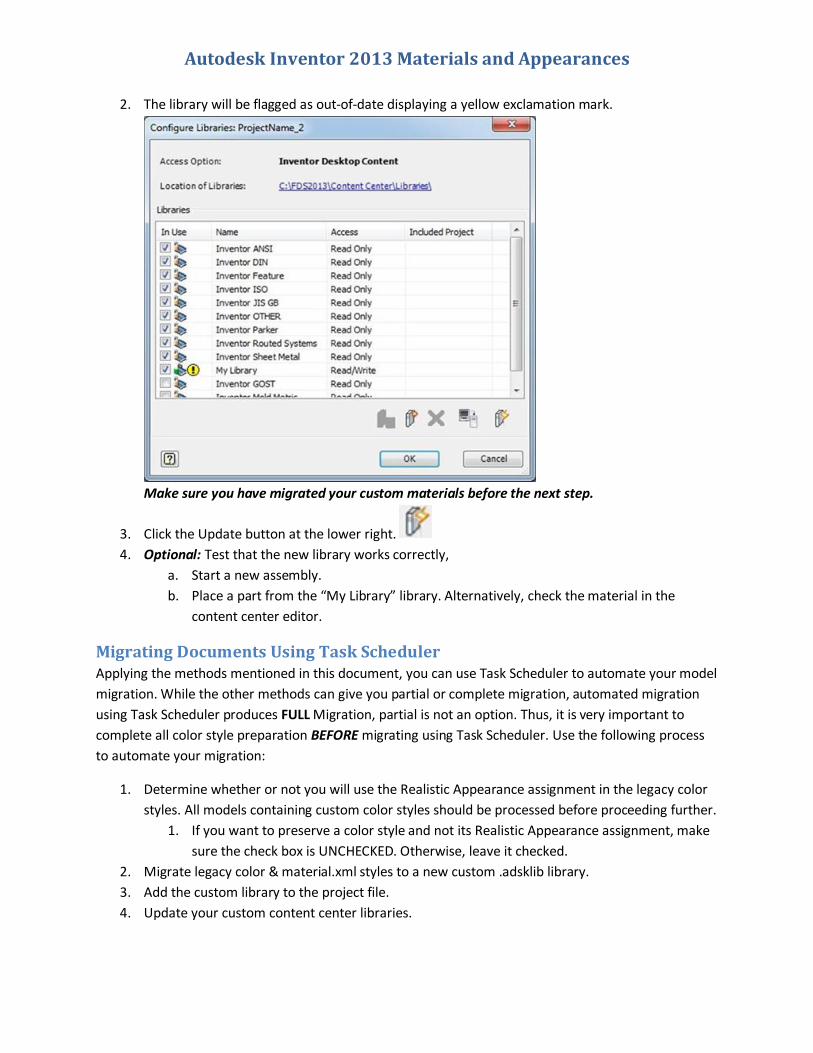
STEP 3 Update the content center library
1. Keep the project file open and add the custom content center library by clicking on the lower
right icon in the editor.
Autodesk Inventor 2013 Materials and Appearances
2. The library will be flagged as out-of-date displaying a yellow exclamation mark.
Make sure you have migrated your custom materials before the next step.
3. Click the Update button at the lower right.
4. Optional: Test that the new library works correctly,
a. Start a new assembly.
b. Place a part from the “My Library” library. Alternatively, check the material in the
content center editor.
Migrating Documents Using Task Scheduler Applying the methods mentioned in this document, you can use Task Scheduler to automate your model
migration. While the other methods can give you partial or complete migration, automated migration
using Task Scheduler produces FULL Migration, partial is not an option. Thus, it is very important to
complete all color style preparation BEFORE migrating using Task Scheduler. Use the following process
to automate your migration:
1. Determine whether or not you will use the Realistic Appearance assignment in the legacy color
styles. All models containing custom color styles should be processed before proceeding further.
1. If you want to preserve a color style and not its Realistic Appearance assignment, make
sure the check box is UNCHECKED. Otherwise, leave it checked.
2. Migrate legacy color & material.xml styles to a new custom .adsklib library.
3. Add the custom library to the project file.
4. Update your custom content center libraries.
Autodesk Inventor 2013 Materials and Appearances
5. This is a good point to test a subset of your data with this configuration ensuring all is as
expected (review visual appearances, textures, physical material properties, and functionality
that leverage custom content center libraries).
6. Once satisfied, do a full backup.
7. Using the project file (step 3), use Task Scheduler to migrate your data in the following order:
Parts, Assemblies, Presentations, and Drawings as discussed in the Migration Best Practices
WikiHelp topic.
8. Test the migration results by reviewing various migrated documents.
Where can I learn more about Material and Appearance libraries and the
associated definitions? Much of the information in this document is found in WikiHelp. There you will find procedures for:
Material and Appearance Libraries
Materials
Appearances
Blog topics
Style conflict message How to preserve Inventor 2012 cached styles in Inventor 2013
Autodesk Inventor 2013 Materials and Appearances
2013 Library Management Methods Inventor 2012 introduced a color style option called Realistic Appearance for use with Realistic Visual
Styles. Inventor 2013 builds on this capability introducing new material and appearance libraries and
tools to assist in managing the libraries and individual material and appearance properties. The new
materials and appearances are used by the Realistic Visual Style and the real time rendering capability in
Inventor 2013.
The goal is to continue the progress toward a more seamless experience when working between
Autodesk products.
To assist in supporting this change to material and appearance handling in Inventor, you will probably
want to review and update your materials and color styles strategy.
Likely, you will want to move your custom or modified color and material styles into the new libraries.
Thereafter, maintaining and improving the libraries so they are compatible across applications will
require less effort. To manage these libraries we recommend either an Overwrite method or a
Versioning method. The overwrite method has you copy and rename the library and perform edits on
the copy. Then, replace the existing library with the modified copy. The versioning method describes
how to copy, rename using a version naming convention. You modify the new version and distribute it.
The details for each method are below.
IMPORTANT: In either management case, the source and copied libraries must not be used in the same
project file or an error occurs.
If you routinely update your materials and appearances we recommend that you create a project file
specifically for managing these assets.
Note, materials and appearances can reside in the same library; they do not require separate libraries.
Overwrite method
In this method we guide you on how to reliably update your 2013 libraries. You start with a copy of the
2013 material library, make the needed modifications, and replace the working library with the updated
library. This method enables safe incremental updates to the material and appearance definitions.
The advantage of this method is that you do not modify the working project file.
Copy the file
1. Locate the InventorMaterialLibrary.adsklib file or your own custom library that requires modification. The Inventor Material Library location varies depending on your installation and deployment methods.
a. Standard Standalone install: C:\Users\Public\Documents\Autodesk\Inventor 2013\Design Data\Materials
Autodesk Inventor 2013 Materials and Appearances
2. Make a copy of the file, and apply a different name, such as My_ InventorMaterialLibrary.adsklib.
Creating an Asset Management project file
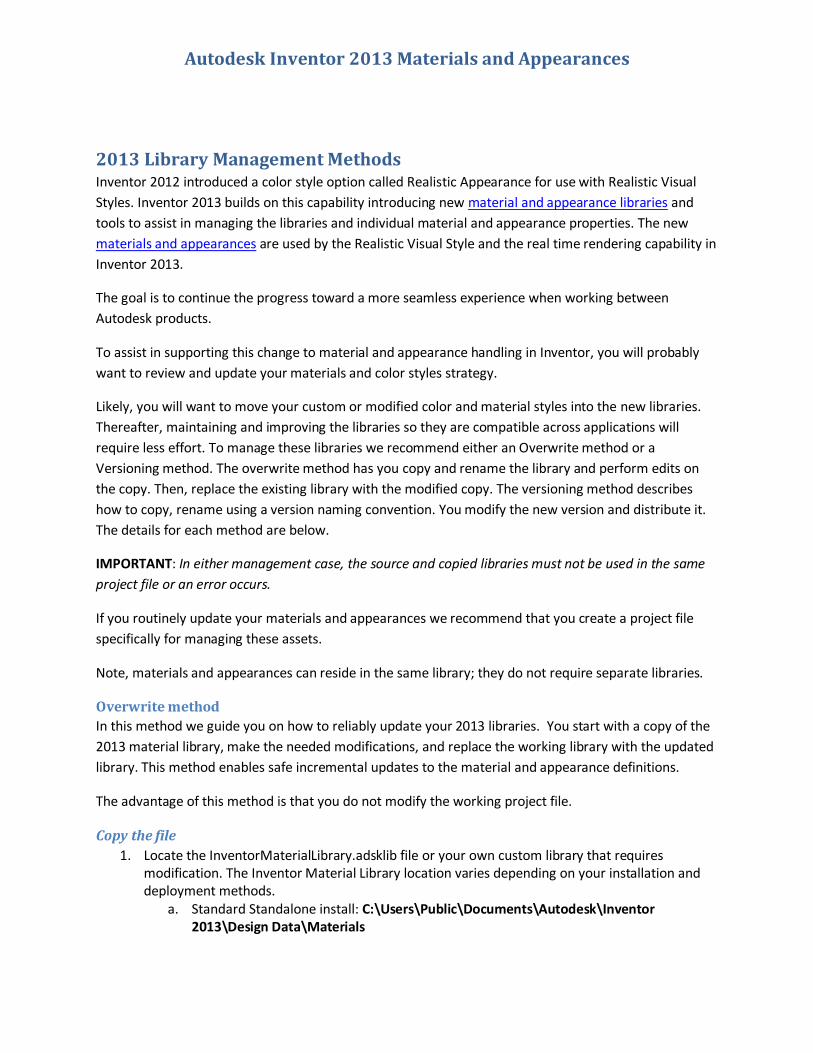
The following steps guide you in creating an asset management project file.
1. Start Inventor. 2. In the Welcome dialog box, click Projects. Or, in Inventor click Get Started > Launch > Projects. 3. In the Project Editor, in the upper section, create a new project for asset management. All that is
required is to define the project name and point the project to the folder where the materials libraries are located.
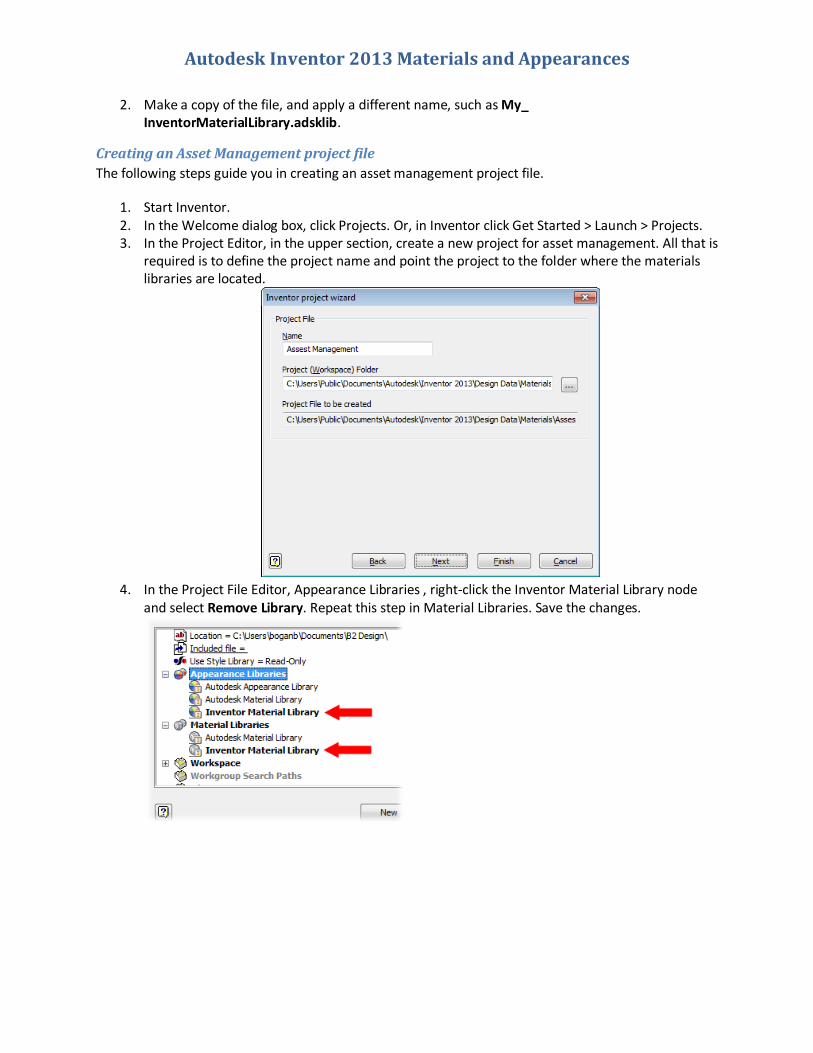
4. In the Project File Editor, Appearance Libraries , right-click the Inventor Material Library node
and select Remove Library. Repeat this step in Material Libraries. Save the changes.
Autodesk Inventor 2013 Materials and Appearances
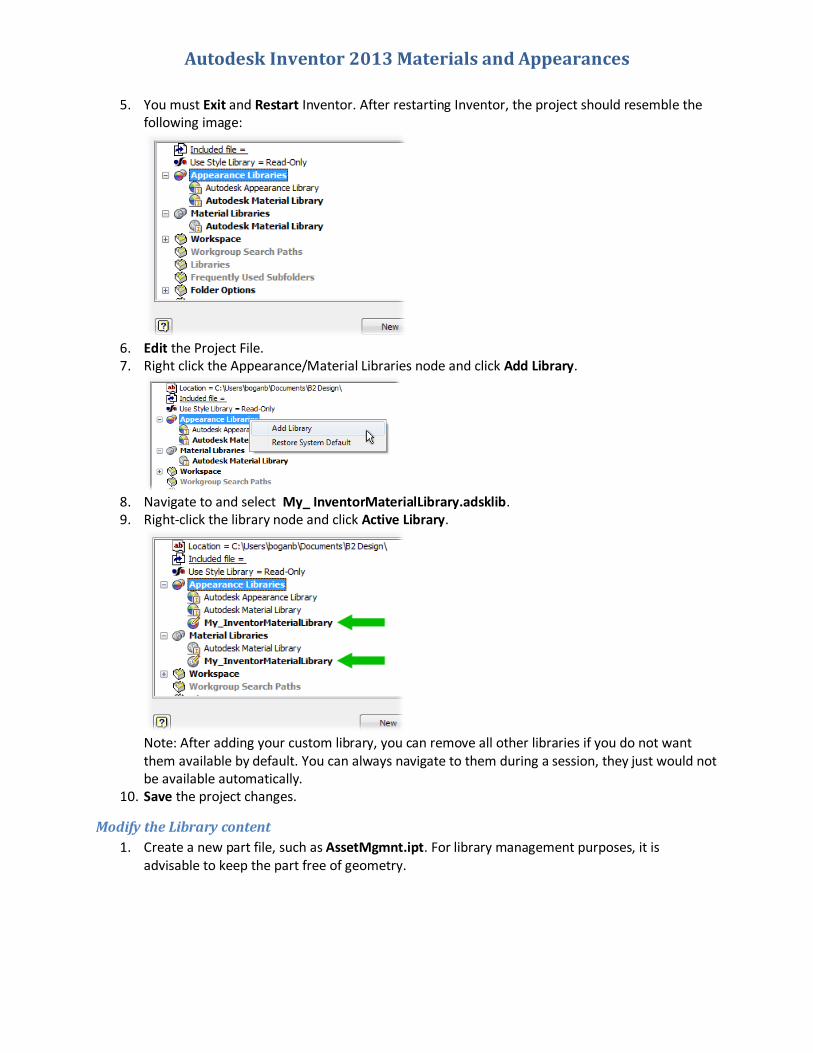
5. You must Exit and Restart Inventor. After restarting Inventor, the project should resemble the following image:
6. Edit the Project File. 7. Right click the Appearance/Material Libraries node and click Add Library.
8. Navigate to and select My_ InventorMaterialLibrary.adsklib. 9. Right-click the library node and click Active Library.
Note: After adding your custom library, you can remove all other libraries if you do not want them available by default. You can always navigate to them during a session, they just would not be available automatically.
10. Save the project changes.
Modify the Library content
1. Create a new part file, such as AssetMgmnt.ipt. For library management purposes, it is advisable to keep the part free of geometry.
Autodesk Inventor 2013 Materials and Appearances
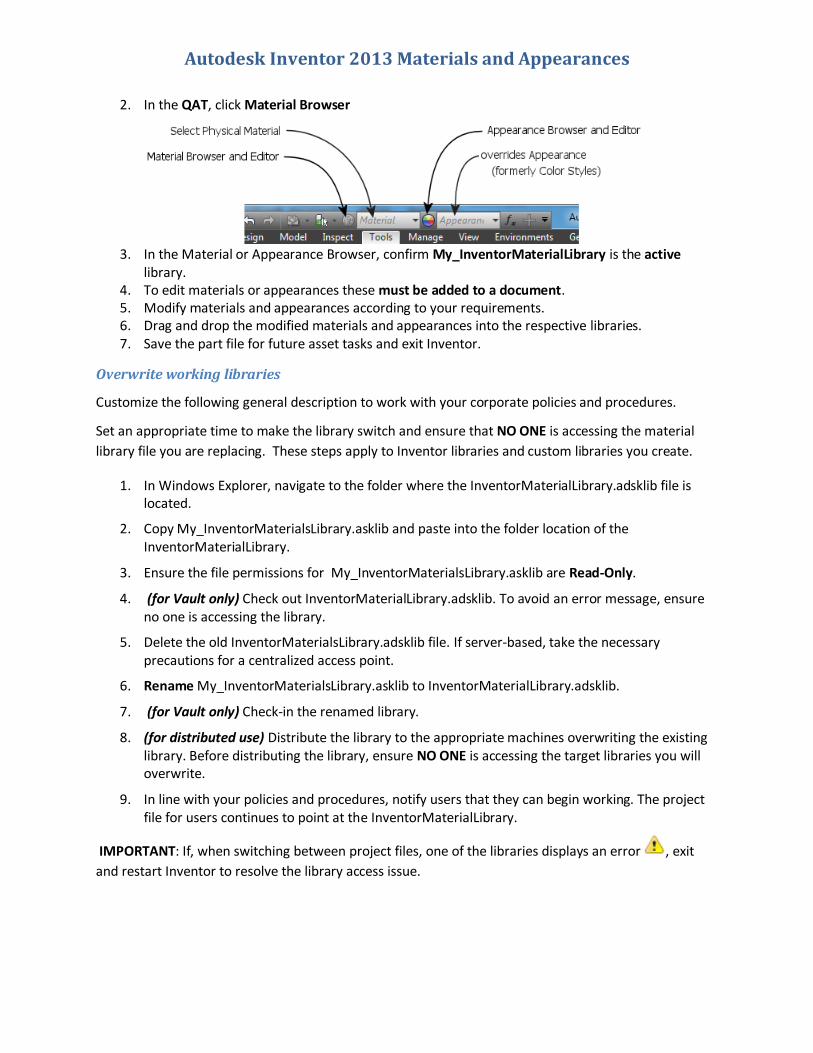
2. In the QAT, click Material Browser
3. In the Material or Appearance Browser, confirm My_InventorMaterialLibrary is the active
library. 4. To edit materials or appearances these must be added to a document. 5. Modify materials and appearances according to your requirements. 6. Drag and drop the modified materials and appearances into the respective libraries. 7. Save the part file for future asset tasks and exit Inventor.
Overwrite working libraries
Customize the following general description to work with your corporate policies and procedures.
Set an appropriate time to make the library switch and ensure that NO ONE is accessing the material
library file you are replacing. These steps apply to Inventor libraries and custom libraries you create.
1. In Windows Explorer, navigate to the folder where the InventorMaterialLibrary.adsklib file is located.
2. Copy My_InventorMaterialsLibrary.asklib and paste into the folder location of the InventorMaterialLibrary.
3. Ensure the file permissions for My_InventorMaterialsLibrary.asklib are Read-Only.
4. (for Vault only) Check out InventorMaterialLibrary.adsklib. To avoid an error message, ensure no one is accessing the library.
5. Delete the old InventorMaterialsLibrary.adsklib file. If server-based, take the necessary precautions for a centralized access point.
6. Rename My_InventorMaterialsLibrary.asklib to InventorMaterialLibrary.adsklib.
7. (for Vault only) Check-in the renamed library.
8. (for distributed use) Distribute the library to the appropriate machines overwriting the existing library. Before distributing the library, ensure NO ONE is accessing the target libraries you will overwrite.
9. In line with your policies and procedures, notify users that they can begin working. The project file for users continues to point at the InventorMaterialLibrary.
IMPORTANT: If, when switching between project files, one of the libraries displays an error , exit
and restart Inventor to resolve the library access issue.
Autodesk Inventor 2013 Materials and Appearances
Versioning method
The versioning method involves establishing a naming convention involving a version number whenever
you release a new version of the appearance library. You copy the existing library, rename it, modify it,
and distribute it. Finally, modify the project files to use the latest version.
The advantage to this method is that you can keep track of which version is being used at any given time
and by comparing with archived versions, can tell what was modified.
Copy the file
1. Locate the InventorMaterialLibrary.adsklib file or your custom library that requires modification. The Inventor Material Library location varies depending on your installation and deployment methods.
a. Standard Standalone install: C:\Users\Public\Documents\Autodesk\Inventor 2013\Design Data\Materials
2. Make a copy of the library and apply a versioned name, such as InventorMaterialLibrary_v1.0.adsklib or corp_custom_materials_v1.0.adsklib
Modify the project file
1. Start Inventor. 2. In the Welcome dialog box, click Projects. Or, in Inventor click Get Started > Launch > Projects. 3. In the Project File Editor, Appearance Libraries , right-click the Inventor Material Library node
and select Remove Library. Repeat this step in Material Libraries. Save the changes.
4. Exit and Restart Inventor. This step removes the library from memory.
5. Edit the Project File.
Autodesk Inventor 2013 Materials and Appearances
6. Right click the Appearance/Material Libraries node and click Add Library.
7. Navigate to and select InventorMaterialLibrary_v1.0.adsklib. 8. Right-click the library node and click Active Library.
9. Save the project changes.
Modify the library content
1. Create a new part file, such as AssetMgmnt.ipt. 2. In the QAT, click Material Browser
3. In the Material Browser, confirm InventorMaterialLibrary_v1.0 is the active library. 4. Modify document materials and appearances according to your requirements. 5. Drag and drop modified materials and appearances from the Document section into the
appropriate library to update the library definition. 6. Save the part file for future asset tasks and exit Inventor.
Overwrite working libraries
Customize the following description to work with your corporate policies and procedures.
1. Copy InventorMaterialLibrary_v1.0.adsklib and paste into the folder where the InventorMaterialLibrary is located.
2. Ensure that the file permissions on the new version library are Read-Only.
3. (for vault) Check in the new library version to Vault.
Autodesk Inventor 2013 Materials and Appearances
4. If you use a centralized project file, modify the project file to use the new version. It is necessary to do the same removal and addition of the library as described previously. The InventorMaterialLibrary and the versioned libraries cannot reside in the same project file.
5. In line with your policies and procedures, notify users to save and restart Inventor before they begin working.
IMPORTANT: If, when switching between project files, one of the libraries displays an error , exit and
restart Inventor to resolve the library access issue.
Important information The following information helps you to determine which method will help you manage your libraries
effectively.
Both methods apply to the Inventor Material Library and custom libraries you create.
Vault has a known issue, when you check out a library that is in use in someone’s document. The following error message displays:
If you edit a material library while someone is still using Inventor the following error message
displays:

Autodesk Inventor 2013 Materials and Appearances
From within the Material or Appearance Browsers, If you open a library and its copy in the same
session, this error message displays:
The two methods involve editing both the project files and library copies. If material library
modifications occur frequently, we recommend that you establish a project dedicated to asset
management.
Autodesk Inventor 2013 Materials and Appearances
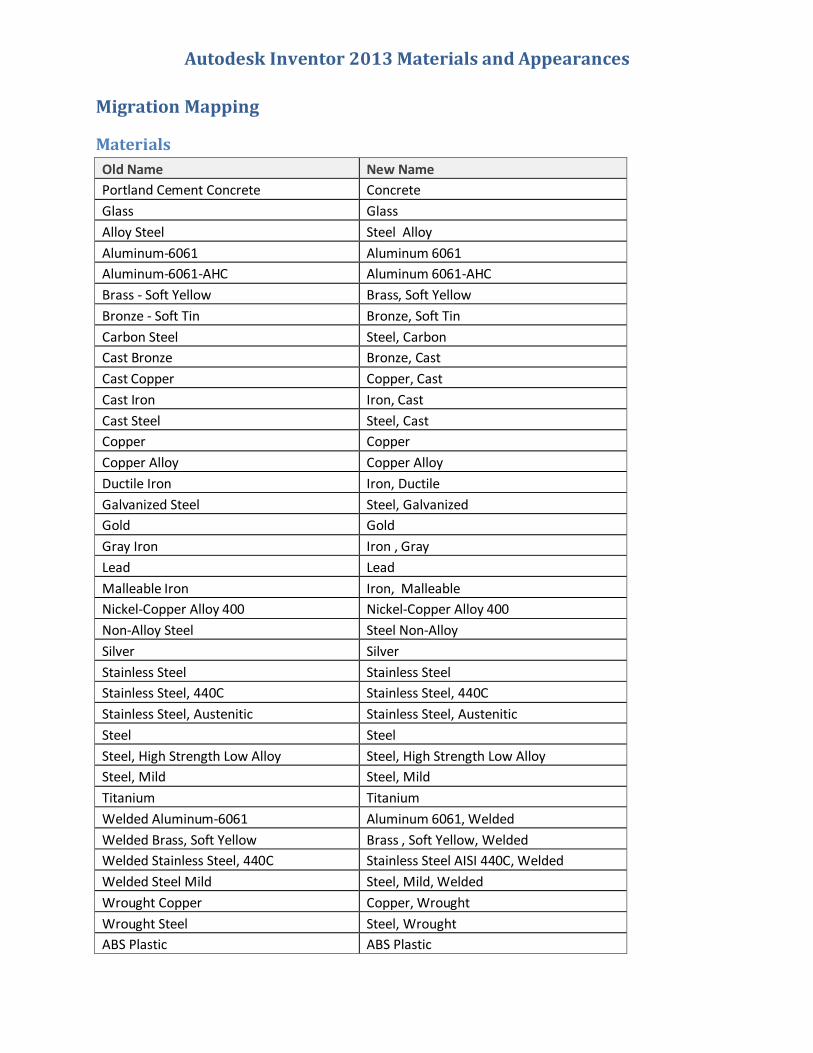
Migration Mapping
Materials
Old Name New Name
Portland Cement Concrete Concrete
Glass Glass
Alloy Steel Steel Alloy
Aluminum-6061 Aluminum 6061
Aluminum-6061-AHC Aluminum 6061-AHC
Brass - Soft Yellow Brass, Soft Yellow
Bronze - Soft Tin Bronze, Soft Tin
Carbon Steel Steel, Carbon
Cast Bronze Bronze, Cast
Cast Copper Copper, Cast
Cast Iron Iron, Cast
Cast Steel Steel, Cast
Copper Copper
Copper Alloy Copper Alloy
Ductile Iron Iron, Ductile
Galvanized Steel Steel, Galvanized
Gold Gold
Gray Iron Iron , Gray
Lead Lead
Malleable Iron Iron, Malleable
Nickel-Copper Alloy 400 Nickel-Copper Alloy 400
Non-Alloy Steel Steel Non-Alloy
Silver Silver
Stainless Steel Stainless Steel
Stainless Steel, 440C Stainless Steel, 440C
Stainless Steel, Austenitic Stainless Steel, Austenitic
Steel Steel
Steel, High Strength Low Alloy Steel, High Strength Low Alloy
Steel, Mild Steel, Mild
Titanium Titanium
Welded Aluminum-6061 Aluminum 6061, Welded
Welded Brass, Soft Yellow Brass , Soft Yellow, Welded
Welded Stainless Steel, 440C Stainless Steel AISI 440C, Welded
Welded Steel Mild Steel, Mild, Welded
Wrought Copper Copper, Wrought
Wrought Steel Steel, Wrought
ABS Plastic ABS Plastic
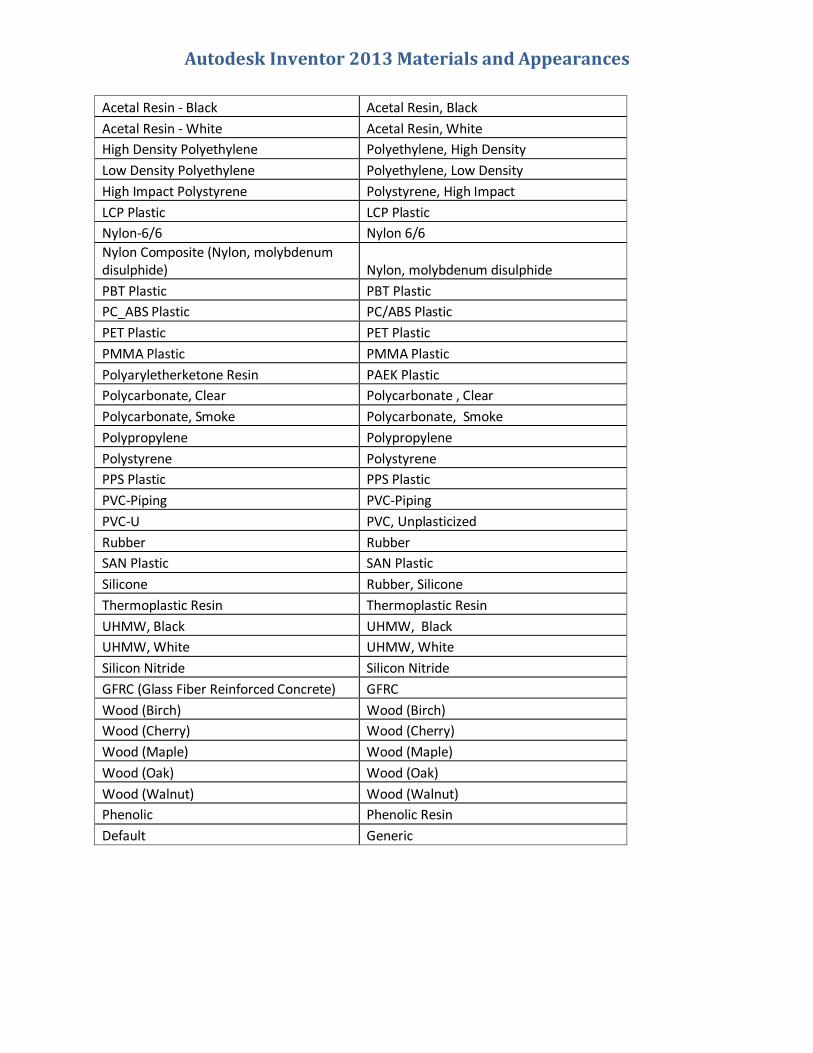
Autodesk Inventor 2013 Materials and Appearances
Acetal Resin - Black Acetal Resin, Black
Acetal Resin - White Acetal Resin, White
High Density Polyethylene Polyethylene, High Density
Low Density Polyethylene Polyethylene, Low Density
High Impact Polystyrene Polystyrene, High Impact
LCP Plastic LCP Plastic
Nylon-6/6 Nylon 6/6
Nylon Composite (Nylon, molybdenum disulphide) Nylon, molybdenum disulphide
PBT Plastic PBT Plastic
PC_ABS Plastic PC/ABS Plastic
PET Plastic PET Plastic
PMMA Plastic PMMA Plastic
Polyaryletherketone Resin PAEK Plastic
Polycarbonate, Clear Polycarbonate , Clear
Polycarbonate, Smoke Polycarbonate, Smoke
Polypropylene Polypropylene
Polystyrene Polystyrene
PPS Plastic PPS Plastic
PVC-Piping PVC-Piping
PVC-U PVC, Unplasticized
Rubber Rubber
SAN Plastic SAN Plastic
Silicone Rubber, Silicone
Thermoplastic Resin Thermoplastic Resin
UHMW, Black UHMW, Black
UHMW, White UHMW, White
Silicon Nitride Silicon Nitride
GFRC (Glass Fiber Reinforced Concrete) GFRC
Wood (Birch) Wood (Birch)
Wood (Cherry) Wood (Cherry)
Wood (Maple) Wood (Maple)
Wood (Oak) Wood (Oak)
Wood (Walnut) Wood (Walnut)
Phenolic Phenolic Resin
Default Generic
Autodesk Inventor 2013 Materials and Appearances
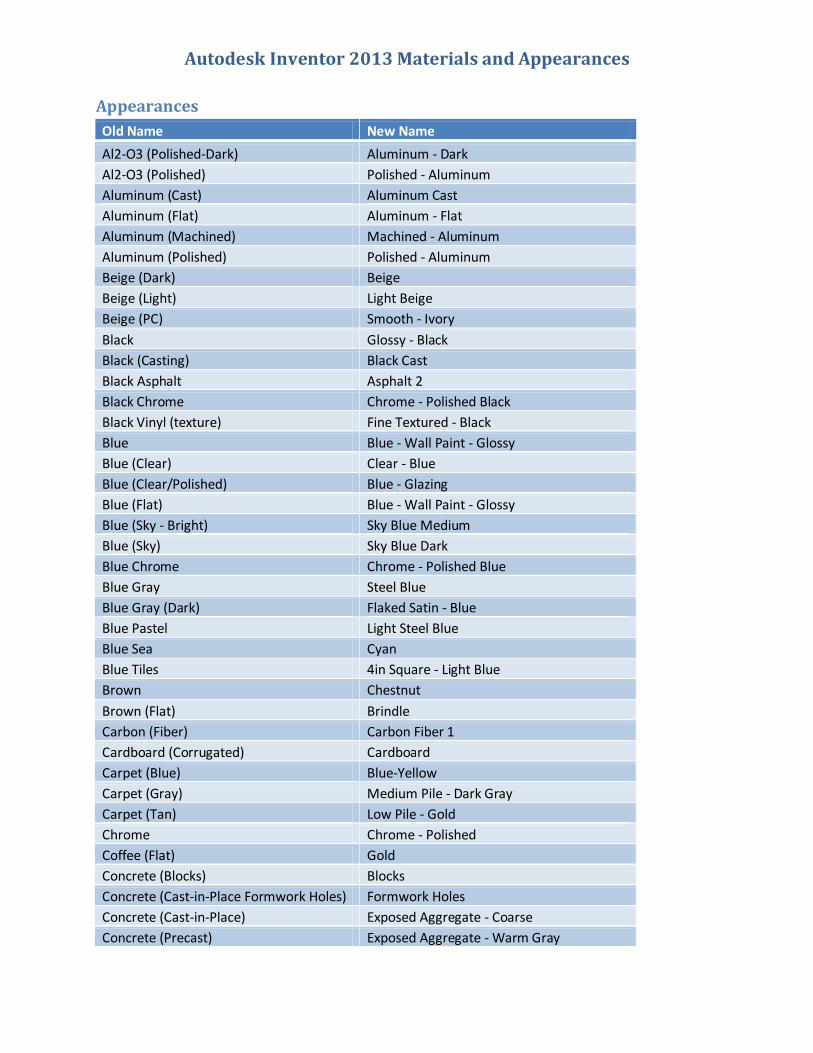
Appearances
Old Name New Name
Al2-O3 (Polished-Dark) Aluminum - Dark
Al2-O3 (Polished) Polished - Aluminum
Aluminum (Cast) Aluminum Cast
Aluminum (Flat) Aluminum - Flat
Aluminum (Machined) Machined - Aluminum
Aluminum (Polished) Polished - Aluminum
Beige (Dark) Beige
Beige (Light) Light Beige
Beige (PC) Smooth - Ivory
Black Glossy - Black
Black (Casting) Black Cast
Black Asphalt Asphalt 2
Black Chrome Chrome - Polished Black
Black Vinyl (texture) Fine Textured - Black
Blue Blue - Wall Paint - Glossy
Blue (Clear) Clear - Blue
Blue (Clear/Polished) Blue - Glazing
Blue (Flat) Blue - Wall Paint - Glossy
Blue (Sky - Bright) Sky Blue Medium
Blue (Sky) Sky Blue Dark
Blue Chrome Chrome - Polished Blue
Blue Gray Steel Blue
Blue Gray (Dark) Flaked Satin - Blue
Blue Pastel Light Steel Blue
Blue Sea Cyan
Blue Tiles 4in Square - Light Blue
Brown Chestnut
Brown (Flat) Brindle
Carbon (Fiber) Carbon Fiber 1
Cardboard (Corrugated) Cardboard
Carpet (Blue) Blue-Yellow
Carpet (Gray) Medium Pile - Dark Gray
Carpet (Tan) Low Pile - Gold
Chrome Chrome - Polished
Coffee (Flat) Gold
Concrete (Blocks) Blocks
Concrete (Cast-in-Place Formwork Holes) Formwork Holes
Concrete (Cast-in-Place) Exposed Aggregate - Coarse
Concrete (Precast) Exposed Aggregate - Warm Gray
Autodesk Inventor 2013 Materials and Appearances
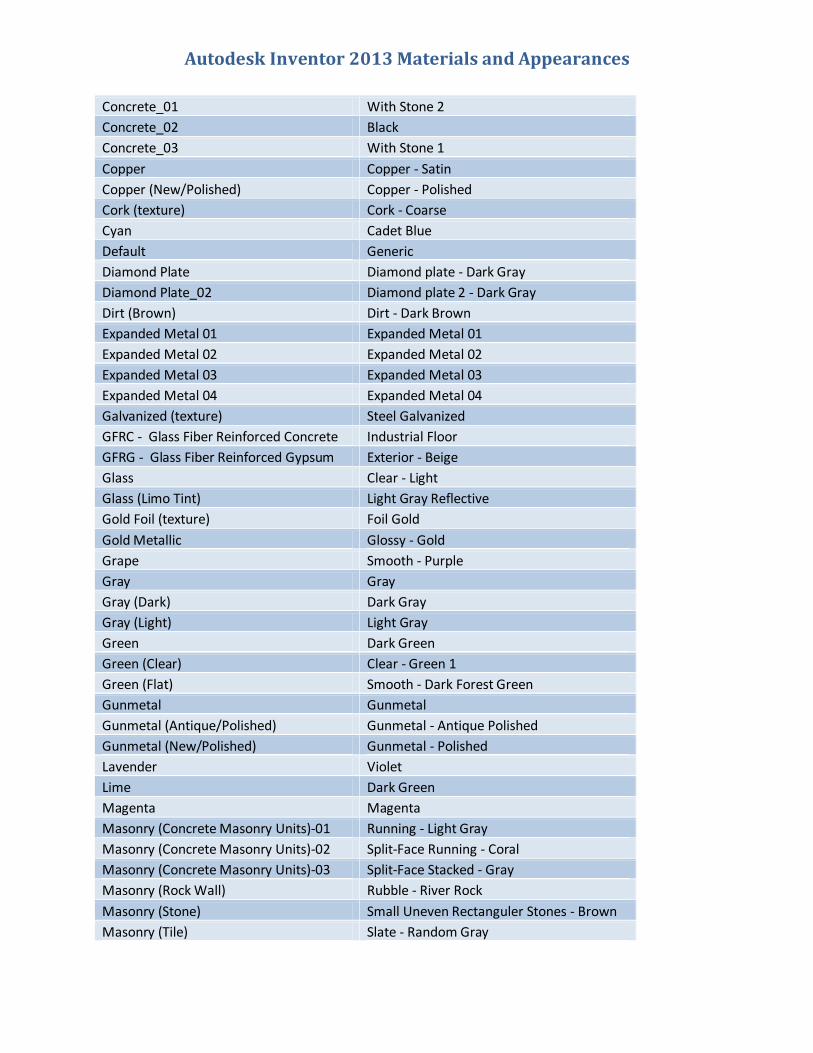
Concrete_01 With Stone 2
Concrete_02 Black
Concrete_03 With Stone 1
Copper Copper - Satin
Copper (New/Polished) Copper - Polished
Cork (texture) Cork - Coarse
Cyan Cadet Blue
Default Generic
Diamond Plate Diamond plate - Dark Gray
Diamond Plate_02 Diamond plate 2 - Dark Gray
Dirt (Brown) Dirt - Dark Brown
Expanded Metal 01 Expanded Metal 01
Expanded Metal 02 Expanded Metal 02
Expanded Metal 03 Expanded Metal 03
Expanded Metal 04 Expanded Metal 04
Galvanized (texture) Steel Galvanized
GFRC - Glass Fiber Reinforced Concrete Industrial Floor
GFRG - Glass Fiber Reinforced Gypsum Exterior - Beige
Glass Clear - Light
Glass (Limo Tint) Light Gray Reflective
Gold Foil (texture) Foil Gold
Gold Metallic Glossy - Gold
Grape Smooth - Purple
Gray Gray
Gray (Dark) Dark Gray
Gray (Light) Light Gray
Green Dark Green
Green (Clear) Clear - Green 1
Green (Flat) Smooth - Dark Forest Green
Gunmetal Gunmetal
Gunmetal (Antique/Polished) Gunmetal - Antique Polished
Gunmetal (New/Polished) Gunmetal - Polished
Lavender Violet
Lime Dark Green
Magenta Magenta
Masonry (Concrete Masonry Units)-01 Running - Light Gray
Masonry (Concrete Masonry Units)-02 Split-Face Running - Coral
Masonry (Concrete Masonry Units)-03 Split-Face Stacked - Gray
Masonry (Rock Wall) Rubble - River Rock
Masonry (Stone) Small Uneven Rectanguler Stones - Brown
Masonry (Tile) Slate - Random Gray
Autodesk Inventor 2013 Materials and Appearances
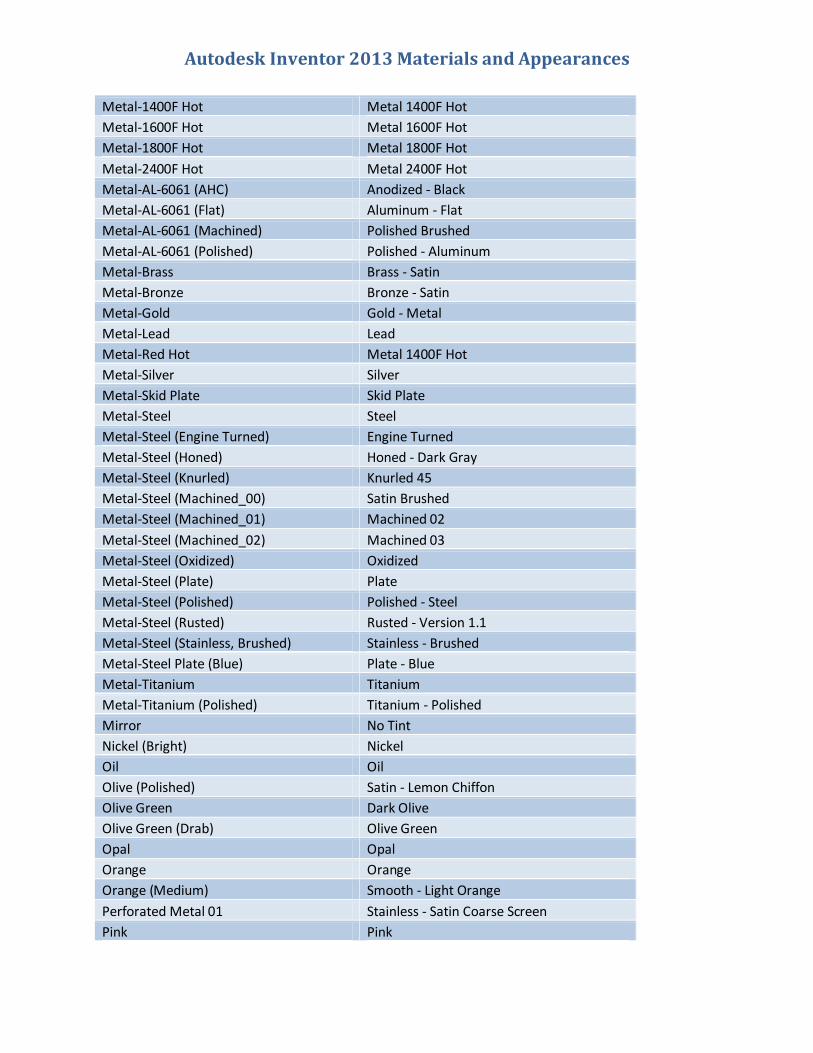
Metal-1400F Hot Metal 1400F Hot
Metal-1600F Hot Metal 1600F Hot
Metal-1800F Hot Metal 1800F Hot
Metal-2400F Hot Metal 2400F Hot
Metal-AL-6061 (AHC) Anodized - Black
Metal-AL-6061 (Flat) Aluminum - Flat
Metal-AL-6061 (Machined) Polished Brushed
Metal-AL-6061 (Polished) Polished - Aluminum
Metal-Brass Brass - Satin
Metal-Bronze Bronze - Satin
Metal-Gold Gold - Metal
Metal-Lead Lead
Metal-Red Hot Metal 1400F Hot
Metal-Silver Silver
Metal-Skid Plate Skid Plate
Metal-Steel Steel
Metal-Steel (Engine Turned) Engine Turned
Metal-Steel (Honed) Honed - Dark Gray
Metal-Steel (Knurled) Knurled 45
Metal-Steel (Machined_00) Satin Brushed
Metal-Steel (Machined_01) Machined 02
Metal-Steel (Machined_02) Machined 03
Metal-Steel (Oxidized) Oxidized
Metal-Steel (Plate) Plate
Metal-Steel (Polished) Polished - Steel
Metal-Steel (Rusted) Rusted - Version 1.1
Metal-Steel (Stainless, Brushed) Stainless - Brushed
Metal-Steel Plate (Blue) Plate - Blue
Metal-Titanium Titanium
Metal-Titanium (Polished) Titanium - Polished
Mirror No Tint
Nickel (Bright) Nickel
Oil Oil
Olive (Polished) Satin - Lemon Chiffon
Olive Green Dark Olive
Olive Green (Drab) Olive Green
Opal Opal
Orange Orange
Orange (Medium) Smooth - Light Orange
Perforated Metal 01 Stainless - Satin Coarse Screen
Pink Pink
Autodesk Inventor 2013 Materials and Appearances
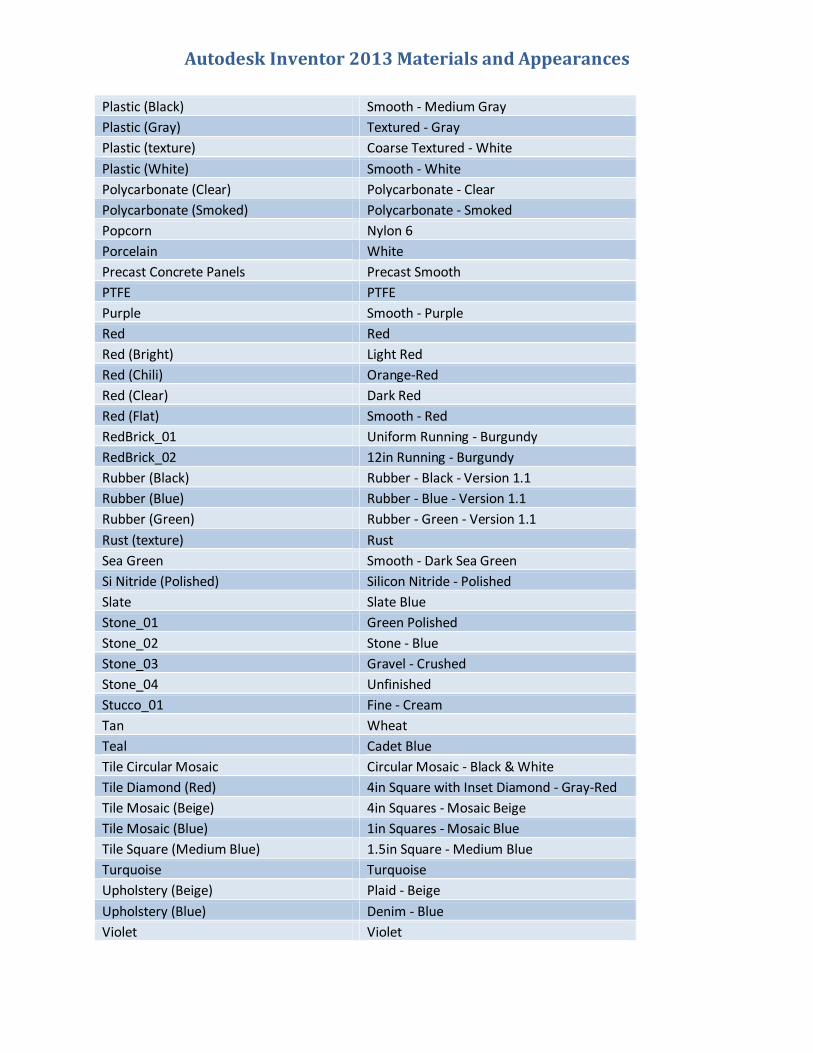
Plastic (Black) Smooth - Medium Gray
Plastic (Gray) Textured - Gray
Plastic (texture) Coarse Textured - White
Plastic (White) Smooth - White
Polycarbonate (Clear) Polycarbonate - Clear
Polycarbonate (Smoked) Polycarbonate - Smoked
Popcorn Nylon 6
Porcelain White
Precast Concrete Panels Precast Smooth
PTFE PTFE
Purple Smooth - Purple
Red Red
Red (Bright) Light Red
Red (Chili) Orange-Red
Red (Clear) Dark Red
Red (Flat) Smooth - Red
RedBrick_01 Uniform Running - Burgundy
RedBrick_02 12in Running - Burgundy
Rubber (Black) Rubber - Black - Version 1.1
Rubber (Blue) Rubber - Blue - Version 1.1
Rubber (Green) Rubber - Green - Version 1.1
Rust (texture) Rust
Sea Green Smooth - Dark Sea Green
Si Nitride (Polished) Silicon Nitride - Polished
Slate Slate Blue
Stone_01 Green Polished
Stone_02 Stone - Blue
Stone_03 Gravel - Crushed
Stone_04 Unfinished
Stucco_01 Fine - Cream
Tan Wheat
Teal Cadet Blue
Tile Circular Mosaic Circular Mosaic - Black & White
Tile Diamond (Red) 4in Square with Inset Diamond - Gray-Red
Tile Mosaic (Beige) 4in Squares - Mosaic Beige
Tile Mosaic (Blue) 1in Squares - Mosaic Blue
Tile Square (Medium Blue) 1.5in Square - Medium Blue
Turquoise Turquoise
Upholstery (Beige) Plaid - Beige
Upholstery (Blue) Denim - Blue
Violet Violet
Autodesk Inventor 2013 Materials and Appearances
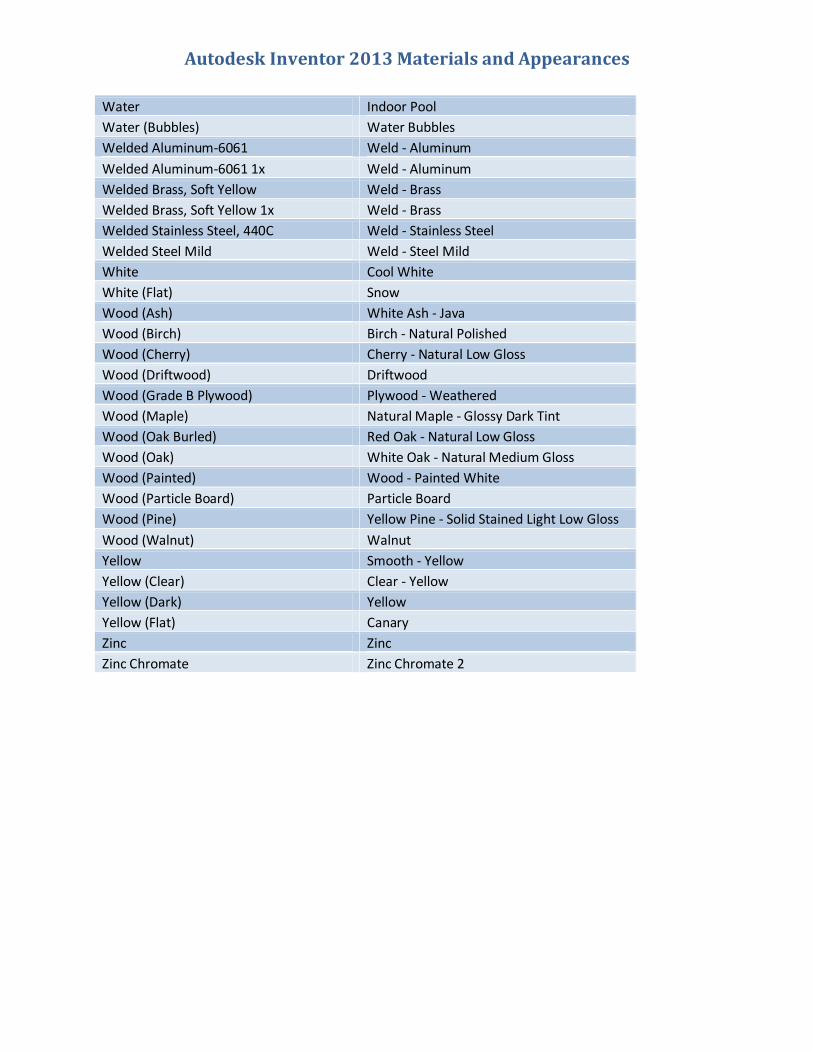
Water Indoor Pool
Water (Bubbles) Water Bubbles
Welded Aluminum-6061 Weld - Aluminum
Welded Aluminum-6061 1x Weld - Aluminum
Welded Brass, Soft Yellow Weld - Brass
Welded Brass, Soft Yellow 1x Weld - Brass
Welded Stainless Steel, 440C Weld - Stainless Steel
Welded Steel Mild Weld - Steel Mild
White Cool White
White (Flat) Snow
Wood (Ash) White Ash - Java
Wood (Birch) Birch - Natural Polished
Wood (Cherry) Cherry - Natural Low Gloss
Wood (Driftwood) Driftwood
Wood (Grade B Plywood) Plywood - Weathered
Wood (Maple) Natural Maple - Glossy Dark Tint
Wood (Oak Burled) Red Oak - Natural Low Gloss
Wood (Oak) White Oak - Natural Medium Gloss
Wood (Painted) Wood - Painted White
Wood (Particle Board) Particle Board
Wood (Pine) Yellow Pine - Solid Stained Light Low Gloss
Wood (Walnut) Walnut
Yellow Smooth - Yellow
Yellow (Clear) Clear - Yellow
Yellow (Dark) Yellow
Yellow (Flat) Canary
Zinc Zinc
Zinc Chromate Zinc Chromate 2