Embed Size (px)
Citation preview

Mark’s 2015 Jetta. Changed oil and 10k service on 11 October 2015.
Updated with 20k service on 28 February 2016.
Mark had the car on the lift when I got there. The dog was friendly, but not much help.
Oil level before the change at 9,997 miles. Good idea to keep the oil level in mid-range. The engine does
not like to be too full, and will complain if it is overfilled.
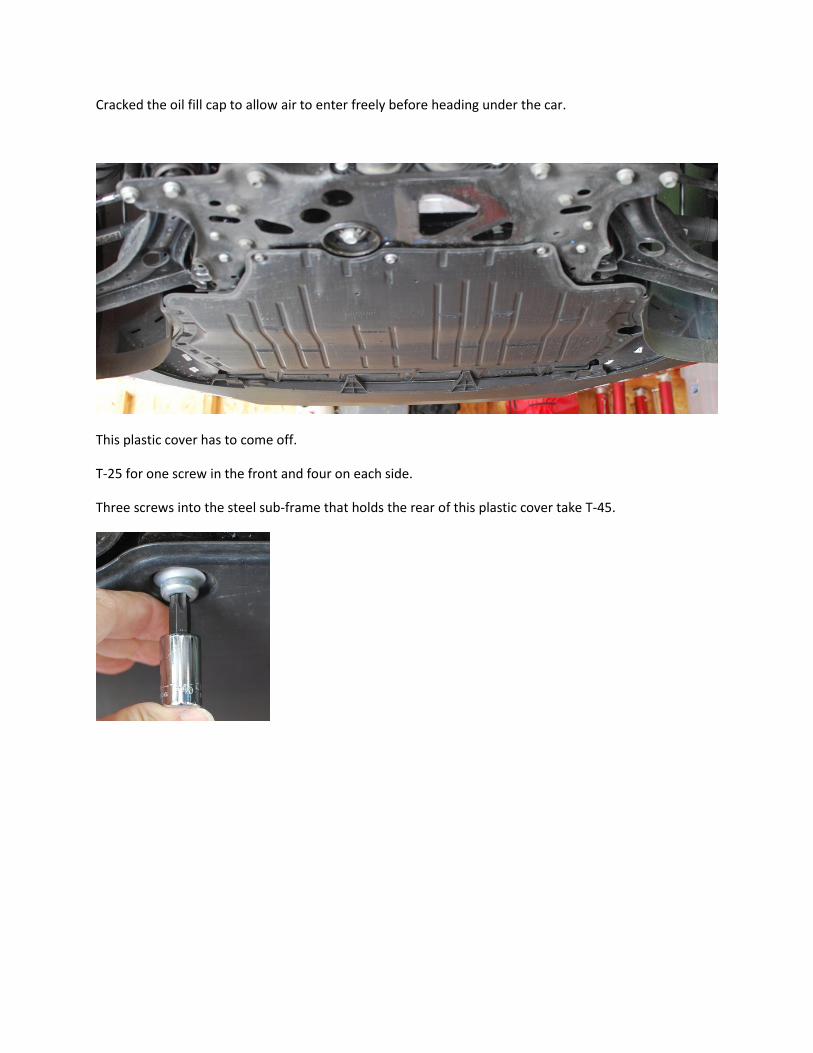
Cracked the oil fill cap to allow air to enter freely before heading under the car.
This plastic cover has to come off.
T-25 for one screw in the front and four on each side.
Three screws into the steel sub-frame that holds the rear of this plastic cover take T-45.

By this time the dogs are bored.

Drain plug 19 mm external hex head. A few drops of oil headed for the floor.

Rotate the tires while the oil drains. We swapped front to rear as called for by the owner’s manual.
While the wheels are off, check the brake pads for wear, and give the parking brake a look-see.
Inside the rear wheel, with the brake released, there should be a gap where shown. As a side note, use
the parking brake once in a while. It adjusts brakes to keep the piston where it goes and helps avoid
sticking pistons, which cause premature pad wear.

There is the oil filter hiding in front. This view is looking up with the car elevated.

Wider shot for reference. The front of the car is on the left.
Wire to one of the coolant pumps is in the way. The gray clip pulls straight back (against the arrow) with
a slight click, then the connector pulls straight out of the pump.

The wiring harness passes through a clip that attaches to a metal bracket. There presumably is a way to
remove the wiring harness from the clip, but we found it easier to just pull the clip out of the metal
bracket with the wiring harness still passing through the clip.

The wiring harness also passes through this clip, closer to the drivers’ side of the car. The harness lifts
right out of this clip.

A cable tie placed around a coolant hose keeps the wiring harness out of the way and free from dripping
oil.

13 mm socket removes the drain plug from the filter cover. Did not counter- hold the filter cover, but if
it starts to move, you might want to do so.

The white and clear bag from a pair of gloves was put in place to protect from spills, but no such spills
occurred. The oil drained without touching anything till it hit the pan. We were inside a garage. Outside
in a breeze, it might be a different story.
Note the O-ring on the oil filter cap drain plug. You also can see the fingers in the cap that engage and
click while turning this drain plug to install.

Filter came with two O-rings. One for the cap plug, and one for the cap itself.
Above, the oil filter is upside down from the way it fits in the car. Bottom of the filter is closed, and has 4
raised parts that hold it to the cap.

A pick is useful for removing the O-ring from the cap plug.
The cap has torque values clearly indicated (but easy to miss if you are not looking)
Small drain plug gets 5 NM (+2, whatever that means) about 45 inch lbs. Use a ¼ inch torque wrench if
so inclined.
The cap itself calls for 25 NM (+5) I think it is meant to indicate a range not to exceed. About 18 ft-lb.
3/8 inch torque wrench should do the trick

With a drop of fresh oil on the new O-ring, the plug goes back into the cap.
It clicks going in. The detents should keep it from backing out. 5 N-M is not very tight.
With the plug back in, the filter and cap come out with a 32mm socket.
While most of the oil has drained out, there is some left inside. So don’t be surprised if a little wants to
drip. Note where the o ring sits in the cap.

For the curious, this is looking up at where the filter mates. This housing is also made of automotive
plastic. It is expensive, so be careful not to cross-thread going back in, and do not over torque.
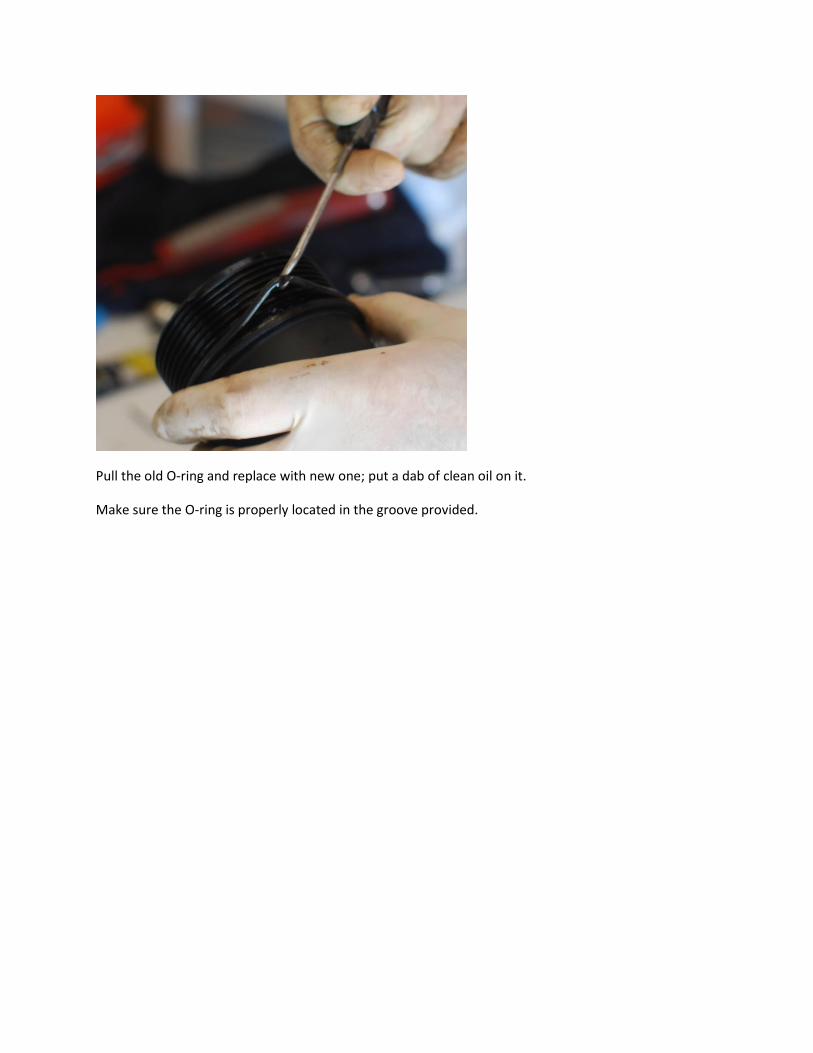
Pull the old O-ring and replace with new one; put a dab of clean oil on it.
Make sure the O-ring is properly located in the groove provided.

Little nibs or posts on the inside of the cap help hold the filter where it goes, and allow oil to get to the
cap drain.

The filter clicks into the cap. The top is a felt-like substance. Seals clean (inside) from dirty (outside).
You may want to put some clean oil on the felt gasket.
Filter cap back on wrist tight, then snug with the 32mm socket and extension. Torque to 25 NM.

Cut the cable tie with some side cutters and remove.
Wiring harness plugged back in. Gray plastic clip pressed back to lock connector in place. Wiring
harness clip secured back in the metal bracket.
Replace the oil pan drain plug. We reused the original, at 10k but it is recommended to use a new plug
and/or new washer. Mark sprang for a new one at 20k. Previous generation engine drain plug was
spec’d at 30 NM (22 ft-lb).
Five and a half liters of 507 00 compliant oil added to the crankcase.
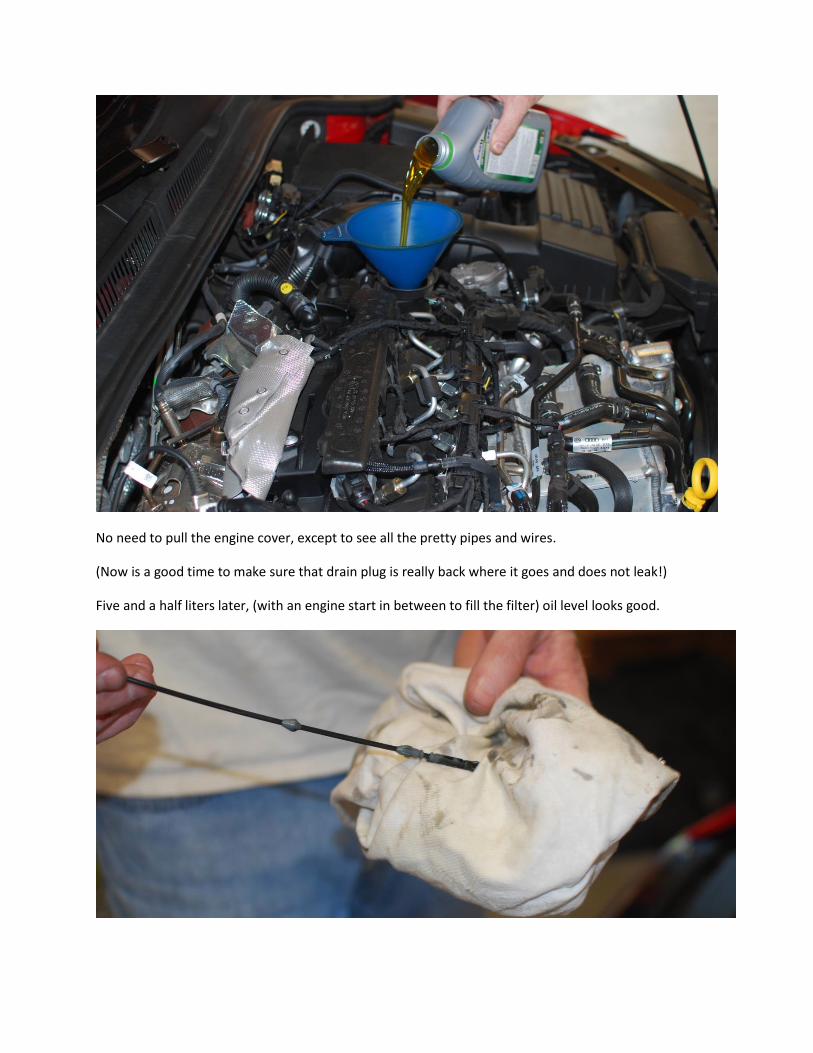
No need to pull the engine cover, except to see all the pretty pipes and wires.
(Now is a good time to make sure that drain plug is really back where it goes and does not leak!)
Five and a half liters later, (with an engine start in between to fill the filter) oil level looks good.

At 20k, the fuel filter needs to be changed. It is located near the front on the passenger side, near the
washer fluid fill.

You will want to place some absorbant rags or towels around the filter to catch the splash that may
result.
The screws are T-25. Be careful not to drop the tiny screws, and watch those washers.

A bungie cord can be used to hold the lid up, to limit the amount of fuel that drips.
You can see the filter container is very full of fuel. The filter will lift up. Take your time and most of the
fuel will drain into the can, and not come with the filter.

This filter design has two seals at the top of the filter. The larger sits in the lip of the can, providing a
seal between the lid and the can, and the smaller seals the filtered fuel outlet tube. As you slowly set
the new filter in, it will filter fuel on the inside, so that any contaminated fuel in the canister is filtered
before it heads to the HPFP.
Put the screws in by hand, back and forth until you have them all back installed. Torque is 5 NM (not
verified by documentation) they just have to hold the lid shut and not back out, so no need for excess
force. Previous versions were known to strip out from heavy-handed tightening.
If you spilled some fuel not caught by your preparations, you may want to flush with some detergent
and water.

Since there is some air in the filter canister, we decided to use VCDS to run the in-tank electric pump to
fill the fuel filter and move as much air as possible past the HPFP. Some folks skip this step.
Basic settings for the engine controller include a pull down menu to operate the fuel pump.
We ran the pump, and could hear the air gurgle for a bit while it was pushed back to the fuel tank, and
then you could hear the fuel pump motor in the fuel tank slow down as it was pushing only fuel.
We ran the in-tank fuel pump three times, 30 seconds each, with 15 seconds or so in between.
More details on the fuel distribution system are explained in a self-study guide VW puts out for
technicians. Search the web for “Self Study Program 820433 The EA288 Diesel Engine Family Design and
Function”
Owner’s manual spells out procedure to reset the service reminder.
You can also use advanced measuring values to see the Diesel Exhaust Fluid (DEF) level and a projection
of how far you can drive until it is out. The first log on next page includes some DPF values, but we did
not notice the distance projection until after putting some fluid in.

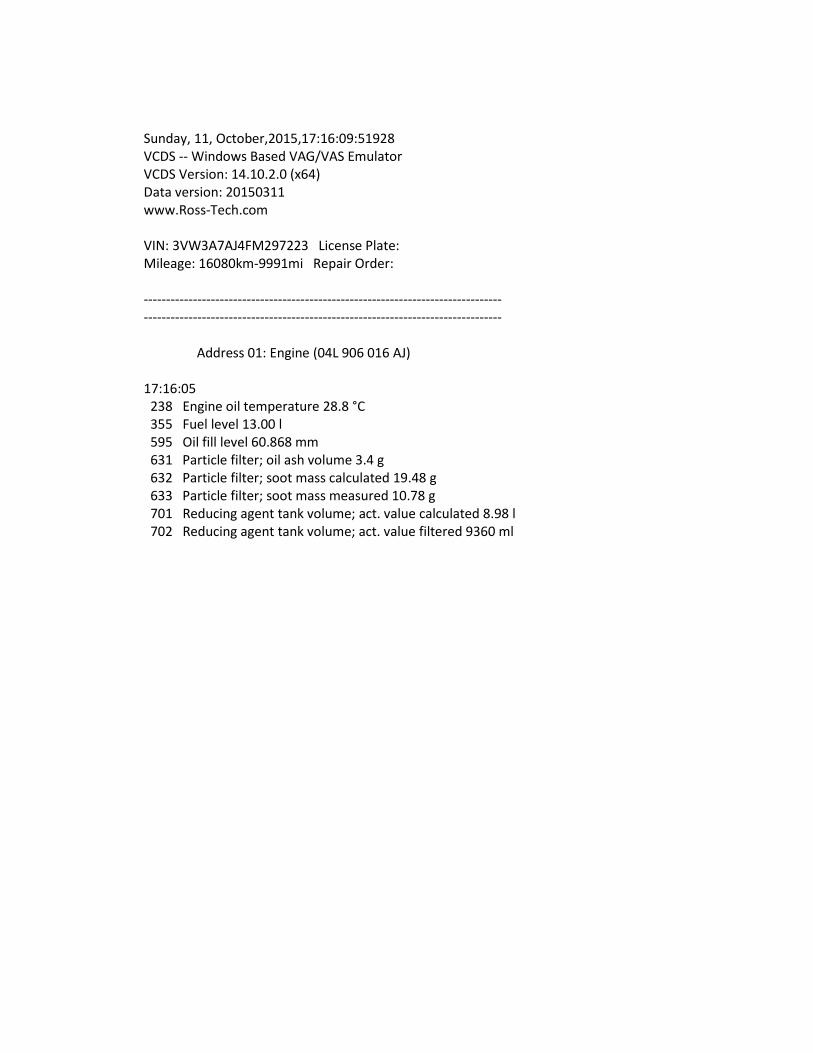
Sunday, 11, October,2015,17:16:09:51928 VCDS -- Windows Based VAG/VAS Emulator VCDS Version: 14.10.2.0 (x64) Data version: 20150311 www.Ross-Tech.com VIN: 3VW3A7AJ4FM297223 License Plate: Mileage: 16080km-9991mi Repair Order: -------------------------------------------------------------------------------- -------------------------------------------------------------------------------- Address 01: Engine (04L 906 016 AJ) 17:16:05 238 Engine oil temperature 28.8 °C 355 Fuel level 13.00 l 595 Oil fill level 60.868 mm 631 Particle filter; oil ash volume 3.4 g 632 Particle filter; soot mass calculated 19.48 g 633 Particle filter; soot mass measured 10.78 g 701 Reducing agent tank volume; act. value calculated 8.98 l 702 Reducing agent tank volume; act. value filtered 9360 ml

Diesel exhaust fluid in this car is filled inside the trunk.
Helpful instructions are included on the part you pull off to get to the fill port.

The cap comes off the container, and the blue part screws on where the cap is removed on the car.

Fluid will not exit the bottle ‘till you press down. The bottle can be refilled, to use a less expensive brand of DEF, (Mark said the cap is difficult to remove from the bottle) or you can cut the bottom of the bottle off to use as a funnel. Mark put two half-gallon bottles in and we could watch some values change during the fill on VCDS (17:3x:xx is time of day)
Address 01: Engine (04L 906 016 AJ) 17:30:11 701 Reducing agent tank volume; act. value calculated 8.98 l 702 Reducing agent tank volume; act. value filtered 9360 ml 706 Remaining engine starts until reducing agent deficiency-Bit 0 25 707 Remaining vehicle distance until reducing agent deficiency 8541.80 km --------------------------------------------------------------------------------
17:33:31 701 Reducing agent tank volume; act. value calculated 8.98 l 702 Reducing agent tank volume; act. value filtered 10124 ml 706 Remaining engine starts until reducing agent deficiency-Bit 0 25 707 Remaining vehicle distance until reducing agent deficiency 8541.80 km --------------------------------------------------------------------------------
17:36:12 701 Reducing agent tank volume; act. value calculated 12.00 l 702 Reducing agent tank volume; act. value filtered 13028 ml 706 Remaining engine starts until reducing agent deficiency-Bit 0 25 707 Remaining vehicle distance until reducing agent deficiency 11897.95 km
Field 702 went from 9350 ml to 13028 ml or 3678 ml, which converts to 0.971 gallons. The DEF tank level sensor only has a couple levels, so do not expect the levels or distance estimates to be too precise. It is not like the fuel tank level sensor.


![ZYBO - Digilent Documentation [Reference.Digilentinc] Z7 B.2 out of 14 2017 MIPI, General I/O 10K R60 10K R62 10K R64 10K R67 GND VCC3V3 SW3 SW2 SW1 SW0 10K R57 10K R71 10K R72 GND](https://img.pdfslide.us/doc/110x75/5abecaa37f8b9a3a428d6851/zybo-digilent-documentation-z7-b2-out-of-14-2017-mipi-general-io-10k-r60.jpg)