Embed Size (px)
Citation preview
1
Tutorial: Setting Up a MapXtreme 2005 WMS ServerThis tutorial describes how to set up a WMS server for use with your own MapXtreme 2005-created WMS client or by an application that already has WMS client capabilities. Refer to the Open Geospatial Consortium (OGC) specifications for more details about the requirements of a WMS or a service compatible client (http://www.opengeospatial.org/docs/01-068r3.pdf).
In this tutorial…
Introduction. . . . . . . . . . . . . . . . . . . . . . . . . . . . . . . . . . . . . . . . 6Prerequisites. . . . . . . . . . . . . . . . . . . . . . . . . . . . . . . . . . . . . . . 6Setting up the WMS Service Under IIS . . . . . . . . . . . . . . . . . . 7Customizing Your WMS Service . . . . . . . . . . . . . . . . . . . . . . 18Creating Parent and Child Layers. . . . . . . . . . . . . . . . . . . . . 22Troubleshooting your WMS Setup . . . . . . . . . . . . . . . . . . . . 26Accessing Network Drives . . . . . . . . . . . . . . . . . . . . . . . . . . 29
Tutorial: Setting Up a MapXtreme 2005 WMS Server
Introduction
A Web Map Service (WMS) allows software clients to reference map images over the Internet or a private intranet. Mapinfo WMS Server and Client implementations are based on the WMS 1.1.1 OGC specification. Using HTTP requests, a WMS server provides GIS data to a client that displays this data as an image. Each image can act as a separate layer. The images can be provided as GIF, JPG, PNG, and several other image formats. The images rendered can be made of layers that are hierarchical—an image can be served that is made up of a layer that is a collection of other layers. Since WMS renders layers, the MapXtreme characteristics that modify the view of layers (styles, coordinate systems, etc.) can also be included in the layers served, allowing a level of customization of the images provided.
Please refer to the OGC WMS specification (http://www.opengeospatial.org/docs/01-068r3.pdf) for more information about developing your own client.
Prerequisites
As with most modern software, and particularly server-based software, these systems rely on a certain number of operating system components to be in place before they will work. For MapXtreme 2005 to run as a Web Map Service you need the following installed:
• MapXtreme 2005• Internet Information Services (IIS)• ASP.NET v1.1.4322
Note: The name of your Windows directory varies depending on the version of the operating system upon which you are running. For the remainder of this document we will refer to this directory as C:\Windows.
If you have the latest version of MapXtreme 2005 and installed it in the manner described in the installation instructions, the necessary components of ASP.NET should already be installed and configured properly on your computer.
MapXtreme 2005 v6.5
© 2006 MapInfo Corporation. All rights reserved. 6 MapXtreme2005_WMS_Server_Setup_Tutorial.pdf
Tutorial: Setting Up a MapXtreme 2005 WMS Server
Setting up the WMS Service Under IIS
MapXtreme 2005 ships with a set of configuration files that allow you to set up a WMS server with very few modifications.
This section describes how to use these files to get a WMS server up and running quickly. .
A high level description of the required steps to set up a Web Map Service is as follows:
1. Verify the MapInfo.WMS.Server software version number.2. Create the folder where the configuration files will reside.3. Copy the sample configuration files from your MapXtreme 2005 CD.4. Modify the configuration files to match your environment.5. Make this folder available as a Web Share directory.6. In IIS, change the security properties of the new virtual directory.7. Test the configuration.8. Request a map.
Each of these steps is described in detail in the next sections.
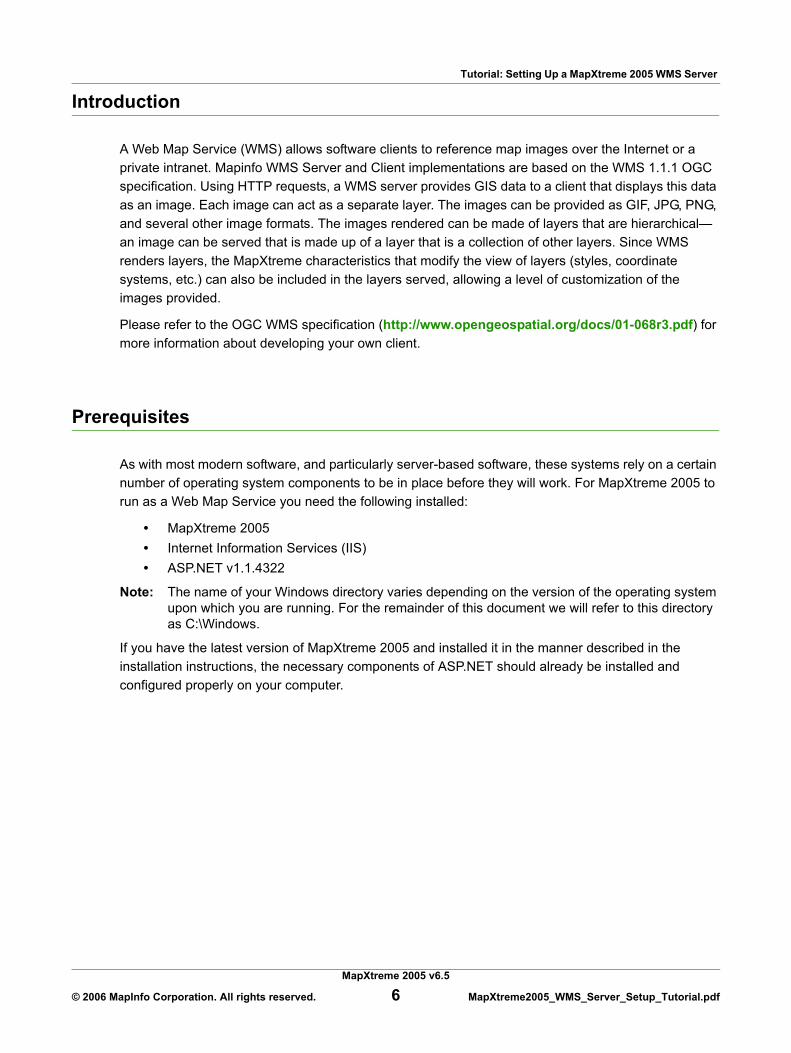
Step 1: Verify the Software VersionThe version number of the MapInfo software needs to be verified in order to include the correct information in the Web.config configuration file. To check the version number, follow this procedure:
1. Select RUN… from the Windows START menu and enter the following command:%windir%\assemblyThe ASSEMBLY directory is displayed. This window lists all the .NET global assemblies you have installed.
2. Locate the MapInfo.Wms.Server and MapInfo.CoreEngine assemblies on the list and note the numbers in the Version and Public Key Token columns. These numbers must be correctly specified in the Web.config file which we will soon be examining. In the example below, the Version is 4.0.0.350. The Public Key Token for MapInfo.Wms.Server is 4ac3224575145b20 and for MapInfo.CoreEngine is 93e298a0f6b95eb1.
MapXtreme 2005 v6.5
© 2006 MapInfo Corporation. All rights reserved. 7 MapXtreme2005_WMS_Server_Setup_Tutorial.pdf
Tutorial: Setting Up a MapXtreme 2005 WMS Server
Step 2: Create a Directory to Hold The Configuration FilesCreate a directory on the server where you intend to store the WMS configuration files. The actual name does not matter. For this tutorial we’ll use c:\WMS. This is the directory already specified in the sample configuration files.
Step 3: Copy the Sample Configuration Files From Your MapXtreme 2005 CDCopy the two sample WMS configuration files from the MapXtreme 2005 CD. The files are located in the folder WMS Config Files and are called Web.config and WMSSample.xml. These files are already configured to work using the sample data provided with MapXtreme 2005.
Step 4: Modify the Configuration Files to Match Your EnvironmentAs shown above, there are two configuration files used in setting up your WMS server. The file Web.config requires less modification as its purpose is to define how the ASP process is handled. One of these functions is to reference the WMSSample.xml file. The WMSSample.xml file defines the data sources and layer definitions you wish to serve.
Web.config fileOpen the Web.config file in any text editor.
You need to modify this file in three places. The first is where the Web.config file points to the second configuration file. In the sample file provided with MapXtreme 2005, this line reads as:
<configuration><appSettings>
<add key="configFile" value="C:\wms\WMSSample.xml" />
Since we are using the default implementation, we only need to verify that this path matches our set up.
Second, modify the file (shown in bold below) that specifies the software version and Public Key Tokens we verified in Step 1: Verify the Software Version for the MapInfo.Wms.Server and MapInfo.CoreEngine assemblies.
<system.web><httpHandlers>
<add verb="GET,POST" path="*.ashx" type="MapInfo.Wms.WmsHttpHandler,MapInfo.Wms.Server, Version=4.0.0.352, Culture=neutral,PublicKeyToken=4ac3224575145b20"/>
</httpHandlers><httpModules>
<add type="MapInfo.Engine.WebSessionActivator, MapInfo.CoreEngine, Version=4.0.0.352, Culture=neutral, PublicKeyToken=93e298a0f6b95eb1" name="WebSessionActivator" />
</httpModules>
Save the changes to this file.
MapXtreme 2005 v6.5
© 2006 MapInfo Corporation. All rights reserved. 8 MapXtreme2005_WMS_Server_Setup_Tutorial.pdf
Tutorial: Setting Up a MapXtreme 2005 WMS Server
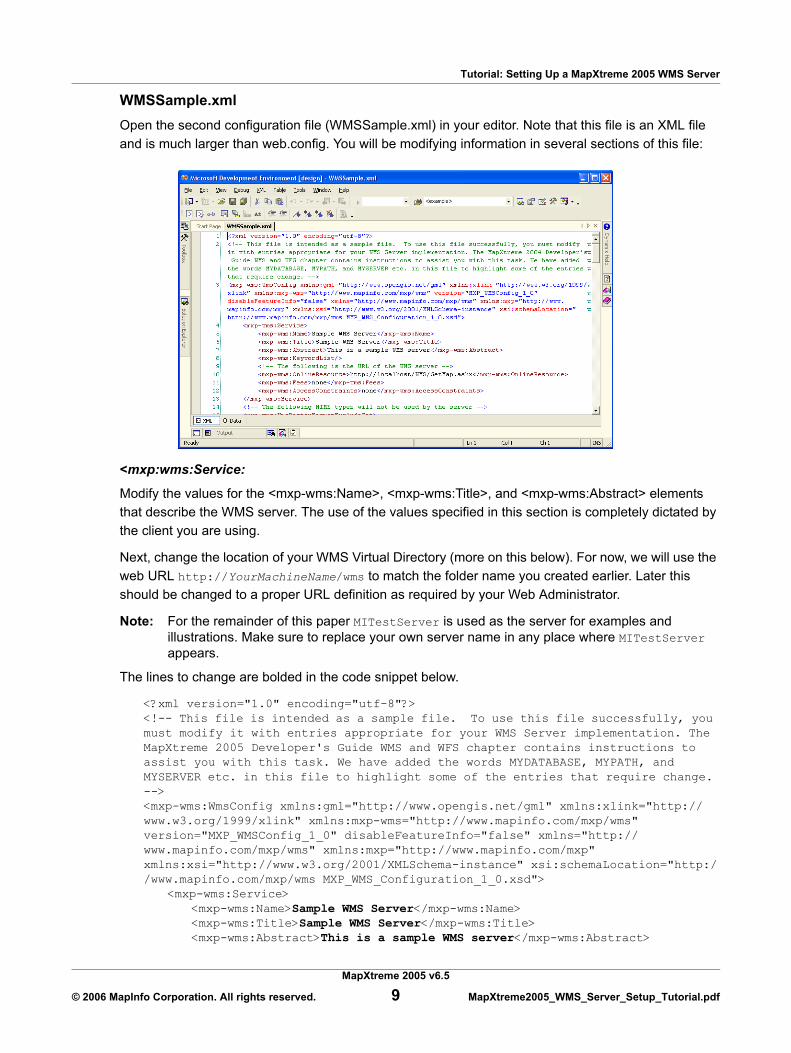
WMSSample.xmlOpen the second configuration file (WMSSample.xml) in your editor. Note that this file is an XML file and is much larger than web.config. You will be modifying information in several sections of this file:
<mxp:wms:Service:
Modify the values for the <mxp-wms:Name>, <mxp-wms:Title>, and <mxp-wms:Abstract> elements that describe the WMS server. The use of the values specified in this section is completely dictated by the client you are using.
Next, change the location of your WMS Virtual Directory (more on this below). For now, we will use the web URL http://YourMachineName/wms to match the folder name you created earlier. Later this should be changed to a proper URL definition as required by your Web Administrator.
Note: For the remainder of this paper MITestServer is used as the server for examples and illustrations. Make sure to replace your own server name in any place where MITestServer appears.
The lines to change are bolded in the code snippet below.
<?xml version="1.0" encoding="utf-8"?><!-- This file is intended as a sample file. To use this file successfully, you must modify it with entries appropriate for your WMS Server implementation. The MapXtreme 2005 Developer's Guide WMS and WFS chapter contains instructions to assist you with this task. We have added the words MYDATABASE, MYPATH, and MYSERVER etc. in this file to highlight some of the entries that require change. --> <mxp-wms:WmsConfig xmlns:gml="http://www.opengis.net/gml" xmlns:xlink="http://www.w3.org/1999/xlink" xmlns:mxp-wms="http://www.mapinfo.com/mxp/wms" version="MXP_WMSConfig_1_0" disableFeatureInfo="false" xmlns="http://www.mapinfo.com/mxp/wms" xmlns:mxp="http://www.mapinfo.com/mxp" xmlns:xsi="http://www.w3.org/2001/XMLSchema-instance" xsi:schemaLocation="http://www.mapinfo.com/mxp/wms MXP_WMS_Configuration_1_0.xsd">
<mxp-wms:Service><mxp-wms:Name>Sample WMS Server</mxp-wms:Name><mxp-wms:Title>Sample WMS Server</mxp-wms:Title><mxp-wms:Abstract>This is a sample WMS server</mxp-wms:Abstract>
MapXtreme 2005 v6.5
© 2006 MapInfo Corporation. All rights reserved. 9 MapXtreme2005_WMS_Server_Setup_Tutorial.pdf

Tutorial: Setting Up a MapXtreme 2005 WMS Server
<mxp-wms:KeywordList/><!-- The following is the URL of the WMS server --><mxp-wms:OnlineResource>http://MITestServer/WMS/GetMap.ashx
</mxp-wms:OnlineResource><mxp-wms:Fees>none</mxp-wms:Fees><mxp-wms:AccessConstraints>none</mxp-wms:AccessConstraints>
</mxp-wms:Service><!-- The following MIME types will not be used by the server --><mxp-wms:WmsRasterFormatExcludeSet>
<mxp-wms:Format>image/jpeg2000</mxp-wms:Format><mxp-wms:Format>image/photoshop</mxp-wms:Format><mxp-wms:Format>image/jp2</mxp-wms:Format>
</mxp-wms:WmsRasterFormatExcludeSet>
<DataSourceDefinitionSet>
Next, register your mapping layers. Data is specified in two locations in the WMSSample.xml: in the section <DataSourceDefinitionSet> and in the section <WMSLayer>. The following portion of the WMSSample.xml defines data files that are installed with your version of MapXtreme 2005.
<DataSourceDefinitionSet xmlns="http://www.mapinfo.com/mxp/wms"><!-- The following data sources reference local TAB files, you need to replace
MYPATH with the real path to those tab files. --><TABFileDataSourceDefinition id="id1" readOnly="false" xmlns="http://
www.mapinfo.com/mxp"><DataSourceName>STATES</DataSourceName><FileName>MYPATH\USA.TAB</FileName>
</TABFileDataSourceDefinition><TABFileDataSourceDefinition id="id2" readOnly="false" xmlns="http://
www.mapinfo.com/mxp"><DataSourceName>US_HIWAY</DataSourceName><FileName>MYPATH\US_HIWAY.TAB</FileName>
</TABFileDataSourceDefinition><TABFileDataSourceDefinition id="id5" readOnly="false" xmlns="http://
www.mapinfo.com/mxp"><DataSourceName>OCEAN</DataSourceName><FileName>MYPATH\OCEAN.TAB</FileName>
</TABFileDataSourceDefinition>
For each <TABFileDataSourceDefinition> element, specify a value for the id attribute and for the <DataSourceName> element. The id value must be a simple string beginning with an alpha character. In the example above, the id values are id1, id2, and id5. Optionally change them to States, US_Highways, and Ocean, respectively.
The <FileName> element in each <TABFileDataSourceDefinition> element should contain the path to the actual file. For example, for a default installation, the path to the sample data files is c:\Program Files\MapInfo\MapXtreme\<version number>\Samples\Data. Ensure this value is correct.
MapXtreme 2005 v6.5
© 2006 MapInfo Corporation. All rights reserved. 10 MapXtreme2005_WMS_Server_Setup_Tutorial.pdf

Tutorial: Setting Up a MapXtreme 2005 WMS Server
<wms:WmsLayerList>
Finally, in the WMS Layer List section, define the actual Layer List as used in the client application to show which layers are available. Layers can be nested so that by requesting a parent layer, all the child layers are included in the response. See WMSConfig.xml on page 19 for an example of this kind of configuration.
<mxp-wms:WmsLayer><mxp-wms:Name>States</mxp-wms:Name><mxp-wms:Title>States</mxp-wms:Title><mxp-wms:SRSNameSet/><mxp-wms:WmsStyleSet>
...style information removed for clarity</mxp-wms:WmsStyleSet><FeatureLayer id="id8" name="STATES" alias="STATES" volatile="unknown"
xmlns="http://www.mapinfo.com/mxp"><DataSourceRef ref="States"/>
</FeatureLayer></mxp-wms:WmsLayer><mxp-wms:WmsLayer>
<mxp-wms:Name>USHighways</mxp-wms:Name><mxp-wms:Title>US Highways</mxp-wms:Title><mxp-wms:Abstract>The major highways for the United States</mxp-
wms:Abstract><mxp-wms:SRSNameSet/><mxp-wms:WmsStyleSet/><FeatureLayer id="id9" name="US_HIWAY" alias="US_HIWAY" volatile="unknown"
xmlns="http://www.mapinfo.com/mxp"><DataSourceRef ref="US_Highway"/>
</FeatureLayer></mxp-wms:WmsLayer>
<mxp-wms:WmsLayer><mxp-wms:Name>Oceans</mxp-wms:Name><mxp-wms:Title>Oceans</mxp-wms:Title><mxp-wms:Abstract>The oceans of the world</mxp-wms:Abstract><mxp-wms:SRSNameSet/><mxp-wms:WmsStyleSet/><mxp:FeatureLayer id="id12" name="OCEAN" alias="OCEAN" volatile="unknown">
<mxp:DataSourceRef ref="Ocean"/></mxp:FeatureLayer>
</mxp-wms:WmsLayer>
Note that the values in the <DataSourceRef> elements (bolded above) refer to the <TABFileDataSourceDefinition> id attribute value supplied in the <DataSourceDefinitionSet>. Make sure these values match.
Once you have made all these changes to the two configuration files, save your work and close them.
MapXtreme 2005 v6.5
© 2006 MapInfo Corporation. All rights reserved. 11 MapXtreme2005_WMS_Server_Setup_Tutorial.pdf

Tutorial: Setting Up a MapXtreme 2005 WMS Server
Step 5: Make this Folder Available as a Web Share DirectoryNext, you must make the folder in which you have the configuration files available for use from the web. Do this by right-clicking on the folder name and selecting SHARING AND SECURITY….
On the WEB SHARING tab, select the radio button for SHARE THIS FOLDER. The EDIT ALIAS dialog box is displayed. Here you can change the Alias name if you choose, then click OK to close the dialog box. The WEB SHARING tab of the PROPERTIES dialog box is updated to show the Alias name to be shared. Click OK to close the PROPERTIES dialog box.
MapXtreme 2005 v6.5
© 2006 MapInfo Corporation. All rights reserved. 12 MapXtreme2005_WMS_Server_Setup_Tutorial.pdf
Tutorial: Setting Up a MapXtreme 2005 WMS Server
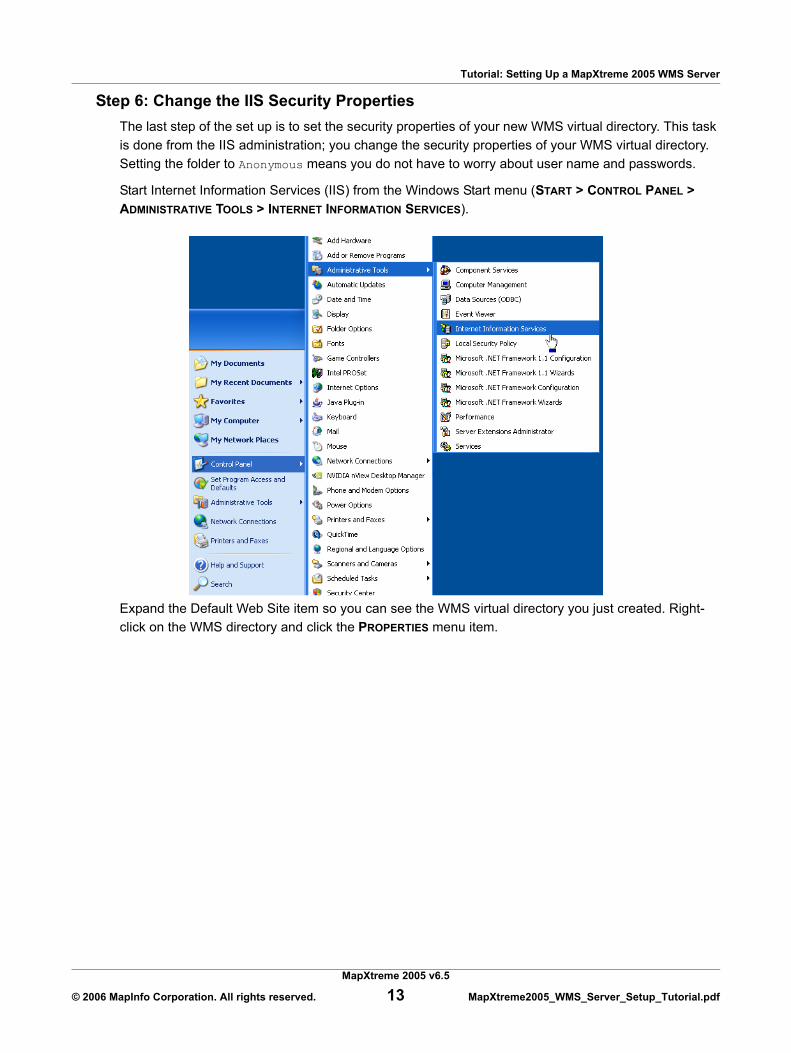
Step 6: Change the IIS Security PropertiesThe last step of the set up is to set the security properties of your new WMS virtual directory. This task is done from the IIS administration; you change the security properties of your WMS virtual directory. Setting the folder to Anonymous means you do not have to worry about user name and passwords.
Start Internet Information Services (IIS) from the Windows Start menu (START > CONTROL PANEL > ADMINISTRATIVE TOOLS > INTERNET INFORMATION SERVICES).
Expand the Default Web Site item so you can see the WMS virtual directory you just created. Right-click on the WMS directory and click the PROPERTIES menu item.
MapXtreme 2005 v6.5
© 2006 MapInfo Corporation. All rights reserved. 13 MapXtreme2005_WMS_Server_Setup_Tutorial.pdf
Tutorial: Setting Up a MapXtreme 2005 WMS Server
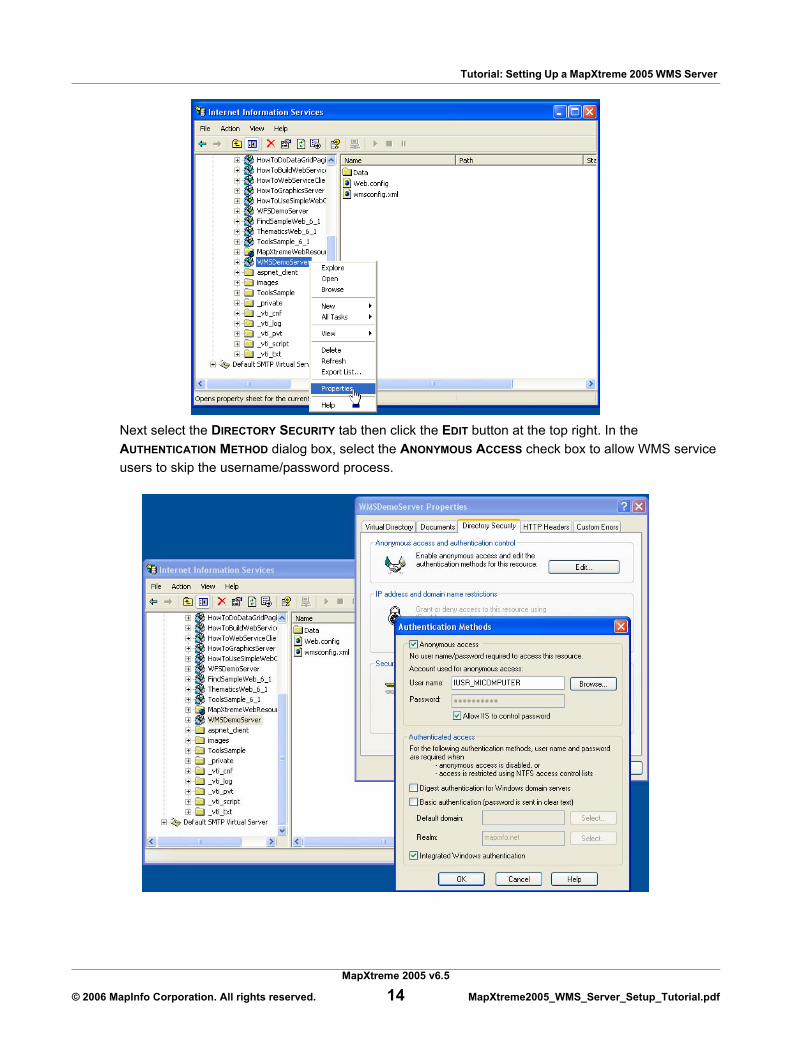
Next select the DIRECTORY SECURITY tab then click the EDIT button at the top right. In the AUTHENTICATION METHOD dialog box, select the ANONYMOUS ACCESS check box to allow WMS service users to skip the username/password process.
MapXtreme 2005 v6.5
© 2006 MapInfo Corporation. All rights reserved. 14 MapXtreme2005_WMS_Server_Setup_Tutorial.pdf
Tutorial: Setting Up a MapXtreme 2005 WMS Server
Step 7: Test the ConfigurationNow that everything is enabled and configured properly, let’s do a simple query using Internet Explorer as a client. Internet Explorer will not show us a map, but we will be able get the capabilities of the server in XML.
Note: Viewing the WMS capabilities in Internet Explorer allows you to expand and collapse the sections you are interested in. You can also use a text editor to display the resulting XML, but the result is hard to read.
1. Launch your browser and type in the following URL:http://MITestServer/WMS/GetMap.ashx?request=GetCapabilities&service=WMS&version=1.1.1
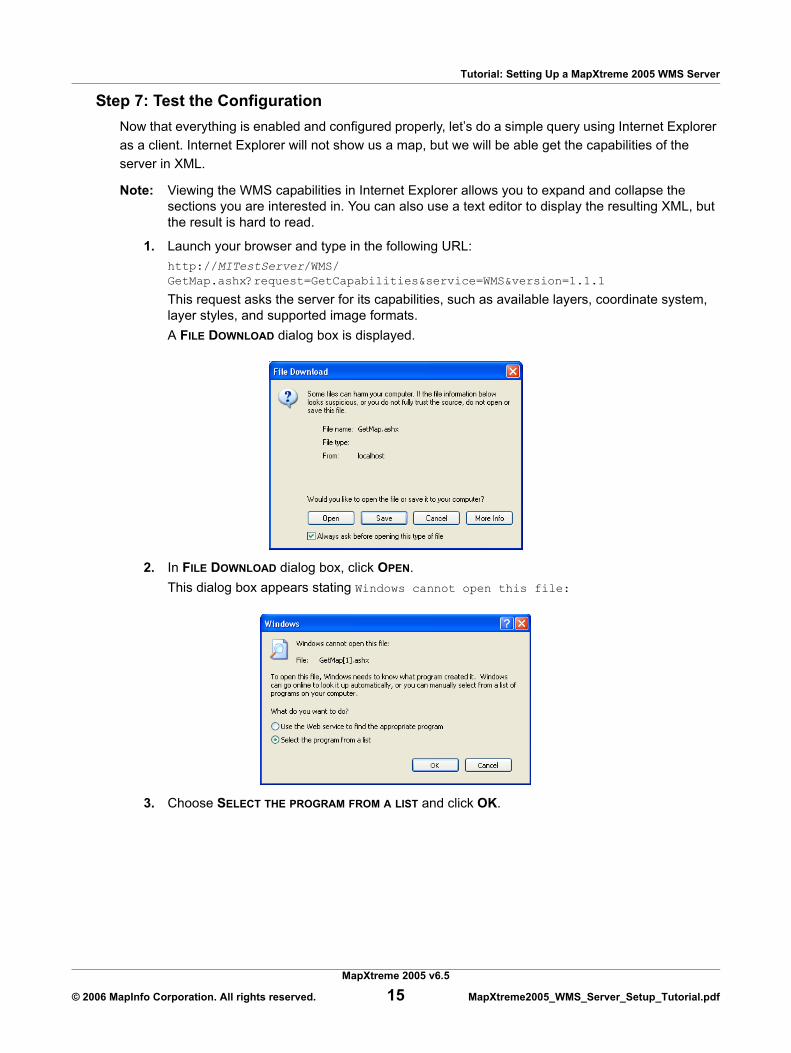
This request asks the server for its capabilities, such as available layers, coordinate system, layer styles, and supported image formats. A FILE DOWNLOAD dialog box is displayed.
2. In FILE DOWNLOAD dialog box, click OPEN.This dialog box appears stating Windows cannot open this file:
3. Choose SELECT THE PROGRAM FROM A LIST and click OK.
MapXtreme 2005 v6.5
© 2006 MapInfo Corporation. All rights reserved. 15 MapXtreme2005_WMS_Server_Setup_Tutorial.pdf
Tutorial: Setting Up a MapXtreme 2005 WMS Server
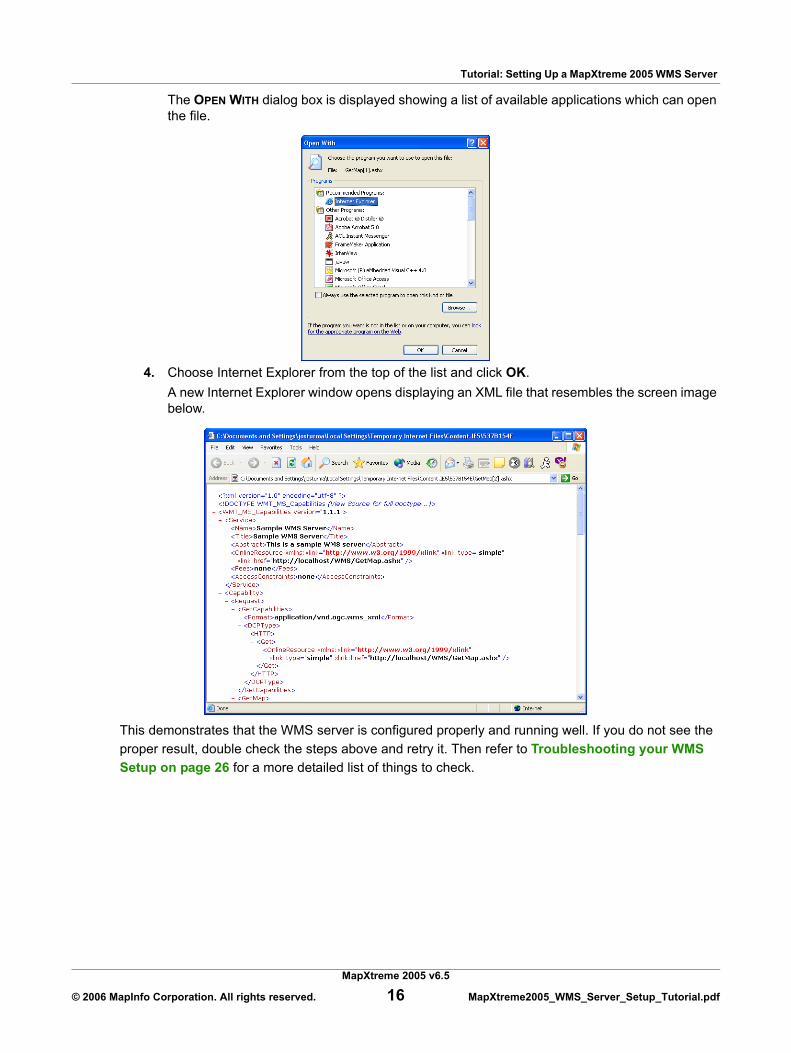
The OPEN WITH dialog box is displayed showing a list of available applications which can open the file.
4. Choose Internet Explorer from the top of the list and click OK.A new Internet Explorer window opens displaying an XML file that resembles the screen image below.
This demonstrates that the WMS server is configured properly and running well. If you do not see the proper result, double check the steps above and retry it. Then refer to Troubleshooting your WMS Setup on page 26 for a more detailed list of things to check.
MapXtreme 2005 v6.5
© 2006 MapInfo Corporation. All rights reserved. 16 MapXtreme2005_WMS_Server_Setup_Tutorial.pdf

Tutorial: Setting Up a MapXtreme 2005 WMS Server
Step 8: Request a MapNow that you know the server is responding to your request, use the following URL to request a map image from the WMS server.
In the web browser, type the URL to request a map image.
http://MITestServer/WMS/GetMap.ashx?service=WMS&VERSION=1.1.1&SRS=epsg:4267&REQUEST=GetMap&LAYERS=USA&STYLES=&BBOX=-180,0,0,90&WIDTH=800&HEIGHT=600&FORMAT=image/gif
LAYERS=USA in the URL above means that the only layers you want to retrieve are those under the USA layer list. In our case that is the States layer and US Highways. But notice that the US Highways in the web browser is not visible. This is due to the order of layers in the WMSSample.xml; US Highways is listed below the States layer. The server draws layers from the bottom up, so if a layer on top is a boundary layer, point and polyline layers below it will not be visible.
To reorder the US Highways and States layers, move the following block above the States layer block in the WMSSample.xml. Save and close the file.
<mxp-wms:WmsLayer><mxp-wms:Name>USHighways</mxp-wms:Name><mxp-wms:Title>US Highways</mxp-wms:Title><mxp-wms:Abstract>The major highways for the United States</mxp-wms:Abstract><mxp-wms:SRSNameSet/><mxp-wms:WmsStyleSet/><FeatureLayer id="id9" name="US_HIWAY" alias="US_HIWAY" volatile="unknown"
xmlns="http://www.mapinfo.com/mxp"><DataSourceRef ref="id2"/>
</FeatureLayer></mxp-wms:WmsLayer>
In the web browser, refresh the URL by clicking on the Refresh button.
MapXtreme 2005 v6.5
© 2006 MapInfo Corporation. All rights reserved. 17 MapXtreme2005_WMS_Server_Setup_Tutorial.pdf

Tutorial: Setting Up a MapXtreme 2005 WMS Server
For more information on the properties associated with GetCapabilities, GetMap and GetFeatureInfo, see Chapter 20: WMS and WFS in the MapXtreme 2005 Developer Guide.
Customizing Your WMS Service
Now that we have our basic service running it is time to customize it to match your data and setup. For this section we are going to start with the same sample configuration files from the MapXtreme 2005 CD that we copied to our WMS directory and add new layers.
We will step through the same procedure as in the last section, only using values to match our new server. The steps are as follows:
1. Create a directory to store the configuration files.2. Copy the sample files from the MapXtreme 2005 CD to the new directory created in step 1.3. Modify the files to match our new environment.4. Make this folder available as a Web Share directory.5. In IIS, change the security properties of the new virtual directory.6. Test the configuration.7. Request a map.
Step 1 and 2: Copy the Sample FilesCreate a new directory, C:\WMSDemoServer and copy the sample WMS files from the product CD. Rename WMSSample.xml to WMSConfig.xml to distinguish it from the previous example.
Step 3: Modify the Files to Match Our New EnvironmentFor this part of the tutorial we are going to add two layers to the WMS Server: state capitals and county boundaries. Begin by editing the Web.config file to match the new path to our WMS server. Verify that the software version number matches your build environment.
MapXtreme 2005 v6.5
© 2006 MapInfo Corporation. All rights reserved. 18 MapXtreme2005_WMS_Server_Setup_Tutorial.pdf
Tutorial: Setting Up a MapXtreme 2005 WMS Server
Web.config<configuration>
<appSettings><add key="configFile" value="C:\WMSDemoServer\WMSConfig.xml" />
...<system.web>
<httpHandlers><add verb="GET,POST" path="*.ashx" type="MapInfo.Wms.WmsHttpHandler,
MapInfo.Wms.Server, Version=4.0.0.350, Culture=neutral,PublicKeyToken=4ac3224575145b20"/>
</httpHandlers>
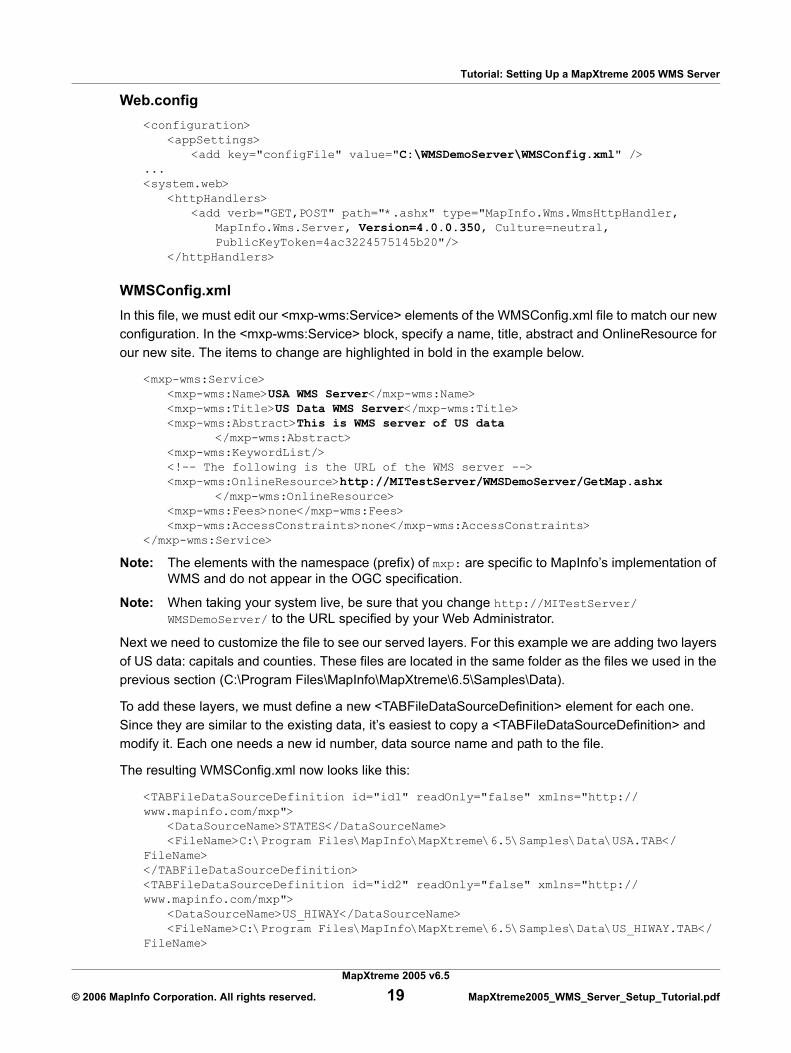
WMSConfig.xmlIn this file, we must edit our <mxp-wms:Service> elements of the WMSConfig.xml file to match our new configuration. In the <mxp-wms:Service> block, specify a name, title, abstract and OnlineResource for our new site. The items to change are highlighted in bold in the example below.
<mxp-wms:Service><mxp-wms:Name>USA WMS Server</mxp-wms:Name><mxp-wms:Title>US Data WMS Server</mxp-wms:Title><mxp-wms:Abstract>This is WMS server of US data
</mxp-wms:Abstract><mxp-wms:KeywordList/><!-- The following is the URL of the WMS server --><mxp-wms:OnlineResource>http://MITestServer/WMSDemoServer/GetMap.ashx
</mxp-wms:OnlineResource><mxp-wms:Fees>none</mxp-wms:Fees><mxp-wms:AccessConstraints>none</mxp-wms:AccessConstraints>
</mxp-wms:Service>
Note: The elements with the namespace (prefix) of mxp: are specific to MapInfo’s implementation of WMS and do not appear in the OGC specification.
Note: When taking your system live, be sure that you change http://MITestServer/WMSDemoServer/ to the URL specified by your Web Administrator.
Next we need to customize the file to see our served layers. For this example we are adding two layers of US data: capitals and counties. These files are located in the same folder as the files we used in the previous section (C:\Program Files\MapInfo\MapXtreme\6.5\Samples\Data).
To add these layers, we must define a new <TABFileDataSourceDefinition> element for each one. Since they are similar to the existing data, it’s easiest to copy a <TABFileDataSourceDefinition> and modify it. Each one needs a new id number, data source name and path to the file.
The resulting WMSConfig.xml now looks like this:
<TABFileDataSourceDefinition id="id1" readOnly="false" xmlns="http://www.mapinfo.com/mxp">
<DataSourceName>STATES</DataSourceName><FileName>C:\Program Files\MapInfo\MapXtreme\6.5\Samples\Data\USA.TAB</
FileName></TABFileDataSourceDefinition><TABFileDataSourceDefinition id="id2" readOnly="false" xmlns="http://www.mapinfo.com/mxp">
<DataSourceName>US_HIWAY</DataSourceName><FileName>C:\Program Files\MapInfo\MapXtreme\6.5\Samples\Data\US_HIWAY.TAB</
FileName>
MapXtreme 2005 v6.5
© 2006 MapInfo Corporation. All rights reserved. 19 MapXtreme2005_WMS_Server_Setup_Tutorial.pdf
Tutorial: Setting Up a MapXtreme 2005 WMS Server
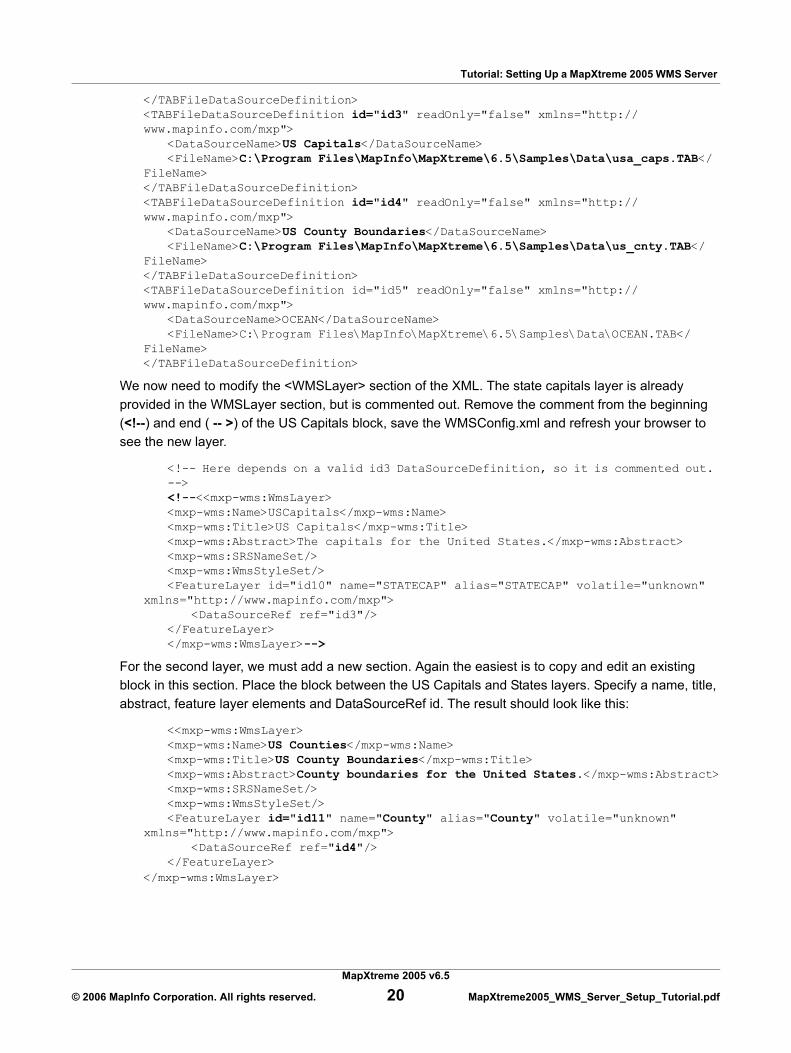
</TABFileDataSourceDefinition><TABFileDataSourceDefinition id="id3" readOnly="false" xmlns="http://www.mapinfo.com/mxp">
<DataSourceName>US Capitals</DataSourceName><FileName>C:\Program Files\MapInfo\MapXtreme\6.5\Samples\Data\usa_caps.TAB</
FileName></TABFileDataSourceDefinition><TABFileDataSourceDefinition id="id4" readOnly="false" xmlns="http://www.mapinfo.com/mxp">
<DataSourceName>US County Boundaries</DataSourceName><FileName>C:\Program Files\MapInfo\MapXtreme\6.5\Samples\Data\us_cnty.TAB</
FileName></TABFileDataSourceDefinition><TABFileDataSourceDefinition id="id5" readOnly="false" xmlns="http://www.mapinfo.com/mxp">
<DataSourceName>OCEAN</DataSourceName><FileName>C:\Program Files\MapInfo\MapXtreme\6.5\Samples\Data\OCEAN.TAB</
FileName></TABFileDataSourceDefinition>
We now need to modify the <WMSLayer> section of the XML. The state capitals layer is already provided in the WMSLayer section, but is commented out. Remove the comment from the beginning (<!--) and end ( -- >) of the US Capitals block, save the WMSConfig.xml and refresh your browser to see the new layer.
<!-- Here depends on a valid id3 DataSourceDefinition, so it is commented out. --><!--<<mxp-wms:WmsLayer><mxp-wms:Name>USCapitals</mxp-wms:Name><mxp-wms:Title>US Capitals</mxp-wms:Title><mxp-wms:Abstract>The capitals for the United States.</mxp-wms:Abstract><mxp-wms:SRSNameSet/><mxp-wms:WmsStyleSet/><FeatureLayer id="id10" name="STATECAP" alias="STATECAP" volatile="unknown"
xmlns="http://www.mapinfo.com/mxp"><DataSourceRef ref="id3"/>
</FeatureLayer></mxp-wms:WmsLayer>-->
For the second layer, we must add a new section. Again the easiest is to copy and edit an existing block in this section. Place the block between the US Capitals and States layers. Specify a name, title, abstract, feature layer elements and DataSourceRef id. The result should look like this:
<<mxp-wms:WmsLayer><mxp-wms:Name>US Counties</mxp-wms:Name><mxp-wms:Title>US County Boundaries</mxp-wms:Title><mxp-wms:Abstract>County boundaries for the United States.</mxp-wms:Abstract><mxp-wms:SRSNameSet/><mxp-wms:WmsStyleSet/><FeatureLayer id="id11" name="County" alias="County" volatile="unknown"
xmlns="http://www.mapinfo.com/mxp"><DataSourceRef ref="id4"/>
</FeatureLayer></mxp-wms:WmsLayer>
MapXtreme 2005 v6.5
© 2006 MapInfo Corporation. All rights reserved. 20 MapXtreme2005_WMS_Server_Setup_Tutorial.pdf

Tutorial: Setting Up a MapXtreme 2005 WMS Server
Step 4: Make This Folder Available as a Web Share DirectoryThis step follows the identical procedure as already described in Step 5: Make this Folder Available as a Web Share Directory on page 12.
Step 5: In IIS, Change the Security Properties of the New Virtual DirectoryThis step follows the identical procedure as already described in Step 6: Change the IIS Security Properties on page 13.
Step 6: Test the ConfigurationTo ensure our configuration is working properly, let’s send a sample request using Internet Explorer. Type the following URL into your browser and then follow the rest of the steps specified in Step 7: Test the Configuration on page 15.
http://MITestServer/WMSDemoServer/GetMap.ashx?request=GetCapabilities&service=WMS&version=1.1.1
You should see a similar result to the image in the above-referenced section.
Step 7: Request a MapTo request a map image that includes the newly added capitals and county boundary layers, follow the step in Step 8: Request a Map on page 17 to display a map with the new layers.
MapXtreme 2005 v6.5
© 2006 MapInfo Corporation. All rights reserved. 21 MapXtreme2005_WMS_Server_Setup_Tutorial.pdf

Tutorial: Setting Up a MapXtreme 2005 WMS Server
Creating Parent and Child Layers
The steps above show how to customize your WMS Server to serve additional layers. For simplicity, these were added under the same parent layer (USA). But in reality, you may want to organize your data into a hierarchy that groups similar layers together. This allows you to request a group of layers by making one request to the parent layer.
This section explains how to work with parent and child nested layers in the WMSConfig.xml.
Parent LayerIn order to for a request to a parent to function properly, you must define an <SRSNameSet> element to indicate its coordinate system. This coordinate system is used for the parent layer and any child layers under it.
...<mxp-wms:WmsLayerList>
<mxp-wms:WmsLayer queryable="false"><mxp-wms:Name>USA</mxp-wms:Name><mxp-wms:Title>United States</mxp-wms:Title><mxp-wms:Abstract>Contains layers for the United States</mxp-wms:Abstract><!-- The following SRS is available to this layer and all of the layers
underneath it --><mxp-wms:SRSNameSet>
<mxp:SRSName>EPSG:4267</mxp:SRSName></mxp-wms:SRSNameSet><mxp-wms:WmsStyleSet/>
...
In the WMSConfig.xml that we have been editing, the USA layer is both a parent to several state-level layers and a child to the World group layer. In the above example, the first line <mxp-wms:WmsLayerList> indicates USA is a child layer.
Continuing to examine the WSMConfig.xml file, you will see another <mxp-wms:WmsLayerList>. This introduces the child layers of the USA group layer.
...<mxp-wms:WmsLayerList>
<mxp-wms:WmsLayer><mxp-wms:Name>USHighways</mxp-wms:Name><mxp-wms:Title>US Highways</mxp-wms:Title><mxp-wms:Abstract>The major highways for the United States</mxp-
wms:Abstract><mxp-wms:SRSNameSet/><mxp-wms:WmsStyleSet/><FeatureLayer id="id9" name="US_HIWAY" alias="US_HIWAY" volatile="unknown"
xmlns="http://www.mapinfo.com/mxp"><DataSourceRef ref="id2"/>
</FeatureLayer></mxp-wms:WmsLayer>
<!-- Here depends on a valid id3 DataSourceDefinition, so it is commented out. --> <<mxp-wms:WmsLayer>
<mxp-wms:Name>USCapitals</mxp-wms:Name><mxp-wms:Title>US Capitals</mxp-wms:Title>
MapXtreme 2005 v6.5
© 2006 MapInfo Corporation. All rights reserved. 22 MapXtreme2005_WMS_Server_Setup_Tutorial.pdf
Tutorial: Setting Up a MapXtreme 2005 WMS Server
<mxp-wms:Abstract>The capitals for the United States.</mxp-wms:Abstract><mxp-wms:SRSNameSet/><mxp-wms:WmsStyleSet/><FeatureLayer id="id10" name="STATECAP" alias="STATECAP"
volatile="unknown" xmlns="http://www.mapinfo.com/mxp"><DataSourceRef ref="id3"/>
</FeatureLayer></mxp-wms:WmsLayer>
...
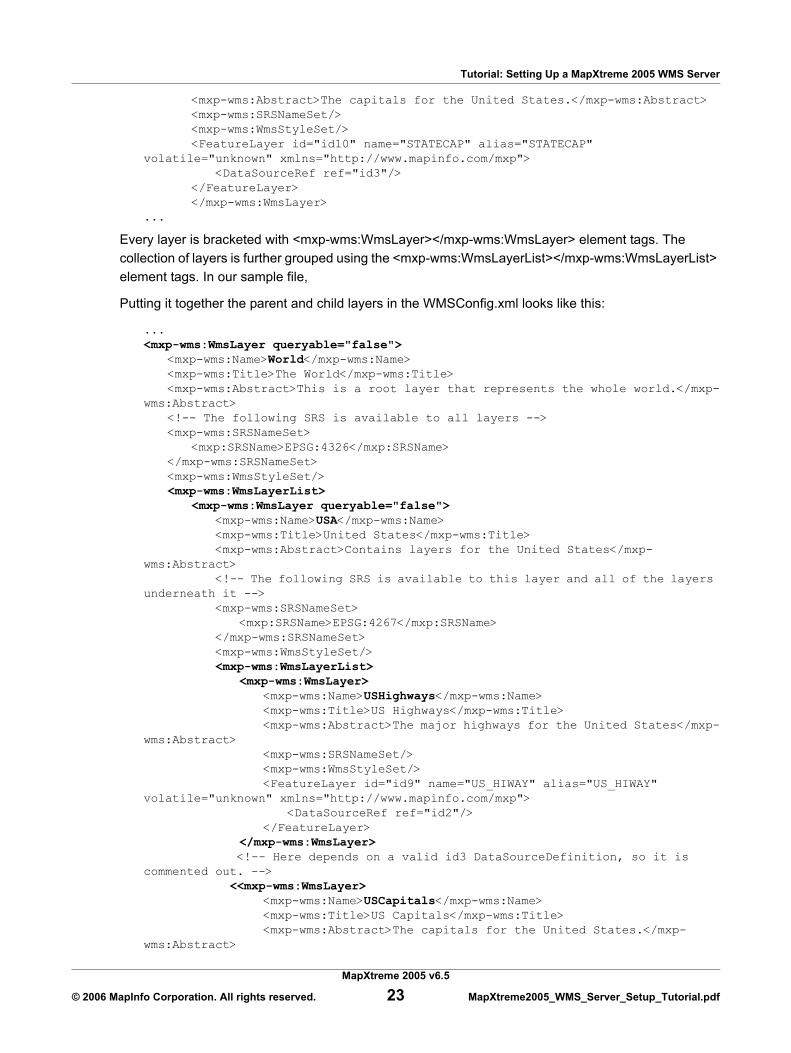
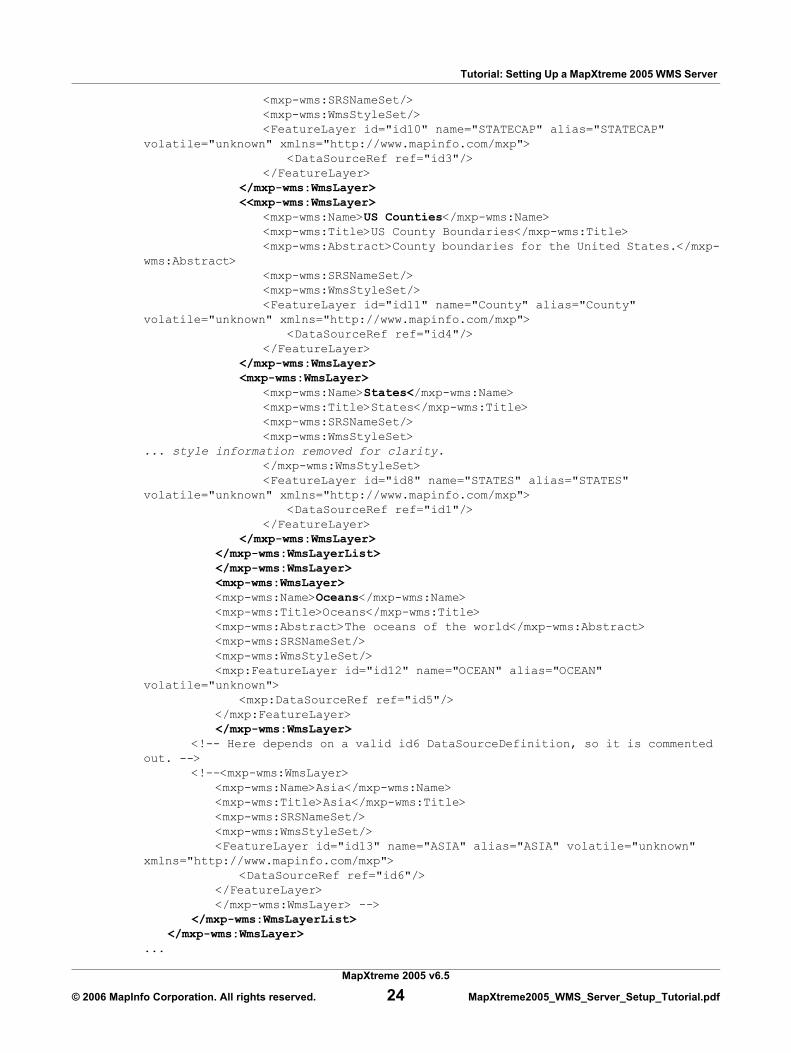
Every layer is bracketed with <mxp-wms:WmsLayer></mxp-wms:WmsLayer> element tags. The collection of layers is further grouped using the <mxp-wms:WmsLayerList></mxp-wms:WmsLayerList> element tags. In our sample file,
Putting it together the parent and child layers in the WMSConfig.xml looks like this:
...<mxp-wms:WmsLayer queryable="false">
<mxp-wms:Name>World</mxp-wms:Name><mxp-wms:Title>The World</mxp-wms:Title><mxp-wms:Abstract>This is a root layer that represents the whole world.</mxp-
wms:Abstract><!-- The following SRS is available to all layers --><mxp-wms:SRSNameSet>
<mxp:SRSName>EPSG:4326</mxp:SRSName></mxp-wms:SRSNameSet><mxp-wms:WmsStyleSet/><mxp-wms:WmsLayerList>
<mxp-wms:WmsLayer queryable="false"><mxp-wms:Name>USA</mxp-wms:Name><mxp-wms:Title>United States</mxp-wms:Title><mxp-wms:Abstract>Contains layers for the United States</mxp-
wms:Abstract><!-- The following SRS is available to this layer and all of the layers
underneath it --><mxp-wms:SRSNameSet>
<mxp:SRSName>EPSG:4267</mxp:SRSName></mxp-wms:SRSNameSet><mxp-wms:WmsStyleSet/><mxp-wms:WmsLayerList>
<mxp-wms:WmsLayer><mxp-wms:Name>USHighways</mxp-wms:Name><mxp-wms:Title>US Highways</mxp-wms:Title><mxp-wms:Abstract>The major highways for the United States</mxp-
wms:Abstract><mxp-wms:SRSNameSet/><mxp-wms:WmsStyleSet/><FeatureLayer id="id9" name="US_HIWAY" alias="US_HIWAY"
volatile="unknown" xmlns="http://www.mapinfo.com/mxp"><DataSourceRef ref="id2"/>
</FeatureLayer></mxp-wms:WmsLayer>
<!-- Here depends on a valid id3 DataSourceDefinition, so it is commented out. -->
<<mxp-wms:WmsLayer><mxp-wms:Name>USCapitals</mxp-wms:Name><mxp-wms:Title>US Capitals</mxp-wms:Title><mxp-wms:Abstract>The capitals for the United States.</mxp-
wms:Abstract>
MapXtreme 2005 v6.5
© 2006 MapInfo Corporation. All rights reserved. 23 MapXtreme2005_WMS_Server_Setup_Tutorial.pdf
Tutorial: Setting Up a MapXtreme 2005 WMS Server
<mxp-wms:SRSNameSet/><mxp-wms:WmsStyleSet/><FeatureLayer id="id10" name="STATECAP" alias="STATECAP"
volatile="unknown" xmlns="http://www.mapinfo.com/mxp"><DataSourceRef ref="id3"/>
</FeatureLayer></mxp-wms:WmsLayer><<mxp-wms:WmsLayer>
<mxp-wms:Name>US Counties</mxp-wms:Name><mxp-wms:Title>US County Boundaries</mxp-wms:Title><mxp-wms:Abstract>County boundaries for the United States.</mxp-
wms:Abstract><mxp-wms:SRSNameSet/><mxp-wms:WmsStyleSet/><FeatureLayer id="id11" name="County" alias="County"
volatile="unknown" xmlns="http://www.mapinfo.com/mxp"><DataSourceRef ref="id4"/>
</FeatureLayer></mxp-wms:WmsLayer><mxp-wms:WmsLayer>
<mxp-wms:Name>States</mxp-wms:Name><mxp-wms:Title>States</mxp-wms:Title><mxp-wms:SRSNameSet/><mxp-wms:WmsStyleSet>
... style information removed for clarity.</mxp-wms:WmsStyleSet><FeatureLayer id="id8" name="STATES" alias="STATES"
volatile="unknown" xmlns="http://www.mapinfo.com/mxp"><DataSourceRef ref="id1"/>
</FeatureLayer></mxp-wms:WmsLayer>
</mxp-wms:WmsLayerList></mxp-wms:WmsLayer><mxp-wms:WmsLayer><mxp-wms:Name>Oceans</mxp-wms:Name><mxp-wms:Title>Oceans</mxp-wms:Title><mxp-wms:Abstract>The oceans of the world</mxp-wms:Abstract><mxp-wms:SRSNameSet/><mxp-wms:WmsStyleSet/><mxp:FeatureLayer id="id12" name="OCEAN" alias="OCEAN"
volatile="unknown"><mxp:DataSourceRef ref="id5"/>
</mxp:FeatureLayer></mxp-wms:WmsLayer>
<!-- Here depends on a valid id6 DataSourceDefinition, so it is commented out. -->
<!--<mxp-wms:WmsLayer><mxp-wms:Name>Asia</mxp-wms:Name><mxp-wms:Title>Asia</mxp-wms:Title><mxp-wms:SRSNameSet/><mxp-wms:WmsStyleSet/><FeatureLayer id="id13" name="ASIA" alias="ASIA" volatile="unknown"
xmlns="http://www.mapinfo.com/mxp"><DataSourceRef ref="id6"/>
</FeatureLayer></mxp-wms:WmsLayer> -->
</mxp-wms:WmsLayerList></mxp-wms:WmsLayer>
...
MapXtreme 2005 v6.5
© 2006 MapInfo Corporation. All rights reserved. 24 MapXtreme2005_WMS_Server_Setup_Tutorial.pdf

Tutorial: Setting Up a MapXtreme 2005 WMS Server
Layer ElementsThere are several different values for each configured layer to fill in when editing the WMSConfig.xml file. There are no set guidelines about how these values are used in a client application. The specific use of these values is dictated by the client reading the information. Refer to the OGC WMS specification (http://www.opengeospatial.org/docs/01-068r3.pdf) for details on how to implement the use of these values.
An example of this is the two elements <Name> and <Title>. According to the OGC WMS Specification, the Name value is to be used by machine-to-machine communication, while the Title value is used for human interaction. The Name value is what the client would request from the server, while the Title value is what would be displayed to the user.
The following list describes each of the elements in the <wms:WMSLayer> portion of the configuration file and how they can be used:
Note: The elements with the namespace (prefix) of mxp: are specific to MapInfo’s implementation of WMS and do not appear in the OGC specification.
<Name>The value of this element is typically the name used for machine-to-machine communication.
Example: <Name>NYSStreets</Name>
<Title>The value of this element is to provide a user-friendly description of the layer.
Example: <Title>New York State Streets</Title>
<Abstract>The abstract is a longer narrative description of an object.
Example: <Abstract>Streets and roads in New York State</Abstract>
<SRSNameSet>This element groups <mxp:SRSName> elements.
<mxp:SRSName>This element specifies the coordinate system to be used for the particular layer. If this value is empty, the layer inherits the <mxp:SRSName> value from the parent layer. A particular layer can have multiple <mxp:SRSName> elements. Any duplicates are ignored.
Example: <mxp:SRSName>epsg:4326</mxp:SRSName>
<WmsStyleSet>This element acts as a container for individual <WmsStyle> elements.
<WmsStyle>Each <WmsStyle> contains a <Name>, <Title>, and <Abstract> element that describe a particular style created in your workspace. Then the specifics of the style are entered. Make sure to prepend the mxp: namespace prefix for the element.
MapXtreme 2005 v6.5
© 2006 MapInfo Corporation. All rights reserved. 25 MapXtreme2005_WMS_Server_Setup_Tutorial.pdf

Tutorial: Setting Up a MapXtreme 2005 WMS Server
Example:
<WmsStyleSet><WmsStyle>
<Name>StreetStyle</Name><Title>Street Style</Title><Abstract>This is the line style for displaying streets.</Abstract><mxp:LineStyle stroke="black" width="1"
width-unit="mapinfo:imagesize pixel"><Pen>mapinfo:pen 2</Pen>
</mxp:LineStyle></WmsStyle>
</WmsStyleSet>
<mxp:FeatureLayer>This element identifies the layers that are rendered. Each <mxp:FeatureLayer> element must have a unique value for its id attribute. The other two attributes in this element, name and alias, must have values, but what those values are have no impact on the WMS.
Example: <mxp:Featurelayer id="NYStreets” name="Streets" alias="streets">
<mxp:DataSourceRef>This empty element has a single attribute, ref, which must match a layer (<mxp:TABFileDataSourceDefinition> element) specified in the <mxp:DataSourceDefinitionSet> section of the configuration file.
Example: <mxp:DataSourceRef ref="Streets"/>
Troubleshooting your WMS Setup
Fixing Your SetupAs with all web service style applications, configuration files are critical. One small spelling mistake can cause the entire system to stop working. Below is shown a typical error message that may occur if you failed to connect to the WMS server you just created.
This error message tells you there is an error on the WMS server but does not explain what is wrong or what to do next. To get more detailed information about the error, connect to the service from Internet Explorer directly. This method allows you to see more details about the error.
MapXtreme 2005 v6.5
© 2006 MapInfo Corporation. All rights reserved. 26 MapXtreme2005_WMS_Server_Setup_Tutorial.pdf

Tutorial: Setting Up a MapXtreme 2005 WMS Server
By connecting to the service using Internet Explorer directly, you can see that there is something wrong with the WMSConfig.xml file at line 180. Now you can navigate to that spot in the XML file to begin troubleshooting.
Every time you adjust the web.config or the WMSConfig.xml files you need to make sure to close the files from your editor. If either of the files are in use by another application while the server is trying to access the file, you’ll get an error.
Note: Due to a bug in Windows, you may need to kill the aspnet_wp.exe (or w3wp.exe for Windows 2003 Server) process each time you need to retry the web service.
The process to fix an error is as follows:
1. Edit configuration file (either web.config or wmsconfig.xml).2. Close the files (and maybe restart the aspnet_wp.exe or w3wp.exe process).3. Retry the WMS server using IE or your sample client.
Troubleshooting your SetupThere are a several places to verify that your configuration information is correct:
Web.config file1. Is the value for ConfigFile correct?
The path to the wmsconfig.xml file needs to be accurate in the value attribute of the <appSettings>|<add> element in the Web.config for the server to work properly.
2. Is the version number of the software correctly specified?Make sure that the Version values discovered in Step 1: Verify the Software Version are correctly specified in the type(Version) attribute of the <httpHandlers>|<add> element of the Web.config file.
MapXtreme 2005 v6.5
© 2006 MapInfo Corporation. All rights reserved. 27 MapXtreme2005_WMS_Server_Setup_Tutorial.pdf

Tutorial: Setting Up a MapXtreme 2005 WMS Server
3. Are the Public Key Tokens correctly specified?Make sure that the Public Key Token values are correctly specified in the type(Version) attribute of the <httpHandlers>|<add> element of the Web.config file. This information can be verified from the same place as the software version number (Start > Run > Assembly).
If any small detail is inaccurate, the system does not operate properly and throws an error. Once you iron out these details, the system works correctly every time.
wmsconfig.xml File1. Is the value in the <mxp-wms:OnlineResource> element properly specified?
This value needs to specify the correct URL ending with getmap.ashx.2. Are the data sources properly defined in the <DataSourceDefinitionSet> elements?
Each data source needs to have its own element containing a valid path to each particular file. Make sure you do not duplicate id attribute values or <DataSourceName> element values in the file. Also each <FileName> element value must be a valid path pointing to a valid file.
3. Are the elements in the <WmsLayerList> properly specified?a. Are the names and titles unique?
If either a name or title is duplicated the system throws an error.b. Are the <mxp:FeatureLayer> attributes unique?
If any of these values are duplicated, the system throws an error.c. Do the ref attributes in the <DataSourceRef> elements properly reference their
<TABFileDataSourceDefinition> element counterparts?Each value for this attribute must perfectly match the id attribute of the corresponding <TABFileDataSourceDefinition> element in order for the system to work properly.
IIS Setup1. Is the directory to be served established as a Virtual Directory?2. Is the IIS server running?3. Did you kill the aspnet_wp.exe or w3wp.exe process?
It is not immediately apparent that the process has been killed as the process restarts almost instantly, however the memory usage is significantly less.
MapXtreme 2005 v6.5
© 2006 MapInfo Corporation. All rights reserved. 28 MapXtreme2005_WMS_Server_Setup_Tutorial.pdf
Tutorial: Setting Up a MapXtreme 2005 WMS Server
Accessing Network Drives
The ASP.NET login is a local machine account which does not have network file access privileges. As a result, the ASP.NET process that runs your WMS server must be configured to run as a user that has permissions to access the network folder. Also, the network folder must be fully specified as a Universal Naming Convention (UNC) instead of a mapped drive. For example, use \\server\data\ rather than a mapped drive such as “Z:\data”.
There are a number of scenarios and options to consider when configuring the ASP.NET process user. The links below access knowledge documents that describe appropriate solutions.
Accessing Network Drives with IIS 5.0/5.1
Simple PasswordChoose a network user to run the ASP.NET process and ensure that user has access to the network folder. Limit the permissions of this user to prevent unexpected or malicious access to data.
As an example, assume that the username is "MYDOMAIN\WMSUser", with a password "WMSUserPassword".
1. Make a backup copy of the Web.config file.2. Add the following line in the <system.web> section of the web.config file:
<identity password="WMSUserPassword" userName="MYDOMAIN\WMSUser" impersonate="true" />
3. Restart the WMS Server.
Because the password for the named user is stored without any form of encryption, this approach makes it possible for someone to access the web.config file and obtain this password. If you need a more secure approach, use the Encrypted Password section below.
Encrypted PasswordInstructions for creating encrypted passwords can be found in the following MSDN articles:
http://support.microsoft.com/default.aspx?scid=kb;en-us;329290.
It may be necessary to use the hotfix described in the following article to enable the use of encrypted registry passwords:
http://support.microsoft.com/default.aspx?scid=kb;EN-US;329250.
Accessing Network Drives with IIS 6.0The methods described above for IIS5.0/5.1 are also relevant to IIS 6.0. There may also be more convenient methods for the configuration of the ASP.NET process user identity and related security. For example, see the section "userName and password Equivalent Settings in IIS 6.0 Worker Process Isolation Mode" in the following article:
http://www.microsoft.com/technet/prodtechnol/WindowsServer2003/Library/IIS/26d8cee3-ec31-4148-afab-b6e089a0300b.mspx.
MapXtreme 2005 v6.5
© 2006 MapInfo Corporation. All rights reserved. 29 MapXtreme2005_WMS_Server_Setup_Tutorial.pdf


![Pageflex Server [document: D-B3EA09A5 00001]webdocs.aub.ac.uk/Winton Halls Guide 2016.pdf · Rfc dmjjmugle argtgrgcq ftc ccl pplecb dmp wms Wms ugjj ftc bbgrgmlj amspqc pcjrcb argtgrgcq](https://img.pdfslide.us/doc/110x75/5ed6eddfff4a11075f77106a/pageflex-server-document-d-b3ea09a5-00001-halls-guide-2016pdf-rfc-dmjjmugle.jpg)