Embed Size (px)
Citation preview
Amazon Web Services – Mapping and GeoSpatial Analysis in Amazon Web Services Using ArcGIS August 2012
Page 1 of 33
Mapping and GeoSpatial Analysis In Amazon Web Services
Using ArcGIS
August 2012
(Please consult http://aws.amazon.com/whitepapers for the latest version of this paper)
Amazon Web Services – Mapping and GeoSpatial Analysis in Amazon Web Services Using ArcGIS August 2012
Page 2 of 33
Abstract
This paper provides Esri ArcGIS users with the necessary information to get started with publishing and analyzing geographic information systems (GIS) imagery data (such as satellite imagery, or aerial imagery), as well as, creating tile cached map services in Amazon Web Services (AWS). The paper focuses on imagery, because that has been the most challenging data type to manage in the cloud, but the approaches discussed are general enough to apply to any type of data.
Introduction
ArcGIS® is a complete system for designing and managing solutions through the application of geographic knowledge. With ArcGIS, you can perform in-depth analysis, gain a greater understanding of your data, and make more informed high-level decisions. It is used by government agencies, utilities, health and human services organizations, departments of transportation, insurance companies, financial institutions, and in many other industries worldwide to gain a greater understanding of their location data and make more informed decisions.
ArcGIS is composed of a core set of fully integrated software and services, including ArcGIS for Desktop, ArcGIS for Server, ArcGIS for Mobile, and ArcGIS Online.
ArcGIS for Desktop enables its users to do powerful editing, perform advanced analysis on geographic data, and supports a full cartographic production process. ArcGIS for Server enables publishing GIS services to the web. Then, through ArcGIS for Mobile users can access GIS services from any mobile device.
ArcGIS Online is a cloud-based geospatial content management system for storing and managing maps, data, and other geospatial information. It gives users access to geographic content shared and registered by Esri and GIS users around the world. With ArcGIS Online, users can:
1. Create and share maps that can be accessed by anyone through a browser, a mobile device, ArcGIS for Desktop, or a custom application.
2. Access and discover thousands of free maps, datasets, services, tools and other geospatial content.
3. Manage geospatial content through an easy-to-use catalog of items or groups.
4. Share your content publicly or with specific groups, or keep it private.
AWS and Esri® have partnered to enable customers to deploy a full-featured enterprise GIS with on-demand elastic infrastructure. ArcGIS on AWS helps organizations reduce the capital costs for server hardware and shorten the provisioning time needed to deploy GIS services across the enterprise.
Amazon Web Services – Mapping and GeoSpatial Analysis in Amazon Web Services Using ArcGIS August 2012
Page 3 of 33
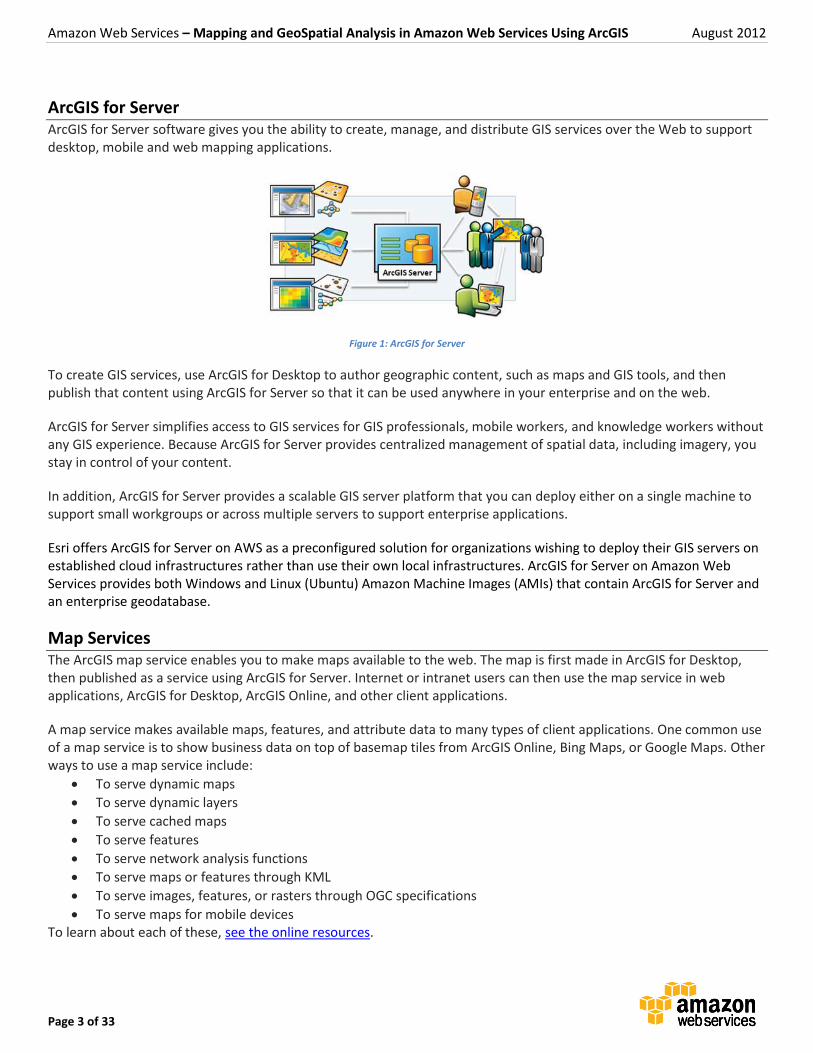
ArcGIS for Server ArcGIS for Server software gives you the ability to create, manage, and distribute GIS services over the Web to support desktop, mobile and web mapping applications.
Figure 1: ArcGIS for Server
To create GIS services, use ArcGIS for Desktop to author geographic content, such as maps and GIS tools, and then publish that content using ArcGIS for Server so that it can be used anywhere in your enterprise and on the web.
ArcGIS for Server simplifies access to GIS services for GIS professionals, mobile workers, and knowledge workers without any GIS experience. Because ArcGIS for Server provides centralized management of spatial data, including imagery, you stay in control of your content.
In addition, ArcGIS for Server provides a scalable GIS server platform that you can deploy either on a single machine to support small workgroups or across multiple servers to support enterprise applications.
Esri offers ArcGIS for Server on AWS as a preconfigured solution for organizations wishing to deploy their GIS servers on established cloud infrastructures rather than use their own local infrastructures. ArcGIS for Server on Amazon Web Services provides both Windows and Linux (Ubuntu) Amazon Machine Images (AMIs) that contain ArcGIS for Server and an enterprise geodatabase.
Map Services The ArcGIS map service enables you to make maps available to the web. The map is first made in ArcGIS for Desktop, then published as a service using ArcGIS for Server. Internet or intranet users can then use the map service in web applications, ArcGIS for Desktop, ArcGIS Online, and other client applications.
A map service makes available maps, features, and attribute data to many types of client applications. One common use of a map service is to show business data on top of basemap tiles from ArcGIS Online, Bing Maps, or Google Maps. Other ways to use a map service include:
To serve dynamic maps
To serve dynamic layers
To serve cached maps
To serve features
To serve network analysis functions
To serve maps or features through KML
To serve images, features, or rasters through OGC specifications
To serve maps for mobile devices To learn about each of these, see the online resources.
Amazon Web Services – Mapping and GeoSpatial Analysis in Amazon Web Services Using ArcGIS August 2012
Page 4 of 33
Image Services Image services are a type of web service optimized to provide fast access to imagery and other raster data. Image services are dynamic services where the imagery is processed on the fly into the required image products. Multiple image products can be created from the same imagery and users can interact with the services: querying the imagery, controlling the processing applied, and getting metadata about the imagery. The source data to an image service can be:
5. A Raster Dataset: A regular grid of pixels with associated properties that define georeferencing information, statistics and other properties. Examples include satellite or aerial imagery, elevation data, and other pixel-based data.
6. A Raster Layer: A reference to a raster dataset that defines additional processing or rendering to be applied, such as stretching, orthorectification, pan-sharpening, or cropping the raster.
7. A Mosaic Dataset: A data model in the geodatabase used for cataloging large collections of imagery and defining metadata and processing to be applied as the imagery is accessed. Mosaic datasets provide a single endpoint for accessing massive volumes of imagery, and also enable extended functionality such as uploading and downloading imagery. Mosaic Datasets are used to serve both large collections of preprocessed imagery such as orthorectified tiles, as well as collections of unprocessed imagery directly from satellite and aerial sensors.
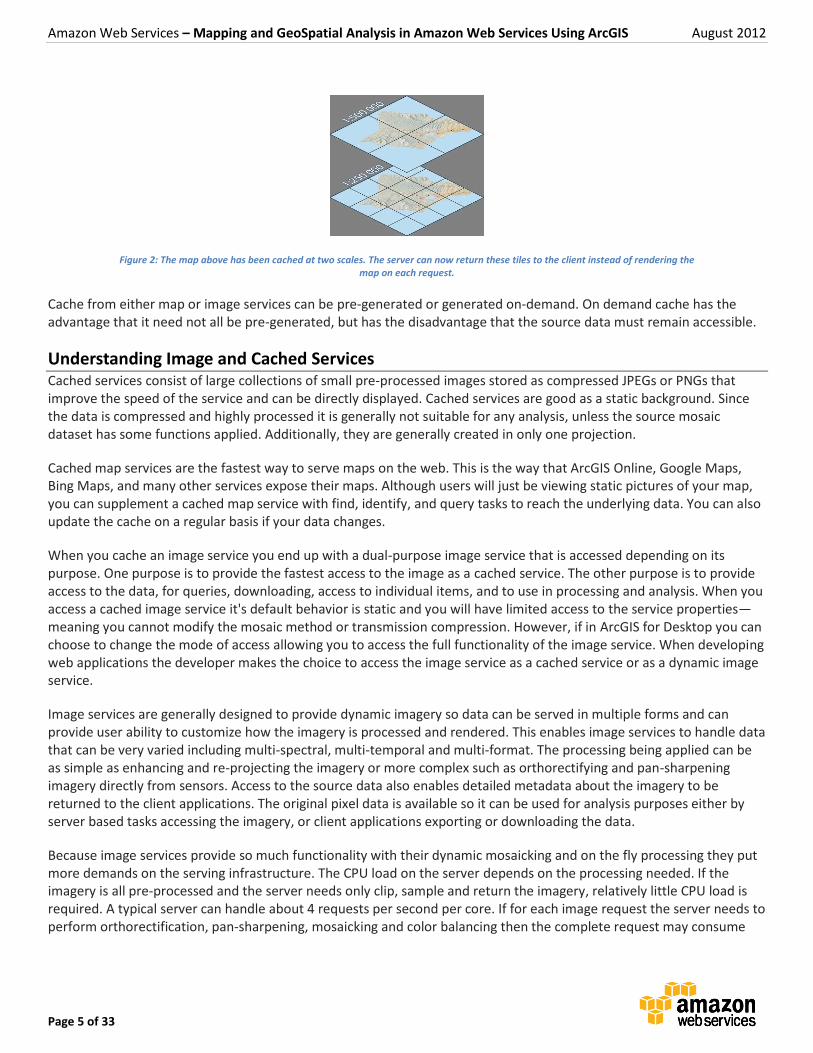
Cached Services Map caching is a very effective method to make your map and image services run faster. When you create a map cache, the server draws the entire map at several different scales and stores copies of the map images. The server can then distribute these images with each request for a map. It's much quicker for the server to return a cached image than to draw the map for each requests. Another benefit of caching is that the amount of detail in the image does not noticeably affect how quickly the server can distribute the copy. Likewise, when you cache an image service, the server pregenerates cache tiles at different levels, which can be pushed out faster than processing the input from the mosaic dataset or the raster dataset each time a request is made to ArcGIS for Server.
You can create a cache from any existing map service or image service published using ArcGIS for Server. Once you create the cache, the server will be able to use the tiles and will not have to dynamically render the map or image again. Additionally most client applications cache the tiles locally reducing the volume of data transmitted to web application that pan and zoom around the same area.
ArcGIS supports two formats of tile cache: compact and exploded. Compact cache is structured as a smaller number of larger files from which each tile can be easily extracted. ArcGIS for Server acts as a tile handler extracting the required tiles and returning them to the client application. The advantage of compact cache is that it is faster to generate and easier to manage and move as larger files. Exploded cache consists of very larger numbers of small tiles and ArcGIS for Server only needs to provide a web accessible link to the file locations.
Amazon Web Services – Mapping and GeoSpatial Analysis in Amazon Web Services Using ArcGIS August 2012
Page 5 of 33
Figure 2: The map above has been cached at two scales. The server can now return these tiles to the client instead of rendering the map on each request.
Cache from either map or image services can be pre-generated or generated on-demand. On demand cache has the advantage that it need not all be pre-generated, but has the disadvantage that the source data must remain accessible.
Understanding Image and Cached Services Cached services consist of large collections of small pre-processed images stored as compressed JPEGs or PNGs that improve the speed of the service and can be directly displayed. Cached services are good as a static background. Since the data is compressed and highly processed it is generally not suitable for any analysis, unless the source mosaic dataset has some functions applied. Additionally, they are generally created in only one projection.
Cached map services are the fastest way to serve maps on the web. This is the way that ArcGIS Online, Google Maps, Bing Maps, and many other services expose their maps. Although users will just be viewing static pictures of your map, you can supplement a cached map service with find, identify, and query tasks to reach the underlying data. You can also update the cache on a regular basis if your data changes.
When you cache an image service you end up with a dual-purpose image service that is accessed depending on its purpose. One purpose is to provide the fastest access to the image as a cached service. The other purpose is to provide access to the data, for queries, downloading, access to individual items, and to use in processing and analysis. When you access a cached image service it's default behavior is static and you will have limited access to the service properties—meaning you cannot modify the mosaic method or transmission compression. However, if in ArcGIS for Desktop you can choose to change the mode of access allowing you to access the full functionality of the image service. When developing web applications the developer makes the choice to access the image service as a cached service or as a dynamic image service.
Image services are generally designed to provide dynamic imagery so data can be served in multiple forms and can provide user ability to customize how the imagery is processed and rendered. This enables image services to handle data that can be very varied including multi-spectral, multi-temporal and multi-format. The processing being applied can be as simple as enhancing and re-projecting the imagery or more complex such as orthorectifying and pan-sharpening imagery directly from sensors. Access to the source data also enables detailed metadata about the imagery to be returned to the client applications. The original pixel data is available so it can be used for analysis purposes either by server based tasks accessing the imagery, or client applications exporting or downloading the data.
Because image services provide so much functionality with their dynamic mosaicking and on the fly processing they put more demands on the serving infrastructure. The CPU load on the server depends on the processing needed. If the imagery is all pre-processed and the server needs only clip, sample and return the imagery, relatively little CPU load is required. A typical server can handle about 4 requests per second per core. If for each image request the server needs to perform orthorectification, pan-sharpening, mosaicking and color balancing then the complete request may consume

Amazon Web Services – Mapping and GeoSpatial Analysis in Amazon Web Services Using ArcGIS August 2012
Page 6 of 33
the one core of the CPU for about a second. This places more load on the server, so more servers are required if large numbers of requests are to be processed simultaneously.
The main benefit of caching an image service is to improve its performance. The cached image service can display an image very fast, as it does virtually no work on ArcGIS for Server since only the cached tiles are used by the application. Specific benefits of a cached image service include:
Improved performance for basic images—If your image service is being used as a base image (like a map service to serve an image or as a background image), without expecting the users to modify any of the properties of the image service, such as changing the mosaic methods, or performing a query, then caching is recommended.
Skip overview generation—If you're publishing a mosaic dataset that will be used as a basic image, you can save time by not creating overviews for the mosaic dataset—if the image service will be cached. For example, if you're serving a collection of preprocessed and tiled ortho photos or a shaded relief rendering of a DEM.
Improved performance for slow formats—If you're publishing low-performing formats or highly compressed formats, then generating a cache is recommended. If the mosaic dataset is slow because of the complex function chains, then the cache will provide faster access to the imagery.
Deploying ArcGIS for Server in Amazon Web Services
Storage Options in Amazon Web Services The AWS cloud platform includes a variety of cloud-based data storage options so you can make choices that best fit your needs. This section provides an overview of the individual storage options that are most relevant for building geospatial applications at scale. These individual storage options form the building blocks that you can use to build powerful web-scale geospatial applications.
Amazon S3
Amazon Simple Storage Service (S3) is a highly scalable, durable and available distributed object store that simplifies web-scale computing. Amazon S3 provides a simple web services interface for storing and retrieving any amount of data, at any time, from anywhere on the web. You can write, read, and delete objects that contain from 1 byte to 5 terabytes of data each, and the number of objects that you can store in an Amazon S3 bucket is unlimited. Because Amazon S3 is highly scalable, it can support concurrent read or write access by many separate clients or application threads.
Amazon S3 is often used as a highly reliable snapshot repository for Amazon Elastic Block Storage (EBS) volumes, and as backup storage for applications such as Microsoft SQL Server or PostgreSQL. By automatically and synchronously storing your data across both multiple devices and multiple facilities within your selected geographical Amazon EC2 region, Amazon S3 storage provides the highest level of data durability and availability in the AWS platform. Error correction is built-in, and there are no single points of failure. Amazon S3 sustains the concurrent loss of data in two facilities, making it very well suited to be the primary data storage for mission-critical data. In fact, Amazon S3 is designed for 99.999999999% (“11 nines”) durability per object, which makes it ideal for tasks such as backing up your relational database. For these reasons, Amazon S3 is the preferred storage facility for static data in the AWS environment.

Amazon Web Services – Mapping and GeoSpatial Analysis in Amazon Web Services Using ArcGIS August 2012
Page 7 of 33
Amazon Elastic Block Store (EBS)
Amazon Elastic Block Store (EBS) volumes are used in conjunction with Amazon Elastic Compute Cloud (EC2) instances (virtual machines) to provide block-level storage. With Amazon EBS volumes you can create a volume from 1 GB to 1 TB and attach them to your Amazon EC2 instance. Just like a USB drive, an EBS volume can be detached from one instance and attached to another instance to quickly and efficiently move data between servers.
On the Windows Server platform, Amazon EBS volumes can be striped together using the Windows Disk Manager to combine multiple physical volumes into a much larger logical volume. For example, if you attach four 1TB EBS volumes to an EC2 instance and create a RAID-0 stripe the resulting volume will appear in Windows as a single 4 TB volume. For more information about creating a RAID-0 stripe on Windows Server 2008 or Ubuntu Linux 10.04.4, please refer to Appendix A.
Using a RAID-0 stripe can dramatically improve the performance of disk I/O. For example, if you require 1TB of data, consider using four 250GB volumes that are striped together to form a logical 1TB drive. Because you pay for allocated storage with Amazon EBS, the cost is exactly the same for doing this, but you get about three times the read and write performance as you would with a single 1 TB physical volume.
If you are serving compressed imagery, the performance of the non-striped Amazon EBS volume is not a bottleneck. For non-compressed imagery, however we recommend using striped disks.
Amazon EC2 Instance Storage
A third storage option is Amazon EC2 instance storage. Instance storage are disks that are physically attached to the host computer. An instance store provides temporary block-level storage for use with an Amazon EC2 instance. An instance store is dedicated to a particular instance; however, the disk subsystem is shared among instances on a host computer. The data in an instance store persists only during the lifetime of its associated Amazon EC2 instance. Instance storage can be advantageous for higher performance disk I/O when using imagery. For further information see Appendix B.
Recommendations For data that changes relatively frequently and requires long-term persistence, we recommend Amazon EBS. Amazon EBS provides persistent virtual block-mode storage for Amazon EC2 virtual servers, so you can use it just as you would use a hard drive on a physical server. Amazon EBS is particularly well suited for use as the primary storage for a file system, database, or for any applications that require fine-grained updates and access to raw, unformatted block-level storage.
Amazon EBS is the simplest option for ArcGIS users, because it can be quickly provisioned and it is persistent storage that can outlive an Amazon EC2 instance. A single Amazon EBS volume is as simple to manage as the hard disk on your laptop. Because a single Amazon EBS volume can be as large as 1 TB, and for Windows Server-based EC2 instances you can have as many as 11 Amazon EBS volumes attached, your dataset on a single instance can be as large as 11 TB. The use of striped disks is also advantageous.
For imagery datasets, Amazon S3 offers a good long-term storage medium. For a distributed system, Amazon S3 is useful as a central repository for your data.

Amazon Web Services – Mapping and GeoSpatial Analysis in Amazon Web Services Using ArcGIS August 2012
Page 8 of 33
Data Upload Options in Amazon Web Services There are a variety of methods for sending and receiving data to services that are running on the AWS platform. For small data sets that you want to place onto an Amazon EC2 instance, you can run a file transfer service such as FTP on your on-premises server to send your files to the EC2 instance. For larger datasets, it is more common to use Amazon S3 as a staging area and then have multiple Amazon EC2 instances grab portions of the data over the high bandwidth that is available within AWS.
There are three choices for moving data from your data center network to AWS:
AWS Import/Export
AWS Direct Connect
Uploading Data
This section will describe the latter 2 connectivity options and then provide some information on tools and techniques for moving large-scale imagery into and around the AWS platform.
AWS Import/Export
AWS Import/Export is a service that accelerates moving large amounts of data into and out of the AWS cloud by using portable storage devices for transport. AWS transfers your data directly onto and off of storage devices by using Amazon’s high-speed internal network and bypassing the Internet. For geospatial datasets, AWS Import/Export is often faster than Internet transfer and more cost-effective than upgrading your connectivity.
For example, you could place 10 TB of imagery on an eSATA drive and ship it to AWS, where it is placed into an Amazon S3 bucket. You could then use ArcGIS for Server in a cluster to process that imagery into 15 TB of image tiles that are subsequently placed in another Amazon S3 bucket. Alternatively, you can create a large collection of compact tile caches on a local server and then use AWS Import/Export to copy the data to an ArcGIS for Server instance or explode it into separate Amazon S3 objects.
You can use the AWS Import/Export calculator to determine the cost of using the AWS Import/Export service for your dataset.
To use AWS Import/Export, you modify a manifest file that describes attributes of the job, such as where you want the data to be placed. You enter your return address and data about the device you are using. Then you use the AWS Import/Export command line interface to schedule the job, and you can send the device to the address provided by the tool. When the job is completed, AWS will return your device so you can reuse it in the future.
AWS Direct Connect
AWS Direct Connect establishes a dedicated network connection from your premise to AWS. Using AWS Direct Connect, you can establish private connectivity between AWS and your datacenter, office, or collocation environment, which in many cases can reduce your network costs, increase throughput, and provide a more consistent network experience than Internet-based connections. AWS Direct Connect provides 1 Gbps or 10 Gbps connections, and you can provision multiple connections if you need additional bandwidth. You can use industry standard 802.1q VLANs to partition this dedicated connection into multiple logical connections. By partitioning your connection, you can use a single connection to access public resources, such as objects stored in Amazon S3 using public IP address space, and private resources, such as Amazon EC2 instances running within an

Amazon Web Services – Mapping and GeoSpatial Analysis in Amazon Web Services Using ArcGIS August 2012
Page 9 of 33
Amazon Virtual Private Cloud (VPC) using private IP space, while maintaining network separation between the public and private environments.
Uploading Data
If you choose to move data electronically over your Internet connection or AWS Direct Connect, you can place data in an Amazon S3 bucket or directly onto storage that is associated with an Amazon EC2 instance. The approach that you take typically depends on the size of the dataset and where it ultimately needs to be for processing. For a smaller dataset, you could run a file transfer service such as FTP and transfer the data directly to the storage associated with your Amazon EC2 instance. Because of throughput limitations on the network interface between the instance and your local computer, we don’t recommend this approach for large datasets.
Amazon S3 can scale massively to support multipart uploads from multiple connections. For large datasets, we recommend uploading the data to an Amazon S3 bucket and then having multiple Amazon EC2 instances pull down their portions of the data over the high-speed network that is internal to AWS.
There are a variety of ways to upload data to Amazon S3, including the use of the AWS Management Console, a browser-based graphical interface. There are also a wide variety of third-party tools that support Amazon S3. Such tools can upload data to Amazon S3 and move data from Amazon S3 into Amazon EC2 instances. For information about third-party uploading tools, see Appendix C.
Optimizing Imagery Imagery stored within an organization is not always optimized or stored in the format in which it was originally obtained. Because of legacy workflows multiple copies of the imagery are often stored in different projections. Moving the data to the cloud provides an opportunity to optimize the imagery to reduce file size and to change to more appropriate file formats. When end users access imagery through image services, they don’t care about the format in which the data is stored; they can change it to whatever format they need. Similarly, multiple versions of the imagery are not required, because enhancements such as reprojection can be applied on the fly.
For best performance, we recommend that you store your data in tiled tagged image file (TIF) files. For raw data access, compressing the data reduces the data access load, but it can increase the load on the CPU, because the server must decompress the data before the data can be processed. We recommend JPEG and LZW compression, which generally have very limited CPU load. For example, TIF with Q85 YCBCR JPEG compression can reduce the data volume of natural color imagery by about ten times with almost no visible loss of image quality. Using lossless compression is not recommended, though, for non-processed imagery that is to be used for analysis. Elevation data or data with no-data areas can often be compressed using lossless LZW compression. We generally recommend against using wavelet-based compression algorithms such as JPEG2000. Although they can provide slightly better compression, they require considerably more CPU to decompress, and so they slow down the serving process. With images services, the compression used to store imagery has no effect on the compression that is used to transmit the imagery to the client application, because the server can dynamically change the compression as the data is processed.
All imagery performance is also improved by creating pyramids for larger images. Image pyramids enable faster access to imagery at smaller scales. We recommend that you generate pyramids for images that have more than about 2000 rows or columns. With ArcGIS, such pyramids are stored as files with the extension .ovr. In many cases, it is suitable to compress the pyramids using lossy compression, even if the original imagery is not to be compressed.
ArcGIS provides geoprocessing tools such as Copy Raster that can be used to convert the imagery into an optimum format and can be used in models tools to convert the data. Alternatively, non-ArcGIS tools such as FWTools are also
Amazon Web Services – Mapping and GeoSpatial Analysis in Amazon Web Services Using ArcGIS August 2012
Page 10 of 33
very effective at format conversion. Note that when using mosaic datasets the compression and structure of the images can be changed without the requirement to recreate the mosaic datasets. For example, when copying satellite imagery that is typically stored as none tiled TIF to the cloud, it is advantageous to have the data converted to Tiled TIF, optionally with JPEG compression.
ArcGIS for Server Setup in Amazon Web Services ArcGIS for Server on Amazon Web Services consists of a number of Amazon Machine Images (AMIs) that have been configured to include ArcGIS for Server ready to use. Purchasing an ArcGIS for Server license enables users to get access to those AMIs by getting them shared to their AWS account. The AMIs available to users are:
Esri ArcGIS 10.1 Server with PostgreSQL (Ubuntu)
Esri ArcGIS 10.1 Server with SQL Server (Windows)
Esri ArcGIS 10.1 Server with SQL Express (Windows)
If you purchase an ArcGIS for Server license, you can use one of these AMIs to launch an Amazon EC2 instance, and the software is ready to use as soon as the instance is available.
If scalability and fault tolerance are important considerations for your ArcGIS for Server deployment, you can use Elastic Load Balancing and AWS Auto Scaling to help ensure that you always have enough EC2 instances to handle your traffic load. To monitor usage and performance, you can use Amazon CloudWatch. This section describes an architecture that uses these services.
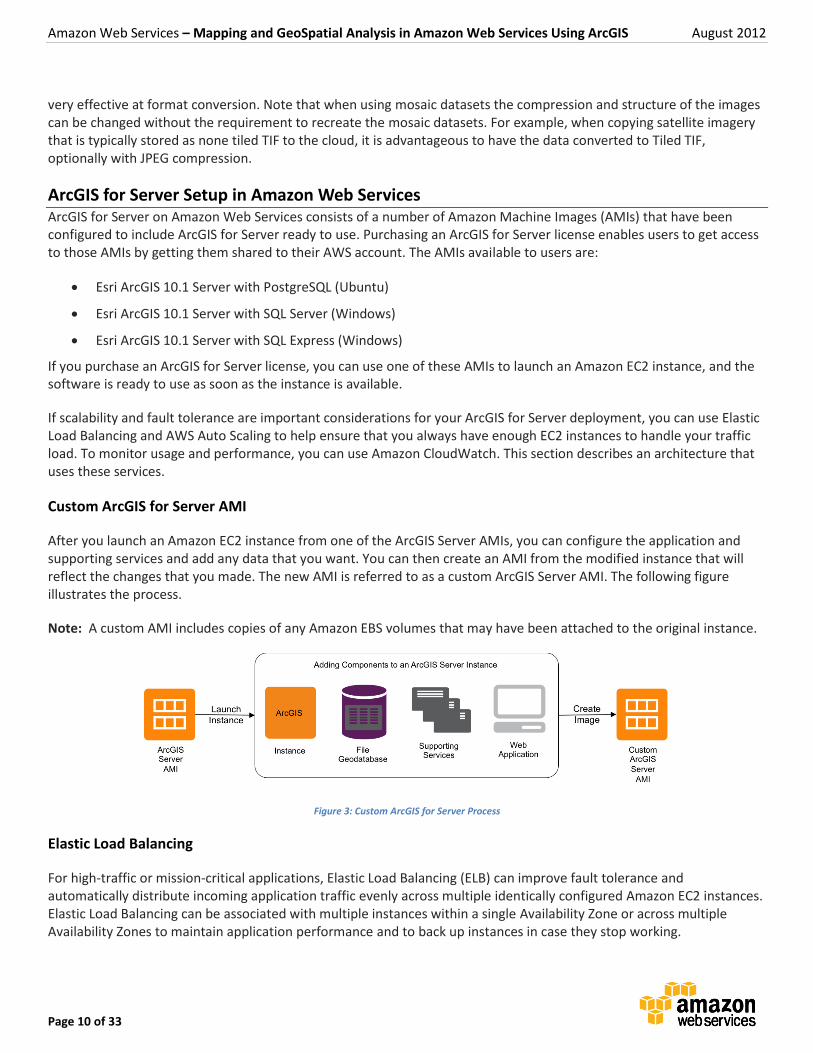
Custom ArcGIS for Server AMI
After you launch an Amazon EC2 instance from one of the ArcGIS Server AMIs, you can configure the application and supporting services and add any data that you want. You can then create an AMI from the modified instance that will reflect the changes that you made. The new AMI is referred to as a custom ArcGIS Server AMI. The following figure illustrates the process.
Note: A custom AMI includes copies of any Amazon EBS volumes that may have been attached to the original instance.
Figure 3: Custom ArcGIS for Server Process
Elastic Load Balancing
For high-traffic or mission-critical applications, Elastic Load Balancing (ELB) can improve fault tolerance and automatically distribute incoming application traffic evenly across multiple identically configured Amazon EC2 instances. Elastic Load Balancing can be associated with multiple instances within a single Availability Zone or across multiple Availability Zones to maintain application performance and to back up instances in case they stop working.
Amazon Web Services – Mapping and GeoSpatial Analysis in Amazon Web Services Using ArcGIS August 2012
Page 11 of 33
Amazon CloudWatch
Amazon CloudWatch provides real-time information about your deployment’s AWS cloud resource utilization, operational performance, and overall demand patterns including metrics such as CPU utilization, disk reads and writes, and network traffic. Amazon CloudWatch provides data about your EC2 instances, Amazon EBS volumes, and Elastic Load Balancing. You can view Amazon this data form the AWS Management Console
Auto Scaling
If your traffic demands vary over time, Auto Scaling allows for the number of Amazon EC2 instances being used to scale up (increase) during demand spikes to maintain performance, then automatically scale down during traffic lulls to minimize costs. Auto Scaling is enabled by Amazon CloudWatch and is available at no additional charge beyond Amazon CloudWatch fees.
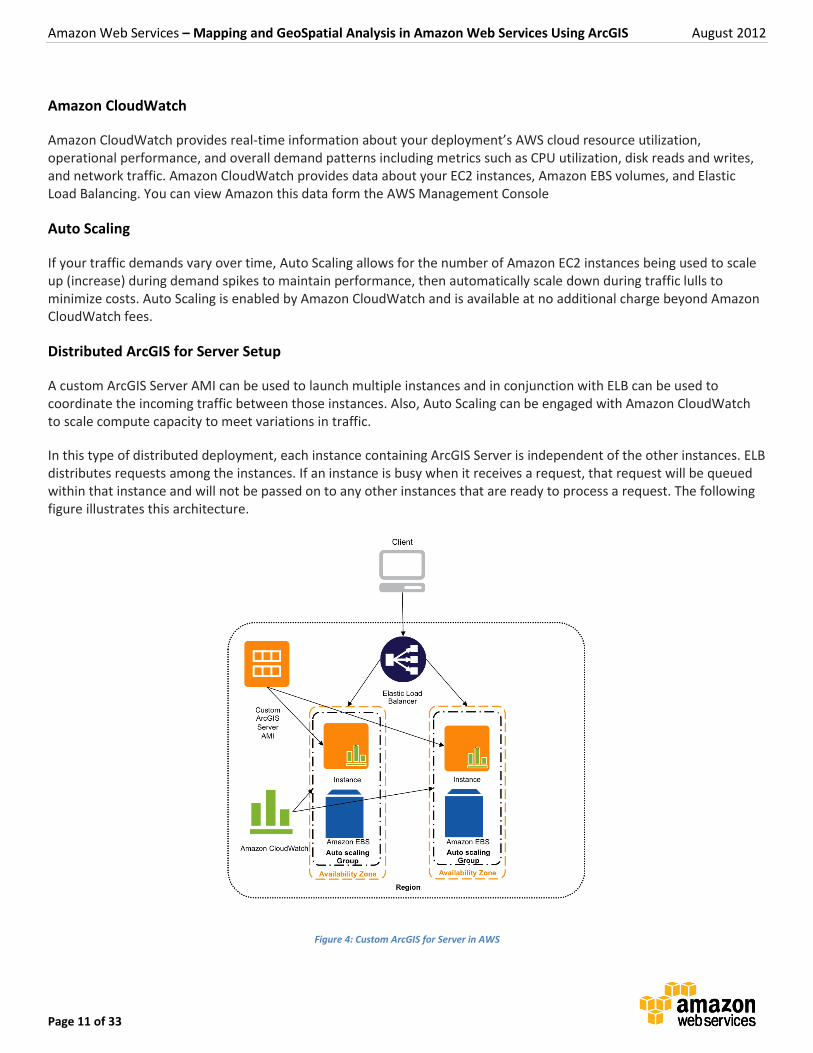
Distributed ArcGIS for Server Setup
A custom ArcGIS Server AMI can be used to launch multiple instances and in conjunction with ELB can be used to coordinate the incoming traffic between those instances. Also, Auto Scaling can be engaged with Amazon CloudWatch to scale compute capacity to meet variations in traffic.
In this type of distributed deployment, each instance containing ArcGIS Server is independent of the other instances. ELB distributes requests among the instances. If an instance is busy when it receives a request, that request will be queued within that instance and will not be passed on to any other instances that are ready to process a request. The following figure illustrates this architecture.
Figure 4: Custom ArcGIS for Server in AWS
Amazon Web Services – Mapping and GeoSpatial Analysis in Amazon Web Services Using ArcGIS August 2012
Page 12 of 33
ArcGIS Server Cloud Builder on Amazon Web Services When ArcGIS for Server is deployed across multiple EC2 instances, the instances can be configured to a task automatically among them. For this configuration, you need to install ArcGIS Cloud Builder on Amazon Web Services on your local computer. Cloud Builder is a lightweight desktop application that is included with your ArcGIS for Server license.
Cloud Builder hides the complexity of assembling and administering your site. You can use it to manage AWS user accounts, security groups, and Amazon EC2 key pairs, as well as Elastic Load Balancing. In addition, you can use Cloud Builder to configure the EC2 instances running ArcGIS Server to work together automatically on larger tasks, such as map service caching. For more information please refer to the online ArcGIS Resources.
Publishing Dynamic Images Services in the Cloud
Managing Content in the Cloud The process to manage and serve imagery in the cloud is very similar to the process of managing and serving the data on-premises. Mosaic datasets should be used to manage the data and to define how the data should be processed and what image services that will be defined. For detailed steps to create a mosaic dataset and publish a service based on that go to the online ArcGIS Resources.
There are typically two different options to manage and publish imagery in the cloud, imagery is managed on-premise and published to the cloud server or everything is done in the cloud.
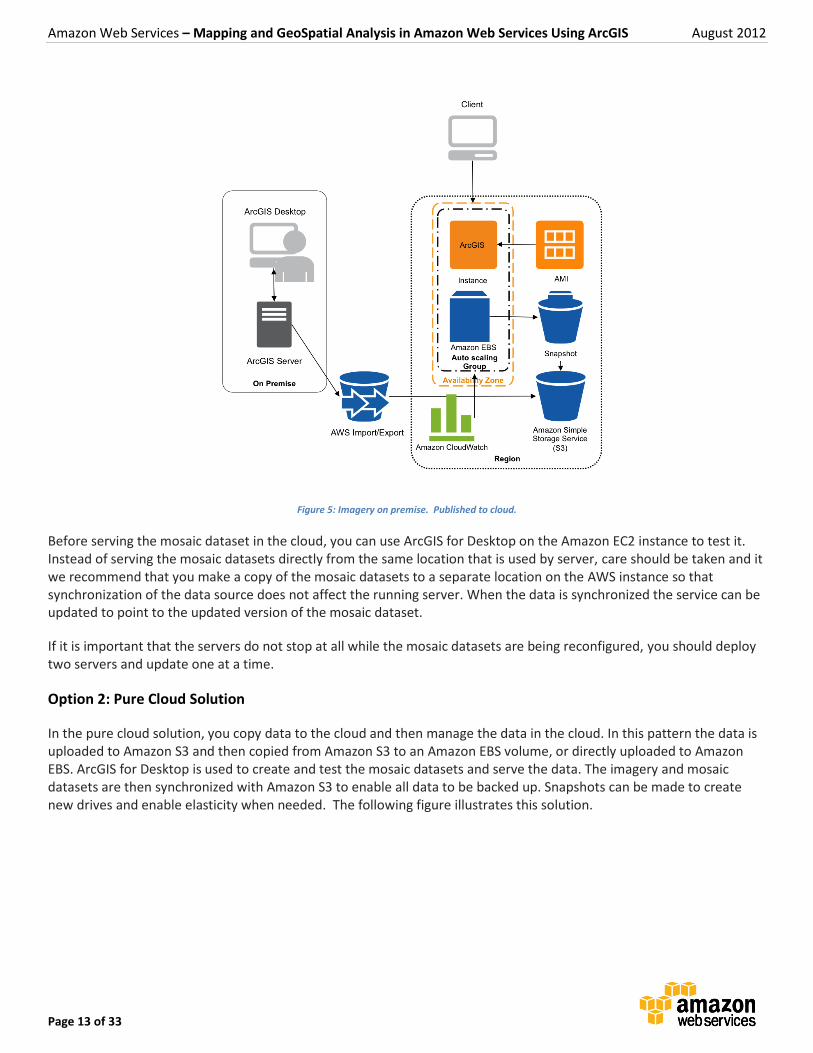
Option 1: On-Premises and Cloud Hybrid
Imagery is managed on-premises and the cloud is used for publishing. In this pattern it is generally simplest to perform all the image management on-premises and then synchronize the imagery and mosaic datasets to the cloud. Because the imagery itself does not change, only the relatively small mosaic datasets that define the image collections means that synchronization of the data can be accomplished using one way synchronization.
Typically the image data at the very start is copied to Amazon S3 buckets using AWS Import/Export following the same structure as the on-premises data. When the data in the Amazon S3 bucket is up to date the data can be synchronized from Amazon S3 to the Amazon EBS volumes being used by the servers. When changes are made to the local structure the changes, which are relatively small in size, can be synchronized. It is considered rare for image files to be modified; most cases new images are added instead. The following figure illustrates this solution.
Amazon Web Services – Mapping and GeoSpatial Analysis in Amazon Web Services Using ArcGIS August 2012
Page 13 of 33
Figure 5: Imagery on premise. Published to cloud.
Before serving the mosaic dataset in the cloud, you can use ArcGIS for Desktop on the Amazon EC2 instance to test it. Instead of serving the mosaic datasets directly from the same location that is used by server, care should be taken and it we recommend that you make a copy of the mosaic datasets to a separate location on the AWS instance so that synchronization of the data source does not affect the running server. When the data is synchronized the service can be updated to point to the updated version of the mosaic dataset.
If it is important that the servers do not stop at all while the mosaic datasets are being reconfigured, you should deploy two servers and update one at a time.
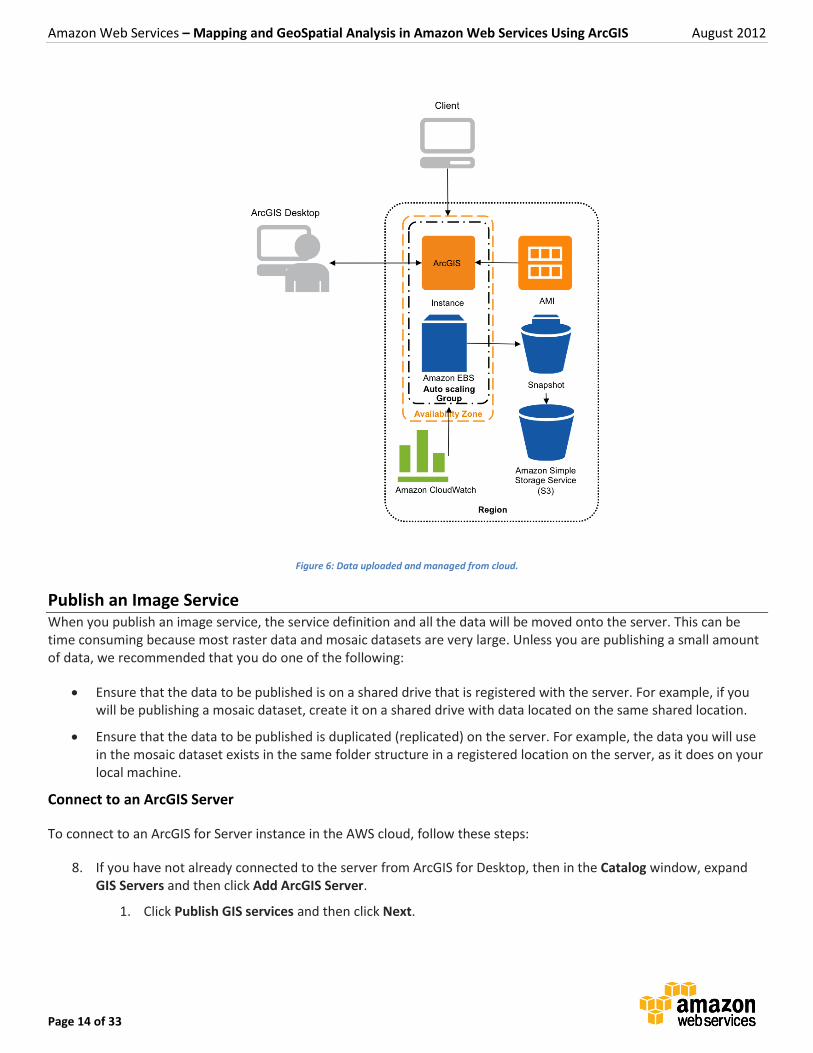
Option 2: Pure Cloud Solution
In the pure cloud solution, you copy data to the cloud and then manage the data in the cloud. In this pattern the data is uploaded to Amazon S3 and then copied from Amazon S3 to an Amazon EBS volume, or directly uploaded to Amazon EBS. ArcGIS for Desktop is used to create and test the mosaic datasets and serve the data. The imagery and mosaic datasets are then synchronized with Amazon S3 to enable all data to be backed up. Snapshots can be made to create new drives and enable elasticity when needed. The following figure illustrates this solution.
Amazon Web Services – Mapping and GeoSpatial Analysis in Amazon Web Services Using ArcGIS August 2012
Page 14 of 33
Figure 6: Data uploaded and managed from cloud.
Publish an Image Service When you publish an image service, the service definition and all the data will be moved onto the server. This can be time consuming because most raster data and mosaic datasets are very large. Unless you are publishing a small amount of data, we recommended that you do one of the following:
Ensure that the data to be published is on a shared drive that is registered with the server. For example, if you will be publishing a mosaic dataset, create it on a shared drive with data located on the same shared location.
Ensure that the data to be published is duplicated (replicated) on the server. For example, the data you will use in the mosaic dataset exists in the same folder structure in a registered location on the server, as it does on your local machine.
Connect to an ArcGIS Server
To connect to an ArcGIS for Server instance in the AWS cloud, follow these steps:
8. If you have not already connected to the server from ArcGIS for Desktop, then in the Catalog window, expand GIS Servers and then click Add ArcGIS Server.
1. Click Publish GIS services and then click Next.
Amazon Web Services – Mapping and GeoSpatial Analysis in Amazon Web Services Using ArcGIS August 2012
Page 15 of 33
2. For the Server URL, type the URL of the ArcGIS Server administrator. For example, http://myserver:6080/arcgis/admin.
3. In the Server Type drop-down list, choose ArcGIS Server.
4. If your server administrator has enabled security for ArcGIS Server, enter your user name and password.
5. For the remaining options, accept the defaults and then click Finish.
2. Register your data locations (either shared or duplicated).
1. Right-click the connection to the server and click Server Properties.
2. To register the folder location where the raster data is stored click the Add Registered Folder button and then enter the required information.
3. Click OK to close the dialog boxes.
Publish an Image Service
To publish an image service, follow these steps:
1. In the Catalog window, right-click the rater dataset, raster layer or mosaic dataset and then click Share As Image Service.
2. Choose Publish as service and click Next.
3. Click the Choose a connection drop-down list and select the server.
4. Optionally, enter a new name for the service.
5. Click Next.
6. Choose the folder where you want to publish the service, or create a new folder to contain the service. By default, services are published to the root directory [root] of ArcGIS Server. Alternatively, services can be organized in folders within the root directory.
7. Click Continue. The Service Editor displays. You'll use the Service Editor to choose what users can do with your image service and take fine-grained control of how the server will expose your image service. For information on specific parameters and capabilities, see Image service parameters in the online ArcGIS Resources.
8. In the left pane of the Service Editor, click Capabilities.
9. In the left pane under Capabilities, click Imaging and review the information.
10. In the left pane of the Service Editor, click Item Description and enter a summary, tags, and description for your image service.
11. In the Service Editor, click Analyze.
12. Optionally, in the Service Editor, click Preview.
13. When you have the desired settings, click Publish.
Amazon Web Services – Mapping and GeoSpatial Analysis in Amazon Web Services Using ArcGIS August 2012
Page 16 of 33
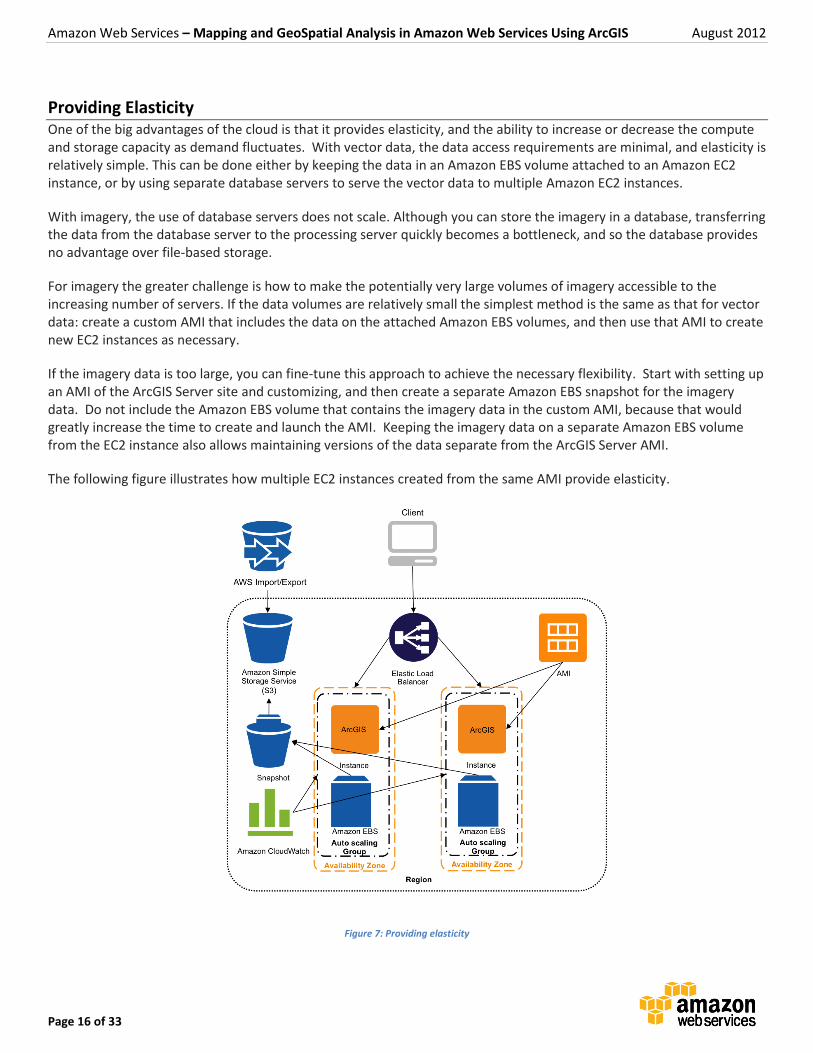
Providing Elasticity One of the big advantages of the cloud is that it provides elasticity, and the ability to increase or decrease the compute and storage capacity as demand fluctuates. With vector data, the data access requirements are minimal, and elasticity is relatively simple. This can be done either by keeping the data in an Amazon EBS volume attached to an Amazon EC2 instance, or by using separate database servers to serve the vector data to multiple Amazon EC2 instances.
With imagery, the use of database servers does not scale. Although you can store the imagery in a database, transferring the data from the database server to the processing server quickly becomes a bottleneck, and so the database provides no advantage over file-based storage.
For imagery the greater challenge is how to make the potentially very large volumes of imagery accessible to the increasing number of servers. If the data volumes are relatively small the simplest method is the same as that for vector data: create a custom AMI that includes the data on the attached Amazon EBS volumes, and then use that AMI to create new EC2 instances as necessary.
If the imagery data is too large, you can fine-tune this approach to achieve the necessary flexibility. Start with setting up an AMI of the ArcGIS Server site and customizing, and then create a separate Amazon EBS snapshot for the imagery data. Do not include the Amazon EBS volume that contains the imagery data in the custom AMI, because that would greatly increase the time to create and launch the AMI. Keeping the imagery data on a separate Amazon EBS volume from the EC2 instance also allows maintaining versions of the data separate from the ArcGIS Server AMI.
The following figure illustrates how multiple EC2 instances created from the same AMI provide elasticity.
Figure 7: Providing elasticity
Amazon Web Services – Mapping and GeoSpatial Analysis in Amazon Web Services Using ArcGIS August 2012
Page 17 of 33
As more running servers are needed, launch new instances from the AMI, then start and attach new Amazon EBS drives from the snapshot, and your new EC2 instance is ready to use. Attaching the Amazon EBS drive when an instance launches is best accomplished through automation such as AWS CloudFormation. You can use AWS CloudFormation’s sample templates or create your own templates to describe the AWS resources, and any associated dependencies or runtime parameters, required to run your application.
Whether your data set is integrated into your AMI or on a dedicated Amazon EBS snapshot, it will take time to completely copy the data to the new Amazon EBS volume from Amazon S3. Even though the Amazon EBS volume shows that all the files are there immediately, they are actually being gradually copied from an Amazon S3 bucket, and eventually all the data will be copied at a standard file transfer pace. The advantage of using an AMI or snapshot is that the files that are requested first will get copied before the files that are not currently needed.
Caching and Publishing Map Services in the Cloud
Caching is a very effective way to make your map and image services run faster. When you create a map cache, the server draws the entire map at several different scales and stores copies of those map images. The server can then distribute these images whenever someone asks for a map. It's quicker for the server to return a cached image than to draw the map each time someone requests it. The following section describes map service caching in detail. Image services can be cached using a similar approach. For specifics about image service caching, see the online ArcGIS Resources.
Designing and Publishing a Map Service
Designing the Map
One benefit of caching your map is that during the design phase, you can use all the cartographic tools at your disposal without worrying about how they will affect performance. Take some time to make your map look nice, because once the cache is created, you will not be able to make changes without re-creating or updating the cache. Users of the cache won't be able to change the symbology either, because they're viewing preexisting images of the map that are stored on the server.
If you are designing a map to match the ArcGIS Online, Bing Maps, or Google Maps tiling scheme, a good practice is to design your map at each scale interval. To do so, follow these steps:
1. In ArcGIS for Desktop, add your datasets and then zoom out to the farthest (smallest) scale.
2. Set the symbology and labeling of your layers for this scale.
3. Zoom in to the next closest scale and then set the symbology and labeling of your layers for this scale.
4. Create group layers to keep track of the copies of your layers. It's easiest to make one group layer for each scale so you only have to set the scale dependency only on the group instead of on each individual layer. You might even include the scale in the name.
5. Set a scale range on each group layer so that only one is visible at each cached scale. Configure the scale range with a tolerance around each cache scale.
6. Continue zooming to each successive scale and symbolizing appropriately until you've worked through all the scales in the scales list.
7. Save your map. You're ready to publish the map.
Amazon Web Services – Mapping and GeoSpatial Analysis in Amazon Web Services Using ArcGIS August 2012
Page 18 of 33
Publishing the Map Service
The following steps walk you through the process of publishing your map document to ArcGIS Server using ArcGIS for Desktop:
1. Open your map document in ArcGIS for Desktop and choose File > Share As > Service from the main menu.
2. In the Share as Service window, choose Publish a service. Click Next.
3. In the Publish a Service dialog box, click Connect to ArcGIS Server to create a new connection to the server.
4. In the Add ArcGIS Server window, choose Publish GIS Services. Click Next.
5. For the Server URL, type the URL of the ArcGIS for Server site that you want to connect to.
6. From the Server Type drop-down list, choose ArcGIS Server.
7. Enter a User Name and Password with at least publisher privileges on ArcGIS Server. If you haven't set up users and roles for security, one option is to use the Primary Site Administrator account you defined when you created the site. Leave the checkbox checked to save the username and password. Then click Finish.
8. During the publishing process, a service definition file is created and temporarily stored locally on disk. When the publishing process completes, the service definition is uploaded to the server and the local file is deleted.
9. Optionally, in the Publish a Service window, enter a new name for the service. Click Next.
10. By default, services are published to the root folder (root) of ArcGIS Server. Services can be organized into subfolders under the root folder. Choose the folder where you want to publish the service, or create a new folder to contain the service. Click Continue.
11. The Service Editor will display. You'll use the Service Editor to choose what users can do with your cached map service, define your caching schema, and take fine-grained control of how the server will expose your service. Click the Caching tab.
12. On the Caching tab, choose to draw the map service using tiles from a cache.
13. In the Tiling Scheme drop-down list, choose ArcGIS Online / Bing Maps / Google Maps.
14. Examine the Estimated cache Size.
15. Click Analyze . This examines your map document to see if it can be published to the server.
16. Fix any Errors in the Prepare window. You must fix errors before you can publish your map as a service. Optionally, you can fix the warnings and informational messages to further improve the performance and appearance of your service.
17. (Optional) To see how your map will appear on the web, in the Service Editor, click the Preview icon .
18. Once you've fixed the errors in your map document, click Publish .
The map service immediately begins publishing. After the publishing is complete, the server starts to build cache tiles, and will continue until the cache is built.
Creating a cache requires that the server generate many map images and save them to disk. Depending on the area and scales covered, the caches can become very large, taking gigabytes of space. Some of the tools can take a long time to

Amazon Web Services – Mapping and GeoSpatial Analysis in Amazon Web Services Using ArcGIS August 2012
Page 19 of 33
run, and you should review the online ArcGIS resources for guidelines on how to plan your cache and anticipate the creation time in general.
The Caching toolset is part of the ArcGIS for Server toolbox. It creates and manages caches. To learn about the caching toolset and how to use it, go to the online ArcGIS resources. The online ArcGIS documentation shows you how to setup and execute the map service caching, and how to best optimize that operation.
The following section provides further details that can help users plan for very large tile caches in the cloud. While the main process for executing the map service caching is the same, changes in the typical setup are suggested to help accommodate the very large size of the data.
Caching a Map Service in the Cloud
Allocating Resources
Map service caching is a resource intensive operation and typically the more resources available the faster it will be completed. Once the cache tiles are generated, the resources used are no longer needed. This makes the cloud a great environment for map service caching because you can add and remove resources as necessary. Amazon Web Services has a wide range of Amazon EC2 instance types. The hourly charge per machine makes it possible to make win-win choices possible. You can run a small number of large machines or a large number of smaller machines to get the caching executed faster.
The following table shows how long caching a map service has taken in a test environment when using certain types of instances. The times listed represent the exact time it took to execute caching. The sample dataset used represents street data for Los Angeles County. This dataset occupies 337 MB of disk space, and the cache generated is 3.27 GB. It’s also interesting to see how cost varies per option.
Instance Type Instance Cost per hour when using Windows
Instance Cost per hour when using Linux
Number of virtual cores
Time taken for caching using 2 instances
Time taken for caching using 4 instances
Standard Large $0.460 per Hour $0.320 per Hour 2 6:24 3:14
Standard Extra Large $0.920 per Hour $0.640 per Hour 4 2:34 2:00
High Memory Double Extra Large $1.140 per Hour $0.900 per Hour 4 2:03 1:06
High Memory Quadruple Extra Large $2.280 per Hour $1.800 per Hour 8 1:06 0:37
* For the latest update on prices please refer to http://aws.amazon.com/ec2
To setup the environment that will be used to cache the map service in the cloud, you will need to make two decisions:
Deciding where to place the source data and the tile cache
Choosing the right instances that will include ArcGIS for Server, where the map service caching will be processed.
For best performance it is recommended to keep the data local to each instance. It is recommended that you use Amazon EBS to store the data. For source data, each Amazon EC2 instance would then have an Amazon EBS drive with the data, being attached to the instance and striped (RAID 0). It is also recommended you put the output data and cache tiles on one Amazon EBS drive. However, one Amazon EBS drive can’t be shared between multiple instances. Thus the
Amazon Web Services – Mapping and GeoSpatial Analysis in Amazon Web Services Using ArcGIS August 2012
Page 20 of 33
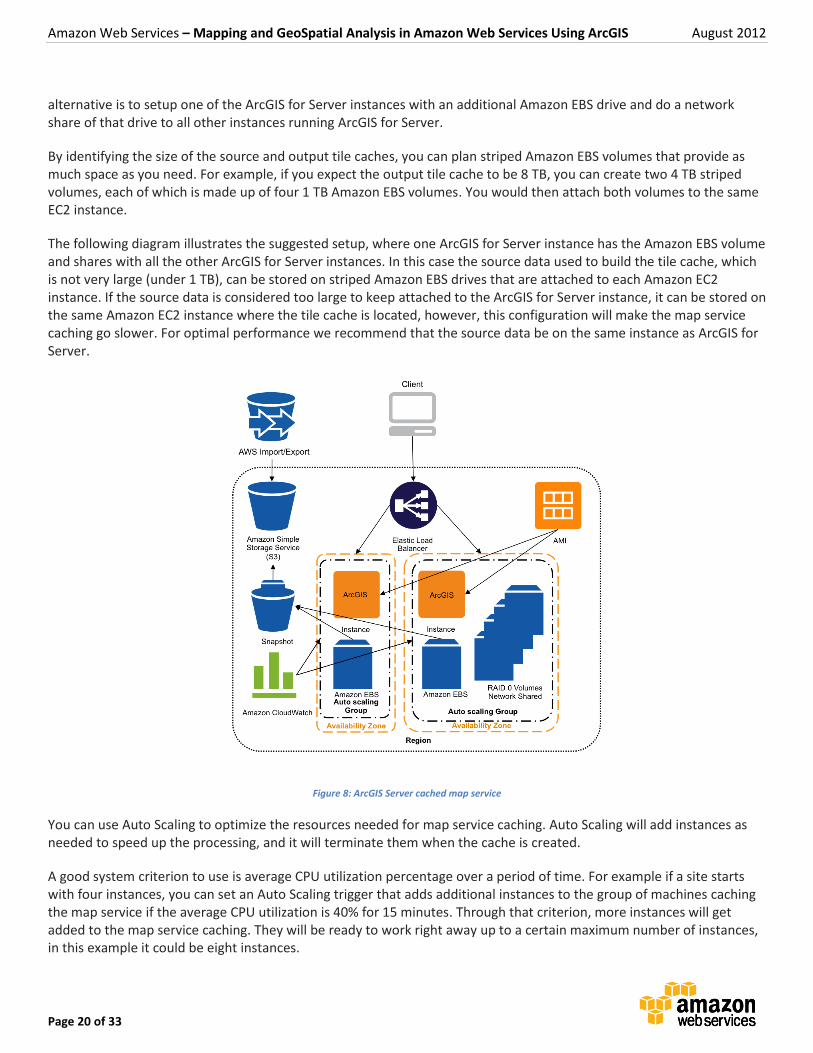
alternative is to setup one of the ArcGIS for Server instances with an additional Amazon EBS drive and do a network share of that drive to all other instances running ArcGIS for Server.
By identifying the size of the source and output tile caches, you can plan striped Amazon EBS volumes that provide as much space as you need. For example, if you expect the output tile cache to be 8 TB, you can create two 4 TB striped volumes, each of which is made up of four 1 TB Amazon EBS volumes. You would then attach both volumes to the same EC2 instance.
The following diagram illustrates the suggested setup, where one ArcGIS for Server instance has the Amazon EBS volume and shares with all the other ArcGIS for Server instances. In this case the source data used to build the tile cache, which is not very large (under 1 TB), can be stored on striped Amazon EBS drives that are attached to each Amazon EC2 instance. If the source data is considered too large to keep attached to the ArcGIS for Server instance, it can be stored on the same Amazon EC2 instance where the tile cache is located, however, this configuration will make the map service caching go slower. For optimal performance we recommend that the source data be on the same instance as ArcGIS for Server.
Figure 8: ArcGIS Server cached map service
You can use Auto Scaling to optimize the resources needed for map service caching. Auto Scaling will add instances as needed to speed up the processing, and it will terminate them when the cache is created.
A good system criterion to use is average CPU utilization percentage over a period of time. For example if a site starts with four instances, you can set an Auto Scaling trigger that adds additional instances to the group of machines caching the map service if the average CPU utilization is 40% for 15 minutes. Through that criterion, more instances will get added to the map service caching. They will be ready to work right away up to a certain maximum number of instances, in this example it could be eight instances.
Amazon Web Services – Mapping and GeoSpatial Analysis in Amazon Web Services Using ArcGIS August 2012
Page 21 of 33
You can also set an Auto Scaling trigger that shuts down extra instances automatically after the map service caching is finished. To follow our example, you could specify that an instance be terminated when its CPU utilization drops to 0% for 30. You can specify the minimum number of instances as 1, so all instances will shut down except for the first instance.
Implementation
The setup described above, including Auto Scaling setup, should be done through Cloud Builder using the following steps:
1. Use Cloud Builder to create a site with two Amazon EC2 instances. This site will not have a database, and it will not have any Auto Scaling triggers setup. Instances will use the same Amazon EC2 key pair, either an existing one or a new one that you create.
2. When the instances are ready, login to each of the instances using the key pair. Change the Administrator Password. Make sure both instances are using the same password.
3. Create a striped Amazon EBS volume for each instance; make sure the volume size is big enough to accommodate your source data. Copy the source data for your cache to the Amazon EBS volume of each instance, and create the image or map service needed using the source data.
4. Create another striped Amazon EBS volume on one of the instances, and share it through the network to the other instance. Verify that this network path works across both instances, if prompted for a password use the Administrator password that was setup in step 2. We recommend that you keep this volume on the “sitehost” instance. That way referring to this instance from other instances can utilize the sitehost in the network path, since Cloud Builder already configured it during setup. This will be the network share where the output cache tiles are located. In order for ArcGIS to write to this directory, make sure it gives full control permissions to the ArcGIS operating system account. (We recommend that users should use “estimated disk size” utility available on the caching tab of service properties to estimate the disk space that is required to generate cache for a service).
5. Make sure to register the above network path as a cache directory on the server using Directories in Server Properties.
6. Using Cloud Builder, create a server template based on the site you have just set up.
7. Launch a new site using the Server template that you created in the previous step. Start the site with four instances, and then set up Auto Scaling with triggers as follows:
o Maximum number of instances: 8
o Minimum number of instances: 1
o Average CPU utilization is 40% for 15 minutes: add instance
o Average CPU utilization drops to 0% for 30 minutes: terminate instance
When the site is up and running, you should be able to administer it by using the ArcGIS for Server Manager and ArcGIS for Desktop.
8. In ArcGIS for Desktop, configure the map service caching properties by pointing to the Amazon EBS volumes that you created earlier. For image services, ensure that the maximum number of rasters in the mosaic dataset properties is increased to a larger value (e.g. 2000). This will ensure that the system does not limit the number of images being used for the larger extents requested for caching than is being used for a standard display.
Amazon Web Services – Mapping and GeoSpatial Analysis in Amazon Web Services Using ArcGIS August 2012
Page 22 of 33
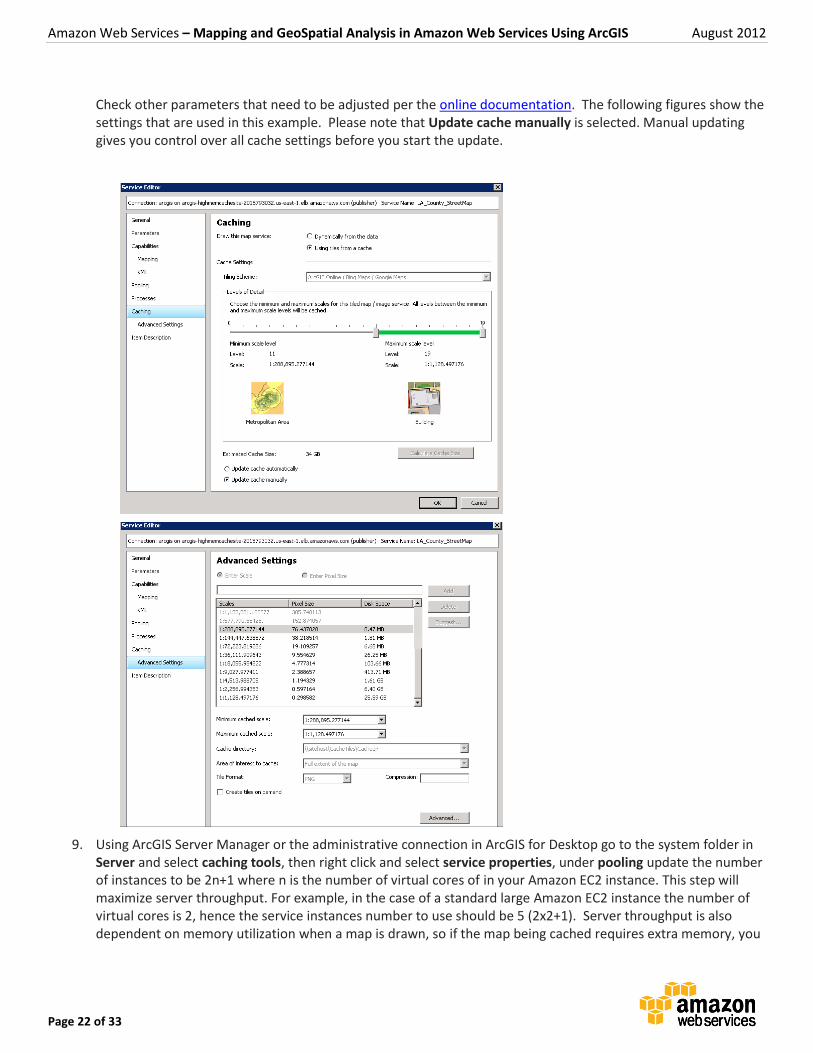
Check other parameters that need to be adjusted per the online documentation. The following figures show the settings that are used in this example. Please note that Update cache manually is selected. Manual updating gives you control over all cache settings before you start the update.
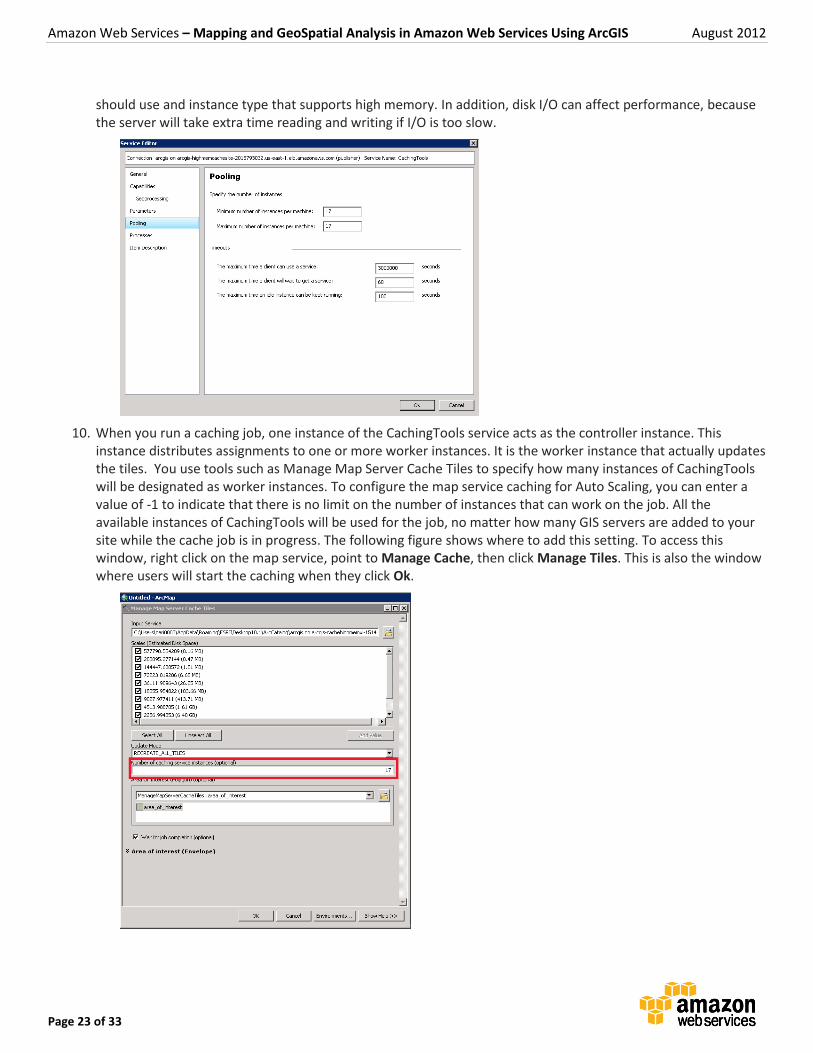
9. Using ArcGIS Server Manager or the administrative connection in ArcGIS for Desktop go to the system folder in Server and select caching tools, then right click and select service properties, under pooling update the number of instances to be 2n+1 where n is the number of virtual cores of in your Amazon EC2 instance. This step will maximize server throughput. For example, in the case of a standard large Amazon EC2 instance the number of virtual cores is 2, hence the service instances number to use should be 5 (2x2+1). Server throughput is also dependent on memory utilization when a map is drawn, so if the map being cached requires extra memory, you
Amazon Web Services – Mapping and GeoSpatial Analysis in Amazon Web Services Using ArcGIS August 2012
Page 23 of 33
should use and instance type that supports high memory. In addition, disk I/O can affect performance, because the server will take extra time reading and writing if I/O is too slow.
10. When you run a caching job, one instance of the CachingTools service acts as the controller instance. This instance distributes assignments to one or more worker instances. It is the worker instance that actually updates the tiles. You use tools such as Manage Map Server Cache Tiles to specify how many instances of CachingTools will be designated as worker instances. To configure the map service caching for Auto Scaling, you can enter a value of -1 to indicate that there is no limit on the number of instances that can work on the job. All the available instances of CachingTools will be used for the job, no matter how many GIS servers are added to your site while the cache job is in progress. The following figure shows where to add this setting. To access this window, right click on the map service, point to Manage Cache, then click Manage Tiles. This is also the window where users will start the caching when they click Ok.
Amazon Web Services – Mapping and GeoSpatial Analysis in Amazon Web Services Using ArcGIS August 2012
Page 24 of 33
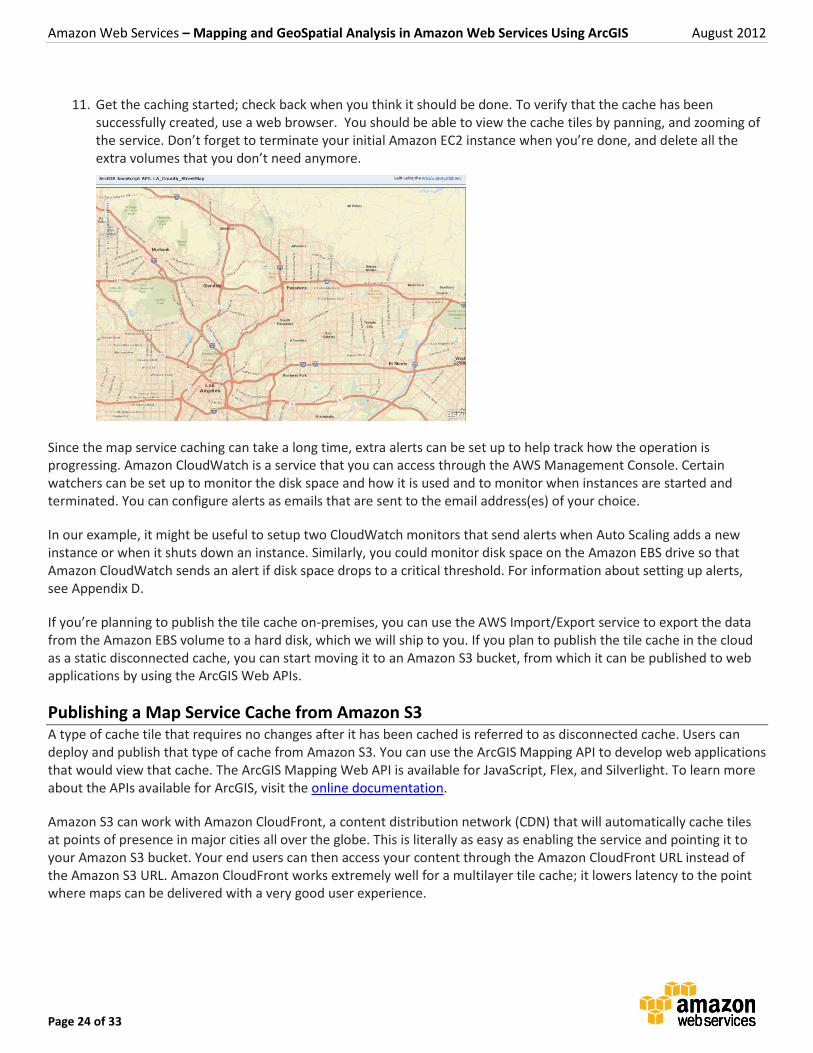
11. Get the caching started; check back when you think it should be done. To verify that the cache has been successfully created, use a web browser. You should be able to view the cache tiles by panning, and zooming of the service. Don’t forget to terminate your initial Amazon EC2 instance when you’re done, and delete all the extra volumes that you don’t need anymore.
Since the map service caching can take a long time, extra alerts can be set up to help track how the operation is progressing. Amazon CloudWatch is a service that you can access through the AWS Management Console. Certain watchers can be set up to monitor the disk space and how it is used and to monitor when instances are started and terminated. You can configure alerts as emails that are sent to the email address(es) of your choice.
In our example, it might be useful to setup two CloudWatch monitors that send alerts when Auto Scaling adds a new instance or when it shuts down an instance. Similarly, you could monitor disk space on the Amazon EBS drive so that Amazon CloudWatch sends an alert if disk space drops to a critical threshold. For information about setting up alerts, see Appendix D.
If you’re planning to publish the tile cache on-premises, you can use the AWS Import/Export service to export the data from the Amazon EBS volume to a hard disk, which we will ship to you. If you plan to publish the tile cache in the cloud as a static disconnected cache, you can start moving it to an Amazon S3 bucket, from which it can be published to web applications by using the ArcGIS Web APIs.
Publishing a Map Service Cache from Amazon S3 A type of cache tile that requires no changes after it has been cached is referred to as disconnected cache. Users can deploy and publish that type of cache from Amazon S3. You can use the ArcGIS Mapping API to develop web applications that would view that cache. The ArcGIS Mapping Web API is available for JavaScript, Flex, and Silverlight. To learn more about the APIs available for ArcGIS, visit the online documentation.
Amazon S3 can work with Amazon CloudFront, a content distribution network (CDN) that will automatically cache tiles at points of presence in major cities all over the globe. This is literally as easy as enabling the service and pointing it to your Amazon S3 bucket. Your end users can then access your content through the Amazon CloudFront URL instead of the Amazon S3 URL. Amazon CloudFront works extremely well for a multilayer tile cache; it lowers latency to the point where maps can be delivered with a very good user experience.
Amazon Web Services – Mapping and GeoSpatial Analysis in Amazon Web Services Using ArcGIS August 2012
Page 25 of 33
For a sample application that shows Amazon CloudFront with one of the ArcGIS Mapping APIs (ArcGIS API for Flex), visit the ArcGIS Resource Center. This example also shows how easy it is to build a custom class that enables the web application that displays the cache tiles.
Note: The cache tile needs to be in an exploded (not compressed) form. This allows the browsers to retrieve the images (png, jpg) and render them in their native format.
Alternatively, if the cache tiles are going to change regularly, or some of the cache tiles will be generated on the fly rather than from prior caching, you should use a setup similar to that for publishing dynamic map services. You would publish a map service cache with the property “cache on demand” enabled. Plenty of disk space should be made available as cache tiles might be generated even in regions with no data, such as oceans. The advantage of this setup is that users don’t have to cache all the tiles in all the possible options before hand. ArcGIS for Server can generate some tiles on the fly if requested with different options from what would already be cached, or if it’s in an area that was not covered in the map service caching. Users can also keep the cache in a compressed format that saves space, and makes the cache management easier.
Publishing Tiled Map Services in ArcGIS Online ArcGIS 10.1 enables sharing tiled map service to ArcGIS Online, thereby removing the requirement to create caches by using your own server. With an organizational subscription you can share your map (with feature and image data) on ArcGIS Online as tiled map services. For image data, this workflow is a simple and quick way to serve up smaller image data as a tiled map service. For large datasets, it is advantageous to create a tile cache using Desktop tile cache tools and then share the tile cache as tiled map service on ArcGIS Online
Conclusion
Together, Esri and Amazon Web Services offer a practical approach to running your GIS services and applications in the cloud. The Amazon cloud is an ideal environment for developing and deploying applications built on ArcGIS for Server and provides virtually unlimited computing power for intensive GIS analyses and spatial data processing. ArcGIS for Server on Amazon Web Services consists of a number of Amazon Machine Images (AMIs) that have been configured to include ArcGIS for Server ready to use. The AMIs available to users are:
Esri ArcGIS 10.1 Server with PostgreSQL (Ubuntu)
Esri ArcGIS 10.1 Server with SQL Server (Windows)
Esri ArcGIS 10.1 Server with SQL Express (Windows)
Using ArcGIS for Server users can create, manage, and distribute GIS services over the Web to support desktop, mobile and web mapping applications.
Amazon Web Services – Mapping and GeoSpatial Analysis in Amazon Web Services Using ArcGIS August 2012
Page 26 of 33
Resources
Resource Description
Other ways to use a map service
http://resources.arcgis.com/en/help/main/10.1/#/Common_reasons_for_using_map_services/015400000435000000/
AWS Import/Export Calculator
http://awsimportexport.s3.amazonaws.com/aws-import-export-calculator.html
ArcGIS Cloud Builder on AWS http://resources.arcgis.com/en/help/main/10.1/index.html#/What_is_ArcGIS_Server_on_Amazon_Web_Services/00rq00000002000000/
Publish mosaic datasets as a service
http://resourcesbeta.arcgis.com/en/help/main/10.1/index.html#/Publishing_image_services/01540000045v000000/
Specific parameters and capabilities
http://resourcesbeta.arcgis.com/en/help/main/10.1/index.html#/Image_service_parameters/015400000524000000/
AWS CloudFormation Sample Templates
http://aws.amazon.com/cloudformation/aws-cloudformation-templates/
Caching a map service http://resources.arcgis.com/en/help/main/10.1/#/Creating_an_image_service_cache/0154000005q5000000/
Create group layers http://resources.arcgis.com/en/help/main/10.1/00s5/00s500000011000000.htm
Scale range on group layers http://resources.arcgis.com/en/help/main/10.1/00s5/00s500000008000000.htm
Guidelines for creating a cache
http://resourcesbeta.arcgis.com/en/help/main/10.1/00sq/00sq00000080000000.htm
How to use the caching toolset
http://resourcesbeta.arcgis.com/en/help/main/10.1/index.html#/An_overview_of_the_Caching_toolset/005400000003000000/
Adjusting image service parameters
http://resourcesbeta.arcgis.com/en/help/main/10.1/index.html#/Image_service_parameters/015400000524000000/
APIs available for ArcGIS http://resources.arcgis.com/content/web/web-apis
Amazon CloudFront and ArcGIS API example
http://help.arcgis.com/en/webapi/flex/samples/index.html#/Access_Custom_Tiles/01nq00000028000000/
Amazon EC2 Instance Types http://aws.amazon.com/ec2/instance-types/
Amazon EC2 Instance Store http://docs.amazonwebservices.com/AWSEC2/latest/UserGuide/InstanceStorage.html
Amazon CloudWatch pricing http://aws.amazon.com/pricing/cloudwatch
AWS Forums http://aws.amazon.com/forums
Amazon CloudWatch Monitoring Scripts for Linux
http://docs.amazonwebservices.com/AmazonCloudWatch/latest/DeveloperGuide/mon-scripts-perl.html
ArcGIS for Server http://www.esri.com/software/arcgis/arcgisserver/index.html
Amazon Web Services – Mapping and GeoSpatial Analysis in Amazon Web Services Using ArcGIS August 2012
Page 27 of 33
Appendix A
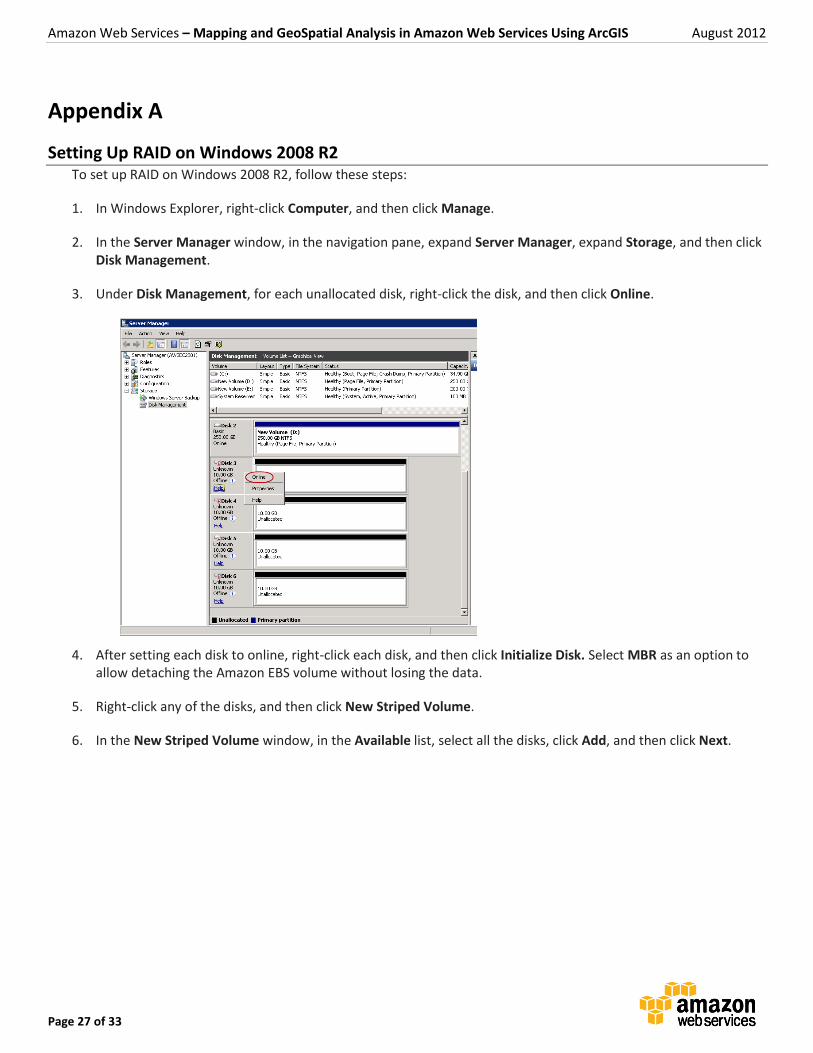
Setting Up RAID on Windows 2008 R2 To set up RAID on Windows 2008 R2, follow these steps:
1. In Windows Explorer, right-click Computer, and then click Manage.
2. In the Server Manager window, in the navigation pane, expand Server Manager, expand Storage, and then click Disk Management.
3. Under Disk Management, for each unallocated disk, right-click the disk, and then click Online.
4. After setting each disk to online, right-click each disk, and then click Initialize Disk. Select MBR as an option to allow detaching the Amazon EBS volume without losing the data.
5. Right-click any of the disks, and then click New Striped Volume.
6. In the New Striped Volume window, in the Available list, select all the disks, click Add, and then click Next.
Amazon Web Services – Mapping and GeoSpatial Analysis in Amazon Web Services Using ArcGIS August 2012
Page 28 of 33
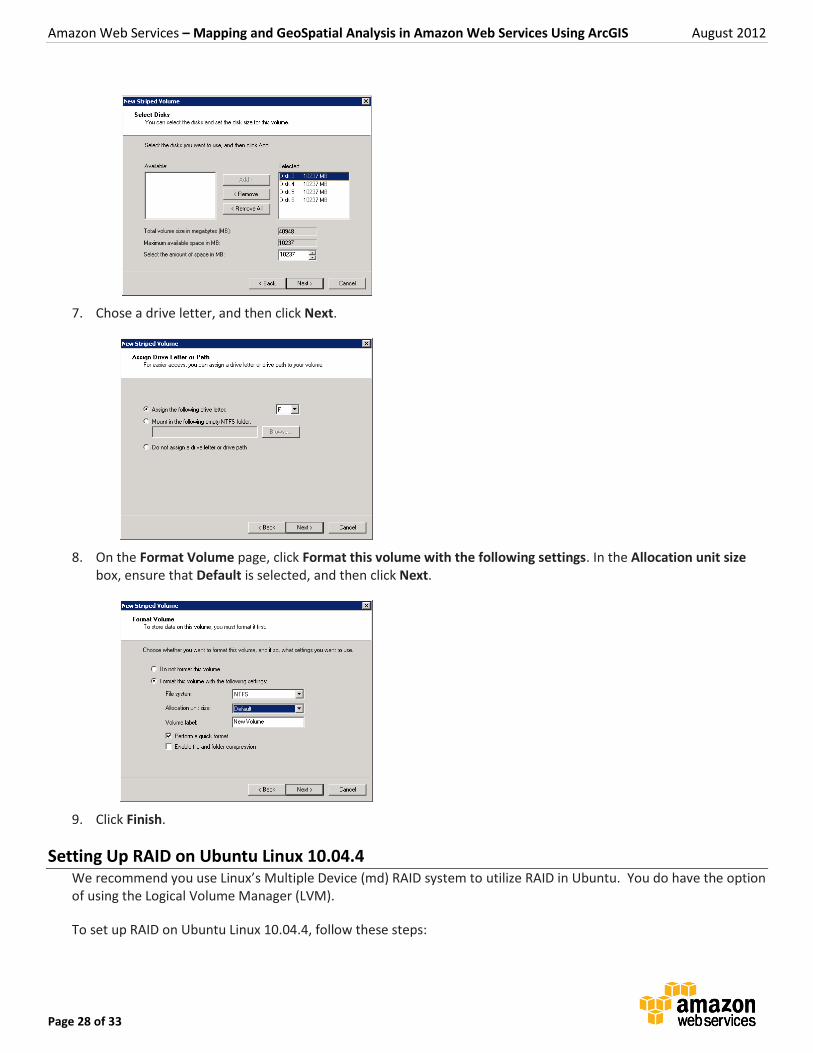
7. Chose a drive letter, and then click Next.
8. On the Format Volume page, click Format this volume with the following settings. In the Allocation unit size box, ensure that Default is selected, and then click Next.
9. Click Finish.
Setting Up RAID on Ubuntu Linux 10.04.4 We recommend you use Linux’s Multiple Device (md) RAID system to utilize RAID in Ubuntu. You do have the option of using the Logical Volume Manager (LVM).
To set up RAID on Ubuntu Linux 10.04.4, follow these steps:

Amazon Web Services – Mapping and GeoSpatial Analysis in Amazon Web Services Using ArcGIS August 2012
Page 29 of 33
1. Create Amazon EBS volumes of your required size
2. Attach Amazon EBS volumes to your Ubuntu Linux instance
3. Log in to your Ubuntu Linux instance using ssh, putty, or similar tool
4. Confirm your volumes are attached:
ubuntu@<ip>:~$ sudo fdisk -l | grep xvd
5. Install the required software:
ubuntu@<ip>:~$ sudo apt-get install mdadm
6. Use mdadm to create the RAID 0 configuration. You will need to modify the following command to specify the number of volumes (--raid-devices=) and the specific volume device name (/dev/sdf etc):
ubuntu@ip-10-248-82-111:~$ sudo mdadm /dev/md0 --create --verbose –
level=0 –raid-devices=4 /dev/sdf /dev/sdg /dev/sdh /dev/sdi
7. Verify your configuration:
ubuntu@<ip>:~$ sudo mdadm --detail /dev/md0
8. Create the filesystem on the RAID array. Be aware that depending upon the number and size of volumes this process could last an extended period of time:
ubuntu@<ip>:~$ sudo mke2fs –t ext4 –F /dev/md0
9. Create the mount point for the array (raiddir is only an example below)
ubuntu@<ip>:~$ sudo mkdir /raiddir
10. Mount the RAID array
ubuntu@<ip>:~$ sudo mount /dev/md0 /raiddir/
11. Verify:
ubuntu@<ip>:/raiddir$ mount
ubuntu@<ip>:/raiddir$ df -h
12. Edit the /etc/fstab file using VIM or a similar editor and add the following line to the end of the file:
/dev/md0 /raiddir auto defaults,nobootwait,noatime 0 0
13. Get information for your mdadm.conf file:
ubuntu@<ip>:/raiddir$ sudo mdadm --detail --scan
14. Edit the /etc/mdadm/mdadm.conf file and add the output from the command in step 13, minus the “metadata” field, to the file. An example entry is:

Amazon Web Services – Mapping and GeoSpatial Analysis in Amazon Web Services Using ArcGIS August 2012
Page 30 of 33
ARRAY /dev/md0 level=raid0 num-devices=4 UUID=d609bd2a:e3e84e7c:12c8006a
15. Reboot your server and confirm RAID array mounts as expected.
Appendix B
Using Amazon EC2 Instance Storage Amazon EC2 instance store volumes provide temporary block-level storage for Amazon EC2 instances. When you create an Amazon EC2 instance from an Amazon Machine Image (AMI), in most cases it comes with a preconfigured block of pre-attached disk storage. Unlike data on Amazon EBS volumes, data on instance store volumes persists only for the life of the associated Amazon EC2 instance. The amount of this disk storage ranges from 160 GB up to 3.3 TB, depending on the Amazon EC2 instance type. Larger Amazon EC2 instances have more and larger instance store volumes.
The difference between Amazon EC2 instance storage and Amazon EBS volumes is very simple: An Amazon EBS volume can be created independently of the Amazon EC2 instance, and its lifetime is independent of any Amazon EC2 instance. Amazon EBS is ideal for storing a database data file that needs to be available beyond the lifetime of a virtual machine. Using an Amazon EBS volume carries a financial cost, though, because you pay for it based on the amount of storage you allocate. The financial cost of Amazon EC2 instance storage is included in the cost of the instance. For more information about Amazon EC2 instance types and their associated instance storage, visit the online documentation.
Although the performance of instance storage is not significantly faster than Amazon EBS storage, instance storage has the advantage of being directly attached to the server, so accessing data on the instance storage does not increase network traffic and is independent of fluctuations of other network traffic. As with Amazon EBS storage, instance storage can be RAIDed to provide faster performance. The disadvantage of instance storage is that the total data volume is limited according to the size of the Amazon EC2 instance. In addition, if the Amazon EC2 instance is terminated or it crashes, the content of the instance storage will be lost. To use instance storage, it is therefore necessary to copy the required imagery from either Amazon S3 or an existing Amazon EBS volume before it can be used.
Amazon EC2 instance storage can be valuable when serving imagery because it can be used as part of a caching strategy. Instead of storing all imagery on Amazon EBS volumes, the images can be copied to the instance storage of the Amazon EC2 instance. Such a pattern is most valuable when requiring elasticity of services where the total data volume is sufficient to be stored on the instance storage and the additional time it takes to launch an additional instance is not an issue.
To summarize, we recommend striping instance storage volumes for optimal performance. Keep in mind that unlike Amazon EBS volumes these instance storage volumes will go away when the instance is terminated.
The use of instance storage can also improve performance for more demanding services. If the amount of data to be processed is greater than the instance storage in your instance, then you should put the most-used data on the instance storage volumes and the rest on Amazon EBS volumes.
You can enable instance storage by using the Amazon EC2 API. For more information, go to the Amazon EC2 User Guide.

Amazon Web Services – Mapping and GeoSpatial Analysis in Amazon Web Services Using ArcGIS August 2012
Page 31 of 33
Appendix C
Using Amazon CloudFormation to Attach an Amazon EBS Volume at Launch The following example AWS CloudFormation template will launch the Esri ArcGIS 10.1 Server with PostgreSQL (Ubuntu) AMI. You must run this template in one of the ArcGIS for Server supported regions: US East (Virginia), US West (Oregon), or US West (Northern California). This template can be launched from the command line or from the AWS Management Console. It requires two pieces of information: the name of an existing EC2 key pair, and the volume ID of an existing EBS volume where your data is stored.
{
{
"AWSTemplateFormatVersion" : "2010-09-09",
"Description" : "AWS CloudFormation Sample Template
ArcGIS_10.1_targetted_launch: Creates an Amazon EC2 instance running in
Availability Zone A for whatever region this script is run in. The
instance will be Ubuntu Linux with PostgreSQL running ESRI ArcGIS 10.1
and will attach an existing EBS volume. IMPORTANT: the EBS InstanceID
must be entered and this EBS volume must reside in AZ A for this
template. **WARNING** This template creates an Amazon EC2 instance and an
EBS Volume. You will be billed for the AWS resources used if you create a
stack from this template.",
"Parameters" : {
"KeyName" : {
"Description" : "Name of an existing EC2 KeyPair to enable SSH
access to the instance",
"Type" : "String"
},
"MyVolID" : {
"Description" : "The Volume ID of your EBS data store.",
"Type" : "String"
}
},
"Mappings" : {
"RegionMap" : {
"us-east-1" : { "AMI" : "ami-e066c389", "AZ" : "us-east-1a" },
"us-west-1" : { "AMI" : "ami-33aff476", "AZ" : "us-west-1a" },
"us-west-2" : { "AMI" : "ami-2aab271a", "AZ" : "us-west-2a" }
}
},
"Resources" : {
"Ec2Instance" : {
"Type" : "AWS::EC2::Instance",
"Properties" : {
"AvailabilityZone" : { "Fn::FindInMap" : [ "RegionMap", { "Ref" :
"AWS::Region" }, "AZ" ]},
"SecurityGroups" : [ { "Ref" : "InstanceSecurityGroup" } ],
"KeyName" : { "Ref" : "KeyName" },
"ImageId" : { "Fn::FindInMap" : [ "RegionMap", { "Ref" :
"AWS::Region" }, "AMI" ]}
}

Amazon Web Services – Mapping and GeoSpatial Analysis in Amazon Web Services Using ArcGIS August 2012
Page 32 of 33
},
"InstanceSecurityGroup" : {
"Type" : "AWS::EC2::SecurityGroup",
"Properties" : {
"GroupDescription" : "Enable ArcGIS Server port 6080",
"SecurityGroupIngress" : [ {
"IpProtocol" : "tcp",
"FromPort" : "22",
"ToPort" : "22",
"CidrIp" : "0.0.0.0/0"
},
{
"IpProtocol" : "tcp",
"FromPort" : "80",
"ToPort" : "80",
"CidrIp" : "0.0.0.0/0"
},
{
"IpProtocol" : "tcp",
"FromPort" : "6443",
"ToPort" : "6443",
"CidrIp" : "0.0.0.0/0"
},
{
"IpProtocol" : "tcp",
"FromPort" : "6080",
"ToPort" : "6080",
"CidrIp" : "0.0.0.0/0"
} ]
}
},
"MyVolume" : {
"Type" : "AWS::EC2::VolumeAttachment",
"Properties" : {
"InstanceId" : { "Ref" : "Ec2Instance" },
"VolumeId" : { "Ref" : "MyVolID" },
"Device" : "/dev/sdh"
}
}
},
"Outputs" : {
"InstanceId" : {
"Description" : "InstanceId of the newly created EC2 instance",
"Value" : { "Ref" : "Ec2Instance" }
}
}
}
Amazon Web Services – Mapping and GeoSpatial Analysis in Amazon Web Services Using ArcGIS August 2012
Page 33 of 33
Appendix D
Setting Up Alerts With Amazon CloudWatch The Amazon CloudWatch Monitoring Scripts for Linux are sample scripts for monitoring memory and disk space utilization on your Amazon EC2 instances running Linux. These scripts are designed for you to run on your Amazon EC2 instances running Linux, where you can configure them to report memory and disk space usage metrics to Amazon
CloudWatch. After the metrics are submitted to CloudWatch, you can view graphs, calculate statistics and set alarms on them in the Amazon CloudWatch console.
Available metrics include:
Memory Utilization (%)
Memory Used (MB)
Memory Available (MB)
Swap Utilization (%)
Swap Used (MB)
Disk Space Utilization (%)
Disk Space Used (GB)
Disk Space Available (GB)
The scripts submit memory and disk space usage metrics as Amazon CloudWatch custom metrics. Standard Amazon CloudWatch free tier quantities and pricing apply. This sample is not supported by AWS, but we appreciate all feedback, comments, and questions that you post to the AWS forums.
For information about using the scripts, including setup and configuration, go to Amazon CloudWatch Monitoring Scripts for Linux documentation in the Amazon CloudWatch Developer Guide.