Embed Size (px)
Citation preview

Hungry for Games in Augmented Reality? Use
Primary Sources!
Presented by:
Janet Austiff, Dr. Mary Lanigan, Laura Lubben,
Susan Lynch and Carol Meyer
Facilitated by:
Dr. Lucianne Brown
Director of TPS-‐GSU
ARIS was created by the
Games, Learning and Society Research Community under the Direction of David Gagnon
at the University of Wisconsin-‐Madison

Teaching with Primary Sources Governors State University Consortium Program Manual designed and written by Janet Austiff and Susan Lynch: TPS-‐GSU Program Specialists
2
Pre-‐requisite Information There are terms and software that will be used within this manual. To make sure all users are familiar with both these items, definitions and technological requirements are listed below.
Place-‐Based Learning – Library of Congress -‐ ARIS Place based learning is an educational approach to curriculum development and school community relations that draws upon local cultural, environmental, economic and political concerns. It captures students’ imaginations and advances environmental stewardship and civic engagement.
The Libray of Congress, which is the national library of the United States, contains the world’s most extensive collection of primary shources that is housed under nine collections including:
• American Memory; • Prints and Photographs; • Historic Newspapers; • Performing Arts; • Veterns History; • Sound Recording; • Films; • Maps; and, • Manuscripts.
These collections can be viewed online at www.loc.gov. Educators can incorporate many of the primary sources found on the Library of Congress web site into their instruction, including the game they will create using this manual.
ARIS, which stands for Augmented Reality and Interactive Storytelling, is an open-source platform used to create mobile tours, games, and digital stories that can be played on Apple devices. Technological Pre-‐requisites You will need: (1) a computer with Internet access to create the game; and, (2) a mobile device such as an iPad, iTouch, iPhone with internet access to play the game.
Teaching with Primary Sources Governors State University Consortium Program Manual designed and written by Janet Austiff and Susan Lynch: TPS-‐GSU Program Specialists
3
Introduction The purpose of this step-by-step training manual is to show participants how to create their own game using primary sources from the Library of Congress and ARIS software (Augmented Reality and Interactive Storytelling). The benefit of creating your own game is to provide students with place-based activities, which makes education come alive. Moreover, this allows students to interact in greater ways with the subject-matter and it allows teachers to incorporate pedagogical tools that help students personalize learning to fit their unique styles of absorbing information.
Objectives At the end of this training, you will be able to:
• Create a new ARIS game; • Add characters to the game; • Add items to the game; • Incorporate quests into the game; • Use the Notebook; and, • Play your ARIS game that you created.

Teaching with Primary Sources Governors State University Consortium Program Manual designed and written by Janet Austiff and Susan Lynch: TPS-‐GSU Program Specialists
4
Part I Designing the Game Page 5 ARIS mobile learning activity design Page 7 Part II Creating the Game Create a new game Page 11 Create a starting point Page 13 Add Object <Plaque> Page 13 Game Settings Page 14 Adding a Character Add Object <Character> Page 16 Script / conversations Page 16 Requirements Page 17 Adding an Item Add Object <Item> Page 21 Media Upload Page 22 Adding a Quest To Show Page 27 To Complete Page 29 Using the Notebook Setup Page 30 Tags Page 30 Comments and Likes Page 31 Part III Playing the Game Page 33

Teaching with Primary Sources Governors State University Consortium Program Manual designed and written by Janet Austiff and Susan Lynch: TPS-‐GSU Program Specialists
5
Part 1: Designing the game Investigative Question (s): Guide the exploration of a topic or concept
Player/Student Objective: select one or more or create your own • To collect • To find • To identify • To investigate • To follow
Common Core Standards: How will your learning activity be played? Guided tour, scavenger hunt, clue search, interactive storytelling, game, other

Teaching with Primary Sources Governors State University Consortium Program Manual designed and written by Janet Austiff and Susan Lynch: TPS-‐GSU Program Specialists
6
Levels of play / accomplishments / tasks Will these be sequential or simultaneous? Level 1: Objective: To finish this level / Quest, player must:
Level 2: Objective: To finish this level / Quest, player must:
Level 3: Objective: To finish this level / Quest, player must:

Teaching with Primary Sources Governors State University Consortium Program Manual designed and written by Janet Austiff and Susan Lynch: TPS-‐GSU Program Specialists
7
ARIS Mobile Learning Activity Design
Narrative -‐-‐ what story do you want to tell?
Elements
Setting • When and where does the story take place? • What is the role of the player?
http://www.loc.gov/pictures/item/2010630615
Characters • Who does the player meet? • Are they historical compositions or fictitious?
http://www.loc.gov/pictures/item/2010647151
Teaching with Primary Sources Governors State University Consortium Program Manual designed and written by Janet Austiff and Susan Lynch: TPS-‐GSU Program Specialists
8
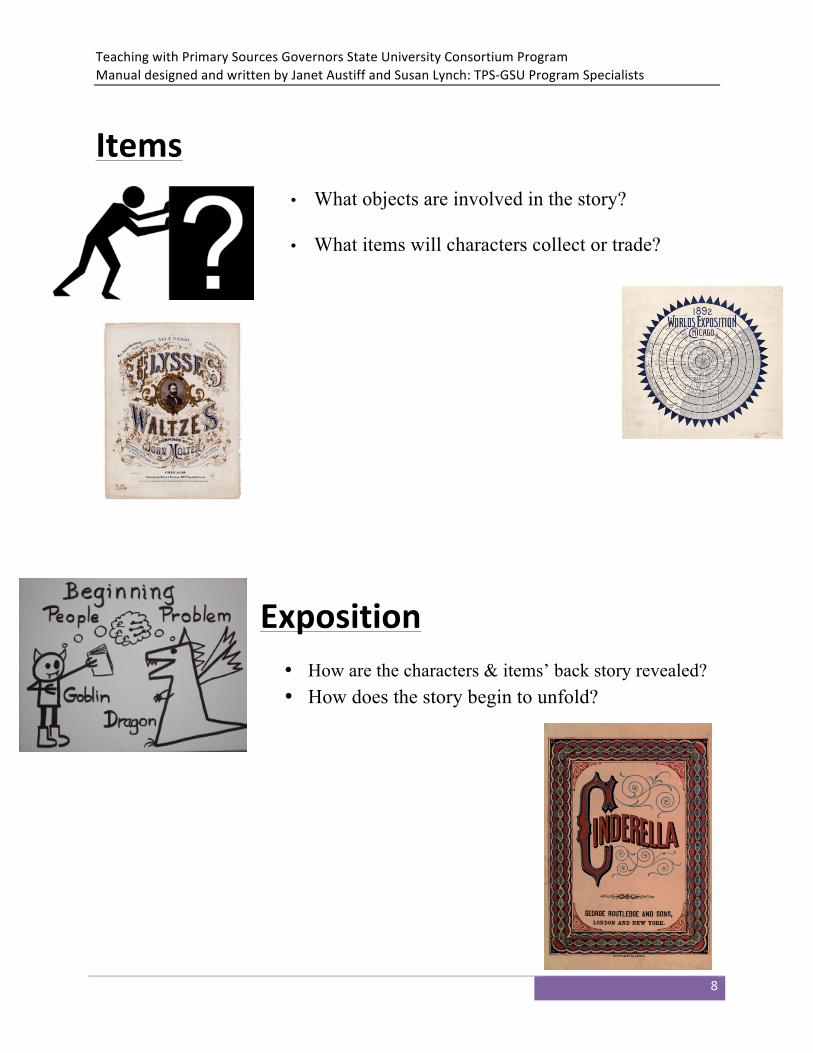
Items • What objects are involved in the story?
• What items will characters collect or trade?
Exposition • How are the characters & items’ back story revealed? • How does the story begin to unfold?

Teaching with Primary Sources Governors State University Consortium Program Manual designed and written by Janet Austiff and Susan Lynch: TPS-‐GSU Program Specialists
9
Events -‐-‐ Rising Action • What events happen to the
player, involving characters and objects?
• How does the story build excitement and interest moving toward the climax?
http://lccn.loc.gov/82196794
Conflict (s) • What ideas, resources, futures are contested by
the character? • Man vs. Nature • Man vs. Man • Man vs. Self • Man vs. World
http://hdl.loc.gov/loc.pnp/var.1422

Teaching with Primary Sources Governors State University Consortium Program Manual designed and written by Janet Austiff and Susan Lynch: TPS-‐GSU Program Specialists
10
Choices • What choices are available to
the character? • What consequences follow?
Climax • What choices are available to the character?
• What consequences follow?
LC-‐MSS-‐77909-‐1
Resolution • What happens after the climax?
• What is the scope of what’s being explored?

Teaching with Primary Sources Governors State University Consortium Program Manual designed and written by Janet Austiff and Susan Lynch: TPS-‐GSU Program Specialists
11
Part 2: Creating the game 1. At a computer with internet access, go to the following
website: www.arisgames.org/editor 2. Existing users login here. First time users will create registration information now. In the lower left corner of the window, press Need To Register?
The Register For Account window is displayed. Type into the appropriate fields, a Username and Password. Re enter the password in the field Confirm. Enter an e-mail address. Optionally, to save this information on this computer, click in the Remember Me box to place a checkmark.
Once all the information is entered press Register! in the lower right corner of the box. The Successfully Registered message should appear.
3. In the center of the screen is the Create Or Select Game window. Click the tab at the top of the box, Create New Game. The following box will appear:
Enter desired information into the two fields.
Name of Game: Title of work, appears in game selection window
Start title of game with LOC: Game Title. For example, LOC: Cruising Chicago
Game Description: brief information about the game, appears on main selection screen for game.
Press Create Game!

Teaching with Primary Sources Governors State University Consortium Program Manual designed and written by Janet Austiff and Susan Lynch: TPS-‐GSU Program Specialists
12
The message, “Successfully Created Game,” should appear on the screen. Press OK to begin game design.
The Game Editor Screen is presented. It has two basic parts, Game Objects and the map.
Move your map to the starting point of your game, for example, Chicago, IL.
Suggestion: use Map Controls, Location Search in Google Maps at bottom of page.

Teaching with Primary Sources Governors State University Consortium Program Manual designed and written by Janet Austiff and Susan Lynch: TPS-‐GSU Program Specialists
13
Create a starting point
4. Click the Add Object button in lower left corner of the screen. Select Plaque from the list. A plaque is information in a space.
An Unnamed Plaque will appear in the Objects list. Double click Unnamed plaque to open the Plaque editor.
Icon picker – Designers choice of image, it will display on Object list to the left. Press Icon Picker, select from existing list or press Upload New. The Media Upload window appears; enter a name and the location of the file. Press Upload.
Media picker –selection that appears on a players screen (choices: image, audio, video). Press Media Picker, highlight choice/type (image, audio, and video) Select from existing list or press Upload New. The Media Upload window appears; enter a name and the location of the file. Press Upload.
Plaque Name – enter a title for the opening screen into this field. This is the first title a player sees when starting the game.
Content – enter the game greeting to go along with Plaque title (appears when player starts the game).
Change Player Inventory when Viewed – allows designer to “give” player an item to use in the game. We will come back to this option.

Teaching with Primary Sources Governors State University Consortium Program Manual designed and written by Janet Austiff and Susan Lynch: TPS-‐GSU Program Specialists
14
Game Settings In the upper left corner of the screen, above the objects listing, are several buttons.
5. Select Game Settings. The Game Settings screen is presented. The Settings tab, has fields that are important to set up now. The Name and Description fields are copied from the original game setup screen. They may be edited at them at this time, if desired.
Hint:
The Icon Picker and Splash Screen Picker would be great places to put images from the Library of Congress that symbolizes this project.
• The image chosen for the Icon displays on the Game Listing screen once players have logged into ARIS.
• The Splash Screen is the image that displays when the game is selected, with the description.
• Introduction Plaque – Select the title of the welcome plaque from this drop down list. The plaque becomes the first screen the player sees after selecting the game.
• Ending Plaque – return here to enter association to this plaque once game creation is finished.
Notice the check box option for “Game ready to be published/ rated.” We’re not ready yet! Be sure to press Save and Close.

Teaching with Primary Sources Governors State University Consortium Program Manual designed and written by Janet Austiff and Susan Lynch: TPS-‐GSU Program Specialists
15
Other tabs in game settings:
Config – Allows designer to allow by placing a checkmark in the box, different options for the learning activity game. Options within the Notebook, Inventory, and Map. Add/Remove Editor – Allows designer to add or remove co-authors/editors to the game. If you would like our assistance, feel free to add [email protected] or [email protected]
Tabs – Allows designer to select which options appear at the bottom of the iDevice screen for players to select. Selecting the icon “removes” it from the players screen list. Currently, four will display, and the More option is used to see the rest. You may also rearrange the order they appear to the user in. Drag and drop the icons to move them around.
Links – this tab brings two Launch options:
Launch Web Backpack – this allows designer to see all content entered for game. Launch Web Notebook – this allows designer to see, on a Google Map or list, all the notebook entries made into the game. It can be viewed by Contributor or Tag
Help – this tab brings two options:
• Read the Manual • Join the Community

Teaching with Primary Sources Governors State University Consortium Program Manual designed and written by Janet Austiff and Susan Lynch: TPS-‐GSU Program Specialists
16
Adding a Character
The game is taking shape. As the designer, decide if you want to have a conversation with a player. Don’t forget to review the brainstorming notes to find an interesting character to add or a reference to a primary source from the Library of Congress.
6. In the lower left corner of the screen, press Add Object, select Character. An Unnamed character entry will appear in the object list. Double click Unnamed Character to open the Character Editor box.
Enter a name into the Character Name field. Press the Icon Picker button. This is the icon the player sees on the map (player will click on the image of the Icon Picker to view conversation). The Media Picker will be the image, audio, or video that the player sees once the player clicks on its icon. The Greeting Script is the text that will appear under the Media Picker on the screen. The Closing Script will be the last thing the player reads before leaving the game. Additionally, the designer can enter conversations between player and this character. The designer can allow set requirements for the conversation to trigger and exchange inventory items with players. We will review this later, once we’ve created Items.

Teaching with Primary Sources Governors State University Consortium Program Manual designed and written by Janet Austiff and Susan Lynch: TPS-‐GSU Program Specialists
17
To enter an additional conversations, press the plus sign in the lower right corner of the character editor window.
The bottom half of the character editor window has a table area listing conversation lines. The left column is titled Option. The system defaults “New Conversation” automatically into the field. Click into this field to type one portion of the conversation.
One “side” of the conversation is entered into the Option field. This is the player or gamer, the screen is titled “You.” The field, Script, is what the object character (guide) the designer has created is saying. Click into this field to type the other portion of the conversation. The game designer can add as many conversations as desired. When these conversations appear will depend upon Requirements and Exchanges entered here, through the next two fields. Entering Requirements for a script sets what a player must have in order to see and interact with the option selected. Try this: To set up a basic conversation after a player has viewed a plaque (game intro/ starting point), enter an additional conversation. Press the plus sign in the lower right corner of the character editor window. Next, click the plus (+) button under the heading Requires.
Teaching with Primary Sources Governors State University Consortium Program Manual designed and written by Janet Austiff and Susan Lynch: TPS-‐GSU Program Specialists
18
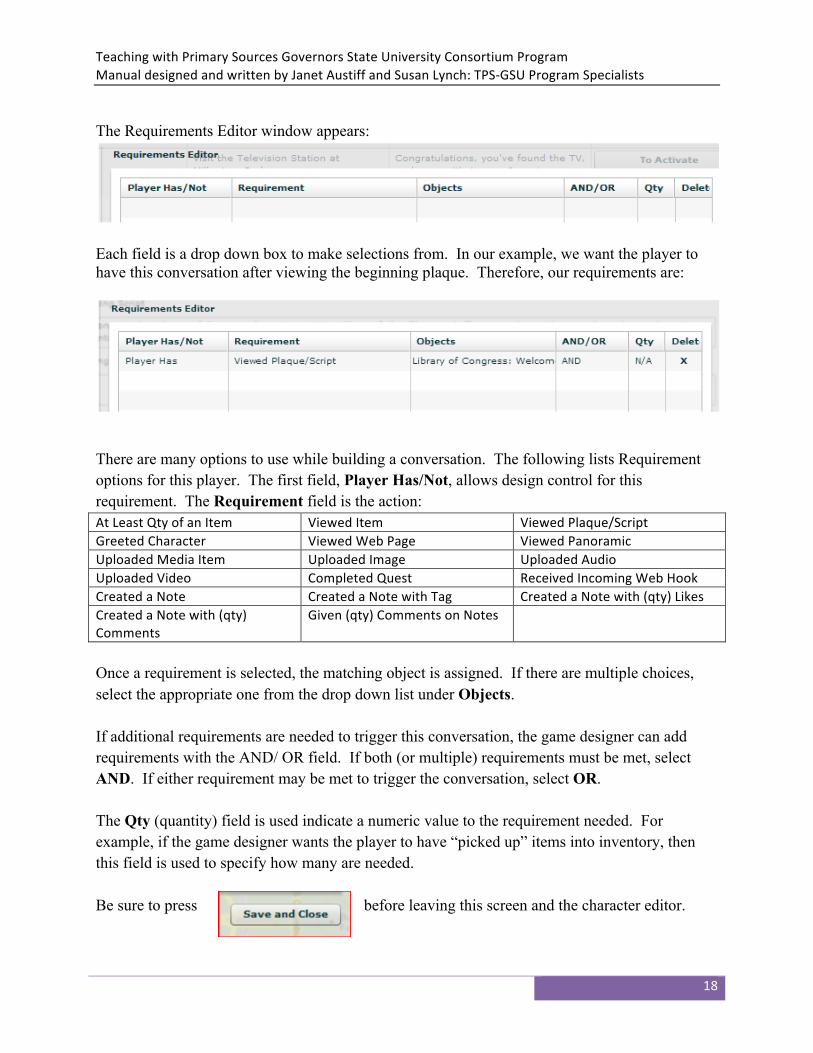
The Requirements Editor window appears:
Each field is a drop down box to make selections from. In our example, we want the player to have this conversation after viewing the beginning plaque. Therefore, our requirements are:
There are many options to use while building a conversation. The following lists Requirement options for this player. The first field, Player Has/Not, allows design control for this requirement. The Requirement field is the action: At Least Qty of an Item Viewed Item Viewed Plaque/Script Greeted Character Viewed Web Page Viewed Panoramic Uploaded Media Item Uploaded Image Uploaded Audio Uploaded Video Completed Quest Received Incoming Web Hook Created a Note Created a Note with Tag Created a Note with (qty) Likes Created a Note with (qty) Comments
Given (qty) Comments on Notes
Once a requirement is selected, the matching object is assigned. If there are multiple choices, select the appropriate one from the drop down list under Objects. If additional requirements are needed to trigger this conversation, the game designer can add requirements with the AND/ OR field. If both (or multiple) requirements must be met, select AND. If either requirement may be met to trigger the conversation, select OR. The Qty (quantity) field is used indicate a numeric value to the requirement needed. For example, if the game designer wants the player to have “picked up” items into inventory, then this field is used to specify how many are needed. Be sure to press before leaving this screen and the character editor.

Teaching with Primary Sources Governors State University Consortium Program Manual designed and written by Janet Austiff and Susan Lynch: TPS-‐GSU Program Specialists
19
Game playing notes: • When the player presses,
o Tap to Continue, they see a list of possible conversation topics (options) o Tap to Review, shows the player the last bit of conversation they just saw o Leave conversation which does what it says
• In all character conversations, pressing the “AA” icon in the title bar will expand the text
to fill the screen.
7. How to place a character in the game. Now that the character object is created, it’s time to place it in the game. Slowly drag the character icon from the Objects Listing window to the GPS location desired on the map. If the icon changes to a red circle with an X in it, try dragging more slowly.

Teaching with Primary Sources Governors State University Consortium Program Manual designed and written by Janet Austiff and Susan Lynch: TPS-‐GSU Program Specialists
20
The character’s tag is now displayed on the map where the game designer “dropped” the object. For example, Game Guide was placed in Washington, DC near the Capitol Building.
Double click the character icon on the map to open the Modify a Location window:
The field Label defaults from the character object name given originally. This is the information that displays on the map. If something else is desired, it can be changed here and left as the original in the object listing.
Nearby Range (m) is the radius for miscalculation when using GPS. A player may be within this zone and still qualify as on target to find and open the object.
Place a check mark in the field to activate these options:
• Hidden – this keeps the icon from displaying on the map.
• Auto Display – character automatically appears on the map
• Quick Travel – used to include characters when physically located somewhere else in the world, than where game is actually being played.
• Wiggle – the icon appears to move or wiggle on the screen to increase visibility to player. • Display Label on Map – the text from the field Label will display over the icon on the map.
This aides the player in keeping track of objects on the screen.
The designer can also setup Requirements to be met before a character is displayed. To do this, press the Edit Requirements button and add called for guidelines.
Be sure to press Save and Close before leaving this screen.

Teaching with Primary Sources Governors State University Consortium Program Manual designed and written by Janet Austiff and Susan Lynch: TPS-‐GSU Program Specialists
21
Adding Items The game is continuing to taking shape. Don’t forget to review the brainstorming notes to find an interesting object to add or a reference to a primary source from the Library of Congress. 8. Adding additional game items The game designer decides what items players will use in this game. For example, they could be requested to collect a picture of a 1940’s band from the Historical Society. Follow the directions below to add such an item.
In the lower left corner of the screen, press Add Object, then select Item. On the left side of the screen, an item has been added. Double click Unnamed Item (A) to open the Item Editor box.
First, the game designer will select an image to use in the Game Objects window associated with this Item. Press the Icon Picker (B) button to enter an image that player will see on the map representing this item. Select one from the list, or upload a new one. At this point, highlight one of the existing icon choices in the list. The name of the icon can be changed here, if desired. Press Select to confirm the choice. Later in the manual we will cover entering a custom option.
C B
A
Teaching with Primary Sources Governors State University Consortium Program Manual designed and written by Janet Austiff and Susan Lynch: TPS-‐GSU Program Specialists
22
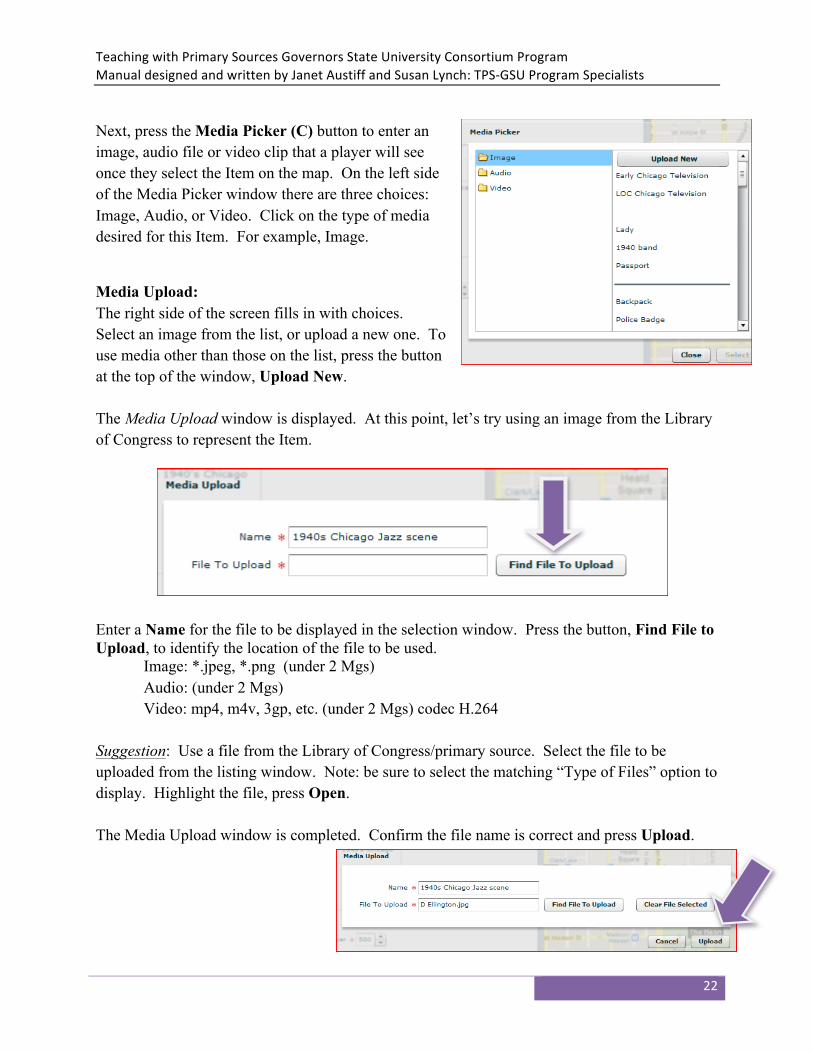
Next, press the Media Picker (C) button to enter an image, audio file or video clip that a player will see once they select the Item on the map. On the left side of the Media Picker window there are three choices: Image, Audio, or Video. Click on the type of media desired for this Item. For example, Image.
Media Upload: The right side of the screen fills in with choices. Select an image from the list, or upload a new one. To use media other than those on the list, press the button at the top of the window, Upload New. The Media Upload window is displayed. At this point, let’s try using an image from the Library of Congress to represent the Item. Enter a Name for the file to be displayed in the selection window. Press the button, Find File to Upload, to identify the location of the file to be used.
Image: *.jpeg, *.png (under 2 Mgs) Audio: (under 2 Mgs) Video: mp4, m4v, 3gp, etc. (under 2 Mgs) codec H.264
Suggestion: Use a file from the Library of Congress/primary source. Select the file to be uploaded from the listing window. Note: be sure to select the matching “Type of Files” option to display. Highlight the file, press Open. The Media Upload window is completed. Confirm the file name is correct and press Upload.

Teaching with Primary Sources Governors State University Consortium Program Manual designed and written by Janet Austiff and Susan Lynch: TPS-‐GSU Program Specialists
23
The Item Editor window is returned. The Icon and Media choices selected are displayed. Next, enter an Item Name, this will appear on the map in the bubble with the icon. Type (of item
Normal – standard items Web –like normal items but can also link players to web pages via any URL. Attributes - cannot be dropped or destroyed, and are to be thought of as aspects of the player rather than things the player is carrying
The options below change with the selection. Select Normal. Enter the Description, or text that will appear as “details” under the media selection to the player on their screen. Button: Edit Item Tags. Press this to create a list of Tags, or identifiers, to be associated with the item, used in the Notebook. Weight per item. To limit the number of items collected by the player, enter a number, the Maximum Quantity Per Player. Type into the field or use the up and down arrows to set the amount. Droppable? Allows a player to release this item on the game map for another player to pickup. Click in the box to activate this option. Trade able? Allows a play to exchange this item for another item in another player’s inventory. Destroyable? Allows a player to destroy the items they pick up, removing it from the game program. Button: Make spawn. This option continues to recreate this item and place them in the game. To complete this work, press the button Save and Close in the lower right corner of the screen.

Teaching with Primary Sources Governors State University Consortium Program Manual designed and written by Janet Austiff and Susan Lynch: TPS-‐GSU Program Specialists
24
9. To place the Item on the Map: Slowly drag the item icon from the Objects Listing window to the GPS location desired as a location point on the map. Double click the Item icon to open the Modify a Location window: Enter the information to identify this Item. Label is the text that will appear in the bubble above the icon on the map.
Nearby Range (in meters) the distance around the GPS map location that a player can be located in and still “qualify” to pick up an item. <Not used with Quick Travel>
QR Code to be used for scanning access to this item also. Error Text: If player is out of range, this is the message they will see. Quantity: Change the answer value for Quantity to -1 for infinity. This value will ensure all players are able to use this item. Otherwise, the game may “run out” of this item. Place a check mark in the field to activate these options:
• Hidden – this keeps the icon from displaying on the map. ü Auto Display – character automatically appears on the map ü Quick Travel – used to include characters when physically located somewhere else in the
world, than where game is actually being played. ü Wiggle – the icon appears to move or wiggle on the screen to increase visibility to player. ü Display Label on Map – the text from the field Label will display over the icon on the map.
This aides the player in keeping track of objects on the screen.
The designer can also setup Requirements to be met before a character is displayed. To do this, press the Edit Requirements button and add called for guidelines.

Teaching with Primary Sources Governors State University Consortium Program Manual designed and written by Janet Austiff and Susan Lynch: TPS-‐GSU Program Specialists
25
These directions create an Item that appears on the map automatically. If the game designer wishes to have an Item appear only after “something” else has happened (ex: a conversation is held, an item is found, etc.) use the Edit Requirements option described next. Continue to add items, repeating this process, for all the items in your brainstorming list. Press Save and Close in the lower right corner to save the work entered.
Try this: To have an Item appear only after a player has picked up a different item, press the Edit Requirements button, then click the plus (+) button in the lower right corner of the screen.
The Requirements Editor window appears:
The first field, Player Has/Not, allows design control for this requirement.
A requirement defaults, click in this field to make a selection. There are seventeen choices available. This is how the designer activates the Item to appear. See the table following for possible action triggers. Select one option from the drop down list for the Requirements field. At Least Qty of an Item Viewed Item Viewed Plaque/Script Greeted Character Viewed Web Page Viewed Panoramic Uploaded Media Item Uploaded Image Uploaded Audio Uploaded Video Completed Quest Received Incoming Web Hook Created a Note Created a Note with Tag Created a Note with (qty) Likes Created a Note with (qty) Comments
Given (qty) Comments on Notes

Teaching with Primary Sources Governors State University Consortium Program Manual designed and written by Janet Austiff and Susan Lynch: TPS-‐GSU Program Specialists
26
In this example, the Item will appear after the player has picked up the Item – picture of Chicago’s Jazz scene 1940s.
Once a requirement is selected, the matching object is assigned. If there are multiple choices, select the appropriate one from the drop down list under Objects.
If additional requirements are needed to trigger this conversation, the game designer can add requirements with the AND/ OR field. If both (or multiple) requirements must be met, select AND. If either requirement may be met to trigger the conversation, select OR.
The Qty (quantity) field is used indicate a numeric value to the requirement needed. For example, if the game designer wants the player to have “picked up” items into inventory, then this field is used to specify how many are needed. Delet – removes or deletes the requirement from the game. To add additional requirements, press the plus sign again and repeat this process for multiple requirements, if desired. Be sure to press Save and Close before leaving this screen and the Item editor.

Teaching with Primary Sources Governors State University Consortium Program Manual designed and written by Janet Austiff and Susan Lynch: TPS-‐GSU Program Specialists
27
Quests A Quest is a set of tasks the player accomplishes within the game, similar to a level in video games. The Quest screen can be used to give players information about what to do next (Active Quests) or what they have already done (Completed Quests). 10. From the Game Objects window, select the Quest
Editor button. Next, press the plus [+] sign in the lower right corner of the Quest Editor window to add a quest. The Quests Editor screen appears:
• Click in the Title field to enter text. The Title is the text or name that appears to the player as a header in the Quests screen. Press the Tab key to move to the next fields.
• Text when Incomplete: These are the words that appear on the players screen when the
Quest is begun. Suggestion: give instructions to the player about what to do in the game.
• Incomplete Media o Icon media - o Media
• Text when Complete: These are the words that appear on the players screen once they finish
the requirements of the Quest. Suggestion: congratulate the player on their success! • Complete Media
o Icon media o Media
• Notif Style – Where the notification will appear, across the top bar or full screen. • Requirements - The game designer can set requirements, or rules, for each quest.
To Show (activation) requirements are things that must happen before the Quest begins. To Complete (finish) requirements are things that must happen before the Quest is finished.

Teaching with Primary Sources Governors State University Consortium Program Manual designed and written by Janet Austiff and Susan Lynch: TPS-‐GSU Program Specialists
28
Quest Requirements continued--
Press the To Show button to bring up the Requirements Editor window. These are the requirements or “rules” that must be met or happen for the Quest to appear in the Active Quests window to the player.
Press the plus [+] sign in the lower right corner of the Requirements Editor window. The Requirements Editor window has the designer enter what the player has to do prior to having the Quest appear in the game. There is a drop down box to select possible Requirement actions from.
For example, Quest 1: player will be instructed to visit and pick up the Item –ticket to the Music Festival at the White House. In order for this Quest to appear in the game screen, the designer wants player to complete the first quest (Music Example). First, there must be a ticket (Item) available to “pick up.” Add Object, Item To set these requirements, use the drop down list in the Requirements field to select the action necessary (i.e. Completed Quest, view plaque, have conversation). Next, select the matching Object from the appropriate list. Only items create prior to opening this window are available. All choice of the appropriate type will appear to select. To enter another Requirement, press the plus [+] sign in the lower right corner.
Teaching with Primary Sources Governors State University Consortium Program Manual designed and written by Janet Austiff and Susan Lynch: TPS-‐GSU Program Specialists
29
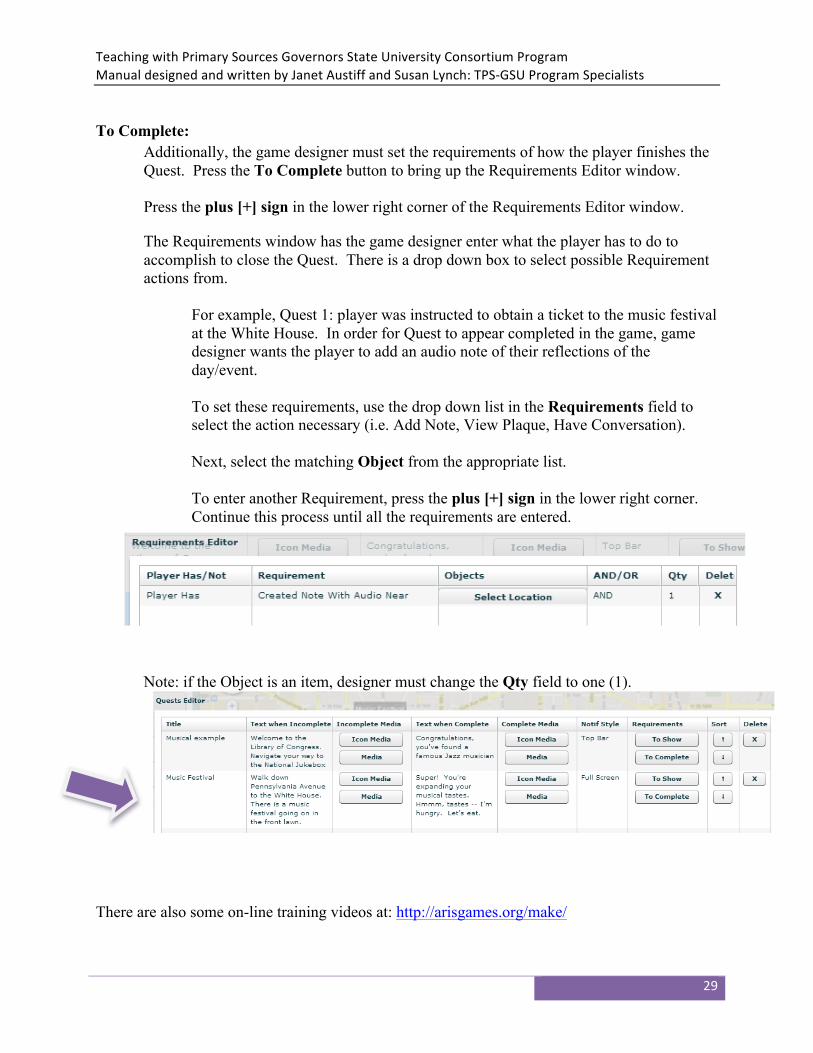
To Complete: Additionally, the game designer must set the requirements of how the player finishes the Quest. Press the To Complete button to bring up the Requirements Editor window.
Press the plus [+] sign in the lower right corner of the Requirements Editor window.
The Requirements window has the game designer enter what the player has to do to accomplish to close the Quest. There is a drop down box to select possible Requirement actions from.
For example, Quest 1: player was instructed to obtain a ticket to the music festival at the White House. In order for Quest to appear completed in the game, game designer wants the player to add an audio note of their reflections of the day/event. To set these requirements, use the drop down list in the Requirements field to select the action necessary (i.e. Add Note, View Plaque, Have Conversation). Next, select the matching Object from the appropriate list. To enter another Requirement, press the plus [+] sign in the lower right corner. Continue this process until all the requirements are entered.
Note: if the Object is an item, designer must change the Qty field to one (1).
There are also some on-line training videos at: http://arisgames.org/make/

Teaching with Primary Sources Governors State University Consortium Program Manual designed and written by Janet Austiff and Susan Lynch: TPS-‐GSU Program Specialists
30
Using the Notebook
The only setup requirements for the Notebook are Tags. These, identifiers allow player s to classify their entries and group them for submission into categories.
From the left side of the screen, in the Game Objects listing, select Note Tag Editor.
Type the desired name of a tag into the field at the top of the screen. Press the [+] plus sign to “create” it. As the designer enters tags, they are listed in the box below. Players can also create tags, if allowed by the game setup. Their tag list is at the bottom of the page. These tags will appear in the Notebook when players are classifying items they are saving.
While playing your game, the Notebook is a very powerful collection tool. Players can enter images from their camera, text from a document file or a voice recording. Each can be labeled or “tagged” to sort and organize later.
Photo text audio

Teaching with Primary Sources Governors State University Consortium Program Manual designed and written by Janet Austiff and Susan Lynch: TPS-‐GSU Program Specialists
31
Players can acccess the Notebook from their iDevice by making a selection from the icons at the bottom of the screen. If the designer has laid out the icons to include Notebook, it will appear in the row across the bottom. If not, select More and find it on the list.
Comments Likes

Teaching with Primary Sources Governors State University Consortium Program Manual designed and written by Janet Austiff and Susan Lynch: TPS-‐GSU Program Specialists
32
To use the materials collected, game designer can see all participants entries from their game design screen. On theleft side of the screen, select Game Settings. Next select the tab, Links. There are two options, Web Notebook and Web Backpack. A sample display of each is shown below. Launch Web Notebook –
Launch Web Backpack

Teaching with Primary Sources Governors State University Consortium Program Manual designed and written by Janet Austiff and Susan Lynch: TPS-‐GSU Program Specialists
33
Part 3: Playing the game Now it’s time to see how all the hard work has turned out!! Participants will need internet access to play the game.
From the mobile device, add the app for ARIS. Search the App Store for ARIS, iPhone Apps. Next, open ARIS app and login. First time users will need to press the Create Account button on the bottom of the screen. To create an account, participants will need:
o Username o Password o Email account address
Once these are entered, press Create Account to begin. Next, this message should appear: “Success Your new User was Created. Please login.” Press OK. Now, login using the newly created Username and Password.
The Select Game window is presented. Nearby games are displayed. At the bottom of the screen, there are distance options (100 m, 1 km, 50 km). Select the most appropriate for the game created. There are also other icons at the bottom of the screen: use the Search option to find games by title, Map to find games by locations and Recent to find games played previously. Press the screen to highlight the title of the game desired to play. The title screen will be displayed. Press Play Now to begin.
Each game will begin on a Quests screen. Play begins in an Active Quest. Read the information and play on! Once a quest is finished, it moves to the Completed Quests section of the display. The bottom of the screen has icons used throughout the game. Select Map and begin your quest!
The map opens to the current location of the participant.

Teaching with Primary Sources Governors State University Consortium Program Manual designed and written by Janet Austiff and Susan Lynch: TPS-‐GSU Program Specialists
34
Use the Decoder Indoors or from a distance, QR codes are used to tell ARIS your position. If you want to play a sample of some of our games and you are not in Madison, check out the sample codes we put in the Featured Projects pages.
NOTES:

Teaching with Primary Sources Governors State University Consortium Program Manual designed and written by Janet Austiff and Susan Lynch: TPS-‐GSU Program Specialists
35
Summary In this lesson you learned the prelimary steps needed to design a mobile game. You also learned how to create an ARIS game that included characters, items, and quests. After creating the game, you played it on your Apple device to see what worked and what still needs tweaking. In the future, you can continue to enhance your game or start fresh by creating a new game. You also can incorporate primary sources from the Library of Congress into these games as well as other educational materials you create for your students.
Resources The Library of Congress www.loc.gov ARIS http://arisgames.org/ Teaching with Primary Sources at GSU http://tps.govst.edu/