Embed Size (px)
Citation preview
Manual of Radiographic Technique
The World Health Organization is a specialized agency of the United Nations with primary responsibility for international health matters and public health. Through this organization, which was created in 1948, the health professions of some 165 countries exchange their knowledge and experience with the aim of making possible the attainment by all citizens of the world by the year 2000 of a level of health that will permit them to lead a socially and economically productive life.
By means of direct technical cooperation with its Member States, and by stimulating such cooperation among them, WHO promotes the development of comprehensive health services, the prevention and control of diseases, the improvement of environmental conditions, the development of health manpower, the coordination and development of biomedical and health services research, and the planning and implementation of health programmes.
These broad fields of endeavour encompass a wide variety of activities, such as developing systems of primary health care that reach the whole population of Member countries; promoting the health of mothers and children; combating malnutrition; controlling malaria and other communicable diseases including tuberculosis and leprosy; having achieved the eradication of smallpox, promoting mass immunization against a number of other preventable diseases; improving mental health; providing safe water supplies; and training health personnel of all categories.
Progress towards better health throughout the world also demands international cooperation in such matters as establishing international standards for biological substances, pesticides and pharmaceuticals; formulating environmental health criteria; recommending international nonproprietary names for drugs; administering the International Health Regulations; revising the International Classification of Diseases, Injuries, and Causes of Death; and collecting and disseminating health statistical information.
Further information on many aspects of WHO's work is presented in the Organization's publications.
WORLD HEALTH ORGANIZATION BASIC RADIOLOGICAL SYSTEM
MANUAL OF RADIOGRAPHIC TECHNIQUE
World Health Organization Basic Radiological System
Manual of Radiographic Technique
by
T. Holm University Hospital, Lund, Sweden
P.E.S. Palmer University of California, Davis,
California, United States of America
E. Lehtinen Radiation Medicine,
World Health Organization, Geneva, Switzerland
• WORLD HEALTH ORGANIZATION
GENEVA 1986
ISBN 92 4 154179 2
©World Health Organization 1986
Publications of the World Health Organization enjoy copyright protection in accordance with the provisions of Protocol 2 of the Universal Copyright Convention. For rights of reproduction or translation of WHO publications, in part or in toto, application should be made to the Office of Publications, World Health Organization, Geneva, Switzerland. The World Health Organization welcomes such applications.
The designations employed and the presentation of the material in this publication do not imply the expression of any opinion whatsoever on the part of the Secretariat of the World Health Organization concerning the legal status of any country, territory, city or area or of its authorities, or concerning the delimitation of its frontiers or boundaries.
The mention of specific companies or of certain manufacturers' products does not imply that they are endorsed or recommended by the World Health Organization in preference to others of a similar nature that are not mentioned. Errors and omissions excepted, the names of proprietary products are distinguished by initial capital letters.
The authors alone are responsible for the views expressed in this publication.
PRINTED IN SWITZERLAND
85/6488 - Atar - 10 000
CONTENTS
Preface ........................ .
Radiation protection: the risk of harm from X-rays Reactions to intravenous drugs used for urography First aid and patient care for the BRS operator
Explanations
Chest ....
Lungs and heart Ribs ...... . Infants weighing up to 10 kg-lungs and heart
Abdomen
General Urinary tract (kidney, ureters, bladder) Gall-bladder (cholecystography) Pregnancy .............. . Infants and small children weighing up to 15 kg-general
Head . . . . . . . . . . . .
Skull .......... . Sinuses, face, and nose Mandible
Spine ....
Cervical spine Cervicothoracic region Thoracic spine . . Lumbosacral spine
Arm ....
Clavicle Scapula Shoulder Humerus Elbow . Forearm . Wrist .. Scaphoid Hand Thumb and fingers
Leg ......... .
Pelvis and hip joints Femur Knee Patella Leg Ankle Foot and toes Heel ..... . Infants and small children-pelvis and hip joints
Exposure tables . . . . . . . . . . . . . . . . . . . .
Page
7
11 12 15
25
27
30 44 48
51
54 60 73 80 86
89
92 100 106
115
118 130 132 136
147
150 152 156 164 170 176 184 188 190 192
199
202 210 216 224 226 232 236 244 248
251
PREFACE
This Manual of Radiographic Technique is for use with the World Health Organization Basic Radiological System. Unlike most books on radiography, it is compiled with the assumption that the person who uses it-usually the BRS operator-has little knowledge of X-ray equipment or experience of how to X-ray a patient. No attempt is made to teach the theory of radiography; rather a visual sequence is presented which should be followed exactly, without deviation or personal variation. Although it can be used with any X-ray equipment, it is specifically designed for use with X-ray machines that comply with the WHO-BRS specification. After a short period of training the operator should be able to use the manual to carry out the techniques it illustrates.
The range of basic radiographic techniques described is sufficient to enable more that 90% of the problems diagnosable through radiography to be routinely examined. If the instructions are followed exactly, the resulting radiographs will be in standard projections, easily repeated for comparison, and understood by physicians and health workers throughout the world.
Descriptions of how to X-ray the urinary tract and the gall-bladder, both needing the help of a physician, are included. Techniques for fluoroscopy are not included because it is not possible to carry them out with the basic radiological system.
Since films and X-ray cassettes vary, the exposures required for each examination must be adjusted to local conditions by a fully qualified radiographer /X-ray technologist when the machine is installed. If the film-cassette combination is changed, readjustment of the exposure will be necessary for the best results.
Each technique has been tested on a number of basic radiological system units. Some are easier to carry out than others and it is hoped that all who use this manual will comment on their problems and experiences, particularly if a technique is found to be difficult or cannot be accurately reproduced. Many of the ideas communicated are new. It is, therefore, important for the members of the WHO-BRS Advisory Group 1 who worked on the manual to be informed of successes or failures, so that future editions can be corrected. Comments should be sent to the Chief Medical Officer, Radiation Medicine, World Health Organization, 1211 Geneva 27, Switzerland.
When used by trained radiographers, techniques more complex than those shown in this manual can be carried out with the basic radiological system, serving the particular needs of specialists in various fields of medicine.
The members of the WHO-BRS Advisory Group are grateful to all those who helped with advice and comments, particularly the staff of the Department of Radiology, University of Lund, Lund, Sweden, and the Department of Radiology, University of California, Davis, CA, United States of America.
1 The members of the WHO-BRS Advisory Group are as follows: Mr. E. Borg. Sana·a, Yemen; Professor W. P. Cockshott, McMaster University, Hamilton, Ontario, Canada; Dr. V. Hegedus, University of Copenhagen, Glostrup, Denmark; Dr. T. Holm, University Hospital, Lund, Sweden; Dr. J. J. Lyimo, Kilimanjaro Christian Medical Centre, Moshi, United Republic of Tanzania; Professor P. E. S. Palmer, University of California, Davis, CA, United States of America; and Professor E. Samuel, University of Edinburgh, Edinburgh, Scotland.
The Group was also responsible for compiling the technical specifications of the BRS, as well as a Manual of Radiographic Interpretation for General Practitioners and a Manual of Darkroom Technique, both published by WHO.
7
PLEASE READ THESE YELLOW PAGES AS SOON AS YOU CAN AND
BEFORE YOU REQUEST ANY X-RAY EXAMINATION NEEDING AN INJECTION OF A RADIOLOGICAL CONTRAST DRUG
• The yellow pages contain EMERGENCY instructions. • They tell you how to treat any drug reactions that may occur.
• It is the duty of every health care practitioner to train all BRS operators to recognize and manage any patient who has an adverse reaction to a drug.
(The same pages are included in the BRS Manual of Radiographic Interpretation for General Practitioners.)
(1) X-RAYS ARE ESPECIALLY DANGEROUS FOR THE DEVELOPING FETUS.
(2) TRY NOT TO X-RAY ANY FEMALE WHO HAS MISSED A MENSTRUAL PERIOD OR IS KNOWN TO BE PREGNANT, EXCEPT IN THE CASE OF ACUTE TRAUMA OR DISEASE. IN THAT EVENT ALWAYS SHIELD THE ABDOMEN WITH A LEAD APRON, EVEN WHEN X-RAYING A LIMB OR THE SKULL. EVEN WITH THE ABDOMEN SHIELDED TAKE AS FEW EXPOSURES AS POSSIBLE: TRY NOT TO HAVE TO REPEAT THE EXAMINATION.
(3) IF A FEMALE OF CHILD-BEARING AGE IS PRESENTED FOR AN X-RAY OF THE PELVIS OR ABDOMEN REFER TO THE DOCTOR TO SEE IF IT IS KNOWN WHETHER SHE IS PREGNANT OR HAS MISSED A PERIOD. IF THE ANSWER IS "YES" THE DOCTOR DECIDES WHETHER THE NECESSITY TO X-RAY OUTWEIGHS THE RISK INVOLVED.
9

RADIATION PROTECTION THE RISK OF HARM FROM X-RAYS
X-RAYS ARE ONLY DANGEROUS IF YOU ARE CARELESS.
Care means adhering to the following rules:
Stand behind the control panel when the X-ray exposure is made. Make sure that lead aprons and lead gloves are worn if the patient needs to be held. If possible, do not allow anyone else in the X-ray room. If other persons must be present, keep them behind the control panel when the exposure is made. When supplied, wear your film badge always. Have it checked regularly. Never take an X-ray unless ordered by a DOCTOR or other qualified medical person.
X-rays may cause harm. You cannot FEEL OR SEE THEM: you may not know you are in the X-ray beam, but REPEATED exposure to X-rays, even those that are scattered off the patient or the X-ray equipment, and even in small doses, can cause permanent damage to the health of the X-ray operator or anyone else. Remember again, it is not only the direct beam of X-rays that may be harmful, but also the scattered rays.
You must NEVER make an X-ray exposure when you are anywhere near the X-ray tube: you must always be behind the control panel. There you are safe.
You must NOT allow anyone except the patient to be in the X -ray room, unless the patient needs to be supported or a child needs to be held. When that is necessary, the parent or friend must wear a lead apron and lead gloves whenever he or she is near the patient while the X -ray is being taken. Do NOT let a nurse or any other member of the hospital staff hold a patient while an exposure is being made.
The risk for patients being X-rayed is very low because they are exposed to X-rays infrequently, and because only a small part of the body is exposed for each picture. But try to get all the details right the first time so that there is no need for a second exposure.
The greatest risk from X-rays is for the operator and the doctor and nurses, who may be exposed repeatedly over the years while they are working. But there is no danger if YOU and THEY ARE CAREFUL
X-RAYS MAY CAUSE HARM EVEN THOUGH YOU DO NOT SEE OR FEEL THEM.
11
12
REACTIONS TO INTRAVENOUS DRUGS USED FOR UROGRAPHY
Contrast drugs are used for urography (the kidneys, ureters, and bladder). THESE DRUGS MUST ONLY BE INJECTED BY A DOCTOR OR WITH THE DOCTOR'S PERMISSION. There must be a doctor in the hospital and immediately available whenever these drugs are given, until the X-ray examination is finished (although, provided the doctor can be reached quickly, he or she need not actually be in the X-ray room).
The drugs used in urography must be injected into a vein : they make it possible to see the kidneys, ureters, and bladder, which are normally invisible on radiographs. All these drugs are complex iodine compounds; they can produce reactions in the patient that range from mild to very serious, and can-in rare instances-even cause death.
Reactions to drugs can occur at the beginning of the injection, or shortly afterwards, or may even be delayed for 20-40 minutes after the injection. The reaction does not depend on how much of the drug has
- been injected; a small amount may cause as much reaction as a large amount. There is no way to test the patient before the injection.
Mild reactions are not uncommon (do not be misled by an epileptic fit), but very serious reactions are fortunately rare. Anyone may react: drug reactions are not specifically associated with any other form of allergy, although patients such as asthmatics may react more readily than those who have no history of allergy. No one can be sure that he will not react. If patients have had this type of X-ray examination before and have reacted, try to find out which drug was used. They are less likely to react a second time if a different contrast drug is injected. But when patients have reacted previously you must be ready for another reaction.
APPROPRIATE TREATMENT MUST ALWAYS BE READILY AVAILABLE (ANTIHISTAMINES, STEROIDS. EPINEPHRINE, A TROPINE, AND INTRA VENOUS SALINE) BEFORE CONTRAST DRUGS ARE INJECTED.
THE DRUGS USED FOR INTRA VENOUS CHOLANGIOGRAPHY ARE MORE LIKELY THAN OTHERS TO CAUSE REACTIONS; THE SAME TREATMENT APPLIES.
TWO BASIC RULES:
( 1) MAKE SURE THAT THE DRUGS ARE AVAILABLE FOR TREATMENT IMMEDIATELY BEFORE THE CONTRAST INJECTION.
(2) WHEN CONTRAST DRUGS HAVE BEEN INJECTED INTRAVENOUSLY. NEVER LEAVE THE PATIENT UNATTENDED UNTIL THE EXAMINATION IS COMPLETED AND THE PATIENT FEELS WELL. NO PATIENT WILL HAVE A SERIOUS REACTION AFTER 60 MINUTES.

BE WISE: IF THE PATIENT HAS A HISTORY OF REACTION TO PREVIOUS CONTRAST INJECTIONS OR A HISTORY OF SEVERE ALLERGY, REFER HIM TO A MAJOR HOSPITAL FOR THE EXAMINATION.
MAKE SURE THAT YOU HAVE INTRAVENOUS ATROPINE, ANTIHISTAMINE, INTRAVENOUS EPINEPHRINE, AND SOLUBLE STEROIDS AVAILABLE WITH SYRINGES IN OR CLOSE TO THE X-RAY ROOM WHENEVER CONTRAST DRUGS ARE BEING GIVEN.
MILP CONTRAST REACTIONS
The patient will complain of a sensation of heat and pressure in the abdomen, may sneeze, develop urticaria (raised patches on the skin), feel nauseous, and become restless.
Treatment
Reassure the patient. Tell him not to worry, the reaction will soon go away. Loosen the patient's clothing if it is tight. Tell the patient to take deep breaths in and out and to relax.
Stay with the patient and watch carefully until symptoms diminish. If the reaction does not improve in a few moments, send for a doctor or nurse.
STRONGER CONTRAST REACTIONS
The patient may vomit, become very short of breath (dyspnoea) and the skin may be pale. He may start to sweat and be very restless. The pulse may be rapid.
Treatment
Keep calm and reassure the patient. Raise the patient's head and shoulders if he is short of breath. If vomiting occurs, turn the patient's head to one side to prevent
aspiration of vomit. If there are signs of collapse (pale skin, sweating, rapid pulse) raise the
patient's feet and lower the head (if this is possible on the X-ray table). More important, KEEP THE PATIENT LYING DOWN.
Stay with the patient all the time. Send for qualified help if symptoms do not improve very quickly (after
a few minutes).
SEVERE CONTRAST REACTIONS
Pale skin, sweating, very shallow breathing, rapid and very weak pulse. Loss of consciousness, cardiac arrest.
SEVERE CONTRAST REACTIONS ARE AN EMERGENCY SITUATION. YOU MUST ACT QUICKLY.
Call for the doctor and nurse. Keep the patient warm and start artificial respiration if the patient stops breathing. If oxygen is available, give it to the patient if breathing is difficult. Make sure the airway is open. When the doctor and nurse arrive, tell them where the emergency drugs are kept.
13
14
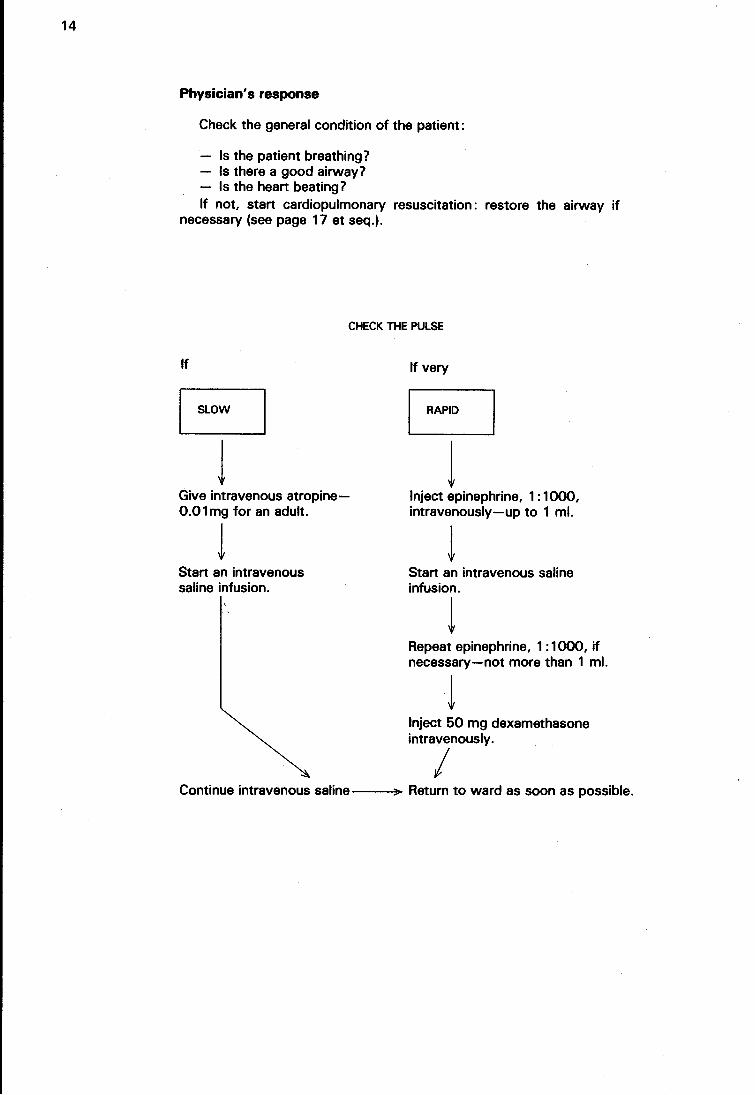
Physician's response
Check the general condition of the patient:
Is the patient breathing 1 Is there a good airway? Is the hean beating 1
If not, stan cardiopulmonary resuscitation : restore the airway if necessary (see page 17 et seq.).
CHECK THE PULSE
If
EJ l
Give intravenous atropine-0.0 1 mg for an adult.
l Stan an intravenous saline infusion.
If very
c::J l
Inject epinephrine, 1:1000, intravenously-up to 1 mi.
Stan an intravenous saline infusion.
1 Repeat epinephrine, 1 : 1 000, if necessary-not more than 1 mi.
l Inject 50 mg dexamethasone intravenously.
I Continue intravenous saline--~ Return to ward as soon as possible.
FIRST AID AND PATIENT CARE FOR THE BRS OPERATOR
INTRODUCTION
( 1) Remember
- You are responsible for the patient in the X-ray department.
(2) You must recognize when the patient's condition is getting worse and
- Call immediately for the nurse or doctor (or both). - Until help is available, you must know what to do and what NOT to
do, and you must know how to help the nurse and doctor when they arrive.
- Always work in a calm and quiet way and alw¥s reassure the patient. Even ordinary patients who are not very sick rna feel apprehensive in an X-ray room. Children may be very frightened. here is no need for this, because they are in no danger, but they are in strange surroundings and need to be reassured.
LOOKING AFTER THE PATIENT
- Seriously ill patients must be kept lying down, unless they are very short of breath and are more comfortable sitting up.
- If the patient is vomiting, turn him on to his side to keep the throat clear so that he can breathe. Do not move seriously injured patients, but turn their head only.
- Do not move accident patients more than is absolutely necessary. If you must move them, be careful not to make their injuries worse.
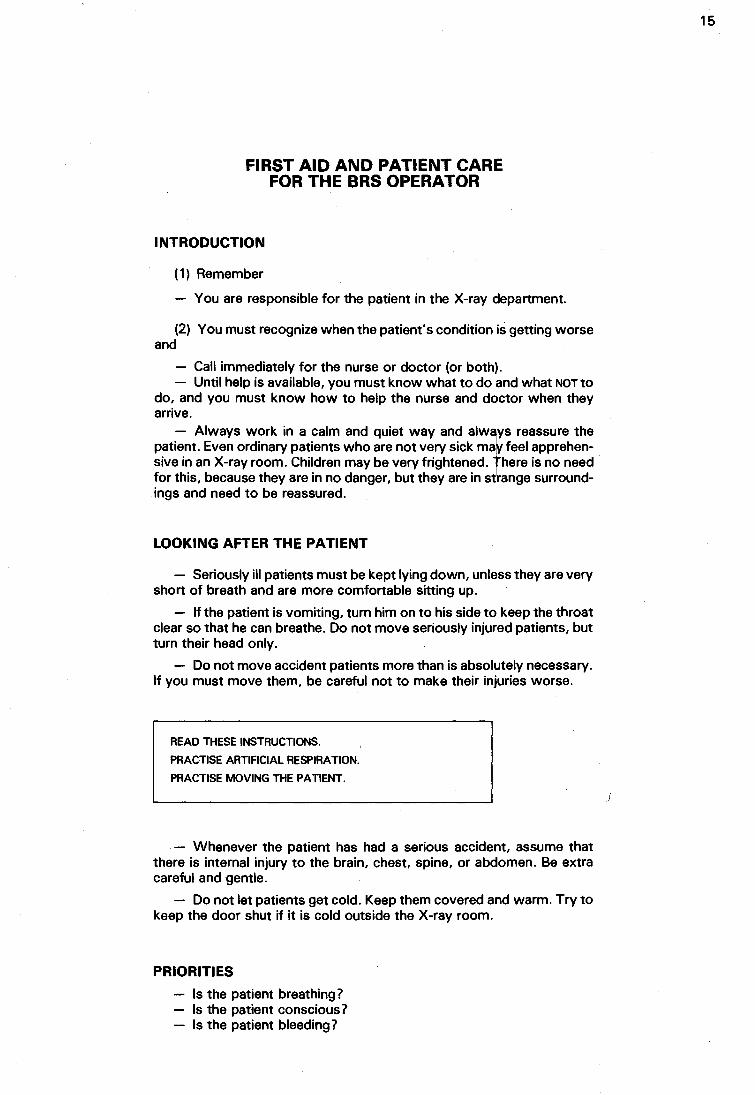
READ THESE INSTRUCTIONS.
PRACTISE ARTIFICIAL RESPIRATION.
PRACTISE MOVING THE PATIENT.
- Whenever the patient has had a serious accident, assume that there is internal injury to the brain, chest, spine, or abdomen. Be extra careful and gentle.
- Do not let patients get cold. Keep them covered and warm. Try to keep the door shut if it is cold outside the X-ray room.
PRIORITIES
Is the patient breathing? Is the patient conscious? Is the patient bleeding?
15
16
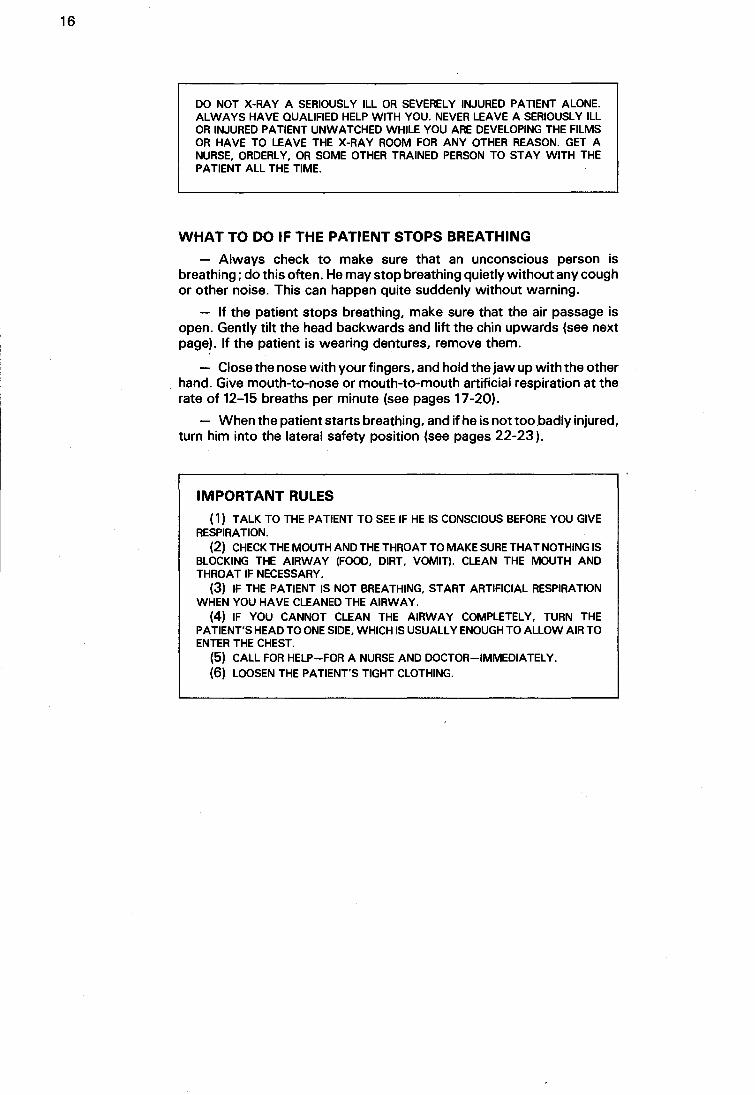
DO NOT X-RAY A SERIOUSLY ILL OR SEVERELY INJURED PATIENT ALONE. ALWAYS HAVE QUALIFIED HELP WITH YOU. NEVER LEAVE A SERIOUSLY ILL OR INJURED PATIENT UNWATCHED WHILE YOU ARE DEVELOPING THE FILMS OR HAVE TO LEAVE THE X-RAY ROOM FOR ANY OTHER REASON. GET A NURSE, ORDERLY, OR SOME OTHER TRAINED PERSON TO STAY WITH THE PATIENT ALL THE TIME.
WHAT TO DO IF THE PATIENT STOPS BREATHING
- Always check to make sure that an unconscious person is breathing; do this often. He may stop breathing quietly without any cough or other noise. This can happen quite suddenly without warning.
- If the patient stops breathing, make sure that the air passage is open. Gently tilt the head backwards and lift the chin upwards (see next page). If the patient is wearing dentures, remove them.
- Close the nose with your fingers, and hold the jaw up with the other hand. Give mouth-to-nose or mouth-to-mouth artificial respiration at the rate of 12-15 breaths per minute (see pages 17-20).
- When the patient starts breathing, and if he is not too badly injured, turn him into the lateral safety position (see pages 22-23 ).
IMPORTANT RULES
(1) TALK TO THE PATIENT TO SEE IF HE IS CONSCIOUS BEFORE YOU GIVE RESPIRATION.
(2) CHECK THE MOUTH AND THE THROAT TO MAKE SURE THAT NOTHING IS BLOCKING THE AIRWAY (FOOD, DIRT, VOMIT). CLEAN THE MOUTH AND THROAT IF NECESSARY.
(3) IF THE PATIENT IS NOT BREATHING, START ARTIFICIAL RESPIRATION WHEN YOU HAVE CLEANED THE AIRWAY.
(4) IF YOU CANNOT CLEAN THE AIRWAY COMPLETELY, TURN THE PATIENT'S HEAD TO ONE SIDE, WHICH IS USUALLY ENOUGH TO ALLOW AIR TO ENTER THE CHEST.
(5) CALL FOR HELP-FOR A NURSE AND DOCTOR-IMMEDIATELY.
(6) LOOSEN THE PATIENT'S TIGHT CLOTHING.
ARTIFICIAL RESPIRATION
Clearing the Airway
17
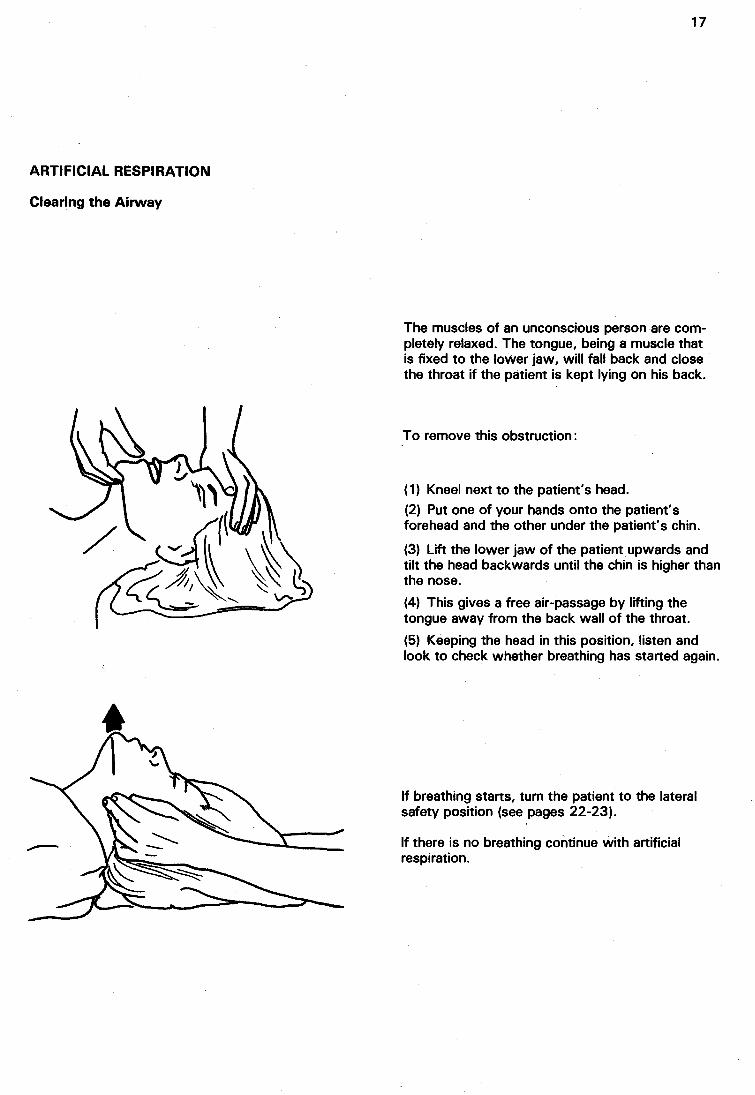
The muscles of an unconscious person are completely relaxed. The tongue, being a muscle that is fixed to the lower jaw, will fall back and close the throat if the patient is kept lying on his back.
To remove this obstruction :
(1) Kneel next to the patient's head.
(2) Put one of your hands onto the patient's forehead and the other under the patient's chin.
(3) Lift the lower jaw of the patient upwards and tilt the head backwards until the chin is higher than the nose.
(4) This gives a free air-passage by lifting the tongue away from the back wall of the throat.
(5) Keeping the head in this position, listen and look to check whether breathing has staned again.
If breathing stans, turn the patient to the lateral safety position (see pages 22-23).
If there is no breathing continue with anificial respiration.
18
You can revive a patient by blowing air through his nose into his lungs, or through his mouth into his lungs. For babies and small children (see page 20), this must be done very carefully.
You must practise this and know exactly how to carry out artificial respiration. You must also REMEMBER TO CLEAR THE AIRWAY befor.e you start (see previous page).
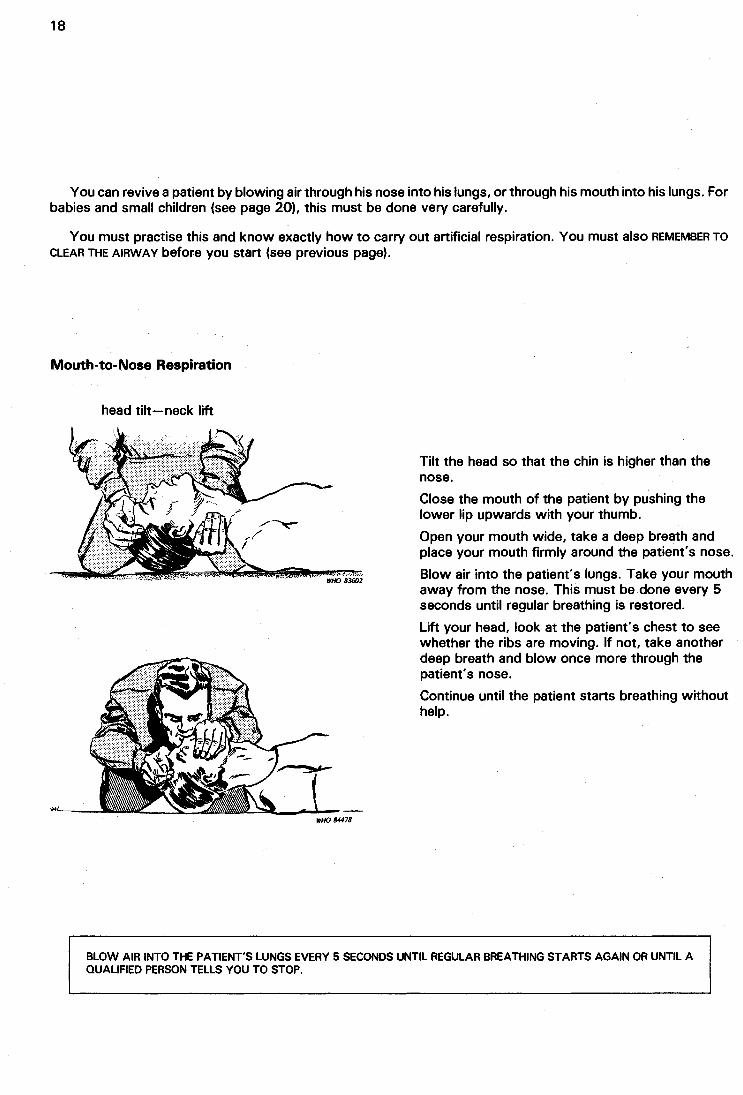
Mouth-to-Nose Respiration
head tilt-neck lift
Tilt the head so that the chin is higher than the nose.
Close the mouth of the patient by pushing the lower lip upwards with your thumb.
Open your mouth wide, take a deep breath and place your mouth firmly around the patient's nose.
Blow air into the patient's lungs. Take your mouth away from the nose. This must be done every 5 seconds until regular breathing is restored.
Lift your head, look at the patient's chest to see whether the ribs are moving. If not, take another deep breath and blow once more through the patient's nose.
Continue until the patient starts breathing without help.
BLOW AIR INTO THE PATIENT"S LUNGS EVERY 5 SECONDS UNTIL REGULAR BREATHING STARTS AGAIN OR UNTIL A QUALIFIED PERSON TELLS YOU TO STOP.
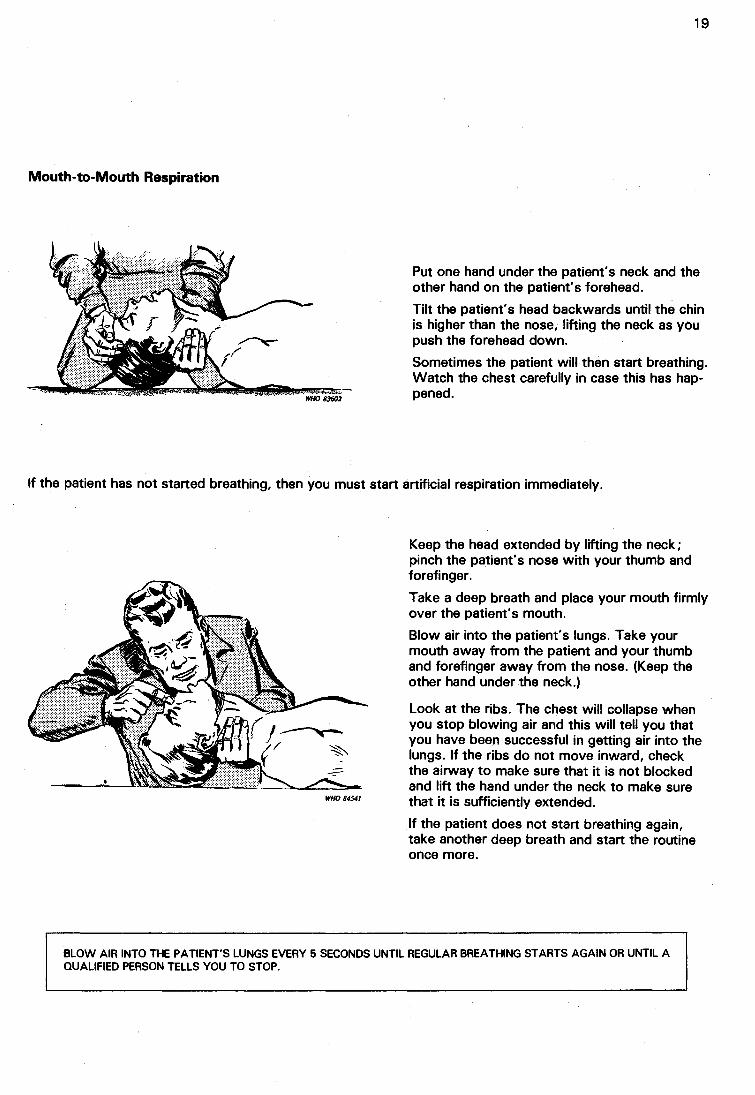
Mouth-to-Mouth Respiration
19
Put one hand under the patient's neck and the other hand on the patient's forehead.
Tilt the patient's head backwards until the chin is higher than the nose, lifting the neck as you push the forehead down.
Sometimes the patient will then start breathing. Watch the chest carefully in case this has happened.
If the patient has not started breathing, then you must start artificial respiration immediately.
WH084541
Keep the head extended by lifting the neck; pinch the patient's nose with your thumb and forefinger.
Take a deep breath and place your mouth firmly over the patient's mouth.
Blow air into the patient's lungs. Take your mouth away from the patient and your thumb and forefinger away from the nose. (Keep the other hand under the neck.)
Look at the ribs. The chest will collapse when you stop blowing air and this will tell you that you have been successful in getting air into the lungs. If the ribs do not move inward, check the airway to make sure that it is not blocked and lift the hand under the neck to make sure that it is sufficiently extended.
If the patient does not start breathing again, take another deep breath and start the routine once more.
BLOW AIR INTO THE PATIENT'S LUNGS EVERY 5 SECONDS UNTIL REGULAR BREATHING STARTS AGAIN OR UNTIL A QUALIFIED PERSON TELLS YOU TO STOP.
20
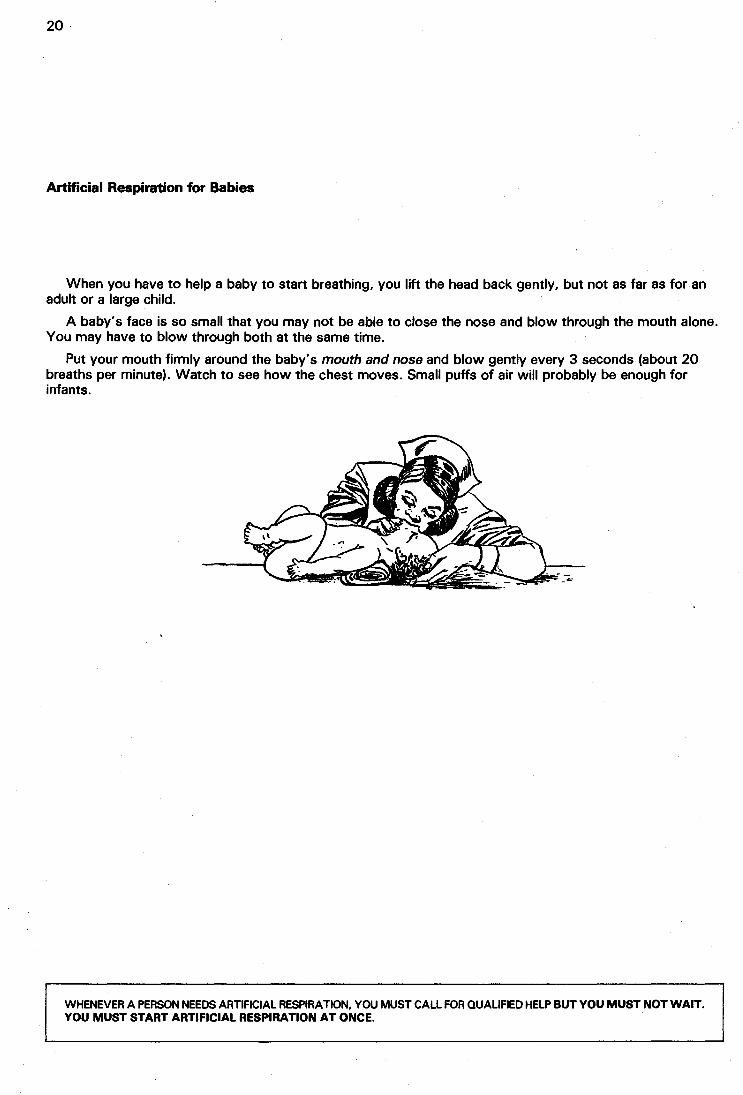
Artificial Respiration for Babies
When you have to help a baby to start breathing, you lift the head back gently, but not as far as for an adult or a large child.
A baby's face is so small that you may not be able to close the nose and blow through the mouth alone. You may have to blow through both at the same time.
Put your mouth firmly around the baby's mouth and nose and blow gently every 3 seconds (about 20 breaths per minute). Watch to see how the chest moves. Small puffs of air will probably be enough for infants.
WHENEVER A PERSON NEEDS ARTIFICIAL RESPIRATION, YOU MUST CALL FOR QUALIFIED HELP BUT YOU MUST NOT WAIT. YOU MUST START ARTIFICIAL RESPIRATION AT ONCE.
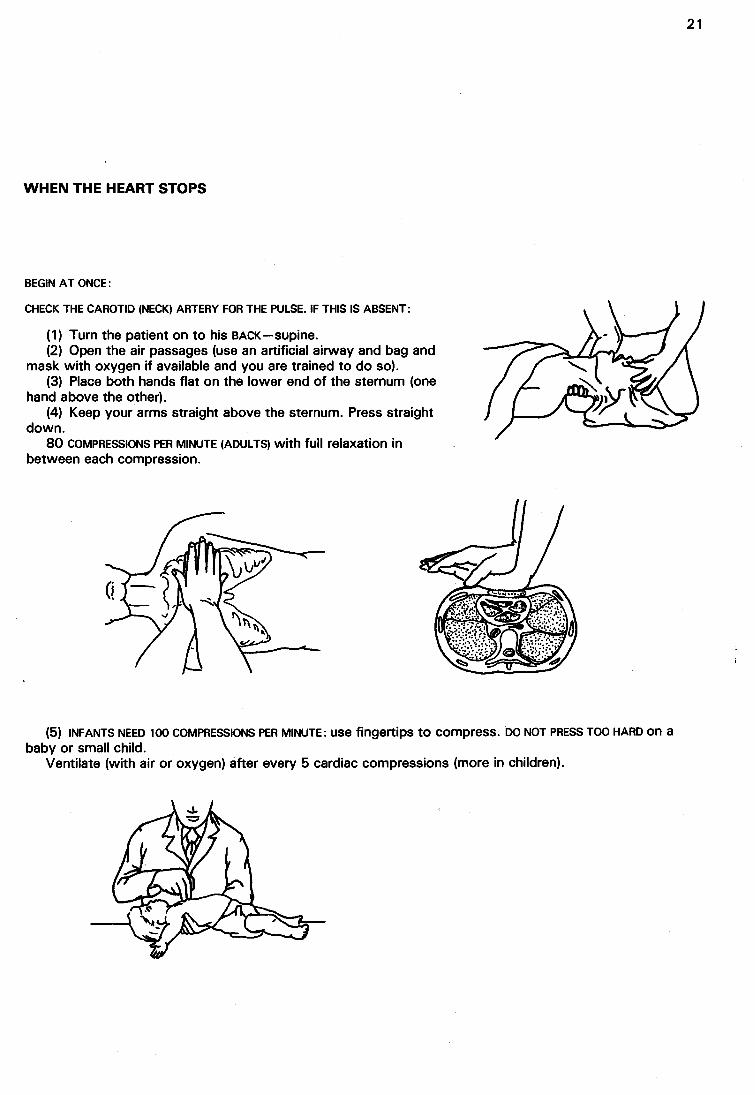
WHEN THE HEART STOPS
BEGIN AT ONCE:
CHECK THE CAROTID (NECK) ARTERY FOR THE PULSE. IF THIS IS ABSENT:
(1) Turn the patient on to his BACK-supine. (2) Open the air passages (use an artificial airway and bag and
mask with oxygen if available and you are trained to do so). (3) Place both hands flat on the lower end of the sternum (one
hand above the other). (4) Keep your arms straight above the sternum. Press straight
down. 80 COMPRESSIONS PER MINUTE (ADULTS) with full relaxation in
between each compression.
(5) INFANTS NEED 100 COMPRESSIONS PER MINUTE: use fingertips to compress. DO NOT PRESS TOO HARD on a baby or small child.
Ventilate (with air or oxygen) after every 5 cardiac compressions (more in children).
21
22
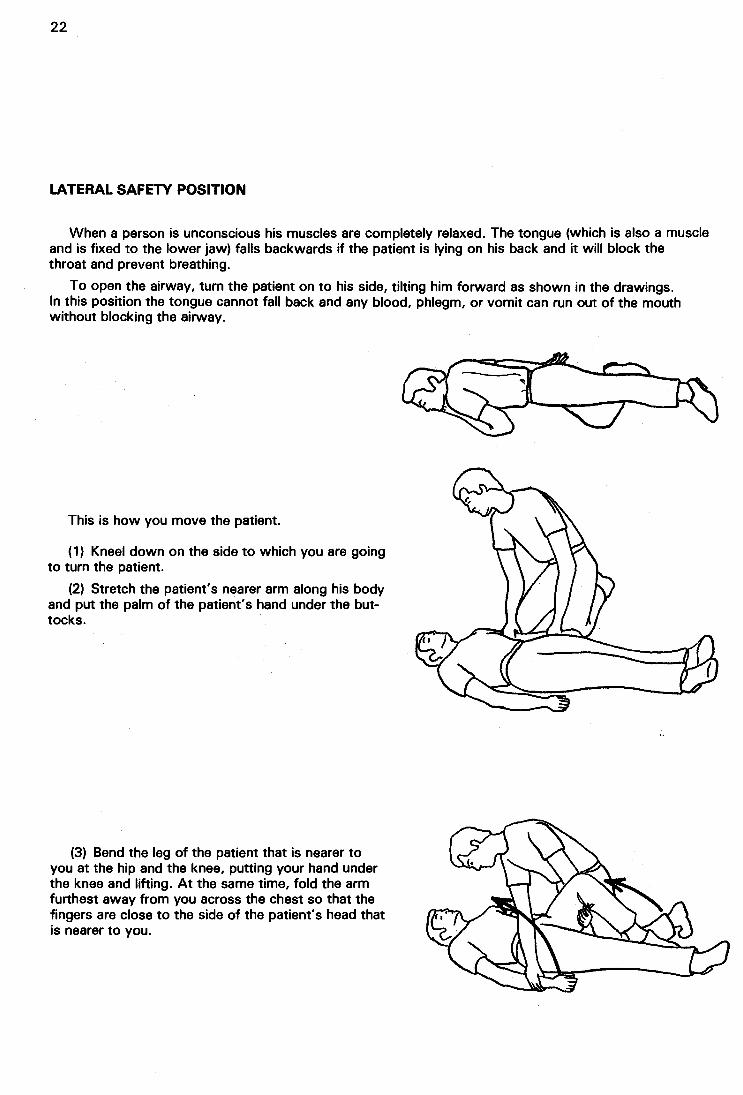
LATERAL SAFETY POSITION
When a person is unconscious his muscles are completely relaxed. The tongue (which is also a muscle and is fixed to the lower jaw) falls backwards if the patient is lying on his back and it will block the throat and prevent breathing.
To open the airway, turn the patient on to his side, tilting him forward as shown in the drawings. In this position the tongue cannot fall back and any blood, phlegm, or vomit can run out of the mouth without blocking the airway.
This is how you move the patient.
( 1) Kneel down on the side to which you are going to turn the patient.
(2) Stretch the patient's nearer arm along his body and put the palm of the patient's hand under the buttocks.
(3) Bend the leg of the patient that is nearer to you at the hip and the knee, putting your hand under the knee and lifting. At the same time, fold the arm furthest away from you across the chest so that the fingers are close to the side of the patient's head that is nearer to you.
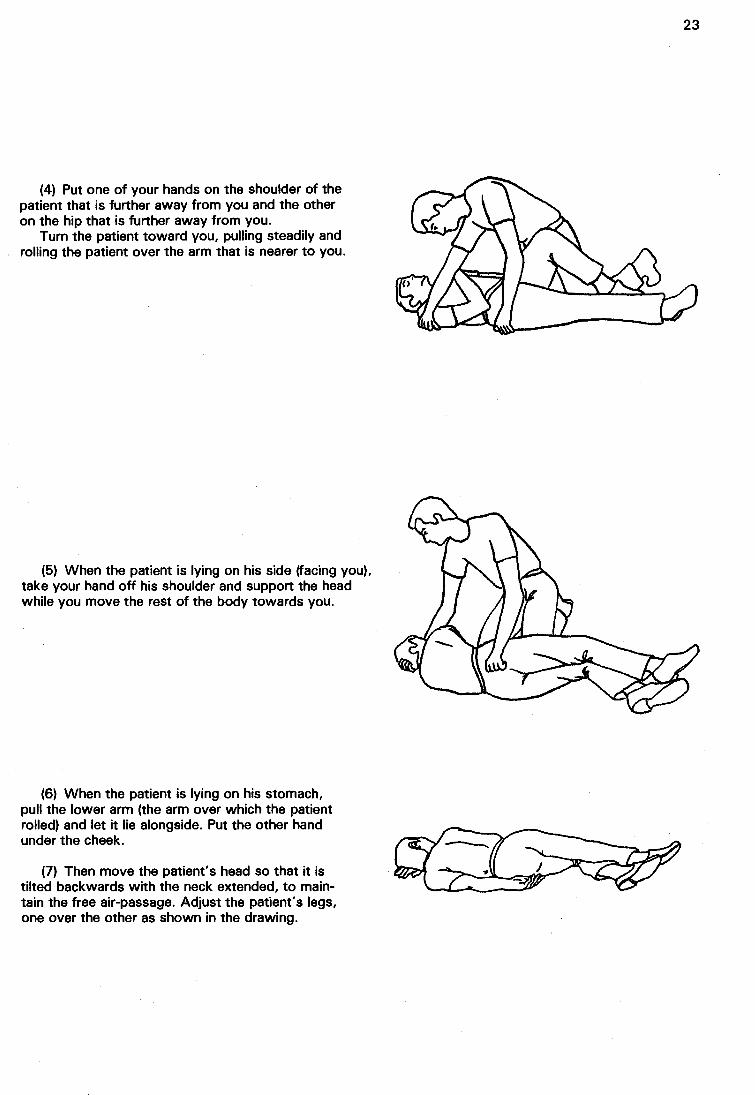
(4) Put one of your hands on the shoulder of the patient that is further away from you and the other on the hip that is further away from you.
Turn the patient toward you, pulling steadily and rolling the patient over the arm that is nearer to you.
(5) When the patient is lying on his side (facing you), take your hand off his shoulder and support the head while you move the rest of the body towards you.
(6) When the patient is lying on his stomach, pull the lower arm (the arm over which the patient rolled) and let it lie alongside. Put the other hand under the cheek.
(7) Then move the patient's head so that it is tilted backwards with the neck extended, to maintain the free air-passage. Adjust the patient's legs, one over the other as shown in the drawing.
23

24
NOTES
25
EXPLANATIONS
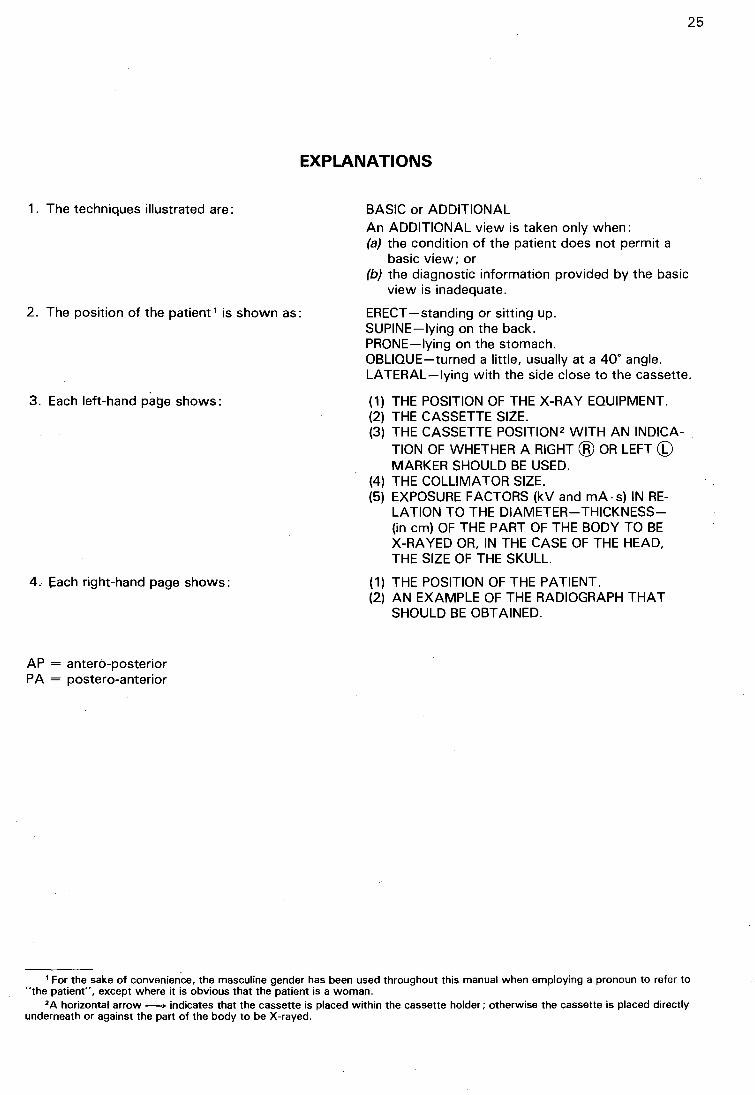
1 . The techniques illustrated are:
2. The position of the patient 1 is shown as:
3. Each left-hand pa9e shows:
4 .. !:ach right-hand page shows:
AP = antero-posterior PA = postero-anterior
BASIC or ADDITIONAL An ADDITIONAL view is taken only when : (a) the condition of the patient does not permit a
basic view; or (b) the diagnostic information provided by the basic
view is inadequate.
ERECT -standing or sitting up. SUPINE-lying on the back. PRONE-lying on the stomach. OBLIQUE-turned a little, usually at a 40° angle. LATERAL-lying with the side close to the cassette.
(1) THE POSITION OF THE X-RAY EQUIPMENT. (2) THE CASSETTE SIZE. (3) THE CASSETTE POSITION 2 WITH AN INDICA
TION OF WHETHER A RIGHT @ OR LEFT (b) MARKER SHOULD BE USED.
(4) THE COLLIMATOR SIZE. (5) EXPOSURE FACTORS (kV and mA · s) IN RE
LATION TO THE DIAMETER-THICKNESS(in em) OF THE PART OF THE BODY TO BE X-RAYED OR, IN THE CASE OF THE HEAD, THE SIZE OF THE SKULL.
( 1) THE POSITION OF THE PATIENT. (2) AN EXAMPLE OF THE RADIOGRAPH THAT
SHOULD BE OBTAINED.
1 For the sake of convenience, the masculine gender has been used throughout this manual when employing a pronoun to refer to "'the patient", except where it is obvious that the patient is a woman.
2A horizontal arrow - indicates that the cassette is placed within the cassette holder; otherwise the cassette is placed directly underneath or against the part of the body to be x~rayed.

CHEST
CHEST
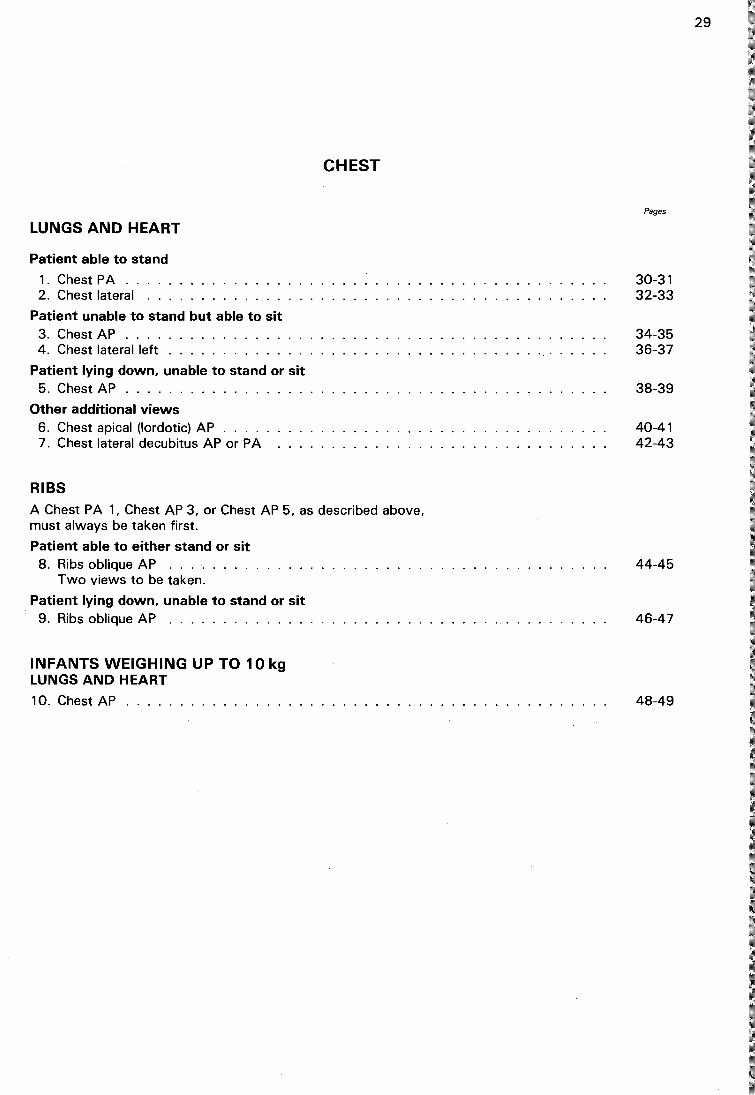
LUNGS AND HEART
Patient able to stand
1. Chest PA ..... 2. Chest lateral . . .
Patient unable to stand but able to sit 3. Chest AP ............... . 4. Chest lateral left . . . . . . . . . . . .
Patient lying down, unable to stand or sit 5. Chest AP ................. .
Other additional views 6. Chest apical (lordotic) AP ..... 7. Chest lateral decubitus AP or PA
RIBS
A Chest PA 1, Chest AP 3, or Chest AP 5, as described above, must always be taken first.
Patient able to either stand or sit 8. Ribs oblique AP ........ .
Two views to be taken.
Patient lying down, unable to stand or sit 9. Ribs oblique AP ........... .
INFANTS WEIGHING UP TO 10 kg LUNGS AND HEART
10. Chest AP . . . . . . . . . . . . . . . .
Pages
30-31 32-33
34-35 36-37
38-39
40-41 42-43
44-45
46-47
48-49
29
30 CHEST 1
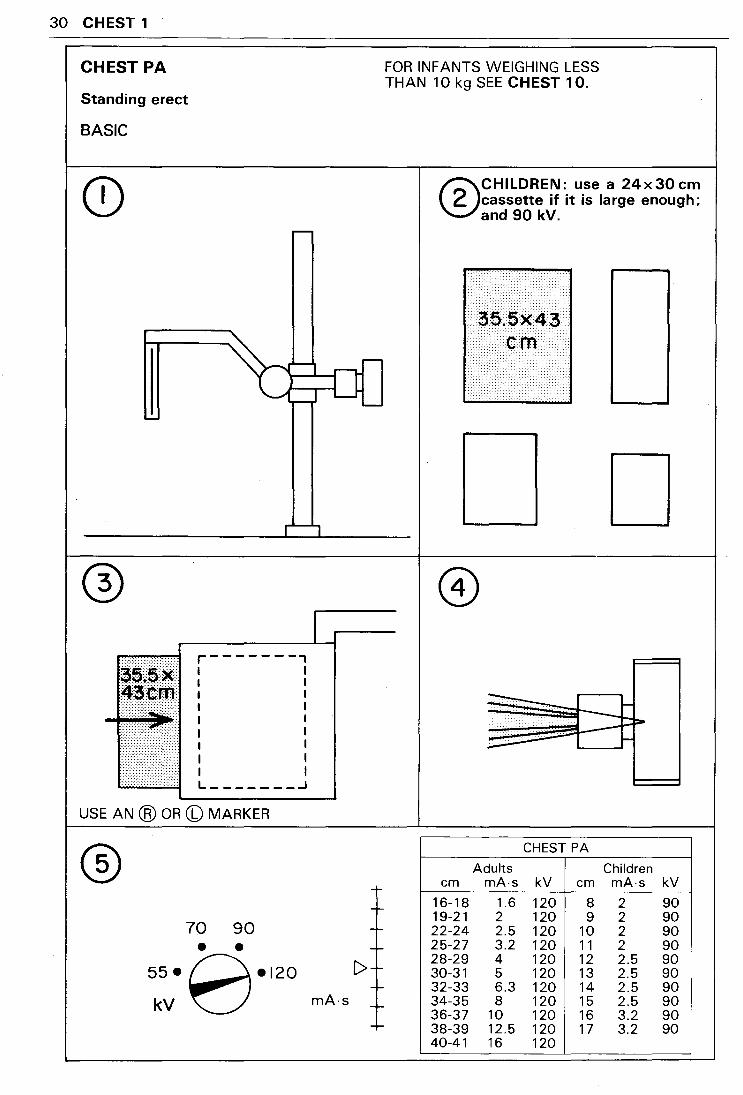
CHEST PA
Standing erect
BASIC
r-------, I I I I I I I I I I I I I I I I I I L _______ .J
USE AN @ OR (b) MARKER
® 70 90 • •
55•8•120 kV
!>
mA·s
FOR INFANTS WEIGHING LESS THAN 10 kg SEE CHEST 10.
®CHILDREN: use a 24x30cm cassette if it is large enough; and 90 kV.
D
CHEST PA
Adults Children em mA-s kV em mA-s kV
16-18 1.6 120 8 2 90 19-21 2 120 9 2 90 22-24 2.5 120 10 2 90 25-27 3.2 120 11 2 90 28-29 4 120 12 2.5 90 30-31 5 120 13 2.5 90 32-33 6.3 120 14 2.5 90 34-35 8 120 15 2.5 90 36-37 10 120 16 3.2 90 38-39 12.5 120 17 3.2 90 40-41 16 120
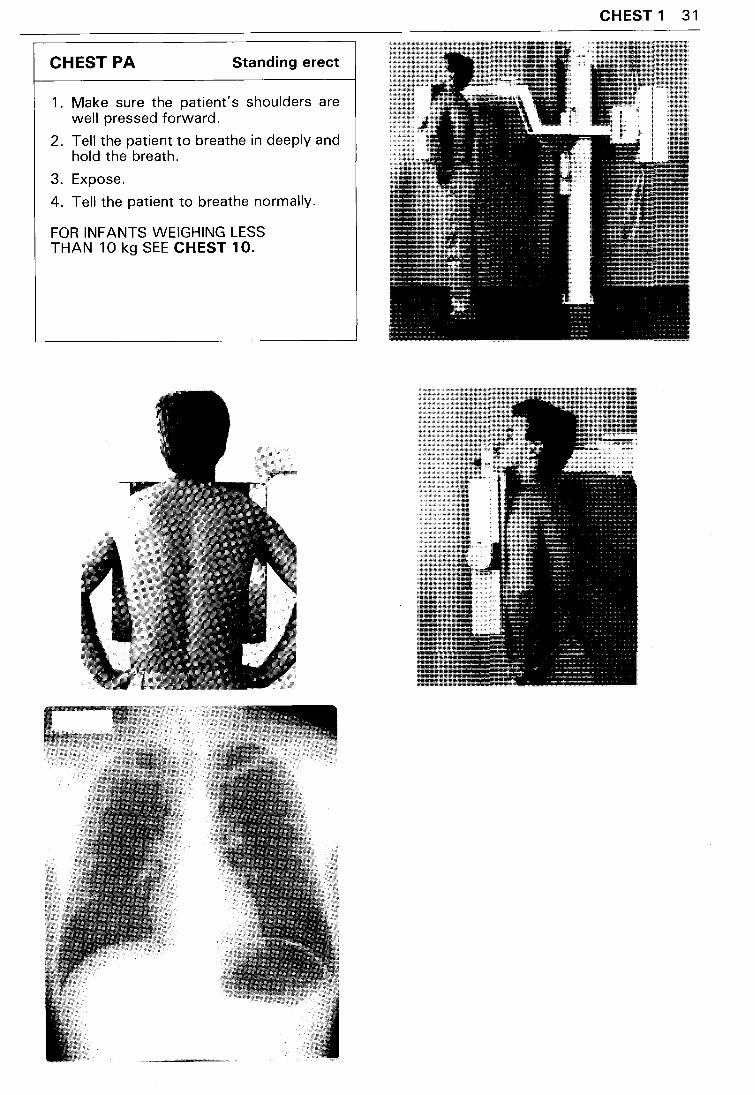
CHEST PA Standing erect
1. Make sure the patient's shoulders are well pressed forward.
2. Tell the patient to breathe in deeply and hold the breath.
3. Expose.
4. Tell the patient to breathe normally.
FOR INFANTS WEIGHING LESS THAN 10 kg SEE CHEST 10.
CHEST 1 31
32 CHEST 2
CHEST LATERAL LEFT (OR RIGHT)
Standing erect
ADDITIONAL
:_:::::::-:::::::::::::::::::::::::.: r-------, I I I I I I
#~~x YV.V-... · .. ·.·
43tm I I I I I I
··:.-:.:-:-:-:-:-:-· . .:-:.:.:.:.
······>>~<···· ·:·:·:<::·······:~ ....... ·:· I I I I I I L-------.J
® 70 90
• • 55•~•120
I
kV ~ mA·s
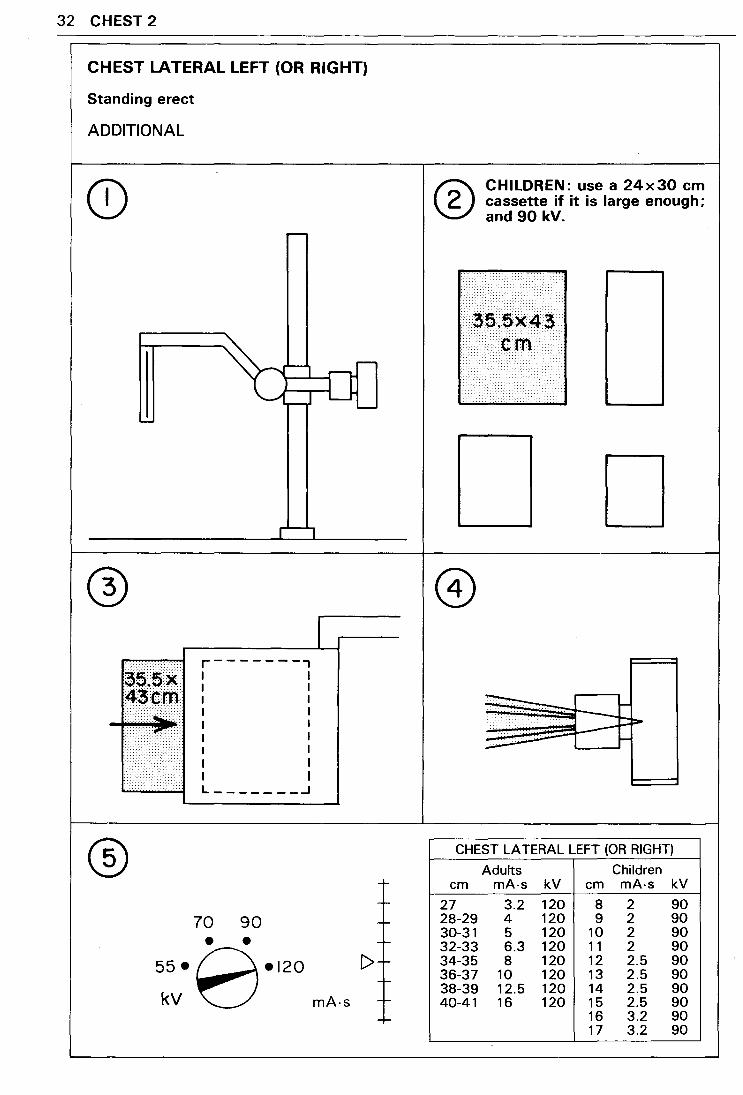
® CHILDREN: use a 24x30 em cassette if it is large enough; and 90 kV.
>/<:::::::::> >>< :·: .... · •••·••ias.5x43 ::-:-:-:-:-·-·.·.:.:-:->.-.··· .· .. ··.·.··· ... ............... em
D
CHEST LATERAL LEFT (OR RIGHT)
Adults Children em mA-s kV em mA-s kV
27 3.2 120 8 2 90 28-29 4 120 9 2 90 30-31 5 120 10 2 90 32-33 6.3 120 11 2 90 34-35 8 120 12 2.5 90 36-37 10 120 13 2.5 90 38-39 12.5 120 14 2.5 90 40-41 16 120 15 2.5 90
16 3.2 90 17 3.2 90
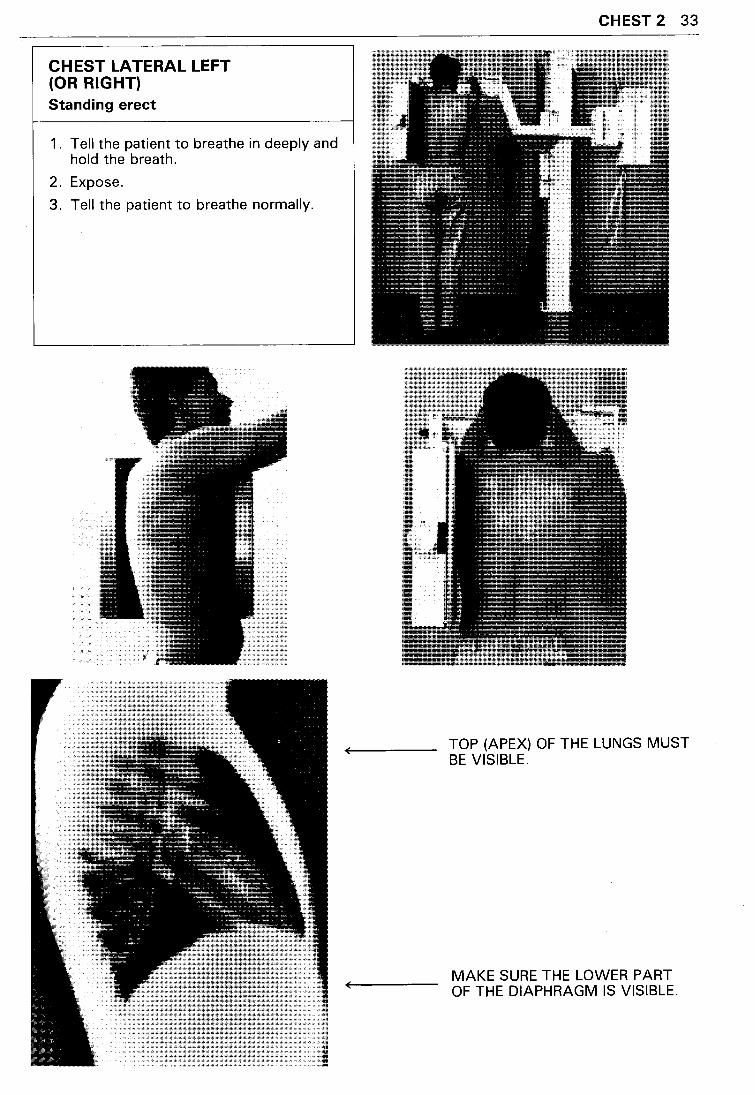
CHEST LATERAL LEFT (OR RIGHT) Standing erect
1. Tell the patient to breathe in deeply and hold the breath.
2. Expose.
3. Tell the patient to breathe normally.
CHEST 2 33
TOP (APEX) OF THE LUNGS MUST BE VISIBLE.
MAKE SURE THE LOWER PART OF THE DIAPHRAGM IS VISIBLE.

34 CHEST 3
CHEST AP
Sitting erect
BASIC
CD
r-------, I I I I I I I I I I I I
·.·.·.·.· .. ·.·.·.·.·.·.·.·.·.·.·.·.·
··················~········· ················~········· I I I I I I L-------.J
USE AN @ OR (b) MARKER
® 70 90 • •
55•~•120
I
FOR INFANTS WEIGHING LESS THAN 10 kg SEE CHEST 10.
--t--r--
-r--
C>-t--
® CHILDREN: use a 24x30 em cassette if it is large enough; and 90 kV .
•••••••••••••
D
CHEST AP
Adults Children em mA·s kV em mA-s kV
16-18 1.6 120 8 2 90 19-21 2 120 9 2 90 22-24 2.5 120 10 2 90 25-27 3.2 120 11 2 90 28-29 4 120 12 2.5 90 30-31 5 120 13 2.5 90 32-33 6.3 120 14 2.5 90 kV~ mA·s -- 34-35 8 120 15 2.5 90 36-37 10 120 16 3.2 90 -- 38-39 12.5 120 17 3.2 90 40-41 16 120
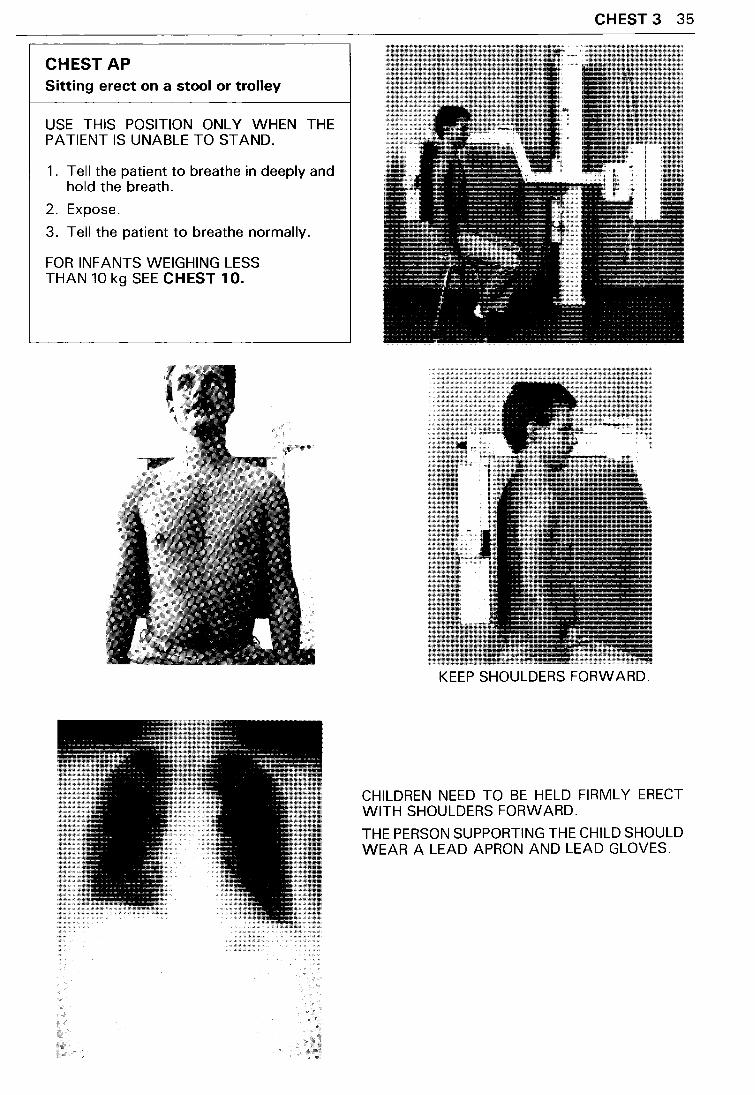
CHEST AP Sitting erect on a stool or trolley
USE THIS POSITION ONLY WHEN THE PATIENT IS UNABLE TO STAND.
1. Tell the patient to breathe in deeply and hold the breath.
2. Expose.
3. Tell the patient to breathe normally.
FOR INFANTS WEIGHING LESS THAN 10 kg SEE CHEST 10.
CHEST 3 35
KEEP SHOULDERS FORWARD.
CHILDREN NEED TO BE HELD FIRMLY ERECT WITH SHOULDERS FORWARD.
THE PERSON SUPPORTING THE CHILD SHOULD WEAR A LEAD APRON AND LEAD GLOVES.
36 CHEST 4
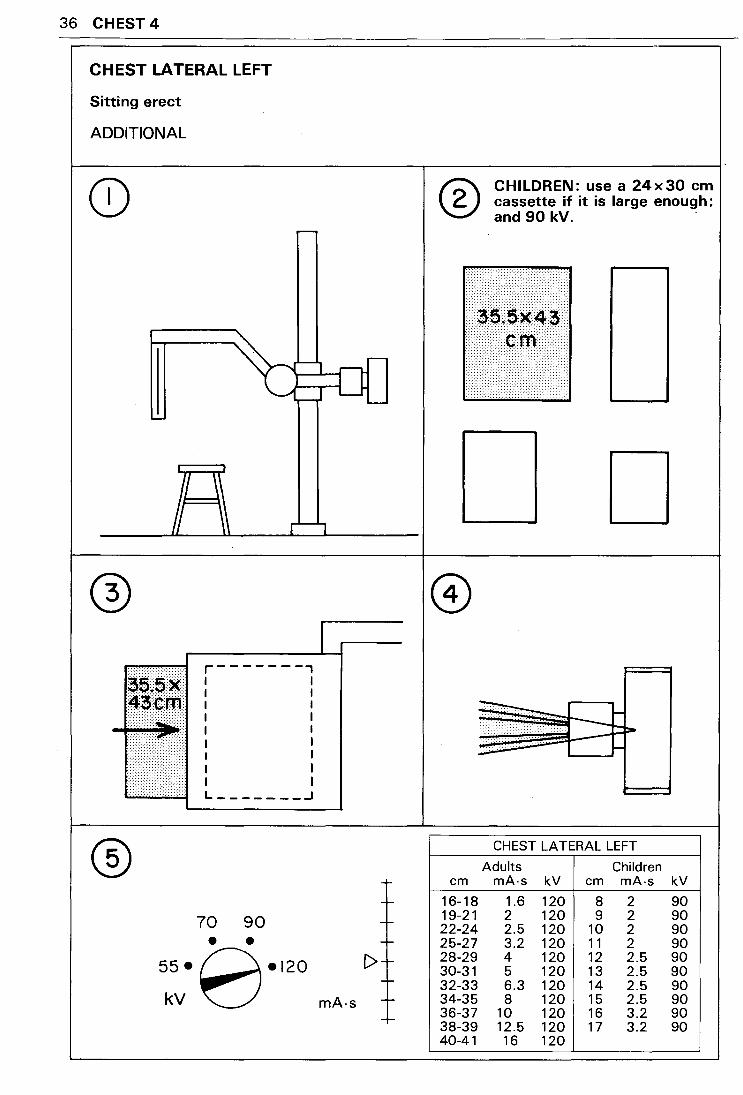
CHEST LATERAL LEFT
Sitting erect
ADDITIONAL
Q)
@
r-------, I I I I I I I I I I I I
I I
I I L _______ .J
70 90 • •
55•8•120 kV
®
em
16-18 19-21 22-24 25-27
C> 28-29 30-31 32-33
mA·s 34-35 36-37 38-39 40-41
CHILDREN: use a 24x30 em cassette if it is large enough; and 90 kV. ·
D
CHEST LATERAL LEFT
Adults Children mA·s kV em mA·s kV
1.6 120 8 2 90 2 120 9 2 90 2.5 120 10 2 90 3.2 120 11 2 90 4 120 12 2.5 90 5 120 13 2.5 90 6.3 120 14 2.5 90 8 120 15 2.5 90
10 120 16 3.2 90 12.5 120 17 3.2 90 16 120
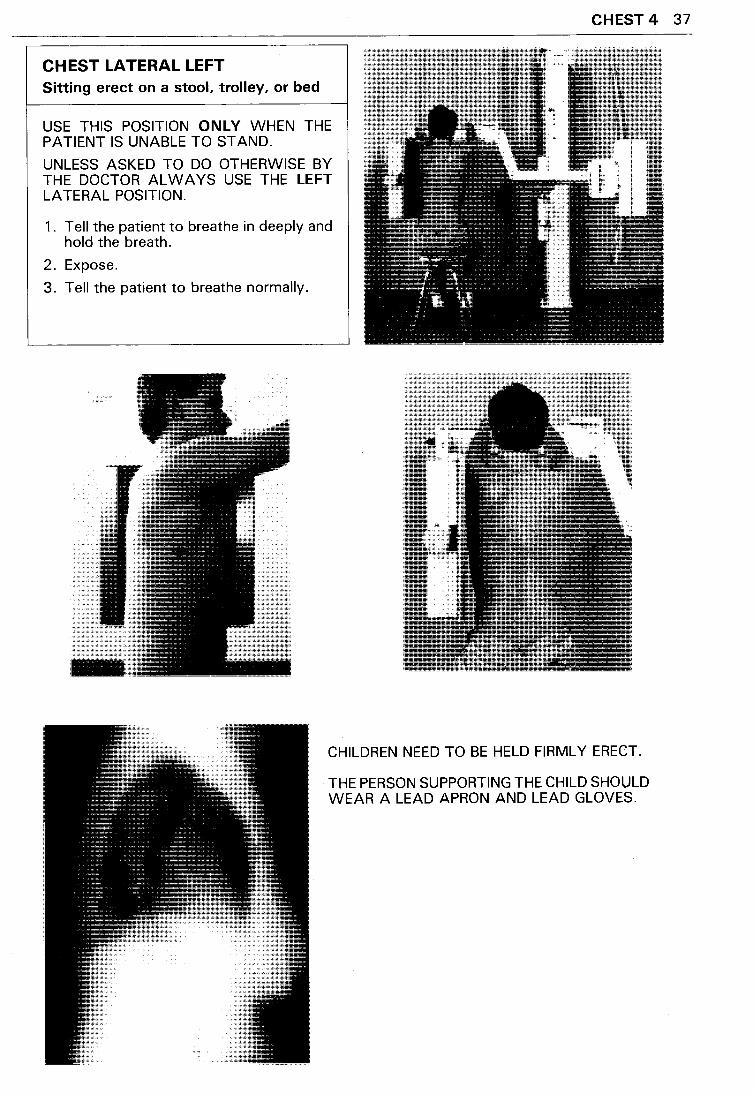
CHEST LATERAL LEFT Sitting erect on a stool, trolley, or bed
USE THIS POSITION ONLY WHEN THE PATIENT IS UNABLE TO STAND.
UNLESS ASKED TO DO OTHERWISE BY THE DOCTOR ALWAYS USE THE LEFT LATERAL POSITION.
1 . Tell the patient to breathe in deeply and hold the breath.
2. Expose.
3. Tell the patient to breathe normally.
CHEST 4 37
CHILDREN NEED TO BE HELD FIRMLY ERECT.
THE PERSON SUPPORTING THE CHILD SHOULD WEAR A LEAD APRON AND LEAD GLOVES.
38 CHEST 5
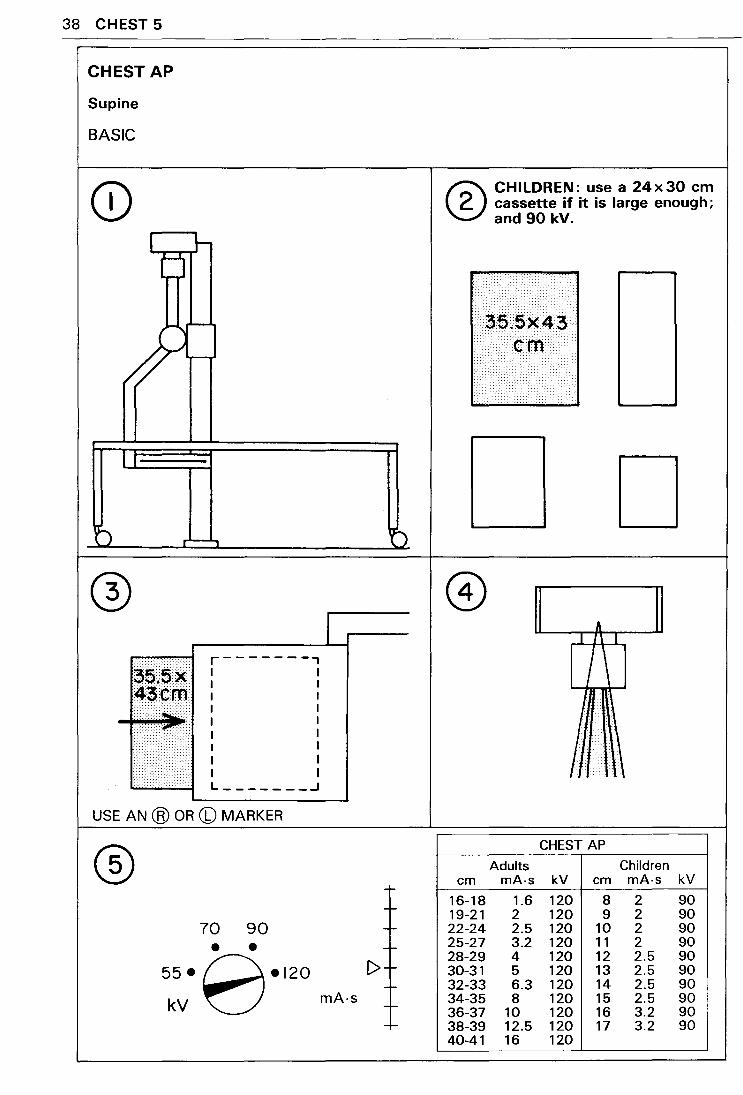
CHEST AP
Supine
BASIC
I 1--(j
r'--,
·.·.·.·.·.·.·.·.·.·.·.·.·.·.·.·.·.·.·
.. • .. >~··
............... '"""' ......
r-------, I I I I I I I I I I I I I I I I I I L _______ ...J
USE AN ® OR CD MARKER
® 70 90 • •
55•8•120 kV
)
I
--1-
-1-
-1-
C>-1-
--mA-s --
--
® CHILDREN: use a 24x30 em cassette if it is large enough; and 90 kV.
..........
........ ... .. . ... ........ ... .
····3···s·····s·· x43 >>· ... ·:·<· :::>. :·:··<:_ ·. ·.:: .. · .·.·.·.·. . ... . . ·. .· . . ·.·.··.·.·.· .. ·.·. . ... ·.·.·.· .
. ....... ..... .
Ctn< >>.·>.- ... >>>> :-:-:·.·
... <·•··· .·.·.··· ........ •••••• ...................... <> ..
D A
I I I
I
'I
CHEST AP
Adults Children em mA-s kV em mA·s kV
16-18 1.6 120 8 2 90 19-21 2 120 9 2 90 22-24 2.5 120 10 2 90 25-27 3.2 120 11 2 90 28-29 4 120 12 2.5 90 30-31 5 120 13 2.5 90 32-33 6.3 120 14 2.5 90 34-35 8 120 15 2.5 90 36-37 10 120 16 3.2 90 38-39 12.5 120 17 3.2 90 40-41 16 120
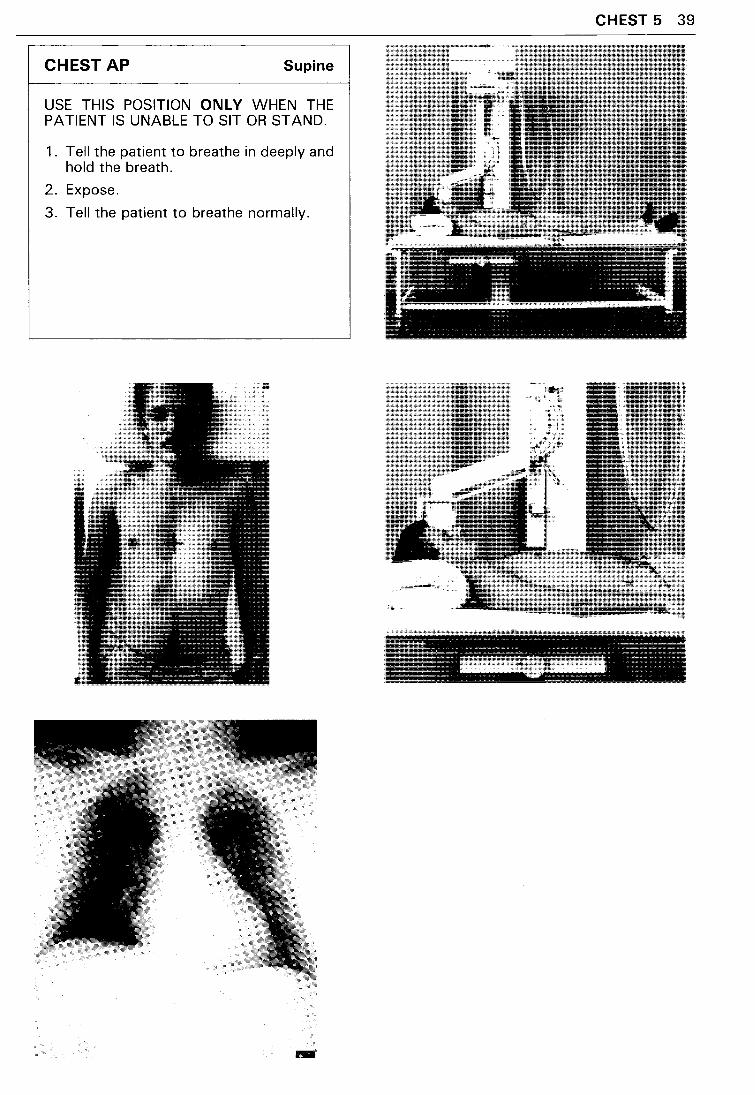
CHEST AP Supine
USE THIS POSITION ONLY WHEN THE PATIENT IS UNABLE TO SIT OR STAND.
1. Tell the patient to breathe in deeply and hold the breath.
2. Expose.
3. Tell the patient to breathe normally.
-
CHEST 5 39
40 CHEST 6
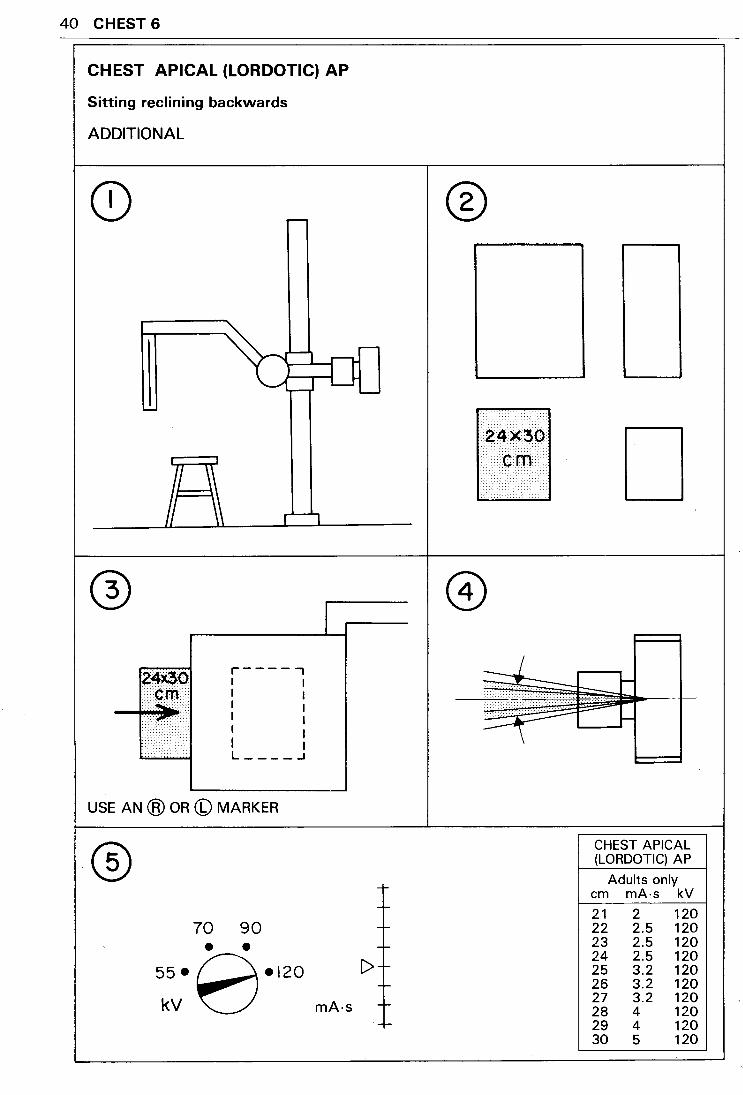
CHEST APICAL (LORDOTIC) AP
Sitting reclining backwards
ADDITIONAL
r----., I I I I I I I I I I I 1 L ____ .J
USE AN @ OR (b) MARKER
® 70 90 • •
55•8•120 kV
1
-
+-
C>+ -1-
mA-s + +-
®
·.·.··.·.·.·.·.·.·.·.·.·.·.··.···· ... em .. < D
~..... ii~·····.·~~ --r~
CHEST APICAL (LORDOTIC) AP
Adults only em mA-s kV
21 2 120 22 2.5 120 23 2.5 120 24 2.5 120 25 3.2 120 26 3.2 120 27 3.2 120 28 4 120 29 4 120 30 5 120
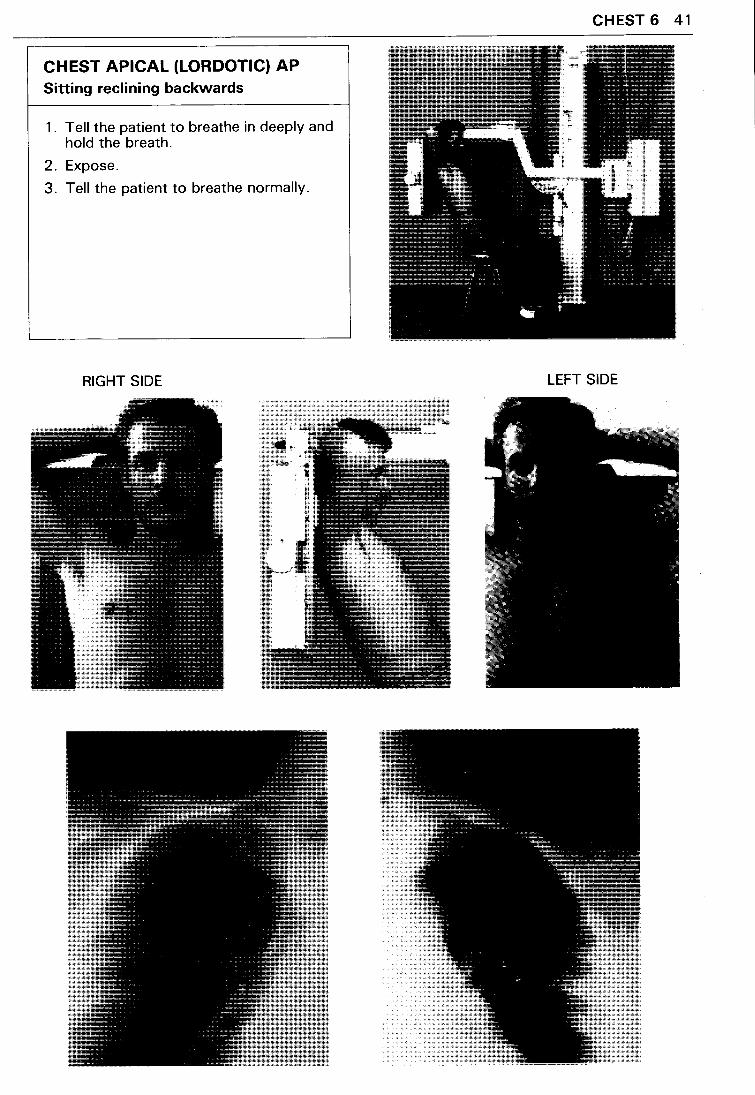
CHEST APICAL (LORDOTIC) AP Sitting reclining backwards
1. Tell the patient to breathe in deeply and hold the breath.
2. Expose.
3. Tell the patient to breathe normally.
RIGHT SIDE
CHEST 6 41
LEFT SIDE
42 CHEST 7
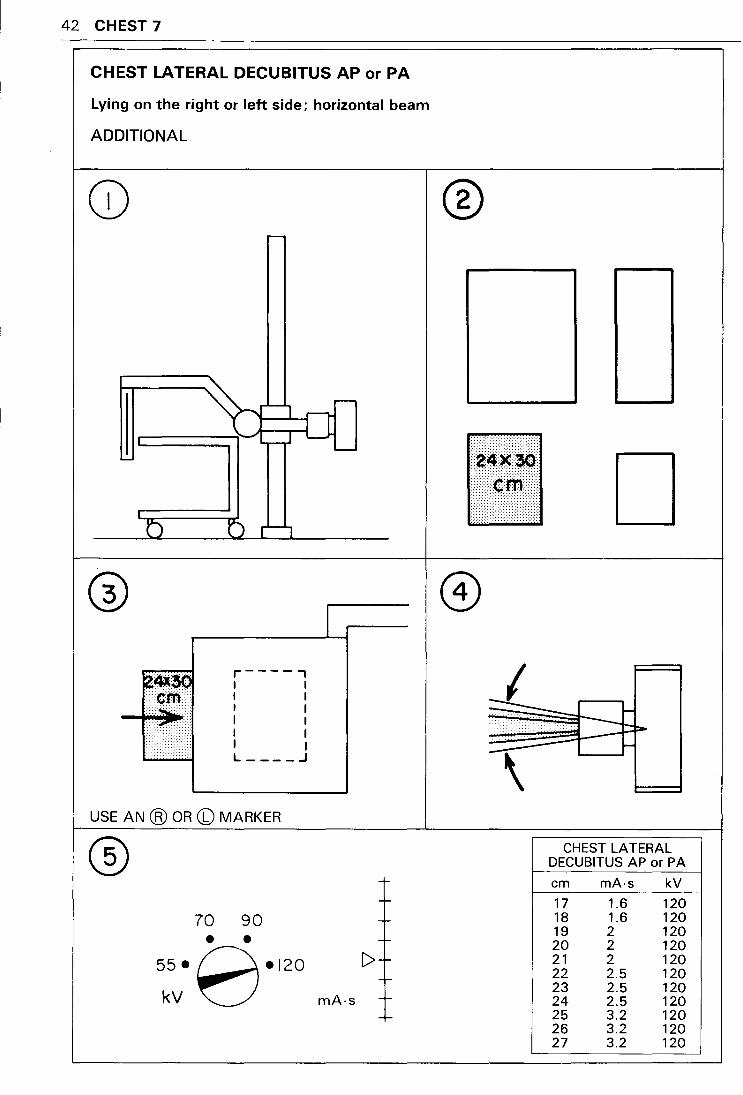
CHEST LATERAL DECUBITUS AP or PA
Lying on the right or left side; horizontal beam
ADDITIONAL
l r----., I I I I I I I I I I I I L ____ .J
r~ •••• .
USE AN @ OR (b) MARKER
® r-
70 90 r-
• • r-
55•8•120 [>r--r-
kV mA·s -t-
-t-
®
::;:;:;::::::;::::::::::::;:::::::;:;:;:;::
a4x30 <:m. .. D
CHEST LATERAL DECUBITUS AP or PA
em mA·s kV
17 1.6 120 18 1.6 120 19 2 120 20 2 120 21 2 120 22 2.5 120 23 2.5 120 24 2.5 120 25 3.2 120 26 3.2 120 27 3.2 120
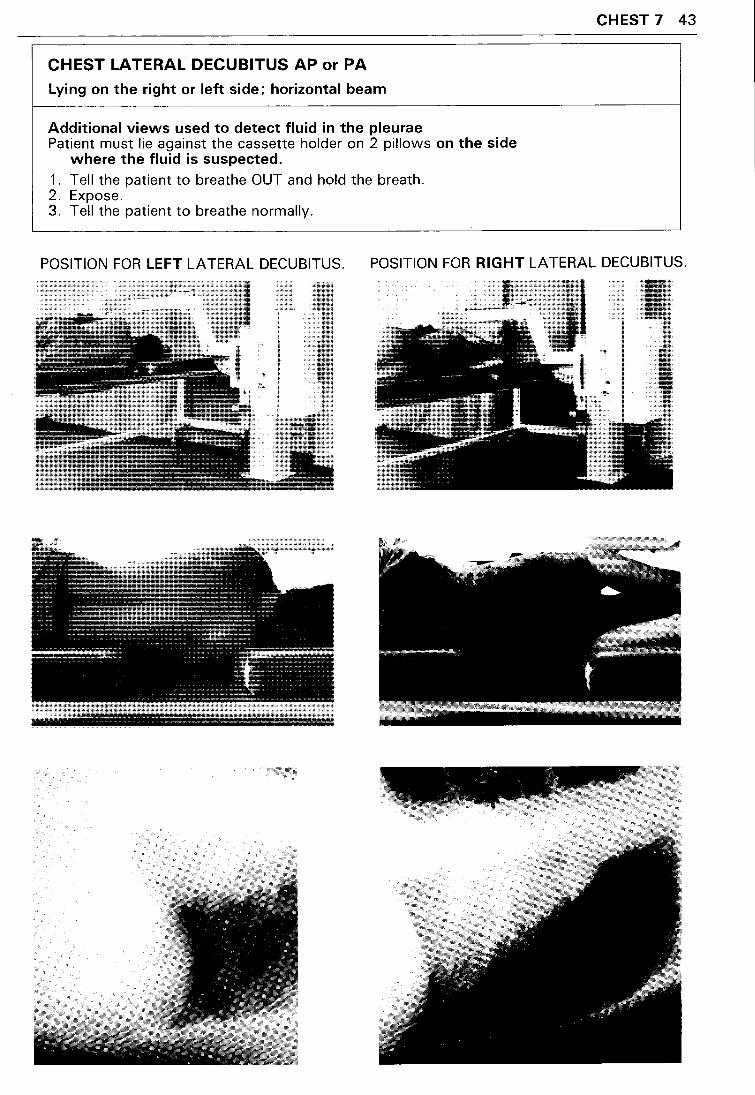
CHEST LATERAL DECUBITUS AP or PA
Lying on the right or left side; horizontal beam
Additional views used to detect fluid in the pleurae Patient must lie against the cassette holder on 2 pillows on the side
where the fluid is suspected.
1. Tell the patient to breathe OUT and hold the breath. 2. Expose. 3. Tell the patient to breathe normally.
CHEST 7 43
POSITION FOR LEFT LATERAL DECUBITUS. POSITION FOR RIGHT LATERAL DECUBITUS.
44 CHEST 8
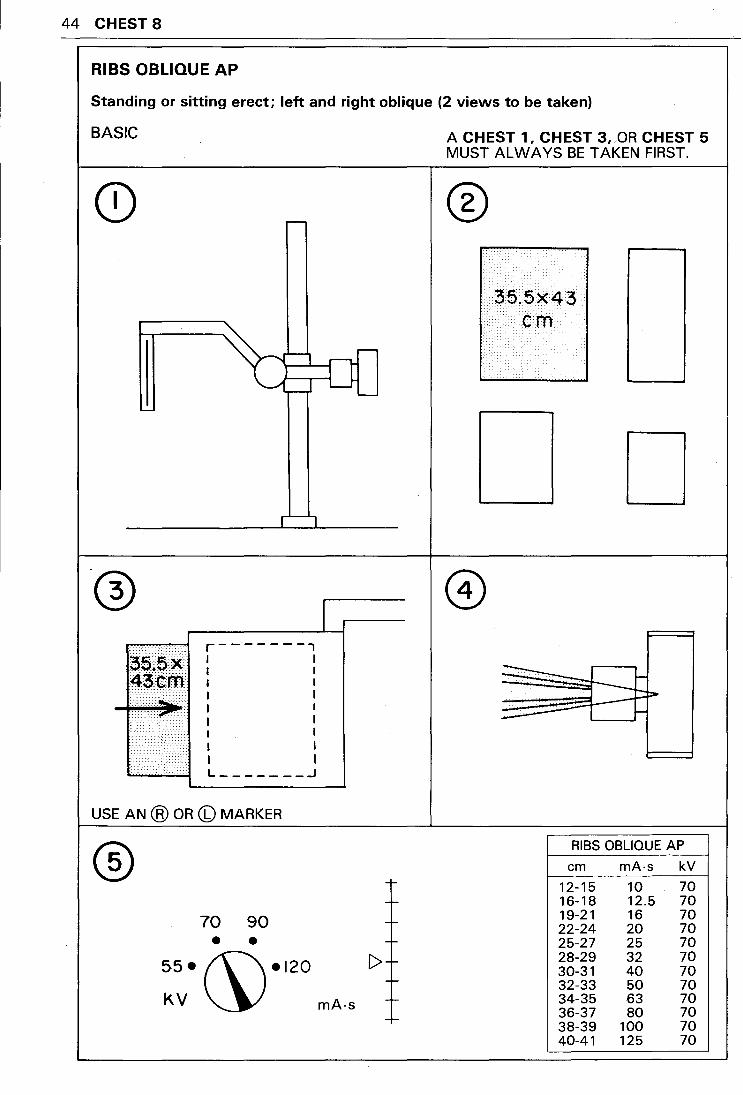
RIBS OBLIQUE AP
Standing or sitting erect; left and right oblique (2 views to be taken)
BASIC
......
·_-_._-_-_._._._._-_-_-_-_-
::<::::.=:::~:::::: .··.·.·.·.·::-:::.....,:.::.
-
r-------, I I I I I I I I I I I I I I I I I I L _______ _J
USE AN @ OR (b) MARKER
® 70 90 • •
55• (\\•120
I
I<.V ~ mA·s
--r-
-r-
-r-
C>-r-
r
-r-
-r-
A CHEST 1, CHEST 3, .OR CHEST 5 MUST ALWAYS BE TAKEN FIRST.
®
I
-;35.5X43 __ : em
D
---._ __ ,_...
-
RIBS OBLIQUE AP
em mA·s kV
12-15 10 70 16-18 12.5 70 19-21 16 70 22-24 20 70 25-27 25 70 28-29 32 70 30-31 40 70 32-33 50 70 34-35 63 70 36-37 80 70 38-39 100 70 40-41 125 70
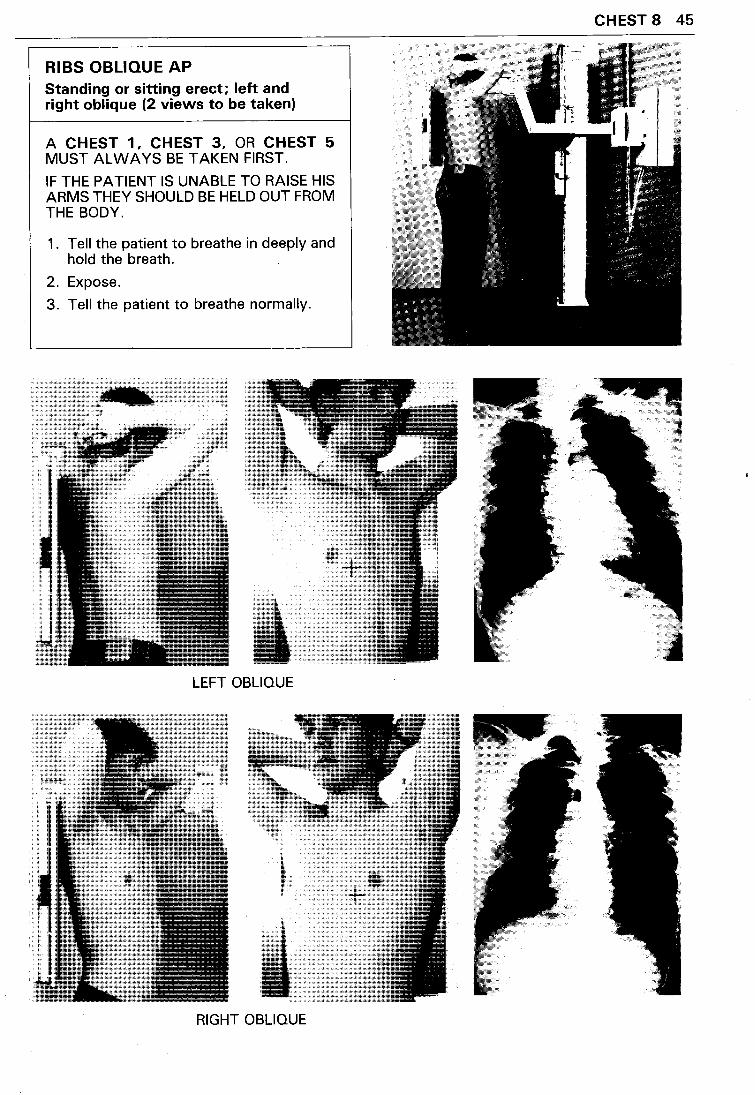
RIBS OBLIQUE AP Standing or sitting erect; left and right oblique (2 views to be taken)
A CHEST 1, CHEST 3, OR CHEST 5 MUST ALWAYS BE TAKEN FIRST.
IF THE PATIENT IS UNABLE TO RAISE HIS ARMS THEY SHOULD BE HELD OUT FROM THE BODY.
1 . Tell the patient to breathe in deeply and hold the breath.
2. Expose.
3. Tell the patient to breathe normally.
,,.~::1!',,·:;:;·,::··· _;!;
LEFT OBLIQUE
RIGHT OBLIQUE
CHEST 8 45
46 CHEST 9
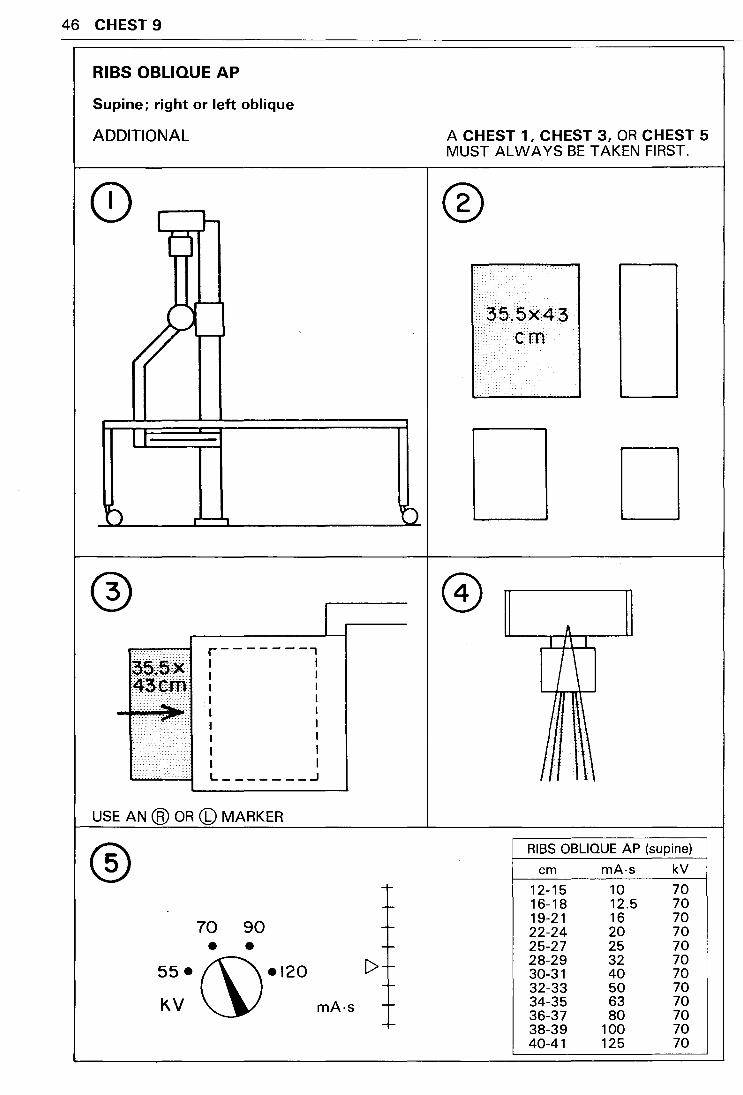
RIBS OBLIQUE AP
Supine: right or left oblique
ADDITIONAL
I 1-(j
I
35ill5l& ,43ttt\! i=::.·.:.:==='-=•=•:·: .··.··=••••=•~.:=:===•
r'--,
r-------, I I I I I I I I I I I I I I I I I I L _______ ...J
USE AN @ OR (b) MARKER
® 70 90
• •
l
55•~•120 KV mA·s
C>
--r-
-------
A CHEST 1, CHEST 3, OR CHEST 5 MUST ALWAYS BE TAKEN FIRST.
®
i.35.5X43 I em .. ·
D I 1\ I
I \
RIBS OBLIQUE AP (supine)
em mA·s kV
12-15 10 70 16-18 12.5 70 19-21 16 70 22-24 20 70 25-27 25 70 28-29 32 70 30-31 40 70 32-33 50 70 34-35 63 70 36-37 80 70 38-39 100 70 40-41 125 70
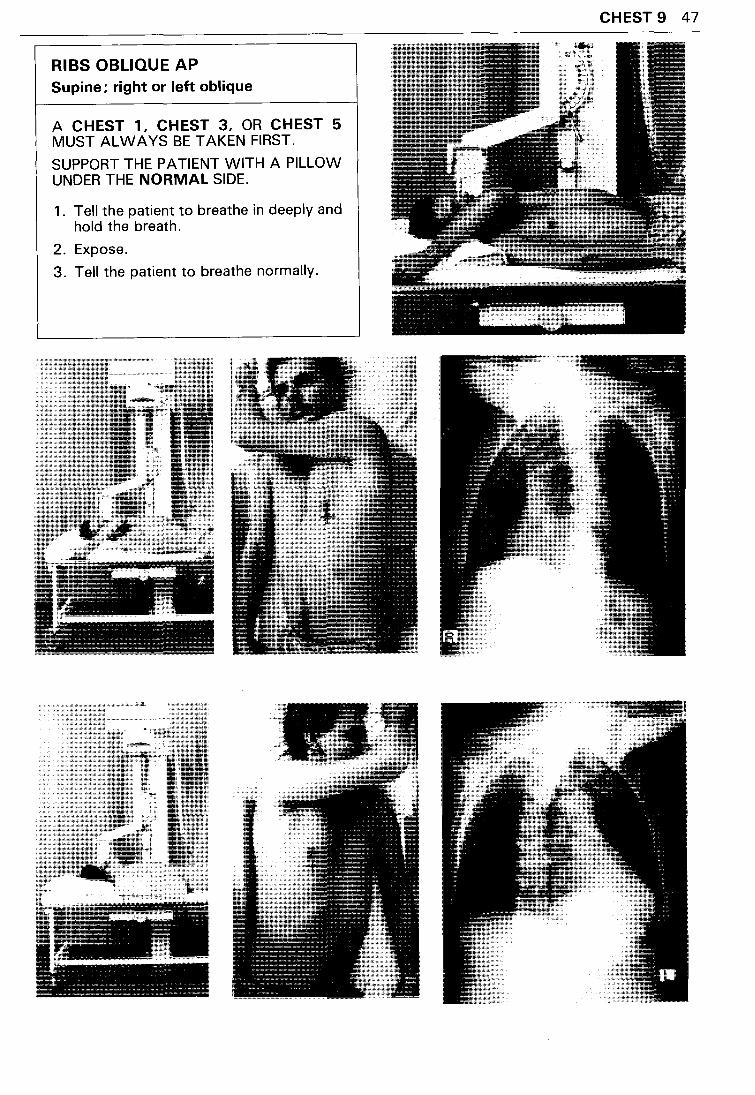
RIBS OBLIQUE AP Supine; right or left oblique
A CHEST 1, CHEST 3, OR CHEST 5 MUST ALWAYS BE TAKEN FIRST.
SUPPORT THE PATIENT WITH A PILLOW UNDER THE NORMAL SIDE.
1 . Tell the patient to breathe in deeply and hold the breath.
2. Expose.
3. Tell the patient to breathe normally.
CHEST 9 47

ABDOMEN
ABDOMEN
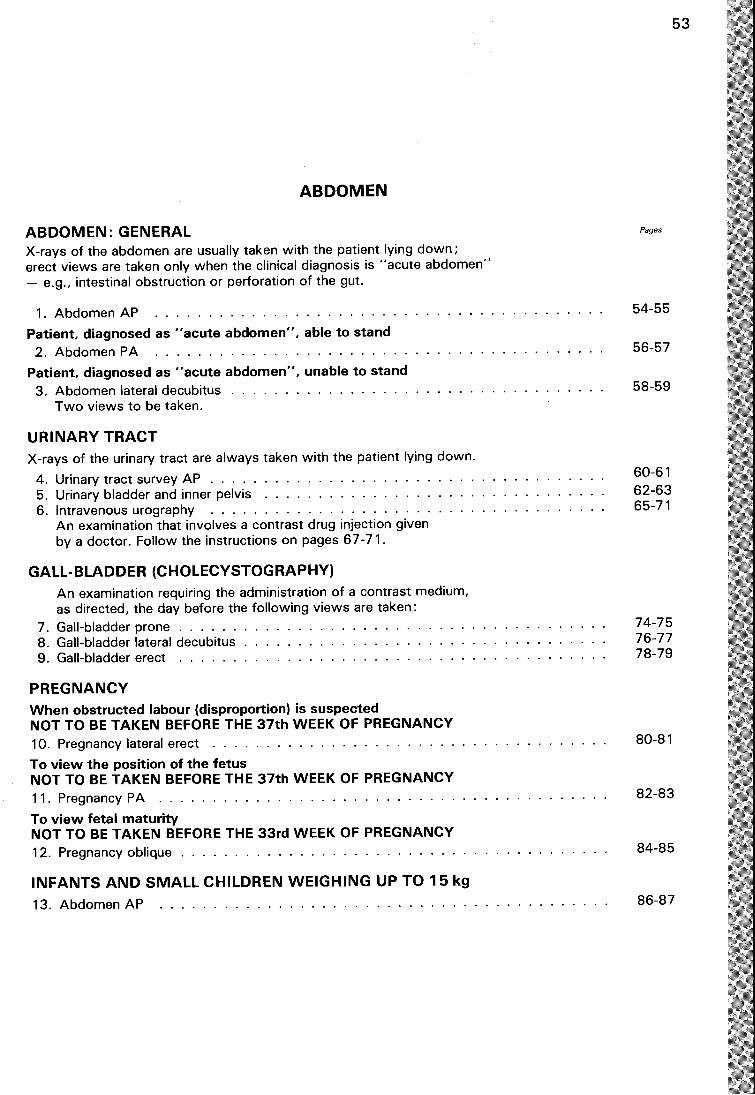
ABDOMEN: GENERAL X-rays of the abdomen are usually taken with the patient lying down; erect views are taken only when the clinical diagnosis is "acute abdomen" - e.g., intestinal obstruction or perforation of the gut.
1 . Abdomen AP
Patient, diagnosed as "acute abdomen", able to stand 2. Abdomen PA ...................... .
Patient, diagnosed as "acute abdomen", unable to stand 3. Abdomen lateral decubitus ................ .
Two views to be taken.
URINARY TRACT X-rays of the urinary tract are always taken with the patient lying down.
4. Urinary tract survey AP . . . . . . . . . . . . . . . . . . . . . 5. Urinary bladder and inner pelvis ............... . 6. Intravenous urography .................... .
An examination that involves a contrast drug injection given by a doctor. Follow the instructions on pages 67-71.
GALL-BLADDER (CHOLECYSTOGRAPHY) An examination requiring the administration of a contrast medium, as directed, the day before the following views are taken:
7. Gall-bladder prone . . . . . . 8. Gall-bladder lateral decubitus 9. Gall-bladder erect ..... .
PREGNANCY When obstructed labour (disproportion) is suspected NOT TO BE TAKEN BEFORE THE 37th WEEK OF PREGNANCY 10. Pregnancy lateral erect . . . . . . . . . . . . . . . . . . . . . . .
To view the position of the fetus NOT TO BE TAKEN BEFORE THE 37th WEEK OF PREGNANCY 11 . Pregnancy PA . . . . . . . . . . . . . . . . . . . . . . . . . . . .
To view fetal maturity NOT TO BE TAKEN BEFORE THE 33rd WEEK OF PREGNANCY 12. Pregnancy oblique . . . . . . . . . . . . . . . . . . . . . . . . . .
INFANTS AND SMALL CHILDREN WEIGHING UP TO 15 kg
13. Abdomen AP ..........................................
Pages
54-55
56-57
58-59
60-61 62-63 65-71
74-75 76-77 78-79
80-81
53
82-83
84-85
86-87
54 ABDOMEN 1
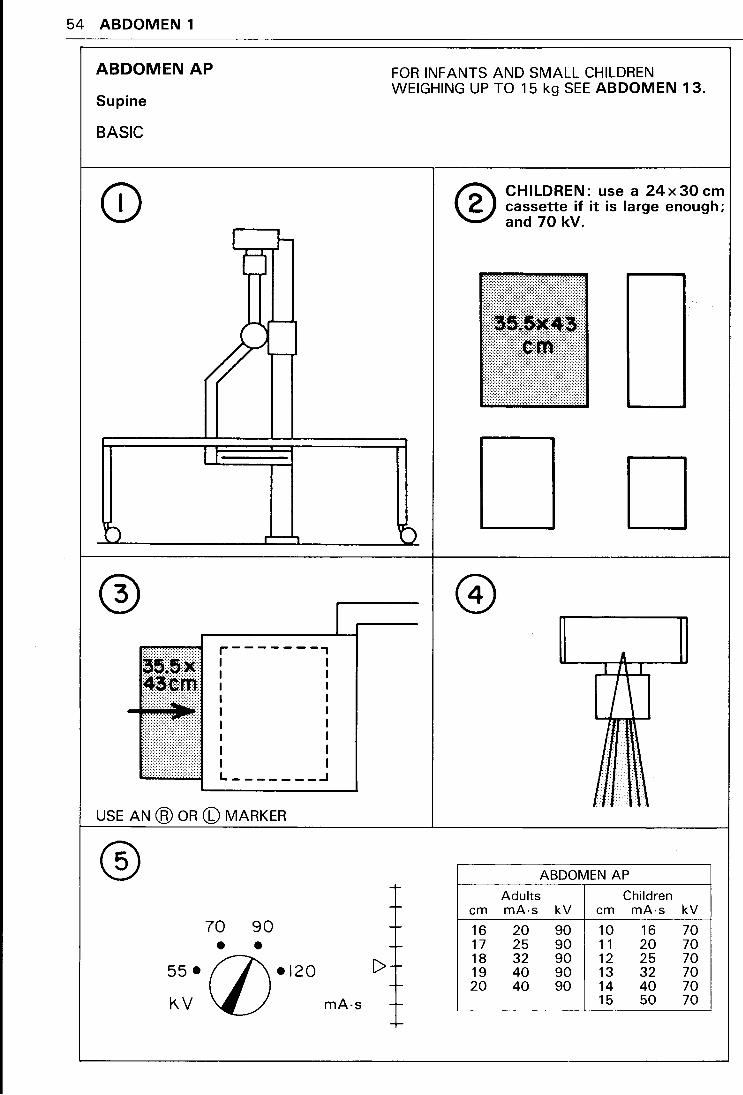
ABDOMEN AP
Supine
BASIC
) r-.,
r-------, I I I I I I I I I I I I I I I I I I L-------.J
USE AN ® OR CD MARKER
® 70 90 • •
I
55• (j)•l20 k. V mA-s
FOR INFANTS AND SMALL CHILDREN WEIGHING UP TO 15 kg SEE ABDOMEN 13.
1-
-
--[> -
---
® CHILDREN: use a 24x30 em cassette if it is large enough; and 70 kV.
D A
1 1\ I
I \
ABDOMEN AP
Adults em mA-s kV
16 20 90 17 25 90 18 32 90 19 40 90 20 40 90
Children em mA-s kV
10 16 70 11 20 70 12 25 70 13 32 70 14 40 70 15 50 70
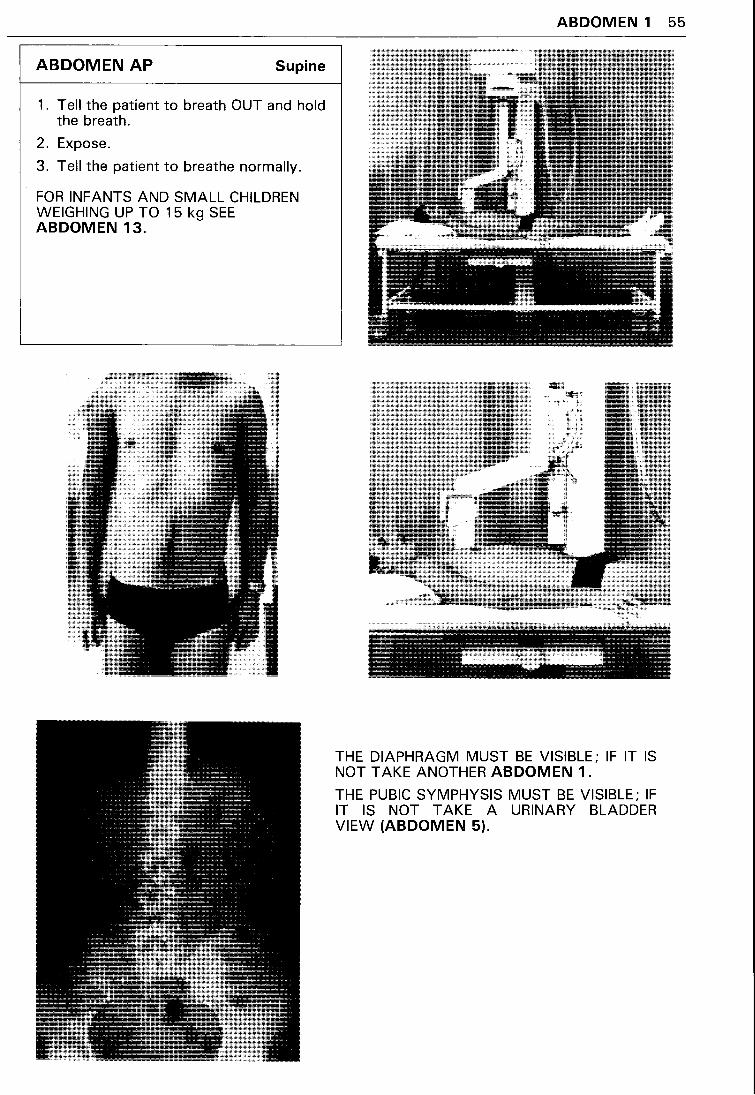
ABDOMEN AP Supine
1. Tell the patient to breath OUT and hold the breath.
2. Expose.
3. Tell the patient to breathe normally.
FOR INFANTS AND SMALL CHILDREN WEIGHING UP TO 15 kg SEE ABDOMEN 13.
ABDOMEN 1 55
THE DIAPHRAGM MUST BE VISIBLE; IF IT IS NOT TAKE ANOTHER ABDOMEN 1.
THE PUBIC SYMPHYSIS MUST BE VISIBLE; IF IT IS NOT TAKE A URINARY BLADDER VIEW (ABDOMEN 5).
56 ABDOMEN 2
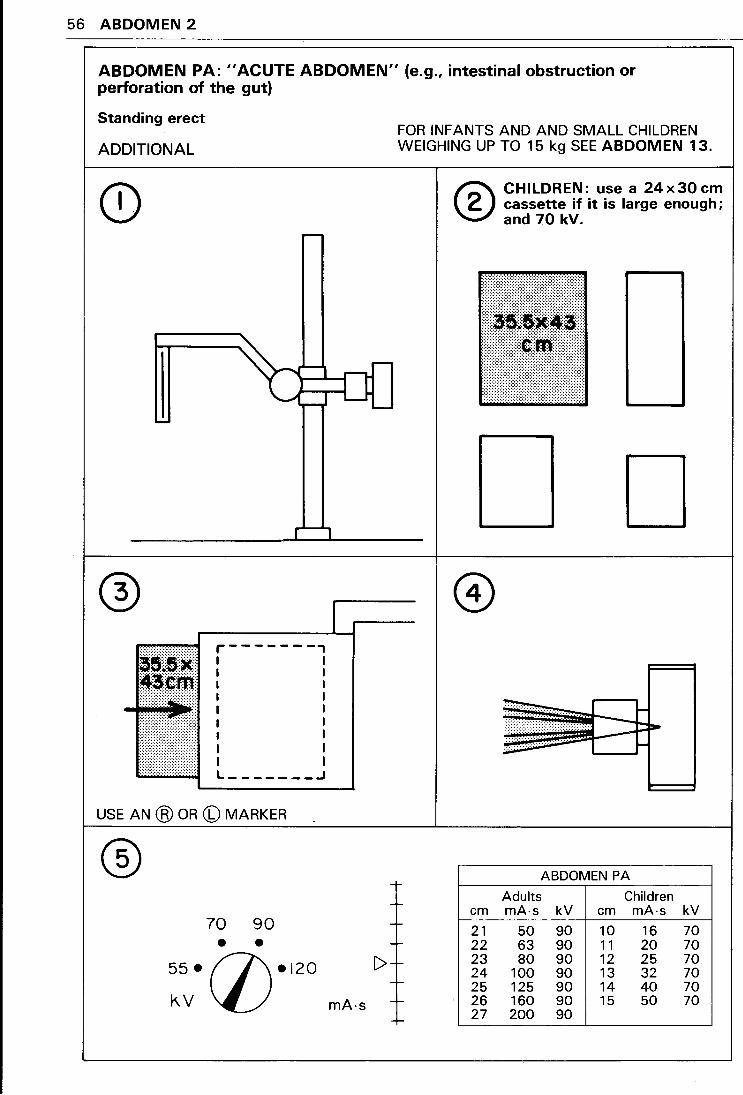
ABDOMEN PA: "ACUTE ABDOMEN" (e.g., intestinal obstruction or perforation of the gut)
Standing erect
ADDITIONAL
-
r._1
® I r-------,
.. I I
.. I I I I
.. I I I I I I I I I I
.. I I L-------.J
USE AN @ OR (b) MARKER -
® 70 90
• • 55• (j)•l20 k.V mA·s
FOR INFANTS AND AND SMALL CHILDREN WEIGHING UP TO 15 kg SEE ABDOMEN 13.
--r-
+· -r-
C>-r--r--r-
-r-
® CHILDREN: use a 24x30cm cassette if it is large enough; and 70 kV.
em
21 22 23 24 25 26 27
.. . .
D
ABDOMEN PA
Adults Children mA-s kV em mA·s kV
50 90 10 16 70 63 90 11 20 70 80 90 12 25 70
100 90 13 32 70 125 90 14 40 70 160 90 15 50 70 200 90
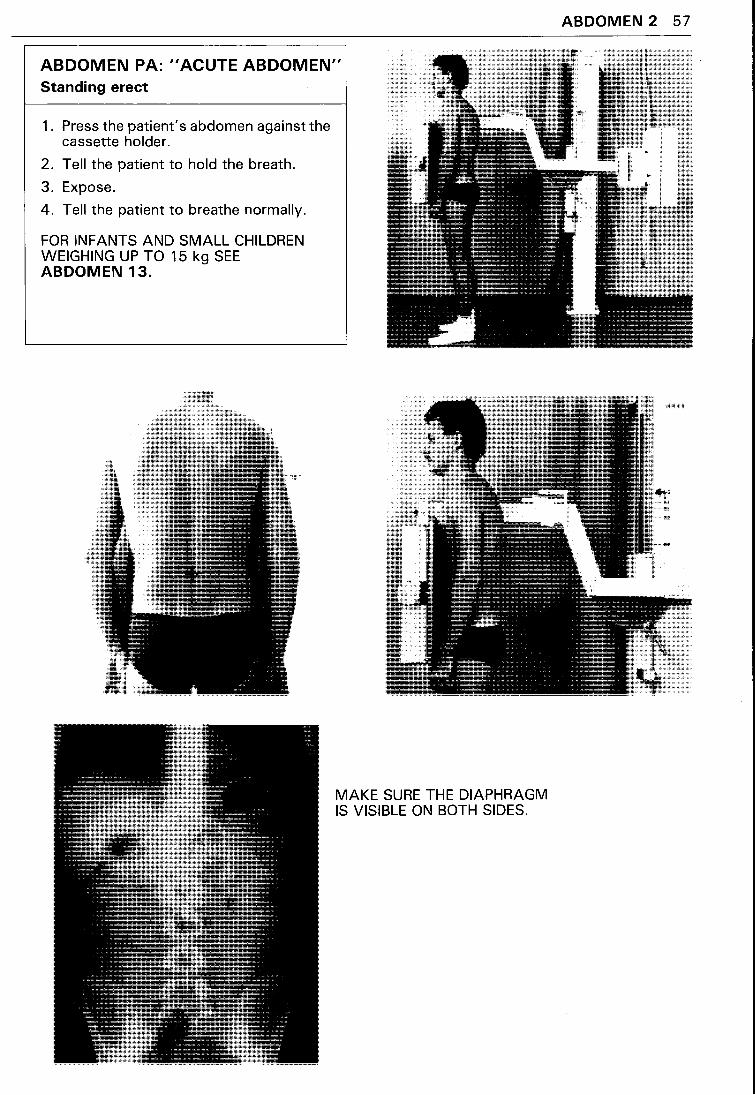
ABDOMEN PA: II ACUTE ABDOMEN" Standing erect
1. Press the patient's abdomen against the cassette holder.
2. Tell the patient to hold the breath.
3. Expose.
4. Tell the patient to breathe normally.
FOR INFANTS AND SMALL CHILDREN WEIGHING UP TO 15 kg SEE ABDOMEN 13.
MAKE SURE THE DIAPHRAGM IS VISIBLE ON BOTH SIDES.
ABDOMEN 2 57
58 ABDOMEN 3
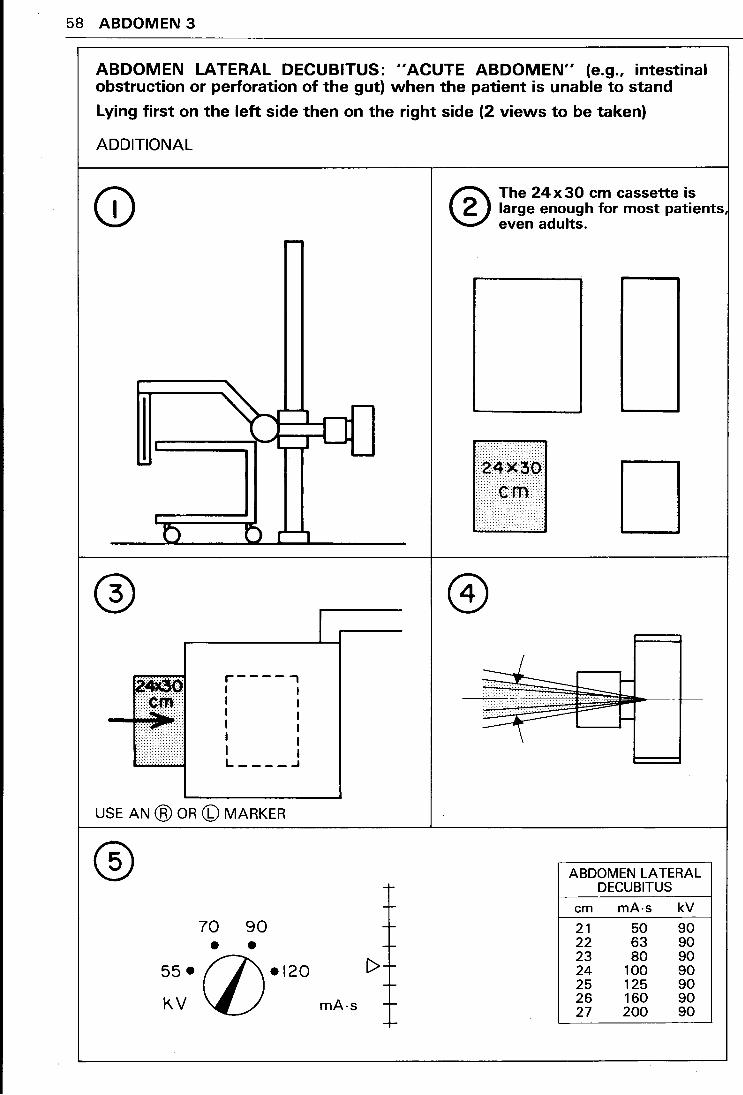
ABDOMEN LATERAL DECUBITUS: "ACUTE ABDOMEN" (e.g., intestinal obstruction or perforation of the gut) when the patient is unable to stand
Lying first on the left side then on the right side (2 views to be taken)
ADDITIONAL
II
D D [ ..... ,
® 1
r----., I I :":\ ··n< I I I I
il I I I I I I L----.J
USE AN @ OR (b) MARKER
® 70 90 • •
55• (j)•l20 kV mA-s
-~
---
C> r-t-
-~
t-
® The 24 x 30 em cassette is large enough for most patients even adults.
D .·.·.·.·.·.·.·.·.·.·.·.·.·.·.·.·.··.·.·.·.
em<
ABDOMEN LATERAL DECUBITUS
em mA-s kV
21 50 90 22 63 90 23 80 90 24 100 90 25 125 90 26 160 90 27 200 90
ABDOMEN 3 59
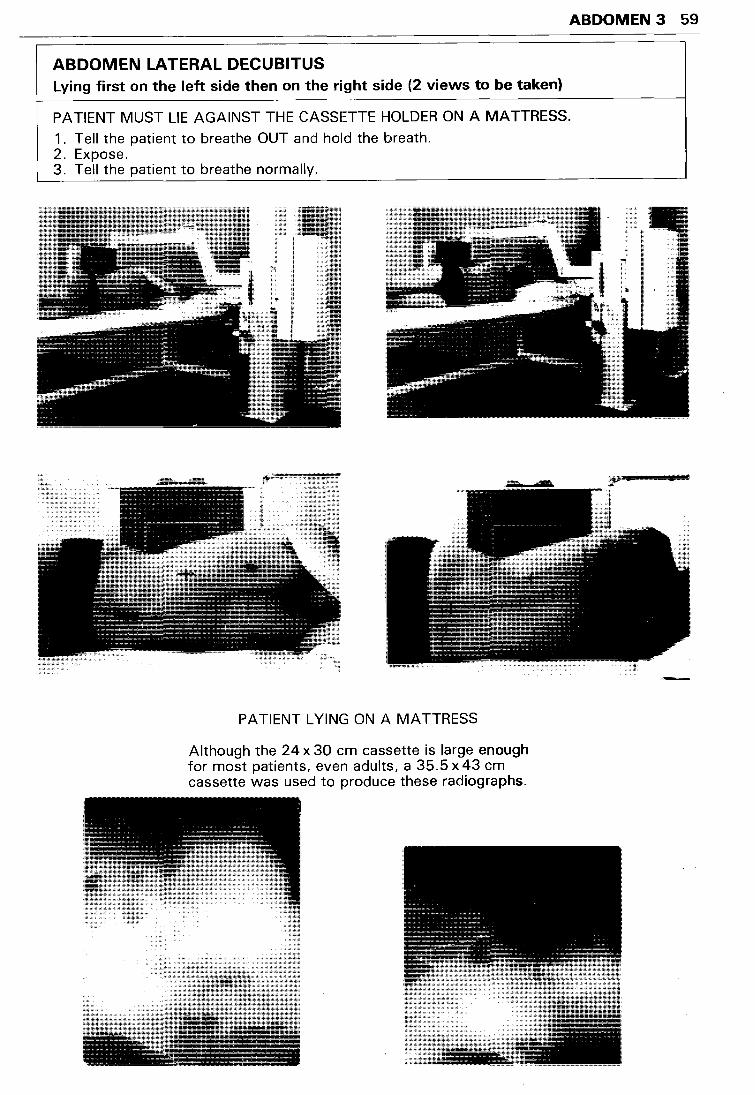
ABDOMEN LATERAL DECUBITUS Lying first on the left side then on the right side (2 views to be taken)
PATIENT MUST LIE AGAINST THE CASSETTE HOLDER ON A MATTRESS.
1. Tell the patient to breathe OUT and hold the breath. 2. Expose. 3. Tell the patient to breathe normally.
PATIENT LYING ON A MATTRESS
Although the 24 x 30 em cassette is large enough for most patients, even adults, a 35.5 x 43 em cassette was used to produce these radiographs.
60 ABDOMEN 4
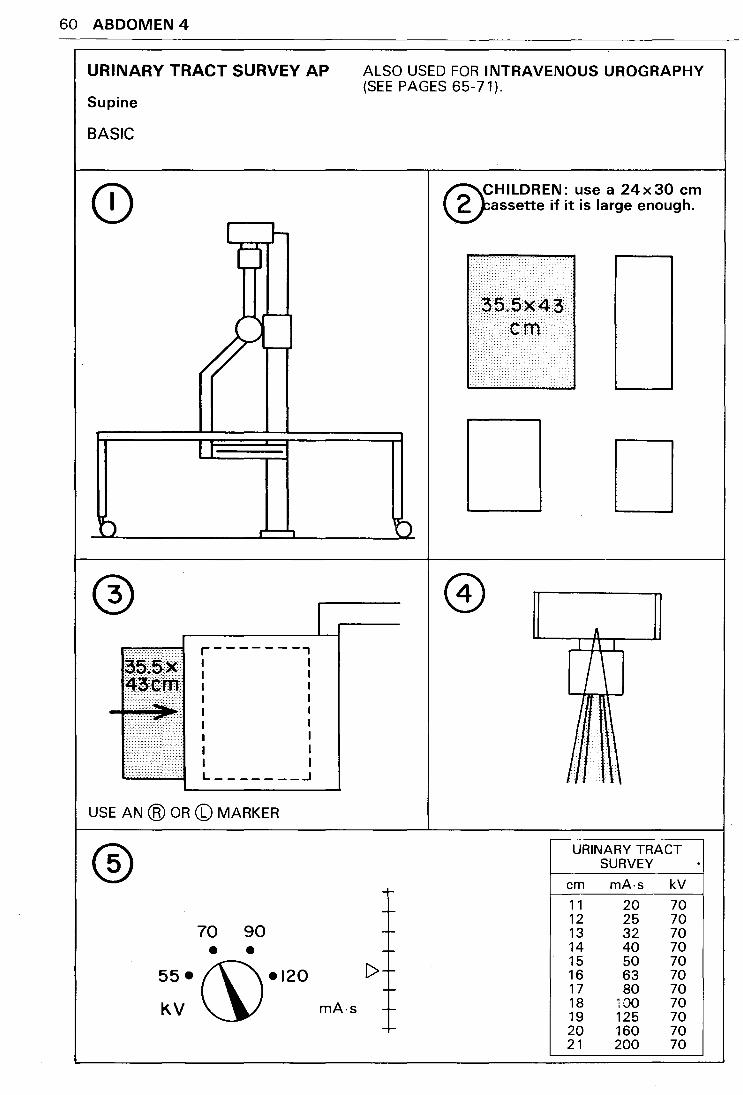
URINARY TRACT SURVEY AP
Supine
BASIC
r-------, I I I I I I I I I I I I I I I I I I L _______ ...J
USE AN ® OR CD MARKER
70 90 • •
55• (\\•120
KV~ mA·s
ALSO USED FOR INTRAVENOUS UROGRAPHY (SEE PAGES 65-71).
[>
~HILDREN: use a 24x30 em ~assette if it is large enough.
•••••e5.5x43 ·.·.·.·.·.·.·.·.·.·.·. · .. ·.·.·.·.·.·.· .. ................ em
D
URINARY TRACT SURVEY
em mA·s kV
11 20 70 12 25 70 13 32 70 14 40 70 15 50 70 16 63 70 17 80 70 18 100 70 19 125 70 20 160 70 21 200 70
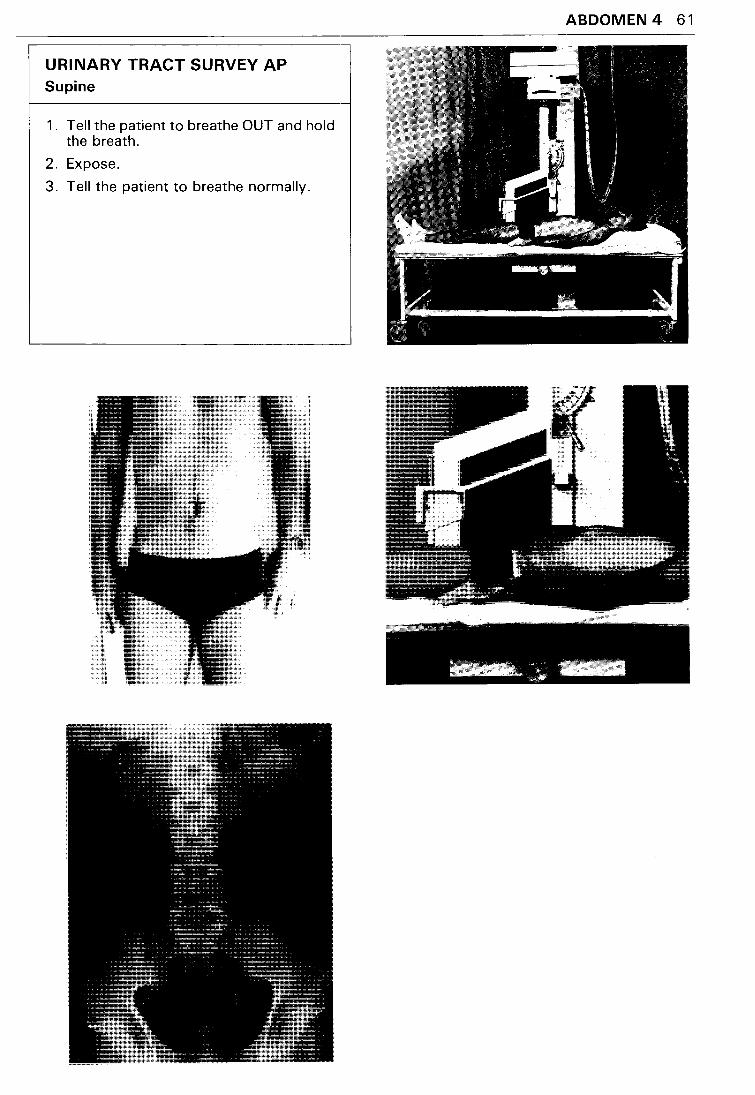
URINARY TRACT SURVEY AP Supine
1. Tell the patient to breathe OUT and hold the breath.
2. Expose.
3. Tell the patient to breathe normally.
ABDOMEN 4 61
::;;: ~ ....,.., ~ ""
-~ .. ~-~'!!!'
62 ABDOMEN 5
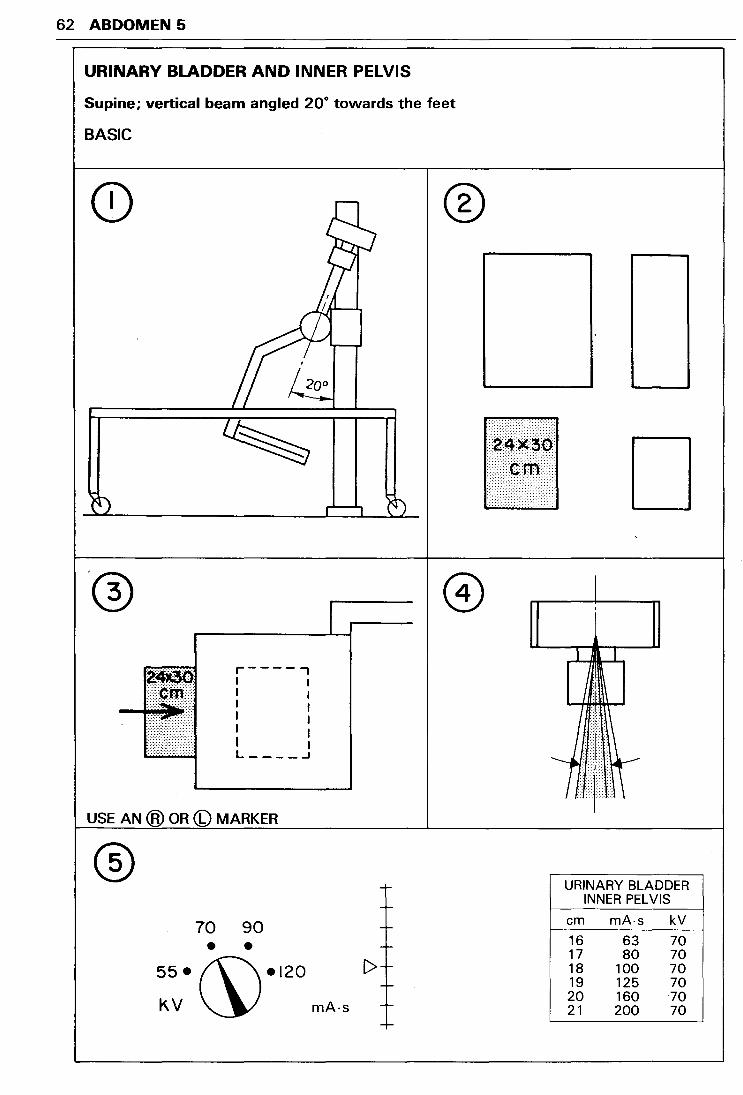
URINARY BLADDER AND INNER PELVIS
Supine; vertical beam angled 20° towards the feet
BASIC
®
l r----,
.i .. I I I I I I
;:) I I
;;;;: I I I I ... L-----'
USE AN® OR CD MARKER
® 70 90 • •
55• (\\•120
I<.V ~ mA·s
[>
~:~~~() ¢rt1> D
URINARY BLADDER INNER PEL VIS
em mA-s kV
16 63 70 17 80 70 18 100 70 19 125 70 20 160 70 21 200 70
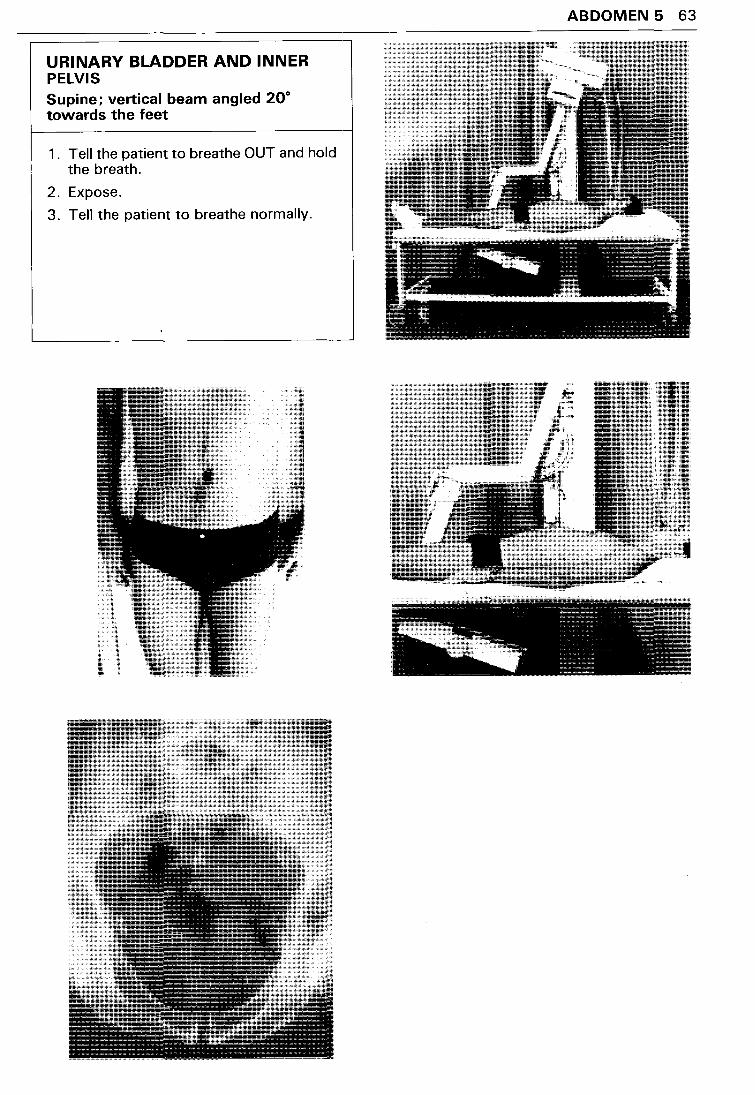
URINARY BLADDER AND INNER PELVIS Supine; vertical beam angled 20° towards the feet
1 . Tell the patient to breathe OUT and hold the breath.
2. Expose.
3. Tell the patient to breathe normally.
ABDOMEN 5 63
ABDOMEN 6 65
INTRAVENOUS UROGRAPHY: EXAMINATION OF THE KIDNEYS, URETERS, AND BLADDER
Supine
BASIC
The patient is given an intravenous injection of a contrast drug during the examination. Make sure the syringe, needles, and contrast solution are ready.
Now read page 67, which describes the procedure for intravenous urography.
ALSO READ THE YELLOW WARNING PAGES 12-14 because the patient may have a reaction after the injection and become very ill.
YOU MUST KNOW HOW TO DIAGNOSE AND TREAT A REACTION TO THE CONTRAST DRUG.
MAKE SURE THAT ALL THE DRUGS FOR TREATMENT ARE READY IN CASE THE PATIENT HAS A REACTION (see page 13).
DOSE OF CONTRAST DRUG: ASK THE DOCTOR. THE NORMAL ADULT DOSE IS BETWEEN 40 ml AND 1 00 mi. FOR CHILDREN AGED BETWEEN 2 AND 1 5 YEARS THE DOSE IS UP TO 1 ml PER KILOGRAM OF BODY-WEIGHT.
ABDOMEN 6 67
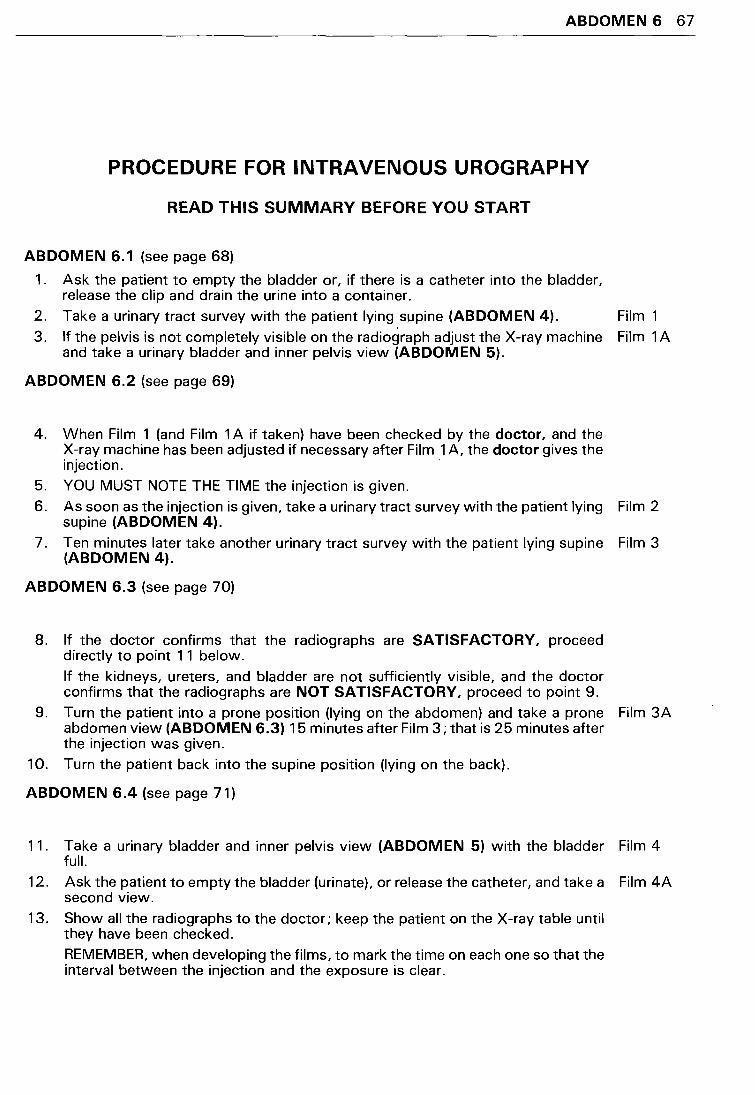
PROCEDUREFORINTRAVENOUSUROGRAPHY
READ THIS SUMMARY BEFORE YOU START
ABDOMEN 6.1 (see page 68)
1. Ask the patient to empty the bladder or, if there is a catheter into the bladder, release the clip and drain the urine into a container.
2. Take a urinary tract survey with the patient lying supine (ABDOMEN 4). Film 1
3. If the pelvis is not completely visible on the radiograph adjust the X-ray machine Film 1 A and take a urinary bladder and inner pelvis view (ABDOMEN 5).
ABDOMEN 6.2 (see page 69)
4. When Film 1 (and Film 1 A if taken) have been checked by the doctor, and the X-ray machine has been adjusted if necessary after Film 1 A, the doctor gives the injection. '
5. YOU MUST NOTE THE TIME the injection is given.
6. As soon as the injection is given, take a urinary tract survey with the patient lying Film 2 supine (ABDOMEN 4}.
7. Ten minutes later take another urinary tract survey with the patient lying supine Film 3 (ABDOMEN 4}.
ABDOMEN 6.3 (see page 70)
8. If the doctor confirms that the radiographs are SATISFACTORY, proceed directly to point 11 below.
If the kidneys, ureters, and bladder are not sufficiently visible, and the doctor confirms that the radiographs are NOT SATISFACTORY, proceed to point 9.
9. Turn the patient into a prone position (lying on the abdomen) and take a prone Film 3A abdomen view (ABDOMEN 6.3} 15 minutes after Film 3; that is 25 minutes after the injection was given.
10. Turn the patient back into the supine position (lying on the back).
ABDOMEN 6.4 (see page 71)
11. Take a urinary bladder and inner pelvis view (ABDOMEN 5) with the bladder Film 4 full.
12. Ask the patient to empty the bladder (urinate), or release the catheter, and take a Film 4A second view.
13. Show all the radiographs to the doctor; keep the patient on the X-ray table until they have been checked.
REMEMBER, when developing the films, to mark the time on each one so that the interval between the injection and the exposure is clear.
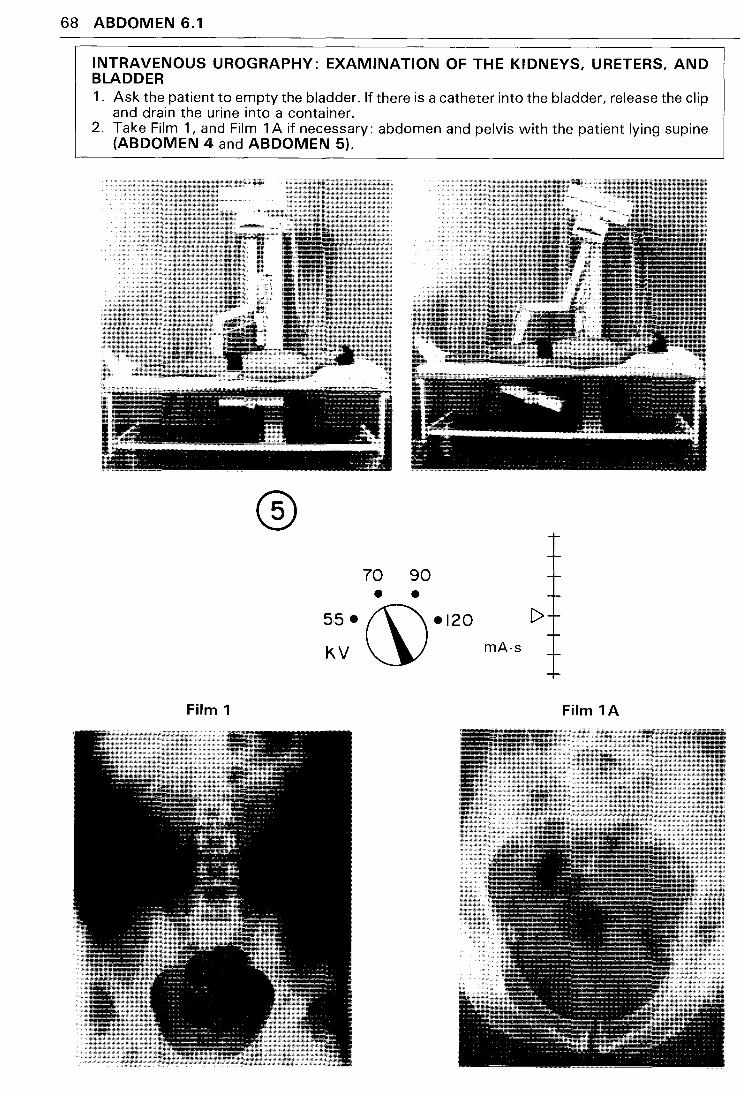
68 ABDOMEN 6.1
INTRAVENOUS UROGRAPHY: EXAMINATION OF THE KIDNEYS, URETERS, AND BLADDER 1. Ask the patient to empty the bladder. If there is a catheter into the bladder, release the clip
and drain the urine into a container. 2. Take Film 1, and Film 1 A if necessary: abdomen and pelvis with the patient lying supine
(ABDOMEN 4 and ABDOMEN 5).
®
Film 1
70 90 • •
55• f\\•120
KV~ mA·s
Film 1A
ABDOMEN 6.2 69
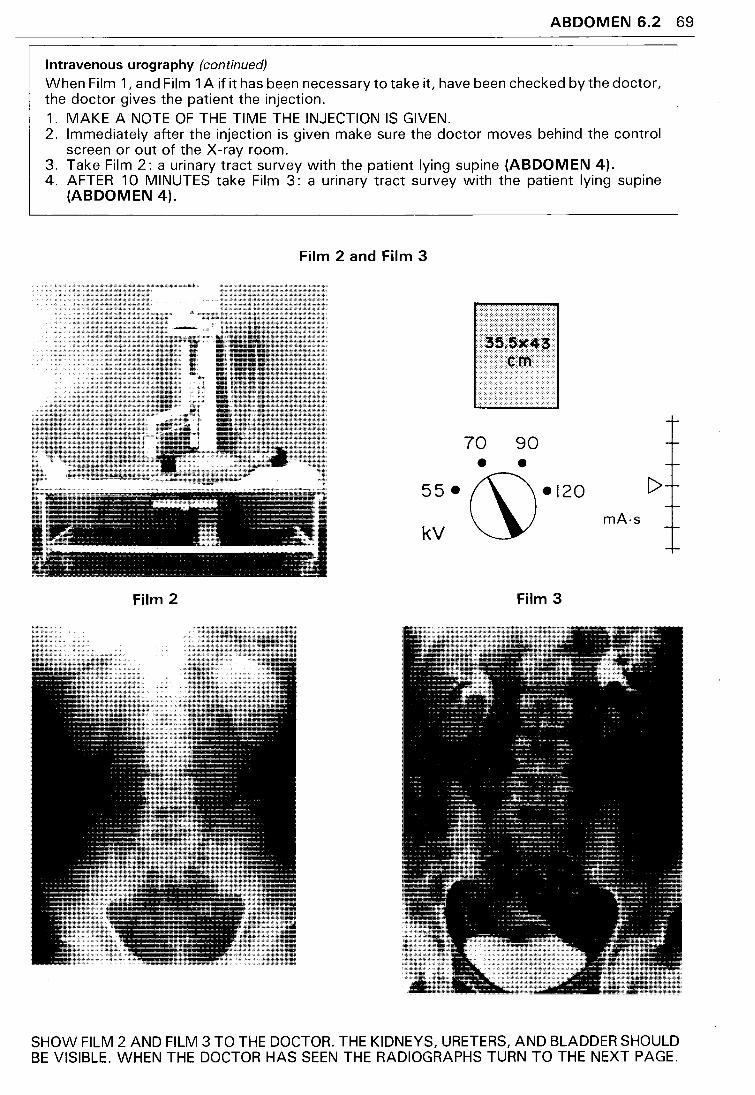
Intravenous urography (continued)
When Film 1, and Film 1 A if it has been necessary to take it, have been checked by the doctor, the doctor gives the patient the injection. 1. MAKE A NOTE OF THE TIME THE INJECTION IS GIVEN. 2. Immediately after the injection is given make sure the doctor moves behind the control
screen or out of the X-ray room. 3. Take Film 2: a urinary tract survey with the patient lying supine (ABDOMEN 4). 4. AFTER 10 MINUTES take Film 3: a urinary tract survey with the patient lying supine
(ABDOMEN 4).
Film 2 and Film 3
kV
Film 2
70 90
• • ~•120
Film 3
mA-s
SHOW FILM 2 AND FILM 3 TO THE DOCTOR. THE KIDNEYS, URETERS, AND BLADDER SHOULD BE VISIBLE. WHEN THE DOCTOR HAS SEEN THE RADIOGRAPHS TURN TO THE NEXT PAGE.
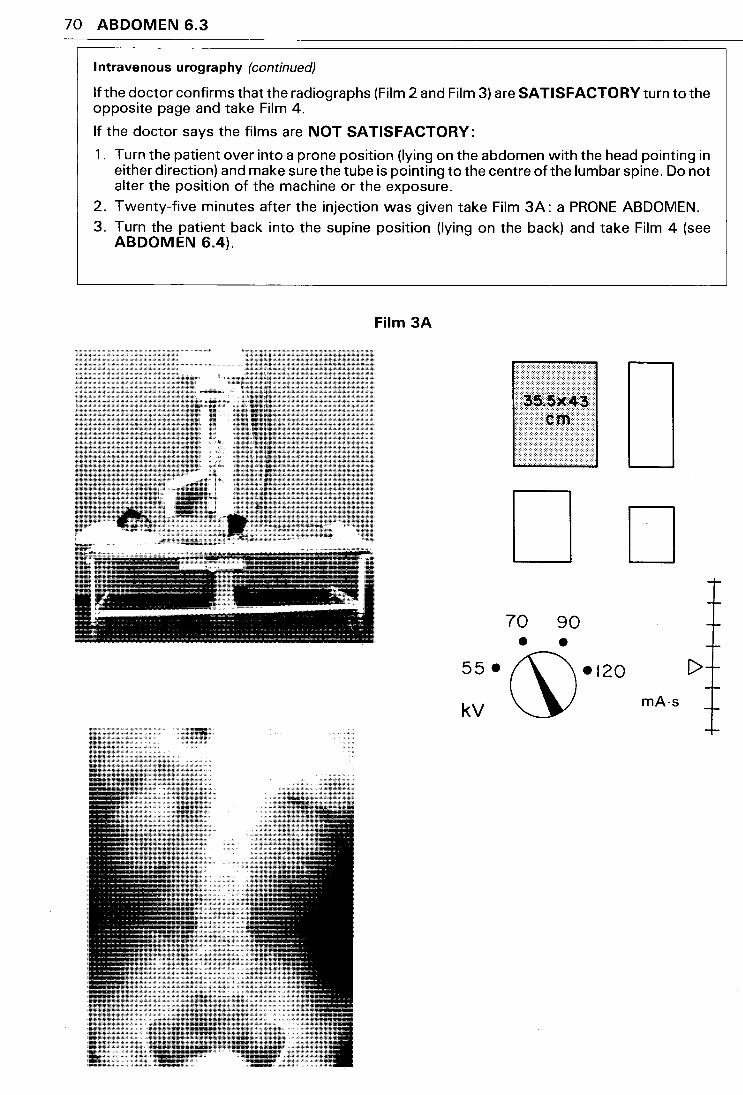
70 ABDOMEN 6.3
Intravenous urography (continued)
If the doctor confirms that the radiographs (Film 2 and Film 3) are SATISFACTORY turn to the opposite page and take Film 4.
If the doctor says the films are NOT SATISFACTORY:
1. Turn the patient over into a prone position (lying on the abdomen with the head pointing in either direction) and make sure the tube is pointing to the centre of the lumbar spine. Do not alter the position of the machine or the exposure.
2. Twenty-five minutes after the injection was given take Film 3A: a PRONE ABDOMEN.
3. Turn the patient back into the supine position (lying on the back) and take Film 4 (see ABDOMEN 6.4).
Film3A
kV
D 70 90 • • ~•120
D [>
mA-s
ABDOMEN 6.4 71
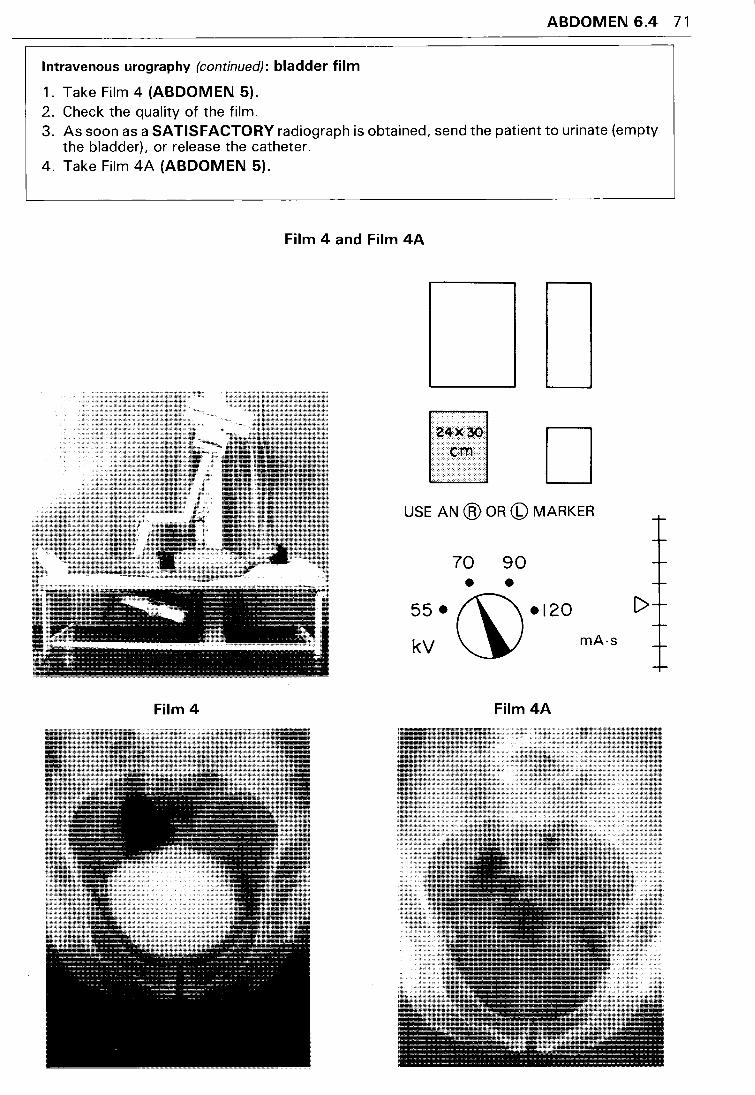
Intravenous urography (continued): bladder film
1. Take Film 4 (ABDOMEN 5). 2. Check the quality of the film. 3. As soon as a SATISFACTORY radiograph is obtained, send the patient to urinate (empty
the bladder), or release the catheter. 4. Take Film 4A (ABDOMEN 5).
Film 4 and Film 4A
D USE AN @ OR (b) MARKER
70 90 • •
55• (\\•120
kV ~ mA·s
I>
Film4 Film4A
ABDOMEN 7-ABDOMEN 9 73
CHOLECYSTOGRAPHY: THE GALL-BLADDER WITH CONTRAST MEDIUM
The contrast medium is usually in the form of tablets. If it is not in the form of tablets, but in liquid form, the directions on the bottle should be followed.
When the contrast medium is in the form of tablets (usually iopanoic acid or equivalent) the patient should take the dose indicated on the package. The tablets should be swallowed with water in the evening, 12 hours before the examination. After that the patient should not eat and should drink only water until after the X-ray films have been taken the next morning.
Gall-bladder not visible 12 hours after administration of the tablets
If the doctor cannot see the gall-bladder on radiographs taken 12 hours after the tablets were administered, there are several possible explanations.
1 . Ask the patient whether the tablets were in fact swallowed.
2. Ask if the patient had diarrhoea or vomiting, as this may have impaired absorption of the tablets.
3. If the first dose has not caused significant upset, ask the doctor if the patient is to take a second dose of tablets the same evening.
4. If a second dose of tablets is taken, take another X-ray 12 hours after the second dose.
If the gall-bladder is still not visible it is probably diseased.
74 ABDOMEN 7
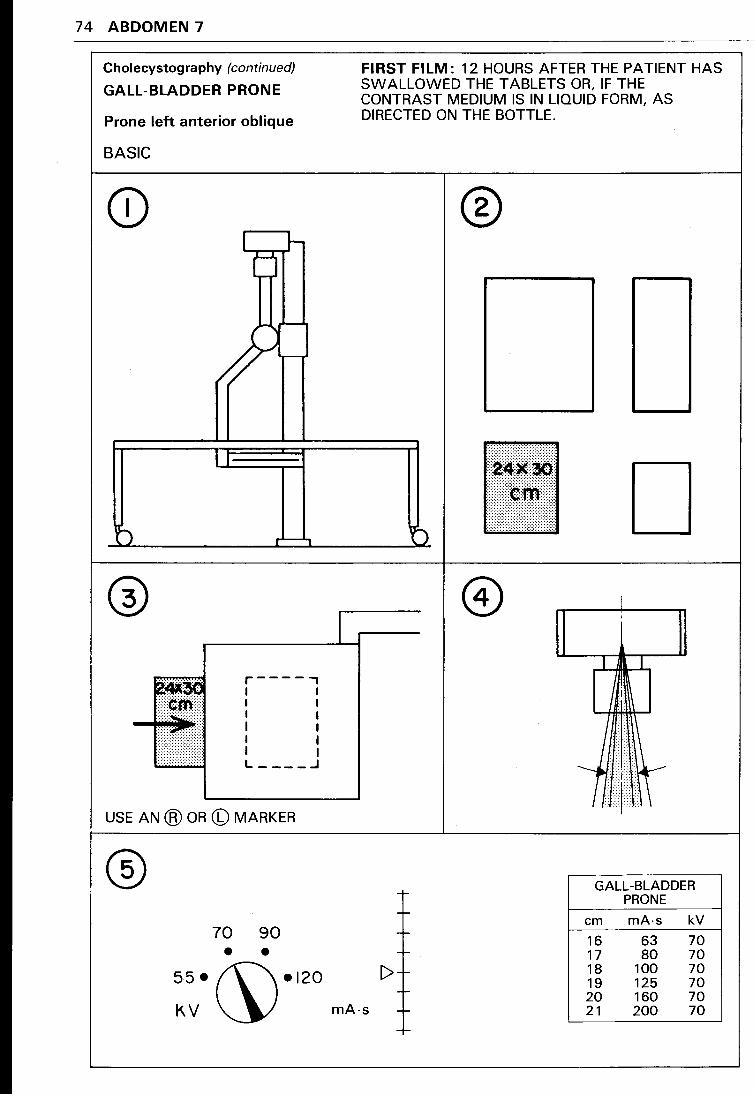
Cholecystography (continued)
GALL-BLADDER PRONE
Prone left anterior oblique
BASIC
CD I ~ (j
I
~ r-'-1
® r----, I I .. I I I I I I I I
:[. I I L ____ .J
USE AN @ OR (b) MARKER
® 70 90 • •
55•~•120 I<.V
I
FIRST FILM: 12 HOURS AFTER THE PATIENT HAS SWALLOWED THE TABLETS OR, IF THE CONTRAST MEDIUM IS IN LIQUID FORM, AS DIRECTED ON THE BOTTLE.
®
D :
..
. .
0
@) I '
I I
I
. I~il.~ GALL -BLADDER
f- PRONE -I-
mA·s kV em -I-
16 63 70 -I- 17 80 70
C> 1- 18 100 70 19 125 70
-I- 20 160 70 mA-s -I- 21 200 70
-I-
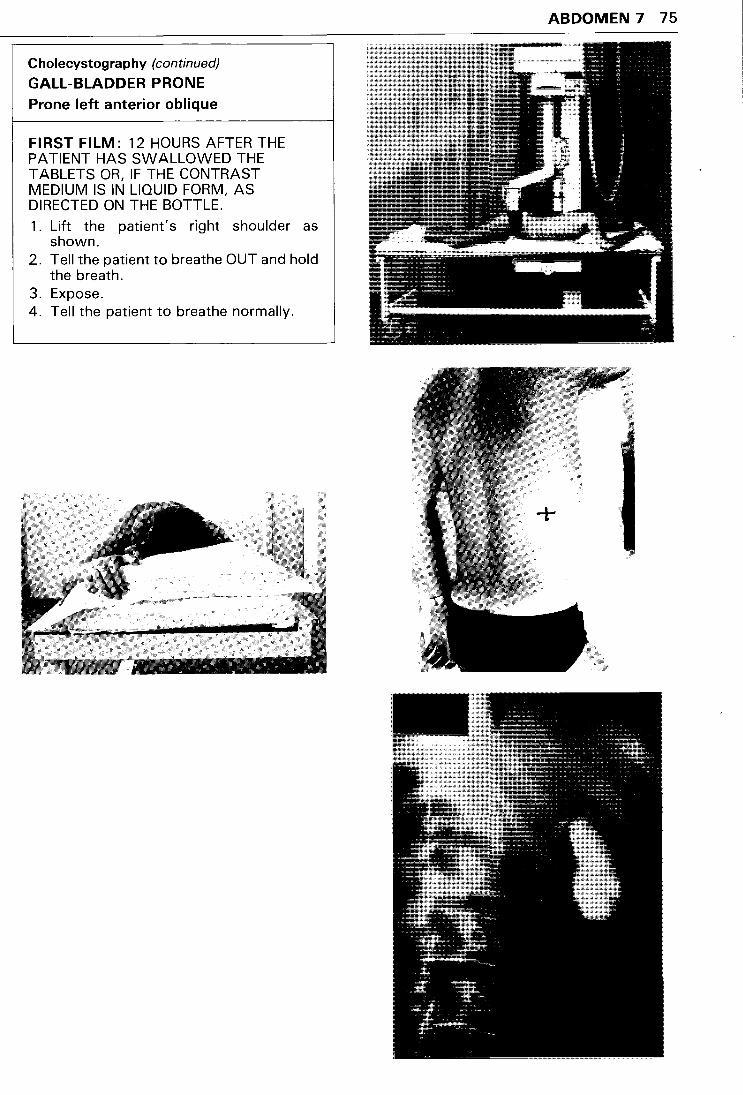
Cholecystography (continued)
GALL-BLADDER PRONE
Prone left anterior oblique
FIRST FILM: 12 HOURS AFTER THE PATIENT HAS SWALLOWED THE TABLETS OR, IF THE CONTRAST MEDIUM IS IN LIQUID FORM, AS DIRECTED ON THE BOTTLE.
1 . Lift the patient's right shoulder as shown.
2. Tell the patient to breathe OUT and hold the breath.
3. Expose. 4. Tell the patient to breathe normally.
ABDOMEN 7 75
76 ABDOMEN 8
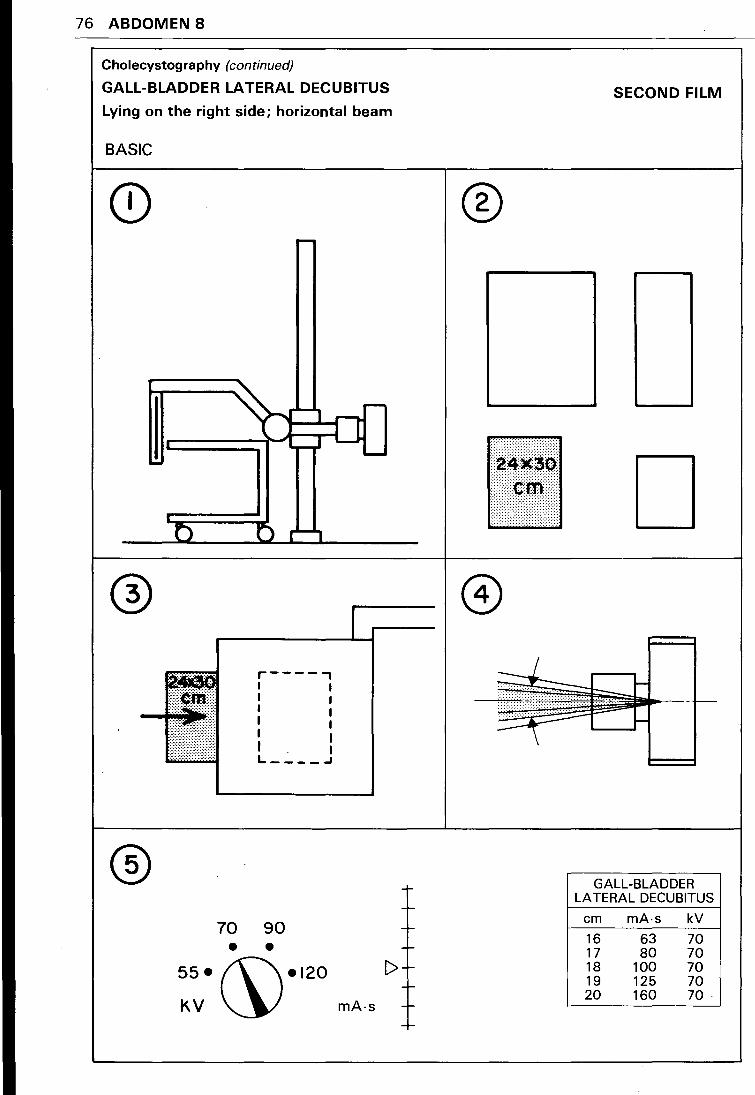
Cholecystography (continued)
GALL-BLADDER LATERAL DECUBITUS
Lying on the right side; horizontal beam
BASIC
r----, I I I I I I I I I I I I L----..J
70 90 • •
55•~•120 KV~
r
I>
mA-s
®
SECOND FILM
D
GALL-BLADDER LATERAL DECUBITUS
em mA-s kV
16 63 70 17 80 70 18 100 70 19 125 70 20 160 70.
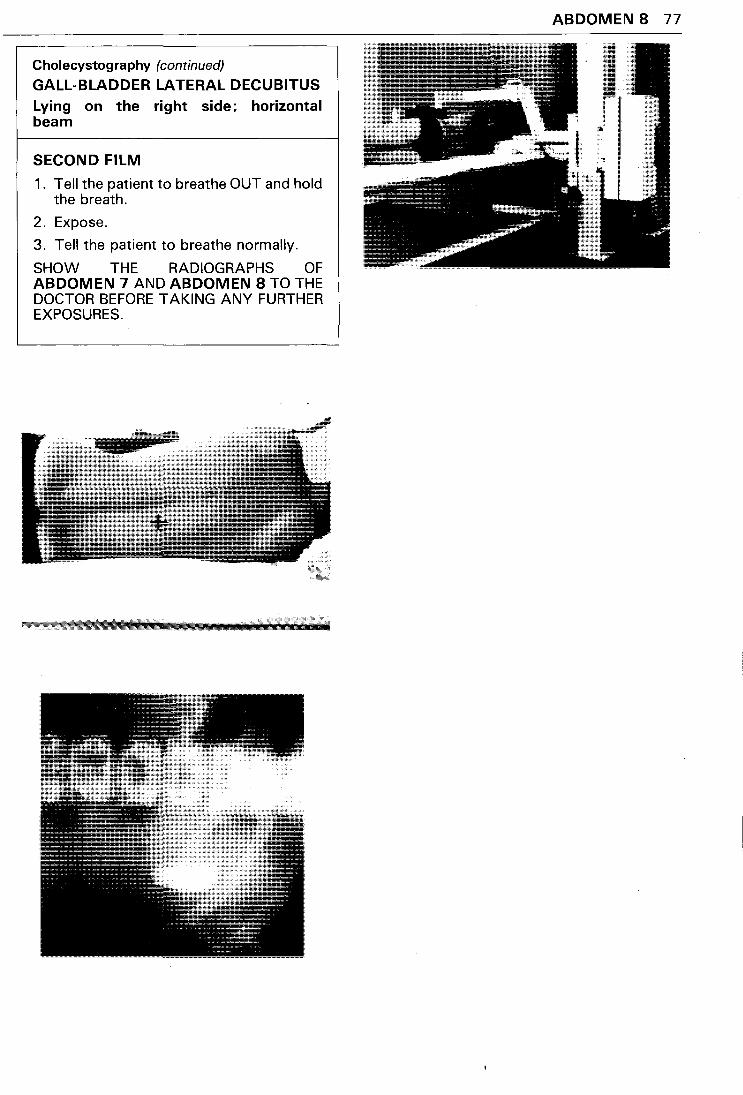
Cholecystography (continued)
GALL-BLADDER LATERAL DECUBITUS
Lying on the right side; horizontal beam
SECOND FILM
1. Tell the patient to breathe OUT and hold the breath.
2. Expose.
3. Tell the patient to breathe normally.
SHOW THE RADIOGRAPHS OF ABDOMEN 7 AND ABDOMEN 8 TO THE DOCTOR BEFORE TAKING ANY FURTHER EXPOSURES.
ABDOMEN 8 77
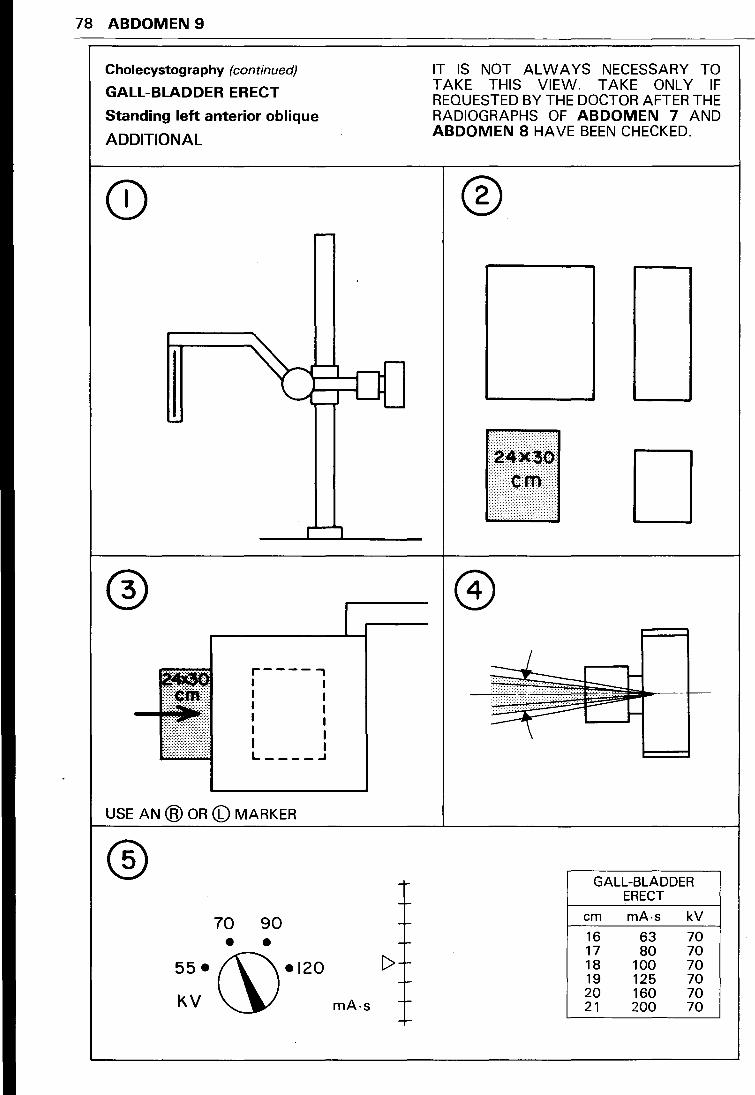
78 ABDOMEN 9
Cholecystography (continued)
GALL-BLADDER ERECT
Standing left anterior oblique
ADDITIONAL
r----, I I I I I I I I I I I I L----.J
USE AN ® OR CD MARKER
® 70 90 • •
55•~•120 KV
I
1-
-----
[> --
mA-s ---
IT IS NOT ALWAYS NECESSARY TO TAKE THIS VIEW. TAKE ONLY IF REQUESTED BY THE DOCTOR AFTER THE RADIOGRAPHS OF ABDOMEN 7 AND ABDOMEN 8 HAVE BEEN CHECKED.
®
~~l!liil! c:m: D
·- f--
GALL-BLADDER ERECT
em mA-s kV
16 63 70 17 80 70 18 100 70 19 125 70 20 160 70 21 200 70
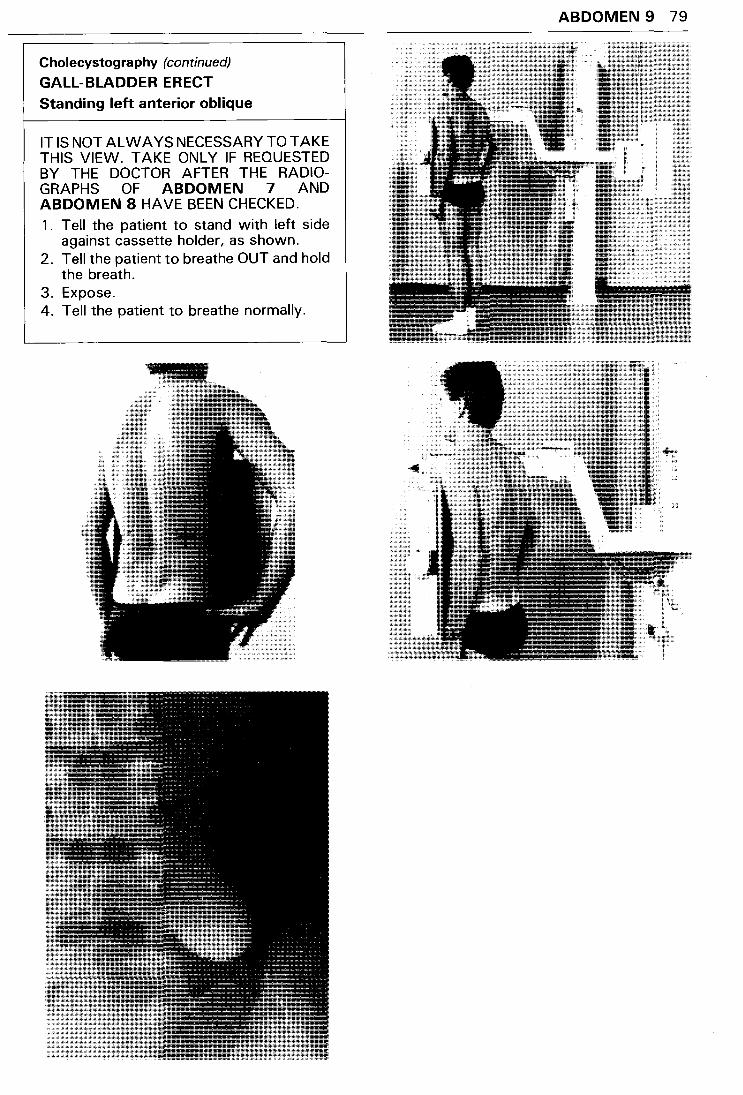
Cholecystography (continued)
GALL-BLADDER ERECT Standing left anterior oblique
IT IS NOTAL WAYS NECESSARY TOT AKE THIS VIEW. TAKE ONLY IF REQUESTED BY THE DOCTOR AFTER THE RADIOGRAPHS OF ABDOMEN 7 AND ABDOMEN 8 HAVE BEEN CHECKED.
1 . Tell the patient to stand with left side against cassette holder, as shown.
2. Tell the patient to breathe OUT and hold the breath.
3. Expose. 4. Tell the patient to breathe normally.
ABDOMEN 9 79
80 ABDOMEN 10
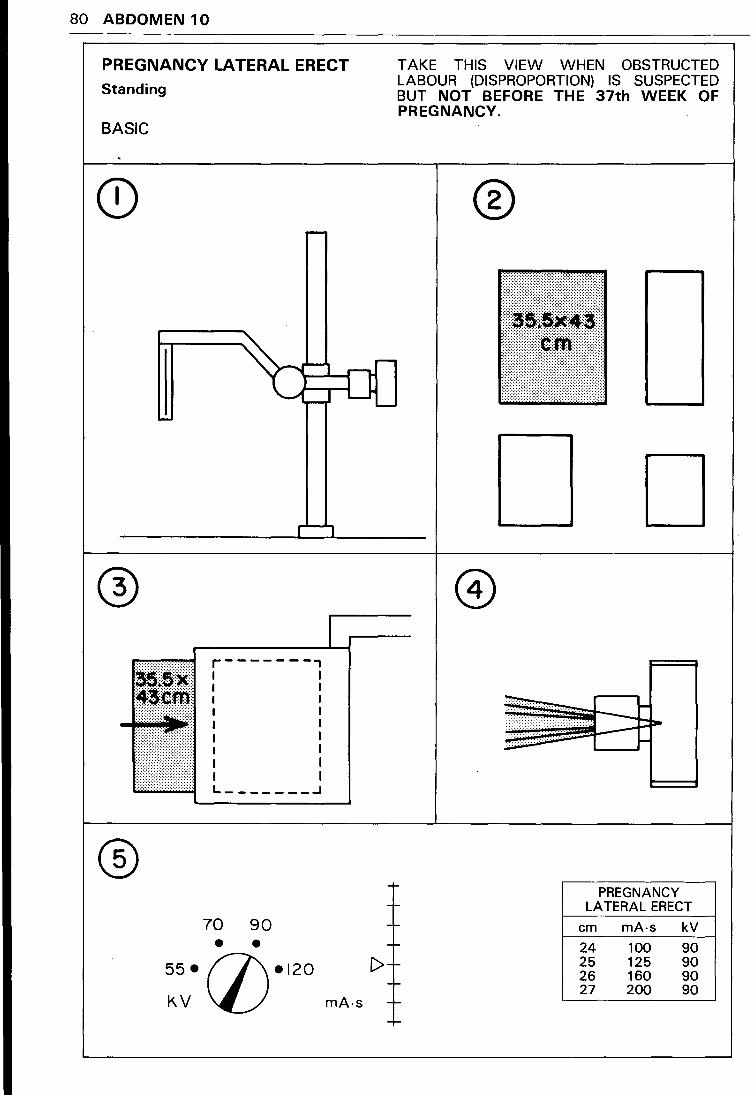
PREGNANCY LATERAL ERECT
Standing
BASIC
- ,...-
TAKE THIS VIEW WHEN OBSTRUCTED LABOUR (DISPROPORTION) IS SUSPECTED BUT NOT BEFORE THE 37th WEEK OF PREGNANCY.
®
: : : :
~ 0 : ..
r-)
® ..
.. . . . ... ..
®
I-.
-
r'-1
.. ..
..
r-------, I I I I I I I I I I I I I I I I I I L-------.J
70 90 • •
55• (j)•l20 KV
I
-r-
r-
[>r--r-
mA·s -r--r-
@
D
~-···· . . ~ . . --~ ~ ~ -- r-
PREGNANCY LATERAL ERECT
em mA·s kV
24 25 26 27
100 125 160 200
90 90 90 90
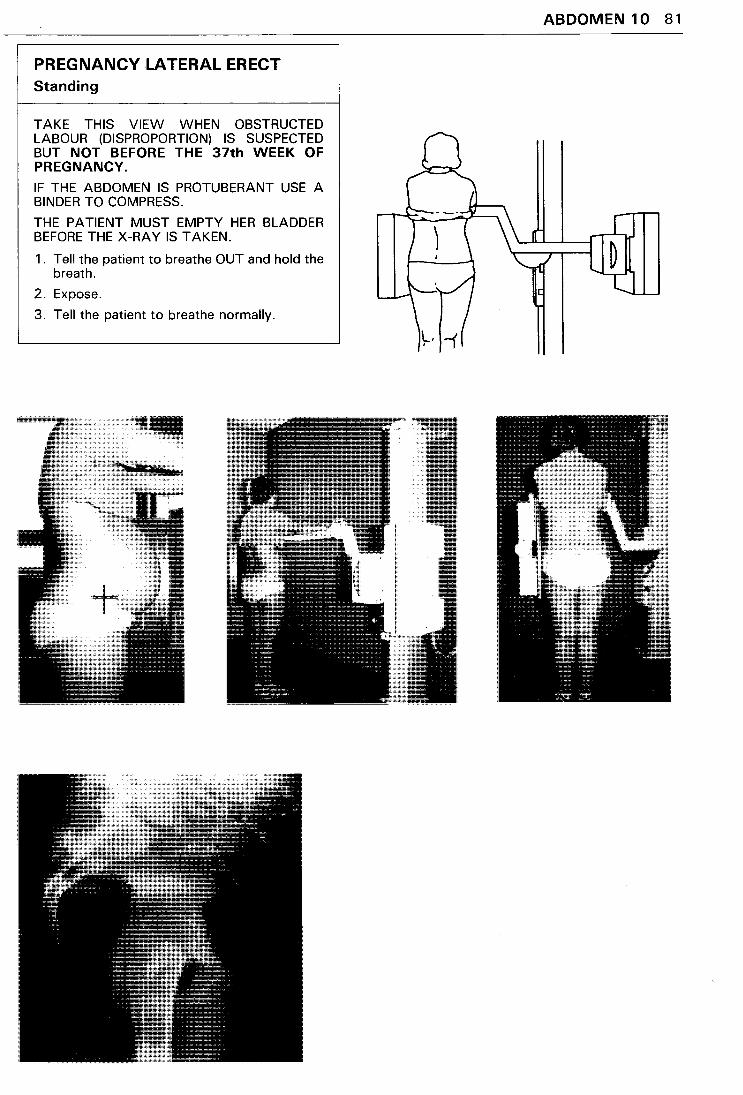
PREGNANCY LATERAL ERECT Standing
TAKE THIS VIEW WHEN OBSTRUCTED LABOUR (DISPROPORTION) IS SUSPECTED BUT NOT BEFORE THE 37th WEEK OF PREGNANCY.
IF THE ABDOMEN IS PROTUBERANT USE A BINDER TO COMPRESS.
THE PATIENT MUST EMPTY HER BLADDER BEFORE THE X-RAY IS TAKEN.
1. Tell the patient to breathe OUT and hold the breath.
2. Expose.
3. Tell the patient to breathe normally.
ABDOMEN 10 81
82 ABDOMEN 11
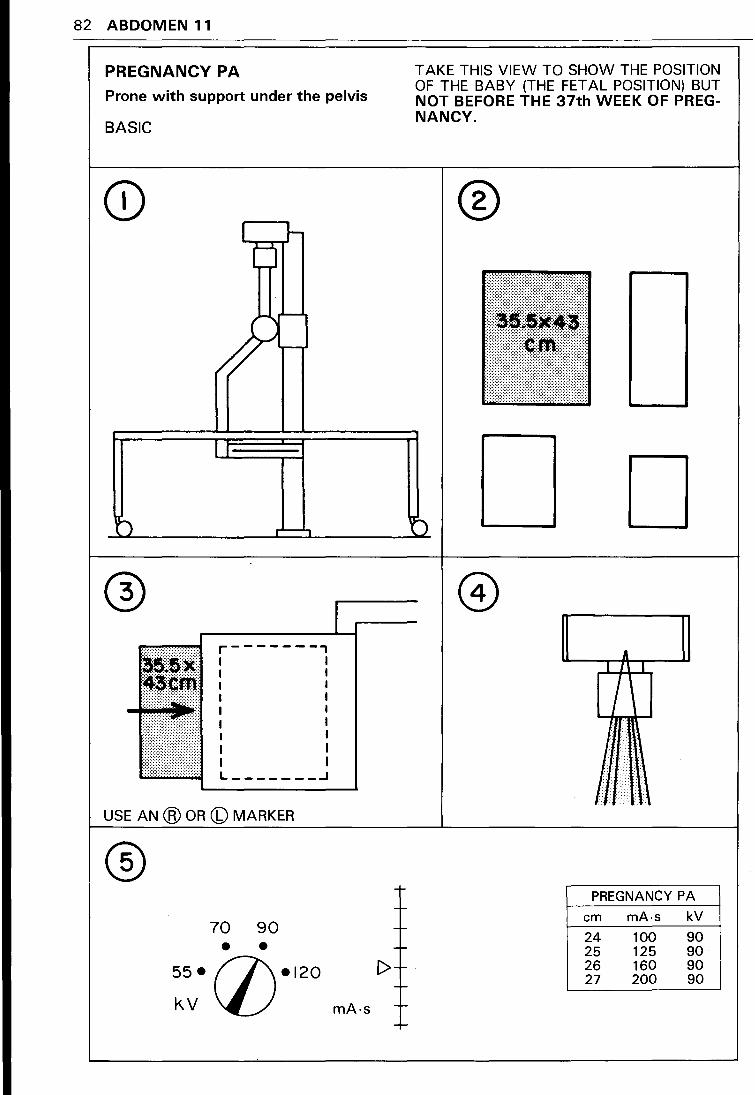
PREGNANCY PA
Prone with support under the pelvis
BASIC
L J-tJ
I
~ r-.,
® .. r-------, . .
I I I I
: I I .. ..
I I . . . . .. .. I I : .. I I
... I I I I
.. I I :
L--------1
USE AN ® OR CD MARKER
® 70 90 • •
55• (j)•l20 k.V
I
--r -r-
-r
[>+ --
mA·s ----
TAKE THIS VIEW TO SHOW THE POSITION OF THE BABY (THE FETAL POSITION) BUT NOT BEFORE THE 37th WEEK OF PREGNANCY.
®
D A
I 1\ I
I'
PREGNANCY PA
em mA-s kV
24 100 90 25 125 90 26 160 90 27 200 90
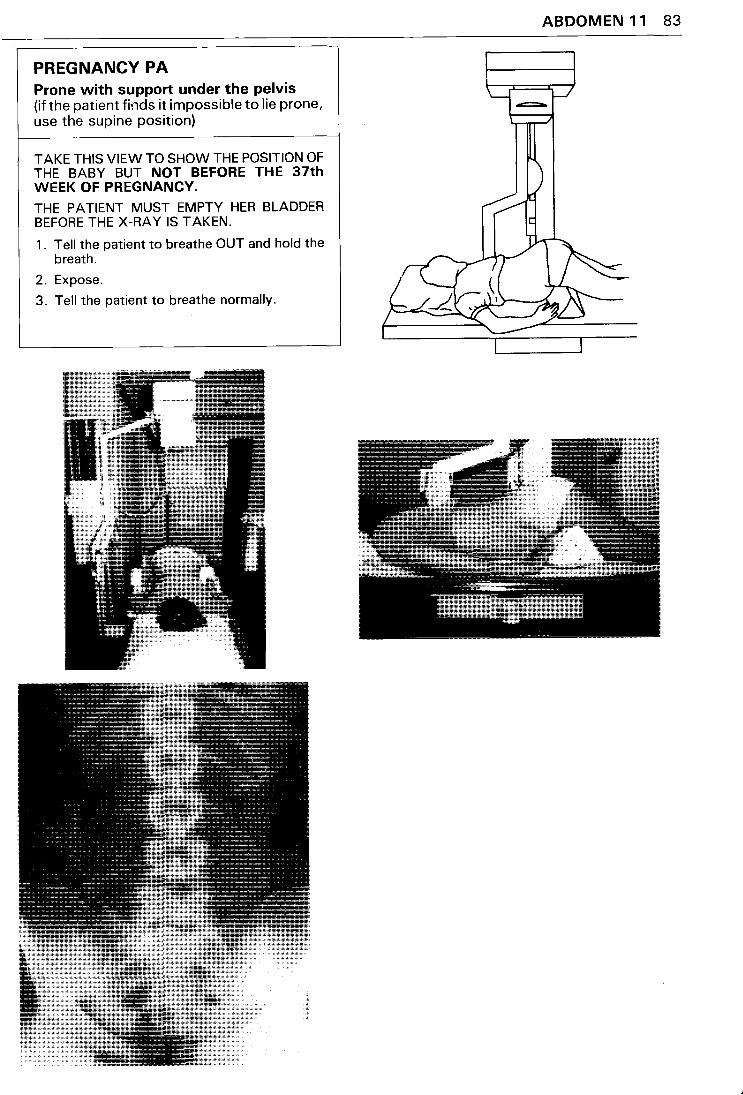
PREGNANCY PA Prone with support under the pelvis (if the patient finds it impossible to lie prone, use the supine position)
TAKE THIS VIEW TO SHOW THE POSITION OF THE BABY BUT NOT BEFORE THE 37th WEEK OF PREGNANCY.
THE PATIENT MUST EMPTY HER BLADDER BEFORE THE X-RAY IS TAKEN.
1 . Tell the patient to breathe OUT and hold the breath.
2. Expose.
3. Tell the patient to breathe normally.
ABDOMEN 11 83
84 ABDOMEN 12
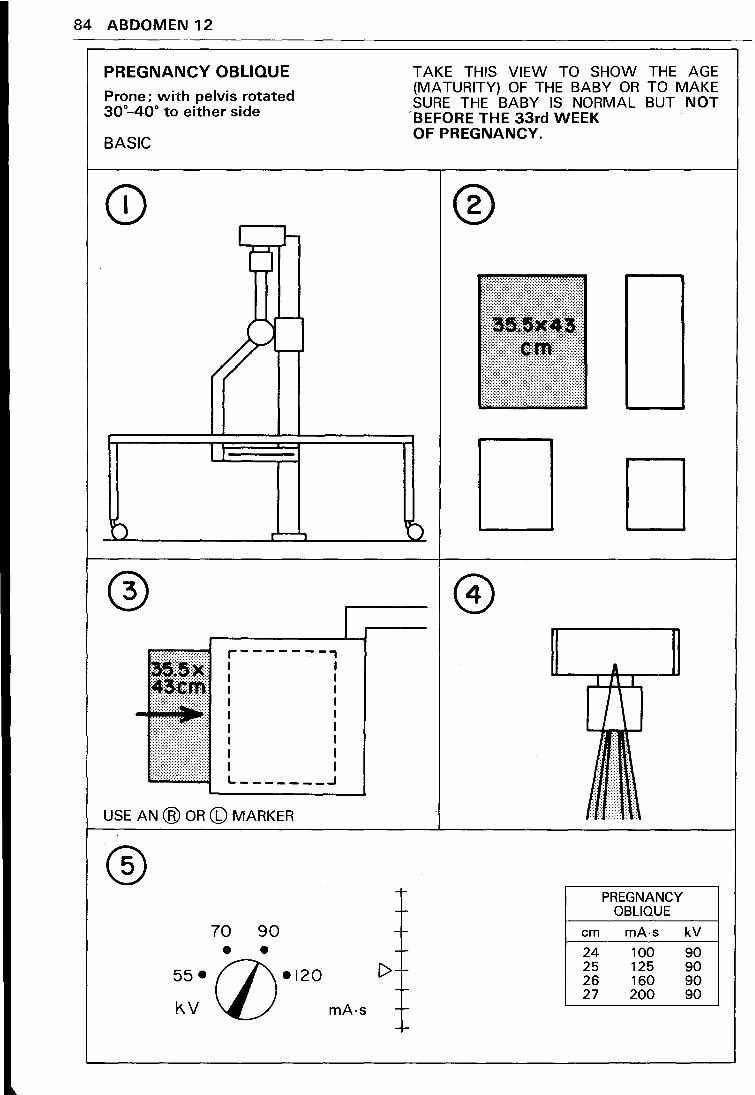
PREGNANCY OBLIQUE
Prone; with pelvis rotated 30°-40° to either side
BASIC
I r-(j
USE AN @ OR (6) MARKER
® 70 90 • •
I
55• (j)•l20 kV mA-s
--r-
-r-
-r-
C>-r-r-
-r-
TAKE THIS VIEW TO SHOW THE AGE (MATURITY) OF THE BABY OR TO MAKE SURE ·THE BABY IS NORMAL BUT NOT
.BEFORE THE 33rd WEEK OF PREGNANCY.
®
D
PREGNANCY OBLIQUE
em mA-s kV
24 100 90 25 125 90 26 160 90 27 200 90
-r-
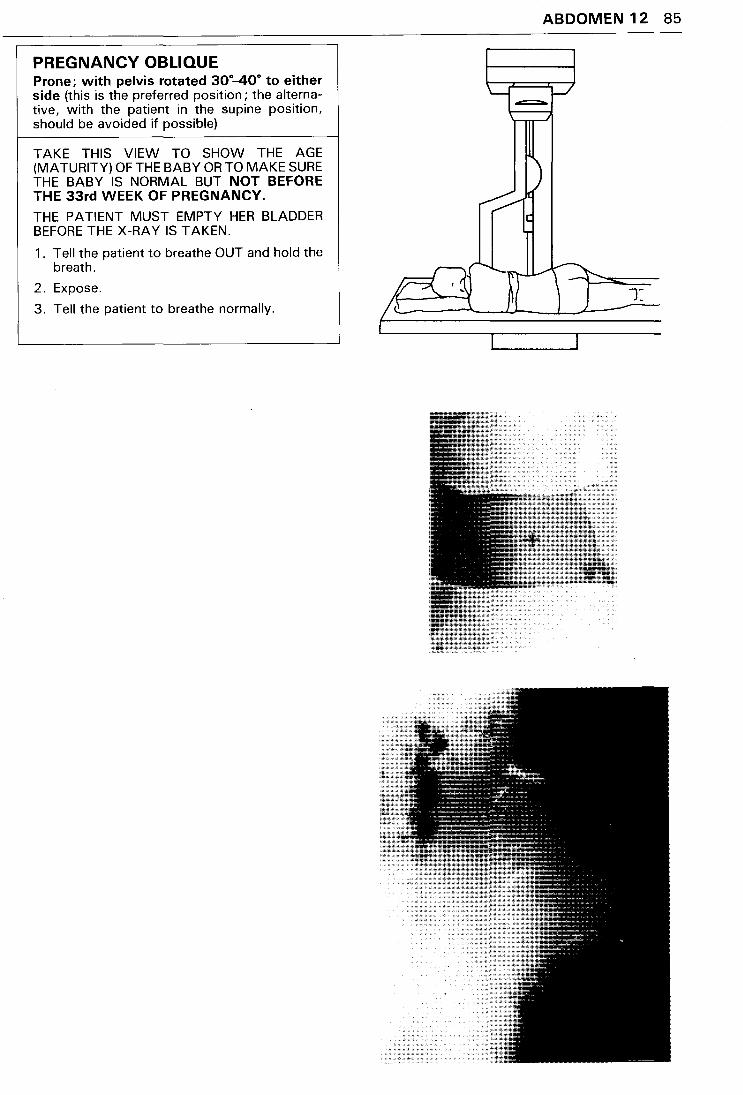
PREGNANCY OBLIQUE Prone; with pelvis rotated 30°-40° to either side (this is the preferred position; the alternative, with the patient in the supine position, should be avoided if possible)
TAKE THIS VIEW TO SHOW THE AGE (MATURITY) OF THE BABY OR TO MAKE SURE THE BABY IS NORMAL BUT NOT BEFORE THE 33rd WEEK OF PREGNANCY.
THE PATIENT MUST EMPTY HER BLADDER BEFORE THE X-RAY IS TAKEN.
1 . Tell the patient to breathe OUT and hold the breath.
2. Expose.
3. Tell the patient to breathe normally.
ABDOMEN 12 85
86 ABDOMEN 13
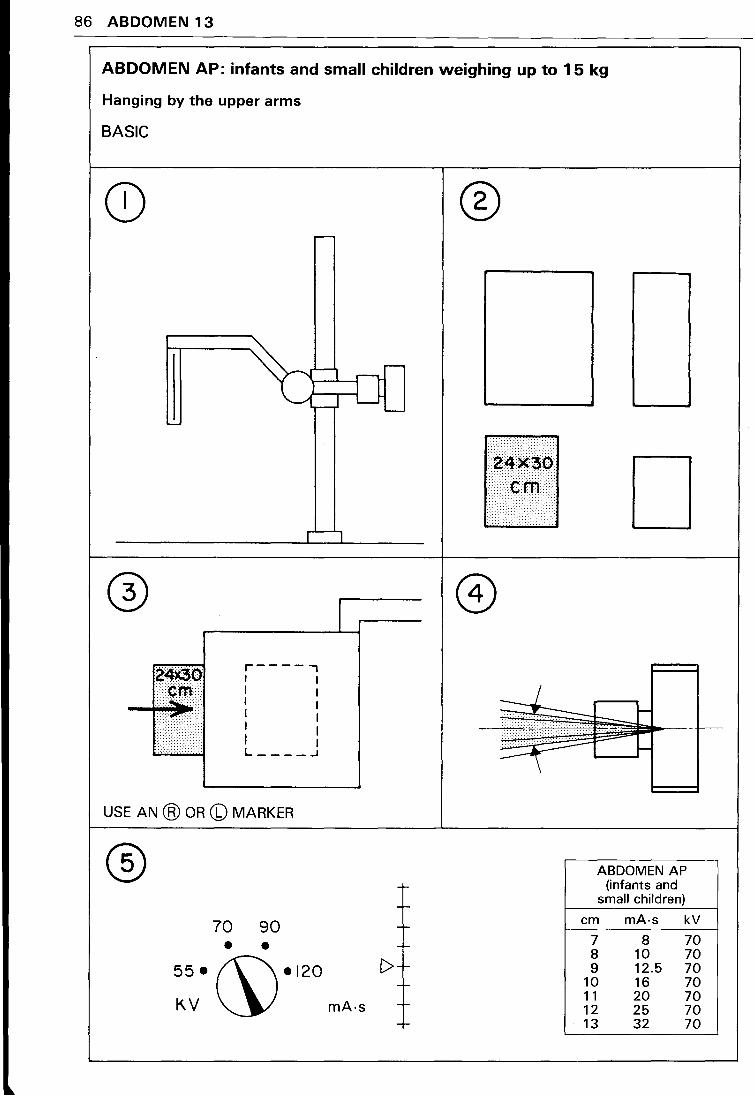
ABDOMEN AP: infants and small children weighing up to 15 kg
Hanging by the upper arms
BASIC
Q)
j r-----, I I I I I I I I I I I I L----...J
USE AN @ OR (b) MARKER
® 1-
-I-
70 90 -r-
• • -r-
55•~•120 [>t--
KV mA-s ----
®
n~4!~~d effi<
/ ? D
ABDOMEN AP (infants and
small children)
em mA-s kV
7 8 70 8 10 70 9 12.5 70
10 16 70 11 20 70 12 25 70 13 32 70
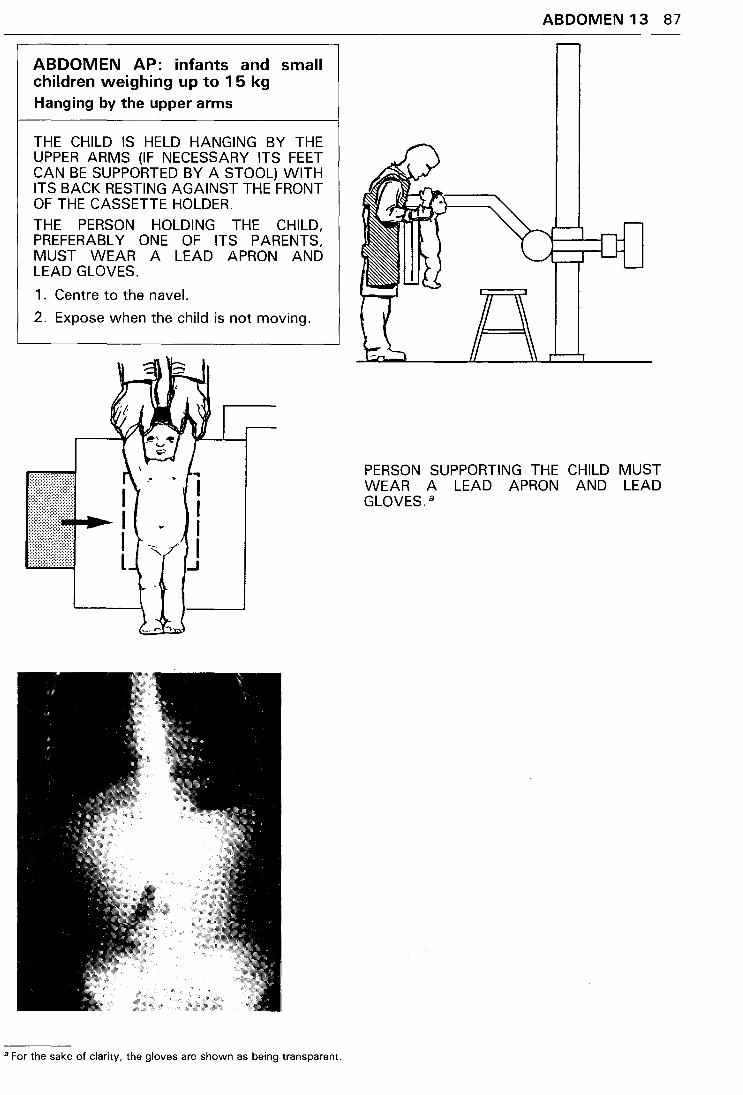
ABDOMEN AP: infants and small children weighing up to 1 5 kg Hanging by the upper arms
THE CHILD IS HELD HANGING BY THE UPPER ARMS (IF NECESSARY ITS FEET CAN BE SUPPORTED BY A STOOL) WITH ITS BACK RESTING AGAINST THE FRONT OF THE CASSETTE HOLDER.
THE PERSON HOLDING THE CHILD, PREFERABLY ONE OF ITS PARENTS, MUST WEAR A LEAD APRON AND LEAD GLOVES.
1 . Centre to the navel.
2. Expose when the child is not moving.
....
. . .
a For the sake of clarity, the gloves are shown as being transparent.
ABDOMEN 13 87
PERSON SUPPORTING THE CHILD MUST WEAR A LEAD APRON AND LEAD GLOVES. a
HEAD
HEAD
SKULL X-rays of the skull are always taken with the patient lying down.
1 . Skull lateral . . . . . . . . . . . . . . . . . . . . . . . . . . . . 2. Skull PA ............................ .
NEVER USE this position when there is a possibility that the facial bones may be fractured, or when the patient is unconscious.
Pages
92-93 94-95
3. Skull AP . . . . . . . . . . . . . . . . . . . . . . . . . . . . . . . . . . . . . . . . . . . 96-97 Use when the patient cannot be X-rayed in the prone position (see HEAD 2 above).
4. Skull (occiput) semiaxial (Towne's projection) . . . . . . . . . . . . . . . . . . . . . . 98-99
SINUSES, FACE, AND NOSE
Patient sitting 5. Sinuses and face PA . . . . . . . . . . 6. Sinuses and face semiaxial, or nose PA 7. Sinuses, face, or nose lateral ..... .
Patient lying down, unable to sit Sinuses, face, or nose AP Sinuses, face, or nose lateral
MANDIBLE
Patient sitting 8. Mandible P A 9. Mandible oblique lateral ....
Patient lying down, unable to sit 10. Mandible AP ..... . 11. Mandible oblique lateral . . . .
Use Skull AP (HEAD 3 above) Use Skull lateral (HEAD 1 above)
100-101 102-103 104-105
106-107 108-109
110-111 112-113
91
92 HEAD 1
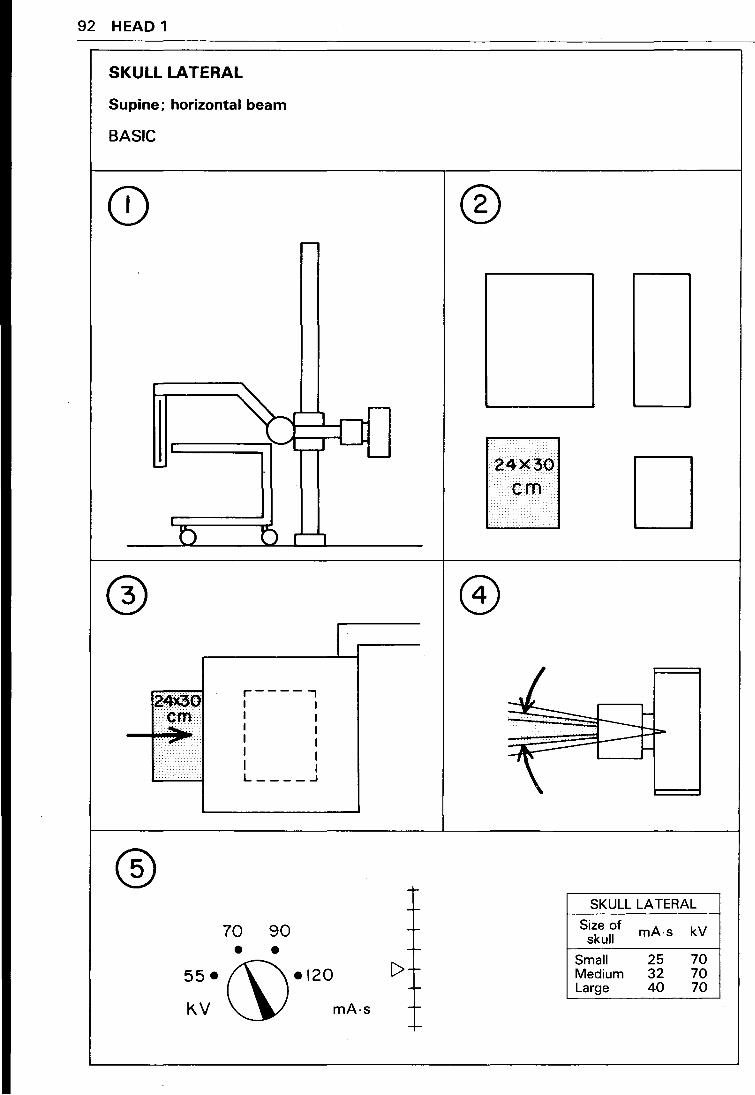
SKULL LATERAL
Supine; horizontal beam
BASIC
24)00 ... ., .,£_rrr .... .. .......... ,_ ........ . i < j:.: ......
®
r----., I I I I I I I I I I I I L ____ .J
70 90 • •
I
55•~•120 K. V mA·s
[>
~
-f-
----
-I-
-I-
-I-
®
24><30 em D
L 1-
--~--t>
SKULL LATERAL
Size of mA·s kV skull
Small 25 70 Medium 32 70 Large 40 70
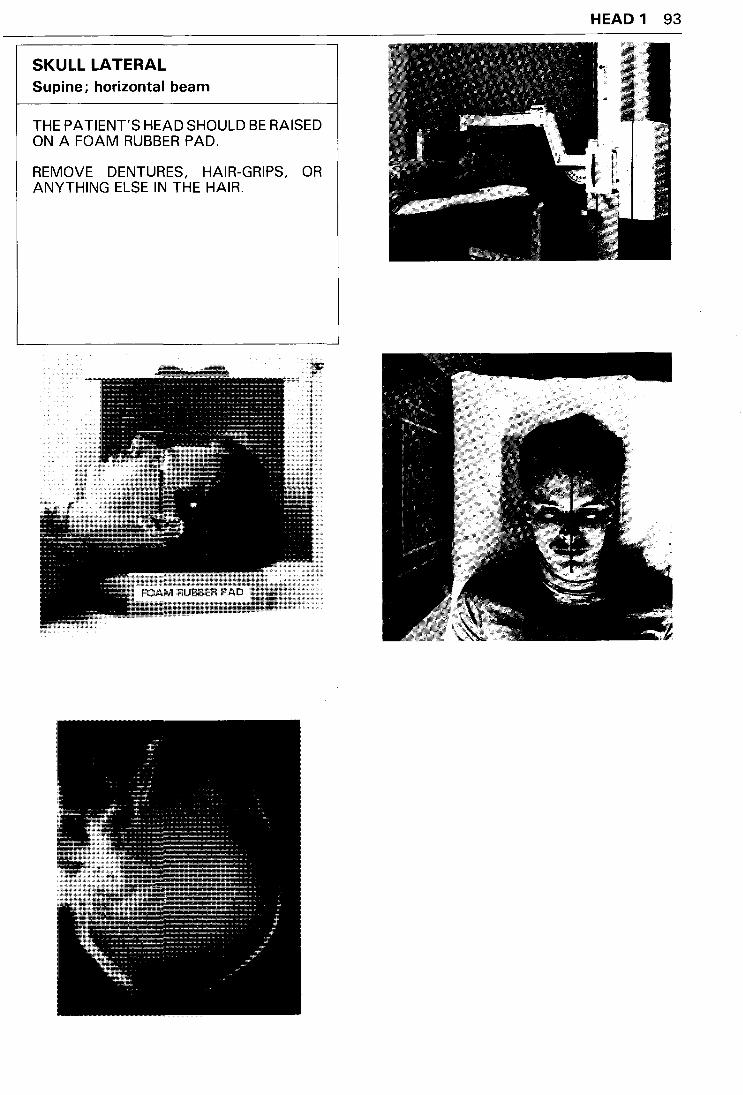
SKULL LATERAL Supine; horizontal beam
THE PATIENT'S HEAD SHOULD BE RAISED ON A FOAM RUBBER PAD.
REMOVE DENTURES, HAIR-GRIPS, OR ANYTHING ELSE IN THE HAIR.
HEAD 1 93
94 HEAD 2
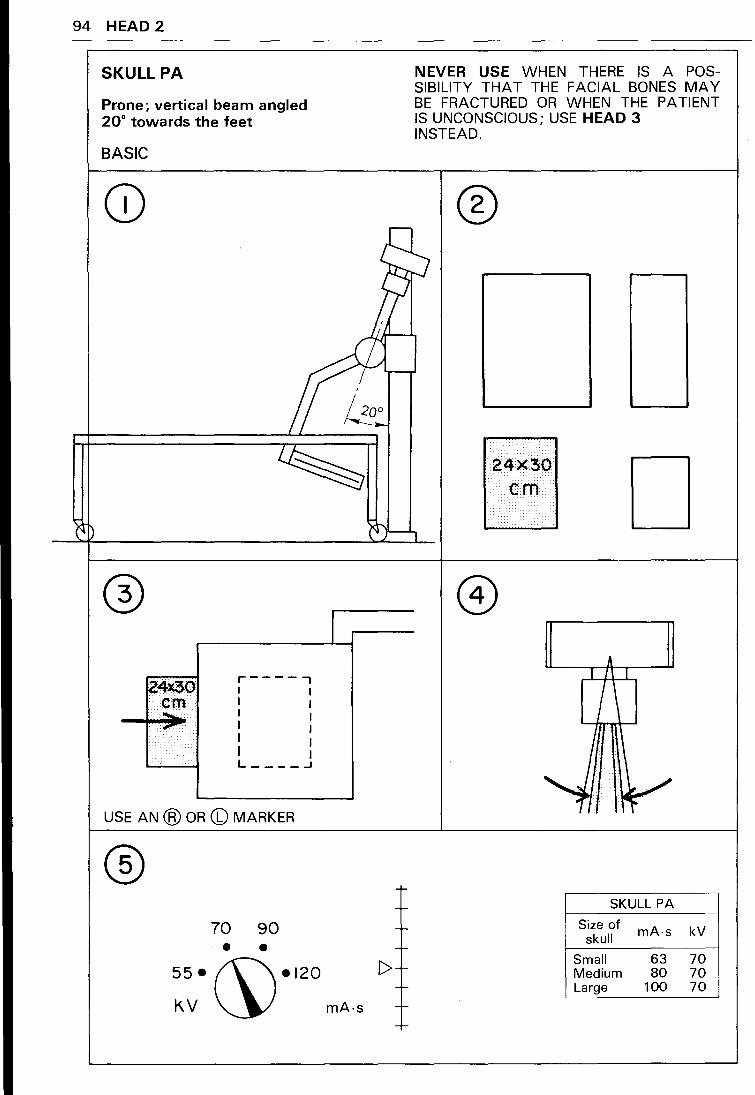
SKULL PA
Prone; vertical beam angled 20° towards the feet
BASIC
24~0 r-----, I I
em I I . ..;,.,._ I I ,:, I I
I I I I L ____ ..J
USE AN ® OR CD MARKER
® 70 90 • •
55• (\\•120
I
KV ~ mA-s
C>
NEVER USE WHEN THERE IS A POSSIBILITY THAT THE FACIAL BONES MAY BE FRACTURED OR WHEN THE PATIENT IS UNCONSCIOUS; USE HEAD 3 INSTEAD.
®
24><.30 c.m D
SKULL PA
Size of mA·s kV skull
Small 63 70 Medium 80 70 Large 100 70
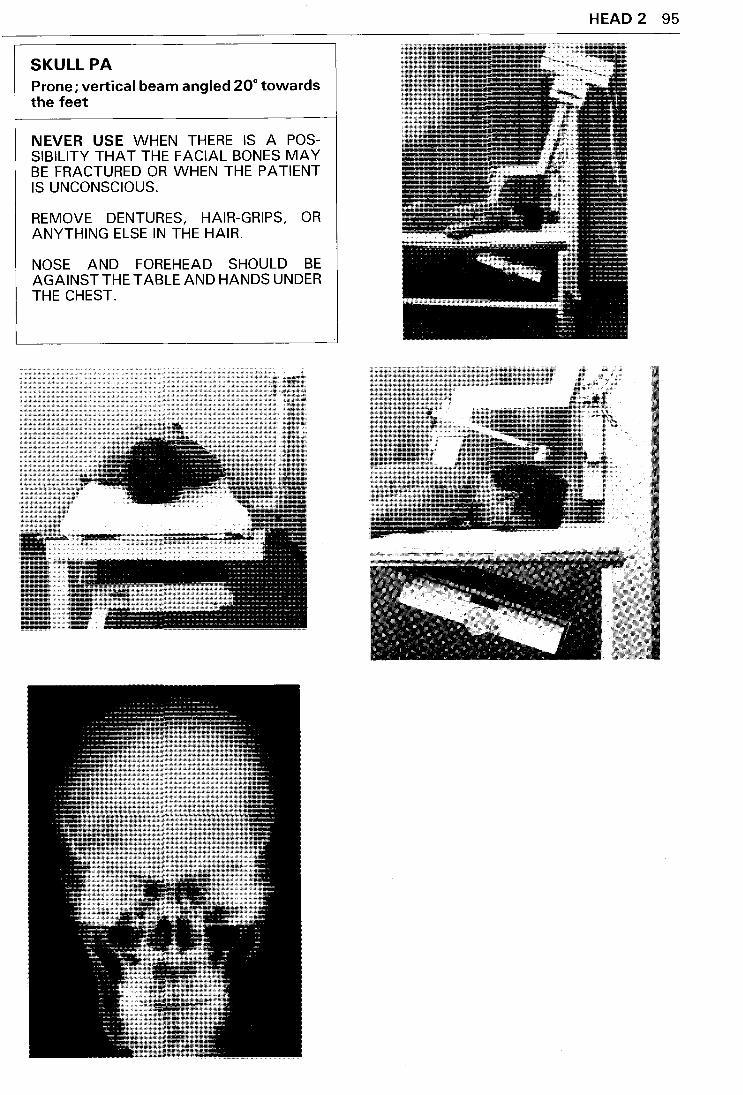
SKULL PA Prone; vertical beam angled 20° towards the feet
NEVER USE WHEN THERE IS A POSSIBILITY THAT THE FACIAL BONES MAY BE FRACTURED OR WHEN THE PATIENT IS UNCONSCIOUS.
REMOVE DENTURES, HAIR-GRIPS, OR ANYTHING ELSE IN THE HAIR.
NOSE AND FOREHEAD SHOULD BE AGAINST THE TABLE AND HANDS UNDER THE CHEST.
HEAD 2 95
98 HEAD 4
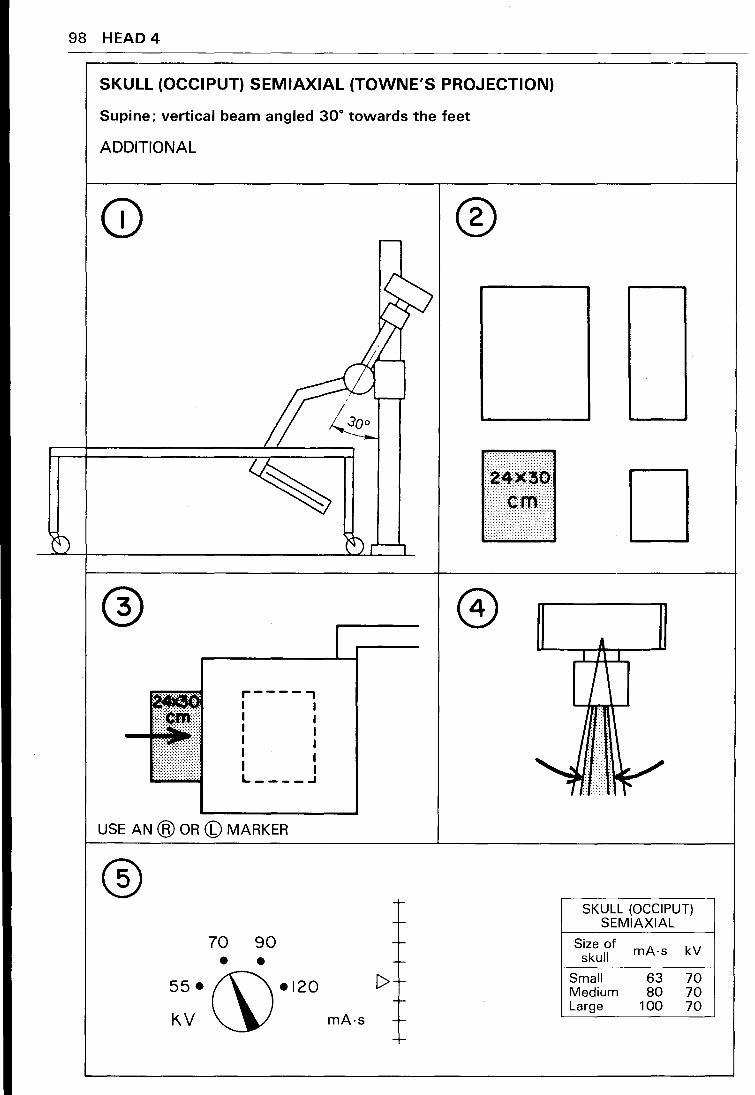
SKULL (OCCIPUT) SEMIAXIAL (TOWNE'S PROJECTION)
Supine: vertical beam angled 30° towards the feet
ADDITIONAL
,-----, I I I I I I I I I I I I L----..1
USE AN @ OR C1) MARKER
® 70 90 • •
55•(\\•120
l
KV ~ mA·s
[>
®
~~~it> :>¢;: D
SKULL (OCCIPUT) SEMIAXIAL
Size of mA·s kV skull
Small 63 70 Medium 80 70 Large 100 70
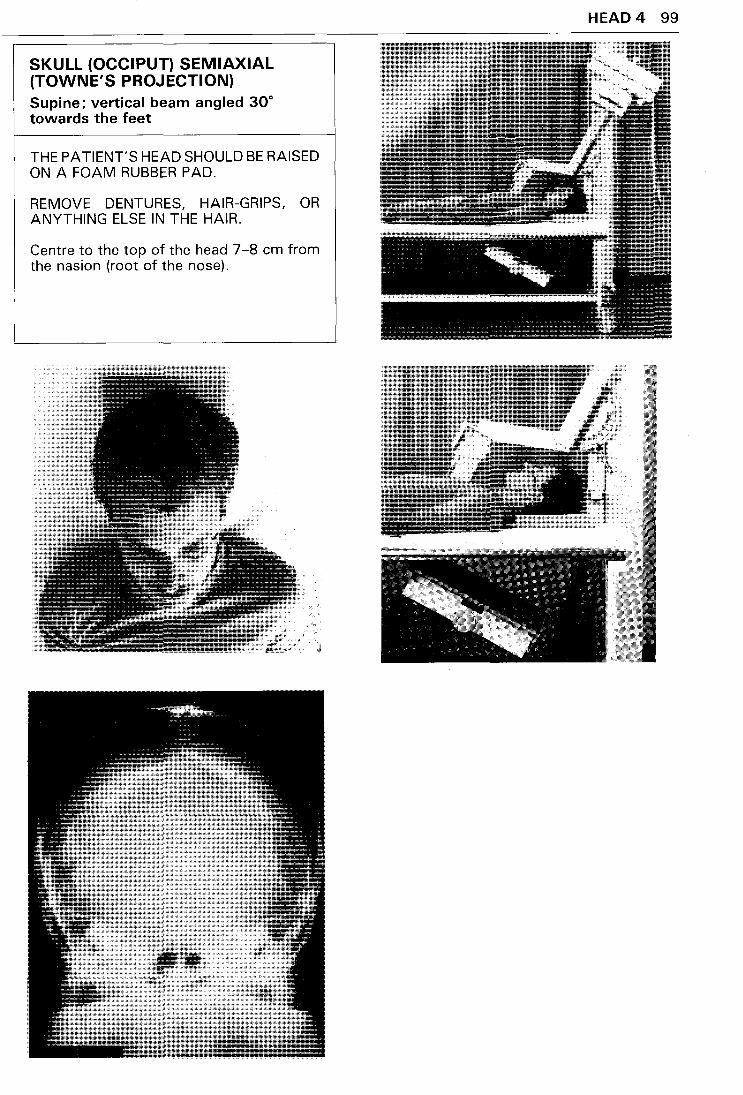
SKULL {OCCIPUT) SEMIAXIAL (TOWNE'S PROJECTION) Supine; vertical beam angled 30° towards the feet
THE PATIENT'S HEAD SHOULD BE RAISED ON A FOAM RUBBER PAD.
REMOVE DENTURES, HAIR-GRIPS, OR ANYTHING ELSE IN THE HAIR.
Centre to the top of the head 7-8 em from the nasion (root of the nose).
HEAD 4 99
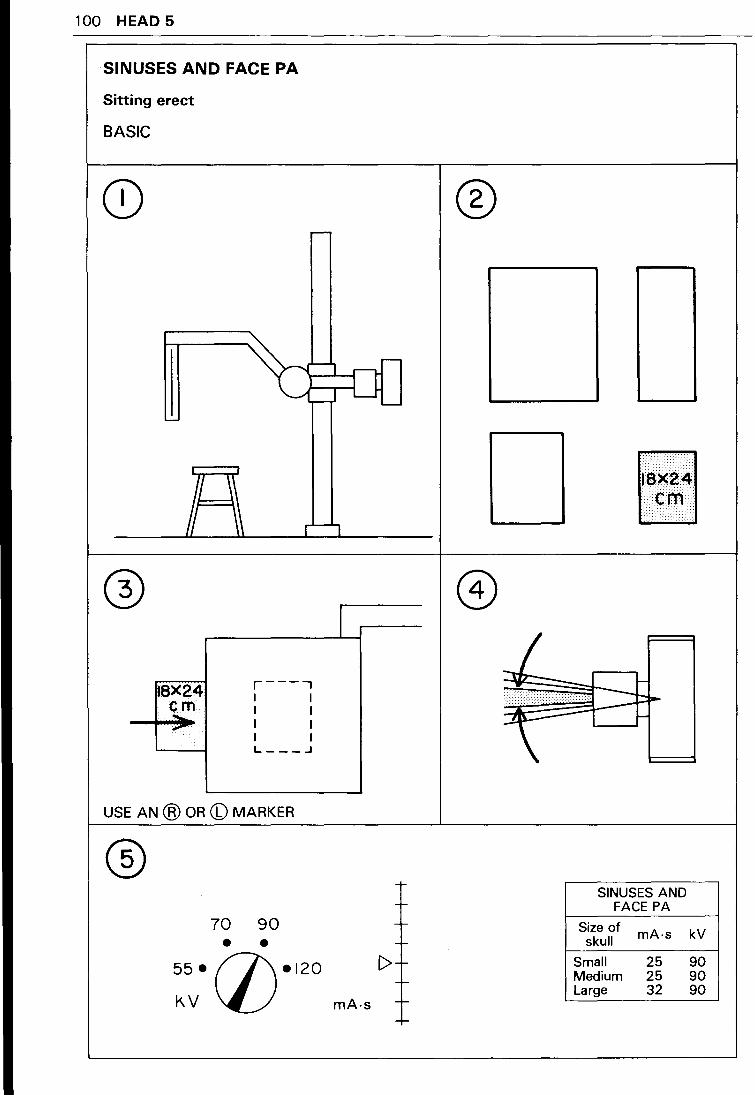
100 HEAD 5
SINUSES AND FACE PA
Sitting erect
BASIC
r----, ltBX24 I I em I I ..... ,. I I
I I L---.J
USE AN ® OR CD MARKER
® 70 90 • •
55• (/)•120 kV
®
I
SINUSES AND FACE PA
Size of mA·s kV skull
[> Small 25 90 Medium 25 90 Large 32 90
mA·s
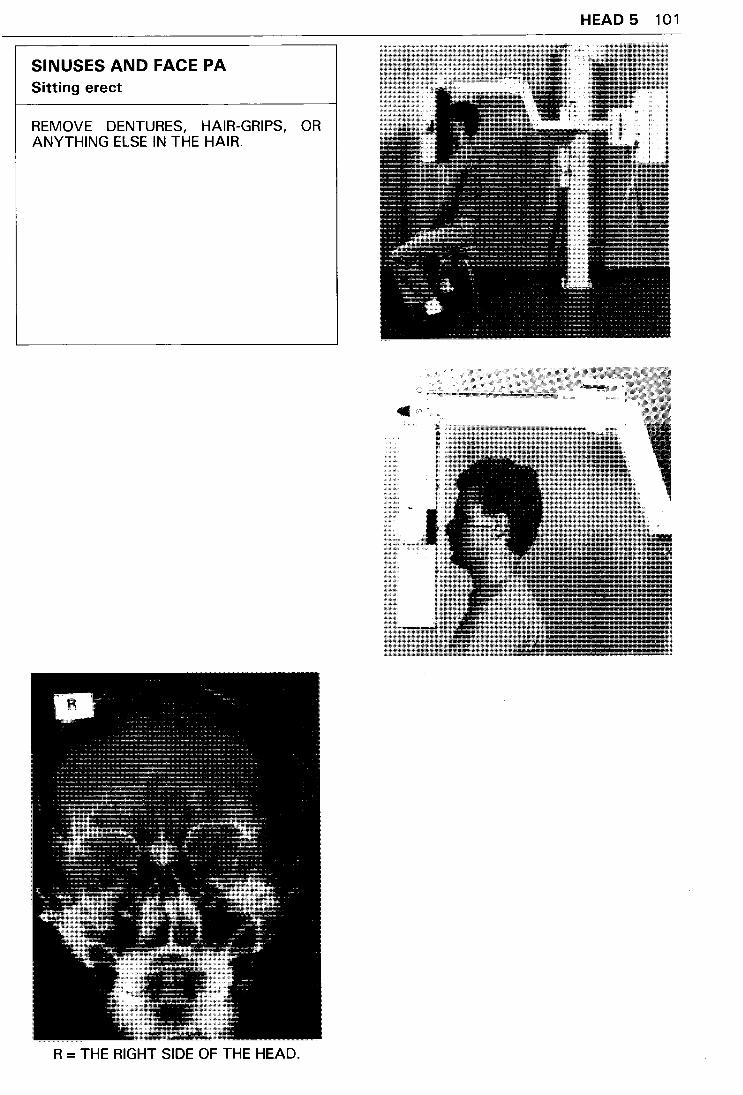
SINUSES AND FACE PA Sitting erect
REMOVE DENTURES, HAIR-GRIPS, OR ANYTHING ELSE IN THE HAIR.
R = THE RIGHT SIDE OF THE HEAD.
HEAD 5 101
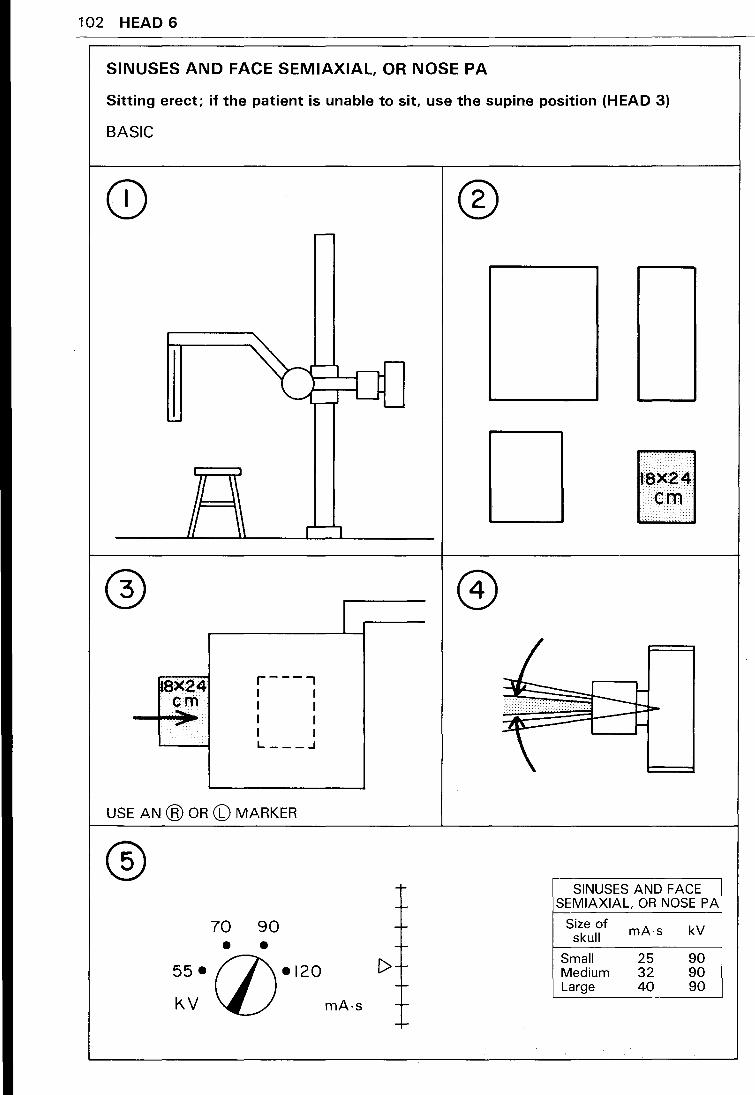
102 HEAD 6
SINUSES AND FACE SEMIAXIAL, OR NOSE PA
Sitting erect; if the patient is unable to sit, use the supine position (HEAD 3)
BASIC
Q)
l
8X24 r---., I I em I I ...... ,. I I I I L---.J
USE AN ® OR CD MARKER
70 90 • •
55• (j)•l20 K.V mA-s
®
SINUSES AND FACE SEMIAXIAL, OR NOSE PA
Size of mA-s kV skull
[> Small 25 90 Medium 32 90 Large 40 90
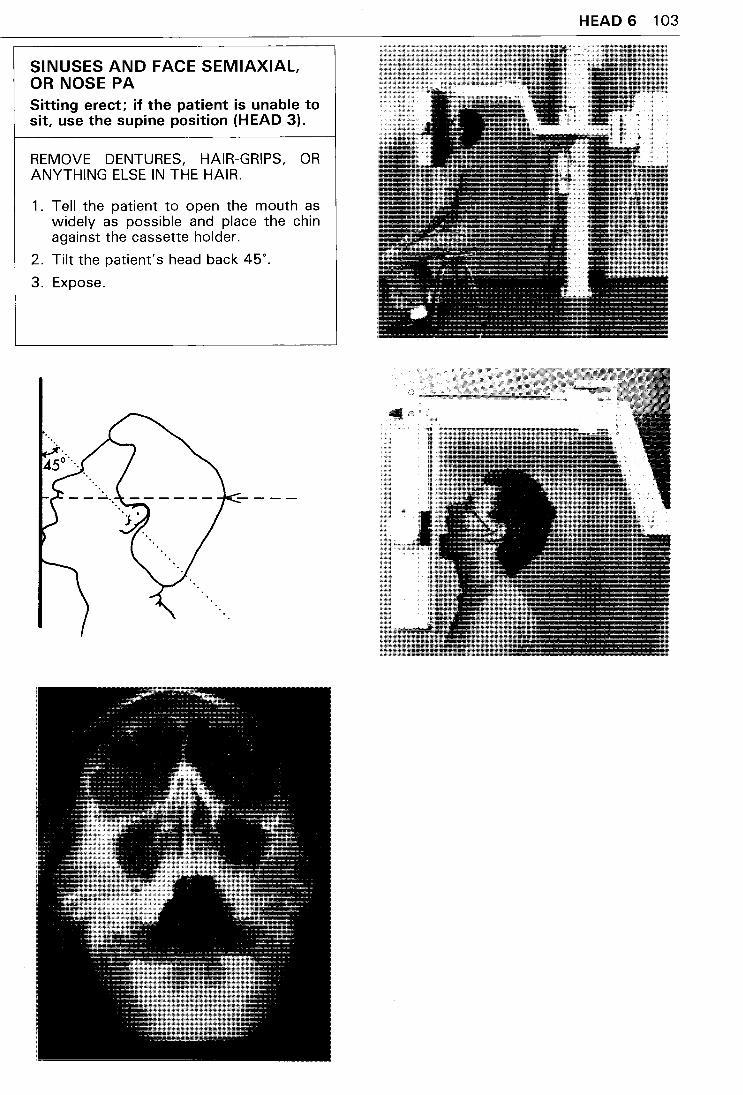
SINUSES AND FACE SEMIAXIAL, OR NOSE PA Sitting erect; if the patient is unable to sit, use the supine position (HEAD 3).
REMOVE DENTURES, HAIR-GRIPS, OR ANYTHING ELSE IN THE HAIR.
1 . Tell the patient to open the mouth as widely as possible and place the chin against the cassette holder.
2. Tilt the patient's head back 45°.
3. Expose.
HEAD 6 103
104 HEAD 7
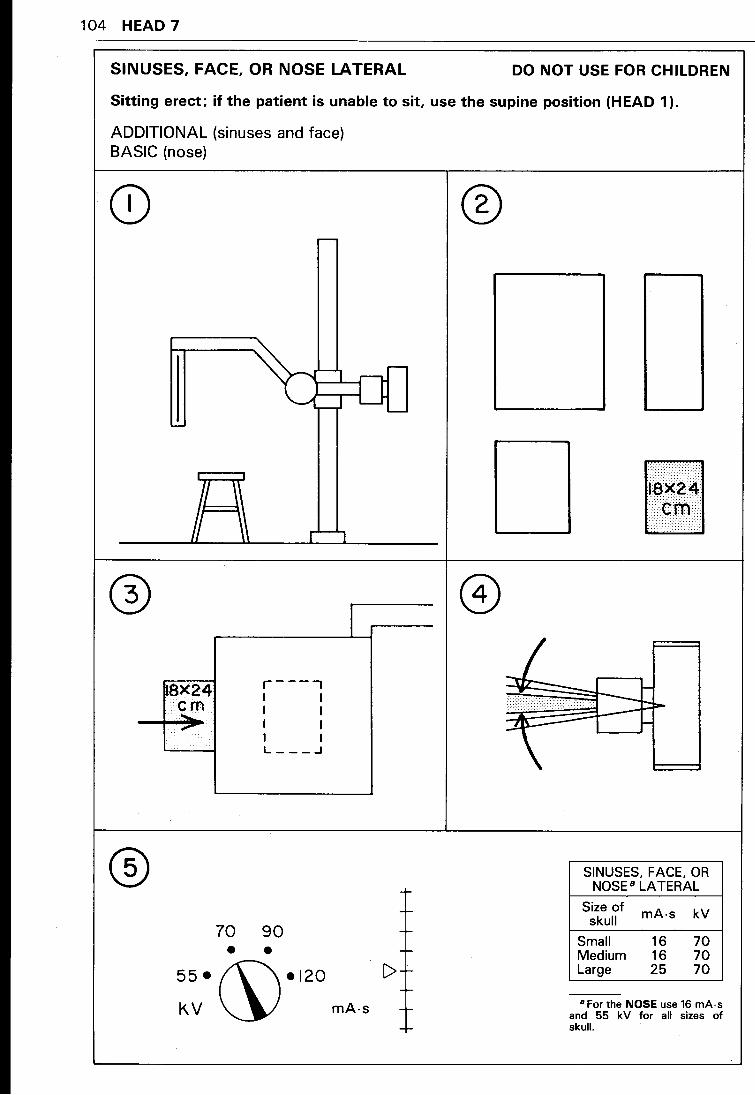
SINUSES, FACE, OR NOSE LATERAL DO NOT USE FOR CHILDREN
Sitting erect; if the patient is unable to sit, use the supine position (HEAD 1 ).
ADDITIONAL (sinuses and face) BASIC (nose)
®
l8X24 r---., I I em I I .....
,- I I I I L ___ .J
70 90 • •
55•(\\•120
I
k.V ~ mA·s
[>
®
1'1~~~1
SINUSES, FACE, OR NOSE 8 LATERAL
Size of mA·s kV skull
Small 16 70 Medium 16 70 Large 25 70
8 For the NOSE use 16 mA·s and 55 kV for all sizes of skull.
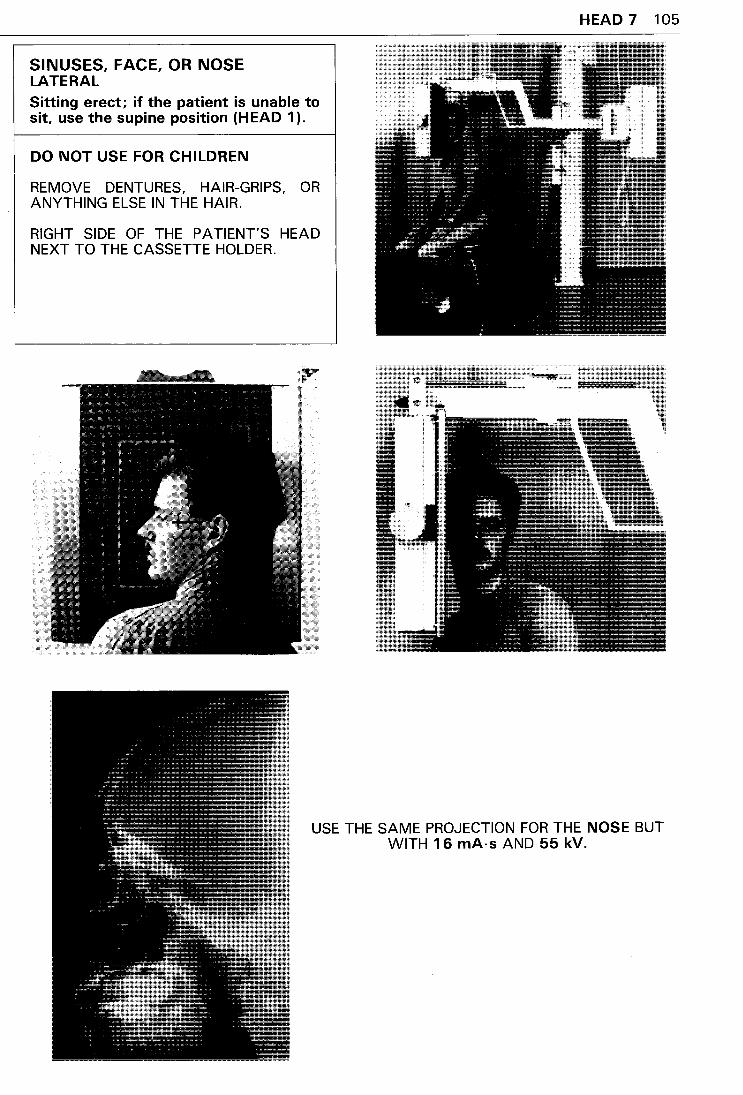
SINUSES, FACE, OR NOSE LATERAL
Sitting erect; if the patient is unable to sit, use the supine position (HEAD 1 ).
DO NOT USE FOR CHILDREN
REMOVE DENTURES, HAIR-GRIPS, OR ANYTHING ELSE IN THE HAIR.
RIGHT SIDE OF THE PATIENT'S HEAD NEXT TO THE CASSETTE HOLDER.
HEAD 7 105
USE THE SAME PROJECTION FOR THE NOSE BUT WITH 16 mA·s AND 55 kV.
106 HEAD 8
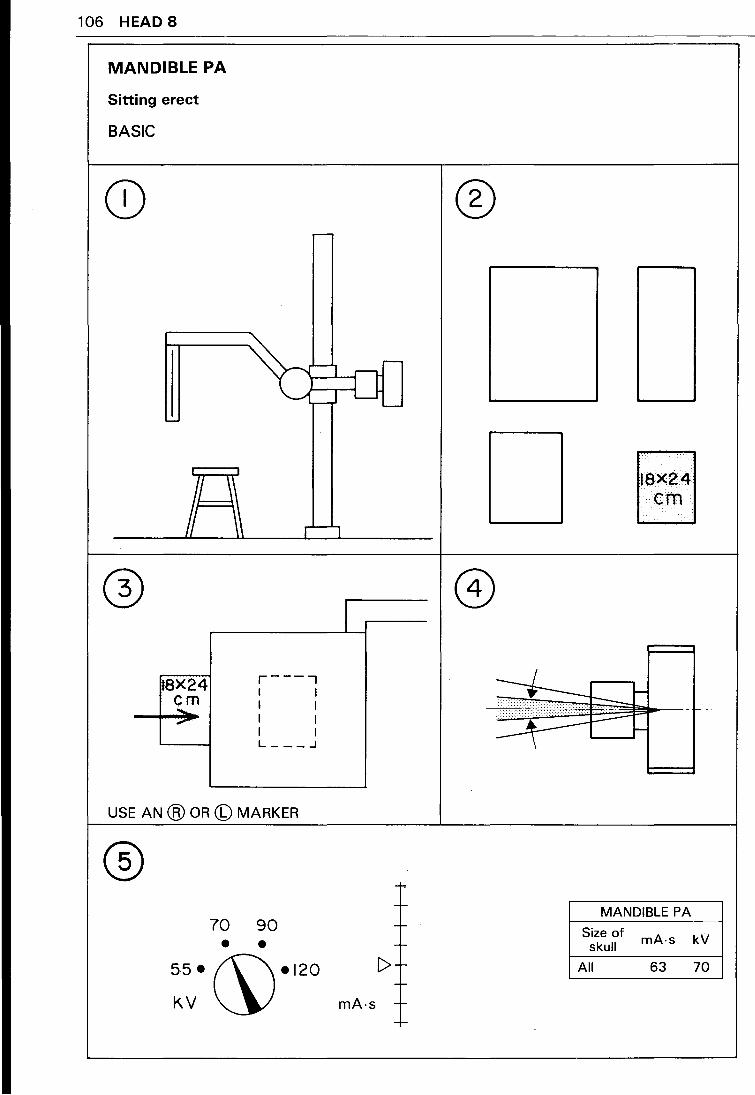
MANDIBLE PA
Sitting erect
BASIC
~ ~--, .---
~J 0~ '--
u ~
h 1\ r'-1
®
~8X24 em ......
.----, I I I I I I I I L ___ .J
USE AN @ OR (b) MARKER
70 90 • •
55• (\\•120
KV~
I
-I-
-I-
-I-
(>1--1-
mA-s + -I-
®
@)
~
MANDIBLE PA
Size of skull
All
mA-s kV
63 70
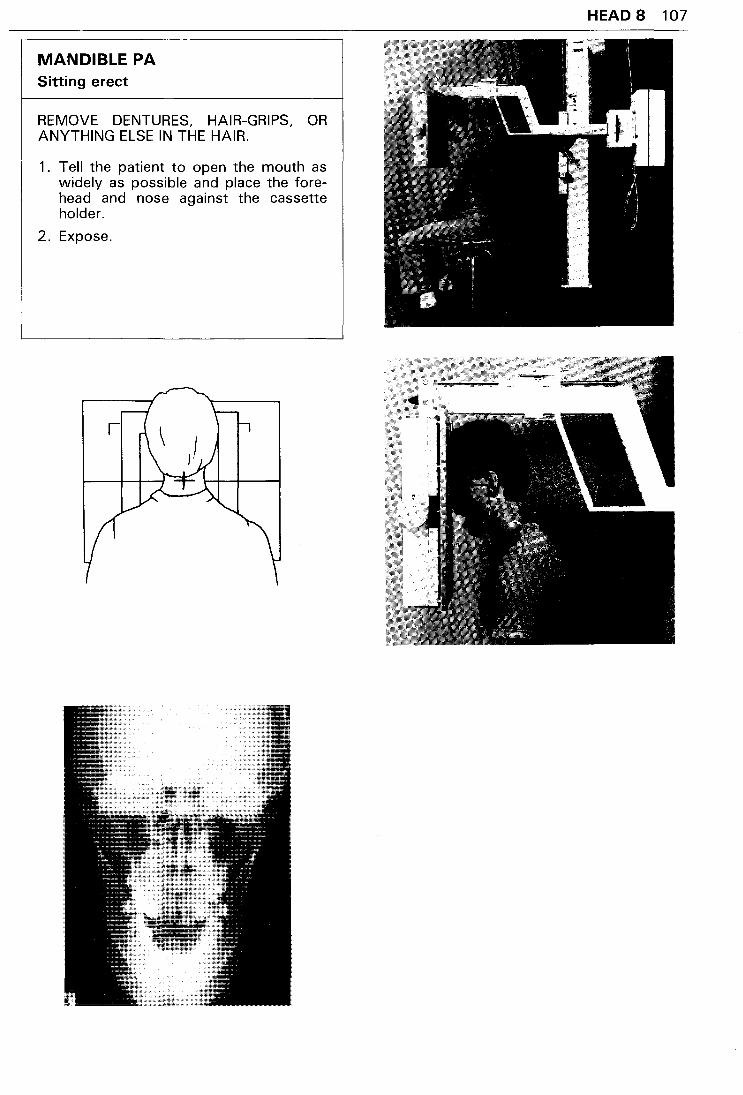
MANDIBLE PA Sitting erect
REMOVE DENTURES, HAIR-GRIPS, OR ANYTHING ELSE IN THE HAIR.
1. Tell the patient to open the mouth as widely as possible and place the forehead and nose against the cassette holder.
2. Expose.
HEAD 8 107
108 HEAD 9
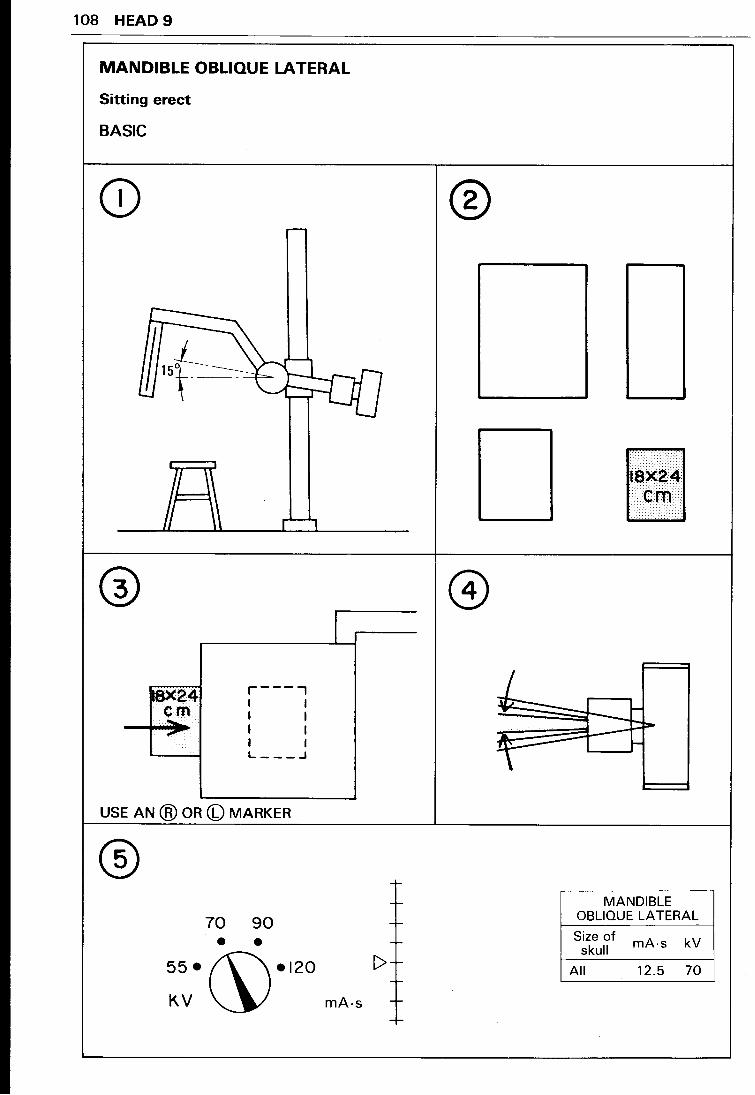
MANDIBLE OBLIQUE LATERAL
Sitting erect
BASIC
Q)
r---., ~X24 I I em I I ...... , I I
I I L ___ .J
USE AN @ OR (b) MARKER
70 90
• • 55• (\\•120
I
KV ~ mA-s
®
MANDIBLE OBLIQUE LATERAL
Size of mA·s kV skull
All 12.5 70
EXHIBITION OF MODERN ILLUSTRATED SCIENTIFIC AND SCHOLARLY pUBLICATIONS
conditions for participation
1. The exhibition will take place in Leyden University Library from October 30, 1987 -January 17, 1988 on the occasion of the fourth centenary of this library.
2. Only one publication of each publisher will be exhibited in principle.
3. Submitted works must be illustrated scientific or scholarly publications, published after 1983, in which image and text must form a functional unity, aimed at the transfer of scientific and scholarly knowledge. No limitations are put on the kind of illustrative material: photographs, drawings, graphics, diagrammes etc. etc. are all permitted. University course books will be considered a scientific or scholarly publication for the purposes of this exhibition.
4. The publisher is requested to provide an explanation of his reasons for choosing the particular publication. Relevant, factual details must be provided: personal details of designer, illustrator, author etc. etc.; details about the origination and production of the work, typeface etc.
5. The publisher will receive three copies of the catalogue free of charge.
6. If the publisher so requests, the publication will be returned after the end of the exhibition. All other submitted works will be kept in the University Library in a separate collection, not available for normal loan purposes.
7. Submissions and correspondence to be sent to: Leiden University Library att. mr. A.J.M. Linmans P.O. Box 9501 2300 RA LEIDEN The Netherlands
8. Submissions must be received before July 31, 1987 at the above-mentioned address.
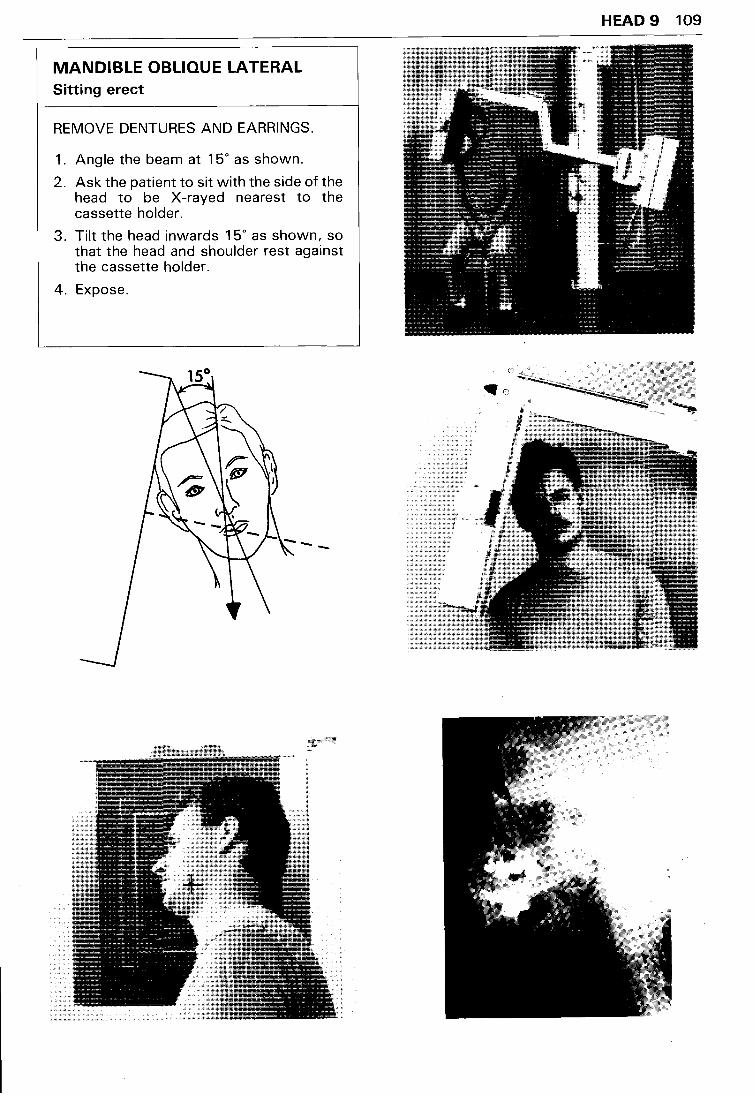
MANDIBLE OBLIQUE LATERAL Sitting erect
REMOVE DENTURES AND EARRINGS.
1. Angle the beam at 15° as shown.
2. Ask the patient to sit with the side of the head to be X-rayed nearest to the cassette holder.
3. Tilt the head inwards 15° as shown, so that the head and shoulder rest against the cassette holder.
4. Expose.
HEAD 9 109
110 HEAD 10
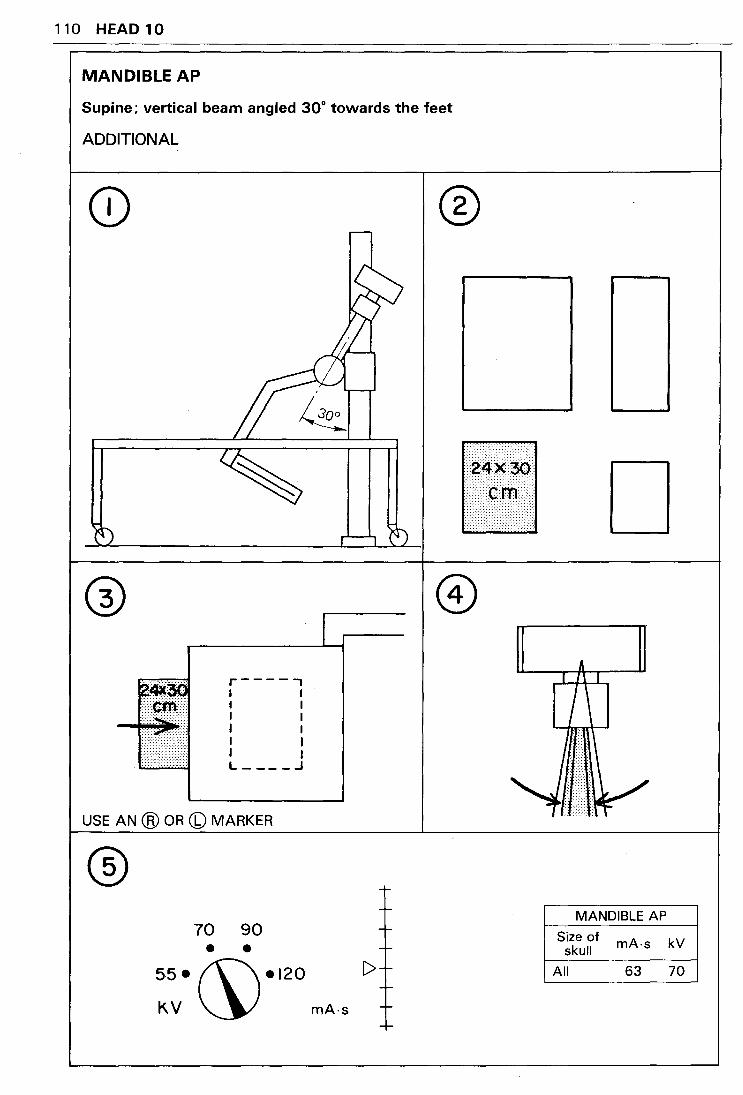
MANDIBLE AP
Supine; vertical beam angled 30° towards the feet
ADDITIONAL
®
D ®
r-----, I I I I I I I I I I I I L ____ .J
USE AN @ OR <1) MARKER
® MANDIBLE AP
70 90 • • Size of mA-s kV skull
55• (\\•120
KV ~ mA·s
All 63 70
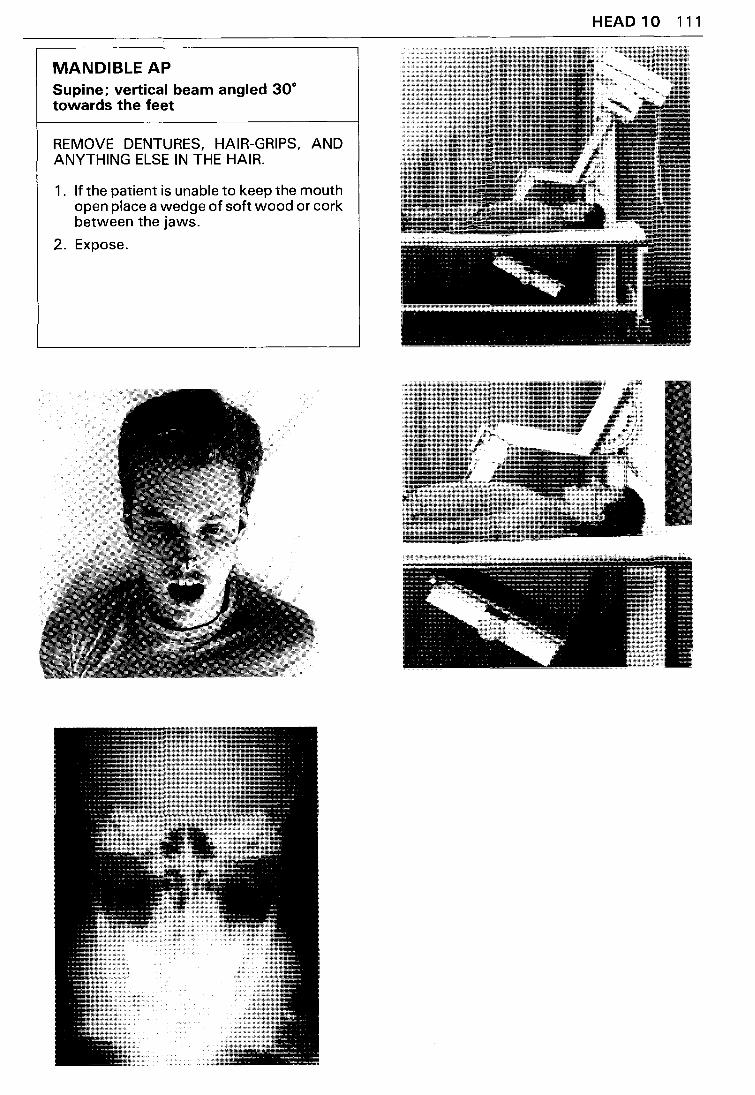
MANDIBLE AP Supine; vertical beam angled 30° towards the feet
REMOVE DENTURES, HAIR-GRIPS, AND ANYTHING ELSE IN THE HAIR.
1 . If the patient is unable to keep the mouth open place a wedge of soft wood or cork between the jaws.
2. Expose.
HEAD 10 111
112 HEAD 11
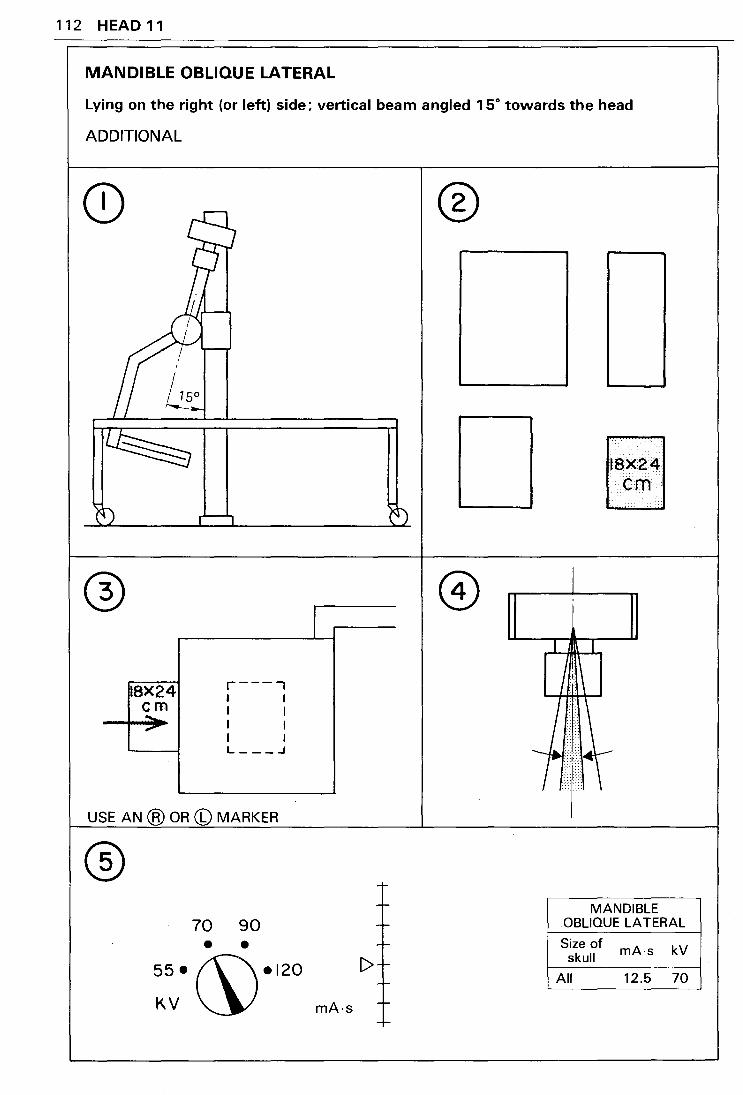
MANDIBLE OBLIQUE LATERAL
Lying on the right (or left) side; vertical beam angled 15° towards the head
ADDITIONAL
r----, 8X24 I I em I I -.- I I I I L ___ .J
USE AN @ OR (b) MARKER
® 70 90 • •
55• f\\•120
KV~
®
I
MANDIBLE OBLIQUE LATERAL
Size of mA-s kV skull
All 12.5 70
mA·s
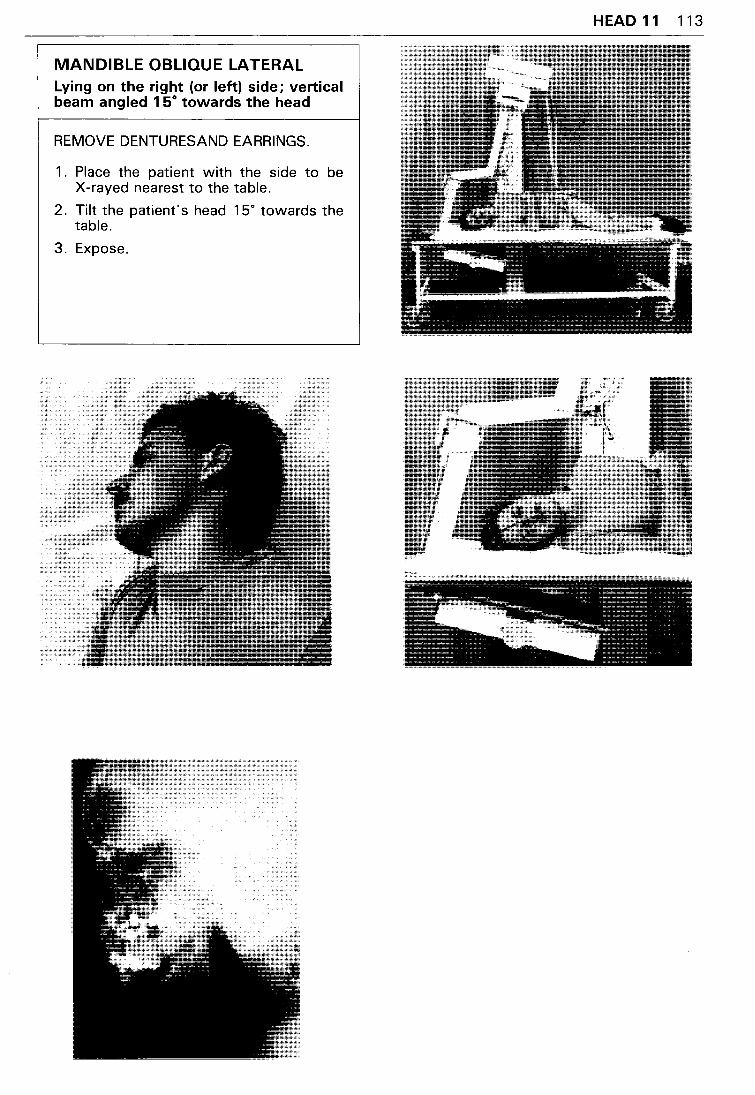
MANDIBLE OBLIQUE LATERAL Lying on the right (or left) side; vertical beam angled 1 5° towards the head
REMOVE DENTURESAND EARRINGS.
1 . Place the patient with the side to be X-rayed nearest to the table.
2. Tilt the patient's head 15° towards the table.
3. Expose.
HEAD 11 113

SPINE
SPINE
CERVICAl SPINE
Patient able to sit
1. Cervical spine PA 2. Cervical spine lateral 3. Cervical spine oblique
Patient lying down, unable to sit
4. Cervical spine AP: after injury . . . . . . . . . . . . . . . . 5. Cervical spine lateral: after injury ............. . 6. Odontoid process AP: first and second cervical vertebrae
CERVICOTHORACIC REGION
117
Pages
118-119 120-121 122-123
124-125 126-127 128-129
7. Cervicothoracic region lateral . . . . . . . . . . . . . . . . . . . . . . . . . . . . . . . . . . 130-131 When an injury is involved the same view can be achieved with the patient lying supine.
THORACIC SPINE X-rays of the thoracic spine are always taken with the patient lying down.
8. Thoracic spine AP ... 9. Thoracic spine lateral .
lUMBOSACRAl SPINE X-rays of the lumbosacral spine are always taken with the patient lying down.
10. Lumbar spine AP . . . . . . . . 11. Lumbar spine lateral: no injury . 12. Lumbar spine lateral: after injury
Use ONLY after injury. 13. Sacrum AP: lumbosacral junction and sacroiliac joints 14. Lumbosacral junction lateral .............. .
132-133 134-135
136-137 138-139 140-141
142-143 144-145
118 SPINE 1
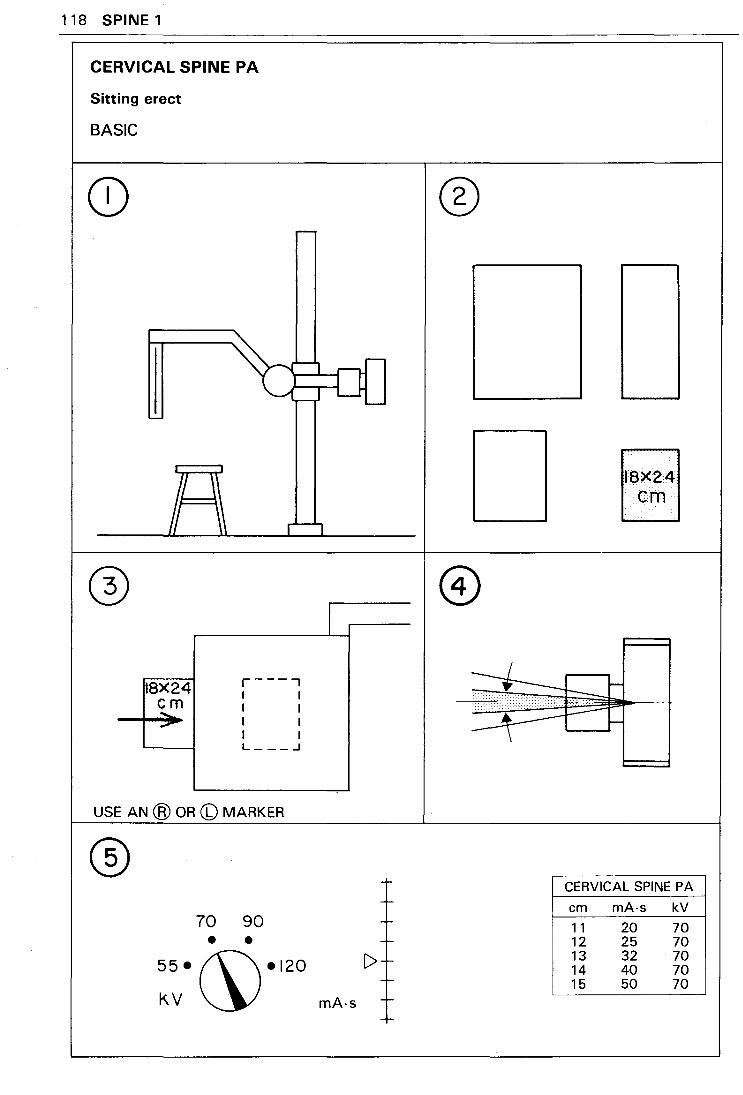
CERVICAL SPINE PA
Sitting erect
BASIC
~ '---1 r-
r-) 0 '-
u r--
i \\ r.__1
8X24 <:._m .-
r----, I I I I I I I I L ___ ..J
USE AN ® OR CD MARKER
® 70 90 • •
55•~•120 K.V
I
mA-s
---
r t-
---
C> -r r
+·
®
§
~~r-=······•·•j·•·•·· .. ffi$········ ....... 85 ....... 55~···~···~··~~~ 1----- s~ .. · ... ·... -
• ---- t-'-----'
CERVICAL SPINE PA
em mA-s kV
11 20 70 12 25 70 13 32 70 14 40 70 15 50 70
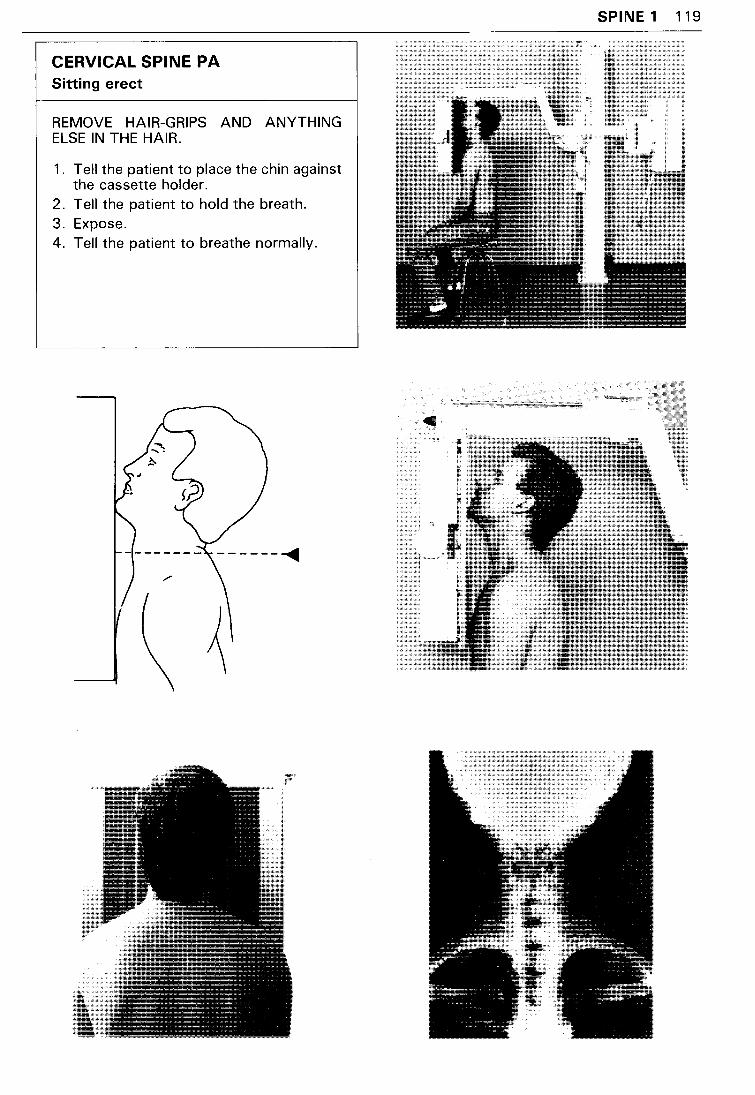
CERVICAL SPINE PA Sitting erect
REMOVE HAIR-GRIPS AND ANYTHING ELSE IN THE HAIR.
1. Tell the patient to place the chin against the cassette holder.
2. Tell the patient to hold the breath. 3. Expose. 4. Tell the patient to breathe normally.
SPINE 1 119
120 SPINE 2
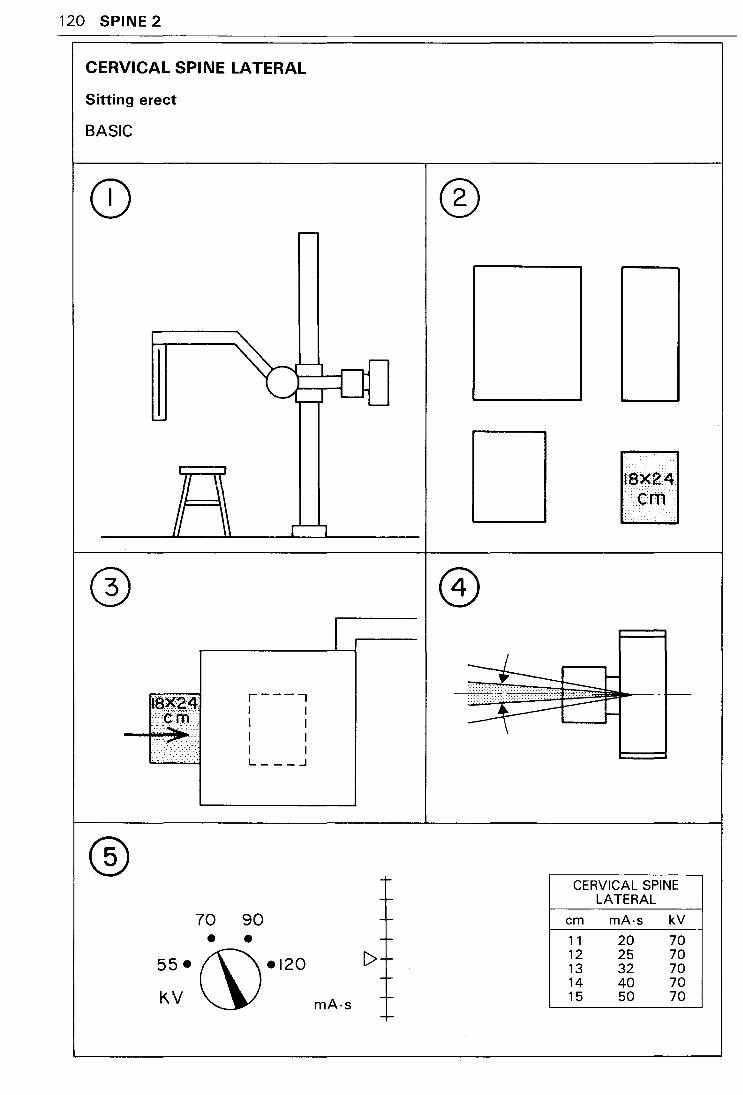
CERVICAL SPINE LATERAL
Sitting erect
BASIC
®
I r----, I I I I I I I I L ___ ...J
® CERVICAL SPINE
,_ LATERAL
70 90 r- em mA·s kV
• • -r- 11 20 70
55•~•120 [>+ 12 25 70 13 32 70
-r- 14 40 70 KV mA·s
-f- 15 50 70 -r-
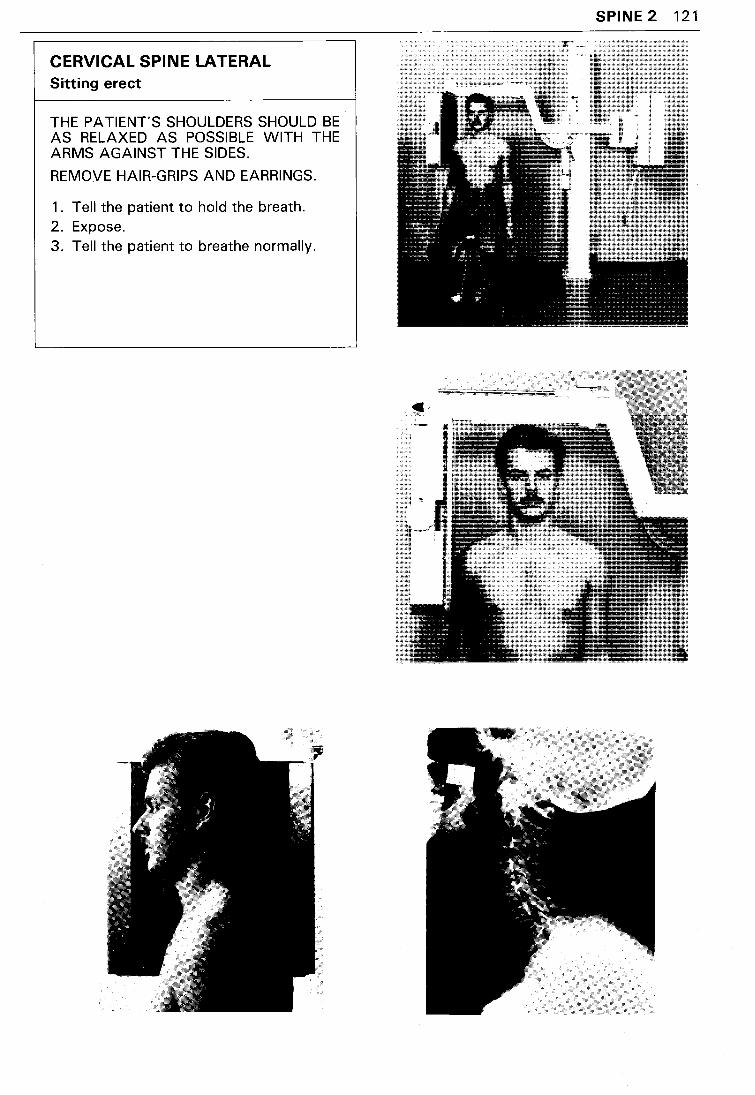
CERVICAL SPINE LATERAL Sitting erect
THE PATIENTS SHOULDERS SHOULD BE AS RELAXED AS POSSIBLE WITH THE ARMS AGAINST THE SIDES.
REMOVE HAIR-GRIPS AND EARRINGS.
1. Tell the patient to hold the breath. 2. Expose. 3. Tell the patient to breathe normally.
SPINE2 121
122 SPINE 3
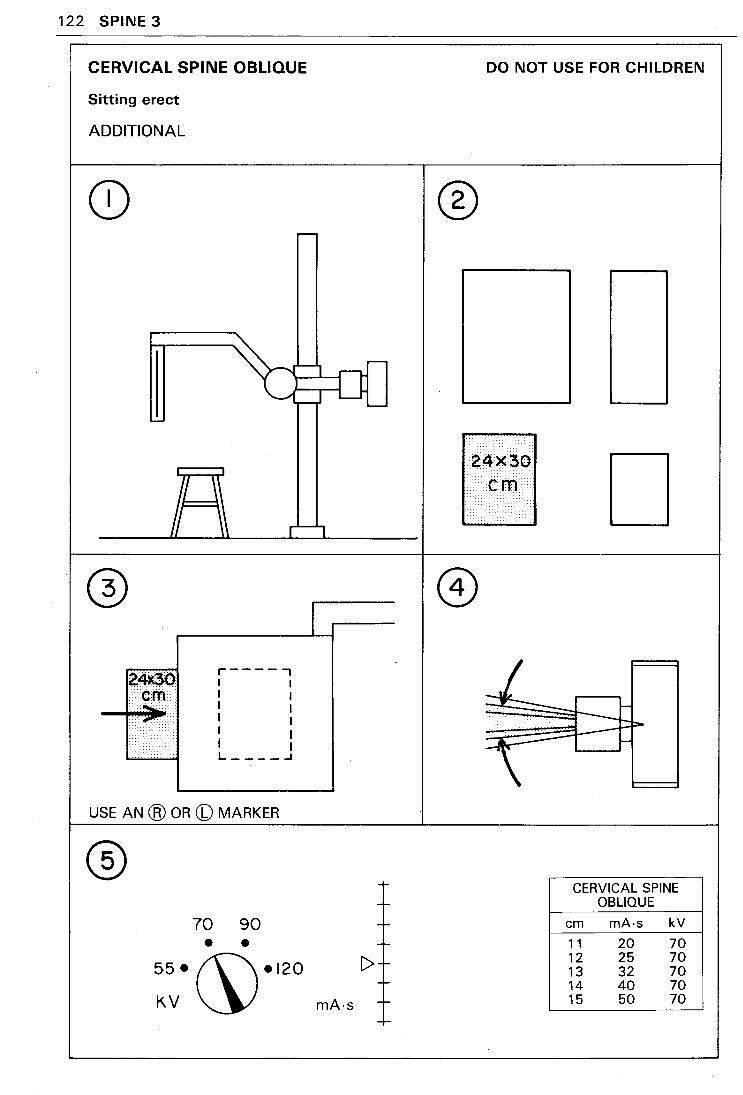
CERVICAL SPINE OBLIQUE
Sitting erect
ADDITIONAL
24)(30. ..... em ::~.
•...•.... ~:·······:·. ... · ··:····
r-----, I I I I I I I I I I I 1 L----..J
USE AN @ OR (b) MARKER
® 70 90 • •
55•~•120 KV
I
r-
r-
-r-
[>+ -r-
mA·s -r-
-f-
DO NOT USE FOR CHILDREN
®
....
24?<30 em D
L_ ---~--:=::==::=:::::::::::1------ -~""'""" \-
CERVICAL SPINE OBLIQUE
em mA·s kV
11 20 70 12 25 70 13 32 70 14 40 70 15 50 70
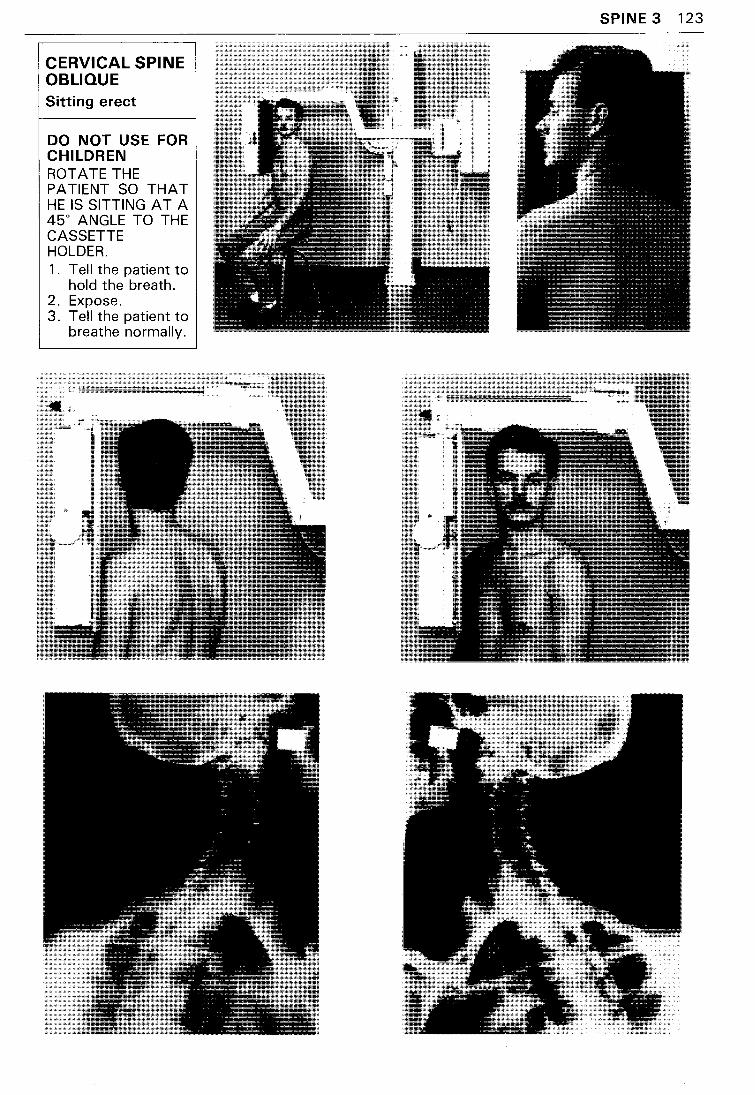
CERVICAL SPINE OBLIQUE Sitting erect
DO NOT USE FOR CHILDREN ROTATE THE PATIENT SO THAT HE IS SITTING AT A 45° ANGLE TO THE CASSETTE HOLDER. 1 . Tell the patient to
hold the breath. 2. Expose. 3. Tell the patient to
breathe normally.
SPINE 3 123
124 SPINE 4
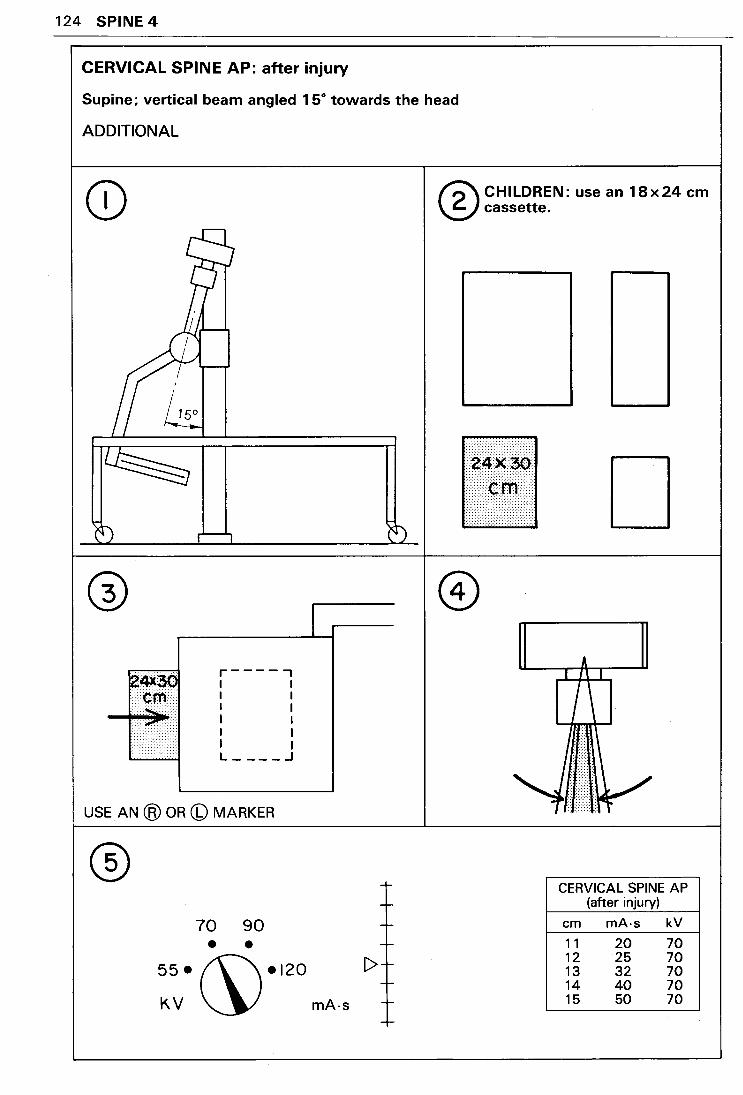
CERVICAL SPINE AP: after injury
Supine; vertical beam angled 1 5° towards the head
ADDITIONAL
CD
r----, I I I I I I I I I I I I L ____ J
USE AN @ OR (b) MARKER
® 70 90 • •
[> . 55.(\\ •120
~V ~ mA-s
® CHILDREN: use an 18x24 em cassette.
:::::::::::::::::::::::::::::::::::::::::::: . :r.m······ ~~~ ~~~~~~ ~ ~~~~~::~::~: :~:~:: :j::::: D
CERVICAL SPINE AP (after injury)
em mA-s kV
11 20 70 12 25 70 13 32 70 14 40 70 15 50 70
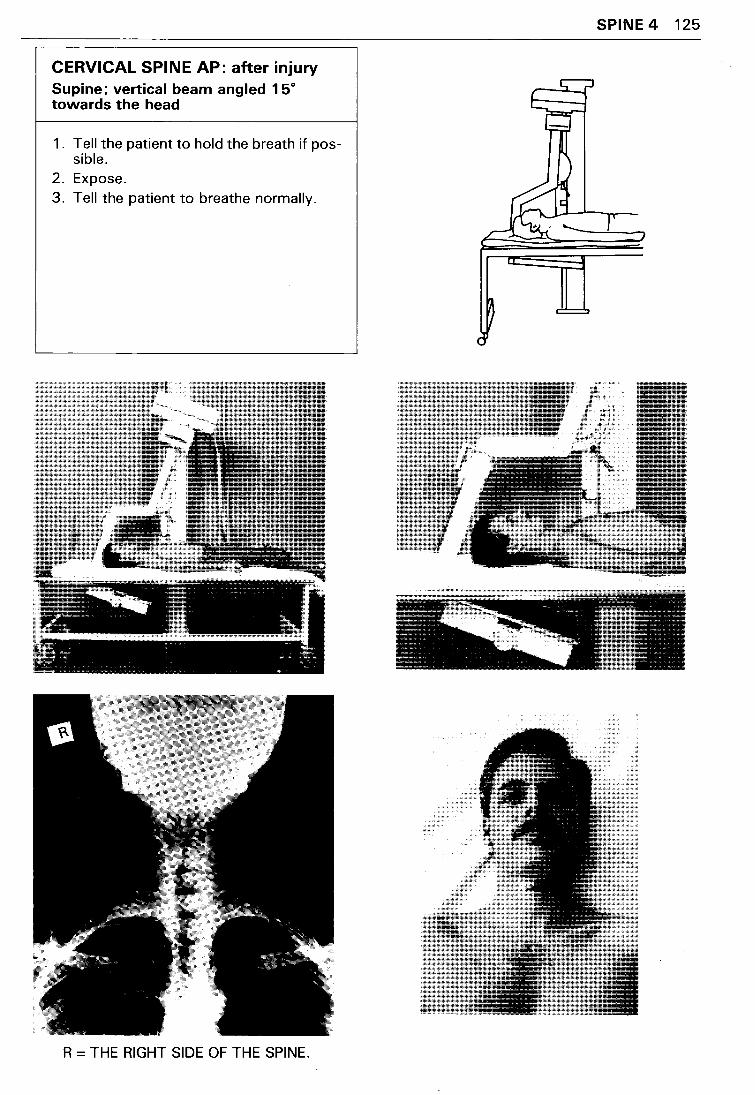
CERVICAL SPINE AP: after injury Supine; vertical beam angled 1 5° towards the head
1. Tell the patient to hold the breath if possible.
2. Expose. 3. Tell the patient to breathe normally.
R =THE RIGHT SIDE OF THE SPINE.
SPINE 4 125
126 SPINE 5
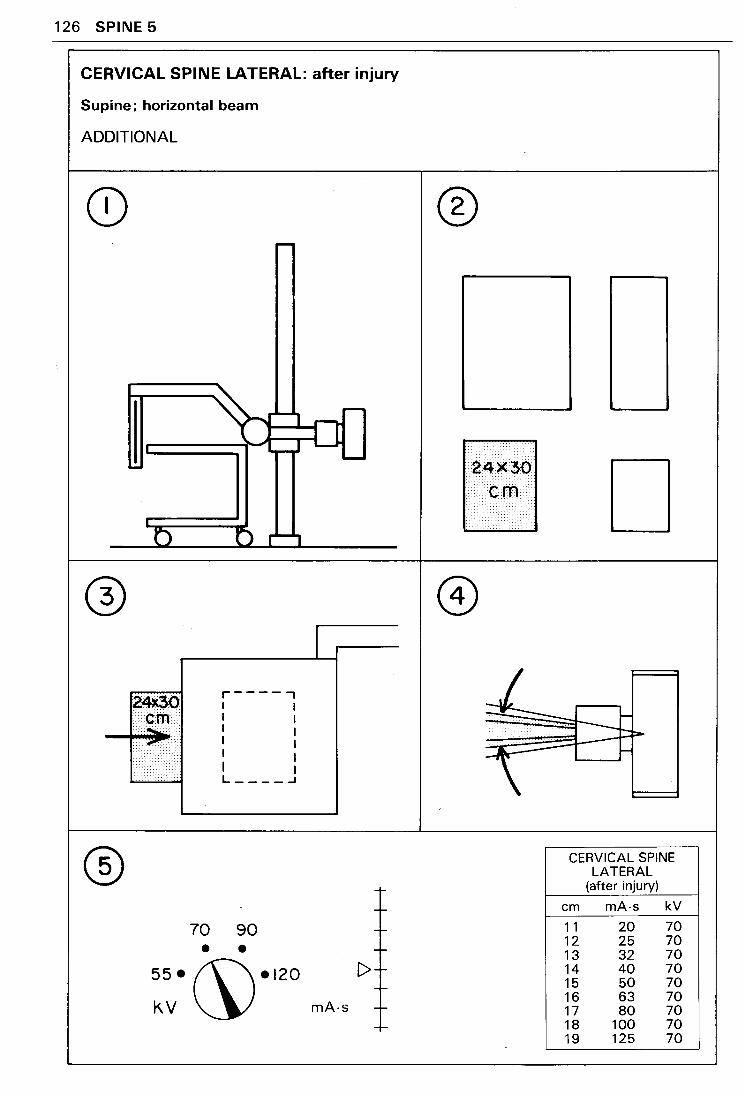
CERVICAL SPINE LATERAL: after injury
Supine; horizontal beam
ADDITIONAL
®
r-----, I I I I I I I I I I I 1 L ____ .J
70 90 • •
55•(\\•120
KV~ I>
mA·s
®
D
CERVICAL SPINE LATERAL
(after injury)
em mA·s kV
11 20 70 12 25 70 13 32 70 14 40 70 15 50 70 16 63 70 17 80 70 18 100 70 19 125 70
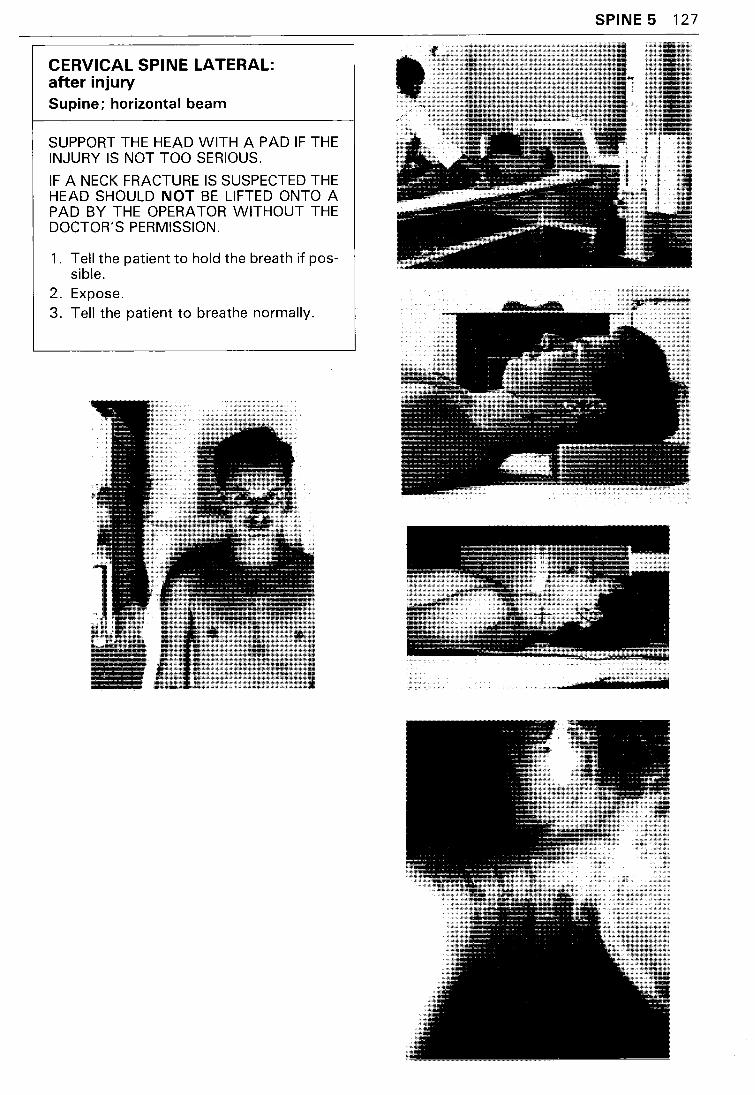
CERVICAL SPINE LATERAL: after injury Supine; horizontal beam
SUPPORT THE HEAD WITH A PAD IF THE INJURY IS NOT TOO SERIOUS.
IF A NECK FRACTURE IS SUSPECTED THE HEAD SHOULD NOT BE LIFTED ONTO A PAD BY THE OPERA TOR WITHOUT THE DOCTOR'S PERMISSION.
1 . Tell the patient to hold the breath if possible.
2. Expose. 3. Tell the patient to breathe normally.
SPINE 5 127
128 SPINE 6
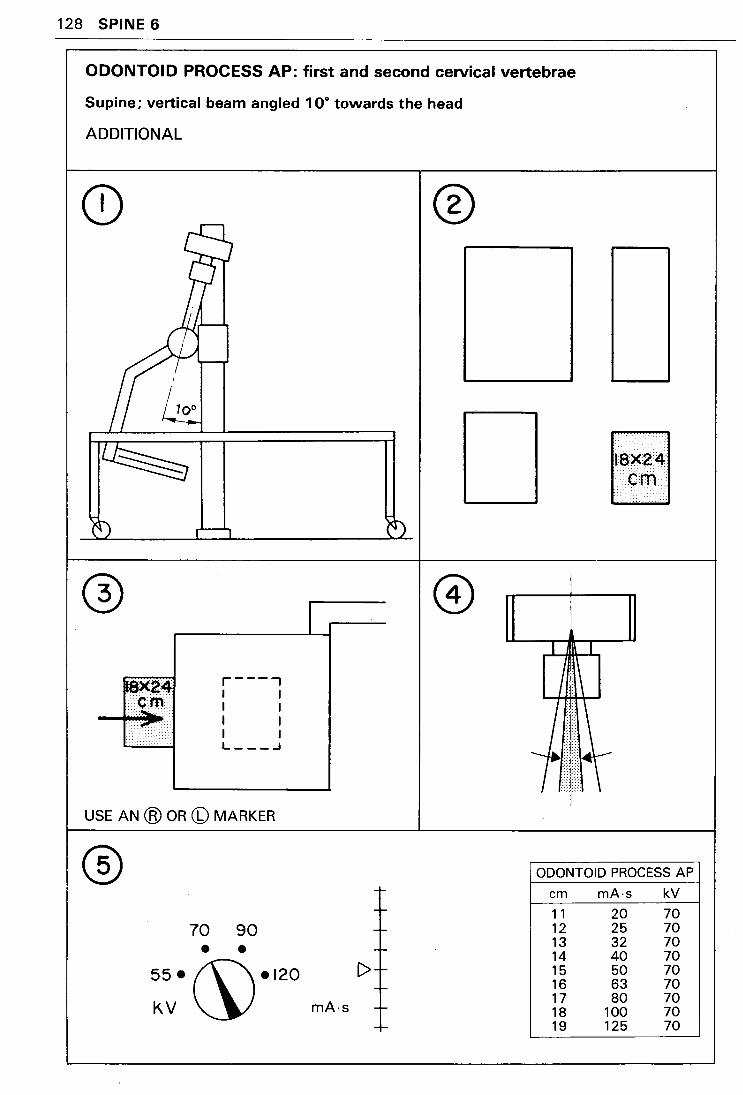
ODONTOID PROCESS AP: first and second cervical vertebrae
Supine; vertical beam angled 1 oo towards the head
ADDITIONAL
r---, I I I I I I I I L ___ .J
USE AN @ OR (b) MARKER
70 90 • •
55• (\\•120
KV~
®
[>
mA·s
ODONTOID PROCESS AP
em mA·s kV
11 20 70 12 25 70 13 32 70 14 40 70 15 50 70 16 63 70 17 80 70 18 100 70 19 125 70
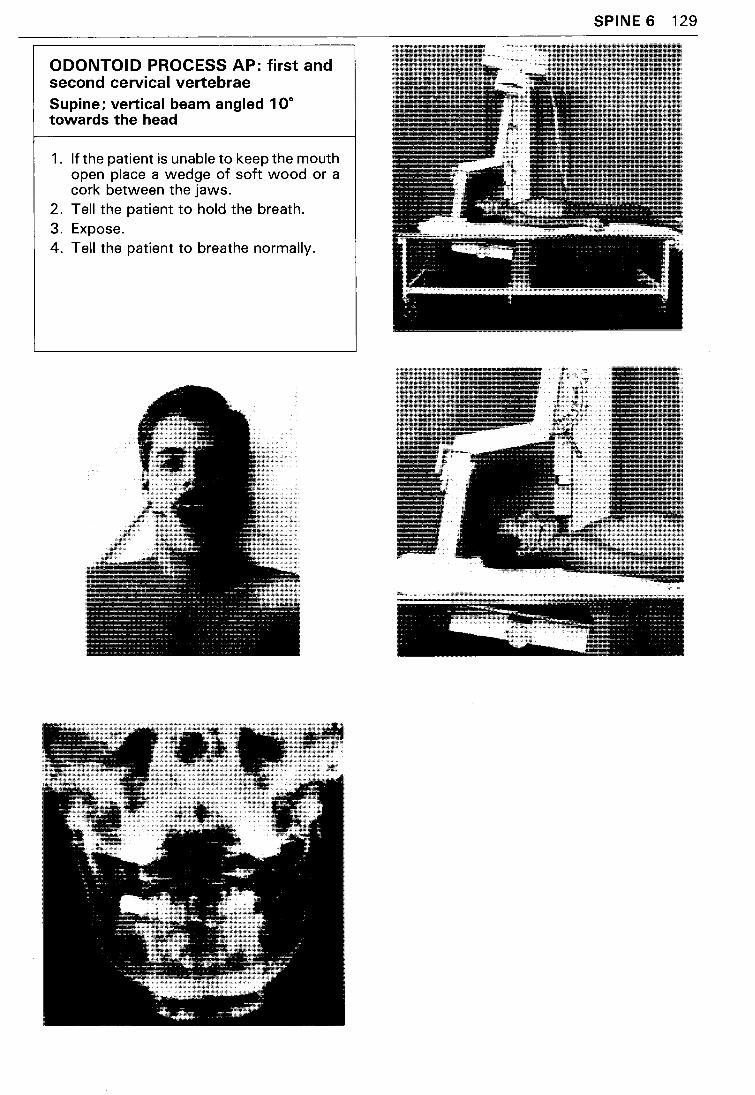
ODONTOID PROCESS AP: first and second cervical vertebrae Supine; vertical beam angled 1 oo towards the head
1 . If the patient is unable to keep the mouth open place a wedge of soft wood or a cork between the jaws.
2. Tell the patient to hold the breath. 3. Expose. 4. Tell the patient to breathe normally.
SPINE 6 129
130 SPINE 7
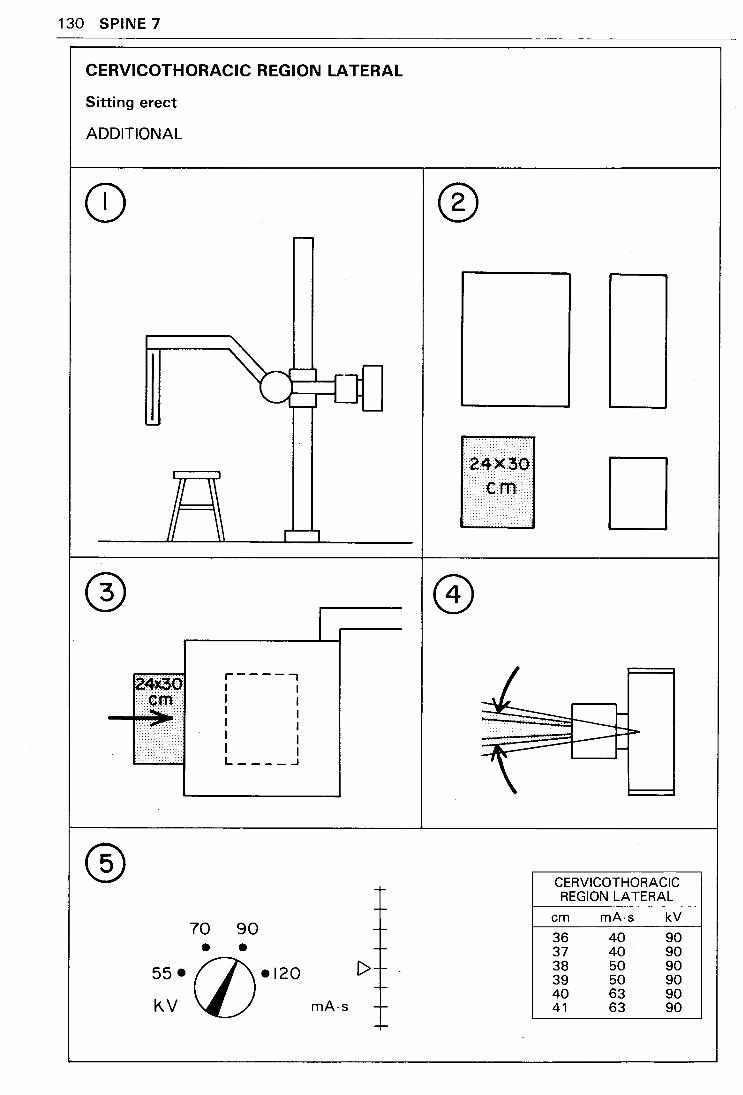
CERVICOTHORACIC REGION LATERAL
Sitting erect
ADDITIONAL
24*30 .·.·.·.·.·.·.·.·.·.· .. _._ ..
···em··
/~<········ >·•····~········
®
r-----, I I I I I I I I I I I 1 L ____ .J
70 90 • •
55• fl\•120
kV \1_)
I
C>
mA·s
®
D
CERVICOTHORACIC REGION LATERAL
em mA·s kV
36 40 90 37 40 90 38 50 90 39 50 90 40 63 90 41 63 90
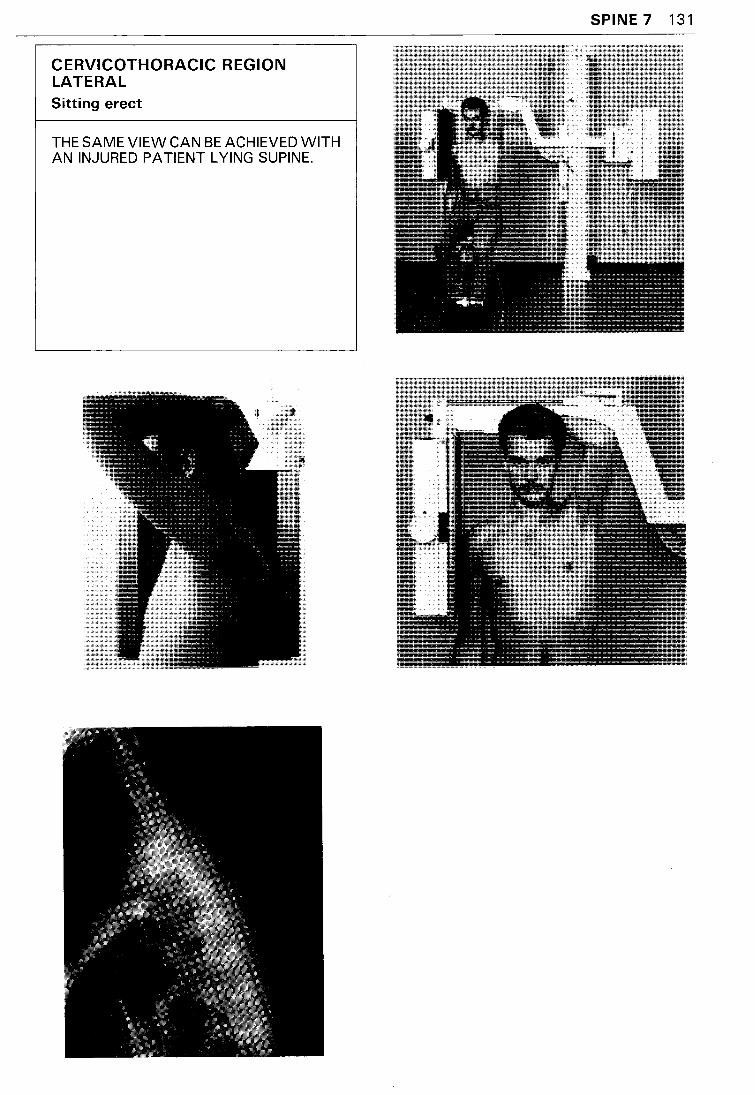
CERVICOTHORACIC REGION LATERAL Sitting erect
THE SAME VIEW CAN BE ACHIEVED WITH AN INJURED PATIENT LYING SUPINE.
SPINE 7 131
132 SPINE 8
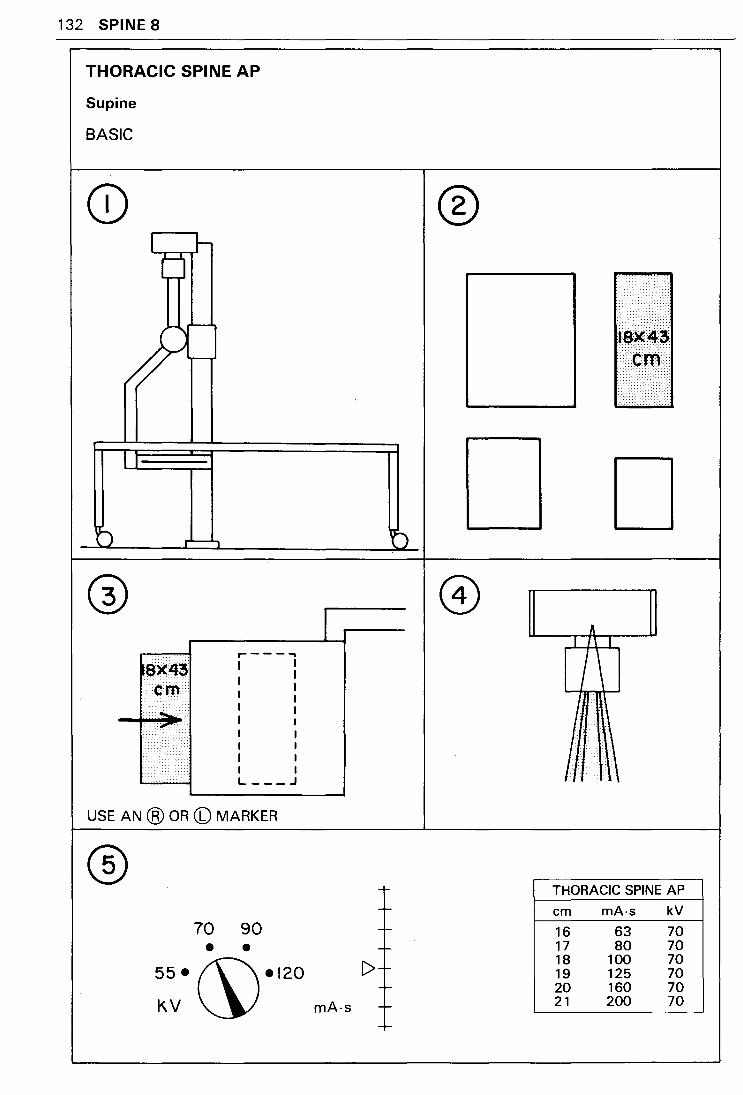
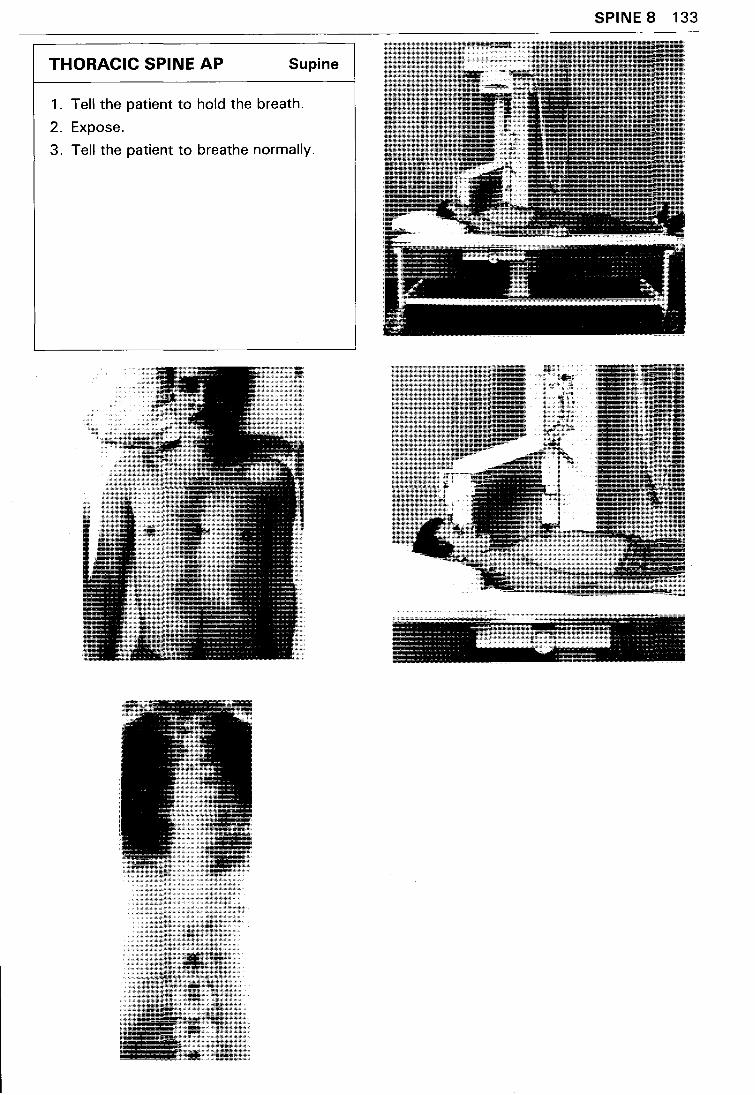
THORACIC SPINE AP
Supine
BASIC
®
· .. ·.· .. ·· ... ·.· .. ·.·.·
>::::.><<><>
'8al~ ················
~ b D
r'--'1
® @ ~ " I 1\ I
r-----. I \ 8)(43 I I I
em.··· I I I I •I
...... I I .... ,..,. I I
.. ::· I I I I I I I I L ___ .J
USE AN @ OR (b) MARKER
® THORACIC SPINE AP
,... em mA·s kV
70 90 f- 16 63 70
• • r- 17 80 70
C> ._ 18 100 70
55•~•120 19 125 70 r- 20 160 70
KV mA·s r- 21 200 70
f-
SPINE 8 133
THORACIC SPINE AP Supine
1. Tell the patient to hold the breath.
2. Expose.
3. Tell the patient to breathe normally.
134 SPINE 9
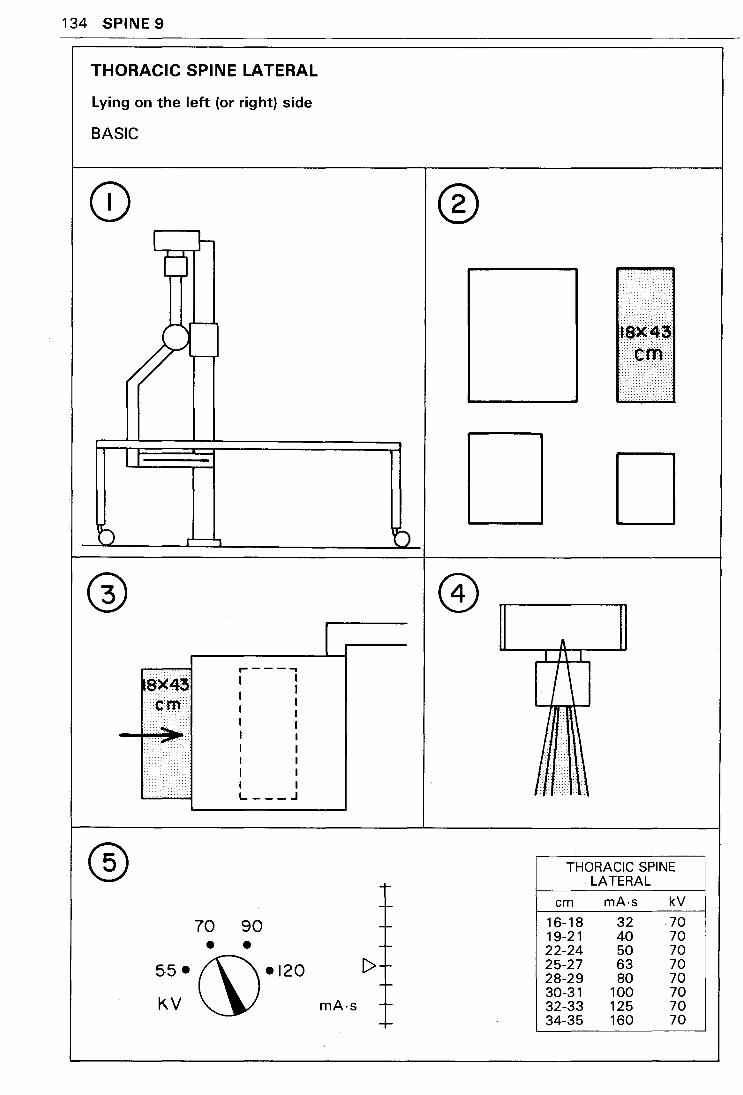
THORACIC SPINE LATERAL
lying on the left (or right) side
BASIC
I
)
@
l J-tj
$X43 C>rll
..... __S.· .. ·••••· I >"""
/
t···· .. · ...• >
70 •
,.------. I I
I I
I I I I I I I I I I I I I I L ___ .J
90 •
55•~•120 KV
I
C>
mA·s
®
b
t-
------t-
-t-
-t-
" I 1\ I
I \
>>>)
18)(~3. coon
D
THORACIC SPINE LATERAL
em mA·s kV
16-18 32 70 19-21 40 70 22-24 50 70 25-27 63 70 28-29 80 70 30-31 100 70 32-33 125 70 34-35 160 70
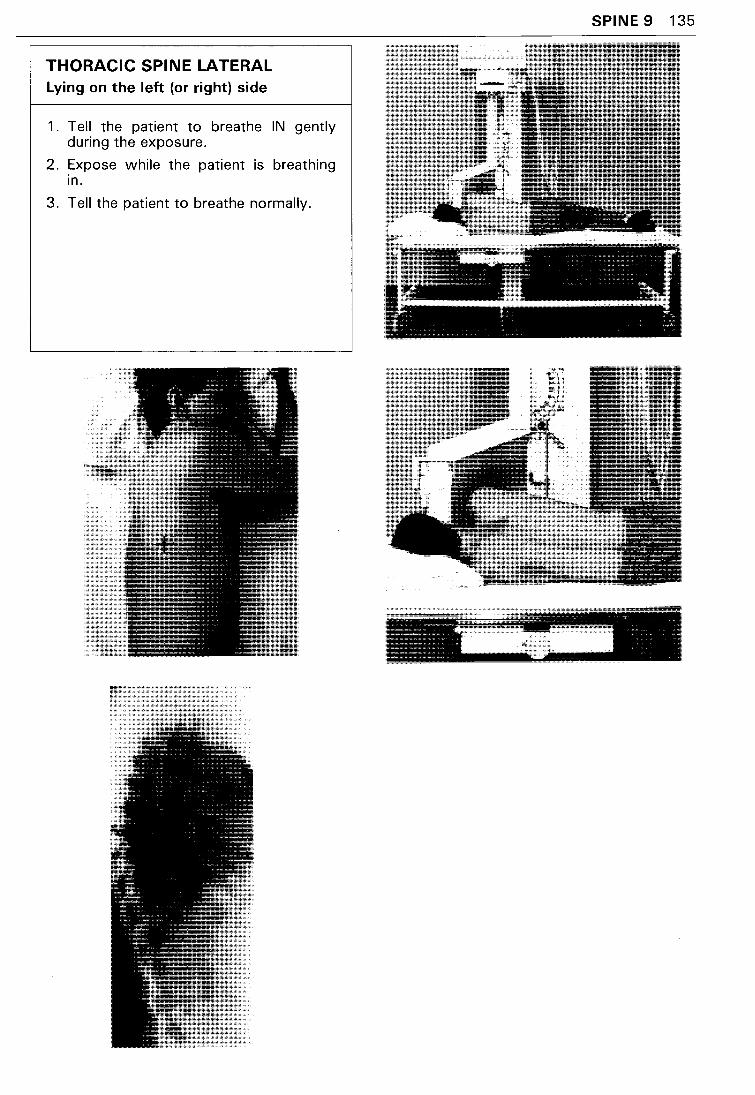
THORACIC SPINE LATERAL Lying on the left {or right) side
1. Tell the patient to breathe IN gently during the exposure.
2. Expose while the patient is breathing in.
3. Tell the patient to breathe normally.
SPINE 9 135
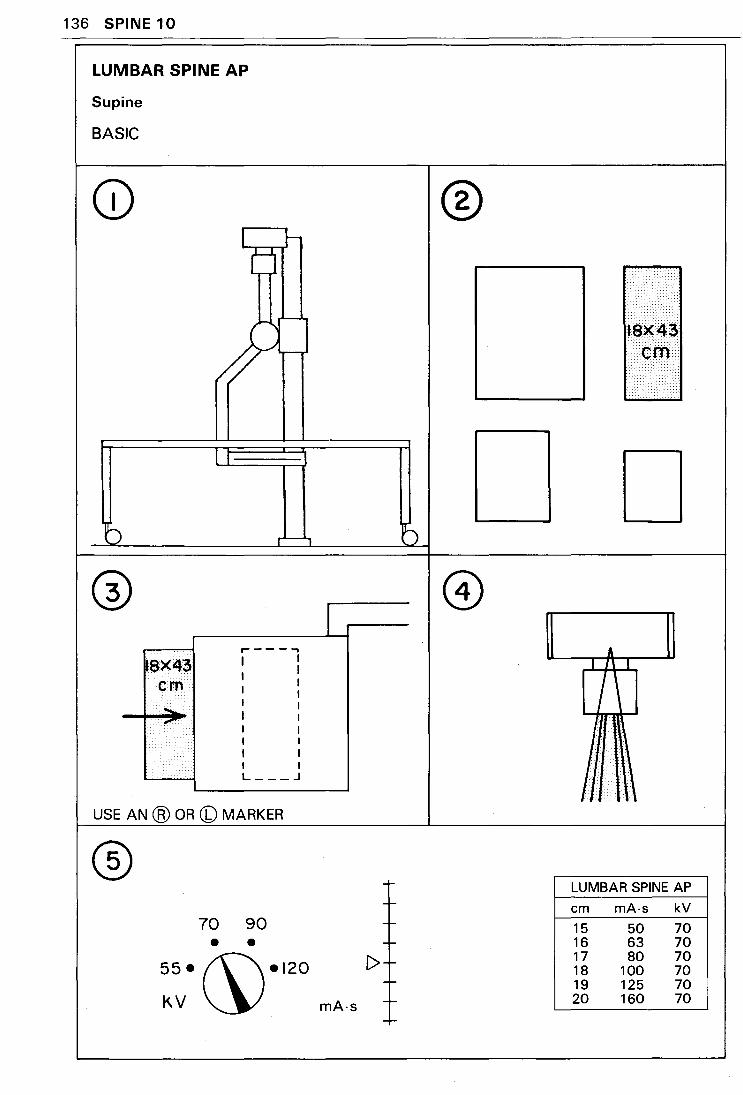
136 SPINE 10
LUMBAR SPINE AP
Supine
BASIC
® 1 r-d .. < .....
. <··.:·
. ::
<<···<< .. ···.:····:
D r'--'1
I A
I 1\ I
I \ ·----,
18X43 I I
I I em I
I I
....... I I , I I
I I I I I I I I L ___ .J
'IJ
USE AN ® OR CD MARKER
® -r- LUMBAR SPINE AP -- em mA-s kV
70 90 -- 15 50 70 • • -- 16 63 70
C> - 17 80 70 55•~•120 18 100 70
r- 19 125 70 I<.V mA-s r- 20 160 70
r-
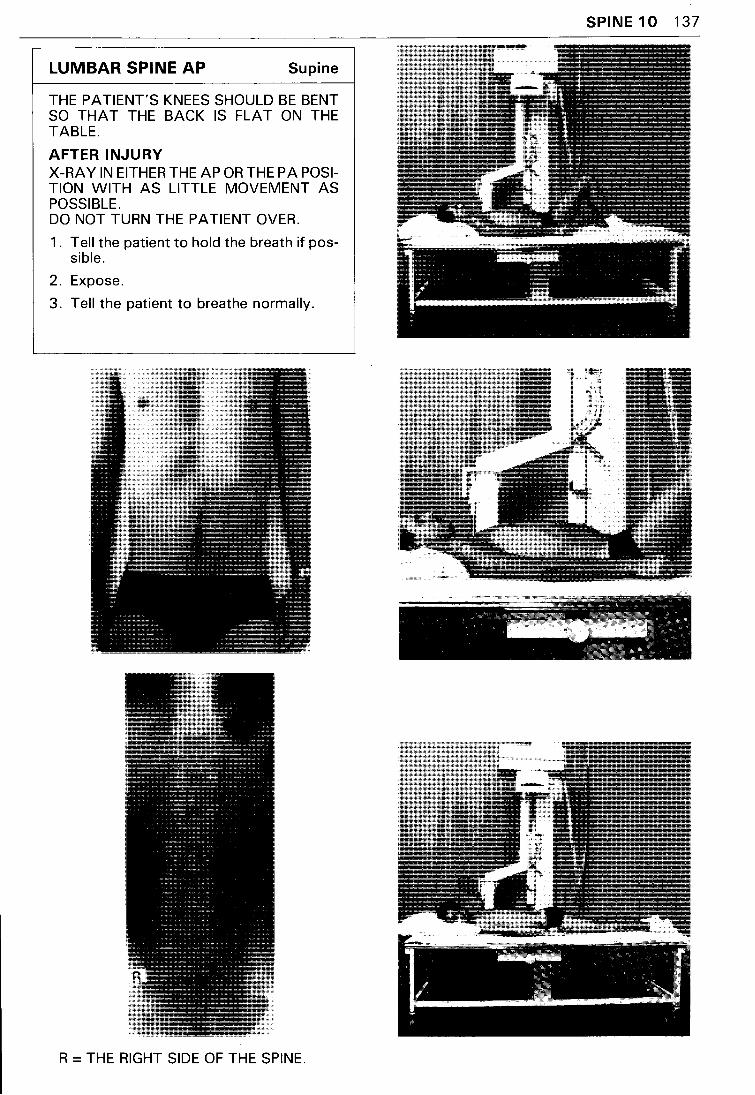
LUMBAR SPINE AP Supine
THE PATIENT'S KNEES SHOULD BE BENT SO THAT THE BACK IS FLAT ON THE TABLE.
AFTER INJURY X-RAY IN EITHER THE AP OR THE PA POSITION WITH AS LITTLE MOVEMENT AS POSSIBLE. DO NOT TURN THE PATIENT OVER.
1 . Tell the patient to hold the breath if possible.
2. Expose.
3. Tell the patient to breathe normally.
R =THE RIGHT SIDE OF THE SPINE.
SPINE 10 137
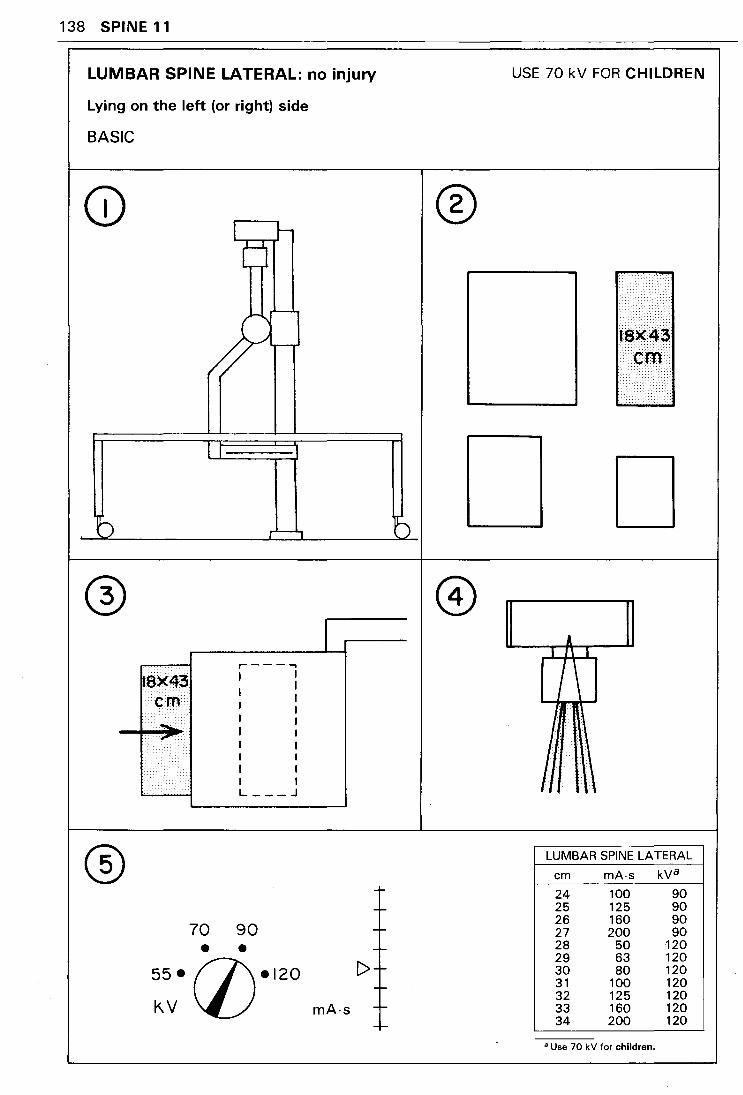
138 SPINE 11
LUMBAR SPINE LATERAL: no injury
Lying on the left (or right) side
BASIC
I ~
0
r'--1
I ,.------.
SX43 I I
I I em· I
I I ....;;._
I I .. , . I I
I I I I I I I I L ___ .J
® 1-
70 90 1-
• • 1-
C>+ 55• (])•120 -I-
KV mA·s -I-
-I-
®
USE 70 kV FOR CHILDREN
l I 1\ I
I '
·.·.· .. -·.·.·.·.·.· .·
ISX4~ ········em>•
D
LUMBAR SPINE LATERAL
em mA·s kV8
24 100 90 25 125 90 26 160 90 27 200 90 28 50 120 29 63 120 30 80 120 31 100 120 32 125 120 33 160 120 34 200 120
• Use 70 kV for children.
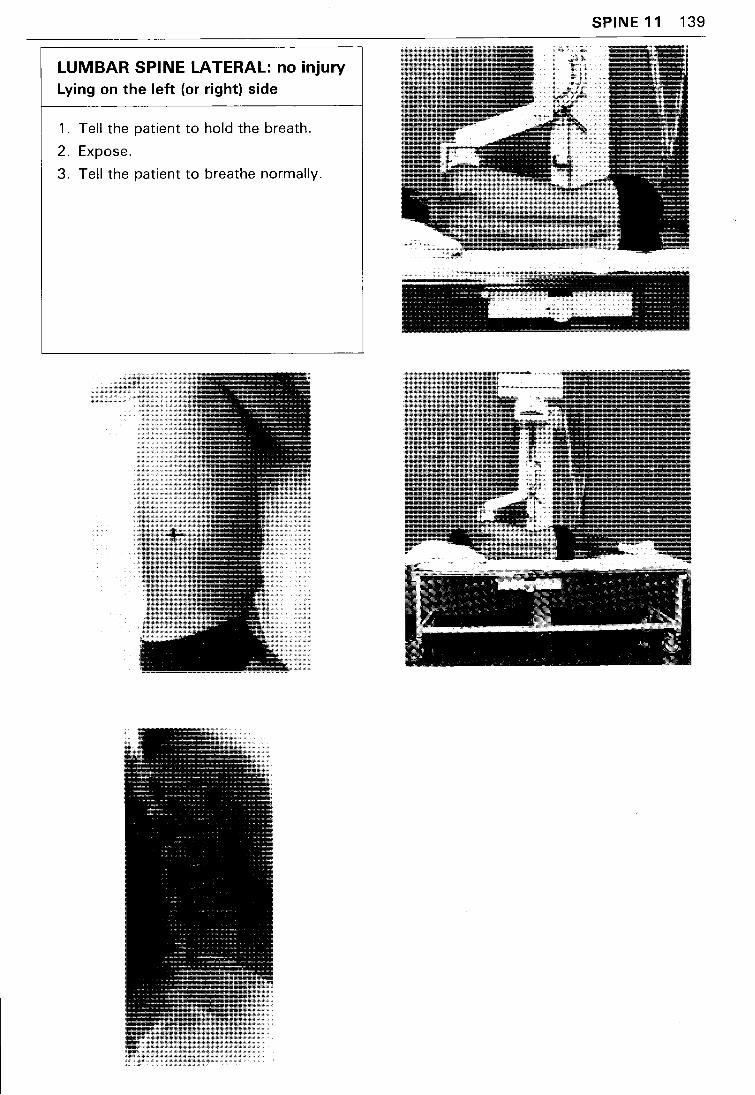
LUMBAR SPINE LATERAL: no injury Lying on the left (or right) side
1. Tell the patient to hold the breath.
2. Expose.
3. Tell the patient to breathe normally.
SPINE 11 139
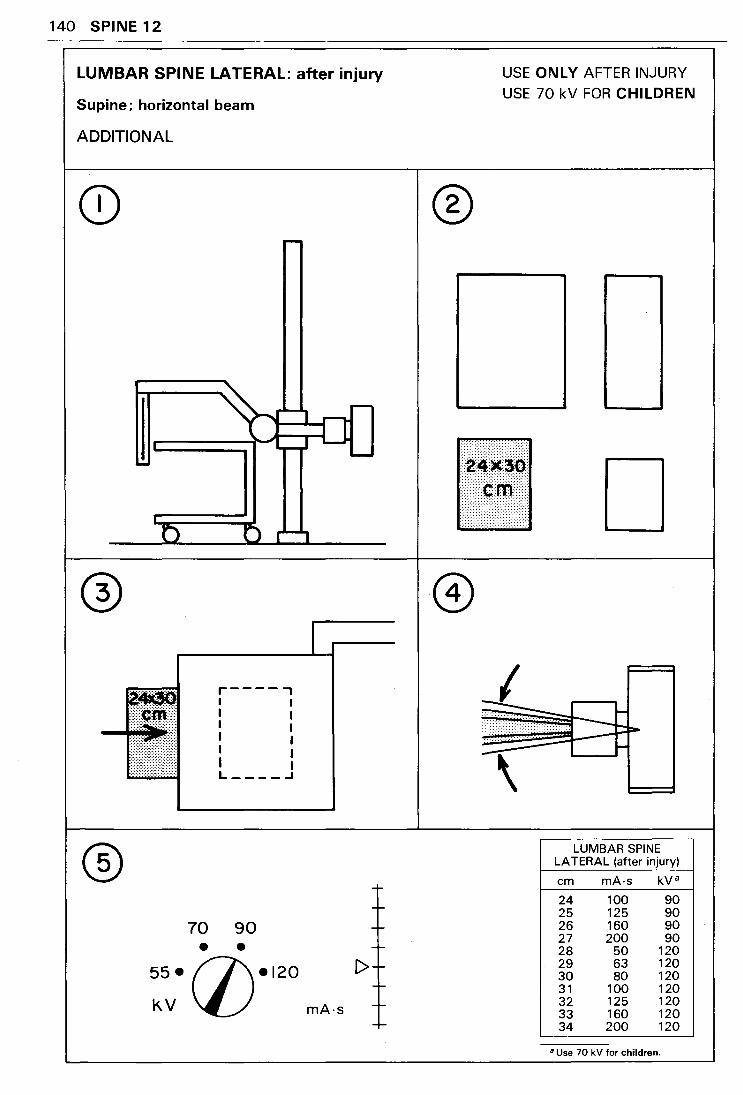
140 SPINE 12
LUMBAR SPINE LATERAL: after injury
Supine; horizontal beam
ADDITIONAL
II
-
® 70 •
..... , -~~0 -
I r----, I I I I I I I I I I I 1 L----.J
90 •
---
1-
55• (j)•l20 !>r---
KV mA·s ----
USE ONLY AFTER INJURY
USE 70 kV FOR CHILDREN
®
~~lia >¢1:: D
LUMBAR SPINE LATERAL (after injury)
em mA-s kV 8
24 100 90 25 125 90 26 160 90 27 200 90 28 50 120 29 63 120 30 80 120 31 100 120 32 125 120 33 160 120 34 200 120
a Use 70 kV for children.
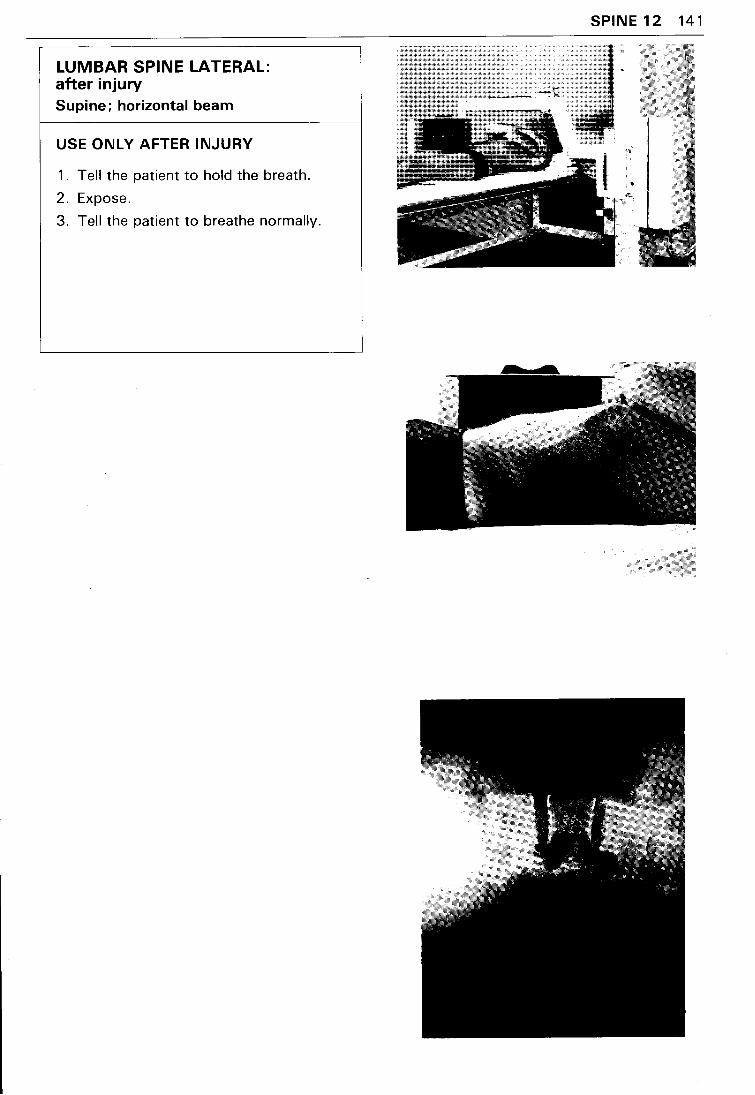
LUMBAR SPINE LATERAL: after injury Supine; horizontal beam
USE ONLY AFTER INJURY
1. Tell the patient to hold the breath.
2. Expose.
3. Tell the patient to breathe normally.
SPINE 12 141
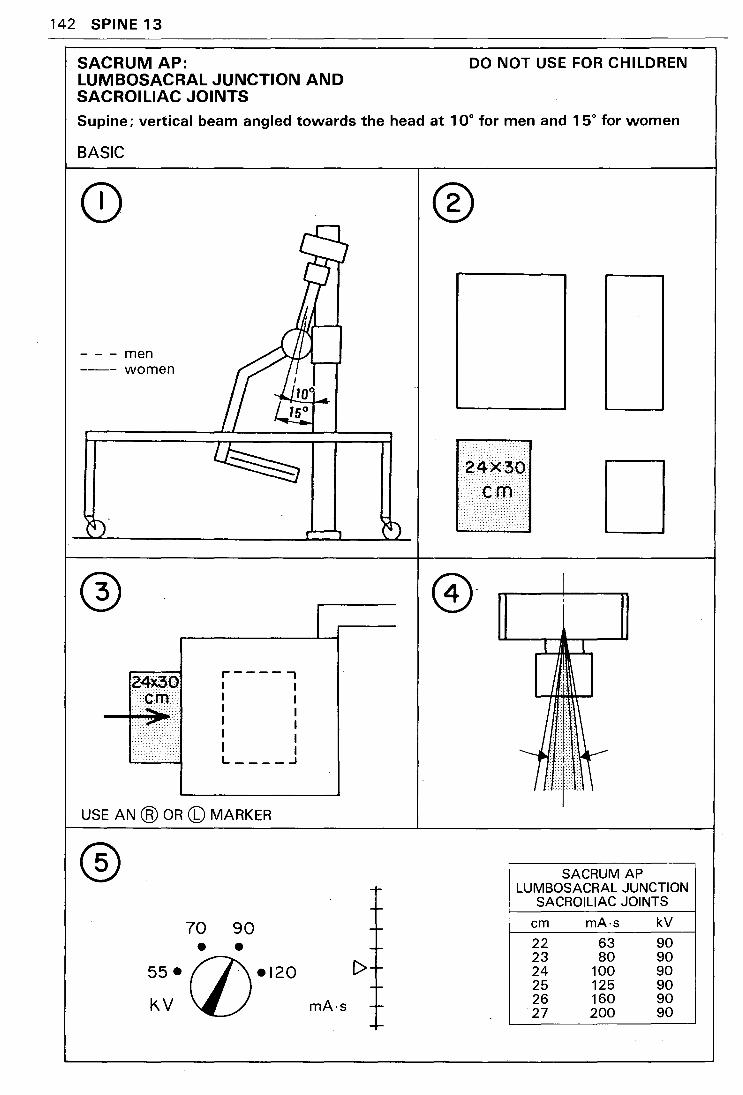
142 SPINE13
SACRUM AP: LUMBOSACRAL JUNCTION AND SACROILIAC JOINTS
DO NOT USE FOR CHILDREN
Supine; vertical beam angled towards the head at 1 ao for men and 1 5° for women
BASIC
--- men -----women
r-----, I I I I I I I I I I I I
21~0 :::::=:~:::::=:==::
L ____ J
USE AN @ OR (b) MARKER
® 70 90 • •
55• (j)•l20 kV
I
f>
mA·s
®
D
SACRUM AP LUMBOSACRAL JUNCTION
SACROILIAC JOINTS
em mA·s kV
22 63 90 23 80 90 24 100 90 25 125 90 26 160 90 27 200 90

SACRUM AP: LUMBOSACRAL JUNCTION AND SACROILIAC JOINTS Supine; vertical beam angled towards the head 1 Oo for men and 1 5° for women
1 . Tell the patient to hold the breath.
2. Expose.
3. Tell the patient to breathe normally.
SPINE13 143
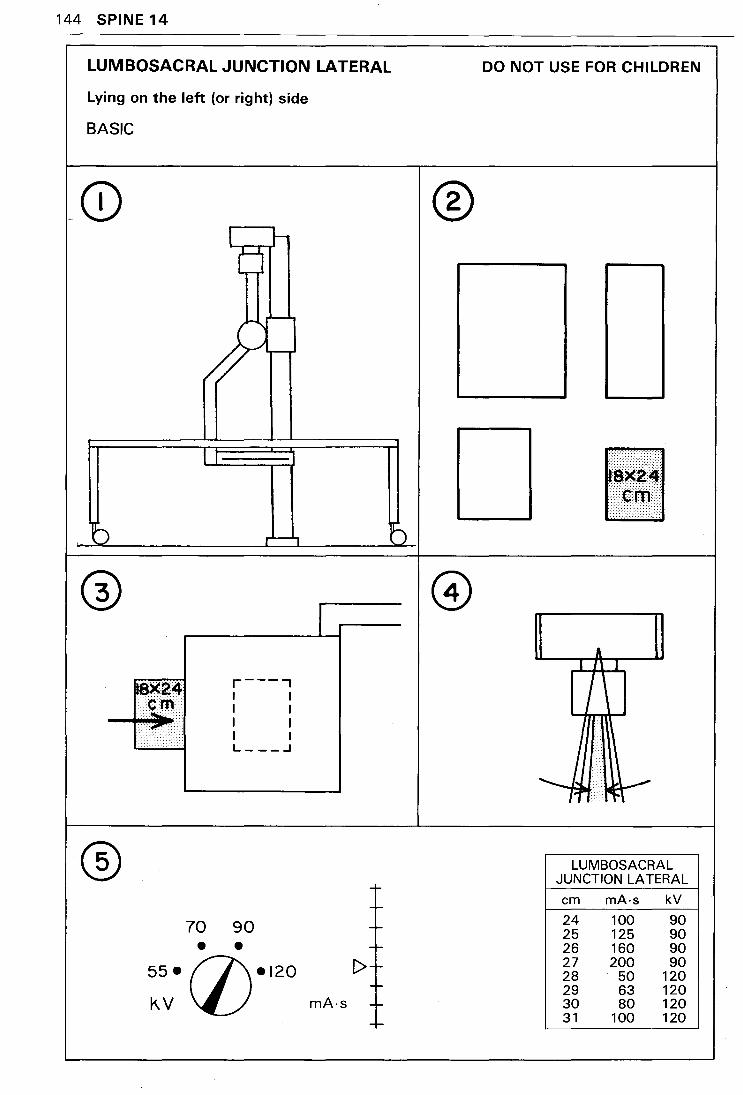
144 SPINE 14
LUMBOSACRAL JUNCTION LATERAL DO NOT USE FOR CHILDREN
Lying on the left (or right) side
BASIC
® l 1-d
I fll] 0
® l
A I 1\ I
r---., I I I \ I I I I I I L---.J
~·······.~ ® LUMBOSACRAL
JUNCTION LATERAL
1-em mA·s kV
70 90 24 100 90 1- 25 125 90
• • 1- 26 160 90 C>t- 27 200 90 55• (j)•l20 28 50 120
+· 29 63 120 k.V mA·s -I- 30 80 120
-I- 31 100 120
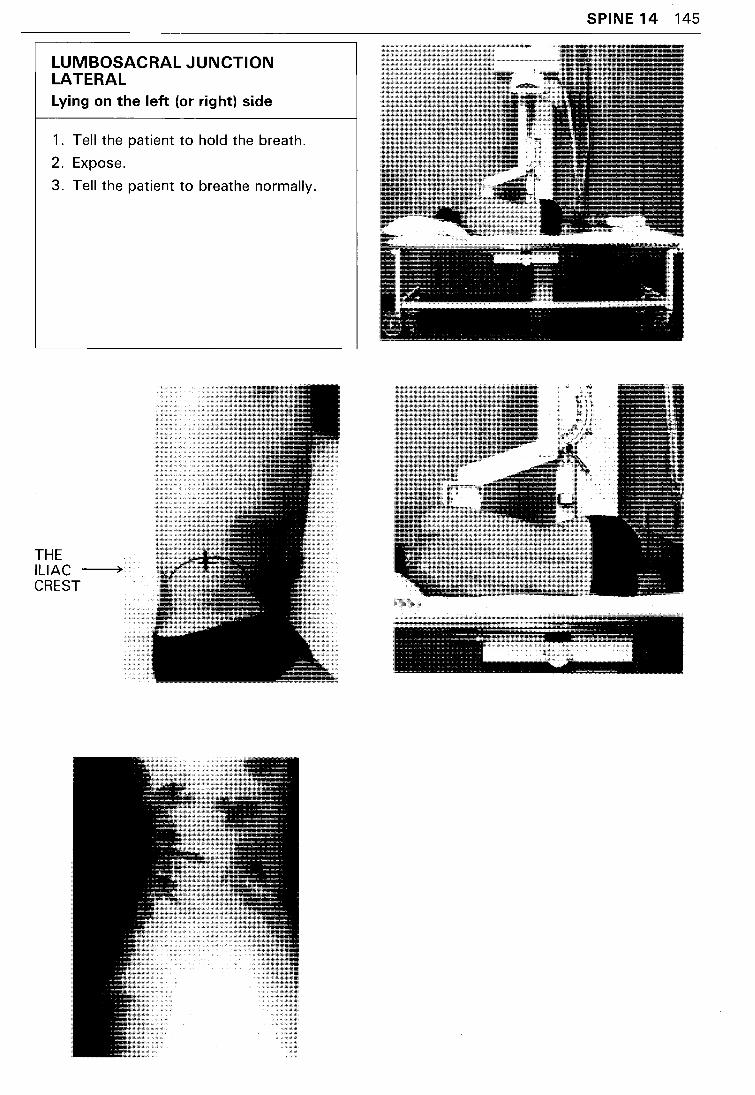
LUMBOSACRAL JUNCTION LATERAL Lying on the left (or right) side
1. Tell the patient to hold the breath.
2. Expose.
3. Tell the patient to breathe normally.
THE ILIAC~ CREST
SPINE 14 145
ARM
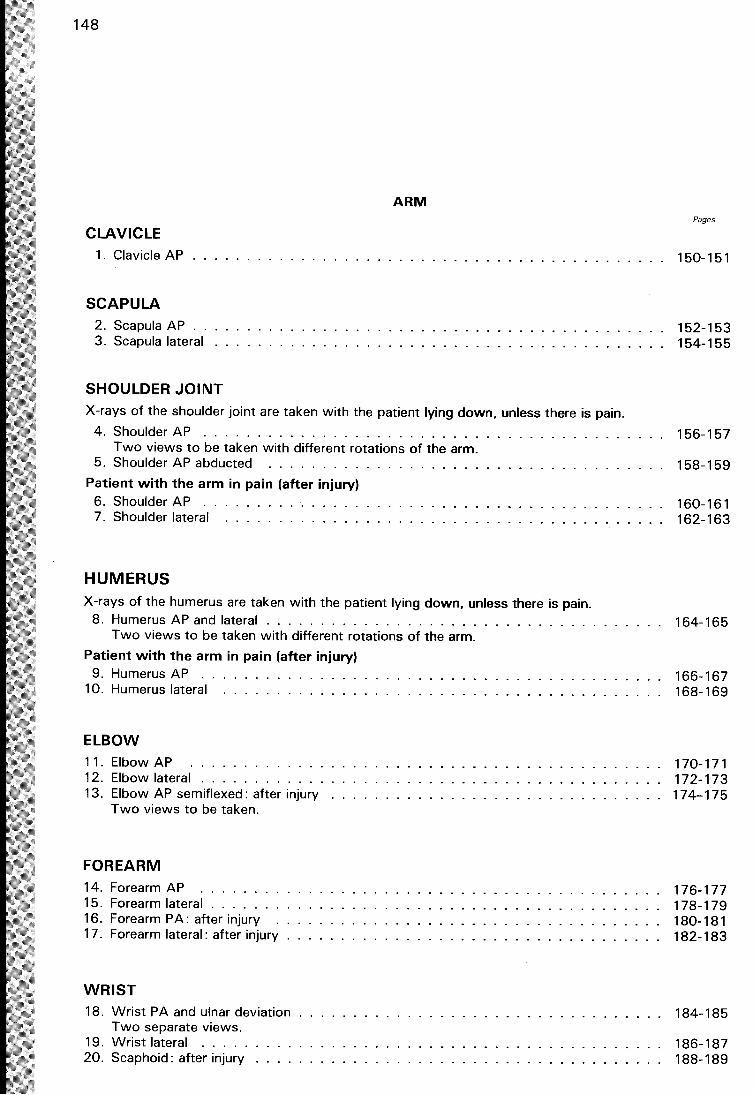
148
ARM
CLAVIClE
1 . Clavicle AP ............................. - .............. .
SCAPULA
2. Scapula AP 3. Scapula lateral
SHOUlDER JOINT
X-rays of the shoulder joint are taken with the patient lying down, unless there is pain.
4. Shoulder AP . . . . . . . . . . . . . . . . . . . . . ..... Two views to be taken with different rotations of the arm.
5. Shoulder AP abducted ................... .
Patient with the arm in pain (after injury) 6. Shoulder AP .. 7. Shoulder lateral . . . . . . . . . . . . .
HUMERUS X-rays of the humerus are taken with the patient lying down, unless there is pain.
Pages
150-151
152-153 154-155
156-157
158-159
160-161 162-163
8. Humerus AP and lateral .............................. . . . . . . . 164-165 Two views to be taken with different rotations of the arm.
Patient with the arm in pain (after injury) 9. Humerus AP ..
10. Humerus lateral ............ .
ElBOW
11 . Elbow AP . . . . . . . . . . . . . 12. Elbow lateral ........... . 13. Elbow AP semiflexed: after injury
Two views to be taken.
FOREARM
14. 15. 16. 17.
Forearm AP Forearm lateral . . . . . . Forearm PA: after injury Forearm lateral : after injury
WRIST
18. Wrist PA and ulnar deviation Two separate views.
19. Wrist lateral . . . . . 20. Scaphoid: after injury
166-167 168-169
170-171 172-173 174-175
176-177 178-179 180-181 182-183
184-185
186-187 188-189
ARM (continued)
HAND 21 . Hand PA and obliques
Three separate views. 22. Thumb AP1 •••..
23. Thumb lateraP ... 24. Single finger lateral
1 One film divided in two may be used to take this view.
149
Pages
190-191
192-193 194-195 196-197
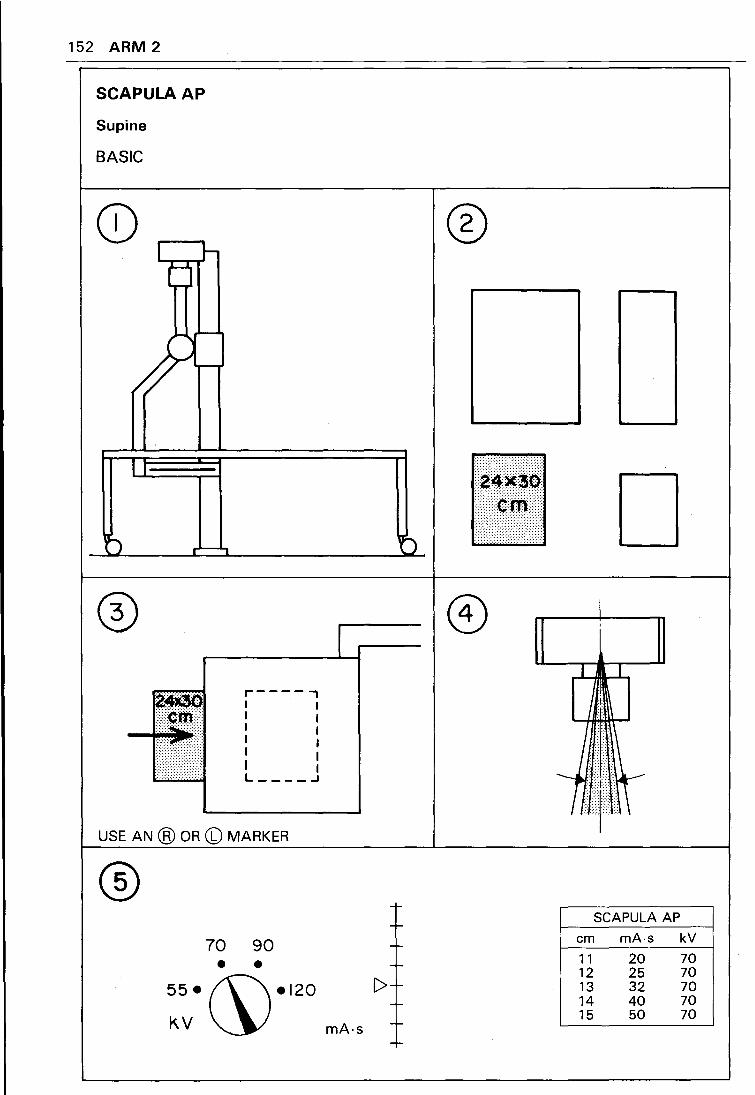
152 ARM 2
SCAPULA AP
Supine
BASIC
I I-t)
1
r----, I I I I I I I I I I I I L ____ ..J
USE AN @ OR (b) MARKER
® 70 90 • •
55• (\\•120
KV~
I
mA·s
--I-
-I-
-1-
C>+ -I-
-I-
-I-
®
il!l!i.l: e=rn=:··= D
I
I
SCAPULA AP
em mA·S kV
11 20 70 12 25 70 13 32 70 14 40 70 15 50 70
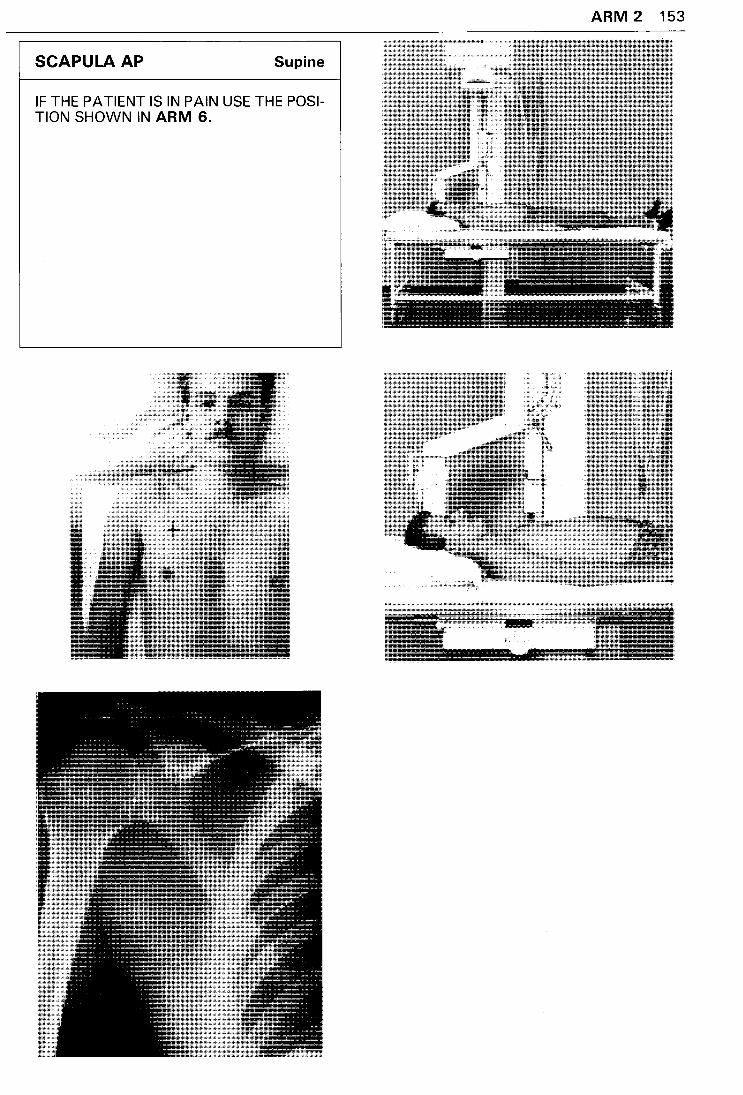
SCAPULA AP Supine
IF THE PATIENT IS IN PAIN USE THE POSITION SHOWN IN ARM 6.
ARM 2 153
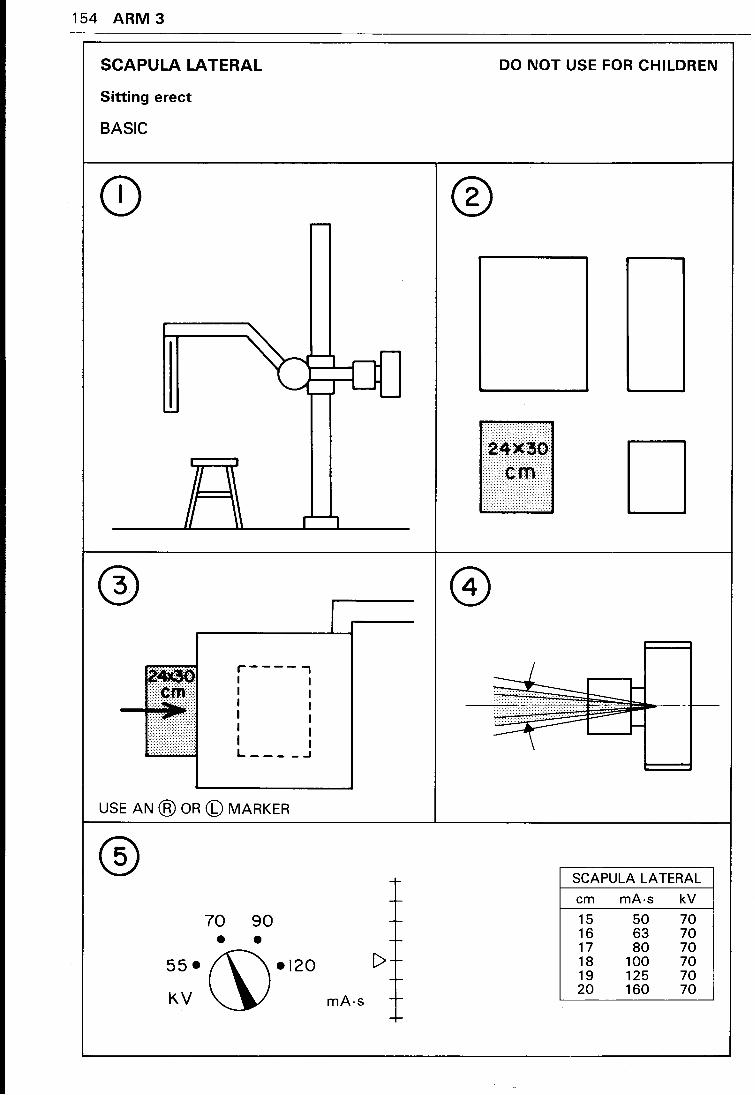
154 ARM 3
SCAPULA LATERAL DO NOT USE FOR CHILDREN
Sitting erect
BASIC
® -
-~~~i<i n ¢tt,> D
r----, I I I I I I I I I I I I
-- f---
L----.J
USE AN @ OR (b) MARKER
® SCAPULA LATERAL ~
-r- em mA-s kV
70 90 -- 15 50 70
• • - 16 63 70 17 80 70
55•~•120 [> - 18 100 70 - 19 125 70
KV 20 160 70 mA·s -
--
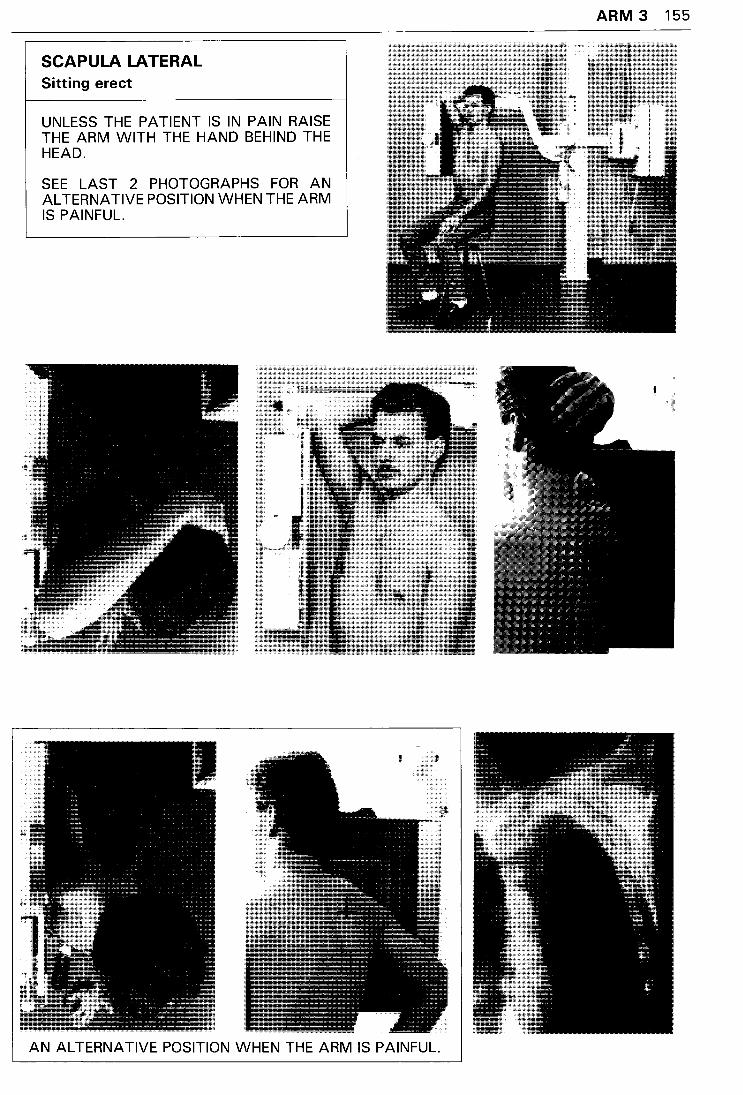
SCAPULA LATERAL Sitting erect
UNLESS THE PATIENT IS IN PAIN RAISE THE ARM WITH THE HAND BEHIND THE HEAD.
SEE LAST 2 PHOTOGRAPHS FOR AN ALTERNATIVE POSITION WHEN THE ARM IS PAINFUL.
AN ALTERNATIVE POSITION WHEN THE ARM IS PAINFUL.
ARM 3 155
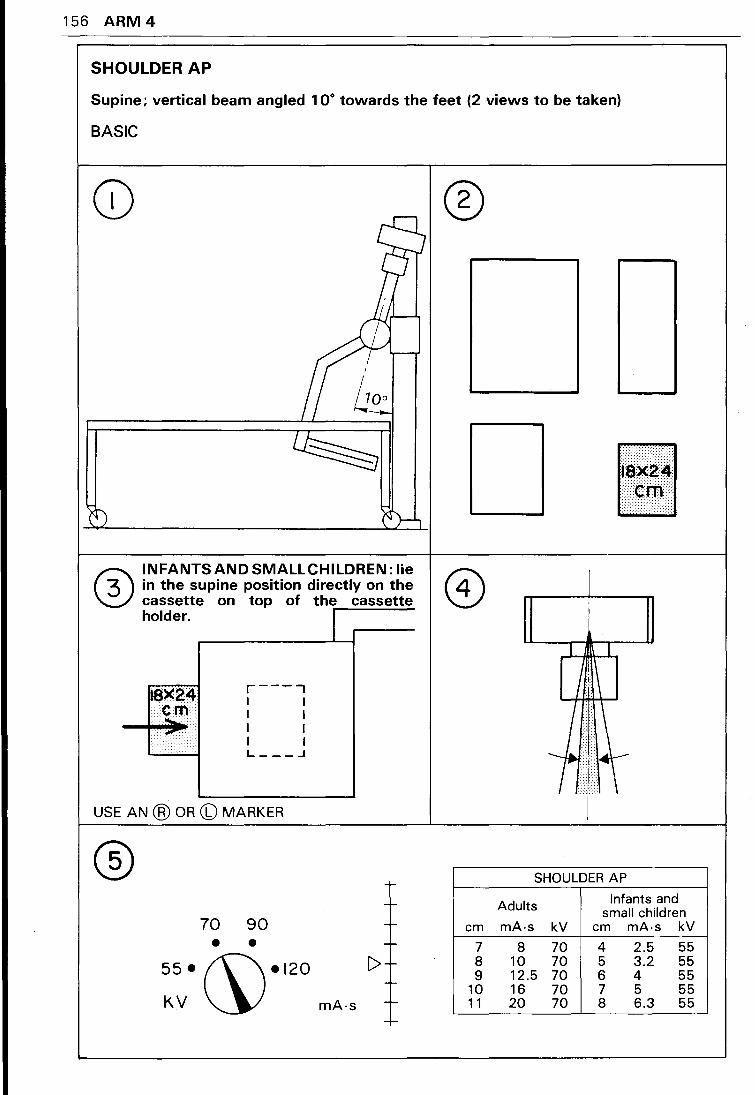
156 ARM 4
SHOULDER AP
Supine; vertical beam angled 1 Oo towards the feet (2 views to be taken)
BASIC
® INFANTS AND SMALL CHILDREN: lie in the supine position directly on the cassette on top of the cassette holder. I
18X24 c;.m .. ·r··.···
••••••
r---., I I I I I I I I L ___ .J
USE AN ® OR CD MARKER
® 70 90 • •
55•~•120 KV mA·s
r-
-I-
-r-
[> r-
---
®
em
7 8 9
10 11
I!-IJJ I
l l
/'i\
~~~-SHOULDER AP
Adults Infants and small children
mA-s kV em mA-s kV
8 70 4 2.5 55 10 70 5 3.2 55 12.5 70 6 4 55 16 70 7 5 55 20 70 8 6.3 55
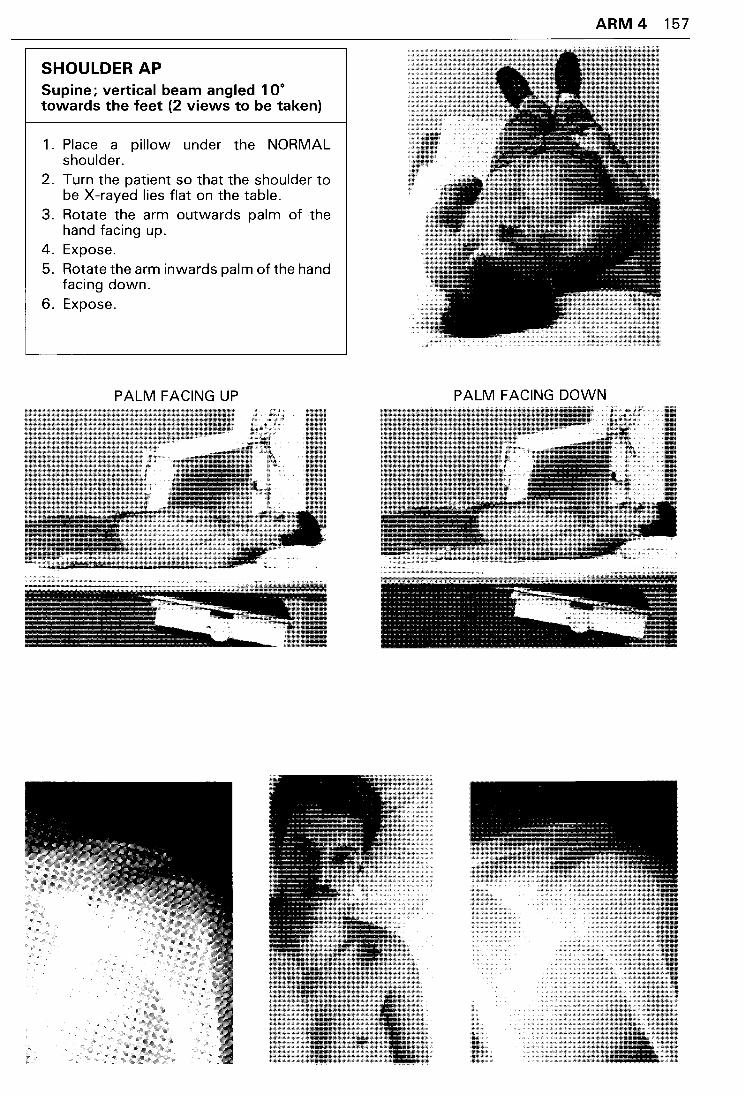
SHOULDER AP Supine; vertical beam angled 1 oo towards the feet (2 views to be taken)
1 . Place a pillow under the NORMAL shoulder.
2. Turn the patient so that the shoulder to be X-rayed lies flat on the table.
3. Rotate the arm outwards palm of the hand facing up.
4. Expose. 5. Rotate the arm inwards palm of the hand
facing down. 6. Expose.
PALM FACING UP
ARM 4 157
PALM FACING DOWN
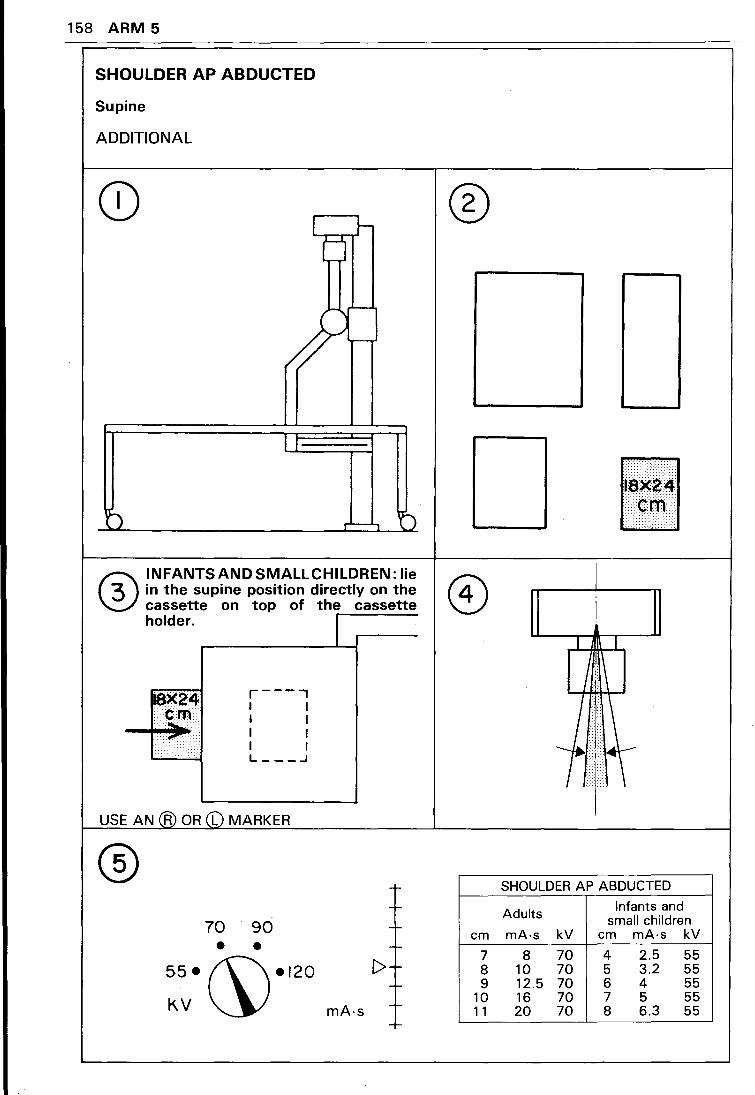
158 ARM 5
SHOULDER AP ABDUCTED
Supine
ADDITIONAL
r 1--(j
I
) r'-, '()
® INFANTSANDSMALLCHILDREN: lie in the supine position directly on the cassette on top of the cassette holder.
11$)(24 2m ..
i••··-·· ·~······
···•·····
r---., I I I I I I I I L ___ .J
USE AN @ OR (0 MARKER
70 90 • •
55• (\\•120
KV~
1-
-I-
[>+ -I-
mA·s -1-
-1-
®
f~141
I T
I i.l\
SHOULDER AP ABDUCTED
Adults Infants and
small children em mA·s kV em mA·s kV
7 8 70 4 2.5 55 8 10 70 5 3.2 55 9 12.5 70 6 4 55
10 16 70 7 5 55 11 20 70 8 6.3 55
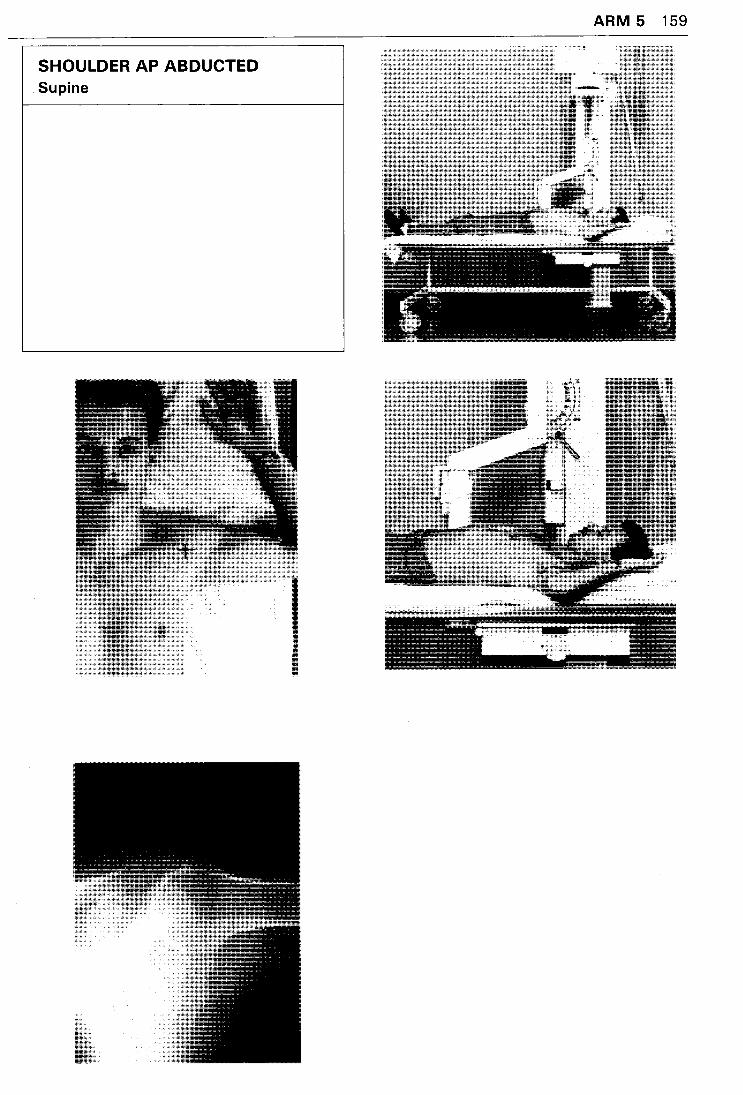
SHOULDER AP ABDUCTED Supine
ARM 5 159

160 ARM 6
SHOULDER AP: after injury
Sitting erect
ADDITIONAL
r----., I I I I I I I I I I I I L----..J
USE AN @ OR (b) MARKER
® 70 90 • •
55• (\\•120
KV~ C>
mA·s
®
~~~~~ > e.m.:\ D
SHOULDER AP (after injury)
em mA·s kV
8 10 70 9 12.5 70
10 16 70 11 20 70 12 25 70 13 32 70
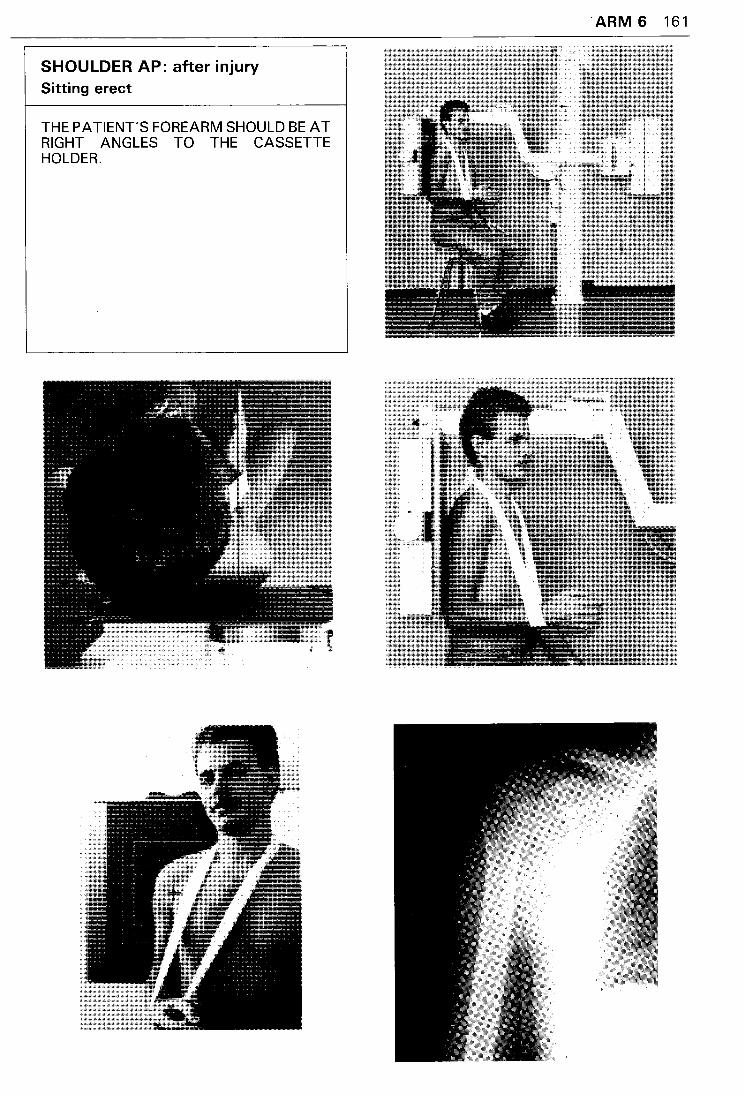
SHOULDER AP: after injury Sitting erect
THE PATIENT'S FOREARM SHOULD BEAT RIGHT ANGLES TO THE CASSETTE HOLDER.
ARM 6 161
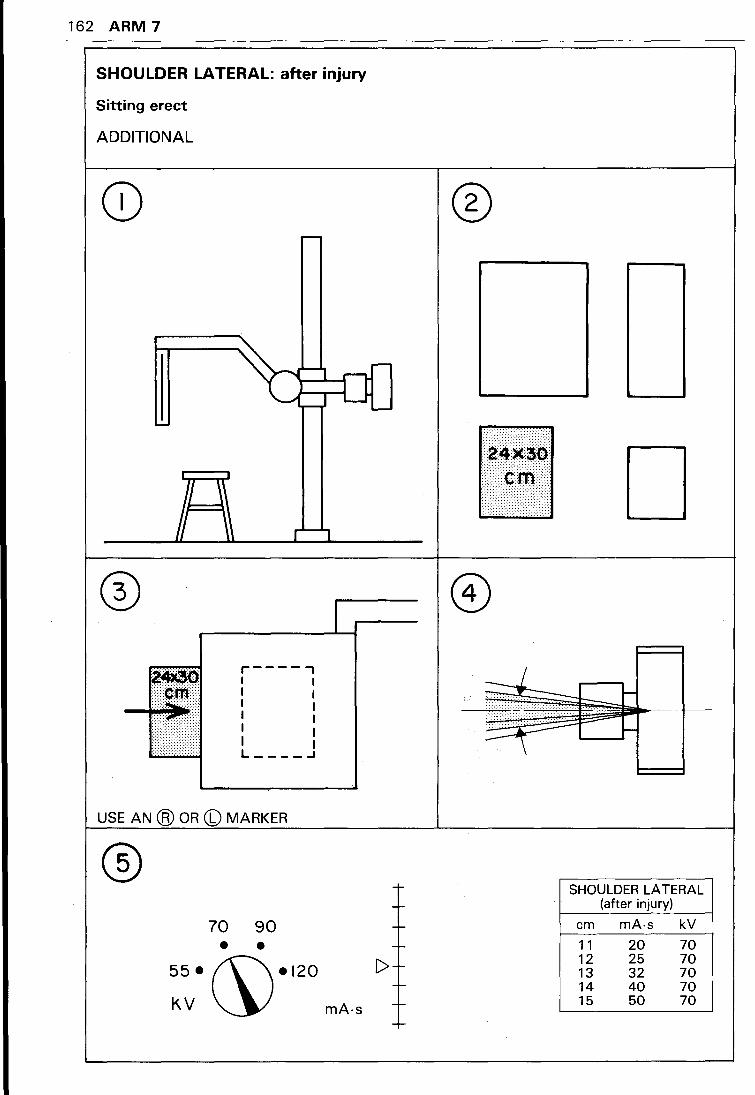
162 ARM 7
SHOULDER LATERAL: after injury
Sitting erect
ADDITIONAL
CD
r----, I I I I I I I I I I I 1 L----.J
USE AN @ OR © MARKER
® 70 90 • •
55• (\\•120
KV ~ mA·s
[>
®
~~)(j(). ¢:n,:n D
SHOULDER LATERAL (after injury)
em mA-s kV
11 20 70 12 25 70 13 32 70 14 40 70 15 50 70
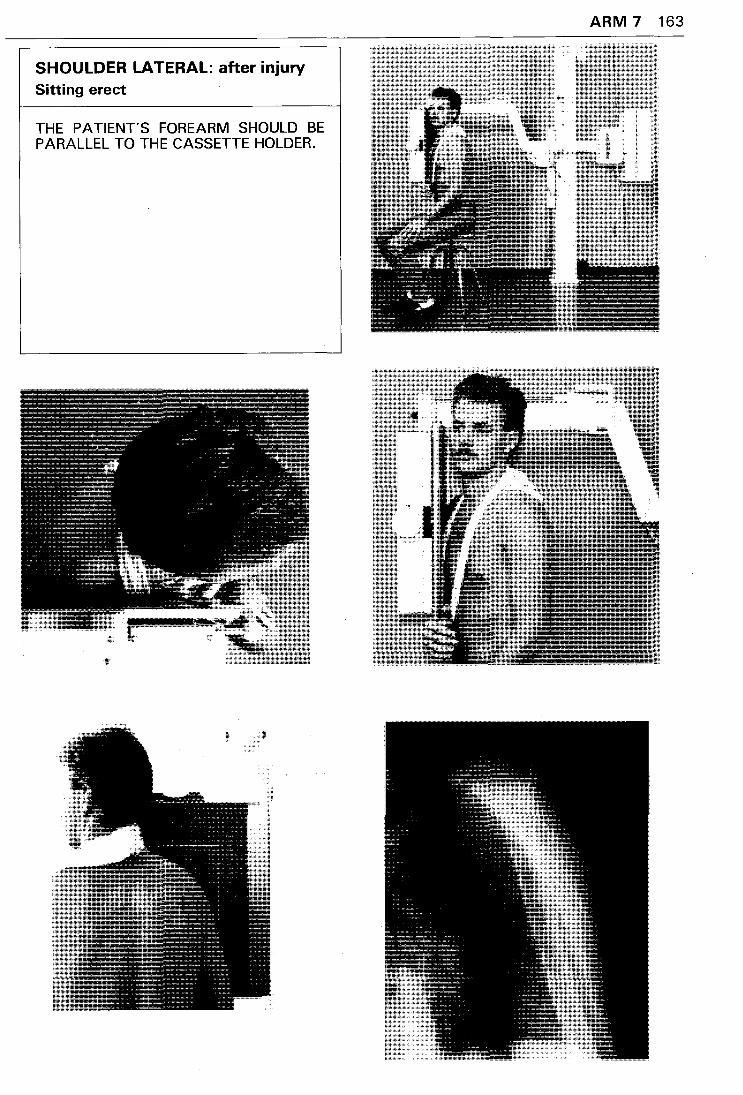
SHOULDER LATERAL: after injury Sitting erect
THE PATIENT'S FOREARM SHOULD BE PARALLEL TO THE CASSETTE HOLDER.
ARM 7 163
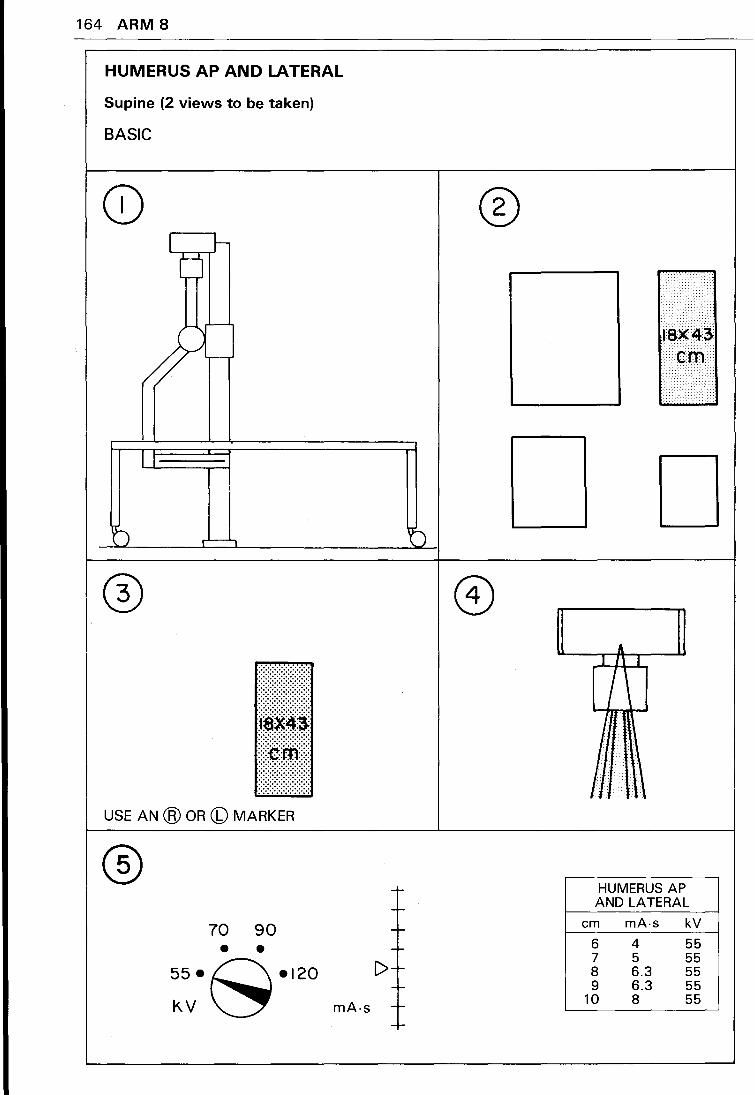
164 ARM 8
HUMERUS AP AND LATERAL
Supine (2 views to be taken)
BASIC
USE AN @ OR (6) MARKER
® 70 90 • •
55•0•120
KV~ mA-s
®
C>
D
HUMERUS AP AND LATERAL
em mA-s kV
6 4 55 7 5 55 8 6.3 55 9 6.3 55
10 8 55
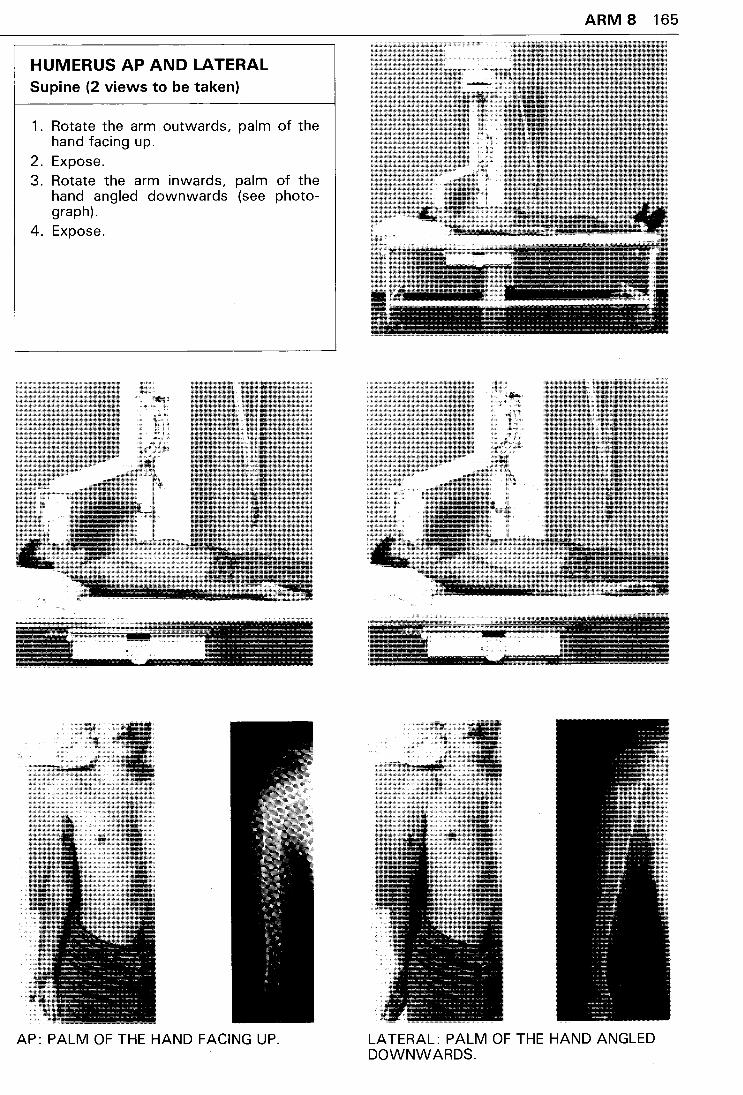
HUMERUS AP AND LATERAL Supine (2 views to be taken)
1. Rotate the arm outwards, palm of the hand facing up.
2. Expose. 3. Rotate the arm inwards, palm of the
hand angled downwards (see photograph).
4. Expose.
AP: PALM OF THE HAND FACING UP.
ARM 8 165
LATERAL: PALM OF THE HAND ANGLED DOWNWARDS.

166 ARM 9
HUMERUS AP: after injury
Sitting erect
ADDITIONAL
CD ®
D I
·---.., 8X43 I I
I I em I
I I
....... I I ::, I I
I I I I I I
_:::: ·,,. I I L ___ .J
USE AN @ OR (D MARKER
HUMERUS AP (after injury)
[>
70 90 • •
55• (\\•120
KV~ mA-s
em mA·s kV
7 8 70 8 10 70 9 12.5 70
10 16 70 11 20 70 12 25 70
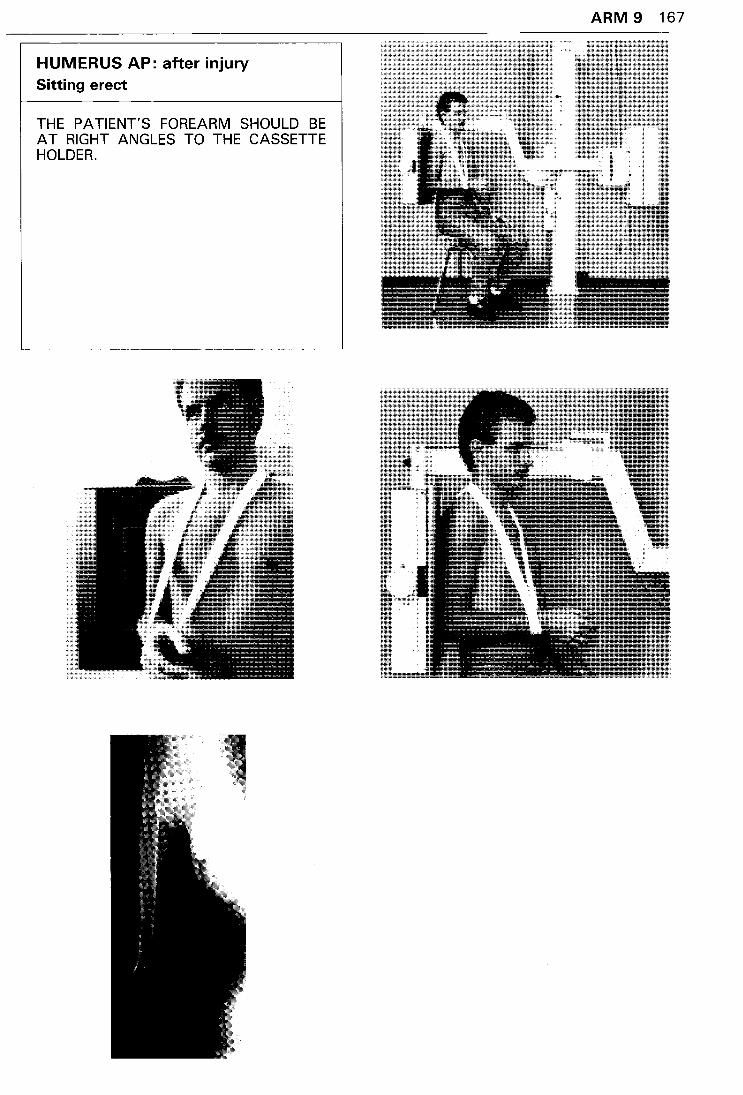
HUMERUS AP: after injury Sitting erect
THE PATIENT'S FOREARM SHOULD BE AT RIGHT ANGLES TO THE CASSETTE HOLDER.
ARM 9 167
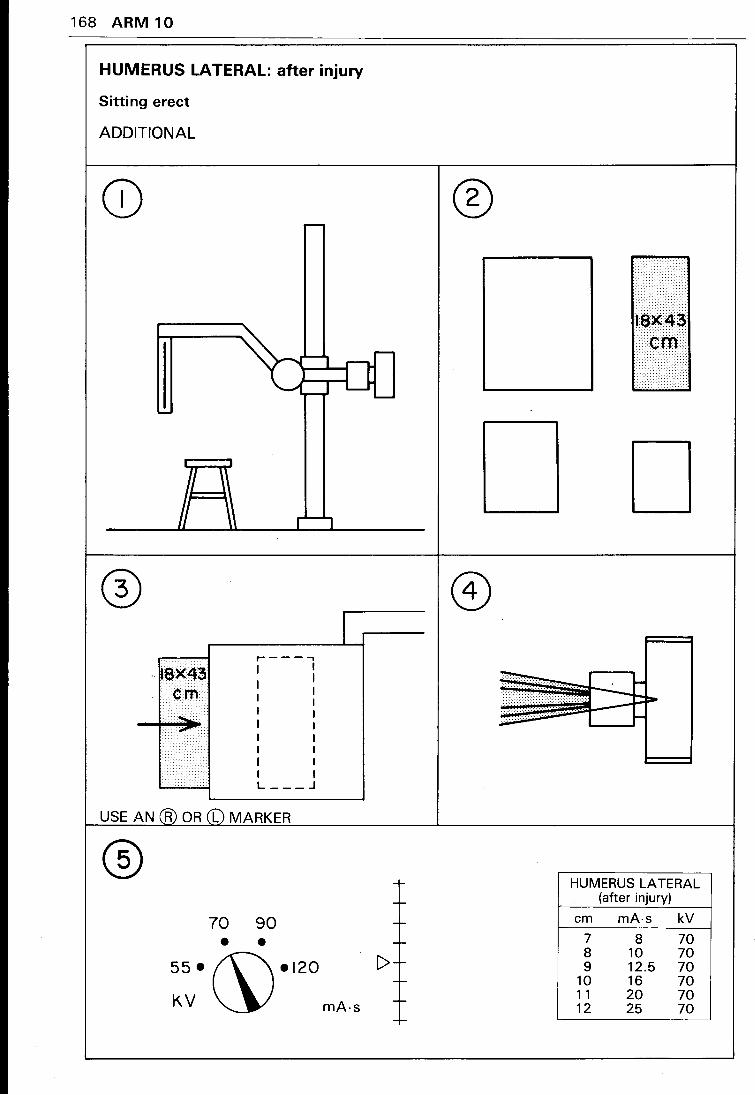
168 ARM 10
HUMERUS LATERAL: after injury
Sitting erect
ADDITIONAL
CD
USE AN
®
SX43 em<
,.------. I I
I I I I I I I I
I I L ___ J
MARKER
70 90 • •
55• (\\•120
KV ~ mA·s
[>
®
D
HUMERUS LATERAL (after injury)
em mAs kV
7 8 70 8 10 70 9 12.5 70
10 16 70 11 20 70 12 25 70

HUMERUS LATERAL: after injury Sitting erect
THE PATIENT'S FOREARM SHOULD BE AGAINST THE CASSETTE HOLDER.
ARM 10 169
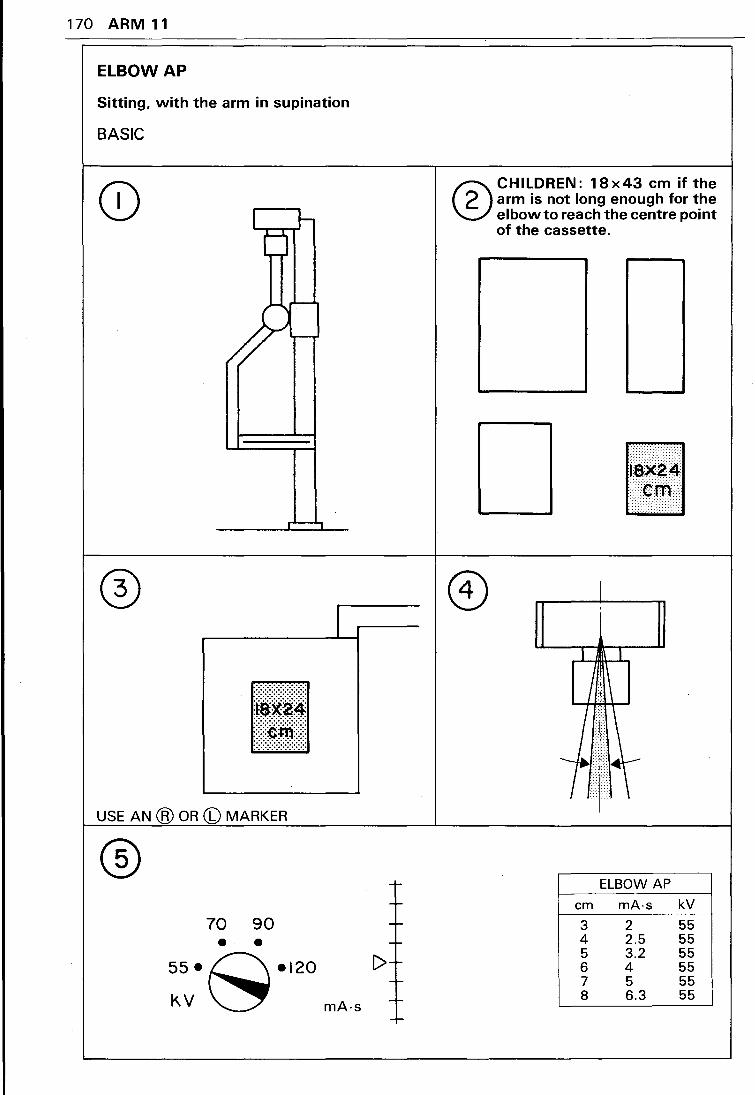
170 ARM 11
ELBOWAP
Sitting, with the arm in supination
BASIC
I ~ (j
I . . . . .
.
USE AN @ OR (b) MARKER
® 70 90 • • ss·s·l20
K.V
I
mA·s
+-
-I-
-I-
-I-
[>+ 1-
-I-
-I-
®CHILDREN: 18x43 em if the arm is not long enough for the elbow to reach the centre point of the cassette.
f:llll I
I l
I i.l\
ELBOW AP
em mA·s kV
3 2 55 4 2.5 55 5 3.2 55 6 4 55 7 5 55 8 6.3 55
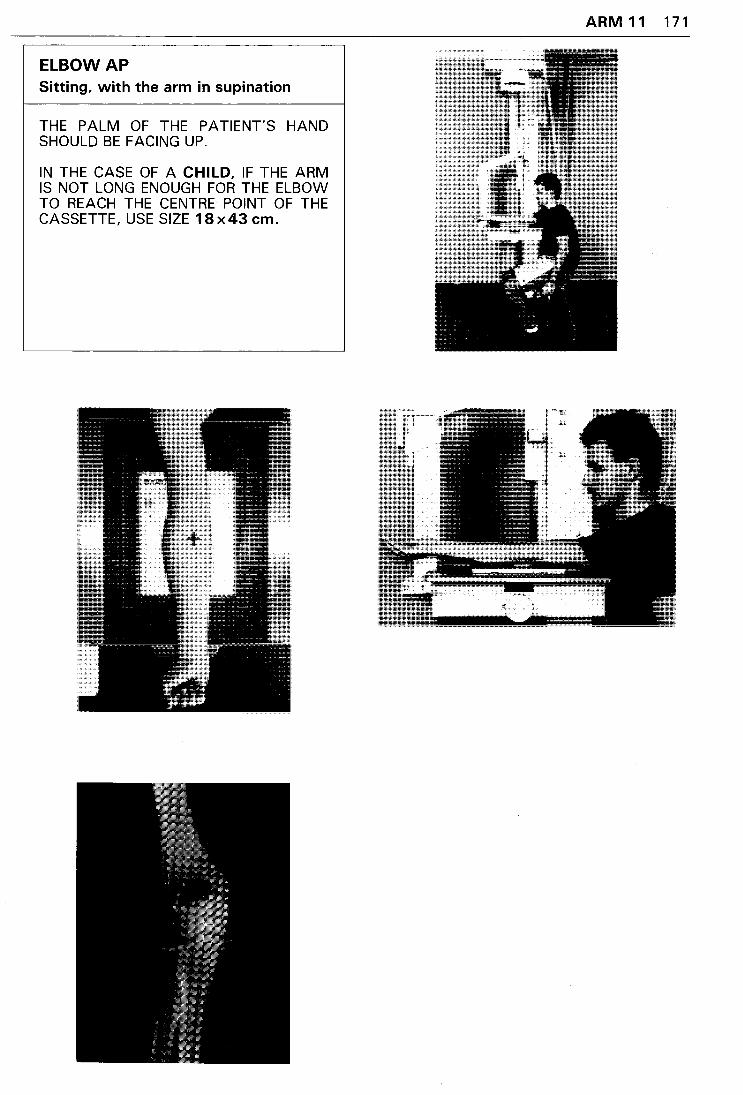
ELBOWAP Sitting, with the arm in supination
THE PALM OF THE PATIENT'S HAND SHOULD BE FACING UP.
IN THE CASE OF A CHILD, IF THE ARM IS NOT LONG ENOUGH FOR THE ELBOW TO REACH THE CENTRE POINT OF THE CASSETTE, USE SIZE 18x43 em.
ARM 11 171
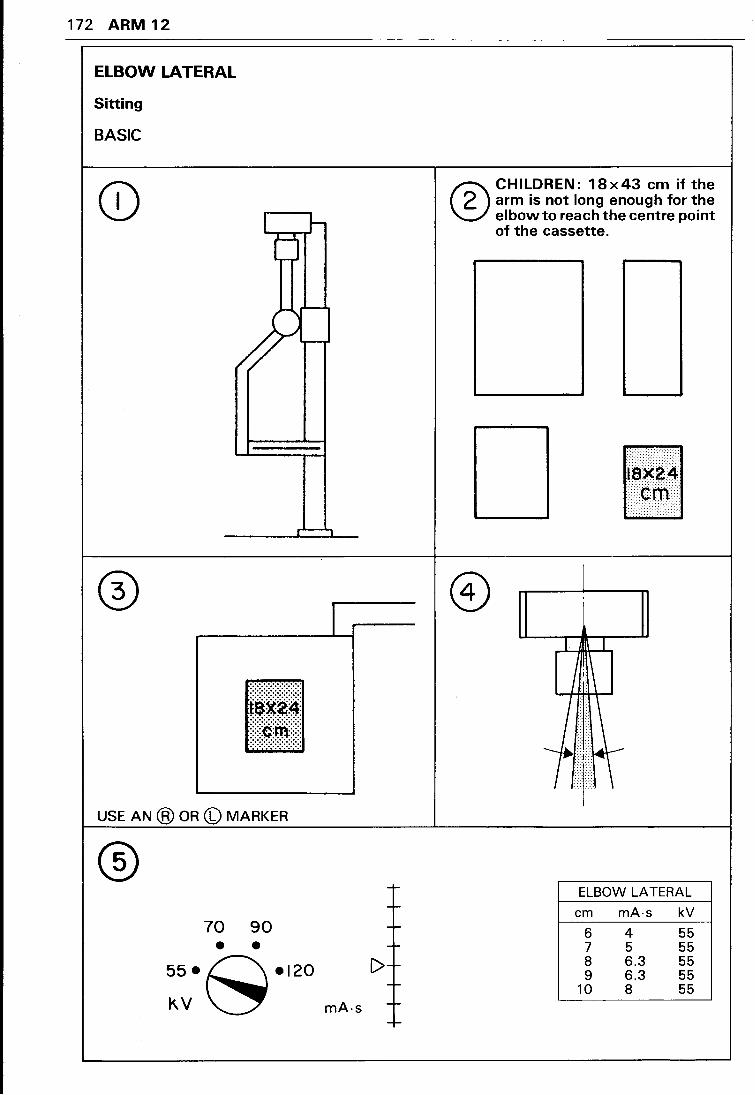
172 ARM 12
ELBOW LATERAL
Sitting
BASIC
CD L J-tJ
I
11r~111 USE AN @ OR (b) MARKER
70 90 • • 55·s·l20
KV mA-s
r
1-
-I-
1-
[>I-
-I-
-I-
-I-
®CHILDREN: 18x43 em if the arm is not long enough for the elbow to reach the centre point of the cassette.
l'irlll I
I I
I
ELBOW LATERAL
em mA·s kV
6 4 55 7 5 55 8 6.3 55 9 6.3 55
10 8 55
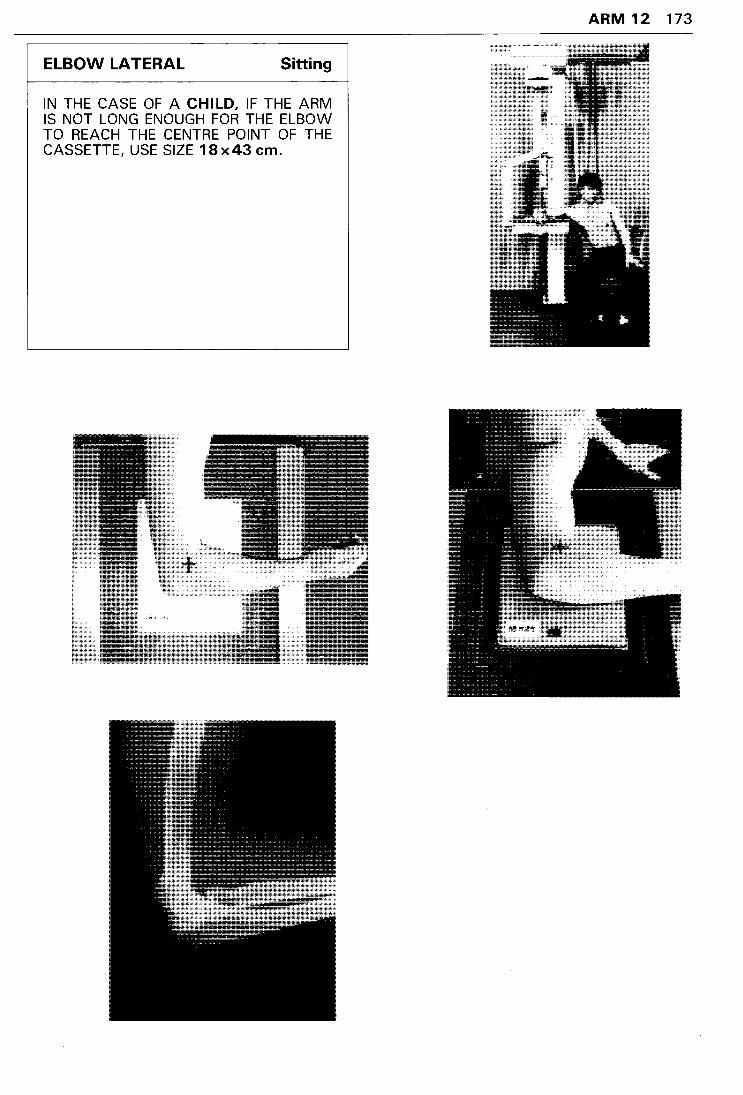
ELBOW LATERAL Sitting
IN THE CASE OF A CHILD, IF THE ARM IS NOT LONG ENOUGH FOR THE ELBOW TO REACH THE CENTRE POINT OF THE CASSETTE, USE SIZE 18 x 43 em.
ARM 12 173
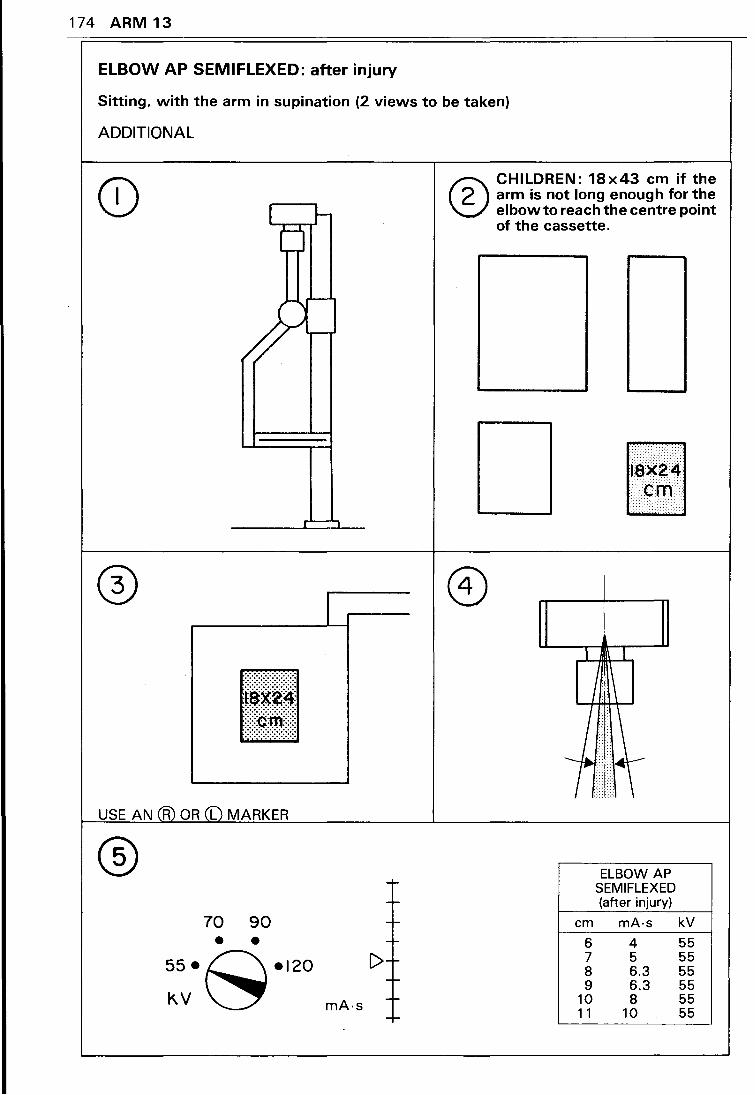
174 ARM 13
ELBOW AP SEMIFLEXED: after injury
Sitting, with the arm in supination (2 views to be taken)
ADDITIONAL
(i) I r-(j
r'---'"1
~[(111 USE AN @ OR ([) MARKER
® 70 90 • •
55•C\ •120
KV~ mA·s
-r-
-r -r-
-C>-
-----
®CHilDREN: 18x43 em if the arm is not long enough for the elbow to reach the centre point of the cassette.
r~~~~.l I
ELBOW AP SEMIFLEXED (after injury)
em mA·s kV
6 4 55 7 5 55 8 6.3 55 9 6.3 55
10 8 55 11 10 55
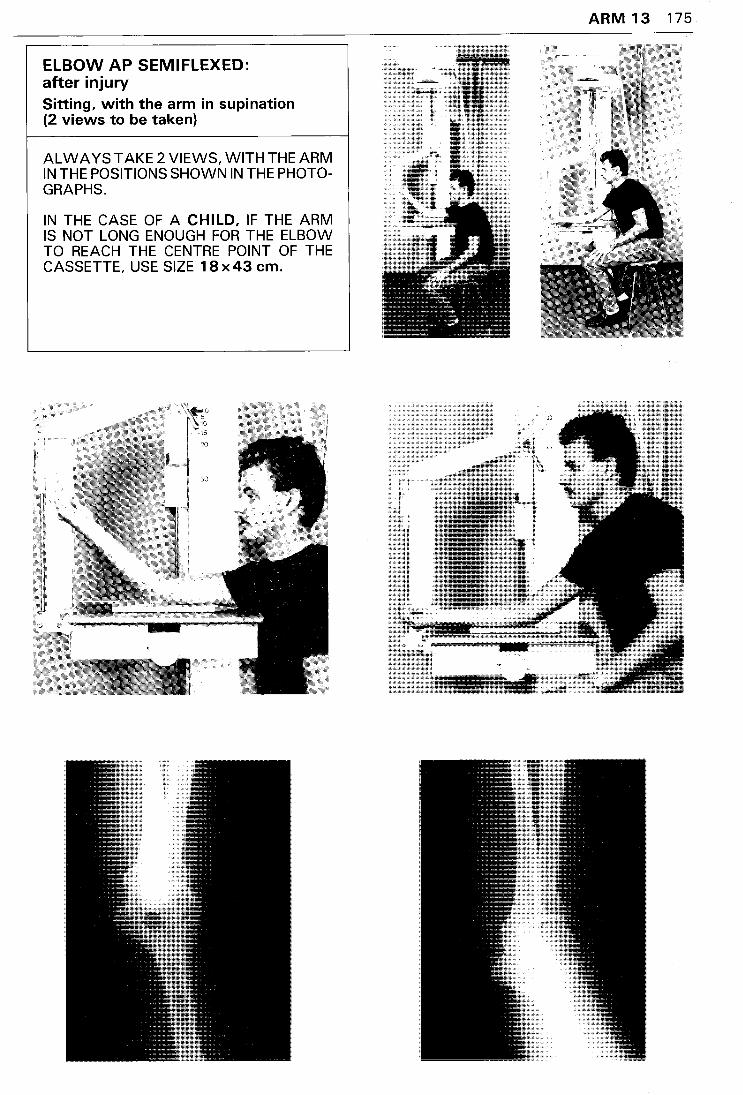
ELBOW AP SEMIFLEXED: after injury Sitting, with the arm in supination (2 views to be taken)
ALWAYS TAKE 2 VIEWS, WITH THE ARM IN THE POSITIONS SHOWN IN THE PHOTOGRAPHS.
IN THE CASE OF A CHILD, IF THE ARM IS NOT LONG ENOUGH FOR THE ELBOW TO REACH THE CENTRE POINT OF THE CASSETTE, USE SIZE 18 x 43 em.
ARM 13 175
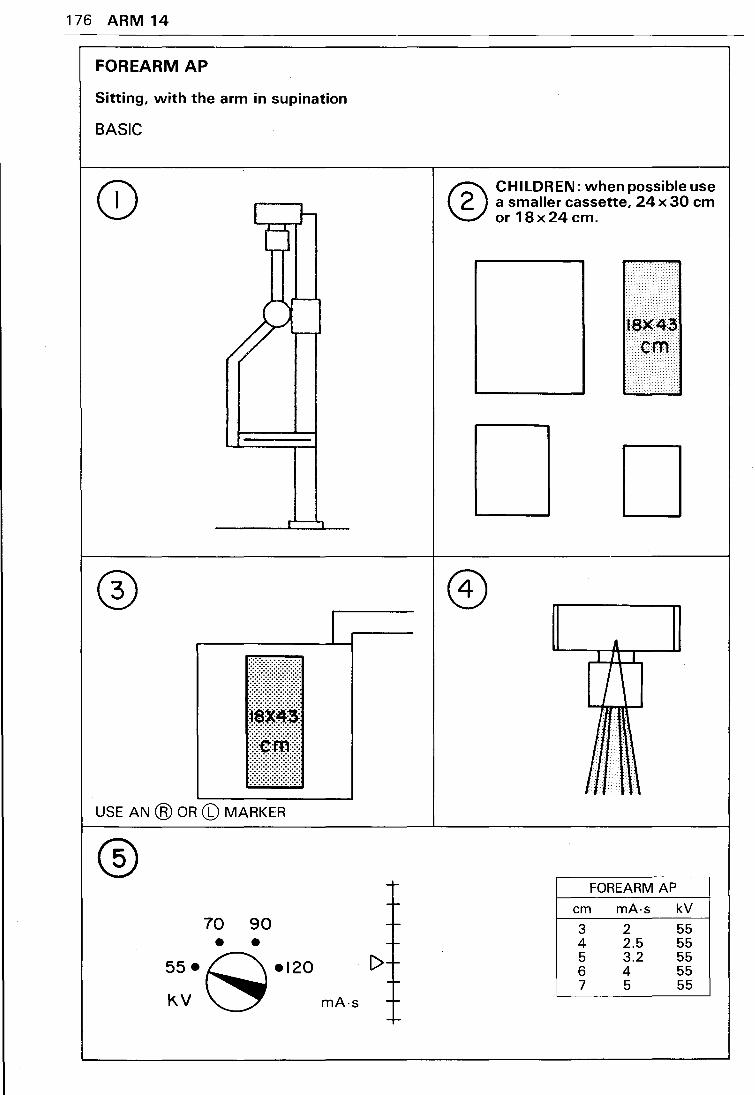
176 ARM14
FOREARM AP
Sitting, with the arm in supination
BASIC
USE AN @ OR (b) MARKER
70 90 • •
55•~•120
I
KV ~ mA·s
® CHILDREN: when possible use a smaller cassette, 24 x 30 em or 18x24cm.
D
FOREARM AP
em mA·s kV
3 2 55 4 2.5 55 5 3.2 55 6 4 55 7 5 55
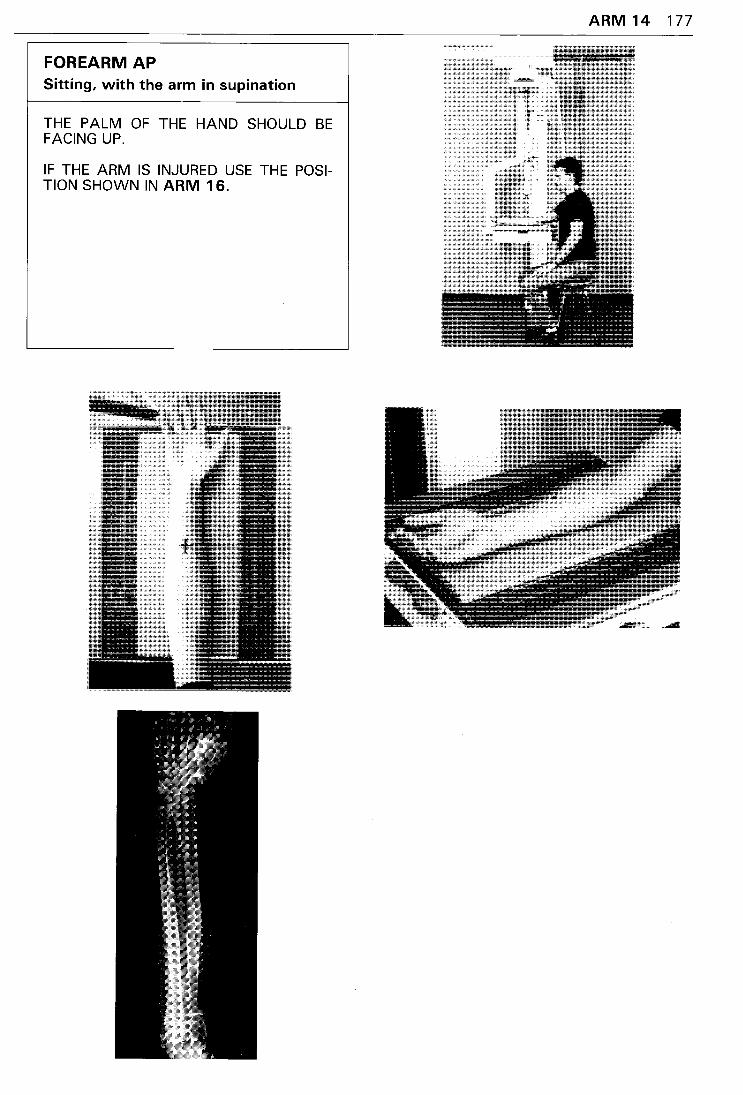
FOREARM AP Sitting, with the arm in supination
THE PALM OF THE HAND SHOULD BE FACING UP.
IF THE ARM IS INJURED USE THE POSITION SHOWN IN ARM 16.
ARM 14 177
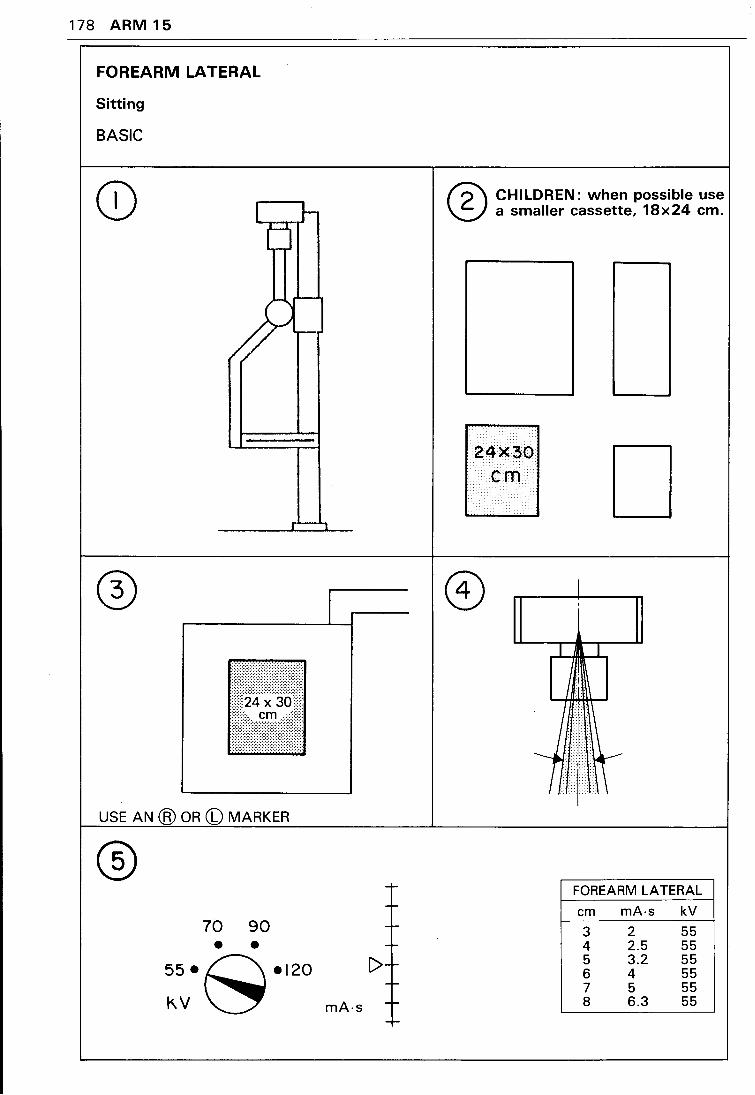
178 ARM 15
FOREARM LATERAL
Sitting
BASIC
I 1-(j
. : .. :::::: .
. . ::::;:::;:::;
::······. 30':
: : .. c.r:Tl.
. . . . ..
USE AN @ OR (b) MARKER
® 70 90 • •
55•~•120 KV~
I
-r-
-----
1>----
mA·s -r--1-
® CHILDREN: when possible use a smaller cassette, 18x24 em.
....
24><:30 em D
I
I
FOREARM LATERAL
em mA·s kV
3 2 55 4 2.5 55 5 3.2 55 6 4 55 7 5 55 8 6.3 55
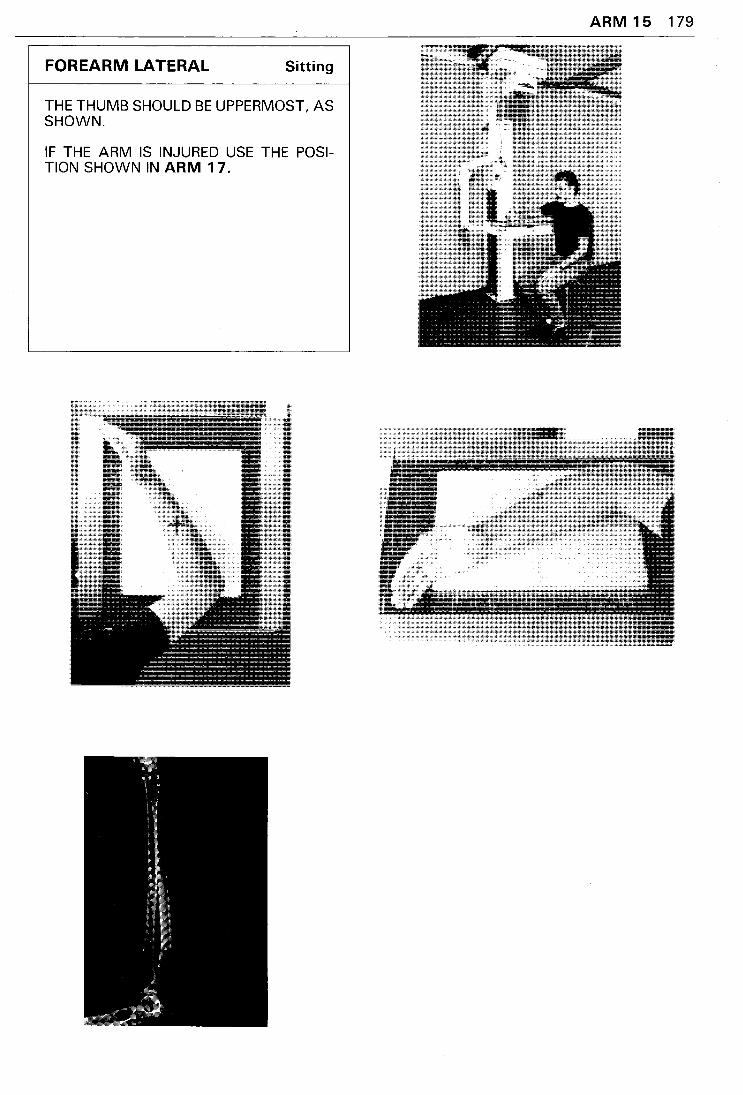
FOREARM LATERAL Sitting
THE THUMB SHOULD BE UPPERMOST, AS SHOWN.
IF THE ARM IS INJURED USE THE POSITION SHOWN IN ARM 17.
ARM 15 179
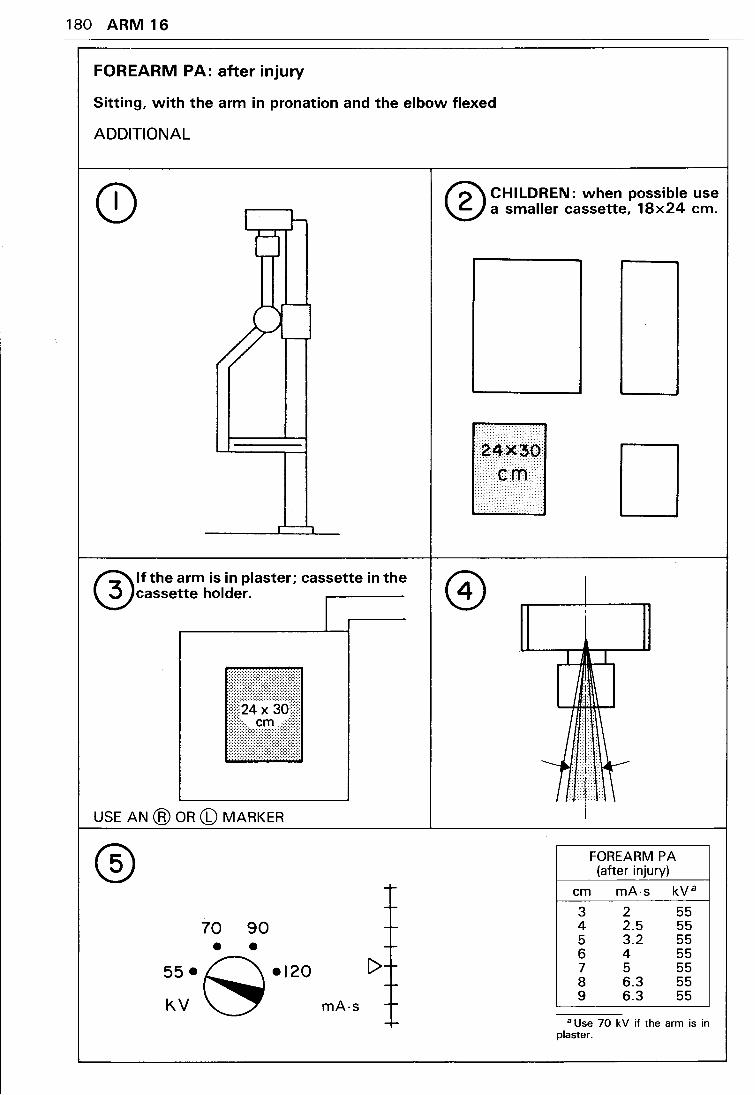
180 ARM 16
FOREARM PA: after injury
Sitting, with the arm in pronation and the elbow flexed
ADDITIONAL
(";:\If the arm is in plaster; cassette in the ~cassette holder.
USE AN @ OR (b) MARKER
® 70 90 • •
55•C\•120
KV \::!!! [>
mA-s
® CHILDREN: when possible use a smaller cassette, 18x24 em.
~4~~() c~>
•···•••· < < ..... . D
FOREARM PA (after injury)
em mA·s kVa
3 2 55 4 2.5 55 5 3.2 55 6 4 55 7 5 55 8 6.3 55 9 6.3 55
a Use 70 kV if the arm is in plaster.
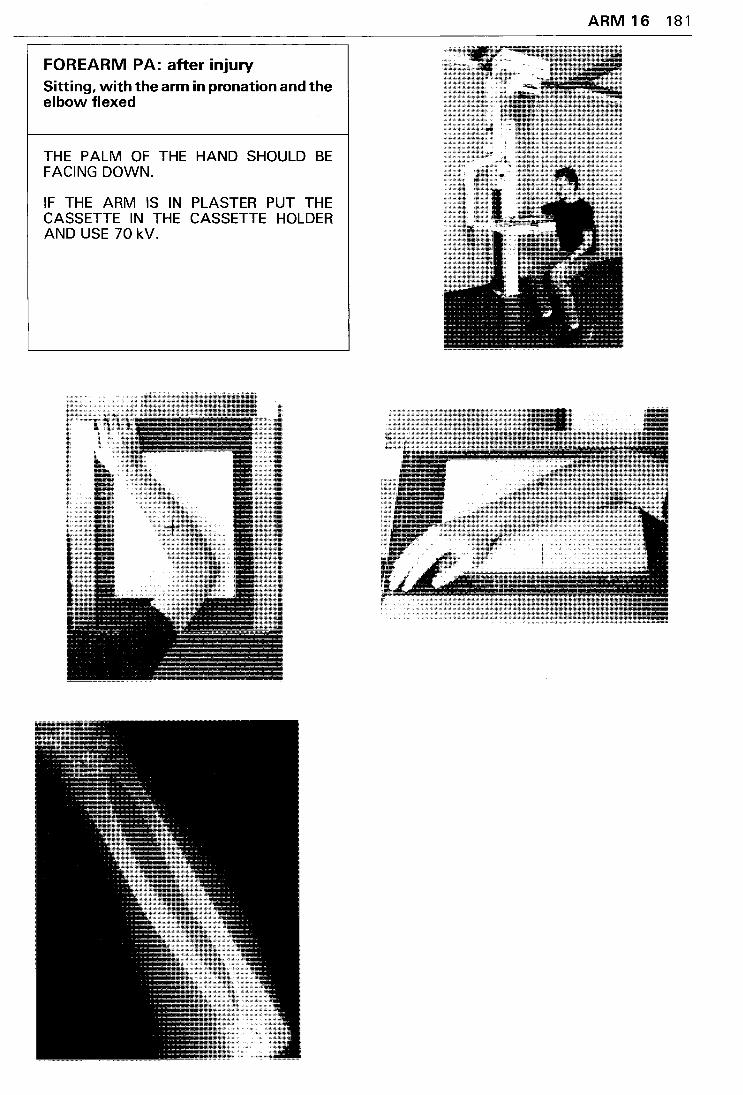
FOREARM PA: after injury Sitting, with the arm in pronation and the elbow flexed
THE PALM OF THE HAND SHOULD BE FACING DOWN.
IF THE ARM IS IN PLASTER PUT THE CASSETTE IN THE CASSETTE HOLDER AND USE 70 kV.
ARM 16 181
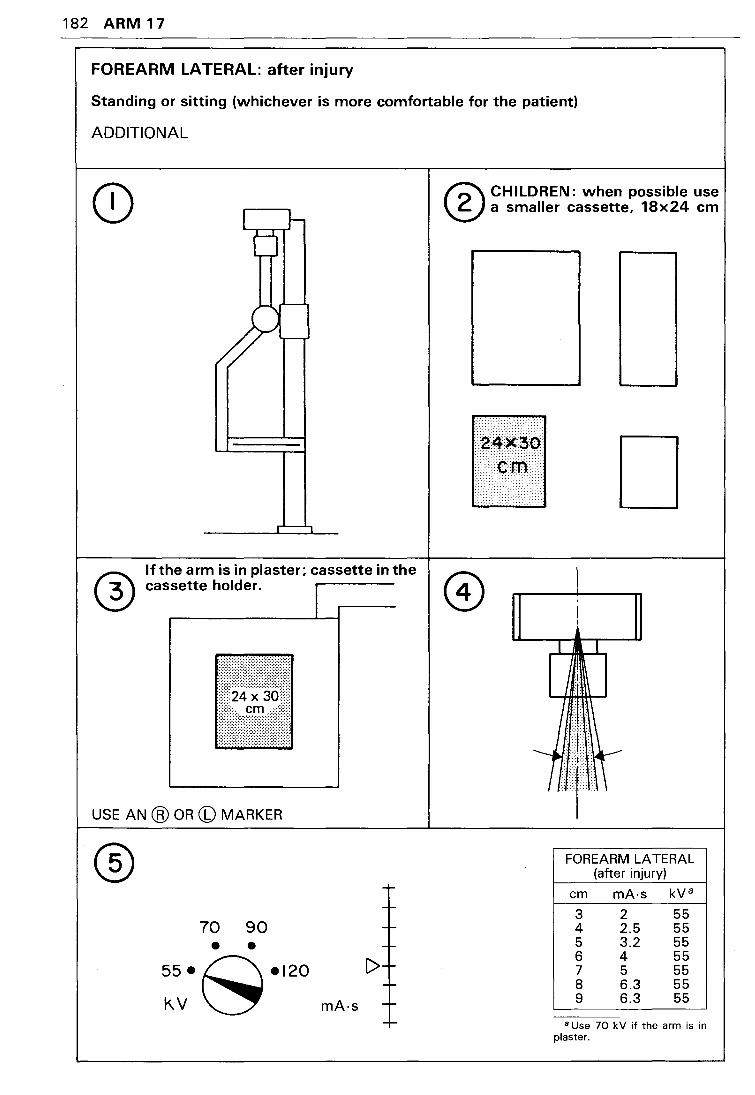
182 ARM 17
FOREARM LATERAL: after injury
Standing or sitting (whichever is more comfortable for the patient)
ADDITIONAL
lfthe arm is in plaster; cassette in the cassette holder.
USE AN ® OR CD MARKER
® 70 90 • •
55•C\ •120
KV~ C>
mA·s
® CHILDREN: when possible use a smaller cassette, 18x24 em
~~~i~B. crrl D
FOREARM LATERAL (after injury)
em mA·s kVa
3 2 55 4 2.5 55 5 3.2 55 6 4 55 7 5 55 8 6.3 55 9 6.3 55
a Use 70 kV if the arm is in plaster.
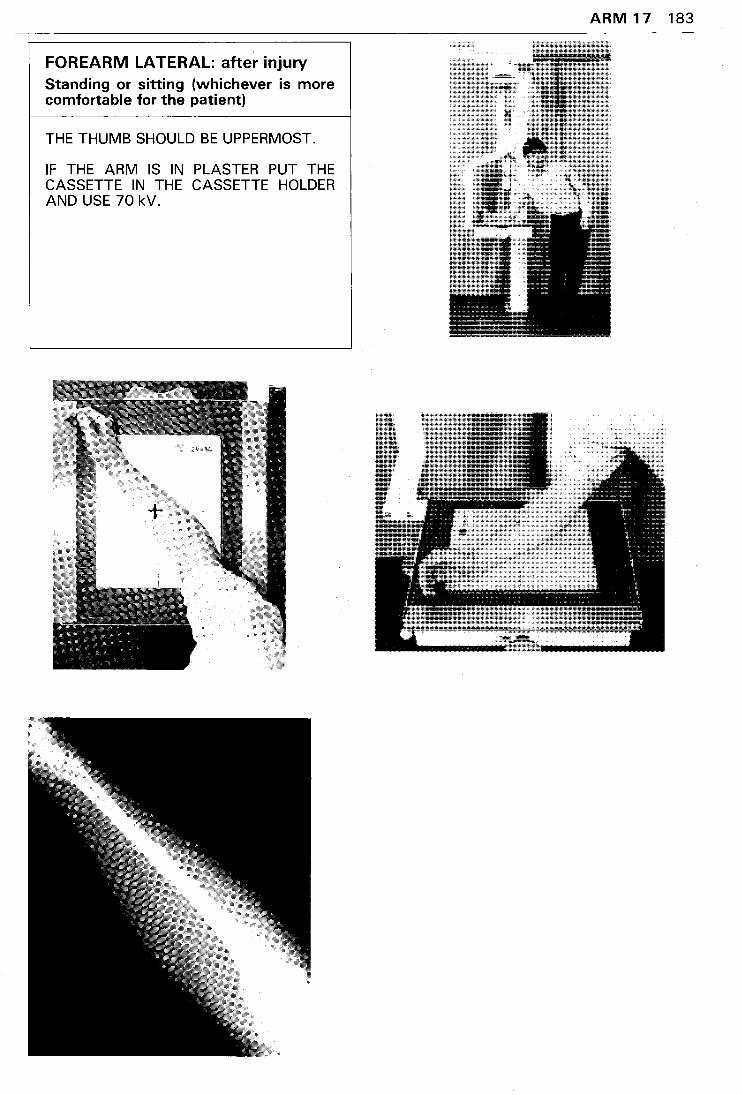
FOREARM LATERAL: after injury Standing or sitting (whichever is more comfortable for the patient)
THE THUMB SHOULD BE UPPERMOST.
IF THE ARM IS IN PLASTER PUT THE CASSETTE IN THE CASSETTE HOLDER AND USE 70 kV.
ARM 17 183
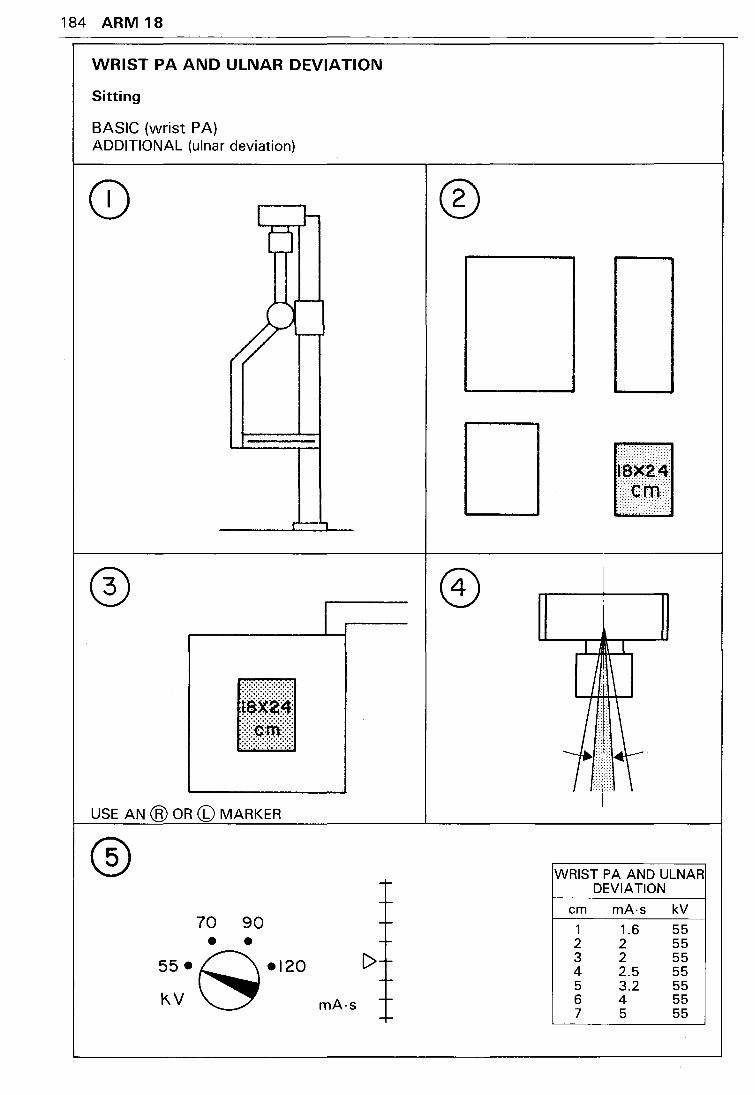
184 ARM 18
WRIST PA AND ULNAR DEVIATION
Sitting
BASIC (wrist P A) ADDITIONAL (ulnar deviation)
• . . .
.
USE AN ® OR CD MARKER
® 70 90 • • ss·s·l20
KV
J
1-
-I-
-I-
!>+ 1-
mA·s -I-
1-
®
t~m~:J l
I I
WRIST PA AND ULNAR DEVIATION
em mA·s kV
1 1.6 55 2 2 55 3 2 55 4 2.5 55 5 3.2 55 6 4 55 7 5 55
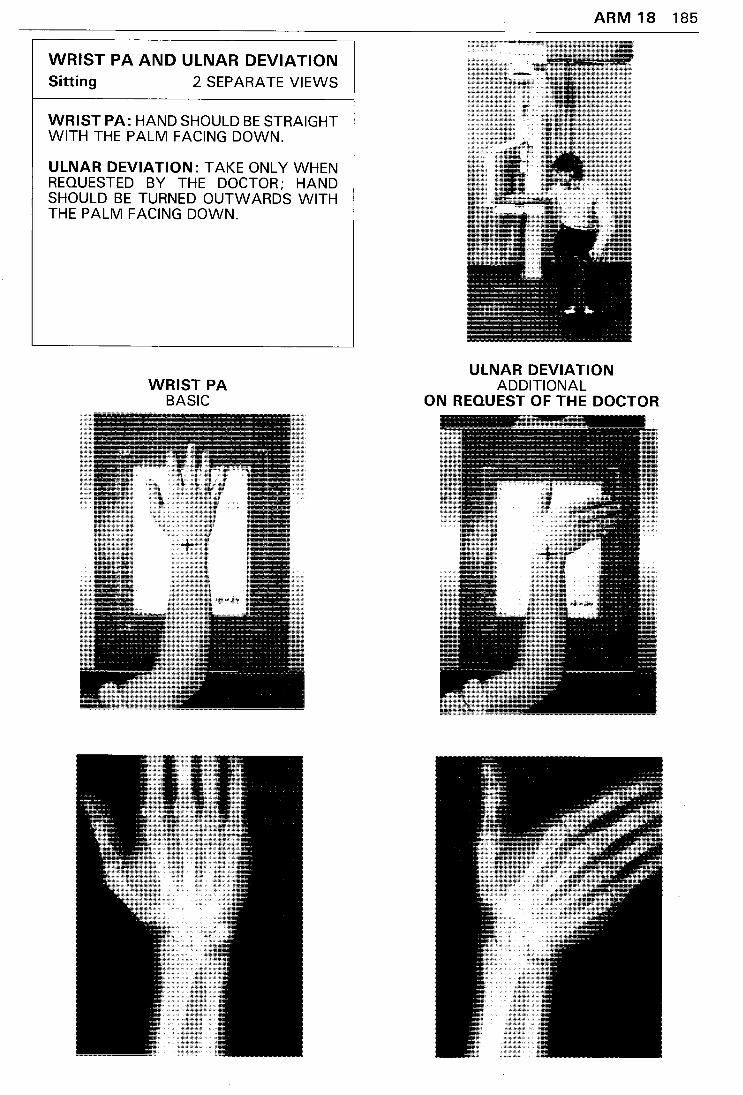
WRIST PA AND ULNAR DEVIATION Sitting 2 SEPARATE VIEWS
WRIST PA: HAND SHOULD BE STRAIGHT WITH THE PALM FACING DOWN.
ULNAR DEVIATION: TAKE ONLY WHEN REQUESTED BY THE DOCTOR; HAND SHOULD BE TURNED OUTWARDS WITH THE PALM FACING DOWN.
WRIST PA BASIC
ARM 18 185
ULNAR DEVIATION ADDITIONAL
ON REQUEST OF THE DOCTOR
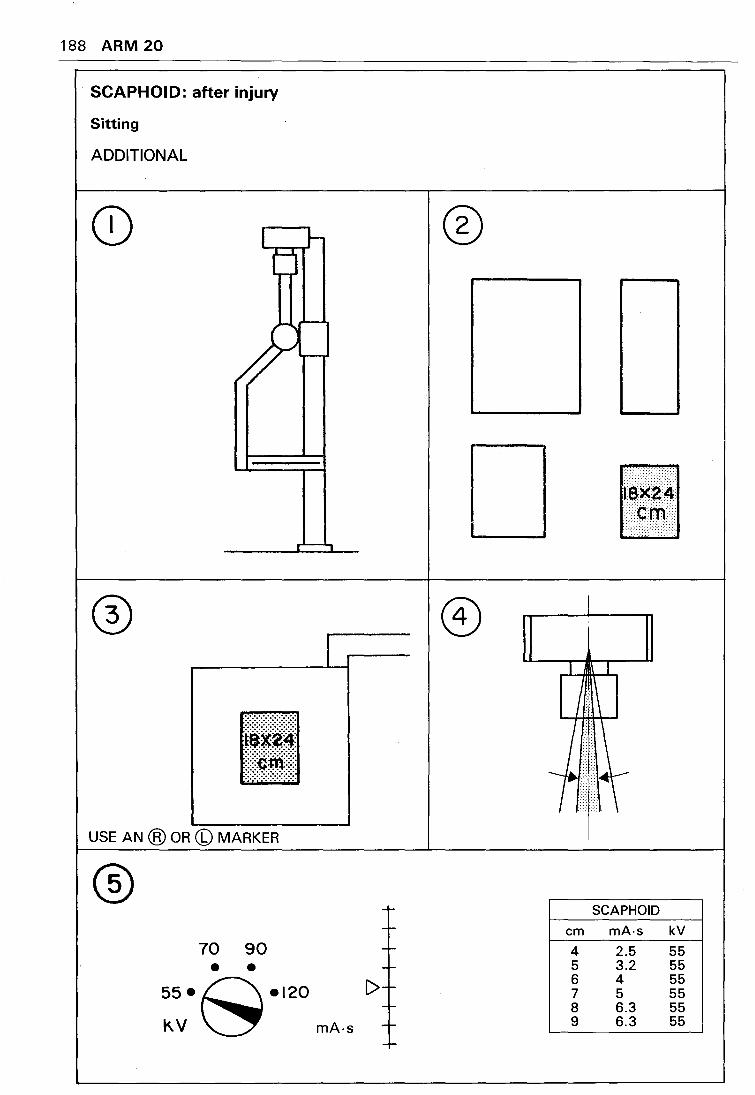
188 ARM 20
SCAPHOID: after injury
Sitting
ADDITIONAL
L r ® Cj
fM11l
I
I J I
~[II~ /i1\
USE AN @ OR (b) MARKER
® -r- SCAPHOID -r- em mA·s kV
70 90 -r- 4 2.5 55
• • - 5 3.2 55
C>- 6 4 55 55·s·l20 7 5 55 -- 8 6.3 55
K. V mA-s -- 9 6.3 55 -I-
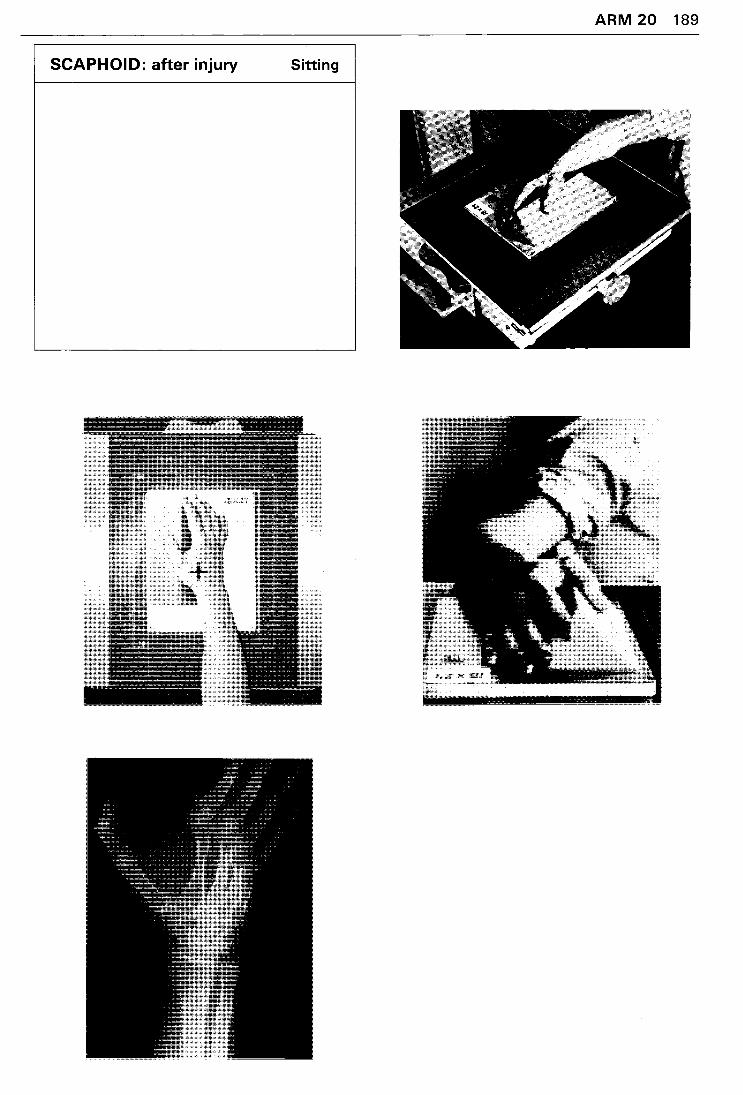
ARM 20 189
SCAPHOID: after injury Sitting
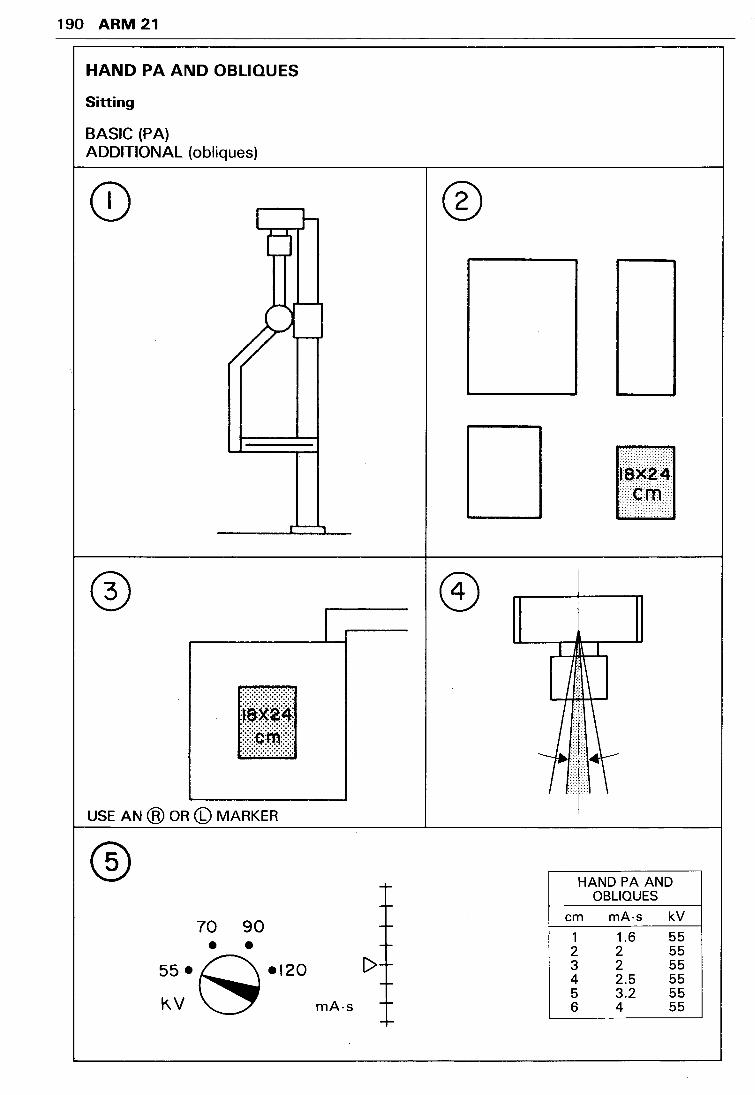
190 ARM 21
HAND PA AND OBLIQUES
Sitting
BASIC (PA) ADDITIONAL (obliques)
I 1-(j
llrfl~l USE AN @ OR (b) MARKER
® 70 90 • •
55•0•120
I
1-
C>+ -
K.V ~ mA-s ---
®
lilllil I
I I
J~.l\
HAND PA AND OBLIQUES
em mA·s kV
1 1.6 55 2 2 55 3 2 55 4 2.5 55 5 3.2 55 6 4 55
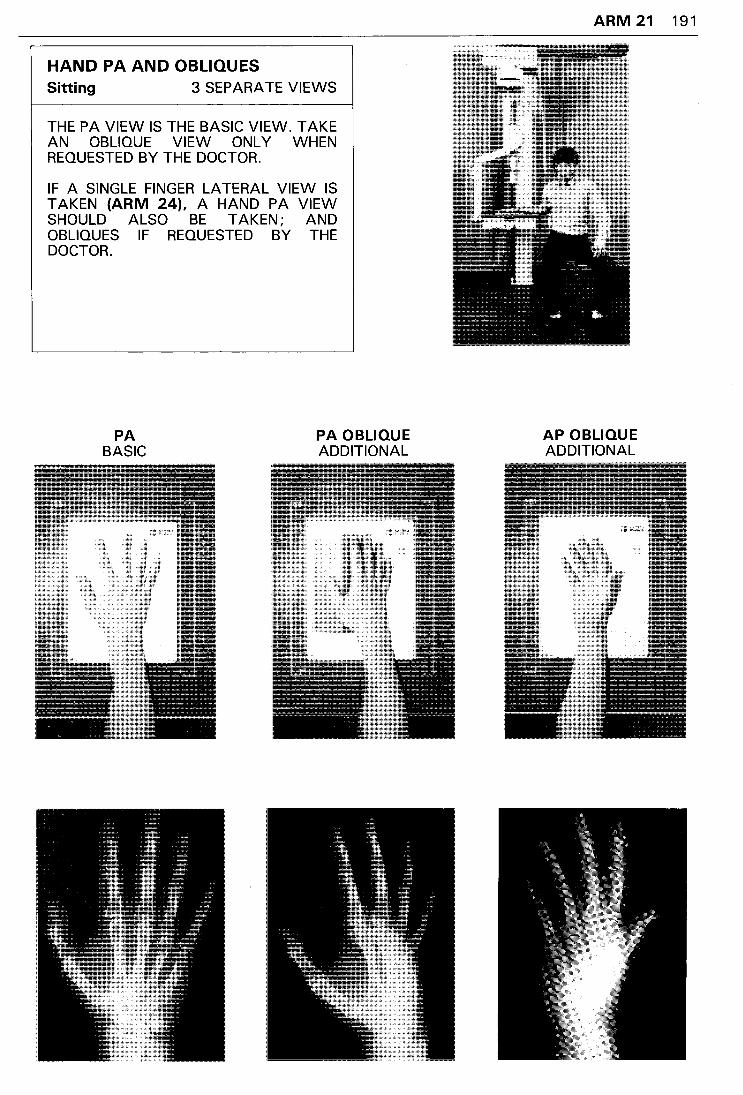
HAND PA AND OBLIQUES Sitting 3 SEPARATE VIEWS
THE PA VIEW IS THE BASIC VIEW. TAKE AN OBLIQUE VIEW ONLY WHEN REQUESTED BY THE DOCTOR.
IF A SINGLE FINGER LATERAL VIEW IS TAKEN (ARM 24), A HAND PA VIEW SHOULD ALSO BE TAKEN; AND OBLIQUES IF REQUESTED BY THE DOCTOR.
PA BASIC
PA OBLIQUE ADDITIONAL
ARM 21 191
AP OBLIQUE ADDITIONAL
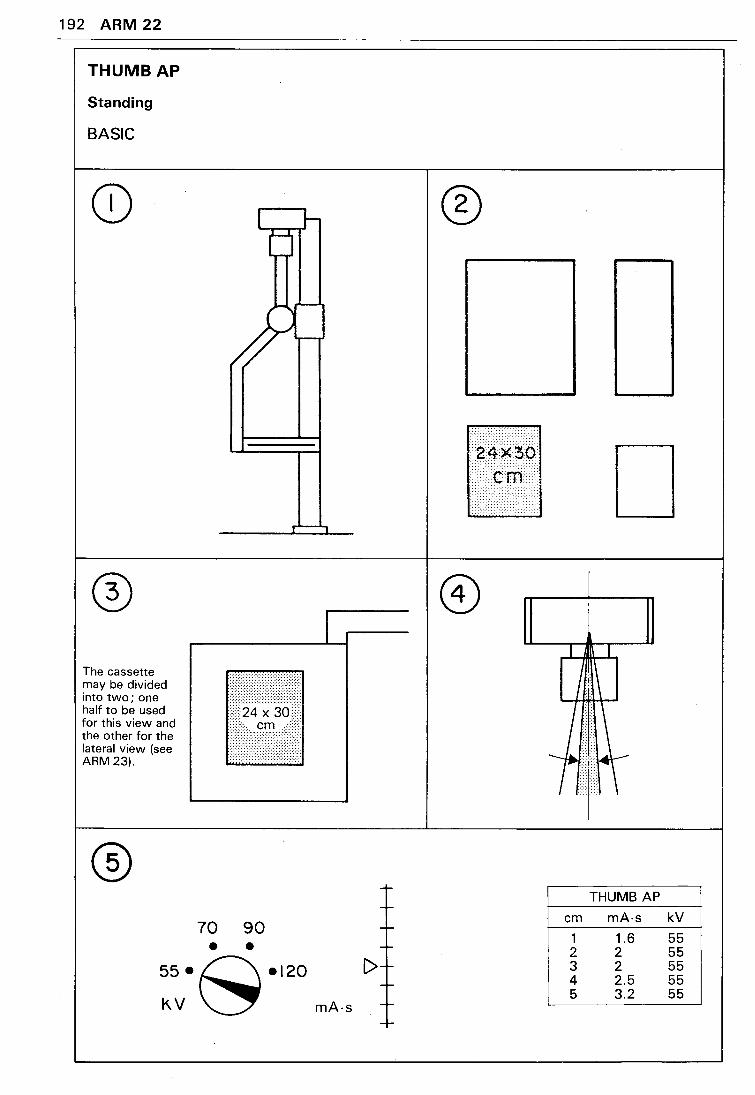
192 ARM 22
THUMB AP
Standing
BASIC
CD
The cassette may be divided into two; one half to be used for this view and the other for the lateral view (see ARM23).
® 70 90 • •
55•~•120 K.V ~ mA·s
®
C>
D
THUMB AP
em mA-s kV
1 1.6 55 2 2 55 3 2 55 4 2.5 55 5 3.2 55
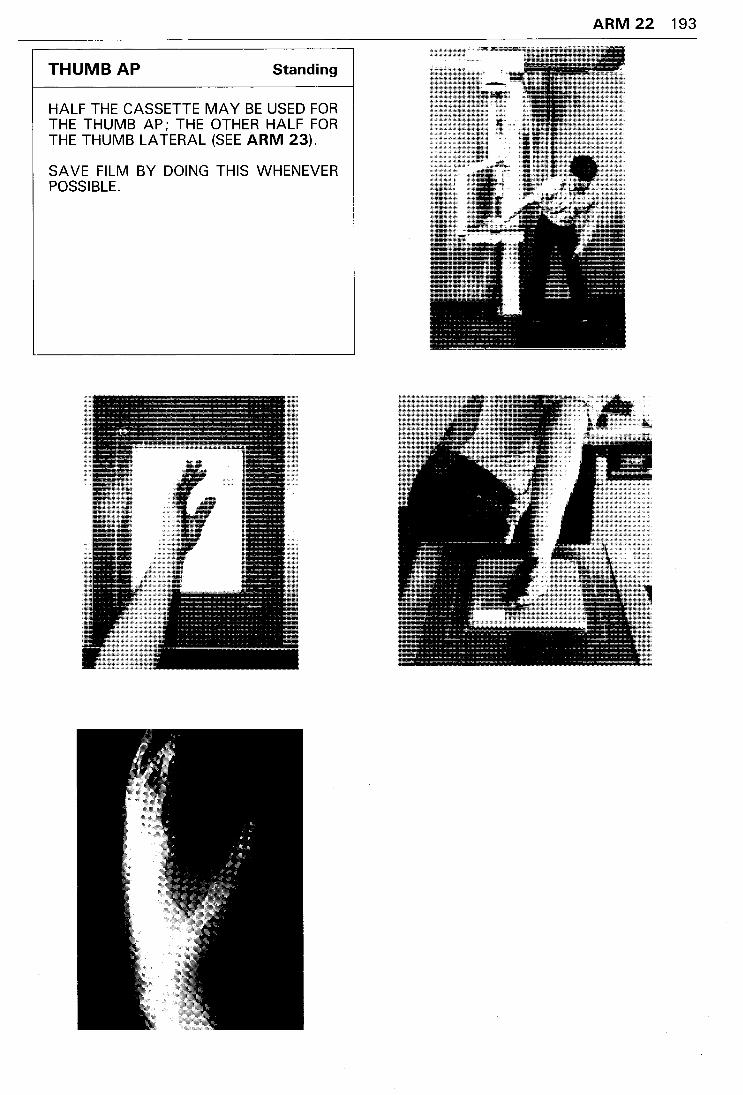
THUMB AP Standing
HALF THE CASSETTE MAY BE USED FOR THE THUMB AP; THE OTHER HALF FOR THE THUMB LATERAL (SEE ARM 23).
SAVE FILM BY DOING THIS WHENEVER POSSIBLE.
ARM 22 193
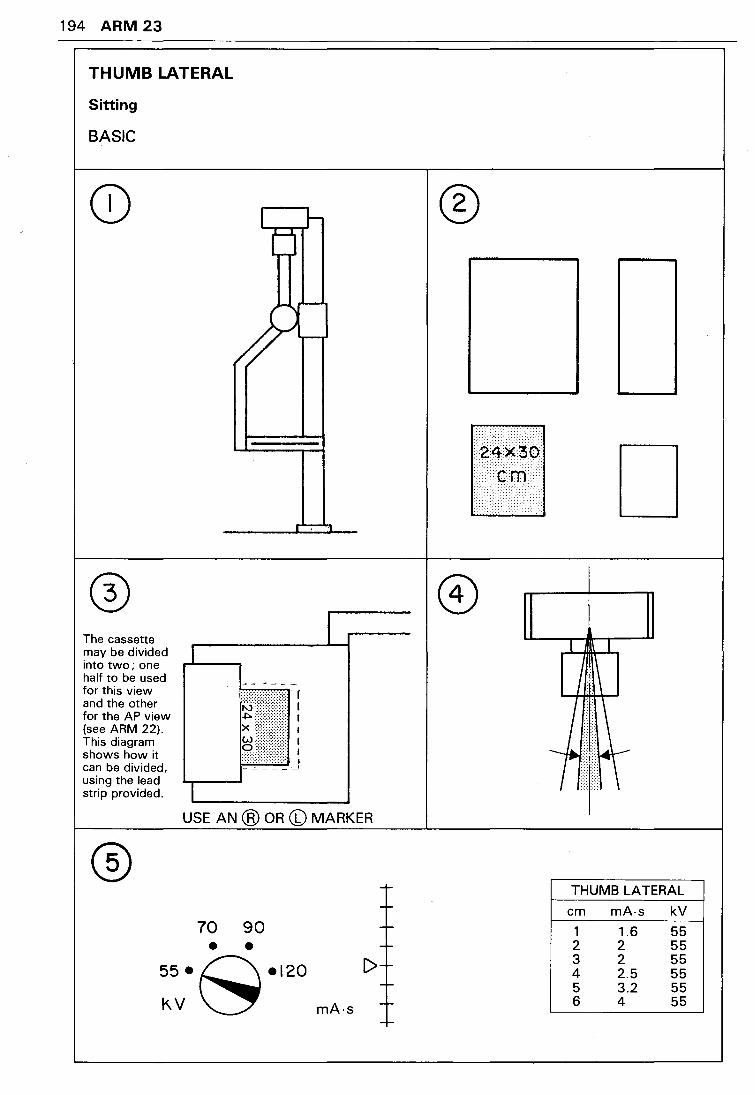
194 ARM 23
THUMB LATERAL
Sitting
BASIC
The cassette may be divided into two; one half to be used for this view and the other for the AP view (see ARM 22). This diagram shows how it can be divided, using the lead strip provided.
USE AN @ OR (b) MARKER
70 90 • •
55•0•120
K.V ~ C>
mA·s
®
D
THUMB LATERAL
em mA·s kV
1 1.6 55 2 2 55 3 2 55 4 2.5 55 5 3.2 55 6 4 55
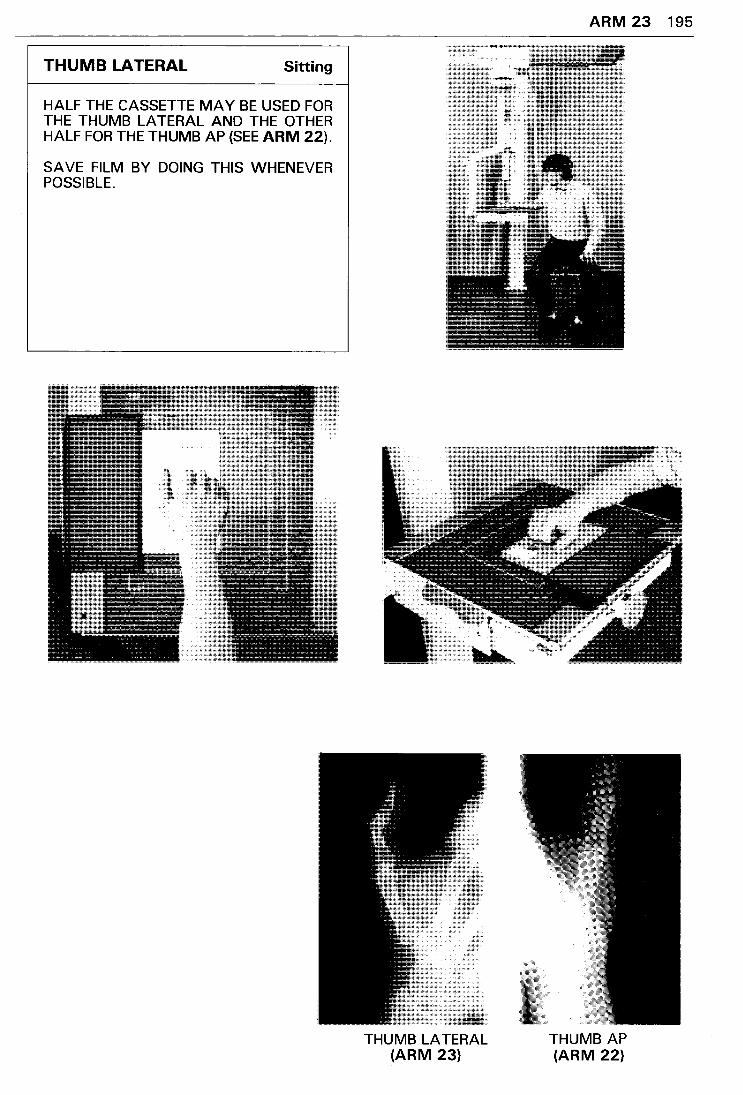
THUMB LATERAL Sitting
HALF THE CASSETTE MAY BE USED FOR THE THUMB LATERAL AND THE OTHER HALF FOR THE THUMB AP (SEE ARM 22).
SAVE FILM BY DOING THIS WHENEVER POSSIBLE.
THUMB LATERAL (ARM 23)
ARM 23 195
THUMB AP (ARM 22)

196 ARM 24
SINGLE FINGER LATERAL
Standing
BASIC
CD I ~ (j
r'--"1
I
USE AN ® OR CD MARKER
® 70 90 • •
55•0•120
K.V ~ mA·s
-r -r
---
[>-------
®
f~1lil I
I I
SINGLE FINGER LATERAL
em mA·s kV
1 1.6 55 2 2 55 3 2 55 4 2.5 55 5 3.2 55
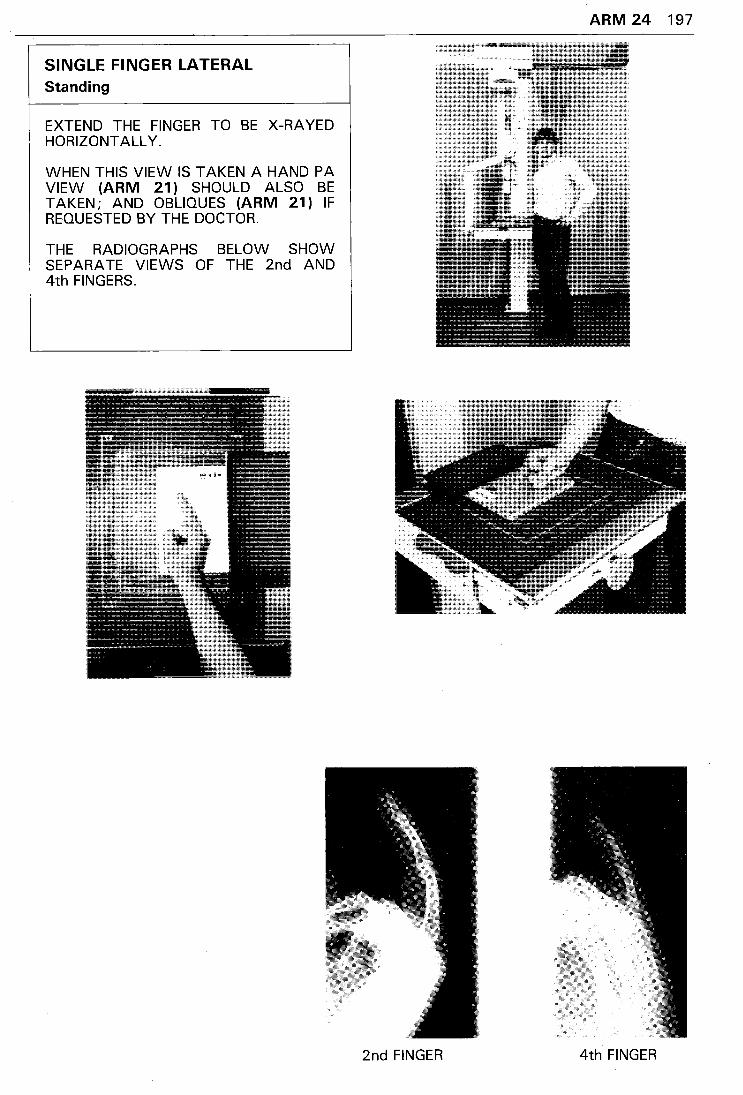
SINGLE FINGER LATERAL Standing
EXTEND THE FINGER TO BE X-RA YEO HORIZONTALLY.
WHEN THIS VIEW IS TAKEN A HAND PA VIEW (ARM 21) SHOULD ALSO BE TAKEN; AND OBLIQUES (ARM 21) IF REQUESTED BY THE DOCTOR.
THE RADIOGRAPHS BELOW SHOW SEPARATE VIEWS OF THE 2nd AND 4th FINGERS.
ARM 24 197
2nd FINGER 4th FINGER

lEG
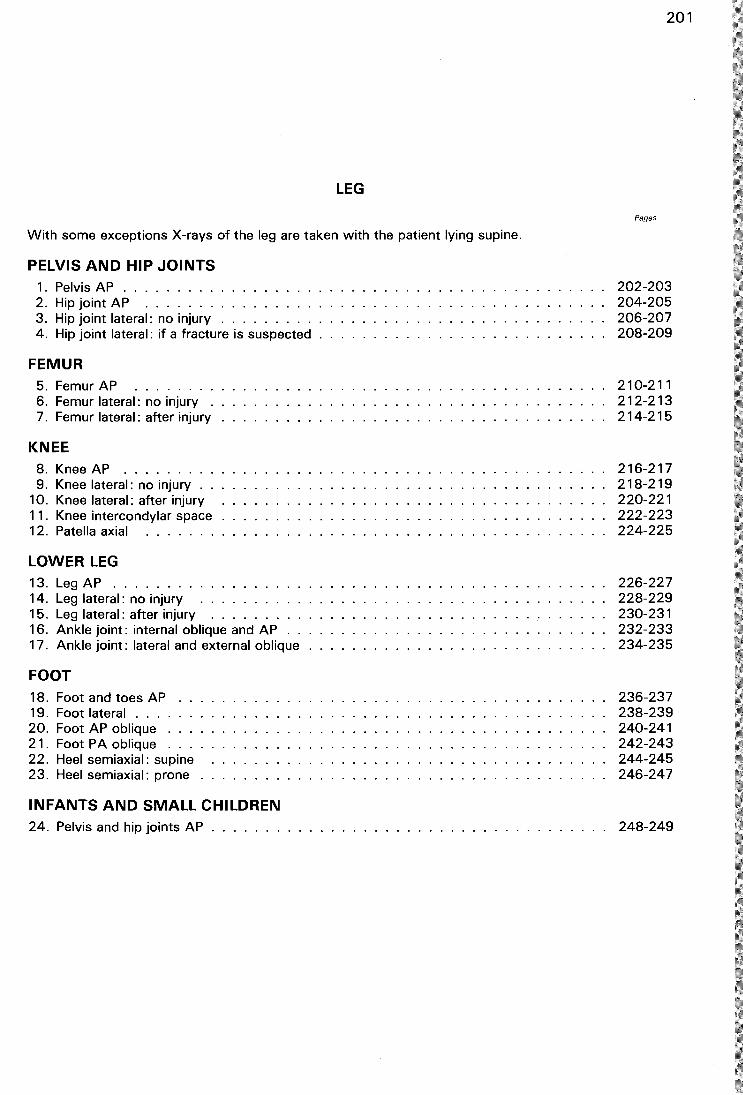
LEG
With some exceptions X-rays of the leg are taken with the patient lying supine.
PELVIS AND HIP JOINTS 1 . Pelvis AP . . . . . . . . . 2. Hip joint AP . . . . . . . . 3. Hip joint lateral: no injury . 4. Hip joint lateral: if a fracture is suspected
FEMUR 5. Femur AP ....... . 6. Femur lateral: no injury . 7. Femur lateral: after injury
KNEE 8. 9.
10. 11 . 12.
Knee AP Knee lateral: no injury . . Knee lateral: after injury Knee intercondylar space Patella axial . . . . . . .
LOWER LEG 13. Leg AP ........ . 14. Leg lateral: no injury 15. Leg lateral: after injury 16. Ankle joint: internal oblique and AP 17. Ankle joint: lateral and external oblique
FOOT 18. Foot and toes AP 19. Foot lateral . . . 20. Foot AP oblique . 2 1 . Foot PA oblique . 22. Heel semiaxial: supine 23. Heel semiaxial: prone .
INFANTS AND SMALL CHILDREN
201
Pages
202-203 204-205 206-207 208-209
210-211 212-213 214-215
216-217 218-219 220-221 222-223 224-225
226-227 228-229 230-231 232-233 234-235
236-237 238-239 240-241 242-243 244-245 246-247
24. Pelvis and hip joints AP . . . . . . . . . . . . . . . . . . . . . . . . . . . . . . . . . . . . . 248-249

202 LEG 1
PELVIS AP
Supine
BASIC
1 r-d
AFTER INJURY A SUPINE VIEW OF THE INNER PELVIS (ABDOMEN 5) SHOULD ALSO BE TAKEN CHILDREN: USE LEG 24 WHEN THE SIZE
18 x 24 em CASSETTE IS LARGE ENOUGH
®
.. . .
. . . .
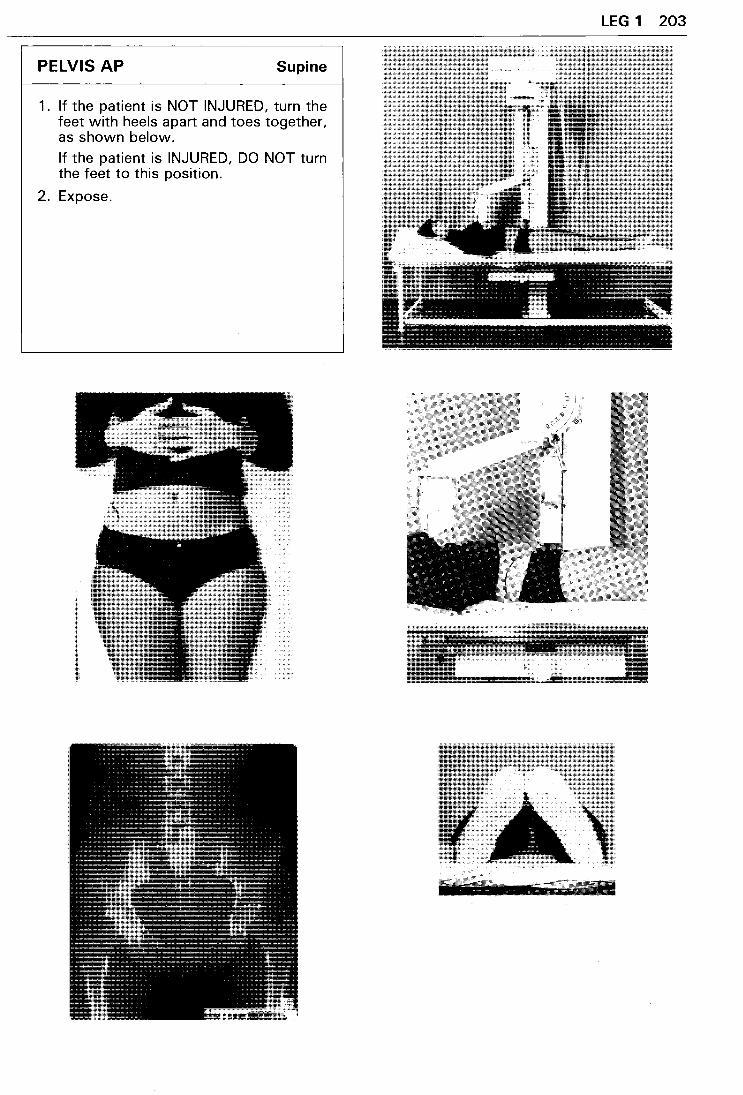
PELVIS AP Supine
1. If the patient is NOT INJURED, turn the feet with heels apart and toes together, as shown below.
If the patient is INJURED, DO NOT turn the feet to this position.
2. Expose.
lEG 1 203
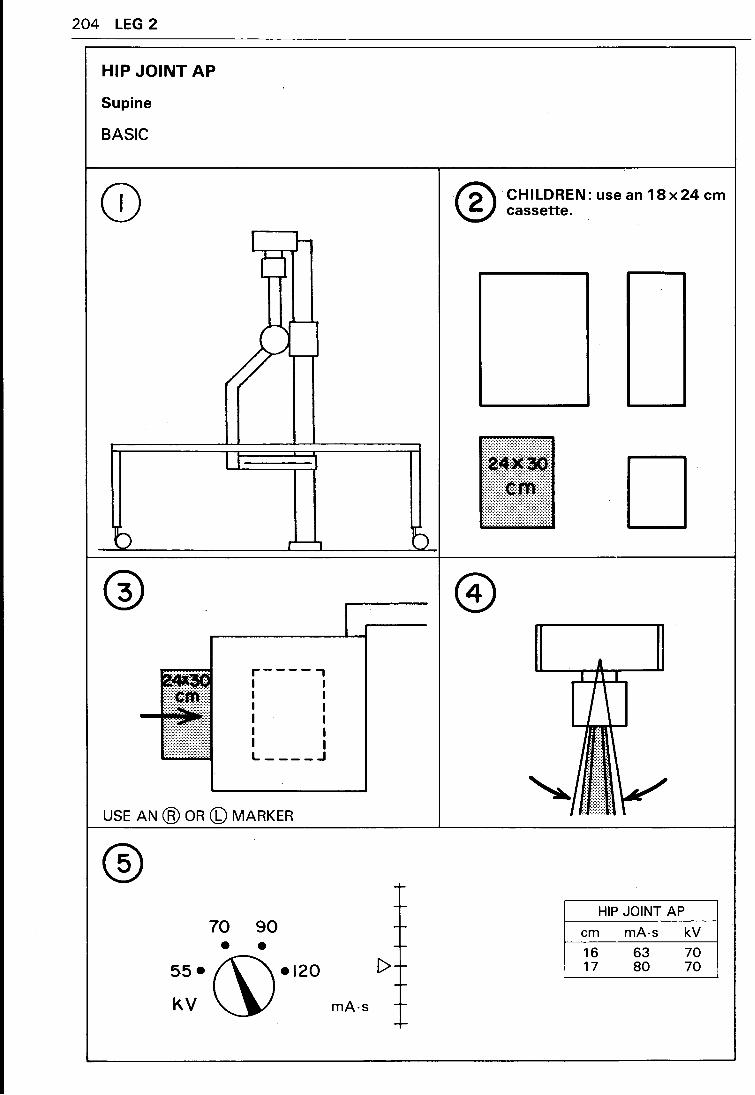
204 LEG 2
HIP JOINT AP
Supine
BASIC
CD L J-[j
~=
~ r'-'"1
® r----, I I I I I I
:=:""'-!-:.:=: I I :::::::::::::::
I I ::::::::::::::: I I L ____ .J
USE AN ® OR CD MARKER
70 90 • •
55•~•120 ~v
®
..
:
0
I ®
-r-
r-
[>-r--r-
mA-s -r-
-r-
CHILDREN: use an 18 x 24 em cassette.
: D
A
" I '
1
HIP JOINT AP
em mA-s kV
16 17
63 80
70 70
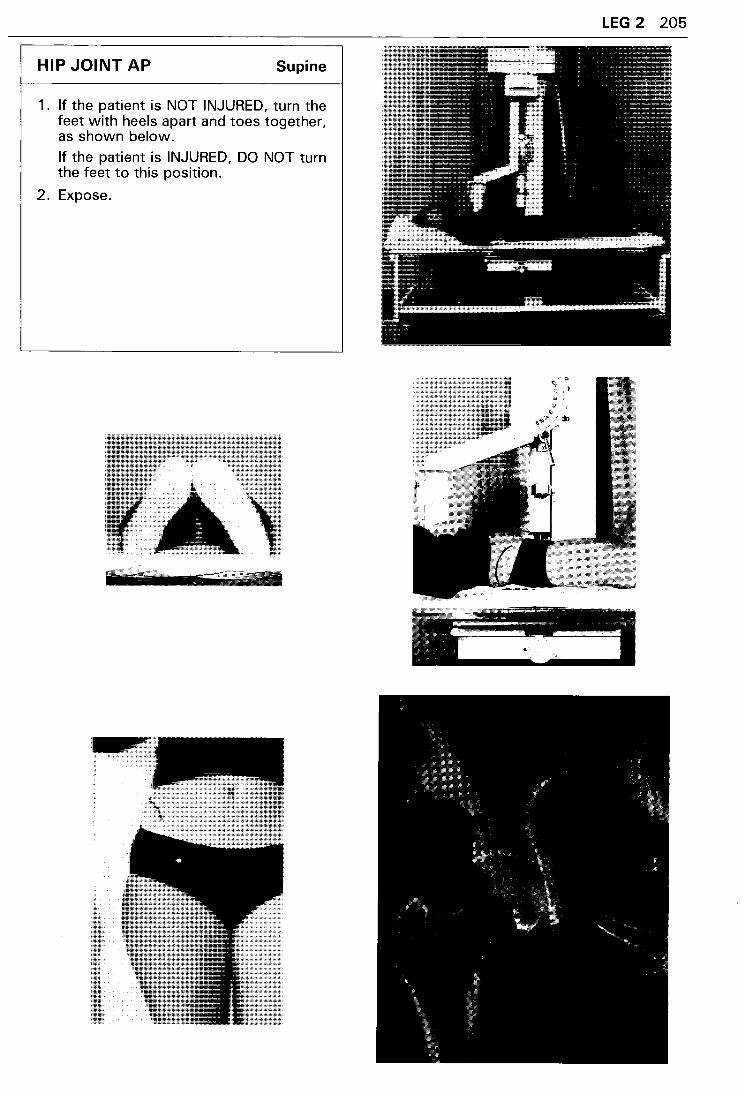
HIP JOINT AP Supine
1. If the patient is NOT INJURED, turn the feet with heels apart and toes together, as shown below.
If the patient is INJURED, DO NOT turn the feet to this position.
2. Expose.
LEG 2 205
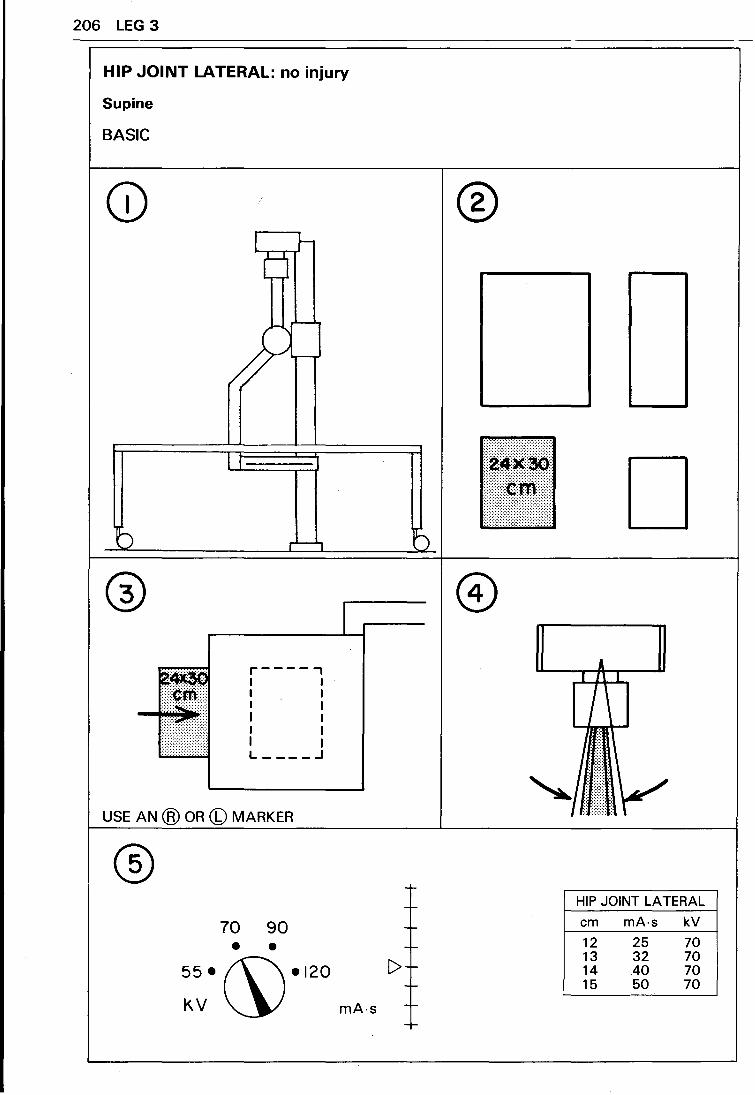
206 LEG 3
HIP JOINT LATERAL: no injury
Supine
BASIC
I 1-[j
I r----, I I I I I I I I I I I I L ____ .J
USE AN @ OR (b) MARKER
® 70 90 • •
55• (\\•120
KV ~ mA·s
~
-1-
---
[> -------
®
D
A I 1\ I
I\
HIP JOINT LATERAL
em mA·s kV
12 13 14 15
25 32 40 50
70 70 70 70
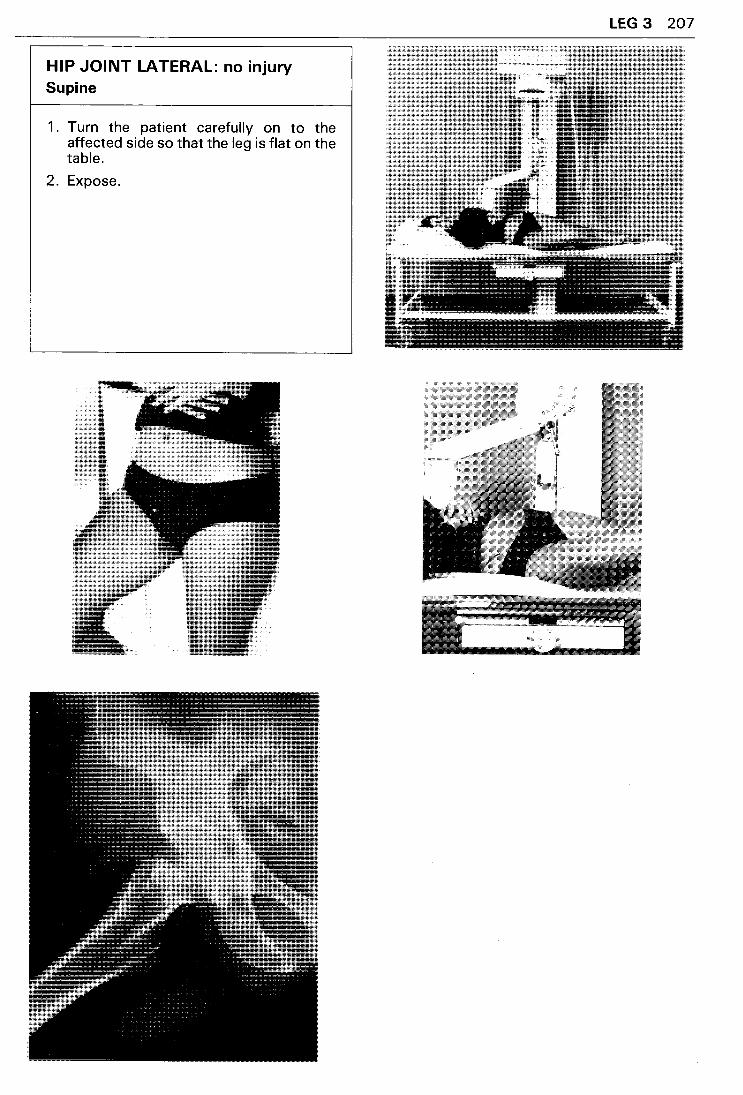
HIP JOINT LATERAL: no injury Supine
1 . Turn the patient carefully on to the affected side so that the leg is flat on the table.
2. Expose.
LEG 3 207
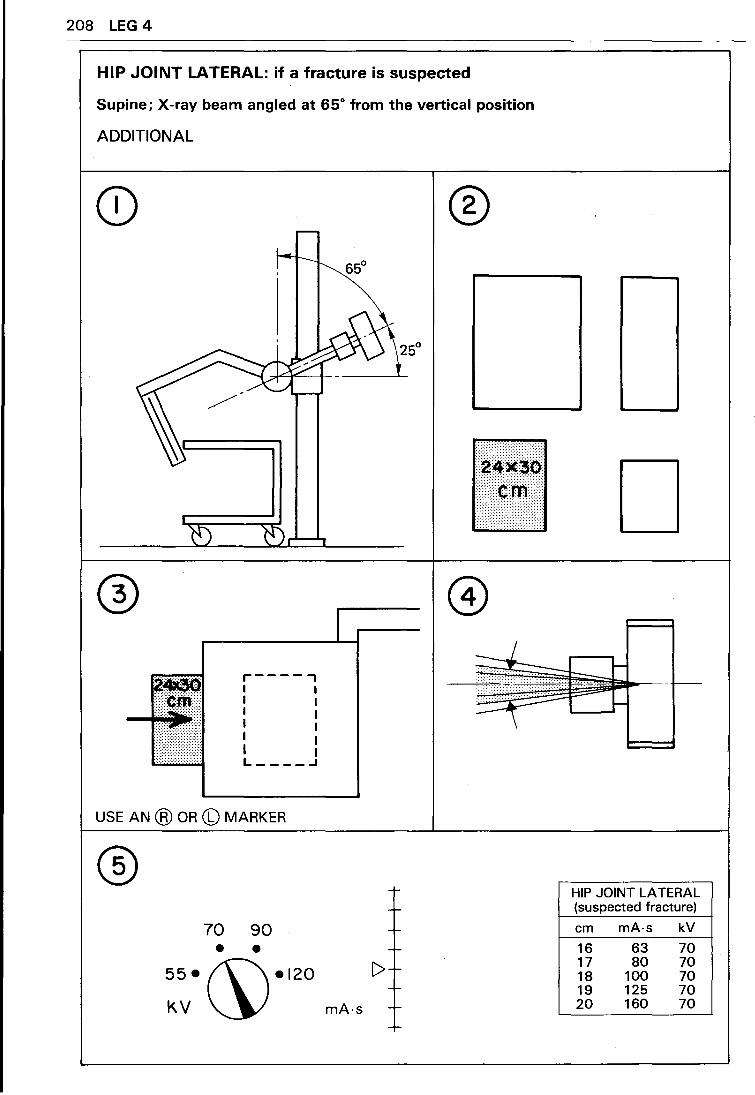
208 LEG 4
HIP JOINT LATERAL: if a fracture is suspected
Supine; X-ray beam angled at 65° from the vertical position
ADDITIONAL
r----, .. I I
I I .. I I . . I I
.. I I . . I .. :::::: I L----.J
USE AN ® OR CD MARKER
® 70 90 • •
55• (\\•120
I<.V~
I
C>
mA·s
®
jiJilll.!ib. : Eli D
HIP JOINT LATERAL (suspected fracture)
em mA·s kV
16 63 70 17 80 70 18 100 70 19 125 70 20 160 70
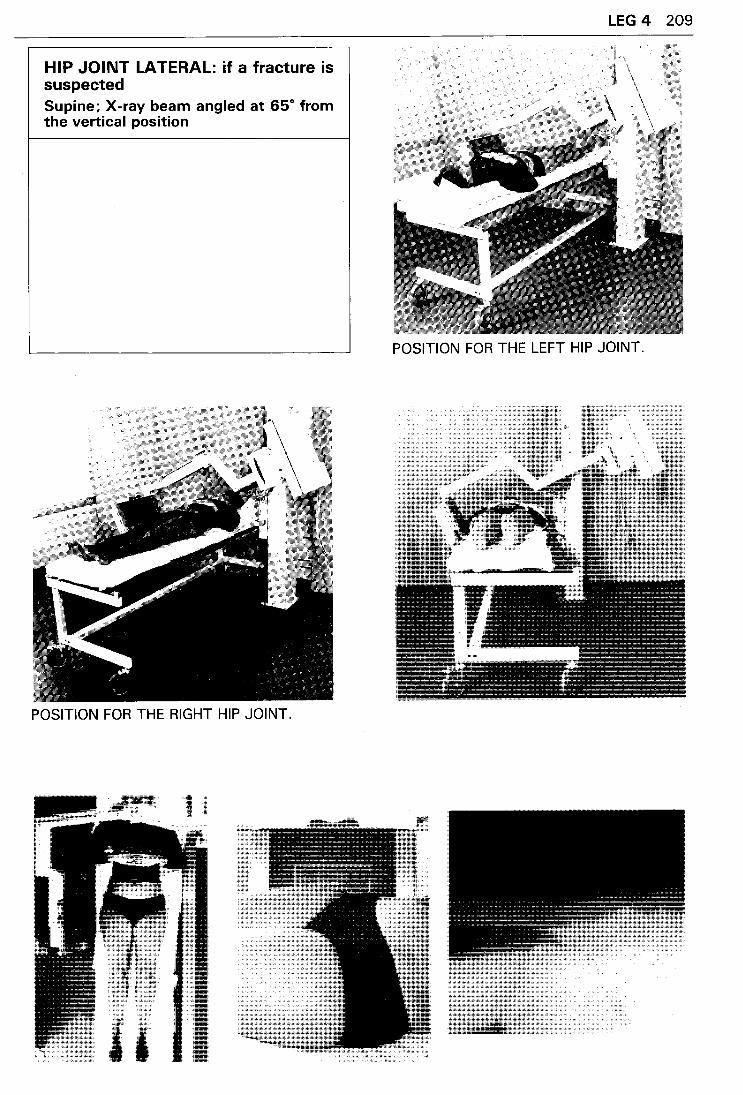
HIP JOINT LATERAL: if a fracture is suspected Supine; X-ray beam angled at 65° from the vertical position
POSITION FOR THE RIGHT HIP JOINT.
LEG 4 209
POSITION FOR THE LEFT HIP JOINT.
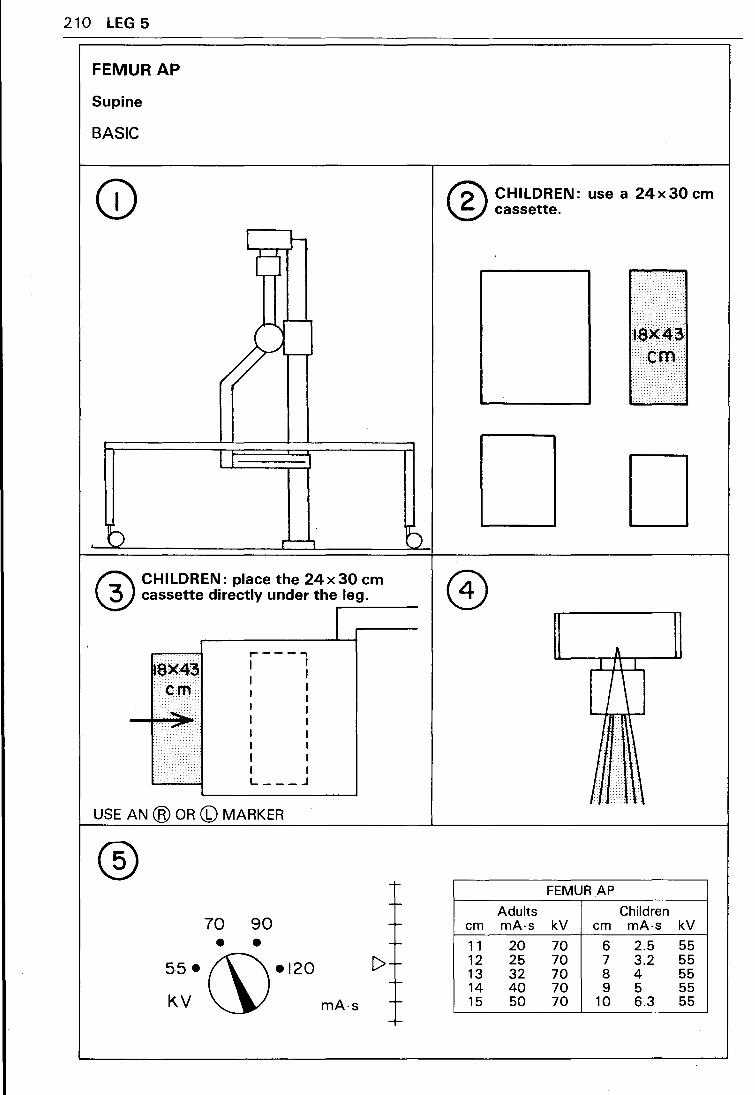
210 LEG 5
FEMUR AP
Supine
BASIC
t r-d
r'--1
® CHILDREN: place the 24x30 em cassette directly under the leg.
1.---r----------'--f
,.....----, I I I I I I
I
.·· ...
~X43 ern
I I I I I I I I I I I I
····~···· · .. ~········
I . i ... L ___ .J
USE AN @ OR (b) MARKER
® --r-
70 90 +-
• • -r-
55•~•120 C>+ -I-
KV mA-s -I-
-I-
® CHILDREN: use a 24x30 em cassette.
Adults em mA-s
11 20 12 25 13 32 14 40 15 50
........... . ·.·.· .. · .. ·.· ... ·.·.· ..
. ······· ....
~~~~~
D
I 1\ I
I \
FEMUR AP
Children kV em mA-s kV
70 6 2.5 55 70 7 3.2 55 70 8 4 55 70 9 5 55 70 10 6.3 55
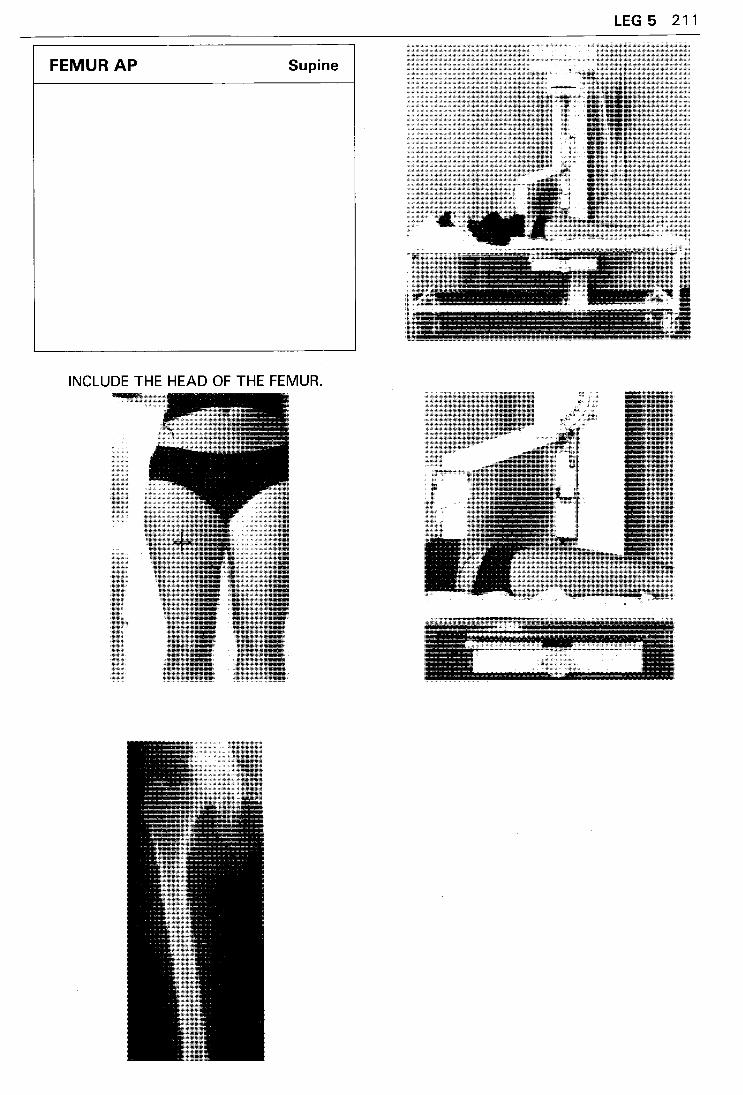
LEG 5 211
FEMUR AP Supine
INCLUDE THE HEAD OF THE FEMUR.
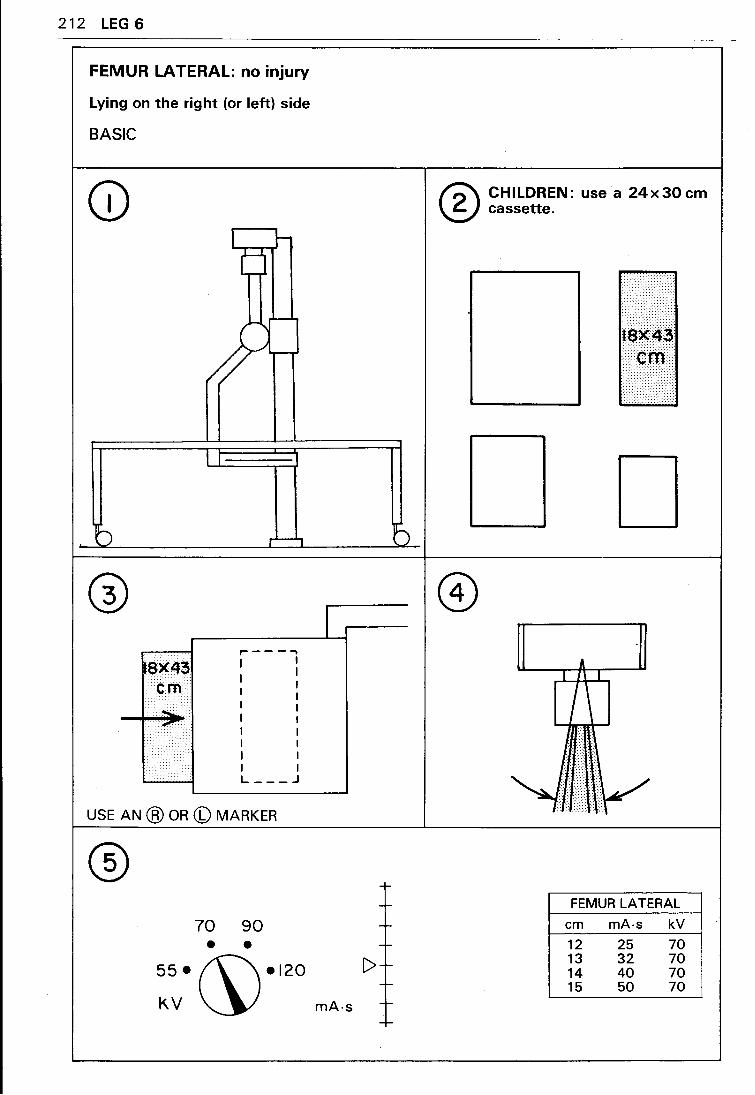
212 LEG 6
FEMUR LATERAL: no injury
lying on the right (or left) side
BASIC
r---.-. I I
I I I I I I I I
I I L ___ .J
USE AN @ OR (b) MARKER
® 70 90 • •
55• (\\•120
KV ~ mA·s
C>
® CHILDREN: ·use a 24x30cm cassette.
D
FEMUR LATERAL
em mA·s kV
12 25 70 13 32 70 14 40 70 15 50 70
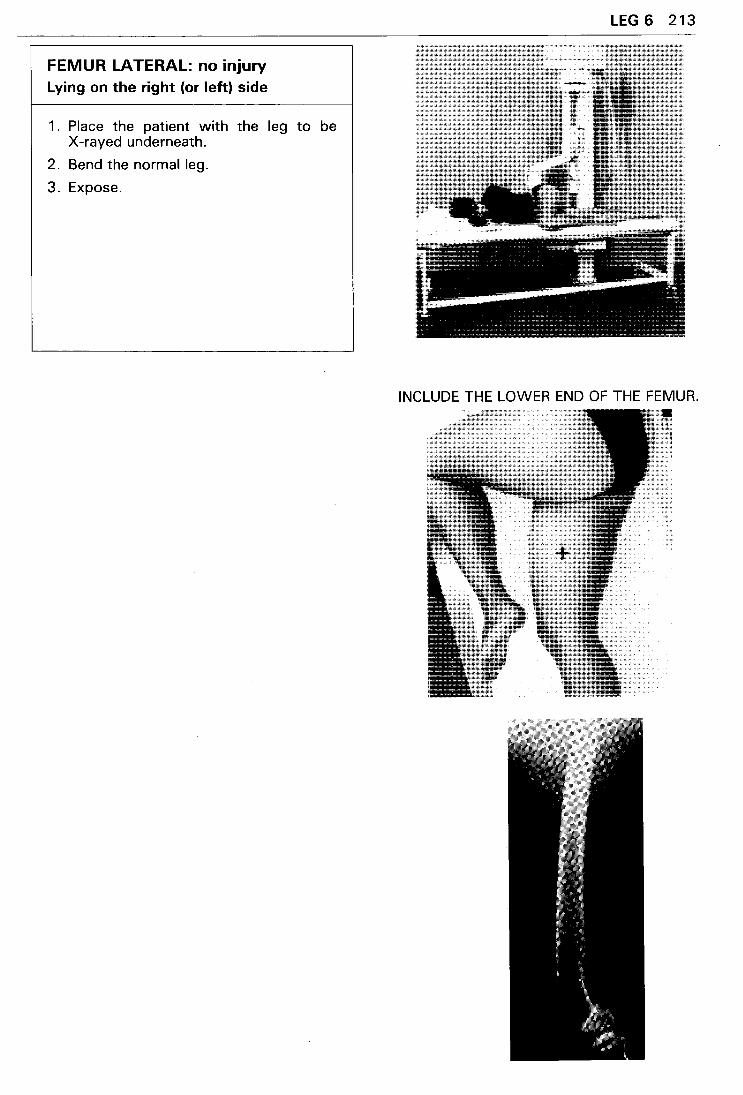
FEMUR LATERAL: no injury Lying on the right (or left) side
1 . Place the patient with the leg to be X-rayed underneath.
2. Bend the normal leg.
3. Expose.
LEG 6 213
INCLUDE THE LOWER END OF THE FEMUR.
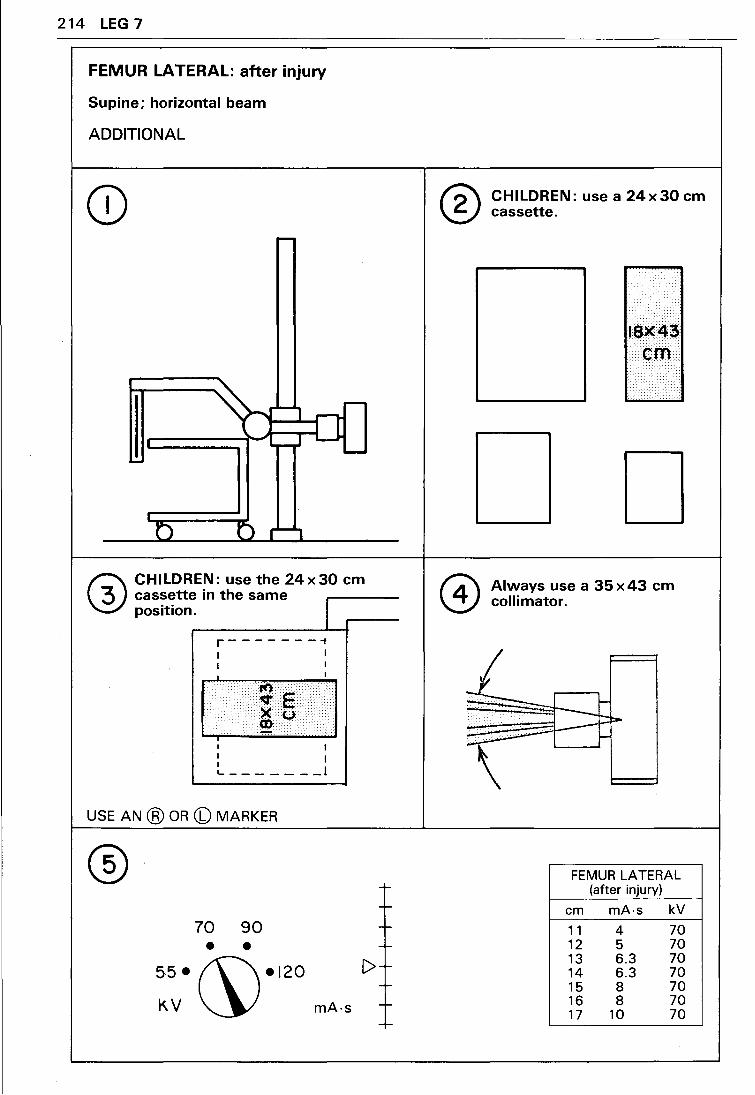
214 LEG 7
FEMUR LATERAL: after injury
Supine; horizontal beam
ADDITIONAL
r--
II
® CHILDREN: use the 24x30 em cas~:tte in the same I pos1t1on. l ~--
r--------t I I I
1
.. · .. :·>:·:·· · .. · .. : ... :~·: '.·.·,·.,··,·,.·,··.·:·:·:·.··,··' ... · •.• ·.··' •. ::· .. ·,·.:·,·.,,····!
,, .• < .... ¢ E ....... )f •:u,.
Cl) ~.:-:"
I I I I :_ _______ l
USE AN ® OR CD MARKER
70 90 • •
55• (\\•120
KV~ mA·s
--t-
-f-
-t-
C>+ -f-
-f-
-I-
® CHILDREN: use a 24x30 em cassette.
...
D (';'\ Always use a 35 x 43 em \:::!) collimator.
FEMUR LATERAL (after injury)
em mA·s kV
11 4 70 12 5 70 13 6.3 70 14 6.3 70 15 8 70 16 8 70 17 10 70
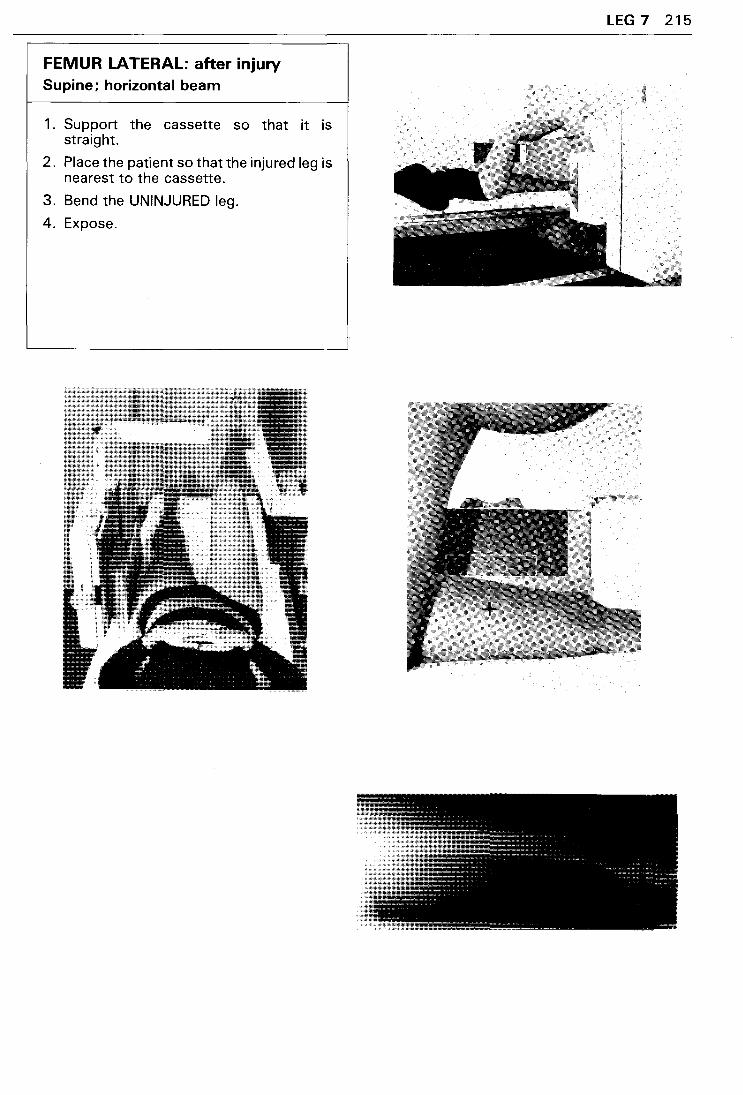
FEMUR LATERAL: after injury Supine; horizontal beam
1 . Support the cassette so that it is straight.
2. Place the patient so that the injured leg is nearest to the cassette.
3. Bend the UNINJURED leg.
4. Expose.
LEG 7 215
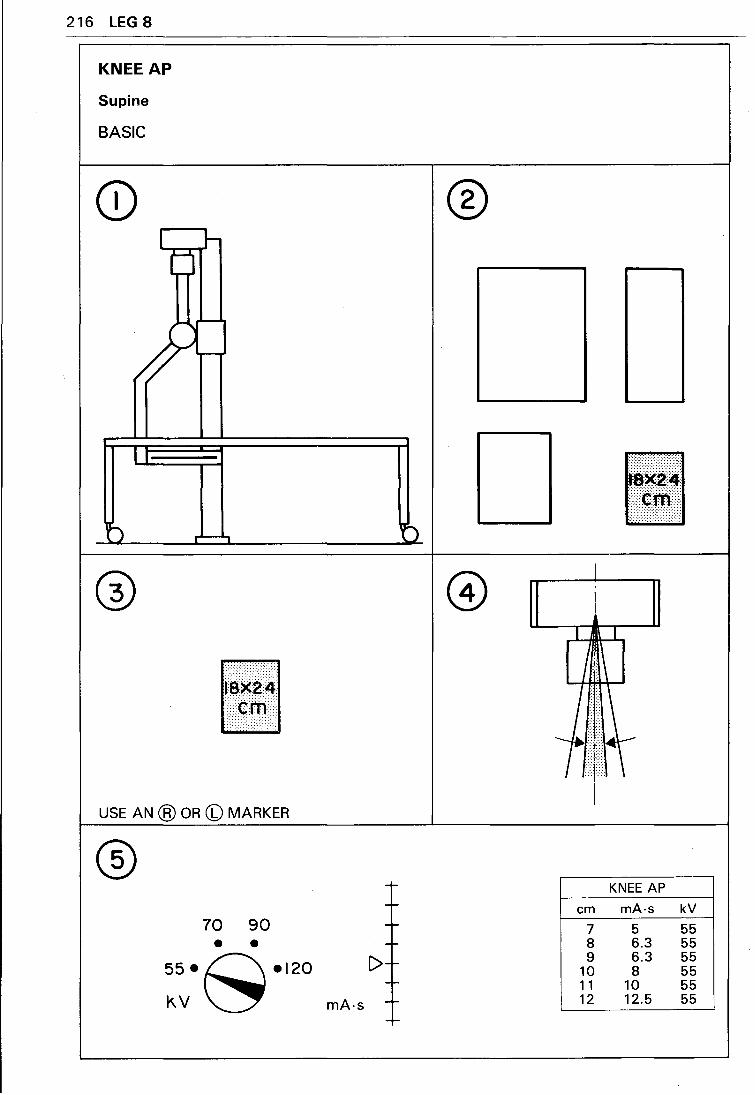
216 LEG 8
KNEE AP
Supine
BASIC
® I 1-tJ
II I
I l
1':11111

KNEE AP Supine
TO FIND SMALL FRACTURES ADDITIONAL OBLIQUE VIEWS MAY BE USED.
LEG 8 217
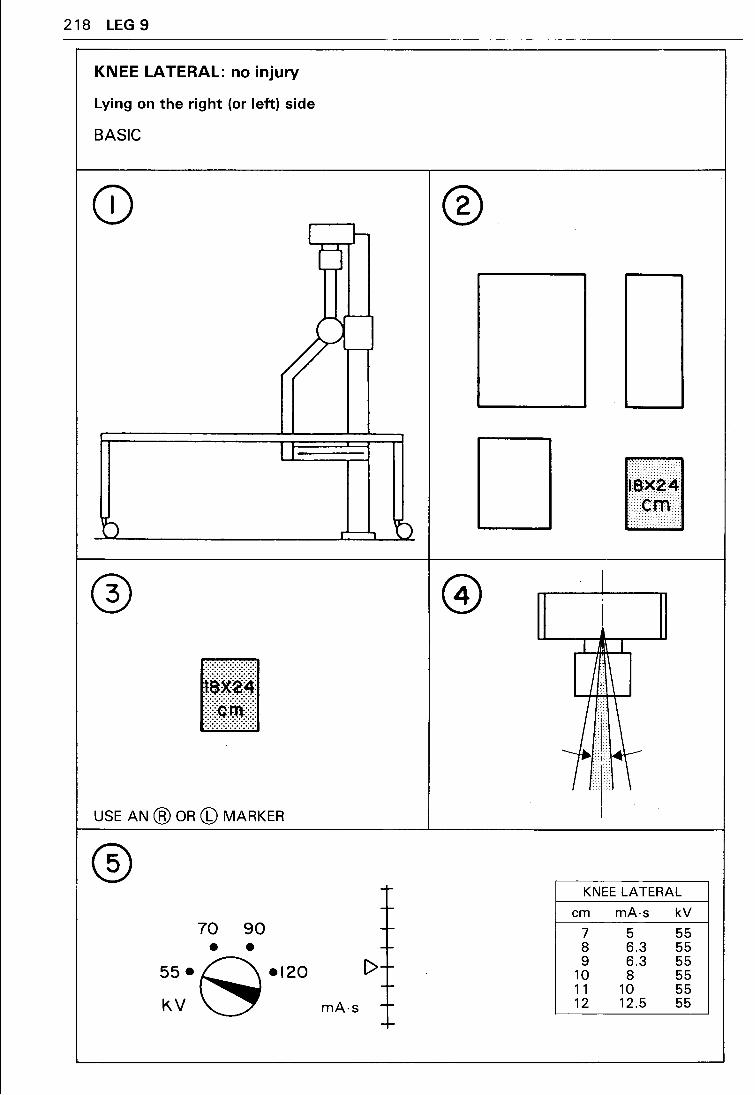
218 LEG 9
KNEE LATERAL: no injury
Lying on the right (or left) side
BASIC
• ·: .
.
.
J
USE AN @ OR (6) MARKER
® 70 90 • • 55·s·l20
KV
I 1--tj
r'-, j
r-
-f-
f-
[>r-f-
mA-s -f-
-f-
®
I
I
.. ...
KNEE LATERAL
em mA-s kV
7 5 55 8 6.3 55 9 6.3 55
10 8 55 11 10 55 12 12.5 55
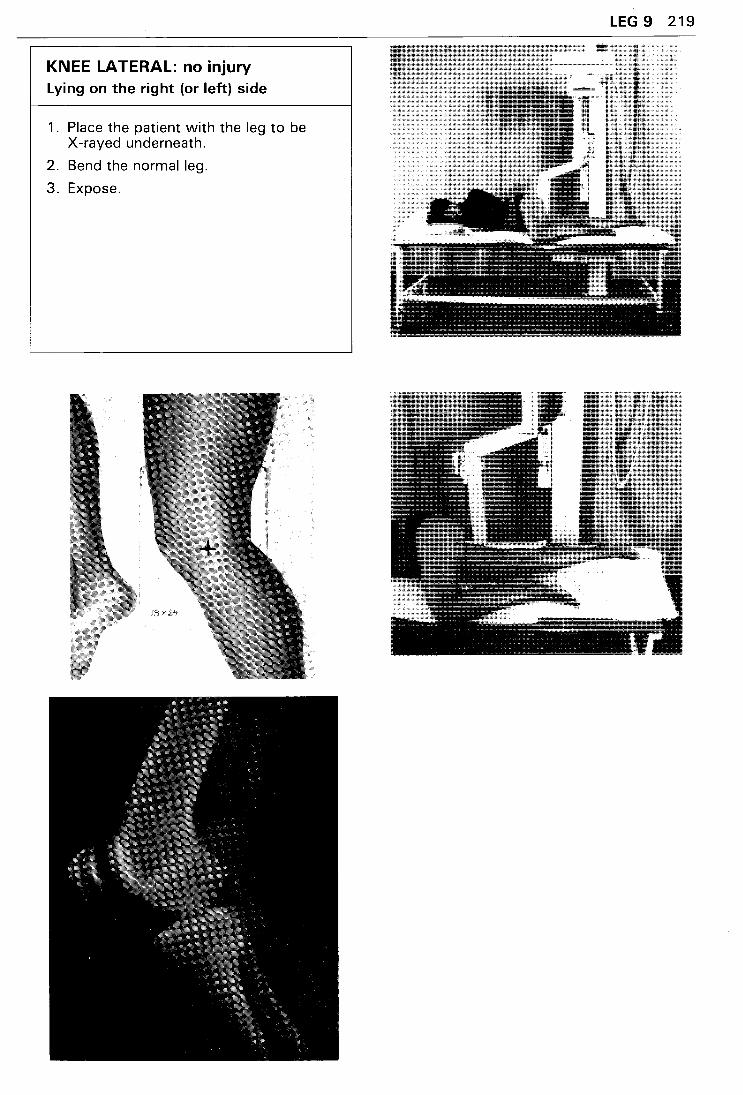
KNEE LATERAL: no injury Lying on the right (or left) side
1 . Place the patient with the leg to be X-rayed underneath.
2. Bend the normal leg.
3. Expose.
LEG 9 219
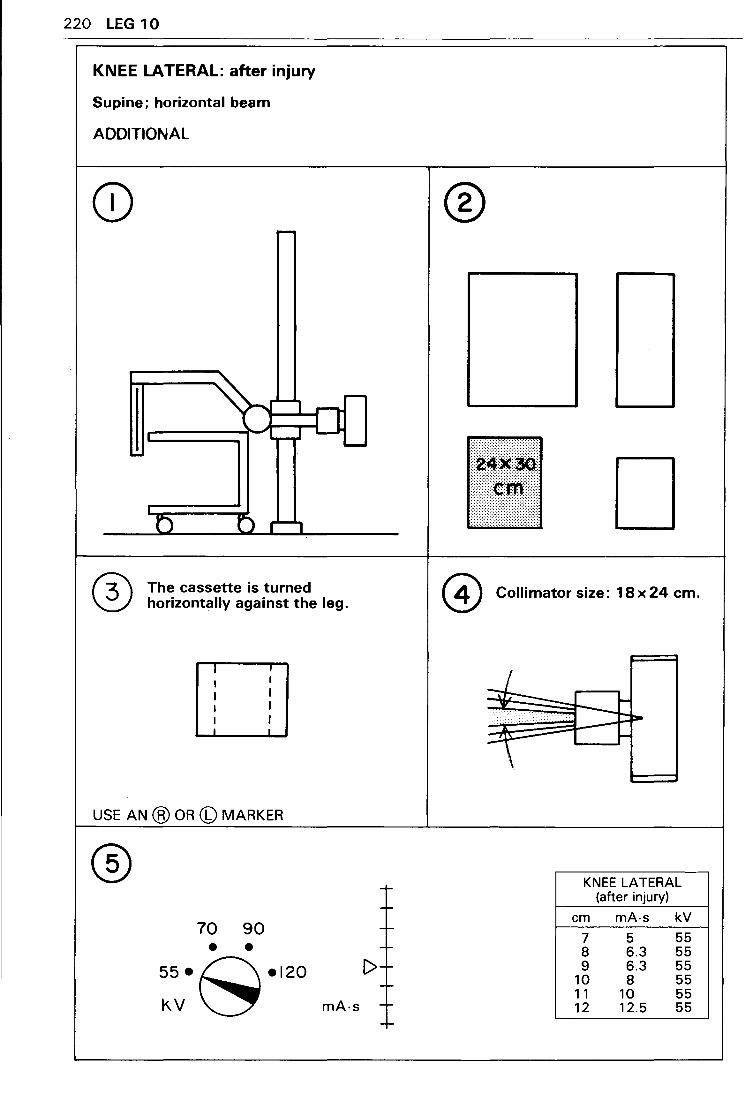
220 LEG 10
KNEE LATERAL: after injury
Supine; horizontal beam
ADDITIONAL
0 [) r'-'1
The cassette is turned horizontally against the leg.
I I
I I
I I I I I I l i
USE AN @ OR (b) MARKER
® 70 90 • • 55·s·120
K.V mA·s
-r-
+· -~
-1>-
--_,...
-r-
®
t:-::_::· .=·=.==: ::,:)-: :. :
D @ Collimator size: 18 x 24 em.
~ t-·. ----PF-- -\ t-
KNEE LATERAL (after injury)
em mA-s kV
7 5 55 8 6.3 55 9 6.3 55
10 8 55 11 10 55 12 12.5 55
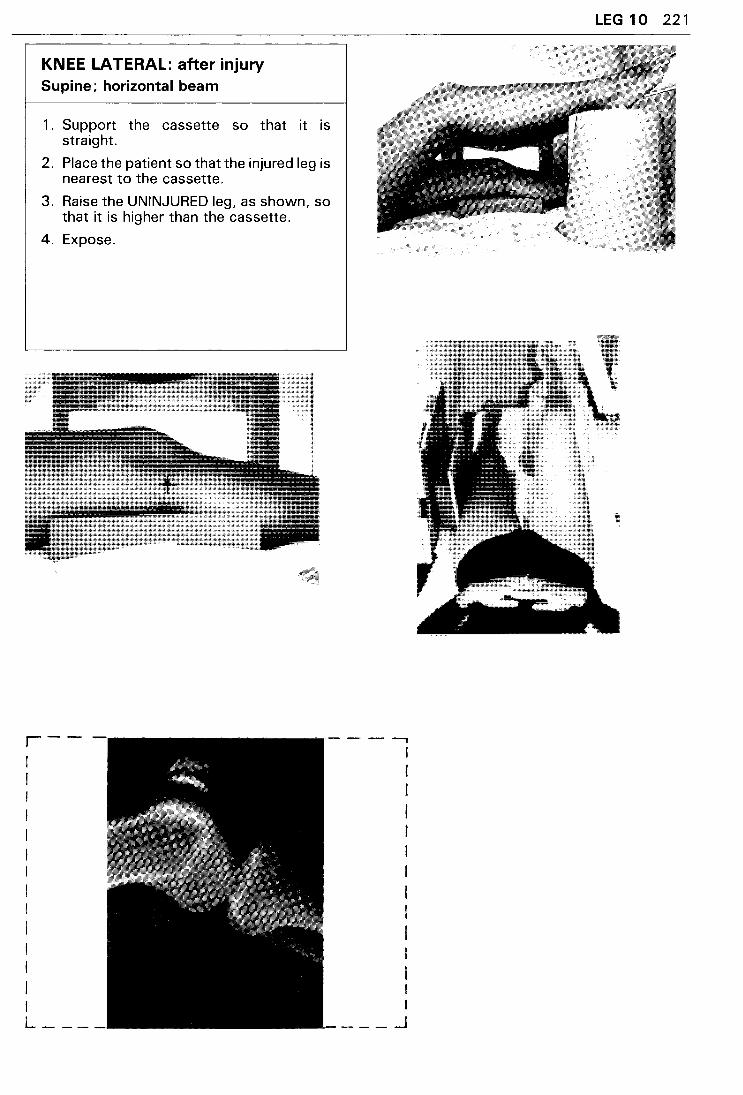
KNEE LATERAL: after injury Supine; horizontal beam
1 . Support the cassette so that it is straight.
2. Place the patient so that the injured leg is nearest to the cassette.
3. Raise the UNINJURED leg, as shown, so that it is higher than the cassette.
4. Expose.
,--1 I I I I I I I I I I I I I L __ _
I I I I
--- _j
LEG 10 221

222 LEG 11
KNEE INTERCONDYLAR SPACE
Supine: vertical beam angled 30° towards the head
ADDITIONAL
II . .
.
USE AN @ OR (b) MARKER
® 70 90 • •
55•0•120
k.V ~ mA-s
®
C>
111111
KNEE INTERCONDYLAR SPACE
em mA·s kV
8 3.2 55 9 3.2 55
10 4 55 11 5 55 12 6.3 55 13 8 55 14 10 55 15 10 55
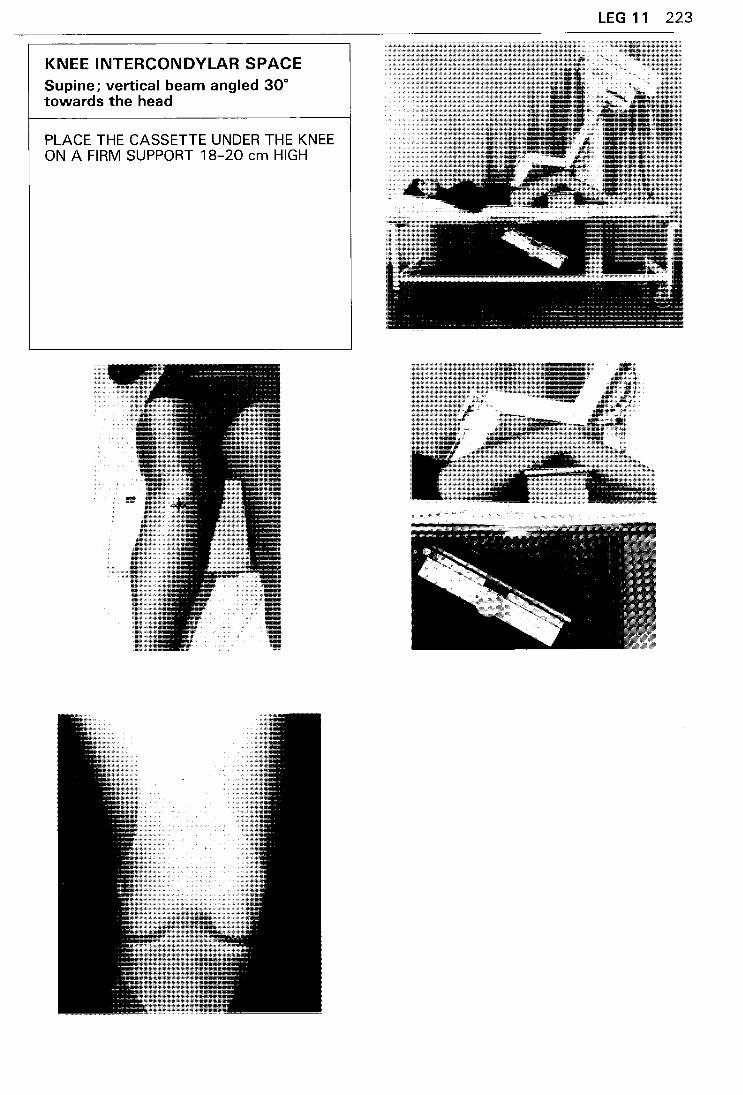
KNEE INTERCONDYLAR SPACE Supine; vertical beam angled 30° towards the head
PLACE THE CASSETTE UNDER THE KNEE ON A FIRM SUPPORT 18-20 em HIGH
LEG 11 223
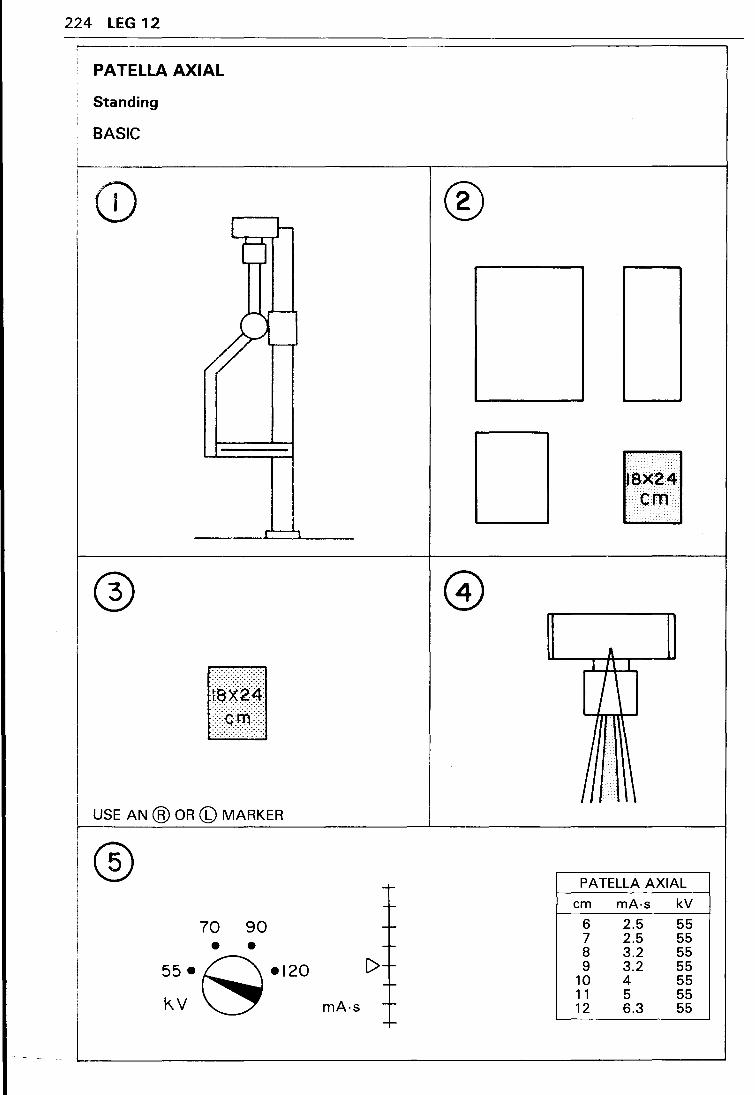
224 LEG 12
PATELLA AXIAL
Standing
BASIC
' ~---,----------------,-----------------t
:CD l J-
® tj
r"-,
A
I I 1\ I
I '
USE AN @ OR (!) MARKER
® -~ PATELLA AXIAL
-- em mA·s kV
70 90 • •
55• C'\ •120
kV~
---
C>--
mA·s --
6 2.5 55 7 2.5 55 8 3.2 55 9 3.2 55
10 4 55 11 5 55 12 6.3 55
f-
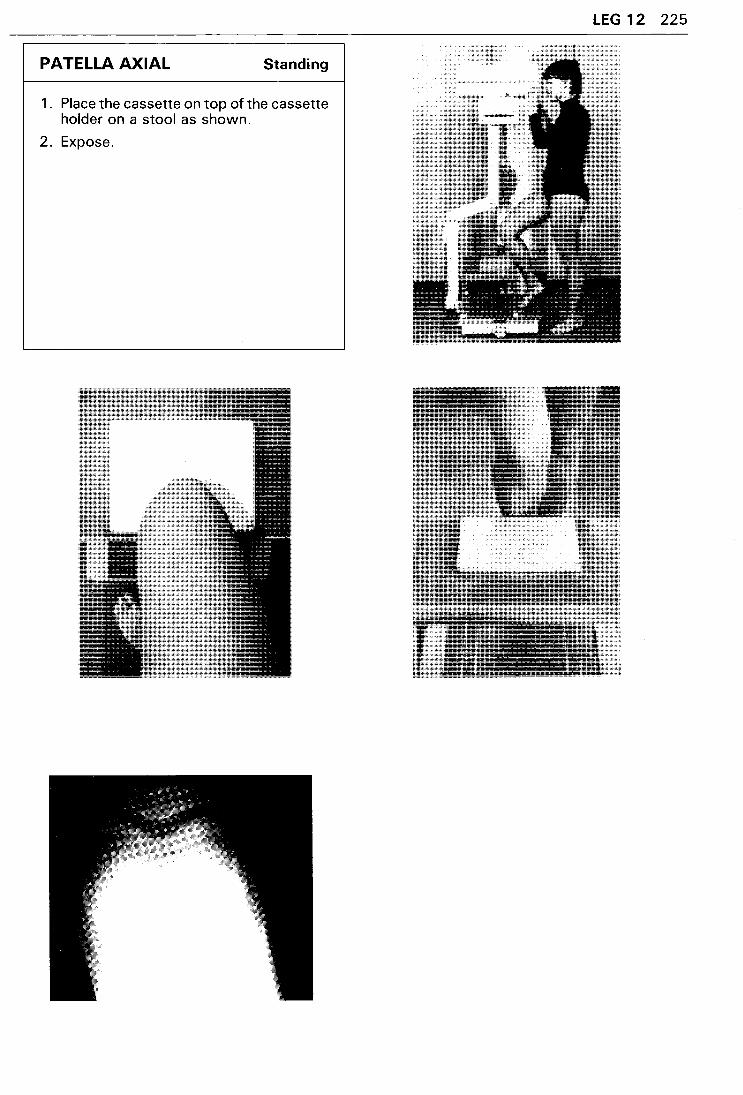
PATELLA AXIAL Standing
1 . Place the cassette on top of the cassette holder on a stool as shown.
2. Expose.
LEG 12 225

226 LEG 13
LEG AP
Supine
BASIC
I J-0
USE AN @ OR (b) MARKER
® 70 90 • •
55•~•120 K.V ~ mA·s
®
--f-
-f-
C>f-
-r-
-f-
-f-
•.·············· •··••·•·••••·•
......... :>:
18X.43 .... ···-······· .-. .:·-.-·-·-.--.:.:-:.::-:-: .· .. ·c·m···· .. ·.·.
::. f:;::::.::::: ... ~ ... ~ ... :: i: ~:
D
I 1\ I
I \
LEG AP
em mA·s kV
9 6.3 55 10 8 55 11 10 55 12 12.5 55 13 16 55
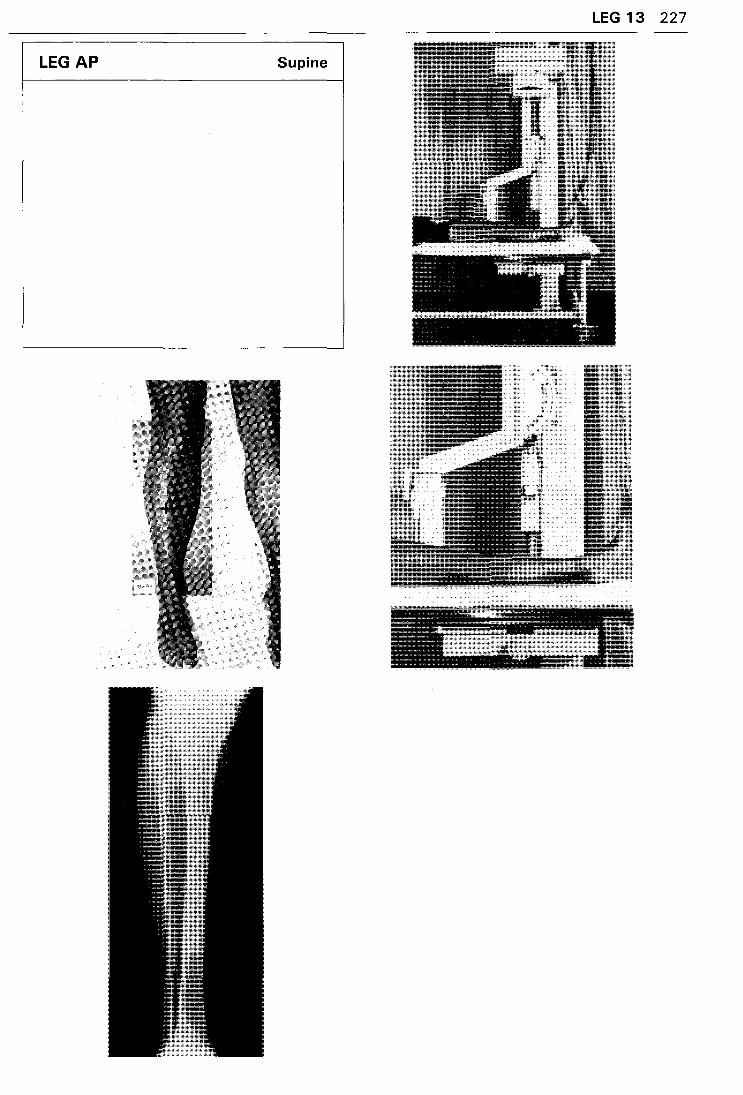
LEG AP Supine
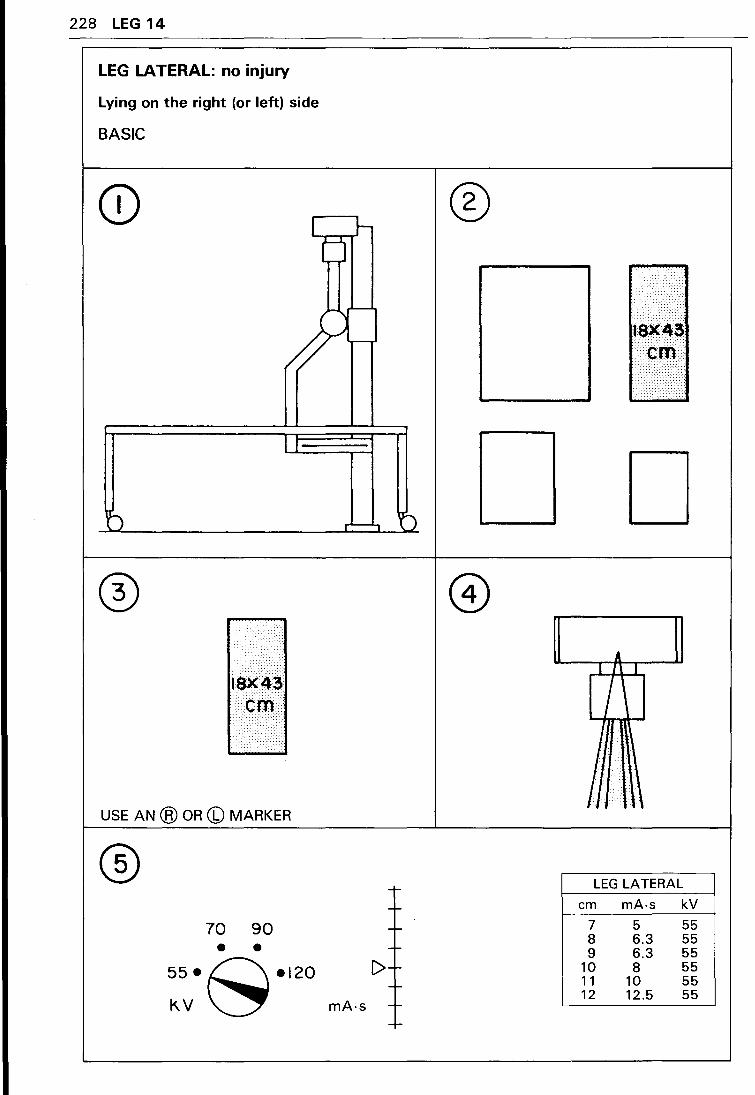
228 LEG 14
LEG LATERAL: no injury
Lying on the right (or left) side
BASIC
CD l J-
•? . >< <
tskc\3 .. ··········
·.·em< . ::>::}> :_::>>
... · .. /> •• >>>•
I
USE AN @ OR (b) MARKER
® 70 90 • •
55•~•120 KV~
tJ
r'---, ~)
-
-I-
mA·s -t-
-t-
®
D A
I 1\ I
I '
LEG LATERAL
em mA-s kV
7 5 55 8 6.3 55 9 6.3 55
10 8 55 11 10 55 12 12.5 55
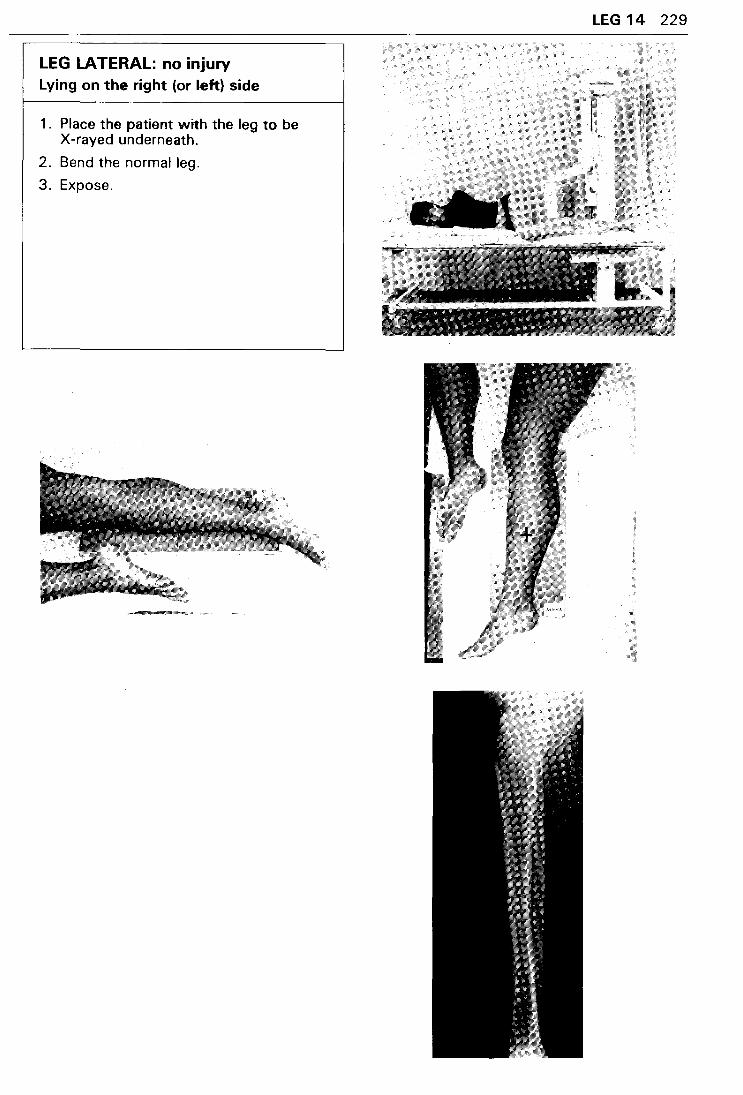
LEG LATERAL: no injury Lying on the right (or left) side
1 . Place the patient with the leg to be X-rayed underneath.
2. Bend the normal leg.
3. Expose.
LEG 14 229
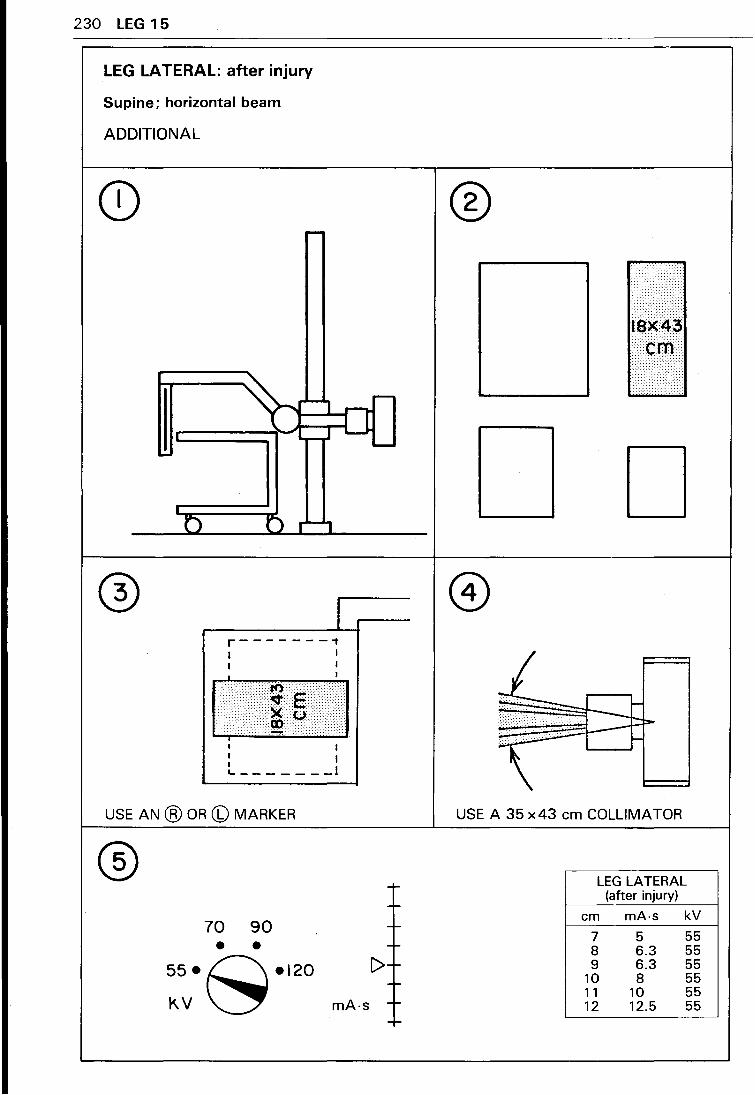
230 LEG 15
LEG LATERAL: after injury
Supine: horizontal beam
ADDITIONAL
I r--------t I I I
I I
: I '------- _l
USE AN @ OR (b) MARKER
® 70 90 • •
55•~•120 KV~ mA·s
C>
®
D
USE A 35 x 43 em COLLIMATOR
LEG LATERAL (after injury)
em mA·s kV
7 5 55 8 6.3 55 9 6.3 55
10 8 55 11 10 55 12 12.5 55
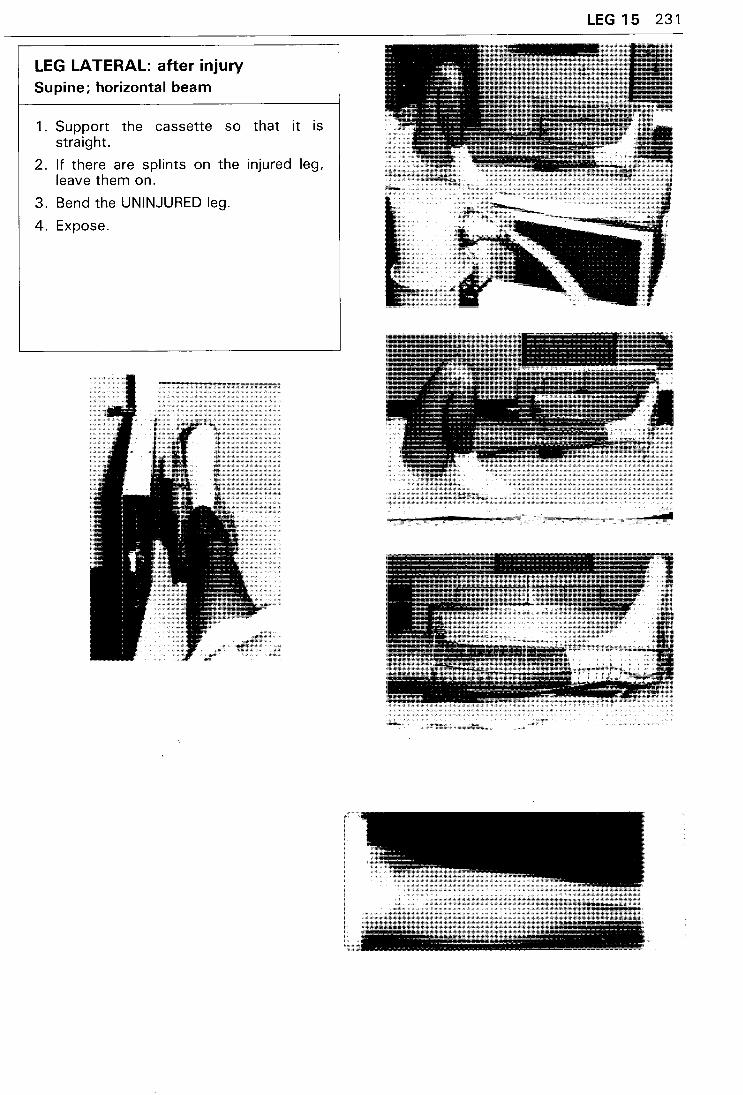
LEG LATERAL: after injury Supine; horizontal beam
1. Support the cassette so that it is straight.
2. If there are splints on the injured leg, leave them on.
3. Bend the UNINJURED leg.
4. Expose.
LEG 15 231
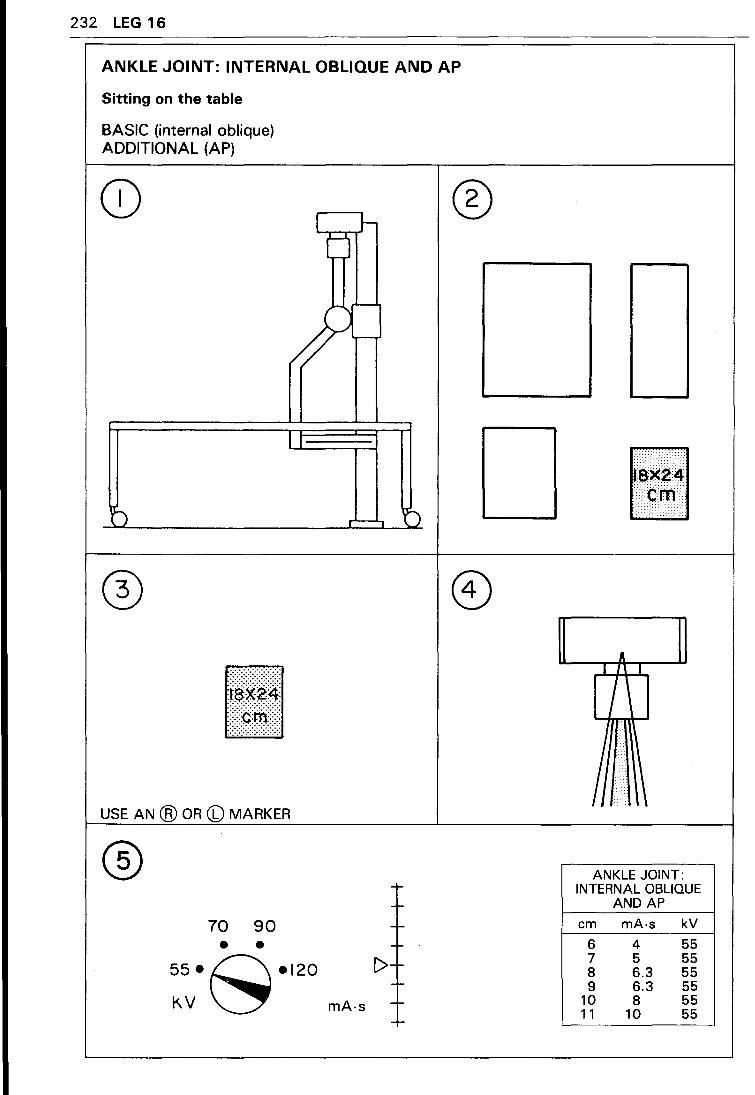
232 LEG 16
ANKLE JOINT: INTERNAL OBLIQUE AND AP
Sitting on the table
BASIC (internal oblique) ADDITIONAL (AP)
CD I ~
)
®
I ·: .
.
USE AN @ OR (b) MARKER
® 70 90 • •
55•0•120
KV~
(j
-,_ -~
--C>--
~
mA-s -~
~
®
f~~41
A I 1\ I
I \
ANKLE JOINT: INTERNAL OBLIQUE
AND AP
em mA-s kV
6 4 55 7 5 55 8 6.3 55 9 6.3 55
10 8 55 11 10 55
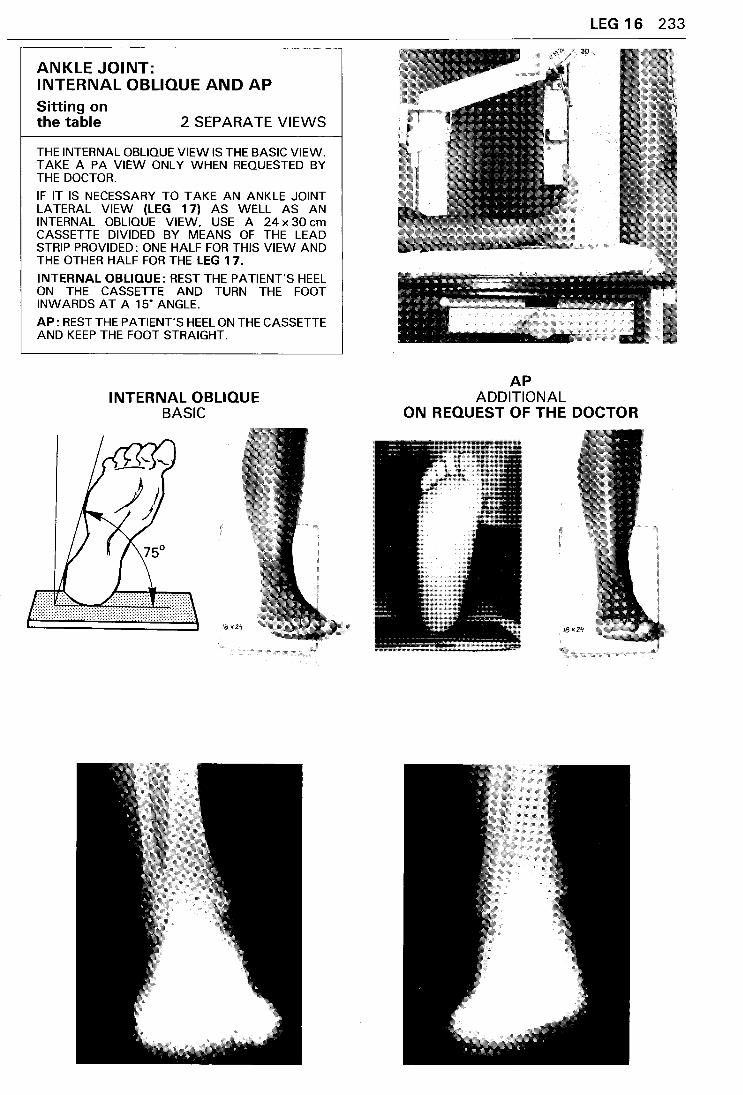
ANKLE JOINT: INTERNAL OBLIQUE AND AP Sitting on the table 2 SEPARATE VIEWS
THE INTERNAL OBLIQUE VIEW IS THE BASIC VIEW. TAKE A PA VIEW ONLY WHEN REQUESTED BY THE DOCTOR.
IF IT IS NECESSARY TO TAKE AN ANKLE JOINT LATERAL VIEW (LEG 17) AS WELL AS AN INTERNAL OBLIQUE VIEW, USE A 24 x 30 em CASSETTE DIVIDED BY MEANS OF THE LEAD STRIP PROVIDED: ONE HALF FOR THIS VIEW AND THE OTHER HALF FOR THE LEG 17.
INTERNAL OBLIQUE: REST THE PATIENT'S HEEL ON THE CASSETTE AND TURN THE FOOT INWARDS AT A 15· ANGLE.
AP: REST THE PATIENT'S HEEL ON THE CASSETTE AND KEEP THE FOOT STRAIGHT.
INTERNAL OBLIQUE BASIC
AP ADDITIONAL
LEG 16 233
ON REQUEST OF THE DOCTOR
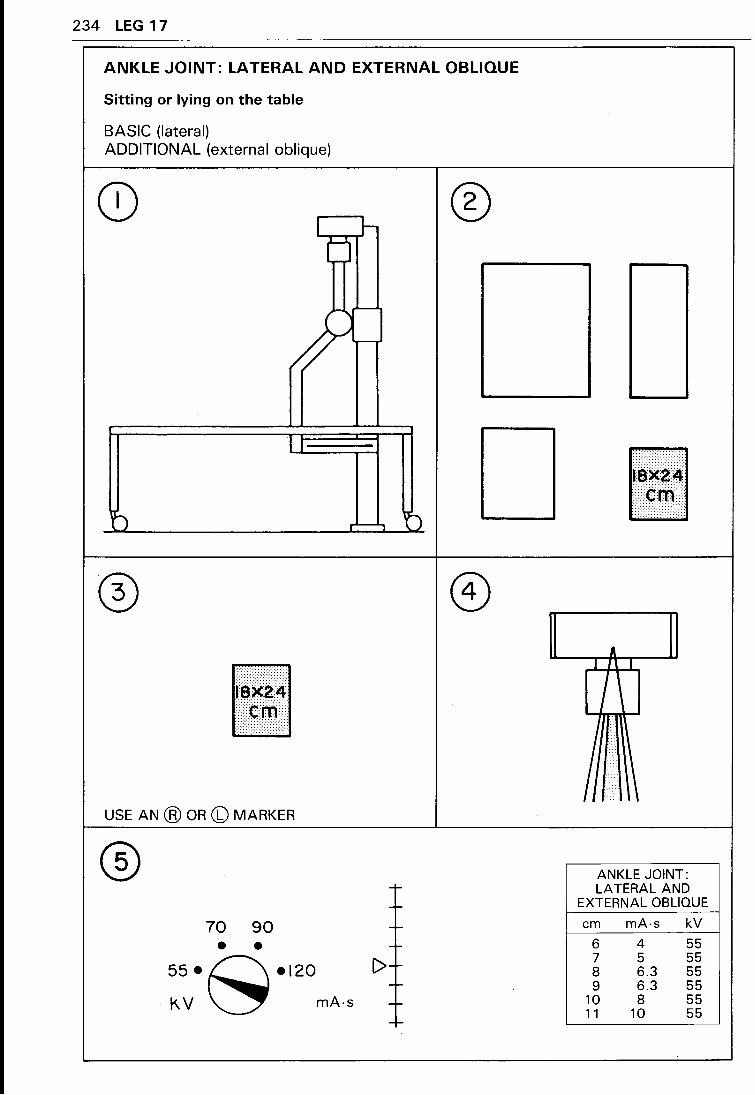
234 LEG 17
ANKLE JOINT: LATERAL AND EXTERNAL OBLIQUE
Sitting or lying on the table
BASIC (lateral) ADDITIONAL (external oblique)
I r ® (j
I
fBifl
A
fill I 1\ I
I \
USE AN @ OR (b) MARKER
® ANKLE JOINT: - LATERAL AND
-- EXTERNAL OBLIQUE
70 90 -- em mA·s kV
• • - 6 4 55
C>-- 7 5 55 55·s·l20 8 6.3 55 -- 9 6.3 55
KV mA·s -- 10 8 55 11 10 55
-f-
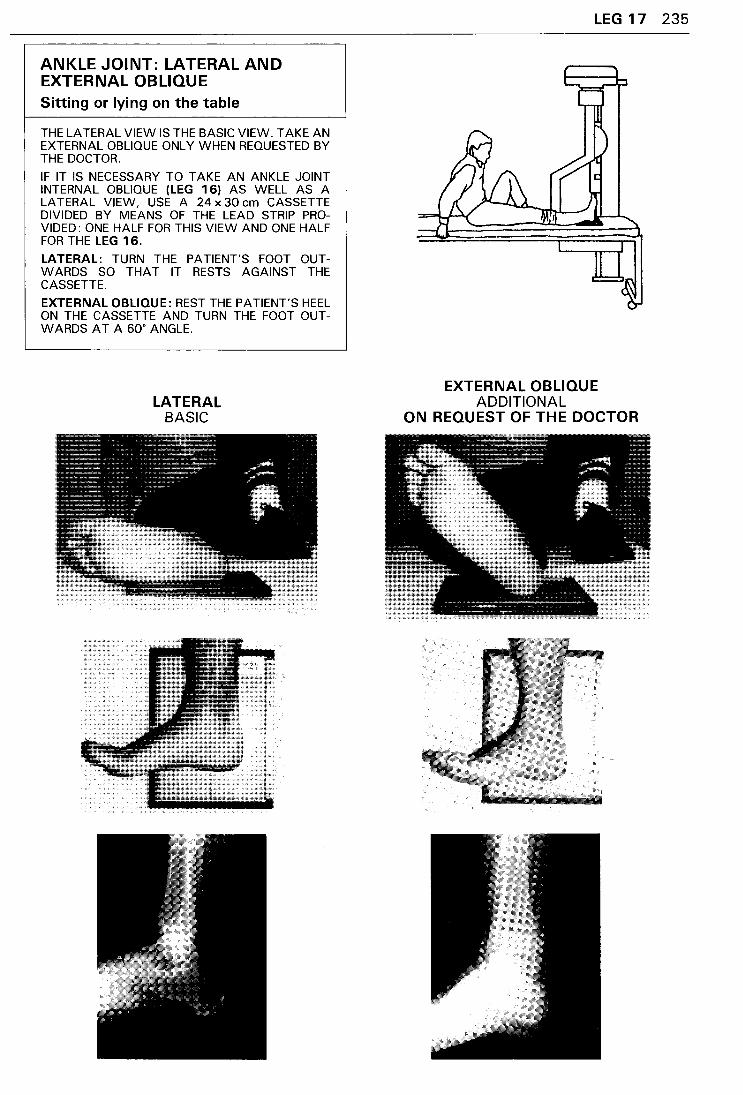
ANKLE JOINT: LATERAL AND EXTERNAL OBLIQUE Sitting or lying on the table
THE LATERAL VIEW IS THE BASIC VIEW. TAKE AN EXTERNAL OBLIQUE ONLY WHEN REQUESTED BY THE DOCTOR.
IF IT IS NECESSARY TO TAKE AN ANKLE JOINT INTERNAL OBLIQUE (LEG 16) AS WELL AS A LATERAL VIEW, USE A 24 x 30 em CASSETTE DIVIDED BY MEANS OF THE LEAD STRIP PROVIDED: ONE HALF FOR THIS VIEW AND ONE HALF FOR THE LEG 16.
LATERAL: TURN THE PATIENT'S FOOT OUTWARDS SO THAT IT RESTS AGAINST THE CASSETTE.
EXTERNAL OBLIQUE: REST THE PATIENT'S HEEL ON THE CASSETTE AND TURN THE FOOT OUTWARDS AT A so· ANGLE.
LATERAL BASIC
LEG 17 235
EXTERNAL OBLIQUE ADDITIONAL
ON REQUEST OF THE DOCTOR
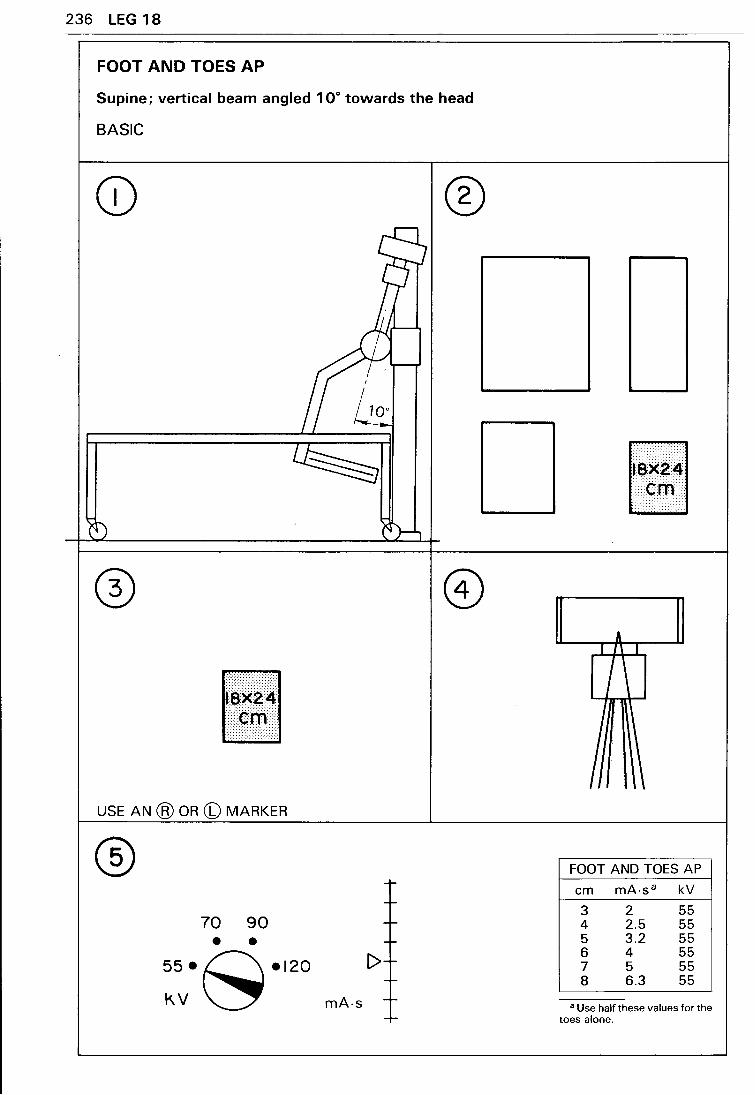
236 LEG 18
FOOT AND TOES AP
Supine; vertical beam angled 1 oo towards the head
BASIC
1111il
USE AN @ OR (b) MARKER
® 70 90 • •
55•C\•120
KV~
®
-
)-,
-r-
-r-
-r-
-C>-
--mA-s --
--
A I 1\ I
I \
\
FOOT AND TOES AP
em mA·s 8 kV
3 4 5 6 7 8
2 2.5 3.2 4 5 6.3
55 55 55 55 55 55
a Use half these values for the toes alone.
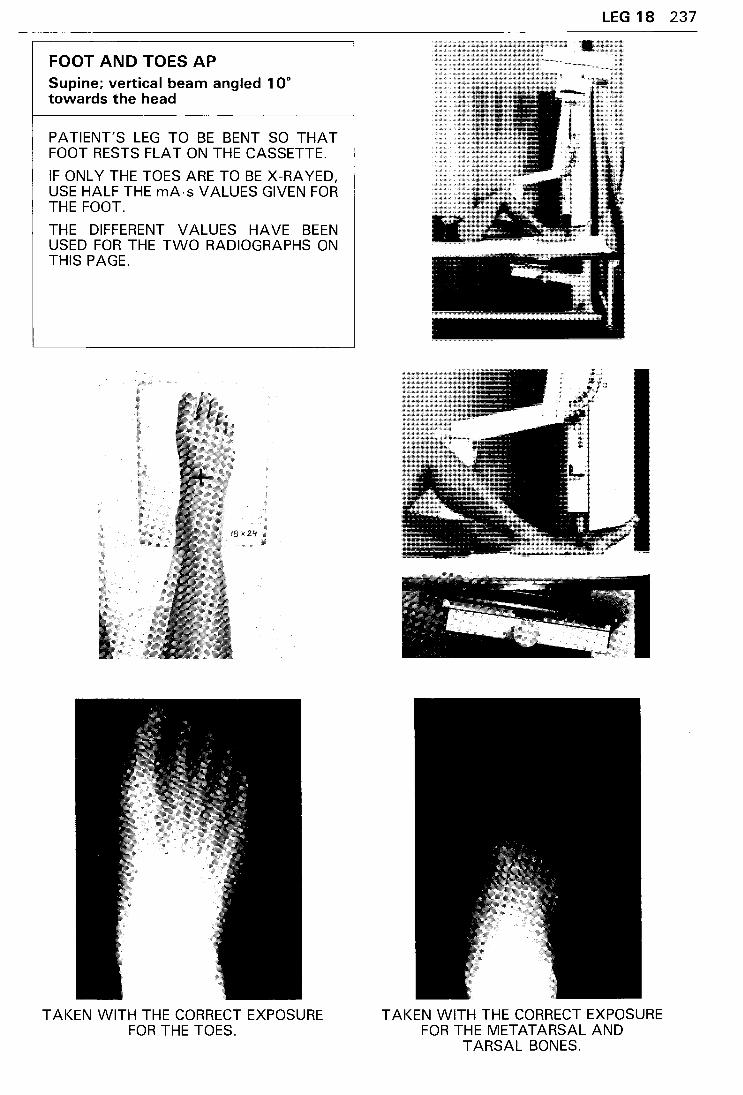
FOOT AND TOES AP Supine; vertical beam angled 1 Oo towards the head
PATIENT'S LEG TO BE BENT SO THAT FOOT RESTS FLAT ON THE CASSETTE.
IF ONLY THE TOES ARE TO BE X-RA YEO, USE HALF THE mA · s VALUES GIVEN FOR THE FOOT.
THE DIFFERENT VALUES HAVE BEEN USED FOR THE TWO RADIOGRAPHS ON THIS PAGE.
TAKEN WITH THE CORRECT EXPOSURE FOR THE TOES.
LEG 18 237
TAKEN WITH THE CORRECT EXPOSURE FOR THE METATARSAL AND
TARSAL BONES.
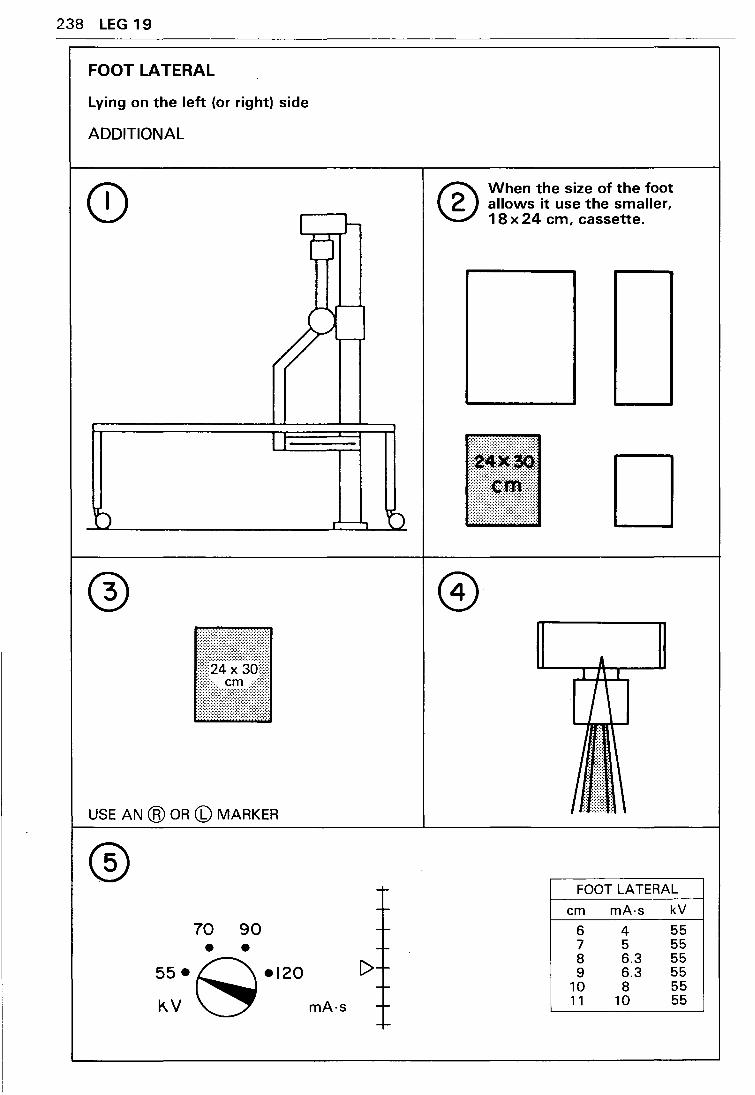
238 LEG 19
FOOT LATERAL
Lying on the left (or right) side
ADDITIONAL
l J-(j
) r"---'1 ~)
USE AN @ OR (b) MARKER
70 90 • •
55•C\ •120
K.V ~ mA·s
------
C>-----~
-~
® When the size of the foot allows it use the smaller, 18 x 24 em, cassette.
. . : D A
I 1\ I
I '
n .·.,
FOOT LATERAL
em mA·s kV
6 4 55 7 5 55 8 6.3 55 9 6.3 55
10 8 55 11 10 55

LEG 19 239
FOOT LATERAL Lying on the left (or right) side
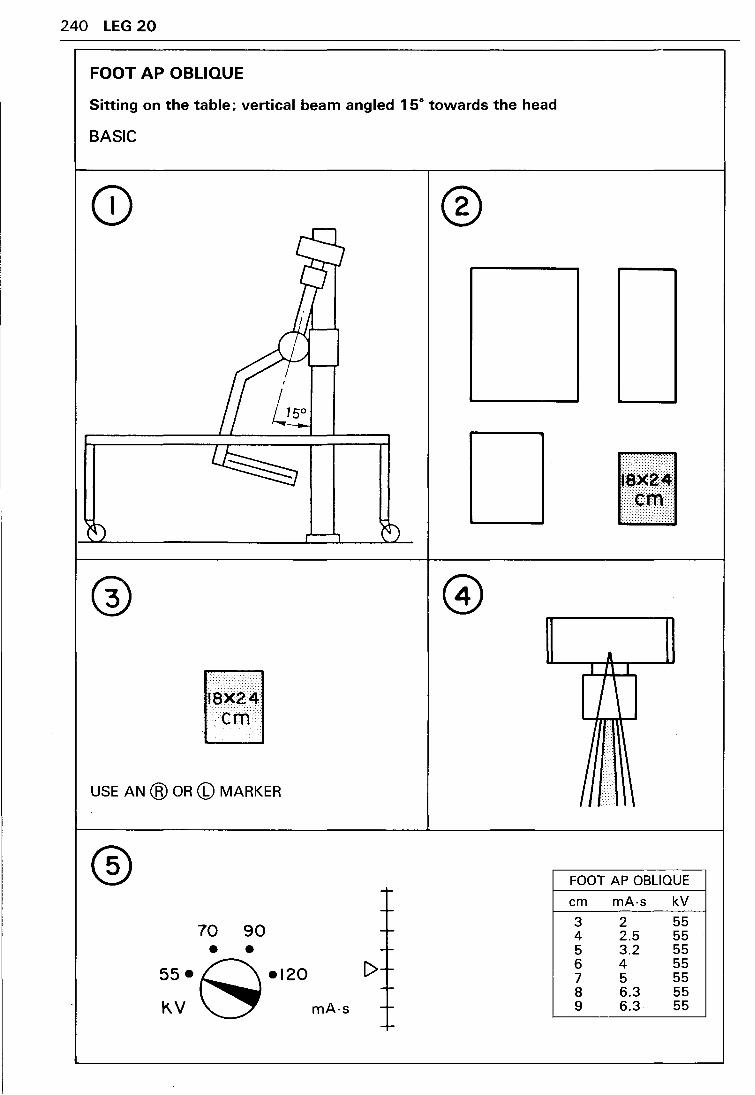
240 LEG 20
FOOT AP OBLIQUE
Sitting on the table; vertical beam angled 15° towards the head
BASIC
USE AN @ OR (b) MARKER
® 70 90 • •
55•~•120 K.V ~ mA·s
®
• .
.
FOOT AP OBLIQUE
em mA·s kV
3 2 55 4 2.5 55 5 3.2 55 6 4 55 7 5 55 8 6.3 55 9 6.3 55
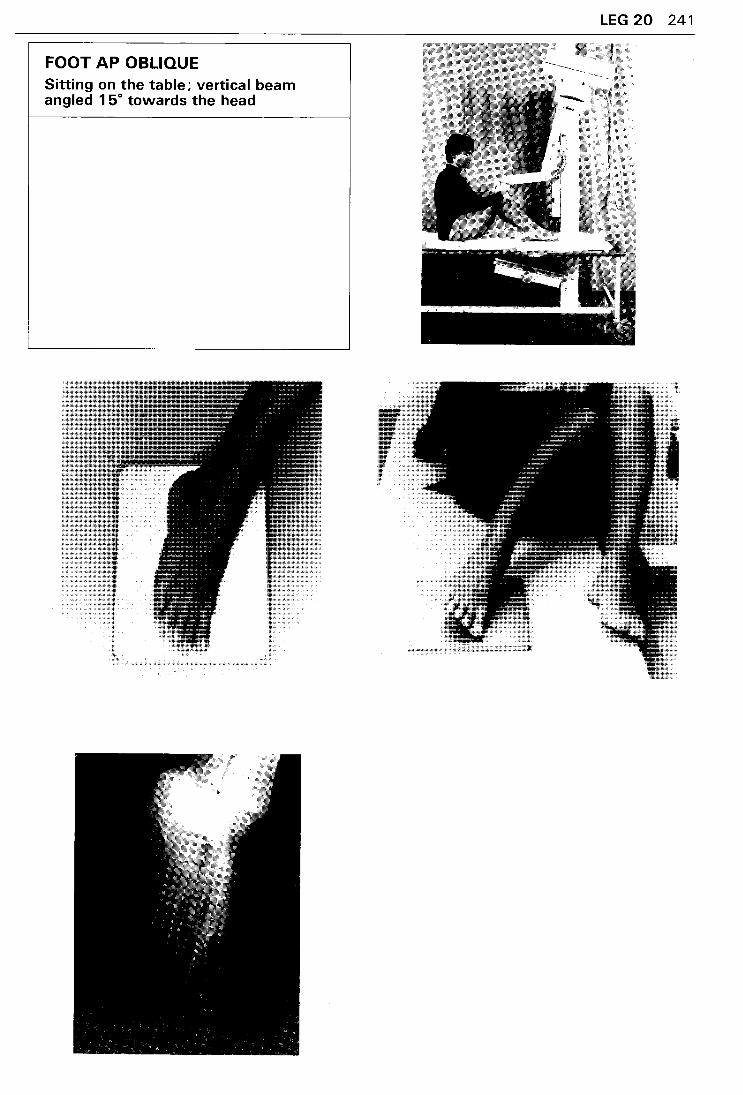
FOOT AP OBLIQUE Sitting on the table; vertical beam angled 1 5° towards the head
LEG 20 241
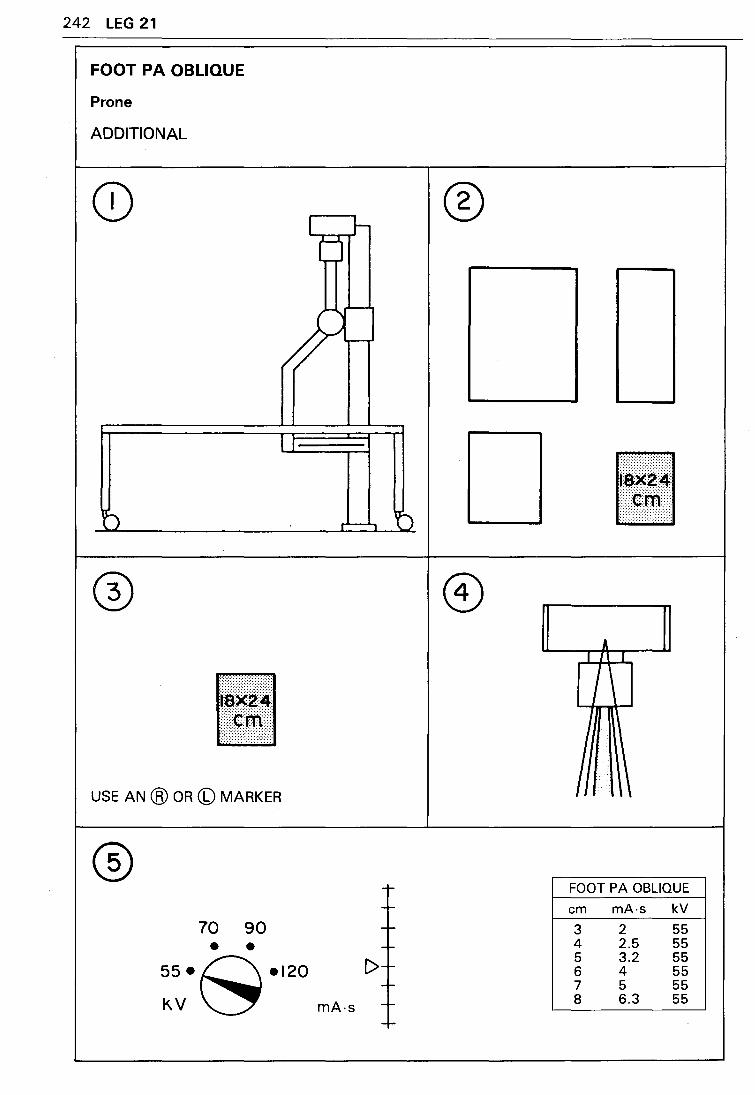
242 LEG 21
FOOT PA OBLIQUE
Prone
ADDITIONAL
l }- ® 0
I
til ®
A IH_l
~l11l I \
USE AN @ OR (b) MARKER r J \
® FOOT PA OBLIQUE
-- em mA·s kV
70 90 -- 3 2 55
• • -- 4 2.5 55 55·s·120 [>-c---
I<.V mA-s --
5 3.2 55 6 4 55 7 5 55 8 6.3 55
-r-

LEG 21 243
FOOT PA OBLIQUE Prone
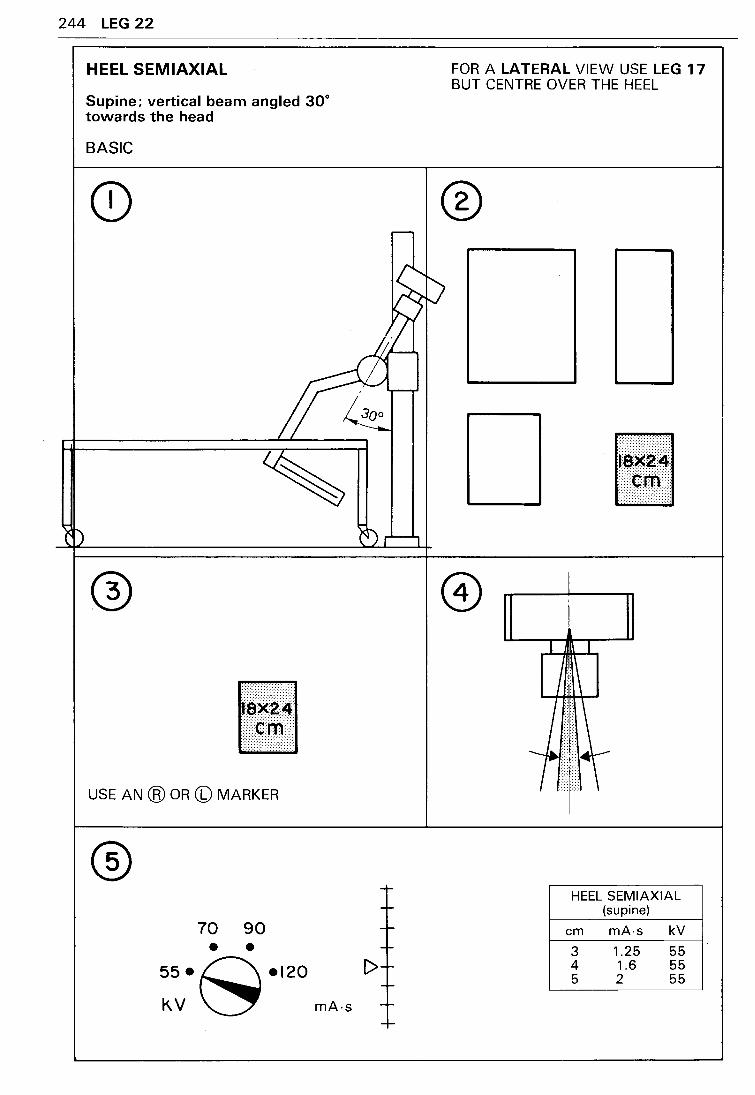
244 LEG 22
HEEL SEMIAXIAL
Supine: vertical beam angled 30° towards the head
BASIC
f;llill USE AN @ OR (b) MARKER
® 70 90 • •
55•~•120 K.V ~ mA·s
I>
FOR A LATERAL VIEW USE LEG 17 BUT CENTRE OVER THE HEEL
®
1111
HEEL SEMIAXIAL (supine)
em mA-s kV
3 1.25 55 4 1.6 55 5 2 55
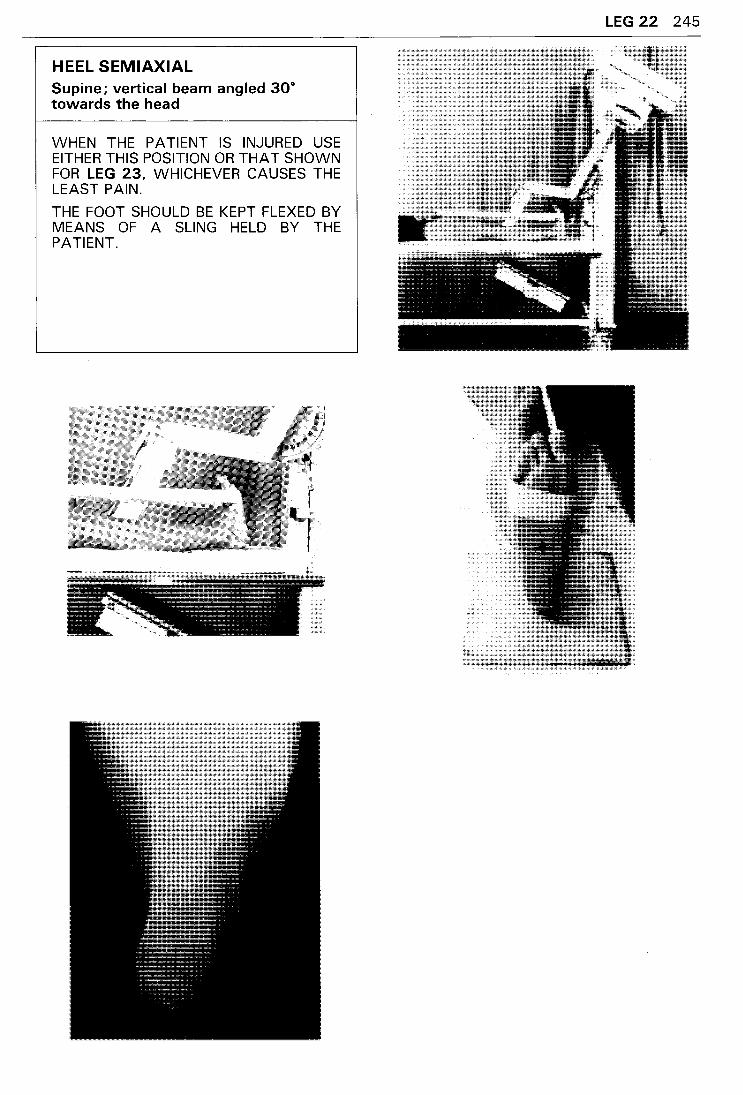
HEEL SEMIAXIAL Supine: vertical beam angled 30° towards the head
WHEN THE PATIENT IS INJURED USE EITHER THIS POSITION OR THAT SHOWN FOR LEG 23, WHICHEVER CAUSES THE LEAST PAIN.
THE FOOT SHOULD BE KEPT FLEXED BY MEANS OF A SLING HELD BY THE PATIENT.
LEG 22 245
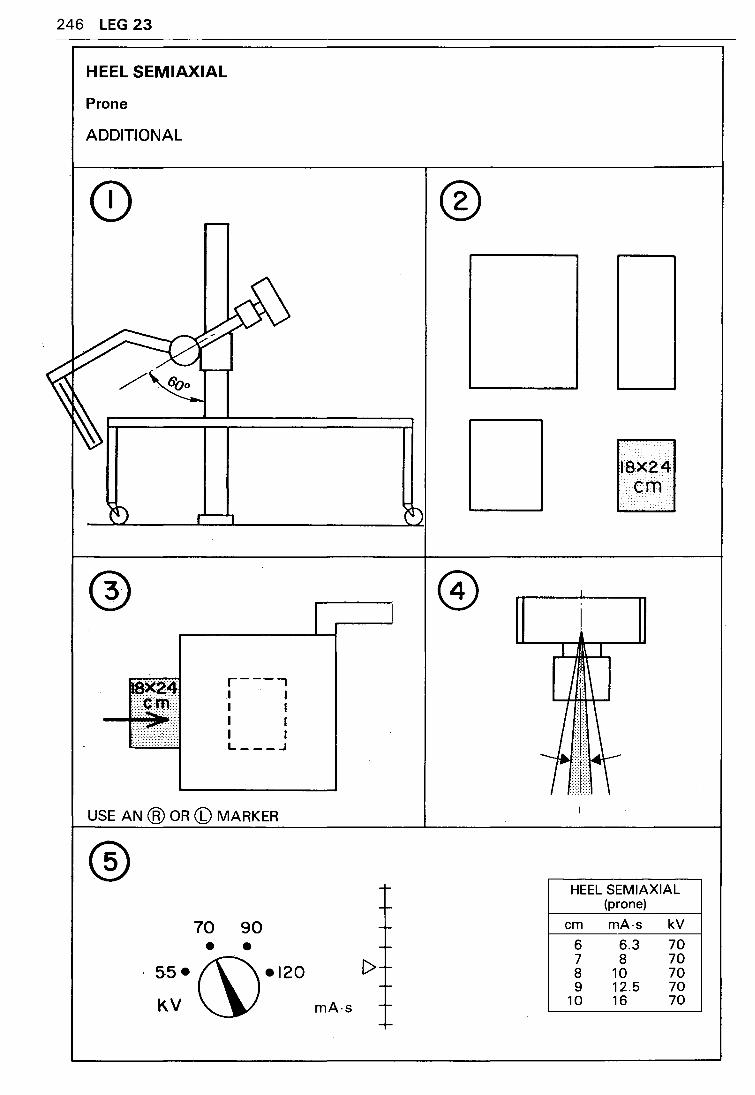
246 LEG 23
HEEL SEMIAXIAL
Prone
ADDITIONAL
Q)
r---, I I I I I I I I L---.J
USE AN @ OR (b) MARKER
® 70 90 • •
55. (\"\ •120
I
KV ~ mA·s
C>
®
HEEL SEMIAXIAL (prone)
em mA·s kV
6 6.3 70 7 8 70 8 10 70 9 12.5 70
10 16 70
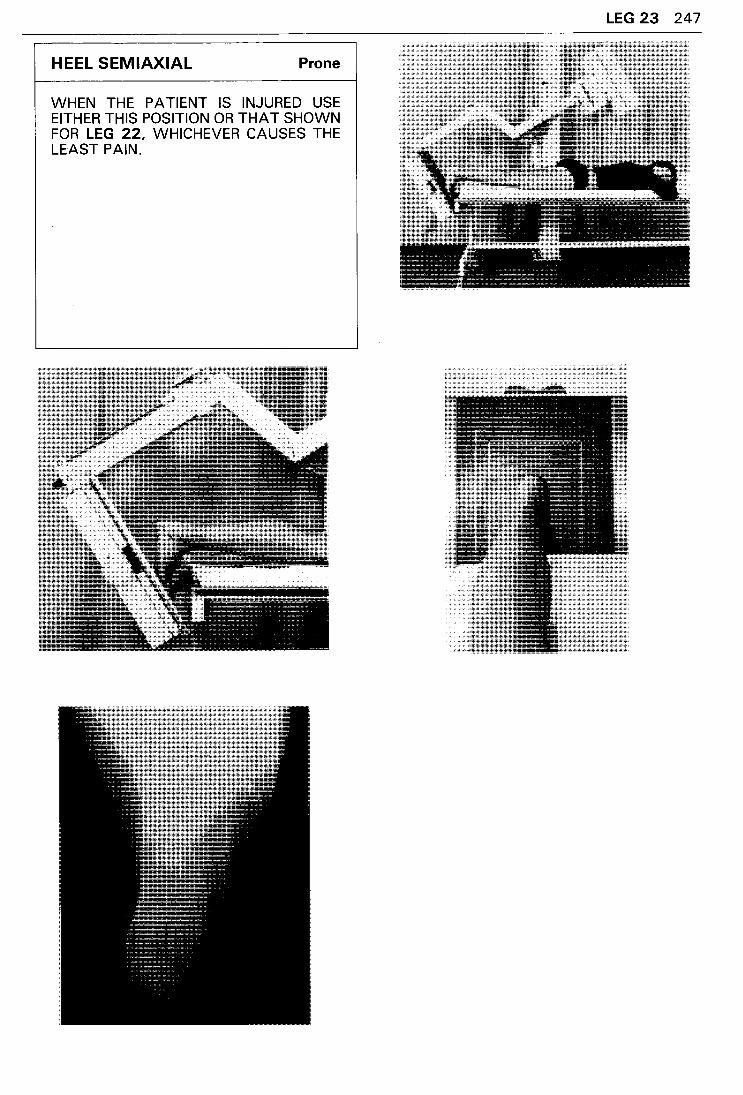
HEEL SEMIAXIAL Prone
WHEN THE PATIENT IS INJURED USE EITHER THIS POSITION OR THAT SHOWN FOR LEG 22, WHICHEVER CAUSES THE LEAST PAIN.
LEG 23 247
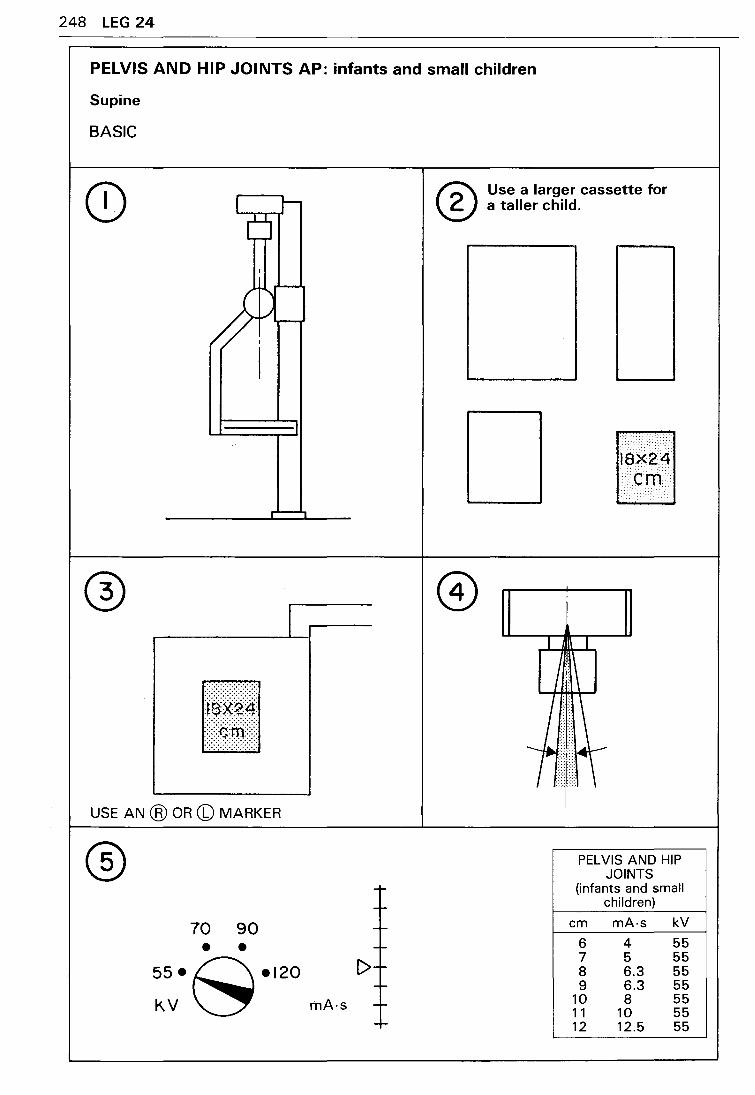
248 LEG 24
PELVIS AND HIP JOINTS AP: infants and small children
Supine
BASIC
I 1-
CJ ®
_r---]_
I
I USE AN @ OR (b) MARKER
® ---
70 90 --• • -
[>--55·s·l20 --KV mA·s --
-I-
Use a larger cassette for a taller child.
I
I I
PEL VIS AND HIP JOINTS
(infants and small children)
em mA·s kV
6 4 55 7 5 55 8 6.3 55 9 6.3 55
10 8 55 1 1 10 55 12 12.5 55
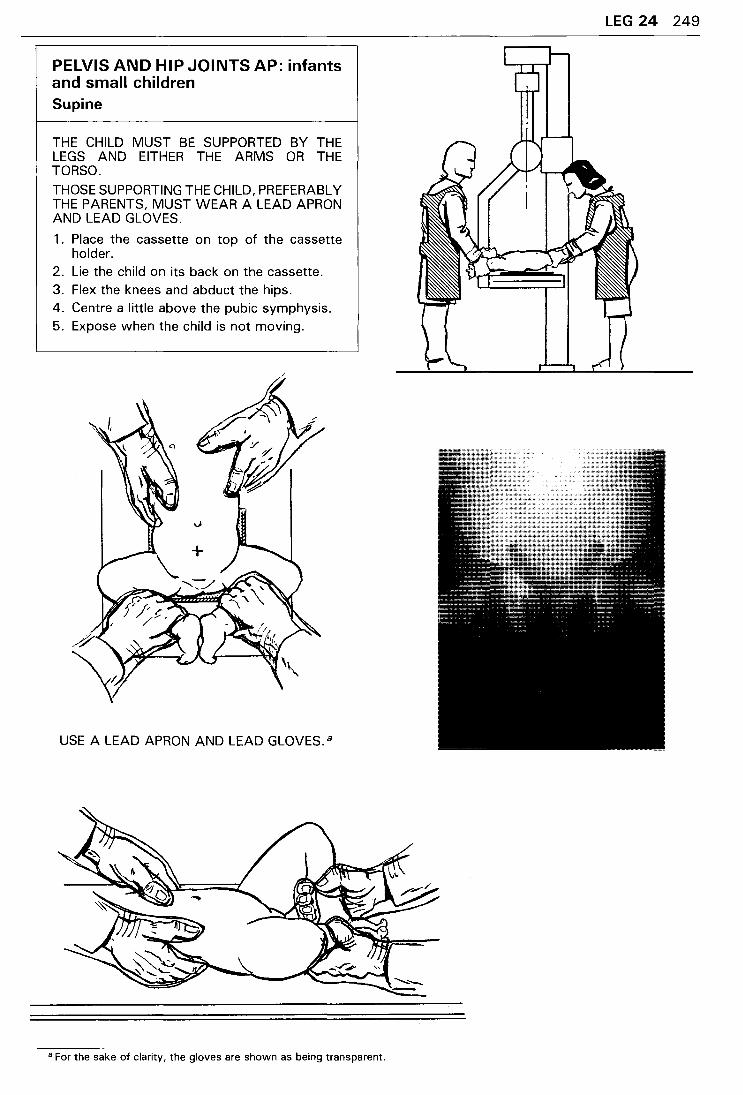
PELVIS AND HIP JOINTS AP: infants and small children Supine
THE CHILD MUST BE SUPPORTED BY THE LEGS AND EITHER THE ARMS OR THE TORSO.
THOSE SUPPORTING THE CHILD, PREFERABLY THE PARENTS, MUST WEAR A LEAD APRON AND LEAD GLOVES.
1. Place the cassette on top of the cassette holder.
2. Lie the child on its back on the cassette. 3. Flex the knees and abduct the hips. 4. Centre a little above the pubic symphysis. 5. Expose when the child is not moving.
USE A LEAD APRON AND LEAD GLOVES. a
8 For the sake of clarity, the gloves are shown as being transparent.
LEG 24 249
EXPOSURE TABLES
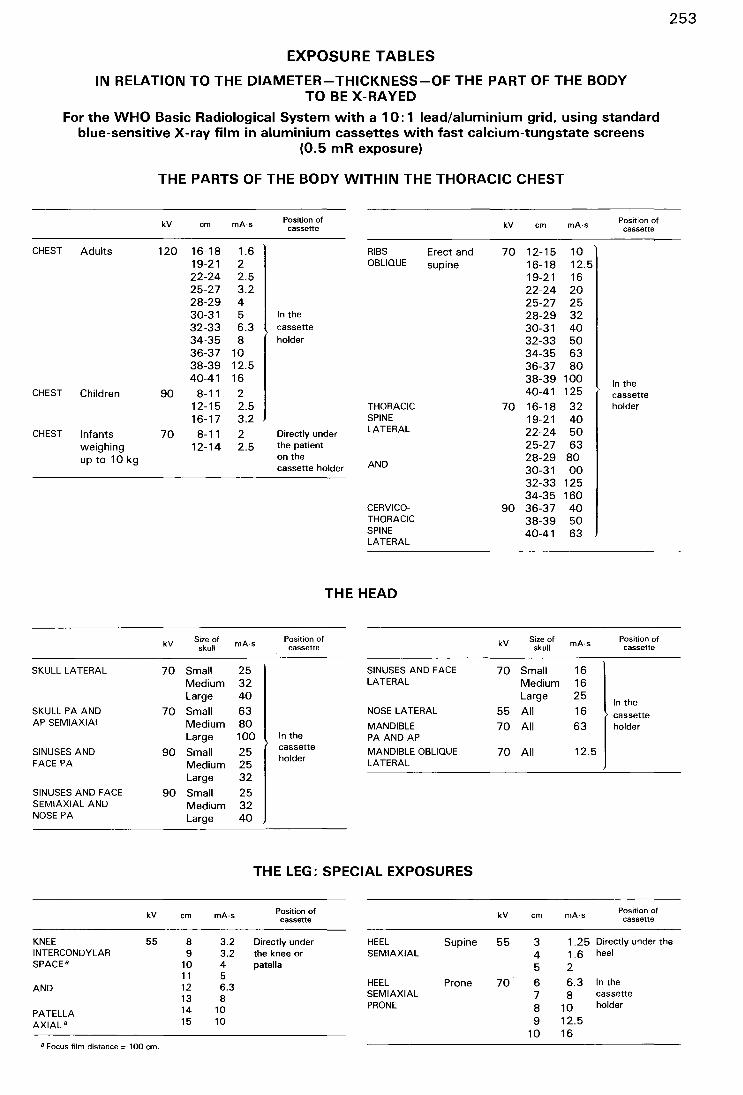
EXPOSURE TABLES
IN RELATION TO THE DIAMETER-THICKNESS-OF THE PART OF THE BODY TO BE X-RAYED
For the WHO Basic Radiological System with a 1 0: 1 lead/aluminium grid, using standard blue-sensitive X-ray film in aluminium cassettes with fast calcium-tungstate screens
(0.5 mR exposure)
THE PARTS OF THE BODY WITHIN THE THORACIC CHEST
kV em mA-s Position of kV mA·s Position of
cassette em cassette
CHEST Adults 120 16-18 1.6 RIBS Erect and 70 12-15 10 19-21 2 OBLIQUE supine 16-18 12.5 22-24 2.5 19-21 16 25-27 3.2 22-24 20 28-29 4 25-27 25 30-31 5 In the 28-29 32 32-33 6.3 cassette 30-31 40 34-35 8 holder 32-33 50 36-37 10 34-35 63 38-39 12.5 36-37 80 40-41 16 38-39 100 In the
CHEST Children 90 8-11 2 40-41 125 cassette 12-15 2.5 THORACIC 70 16-18 32 holder 16-17 3.2 SPINE 19-21 40
CHEST Infants 70 8-11 2 Directly under LATERAL 22-24 50
weighing 12-14 2.5 the patient 25-27 63
up to 10 kg on the 28-29 80 cassette holder AND
30-31 00 32-33 125 34-35 160
CERVICO- 90 36-37 40 THORACIC 38-39 50 SPINE 40-41 63 LATERAL
THE HEAD
kV Size of mA-s Position of kV Size of mA-s Position of
skull cassette skull cassette
SKULL LATERAL 70 Small 25 SINUSES AND FACE 70 Small 16 Medium 32 LATERAL Medium 16 Large 40 Large 25
In the SKULL PA AND 70 Small 63 NOSE LATERAL 55 All 16 cassette AP SEMIAXIAL Medium 80 MANDIBLE 70 All 63 holder
Large 100 In the PA AND AP
SINUSES AND 90 Small 25 cassette MANDIBLE OBLIQUE 70 All 12.5
FACE PA Medium 25 holder LATERAL
Large 32
SINUSES AND FACE 90 Small 25 SEMIAXIAL AND Medium 32 NOSE PA Large 40
THE LEG: SPECIAL EXPOSURES
kV em mA-s Position of cassette kV em mA-s Position of
cassette
253
KNEE 55 8 3.2 Directly under HEEL Supine 55 3 1.25 Directly under the INTERCONDYLAR 9 3.2 the knee or SEMIAXIAL 4 1.6 heel SPACE• 10 4 patella 5 2
11 5 Prone 70 6 6.3 In the
AND 12 6.3 HEEL
13 8 SEMIAXIAL 7 8 cassette
14 10 PRONE 8 10 holder PATELLA AXIAL• 15 10 9 12.5
10 16 a Focus film distance;;; 100 em.
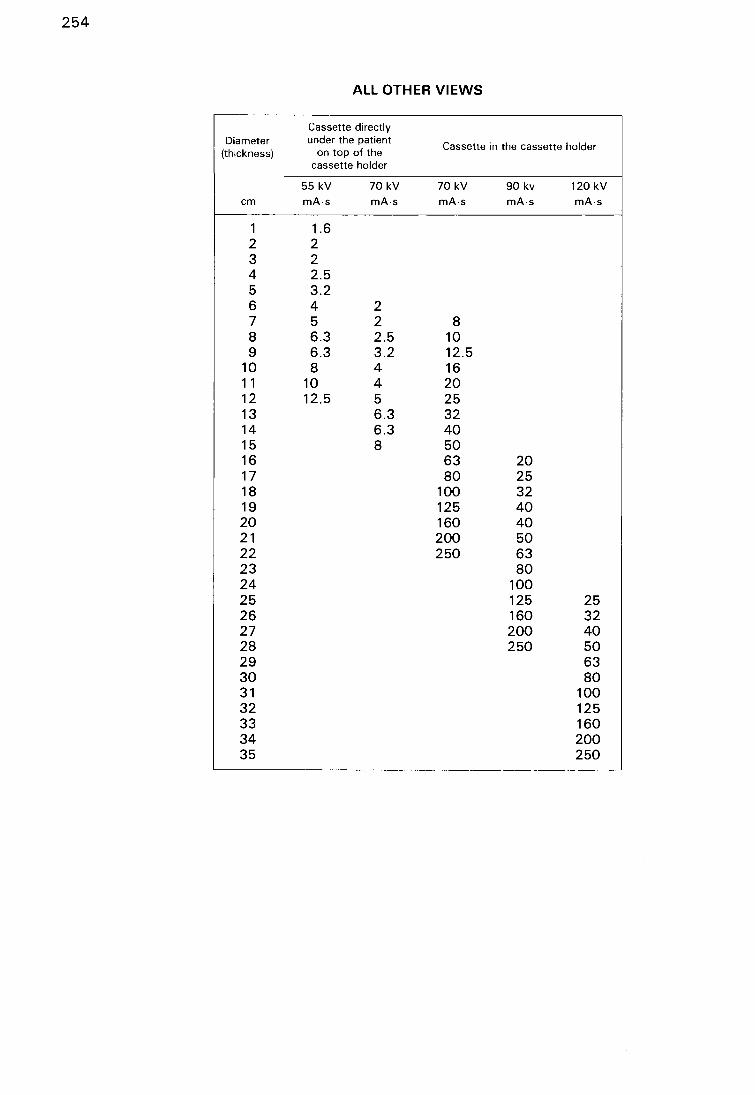
254
ALL OTHER VIEWS
Cassette directly Diameter under the patient
Cassette in the cassette holder (thickness) on top of the
cassette holder
55 kV 70 kV 70 kV 90 kv 120 kV
em mA·s mA·s mA·s mA·s mA·s
1 1.6 2 2 3 2 4 2.5 5 3.2 6 4 2 7 5 2 8 8 6.3 2.5 10 9 6.3 3.2 12.5
10 8 4 16 11 10 4 20 12 12.5 5 25 13 6.3 32 14 6.3 40 15 8 50 16 63 20 17 80 25 18 100 32 19 125 40 20 160 40 21 200 50 22 250 63 23 80 24 100 25 125 25 26 160 32 27 200 40 28 250 50 29 63 30 80 31 100 32 125 33 160 34 200 35 250
WHO publications may be obtained, direct or through booksellers, from: ALGERIA: Entreprise nationale du Livre (ENAL). 3 bd Zirout Youcef. MALAWI: Malawi !look Service, P.O. Box 30044, Chichiti.
ALGIERS OLANTYRE J ARGENTINA: Carlos Hirsch SRL. Florida 165, Galerias Gilemes, Escri- MALAYSIA: The WHO Programme Coordinator, Room 1004. lOth
torio 453/465. IJUENOS AIRES Floor, Wisma Lim Foo Yong (formerly Fitzpatrick's Building), Jalan AUSTRALIA: Hunter Publications. 58A Gipps Street. COLI.INGWOOD. Raja Chulan, KUALA LUMPUR 05-10; P.O. Box 2550, KUALA
VIC 3066- Australian Government Publishing Service (.Had order LUMPUR 01--{)2 - Parry's Book Center, K. L. Hilton Hotel, Jln. w/es), P.O. Box 84, CANBERRA A.C.T. 2601; or over the counter /r01n Treacher. P.O. Box 960, KUALA LUMPUR Australian Government Publishing Service Bookshops at: 70 A.linga 1\IALDIVES: see India, WHO Regional Office Street. CANBERRA CITY A.C.T. 2600; 294 Adelaide Street. BRISBANE. MEXICO: Libreria lntemacional, S.A. de C. V .. av. Sonora 206, 06100-Queensland 4000; 347 Swanston Street. MELBOURNE. VIC 3000; MEXICO. D.F. 309 Pitt Street, SYDNEY, N.S.W. 2000; Mt Newman House, MONGOLIA: see India, WHO Regional Office 200 St. George's Terrace, PERTH. WA 6000: Industry House, 12 Pirie MOROCCO: Editions La Pone, 281 avenue Mohammed V, RABAT Street, ADELAIDE. SA 5000; 156-162 Macquarie Street, HOBART. TAS 7000 _ R. Hill & Son Ltd, 608 St. Kilda Road. MELBOURNE. MOZAMBIQUE: INLD, Caixa Postal4030, MAPUTO VIC 3004: Lawson House, 10-12 Clark Street, CROW'S NEST. NEPAL: see India, WHO Regional Office NSW 2065 NETHERLANDS: Medical Books Europe BY. Noorderwal 38, 7241 IlL
AUSTRIA: Gerold & Co .. Graben 31, lOll VIENNA I LOCHEM BAHRAIN: United Schools International, Arab Regional Office, P.O. NEW ZEALAND: Government Printing Office. Publications Section,
Box 726. BAHRAIN Mulgrave Street, Private Bag, WELLINGTON 1; Walter Street, WEL-BANGLADESH: The WHO Programme Coordinator, G.P.O. Box 250. LING TON: World Trade Building, Cubacade, Cuba Street. WELLING-
DHAKA 5 TON. Gm•ernment Bookshops at. Hannaford Bunon Building, Rutland BELGIUM: For books: Office International de Librairie s.a., avenue Mar- Street. Private Bag, AUCKLAND; 159 Hereford Street, Private Bag,
nix 30, 1050 BRUSSELS. For periodicals and subsaiplions: Office Inter- CHRISTCHURCH: Alexandra Street, P.O. llo> 857, HAMIL TON; T & G national des Periodiques, avenue Mamix 30, 1050 BRUSSELS- Sub- Building, Princes Street, P.O. Box 1104, DUNEDIN- R. Hill & Son, scnptivns to World llealth only: Jean de lannoy, 202 avenue du Roi, Ltd, Ideal House, Cnr Gillies Avenue & Eden St., Newmarket, AUCK-1060 BRUSSELS LAND I
BHUTAN: see India, WHO Regional Office NIGERIA: University Bookshop Nigeria Ltd, University of lbadan, BOTSWANA: Botsalo Books (Ply) Ltd .. P.O. Box 1532. GABORONE lBADAN BRAZIL: Biblioteca Regional de Medicina OM SlOPS, Unidade de Venda NORWAY: J. G. Tanum A/S, P.O. Box 1177 Scntrum. OSLO I
de Publica~oes, Caixa Postal 20.381, Vila Clementi no, 04023 SAO PAKISTAN: Mirza Book Agency, 65 Shahrah-E-Quaid-E-Azam, P.O. PAULO, S.P. Box 729, LAHORE 3; Sasi Limited, Sasi Centre, G. P.O. Box 779, 1.1.
BURMA: see India, WHO Regional Office Chundrigar Road. KARACHI CANADA: Canadian Public Health Association, 1335 Carling Avenue. PAPUA NEW GUINEA: The WHO Programme Coordinator, P.O.
Suite 210, OTTAWA, Ont. KlZ 8N8. (Tel: (613) 725-3769. Box 646, KONEDOBU
Telex: 21--{)5}-3841) PHILIPPINES: World Health Organization, Regional Office for the Wes-CHINA: China National Publications lmpon & bpon Corporation. P.O. tern Pacific, P.O. Box 2932, MANILA_ The Modem Book Company
c:;~~~·: ~,~:M~-~~E~.~:~ 1722, NICOSIA Inc .. P.O. Box 632, 922 Rizal Avenue, MANILA 2800 CZECHOSLOVAKIA: Ania, Ve Smeckach 30. 11127 PRAGUE 1 POLAND: Skladnica Ksiegarska, ul Mazowiecka 9, 00052 WARSAW (ex-DEMOCRATIC PEOPLE'S REPUBLIC OF KOREA: see India, WHO cept periodicals}- BKWZ Ruch, ul Wronia 23,00840 WARSAW (per-
Regional Office iodicals onlv) DENMARK: Munksgaard Export and Subscription Service, Norre PORTUGAL.; Livraria Rodrigues, 186 Rua da Ouro, LISBON 2
Segade 35, 1370 COPENHAGEN K (Tel: -+45 I 12 85 70) REPUBLIC OF KOREA: The WHO Programme Coordinator, Central ECUADOR: Libreria Cientifica S.A., P.O. Box 362. Luque 223, GUAYA- P.O. Box 540, SEOUL
QUIL SIERRA LEONE: Njala University College Bookshop (University ofSier-EGYPT: Osiris Office for Books and Reviews, 50 Kasr El Nil Street, ra Leone). Private Mail Bag.. FREETOWN
CAIRO SINGAPORE: The WHO Programme Coordinator, 144 Moulmein Road, FIJI: The WHO Programme Coordinator, P.O. Box 113, SUVA SINGAPORE 1130; Newton P.O. Box 31, SINGAPORE 9122- Select FINLAND: Akateeminen Kirjakauppa, Keskuskatu 2. 00101 Books (Pte) Ltd, Tanglin Shopping Centre, 19 Tanglin Road 03-15,
HELSINKI 10 SINGAPORE 10 FRANCE: Librairie Arnette, 2 rue Casimir-Dclavigne, 75006 PARIS SOUTH AFRICA: Contact major hook stores GABON: Librairie Universitaire du Gabon, B.P. 3881. LIBREVILLE SPAIN: Ministerio de Sanidad y Consumo, Scrvicio de Publicacicnes, GERMAN DEMOCRATIC REPUBLIC: Buchhaus Leipzig, Post- Pasco del Prado 18-20, MADRID-14 _ Comercial Atheneum S.A.,
fach 140, 701 LEIPZIG Consejo de Ciento IJI.l-136, 08015 BARCELONA: General Moscar-GERMANY, FEDERAL REPUBLIC OF: Govi-Verlag GmbH, Ginnhei- d6 29, MADRID 20 _ Libreria Diaz de Santos, Lagasca 95 y Maldon-
merstrasse 20, Postfach 5360, 6236 ESCHBORN - W. E. Saarbach ado 6, MADRID 6: Balmes 417 y 419, 08022 BARCELONA GmbH, Tradis Diffusion. Neue Eiler Strasse 50, Postfach 900369, SRI LANKA: see India, WHO Regional Office 5000 COLOGNE I - Buchhandlung Alexander Hom, Friedrich-strasse 39, Postfach 3340, 6200 WlESBADEN SWEDEN: For books: Aktiebolaget CE. Fritzes Kung!. Hovbokhandel,
GHANA: Fides Entreprises, P.O. Box 1628. ACCRA Regeringsgatan 12. 103 27 STOCKHOLM. For periodicals: Wennergren-GREECE: G. C Eleftheroudakis S.A .. Librairie internationale, rue Ni- Williams All. Box 30004, 104 25 STOCKHOLM
kis 4, ATHENS (T. 126) SWITZERLAND: Medizinischer Verlag Hans Huber, l.iinggass HAITI: Ma~ Bouchereau, Librairie cc A Ia Caravelle )), Boite postale Ill-B. Strasse 76, 3012 BERN 9
PORT-AU-PRINCE THAILAND: see India, WHO Regional Office HONG KONG: Hong Kong Government Information Services, Beacons- TUNISIA: Societe Tunisienne de Diffusion, 5 avenue de Canhage.
field House, 6th Floor, Queen's Road. Central, VICTORIA TUNIS HUNGARY: Kultura, P.O.B. 149, BUDAPEST 62 - Akademiai Kony- TliRKEY: Haset Kitapevi, 469 lstiklal Caddesi, Beyoglu, ISTANBUL
vesbolt, Vaci utca 22, BUDAPEST V UNITED KINGDOM: H.M. Stationery Office: 49 High Holbom, LON-ICELAND: Snacbjern Jonsson & Co .. P.O. Box 1131, Hafnarstraeti 9, OON WCIV 6HB: 13 a Castle Street, EDINBURGH EH2 JAR; 80 Chi-
REYKJAVIK chester Street, BELFAST BTl 4JY; Brazennose Street. MANCHESTER INDIA: WHO Regional Office for South-East Asia, World Health House, M60 8AS: 258 Broad Street, BIRMINGHAM Ill 2HE; Southey House,
lndraprastha Estate. Mahatma Gandhi Road, NEW DELHI 110002 Wine Street, BRISTOL BSl 2BQ. All mall orders should be sent to: INDONESIA: P.T. Kalman Media Pusaka, Pusat Perdagangan Senen. HMSO Publications Centre, 51 Nine Elms Lane, LONDON SW8
Block I, 4th Floor. P.O. Box 3433/Jkt, JAKARTA 5DR IRAN (ISLAMIC REPUBLIC OF): Iran University Press, 85 Park UNITED STATES OF AMERICA: Copies <!f'ind/vldua/ publications (not
Avenue. P.O. Do~ 54/551, TEHERAN wbscriptions): WHO Publications Center USA, 49 Sheridan Avenue, IRAQ: Ministry oflnformation, National House for Publishing, Distribut- ALBANY, NY 12210. Suhscription orders and correspondence concerning
ing and Advertising, BAGHDAD subscriptions should be addressed to the World Health Organization, IRELAND: TDC Publishers. 12 Nonh Frederick Street, DUBLIN I Distribution and Sales, 1211 GENEVA 27, Switzerland. Publications are
(Tel: 74483>-749677) a/so a•·ai/ab/e !fom the United Nations Bookshop, NEW YORK. ISRAEL: Heiliger & Co .. 3 Nathan Strauss Street, JERUSALEM 94227 NY 10017 (retail onlri ITALY: Edizioni Minerva Medica, Corso Bramante 83-85, 10126
TURIN: Via Lamarmora J, 20!00 MILAN URUGUAY: Libreria Agropecuaria S.R.L.. Casilla de Correa 1755, Alzai-
JA1~~3:l Maruzen Co. Ltd, P.O. Bo~ 5050. TOKYO International. u:~~\3f~:; r~~;,;~nvt~E{.~\'SR requiring Russian editions: Komsomolskij
JORDAN: Jordan Book Centre Co. Ltd., University Street, P.O. Bo~ 301 prospekt 18, Medicinskaja Kniga, MOSCOW- For readers outside the (Al-Jubeiha), AMMAN L'SSR requiring Russian editions. Kuzneckij most 18, Meldunarodnaja
KUWAIT: The Kuwait Bookshops Co. Ltd, Thunayan Al-Ghanem Bldg. Kniga. Moscow G-200 P.O. Box 2942, KUWAIT VENEZUELA: Libreria del Este, Apartado 60.337, CARACAS 106-
LAO PEOPLE'S DEMOCRATIC REPUBI.IC: The WHO Programme Libreria Medica Paris, Apanado 60.681, CARACAS 106 Coordinator, P.O. Box 343. VIENTIANE YUGOSLAVIA: Jugoslovenska Knjiga, Terazije 27/11, 11000
LEBANON: The Levant Distributors Co. S.A.R.L.. Box 1181. Makdassi BELGRADE Street. Hanna Bldg. BEIRUT ZAIRE: Librairie universitaire, avenue de Ia Paix. N° 167, B.P. 1682,
LUXEMBOURG: Librairie du Centre. 49 bd Royal. LUXEMBOURG KINSHASA I
Special terms for developing countries are obtainable on application to the WHO Programme Coordinators or WHO Regional Offices listed above or to the World Health Organization, Distribution and Sales Service, 1211 Geneva 27, Switzerland. Orders from countries where sales agents have not yet been appointed may also be sent to the Geneva address, but must be paid for in pounds sterling, US dollars, or Swiss francs. Unesco book coupons may also be used.
Prices are subject to change without notice. C/1 /85
This manual was prepared with the collaboration of an international group of radiologists with wide experience in both developed and developing countries. As one of a series of three designed to help those working at the primary health care level with the WHO Basic Radiological System, it is intended for the use of operators who may have little prior knowledge or experience of X-ray equipment.
No attempt is made to teach the theory of radiography; rather, diagrams, photographs, and instructions to the operator are presented. Grouped under broad headings-chest, abdomen, head, spine, arm, and leg-they illustrate the position of the X-ray equipment, the size and position of the cassette, the collimator size, the position of the patient, and the desired result, for basic radiographic techniques that will allow more than 90% of the problems diagnosable through radiography to be routinely examined.
Price: Sw. fr .. 10.-