Embed Size (px)
Citation preview

3DForce4 MX440-8X SeriesnVIDIA GeForce4 MX 440 with AGP8X
User’s Manual
Version 1.00
Copyright © 2003 Jaton Corporation, USA

2
Contents
INTRODUCTION .........................................................4
FEATURES ................................................................5
AGP BUS INTERFACE .....................................................5
GRAPHICS PROCESSOR UNIT (GPU) ..................................5
PERFORMANCE...............................................................5
COMPATIBILITY ..............................................................6
HDTV/DVD PLAYBACK .................................................6
SYSTEM REQUIREMENT............................................7
CHECK LIST...............................................................7
HARDWARE DESCRIPTION ........................................8
DISPLAY DEVICES OUTPUT ......................................9
Device Output Connection (TVout).............................9
Device Output Connection (Dual RGB out)................ 10
3DForce4 MX440-8X-64TV’s Device Output Connection10
HARDWARE INSTALLATION ..................................... 11
INSTALLATION PROCEDURES........................................... 11
STEPS: ...................................................................... 11
SOFTWARE INSTALLATION .................................... 12
ÿÿ WINDOWS 98 DRIVER INSTALLATION ...................... 13

3
ÿÿ WINDOWS ME DRIVE INSTALLATION ....................... 17
ÿÿ MICROSOFT WINDOWS NT™4.0 ........................... 21
ÿÿ WINDOWS 2000 DRIVER INSTALLATION................... 25
ÿÿ WINDOWS XP DRIVER INSTALLATION...................... 29
TECHNICAL ASSISTANCE ........................................ 32
FREQUENTLY ASKED QUESTIONS (FAQ) ........................... 32
PINOUT AND SYNC FREQUENCIES.......................... 35
ANALOG COLOR DISPLAY PINOUTS (DB 15)...................... 35
CONVERSION TABLE: PIN ADAPTERS ................................ 35
9-TO-15 PIN CONVERSION TABLE.................................... 36
TECHNICAL SUPPORT .................................................... 36
LIMITED WARRANTY................................................ 39
OTHER LIMITS. ............................................................. 39
EXCLUSIVE OBLIGATION. ............................................... 40
OTHER STATEMENTS..................................................... 40
TERMS AND CONDITIONS. ............................................... 40
SERVICES AGREEMENT: ................................................. 41
ENTIRE OBLIGATION...................................................... 41
REDUCING WARRANTY CLAIM REJECTIONS............ 42

4
IntroductionIntroductionThe 3DForce4 MX440-8X Series video accelerators areexcellent 2D/3D multimedia video adapters for AGP 8X localbus desktop PCs’. Based on nVIDIA GeForce4 MX440-8Xcore technology, built-in with 64MB or 128MB DDR SDRAMmemory module, these video cards will provide multipledisplay outputs onboard for TVout (Analog and Digital) orDual RGBout (Twin) all together in optional.
As the previously core technology from nVIDIA, theGeForce4 MX440-8X Graphics Processing Unit (GPU)shakes up the gaming industry with its extremelyperformance, unusual visual effects, and speedy framerates-injecting life into the artificial world of computer-generated graphics.
The significant enhancement is the new high quality imagecontrol. The nVIDIA GeForce4™MX GPU has added two morerendering pipelines and the DirectX 8-compliant T&L unit intoits graphic engine, which enables the maximum flexibility andhigh quality 4Xs mode control capabilities; gathered with thedata bus Double Data Rate RAM (DDR) circuit, the PC userscan ultimately enjoy the virtual environment of 3D scenes,and ambiance textures appear photo-realistic and customlighting heightens at a highest resolution with astonishinglyfast frame refresh rate.
Another feature of the 3DForce4 MX440-8X Series is the videoaccelerator, which integrates the HDVP (High Definition VideoProcessor) and DVD (Digital Versa Display) for videoplayback with higher definitions at greatly increased framerates.
A leverage of the combination of hardware and softwaretechnology, nVIDIA GeForce4™ MX GPU will provide many ofthe new features and benefits you look for in your desktopcomputing as well as the best performance, combining usualquality and exceeding crisp resolution. With all of this, the3DForce4 MX440-8X Series video cards bring a new level of

5
graphics accomplishment and flexibility to the mainstreamdesktop PC market!
Features
AGP Bus Interface
• AGP 8x/4x/2x compatible
• AGP 3.0 supported
Graphics Processor Unit (GPU)
• 256-bit graphics engine
• 64MB/128MB DDR SDRAM memory access bus.
• Integrated dual 270 MHz RAMDACs drives CRTdisplay
• 2 dual 128bit pixel pipelines rendering
• Surface engine for high-order surfaces and patches
• Programmable Vertex Shader
• Programmable Pixel Shader
• HRAA - high - resolution anti-aliasing
• Integrated hardware transform engine
• Integrated hardware lighting engine
• DirectX and S3TC texture compression
• Dual cube environment mapping capability
• Hardware accelerated real-time shadows
performance
• Up to 1.1billion AA samples per second fill rate
6
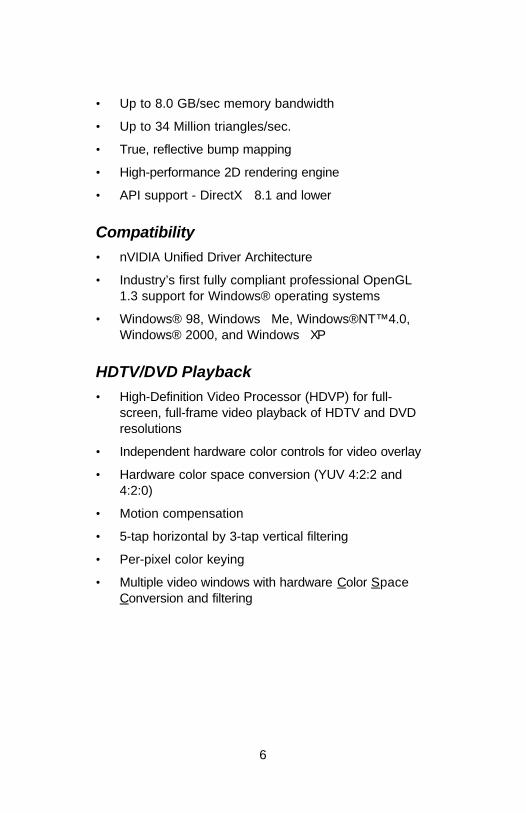
• Up to 8.0 GB/sec memory bandwidth
• Up to 34 Million triangles/sec.
• True, reflective bump mapping
• High-performance 2D rendering engine
• API support - DirectX 8.1 and lower
Compatibility
• nVIDIA Unified Driver Architecture
• Industry’s first fully compliant professional OpenGL1.3 support for Windows® operating systems
• Windows® 98, WindowsMe, Windows®NT™4.0,Windows® 2000, and WindowsXP
HDTV/DVD Playback
• High-Definition Video Processor (HDVP) for full-screen, full-frame video playback of HDTV and DVDresolutions
• Independent hardware color controls for video overlay
• Hardware color space conversion (YUV 4:2:2 and4:2:0)
• Motion compensation
• 5-tap horizontal by 3-tap vertical filtering
• Per-pixel color keying
• Multiple video windows with hardware Color SpaceConversion and filtering

7
System Requirement• Intel Pentium® II, III or P4, or compatible system with
AGP 2x/4x/8x Bus Extension Slot
• CD-ROM drive, Double speed or faster
• Hard Drive with at least 10MB Free space
• MS Windows® 98/Me/NT 4.0/2000/XP operatingsystems
Check List• 3DForce4 MX440-8X-64TV or 3DForce4 MX440-8X-
64Twin, or 3DForce4 MX440-8X-128TV, or 3DForce4MX440-8X-128Twin Multimedia Accelerator
• Software & Documents CD
• Quick Start Guide (Printed)
• TVout convert cable may vary in package, whichdepends the offering from manufacturer. Please, seethe PCB Layout diagrams below for details.

8
Hardware Description
nVIDIAGeForce4
DB 15 VGA(RGB out)
Display Memory
Bracket
Width
Height
Y200
Product Name / PCB Version
3DForce4 MX440-8X-64Twin
3DForce4 MX440-8X-128Twin
82198D
82198D
Core Chipset PCB Size Memory / Size
nVIDIA GeForce4 MX440-8X
nVIDIA GeForce4 MX440-8X
W = 6.6" x H = 2.587"
W = 6.6" x H = 2.587"
8M*16 DDR SDRAM x 4
16M*16 DDR SDRAM x 4
64MB
128MB
AGP Bus 2x 4x 8x
Special Bracket(s) Alternative
P223 DB 15 VGA + DB 15 VGA L = 3.118", W = 0.725" For low profile PC use only
DB 15 VGA(RGB out)
8
1
15
16
CON4
The second RGBout connector is portable component with a shortlyribbon data cable that has plugged on CON4 as default bymanufacturer. Do not unplug it if unnecessary. For some reasons, ifyou try to re-plugging the cable with connector on CON4, make sureRED line on edge of cable is align to the PIN 1 which labeled on CON4.Otherwise, the video signal may not straight throughout approriatelyor, it may damages the video components onboard.
nVIDIAGeForce4
DB 15 VGA(RGB out)
Display Memory
Bracket
Width
Height
Y200
Product Name / PCB Version
3DForce4 MX440-8X-64TV
3DForce4 MX440-8X-128TV
82198D
82198D
Core Chipset PCB Size Memory / Size
nVIDIA GeForce4 MX440 - 8X
nVIDIA GeForce4 MX440 - 8X
W = 6.6" x H = 2.587"
W = 6.6" x H = 2.587"
8M*16 DDR SDRAM x 4
16M*16 DDR SDRAM x 4
64MB
128MB
AGP Bus 2x 4x 8x
Special Bracket(s) Alternative
P203 DB 15 VGA + MD 4Pin + RCA Composite L = 3.118", W = 0.725" For low profile PC use only
MD 4pin(TVout)
RCAComposite
TVout ports built-in onboard that Do Not need any converter cables from manufacturer.

9
Alternative brackets for low profile system are sold separately.Please go to www.togopc.com for detail informatin.
MD 4pin(TVout)
nVIDIAGeForce4
MX 440Display Memory
Bracket
DB 15 VGA(RGB out)
Width
Height
Y200
Product Name / PCB Version
3DForce4 MX440-8X-64TV 82198B
Core Chipset PCB Size Memory / Size
MX440SE with AGP8X W = 6.6" x H = 2.587" 4M*32 DDR SDRAM x 4 64MB
AGP Bus 4x 8x
Special Bracket(s) Alternative
P201 DB 15 VGA + MD 4Pin L = 3.118", W = 0.725" For low profile PC use only
MD 4Pin TVout port built-in onboard which has bundled an 3” converter cable for MD 4Pin to RCA Composite frommanufacturer.
Display Devices OutputDisplay Devices OutputDevice Output Connection (TVout)
Plate
TV set
DB 15 VGAConnector
S_VideoConnector
RCA Composite Connector
CRT Monitor

10
Device Output Connection (Dual RGB out)
AGP Plate
DB 15 VGA Connector
DB 15 VGA Connector
CRT Monitor 2
CRT Monitor 1(Default output Connector)
(Additional output Connector)
Device Output Connection (PCB revision - 82198B)
Plate
TV set
PC ComputerDB 15 VGAConnector
1
S_VideoConnector
Composite RCA
Convert Cable
2
3
MD 4Pin
Note: TVout convert cable that describes above is bundlewithin the package from manufacturer.

11
Hardware Installation
Installation Procedures
!! WARNING !!
Discharge static electricity bytouching the GROUND such as
metal part of your caseconnected with good power
ground before you handle theelectronic circuit boards.
The manufacturer assumes no liability for any damage,caused directly or indirectly, by improper installation of anycomponents by unauthorized service personnel. If you do notfeel comfortable performing the installation, consult with aqualified computer technician.
Steps:1. Turn OFF all powers to your system, including any
peripherals (printer, external drives, modem, etc.).
2. Disconnect the power cord and the monitor cable from theback of the computer.
3. Unfasten the cover mounting screws on your system andremove the system cover. Refer to your system usermanual for instructions to determine the location of themounting screws.
4. Remove the retaining screw that holds the slot cover inplace. Slide the slot cover out and put the screw aside(you will need it to secure the adapter).
5. To install the adapter in AGP expansion slot, carefully lineup the gold-fingered edge connector on the adapter directlyabove the expansion slot connector on the motherboard.Then press the adapter into place, completely. Use the

12
(remaining) screw you removed to secure the adapter-retaining bracket in place.
6. Replace the computer cover. Secure the cover with themounting screws you removed in Step 3.
You have now completed the installation of your new graphicsadapter on your system.
< Upgrade Steps:
To add or change your video adapter to an existingsystem, you may proceed a few steps before you installthe new hardware and software(video display driver). Thefollowing are some of the considerations:
1. To change a new adapter, please remove the existingvideo driver, or replace it with a SVGA driver fromWindows®98/Me system before you remove theexisting hardware.
2. To add a new adapter, ensure the mainboard that hasavailable IRQ for new devices, and there is no conflictbetween the others.
3. If you try adding this video adapter to an ALL-IN-ONEmainboard (which video port built-in already), then youmust disable that port first. Otherwise, that will be aproblem for the new video adapter setup.
4. The driver installation for system upgrade is as thesame as below, if an error occurs when you proceedstep 1,2 or 3, please consult with your system’sdealer or the existing hardware manufacturerssupport.
Software InstallationSoftware Installation

13
ÿ Windows 98 Driver Installation
Upgrade video adapter to an existing system.(Windows has been pre-loaded)
1. Select [Next] to install Standard VGA GraphicsAdapter at Add New Hardware Wizard screen.
2. Check [Search for the best driver for your device] thenselect [Next].
3. Insert the software’s CD.
4. Check [Specify a location:] ,Under that enterD:\Win9x, then select [Next].
5. Select [Next] to install “3DForce4 MX440-8X Series,NVIDIA GeForce4 MX 440 with AGP8X” driver.
6. Select [Finish] to restart the computer.
To a new system:
1 SELECT the “Display” icon from control panel and thentab on “Settings” screen.
1. Select Advanced at selection bar.
2. Click on Adapter tab screen.
3. Click the Change button.
4. Click the Next button at Update Device Driver Wizard.
5. Click the Next button.
6. Select Display a list of the drivers in a specificlocation... Then click the Next.
7. Insert the Software’s CD then Click the Have Diskbutton.

14
8. Under Copy manufacturer’s file from statemententer D:\Win9x ,click the OK button. (Where D is theletter of your CD ROM drive, typically, D or E Drives,etc.)
9. Select ”3DForce4 MX440-8X Series , NVIDIAGeForce4 MX 440 with AGP8X”, then Click the OKbutton.
10. Click the Next button.
11. Click the Finish button.
12. Click the Close button.
13. Click Close at the Display Properties screen.
14. Click the Yes button next to restart computer.
InstallShield Program:
Since the Microsoft InstallShield program has been addedinto our software’s CD, the Display Driver Installation and itsprocedures are much easier for users to run with Windows95/98/Me operating systems. When you power-up thecomputer and boot-up to Windows, the Plug-and-Play detectsnew hardware and it pops-up install wizard. Do Not [Cancel]because you must place a default display setting fromMicrosoft Windows for your video adapter, then restart theWindows. After the desktop is loaded completely, insert thesoftware’s CD into CD ROM drive and proceed to the displaydriver installation which provided from the hardwaremanufacturer.

15
1. Autorun feature brings-up the “Welcome Screen”, andyou may point to “display driver” then press on it.
2. Microsoft InstallShield Wizard has start loading itssetup process, please wait until it is finished.

16
3. Click on “Next” to continue the process.
4. Windows system will copy all driver files from source
media to your local hard disk, please wait until theprocess has completed.

17
5. Click on “Finish” to restart your computer, the new displaydriver will be in place after Windows boots-up.
ÿ Windows Me Drive Installation
Upgrade video adapter to an existing system.(Windows has been pre-loaded)
1. Select [Next] to install Standard VGA Graphics Adapter atAdd New Hardware Wizard screen.
2. Check [Search for the best driver for your device] thenselect [Next]
3. Insert the software’s CD.
4. Check [Specify a location:] ,Under that enter D:\Win9x,then select [Next].

18
5. Select [Next] to install “3DForce4 MX440-8X Series,NVIDIA GeForce4 MX 440 with AGP8X” driver.
6. Select [Finish] to restart the computer.
To a new system:
1. SELECT the “Display” icon from control panel and thentab on “Settings” screen.
2. Select Advanced at selection bar.
3. Click on Adapter tab.
4. Click the Change button at Adapter Screen
5. Click [Specify the location of the driver (Advanced)] thencheck Next.
6. Insert Software’s CD to CD ROM.
7. Click Specify a location then under Copy manufacturer’sfile from statement enter D:\Win9x, click the Nextbutton.(Where D is the letter of your CD ROM drive,typically, D or E drives, etc.)
8. Click Next to install “3DForce4 MX440-8X Series,NVIDIA GeForce4 MX 440 with AGP8X” driver.
9. Click the Finish button.
10. Click the Yes button next to restart computer.
InstallShield Program:
Since the Microsoft InstallShield program has been addedinto our software’s CD, the Display Driver Installation and itsprocedures are much easier for users to run with Windows95/98/Me operating systems. When you power-up the

19
computer and boot-up to Windows, the Plug-and-Play detectsnew hardware and it pops-up install wizard. Do Not [Cancel]because you must place a default display setting fromMicrosoft Windows for your video adapter, then restart theWindows. After the desktop is loaded completely, insert thesoftware’s CD into CD ROM drive and proceed to the displaydriver installation which provided from the hardwaremanufacturer.
1. Autorun feature brings-up the “Welcome Screen”, andyou may point to “display driver” then press on it.

20
2. Microsoft InstallShield Wizard has start loading itssetup process, please wait until it is finished.
3. Click on “Next” to continue the process.
4. Windows system will copy all driver files from source
media to your local hard disk, please wait until theprocess has completed.

21
5. Click on “Finish” to restart your computer, the new displaydriver will be in place after Windows boots-up.
ÿ Microsoft Windows NT™4.0
The procedure of display driver installation requires setupwith service pack 6 (Microsoft® Windows NT™4.0) first. Afteryour windows desktop has fully loaded service pack 6, youmay insert the software CD into CD ROM drive and follow theinstall steps below:
Upgrade video adapter to an existing system.(Windows has been pre-loaded)
1. SELECT the “Display” icon in control panel andthen SELECT the “Settings” page.
2. SELECT “Display Type...” button in the “Settings”page.
3. SELECT “Change...” button from the Adaptertype section.

22
4. SELECT “Have Disk...” button from the ChangeDisplay page.
5. Windows NT 4.0 prompt you for the locationwhere those files for video driver. INPUT thepath or unfold with “X:\Winnt4\”. (X: is the CDROM drive where the Software & DocumentsCD has been inserted.)
6. If the driver “3DForce4 MX440-8X Series,NVIDIA GeForce4 MX 440 with AGP8X” is listedunder the Display list, SELECT the “OK” buttonto continue.
7. Once the driver files are copied, RESTARTMicrosoft Windows NT 4.0 for the changes totake effect.
8. SELECT the desired color palette (the numberof colors), desktop area (resolution), and refreshfrequency in the settings page of DisplayProperties and then SELECT the “Test” button inthe same page to determine whether yourselection works properly. SELECT “Apply” toactive the selected mode.
InstallShield Program:
Since the Microsoft InstallShield program has been addedinto our software’s CD, the Display Driver Installation and itsprocedures are much easier for users to run withWindowsNT™ operating system. After the desktop hascompletely loaded service pack 6, insert the software’s CDinto CD ROM drive and proceed the display driver installation,which is provided from the hardware manufacturer.

23
1. Autorun feature brings-up the “Welcome Screen”, andyou may point to “display driver” then press on it.
2. Microsoft InstallShield Wizard has preparing its setup,
please wait until it completes.

24
3. Click on “Next” to continue.
4. Scroll down and Select on the “3DForce4 MX440-8X
Series, NVIDIA GeForce4 MX440 with AGP8X” , then clickon “OK” for next screen.

25
5. Windows system will transmit all driver files from source
media to your local hard disk, please wait until theprocess has completed.
6. Click on “Finish” to restart your computer, the new display
driver will be in place after Windows boots-up.
ÿ Windows 2000 Driver Installation
Upgrade video adapter to an existing system.(Windows has been pre-loaded)
1. Select [Next] at Found New Hardware Wizard.

26
2. Check [Search for a suitable driver for my device(recommended) ]then select [Next].
3. Insert the Software’s CD.
4. Check [Specify a location:]
5. Under [Copy manufacturer’s files from:] enterD:\WIN2K&XP, where D is your CD_ROM drive. Then clickon [OK].
6. Select [Next] to install “3DForce4 MX440-8X Series,NVIDIA GeForce4 MX 440 with AGP8X” driver.
7. Select [Finish] to restart the computer.
InstallShield Program:
Microsoft Windows®2000 detects this new hardware andplaces the appropriate display driver from its system folderautomatically - it doesn’t matter you have added a new driveror changed the existing one. To maximum the video boardacceleration and increase its performance, you may installthe manufacturer display driver as the follows:

27
1. Autorun feature brings-up the “Welcome Screen”, andyou may point to “display driver” then press on it.
2. Microsoft InstallShield Wizard has start loading its
setup process, please wait until it has completed.

28
3. Click on “Next” to continue the process.
4. Click on “Yes” to continue the installation. Otherwise, you
may terminate the process by click on “No”.

29
5. Click on “Finish” to restart your computer, the new display
driver will be in place after Windows boots-up.
ÿ Windows XP Driver Installation
Upgrade video adapter to an existing system.(Windows has been pre-loaded)
1. Select [Next] at Found New Hardware Wizard.
2. Check [Search for a suitable driver for my device(recommended) ]then select [Next].
3. Insert the Software’s CD.
4. Check [Specify a location:]
5. Under [Copy manufacturer’s files from:] enterD:\WIN2K&XP, where D is your CD_ROM drive. Then clickon [OK].
6. Select [Next] to install “3DForce4 MX440-8X Series,NVIDIA GeForce4 MX 440 with AGP8X” driver.
7. Select [Finish] to restart the computer.

30
InstallShield Program:
Microsoft Windows® XP detects this new hardware andplaces the appropriate display driver from its system folderautomatically - it doesn’t matter you have added a new driveror changed the existing one. To maximum the video boardacceleration and increase its performance, you may installthe manufacturer display driver as the follows:
1. Autorun feature brings-up the “Welcome Screen”, andyou may point to “display driver” then press on it.

31
2. Microsoft InstallShield Wizard has start loading itssetup process, please wait until it has completed.
3. Click on “Next” to continue the process.
4. Click on “Continue Anyway” to complete the
installation. Otherwise, you may terminate theprocess at this time.

32
5. Click on “Finish” to restart your computer, the new display
driver will be in place after Windows boots-up.
Technical Assistance
Frequently Asked Questions (FAQ)Q1 Why do we need 3D graphics capability in our PC?
Answer
3D technology is becoming increasingly important (and common) notonly in games, but also in other applications such as VRML, whichallows 3D scene descriptions in Web applications. 3D technology isused for image editing, modeling, and an increasing number of theseare found in home and business applications. In games, as well asother applications, 3D acceleration not only allows better visualqualities and more realistic scenery attributes than software alone,but it also allows a higher frame rate, which translates into a moreinteractive experience for the end user.

33
Q2 What does “Rendering Engine” mean?
Answer
“Rendering Engine” generically applies to the part of the graphicsengine that draws 3D primitives, usually triangles. In mostimplementations, the rendering engine is responsible for interpolationof edges and "filling in" the triangle.
Q3 What does the set-up engine do in a graphics controller?
Answer
A set-up engine allows drivers to pass triangles in the form of rawvertex information; whereas, most common designs force triangles tobe pre-processed for the rendering engine in terms of delta valuesfor edges, color, and texture.
Q4 Why does a 3D graphics chip need to have both a renderingengine and a setup engine?
Answer
Any “3D application”, a game, VRML, or modeling package, canbenefit from 3D rendering. This is especially true of an application thatuses texturing extensively, because texturing and texture filtering arevery intensive operations at the pixel level in terms of CPU operationsand demands for memory bandwidth. Without a set-up engine in agraphics controller, the CPU has to calculate the delta values foredges, color, and textures; the drivers need to handle ten (10) timesmore extensive data. This results in slower 3D pipeline operationsbetween the CPU and the graphics controller.
Q5 If we use powerful CPUs, such as a Pentium™ 200, can astandard 2D graphics card achieve 3D performance?
Answer
Yes and no. Software rendering can take advantage of "tricks"learned by force of necessity through years of trial and error. Withsuch stratagems, the speed of software rendering for simple scenescan approach that of low-level hardware 3D rendering. On the otherhand, as scenes become more complex (or frame sizes becomelarger), there are conflicts between using the CPU for high-levelgame logic, geometry, lighting, and rendering, all of which increase

34
their demands. No current CPU or system can perform advancedquality-enhancements (bilinear filtering and alpha blending) in realtime. Even general case texture mapping with RGB lighting is toomuch for the current CPU generation.
Q6 What does "software 3D" mean?
Answer
Software 3D is generally used to mean using non-specific (2D)hardware in conjunction with the CPU to render for 3D applications.Some of these techniques allow usable 3D applications when high-powered and/or MMX™-equipped CPU's are employed along withspecial-case software optimization techniques. As stated above, SW3D can achieve credible results with today's (software optimized)applications, but the rising popularity of good 3D hardware at theconsumer price level is inexorably compelling the public to expecthardware level scene enhancements and frame rates.
Q7 What is “SGRAM”?
Answer
Synchronous Graphics Random Access Memory (SGRAM) is a newand improved type of memory, custom-designed for graphics use.
Q8 What is the advantage of as compared to ordinary DRAM?
Answer
is now capable of running at much higher speeds than Fast PageMode or EDO DRAM. Also, is able to execute a small number offrequently executed operations, such as buffer clears, specific tographics applications, independently of the controller.

35
Pinout and Sync Frequencies
Analog Color Display Pinouts (DB 15)
PIN FUNCTION
1 Red Video1
2 Green Video1
3 Blue Video1
4 Not Used
5 Ground
6 Red Return (ground)
7 Green Return (ground)
8 Blue Return (ground)
9 Vcc (+5v DDC Power)
10 Sync Return (ground)
11 Monitor ID (not used)
12 SDA (DDC support)
13 Horizontal Sync
14 Vertical Sync
15 SCL (DDC support)
Note: Analog monochrome type monitors use green video for allvideo input and ignore red and blue video.
Conversion Table: Pin AdaptersIf you will be using a 9-to-15-pin adapter cable to link your 9-pinmonitor connector to the 15-pin accelerator card connector, checkTable carefully before you install the cable. The 9-to-15 pin adaptercables are available from a variety of sources, but they need tomatch the specifications in Table to work properly with your newcard.
The adapter cable requires a D-shaped 9 pin female connector and aD-shaped 15 pin male connector.

36
9-to-15 Pin Conversion Table
9 PIN SIGNALS PIN NO. 15 PIN SIGNALS PIN NO.
Red 1 Red 1
Green 2 Green 2
Blue 3 Blue 3
Horz Sync 4 Horz Sync 13
Vert Sync 5 Vert Sync 14
Red Ground 6 Return Red 6
Green Ground 7 Return Green 7
Blue Ground 8 Return Blue 8
Sync Ground 9 Digital Ground 10
Ground 5
Analog Video Signals
Black Level = 0 V
Full Intensity (White) Level = +0.7 V
Technical SupportIn the event you have a technical problem with this product,please read the README files in the software CD_ROM.Updated drivers are available through Jaton Web site. Havefollowing information handy when you contact technicalsupport:
þ Name of the product.
þ Software Driver and Version.
þ System Information, such as CPU speed, BIOS version, MonitorSpecification, etc.
þ Description of the problems including any error messages.
Telephone: (408) 934-9369 9-5 PST Mon. - Fri.
FAX: (408) 942-6699
email: [email protected]

37
Website: www.jaton.com
NOTICE
The information in this document is subject to change in order to improvereliability, design, or function without prior notice and does not represent acommitment on the part of the company. In no event will the company be liablefor direct, indirect, special, incidental, or consequential damages arising out ofthe use or the inability to use the product or documentation, even if advised ofthe possibility of such damages. No part of this manual may be reproduced ortransmitted in any form or by any means without the prior written permission ofthe company.
July 2003, Rev. A
FCC SHIELDED CABLE WARNING:
This equipment has been tested and found to comply with the limits for a ClassB digital device, pursuant to Part 15 of the FCC Rules. Operation is subject tothe following conditions: (1) this device may not cause harmful interference,and (2) this device must accept any interference received, includinginterference that may cause undesired operation,
“SHIELD INTERFERENCE CABLE (S) MUST BE USED ACCORDING TO FCC15.27©.”
CAUTION:
Changes or modifications not expressly approved by the Manufacturer couldvoid your authority to operate this equipment in accordance with FCC rules andregulations.
SOFTWARE LICENSE AGREEMENT:
The Company grants the customer a non-exclusive, non-transferable license touse the software in this package for internal use on a single computer system.No other license of any kind is granted to any part of the product or any of theintellectual property therein.

38
TRADEMARK AND COPYRIGHT:
This product incorporates copyright protection technology that
is protected by method claims of certain U.S. patents and
other intellectual property rights owned by Macrovision
Corporation and other rights owners. Use of this copyright
protection technology must be authorized by Macrovision
Corporation , and is intended for home and other limited
viewing used only unless otherwise authorized by
Macrovision Corporation. Reverse engineering or
disassembly is prohibited.
All Trademarks and Registered Trademarks belong torespective owners.
2002 Jaton Corporation. All rights reserved.

39
Limited Warranty.Manufacturer warrants that the products sold hereunderare free from defects in material and workmanship for aperiod of two (2) years from manufacturing date. Thislimited warranty applies only to the original purchaser ofJaton Product and is not transferable. This limitedwarranty does not apply if failure to the ProductRegistration, or over thirty (30) days from purchase(original invoice date). This Limited Warranty does notcover any incompatibilities due to the user’s computer,hardware, software or any related system configuration inwhich the Jaton Products interfaces. Proof of purchasewill be requiring before any consideration by Manufactureroccurs.
Other Limits.
The forgoing is in lieu of all other warranties,expressed or implied. Including but not limited tothe implied warranties of merchantability and fitnessfor a particular purpose. Manufacturer does not warrantagainst damages or defects arising out of improper orabnormal use of handling of the products; against defectsor damages arising from improper installation (whereinstallation is by persons other than Manufacturer),against defects in products or components notmanufactured or installed by Manufacturer, or againstdamages result from non-manufacturer made products orcomponents. This warranty does not apply if the Producthas been damaged by accident, abuse, nor misuse. Thiswarranty also does not apply to products upon whichrepairs have been affected or attempted by persons otherthan pursuant to written authorization by Manufacturer.

40
Exclusive Obligation.
This warranty is exclusive. The sole and exclusiveobligation of Manufacturer shall repair or replace thedefective products in the manner and for the periodprovided above. Manufacturer shall not have any otherobligation with respect to the Products or any part thereof,whether based on contract, tort, and strict liability orotherwise. Under no circumstances, whether based onthis Limited Warranty or otherwise, Manufacturer shall notbe liable for incidental, special, or consequential damage.
Other Statements.
Manufacturer’s employees or representatives’ ORAL OROTHER WRITTEN STATEMENTS DO NOT CONSTITUEWARRANTIES, shall not be relied upon by Buyer, and arenot a part of the contract for sale or this Limited Warranty.
Terms and Conditions.
Direct Jaton Customer: This warranty applies only fora period of two (2) years frompurchase date of Jatonoriginal invoice.
Reseller/ Vendor: This warranty applies only fora period of two (2) years frommanufacturing date.
Registered User: This warranty applies only fora period of two (2) years frompurchase date and registerwithin 30 days of purchasedate from legal reseller.
Others: If the products do not conformto this Limited Warranty (asherein above described),Manufacturer should charge

41
services such as repair,replacement whether basedon its costs. Shipping andinstallation of the replacementProducts or replacementparts shall be at User’sexpanse.
Services agreement:
(1) All applicants shall completed a service requestform from Manufacturer.
(2) All returned checks will be charged a $20.00 feeby Manufacturer.
(3) All repair and replacement services allow 4-6weeks from the date of receiving byManufacturer.
(4) All products without warranties require serviceprocessing fee $20 (payment in advance), whichis not refundable.
Entire Obligation.
This Limited Warranty states the entire obligation ofManufacturer with respect to the Products. If any part ofthis Limited Warranty is determined to be void or illegal,the remainder shall remain in force and effect. Somestates do not allow limitation of implied warranties, orexclusive or limitation on product incidental orconsequential damages, so above limitation may notapply to you. This warranty gives you specific legal rights.You may have other rights, which may vary from state tostate.

42
This warranty applies only to this product, and is governedby the law of the State of California.
Reducing Warranty ClaimRejections.To reduce the potential of incurring damages not coveredby Manufacturers warranties, we strongly recommend thefollowing:
• Read your manuals before installingperipherals and/or before making changes tothe machine’s configuration;
• Ask your dealer if there are any knownproblems with the system requirements orinstallation procedures for any add-onproducts that your are purchasing;
• Buy industry standard products wherecompatibility issue are more likely to surface;
• If you are unsure about installation for a newproduct, contact your dealer’s servicedepartment.
We believe it is important for you to know and understandwhat your warranty coverage provides and what it doesnot.
We also want you to be aware that most hardwarewarranties only relate to the function of the hardware. Inmost cases, no assurances are given by the manufacturerthat the hardware item will work in conjunction with anyother hardware item. If a computer product is not working

43
because it is not compatible with another product, orbecause it has not been properly installed and set-up, themanufacturer does not pay for the service time. To helpavoid these inconveniences, contact a professionalconsultant that one can help you determine the possibilityof incompatibility issue before you purchase add-on oraccessories.
Warranty Service Use Only
XXXX XX XXXXXX00.0xxxx/xxxx
XXXXX-XXX-XX S/N: A008000015
Product Label and Manufactured Date Code
Serial Number - ten or eleven digit code, the serial number consists of the following parts:
Packaging Type Manufactured Date Code Production Numerical Code
A 00 8 000015
Year Month