Embed Size (px)
Citation preview

Multi-Function Digital Viewer
User Manual

Preface
About this ManualThis manual describes how to get the most out of the Multi-Function DigitalViewer. You should read through this manual before using the DigitalViewer to familiarize yourself with the various features and functions. Thecontent of this manual was accurate at the time of writing but there is noguarantees it will be so at the time of the product’s release.

Table of Contents
Introducing the Multi-Function Digital Viewer ................................1Features ...................................................................................................1Package Contents ....................................................................................2About the Multi-Function Digital Viewer...............................................2
Front View ........................................................................................2Back View.........................................................................................5
Getting Started ..........................................................................................6Using the Stand .......................................................................................6Mounting the Frame On the Wall ...........................................................7Connecting the Power .............................................................................8Connecting to a TV .................................................................................8Connecting to a Computer ......................................................................9Connecting an External USB Device ......................................................9Connecting the Earphone ......................................................................10Inserting Memory Cards .......................................................................10
Removing the Card Cover...............................................................10Inserting a Memory Card ................................................................11Removing a Memory Card..............................................................12
Powering Up..........................................................................................12Navigating the Menus ...........................................................................13
General Settings ......................................................................................15Configuring Display Settings ................................................................15Setting the TV Mode.............................................................................16Setting Factory Defaults........................................................................16

ii
Using the Multi-Function Digital Viewer..........................................17Selecting the Mode................................................................................17Photo Mode ...........................................................................................17
Viewing Photos ...............................................................................17Rotating a Photo..............................................................................20Slideshow........................................................................................21Displaying Photo Information.........................................................23Setting the Default Action...............................................................23Setting the Frame ............................................................................24Setting the Default Picture ..............................................................24Adding to Internal Memory ............................................................24
Audio Mode ..........................................................................................26Playing Songs..................................................................................26Changing the Volume .....................................................................28Setting the Play Mode .....................................................................28Setting the Equalizer .......................................................................29Adding to Internal Memory ............................................................29
Video Mode...........................................................................................30Watching a Video............................................................................30Changing the Volume .....................................................................31Displaying Video Information ........................................................31
Deleting Files from Internal Memory ...................................................32Deleting a Single File......................................................................32Deleting All Files ............................................................................32
Copying Files to and from a Computer.................................................33
Appendix ...................................................................................................34Troubleshooting ....................................................................................34Specifications ........................................................................................35
i

Introducing the Multi-Function Digital Viewer
Thank you for purchasing the Multi-Function Digital Viewer. The DigitalViewer is the new revolutionized replacement for the photo frame sitting onyour desk at work. Instead of a single permanent picture of your spouse,family or friends sitting on your desk, the all new Digital Viewer enablesyou to change the photo whenever you want. In addition to displaying a sin-gle photo, a number of photos can be displayed in sequence using the slide-show function as well as viewing short film clips or listening to music.
Features• 5.6” TFT LCD screen for displaying images and movies from a
flash card or internal memory• Supports JPG, BMP and PNG images• Supports MPEG4 for playing back film clips• Supports the MP3 format for listening to music• Image display functions such as slideshow and rotate• Supports CF, SD, MMC and MS flash memory cards• 16 MB built-in flash memory with a storage function for storing
your favorite images• AV out for viewing movies on a television• USB interface for connecting to a PC• A single stand/wall mount enabling you to place the Digital Viewer
on a desk or mount it on a wall
Package Contents
2
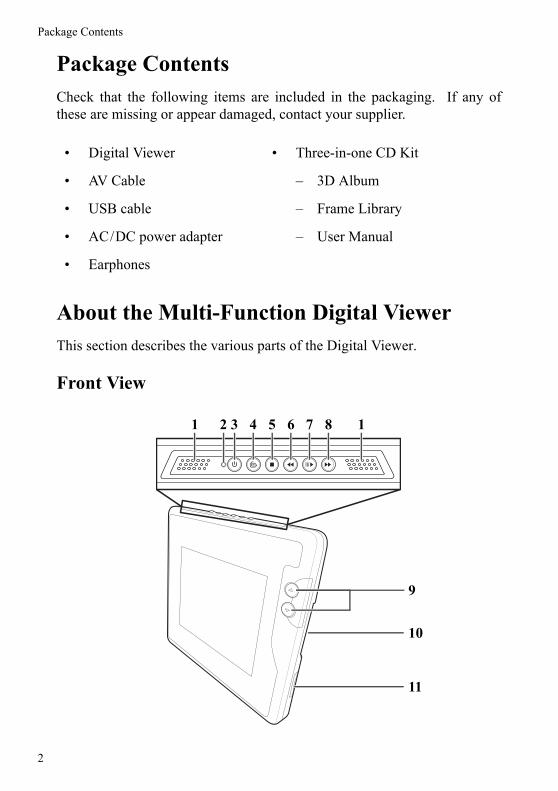
Package ContentsCheck that the following items are included in the packaging. If any ofthese are missing or appear damaged, contact your supplier.
About the Multi-Function Digital ViewerThis section describes the various parts of the Digital Viewer.
Front View
• Digital Viewer • Three-in-one CD Kit
• AV Cable – 3D Album
• USB cable – Frame Library
• AC/DC power adapter – User Manual
• Earphones
1 3 4 5 6 72 8 1
9
10
11

Introducing the Multi-Function Digital Viewer
Name Description
1 Speakers Inbuilt speakers.
2 Power LED Lights up green when turned on.
3 Power ( ) Turns the Digital Viewer on and off.
4 Menu/Ok ( ) Press to display the menu or to confirm a set-ting or function.
5 Stop ( ) • Stops playback of video clips or musicfiles.
• Switches between thumbnail icons andfull screen view.
6 Backward ( ) • Same as Fast Forward but in reverse.• Hotkey for Switching between Photo and
Audio modes.
7 Play/Pause ( ) • Starts/stops the slideshow.• Plays/pauses video clips and music files.
8 Fast Forward ( ) • Fast forwards through a video clip at 2x,4x, 8x and 16x times the speed of normalplay.
• Displays a border when in photo mode.
9 Up/Down ( / ) buttons
• Moves up and down in the menus.• Changes to the previous or next photo,
video clip or music file.
10 Flash Memory Card slot
Accommodates CF cards.
11 Flash Memory Card slot
Accommodates SD, MMC and MS cards.
3

About the Multi-Function Digital Viewer
4
Compatible Flash Memory CardsThe following table lists those cards that have been tested and are guaran-teed to work. If your card is not listed, we can not guarantee that it willwork.
Memory Card Brand Name Capacity
SD IO-Data 128 MB
KingMax 256 MB
SanDisk 256 MB
MMC Apacer 64 MB
Ready 256 MB
MS Apacer 128 MB
Lexar 128 MB
SanDisk 128 MB
Sony 16 MB, 32 MB, 128 MB
MS Pro Sony 256 MB, 512 MB, 1 GB
MS Pro Duo Sony 256 MB
CF Canon 32 MB
PQI 1 GB
Transcend 512 MB
USB Pen Drive Apacer 128 MB
PQI 128 MB
SanDisk 128 MB, 256 MB
Sony 128 MB
Transcend 128 MB

Introducing the Multi-Function Digital Viewer
Back View
Name Description
1 Mode Switches between Photo, Audio and Video modes.
2 Volume +/-( / )
Adjusts the volume.
3 Earphone socket Connect an earphone to the Digital Viewer.
4 AV Jack Connect an AV cable for viewing on a TV.
5 USB 1.1 host port
Connect other USB devices such as a portable USB hard drive or a flash memory card reader.
6 mini-USB port Connect to a PC using a USB cable.
7 DC IN socket Power Connection.
8 Stand A stand for placing the Digital Viewer on a desk or mounting it on the wall.
1
2
3
4
5
6
7
8
5

Getting Started
Using the StandThe Digital Viewer can be placed in a landscape or portrait position on adesk or any other flat surface.To place it on a desk or flat surface, pull the end of the stand away from thebase of the Digital Viewer so that it is at the desired angle.
To change the orientation from landscape to portrait, rotate the stand 90°clockwise.
C F

Getting Started
Mounting the Frame On the WallBesides placing the Digital Viewer on a desk or another flat surface, thestand can also be used for mounting the Digital Viewer on a wall.To mount the frame on the wall:1. Insert a nail or screw into the wall at the position you want to hang the
frame.2. If you want a portrait view, rotate the stand 90° clockwise as described
in Using the Stand on page 6.3. Pull the end of the stand away from the Digital Viewer as described in
Using the Stand on page 6 and continue pulling it up to the top.
4. Place the hole in the stand over the screw or nail as shown in the dia-gram.
C F
7
Connecting the Power
8
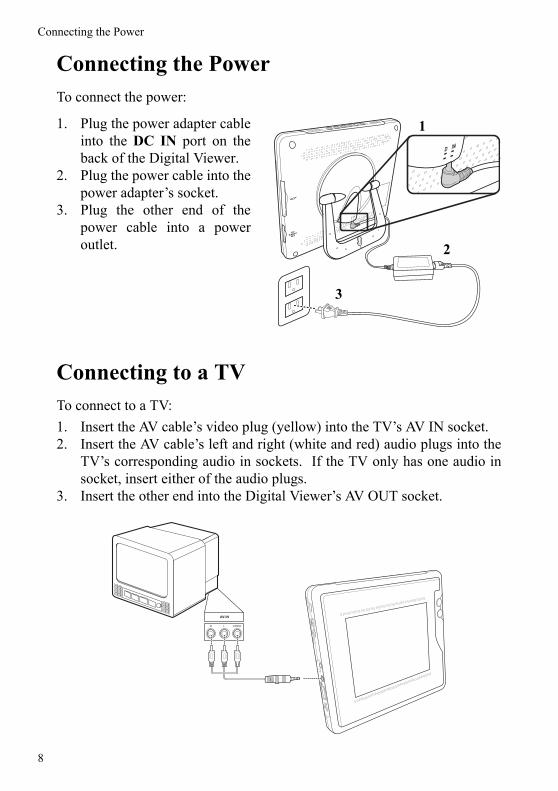
Connecting the PowerTo connect the power:
1. Plug the power adapter cableinto the DC IN port on theback of the Digital Viewer.
2. Plug the power cable into thepower adapter’s socket.
3. Plug the other end of thepower cable into a poweroutlet.
Connecting to a TVTo connect to a TV:1. Insert the AV cable’s video plug (yellow) into the TV’s AV IN socket.2. Insert the AV cable’s left and right (white and red) audio plugs into the
TV’s corresponding audio in sockets. If the TV only has one audio insocket, insert either of the audio plugs.
3. Insert the other end into the Digital Viewer’s AV OUT socket.
2
3
1
AV-IN
R L VIDEO

Getting Started
Connecting to a ComputerTo connect to a computer:1. Connect the type A plug of the USB cable to the computer.2. Connect the other end to the Digital Viewer’s mini-USB port.
Connecting an External USB DeviceYou can attach an external USB device,such as a portable USB hard drive or aflash memory card reader, that containsmultimedia files for viewing on theDigital Viewer. This is especially use-ful where you have video files that aretoo large to fit on a flash memory card.Connect the external USB device intothe top USB 1.1 host port as shown inthe diagram.
9
Connecting the Earphone
10
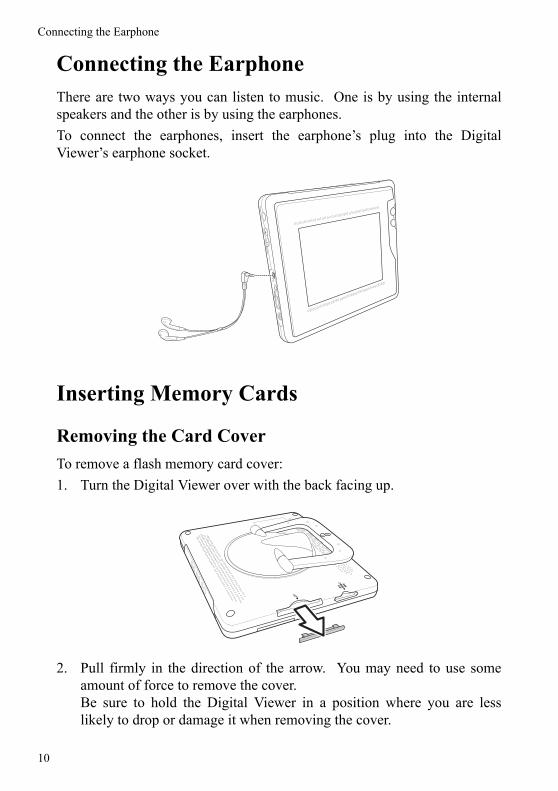
Connecting the EarphoneThere are two ways you can listen to music. One is by using the internalspeakers and the other is by using the earphones.To connect the earphones, insert the earphone’s plug into the DigitalViewer’s earphone socket.
Inserting Memory Cards
Removing the Card CoverTo remove a flash memory card cover:1. Turn the Digital Viewer over with the back facing up.
2. Pull firmly in the direction of the arrow. You may need to use someamount of force to remove the cover.Be sure to hold the Digital Viewer in a position where you are lesslikely to drop or damage it when removing the cover.
Getting Started
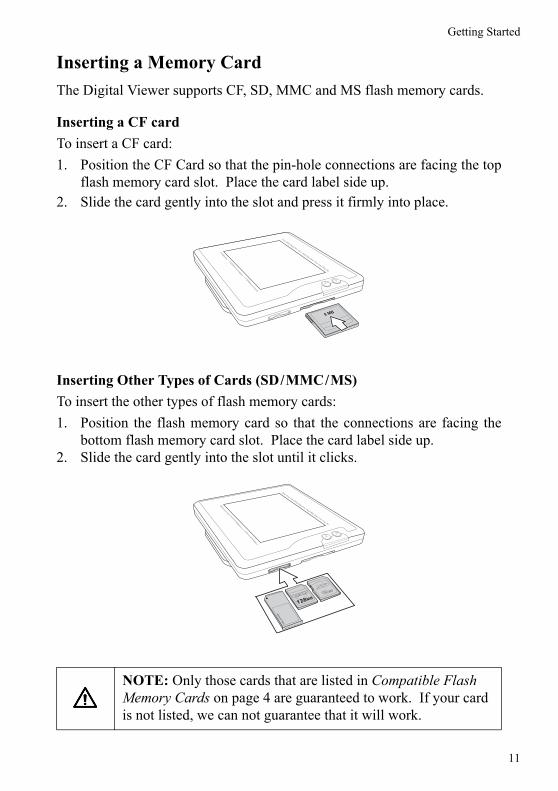
Inserting a Memory CardThe Digital Viewer supports CF, SD, MMC and MS flash memory cards.
Inserting a CF cardTo insert a CF card:1. Position the CF Card so that the pin-hole connections are facing the top
flash memory card slot. Place the card label side up.2. Slide the card gently into the slot and press it firmly into place.
Inserting Other Types of Cards (SD/MMC/MS)To insert the other types of flash memory cards:1. Position the flash memory card so that the connections are facing the
bottom flash memory card slot. Place the card label side up.2. Slide the card gently into the slot until it clicks.
NOTE: Only those cards that are listed in Compatible Flash Memory Cards on page 4 are guaranteed to work. If your card is not listed, we can not guarantee that it will work.
11

Powering Up
12
Removing a Memory Card
Removing a CF CardTo remove a CF card, gently pull the card out of the slot.
Removing Other Types of Cards (SD/MMC/MS)1. Lightly press on the card until it clicks.2. Release the card and it will spring out.3. Gently pull the card out of the slot.
Powering UpTo turn on the Digital Viewer:1. Ensure that the power is connected as described in Connecting the
Power on page 8.2. Press the Power ( ) button to turn it on. The power LED lights up
green on the Digital Viewer is on.3. Press the Power ( ) button for about three seconds to turn it off. A
screen showing the machine shutting down, is displayed.
NOTE: The reason for needing to hold down the Power ( ) button for about three seconds is so that you do not turn the Digital Viewer off accidentally while using it.

Getting Started
Navigating the MenusEach of the different file types has its own set of menus. To navigatethrough the menus:• Press the Mode button to change to the mode you want then press the
Menu/Ok ( ) button to display the menu. The mode type, Photo,Audio and Video, is displayed for about three seconds in the lower rightcorner before it disappears.
The menu is a set of icons listed down the left side of the screen. Themenu icon name appears at the bottom of the screen.
• Press the Up ( ) and Down ( ) buttons to move up and down in themenus.When you move to another menu item, the selected item becomes yel-low and a set of submenus may appear depending on whether the cur-rent icon is a menu item or a configuration setting.
XYZ
AutorunAutorunAutorun VideoVideo
XYZ
Video SelectVideo SelectVideo Select
13

Navigating the Menus
14
• Press the Backward ( ) and Fast Forward ( ) buttons to enter orexit a submenu. You can also press the Menu/Ok ( ) button to entersubmenus or to exit the menus if the currently selected item is a config-uration setting.
• Press the Stop ( ) button to exit from anywhere within the menus.If the selected item is a configuration setting, you can press the Menu/Ok ( ) button to exit.You can also select the Exit ( ) icon at the bottom of the photo andaudio main menus and press the Menu/Ok ( ) button.
NO FileNO File
CFCFCF

General Settings
This section describes how to configure general settings. These settings areaccessed through the Setup ( ) submenu which can be found in the sec-ond last position in each of the three main menus.
Configuring Display SettingsThe Display Settings enables you to configure settings such as brightnessand contrast. To configure a setting:
1. Select the Display Settings ( ) icon, third from the top.
2. Select the setting you want to configure.3. Press the Menu/Ok ( ) or Fast Forward ( ) buttons to select the
number.4. Press the Up ( ) and Down ( ) buttons to change the setting.
BacklightBacklightBacklight
00003
00003
Setting the TV Mode
16
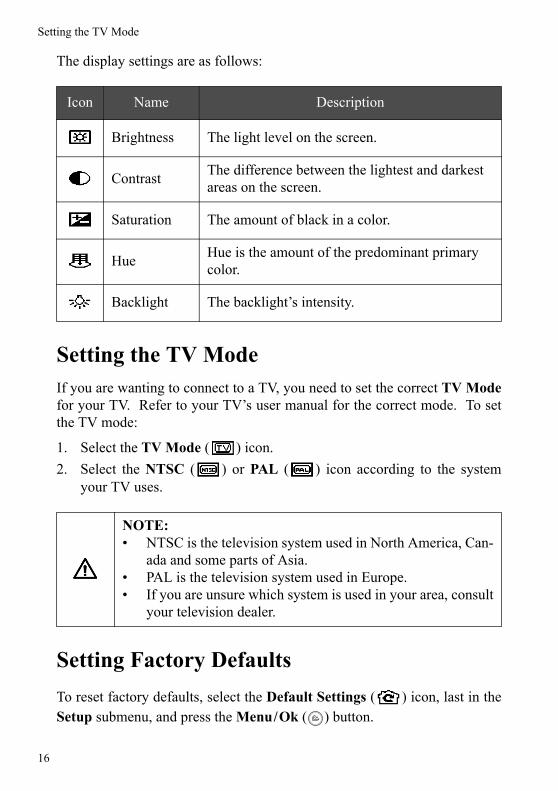
The display settings are as follows:
Setting the TV ModeIf you are wanting to connect to a TV, you need to set the correct TV Modefor your TV. Refer to your TV’s user manual for the correct mode. To setthe TV mode:
1. Select the TV Mode ( ) icon.2. Select the NTSC ( ) or PAL ( ) icon according to the system
your TV uses.
Setting Factory DefaultsTo reset factory defaults, select the Default Settings ( ) icon, last in theSetup submenu, and press the Menu/Ok ( ) button.
Icon Name Description
Brightness The light level on the screen.
Contrast The difference between the lightest and darkest areas on the screen.
Saturation The amount of black in a color.
Hue Hue is the amount of the predominant primary color.
Backlight The backlight’s intensity.
NOTE: • NTSC is the television system used in North America, Can-
ada and some parts of Asia.• PAL is the television system used in Europe.• If you are unsure which system is used in your area, consult
your television dealer.

Using the Multi-Function Digital Viewer
Now that you have set up the Digital Viewer, you are ready to start using it.This section describes how to switch between the various multimediamodes, configure each multimedia types’ settings and use the DigitalViewer.
Selecting the ModeYou will first need to switch to the correct mode before you can use a multi-media file. To do this, press the Mode button until the desired multimediamode appears in the bottom right corner of the screen.You can also press the Backward ( ) button as a hotkey for switchingbetween Audio and Photo modes. However, this can not be used to selectVideo mode.
Photo Mode
Viewing PhotosWhen you turn on the Digital Viewer, it will automatically display thedefault picture. Press the Up ( ) and Down ( ) buttons to change the pic-ture. See Setting the Default Picture on page 24 on how to change thedefault picture.
Selecting a Particular MediumIf you have many photos on different types of media, you can limit the num-ber of photos being displayed by selecting a single medium to view photosfrom.
NOTE: If you the Backward ( ) button to switch to Audio mode and do not press a button within ten seconds, the Digital Viewer will automatically switch back to Photo mode.

Photo Mode
18
To select a medium to view photos from:
1. Select Select ( ) from the Picture Select ( ) submenu.2. Select the medium that the photo is on and press the Play/Pause ( )
button.The media types are as follows:
When you start the slideshow (see Slideshow on page 21) or change thephoto by pressing the Up ( ) and Down ( ) buttons, only those photos onthe selected medium will be displayed.
Icon Name Description
INT Select files from internal memory only.
CF Select files from a CF card only.
SD Select files from an SD card only.
MMC Select files from an MMC card only.
MS Select files from an MS card only.
USB Select files from a USB device only, such as portable USB hard drive or a flash memory card reader.
NOTE: As you select each medium in turn, a list of files and folders that are on that medium are listed to the right. See Browsing for a Particular Photo or Folder on page 19 for more details.

Using the Multi-Function Digital Viewer
Viewing All PhotosTo view all photos on all the different types of available medium, selectAutorun ( ) from the Picture Select ( ) submenu and press thePlay/Pause ( ) button.When you start the slideshow (see Slideshow on page 21) or change thephoto by pressing the Up ( ) and Down ( ) buttons, you will be able todisplay all photos on all the different types of available medium.
Browsing for a Particular Photo or FolderTo browse for a particular photo to display:1. Select the medium type as described in Selecting a Particular Medium
on page 17.2. Instead of pressing the Play/Pause ( ) button, press the Fast For-
ward ( ) button to select the file/folder list.3. Press the Up ( ) and Down ( ) buttons to select a file or folder.
4. Press the Fast Forward ( ) button to enter a folder or the Play/Pause( ) button to view a picture.
File names with the icon ( ) in front of them are folders.Another way to browse for a particular photo is to switch to thumbnail viewas described in Thumbnail View on page 20.
My PicturesPALMBLACK.BMPBLACK.JPG
1/4, SD1/4, SD1/4, SD
19

Photo Mode
20
Viewing FavoritesViewing favorites is the same as setting the medium to internal memory asdescribed in Selecting a Particular Medium on page 17 but with the inclu-sion of the default picture.
To view favorites, select My Favorites ( ) from the Picture Select( ) submenu and press the Play/Pause ( ) button.
Thumbnail ViewYou can view photos as thumbnails. This is another way of browsing for aparticular photo (See Browsing for a Particular Photo or Folder onpage 19).• Press the Stop ( ) but-
ton to switch to thumb-nail view.
• If there are more thannine photos on thescreen, press the Up ( )and Down ( ) buttonsto select the previous ornext page to view morephotos.
• Press the Backward( ) and Fast Forward ( ) buttons to select a photo.
• Press the Play/Pause ( ) button to view the photo.
Rotating a PhotoThe rotation function is useful in reorientating a photo when you want tochange the Digital Viewer’s orientation. See Using the Stand on page 6 formore information on changing the Digital Viewer’s orientation.To rotate the picture:
1. Select the Rotate ( ) icon from the main menu.2. Press the Menu/Ok ( ) button as many times as required to obtain the
correct orientation.Each time you press the Menu/Ok ( ) button, the currently displayedphoto is rotated 90° clockwise.

Using the Multi-Function Digital Viewer
Slideshow
Viewing Photos as a SlideshowPhotos can be displayed as a slideshow. Press the Play/Pause ( ) buttonto start or stop the slideshow.
Changing the Time IntervalThe time interval is the amount of time, in seconds, before the next photo isdisplayed when viewing photos as a slideshow. To set the time interval:
1. Select the Slideshow Interval ( ) icon from the main menu.2. Select the desired time interval.Available time intervals are as follows.
Icon Name Description
10 sec Sets the slideshow time interval to 10 seconds.
15 sec Sets the slideshow time interval to 15 seconds.
20 sec Sets the slideshow time interval to 20 seconds.
25 sec Sets the slideshow time interval to 25 seconds.
30 sec Sets the slideshow time interval to 30 seconds.
21

Photo Mode
22
Changing the Slideshow EffectThe slideshow effect setting enables you to set the way in which photos aredisplayed on the screen. To set the slideshow effect:
1. Select the Slideshow Effect ( ) icon from the main menu.2. Select the desired slideshow effect.Available slideshow effects are as follows:
Icon Name Description
None No special effect.
Left to Right Photo slides onto the screen from the left.
Right to Left Photo slides onto the screen from the right.
Top to Bottom Photo slides onto the screen from the top.
Bottom to Top Photo slides onto the screen from the bottom.
Checkered Photo is displayed on the screen in a check-ered pattern.

Using the Multi-Function Digital Viewer
Displaying Photo InformationThe Photo Information setting enables you to display information aboutthe currently displayed Photo. To display photo information:
1. Select the Photo Information ( ) icon from the main menu.2. Select the desired information setting that you wish to display.The available information settings are as follows:
Setting the Default ActionThe Default Action setting is for setting the action taken when the DigitalViewer is turned on. To set the default action:
1. Select the Default Action ( ) icon from the main menu.2. Select the default action.The available default actions are as follows:
Icon Name Description
BasicDisplays basic information such as the storage medium the photo is on, the file name, the photo size and the number of photos.
Camera InfoDisplays the camera model that was used to take the photo and the time & date of when the photo was taken, if available.
All Displays all information regarding the photo.
Off No information is displayed.
Icon Name Description
Single Picture Displays a single photo.
Slideshow Starts the slideshow.
23

Photo Mode
24
Setting the FrameThe Digital Viewer enables you to display photos in a picture frame. Thereare two ways to turn the picture frame on and off.
• Select the Frame ( ) icon from the main menu then select one of theOff ( ) or On ( ) icons as required.
• Instead of bringing up the menu, press the Fast Forward ( ) buttoninstead to turn the picture frame on or off.
Setting the Default PictureAs described in Viewing Photos on page 17, when you turn on the DigitalViewer, the default picture is displayed.To change the default picture:1. Select a picture that you wish to set as default.2. Select the Default Picture ( ) icon from the main menu and press
the Menu/Ok ( ) button.
Adding to Internal MemoryThe Digital Viewer comes with an internal memory enabling you to storeyour favorite photos in the Digital Viewer.
Adding PhotosTo add photos to the internal memory:1. Select a picture that you wish to add.2. Select the Add To Internal Mem ( ) icon from the main menu.3. Select the Add Photo ( ) icon and press the Menu/Ok ( ) button.

Using the Multi-Function Digital Viewer
You can cancel the copying operation by pressing the Stop ( ) button.The following screen appears.
1. Press the Fast Forward/Backward ( / ) or Up/Down ( / )buttons to select Yes to cancel the copying operation or No to continue.
2. Press the Menu/Ok ( ) button.
Changing the FrameThe Digital Viewer comes with a CD containing additional frames enablingyou to change the frame. The frame files are picture files in PNG format.To change the frame:1. Connect the Digital Viewer to your computer.2. Copy the desired frame file to a compact flash card as described in
Copying Files to and from a Computer on page 33.3. Disconnect the Digital Viewer from your computer.4. Select the frame file as described in Viewing Photos on page 17.5. Select the Add To Internal Mem ( ) icon from the main menu.6. Select the Add Frame ( ) icon and press the Menu/Ok ( ) button.You can display the new frame as described in Setting the Frame onpage 24.
NOTE: The Digital Viewer can only support one frame at a time. You will need to repeat the above procedure if you want to change the frame.
Copy FileCopy FileCopy File
YesYesYes No
Abort copy?
25

Audio Mode
26
Audio Mode
Playing SongsThe following screen appears when you switch to audio mode.
This screen shows the current status, number of audio files, the currentequalizer mode, repeat status, song title, artist, remaining time and totaltime.• Press the Play/Pause ( ) button to start playing an audio file.• Press the Play/Pause ( ) button to pause or continue playback.• Press the Up ( ) and Down ( ) buttons to skip to the previous or next
audio file.• Press the Stop ( ) button to stop playback.If you don’t press a button within ten seconds, it will automatically switchback to photo mode. Besides the Mode button, you can also press the Back-ward ( ) button to view details of the currently playing audio file.
Selecting a Particular MediumIf you have many audio files on different types of media, you can limit thenumber of audio files to play by selecting a single medium in which to playmusic from. To select a medium to play music from:
1. Select Audio Select ( ) from the Song Select ( ) submenu.2. Select the medium type that the audio is on and press the Play/Pause
( ) button.
Stop 6/6 Rock Repeat All
Artist UnavailableTitle Music 01.mp3

Using the Multi-Function Digital Viewer
The media types are the same as described in Selecting a Particular Mediumon page 17.The Digital Viewer only cycles through the audio files on the selectedmedium.
Playing all Audio FilesTo play all audio files on all the different types of available medium, selectAutorun ( ) from the Song Select ( ) submenu and press the Play/Pause ( ) button.The Digital Viewer cycles through all audio files on all the different types ofavailable medium.
Browsing for a Particular Audio FileTo browse for a particularaudio file to play:1. Select the medium type
as described in Selectinga Particular Medium onpage 26.
2. Instead of pressing thePlay/Pause ( ) button,press the Fast Forward( ) button to select thefile/folder list.
3. Entering folders and playing audio files is similar to that described inBrowsing for a Particular Photo or Folder on page 19.
Another way to browse for a particular audio file is to:
1. Select Song List ( ) from the Song Select ( ) submenu.2. Select and press the Menu/Ok ( ) button to mark audio files for play-
back.3. Press the Play/Pause ( ) button to begin playing the selected files.
NOTE: As you select each medium in turn, a list of files and folders that are on that medium are listed to the right. See Browsing for a Particular Audio File on page 27 for more details.
My PicturesPALMMUSIC01.MP3MUSIC02.MP3MUSIC03.MP3MUSIC04.MP3MUSIC05.MP3
3/7, SD3/7, SD
27

Audio Mode
28
Playing FavoritesPlaying favorites is the same as setting the medium to internal memory asdescribed in Selecting a Particular Medium on page 26.
To play favorites, select My Favorites ( ) from the Song Select ( )submenu and press the Play/Pause ( ) button.
Changing the VolumePress the Volume + ( ) and Volume - ( ) buttons to change the volume.
Setting the Play ModeThe Audio Play Mode setting enables you to set how audio files arerepeated. To set the play mode:
1. Select the Audio Play Mode ( ) icon from the main menu.2. Select the desired repeat mode.Available repeat modes are as follows.
NOTE: If you plug in the AV cable, you will not be able hear audio through earphones or using the internal speakers. See Connecting to a TV on page 8 for correct instructions on how to connect the AV cable.
Icon Name Description
Repeat AllRepeats playback of all audio files. This depends on which medium has been selected. See Playing Songs on page 26 for more details.
Repeat One Repeats the current audio file only.
Shuffle Plays audio files in random order. This also depends on which medium has been selected.
Using the Multi-Function Digital Viewer
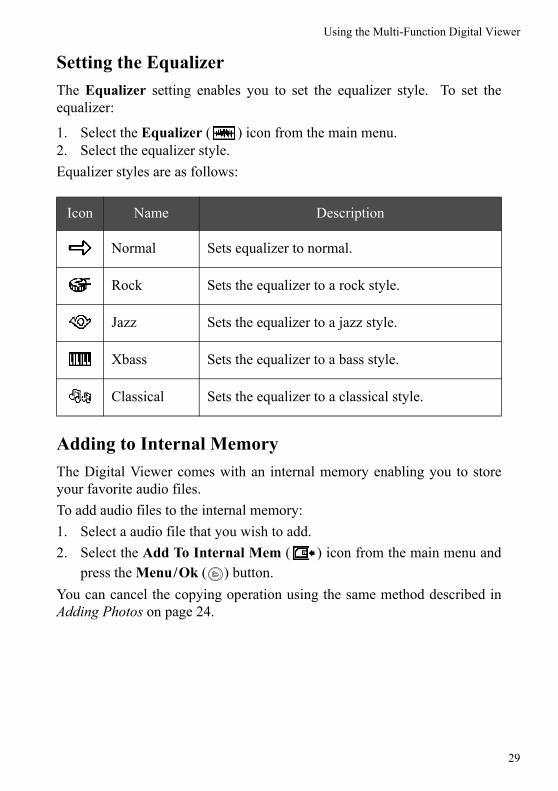
Setting the EqualizerThe Equalizer setting enables you to set the equalizer style. To set theequalizer:
1. Select the Equalizer ( ) icon from the main menu.2. Select the equalizer style.Equalizer styles are as follows:
Adding to Internal MemoryThe Digital Viewer comes with an internal memory enabling you to storeyour favorite audio files.To add audio files to the internal memory:1. Select a audio file that you wish to add.2. Select the Add To Internal Mem ( ) icon from the main menu and
press the Menu/Ok ( ) button.You can cancel the copying operation using the same method described inAdding Photos on page 24.
Icon Name Description
Normal Sets equalizer to normal.
Rock Sets the equalizer to a rock style.
Jazz Sets the equalizer to a jazz style.
Xbass Sets the equalizer to a bass style.
Classical Sets the equalizer to a classical style.
29

Video Mode
30
Video Mode
Watching a VideoThe video’s main menu is automatically displayed on the screen when youswitch to video mode.• Press the Play/Pause ( ) button to start playing a video file.• Press the Play/Pause ( ) button to pause or continue playback.• Press the Up ( ) and Down ( ) buttons to skip to the previous or next
video file.• Press the Backward ( ) or Fast Forward ( ) buttons to fast rewind
or fast forward through 2x, 4x, 8x and 16x times normal speed.Press the Play/Pause ( ) button to return to normal speed.
• Press the Stop ( ) button to stop playback.
Selecting a Particular MediumIf you have many video files on different types of media, you can limit thenumber of video files to play by selecting a single medium in which to playvideo clips from. To select a medium to play video clips from:
1. Select the Video Select ( ) icon from the main menu.2. Select the medium type that the video clip is on and press the Play/
Pause ( ) button.The medium types are the same as described in Selecting a ParticularMedium on page 17.The Digital Viewer only cycles through the video files on the selectedmedium.
NOTE: • As you select each medium in turn, a list of files and fold-
ers that are on that medium are listed to the right. SeeBrowsing for a Particular Video File on page 31 for moredetails.
• Due to the number of different AVI video file formats, weadvise you to convert your video files using the MPEG4Movie Converter (3D Album) before playing videos on theDigital Viewer.

Using the Multi-Function Digital Viewer
Playing all Video FilesTo play all video files on all the different types of available medium, selectAutorun ( ) from the main menu and press the Play/Pause ( ) button.The Digital Viewer cycles through all video files on all the different types ofavailable medium.
Browsing for a Particular Video FileTo browse for a particularvideo file to play:1. Select the medium type
as described in Selectinga Particular Medium onpage 30.
2. Instead of pressing thePlay/Pause ( ) button,press the Fast Forward( ) button to select thefile/folder list.
3. Entering folders and playing video files is similar to that described inBrowsing for a Particular Photo or Folder on page 19.
Changing the VolumePress the Volume + ( ) and Volume - ( ) buttons to change the volume.
Displaying Video InformationVideo Information enables you to display the time elapsed and the totallength of the video clip across the top of the screen. To turn video informa-tion on or off:
1. Select the Video Information ( ) icon from the main menu.2. Select one of the On ( ) or Off ( ) icons as required.
NOTE: If you plug in the AV cable, you will not be able hear audio through earphones or using the internal speakers. See Connecting to a TV on page 8 for correct instructions on how to connect the AV cable.
My DocumentsFSHORT.AVIPEARL.AVI
USB
2/3, USB02/3, USB0
31

Deleting Files from Internal Memory
32
Deleting Files from Internal MemoryDeleting files from internal memory only applies to image and audio files.Due to the internal memory’s limited amount of space and video files beingrather large, there is no function for adding video files to internal memoryand thus, no delete function either.
Deleting a Single FileTo delete a single image or audio file:1. Switch to photo or audio mode according to the file type.2. Select the file from the internal memory that you wish to delete.3. Select the Current ( ) icon from the Delete from Internal Mem
( ) submenu.4. Press the Menu/Ok ( )
button and it will ask youif you want to delete ornot.
5. Press the Fast Forward/Backward ( / ) orUp/Down ( / ) but-tons to select Yes todelete or No to cancelthen press the Menu/Ok( ) button.
Deleting All FilesTo delete all image and audio files:1. Switch to either photo or audio mode.2. Select the All ( ) icon from the Delete from Internal Mem ( )
submenu.3. Press the Menu/Ok ( ) button and it will ask you if you want to delete
or not.4. Press the Fast Forward/Backward ( / ) or Up/Down ( / )
buttons to select Yes to delete or No to cancel then press the Menu/Ok( ) button.
YesYesYes No
Sure to delete file ?
Delete from InternalDelete from InternalDelete from Internal

Using the Multi-Function Digital Viewer
Copying Files to and from a ComputerThe supplied USB cable enables you to use the Digital Viewer as a compactflash memory card reader so that you can copy files to and from a computer.To copy files, connect the Digital Viewer to a computer as described inConnecting to a Computer on page 9.Two “Removable Disk” icons will automatically appear in WindowsExplorer as shown. Copy files to and from the Digital Viewer as you nor-mally would.
NOTE: • When you use the Digital Viewer as a card reader, you will
only be able to copy files to and from flash memory cards(CF, SD, MMC and MS), not the internal memory or exter-nal USB devices.
• For SD cards, setting the write protect will have no effectwhen using it with the Digital Viewer. In other words, youcan still copy and delete files, regardless of whether thewrite protect is set or not.
33

Appendix
Troubleshooting
Problem Solution
No Sound • If you are using headphones, ensure that it isworking and plugged in correctly.
• If you have plugged the video cable into theDigital Viewer, you will not be able to hearaudio through the earphones or from the inter-nal speakers. Disconnect the video cable orconnect it properly as described in Connectingto a TV on page 8.
• The volume may be too low. Try turning upthe volume.
• The video file may not have been recorded withsound.
No Video • Ensure you have connected the power properlyand turned it on.
• The screen goes blank when you plug the videocable into the Digital Viewer. Disconnect thevideo cable or connect it properly as describedin Connecting to a TV on page 8.
• If you have connected it to a TV, ensure thatyou have selected the correct TV mode (NTSCor PAL) for your TV.
Not reading the flash memory card/external USB device or there are no files.
• The flash memory card/external USB devicehasn’t been inserted correctly.
• Ensure you have selected a medium withaudiovisual files on it.
• Set the Digital Viewer to view files on the dif-ferent types of media

Appendix
Specifications
Item Feature
Dimension (W x H x D) 180 x 158 x 21/32.5 mm
Weight 612 g w/o expansion module
Display 5.6 inch TFT LCD (320 x 234 x RGB),CCFL analog I/F
LCD BrightnessControl
OSD SW control
Image format JPEG, BMP and PNG
Video format Video: MPEG-4 SP with MP3 stereo audioResolution: 800 x 480 at 30 fpsCompatible with DVD (720 x 480 in NTSC) and Digital-TV (720 x 480 full D1)Support XviD and DivX 4.0 and 5.0
Audio format AC 97 / MP3 interface
Music Playback Stereo MP3 format decoding @ 16 - 320 kb/s, CBR and VBR
Flash Memory NAND Flash 16/32 MB on-board (Optional)
Expansion Memory 4 in 1 Card Reader (SD/MMC/MS/CF)
Communication USB 1.1 host portMini-USB portAV OutEarphone
Speaker Stereo
I/O Port/Internal SlotAV Connections
Stereo EarphoneComposite Video OutDC-IN Jack
LED Indicators Power Charge status LED (Green)
AC Adapter Input: AC 100 – 240 V ~ 50/60 HzOutput: DC 9.5 V --- 1.6 A
35