Embed Size (px)
Citation preview

BTW300 6V/12V Wireless Battery and System Tester
English ...................... 02
Deutsch ....................... 16
Español ..................... 30
Français ................... 43
Italiano ................. 59
Português .............. 72
OWNERS MANUAL


Bluetooth Status (blue) LED Battery Status Check

• 6 •
6. CONNECTING THE TESTER
6.1 Before you test a battery in a vehicle, turn off the ignition, all accessories and loads. Close all of the vehicle’s doors and trunk lid.
6.2 Make sure the battery terminals are clean. Use a wire brush to clean them, if necessary. NOTE: This tester works best if the battery connectors have been removed and the battery posts have been cleaned. Any corrosion
between the tester clamps and the battery connectors, or between the battery connectors and the battery posts, will degrade the tester’s efficiency.
6.3 Connect the positive (red) clamp to the positive (POS, P, +) battery post. Connect the negative (black) clamp to the negative (NEG, N, -) battery post.
7. OPERATING INSTRUCTIONS
7.1 BATTERY TEST
1. Run the App on your mobile device and log in.
2. Press “Scan+” in the upper right corner of the HOME screen. (If the TEST icon is red, the tester is connected; no need to proceed to Scan+.)
The system will scan and find the tester.
3. Once the tester shows on the screen, select “Press To Start” to connect.
4. When connected, press “CONNECTED CONTINUE”.
CONNECTED CONTINUE
• 7 •
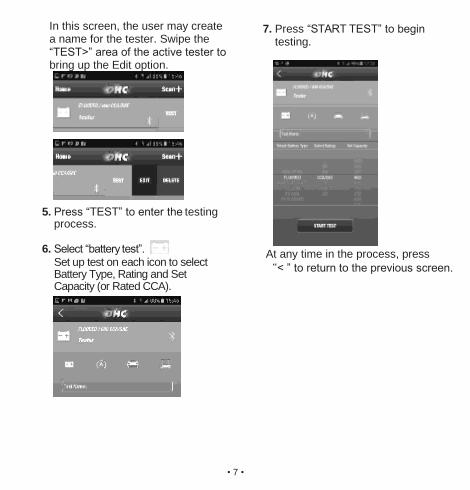
In this screen, the user may create a name for the tester. Swipe the “TEST>” area of the active tester to bring up the Edit option.
5. Press “TEST” to enter the testing process.
6. Select “battery test”. Set up test on each icon to select Battery Type, Rating and Set Capacity (or Rated CCA).
7. Press “START TEST” to begin testing.
At any time in the process, press
“< ” to return to the previous screen.

• 8 •
8. Confirm whether the battery has been charged.
9. The test report is displayed.
User may select “RETEST BATTERY”.
10. Press “EMAIL /TEXT RESULTS”, and then select the application. NOTE: Your mobile device must have E-Mail capability to use the EMAIL/TEXT RESULTS function.
11. Results will be sent.

• 9 •
7.2 SYSTEM TEST
1. Follow steps 1-6 for "BATTERY TEST".
2. From the TEST menu, select
Select Battery Type, Rating and Set Capacity (or Rated CCA).
3. Press “START TEST” to begin the system test.
At any time in the process, press “< ” to return to the previous screen.
4. Follow all screen prompts.
5. The test report is displayed.

• 10 •
6. Press “EMAIL /TEXT RESULTS”, and then select the application. NOTE: Your mobile device must have E-Mail capability to use the EMAIL/TEXT RESULTS function.
7. Results will be sent.
7.3 EV BATTERYTEST
1. Follow steps 1-6 for "BATTERYTEST".
2. From the TEST menu, select
“EV BATTERY TEST”.
Set up the test by swiping up ordown on each column to select the battery brand and model.
3. Press “START TEST” to begin testing. At any time in the process, press“< ” to return to the previous screen.
Set up test by swiping up or down on each column to select Battery Type, Rating and Set Capacity (or Rated CCA)
4. Follow all screen prompts.
5. The test report is displayed.
6. Press “EMAIL /TEXT RESULTS”, and then select the application. NOTE: Your mobile device must have E-Mail capability to use the EMAIL/ TEXT RESULTS function.
7. Results will be sent.
7.4 START-STOP TEST
1. Follow steps 1-6 for "BATTERY
TEST".
2. From the TEST menu,
select .

• 11 •
3. Press “START TEST” to begin testing.
4. Follow all screen prompts.
5. The test report is displayed.
6. Press “EMAIL /TEXT RESULTS”, and then select the application. NOTE: Your mobile device must have E-Mail capability to use the EMAIL/TEXT RESULTS function.
7. Results will be sent.
7.5 ACCESSING TEST RECORDS
1. From the HOME screen, scroll down and select "TEST RECORDS".
2. Select from stored test records to view, email/text or delete.
8. SPECIFICATIONS
Wireless connectivity ............................................... Bluetooth 4.0 class 2 (BLE)
Internal battery............................................ Lithium ion battery 3.7 V, 1150 mAh
Operation range.................................................................40~2,000 (CCA/SAE)
Voltage range....................................................................................... 1.5V~32V
Rating system .................................................................SAE, DIN, EN, IEC, CA
Wireless connection range...........................................................10m (32.8 feet)
Ingress protection rating ...............................................................................IP65
Cable length....................................................................................................20˝
Product dimension (L x W x H) ............................................3.88˝ x 2.75˝ x 1.13˝
Weight (with clamps)................................................................................ 11.5 oz

• 12 •
9. LIMITED WARRANTY
WARRANTY TERMS AND CONDITIONS
DHC Speciality Corporation (the “Manufacturer”) or the resellers authorized by the Manufacturer (the “Reseller”) warrant this Tester (the “Product”) for eighteen (18) months, according to the following stipulations. Any and all warranties, other than the warranty included herein, are hereby expressly disclaimed and excluded to the fullest extent permissible under applicable law. Legislation may imply warranties or conditions or impose obligations on Manufacturer which cannot be excluded, restricted or modified in relation to consumer goods.
Consumer End-User Warranty
Any claims under this warranty must be communicated to Reseller within 2 months after discovery of the non-conformity.
Resellers/Professional End-User Warranty
The Manufacturer provides a limited warranty for hidden defects or non-conformities. This warranty is subject to the followingconditions:
a. The Manufacturer only warrants hidden defects in material or workmanship present in their root cause at the moment of the first sale by the Manufacturer;
b. Manufacturer’s obligation under this warranty is limited to repairing or replacing the Product with a new or reconditioned unit at the sole option of the Manufacturer;
c. Manufacturer does not have any warranty obligations if the alleged defects were caused by abnormal usage, fair wear and tear, unauthorized use of the Product or use of the Product differing from the description in the applicable manual or other specifications given by the Manufacturer, insufficient care, repairs carried out by persons or entities or with parts not approved by Manufacturer, poor care, accidents, unauthorized changes or modifications, incorrect transport, storage or treatment of the Product;
d. In order to exercise this right, the Product must be returned complete and in its original state and packaging, with mail costs prepaid, along with proof of purchase to the Manufacturer or its authorized representatives in order for repair or replacement tooccur.

• 13 •
Common Warranty Provisions
The warranty mentioned above only applies to the first professional or consumer user having legally acquired the Product from the Manufacturer or a Reseller. No warranty is extended towards clients, agents or representatives of those buyers. The Product is sold under the specifications, for the use and purpose in accordance with the provisions of this manual, with express exclusion and disclaimer of warranty of any other specifications, uses and purposes.
Authorized Resellers are prohibited from making any statements or providing any warranty in excess of the above warranties Non-authorized resellers may only sell the product under the condition that they assume all warranty obligations with the total exclusion of any warranty provided by the Manufacturer.
Manufacturer does not provide any warranty for any accessories used with the Product that are not manufactured by Schumacher Electric Corporation.
This warranty does not exclude or diminish any claims the Manufacturer may have against the distributors of The Product.
THE MANUFACTURER NEITHER ASSUMES NOR AUTHORIZES ANYONE TO ASSUME OR MAKE ANY OTHER OBLIGATION TOWARDS THE PRODUCT OTHER THAN THIS WARRANTY.
Warranty, Repair Service and Distribution Centers:
North America Office,
Johnson City, TN 37604 423-646-6697
Taiwan: Head Office
8F, No.308, Datong Rd., Xizhi Dist.,22146
+886 2-2641-7399 [email protected]
DHC® and the DHC logo are registered trademarks of DHC Specialty Corporation.

• 14 •
FCC INFORMATION
This product contains transmitter FCC ID SH6MDBT40.
WARNING: Changes or modifications to this unit not expressly approved by the party responsible for compliance could void the user’s authority to operate the equipment.
This equipment has been tested and found to comply with the limits for a Class B Digital Device, pursuant to Part 15 of the FCC Rules. These limits are designed to provide reasonable protection against harmful interference in a residential installation. This equipment generates, uses, and can radiate radio frequency energy and, if not installed and used in accordance with the instructions, may cause harmful interference to radio communications. However, there is no guarantee that interference will not occur in a particular installation. If this equipment does cause harmful interference to radio or television reception, which can be determined by turning the equipment off and on, the user is encouraged to try to correct the interference by one or more of the following measures:
• Reorient or relocate the receiving antenna.
• Increase the separation between the equipment and receiver.
• Connect the equipment into an outlet on a circuit different from that to which the receiver is connected.
• Consult the dealer or an experienced radio/TV technician for help.
This equipment complies with Part 15 of the FCC Rules. Operation is subject to the following two conditions:
1. This equipment may not cause harmful interference.
2. This equipment must accept any interference received, including interference that may cause undesired operation.
This equipment complies with FCC radiation exposure limits set forth for an uncontrolled environment. This equipment should be installed and operated with minimum 20cm between the radiator and your body. This transmitter must not be collocated or operating in conjunction with any other antenna or transmitter unless authorized to do so by the FCC.
Modifications not authorized by the manufacturer may void the user’s authority to operate this device. This equipment complies with FCC RF radiation exposure limits set forth for an uncontrolled environment. This transmitter must not be co- located or operating in conjunction with any other antenna or transmitter.

• 15 •
CANADIAN REGULATION INFORMATION
CAN ICES-3 (B)/NMB-3(B)
Contains transmitter module IC: 8017A-MDBT40, Hardware Version Identification Number (HVIN): MDBT40
This device complies with Industry Canada license exempt RSS standard(s). Operation is subject to the following two conditions: (1) this device may not cause interference, and (2) this device must accept any interference, including interference that may cause undesired operation of the device.
Under Industry Canada regulations, this radio transmitter may only operate using an antenna of a type and maximum (or lesser) gain approved for the transmitter by Industry Canada. To reduce potential radio interference to other users, the antenna type and its gain should be so chosen that the equivalent isotropically radiated power (e.i.r.p.) is not more than that necessary for successful communication.


19

• 20 •
5. INSTALLATION DER APP
5.1 Laden Sie die App herunter und installieren Sie diese: „DHC Sync“. (App Store oder Google Play). Achten
Sie auf das Symbol .
HINWEIS: Für Apple-Geräte: erfordert iOS 8.0 oder höher; Android-Geräte: Android-OS 4.3 oder höher.
5.2 EINRICHTEN NEUER BENUTZER Wenn Sie die App erstmalig nutzen, müssen Sie die Registrierung erledigen.
1. Öffnen Sie die App auf Ihrem Mobilgerät.
2. Wählen Sie „NEUER BENUTZER“ aus.
3. Füllen Sie sämtliche Mussfelder aus und kreuzen Sie dann das Kästchen „BITTE DEN
GESCHÄFTSBEDINGUNGEN ZUSTIMMEN“ an. Drücken Sie auf „FORTSETZEN“.
4. Anmelden: Geben Sie die bei der Registrierung angegebene E-Mail- Adresse an. Kreuzen Sie das Kästchen „KONTO SPEICHERN“ an. Drücken Sie auf „ANMELDEN“.
6. ANSCHLIESSEN DES PRÜFERS
6.1 Schalten Sie die Zündung, sämtliche Zusatzgeräte und Verbraucher aus, bevor Sie eine Batterie in einem Fahrzeug prüfen,. Schließen Sie sämtliche Türen des Fahrzeugs und die Heckklappe.
6.2 Stellen Sie sicher, dass die Batterieklemmen sauber sind. Verwenden Sie, sofern notwendig, eine Drahtbürste zu deren Reinigung. HINWEIS: Dieser Prüfer funktioniert am Besten, wenn die Batterieanschlüsse
entfernt und die Batteriepole gereinigt wurden. Jegliche Korrosion zwischen den Klemmen des Prüfers und den Batterieanschlüssen oder zwischen den Batterieanschlüssen und den Batteriepolen schwächt die Wirksamkeit des Prüfers.
6.3 Schließen Sie die (rote) Plusklemme an den Pluspol (POS P, +) der Batterie an. Schließen Sie die (schwarze) Minusklemme an den Minuspol (NEG, N, -) der Batterie an.

• 21 •
7. BETRIEBSANLEITUNG
7.1 BATTERIEPRÜFUNG
1. Öffnen Sie die App auf Ihrem Mobilgerät und melden Sie sich an.
2. Drücken Sie auf „Scannen+“ in der oberen rechten Ecke der START- Seite. (Sofern das TEST >-Symbol rot ist, ist der Prüfer angeschlossen; keine Notwendigkeit, mit Scannen+ fortzufahren.)
Das System sucht und findet den Prüfer.
3. Sobald der Prüfer auf dem Bildschirm angezeigt wird, zum Verbinden „Zum Starten drücken“ auswählen.
4. Wenn angeschlossen, „VERBUNDEN FORTSETZEN“ drücken.
Auf diesem Bildschirm kann der Benutzer einen Namen für den Prüfer vergeben. Im „TEST >“- Bereich des aktiven Prüfers wischen, um die Bearbeiten- Option anzuzeigen.
„TEST >“ drücken, um das Prüfverfahren einzugeben.
5. Zur Anzeige eines Symbol auf „Drücken, um Test auszurwählen“ tippen.
6. „BATTERIEPRÜFUNG“ auswä hlen.Stellen Sie die Prüfung durch Wischen nach oben oder unten bei

• 22 •
jeder Spalte ein, um Batterieart, -leistung und -kapazität (oder Nennkaltstartstrom) auszuwählen.
7. „TEST STARTEN“ drücken, um mit
der Prüfung zu beginnen.
Um zum vorhergehenden Bildschirm zurückzukehren, drücken Sie jederzeit während des Verfahrens auf „<“.
8. Rückmelden Sie, ob die Batterie geladen wurde.
9. Der Prüfbericht wird angezeigt.
Der Benutzer kann „BATTERIE ERNEUT TESTEN“ auswählen.

• 23 •
10. „ERGEBNISSE PER E-MAIL /SMS SCHICKEN“ drücken und dann die Anwendung auswählen. (HINWEIS: Ihr Mobilgerät muss Sendefähigkeit aufweisen, um die Funktion ERGEBNISSE PER EMAIL SCHICKEN zu nutzen.)
11. Ergebnisse werden gesendet.
7.2 SYSTEMTEST
1. FolgenSiedenSchritten1-6für „BATTERIEPRÜFUNG“.
2. Wählen Sie „SYSTEMTEST“im Menü TEST aus.
Stellen Sie die Prüfung durch Wischen nach oben oder unten bei jeder Spalte ein, um Batterieart, -leistung und -kapazität (oder Nennkaltstartstrom) auszuwählen.
3. Drücken Sie „TEST STARTEN“, um mit der Systemprüfung zu beginnen. Um zum vorhergehenden Bildschirm zurückzukehren, drücken Sie jederzeit während des Verfahrens auf „<“.
4. Folgen Sie sämtlichen Bedienerhinweisen auf dem Bildschirm.

• 24 •
5. Der Prüfbericht wird angezeigt.
6. „ERGEBNISSE PER E-MAIL /SMS SCHICKEN“ drücken und dann die Anwendung auswählen. (HINWEIS: Ihr Mobilgerät muss Sendefähigkeit aufweisen, um die Funktion ERGEBNISSE PER EMAIL SCHICKEN zu nutzen.)
7. Ergebnisse werden gesendet.
7.3 EV-BATTERIEPRÜFUNG
1. FolgenSiedenSchritten1-6für „BATTERIEPRÜFUNG“.
2. Wählen Sie „EV
BATTERIEPRÜFUNG“
im Menü TEST aus.

• 25 •
Stellen Sie die Prüfung durch Wischen nach oben oder unten bei jeder Spalte ein, um die Batteriemarke und das -modell auszuwählen.
3. „TEST STARTEN“ drücken, um mit der Prüfung zu beginnen. Um zum vorhergehenden Bildschirm zurückzukehren, drücken Sie jederzeit während des Verfahrens auf „<“.
4. Folgen Sie sämtlichen Bedienerhinweisen auf dem Bildschirm.
5. Der Prüfbericht wird angezeigt.
6. „ERGEBNISSE PER E-MAIL /SMS SCHICKEN“ drücken und dann die Anwendung auswählen. (HINWEIS: Ihr Mobilgerät muss Sendefähigkeit aufweisen, um die Funktion ERGEBNISSE PER EMAIL SCHICKEN zu nutzen.)
7. Ergebnisse werden gesendet.
7.4 TEST STARTEN/BEENDEN 1. FolgenSiedenSchritten1-6für
„BATTERIEPRÜFUNG“.
2. Wählen Sie „TEST STARTEN/ BEENDEN“ im Menü TEST aus.
Stellen Sie die Prüfung durch Wischen nach oben oder unten bei jeder Spalte ein, um Batterieart, -leistung und -kapazität (oder Nennkaltstartstrom) auszuwählen.
3. „TEST STARTEN“ drücken, um mit der Prüfung zu beginnen.
4. Folgen Sie sämtlichen Bedienerhinweisen auf dem Bildschirm.
5. Der Prüfbericht wird angezeigt.
6. „ERGEBNISSE PER E-MAIL /SMS SCHICKEN“ drücken und dann die Anwendung auswählen. (HINWEIS: Ihr Mobilgerät muss Sendefähigkeit aufweisen, um die Funktion ERGEBNISSE PER EMAIL SCHICKEN zu nutzen.)
7. Ergebnisse werden gesendet.

• 26 •
7.5 ZUGRIFF AUF PRÜFPROTOKOLLE
1. Auf der Startseite nach unten scrollen und „PRÜFPROTOKOLLE“ auswählen.
2. Aus den gespeicherten Prüfprotokollen zum Ansehen, per E-Mail verschicken oder Löschen auswählen.
8. TECHNISCHE DATEN
Drahtlose Verbindung ............................................Bluetooth 4.0 Klasse 2 (BLE)
Interne Batterie ..................................... Lithium-Ionen-Batterie 3,7 V, 1150 mAh
Betriebsbereich ..................................................................40~2.000 (CCA/SAE)
Spannungsbereich ............................................................................... 1,5V~32V
Bewertungssystem..........................................................SAE, DIN, EN, IEC, CA
Drahtloser Verbindungsbereich.................................................. 10 m (32,8 Fuß)
Schutzklasse-Bewertung ..............................................................................IP65
Kabellänge ............................................................................. ca. 50 cm (20 Zoll)
Produktabmessungen (L x B x H)...... ca. 9,9 x 7,0 x 2,9 cm (3,88 x 2,75 x 1,13 Zoll)
Gewicht (mit Klemmen)....................................................ca. 326 g (11,5 Unzen)

• 27 •
9. BESCHRÄNKTE GARANTIE
GEWÄHRLEISTUNGSBEDINGUNGEN
Schumacher Electric Corporation (der „Hersteller“) oder die vom Hersteller autorisierten Wiederverkäufer (der „Wiederverkäufer“) übernehmen für diesen Prüfer (das „Produkt“) gemäß den folgenden Bestimmungen die Gewährleistung für achtzehn (18) Monate. Jegliche und sämtliche Gewährleistungen mit Ausnahme der hierin eingeschlossenen Gewährleistung werden hiermit im nach geltendem Recht höchstzulässigen Ausmaß ausdrücklich abgelehnt und ausgeschlossen. Rechtsvorschriften implizieren möglicherweise Gewährleistungen oder Bedingungen oder erlegen dem Hersteller Verpflichtungen auf, welche in Bezug auf Konsumgüter nicht ausgeschlossen, begrenzt oder abgeändert werden können.
Gewährleistung Für Konsumenten-Endverbraucher
Jegliche Ansprüche unter dieser Gewährleistung müssen dem Wiederverkäufer innerhalb von 2 Monaten nach Erkennung der Nichtübereinstimmung mitgeteilt werden. Gewährleistung Für Wiederverkäufer / Fachleute Als Endverbraucher
Der Hersteller bietet eine eingeschränkte Gewährleistung für versteckte Mängel oder Nichtübereinstimmungen. Diese Gewährleistung unterliegt den folgenden Bedingungen:
a. Der Hersteller übernimmt lediglich die Gewährleistung für versteckte Material- oder Verarbeitungsmängel, welche nach ihrer Grundursache zum Zeitpunkt des Erstverkaufs durch den Hersteller vorhanden sind;
b. Die Verpflichtung des Herstellers unter dieser Gewährleistung ist auf die Reparatur oder den Austausch des Produkts durch ein neues oder überholtes Gerät nach alleiniger Wahl des Herstellers beschränkt;
c. Der Hersteller hat keinerlei Gewährleistungsverpflichtungen, sofern die mutmaßlichen Mängel durchungewöhnliche Nutzung, üblicheAbnutzungoder unbefugte Nutzung des Produkts oder die Nutzung des Produkts abweichend von der Beschreibung im Handbuch oder sonstigen vom Hersteller gemachten Vorgaben, durch unzureichende Pflege, durch von Personen oder juristische Personen oder mit Teilen vorgenommene Reparaturen, welche vom Hersteller nicht anerkannt sind, durch mangelhafte Pflege, Missgeschicke, unbefugte Änderungen oder Modifikationen oder durch unsachgemäße(n) Transport, Lagerung oder Behandlung des Produkts verursacht wurden;

• 28 •
d. Um dieses Recht geltend zu machen, muss das Produkt vollständig und in seinem Originalzustand und der Originalverpackung mit frankierter Post zusammen mit einem Erwerbsnachweis an den Hersteller oder seine bevollmächtigten Vertreter zurückgesandt werden, damit die Reparatur oder der Austausch erfolgen kann.
Allgemeine Gewährleistungsbestimmungen
Die oben genannte Gewährleistung gilt nur für den ersten Fachanwender- oder Konsumentenbenutzer, welcher das Produkt rechtmäßig vom Hersteller oder einem Wiederverkäufer erworben hat. Auf Kunden, Vertreter oder Bevollmächtigte jener Käufer erstreckt sich keine Gewährleistung.
Das Produkt wird unter den Leistungsbeschreibungen für die Nutzung und den Einsatzzweck im Einklang mit den Bestimmungen dieses Handbuchs mit ausdrücklicher Ausnahme und Haftungsausschluss jeglicher sonstiger Leistungsbeschreibungen, Nutzungen und Einsatzzwecke verkauft.
Autorisierten Wiederverkäufern ist es untersagt, jegliche Erklärungen abzugeben oder eine Gewährleistung zu bieten, welche über die oben genannten Gewährleistungen hinausgehen bzw. hinausgeht. Unautorisierte Wiederverkäufer dürfen das Produkt nur unter der Maßgabe verkaufen, dass sie sämtliche Gewährleistungsverpflichtungen mit vollständigem Ausschluss jeglicher vom Hersteller gebotenen Gewährleistung übernehmen.
Der Hersteller bietet keinerlei Gewährleistung für jegliche mit dem Produkt genutzten Zubehörteile, welche nicht von Schumacher Electric Corporation hergestellt werden. Diese Gewährleistung schließt jegliche Ansprüche nicht aus und schmälert nicht jegliche Ansprüche, welche der Hersteller möglicherweise gegen die Vertreiber des Produkts hat.
DER HERSTELLER GEHT WEDER DARAUF EIN NOCH BEFUGT ER IRGENDJEMAND, JEGLICHE SONSTIGE VERPFLICHTUNG GEGENÜBER DEM PRODUKT AUSSER DIESER GEWÄHRLEISTUNG ZU ÜBERNEHMEN ODER ZU GESTALTEN.

• 29 •
Garantie, Reparaturservice und Vertriebszentren:
Johnson City, TN 37604 USA 423-646-6697
Taiwan: Head Office 8F, No.308, Datong Rd., Xizhi Dist.,22146
+886 2-2641-7399 [email protected]
DHC® und das DHC-Logo sind Marken der DHC Specialty Corporation.

• 30 •

• 31 •

• 32 •

• 33 •

• 34 •
3. Rellene todos los campos obligatorios y luego marque la casilla para “ACEPTAR TÉRMINOS Y CONDICIONES”. Pulse “CONTINUAR”.
4. Inicie sesión: introduzca la dirección de correo electrónico proporcionada durante el registro. Marque la casilla “RECORDAR CUENTA”. Pulse “INICIAR SESIÓN”.
6. INSTRUCCIONES PARA CONECTAR EL PROBADOR
6.1 Antes de comprobar la batería de un vehículo, apague el motor y todos los accesorios y cargas. Cierre todas las puertas del vehículo y del maletero.
6.2 Asegúrese de que los terminales de la batería estén limpios. Use un cepillo de alambre para limpiarlos, si es necesario. Nota: Este probador funciona mejor si se retiran los conectores de la batería y se limpian los bornes de la batería.
Cualquier corrosión entre las pinzas del probador y los conectores de la batería, o entre los conectores de la batería y los bornes de la batería, degradará la eficiencia del probador.
6.3 Conecte la pinza positiva (color rojo) al borne positivo (POS, P, +) de la batería. Conecte la pinza negativa (color negro) al borne negativo (NEG, N, -) de la batería.
7. INSTRUCCIONES DE FUNCIONAMIENTO
7.1 VERIFICACIÓN DE LA BATERÍA
1. Abra la aplicación en su dispositivo móvil e inicie sesión.
2. Pulse “Escanear+” en la esquina superior derecha de la pantalla INICIO. (Si el icono VERIFICACIÓN > está rojo quiere decir que el probador está conectado y no hay necesidad de presionar Escanear+).
El sistema buscará y encontrará el probador.
3. Una vez que el probador se muestre en la pantalla, seleccione “Presionar para Empezar” para conectar.

• 35 •
4. Una vez conectado, pulse “CONTINUAR CONECTADO”.
En esta pantalla, el usuario puede crear un nombre para el probador. Deslice el área “VERIFICACIÓN >” del probador activo para que aparezca la opción Editar.
5. Pulse “VERIFICACIÓN >” para entrar en el proceso de comprobación.
6. Seleccione “Pulsar para seleccionar la prueba” para un menú desplegable.
7. Seleccione “VERIFICACIÓN DE
LA BATERÍA”. Configure la prueba al desplazarse hacia arriba o abajo en cada columna para seleccionar Tipo de batería, Potencia y Seleccionar capacidad (o CCA de potencia).

• 36 •
8. Pulse “INICIAR VERIFICACIÓN” para comenzar la verificación.
En cualquier momento del proceso, pulse “<” para regresar a la pantalla anterior.
9. Confirme si la batería se ha cargado.
10. Se muestra el informe de la prueba.
El usuario puede seleccionar “VOLVER A VERIFICAR LA BATERÍA”.
11. Pulse “CORREO ELECTRÓNICO / TEXTO DE LOS RESULTADOS”, y luego seleccione la aplicación. NOTA: Su dispositivo móvil debe tener capacidad de texto para utilizar la característica TEXTO DE LOS RESULTADOS.

• 37 •
12. Los resultados serán enviados. 3. Pulse “INICIAR VERIFICACIÓN”
para comenzar la prueba del sistema.
En cualquier momento del proceso, pulse “<” para regresar a la pantalla anterior.
4. Siga todas las indicaciones en su pantalla.
7.2 VERIFICACIÓN DEL SISTEMA
1. Siga los pasos del 1 al 6 para “VERIFICACIÓN DE BATERÍA”.
2. En el menú VERIFICACIÓN, seleccione “VERIFICACIÓN DEL SISTEMA”.
Configure la prueba al desplazarse hacia arriba o abajo en cada columna para seleccionar Tipo de batería, Potencia y Seleccionar capacidad (o CCA de potencia).

• 38 •
7.3 VERIFICACIÓN BATERÍAEV
1. Siga los pasos del 1 al 6 para “VERIFICACIÓN DE BATERÍA”.
2. En el menú VERIFICACIÓN, seleccione “VERIFICACIÓN BATERÍA EV”.
5. Se muestra el informe de la prueba.
6. Pulse “CORREO ELECTRÓNICO /
TEXTO DE LOS RESULTADOS”, y luego seleccione la aplicación. NOTA: Su dispositivo móvil debe tener capacidad de texto para utilizar la característica TEXTO DE LOS RESULTADOS.
7. Los resultados serán enviados.
Configure la prueba al desplazarse hacia arriba o abajo en cada columna para seleccionar la marca y el modelo de la batería.
3. Pulse“INICIAR VERIFICACIÓN” para comenzar la verificación. En cualquier momento del proceso, pulse “<” para regresar a la pantalla anterior.
4. Siga todas las indicaciones en su pantalla.
5. Se muestra el informe de la prueba.
6. Pulse “CORREO ELECTRÓNICO / TEXTO DE LOS RESULTADOS”,

• 39 •
y luego seleccione la aplicación. NOTA: Su dispositivo móvil debe tener capacidad de texto para utilizar la característica TEXTO DE LOS RESULTADOS.
7. Los resultados serán enviados.
7.4 INICIAR DETENERVERIFICACIÓN
1. Siga los pasos del 1 al 6 para “VERIFICACIÓN DE BATERÍA”.
2. En el menú VERIFICACIÓN, seleccione “INICIAR DETENER VERIFICACIÓN”.
Configure la prueba al desplazarse hacia arriba o abajo en cada columna para seleccionar Tipo de batería, Potencia y Seleccionar capacidad (o CCA de potencia).
3. Pulse “INICIAR VERIFICACIÓN” para comenzar la verificación. En cualquier momento del proceso, pulse “<” para regresar a la pantalla anterior.
4. Siga todas las indicaciones en su pantalla.
5. Se muestra el informe de la prueba.
6. Pulse “CORREO ELECTRÓNICO / TEXTO DE LOS RESULTADOS”, y luego seleccione la aplicación.
NOTA: Su dispositivo móvil debe tener capacidad de texto para utilizar la característica TEXTO DE LOS RESULTADOS.
7. Los resultados serán enviados.
7.5 ACCESO A LOS REGISTROS
DE LASPRUEBAS
1. En la pantalla INICIO, desplácese hacia abajo y seleccione “REGISTROS DE LAS PRUEBAS”.
2. Seleccione de los registros de
las pruebas almacenados para consultar, enviar por correo electrónico o texto, o eliminar.

• 40 •
8. ESPECIFICACIONES
Conectividad inalámbrica..................................... Bluetooth 4.0 de case 2 (BLE)
Batería interna ............................... Batería de iones de litio de 3,7 V, 1150 mAh
Rango de funcionamiento............................................de 40 a 2000 (CCA/SAE)
Rango de voltaje......................................................................... de 1,5 V a 32 V
Sistema de potencia .......................................................SAE, DIN, EN, IEC, CA
Rango de conexión inalámbrica ................................................ 10 m (32,8 pies)
Clasificación de protección de ingreso .........................................................IP65
Longitud del cable........................................................................................ 20 in
Dimensión del producto (largo x ancho x alto) ............ 3,88 in x 2,75 in x 1,13 in
Peso (con pinzas) .................................................................................... 11,5 oz
9. GARANTÍA LIMITADA
TÉRMINOS Y CONDICIONES DE LA GARANTÍA
Schumacher Electric Corporation (el “Fabricante”) o los distribuidores autorizados por el Fabricante (el “Distribuidor”) garantizan este probador (el “Producto”) durante dieciocho (18) meses en base a las estipulaciones siguientes. Cualquier garantía distinta a la aquí incluida, queda por la presente expresamente rechazada y excluida hasta el máximo alcance permitido por la ley correspondiente. La legislación podrá suponer garantías o condiciones o imponer obligaciones al Fabricante que no podrán ser excluidas, limitadas o modificadas en relación a los bienes de consumo. Garantía Respecto al Consumidor Final
Cualquier reclamación, bajo el marco de esta garantía, debe ser comunicada al distribuidor en un plazo de 2 meses a contar a partir del momento de detectar la condición de no conformidad. Garantia Consumidor Final Profesional / Distribuidores
El fabricante estipula una garantía limitada para defectos ocultos y no conformidades. Esta garantía está sujeta a las siguientes condiciones:
a. El Fabricante solo garantiza los defectos ocultos en el material o calidad de manufactura presentes en su origen al momento de la primera venta por parte del Fabricante;
b. La obligación del Fabricante bajo esta garantía está limitada a reparar o reemplazar el Producto con unonuevo oreparado según elcriterio del Fabricante.

• 41 •
c. El Fabricante no tiene obligaciones en relación a la garantía si los presuntos defectos fueren causados por uso indebido, deterioro o desgaste normal por el uso, utilización no recomendada o utilización diferente a la descrita en el manual correspondiente u otras especificaciones estipuladas por el Fabricante, mantenimiento y cuidados insuficientes, reparaciones realizadas por personas o entidades o con piezas o repuestos no aprobados por el Fabricante, mantenimiento deficiente, accidentes, cambios o modificaciones no autorizadas, transporte, almacenamiento o tratamiento inapropiado del Producto;
d. A fin de ejercer este derecho, el Producto debe ser devuelto en su totalidad y en su estado y empaque original, con los gastos de envío pagados, adjuntando el resguardo de compra del Fabricante o sus representantes autorizados para que la reparación o reemplazo pueda efectuarse.
Condiciones Generales de la Garantía La garantía arriba mencionada es solo aplicable al primer consumidor o profesional que haya adquirido legalmente el Producto del Fabricante o de un Distribuidor. La garantía no es extensible a clientes, agentes o representantes de dichos compradores. El Producto es vendido bajo las especificaciones y para el uso y propósito en conformidad con las estipulaciones de este manual, con exclusión expresa y limitación de responsabilidad de cualesquiera otras especificaciones, usos y propósitos. Los Distribuidores autorizados no podrán realizar declaración alguna o hacer estipulaciones adicionales respecto a las garantías arriba indicadas. Los distribuidores no autorizados podrán vender el Producto solo bajo condición que asuman todas las obligaciones de la garantía contotal exclusión de cualquier garantía estipulada por el Fabricante. El Fabricante no estipula garantía alguna para cualesquiera accesorios utilizados con el Producto que no hayan sido manufacturados por Schumacher Electric Corporation. Esta garantía no excluye o descarta cualquier reclamación que el Fabricante pueda ejercer contra los distribuidores del Producto.
EL FABRICANTE NI ASUME NI AUTORIZA A TERCEROS A ADQUIRIR O ACEPTAR CUALQUIER OTRA OBLIGACIÓN EN RELACIÓN AL PRODUCTO QUE AQUELLAS ESTIPULADAS EN ESTA GARANTÍA.

• 42 •
Centros de garantía, servicio de reparación y distribución:
Johnson City, TN 37604, USA 423-646-6697
Taiwan: Head Office 8F, No.308, Datong Rd., Xizhi Dist.,22146
+886 2-2641-7399 [email protected]
DHC® y el logotipo DHC son marcas registradas de DHC Specialty Corporation.

• 43 •

• 44 •

• 45 •
• 46 •

• 47 •
5. INSTALLATION DE L’APPLICATION
5.1 Téléchargement et installation de l’application : “DHC Sync”. (App Store ou Google Play). Recherchez
l’icône .
REMARQUE : Nécessite un iOS 8.0 ou version ultérieure pour les appareils Apple ; OS 4.3 ou version ultérieure pour les appareils Android.
5.2 CONFIGURATION NOUVEL UTILISATEUR
Vous devez vous inscrire lorsque vous utilisez l’application pour la première fois.
1. Ouvrez l’application sur votre appareil mobile.
2. Sélectionnez « NOUVEL UTILISATEUR ».
3. Remplissez tous les champs obligatoires, puis cochez la case
« J’ACCEPTE LES CONDITIONS GÉNÉRALES ». Appuyez sur « CONTINUER ».
4. Connexion : Saisissez l’adresse e-mail que vous avez fournie au cours de votre inscription. Cochez la case « SE SOUVENIR DU COMPTE ». Appuyez sur « CONNEXION ».
6. BRANCHEMENT DU TESTEUR
6.1 Avant de tester une batterie dans un véhicule, coupez le contact et éteignez tout accessoire et charges. Fermez toutes les portes et le capot du véhicule.
6.2 Assurez-vous que les bornes de la batterie soient propres. Sinécessaire, nettoyez-les à l’aide d’une brosse métallique. REMARQUE : Ce testeur fonctionne mieux lorsque les connecteurs de la batterie ont été retirés et que les bornes ont été nettoyées.
Toute présence de rouille entre les pinces du testeur et les connecteurs de la batterie ou entre les connecteurs de la batterie et les bornes de cette dernière diminue l’efficacité du testeur.
6.3 Branchez la pince positive (rouge) sur la borne positive (POS, P, +) de la batterie. Branchez la pince négative (noire) à la borne négative (NEG, N, -) de la batterie.

• 48 •
7. INSTRUCTIONS DE FONCTIONNEMENT
7.1 TEST BATTERIE
1. Ouvrez l’application sur votre appareil mobile et connectez-vous.
2. Appuyez sur « Scan+ » situé en haut à droite de l’écran d’ACCUEIL. (Si l’icône TEST est affichée en rouge, cela signifie que le testeur est branché et qu’il n’est pas nécessaire d’exécuter Scan+).
Le système effectue un scan et recherche le testeur.
3. Lorsque le testeur apparaît sur l’écran, sélectionnez « APPUYEZ SUR DÉMARRER » afin d’établir la connexion.
4. Une fois connecté, appuyez sur « CONTINUER CONNECTÉ ».
Sur cet écran, l’utilisateur peut nommer le testeur. Faites glisser votre doigt sur la zone « TEST > » du testeur actif afin de faire apparaître l’option Modifier.
5. Appuyez sur « TEST > » pour
démarrer le processus de test.
6. Appuyez sur l’onglet « Appuyez pour sélectionner le test » afin d’accéder à un menu déroulant.
• 49 •
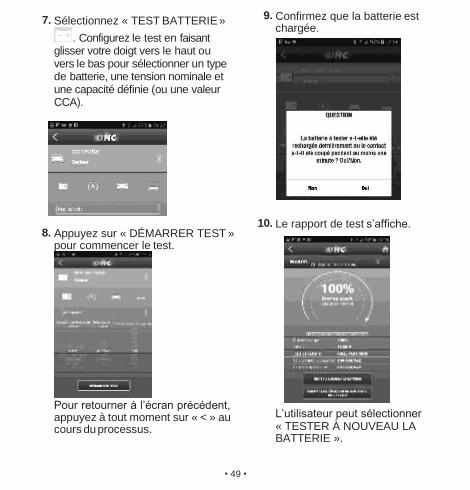
7. Sélectionnez « TEST BATTERIE »
. Configurez le test en faisant glisser votre doigt vers le haut ou vers le bas pour sélectionner un type de batterie, une tension nominale et une capacité définie (ou une valeur CCA).
8. Appuyez sur « DÉMARRER TEST » pour commencer le test.
Pour retourner à l’écran précédent, appuyez à tout moment sur « < » au cours du processus.
9. Confirmez que la batterie est chargée.
10. Le rapport de test s’affiche.
L’utilisateur peut sélectionner « TESTER À NOUVEAU LA BATTERIE ».

• 50 •
11. Appuyez sur « ENVOYER LES RÊSULTATS DE TEST PAR E-MAIL/ TEXTO », puis sélectionnez l’application.
REMARQUE : Pour utiliser la fonction TEXTO, votre appareil mobile doit être équipé de la fonction de textos.
12. Les résultats sont envoyés.
7.2 TEST SYSTÈME
1. Suivez les étapes 1 à 6 de la
section « TEST BATTERIE ».
2. Dans le menu TEST, sélectionnez
« TEST SYSTÈME ».
Configurez le test en faisant glisser votre doigt vers le haut ou vers le bas dans chaque colonne pour sélectionner un type de batterie, une tension nominale et une capacité définie (ou une valeur CCA).
3. Appuyez sur « DÉMARRER TEST » pour commencer le test système. Pour retourner à l’écran précédent, appuyez à tout moment sur « < » au cours du processus.
4. Suivez toutes les instructions qui s’affichent à l’écran.

• 51 •
5. Le rapport de test s’affiche.
6. Appuyez sur « ENVOYER LES RÊSULTATS DE TEST PAR E-MAIL/ TEXTO », puis sélectionnez l’application.
REMARQUE : Pour utiliser la fonction TEXTO, votre appareil mobile doit être équipé de la fonction de textos.
7. Les résultats sont envoyés.

• 52 •
7.2 TEST BATTERIE EV
1. Suivez les étapes 1 à 6 delasection « TEST BATTERIE ».
2. Dans le menu TEST, sélectionnez
« TEST BATTERIE EV
Configurez le test en faisant glisser votre doigt vers le haut ou vers le bas sur chaque colonne afin de sélectionner la marque et le modèle de la batterie.
3. Appuyez sur « DÉMARRER LE TEST » pour commencer le test.
Pour retourner à l’écran précédent, appuyez à tout moment sur « < » au cours du processus.
4. Suivez toutes les instructions qui s’affichent à l’écran.
5. Le rapport de test s’affiche.
6. Appuyez sur « ENVOYER LES RÊSULTATS DE TEST PAR E-MAIL/ TEXTO », puis sélectionnez l’application.
REMARQUE : Pour utiliser la fonction TEXTO, votre appareil mobile doit être équipé de la fonction de textos.
7. Les résultats sont envoyés.
7.3 TEST START-STOP
1. Suivez les étapes 1 à 6 de lasection « TEST BATTERIE ».
2. Dans le menu TEST, sélectionnez « START-STOP TEST ».
Configurez le test en faisant glisser votre doigt vers le haut ou vers le bas dans chaque colonne pour sélectionner un type de batterie, une tension nominale et une capacité définie (ou une valeur CCA).

• 53 •
3. Appuyez sur « DÉMARRER TEST » pour commencer le test.
4. Suivez toutes les instructions qui s’affichent à l’écran.
5. Le rapport de test s’affiche.
6. Appuyez sur « ENVOYER LES RÊSULTATS DE TEST PAR E-MAIL/ TEXTO », puis sélectionnez l’application.
REMARQUE : Pour utiliser la fonction TEXTO, votre appareil mobile doit être équipé de la fonction de textos.
7. Les résultats sont envoyés.
7.4 ACCÈS AUX ENREGISTREMENTS DE TESTS
1. Faites défiler l’écran d’ACCUEIL vers le bas et sélectionnez « ENREGISTREMENT TEST ».
2. Sélectionnez les enregistrements de tests que vous souhaitez consulter, envoyer par e-mail ou supprimer.
8. SPÉCIFICATIONS
Connectivité sans fil ...........................................Bluetooth 4.0 catégorie 2 (BLE)
Batterie interne........................................... Batterie Lithium ion 3,7 V, 1150 mAh
Plage de fonctionnement ...................................................40~2,000 (CCA/SAE)
Plage de tension .................................................................................. 1,5V~32V
Système de classification................................................SAE, DIN, EN, IEC, CA
Portée de la connexion sans fil ..................................................................... 10m
Indice de protection à l’immersion ................................................................IP65
Longueur du câble .................................................................................. 50,8 cm
Dimensions du produit (L x L x H)................................ 9,9 cm x 6,9 cm x 2,9 cm
Poids (avec pinces)..................................................................................... 326 g

• 54 •
9. GARANTIE LIMITÉE
CONDITIONS GÉNÉRALES DE GARANTIE
Schumacher Electric Corporation (le « Fabricant ») ou les revendeurs autorisés par le Fabricant (le « Revendeur ») garantit ce testeur (le « Produit ») pour une durée de dix-huit (18) mois, selon les dispositions ci-après. Toute forme ou clause de garantie non prévue par la présente garantie sont expressément rejetées et exclues, dans la mesure autorisée par les lois en vigueur. La Loi peut impliquer des garanties ou conditions ou imposer au Fabricant des obligations concernant les biens de consommation qui ne peuvent être exclues, limitées ou modifiées. Garantie de l’Utilisateur Final
Touteréclamation couverte par cette garantie doit-être formulée auprès du Revendeur dans un délai de 2 mois après la découverte de la non-conformité concernée. Garantie des Revendeurs et des Utilisateurs Finaux Professionnels
Le Fabricant fournit une garantie limitée couvrant les vices cachés et les non- conformités. Cette garantie est soumise aux conditions suivantes :
a. La garantie du Fabricant ne couvre que les vices de matière ou de fabrication présents à l’origine, au moment de la première vente par le Fabricant.
b. Les obligations du Fabricant dans le cadre de cette garantie se limitent à la réparation ou au remplacement du Produit par un exemplaire neuf ou remis à neuf, à l’unique discrétion du Fabricant.
c. Le Fabricant n’a aucune obligation de garantie si les vices présumés ont été causés par une utilisation anormale, une usure normale, une utilisation non- autorisée du produit ou une utilisation autre que celle décrite dans le manuel applicable ou par d’autres spécifications fournies par le Fabricant, un défaut d’entretien, des réparations effectuées par des personnes et entités non- autorisées ou avec des pièces non-approuvées par le Fabricant, de la négligence, des accidents, des modifications non-autorisées ou un transport, stockage ou traitement inadéquat.
d. Pour pouvoir exercer ce droit, le Produit doit être retourné complet dans son état et emballage d’origine, les frais d’envoi prépayés et accompagné de sa preuve d’achat au Fabricant ou à l’un de ses représentants autorisés, afin que la réparation ou le remplacement puissent avoir lieu.

• 55 •
Dispositions Communes en Matière de Garantie
La garantie mentionnée ci-dessus ne s’applique qu’au premier client professionnel ou consommateur-utilisateur ayant acquis légalement le produit auprès du Fabricant ou d’un Revendeur. La garantie ne s’applique pas aux clients, agents ou représentants de ces acheteurs. Le produit est vendu sous ses propres spécifications et à des fins d’utilisation conformes aux dispositions de ce manuel. Toute garantie est expressément exclue et annulée dans le cadre de toute autre spécification ou utilisation.
Il est interdit aux Revendeurs autorisés de formuler des déclarations ou de fournir des garanties allant au-delà des garanties décrites ci-dessus. Les Revendeurs non- autorisés peuvent vendre le Produit à l’unique condition que toute garantie soit prise en charge par ces derniers, en excluant totalement toute garantie fournie par le Fabricant.
Le Fabricant ne fournit aucune garantie couvrant tout accessoire utilisé avec le Produit et qui n’est pas fabriqué par Schumacher Electric Corporation.
Cette garantie n’exclut ou n’atténue aucune réclamation que le Fabricant pourrait avoir à formuler à l’encontre des distributeurs du Produit. LE FABRICANT N’ASSUME AUCUNE OBLIGATION QUE CELLES DÉFINIES PAR LA PRÉSENTE GARANTIE ET N’AUTORISE PERSONNE À LE FAIRE OU À ÉTABLIR TOUTE AUTRE OBLIGATION EN SON NOM.
Garantie, service de réparation et de centres de distribution:
Johnson City, TN 37604, USA
423-646-6697
Taiwan: Head Office
8F, No.308, Datong Rd., Xizhi Dist.,22146
+886 2-2641-7399
DHC® et le logo DHC sont des marques déposées de DHC Specialty Corporation FORMATIONS FCC

• 56 •
Ce produit contient l’émetteur FCC ID SH6MDBT40.
AVERTISSEMENT : Tout changement ou toute modification non expressément approuvé par la partie responsable de la conformité pourrait annuler l’autorisation accordée à l’utilisateur d’utiliser cet appareil.
Cet équipement a été testé et se conforme aux limites pour un dispositif digital de Classe B, selon la partie 15 des réglementations du FCC. Ces limites sont conçues pour offrir une protection raisonnable contre les interférences nocives d’une installation résidentielle. Cet équipement génère, utilise et peut émettre une énergie de fréquence par radio et, s’il n’est pas installé et utilisé selon les directives, peut causer une interférence nocive aux communications par radio. Cependant, il n’y a aucune garantie qu’une interférence ne prendra pas place dans une installation particulière. Si cet appareil produit des interférences nuisibles sur la réception de la radio ou de la télévision, ce que vous pouvez facilement constater en l’éteignant et en le rallumant, nous vous incitons fortement à prendre l’une ou plusieurs des mesures suivantes:
• Réorientez ou resituez l’antenne de réception.
• Augmentez la séparation entre l’équipement et le récepteur.
• Branchez l’équipement dans une prise d’un circuit différent que celui dans lequel est branché le récepteur.
• Contactez votre revendeur ou un technicien radio / TV qualifié.
Cet appareil est conforme aux dispositions de la section 15 de la règlementation de la FCC. Son fonctionnement est soumis aux deux conditions suivantes :
5. Cet appareil ne doit pas causer d’interférences nuisibles.
6. Cet appareil doit accepter toute interférence reçue, meme celles pouvant perturber son fonctionnement.

• 57 •
Cet appareil est conforme aux limites d’exposition au rayonnement établies par la FCC pour un environnement non contrôlé. Cet appareil doit être installé et utilisé à une distance minimale de 20 cm d’un radiateur et de toute personne. Cet émetteur ne doit pas être installé à proximité ou fonctionnant conjointement avec une autre antenne ou émetteur sans l’autorisation de la FCC.
Toute modification qui ne serait pas expressément autorisée par le fabricant peut annuler la permission accordée à l’utilisateur de s’en servir. Cet appareil est conforme aux limites d’exposition au rayonnement RF établies par la FCC pour un environnement non contrôlé. Cet émetteur ne doit pas être placé ou utilisé conjointement avec une autre antenne ou émetteur.
INFORMATIONS SUR LES RÈGLEMENTS CANADIENS
CAN ICES-3 (B)/NMB-3(B)
Contient le module émetteur IC : 8017A-MDBT40, Version Hardware Numéro d’Identification (HVIN) : MDBT40
Le présent appareil est conforme aux CNR d’Industrie Canada applicables aux appareils radio exempts de licence. L’exploitation est autorisée aux deux conditions suivantes: (1) l’appareil ne doit pas produire de brouillage, et (2) l’utilisateur de l’appareil doit accepter tout brouillage radioélectrique subi, même si le brouillage est susceptible d’en compromettre le fonctionnement.
Conformément à la réglementation d’Industrie Canada, le présent émetteur radio peut fonctionner avec une antenne d’un type et d’un gain maximal (ou inférieur) approuvé pour l’émetteur par Industrie Canada. Dans le but de réduire les risques de brouillage radioélectrique à l’intention des autres utilisateurs, il faut choisir le type d’antenne et son gain de sorte que la puissance isotrope rayonnée équivalente (p.i.r.e.) ne dépasse pas l’intensité nécessaire à l’établissement d’une communication satisfaisante.


• 59 •
• 60 •

• 61 •

• 62 •

• 63 •
6. COLLEGAMENTO DEL TESTER
6.1 Prima di testare una batteria a bordo di unveicolo, spegnere l’accensione, tutti gli accessori e i carichi elettrici. Chiudere tutte le porte e il vano bagagli del veicolo.
6.2 Assicurarsi che i morsetti della batteria siano puliti. Utilizzare una spazzola metallica per pulirli, se necessario. NOTA: Questo tester funziona al meglio se i connettori della batteria sono stati rimossi e i poli della batteria
sono stati puliti. Eventuali effetti della corrosione tra i mandrini del tester e i connettori della batteria, o tra i connettori e i poli della batteria, degraderanno l’efficienza del tester.
6.3 Collegare il morsetto positivo (rosso) al polo positivo (POS, P, +) della batteria. Ammorsare il morsetto negativo (nero) al polo negativo (NEG, N, -) della batteria.
7. ISTRUZIONI OPERATIVE
7.1 TEST BATTERIA
1. Aprire l’APP sul vostro dispositivo mobile ed eseguire l’accesso.
2. Premere “Scansione+” nell’angolo in alto a destra dello schermo HOME. (Se l’icona TEST > è di colore rosso, il tester è collegato; non è necessario di procedere con Scansione+.)
Il sistema effettuerà una scansione e troverà il tester.
3. Una volta che il tester è visualizzato sullo schermo, selezionare “Premere per connettere” per connettersi.
4. Quando collegato, premere “CONNESSO CONTINUARE”.

• 64 •
In questa schermata, l’utente può creare il nome del tester. Far scorrere l’area “TEST >” del tester attivo per far apparire l’opzione Modifica
5. Premere “TEST >” per entrare nella procedura di test.
6. Toccare “Premere per selezionare la prova” per un menu a tendina.
7. Selezionare “TEST BATTERIA”. Configurare il vostro test facendo scorrere verso l’alto o verso il basso ciascuna colonna per selezionare il tipo di batteria, il voltaggio e la capacità (o le CCA nominali).
8. Premere “AVVIA TEST” per iniziare
il test.
In qualsiasi momento, premere “<” per ritornare alla schermata precedente.

• 65 •
9. Confermare che la batteria è stata caricata.
11. Premere “EMAIL/RISULTATI TEST”, e successivamente selezionare l’applicazione. NOTA: Il vostro dispositivo mobile deve avere funzionalità testuali per utilizzare le caratteristiche EMAIL/ RISULTATI TEST.
10. Il resoconto di test è visualizzato.
12. I risultati vi saranno inviati.
L’utente potrà selezionare “BATTERIA RETEST”.

• 66 •
7.2 TEST SISTEMA
1. Seguire i passi 1-6 per il “TEST BATTERIA”.
2. Dal menù TEST, selezionare “TEST SISTEMA”.
Configurare il vostro test facendo scorrere verso l’alto o verso il basso ciascuna colonna per selezionare il tipo di batteria, il voltaggio e la capacità (o le CCA nominali).
3. Premere “AVVIA TEST” per iniziare il test di sistema.
In qualsiasi momento, premere “<” per ritornare allo schermo precedente.
4. Seguire tutte le istruzioni sullo schermo.

• 67 •
5. Il resoconto di test è visualizzato.
6. Premere “EMAIL/RISULTATI TEST”, e successivamente selezionare l’applicazione. NOTA: Il vostro dispositivo mobile deve avere funzionalità testuali per utilizzare le caratteristiche EMAIL/ RISULTATI TEST.
7. I risultati vi saranno inviati.
7.3 TEST BATTERIA EV
1. Seguire i passi 1-6 per il “TEST BATTERIA”.
2. Dal menù TEST, selezionare “TEST BATTERIA EV”.
Configurare il vostro test facendo scorrere verso l’alto o verso il basso ciascuna colonna per selezionare la marca della batteria e il modello.
3. Premere “AVVIA TEST” per iniziare il test.
In qualsiasi momento, premere “<” per ritornare allo schermo precedente.
4. Seguire tutte le istruzioni sullo schermo.
5. Il resoconto di test è visualizzato.
6. Premere “EMAIL/RISULTATI TEST”, e successivamente selezionare l’applicazione. NOTA: Il vostro dispositivo mobile deve avere funzionalità testuali per utilizzare le caratteristiche EMAIL/ RISULTATI TEST.
7. I risultati vi saranno inviati.

• 68 •
7.4 TEST AVVIAFERMA
1. Seguire i passi 1-6 per il “TEST BATTERIA”.
2. Dal menù TEST, selezionare “AVVIA FERMA TEST”.
6. Premere “EMAIL/RISULTATI TEST”, e successivamente selezionare l’applicazione. NOTA: Il vostro dispositivo mobile deve avere funzionalità testuali per utilizzare le caratteristiche EMAIL/ RISULTATI TEST.
7. I risultati vi saranno inviati.
7.5 ACCESSO AI RECORD DI TEST
1. Dallo schermo HOME, scorrere verso il basso e selezionare “VERBALI DI PROVA”.
Configurare il vostro test facendo scorrere verso l’alto o verso il basso ciascuna colonna per selezionare il tipo di batteria, il voltaggio e la capacità (o le CCA nominali).
3. Premere “AVVIA TEST” per iniziare
il test.
4. Seguire tutte le istruzioni sullo schermo.
5. Il resoconto di test è visualizzato.
2. Selezionare tra i record di test memorizzati per visualizzarli, inviarli per e-mail/editarli o per cancellarli.

• 69 •
8. SPECIFICHE
Connettività senza fili ............................................. Bluetooth 4.0 classe 2 (BLE)
Batteria interna................................... Batteria agli ioni di litio a 3.7 V, 1150 mAh
Intervallo di funzionamento................................................40~2,000 (CCA/SAE)
Intervallo dei valori di tensione............................................................. 1.5V~32V
Sistema di classificazione ...............................................SAE, DIN, EN, IEC, CA
Intervallo di connessioni senza fili.............................................. 10m (32.8 piedi)
Grado di protezione in ingresso ....................................................................IP65
Lunghezza cavo..............................................................................................20˝
Dimensioni del prodotto (L x W x H) ....................................3.88˝ x 2.75˝ x 1.13˝
Peso (con morsetti).................................................................................. 11.5 oz
9. GARANZIA LIMITATA
TERMINI E CONDIZIONI DI GARANZIA
Schumacher Electric Corporation (il “Produttore”) oi rivenditori autorizzati dal costruttore (il “Rivenditore”) garantisce questo Tester (il “Prodotto”) per diciotto (18) mesi, secondo le seguenti disposizioni. Qualsiasi altra garanzia, diversa dalla garanzia qui inclusa, è con la presente espressamente revocata ed esclusa per quanto ammesso dalla normativa applicabile. La legge può implicare garanzia o condizioni o imporre obblighi al Produttore che non possono essere esclusi, ristretti o modificati in relazione ai beni.
Garanzia Utente Finale Consumatore
Qualsiasi richiesta di intervento secondo questa garanzia deve essere comunicata al Rivenditore entro 2 mesi dalla scoperta della non conformità. Garanzia Utente Finale Rivenditori / Professionisti
ll Produttore fornisce una garanzia limitata per difetti nascosti o non conformità. La presente garanzia è soggetta alle seguenti condizioni:
a. Il Produttore garantisce solo difetti nascosti in materiali o fabbricazione che presentano la loro causa principale al momento della prima vendita da parte del Produttore.
b. L’obbligo a carico del Produttore derivante dalla presente garanzia si limita alla riparazione o sostituzione del Prodotto con un’unità nuova o ricondizionata, a discrezione del Produttore;

• 70 •
c. Il Produttore non ha alcun obbligo derivante dalla garanzia se i difetti presunti sono stati causati da uso anomalo, usura regolare, uso non autorizzato del Prodotto o uso del Prodotto diverso dalla descrizione nel manuale o altre specifiche fornite dal Produttore, cura insufficiente, riparazioni eseguite da persone o enti o con parti non approvate dal Produttore, scarsa cura, incidenti, modifiche o variazioni non autorizzate, trasporto scorretto, conservazione o trattamento del Prodotto;
d. Per esercitare questo diritto, il Prodotto deve essere restituito completo e nel suo stato e imballo originale, con spese postali prepagate, con la prova di acquisto al Produttore o suo rappresentante autorizzato per la riparazione o sostituzione.
Disposizioni Comuni Della Garanzia
La garanzia menzionata in precedenza si applica solo al primo utente professionista o consumatore che ha legalmente acquistato il Prodotto dal Produttore o un Rivenditore. Nessuna garanzia è estesa a clienti, agenti o rappresentanti di quegli acquirenti.
Il Prodotto è venduto secondo le specifiche, per l’uso e lo scopo in conformità alle disposizioni di questo manuale, con espressa esclusione della garanzia di qualsiasi altra specifica, uso e scopo.
Ai Rivenditori autorizzati è vietato fare qualsiasi dichiarazione o fornire garanzia oltre alle suddette garanzie. Rivenditori non autorizzati possono solo vendere il prodotto a condizione di assumersi tutti gli obblighi di garanza con l’esclusione totale di qualsiasi garanzia fornita dal Produttore.
Il Produttore non fornisce alcuna garanzia per gli accessori usati con il Prodotto non prodotti da Schumacher Electric Corporation.
Questa garanzia non esclude o riduce alcuna richiesta di intervento in garanzia che il Produttore può avere nei confronti dei distributori del Prodotto.
IL PRODUTTORE NON SI ASSUME NÉ AUTORIZZA NESSUNO AD ASSUMERSI O AVERE ALTRI OBBLIGHI RISPETTO AL PRODOTTO OLTRE QUESTA GARANZIA.

• 71 •
Centri di garanzia, riparazione e distribuzione: Johnson City, TN 37604, USA
423-646-6697 [email protected]
Taiwan: Head Office 8F, No.308, Datong Rd., Xizhi Dist.,22146
+886 2-2641-7399 [email protected]
DHC® e il relativo logo DHC sono marchi commerciali registrati di proprietà di DHC Specialty Corporation.

• 72 •

• 73 •

• 74 •

• 75 •

• 76 •
6. LIGAR O APARELHO DE TESTE
6.1 Antes de testar a bateria no veículo, desligue a ignição, todos os acessórios e cargas. Feche todas as portas do veículo e a porta da bagageira.
6.2 Certifique-se de que os terminais da bateria estão limpos. Se necessário, utilize uma escova de arame para limpá-los. NOTA: Este aparelho de teste trabalha melhor se os conectores da bateria forem retirados e seos
pólos da bateria tiverem sido limpos. Qualquer corrosão entre os grampos do aparelho de teste e os conectores da bateria, ou entre os conectores e os pólos da bateria, irá prejudicar a eficiência do aparelho de teste.
6.3 Ligue o grampo positivo (vermelho) ao pólo positivo (POS, P, +) da bateria. Ligue o grampo negativo (preto) ao pólo positivo (NEG, N, -) da bateria.
7. INSTRUÇÕES DE FUNCIONAMENTO
7.1 TESTE DA BATERIA
1. Abra a Aplicação no seu dispositivo móvel e inicie a sessão.
2. Pressione “Scan+” no canto direito de cima do ecrã PÁGINA INICIAL. (Se o ícone TESTE > estiver vermelho, o aparelho de teste está ligado; não é necessário continuar para Scan+.)
O sistema vai efetuar o scan e encontrar o aparelho de teste.
3. Após o aparelho de teste aparecer no ecrã, selecione “Pressione Para Iniciar” para ligar.
4. Uma vez ligado, prima “LIGAÇÃO CONTÍNUA”.
Neste ecrã, o utilizador pode criar um nome para o aparelho de teste. Toque na área de “TESTE >” do aparelho de teste ativo para fazer aparecer a opção de Editar.

• 77 •
.
5. Prima “TESTE >” para iniciar o processo de teste.
6. Clique em “Pressione Para Selecionar o Teste” para aceder ao menu suspenso.
8. Prima “INICIAR TESTE” para começar a testar.
7. Selecione “TESTE DA
Ajuste o teste deslizando para cima ou para baixo em cada coluna para selecionar o Tipo de Bateria, a Classificação e Regular a Capacidade (ou a Capacidade CCA).
Em qualquer altura do processo, prima “<” para regressar ao ecrã anterior.
9. Confirme se a bateria foi carregada.

• 78 •
10. O relatório do teste é exibido. 12. Os resultados serão enviados.
O utilizador pode selecionar “VOLTE A TESTAR A BATERIA”.
11. Prima “EMAIL/RESULTADOS DO TESTE”, e de seguida selecione a aplicação. NOTA: O seu dispositivo móvel deve ter capacidade de texto para poder utilizar o recurso de RESULTADOS POR EMAIL.
7.2 TESTEAO SISTEMA
1. Siga os passos 1-6 parao “TESTE DA BATERIA”.
2. A partir do menu TESTE >, selecione “TESTE AO SISTEMA”.
Ajuste o teste deslizando para cima ou para baixo em cada coluna para selecionar o Tipo de Bateria, a Classificação e Regular a Capacidade (ou a Capacidade CCA).

• 79 •
3. Prima “INICIAR TESTE” para iniciar o teste ao sistema.
Em qualquer altura do processo, prima “<” para regressar ao ecrã anterior.
4. Siga os comandos que lhe são apresentados no ecrã.
5. O relatório do teste é exibido.
6. Prima “EMAIL/RESULTADOS DO TESTE”, e de seguida selecione a aplicação.
NOTA: O seu dispositivo móvel deve ter capacidade de texto para poder utilizar o recurso de RESULTADOS POR EMAIL.
7. Os resultados serão enviados.

• 80 •
7.3 TESTE DA BATERIA DE VEÍCULOS ELÉTRICOS
1. Siga os passos 1-6 para o “TESTE DA BATERIA”.
2. A partir do menu TESTE >, selecione “TESTE DA BATERIA
VEÍCULOSELÉTRICOS”.
Ajuste o teste deslizando para cima ou para baixo em cada coluna para selecionar a marca e o modelo da bateria.
3. Prima “INICIAR TESTE” para começar a testar.
Em qualquer altura do processo, prima “<” para regressar ao ecrã anterior.
4. Siga os comandos que lhe são apresentados no ecrã.
5. O relatório do teste é exibido.
6. Prima “EMAIL/RESULTADOS DO TESTE”, e de seguida selecione a aplicação.
NOTA: O seu dispositivo móvel deve ter capacidade de texto para poder utilizar o recurso de RESULTADOS POR EMAIL.
7. Os resultados serão enviados.
7.4 TESTE START STOP
1. Siga os passos 1-6 parao “TESTE DA BATERIA”.
2. A partir do menu TESTE >, selecione “TESTE START STOP”.
Ajuste o teste deslizando para cima ou para baixo em cada coluna para selecionar o Tipo de Bateria, a Classificação e Regular a Capacidade (ou a Capacidade CCA).
3. Prima “INICIAR TESTE” para começar a testar.

• 81 •
4. Siga os comandos que lhe são apresentados no ecrã.
5. O relatório do teste é exibido.
6. Prima “EMAIL/RESULTADOS DO TESTE”, e de seguida selecione a aplicação.
NOTA: O seu dispositivo móvel deve ter capacidade de texto para poder utilizar o recurso de RESULTADOS POR EMAIL.
7. Os resultados serão enviados.
7.5 ACEDER AOS RELATÓRIOS DE TESTE
1. A partir do ecrã “INÍCIO”, desça e selecione “RELATÓRIOS DE TESTE”.
2. Selecione, a partir dos registos de teste guardados, ver, enviar por email ou apagar.
8. ESPECIFICAÇÕES
Ligação sem fios .................................................... Bluetooth 4.0 classe 2 (BLE)
Bateria interna....................................... Bateria de iões de lítio 3.7 V, 1150 mAh
Gama de funcionamento....................................................40~2,000 (CCA/SAE)
Gama de tensão .................................................................................. 1.5V~32V
Sistema de Classificação................................................SAE, DIN, EN, IEC, CA
Alcance da ligação sem fios ........................................................10m (32.8 pés)
Grau de proteção da entrada........................................................................IP65
Comprimento do cabo.....................................................................................20˝
Dimensões do produto (C x L x A) .......................................3.88˝ x 2.75˝ x 1.13˝
Peso (com grampos)..................................................................................325 gr

• 82 •
9. GARANTIA LIMITADA
TERMOS E CONDIÇÕES DE GARANTIA
A Schumacher Electric Corporation (o “Fabricante”) ou os revendedores autorizados pelo Fabricante (o “Revendedor”) garantem este Aparelho de Teste (o “Produto”) por 18 (dezoito) meses de acordo com as seguintes estipulações. Toda e qualquer garantia, excepto a garantia incluída neste documento, são expressamente rejeitadas e excluídas até à máxima extensão permitida pela lei aplicável. Alegislação poderá implicar garantias ou condições ou impor obrigações ao Fabricante as quais não podem ser excluídas, restringidas ou modificadas em relação aos bens de consumo.
Garantia de Consumidor Final
Quaisquer reclamações ao abrigo desta garantia devem ser comunicadas ao Revendedor no prazo de 2 meses após a descoberta da não-conformidade. Revendedores / Garantia de Utilizador Final Profissional
Quaisquer reclamações ao abrigo desta garantia devem ser comunicadas ao Revendedor no prazo de 2 meses após a descoberta da não-conformidade.
a. O Fabricante garante apenas defeitos ocultos de material ou de fabrico presentes, quanto à sua causa principal, no momento da primeira venda pelo Fabricante;
b. A obrigação do Fabricante sob esta garantia está limitada à reparação ou à substituição do Produto por uma unidade nova ou recondicionada por opção exclusiva do Fabricante;
c. O Fabricante não tem quaisquer obrigações de garantia se os defeitos alegados foram causados por uso anormal, desgaste, uso não autorizado do Produto ou pela utilização do Produto diferente da descrita no manual aplicável ou quaisquer outras especificações dadas pelo Fabricante, cuidados insuficientes, reparações efectuadas por pessoas ou entidades, ou com peças não aprovadas pelo Fabricante, cuidado deficiente, acidentes, alterações não autorizadas ou modificações, transporte, armazenamento ou tratamento incorreto do Produto;
d. Para exercer este direito, o Produto deve ser devolvido completo e no seu estado e embalagem original, com custos de correio pré-pagos, juntamente com o comprovativo de compra para o Fabricante ou para os seus representantes autorizados para que a reparação ou a substituição possaocorrer.

• 83 •
Disposições Comuns de Garantia
A garantia acima mencionada só se aplica ao primeiro utilizador, consumidor ou profissional, que tenha adquirido legalmente o Produto do Fabricante ou de um Revendedor. Nenhuma garantia é estendida a clientes, agentes ou representantes dos compradores. O Produto é vendido sob as especificações, para o uso, efeitos e em conformidade com as disposições deste manual, com a expressa exclusão e limitação da garantia de quaisquer outras especificações, usos e finalidades.
Os Revendedores Autorizados estão proibidos de fazer quaisquer declarações ou fornecer qualquer garantia que exceda as garantias acima referidas. Os Revendedores Não-autorizados só podem vender o produto sob a condição de que assumem todas as obrigações de garantia, com a exclusão total de qualquer garantia fornecida pelo fabricante.
O Fabricante não oferece qualquer garantia para os acessórios utilizados com o Produto que não sejam fabricados pela Schumacher Electric Corporation.
Esta garantia não exclui ou diminui quaisquer reclamações que o Fabricante possa ter contra os distribuidores Do Produto. O FABRICANTE NÃO ASSUME NEM AUTORIZA NINGUÉM A ASSUMIR OU A FAZER QUALQUER OUTRA OBRIGAÇÃO PARA COM O PRODUTO QUE NÃO SEJA ESTA GARANTIA.
Garantia, assistência técnica e centros de distribuição: Johnson
City, TN 37604, USA
423-646-6697
Taiwan: Head Office
8F, No.308, Datong Rd., Xizhi Dist.,22146 +886 2-2641-7399
DHC® e DHC logo são marcas comerciais registadas da DHC Specialty Corporation

195BW3000