Embed Size (px)
Citation preview
Oracle Database 10g: Managing Oracle on Linux for DBAs
Student Guide
D46590GC11
Edition 1.1
April 2007
D49900
®
Oracle In
ternal & O
racle Aca
demy
Use O
nly
Copyright © 2007, Oracle. All rights reserved.
Disclaimer
This document contains proprietary information and is protected by copyright and other intellectual property laws. You may copy and print this document solely for your own use in an Oracle training course. The document may not be modified or altered in any way. Except where your use constitutes "fair use" under copyright law, you may not use, share, download, upload, copy, print, display, perform, reproduce, publish, license, post, transmit, or distribute this document in whole or in part without the express authorization of Oracle.
The information contained in this document is subject to change without notice. If you find any problems in the document, please report them in writing to: Oracle University, 500 Oracle Parkway, Redwood Shores, California 94065 USA. This document is not warranted to be error-free.
Restricted Rights Notice
If this documentation is delivered to the United States Government or anyone using the documentation on behalf of the United States Government, the following notice is applicable:
U.S. GOVERNMENT RIGHTSThe U.S. Government’s rights to use, modify, reproduce, release, perform, display, or disclose these training materials are restricted by the terms of the applicable Oracle license agreement and/or the applicable U.S. Government contract.
Trademark Notice
Oracle, JD Edwards, PeopleSoft, and Siebel are registered trademarks of Oracle Corporation and/or its affiliates. Other names may be trademarks of their respective owners.
AuthorsTom BestS. Matt Taylor Jr.
Technical Contributorsand ReviewersMaria BillingsMJ BryksaAl FlournoyMark FullerSush JagannathDonna KeeslingSergio LeunissenGreg MarsdenPrasanth NarayananAbhishek SinghJames SpillerHerbert van den BerghHarald van BreederodeJames Womack
EditorAmitha Narayan
Graphic DesignersSatish BettegowdaSamir Mozumdar
PublishersSujatha NagendraNita Brozowski
Oracle In
ternal & O
racle Aca
demy
Use O
nly
iii
Contents Preface 1 Introduction
Objectives 1-2 Suggested Course Schedule 1-3 Supported Linux Distributions 1-4 Linux Distribution: Overview 1-5 Linux Packages 1-6 Linux Kernel 1-7 Verifying the Kernel 1-8 Interpreting the Linux Kernel Version Number 1-9 A Tainted Linux Kernel 1-10 Checking for a Tainted Kernel 1-11 Supported Hardware 1-12 Common Linux Commands and Programs 1-13 Navigating the File System 1-15 The Virtual File System 1-16 Using the Virtual File System 1-17 Bash Shell Scripting 1-18 Bash Shell Scripting: Environment Variables 1-19 Redirecting Input and Output 1-21 Bash Shell Scripting: Conditions 1-23 Bash Shell Scripting: case 1-24 Bash Shell Scripting: while 1-25 Bash Shell Scripting: In-List Syntax of for 1-26 Bash Shell Scripting: Controlled Loop Syntax of for 1-27 Summary 1-28 Practice 1 Overview: Working with Linux 1-29
2 Preparing Linux for Oracle Objectives 2-2 Setting Kernel Parameters 2-3 Linux Shared Memory: Overview 2-6 Shared Memory Parameters for 32-Bit Linux 2-7 Semaphores 2-9
Oracle In
ternal & O
racle Aca
demy
Use O
nly
iv
Setting Semaphore Parameters 2-10 Setting the File Handles Parameter 2-11 Setting Other Parameters 2-12 Shell Limits 2-13 Setting Shell Limits 2-15 Managing Packages 2-17 Required Software 2-19 Linux Patches 2-21 Configuring the X Window System 2-22 Testing the X Window System 2-23 Creating Groups 2-25 Creating and Viewing a Group 2-27 Creating the Oracle Software Owner 2-28 The nobody User 2-30 Summary 2-31 Practice 2 Overview: Preparing Linux for Oracle 2-32
3 Installing Oracle on Linux Objectives 3-2 File System Security 3-3 File Security Attributes 3-4 SETUID and SETGID Bits 3-5 Choosing a Shell 3-6 Setting Environment Variables 3-7 User File Creation Mask 3-8 Setting Oracle Environment Variables 3-9 Optimal Flexible Architecture 3-10 OFA Characteristics 3-11 Mount Points 3-13 ORACLE_HOME and ORACLE_BASE 3-14 Creating the Oracle Directories 3-15 Installing New Releases 3-16 Managing Multiple Versions 3-17 Setting Oracle Environment Variables 3-19 Mounting the CD-ROM 3-21 Starting the Installer 3-22 Oracle Universal Installer 3-23 Installation Log Files 3-24 Prerequisite Check Results 3-25 Oracle Patch Utility 3-26
Oracle In
ternal & O
racle Aca
demy
Use O
nly
v
Oracle Relink Utility 3-28 Troubleshooting 3-30 Summary 3-31 Practice 3 Overview: Installing Oracle on Linux 3-32
4 Managing Storage Objectives 4-2 Certified and Supported File Systems 4-3 Disk Partitioning 4-4 Comparing File Systems 4-6 File System Characteristics 4-7 Automatic Storage Management 4-9 ext2 and ext3 4-10 Oracle Clustered File System 2 4-11 Network File System 4-12 Summary 4-13
5 Automatic Storage Management and Automatic Storage Management Library
Driver Objectives 5-2 Automatic Storage Management 5-3 Automatic Storage Management Library Driver (ASMLib) 5-4 Installing and Initializing ASMLib 5-5 Configuring Disks 5-6 Marking Disks As Automatic Storage Management Disks 5-7 Creating an ASM Instance 5-8 ASM and ASMLib Installation and Configuration Summary 5-9 ASM Installation: Best Practices 5-10 Disk Group: Best Practices 5-11 Summary 5-12 Practice 5 Overview: Installing and Configuring ASMLib and ASM 5-13
6 Creating the Database Objectives 6-2 Creating a Database 6-3 Choosing the Storage Mechanism 6-4 Specifying the ASM Disk Groups 6-5 Assigning ASM Disk Groups 6-6 dbca Log Files 6-7 The Instance admin Directory 6-8
Oracle In
ternal & O
racle Aca
demy
Use O
nly
vi
Parameter and Dump Files 6-9 The portlist.ini File 6-10 URL Deployment Information 6-11 Miscellaneous Files 6-12 Background Processes 6-13 Server Processes 6-15 Process Hierarchy 6-16 Implementing OS Authentication for DBAs 6-17 Summary 6-18 Practice 6 Overview: Creating a Database 6-19
7 Customizing Oracle on Linux Objectives 7-2 Controlling Oracle Database 7-3 Linux Startup Sequence 7-4 Linux Runlevels 7-7 Database Startup and Shutdown 7-8 Administrative Scripts 7-10 Managing Services with chkconfig 7-12 Automating Jobs 7-13 OS Scheduling Tools 7-14 Job Capabilities of DB Console 7-16 Database Backups 7-17 Backing Up with RMAN 7-18 Server Parameter File 7-19 Summary 7-20 Practice 7 Overview: Automating Tasks 7-21
8 Managing Memory Objectives 8-2 Swap Space 8-3 Swap Cache 8-4 Sizing Swap Space 8-6 /proc/meminfo 8-7 Evaluating Free Memory 8-8 Memory Terminology 8-9 Page Address Extensions (PAE) 8-10 Hugepages 8-11 Implementing Hugepages on 32-Bit Linux 8-12 Implementing a Large SGA 8-14
Oracle In
ternal & O
racle Aca
demy
Use O
nly
vii
Standard Linux Memory Map 8-15 Modified Linux Memory Map 8-16 Altering the Linux Memory Map 8-17 Relocating the SGA 8-19 Relocating the Database Buffer Cache 8-20 hugemem Kernel 8-22 Summary 8-23 Practice 8 Overview: Managing Memory 8-24
9 Using Linux Measurement Tools Objectives 9-2 Basic Tuning Methodology 9-3 Standard Measurement Tools 9-4 Linux Tools 9-6 Common Areas to Tune 9-8 Monitoring and Tuning CPU 9-9 Is the CPU a Bottleneck? 9-10 CPU Measurements 9-12 Measuring CPU Activity with vmstat 9-14 Interpreting CPU Measurements 9-17 Reducing CPU Bottlenecks 9-19 Monitoring and Tuning Memory 9-20 Measuring Memory Usage 9-21 Measuring Total Memory 9-23 Measuring Memory with sar 9-25 Interpreting Memory Measurements 9-27 Reducing Memory Bottlenecks 9-29 Monitoring and Tuning I/O 9-30 Is I/O a Bottleneck? 9-31 I/O Measurements 9-32 Measuring I/O with iostat 9-33 Interpreting I/O Measurements 9-36 Reducing I/O Bottlenecks 9-37 Summary 9-38 Practice 9 Overview: Using Linux Measurement Tools 9-39
10 Tuning Oracle on Linux Objectives 10-2 Basic Oracle Database Optimizations 10-3 Sizing Database Blocks 10-4
Oracle In
ternal & O
racle Aca
demy
Use O
nly
viii
LOG_BUFFER and Redo Log File 10-6 Advanced Features of Oracle Server 10-8 Multiple DBWR Processes 10-9 DB Writer Slaves 10-10 Changing SGA Behavior 10-11 Automatic Shared Memory Management 10-12 Basic Linux Optimizations 10-13 Choosing a Kernel 10-14 Summary 10-15 Practice 10 Overview: Tuning Performance 10-16
11 Dedugging Oracle on Linux Objectives 11-2 OS Watcher 11-3 Installing OSW 11-4 Configuring OSW 11-5 Running OSW 11-6 Viewing OSW Output 11-7 Remote Diagnostics Agent 11-8 Installing the RDA 11-9 Running the RDA 11-10 Viewing the RDA Output 11-11 Navigating the RDA Output 11-12 strace 11-13 ORA-600 Errors 11-15 ORA-7445 Errors 11-16 Resolving ORA-600/ORA-7445 Errors 11-17 Summary 11-19 Practice 11 Overview: Debugging Oracle on Linux 11-20
Appendix A: Practices Appendix B: Practice Solutions Appendix C: Basic Linux and vi Commands Index
Oracle In
ternal & O
racle Aca
demy
Use O
nly
Preface
Oracle In
ternal & O
racle Aca
demy
Use O
nly

Oracle In
ternal & O
racle Aca
demy
Use O
nly
Preface - 3
ProfileBefore You Begin This Course
Before you begin this course, you should have working knowledge with administering an Oracle database.
How This Course Is OrganizedOracle Database 10g: Managing Oracle on Linux for DBAs is an instructor-led course featuring lectures and hands-on exercises. Online demonstrations and written practice sessions reinforce the concepts and skills that are introduced.
Oracle In
ternal & O
racle Aca
demy
Use O
nly
Preface - 4
Related PublicationsOracle Publications
Title Part NumberOracle® Database Administrator's Guide
10g Release 2 (10.2) B14231-02Oracle® Database Installation Guide
10g Release 2 (10.2) for Linux x86 B15660-02 Oracle® Database Release Notes
10g Release 2 (10.2) for Linux x86 B15659-05Additional Publications
• System release bulletins• Installation and user’s guides• Read-me files• International Oracle User’s Group (IOUG) articles• Oracle Magazine
Oracle In
ternal & O
racle Aca
demy
Use O
nly
Preface - 5
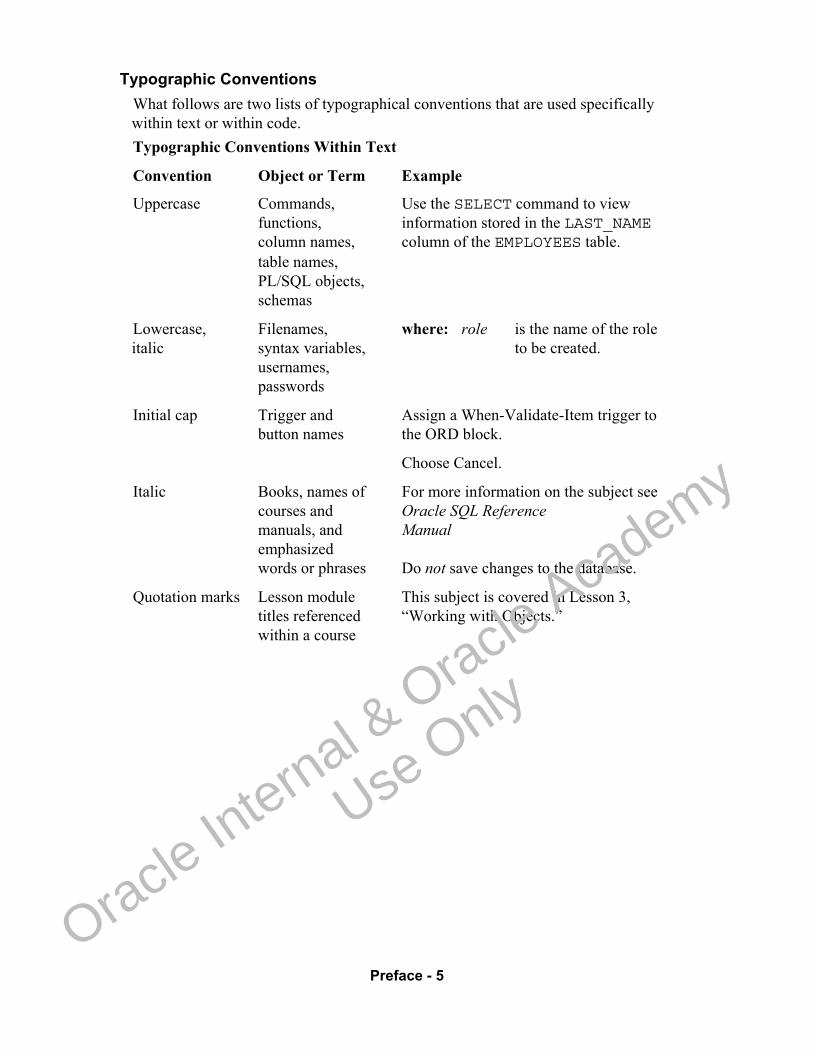
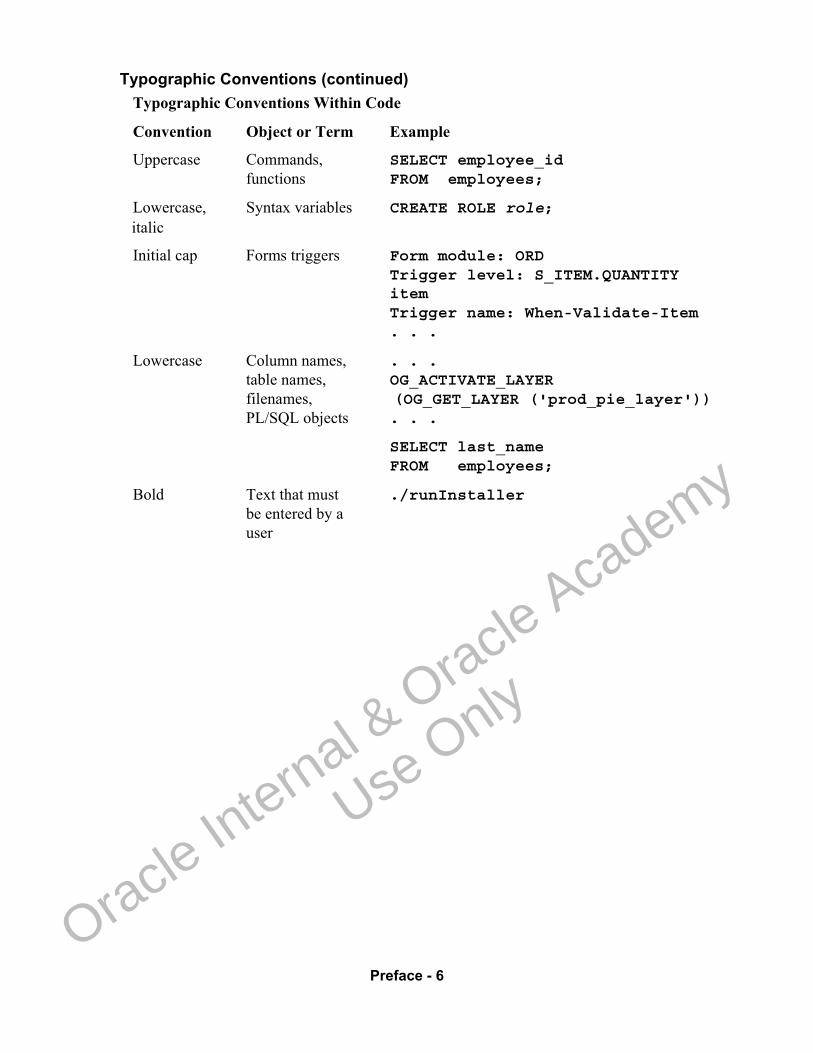
Typographic ConventionsWhat follows are two lists of typographical conventions that are used specifically within text or within code.Typographic Conventions Within Text
Convention Object or Term Example
Uppercase Commands, Use the SELECT command to viewfunctions, information stored in the LAST_NAMEcolumn names, column of the EMPLOYEES table.table names,PL/SQL objects,schemas
Lowercase, Filenames, where: role is the name of the role italic syntax variables, to be created.
usernames,passwords
Initial cap Trigger and Assign a When-Validate-Item trigger tobutton names the ORD block.
Choose Cancel.
Italic Books, names of For more information on the subject seecourses and Oracle SQL Referencemanuals, and Manualemphasized words or phrases Do not save changes to the database.
Quotation marks Lesson module This subject is covered in Lesson 3,titles referenced “Working with Objects.”within a course
Oracle In
ternal & O
racle Aca
demy
Use O
nly
Preface - 6
Typographic Conventions (continued)Typographic Conventions Within Code
Convention Object or Term Example
Uppercase Commands, SELECT employee_idfunctions FROM employees;
Lowercase, Syntax variables CREATE ROLE role;italic
Initial cap Forms triggers Form module: ORDTrigger level: S_ITEM.QUANTITYitemTrigger name: When-Validate-Item. . .
Lowercase Column names, . . .table names, OG_ACTIVATE_LAYERfilenames, (OG_GET_LAYER ('prod_pie_layer'))PL/SQL objects . . .
SELECT last_nameFROM employees;
Bold Text that must ./runInstallerbe entered by auser
Oracle In
ternal & O
racle Aca
demy
Use O
nly
Copyright © 2007, Oracle. All rights reserved.
Introduction
Oracle In
ternal & O
racle Aca
demy
Use O
nly
Oracle Database 10g: Managing Oracle on Linux for DBAs 1 - 2
Copyright © 2007, Oracle. All rights reserved.
Objectives
After completing this lesson, you should be able to:• Interpret Linux kernel version information• Identify a tainted kernel• Use common Linux commands• Write a simple bash shell script
Oracle In
ternal & O
racle Aca
demy
Use O
nly
Oracle Database 10g: Managing Oracle on Linux for DBAs 1 - 3
Copyright © 2007, Oracle. All rights reserved.
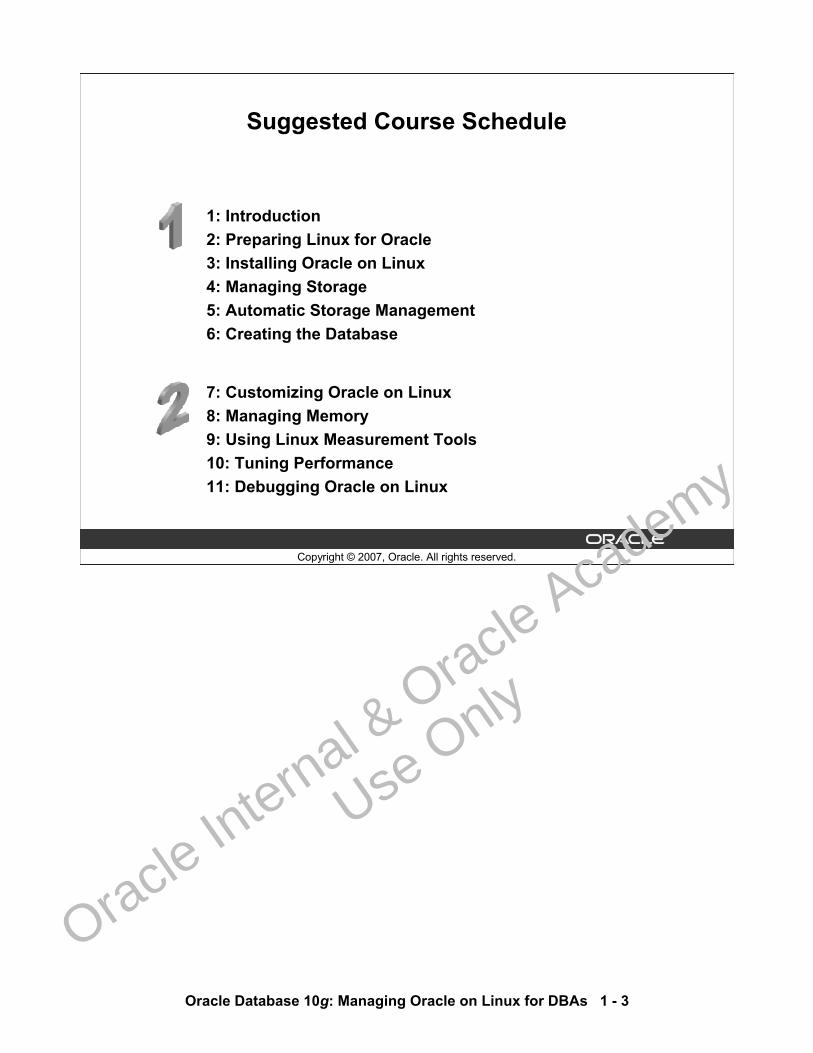
Suggested Course Schedule
1: Introduction2: Preparing Linux for Oracle3: Installing Oracle on Linux4: Managing Storage5: Automatic Storage Management6: Creating the Database
7: Customizing Oracle on Linux8: Managing Memory9: Using Linux Measurement Tools10: Tuning Performance11: Debugging Oracle on Linux
Oracle In
ternal & O
racle Aca
demy
Use O
nly
Oracle Database 10g: Managing Oracle on Linux for DBAs 1 - 4
Copyright © 2007, Oracle. All rights reserved.
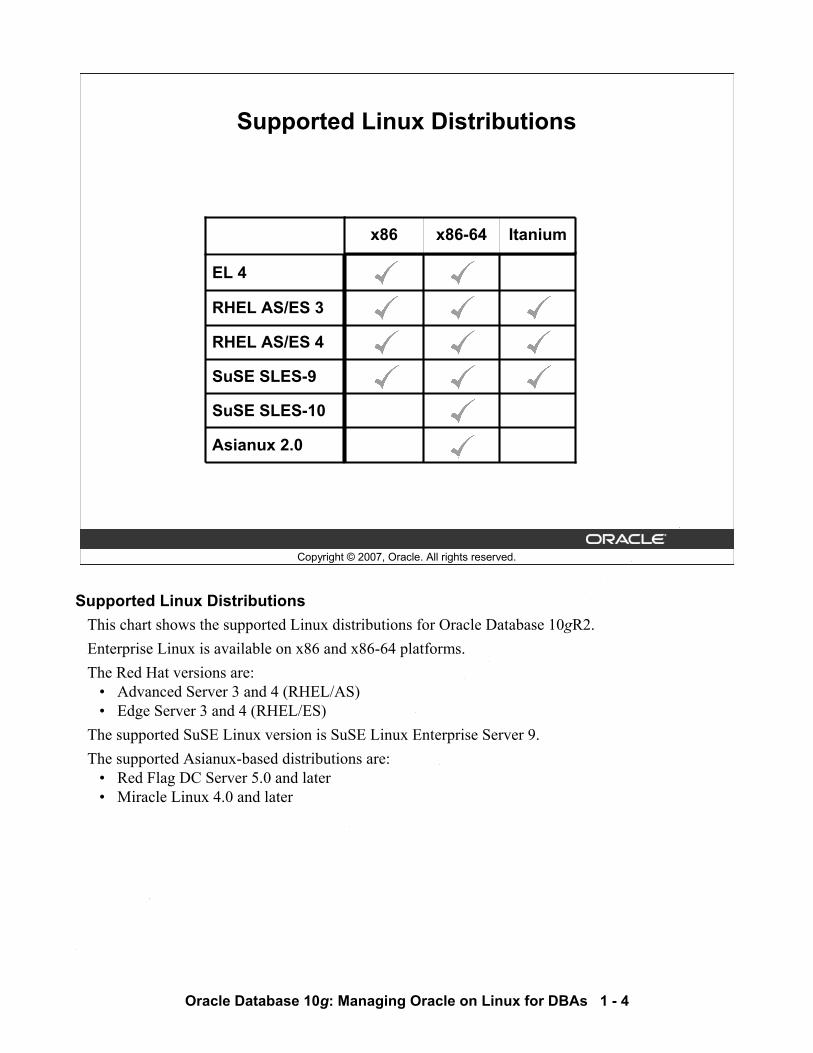
Supported Linux Distributions
SuSE SLES-10
SuSE SLES-9
Asianux 2.0
RHEL AS/ES 4
RHEL AS/ES 3
x86-64 Itaniumx86
EL 4
Supported Linux DistributionsThis chart shows the supported Linux distributions for Oracle Database 10gR2.Enterprise Linux is available on x86 and x86-64 platforms.The Red Hat versions are:
• Advanced Server 3 and 4 (RHEL/AS)• Edge Server 3 and 4 (RHEL/ES)
The supported SuSE Linux version is SuSE Linux Enterprise Server 9.The supported Asianux-based distributions are:
• Red Flag DC Server 5.0 and later• Miracle Linux 4.0 and later
Oracle In
ternal & O
racle Aca
demy
Use O
nly
Oracle Database 10g: Managing Oracle on Linux for DBAs 1 - 5
Copyright © 2007, Oracle. All rights reserved.
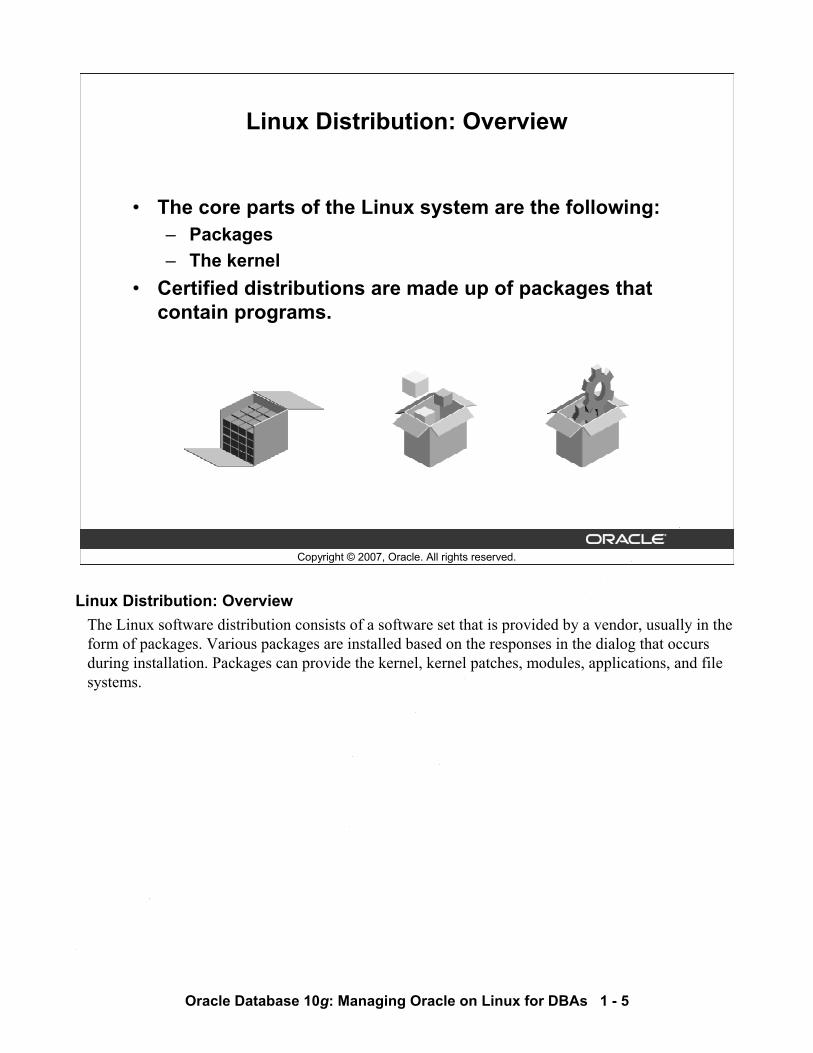
Linux Distribution: Overview
• The core parts of the Linux system are the following:– Packages– The kernel
• Certified distributions are made up of packages that contain programs.
Linux Distribution: OverviewThe Linux software distribution consists of a software set that is provided by a vendor, usually in the form of packages. Various packages are installed based on the responses in the dialog that occurs during installation. Packages can provide the kernel, kernel patches, modules, applications, and file systems.
Oracle In
ternal & O
racle Aca
demy
Use O
nly
Oracle Database 10g: Managing Oracle on Linux for DBAs 1 - 6
Copyright © 2007, Oracle. All rights reserved.
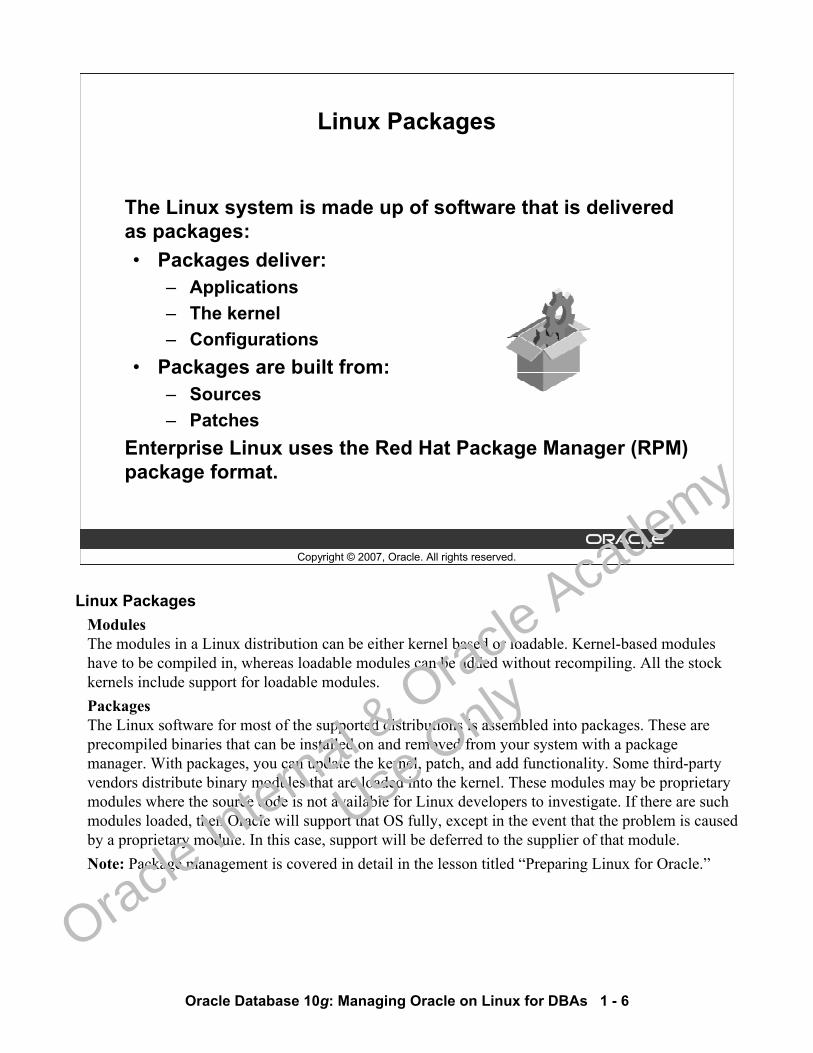
Linux Packages
The Linux system is made up of software that is delivered as packages:• Packages deliver:
– Applications– The kernel– Configurations
• Packages are built from:– Sources– Patches
Enterprise Linux uses the Red Hat Package Manager (RPM) package format.
Linux PackagesModulesThe modules in a Linux distribution can be either kernel based or loadable. Kernel-based modules have to be compiled in, whereas loadable modules can be added without recompiling. All the stock kernels include support for loadable modules. PackagesThe Linux software for most of the supported distributions is assembled into packages. These are precompiled binaries that can be installed on and removed from your system with a package manager. With packages, you can update the kernel, patch, and add functionality. Some third-party vendors distribute binary modules that are loaded into the kernel. These modules may be proprietary modules where the source code is not available for Linux developers to investigate. If there are such modules loaded, then Oracle will support that OS fully, except in the event that the problem is caused by a proprietary module. In this case, support will be deferred to the supplier of that module.Note: Package management is covered in detail in the lesson titled “Preparing Linux for Oracle.”
Oracle In
ternal & O
racle Aca
demy
Use O
nly
Oracle Database 10g: Managing Oracle on Linux for DBAs 1 - 7
Copyright © 2007, Oracle. All rights reserved.
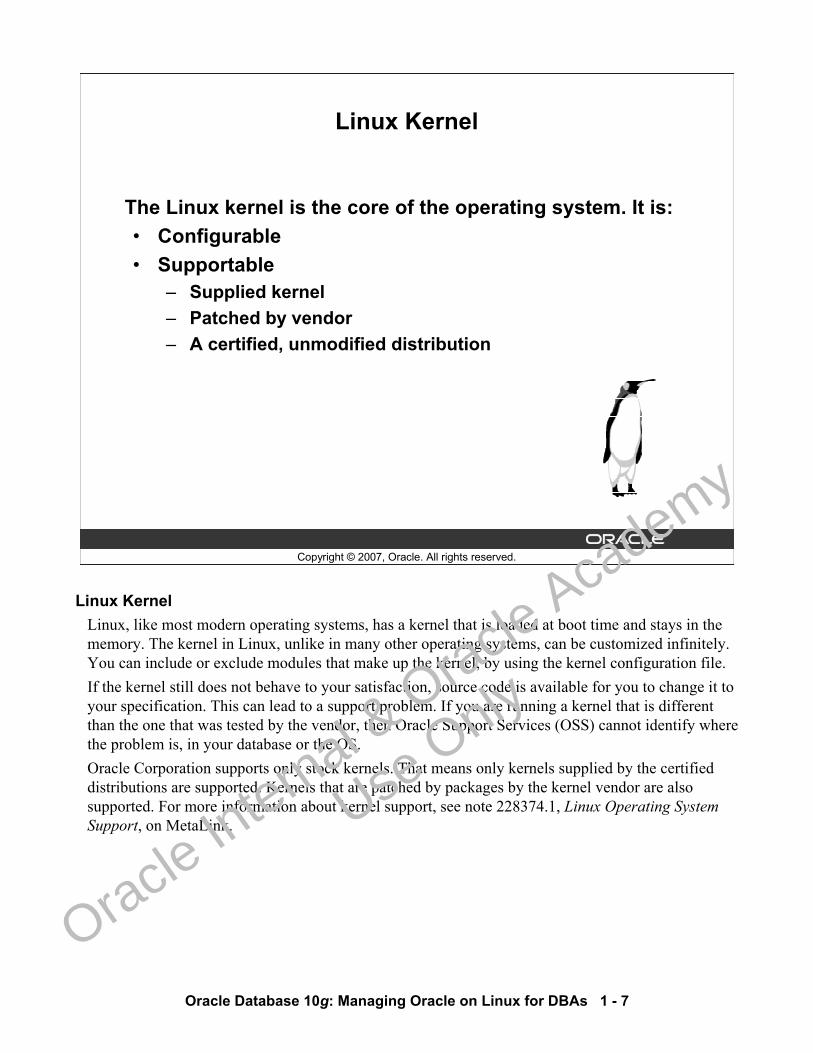
Linux Kernel
The Linux kernel is the core of the operating system. It is:• Configurable• Supportable
– Supplied kernel– Patched by vendor– A certified, unmodified distribution
Linux KernelLinux, like most modern operating systems, has a kernel that is loaded at boot time and stays in the memory. The kernel in Linux, unlike in many other operating systems, can be customized infinitely. You can include or exclude modules that make up the kernel, by using the kernel configuration file. If the kernel still does not behave to your satisfaction, source code is available for you to change it to your specification. This can lead to a support problem. If you are running a kernel that is different than the one that was tested by the vendor, then Oracle Support Services (OSS) cannot identify where the problem is, in your database or the OS. Oracle Corporation supports only stock kernels. That means only kernels supplied by the certified distributions are supported. Kernels that are patched by packages by the kernel vendor are also supported. For more information about kernel support, see note 228374.1, Linux Operating System Support, on MetaLink.
Oracle In
ternal & O
racle Aca
demy
Use O
nly
Oracle Database 10g: Managing Oracle on Linux for DBAs 1 - 8
Copyright © 2007, Oracle. All rights reserved.
Verifying the Kernel
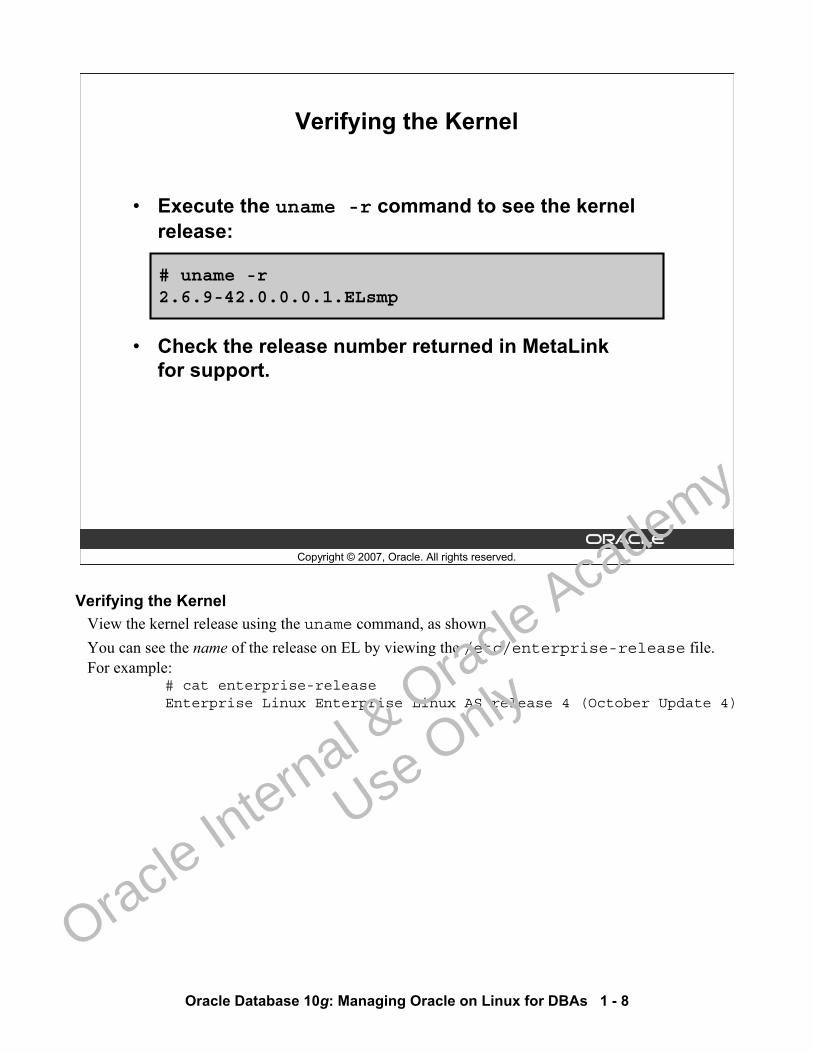
• Execute the uname -r command to see the kernel release:
• Check the release number returned in MetaLinkfor support.
# uname -r2.6.9-42.0.0.0.1.ELsmp
Verifying the Kernel View the kernel release using the uname command, as shown.You can see the name of the release on EL by viewing the /etc/enterprise-release file. For example:
# cat enterprise-releaseEnterprise Linux Enterprise Linux AS release 4 (October Update 4)
Oracle In
ternal & O
racle Aca
demy
Use O
nly
Oracle Database 10g: Managing Oracle on Linux for DBAs 1 - 9
Copyright © 2007, Oracle. All rights reserved.
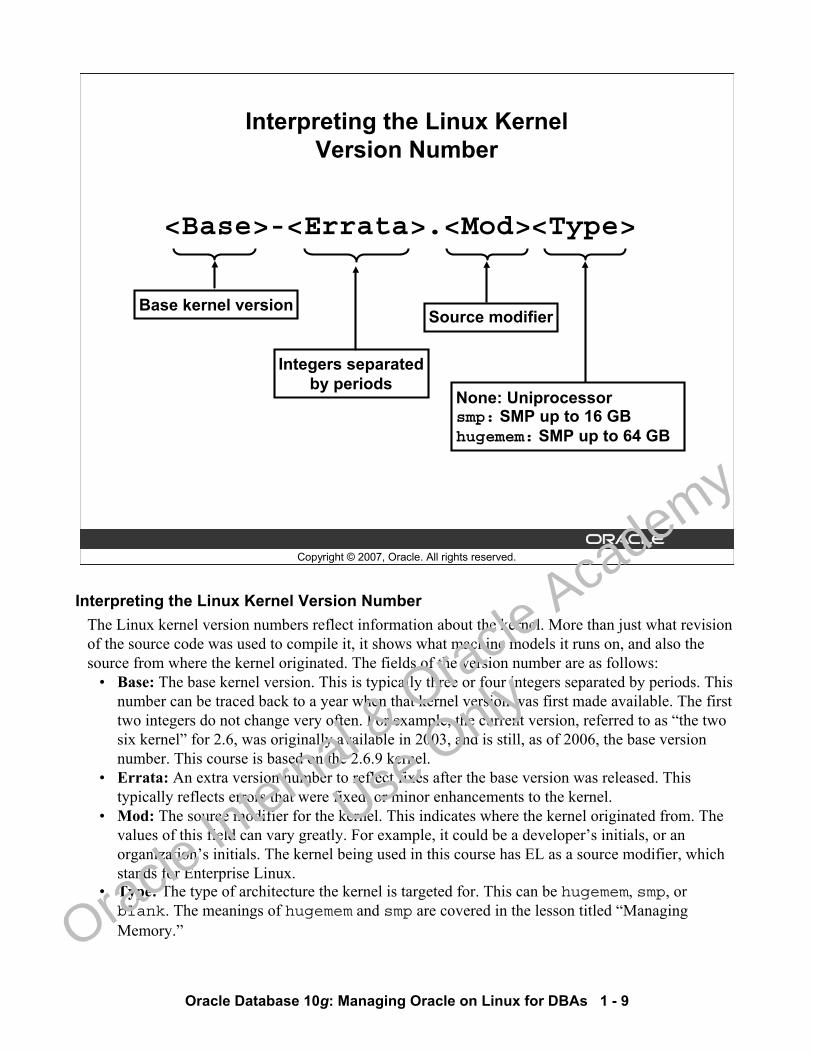
Interpreting the Linux KernelVersion Number
Base kernel version
<Base>-<Errata>.<Mod><Type>
None: Uniprocessorsmp: SMP up to 16 GBhugemem: SMP up to 64 GB
Integers separatedby periods
Source modifier
Interpreting the Linux Kernel Version NumberThe Linux kernel version numbers reflect information about the kernel. More than just what revision of the source code was used to compile it, it shows what machine models it runs on, and also the source from where the kernel originated. The fields of the version number are as follows:
• Base: The base kernel version. This is typically three or four integers separated by periods. This number can be traced back to a year when that kernel version was first made available. The first two integers do not change very often. For example, the current version, referred to as “the two six kernel” for 2.6, was originally available in 2003, and is still, as of 2006, the base version number. This course is based on the 2.6.9 kernel.
• Errata: An extra version number to reflect fixes after the base version was released. This typically reflects errors that were fixed, or minor enhancements to the kernel.
• Mod: The source modifier for the kernel. This indicates where the kernel originated from. The values of this field can vary greatly. For example, it could be a developer’s initials, or an organization’s initials. The kernel being used in this course has EL as a source modifier, which stands for Enterprise Linux.
• Type: The type of architecture the kernel is targeted for. This can be hugemem, smp, or blank. The meanings of hugemem and smp are covered in the lesson titled “Managing Memory.”
Oracle In
ternal & O
racle Aca
demy
Use O
nly
Oracle Database 10g: Managing Oracle on Linux for DBAs 1 - 10
Copyright © 2007, Oracle. All rights reserved.
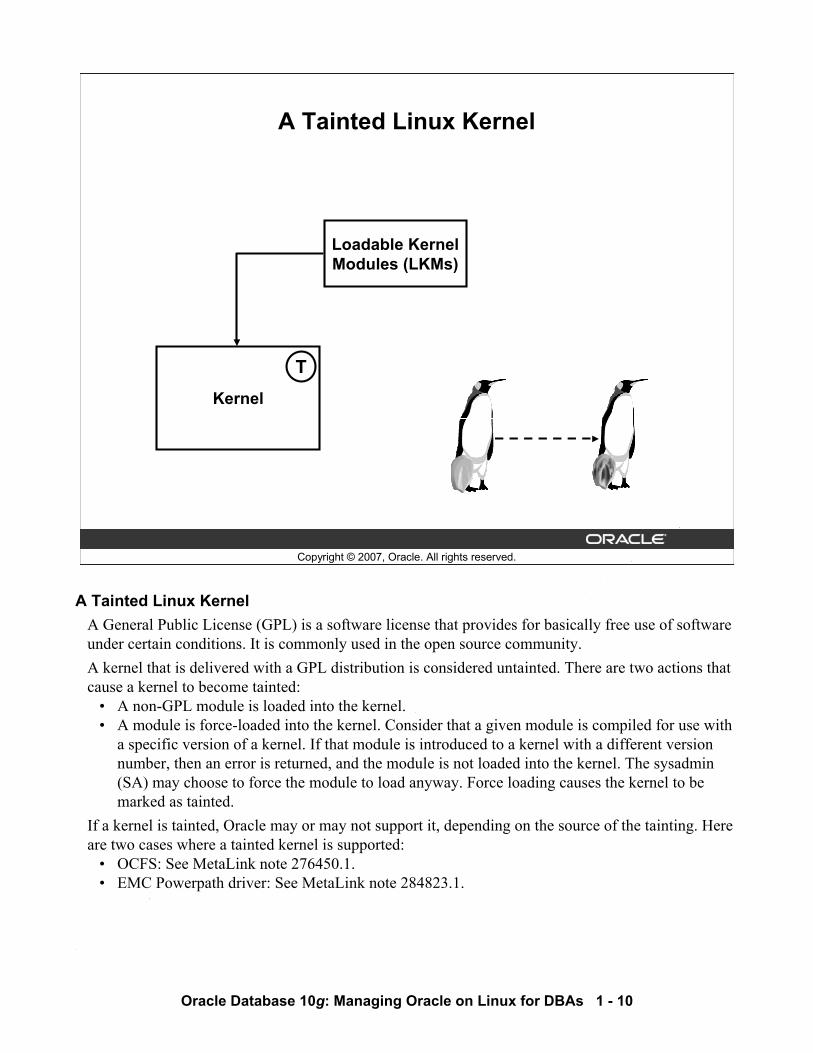
A Tainted Linux Kernel
Kernel
Loadable KernelModules (LKMs)
T
A Tainted Linux KernelA General Public License (GPL) is a software license that provides for basically free use of software under certain conditions. It is commonly used in the open source community.A kernel that is delivered with a GPL distribution is considered untainted. There are two actions that cause a kernel to become tainted:
• A non-GPL module is loaded into the kernel.• A module is force-loaded into the kernel. Consider that a given module is compiled for use with
a specific version of a kernel. If that module is introduced to a kernel with a different version number, then an error is returned, and the module is not loaded into the kernel. The sysadmin (SA) may choose to force the module to load anyway. Force loading causes the kernel to be marked as tainted.
If a kernel is tainted, Oracle may or may not support it, depending on the source of the tainting. Here are two cases where a tainted kernel is supported:
• OCFS: See MetaLink note 276450.1.• EMC Powerpath driver: See MetaLink note 284823.1.
Oracle In
ternal & O
racle Aca
demy
Use O
nly
Oracle Database 10g: Managing Oracle on Linux for DBAs 1 - 11
Copyright © 2007, Oracle. All rights reserved.
Checking for a Tainted Kernel
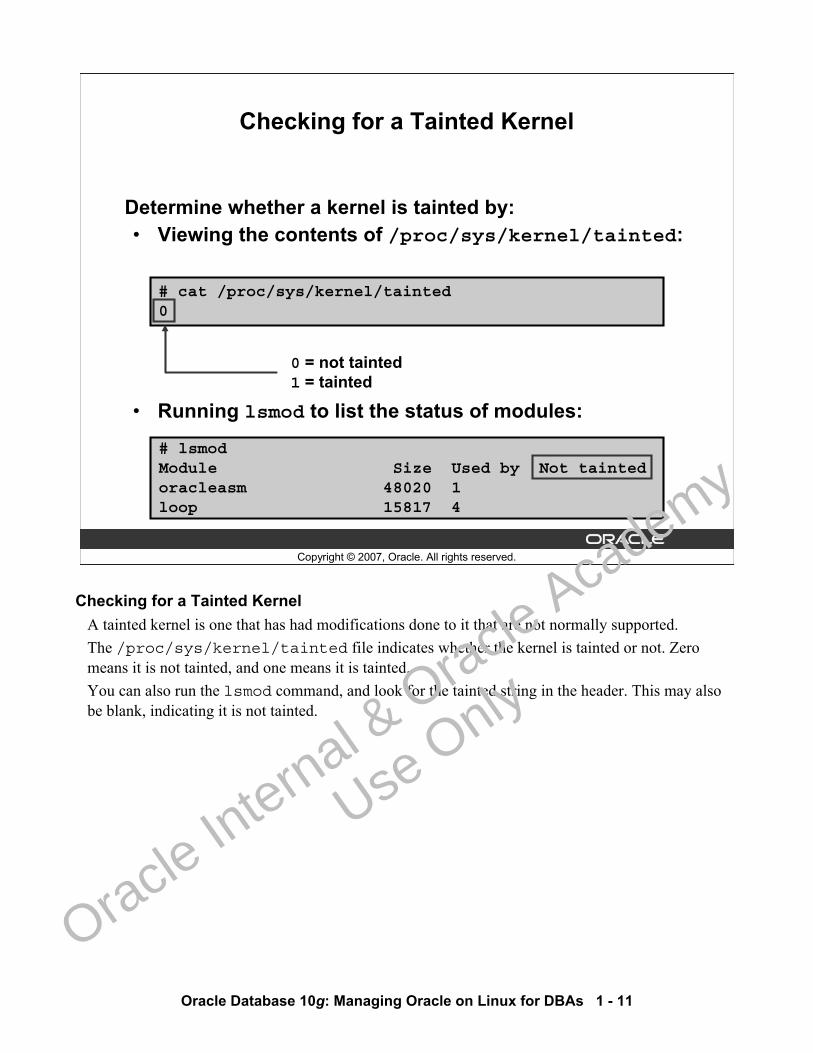
Determine whether a kernel is tainted by:• Viewing the contents of /proc/sys/kernel/tainted:
# cat /proc/sys/kernel/tainted0
0 = not tainted1 = tainted
# lsmodModule Size Used by Not taintedoracleasm 48020 1loop 15817 4
• Running lsmod to list the status of modules:
Checking for a Tainted Kernel A tainted kernel is one that has had modifications done to it that are not normally supported. The /proc/sys/kernel/tainted file indicates whether the kernel is tainted or not. Zero means it is not tainted, and one means it is tainted.You can also run the lsmod command, and look for the tainted string in the header. This may also be blank, indicating it is not tainted.
Oracle In
ternal & O
racle Aca
demy
Use O
nly
Oracle Database 10g: Managing Oracle on Linux for DBAs 1 - 12
Copyright © 2007, Oracle. All rights reserved.
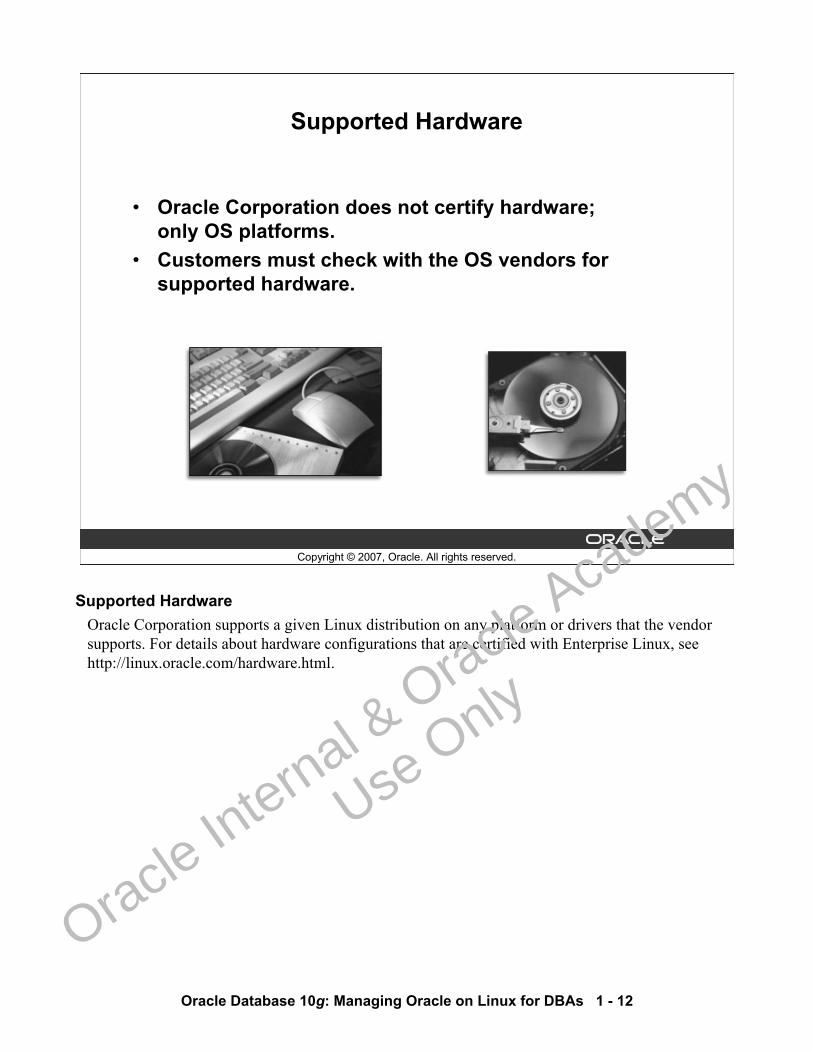
Supported Hardware
• Oracle Corporation does not certify hardware;only OS platforms.
• Customers must check with the OS vendors for supported hardware.
Supported HardwareOracle Corporation supports a given Linux distribution on any platform or drivers that the vendor supports. For details about hardware configurations that are certified with Enterprise Linux, see http://linux.oracle.com/hardware.html.
Oracle In
ternal & O
racle Aca
demy
Use O
nly
Oracle Database 10g: Managing Oracle on Linux for DBAs 1 - 13
Copyright © 2007, Oracle. All rights reserved.
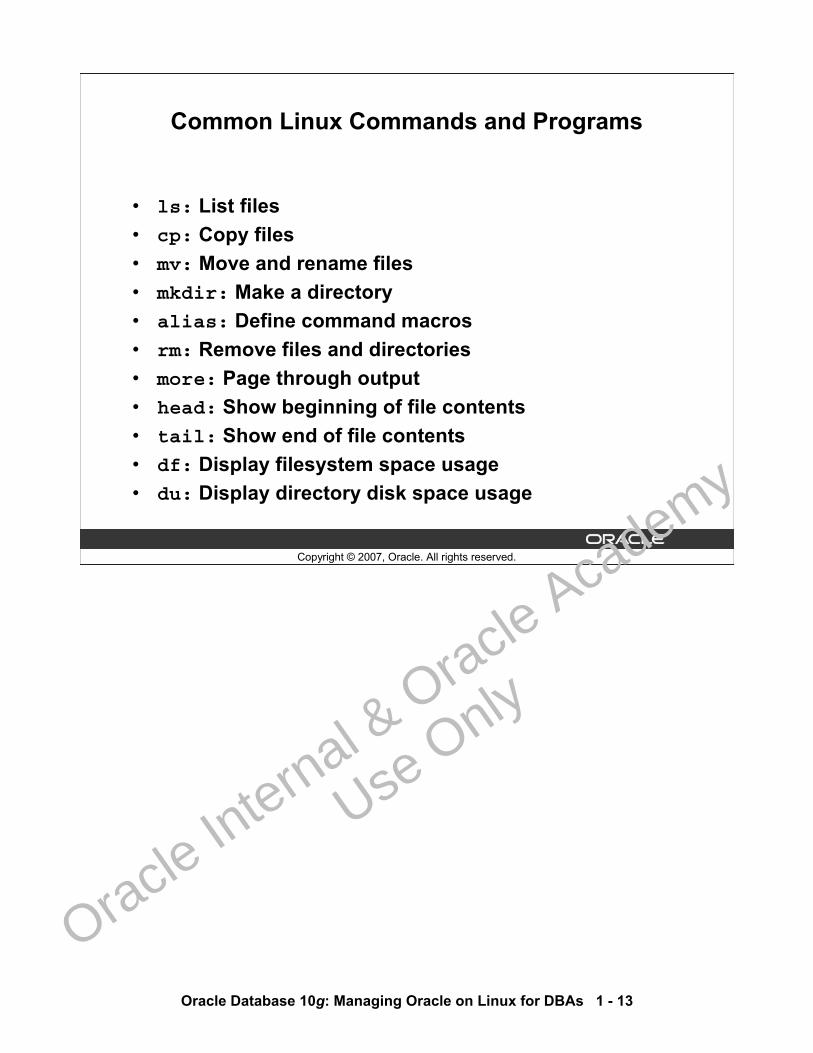
Common Linux Commands and Programs
• ls: List files• cp: Copy files• mv: Move and rename files• mkdir: Make a directory• alias: Define command macros• rm: Remove files and directories• more: Page through output• head: Show beginning of file contents• tail: Show end of file contents• df: Display filesystem space usage• du: Display directory disk space usage
Oracle In
ternal & O
racle Aca
demy
Use O
nly
Oracle Database 10g: Managing Oracle on Linux for DBAs 1 - 14
Copyright © 2007, Oracle. All rights reserved.
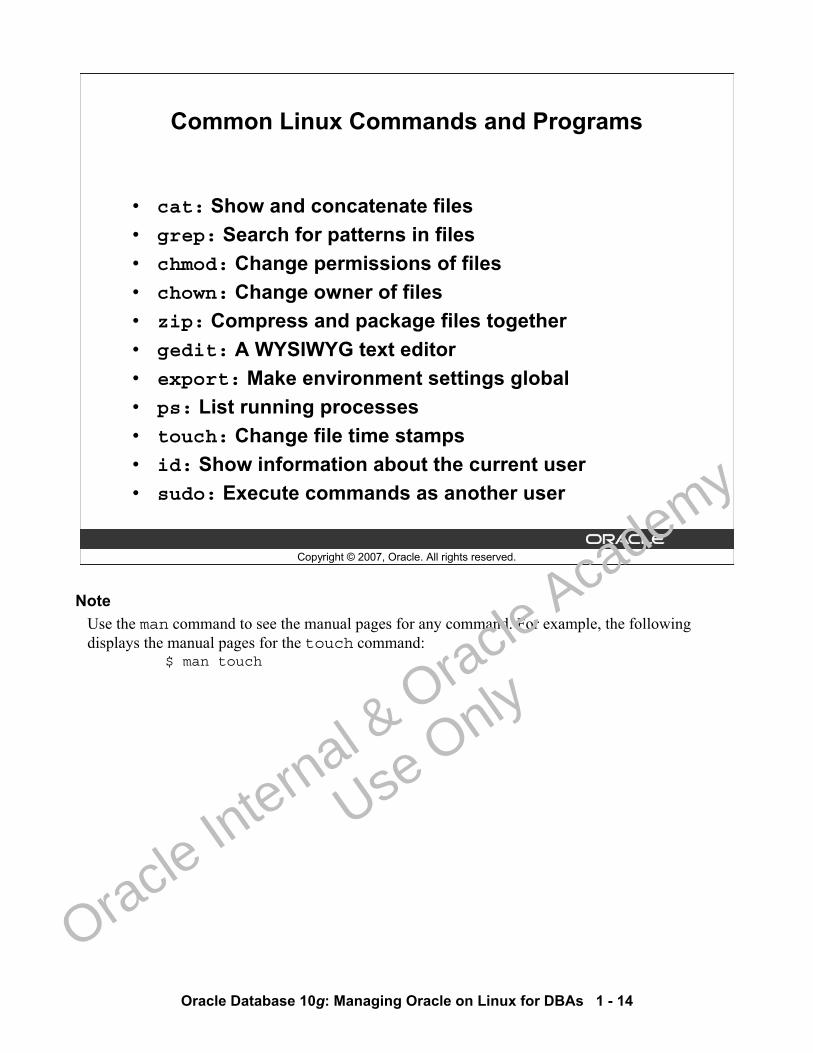
Common Linux Commands and Programs
• cat: Show and concatenate files• grep: Search for patterns in files• chmod: Change permissions of files• chown: Change owner of files• zip: Compress and package files together• gedit: A WYSIWYG text editor• export: Make environment settings global• ps: List running processes• touch: Change file time stamps• id: Show information about the current user• sudo: Execute commands as another user
NoteUse the man command to see the manual pages for any command. For example, the following displays the manual pages for the touch command:
$ man touch
Oracle In
ternal & O
racle Aca
demy
Use O
nly
Oracle Database 10g: Managing Oracle on Linux for DBAs 1 - 15
Copyright © 2007, Oracle. All rights reserved.
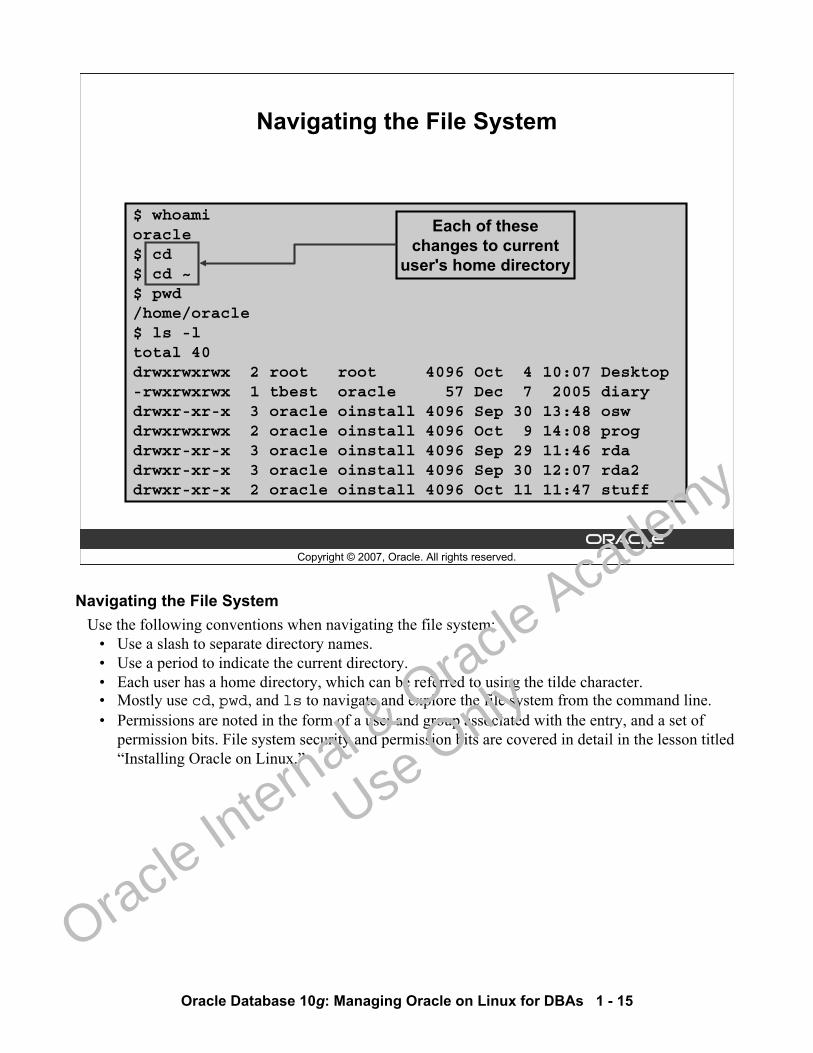
Navigating the File System
$ whoamioracle$ cd$ cd ~$ pwd/home/oracle$ ls -ltotal 40drwxrwxrwx 2 root root 4096 Oct 4 10:07 Desktop-rwxrwxrwx 1 tbest oracle 57 Dec 7 2005 diarydrwxr-xr-x 3 oracle oinstall 4096 Sep 30 13:48 oswdrwxrwxrwx 2 oracle oinstall 4096 Oct 9 14:08 progdrwxr-xr-x 3 oracle oinstall 4096 Sep 29 11:46 rdadrwxr-xr-x 3 oracle oinstall 4096 Sep 30 12:07 rda2drwxr-xr-x 2 oracle oinstall 4096 Oct 11 11:47 stuff
Each of thesechanges to current
user's home directory
Navigating the File SystemUse the following conventions when navigating the file system:
• Use a slash to separate directory names.• Use a period to indicate the current directory.• Each user has a home directory, which can be referred to using the tilde character.• Mostly use cd, pwd, and ls to navigate and explore the file system from the command line.• Permissions are noted in the form of a user and group associated with the entry, and a set of
permission bits. File system security and permission bits are covered in detail in the lesson titled “Installing Oracle on Linux.”
Oracle In
ternal & O
racle Aca
demy
Use O
nly
Oracle Database 10g: Managing Oracle on Linux for DBAs 1 - 16
Copyright © 2007, Oracle. All rights reserved.
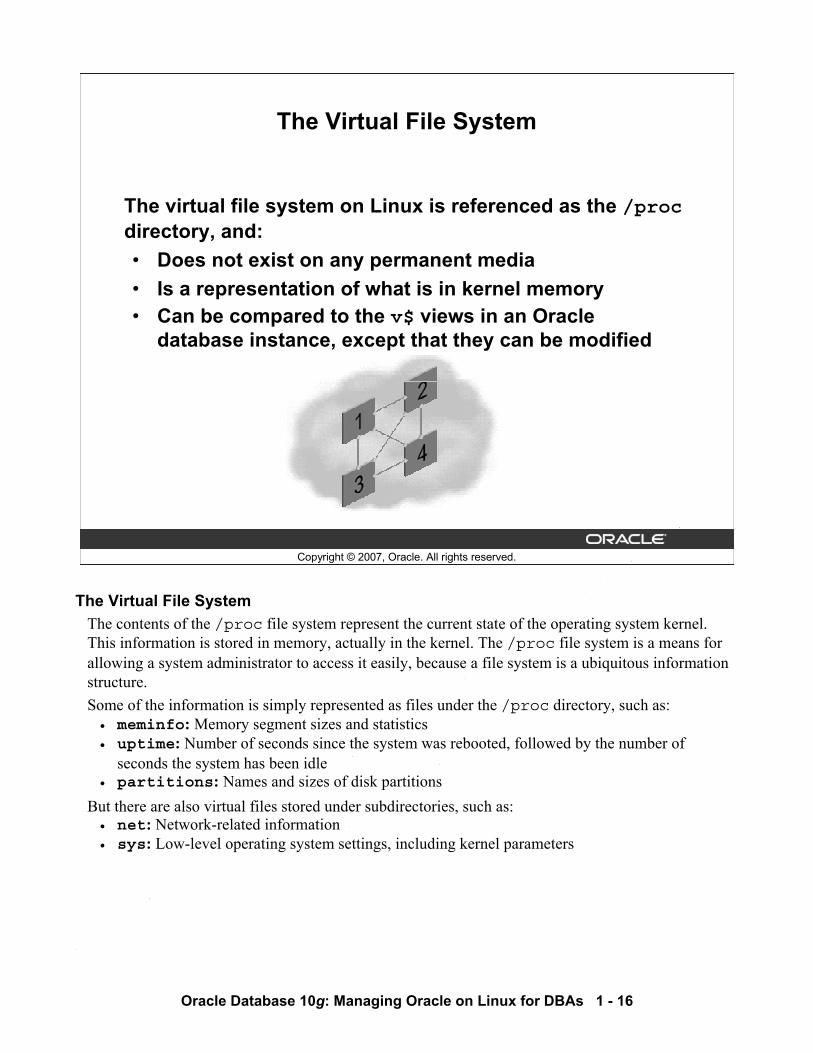
The Virtual File System
The virtual file system on Linux is referenced as the /procdirectory, and:• Does not exist on any permanent media• Is a representation of what is in kernel memory• Can be compared to the v$ views in an Oracle
database instance, except that they can be modified
The Virtual File SystemThe contents of the /proc file system represent the current state of the operating system kernel. This information is stored in memory, actually in the kernel. The /proc file system is a means for allowing a system administrator to access it easily, because a file system is a ubiquitous information structure.Some of the information is simply represented as files under the /proc directory, such as:• meminfo: Memory segment sizes and statistics• uptime: Number of seconds since the system was rebooted, followed by the number of
seconds the system has been idle• partitions: Names and sizes of disk partitions
But there are also virtual files stored under subdirectories, such as:• net: Network-related information• sys: Low-level operating system settings, including kernel parameters
Oracle In
ternal & O
racle Aca
demy
Use O
nly
Oracle Database 10g: Managing Oracle on Linux for DBAs 1 - 17
Copyright © 2007, Oracle. All rights reserved.
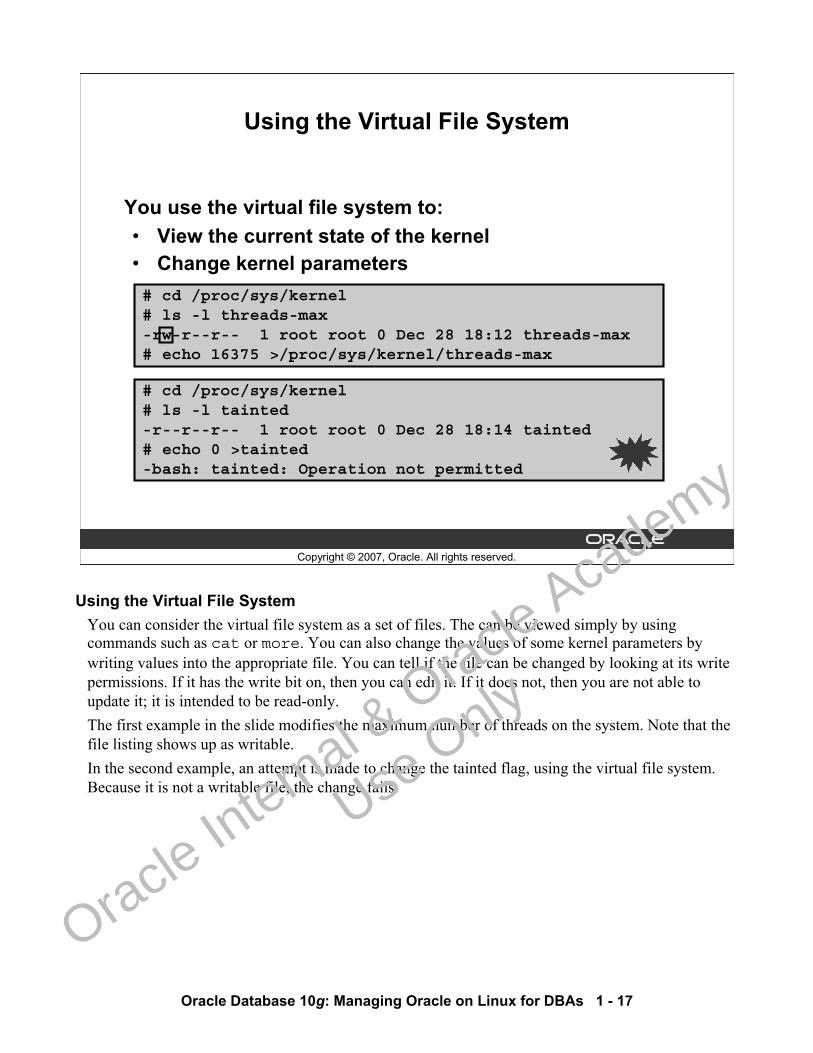
Using the Virtual File System
You use the virtual file system to:• View the current state of the kernel• Change kernel parameters# cd /proc/sys/kernel# ls -l threads-max-rw-r--r-- 1 root root 0 Dec 28 18:12 threads-max# echo 16375 >/proc/sys/kernel/threads-max
# cd /proc/sys/kernel# ls -l tainted-r--r--r-- 1 root root 0 Dec 28 18:14 tainted# echo 0 >tainted-bash: tainted: Operation not permitted
Using the Virtual File SystemYou can consider the virtual file system as a set of files. The can be viewed simply by using commands such as cat or more. You can also change the values of some kernel parameters by writing values into the appropriate file. You can tell if the file can be changed by looking at its write permissions. If it has the write bit on, then you can edit it. If it does not, then you are not able to update it; it is intended to be read-only.The first example in the slide modifies the maximum number of threads on the system. Note that the file listing shows up as writable.In the second example, an attempt is made to change the tainted flag, using the virtual file system. Because it is not a writable file, the change fails.
Oracle In
ternal & O
racle Aca
demy
Use O
nly
Oracle Database 10g: Managing Oracle on Linux for DBAs 1 - 18
Copyright © 2007, Oracle. All rights reserved.
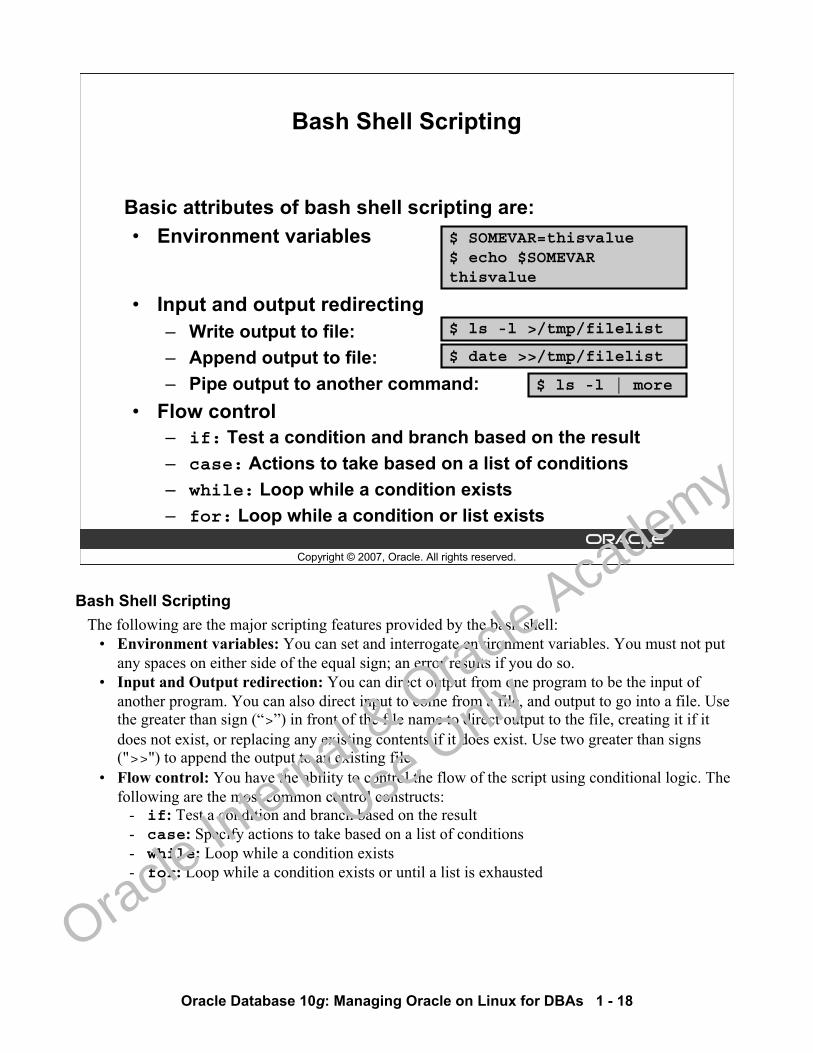
Bash Shell Scripting
Basic attributes of bash shell scripting are:• Environment variables
• Input and output redirecting– Write output to file:– Append output to file:– Pipe output to another command:
• Flow control– if: Test a condition and branch based on the result– case: Actions to take based on a list of conditions– while: Loop while a condition exists– for: Loop while a condition or list exists
$ SOMEVAR=thisvalue$ echo $SOMEVARthisvalue
$ ls -l >/tmp/filelist
$ date >>/tmp/filelist
$ ls -l | more
Bash Shell ScriptingThe following are the major scripting features provided by the bash shell:
• Environment variables: You can set and interrogate environment variables. You must not put any spaces on either side of the equal sign; an error results if you do so.
• Input and Output redirection: You can direct output from one program to be the input of another program. You can also direct input to come from a file, and output to go into a file. Use the greater than sign (“>”) in front of the file name to direct output to the file, creating it if it does not exist, or replacing any existing contents if it does exist. Use two greater than signs (">>") to append the output to an existing file.
• Flow control: You have the ability to control the flow of the script using conditional logic. The following are the most common control constructs:
- if: Test a condition and branch based on the result- case: Specify actions to take based on a list of conditions- while: Loop while a condition exists- for: Loop while a condition exists or until a list is exhausted
Oracle In
ternal & O
racle Aca
demy
Use O
nly

Oracle Database 10g: Managing Oracle on Linux for DBAs 1 - 19
Copyright © 2007, Oracle. All rights reserved.
Bash Shell Scripting: Environment Variables
The following are some of the variables that are available:• Built-in shell variables:
– PWD: The current working directory– $#: Number of command shell variables– $?: Exit value of last command– $n: Positional command-line arguments– $*: All command-line arguments
• Other variables:– HOME: The current user's home directory– PATH: List of directories to search for programs– PS1: Primary prompt string
Bash Shell Scripting: Environment VariablesThe following variables are available in the bash shell:• PWD: The current working directory
$ echo $PWD/home/oracle
• $#: The number of command shell variables. This allows you to know how many command-like values were provided so that they can be processed, for example, by a loop.
• $?: The exit status value of the last command. This is useful for taking action based on the success or failure of previous commands or other called shell scripts.
• $n: Any of the command-line parameters, according to their position (for example, $1, $2, and so on). $0 is the command or script name as it was invoked on the command line.- For this example script called showparams.sh:
echo $0echo $2
- This is the output, based on this invocation:$ ./showparms.sh abc xyz./showparms.shxyz
• $*: All command-line parameters passed in to the shell script
Oracle In
ternal & O
racle Aca
demy
Use O
nly
Oracle Database 10g: Managing Oracle on Linux for DBAs 1 - 20
Bash Shell Scripting: Environment Variables (continued)The following variables are also available in the bash shell:• HOME: The current user's home directory. A shortcut for this is the tilde character (“~”). For
example:$ echo $HOME/home/oracle$ cd ~$ pwd/home/oracle
• PATH: The list of directories to be searched when looking for a command or executable file that is being invoked. Each directory is separated by a colon (“:”) .- An example of a PATH setting is:
/usr/local/bin:/bin:/usr/bin:/home/vncuser/bin
- Which means that any unqualified command or script names entered on the command line will be located by searching these directories, in the order specified. An unqualified script is one that has no directory specification in front of it.
• PS1: Primary prompt string. This defines what is displayed at the command-line prompt. This can contain literal strings, but special characters may be included to display dynamic values based on your environment. These are some of the most often used characters:
- \h: The host name, up to the first period- \u: The current user's name- \w: The current directory, shown fully- \W: The same as \w, except that it shows only the last subdirectory name, not the full
directory nameIn the following example, the username, machine name, and current directory are included in the prompt:
[vncuser@EDRSR9P1 ~]$ echo $PS1[\u@\h \W]\$[vncuser@EDRSR9P1 ~]$ cd /tmp/files[vncuser@EDRSR9P1 files]$
Oracle In
ternal & O
racle Aca
demy
Use O
nly
Oracle Database 10g: Managing Oracle on Linux for DBAs 1 - 21
Copyright © 2007, Oracle. All rights reserved.
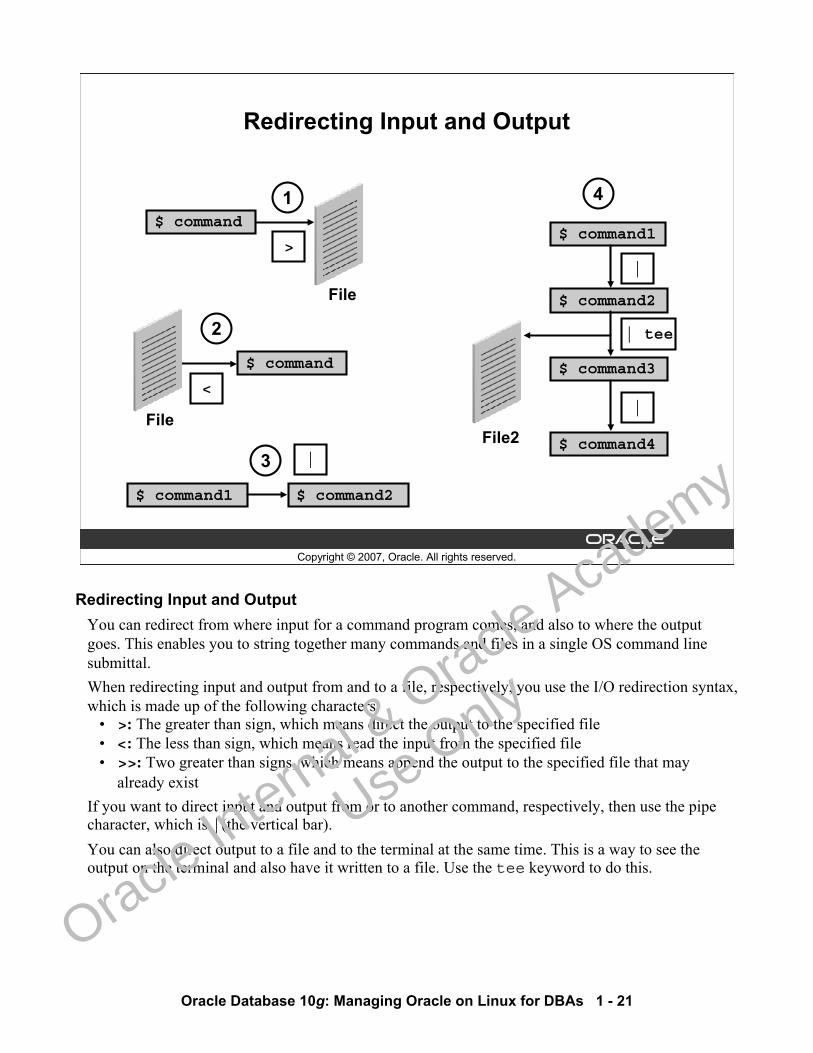
Redirecting Input and Output
$ command
$ command2
File
$ command1 $ command2
$ command1
File
$ command3
File2
$ command
1
2
3
4
>
<
|
|
| tee
|
$ command4
Redirecting Input and OutputYou can redirect from where input for a command program comes, and also to where the output goes. This enables you to string together many commands and files in a single OS command line submittal.When redirecting input and output from and to a file, respectively, you use the I/O redirection syntax, which is made up of the following characters:
• >: The greater than sign, which means direct the output to the specified file• <: The less than sign, which means read the input from the specified file• >>: Two greater than signs, which means append the output to the specified file that may
already existIf you want to direct input and output from or to another command, respectively, then use the pipe character, which is |(the vertical bar).You can also direct output to a file and to the terminal at the same time. This is a way to see the output on the terminal and also have it written to a file. Use the tee keyword to do this.
Oracle In
ternal & O
racle Aca
demy
Use O
nly
Oracle Database 10g: Managing Oracle on Linux for DBAs 1 - 22
Redirecting Input and Output (continued)In the slide, the following scenarios are illustrated:
1. A command is run, and its output is written to a file. The following example writes the directory listing out to the out.txt file:
ls –a >out.txt2. A command is run, and its input is taken from a file. In the example, the factor command
is used, which calculates and displays the prime factors of the provided number, which come from the standard input stream. You can indicate that factor should read a list of numbers from a file by redirecting input from a file that contains those numbers:
$ factor <numbers.dat23: 2355: 5 11103: 10386: 2 43256: 2 2 2 2 2 2 2 2
This presumes the numbers.dat file has the following contents:235510386256
3. A command is run, and its output is provided as input to a second command. In the following example, the process listing is searched for incidents of the string _pmon_, which is the Oracle Database process monitor. There are three occurrences: one for each database instance running, and one for the grep command itself because it is also a running process at the time.
$ ps -ef | grep _pmon_oracle 6985 1 0 Sep27 ? 00:01:29 asm_pmon_+ASMoracle 6886 1 0 Oct15 ? 00:00:22 ora_pmon_orcloracle 3571 21645 0 12:34 pts/3 00:00:00 grep _pmon_
4. A series of four commands are run, each accepting as input the output of the previous command. Also, the output of the second command is written to a file. This example parses out the process listing down to displaying only the names of the two database instances that are currently running a pmon process. Note that grep –v searches for those lines in the input that do not have the given string. That serves to eliminate the process that is the grepcommand itself, which was shown in example (3). The cut command is used here to extract only characters 58 through 61 inclusive.
$ ps -ef | grep _pmon_ | tee all_pmon.txt | grep -v grep | cut -c58-61+ASMorcl
Oracle In
ternal & O
racle Aca
demy
Use O
nly
Oracle Database 10g: Managing Oracle on Linux for DBAs 1 - 23
Copyright © 2007, Oracle. All rights reserved.
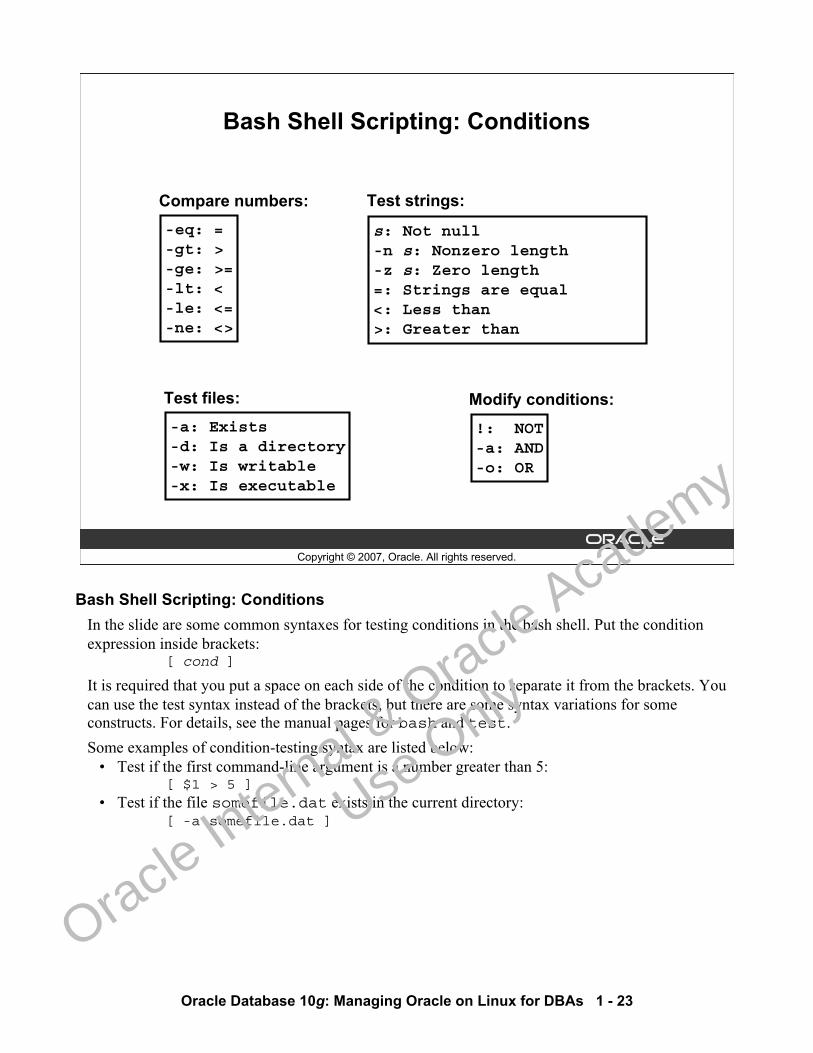
Bash Shell Scripting: Conditions
-eq: =-gt: >-ge: >=-lt: <-le: <=-ne: <>
Compare numbers:
!: NOT-a: AND-o: OR
Modify conditions:-a: Exists-d: Is a directory-w: Is writable-x: Is executable
Test files:
s: Not null-n s: Nonzero length-z s: Zero length=: Strings are equal<: Less than>: Greater than
Test strings:
Bash Shell Scripting: ConditionsIn the slide are some common syntaxes for testing conditions in the bash shell. Put the condition expression inside brackets:
[ cond ]
It is required that you put a space on each side of the condition to separate it from the brackets. You can use the test syntax instead of the brackets, but there are some syntax variations for some constructs. For details, see the manual pages for bash and test.Some examples of condition-testing syntax are listed below:
• Test if the first command-line argument is a number greater than 5:[ $1 > 5 ]
• Test if the file somefile.dat exists in the current directory:[ -a somefile.dat ]
Oracle In
ternal & O
racle Aca
demy
Use O
nly
Oracle Database 10g: Managing Oracle on Linux for DBAs 1 - 24
Copyright © 2007, Oracle. All rights reserved.
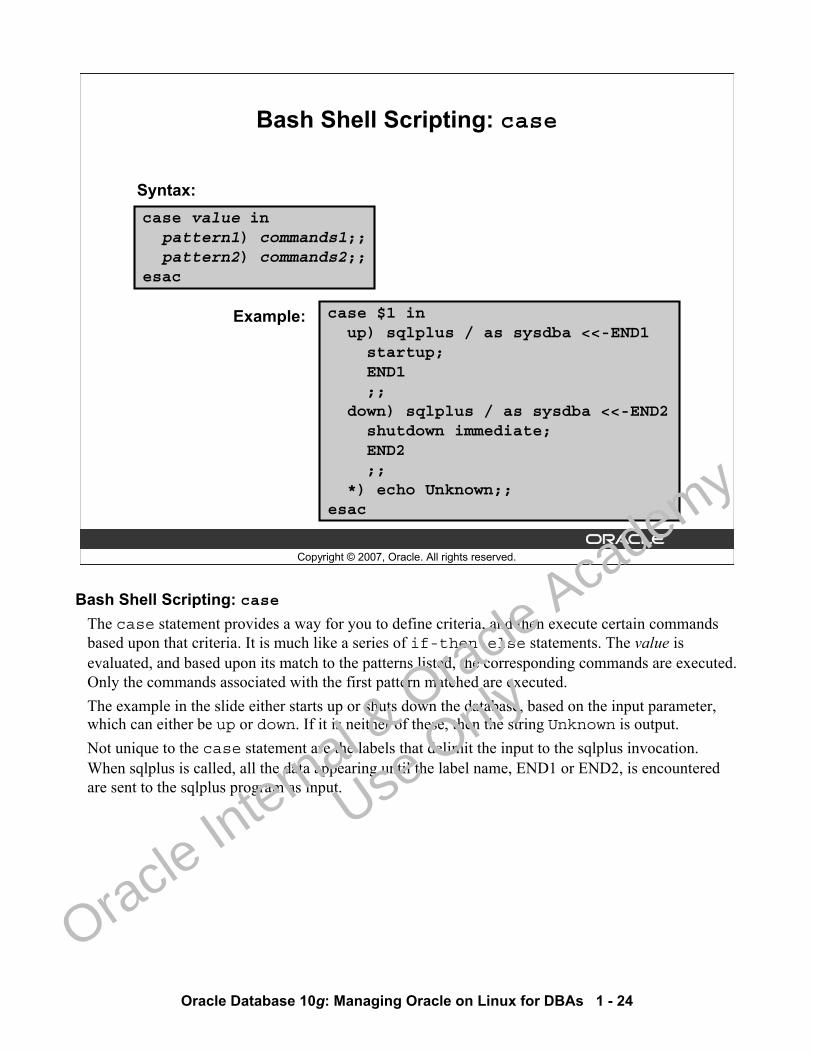
Bash Shell Scripting: case
case $1 inup) sqlplus / as sysdba <<-END1startup;END1;;
down) sqlplus / as sysdba <<-END2shutdown immediate;END2;;
*) echo Unknown;;esac
case value inpattern1) commands1;;pattern2) commands2;;
esac
Syntax:
Example:
Bash Shell Scripting: caseThe case statement provides a way for you to define criteria, and then execute certain commands based upon that criteria. It is much like a series of if-then-else statements. The value is evaluated, and based upon its match to the patterns listed, the corresponding commands are executed. Only the commands associated with the first pattern matched are executed.The example in the slide either starts up or shuts down the database, based on the input parameter, which can either be up or down. If it is neither of these, then the string Unknown is output.Not unique to the case statement are the labels that delimit the input to the sqlplus invocation. When sqlplus is called, all the data appearing until the label name, END1 or END2, is encountered are sent to the sqlplus program as input.
Oracle In
ternal & O
racle Aca
demy
Use O
nly
Oracle Database 10g: Managing Oracle on Linux for DBAs 1 - 25
Copyright © 2007, Oracle. All rights reserved.
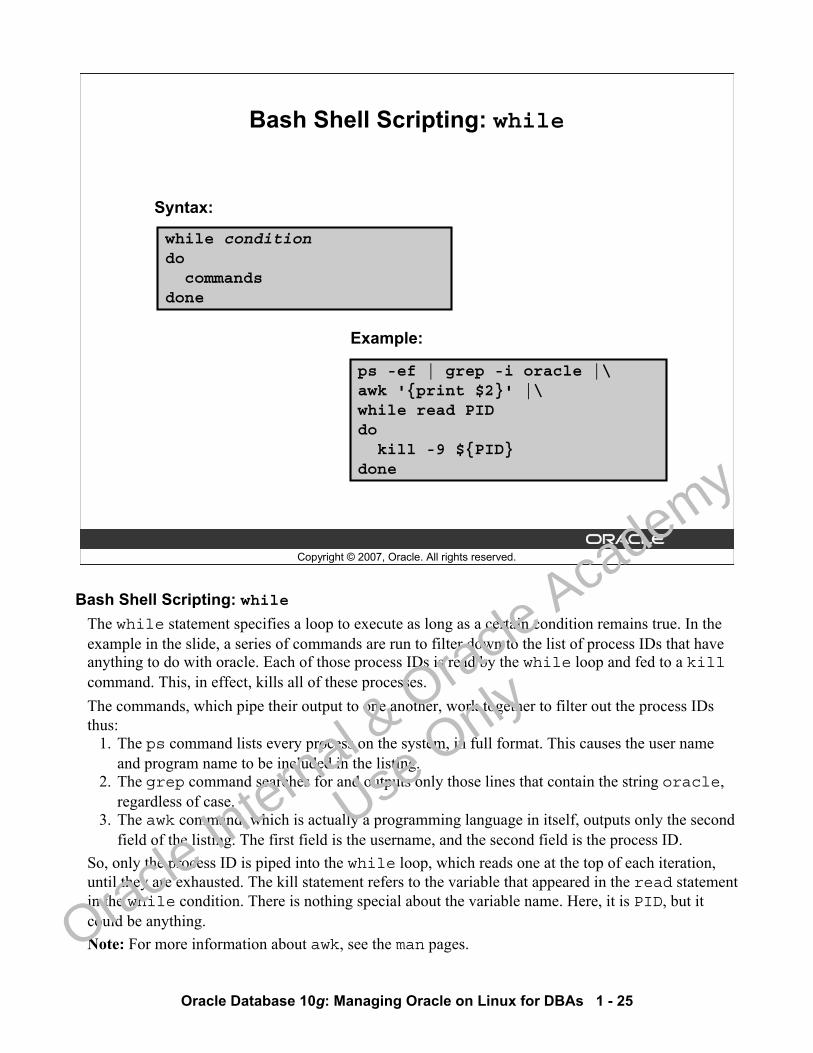
Bash Shell Scripting: while
while conditiondocommands
done
Syntax:
Example:
ps -ef | grep -i oracle |\awk '{print $2}' |\while read PIDdokill -9 ${PID}
done
Bash Shell Scripting: whileThe while statement specifies a loop to execute as long as a certain condition remains true. In the example in the slide, a series of commands are run to filter down to the list of process IDs that have anything to do with oracle. Each of those process IDs is read by the while loop and fed to a killcommand. This, in effect, kills all of these processes.The commands, which pipe their output to one another, work together to filter out the process IDs thus:
1. The ps command lists every process on the system, in full format. This causes the user name and program name to be included in the listing.
2. The grep command searches for and outputs only those lines that contain the string oracle, regardless of case.
3. The awk command, which is actually a programming language in itself, outputs only the second field of the listing. The first field is the username, and the second field is the process ID.
So, only the process ID is piped into the while loop, which reads one at the top of each iteration, until they are exhausted. The kill statement refers to the variable that appeared in the read statement in the while condition. There is nothing special about the variable name. Here, it is PID, but it could be anything.Note: For more information about awk, see the man pages.
Oracle In
ternal & O
racle Aca
demy
Use O
nly
Oracle Database 10g: Managing Oracle on Linux for DBAs 1 - 26
Copyright © 2007, Oracle. All rights reserved.
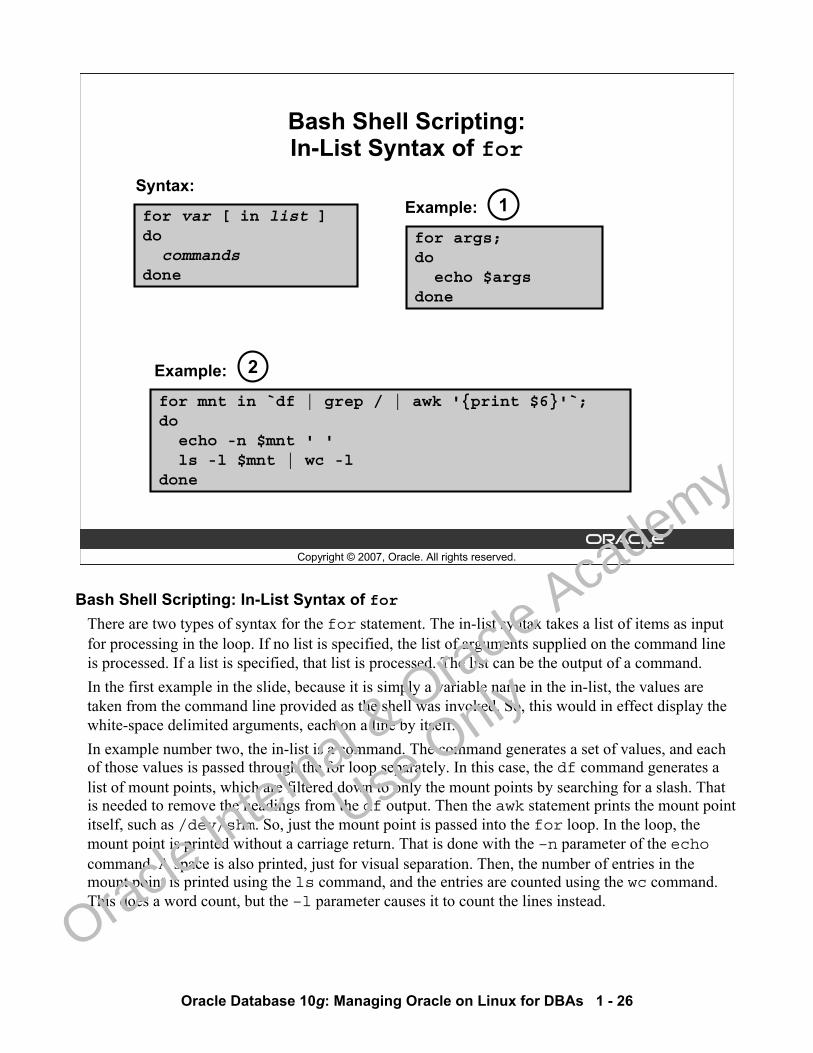
Bash Shell Scripting:In-List Syntax of for
for var [ in list ]docommands
done
Syntax:
for args;doecho $args
done
1
for mnt in `df | grep / | awk '{print $6}'`;doecho -n $mnt ' ' ls -l $mnt | wc -l
done
2
Example:
Example:
Bash Shell Scripting: In-List Syntax of forThere are two types of syntax for the for statement. The in-list syntax takes a list of items as input for processing in the loop. If no list is specified, the list of arguments supplied on the command line is processed. If a list is specified, that list is processed. The list can be the output of a command.In the first example in the slide, because it is simply a variable name in the in-list, the values are taken from the command line provided as the shell was invoked. So, this would in effect display the white-space delimited arguments, each on a line by itself.In example number two, the in-list is a command. The command generates a set of values, and each of those values is passed through the for loop separately. In this case, the df command generates a list of mount points, which are filtered down to only the mount points by searching for a slash. That is needed to remove the headings from the df output. Then the awk statement prints the mount point itself, such as /dev/shm. So, just the mount point is passed into the for loop. In the loop, the mount point is printed without a carriage return. That is done with the –n parameter of the echocommand. A space is also printed, just for visual separation. Then, the number of entries in the mount point is printed using the ls command, and the entries are counted using the wc command. This does a word count, but the –l parameter causes it to count the lines instead.
Oracle In
ternal & O
racle Aca
demy
Use O
nly
Oracle Database 10g: Managing Oracle on Linux for DBAs 1 - 27
Copyright © 2007, Oracle. All rights reserved.
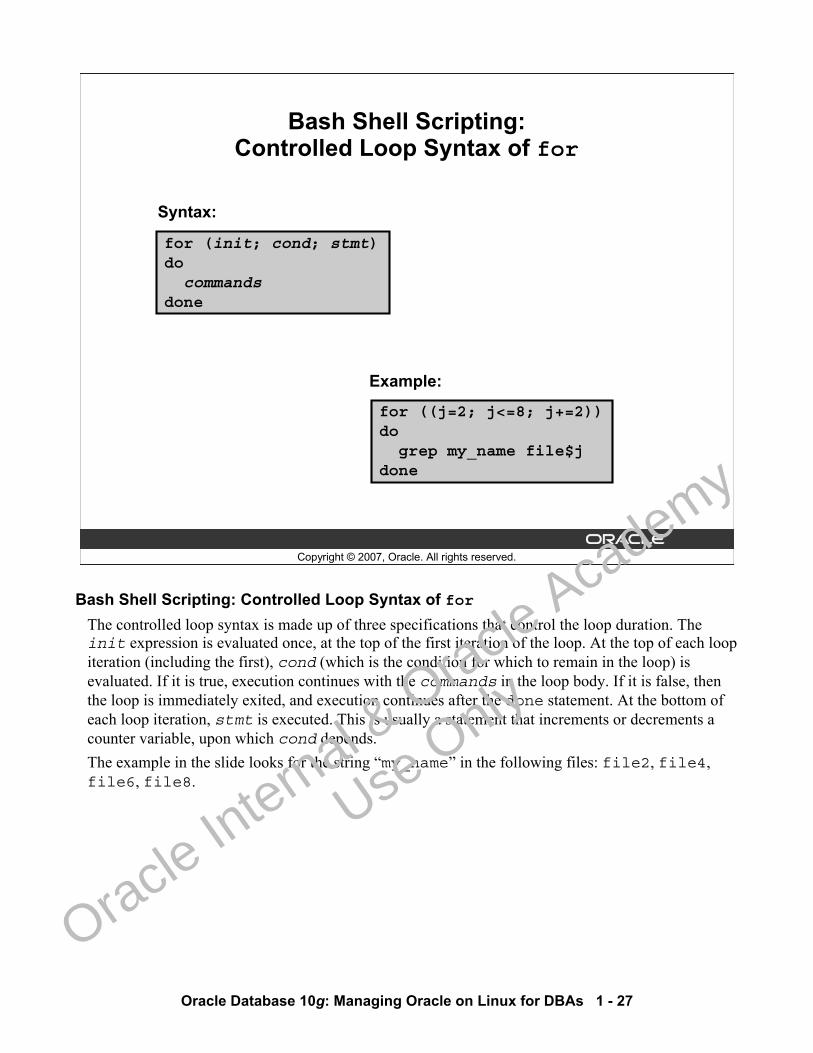
Bash Shell Scripting:Controlled Loop Syntax of for
for (init; cond; stmt)docommands
done
Syntax:
for ((j=2; j<=8; j+=2))dogrep my_name file$j
done
Example:
Bash Shell Scripting: Controlled Loop Syntax of forThe controlled loop syntax is made up of three specifications that control the loop duration. The init expression is evaluated once, at the top of the first iteration of the loop. At the top of each loop iteration (including the first), cond (which is the condition for which to remain in the loop) is evaluated. If it is true, execution continues with the commands in the loop body. If it is false, then the loop is immediately exited, and execution continues after the done statement. At the bottom of each loop iteration, stmt is executed. This is usually a statement that increments or decrements a counter variable, upon which cond depends.The example in the slide looks for the string “my_name” in the following files: file2, file4, file6, file8.
Oracle In
ternal & O
racle Aca
demy
Use O
nly
Oracle Database 10g: Managing Oracle on Linux for DBAs 1 - 28
Copyright © 2007, Oracle. All rights reserved.
Summary
In this lesson, you should have learned how to:• Interpret Linux kernel version information• Identify a tainted kernel• Use common Linux commands• Write a simple bash shell script
Oracle In
ternal & O
racle Aca
demy
Use O
nly
Oracle Database 10g: Managing Oracle on Linux for DBAs 1 - 29
Copyright © 2007, Oracle. All rights reserved.
Practice 1 Overview: Working with Linux
This practice covers the following topics:• Identifying the kernel type• Using Linux commands• Writing a simple shell script
Oracle In
ternal & O
racle Aca
demy
Use O
nly

Oracle In
ternal & O
racle Aca
demy
Use O
nly
Copyright © 2007, Oracle. All rights reserved.
Preparing Linux for Oracle
Oracle In
ternal & O
racle Aca
demy
Use O
nly

Oracle Database 10g: Managing Oracle on Linux for DBAs 2 - 2
Copyright © 2007, Oracle. All rights reserved.
Objectives
After completing this lesson, you should be able to:• Use the package manager to determine and update
package support• Set up the operating system environment for Oracle
Database• Create the necessary groups and users for Oracle
Database
Oracle In
ternal & O
racle Aca
demy
Use O
nly
Oracle Database 10g: Managing Oracle on Linux for DBAs 2 - 3
Copyright © 2007, Oracle. All rights reserved.
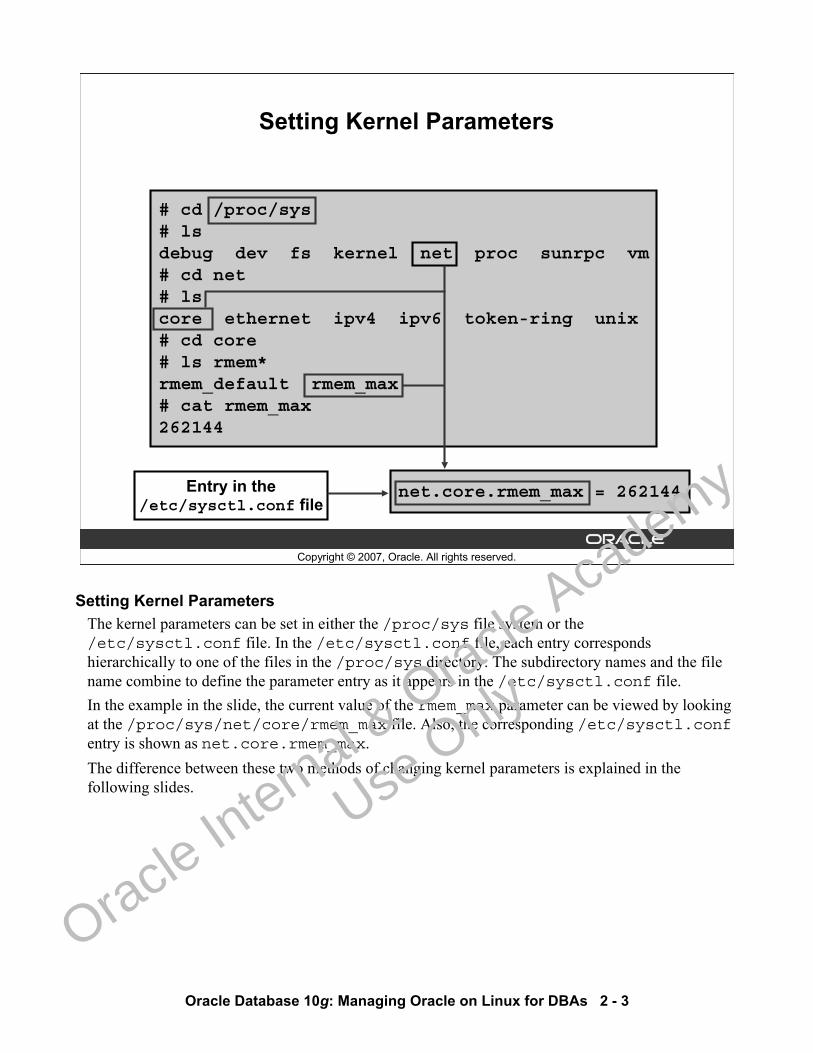
Setting Kernel Parameters
# cd /proc/sys# lsdebug dev fs kernel net proc sunrpc vm# cd net# lscore ethernet ipv4 ipv6 token-ring unix# cd core# ls rmem*rmem_default rmem_max# cat rmem_max262144
net.core.rmem_max = 262144Entry in the/etc/sysctl.conf file
Setting Kernel ParametersThe kernel parameters can be set in either the /proc/sys file system or the /etc/sysctl.conf file. In the /etc/sysctl.conf file, each entry corresponds hierarchically to one of the files in the /proc/sys directory. The subdirectory names and the file name combine to define the parameter entry as it appears in the /etc/sysctl.conf file.In the example in the slide, the current value of the rmem_max parameter can be viewed by looking at the /proc/sys/net/core/rmem_max file. Also, the corresponding /etc/sysctl.confentry is shown as net.core.rmem_max.The difference between these two methods of changing kernel parameters is explained in the following slides.
Oracle In
ternal & O
racle Aca
demy
Use O
nly
Oracle Database 10g: Managing Oracle on Linux for DBAs 2 - 4
Copyright © 2007, Oracle. All rights reserved.
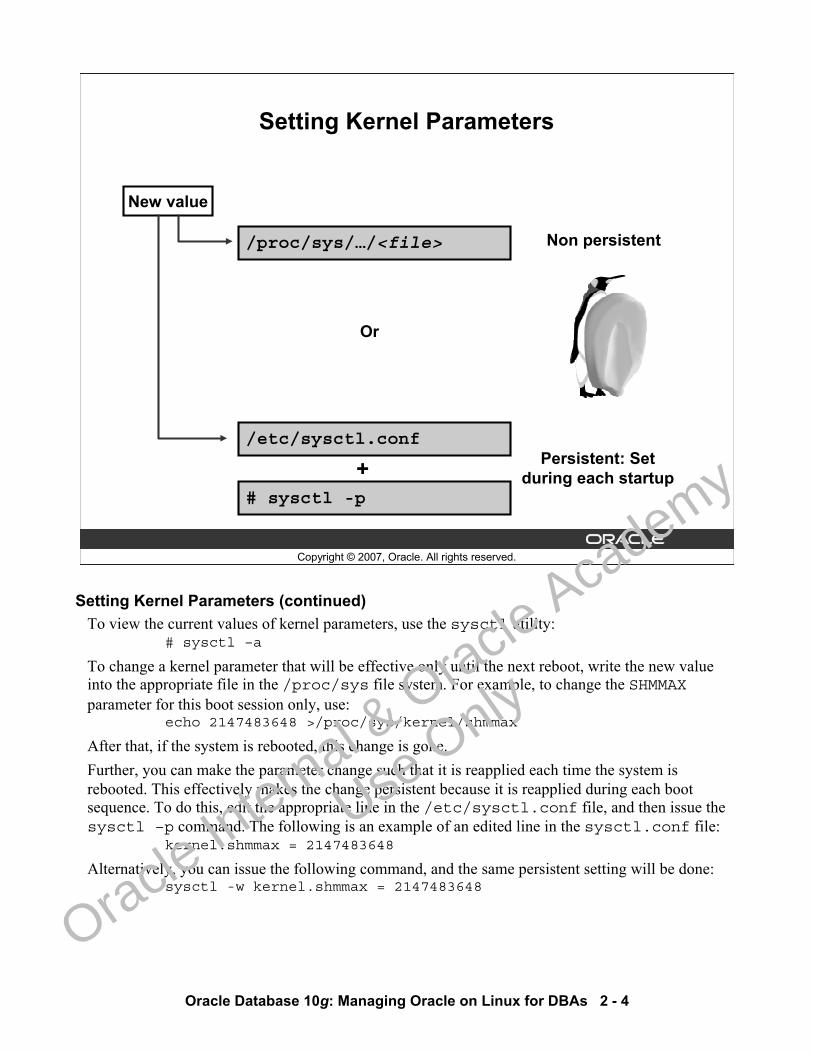
Setting Kernel Parameters
/proc/sys/…/<file>
New value
/etc/sysctl.conf
Non persistent
Persistent: Setduring each startup
# sysctl -p
+
Or
Setting Kernel Parameters (continued)To view the current values of kernel parameters, use the sysctl utility:
# sysctl –a
To change a kernel parameter that will be effective only until the next reboot, write the new value into the appropriate file in the /proc/sys file system. For example, to change the SHMMAXparameter for this boot session only, use:
echo 2147483648 >/proc/sys/kernel/shmmax
After that, if the system is rebooted, this change is gone.Further, you can make the parameter change such that it is reapplied each time the system is rebooted. This effectively makes the change persistent because it is reapplied during each boot sequence. To do this, edit the appropriate line in the /etc/sysctl.conf file, and then issue the sysctl –p command. The following is an example of an edited line in the sysctl.conf file:
kernel.shmmax = 2147483648
Alternatively, you can issue the following command, and the same persistent setting will be done:sysctl -w kernel.shmmax = 2147483648
Oracle In
ternal & O
racle Aca
demy
Use O
nly
Oracle Database 10g: Managing Oracle on Linux for DBAs 2 - 5
Setting Kernel Parameters (continued)You must have root privileges to perform these operations.Note: If you make a mistake with a parameter setting and your system does not start, then you must start Linux in the single-user runlevel (runlevel 1). At this runlevel, the /etc/sysctl.conf file is not run. The different runlevels will be discussed in detail in the lesson titled “Customizing Oracle on Linux.”
Oracle In
ternal & O
racle Aca
demy
Use O
nly
Oracle Database 10g: Managing Oracle on Linux for DBAs 2 - 6
Copyright © 2007, Oracle. All rights reserved.
Linux Shared Memory: Overview
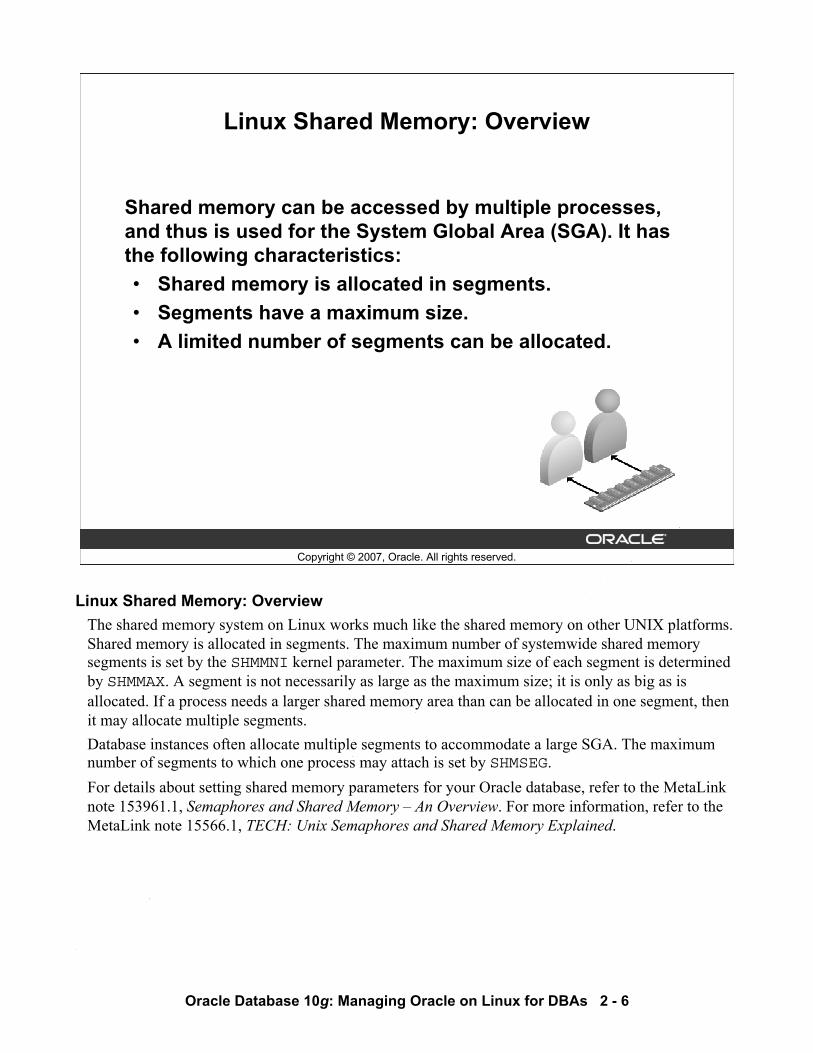
Shared memory can be accessed by multiple processes, and thus is used for the System Global Area (SGA). It has the following characteristics: • Shared memory is allocated in segments.• Segments have a maximum size.• A limited number of segments can be allocated.
Linux Shared Memory: Overview The shared memory system on Linux works much like the shared memory on other UNIX platforms. Shared memory is allocated in segments. The maximum number of systemwide shared memory segments is set by the SHMMNI kernel parameter. The maximum size of each segment is determined by SHMMAX. A segment is not necessarily as large as the maximum size; it is only as big as is allocated. If a process needs a larger shared memory area than can be allocated in one segment, then it may allocate multiple segments. Database instances often allocate multiple segments to accommodate a large SGA. The maximum number of segments to which one process may attach is set by SHMSEG. For details about setting shared memory parameters for your Oracle database, refer to the MetaLink note 153961.1, Semaphores and Shared Memory – An Overview. For more information, refer to the MetaLink note 15566.1, TECH: Unix Semaphores and Shared Memory Explained.
Oracle In
ternal & O
racle Aca
demy
Use O
nly
Oracle Database 10g: Managing Oracle on Linux for DBAs 2 - 7
Copyright © 2007, Oracle. All rights reserved.
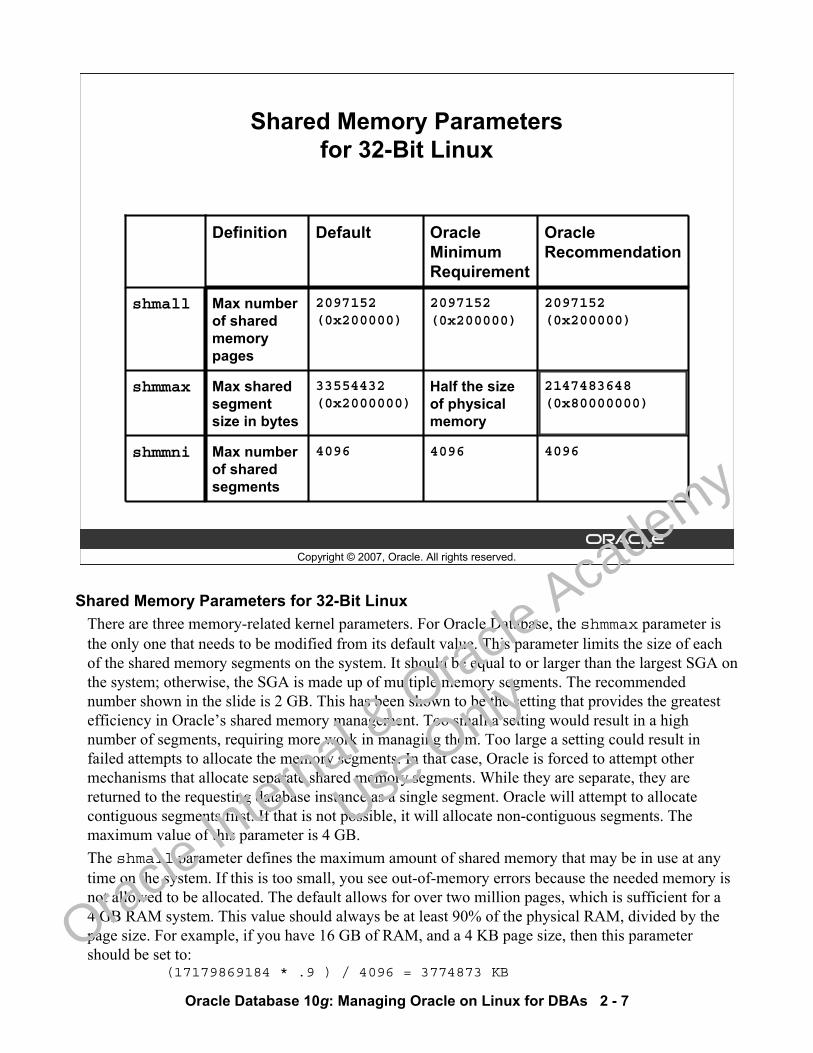
Shared Memory Parametersfor 32-Bit Linux
4096
33554432(0x2000000)
2097152(0x200000)
Default
shmmni
shmmax
shmall 2097152(0x200000)
2097152(0x200000)
Max number of shared memory pages
40964096Max number of shared segments
Half the size of physical memory
Oracle Minimum Requirement
2147483648(0x80000000)
Max shared segment size in bytes
Oracle Recommendation
Definition
Shared Memory Parameters for 32-Bit LinuxThere are three memory-related kernel parameters. For Oracle Database, the shmmax parameter is the only one that needs to be modified from its default value. This parameter limits the size of each of the shared memory segments on the system. It should be equal to or larger than the largest SGA on the system; otherwise, the SGA is made up of multiple memory segments. The recommended number shown in the slide is 2 GB. This has been shown to be the setting that provides the greatest efficiency in Oracle’s shared memory management. Too small a setting would result in a high number of segments, requiring more work in managing them. Too large a setting could result in failed attempts to allocate the memory segments. In that case, Oracle is forced to attempt other mechanisms that allocate separate shared memory segments. While they are separate, they are returned to the requesting database instance as a single segment. Oracle will attempt to allocate contiguous segments first. If that is not possible, it will allocate non-contiguous segments. The maximum value of this parameter is 4 GB.The shmall parameter defines the maximum amount of shared memory that may be in use at any time on the system. If this is too small, you see out-of-memory errors because the needed memory is not allowed to be allocated. The default allows for over two million pages, which is sufficient for a 4 GB RAM system. This value should always be at least 90% of the physical RAM, divided by the page size. For example, if you have 16 GB of RAM, and a 4 KB page size, then this parameter should be set to:
(17179869184 * .9 ) / 4096 = 3774873 KB
Oracle In
ternal & O
racle Aca
demy
Use O
nly
Oracle Database 10g: Managing Oracle on Linux for DBAs 2 - 8
Shared Memory Parameters for 32-Bit Linux (continued)The shmmni parameter defines the maximum number of shared memory segments across the system. The default 4096 value is sufficient for any size SGA. This is because any larger SGA would instead require an increase in the size of each shared memory segment.Note: For details about these kernel parameters, refer to the Oracle Database Installation Guide 10g Release 2 (10.2) for Linux x86.
Oracle In
ternal & O
racle Aca
demy
Use O
nly
Oracle Database 10g: Managing Oracle on Linux for DBAs 2 - 9
Copyright © 2007, Oracle. All rights reserved.
Semaphores
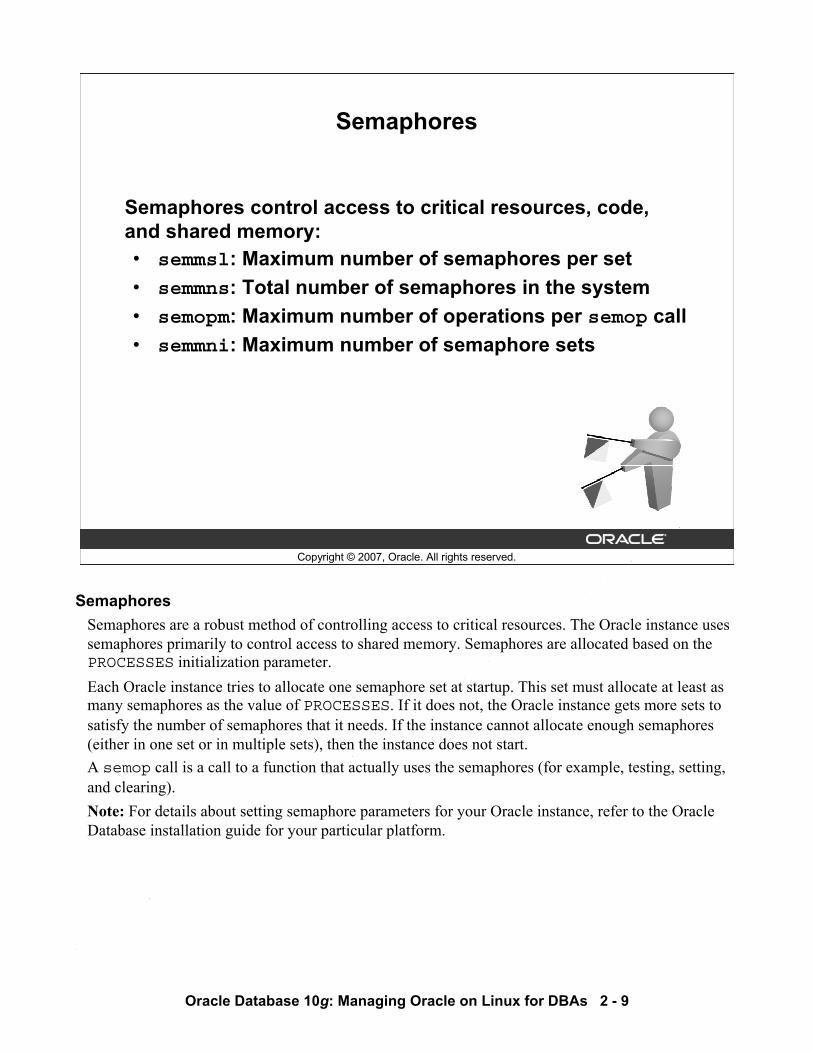
Semaphores control access to critical resources, code, and shared memory:• semmsl: Maximum number of semaphores per set • semmns: Total number of semaphores in the system• semopm: Maximum number of operations per semop call• semmni: Maximum number of semaphore sets
SemaphoresSemaphores are a robust method of controlling access to critical resources. The Oracle instance uses semaphores primarily to control access to shared memory. Semaphores are allocated based on the PROCESSES initialization parameter.Each Oracle instance tries to allocate one semaphore set at startup. This set must allocate at least as many semaphores as the value of PROCESSES. If it does not, the Oracle instance gets more sets to satisfy the number of semaphores that it needs. If the instance cannot allocate enough semaphores (either in one set or in multiple sets), then the instance does not start.A semop call is a call to a function that actually uses the semaphores (for example, testing, setting, and clearing).Note: For details about setting semaphore parameters for your Oracle instance, refer to the Oracle Database installation guide for your particular platform.
Oracle In
ternal & O
racle Aca
demy
Use O
nly
Oracle Database 10g: Managing Oracle on Linux for DBAs 2 - 10
Copyright © 2007, Oracle. All rights reserved.
Setting Semaphore Parameters
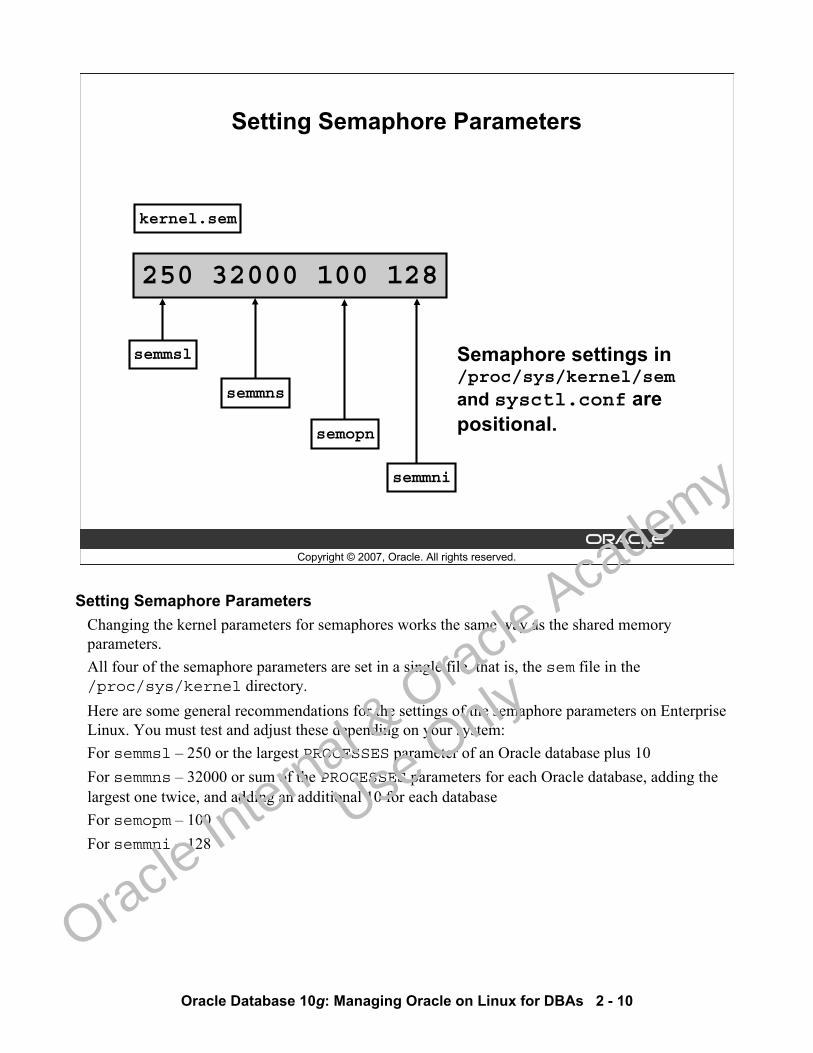
250 32000 100 128
Semaphore settings in /proc/sys/kernel/semand sysctl.conf are positional.
kernel.sem
semmsl
semmns
semopn
semmni
Setting Semaphore ParametersChanging the kernel parameters for semaphores works the same way as the shared memory parameters.All four of the semaphore parameters are set in a single file, that is, the sem file in the /proc/sys/kernel directory. Here are some general recommendations for the settings of the semaphore parameters on Enterprise Linux. You must test and adjust these depending on your system:For semmsl – 250 or the largest PROCESSES parameter of an Oracle database plus 10For semmns – 32000 or sum of the PROCESSES parameters for each Oracle database, adding the largest one twice, and adding an additional 10 for each databaseFor semopm – 100For semmni – 128
Oracle In
ternal & O
racle Aca
demy
Use O
nly
Oracle Database 10g: Managing Oracle on Linux for DBAs 2 - 11
Copyright © 2007, Oracle. All rights reserved.
Setting the File Handles Parameter
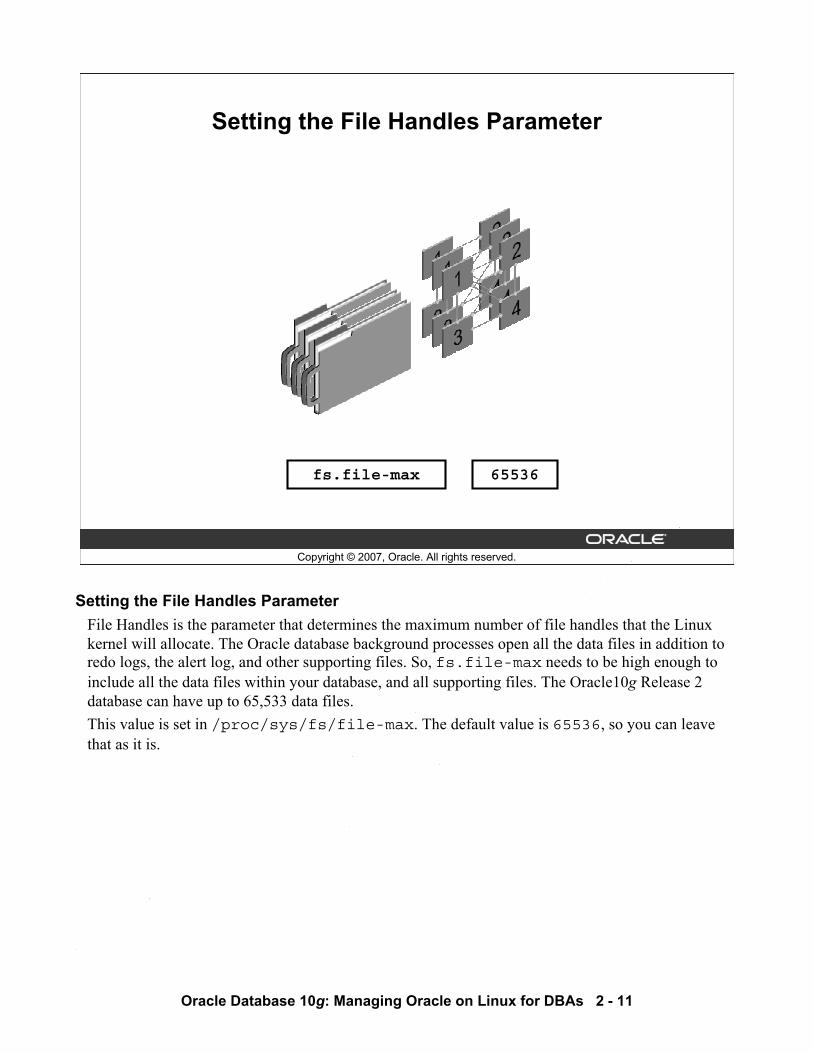
65536fs.file-max
Setting the File Handles ParameterFile Handles is the parameter that determines the maximum number of file handles that the Linux kernel will allocate. The Oracle database background processes open all the data files in addition to redo logs, the alert log, and other supporting files. So, fs.file-max needs to be high enough to include all the data files within your database, and all supporting files. The Oracle10g Release 2 database can have up to 65,533 data files. This value is set in /proc/sys/fs/file-max. The default value is 65536, so you can leave that as it is.
Oracle In
ternal & O
racle Aca
demy
Use O
nly
Oracle Database 10g: Managing Oracle on Linux for DBAs 2 - 12
Copyright © 2007, Oracle. All rights reserved.
Setting Other Parameters
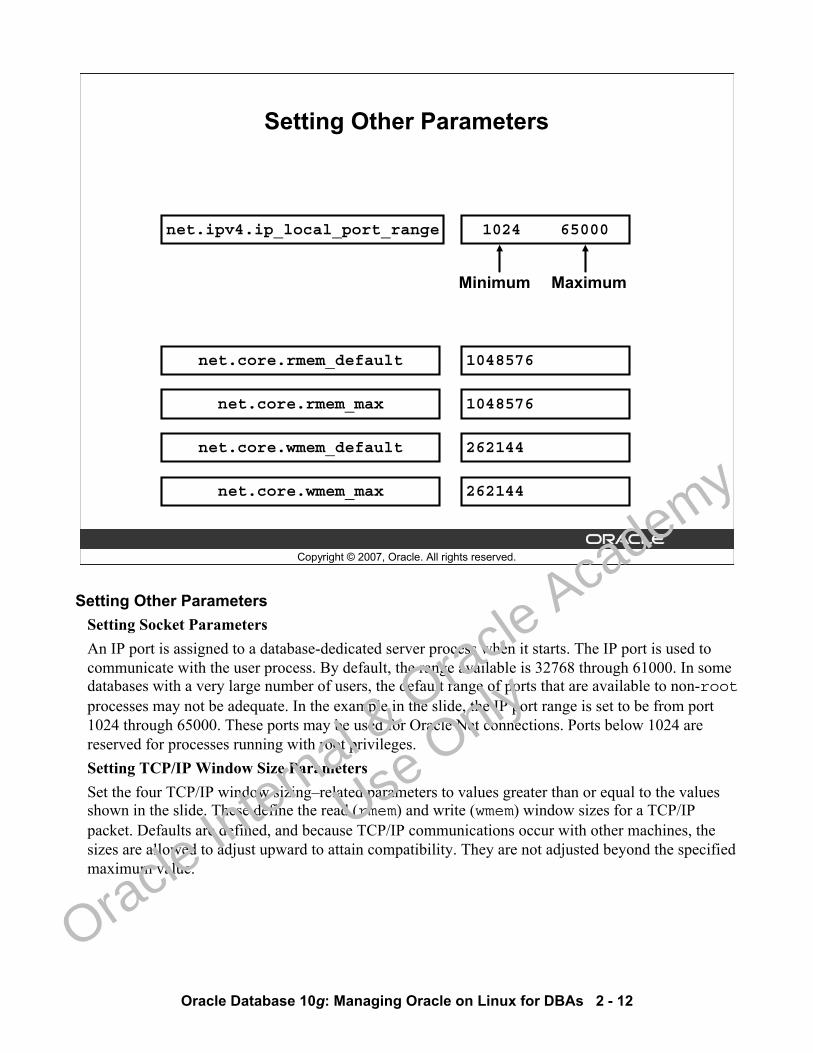
1024 65000net.ipv4.ip_local_port_range
MaximumMinimum
1048576net.core.rmem_default
1048576net.core.rmem_max
262144net.core.wmem_default
262144net.core.wmem_max
Setting Other ParametersSetting Socket ParametersAn IP port is assigned to a database-dedicated server process when it starts. The IP port is used to communicate with the user process. By default, the range available is 32768 through 61000. In some databases with a very large number of users, the default range of ports that are available to non-rootprocesses may not be adequate. In the example in the slide, the IP port range is set to be from port 1024 through 65000. These ports may be used for Oracle Net connections. Ports below 1024 are reserved for processes running with root privileges. Setting TCP/IP Window Size ParametersSet the four TCP/IP window sizing–related parameters to values greater than or equal to the valuesshown in the slide. These define the read (rmem) and write (wmem) window sizes for a TCP/IP packet. Defaults are defined, and because TCP/IP communications occur with other machines, the sizes are allowed to adjust upward to attain compatibility. They are not adjusted beyond the specified maximum value.
Oracle In
ternal & O
racle Aca
demy
Use O
nly
Oracle Database 10g: Managing Oracle on Linux for DBAs 2 - 13
Copyright © 2007, Oracle. All rights reserved.
Shell Limits
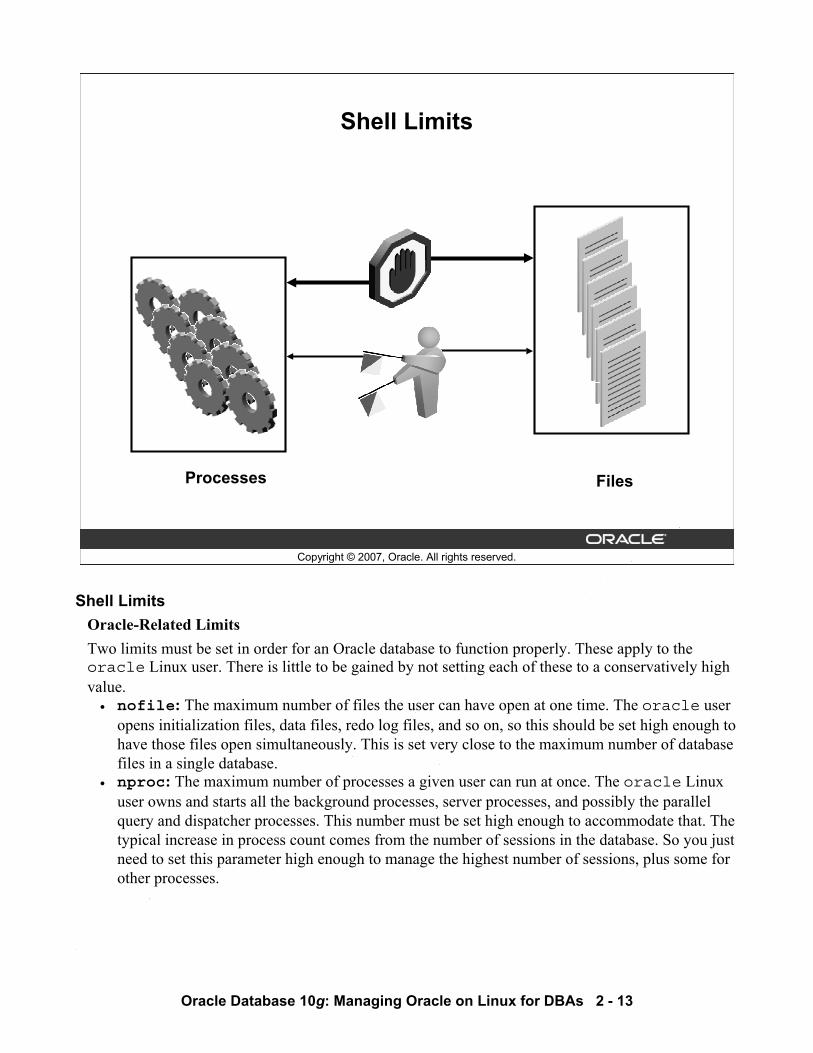
Processes Files
Shell LimitsOracle-Related LimitsTwo limits must be set in order for an Oracle database to function properly. These apply to the oracle Linux user. There is little to be gained by not setting each of these to a conservatively high value.• nofile: The maximum number of files the user can have open at one time. The oracle user
opens initialization files, data files, redo log files, and so on, so this should be set high enough to have those files open simultaneously. This is set very close to the maximum number of database files in a single database.
• nproc: The maximum number of processes a given user can run at once. The oracle Linux user owns and starts all the background processes, server processes, and possibly the parallel query and dispatcher processes. This number must be set high enough to accommodate that. The typical increase in process count comes from the number of sessions in the database. So you just need to set this parameter high enough to manage the highest number of sessions, plus some for other processes.
Oracle In
ternal & O
racle Aca
demy
Use O
nly
Oracle Database 10g: Managing Oracle on Linux for DBAs 2 - 14
Shell Limits (continued)Soft Limit Versus Hard LimitFor each of these settings, there is a soft limit and a hard limit. The hard limit can be changed only by the root user. The soft limit serves as the limit for the resource at any given time; the user may not exceed that. But the soft limit can be changed by the user, up to the value of the hard limit. The purpose of a limit is to prevent runaway situations, where resources are being used up beyond what was intended by the processes running in the user space. So allowing the soft limit to be adjusted by the user, but never exceeding the root-defined hard limit, provides flexibility along with control.
Oracle In
ternal & O
racle Aca
demy
Use O
nly
Oracle Database 10g: Managing Oracle on Linux for DBAs 2 - 15
Copyright © 2007, Oracle. All rights reserved.
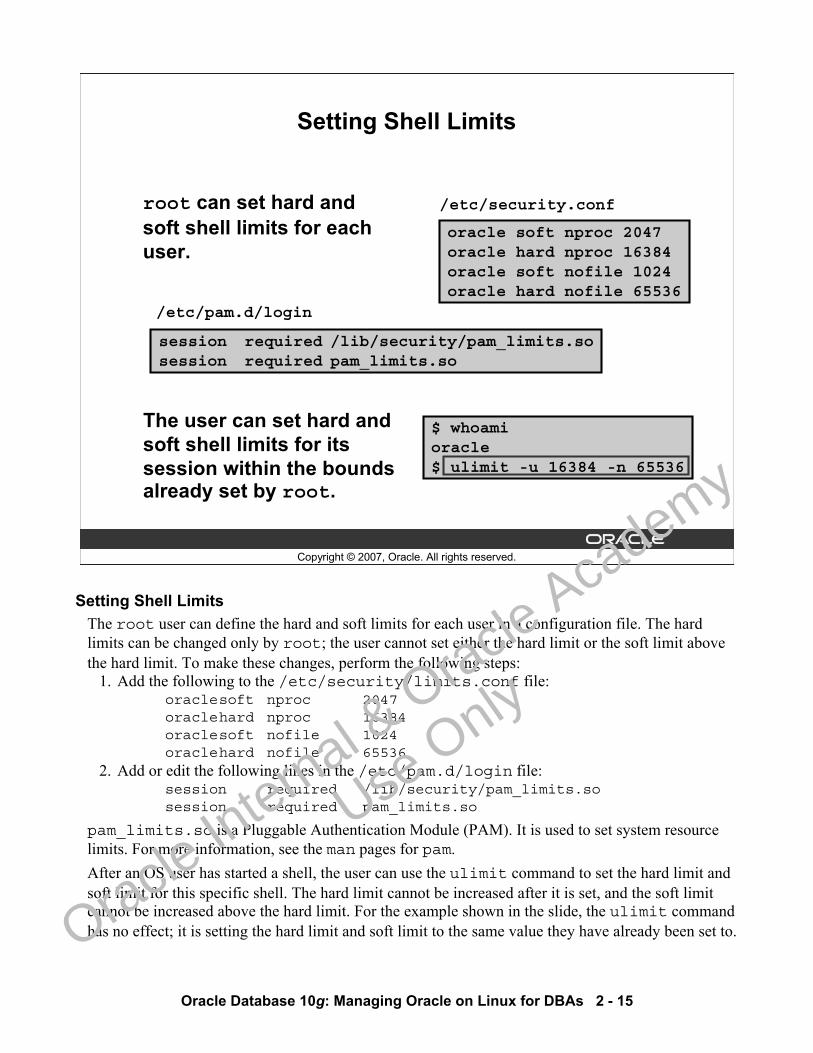
root can set hard and soft shell limits for each user.
Setting Shell Limits
oracle soft nproc 2047oracle hard nproc 16384oracle soft nofile 1024oracle hard nofile 65536
$ whoamioracle$ ulimit -u 16384 -n 65536
The user can set hard and soft shell limits for its session within the bounds already set by root.
session required /lib/security/pam_limits.sosession required pam_limits.so
/etc/security.conf
/etc/pam.d/login
Setting Shell LimitsThe root user can define the hard and soft limits for each user in a configuration file. The hard limits can be changed only by root; the user cannot set either the hard limit or the soft limit above the hard limit. To make these changes, perform the following steps:
1. Add the following to the /etc/security/limits.conf file:oraclesoft nproc 2047oraclehard nproc 16384oraclesoft nofile 1024oraclehard nofile 65536
2. Add or edit the following lines in the /etc/pam.d/login file:session required /lib/security/pam_limits.sosession required pam_limits.so
pam_limits.so is a Pluggable Authentication Module (PAM). It is used to set system resource limits. For more information, see the man pages for pam.After an OS user has started a shell, the user can use the ulimit command to set the hard limit and soft limit for this specific shell. The hard limit cannot be increased after it is set, and the soft limit cannot be increased above the hard limit. For the example shown in the slide, the ulimit command has no effect; it is setting the hard limit and soft limit to the same value they have already been set to.
Oracle In
ternal & O
racle Aca
demy
Use O
nly
Oracle Database 10g: Managing Oracle on Linux for DBAs 2 - 16
Setting Shell Limits (continued)If it were to issue the ulimit –Sn 50 command (which sets the soft limit for number of open files to 50), then any attempt to open more than that would result in an error. The user could still set it higher (for example, ulimit –Sn 100), which would result only in errors when the number of open file requests exceeds 100. However, this cannot be set higher than the hard limit.Note: A process inherits these settings from the shell from which it is started at the time it is started, so if you change the settings, any processes would have to be restarted for them to take effect. So, for example, the Oracle database would have to be shut down and restarted.
Oracle In
ternal & O
racle Aca
demy
Use O
nly
Oracle Database 10g: Managing Oracle on Linux for DBAs 2 - 17
Copyright © 2007, Oracle. All rights reserved.
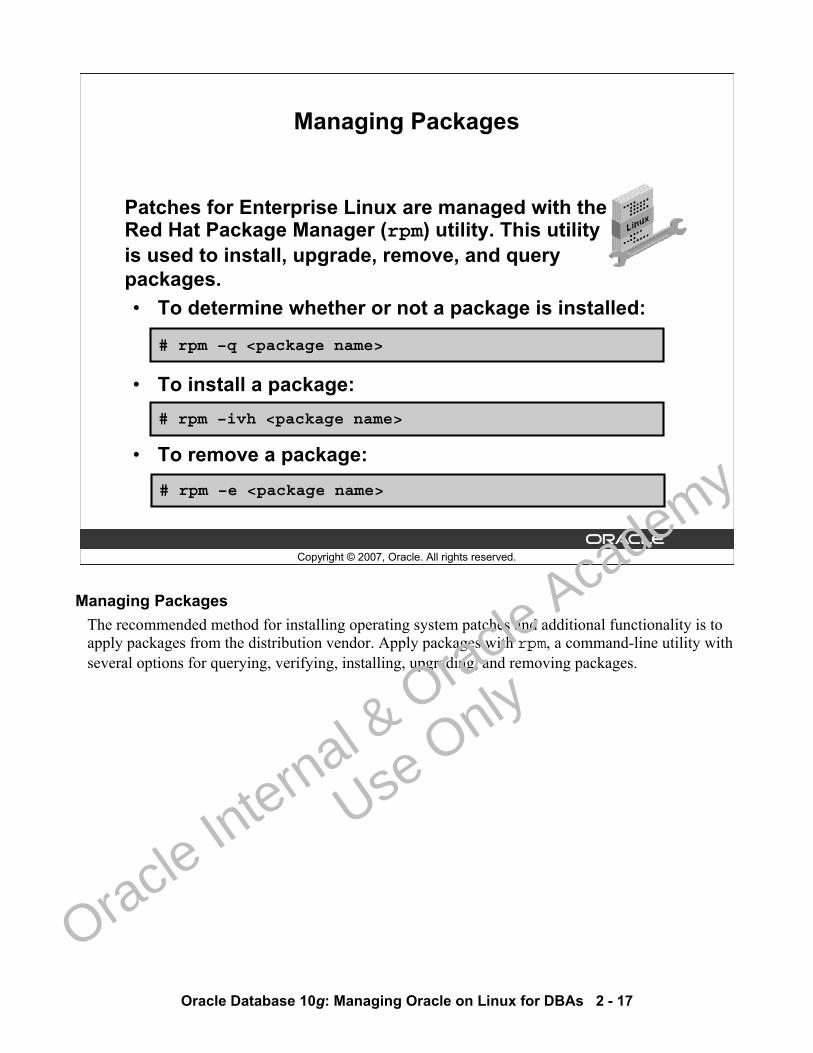
Managing Packages
Patches for Enterprise Linux are managed with theRed Hat Package Manager (rpm) utility. This utilityis used to install, upgrade, remove, and querypackages.• To determine whether or not a package is installed:
• To install a package:
• To remove a package:
# rpm –q <package name>
# rpm –ivh <package name>
# rpm –e <package name>
Managing Packages The recommended method for installing operating system patches and additional functionality is to apply packages from the distribution vendor. Apply packages with rpm, a command-line utility with several options for querying, verifying, installing, upgrading, and removing packages.
Oracle In
ternal & O
racle Aca
demy
Use O
nly
Oracle Database 10g: Managing Oracle on Linux for DBAs 2 - 18
Managing Packages (continued)The rpm utility accepts several command-line arguments including:• -q: Queries the system for a package. A special argument, -qa, lists all installed packages. This
list can then be filtered by piping to a grep command. For example:#rpm -qa |grep gccgcc-2.96-108.1
• -i: Installs the named package. The optional –h argument shows hash marks on the screen to indicate progress. The optional –v argument generates verbose output. For example:
#rpm -ivh my_new_package-1.0-14.i386.rpmPreparing... ####################################### [100%]1:my_new_package ####################################### [100%]
• -e: Erases/removes the selected package. Optional arguments –h and –v can also be used. For example:
# rpm -ev IBMJava2-JRE
• -U: Upgrades the current package. It removes the current package and replaces it with a different version.Note: The replacement happens without removing any existing configuration files. This is used when upgrading kernel packages because you cannot remove the existing kernel before installing a new one.
rpm -Uh kernel-2.4.9-e.27.i686.rpmPreparing... ####################################### [100%]1:kernel-2.4.9-e27 ####################################### [100%]
Oracle In
ternal & O
racle Aca
demy
Use O
nly
Oracle Database 10g: Managing Oracle on Linux for DBAs 2 - 19
Copyright © 2007, Oracle. All rights reserved.
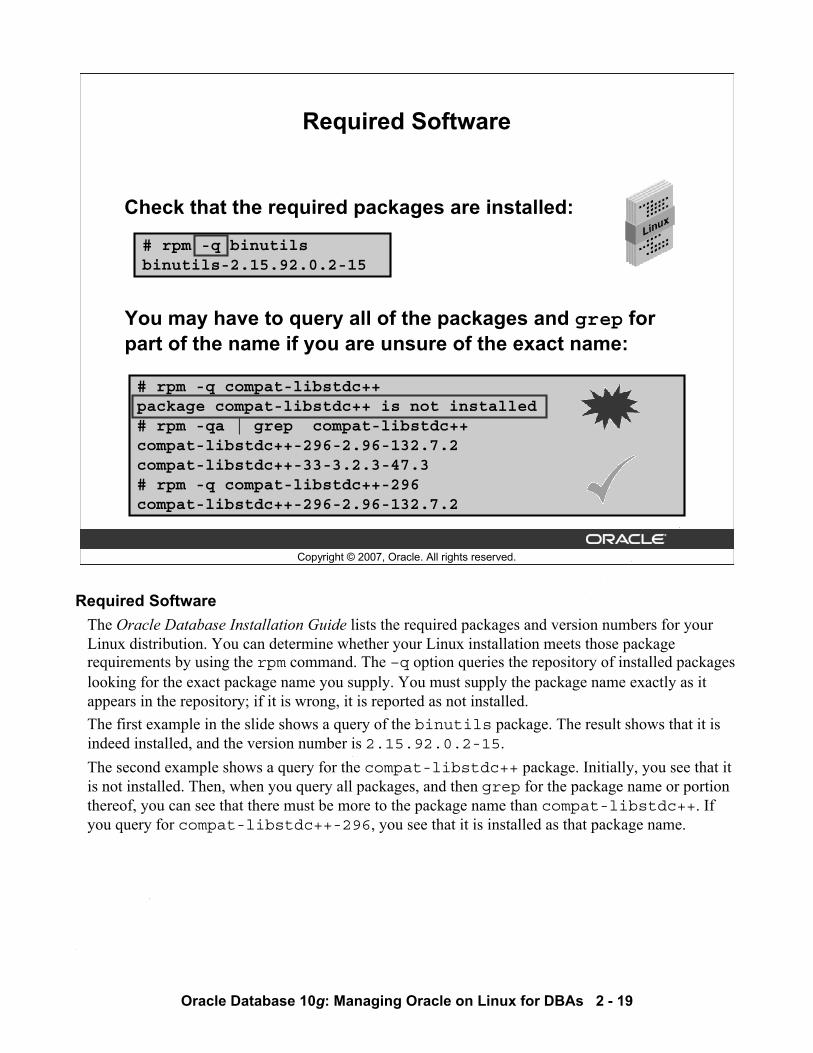
Required Software
Check that the required packages are installed:
# rpm -q binutilsbinutils-2.15.92.0.2-15
# rpm -q compat-libstdc++package compat-libstdc++ is not installed# rpm -qa | grep compat-libstdc++compat-libstdc++-296-2.96-132.7.2compat-libstdc++-33-3.2.3-47.3# rpm -q compat-libstdc++-296compat-libstdc++-296-2.96-132.7.2
You may have to query all of the packages and grep for part of the name if you are unsure of the exact name:
Required SoftwareThe Oracle Database Installation Guide lists the required packages and version numbers for your Linux distribution. You can determine whether your Linux installation meets those package requirements by using the rpm command. The –q option queries the repository of installed packages looking for the exact package name you supply. You must supply the package name exactly as it appears in the repository; if it is wrong, it is reported as not installed.The first example in the slide shows a query of the binutils package. The result shows that it is indeed installed, and the version number is 2.15.92.0.2-15.The second example shows a query for the compat-libstdc++ package. Initially, you see that it is not installed. Then, when you query all packages, and then grep for the package name or portion thereof, you can see that there must be more to the package name than compat-libstdc++. If you query for compat-libstdc++-296, you see that it is installed as that package name.
Oracle In
ternal & O
racle Aca
demy
Use O
nly
Oracle Database 10g: Managing Oracle on Linux for DBAs 2 - 20
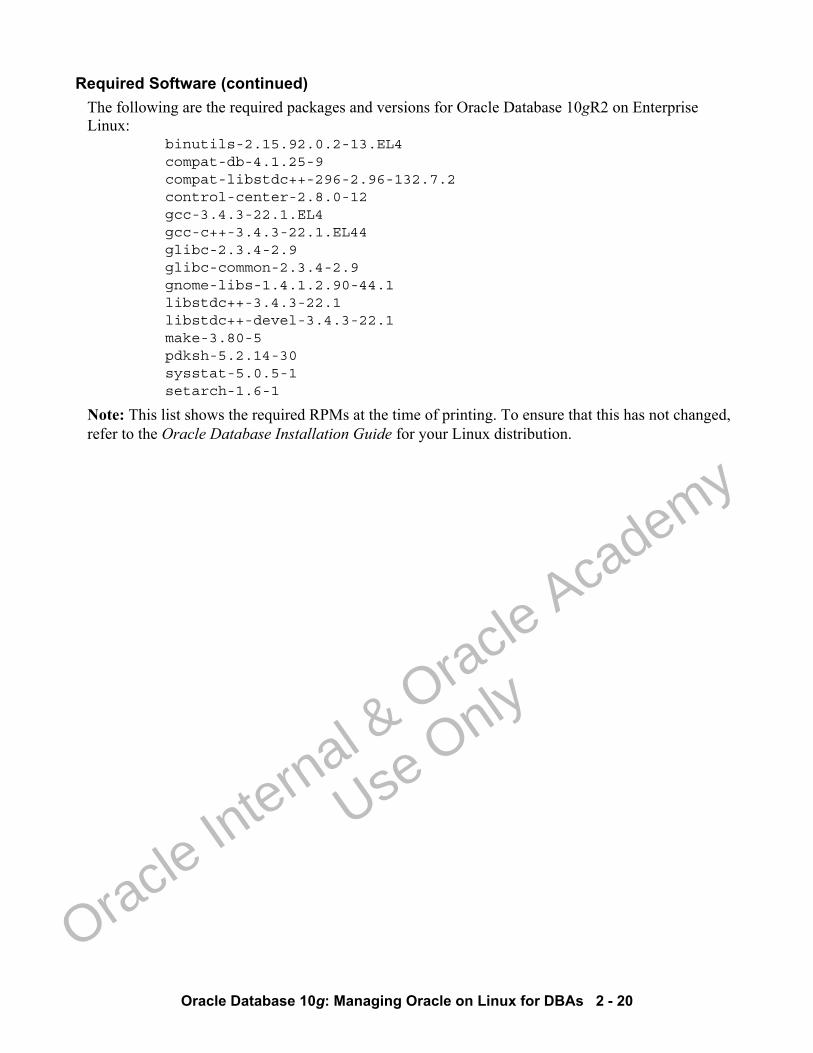
Required Software (continued)The following are the required packages and versions for Oracle Database 10gR2 on Enterprise Linux:
binutils-2.15.92.0.2-13.EL4compat-db-4.1.25-9compat-libstdc++-296-2.96-132.7.2control-center-2.8.0-12gcc-3.4.3-22.1.EL4gcc-c++-3.4.3-22.1.EL44glibc-2.3.4-2.9glibc-common-2.3.4-2.9gnome-libs-1.4.1.2.90-44.1libstdc++-3.4.3-22.1libstdc++-devel-3.4.3-22.1make-3.80-5pdksh-5.2.14-30sysstat-5.0.5-1setarch-1.6-1
Note: This list shows the required RPMs at the time of printing. To ensure that this has not changed, refer to the Oracle Database Installation Guide for your Linux distribution.
Oracle In
ternal & O
racle Aca
demy
Use O
nly
Oracle Database 10g: Managing Oracle on Linux for DBAs 2 - 21
Copyright © 2007, Oracle. All rights reserved.
Linux Patches
Apply the patches recommended by the distribution vendor:• Unbreakable Linux Network (ULN) supplies patches
automatically.• Other distribution vendors have patch channels.
Linux PatchesLinux distribution vendors do not supply megapatches like other UNIX vendors, but supply patches for components. The latest version of all the patches are tested to work together. Each distribution vendor has a subscription service and a method for distributing patches. Enterprise Linux is supported by Unbreakable Linux Network. The latest patches should be applied; especially the kernel patches and the security patches.Note: Oracle Enterprise Manager Database Control and Grid Control provide an interface for finding and applying patches for the OS and for the database. For details, see Oracle Database 2 Day DBA 10g Release 2.
Oracle In
ternal & O
racle Aca
demy
Use O
nly
Oracle Database 10g: Managing Oracle on Linux for DBAs 2 - 22
Copyright © 2007, Oracle. All rights reserved.
Configuring the X Window System
Install and configure the X Window System with the distribution installation. Before the installation:• Determine the monitor model number• Determine the graphics card model number or chipset
Configuring the X Window SystemOracle Universal Installer (OUI) is a Java-based product, and Java calls the X Window System on UNIX and Linux operating systems. So the X Window System must be enabled. This is usually accomplished during the installation of the Linux distribution. If the X Window System configuration needs to be changed after the installation, there are several files, such as /etc/X11/XF86Config, where the X Window System configuration information is kept. You must know the monitor model number, the graphics card model, the video memory size, and the chipset before configuring these items. With this information, you are able to configure your system correctly.
Oracle In
ternal & O
racle Aca
demy
Use O
nly
Oracle Database 10g: Managing Oracle on Linux for DBAs 2 - 23
Copyright © 2007, Oracle. All rights reserved.
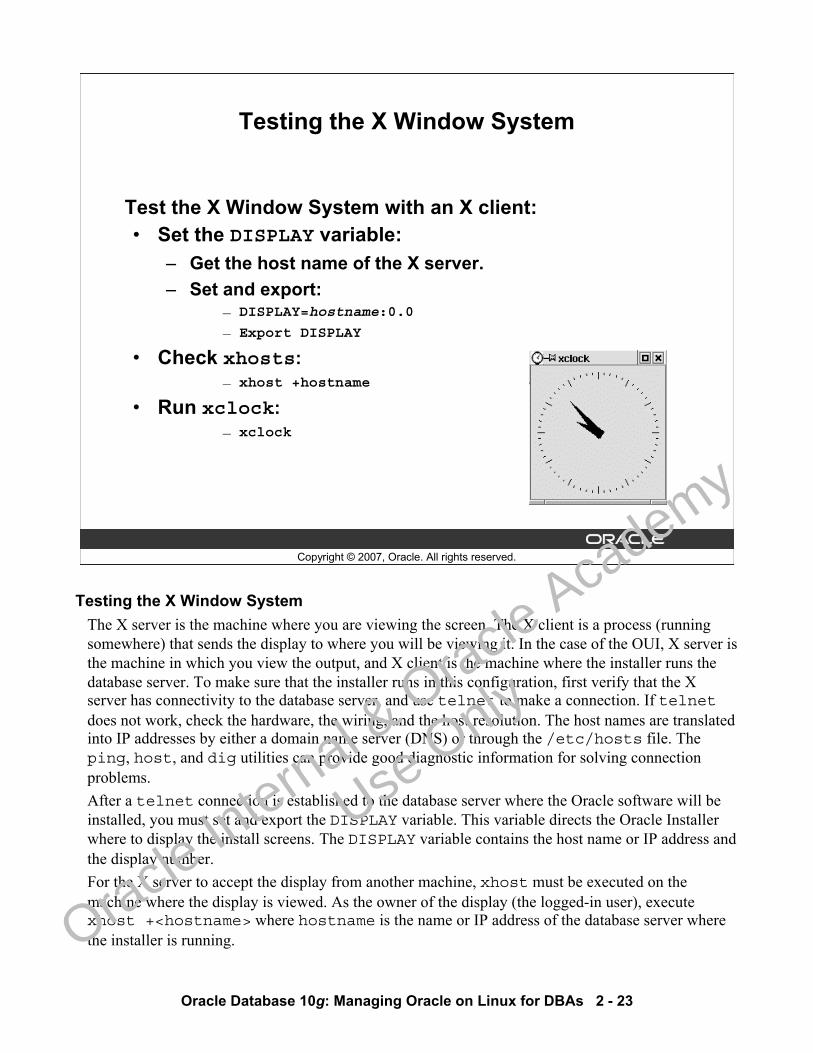
Testing the X Window System
Test the X Window System with an X client:• Set the DISPLAY variable:
– Get the host name of the X server.– Set and export:
— DISPLAY=hostname:0.0
— Export DISPLAY
• Check xhosts:— xhost +hostname
• Run xclock:— xclock
Testing the X Window SystemThe X server is the machine where you are viewing the screen. The X client is a process (running somewhere) that sends the display to where you will be viewing it. In the case of the OUI, X server is the machine in which you view the output, and X client is the machine where the installer runs the database server. To make sure that the installer runs in this configuration, first verify that the X server has connectivity to the database server, and use telnet to make a connection. If telnetdoes not work, check the hardware, the wiring, and the host resolution. The host names are translated into IP addresses by either a domain name server (DNS) or through the /etc/hosts file. The ping, host, and dig utilities can provide good diagnostic information for solving connection problems.After a telnet connection is established to the database server where the Oracle software will be installed, you must set and export the DISPLAY variable. This variable directs the Oracle Installer where to display the install screens. The DISPLAY variable contains the host name or IP address and the display number.For the X server to accept the display from another machine, xhost must be executed on the machine where the display is viewed. As the owner of the display (the logged-in user), execute xhost +<hostname> where hostname is the name or IP address of the database server where the installer is running.
Oracle In
ternal & O
racle Aca
demy
Use O
nly
Oracle Database 10g: Managing Oracle on Linux for DBAs 2 - 24
Testing the X Window System (continued)On the X server, issue a hostname command to find the name of the X server. In the following example, the machine jspiller-us is the X server where the installer will display the output. Check which hosts are allowed to connect to the X server machine with xhosts. With xhost +<hostname>, add the name of the database server to the X access control list. In this example, the machine delphi is the database server where the installer will be running:
$ hostnamejspiller-us$ xhostAccess control enabled, only authorized clients can connect$ xhost +delphiDelphi being added to access control list.
Connect to the database server, with telnet, set the DISPLAY variable and start an X client. $ telnet delphi$ DISPLAY=jspiller-us:0.0$ export DISPLAY$ xclock
The xclock client should appear on the X server screen or an error message will appear in the telnet session.The DISPLAY variable may also be set by using the IP address instead of the name as:
$ DISPLAY=192.168.1.2:0.0
This method is sometimes helpful when the host name resolution must be bypassed.For further information about the commands used in this lesson, refer to Appendix C, or the man and info pages on your Linux system.
Oracle In
ternal & O
racle Aca
demy
Use O
nly
Oracle Database 10g: Managing Oracle on Linux for DBAs 2 - 25
Copyright © 2007, Oracle. All rights reserved.
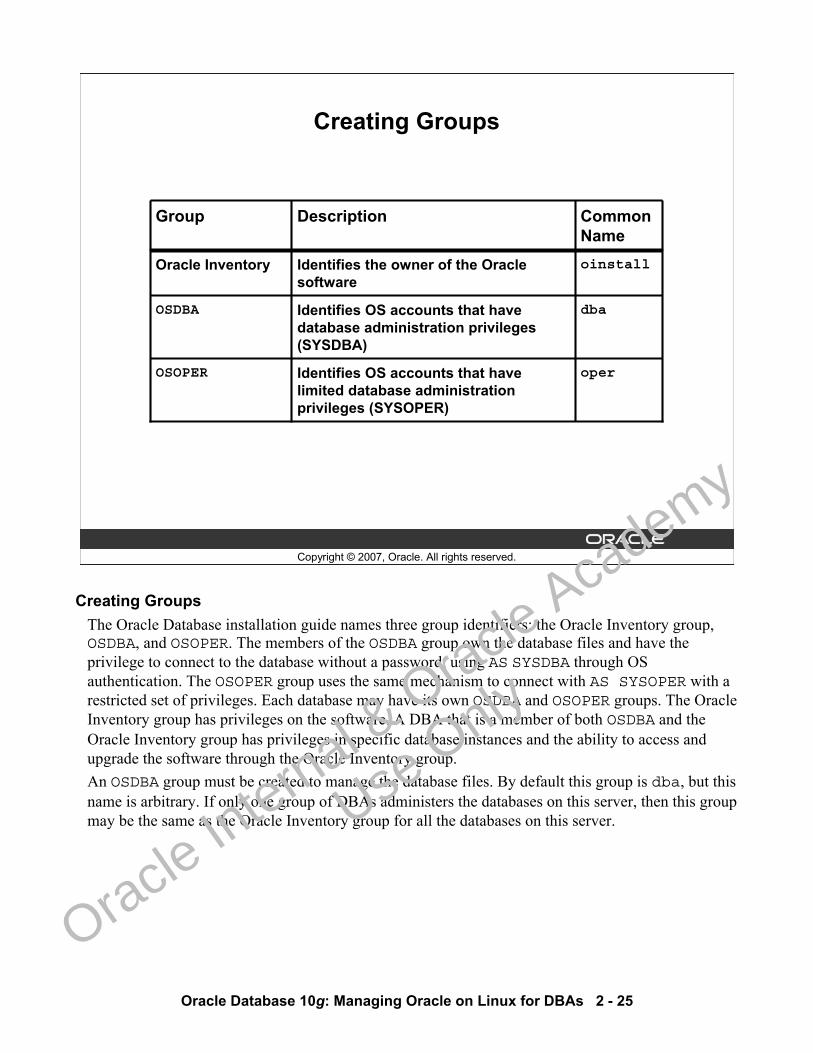
Creating Groups
oinstallIdentifies the owner of the Oracle software
Oracle Inventory
OSOPER
OSDBA
Group
dbaIdentifies OS accounts that have database administration privileges (SYSDBA)
operIdentifies OS accounts that have limited database administration privileges (SYSOPER)
Common Name
Description
Creating GroupsThe Oracle Database installation guide names three group identifiers: the Oracle Inventory group, OSDBA, and OSOPER. The members of the OSDBA group own the database files and have the privilege to connect to the database without a password, using AS SYSDBA through OS authentication. The OSOPER group uses the same mechanism to connect with AS SYSOPER with a restricted set of privileges. Each database may have its own OSDBA and OSOPER groups. The Oracle Inventory group has privileges on the software. A DBA that is a member of both OSDBA and the Oracle Inventory group has privileges in specific database instances and the ability to access and upgrade the software through the Oracle Inventory group. An OSDBA group must be created to manage the database files. By default this group is dba, but this name is arbitrary. If only one group of DBAs administers the databases on this server, then this group may be the same as the Oracle Inventory group for all the databases on this server.
Oracle In
ternal & O
racle Aca
demy
Use O
nly
Oracle Database 10g: Managing Oracle on Linux for DBAs 2 - 26
Creating Groups (continued)When there are multiple groups of DBAs, each administering different databases on the same server, you should create a separate Oracle Inventory group to own the Oracle software. This group is commonly called oinstall. For each set of databases that will have a common set of DBAs,create an additional OSDBA group. This allows each DBA to have privileges in the database of responsibility but not in other databases.
Oracle In
ternal & O
racle Aca
demy
Use O
nly
Oracle Database 10g: Managing Oracle on Linux for DBAs 2 - 27
Copyright © 2007, Oracle. All rights reserved.
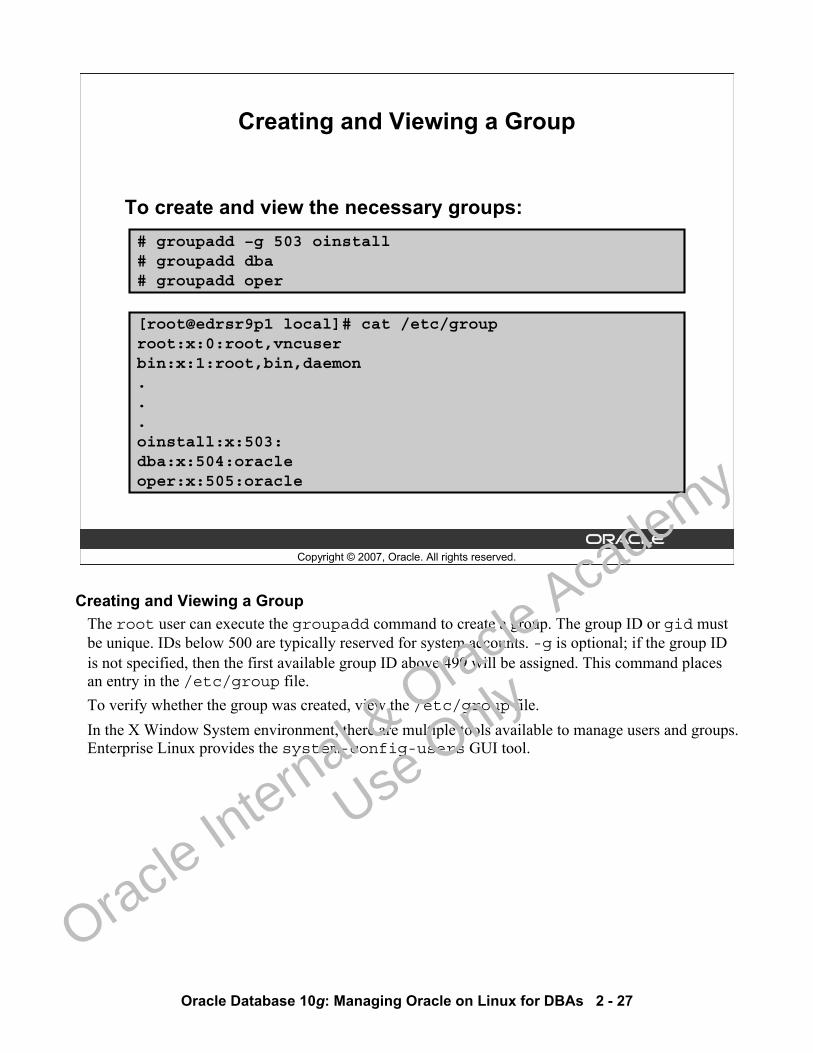
Creating and Viewing a Group
To create and view the necessary groups:# groupadd –g 503 oinstall# groupadd dba# groupadd oper
[root@edrsr9p1 local]# cat /etc/grouproot:x:0:root,vncuserbin:x:1:root,bin,daemon...oinstall:x:503:dba:x:504:oracleoper:x:505:oracle
Creating and Viewing a GroupThe root user can execute the groupadd command to create a group. The group ID or gid must be unique. IDs below 500 are typically reserved for system accounts. -g is optional; if the group ID is not specified, then the first available group ID above 499 will be assigned. This command places an entry in the /etc/group file. To verify whether the group was created, view the /etc/group file. In the X Window System environment, there are multiple tools available to manage users and groups. Enterprise Linux provides the system-config-users GUI tool.
Oracle In
ternal & O
racle Aca
demy
Use O
nly
Oracle Database 10g: Managing Oracle on Linux for DBAs 2 - 28
Copyright © 2007, Oracle. All rights reserved.
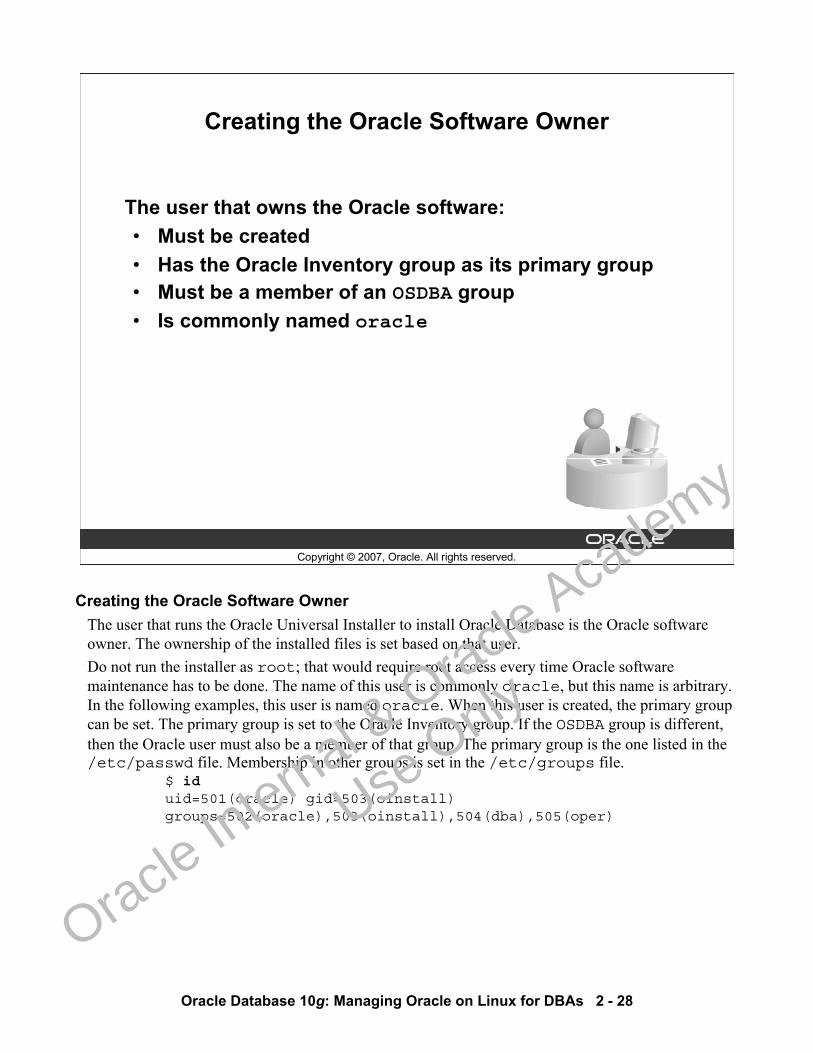
Creating the Oracle Software Owner
The user that owns the Oracle software:• Must be created• Has the Oracle Inventory group as its primary group• Must be a member of an OSDBA group• Is commonly named oracle
Creating the Oracle Software OwnerThe user that runs the Oracle Universal Installer to install Oracle Database is the Oracle software owner. The ownership of the installed files is set based on that user.Do not run the installer as root; that would require root access every time Oracle software maintenance has to be done. The name of this user is commonly oracle, but this name is arbitrary. In the following examples, this user is named oracle. When this user is created, the primary group can be set. The primary group is set to the Oracle Inventory group. If the OSDBA group is different, then the Oracle user must also be a member of that group. The primary group is the one listed in the /etc/passwd file. Membership in other groups is set in the /etc/groups file.
$ iduid=501(oracle) gid=503(oinstall) groups=502(oracle),503(oinstall),504(dba),505(oper)
Oracle In
ternal & O
racle Aca
demy
Use O
nly
Oracle Database 10g: Managing Oracle on Linux for DBAs 2 - 29
Copyright © 2007, Oracle. All rights reserved.
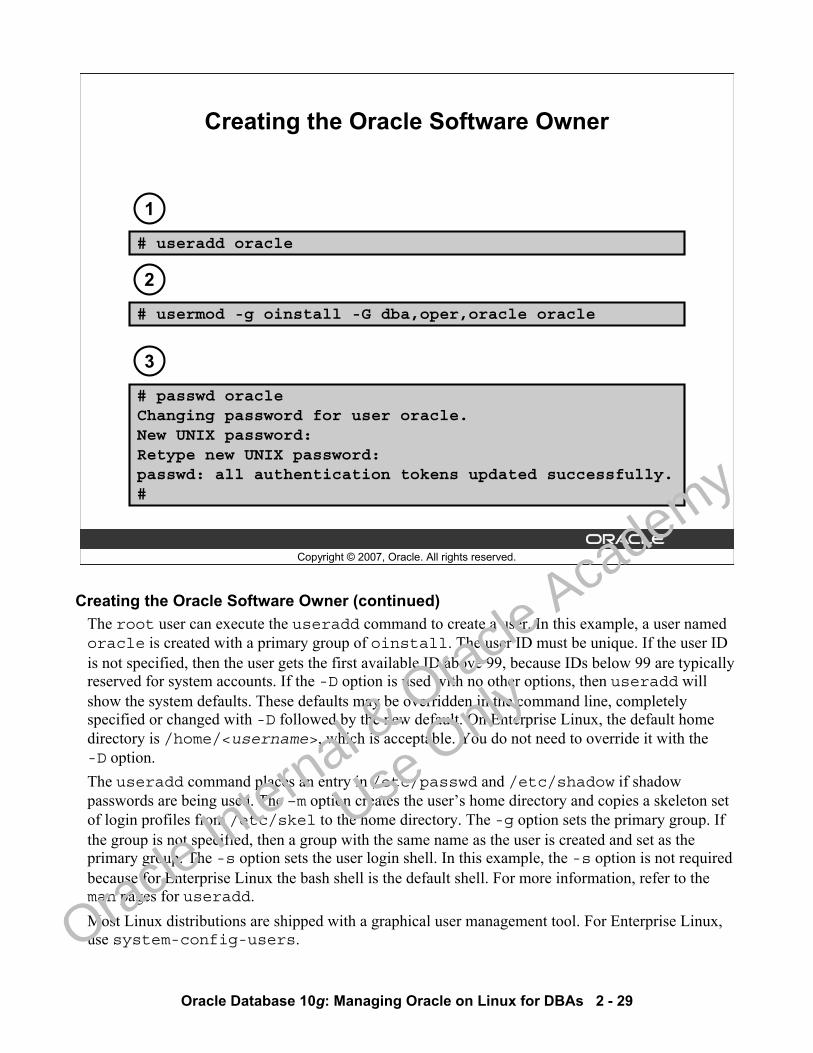
Creating the Oracle Software Owner
# useradd oracle
# usermod -g oinstall -G dba,oper,oracle oracle
# passwd oracleChanging password for user oracle.New UNIX password:Retype new UNIX password:passwd: all authentication tokens updated successfully.#
1
2
3
Creating the Oracle Software Owner (continued)The root user can execute the useradd command to create a user. In this example, a user named oracle is created with a primary group of oinstall. The user ID must be unique. If the user ID is not specified, then the user gets the first available ID above 99, because IDs below 99 are typically reserved for system accounts. If the -D option is used with no other options, then useradd will show the system defaults. These defaults may be overridden in the command line, completely specified or changed with -D followed by the new default. On Enterprise Linux, the default home directory is /home/<username>, which is acceptable. You do not need to override it with the -D option. The useradd command places an entry in /etc/passwd and /etc/shadow if shadow passwords are being used. The –m option creates the user’s home directory and copies a skeleton set of login profiles from /etc/skel to the home directory. The -g option sets the primary group. If the group is not specified, then a group with the same name as the user is created and set as the primary group. The -s option sets the user login shell. In this example, the -s option is not required because for Enterprise Linux the bash shell is the default shell. For more information, refer to the man pages for useradd.Most Linux distributions are shipped with a graphical user management tool. For Enterprise Linux, use system-config-users.
Oracle In
ternal & O
racle Aca
demy
Use O
nly
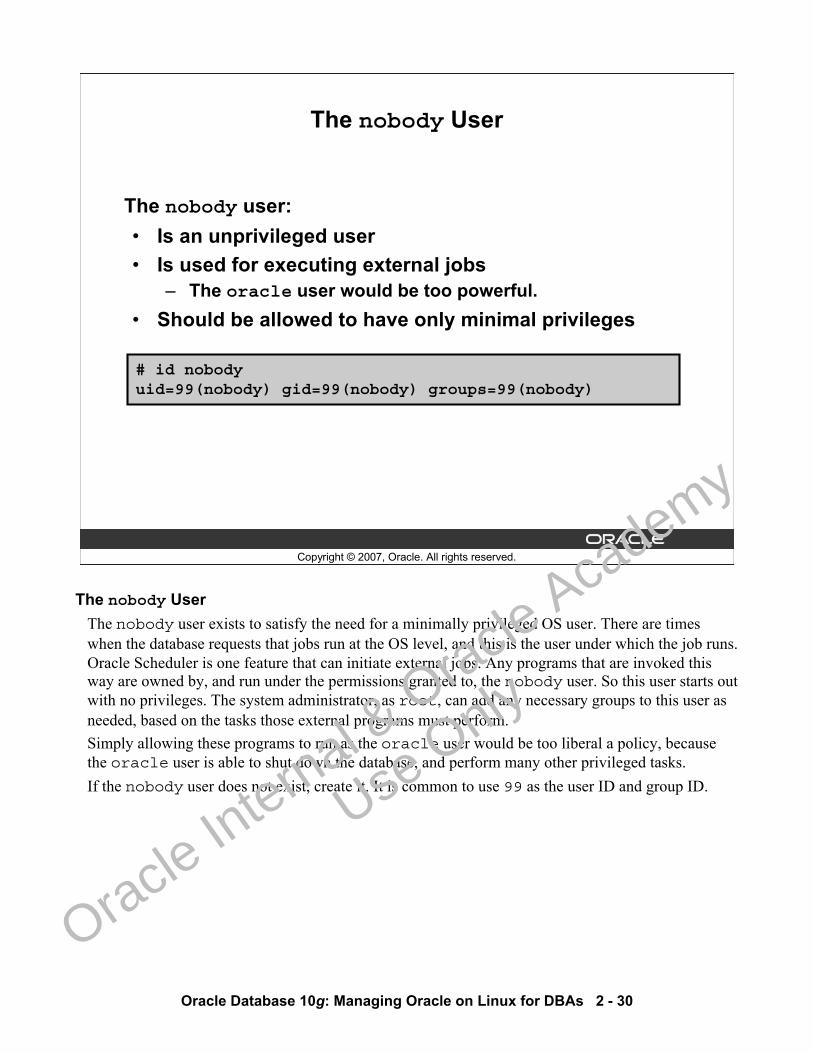
Oracle Database 10g: Managing Oracle on Linux for DBAs 2 - 30
Copyright © 2007, Oracle. All rights reserved.
The nobody User
# id nobodyuid=99(nobody) gid=99(nobody) groups=99(nobody)
The nobody user:• Is an unprivileged user• Is used for executing external jobs
– The oracle user would be too powerful.• Should be allowed to have only minimal privileges
The nobody UserThe nobody user exists to satisfy the need for a minimally privileged OS user. There are times when the database requests that jobs run at the OS level, and this is the user under which the job runs. Oracle Scheduler is one feature that can initiate external jobs. Any programs that are invoked this way are owned by, and run under the permissions granted to, the nobody user. So this user starts out with no privileges. The system administrator, as root, can add any necessary groups to this user as needed, based on the tasks those external programs must perform.Simply allowing these programs to run as the oracle user would be too liberal a policy, because the oracle user is able to shut down the database, and perform many other privileged tasks.If the nobody user does not exist, create it. It is common to use 99 as the user ID and group ID.
Oracle In
ternal & O
racle Aca
demy
Use O
nly
Oracle Database 10g: Managing Oracle on Linux for DBAs 2 - 31
Copyright © 2007, Oracle. All rights reserved.
Summary
In this lesson, you should have learned how to:• Use the package manager to determine and update
package support• Set up the operating system environment for Oracle
Database• Create the necessary groups and users for Oracle
Database
Oracle In
ternal & O
racle Aca
demy
Use O
nly
Oracle Database 10g: Managing Oracle on Linux for DBAs 2 - 32
Copyright © 2007, Oracle. All rights reserved.
Practice 2 Overview:Preparing Linux for Oracle
This practice covers the following topics:• Using the package manager to determine and update
package support• Creating groups and users in preparation for an Oracle
database installation• Setting up the operating system environment for
Oracle Database 10gR2
Oracle In
ternal & O
racle Aca
demy
Use O
nly
Copyright © 2007, Oracle. All rights reserved.
Installing Oracle on Linux
Oracle In
ternal & O
racle Aca
demy
Use O
nly
Oracle Database 10g: Managing Oracle on Linux for DBAs 3 - 2
Copyright © 2007, Oracle. All rights reserved.
Objectives
After completing this lesson, you should be able to:• Describe the Linux file system security• Install multiple versions of the Oracle Database
software on the same server• Accommodate multiple Oracle homes on one database
server
Oracle In
ternal & O
racle Aca
demy
Use O
nly
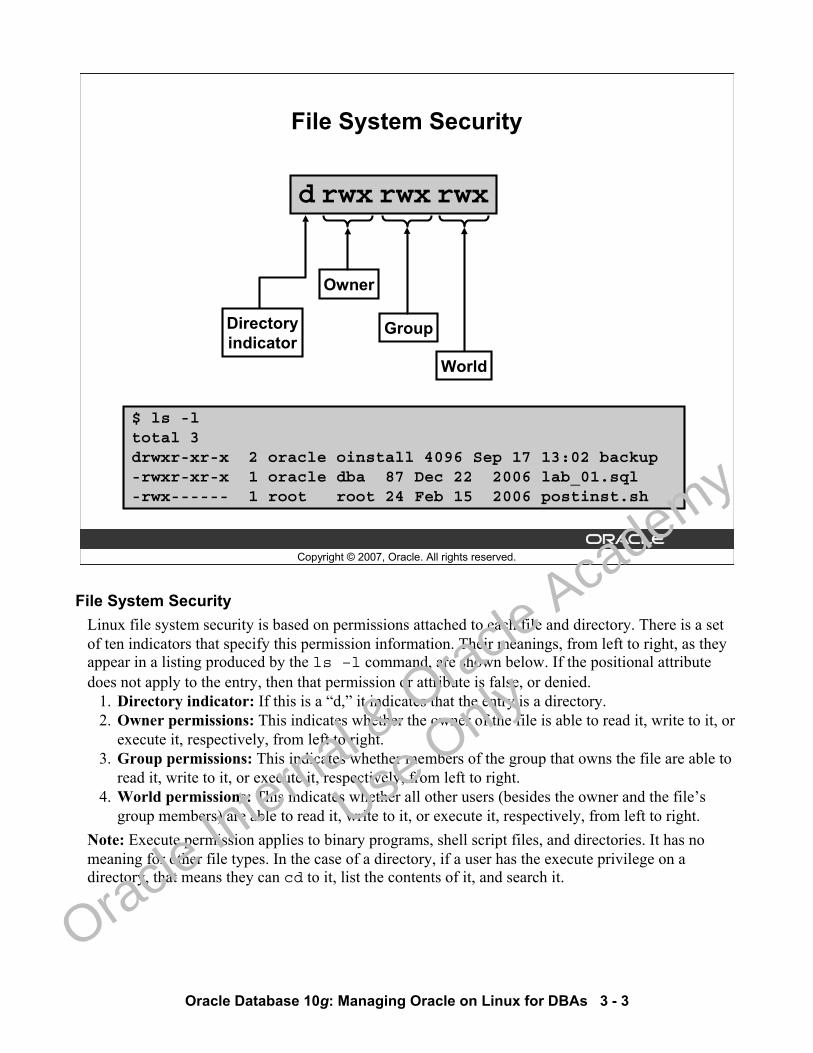
Oracle Database 10g: Managing Oracle on Linux for DBAs 3 - 3
Copyright © 2007, Oracle. All rights reserved.
File System Security
$ ls -ltotal 3drwxr-xr-x 2 oracle oinstall 4096 Sep 17 13:02 backup-rwxr-xr-x 1 oracle dba 87 Dec 22 2006 lab_01.sql-rwx------ 1 root root 24 Feb 15 2006 postinst.sh
d rwx rwx rwx
Owner
Group
World
Directoryindicator
File System SecurityLinux file system security is based on permissions attached to each file and directory. There is a set of ten indicators that specify this permission information. Their meanings, from left to right, as they appear in a listing produced by the ls –l command, are shown below. If the positional attribute does not apply to the entry, then that permission or attribute is false, or denied.
1. Directory indicator: If this is a “d,” it indicates that the entry is a directory.2. Owner permissions: This indicates whether the owner of the file is able to read it, write to it, or
execute it, respectively, from left to right.3. Group permissions: This indicates whether members of the group that owns the file are able to
read it, write to it, or execute it, respectively, from left to right.4. World permissions: This indicates whether all other users (besides the owner and the file’s
group members) are able to read it, write to it, or execute it, respectively, from left to right.Note: Execute permission applies to binary programs, shell script files, and directories. It has no meaning for other file types. In the case of a directory, if a user has the execute privilege on a directory, that means they can cd to it, list the contents of it, and search it.
Oracle In
ternal & O
racle Aca
demy
Use O
nly
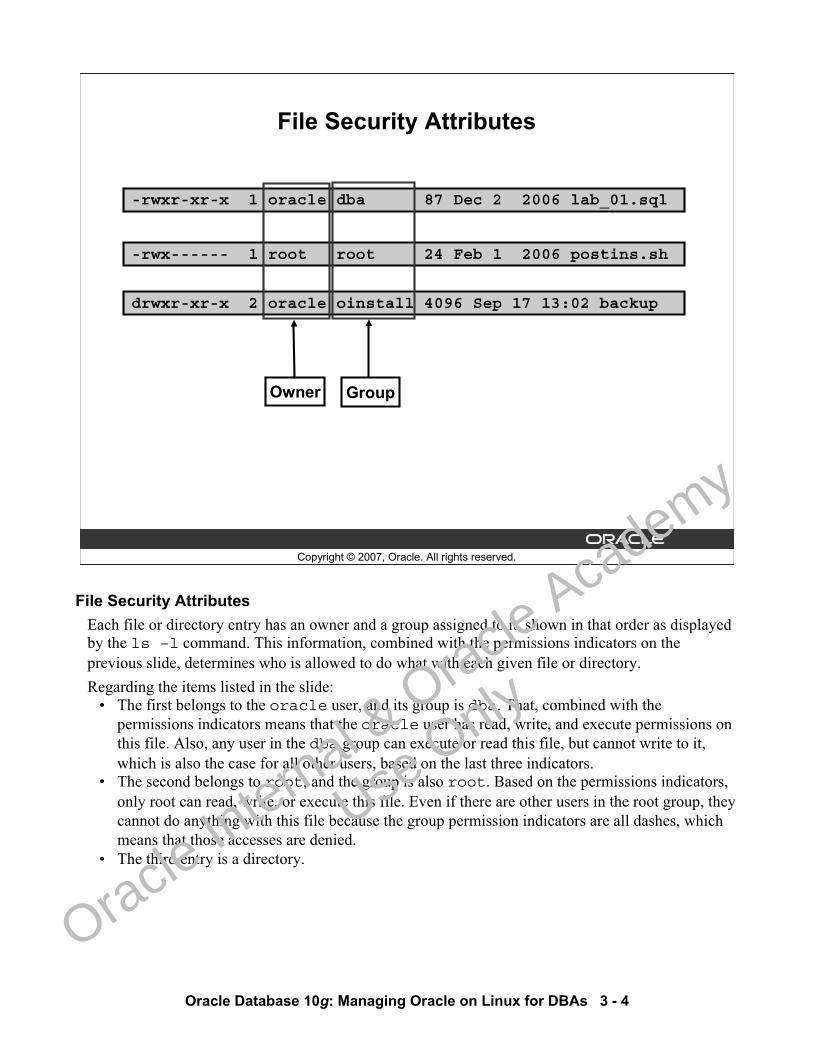
Oracle Database 10g: Managing Oracle on Linux for DBAs 3 - 4
Copyright © 2007, Oracle. All rights reserved.
-rwx------ 1 root root 24 Feb 1 2006 postins.sh
File Security Attributes
-rwxr-xr-x 1 oracle dba 87 Dec 2 2006 lab_01.sql
drwxr-xr-x 2 oracle oinstall 4096 Sep 17 13:02 backup
Owner Group
File Security AttributesEach file or directory entry has an owner and a group assigned to it, shown in that order as displayed by the ls –l command. This information, combined with the permissions indicators on the previous slide, determines who is allowed to do what with each given file or directory.Regarding the items listed in the slide:
• The first belongs to the oracle user, and its group is dba. That, combined with the permissions indicators means that the oracle user has read, write, and execute permissions on this file. Also, any user in the dba group can execute or read this file, but cannot write to it, which is also the case for all other users, based on the last three indicators.
• The second belongs to root, and the group is also root. Based on the permissions indicators, only root can read, write, or execute this file. Even if there are other users in the root group, they cannot do anything with this file because the group permission indicators are all dashes, which means that those accesses are denied.
• The third entry is a directory.
Oracle In
ternal & O
racle Aca
demy
Use O
nly
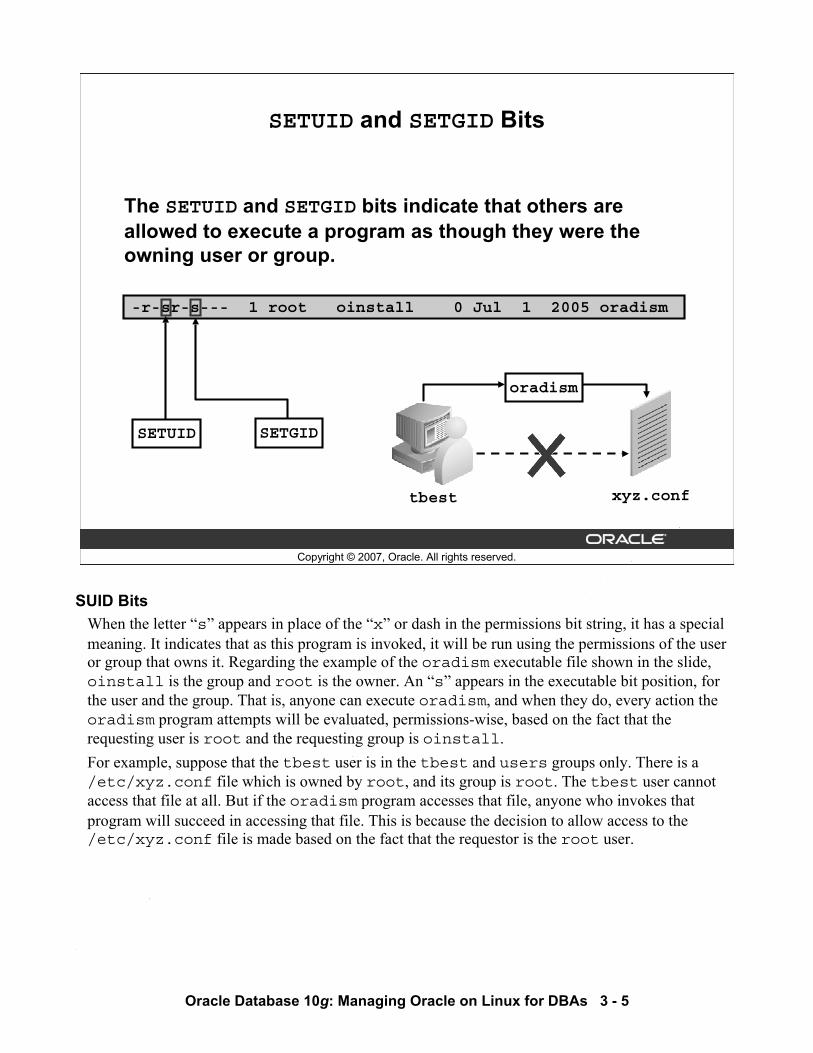
Oracle Database 10g: Managing Oracle on Linux for DBAs 3 - 5
Copyright © 2007, Oracle. All rights reserved.
SETUID and SETGID Bits
-r-sr-s--- 1 root oinstall 0 Jul 1 2005 oradism
The SETUID and SETGID bits indicate that others are allowed to execute a program as though they were the owning user or group.
oradism
xyz.conftbest
SETUID SETGID
SUID BitsWhen the letter “s” appears in place of the “x” or dash in the permissions bit string, it has a special meaning. It indicates that as this program is invoked, it will be run using the permissions of the user or group that owns it. Regarding the example of the oradism executable file shown in the slide, oinstall is the group and root is the owner. An “s” appears in the executable bit position, for the user and the group. That is, anyone can execute oradism, and when they do, every action the oradism program attempts will be evaluated, permissions-wise, based on the fact that the requesting user is root and the requesting group is oinstall.For example, suppose that the tbest user is in the tbest and users groups only. There is a /etc/xyz.conf file which is owned by root, and its group is root. The tbest user cannot access that file at all. But if the oradism program accesses that file, anyone who invokes that program will succeed in accessing that file. This is because the decision to allow access to the /etc/xyz.conf file is made based on the fact that the requestor is the root user.
Oracle In
ternal & O
racle Aca
demy
Use O
nly
Oracle Database 10g: Managing Oracle on Linux for DBAs 3 - 6
Copyright © 2007, Oracle. All rights reserved.
Choosing a Shell
There are many shells available for Linux:• Oracle shell scripts are Bourne shell scripts.• bash is the Bourne-again shell:
– It is Bourne shell compatible.– It is POSIX compliant.
• Korn is a superset of Bourne:– The Korn shell is required for certain actions.
• The C shell is preferred by many. • The working-level shell is a matter of preference.• Most shell scripts specify the shell that is required.
Choosing a ShellLinux has many popular features. One of the most popular features is that the user interface can be easily customized. There are at least four different shells in the default EL installation. The Bourne shell, one of the first shells that was available on AT&T UNIX, is the standard shell that the Oracle database uses for scripting. The C shell was the BSD UNIX shell. The C shell has many user-friendly features, such as command history, that are not available in the Bourne shell. But the C shell was interpreted, and not compiled like the Bourne shell, and is consequently slower. The Korn shell is a superset of the Bourne shell with command history, and is compiled. The Bourne-again shell, bash, was written to be Bourne shell compatible, with features of both the Korn and C shells. It is intended to be POSIX compliant. Some Oracle installation actions require a Korn shell such as the Oracle Internet Directory configuration script, oidca.Most Oracle shell scripts specify the shell that is required in the first line of the script. A first line of #!/bin/sh indicates that the script uses the Bourne shell. On Linux, /bin/sh is usually a link to the Bourne-again shell (bash).To view the shell that you are currently in, use the echo $0 command.
Oracle In
ternal & O
racle Aca
demy
Use O
nly
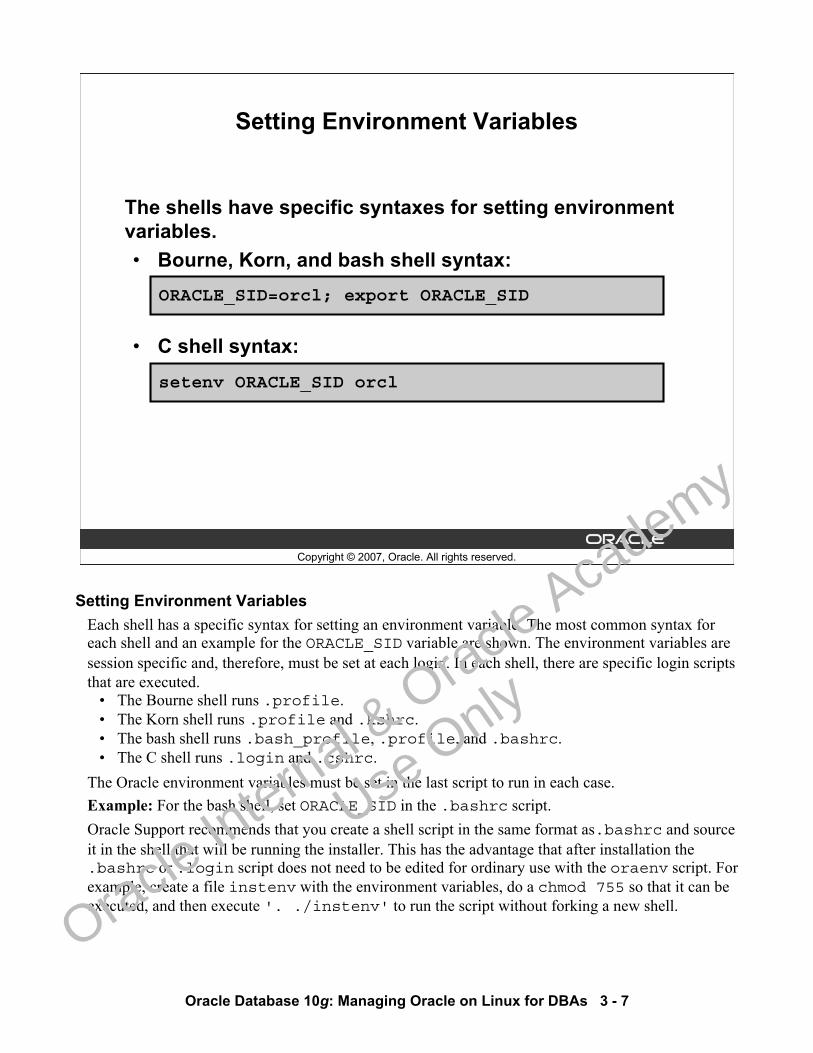
Oracle Database 10g: Managing Oracle on Linux for DBAs 3 - 7
Copyright © 2007, Oracle. All rights reserved.
Setting Environment Variables
The shells have specific syntaxes for setting environment variables.• Bourne, Korn, and bash shell syntax:
• C shell syntax:
ORACLE_SID=orcl; export ORACLE_SID
setenv ORACLE_SID orcl
Setting Environment VariablesEach shell has a specific syntax for setting an environment variable. The most common syntax for each shell and an example for the ORACLE_SID variable are shown. The environment variables are session specific and, therefore, must be set at each login. In each shell, there are specific login scripts that are executed.
• The Bourne shell runs .profile.• The Korn shell runs .profile and .kshrc.• The bash shell runs .bash_profile, .profile, and .bashrc.• The C shell runs .login and .cshrc.
The Oracle environment variables must be set in the last script to run in each case. Example: For the bash shell, set ORACLE_SID in the .bashrc script. Oracle Support recommends that you create a shell script in the same format as.bashrc and source it in the shell that will be running the installer. This has the advantage that after installation the .bashrc or .login script does not need to be edited for ordinary use with the oraenv script. For example, create a file instenv with the environment variables, do a chmod 755 so that it can be executed, and then execute '. ./instenv' to run the script without forking a new shell.
Oracle In
ternal & O
racle Aca
demy
Use O
nly

Oracle Database 10g: Managing Oracle on Linux for DBAs 3 - 8
Copyright © 2007, Oracle. All rights reserved.
User File Creation Mask
Every file that a user creates has a set of permissions controlled by a mask.• View the mask with umask -S.• Set the mask with umask -S u=rwx,g=rx,o=rx.
User File Creation MaskEvery file that is created by a user receives a default set of permissions. The permissions determine who can read, write, and execute a file. The example above indicates that the files that are created have permissions set as follows: read, write, execute for the owner (u); read and execute permissions for the group (g); and read and execute permissions for the other (o). For EL, by default, umask is set to u=rwx,g=rx,o=rx. But if it is not set to this value, it can be changed. In the .bashrc script for the oracle user, place a line as shown below:
umask -S u=rwx,g=rx,o=rx
The umask can optionally be specified as an octal value, which specifies which permission bits should be off. For example, 022 is the equivalent of the above example. The two bits that are on in the octal value represent the only two permissions that are not allowed: write for group and write for other.The umask must be verified before running the Oracle Universal Installer (OUI) and set for the oracle user in the .bashrc file.
Oracle In
ternal & O
racle Aca
demy
Use O
nly
Oracle Database 10g: Managing Oracle on Linux for DBAs 3 - 9
Copyright © 2007, Oracle. All rights reserved.
Setting Oracle Environment Variables
For the oracle user, you must set the following shell variables before the installer is run:• DISPLAY (required)
– Location of the X Window System server• PATH (required)
– Location of the OS linker and compiler– Location of the Oracle database executables
Setting Oracle Environment VariablesOnly two shell variables need to be initialized before the installer is run: the DISPLAY variable and the PATH variable. Other variables can be initialized to facilitate the installation. The DISPLAYvariable must be set to the location of the X Window System server. If X-based terminal windows are being used, then the DISPLAY is usually set properly in login scripts. Before installation, set the PATH variable manually or with a script in the shell where the Oracle Installer is invoked to include the $ORACLE_HOME/bin directory. If the '$ORACLE_HOME' string is used instead of a full path to set the PATH variable, then the ORACLE_HOME variable must be set before its use. Usually, base PATH is set to /usr/bin:/bin:/usr/bin/X11R6:/usr/local/bin by default. If it is not, then set it in the .bashrc file.After the installation, the PATH variable for any database user on Linux can be set by using thesupplied oraenv script. It adds $ORACLE_HOME/bin to the end of the existing PATH variable.
Oracle In
ternal & O
racle Aca
demy
Use O
nly
Oracle Database 10g: Managing Oracle on Linux for DBAs 3 - 10
Copyright © 2007, Oracle. All rights reserved.
Optimal Flexible Architecture
Optimal Flexible Architecture (OFA) was introduced to optimize the relationship between the database files and the host operating system. You can use OFA to:• Distribute files across multiple mount points:
– Balance I/O for performance– Increase reliability
• Handle large and growing directories• Administer multiple releases
Optimal Flexible Architecture Optimal Flexible Architecture (OFA) is a method for configuring the Oracle database and other databases. OFA makes use of the operating system (OS) and disk subsystems capabilities to create an easy-to-administer configuration that allows maximum flexibility for growing and high performance databases. The methods described here are the basics of OFA. For details about the goals and implementation of OFA, refer to the Oracle Database Administrator’s Guide 10g Release 2 and the Oracle Database Installation Guide 10g Release 2 (10.2) for Linux x86-64.
Oracle In
ternal & O
racle Aca
demy
Use O
nly
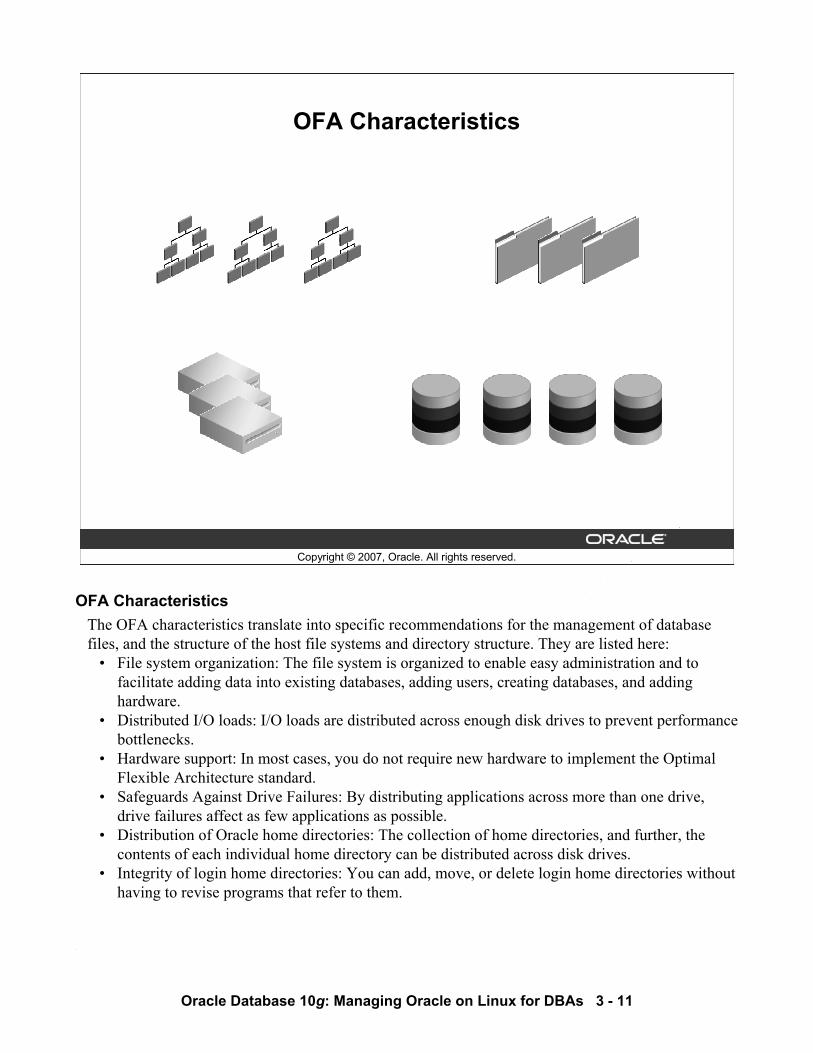
Oracle Database 10g: Managing Oracle on Linux for DBAs 3 - 11
Copyright © 2007, Oracle. All rights reserved.
OFA Characteristics
OFA CharacteristicsThe OFA characteristics translate into specific recommendations for the management of database files, and the structure of the host file systems and directory structure. They are listed here:
• File system organization: The file system is organized to enable easy administration and to facilitate adding data into existing databases, adding users, creating databases, and adding hardware.
• Distributed I/O loads: I/O loads are distributed across enough disk drives to prevent performance bottlenecks.
• Hardware support: In most cases, you do not require new hardware to implement the Optimal Flexible Architecture standard.
• Safeguards Against Drive Failures: By distributing applications across more than one drive, drive failures affect as few applications as possible.
• Distribution of Oracle home directories: The collection of home directories, and further, the contents of each individual home directory can be distributed across disk drives.
• Integrity of login home directories: You can add, move, or delete login home directories without having to revise programs that refer to them.
Oracle In
ternal & O
racle Aca
demy
Use O
nly
Oracle Database 10g: Managing Oracle on Linux for DBAs 3 - 12
OFA Characteristics (continued)• Independence of UNIX directory subtrees: Categories of files are separated into independent
UNIX directory subtrees so that files in one category are minimally affected by operations on files in other categories.
• Supports concurrent execution of application software: You can run multiple versions of Oracle software simultaneously, enabling you to test and use a new release before retiring the previous release. Transferring to a new release after an upgrade is simple for the administrator and transparent for the user.
• Separate administrative information for each database: The ability to separate administrative information for each database ensures a reasonable structure for the organization and storage of administrative data.
• Consistent database file naming: Database files are named so that:- Database files are easy to distinguish from other files- Files belonging to one database are easy to distinguish from files that belong to another
database- Control files, redo log files, and data files can be identified as such- The association of data file to tablespace is clearly indicated
• Separation of tablespace contents: Tablespace contents are separated to minimize tablespace free space fragmentation, minimize I/O request contention, and maximize administrative flexibility.
• I/O loads tuned across all drives: I/O loads are tuned across all drives, including drives storing Oracle data in either Automatic Storage Management disk groups or in raw devices.
Oracle In
ternal & O
racle Aca
demy
Use O
nly
Oracle Database 10g: Managing Oracle on Linux for DBAs 3 - 13
Copyright © 2007, Oracle. All rights reserved.
Mount Points
To be OFA compliant, the database requires two mount points: • Mount points are listed in /etc/fstab.• Name mount point /pm or /pm/q/db.
– p is a string.– m is a unique identifier (2 to 4 digit number).– q indicates Oracle database files (default oradata).– db is the database name.
• Examples: – /u01
– /u02/oradata/orcl
– /sales01
Mount PointsA database that is fully OFA compliant has at least two mount points: one for the software and at least one for database files. The Oracle Installer requests two directories. The installer does not know if you are supplying mount points or directories. The naming of the database software directory was performed when you created the ORACLE_HOME environment variable.Although there are many correct names that you can use, it is usually a good idea to avoid names that map to hardware. For example, if you choose a name that corresponds to a particular disk controller, then a later upgrade may result in a name that is deceptive. It is much easier to separately track hardware to logical name mappings.You should not use names that suggest that a mount point is devoted to one application’s data unless it is true. For example, you do not want to neglect your Oracle database files just because they were stored under a mount point called /backup01.In the original OFA, the concept of a mount point almost always referred to a single physical disk, that is, each disk had one mount point. In today’s environment, disks can be very large, and they are partitioned to useful sizes. Each partition requires a mount point.Note: The usage of Automatic Storage Management (ASM) eliminates many of the concerns about mount points. ASM is covered in detail in the lesson titled “Automatic Storage Management and Automatic Storage Management Library Driver.”
Oracle In
ternal & O
racle Aca
demy
Use O
nly
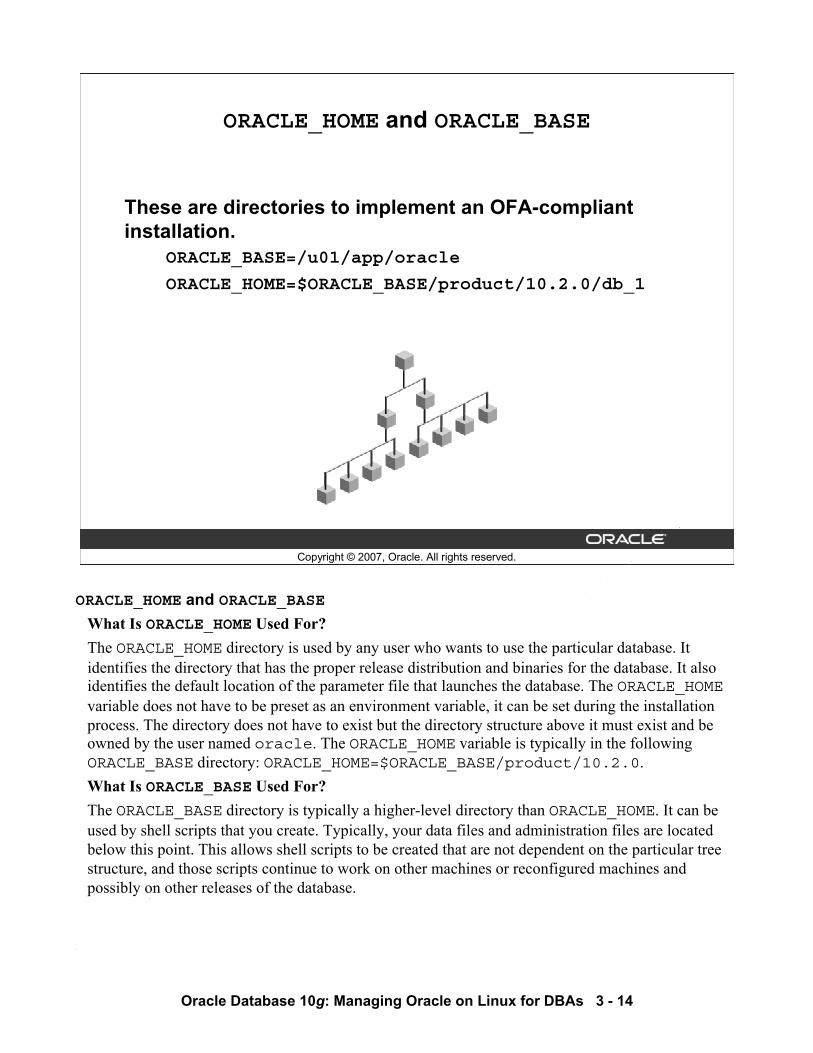
Oracle Database 10g: Managing Oracle on Linux for DBAs 3 - 14
Copyright © 2007, Oracle. All rights reserved.
ORACLE_HOME and ORACLE_BASE
These are directories to implement an OFA-compliant installation.
ORACLE_BASE=/u01/app/oracle
ORACLE_HOME=$ORACLE_BASE/product/10.2.0/db_1
ORACLE_HOME and ORACLE_BASEWhat Is ORACLE_HOME Used For?The ORACLE_HOME directory is used by any user who wants to use the particular database. It identifies the directory that has the proper release distribution and binaries for the database. It also identifies the default location of the parameter file that launches the database. The ORACLE_HOMEvariable does not have to be preset as an environment variable, it can be set during the installation process. The directory does not have to exist but the directory structure above it must exist and be owned by the user named oracle. The ORACLE_HOME variable is typically in the following ORACLE_BASE directory: ORACLE_HOME=$ORACLE_BASE/product/10.2.0.What Is ORACLE_BASE Used For?The ORACLE_BASE directory is typically a higher-level directory than ORACLE_HOME. It can be used by shell scripts that you create. Typically, your data files and administration files are located below this point. This allows shell scripts to be created that are not dependent on the particular tree structure, and those scripts continue to work on other machines or reconfigured machines and possibly on other releases of the database.
Oracle In
ternal & O
racle Aca
demy
Use O
nly
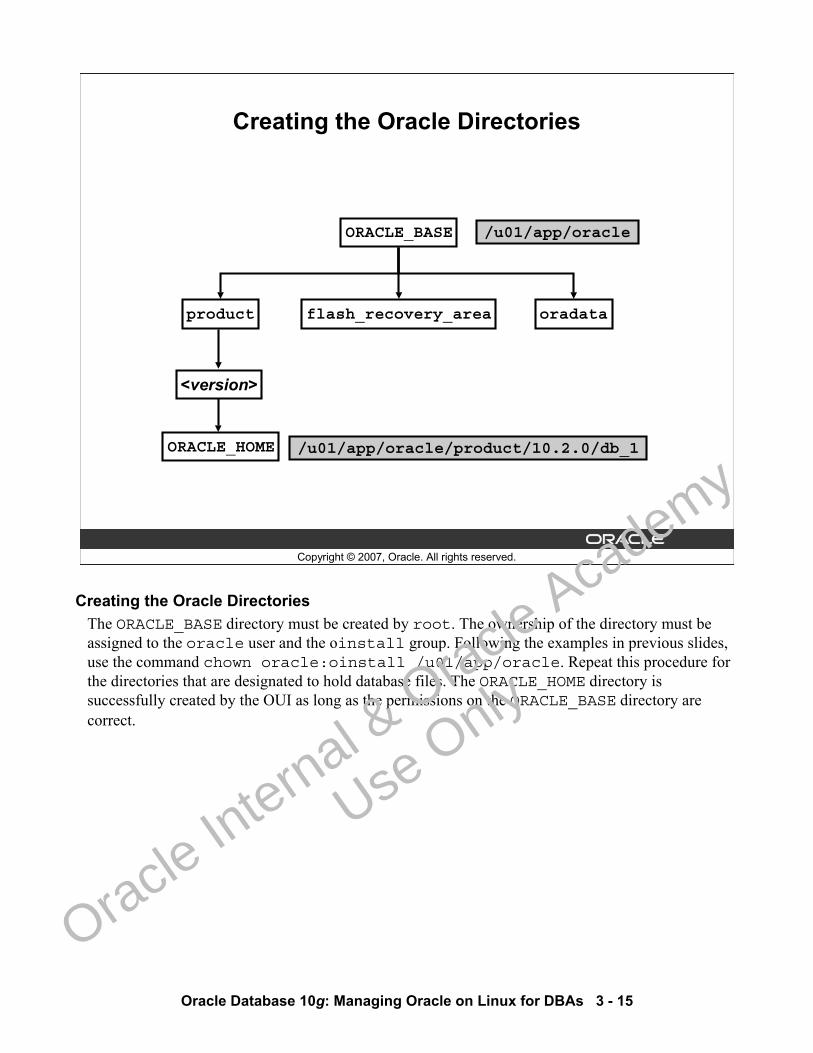
Oracle Database 10g: Managing Oracle on Linux for DBAs 3 - 15
Copyright © 2007, Oracle. All rights reserved.
Creating the Oracle Directories
ORACLE_BASE
ORACLE_HOME
flash_recovery_area oradataproduct
<version>
/u01/app/oracle
/u01/app/oracle/product/10.2.0/db_1
Creating the Oracle DirectoriesThe ORACLE_BASE directory must be created by root. The ownership of the directory must be assigned to the oracle user and the oinstall group. Following the examples in previous slides, use the command chown oracle:oinstall /u01/app/oracle. Repeat this procedure for the directories that are designated to hold database files. The ORACLE_HOME directory is successfully created by the OUI as long as the permissions on the ORACLE_BASE directory are correct.
Oracle In
ternal & O
racle Aca
demy
Use O
nly
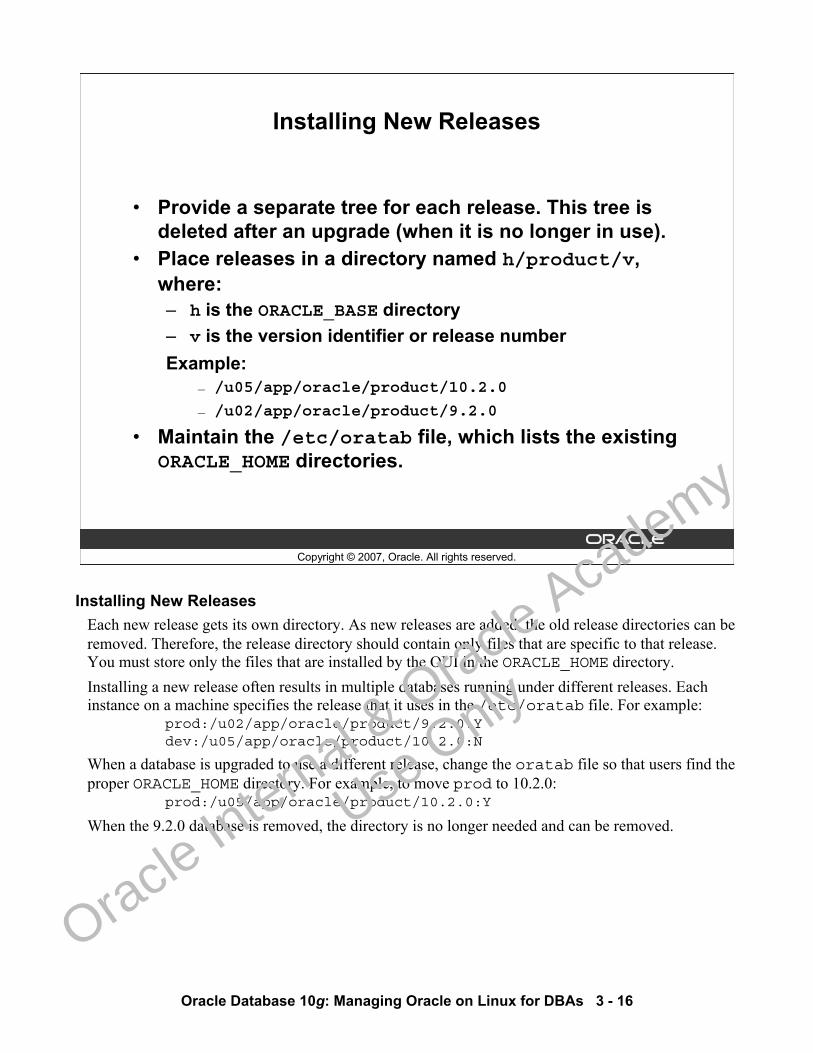
Oracle Database 10g: Managing Oracle on Linux for DBAs 3 - 16
Copyright © 2007, Oracle. All rights reserved.
Installing New Releases
• Provide a separate tree for each release. This tree is deleted after an upgrade (when it is no longer in use).
• Place releases in a directory named h/product/v,where: – h is the ORACLE_BASE directory– v is the version identifier or release numberExample:
— /u05/app/oracle/product/10.2.0
— /u02/app/oracle/product/9.2.0
• Maintain the /etc/oratab file, which lists the existing ORACLE_HOME directories.
Installing New ReleasesEach new release gets its own directory. As new releases are added, the old release directories can be removed. Therefore, the release directory should contain only files that are specific to that release. You must store only the files that are installed by the OUI in the ORACLE_HOME directory.Installing a new release often results in multiple databases running under different releases. Each instance on a machine specifies the release that it uses in the /etc/oratab file. For example:
prod:/u02/app/oracle/product/9.2.0:Ydev:/u05/app/oracle/product/10.2.0:N
When a database is upgraded to use a different release, change the oratab file so that users find the proper ORACLE_HOME directory. For example, to move prod to 10.2.0:
prod:/u05/app/oracle/product/10.2.0:Y
When the 9.2.0 database is removed, the directory is no longer needed and can be removed.
Oracle In
ternal & O
racle Aca
demy
Use O
nly
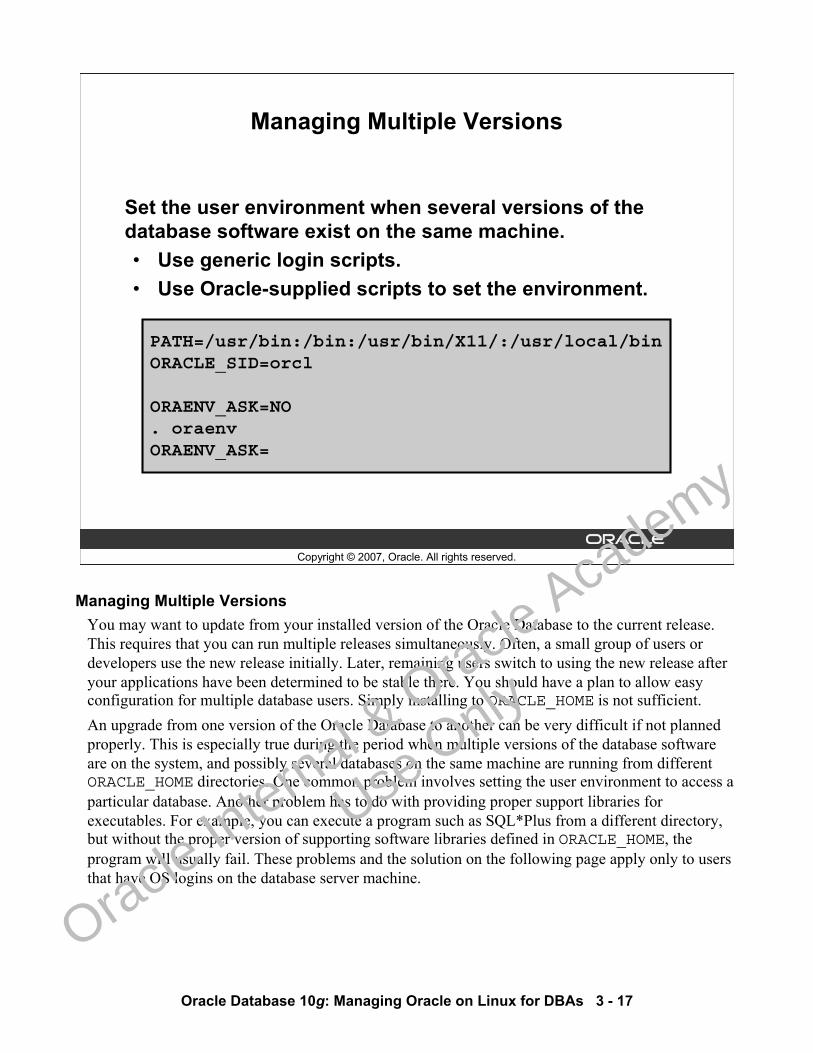
Oracle Database 10g: Managing Oracle on Linux for DBAs 3 - 17
Copyright © 2007, Oracle. All rights reserved.
Managing Multiple Versions
Set the user environment when several versions of the database software exist on the same machine.• Use generic login scripts.• Use Oracle-supplied scripts to set the environment.
PATH=/usr/bin:/bin:/usr/bin/X11/:/usr/local/binORACLE_SID=orcl
ORAENV_ASK=NO. oraenvORAENV_ASK=
Managing Multiple VersionsYou may want to update from your installed version of the Oracle Database to the current release. This requires that you can run multiple releases simultaneously. Often, a small group of users or developers use the new release initially. Later, remaining users switch to using the new release after your applications have been determined to be stable there. You should have a plan to allow easy configuration for multiple database users. Simply installing to ORACLE_HOME is not sufficient.An upgrade from one version of the Oracle Database to another can be very difficult if not planned properly. This is especially true during the period when multiple versions of the database software are on the system, and possibly several databases on the same machine are running from different ORACLE_HOME directories. One common problem involves setting the user environment to access a particular database. Another problem has to do with providing proper support libraries for executables. For example, you can execute a program such as SQL*Plus from a different directory, but without the proper version of supporting software libraries defined in ORACLE_HOME, the program will usually fail. These problems and the solution on the following page apply only to users that have OS logins on the database server machine.
Oracle In
ternal & O
racle Aca
demy
Use O
nly
Oracle Database 10g: Managing Oracle on Linux for DBAs 3 - 18
Managing Multiple Versions (continued) The solution is to embed a call in each user’s login script to a separate file that determines the environment for the user’s preferred database. This makes the switching over of all users to a different ORACLE_HOME much simpler. The login script that is used depends on the user login shell. For the bash shell, the login script would be .bashrc. In the slide, setting ORACLE_SID and ORAENV_ASK=NO in .bashrc sets a default environment for this user, without requiring user interaction. Other variations can be set to suit your environment.Generic Login ScriptEach user should have a login script that includes only the environment variables that are specific to that user, such as the instance SID that the user accesses. A call to the Oracle-supplied oraenvscript from the login script finds and sets the proper ORACLE_HOME and other site-specific, required environment variables. oraenv
The oraenv script is provided with the database software and is relocated by the root.sh script at installation. The default location is /usr/local/bin. If the ORAENV_ASK variable is not set, then the oraenv script prompts the user for ORACLE_SID that the user wants to set, and presents a default of ORACLE_SID in the user’s environment. This is a convenient way for users to change their environments or access multiple databases. If ORAENV_ASK is set to NO, then oraenv does not prompt the user, but sets ORACLE_HOME and other variables unless ORACLE_SID is set to a value not specified in the /etc/oratab file. In that case, the user is asked to provide ORACLE_HOME for the SID. If ORAENV_ASK is set to anything other than NO (including a blank), then the user will be prompted. Korn, Bourne, and bash shell users can use the oraenv script; coraenv is provided for C shell users. The oraenv script should be customized for each site. If the site requirements change, the DBA can modify oraenv and alter all the users’ environments without changing every login script. The oraenv script calls another script, dbhome, which looks up the ORACLE_HOME associated with the ORACLE_SID in the /etc/oratab file. An example of calling oraenv from a login script is:
PATH=/usr/local/bin:/$PATHORACLE_SID=orclexport PATH ORACLE_SIDORAENV_ASK=NO. oraenv ORAENV_ASK=
Note: The '.' command sources the oraenv script, causing it to run in the current shell. This allows the oraenv script to set environment variables in this shell. Without the source command, the parent forks a new shell, the script executes and exits, returning to the calling shell.
Oracle In
ternal & O
racle Aca
demy
Use O
nly
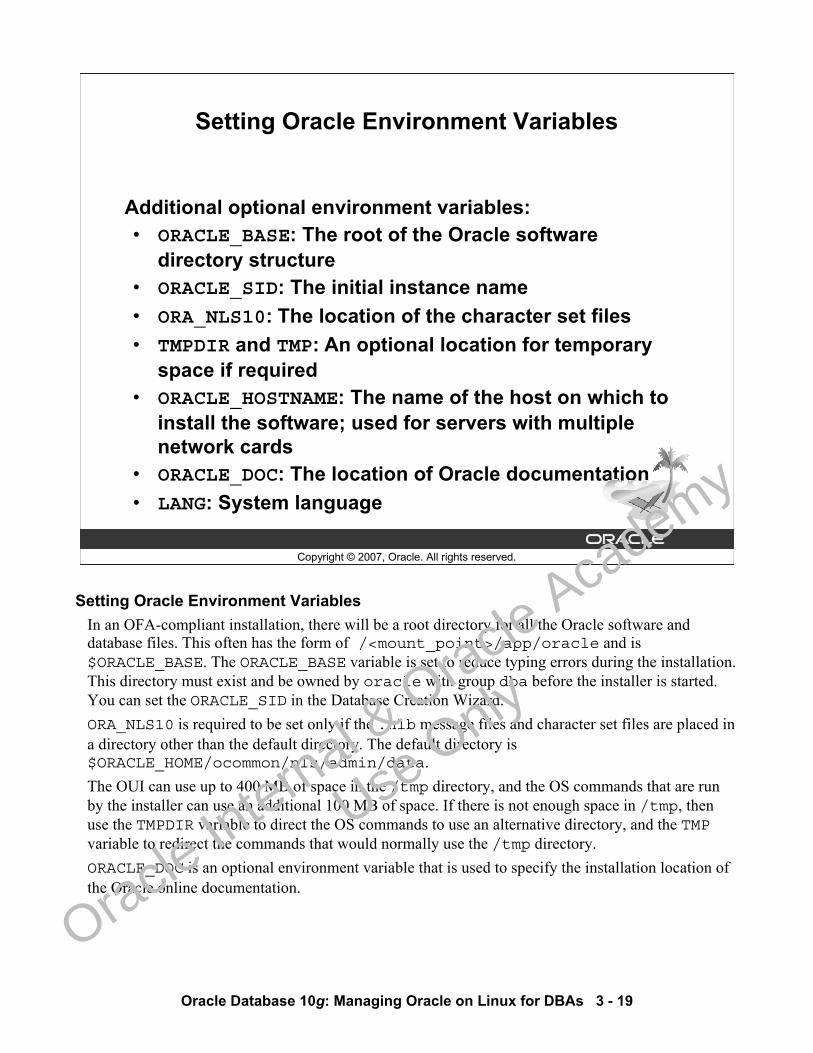
Oracle Database 10g: Managing Oracle on Linux for DBAs 3 - 19
Copyright © 2007, Oracle. All rights reserved.
Setting Oracle Environment Variables
Additional optional environment variables:• ORACLE_BASE: The root of the Oracle software
directory structure• ORACLE_SID: The initial instance name• ORA_NLS10: The location of the character set files • TMPDIR and TMP: An optional location for temporary
space if required• ORACLE_HOSTNAME: The name of the host on which to
install the software; used for servers with multiple network cards
• ORACLE_DOC: The location of Oracle documentation• LANG: System language
Setting Oracle Environment VariablesIn an OFA-compliant installation, there will be a root directory for all the Oracle software and database files. This often has the form of /<mount_point>/app/oracle and is $ORACLE_BASE. The ORACLE_BASE variable is set to reduce typing errors during the installation. This directory must exist and be owned by oracle with group dba before the installer is started. You can set the ORACLE_SID in the Database Creation Wizard.ORA_NLS10 is required to be set only if the .nlb message files and character set files are placed in a directory other than the default directory. The default directory is $ORACLE_HOME/ocommon/nls/admin/data.The OUI can use up to 400 MB of space in the /tmp directory, and the OS commands that are run by the installer can use an additional 100 MB of space. If there is not enough space in /tmp, then use the TMPDIR variable to direct the OS commands to use an alternative directory, and the TMPvariable to redirect the commands that would normally use the /tmp directory. ORACLE_DOC is an optional environment variable that is used to specify the installation location of the Oracle online documentation.
Oracle In
ternal & O
racle Aca
demy
Use O
nly
Oracle Database 10g: Managing Oracle on Linux for DBAs 3 - 20
Setting Oracle Environment Variables (continued) LANG is a mandatory system environment variable that may optionally be changed for the Oracle user. Normally, the LANG variable will be set to something like en_US.utf8 when you install your operating system. For the oracle user, the character set (utf8) should be omitted so that the environment variable is just en_US. Failure to set this variable for the oracle user will limit Oracle Enterprise Manager functionality, including the abilities to:
• Store preferred credentials• Run jobs• Access reports
LD_LIBRARY_PATH specifies the path to C libraries. For the oracle user, that path normally includes the system default (/usr/lib and /usr/X11R6/lib), as well as the following: • $ORACLE_HOME/jdk/jre/lib/i386• $ORACLE_HOME/jdk/jre/lib/i386/lib• $ORACLE_HOME/rdbms/lib• $ORACLE_HOME/lib
Oracle In
ternal & O
racle Aca
demy
Use O
nly
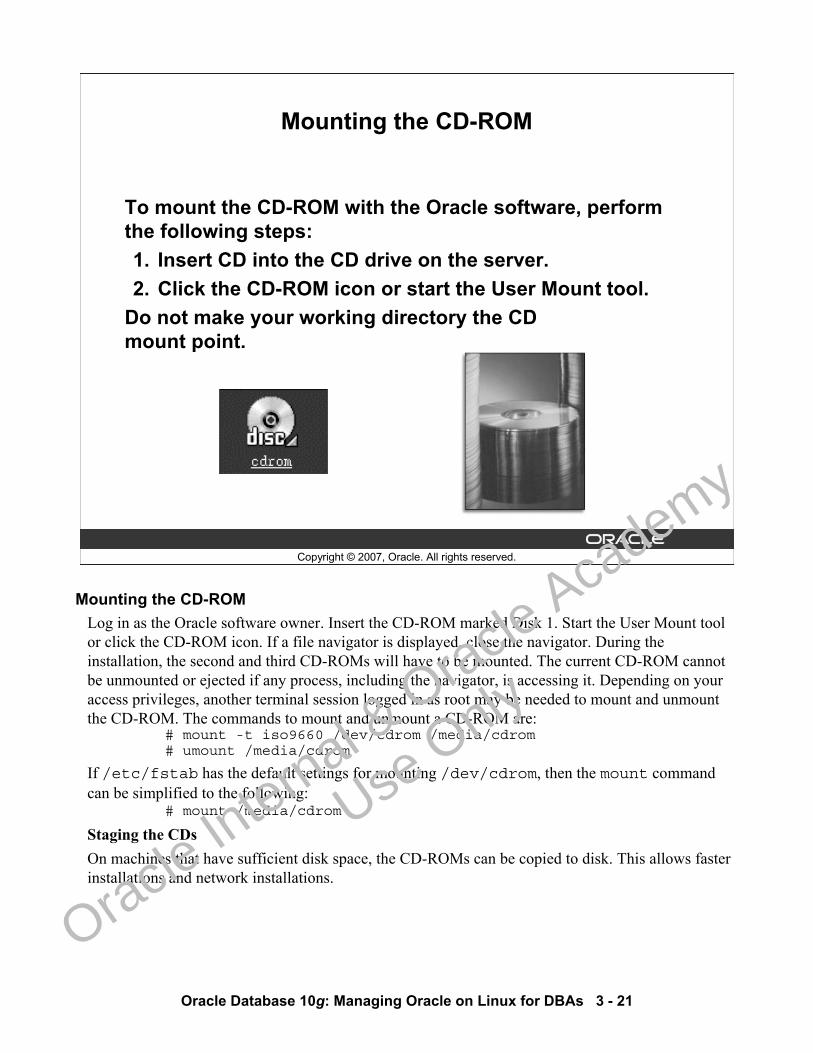
Oracle Database 10g: Managing Oracle on Linux for DBAs 3 - 21
Copyright © 2007, Oracle. All rights reserved.
Mounting the CD-ROM
To mount the CD-ROM with the Oracle software, perform the following steps: 1. Insert CD into the CD drive on the server.2. Click the CD-ROM icon or start the User Mount tool.
Do not make your working directory the CDmount point.
Mounting the CD-ROMLog in as the Oracle software owner. Insert the CD-ROM marked Disk 1. Start the User Mount tool or click the CD-ROM icon. If a file navigator is displayed, close the navigator. During the installation, the second and third CD-ROMs will have to be mounted. The current CD-ROM cannot be unmounted or ejected if any process, including the navigator, is accessing it. Depending on your access privileges, another terminal session logged in as root may be needed to mount and unmount the CD-ROM. The commands to mount and unmount a CD-ROM are:
# mount -t iso9660 /dev/cdrom /media/cdrom # umount /media/cdrom
If /etc/fstab has the default settings for mounting /dev/cdrom, then the mount command can be simplified to the following:
# mount /media/cdrom
Staging the CDsOn machines that have sufficient disk space, the CD-ROMs can be copied to disk. This allows faster installations and network installations.
Oracle In
ternal & O
racle Aca
demy
Use O
nly
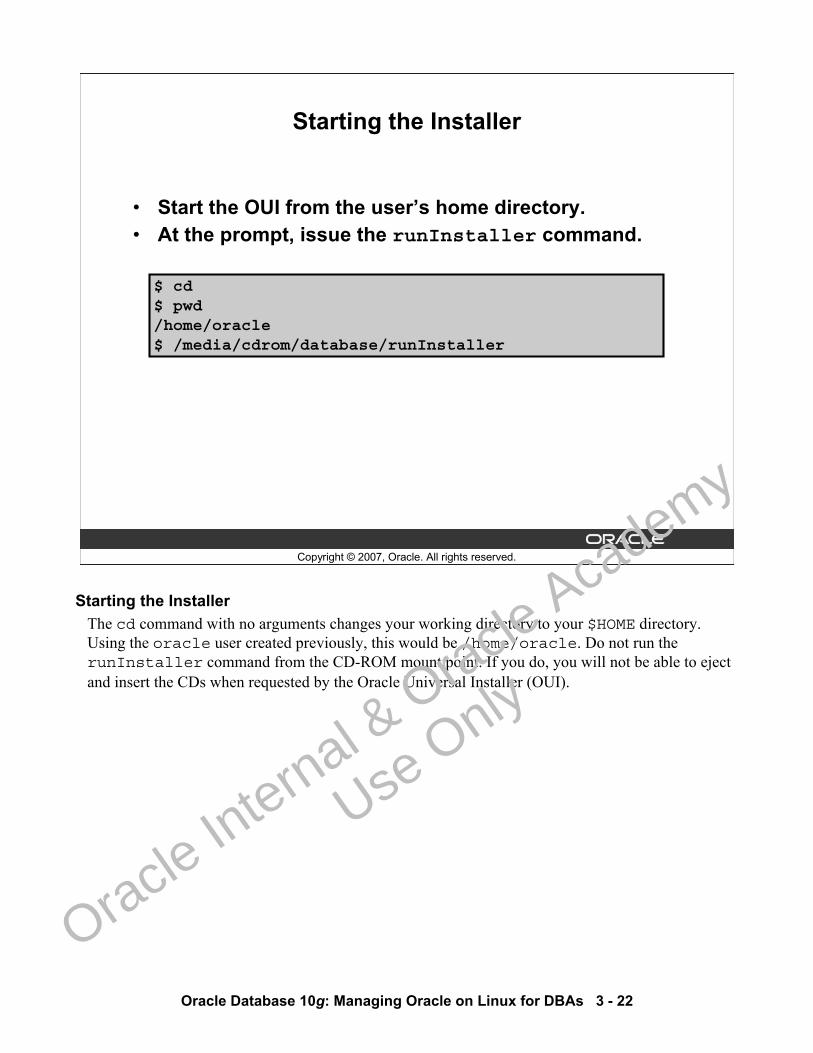
Oracle Database 10g: Managing Oracle on Linux for DBAs 3 - 22
Copyright © 2007, Oracle. All rights reserved.
$ cd$ pwd/home/oracle$ /media/cdrom/database/runInstaller
Starting the Installer
• Start the OUI from the user’s home directory.• At the prompt, issue the runInstaller command.
Starting the InstallerThe cd command with no arguments changes your working directory to your $HOME directory. Using the oracle user created previously, this would be /home/oracle. Do not run the runInstaller command from the CD-ROM mount point. If you do, you will not be able to eject and insert the CDs when requested by the Oracle Universal Installer (OUI).
Oracle In
ternal & O
racle Aca
demy
Use O
nly
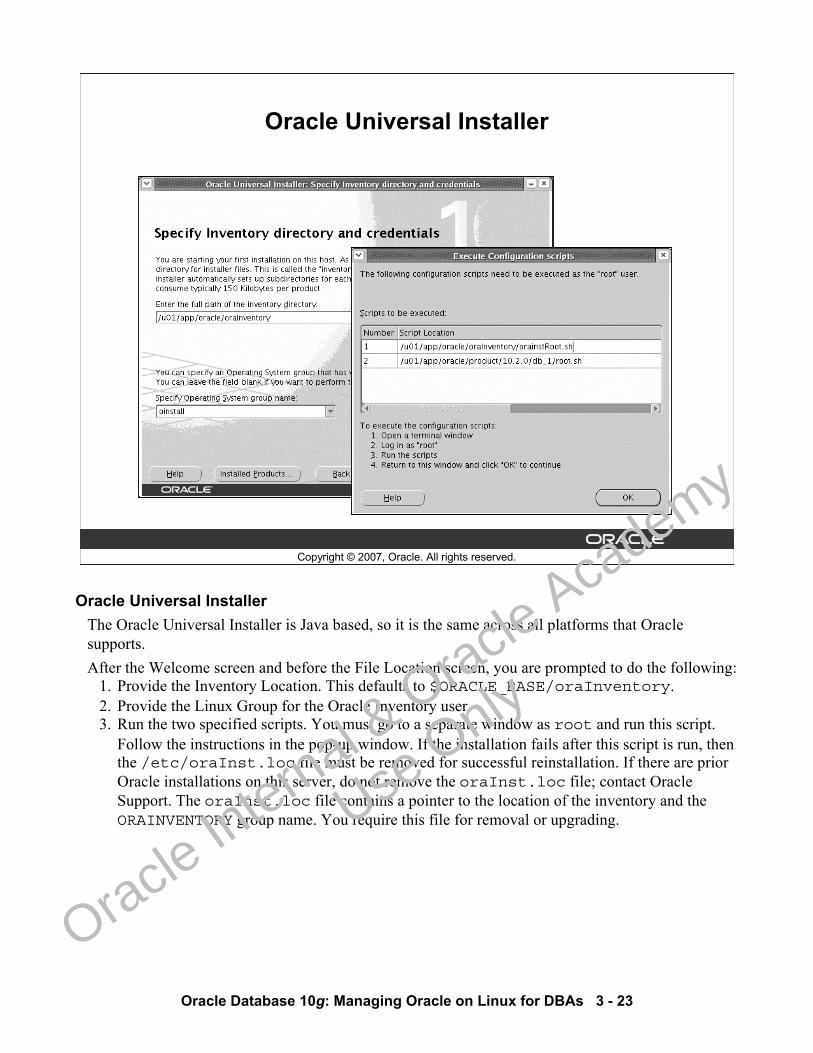
Oracle Database 10g: Managing Oracle on Linux for DBAs 3 - 23
Copyright © 2007, Oracle. All rights reserved.
Oracle Universal Installer
Oracle Universal InstallerThe Oracle Universal Installer is Java based, so it is the same across all platforms that Oracle supports.After the Welcome screen and before the File Location screen, you are prompted to do the following:
1. Provide the Inventory Location. This defaults to $ORACLE_BASE/oraInventory.2. Provide the Linux Group for the Oracle Inventory user.3. Run the two specified scripts. You must go to a separate window as root and run this script.
Follow the instructions in the pop-up window. If the installation fails after this script is run, then the /etc/oraInst.loc file must be removed for successful reinstallation. If there are prior Oracle installations on this server, do not remove the oraInst.loc file; contact Oracle Support. The oraInst.loc file contains a pointer to the location of the inventory and the ORAINVENTORY group name. You require this file for removal or upgrading.
Oracle In
ternal & O
racle Aca
demy
Use O
nly
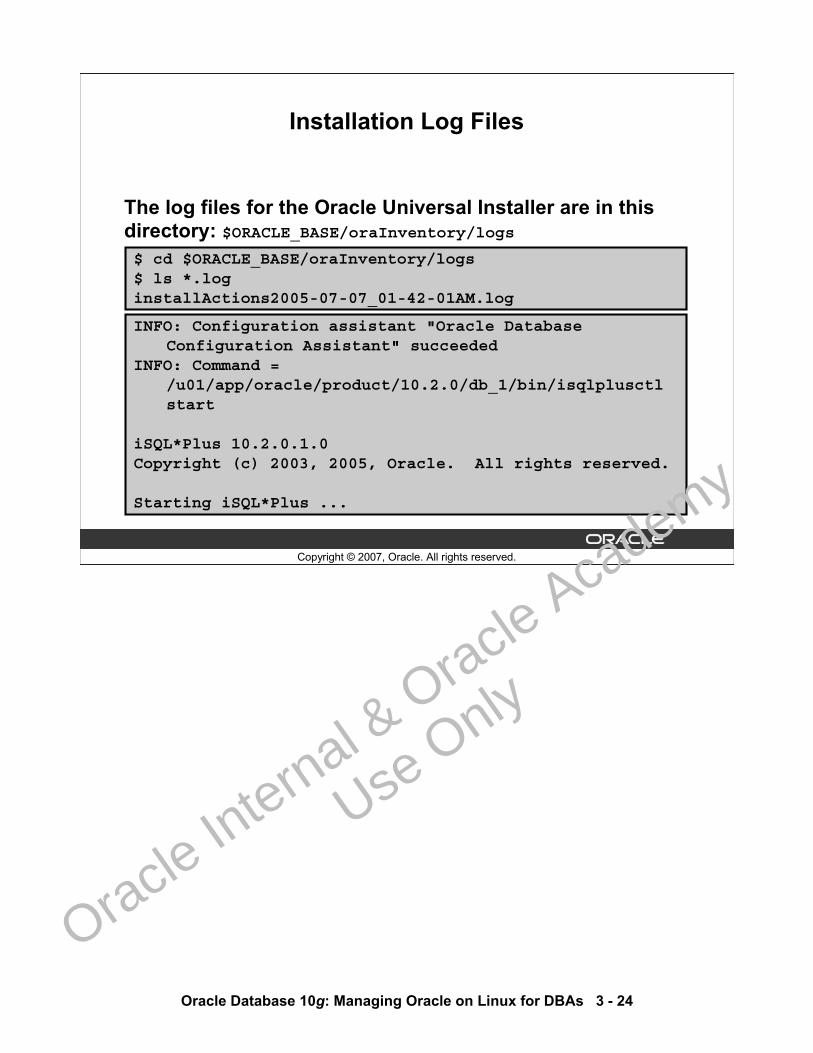
Oracle Database 10g: Managing Oracle on Linux for DBAs 3 - 24
Copyright © 2007, Oracle. All rights reserved.
Installation Log Files
The log files for the Oracle Universal Installer are in this directory: $ORACLE_BASE/oraInventory/logs$ cd $ORACLE_BASE/oraInventory/logs$ ls *.loginstallActions2005-07-07_01-42-01AM.log
INFO: Configuration assistant "Oracle Database Configuration Assistant" succeeded
INFO: Command = /u01/app/oracle/product/10.2.0/db_1/bin/isqlplusctl start
iSQL*Plus 10.2.0.1.0Copyright (c) 2003, 2005, Oracle. All rights reserved.
Starting iSQL*Plus ...
Oracle In
ternal & O
racle Aca
demy
Use O
nly
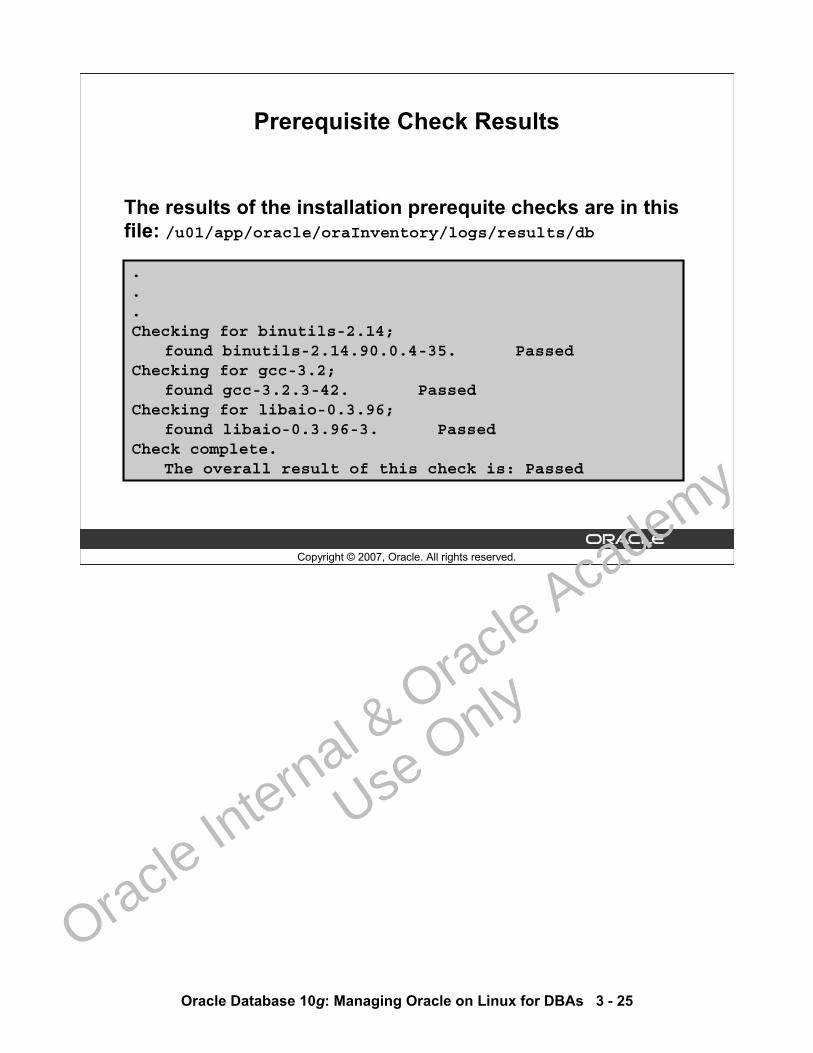
Oracle Database 10g: Managing Oracle on Linux for DBAs 3 - 25
Copyright © 2007, Oracle. All rights reserved.
Prerequisite Check Results
The results of the installation prerequite checks are in this file: /u01/app/oracle/oraInventory/logs/results/db
.
.
.Checking for binutils-2.14;
found binutils-2.14.90.0.4-35. PassedChecking for gcc-3.2;
found gcc-3.2.3-42. PassedChecking for libaio-0.3.96;
found libaio-0.3.96-3. PassedCheck complete.
The overall result of this check is: Passed
Oracle In
ternal & O
racle Aca
demy
Use O
nly
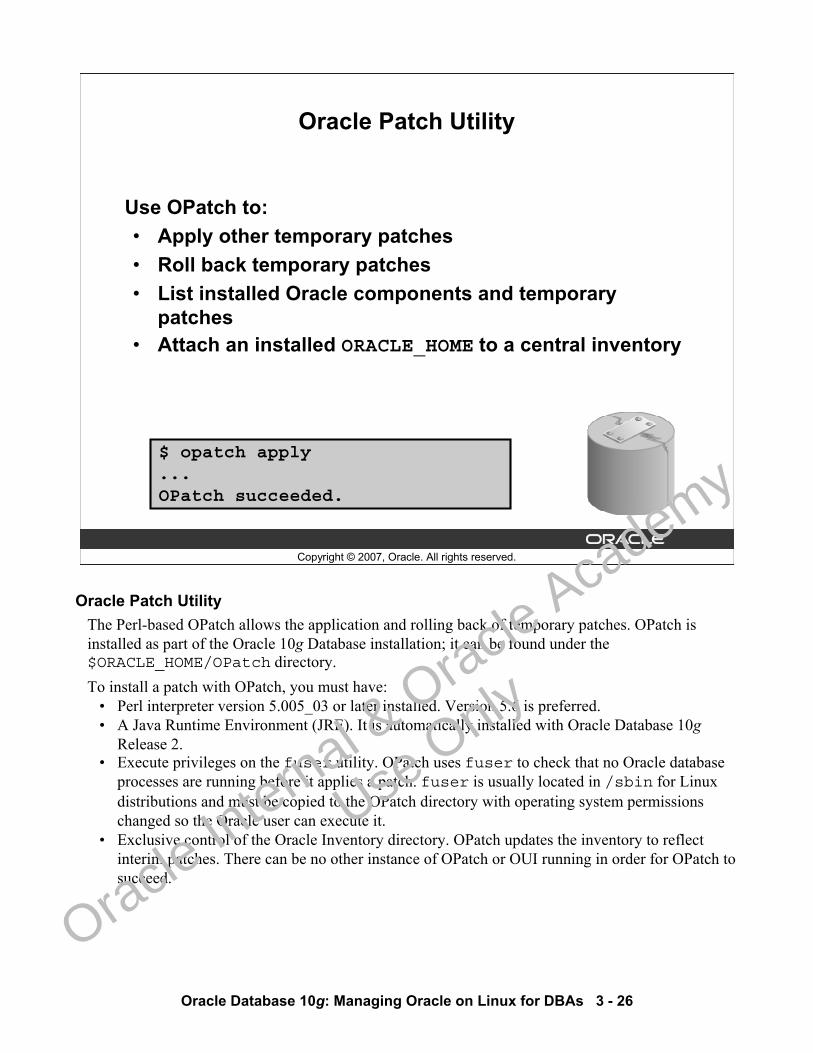
Oracle Database 10g: Managing Oracle on Linux for DBAs 3 - 26
Copyright © 2007, Oracle. All rights reserved.
Oracle Patch Utility
Use OPatch to:• Apply other temporary patches• Roll back temporary patches• List installed Oracle components and temporary
patches• Attach an installed ORACLE_HOME to a central inventory
$ opatch apply...OPatch succeeded.
Oracle Patch UtilityThe Perl-based OPatch allows the application and rolling back of temporary patches. OPatch is installed as part of the Oracle 10g Database installation; it can be found under the $ORACLE_HOME/OPatch directory.To install a patch with OPatch, you must have:
• Perl interpreter version 5.005_03 or later installed. Version 5.6 is preferred.• A Java Runtime Environment (JRE). It is automatically installed with Oracle Database 10g
Release 2.• Execute privileges on the fuser utility. OPatch uses fuser to check that no Oracle database
processes are running before it applies a patch. fuser is usually located in /sbin for Linux distributions and must be copied to the OPatch directory with operating system permissions changed so the Oracle user can execute it.
• Exclusive control of the Oracle Inventory directory. OPatch updates the inventory to reflect interim patches. There can be no other instance of OPatch or OUI running in order for OPatch to succeed.
Oracle In
ternal & O
racle Aca
demy
Use O
nly
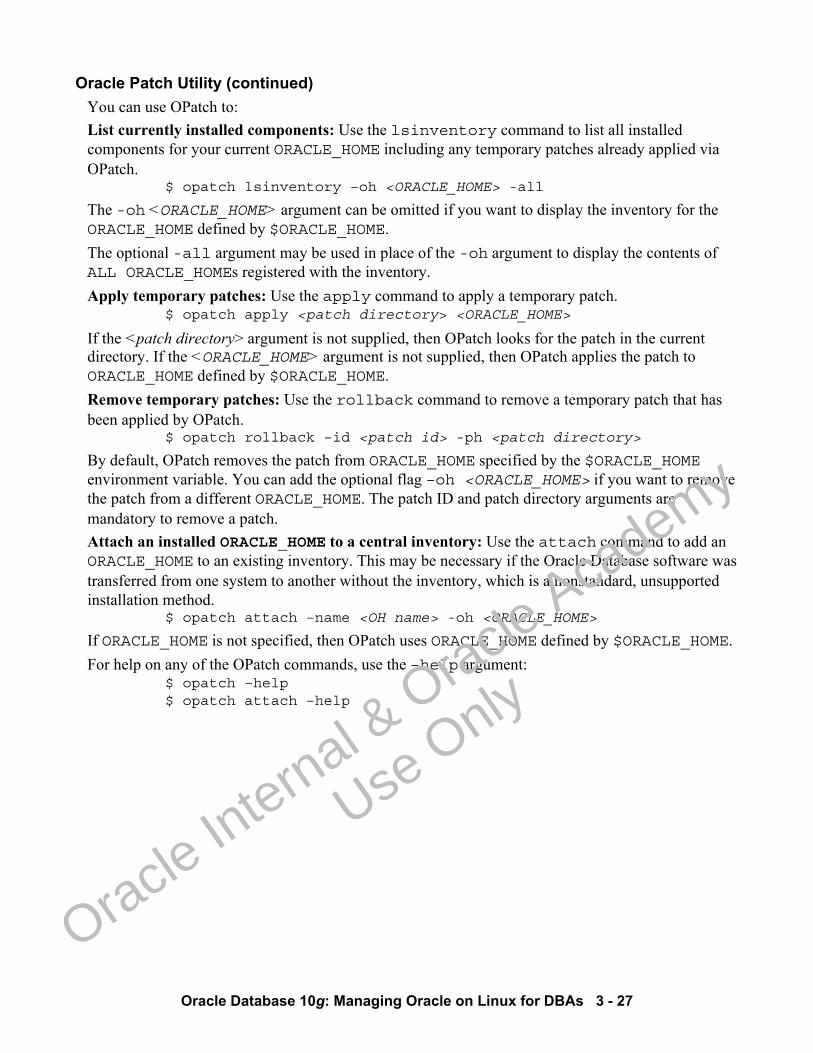
Oracle Database 10g: Managing Oracle on Linux for DBAs 3 - 27
Oracle Patch Utility (continued) You can use OPatch to:List currently installed components: Use the lsinventory command to list all installed components for your current ORACLE_HOME including any temporary patches already applied via OPatch.
$ opatch lsinventory –oh <ORACLE_HOME> -all
The -oh <ORACLE_HOME> argument can be omitted if you want to display the inventory for the ORACLE_HOME defined by $ORACLE_HOME.The optional -all argument may be used in place of the -oh argument to display the contents of ALL ORACLE_HOMEs registered with the inventory.Apply temporary patches: Use the apply command to apply a temporary patch.
$ opatch apply <patch directory> <ORACLE_HOME>
If the <patch directory> argument is not supplied, then OPatch looks for the patch in the current directory. If the <ORACLE_HOME> argument is not supplied, then OPatch applies the patch to ORACLE_HOME defined by $ORACLE_HOME.Remove temporary patches: Use the rollback command to remove a temporary patch that has been applied by OPatch.
$ opatch rollback –id <patch id> -ph <patch directory>
By default, OPatch removes the patch from ORACLE_HOME specified by the $ORACLE_HOMEenvironment variable. You can add the optional flag –oh <ORACLE_HOME> if you want to remove the patch from a different ORACLE_HOME. The patch ID and patch directory arguments are mandatory to remove a patch.Attach an installed ORACLE_HOME to a central inventory: Use the attach command to add an ORACLE_HOME to an existing inventory. This may be necessary if the Oracle Database software was transferred from one system to another without the inventory, which is a nonstandard, unsupported installation method.
$ opatch attach –name <OH name> -oh <ORACLE_HOME>
If ORACLE_HOME is not specified, then OPatch uses ORACLE_HOME defined by $ORACLE_HOME. For help on any of the OPatch commands, use the –help argument:
$ opatch –help$ opatch attach –help
Oracle In
ternal & O
racle Aca
demy
Use O
nly
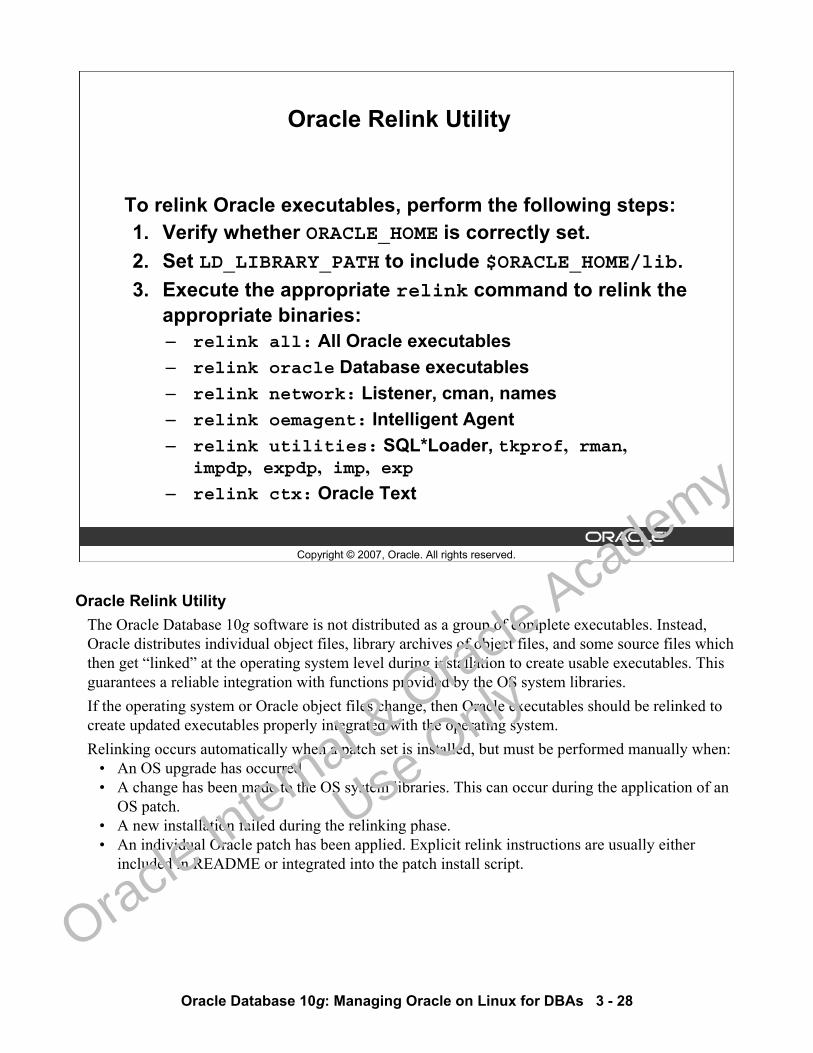
Oracle Database 10g: Managing Oracle on Linux for DBAs 3 - 28
Copyright © 2007, Oracle. All rights reserved.
Oracle Relink Utility
To relink Oracle executables, perform the following steps:1. Verify whether ORACLE_HOME is correctly set.2. Set LD_LIBRARY_PATH to include $ORACLE_HOME/lib.3. Execute the appropriate relink command to relink the
appropriate binaries:– relink all: All Oracle executables– relink oracle Database executables– relink network: Listener, cman, names– relink oemagent: Intelligent Agent– relink utilities: SQL*Loader, tkprof, rman,
impdp, expdp, imp, exp
– relink ctx: Oracle Text
Oracle Relink UtilityThe Oracle Database 10g software is not distributed as a group of complete executables. Instead, Oracle distributes individual object files, library archives of object files, and some source files which then get “linked” at the operating system level during installation to create usable executables. This guarantees a reliable integration with functions provided by the OS system libraries. If the operating system or Oracle object files change, then Oracle executables should be relinked to create updated executables properly integrated with the operating system.Relinking occurs automatically when a patch set is installed, but must be performed manually when:
• An OS upgrade has occurred• A change has been made to the OS system libraries. This can occur during the application of an
OS patch. • A new installation failed during the relinking phase.• An individual Oracle patch has been applied. Explicit relink instructions are usually either
included in README or integrated into the patch install script.
Oracle In
ternal & O
racle Aca
demy
Use O
nly
Oracle Database 10g: Managing Oracle on Linux for DBAs 3 - 29
Oracle Relink Utility (continued)To relink, you can use the relink utility as shown in the preceding slide, or manually relink with the make command. Unlike OPatch, the relink utility does not return positive feedback. Unless you receive an error message, relink succeeded.
Oracle In
ternal & O
racle Aca
demy
Use O
nly
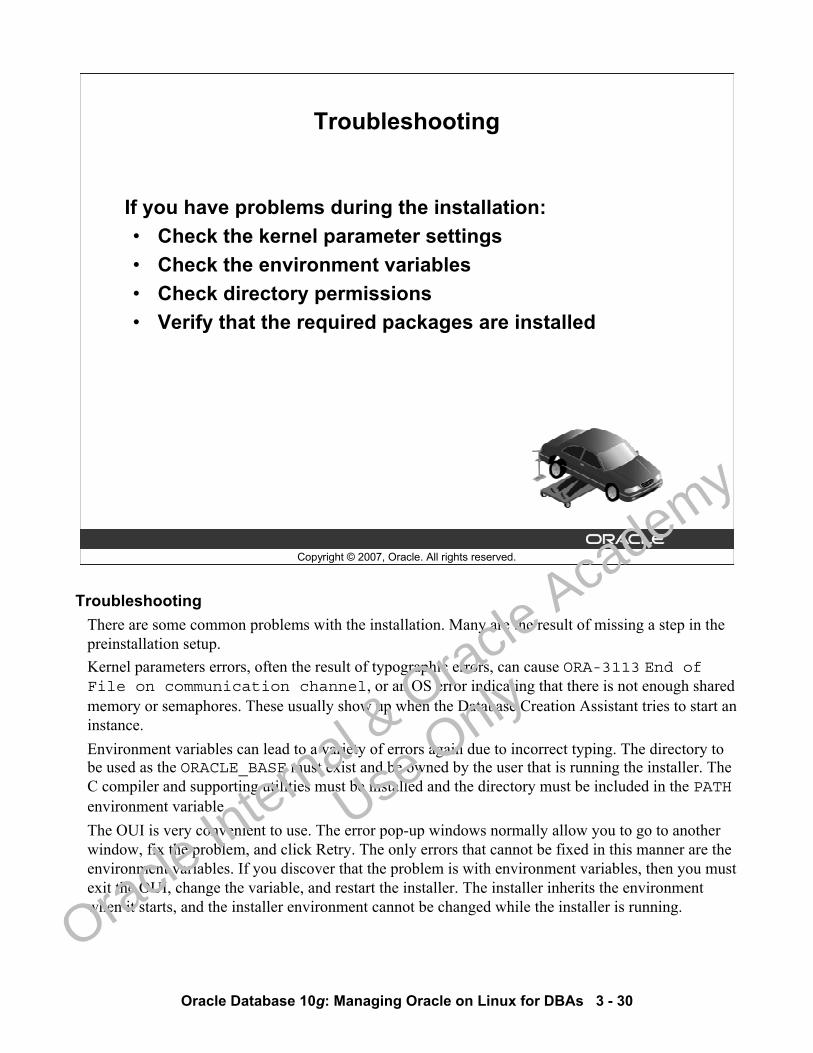
Oracle Database 10g: Managing Oracle on Linux for DBAs 3 - 30
Copyright © 2007, Oracle. All rights reserved.
Troubleshooting
If you have problems during the installation:• Check the kernel parameter settings• Check the environment variables • Check directory permissions• Verify that the required packages are installed
TroubleshootingThere are some common problems with the installation. Many are the result of missing a step in the preinstallation setup. Kernel parameters errors, often the result of typographic errors, can cause ORA-3113 End of File on communication channel, or an OS error indicating that there is not enough shared memory or semaphores. These usually show up when the Database Creation Assistant tries to start an instance. Environment variables can lead to a variety of errors again due to incorrect typing. The directory to be used as the ORACLE_BASE must exist and be owned by the user that is running the installer. The C compiler and supporting utilities must be installed and the directory must be included in the PATHenvironment variable. The OUI is very convenient to use. The error pop-up windows normally allow you to go to another window, fix the problem, and click Retry. The only errors that cannot be fixed in this manner are the environment variables. If you discover that the problem is with environment variables, then you must exit the OUI, change the variable, and restart the installer. The installer inherits the environment when it starts, and the installer environment cannot be changed while the installer is running.
Oracle In
ternal & O
racle Aca
demy
Use O
nly

Oracle Database 10g: Managing Oracle on Linux for DBAs 3 - 31
Copyright © 2007, Oracle. All rights reserved.
Summary
In this lesson, you should have learned how to:• Describe the Linux file system security• Install Multiple versions of Oracle Database software
on the same server• Accommodate multiple Oracle homes on one database
server
Oracle In
ternal & O
racle Aca
demy
Use O
nly

Oracle Database 10g: Managing Oracle on Linux for DBAs 3 - 32
Copyright © 2007, Oracle. All rights reserved.
Practice 3 Overview:Installing Oracle on Linux
This practice covers the following topics:• Working with Linux users and groups• Installing Oracle on Linux
Oracle In
ternal & O
racle Aca
demy
Use O
nly
Copyright © 2007, Oracle. All rights reserved.
Managing Storage
Oracle In
ternal & O
racle Aca
demy
Use O
nly
Oracle Database 10g: Managing Oracle on Linux for DBAs 4 - 2
Copyright © 2007, Oracle. All rights reserved.
Objectives
After completing this lesson, you should be able to:• Distinguish the differences between certified and
supported file systems• Select a file system
Oracle In
ternal & O
racle Aca
demy
Use O
nly
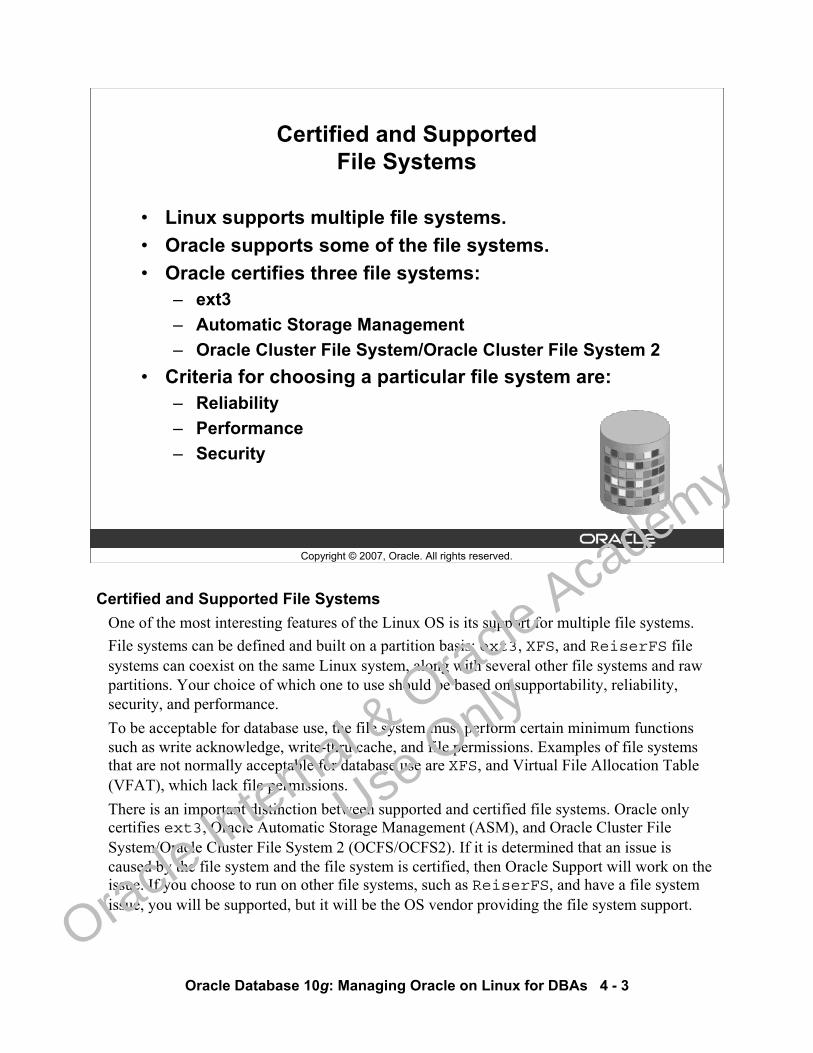
Oracle Database 10g: Managing Oracle on Linux for DBAs 4 - 3
Copyright © 2007, Oracle. All rights reserved.
Certified and SupportedFile Systems
• Linux supports multiple file systems.• Oracle supports some of the file systems.• Oracle certifies three file systems:
– ext3– Automatic Storage Management– Oracle Cluster File System/Oracle Cluster File System 2
• Criteria for choosing a particular file system are: – Reliability– Performance– Security
Certified and Supported File SystemsOne of the most interesting features of the Linux OS is its support for multiple file systems.File systems can be defined and built on a partition basis; ext3, XFS, and ReiserFS file systems can coexist on the same Linux system, along with several other file systems and raw partitions. Your choice of which one to use should be based on supportability, reliability, security, and performance. To be acceptable for database use, the file system must perform certain minimum functions such as write acknowledge, write-thru cache, and file permissions. Examples of file systems that are not normally acceptable for database use are XFS, and Virtual File Allocation Table (VFAT), which lack file permissions. There is an important distinction between supported and certified file systems. Oracle only certifies ext3, Oracle Automatic Storage Management (ASM), and Oracle Cluster File System/Oracle Cluster File System 2 (OCFS/OCFS2). If it is determined that an issue is caused by the file system and the file system is certified, then Oracle Support will work on the issue. If you choose to run on other file systems, such as ReiserFS, and have a file system issue, you will be supported, but it will be the OS vendor providing the file system support.
Oracle In
ternal & O
racle Aca
demy
Use O
nly
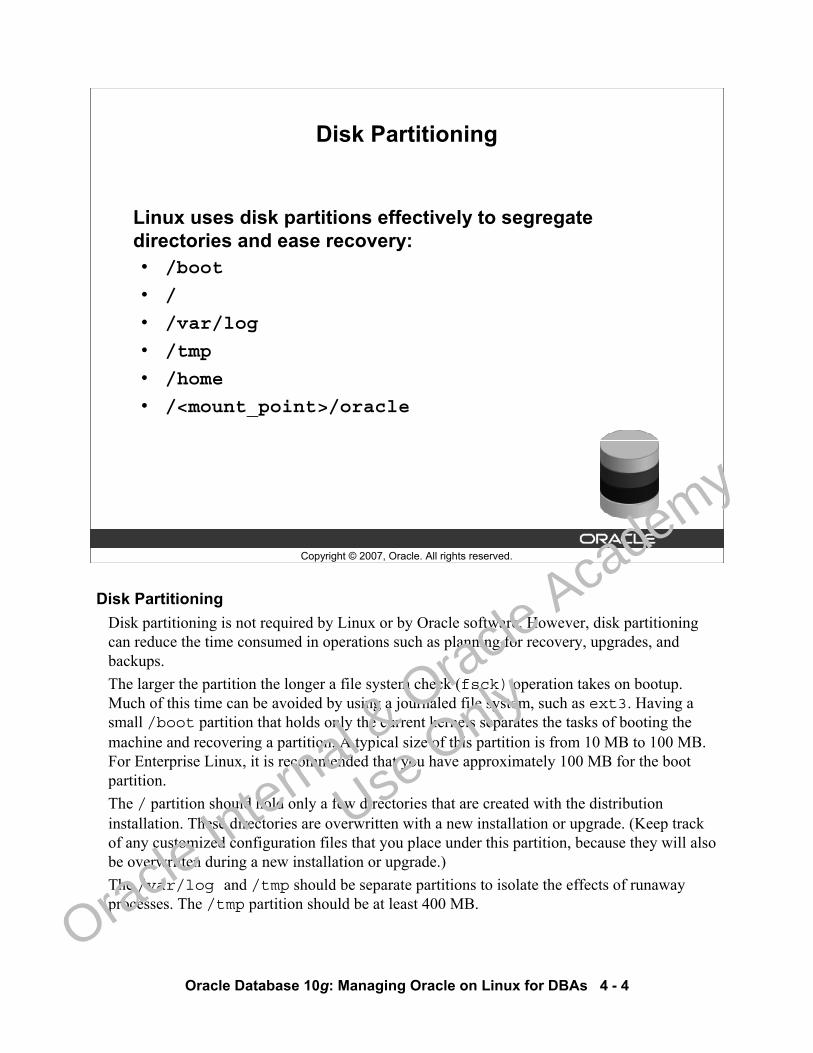
Oracle Database 10g: Managing Oracle on Linux for DBAs 4 - 4
Copyright © 2007, Oracle. All rights reserved.
Disk Partitioning
Linux uses disk partitions effectively to segregate directories and ease recovery:• /boot
• /
• /var/log
• /tmp
• /home
• /<mount_point>/oracle
Disk PartitioningDisk partitioning is not required by Linux or by Oracle software. However, disk partitioning can reduce the time consumed in operations such as planning for recovery, upgrades, and backups.The larger the partition the longer a file system check (fsck) operation takes on bootup. Much of this time can be avoided by using a journaled file system, such as ext3. Having a small /boot partition that holds only the current kernels separates the tasks of booting the machine and recovering a partition. A typical size of this partition is from 10 MB to 100 MB. For Enterprise Linux, it is recommended that you have approximately 100 MB for the boot partition.The / partition should hold only a few directories that are created with the distribution installation. These directories are overwritten with a new installation or upgrade. (Keep track of any customized configuration files that you place under this partition, because they will also be overwritten during a new installation or upgrade.) The /var/log and /tmp should be separate partitions to isolate the effects of runawayprocesses. The /tmp partition should be at least 400 MB.
Oracle In
ternal & O
racle Aca
demy
Use O
nly
Oracle Database 10g: Managing Oracle on Linux for DBAs 4 - 5
Disk Partitioning (continued) If these separate partitions become full, the process dies or stops logging. If these directories become full when they are on the / partition, the system can crash. If /home is a separate partition, it can be backed up and restored separately. An OS upgrade need not touch this partition.
Oracle In
ternal & O
racle Aca
demy
Use O
nly
Oracle Database 10g: Managing Oracle on Linux for DBAs 4 - 6
Copyright © 2007, Oracle. All rights reserved.
Comparing File Systems
Linux supports multiple file systems:• Operating system (OS) is file system independent.• Multiple file systems can be on the same server.
– Cross-platform compatibility– Performance– Special requirements: Oracle Cluster File System (OCFS)
Comparing File SystemsThe Linux kernel is file system independent. It has a file system API. If the file system uses the API, it can be supported. A variety of file systems are available with the standard distribution. Some are just for compatibility with other systems, such as FAT32 for MS Windows compatibility. Others are included for historical reasons, such as minix which was the first file system supported by Linux. The most popular file systems are ext3 and ReiserFS. There are other file systems available from various sources. Most of these should be considered experimental. Oracle provides Automatic Storage Management (ASM) and Oracle Cluster File System/Oracle Cluster File System 2 (OCFS/OCFS2). The OCFS is designed for use with Linux clusters running the Real Application Clusters (RAC) database. This file system overcomes the limitations of raw devices on Linux. OCFS2 has been designed to be a general purpose cluster file system. With it, you can store not only database-related files on a shared disk, but also store Oracle binaries and configuration files (shared Oracle home) making management of RAC even easier. OCFS2 began shipping as part of the Linux kernel in version 2.6.16.Oracle recommends using ASM for database files.
Oracle In
ternal & O
racle Aca
demy
Use O
nly
Oracle Database 10g: Managing Oracle on Linux for DBAs 4 - 7
Copyright © 2007, Oracle. All rights reserved.
File System Characteristics
Certain characteristics are better for database use:• Write-thru-cache ability• Write acknowledgement• Security • Journaling • High Performance
File System CharacteristicsIn choosing a file system, performance is important, but not the primary consideration. It does not matter how fast the file system is if the data is corrupted, lost, or compromised. To achieve this end, the Oracle database does not support database files on file systems that do not have a write-thru-cache capability. Supported file systems must acknowledge writes. There are security requirements as well. Oracle server and the database files require special file permissions that are not available on certain file systems. When these file permissions are not set correctly, the Oracle server does not function properly. Data files should be accessible only to the database owner, and all other access should be controlled by the database itself. Journaling is a popular characteristic. The major benefit is that the changes to the file system are recorded in a journal file similar to database redo logs. If the server crashes or shuts down without synchronizing the disks, then the journal file can be applied to the file system, thus restoring the file system integrity very quickly. This effect can be seen on bootup. The fsckcommand checks journaled file systems more quickly than nonjournaled file systems.Oracle Database must be able to verify that writes to a disk are completed successfully. Standard NFS, including file systems on NAS devices, may not be able to guarantee that writes to a disk are completed successfully, and this may lead to possible data file corruption.
Oracle In
ternal & O
racle Aca
demy
Use O
nly
Oracle Database 10g: Managing Oracle on Linux for DBAs 4 - 8
File System Characteristics (continued)Oracle recommends that you do not store files on standard NFS. If you use NFS, it is recommended you use a storage vendor and storage device listed in the Oracle Storage Compatibility Program list. This list is available from the following Web site:http://www.oracle.com/technology/deploy/availability/htdocs/oscp.htmlIf a storage device is supported, then you can use it to store Oracle software files, Oracle database files, or both.
Oracle In
ternal & O
racle Aca
demy
Use O
nly
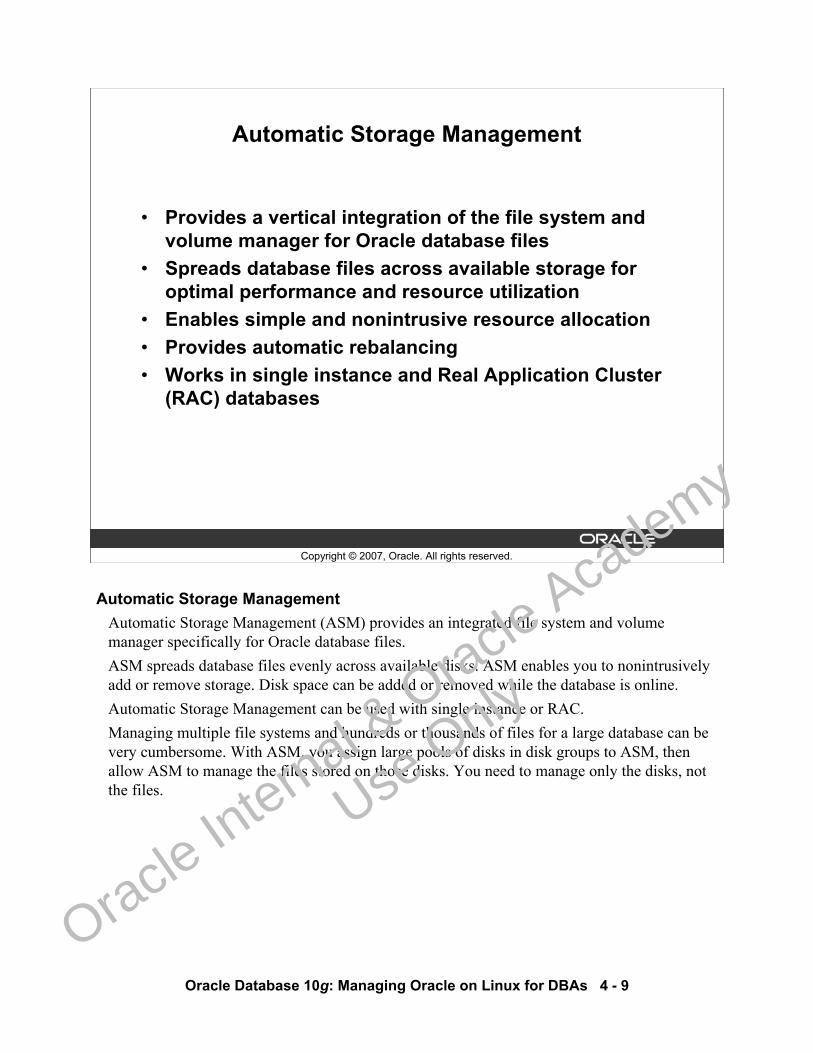
Oracle Database 10g: Managing Oracle on Linux for DBAs 4 - 9
Copyright © 2007, Oracle. All rights reserved.
Automatic Storage Management
• Provides a vertical integration of the file system and volume manager for Oracle database files
• Spreads database files across available storage for optimal performance and resource utilization
• Enables simple and nonintrusive resource allocation• Provides automatic rebalancing• Works in single instance and Real Application Cluster
(RAC) databases
Automatic Storage ManagementAutomatic Storage Management (ASM) provides an integrated file system and volume manager specifically for Oracle database files.ASM spreads database files evenly across available disks. ASM enables you to nonintrusively add or remove storage. Disk space can be added or removed while the database is online.Automatic Storage Management can be used with single instance or RAC. Managing multiple file systems and hundreds or thousands of files for a large database can be very cumbersome. With ASM, you assign large pools of disks in disk groups to ASM, then allow ASM to manage the files stored on those disks. You need to manage only the disks, not the files.
Oracle In
ternal & O
racle Aca
demy
Use O
nly

Oracle Database 10g: Managing Oracle on Linux for DBAs 4 - 10
Copyright © 2007, Oracle. All rights reserved.
ext2 and ext3
The ext2 and ext3 file systems are closely related:• ext2 can be converted to ext3.• ext3 can be mounted as an ext2 file system.• ext3 is a journaled file system.• ext3 has several performance enhancements.
ext2 and ext3The differences between the ext2 and ext3 file systems are important. ext2 has, in computer terms, a long history of improvements and reliability. ext3 starts with the same base and adds journaling and speed. In general, journaling is slower than nonjournaled file systems, but ext3 optimizes the disk head movement to give excellent performance. In several tests that compared ext2, ext3, ReiserFS, and raw, ext3 was the fastest. ext3 has three journaling levels that may be set with the -o option in the mount command or in the options section of /etc/fstab. The highest level—the one that does the most journaling is data=journal—writes the journal entries for all the data and metadata changes. The lowest level, which does the least journaling, is data=writeback with only metadata being written. The default is data=ordered, where metadata with increased integrity is written.Comparing ext3 at different journaling levels has not been as thoroughly documented, but preliminary results indicate that setting data=journal is the fastest and most reliable. The other levels of journaling, data=writeback (the lowest) and data=ordered (the default), would be expected to yield performance benefits at the expense of reliability, but do not seem to be faster.
Oracle In
ternal & O
racle Aca
demy
Use O
nly
Oracle Database 10g: Managing Oracle on Linux for DBAs 4 - 11
Copyright © 2007, Oracle. All rights reserved.
Oracle Clustered File System 2
Oracle Corporation makes OCFS2 available under the General Public License (GPL) for use with Linux.• OCFS2 is a general purpose cluster file system that
shares between files nodes of a cluster:• OCFS2 can be downloaded from:
— http://oss.oracle.com• More information about OCFS2 and other products
from Oracle’s Linux Projects Development group can be found at Oracle’s home for Open Source projects, http://oss.oracle.com, and the Oracle Technology Network http://otn.oracle.com.
Oracle Clustered File System 2Oracle Clustered File System 2 (OCFS2) is designed to be a general-purpose cluster file system. It can store data files, as well as binaries and configuration files.
Oracle In
ternal & O
racle Aca
demy
Use O
nly
Oracle Database 10g: Managing Oracle on Linux for DBAs 4 - 12
Copyright © 2007, Oracle. All rights reserved.
Network File System
• Oracle Compatible Network Attached File Servers– http://www.oracle.com/technology/deploy/availability/htd
ocs/vendors_nfs.html• Oracle Storage Compatibility Program (OSCP)
– http://www.oracle.com/technology/deploy/availability/htdocs/oscp.html
Network File SystemOracle supports only NFS protocol with network file servers. Oracle does not support CIFS protocol because CIFS protocol cannot guarantee certain write block size and data commitment to disk or cache. Oracle does not recommend using an NFS device unless the NFS vendor is a member of the Oracle Storage Compatibility Program (OSCP). Members in OSCP test and verify their products compatibility with the Oracle product.
Oracle In
ternal & O
racle Aca
demy
Use O
nly
Oracle Database 10g: Managing Oracle on Linux for DBAs 4 - 13
Copyright © 2007, Oracle. All rights reserved.
Summary
In this lesson, you should have learned how to:• Distinguish between certified and supported file
systems• Choose a file system
Oracle In
ternal & O
racle Aca
demy
Use O
nly

Oracle In
ternal & O
racle Aca
demy
Use O
nly
Copyright © 2007, Oracle. All rights reserved.
Automatic Storage Management and Automatic Storage Management
Library Driver
Oracle In
ternal & O
racle Aca
demy
Use O
nly

Oracle Database 10g: Managing Oracle on Linux for DBAs 5 - 2
Copyright © 2007, Oracle. All rights reserved.
Objectives
After completing this lesson, you should be able to:• Install and initialize Automatic Storage Management
Library Driver (ASMLib)• Mark disks for ASMLib• Create an Automatic Storage Management instance
Oracle In
ternal & O
racle Aca
demy
Use O
nly
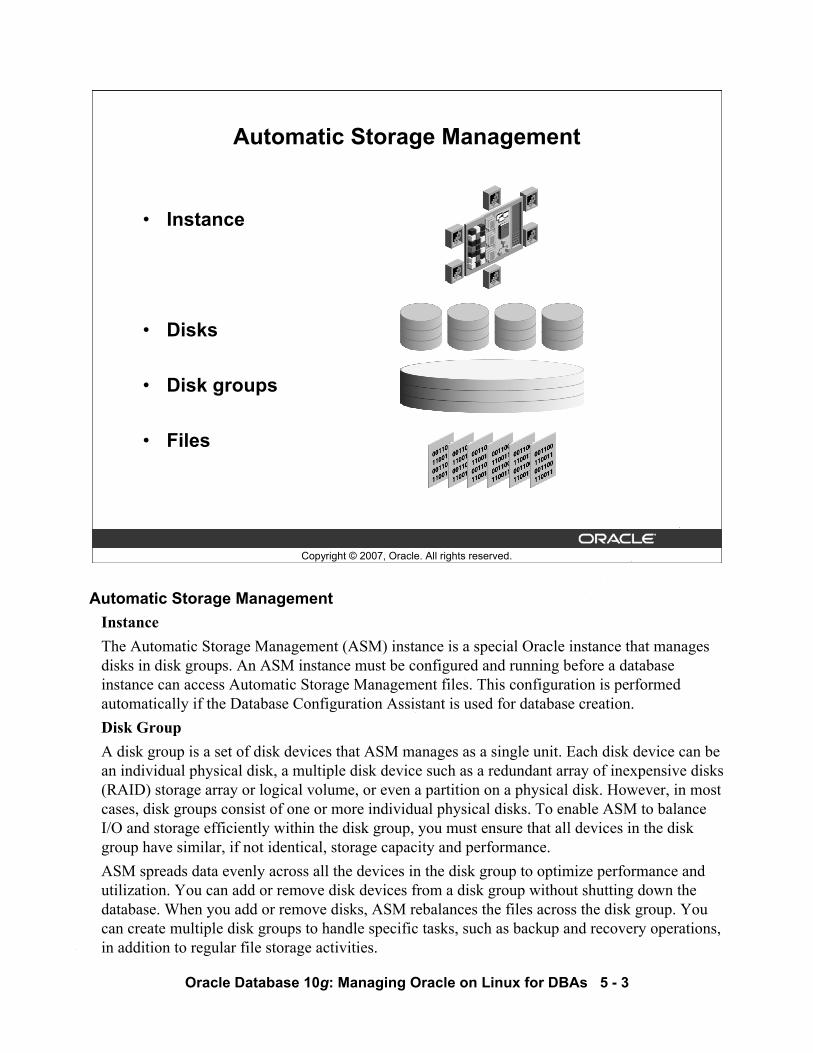
Oracle Database 10g: Managing Oracle on Linux for DBAs 5 - 3
Copyright © 2007, Oracle. All rights reserved.
Automatic Storage Management
• Instance
• Disks
• Disk groups
• Files
Automatic Storage ManagementInstanceThe Automatic Storage Management (ASM) instance is a special Oracle instance that manages disks in disk groups. An ASM instance must be configured and running before a database instance can access Automatic Storage Management files. This configuration is performed automatically if the Database Configuration Assistant is used for database creation. Disk GroupA disk group is a set of disk devices that ASM manages as a single unit. Each disk device can be an individual physical disk, a multiple disk device such as a redundant array of inexpensive disks (RAID) storage array or logical volume, or even a partition on a physical disk. However, in most cases, disk groups consist of one or more individual physical disks. To enable ASM to balance I/O and storage efficiently within the disk group, you must ensure that all devices in the disk group have similar, if not identical, storage capacity and performance. ASM spreads data evenly across all the devices in the disk group to optimize performance and utilization. You can add or remove disk devices from a disk group without shutting down the database. When you add or remove disks, ASM rebalances the files across the disk group. You can create multiple disk groups to handle specific tasks, such as backup and recovery operations, in addition to regular file storage activities.
Oracle In
ternal & O
racle Aca
demy
Use O
nly
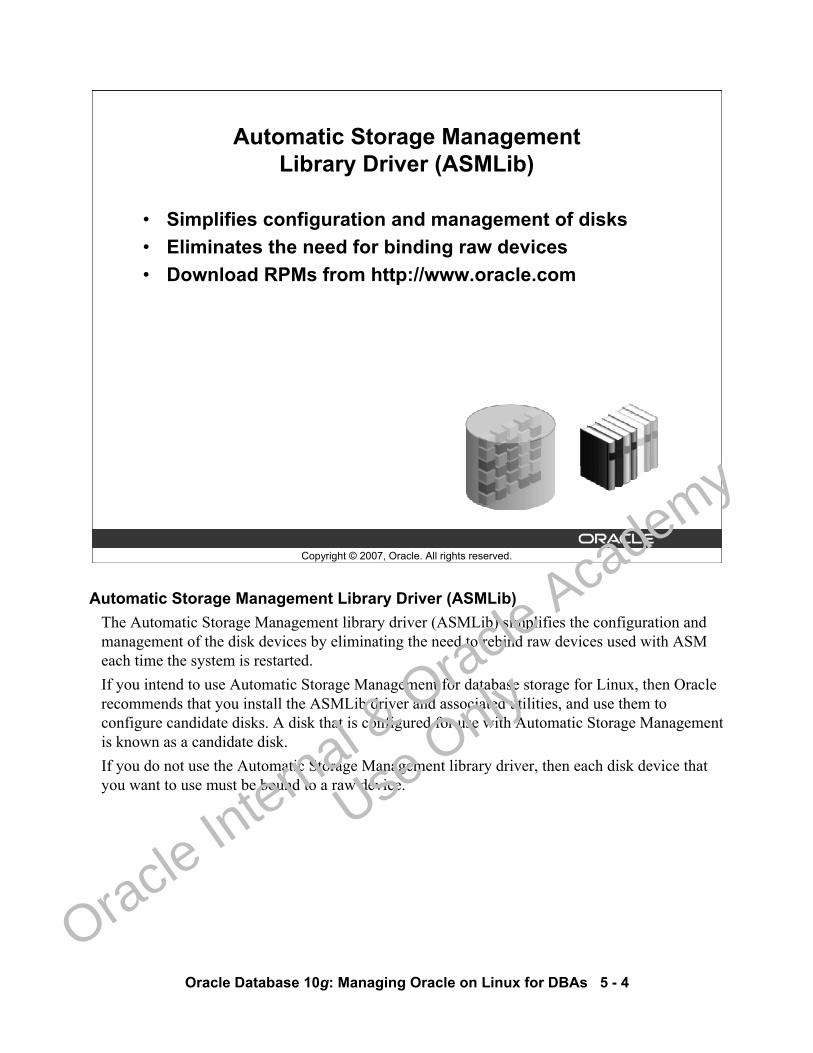
Oracle Database 10g: Managing Oracle on Linux for DBAs 5 - 4
Copyright © 2007, Oracle. All rights reserved.
Automatic Storage Management Library Driver (ASMLib)
• Simplifies configuration and management of disks• Eliminates the need for binding raw devices• Download RPMs from http://www.oracle.com
Automatic Storage Management Library Driver (ASMLib)The Automatic Storage Management library driver (ASMLib) simplifies the configuration and management of the disk devices by eliminating the need to rebind raw devices used with ASM each time the system is restarted.If you intend to use Automatic Storage Management for database storage for Linux, then Oracle recommends that you install the ASMLib driver and associated utilities, and use them to configure candidate disks. A disk that is configured for use with Automatic Storage Management is known as a candidate disk.If you do not use the Automatic Storage Management library driver, then each disk device that you want to use must be bound to a raw device.
Oracle In
ternal & O
racle Aca
demy
Use O
nly
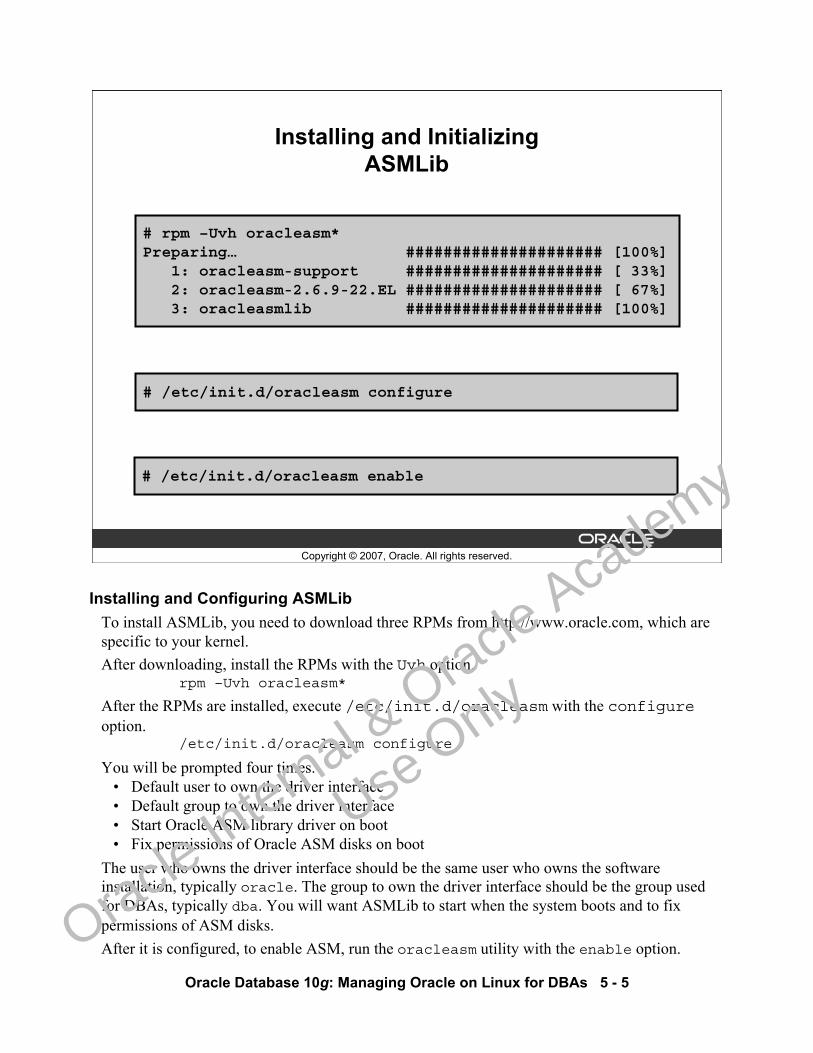
Oracle Database 10g: Managing Oracle on Linux for DBAs 5 - 5
Copyright © 2007, Oracle. All rights reserved.
Installing and InitializingASMLib
# rpm –Uvh oracleasm*Preparing… ##################### [100%]
1: oracleasm-support ##################### [ 33%]2: oracleasm-2.6.9-22.EL ##################### [ 67%]3: oracleasmlib ##################### [100%]
# /etc/init.d/oracleasm configure
# /etc/init.d/oracleasm enable
Installing and Configuring ASMLibTo install ASMLib, you need to download three RPMs from http://www.oracle.com, which are specific to your kernel.After downloading, install the RPMs with the Uvh option.
rpm –Uvh oracleasm*
After the RPMs are installed, execute /etc/init.d/oracleasm with the configureoption.
/etc/init.d/oracleasm configure
You will be prompted four times.• Default user to own the driver interface• Default group to own the driver interface• Start Oracle ASM library driver on boot• Fix permissions of Oracle ASM disks on boot
The user who owns the driver interface should be the same user who owns the software installation, typically oracle. The group to own the driver interface should be the group usedfor DBAs, typically dba. You will want ASMLib to start when the system boots and to fixpermissions of ASM disks. After it is configured, to enable ASM, run the oracleasm utility with the enable option.
Oracle In
ternal & O
racle Aca
demy
Use O
nly
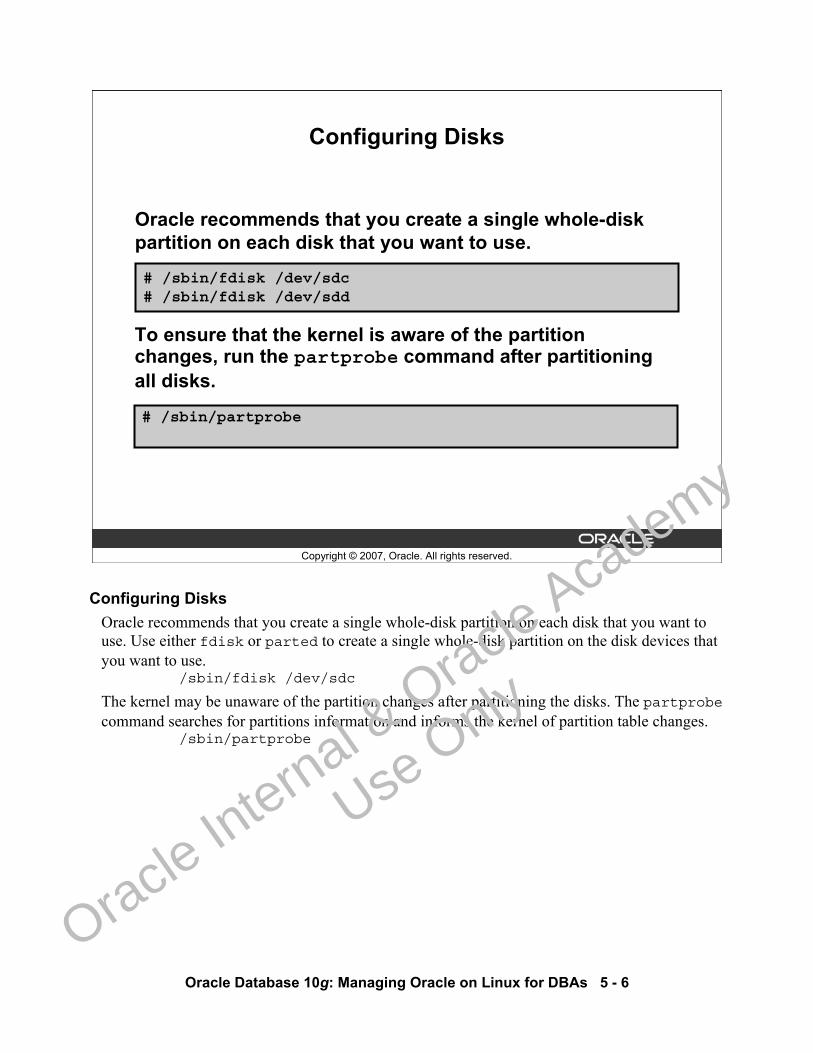
Oracle Database 10g: Managing Oracle on Linux for DBAs 5 - 6
Copyright © 2007, Oracle. All rights reserved.
Configuring Disks
Oracle recommends that you create a single whole-disk partition on each disk that you want to use.
# /sbin/fdisk /dev/sdc# /sbin/fdisk /dev/sdd
# /sbin/partprobe
To ensure that the kernel is aware of the partition changes, run the partprobe command after partitioning all disks.
Configuring DisksOracle recommends that you create a single whole-disk partition on each disk that you want to use. Use either fdisk or parted to create a single whole-disk partition on the disk devices that you want to use.
/sbin/fdisk /dev/sdc
The kernel may be unaware of the partition changes after partitioning the disks. The partprobecommand searches for partitions information and informs the kernel of partition table changes.
/sbin/partprobe
Oracle In
ternal & O
racle Aca
demy
Use O
nly
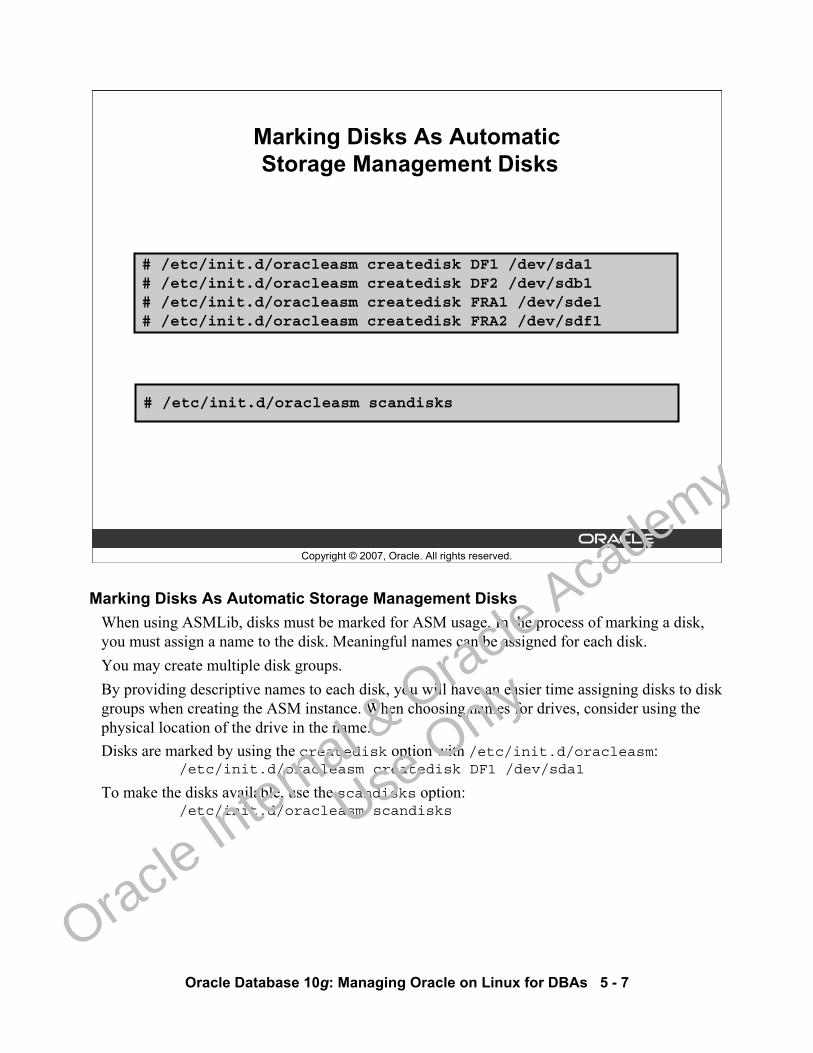
Oracle Database 10g: Managing Oracle on Linux for DBAs 5 - 7
Copyright © 2007, Oracle. All rights reserved.
Marking Disks As AutomaticStorage Management Disks
# /etc/init.d/oracleasm createdisk DF1 /dev/sda1# /etc/init.d/oracleasm createdisk DF2 /dev/sdb1# /etc/init.d/oracleasm createdisk FRA1 /dev/sde1# /etc/init.d/oracleasm createdisk FRA2 /dev/sdf1
# /etc/init.d/oracleasm scandisks
Marking Disks As Automatic Storage Management DisksWhen using ASMLib, disks must be marked for ASM usage. In the process of marking a disk, you must assign a name to the disk. Meaningful names can be assigned for each disk.You may create multiple disk groups. By providing descriptive names to each disk, you will have an easier time assigning disks to disk groups when creating the ASM instance. When choosing names for drives, consider using the physical location of the drive in the name.Disks are marked by using the createdisk option with /etc/init.d/oracleasm:
/etc/init.d/oracleasm createdisk DF1 /dev/sda1
To make the disks available, use the scandisks option:/etc/init.d/oracleasm scandisks
Oracle In
ternal & O
racle Aca
demy
Use O
nly
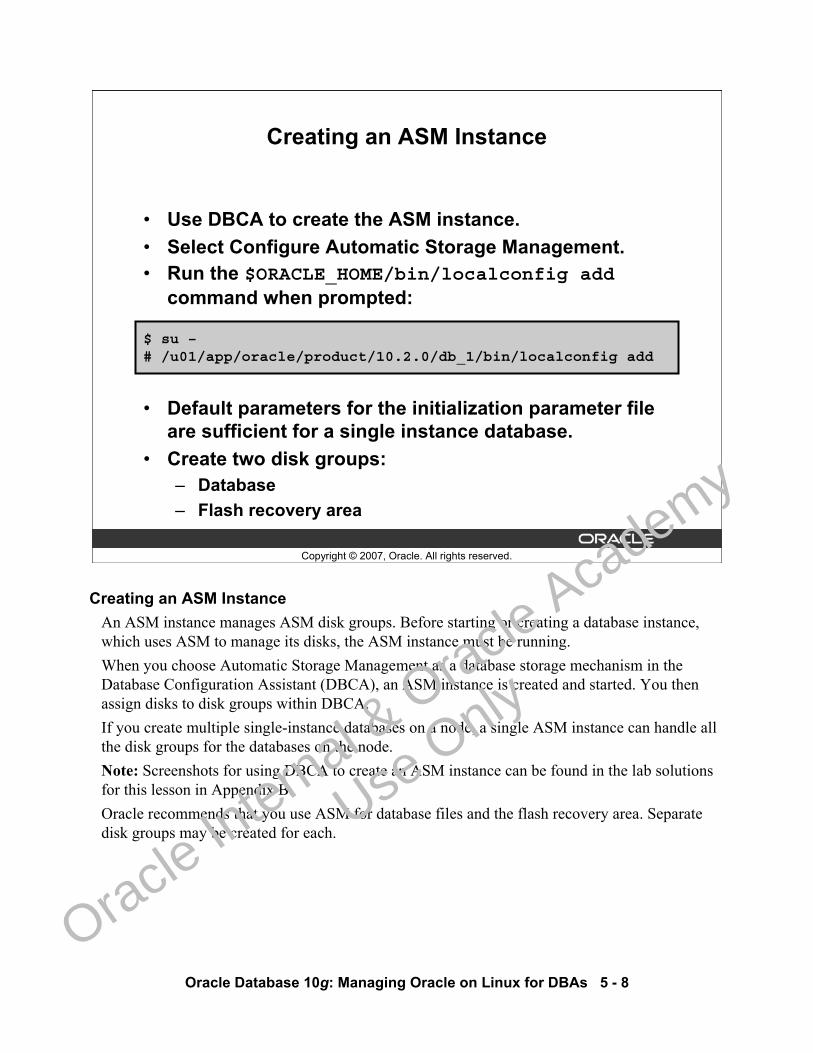
Oracle Database 10g: Managing Oracle on Linux for DBAs 5 - 8
Copyright © 2007, Oracle. All rights reserved.
Creating an ASM Instance
• Use DBCA to create the ASM instance.• Select Configure Automatic Storage Management.• Run the $ORACLE_HOME/bin/localconfig add
command when prompted:
• Default parameters for the initialization parameter file are sufficient for a single instance database.
• Create two disk groups: – Database– Flash recovery area
$ su –# /u01/app/oracle/product/10.2.0/db_1/bin/localconfig add
Creating an ASM InstanceAn ASM instance manages ASM disk groups. Before starting or creating a database instance, which uses ASM to manage its disks, the ASM instance must be running. When you choose Automatic Storage Management as a database storage mechanism in the Database Configuration Assistant (DBCA), an ASM instance is created and started. You then assign disks to disk groups within DBCA.If you create multiple single-instance databases on a node, a single ASM instance can handle all the disk groups for the databases on the node. Note: Screenshots for using DBCA to create an ASM instance can be found in the lab solutions for this lesson in Appendix B.Oracle recommends that you use ASM for database files and the flash recovery area. Separate disk groups may be created for each.
Oracle In
ternal & O
racle Aca
demy
Use O
nly
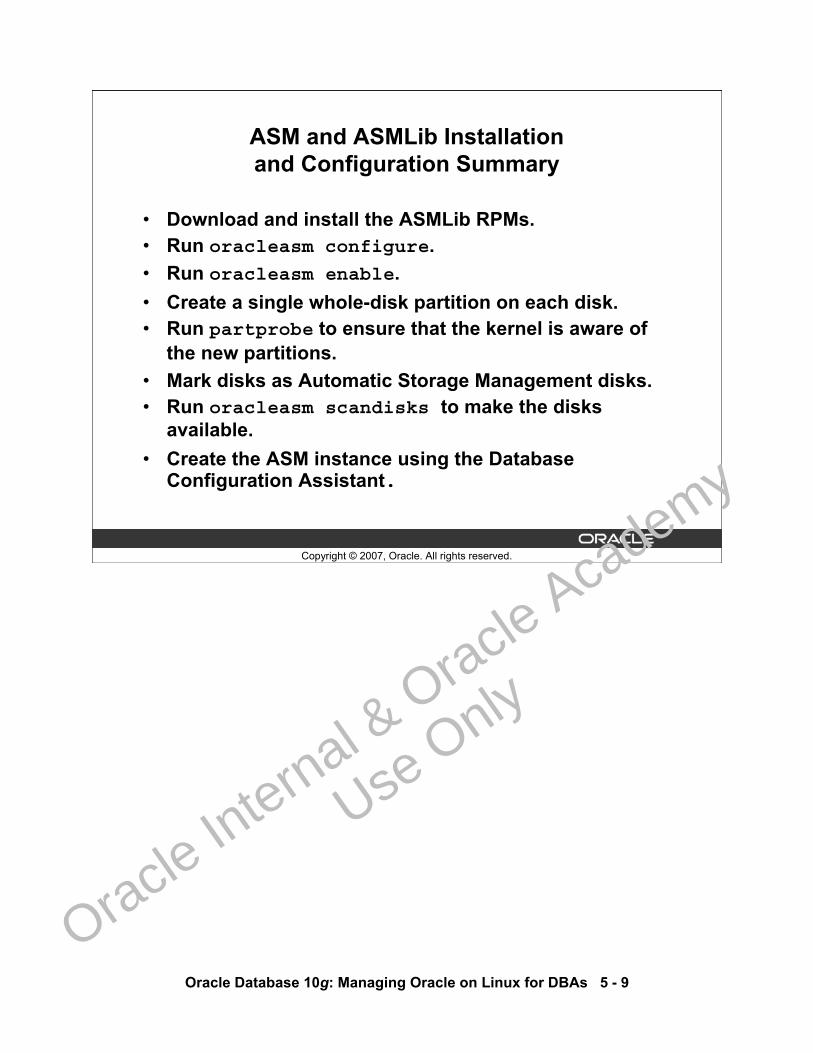
Oracle Database 10g: Managing Oracle on Linux for DBAs 5 - 9
Copyright © 2007, Oracle. All rights reserved.
ASM and ASMLib Installationand Configuration Summary
• Download and install the ASMLib RPMs.• Run oracleasm configure.• Run oracleasm enable.• Create a single whole-disk partition on each disk.• Run partprobe to ensure that the kernel is aware of
the new partitions.• Mark disks as Automatic Storage Management disks.• Run oracleasm scandisks to make the disks
available.• Create the ASM instance using the Database
Configuration Assistant.
Oracle In
ternal & O
racle Aca
demy
Use O
nly
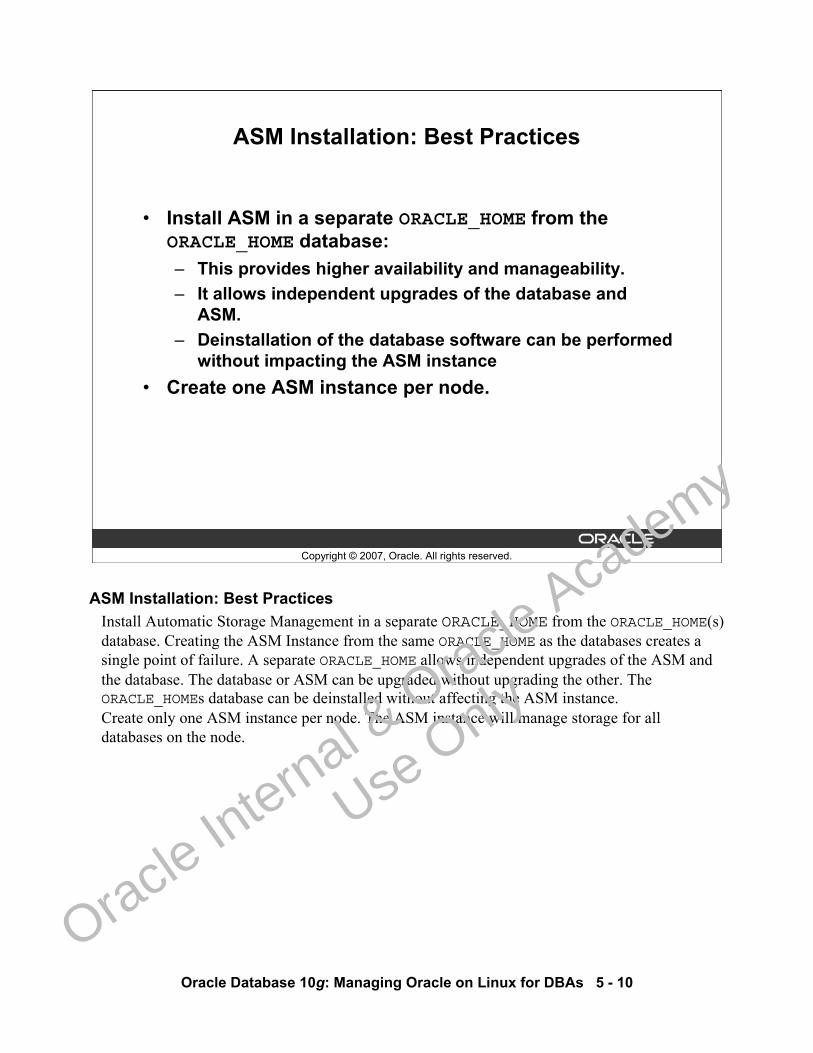
Oracle Database 10g: Managing Oracle on Linux for DBAs 5 - 10
Copyright © 2007, Oracle. All rights reserved.
ASM Installation: Best Practices
• Install ASM in a separate ORACLE_HOME from the ORACLE_HOME database: – This provides higher availability and manageability.– It allows independent upgrades of the database and
ASM.– Deinstallation of the database software can be performed
without impacting the ASM instance• Create one ASM instance per node.
ASM Installation: Best PracticesInstall Automatic Storage Management in a separate ORACLE_HOME from the ORACLE_HOME(s) database. Creating the ASM Instance from the same ORACLE_HOME as the databases creates a single point of failure. A separate ORACLE_HOME allows independent upgrades of the ASM and the database. The database or ASM can be upgraded without upgrading the other. The ORACLE_HOMEs database can be deinstalled without affecting the ASM instance.Create only one ASM instance per node. The ASM instance will manage storage for all databases on the node.
Oracle In
ternal & O
racle Aca
demy
Use O
nly
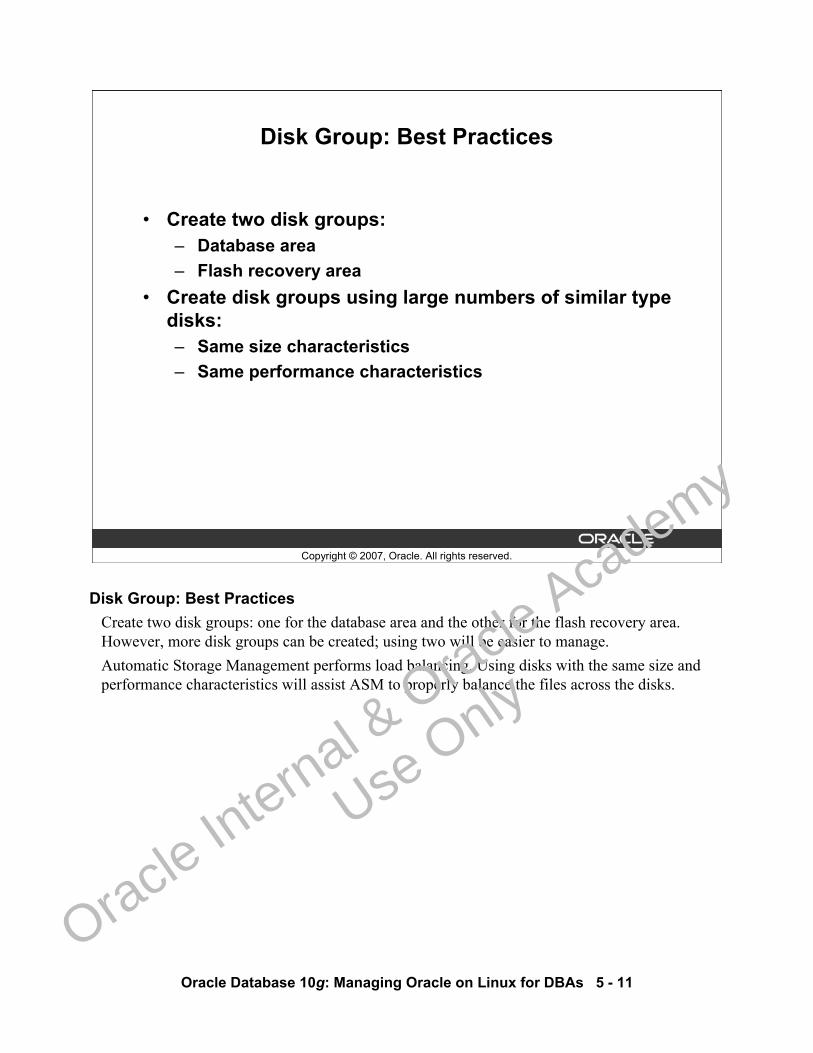
Oracle Database 10g: Managing Oracle on Linux for DBAs 5 - 11
Copyright © 2007, Oracle. All rights reserved.
Disk Group: Best Practices
• Create two disk groups:– Database area– Flash recovery area
• Create disk groups using large numbers of similar type disks:– Same size characteristics– Same performance characteristics
Disk Group: Best PracticesCreate two disk groups: one for the database area and the other for the flash recovery area. However, more disk groups can be created; using two will be easier to manage.Automatic Storage Management performs load balancing. Using disks with the same size and performance characteristics will assist ASM to properly balance the files across the disks.
Oracle In
ternal & O
racle Aca
demy
Use O
nly
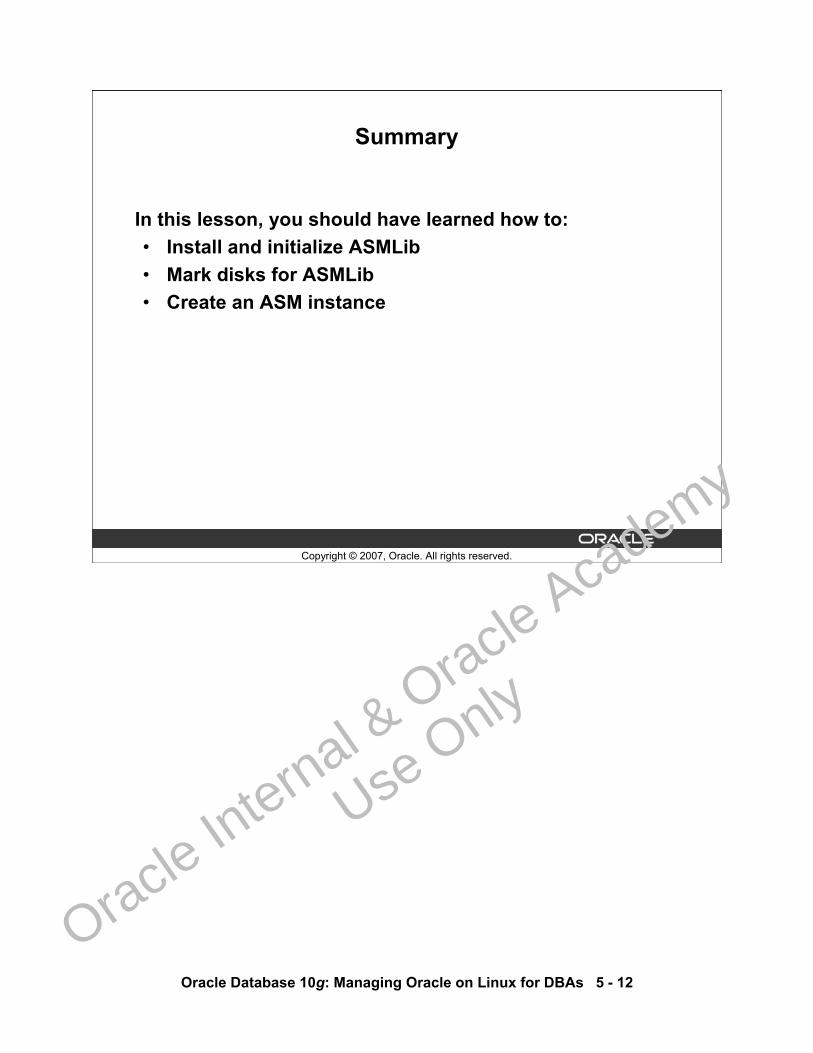
Oracle Database 10g: Managing Oracle on Linux for DBAs 5 - 12
Copyright © 2007, Oracle. All rights reserved.
Summary
In this lesson, you should have learned how to:• Install and initialize ASMLib• Mark disks for ASMLib• Create an ASM instance
Oracle In
ternal & O
racle Aca
demy
Use O
nly
Oracle Database 10g: Managing Oracle on Linux for DBAs 5 - 13
Copyright © 2007, Oracle. All rights reserved.
Practice 5 Overview:Installing and Configuring ASMLib and ASM
This practice covers the following topics:• Installing Oracle ASMLib RPMs• Configuring ASMLib• Configuring disks• Marking disks for ASM• Creating an ASM instance
Oracle In
ternal & O
racle Aca
demy
Use O
nly

Oracle In
ternal & O
racle Aca
demy
Use O
nly
Copyright © 2007, Oracle. All rights reserved.
Creating the Database
Oracle In
ternal & O
racle Aca
demy
Use O
nly
Oracle Database 10g: Managing Oracle on Linux for DBAs 6 - 2
Copyright © 2007, Oracle. All rights reserved.
Objectives
After completing this lesson, you should be able to:• Create an Oracle database that uses ASM• Identify the location of various Oracle files• Implement OS authentication
Oracle In
ternal & O
racle Aca
demy
Use O
nly
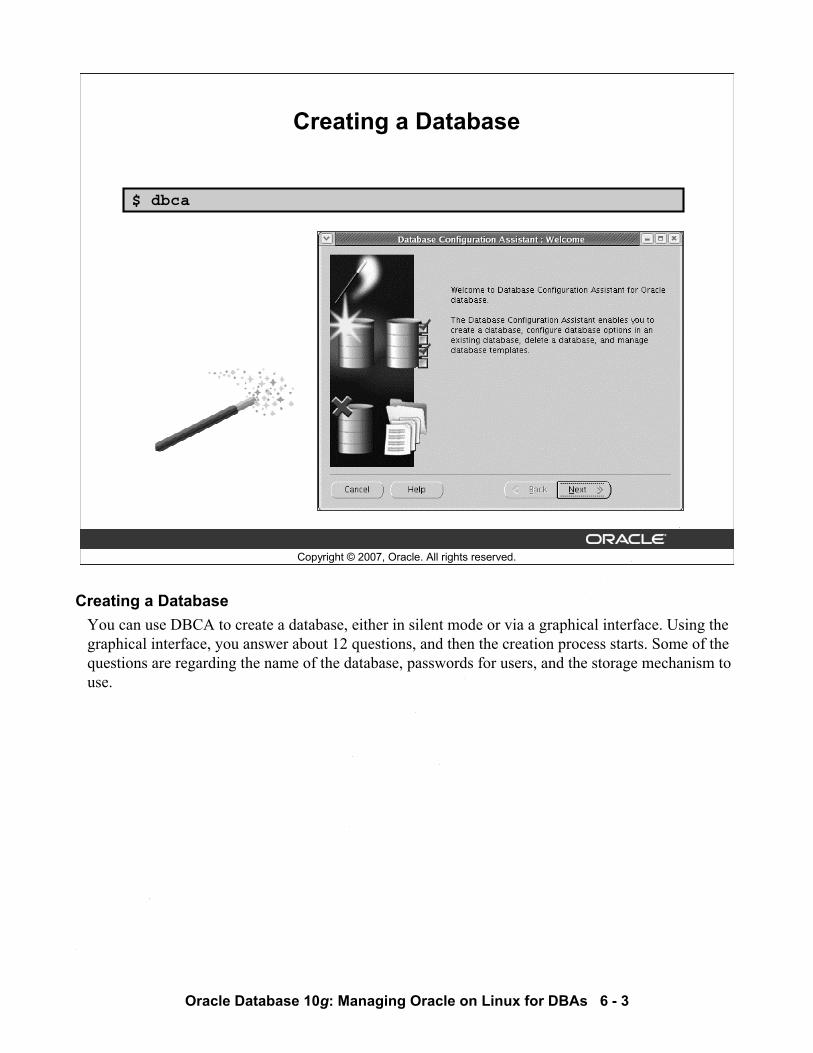
Oracle Database 10g: Managing Oracle on Linux for DBAs 6 - 3
Copyright © 2007, Oracle. All rights reserved.
Creating a Database
$ dbca
Creating a DatabaseYou can use DBCA to create a database, either in silent mode or via a graphical interface. Using the graphical interface, you answer about 12 questions, and then the creation process starts. Some of the questions are regarding the name of the database, passwords for users, and the storage mechanism to use.
Oracle In
ternal & O
racle Aca
demy
Use O
nly
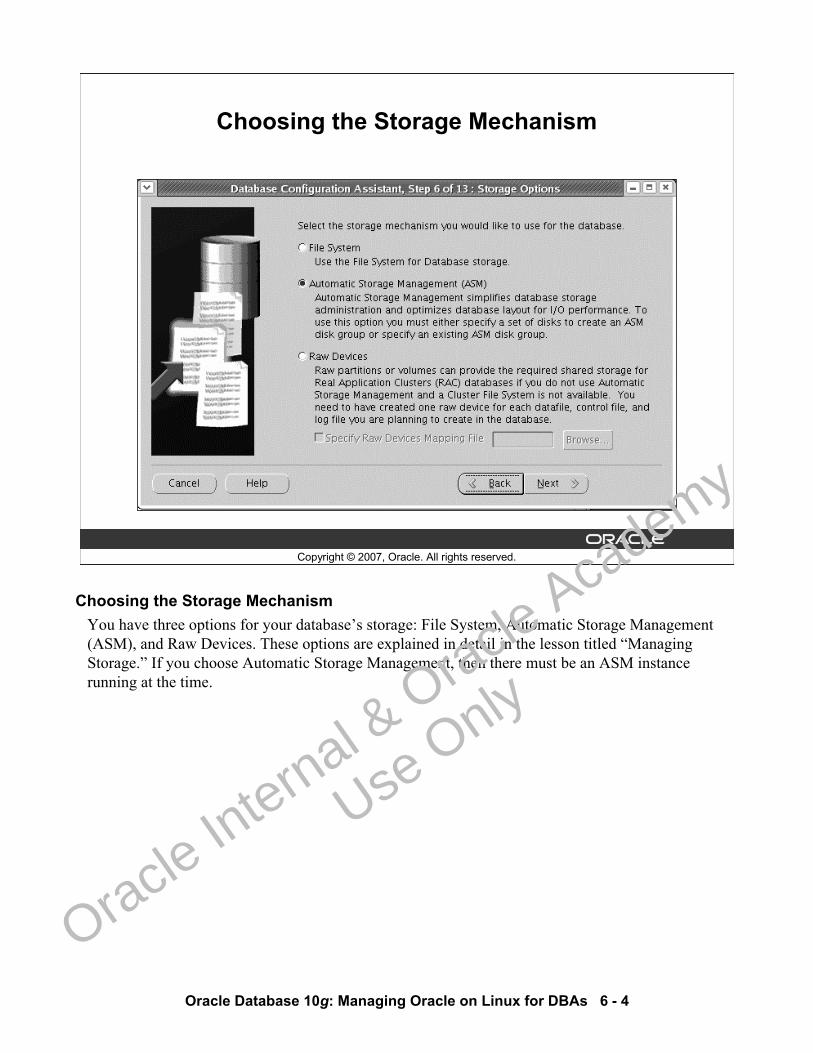
Oracle Database 10g: Managing Oracle on Linux for DBAs 6 - 4
Copyright © 2007, Oracle. All rights reserved.
Choosing the Storage Mechanism
Choosing the Storage MechanismYou have three options for your database’s storage: File System, Automatic Storage Management (ASM), and Raw Devices. These options are explained in detail in the lesson titled “Managing Storage.” If you choose Automatic Storage Management, then there must be an ASM instance running at the time.
Oracle In
ternal & O
racle Aca
demy
Use O
nly
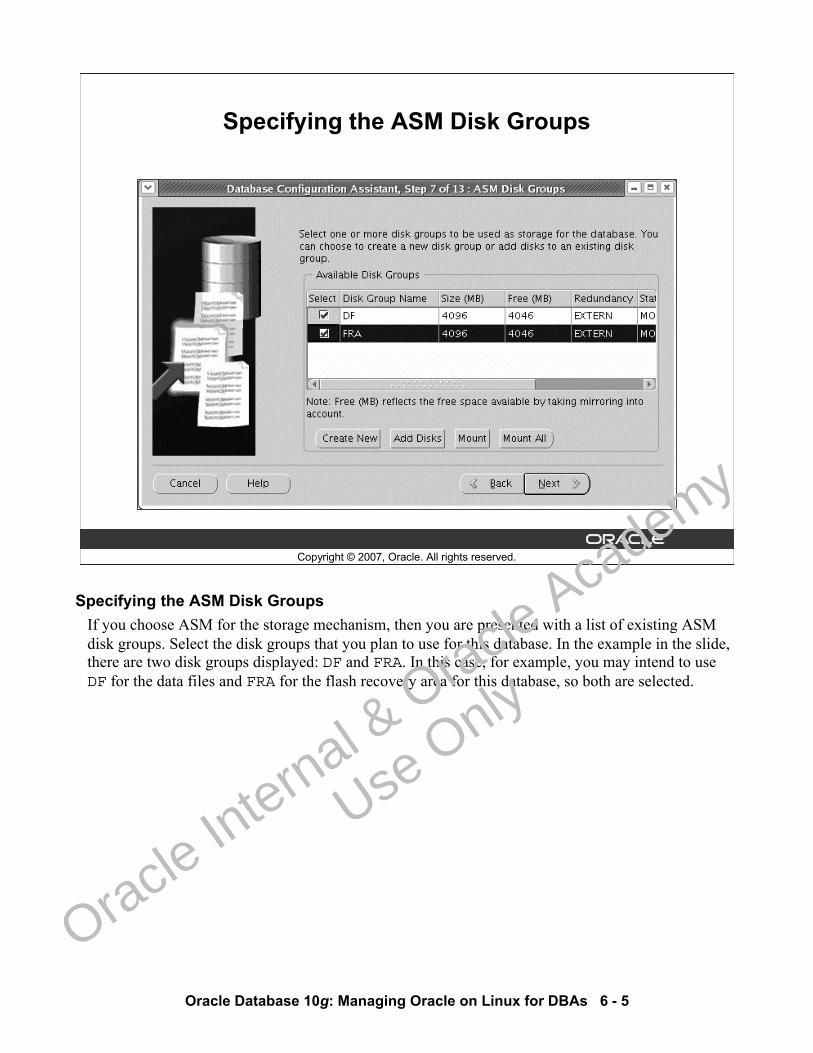
Oracle Database 10g: Managing Oracle on Linux for DBAs 6 - 5
Copyright © 2007, Oracle. All rights reserved.
Specifying the ASM Disk Groups
Specifying the ASM Disk GroupsIf you choose ASM for the storage mechanism, then you are presented with a list of existing ASM disk groups. Select the disk groups that you plan to use for this database. In the example in the slide, there are two disk groups displayed: DF and FRA. In this case, for example, you may intend to use DF for the data files and FRA for the flash recovery area for this database, so both are selected.
Oracle In
ternal & O
racle Aca
demy
Use O
nly
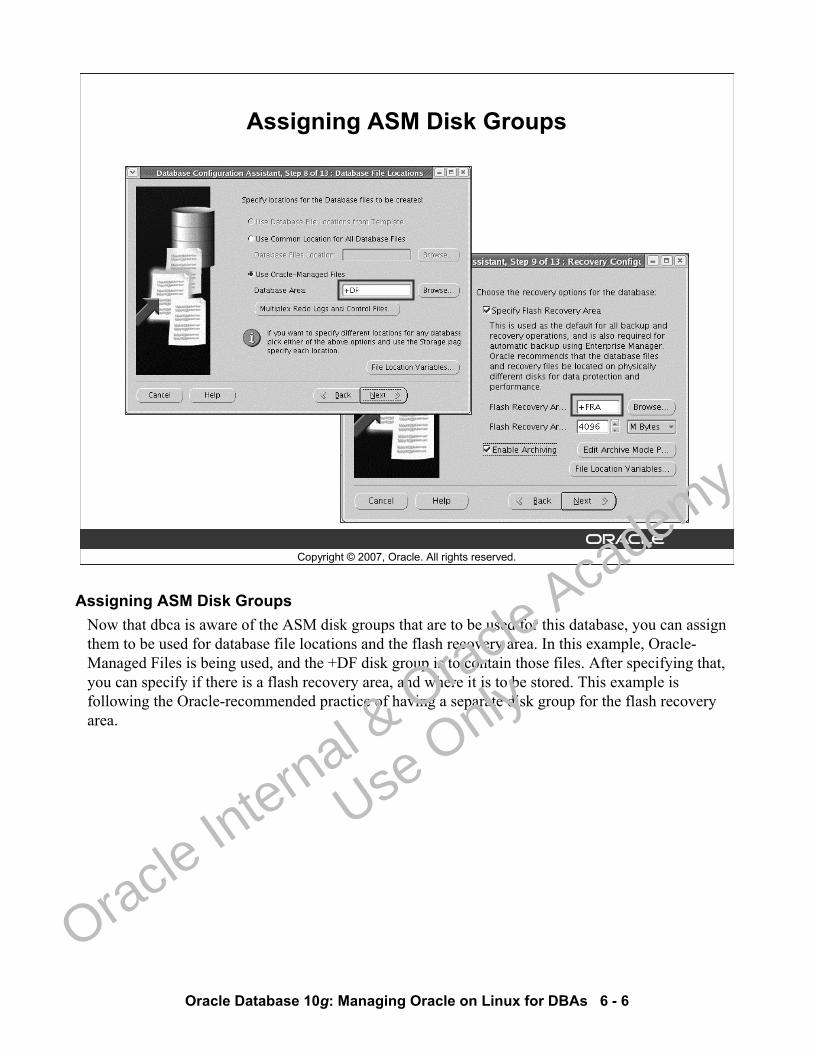
Oracle Database 10g: Managing Oracle on Linux for DBAs 6 - 6
Copyright © 2007, Oracle. All rights reserved.
Assigning ASM Disk Groups
Assigning ASM Disk GroupsNow that dbca is aware of the ASM disk groups that are to be used for this database, you can assign them to be used for database file locations and the flash recovery area. In this example, Oracle-Managed Files is being used, and the +DF disk group is to contain those files. After specifying that, you can specify if there is a flash recovery area, and where it is to be stored. This example is following the Oracle-recommended practice of having a separate disk group for the flash recovery area.
Oracle In
ternal & O
racle Aca
demy
Use O
nly

Oracle Database 10g: Managing Oracle on Linux for DBAs 6 - 7
Copyright © 2007, Oracle. All rights reserved.
dbca Log Files
The $ORACLE_HOME/cfgtoollogs/dbca/<SID> directory contains text log files of the following, during and after the creation of the database:• Creation of the database objects• Configuration of Enterprise Manager• Importing of example schemas
dbca Log FilesTo see the details of the dbca execution, you can navigate to the $ORACLE_HOME/cfgtoollogs/dbca/<SID> directory and view the log files there, using a text editor. Here are some sample contents of the tts_example_imp.log file, which shows the log of the import of the EXAMPLE tablespace:
$ head tts_example_imp.log
Connected to: Oracle Database 10g Enterprise Edition Release 10.2.0.1.0 - ProductionWith the Partitioning, OLAP and Data Mining options
Export file created by EXPORT:V10.02.01 via conventional pathAbout to import transportable tablespace(s) metadata...import done in US7ASCII character set and AL16UTF16 NCHAR character set. importing SYS's objects into SYS. importing SYS's objects into SYS. importing HR's objects into HR
Oracle In
ternal & O
racle Aca
demy
Use O
nly
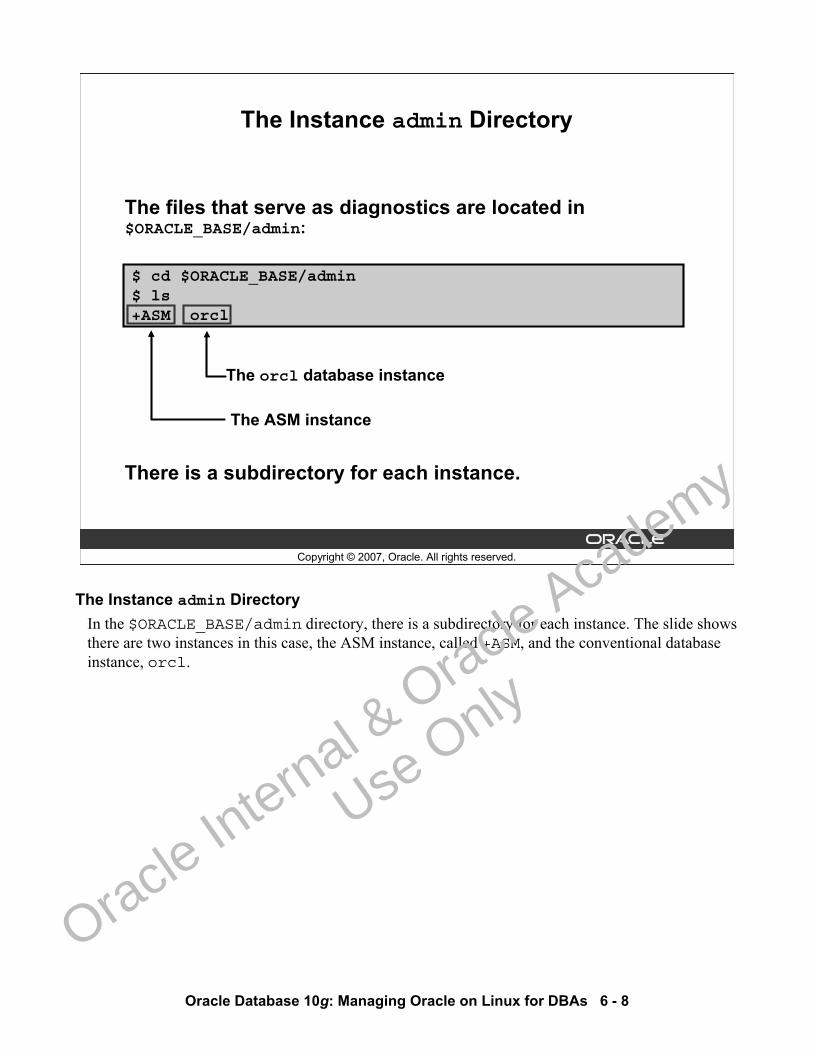
Oracle Database 10g: Managing Oracle on Linux for DBAs 6 - 8
Copyright © 2007, Oracle. All rights reserved.
The Instance admin Directory
The files that serve as diagnostics are located in $ORACLE_BASE/admin:
$ cd $ORACLE_BASE/admin$ ls+ASM orcl
There is a subdirectory for each instance.
The ASM instance
The orcl database instance
The Instance admin DirectoryIn the $ORACLE_BASE/admin directory, there is a subdirectory for each instance. The slide shows there are two instances in this case, the ASM instance, called +ASM, and the conventional database instance, orcl.
Oracle In
ternal & O
racle Aca
demy
Use O
nly
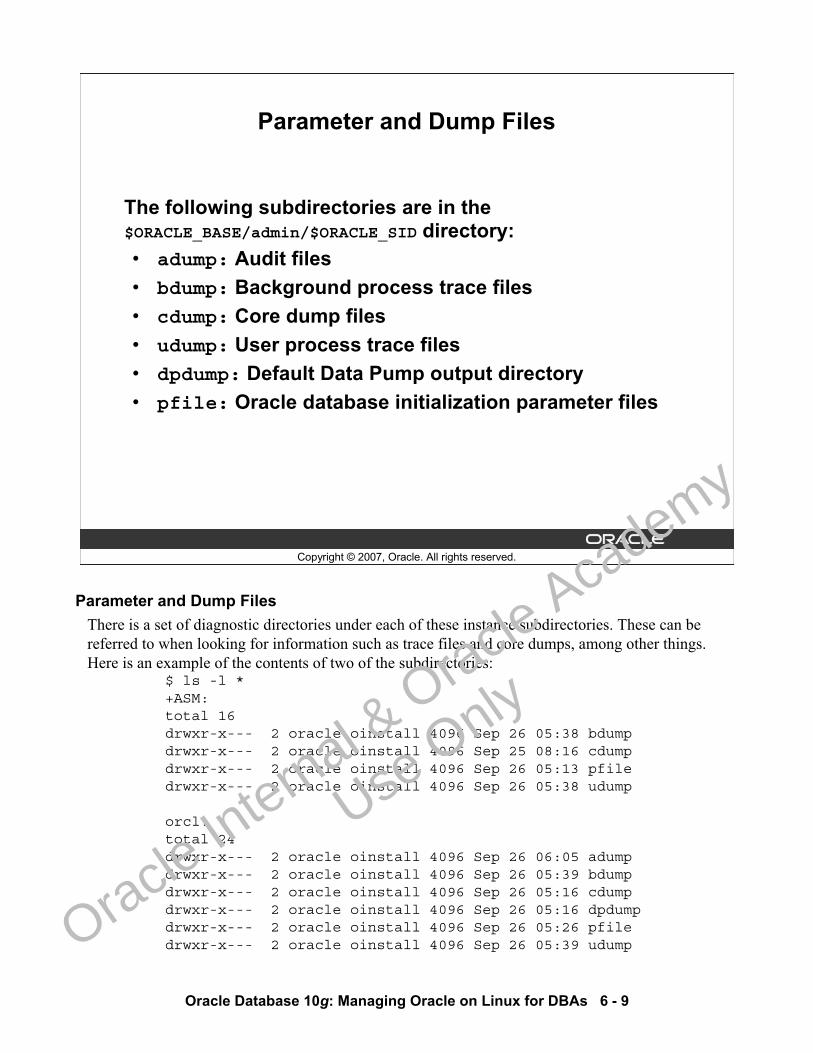
Oracle Database 10g: Managing Oracle on Linux for DBAs 6 - 9
Copyright © 2007, Oracle. All rights reserved.
Parameter and Dump Files
The following subdirectories are in the $ORACLE_BASE/admin/$ORACLE_SID directory:• adump: Audit files• bdump: Background process trace files• cdump: Core dump files• udump: User process trace files• dpdump: Default Data Pump output directory• pfile: Oracle database initialization parameter files
Parameter and Dump FilesThere is a set of diagnostic directories under each of these instance subdirectories. These can be referred to when looking for information such as trace files and core dumps, among other things. Here is an example of the contents of two of the subdirectories:
$ ls -l *+ASM:total 16drwxr-x--- 2 oracle oinstall 4096 Sep 26 05:38 bdumpdrwxr-x--- 2 oracle oinstall 4096 Sep 25 08:16 cdumpdrwxr-x--- 2 oracle oinstall 4096 Sep 26 05:13 pfiledrwxr-x--- 2 oracle oinstall 4096 Sep 26 05:38 udump
orcl:total 24drwxr-x--- 2 oracle oinstall 4096 Sep 26 06:05 adumpdrwxr-x--- 2 oracle oinstall 4096 Sep 26 05:39 bdumpdrwxr-x--- 2 oracle oinstall 4096 Sep 26 05:16 cdumpdrwxr-x--- 2 oracle oinstall 4096 Sep 26 05:16 dpdumpdrwxr-x--- 2 oracle oinstall 4096 Sep 26 05:26 pfiledrwxr-x--- 2 oracle oinstall 4096 Sep 26 05:39 udump
Oracle In
ternal & O
racle Aca
demy
Use O
nly
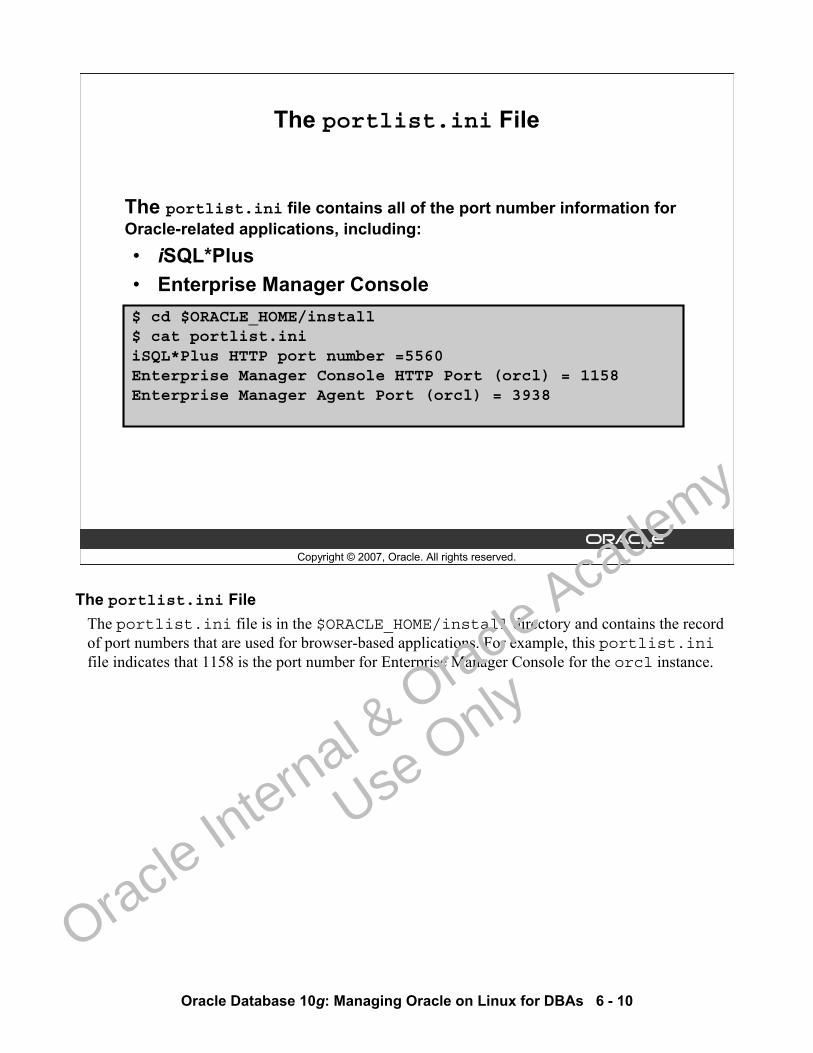
Oracle Database 10g: Managing Oracle on Linux for DBAs 6 - 10
Copyright © 2007, Oracle. All rights reserved.
The portlist.ini File
The portlist.ini file contains all of the port number information for Oracle-related applications, including:• iSQL*Plus• Enterprise Manager Console$ cd $ORACLE_HOME/install$ cat portlist.iniiSQL*Plus HTTP port number =5560Enterprise Manager Console HTTP Port (orcl) = 1158Enterprise Manager Agent Port (orcl) = 3938
The portlist.ini FileThe portlist.ini file is in the $ORACLE_HOME/install directory and contains the record of port numbers that are used for browser-based applications. For example, this portlist.inifile indicates that 1158 is the port number for Enterprise Manager Console for the orcl instance.
Oracle In
ternal & O
racle Aca
demy
Use O
nly
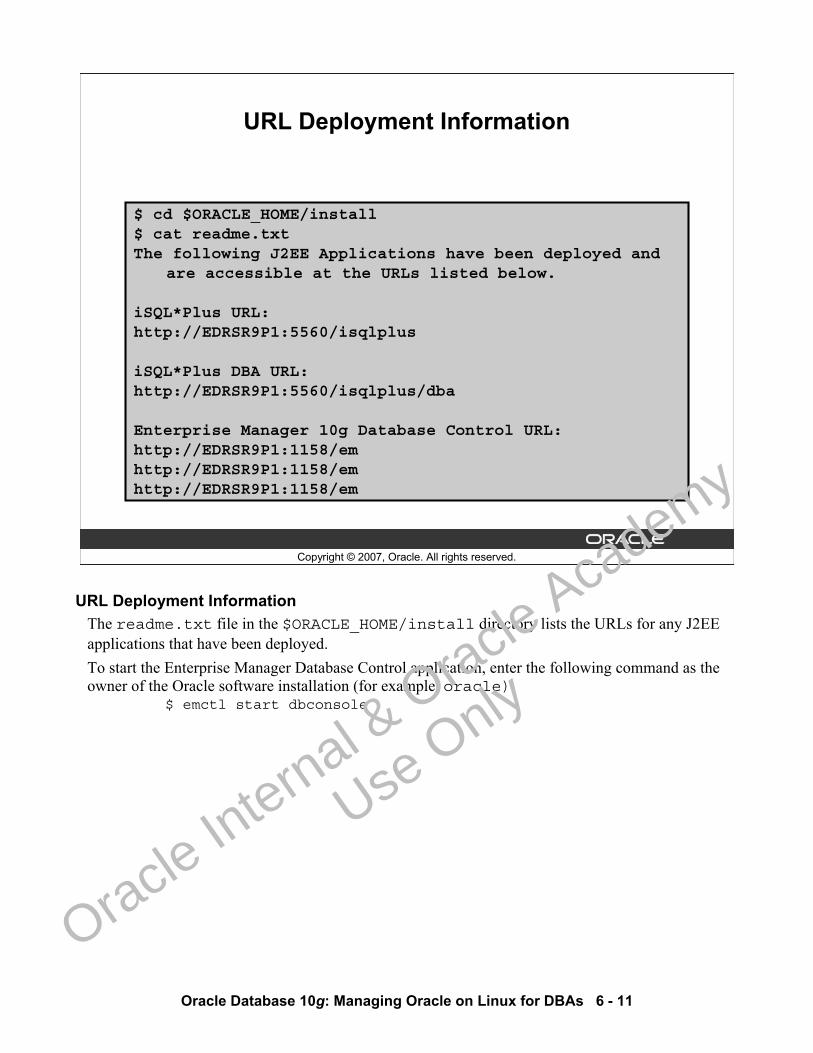
Oracle Database 10g: Managing Oracle on Linux for DBAs 6 - 11
Copyright © 2007, Oracle. All rights reserved.
URL Deployment Information
$ cd $ORACLE_HOME/install$ cat readme.txtThe following J2EE Applications have been deployed and
are accessible at the URLs listed below.
iSQL*Plus URL:http://EDRSR9P1:5560/isqlplus
iSQL*Plus DBA URL:http://EDRSR9P1:5560/isqlplus/dba
Enterprise Manager 10g Database Control URL:http://EDRSR9P1:1158/emhttp://EDRSR9P1:1158/emhttp://EDRSR9P1:1158/em
URL Deployment InformationThe readme.txt file in the $ORACLE_HOME/install directory lists the URLs for any J2EE applications that have been deployed.To start the Enterprise Manager Database Control application, enter the following command as the owner of the Oracle software installation (for example, oracle):
$ emctl start dbconsole
Oracle In
ternal & O
racle Aca
demy
Use O
nly
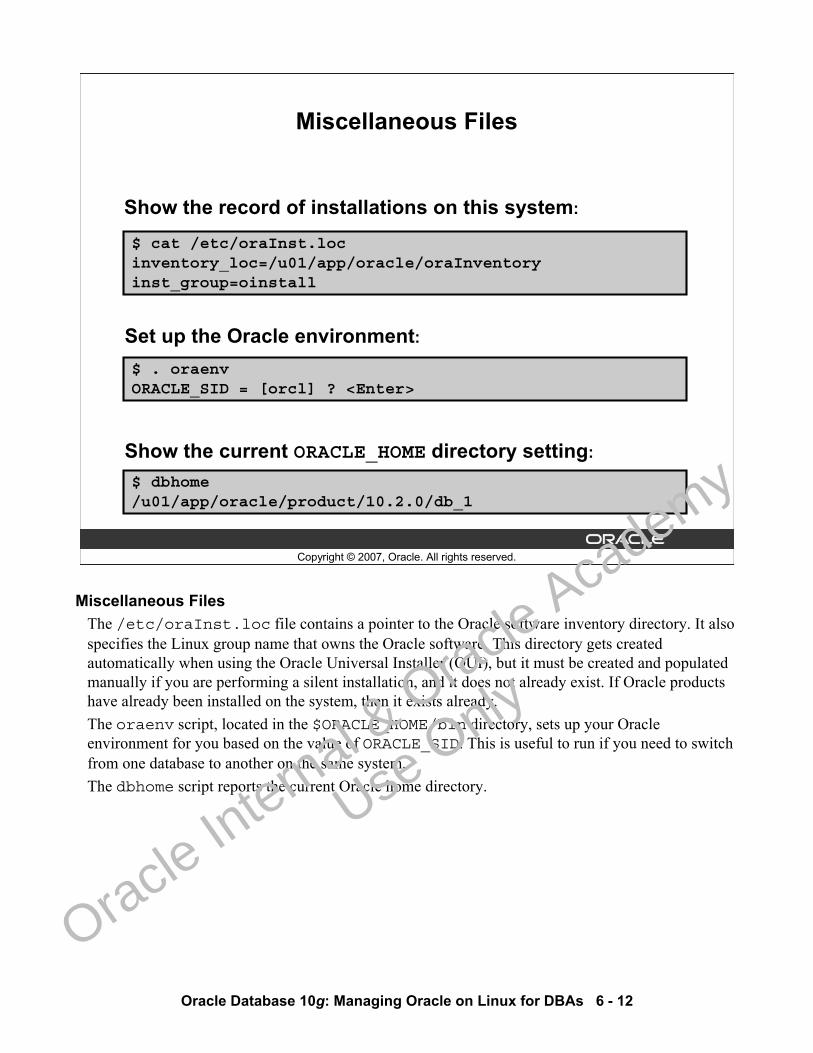
Oracle Database 10g: Managing Oracle on Linux for DBAs 6 - 12
Copyright © 2007, Oracle. All rights reserved.
Miscellaneous Files
$ cat /etc/oraInst.locinventory_loc=/u01/app/oracle/oraInventoryinst_group=oinstall
$ . oraenvORACLE_SID = [orcl] ? <Enter>
$ dbhome/u01/app/oracle/product/10.2.0/db_1
Show the record of installations on this system:
Set up the Oracle environment:
Show the current ORACLE_HOME directory setting:
Miscellaneous FilesThe /etc/oraInst.loc file contains a pointer to the Oracle software inventory directory. It also specifies the Linux group name that owns the Oracle software. This directory gets created automatically when using the Oracle Universal Installer (OUI), but it must be created and populated manually if you are performing a silent installation, and it does not already exist. If Oracle products have already been installed on the system, then it exists already.The oraenv script, located in the $ORACLE_HOME/bin directory, sets up your Oracle environment for you based on the value of ORACLE_SID. This is useful to run if you need to switch from one database to another on the same system.The dbhome script reports the current Oracle home directory.
Oracle In
ternal & O
racle Aca
demy
Use O
nly
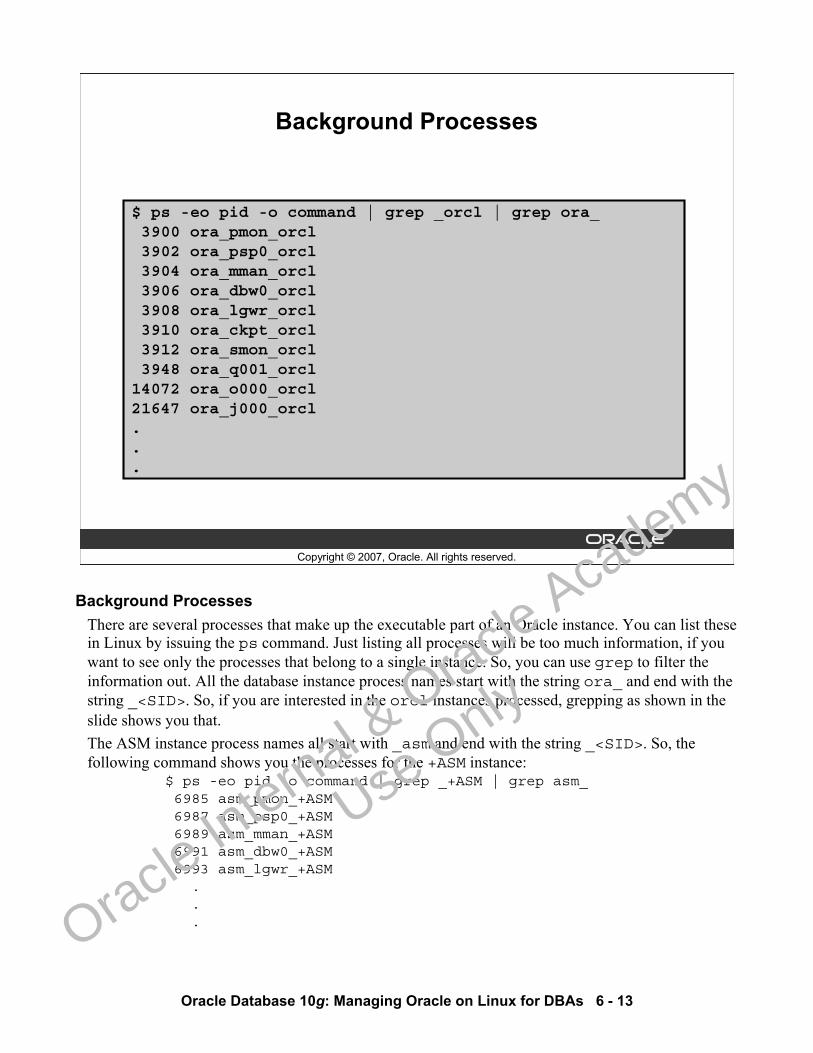
Oracle Database 10g: Managing Oracle on Linux for DBAs 6 - 13
Copyright © 2007, Oracle. All rights reserved.
Background Processes
$ ps -eo pid -o command | grep _orcl | grep ora_3900 ora_pmon_orcl3902 ora_psp0_orcl3904 ora_mman_orcl3906 ora_dbw0_orcl3908 ora_lgwr_orcl3910 ora_ckpt_orcl3912 ora_smon_orcl3948 ora_q001_orcl14072 ora_o000_orcl21647 ora_j000_orcl...
Background ProcessesThere are several processes that make up the executable part of an Oracle instance. You can list these in Linux by issuing the ps command. Just listing all processes will be too much information, if you want to see only the processes that belong to a single instance. So, you can use grep to filter the information out. All the database instance process names start with the string ora_ and end with the string _<SID>. So, if you are interested in the orcl instances processed, grepping as shown in the slide shows you that.The ASM instance process names all start with _asm and end with the string _<SID>. So, the following command shows you the processes for the +ASM instance:
$ ps -eo pid -o command | grep _+ASM | grep asm_6985 asm_pmon_+ASM6987 asm_psp0_+ASM6989 asm_mman_+ASM6991 asm_dbw0_+ASM6993 asm_lgwr_+ASM
.
.
.
Oracle In
ternal & O
racle Aca
demy
Use O
nly
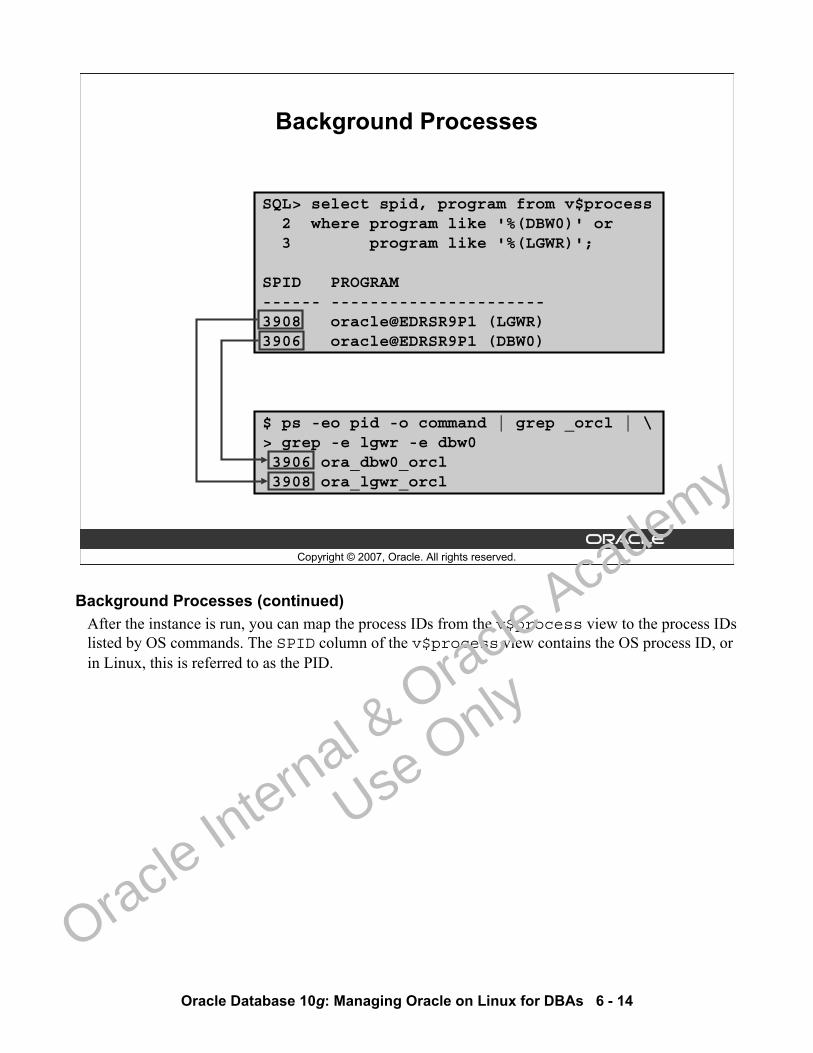
Oracle Database 10g: Managing Oracle on Linux for DBAs 6 - 14
Copyright © 2007, Oracle. All rights reserved.
Background Processes
SQL> select spid, program from v$process2 where program like '%(DBW0)' or3 program like '%(LGWR)';
SPID PROGRAM------ ----------------------3908 oracle@EDRSR9P1 (LGWR)3906 oracle@EDRSR9P1 (DBW0)
$ ps -eo pid -o command | grep _orcl | \> grep -e lgwr -e dbw03906 ora_dbw0_orcl3908 ora_lgwr_orcl
Background Processes (continued)After the instance is run, you can map the process IDs from the v$process view to the process IDs listed by OS commands. The SPID column of the v$process view contains the OS process ID, or in Linux, this is referred to as the PID.
Oracle In
ternal & O
racle Aca
demy
Use O
nly
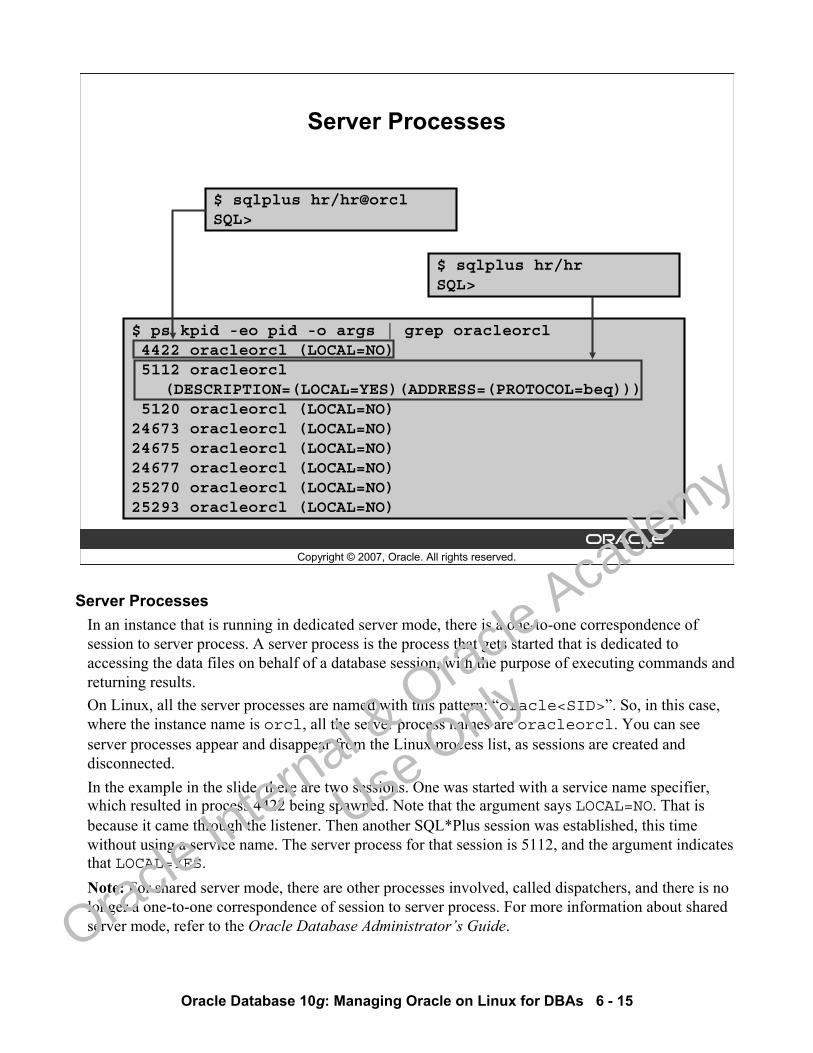
Oracle Database 10g: Managing Oracle on Linux for DBAs 6 - 15
Copyright © 2007, Oracle. All rights reserved.
Server Processes
$ sqlplus hr/hrSQL>
$ sqlplus hr/hr@orclSQL>
$ ps kpid -eo pid -o args | grep oracleorcl4422 oracleorcl (LOCAL=NO)5112 oracleorcl
(DESCRIPTION=(LOCAL=YES)(ADDRESS=(PROTOCOL=beq)))5120 oracleorcl (LOCAL=NO)
24673 oracleorcl (LOCAL=NO)24675 oracleorcl (LOCAL=NO)24677 oracleorcl (LOCAL=NO)25270 oracleorcl (LOCAL=NO)25293 oracleorcl (LOCAL=NO)
Server ProcessesIn an instance that is running in dedicated server mode, there is a one-to-one correspondence of session to server process. A server process is the process that gets started that is dedicated to accessing the data files on behalf of a database session, with the purpose of executing commands and returning results.On Linux, all the server processes are named with this pattern: “oracle<SID>”. So, in this case, where the instance name is orcl, all the server process names are oracleorcl. You can see server processes appear and disappear from the Linux process list, as sessions are created and disconnected.In the example in the slide, there are two sessions. One was started with a service name specifier, which resulted in process 4422 being spawned. Note that the argument says LOCAL=NO. That is because it came through the listener. Then another SQL*Plus session was established, this time without using a service name. The server process for that session is 5112, and the argument indicates that LOCAL=YES.Note: For shared server mode, there are other processes involved, called dispatchers, and there is no longer a one-to-one correspondence of session to server process. For more information about shared server mode, refer to the Oracle Database Administrator’s Guide.
Oracle In
ternal & O
racle Aca
demy
Use O
nly
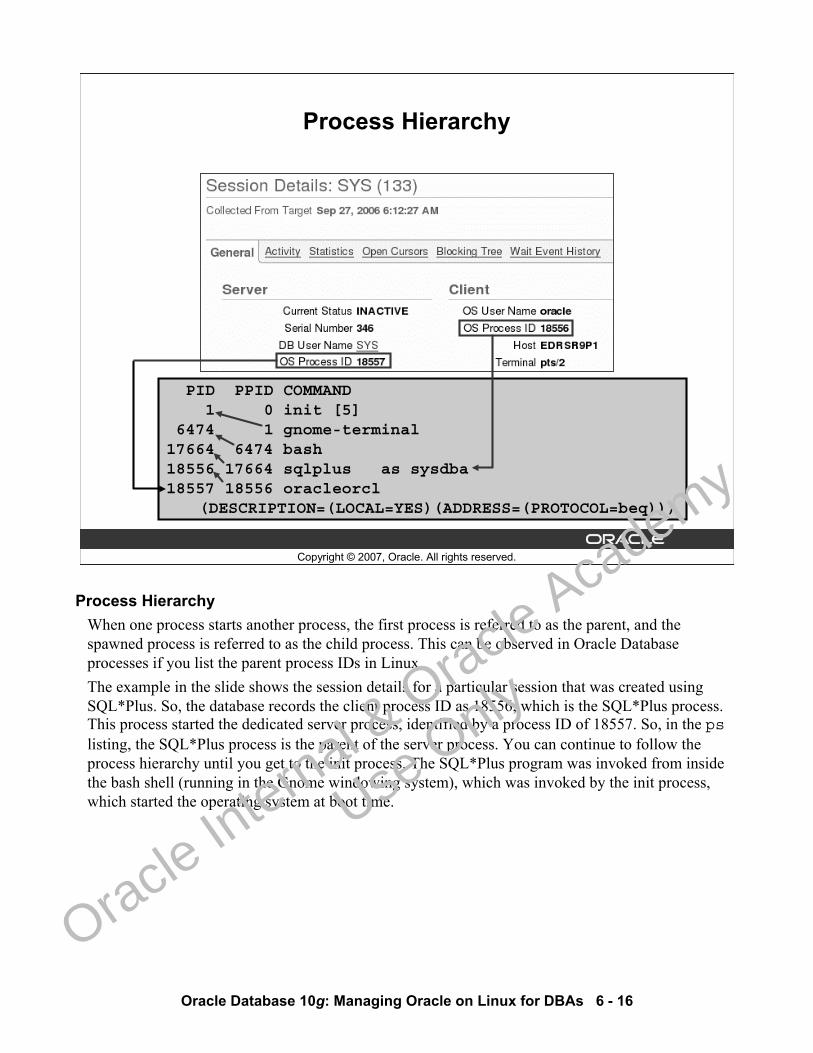
Oracle Database 10g: Managing Oracle on Linux for DBAs 6 - 16
Copyright © 2007, Oracle. All rights reserved.
PID PPID COMMAND1 0 init [5]
6474 1 gnome-terminal17664 6474 bash18556 17664 sqlplus as sysdba18557 18556 oracleorcl
(DESCRIPTION=(LOCAL=YES)(ADDRESS=(PROTOCOL=beq)))
Process Hierarchy
Process HierarchyWhen one process starts another process, the first process is referred to as the parent, and the spawned process is referred to as the child process. This can be observed in Oracle Database processes if you list the parent process IDs in Linux.The example in the slide shows the session details for a particular session that was created using SQL*Plus. So, the database records the client process ID as 18556, which is the SQL*Plus process. This process started the dedicated server process, identified by a process ID of 18557. So, in the pslisting, the SQL*Plus process is the parent of the server process. You can continue to follow the process hierarchy until you get to the init process. The SQL*Plus program was invoked from inside the bash shell (running in the Gnome windowing system), which was invoked by the init process, which started the operating system at boot time.
Oracle In
ternal & O
racle Aca
demy
Use O
nly
Oracle Database 10g: Managing Oracle on Linux for DBAs 6 - 17
Copyright © 2007, Oracle. All rights reserved.
Implementing OS Authentication for DBAs
OS authentication is the provisioning of access to the database based on the OS username rather than a database username, and is implemented by doing the following:1. Create the needed OS accounts for users.2. Define the OSDBA and OSOPER operating system
groups.3. Assign those groups to the users you want
authenticated.4. Set REMOTE_LOGIN_PASSWORDFILE parameter to NONE.
Now, as one of those users, you can log in, including ASSYSDBA or AS SYSOPER in the connect string.
Implementing OS Authentication for DBAsProvisioning of access is the process of authenticating a user to the database, that is, allowing access to it. Operating system authentication is a type of access provisioning that imposes the operating system credentials onto the database, allowing the database to discern access based on that, rather than the database requiring username and password information. By default, the database is configured to allow certain users to connect without a password. The database considers the OS to be trusted to provide the authentication service. The configuration shown is for privileged users and is configured by default when using the Oracle Universal Installer. A privileged user is granted the SYSDBA or SYSOPER privilege. Any OS user that is a member of the OSDBA group, named dba by default, can connect to the database with “/ as SYSDBA” included in the connect string.
Oracle In
ternal & O
racle Aca
demy
Use O
nly

Oracle Database 10g: Managing Oracle on Linux for DBAs 6 - 18
Copyright © 2007, Oracle. All rights reserved.
Summary
In this lesson, you should have learned how to:• Create an Oracle database that uses ASM• Identify the location of various Oracle files• Implement OS authentication
Oracle In
ternal & O
racle Aca
demy
Use O
nly
Oracle Database 10g: Managing Oracle on Linux for DBAs 6 - 19
Copyright © 2007, Oracle. All rights reserved.
Practice 6 Overview:Creating a Database
This practice covers the following topics:• Creating a database that uses ASM storage• Interrogating the installation
Oracle In
ternal & O
racle Aca
demy
Use O
nly

Oracle In
ternal & O
racle Aca
demy
Use O
nly
Copyright © 2007, Oracle. All rights reserved.
Customizing Oracle on Linux
Oracle In
ternal & O
racle Aca
demy
Use O
nly

Oracle Database 10g: Managing Oracle on Linux for DBAs 7 - 2
Copyright © 2007, Oracle. All rights reserved.
Objectives
After completing this lesson, you should be able to:• Create automated startup/shutdown scripts• Automate tasks using scheduling tools• Configure Linux startup and shutdown sequence
Oracle In
ternal & O
racle Aca
demy
Use O
nly
Oracle Database 10g: Managing Oracle on Linux for DBAs 7 - 3
Copyright © 2007, Oracle. All rights reserved.
Controlling Oracle Database
After a server restart, all Oracle processes will be stopped by default. In order for the database server to be used, they must be started in one of the following ways:• Manually• Automatically
Controlling Oracle DatabaseBy default, the database instance and its related services do not start when the Linux server is started. Depending on your needs you will want to start all or some of the following services:
• Database Listener• ASM Instance• Database Instance• DB Console• iSQL*Plus
These can be started manually through standard commands:• lsnrctl start• sqlplus “/ as sysdba” and then execute the startup command• emctl start dbconsole• isqlplusctl start
Or, they can be started automatically. The next few pages discuss how to start the Oracle database and related services automatically.
Oracle In
ternal & O
racle Aca
demy
Use O
nly
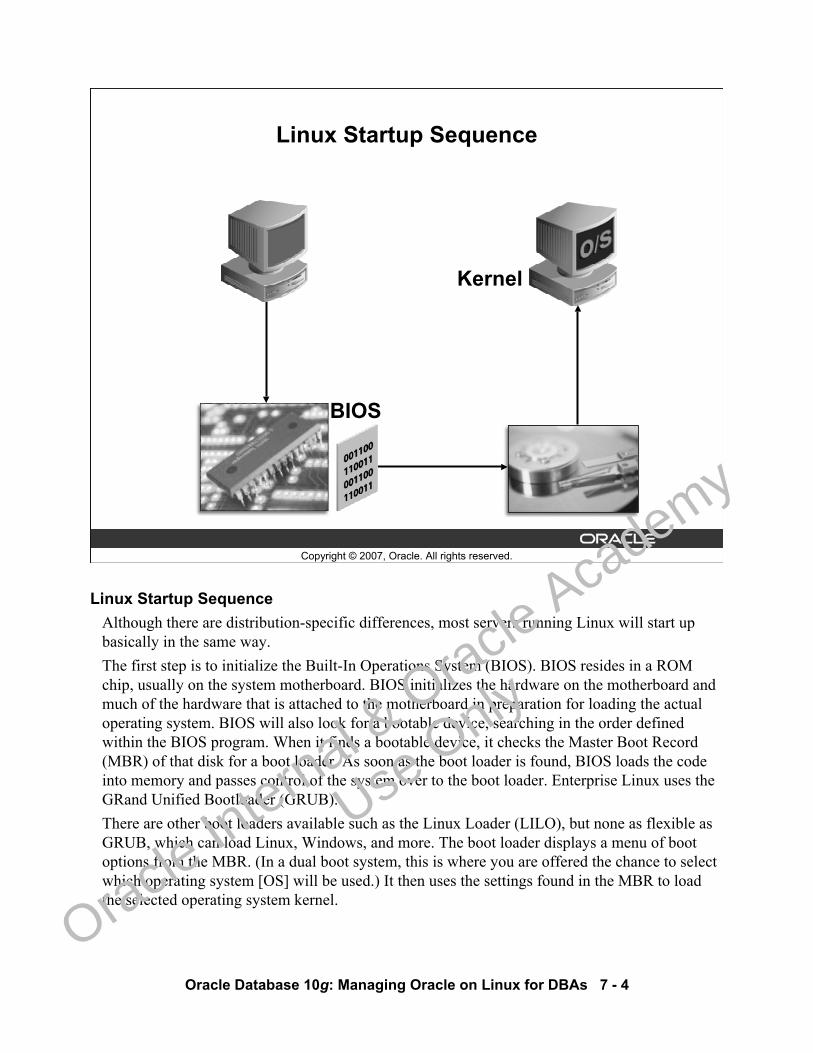
Oracle Database 10g: Managing Oracle on Linux for DBAs 7 - 4
Copyright © 2007, Oracle. All rights reserved.
Linux Startup Sequence
Kernel
BIOS
Linux Startup Sequence Although there are distribution-specific differences, most servers running Linux will start up basically in the same way.The first step is to initialize the Built-In Operations System (BIOS). BIOS resides in a ROM chip, usually on the system motherboard. BIOS initializes the hardware on the motherboard and much of the hardware that is attached to the motherboard in preparation for loading the actual operating system. BIOS will also look for a bootable device, searching in the order defined within the BIOS program. When it finds a bootable device, it checks the Master Boot Record (MBR) of that disk for a boot loader. As soon as the boot loader is found, BIOS loads the code into memory and passes control of the system over to the boot loader. Enterprise Linux uses the GRand Unified Bootloader (GRUB).There are other boot loaders available such as the Linux Loader (LILO), but none as flexible as GRUB, which can load Linux, Windows, and more. The boot loader displays a menu of boot options from the MBR. (In a dual boot system, this is where you are offered the chance to select which operating system [OS] will be used.) It then uses the settings found in the MBR to load the selected operating system kernel.
Oracle In
ternal & O
racle Aca
demy
Use O
nly
Oracle Database 10g: Managing Oracle on Linux for DBAs 7 - 5
Linux Startup Sequence (continued)After the kernel is loaded, it checks /sbin and starts the init process. This is process number one. The init process reads /etc/inittab, which contains instructions telling the kernel to run a basic setup script that describes actions such as how to set the system clock, where the swap file is located, and what the global environment variables are.In Enterprise Linux, that basic setup script is /etc/rc.d/rc.sysinit.Here is where you become concerned as the administrator. After the basic setup script is run, the init process continues reading /etc/inittab and makes its decisions on what to do next based on which of the seven runlevels you have booted to. The runlevel you select will determine who can log on, how many users can be logged on, and what services are available. The runlevels are described in detail later in the lesson.In Enterprise Linux, there are a series of directories under /etc/rc.d with names such as rc0.d, rc1.d…rc6.d. For example, if you were to boot to runlevel 5 (the default), then the init process would run scripts located in rc5.d. On most systems, you will find that the scripts are not actually in these directories, rather there are links to the scripts.
Oracle In
ternal & O
racle Aca
demy
Use O
nly
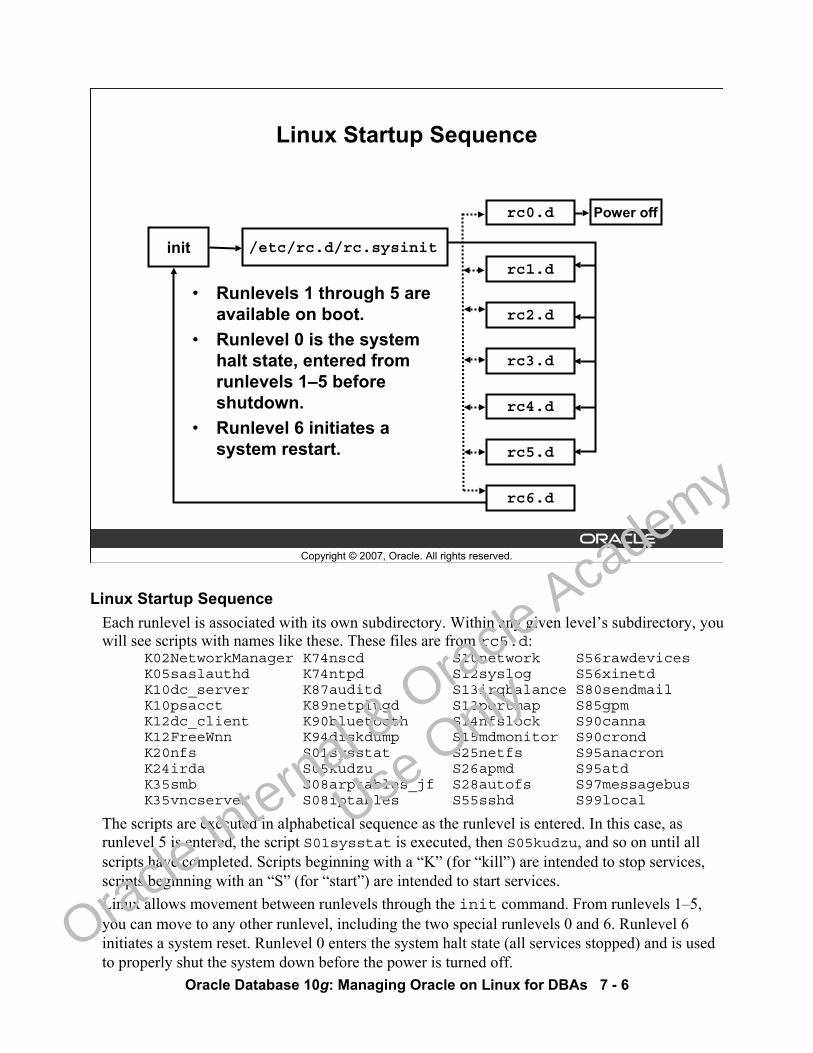
Oracle Database 10g: Managing Oracle on Linux for DBAs 7 - 6
Copyright © 2007, Oracle. All rights reserved.
Linux Startup Sequence
• Runlevels 1 through 5 are available on boot.
• Runlevel 0 is the system halt state, entered from runlevels 1–5 before shutdown.
• Runlevel 6 initiates a system restart.
rc0.d
rc1.d
rc2.d
rc3.d
rc4.d
rc5.d
/etc/rc.d/rc.sysinit
rc6.d
init
Power off
Linux Startup SequenceEach runlevel is associated with its own subdirectory. Within any given level’s subdirectory, you will see scripts with names like these. These files are from rc5.d:
K02NetworkManager K74nscd S10network S56rawdevicesK05saslauthd K74ntpd S12syslog S56xinetdK10dc_server K87auditd S13irqbalance S80sendmailK10psacct K89netplugd S13portmap S85gpmK12dc_client K90bluetooth S14nfslock S90cannaK12FreeWnn K94diskdump S15mdmonitor S90crondK20nfs S01sysstat S25netfs S95anacronK24irda S05kudzu S26apmd S95atdK35smb S08arptables_jf S28autofs S97messagebusK35vncserver S08iptables S55sshd S99local
The scripts are executed in alphabetical sequence as the runlevel is entered. In this case, as runlevel 5 is entered, the script S01sysstat is executed, then S05kudzu, and so on until all scripts have completed. Scripts beginning with a “K” (for “kill”) are intended to stop services, scripts beginning with an “S” (for “start”) are intended to start services. Linux allows movement between runlevels through the init command. From runlevels 1–5, you can move to any other runlevel, including the two special runlevels 0 and 6. Runlevel 6 initiates a system reset. Runlevel 0 enters the system halt state (all services stopped) and is used to properly shut the system down before the power is turned off.
Oracle In
ternal & O
racle Aca
demy
Use O
nly
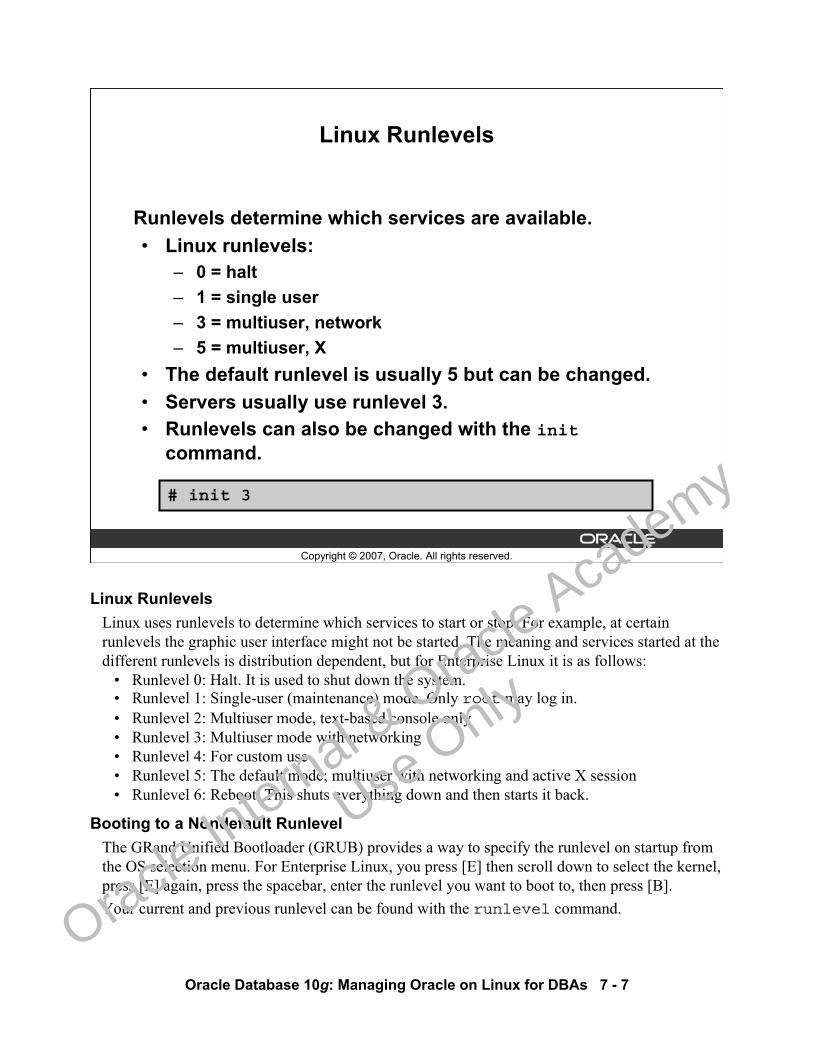
Oracle Database 10g: Managing Oracle on Linux for DBAs 7 - 7
Copyright © 2007, Oracle. All rights reserved.
Linux Runlevels
Runlevels determine which services are available.• Linux runlevels:
– 0 = halt– 1 = single user– 3 = multiuser, network – 5 = multiuser, X
• The default runlevel is usually 5 but can be changed.• Servers usually use runlevel 3.• Runlevels can also be changed with the init
command.
# init 3
Linux RunlevelsLinux uses runlevels to determine which services to start or stop. For example, at certain runlevels the graphic user interface might not be started. The meaning and services started at the different runlevels is distribution dependent, but for Enterprise Linux it is as follows:
• Runlevel 0: Halt. It is used to shut down the system. • Runlevel 1: Single-user (maintenance) mode. Only root may log in. • Runlevel 2: Multiuser mode, text-based console only• Runlevel 3: Multiuser mode with networking• Runlevel 4: For custom use• Runlevel 5: The default mode; multiuser with networking and active X session• Runlevel 6: Reboot. This shuts everything down and then starts it back.
Booting to a Nondefault RunlevelThe GRand Unified Bootloader (GRUB) provides a way to specify the runlevel on startup from the OS selection menu. For Enterprise Linux, you press [E] then scroll down to select the kernel, press [E] again, press the spacebar, enter the runlevel you want to boot to, then press [B].Your current and previous runlevel can be found with the runlevel command.
Oracle In
ternal & O
racle Aca
demy
Use O
nly
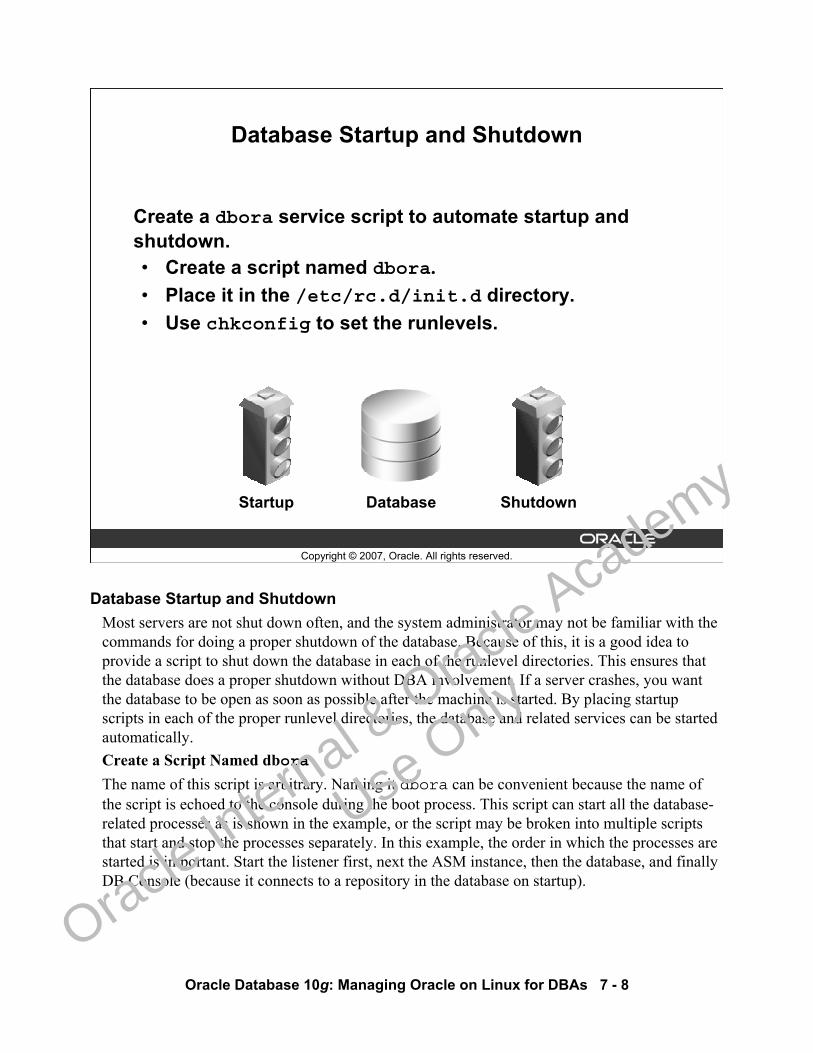
Oracle Database 10g: Managing Oracle on Linux for DBAs 7 - 8
Copyright © 2007, Oracle. All rights reserved.
Database Startup and Shutdown
Create a dbora service script to automate startup and shutdown.• Create a script named dbora.• Place it in the /etc/rc.d/init.d directory.• Use chkconfig to set the runlevels.
Startup ShutdownDatabase
Database Startup and ShutdownMost servers are not shut down often, and the system administrator may not be familiar with the commands for doing a proper shutdown of the database. Because of this, it is a good idea to provide a script to shut down the database in each of the runlevel directories. This ensures that the database does a proper shutdown without DBA involvement. If a server crashes, you want the database to be open as soon as possible after the machine is started. By placing startup scripts in each of the proper runlevel directories, the database and related services can be started automatically.Create a Script Named dboraThe name of this script is arbitrary. Naming it dbora can be convenient because the name of the script is echoed to the console during the boot process. This script can start all the database-related processes as is shown in the example, or the script may be broken into multiple scripts that start and stop the processes separately. In this example, the order in which the processes are started is important. Start the listener first, next the ASM instance, then the database, and finally DB Console (because it connects to a repository in the database on startup).
Oracle In
ternal & O
racle Aca
demy
Use O
nly
Oracle Database 10g: Managing Oracle on Linux for DBAs 7 - 9
Database Startup and Shutdown (continued)The stop commands are in sequence and the database is stopped in the end. Any process that is not stopped here is stopped by the killall command later during the shutdown process. Enterprise Linux uses a subsystem lock file at /var/lock/subsys/<service_name>. The stop script runs only if the lock file exists.
Oracle In
ternal & O
racle Aca
demy
Use O
nly
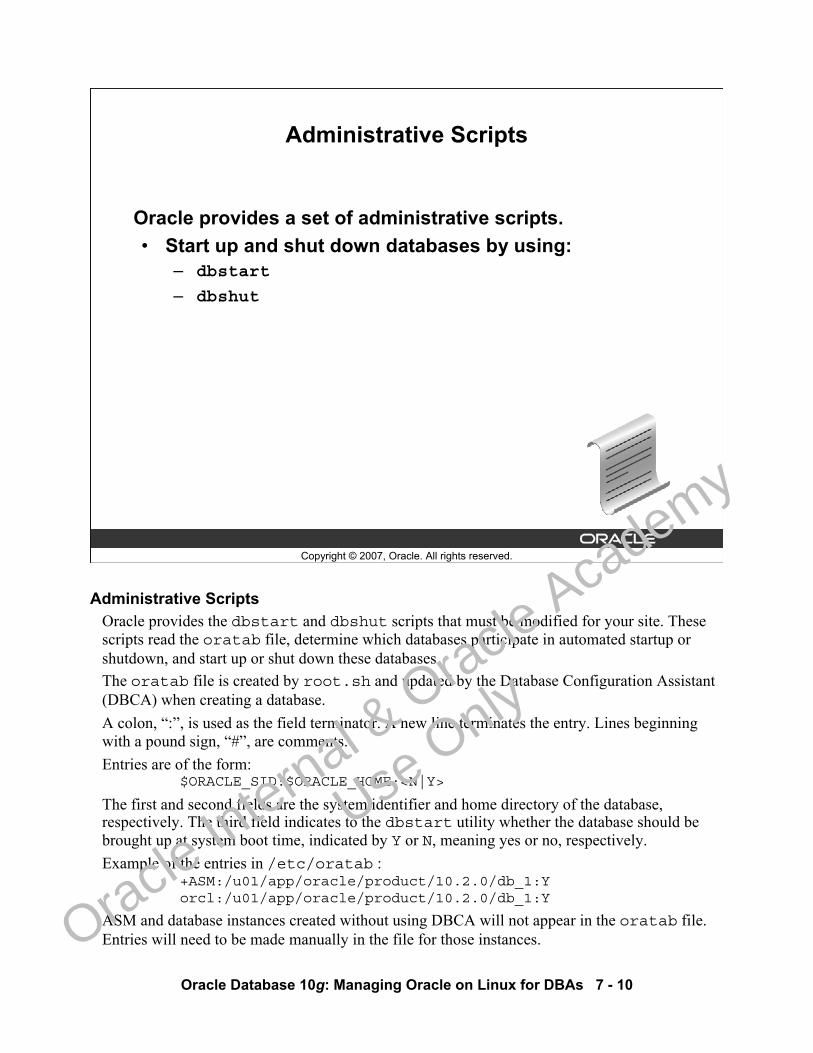
Oracle Database 10g: Managing Oracle on Linux for DBAs 7 - 10
Copyright © 2007, Oracle. All rights reserved.
Administrative Scripts
Oracle provides a set of administrative scripts.• Start up and shut down databases by using:
– dbstart
– dbshut
Administrative ScriptsOracle provides the dbstart and dbshut scripts that must be modified for your site. These scripts read the oratab file, determine which databases participate in automated startup or shutdown, and start up or shut down these databases.The oratab file is created by root.sh and updated by the Database Configuration Assistant (DBCA) when creating a database. A colon, “:”, is used as the field terminator. A new line terminates the entry. Lines beginning with a pound sign, “#”, are comments.Entries are of the form:
$ORACLE_SID:$ORACLE_HOME:<N|Y>
The first and second fields are the system identifier and home directory of the database, respectively. The third field indicates to the dbstart utility whether the database should be brought up at system boot time, indicated by Y or N, meaning yes or no, respectively.Example of the entries in /etc/oratab :
+ASM:/u01/app/oracle/product/10.2.0/db_1:Yorcl:/u01/app/oracle/product/10.2.0/db_1:Y
ASM and database instances created without using DBCA will not appear in the oratab file. Entries will need to be made manually in the file for those instances.
Oracle In
ternal & O
racle Aca
demy
Use O
nly
Oracle Database 10g: Managing Oracle on Linux for DBAs 7 - 11
Administrative Scripts (continued)dbstart
dbstart first starts the listener, then scans oratab twice. Databases that use ASM for managing storage require the ASM instance to be started before the database instance. On the first scan, dbstart looks for ASM instances with a “Y” in the third field. Values of $ORACLE_SID which start with a “+” denote an ASM instance. When found the instances are started. On the second scan, the script looks for database instances with a “Y” in the third field. The dbstart script that is provided with 10.2.0.1.0 contains an error. The Metalink note 336299.1 documents this issue. To solve this problem, perform the following steps:
1. Edit $ORACLE_HOME/bin/dbstart2. Go to line 78.3. Replace the line with:
ORACLE_HOME_LISTNER=$ORACLE_HOME
4. Save the file and exit the editor.5. Execute dbstart.
The script can be customized to start other utilities, such as DB Control.dbshut
The dbshut performs shutdown immediate. This mode terminates all connections and then shuts down the database. The dbshut script can be modified to shut down DB Console before shutting down the database. This would allow for a faster shutdown of the database.
Oracle In
ternal & O
racle Aca
demy
Use O
nly
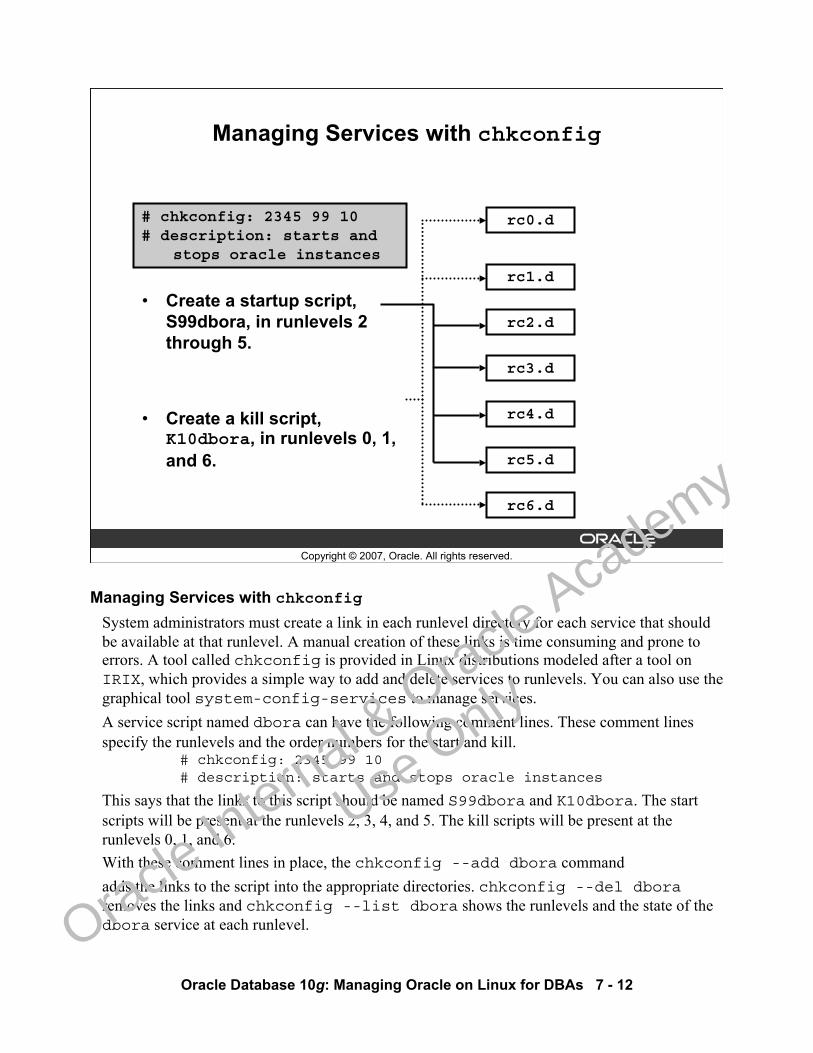
Oracle Database 10g: Managing Oracle on Linux for DBAs 7 - 12
Copyright © 2007, Oracle. All rights reserved.
Managing Services with chkconfig
• Create a startup script, S99dbora, in runlevels 2 through 5.
• Create a kill script, K10dbora, in runlevels 0, 1, and 6.
rc0.d
rc1.d
rc2.d
rc3.d
rc4.d
rc5.d
rc6.d
# chkconfig: 2345 99 10# description: starts and
stops oracle instances
Managing Services with chkconfigSystem administrators must create a link in each runlevel directory for each service that should be available at that runlevel. A manual creation of these links is time consuming and prone to errors. A tool called chkconfig is provided in Linux distributions modeled after a tool on IRIX, which provides a simple way to add and delete services to runlevels. You can also use the graphical tool system-config-services to manage services.A service script named dbora can have the following comment lines. These comment lines specify the runlevels and the order numbers for the start and kill.
# chkconfig: 2345 99 10# description: starts and stops oracle instances
This says that the links to this script should be named S99dbora and K10dbora. The start scripts will be present at the runlevels 2, 3, 4, and 5. The kill scripts will be present at the runlevels 0, 1, and 6.With these comment lines in place, the chkconfig --add dbora command adds the links to the script into the appropriate directories. chkconfig --del dboraremoves the links and chkconfig --list dbora shows the runlevels and the state of the dbora service at each runlevel.
Oracle In
ternal & O
racle Aca
demy
Use O
nly
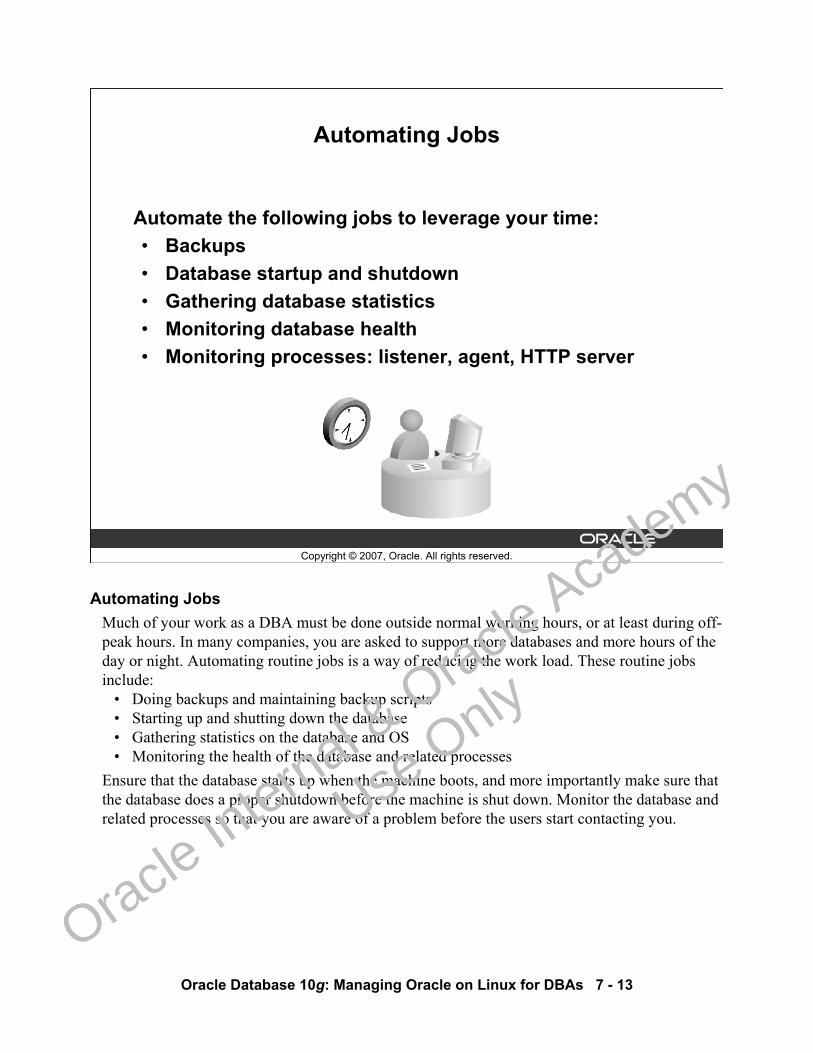
Oracle Database 10g: Managing Oracle on Linux for DBAs 7 - 13
Copyright © 2007, Oracle. All rights reserved.
Automating Jobs
Automate the following jobs to leverage your time:• Backups• Database startup and shutdown • Gathering database statistics• Monitoring database health• Monitoring processes: listener, agent, HTTP server
Automating JobsMuch of your work as a DBA must be done outside normal working hours, or at least during off-peak hours. In many companies, you are asked to support more databases and more hours of the day or night. Automating routine jobs is a way of reducing the work load. These routine jobs include:
• Doing backups and maintaining backup scripts • Starting up and shutting down the database• Gathering statistics on the database and OS• Monitoring the health of the database and related processes
Ensure that the database starts up when the machine boots, and more importantly make sure that the database does a proper shutdown before the machine is shut down. Monitor the database and related processes so that you are aware of a problem before the users start contacting you.
Oracle In
ternal & O
racle Aca
demy
Use O
nly
Oracle Database 10g: Managing Oracle on Linux for DBAs 7 - 14
Copyright © 2007, Oracle. All rights reserved.
OS Scheduling Tools
Linux offers the standard UNIX tools for scheduling:• cron and anacron• at and batch• Task Scheduler
OS Scheduling Tools Linux offers several scheduling tools that usually are a variation of the standard cron and attools, or a GUI for one of these tools. Task Scheduler is one of these user interfaces that makes cron and at easier to use. cron
The system cron daemon is started as part of the boot process. Security for cron is handled by the system administrator by using the /etc/cron.allow and /etc/cron.deny files. Only users listed in the /etc/cron.allow file are allowed to use cron, users listed in the /etc/cron.deny file cannot use cron. If neither of these files exist, only the superuser is allowed to use cron. The cron daemon checks the system-level schedule in the /etc/crontab file and user-level schedules in the /var/spool/cron directory. In Enterprise Linux, there is also a set of directories /etc/cron.hourly, /etc/cron.daily, /etc/cron.weekly, and /etc/cron.monthly that hold executable scripts. If the system administrator puts an executable script into one of these directories, then cron runs the script at the appropriate interval.
Oracle In
ternal & O
racle Aca
demy
Use O
nly
Oracle Database 10g: Managing Oracle on Linux for DBAs 7 - 15
OS Scheduling Tools (continued)cron (continued)The format of an entry in the crontab file is <minute> <hour> <day> <month> <weekday> <cmd>. If any of these fields has a “*”, then the meaning is “every.” A crontabentry to run a backup script might look like the following:14 22 * * 1-5 su - oracle -c /usr/local/bin/backup.cmd >/dev/null 2>&1
This command runs 14 minutes after 10 p.m. every weekday of every month, Monday through Friday. The command says, log in as the oracle owner and execute backup.cmd, sending the standard out to /dev/null, the bit bucket, and standard error to the same place.anacron
It is an interesting variation of cron that does not require the system to be running continuously. The anacron daemon periodically checks the /etc/anacrontab file, and verifies whether the task has been executed within the time specified in the Period field of the configuration file. If not, anacron executes the command specified after waiting for the number of minutes specified in the Delay field.at and batchThe at command executes a command once at a specified time, as opposed to cron that executes recurring commands. The atd daemon runs the at commands and the batchcommands. The batch commands wait until the system load average drops below 0.8, and then executes the given commands.Task SchedulerThere are GUI task schedulers available that are front ends for cron in both the Gnome and the K(ommon) Desktop Environment (KDE).
Oracle In
ternal & O
racle Aca
demy
Use O
nly
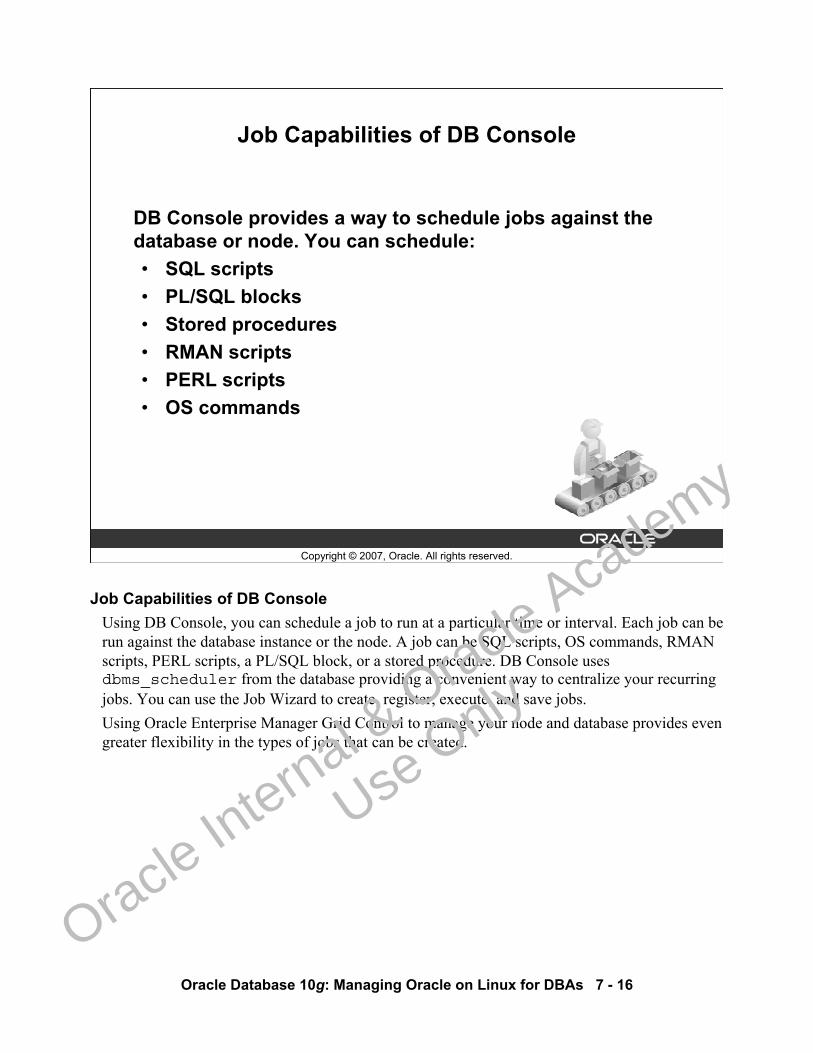
Oracle Database 10g: Managing Oracle on Linux for DBAs 7 - 16
Copyright © 2007, Oracle. All rights reserved.
Job Capabilities of DB Console
DB Console provides a way to schedule jobs against the database or node. You can schedule:• SQL scripts• PL/SQL blocks• Stored procedures• RMAN scripts• PERL scripts• OS commands
Job Capabilities of DB ConsoleUsing DB Console, you can schedule a job to run at a particular time or interval. Each job can be run against the database instance or the node. A job can be SQL scripts, OS commands, RMAN scripts, PERL scripts, a PL/SQL block, or a stored procedure. DB Console uses dbms_scheduler from the database providing a convenient way to centralize your recurring jobs. You can use the Job Wizard to create, register, execute, and save jobs. Using Oracle Enterprise Manager Grid Control to manage your node and database provides even greater flexibility in the types of jobs that can be created.
Oracle In
ternal & O
racle Aca
demy
Use O
nly
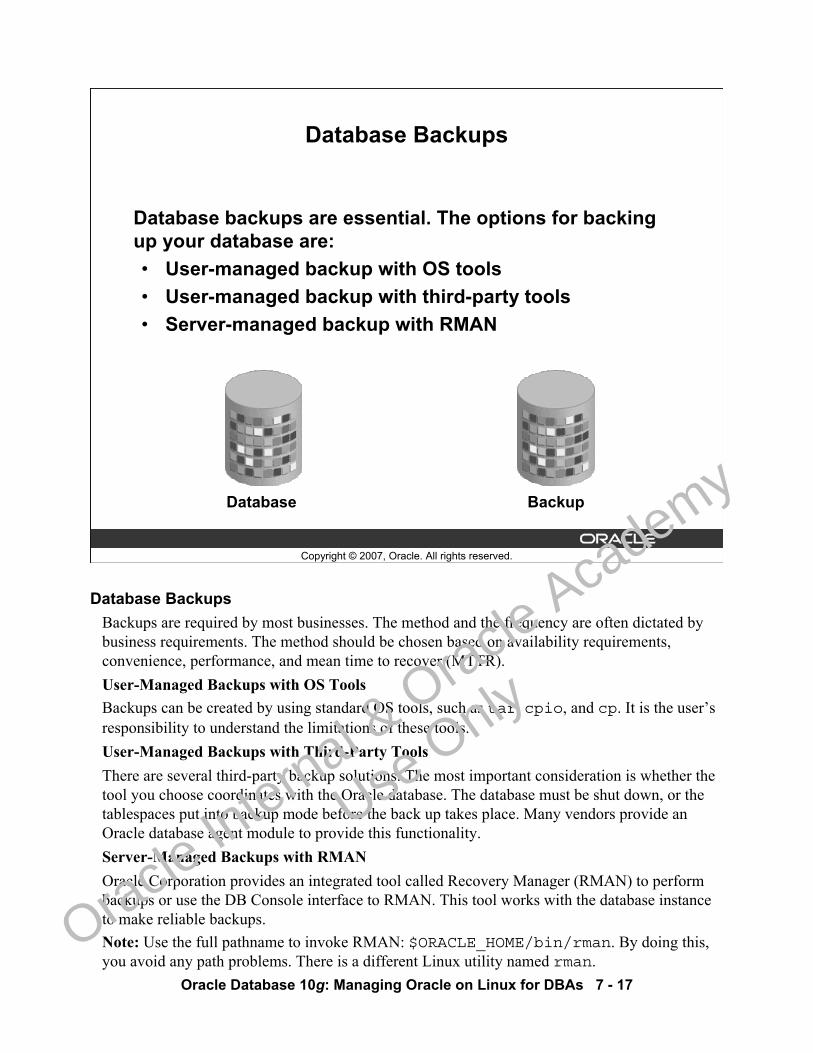
Oracle Database 10g: Managing Oracle on Linux for DBAs 7 - 17
Copyright © 2007, Oracle. All rights reserved.
Database Backups
Database backups are essential. The options for backing up your database are:• User-managed backup with OS tools• User-managed backup with third-party tools• Server-managed backup with RMAN
Database Backup
Database BackupsBackups are required by most businesses. The method and the frequency are often dictated by business requirements. The method should be chosen based on availability requirements, convenience, performance, and mean time to recover (MTTR).User-Managed Backups with OS ToolsBackups can be created by using standard OS tools, such as tar, cpio, and cp. It is the user’s responsibility to understand the limitations of these tools. User-Managed Backups with Third-Party ToolsThere are several third-party backup solutions. The most important consideration is whether the tool you choose coordinates with the Oracle database. The database must be shut down, or the tablespaces put into backup mode before the back up takes place. Many vendors provide an Oracle database agent module to provide this functionality. Server-Managed Backups with RMANOracle Corporation provides an integrated tool called Recovery Manager (RMAN) to perform backups or use the DB Console interface to RMAN. This tool works with the database instance to make reliable backups. Note: Use the full pathname to invoke RMAN: $ORACLE_HOME/bin/rman. By doing this, you avoid any path problems. There is a different Linux utility named rman.
Oracle In
ternal & O
racle Aca
demy
Use O
nly
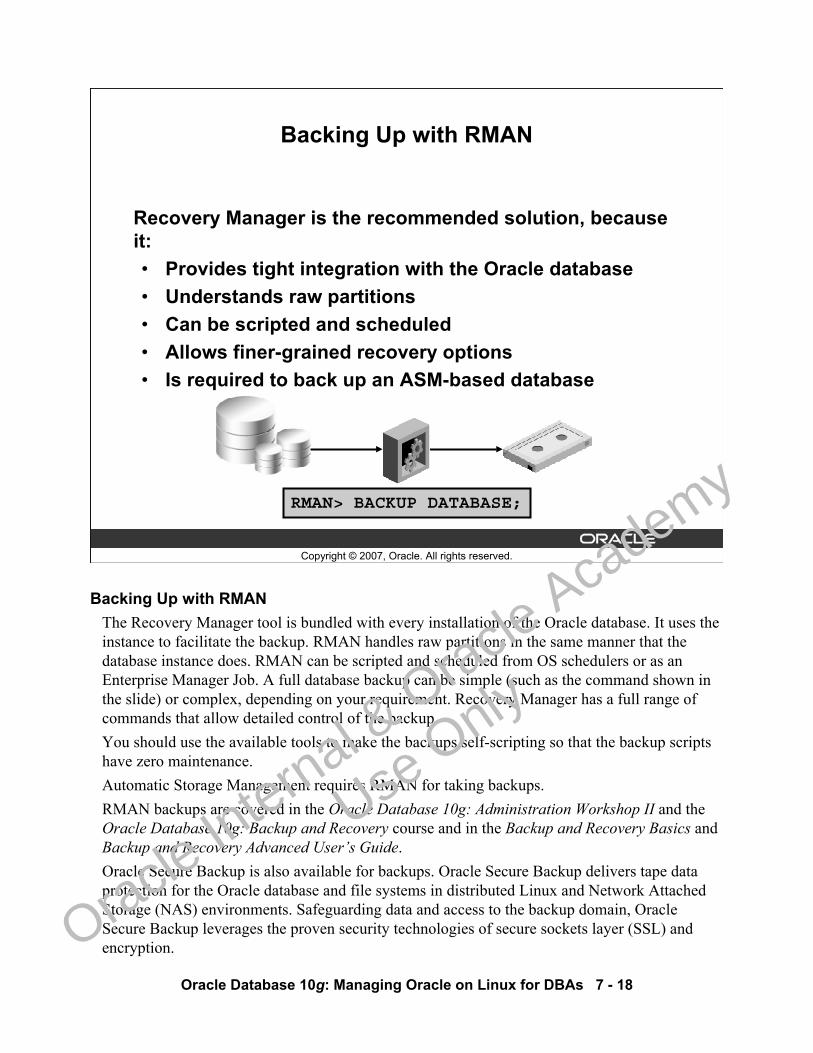
Oracle Database 10g: Managing Oracle on Linux for DBAs 7 - 18
Copyright © 2007, Oracle. All rights reserved.
Backing Up with RMAN
Recovery Manager is the recommended solution, because it:• Provides tight integration with the Oracle database • Understands raw partitions• Can be scripted and scheduled• Allows finer-grained recovery options• Is required to back up an ASM-based database
RMAN> BACKUP DATABASE;
Backing Up with RMANThe Recovery Manager tool is bundled with every installation of the Oracle database. It uses the instance to facilitate the backup. RMAN handles raw partitions in the same manner that the database instance does. RMAN can be scripted and scheduled from OS schedulers or as an Enterprise Manager Job. A full database backup can be simple (such as the command shown in the slide) or complex, depending on your requirement. Recovery Manager has a full range of commands that allow detailed control of the backup.You should use the available tools to make the backups self-scripting so that the backup scripts have zero maintenance.Automatic Storage Management requires RMAN for taking backups.RMAN backups are covered in the Oracle Database 10g: Administration Workshop II and theOracle Database 10g: Backup and Recovery course and in the Backup and Recovery Basics and Backup and Recovery Advanced User’s Guide.Oracle Secure Backup is also available for backups. Oracle Secure Backup delivers tape data protection for the Oracle database and file systems in distributed Linux and Network Attached Storage (NAS) environments. Safeguarding data and access to the backup domain, Oracle Secure Backup leverages the proven security technologies of secure sockets layer (SSL) and encryption.
Oracle In
ternal & O
racle Aca
demy
Use O
nly
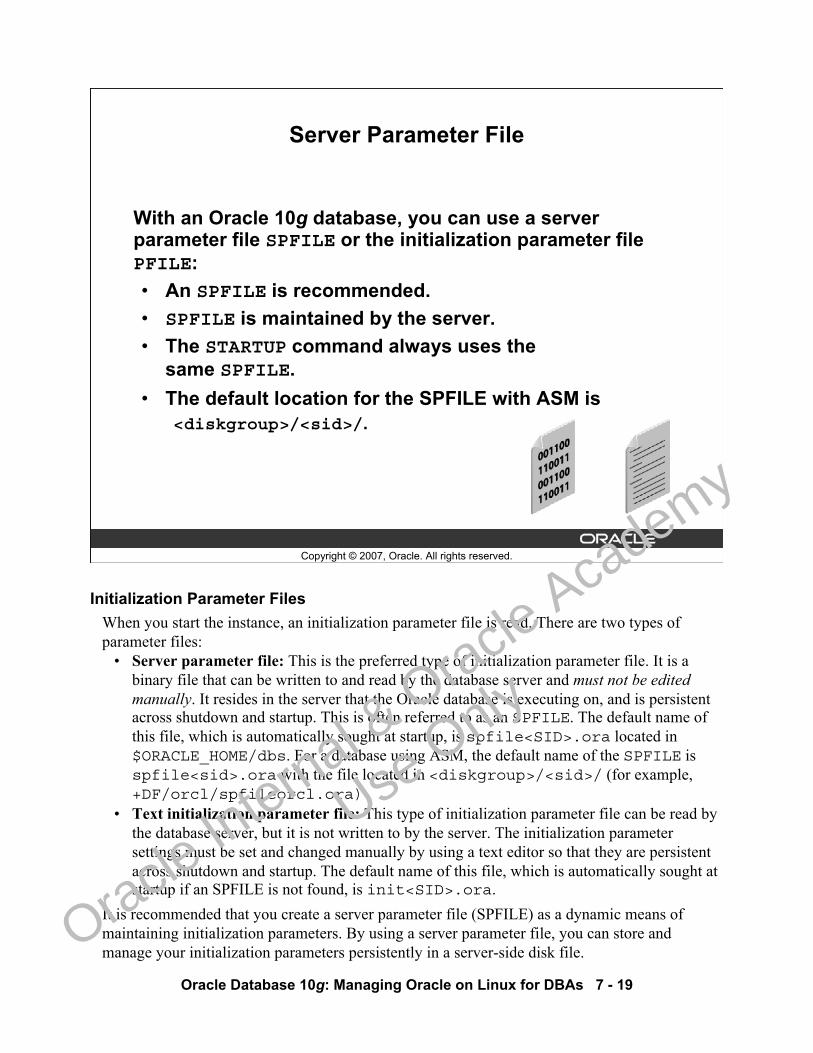
Oracle Database 10g: Managing Oracle on Linux for DBAs 7 - 19
Copyright © 2007, Oracle. All rights reserved.
Server Parameter File
With an Oracle 10g database, you can use a server parameter file SPFILE or the initialization parameter file PFILE:• An SPFILE is recommended.• SPFILE is maintained by the server.• The STARTUP command always uses the
same SPFILE.• The default location for the SPFILE with ASM is
<diskgroup>/<sid>/.
Initialization Parameter FilesWhen you start the instance, an initialization parameter file is read. There are two types of parameter files:
• Server parameter file: This is the preferred type of initialization parameter file. It is a binary file that can be written to and read by the database server and must not be edited manually. It resides in the server that the Oracle database is executing on, and is persistent across shutdown and startup. This is often referred to as an SPFILE. The default name of this file, which is automatically sought at startup, is spfile<SID>.ora located in $ORACLE_HOME/dbs. For a database using ASM, the default name of the SPFILE is spfile<sid>.ora with the file located in <diskgroup>/<sid>/ (for example, +DF/orcl/spfileorcl.ora)
• Text initialization parameter file: This type of initialization parameter file can be read by the database server, but it is not written to by the server. The initialization parameter settings must be set and changed manually by using a text editor so that they are persistent across shutdown and startup. The default name of this file, which is automatically sought at startup if an SPFILE is not found, is init<SID>.ora.
It is recommended that you create a server parameter file (SPFILE) as a dynamic means of maintaining initialization parameters. By using a server parameter file, you can store and manage your initialization parameters persistently in a server-side disk file.
Oracle In
ternal & O
racle Aca
demy
Use O
nly

Oracle Database 10g: Managing Oracle on Linux for DBAs 7 - 20
Copyright © 2007, Oracle. All rights reserved.
Summary
In this lesson, you should have learned how to:• Create automated startup/shutdown scripts• Automate tasks using scheduling tools• Configure Linux startup and shutdown sequence
Oracle In
ternal & O
racle Aca
demy
Use O
nly
Oracle Database 10g: Managing Oracle on Linux for DBAs 7 - 21
Copyright © 2007, Oracle. All rights reserved.
Practice 7 Overview: Automating Tasks
This practice covers the following topics:• Automating the startup and shutdown of
the database• Adding starting and stopping DB Control to dbstart
and dbshut
Practice 7 Overview: Automating TasksFor detailed instructions on performing this practice, see Practice 7 in Appendix A.
Oracle In
ternal & O
racle Aca
demy
Use O
nly

Oracle In
ternal & O
racle Aca
demy
Use O
nly
Copyright © 2007, Oracle. All rights reserved.
Managing Memory
Oracle In
ternal & O
racle Aca
demy
Use O
nly
Oracle Database 10g: Managing Oracle on Linux for DBAs 8 - 2
Copyright © 2007, Oracle. All rights reserved.
Objectives
After completing this lesson, you should be able to:• List the memory models available in Linux kernels• Implement hugepages• Describe /proc/meminfo contents• List the implications of Linux memory configuration on
Oracle Database• Identify the issues regarding 32-bit OS versus 64-bit
OS
Oracle In
ternal & O
racle Aca
demy
Use O
nly
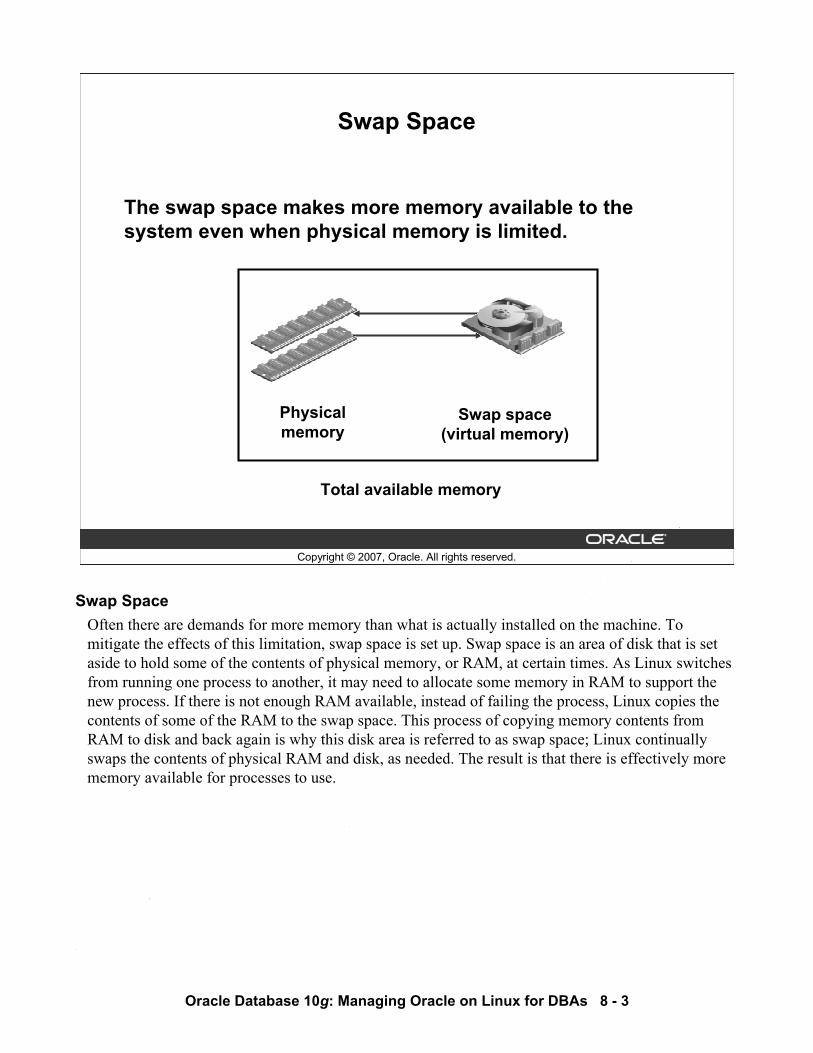
Oracle Database 10g: Managing Oracle on Linux for DBAs 8 - 3
Copyright © 2007, Oracle. All rights reserved.
Swap Space
The swap space makes more memory available to the system even when physical memory is limited.
Swap space(virtual memory)
Physicalmemory
Total available memory
Swap SpaceOften there are demands for more memory than what is actually installed on the machine. To mitigate the effects of this limitation, swap space is set up. Swap space is an area of disk that is set aside to hold some of the contents of physical memory, or RAM, at certain times. As Linux switches from running one process to another, it may need to allocate some memory in RAM to support the new process. If there is not enough RAM available, instead of failing the process, Linux copies the contents of some of the RAM to the swap space. This process of copying memory contents from RAM to disk and back again is why this disk area is referred to as swap space; Linux continually swaps the contents of physical RAM and disk, as needed. The result is that there is effectively more memory available for processes to use.
Oracle In
ternal & O
racle Aca
demy
Use O
nly
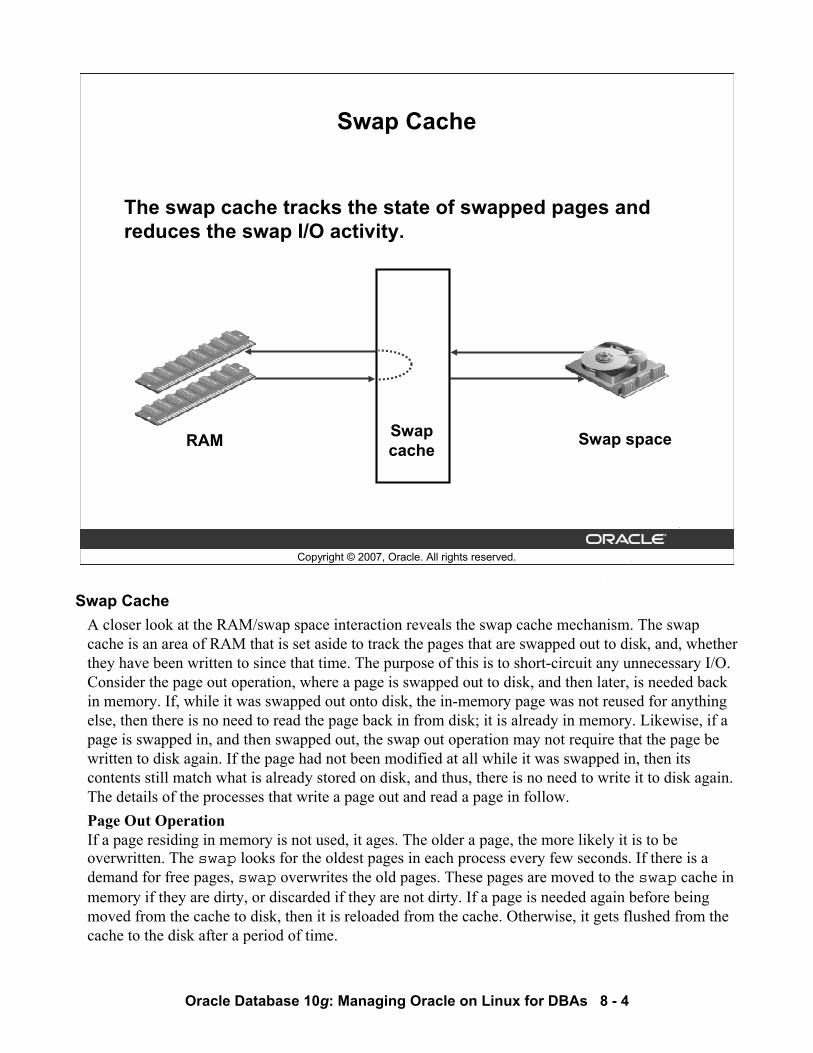
Oracle Database 10g: Managing Oracle on Linux for DBAs 8 - 4
Copyright © 2007, Oracle. All rights reserved.
Swap Cache
The swap cache tracks the state of swapped pages and reduces the swap I/O activity.
Swapcache Swap spaceRAM
Swap CacheA closer look at the RAM/swap space interaction reveals the swap cache mechanism. The swap cache is an area of RAM that is set aside to track the pages that are swapped out to disk, and, whether they have been written to since that time. The purpose of this is to short-circuit any unnecessary I/O. Consider the page out operation, where a page is swapped out to disk, and then later, is needed back in memory. If, while it was swapped out onto disk, the in-memory page was not reused for anything else, then there is no need to read the page back in from disk; it is already in memory. Likewise, if a page is swapped in, and then swapped out, the swap out operation may not require that the page be written to disk again. If the page had not been modified at all while it was swapped in, then its contents still match what is already stored on disk, and thus, there is no need to write it to disk again. The details of the processes that write a page out and read a page in follow.Page Out OperationIf a page residing in memory is not used, it ages. The older a page, the more likely it is to be overwritten. The swap looks for the oldest pages in each process every few seconds. If there is a demand for free pages, swap overwrites the old pages. These pages are moved to the swap cache in memory if they are dirty, or discarded if they are not dirty. If a page is needed again before being moved from the cache to disk, then it is reloaded from the cache. Otherwise, it gets flushed from the cache to the disk after a period of time.
Oracle In
ternal & O
racle Aca
demy
Use O
nly
Oracle Database 10g: Managing Oracle on Linux for DBAs 8 - 5
Swap Cache (continued)Page In OperationIf the process tries to access a page that is not mapped into physical memory, a page fault occurs. A page fault causes the process to suspend. The page is read from a disk or a swap cache. The page is loaded into a free page of memory. This page is mapped to the Translation Lookaside Buffer (TLB). Then the process is placed on the run queue. To bring a page into memory, a free page must exist. The swap process works to keep a pool of free pages available for these page in operations.
Oracle In
ternal & O
racle Aca
demy
Use O
nly

Oracle Database 10g: Managing Oracle on Linux for DBAs 8 - 6
Copyright © 2007, Oracle. All rights reserved.
Sizing Swap Space
Swap space should be sized based on the amount of RAM installed.
1.5 GBSwap
1 GBRAM
4 GBSwap
4 GBRAM =
Total = 2.5 GB
Total = 8 GB
7.5 GBSwap10 GB
RAM
Total = 17.5 GB
Sizing Swap SpaceThe amount of swap space to allocate depends on the amount of RAM installed on the machine. The following conditions show the RAM size followed by the reasonable swap space size, respectively:
• <= 2 GB: 150% of the RAM size• Between 2 GB and 8 GB: Equal to the RAM size• > 8 GB: 75% of the RAM size
Some examples are shown in the slide. You can use the free command to see the size of the swap space, and also to see how much of it is being used. You can also view the contents of /proc/swaps.Note: Diagram sizes are not to scale.
Oracle In
ternal & O
racle Aca
demy
Use O
nly

Oracle Database 10g: Managing Oracle on Linux for DBAs 8 - 7
Copyright © 2007, Oracle. All rights reserved.
/proc/meminfo
The most useful high-level statistics found in the /proc/meminfo file are:• MemTotal: Total usable physical RAM• MemFree: RAM that is currently free• Cached: Memory in the page cache• SwapCached: Memory that was swapped back in after
being swapped out
/proc/meminfo
The /proc/meminfo virtual file shows the current state of memory for the Linux kernel. The following information can be found there:• MemTotal: The total physical memory in the system. All of your server's physical memory
should be reported here at all times.• MemFree: Total amount of memory that is currently free• Cached: Memory in the pagecache (diskcache) minus SwapCached. This does not include
SwapCache.• SwapCached: Memory that once was swapped out and has been swapped back in, but is still in
the swap file. This is a performance feature because if memory is needed it does not need to be swapped out again; it is already in the swap file. This saves I/O.
Oracle In
ternal & O
racle Aca
demy
Use O
nly

Oracle Database 10g: Managing Oracle on Linux for DBAs 8 - 8
Copyright © 2007, Oracle. All rights reserved.
As reported by top, the situation seems dire because it appears that almost all memory is being used:
Evaluating Free Memory
Mem: 16124948K used, 42724K free
But the free command shows that 13 GB of this memory is cache, which is available to processes as needed:
shared buffers cached
1710184 351312 13330324
total used free
16167672 16129820 37852
top and freeSome of the used memory that the top command reports is actually being used for cache. That means that it is available to be reassigned if another process requires it. The slide illustrates how the top command memory information can be misleading. It appears that only 42 MB of memory is free. But the free command reports that 13 GB is currently being used for cache. By the nature of caching, that memory buffer is useful, but not all of it is always necessary. If another process starts up, or an existing one requests more memory than is reported in the free category of the topcommand, then some of this cache memory can be allocated to those memory requests, and that will be reflected in a higher used value, and a lower cached value. So, there is more memory available for use by processes than appears as reported by the top command.
Oracle In
ternal & O
racle Aca
demy
Use O
nly
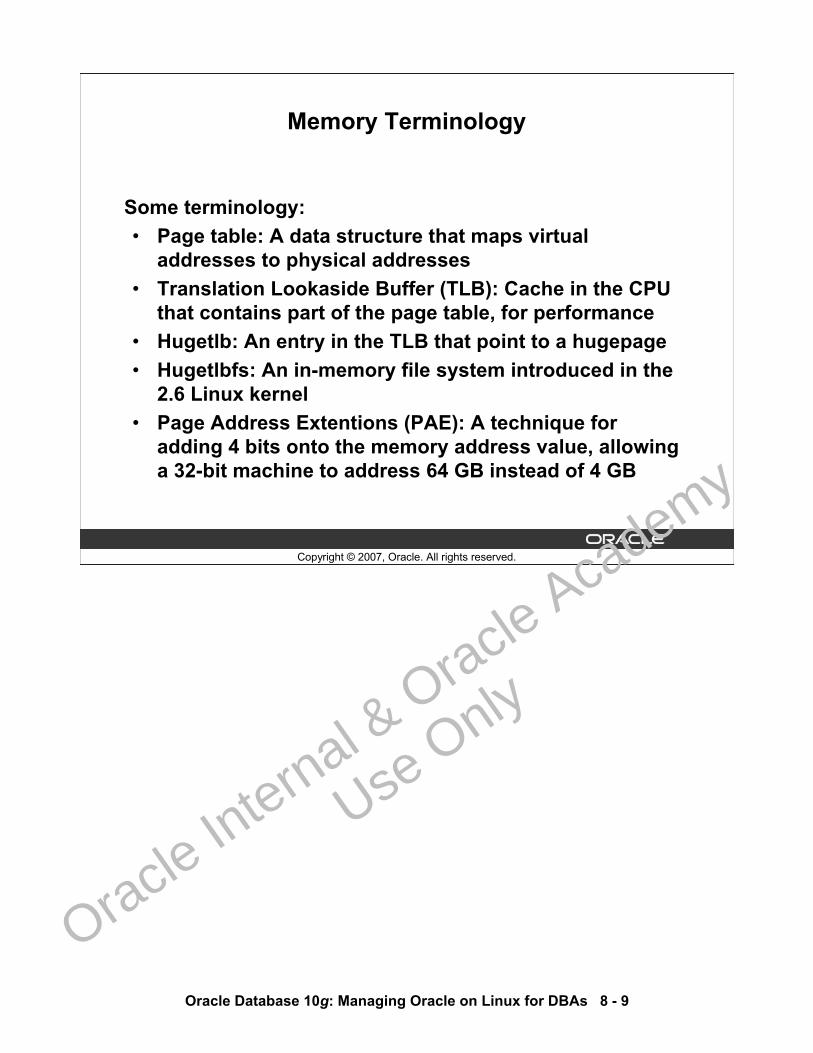
Oracle Database 10g: Managing Oracle on Linux for DBAs 8 - 9
Copyright © 2007, Oracle. All rights reserved.
Some terminology:• Page table: A data structure that maps virtual
addresses to physical addresses• Translation Lookaside Buffer (TLB): Cache in the CPU
that contains part of the page table, for performance• Hugetlb: An entry in the TLB that point to a hugepage• Hugetlbfs: An in-memory file system introduced in the
2.6 Linux kernel• Page Address Extentions (PAE): A technique for
adding 4 bits onto the memory address value, allowing a 32-bit machine to address 64 GB instead of 4 GB
Memory Terminology
Oracle In
ternal & O
racle Aca
demy
Use O
nly
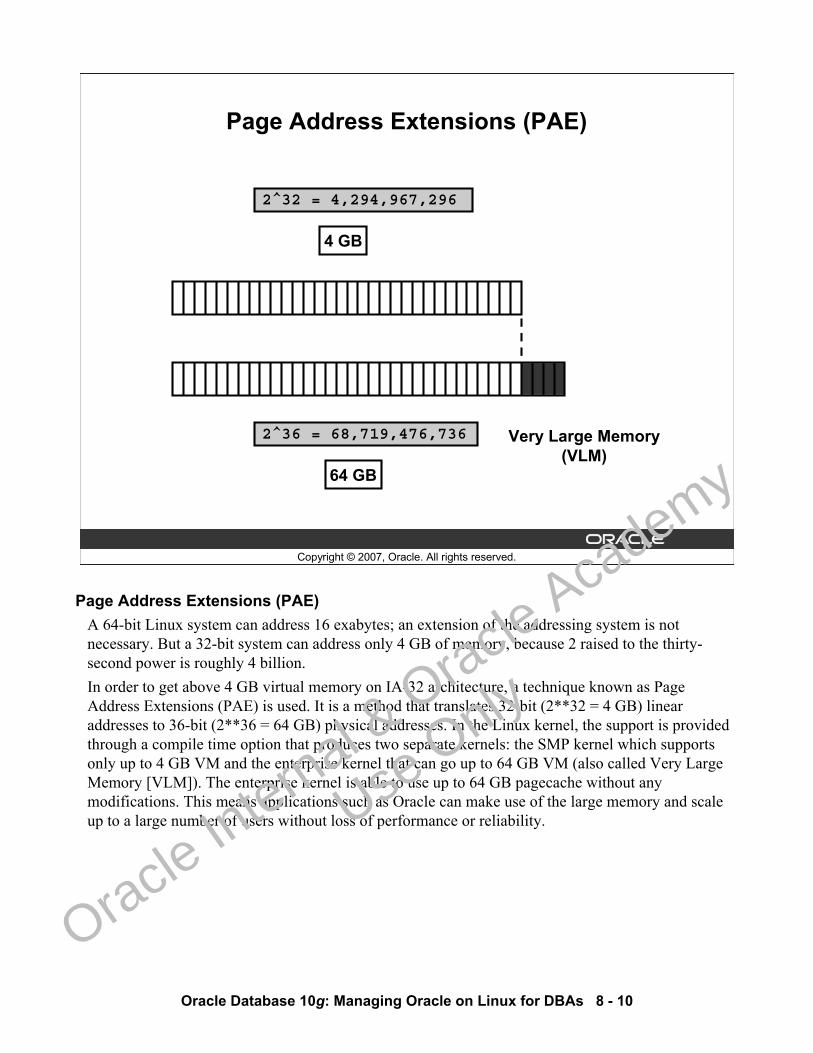
Oracle Database 10g: Managing Oracle on Linux for DBAs 8 - 10
Copyright © 2007, Oracle. All rights reserved.
Page Address Extensions (PAE)
2^32 = 4,294,967,296
4 GB
2^36 = 68,719,476,736
64 GB
Very Large Memory(VLM)
Page Address Extensions (PAE) A 64-bit Linux system can address 16 exabytes; an extension of the addressing system is not necessary. But a 32-bit system can address only 4 GB of memory, because 2 raised to the thirty-second power is roughly 4 billion.In order to get above 4 GB virtual memory on IA-32 architecture, a technique known as Page Address Extensions (PAE) is used. It is a method that translates 32-bit (2**32 = 4 GB) linear addresses to 36-bit (2**36 = 64 GB) physical addresses. In the Linux kernel, the support is provided through a compile time option that produces two separate kernels: the SMP kernel which supports only up to 4 GB VM and the enterprise kernel that can go up to 64 GB VM (also called Very Large Memory [VLM]). The enterprise kernel is able to use up to 64 GB pagecache without any modifications. This means applications such as Oracle can make use of the large memory and scale up to a large number of users without loss of performance or reliability.
Oracle In
ternal & O
racle Aca
demy
Use O
nly
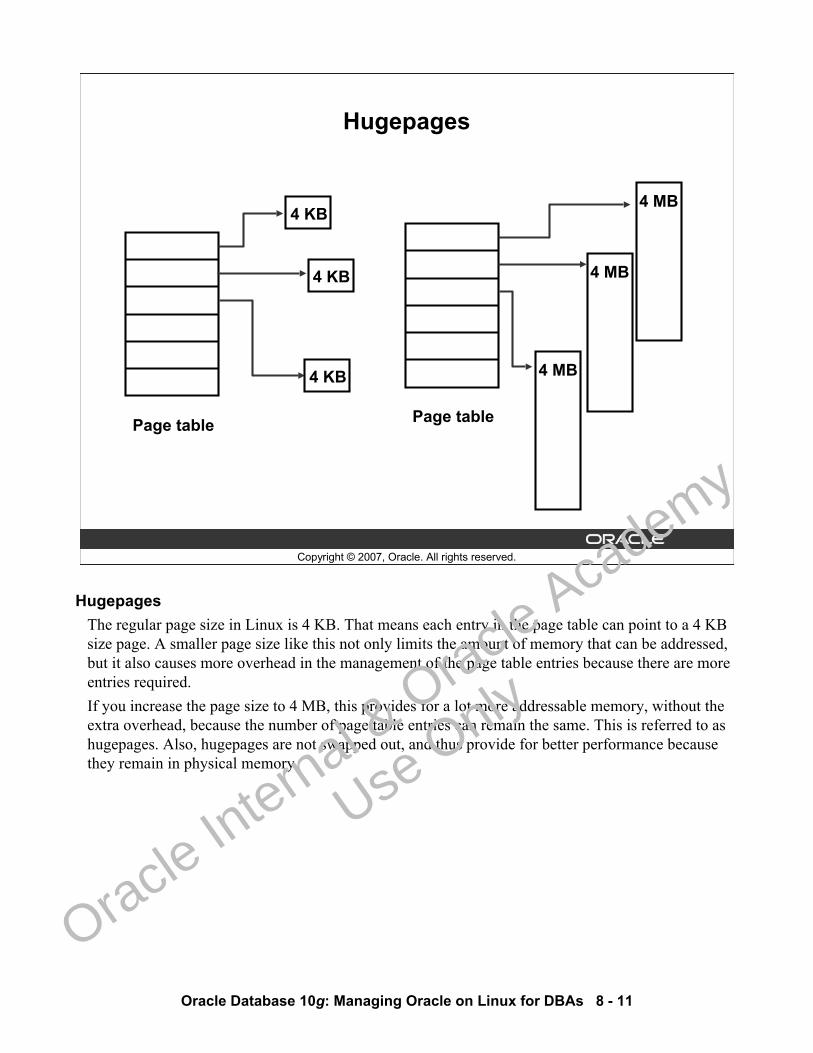
Oracle Database 10g: Managing Oracle on Linux for DBAs 8 - 11
Copyright © 2007, Oracle. All rights reserved.
Hugepages
Page table
4 KB
Page table
4 MB
4 KB
4 KB
4 MB
4 MB
Hugepages The regular page size in Linux is 4 KB. That means each entry in the page table can point to a 4 KB size page. A smaller page size like this not only limits the amount of memory that can be addressed, but it also causes more overhead in the management of the page table entries because there are more entries required.If you increase the page size to 4 MB, this provides for a lot more addressable memory, without the extra overhead, because the number of page table entries can remain the same. This is referred to as hugepages. Also, hugepages are not swapped out, and thus provide for better performance because they remain in physical memory.
Oracle In
ternal & O
racle Aca
demy
Use O
nly

Oracle Database 10g: Managing Oracle on Linux for DBAs 8 - 12
Copyright © 2007, Oracle. All rights reserved.
Implementing Hugepages on 32-Bit Linux
To implement the hughpages feature:• Configure Linux to mount ramfs at boot time• Increase locked memory limit• Configure instance parameters for VLM• Set the hugepages kernel parameter
Note: Using this feature removes the ability to configure automatic shared memory management. You must configure DB_CACHE_SIZE instead.
Implementing Hugepages on 32-Bit LinuxTo configure hugepages, perform the following steps:
1. Log on as root.2. Configure Linux to mount ramfs over /dev/shm at every boot. Edit /etc/rc.local and
add the following:umount /dev/shmmount -t ramfs ramfs /dev/shmchown oracle:oinstall /dev/shm
where oracle is the Oracle owner and oinstall is the group for Oracle owner account.3. Reboot the server.4. Log on as root.5. Check whether /dev/shm is mounted with the type ramfs:
# mount | grep shm6. Check the permissions of /dev/shm:
# ls -ld /dev/shm7. Increase max locked memory limit. Edit /etc/security/limits.conf and add:
* soft memlock 3145728* hard memlock 3145728
Oracle In
ternal & O
racle Aca
demy
Use O
nly
Oracle Database 10g: Managing Oracle on Linux for DBAs 8 - 13
Implementing Hugepages on 32-Bit Linux (continued)8. Log in as the oracle Linux user.9. Check max locked memory limit:
$ ulimit –l3145728
10. Configure instance parameters for VLM:a. Convert the DB_CACHE_SIZE, DB_xK_CACHE_SIZE parameters to
DB_BLOCK_BUFFERS.b. Add the USE_INDIRECT_DATA_BUFFERS=TRUE parameter.c. Configure SGA size according to needs.d. Remove SGA_TARGET if set.
11. Start up the instance.12. Examine the memory allocation:
$ ls -l /dev/shm$ ipcs -m
13. Configure hugepages.a. Get Hugepagesize from:
$ grep Hugepagesize /proc/meminfob. Compute nr_hugepages = max(ipcs -m) / (Hugepagesize * 1024) +
1.c. Set kernel parameter:
# sysctl -w vm.nr_hugepages=<value from above>d. Set parameter for every boot. Edit /etc/sysctl.conf for
vm.nr_hugepages=<value from above>14. Check the available hugepages:
$ grep Huge /proc/meminfo
15. Restart the instance.16. Check available hugepages (1 or 2 pages free)
$ grep Huge /proc/meminfo
Note: If the setting of nr_hugepages is not effective, you may need to reboot the server.
Oracle In
ternal & O
racle Aca
demy
Use O
nly
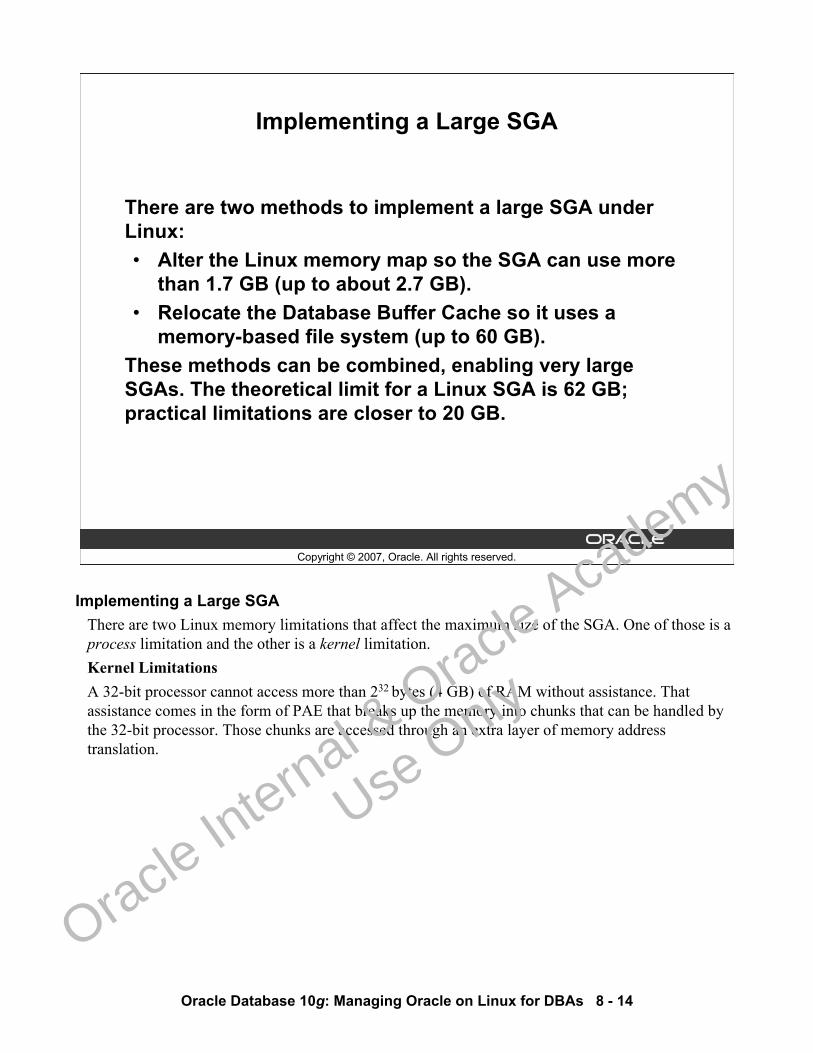
Oracle Database 10g: Managing Oracle on Linux for DBAs 8 - 14
Copyright © 2007, Oracle. All rights reserved.
Implementing a Large SGA
There are two methods to implement a large SGA under Linux:• Alter the Linux memory map so the SGA can use more
than 1.7 GB (up to about 2.7 GB).• Relocate the Database Buffer Cache so it uses a
memory-based file system (up to 60 GB).These methods can be combined, enabling very large SGAs. The theoretical limit for a Linux SGA is 62 GB; practical limitations are closer to 20 GB.
Implementing a Large SGA There are two Linux memory limitations that affect the maximum size of the SGA. One of those is a process limitation and the other is a kernel limitation. Kernel LimitationsA 32-bit processor cannot access more than 232 bytes (4 GB) of RAM without assistance. That assistance comes in the form of PAE that breaks up the memory into chunks that can be handled by the 32-bit processor. Those chunks are accessed through an extra layer of memory address translation.
Oracle In
ternal & O
racle Aca
demy
Use O
nly
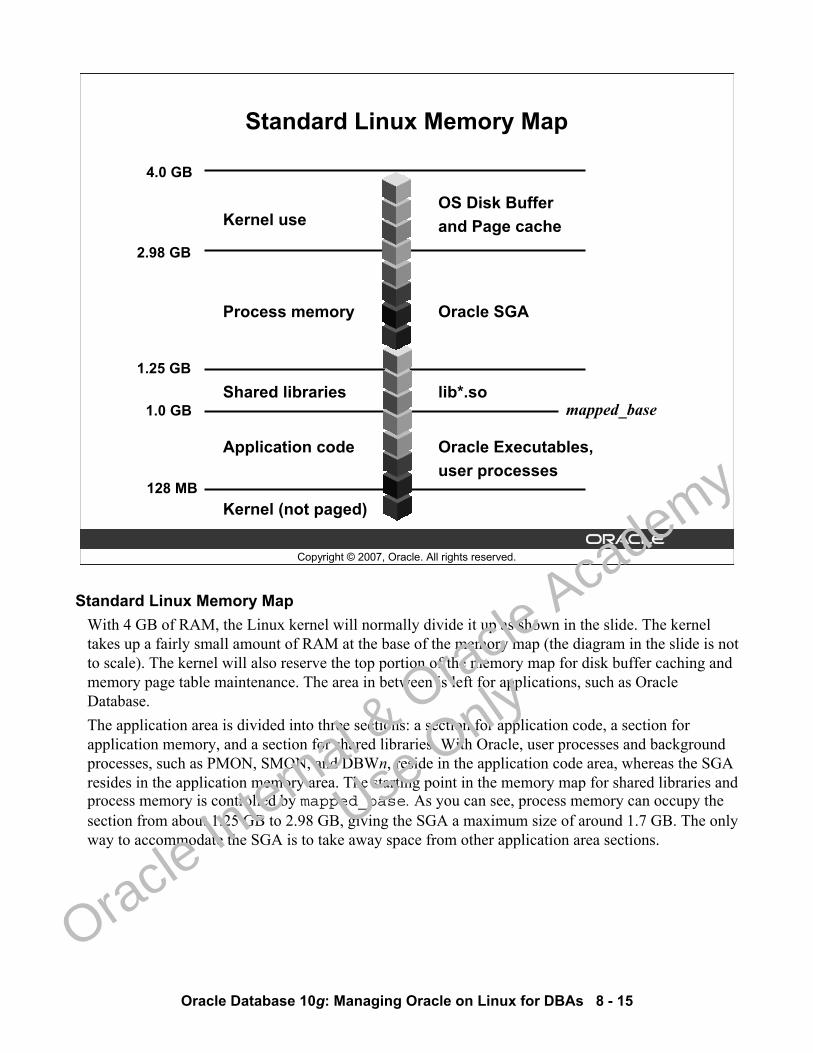
Oracle Database 10g: Managing Oracle on Linux for DBAs 8 - 15
Copyright © 2007, Oracle. All rights reserved.
Standard Linux Memory Map
Kernel (not paged)
lib*.so
Process memory
OS Disk Bufferand Page cache
Oracle Executables, user processes
Kernel use
Oracle SGA
Shared libraries
Application code
4.0 GB
2.98 GB
1.25 GB
1.0 GB
128 MB
mapped_base
Standard Linux Memory Map With 4 GB of RAM, the Linux kernel will normally divide it up as shown in the slide. The kernel takes up a fairly small amount of RAM at the base of the memory map (the diagram in the slide is not to scale). The kernel will also reserve the top portion of the memory map for disk buffer caching and memory page table maintenance. The area in between is left for applications, such as Oracle Database.The application area is divided into three sections: a section for application code, a section for application memory, and a section for shared libraries. With Oracle, user processes and background processes, such as PMON, SMON, and DBWn, reside in the application code area, whereas the SGA resides in the application memory area. The starting point in the memory map for shared libraries and process memory is controlled by mapped_base. As you can see, process memory can occupy the section from about 1.25 GB to 2.98 GB, giving the SGA a maximum size of around 1.7 GB. The only way to accommodate the SGA is to take away space from other application area sections.
Oracle In
ternal & O
racle Aca
demy
Use O
nly

Oracle Database 10g: Managing Oracle on Linux for DBAs 8 - 16
Copyright © 2007, Oracle. All rights reserved.
Modified Linux Memory Map
Kernel (not paged)
lib*.so
Process memory
OS Disk Bufferand Page cache
Oracle Executables, user processes
Kernel use
Oracle SGA
Shared libraries
Application code
4.0 GB
2.98 GB
336 MB
256 MB
128 MB
mapped_base
Modified Linux Memory Map It is possible to modify the Linux memory map and allocate more memory to the SGA. The kernel will still take up about 128 MB at the base of the map as well as the upper 1 GB, but the three application areas can be redistributed by changing the mapped_base. As you can see in the slide, lowering mapped_base expands the area available to the SGA at the expense of room for shared libraries and application code. The theoretical limit for the SGA using this method is approximately 2.7 GB. From a practical standpoint, you have to worry about shrinking the space for application code too much because it does little good to have a large SGA if your users cannot create sessions to access it. Ensure that you leave enough room below mapped_base for your applications to run.You can check the memory mappings by looking at a /proc/<pid>/maps file for any process ID. The lowest address for the ld*.so shared library files is where shared libraries are mapped.
Oracle In
ternal & O
racle Aca
demy
Use O
nly
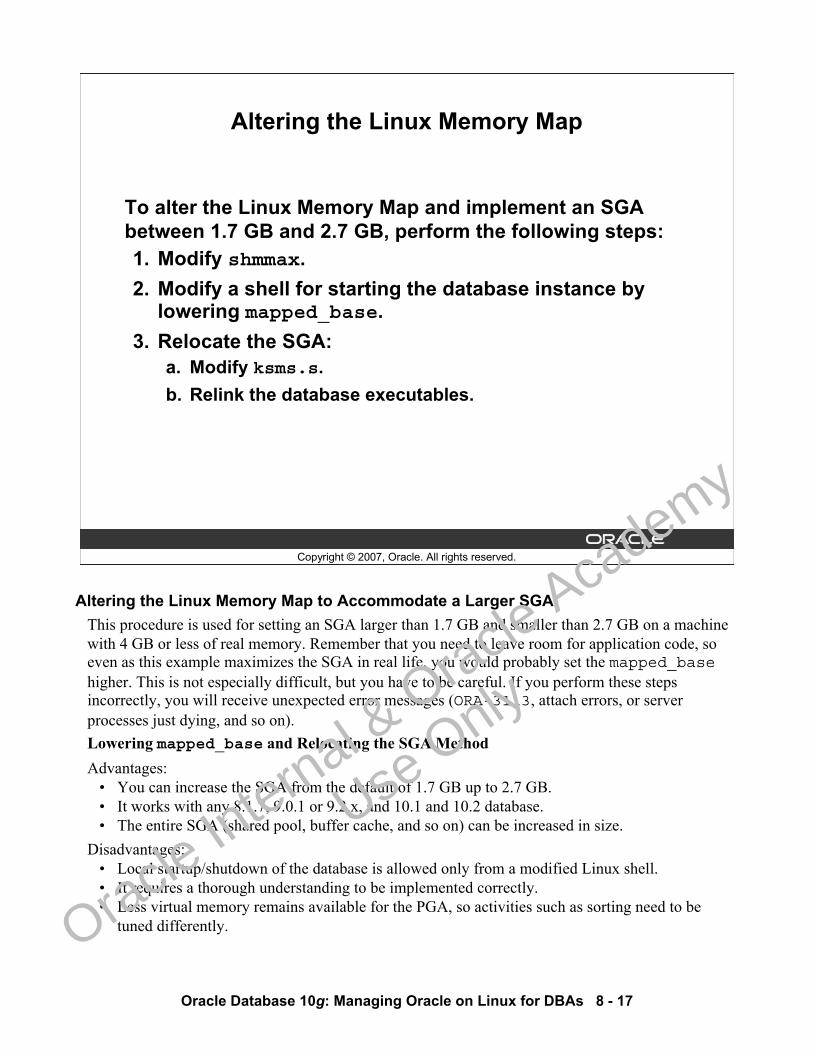
Oracle Database 10g: Managing Oracle on Linux for DBAs 8 - 17
Copyright © 2007, Oracle. All rights reserved.
Altering the Linux Memory Map
To alter the Linux Memory Map and implement an SGA between 1.7 GB and 2.7 GB, perform the following steps: 1. Modify shmmax.2. Modify a shell for starting the database instance by
lowering mapped_base.3. Relocate the SGA:
a. Modify ksms.s.b. Relink the database executables.
Altering the Linux Memory Map to Accommodate a Larger SGAThis procedure is used for setting an SGA larger than 1.7 GB and smaller than 2.7 GB on a machine with 4 GB or less of real memory. Remember that you need to leave room for application code, so even as this example maximizes the SGA in real life, you would probably set the mapped_basehigher. This is not especially difficult, but you have to be careful. If you perform these steps incorrectly, you will receive unexpected error messages (ORA-3113, attach errors, or server processes just dying, and so on).Lowering mapped_base and Relocating the SGA MethodAdvantages:
• You can increase the SGA from the default of 1.7 GB up to 2.7 GB.• It works with any 8.1.7, 9.0.1 or 9.2.x, and 10.1 and 10.2 database.• The entire SGA (shared pool, buffer cache, and so on) can be increased in size.
Disadvantages: • Local startup/shutdown of the database is allowed only from a modified Linux shell. • It requires a thorough understanding to be implemented correctly. • Less virtual memory remains available for the PGA, so activities such as sorting need to be
tuned differently.
Oracle In
ternal & O
racle Aca
demy
Use O
nly
Oracle Database 10g: Managing Oracle on Linux for DBAs 8 - 18
Altering the Linux Memory Map to Accommodate a Larger SGA (continued)Modifying shmmaxThe shmmax parameter can be changed dynamically, but unless you want to repeat the change every time you reboot the server, you should enter the change in the /etc/sysctl.conf file. The previous rule of thumb of limiting shmmax to half of real memory does not apply here. It is assumed that the amount of SGA needed has already been determined. The amount of process memory needed is also known. The sum of the SGA, the process memory, and the kernel and OS caches must be sized to be allocated without excessive paging.Lowering mapped_baseThe mapped_base is an address in virtual memory where the mmap starts looking for a chunk of memory to allocate to the shared memory. The larger memory addresses are considered lower in memory. By starting the search at a lower address, a larger shared memory allocation up to 2.7 GB is possible. The mapped_base parameter is set on a per process basis, so it cannot be set during boot up, or for the entire system. Lowering the mapped base is a requirement for every shell that spawns an Oracle server process on the server. This includes any shell that is used to connect locally to the database and the shell used to start the listener. (This way, listener-spawned processes inherit a lowered mapped_base.) This step will have to be performed every time you start the instance. This means you will not be able to start the instance using Oracle Enterprise Manager or other tools. The mapped_base parameter is inherited by any process spawned by a shell that has mapped_base lowered. Start a shell as the oracle user. In the shell, find the process ID by using ps or echo $$.Start another shell as the root user and lower the mapped_base with the following command:# echo 268435456 > /proc/<your process ID>/mapped_basewhere 268435456 is decimal for 0 x 10000000.
Oracle In
ternal & O
racle Aca
demy
Use O
nly
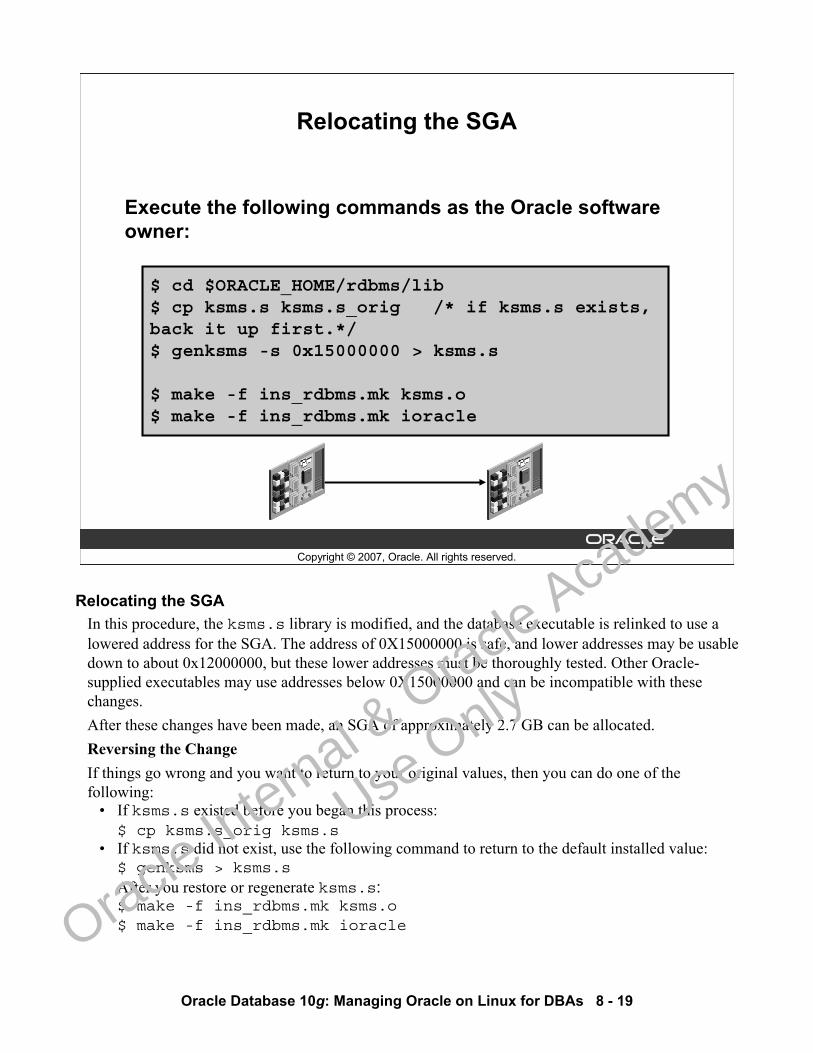
Oracle Database 10g: Managing Oracle on Linux for DBAs 8 - 19
Copyright © 2007, Oracle. All rights reserved.
$ cd $ORACLE_HOME/rdbms/lib $ cp ksms.s ksms.s_orig /* if ksms.s exists, back it up first.*/$ genksms -s 0x15000000 > ksms.s
$ make -f ins_rdbms.mk ksms.o $ make -f ins_rdbms.mk ioracle
Relocating the SGA
Execute the following commands as the Oracle software owner:
Relocating the SGAIn this procedure, the ksms.s library is modified, and the database executable is relinked to use a lowered address for the SGA. The address of 0X15000000 is safe, and lower addresses may be usable down to about 0x12000000, but these lower addresses must be thoroughly tested. Other Oracle-supplied executables may use addresses below 0X15000000 and can be incompatible with these changes. After these changes have been made, an SGA of approximately 2.7 GB can be allocated. Reversing the ChangeIf things go wrong and you want to return to your original values, then you can do one of the following:
• If ksms.s existed before you began this process:$ cp ksms.s_orig ksms.s
• If ksms.s did not exist, use the following command to return to the default installed value:$ genksms > ksms.sAfter you restore or regenerate ksms.s: $ make -f ins_rdbms.mk ksms.o $ make -f ins_rdbms.mk ioracle
Oracle In
ternal & O
racle Aca
demy
Use O
nly
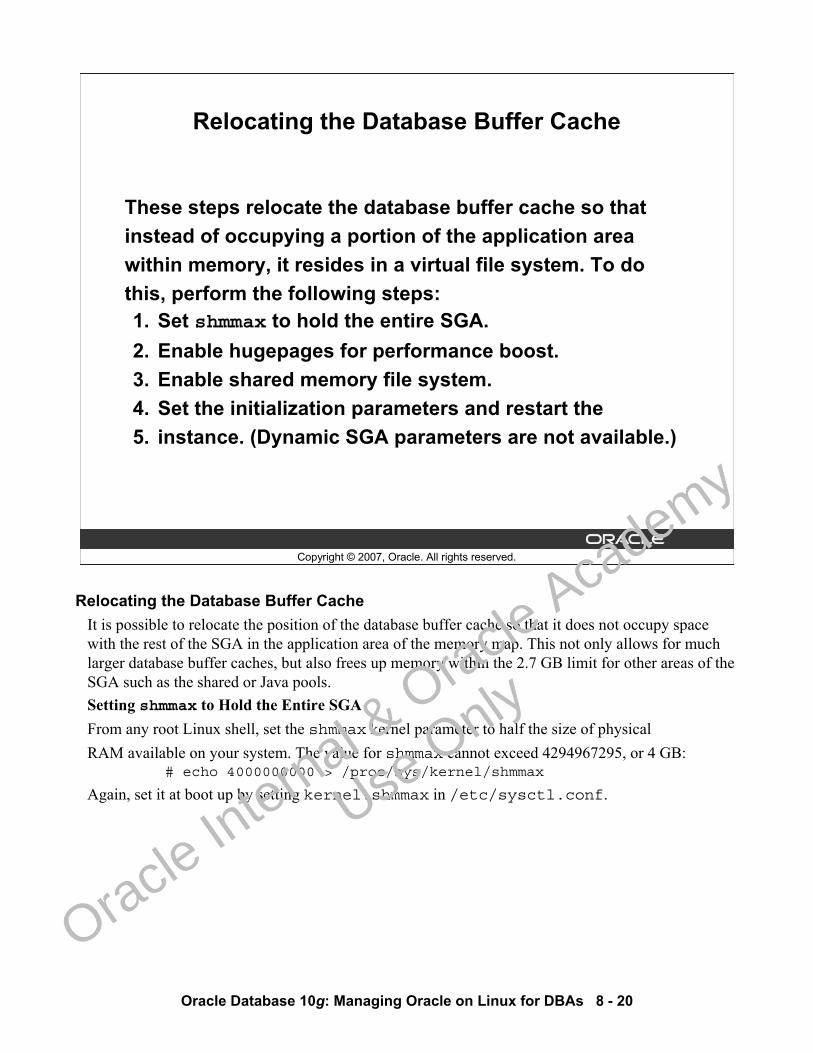
Oracle Database 10g: Managing Oracle on Linux for DBAs 8 - 20
Copyright © 2007, Oracle. All rights reserved.
Relocating the Database Buffer Cache
These steps relocate the database buffer cache so thatinstead of occupying a portion of the application areawithin memory, it resides in a virtual file system. To dothis, perform the following steps:1. Set shmmax to hold the entire SGA.2. Enable hugepages for performance boost.3. Enable shared memory file system.4. Set the initialization parameters and restart the 5. instance. (Dynamic SGA parameters are not available.)
Relocating the Database Buffer Cache It is possible to relocate the position of the database buffer cache so that it does not occupy space with the rest of the SGA in the application area of the memory map. This not only allows for much larger database buffer caches, but also frees up memory within the 2.7 GB limit for other areas of the SGA such as the shared or Java pools. Setting shmmax to Hold the Entire SGAFrom any root Linux shell, set the shmmax kernel parameter to half the size of physical RAM available on your system. The value for shmmax cannot exceed 4294967295, or 4 GB:
# echo 4000000000 > /proc/sys/kernel/shmmax
Again, set it at boot up by setting kernel.shmmax in /etc/sysctl.conf.
Oracle In
ternal & O
racle Aca
demy
Use O
nly

Oracle Database 10g: Managing Oracle on Linux for DBAs 8 - 21
Relocating the Database Buffer Cache (continued)Ensuring that hugepages Are EnabledEnsure that hugepages are enabled, as described earlier in this lesson.
Implementing a Large SGAMounting a Shared Memory File System (SHMFS)As root, mount a shared memory file system and mount it at every boot up by changing the /etc/fstab file:# mount -t shm shmfs -o size=8g /dev/shm
Add the following line to the /etc/fstab file:none /dev/shm tmpfs size=8g 0 0
This creates an shmfs file system on /dev/shm of 8 GB size. The size parameter accepts the “k”and “m” multipliers as well. When the database instance is started with the extended buffer cache feature enabled, a file is created in /dev/shm that corresponds to the SGA database buffer cache.Configure the Instance to Use the Shared Memory File SystemSet the following initialization parameters, assuming an 8 KB block size and 3.8 GB cache:USE_INDIRECT_BUFFERS = TRUEDB_BLOCK_BUFFERS = 475000
Note: Multiple database buffer cache block sizes and the dynamic SGA buffer cache parameters cannot be used with INDIRECT_BUFFERS. The database buffer cache size must be set with DB_BLOCK_BUFFERS.Verify that the following initialization parameters are not set:DB_CACHE_SIZE
DB_2K_CACHE_SIZE
DB_4K_CACHE_SIZE
DB_8K_CACHE_SIZE
DB_16K_CACHE_SIZE
DB_32K_CACHE_SIZE
Start up the Oracle database instance. If you are using this method in conjunction with altering the Linux memory map, then do not forget to reset mapped_base before starting the instance. The memory allocated to DB_BLOCK_BUFFERS will now be consumed from the shared file system located at (in this example) /dev/shm leaving up to 2.7 GB for other SGA areas.Note: It is possible to make your buffer cache too large to the point where it defeats any performance gains. For details, see the Oracle Database Performance Tuning Guide.
Oracle In
ternal & O
racle Aca
demy
Use O
nly
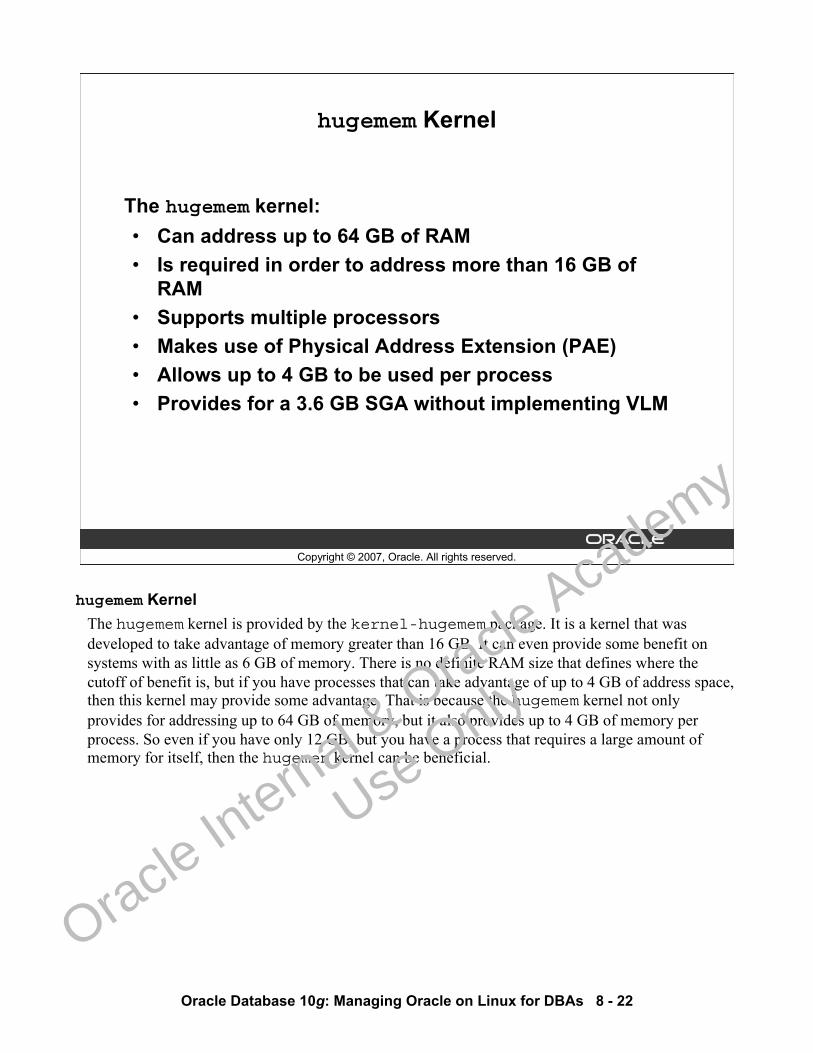
Oracle Database 10g: Managing Oracle on Linux for DBAs 8 - 22
Copyright © 2007, Oracle. All rights reserved.
hugemem Kernel
The hugemem kernel:• Can address up to 64 GB of RAM• Is required in order to address more than 16 GB of
RAM• Supports multiple processors• Makes use of Physical Address Extension (PAE)• Allows up to 4 GB to be used per process• Provides for a 3.6 GB SGA without implementing VLM
hugemem KernelThe hugemem kernel is provided by the kernel-hugemem package. It is a kernel that was developed to take advantage of memory greater than 16 GB. It can even provide some benefit on systems with as little as 6 GB of memory. There is no definite RAM size that defines where the cutoff of benefit is, but if you have processes that can take advantage of up to 4 GB of address space, then this kernel may provide some advantage. That is because the hugemem kernel not only provides for addressing up to 64 GB of memory, but it also provides up to 4 GB of memory per process. So even if you have only 12 GB, but you have a process that requires a large amount of memory for itself, then the hugemen kernel can be beneficial.
Oracle In
ternal & O
racle Aca
demy
Use O
nly
Oracle Database 10g: Managing Oracle on Linux for DBAs 8 - 23
Copyright © 2007, Oracle. All rights reserved.
Summary
In this lesson, you should have learned how to:• List the memory models available in Linux kernels• Implement hugepages• Describe /proc/meminfo contents• List implications of Linux memory configuration on
Oracle Database• Identify issues regarding 32-bit OS versus 64-bit OS
Oracle In
ternal & O
racle Aca
demy
Use O
nly
Oracle Database 10g: Managing Oracle on Linux for DBAs 8 - 24
Copyright © 2007, Oracle. All rights reserved.
Practice 8 Overview:Managing Memory
This practice covers the following topics:• Understanding the contents of /proc/meminfo• Viewing shared memory segment information
Oracle In
ternal & O
racle Aca
demy
Use O
nly
Copyright © 2007, Oracle. All rights reserved.
Using Linux Measurement Tools
Oracle In
ternal & O
racle Aca
demy
Use O
nly
Oracle Database 10g: Managing Oracle on Linux for DBAs 9 - 2
Copyright © 2007, Oracle. All rights reserved.
Objectives
After completing this lesson, you should be able to:• Use Linux monitoring tools• Interpret memory measurements• Interpret I/O measurements
Oracle In
ternal & O
racle Aca
demy
Use O
nly
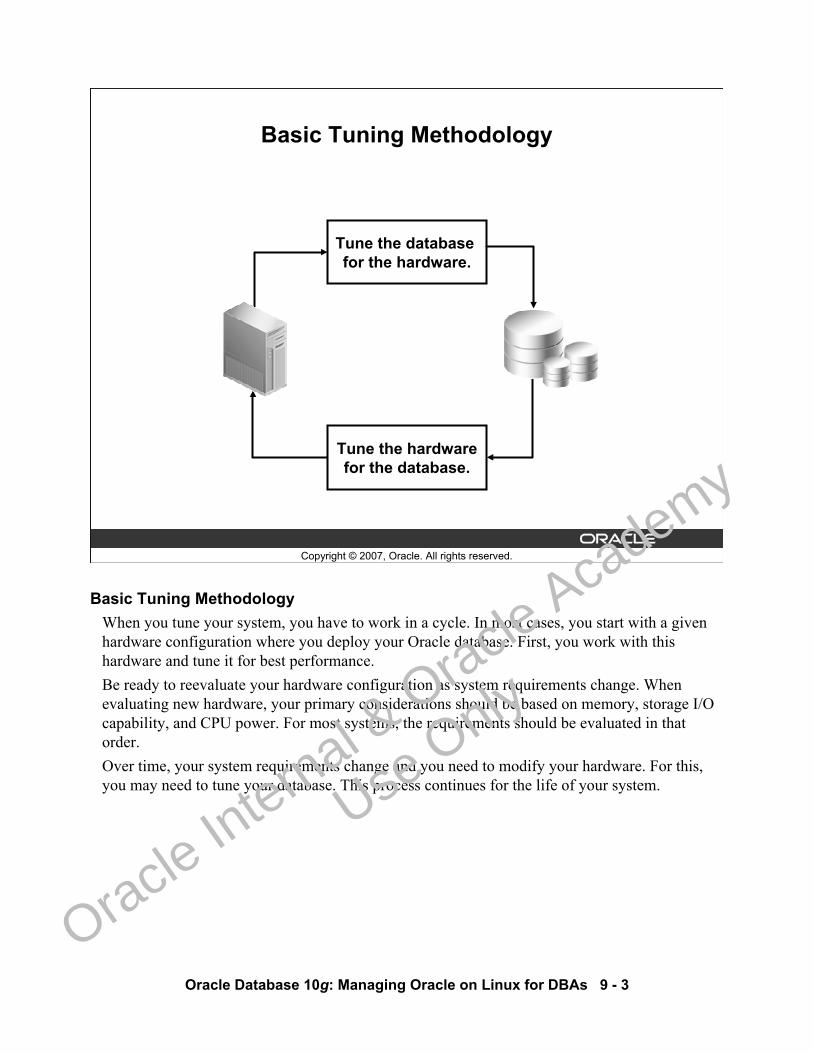
Oracle Database 10g: Managing Oracle on Linux for DBAs 9 - 3
Copyright © 2007, Oracle. All rights reserved.
Basic Tuning Methodology
Tune the database for the hardware.
Tune the hardwarefor the database.
Basic Tuning MethodologyWhen you tune your system, you have to work in a cycle. In most cases, you start with a given hardware configuration where you deploy your Oracle database. First, you work with this hardware and tune it for best performance.Be ready to reevaluate your hardware configuration as system requirements change. When evaluating new hardware, your primary considerations should be based on memory, storage I/O capability, and CPU power. For most systems, the requirements should be evaluated in that order.Over time, your system requirements change and you need to modify your hardware. For this, you may need to tune your database. This process continues for the life of your system.
Oracle In
ternal & O
racle Aca
demy
Use O
nly
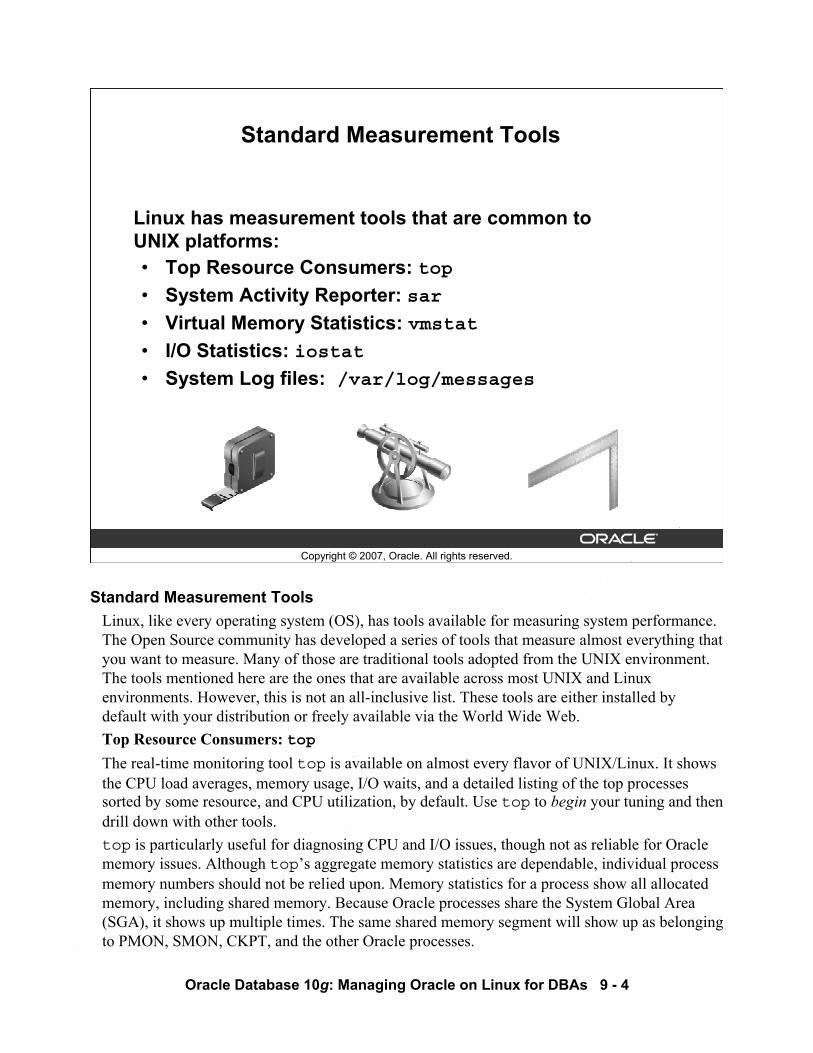
Oracle Database 10g: Managing Oracle on Linux for DBAs 9 - 4
Copyright © 2007, Oracle. All rights reserved.
Standard Measurement Tools
Linux has measurement tools that are common toUNIX platforms:• Top Resource Consumers: top• System Activity Reporter: sar• Virtual Memory Statistics: vmstat• I/O Statistics: iostat• System Log files: /var/log/messages
Standard Measurement ToolsLinux, like every operating system (OS), has tools available for measuring system performance. The Open Source community has developed a series of tools that measure almost everything that you want to measure. Many of those are traditional tools adopted from the UNIX environment. The tools mentioned here are the ones that are available across most UNIX and Linux environments. However, this is not an all-inclusive list. These tools are either installed by default with your distribution or freely available via the World Wide Web.Top Resource Consumers: topThe real-time monitoring tool top is available on almost every flavor of UNIX/Linux. It shows the CPU load averages, memory usage, I/O waits, and a detailed listing of the top processes sorted by some resource, and CPU utilization, by default. Use top to begin your tuning and then drill down with other tools.top is particularly useful for diagnosing CPU and I/O issues, though not as reliable for Oracle memory issues. Although top’s aggregate memory statistics are dependable, individual process memory numbers should not be relied upon. Memory statistics for a process show all allocated memory, including shared memory. Because Oracle processes share the System Global Area (SGA), it shows up multiple times. The same shared memory segment will show up as belonging to PMON, SMON, CKPT, and the other Oracle processes.
Oracle In
ternal & O
racle Aca
demy
Use O
nly
Oracle Database 10g: Managing Oracle on Linux for DBAs 9 - 5
Standard Measurement Tools (continued)System Activity Reporter: sarsar provides a variety of ways to look at the system activity including memory, I/O, and CPU usage. In addition to viewing snapshots of system activity, sar collects regular samples of statistics to a file that can be queried for particular activity at particular times. If you are already familiar with sar from some other UNIX variant, check the man pages to verify the options because they are different on Linux. It is usually executed with three arguments:
$ sar <options> <interval> <count>
The <options> flag determines what the output of sar will be. The report can include statistics on memory use, I/O, system processes, interrupts, network and so on.In addition to providing real-time metrics, sar samples the /proc file system at 10-minute intervals and records the data in /var/log/sa as a sa# file where # is the day of the month. A full month’s worth of statistics are retained so that the administrator can use sar to view past statistics as well as current. For example, to view the CPU statistics for the 23rd of the month:
sar –u 2 4 –f /var/log/sa/sa23
Virtual Memory Statistics: vmstatProbably the best tool for monitoring memory usage, the vmstat program reports information about processes, memory, paging, block I/O, traps, and CPU activity. It is usually executed with two arguments:
$ vmstat <interval> <count>
with <interval> being the number of seconds between statistics samplings and <count>being the number of samples to take. Unlike sar, the vmstat report allows very little customization. (You can give a –n option before the interval to suppress the report page header.)I/O Statistics: iostatDisk activity, disk queue lengths, and hot spots are all important pieces of information for tuning the I/O related to the database. The iostat program provides these statistics, overlapping and extending the disk statistics available from sar.System Log Files: /var/log/message ../syslogThe operating system maintains various log files that can be of use in monitoring and tuning the system.
Oracle In
ternal & O
racle Aca
demy
Use O
nly
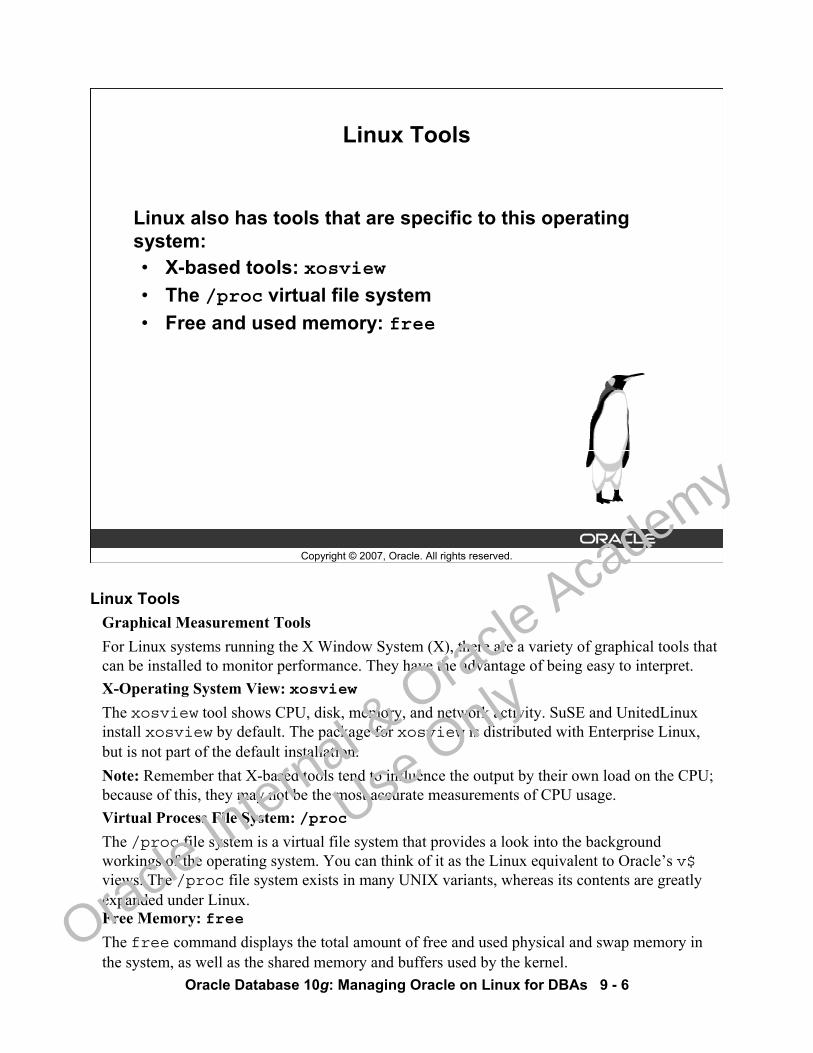
Oracle Database 10g: Managing Oracle on Linux for DBAs 9 - 6
Copyright © 2007, Oracle. All rights reserved.
Linux Tools
Linux also has tools that are specific to this operating system:• X-based tools: xosview• The /proc virtual file system• Free and used memory: free
Linux ToolsGraphical Measurement ToolsFor Linux systems running the X Window System (X), there are a variety of graphical tools that can be installed to monitor performance. They have the advantage of being easy to interpret.X-Operating System View: xosviewThe xosview tool shows CPU, disk, memory, and network activity. SuSE and UnitedLinux install xosview by default. The package for xosview is distributed with Enterprise Linux, but is not part of the default installation. Note: Remember that X-based tools tend to influence the output by their own load on the CPU; because of this, they may not be the most accurate measurements of CPU usage.Virtual Process File System: /procThe /proc file system is a virtual file system that provides a look into the background workings of the operating system. You can think of it as the Linux equivalent to Oracle’s v$views. The /proc file system exists in many UNIX variants, whereas its contents are greatly expanded under Linux.Free Memory: freeThe free command displays the total amount of free and used physical and swap memory in the system, as well as the shared memory and buffers used by the kernel.
Oracle In
ternal & O
racle Aca
demy
Use O
nly
Oracle Database 10g: Managing Oracle on Linux for DBAs 9 - 7
Linux Tools (continued)Process Tree: pstreeThis tool displays the relationship between processes in a tree structure, with parents to the left and children to the right:
$ pstreeinit-+-2*[Xvnc]
|-apmd|-oafd|-26*[oracle]|-perl-+-emagent---emagent---4*[emagent]
`-java---java---52*[java]
Because the init process is system process number 1, it will always appear to the left. In this snippet from the pstree output, you can see that there are two Xvnc processes running, 26 Oracle process running, and that the perl process has started two children, each of which has started several other processes. Resource Limits: ulimitThis tool shows the resources available to your shell. This tool is shell dependent; with the C shell you would use limit –h instead.
/> bash# ulimit –a (the –a flag shows all current limits)core file size (blocks, -c) 0data seg size (kbytes, -d) unlimitedfile size (blocks, -f) unlimitedmax locked memory (kbytes, -l) 4max memory size (kbytes, -m) unlimitedopen files (-n) 1024pipe size (512 bytes, -p) 8stack size (kbytes, -s) 10240cpu time (seconds, -t) unlimitedmax user processes (-u) 7168virtual memory (kbytes, -v) unlimited
And many moreIf it is measurable, chances are that there is a Linux package already written to measure it. Many more utilities may be available depending on your distribution and which packages you have installed. Consult your distribution-specific documentation for more information. Also, Oracle provides Oracle Enterprise Manager DB Control, which provides a great deal of performance-monitoring information about the systems it is monitoring.
Oracle In
ternal & O
racle Aca
demy
Use O
nly
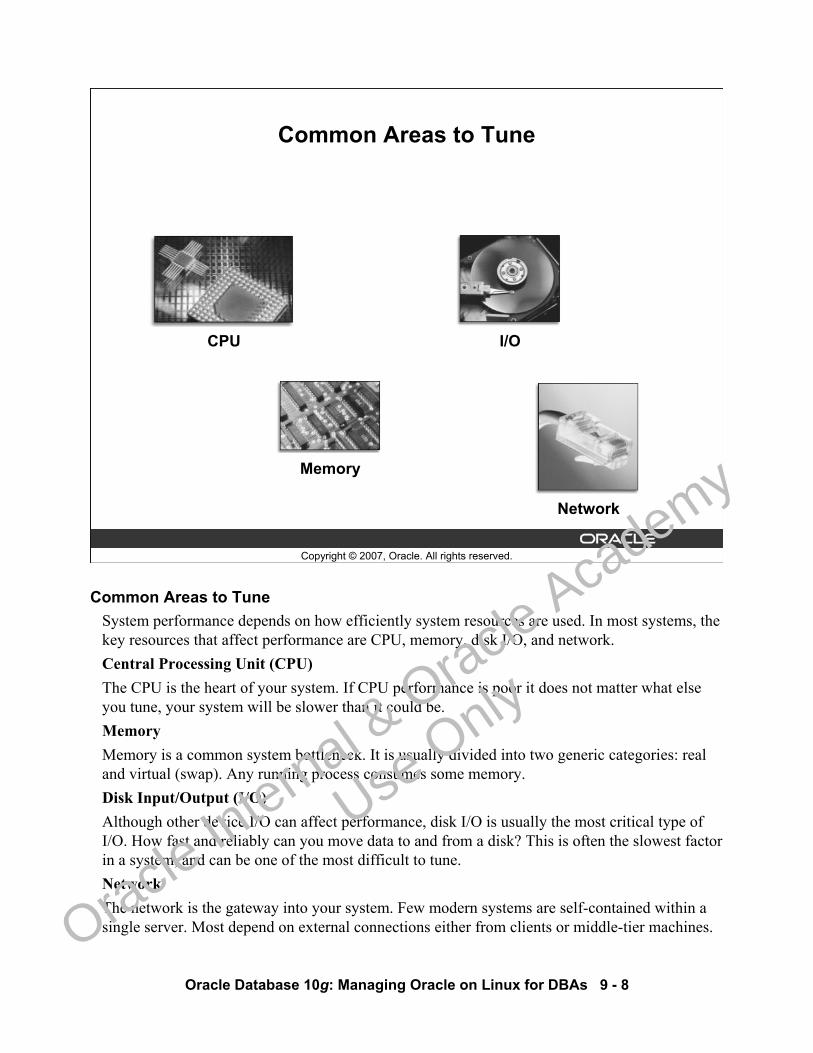
Oracle Database 10g: Managing Oracle on Linux for DBAs 9 - 8
Copyright © 2007, Oracle. All rights reserved.
Common Areas to Tune
CPU
Network
I/O
Memory
Common Areas to TuneSystem performance depends on how efficiently system resources are used. In most systems, the key resources that affect performance are CPU, memory, disk I/O, and network. Central Processing Unit (CPU)The CPU is the heart of your system. If CPU performance is poor it does not matter what else you tune, your system will be slower than it could be.MemoryMemory is a common system bottleneck. It is usually divided into two generic categories: real and virtual (swap). Any running process consumes some memory. Disk Input/Output (I/O)Although other device I/O can affect performance, disk I/O is usually the most critical type of I/O. How fast and reliably can you move data to and from a disk? This is often the slowest factor in a system, and can be one of the most difficult to tune.NetworkThe network is the gateway into your system. Few modern systems are self-contained within a single server. Most depend on external connections either from clients or middle-tier machines.
Oracle In
ternal & O
racle Aca
demy
Use O
nly
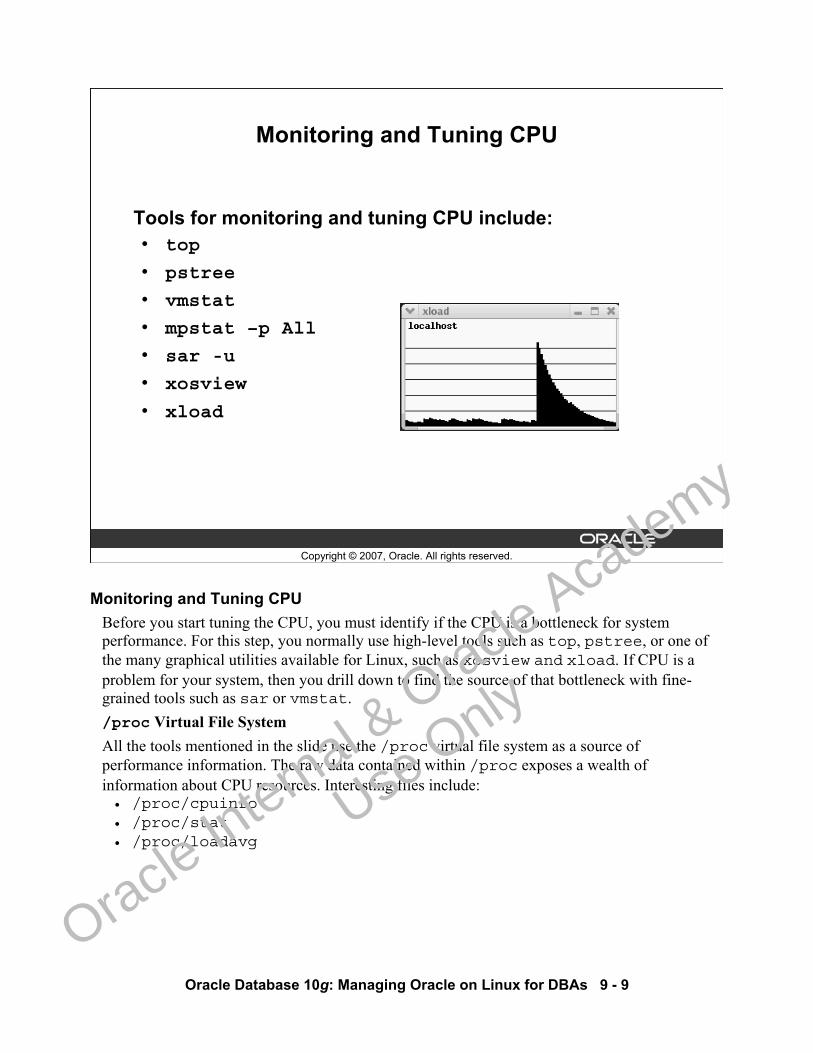
Oracle Database 10g: Managing Oracle on Linux for DBAs 9 - 9
Copyright © 2007, Oracle. All rights reserved.
Monitoring and Tuning CPU
Tools for monitoring and tuning CPU include:• top
• pstree
• vmstat
• mpstat –p All
• sar -u
• xosview
• xload
Monitoring and Tuning CPU Before you start tuning the CPU, you must identify if the CPU is a bottleneck for system performance. For this step, you normally use high-level tools such as top, pstree, or one of the many graphical utilities available for Linux, such as xosview and xload. If CPU is a problem for your system, then you drill down to find the source of that bottleneck with fine-grained tools such as sar or vmstat./proc Virtual File SystemAll the tools mentioned in the slide use the /proc virtual file system as a source of performance information. The raw data contained within /proc exposes a wealth of information about CPU resources. Interesting files include:• /proc/cpuinfo• /proc/stat• /proc/loadavg
Oracle In
ternal & O
racle Aca
demy
Use O
nly
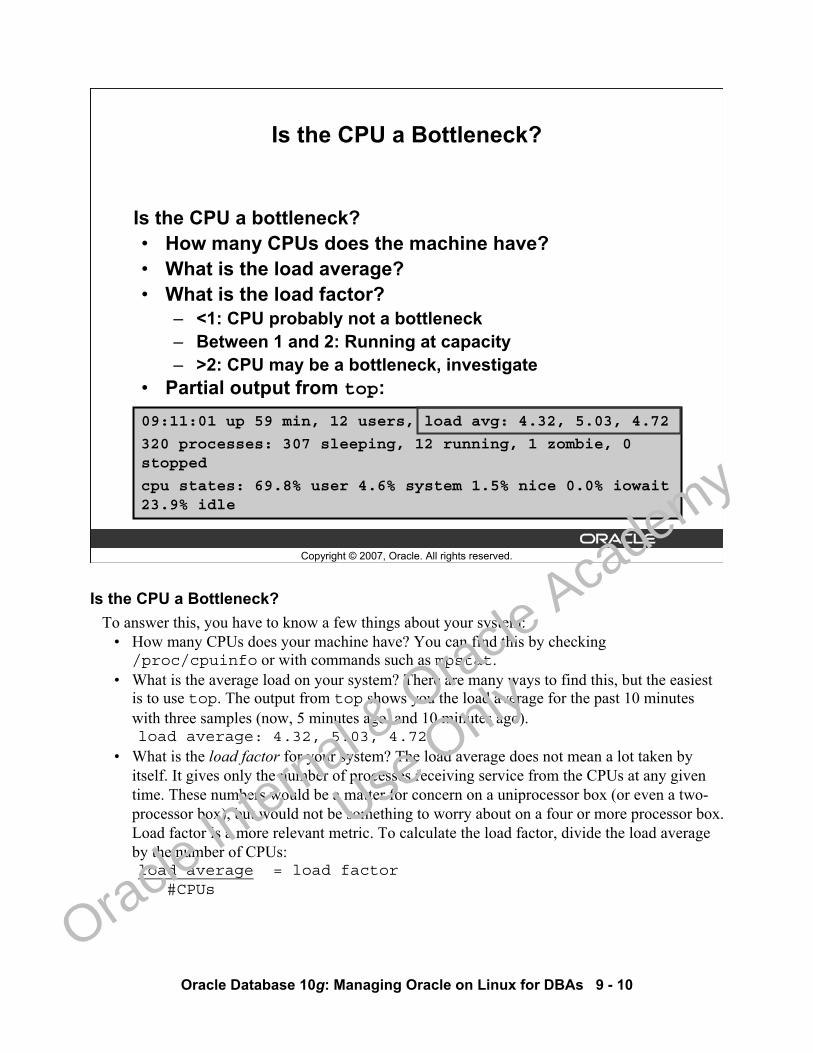
Oracle Database 10g: Managing Oracle on Linux for DBAs 9 - 10
Copyright © 2007, Oracle. All rights reserved.
Is the CPU a Bottleneck?
Is the CPU a bottleneck?• How many CPUs does the machine have?• What is the load average?• What is the load factor?
– <1: CPU probably not a bottleneck– Between 1 and 2: Running at capacity– >2: CPU may be a bottleneck, investigate
• Partial output from top:09:11:01 up 59 min, 12 users, load avg: 4.32, 5.03, 4.72
320 processes: 307 sleeping, 12 running, 1 zombie, 0 stopped
cpu states: 69.8% user 4.6% system 1.5% nice 0.0% iowait 23.9% idle
Is the CPU a Bottleneck?To answer this, you have to know a few things about your system:
• How many CPUs does your machine have? You can find this by checking /proc/cpuinfo or with commands such as mpstat.
• What is the average load on your system? There are many ways to find this, but the easiest is to use top. The output from top shows you the load average for the past 10 minutes with three samples (now, 5 minutes ago, and 10 minutes ago).load average: 4.32, 5.03, 4.72
• What is the load factor for your system? The load average does not mean a lot taken by itself. It gives only the number of processes receiving service from the CPUs at any given time. These numbers would be a matter for concern on a uniprocessor box (or even a two-processor box), but would not be something to worry about on a four or more processor box. Load factor is a more relevant metric. To calculate the load factor, divide the load average by the number of CPUs:load average = load factor
#CPUs
Oracle In
ternal & O
racle Aca
demy
Use O
nly
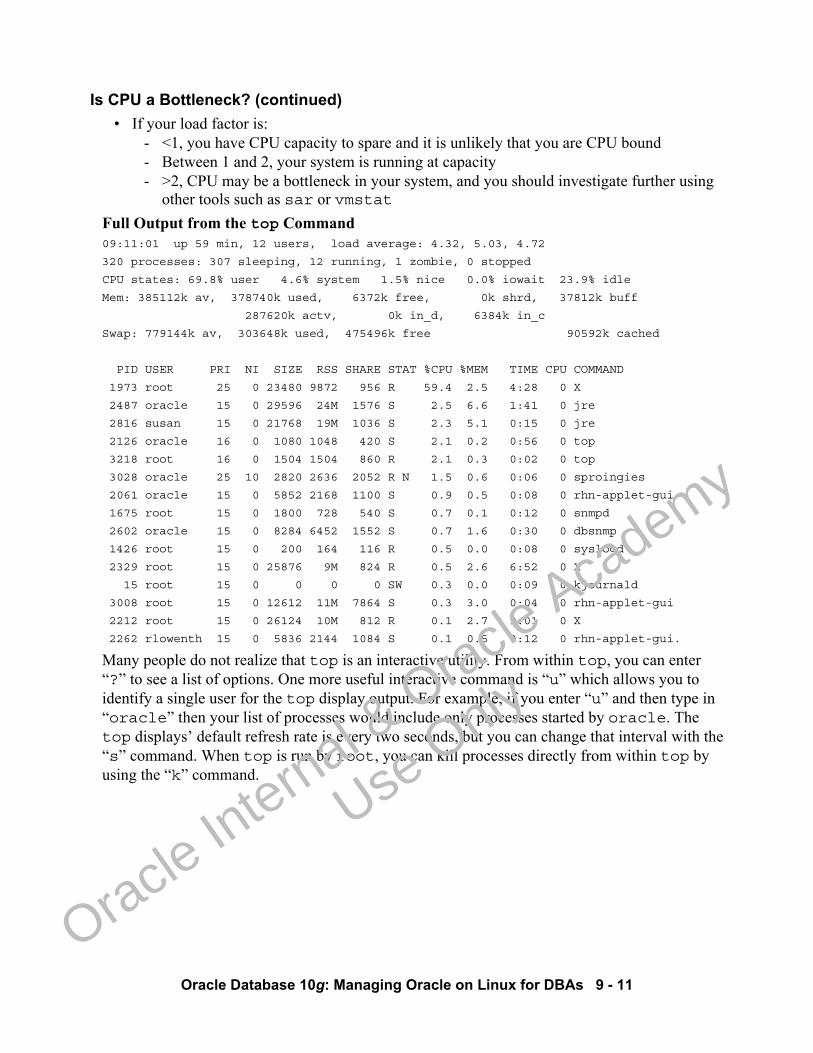
Oracle Database 10g: Managing Oracle on Linux for DBAs 9 - 11
Is CPU a Bottleneck? (continued)• If your load factor is:
- <1, you have CPU capacity to spare and it is unlikely that you are CPU bound- Between 1 and 2, your system is running at capacity- >2, CPU may be a bottleneck in your system, and you should investigate further using
other tools such as sar or vmstatFull Output from the top Command09:11:01 up 59 min, 12 users, load average: 4.32, 5.03, 4.72
320 processes: 307 sleeping, 12 running, 1 zombie, 0 stopped
CPU states: 69.8% user 4.6% system 1.5% nice 0.0% iowait 23.9% idle
Mem: 385112k av, 378740k used, 6372k free, 0k shrd, 37812k buff
287620k actv, 0k in_d, 6384k in_c
Swap: 779144k av, 303648k used, 475496k free 90592k cached
PID USER PRI NI SIZE RSS SHARE STAT %CPU %MEM TIME CPU COMMAND
1973 root 25 0 23480 9872 956 R 59.4 2.5 4:28 0 X
2487 oracle 15 0 29596 24M 1576 S 2.5 6.6 1:41 0 jre
2816 susan 15 0 21768 19M 1036 S 2.3 5.1 0:15 0 jre
2126 oracle 16 0 1080 1048 420 S 2.1 0.2 0:56 0 top
3218 root 16 0 1504 1504 860 R 2.1 0.3 0:02 0 top
3028 oracle 25 10 2820 2636 2052 R N 1.5 0.6 0:06 0 sproingies
2061 oracle 15 0 5852 2168 1100 S 0.9 0.5 0:08 0 rhn-applet-gui
1675 root 15 0 1800 728 540 S 0.7 0.1 0:12 0 snmpd
2602 oracle 15 0 8284 6452 1552 S 0.7 1.6 0:30 0 dbsnmp
1426 root 15 0 200 164 116 R 0.5 0.0 0:08 0 syslogd
2329 root 15 0 25876 9M 824 R 0.5 2.6 6:52 0 X
15 root 15 0 0 0 0 SW 0.3 0.0 0:09 0 kjournald
3008 root 15 0 12612 11M 7864 S 0.3 3.0 0:04 0 rhn-applet-gui
2212 root 15 0 26124 10M 812 R 0.1 2.7 9:01 0 X
2262 rlowenth 15 0 5836 2144 1084 S 0.1 0.5 0:12 0 rhn-applet-gui.
Many people do not realize that top is an interactive utility. From within top, you can enter “?” to see a list of options. One more useful interactive command is “u” which allows you to identify a single user for the top display output. For example, if you enter “u” and then type in “oracle” then your list of processes would include only processes started by oracle. The top displays’ default refresh rate is every two seconds, but you can change that interval with the “s” command. When top is run by root, you can kill processes directly from within top by using the “k” command.
Oracle In
ternal & O
racle Aca
demy
Use O
nly
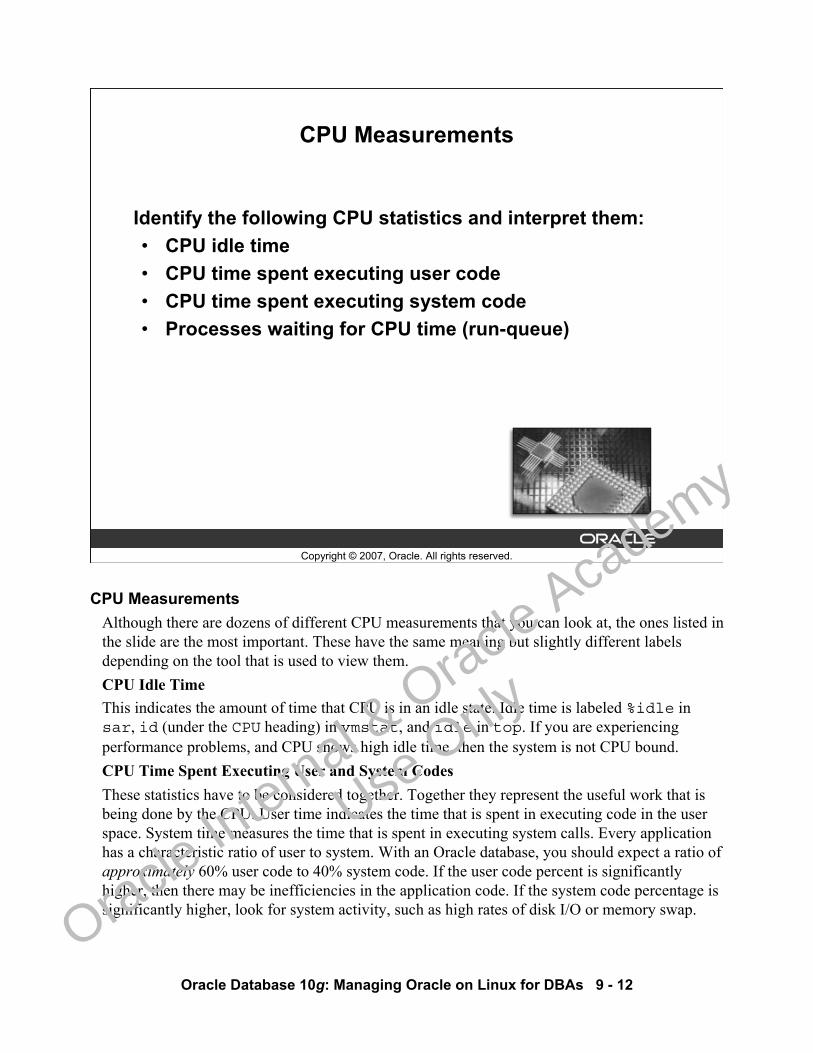
Oracle Database 10g: Managing Oracle on Linux for DBAs 9 - 12
Copyright © 2007, Oracle. All rights reserved.
CPU Measurements
Identify the following CPU statistics and interpret them:• CPU idle time• CPU time spent executing user code• CPU time spent executing system code• Processes waiting for CPU time (run-queue)
CPU MeasurementsAlthough there are dozens of different CPU measurements that you can look at, the ones listed in the slide are the most important. These have the same meaning but slightly different labels depending on the tool that is used to view them. CPU Idle TimeThis indicates the amount of time that CPU is in an idle state. Idle time is labeled %idle in sar, id (under the CPU heading) in vmstat, and idle in top. If you are experiencing performance problems, and CPU shows high idle time, then the system is not CPU bound.CPU Time Spent Executing User and System CodesThese statistics have to be considered together. Together they represent the useful work that is being done by the CPU. User time indicates the time that is spent in executing code in the user space. System time measures the time that is spent in executing system calls. Every application has a characteristic ratio of user to system. With an Oracle database, you should expect a ratio of approximately 60% user code to 40% system code. If the user code percent is significantly higher, then there may be inefficiencies in the application code. If the system code percentage is significantly higher, look for system activity, such as high rates of disk I/O or memory swap.
Oracle In
ternal & O
racle Aca
demy
Use O
nly
Oracle Database 10g: Managing Oracle on Linux for DBAs 9 - 13
CPU Measurements (continued)run-queue size
The run queue size indicates the number of processes that are ready to run. Processes that are blocked (waiting on I/O or for other reasons) are not counted in the run queue. All the processes in the run queue are waiting for a time slice of the CPU. If the run queue size is more than one, performance could probably be increased by adding additional CPUs.Obtaining CPU MeasurementsThere are several ways to obtain the key CPU metrics. Each of these tools gives a slightly different view of the same information about the CPU activity. # vmstat <interval> <count># mpstat -P <CPU> <interval> <count>
# sar -u <interval> <count># sar -q <interval> <count> # iostat -c <interval> <count>
vmstat, mpstat, and iostat get their information directly from the /proc file system.
Oracle In
ternal & O
racle Aca
demy
Use O
nly
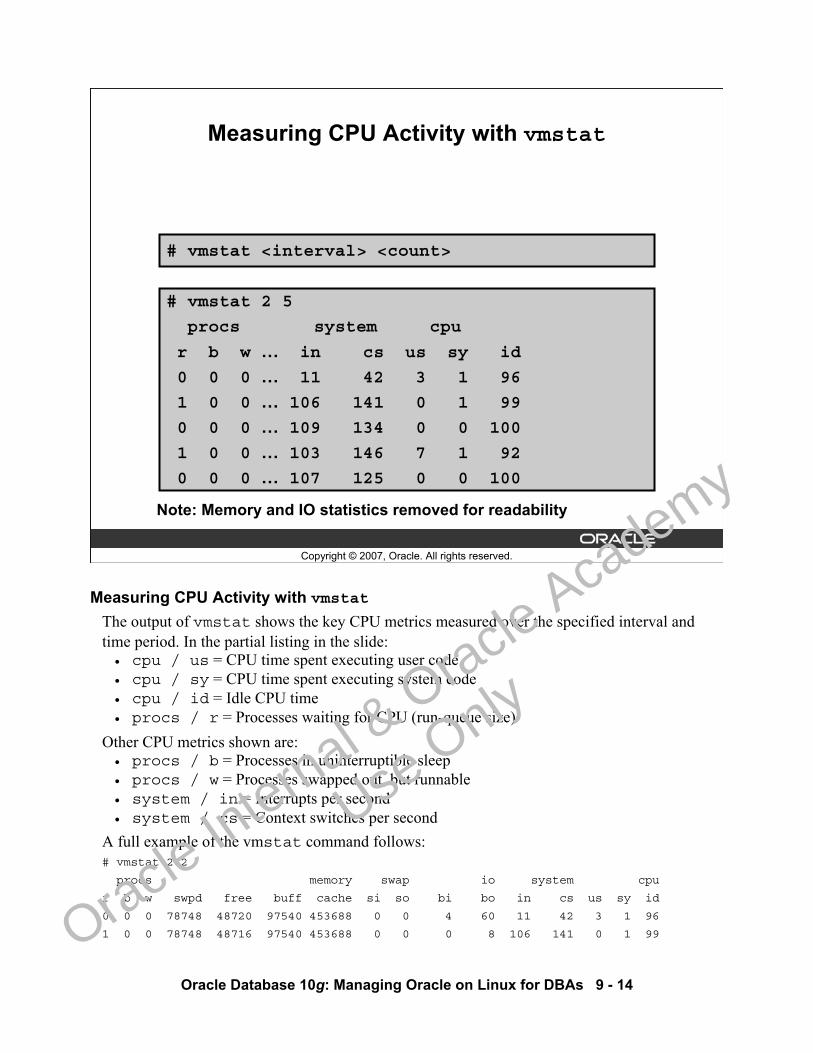
Oracle Database 10g: Managing Oracle on Linux for DBAs 9 - 14
Copyright © 2007, Oracle. All rights reserved.
Measuring CPU Activity with vmstat
# vmstat <interval> <count>
# vmstat 2 5
procs system cpu
r b w … in cs us sy id
0 0 0 … 11 42 3 1 96
1 0 0 … 106 141 0 1 99
0 0 0 … 109 134 0 0 100
1 0 0 … 103 146 7 1 92
0 0 0 … 107 125 0 0 100
Note: Memory and IO statistics removed for readability
Measuring CPU Activity with vmstatThe output of vmstat shows the key CPU metrics measured over the specified interval and time period. In the partial listing in the slide:• cpu / us = CPU time spent executing user code• cpu / sy = CPU time spent executing system code• cpu / id = Idle CPU time• procs / r = Processes waiting for CPU (run-queue size)
Other CPU metrics shown are:• procs / b = Processes in uninterruptible sleep• procs / w = Processes swapped out, but runnable• system / in = Interrupts per second• system / cs = Context switches per second
A full example of the vmstat command follows:# vmstat 2 2
procs memory swap io system cpu
r b w swpd free buff cache si so bi bo in cs us sy id
0 0 0 78748 48720 97540 453688 0 0 4 60 11 42 3 1 96
1 0 0 78748 48716 97540 453688 0 0 0 8 106 141 0 1 99
Oracle In
ternal & O
racle Aca
demy
Use O
nly
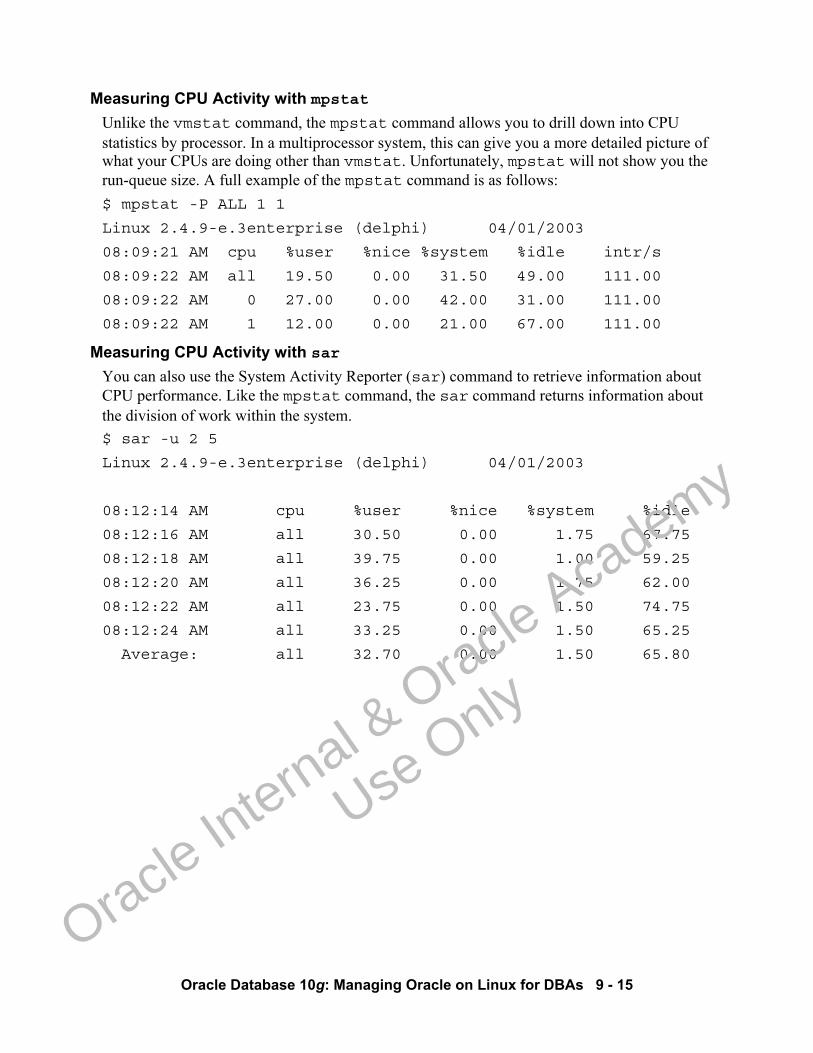
Oracle Database 10g: Managing Oracle on Linux for DBAs 9 - 15
Measuring CPU Activity with mpstatUnlike the vmstat command, the mpstat command allows you to drill down into CPU statistics by processor. In a multiprocessor system, this can give you a more detailed picture of what your CPUs are doing other than vmstat. Unfortunately, mpstat will not show you the run-queue size. A full example of the mpstat command is as follows:$ mpstat -P ALL 1 1
Linux 2.4.9-e.3enterprise (delphi) 04/01/2003
08:09:21 AM cpu %user %nice %system %idle intr/s
08:09:22 AM all 19.50 0.00 31.50 49.00 111.00
08:09:22 AM 0 27.00 0.00 42.00 31.00 111.00
08:09:22 AM 1 12.00 0.00 21.00 67.00 111.00
Measuring CPU Activity with sarYou can also use the System Activity Reporter (sar) command to retrieve information about CPU performance. Like the mpstat command, the sar command returns information about the division of work within the system.$ sar -u 2 5
Linux 2.4.9-e.3enterprise (delphi) 04/01/2003
08:12:14 AM cpu %user %nice %system %idle
08:12:16 AM all 30.50 0.00 1.75 67.75
08:12:18 AM all 39.75 0.00 1.00 59.25
08:12:20 AM all 36.25 0.00 1.75 62.00
08:12:22 AM all 23.75 0.00 1.50 74.75
08:12:24 AM all 33.25 0.00 1.50 65.25
Average: all 32.70 0.00 1.50 65.80
Oracle In
ternal & O
racle Aca
demy
Use O
nly
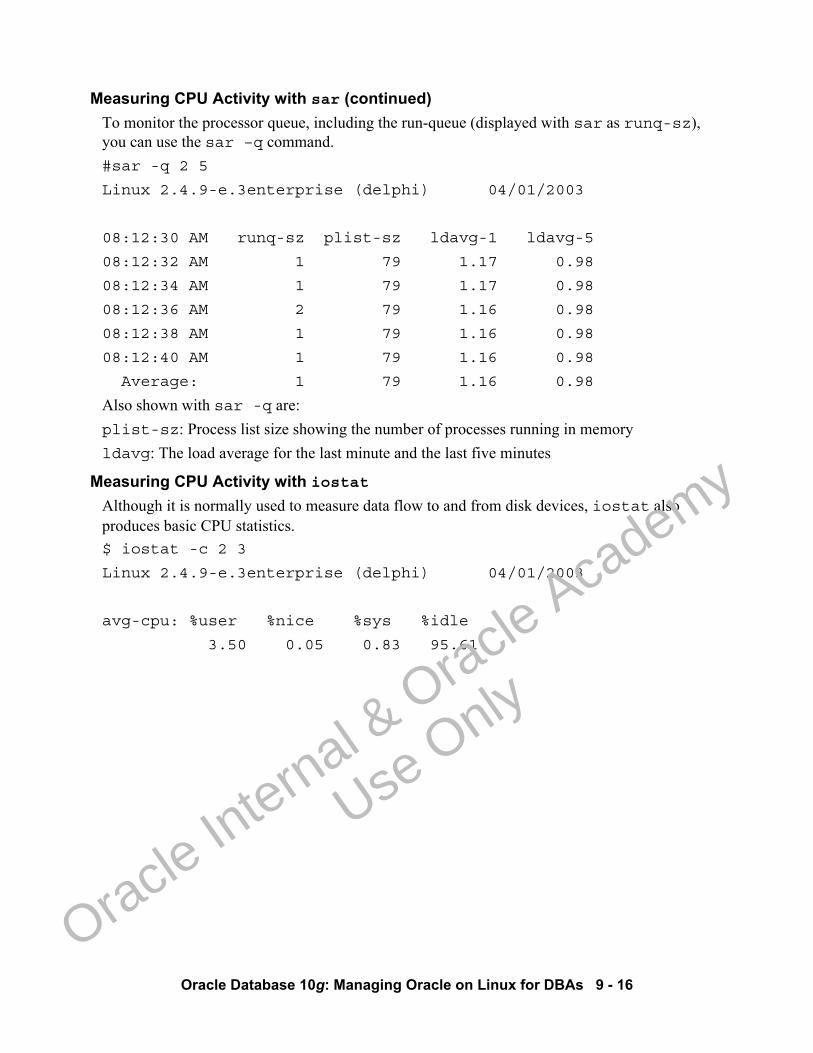
Oracle Database 10g: Managing Oracle on Linux for DBAs 9 - 16
Measuring CPU Activity with sar (continued)To monitor the processor queue, including the run-queue (displayed with sar as runq-sz), you can use the sar –q command. #sar -q 2 5
Linux 2.4.9-e.3enterprise (delphi) 04/01/2003
08:12:30 AM runq-sz plist-sz ldavg-1 ldavg-5
08:12:32 AM 1 79 1.17 0.98
08:12:34 AM 1 79 1.17 0.98
08:12:36 AM 2 79 1.16 0.98
08:12:38 AM 1 79 1.16 0.98
08:12:40 AM 1 79 1.16 0.98
Average: 1 79 1.16 0.98
Also shown with sar -q are:plist-sz: Process list size showing the number of processes running in memoryldavg: The load average for the last minute and the last five minutes
Measuring CPU Activity with iostatAlthough it is normally used to measure data flow to and from disk devices, iostat also produces basic CPU statistics.$ iostat -c 2 3
Linux 2.4.9-e.3enterprise (delphi) 04/01/2003
avg-cpu: %user %nice %sys %idle
3.50 0.05 0.83 95.61
Oracle In
ternal & O
racle Aca
demy
Use O
nly
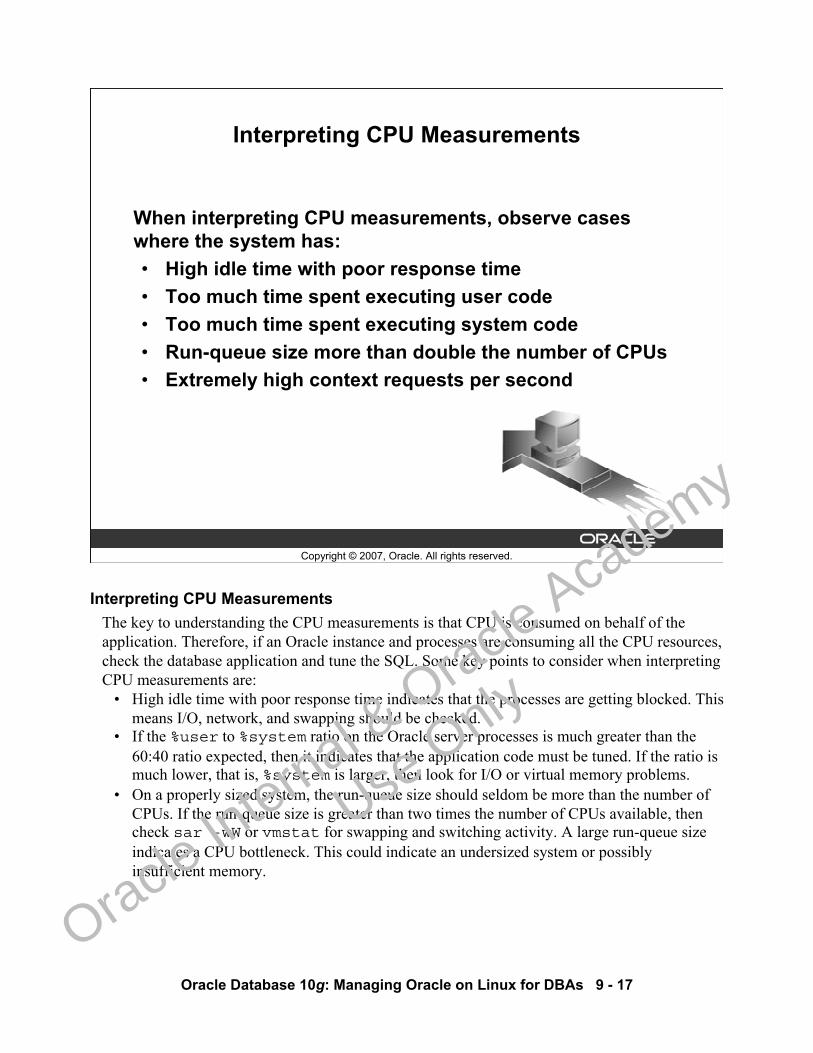
Oracle Database 10g: Managing Oracle on Linux for DBAs 9 - 17
Copyright © 2007, Oracle. All rights reserved.
Interpreting CPU Measurements
When interpreting CPU measurements, observe cases where the system has:• High idle time with poor response time• Too much time spent executing user code• Too much time spent executing system code• Run-queue size more than double the number of CPUs• Extremely high context requests per second
Interpreting CPU MeasurementsThe key to understanding the CPU measurements is that CPU is consumed on behalf of the application. Therefore, if an Oracle instance and processes are consuming all the CPU resources, check the database application and tune the SQL. Some key points to consider when interpreting CPU measurements are:
• High idle time with poor response time indicates that the processes are getting blocked. This means I/O, network, and swapping should be checked.
• If the %user to %system ratio on the Oracle server processes is much greater than the 60:40 ratio expected, then it indicates that the application code must be tuned. If the ratio is much lower, that is, %system is larger, then look for I/O or virtual memory problems.
• On a properly sized system, the run-queue size should seldom be more than the number of CPUs. If the run-queue size is greater than two times the number of CPUs available, then check sar -wW or vmstat for swapping and switching activity. A large run-queue size indicates a CPU bottleneck. This could indicate an undersized system or possibly insufficient memory.
Oracle In
ternal & O
racle Aca
demy
Use O
nly
Oracle Database 10g: Managing Oracle on Linux for DBAs 9 - 18
Interpreting CPU Measurements (continued)• Each process takes virtual memory. When more process memory is required than is
available in real memory, paging takes place. As more processes are added, more memory is required, and more CPU overhead is required to process the paging and context switching requests. This can continue until the CPU spends most of its time paging and switching. This situation is called thrashing.
Oracle In
ternal & O
racle Aca
demy
Use O
nly
Oracle Database 10g: Managing Oracle on Linux for DBAs 9 - 19
Copyright © 2007, Oracle. All rights reserved.
Reducing CPU Bottlenecks
If you determine that CPU is the limiting factor in your system:• Increase CPU resources• Decrease CPU demand• Schedule CPU demand more efficiently
Reducing CPU Bottlenecks CPU is usually a finite resource. Sometimes it is possible to increase CPU resources (upgrade the processor or add additional processors), but it is usually difficult or expensive unless you are working in a grid system. Therefore, you usually concentrate on either using existing resources more efficiently or offloading unnecessary work to other systems.Using Your CPU More EfficientlyThere are some basic things you can do to make your CPU more efficient:
• Schedule non-time-critical jobs to run during times when CPU is less loaded. For example, database backups, index rebuilds, optimizer statistics collection, and batch jobs could run at night rather than during the day.
• Employ a resource management system (such as Oracle Resource Manager) to ensure that your most important jobs are serviced first, and that too many batch jobs cannot be started simultaneously. The use of system process priority manipulation to assign resources to more important processes is not recommended for Oracle processes because Oracle has its own built-in process management system.
• Reduce the demand on your CPU by eliminating unnecessary work or offloading work to a different server.
Oracle In
ternal & O
racle Aca
demy
Use O
nly
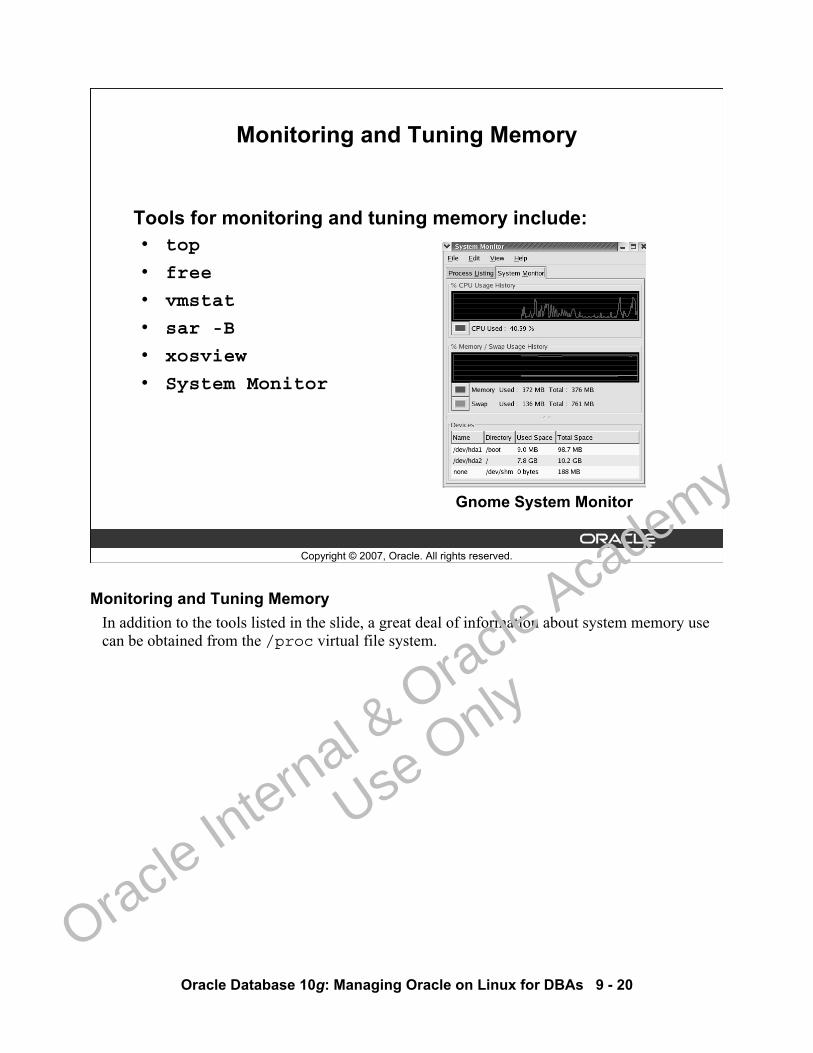
Oracle Database 10g: Managing Oracle on Linux for DBAs 9 - 20
Copyright © 2007, Oracle. All rights reserved.
Monitoring and Tuning Memory
Tools for monitoring and tuning memory include:• top
• free
• vmstat
• sar -B
• xosview
• System Monitor
Gnome System Monitor
Monitoring and Tuning MemoryIn addition to the tools listed in the slide, a great deal of information about system memory use can be obtained from the /proc virtual file system.
Oracle In
ternal & O
racle Aca
demy
Use O
nly
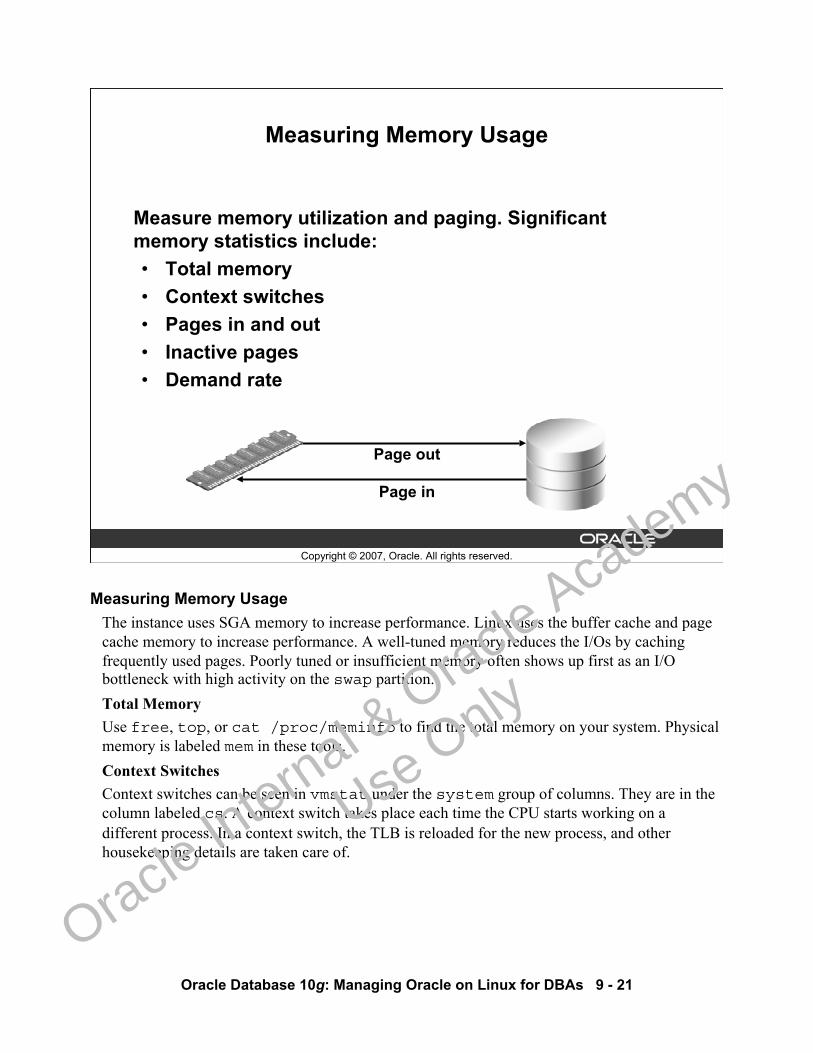
Oracle Database 10g: Managing Oracle on Linux for DBAs 9 - 21
Copyright © 2007, Oracle. All rights reserved.
Measuring Memory Usage
Measure memory utilization and paging. Significant memory statistics include:• Total memory• Context switches • Pages in and out• Inactive pages• Demand rate
Page out
Page in
Measuring Memory UsageThe instance uses SGA memory to increase performance. Linux uses the buffer cache and page cache memory to increase performance. A well-tuned memory reduces the I/Os by caching frequently used pages. Poorly tuned or insufficient memory often shows up first as an I/O bottleneck with high activity on the swap partition. Total Memory Use free, top, or cat /proc/meminfo to find the total memory on your system. Physical memory is labeled mem in these tools. Context SwitchesContext switches can be seen in vmstat under the system group of columns. They are in the column labeled cs. A context switch takes place each time the CPU starts working on a different process. In a context switch, the TLB is reloaded for the new process, and other housekeeping details are taken care of.
Oracle In
ternal & O
racle Aca
demy
Use O
nly
Oracle Database 10g: Managing Oracle on Linux for DBAs 9 - 22
Measuring Memory Usage (continued) Pages OutPages out and pages in are measured in 1 KB blocks, even though the memory page size is 4 KB. Pages out are seldom zero, and should not be a cause for concern as some “page out” activity is normal. The swap process frequently moves a few pages out to swap to be sure that free pages are always available for page in operations. As more pages of real memory are needed, the number of pages moved to swap increases. Pages InThe number of pages in is a good measure of RAM shortage. A page in operation occurs when a memory page is pulled from virtual memory back to RAM. As processes access pages that are not mapped or have been paged out, a page in is registered. Ideally, the average pages in over time is near zero. This means that all the processes fit in real memory. As more processes start and require memory, the pages in increase. This is a key measurement when adjusting the SGA size for the database. If the pages in increases significantly after an increase in SGA size, it may indicate that the SGA is too large. Inactive PagesThis is also known as free or freeable memory. Inactive “clean” pages can be immediately replaced by other memory pages. Inactive “dirty” pages are free but must be written to disk before they can be used.Demand RateThis is also known as “Inactive Page Target.” This is one of the most important memory statistic. It is shown as the inatarpg column with sar -B. The value shown is the average number of pages per second, within the last minute, the system needed to make “free” to meet memory demands. This value may also be seen as inact_target in /proc/meminfo. This is the goal the kernel tries to reach to make sure that there are enough inactive pages available.
Oracle In
ternal & O
racle Aca
demy
Use O
nly
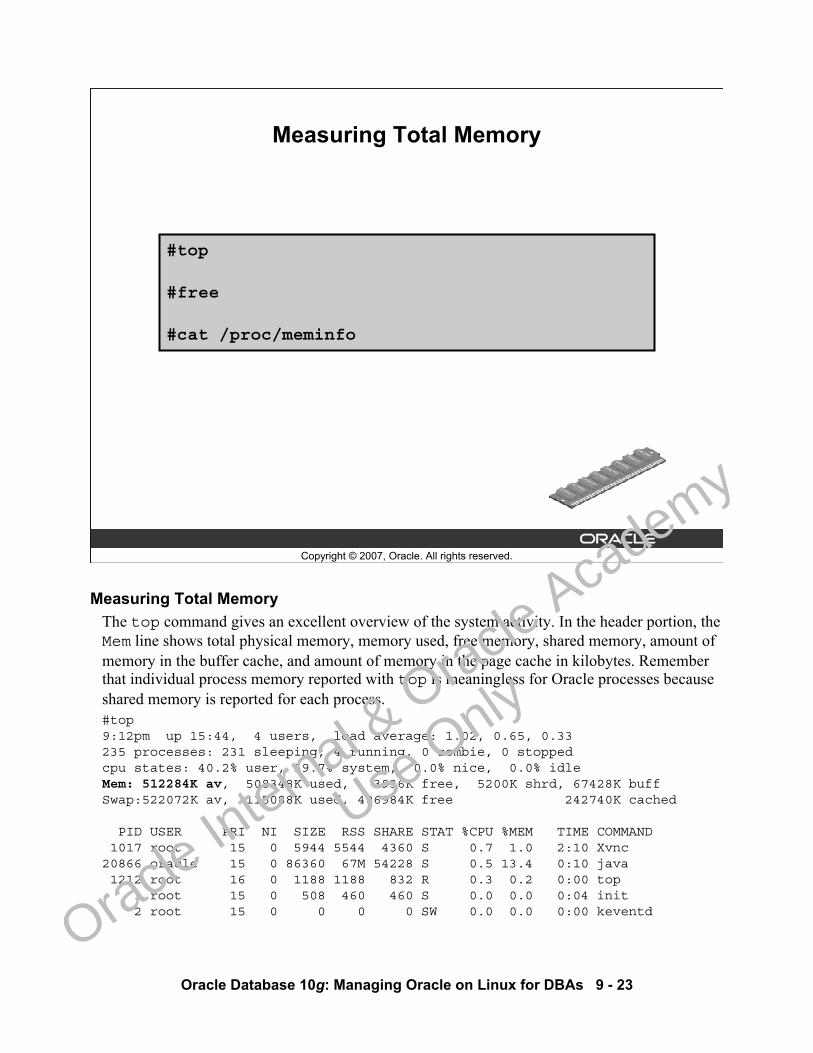
Oracle Database 10g: Managing Oracle on Linux for DBAs 9 - 23
Copyright © 2007, Oracle. All rights reserved.
Measuring Total Memory
#top
#free
#cat /proc/meminfo
Measuring Total Memory The top command gives an excellent overview of the system activity. In the header portion, the Mem line shows total physical memory, memory used, free memory, shared memory, amount of memory in the buffer cache, and amount of memory in the page cache in kilobytes. Remember that individual process memory reported with top is meaningless for Oracle processes because shared memory is reported for each process.#top9:12pm up 15:44, 4 users, load average: 1.02, 0.65, 0.33235 processes: 231 sleeping, 4 running, 0 zombie, 0 stoppedcpu states: 40.2% user, 59.7% system, 0.0% nice, 0.0% idleMem: 512284K av, 508348K used, 3936K free, 5200K shrd, 67428K buffSwap:522072K av, 115088K used, 406984K free 242740K cached
PID USER PRI NI SIZE RSS SHARE STAT %CPU %MEM TIME COMMAND1017 root 15 0 5944 5544 4360 S 0.7 1.0 2:10 Xvnc20866 oracle 15 0 86360 67M 54228 S 0.5 13.4 0:10 java1212 root 16 0 1188 1188 832 R 0.3 0.2 0:00 top
1 root 15 0 508 460 460 S 0.0 0.0 0:04 init2 root 15 0 0 0 0 SW 0.0 0.0 0:00 keventd
Oracle In
ternal & O
racle Aca
demy
Use O
nly

Oracle Database 10g: Managing Oracle on Linux for DBAs 9 - 24
Measuring Total Memory (continued)The free command also shows total memory and swap usage. The -/+ buffers/cache line indicates the adjustment to free and used memory by the kernel’s disk buffers and page cache (how much a process could get if it requested it—the kernel will dump its own page cache and disk buffers to support running processes):#free
total used free shared buffers cachedMem: 512284 506880 5404 5200 68196 239984-/+ buffers/cache: 198700 313584Swap: 522072 114884 407188
All the utilities that collect statistics gather information from the /proc file system. The virtual meminfo “file” gives an instantaneous snapshot of memory usage.
# cat /proc/meminfo total: used: free: shared: buffers: cached:
Mem: 1054806016 1029685248 25120768 0 136949760 617668608Swap: 534601728 22032384 512569344MemTotal: 1030084 kBMemFree: 24532 kBMemShared: 0 kBBuffers: 133740 kBCached: 585920 kBSwapCached: 17272 kBActive: 674312 kBActiveAnon: 214892 kBActiveCache: 459420 kBInact_dirty: 0 kBInact_laundry: 159476 kBInact_clean: 14016 kBInact_target: 169560 kBHighTotal: 130524 kBHighFree: 2032 kBLowTotal: 899560 kBLowFree: 22500 kBSwapTotal: 522072 kBSwapFree: 500556 kBHugePages_Total: 0HugePages_Free: 0Hugepagesize: 4096 kB
A few key statistics from the meminfo output are:• Mem: The current state of physical RAM in the system, including a full breakdown of total,
used, free, shared, buffered, and cached memory utilization in bytes• MemFree: The amount of physical RAM left unused by the system. It is usually very low.• Active: The total amount of buffer or page cache memory that is in active use• Inact_dirty: Buffers that might need writing to disk or swap. It should be relatively
low.• Inact_target: Demand rate. This is the goal the kernel tries to reach to make sure that
there are enough inactive pages available. • SwapFree: The total amount of swap free. It should not stay below 20% of SwapTotal.
Oracle In
ternal & O
racle Aca
demy
Use O
nly
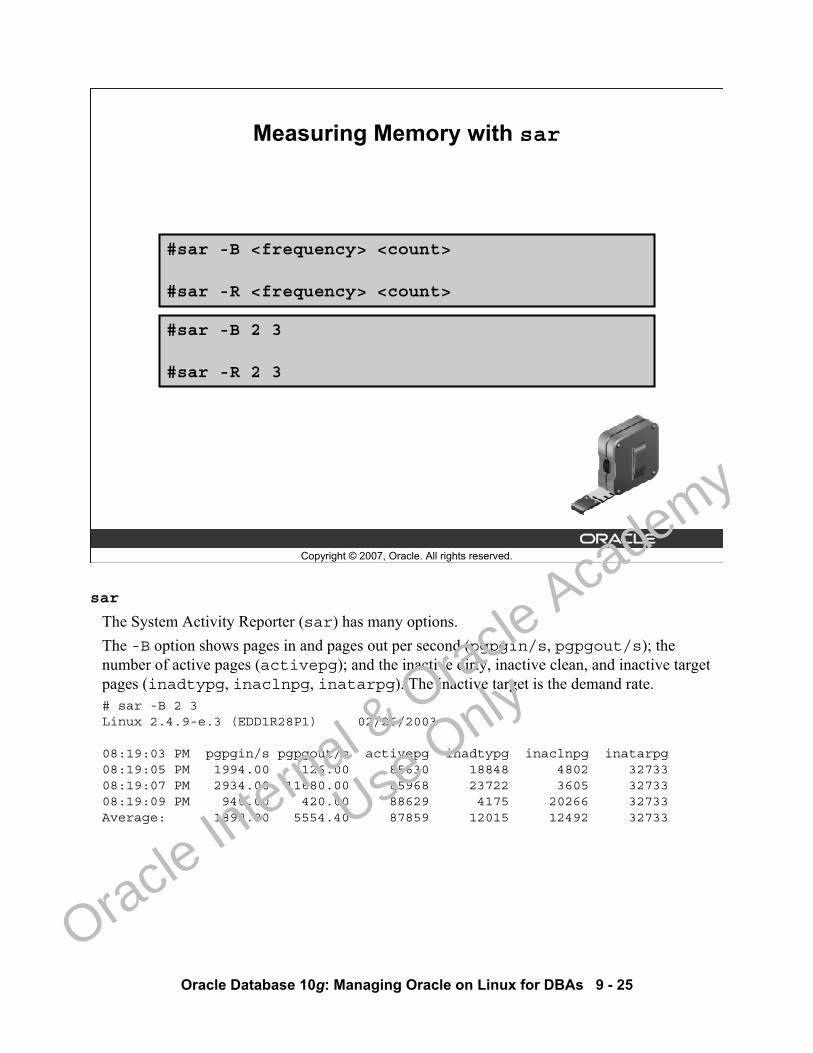
Oracle Database 10g: Managing Oracle on Linux for DBAs 9 - 25
Copyright © 2007, Oracle. All rights reserved.
Measuring Memory with sar
#sar -B 2 3
#sar -R 2 3
#sar -B <frequency> <count>
#sar -R <frequency> <count>
sar
The System Activity Reporter (sar) has many options.The -B option shows pages in and pages out per second (pgpgin/s, pgpgout/s); the number of active pages (activepg); and the inactive dirty, inactive clean, and inactive target pages (inadtypg, inaclnpg, inatarpg). The inactive target is the demand rate.# sar -B 2 3Linux 2.4.9-e.3 (EDD1R28P1) 02/26/2003
08:19:03 PM pgpgin/s pgpgout/s activepg inadtypg inaclnpg inatarpg08:19:05 PM 1994.00 126.00 85630 18848 4802 3273308:19:07 PM 2934.00 11680.00 85968 23722 3605 3273308:19:09 PM 940.00 420.00 88629 4175 20266 32733Average: 1898.80 5554.40 87859 12015 12492 32733
Oracle In
ternal & O
racle Aca
demy
Use O
nly
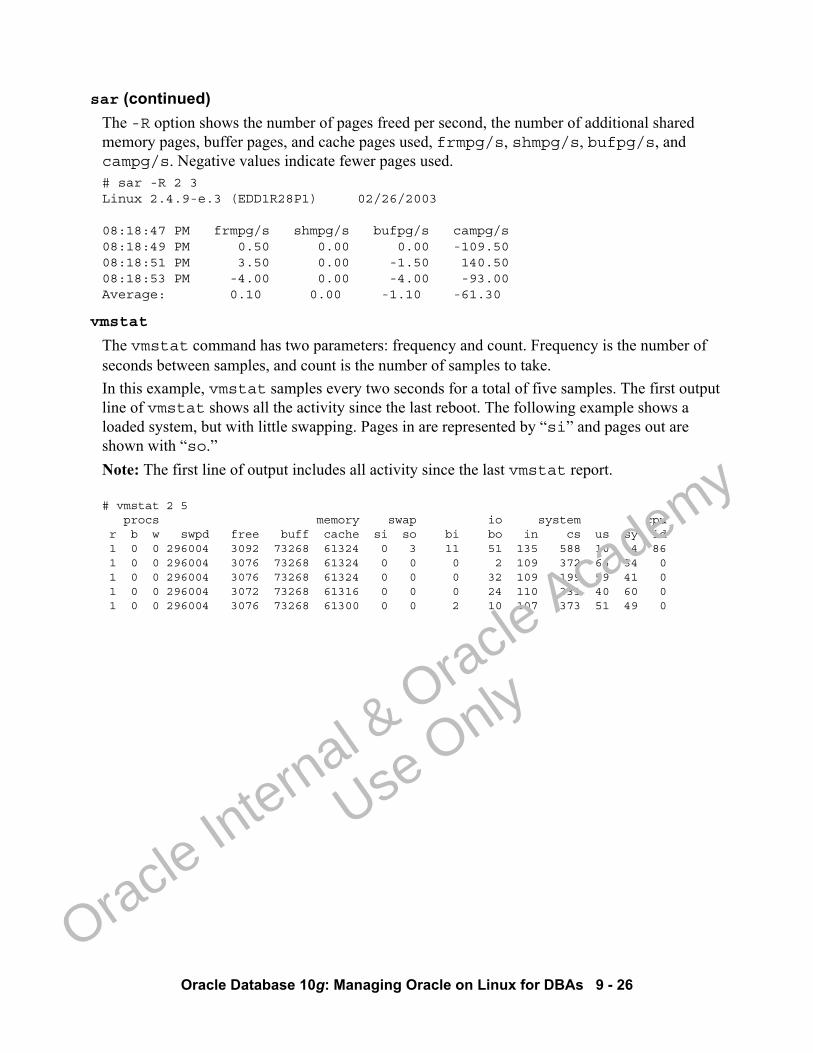
Oracle Database 10g: Managing Oracle on Linux for DBAs 9 - 26
sar (continued)The -R option shows the number of pages freed per second, the number of additional shared memory pages, buffer pages, and cache pages used, frmpg/s, shmpg/s, bufpg/s, and campg/s. Negative values indicate fewer pages used. # sar -R 2 3Linux 2.4.9-e.3 (EDD1R28P1) 02/26/2003
08:18:47 PM frmpg/s shmpg/s bufpg/s campg/s08:18:49 PM 0.50 0.00 0.00 -109.5008:18:51 PM 3.50 0.00 -1.50 140.5008:18:53 PM -4.00 0.00 -4.00 -93.00Average: 0.10 0.00 -1.10 -61.30
vmstat
The vmstat command has two parameters: frequency and count. Frequency is the number of seconds between samples, and count is the number of samples to take. In this example, vmstat samples every two seconds for a total of five samples. The first output line of vmstat shows all the activity since the last reboot. The following example shows a loaded system, but with little swapping. Pages in are represented by “si” and pages out are shown with “so.”Note: The first line of output includes all activity since the last vmstat report.
# vmstat 2 5procs memory swap io system cpu
r b w swpd free buff cache si so bi bo in cs us sy id1 0 0 296004 3092 73268 61324 0 3 11 51 135 588 10 4 861 0 0 296004 3076 73268 61324 0 0 0 2 109 372 66 34 01 0 0 296004 3076 73268 61324 0 0 0 32 109 199 59 41 01 0 0 296004 3072 73268 61316 0 0 0 24 110 331 40 60 01 0 0 296004 3076 73268 61300 0 0 2 10 107 373 51 49 0
Oracle In
ternal & O
racle Aca
demy
Use O
nly

Oracle Database 10g: Managing Oracle on Linux for DBAs 9 - 27
Copyright © 2007, Oracle. All rights reserved.
Interpreting Memory Measurements
When interpreting memory measurements, observe cases where the system has:• High swap memory usage• Kernel file cache that continue to be allocated despite
low system memory• High page ins/page outs• Low inactive pages
Interpreting Memory MeasurementsRemember that a single measurement is meaningless. The key to using memory statistics is measurement over a period of time. You can use the average demand rate (when the system performance is acceptable) as a baseline to compare with when the system performs poorly. This, along with the pages in over the same time periods, may indicate memory problems. High Swap Memory UsageIndicates memory demand is too high for the available RAM. If this is consistently high, then consider adding RAM.Kernel File Cache Continues to Be Allocated Despite Low System MemoryThis may be an indication of kernel problems. (Earlier Linux kernels did not release file cache quickly enough.)
Oracle In
ternal & O
racle Aca
demy
Use O
nly
Oracle Database 10g: Managing Oracle on Linux for DBAs 9 - 28
Interpreting Memory Measurements (continued)High Page InsThis can indicate that the SGA is too large for available memory, or that the SGA needs to be “locked” into RAM. If you are using a supported enterprise distribution, then use the hugepages feature. If using a nonenterprise kernel, then set lock_sga=true to lock the SGA into RAM. Note that this requires the oracle user to have the CAP_IPC_LOCK privilege granted through and advanced permissions management system such as the Linux Intrusion Detection System (LIDS).Low Inactive PagesThis indicates that you do not have enough memory. The best solution is to increase RAM.
Oracle In
ternal & O
racle Aca
demy
Use O
nly

Oracle Database 10g: Managing Oracle on Linux for DBAs 9 - 29
Copyright © 2007, Oracle. All rights reserved.
Reducing Memory Bottlenecks
If you determine that memory is the limiting factor in your system, then:• Increase memory resources• Decrease memory demand
Reducing Memory Bottlenecks All the solutions are in the form of Use less memory or Get more memory.
• Identify nonessential memory consumption and eliminate it. Look for running non-Oracle processes and eliminate those you can do without.
• Use Linux hugepages.• Reducing the SGA is not usually acceptable, but check the installation and configuration.
Are you using the Java Virtual Machine (JVM)? If not, reduce JAVA_POOL_SIZE to zero. Can your buffer cache be reduced without affecting performance? Although the SGA would not complain about excessive pool sizes (within reason), your server certainly will.
• Reduce the number of user processes. Without restricting the number of users, the number of user processes can be reduced by using shared servers if the workload supports them.
• Reduce the amount of process memory with PGA_AGGREGATE_TARGET.• Add memory to your server.
Oracle In
ternal & O
racle Aca
demy
Use O
nly
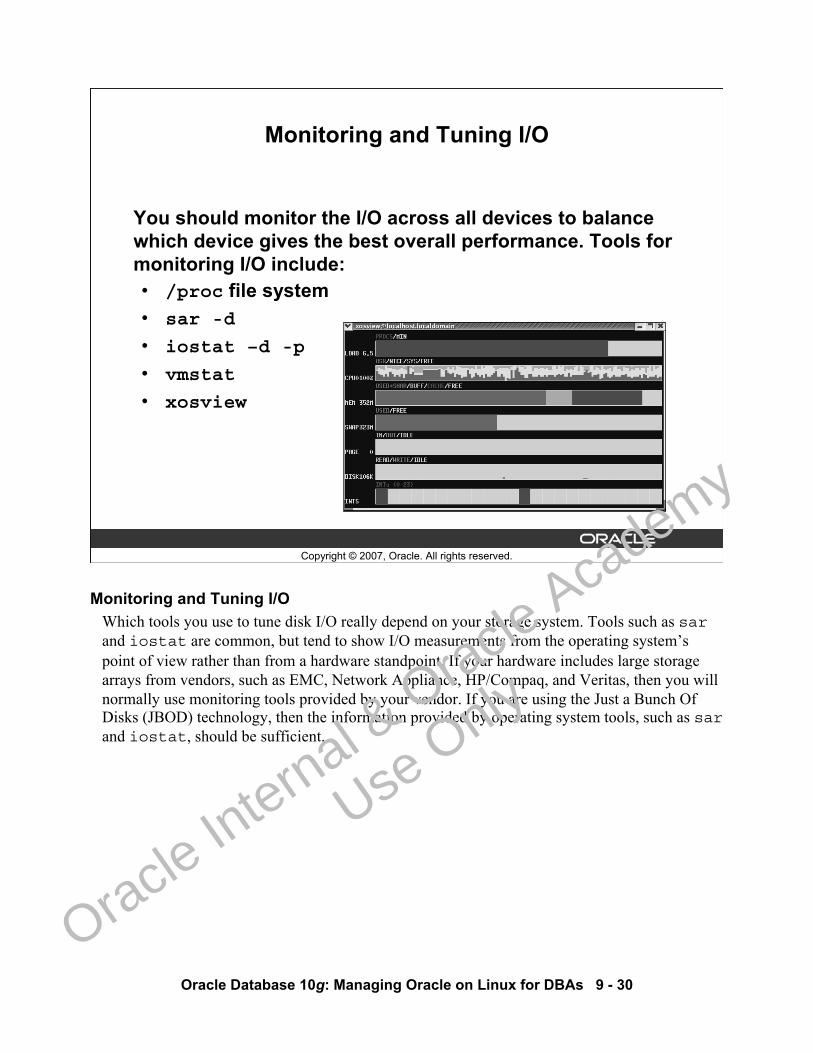
Oracle Database 10g: Managing Oracle on Linux for DBAs 9 - 30
Copyright © 2007, Oracle. All rights reserved.
Monitoring and Tuning I/O
You should monitor the I/O across all devices to balance which device gives the best overall performance. Tools for monitoring I/O include:• /proc file system• sar -d
• iostat –d -p
• vmstat
• xosview
Monitoring and Tuning I/OWhich tools you use to tune disk I/O really depend on your storage system. Tools such as sarand iostat are common, but tend to show I/O measurements from the operating system’s point of view rather than from a hardware standpoint. If your hardware includes large storage arrays from vendors, such as EMC, Network Appliance, HP/Compaq, and Veritas, then you will normally use monitoring tools provided by your vendor. If you are using the Just a Bunch Of Disks (JBOD) technology, then the information provided by operating system tools, such as sarand iostat, should be sufficient.
Oracle In
ternal & O
racle Aca
demy
Use O
nly
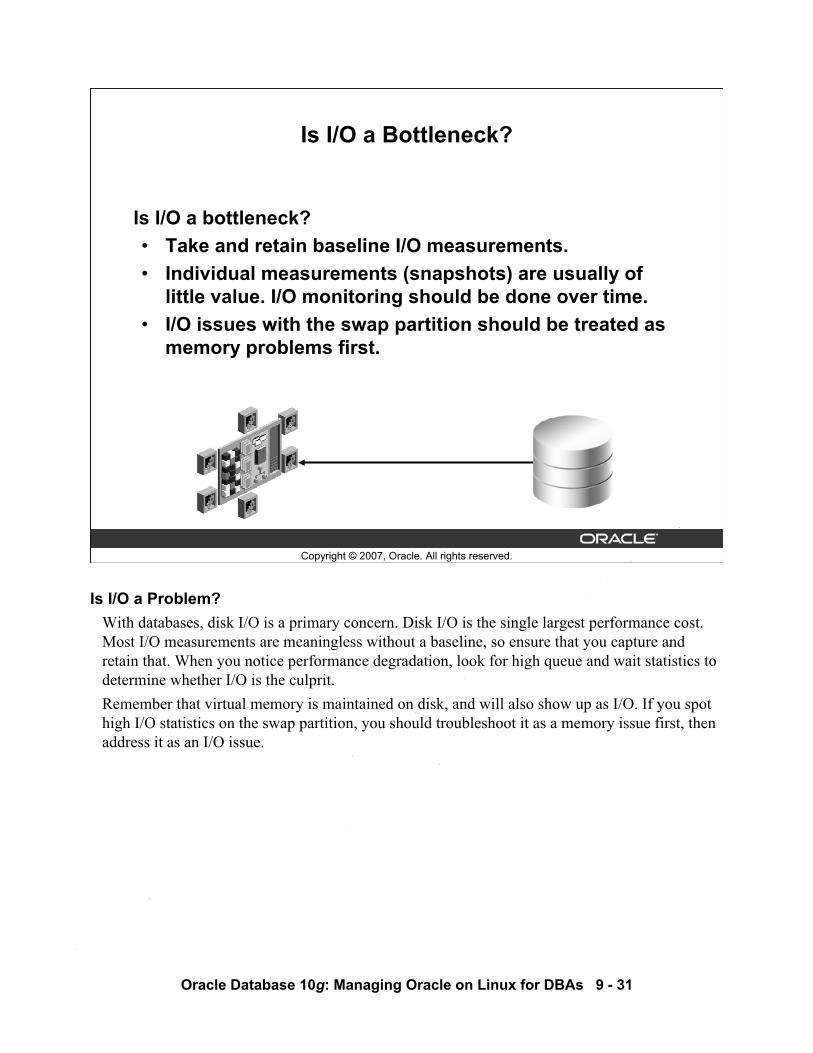
Oracle Database 10g: Managing Oracle on Linux for DBAs 9 - 31
Copyright © 2007, Oracle. All rights reserved.
Is I/O a Bottleneck?
Is I/O a bottleneck?• Take and retain baseline I/O measurements.• Individual measurements (snapshots) are usually of
little value. I/O monitoring should be done over time.• I/O issues with the swap partition should be treated as
memory problems first.
Is I/O a Problem?With databases, disk I/O is a primary concern. Disk I/O is the single largest performance cost. Most I/O measurements are meaningless without a baseline, so ensure that you capture and retain that. When you notice performance degradation, look for high queue and wait statistics to determine whether I/O is the culprit.Remember that virtual memory is maintained on disk, and will also show up as I/O. If you spot high I/O statistics on the swap partition, you should troubleshoot it as a memory issue first, then address it as an I/O issue.
Oracle In
ternal & O
racle Aca
demy
Use O
nly
Oracle Database 10g: Managing Oracle on Linux for DBAs 9 - 32
Copyright © 2007, Oracle. All rights reserved.
I/O Measurements
I/O measurements concentrate on volume and speed:• Read I/O operations• Write I/O operations• Request queue size• Transfer rate• Wait time• Service time
I/O MeasurementsI/O measurements usually concentrate on either the volume of data being handled or the speed with which that data is handled.VolumeObviously, the more work that is being done the longer it will take to do that work. When you measure volume, look at read and write volume separately. Also, if your tools allow you to view it, monitor sequential operations as compared with random access. It is usually quicker to write 1 MB of sequential data than to write 20 KB in multiple locations on the disk because of the time required for disk head positioning.SpeedWhen monitoring speed, look for transfer rate (bytes per second), wait time (how much time was spent waiting for I/O to respond), and service time (how long does each I/O operation take from start to finish). Of these three, the wait time is the most important from a database performance standpoint.
Oracle In
ternal & O
racle Aca
demy
Use O
nly
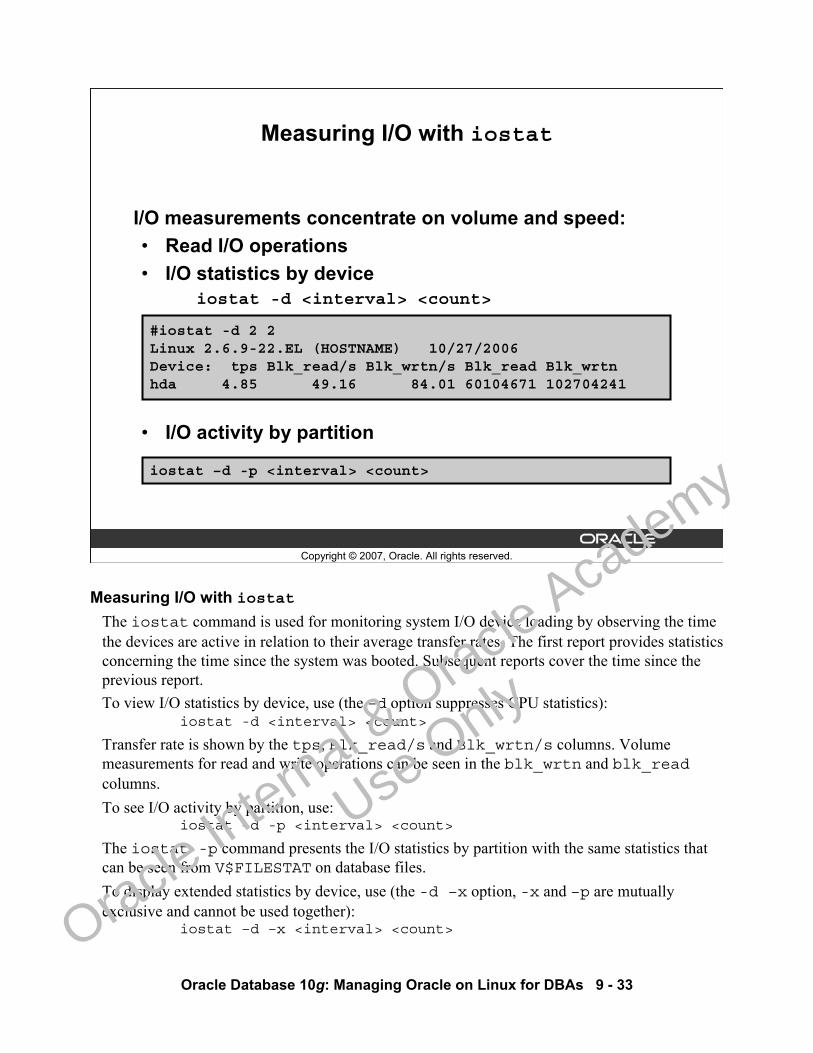
Oracle Database 10g: Managing Oracle on Linux for DBAs 9 - 33
Copyright © 2007, Oracle. All rights reserved.
Measuring I/O with iostat
I/O measurements concentrate on volume and speed:• Read I/O operations• I/O statistics by device
iostat -d <interval> <count>
• I/O activity by partition
#iostat -d 2 2Linux 2.6.9-22.EL (HOSTNAME) 10/27/2006Device: tps Blk_read/s Blk_wrtn/s Blk_read Blk_wrtnhda 4.85 49.16 84.01 60104671 102704241
iostat –d -p <interval> <count>
Measuring I/O with iostatThe iostat command is used for monitoring system I/O device loading by observing the time the devices are active in relation to their average transfer rates. The first report provides statistics concerning the time since the system was booted. Subsequent reports cover the time since the previous report.To view I/O statistics by device, use (the –d option suppresses CPU statistics):
iostat -d <interval> <count>
Transfer rate is shown by the tps, Blk_read/s and Blk_wrtn/s columns. Volume measurements for read and write operations can be seen in the blk_wrtn and blk_readcolumns.To see I/O activity by partition, use:
iostat –d -p <interval> <count>
The iostat -p command presents the I/O statistics by partition with the same statistics that can be seen from V$FILESTAT on database files.To display extended statistics by device, use (the -d –x option, -x and –p are mutually exclusive and cannot be used together):
iostat –d –x <interval> <count>
Oracle In
ternal & O
racle Aca
demy
Use O
nly

Oracle Database 10g: Managing Oracle on Linux for DBAs 9 - 34
Measuring I/O with iostat (continued)Speed measurements are shown in three ways: merged requests as rrqm/s and wrqm/s (how many operations were performed), requests as r/s and w/s (how many requests were made of the I/O system), and sectors handled per second as rsec/s and wsec/s.Volume statistics are shown including average requests size avgrq-sz.await gives the average wait time for requests. avgqu-sz is a key metric that shows the length of the request queue (this is the I/O equivalent of CPU load). Service time, another key metric, appears as svctm. %util is the percentage of time the CPU spends handling I/O requests.The output of the following command has been reformatted to fit the page. # iostat –d -x 2 2
Linux 2.6.9-22.EL (EDRSR24P1) 10/27/2006
Device: rrqm/s wrqm/s r/s w/s rsec/s wsec/s rkB/s wkB/s
hda 0.26 8.09 2.44 2.39 48.99 83.83 24.50 41.92
<would normally appear on same line as above>Device: avgrq-sz avgqu-sz await svctm %util
hda 27.51 0.34 70.08 2.89 1.40
#iostat -d -p 2 2
Linux 2.6.9-22.EL (EDRSR24P1) 10/27/2006
Device: tps Blk_read/s Blk_wrtn/s Blk_read Blk_wrtn
hda 4.84 49.08 83.93 59993375 102593945
hda1 0.02 0.01 0.00 15083 5179
hda2 0.00 0.00 0.00 1595 70
hda3 0.59 2.30 2.40 2806293 2932664
hda5 12.60 46.77 81.52 57168926 99656032
As you can see in the above example, hda5 is the only partition that is really affecting system performance.
Oracle In
ternal & O
racle Aca
demy
Use O
nly
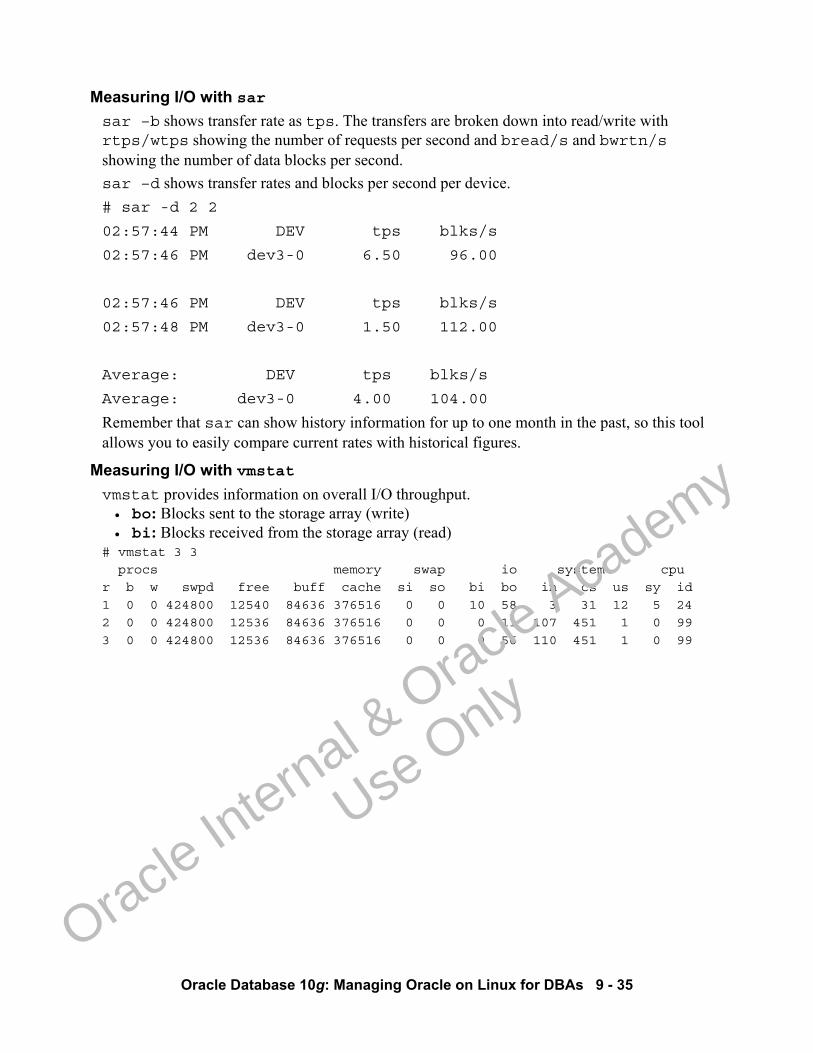
Oracle Database 10g: Managing Oracle on Linux for DBAs 9 - 35
Measuring I/O with sarsar –b shows transfer rate as tps. The transfers are broken down into read/write with rtps/wtps showing the number of requests per second and bread/s and bwrtn/sshowing the number of data blocks per second.sar –d shows transfer rates and blocks per second per device.# sar -d 2 2
02:57:44 PM DEV tps blks/s
02:57:46 PM dev3-0 6.50 96.00
02:57:46 PM DEV tps blks/s
02:57:48 PM dev3-0 1.50 112.00
Average: DEV tps blks/s
Average: dev3-0 4.00 104.00
Remember that sar can show history information for up to one month in the past, so this tool allows you to easily compare current rates with historical figures.
Measuring I/O with vmstatvmstat provides information on overall I/O throughput. • bo: Blocks sent to the storage array (write)• bi: Blocks received from the storage array (read)
# vmstat 3 3procs memory swap io system cpu
r b w swpd free buff cache si so bi bo in cs us sy id
1 0 0 424800 12540 84636 376516 0 0 10 58 3 31 12 5 24
2 0 0 424800 12536 84636 376516 0 0 0 11 107 451 1 0 99
3 0 0 424800 12536 84636 376516 0 0 0 56 110 451 1 0 99
Oracle In
ternal & O
racle Aca
demy
Use O
nly
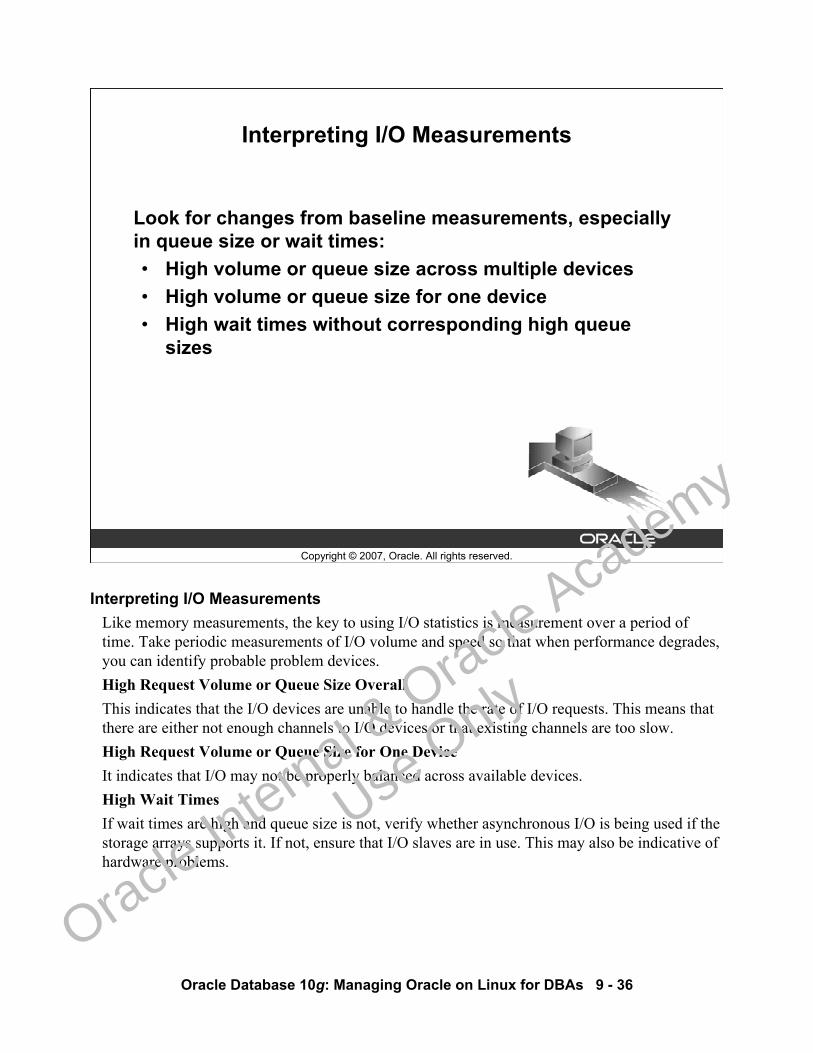
Oracle Database 10g: Managing Oracle on Linux for DBAs 9 - 36
Copyright © 2007, Oracle. All rights reserved.
Interpreting I/O Measurements
Look for changes from baseline measurements, especially in queue size or wait times:• High volume or queue size across multiple devices• High volume or queue size for one device• High wait times without corresponding high queue
sizes
Interpreting I/O MeasurementsLike memory measurements, the key to using I/O statistics is measurement over a period of time. Take periodic measurements of I/O volume and speed so that when performance degrades, you can identify probable problem devices.High Request Volume or Queue Size OverallThis indicates that the I/O devices are unable to handle the rate of I/O requests. This means that there are either not enough channels to I/O devices or that existing channels are too slow.High Request Volume or Queue Size for One DeviceIt indicates that I/O may not be properly balanced across available devices. High Wait TimesIf wait times are high and queue size is not, verify whether asynchronous I/O is being used if the storage arrays supports it. If not, ensure that I/O slaves are in use. This may also be indicative of hardware problems.
Oracle In
ternal & O
racle Aca
demy
Use O
nly
Oracle Database 10g: Managing Oracle on Linux for DBAs 9 - 37
Copyright © 2007, Oracle. All rights reserved.
Reducing I/O Bottlenecks
To reduce I/O as a bottleneck:• Reduce the volume of I/O through application and
memory tuning• Increase I/O throughput by parallelizing I/O
– Multiple disk controllers– Multiple disks– Multiple data bus adapters
• Select your hardware carefully, and build your storage arrays with performance in mind
• Separate redo, data, and index files
Reducing I/O BottlenecksA good rule of thumb is to tune the application and memory to reduce or eliminate I/O as much as possible. When this is accomplished, balance the remaining I/O across all the available drives and controllers. In general, the more disks and controllers you are working with, the greater your I/O performance can be.Carefully consider how your storage arrays are built. If you mix drives with different performance characteristics, keep the fastest drives on a different bus than the slowest drives. The controller bus speed is limited to the speed of the slowest device. More data channels means more data bandwidth. Consider adding additional Host Bus Adapters (HBAs).If you are using Redundant Arrays of Inexpensive Disks (RAID), choose hardware-based RAID over software-managed RAID. Software-managed RAID consumes CPU and memory resources and seldom performs as well as hardware-based RAID. Additionally, RAID 5 generally performs well for read operations, but poorly for write due to the parity calculations required. Try to minimize the number of stripe columns in RAID 5. More columns means more calculations to generate the parity bit.Remember to place files with different requirements on different disks. For example, your redo log members should be placed on separate disks (away from data and control files) and should be on your fastest disks, bus, and controllers.
Oracle In
ternal & O
racle Aca
demy
Use O
nly
Oracle Database 10g: Managing Oracle on Linux for DBAs 9 - 38
Copyright © 2007, Oracle. All rights reserved.
Summary
In this lesson, you should have learned how to:• Use Linux monitoring tools• Interpret memory measurements• Interpret I/O measurements
Oracle In
ternal & O
racle Aca
demy
Use O
nly
Oracle Database 10g: Managing Oracle on Linux for DBAs 9 - 39
Copyright © 2007, Oracle. All rights reserved.
Practice 9 Overview:Using Linux Measurement Tools
This practice covers using:• sar to measure CPU loads• vmstat to measure memory usage• iostat to measure disk I/O loads
Practice 9 Overview: Using Linux Measurement ToolsFor detailed instructions on performing this practice, see Practice 9 in Appendix A.
Oracle In
ternal & O
racle Aca
demy
Use O
nly

Oracle In
ternal & O
racle Aca
demy
Use O
nly
Copyright © 2007, Oracle. All rights reserved.
Tuning Oracle on Linux
Oracle In
ternal & O
racle Aca
demy
Use O
nly

Oracle Database 10g: Managing Oracle on Linux for DBAs 10 - 2
Copyright © 2007, Oracle. All rights reserved.
Objectives
After completing this lesson, you should be able to do the following:• Tune supported file systems• Configure initialization parameters• Implement asynchronous input/output (I/O) • Implement advanced memory management techniques
Oracle In
ternal & O
racle Aca
demy
Use O
nly
Oracle Database 10g: Managing Oracle on Linux for DBAs 10 - 3
Copyright © 2007, Oracle. All rights reserved.
Basic Oracle Database Optimizations
• Use locally managed tablespaces (default).• Use a larger database buffer cache (within reason).• Use an appropriately sized database block.• Use a larger redo log buffer.• Use multiple database writer processes on Symmetric
Multiprocessing (SMP) machines.• Use Automatic Shared Memory Management.
Basic Oracle Database Optimizations Oracle Database has a set of well-known (but often overlooked) features that enhance performance. Locally Managed TablespacesLocally Managed Tablespaces (LMT) are the default in Oracle Database 10g. Starting with Oracle9iRelease 2, even the system tablespace may be locally managed. LMT reduces I/O by managing the extent allocation within a file with a bitmap in that data file instead of updating tables in the data dictionary. This decreases the I/O requirements for the system tablespace. Performance increases of 2% to 15% have been documented using LMT, depending on the application. Larger Database Buffer CacheThe database instance caches the most recently used blocks in the database buffer cache. The larger the cache, the more data blocks can be cached. Because a disk access takes much longer than a memory access, each database block that can be cached and reused improves performance. Size the cache according to the db_cache_advice feature in Oracle Enterprise Manager. Do not make the cache so large that paging increases or (in extreme cases) it takes longer to search for a block in memory than it would have to just read the block from disk. Performance gains depend on the amount of reuse in the data blocks.
Oracle In
ternal & O
racle Aca
demy
Use O
nly
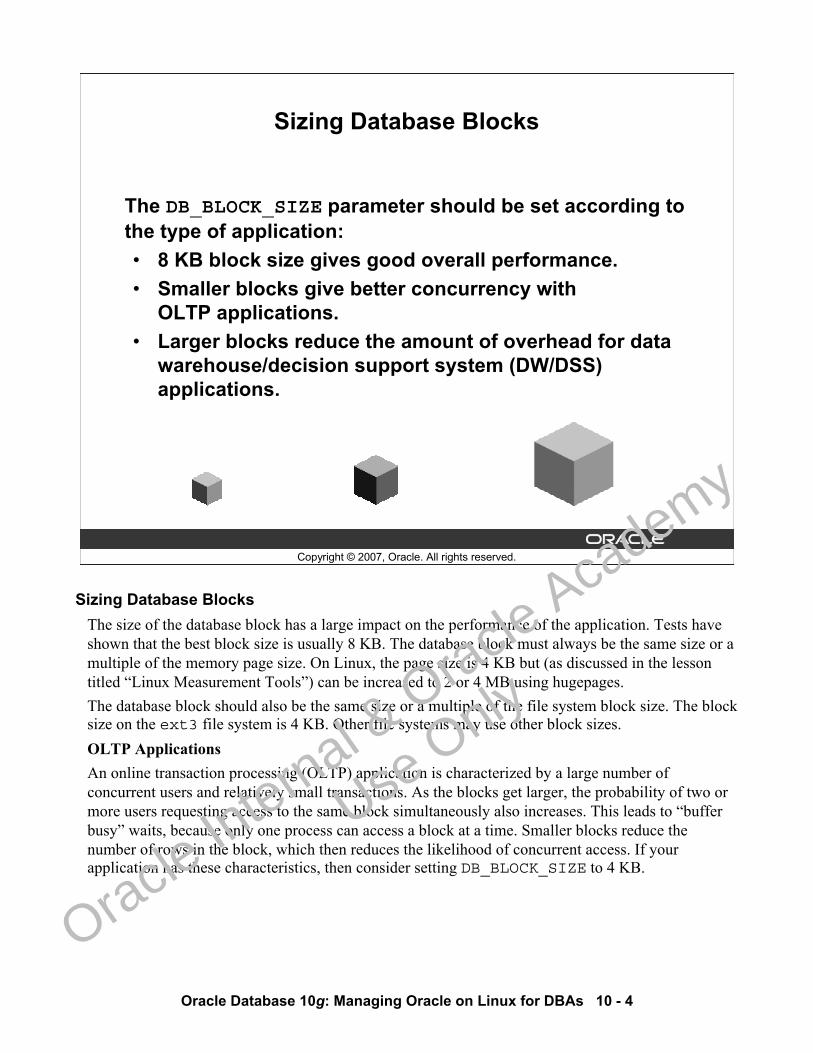
Oracle Database 10g: Managing Oracle on Linux for DBAs 10 - 4
Copyright © 2007, Oracle. All rights reserved.
Sizing Database Blocks
The DB_BLOCK_SIZE parameter should be set according to the type of application:• 8 KB block size gives good overall performance.• Smaller blocks give better concurrency with
OLTP applications.• Larger blocks reduce the amount of overhead for data
warehouse/decision support system (DW/DSS) applications.
Sizing Database BlocksThe size of the database block has a large impact on the performance of the application. Tests have shown that the best block size is usually 8 KB. The database block must always be the same size or a multiple of the memory page size. On Linux, the page size is 4 KB but (as discussed in the lesson titled “Linux Measurement Tools”) can be increased to 2 or 4 MB using hugepages.The database block should also be the same size or a multiple of the file system block size. The block size on the ext3 file system is 4 KB. Other file systems may use other block sizes.OLTP Applications An online transaction processing (OLTP) application is characterized by a large number of concurrent users and relatively small transactions. As the blocks get larger, the probability of two or more users requesting access to the same block simultaneously also increases. This leads to “buffer busy” waits, because only one process can access a block at a time. Smaller blocks reduce the number of rows in the block, which then reduces the likelihood of concurrent access. If your application has these characteristics, then consider setting DB_BLOCK_SIZE to 4 KB.
Oracle In
ternal & O
racle Aca
demy
Use O
nly
Oracle Database 10g: Managing Oracle on Linux for DBAs 10 - 5
Sizing Database Blocks (continued)DSS/DW ApplicationsData warehouse–type applications are characterized by large data sets and frequent full table scans. Because the data sets are so large that the database buffer cache cannot hold the full set, the set must be read from disk. In this case, use the largest block size available (16 KB on 32-bit Linux). This reduces the percentage of space used by block headers, and increases the number of rows per block, thus reducing the number of I/Os by packing more data into the same number of bytes. Effect of Block Size on IndexesIn databases with large tables and small database blocks, consider a very large OLTP application such as credit card processing. The indexes may get quite large. Index lookups are always done serially: first the root block is accessed, and then the first-level branch block is accessed. This process continues to the n-1 level branch, finally reaching the leaf block, which is the nth level. This lookup may require n I/Os for an n-level index, if the blocks needed are not already in the cache. Ideally, the index is no more than three levels deep, meaning n should be three or less. In the following example, a 20-level index is chosen to simplify the mathematics. Realistically, an index would seldom get that large. To illustrate the effect of the block size on an index, assume a 2 KB block size and a 20-level index. If this index were in a database with 4 KB block size, then each leaf would hold at least twice as many index row entries, so that half as many leaf blocks would be used. The first-level branch blocks would hold twice as many leaf pointers, but there would be only half as many leaf blocks, so the number of first-level branch blocks would be reduced to 1/4 of the original index. Continuing with this exponential reduction in branches would reduce the number of levels to five. The first index required 20 reads for an index lookup, and the rebuilt index requires five reads. This significantly improves the performance of index lookups. Because of this, you may want to use a larger block size if the application has very large indexes, or consider using partitioned indexes.
Oracle In
ternal & O
racle Aca
demy
Use O
nly
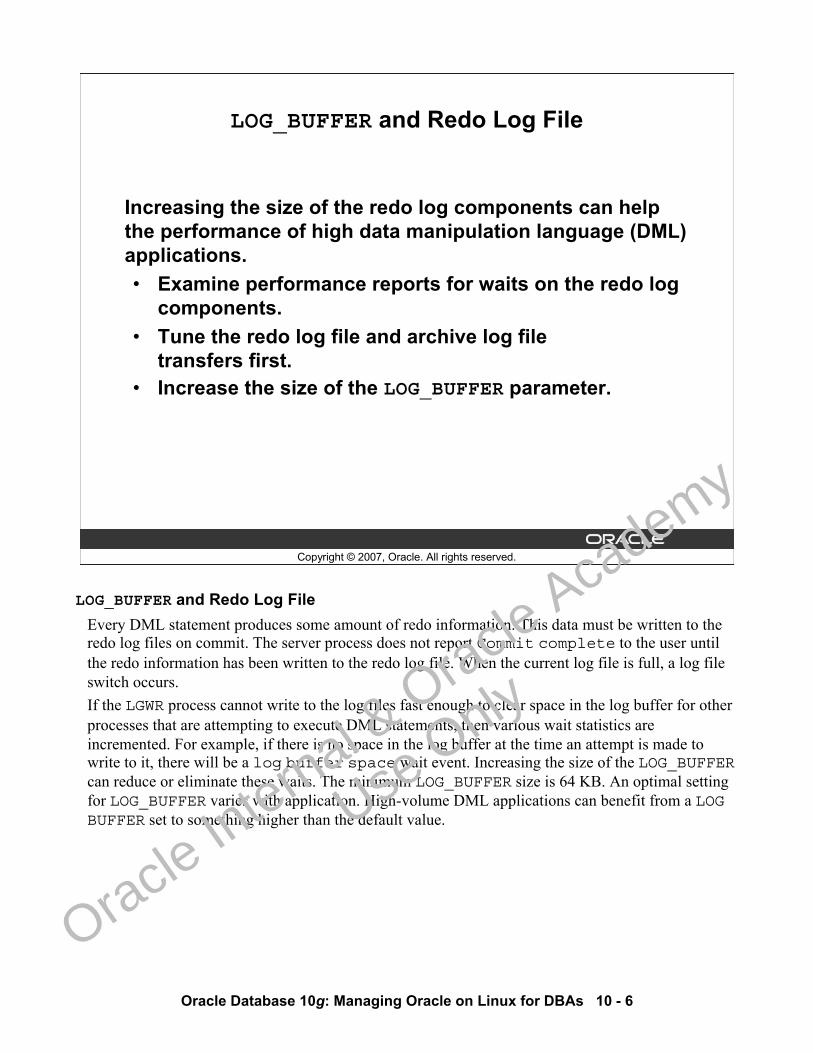
Oracle Database 10g: Managing Oracle on Linux for DBAs 10 - 6
Copyright © 2007, Oracle. All rights reserved.
LOG_BUFFER and Redo Log File
Increasing the size of the redo log components can help the performance of high data manipulation language (DML) applications.• Examine performance reports for waits on the redo log
components.• Tune the redo log file and archive log file
transfers first.• Increase the size of the LOG_BUFFER parameter.
LOG_BUFFER and Redo Log FileEvery DML statement produces some amount of redo information. This data must be written to the redo log files on commit. The server process does not report Commit complete to the user until the redo information has been written to the redo log file. When the current log file is full, a log file switch occurs. If the LGWR process cannot write to the log files fast enough to clear space in the log buffer for other processes that are attempting to execute DML statements, then various wait statistics are incremented. For example, if there is no space in the log buffer at the time an attempt is made to write to it, there will be a log buffer space wait event. Increasing the size of the LOG_BUFFERcan reduce or eliminate these waits. The minimum LOG_BUFFER size is 64 KB. An optimal setting for LOG_BUFFER varies with application. High-volume DML applications can benefit from a LOG BUFFER set to something higher than the default value.
Oracle In
ternal & O
racle Aca
demy
Use O
nly
Oracle Database 10g: Managing Oracle on Linux for DBAs 10 - 7
LOG_BUFFER and Redo Log File (continued)Sizing redo log files is dependent on the speed at which redo is generated. If the switch is delayed for any reason, the processes trying to write into the LOG_BUFFER have to wait, and a wait event logfile completion is recorded. You want to eliminate these waits and at the same time, do not want to size the files so large that they become unmanageable. Redo log files in the range of tens to hundreds of megabytes are considered reasonable. A tentative guideline is to size them such that the log file switch occurs every 20 to 30 minutes. For details, refer to the Oracle Database 10g: Performance Tuning course and the Oracle Database 10g Performance Tuning Guide.
Oracle In
ternal & O
racle Aca
demy
Use O
nly

Oracle Database 10g: Managing Oracle on Linux for DBAs 10 - 8
Copyright © 2007, Oracle. All rights reserved.
Advanced Features of Oracle Server
There are a few advanced initialization parameters that affect performance on Linux:• DB_WRITER_PROCESSES
• DBWR_IO_SLAVES
• PRE_PAGE_SGA
Advanced Features of Oracle ServerThe parameters listed here are considered advanced parameters. Very few initialization parameters depend on the OS. The parameters listed in the slide are the ones that are most affected by the OS.
Oracle In
ternal & O
racle Aca
demy
Use O
nly
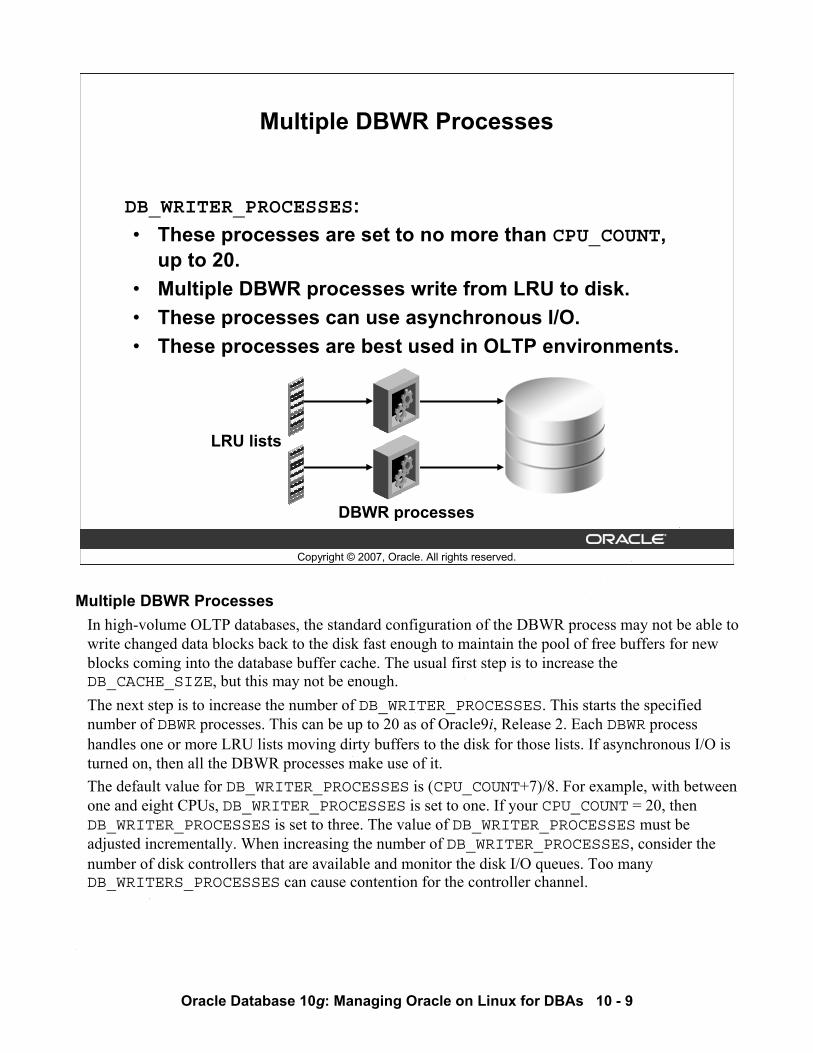
Oracle Database 10g: Managing Oracle on Linux for DBAs 10 - 9
Copyright © 2007, Oracle. All rights reserved.
DBWR processes
Multiple DBWR Processes
DB_WRITER_PROCESSES:• These processes are set to no more than CPU_COUNT,
up to 20.• Multiple DBWR processes write from LRU to disk.• These processes can use asynchronous I/O.• These processes are best used in OLTP environments.
LRU lists
Multiple DBWR ProcessesIn high-volume OLTP databases, the standard configuration of the DBWR process may not be able to write changed data blocks back to the disk fast enough to maintain the pool of free buffers for new blocks coming into the database buffer cache. The usual first step is to increase the DB_CACHE_SIZE, but this may not be enough. The next step is to increase the number of DB_WRITER_PROCESSES. This starts the specified number of DBWR processes. This can be up to 20 as of Oracle9i, Release 2. Each DBWR process handles one or more LRU lists moving dirty buffers to the disk for those lists. If asynchronous I/O is turned on, then all the DBWR processes make use of it. The default value for DB_WRITER_PROCESSES is (CPU_COUNT+7)/8. For example, with between one and eight CPUs, DB_WRITER_PROCESSES is set to one. If your CPU_COUNT = 20, then DB_WRITER_PROCESSES is set to three. The value of DB_WRITER_PROCESSES must be adjusted incrementally. When increasing the number of DB_WRITER_PROCESSES, consider the number of disk controllers that are available and monitor the disk I/O queues. Too many DB_WRITERS_PROCESSES can cause contention for the controller channel.
Oracle In
ternal & O
racle Aca
demy
Use O
nly
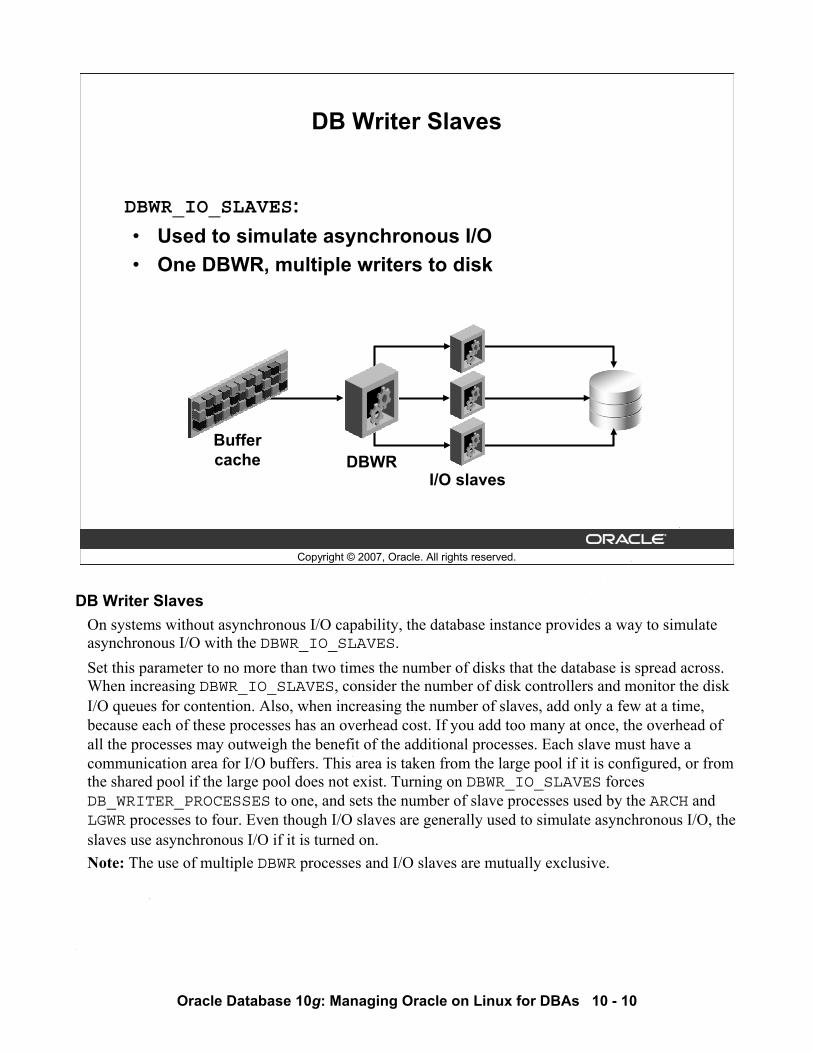
Oracle Database 10g: Managing Oracle on Linux for DBAs 10 - 10
Copyright © 2007, Oracle. All rights reserved.
DB Writer Slaves
DBWR_IO_SLAVES:• Used to simulate asynchronous I/O• One DBWR, multiple writers to disk
DBWRBuffercache
I/O slaves
DB Writer Slaves On systems without asynchronous I/O capability, the database instance provides a way to simulate asynchronous I/O with the DBWR_IO_SLAVES.Set this parameter to no more than two times the number of disks that the database is spread across. When increasing DBWR_IO_SLAVES, consider the number of disk controllers and monitor the disk I/O queues for contention. Also, when increasing the number of slaves, add only a few at a time, because each of these processes has an overhead cost. If you add too many at once, the overhead of all the processes may outweigh the benefit of the additional processes. Each slave must have a communication area for I/O buffers. This area is taken from the large pool if it is configured, or from the shared pool if the large pool does not exist. Turning on DBWR_IO_SLAVES forces DB_WRITER_PROCESSES to one, and sets the number of slave processes used by the ARCH and LGWR processes to four. Even though I/O slaves are generally used to simulate asynchronous I/O, the slaves use asynchronous I/O if it is turned on. Note: The use of multiple DBWR processes and I/O slaves are mutually exclusive.
Oracle In
ternal & O
racle Aca
demy
Use O
nly
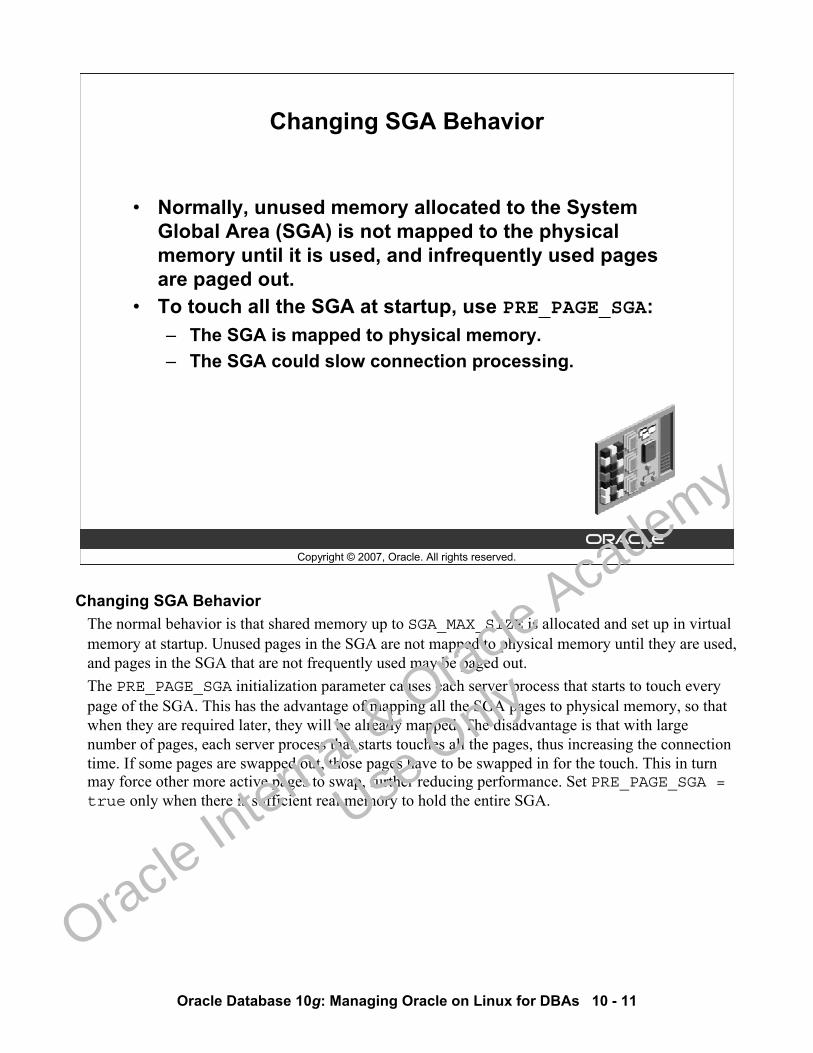
Oracle Database 10g: Managing Oracle on Linux for DBAs 10 - 11
Copyright © 2007, Oracle. All rights reserved.
Changing SGA Behavior
• Normally, unused memory allocated to the System Global Area (SGA) is not mapped to the physical memory until it is used, and infrequently used pages are paged out.
• To touch all the SGA at startup, use PRE_PAGE_SGA:– The SGA is mapped to physical memory.– The SGA could slow connection processing.
Changing SGA BehaviorThe normal behavior is that shared memory up to SGA_MAX_SIZE is allocated and set up in virtual memory at startup. Unused pages in the SGA are not mapped to physical memory until they are used, and pages in the SGA that are not frequently used may be paged out.The PRE_PAGE_SGA initialization parameter causes each server process that starts to touch every page of the SGA. This has the advantage of mapping all the SGA pages to physical memory, so that when they are required later, they will be already mapped. The disadvantage is that with large number of pages, each server process that starts touches all the pages, thus increasing the connection time. If some pages are swapped out, those pages have to be swapped in for the touch. This in turn may force other more active pages to swap, further reducing performance. Set PRE_PAGE_SGA = true only when there is sufficient real memory to hold the entire SGA.
Oracle In
ternal & O
racle Aca
demy
Use O
nly
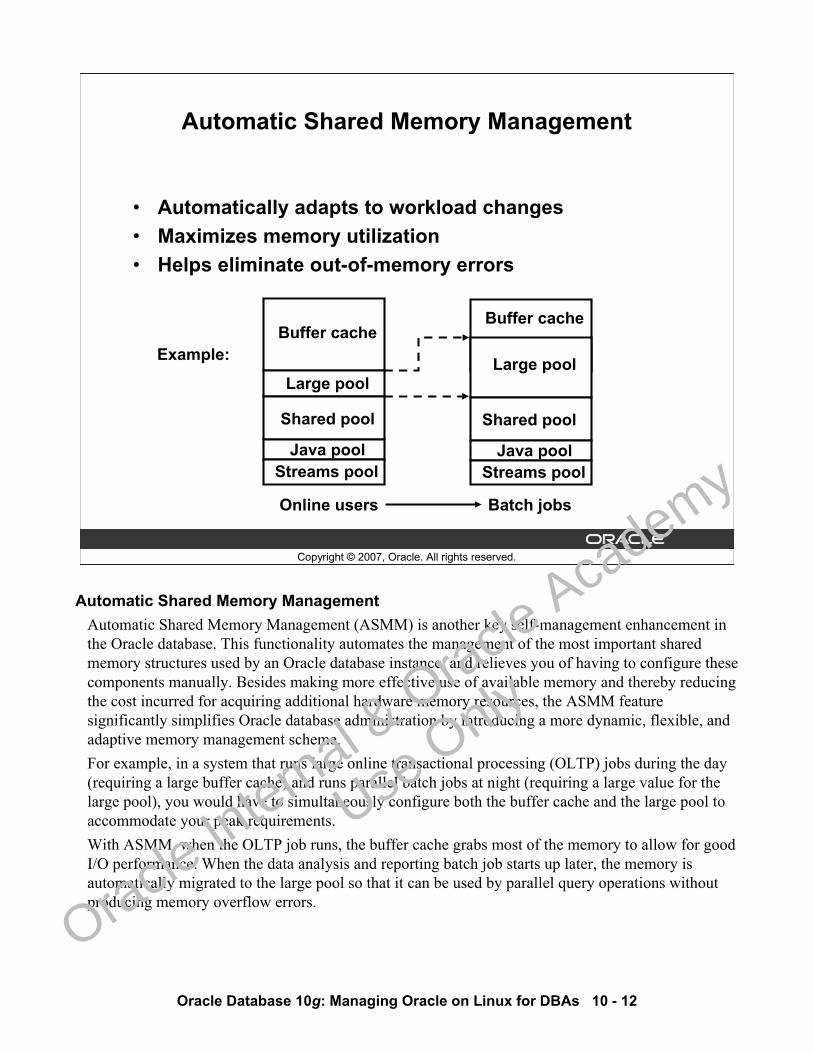
Oracle Database 10g: Managing Oracle on Linux for DBAs 10 - 12
Copyright © 2007, Oracle. All rights reserved.
Automatic Shared Memory Management
• Automatically adapts to workload changes• Maximizes memory utilization• Helps eliminate out-of-memory errors
Buffer cache
Large pool
Shared pool
Java pool
Buffer cache
Large pool
Shared pool
Java pool
Online users Batch jobs
Streams pool Streams pool
Example:
Automatic Shared Memory ManagementAutomatic Shared Memory Management (ASMM) is another key self-management enhancement in the Oracle database. This functionality automates the management of the most important shared memory structures used by an Oracle database instance, and relieves you of having to configure these components manually. Besides making more effective use of available memory and thereby reducing the cost incurred for acquiring additional hardware memory resources, the ASMM feature significantly simplifies Oracle database administration by introducing a more dynamic, flexible, and adaptive memory management scheme.For example, in a system that runs large online transactional processing (OLTP) jobs during the day (requiring a large buffer cache) and runs parallel batch jobs at night (requiring a large value for the large pool), you would have to simultaneously configure both the buffer cache and the large pool to accommodate your peak requirements.With ASMM, when the OLTP job runs, the buffer cache grabs most of the memory to allow for good I/O performance. When the data analysis and reporting batch job starts up later, the memory is automatically migrated to the large pool so that it can be used by parallel query operations without producing memory overflow errors.
Oracle In
ternal & O
racle Aca
demy
Use O
nly
Oracle Database 10g: Managing Oracle on Linux for DBAs 10 - 13
Copyright © 2007, Oracle. All rights reserved.
Basic Linux Optimizations
Basic changes to the Linux default setup can give some performance improvements.• Use the latest supported kernel.• Turn off last time-read updates for the database files.
Basic Linux OptimizationsApply the latest supported kernel patches through the .rpm files provided by the distribution vendor. This ensures that you are using the most efficient kernel available. By default, the last time-read attribute (atime) is updated every time a file is read. For database files, this is not an important statistic and you can turn it off to reduce the number of I/Os. This parameter can be set for a file with chattr +A <filename> or for a directory with chattr -R +A <directory name>. To make this change persistent across reboots, change it for a file system by changing the /etc/fstab file and adding the noatime option to the fourth column. /dev/hdb7 /u3/app/oracle/ ext3 rw,noatime 1 1
Oracle In
ternal & O
racle Aca
demy
Use O
nly
Oracle Database 10g: Managing Oracle on Linux for DBAs 10 - 14
Copyright © 2007, Oracle. All rights reserved.
Choosing a Kernel
Choose the appropriate kernel for best performance:• If you have more than 4 GB of physical memory, then
use the enterprise or hugemem kernel.• If you have more than one CPU, then use the smp
kernel. • Otherwise, use the uniprocessor kernel.
Choosing a Kernel The Linux installers tend to make good choices about which kernel to install, and install the kernel that uses your hardware and gives a good performance. If you have to choose which kernel to use, follow these guidelines.For machines with more than 4 GB of physical memory, an enterprise kernel is required. The enterprise kernel includes the Physical Address Extensions (PAE) that are required to address more than 4 GB of physical memory. This includes a three-level memory page table, so if you have less than 4 GB of physical RAM, then the three-level page table is an extra overhead that is not required.For multiprocessor machines, the installer chooses an smp kernel. The smp kernel has the required extensions to handle scheduling processes on more than one CPU.The uniprocessor kernel handles up to 4 GB of physical memory on a single processor. An example of the uniprocessor name is 2.4.9-e.3. (Note that there is no special designator.)An enterprise or smp kernel may be used on a uniprocessor machine, but has extra overhead associated with the unused features.
Oracle In
ternal & O
racle Aca
demy
Use O
nly
Oracle Database 10g: Managing Oracle on Linux for DBAs 10 - 15
Copyright © 2007, Oracle. All rights reserved.
Summary
In this lesson, you should have learned how to:• Evaluate file systems• Tune supported file systems• Configure initialization parameters• Implement asynchronous input/output (I/O) • Implement advanced memory management techniques
Oracle In
ternal & O
racle Aca
demy
Use O
nly
Oracle Database 10g: Managing Oracle on Linux for DBAs 10 - 16
Copyright © 2007, Oracle. All rights reserved.
Practice 10 Overview:Tuning Performance
This practice covers the following topics:• Adjusting the block size of database objects• Identifying poorly performing sessions at the operating
system level
Oracle In
ternal & O
racle Aca
demy
Use O
nly
Copyright © 2007, Oracle. All rights reserved.
Debugging Oracle on Linux
Oracle In
ternal & O
racle Aca
demy
Use O
nly
Oracle Database 10g: Managing Oracle on Linux for DBAs 11 - 2
Copyright © 2007, Oracle. All rights reserved.
Objectives
After completing this lesson, you should be able to:• Install and configure OS Watcher• Use Oracle Support’s Remote Diagnostics Agent• Trace programs and processes with strace• Gather required information for resolving ORA-600 and
ORA-7445 errrors
Oracle In
ternal & O
racle Aca
demy
Use O
nly
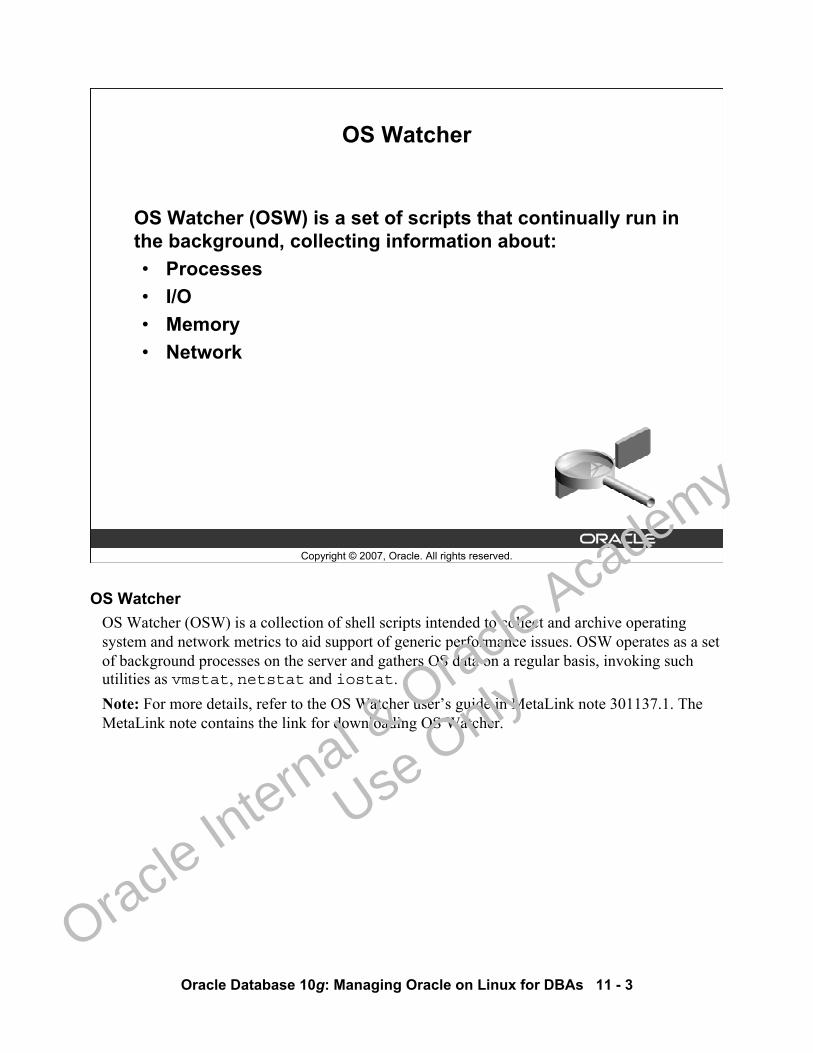
Oracle Database 10g: Managing Oracle on Linux for DBAs 11 - 3
Copyright © 2007, Oracle. All rights reserved.
OS Watcher
OS Watcher (OSW) is a set of scripts that continually run in the background, collecting information about:• Processes• I/O• Memory• Network
OS WatcherOS Watcher (OSW) is a collection of shell scripts intended to collect and archive operating system and network metrics to aid support of generic performance issues. OSW operates as a set of background processes on the server and gathers OS data on a regular basis, invoking such utilities as vmstat, netstat and iostat.Note: For more details, refer to the OS Watcher user’s guide in MetaLink note 301137.1. The MetaLink note contains the link for downloading OS Watcher.
Oracle In
ternal & O
racle Aca
demy
Use O
nly
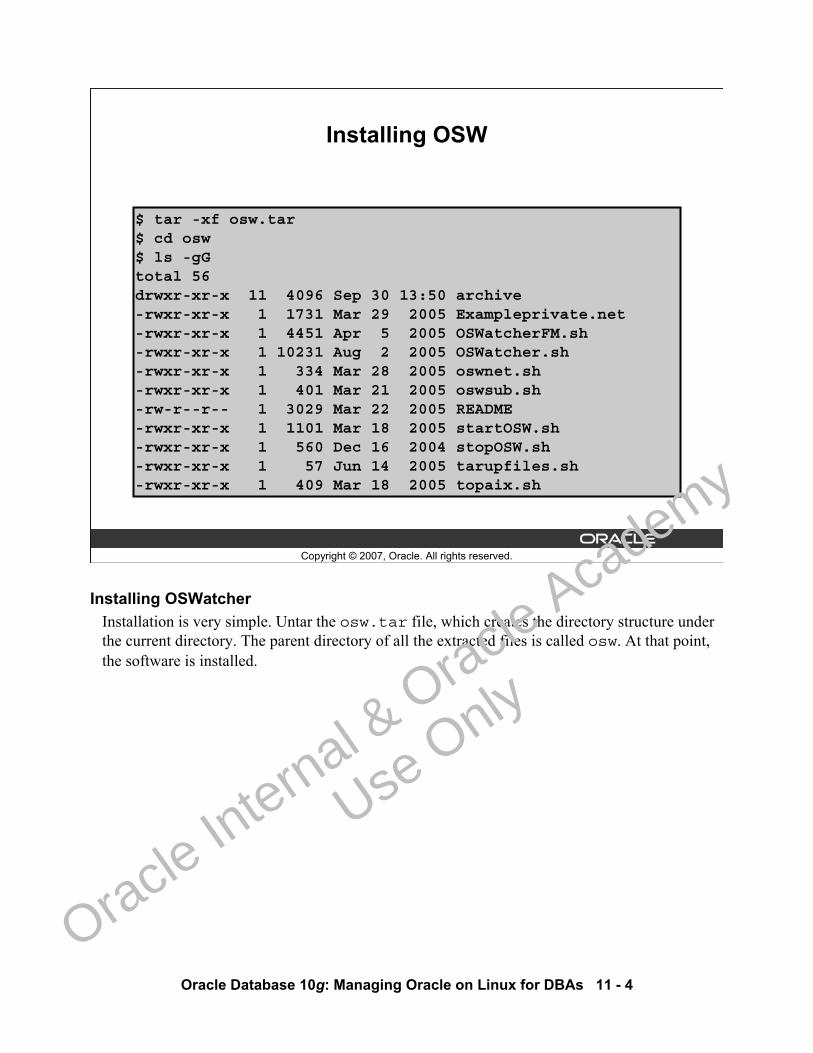
Oracle Database 10g: Managing Oracle on Linux for DBAs 11 - 4
Copyright © 2007, Oracle. All rights reserved.
Installing OSW
$ tar -xf osw.tar$ cd osw$ ls -gGtotal 56drwxr-xr-x 11 4096 Sep 30 13:50 archive-rwxr-xr-x 1 1731 Mar 29 2005 Exampleprivate.net-rwxr-xr-x 1 4451 Apr 5 2005 OSWatcherFM.sh-rwxr-xr-x 1 10231 Aug 2 2005 OSWatcher.sh-rwxr-xr-x 1 334 Mar 28 2005 oswnet.sh-rwxr-xr-x 1 401 Mar 21 2005 oswsub.sh-rw-r--r-- 1 3029 Mar 22 2005 README-rwxr-xr-x 1 1101 Mar 18 2005 startOSW.sh-rwxr-xr-x 1 560 Dec 16 2004 stopOSW.sh-rwxr-xr-x 1 57 Jun 14 2005 tarupfiles.sh-rwxr-xr-x 1 409 Mar 18 2005 topaix.sh
Installing OSWatcherInstallation is very simple. Untar the osw.tar file, which creates the directory structure under the current directory. The parent directory of all the extracted files is called osw. At that point, the software is installed.
Oracle In
ternal & O
racle Aca
demy
Use O
nly
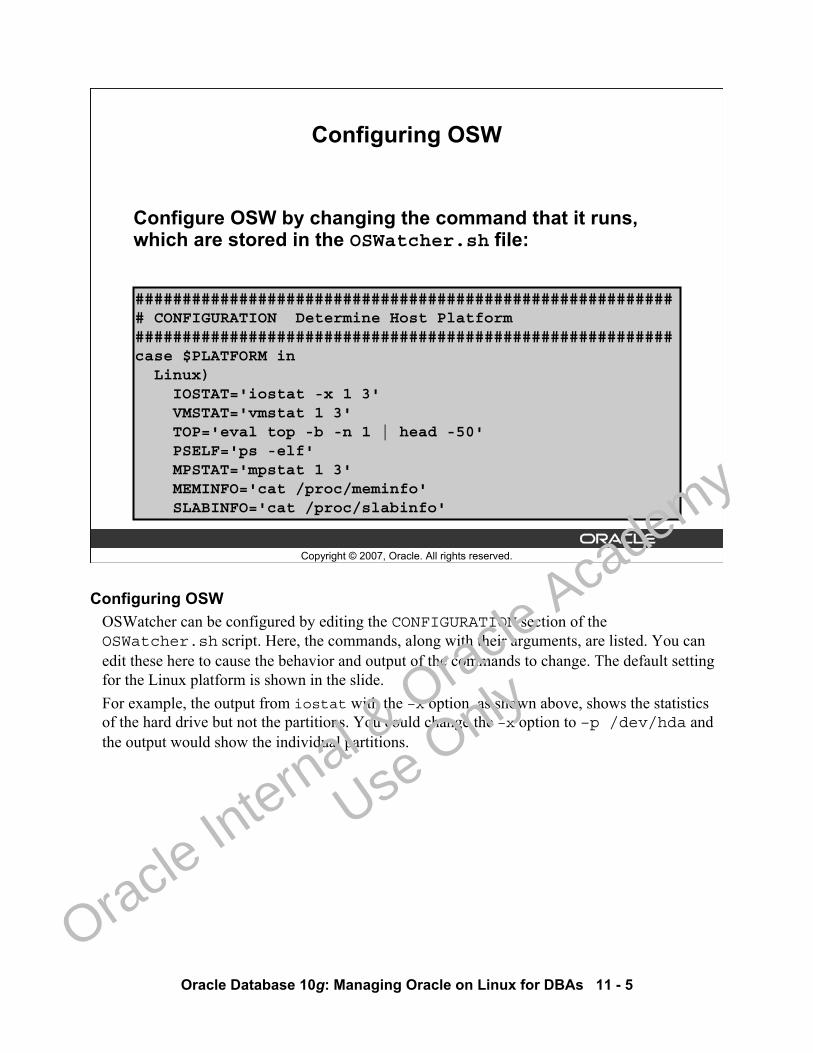
Oracle Database 10g: Managing Oracle on Linux for DBAs 11 - 5
Copyright © 2007, Oracle. All rights reserved.
Configuring OSW
########################################################## CONFIGURATION Determine Host Platform#########################################################case $PLATFORM inLinux)IOSTAT='iostat -x 1 3'VMSTAT='vmstat 1 3'TOP='eval top -b -n 1 | head -50'PSELF='ps -elf'MPSTAT='mpstat 1 3'MEMINFO='cat /proc/meminfo'SLABINFO='cat /proc/slabinfo'
Configure OSW by changing the command that it runs, which are stored in the OSWatcher.sh file:
Configuring OSWOSWatcher can be configured by editing the CONFIGURATION section of the OSWatcher.sh script. Here, the commands, along with their arguments, are listed. You can edit these here to cause the behavior and output of the commands to change. The default setting for the Linux platform is shown in the slide.For example, the output from iostat with the –x option, as shown above, shows the statistics of the hard drive but not the partitions. You could change the –x option to –p /dev/hda and the output would show the individual partitions.
Oracle In
ternal & O
racle Aca
demy
Use O
nly
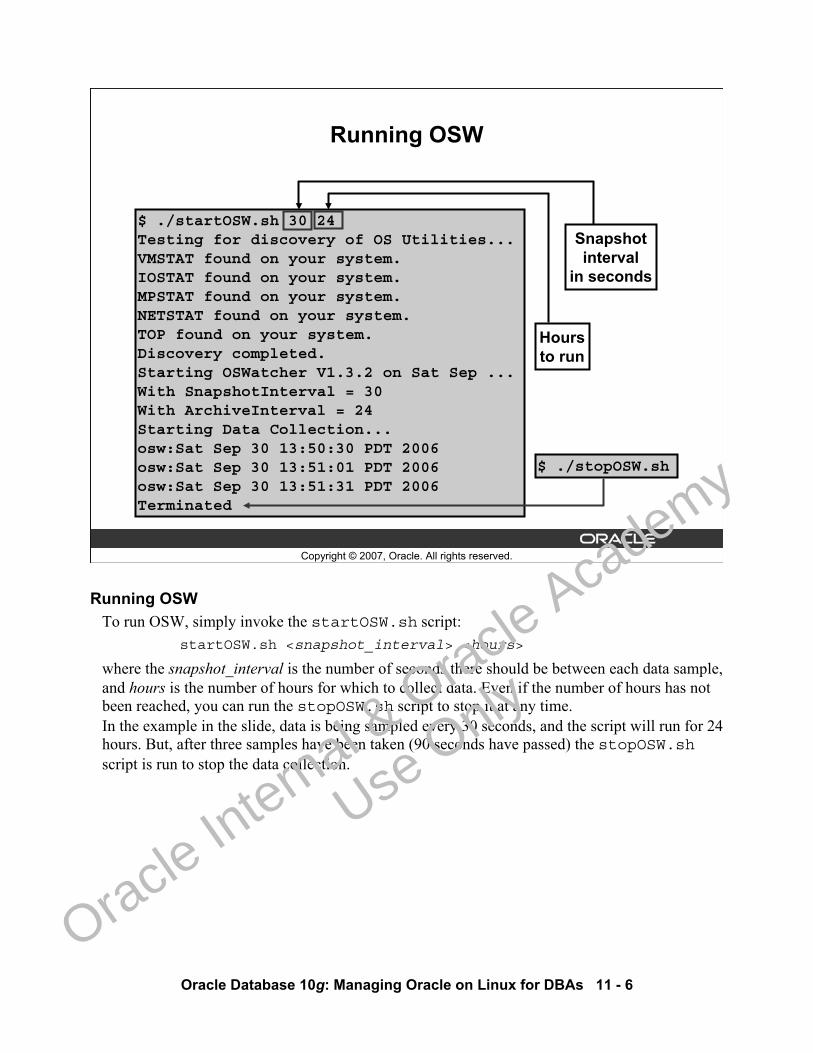
Oracle Database 10g: Managing Oracle on Linux for DBAs 11 - 6
Copyright © 2007, Oracle. All rights reserved.
$ ./startOSW.sh 30 24Testing for discovery of OS Utilities...VMSTAT found on your system.IOSTAT found on your system.MPSTAT found on your system.NETSTAT found on your system.TOP found on your system.Discovery completed.Starting OSWatcher V1.3.2 on Sat Sep ... With SnapshotInterval = 30With ArchiveInterval = 24Starting Data Collection...osw:Sat Sep 30 13:50:30 PDT 2006osw:Sat Sep 30 13:51:01 PDT 2006osw:Sat Sep 30 13:51:31 PDT 2006Terminated
Running OSW
Snapshotinterval
in seconds
Hoursto run
$ ./stopOSW.sh
Running OSWTo run OSW, simply invoke the startOSW.sh script:
startOSW.sh <snapshot_interval> <hours>
where the snapshot_interval is the number of seconds there should be between each data sample, and hours is the number of hours for which to collect data. Even if the number of hours has not been reached, you can run the stopOSW.sh script to stop it at any time.In the example in the slide, data is being sampled every 30 seconds, and the script will run for 24 hours. But, after three samples have been taken (90 seconds have passed) the stopOSW.shscript is run to stop the data collection.
Oracle In
ternal & O
racle Aca
demy
Use O
nly
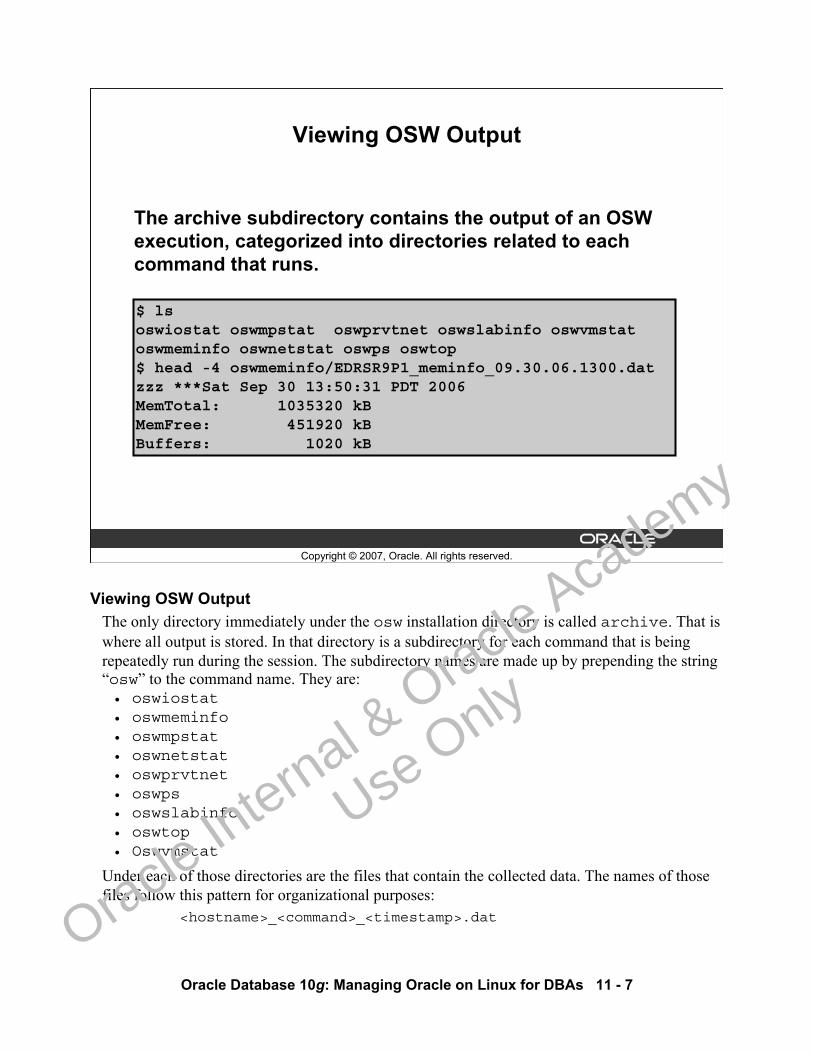
Oracle Database 10g: Managing Oracle on Linux for DBAs 11 - 7
Copyright © 2007, Oracle. All rights reserved.
Viewing OSW Output
The archive subdirectory contains the output of an OSW execution, categorized into directories related to each command that runs.
$ lsoswiostat oswmpstat oswprvtnet oswslabinfo oswvmstatoswmeminfo oswnetstat oswps oswtop$ head -4 oswmeminfo/EDRSR9P1_meminfo_09.30.06.1300.datzzz ***Sat Sep 30 13:50:31 PDT 2006MemTotal: 1035320 kBMemFree: 451920 kBBuffers: 1020 kB
Viewing OSW OutputThe only directory immediately under the osw installation directory is called archive. That is where all output is stored. In that directory is a subdirectory for each command that is being repeatedly run during the session. The subdirectory names are made up by prepending the string “osw” to the command name. They are:• oswiostat• oswmeminfo• oswmpstat• oswnetstat• oswprvtnet• oswps• oswslabinfo• oswtop• Oswvmstat
Under each of those directories are the files that contain the collected data. The names of those files follow this pattern for organizational purposes:
<hostname>_<command>_<timestamp>.dat
Oracle In
ternal & O
racle Aca
demy
Use O
nly
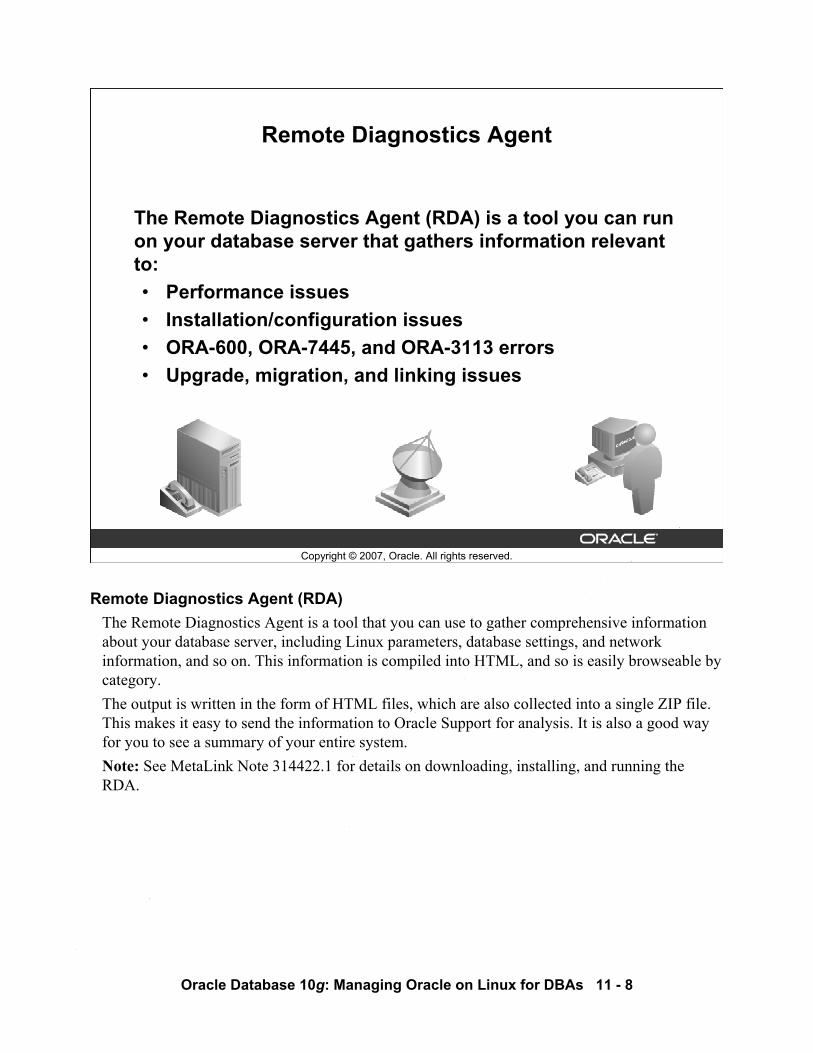
Oracle Database 10g: Managing Oracle on Linux for DBAs 11 - 8
Copyright © 2007, Oracle. All rights reserved.
Remote Diagnostics Agent
The Remote Diagnostics Agent (RDA) is a tool you can run on your database server that gathers information relevant to:• Performance issues• Installation/configuration issues• ORA-600, ORA-7445, and ORA-3113 errors• Upgrade, migration, and linking issues
Remote Diagnostics Agent (RDA)The Remote Diagnostics Agent is a tool that you can use to gather comprehensive information about your database server, including Linux parameters, database settings, and network information, and so on. This information is compiled into HTML, and so is easily browseable by category.The output is written in the form of HTML files, which are also collected into a single ZIP file. This makes it easy to send the information to Oracle Support for analysis. It is also a good way for you to see a summary of your entire system.Note: See MetaLink Note 314422.1 for details on downloading, installing, and running the RDA.
Oracle In
ternal & O
racle Aca
demy
Use O
nly
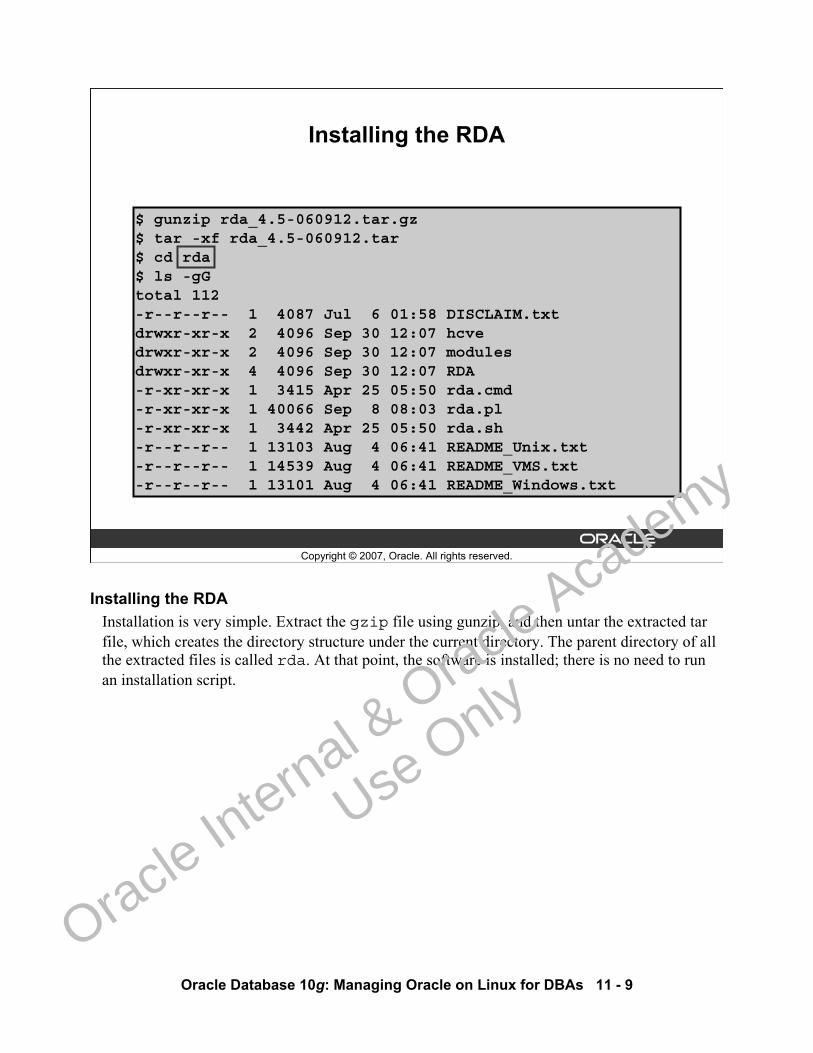
Oracle Database 10g: Managing Oracle on Linux for DBAs 11 - 9
Copyright © 2007, Oracle. All rights reserved.
Installing the RDA
$ gunzip rda_4.5-060912.tar.gz$ tar -xf rda_4.5-060912.tar$ cd rda$ ls -gGtotal 112-r--r--r-- 1 4087 Jul 6 01:58 DISCLAIM.txtdrwxr-xr-x 2 4096 Sep 30 12:07 hcvedrwxr-xr-x 2 4096 Sep 30 12:07 modulesdrwxr-xr-x 4 4096 Sep 30 12:07 RDA-r-xr-xr-x 1 3415 Apr 25 05:50 rda.cmd-r-xr-xr-x 1 40066 Sep 8 08:03 rda.pl-r-xr-xr-x 1 3442 Apr 25 05:50 rda.sh-r--r--r-- 1 13103 Aug 4 06:41 README_Unix.txt-r--r--r-- 1 14539 Aug 4 06:41 README_VMS.txt-r--r--r-- 1 13101 Aug 4 06:41 README_Windows.txt
Installing the RDAInstallation is very simple. Extract the gzip file using gunzip, and then untar the extracted tar file, which creates the directory structure under the current directory. The parent directory of all the extracted files is called rda. At that point, the software is installed; there is no need to run an installation script.
Oracle In
ternal & O
racle Aca
demy
Use O
nly
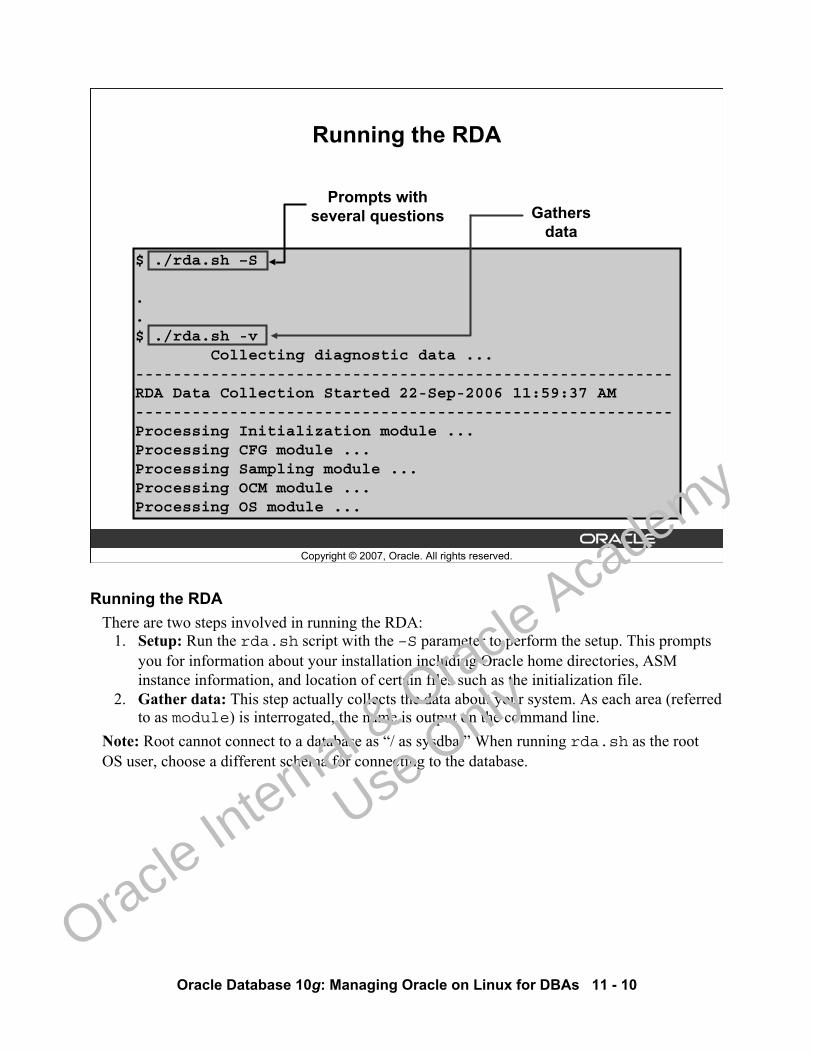
Oracle Database 10g: Managing Oracle on Linux for DBAs 11 - 10
Copyright © 2007, Oracle. All rights reserved.
$ ./rda.sh –S
.
.$ ./rda.sh -v
Collecting diagnostic data ...---------------------------------------------------------RDA Data Collection Started 22-Sep-2006 11:59:37 AM---------------------------------------------------------Processing Initialization module ...Processing CFG module ...Processing Sampling module ...Processing OCM module ...Processing OS module ...
Running the RDA
Prompts withseveral questions Gathers
data
Running the RDAThere are two steps involved in running the RDA:
1. Setup: Run the rda.sh script with the –S parameter to perform the setup. This prompts you for information about your installation including Oracle home directories, ASM instance information, and location of certain files such as the initialization file.
2. Gather data: This step actually collects the data about your system. As each area (referred to as module) is interrogated, the name is output on the command line.
Note: Root cannot connect to a database as “/ as sysdba.” When running rda.sh as the rootOS user, choose a different schema for connecting to the database.
Oracle In
ternal & O
racle Aca
demy
Use O
nly
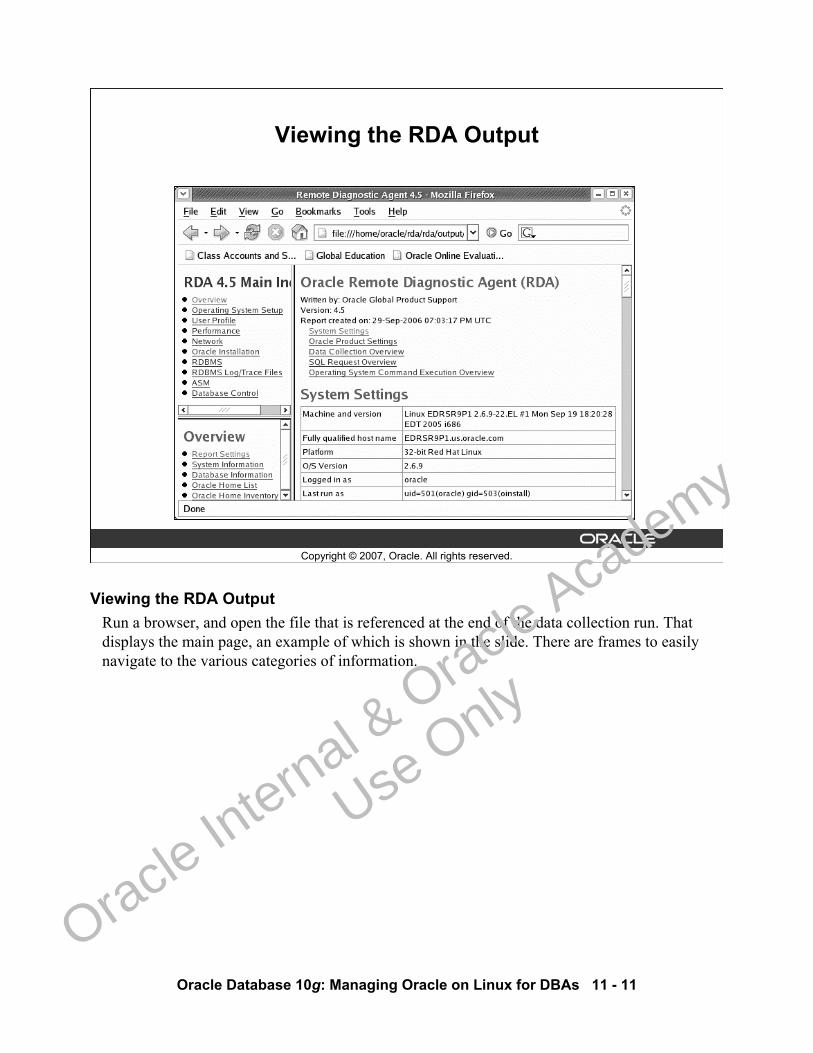
Oracle Database 10g: Managing Oracle on Linux for DBAs 11 - 11
Copyright © 2007, Oracle. All rights reserved.
Viewing the RDA Output
Viewing the RDA OutputRun a browser, and open the file that is referenced at the end of the data collection run. That displays the main page, an example of which is shown in the slide. There are frames to easily navigate to the various categories of information.
Oracle In
ternal & O
racle Aca
demy
Use O
nly
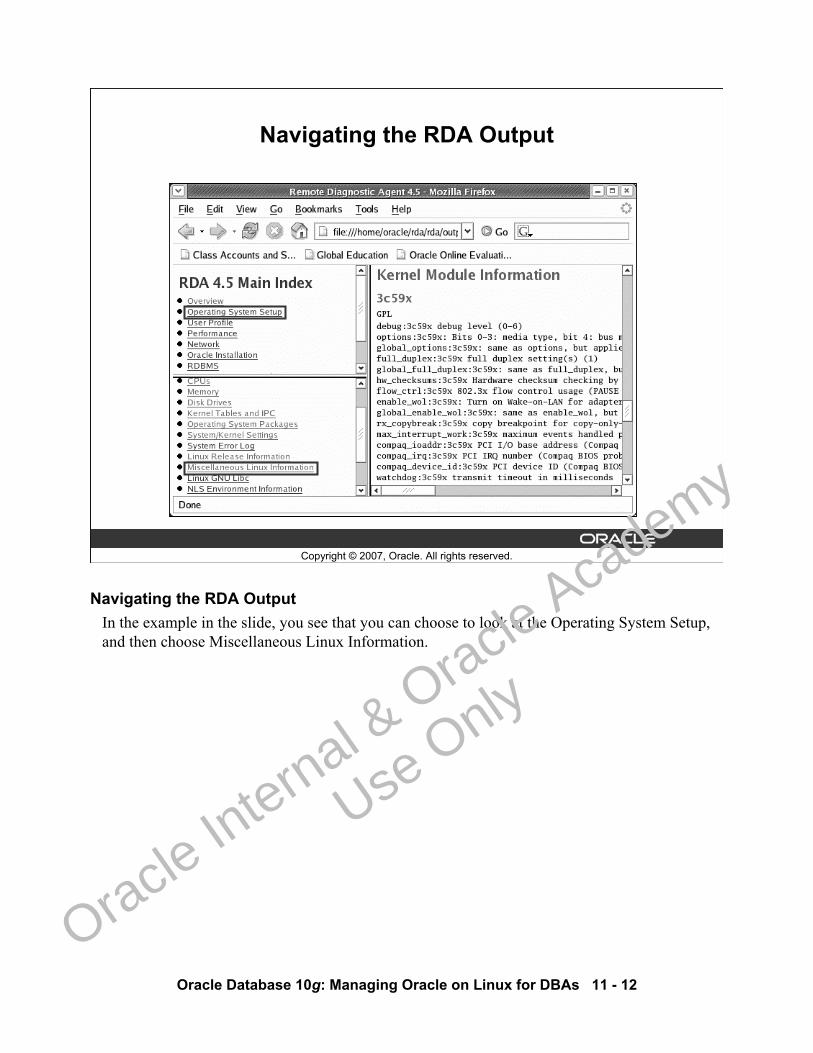
Oracle Database 10g: Managing Oracle on Linux for DBAs 11 - 12
Copyright © 2007, Oracle. All rights reserved.
Navigating the RDA Output
Navigating the RDA OutputIn the example in the slide, you see that you can choose to look at the Operating System Setup, and then choose Miscellaneous Linux Information.
Oracle In
ternal & O
racle Aca
demy
Use O
nly
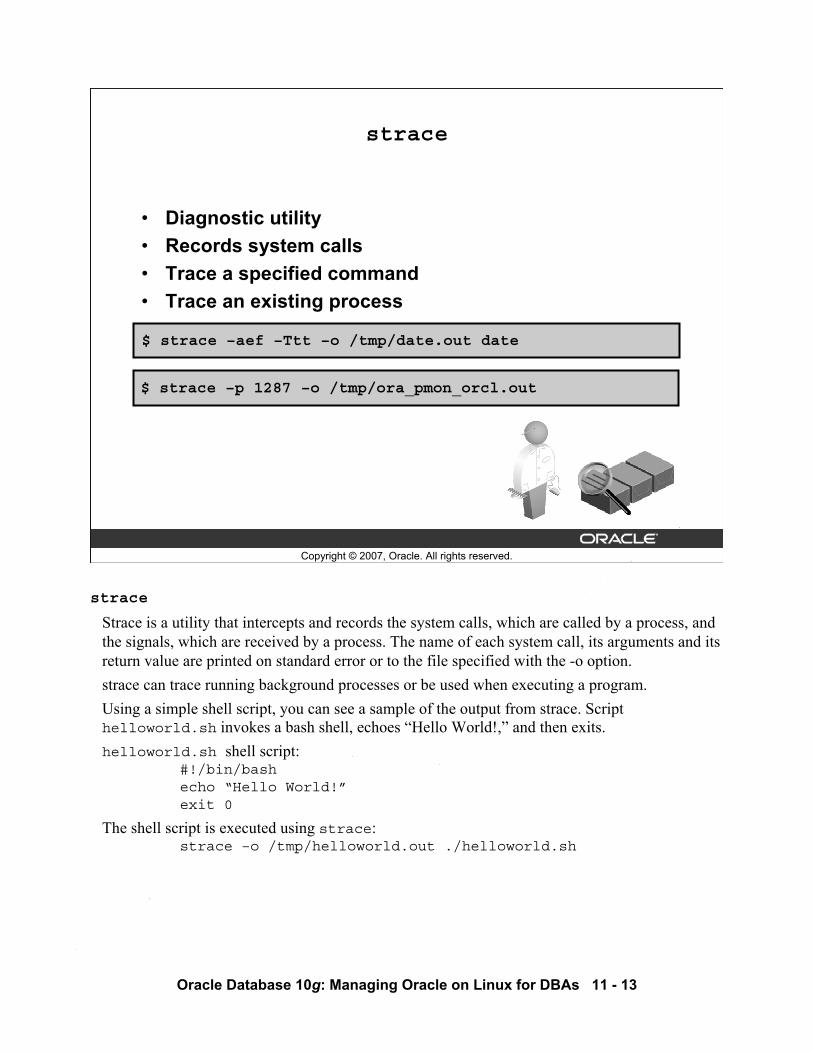
Oracle Database 10g: Managing Oracle on Linux for DBAs 11 - 13
Copyright © 2007, Oracle. All rights reserved.
strace
• Diagnostic utility• Records system calls• Trace a specified command• Trace an existing process
$ strace –aef –Ttt –o /tmp/date.out date
$ strace –p 1287 –o /tmp/ora_pmon_orcl.out
strace
Strace is a utility that intercepts and records the system calls, which are called by a process, and the signals, which are received by a process. The name of each system call, its arguments and its return value are printed on standard error or to the file specified with the -o option.strace can trace running background processes or be used when executing a program.Using a simple shell script, you can see a sample of the output from strace. Script helloworld.sh invokes a bash shell, echoes “Hello World!,” and then exits.helloworld.sh shell script:
#!/bin/bashecho “Hello World!”exit 0
The shell script is executed using strace:strace –o /tmp/helloworld.out ./helloworld.sh
Oracle In
ternal & O
racle Aca
demy
Use O
nly
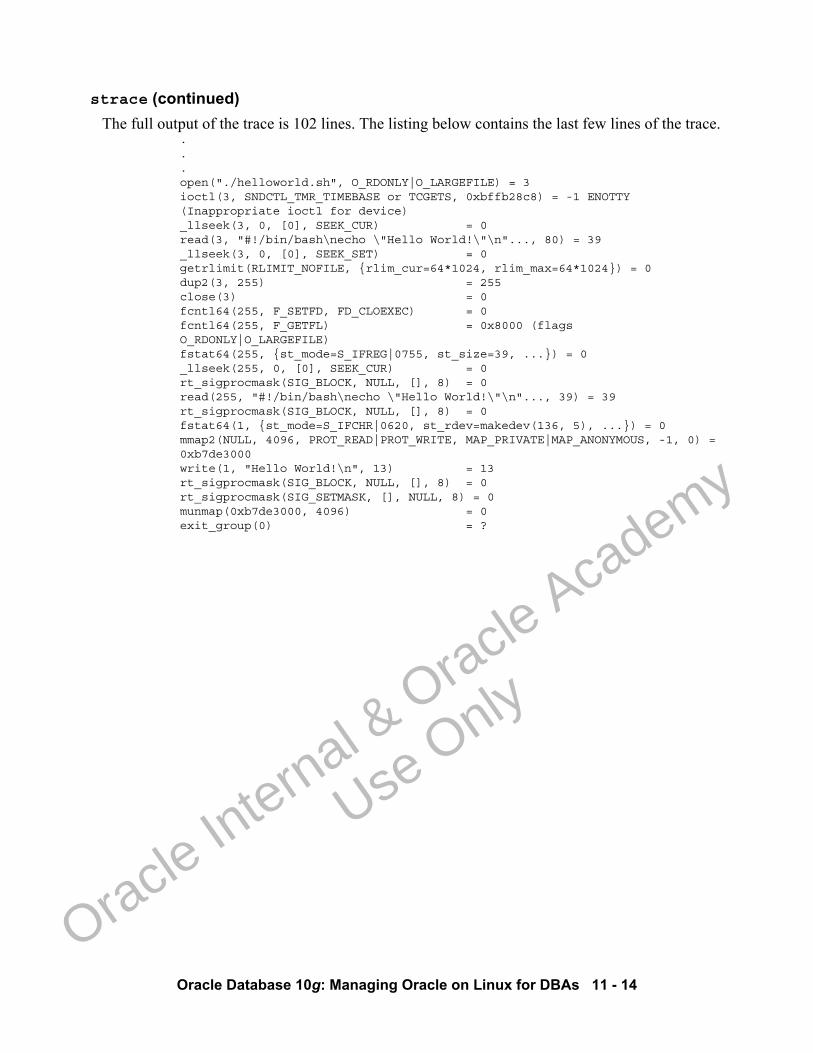
Oracle Database 10g: Managing Oracle on Linux for DBAs 11 - 14
strace (continued)The full output of the trace is 102 lines. The listing below contains the last few lines of the trace.
.
.
.open("./helloworld.sh", O_RDONLY|O_LARGEFILE) = 3ioctl(3, SNDCTL_TMR_TIMEBASE or TCGETS, 0xbffb28c8) = -1 ENOTTY (Inappropriate ioctl for device)_llseek(3, 0, [0], SEEK_CUR) = 0read(3, "#!/bin/bash\necho \"Hello World!\"\n"..., 80) = 39_llseek(3, 0, [0], SEEK_SET) = 0getrlimit(RLIMIT_NOFILE, {rlim_cur=64*1024, rlim_max=64*1024}) = 0dup2(3, 255) = 255close(3) = 0fcntl64(255, F_SETFD, FD_CLOEXEC) = 0fcntl64(255, F_GETFL) = 0x8000 (flags O_RDONLY|O_LARGEFILE)fstat64(255, {st_mode=S_IFREG|0755, st_size=39, ...}) = 0_llseek(255, 0, [0], SEEK_CUR) = 0rt_sigprocmask(SIG_BLOCK, NULL, [], 8) = 0read(255, "#!/bin/bash\necho \"Hello World!\"\n"..., 39) = 39rt_sigprocmask(SIG_BLOCK, NULL, [], 8) = 0fstat64(1, {st_mode=S_IFCHR|0620, st_rdev=makedev(136, 5), ...}) = 0mmap2(NULL, 4096, PROT_READ|PROT_WRITE, MAP_PRIVATE|MAP_ANONYMOUS, -1, 0) = 0xb7de3000write(1, "Hello World!\n", 13) = 13rt_sigprocmask(SIG_BLOCK, NULL, [], 8) = 0rt_sigprocmask(SIG_SETMASK, [], NULL, 8) = 0munmap(0xb7de3000, 4096) = 0exit_group(0) = ?
Oracle In
ternal & O
racle Aca
demy
Use O
nly
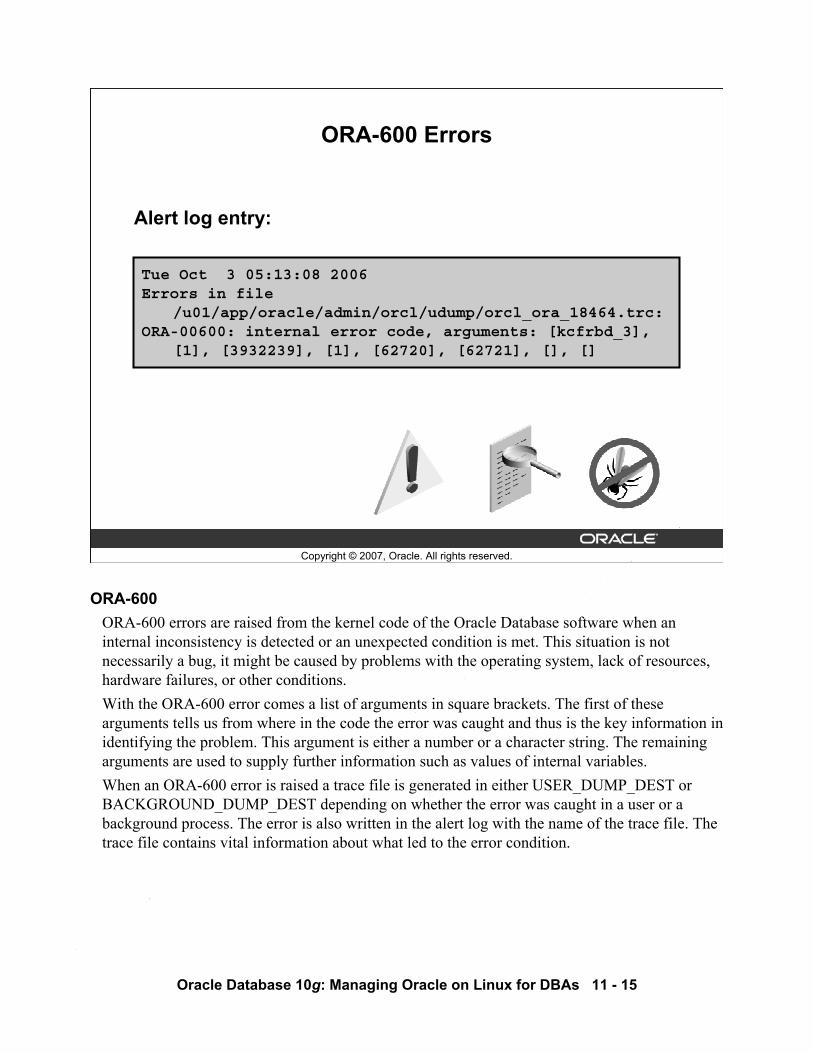
Oracle Database 10g: Managing Oracle on Linux for DBAs 11 - 15
Copyright © 2007, Oracle. All rights reserved.
ORA-600 Errors
Alert log entry:
Tue Oct 3 05:13:08 2006Errors in file
/u01/app/oracle/admin/orcl/udump/orcl_ora_18464.trc:ORA-00600: internal error code, arguments: [kcfrbd_3],
[1], [3932239], [1], [62720], [62721], [], []
ORA-600ORA-600 errors are raised from the kernel code of the Oracle Database software when an internal inconsistency is detected or an unexpected condition is met. This situation is not necessarily a bug, it might be caused by problems with the operating system, lack of resources, hardware failures, or other conditions. With the ORA-600 error comes a list of arguments in square brackets. The first of these arguments tells us from where in the code the error was caught and thus is the key information in identifying the problem. This argument is either a number or a character string. The remaining arguments are used to supply further information such as values of internal variables. When an ORA-600 error is raised a trace file is generated in either USER_DUMP_DEST or BACKGROUND_DUMP_DEST depending on whether the error was caught in a user or a background process. The error is also written in the alert log with the name of the trace file. The trace file contains vital information about what led to the error condition.
Oracle In
ternal & O
racle Aca
demy
Use O
nly
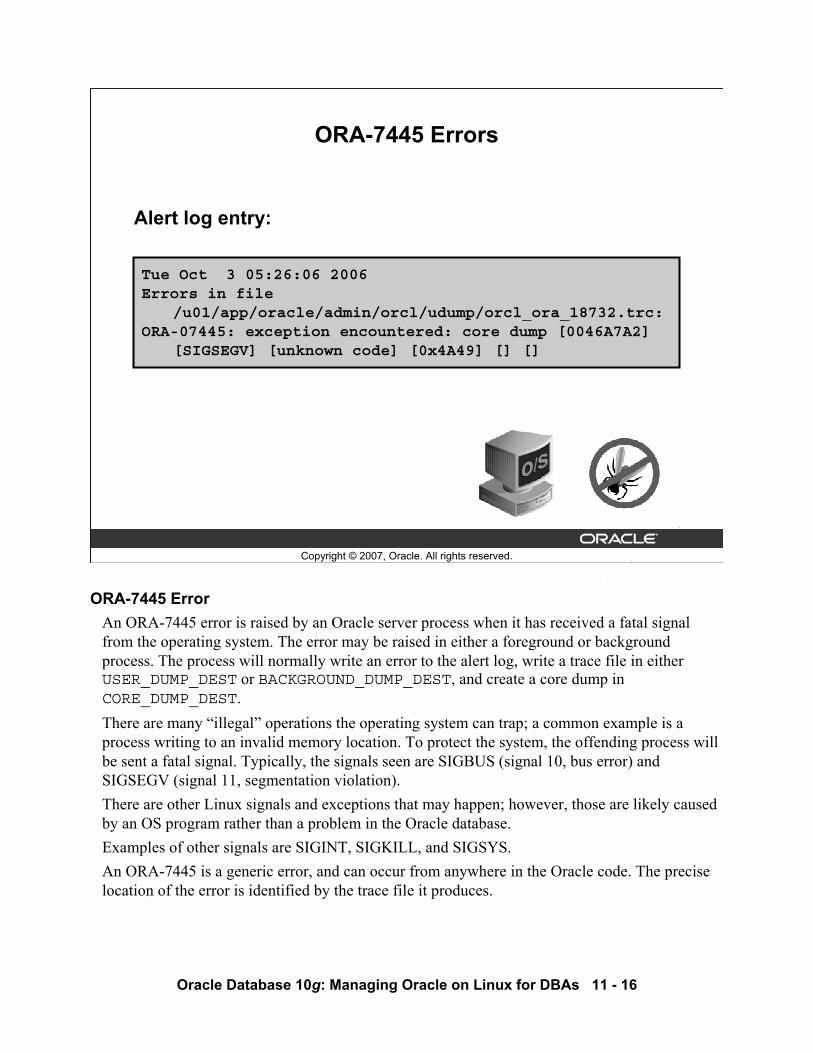
Oracle Database 10g: Managing Oracle on Linux for DBAs 11 - 16
Copyright © 2007, Oracle. All rights reserved.
ORA-7445 Errors
Alert log entry:
Tue Oct 3 05:26:06 2006Errors in file
/u01/app/oracle/admin/orcl/udump/orcl_ora_18732.trc:ORA-07445: exception encountered: core dump [0046A7A2]
[SIGSEGV] [unknown code] [0x4A49] [] []
ORA-7445 ErrorAn ORA-7445 error is raised by an Oracle server process when it has received a fatal signal from the operating system. The error may be raised in either a foreground or background process. The process will normally write an error to the alert log, write a trace file in either USER_DUMP_DEST or BACKGROUND_DUMP_DEST, and create a core dump in CORE_DUMP_DEST.There are many “illegal” operations the operating system can trap; a common example is a process writing to an invalid memory location. To protect the system, the offending process will be sent a fatal signal. Typically, the signals seen are SIGBUS (signal 10, bus error) and SIGSEGV (signal 11, segmentation violation). There are other Linux signals and exceptions that may happen; however, those are likely caused by an OS program rather than a problem in the Oracle database.Examples of other signals are SIGINT, SIGKILL, and SIGSYS. An ORA-7445 is a generic error, and can occur from anywhere in the Oracle code. The precise location of the error is identified by the trace file it produces.
Oracle In
ternal & O
racle Aca
demy
Use O
nly
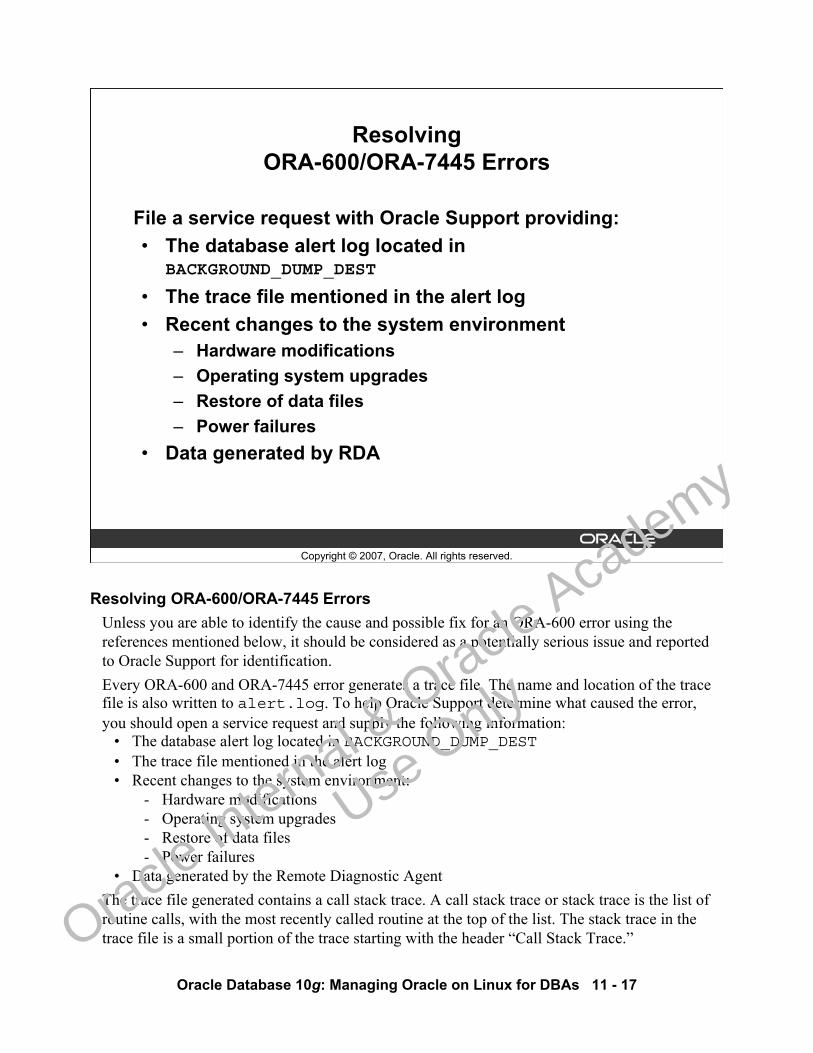
Oracle Database 10g: Managing Oracle on Linux for DBAs 11 - 17
Copyright © 2007, Oracle. All rights reserved.
Resolving ORA-600/ORA-7445 Errors
File a service request with Oracle Support providing:• The database alert log located in
BACKGROUND_DUMP_DEST
• The trace file mentioned in the alert log• Recent changes to the system environment
– Hardware modifications– Operating system upgrades– Restore of data files– Power failures
• Data generated by RDA
Resolving ORA-600/ORA-7445 ErrorsUnless you are able to identify the cause and possible fix for an ORA-600 error using the references mentioned below, it should be considered as a potentially serious issue and reported to Oracle Support for identification. Every ORA-600 and ORA-7445 error generates a trace file. The name and location of the trace file is also written to alert.log. To help Oracle Support determine what caused the error, you should open a service request and supply the following information:
• The database alert log located in BACKGROUND_DUMP_DEST • The trace file mentioned in the alert log• Recent changes to the system environment:
- Hardware modifications- Operating system upgrades- Restore of data files- Power failures
• Data generated by the Remote Diagnostic Agent The trace file generated contains a call stack trace. A call stack trace or stack trace is the list of routine calls, with the most recently called routine at the top of the list. The stack trace in the trace file is a small portion of the trace starting with the header “Call Stack Trace.”
Oracle In
ternal & O
racle Aca
demy
Use O
nly
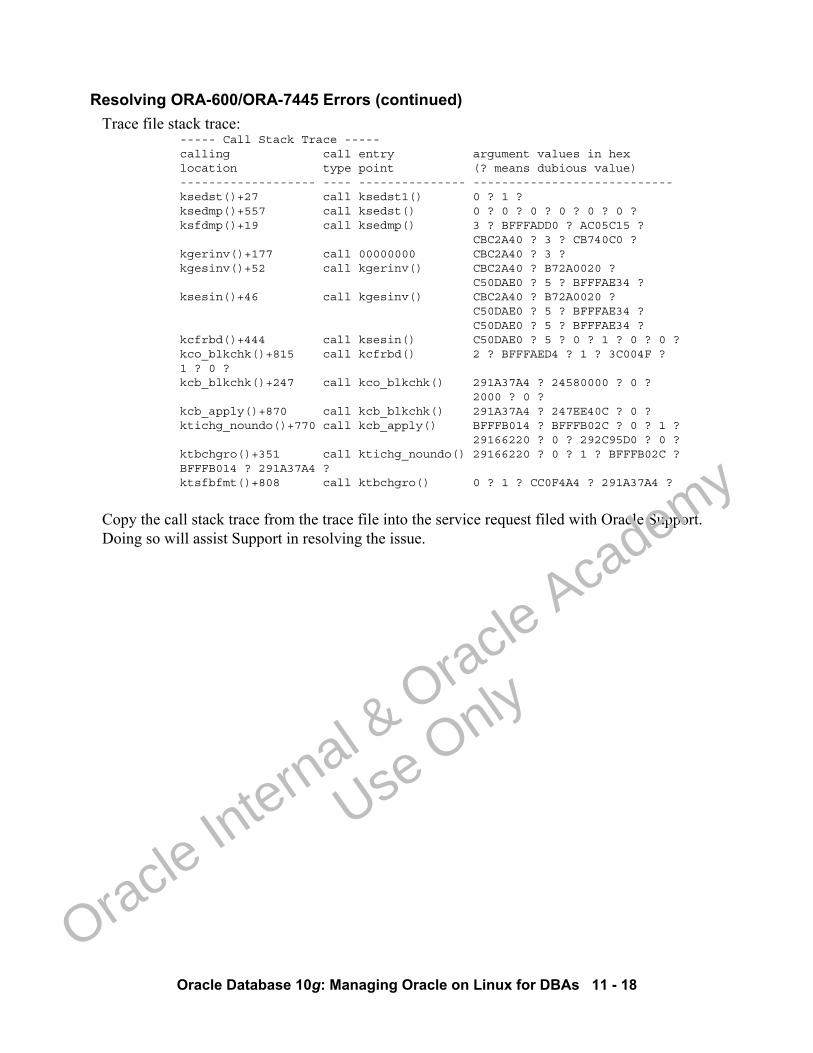
Oracle Database 10g: Managing Oracle on Linux for DBAs 11 - 18
Resolving ORA-600/ORA-7445 Errors (continued)Trace file stack trace:
----- Call Stack Trace -----calling call entry argument values in hexlocation type point (? means dubious value)------------------- ---- --------------- ----------------------------ksedst()+27 call ksedst1() 0 ? 1 ?ksedmp()+557 call ksedst() 0 ? 0 ? 0 ? 0 ? 0 ? 0 ?ksfdmp()+19 call ksedmp() 3 ? BFFFADD0 ? AC05C15 ?
CBC2A40 ? 3 ? CB740C0 ?kgerinv()+177 call 00000000 CBC2A40 ? 3 ?kgesinv()+52 call kgerinv() CBC2A40 ? B72A0020 ?
C50DAE0 ? 5 ? BFFFAE34 ?ksesin()+46 call kgesinv() CBC2A40 ? B72A0020 ?
C50DAE0 ? 5 ? BFFFAE34 ?C50DAE0 ? 5 ? BFFFAE34 ?
kcfrbd()+444 call ksesin() C50DAE0 ? 5 ? 0 ? 1 ? 0 ? 0 ?kco_blkchk()+815 call kcfrbd() 2 ? BFFFAED4 ? 1 ? 3C004F ? 1 ? 0 ?kcb_blkchk()+247 call kco_blkchk() 291A37A4 ? 24580000 ? 0 ?
2000 ? 0 ?kcb_apply()+870 call kcb_blkchk() 291A37A4 ? 247EE40C ? 0 ?ktichg_noundo()+770 call kcb_apply() BFFFB014 ? BFFFB02C ? 0 ? 1 ?
29166220 ? 0 ? 292C95D0 ? 0 ?ktbchgro()+351 call ktichg_noundo() 29166220 ? 0 ? 1 ? BFFFB02C ? BFFFB014 ? 291A37A4 ?ktsfbfmt()+808 call ktbchgro() 0 ? 1 ? CC0F4A4 ? 291A37A4 ?
Copy the call stack trace from the trace file into the service request filed with Oracle Support. Doing so will assist Support in resolving the issue.
Oracle In
ternal & O
racle Aca
demy
Use O
nly
Oracle Database 10g: Managing Oracle on Linux for DBAs 11 - 19
Copyright © 2007, Oracle. All rights reserved.
Summary
In this lesson, you should have learned how to:• Use OS Watcher• Use the Oracle Support’s Remote Diagnostics Agent • Trace programs and processes with strace• Gather information for resolving ORA-600 and
ORA-7445 errors
Oracle In
ternal & O
racle Aca
demy
Use O
nly
Oracle Database 10g: Managing Oracle on Linux for DBAs 11 - 20
Copyright © 2007, Oracle. All rights reserved.
Practice 11 Overview:Debugging Oracle on Linux
This practice covers the following topics:• Installing and configuring OS Watcher• Gathering OS and database information using RDA• Tracing programs and processes using strace• Forcing ORA-600 and ORA-7445 errors, and then
gathering the needed information for Oracle Support
Oracle In
ternal & O
racle Aca
demy
Use O
nly
Appendix APractices
Oracle In
ternal & O
racle Aca
demy
Use O
nly
Oracle Database 10g: Managing Oracle on Linux for DBAs A - 2
Practice for Lesson 1
Oracle In
ternal & O
racle Aca
demy
Use O
nly
Oracle Database 10g: Managing Oracle on Linux for DBAs A - 3
Practice 1-1: Working with the Linux Kernel This practice enables you to gather some information about the Linux operating system you are using. This includes the kernel version, users and groups, and disk partitions. You will also write a simple shell script.
1) Determine the complete version number of your Linux kernel, and record it here:
2) Determine if your kernel is tainted.
3) Find out what groups the user you are logged in as belongs to. What is the primary group?
4) What other users are in this group?
5) Display information about disk storage on your database server. How much disk space do you have free in the root partition?
6) Using the /proc file system, display the list of partitions.
7) Change your prompt string to include the full directory path instead of just the last subdirectory name. Test this by changing to the /stage/labs directory. Question: Why does the prompt still end with a hash sign when you have specified it to be a dollar sign? You may need to check the bash man page to answer this. Note: Your prompt will look different from those shown here because of the specific machine name being shown.
8) Write a shell script called showargs.sh that displays each space-delimited parameter passed to it, on a separate line. For example:
./showargs.sh abc 123 xyz
abc
123
xyz
9) Determine why the showargs.sh script did not run, correct that, and run it successfully with test input.
10) Determine how long the system has been up, using the virtual file system. Compare your result to the value returned by the uptime command.
Oracle In
ternal & O
racle Aca
demy
Use O
nly
Oracle Database 10g: Managing Oracle on Linux for DBAs A - 4
Practice 1-2: Setting Up locatedb There are times during these practices when you may need to locate a file. In this practice, you will set up the data structure that supports that search.
1) Run the locate command to find all rpm files.
Oracle In
ternal & O
racle Aca
demy
Use O
nly

Oracle Database 10g: Managing Oracle on Linux for DBAs A - 5
Practice for Lesson 2: Preparing Linux for Oracle
Oracle In
ternal & O
racle Aca
demy
Use O
nly
Oracle Database 10g: Managing Oracle on Linux for DBAs A - 6
Practice 2-1: Installing Linux Packages In this practice, you will determine whether all the packages required by Oracle Database 10g R2 are installed, and install them if needed.
Note: Scripts for this practice are in the /stage/labs directory.
1) Use the rpm command to determine whether the correct packages are installed to support Oracle Database 10g R2. Use the lab_02_01_01.sh script to check for missing packages.
2) Install any missing RPMs. The necessary RPM files can be found in the labs directory also. Then verify that all the required packages are installed.
Oracle In
ternal & O
racle Aca
demy
Use O
nly
Oracle Database 10g: Managing Oracle on Linux for DBAs A - 7
Practice 2-2: Creating the oracle User Now you will create the oracle user and set up its environment. All lab files are in the /stage/labs directory.
1) Verify that there is no oracle user already on the system.
2) Create the oracle user by running the lab_02_02_02.sh script:
3) Now that the oracle user exists, copy the script files into their proper place in the oracle home directory. References to script files will be to the new labs directory from this point on. Do this for the labs and solutions directories only, which are currently in the /stage directory.
4) Verify that the nobody user exists.
Oracle In
ternal & O
racle Aca
demy
Use O
nly
Oracle Database 10g: Managing Oracle on Linux for DBAs A - 8
Practice 2-3: Configuring Kernel Parameters You now need to view and modify kernel parameters to meet the requirements of an Oracle database installation.
1) As the root user, view the kernel memory parameters. What are their names and values? Are they adequate for the Oracle database installation?
Name Value Adequate? __________ ____________ __Y/N_ __________ ____________ __Y/N_ __________ ____________ __Y/N_
2) Update any of the kernel parameters that are not set correctly.
3) Change the kernel parameters for the semaphore, file handle, and network settings. The correct settings should be: Semaphores: 250 32000 100 128 File Handles: 65536 Local port range: 1024 65000 net.core.rmem_default: 1048576 net.core.rmem_max: 1048576 net.core.wmem_default: 262144 net.core.wmem_max: 262144
4) Set the shell limits according to the following:
Number of processes: soft = 2047, hard = 16384
Number of open file handles: soft = 1024, hard = 65536
Oracle In
ternal & O
racle Aca
demy
Use O
nly
Oracle Database 10g: Managing Oracle on Linux for DBAs A - 9
Practice 2-4: Creating Oracle Directories Set up the needed directories and environment variables for the Oracle software installation.
1) Determine a mount point that has enough space, and create the directory that will serve as ORACLE_BASE. This should be named /u01/app/oracle.
Oracle In
ternal & O
racle Aca
demy
Use O
nly
Oracle Database 10g: Managing Oracle on Linux for DBAs A - 10
Practice 2-5: Setting Up the Host Name When you run Oracle Universal Installer, an error may occur if name resolution is not set up. To avoid this error, before you begin installation, you must ensure that host names are resolved only through the /etc/hosts file.
1) Verify that the /etc/hosts file is used for name resolution.
2) Verify that the host name has been set correctly. If it does not include the domain name, run the hostname.sh script to correct it.
Oracle In
ternal & O
racle Aca
demy
Use O
nly
Oracle Database 10g: Managing Oracle on Linux for DBAs A - 11
Practice for Lesson 3: Installing Oracle on Linux
Oracle In
ternal & O
racle Aca
demy
Use O
nly
Oracle Database 10g: Managing Oracle on Linux for DBAs A - 12
Practice 3-1: Installing Oracle Database on Linux Install Oracle Database. The database software is staged in the /stage/database directory.
1) Exit all windows of the current session, and log out of the root session.
2) Log in to the machine as the oracle user. The password is oracle.
3) Open a new terminal window, and run the installer program that is in the /stage/database directory. Perform the installation, selecting the Basic option. Use oracle for any passwords. Use the default settings for everything except for these options:
Set the UNIX DBA Group to oinstall
Do not create the starter database
4) In the End of Installation window, click Exit to quit the installation.
Oracle In
ternal & O
racle Aca
demy
Use O
nly
Oracle Database 10g: Managing Oracle on Linux for DBAs A - 13
Practice 3-2: Configuring the Listener Configure and start the listener.
1) Run the Network Configuration Assistant (netca) to configure the listener. Use the default settings on every screen.
2) Verify that the listener has been started.
Oracle In
ternal & O
racle Aca
demy
Use O
nly
Oracle Database 10g: Managing Oracle on Linux for DBAs A - 14
Practice for Lesson 4
There is no practice for lesson 4.
Oracle In
ternal & O
racle Aca
demy
Use O
nly

Oracle Database 10g: Managing Oracle on Linux for DBAs A - 15
Practice for Lesson 5: Automatic Storage Management
Oracle In
ternal & O
racle Aca
demy
Use O
nly
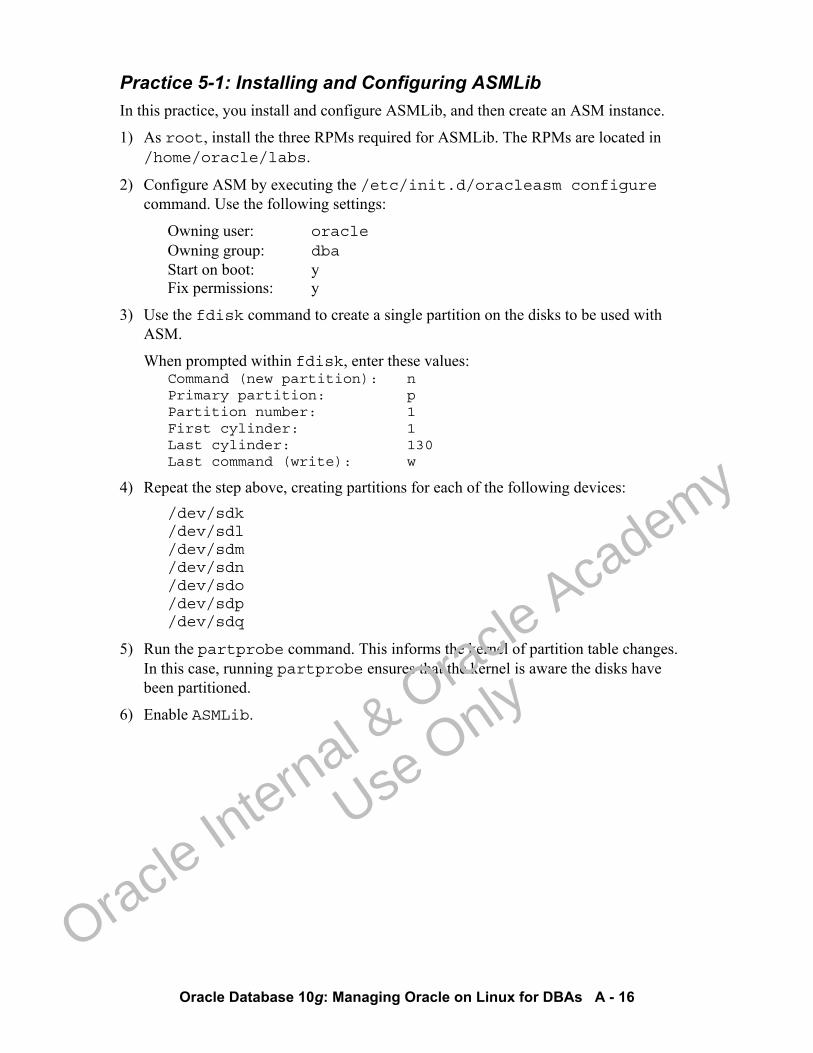
Oracle Database 10g: Managing Oracle on Linux for DBAs A - 16
Practice 5-1: Installing and Configuring ASMLib In this practice, you install and configure ASMLib, and then create an ASM instance.
1) As root, install the three RPMs required for ASMLib. The RPMs are located in /home/oracle/labs.
2) Configure ASM by executing the /etc/init.d/oracleasm configure command. Use the following settings:
Owning user: oracle Owning group: dba Start on boot: y Fix permissions: y
3) Use the fdisk command to create a single partition on the disks to be used with ASM.
When prompted within fdisk, enter these values: Command (new partition): n Primary partition: p Partition number: 1 First cylinder: 1 Last cylinder: 130 Last command (write): w
4) Repeat the step above, creating partitions for each of the following devices: /dev/sdk /dev/sdl /dev/sdm /dev/sdn /dev/sdo /dev/sdp /dev/sdq
5) Run the partprobe command. This informs the kernel of partition table changes. In this case, running partprobe ensures that the kernel is aware the disks have been partitioned.
6) Enable ASMLib.
Oracle In
ternal & O
racle Aca
demy
Use O
nly
Practice 5-1: Installing and Configuring ASMLib (continued)
Oracle Database 10g: Managing Oracle on Linux for DBAs A - 17
7) Create the ASM disk for storing the database’s data files and flash recovery area files. Use the oracleasm utility to do this. Map the ASM disk names to devices:
8) Make the ASM disks available using the scandisks option of the oracleasm utility.
Oracle In
ternal & O
racle Aca
demy
Use O
nly
Oracle Database 10g: Managing Oracle on Linux for DBAs A - 18
Practice 5-2: Creating an ASM Instance Now that the ASM disks are set up, you can create the ASM instance that uses them. In this practice, you will create an ASM instance, and define the ASM disk groups that it is to use for data, and for the flash recovery area.
1) Use DBCA to configure Automatic Storage Management.
Oracle In
ternal & O
racle Aca
demy
Use O
nly
Oracle Database 10g: Managing Oracle on Linux for DBAs A - 19
Practice for Lesson 6: Creating the Database
Oracle In
ternal & O
racle Aca
demy
Use O
nly
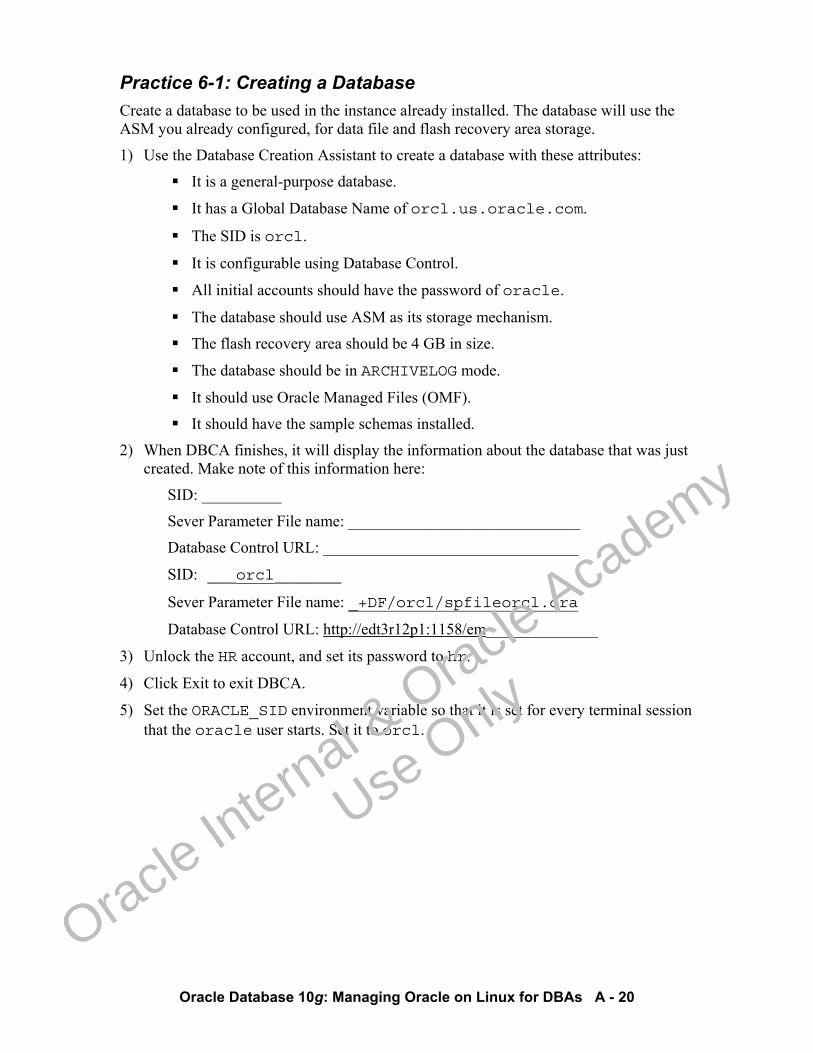
Oracle Database 10g: Managing Oracle on Linux for DBAs A - 20
Practice 6-1: Creating a Database Create a database to be used in the instance already installed. The database will use the ASM you already configured, for data file and flash recovery area storage.
1) Use the Database Creation Assistant to create a database with these attributes:
It is a general-purpose database.
It has a Global Database Name of orcl.us.oracle.com.
The SID is orcl.
It is configurable using Database Control.
All initial accounts should have the password of oracle.
The database should use ASM as its storage mechanism.
The flash recovery area should be 4 GB in size.
The database should be in ARCHIVELOG mode.
It should use Oracle Managed Files (OMF).
It should have the sample schemas installed.
2) When DBCA finishes, it will display the information about the database that was just created. Make note of this information here:
SID: __________
Sever Parameter File name: _____________________________
Database Control URL: ________________________________
SID: ___orcl_______
Sever Parameter File name: _+DF/orcl/spfileorcl.ora
Database Control URL: http://edt3r12p1:1158/em______________
3) Unlock the HR account, and set its password to hr.
4) Click Exit to exit DBCA.
5) Set the ORACLE_SID environment variable so that it is set for every terminal session that the oracle user starts. Set it to orcl.
Oracle In
ternal & O
racle Aca
demy
Use O
nly
Oracle Database 10g: Managing Oracle on Linux for DBAs A - 21
Practice 6-2: Backing Up Your Database It is good to have a backup of the database you are working with. Take a backup of the database that has just been created.
1) Back up the database.
Oracle In
ternal & O
racle Aca
demy
Use O
nly

Oracle Database 10g: Managing Oracle on Linux for DBAs A - 22
Practice for Lesson 7: Customizing Oracle on Linux
Oracle In
ternal & O
racle Aca
demy
Use O
nly
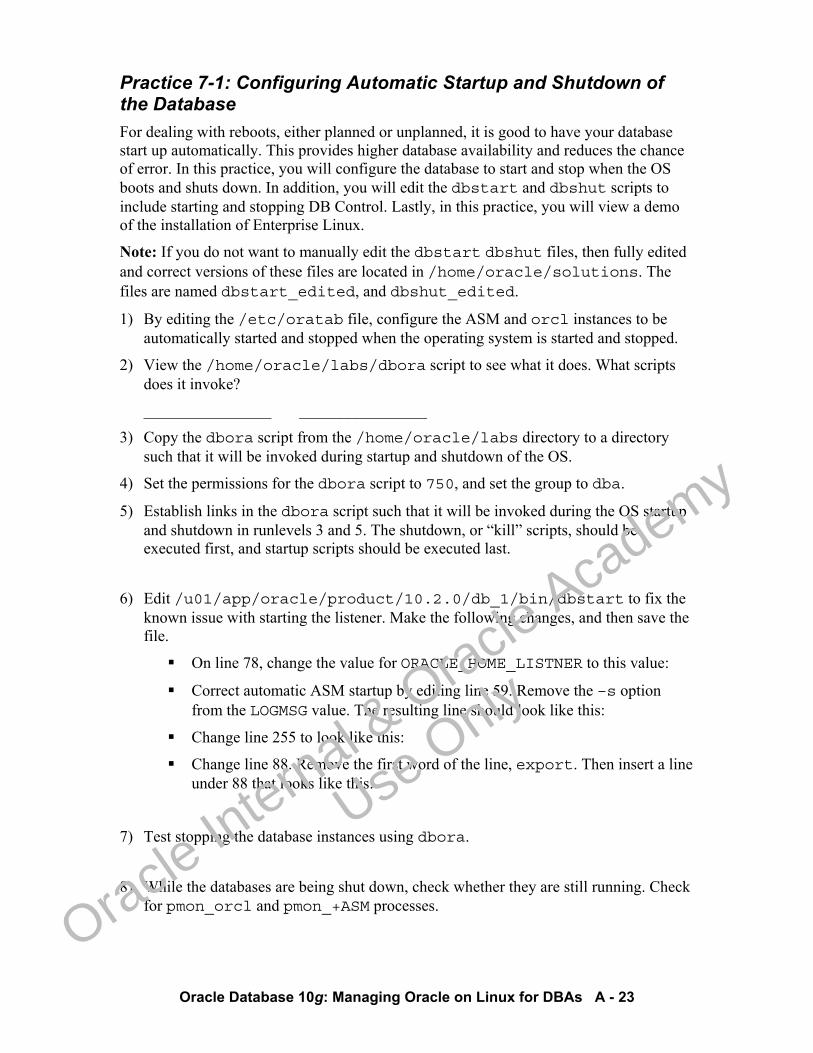
Oracle Database 10g: Managing Oracle on Linux for DBAs A - 23
Practice 7-1: Configuring Automatic Startup and Shutdown of the Database For dealing with reboots, either planned or unplanned, it is good to have your database start up automatically. This provides higher database availability and reduces the chance of error. In this practice, you will configure the database to start and stop when the OS boots and shuts down. In addition, you will edit the dbstart and dbshut scripts to include starting and stopping DB Control. Lastly, in this practice, you will view a demo of the installation of Enterprise Linux.
Note: If you do not want to manually edit the dbstart dbshut files, then fully edited and correct versions of these files are located in /home/oracle/solutions. The files are named dbstart_edited, and dbshut_edited.
1) By editing the /etc/oratab file, configure the ASM and orcl instances to be automatically started and stopped when the operating system is started and stopped.
2) View the /home/oracle/labs/dbora script to see what it does. What scripts does it invoke?
________________ ________________
3) Copy the dbora script from the /home/oracle/labs directory to a directory such that it will be invoked during startup and shutdown of the OS.
4) Set the permissions for the dbora script to 750, and set the group to dba.
5) Establish links in the dbora script such that it will be invoked during the OS startup and shutdown in runlevels 3 and 5. The shutdown, or “kill” scripts, should be executed first, and startup scripts should be executed last.
6) Edit /u01/app/oracle/product/10.2.0/db_1/bin/dbstart to fix the known issue with starting the listener. Make the following changes, and then save the file.
On line 78, change the value for ORACLE_HOME_LISTNER to this value:
Correct automatic ASM startup by editing line 59. Remove the –s option from the LOGMSG value. The resulting line should look like this:
Change line 255 to look like this:
Change line 88. Remove the first word of the line, export. Then insert a line under 88 that looks like this:
7) Test stopping the database instances using dbora.
8) While the databases are being shut down, check whether they are still running. Check for pmon_orcl and pmon_+ASM processes.
Oracle In
ternal & O
racle Aca
demy
Use O
nly
Practice 7-1: Configuring Automatic Startup and Shutdown of the Database (continued)
Oracle Database 10g: Managing Oracle on Linux for DBAs A - 24
When the commands return no results, the instances have been shut down.
9) Test starting the database with dbora. First shut down the listener to set up the environment, as it would be at normal boot-up time.
10) Test that these scripts will be called and will function properly during a reboot.
Oracle In
ternal & O
racle Aca
demy
Use O
nly
Oracle Database 10g: Managing Oracle on Linux for DBAs A - 25
Practice 7-2: Configuring Automatic Startup and Shutdown of DB Control (optional) Note: If you have already copied the dbstart_edited and dbshut_edited files as described in practice 7-1, then you do not need to do this practice. You need to configure DB Console to start and stop when the database starts up and shuts down. If DB Control has been configured for an instance, then there exists a directory under $ORACLE_HOME with the format FullyQualifiedHostname_SID. For example:
textbox.us.oracle.com_orcl If DB Control is available in this version of the database, then the executable emctl exists under the $ORACLE_HOME/bin directory.
1) Configure DB Control to start with the database. It is best to start DB Control after the database has successfully started. So position the commands in the dbstart script to be after a test for a successful start of the database. Add the following text to the dbstart script. Insert it at line 221, which is following these three lines:
Line 218: if test $? -eq 0 ; then Line 219: echo "" Line 220: echo "$0: ${INST} \"${ORACLE_SID}\" warm started."
Note: You can either edit this file manually (the text above is in a file named lab_07_02_01.txt) or simply copy the dbstart_edited file from the solutions directory to $ORACLE_HOME/bin/dbstart. The copy command to use, as the oracle user, is:
2) Configure DB Control to stop when the database is shut down. Do this by editing the dbshut script, adding the following text at line 101, which is following these lines:
Line 94: if [ -f $ORACLE_HOME/bin/svrmgrl ] ; then Line 95: SQLDBA=svrmgrl Line 96: VERSION="internal" Line 97: else Line 98: SQLDBA="sqlplus /nolog" Line 99: fi Line 100: fi
Note: You can either edit this file manually (the text above is in a file named lab_07_02_02.txt) or simply copy the dbshut_edited file from the solutions directory to $ORACLE_HOME/bin/dbshut. The copy command to use, as the oracle user, is:
3) Test the automatic shutdown of DB Control by issuing a dbora stop command.
4) Test the automatic startup of DB Control by issuing a dbora start command.
5) Test the automatic restart by rebooting the system.
Oracle In
ternal & O
racle Aca
demy
Use O
nly
Oracle Database 10g: Managing Oracle on Linux for DBAs A - 26
Practice 7-3: Installing Linux In this practice, you will run a viewlet of the process of installing Enterprise Linux.
1) Launch the viewlet using the install_el4u4_launcher.html file.
2) Answer the following questions:
a. Why was a graphical environment not installed by default?
__________________________________________________________________
b. What is the mount point for the swap partition?
________________________
c. Are sar and iostat installed by default?
________________________
d. Is creating a root user optional?
________________________
Oracle In
ternal & O
racle Aca
demy
Use O
nly
Oracle Database 10g: Managing Oracle on Linux for DBAs A - 27
Practice for Lesson 8: Managing Memory
Oracle In
ternal & O
racle Aca
demy
Use O
nly
Oracle Database 10g: Managing Oracle on Linux for DBAs A - 28
Practice 8-1: Managing Memory In this practice you will inspect your system’s memory parameters. You will look at statistics and behavior regarding physical memory, and swap space.
1) View the current memory settings and status for the kernel. How much total memory is on your system?
Note: You may see different memory related values from those shown here, depending on the type of machine you are on.
2) According to the top command, how much memory is currently in use?
3) How much of this used memory is being used for cache, which means that it is
available to be used for noncache uses such as new process starting up, or new requests for memory allocation?
4) How much swap space is there, and how much is in use?
5) What is the device name that is being used for the swap space?
Oracle In
ternal & O
racle Aca
demy
Use O
nly
Oracle Database 10g: Managing Oracle on Linux for DBAs A - 29
Practice 8-2: Managing Shared Memory Now you will view the state and behavior of shared memory segments on your system, and how they relate to an Oracle database instance.
1) Display the list of shared memory segments belonging to the oracle user on your system.
2) Note the largest shared memory segment. What is it being used for? Prove your answer.
Note: The numbers you see will most likely be different from those shown here.
3) What does the next highest oracle shared memory segment belong to?
4) What is the meaning of the nattch column? Prove it by demonstrating how it changes.
Oracle In
ternal & O
racle Aca
demy
Use O
nly

Oracle Database 10g: Managing Oracle on Linux for DBAs A - 30
Practice for Lesson 9
Oracle In
ternal & O
racle Aca
demy
Use O
nly
Oracle Database 10g: Managing Oracle on Linux for DBAs A - 31
Practice 9-1: Gather Statistics Using iostat, sar, and vmstat In this practice, you will measure CPU, virtual memory, and I/O usage on your system. A table of commands is provided for your reference.
Diagnostic Measures Notes
sar -uq 5 3 runq-sz, ldavg, %user,%sys, %idle
On the system the averages provide a baseline
sar -d 5 3 rps, sect/s Overall activity by device
vmstat 5 3 Free, si Swapping information also includes disk and CPU. First line is all activity since last report. Pick a representative line other than the first to record.
iostat -p /dev/hda 5 3 avgqu-sz, await, svctm
Disk activity by partition. hda5 is the / partition. Note hda is sum of hda* lines. First output section is all activity since last report. Pick a representative section other than the first to record.
Record your measurements in the following table.
Measurement Quiet Database Activity
I/O Activity
sar -uq AVERAGE runq-sz
sar -uq AVERAGE ldavg
sar -uq AVERAGE
sar -uq AVERAGE %user
sar -uq AVERAGE %sys
sar -uq AVERAGE %idle
sar -d AVERAGE dev3-0 tps
sar -d AVERAGE dev3-0 rd_sec/s
sar -d AVERAGE dev3-0 wr_sec/s
vmstat memory free
Oracle In
ternal & O
racle Aca
demy
Use O
nly

Practice 9-1: Gather Statistics Using iostat, sar, and vmstat (continued)
Oracle Database 10g: Managing Oracle on Linux for DBAs A - 32
vmstat swap si
iostat -p hda5 tps
iostat -p hda5 Blk_read/s
iostat -p hda5 Blk_wrtn/s
1) Use the sar command to measure system stats including:
Run queue size
Load average
Percent CPU utilization for user processes
Percent CPU utilization for system (kernel) processes
Percent CPU is idle
Take three measurements at an interval of five seconds. Record the results in the Quiet column of the previous table.
2) Use the sar command to report on device statistics. Use the same repeat interval and count as above. Record the results in the Quiet column of the previous table.
3) Use the vmstat command to measure virtual memory statistics, using the same interval as above. In the Quiet column of the table above, record the amount of free virtual memory and the amount of virtual memory swapped in (si).
4) Use the iostat command to report I/O statistics for the root partition. Record the results in the Quiet column of the table above.
5) Run the $ORACLE_HOME/rdbms/admin/catproc.sql script to put a load on the system.
6) While the catproc.sql script is running, take measurements on your system again (as earlier), but this time, you can simply use the script that runs the commands you ran before. The script is monitor.sh.
7) While the catproc.sql script is still running, run the following dd command to generate I/O activity. Then run the monitor.sh script again and record the results in the I/O Activity column of the chart mentioned earlier.
Note: In order to determine the if parameter for the dd command, use the df command to find out the device name of the root partition.
8) Stop the dd command by pressing [Ctrl] + [C]. Do not interrupt the catproc.sql script run. It should complete in order for the database objects to end up in a consistent state.
9) Review the results recorded in the chart. Note the differences when the catproc.sql script ran, and when the dd command executed.
Oracle In
ternal & O
racle Aca
demy
Use O
nly
Oracle Database 10g: Managing Oracle on Linux for DBAs A - 33
Practice 9-2: Using Graphical Monitoring Tools This practice enables you to install and use xosview to monitor CPU, memory, and disk I/O.
1) Attempt to run xosview. This will fail because xosview is not installed by default.
2) Install xosview as root, using the xosview-1.8.2-1.i386.rpm file.
3) Run xosview by entering the xosview command, as root.
Oracle In
ternal & O
racle Aca
demy
Use O
nly
Oracle Database 10g: Managing Oracle on Linux for DBAs A - 34
Practice for Lesson 10: Tuning Performance
Oracle In
ternal & O
racle Aca
demy
Use O
nly
Oracle Database 10g: Managing Oracle on Linux for DBAs A - 35
Practice 10-1: Adjusting the SGA Size Often increasing the size of the Shared Global Area (SGA) improves performance by allowing more data to be resident in memory rather than having to be read from disk frequently. In this practice, you will increase the size of the SGA.
1) Adjust the SGA size to at least 400 MB.
Note: If it is already greater than 400 MB, do not change anything.
Oracle In
ternal & O
racle Aca
demy
Use O
nly
Oracle Database 10g: Managing Oracle on Linux for DBAs A - 36
Practice 10-2: Adjusting Block Sizes You can select different block sizes for each tablespace, and that can affect performance. This practice illustrates the difference in performance different block sizes can have, depending on the type of activity on the tablespace.
1) Set the cache size to 128 MB for tablespaces with 2 KB block size.
2) Set the cache size to 128 MB for the 16 KB block size.
3) Create the TS2 tablespace in ASM, which has a 2 KB block size, is NOLOGGING, and is 128 MB in size.
4) Create the TS16 tablespace in ASM, which has a 16 KB block size, is NOLOGGING, and is 128 MB in size.
5) Run the lab_10_02_05.sql script to create and populate the T2 and T16 tables, which are created in the TS2 and TS16 tablespaces, respectively.
6) Using SQL*Plus, turn on timing, and repeatedly select count(*) from each of these tables using a WHERE clause that forces each row to be read. Compare the times between each of the tables. Which is faster?
7) Turn on SQL tracing for this HR session.
8) Rerun each of the two statements once, putting in a comment to force a reparse of each statement.
9) Use EM to view the statistics for each of these two statement executions.
Oracle In
ternal & O
racle Aca
demy
Use O
nly

Oracle Database 10g: Managing Oracle on Linux for DBAs A - 37
Practice 10-3: Identifying Sessions in Linux At times you need to correlate database sessions to specific processes running at the operating system level. In this practice, you will identify a resource-consuming operating system process, determine which database session it belongs to, and take action to correct it.
1) Run the lab_10_03_01.sh script to generate some HR sessions that do some work in the database.
2) Run the top command to see the oracle session that is consuming many system resources. Find the session associated with that process, and kill it.
Oracle In
ternal & O
racle Aca
demy
Use O
nly

Oracle Database 10g: Managing Oracle on Linux for DBAs A - 38
Practice for Lesson 11: Diagnosing Oracle on Linux
Oracle In
ternal & O
racle Aca
demy
Use O
nly
Oracle Database 10g: Managing Oracle on Linux for DBAs A - 39
Practice 11-1: Install and Configure OS Watcher OS Watcher is a utility that collects statistics about the operating system. It is useful for gathering historical data for comparison and for providing OS information about your system to Oracle Support Services. You will now install and configure OS Watcher, and then run it, reviewing the results from the generated reports.
1) Install OS Watcher. Create a directory for OS Watcher named osw under the /home/oracle directory. Extract the tar OSW.tar file, located in /home/oracle/labs directory, into the new directory.
2) Use startOSW.sh to start the tool. Provide parameters such that data is sampled every 10 seconds, and the last 10 hours of data is logged to archive files. Make the tool run as a background process.
3) Verify that the script is running by checking the Linux process listing. 4) View the iostat report that has been created by OSW so far. The output is being
written to the archive directory where OSW has been installed.
5) View the OSW generated output for other types of data you see in the archive directory.
6) Stop OSW.
Oracle In
ternal & O
racle Aca
demy
Use O
nly
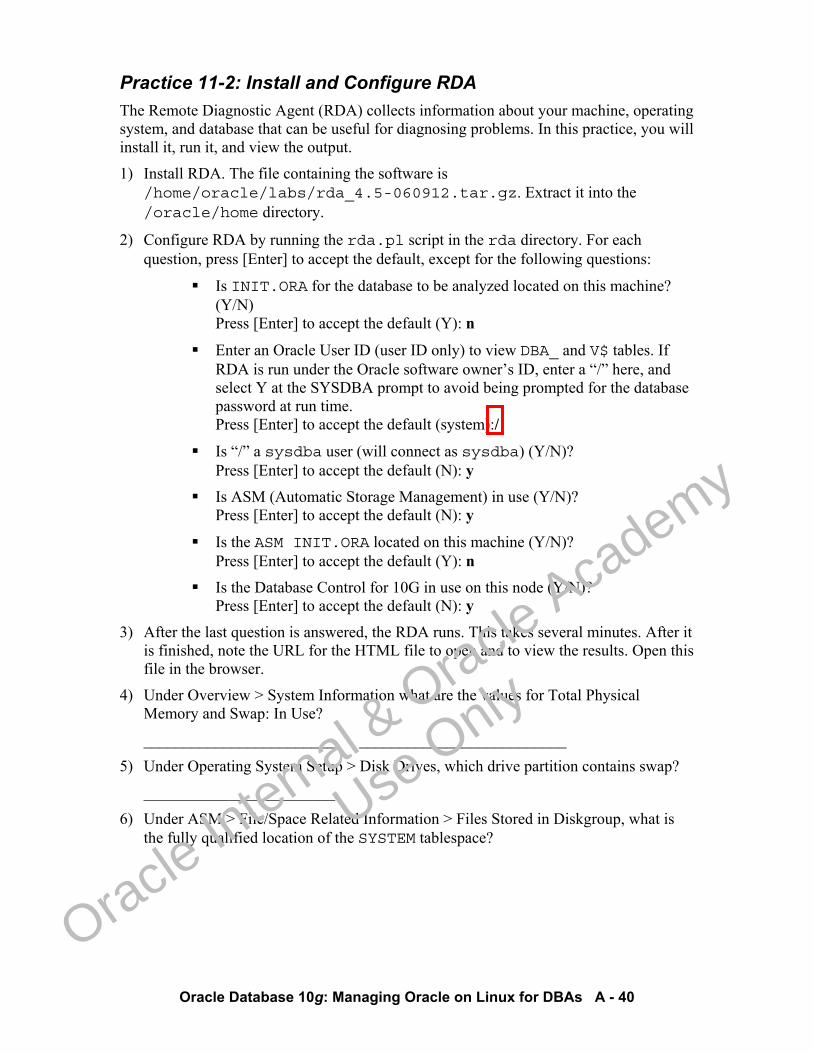
Oracle Database 10g: Managing Oracle on Linux for DBAs A - 40
Practice 11-2: Install and Configure RDA The Remote Diagnostic Agent (RDA) collects information about your machine, operating system, and database that can be useful for diagnosing problems. In this practice, you will install it, run it, and view the output.
1) Install RDA. The file containing the software is /home/oracle/labs/rda_4.5-060912.tar.gz. Extract it into the /oracle/home directory.
2) Configure RDA by running the rda.pl script in the rda directory. For each question, press [Enter] to accept the default, except for the following questions:
Is INIT.ORA for the database to be analyzed located on this machine? (Y/N) Press [Enter] to accept the default (Y): n
Enter an Oracle User ID (user ID only) to view DBA_ and V$ tables. If RDA is run under the Oracle software owner’s ID, enter a “/” here, and select Y at the SYSDBA prompt to avoid being prompted for the database password at run time. Press [Enter] to accept the default (system):/
Is “/” a sysdba user (will connect as sysdba) (Y/N)? Press [Enter] to accept the default (N): y
Is ASM (Automatic Storage Management) in use (Y/N)? Press [Enter] to accept the default (N): y
Is the ASM INIT.ORA located on this machine (Y/N)? Press [Enter] to accept the default (Y): n
Is the Database Control for 10G in use on this node (Y/N)? Press [Enter] to accept the default (N): y
3) After the last question is answered, the RDA runs. This takes several minutes. After it is finished, note the URL for the HTML file to open and to view the results. Open this file in the browser.
4) Under Overview > System Information what are the values for Total Physical Memory and Swap: In Use?
________________________ __________________________
5) Under Operating System Setup > Disk Drives, which drive partition contains swap?
________________________
6) Under ASM > File/Space Related Information > Files Stored in Diskgroup, what is the fully qualified location of the SYSTEM tablespace?
Oracle In
ternal & O
racle Aca
demy
Use O
nly
Oracle Database 10g: Managing Oracle on Linux for DBAs A - 41
Practice 11-3: Using strace In this practice, you will look at the output of the strace command. First you look at the output of a simple shell script. Then you use strace on a running process and send the output to a file.
1) View the contents of the helloworld.sh test script.
2) Execute the helloworld.sh script.
3) Execute the helloworld.sh script using strace. After tracing the script, review the output.
4) Trace the PMON process execution using strace. Send the output of the trace to the /tmp/orcl_pmon.out file. Run the lab_11_03_04_a.sh script to find the process ID of PMON.
5) View the output file by using the tail command. Do not cancel this tail command. It is used in the next practice.
Oracle In
ternal & O
racle Aca
demy
Use O
nly
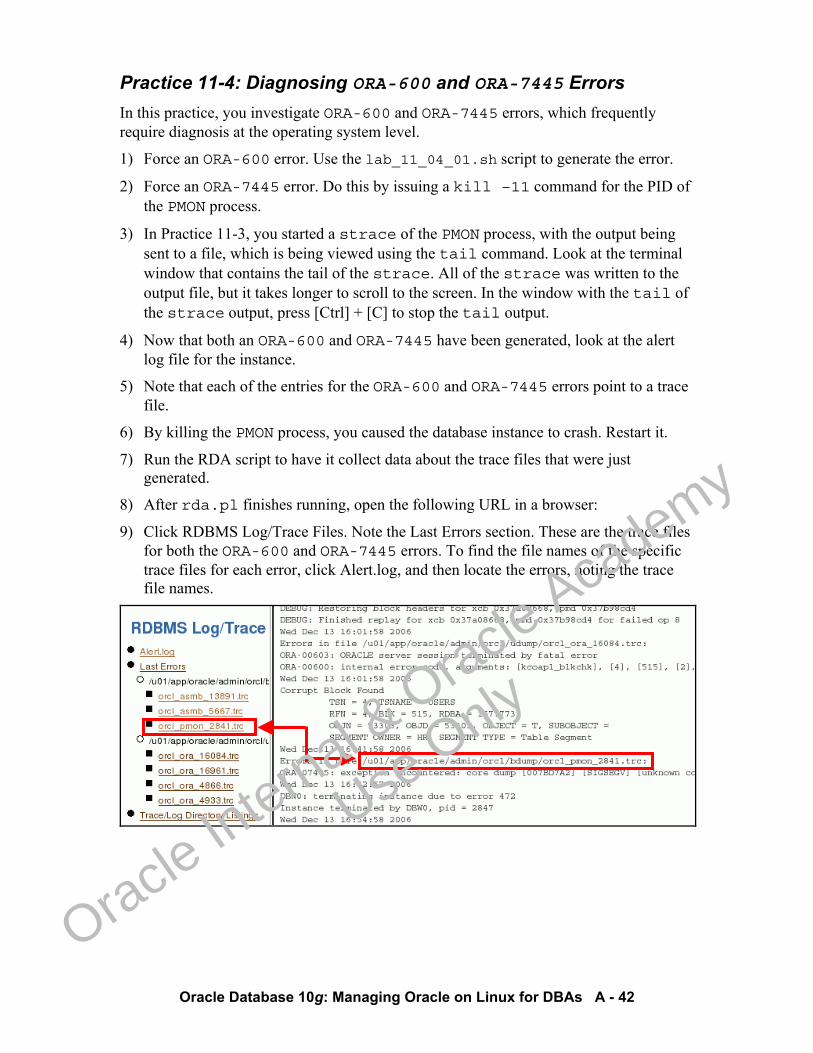
Oracle Database 10g: Managing Oracle on Linux for DBAs A - 42
Practice 11-4: Diagnosing ORA-600 and ORA-7445 Errors In this practice, you investigate ORA-600 and ORA-7445 errors, which frequently require diagnosis at the operating system level.
1) Force an ORA-600 error. Use the lab_11_04_01.sh script to generate the error.
2) Force an ORA-7445 error. Do this by issuing a kill –11 command for the PID of the PMON process.
3) In Practice 11-3, you started a strace of the PMON process, with the output being sent to a file, which is being viewed using the tail command. Look at the terminal window that contains the tail of the strace. All of the strace was written to the output file, but it takes longer to scroll to the screen. In the window with the tail of the strace output, press [Ctrl] + [C] to stop the tail output.
4) Now that both an ORA-600 and ORA-7445 have been generated, look at the alert log file for the instance.
5) Note that each of the entries for the ORA-600 and ORA-7445 errors point to a trace file.
6) By killing the PMON process, you caused the database instance to crash. Restart it.
7) Run the RDA script to have it collect data about the trace files that were just generated.
8) After rda.pl finishes running, open the following URL in a browser:
9) Click RDBMS Log/Trace Files. Note the Last Errors section. These are the trace files for both the ORA-600 and ORA-7445 errors. To find the file names of the specific trace files for each error, click Alert.log, and then locate the errors, noting the trace file names.
Oracle In
ternal & O
racle Aca
demy
Use O
nly
Appendix BPractice Solutions
Oracle In
ternal & O
racle Aca
demy
Use O
nly
Oracle Database 10g: Managing Oracle on Linux for DBAs B - 2
Practice Solutions for Lesson 1
Oracle In
ternal & O
racle Aca
demy
Use O
nly
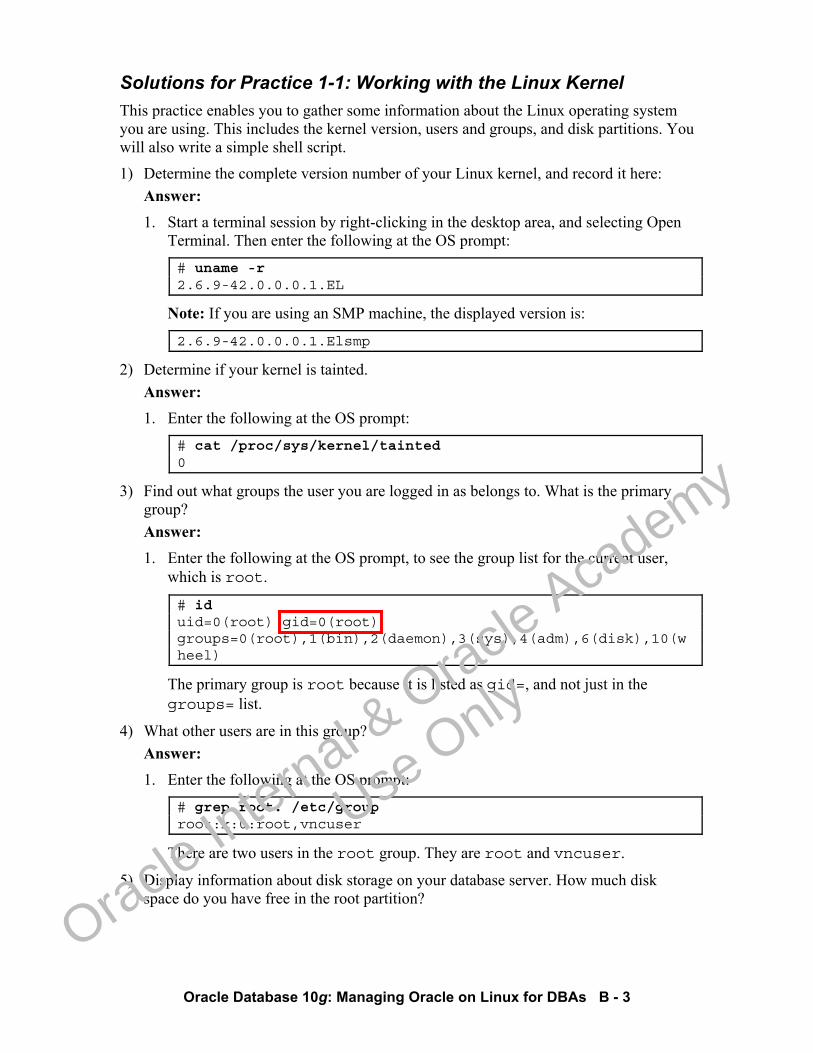
Oracle Database 10g: Managing Oracle on Linux for DBAs B - 3
Solutions for Practice 1-1: Working with the Linux Kernel This practice enables you to gather some information about the Linux operating system you are using. This includes the kernel version, users and groups, and disk partitions. You will also write a simple shell script.
1) Determine the complete version number of your Linux kernel, and record it here: Answer: 1. Start a terminal session by right-clicking in the desktop area, and selecting Open
Terminal. Then enter the following at the OS prompt:
# uname -r 2.6.9-42.0.0.0.1.EL
Note: If you are using an SMP machine, the displayed version is:
2.6.9-42.0.0.0.1.Elsmp
2) Determine if your kernel is tainted. Answer: 1. Enter the following at the OS prompt:
# cat /proc/sys/kernel/tainted 0
3) Find out what groups the user you are logged in as belongs to. What is the primary group? Answer: 1. Enter the following at the OS prompt, to see the group list for the current user,
which is root.
# id uid=0(root) gid=0(root) groups=0(root),1(bin),2(daemon),3(sys),4(adm),6(disk),10(wheel)
The primary group is root because it is listed as gid=, and not just in the groups= list.
4) What other users are in this group? Answer: 1. Enter the following at the OS prompt:
# grep root: /etc/group root:x:0:root,vncuser
There are two users in the root group. They are root and vncuser.
5) Display information about disk storage on your database server. How much disk space do you have free in the root partition?
Oracle In
ternal & O
racle Aca
demy
Use O
nly
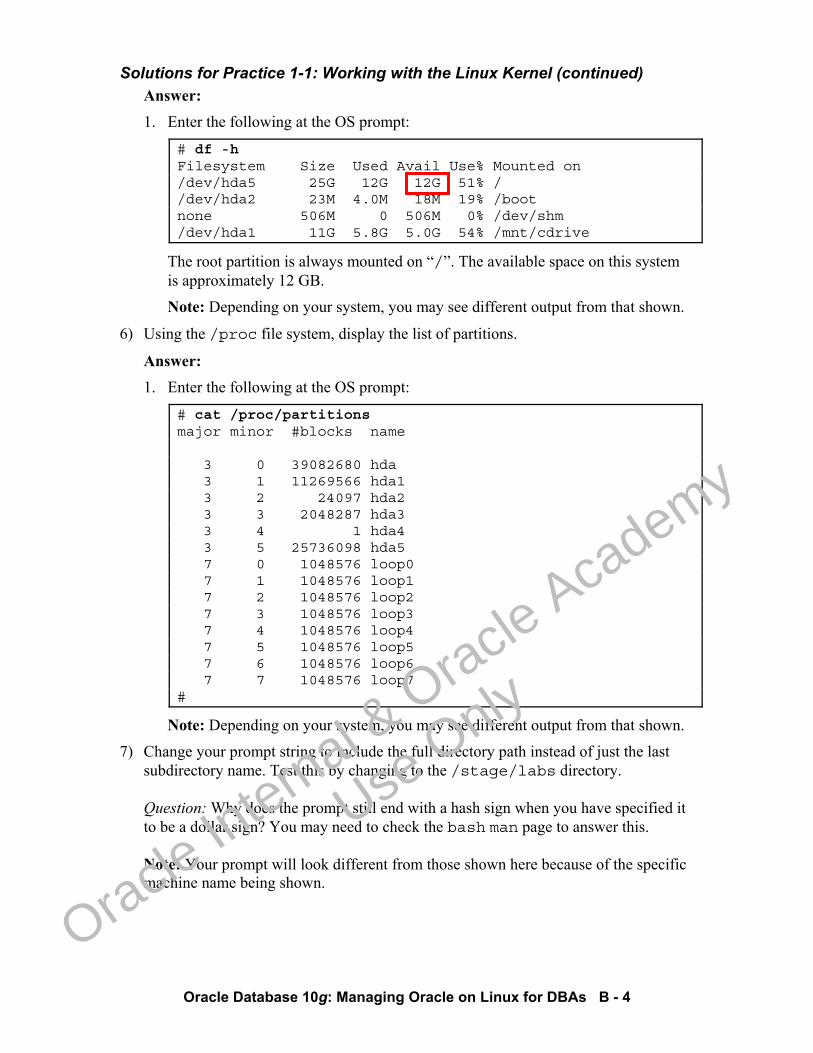
Solutions for Practice 1-1: Working with the Linux Kernel (continued)
Oracle Database 10g: Managing Oracle on Linux for DBAs B - 4
Answer: 1. Enter the following at the OS prompt:
# df -h Filesystem Size Used Avail Use% Mounted on /dev/hda5 25G 12G 12G 51% / /dev/hda2 23M 4.0M 18M 19% /boot none 506M 0 506M 0% /dev/shm /dev/hda1 11G 5.8G 5.0G 54% /mnt/cdrive
The root partition is always mounted on “/”. The available space on this system is approximately 12 GB.
Note: Depending on your system, you may see different output from that shown.
6) Using the /proc file system, display the list of partitions.
Answer: 1. Enter the following at the OS prompt:
# cat /proc/partitions major minor #blocks name 3 0 39082680 hda 3 1 11269566 hda1 3 2 24097 hda2 3 3 2048287 hda3 3 4 1 hda4 3 5 25736098 hda5 7 0 1048576 loop0 7 1 1048576 loop1 7 2 1048576 loop2 7 3 1048576 loop3 7 4 1048576 loop4 7 5 1048576 loop5 7 6 1048576 loop6 7 7 1048576 loop7 #
Note: Depending on your system, you may see different output from that shown.
7) Change your prompt string to include the full directory path instead of just the last subdirectory name. Test this by changing to the /stage/labs directory. Question: Why does the prompt still end with a hash sign when you have specified it to be a dollar sign? You may need to check the bash man page to answer this. Note: Your prompt will look different from those shown here because of the specific machine name being shown.
Oracle In
ternal & O
racle Aca
demy
Use O
nly
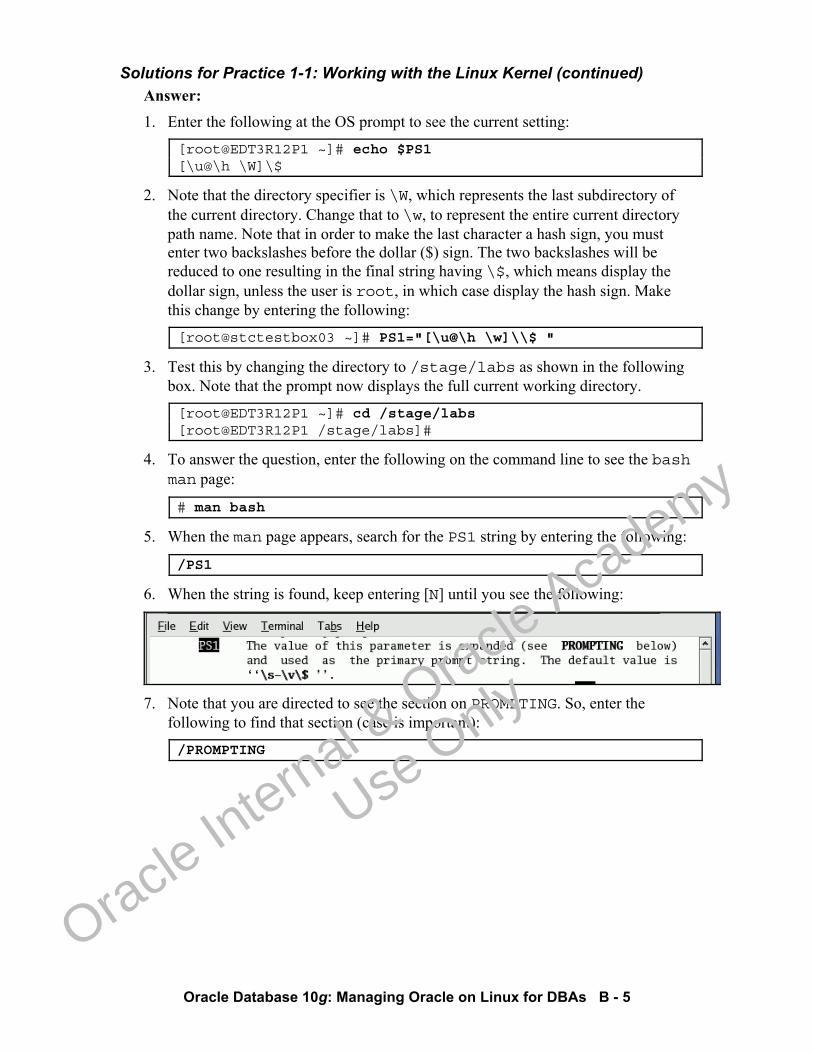
Solutions for Practice 1-1: Working with the Linux Kernel (continued)
Oracle Database 10g: Managing Oracle on Linux for DBAs B - 5
Answer: 1. Enter the following at the OS prompt to see the current setting:
[root@EDT3R12P1 ~]# echo $PS1 [\u@\h \W]\$
2. Note that the directory specifier is \W, which represents the last subdirectory of the current directory. Change that to \w, to represent the entire current directory path name. Note that in order to make the last character a hash sign, you must enter two backslashes before the dollar ($) sign. The two backslashes will be reduced to one resulting in the final string having \$, which means display the dollar sign, unless the user is root, in which case display the hash sign. Make this change by entering the following:
[root@stctestbox03 ~]# PS1="[\u@\h \w]\\$ "
3. Test this by changing the directory to /stage/labs as shown in the following box. Note that the prompt now displays the full current working directory.
[root@EDT3R12P1 ~]# cd /stage/labs [root@EDT3R12P1 /stage/labs]#
4. To answer the question, enter the following on the command line to see the bash man page:
# man bash
5. When the man page appears, search for the PS1 string by entering the following:
/PS1
6. When the string is found, keep entering [N] until you see the following:
7. Note that you are directed to see the section on PROMPTING. So, enter the
following to find that section (case is important):
/PROMPTING
Oracle In
ternal & O
racle Aca
demy
Use O
nly
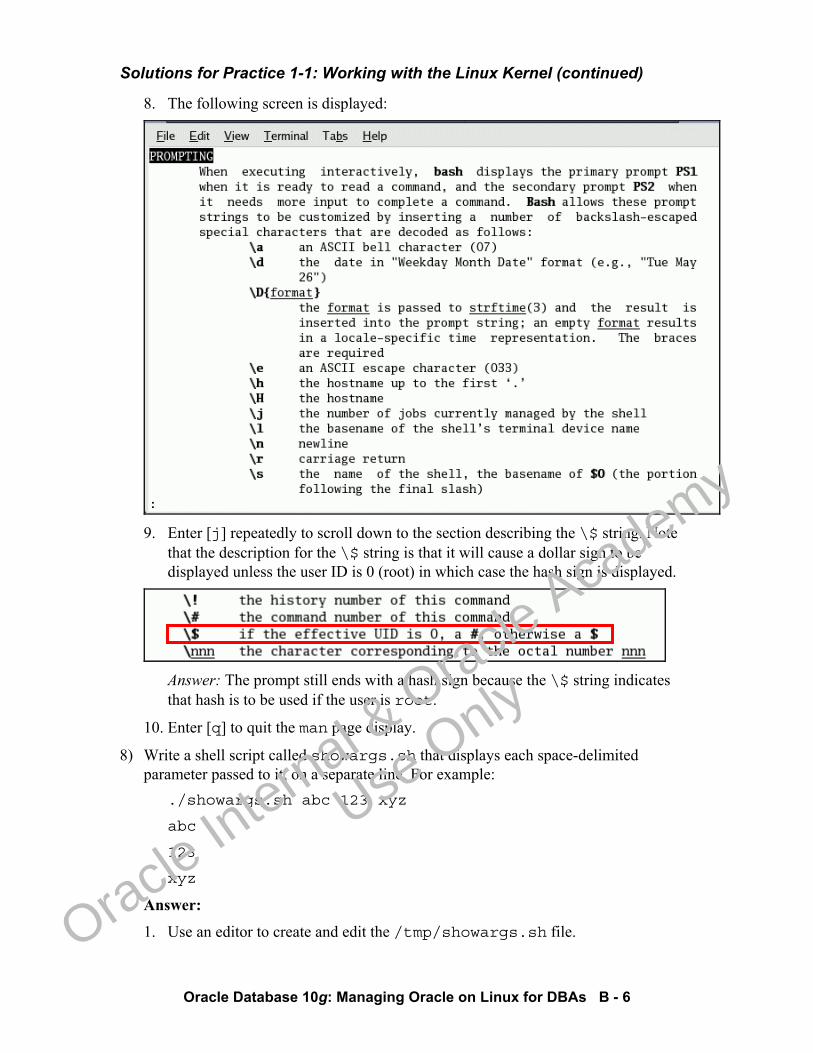
Solutions for Practice 1-1: Working with the Linux Kernel (continued)
Oracle Database 10g: Managing Oracle on Linux for DBAs B - 6
8. The following screen is displayed:
9. Enter [j] repeatedly to scroll down to the section describing the \$ string. Note
that the description for the \$ string is that it will cause a dollar sign to be displayed unless the user ID is 0 (root) in which case the hash sign is displayed.
Answer: The prompt still ends with a hash sign because the \$ string indicates that hash is to be used if the user is root.
10. Enter [q] to quit the man page display.
8) Write a shell script called showargs.sh that displays each space-delimited parameter passed to it, on a separate line. For example:
./showargs.sh abc 123 xyz
abc
123
xyz
Answer:
1. Use an editor to create and edit the /tmp/showargs.sh file.
Oracle In
ternal & O
racle Aca
demy
Use O
nly
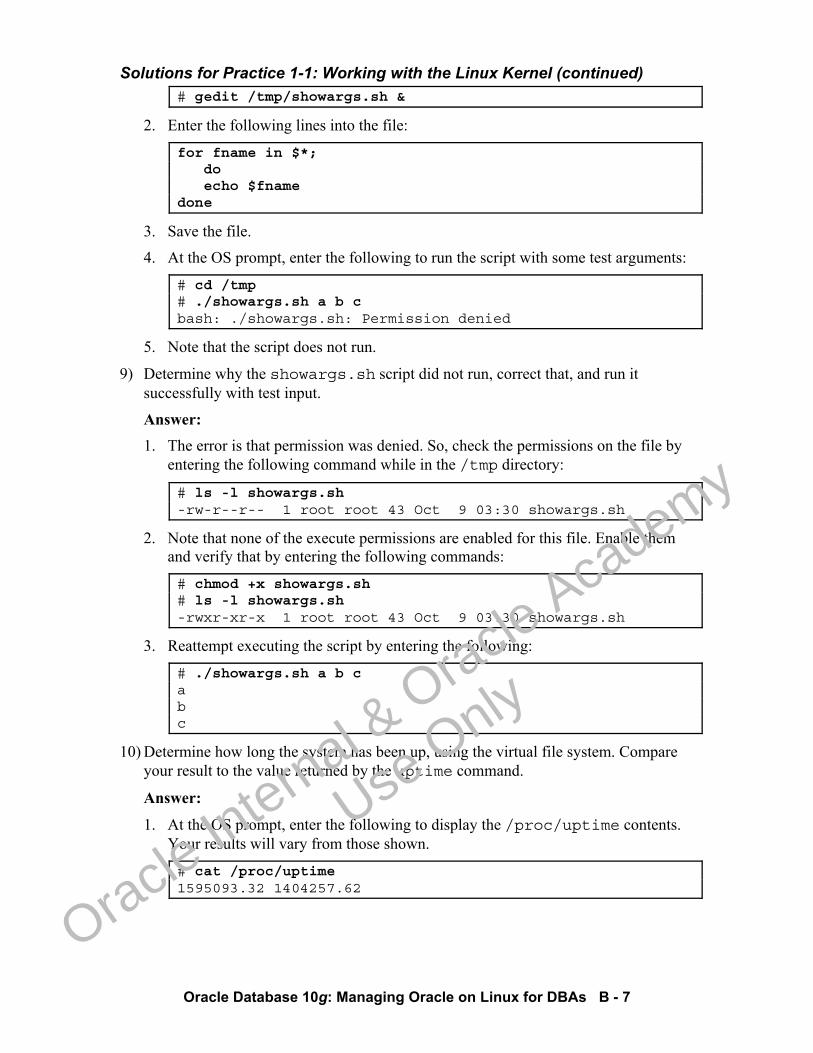
Solutions for Practice 1-1: Working with the Linux Kernel (continued)
Oracle Database 10g: Managing Oracle on Linux for DBAs B - 7
# gedit /tmp/showargs.sh &
2. Enter the following lines into the file:
for fname in $*; do echo $fname done
3. Save the file.
4. At the OS prompt, enter the following to run the script with some test arguments:
# cd /tmp # ./showargs.sh a b c bash: ./showargs.sh: Permission denied
5. Note that the script does not run.
9) Determine why the showargs.sh script did not run, correct that, and run it successfully with test input.
Answer: 1. The error is that permission was denied. So, check the permissions on the file by
entering the following command while in the /tmp directory:
# ls -l showargs.sh -rw-r--r-- 1 root root 43 Oct 9 03:30 showargs.sh
2. Note that none of the execute permissions are enabled for this file. Enable them and verify that by entering the following commands:
# chmod +x showargs.sh # ls -l showargs.sh -rwxr-xr-x 1 root root 43 Oct 9 03:30 showargs.sh
3. Reattempt executing the script by entering the following:
# ./showargs.sh a b c a b c
10) Determine how long the system has been up, using the virtual file system. Compare your result to the value returned by the uptime command.
Answer:
1. At the OS prompt, enter the following to display the /proc/uptime contents. Your results will vary from those shown.
# cat /proc/uptime 1595093.32 1404257.62
Oracle In
ternal & O
racle Aca
demy
Use O
nly
Solutions for Practice 1-1: Working with the Linux Kernel (continued)
Oracle Database 10g: Managing Oracle on Linux for DBAs B - 8
2. At the OS prompt, enter the following to run the uptime command:
$ uptime 18:33:36 up 18 days, 11:04, 5 users, load average: 0.20, 0.75, 1.09
3. The returned number of seconds of uptime is 1595093.32. Dividing that by (60*60*24), which is the number of seconds in a day, results in approximately 18.46 days, which comes to about 18 days and 11 hours. Note: Your numbers will most certainly vary from those given here.
Oracle In
ternal & O
racle Aca
demy
Use O
nly
Oracle Database 10g: Managing Oracle on Linux for DBAs B - 9
Solutions for Practice 1-2: Setting Up locatedb There are times during these practices when you may need to locate a file. In this practice, you will set up the data structure that supports that search.
1) Run the locate command to find all rpm files.
Answer: 1. Enter the following at the OS prompt:
# locate rpm warning: locate: could not open database: /var/lib/slocate/slocate.db: No such file or directory warning: You need to run the 'updatedb' command (as root) to create the database . Please have a look at /etc/updatedb.conf to enable the daily cron job. #
2. Note that the locate command is not able to perform the search because the locate DB cannot be initialized. Initialize it by entering the following command. This will take about two minutes to run.
# updatedb
Oracle In
ternal & O
racle Aca
demy
Use O
nly

Oracle Database 10g: Managing Oracle on Linux for DBAs B - 10
Practice Solutions for Lesson 2: Preparing Linux for Oracle
Oracle In
ternal & O
racle Aca
demy
Use O
nly
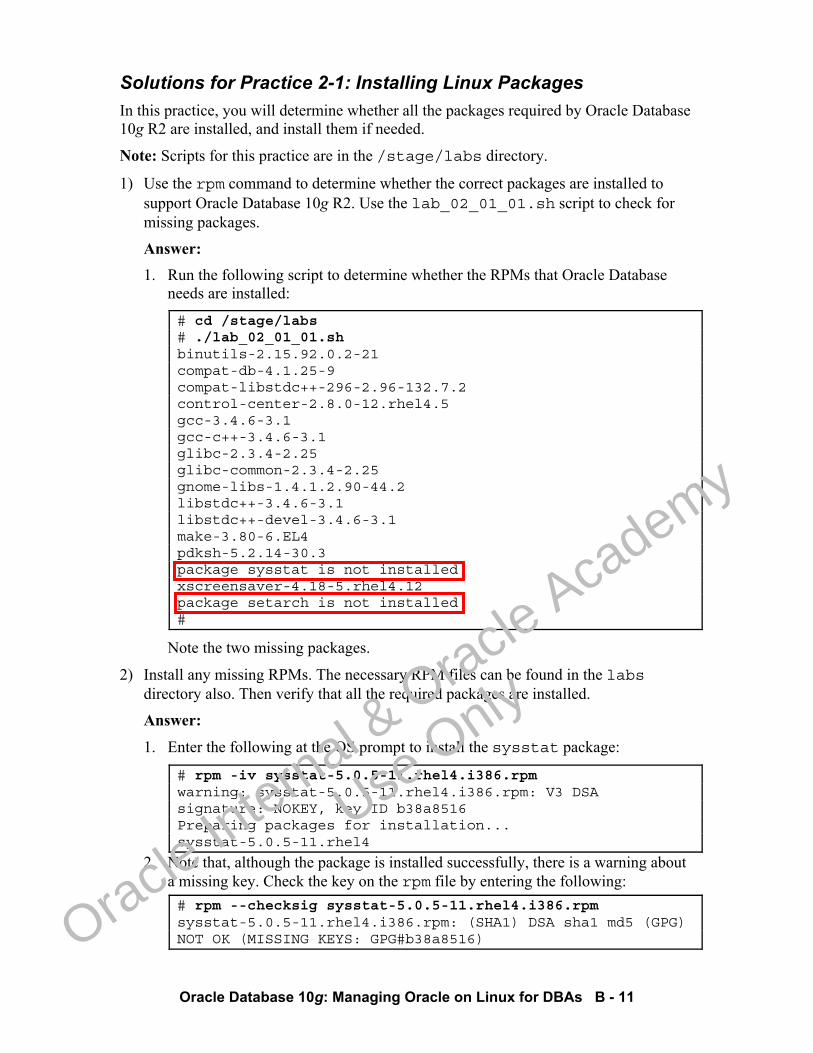
Oracle Database 10g: Managing Oracle on Linux for DBAs B - 11
Solutions for Practice 2-1: Installing Linux Packages In this practice, you will determine whether all the packages required by Oracle Database 10g R2 are installed, and install them if needed.
Note: Scripts for this practice are in the /stage/labs directory.
1) Use the rpm command to determine whether the correct packages are installed to support Oracle Database 10g R2. Use the lab_02_01_01.sh script to check for missing packages.
Answer: 1. Run the following script to determine whether the RPMs that Oracle Database
needs are installed:
# cd /stage/labs # ./lab_02_01_01.sh binutils-2.15.92.0.2-21 compat-db-4.1.25-9 compat-libstdc++-296-2.96-132.7.2 control-center-2.8.0-12.rhel4.5 gcc-3.4.6-3.1 gcc-c++-3.4.6-3.1 glibc-2.3.4-2.25 glibc-common-2.3.4-2.25 gnome-libs-1.4.1.2.90-44.2 libstdc++-3.4.6-3.1 libstdc++-devel-3.4.6-3.1 make-3.80-6.EL4 pdksh-5.2.14-30.3 package sysstat is not installed xscreensaver-4.18-5.rhel4.12 package setarch is not installed #
Note the two missing packages.
2) Install any missing RPMs. The necessary RPM files can be found in the labs directory also. Then verify that all the required packages are installed.
Answer:
1. Enter the following at the OS prompt to install the sysstat package:
# rpm -iv sysstat-5.0.5-11.rhel4.i386.rpm warning: sysstat-5.0.5-11.rhel4.i386.rpm: V3 DSA signature: NOKEY, key ID b38a8516 Preparing packages for installation... sysstat-5.0.5-11.rhel4
2. Note that, although the package is installed successfully, there is a warning about a missing key. Check the key on the rpm file by entering the following: # rpm --checksig sysstat-5.0.5-11.rhel4.i386.rpm sysstat-5.0.5-11.rhel4.i386.rpm: (SHA1) DSA sha1 md5 (GPG) NOT OK (MISSING KEYS: GPG#b38a8516)
Oracle In
ternal & O
racle Aca
demy
Use O
nly
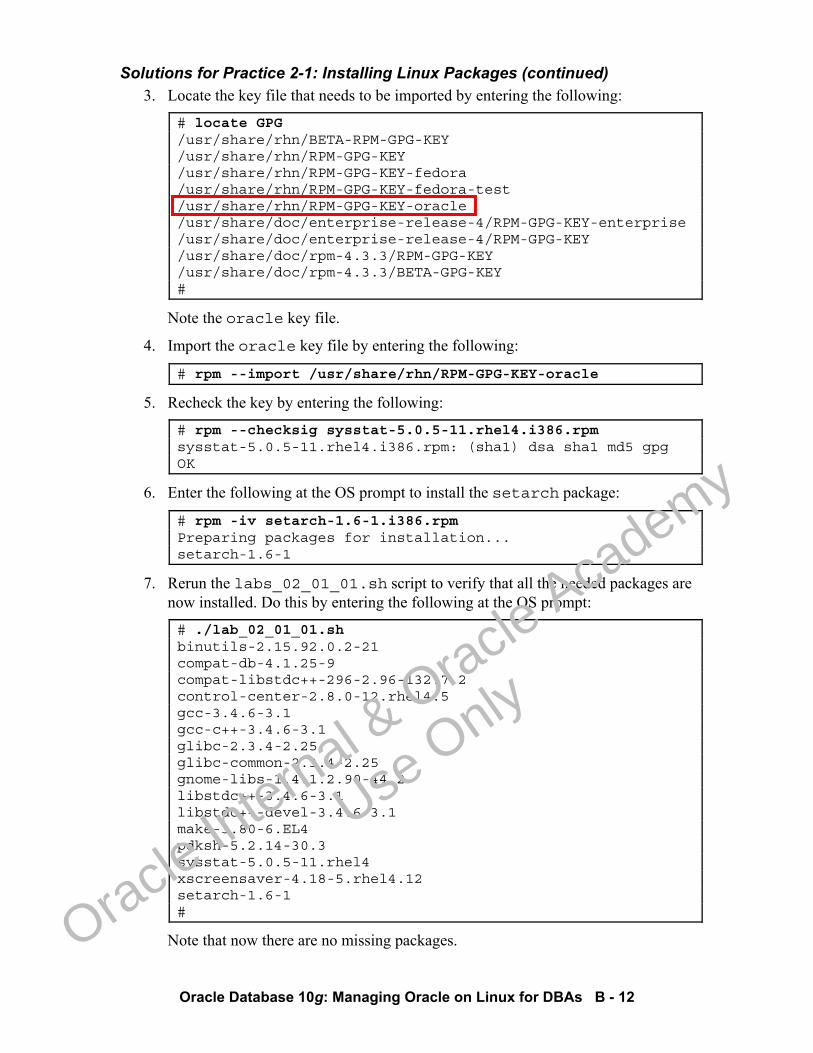
Solutions for Practice 2-1: Installing Linux Packages (continued)
Oracle Database 10g: Managing Oracle on Linux for DBAs B - 12
3. Locate the key file that needs to be imported by entering the following:
# locate GPG /usr/share/rhn/BETA-RPM-GPG-KEY /usr/share/rhn/RPM-GPG-KEY /usr/share/rhn/RPM-GPG-KEY-fedora /usr/share/rhn/RPM-GPG-KEY-fedora-test /usr/share/rhn/RPM-GPG-KEY-oracle /usr/share/doc/enterprise-release-4/RPM-GPG-KEY-enterprise /usr/share/doc/enterprise-release-4/RPM-GPG-KEY /usr/share/doc/rpm-4.3.3/RPM-GPG-KEY /usr/share/doc/rpm-4.3.3/BETA-GPG-KEY #
Note the oracle key file.
4. Import the oracle key file by entering the following:
# rpm --import /usr/share/rhn/RPM-GPG-KEY-oracle
5. Recheck the key by entering the following:
# rpm --checksig sysstat-5.0.5-11.rhel4.i386.rpm sysstat-5.0.5-11.rhel4.i386.rpm: (sha1) dsa sha1 md5 gpg OK
6. Enter the following at the OS prompt to install the setarch package:
# rpm -iv setarch-1.6-1.i386.rpm Preparing packages for installation... setarch-1.6-1
7. Rerun the labs_02_01_01.sh script to verify that all the needed packages are now installed. Do this by entering the following at the OS prompt:
# ./lab_02_01_01.sh binutils-2.15.92.0.2-21 compat-db-4.1.25-9 compat-libstdc++-296-2.96-132.7.2 control-center-2.8.0-12.rhel4.5 gcc-3.4.6-3.1 gcc-c++-3.4.6-3.1 glibc-2.3.4-2.25 glibc-common-2.3.4-2.25 gnome-libs-1.4.1.2.90-44.2 libstdc++-3.4.6-3.1 libstdc++-devel-3.4.6-3.1 make-3.80-6.EL4 pdksh-5.2.14-30.3 sysstat-5.0.5-11.rhel4 xscreensaver-4.18-5.rhel4.12 setarch-1.6-1 #
Note that now there are no missing packages.
Oracle In
ternal & O
racle Aca
demy
Use O
nly
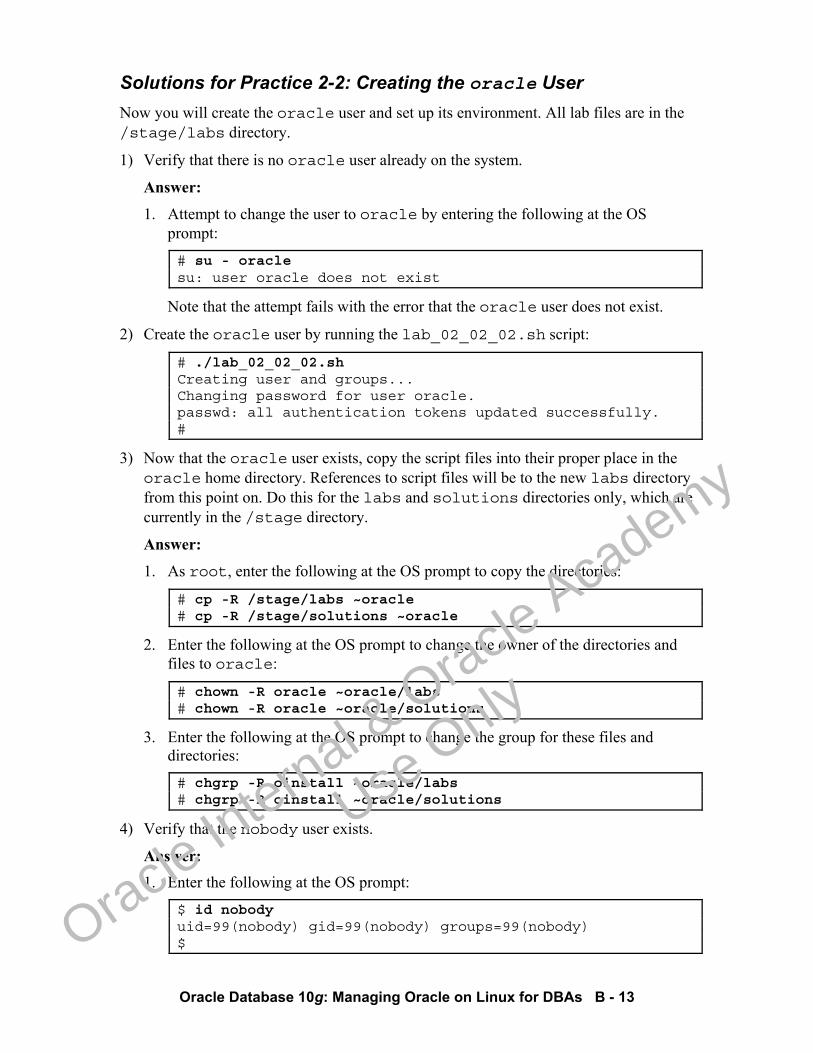
Oracle Database 10g: Managing Oracle on Linux for DBAs B - 13
Solutions for Practice 2-2: Creating the oracle User Now you will create the oracle user and set up its environment. All lab files are in the /stage/labs directory.
1) Verify that there is no oracle user already on the system.
Answer:
1. Attempt to change the user to oracle by entering the following at the OS prompt:
# su - oracle su: user oracle does not exist
Note that the attempt fails with the error that the oracle user does not exist.
2) Create the oracle user by running the lab_02_02_02.sh script:
# ./lab_02_02_02.sh Creating user and groups... Changing password for user oracle. passwd: all authentication tokens updated successfully. #
3) Now that the oracle user exists, copy the script files into their proper place in the oracle home directory. References to script files will be to the new labs directory from this point on. Do this for the labs and solutions directories only, which are currently in the /stage directory.
Answer:
1. As root, enter the following at the OS prompt to copy the directories:
# cp -R /stage/labs ~oracle # cp -R /stage/solutions ~oracle
2. Enter the following at the OS prompt to change the owner of the directories and files to oracle:
# chown -R oracle ~oracle/labs # chown -R oracle ~oracle/solutions
3. Enter the following at the OS prompt to change the group for these files and directories:
# chgrp -R oinstall ~oracle/labs # chgrp -R oinstall ~oracle/solutions
4) Verify that the nobody user exists.
Answer: 1. Enter the following at the OS prompt:
$ id nobody uid=99(nobody) gid=99(nobody) groups=99(nobody) $
Oracle In
ternal & O
racle Aca
demy
Use O
nly
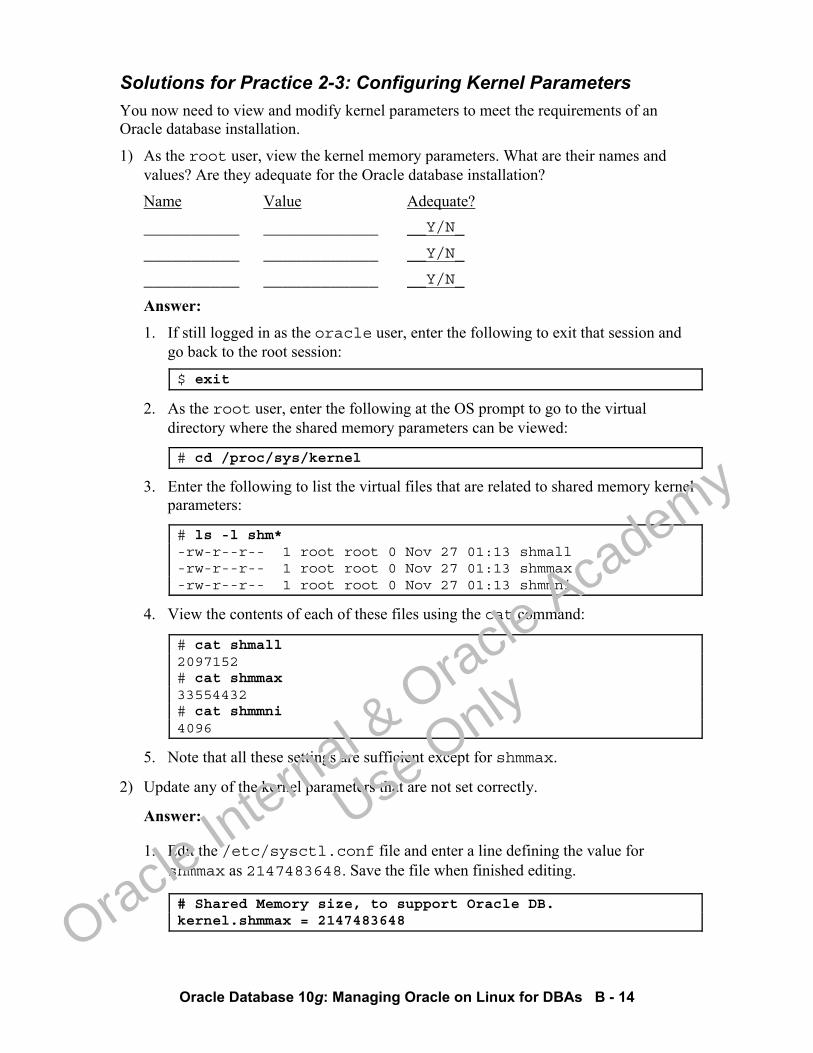
Oracle Database 10g: Managing Oracle on Linux for DBAs B - 14
Solutions for Practice 2-3: Configuring Kernel Parameters You now need to view and modify kernel parameters to meet the requirements of an Oracle database installation.
1) As the root user, view the kernel memory parameters. What are their names and values? Are they adequate for the Oracle database installation?
Name Value Adequate? __________ ____________ __Y/N_ __________ ____________ __Y/N_ __________ ____________ __Y/N_
Answer:
1. If still logged in as the oracle user, enter the following to exit that session and go back to the root session:
$ exit
2. As the root user, enter the following at the OS prompt to go to the virtual directory where the shared memory parameters can be viewed:
# cd /proc/sys/kernel
3. Enter the following to list the virtual files that are related to shared memory kernel parameters:
# ls -l shm* -rw-r--r-- 1 root root 0 Nov 27 01:13 shmall -rw-r--r-- 1 root root 0 Nov 27 01:13 shmmax -rw-r--r-- 1 root root 0 Nov 27 01:13 shmmni
4. View the contents of each of these files using the cat command:
# cat shmall 2097152 # cat shmmax 33554432 # cat shmmni 4096
5. Note that all these settings are sufficient except for shmmax.
2) Update any of the kernel parameters that are not set correctly.
Answer:
1. Edit the /etc/sysctl.conf file and enter a line defining the value for shmmax as 2147483648. Save the file when finished editing.
# Shared Memory size, to support Oracle DB. kernel.shmmax = 2147483648
Oracle In
ternal & O
racle Aca
demy
Use O
nly
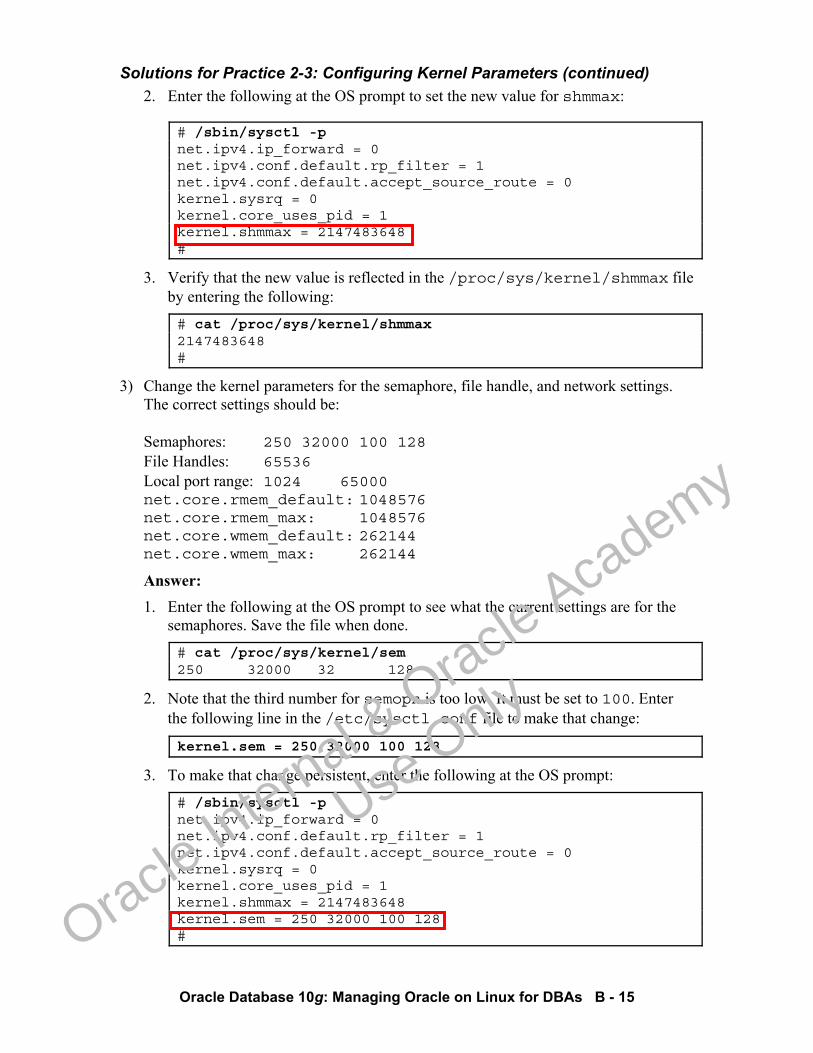
Solutions for Practice 2-3: Configuring Kernel Parameters (continued)
Oracle Database 10g: Managing Oracle on Linux for DBAs B - 15
2. Enter the following at the OS prompt to set the new value for shmmax:
# /sbin/sysctl -p net.ipv4.ip_forward = 0 net.ipv4.conf.default.rp_filter = 1 net.ipv4.conf.default.accept_source_route = 0 kernel.sysrq = 0 kernel.core_uses_pid = 1 kernel.shmmax = 2147483648 #
3. Verify that the new value is reflected in the /proc/sys/kernel/shmmax file by entering the following:
# cat /proc/sys/kernel/shmmax 2147483648 #
3) Change the kernel parameters for the semaphore, file handle, and network settings. The correct settings should be: Semaphores: 250 32000 100 128 File Handles: 65536 Local port range: 1024 65000 net.core.rmem_default: 1048576 net.core.rmem_max: 1048576 net.core.wmem_default: 262144 net.core.wmem_max: 262144
Answer: 1. Enter the following at the OS prompt to see what the current settings are for the
semaphores. Save the file when done.
# cat /proc/sys/kernel/sem 250 32000 32 128
2. Note that the third number for semopn is too low. It must be set to 100. Enter the following line in the /etc/sysctl.conf file to make that change:
kernel.sem = 250 32000 100 128
3. To make that change persistent, enter the following at the OS prompt:
# /sbin/sysctl -p net.ipv4.ip_forward = 0 net.ipv4.conf.default.rp_filter = 1 net.ipv4.conf.default.accept_source_route = 0 kernel.sysrq = 0 kernel.core_uses_pid = 1 kernel.shmmax = 2147483648 kernel.sem = 250 32000 100 128 #
Oracle In
ternal & O
racle Aca
demy
Use O
nly

Solutions for Practice 2-3: Configuring Kernel Parameters (continued)
Oracle Database 10g: Managing Oracle on Linux for DBAs B - 16
4. Enter the following at the OS prompt to see what the values for the file handle limit are:
# cat /proc/sys/fs/file-max 102714
5. Edit the /etc/sysctl.conf file, and then enter the following line:
fs.file-max = 65536
6. Enter the following at the OS prompt to see the current settings for the local port range:
# cat /proc/sys/net/ipv4/ip_local_port_range 32768 61000
Note that it is not correct.
7. Edit the /etc/sysctl.conf file and enter the following line:
net.ipv4.ip_local_port_range = 1024 65000
8. Enter the following to check the current values for the TCP/IP window size parameters:
# cat /proc/sys/net/core/rmem_default 110592 # cat /proc/sys/net/core/rmem_max 131071 # cat /proc/sys/net/core/wmem_default 110592 # cat /proc/sys/net/core/wmem_max 131071 #
Note that all these are too small.
9. Edit the /etc/sysctl.conf file and enter the following lines:
net.core.rmem_default = 1048576 net.core.rmem_max = 1048576 net.core.wmem_default = 262144 net.core.wmem_max = 262144
10. Now that all the correct entries have been made in the /etc/sysctl.conf file, make sure that the file has been saved, and then issue the following OS command to make them effectively permanent:
# sysctl -p net.ipv4.ip_forward = 0 net.ipv4.conf.default.rp_filter = 1 net.ipv4.conf.default.accept_source_route = 0 kernel.sysrq = 0 kernel.core_uses_pid = 1 kernel.shmmax = 2147483648 kernel.sem = 250 32000 100 128
Oracle In
ternal & O
racle Aca
demy
Use O
nly

Solutions for Practice 2-3: Configuring Kernel Parameters (continued)
Oracle Database 10g: Managing Oracle on Linux for DBAs B - 17
fs.file-max = 65536 net.ipv4.ip_local_port_range = 1024 65000 net.core.rmem_default = 1048576 net.core.rmem_max = 1048576 net.core.wmem_default = 262144 net.core.wmem_max = 262144 #
4) Set the shell limits according to the following:
Number of processes: soft = 2047, hard = 16384
Number of open file handles: soft = 1024, hard = 65536
Answer:
1. Edit the /etc/security/limits.conf file, and make the following entries, and then save the file:
oracle soft nproc 2047 oracle hard nproc 16384 oracle soft nofile 1024 oracle hard nofile 65536
2. Add the following lines to the /etc/pam.d/login file, and then save it:
session required /lib/security/pam_limits.so session required pam_limits.so
3. Add the following lines to the /etc/profile file, and then save it: ulimit -u 16384 -n 65536
Oracle In
ternal & O
racle Aca
demy
Use O
nly
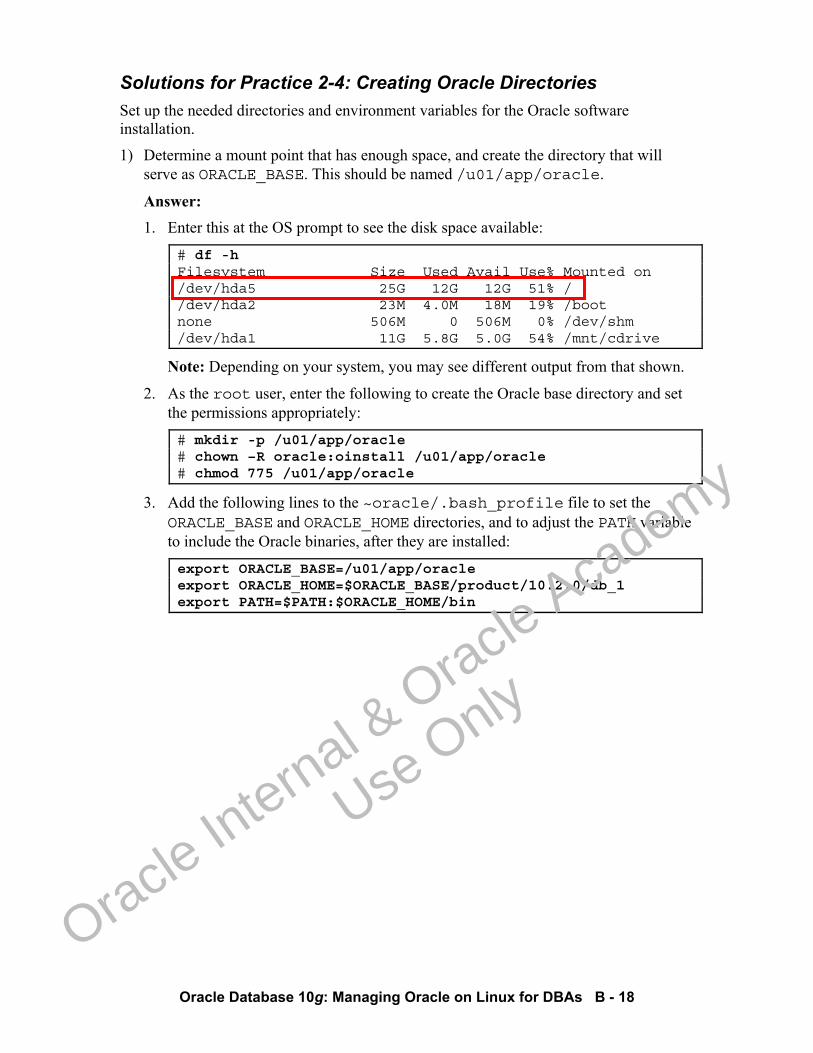
Oracle Database 10g: Managing Oracle on Linux for DBAs B - 18
Solutions for Practice 2-4: Creating Oracle Directories Set up the needed directories and environment variables for the Oracle software installation.
1) Determine a mount point that has enough space, and create the directory that will serve as ORACLE_BASE. This should be named /u01/app/oracle.
Answer: 1. Enter this at the OS prompt to see the disk space available:
# df -h Filesystem Size Used Avail Use% Mounted on /dev/hda5 25G 12G 12G 51% / /dev/hda2 23M 4.0M 18M 19% /boot none 506M 0 506M 0% /dev/shm /dev/hda1 11G 5.8G 5.0G 54% /mnt/cdrive
Note: Depending on your system, you may see different output from that shown.
2. As the root user, enter the following to create the Oracle base directory and set the permissions appropriately:
# mkdir -p /u01/app/oracle # chown –R oracle:oinstall /u01/app/oracle # chmod 775 /u01/app/oracle
3. Add the following lines to the ~oracle/.bash_profile file to set the ORACLE_BASE and ORACLE_HOME directories, and to adjust the PATH variable to include the Oracle binaries, after they are installed:
export ORACLE_BASE=/u01/app/oracle export ORACLE_HOME=$ORACLE_BASE/product/10.2.0/db_1 export PATH=$PATH:$ORACLE_HOME/bin
Oracle In
ternal & O
racle Aca
demy
Use O
nly
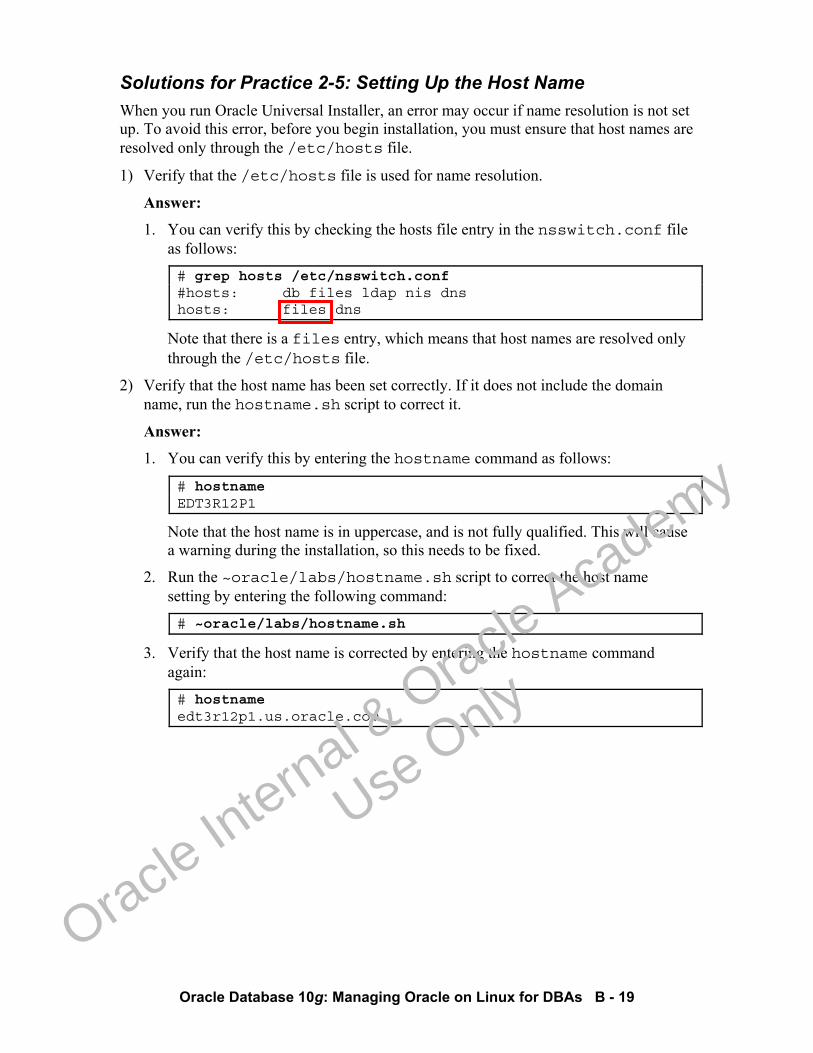
Oracle Database 10g: Managing Oracle on Linux for DBAs B - 19
Solutions for Practice 2-5: Setting Up the Host Name When you run Oracle Universal Installer, an error may occur if name resolution is not set up. To avoid this error, before you begin installation, you must ensure that host names are resolved only through the /etc/hosts file.
1) Verify that the /etc/hosts file is used for name resolution.
Answer:
1. You can verify this by checking the hosts file entry in the nsswitch.conf file as follows:
# grep hosts /etc/nsswitch.conf #hosts: db files ldap nis dns hosts: files dns
Note that there is a files entry, which means that host names are resolved only through the /etc/hosts file.
2) Verify that the host name has been set correctly. If it does not include the domain name, run the hostname.sh script to correct it.
Answer:
1. You can verify this by entering the hostname command as follows:
# hostname EDT3R12P1
Note that the host name is in uppercase, and is not fully qualified. This will cause a warning during the installation, so this needs to be fixed.
2. Run the ~oracle/labs/hostname.sh script to correct the host name setting by entering the following command:
# ~oracle/labs/hostname.sh
3. Verify that the host name is corrected by entering the hostname command again:
# hostname edt3r12p1.us.oracle.com
Oracle In
ternal & O
racle Aca
demy
Use O
nly
Oracle Database 10g: Managing Oracle on Linux for DBAs B - 20
Practice Solutions for Lesson 3: Installing Oracle on Linux
Oracle In
ternal & O
racle Aca
demy
Use O
nly
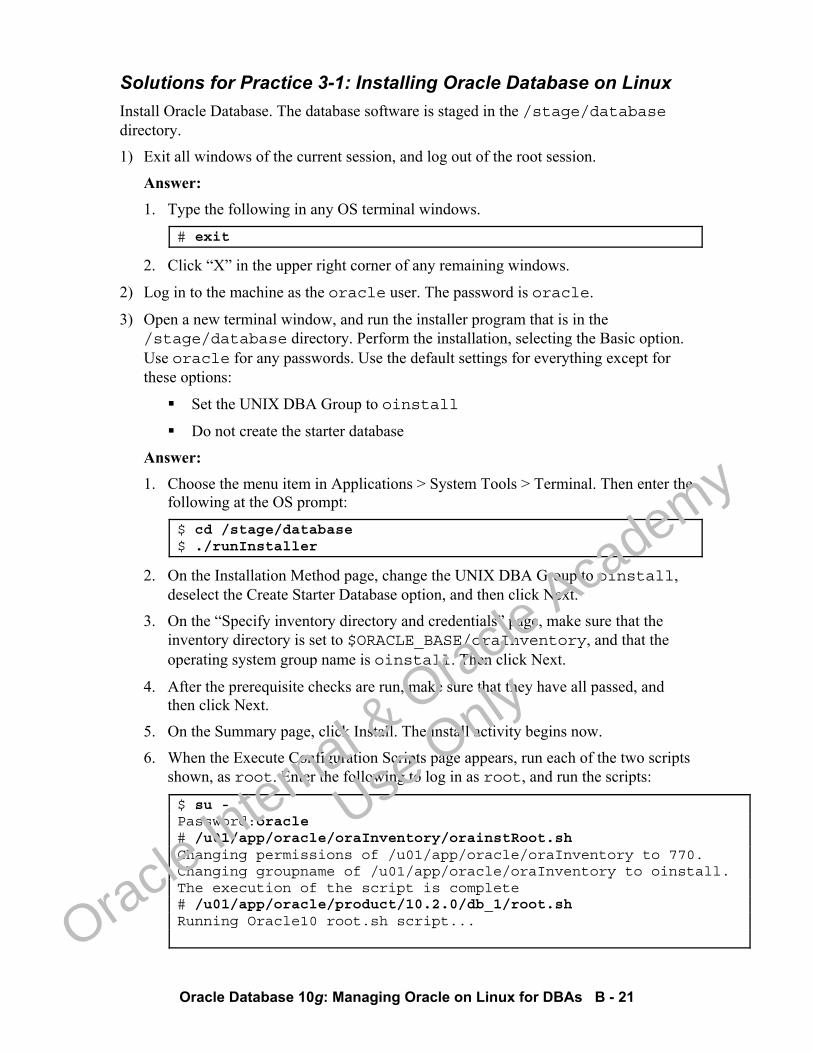
Oracle Database 10g: Managing Oracle on Linux for DBAs B - 21
Solutions for Practice 3-1: Installing Oracle Database on Linux Install Oracle Database. The database software is staged in the /stage/database directory.
1) Exit all windows of the current session, and log out of the root session.
Answer: 1. Type the following in any OS terminal windows.
# exit
2. Click “X” in the upper right corner of any remaining windows.
2) Log in to the machine as the oracle user. The password is oracle.
3) Open a new terminal window, and run the installer program that is in the /stage/database directory. Perform the installation, selecting the Basic option. Use oracle for any passwords. Use the default settings for everything except for these options:
Set the UNIX DBA Group to oinstall
Do not create the starter database
Answer: 1. Choose the menu item in Applications > System Tools > Terminal. Then enter the
following at the OS prompt:
$ cd /stage/database $ ./runInstaller
2. On the Installation Method page, change the UNIX DBA Group to oinstall, deselect the Create Starter Database option, and then click Next.
3. On the “Specify inventory directory and credentials” page, make sure that the inventory directory is set to $ORACLE_BASE/oraInventory, and that the operating system group name is oinstall. Then click Next.
4. After the prerequisite checks are run, make sure that they have all passed, and then click Next.
5. On the Summary page, click Install. The install activity begins now.
6. When the Execute Configuration Scripts page appears, run each of the two scripts shown, as root. Enter the following to log in as root, and run the scripts:
$ su - Password:oracle # /u01/app/oracle/oraInventory/orainstRoot.sh Changing permissions of /u01/app/oracle/oraInventory to 770. Changing groupname of /u01/app/oracle/oraInventory to oinstall. The execution of the script is complete # /u01/app/oracle/product/10.2.0/db_1/root.sh Running Oracle10 root.sh script...
Oracle In
ternal & O
racle Aca
demy
Use O
nly
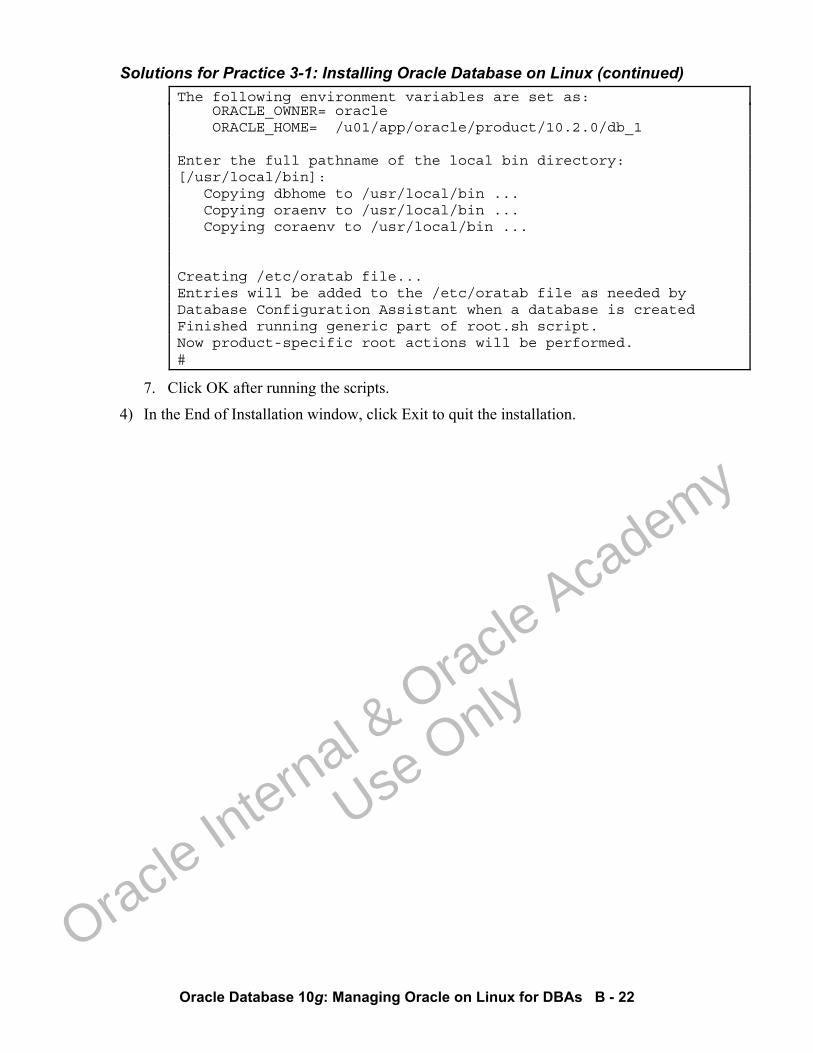
Solutions for Practice 3-1: Installing Oracle Database on Linux (continued)
Oracle Database 10g: Managing Oracle on Linux for DBAs B - 22
The following environment variables are set as: ORACLE_OWNER= oracle ORACLE_HOME= /u01/app/oracle/product/10.2.0/db_1 Enter the full pathname of the local bin directory: [/usr/local/bin]: Copying dbhome to /usr/local/bin ... Copying oraenv to /usr/local/bin ... Copying coraenv to /usr/local/bin ... Creating /etc/oratab file... Entries will be added to the /etc/oratab file as needed by Database Configuration Assistant when a database is created Finished running generic part of root.sh script. Now product-specific root actions will be performed. #
7. Click OK after running the scripts.
4) In the End of Installation window, click Exit to quit the installation.
Oracle In
ternal & O
racle Aca
demy
Use O
nly
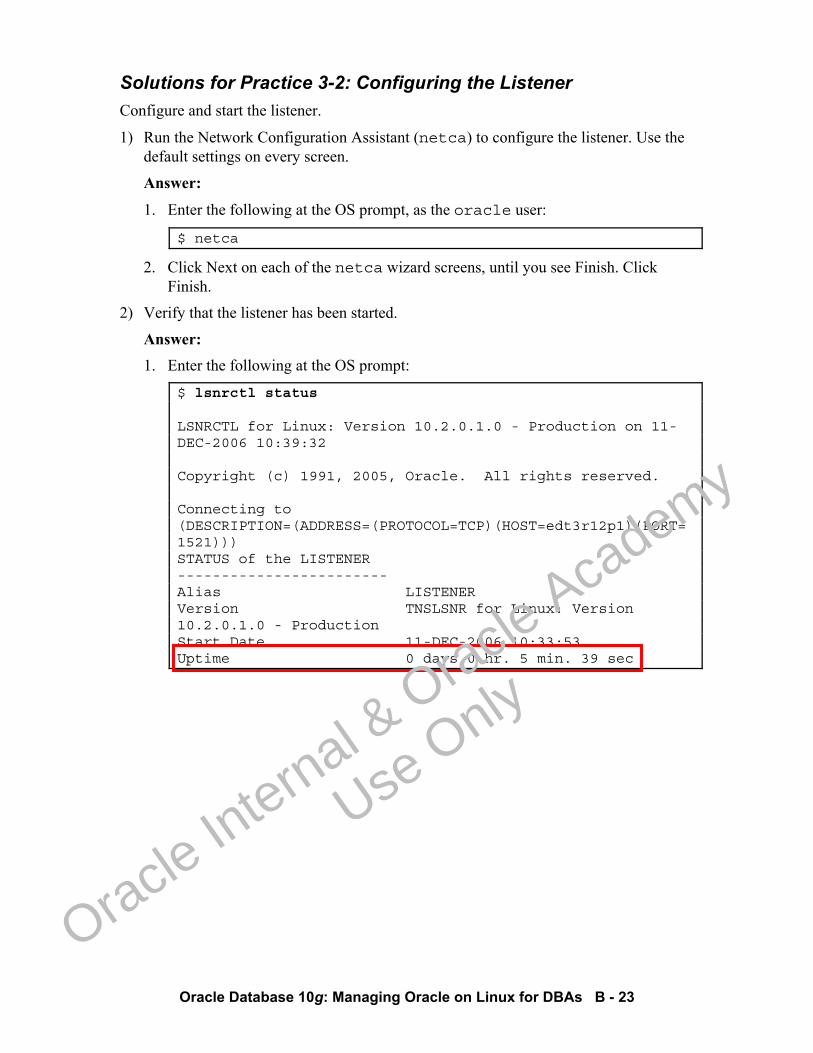
Oracle Database 10g: Managing Oracle on Linux for DBAs B - 23
Solutions for Practice 3-2: Configuring the Listener Configure and start the listener.
1) Run the Network Configuration Assistant (netca) to configure the listener. Use the default settings on every screen.
Answer:
1. Enter the following at the OS prompt, as the oracle user:
$ netca
2. Click Next on each of the netca wizard screens, until you see Finish. Click Finish.
2) Verify that the listener has been started.
Answer: 1. Enter the following at the OS prompt:
$ lsnrctl status LSNRCTL for Linux: Version 10.2.0.1.0 - Production on 11-DEC-2006 10:39:32 Copyright (c) 1991, 2005, Oracle. All rights reserved. Connecting to (DESCRIPTION=(ADDRESS=(PROTOCOL=TCP)(HOST=edt3r12p1)(PORT=1521))) STATUS of the LISTENER ------------------------ Alias LISTENER Version TNSLSNR for Linux: Version 10.2.0.1.0 - Production Start Date 11-DEC-2006 10:33:53 Uptime 0 days 0 hr. 5 min. 39 sec
Oracle In
ternal & O
racle Aca
demy
Use O
nly
Oracle Database 10g: Managing Oracle on Linux for DBAs B - 24
Practice Solutions for Lesson 4
There is no practice for lesson 4.
Oracle In
ternal & O
racle Aca
demy
Use O
nly

Oracle Database 10g: Managing Oracle on Linux for DBAs B - 25
Practice Solutions for Lesson 5: Automatic Storage Management
Oracle In
ternal & O
racle Aca
demy
Use O
nly
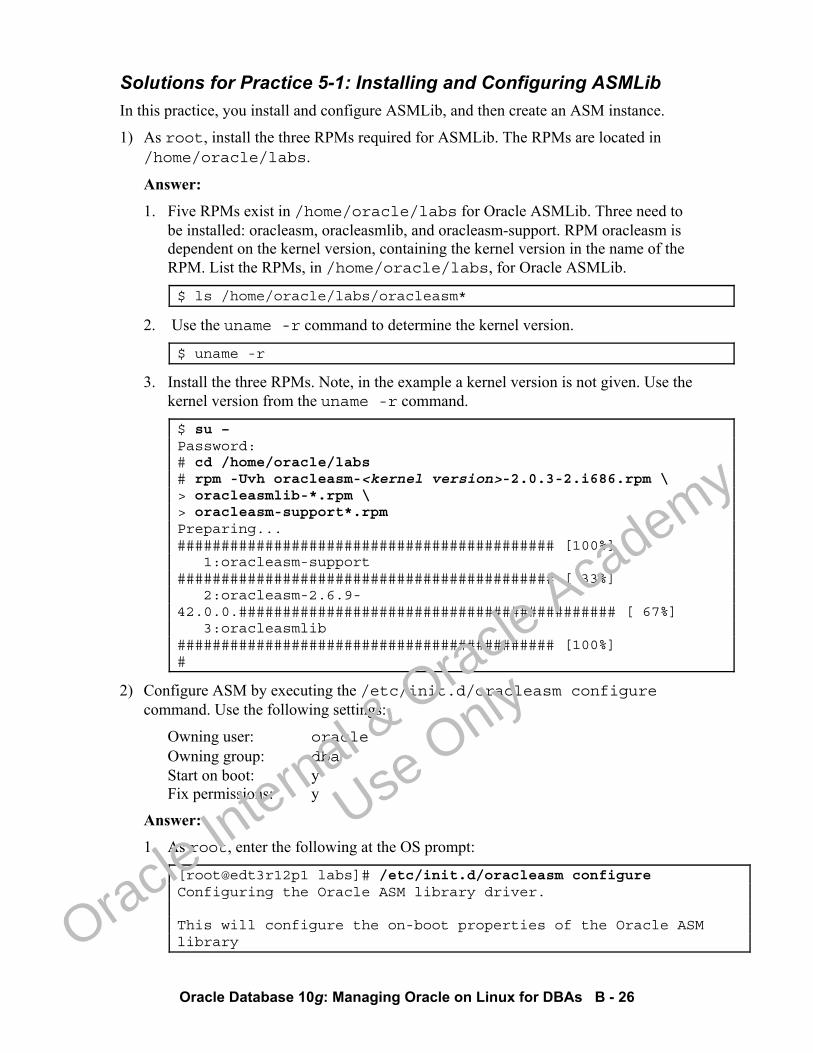
Oracle Database 10g: Managing Oracle on Linux for DBAs B - 26
Solutions for Practice 5-1: Installing and Configuring ASMLib In this practice, you install and configure ASMLib, and then create an ASM instance.
1) As root, install the three RPMs required for ASMLib. The RPMs are located in /home/oracle/labs.
Answer:
1. Five RPMs exist in /home/oracle/labs for Oracle ASMLib. Three need to be installed: oracleasm, oracleasmlib, and oracleasm-support. RPM oracleasm is dependent on the kernel version, containing the kernel version in the name of the RPM. List the RPMs, in /home/oracle/labs, for Oracle ASMLib.
$ ls /home/oracle/labs/oracleasm*
2. Use the uname -r command to determine the kernel version.
$ uname -r
3. Install the three RPMs. Note, in the example a kernel version is not given. Use the kernel version from the uname -r command.
$ su – Password: # cd /home/oracle/labs # rpm -Uvh oracleasm-<kernel version>-2.0.3-2.i686.rpm \ > oracleasmlib-*.rpm \ > oracleasm-support*.rpm Preparing... ########################################### [100%] 1:oracleasm-support ########################################### [ 33%] 2:oracleasm-2.6.9-42.0.0.########################################### [ 67%] 3:oracleasmlib ########################################### [100%] #
2) Configure ASM by executing the /etc/init.d/oracleasm configure command. Use the following settings:
Owning user: oracle Owning group: dba Start on boot: y Fix permissions: y
Answer:
1. As root, enter the following at the OS prompt:
[root@edt3r12p1 labs]# /etc/init.d/oracleasm configure Configuring the Oracle ASM library driver. This will configure the on-boot properties of the Oracle ASM library
Oracle In
ternal & O
racle Aca
demy
Use O
nly
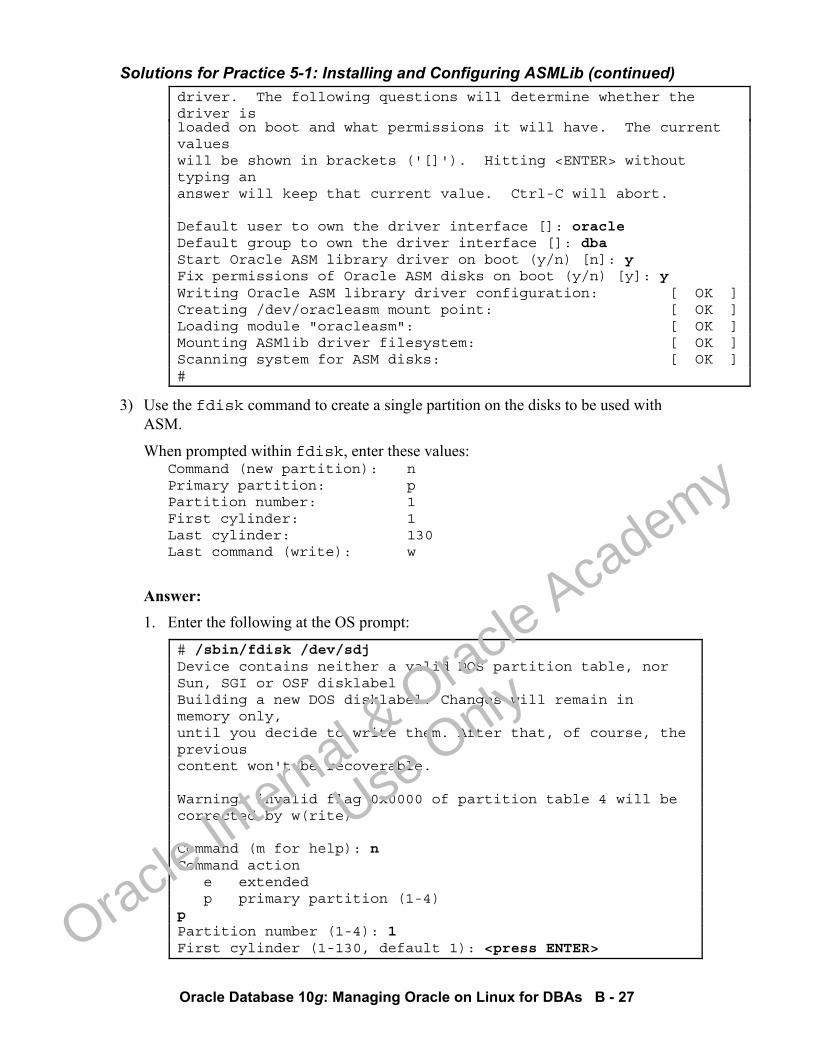
Solutions for Practice 5-1: Installing and Configuring ASMLib (continued)
Oracle Database 10g: Managing Oracle on Linux for DBAs B - 27
driver. The following questions will determine whether the driver is loaded on boot and what permissions it will have. The current values will be shown in brackets ('[]'). Hitting <ENTER> without typing an answer will keep that current value. Ctrl-C will abort. Default user to own the driver interface []: oracle Default group to own the driver interface []: dba Start Oracle ASM library driver on boot (y/n) [n]: y Fix permissions of Oracle ASM disks on boot (y/n) [y]: y Writing Oracle ASM library driver configuration: [ OK ] Creating /dev/oracleasm mount point: [ OK ] Loading module "oracleasm": [ OK ] Mounting ASMlib driver filesystem: [ OK ] Scanning system for ASM disks: [ OK ] #
3) Use the fdisk command to create a single partition on the disks to be used with ASM.
When prompted within fdisk, enter these values: Command (new partition): n Primary partition: p Partition number: 1 First cylinder: 1 Last cylinder: 130 Last command (write): w
Answer: 1. Enter the following at the OS prompt:
# /sbin/fdisk /dev/sdj Device contains neither a valid DOS partition table, nor Sun, SGI or OSF disklabel Building a new DOS disklabel. Changes will remain in memory only, until you decide to write them. After that, of course, the previous content won't be recoverable. Warning: invalid flag 0x0000 of partition table 4 will be corrected by w(rite) Command (m for help): n Command action e extended p primary partition (1-4) p Partition number (1-4): 1 First cylinder (1-130, default 1): <press ENTER>
Oracle In
ternal & O
racle Aca
demy
Use O
nly
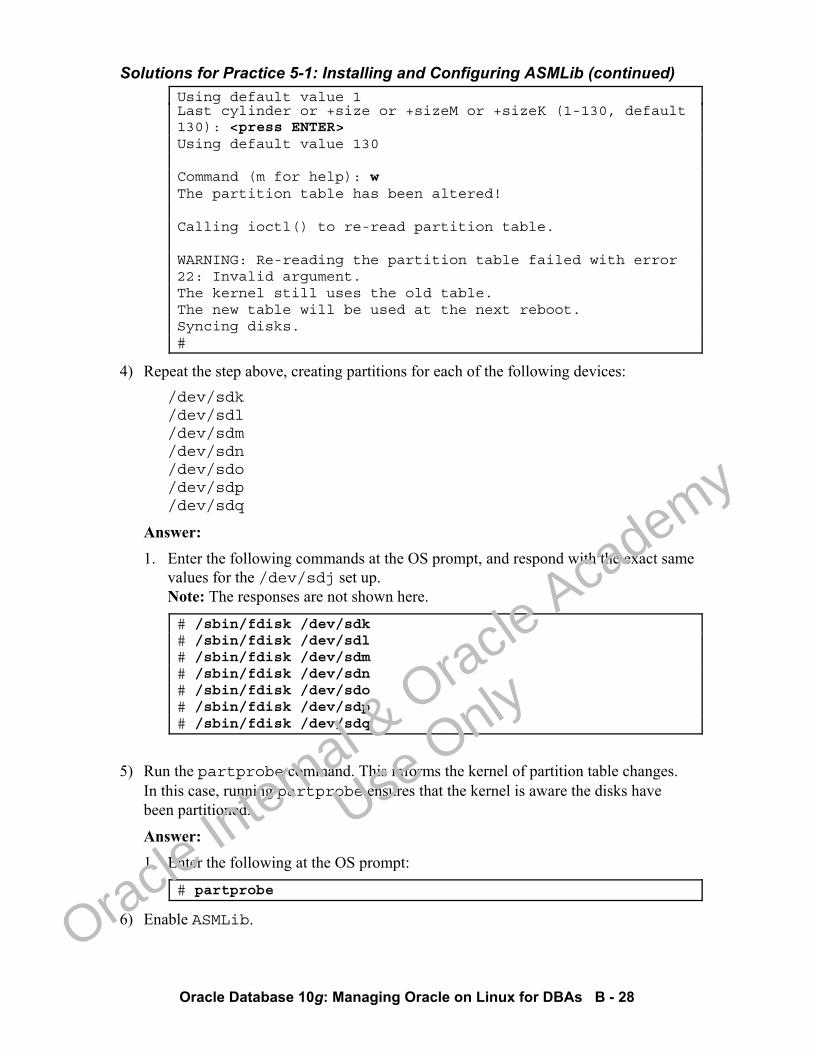
Solutions for Practice 5-1: Installing and Configuring ASMLib (continued)
Oracle Database 10g: Managing Oracle on Linux for DBAs B - 28
Using default value 1 Last cylinder or +size or +sizeM or +sizeK (1-130, default 130): <press ENTER> Using default value 130 Command (m for help): w The partition table has been altered! Calling ioctl() to re-read partition table. WARNING: Re-reading the partition table failed with error 22: Invalid argument. The kernel still uses the old table. The new table will be used at the next reboot. Syncing disks. #
4) Repeat the step above, creating partitions for each of the following devices: /dev/sdk /dev/sdl /dev/sdm /dev/sdn /dev/sdo /dev/sdp /dev/sdq
Answer: 1. Enter the following commands at the OS prompt, and respond with the exact same
values for the /dev/sdj set up. Note: The responses are not shown here.
# /sbin/fdisk /dev/sdk # /sbin/fdisk /dev/sdl # /sbin/fdisk /dev/sdm # /sbin/fdisk /dev/sdn # /sbin/fdisk /dev/sdo # /sbin/fdisk /dev/sdp # /sbin/fdisk /dev/sdq
5) Run the partprobe command. This informs the kernel of partition table changes. In this case, running partprobe ensures that the kernel is aware the disks have been partitioned.
Answer: 1. Enter the following at the OS prompt:
# partprobe
6) Enable ASMLib.
Oracle In
ternal & O
racle Aca
demy
Use O
nly
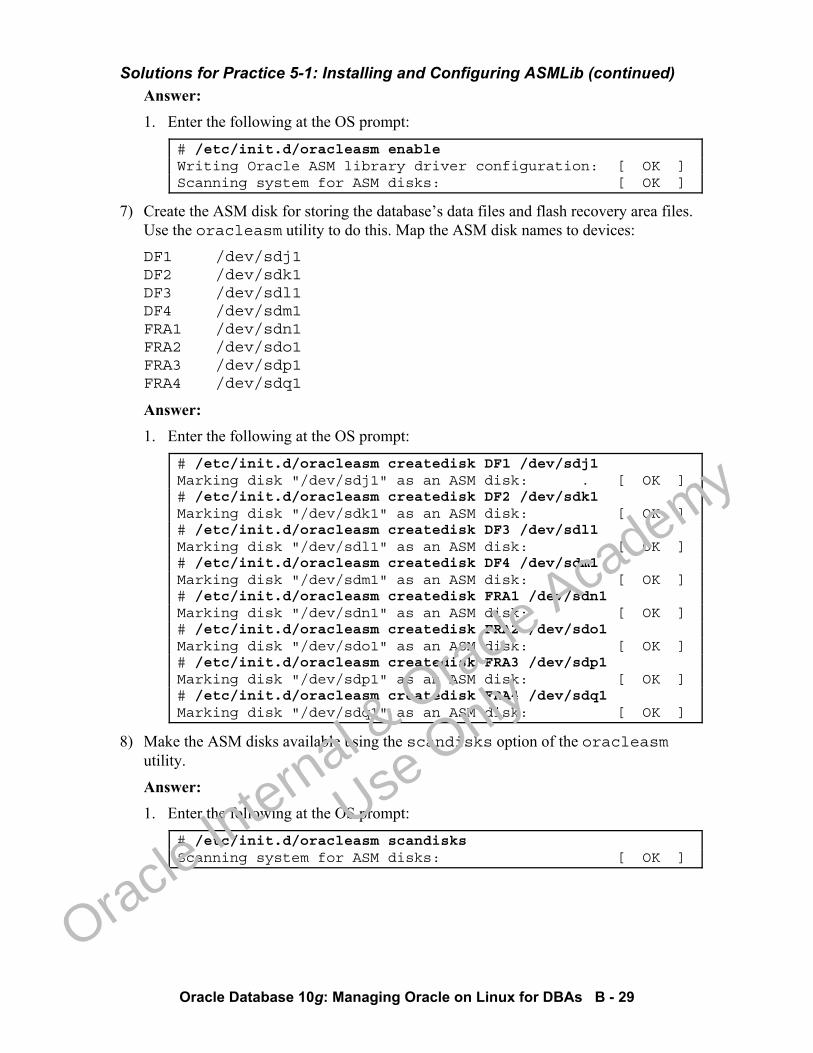
Solutions for Practice 5-1: Installing and Configuring ASMLib (continued)
Oracle Database 10g: Managing Oracle on Linux for DBAs B - 29
Answer: 1. Enter the following at the OS prompt:
# /etc/init.d/oracleasm enable Writing Oracle ASM library driver configuration: [ OK ] Scanning system for ASM disks: [ OK ]
7) Create the ASM disk for storing the database’s data files and flash recovery area files. Use the oracleasm utility to do this. Map the ASM disk names to devices: DF1 /dev/sdj1 DF2 /dev/sdk1 DF3 /dev/sdl1 DF4 /dev/sdm1 FRA1 /dev/sdn1 FRA2 /dev/sdo1 FRA3 /dev/sdp1 FRA4 /dev/sdq1
Answer: 1. Enter the following at the OS prompt:
# /etc/init.d/oracleasm createdisk DF1 /dev/sdj1 Marking disk "/dev/sdj1" as an ASM disk: . [ OK ] # /etc/init.d/oracleasm createdisk DF2 /dev/sdk1 Marking disk "/dev/sdk1" as an ASM disk: [ OK ] # /etc/init.d/oracleasm createdisk DF3 /dev/sdl1 Marking disk "/dev/sdl1" as an ASM disk: [ OK ] # /etc/init.d/oracleasm createdisk DF4 /dev/sdm1 Marking disk "/dev/sdm1" as an ASM disk: [ OK ] # /etc/init.d/oracleasm createdisk FRA1 /dev/sdn1 Marking disk "/dev/sdn1" as an ASM disk: [ OK ] # /etc/init.d/oracleasm createdisk FRA2 /dev/sdo1 Marking disk "/dev/sdo1" as an ASM disk: [ OK ] # /etc/init.d/oracleasm createdisk FRA3 /dev/sdp1 Marking disk "/dev/sdp1" as an ASM disk: [ OK ] # /etc/init.d/oracleasm createdisk FRA4 /dev/sdq1 Marking disk "/dev/sdq1" as an ASM disk: [ OK ]
8) Make the ASM disks available using the scandisks option of the oracleasm utility.
Answer:
1. Enter the following at the OS prompt:
# /etc/init.d/oracleasm scandisks Scanning system for ASM disks: [ OK ]
Oracle In
ternal & O
racle Aca
demy
Use O
nly
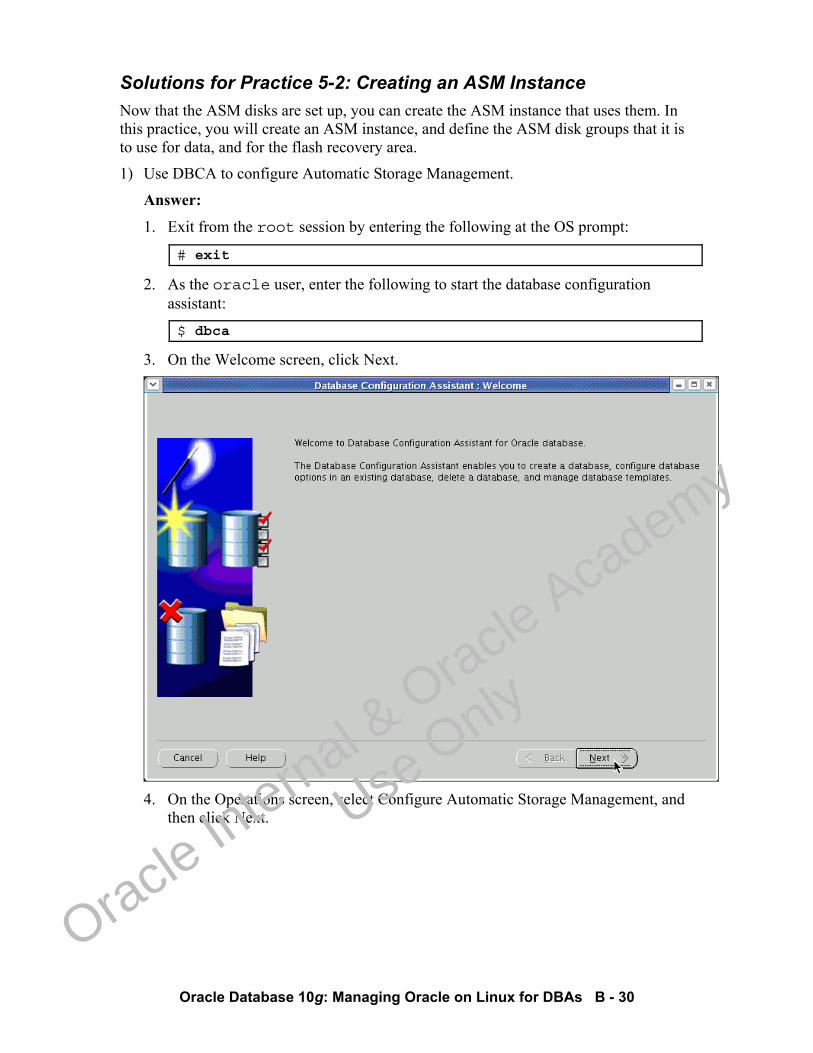
Oracle Database 10g: Managing Oracle on Linux for DBAs B - 30
Solutions for Practice 5-2: Creating an ASM Instance Now that the ASM disks are set up, you can create the ASM instance that uses them. In this practice, you will create an ASM instance, and define the ASM disk groups that it is to use for data, and for the flash recovery area.
1) Use DBCA to configure Automatic Storage Management.
Answer:
1. Exit from the root session by entering the following at the OS prompt:
# exit
2. As the oracle user, enter the following to start the database configuration assistant:
$ dbca
3. On the Welcome screen, click Next.
4. On the Operations screen, select Configure Automatic Storage Management, and
then click Next.
Oracle In
ternal & O
racle Aca
demy
Use O
nly
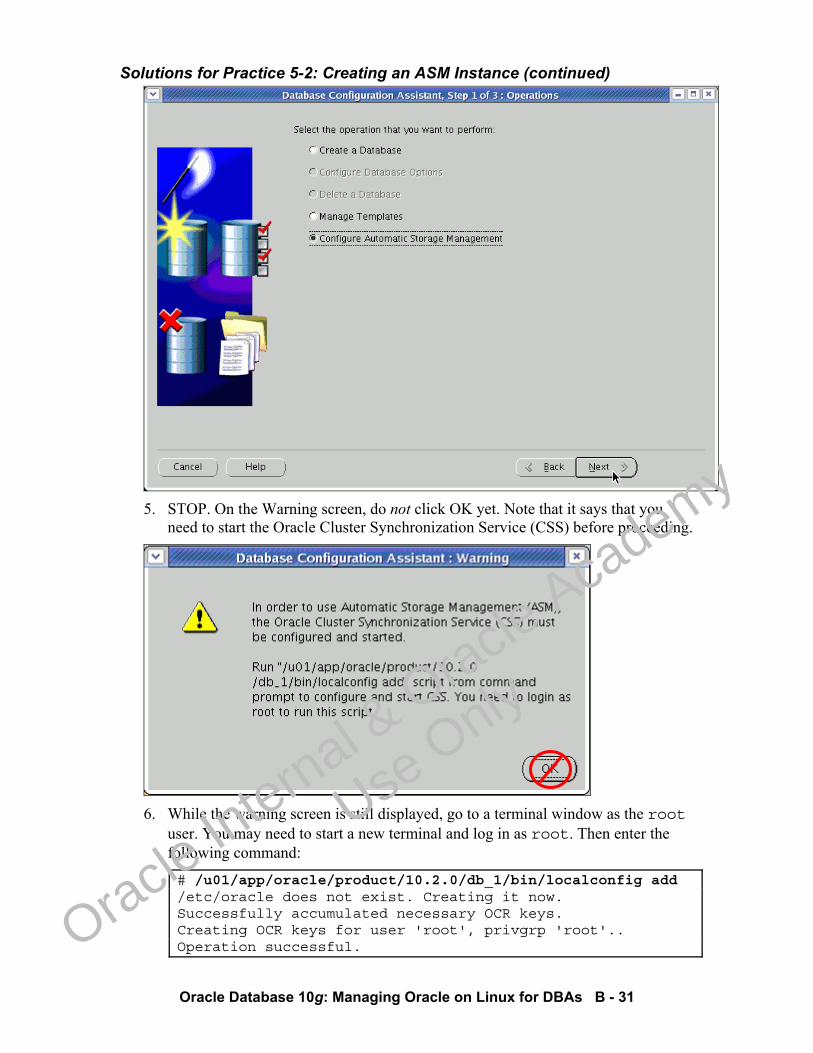
Solutions for Practice 5-2: Creating an ASM Instance (continued)
Oracle Database 10g: Managing Oracle on Linux for DBAs B - 31
5. STOP. On the Warning screen, do not click OK yet. Note that it says that you
need to start the Oracle Cluster Synchronization Service (CSS) before proceeding.
6. While the warning screen is still displayed, go to a terminal window as the root
user. You may need to start a new terminal and log in as root. Then enter the following command:
# /u01/app/oracle/product/10.2.0/db_1/bin/localconfig add /etc/oracle does not exist. Creating it now. Successfully accumulated necessary OCR keys. Creating OCR keys for user 'root', privgrp 'root'.. Operation successful.
Oracle In
ternal & O
racle Aca
demy
Use O
nly
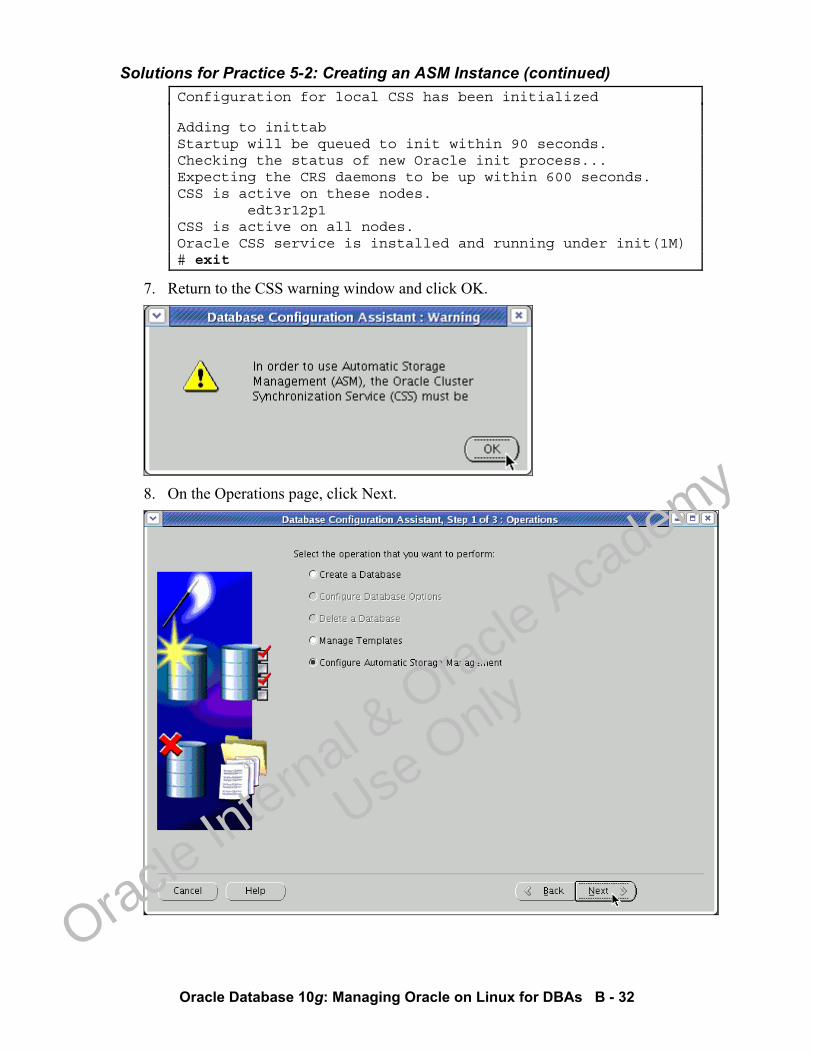
Solutions for Practice 5-2: Creating an ASM Instance (continued)
Oracle Database 10g: Managing Oracle on Linux for DBAs B - 32
Configuration for local CSS has been initialized Adding to inittab Startup will be queued to init within 90 seconds. Checking the status of new Oracle init process... Expecting the CRS daemons to be up within 600 seconds. CSS is active on these nodes. edt3r12p1 CSS is active on all nodes. Oracle CSS service is installed and running under init(1M) # exit
7. Return to the CSS warning window and click OK.
8. On the Operations page, click Next.
Oracle In
ternal & O
racle Aca
demy
Use O
nly
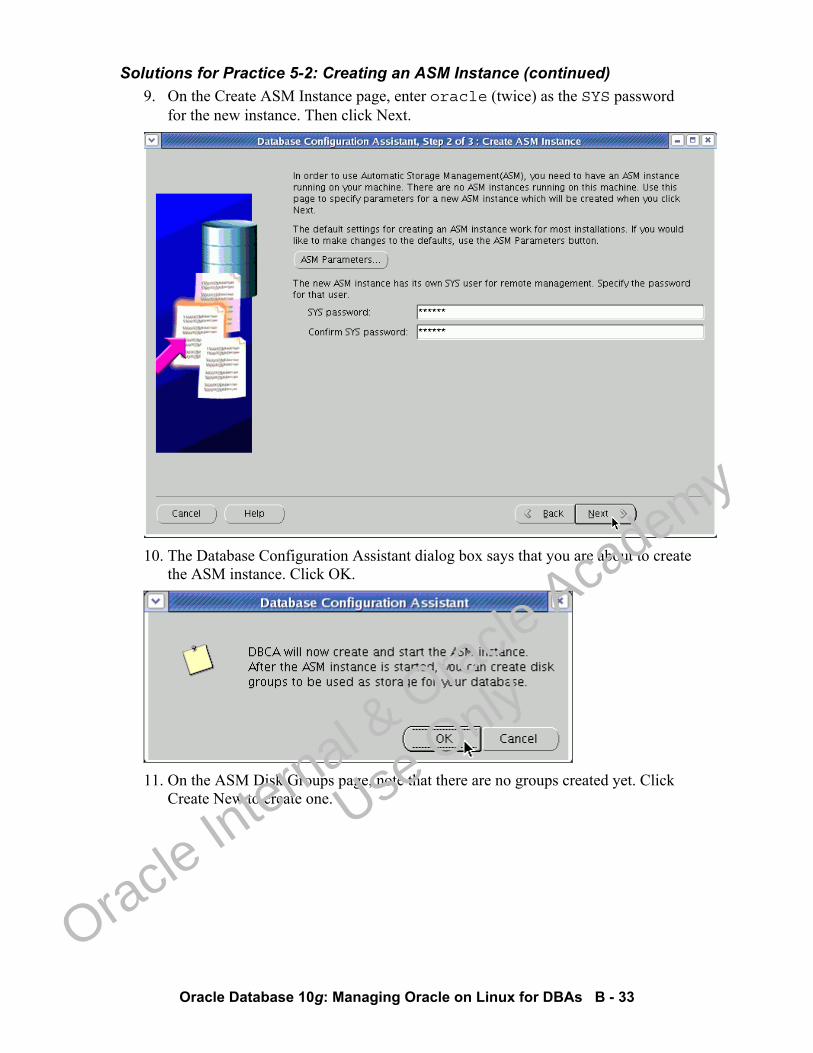
Solutions for Practice 5-2: Creating an ASM Instance (continued)
Oracle Database 10g: Managing Oracle on Linux for DBAs B - 33
9. On the Create ASM Instance page, enter oracle (twice) as the SYS password for the new instance. Then click Next.
10. The Database Configuration Assistant dialog box says that you are about to create
the ASM instance. Click OK.
11. On the ASM Disk Groups page, note that there are no groups created yet. Click
Create New to create one.
Oracle In
ternal & O
racle Aca
demy
Use O
nly
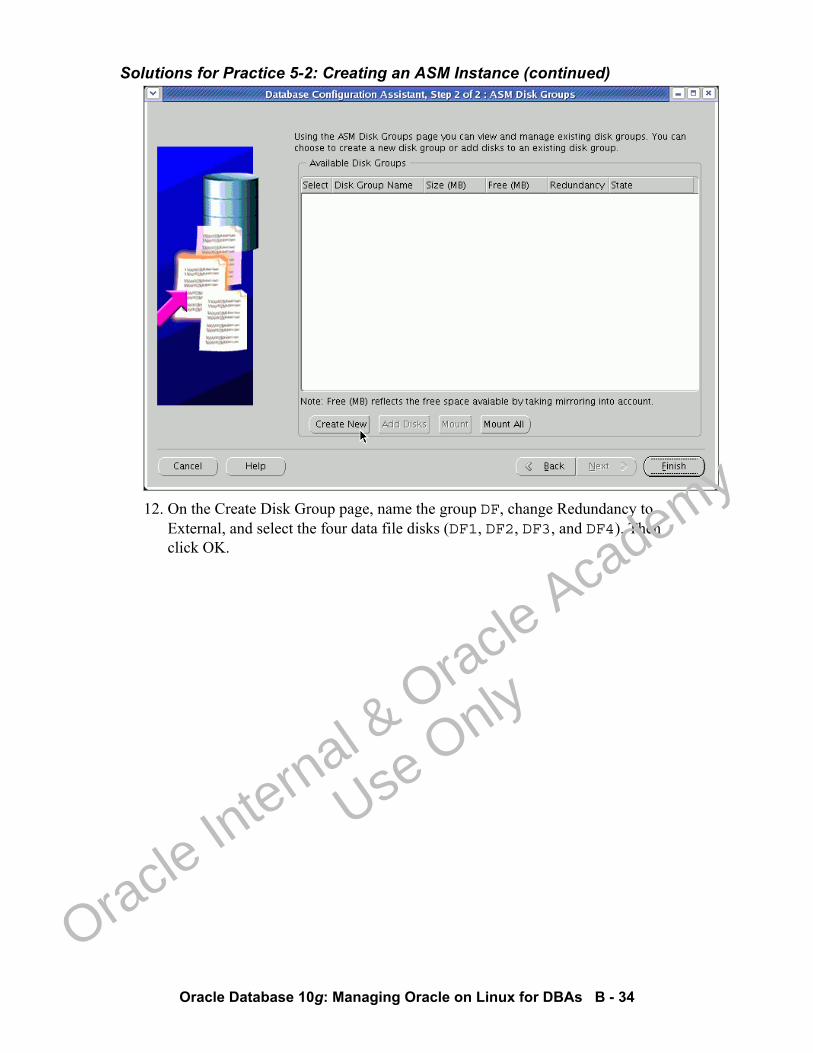
Solutions for Practice 5-2: Creating an ASM Instance (continued)
Oracle Database 10g: Managing Oracle on Linux for DBAs B - 34
12. On the Create Disk Group page, name the group DF, change Redundancy to
External, and select the four data file disks (DF1, DF2, DF3, and DF4). Then click OK.
Oracle In
ternal & O
racle Aca
demy
Use O
nly
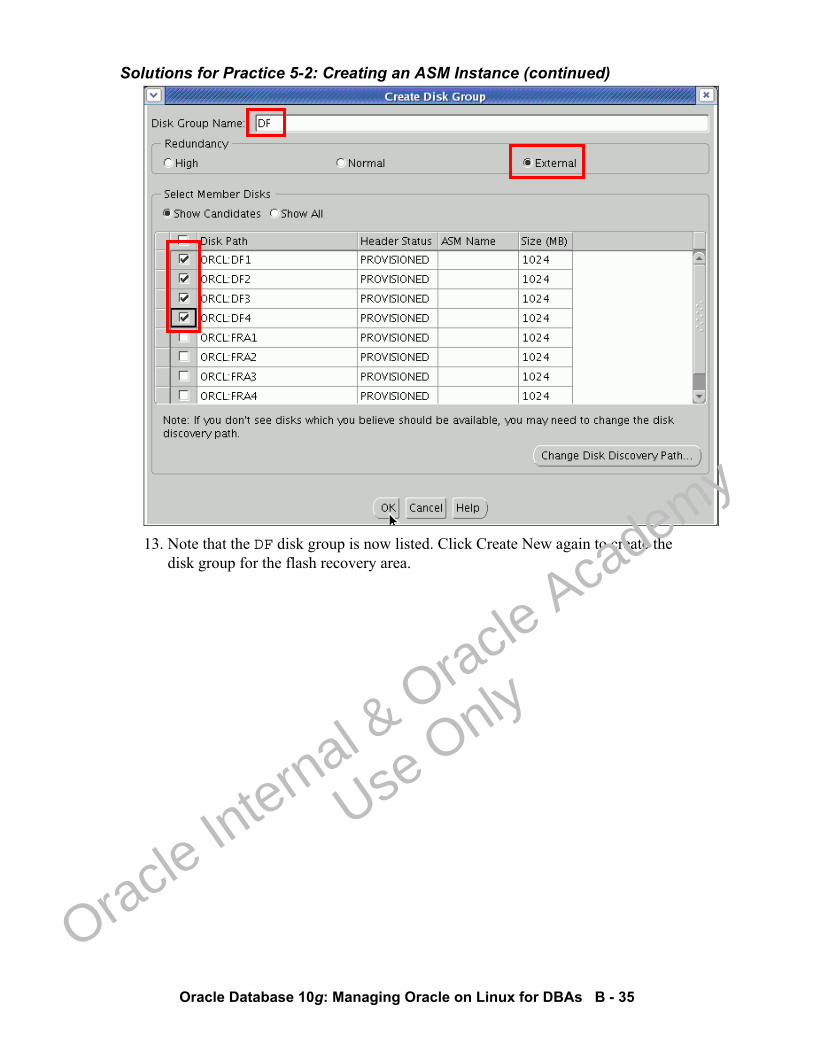
Solutions for Practice 5-2: Creating an ASM Instance (continued)
Oracle Database 10g: Managing Oracle on Linux for DBAs B - 35
13. Note that the DF disk group is now listed. Click Create New again to create the
disk group for the flash recovery area.
Oracle In
ternal & O
racle Aca
demy
Use O
nly

Solutions for Practice 5-2: Creating an ASM Instance (continued)
Oracle Database 10g: Managing Oracle on Linux for DBAs B - 36
14. Name the disk group FRA, change the Redundancy to External, and select all four
of the remaining disks. Then click OK.
Oracle In
ternal & O
racle Aca
demy
Use O
nly
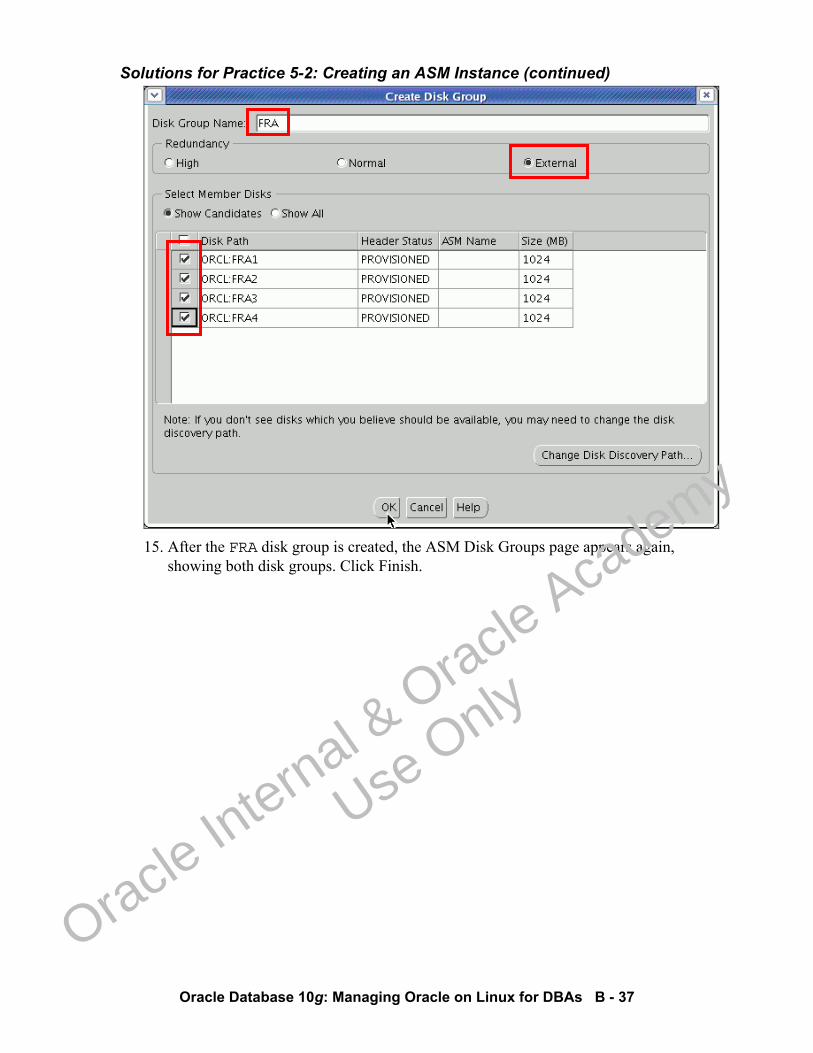
Solutions for Practice 5-2: Creating an ASM Instance (continued)
Oracle Database 10g: Managing Oracle on Linux for DBAs B - 37
15. After the FRA disk group is created, the ASM Disk Groups page appears again,
showing both disk groups. Click Finish.
Oracle In
ternal & O
racle Aca
demy
Use O
nly

Solutions for Practice 5-2: Creating an ASM Instance (continued)
Oracle Database 10g: Managing Oracle on Linux for DBAs B - 38
16. Click No when asked if you want to perform another operation.
Oracle In
ternal & O
racle Aca
demy
Use O
nly
Oracle Database 10g: Managing Oracle on Linux for DBAs B - 39
Practice Solutions for Lesson 6: Creating the Database
Oracle In
ternal & O
racle Aca
demy
Use O
nly

Oracle Database 10g: Managing Oracle on Linux for DBAs B - 40
Solutions for Practice 6-1: Creating a Database Create a database to be used in the instance already installed. The database will use the ASM you already configured, for data file and flash recovery area storage.
1) Use the Database Creation Assistant to create a database with these attributes:
It is a general-purpose database.
It has a Global Database Name of orcl.us.oracle.com.
The SID is orcl.
It is configurable using Database Control.
All initial accounts should have the password of oracle.
The database should use ASM as its storage mechanism.
The flash recovery area should be 4 GB in size.
The database should be in ARCHIVELOG mode.
It should use Oracle Managed Files (OMF).
It should have the sample schemas installed.
Answer:
1. Enter the following at the OS prompt, as the oracle user:
$ dbca
2. Click Next on the Welcome page.
3. Select the Create a Database option, and click Next.
4. Select General Purpose for the template to use, and click Next.
5. On the Database Identification page, enter the following for the Global Database Name, and then click Next.
orcl.us.oracle.com
6. Click Next on the Management Options page.
7. Enter oracle for both password fields on the Database Credentials page.
8. On the Storage Options page, select Automatic Storage Management, and click Next.
Oracle In
ternal & O
racle Aca
demy
Use O
nly
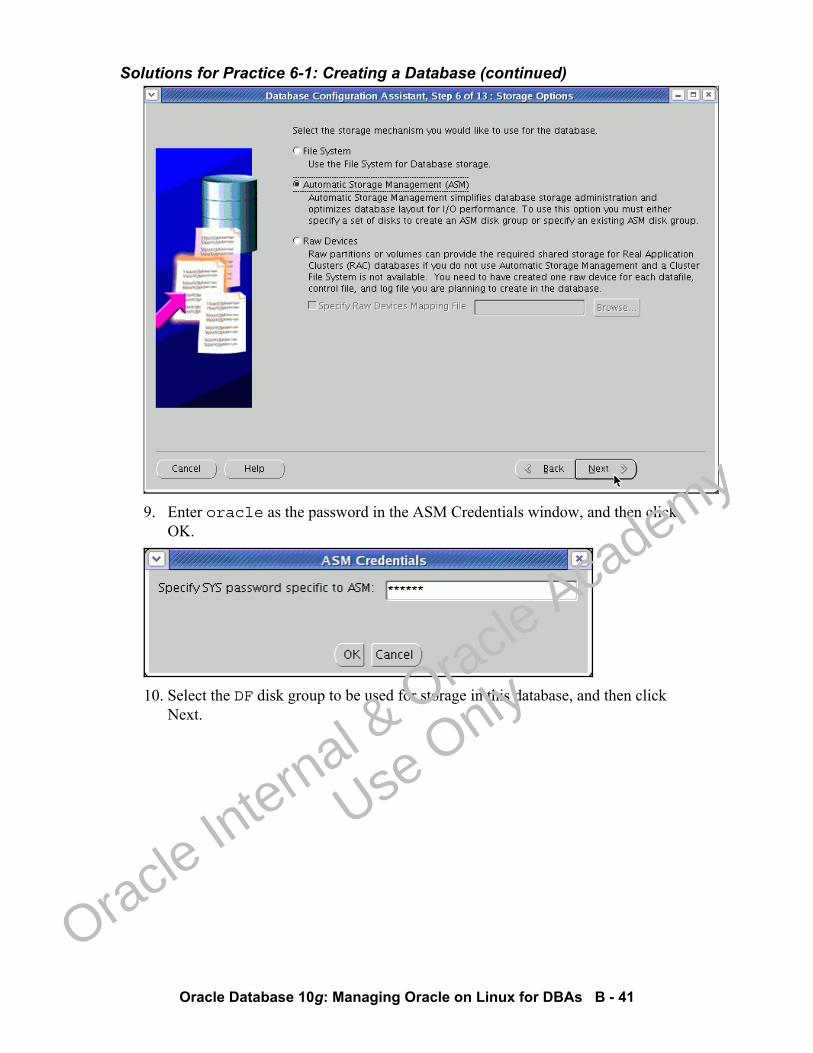
Solutions for Practice 6-1: Creating a Database (continued)
Oracle Database 10g: Managing Oracle on Linux for DBAs B - 41
9. Enter oracle as the password in the ASM Credentials window, and then click
OK.
10. Select the DF disk group to be used for storage in this database, and then click
Next.
Oracle In
ternal & O
racle Aca
demy
Use O
nly
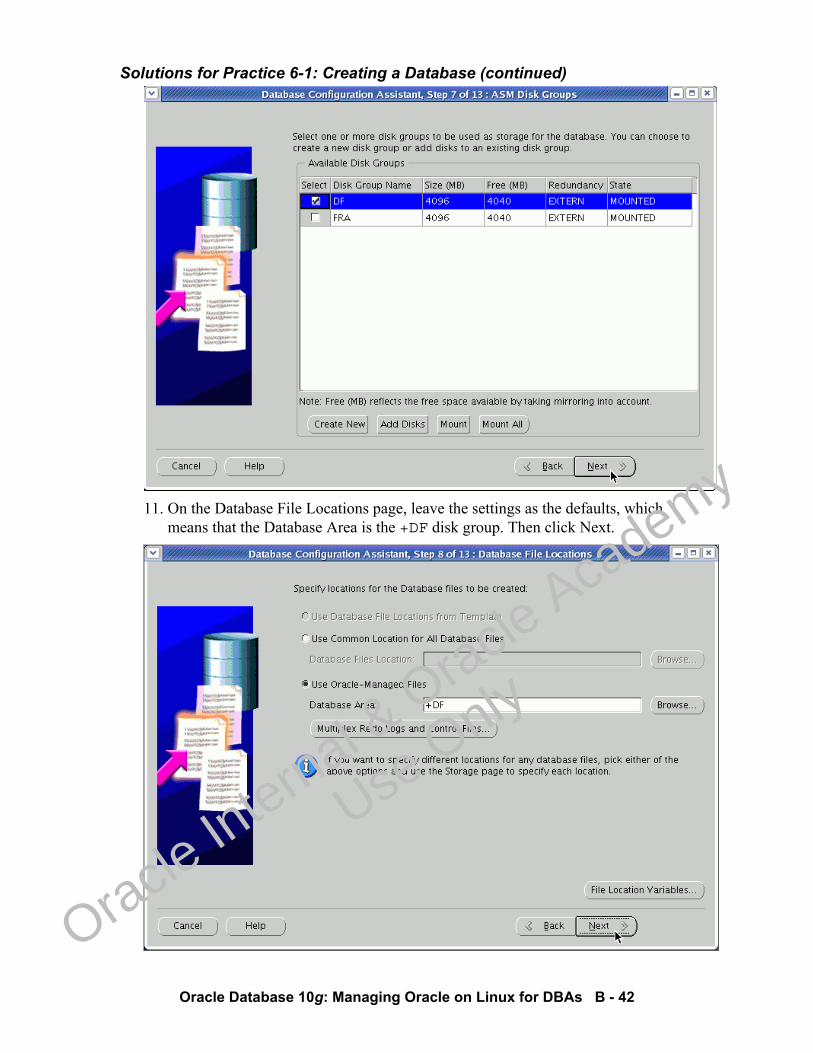
Solutions for Practice 6-1: Creating a Database (continued)
Oracle Database 10g: Managing Oracle on Linux for DBAs B - 42
11. On the Database File Locations page, leave the settings as the defaults, which
means that the Database Area is the +DF disk group. Then click Next.
Oracle In
ternal & O
racle Aca
demy
Use O
nly
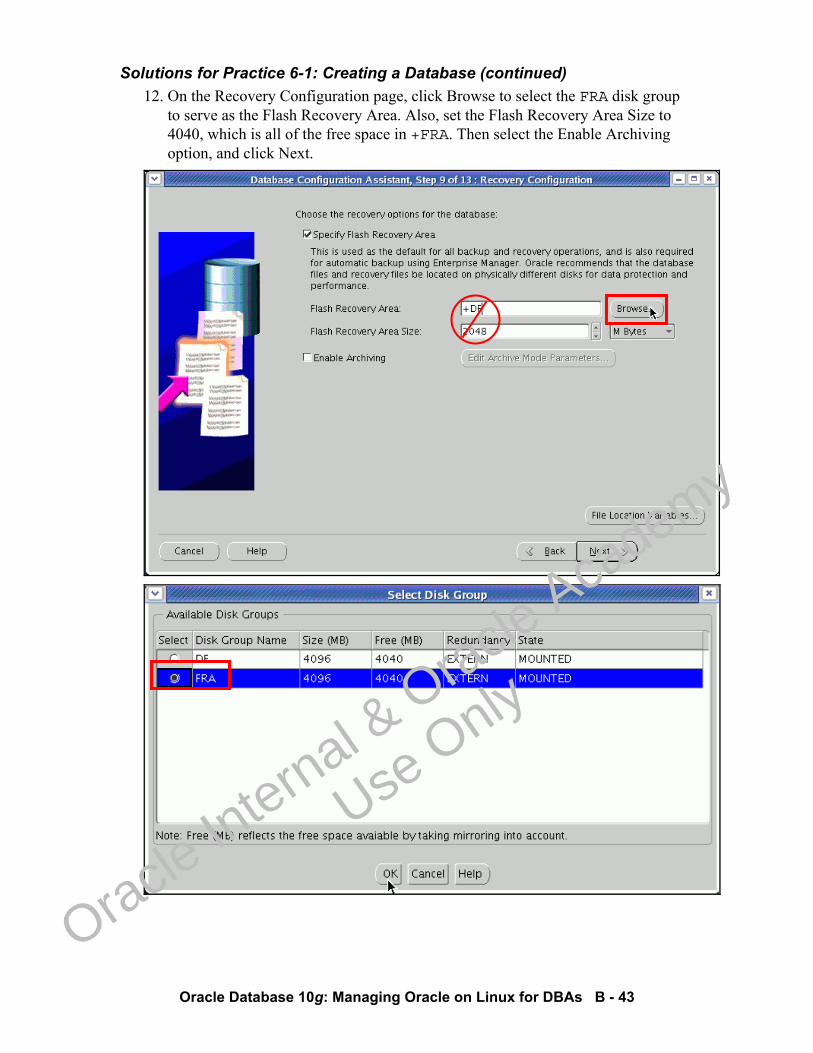
Solutions for Practice 6-1: Creating a Database (continued)
Oracle Database 10g: Managing Oracle on Linux for DBAs B - 43
12. On the Recovery Configuration page, click Browse to select the FRA disk group to serve as the Flash Recovery Area. Also, set the Flash Recovery Area Size to 4040, which is all of the free space in +FRA. Then select the Enable Archiving option, and click Next.
Oracle In
ternal & O
racle Aca
demy
Use O
nly
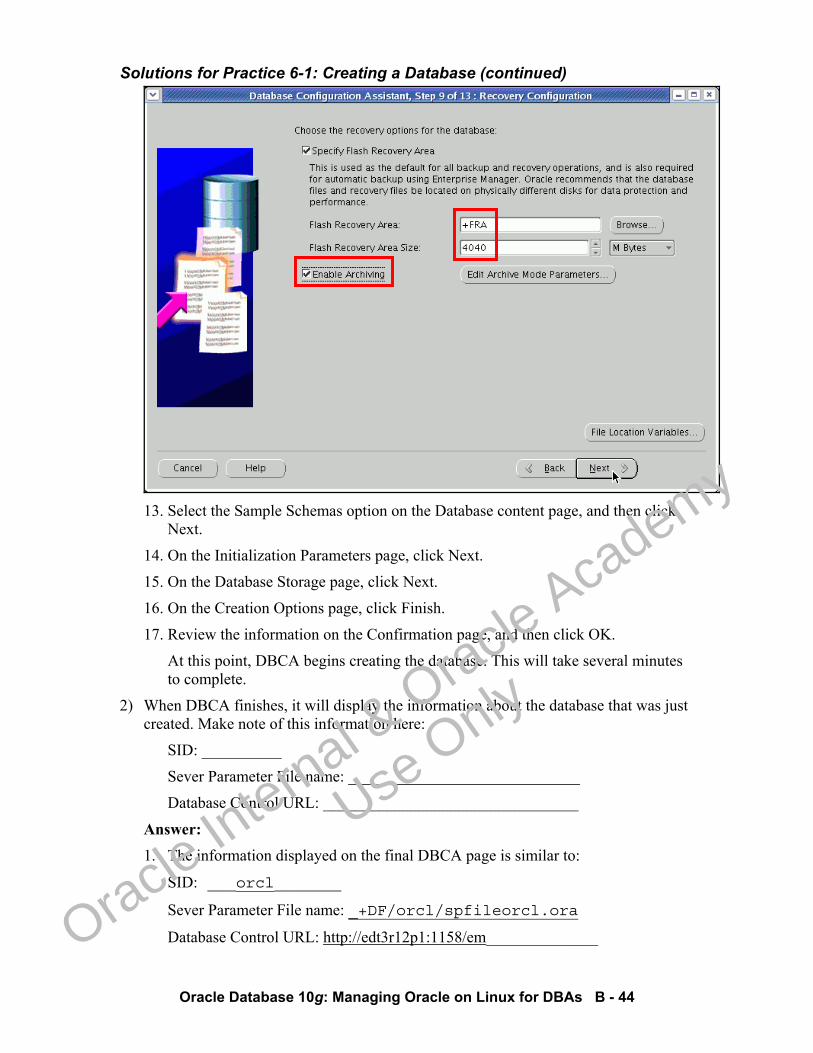
Solutions for Practice 6-1: Creating a Database (continued)
Oracle Database 10g: Managing Oracle on Linux for DBAs B - 44
13. Select the Sample Schemas option on the Database content page, and then click
Next.
14. On the Initialization Parameters page, click Next.
15. On the Database Storage page, click Next.
16. On the Creation Options page, click Finish.
17. Review the information on the Confirmation page, and then click OK.
At this point, DBCA begins creating the database. This will take several minutes to complete.
2) When DBCA finishes, it will display the information about the database that was just created. Make note of this information here:
SID: __________
Sever Parameter File name: _____________________________
Database Control URL: ________________________________
Answer: 1. The information displayed on the final DBCA page is similar to:
SID: ___orcl_______
Sever Parameter File name: _+DF/orcl/spfileorcl.ora
Database Control URL: http://edt3r12p1:1158/em______________
Oracle In
ternal & O
racle Aca
demy
Use O
nly

Solutions for Practice 6-1: Creating a Database (continued)
Oracle Database 10g: Managing Oracle on Linux for DBAs B - 45
3) Unlock the HR account, and set its password to hr.
Answer: 1. Click Password Management.
2. On the Password Management page, deselect the Lock Account column for the HR username. Enter hr for the New Password and the Confirm Password fields. Then click OK.
4) Click Exit to exit DBCA.
5) Set the ORACLE_SID environment variable so that it is set for every terminal session that the oracle user starts. Set it to orcl.
Answer:
1. Edit the .bash_profile file, and then add the following line:
export ORACLE_SID=orcl
2. Exit from all open terminal shells, and log out of the machine.
3. Log in as the oracle user again.
4. Start a terminal shell, and check the ORACLE_SID variable by entering the following:
$ echo $ORACLE_SID
Oracle In
ternal & O
racle Aca
demy
Use O
nly
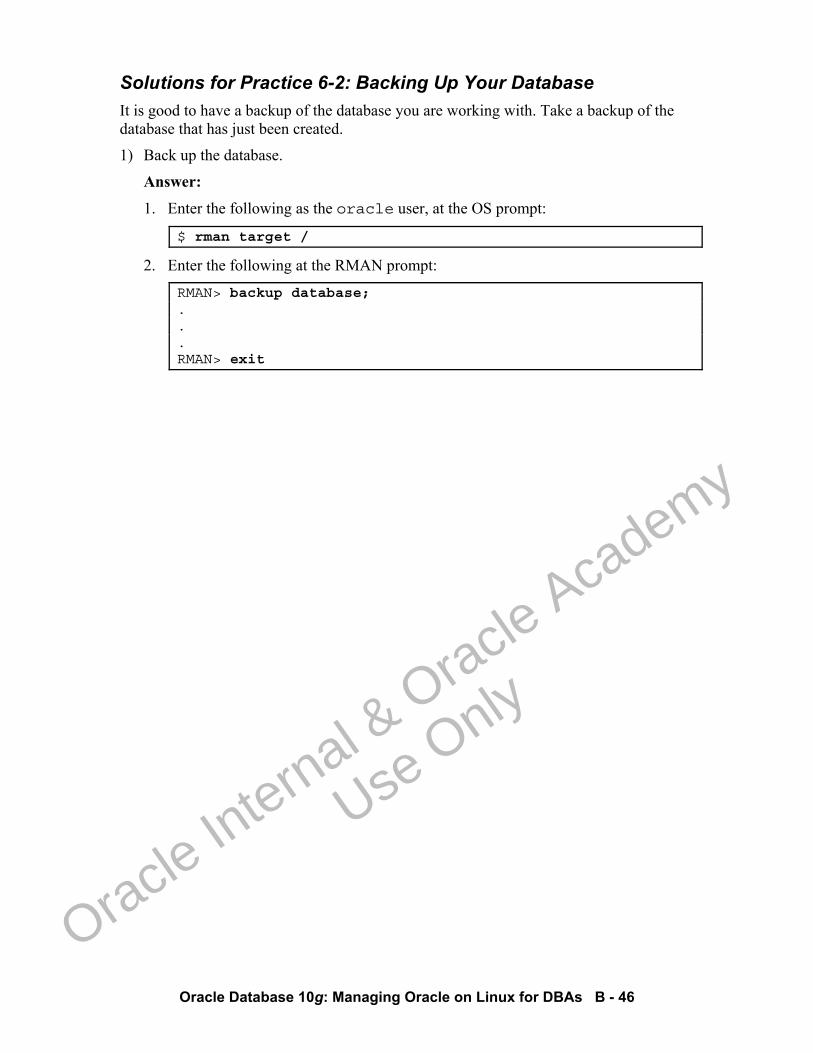
Oracle Database 10g: Managing Oracle on Linux for DBAs B - 46
Solutions for Practice 6-2: Backing Up Your Database It is good to have a backup of the database you are working with. Take a backup of the database that has just been created.
1) Back up the database.
Answer:
1. Enter the following as the oracle user, at the OS prompt:
$ rman target /
2. Enter the following at the RMAN prompt:
RMAN> backup database; . . . RMAN> exit
Oracle In
ternal & O
racle Aca
demy
Use O
nly

Oracle Database 10g: Managing Oracle on Linux for DBAs B - 47
Practice Solutions for Lesson 7: Customizing Oracle on Linux
Oracle In
ternal & O
racle Aca
demy
Use O
nly
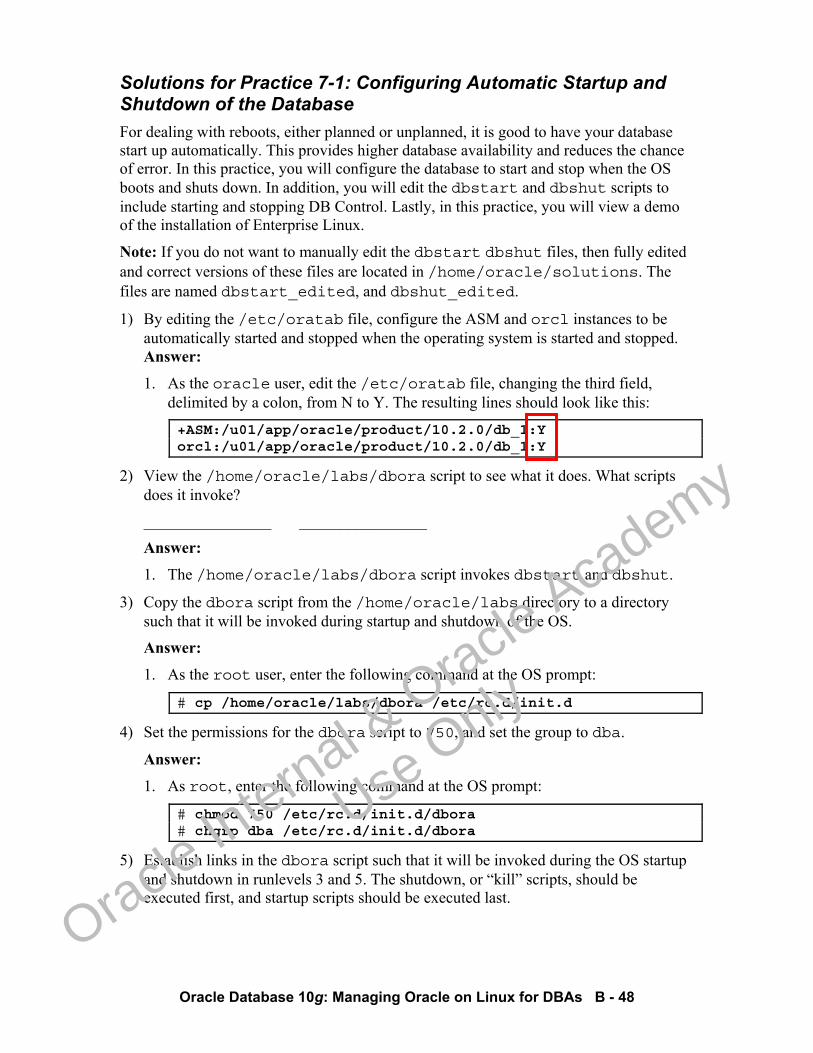
Oracle Database 10g: Managing Oracle on Linux for DBAs B - 48
Solutions for Practice 7-1: Configuring Automatic Startup and Shutdown of the Database For dealing with reboots, either planned or unplanned, it is good to have your database start up automatically. This provides higher database availability and reduces the chance of error. In this practice, you will configure the database to start and stop when the OS boots and shuts down. In addition, you will edit the dbstart and dbshut scripts to include starting and stopping DB Control. Lastly, in this practice, you will view a demo of the installation of Enterprise Linux.
Note: If you do not want to manually edit the dbstart dbshut files, then fully edited and correct versions of these files are located in /home/oracle/solutions. The files are named dbstart_edited, and dbshut_edited.
1) By editing the /etc/oratab file, configure the ASM and orcl instances to be automatically started and stopped when the operating system is started and stopped. Answer:
1. As the oracle user, edit the /etc/oratab file, changing the third field, delimited by a colon, from N to Y. The resulting lines should look like this:
+ASM:/u01/app/oracle/product/10.2.0/db_1:Y orcl:/u01/app/oracle/product/10.2.0/db_1:Y
2) View the /home/oracle/labs/dbora script to see what it does. What scripts does it invoke?
________________ ________________
Answer:
1. The /home/oracle/labs/dbora script invokes dbstart and dbshut.
3) Copy the dbora script from the /home/oracle/labs directory to a directory such that it will be invoked during startup and shutdown of the OS.
Answer:
1. As the root user, enter the following command at the OS prompt:
# cp /home/oracle/labs/dbora /etc/rc.d/init.d
4) Set the permissions for the dbora script to 750, and set the group to dba.
Answer:
1. As root, enter the following command at the OS prompt:
# chmod 750 /etc/rc.d/init.d/dbora # chgrp dba /etc/rc.d/init.d/dbora
5) Establish links in the dbora script such that it will be invoked during the OS startup and shutdown in runlevels 3 and 5. The shutdown, or “kill” scripts, should be executed first, and startup scripts should be executed last.
Oracle In
ternal & O
racle Aca
demy
Use O
nly
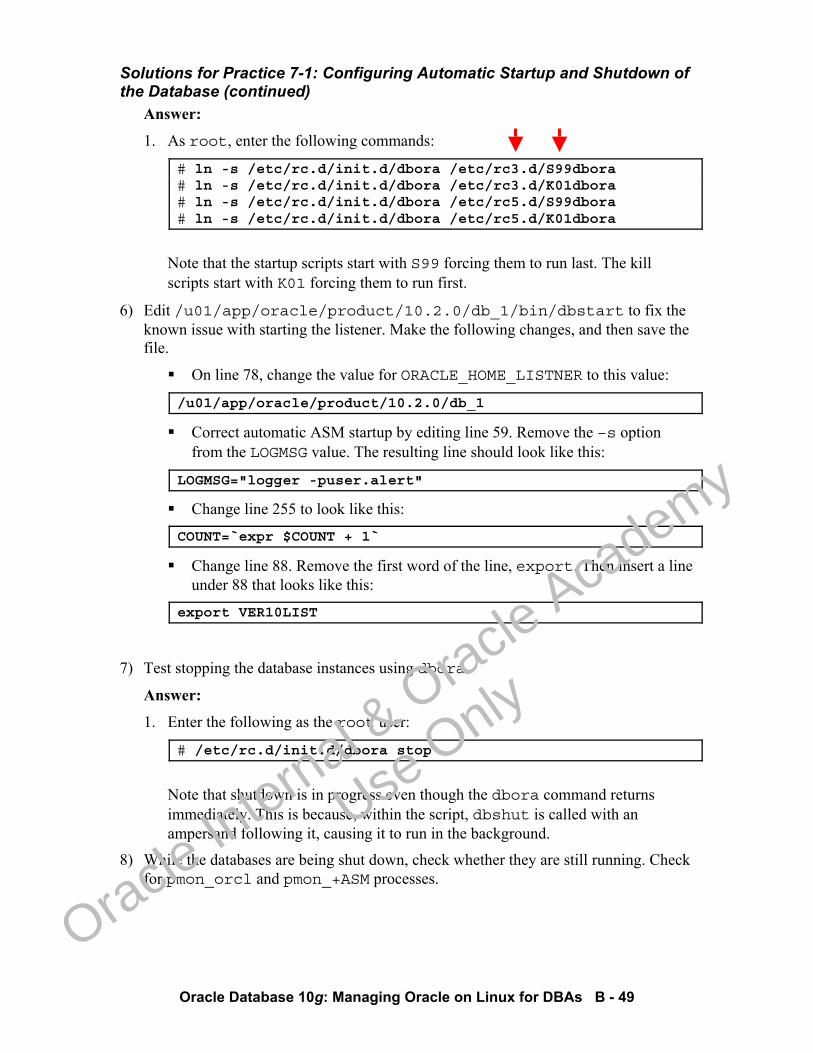
Solutions for Practice 7-1: Configuring Automatic Startup and Shutdown of the Database (continued)
Oracle Database 10g: Managing Oracle on Linux for DBAs B - 49
Answer:
1. As root, enter the following commands:
# ln -s /etc/rc.d/init.d/dbora /etc/rc3.d/S99dbora # ln -s /etc/rc.d/init.d/dbora /etc/rc3.d/K01dbora # ln -s /etc/rc.d/init.d/dbora /etc/rc5.d/S99dbora # ln -s /etc/rc.d/init.d/dbora /etc/rc5.d/K01dbora
Note that the startup scripts start with S99 forcing them to run last. The kill scripts start with K01 forcing them to run first.
6) Edit /u01/app/oracle/product/10.2.0/db_1/bin/dbstart to fix the known issue with starting the listener. Make the following changes, and then save the file.
On line 78, change the value for ORACLE_HOME_LISTNER to this value:
/u01/app/oracle/product/10.2.0/db_1
Correct automatic ASM startup by editing line 59. Remove the –s option from the LOGMSG value. The resulting line should look like this:
LOGMSG="logger -puser.alert"
Change line 255 to look like this:
COUNT=`expr $COUNT + 1`
Change line 88. Remove the first word of the line, export. Then insert a line under 88 that looks like this:
export VER10LIST
7) Test stopping the database instances using dbora.
Answer:
1. Enter the following as the root user:
# /etc/rc.d/init.d/dbora stop
Note that shutdown is in progress even though the dbora command returns immediately. This is because, within the script, dbshut is called with an ampersand following it, causing it to run in the background.
8) While the databases are being shut down, check whether they are still running. Check for pmon_orcl and pmon_+ASM processes.
Oracle In
ternal & O
racle Aca
demy
Use O
nly
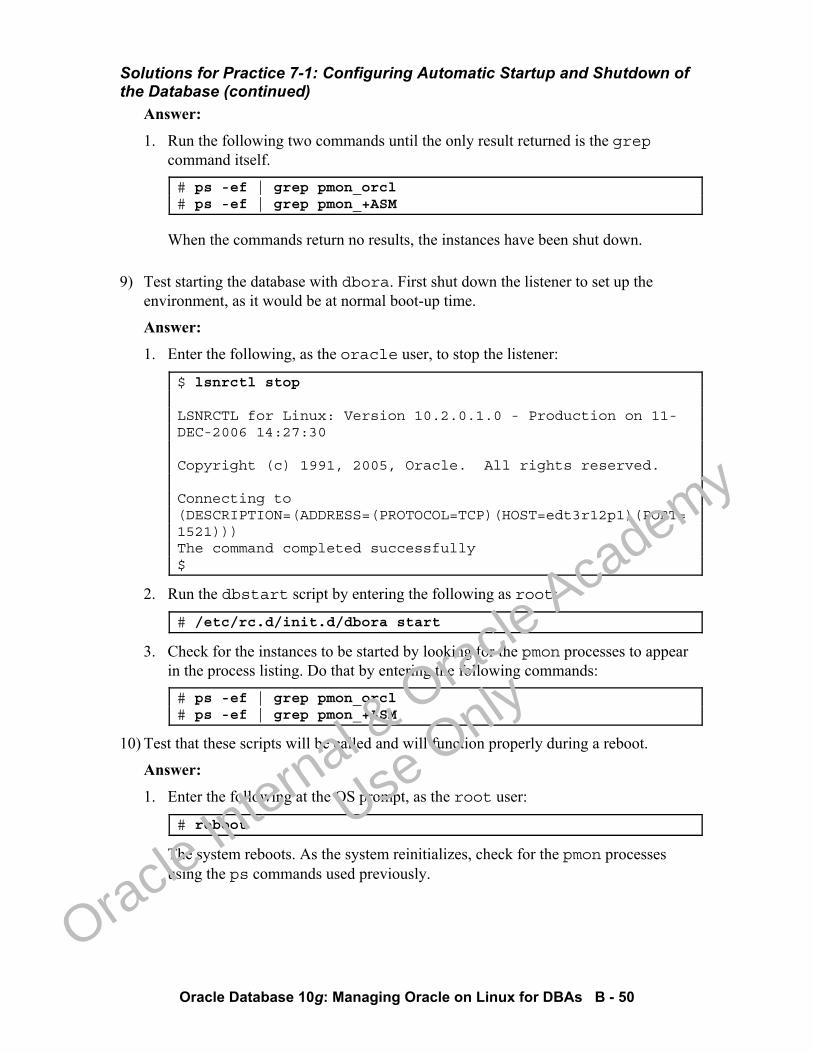
Solutions for Practice 7-1: Configuring Automatic Startup and Shutdown of the Database (continued)
Oracle Database 10g: Managing Oracle on Linux for DBAs B - 50
Answer:
1. Run the following two commands until the only result returned is the grep command itself.
# ps -ef | grep pmon_orcl # ps -ef | grep pmon_+ASM
When the commands return no results, the instances have been shut down.
9) Test starting the database with dbora. First shut down the listener to set up the environment, as it would be at normal boot-up time.
Answer:
1. Enter the following, as the oracle user, to stop the listener:
$ lsnrctl stop LSNRCTL for Linux: Version 10.2.0.1.0 - Production on 11-DEC-2006 14:27:30 Copyright (c) 1991, 2005, Oracle. All rights reserved. Connecting to (DESCRIPTION=(ADDRESS=(PROTOCOL=TCP)(HOST=edt3r12p1)(PORT=1521))) The command completed successfully $
2. Run the dbstart script by entering the following as root:
# /etc/rc.d/init.d/dbora start
3. Check for the instances to be started by looking for the pmon processes to appear in the process listing. Do that by entering the following commands:
# ps -ef | grep pmon_orcl # ps -ef | grep pmon_+ASM
10) Test that these scripts will be called and will function properly during a reboot.
Answer:
1. Enter the following at the OS prompt, as the root user:
# reboot
The system reboots. As the system reinitializes, check for the pmon processes using the ps commands used previously.
Oracle In
ternal & O
racle Aca
demy
Use O
nly
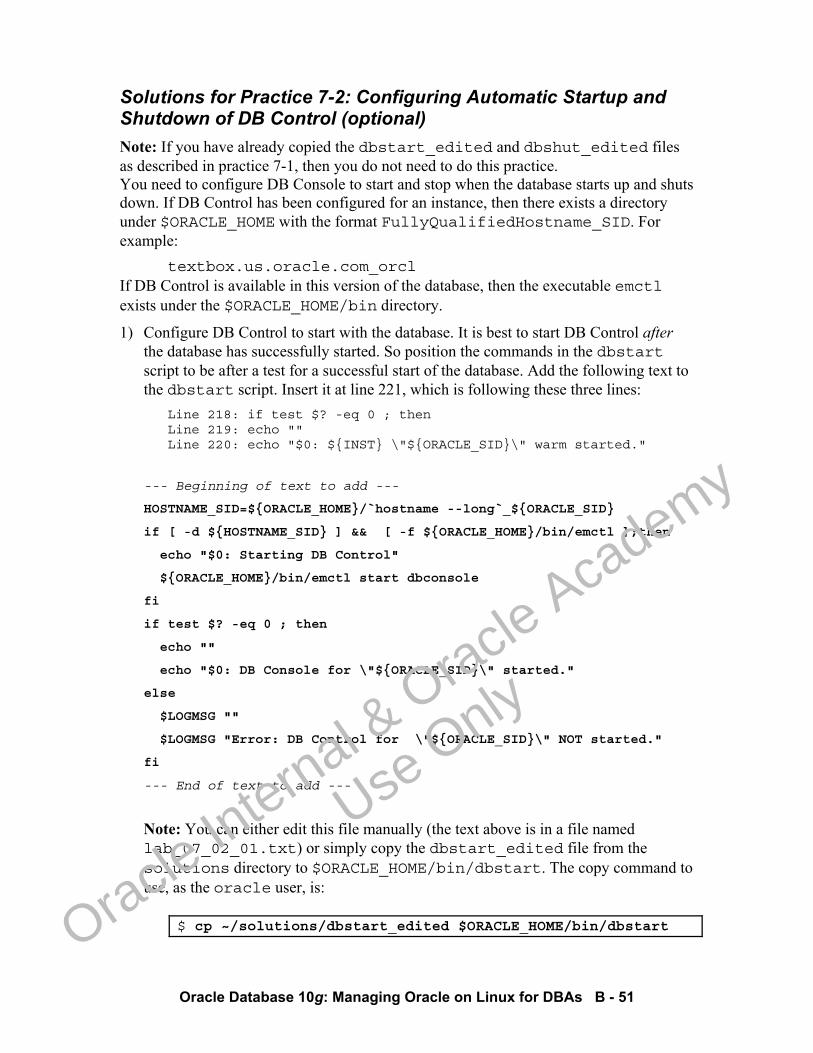
Oracle Database 10g: Managing Oracle on Linux for DBAs B - 51
Solutions for Practice 7-2: Configuring Automatic Startup and Shutdown of DB Control (optional) Note: If you have already copied the dbstart_edited and dbshut_edited files as described in practice 7-1, then you do not need to do this practice. You need to configure DB Console to start and stop when the database starts up and shuts down. If DB Control has been configured for an instance, then there exists a directory under $ORACLE_HOME with the format FullyQualifiedHostname_SID. For example:
textbox.us.oracle.com_orcl If DB Control is available in this version of the database, then the executable emctl exists under the $ORACLE_HOME/bin directory.
1) Configure DB Control to start with the database. It is best to start DB Control after the database has successfully started. So position the commands in the dbstart script to be after a test for a successful start of the database. Add the following text to the dbstart script. Insert it at line 221, which is following these three lines:
Line 218: if test $? -eq 0 ; then Line 219: echo "" Line 220: echo "$0: ${INST} \"${ORACLE_SID}\" warm started."
--- Beginning of text to add ---
HOSTNAME_SID=${ORACLE_HOME}/`hostname --long`_${ORACLE_SID}
if [ -d ${HOSTNAME_SID} ] && [ -f ${ORACLE_HOME}/bin/emctl ];then
echo "$0: Starting DB Control"
${ORACLE_HOME}/bin/emctl start dbconsole
fi
if test $? -eq 0 ; then
echo ""
echo "$0: DB Console for \"${ORACLE_SID}\" started."
else
$LOGMSG ""
$LOGMSG "Error: DB Control for \"${ORACLE_SID}\" NOT started."
fi
--- End of text to add ---
Note: You can either edit this file manually (the text above is in a file named lab_07_02_01.txt) or simply copy the dbstart_edited file from the solutions directory to $ORACLE_HOME/bin/dbstart. The copy command to use, as the oracle user, is:
$ cp ~/solutions/dbstart_edited $ORACLE_HOME/bin/dbstart
Oracle In
ternal & O
racle Aca
demy
Use O
nly
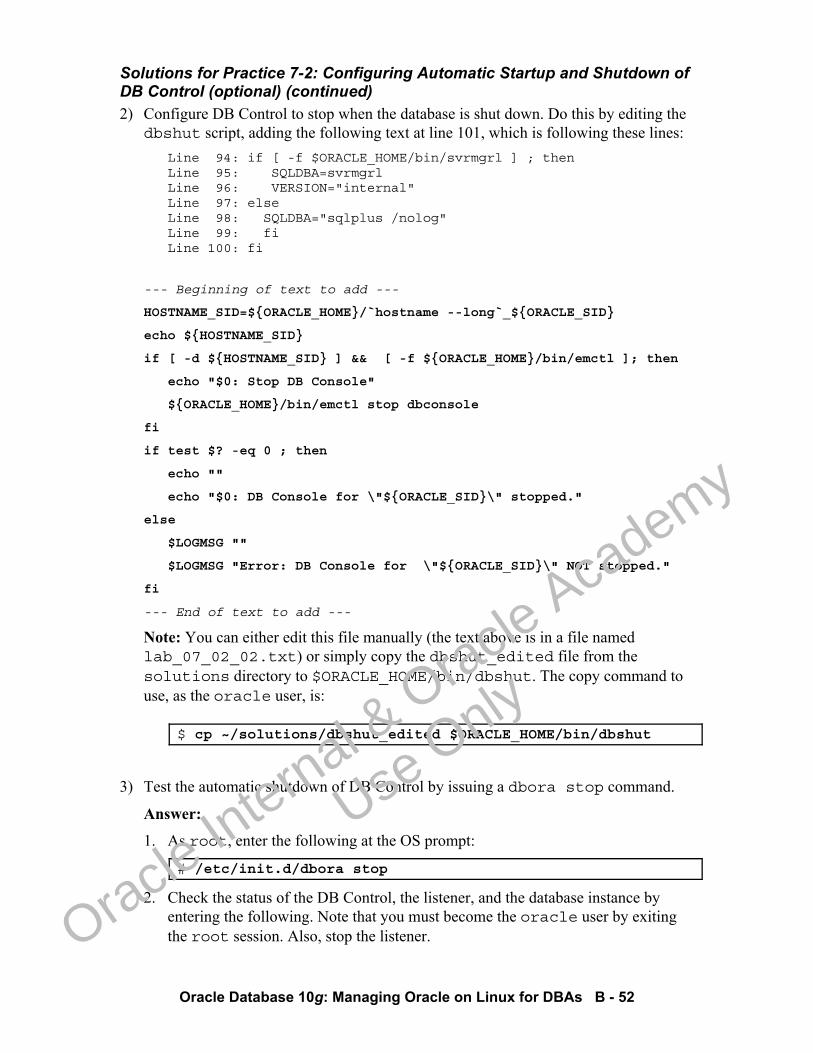
Solutions for Practice 7-2: Configuring Automatic Startup and Shutdown of DB Control (optional) (continued)
Oracle Database 10g: Managing Oracle on Linux for DBAs B - 52
2) Configure DB Control to stop when the database is shut down. Do this by editing the dbshut script, adding the following text at line 101, which is following these lines:
Line 94: if [ -f $ORACLE_HOME/bin/svrmgrl ] ; then Line 95: SQLDBA=svrmgrl Line 96: VERSION="internal" Line 97: else Line 98: SQLDBA="sqlplus /nolog" Line 99: fi Line 100: fi
--- Beginning of text to add ---
HOSTNAME_SID=${ORACLE_HOME}/`hostname --long`_${ORACLE_SID}
echo ${HOSTNAME_SID}
if [ -d ${HOSTNAME_SID} ] && [ -f ${ORACLE_HOME}/bin/emctl ]; then
echo "$0: Stop DB Console"
${ORACLE_HOME}/bin/emctl stop dbconsole
fi
if test $? -eq 0 ; then
echo ""
echo "$0: DB Console for \"${ORACLE_SID}\" stopped."
else
$LOGMSG ""
$LOGMSG "Error: DB Console for \"${ORACLE_SID}\" NOT stopped."
fi
--- End of text to add ---
Note: You can either edit this file manually (the text above is in a file named lab_07_02_02.txt) or simply copy the dbshut_edited file from the solutions directory to $ORACLE_HOME/bin/dbshut. The copy command to use, as the oracle user, is:
$ cp ~/solutions/dbshut_edited $ORACLE_HOME/bin/dbshut
3) Test the automatic shutdown of DB Control by issuing a dbora stop command.
Answer:
1. As root, enter the following at the OS prompt:
# /etc/init.d/dbora stop
2. Check the status of the DB Control, the listener, and the database instance by entering the following. Note that you must become the oracle user by exiting the root session. Also, stop the listener.
Oracle In
ternal & O
racle Aca
demy
Use O
nly
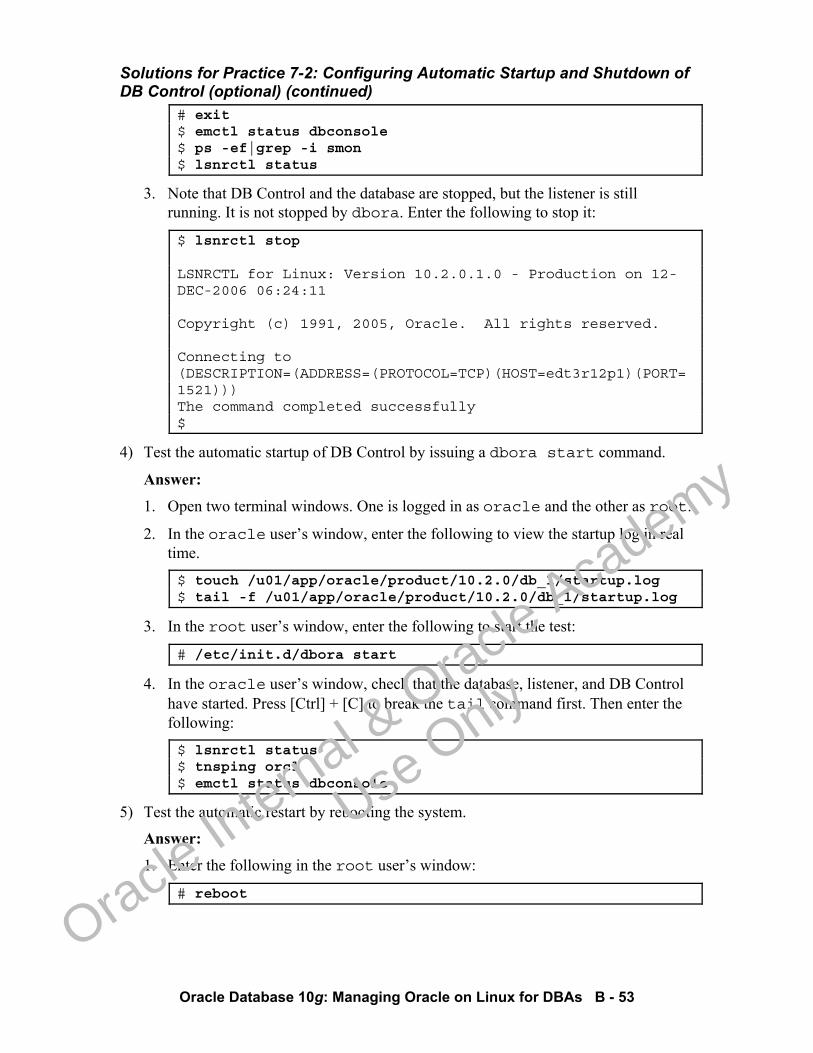
Solutions for Practice 7-2: Configuring Automatic Startup and Shutdown of DB Control (optional) (continued)
Oracle Database 10g: Managing Oracle on Linux for DBAs B - 53
# exit $ emctl status dbconsole $ ps -ef|grep -i smon $ lsnrctl status
3. Note that DB Control and the database are stopped, but the listener is still running. It is not stopped by dbora. Enter the following to stop it:
$ lsnrctl stop LSNRCTL for Linux: Version 10.2.0.1.0 - Production on 12-DEC-2006 06:24:11 Copyright (c) 1991, 2005, Oracle. All rights reserved. Connecting to (DESCRIPTION=(ADDRESS=(PROTOCOL=TCP)(HOST=edt3r12p1)(PORT=1521))) The command completed successfully $
4) Test the automatic startup of DB Control by issuing a dbora start command.
Answer:
1. Open two terminal windows. One is logged in as oracle and the other as root.
2. In the oracle user’s window, enter the following to view the startup log in real time.
$ touch /u01/app/oracle/product/10.2.0/db_1/startup.log $ tail -f /u01/app/oracle/product/10.2.0/db_1/startup.log
3. In the root user’s window, enter the following to start the test:
# /etc/init.d/dbora start
4. In the oracle user’s window, check that the database, listener, and DB Control have started. Press [Ctrl] + [C] to break the tail command first. Then enter the following:
$ lsnrctl status $ tnsping orcl $ emctl status dbconsole
5) Test the automatic restart by rebooting the system.
Answer:
1. Enter the following in the root user’s window:
# reboot
Oracle In
ternal & O
racle Aca
demy
Use O
nly
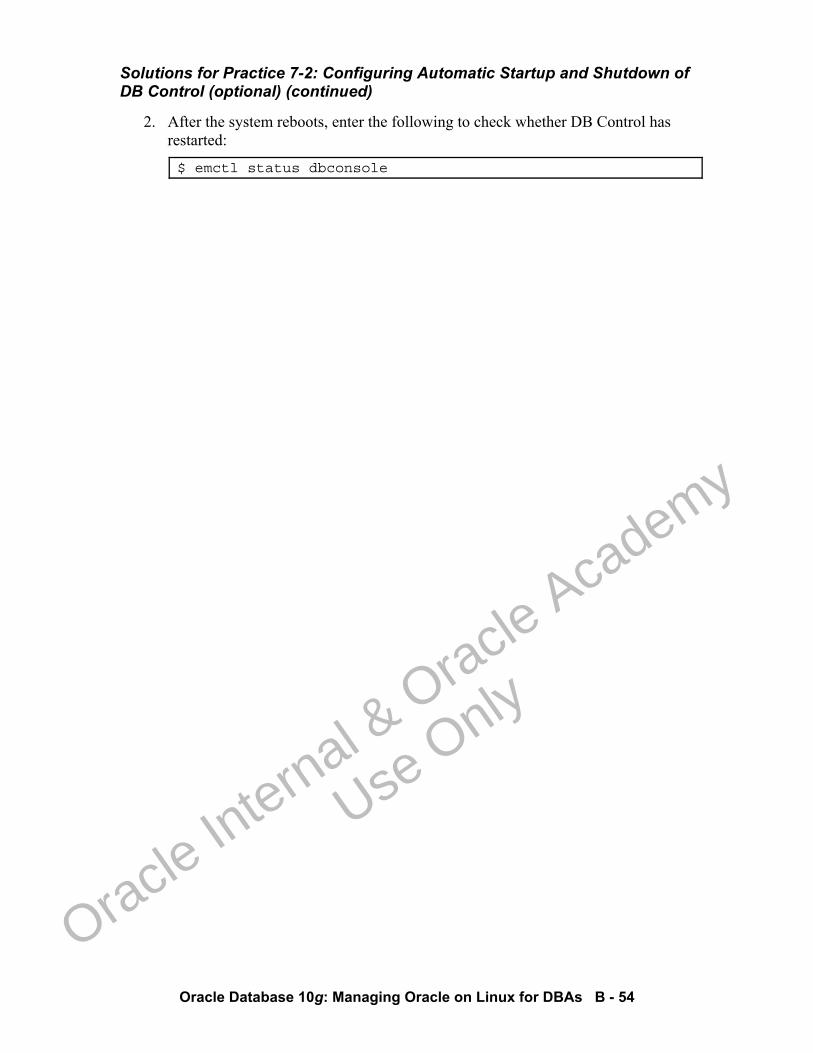
Solutions for Practice 7-2: Configuring Automatic Startup and Shutdown of DB Control (optional) (continued)
Oracle Database 10g: Managing Oracle on Linux for DBAs B - 54
2. After the system reboots, enter the following to check whether DB Control has restarted:
$ emctl status dbconsole
Oracle In
ternal & O
racle Aca
demy
Use O
nly
Oracle Database 10g: Managing Oracle on Linux for DBAs B - 55
Solutions for Practice 7-3: Installing Linux In this practice, you will run a viewlet of the process of installing Enterprise Linux.
1) Launch the viewlet using the install_el4u4_launcher.html file.
Answer:
1. While in the ~oracle/labs directory, enter the following at the OS prompt:
$ htmlview install_el4u4_launcher.html
2. When the browser window appears, click the link that appears on the page.
3. The viewlet begins running. Use the navigation buttons at the bottom of the screen to pause, restart, and so on.
2) Answer the following questions:
a. Why was a graphical environment not installed by default?
__________________________________________________________________
b. What is the mount point for the swap partition?
________________________
c. Are sar and iostat installed by default?
________________________
d. Is creating a root user optional?
________________________
Answer: 1. Following are the answers to the questions listed:
a. The graphical environment was not installed by default because you chose a Server type installation.
b. You do not specify the mount point for a swap partition. It is not actually a file system, and thus is not mounted.
c. No, sar and iostat are not installed by default. You have to select those from the System Tools list of packages.
d. No, you must have a root user. The installation process creates the user, and asks you for the password.
Oracle In
ternal & O
racle Aca
demy
Use O
nly
Oracle Database 10g: Managing Oracle on Linux for DBAs B - 56
Practice Solutions for Lesson 8: Managing Memory
Oracle In
ternal & O
racle Aca
demy
Use O
nly
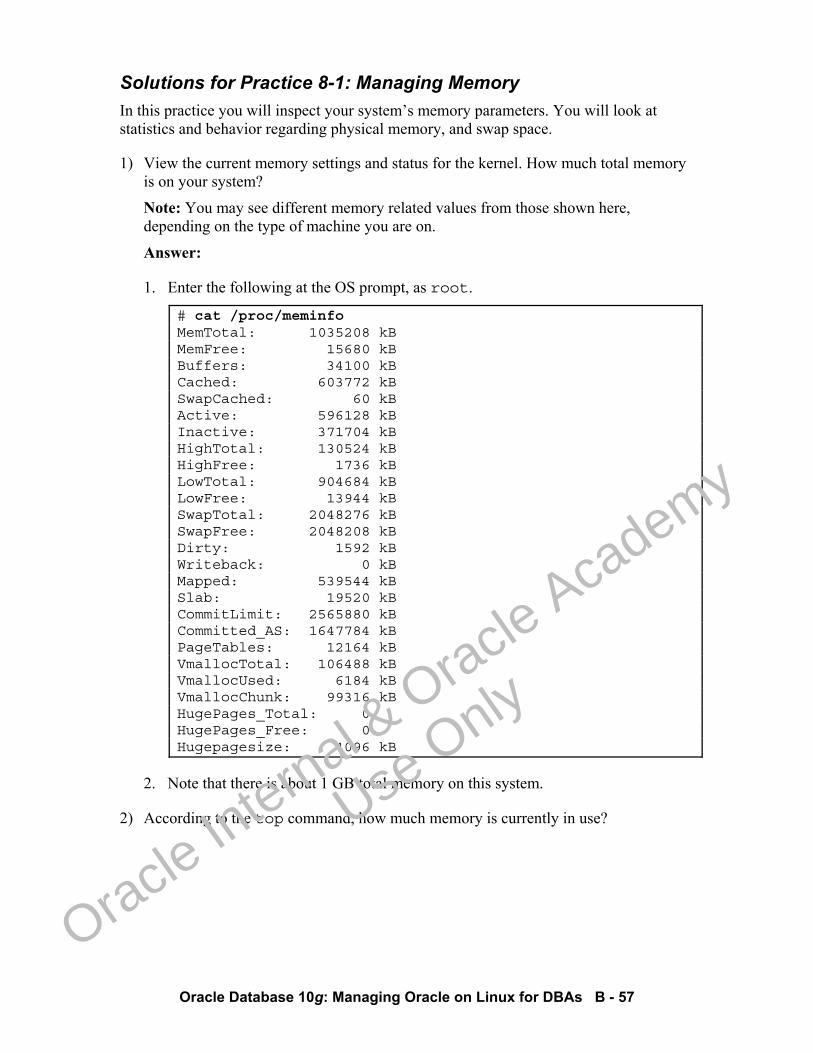
Oracle Database 10g: Managing Oracle on Linux for DBAs B - 57
Solutions for Practice 8-1: Managing Memory In this practice you will inspect your system’s memory parameters. You will look at statistics and behavior regarding physical memory, and swap space.
1) View the current memory settings and status for the kernel. How much total memory is on your system?
Note: You may see different memory related values from those shown here, depending on the type of machine you are on.
Answer:
1. Enter the following at the OS prompt, as root.
# cat /proc/meminfo MemTotal: 1035208 kB MemFree: 15680 kB Buffers: 34100 kB Cached: 603772 kB SwapCached: 60 kB Active: 596128 kB Inactive: 371704 kB HighTotal: 130524 kB HighFree: 1736 kB LowTotal: 904684 kB LowFree: 13944 kB SwapTotal: 2048276 kB SwapFree: 2048208 kB Dirty: 1592 kB Writeback: 0 kB Mapped: 539544 kB Slab: 19520 kB CommitLimit: 2565880 kB Committed_AS: 1647784 kB PageTables: 12164 kB VmallocTotal: 106488 kB VmallocUsed: 6184 kB VmallocChunk: 99316 kB HugePages_Total: 0 HugePages_Free: 0 Hugepagesize: 4096 kB
2. Note that there is about 1 GB total memory on this system.
2) According to the top command, how much memory is currently in use?
Oracle In
ternal & O
racle Aca
demy
Use O
nly
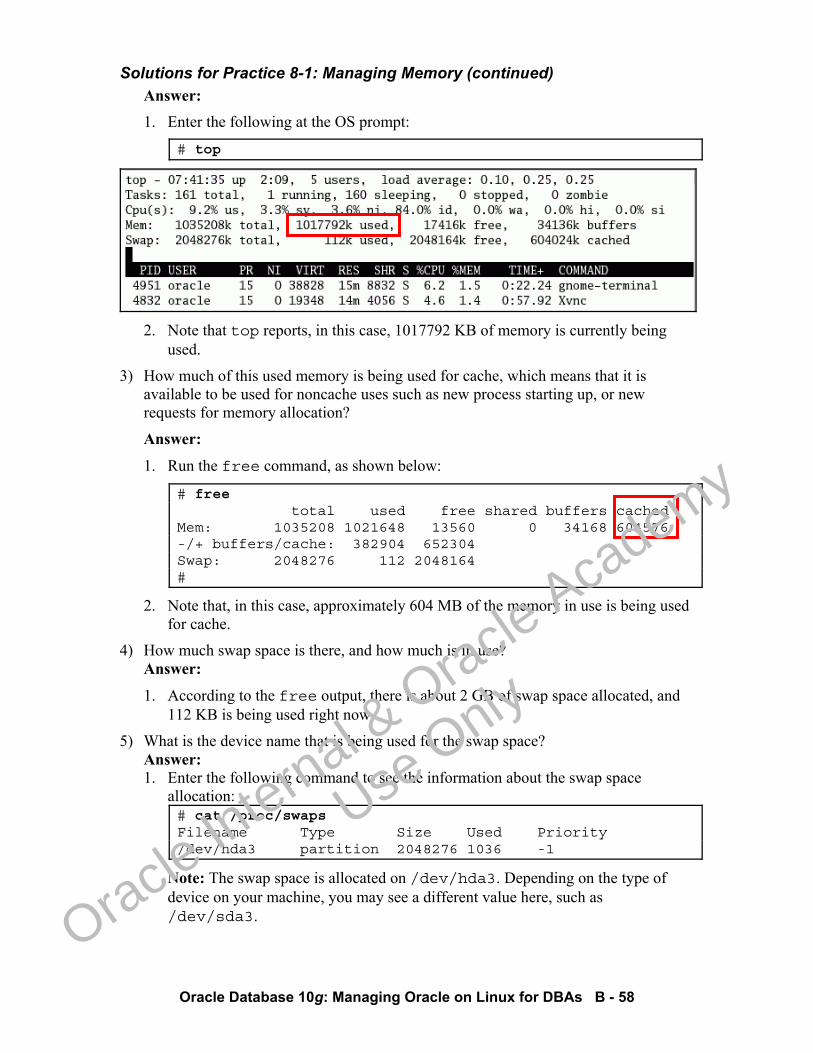
Solutions for Practice 8-1: Managing Memory (continued)
Oracle Database 10g: Managing Oracle on Linux for DBAs B - 58
Answer: 1. Enter the following at the OS prompt:
# top
2. Note that top reports, in this case, 1017792 KB of memory is currently being
used.
3) How much of this used memory is being used for cache, which means that it is available to be used for noncache uses such as new process starting up, or new requests for memory allocation?
Answer:
1. Run the free command, as shown below:
# free total used free shared buffers cached Mem: 1035208 1021648 13560 0 34168 604576 -/+ buffers/cache: 382904 652304 Swap: 2048276 112 2048164 #
2. Note that, in this case, approximately 604 MB of the memory in use is being used for cache.
4) How much swap space is there, and how much is in use? Answer:
1. According to the free output, there is about 2 GB of swap space allocated, and 112 KB is being used right now.
5) What is the device name that is being used for the swap space? Answer: 1. Enter the following command to see the information about the swap space
allocation: # cat /proc/swaps Filename Type Size Used Priority /dev/hda3 partition 2048276 1036 -1
Note: The swap space is allocated on /dev/hda3. Depending on the type of device on your machine, you may see a different value here, such as /dev/sda3.
Oracle In
ternal & O
racle Aca
demy
Use O
nly
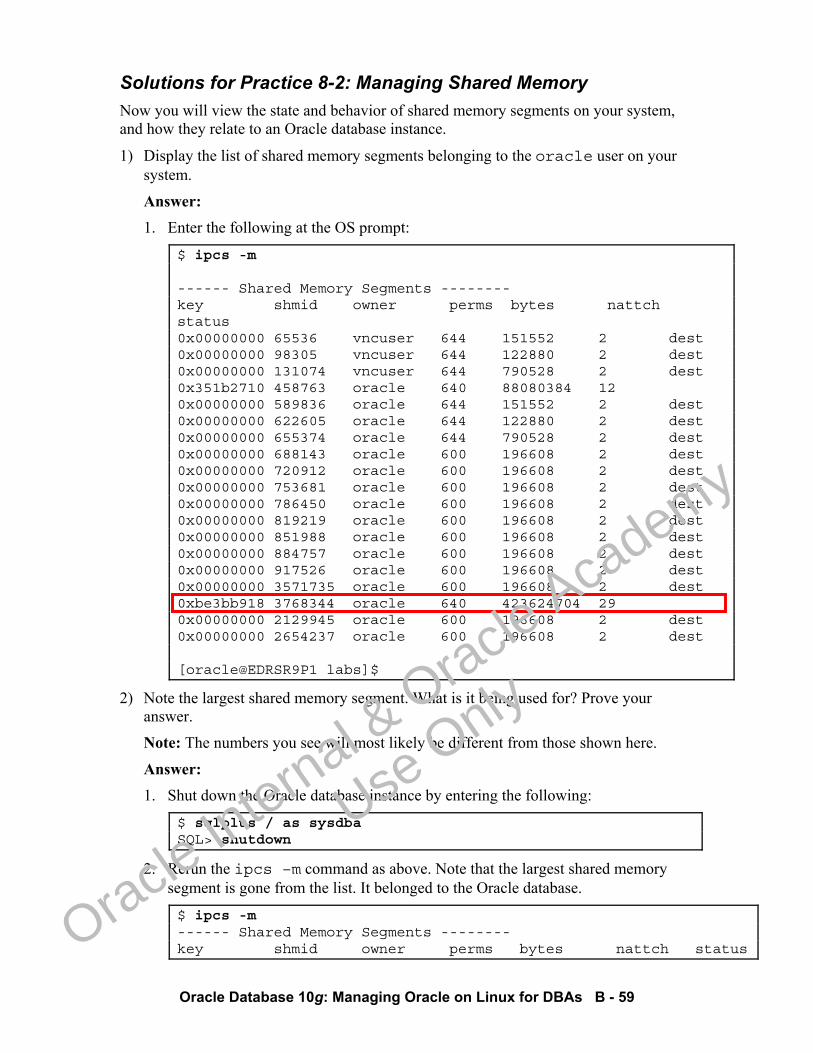
Oracle Database 10g: Managing Oracle on Linux for DBAs B - 59
Solutions for Practice 8-2: Managing Shared Memory Now you will view the state and behavior of shared memory segments on your system, and how they relate to an Oracle database instance.
1) Display the list of shared memory segments belonging to the oracle user on your system.
Answer: 1. Enter the following at the OS prompt:
$ ipcs -m ------ Shared Memory Segments -------- key shmid owner perms bytes nattch status 0x00000000 65536 vncuser 644 151552 2 dest 0x00000000 98305 vncuser 644 122880 2 dest 0x00000000 131074 vncuser 644 790528 2 dest 0x351b2710 458763 oracle 640 88080384 12 0x00000000 589836 oracle 644 151552 2 dest 0x00000000 622605 oracle 644 122880 2 dest 0x00000000 655374 oracle 644 790528 2 dest 0x00000000 688143 oracle 600 196608 2 dest 0x00000000 720912 oracle 600 196608 2 dest 0x00000000 753681 oracle 600 196608 2 dest 0x00000000 786450 oracle 600 196608 2 dest 0x00000000 819219 oracle 600 196608 2 dest 0x00000000 851988 oracle 600 196608 2 dest 0x00000000 884757 oracle 600 196608 2 dest 0x00000000 917526 oracle 600 196608 2 dest 0x00000000 3571735 oracle 600 196608 2 dest 0xbe3bb918 3768344 oracle 640 423624704 29 0x00000000 2129945 oracle 600 196608 2 dest 0x00000000 2654237 oracle 600 196608 2 dest [oracle@EDRSR9P1 labs]$
2) Note the largest shared memory segment. What is it being used for? Prove your answer.
Note: The numbers you see will most likely be different from those shown here.
Answer: 1. Shut down the Oracle database instance by entering the following:
$ sqlplus / as sysdba SQL> shutdown
2. Rerun the ipcs –m command as above. Note that the largest shared memory segment is gone from the list. It belonged to the Oracle database.
$ ipcs -m ------ Shared Memory Segments -------- key shmid owner perms bytes nattch status
Oracle In
ternal & O
racle Aca
demy
Use O
nly
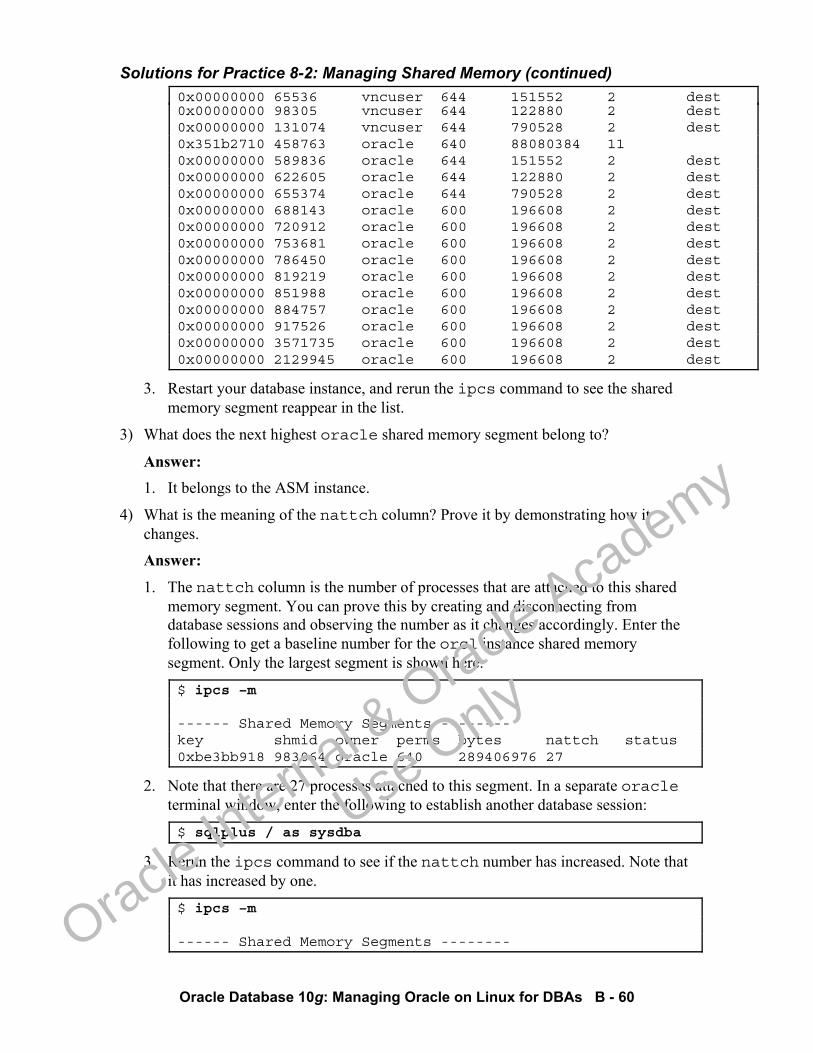
Solutions for Practice 8-2: Managing Shared Memory (continued)
Oracle Database 10g: Managing Oracle on Linux for DBAs B - 60
0x00000000 65536 vncuser 644 151552 2 dest 0x00000000 98305 vncuser 644 122880 2 dest 0x00000000 131074 vncuser 644 790528 2 dest 0x351b2710 458763 oracle 640 88080384 11 0x00000000 589836 oracle 644 151552 2 dest 0x00000000 622605 oracle 644 122880 2 dest 0x00000000 655374 oracle 644 790528 2 dest 0x00000000 688143 oracle 600 196608 2 dest 0x00000000 720912 oracle 600 196608 2 dest 0x00000000 753681 oracle 600 196608 2 dest 0x00000000 786450 oracle 600 196608 2 dest 0x00000000 819219 oracle 600 196608 2 dest 0x00000000 851988 oracle 600 196608 2 dest 0x00000000 884757 oracle 600 196608 2 dest 0x00000000 917526 oracle 600 196608 2 dest 0x00000000 3571735 oracle 600 196608 2 dest 0x00000000 2129945 oracle 600 196608 2 dest
3. Restart your database instance, and rerun the ipcs command to see the shared memory segment reappear in the list.
3) What does the next highest oracle shared memory segment belong to?
Answer: 1. It belongs to the ASM instance.
4) What is the meaning of the nattch column? Prove it by demonstrating how it changes.
Answer:
1. The nattch column is the number of processes that are attached to this shared memory segment. You can prove this by creating and disconnecting from database sessions and observing the number as it changes accordingly. Enter the following to get a baseline number for the orcl instance shared memory segment. Only the largest segment is shown here.
$ ipcs –m ------ Shared Memory Segments -------- key shmid owner perms bytes nattch status 0xbe3bb918 983064 oracle 640 289406976 27
2. Note that there are 27 processes attached to this segment. In a separate oracle terminal window, enter the following to establish another database session:
$ sqlplus / as sysdba
3. Rerun the ipcs command to see if the nattch number has increased. Note that it has increased by one.
$ ipcs –m ------ Shared Memory Segments --------
Oracle In
ternal & O
racle Aca
demy
Use O
nly
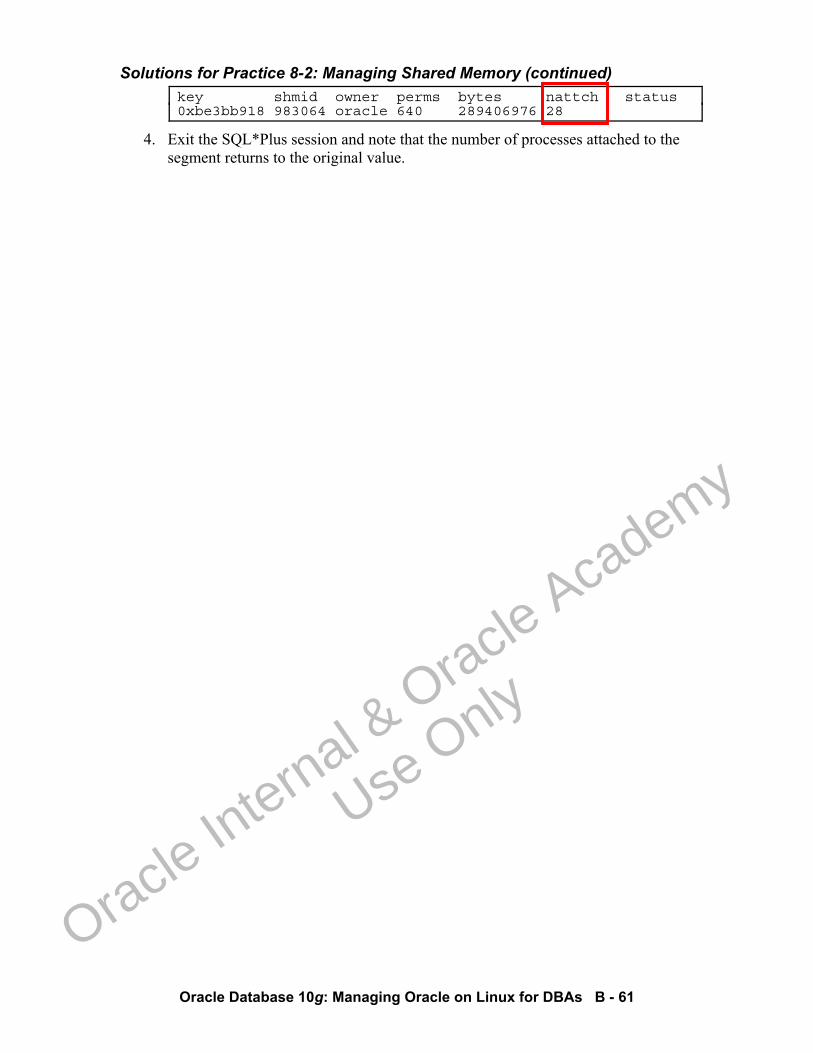
Solutions for Practice 8-2: Managing Shared Memory (continued)
Oracle Database 10g: Managing Oracle on Linux for DBAs B - 61
key shmid owner perms bytes nattch status 0xbe3bb918 983064 oracle 640 289406976 28
4. Exit the SQL*Plus session and note that the number of processes attached to the segment returns to the original value.
Oracle In
ternal & O
racle Aca
demy
Use O
nly
Oracle Database 10g: Managing Oracle on Linux for DBAs B - 62
Practice Solutions for Lesson 9
Oracle In
ternal & O
racle Aca
demy
Use O
nly
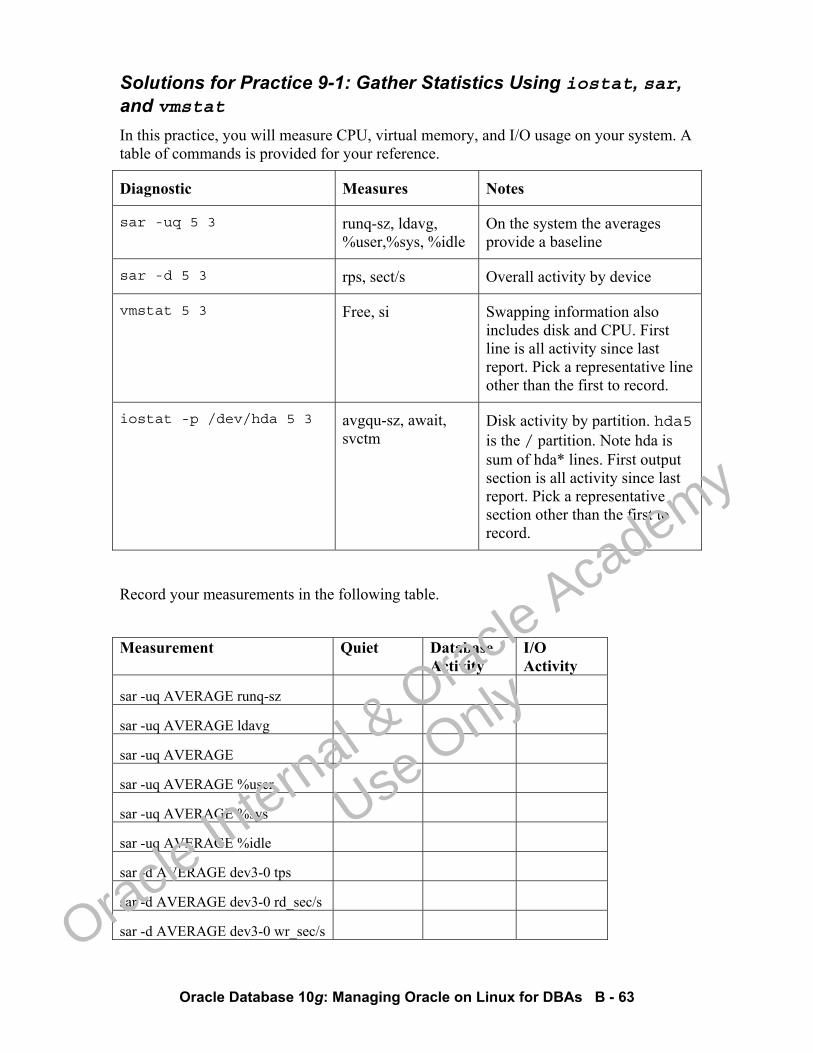
Oracle Database 10g: Managing Oracle on Linux for DBAs B - 63
Solutions for Practice 9-1: Gather Statistics Using iostat, sar, and vmstat In this practice, you will measure CPU, virtual memory, and I/O usage on your system. A table of commands is provided for your reference.
Diagnostic Measures Notes
sar -uq 5 3 runq-sz, ldavg, %user,%sys, %idle
On the system the averages provide a baseline
sar -d 5 3 rps, sect/s Overall activity by device
vmstat 5 3 Free, si Swapping information also includes disk and CPU. First line is all activity since last report. Pick a representative line other than the first to record.
iostat -p /dev/hda 5 3 avgqu-sz, await, svctm
Disk activity by partition. hda5 is the / partition. Note hda is sum of hda* lines. First output section is all activity since last report. Pick a representative section other than the first to record.
Record your measurements in the following table.
Measurement Quiet Database Activity
I/O Activity
sar -uq AVERAGE runq-sz
sar -uq AVERAGE ldavg
sar -uq AVERAGE
sar -uq AVERAGE %user
sar -uq AVERAGE %sys
sar -uq AVERAGE %idle
sar -d AVERAGE dev3-0 tps
sar -d AVERAGE dev3-0 rd_sec/s
sar -d AVERAGE dev3-0 wr_sec/s
Oracle In
ternal & O
racle Aca
demy
Use O
nly
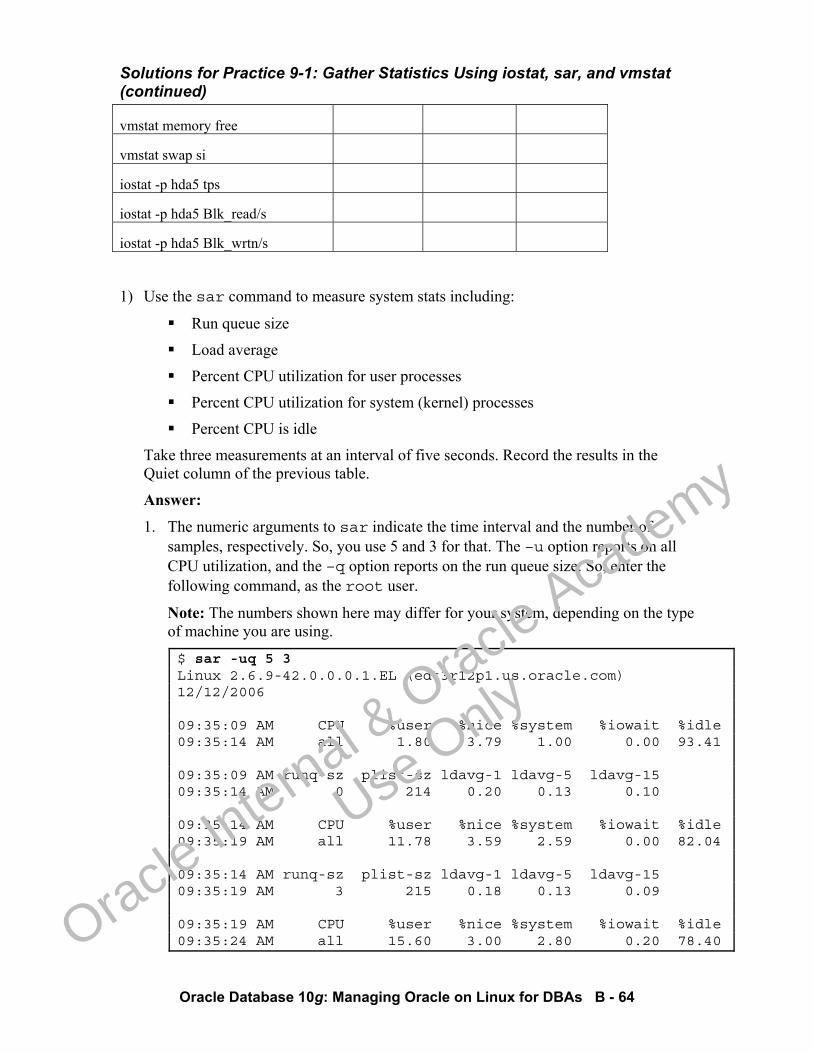
Solutions for Practice 9-1: Gather Statistics Using iostat, sar, and vmstat (continued)
Oracle Database 10g: Managing Oracle on Linux for DBAs B - 64
vmstat memory free
vmstat swap si
iostat -p hda5 tps
iostat -p hda5 Blk_read/s
iostat -p hda5 Blk_wrtn/s
1) Use the sar command to measure system stats including:
Run queue size
Load average
Percent CPU utilization for user processes
Percent CPU utilization for system (kernel) processes
Percent CPU is idle
Take three measurements at an interval of five seconds. Record the results in the Quiet column of the previous table.
Answer:
1. The numeric arguments to sar indicate the time interval and the number of samples, respectively. So, you use 5 and 3 for that. The –u option reports on all CPU utilization, and the –q option reports on the run queue size. So, enter the following command, as the root user.
Note: The numbers shown here may differ for your system, depending on the type of machine you are using.
$ sar -uq 5 3 Linux 2.6.9-42.0.0.0.1.EL (edt3r12p1.us.oracle.com) 12/12/2006 09:35:09 AM CPU %user %nice %system %iowait %idle 09:35:14 AM all 1.80 3.79 1.00 0.00 93.41 09:35:09 AM runq-sz plist-sz ldavg-1 ldavg-5 ldavg-15 09:35:14 AM 0 214 0.20 0.13 0.10 09:35:14 AM CPU %user %nice %system %iowait %idle 09:35:19 AM all 11.78 3.59 2.59 0.00 82.04 09:35:14 AM runq-sz plist-sz ldavg-1 ldavg-5 ldavg-15 09:35:19 AM 3 215 0.18 0.13 0.09 09:35:19 AM CPU %user %nice %system %iowait %idle 09:35:24 AM all 15.60 3.00 2.80 0.20 78.40
Oracle In
ternal & O
racle Aca
demy
Use O
nly
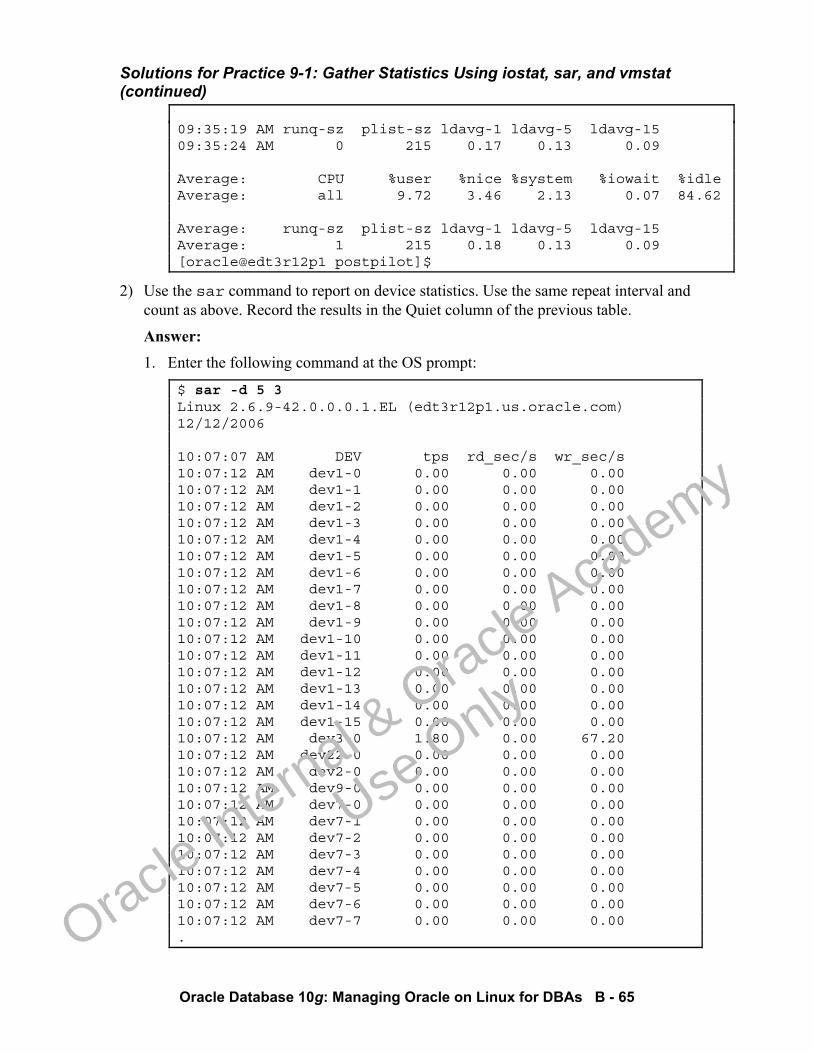
Solutions for Practice 9-1: Gather Statistics Using iostat, sar, and vmstat (continued)
Oracle Database 10g: Managing Oracle on Linux for DBAs B - 65
09:35:19 AM runq-sz plist-sz ldavg-1 ldavg-5 ldavg-15 09:35:24 AM 0 215 0.17 0.13 0.09 Average: CPU %user %nice %system %iowait %idle Average: all 9.72 3.46 2.13 0.07 84.62 Average: runq-sz plist-sz ldavg-1 ldavg-5 ldavg-15 Average: 1 215 0.18 0.13 0.09 [oracle@edt3r12p1 postpilot]$
2) Use the sar command to report on device statistics. Use the same repeat interval and count as above. Record the results in the Quiet column of the previous table.
Answer: 1. Enter the following command at the OS prompt:
$ sar -d 5 3 Linux 2.6.9-42.0.0.0.1.EL (edt3r12p1.us.oracle.com) 12/12/2006 10:07:07 AM DEV tps rd_sec/s wr_sec/s 10:07:12 AM dev1-0 0.00 0.00 0.00 10:07:12 AM dev1-1 0.00 0.00 0.00 10:07:12 AM dev1-2 0.00 0.00 0.00 10:07:12 AM dev1-3 0.00 0.00 0.00 10:07:12 AM dev1-4 0.00 0.00 0.00 10:07:12 AM dev1-5 0.00 0.00 0.00 10:07:12 AM dev1-6 0.00 0.00 0.00 10:07:12 AM dev1-7 0.00 0.00 0.00 10:07:12 AM dev1-8 0.00 0.00 0.00 10:07:12 AM dev1-9 0.00 0.00 0.00 10:07:12 AM dev1-10 0.00 0.00 0.00 10:07:12 AM dev1-11 0.00 0.00 0.00 10:07:12 AM dev1-12 0.00 0.00 0.00 10:07:12 AM dev1-13 0.00 0.00 0.00 10:07:12 AM dev1-14 0.00 0.00 0.00 10:07:12 AM dev1-15 0.00 0.00 0.00 10:07:12 AM dev3-0 1.80 0.00 67.20 10:07:12 AM dev22-0 0.00 0.00 0.00 10:07:12 AM dev2-0 0.00 0.00 0.00 10:07:12 AM dev9-0 0.00 0.00 0.00 10:07:12 AM dev7-0 0.00 0.00 0.00 10:07:12 AM dev7-1 0.00 0.00 0.00 10:07:12 AM dev7-2 0.00 0.00 0.00 10:07:12 AM dev7-3 0.00 0.00 0.00 10:07:12 AM dev7-4 0.00 0.00 0.00 10:07:12 AM dev7-5 0.00 0.00 0.00 10:07:12 AM dev7-6 0.00 0.00 0.00 10:07:12 AM dev7-7 0.00 0.00 0.00 .
Oracle In
ternal & O
racle Aca
demy
Use O
nly
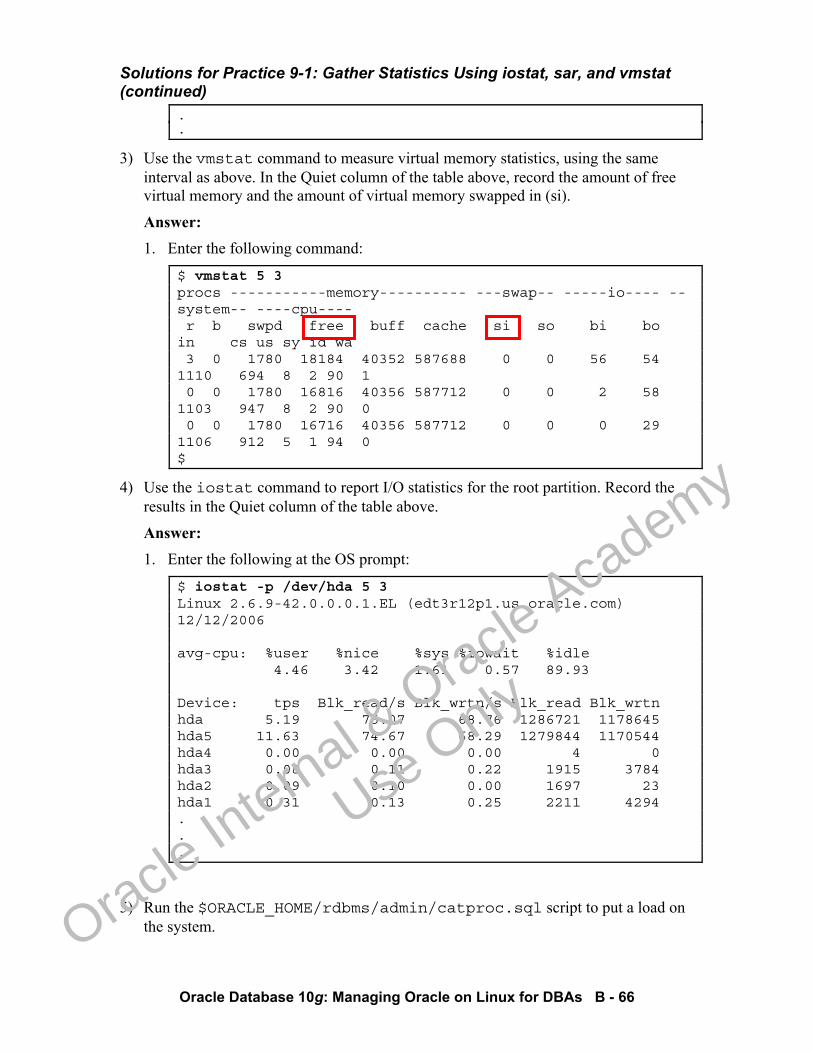
Solutions for Practice 9-1: Gather Statistics Using iostat, sar, and vmstat (continued)
Oracle Database 10g: Managing Oracle on Linux for DBAs B - 66
.
.
3) Use the vmstat command to measure virtual memory statistics, using the same interval as above. In the Quiet column of the table above, record the amount of free virtual memory and the amount of virtual memory swapped in (si).
Answer: 1. Enter the following command:
$ vmstat 5 3 procs -----------memory---------- ---swap-- -----io---- --system-- ----cpu---- r b swpd free buff cache si so bi bo in cs us sy id wa 3 0 1780 18184 40352 587688 0 0 56 54 1110 694 8 2 90 1 0 0 1780 16816 40356 587712 0 0 2 58 1103 947 8 2 90 0 0 0 1780 16716 40356 587712 0 0 0 29 1106 912 5 1 94 0 $
4) Use the iostat command to report I/O statistics for the root partition. Record the results in the Quiet column of the table above.
Answer: 1. Enter the following at the OS prompt:
$ iostat -p /dev/hda 5 3 Linux 2.6.9-42.0.0.0.1.EL (edt3r12p1.us.oracle.com) 12/12/2006 avg-cpu: %user %nice %sys %iowait %idle 4.46 3.42 1.61 0.57 89.93 Device: tps Blk_read/s Blk_wrtn/s Blk_read Blk_wrtn hda 5.19 75.07 68.76 1286721 1178645 hda5 11.63 74.67 68.29 1279844 1170544 hda4 0.00 0.00 0.00 4 0 hda3 0.08 0.11 0.22 1915 3784 hda2 0.09 0.10 0.00 1697 23 hda1 0.31 0.13 0.25 2211 4294 . . .
5) Run the $ORACLE_HOME/rdbms/admin/catproc.sql script to put a load on the system.
Oracle In
ternal & O
racle Aca
demy
Use O
nly
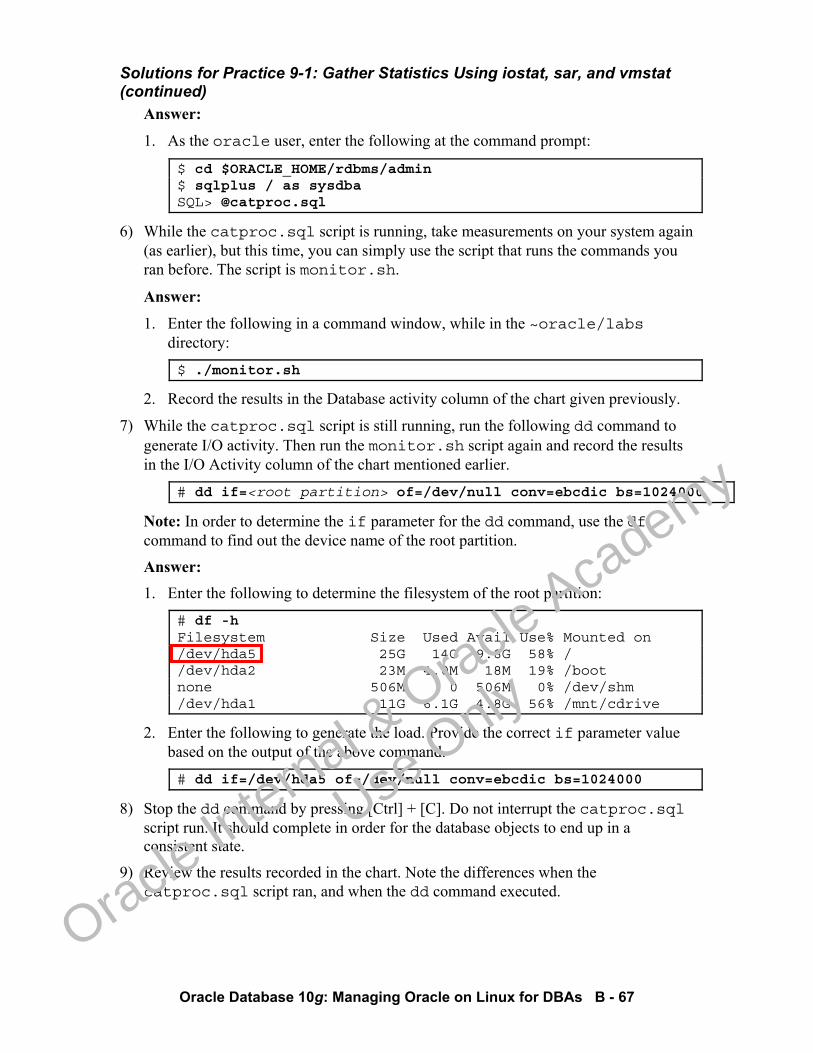
Solutions for Practice 9-1: Gather Statistics Using iostat, sar, and vmstat (continued)
Oracle Database 10g: Managing Oracle on Linux for DBAs B - 67
Answer:
1. As the oracle user, enter the following at the command prompt:
$ cd $ORACLE_HOME/rdbms/admin $ sqlplus / as sysdba SQL> @catproc.sql
6) While the catproc.sql script is running, take measurements on your system again (as earlier), but this time, you can simply use the script that runs the commands you ran before. The script is monitor.sh.
Answer:
1. Enter the following in a command window, while in the ~oracle/labs directory:
$ ./monitor.sh
2. Record the results in the Database activity column of the chart given previously.
7) While the catproc.sql script is still running, run the following dd command to generate I/O activity. Then run the monitor.sh script again and record the results in the I/O Activity column of the chart mentioned earlier.
# dd if=<root partition> of=/dev/null conv=ebcdic bs=1024000
Note: In order to determine the if parameter for the dd command, use the df command to find out the device name of the root partition.
Answer: 1. Enter the following to determine the filesystem of the root partition:
# df -h Filesystem Size Used Avail Use% Mounted on /dev/hda5 25G 14G 9.8G 58% / /dev/hda2 23M 4.0M 18M 19% /boot none 506M 0 506M 0% /dev/shm /dev/hda1 11G 6.1G 4.8G 56% /mnt/cdrive
2. Enter the following to generate the load. Provide the correct if parameter value based on the output of the above command.
# dd if=/dev/hda5 of=/dev/null conv=ebcdic bs=1024000
8) Stop the dd command by pressing [Ctrl] + [C]. Do not interrupt the catproc.sql script run. It should complete in order for the database objects to end up in a consistent state.
9) Review the results recorded in the chart. Note the differences when the catproc.sql script ran, and when the dd command executed.
Oracle In
ternal & O
racle Aca
demy
Use O
nly
Oracle Database 10g: Managing Oracle on Linux for DBAs B - 68
Solutions for Practice 9-2: Using Graphical Monitoring Tools This practice enables you to install and use xosview to monitor CPU, memory, and disk I/O.
1) Attempt to run xosview. This will fail because xosview is not installed by default.
Answer: 1. Enter the following at the OS prompt:
# xosview -bash: xosview: command not found #
2) Install xosview as root, using the xosview-1.8.2-1.i386.rpm file.
Answer:
1. As the root user, enter the following at the OS prompt:
# cd /home/oracle/labs # rpm -ivh xosview-1.8.2-1.i386.rpm warning: xosview-1.8.2-1.i386.rpm: V3 DSA signature: NOKEY, key ID 4f2a6fd2 Preparing... ########################################### [100%] 1:xosview ########################################### [100%] #
3) Run xosview by entering the xosview command, as root.
Answer:
1. Enter the following, as root, at the command line:
# xosview
2. Note the graphic that appears, showing various statistics.
Oracle In
ternal & O
racle Aca
demy
Use O
nly
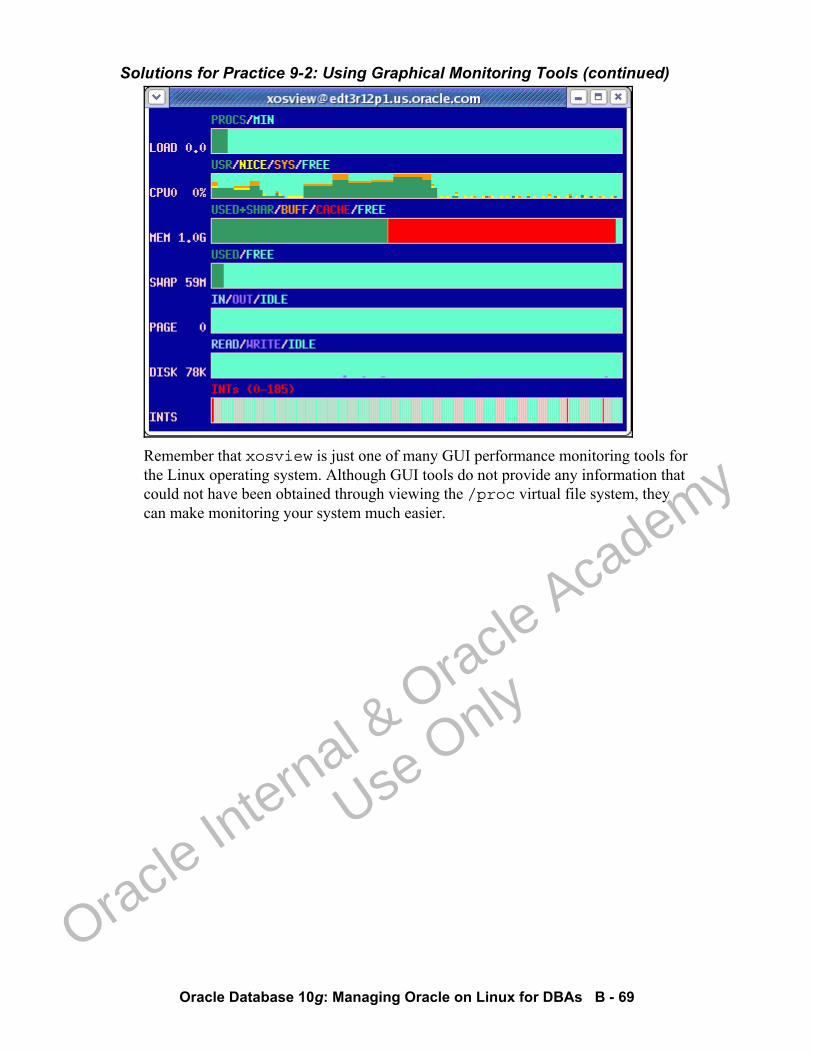
Solutions for Practice 9-2: Using Graphical Monitoring Tools (continued)
Oracle Database 10g: Managing Oracle on Linux for DBAs B - 69
Remember that xosview is just one of many GUI performance monitoring tools for the Linux operating system. Although GUI tools do not provide any information that could not have been obtained through viewing the /proc virtual file system, they can make monitoring your system much easier.
Oracle In
ternal & O
racle Aca
demy
Use O
nly

Oracle Database 10g: Managing Oracle on Linux for DBAs B - 70
Practice Solutions for Lesson 10: Tuning Performance
Oracle In
ternal & O
racle Aca
demy
Use O
nly
Oracle Database 10g: Managing Oracle on Linux for DBAs B - 71
Solutions for Practice 10-1: Adjusting the SGA Size Often increasing the size of the Shared Global Area (SGA) improves performance by allowing more data to be resident in memory rather than having to be read from disk frequently. In this practice, you will increase the size of the SGA.
1) Adjust the SGA size to at least 400 MB.
Note: If it is already greater than 400 MB, do not change anything.
Answer: 1. Start the browser by clicking the Web browser icon at the top of the screen.
2. Navigate to the following URL:
http://<machine name>:1158/em
3. Log in to Enterprise Manager as the SYS user with the password, oracle. Connect as SYSDBA.
4. Click Memory Parameters on the Administration tabbed page.
5. If the value for Maximum SGA Size is less than 400 MB, enter 400 for it, and then click Apply. If it is already at least 400 MB, you can skip this step and the remainder of this practice (10-1).
6. Click Yes to confirm that the database is to be restarted.
7. Enter oracle and oracle for the Host Username and Password, respectively. Click OK, and then click Yes to proceed with the restart.
8. Click Refresh after a minute until the database is restarted. Then log in as SYS again, and check the maximum SGA size setting, to verify that it is now 400 MB.
9. Enter 400 for the Total SGA size, and click Apply.
Oracle In
ternal & O
racle Aca
demy
Use O
nly
Oracle Database 10g: Managing Oracle on Linux for DBAs B - 72
Solutions for Practice 10-2: Adjusting Block Sizes You can select different block sizes for each tablespace, and that can affect performance. This practice illustrates the difference in performance different block sizes can have, depending on the type of activity on the tablespace.
1) Set the cache size to 128 MB for tablespaces with 2 KB block size.
Answer: 1. In Enterprise Manager (EM), click All Initialization Parameters on the
Administration tabbed page.
2. On the Initialization Parameters page, enter 2k in the Name field, and click Go.
3. For the db_2k_cache_size variable, enter 128M for the value, and then click Apply.
2) Set the cache size to 128 MB for the 16 KB block size.
Answer: 1. Perform the same steps as for the 2k setting, except making the change to the
db_16k_cache_size variable.
3) Create the TS2 tablespace in ASM, which has a 2 KB block size, is NOLOGGING, and is 128 MB in size.
Answer: 1. Click Tablespaces on the Administration tabbed page.
2. On the Tablespaces page, click Create.
3. Enter TS2 for the Name, and then click Add in the Datafiles section.
4. Set the File Size to 128 MB, and then click Continue.
5. Click the Storage tab.
6. Set the Block Size to 2048.
7. Click OK.
Note: You can optionally run this statement in SQL*Plus:
CREATE SMALLFILE TABLESPACE "TS2" DATAFILE'+DF' SIZE 128M LOGGING EXTENT MANAGEMENT LOCAL SEGMENT SPACE MANAGEMENT AUTO BLOCKSIZE 2048
4) Create the TS16 tablespace in ASM, which has a 16 KB block size, is NOLOGGING, and is 128 MB in size.
Answer:
1. Perform the same steps as you did for the TS2 tablespace, except naming it TS16, and setting the block size to 16384.
Note: You can optionally run this statement in SQL*Plus:
Oracle In
ternal & O
racle Aca
demy
Use O
nly
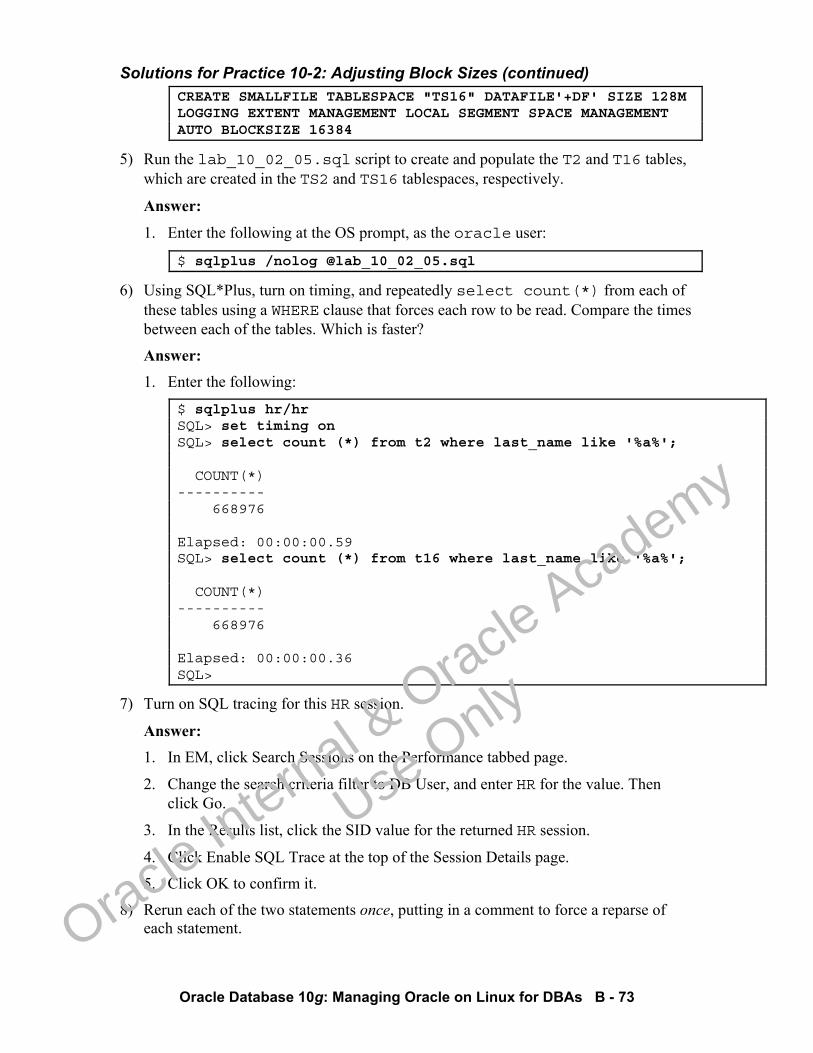
Solutions for Practice 10-2: Adjusting Block Sizes (continued)
Oracle Database 10g: Managing Oracle on Linux for DBAs B - 73
CREATE SMALLFILE TABLESPACE "TS16" DATAFILE'+DF' SIZE 128M LOGGING EXTENT MANAGEMENT LOCAL SEGMENT SPACE MANAGEMENT AUTO BLOCKSIZE 16384
5) Run the lab_10_02_05.sql script to create and populate the T2 and T16 tables, which are created in the TS2 and TS16 tablespaces, respectively.
Answer:
1. Enter the following at the OS prompt, as the oracle user:
$ sqlplus /nolog @lab_10_02_05.sql
6) Using SQL*Plus, turn on timing, and repeatedly select count(*) from each of these tables using a WHERE clause that forces each row to be read. Compare the times between each of the tables. Which is faster?
Answer: 1. Enter the following:
$ sqlplus hr/hr SQL> set timing on SQL> select count (*) from t2 where last_name like '%a%'; COUNT(*) ---------- 668976 Elapsed: 00:00:00.59 SQL> select count (*) from t16 where last_name like '%a%'; COUNT(*) ---------- 668976 Elapsed: 00:00:00.36 SQL>
7) Turn on SQL tracing for this HR session.
Answer: 1. In EM, click Search Sessions on the Performance tabbed page.
2. Change the search criteria filter to DB User, and enter HR for the value. Then click Go.
3. In the Results list, click the SID value for the returned HR session.
4. Click Enable SQL Trace at the top of the Session Details page.
5. Click OK to confirm it.
8) Rerun each of the two statements once, putting in a comment to force a reparse of each statement.
Oracle In
ternal & O
racle Aca
demy
Use O
nly
Solutions for Practice 10-2: Adjusting Block Sizes (continued)
Oracle Database 10g: Managing Oracle on Linux for DBAs B - 74
Answer: 1. Edit and rerun each of the statements to look similar to the following. It is
important to put a comment in to make the statement get reparsed. Run each of the statements only once.
SQL> select /* 1 */ count (*) from t2 where last_name like '%a%'; COUNT(*) ---------- 668976 Elapsed: 00:00:00.59 SQL> select /* 1 */ count (*) from t16 where last_name like '%a%'; COUNT(*) ---------- 668976 Elapsed: 00:00:00.36
9) Use EM to view the statistics for each of these two statement executions.
Answer: 1. In EM, on the Session Details page, click the Activity tab.
2. Click the SQL ID that corresponds to one of the statements you just ran, in the section labeled Detail for Selected 5 Minute Interval.
3. On the SQL Details page, click the Statistics tab, and note the time-related statistics.
Oracle In
ternal & O
racle Aca
demy
Use O
nly
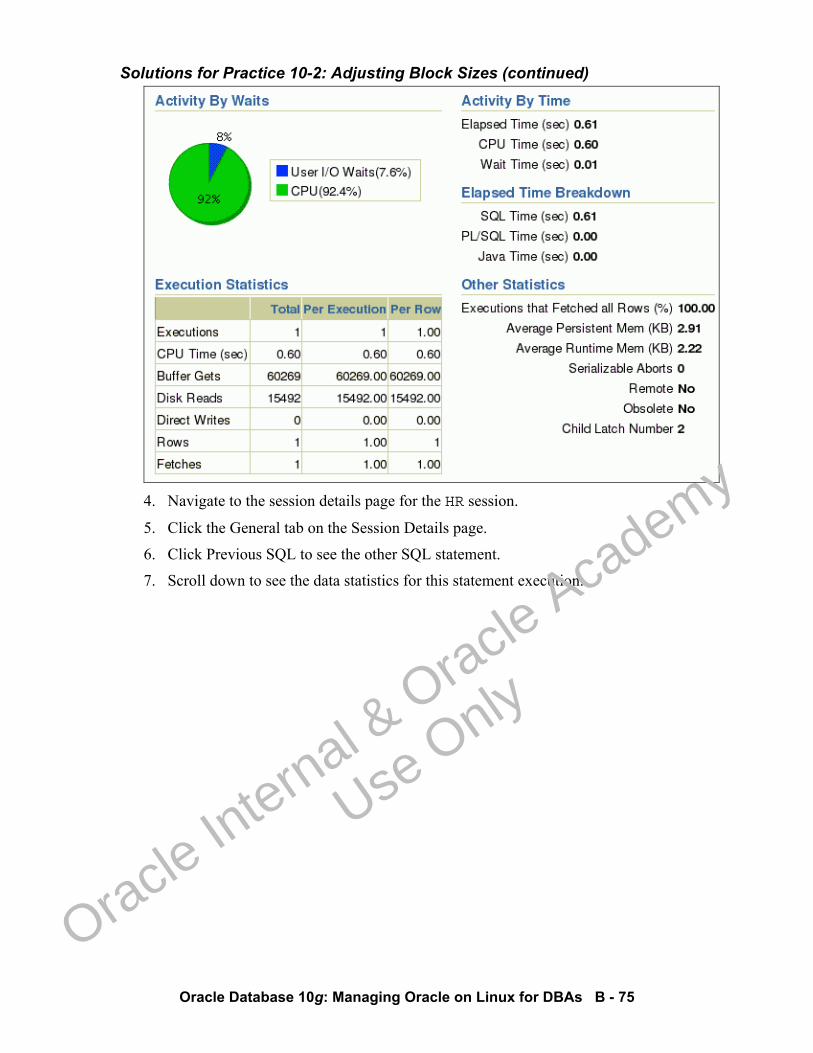
Solutions for Practice 10-2: Adjusting Block Sizes (continued)
Oracle Database 10g: Managing Oracle on Linux for DBAs B - 75
4. Navigate to the session details page for the HR session.
5. Click the General tab on the Session Details page.
6. Click Previous SQL to see the other SQL statement.
7. Scroll down to see the data statistics for this statement execution.
Oracle In
ternal & O
racle Aca
demy
Use O
nly
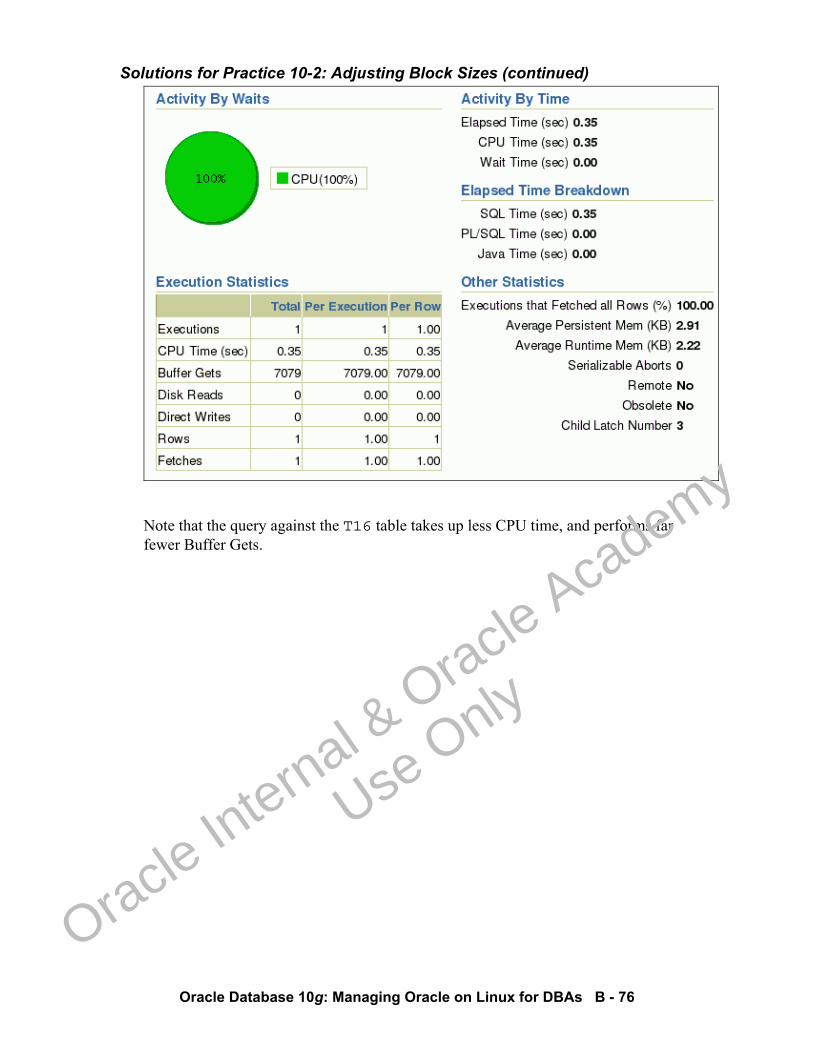
Solutions for Practice 10-2: Adjusting Block Sizes (continued)
Oracle Database 10g: Managing Oracle on Linux for DBAs B - 76
Note that the query against the T16 table takes up less CPU time, and performs far fewer Buffer Gets.
Oracle In
ternal & O
racle Aca
demy
Use O
nly
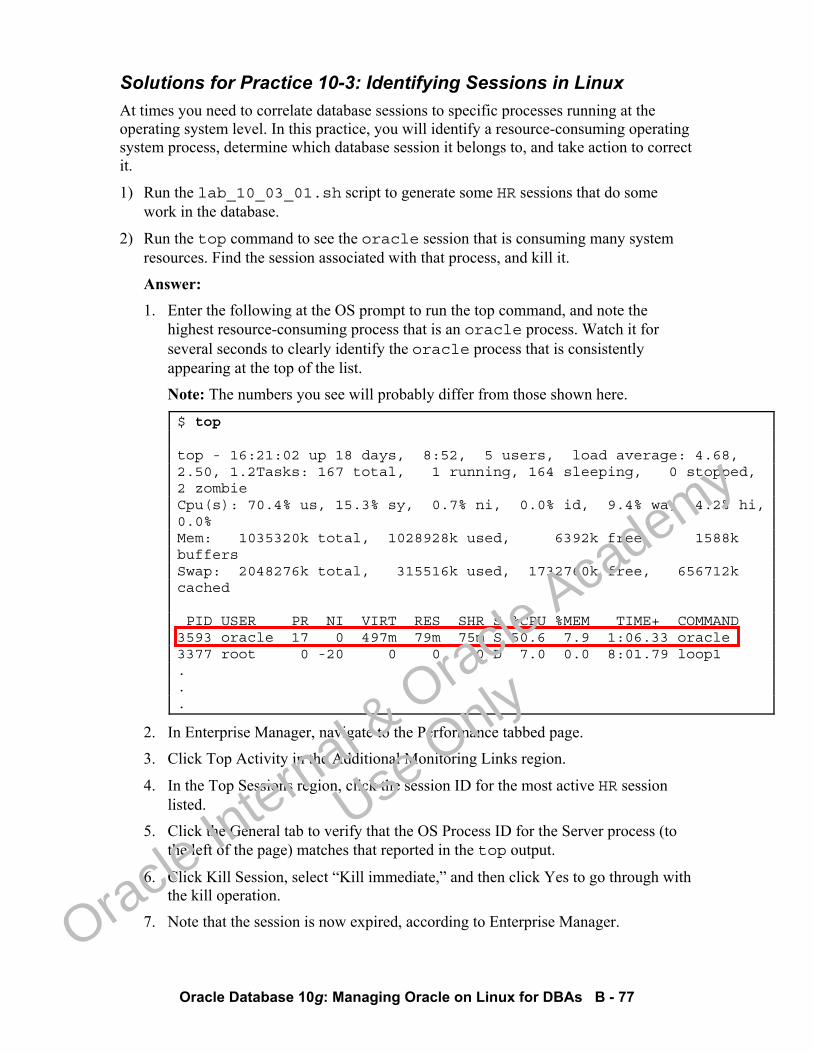
Oracle Database 10g: Managing Oracle on Linux for DBAs B - 77
Solutions for Practice 10-3: Identifying Sessions in Linux At times you need to correlate database sessions to specific processes running at the operating system level. In this practice, you will identify a resource-consuming operating system process, determine which database session it belongs to, and take action to correct it.
1) Run the lab_10_03_01.sh script to generate some HR sessions that do some work in the database.
2) Run the top command to see the oracle session that is consuming many system resources. Find the session associated with that process, and kill it.
Answer: 1. Enter the following at the OS prompt to run the top command, and note the
highest resource-consuming process that is an oracle process. Watch it for several seconds to clearly identify the oracle process that is consistently appearing at the top of the list.
Note: The numbers you see will probably differ from those shown here.
$ top top - 16:21:02 up 18 days, 8:52, 5 users, load average: 4.68, 2.50, 1.2Tasks: 167 total, 1 running, 164 sleeping, 0 stopped, 2 zombie Cpu(s): 70.4% us, 15.3% sy, 0.7% ni, 0.0% id, 9.4% wa, 4.2% hi, 0.0% Mem: 1035320k total, 1028928k used, 6392k free, 1588k buffers Swap: 2048276k total, 315516k used, 1732760k free, 656712k cached PID USER PR NI VIRT RES SHR S %CPU %MEM TIME+ COMMAND 3593 oracle 17 0 497m 79m 75m S 50.6 7.9 1:06.33 oracle 3377 root 0 -20 0 0 0 D 7.0 0.0 8:01.79 loop1 . . .
2. In Enterprise Manager, navigate to the Performance tabbed page.
3. Click Top Activity in the Additional Monitoring Links region.
4. In the Top Sessions region, click the session ID for the most active HR session listed.
5. Click the General tab to verify that the OS Process ID for the Server process (to the left of the page) matches that reported in the top output.
6. Click Kill Session, select “Kill immediate,” and then click Yes to go through with the kill operation.
7. Note that the session is now expired, according to Enterprise Manager.
Oracle In
ternal & O
racle Aca
demy
Use O
nly
Solutions for Practice 10-3: Identifying Sessions in Linux (continued)
Oracle Database 10g: Managing Oracle on Linux for DBAs B - 78
8. View the top output again, and ensure that the process in question is no longer there.
Oracle In
ternal & O
racle Aca
demy
Use O
nly
Oracle Database 10g: Managing Oracle on Linux for DBAs B - 79
Practice Solutions for Lesson 11: Diagnosing Oracle on Linux
Oracle In
ternal & O
racle Aca
demy
Use O
nly
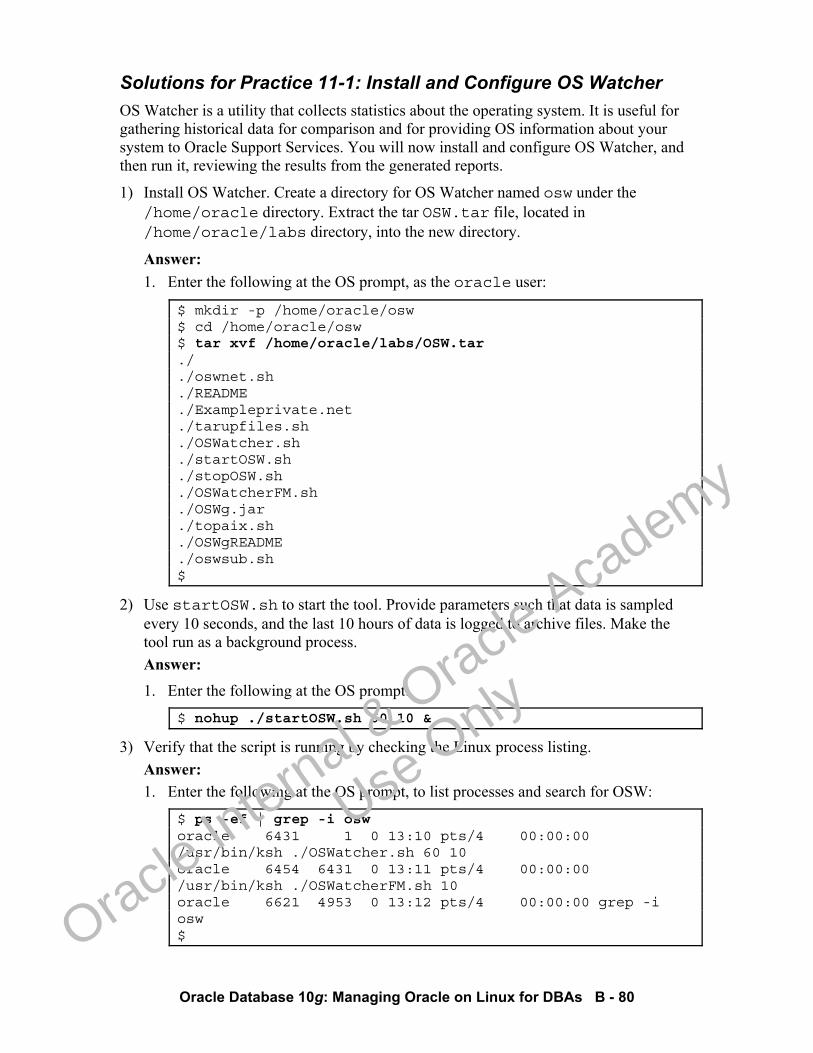
Oracle Database 10g: Managing Oracle on Linux for DBAs B - 80
Solutions for Practice 11-1: Install and Configure OS Watcher OS Watcher is a utility that collects statistics about the operating system. It is useful for gathering historical data for comparison and for providing OS information about your system to Oracle Support Services. You will now install and configure OS Watcher, and then run it, reviewing the results from the generated reports.
1) Install OS Watcher. Create a directory for OS Watcher named osw under the /home/oracle directory. Extract the tar OSW.tar file, located in /home/oracle/labs directory, into the new directory.
Answer: 1. Enter the following at the OS prompt, as the oracle user:
$ mkdir -p /home/oracle/osw $ cd /home/oracle/osw $ tar xvf /home/oracle/labs/OSW.tar ./ ./oswnet.sh ./README ./Exampleprivate.net ./tarupfiles.sh ./OSWatcher.sh ./startOSW.sh ./stopOSW.sh ./OSWatcherFM.sh ./OSWg.jar ./topaix.sh ./OSWgREADME ./oswsub.sh $
2) Use startOSW.sh to start the tool. Provide parameters such that data is sampled every 10 seconds, and the last 10 hours of data is logged to archive files. Make the tool run as a background process. Answer: 1. Enter the following at the OS prompt:
$ nohup ./startOSW.sh 60 10 &
3) Verify that the script is running by checking the Linux process listing. Answer: 1. Enter the following at the OS prompt, to list processes and search for OSW:
$ ps -ef | grep -i osw oracle 6431 1 0 13:10 pts/4 00:00:00 /usr/bin/ksh ./OSWatcher.sh 60 10 oracle 6454 6431 0 13:11 pts/4 00:00:00 /usr/bin/ksh ./OSWatcherFM.sh 10 oracle 6621 4953 0 13:12 pts/4 00:00:00 grep -i osw $
Oracle In
ternal & O
racle Aca
demy
Use O
nly
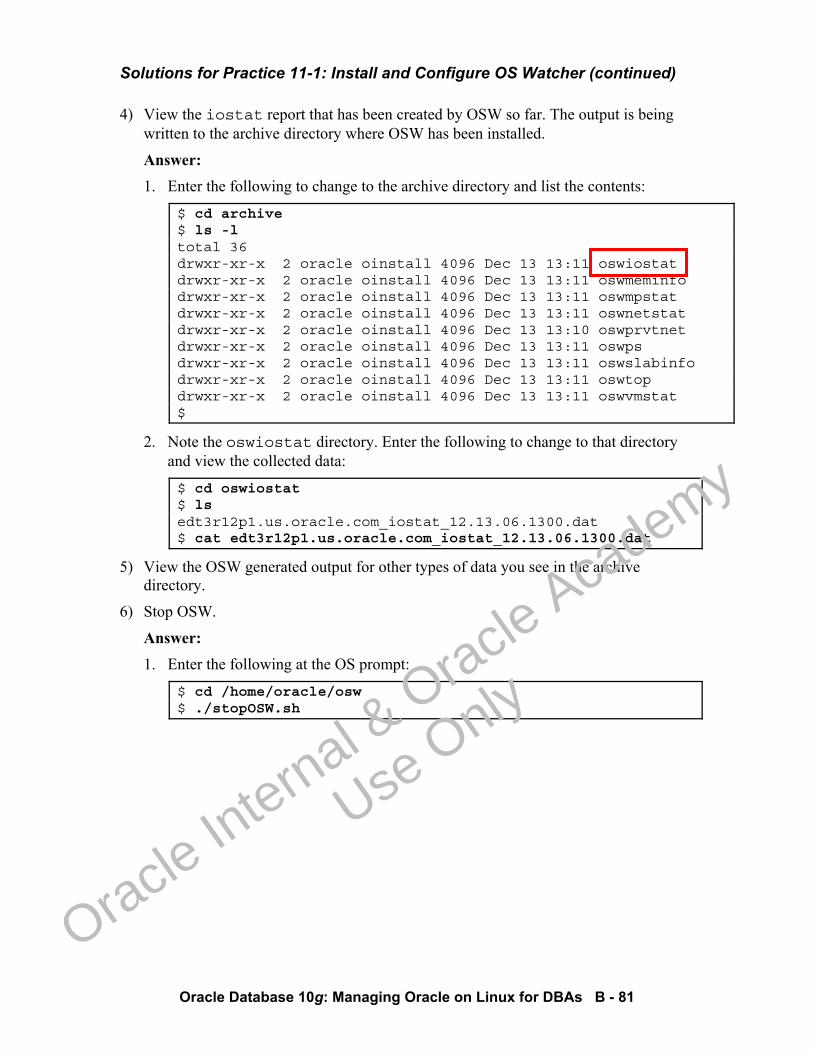
Solutions for Practice 11-1: Install and Configure OS Watcher (continued)
Oracle Database 10g: Managing Oracle on Linux for DBAs B - 81
4) View the iostat report that has been created by OSW so far. The output is being written to the archive directory where OSW has been installed.
Answer: 1. Enter the following to change to the archive directory and list the contents:
$ cd archive $ ls -l total 36 drwxr-xr-x 2 oracle oinstall 4096 Dec 13 13:11 oswiostat drwxr-xr-x 2 oracle oinstall 4096 Dec 13 13:11 oswmeminfo drwxr-xr-x 2 oracle oinstall 4096 Dec 13 13:11 oswmpstat drwxr-xr-x 2 oracle oinstall 4096 Dec 13 13:11 oswnetstat drwxr-xr-x 2 oracle oinstall 4096 Dec 13 13:10 oswprvtnet drwxr-xr-x 2 oracle oinstall 4096 Dec 13 13:11 oswps drwxr-xr-x 2 oracle oinstall 4096 Dec 13 13:11 oswslabinfo drwxr-xr-x 2 oracle oinstall 4096 Dec 13 13:11 oswtop drwxr-xr-x 2 oracle oinstall 4096 Dec 13 13:11 oswvmstat $
2. Note the oswiostat directory. Enter the following to change to that directory and view the collected data:
$ cd oswiostat $ ls edt3r12p1.us.oracle.com_iostat_12.13.06.1300.dat $ cat edt3r12p1.us.oracle.com_iostat_12.13.06.1300.dat
5) View the OSW generated output for other types of data you see in the archive directory.
6) Stop OSW.
Answer: 1. Enter the following at the OS prompt:
$ cd /home/oracle/osw $ ./stopOSW.sh
Oracle In
ternal & O
racle Aca
demy
Use O
nly
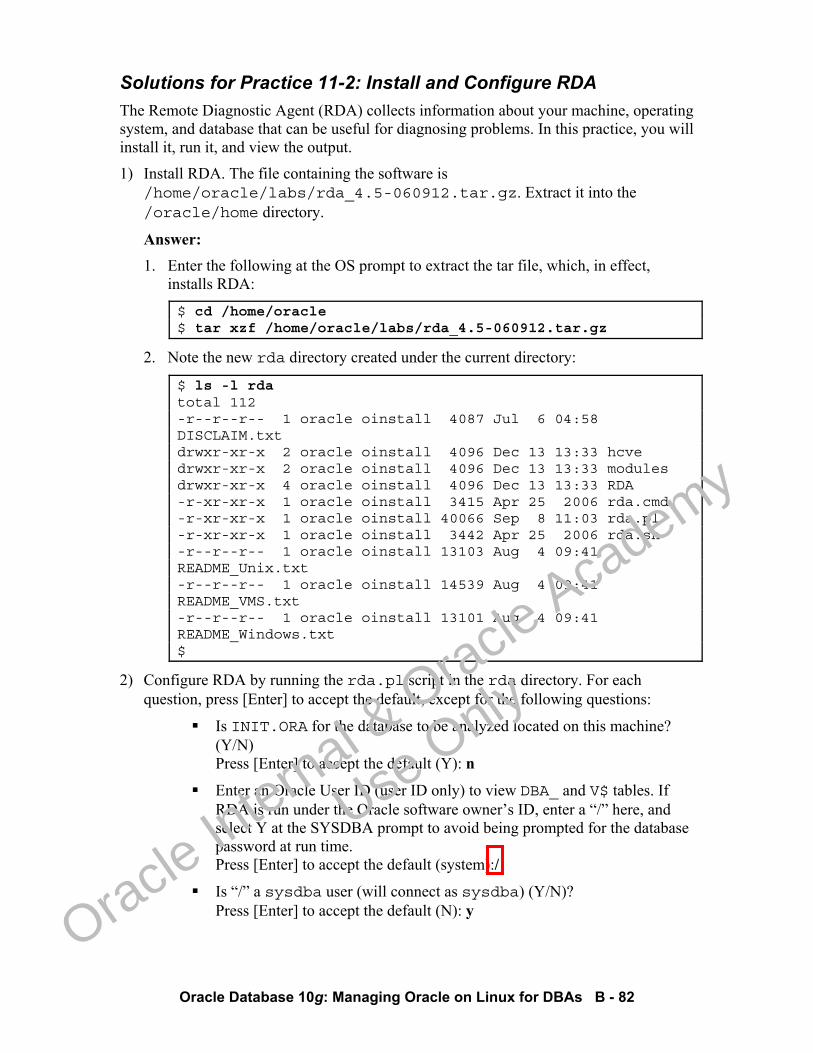
Oracle Database 10g: Managing Oracle on Linux for DBAs B - 82
Solutions for Practice 11-2: Install and Configure RDA The Remote Diagnostic Agent (RDA) collects information about your machine, operating system, and database that can be useful for diagnosing problems. In this practice, you will install it, run it, and view the output.
1) Install RDA. The file containing the software is /home/oracle/labs/rda_4.5-060912.tar.gz. Extract it into the /oracle/home directory.
Answer: 1. Enter the following at the OS prompt to extract the tar file, which, in effect,
installs RDA:
$ cd /home/oracle $ tar xzf /home/oracle/labs/rda_4.5-060912.tar.gz
2. Note the new rda directory created under the current directory:
$ ls -l rda total 112 -r--r--r-- 1 oracle oinstall 4087 Jul 6 04:58 DISCLAIM.txt drwxr-xr-x 2 oracle oinstall 4096 Dec 13 13:33 hcve drwxr-xr-x 2 oracle oinstall 4096 Dec 13 13:33 modules drwxr-xr-x 4 oracle oinstall 4096 Dec 13 13:33 RDA -r-xr-xr-x 1 oracle oinstall 3415 Apr 25 2006 rda.cmd -r-xr-xr-x 1 oracle oinstall 40066 Sep 8 11:03 rda.pl -r-xr-xr-x 1 oracle oinstall 3442 Apr 25 2006 rda.sh -r--r--r-- 1 oracle oinstall 13103 Aug 4 09:41 README_Unix.txt -r--r--r-- 1 oracle oinstall 14539 Aug 4 09:41 README_VMS.txt -r--r--r-- 1 oracle oinstall 13101 Aug 4 09:41 README_Windows.txt $
2) Configure RDA by running the rda.pl script in the rda directory. For each question, press [Enter] to accept the default, except for the following questions:
Is INIT.ORA for the database to be analyzed located on this machine? (Y/N) Press [Enter] to accept the default (Y): n
Enter an Oracle User ID (user ID only) to view DBA_ and V$ tables. If RDA is run under the Oracle software owner’s ID, enter a “/” here, and select Y at the SYSDBA prompt to avoid being prompted for the database password at run time. Press [Enter] to accept the default (system):/
Is “/” a sysdba user (will connect as sysdba) (Y/N)? Press [Enter] to accept the default (N): y
Oracle In
ternal & O
racle Aca
demy
Use O
nly
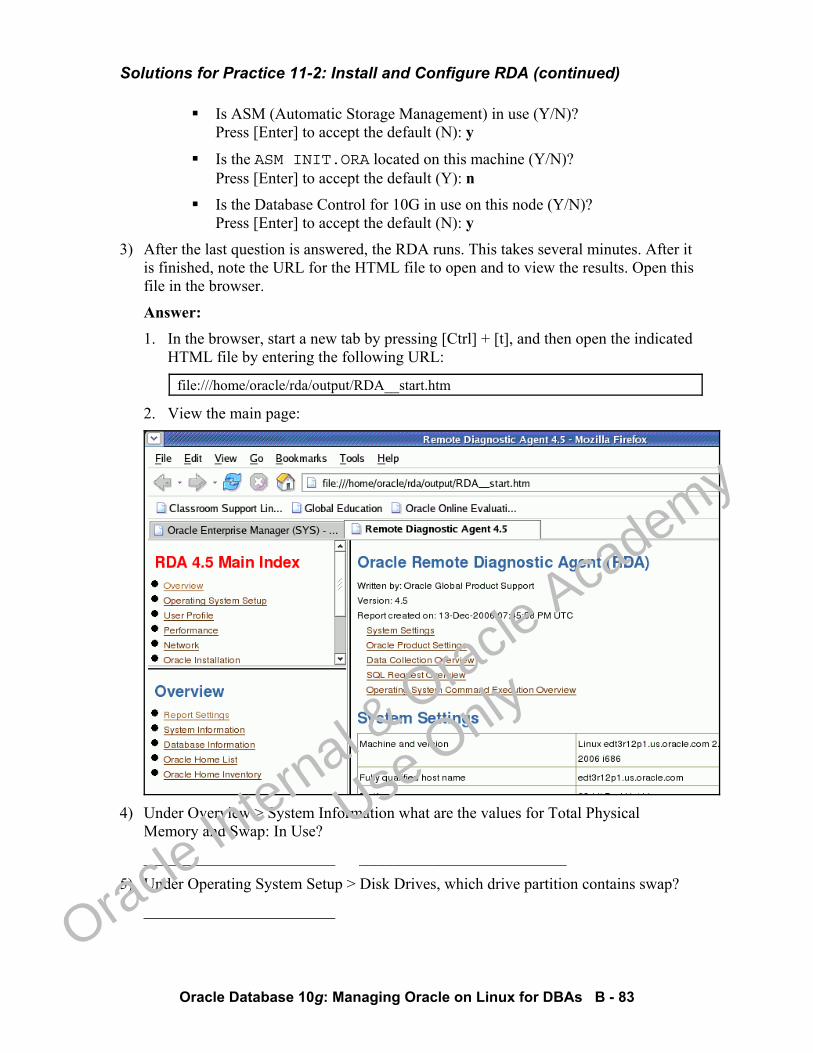
Solutions for Practice 11-2: Install and Configure RDA (continued)
Oracle Database 10g: Managing Oracle on Linux for DBAs B - 83
Is ASM (Automatic Storage Management) in use (Y/N)? Press [Enter] to accept the default (N): y
Is the ASM INIT.ORA located on this machine (Y/N)? Press [Enter] to accept the default (Y): n
Is the Database Control for 10G in use on this node (Y/N)? Press [Enter] to accept the default (N): y
3) After the last question is answered, the RDA runs. This takes several minutes. After it is finished, note the URL for the HTML file to open and to view the results. Open this file in the browser.
Answer: 1. In the browser, start a new tab by pressing [Ctrl] + [t], and then open the indicated
HTML file by entering the following URL:
file:///home/oracle/rda/output/RDA__start.htm
2. View the main page:
4) Under Overview > System Information what are the values for Total Physical
Memory and Swap: In Use?
________________________ __________________________
5) Under Operating System Setup > Disk Drives, which drive partition contains swap?
________________________
Oracle In
ternal & O
racle Aca
demy
Use O
nly
Solutions for Practice 11-2: Install and Configure RDA (continued)
Oracle Database 10g: Managing Oracle on Linux for DBAs B - 84
6) Under ASM > File/Space Related Information > Files Stored in Diskgroup, what is the fully qualified location of the SYSTEM tablespace?
Oracle In
ternal & O
racle Aca
demy
Use O
nly
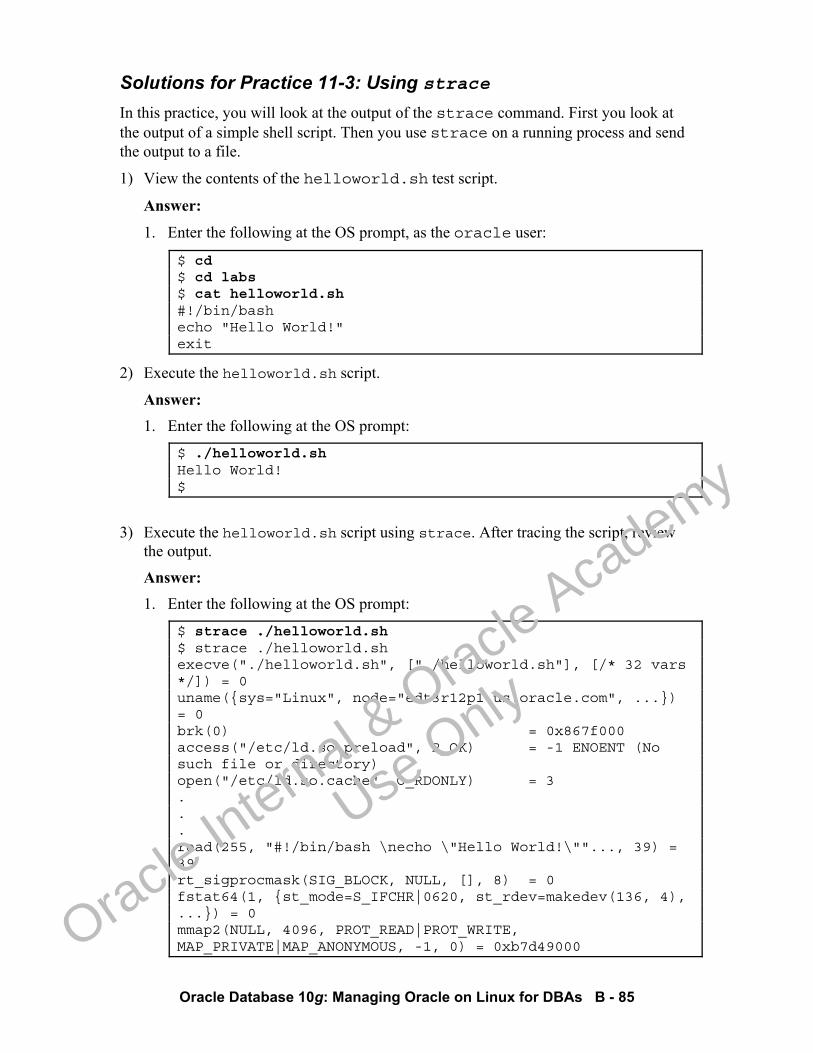
Oracle Database 10g: Managing Oracle on Linux for DBAs B - 85
Solutions for Practice 11-3: Using strace In this practice, you will look at the output of the strace command. First you look at the output of a simple shell script. Then you use strace on a running process and send the output to a file.
1) View the contents of the helloworld.sh test script.
Answer:
1. Enter the following at the OS prompt, as the oracle user:
$ cd $ cd labs $ cat helloworld.sh #!/bin/bash echo "Hello World!" exit
2) Execute the helloworld.sh script.
Answer: 1. Enter the following at the OS prompt:
$ ./helloworld.sh Hello World! $
3) Execute the helloworld.sh script using strace. After tracing the script, review the output.
Answer: 1. Enter the following at the OS prompt:
$ strace ./helloworld.sh $ strace ./helloworld.sh execve("./helloworld.sh", ["./helloworld.sh"], [/* 32 vars */]) = 0 uname({sys="Linux", node="edt3r12p1.us.oracle.com", ...}) = 0 brk(0) = 0x867f000 access("/etc/ld.so.preload", R_OK) = -1 ENOENT (No such file or directory) open("/etc/ld.so.cache", O_RDONLY) = 3 . . . read(255, "#!/bin/bash \necho \"Hello World!\""..., 39) = 39 rt_sigprocmask(SIG_BLOCK, NULL, [], 8) = 0 fstat64(1, {st_mode=S_IFCHR|0620, st_rdev=makedev(136, 4), ...}) = 0 mmap2(NULL, 4096, PROT_READ|PROT_WRITE, MAP_PRIVATE|MAP_ANONYMOUS, -1, 0) = 0xb7d49000
Oracle In
ternal & O
racle Aca
demy
Use O
nly
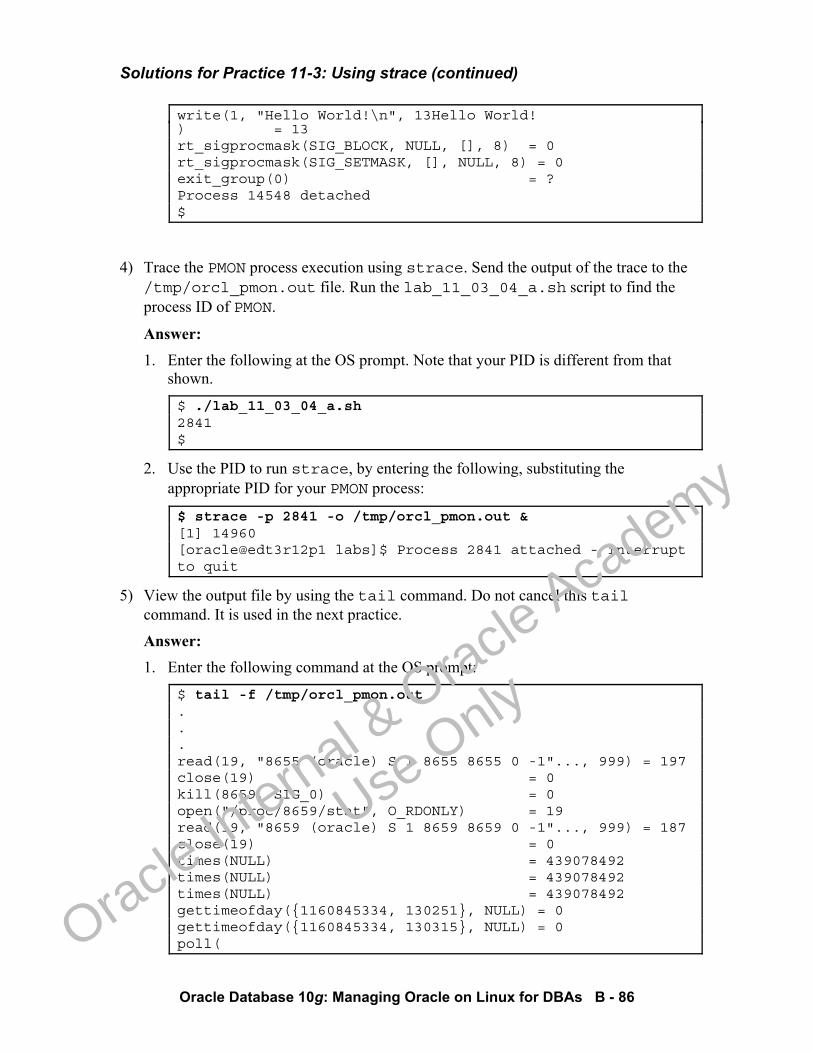
Solutions for Practice 11-3: Using strace (continued)
Oracle Database 10g: Managing Oracle on Linux for DBAs B - 86
write(1, "Hello World!\n", 13Hello World! ) = 13 rt_sigprocmask(SIG_BLOCK, NULL, [], 8) = 0 rt_sigprocmask(SIG_SETMASK, [], NULL, 8) = 0 exit_group(0) = ? Process 14548 detached $
4) Trace the PMON process execution using strace. Send the output of the trace to the /tmp/orcl_pmon.out file. Run the lab_11_03_04_a.sh script to find the process ID of PMON.
Answer: 1. Enter the following at the OS prompt. Note that your PID is different from that
shown.
$ ./lab_11_03_04_a.sh 2841 $
2. Use the PID to run strace, by entering the following, substituting the appropriate PID for your PMON process:
$ strace -p 2841 -o /tmp/orcl_pmon.out & [1] 14960 [oracle@edt3r12p1 labs]$ Process 2841 attached - interrupt to quit
5) View the output file by using the tail command. Do not cancel this tail command. It is used in the next practice.
Answer: 1. Enter the following command at the OS prompt:
$ tail -f /tmp/orcl_pmon.out . . . read(19, "8655 (oracle) S 1 8655 8655 0 -1"..., 999) = 197 close(19) = 0 kill(8659, SIG_0) = 0 open("/proc/8659/stat", O_RDONLY) = 19 read(19, "8659 (oracle) S 1 8659 8659 0 -1"..., 999) = 187 close(19) = 0 times(NULL) = 439078492 times(NULL) = 439078492 times(NULL) = 439078492 gettimeofday({1160845334, 130251}, NULL) = 0 gettimeofday({1160845334, 130315}, NULL) = 0 poll(
Oracle In
ternal & O
racle Aca
demy
Use O
nly
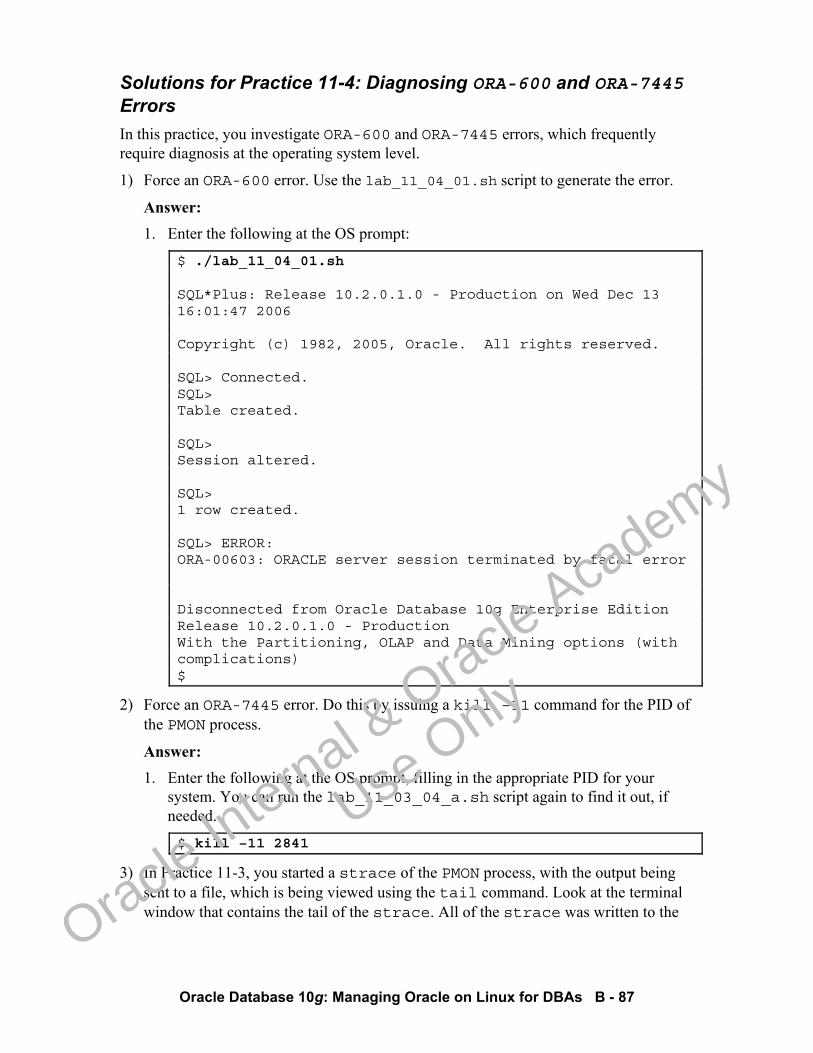
Oracle Database 10g: Managing Oracle on Linux for DBAs B - 87
Solutions for Practice 11-4: Diagnosing ORA-600 and ORA-7445 Errors In this practice, you investigate ORA-600 and ORA-7445 errors, which frequently require diagnosis at the operating system level.
1) Force an ORA-600 error. Use the lab_11_04_01.sh script to generate the error.
Answer: 1. Enter the following at the OS prompt:
$ ./lab_11_04_01.sh SQL*Plus: Release 10.2.0.1.0 - Production on Wed Dec 13 16:01:47 2006 Copyright (c) 1982, 2005, Oracle. All rights reserved. SQL> Connected. SQL> Table created. SQL> Session altered. SQL> 1 row created. SQL> ERROR: ORA-00603: ORACLE server session terminated by fatal error Disconnected from Oracle Database 10g Enterprise Edition Release 10.2.0.1.0 - Production With the Partitioning, OLAP and Data Mining options (with complications) $
2) Force an ORA-7445 error. Do this by issuing a kill –11 command for the PID of the PMON process.
Answer: 1. Enter the following at the OS prompt, filling in the appropriate PID for your
system. You can run the lab_11_03_04_a.sh script again to find it out, if needed.
$ kill –11 2841
3) In Practice 11-3, you started a strace of the PMON process, with the output being sent to a file, which is being viewed using the tail command. Look at the terminal window that contains the tail of the strace. All of the strace was written to the
Oracle In
ternal & O
racle Aca
demy
Use O
nly
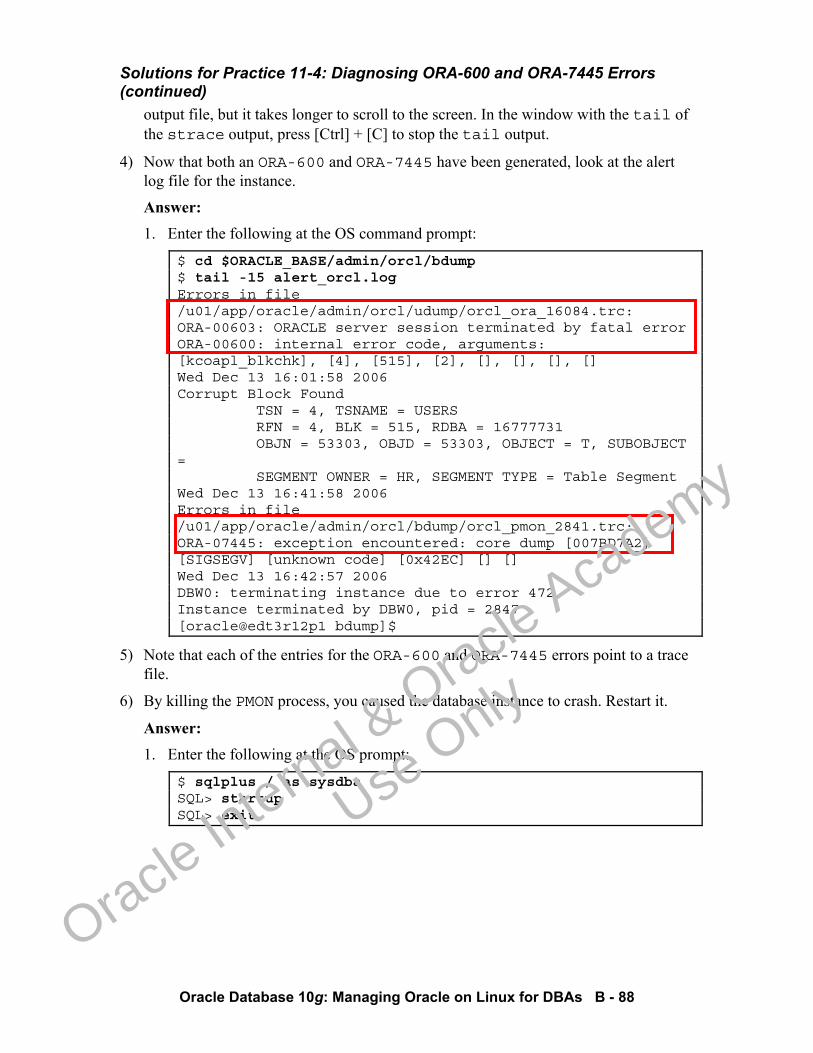
Solutions for Practice 11-4: Diagnosing ORA-600 and ORA-7445 Errors (continued)
Oracle Database 10g: Managing Oracle on Linux for DBAs B - 88
output file, but it takes longer to scroll to the screen. In the window with the tail of the strace output, press [Ctrl] + [C] to stop the tail output.
4) Now that both an ORA-600 and ORA-7445 have been generated, look at the alert log file for the instance.
Answer: 1. Enter the following at the OS command prompt:
$ cd $ORACLE_BASE/admin/orcl/bdump $ tail -15 alert_orcl.log Errors in file /u01/app/oracle/admin/orcl/udump/orcl_ora_16084.trc: ORA-00603: ORACLE server session terminated by fatal error ORA-00600: internal error code, arguments: [kcoapl_blkchk], [4], [515], [2], [], [], [], [] Wed Dec 13 16:01:58 2006 Corrupt Block Found TSN = 4, TSNAME = USERS RFN = 4, BLK = 515, RDBA = 16777731 OBJN = 53303, OBJD = 53303, OBJECT = T, SUBOBJECT = SEGMENT OWNER = HR, SEGMENT TYPE = Table Segment Wed Dec 13 16:41:58 2006 Errors in file /u01/app/oracle/admin/orcl/bdump/orcl_pmon_2841.trc: ORA-07445: exception encountered: core dump [007BD7A2] [SIGSEGV] [unknown code] [0x42EC] [] [] Wed Dec 13 16:42:57 2006 DBW0: terminating instance due to error 472 Instance terminated by DBW0, pid = 2847 [oracle@edt3r12p1 bdump]$
5) Note that each of the entries for the ORA-600 and ORA-7445 errors point to a trace file.
6) By killing the PMON process, you caused the database instance to crash. Restart it.
Answer: 1. Enter the following at the OS prompt:
$ sqlplus / as sysdba SQL> startup SQL> exit
Oracle In
ternal & O
racle Aca
demy
Use O
nly
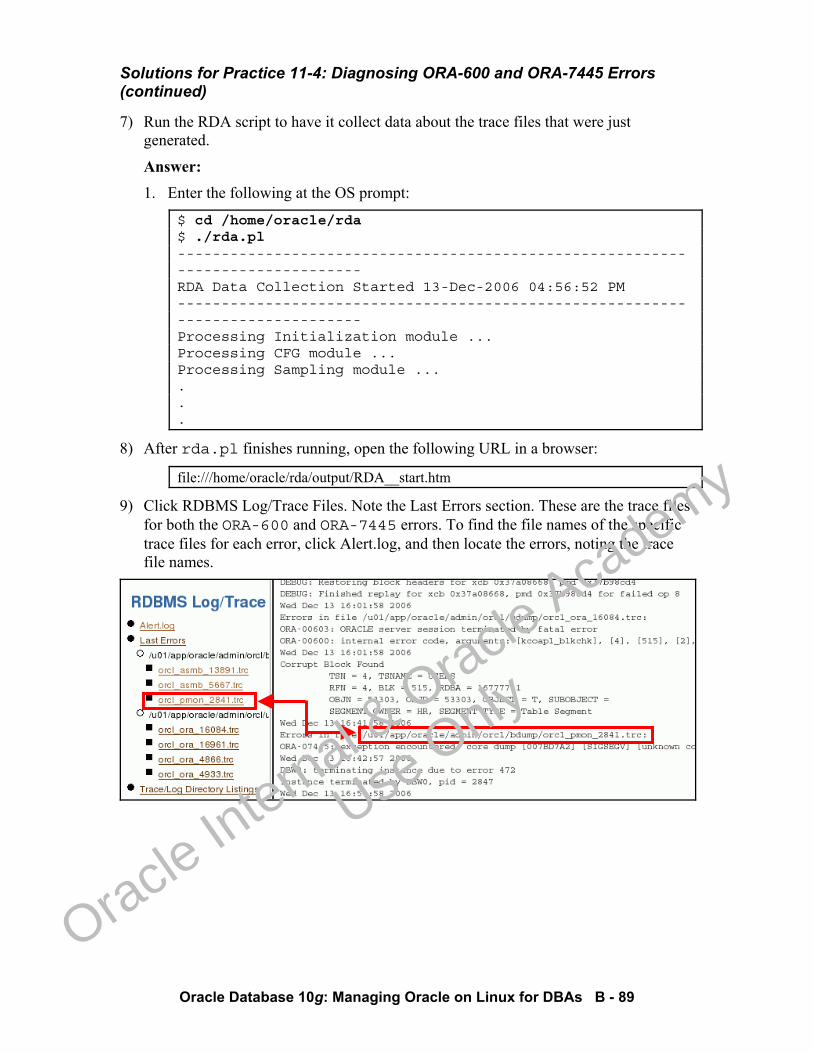
Solutions for Practice 11-4: Diagnosing ORA-600 and ORA-7445 Errors (continued)
Oracle Database 10g: Managing Oracle on Linux for DBAs B - 89
7) Run the RDA script to have it collect data about the trace files that were just generated.
Answer: 1. Enter the following at the OS prompt:
$ cd /home/oracle/rda $ ./rda.pl ------------------------------------------------------------------------------- RDA Data Collection Started 13-Dec-2006 04:56:52 PM ------------------------------------------------------------------------------- Processing Initialization module ... Processing CFG module ... Processing Sampling module ... . . .
8) After rda.pl finishes running, open the following URL in a browser:
file:///home/oracle/rda/output/RDA__start.htm
9) Click RDBMS Log/Trace Files. Note the Last Errors section. These are the trace files for both the ORA-600 and ORA-7445 errors. To find the file names of the specific trace files for each error, click Alert.log, and then locate the errors, noting the trace file names.
Oracle In
ternal & O
racle Aca
demy
Use O
nly

Oracle In
ternal & O
racle Aca
demy
Use O
nly
___________________
Appendix C Basic Linux and
vi Commands ___________________
Oracle In
ternal & O
racle Aca
demy
Use O
nly

Oracle Database 10g: Managing Oracle on Linux for DBAs C - 2
vi Commands The Visual Interpreter/Editor (vi) is the most widely used text editor available for the UNIX environment. Although almost everybody curses its unwieldy command syntax, it is still the only editor almost certain to be included with every version of the UNIX and Linux operating system. The following is a partial list of available vi commands. vi has two modes. Command line (where anything typed is taken as an editing command) and input mode (where everything typed will be treated as part of the file being edited. To enter input mode, type a, A, i, I, o, O, c, C, s, S, r, or R. To return to command-line mode, use the <ESC> key. To access the vi editor from SQL*Plus, enter the following command:
SQL> define _editor=vi To edit a file from the SQL*Plus prompt, type edit <filename> and press [Enter]. To edit a file from the Linux command prompt, type vi <filename> and press [Enter]. To MOVE the cursor:
h - move left j - move down k - move up l - move right w - one word forward b - one word backward e - end of current word W, B, or E - same as lowercase but ignores punctuation 0 (zero) - Move to the beginning of current line $ - move to the end of current line G - go to last line of file H - go to top line on the screen L - go to last line on screen M - go to bottom line on the screen /<string> - search forward to the next occurrence of <string> ?<string> - search backward to the next occurrence of <string> n - repeat previous search N - repeat previous search in opposite direction <ctrl> f - scroll forward one page <ctrl> b - scroll backward one page
To UNDO previous changes:
u - undo the most recent change U - undo the most recently deleted text
:e! - re-edit current file without saving any changes made since last change To ENTER NEW text:
a - append text after the current cursor position. A - append text to the end of a line (jumps to end of line and begin appending). c - change object C - change from current cursor position to end of the line
Oracle In
ternal & O
racle Aca
demy
Use O
nly
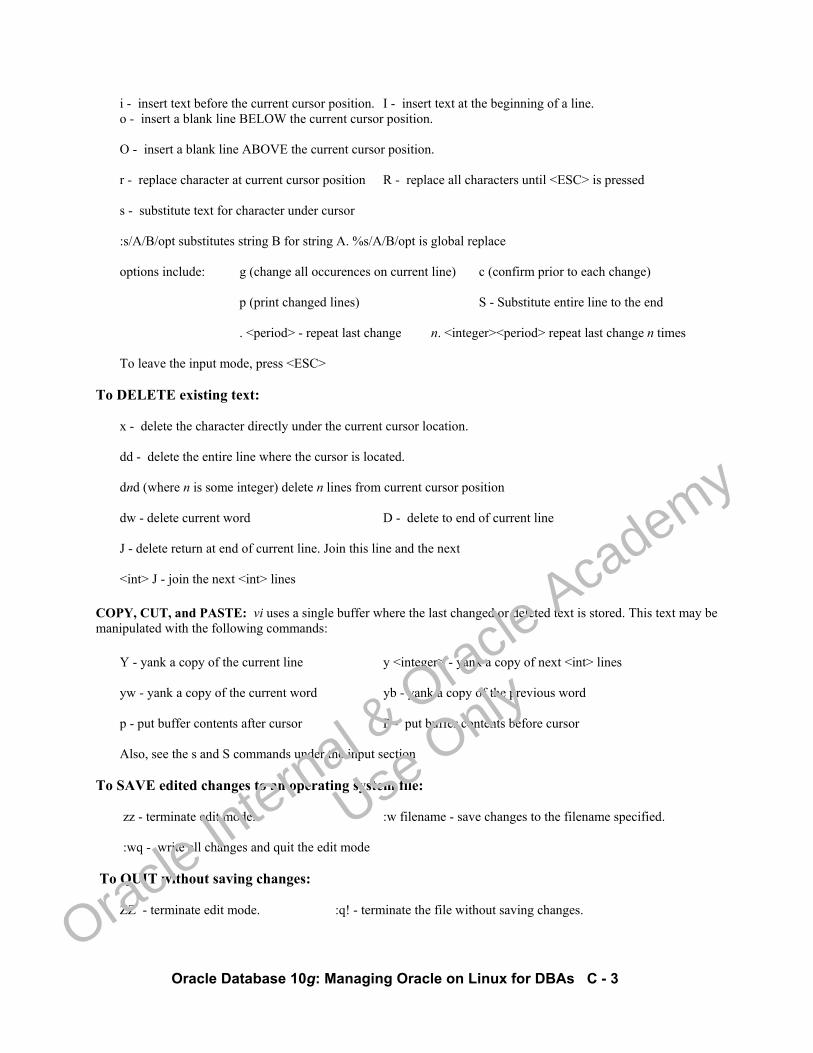
Oracle Database 10g: Managing Oracle on Linux for DBAs C - 3
i - insert text before the current cursor position. I - insert text at the beginning of a line. o - insert a blank line BELOW the current cursor position. O - insert a blank line ABOVE the current cursor position. r - replace character at current cursor position R - replace all characters until <ESC> is pressed s - substitute text for character under cursor :s/A/B/opt substitutes string B for string A. %s/A/B/opt is global replace options include: g (change all occurences on current line) c (confirm prior to each change) p (print changed lines) S - Substitute entire line to the end . <period> - repeat last change n. <integer><period> repeat last change n times To leave the input mode, press <ESC>
To DELETE existing text:
x - delete the character directly under the current cursor location. dd - delete the entire line where the cursor is located. dnd (where n is some integer) delete n lines from current cursor position dw - delete current word D - delete to end of current line J - delete return at end of current line. Join this line and the next <int> J - join the next <int> lines
COPY, CUT, and PASTE: vi uses a single buffer where the last changed or deleted text is stored. This text may be manipulated with the following commands:
Y - yank a copy of the current line y <integer> - yank a copy of next <int> lines yw - yank a copy of the current word yb - yank a copy of the previous word p - put buffer contents after cursor P - put buffer contents before cursor Also, see the s and S commands under the input section
To SAVE edited changes to an operating system file:
zz - terminate edit mode. :w filename - save changes to the filename specified. :wq - write all changes and quit the edit mode
To QUIT without saving changes: ZZ - terminate edit mode. :q! - terminate the file without saving changes.
Oracle In
ternal & O
racle Aca
demy
Use O
nly
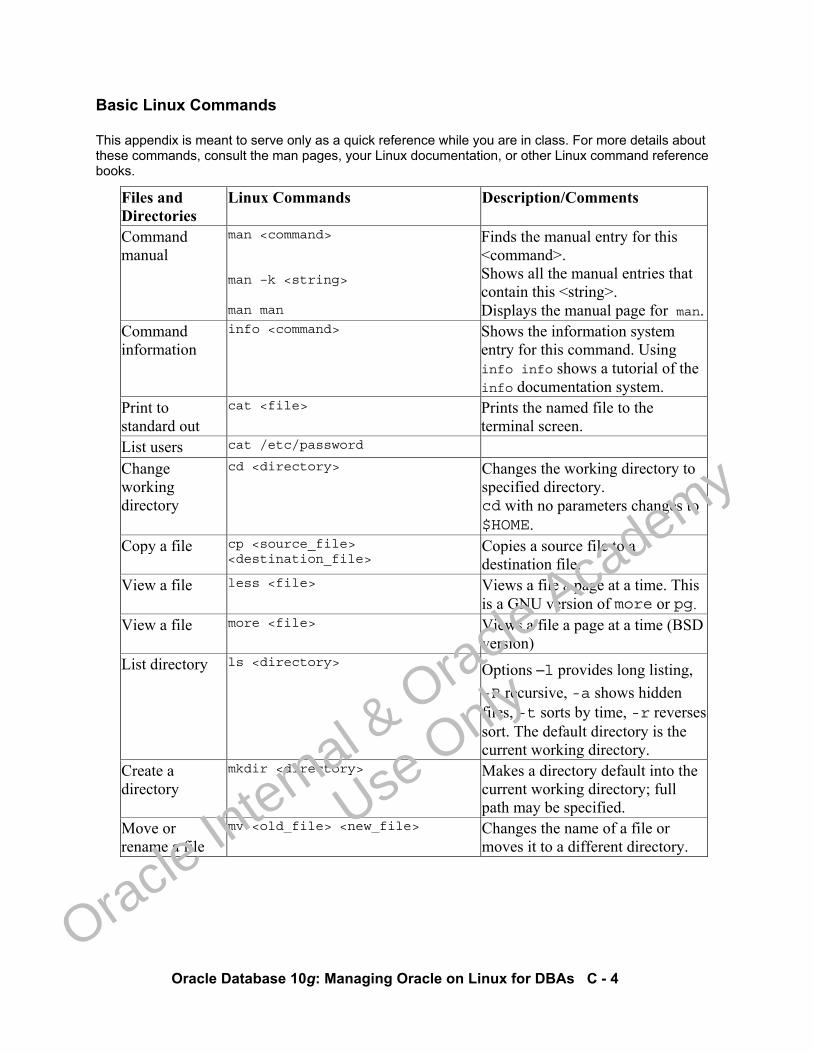
Oracle Database 10g: Managing Oracle on Linux for DBAs C - 4
Basic Linux Commands
This appendix is meant to serve only as a quick reference while you are in class. For more details about these commands, consult the man pages, your Linux documentation, or other Linux command reference books.
Files and Directories
Linux Commands Description/Comments
Command manual
man <command> man –k <string> man man
Finds the manual entry for this <command>. Shows all the manual entries that contain this <string>. Displays the manual page for man.
Command information
info <command> Shows the information system entry for this command. Using info info shows a tutorial of the info documentation system.
Print to standard out
cat <file> Prints the named file to the terminal screen.
List users cat /etc/password Change working directory
cd <directory> Changes the working directory to specified directory. cd with no parameters changes to $HOME.
Copy a file cp <source_file> <destination_file>
Copies a source file to a destination file.
View a file less <file> Views a file a page at a time. This is a GNU version of more or pg.
View a file more <file> Views a file a page at a time (BSD version)
List directory ls <directory> Options –l provides long listing, -R recursive, -a shows hidden files, -t sorts by time, -r reversessort. The default directory is the current working directory.
Create a directory
mkdir <directory> Makes a directory default into the current working directory; full path may be specified.
Move or rename a file
mv <old_file> <new_file> Changes the name of a file or moves it to a different directory.
Oracle In
ternal & O
racle Aca
demy
Use O
nly
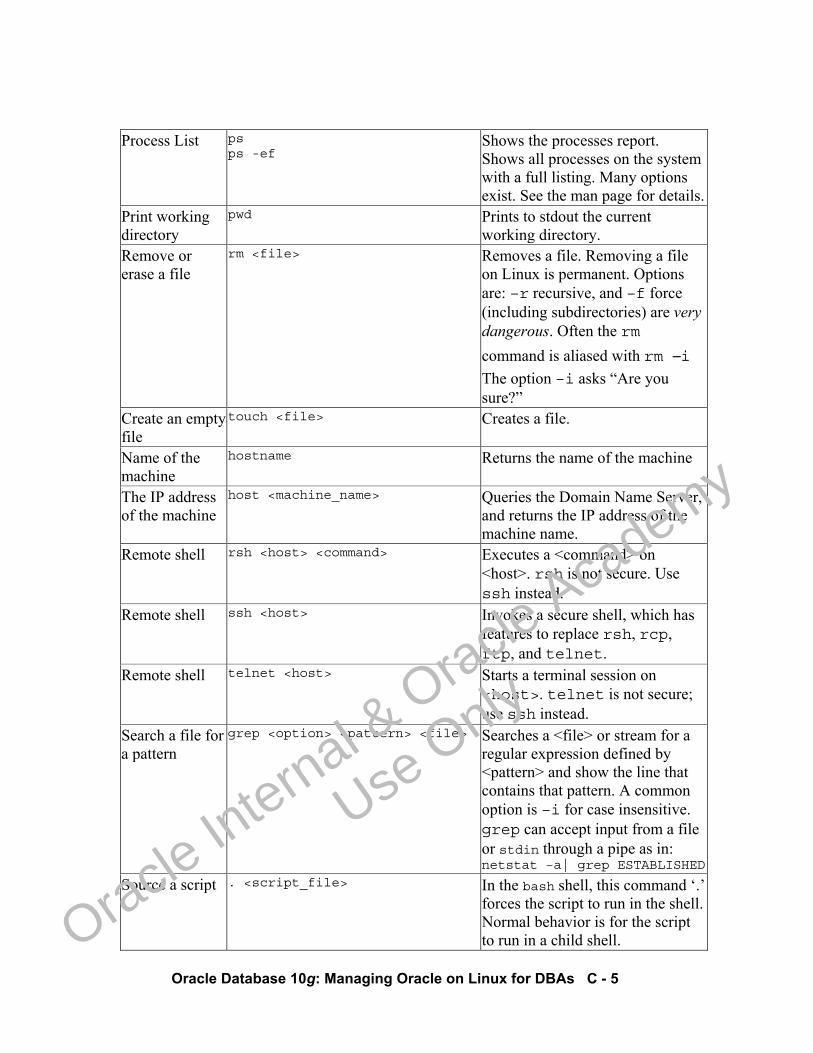
Oracle Database 10g: Managing Oracle on Linux for DBAs C - 5
Process List ps ps -ef
Shows the processes report. Shows all processes on the system with a full listing. Many options exist. See the man page for details.
Print working directory
pwd Prints to stdout the current working directory.
Remove or erase a file
rm <file> Removes a file. Removing a file on Linux is permanent. Options are: –r recursive, and –f force (including subdirectories) are very dangerous. Often the rm command is aliased with rm –i The option –i asks “Are you sure?”
Create an empty file
touch <file> Creates a file.
Name of the machine
hostname Returns the name of the machine
The IP address of the machine
host <machine_name> Queries the Domain Name Server, and returns the IP address of the machine name.
Remote shell rsh <host> <command> Executes a <command> on <host>. rsh is not secure. Use ssh instead.
Remote shell ssh <host> Invokes a secure shell, which has features to replace rsh, rcp, ftp, and telnet.
Remote shell telnet <host> Starts a terminal session on <host>. telnet is not secure; use ssh instead.
Search a file for a pattern
grep <option> <pattern> <file> Searches a <file> or stream for a regular expression defined by <pattern> and show the line that contains that pattern. A common option is –i for case insensitive. grep can accept input from a file or stdin through a pipe as in: netstat –a| grep ESTABLISHED
Source a script . <script_file> In the bash shell, this command ‘.’ forces the script to run in the shell. Normal behavior is for the script to run in a child shell.
Oracle In
ternal & O
racle Aca
demy
Use O
nly
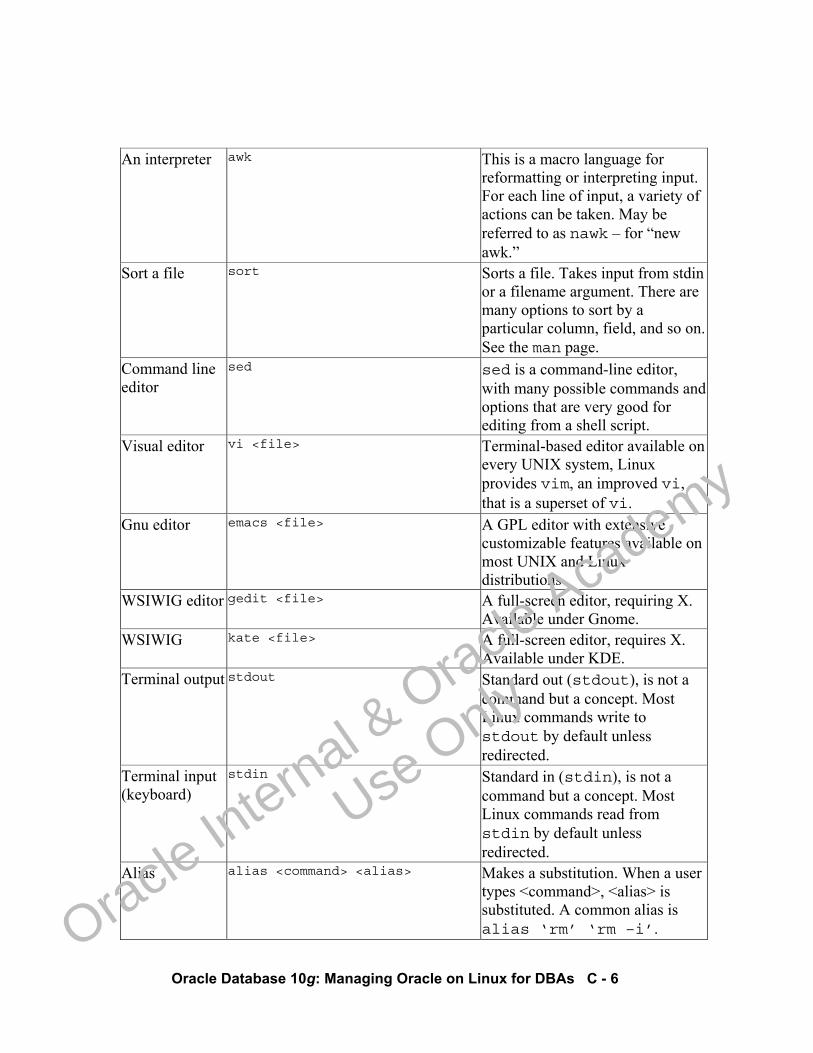
Oracle Database 10g: Managing Oracle on Linux for DBAs C - 6
An interpreter awk This is a macro language for reformatting or interpreting input. For each line of input, a variety of actions can be taken. May be referred to as nawk – for “new awk.”
Sort a file sort Sorts a file. Takes input from stdin or a filename argument. There are many options to sort by a particular column, field, and so on. See the man page.
Command line editor
sed sed is a command-line editor, with many possible commands and options that are very good for editing from a shell script.
Visual editor vi <file> Terminal-based editor available on every UNIX system, Linux provides vim, an improved vi, that is a superset of vi.
Gnu editor emacs <file> A GPL editor with extensive customizable features available on most UNIX and Linux distributions
WSIWIG editor gedit <file> A full-screen editor, requiring X. Available under Gnome.
WSIWIG kate <file> A full-screen editor, requires X. Available under KDE.
Terminal output stdout Standard out (stdout), is not a command but a concept. Most Linux commands write to stdout by default unless redirected.
Terminal input (keyboard)
stdin Standard in (stdin), is not a command but a concept. Most Linux commands read from stdin by default unless redirected.
Alias alias <command> <alias> Makes a substitution. When a user types <command>, <alias> is substituted. A common alias is alias ‘rm’ ‘rm –i’.
Oracle In
ternal & O
racle Aca
demy
Use O
nly
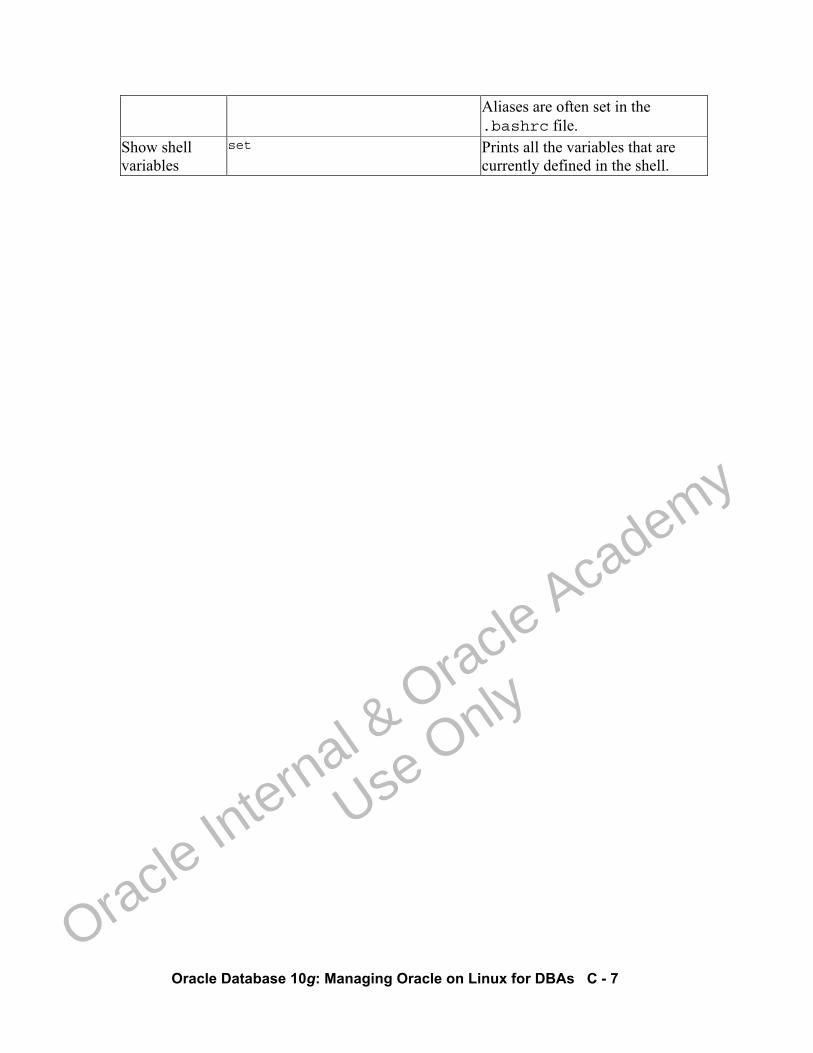
Oracle Database 10g: Managing Oracle on Linux for DBAs C - 7
Aliases are often set in the .bashrc file.
Show shell variables
set Prints all the variables that are currently defined in the shell.
Oracle In
ternal & O
racle Aca
demy
Use O
nly
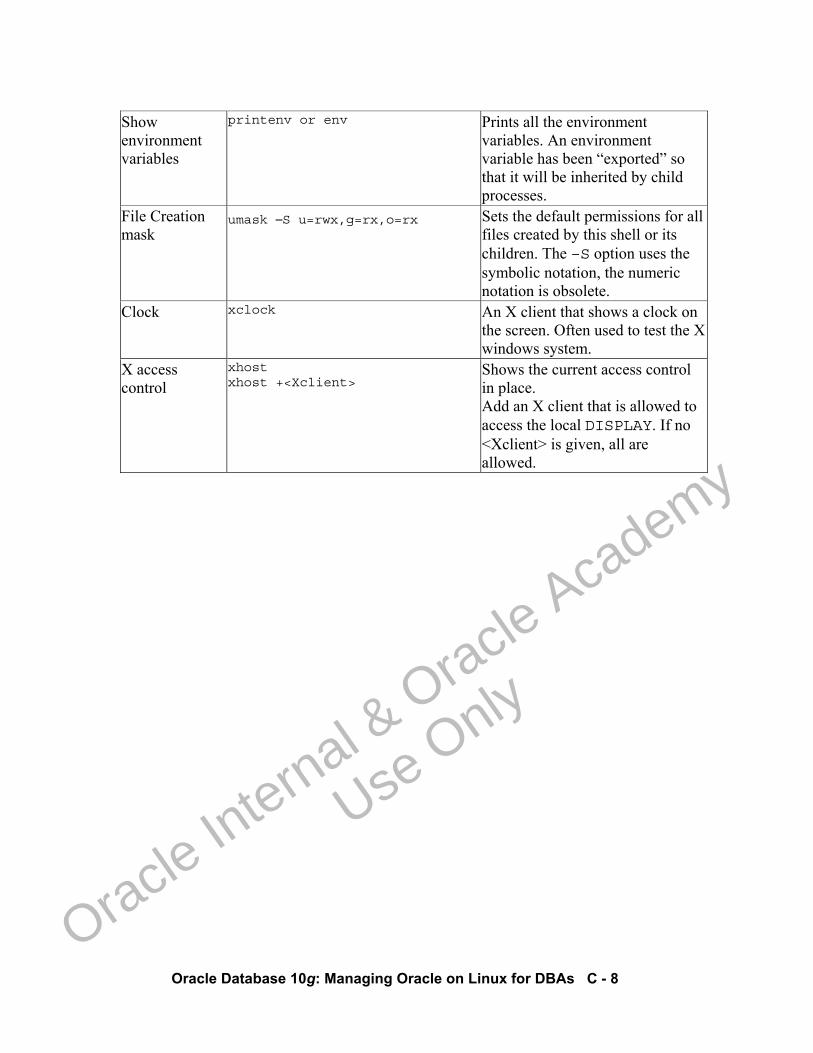
Oracle Database 10g: Managing Oracle on Linux for DBAs C - 8
Show environment variables
printenv or env Prints all the environment variables. An environment variable has been “exported” so that it will be inherited by child processes.
File Creation mask
umask –S u=rwx,g=rx,o=rx Sets the default permissions for all files created by this shell or its children. The –S option uses the symbolic notation, the numeric notation is obsolete.
Clock xclock An X client that shows a clock on the screen. Often used to test the X windows system.
X access control
xhost xhost +<Xclient>
Shows the current access control in place. Add an X client that is allowed to access the local DISPLAY. If no <Xclient> is given, all are allowed.
Oracle In
ternal & O
racle Aca
demy
Use O
nly
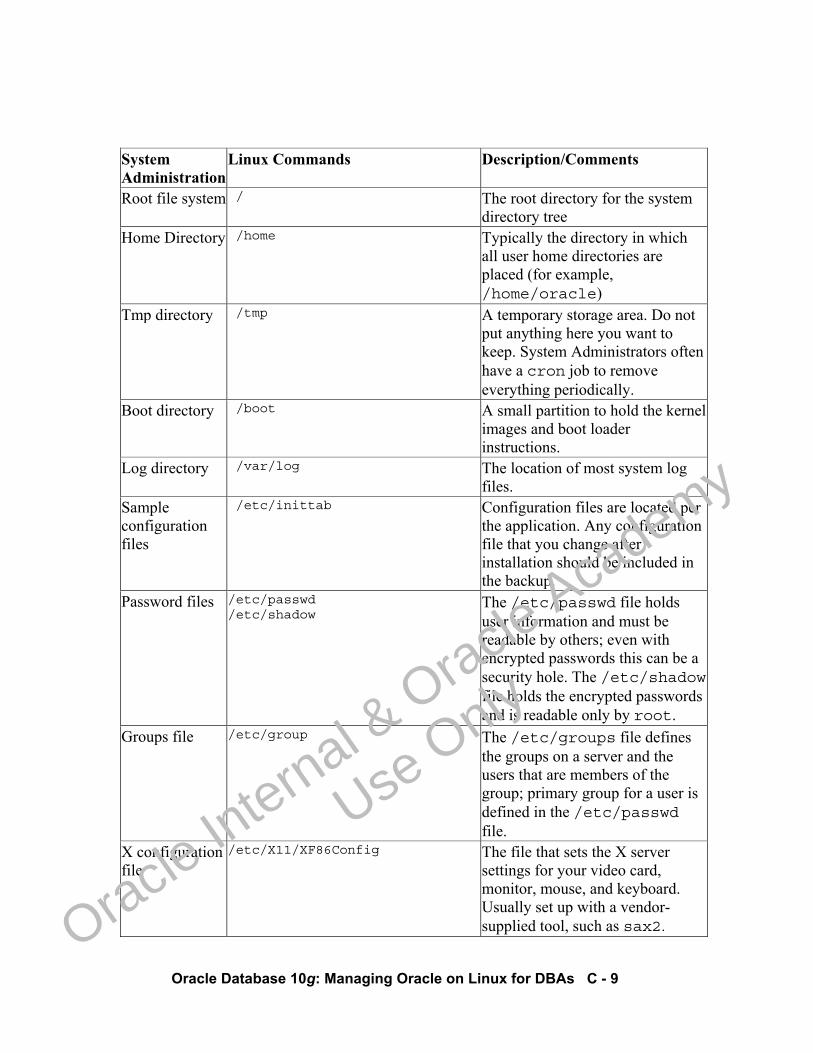
Oracle Database 10g: Managing Oracle on Linux for DBAs C - 9
System Administration
Linux Commands Description/Comments
Root file system / The root directory for the system directory tree
Home Directory /home Typically the directory in which all user home directories are placed (for example, /home/oracle)
Tmp directory /tmp A temporary storage area. Do not put anything here you want to keep. System Administrators often have a cron job to remove everything periodically.
Boot directory /boot A small partition to hold the kernel images and boot loader instructions.
Log directory /var/log The location of most system log files.
Sample configuration files
/etc/inittab Configuration files are located per the application. Any configuration file that you change after installation should be included in the backup.
Password files /etc/passwd /etc/shadow
The /etc/passwd file holds user information and must be readable by others; even with encrypted passwords this can be a security hole. The /etc/shadowfile holds the encrypted passwords and is readable only by root.
Groups file /etc/group The /etc/groups file defines the groups on a server and the users that are members of the group; primary group for a user is defined in the /etc/passwd file.
X configuration file
/etc/X11/XF86Config The file that sets the X server settings for your video card, monitor, mouse, and keyboard. Usually set up with a vendor-supplied tool, such as sax2.
Oracle In
ternal & O
racle Aca
demy
Use O
nly
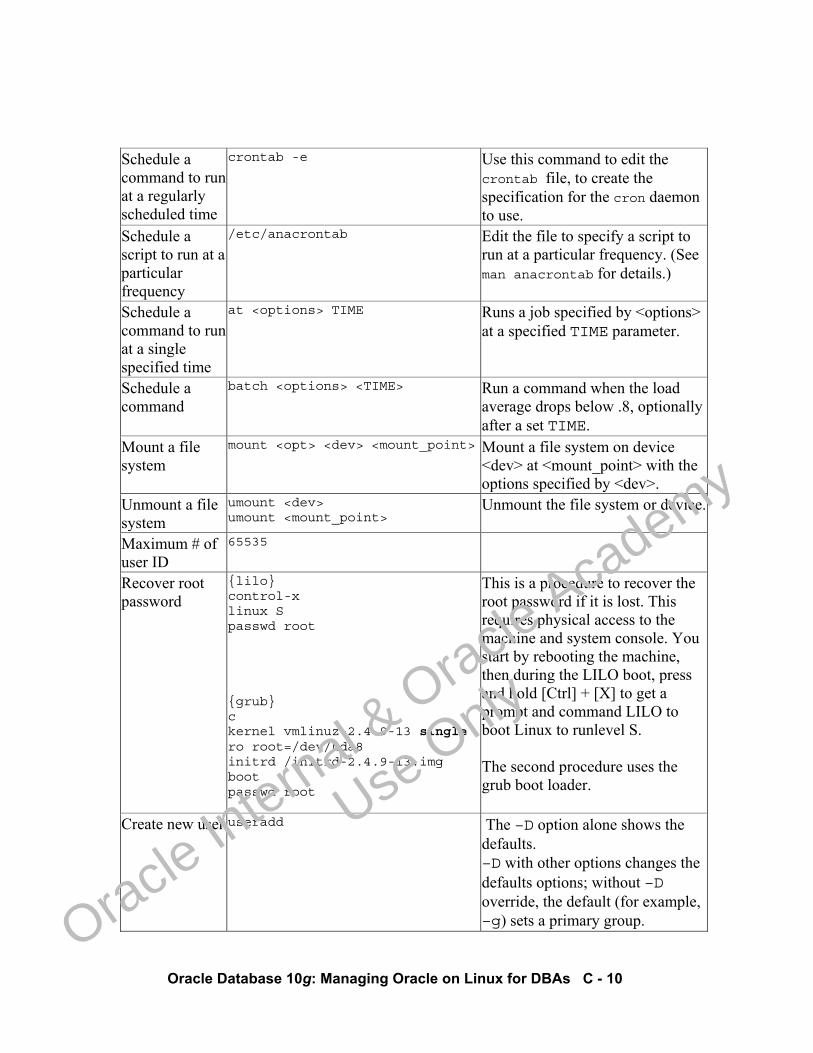
Oracle Database 10g: Managing Oracle on Linux for DBAs C - 10
Schedule a command to run at a regularly scheduled time
crontab -e Use this command to edit the crontab file, to create the specification for the cron daemon to use.
Schedule a script to run at a particular frequency
/etc/anacrontab Edit the file to specify a script to run at a particular frequency. (See man anacrontab for details.)
Schedule a command to run at a single specified time
at <options> TIME Runs a job specified by <options> at a specified TIME parameter.
Schedule a command
batch <options> <TIME> Run a command when the load average drops below .8, optionally after a set TIME.
Mount a file system
mount <opt> <dev> <mount_point> Mount a file system on device <dev> at <mount_point> with the options specified by <dev>.
Unmount a file system
umount <dev> umount <mount_point>
Unmount the file system or device.
Maximum # of user ID
65535
Recover root password
{lilo} control-x linux S passwd root {grub} c kernel vmlinuz-2.4.9-13 single ro root=/dev/hda8 initrd /initrd-2.4.9-13.img boot passwd root
This is a procedure to recover the root password if it is lost. This requires physical access to the machine and system console. You start by rebooting the machine, then during the LILO boot, press and hold [Ctrl] + [X] to get a prompt and command LILO to boot Linux to runlevel S. The second procedure uses the grub boot loader.
Create new user useradd The –D option alone shows the defaults. –D with other options changes the defaults options; without –D override, the default (for example, –g) sets a primary group.
Oracle In
ternal & O
racle Aca
demy
Use O
nly
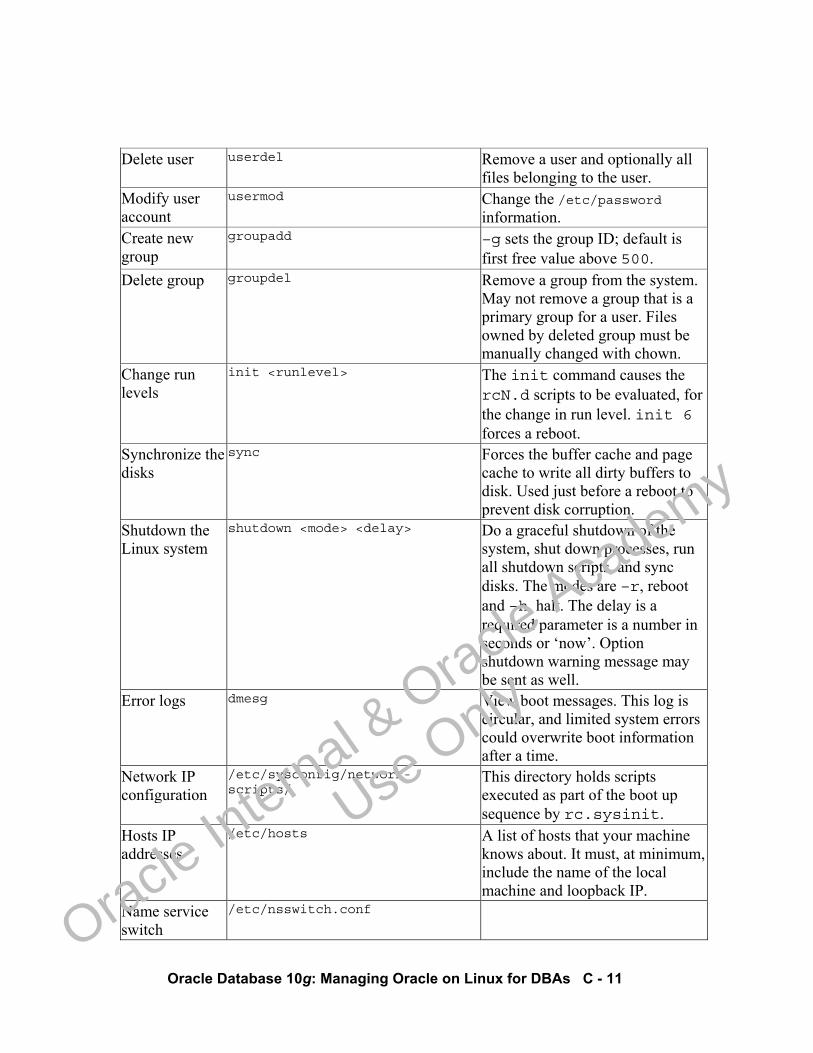
Oracle Database 10g: Managing Oracle on Linux for DBAs C - 11
Delete user userdel Remove a user and optionally all files belonging to the user.
Modify user account
usermod Change the /etc/password information.
Create new group
groupadd –g sets the group ID; default is first free value above 500.
Delete group groupdel Remove a group from the system. May not remove a group that is a primary group for a user. Files owned by deleted group must be manually changed with chown.
Change run levels
init <runlevel> The init command causes the rcN.d scripts to be evaluated, for the change in run level. init 6 forces a reboot.
Synchronize the disks
sync Forces the buffer cache and page cache to write all dirty buffers to disk. Used just before a reboot to prevent disk corruption.
Shutdown the Linux system
shutdown <mode> <delay> Do a graceful shutdown of the system, shut down processes, run all shutdown scripts, and sync disks. The modes are –r, reboot and –h, halt. The delay is a required parameter is a number in seconds or ‘now’. Option shutdown warning message may be sent as well.
Error logs dmesg View boot messages. This log is circular, and limited system errors could overwrite boot information after a time.
Network IP configuration
/etc/sysconfig/network-scripts/
This directory holds scripts executed as part of the boot up sequence by rc.sysinit.
Hosts IP addresses
/etc/hosts A list of hosts that your machine knows about. It must, at minimum,include the name of the local machine and loopback IP.
Name service switch
/etc/nsswitch.conf
Oracle In
ternal & O
racle Aca
demy
Use O
nly

Oracle Database 10g: Managing Oracle on Linux for DBAs C - 12
Network parameters
sysctl -a | grep net View all net parameters that are set for the kernel.
Routing daemon
routed
NIC Configurations
ifconfig -a Show all the network devices currently configured.
modprobe ip_alias Secondary IP Address ifconfig eth0:1 IP
Login prompt /etc/issue Banner message user sees when issued the login prompt.
YP/NIS service binder
/sbin/ypbind Finds and attaches to an NIS server for name resolution and other services.
Module information
modinfo <options> <module> Display information about kernel modules: –l shows license, –p parameters, –d description.
List modules lsmod Show currently loaded modules. Load module insmod Load a loadable module. Unload module rmmod Unload a loadable module. Install Software rpm -ivh package Install -i, verbose –v, with
progress hash marks –h. Uninstall software
rpm -e package Erase package –e; will not uninstall if dependencies exist.
List installed software
rpm -qa Query -q, All –a, lists all installed packages.
Verify installed software
rpm -V package Compares installed files with the rpm database information.
List all files rpm -ql package List all the files that are part of a package.
Package owner rpm -qf file List the package when given the full file name.
Machine model uname -m Shows CPU level (for example, i686)
OS Level uname -r Shows kernel version Run Level runlevel Shows previous and current
runlevel Kernel Parameters
sysctl -a Show settings of all settable kernel parameters.
Max # File Descriptors
sysctl fs.file-max Shows the value of maximum number of file descriptor per process.
Oracle In
ternal & O
racle Aca
demy
Use O
nly
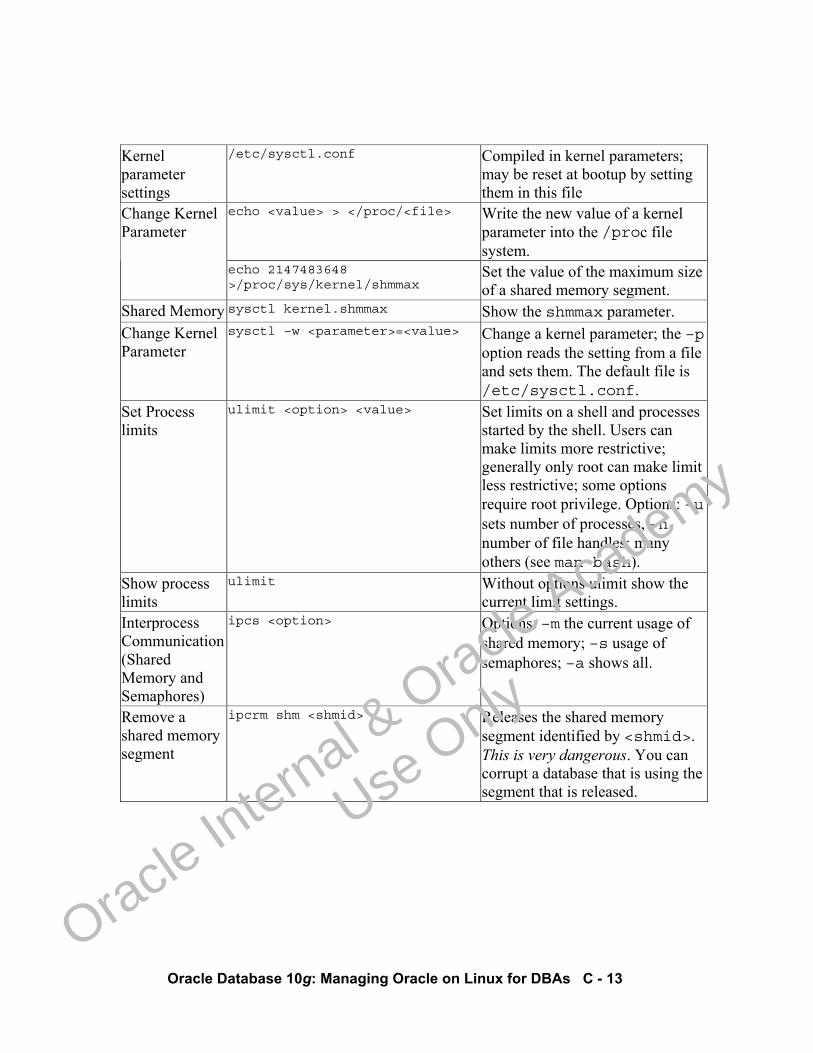
Oracle Database 10g: Managing Oracle on Linux for DBAs C - 13
Kernel parameter settings
/etc/sysctl.conf Compiled in kernel parameters; may be reset at bootup by setting them in this file
echo <value> > </proc/<file> Write the new value of a kernel parameter into the /proc file system.
Change Kernel Parameter
echo 2147483648 >/proc/sys/kernel/shmmax
Set the value of the maximum size of a shared memory segment.
Shared Memory sysctl kernel.shmmax Show the shmmax parameter. Change Kernel Parameter
sysctl –w <parameter>=<value> Change a kernel parameter; the –poption reads the setting from a file and sets them. The default file is /etc/sysctl.conf.
Set Process limits
ulimit <option> <value> Set limits on a shell and processes started by the shell. Users can make limits more restrictive; generally only root can make limit less restrictive; some options require root privilege. Options: –usets number of processes, –n number of file handles; many others (see man bash).
Show process limits
ulimit Without options ulimit show the current limit settings.
Interprocess Communication (Shared Memory and Semaphores)
ipcs <option> Options: –m the current usage of shared memory; –s usage of semaphores; –a shows all.
Remove a shared memory segment
ipcrm shm <shmid> Releases the shared memory segment identified by <shmid>. This is very dangerous. You can corrupt a database that is using the segment that is released.
Oracle In
ternal & O
racle Aca
demy
Use O
nly
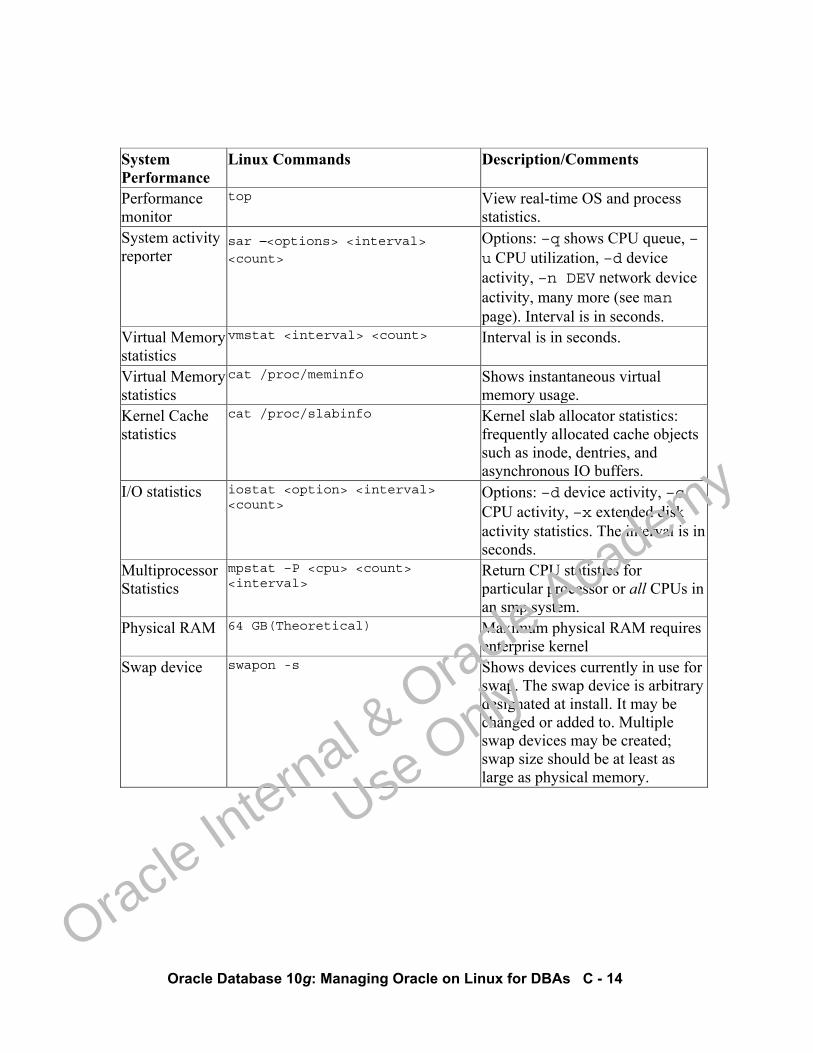
Oracle Database 10g: Managing Oracle on Linux for DBAs C - 14
System Performance
Linux Commands Description/Comments
Performance monitor
top View real-time OS and process statistics.
System activity reporter
sar –<options> <interval> <count>
Options: –q shows CPU queue, –u CPU utilization, –d device activity, –n DEV network device activity, many more (see man page). Interval is in seconds.
Virtual Memory statistics
vmstat <interval> <count> Interval is in seconds.
Virtual Memory statistics
cat /proc/meminfo Shows instantaneous virtual memory usage.
Kernel Cache statistics
cat /proc/slabinfo Kernel slab allocator statistics: frequently allocated cache objects such as inode, dentries, and asynchronous IO buffers.
I/O statistics iostat <option> <interval> <count>
Options: –d device activity, –c CPU activity, –x extended disk activity statistics. The interval is in seconds.
Multiprocessor Statistics
mpstat –P <cpu> <count> <interval>
Return CPU statistics for particular processor or all CPUs in an smp system.
Physical RAM 64 GB(Theoretical) Maximum physical RAM requires enterprise kernel
Swap device swapon -s Shows devices currently in use for swap. The swap device is arbitrary designated at install. It may be changed or added to. Multiple swap devices may be created; swap size should be at least as large as physical memory.
Oracle In
ternal & O
racle Aca
demy
Use O
nly

Oracle Database 10g: Managing Oracle on Linux for DBAs C - 15
Display swap size
free Show the current memory and swap usage.
Activate Swap swapon -a Turn on swap. Free disk blocks df -k Measured in KB; use –m for MB
units. Device listing cat /proc/devices List devices known to the system
by major and minor number. Disk information
cat /proc/scsi/scsi0/sda/model
cat /proc/ide/ide0/hda/model
View SCSI disk information.
View IDE disk information. Print network statistics
netstat <options> Print a wide variety of network statistics (see man netstat).
Graphical system statistics viewer
xosview An X-based display of recent OS statistics.
Oracle In
ternal & O
racle Aca
demy
Use O
nly
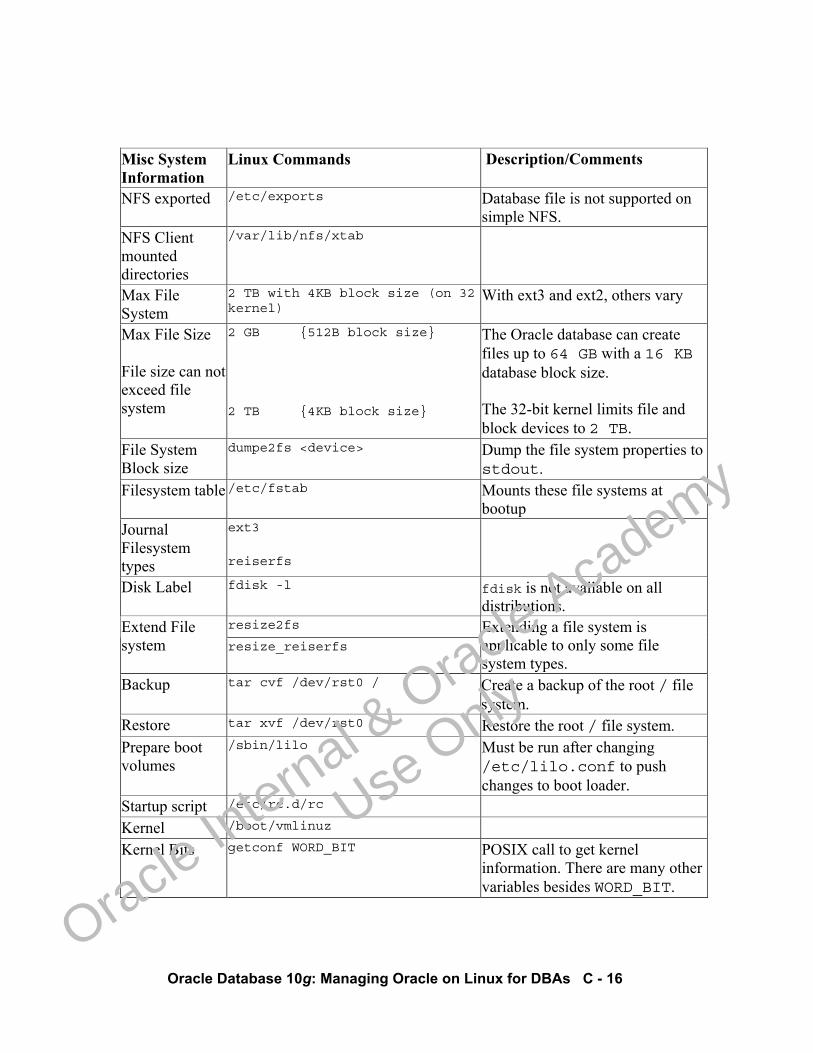
Oracle Database 10g: Managing Oracle on Linux for DBAs C - 16
Misc System Information
Linux Commands Description/Comments
NFS exported /etc/exports Database file is not supported on simple NFS.
NFS Client mounted directories
/var/lib/nfs/xtab
Max File System
2 TB with 4KB block size (on 32 kernel)
With ext3 and ext2, others vary
Max File Size
File size can not exceed file system
2 GB {512B block size}
2 TB {4KB block size}
The Oracle database can create files up to 64 GB with a 16 KB database block size. The 32-bit kernel limits file and block devices to 2 TB.
File System Block size
dumpe2fs <device> Dump the file system properties to stdout.
Filesystem table /etc/fstab Mounts these file systems at bootup
Journal Filesystem types
ext3
reiserfs
Disk Label fdisk -l fdisk is not available on all distributions.
resize2fs Extend File system resize_reiserfs
Extending a file system is applicable to only some file system types.
Backup tar cvf /dev/rst0 / Create a backup of the root / file system.
Restore tar xvf /dev/rst0 Restore the root / file system. Prepare boot volumes
/sbin/lilo Must be run after changing /etc/lilo.conf to push changes to boot loader.
Startup script /etc/rc.d/rc Kernel /boot/vmlinuz Kernel Bits getconf WORD_BIT POSIX call to get kernel
information. There are many other variables besides WORD_BIT.
Oracle In
ternal & O
racle Aca
demy
Use O
nly
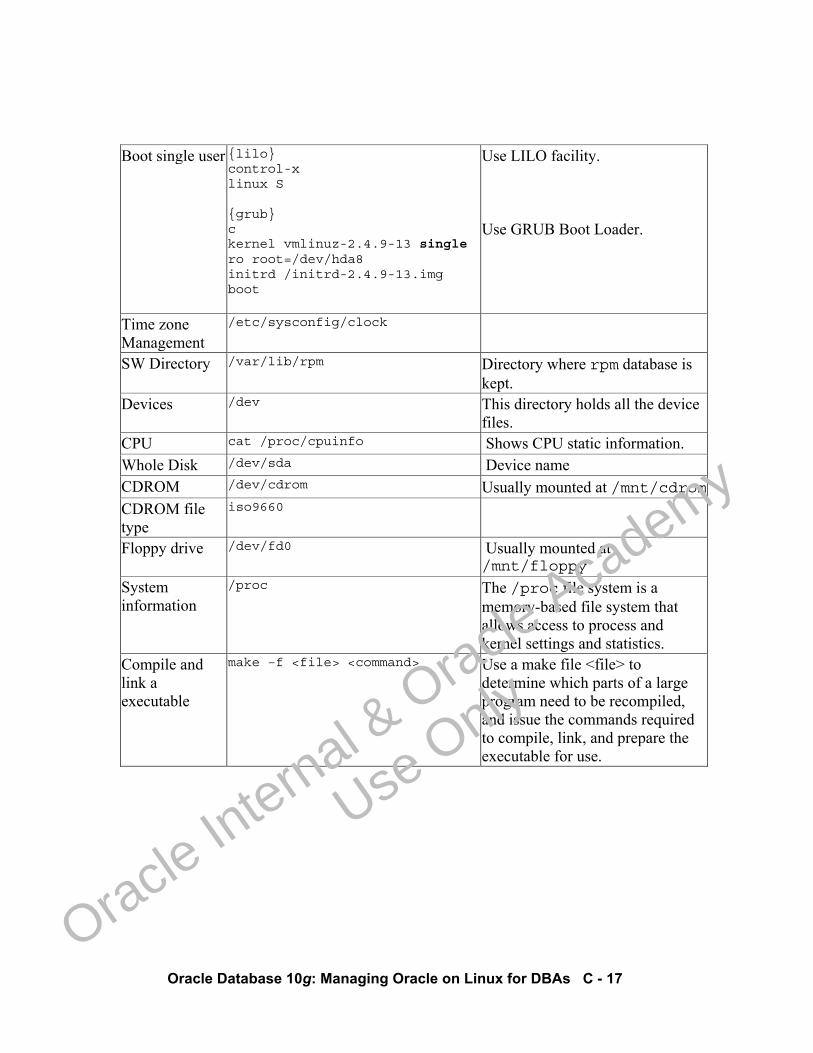
Oracle Database 10g: Managing Oracle on Linux for DBAs C - 17
Boot single user {lilo} control-x linux S {grub} c kernel vmlinuz-2.4.9-13 single ro root=/dev/hda8 initrd /initrd-2.4.9-13.img boot
Use LILO facility. Use GRUB Boot Loader.
Time zone Management
/etc/sysconfig/clock
SW Directory /var/lib/rpm Directory where rpm database is kept.
Devices /dev This directory holds all the device files.
CPU cat /proc/cpuinfo Shows CPU static information. Whole Disk /dev/sda Device name CDROM /dev/cdrom Usually mounted at /mnt/cdromCDROM file type
iso9660
Floppy drive /dev/fd0 Usually mounted at /mnt/floppy
System information
/proc The /proc file system is a memory-based file system that allows access to process and kernel settings and statistics.
Compile and link a executable
make –f <file> <command> Use a make file <file> to determine which parts of a large program need to be recompiled, and issue the commands required to compile, link, and prepare the executable for use.
Oracle In
ternal & O
racle Aca
demy
Use O
nly
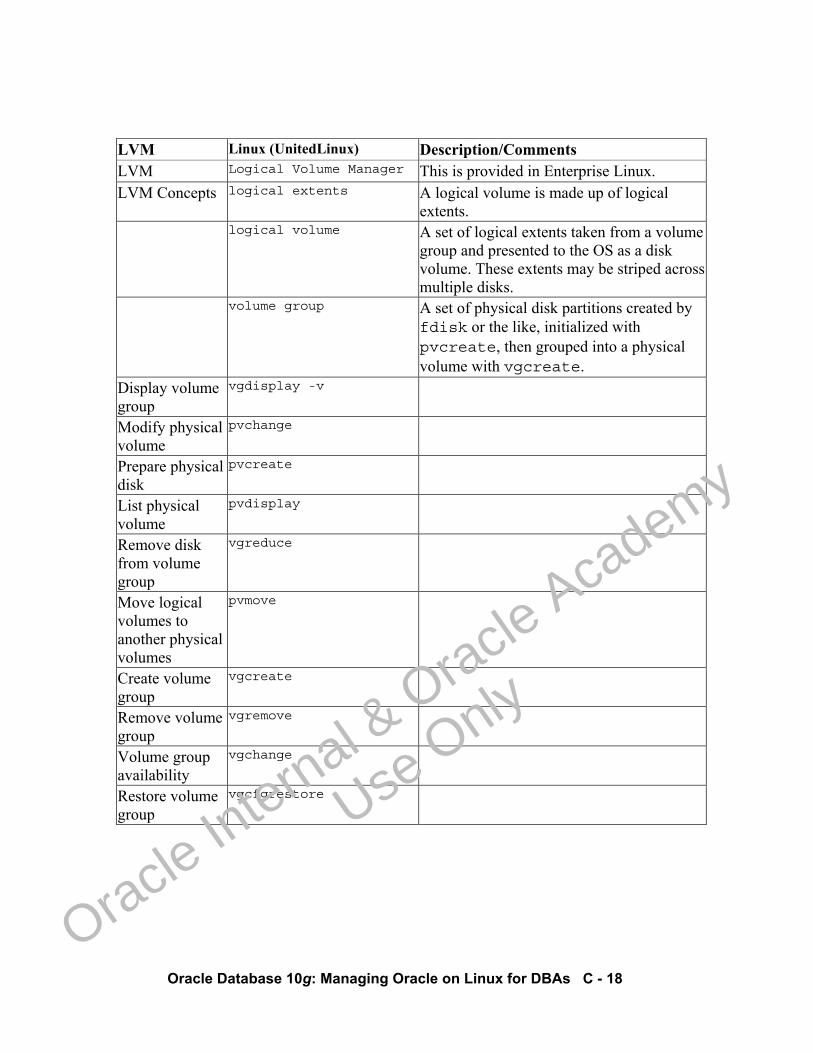
Oracle Database 10g: Managing Oracle on Linux for DBAs C - 18
LVM Linux (UnitedLinux) Description/Comments LVM Logical Volume Manager This is provided in Enterprise Linux. LVM Concepts logical extents A logical volume is made up of logical
extents. logical volume A set of logical extents taken from a volume
group and presented to the OS as a disk volume. These extents may be striped across multiple disks.
volume group A set of physical disk partitions created by fdisk or the like, initialized with pvcreate, then grouped into a physical volume with vgcreate.
Display volume group
vgdisplay -v
Modify physical volume
pvchange
Prepare physical disk
pvcreate
List physical volume
pvdisplay
Remove disk from volume group
vgreduce
Move logical volumes to another physical volumes
pvmove
Create volume group
vgcreate
Remove volume group
vgremove
Volume group availability
vgchange
Restore volume group
vgcfgrestore
Oracle In
ternal & O
racle Aca
demy
Use O
nly
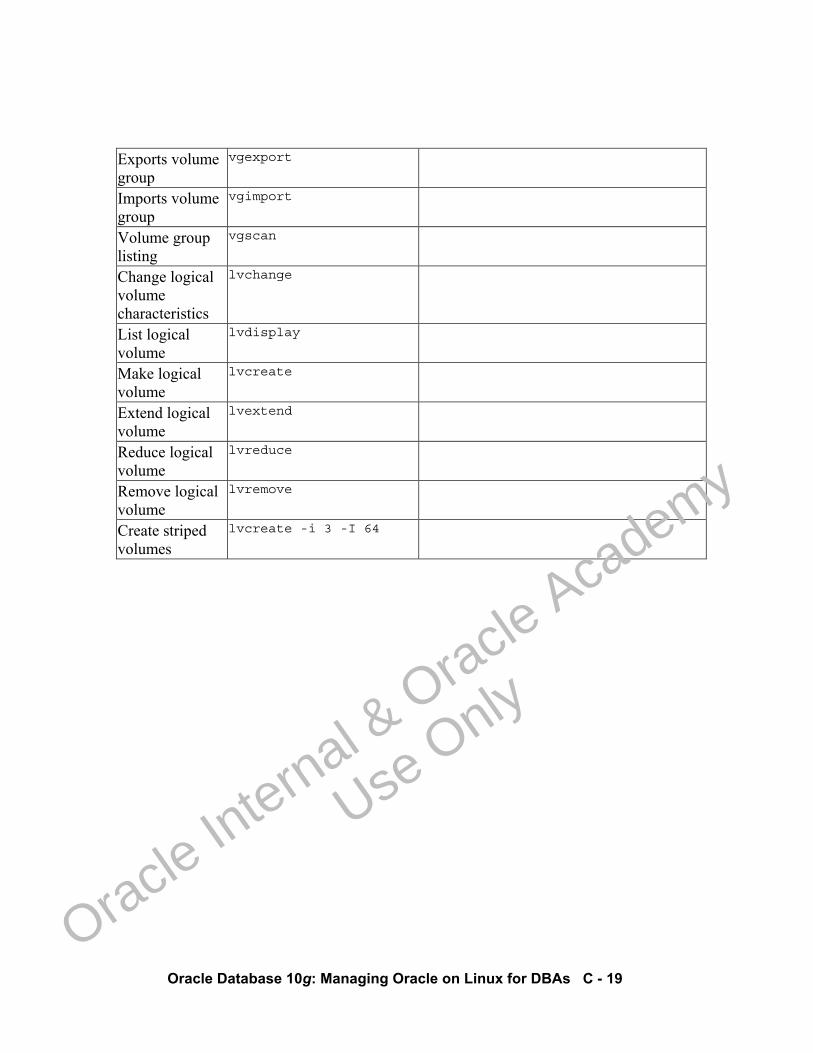
Oracle Database 10g: Managing Oracle on Linux for DBAs C - 19
Exports volume group
vgexport
Imports volume group
vgimport
Volume group listing
vgscan
Change logical volume characteristics
lvchange
List logical volume
lvdisplay
Make logical volume
lvcreate
Extend logical volume
lvextend
Reduce logical volume
lvreduce
Remove logical volume
lvremove
Create striped volumes
lvcreate -i 3 -I 64
Oracle In
ternal & O
racle Aca
demy
Use O
nly

Oracle In
ternal & O
racle Aca
demy
Use O
nly
Index
Oracle In
ternal & O
racle Aca
demy
Use O
nly
Oracle Database 10g: Managing Oracle on Linux for DBAs Index - 2
AAlert 2-11, 11-15, 11-16, 11-17anacron 7-14, 7-15Archive 10-6, 11-3, 11-4, 11-7ASM 1-22, 3-13, 4-3, 4-6, 4-9, 5-3, 5-4, 5-5, 5-7, 5-8,
5-9, 5-10, 5-11, 5-12, 5-13, 6-2, 6-4, 6-5, 6-6, 6-8, 6-9, 6-13, 6-18, 6-19, 7-3, 7-8, 7-10, 7-11, 7-18, 7-19, 11-10
+ASM 1-22, 6-8, 6-9, 6-13, 7-10ASM Instance 5-3, 5-7, 5-8, 5-9, 5-10, 5-12, 5-13, 6-4, 6-8,
6-13, 7-3, 7-8, 7-11, 11-10ASMLib 5-2, 5-4, 5-5, 5-7, 5-9, 5-12, 5-13ASMM 10-12Audit 6-9Automatic Shared Memory Management 8-12, 10-3, 10-12Automatic Storage Management 1-3, 3-12, 3-13, 4-3, 4-6, 4-9,
5-1, 5-2, 5-3, 5-4, 5-7, 5-8, 5-9, 5-10, 5-11, 6-4, 7-18
BBACKGROUND_DUMP_DEST 11-15, 11-16, 11-17Block 4-12, 7-16, 8-13, 8-21, 9-5, 10-3, 10-4, 10-5, 10-16, 11-14Buffer cache 8-14, 8-17, 8-20, 8-21, 9-21, 9-23, 9-29, 10-3, 10-5,
10-9, 10-12
CChannel 3-30, 10-9chkconfig 7-8, 7-12CKPT 6-13, 9-4Cluster 4-3, 4-6, 4-9, 4-11CMAN 3-28COMPATIBLE 3-6, 4-12Configuration assistant 3-24, 5-3, 5-8, 5-9, 7-10CORE_DUMP_DEST 11-16Corruption 4-7CPU_COUNT 10-9cron 7-14, 7-15
DData file 3-12, 4-7, 10-3
Oracle In
ternal & O
racle Aca
demy
Use O
nly
Oracle Database 10g: Managing Oracle on Linux for DBAs Index - 3
DDatabase Control 2-21, 6-11Database writer 10-3DB_BLOCK_BUFFERS 8-13, 8-21DB_BLOCK_SIZE 10-4DB_CACHE_ADVICE 10-3DB_CACHE_SIZE 8-12, 8-13, 8-21, 10-9DB_WRITER_PROCESSES 10-8, 10-9, 10-10DBA 2-21, 2-25, 2-26, 2-27, 2-28, 2-29, 3-3, 3-4, 3-18, 3-19,
5-5, 6-11, 6-17, 7-8, 7-13DBCA 5-8, 6-3, 6-6, 6-7, 7-10dbshut 7-10, 7-11, 7-21dbstart 7-10, 7-11, 7-21DBWn 8-15DBWR_IO_SLAVES 10-8, 10-10Dedicated server 2-12, 6-15, 6-16disk group 5-3, 5-11, 6-6DISPATCHERS 6-15DML 10-6
Eemctl 6-11, 7-3Enterprise Manager 2-21, 3-20, 6-7, 6-10, 6-11, 7-16, 7-18, 8-18,
9-7, 10-3Enterprise Manager Database Control 2-21, 6-11Environment variable 3-7, 3-13, 3-14, 3-19, 3-20, 3-27, 3-30EVENT 1-6, 10-6, 10-7ext3 4-3, 4-4, 4-6, 4-10, 10-4, 10-13ext2 4-10
FFactor 1-22, 9-8, 9-10, 9-11, 9-19, 9-29fdisk 5-6Flash recovery area 5-8, 5-11, 6-5, 6-6
Hhugemem 1-9, 8-22, 10-14
Oracle In
ternal & O
racle Aca
demy
Use O
nly

Oracle Database 10g: Managing Oracle on Linux for DBAs Index - 4
Hhugepages 8-2, 8-11, 8-12, 8-13, 8-20, 8-21, 8-23, 9-24, 9-28,
9-29, 10-4
IIndex 9-19, 9-37, 10-5Initialization parameters 7-19, 8-20, 8-21, 10-2, 10-8, 10-15Instance 1-16, 1-22, 2-7, 2-9, 3-16, 3-18, 3-19, 3-26, 3-30,
4-9, 5-2, 5-3, 5-7, 5-8, 5-9, 5-10, 5-12, 5-13, 6-4, 6-8, 6-9, 6-10, 6-13, 6-14, 6-15, 7-3, 7-8, 7-11, 7-16, 7-17, 7-18, 7-19, 8-12, 8-13, 8-17, 8-18, 8-20, 8-21, 9-17, 9-21, 10-3, 10-10, 10-12, 11-10
iostat 9-4, 9-5, 9-13, 9-16, 9-30, 9-33, 9-34, 9-39, 11-3, 11-5, 11-6
IPC 9-28iSQL*Plus 3-24, 6-10, 6-11, 7-3isqlplusctl 3-24, 7-3
JJava pool 10-12JAVA_POOL_SIZE 9-29job 2-30, 7-16, 7-18, 10-12
Kkernel 1-2, 1-5, 1-6, 1-7, 1-8, 1-9, 1-10, 1-11, 1-16, 1-17,
1-28, 1-29, 2-3, 2-4, 2-5, 2-6, 2-7, 2-8, 2-10, 2-11, 2-18, 2-21, 3-30, 4-6, 5-5, 5-6, 5-9, 7-4, 7-5, 7-7, 8-7, 8-9, 8-10, 8-12, 8-13, 8-14, 8-15, 8-16, 8-18, 8-20, 8-22, 9-6, 9-22, 9-24, 9-27, 9-28, 10-13, 10-14, 11-15
LLarge pool 10-10, 10-12Listener 3-28, 6-15, 7-3, 7-8, 7-11, 7-13, 8-18Lock 7-9, 9-28LOCK_SGA 9-28LOG_BUFFER 10-6, 10-7
Mmeminfo 1-16, 8-2, 8-7, 8-13, 8-23, 8-24, 9-21, 9-22, 9-23,
9-24, 11-5
Oracle In
ternal & O
racle Aca
demy
Use O
nly
Oracle Database 10g: Managing Oracle on Linux for DBAs Index - 5
MMetric 9-10, 9-34MMAN 6-13MTTR 7-17
NNLS 3-19nobody 2-30
Oocfs2 4-3, 4-6, 4-11ofa 3-10, 3-11, 3-12, 3-13, 3-14, 3-19OINSTALL 1-15, 2-25, 2-26, 2-27, 2-28, 2-29, 3-3, 3-4, 3-5,
3-15, 6-9, 6-12, 8-12opatch 3-26, 3-27, 3-29Optimizer statistics 9-19Oracle Net 2-12ORACLE_BASE 3-14, 3-15, 3-16, 3-19, 3-23, 3-24, 3-30, 6-8, 6-9ORACLE_HOME 3-9, 3-13, 3-14, 3-15, 3-16, 3-17, 3-18, 3-19, 3-20,
3-26, 3-27, 3-28, 5-8, 5-10, 6-7, 6-10, 6-11, 6-12, 7-10, 7-11, 7-17, 7-19, 8-19
ORACLE_SID 3-7, 3-17, 3-18, 3-19, 6-9, 6-12, 7-10, 7-11oracleasm 1-11, 5-5, 5-7, 5-9orcl 1-22, 3-7, 3-13, 3-17, 3-18, 6-8, 6-9, 6-10, 6-12, 6-13,
6-14, 6-15, 7-10, 7-19, 11-13, 11-15, 11-16OUI 2-22, 2-23, 3-8, 3-15, 3-16, 3-19, 3-22, 3-26, 3-30, 6-12
PPackage 1-6, 1-14, 2-2, 2-17, 2-18, 2-19, 2-31, 2-32, 8-22,
9-6, 9-7partition 3-13, 4-3, 4-4, 4-5, 5-3, 5-6, 5-9, 9-21, 9-31,
9-33, 9-34Password 2-25, 2-29, 6-17Performance 1-3, 3-10, 3-11, 4-3, 4-6, 4-7, 4-9, 4-10, 5-3,
5-11, 7-17, 8-7, 8-9, 8-10, 8-11, 8-20, 8-21, 9-3, 9-4, 9-6, 9-7, 9-8, 9-9, 9-12, 9-13, 9-15, 9-21, 9-27, 9-29, 9-30, 9-31, 9-32, 9-34, 9-36, 9-37, 10-3, 10-4, 10-5, 10-6, 10-7, 10-8, 10-11, 10-12, 10-13, 10-14, 10-16, 11-3, 11-8
Oracle In
ternal & O
racle Aca
demy
Use O
nly
Oracle Database 10g: Managing Oracle on Linux for DBAs Index - 6
PPGA 8-17, 9-29PGA_AGGREGATE_TARGET 9-29Pipe 1-18, 1-21, 1-25, 9-7PMON 1-22, 6-13, 8-15, 9-4, 11-13PRE_PAGE_SGA 10-8, 10-11Privilege 2-25, 3-3, 6-17, 9-28Procedure 3-15, 7-16, 8-17, 8-19PROCESSES 1-14, 1-25, 2-6, 2-9, 2-10, 2-11, 2-12, 2-13, 2-14,
2-16, 3-26, 4-4, 6-13, 6-14, 6-15, 6-16, 7-3, 7-8, 7-13, 8-3, 8-4, 8-8, 8-15, 8-16, 8-17, 8-18, 8-22, 9-4, 9-5, 9-7, 9-10, 9-11, 9-12, 9-13, 9-14, 9-16, 9-17, 9-18, 9-19, 9-22, 9-23, 9-24, 9-29, 10-3, 10-6, 10-7, 10-8, 10-9, 10-10, 10-14, 11-2, 11-3, 11-13, 11-19, 11-20
Profile 3-7pstree 9-7, 9-9
RRecovery Manager 7-17, 7-18Redo 2-11, 2-13, 3-12, 4-7, 9-37, 10-3, 10-6, 10-7Redo log buffer 10-3relink 3-28, 3-29, 8-17REMOTE_LOGIN_PASSWORDFILE 6-17Resource Manager 9-19RMAN 3-28, 7-16, 7-17, 7-18rpm 1-6, 2-17, 2-18, 2-19, 5-5, 10-13Rule 8-18, 9-37runInstaller 3-22runlevel 2-5, 7-5, 7-6, 7-7, 7-8, 7-12
Ssar 9-4, 9-5, 9-9, 9-11, 9-12, 9-13, 9-15, 9-16, 9-17, 9-20,
9-22, 9-25, 9-26, 9-30, 9-35, 9-39scandisks 5-7, 5-9Scheduler 2-30, 7-14, 7-15, 7-16Schema 11-10Segment 1-16, 2-6, 2-7, 2-8, 8-24, 9-4
Oracle In
ternal & O
racle Aca
demy
Use O
nly
Oracle Database 10g: Managing Oracle on Linux for DBAs Index - 7
Ssemaphore 2-9, 2-10Sequence 2-4, 7-2, 7-4, 7-5, 7-6, 7-9, 7-20SESSIONS 2-13, 6-15, 8-16, 10-16SGA 2-6, 2-7, 2-8, 8-13, 8-14, 8-15, 8-16, 8-17, 8-18, 8-19,
8-20, 8-21, 8-22, 9-4, 9-21, 9-22, 9-28, 9-29, 10-8, 10-11SGA_MAX_SIZE 10-11SGA_TARGET 8-13Shared pool 8-17, 10-10, 10-12Shared server 6-15SID 3-7, 3-17, 3-18, 3-19, 6-7, 6-9, 6-12, 6-13, 6-15, 7-10,
7-11, 7-19SMON 6-13, 8-15, 9-4Snapshot 9-24, 11-6SPFILE 7-19SQL*Loader 3-28SQL*Plus 3-17, 6-15, 6-16Statistics 1-16, 7-13, 8-7, 9-4, 9-5, 9-12, 9-14, 9-15, 9-16,
9-19, 9-21, 9-24, 9-27, 9-31, 9-33, 9-34, 9-36, 10-6, 11-5strace 11-2, 11-13, 11-14, 11-19, 11-20Streams pool 10-12SYSDBA 1-24, 2-25, 6-16, 6-17, 7-3, 11-10SYSOPER 2-25, 6-17SYSTEM tablespace 10-3
TTablespace 3-12, 6-7, 10-3tainted 1-2, 1-10, 1-11, 1-17, 1-28Trace Files 6-9TRANSACTIONS 10-4
Uumask 3-8unbreakable 2-21USE_INDIRECT_DATA_BUFFERS 8-13USER_DUMP_DEST 11-15, 11-16
Oracle In
ternal & O
racle Aca
demy
Use O
nly
Oracle Database 10g: Managing Oracle on Linux for DBAs Index - 8
VV$FILESTAT 9-33V$PROCESS 6-14View 1-8, 1-17, 2-4, 2-23, 2-27, 3-6, 3-8, 6-7, 6-14, 8-6,
9-5, 9-6, 9-12, 9-13, 9-30, 9-32, 9-33vmstat 9-4, 9-5, 9-9, 9-11, 9-12, 9-13, 9-14, 9-15, 9-17, 9-20,
9-21, 9-26, 9-30, 9-35, 9-39, 11-3, 11-5, 11-6
WWait event 10-6, 10-7
Xxload 9-9xosview 9-6, 9-9, 9-20, 9-30
Oracle In
ternal & O
racle Aca
demy
Use O
nly