Embed Size (px)
Citation preview
1/27/2018
1
MANAGER JOB AID CREATE REQUISITION (for existing position) Booz Allen utilizes Position Management to support effective workforce planning. Every Job Requisition requires an
open position before it can be approved and posted. When you have an approved open position, you can create (or
finish creating) a requisition to fill that position.
1. From the homepage, click the Recruiting worklet. Under Actions, click Create Job Requisition.
2. Validate or enter the Supervisory Organization for the req. You will only be able to create a req on
behalf of someone whom you are their Career Manager and they are within your management chain.
NOTE: If you want to copy details from an existing Job Requisition in your Supervisory Organization,
you can click on that menu first.
NOTE: Supervisory Org is referring to who the Career Manager will be. If this needs to be modified
once the req has been posted, contact the recruiter.
3. In For Existing Position, search and select the unfilled position you are looking to fill.
1/27/2018
2
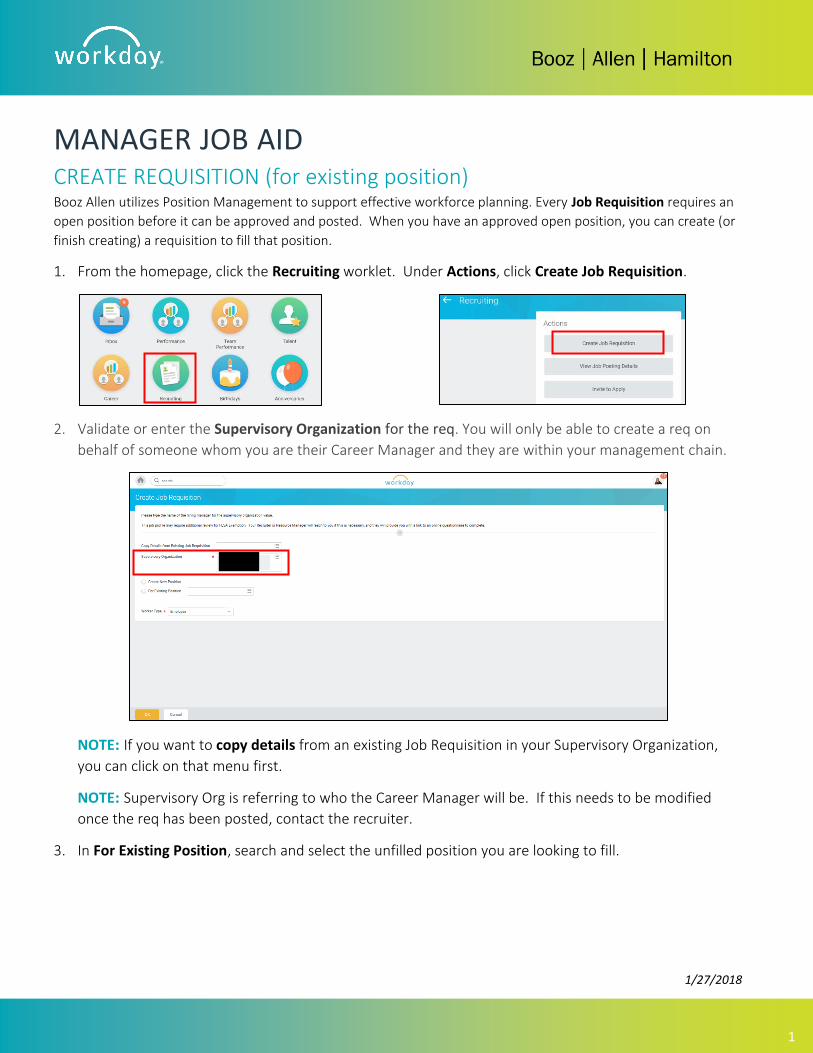
4. Under Worker Type, select Employee and click OK.
NOTE: All Requisitions should have a Worker Type of Employee. Contingent Workers are handled
outside of Workday. If a req is created with a Worker Type of Contingent Worker, the req will need to
be closed and re-created with the Worker Type of Employee.
5. This will first take you to a page to enter Recruiting information. From this page, you can enter details
about the position by selecting options from the menu on the left side of the screen.
6. Click the pencil icon and enter the Reason for the requisition being opened (New requisition or a
replacement/backfill).
NOTE: If you choose Backfill as your Reason, you must enter the name of the worker you are
replacing. You will not be able to hire or transfer anyone into that role until the incumbent has left the
position. If someone is transferring out of the position, please confirm that the position is not moving
with them.
1/27/2018
3
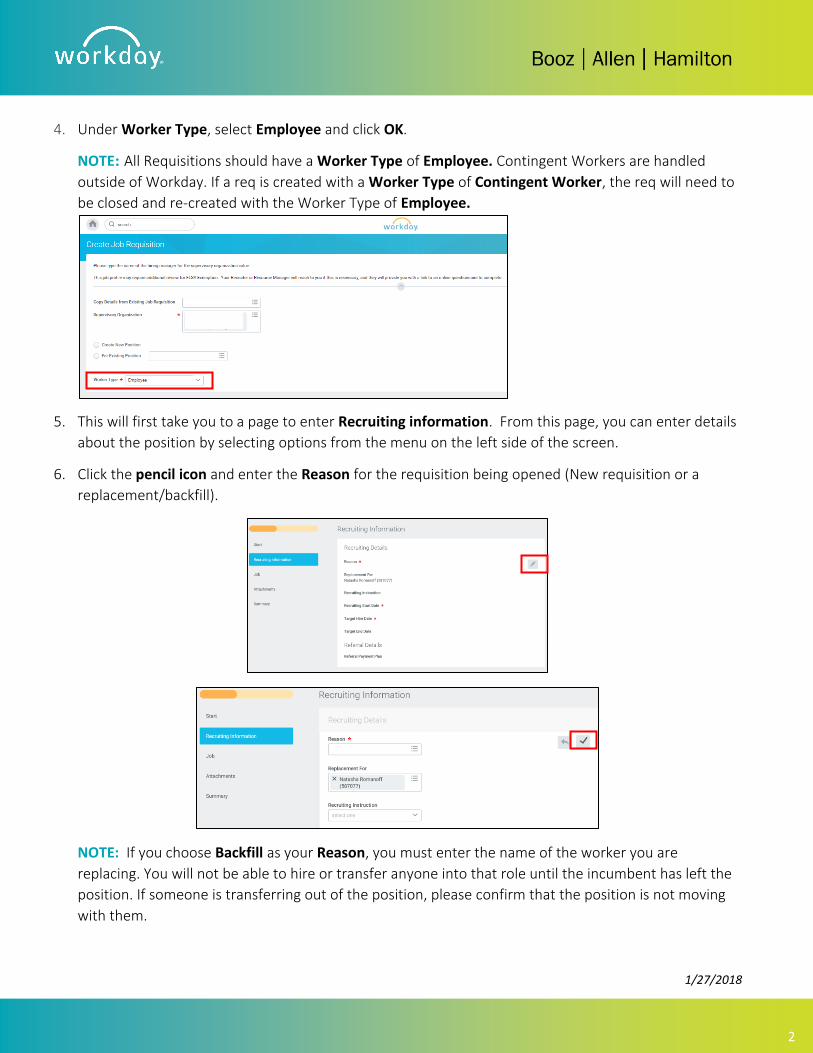
7. Recruiting Instruction is direction to the posting team on where to post the position, it will not
prepopulate. We recommend choosing Internally and Externally.
8. You will be required to enter the Recruiting Start date and Target Hire date. The Recruiting Start date
is the earliest date you want your position posted and your recruiter to begin the search.
9. Click the check mark to accept changes.
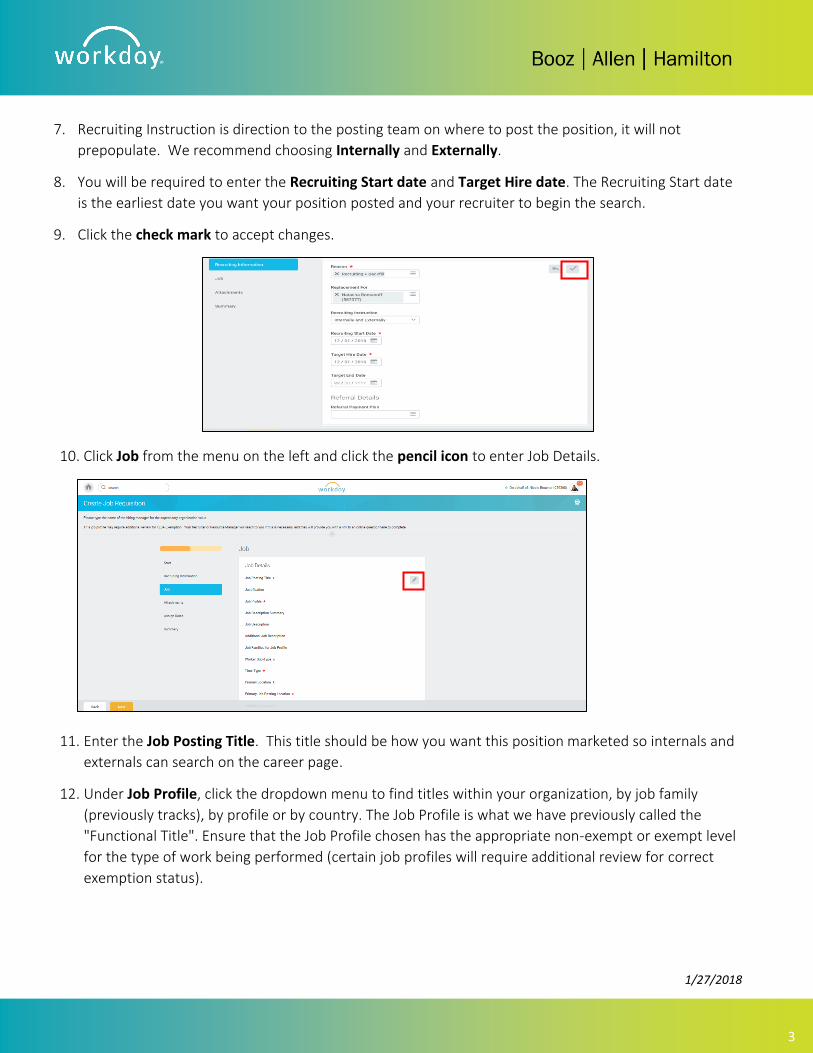
10. Click Job from the menu on the left and click the pencil icon to enter Job Details.
11. Enter the Job Posting Title. This title should be how you want this position marketed so internals and
externals can search on the career page.
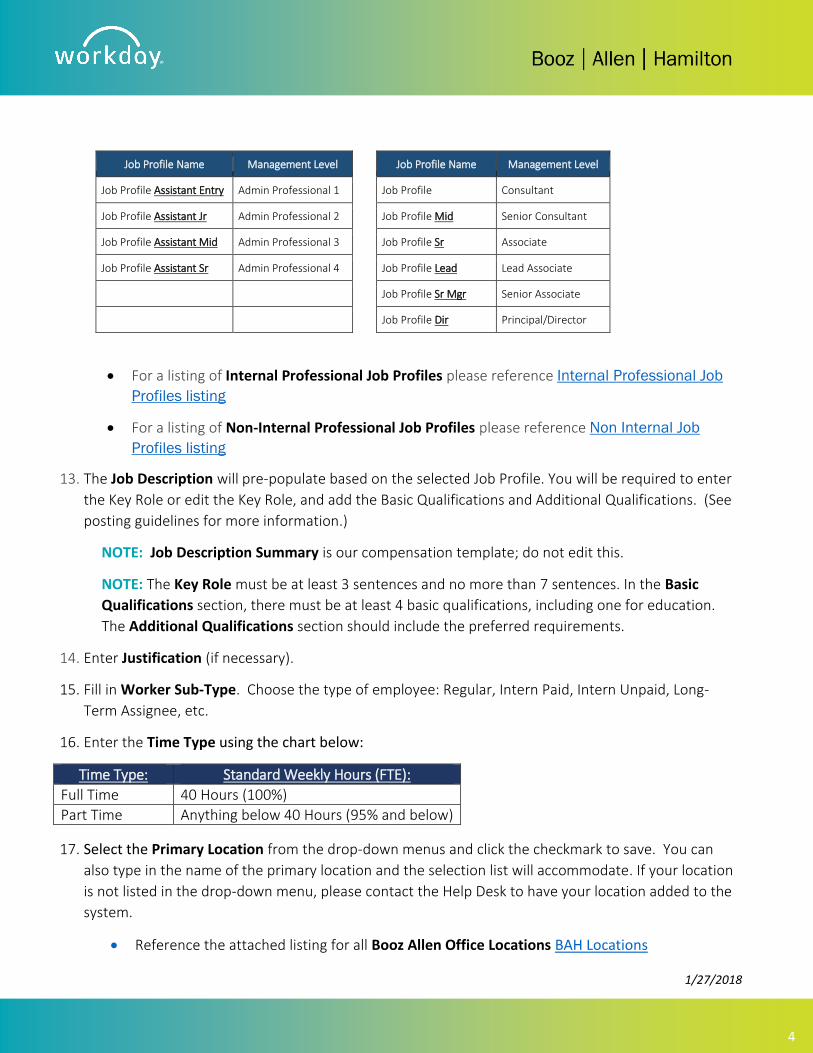
12. Under Job Profile, click the dropdown menu to find titles within your organization, by job family
(previously tracks), by profile or by country. The Job Profile is what we have previously called the
"Functional Title". Ensure that the Job Profile chosen has the appropriate non-exempt or exempt level
for the type of work being performed (certain job profiles will require additional review for correct
exemption status).
1/27/2018
4
Job Profile Name Management Level Job Profile Name Management Level
Job Profile Assistant Entry Admin Professional 1 Job Profile Consultant
Job Profile Assistant Jr Admin Professional 2 Job Profile Mid Senior Consultant
Job Profile Assistant Mid Admin Professional 3 Job Profile Sr Associate
Job Profile Assistant Sr Admin Professional 4 Job Profile Lead Lead Associate
Job Profile Sr Mgr Senior Associate
Job Profile Dir Principal/Director
• For a listing of Internal Professional Job Profiles please reference Internal Professional Job
Profiles listing
• For a listing of Non-Internal Professional Job Profiles please reference Non Internal Job
Profiles listing
13. The Job Description will pre-populate based on the selected Job Profile. You will be required to enter
the Key Role or edit the Key Role, and add the Basic Qualifications and Additional Qualifications. (See
posting guidelines for more information.)
NOTE: Job Description Summary is our compensation template; do not edit this.
NOTE: The Key Role must be at least 3 sentences and no more than 7 sentences. In the Basic
Qualifications section, there must be at least 4 basic qualifications, including one for education.
The Additional Qualifications section should include the preferred requirements.
14. Enter Justification (if necessary).
15. Fill in Worker Sub-Type. Choose the type of employee: Regular, Intern Paid, Intern Unpaid, Long-
Term Assignee, etc.
16. Enter the Time Type using the chart below:
Time Type: Standard Weekly Hours (FTE):
Full Time 40 Hours (100%)
Part Time Anything below 40 Hours (95% and below)
17. Select the Primary Location from the drop-down menus and click the checkmark to save. You can
also type in the name of the primary location and the selection list will accommodate. If your location
is not listed in the drop-down menu, please contact the Help Desk to have your location added to the
system.
• Reference the attached listing for all Booz Allen Office Locations BAH Locations
1/27/2018
5
• For all Client Site Locations, please reference the attached listing Client Site Locations
NOTE: Due to post government employment restrictions, if this position is for a US Government
Job OCONUS, please enter a US based location first as a primary location and the OCONUS location
should be added in the additional locations field.
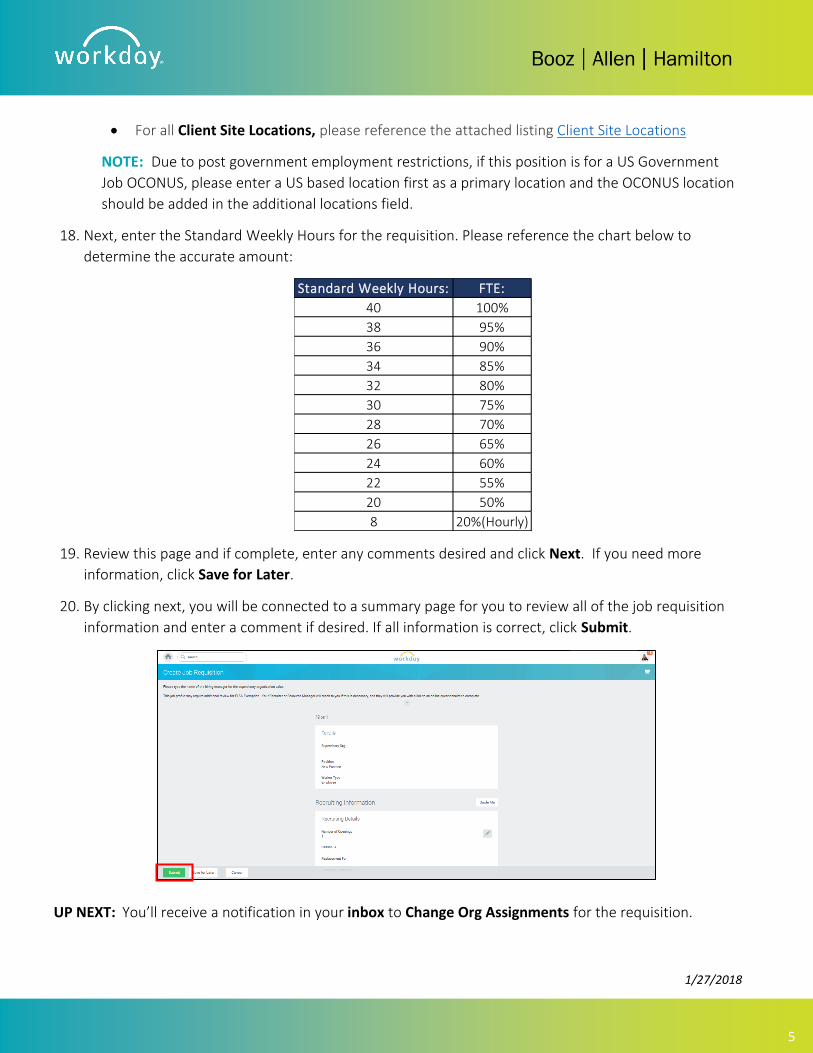
18. Next, enter the Standard Weekly Hours for the requisition. Please reference the chart below to
determine the accurate amount:
19. Review this page and if complete, enter any comments desired and click Next. If you need more
information, click Save for Later.
20. By clicking next, you will be connected to a summary page for you to review all of the job requisition
information and enter a comment if desired. If all information is correct, click Submit.
UP NEXT: You’ll receive a notification in your inbox to Change Org Assignments for the requisition.
Standard Weekly Hours: FTE:
40 100%
38 95%
36 90%
34 85%
32 80%
30 75%
28 70%
26 65%
24 60%
22 55%
20 50%
8 20%(Hourly)
1/27/2018
6
21. From your inbox, open the action Change Orginization Assignments and complete the required
fields.
22. Select the Company from the drop down menu. To select the United States as the Country, type 631.
NOTE: If creating a position in a different country, please contact
[email protected] for assistance on company codes.
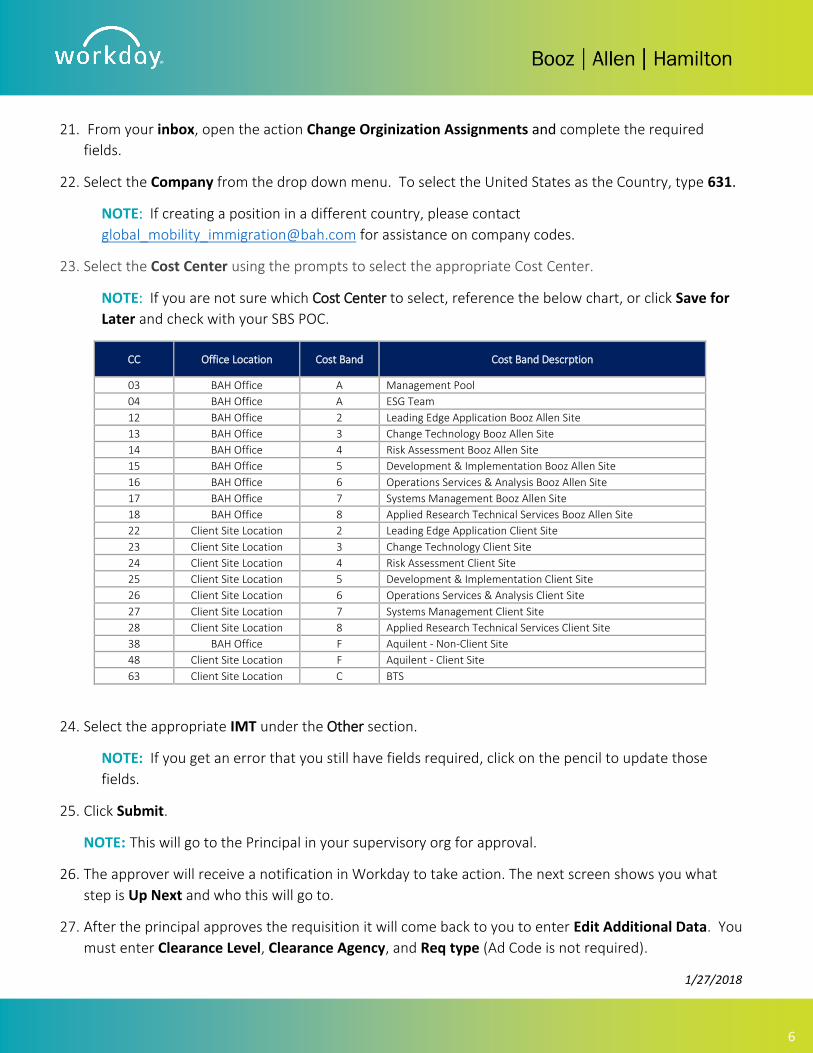
23. Select the Cost Center using the prompts to select the appropriate Cost Center.
NOTE: If you are not sure which Cost Center to select, reference the below chart, or click Save for
Later and check with your SBS POC.
CC Office Location Cost Band Cost Band Descrption
03 BAH Office A Management Pool
04 BAH Office A ESG Team
12 BAH Office 2 Leading Edge Application Booz Allen Site
13 BAH Office 3 Change Technology Booz Allen Site
14 BAH Office 4 Risk Assessment Booz Allen Site
15 BAH Office 5 Development & Implementation Booz Allen Site
16 BAH Office 6 Operations Services & Analysis Booz Allen Site
17 BAH Office 7 Systems Management Booz Allen Site
18 BAH Office 8 Applied Research Technical Services Booz Allen Site
22 Client Site Location 2 Leading Edge Application Client Site
23 Client Site Location 3 Change Technology Client Site
24 Client Site Location 4 Risk Assessment Client Site
25 Client Site Location 5 Development & Implementation Client Site
26 Client Site Location 6 Operations Services & Analysis Client Site
27 Client Site Location 7 Systems Management Client Site
28 Client Site Location 8 Applied Research Technical Services Client Site
38 BAH Office F Aquilent - Non-Client Site
48 Client Site Location F Aquilent - Client Site
63 Client Site Location C BTS
24. Select the appropriate IMT under the Other section.
NOTE: If you get an error that you still have fields required, click on the pencil to update those
fields.
25. Click Submit.
NOTE: This will go to the Principal in your supervisory org for approval.
26. The approver will receive a notification in Workday to take action. The next screen shows you what
step is Up Next and who this will go to.
27. After the principal approves the requisition it will come back to you to enter Edit Additional Data. You
must enter Clearance Level, Clearance Agency, and Req type (Ad Code is not required).
1/27/2018
7
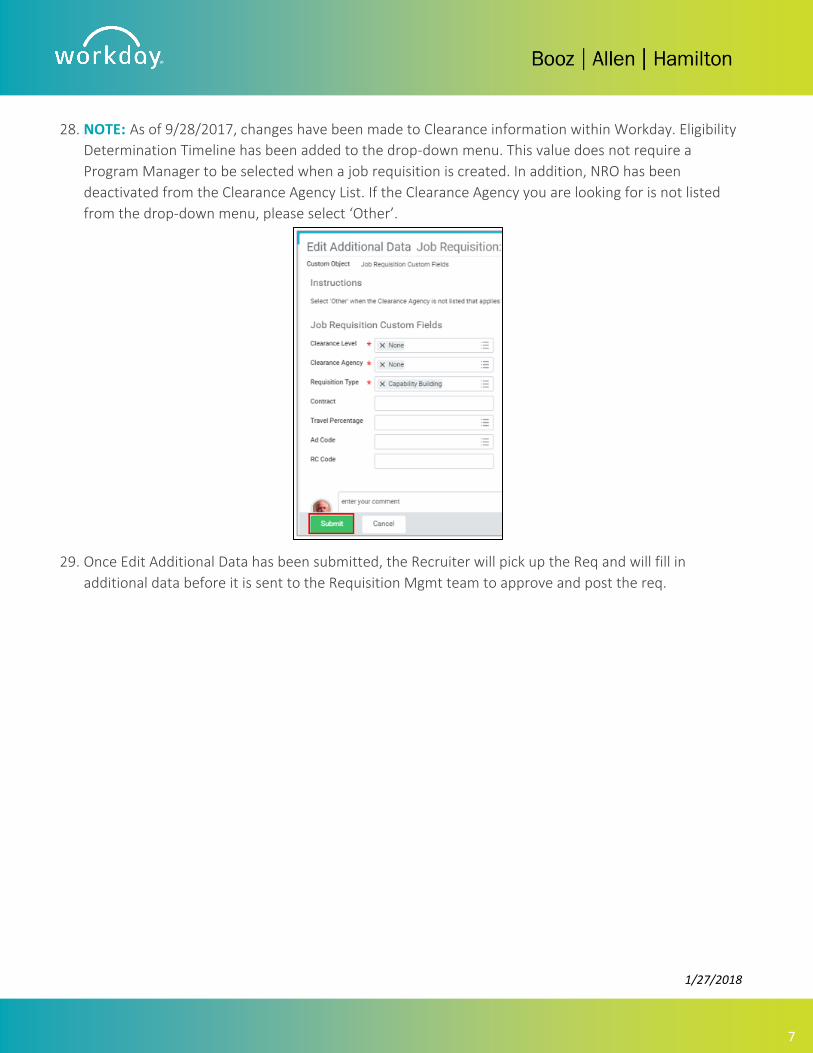
28. NOTE: As of 9/28/2017, changes have been made to Clearance information within Workday. Eligibility
Determination Timeline has been added to the drop-down menu. This value does not require a
Program Manager to be selected when a job requisition is created. In addition, NRO has been
deactivated from the Clearance Agency List. If the Clearance Agency you are looking for is not listed
from the drop-down menu, please select ‘Other’.
29. Once Edit Additional Data has been submitted, the Recruiter will pick up the Req and will fill in
additional data before it is sent to the Requisition Mgmt team to approve and post the req.