Embed Size (px)
Citation preview
www.GaryMKatz.com page 1From Mastering the Miter Saw DVD ©2004 Gary Katz, OnSite Productions, LLC
I PREFER TO CUT CROWN IN POSITION
rather than lying flat, so I made ajig for this otherwise dangerousjob. If you like to cut crown mold-ing on-the-flat, you don’t need ajig like this, as most crown joints,even acute corners, can be cut in acompound miter saw with the ma-terial lying flat. (If the cornermeasures 45°, for instance, thenthe miter is 56° and the bevel is463⁄4°, well within the limits ofmany compound miter saws.) Butfor cutting acute angles with thematerial in position, you must usea jig, you must clamp the jig to thefence on your saw, and you mustclamp the molding to the jig.
I’ve made two jigs — reallythey’re accessory fences — thatclamp to the fence on my mitersaw. I built the fences 41 ⁄4 in. tallbecause that’s the maximum depthof cut on my Bosch 12-in. SCMsaw. Each fence is at a 45° angle tothe standard metal fence on mysaw. Any material will work; Iused 3⁄4-in. hardwood, 41 ⁄4 in. wideand 12 in. long for the rear support,16 in. long for the front fence. Theexact length of the two pieces isn’tcritical, though I did cut the rearsupport so that when it’s flush withthe far end of the existing fence,the jig is positioned perfectly inmy saw.
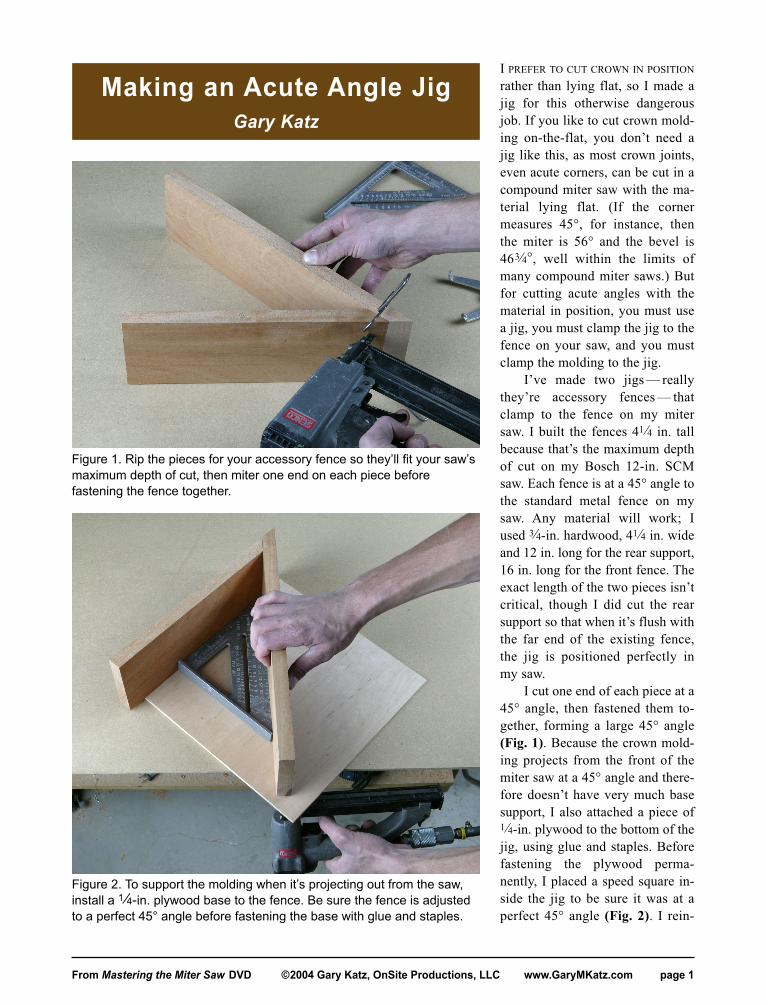
I cut one end of each piece at a45° angle, then fastened them to-gether, forming a large 45° angle(Fig. 1). Because the crown mold-ing projects from the front of themiter saw at a 45° angle and there-fore doesn’t have very much basesupport, I also attached a piece of1 ⁄4-in. plywood to the bottom of thejig, using glue and staples. Beforefastening the plywood perma-nently, I placed a speed square in-side the jig to be sure it was at aperfect 45° angle (Fig. 2). I rein-
Figure 1. Rip the pieces for your accessory fence so they’ll fit your saw’smaximum depth of cut, then miter one end on each piece beforefastening the fence together.
Figure 2. To support the molding when it’s projecting out from the saw,install a 1 ⁄4-in. plywood base to the fence. Be sure the fence is adjustedto a perfect 45° angle before fastening the base with glue and staples.
Making an Acute Angle JigGary Katz
www.GaryMKatz.com page 2From Mastering the Miter Saw DVD ©2004 Gary Katz, OnSite Productions, LLC
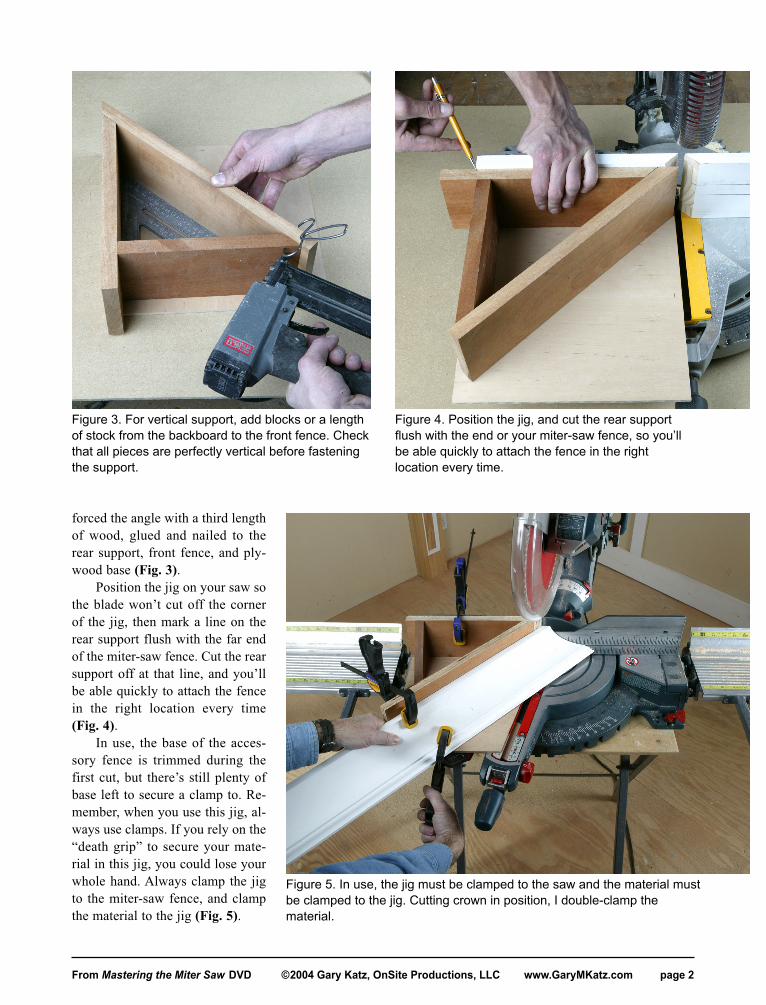
forced the angle with a third lengthof wood, glued and nailed to therear support, front fence, and ply-wood base (Fig. 3).
Position the jig on your saw sothe blade won’t cut off the cornerof the jig, then mark a line on therear support flush with the far endof the miter-saw fence. Cut the rearsupport off at that line, and you’llbe able quickly to attach the fencein the right location every time(Fig. 4).
In use, the base of the acces-sory fence is trimmed during thefirst cut, but there’s still plenty ofbase left to secure a clamp to. Re-member, when you use this jig, al-ways use clamps. If you rely on the“death grip” to secure your mate-rial in this jig, you could lose yourwhole hand. Always clamp the jigto the miter-saw fence, and clampthe material to the jig (Fig. 5).
Figure 3. For vertical support, add blocks or a lengthof stock from the backboard to the front fence. Checkthat all pieces are perfectly vertical before fasteningthe support.
Figure 4. Position the jig, and cut the rear supportflush with the end or your miter-saw fence, so you’llbe able quickly to attach the fence in the rightlocation every time.
Figure 5. In use, the jig must be clamped to the saw and the material mustbe clamped to the jig. Cutting crown in position, I double-clamp thematerial.