Embed Size (px)
Citation preview

! Warning:For outdoor use only
DO NOT use for cookingDO NOT use under any
overhead enclosure
! Warning:If the information in this manual is not followed exactly, a fire or explosion may result causing property damage, personal injury or loss of life.
Installation and service must be performed by a qualified installer, service agency or gas supplier.
Improper installation, adjustment, alteration, service or maintenance can cause injury or property damage.
Read the installation, operation and maintenance instructions thoroughly before installing or servicing this equipment.
Save these instructions for future reference. If you are assembling this unit for someone else, give this manual to him or her to read and save for future reference.
!
!
!
!
!
Designed and Engineer
US
ed by Real Flame. Manufactured as Model # 11560LP
ed in the vicinity of
DANGER!If you smell gas:
! WARNING
An LP-cylinder not connected for use should not be storthis or any other appliance.
PO:
For Technical Support call1-800-654-1704
Makena Propane Fire Table Owner’s Manual Square Style # 42100275/ 42100114
away from the appliance andimmediately call your gas supplieror fire department.
1. Shut off gas to the appliance.Do not store or use gasoline or otherflammable vapors and liquids in the vicinity of this or any other appliance.
020417

3
5
7
8
9
13
14
15
17
!CARBON MONOXIDE HAZARD
This appliance can produce carbon monoxide which has no odor.
Using it in an enclosed space can kill you.
Never use this appliance in an enclosed space such as a camper, tent, car or home.
Important Safety Information
Propane (LP) Gas Dangers and Warnings
Hose and Regulator Assembly and Replacement
Parts List
Assembly Instructions
Lighting
Care and Cleaning
Gas Component Connection Checks
Troubleshooting
Table of Contents
DANGER
2
Product Name Makena Square
Model No. 11560LP1
Rated Heat Output 40,000 btu/hr
Type of GasPropane (LP)
Gas Supply20 lb LP-Gas Cylinder
SPECIFICATIONS
!

!Important Safety Information
WARNING FIRE TABLE IS FOR OUTDOOR USE ONLY
3
• WARNING Failure to follow the dangers, warning and cautions in this manual may result in serious bodily injury or death, or in a fire or an explosion causing damage to property.• WARNING Improper installation, adjustment, alteration, service or maintenance can cause injury or property damage. Read the installation, operating and maintenance instructions thoroughly before installing or servicing this equipment.
• Minimum Clearance from Unit to Combustible Materials 48” (121.9 cm) from all sides and back. Do not locate this fire table under any overhead enclosure.IF YOU SMELL GAS
• Extinguish any open flame.• Do not try lighting any appliance.• Do not touch any electrical switch; do not use any phone in your building.• Immediately call your gas supplier from a neighbor’s phone.• Follow the gas supplier’s instructions.• If you cannot reach your gas supplier, call the fire department.
• Children and adults should be alerted to the hazards of high surface temperatures and be kept at a safe distance while fire table is in use.• This outdoor fire table is NOT to be operated by children. Young children should be closely supervised when in the vicinity of this outdoor fire table.• Do not hang or place clothing or other flammable materials on or near the gas fire table.• Any guard or protective device removed for servicing the appliance shall be replaced prior to operating the appliance.• Installation and repair should be done by a qualified service person. The appliance should be inspected before use and at least annually by a qualified service person. More frequent cleaning may be required as necessary. It is imperative that the control compartment, burners, and circulating air passageways of the appliance are kept clean. • Keep these instructions for future reference. If you are assembling this unit for someone else, give this manual to him or her to read and keep for future reference.• Do not use this unit for cooking.• Do not pour water into the fire table.• Do not use this outdoor fire table if any part has been under water. Immediately call a qualified service technician to inspect the fire table and to replace any part or control system and any gas control which has been under water.

Important Safety Information (Continued)
4
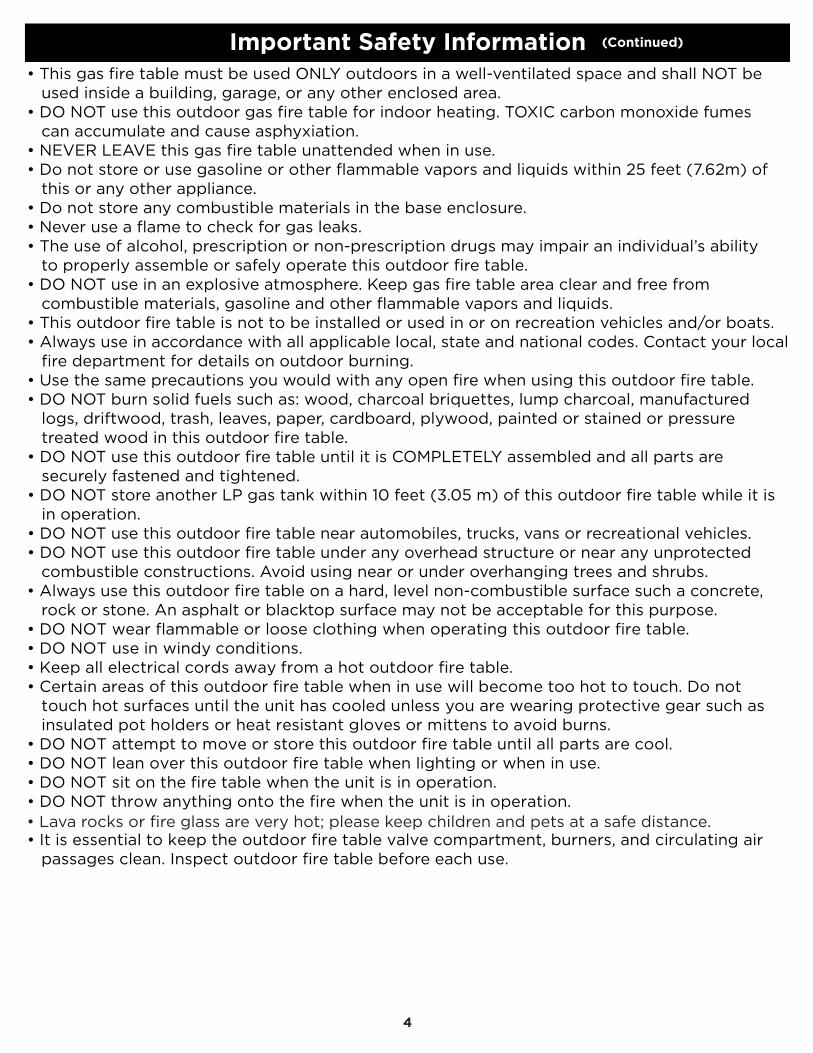
• This gas fire table must be used ONLY outdoors in a well-ventilated space and shall NOT be used inside a building, garage, or any other enclosed area.• DO NOT use this outdoor gas fire table for indoor heating. TOXIC carbon monoxide fumes can accumulate and cause asphyxiation.• NEVER LEAVE this gas fire table unattended when in use.• Do not store or use gasoline or other flammable vapors and liquids within 25 feet (7.62m) of this or any other appliance.• Do not store any combustible materials in the base enclosure.• Never use a flame to check for gas leaks.• The use of alcohol, prescription or non-prescription drugs may impair an individual’s ability to properly assemble or safely operate this outdoor fire table.• DO NOT use in an explosive atmosphere. Keep gas fire table area clear and free from combustible materials, gasoline and other flammable vapors and liquids. • This outdoor fire table is not to be installed or used in or on recreation vehicles and/or boats. • Always use in accordance with all applicable local, state and national codes. Contact your local fire department for details on outdoor burning.• Use the same precautions you would with any open fire when using this outdoor fire table. • DO NOT burn solid fuels such as: wood, charcoal briquettes, lump charcoal, manufactured logs, driftwood, trash, leaves, paper, cardboard, plywood, painted or stained or pressure treated wood in this outdoor fire table. • DO NOT use this outdoor fire table until it is COMPLETELY assembled and all parts are securely fastened and tightened. • DO NOT store another LP gas tank within 10 feet (3.05 m) of this outdoor fire table while it is in operation. • DO NOT use this outdoor fire table near automobiles, trucks, vans or recreational vehicles. • DO NOT use this outdoor fire table under any overhead structure or near any unprotected combustible constructions. Avoid using near or under overhanging trees and shrubs. • Always use this outdoor fire table on a hard, level non-combustible surface such a concrete, rock or stone. An asphalt or blacktop surface may not be acceptable for this purpose. • DO NOT wear flammable or loose clothing when operating this outdoor fire table. • DO NOT use in windy conditions. • Keep all electrical cords away from a hot outdoor fire table. • Certain areas of this outdoor fire table when in use will become too hot to touch. Do not touch hot surfaces until the unit has cooled unless you are wearing protective gear such as insulated pot holders or heat resistant gloves or mittens to avoid burns. • DO NOT attempt to move or store this outdoor fire table until all parts are cool. • DO NOT lean over this outdoor fire table when lighting or when in use. • Use only the regulator and hose assembly provided. The replacement regulator and hose assembly shall be that specified by the manufacturer. • DO NOT attempt to disconnect the gas regulator from the tank or any gas fitting while the outdoor fire table is in use. • Always shut o gas supply at the tank valve and disconnect regulator from the tank when the fire table is not in use. • DO NOT sit on the fire table when the unit is in operation. • DO NOT throw anything onto the fire when the unit is in operation.
• It is essential to keep the outdoor fire table valve compartment, burners, and circulating air passages clean. Inspect outdoor fire table before each use.
• Lava rocks or fire glass are very hot; please keep children and pets at a safe distance.

Important Safety Information(Continued)
Propane (LP) Dangers And Warnings
!
5
• Prior to each fire table operation, check the hose for evidence of excessive abrasion or wear. Use a handheld mirror to see hose sections located under the unit. If the hose is damaged, cracked or cut, it must be replaced before using the gas fire table. The hose assembly can only be replaced with a hose assembly specified by the manufacturer. Please call Real Flame at 1-800-654-1704.• Before each use, examine the burner and its components. If dirty, clean with a soft brush and
soapy water solution. Also examine the area around the burner. Any dirt or foreign material, such as spider webs or nests in this area should be removed. If it is evident that the burner is damaged, the fire table must not be used. The burner assembly must be replaced. Please contact Real Flame at 1-800-654-1704 for technical support.
• Place the hose out of the pathways where people may trip over it. Do not place the hose in areas where it may be subjected to accidental damage.
DANGER This outdoor fire table is for use with liquefied petroleum (LP) gas only. The conversion to or attempted use of natural gas (NG) in this outdoor fire table is dangerous and could result in serious personal injury, or property damage.
ATTENTION: Any alteration of the outdoor fire table that is not specifically directed in the operations manual will void manufacturer warranty.
LP GAS
LP gas is flammable and hazardous if handled improperly. Become aware of the characteristics before using any LP gas product.
Propane Characteristics• Flammable, explosive under pressure, heavier than air and settles in pools in low areas.• In its natural state, propane has no odor. For your safety, an odorant has been added.• Contact with propane could burn your skin.• Propane is extremely flammable and hazardous if handled improperly.
LP GAS WARNINGS• Cylinders must be stored outdoors in a well-ventilated area out of reach of children.• Disconnected cylinders must have valve dust caps installed and must not be stored in a
building, garage or any other enclosed area.• Never use a propane cylinder with a damaged body, valve, collar or footing.• Dented or rusted propane cylinders may be hazardous and should be checked by your
propane gas supplier.• Be sure to use only one 20 lb (9.1 kg) LP gas cylinder with a Type 1 valve with this appliance as
required by the American National Standards Institute (ANSI) and the Canadian Standards Steering Committee.
• Only tanks marked “propane” may be used.• The LP gas supply tank must be constructed and marked in accordance with the Specifications
for LP gas LP gas tanks of the U.S. Department of Transportation (DOT) or the National Standard of Canada, CAN/CSA-B339, LP gas tanks, Spheres and Tubes for the Transportation of Dangerous Goods; and Commission.
• LP gas tank must be arranged for vapor withdrawal.• The LP gas tank must have a listed overfilling prevention device (OPD) and a QCCI or
Type I (CGA810) LP gas tank connection.

Propane (LP) Dangers And Warnings (Continued)
6
• The LP gas tank must have a tank collar to protect the tank valve.
Cylinder Valve Outlet and Inlet Connection, ANSI/CGA-V-1-1977, CSA B96.• The LP gas tank should not be dropped or handled roughly.• Tanks must be stored outdoors out of the reach of children. Do NOT store in a building,
garage, or any other enclosed area.• Never store your LP gas tank where temperatures can reach over 125°F.• Do not store the LP gas cylinder in direct sunlight or near a source of heat or combustion.• Never keep a filled LP gas tank in a hot car or car trunk. Heat will cause the gas pressure to
increase, which may open the relief valve and allow gas to escape.• Place dust cap on valve outlet whenever the LP gas tank is not in use. Only install the type of
dust cap on the LP gas tank valve outlet that is provided with the LP gas tank valve. Other types of caps or plugs may result in leakage of propane.
a. Do not store a spare LP gas cylinder under or near this appliance. b. Never fill the LP gas cylinder beyond 80% full. c. If the information in (a) and (b) is not followed exactly, a fire causing death or serious injury may occur.• LP gas cylinders should be filled only by a certified LP gas dealer.• The pressure regulator is set for 11 inches of water column (pressure).• The normal inlet gas pressure for this outdoor fire table is 11 inches of water column pressure.• Never attempt to attach this appliance to the self-contained LP gas system of a camper trailer,
motor home or house.• Always use the pressure regulator and hose assembly provided with the appliance to connect
to a LP gas cylinder. Never connect to an unregulated LP gas supply. For technical support contact Real Flame at 1-800-654-1704.
• Hand turn the manual gas control valve. Never use tools. If the valve will not turn by hand, do not try to repair it. Call a Certified Gas Technician. The use of force or any self attempted repair may result in a fire or explosion.
• Children and adults should be alerted to the hazards of high surface temperatures and should stay away to avoid burns or clothing ignition.
• Young children should be carfully supervised when they are in the area of the appliance. • Clothing or other flammable material should not be hung from the appliance, or placed on or
near the appliance. • Any guard or other protective device removed for servicing the appliance shall be replaced
prior to operating the appliance. • Installation and repair should be done by a qualified service person. The appliance should be
inspected before use and at least annually by a qualified service person. More frequent cleaning may be required as necessary. It is imperative that the control compartment, burners, and circulating air passageways of the appliance are kept clean.
Connecting your gas cylinder Before connection, be sure that there is no debris caught in the head of the gas cylinder, head
of the regulator valve or in the head of the burner and burner ports. Connect regulator valve and hand-tighten firmly. Disconnect the propane cylinder from the regulator valve when the fire table is not in use. DO NOT obstruct the flow of combustion air and ventilation air to the burner.
• LP gas cylinder must contain a shuto� valve as specified in the Standard for Compressed Gas

7
Hose & Regulator Assembly And Replacement
1. This fire table comes equipped with a standard LP gas hose and regulator including the appliance side connection for a CGA No 791 Cylinder Connection Device. The LP gas hose and regulator supplied with this fire table must be used. Only a hose and regulator specified by manufacturer can be used for replacement. a. The CGA No 791 connection incorporates a magnetic flow limiting device that acts to limit the flow of gas if a leak is detected between the regulator and the burner valve. b. If the burner valve is open prior to the LP gas cylinder service valve being opened, the connection will interpret this free flow of gas to be a leak. c. The connection safety feature will reduce gas flow from the regulator to the appliance to a minimal level. d. Be sure that the burner control valve is closed prior to opening the LP gas cylinder service valve to ensure that the connection flow limiting device is not triggered mistakenly. e. If the connection flow limiting device is triggered mistakenly, close the LP gas cylinder service valve and the burner valve, wait 10 seconds to allow the device to reset, open the cylinder service valve, then open the burner valve and light the fire table as per lighting instructions.
2. Be sure to protect the hose from any hot surfaces. Serious danger may result if the hose contacts any hot surface.
3. Regular maintenance of the hose and regulator: a. Inspect the hose before each use of the fire table. Use a handheld mirror to see hose sections located under the unit. If the hose shows signs of cracks, abrasions, cuts or damage of any kind, do not operate the appliance. Fix or replace the hose as required before using the appliance. For assistance with repair or replacement of the hose, call Real Flame at 1-800-654-1704. Use only replacement parts from the manufacturer. b. Inspect the seal inside the CGA No 791 service valve on the LP gas cylinder when replacing the cylinder or at least once per year. If there is any indication of damage, have the seal replaced by a certified gas dealer before operating the appliance.
4. Do not use tools to tighten the CGA No 791 connection nut onto the LP gas cylinder service valve. Hand tighten only.
5. Be careful to not cross the threads on the connection when tightening the CGA No 791 connection on to the LP gas cylinder service valve.
6. “Leak Test” should always be performed after attaching the connection to the LP gas cylinder service valve. (See “Checking for Leaks” section of this manual on page 12)
7. For the connection of the hose and regulator to the LP tank, refer to the “Connection” section of the LP gas cylinder section above.

8
Parts List
1
3
33
3
2
8
Tank Seat 95600940
LP Hose and Regulator 95600934
Lava Rock (10lb) 66440999
AA Battery N/A
7
8
9
10
4
7
4
4
4
910
1 Table Top LMST 115604796A WSLT 115604396A
Table Base LMST 115604796B WSLT 115604396B
Glass Panels 49510990
Feet 95600931
2
3
4
11
11 Touch-up Paint (.75oz)
WSLT - LMST -
49490991 49490992Ignitor Button 95600938 5
Control Knob 95600939 6
56
1
1
4
1 set
1
1
1
1
1 box
1
1

9
Assembly Instructions
3
33
3
2.) Insert glass into the slots inthe table top as shown.
1.) Place lava rock by hand. DO NOT dump bag out into tray to avoid clogging the burner with dust. Position the lava rock across the burn pan to a level about 1” above the top of the burner.Make sure that you do not block the igniter housing with lava rock to ensure proper ignition.
Igniter Housing
Lava Rock Warning:
2. Do not light or use this fire table if filler is wet. Ensure filler is completely dry before lighting. Intense heat can cause wet filler to explode and hit someone causing injury.
3. Please keep away from the fire table for at least 20 minutes during initial startup as filler could retain some moisture from manufacturing and shipping.
1. Do not overfill the burner area with rock. The depth of the filler should not bemore than one inch above the burner tube. Only Real Flame filler products have been certified and tested by CSA for safe use with this Real Flame fire table. Using other filler material may result in increased popping and cracking or increased CO gas emission.

10
Assembly Instructions
+-
3.) Install the AA battery as shown inthe diagram below.
a. Place the tank seat on the ground and place a 20lb. propane tank into the tank seat.a. Tighten down the screw on the side of the tank seat to secure the propane tank.
b
4.) Place LP tank
a

11
Check to make sure there is no debris in the head of the LP gas tank or in the head of the regulator valve. Make sure you check the burner and burner ports as well.
Connect gas line to tank by turning knob clockwise. Hand tighten only.
Make sure the valve on the LP gas tank is OFF.
5.) Connecting the LP Gas Tank
Disconnecting the LP Gas Tank
Assembly Instructions
Place the LP tank 56” away from the fire table.
Watch your step while moving between the tank and the fire table.The hose creates a tripping hazard.
56”WARNING!
Disconnect by turning the knobcounterclockwise until it is detatchedfrom the valve.

12
Pre-Use Instructions
Prior to each gas fire table operation, check the hose and valve for evidence of excessive abrasion or wear. Use a handheld mirror to see hose sections located under the unit.
CHECKING FOR LEAKS
Ma
Make a leak check solution by mixing 1 part dishwashing soap with 3 parts water in a spray bottle.
ke sure control knob is “OFF.” Then, turn LP gas tankto “ON” at valve.
Spray leak solution on valve connections paying particular attention to the areas indicated by arrows.
If any bubbles appear turn LP gas tank OFF, reconnect and retest. If you continue to see bubbles after several attempts, disconnect LP gas source and contact Real Flame at 1-800-654-1704 for assistance.
If no bubbles appear after one minute turn tank OFF, wipe away solution and proceed.
Check for leaks at these locationsUse a handheld mirror to see valve located under the unit.
WARNING Before using this outdoor fire table, make sure you have read, understand andare following all information provided in the Important Safety Information section of this manual. Failure to follow those instructions can cause death, serious injury or property damage.
!

13
Lighting Instructions
HI
OFF
LIGHT
LOW
Control Knob
PUSHIN
1. Read and understand all operating instructions before lighting. 2. Burner control knob must be in the “OFF” position. 3. Connect propane (LP) cylinder (see previous pages). 4. Slowly open valve on LP gas cylinder.5. Push and hold igniter button to create sparks.6. While holding the igniter button with one hand, use
your other hand to push and turn the control knobto the “LIGHT” position to light the burner. 7. Keep Burner Control Knob pressed in for 15-30 seconds after ignition.
8. If ignition does not occur in 30 seconds, turn control knob repeat lighting procedure.
Using a
Please refer to the trouble shooting pages for additional support, beginning on page 17.
Using the igniter
Long Match or Lighter
WARNINGWhen using this method to lightyour fire table use heat resistant gloves and follow the step by stepinstructions. Failure to do so couldresult in severe injury.
9.
10. Adjust the flame to the desired height with the control knob.
WARNING If burner flame goes out during operation, immediately turn the control knob “OFF” and let thegas clear a minimum of 5 minutes before attempting to relight the fire table.
After lighting, rotate the Burner Control Knob counterclockwise to “Low” setting.
13 inches tall.
!
!
8-13”20.3 - 30.5 cm
Observe flame, make sure all burner ports are lit. Flame height should be no higher than
2.
1. Prior to lighting, use a shovel to move the filler for access to the burner
5. After lighting, use a shovel and heat resistant gloves to carefully move the filler back into the proper position.
Wearing heat resistant gloves, position
lighter near the side of the burner. DO NOTlean over the fire table while lighting!
the burning long match or burning butane
3. Turn control knob counterclockwise to LIGHT.4. Remove long match/long butane lighter.
6.
7. Adjust the flame to the desired height with the control knob.
After lighting, rotate the Burner Control Knob counterclockwise to LOW setting. Observe flame, make sure all burner ports are lit. Flame height should be no higher than 13 inches tall.

14
Care and CleaningInspecting
WARNING
DO NOT USE SOLVENTS while in closed spaces or while smoking.
!
!
!
!
product life.DO NOT inspect this outdoor �re table until the �re is COMPLETELY out.
1. Make sure all parts are securely fastened in place. If a part moves when touched, check its connection points to see if they are lose.
WARNING DO NOT tamper with this appliance. This is DANGEROUS and will void the warranty. Any part found to
Real Flame at: 1-800-654-1704.be faulty must be replaced with an approved part, con�rmed by the manufacturer. For technical support contact
2. Check all gas connections for leaks.3. Check ignition system to ensure proper sparking.4. Check components for any signs of damage, rust or excessive wear.5. If damage to any component is detected, DO NOT operate until the proper repairs have been made.
ARNING cool to the touch.
General Care and Cleaning
W
DO NOT use oven cleaner or abrasive cleaners as they will damage this product.
1. Wipe exterior surfaces with a mild dishwashing soap, then rinse clean with water.
Storage:
WARNING
1. Turn gas OFF at tank connection. Remove tank and store in a cool, dry location outdoors, away from children.
4. Store in a cool, dry location away from children and pets.
Table
2. Carefully remove �ller and store components �at to protect them from breakage.
table
15
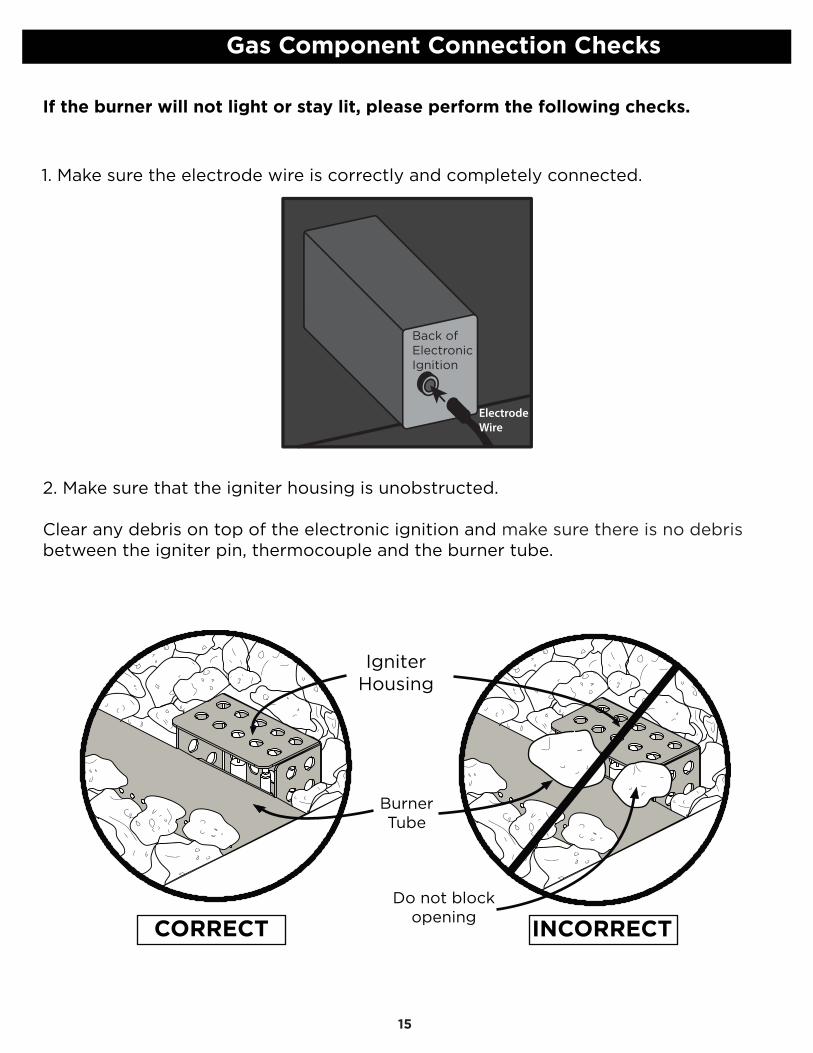
Gas Component Connection Checks
If the burner will not light or stay lit, please perform the following checks.
1. Make sure the electrode wire is correctly and completely connected.
2. Make sure that the igniter housing is unobstructed.
Clear any debris on top of the electronic ignition and make sure there is no debrisbetween the igniter pin, thermocouple and the burner tube.
IgniterHousing
Burner Tube
Do not block openingCORRECT INCORRECT
Back ofElectronicIgnition

16
Gas Component Connection Checks
3. Make sure that the igniter pin and thermocouple are correctly positioned.- The igniter pin should be pointed straight to the thermocouple.- The thermocouple should be positioned 5mm away from the burner tube.
4. Make sure that the thermocouple wire is correctly positioned. The thermocouple wire should be in line with the valve.
Thermocouple Wire
Wire should be in line with valve
Valve
5mmThermocouple
Igniter Pin
Electronic Ignition
Thermocouple Wire
Valve

17
Possible Cause 1: No Gas Flow. -Check if the LP gas tank is empty. If empty, replace and refi ll. If the propane tank is not empty, refer to “Problem: Sudden drop in gas fl ow” on the following page.Possible Cause 2: Coupling nut and regulator not fully connected. -Turn the coupling nut about one half to three fourths a turn, until you feel a solid stop. Do not use tools, tighten by hand only.Possible Cause 3: Obstruction of gas fl ow. - Check for bent or kinked hose.Possible Cause 4: Spider webs or insect nest in the Venturi. - Clean the Venturi using compressed air.Possible Cause 5: Burner ports clogged or blocked. -Reference “Problem: Irregular fl ame pattern” on the following page. Clean the burner ports as described there.
Possible Cause 1: Electrode and burners are wet.-Wipe dry with cloth.
Possible Cause 2: Igniter battery is dead or backwards.-Check that the AA battery is inserted correctly in the igniter (see page 10) or replace the battery.
Possible Cause 3: Igniter Pin cracked or broken - sparks at crack.-Call Real Flame at 1-800-654-1704 for technical support.
Possible Cause 4: Wire loose or disconnected.-Reference page 15, step 1, reconnect wire. Call Real Flame at 1-800-654-1704.
Possible Cause 5: Wire is shorting (sparking) between igniter and electrode.-Call Real Flame at 1-800-654-1704 for support.
Possible Cause 6: Igniter Pin not pointing at thermocouple.-Reference page 16, turn electrode to point at the thermocouple.
Possible Cause 7: Bad Igniter.-Call Real Flame at 1-800-654-1704 for support.
Troubleshooting
Problem: Burner will not light using igniter
For Technical Support Contact Real Flame at: 1-800-654-1704
Problem: The Fire Table emits a lot of black smoke when in use
Problem: Burner will not light with match
Possible Cause 1: Hose from gas fi replace is pinched.-Make sure the hose is not pinched between thefi re table and the source of the gas.Possible Cause 2: Flame is being obstructed at burner ports.-Make sure that the gas ports on the burner are free
Burner Ports
Igniter Pin(Electrode)
Thermocouple Burner
Burner Ports
of any filler so that the flame can flow naturally.

18
Possible Cause: Burner ports are clogged or blocked. -Clean burner ports. Do this by inserting a paperclip into each of the burner ports to ensure they are not clogged. WARNING: Make sure burner is not on and the gas supply has been properly disconnected. Allow 15 minutes for unit to cool completely before touching it.
If these troubleshooting steps are unable to resolve the problem, please call Real Flame at: 1-800-654-1704
Possible Cause 1: High or gusting winds. -Increase fl ame to “HIGH” setting.Possible Cause 2: Low on LP gas. -Replace or refi ll LP gas tank.Possible Cause 3: Excess fl ow valve tripped. -Refer to “Problem: Sudden drop in gas fl ow”
Possible Cause 1: Ice has built up on the outside of the LP gas tank because the vaporization process is too low. -Turn the control knob and the LP gas tank to “OFF”. Replace with a spare LP gas tank and resume burning. Store the spare LP gas tank in a well ventilated area, away from children.
Possible Cause 1: Out of gas. - Refill or exchange your LP tank.Possible Cause 2: Excess fl ow safety device may have been activated. -
if the flame goes out. In order for the unit to work flames must be contacting the thermocouple located in the igniter housing. Visually inspect the thermocouple and igniter housing to make sure there are no obstructions, such as lava rock or glass filler and that flames are contacting the thermocouple.
Problem: Sudden drop in gas fl ow, or a reduced fl ame height
Problem: Irregular fl ame pattern, fl ame does not run the full length of the burner
Problem: Flame blow out
Problem: Flame seems to lose heat when burning in cold weather -temperature below 50°F
Burner Ports
Troubleshooting

Warranty & Return Policies
Customer Service: 1-800-654-1704 in USAService à la clientèle: 1-800-363-6443 in Canada
WarrantyReal Flame® Company warrants Real Flame gas fireplaces and accessories to be free from defects in parts under normal use and service for a period of 2 years from the date of purchase and defective from finish issues for a period of 5 years from the date of purchase. In the event of such defects Real Flame will, at its option, replace the defective product or refund the purchase price. The foregoing is the exclusive remedy and Real Flame disclaims all other warranties, including any implied warranty of merchantability or fitness for a particular purpose. In addition, Real Flame will not be responsible for consequential damages in excess of the purchase price of the product on which such liability is based.
Return PolicyContact Restoration Hardware customer service at 1-877-777-7059 for complete return policy.
Replacement PartsIn the event that an item has been lost or damaged, either by the manufacturer or in shipping, you may request a replacement within 30 days of receipt. Replacement parts are not available for all units and only given at Real Flame’s discretion. We will assess any damage and find a solution, which could include shipping you a replacement. No replacements are available for discontinued items or repackaged (open box) products. Please call Real Flame Customer Service at 1-800-654-1704 for replacement parts before returning the damaged item. Please have the following information (which can be found in your instruction manual) ready before you call Customer Service.• Model Number of Item• 4-8 digit Part Number• Lot Code Number• Shipping Address• A picture of the damaged item may be requested. Pictures should be sent to [email protected]
If a part has been lost or damaged after 30 days, please contact Restoration Hardware for replacement options. 1-877-777-7059
Incorrect Order ReceivedIf you received something other than what you ordered, please contact Restoration HardwareCustomer Service at 1-877-777-7059 within 48 hours of receiving the item.
Version 2. 04/04/17
Real Flame Customer Service
Restoration Hardware Customer ServiceCustomer Service: 1-877-777-7059

! Warning ! WARNING
Note
If the information in this manual is not followed exactly, a fire or explosion may result causing property damage, personal injury or loss of life.
Installation and service must be performed by a qualified installer, service agency or gas supplier.
Improper installation, adjustment, alteration, service or maintenance can cause injury or property damage.
Read the installation, operation and maintenance instructions thoroughly before installing or servicing this equipment.
Save these instructions for future reference. If you are assembling this unit for someone else, give this manual to him or her to read and save for future reference.
!
!
!
!
!
DANGER! ! WARNING
PO: _______________
For Technical Support call1-800-654-1704
USDesigned and Engineered by Real Flame. Manufactured as Model # 11560NG
A Natural Gas line with a 3/8” connection is required to install this unit.
Makena Natural Gas Fire Table Owner’s Manual Square Style # 42100285/ 42100136
For outdoor use onlyDO NOT use for cookingDO NOT use under any
overhead enclosure
If you smell gas:1. Shut off the gas to the appliance.
from the appliance and immediatelycall your gas supplier orfire department.
Do not store or use gasoline or otherflammable vapors and liquids in the vicinity of this or any other appliance.
This unit is not for use with propane.Use only with Natural Gas.
020417

Important Safety Information
Natural Gas Warnings
Parts List and Descriptions
Base Assembly Instructions
Pre-Use Instructions
Assembly Instructions
Connecting to Natural Gas Source
Lighting
Care and Cleaning
Gas Component Connection Checks
Troubleshooting
3
5
7
8
9
10
11
13
14
15
17
!CARBON MONOXIDE HAZARD
This appliance can produce carbon monoxide which has no odor.
Using it in an enclosed space can kill you.
Never use this appliance in an enclosed space such as a camper, tent, car or home.
DANGER
2
Product Name Makena Square
Model No. 11560NG1
Rated Heat Output 65,000 btu/hr
Type of GasNatural Gas (NG)
Gas SupplyQuick Connect to Gas Line
SPECIFICATIONS
Table of Contents
!

Important Safety Information
3
! WARNING FIRE TABLE IS FOR OUTDOOR USE ONLY
• WARNING Failure to follow the dangers, warning and cautions in this manual may result in serious bodily injury or death, or in a fire or an explosion causing damage to property.• WARNING Improper installation, adjustment, alteration, service or maintenance can cause injury or property damage. Read the installation,operating and maintenance instructions thoroughly before installing or servicing this equipment. • NOTE When an appliance is for connection to a fixed piping system, the installation must conform with local codes, or in the absence of local codes with the National Fuel Gas Code, ANSI Z223.1/NFPA 54; National Fuel Gas Code, Natural Gas and Propane Installation Code, CSA B149.1; or Propane Storage and Handling Code, B149.2, as applicable.
• Minimum Clearance from Unit to Combustible Materials 48” (121.9 cm) from all sides and back. Do not locate this fire table under any overhead enclosure.IF YOU SMELL GAS
• Extinguish any open flame.• Do not try lighting any appliance.• Do not touch any electrical switch; do not use any phone in your building.• Immediately call your gas supplier from a neighbor’s phone.• Follow the gas supplier’s instructions.• If you cannot reach your gas supplier, call the fire department.
• Children and adults should be alerted to the hazards of high surface temperatures and be kept at a safe distance while fire table is in use.• This outdoor fire table is NOT to be operated by children. Young children should be closely supervised when in the vicinity of this outdoor fire table.• Do not hang or place clothing or other flammable materials on or near the gas fire table.• Any guard or protective device removed for servicing the appliance shall be replaced prior to operating the appliance.• Installation and repair should be done by a qualified service person. The appliance should be inspected before use and at least annually by a qualified service person. More frequent cleaning may be required as necessary. It is imperative that the control compartment, burners, and circulating air passageways of the appliance are kept clean. • Keep these instructions for future reference. If you are assembling this unit for someone else, give this manual to him or her to read and keep for future reference.• Do not use this unit for cooking.• Do not pour water into the fire table.• Do not use this outdoor fire table if any part has been under water. Immediately call a qualified service technician to inspect the fire table and to replace any part or control system and any gas control which has been under water.
piping system during any pressure testing of that system at test pressures in excess of 1/2 of psi (3.5 kPa). The appliance must be isolated from the gas supply piping system by closing
system at test pressures equal to or less than 1/2 psi (3.5 kPa).
Important Safety Information (Continued)
4
• This gas fire table must be used ONLY outdoors in a well-ventilated space and shall NOT be used inside a building, garage, or any other enclosed area.• DO NOT use this outdoor gas fire table for indoor heating. TOXIC carbon monoxide fumes can accumulate and cause asphyxiation.• NEVER LEAVE this gas fire table unattended when in use.• Do not store or use gasoline or other flammable vapors and liquids within 25 feet (7.62m) of this or any other appliance.• Do not store any combustible materials in the base enclosure.• Never use a flame to check for gas leaks.• The use of alcohol, prescription or non-prescription drugs may impair an individual’s ability to properly assemble or safely operate this outdoor fire table.• DO NOT use in an explosive atmosphere. Keep gas fire table area clear and free from combustible materials, gasoline and other flammable vapors and liquids. • This outdoor fire table is not to be installed or used in or on recreation vehicles and/or boats. • Always use in accordance with all applicable local, state and national codes. Contact your local fire department for details on outdoor burning.• Use the same precautions you would with any open fire when using this outdoor fire table. • DO NOT burn solid fuels such as: wood, charcoal briquettes, lump charcoal, manufactured logs, driftwood, trash, leaves, paper, cardboard, plywood, painted or stained or pressure treated wood in this outdoor fire table. • DO NOT use this outdoor fire table until it is COMPLETELY assembled and all parts are securely fastened and tightened. • DO NOT store another LP gas tank within 10 feet (3.05 m) of this outdoor fire table while it is in operation. • DO NOT use this outdoor fire table near automobiles, trucks, vans or recreational vehicles. • DO NOT use this outdoor fire table under any overhead structure or near any unprotected combustible constructions. Avoid using near or under overhanging trees and shrubs. • Always use this outdoor fire table on a hard, level non-combustible surface such a concrete, rock or stone. An asphalt or blacktop surface may not be acceptable for this purpose. • DO NOT wear flammable or loose clothing when operating this outdoor fire table. • DO NOT use in windy conditions. • Keep all electrical cords away from a hot outdoor fire table. • Certain areas of this outdoor fire table when in use will become too hot to touch. Do not touch hot surfaces until the unit has cooled unless you are wearing protective gear such as insulated pot holders or heat resistant gloves or mittens to avoid burns. • DO NOT attempt to move or store this outdoor fire table until all parts are cool. • DO NOT lean over this outdoor fire table when lighting or when in use. • DO NOT sit on the fire table when the unit is in operation. • DO NOT throw anything onto the fire when the unit is in operation.
• It is essential to keep the outdoor fire table valve compartment, burners, and circulating air passages clean. Inspect outdoor fire table before each use.
• Lava rocks or fire glass are very hot; please keep children and pets at a safe distance.

5
Natural Gas Dangers And WarningsNatural Gas is flammable and hazardous if handled improperly. Become aware of the characteristics before using any natural gas product.
Natural Gas Characteristics• Flammable, explosive under pressure, lighter than air and settles in pools in high areas.• In its natural state, Natural Gas has no odor. For your safety, an odorant has been added.• Contact with Natural Gas could burn the skin.• Natural Gas is extremely flammable and hazardous if handled improperly.
Chemicals known to the state of California to cause cancer, birth defects, or other reproductive harm are created by the combustion of Natural Gas.
Your Natural Gas fire pit is designed to operate on Natural Gas only, at a pressure of seven inches water column (7" W.C.) Check with your gas utility for local gas pressure, because in some areas Natural Gas pressure varies. Also, check with your gas company or with local building codes for instructions to install gas supply line, or call a licensed and qualified installer.
source, outdoors: after the gas line exits outside wall and before quick disconnect or before gas supply line enters ground, indoors: in the branch gas line in an accessible location near the gas supply line.
Pipe sealing compound or pipe thread tape of the type resistant to the action of Natural Gas must be used on all male pipe threads. Apply compound or tape to at least the first
three to four threads when making a connection.
Important Safety Information (Continued)
!
• Prior to each fire table operation, check the hose for evidence of excessive abrasion or wear. Use a handheld mirror to see hose sections located under the unit. If the hose is damaged, cracked or cut, it must be replaced before using the gas fire table. The hose assembly can only be replaced with a hose assembly specified by the manufacturer. Please call Real Flame at 1-800-654-1704.• Before each use, examine the burner and its components. If dirty, clean with a soft brush and
soapy water solution. Also examine the area around the burner. Any dirt or foreign material, such as spider webs or nests in this area should be removed. If it is evident that the burner is damaged, the fire table must not be used. The burner assembly must be replaced. Please contact Real Flame at 1-800-654-1704 for technical support.
• Place the hose out of the pathways where people may trip over it. Do not place the hose in areas where it may be subjected to accidental damage.
DANGER This outdoor fire table is for use with natural gas (NG) only. The conversion to or attempted
use of liquefied petroleum (LP) in this outdoor fire table is dangerous and could result in serious personal injury, or property damage.
ATTENTION: Any alteration of the outdoor fire table that is not specifically directed in the operations manual will void manufacturer warranty.

Caution:During any high pressure testing of the gas supply piping system at test pressures in
(Natural Gas Dangers And Warnings (Continued)
Never store or use gasoline or other volatile substance in the vicinity of this fire table.
Natural Gas Connection
The outdoor fire table must be isolated from the gas supply piping system by closing the
least equal to or less than 1/2 psi (3.5 kPa).
!
Warning: Burner valves are pre-tested at the factory to operate on Natural Gas. Do not attempt to convert or change.
!
6
disconnected from the gas supply piping system.
tape of the type resistant to the action of the Natural Gas on all male pipe threads. Connect
valve at the gas supply.

7
Parts List
1
3
33
3
4 4
4
4
89
1 Table Top LMST 115604777A WSLT 115604377A
Table Base LMST 115604777B WSLT 115604377B
Glass Panels 49510990
Feet 95600931
NG Hose and 95600936Quick ConnectLava Rock (10lb) 66440999
AA Battery N/A
2
3
7
8
9
4
10
10 Touch-up Kit (.75oz)
WSLT - LMST -
49490991 49490992
7
62
5 Ignitor Button 95600938
6 Control Knob 956009391
1
4
1 set
1
1
1
1 box
1
1
5

8
Assembly Instructions
3
33
3
Igniter Housing
2.) Insert glass into the slots inthe table top as shown.
1.) Place lava rock by hand. DO NOT dump bag out into tray to avoid clogging the burner with dust. Position the lava rock across the burn pan to a level about 1” above the top of the burner.Make sure that you do not block the igniter housing with lava rock to ensure proper ignition.
Lava Rock and Warning:
2. Do not light or use this fire table if filler is wet. Ensure filler is completely dry before lighting. Intense heat can cause wet filler to explode and hit someone causing injury.
3. Please keep away from the fire table for at least 20 minutes during initial start up as filler could retain some moisture from manufacturing and shipping.
1. Do not overfill the burner area with rock. The depth of the filler should not bemore than one inch above the burner tube. Only Real Flame filler products have been certified and tested by CSA for safe use with this Real Flame fire table. Using other filler material may result in increased popping and cracking or increased CO gas emission.

9
3.) Install the AA battery as shown in the diagram below.
Assembly Instructions
4.) Connecting your fire table to the Natural Gas Source:
socket is recommended by the National Fuel Gas Code. Socket connection must be made outdoors. The diagram below shows the main components of a standard Natural Gas system. This unit requires a 3/8” thread for the hook-up.
+-

10
5.) Connecting the Socket
Coat the gas supply pipe nipple with gas resistant pipe compound or approved teflon tape.Screw socket onto gas supply pipe (housegas source) as shown to the right, and wrenchtighten.
The quick disconnect socket should never beconnected to the fire table. Direction of gas flow is indicated on the socket.
6.) Using the Quick Connect Socket
Pull back the sleeve on the quick disconnectsocket and insert the unattached end of the gas hose into the socket. Release the sleeveand continue pushing the hose into the socketuntil the sleeve snaps into the lockedposition.
After making all connections, perform a leaktest as described on page 11 of this manual.
Assembly Instructions

11
Check for leaks at these locations
CHECKING FOR LEAKS
Ma
Make a leak check solution by mixing 1 part dishwashing soap with 3 parts water in a spray bottle.
ke sure control knob is “OFF.” Then, turn Natural Gas on at its source.
Spray leak solution on valve connections paying particular attention to the areas indicated by arrows.
If an , reconnect and retest. If you continue to see bubbles after
dna ecruos saG larutaN tcennocsid ,stpmetta larevescontact Real Flame® at 1-800-654-1704 for assistance.
If no bubbles appear after one minute turn source OFF,wipe away solution and proceed.
Pre-Use Instructions
WARNING Before using this outdoor fire table, make sure you have read, understand andare following all information provided in the Important Safety Information section of this manual. Failure to follow those instructions can cause death, serious injury or property damage.
!
Prior to each gas fire table operation, check the hose and valve for evidence of excessive abrasion or wear.

12
Control Knob
PUSHLIGHT
HIGH
LOW IN
1. Read and understand all operating instructions before lighting.2. Burner control knob must be in the “OFF” position. 3. Connect Natural Gas source (see previous pages). 4. Open the Natural Gas supply to the unit.5. Push and hold igniter button to create sparks.6. While holding the igniter button with one hand, use
your other hand to push and turn the control knobto the “LIGHT” position to light the burner. 7. Keep Burner Control Knob pressed in for 15-30 seconds after ignition.
Using a
Please refer to the trouble shooting pages for additional support, beginning on page 16.
Using the Igniter
Long Match or Lighter
WARNINGWhen using this method to lightyour fire table use heat resistant gloves and follow the step by stepinstructions. Failure to do so couldresult in severe injury.
9.
10. Adjust the flame to the desired height with the control knob .
WARNING If burner flame goes out during operation, immediately turn the control knob “OFF” and let thegas clear a minimum of 5 minutes before attempting to relight the fire table.
After lighting, rotate the Burner Control Knob counterclockwise to “Low” setting. Observe flame, make sure all burner ports are lit. Flame height should be no higher than 13 inches tall.
!
!
!
WARNING
while lig
Lighting Instructions
8-13”20.3 - 30.5 cm
2.
1. Prior to lighting, use a shovel to move the filler for access to the burner
5. After lighting, use a shovel and heat resistant gloves to carefully move the filler back into the proper position.
Wearing heat resistant gloves, position
lighter near the side of the burner. DO NOTlean over the fire table while lighting!
the burning long match or burning butane
3. Turn control knob counterclockwise to LIGHT.4. Remove long match/long butane lighter.
6.
7. Adjust the flame to the desired height with the control knob.
After lighting, rotate the Burner Control Knob counterclockwise to LOW setting. Observe flame, make sure all burner ports are lit. Flame height should be no higher than 13 inches tall.

13
Care and CleaningInspecting
WARNING
DO NOT USE SOLVENTS while in closed spaces or while smoking.
!
!
!
!
product life.
1. Make sure all parts are securely fastened in place. If a part moves when touched, check its connection points to see if they are lose.
WARNING DO NOT tamper with this appliance. This is DANGEROUS and will void the warranty. Any part found to
Real Flame at: 1-800-654-1704.be faulty must be replaced with an approved part, con�rmed by the manufacturer. For technical support contact
2. Check all gas connections for leaks.3. Check ignition system to ensure proper sparking.4. Check components for any signs of damage, rust or excessive wear.5. If damage to any component is detected, DO NOT operate until the proper repairs have been made.
ARNING cool to the touch.
General Care and Cleaning
W
DO NOT use oven cleaner or abrasive cleaners as they will damage this product.
1. Wipe exterior surfaces with a mild dishwashing soap, then rinse clean with water.
Storage:
WARNING
1. Turn gas OFF at tank connection. Remove tank and store in a cool, dry location outdoors, away from children.
4. Store in a cool, dry location away from children and pets.
Table and Glass
2. Carefully remove �ller and store components �at to protect them from breakage.
table

14
2. Make sure that the igniter housing is unobstructed.
between the igniter pin, thermocouple and the burner tube.
If the burner will not light or stay lit, please perform the following checks.
CORRECT INCORRECT
Igniter Housing
Burner Tube
Do not block opening
Gas Component Connection Checks
1. Make sure the electrode wire is correctly and completely connected.
Back of Electronic Ignition
Clear any debris on top of the igniter housing and make sure there is no debris

15
3. Make sure that the igniter pin and thermocouple are correctly positioned. - The igniter pin should be pointed straight to the thermocouple.- The thermocouple should be positioned 5mm away from the burner tube.
4. Make sure that the thermocouple wire is correctly positioned. The thermocouple wire should be in line with the valve.
Thermocouple Wire
Wire should be in line with valve
Valve
5mmThermocouple
Igniter Pin
Gas Component Connection Checks (Cont.)
Electronic Ignition
Thermocouple Wire
Valve

16
For Technical Support Contact Real Flame at: 1-800-654-1704
Problem: Burner will not light using igniterPossible Cause 1: Electrode and burners are wet.
-Wipe dry with cloth.
Possible Cause 3: Igniter Pin cracked or broken - sparks at crack.-Call Real Flame at 1-800-654-1704 for technical support.
Possible Cause 2: Igniter battery is dead.-Check or replace the AA battery in the igniter. (Reference page 10)
Possible Cause 4: Wire loose or disconnected.-Reference page 14, step 1, reconnect wire. Call Real Flame at 1-800-654-1704.
Possible Cause 5: Wire is shorting (sparking) between igniter and electrode.-Call Real Flame at 1-800-654-1704 for support.
Possible Cause 6: Igniter Pin not pointing at thermocouple. -Reference page 15, turn electrode to point at the thermocouple.
Possible Cause 7: Bad Igniter-Call Real Flame at 1-800-654-1704 for support.
Possible Cause 1: No Gas Flow.-Check if Natural Gas supply is stopped. If it is not stopped, refer to“Problem: Sudden drop in gas flow” on the following page.
Possible Cause 2: Quick Connect not fully engaged.-Disconnect the quick connect at the gas supply and reconnect to ensure a proper connection is made.
Possible Cause 3: Obstruction of gas flow.- Check for bent or kinked hose.
- Clean the venturi.Possible Cause 4: Spider webs or insect nest in the venturi.
Possible Cause 5: Burner ports clogged or blocked.-Reference “Problem: Irregular flame pattern” on the following page. Clean the burner ports as described there.
Problem: Burner will not light with match
Problem: The fire table emits a lot of black smoke when in usePossible Cause 1: Hose from gas fire table is pinched.
-Make sure the hose is not pinched between the fire table and the source of the gas.
Possible Cause 2: Flame is being obstructed at burner ports.-Make sure that the gas ports on the burner are free
Troubleshooting
Igniter Pin(Electrode)
Thermocouple Burner
Burner Ports
Burner Ports
of any filler so that the flame can flow naturally.

17
For Technical Support Contact Real Flame at: 1-800-654-1704
Problem: Sudden drop in gas flow, or a reduced flame height
Possible Cause 1: Out of Gas.
-Call your local gas company.
Possible Cause 2: Excess flow safety device may have been activated.
-Turn control knob to “OFF”, wait 30 seconds and light outdoor fire table. If
the control knob and the gas supply. Disconnect the quick disconnect socket. Turn Burner Control Knob to “HIGH”. Wait 1 minute. Turn Burner
gas supply and perform a leak check at the Natural Gas connection.
Problem: Irregular flame pattern, flame does not run the full length of the burner
Possible Cause: Burner ports are clogged or blocked.-Clean burner ports. Do this by inserting a paperclip into each of the burner ports to ensure they are not clogged. WARNING: Make
time to cool completely before touching it.
Problem: Flame blow out
Possible Cause 1: High or gusting winds.-Increase flame to “HIGH” setting.
Possible Cause 2: Low on Natural gas.
-Call your local gas company.
Possible Cause 3: Excess flow valve tripped.-Refer to “Problem: Sudden drop in gas flow”
If these trouble shooting steps are unable to resolve the problem, please call the number listed below.
Troubleshooting
Burner Ports

Warranty & Return Policies
Customer Service: 1-800-654-1704 in USAService à la clientèle: 1-800-363-6443 in Canada
WarrantyReal Flame® Company warrants Real Flame gas fireplaces and accessories to be free from defects in parts under normal use and service for a period of 2 years from the date of purchase and defective from finish issues for a period of 5 years from the date of purchase. In the event of such defects Real Flame will, at its option, replace the defective product or refund the purchase price. The foregoing is the exclusive remedy and Real Flame disclaims all other warranties, including any implied warranty of merchantability or fitness for a particular purpose. In addition, Real Flame will not be responsible for consequential damages in excess of the purchase price of the product on which such liability is based.
Return PolicyContact Restoration Hardware customer service at 1-877-777-7059 for complete return policy.
Replacement PartsIn the event that an item has been lost or damaged, either by the manufacturer or in shipping, you may request a replacement within 30 days of receipt. Replacement parts are not available for all units and only given at Real Flame’s discretion. We will assess any damage and find a solution, which could include shipping you a replacement. No replacements are available for discontinued items or repackaged (open box) products. Please call Real Flame Customer Service at 1-800-654-1704 for replacement parts before returning the damaged item. Please have the following information (which can be found in your instruction manual) ready before you call Customer Service.• Model Number of Item• 4-8 digit Part Number• Lot Code Number• Shipping Address• A picture of the damaged item may be requested. Pictures should be sent to [email protected]
If a part has been lost or damaged after 30 days, please contact Restoration Hardware for replacement options. 1-877-777-7059
Incorrect Order ReceivedIf you received something other than what you ordered, please contact Restoration HardwareCustomer Service at 1-877-777-7059 within 48 hours of receiving the item.
Version 2. 04/04/17
Real Flame Customer Service
Restoration Hardware Customer ServiceCustomer Service: 1-877-777-7059