Embed Size (px)
Citation preview
HOW TO MAKE YOUR OWN ARCADE GAMES
62 MacFormat.co.uk October 2006
Computer games are all built around a few simple principles: objects appear on the screen, they
move about, and they interact with one another. This holds true whether you’re talking about archaic games like Breakout or the latest version of Quake.
In this tutorial, we’ll be creating a program similar to the popular arcade game Frogger. In our game, the hero, Mr Frog, will need to cross a busy road to get to the safety of the pond. Put into terms of game mechanics, we will have one object, Mr Frog, that moves in a vertical direction, and a number of other objects, the cars on the road, that move in a horizontal direction. The player will control the movement of Mr Frog, while the computer will move the cars. If the computer detects a collision between Mr Frog and the cars, the player loses, but if the player gets Mr Frog safely to the pond without a collision, the player wins. Essentially, the game is about moving objects and detecting collisions.
The right toolsArcadeEngine is an add-on for the Revolution programming environment that provides a suite of intuitive, easily learned tools that handle the types of movements and interactions common to arcade-style games. For example, a straight-line
movement handler, moveLinear, is defined by a series of custom properties that can be applied to objects such as graphics. Two important custom properties are startpoint and endpoint, which define where the starting point and end point of an object’s path in terms of X and Y coordinates (based on the centre of the object relative to the top left corner of the card). Another custom property is step, which is the speed at which an object moves along its path. By
raising or lowering the value of step, an object can be sped up or slowed
down. A fourth custom property, isDistance, describes how far an object has moved along that path, and by changing the value of isDistance, an object can be
moved instantly from one point to another. What ArcadeEngine is
effectively doing is reducing the complexity of creating an animation into
simply changing custom property values.
Collision effectsArcadeEngine handles collisions by using another handler, imageCollide, which detects when the pixels making up one graphic overlap the pixels of another. This could be used, for example, to detect when a spaceship runs into an asteroid or a missile hits a monster. In this example, imageCollide will be used to detect collisions between Mr Frog and the cars.
Scripting is the most difficult part of programming Revolution. This tutorial explains what’s going on in broad-brush terms, but to really get the hang of things, you’ll need to read the Revolution and ArcadeEngine multimedia tutorials and documentation. In the meantime, you’ll find the finished stack as well as the scripts and graphics used on the MacFormat DVD. Playing around with the code is a good way to get started with Runtime Revolution.Neale Monks
Make your own arcade gamesArcadeEngine and Runtime Revolution make creating computer games easier than ever
WHAT YOU’LL NEED
● Revolution Studio or Media (demo of Studio on DVD)
● ArcadeEngine 2.0 (demo on DVD)● The MacFormat DVD● A graphics program that has the ability
to export PNG files with transparent backgrounds, such as Photoshop, The GIMP or GraphicConverter
STEP BY STEP Learning your way
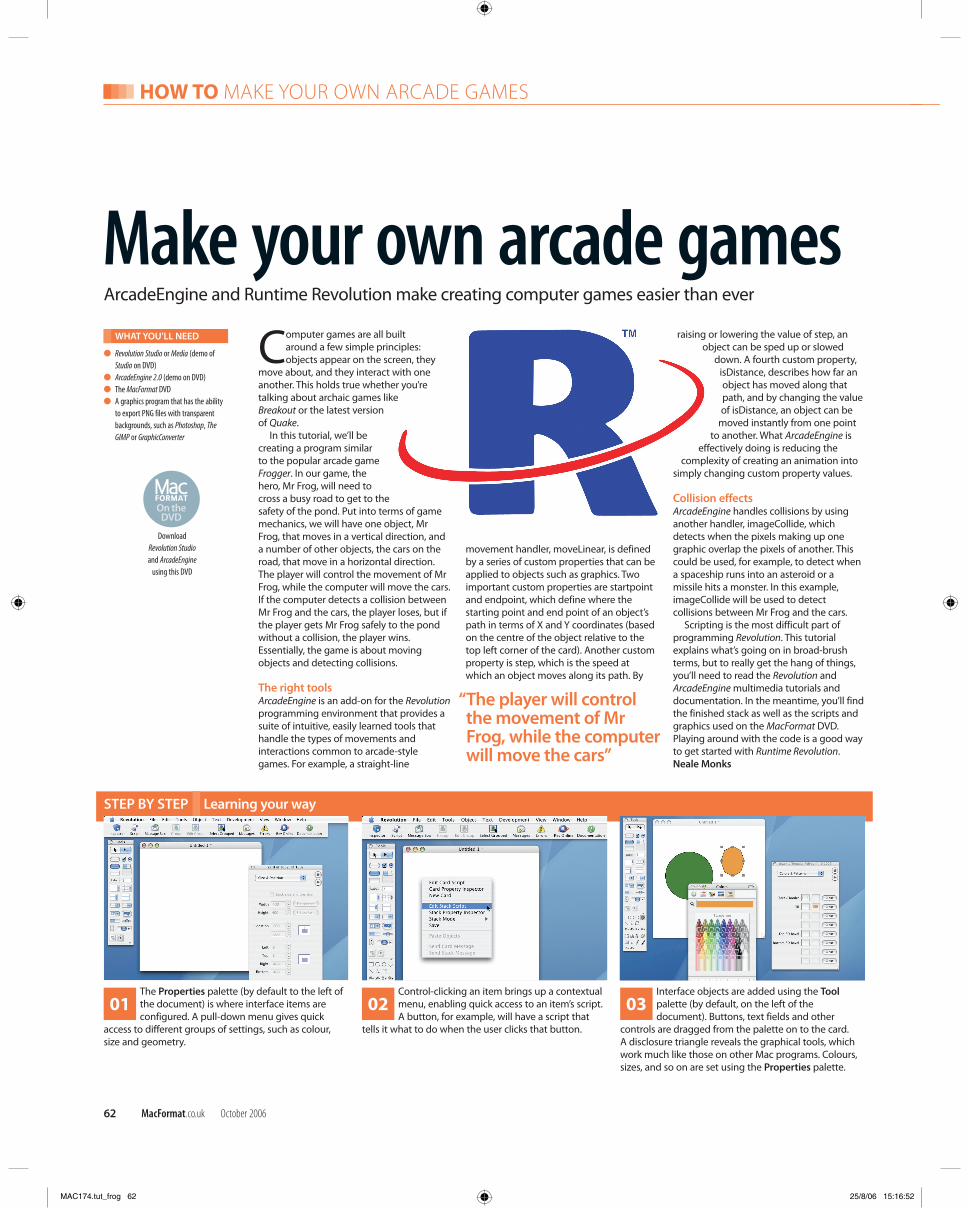
The Properties palette (by default to the left of the document) is where interface items are configured. A pull-down menu gives quick
access to different groups of settings, such as colour, size and geometry.
01Control-clicking an item brings up a contextual menu, enabling quick access to an item’s script. A button, for example, will have a script that
tells it what to do when the user clicks that button.
02Interface objects are added using the Tool palette (by default, on the left of the document). Buttons, text fields and other
controls are dragged from the palette on to the card. A disclosure triangle reveals the graphical tools, which work much like those on other Mac programs. Colours, sizes, and so on are set using the Properties palette.
03
Download Revolution Studio and ArcadeEngine
using this DVD
“The player will control the movement of Mr Frog, while the computer will move the cars”
MAC174.tut_frog 62MAC174.tut_frog 62 25/8/06 15:16:5225/8/06 15:16:52
MAKE YOUR OWN ARCADE GAMES HOW TO
October 2006 MacFormat.co.uk 63
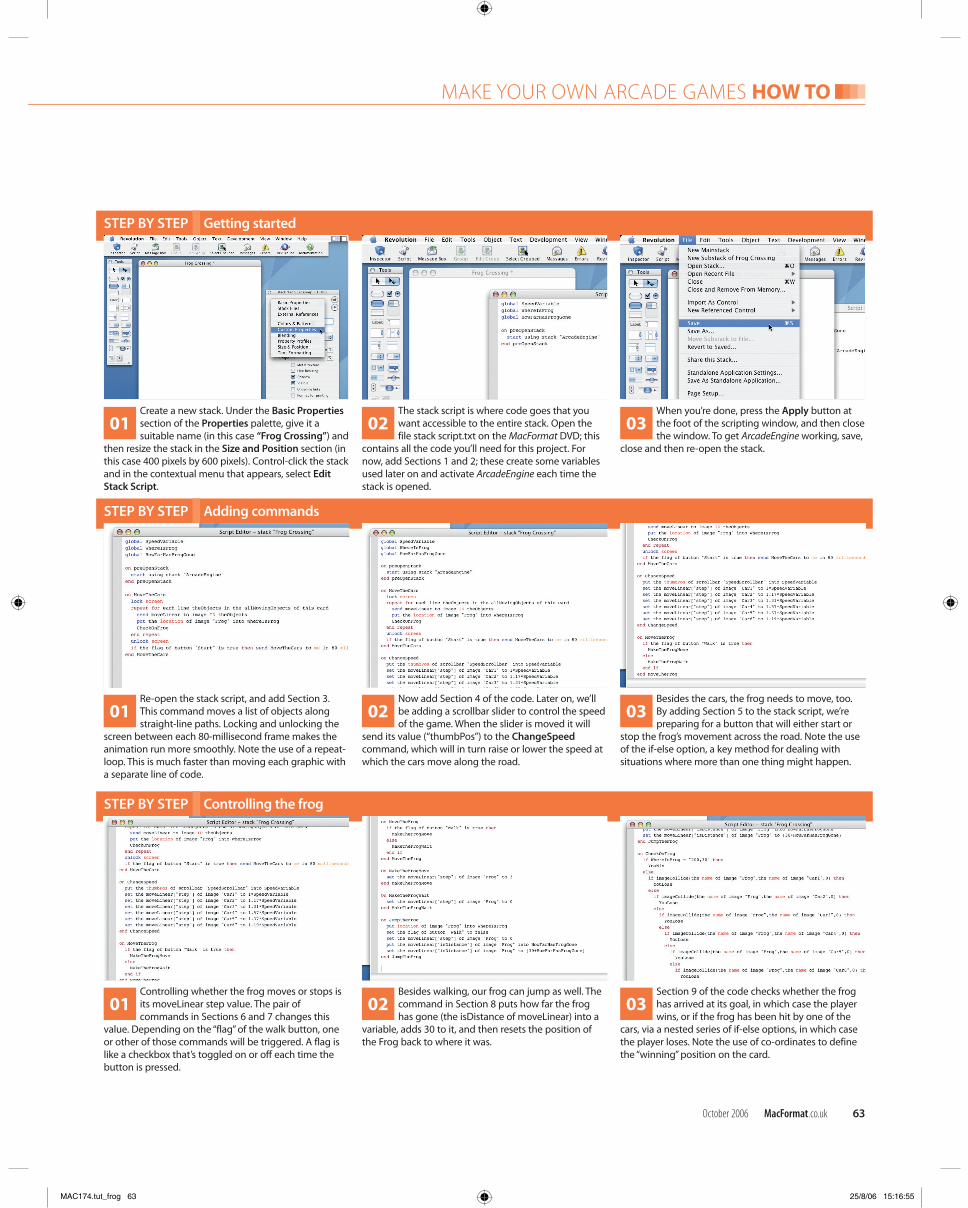
STEP BY STEP Getting started
STEP BY STEP Adding commands
Re-open the stack script, and add Section 3. This command moves a list of objects along straight-line paths. Locking and unlocking the
screen between each 80-millisecond frame makes the animation run more smoothly. Note the use of a repeat-loop. This is much faster than moving each graphic with a separate line of code.
01Now add Section 4 of the code. Later on, we’ll be adding a scrollbar slider to control the speed of the game. When the slider is moved it will
send its value (“thumbPos”) to the ChangeSpeed command, which will in turn raise or lower the speed at which the cars move along the road.
02Besides the cars, the frog needs to move, too. By adding Section 5 to the stack script, we’re preparing for a button that will either start or
stop the frog’s movement across the road. Note the use of the if-else option, a key method for dealing with situations where more than one thing might happen.
03
Create a new stack. Under the Basic Properties section of the Properties palette, give it a suitable name (in this case “Frog Crossing”) and
then resize the stack in the Size and Position section (in this case 400 pixels by 600 pixels). Control-click the stack and in the contextual menu that appears, select Edit Stack Script.
01The stack script is where code goes that you want accessible to the entire stack. Open the file stack script.txt on the MacFormat DVD; this
contains all the code you’ll need for this project. For now, add Sections 1 and 2; these create some variables used later on and activate ArcadeEngine each time the stack is opened.
02When you’re done, press the Apply button at the foot of the scripting window, and then close the window. To get ArcadeEngine working, save,
close and then re-open the stack.
03
STEP BY STEP Controlling the frog
Controlling whether the frog moves or stops is its moveLinear step value. The pair of commands in Sections 6 and 7 changes this
value. Depending on the “flag” of the walk button, one or other of those commands will be triggered. A flag is like a checkbox that’s toggled on or off each time the button is pressed.
01Besides walking, our frog can jump as well. The command in Section 8 puts how far the frog has gone (the isDistance of moveLinear) into a
variable, adds 30 to it, and then resets the position of the Frog back to where it was.
02Section 9 of the code checks whether the frog has arrived at its goal, in which case the player wins, or if the frog has been hit by one of the
cars, via a nested series of if-else options, in which case the player loses. Note the use of co-ordinates to define the “winning” position on the card.
03
MAC174.tut_frog 63MAC174.tut_frog 63 25/8/06 15:16:5525/8/06 15:16:55
HOW TO MAKE YOUR OWN ARCADE GAMES
64 MacFormat.co.uk October 2006
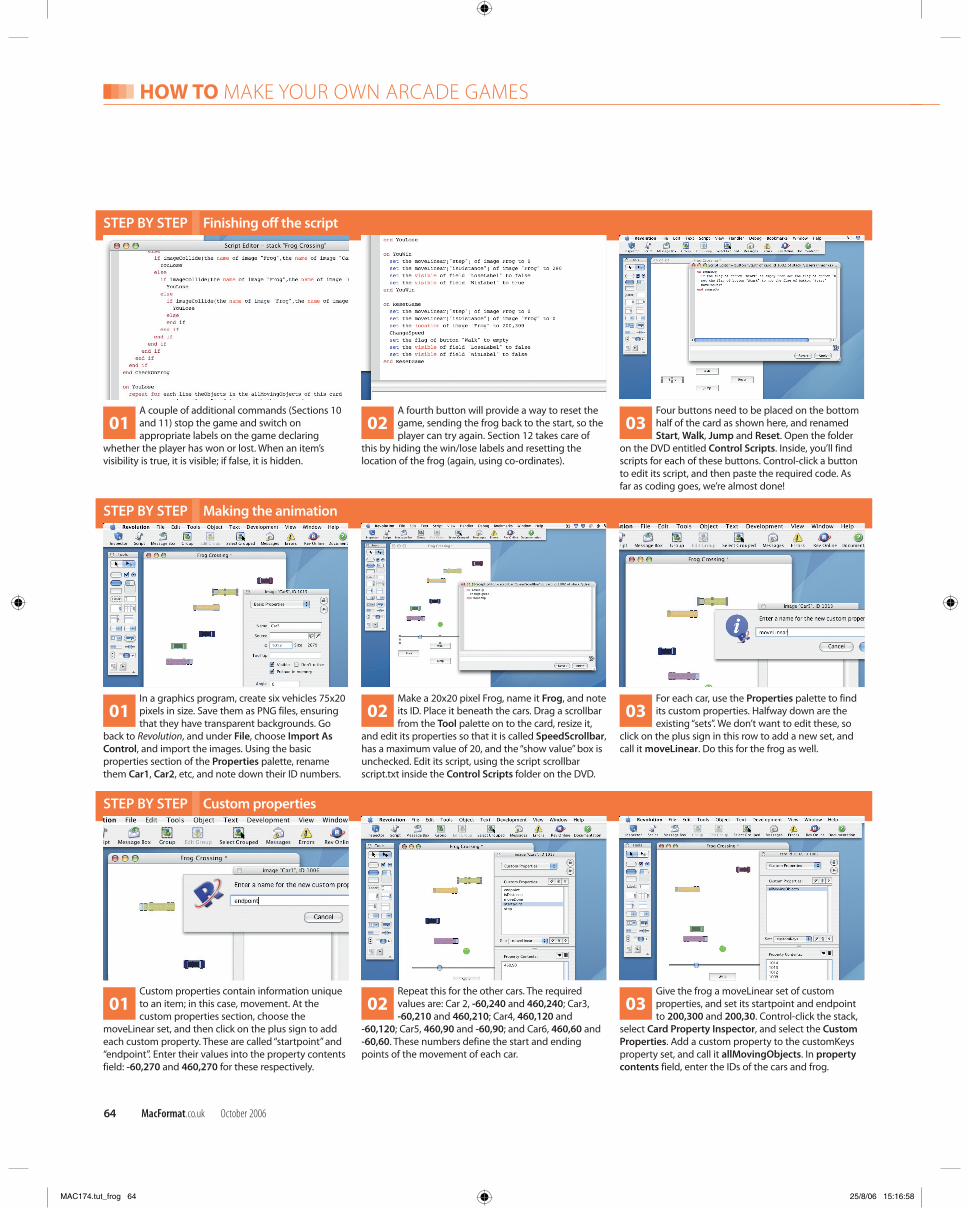
STEP BY STEP Finishing off the script
STEP BY STEP Making the animation
In a graphics program, create six vehicles 75x20 pixels in size. Save them as PNG files, ensuring that they have transparent backgrounds. Go
back to Revolution, and under File, choose Import As Control, and import the images. Using the basic properties section of the Properties palette, rename them Car1, Car2, etc, and note down their ID numbers.
01Make a 20x20 pixel Frog, name it Frog, and note its ID. Place it beneath the cars. Drag a scrollbar from the Tool palette on to the card, resize it,
and edit its properties so that it is called SpeedScrollbar, has a maximum value of 20, and the “show value” box is unchecked. Edit its script, using the script scrollbar script.txt inside the Control Scripts folder on the DVD.
02For each car, use the Properties palette to find its custom properties. Halfway down are the existing “sets”. We don’t want to edit these, so
click on the plus sign in this row to add a new set, and call it moveLinear. Do this for the frog as well.
03
A couple of additional commands (Sections 10 and 11) stop the game and switch on appropriate labels on the game declaring
whether the player has won or lost. When an item’s visibility is true, it is visible; if false, it is hidden.
01A fourth button will provide a way to reset the game, sending the frog back to the start, so the player can try again. Section 12 takes care of
this by hiding the win/lose labels and resetting the location of the frog (again, using co-ordinates).
02Four buttons need to be placed on the bottom half of the card as shown here, and renamed Start, Walk, Jump and Reset. Open the folder
on the DVD entitled Control Scripts. Inside, you’ll find scripts for each of these buttons. Control-click a button to edit its script, and then paste the required code. As far as coding goes, we’re almost done!
03
STEP BY STEP Custom properties
Custom properties contain information unique to an item; in this case, movement. At the custom properties section, choose the
moveLinear set, and then click on the plus sign to add each custom property. These are called “startpoint” and “endpoint”. Enter their values into the property contents field: -60,270 and 460,270 for these respectively.
01Repeat this for the other cars. The required values are: Car 2, -60,240 and 460,240; Car3, -60,210 and 460,210; Car4, 460,120 and
-60,120; Car5, 460,90 and -60,90; and Car6, 460,60 and -60,60. These numbers define the start and ending points of the movement of each car.
02Give the frog a moveLinear set of custom properties, and set its startpoint and endpoint to 200,300 and 200,30. Control-click the stack,
select Card Property Inspector, and select the Custom Properties. Add a custom property to the customKeys property set, and call it allMovingObjects. In property contents field, enter the IDs of the cars and frog.
03
MAC174.tut_frog 64MAC174.tut_frog 64 25/8/06 15:16:5825/8/06 15:16:58
MAKE YOUR OWN ARCADE GAMES HOW TO
October 2006 MacFormat.co.uk 65
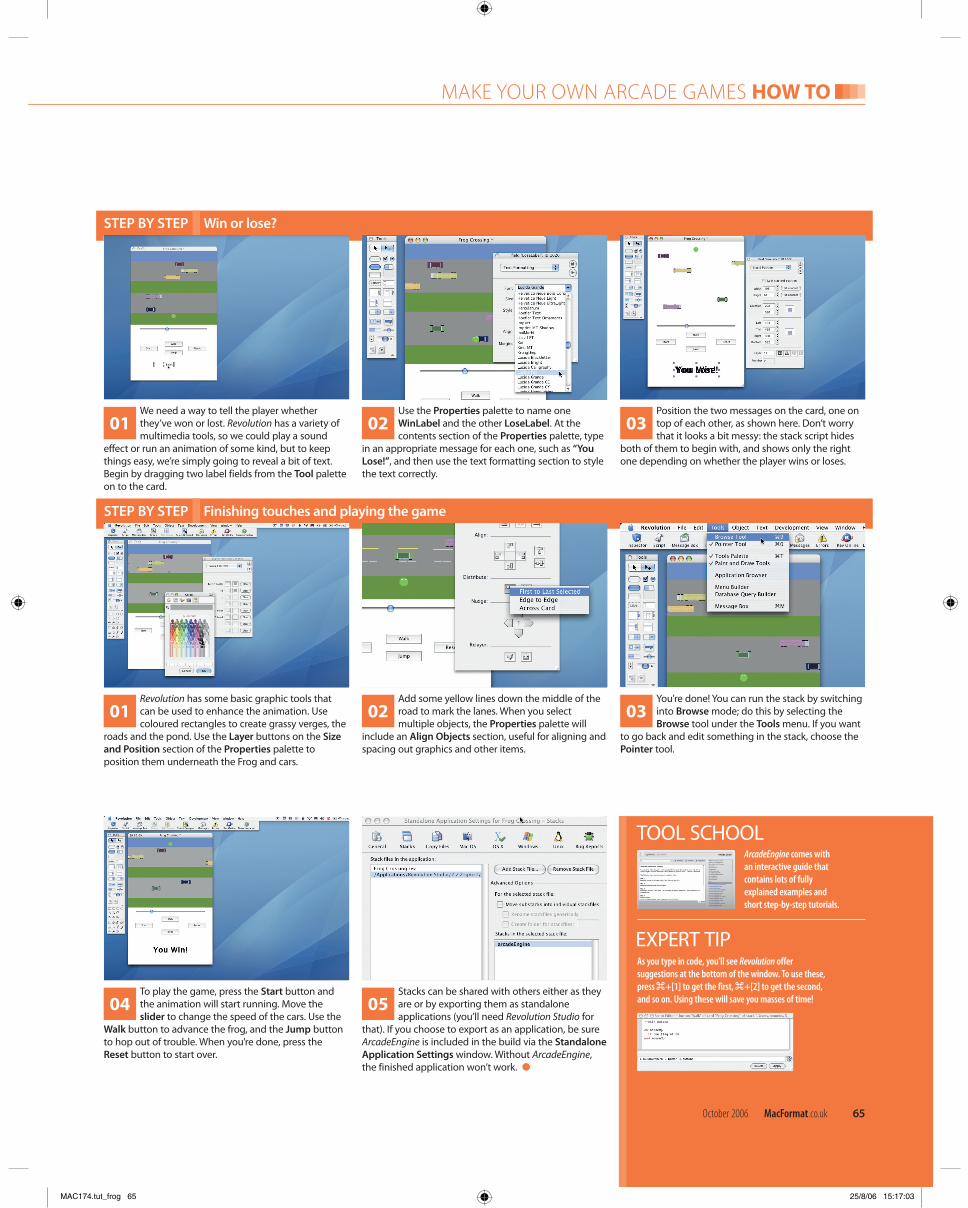
STEP BY STEP Win or lose?
STEP BY STEP Finishing touches and playing the game
To play the game, press the Start button and the animation will start running. Move the slider to change the speed of the cars. Use the
Walk button to advance the frog, and the Jump button to hop out of trouble. When you’re done, press the Reset button to start over.
04Stacks can be shared with others either as they are or by exporting them as standalone applications (you’ll need Revolution Studio for
that). If you choose to export as an application, be sure ArcadeEngine is included in the build via the Standalone Application Settings window. Without ArcadeEngine, the finished application won’t work. ●
05
Revolution has some basic graphic tools that can be used to enhance the animation. Use coloured rectangles to create grassy verges, the
roads and the pond. Use the Layer buttons on the Size and Position section of the Properties palette to position them underneath the Frog and cars.
01Add some yellow lines down the middle of the road to mark the lanes. When you select multiple objects, the Properties palette will
include an Align Objects section, useful for aligning and spacing out graphics and other items.
02You’re done! You can run the stack by switching into Browse mode; do this by selecting the Browse tool under the Tools menu. If you want
to go back and edit something in the stack, choose the Pointer tool.
03
We need a way to tell the player whether they’ve won or lost. Revolution has a variety of multimedia tools, so we could play a sound
effect or run an animation of some kind, but to keep things easy, we’re simply going to reveal a bit of text. Begin by dragging two label fields from the Tool palette on to the card.
01Use the Properties palette to name one WinLabel and the other LoseLabel. At the contents section of the Properties palette, type
in an appropriate message for each one, such as “You Lose!”, and then use the text formatting section to style the text correctly.
02Position the two messages on the card, one on top of each other, as shown here. Don’t worry that it looks a bit messy: the stack script hides
both of them to begin with, and shows only the right one depending on whether the player wins or loses.
03
TOOL SCHOOLArcadeEngine comes with an interactive guide that contains lots of fully explained examples and short step-by-step tutorials.
EXPERT TIPAs you type in code, you’ll see Revolution offer suggestions at the bottom of the window. To use these, press C+[1] to get the first, C+[2] to get the second, and so on. Using these will save you masses of time!
MAC174.tut_frog 65MAC174.tut_frog 65 25/8/06 15:17:0325/8/06 15:17:03